Embed Size (px)
Citation preview

Designing with White and Specialty Ink
ONYX WHITE PAPER | 03/29/2013
onyxgfx.com
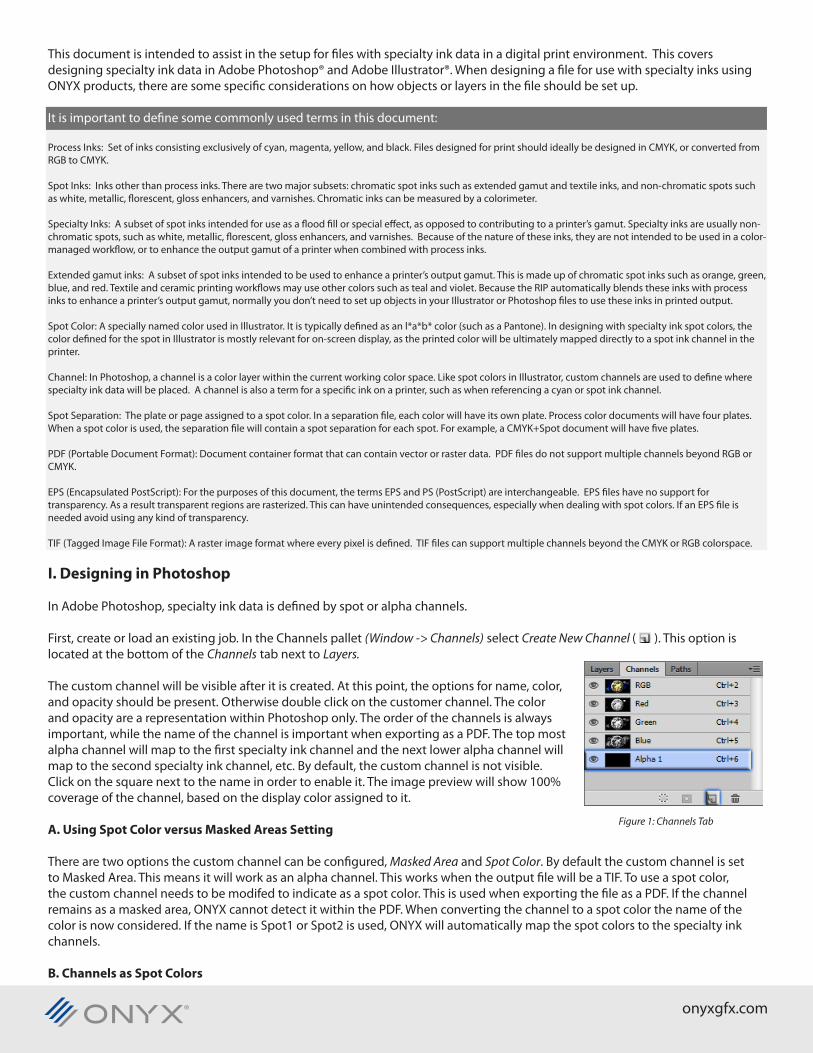
Figure 1: Channels Tab
This document is intended to assist in the setup for files with specialty ink data in a digital print environment. This covers designing specialty ink data in Adobe Photoshop® and Adobe Illustrator®. When designing a file for use with specialty inks using ONYX products, there are some specific considerations on how objects or layers in the file should be set up.
It is important to define some commonly used terms in this document:
Process Inks: Set of inks consisting exclusively of cyan, magenta, yellow, and black. Files designed for print should ideally be designed in CMYK, or converted from RGB to CMYK.
Spot Inks: Inks other than process inks. There are two major subsets: chromatic spot inks such as extended gamut and textile inks, and non-chromatic spots such as white, metallic, florescent, gloss enhancers, and varnishes. Chromatic inks can be measured by a colorimeter.
Specialty Inks: A subset of spot inks intended for use as a flood fill or special effect, as opposed to contributing to a printer’s gamut. Specialty inks are usually non-chromatic spots, such as white, metallic, florescent, gloss enhancers, and varnishes. Because of the nature of these inks, they are not intended to be used in a color-managed workflow, or to enhance the output gamut of a printer when combined with process inks.
Extended gamut inks: A subset of spot inks intended to be used to enhance a printer’s output gamut. This is made up of chromatic spot inks such as orange, green, blue, and red. Textile and ceramic printing workflows may use other colors such as teal and violet. Because the RIP automatically blends these inks with process inks to enhance a printer’s output gamut, normally you don’t need to set up objects in your Illustrator or Photoshop files to use these inks in printed output.
Spot Color: A specially named color used in Illustrator. It is typically defined as an l*a*b* color (such as a Pantone). In designing with specialty ink spot colors, the color defined for the spot in Illustrator is mostly relevant for on-screen display, as the printed color will be ultimately mapped directly to a spot ink channel in the printer.
Channel: In Photoshop, a channel is a color layer within the current working color space. Like spot colors in Illustrator, custom channels are used to define where specialty ink data will be placed. A channel is also a term for a specific ink on a printer, such as when referencing a cyan or spot ink channel.
Spot Separation: The plate or page assigned to a spot color. In a separation file, each color will have its own plate. Process color documents will have four plates. When a spot color is used, the separation file will contain a spot separation for each spot. For example, a CMYK+Spot document will have five plates.
PDF (Portable Document Format): Document container format that can contain vector or raster data. PDF files do not support multiple channels beyond RGB or CMYK.
EPS (Encapsulated PostScript): For the purposes of this document, the terms EPS and PS (PostScript) are interchangeable. EPS files have no support for transparency. As a result transparent regions are rasterized. This can have unintended consequences, especially when dealing with spot colors. If an EPS file is needed avoid using any kind of transparency.
TIF (Tagged Image File Format): A raster image format where every pixel is defined. TIF files can support multiple channels beyond the CMYK or RGB colorspace. I. Designing in Photoshop
In Adobe Photoshop, specialty ink data is defined by spot or alpha channels.
First, create or load an existing job. In the Channels pallet (Window -> Channels) select Create New Channel ( ). This option is located at the bottom of the Channels tab next to Layers.
The custom channel will be visible after it is created. At this point, the options for name, color, and opacity should be present. Otherwise double click on the customer channel. The color and opacity are a representation within Photoshop only. The order of the channels is always important, while the name of the channel is important when exporting as a PDF. The top most alpha channel will map to the first specialty ink channel and the next lower alpha channel will map to the second specialty ink channel, etc. By default, the custom channel is not visible. Click on the square next to the name in order to enable it. The image preview will show 100% coverage of the channel, based on the display color assigned to it.
A. Using Spot Color versus Masked Areas Setting There are two options the custom channel can be configured, Masked Area and Spot Color. By default the custom channel is set to Masked Area. This means it will work as an alpha channel. This works when the output file will be a TIF. To use a spot color, the custom channel needs to be modifed to indicate as a spot color. This is used when exporting the file as a PDF. If the channel remains as a masked area, ONYX cannot detect it within the PDF. When converting the channel to a spot color the name of the color is now considered. If the name is Spot1 or Spot2 is used, ONYX will automatically map the spot colors to the specialty ink channels.
B. Channels as Spot Colors
onyxgfx.com
When outputting a PDF file, the custom channel must be set to indicate a spot color. In the Color Indicates region, select Spot Color. This will turn the custom channel into a spot color when the file is saved as a TIF or PDF. After selecting Spot Color as the option, all other channel options will no longer be available. Only using Undo (Crtl-Z or Cmd-Z) will reverse the spot color back to a custom
channel. In the Save As dialogue, the options available will depend on how the custom channel is configured. In the example above, the Spot Color option should appear. This option is enabled by default.
When saving in Photoshop to a PDF file, the name of the spot color is important. In order for ONYX to automatically assign the spot color to the specialty ink channel, the custom channel (and thus the spot color in the saved file) must be Spot1, Spot2, etc. Other names can be used, but will require additional steps in ONYX for the spot color to be properly rendered and printed. These steps will be outlined in Section III.
C. Channels as Masked Area (Alpha Channel)
For TIF files, the custom channel can be set to represent an alpha channel. In ONYX software, when an alpha channel is detected it is automatically assigned to a specialty ink channel. The option in the Save As window shows the Alpha Channels enabled by default.
In the Save As window, Alpha Channels will be available to select as an option, and is automatically enabled.
D. Designing Your Channel
The custom channel can be modified just like a Layer Mask. The only difference is black indicates channel data and white indicates no data. The same tools and filters available for Layer Masks are also available when editing a custom channel. E. Which File Type Should Be Chosen When Using Adobe Photoshop Photoshop is a raster-only workflow. Using a PDF provides no advantages over raster filetypes. In the case of PDFs, the user modifies the custom channel and renames it. Names other than Spot1 will require additional steps for ONYX to map the spot color to the printer’s specialty ink channel. Using TIF files the alpha channels do not need editing and the names are not used by ONYX. TIF files can contain multiple alpha channels and ONYX is able read map each one in order.
II. Designing in Adobe Illustrator
Creating specialty ink data in Adobe Illustrator is done with spot colors.
A. Spot Colors
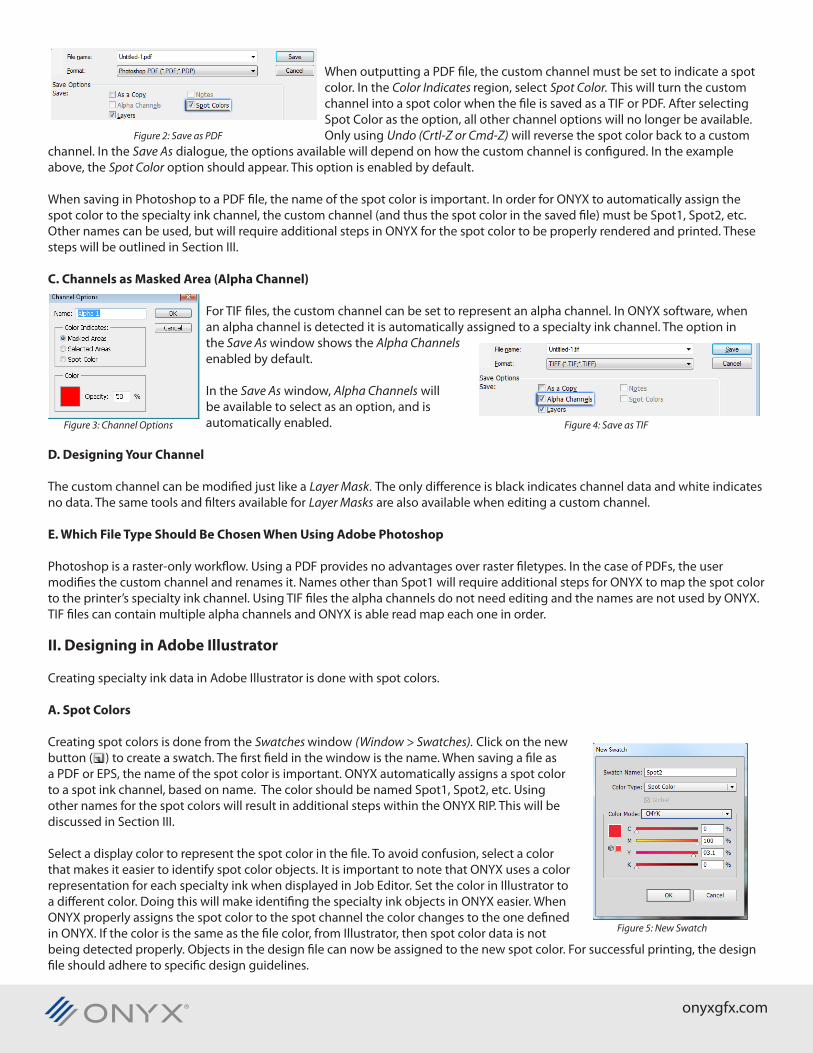
Creating spot colors is done from the Swatches window (Window > Swatches). Click on the new button ( ) to create a swatch. The first field in the window is the name. When saving a file as a PDF or EPS, the name of the spot color is important. ONYX automatically assigns a spot color to a spot ink channel, based on name. The color should be named Spot1, Spot2, etc. Using other names for the spot colors will result in additional steps within the ONYX RIP. This will be discussed in Section III.
Select a display color to represent the spot color in the file. To avoid confusion, select a color that makes it easier to identify spot color objects. It is important to note that ONYX uses a color representation for each specialty ink when displayed in Job Editor. Set the color in Illustrator to a different color. Doing this will make identifing the specialty ink objects in ONYX easier. When ONYX properly assigns the spot color to the spot channel the color changes to the one defined in ONYX. If the color is the same as the file color, from Illustrator, then spot color data is not being detected properly. Objects in the design file can now be assigned to the new spot color. For successful printing, the design file should adhere to specific design guidelines.
Figure 4: Save as TIF
onyxgfx.com
Figure 5: New Swatch
Figure 2: Save as PDF
Figure 3: Channel Options
B. Designing Guidelines
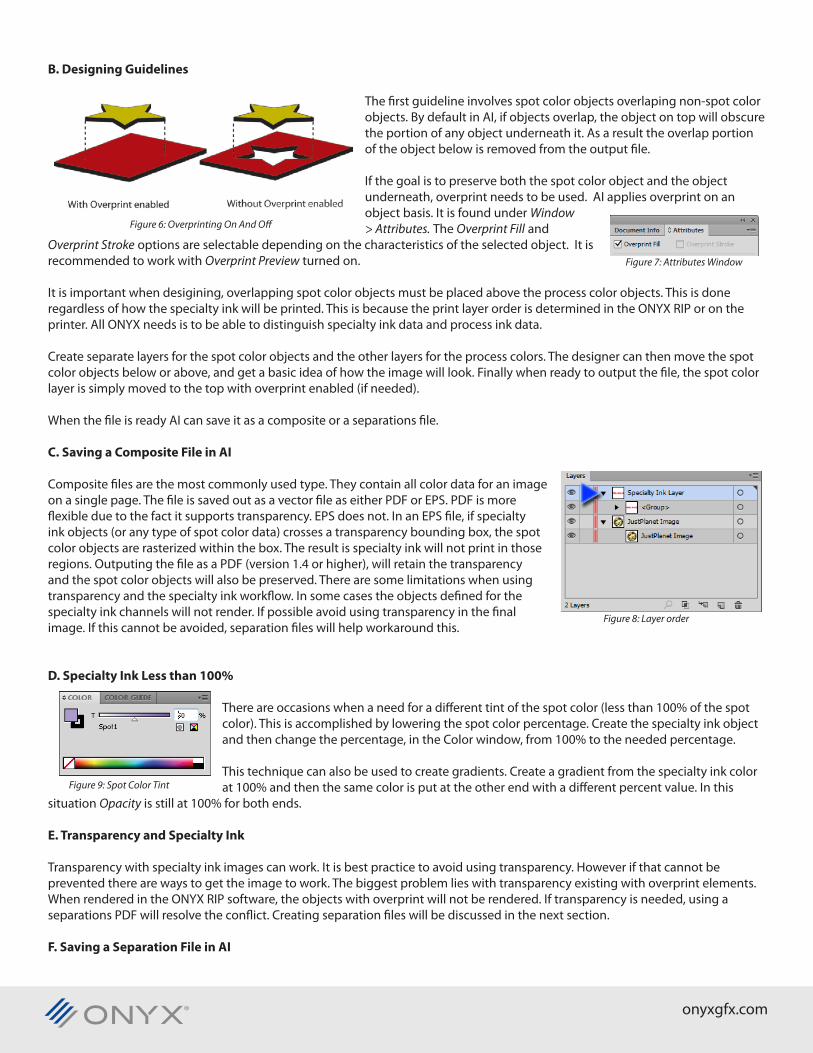
The first guideline involves spot color objects overlaping non-spot color objects. By default in AI, if objects overlap, the object on top will obscure the portion of any object underneath it. As a result the overlap portion of the object below is removed from the output file.
If the goal is to preserve both the spot color object and the object underneath, overprint needs to be used. AI applies overprint on an object basis. It is found under Window > Attributes. The Overprint Fill and
Overprint Stroke options are selectable depending on the characteristics of the selected object. It is recommended to work with Overprint Preview turned on. It is important when desigining, overlapping spot color objects must be placed above the process color objects. This is done regardless of how the specialty ink will be printed. This is because the print layer order is determined in the ONYX RIP or on the printer. All ONYX needs is to be able to distinguish specialty ink data and process ink data.
Create separate layers for the spot color objects and the other layers for the process colors. The designer can then move the spot color objects below or above, and get a basic idea of how the image will look. Finally when ready to output the file, the spot color layer is simply moved to the top with overprint enabled (if needed).
When the file is ready AI can save it as a composite or a separations file.
C. Saving a Composite File in AI
Composite files are the most commonly used type. They contain all color data for an image on a single page. The file is saved out as a vector file as either PDF or EPS. PDF is more flexible due to the fact it supports transparency. EPS does not. In an EPS file, if specialty ink objects (or any type of spot color data) crosses a transparency bounding box, the spot color objects are rasterized within the box. The result is specialty ink will not print in those regions. Outputing the file as a PDF (version 1.4 or higher), will retain the transparency and the spot color objects will also be preserved. There are some limitations when using transparency and the specialty ink workflow. In some cases the objects defined for the specialty ink channels will not render. If possible avoid using transparency in the final image. If this cannot be avoided, separation files will help workaround this.
D. Specialty Ink Less than 100%
There are occasions when a need for a different tint of the spot color (less than 100% of the spot color). This is accomplished by lowering the spot color percentage. Create the specialty ink object and then change the percentage, in the Color window, from 100% to the needed percentage.
This technique can also be used to create gradients. Create a gradient from the specialty ink color at 100% and then the same color is put at the other end with a different percent value. In this
situation Opacity is still at 100% for both ends.
E. Transparency and Specialty Ink
Transparency with specialty ink images can work. It is best practice to avoid using transparency. However if that cannot be prevented there are ways to get the image to work. The biggest problem lies with transparency existing with overprint elements. When rendered in the ONYX RIP software, the objects with overprint will not be rendered. If transparency is needed, using a separations PDF will resolve the conflict. Creating separation files will be discussed in the next section.
F. Saving a Separation File in AI
Figure 6: Overprinting On And Off
Figure 7: Attributes Window
onyxgfx.com
Figure 8: Layer order
Figure 9: Spot Color Tint

In contrast to composite files, separation files are created with multiple pages (plates). Each page represents each process and spot color. A job designed in CMYK will contain four pages. Jobs containing spot colors will have an additional page per spot color.
Any PDF reader will display the separation PDF as a multi page PDF. Each page will be one channel and dispplayed black and white. White indicates there is no channel data and black indicates 100% channel data. Anything in between is a percentage of that channel. ONYX by default, will also display a separation PDF in the same manner. ONYX
can recombine the separated PDF back together. This is discussed in Section III.
To output an image as a separation file, go to File -> Print. In the Print window, change the printer to Adobe PDF. Once selected, the options in the window will change. By default the dialog uses a known page size to size the image. As a result parts of it will be cropped out. To tell the PDF printer to respect the artboard, click on the drop down menu under Size. Change the value to Custom. The preview on the left will update and show the image correctly. If the orientation is not correct, simply click on the orientation buttons to the right of Width and Height.
The next step is to choose a separations output. This is found under the Output option located to the upper left of the Print window. In Output, click on the Mode drop down menu, and select Separations (Host-Based). The Document Ink Options will become available. The document will be broken up into the process color channels (based on the document’s color space) plus spot colors. Next to each of the listed colors are different. These icons are used in Illustrator to designate between spot colors ( ) and process colors ( ). Figure 9 shows a typical setup, the output will be a five-page PDF. When working with separation files and spot colors, do not enable the option Convert All Spot Colors to Process. This option will break the spot colors into CMYK process equivalent, removing all spot color data.
In the Mode drop down menu, there is an additional separation option called In-RIP Separations. There is an important difference between the two types. With Separations (Host-Based), the host computer does the separations, meaning the file is separated into multiple pages as it is saved by Illustrator. With In-RIP Separations, the file is saved as a composite file and assumes the separation will be created on the RIP side. It is possible to save the file out as a separation PS file. The steps are almost identical. The only difference is the printer selected is Adobe PostScript printer. The output would be the same, a multipage file, in black and white. Just like PDFs the black indicates channel data and white is no channel data.
Like all file formats, there are benefits and drawbacks to using separation files. A major benefit is you can avoid rendering problems with specialty ink objects and transparency effects. Also, once the file is separated, the only task of the RIP is to “put it back together”. As a result, rip errors and other problems will be minimized. Also, separated files are supported in any ONYX software package that contains Rip-Queue.
Some drawbacks include all gradient and transparent objects are rasterized (though the resolution can be adjusted in AI up to 400 dpi). This may be an important factor depending on the intended output size of the printed image. Some additional job setup work may be required in ONYX. In ONYX, there is a max separation limit of 12. This value is the sum total of process and extended gamut colors, plus spot colors. If this sum total is greater than 12, you will need to use a composite file. Separated files are not supported in Layout Tool and its equivalent in GamaPrint.
Additionally color management is not applied to separation files.
III. How It Comes Together In ONYX
There are various paths to set up the ONYX RIP software to render specialty ink files. These paths depend on what the file is and how the specialty ink representation is defined in the design application. Regardless all these paths can be automated using a Quick Set. This section will cover the paths used to generate specialty ink.
A. Loading a TIF with Alpha Channel
Figure 11: Printing as a Separations File
onyxgfx.com
Figure 10: CMYK to Separations
TIF files with an alpha channel only need to be loaded using a printer and media that contains the spot ink channel (such as white). ONYX automatically detects any alpha channels in the image and assigns them (in order) to any available spot ink channels on the printer.
It is important to remember that with a media profile having multiple spot ink channels, the alpha channels will be assigned in order. For example, if a media has an ink configuration with CMYK, White, and Silver, ONYX will assign the first alpha channel to the white spot channel. The second alpha channel will map to the silver spot channel.
If the alpha channel is not being assigned to the spot ink channel, make sure the media profile does contain spot ink channels. Also verify the TIF file does have alpha channels enabled when the TIF was created.
B. Loading a PDF or EPS Composite File
PDF or EPS files rely on spot colors to define the regions where spot ink will print. For ONYX to automatically assign a spot color to the correct spot ink channel, the name must be Spot1, Spot2, etc. Spot1 is assigned to the first spot ink channel listed in the media profile, and Spot2 is assigned to the second spot ink channel, etc. If the spots colors are being mapped to the incorrect spot channel on the printer, the spot colors will need to be renamed in AI to be auto-assigned correctly in ONYX. ONYX can correctly process jobs that have spot color names other than Spot1 or Spot2 but it requires additional steps to map them correctly.
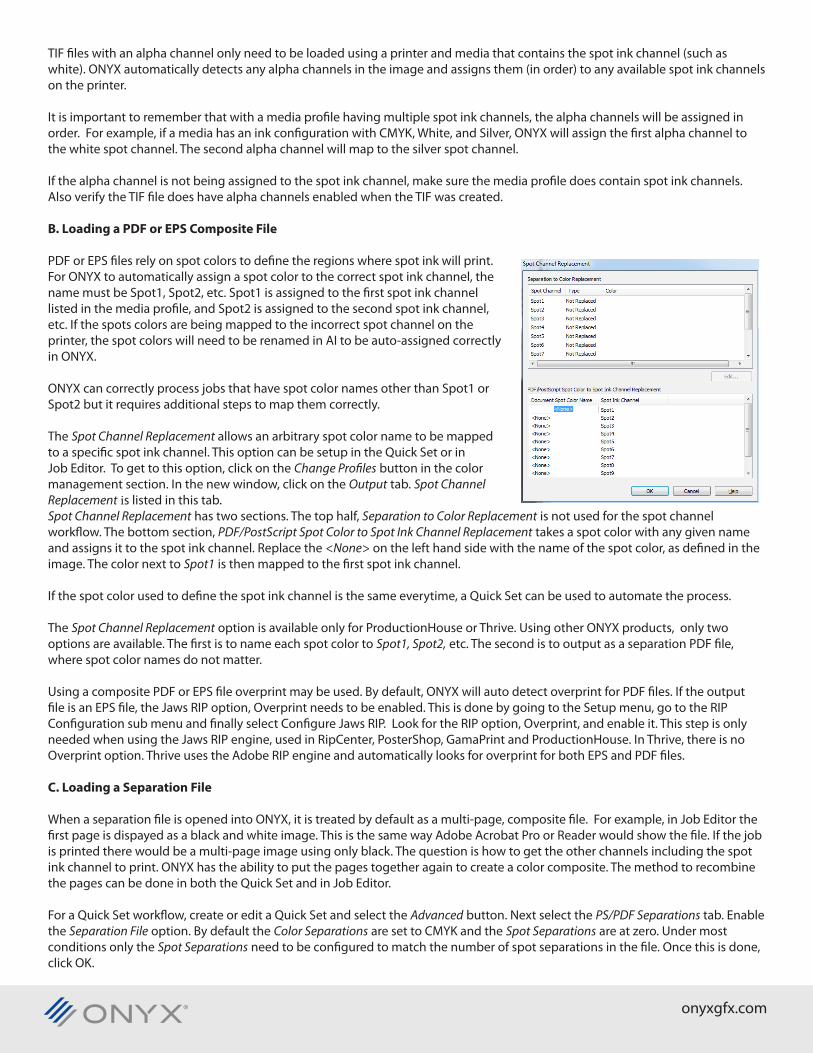
The Spot Channel Replacement allows an arbitrary spot color name to be mapped to a specific spot ink channel. This option can be setup in the Quick Set or in Job Editor. To get to this option, click on the Change Profiles button in the color management section. In the new window, click on the Output tab. Spot Channel Replacement is listed in this tab. Spot Channel Replacement has two sections. The top half, Separation to Color Replacement is not used for the spot channel workflow. The bottom section, PDF/PostScript Spot Color to Spot Ink Channel Replacement takes a spot color with any given name and assigns it to the spot ink channel. Replace the <None> on the left hand side with the name of the spot color, as defined in the image. The color next to Spot1 is then mapped to the first spot ink channel. If the spot color used to define the spot ink channel is the same everytime, a Quick Set can be used to automate the process.
The Spot Channel Replacement option is available only for ProductionHouse or Thrive. Using other ONYX products, only two options are available. The first is to name each spot color to Spot1, Spot2, etc. The second is to output as a separation PDF file, where spot color names do not matter. Using a composite PDF or EPS file overprint may be used. By default, ONYX will auto detect overprint for PDF files. If the output file is an EPS file, the Jaws RIP option, Overprint needs to be enabled. This is done by going to the Setup menu, go to the RIP Configuration sub menu and finally select Configure Jaws RIP. Look for the RIP option, Overprint, and enable it. This step is only needed when using the Jaws RIP engine, used in RipCenter, PosterShop, GamaPrint and ProductionHouse. In Thrive, there is no Overprint option. Thrive uses the Adobe RIP engine and automatically looks for overprint for both EPS and PDF files. C. Loading a Separation File
When a separation file is opened into ONYX, it is treated by default as a multi-page, composite file. For example, in Job Editor the first page is dispayed as a black and white image. This is the same way Adobe Acrobat Pro or Reader would show the file. If the job is printed there would be a multi-page image using only black. The question is how to get the other channels including the spot ink channel to print. ONYX has the ability to put the pages together again to create a color composite. The method to recombine the pages can be done in both the Quick Set and in Job Editor. For a Quick Set workflow, create or edit a Quick Set and select the Advanced button. Next select the PS/PDF Separations tab. Enable the Separation File option. By default the Color Separations are set to CMYK and the Spot Separations are at zero. Under most conditions only the Spot Separations need to be configured to match the number of spot separations in the file. Once this is done, click OK.
onyxgfx.com
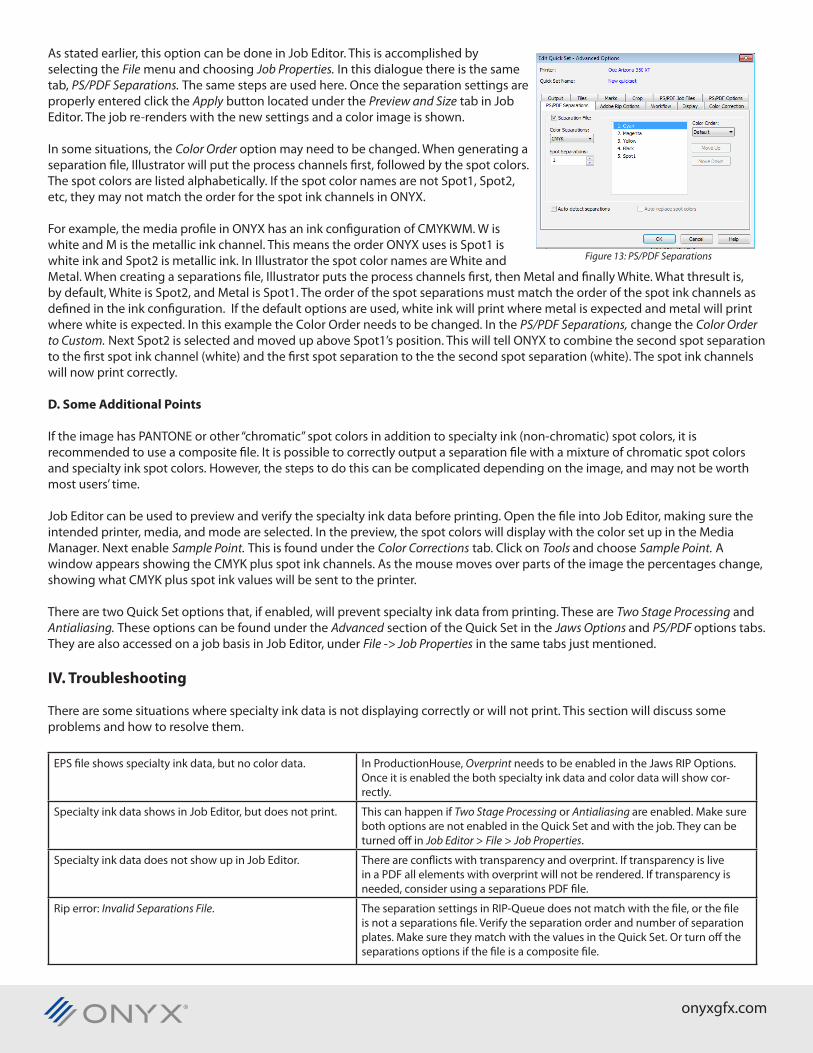
As stated earlier, this option can be done in Job Editor. This is accomplished by selecting the File menu and choosing Job Properties. In this dialogue there is the same tab, PS/PDF Separations. The same steps are used here. Once the separation settings are properly entered click the Apply button located under the Preview and Size tab in Job Editor. The job re-renders with the new settings and a color image is shown. In some situations, the Color Order option may need to be changed. When generating a separation file, Illustrator will put the process channels first, followed by the spot colors. The spot colors are listed alphabetically. If the spot color names are not Spot1, Spot2, etc, they may not match the order for the spot ink channels in ONYX. For example, the media profile in ONYX has an ink configuration of CMYKWM. W is white and M is the metallic ink channel. This means the order ONYX uses is Spot1 is white ink and Spot2 is metallic ink. In Illustrator the spot color names are White and Metal. When creating a separations file, Illustrator puts the process channels first, then Metal and finally White. What thresult is, by default, White is Spot2, and Metal is Spot1. The order of the spot separations must match the order of the spot ink channels as defined in the ink configuration. If the default options are used, white ink will print where metal is expected and metal will print where white is expected. In this example the Color Order needs to be changed. In the PS/PDF Separations, change the Color Order to Custom. Next Spot2 is selected and moved up above Spot1’s position. This will tell ONYX to combine the second spot separation to the first spot ink channel (white) and the first spot separation to the the second spot separation (white). The spot ink channels will now print correctly.
D. Some Additional Points
If the image has PANTONE or other “chromatic” spot colors in addition to specialty ink (non-chromatic) spot colors, it is recommended to use a composite file. It is possible to correctly output a separation file with a mixture of chromatic spot colors and specialty ink spot colors. However, the steps to do this can be complicated depending on the image, and may not be worth most users’ time.
Job Editor can be used to preview and verify the specialty ink data before printing. Open the file into Job Editor, making sure the intended printer, media, and mode are selected. In the preview, the spot colors will display with the color set up in the Media Manager. Next enable Sample Point. This is found under the Color Corrections tab. Click on Tools and choose Sample Point. A window appears showing the CMYK plus spot ink channels. As the mouse moves over parts of the image the percentages change, showing what CMYK plus spot ink values will be sent to the printer.
There are two Quick Set options that, if enabled, will prevent specialty ink data from printing. These are Two Stage Processing and Antialiasing. These options can be found under the Advanced section of the Quick Set in the Jaws Options and PS/PDF options tabs. They are also accessed on a job basis in Job Editor, under File -> Job Properties in the same tabs just mentioned.
IV. Troubleshooting
There are some situations where specialty ink data is not displaying correctly or will not print. This section will discuss some problems and how to resolve them.
EPS file shows specialty ink data, but no color data. In ProductionHouse, Overprint needs to be enabled in the Jaws RIP Options. Once it is enabled the both specialty ink data and color data will show cor-rectly.
Specialty ink data shows in Job Editor, but does not print. This can happen if Two Stage Processing or Antialiasing are enabled. Make sure both options are not enabled in the Quick Set and with the job. They can be turned off in Job Editor > File > Job Properties.
Specialty ink data does not show up in Job Editor. There are conflicts with transparency and overprint. If transparency is live in a PDF all elements with overprint will not be rendered. If transparency is needed, consider using a separations PDF file.
Rip error: Invalid Separations File. The separation settings in RIP-Queue does not match with the file, or the file is not a separations file. Verify the separation order and number of separation plates. Make sure they match with the values in the Quick Set. Or turn off the separations options if the file is a composite file.
onyxgfx.com
Figure 13: PS/PDF Separations