Embed Size (px)
Citation preview
Designing a Secondary Designing a Secondary Profile/Outline Profile/Outline
Training Presentation # 10Training Presentation # 10
Ontario Curriculum Unit PlannerOntario Curriculum Unit Planner
© Queen’s Printer for Ontario, 2003
© Queen’s Printer for Ontario, 2003
2
Menu
Welcome to this presentation about the Ontario Curriculum Unit Planner Official Version 3.0.
The presentation demonstrates step by step how to create, edit, share, and manage secondary course profiles and course outlines that combine individual units.
The menu that follows outlines the key components of this presentation.

© Queen’s Printer for Ontario, 2003
3
Menu
You can use this tutorial is several ways:
1. View it in its entirety or section by section from the main menu.
2. Open the Planner and toggle between the Planner and this PowerPoint presentation as you create a new secondary Profile/Outline step by step.
You can use this tutorial is several ways:
1. View it in its entirety or section by section from the main menu.
2. Open the Planner and toggle between the Planner and this PowerPoint presentation as you create a new secondary Profile/Outline step by step.

MAIN MENUMAIN MENU
Click a Subtitle to jump to that section. Click the Spacebar to go to next slide.
1. Creating a Profile1. Creating a Profile
2. 2. Creating an OutlineCreating an Outline
3. Editing, Sharing, and Managing 3. Editing, Sharing, and Managing Profiles and OutlinesProfiles and Outlines
4
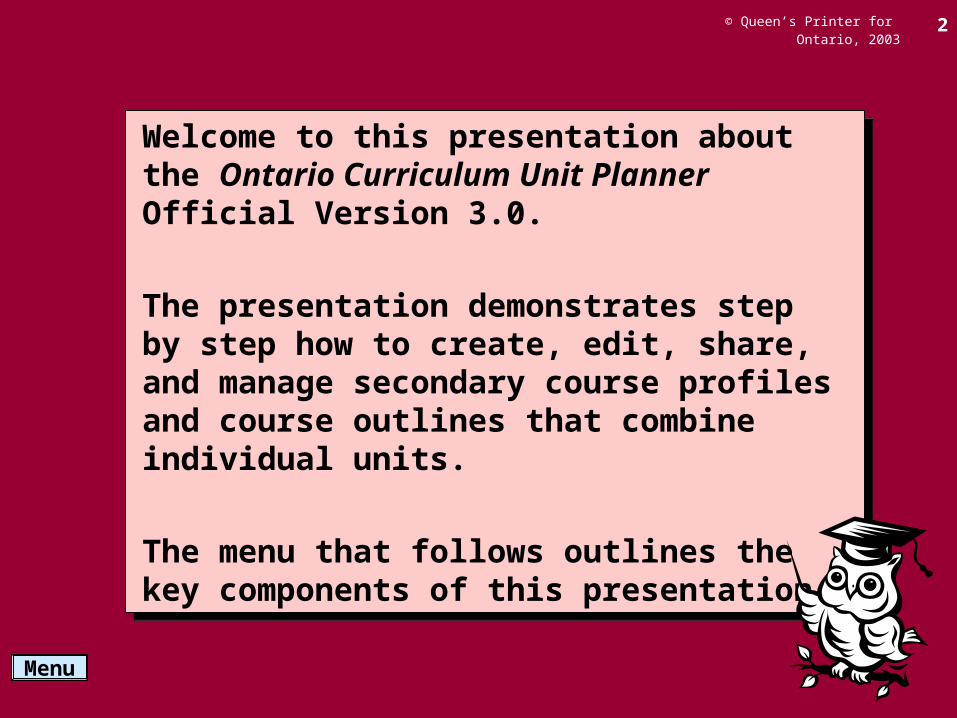
1. Creating a Profile1. Creating a Profile
1.1 1.1 IntroductionIntroduction
1.21.2 Getting startedGetting started
1.3 1.3 Overview and unitsOverview and units
1.4 1.4 ExpectationsExpectations
1.51.5 NotesNotes
1.61.6 Teaching and learning strategiesTeaching and learning strategies
1.71.7 Assessment and evaluation strategiesAssessment and evaluation strategies
1.81.8 ResourcesResources
5Menu

© Queen’s Printer for Ontario, 2003
6
Menu
1.1 Introduction1.1 Introduction
The Planner helps you to organize your entire year’s course of study into: a Profile that combines units already stored in "My Work" into a larger structure (see slides 7-29): OR an Outline that sketches out units with basic information into a quick framework (see slides 30-40) .
The Planner helps you to organize your entire year’s course of study into: a Profile that combines units already stored in "My Work" into a larger structure (see slides 7-29): OR an Outline that sketches out units with basic information into a quick framework (see slides 30-40) .
Diversity
“I imported this unit from a colleague.”
“I created this unit.”
Beauty and the Beast
Interactions
“I imported this unit from the OCUP
website.”
Voices
“I imported this unit from a CD-ROM .”
ENG2DGrade 10 English
AcademicMy Profile
Grade 10
Independence
“I sketched this unit in Outline to be completed later.”

© Queen’s Printer for Ontario, 2003
7
Menu
1.1 Introduction1.1 Introduction
Each time you add units you have created or adapted from other sources to a Profile, data from each unit are grouped and aggregated under specific elements of curriculum design.
Each time you add units you have created or adapted from other sources to a Profile, data from each unit are grouped and aggregated under specific elements of curriculum design.
Topic/Theme/Resources
Expectations
Teaching/LearningStrategies
Assessment andEvaluation
Performance Tasks and Criteria
© Queen’s Printer for Ontario, 2003
8
Menu
1.1 Introduction1.1 Introduction
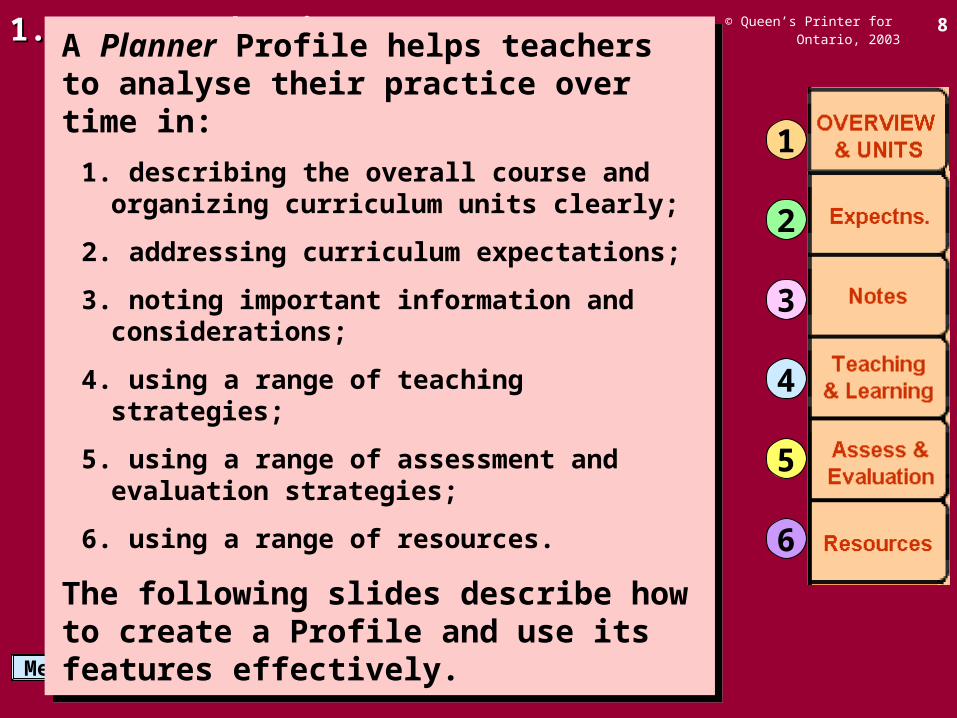
A Planner Profile helps teachers to analyse their practice over time in:
1. describing the overall course and organizing curriculum units clearly;
2. addressing curriculum expectations;
3. noting important information and considerations;
4. using a range of teaching strategies;
5. using a range of assessment and evaluation strategies;
6. using a range of resources.
The following slides describe how to create a Profile and use its features effectively.
1
2
3
4
5
6

© Queen’s Printer for Ontario, 2003
9
Menu
1.1 Introduction1.1 Introduction
1
Cover PageProgram Resource List
Program Description and Unit Titles
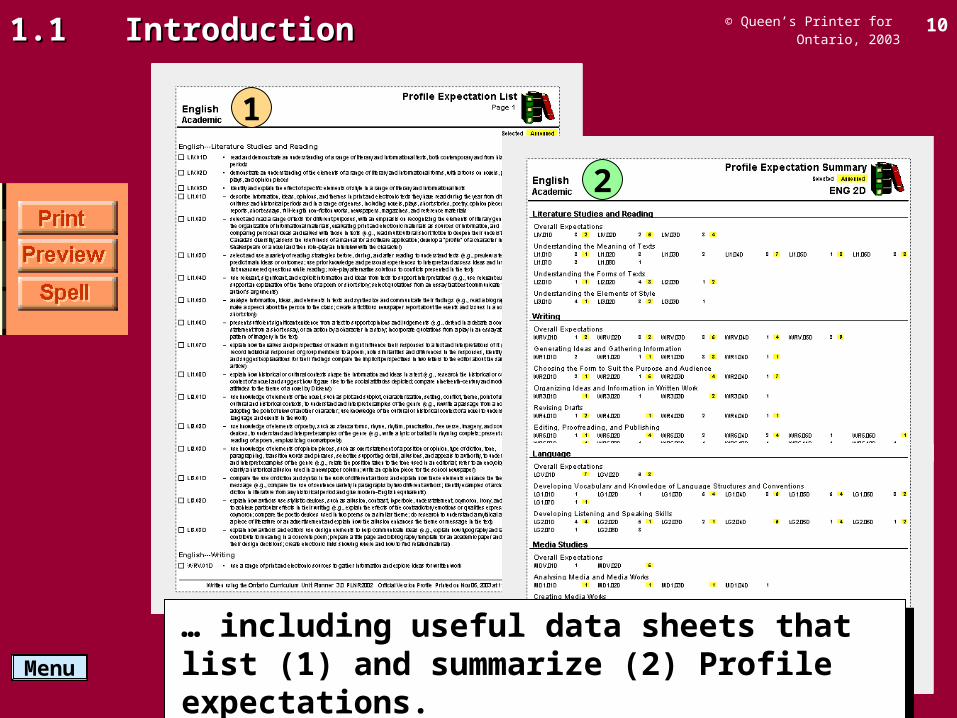
To make such analysis easy, the Print or Preview buttons (1) on the Profile screen allow you to view the aggregated data from all linked units …
To make such analysis easy, the Print or Preview buttons (1) on the Profile screen allow you to view the aggregated data from all linked units …
© Queen’s Printer for Ontario, 2003
10
Menu
1.1 Introduction1.1 Introduction
1
… including useful data sheets that list (1) and summarize (2) Profile expectations.
… including useful data sheets that list (1) and summarize (2) Profile expectations.
2
© Queen’s Printer for Ontario, 2003
11
Menu
1.2 Getting started1.2 Getting started
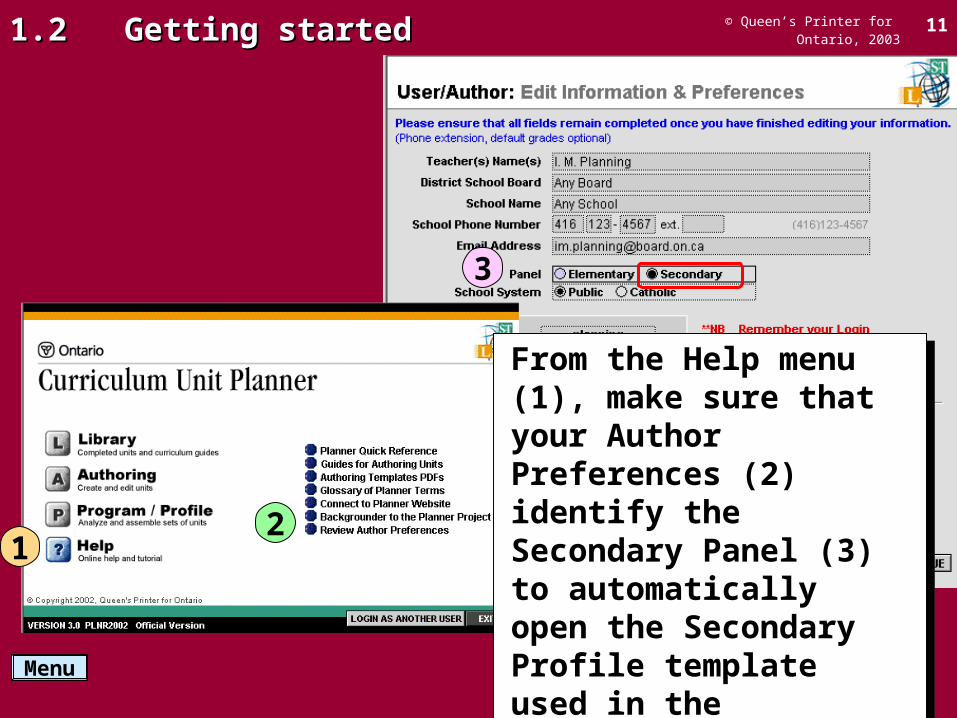
From the Help menu (1), make sure that your Author Preferences (2) identify the Secondary Panel (3) to automatically open the Secondary Profile template used in the following steps.
From the Help menu (1), make sure that your Author Preferences (2) identify the Secondary Panel (3) to automatically open the Secondary Profile template used in the following steps.
3
12
© Queen’s Printer for Ontario, 2003
12
Menu
1.2 Getting started1.2 Getting started
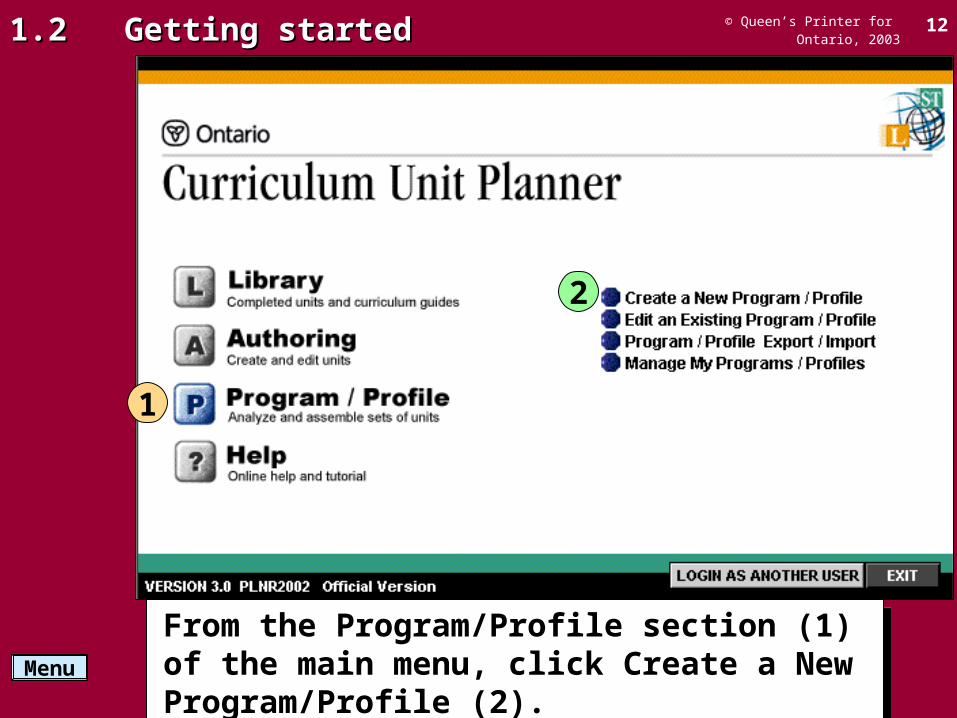
From the Program/Profile section (1) of the main menu, click Create a New Program/Profile (2).
From the Program/Profile section (1) of the main menu, click Create a New Program/Profile (2).
1
2
© Queen’s Printer for Ontario, 2003
13
Menu
1.2 Getting started1.2 Getting started
1
2
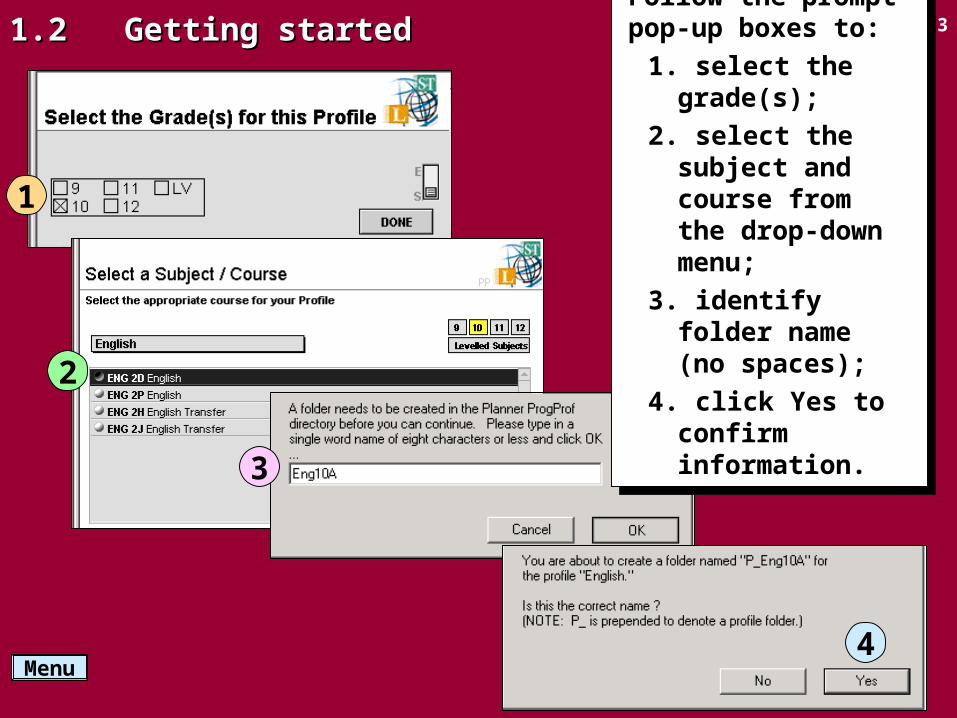
Follow the prompt pop-up boxes to:
1. select the grade(s);
2. select the subject and course from the drop-down menu;
3. identify folder name (no spaces);
4. click Yes to confirm information.
Follow the prompt pop-up boxes to:
1. select the grade(s);
2. select the subject and course from the drop-down menu;
3. identify folder name (no spaces);
4. click Yes to confirm information.
4
3
© Queen’s Printer for Ontario, 2003
14
Menu
1.3 Overview and units1.3 Overview and units
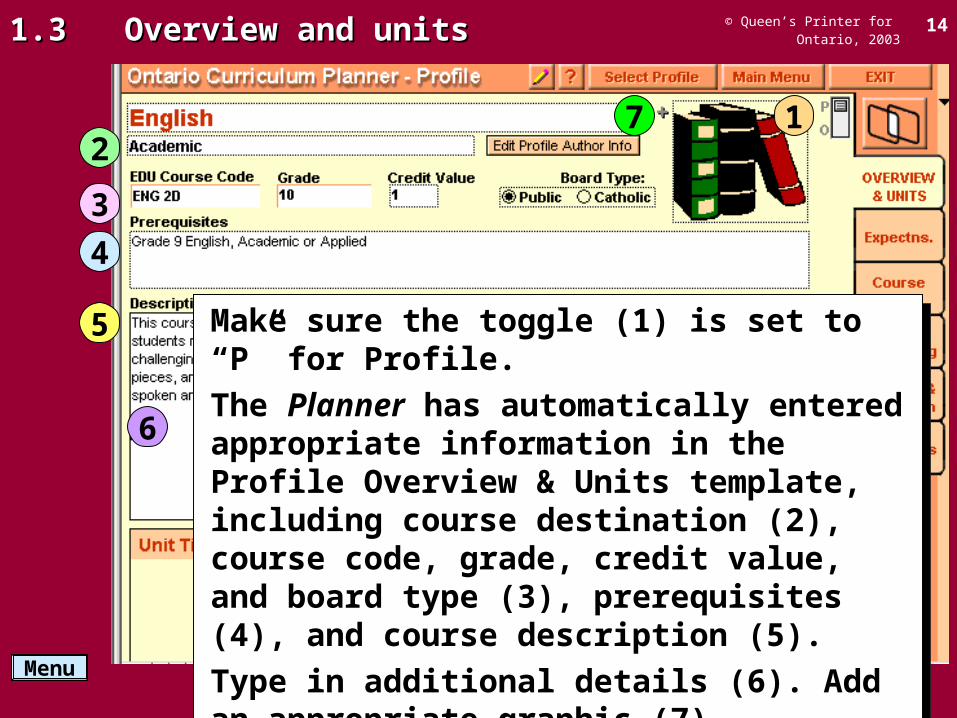
Make sure the toggle (1) is set to “P” for Profile.
The Planner has automatically entered appropriate information in the Profile Overview & Units template, including course destination (2), course code, grade, credit value, and board type (3), prerequisites (4), and course description (5).
Type in additional details (6). Add an appropriate graphic (7).
12
3
4
5
6
7

© Queen’s Printer for Ontario, 2003
15
Menu
1.3 Overview and units1.3 Overview and units
1
Click here (1) to edit the Profile Author Information (2) if necessary (e.g., to specify department information, to add multiple authors).
Click here (1) to edit the Profile Author Information (2) if necessary (e.g., to specify department information, to add multiple authors).
2
© Queen’s Printer for Ontario, 2003
16
Menu
1.3 Overview and units1.3 Overview and units
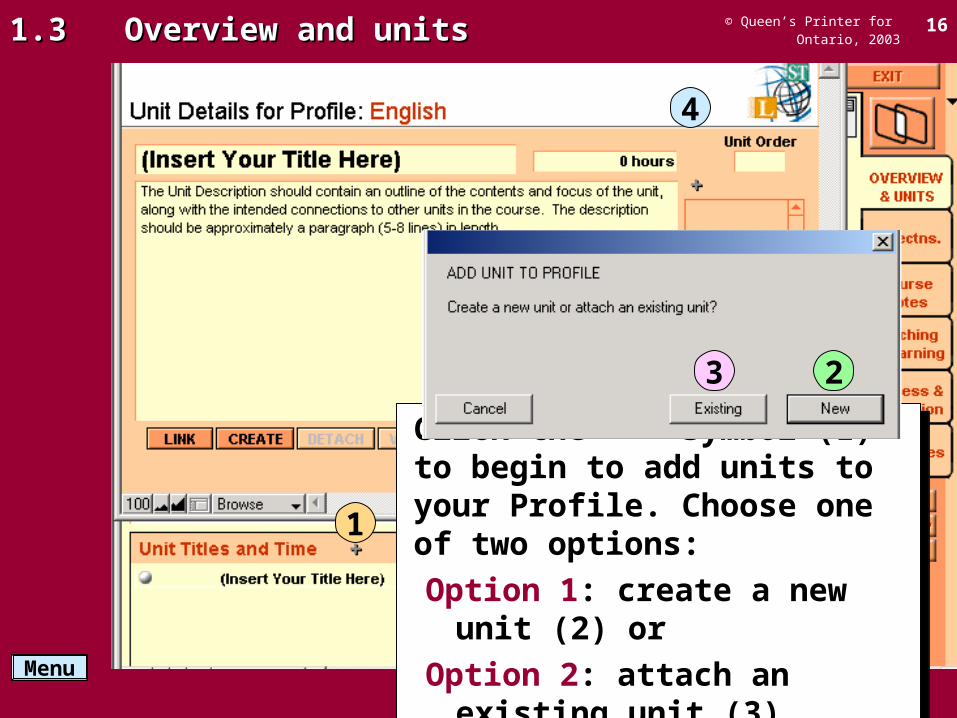
Click the “+” symbol (1) to begin to add units to your Profile. Choose one of two options:
Option 1: create a new unit (2) or
Option 2: attach an existing unit (3).
Click the “+” symbol (1) to begin to add units to your Profile. Choose one of two options:
Option 1: create a new unit (2) or
Option 2: attach an existing unit (3).
1
4
23

© Queen’s Printer for Ontario, 2003
17
Menu
1.3 Overview and units1.3 Overview and units
1 2
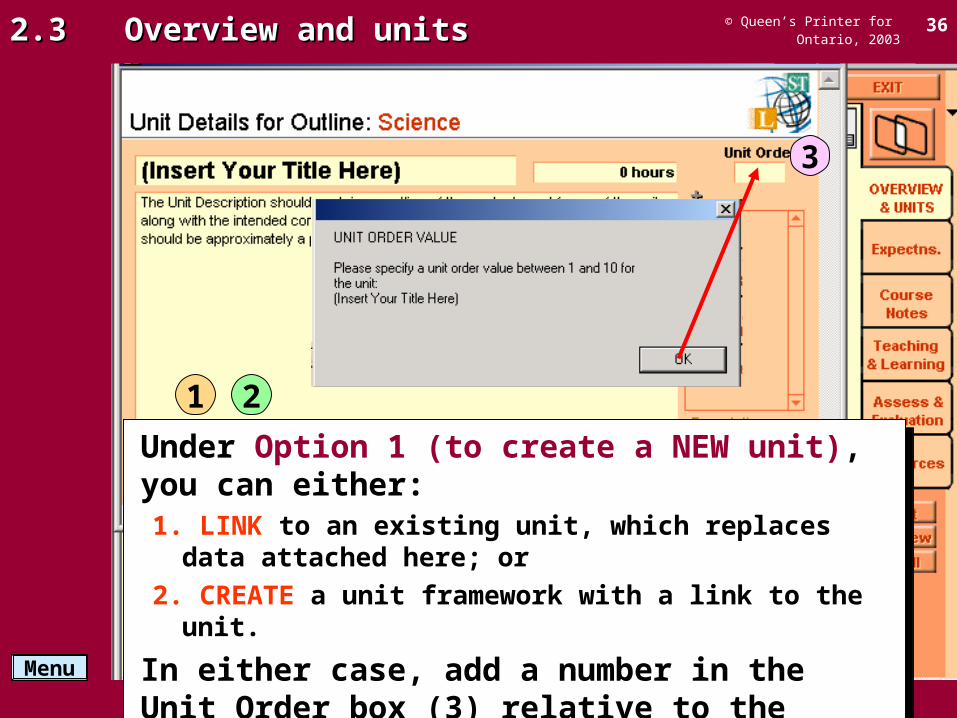
Under Option 1 (to create a NEW unit), you can either:1. LINK to an existing unit, which replaces data attached here; or
2. CREATE a unit framework with a link to the unit.
In either case, add a number in the Unit Order box (3) relative to the other units in the Profile.
Under Option 1 (to create a NEW unit), you can either:1. LINK to an existing unit, which replaces data attached here; or
2. CREATE a unit framework with a link to the unit.
In either case, add a number in the Unit Order box (3) relative to the other units in the Profile.
3
© Queen’s Printer for Ontario, 2003
18
Menu
1.3 Overview and units1.3 Overview and units
31
2
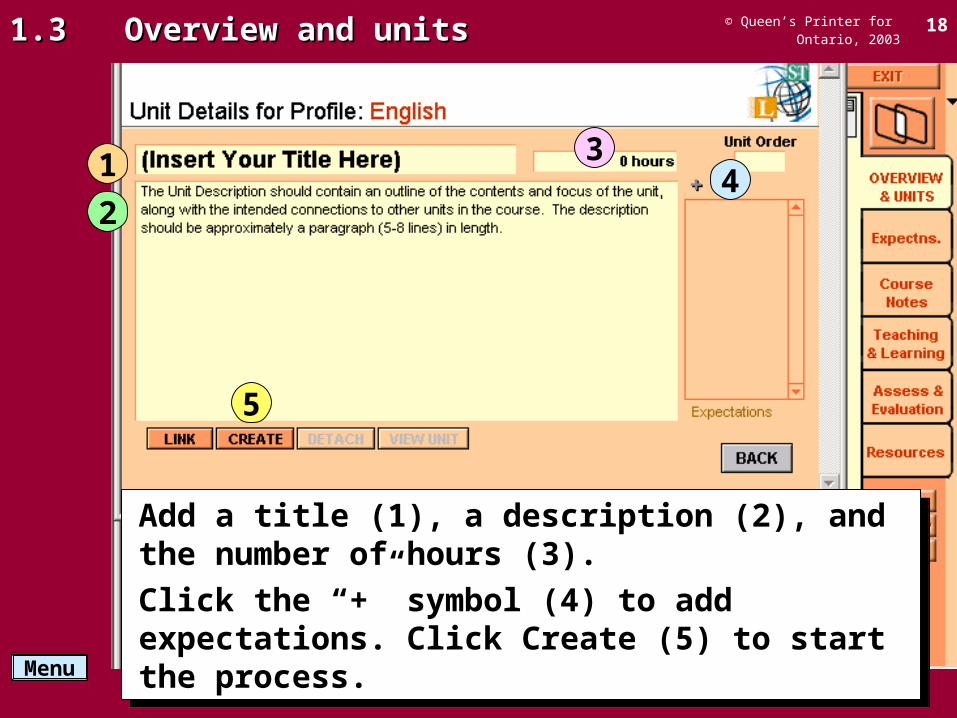
Add a title (1), a description (2), and the number of hours (3).
Click the “+” symbol (4) to add expectations. Click Create (5) to start the process.
Add a title (1), a description (2), and the number of hours (3).
Click the “+” symbol (4) to add expectations. Click Create (5) to start the process.
4
5
© Queen’s Printer for Ontario, 2003
19
Menu
1.3 Overview and units1.3 Overview and units
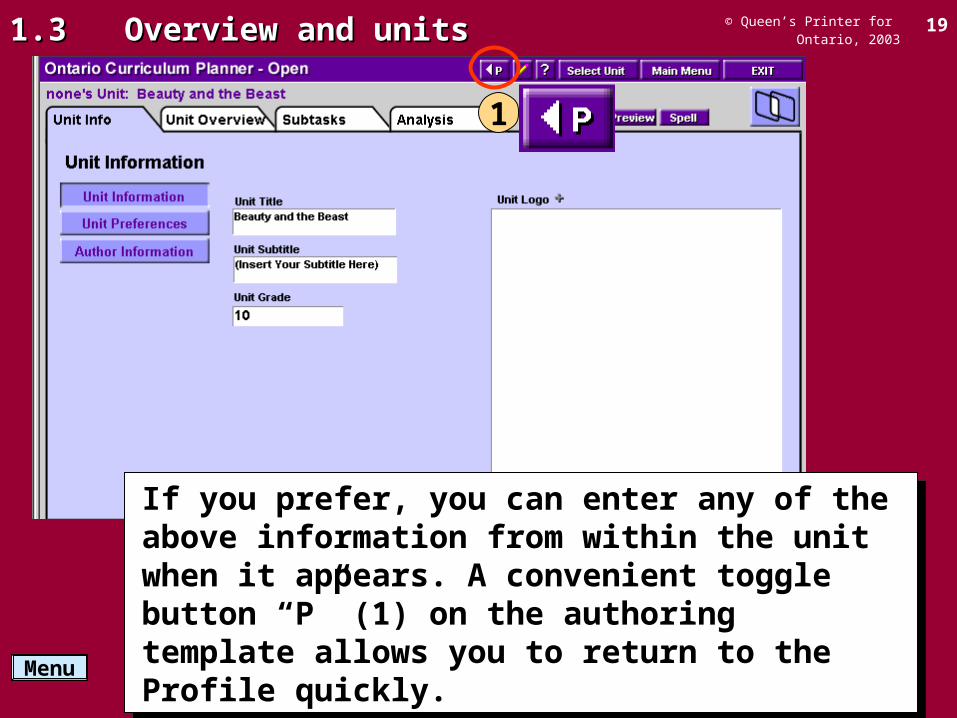
1
If you prefer, you can enter any of the above information from within the unit when it appears. A convenient toggle button “P” (1) on the authoring template allows you to return to the Profile quickly.
If you prefer, you can enter any of the above information from within the unit when it appears. A convenient toggle button “P” (1) on the authoring template allows you to return to the Profile quickly.

© Queen’s Printer for Ontario, 2003
20
Menu
1.3 Overview and units1.3 Overview and units
If you choose Option 2 (to attach an EXISTING unit), you will view any units for that grade(s) that are available in your Library (1). Click a title (2) to read its description and identify its Profile order (3). Click Back (4) to attach the unit.
If you choose Option 2 (to attach an EXISTING unit), you will view any units for that grade(s) that are available in your Library (1). Click a title (2) to read its description and identify its Profile order (3). Click Back (4) to attach the unit.
2 3
4
1

© Queen’s Printer for Ontario, 2003
21
Menu
1.3 Overview and units1.3 Overview and units
For example, in this Profile five existing units from the library have been linked (1) and ordered (2). The duration of each unit (3) is automatically recorded.
For example, in this Profile five existing units from the library have been linked (1) and ordered (2). The duration of each unit (3) is automatically recorded.
123
© Queen’s Printer for Ontario, 2003
22
Menu
1.4 Expectations1.4 Expectations
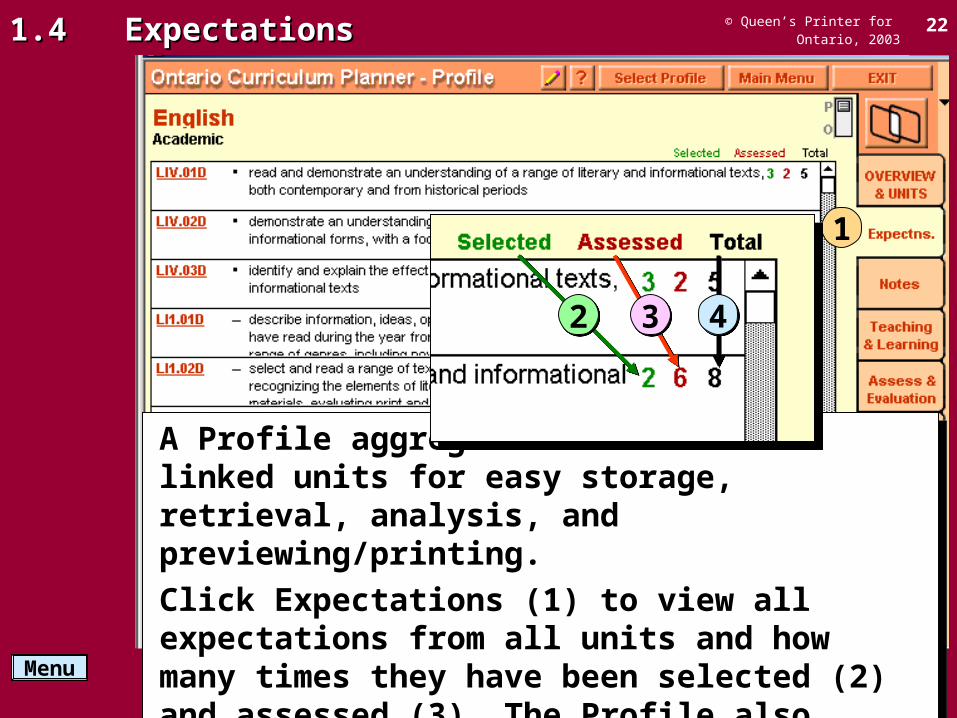
A Profile aggregates data from all linked units for easy storage, retrieval, analysis, and previewing/printing.
Click Expectations (1) to view all expectations from all units and how many times they have been selected (2) and assessed (3). The Profile also gives the total (4).
A Profile aggregates data from all linked units for easy storage, retrieval, analysis, and previewing/printing.
Click Expectations (1) to view all expectations from all units and how many times they have been selected (2) and assessed (3). The Profile also gives the total (4).
1
22 33 44

© Queen’s Printer for Ontario, 2003
23
Menu
1.5 Notes1.5 Notes
2
Click Course Notes (1) and add any information here (2) that is related to the course as a whole such as daily reminders and program considerations (click Considerations (3) to register them).
Click here (4) to add specific competencies from the Choices Into Action database.
Click Course Notes (1) and add any information here (2) that is related to the course as a whole such as daily reminders and program considerations (click Considerations (3) to register them).
Click here (4) to add specific competencies from the Choices Into Action database.
1
3 4
© Queen’s Printer for Ontario, 2003
24
Menu
1.6 Teaching and learning strategies1.6 Teaching and learning strategies
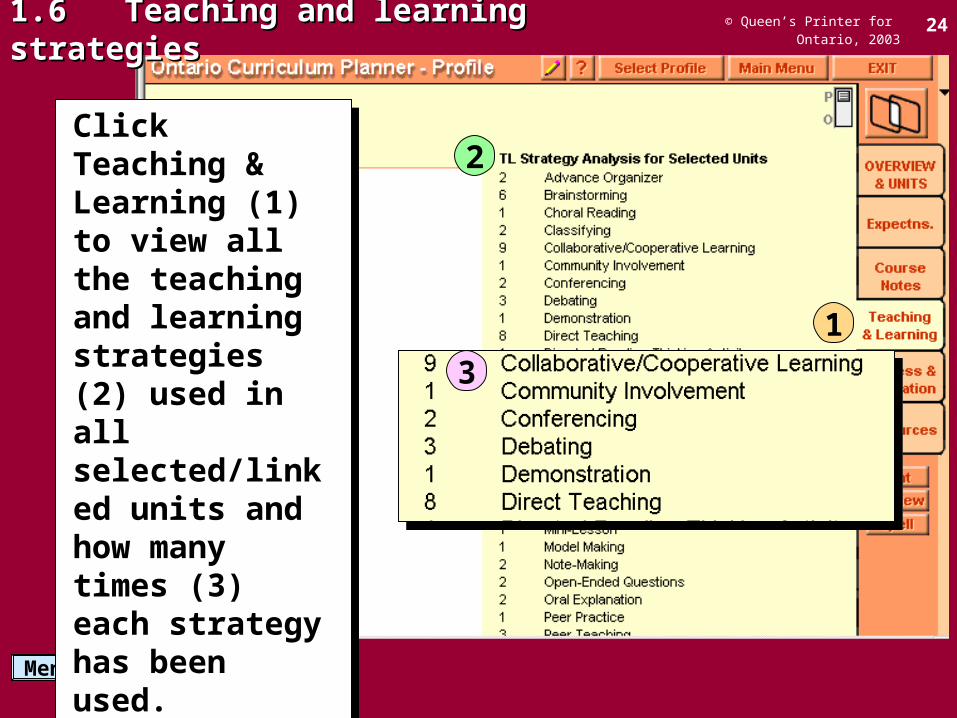
Click Teaching & Learning (1) to view all the teaching and learning strategies (2) used in all selected/linked units and how many times (3) each strategy has been used.
Click Teaching & Learning (1) to view all the teaching and learning strategies (2) used in all selected/linked units and how many times (3) each strategy has been used.
1
2
3
© Queen’s Printer for Ontario, 2003
25
Menu
1.6 Teaching and learning strategies1.6 Teaching and learning strategies
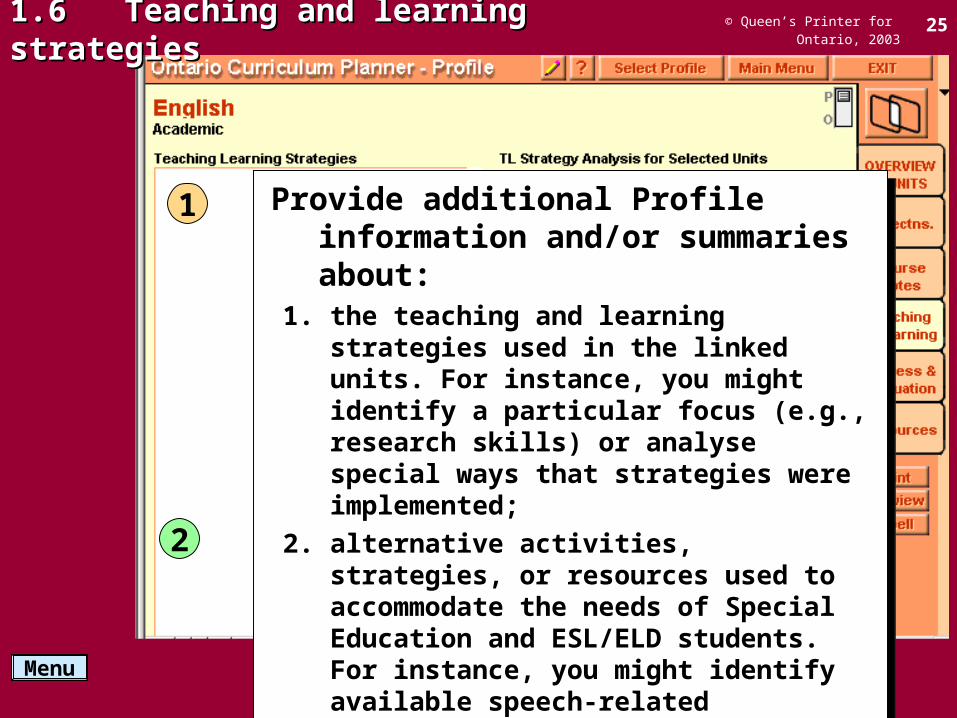
Provide additional Profile information and/or summaries about:
1. the teaching and learning strategies used in the linked units. For instance, you might identify a particular focus (e.g., research skills) or analyse special ways that strategies were implemented;
2. alternative activities, strategies, or resources used to accommodate the needs of Special Education and ESL/ELD students. For instance, you might identify available speech-related technologies used throughout the course.
1
2
© Queen’s Printer for Ontario, 2003
26
Menu
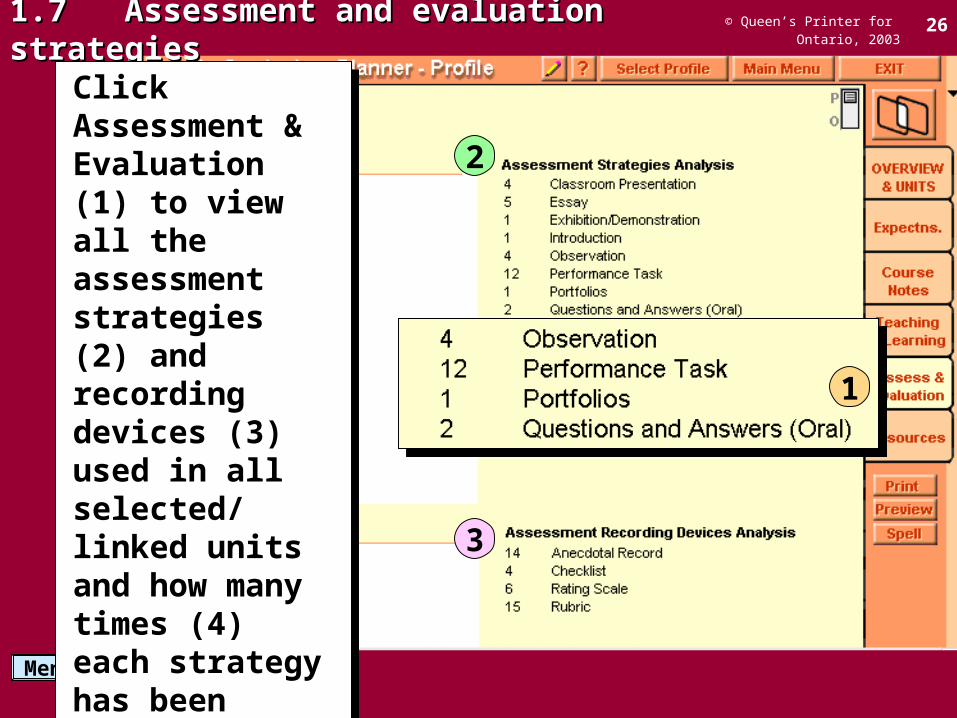
1.7 Assessment and evaluation strategies1.7 Assessment and evaluation strategies
Click Assessment & Evaluation (1) to view all the assessment strategies (2) and recording devices (3) used in all selected/ linked units and how many times (4) each strategy has been used.
Click Assessment & Evaluation (1) to view all the assessment strategies (2) and recording devices (3) used in all selected/ linked units and how many times (4) each strategy has been used.
2
3
4 1

© Queen’s Printer for Ontario, 2003
27
Menu
1.7 Assessment and evaluation strategies1.7 Assessment and evaluation strategies
Provide additional Profile information and/or summaries about:
1. assessment/evaluation strategies used in the course and the final methods of student evaluation (1). For instance, you might identify a particular focus (e.g., use of task-specific rubrics from provincial exemplars);
2. how the effectiveness of the course will be measured (2).
1
2
© Queen’s Printer for Ontario, 2003
28
Menu
1.8 Resources1.8 Resources
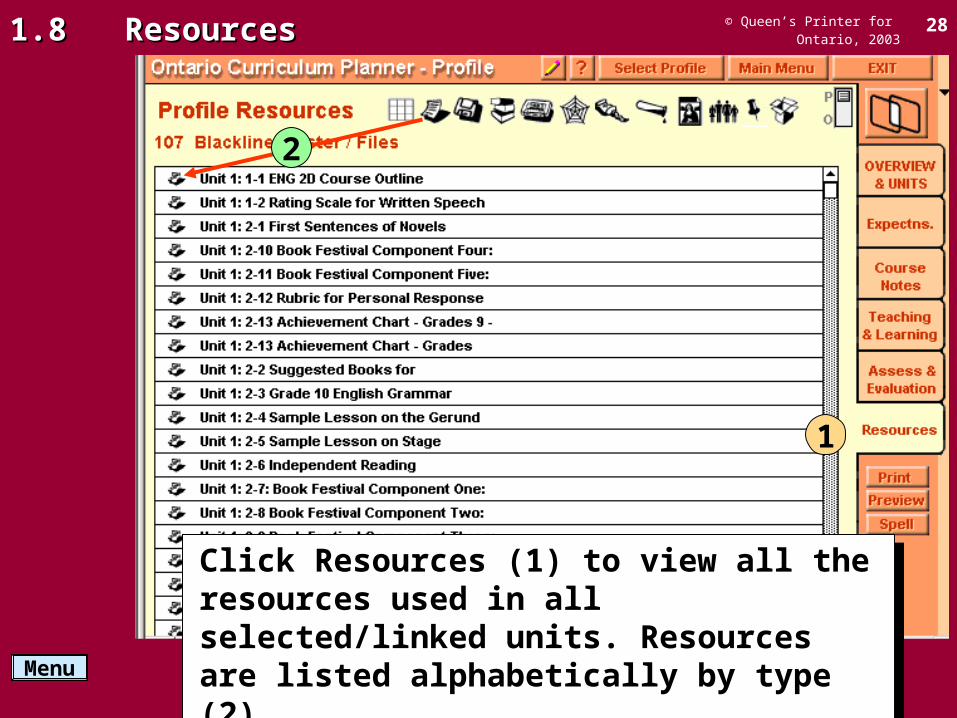
Click Resources (1) to view all the resources used in all selected/linked units. Resources are listed alphabetically by type (2).
Click Resources (1) to view all the resources used in all selected/linked units. Resources are listed alphabetically by type (2).
1
2
© Queen’s Printer for Ontario, 2003
29
Menu
1.8 Resources1.8 Resources
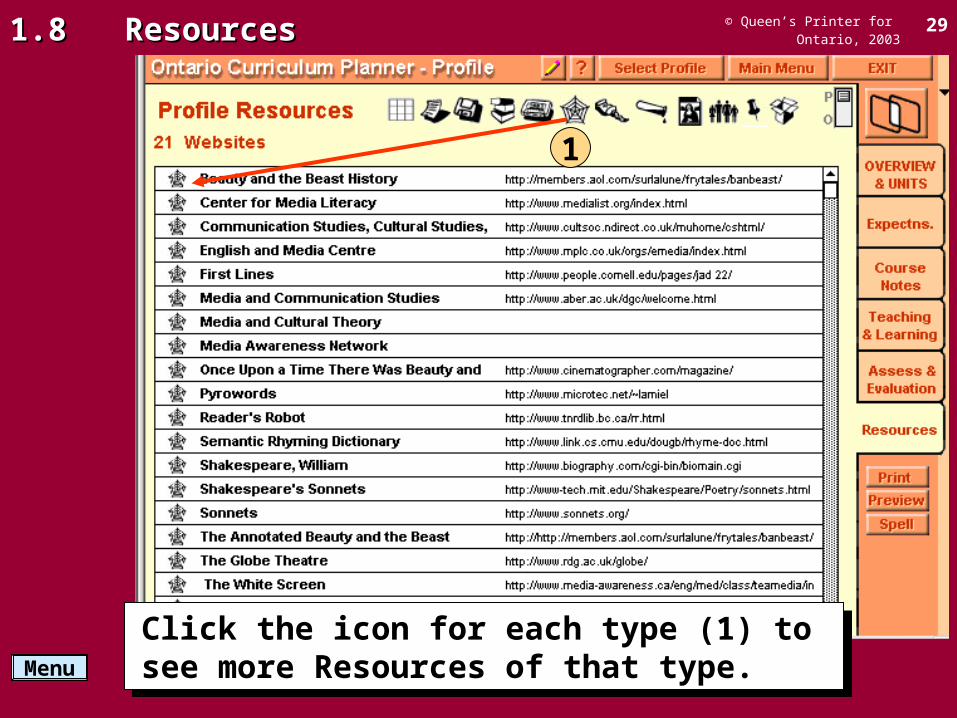
Click the icon for each type (1) to see more Resources of that type.
Click the icon for each type (1) to see more Resources of that type.
1

© Queen’s Printer for Ontario, 2003
30
Menu
2. Creating an Outline2. Creating an Outline
2.1 2.1 IntroductionIntroduction
2.22.2 Getting startedGetting started
2.3 2.3 Overview and unitsOverview and units
2.4 2.4 ExpectationsExpectations
2.52.5 NotesNotes
2.62.6 Teaching and learning strategiesTeaching and learning strategies
2.72.7 Assessment and evaluation strategiesAssessment and evaluation strategies
2.82.8 ResourcesResources
30Menu
© Queen’s Printer for Ontario, 2003
31
Menu
2.1 Introduction2.1 Introduction
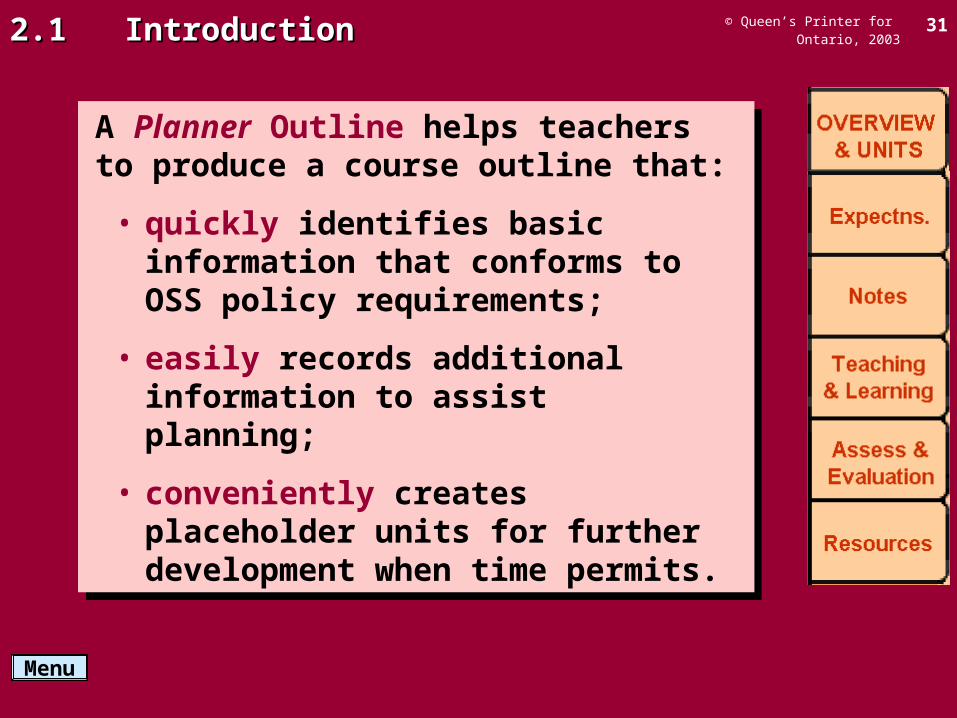
A Planner Outline helps teachers to produce a course outline that:
• quickly identifies basic information that conforms to OSS policy requirements;
• easily records additional information to assist planning;
• conveniently creates placeholder units for further development when time permits.
A Planner Outline helps teachers to produce a course outline that:
• quickly identifies basic information that conforms to OSS policy requirements;
• easily records additional information to assist planning;
• conveniently creates placeholder units for further development when time permits.
© Queen’s Printer for Ontario, 2003
32
Menu
2.1 Introduction2.1 Introduction
1Cover Page
Program Description and Unit Titles
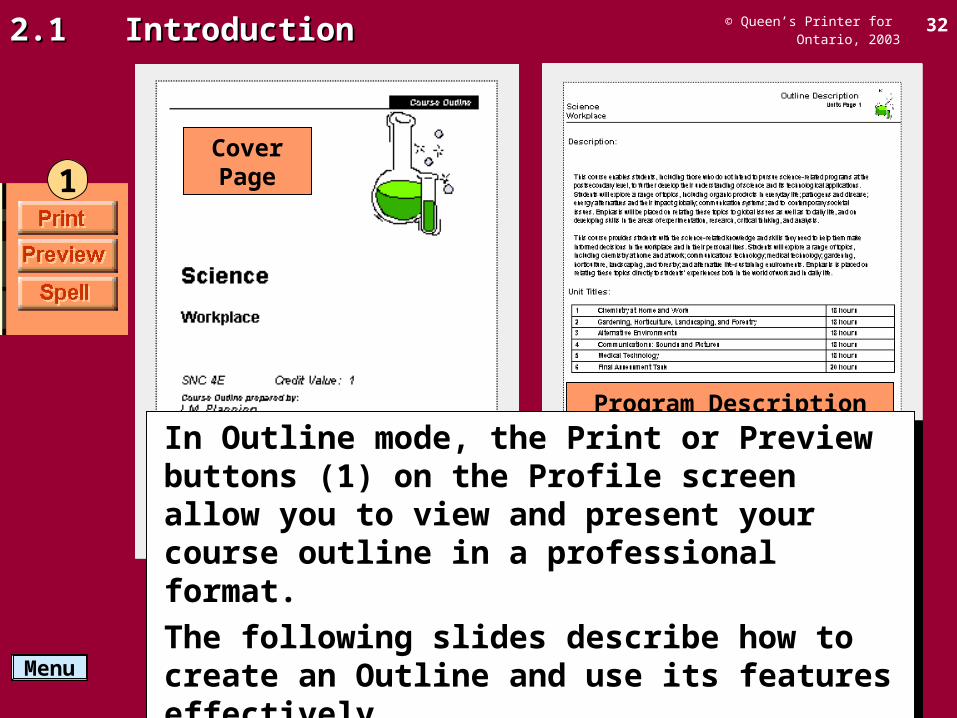
In Outline mode, the Print or Preview buttons (1) on the Profile screen allow you to view and present your course outline in a professional format.
The following slides describe how to create an Outline and use its features effectively.
In Outline mode, the Print or Preview buttons (1) on the Profile screen allow you to view and present your course outline in a professional format.
The following slides describe how to create an Outline and use its features effectively.
© Queen’s Printer for Ontario, 2003
33
Menu
2.2 Getting started2.2 Getting started
1
2
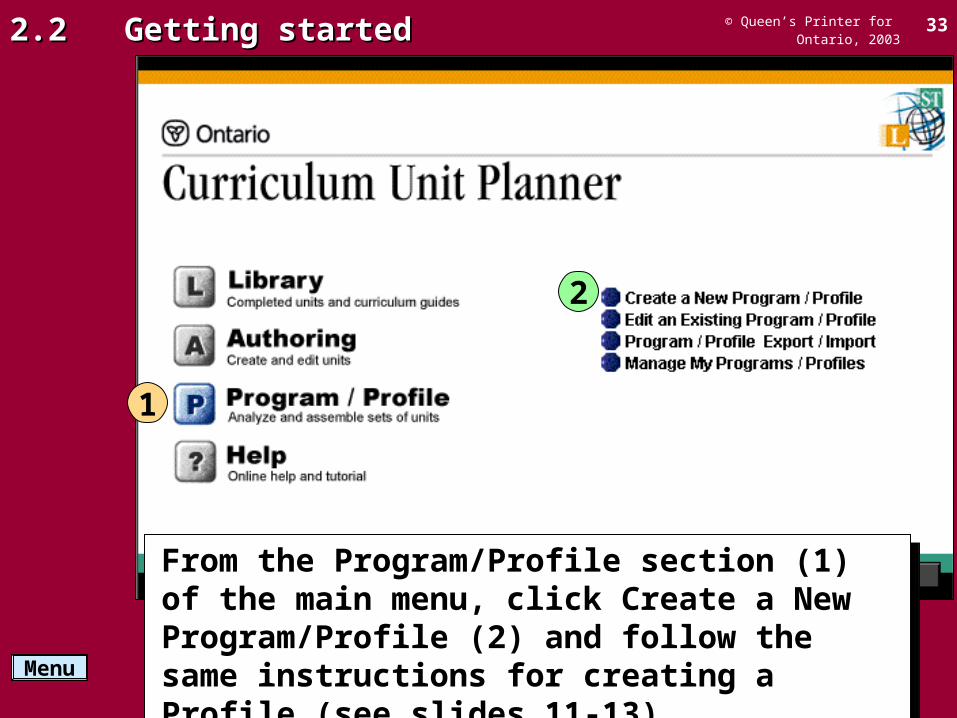
From the Program/Profile section (1) of the main menu, click Create a New Program/Profile (2) and follow the same instructions for creating a Profile (see slides 11-13).
From the Program/Profile section (1) of the main menu, click Create a New Program/Profile (2) and follow the same instructions for creating a Profile (see slides 11-13).
© Queen’s Printer for Ontario, 2003
34
Menu
2.3 Overview and units2.3 Overview and units
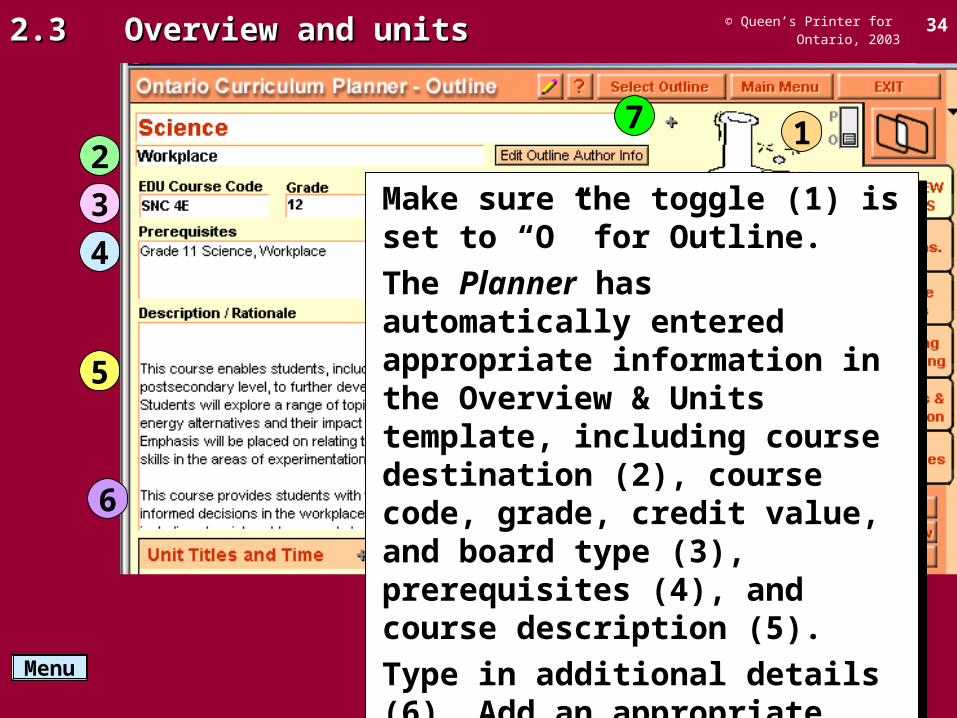
Make sure the toggle (1) is set to “O” for Outline.
The Planner has automatically entered appropriate information in the Overview & Units template, including course destination (2), course code, grade, credit value, and board type (3), prerequisites (4), and course description (5).
Type in additional details (6). Add an appropriate graphic (7).
12
3
4
5
6
7
© Queen’s Printer for Ontario, 2003
35
Menu
2.3 Overview and units2.3 Overview and units
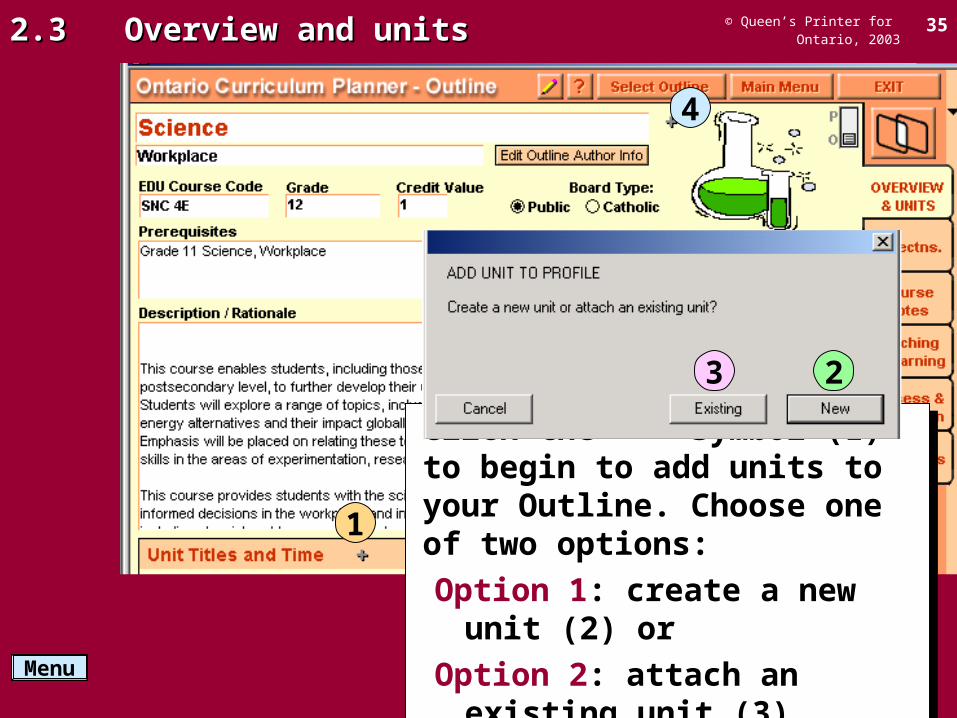
Click the “+” symbol (1) to begin to add units to your Outline. Choose one of two options:
Option 1: create a new unit (2) or
Option 2: attach an existing unit (3).
Click the “+” symbol (1) to begin to add units to your Outline. Choose one of two options:
Option 1: create a new unit (2) or
Option 2: attach an existing unit (3).
1
4
23
© Queen’s Printer for Ontario, 2003
36
Menu
2.3 Overview and units2.3 Overview and units
1 2
Under Option 1 (to create a NEW unit), you can either:1. LINK to an existing unit, which replaces data attached here; or
2. CREATE a unit framework with a link to the unit.
In either case, add a number in the Unit Order box (3) relative to the other units in the Outline.
Under Option 1 (to create a NEW unit), you can either:1. LINK to an existing unit, which replaces data attached here; or
2. CREATE a unit framework with a link to the unit.
In either case, add a number in the Unit Order box (3) relative to the other units in the Outline.
3

© Queen’s Printer for Ontario, 2003
37
Menu
2.3 Overview and units2.3 Overview and units
31
2
Add a title (1), a description (2), and the number of hours (3).
Click the “+” symbol (4) to add expectations. Click Create (5) to start the process.
Add a title (1), a description (2), and the number of hours (3).
Click the “+” symbol (4) to add expectations. Click Create (5) to start the process.
4
5

© Queen’s Printer for Ontario, 2003
38
Menu
2.3 Overview and units2.3 Overview and units
1
If you prefer, you can enter any of the above information from within the unit when it appears. A convenient toggle button “O” (1) on the authoring template allows you to return to the Outline quickly.
If you prefer, you can enter any of the above information from within the unit when it appears. A convenient toggle button “O” (1) on the authoring template allows you to return to the Outline quickly.
© Queen’s Printer for Ontario, 2003
39
Menu
2.3 Overview and units2.3 Overview and units
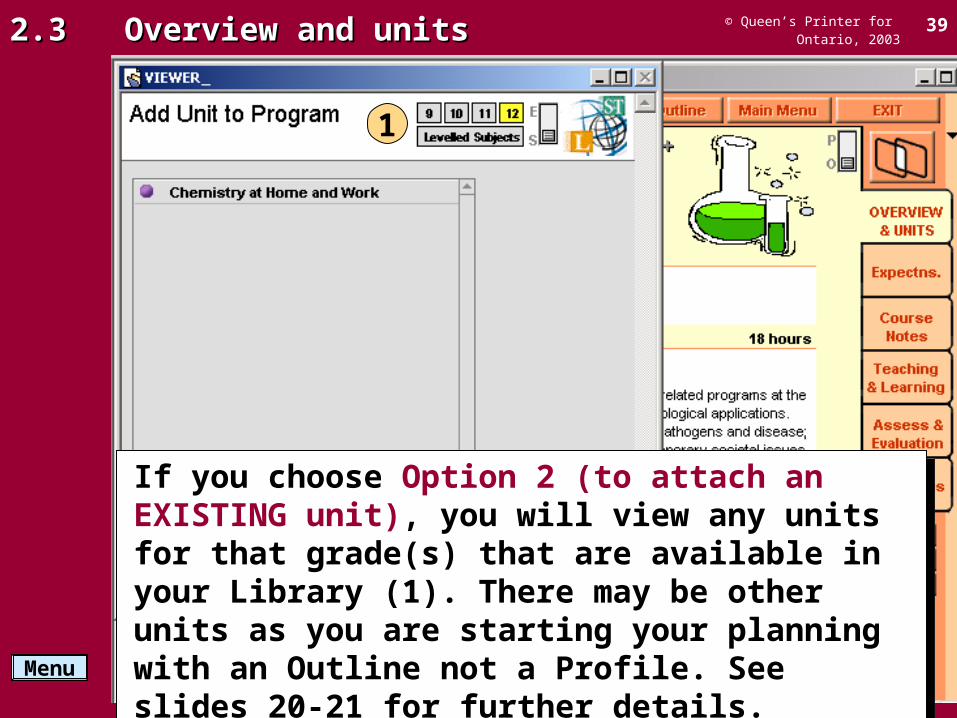
If you choose Option 2 (to attach an EXISTING unit), you will view any units for that grade(s) that are available in your Library (1). There may be other units as you are starting your planning with an Outline not a Profile. See slides 20-21 for further details.
If you choose Option 2 (to attach an EXISTING unit), you will view any units for that grade(s) that are available in your Library (1). There may be other units as you are starting your planning with an Outline not a Profile. See slides 20-21 for further details.
1

© Queen’s Printer for Ontario, 2003
40
Menu
2.4 Expectations2.4 Expectations
In the Outline mode, you will have mapped out the expectations as part of the planned units in the Unit Information pop-up screen while in Overview & Units (1).
However, the actual expectations will only appear in the Expectations list (2) once you begin to commit the expectations within specific units.
Print versions of the Outline provide a complete list of the Overall Expectations for the course as provided in the Ministry policy document.
2
1
© Queen’s Printer for Ontario, 2003
41
Menu
2.5 Notes2.5 Notes
2
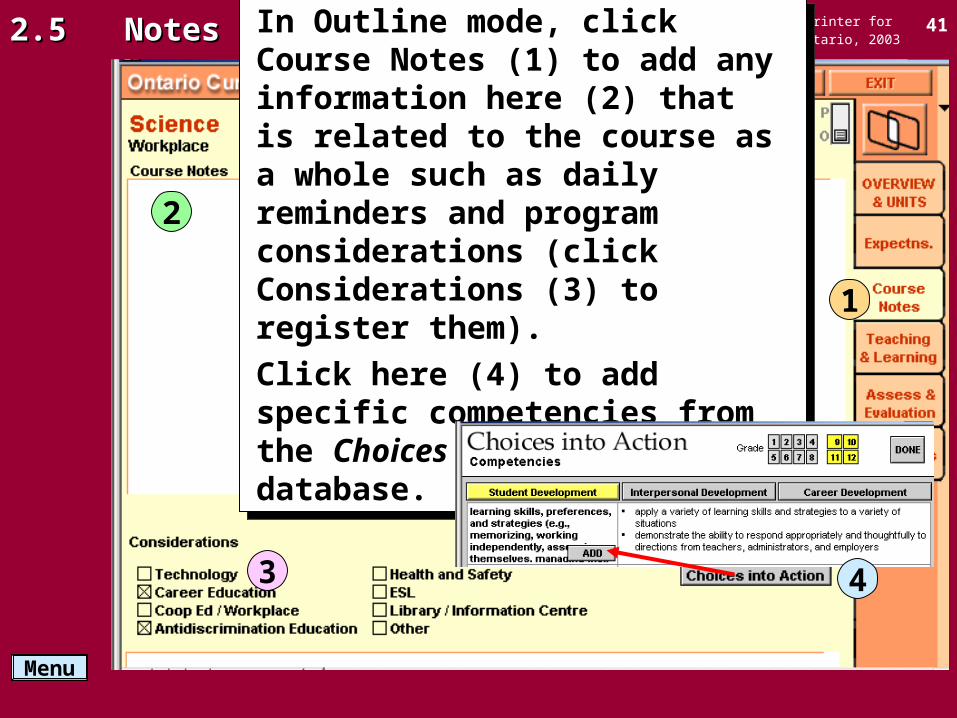
In Outline mode, click Course Notes (1) to add any information here (2) that is related to the course as a whole such as daily reminders and program considerations (click Considerations (3) to register them).
Click here (4) to add specific competencies from the Choices Into Action database.
In Outline mode, click Course Notes (1) to add any information here (2) that is related to the course as a whole such as daily reminders and program considerations (click Considerations (3) to register them).
Click here (4) to add specific competencies from the Choices Into Action database.
1
3 4
© Queen’s Printer for Ontario, 2003
42
Menu
2.6 Teaching and learning strategies2.6 Teaching and learning strategies
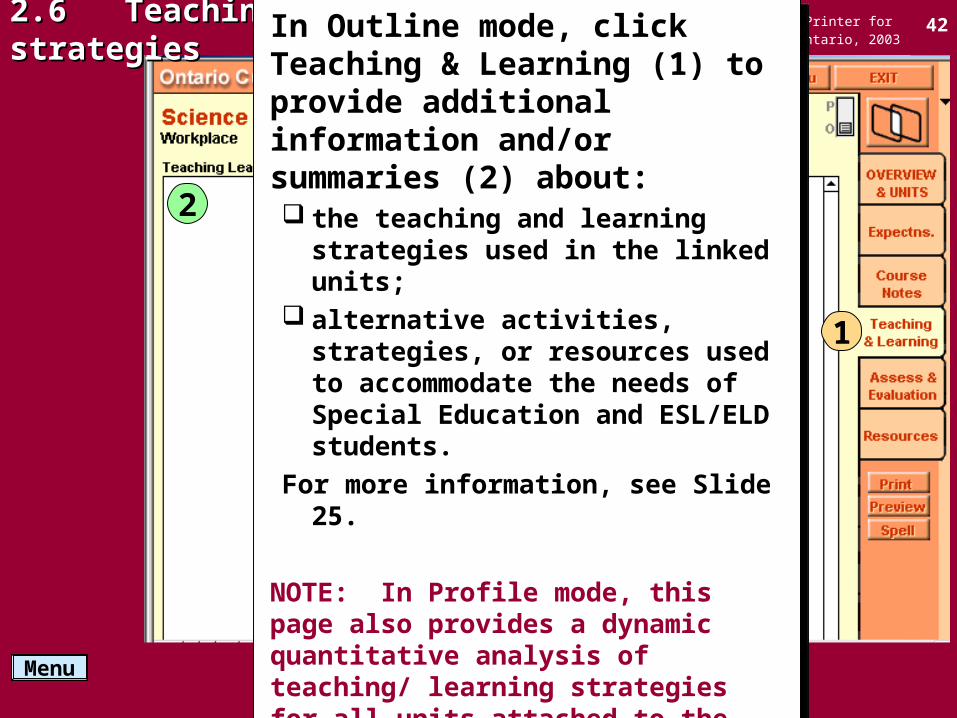
In Outline mode, click Teaching & Learning (1) to provide additional information and/or summaries (2) about: the teaching and learning strategies used in
the linked units; alternative activities, strategies, or resources
used to accommodate the needs of Special Education and ESL/ELD students.
For more information, see Slide 25.
NOTE: In Profile mode, this page also provides a dynamic quantitative analysis of teaching/ learning strategies for all units attached to the program as they are added and subsequently modified.
1
2
© Queen’s Printer for Ontario, 2003
43
Menu
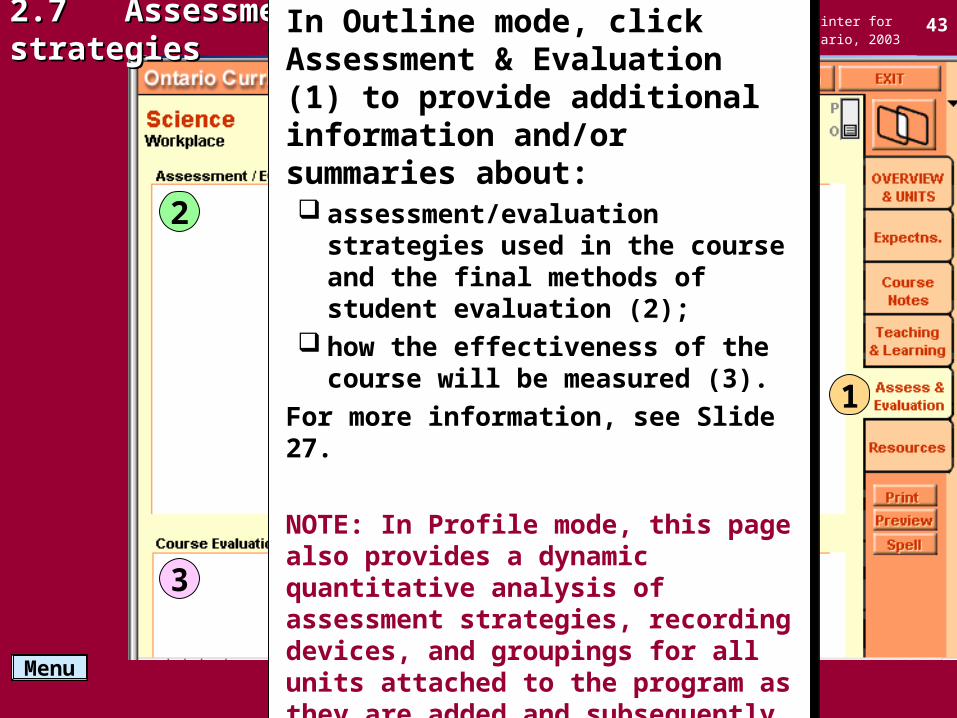
2.7 Assessment and evaluation strategies2.7 Assessment and evaluation strategies
In Outline mode, click Assessment & Evaluation (1) to provide additional information and/or summaries about: assessment/evaluation strategies used in
the course and the final methods of student evaluation (2);
how the effectiveness of the course will be measured (3).
For more information, see Slide 27.
NOTE: In Profile mode, this page also provides a dynamic quantitative analysis of assessment strategies, recording devices, and groupings for all units attached to the program as they are added and subsequently modified.
1
2
3
© Queen’s Printer for Ontario, 2003
44
Menu
2.8 Resources2.8 Resources
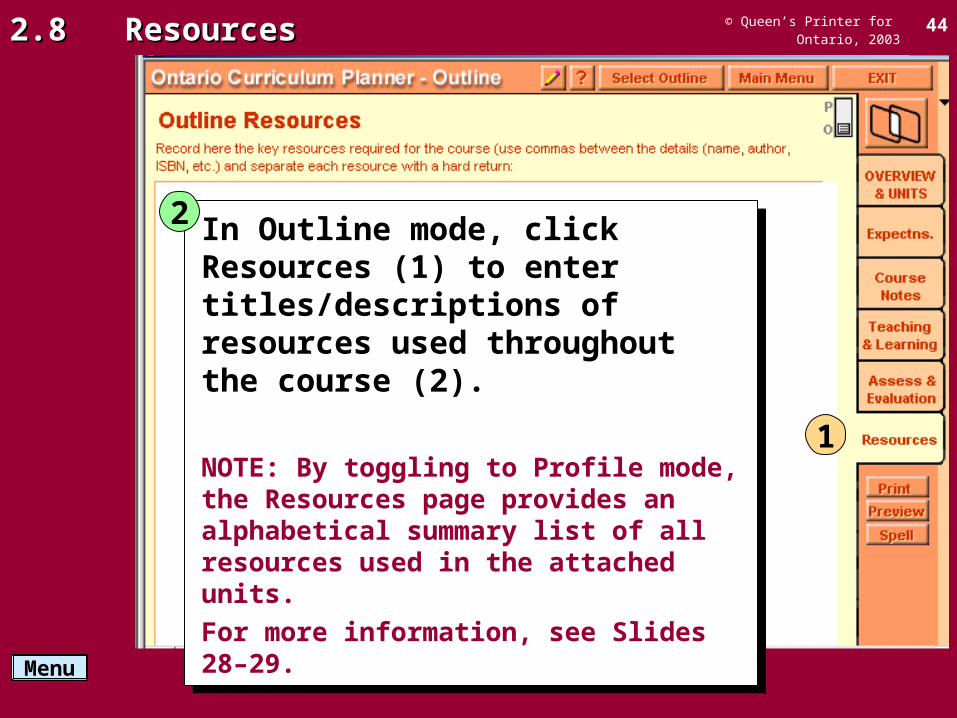
In Outline mode, click Resources (1) to enter titles/descriptions of resources used throughout the course (2).
NOTE: By toggling to Profile mode, the Resources page provides an alphabetical summary list of all resources used in the attached units.
For more information, see Slides 28–29.
In Outline mode, click Resources (1) to enter titles/descriptions of resources used throughout the course (2).
NOTE: By toggling to Profile mode, the Resources page provides an alphabetical summary list of all resources used in the attached units.
For more information, see Slides 28–29.
1
2
3. 3. Editing, Sharing, and Managing Editing, Sharing, and Managing Profiles and OutlinesProfiles and Outlines
3.1 3.1 IntroductionIntroduction
3.23.2 Editing a Profile/OutlineEditing a Profile/Outline
3.3 3.3 Sharing a Profile/Outline (exporting/importing)Sharing a Profile/Outline (exporting/importing)
3.4 3.4 Managing Profiles/OutlinesManaging Profiles/Outlines
3.53.5 Additional notes about Profiles/OutlinesAdditional notes about Profiles/Outlines
45Menu
© Queen’s Printer for Ontario, 2003
46
Menu
3.1 Introduction3.1 Introduction
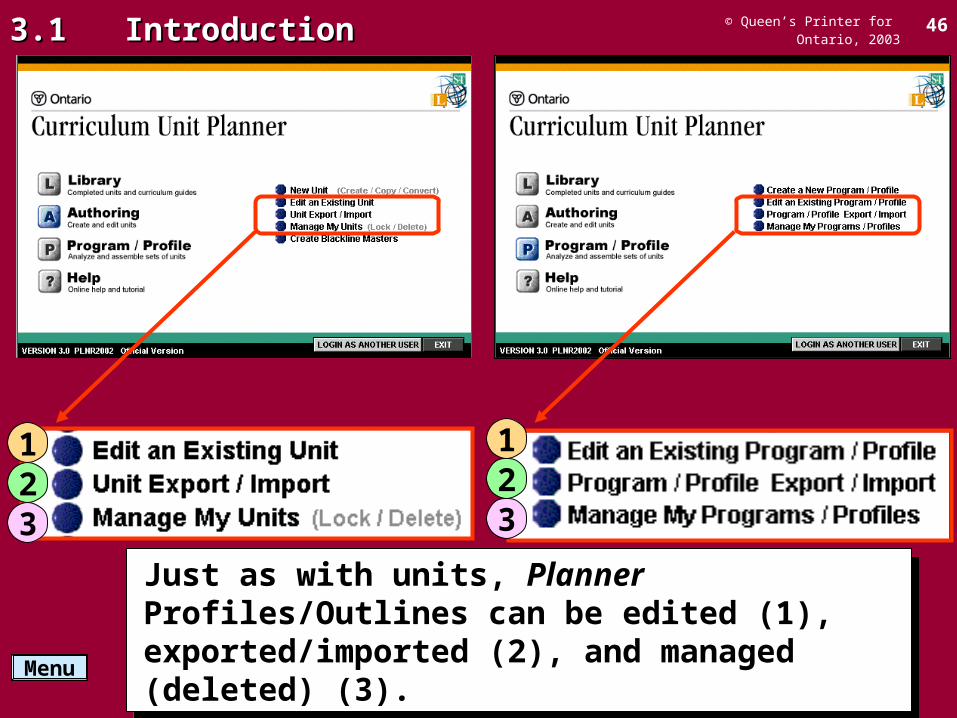
Just as with units, Planner Profiles/Outlines can be edited (1), exported/imported (2), and managed (deleted) (3).
Just as with units, Planner Profiles/Outlines can be edited (1), exported/imported (2), and managed (deleted) (3).
23
123
1

© Queen’s Printer for Ontario, 2003
47
Menu
3.2 Editing a Profile/Outline3.2 Editing a Profile/Outline
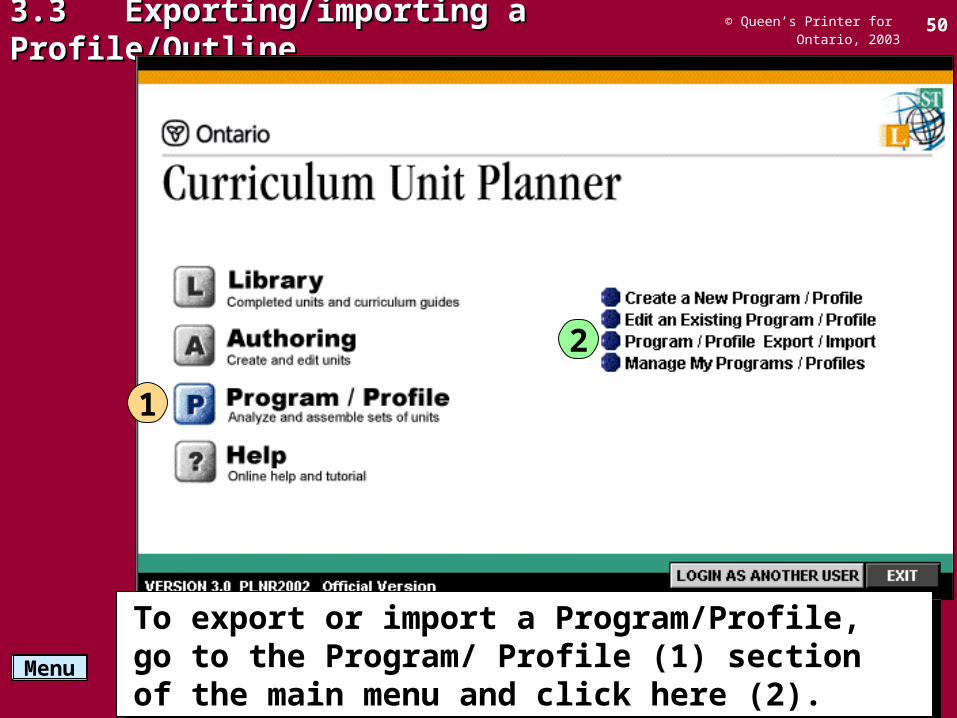
To edit an existing Profile/Outline go to the Program/Profile (1) section of the main menu and click here (2).
To edit an existing Profile/Outline go to the Program/Profile (1) section of the main menu and click here (2).
1
2
© Queen’s Printer for Ontario, 2003
48
Menu
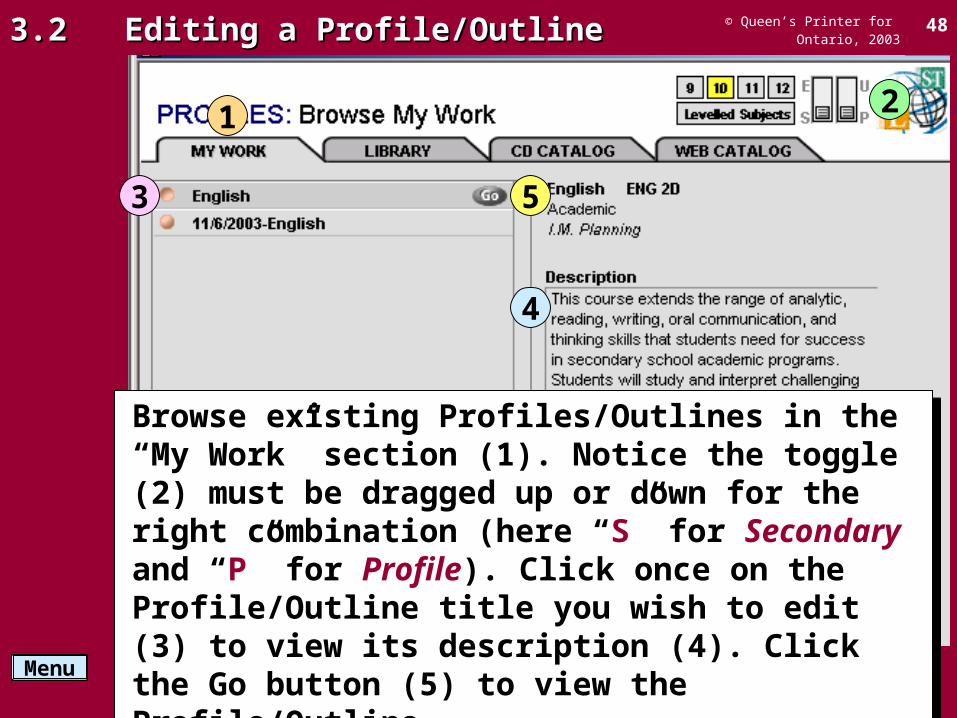
Browse existing Profiles/Outlines in the “My Work” section (1). Notice the toggle (2) must be dragged up or down for the right combination (here “S” for Secondary and “P” for Profile). Click once on the Profile/Outline title you wish to edit (3) to view its description (4). Click the Go button (5) to view the Profile/Outline.
Browse existing Profiles/Outlines in the “My Work” section (1). Notice the toggle (2) must be dragged up or down for the right combination (here “S” for Secondary and “P” for Profile). Click once on the Profile/Outline title you wish to edit (3) to view its description (4). Click the Go button (5) to view the Profile/Outline.
3.2 Editing a Profile/Outline3.2 Editing a Profile/Outline
1
3
4
2
5
© Queen’s Printer for Ontario, 2003
49
Menu
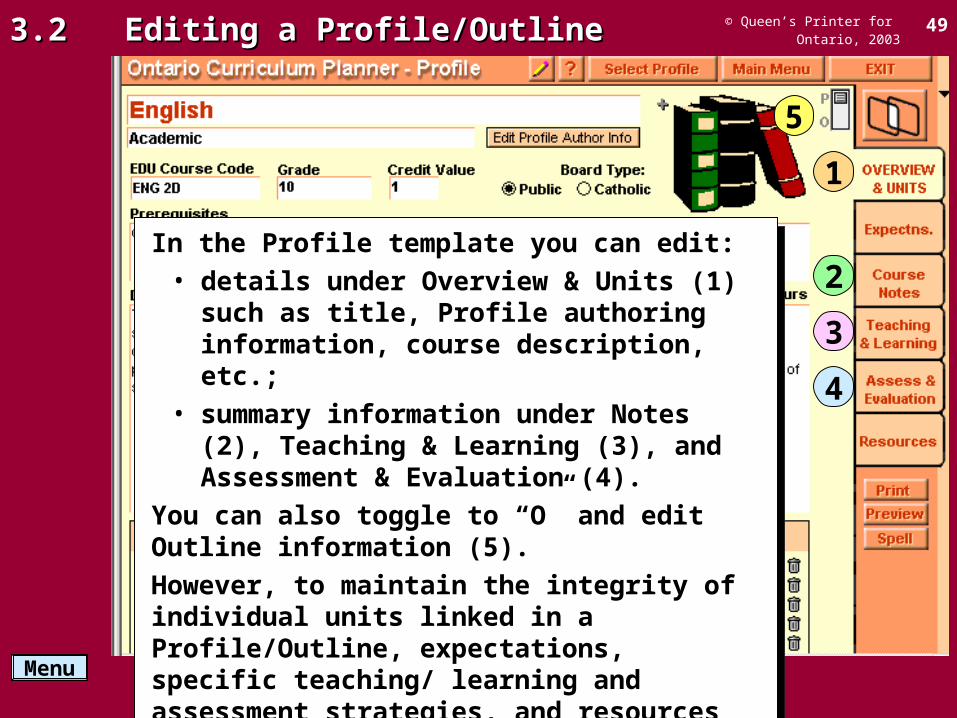
In the Profile template you can edit:• details under Overview & Units (1) such as title,
Profile authoring information, course description, etc.;
• summary information under Notes (2), Teaching & Learning (3), and Assessment & Evaluation (4).
You can also toggle to “O” and edit Outline information (5).
However, to maintain the integrity of individual units linked in a Profile/Outline, expectations, specific teaching/ learning and assessment strategies, and resources must be edited within a specific unit.
3.2 Editing a Profile/Outline3.2 Editing a Profile/Outline
1
3
4
2
5
© Queen’s Printer for Ontario, 2003
50
Menu
3.3 Exporting/importing a Profile/Outline3.3 Exporting/importing a Profile/Outline
To export or import a Program/Profile, go to the Program/ Profile (1) section of the main menu and click here (2).
To export or import a Program/Profile, go to the Program/ Profile (1) section of the main menu and click here (2).
1
2

© Queen’s Printer for Ontario, 2003
51
Menu
3.3 Exporting/importing a Profile/Outline3.3 Exporting/importing a Profile/Outline
Click the Export button to upload the Profile/Outline to:
• send to a colleague as an e-mail attachment;
• store on another disk medium (e.g., to take to another computer).
Click the Export button to upload the Profile/Outline to:
• send to a colleague as an e-mail attachment;
• store on another disk medium (e.g., to take to another computer).

© Queen’s Printer for Ontario, 2003
52
Menu
3.3 Exporting/importing a Profile/Outline3.3 Exporting/importing a Profile/Outline
Select the Profile/Outline you wish to export (1). Choose to export the Profile either with all attached units (2) or just as the Outline “front end” alone (3).
Select the Profile/Outline you wish to export (1). Choose to export the Profile either with all attached units (2) or just as the Outline “front end” alone (3).
1
3 2
© Queen’s Printer for Ontario, 2003
53
Menu
3.3 Exporting/importing a Profile/Outline3.3 Exporting/importing a Profile/Outline
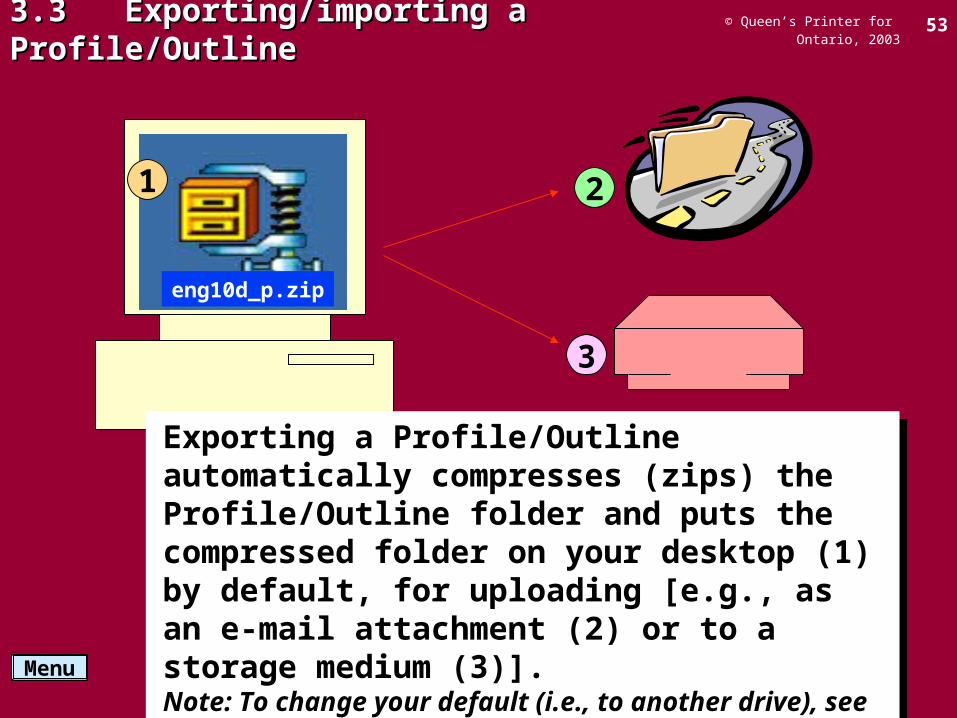
Exporting a Profile/Outline automatically compresses (zips) the Profile/Outline folder and puts the compressed folder on your desktop (1) by default, for uploading [e.g., as an e-mail attachment (2) or to a storage medium (3)].Note: To change your default (i.e., to another drive), see Review Author Preferences under the Help menu.
Exporting a Profile/Outline automatically compresses (zips) the Profile/Outline folder and puts the compressed folder on your desktop (1) by default, for uploading [e.g., as an e-mail attachment (2) or to a storage medium (3)].Note: To change your default (i.e., to another drive), see Review Author Preferences under the Help menu.
1
3
2
eng10d_p.zip
© Queen’s Printer for Ontario, 2003
54
Menu
3.3 Exporting/importing a Profile/Outline3.3 Exporting/importing a Profile/Outline
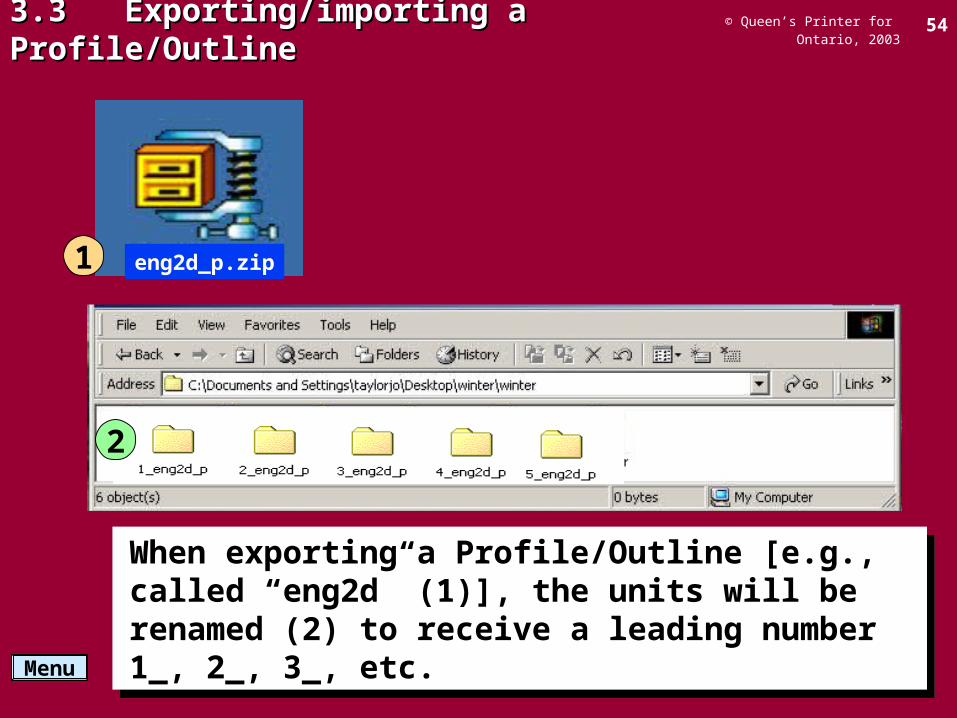
When exporting a Profile/Outline [e.g., called “eng2d” (1)], the units will be renamed (2) to receive a leading number 1_, 2_, 3_, etc.
When exporting a Profile/Outline [e.g., called “eng2d” (1)], the units will be renamed (2) to receive a leading number 1_, 2_, 3_, etc.
eng2d_p.zip1
2
© Queen’s Printer for Ontario, 2003
55
Menu
3.3 Exporting/importing a Profile/Outline3.3 Exporting/importing a Profile/Outline
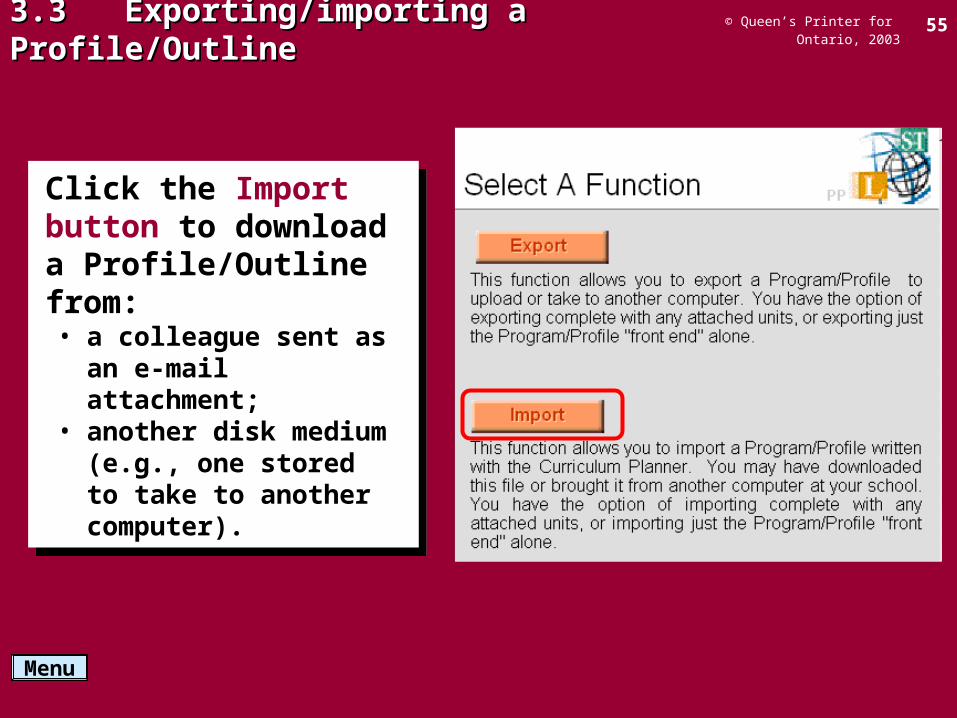
Click the Import button to download a Profile/Outline from: • a colleague sent as an e-mail
attachment;• another disk medium (e.g.,
one stored to take to another computer).
Click the Import button to download a Profile/Outline from: • a colleague sent as an e-mail
attachment;• another disk medium (e.g.,
one stored to take to another computer).

© Queen’s Printer for Ontario, 2003
56
Menu
3.3 Exporting/importing a Profile/Outline3.3 Exporting/importing a Profile/Outline
123
You may choose to import a Profile with all attached units (1) or just the Outline (i.e., “front end”) alone (2). Browse to the desired zipped folder on your directory (3).
Note: To prepare for importing a Profile/Outline sent as an e-mailed attachment, save its zipped Profile/Outline folder to your desktop. The file can be brought in while zipped.
eng10d_p.zip
eng10d_p.zip

© Queen’s Printer for Ontario, 2003
57
Menu
3.3 Exporting/importing a Profile/Outline3.3 Exporting/importing a Profile/Outline
After importing the Profile/Outline, you may view it (1) or import another (2). Importing a Profile/Outline brings it into the “My Work” section (3) of the Library. Copies of Profiles/Outlines (4) are dated for added flexibility in adapting them for different circumstances.Note: Slide the toggle to “P” (5) to view Profiles/Outlines.
After importing the Profile/Outline, you may view it (1) or import another (2). Importing a Profile/Outline brings it into the “My Work” section (3) of the Library. Copies of Profiles/Outlines (4) are dated for added flexibility in adapting them for different circumstances.Note: Slide the toggle to “P” (5) to view Profiles/Outlines.
1
3
2
4
5
© Queen’s Printer for Ontario, 2003
58
Menu
3.4 Managing Profiles/Outlines3.4 Managing Profiles/Outlines
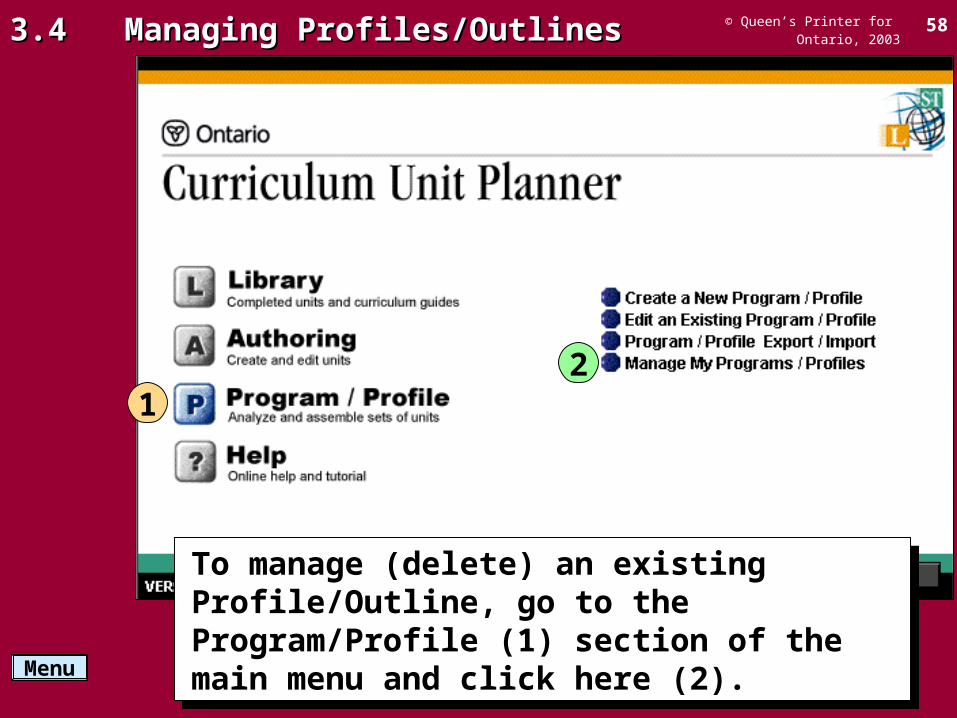
To manage (delete) an existing Profile/Outline, go to the Program/Profile (1) section of the main menu and click here (2).
To manage (delete) an existing Profile/Outline, go to the Program/Profile (1) section of the main menu and click here (2).
12
© Queen’s Printer for Ontario, 2003
59
Menu
3.4 Managing Profiles/Outlines3.4 Managing Profiles/Outlines
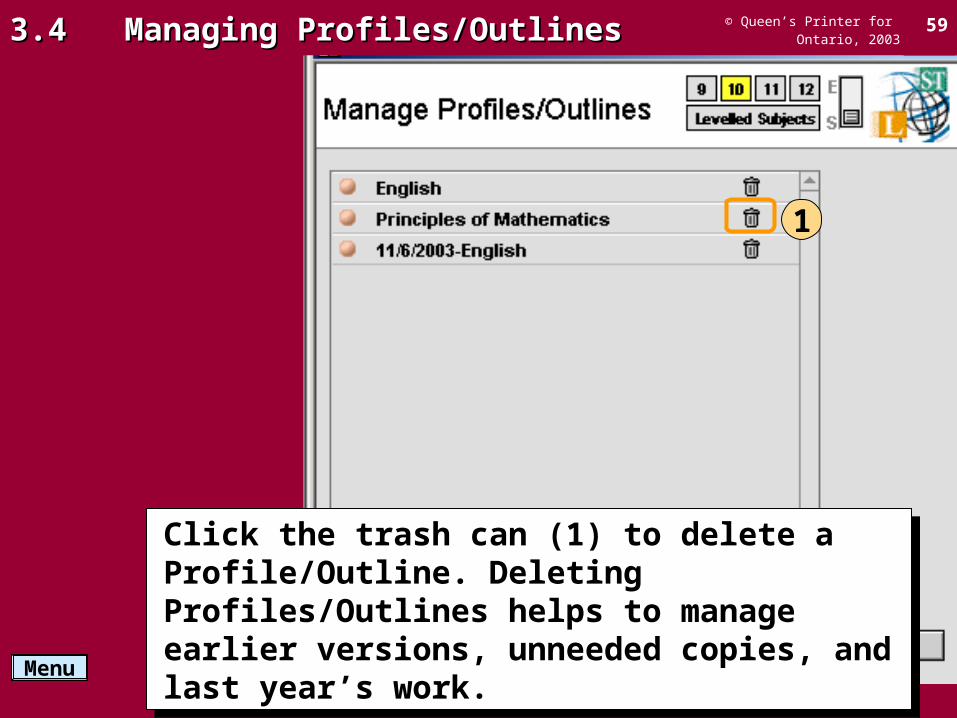
Click the trash can (1) to delete a Profile/Outline. Deleting Profiles/Outlines helps to manage earlier versions, unneeded copies, and last year’s work.
Click the trash can (1) to delete a Profile/Outline. Deleting Profiles/Outlines helps to manage earlier versions, unneeded copies, and last year’s work.
1

© Queen’s Printer for Ontario, 2003
60
Menu
3.4 Managing Profiles/Outlines3.4 Managing Profiles/Outlines
You may also remove ( i.e., detach) any linked unit from a Profile/Outline. Click the title of the unit (1) on the Unit Overview screen and click Detach (2). This does not remove the unit from your Library.
You may also remove ( i.e., detach) any linked unit from a Profile/Outline. Click the title of the unit (1) on the Unit Overview screen and click Detach (2). This does not remove the unit from your Library.
1
2
© Queen’s Printer for Ontario, 2003
61
Menu
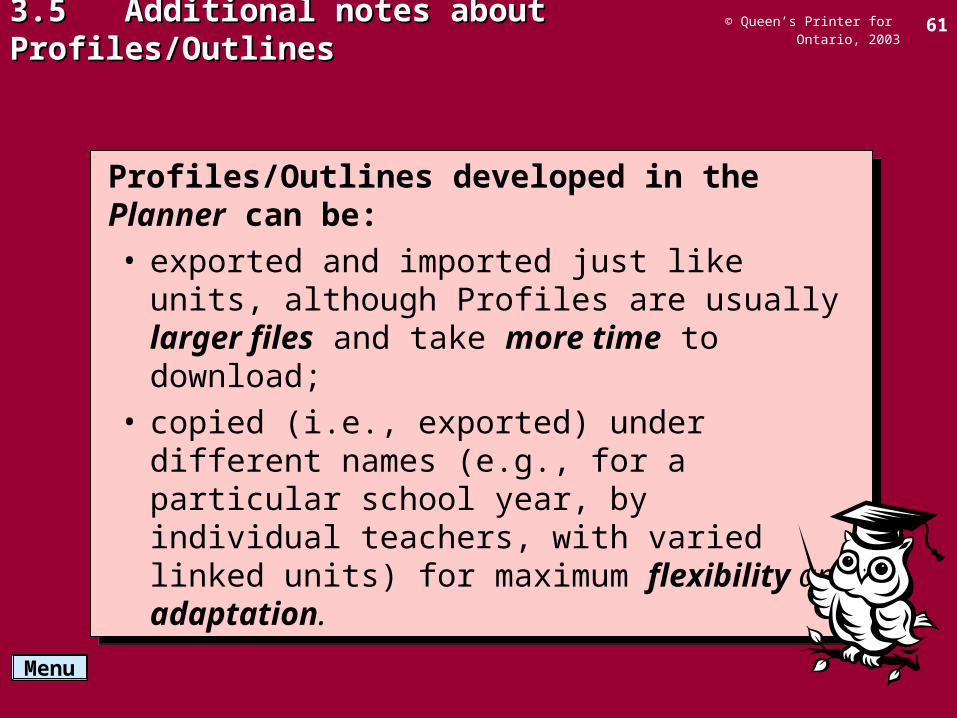
3.5 Additional notes about Profiles/Outlines3.5 Additional notes about Profiles/Outlines
Profiles/Outlines developed in the Planner can be: • exported and imported just like units, although Profiles are
usually larger files and take more time to download;• copied (i.e., exported) under different names (e.g., for a
particular school year, by individual teachers, with varied linked units) for maximum flexibility and adaptation.
© Queen’s Printer for Ontario, 2003
62
Menu
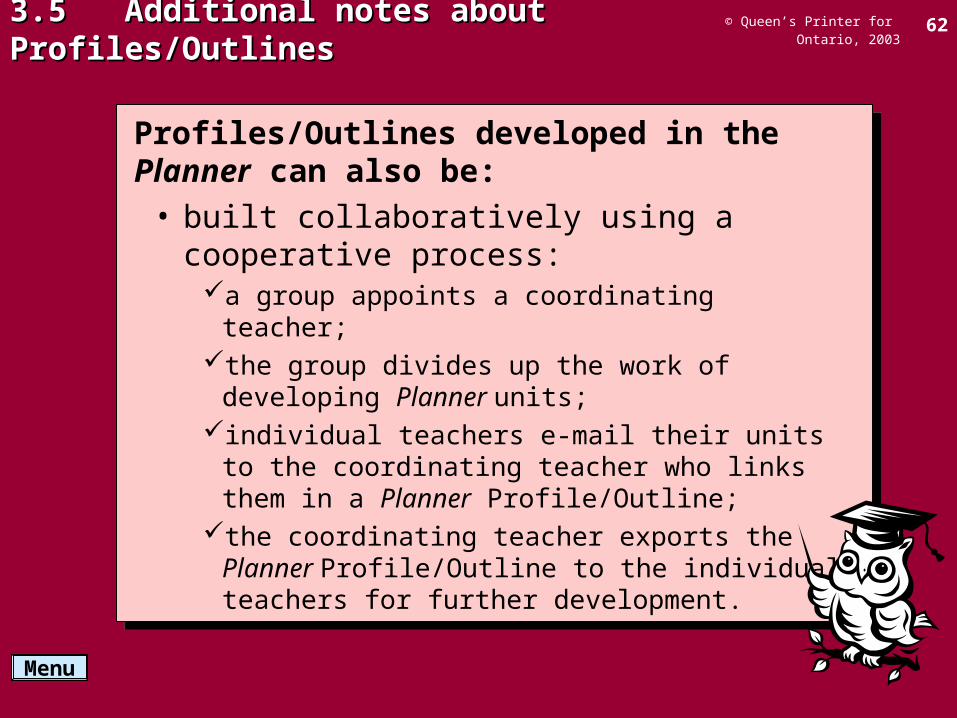
3.5 Additional notes about Profiles/Outlines3.5 Additional notes about Profiles/Outlines
Profiles/Outlines developed in the Planner can also be:• built collaboratively using a cooperative process:
a group appoints a coordinating teacher; the group divides up the work of developing Planner units;individual teachers e-mail their units to the coordinating teacher
who links them in a Planner Profile/Outline;the coordinating teacher exports the Planner Profile/Outline to
the individual teachers for further development.
Thank you for viewing this presentation:
Designing a Secondary Profile/Outline Designing a Secondary Profile/Outline
For other presentations go to www.ocup.org
Thank you for viewing this presentation:
Designing a Secondary Profile/Outline Designing a Secondary Profile/Outline
For other presentations go to www.ocup.org
© Queen’s Printer for Ontario, 2003 63
ExitMenu