Embed Size (px)
Citation preview
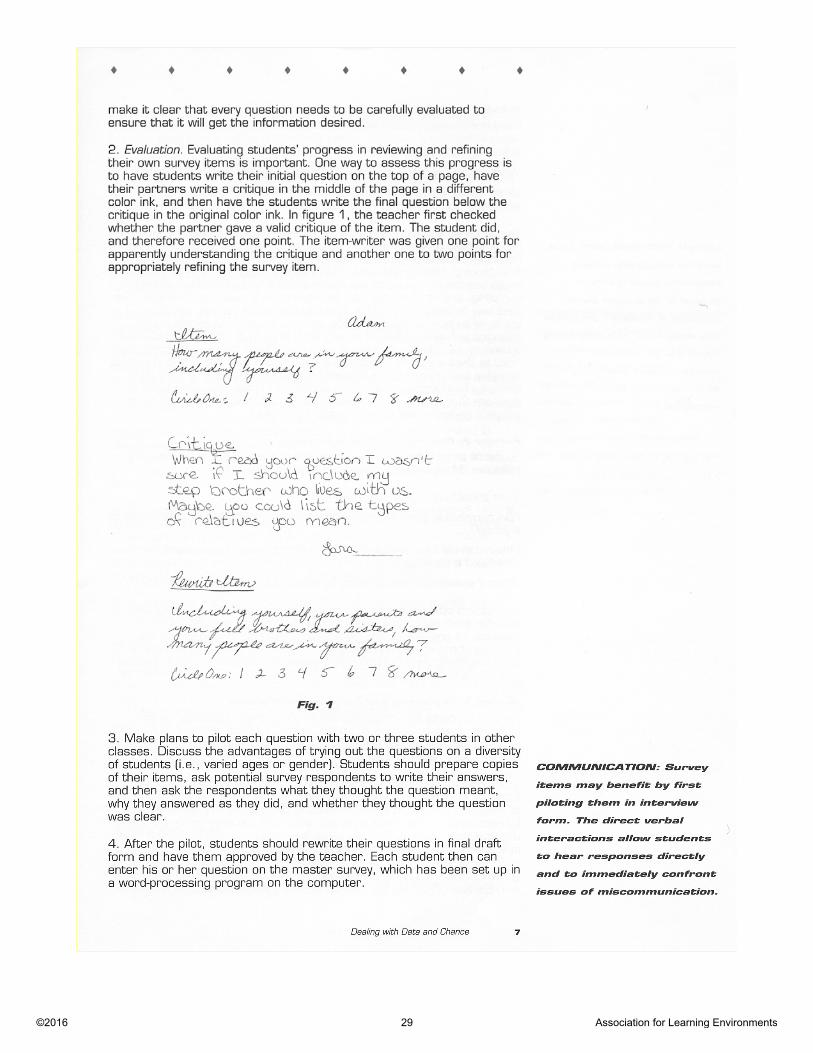
Design Competition Curriculum
STEM and Visual Arts Connections to Green Schools
SchoolsNEXT Design Competition
Association for Learning Environments
Project Authors:
Regina Brown, M.Ed. Susan Fischbein, M.Ed. Lynne Forman, M.L.S.
Jacqueline Olson, Ed.D. Lynda Timbrooks, M.Ed.
A4LE’s SchoolsNEXT Design Competition Curriculum (formerly CEFPI’s School Building Week School of the
Future Student Design Competition Curriculum) won the U.S. Green Building Council’s Inaugural Excellence in Green
Building Curriculum Recognition Award in 2008
www.A4LE.org
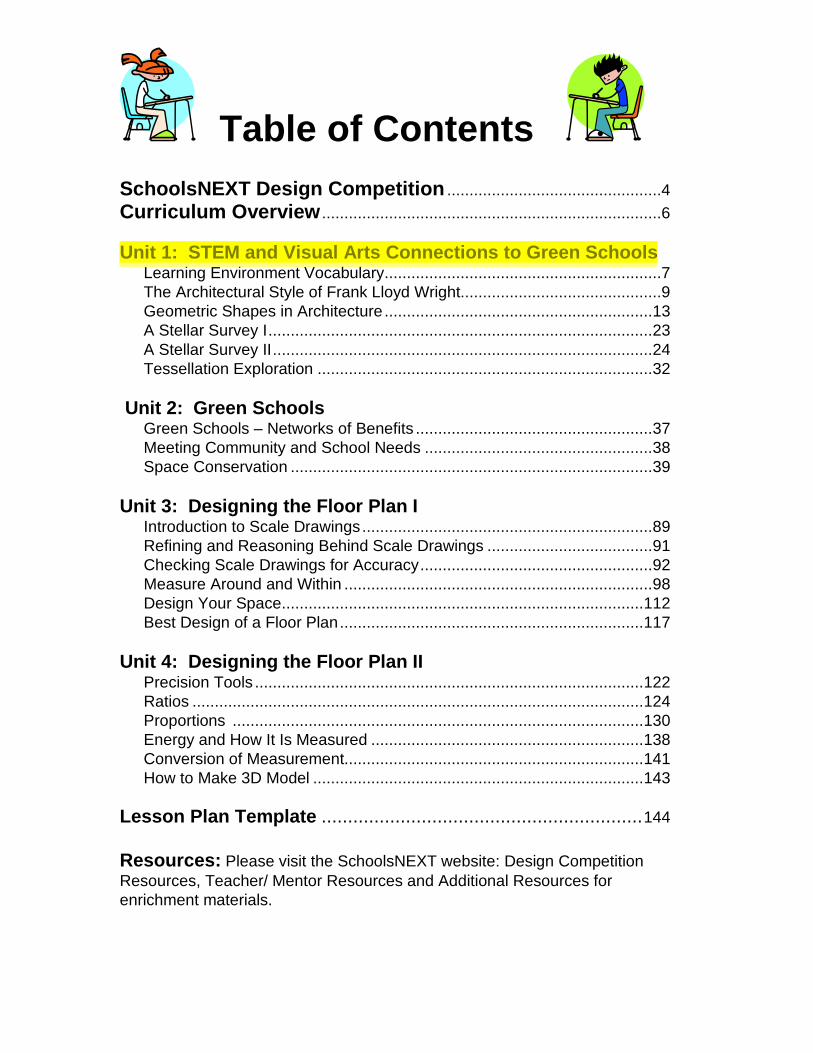
Table of Contents SchoolsNEXT Design Competition ................................................4
Curriculum Overview ............................................................................6 Unit 1: STEM and Visual Arts Connections to Green Schools Learning Environment Vocabulary ..............................................................7 The Architectural Style of Frank Lloyd Wright.............................................9 Geometric Shapes in Architecture ............................................................ 13 A Stellar Survey I ...................................................................................... 23
A Stellar Survey II ..................................................................................... 24 Tessellation Exploration ........................................................................... 32
Unit 2: Green Schools Green Schools – Networks of Benefits ..................................................... 37 Meeting Community and School Needs ................................................... 38 Space Conservation ................................................................................. 39 Unit 3: Designing the Floor Plan I Introduction to Scale Drawings ................................................................. 89 Refining and Reasoning Behind Scale Drawings ..................................... 91 Checking Scale Drawings for Accuracy .................................................... 92 Measure Around and Within ..................................................................... 98 Design Your Space ................................................................................. 112 Best Design of a Floor Plan .................................................................... 117 Unit 4: Designing the Floor Plan II Precision Tools ....................................................................................... 122 Ratios ..................................................................................................... 124 Proportions ............................................................................................ 130 Energy and How It Is Measured ............................................................. 138 Conversion of Measurement................................................................... 141 How to Make 3D Model .......................................................................... 143 Lesson Plan Template ............................................................. 144 Resources: Please visit the SchoolsNEXT website: Design Competition Resources, Teacher/ Mentor Resources and Additional Resources for enrichment materials.
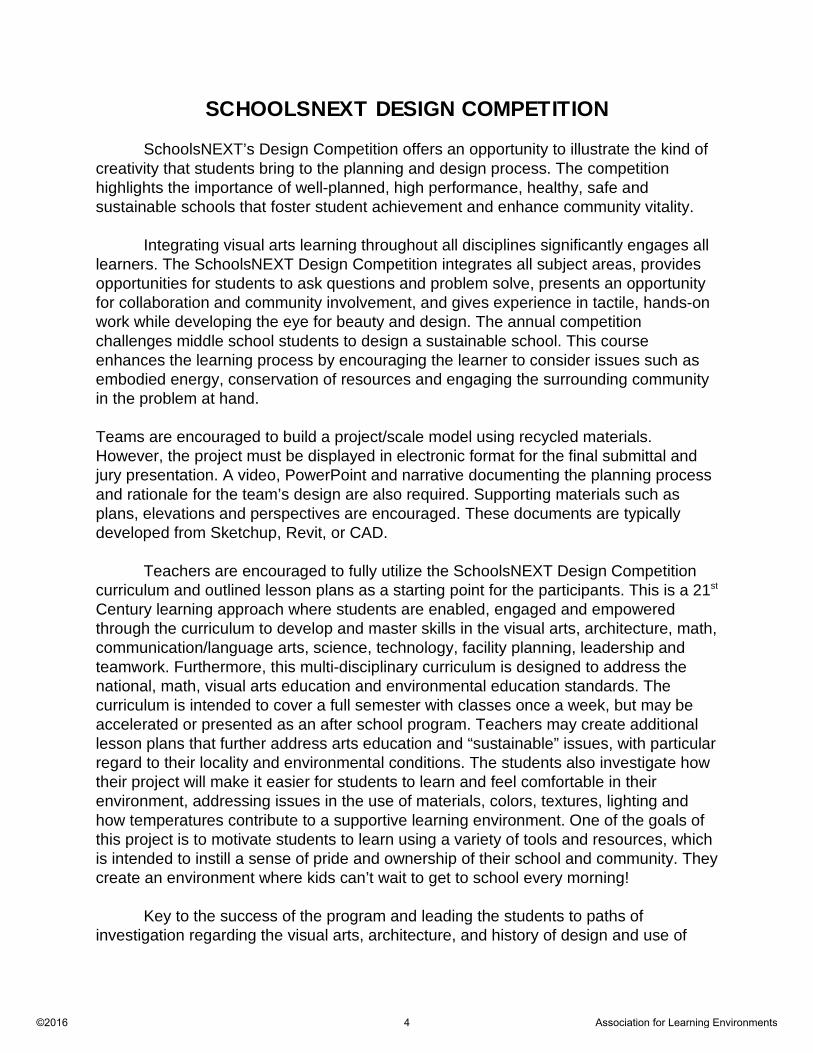
SCHOOLSNEXT DESIGN COMPETITION
SchoolsNEXT’s Design Competition offers an opportunity to illustrate the kind of creativity that students bring to the planning and design process. The competition highlights the importance of well-planned, high performance, healthy, safe and sustainable schools that foster student achievement and enhance community vitality.
Integrating visual arts learning throughout all disciplines significantly engages all learners. The SchoolsNEXT Design Competition integrates all subject areas, provides opportunities for students to ask questions and problem solve, presents an opportunity for collaboration and community involvement, and gives experience in tactile, hands-on work while developing the eye for beauty and design. The annual competition challenges middle school students to design a sustainable school. This course enhances the learning process by encouraging the learner to consider issues such as embodied energy, conservation of resources and engaging the surrounding community in the problem at hand. Teams are encouraged to build a project/scale model using recycled materials. However, the project must be displayed in electronic format for the final submittal and jury presentation. A video, PowerPoint and narrative documenting the planning process and rationale for the team’s design are also required. Supporting materials such as plans, elevations and perspectives are encouraged. These documents are typically developed from Sketchup, Revit, or CAD. Teachers are encouraged to fully utilize the SchoolsNEXT Design Competition curriculum and outlined lesson plans as a starting point for the participants. This is a 21st Century learning approach where students are enabled, engaged and empowered through the curriculum to develop and master skills in the visual arts, architecture, math, communication/language arts, science, technology, facility planning, leadership and teamwork. Furthermore, this multi-disciplinary curriculum is designed to address the national, math, visual arts education and environmental education standards. The curriculum is intended to cover a full semester with classes once a week, but may be accelerated or presented as an after school program. Teachers may create additional lesson plans that further address arts education and “sustainable” issues, with particular regard to their locality and environmental conditions. The students also investigate how their project will make it easier for students to learn and feel comfortable in their environment, addressing issues in the use of materials, colors, textures, lighting and how temperatures contribute to a supportive learning environment. One of the goals of this project is to motivate students to learn using a variety of tools and resources, which is intended to instill a sense of pride and ownership of their school and community. They create an environment where kids can’t wait to get to school every morning! Key to the success of the program and leading the students to paths of investigation regarding the visual arts, architecture, and history of design and use of
©2016 4 Association for Learning Environments

technological tools to enhance their work, the mentor program adds an inspiring and motivational dimension to the competition. Mentors challenge and develop the students’ strengths, talents and interests, providing critical connections between arts and STEM education and careers. Through project-based learning, students explore real world problems relevant to their lives and offer solutions, bridging the gap between conceptual theory and real life skills. They learn how math, art, science and history are part of the design process. In order to design a project they need to understand what and how a school looks, feels and functions to support the teaching and learning. The competition highlights the value of arts education, STEM disciplines, design aesthetic (composition of form, color, texture and light) in concert with cooperation, teamwork and a shared vision that transcends parochial interests. To create and facilitate the structures and opportunities for these powerful connections is a significant part of working thoughtfully with education and social systems in which students are genuinely affirmed and encouraged to build self-confidence.
©2016 5 Association for Learning Environments
STEM and Visual Arts Connections to
Green Schools
SchoolsNEXT Design Competition
The information that follows is the beginning of a pathway to a vibrant venue for integrating all disciplines through the visual arts and applying multidisciplinary elements relevant to students’ lives. All too often in middle school classrooms mathematics, science, and language arts are taught from a textbook as a series of skills in isolation. While focusing on visual arts projects such as designing a school, STEM and language arts disciplines are extended and applied as students become engaged in their learning.
Each of the four units of study, Introduction to Visual Arts, Green Buildings, Designing the Floor Plan I and Designing the Floor Plan II, is broken down into lessons that not only emphasize visual arts, mathematics and science, but also communication, teamwork and further connections to English, social studies and health. It is assumed that the included lessons are not a student’s first exposure to these middle school standards and that prior teaching has provided requisite skills for success.
The design is flexible and adaptable to the style of a teacher and needs of the participants of the SchoolsNEXT Design Competition. It is meant to be a living document, a guideline, and a starting point for creative ideas to implement a sustainable learning environment.
©2016 6 Association for Learning Environments
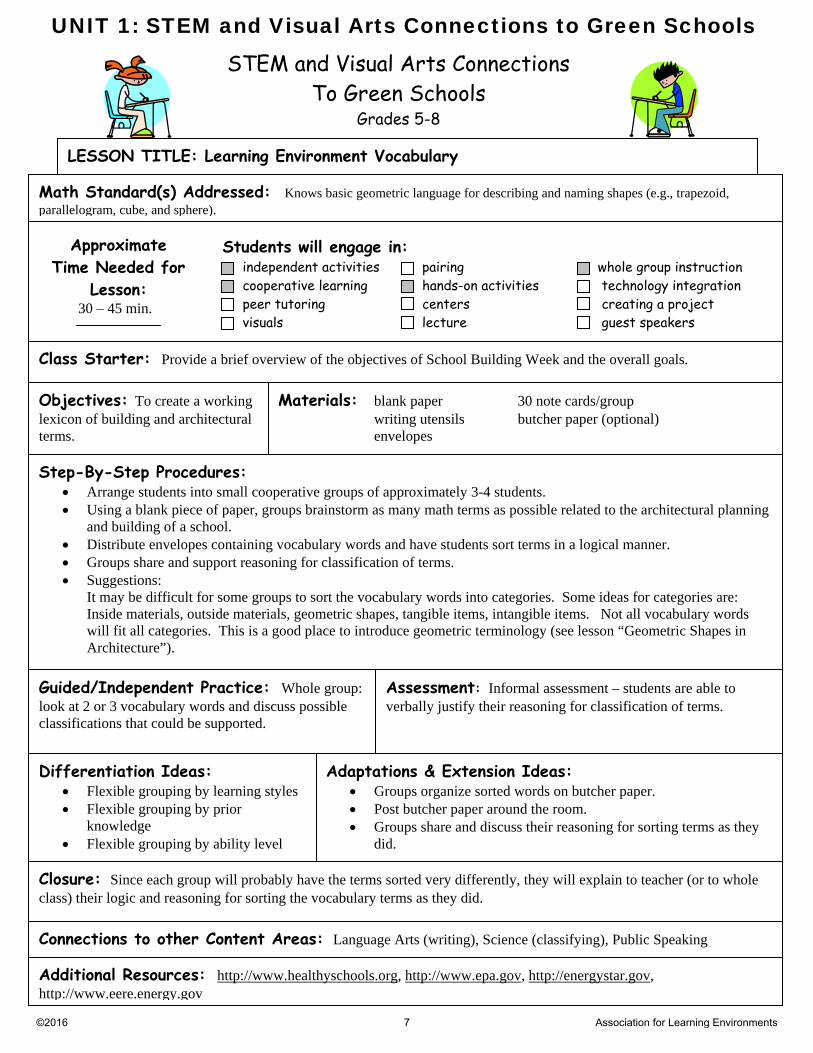
Math Standard(s) Addressed: Knows basic geometric language for describing and naming shapes (e.g., trapezoid, parallelogram, cube, and sphere).
Approximate Time Needed for
Lesson: 30 – 45 min.
Students will engage in: independent activities pairing whole group instruction cooperative learning hands-on activities technology integration peer tutoring centers creating a project visuals lecture guest speakers
Class Starter: Provide a brief overview of the objectives of School Building Week and the overall goals.
Objectives: To create a working lexicon of building and architectural terms.
Materials: blank paper 30 note cards/group writing utensils butcher paper (optional) envelopes
Step-By-Step Procedures: Arrange students into small cooperative groups of approximately 3-4 students. Using a blank piece of paper, groups brainstorm as many math terms as possible related to the architectural planning
and building of a school. Distribute envelopes containing vocabulary words and have students sort terms in a logical manner. Groups share and support reasoning for classification of terms. Suggestions:
It may be difficult for some groups to sort the vocabulary words into categories. Some ideas for categories are: Inside materials, outside materials, geometric shapes, tangible items, intangible items. Not all vocabulary words will fit all categories. This is a good place to introduce geometric terminology (see lesson “Geometric Shapes in Architecture”).
Guided/Independent Practice: Whole group: look at 2 or 3 vocabulary words and discuss possible classifications that could be supported.
Assessment: Informal assessment – students are able to verbally justify their reasoning for classification of terms.
Closure: Since each group will probably have the terms sorted very differently, they will explain to teacher (or to whole class) their logic and reasoning for sorting the vocabulary terms as they did.
Differentiation Ideas: Flexible grouping by learning styles Flexible grouping by prior
knowledge Flexible grouping by ability level
Adaptations & Extension Ideas: Groups organize sorted words on butcher paper. Post butcher paper around the room. Groups share and discuss their reasoning for sorting terms as they
did.
Connections to other Content Areas: Language Arts (writing), Science (classifying), Public Speaking
Additional Resources: http://www.healthyschools.org, http://www.epa.gov, http://energystar.gov, http://www.eere.energy.gov
STEM and Visual Arts Connections To Green Schools
Grades 5-8
LESSON TITLE: Learning Environment Vocabulary
UNIT 1: STEM and Visual Arts Connections to Green Schools
©2016 7 Association for Learning Environments
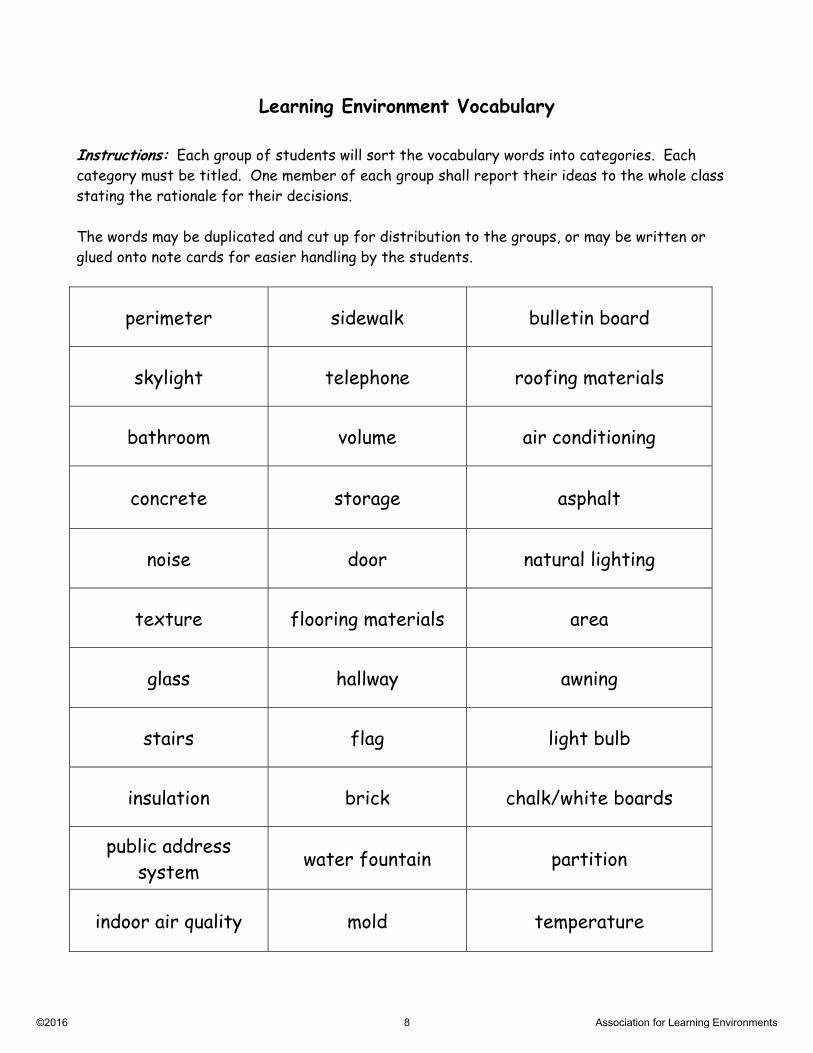
Learning Environment Vocabulary
Instructions: Each group of students will sort the vocabulary words into categories. Each category must be titled. One member of each group shall report their ideas to the whole class stating the rationale for their decisions. The words may be duplicated and cut up for distribution to the groups, or may be written or glued onto note cards for easier handling by the students.
perimeter sidewalk bulletin board
skylight telephone roofing materials
bathroom volume air conditioning
concrete storage asphalt
noise door natural lighting
texture flooring materials area
glass hallway awning
stairs flag light bulb
insulation brick chalk/white boards
public address system water fountain partition
indoor air quality mold temperature
©2016 8 Association for Learning Environments
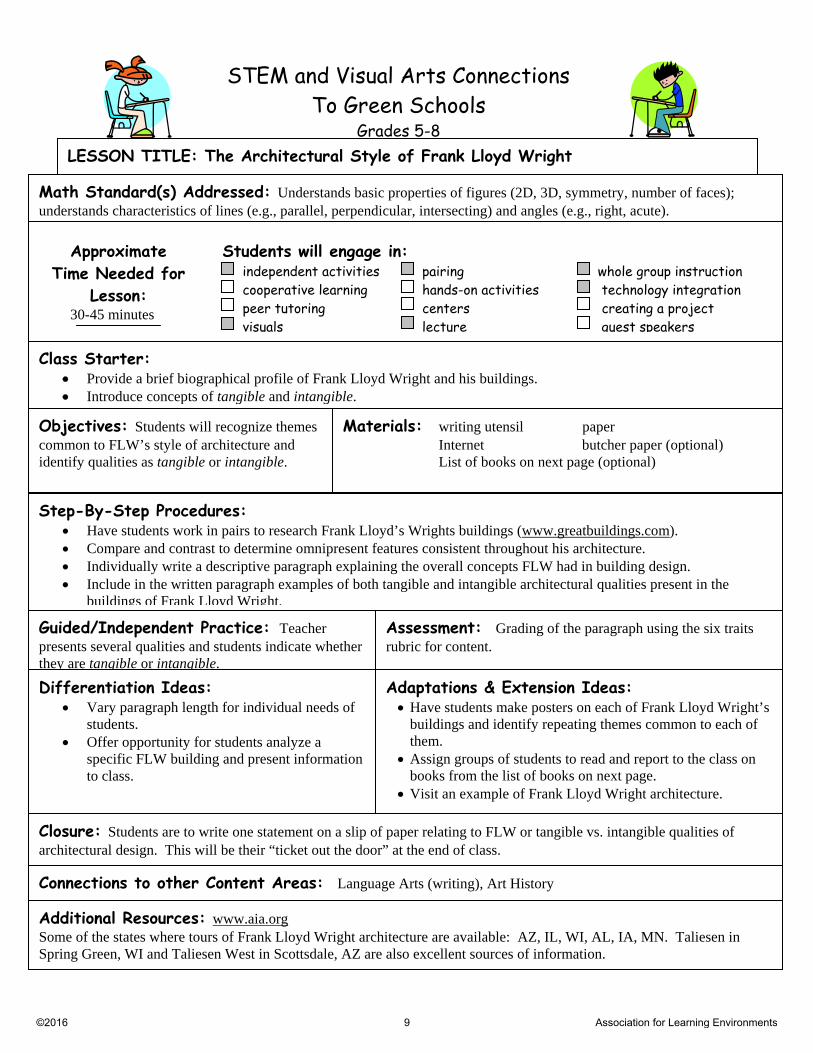
Math Standard(s) Addressed: Understands basic properties of figures (2D, 3D, symmetry, number of faces); understands characteristics of lines (e.g., parallel, perpendicular, intersecting) and angles (e.g., right, acute).
Approximate
Time Needed for Lesson:
30-45 minutes
Students will engage in: independent activities pairing whole group instruction cooperative learning hands-on activities technology integration peer tutoring centers creating a project visuals lecture guest speakers
Class Starter: Provide a brief biographical profile of Frank Lloyd Wright and his buildings. Introduce concepts of tangible and intangible.
Objectives: Students will recognize themes common to FLW’s style of architecture and identify qualities as tangible or intangible.
Materials: writing utensil paper Internet butcher paper (optional) List of books on next page (optional)
Step-By-Step Procedures: Have students work in pairs to research Frank Lloyd’s Wrights buildings (www.greatbuildings.com). Compare and contrast to determine omnipresent features consistent throughout his architecture. Individually write a descriptive paragraph explaining the overall concepts FLW had in building design. Include in the written paragraph examples of both tangible and intangible architectural qualities present in the
buildings of Frank Lloyd Wright.
Guided/Independent Practice: Teacher presents several qualities and students indicate whether they are tangible or intangible.
Assessment: Grading of the paragraph using the six traits rubric for content.
Closure: Students are to write one statement on a slip of paper relating to FLW or tangible vs. intangible qualities of architectural design. This will be their “ticket out the door” at the end of class.
Differentiation Ideas: Vary paragraph length for individual needs of
students. Offer opportunity for students analyze a
specific FLW building and present information to class.
Adaptations & Extension Ideas: Have students make posters on each of Frank Lloyd Wright’s
buildings and identify repeating themes common to each of them.
Assign groups of students to read and report to the class on books from the list of books on next page.
Visit an example of Frank Lloyd Wright architecture.
Connections to other Content Areas: Language Arts (writing), Art History
Additional Resources: www.aia.org Some of the states where tours of Frank Lloyd Wright architecture are available: AZ, IL, WI, AL, IA, MN. Taliesen in Spring Green, WI and Taliesen West in Scottsdale, AZ are also excellent sources of information.
STEM and Visual Arts Connections To Green Schools
Grades 5-8 LESSON TITLE: The Architectural Style of Frank Lloyd Wright
©2016 9 Association for Learning Environments
Some examples of books available on Frank Lloyd Wright:
1. Frank Lloyd Wright by Robert McCarter 2. Frank Lloyd Wright: The Masterworks by David Larkin (Editor), Bruce Brooks Pfeiffer. 3. A Frank Lloyd Wright Companion by William Allin Storrer. 4. Lost Wright: Frank Lloyd Wright’s Vanished Masterpieces by Carla Lind 5. Frank Lloyd Wright: Glass Art by Thomas A. Heinz 6. Frank Lloyd Wright's Usonian Houses: The Case for Organic Architecture by John Sergeant 7. Frank Lloyd Wright: Force of Nature by Eric Peter Nash 8. Frank Lloyd Wright by Iain Thomson, Frank Lloyd Wright, Maria Constantino 9. Truth Against the World: Frank Lloyd Wright Speaks for an Organic Architecture by Frank
Lloyd Wright, Patrick J. Meehan (Editor) 10. 50 Favorite Rooms by Frank Lloyd Wright by Diane Maddex 11. About Wright: An Album of Recollections by Those Who Knew Frank Lloyd Wright by Edgar
Tafel 12. Frank Lloyd Wright Remembered by Patrick J. Meehan (Editor) 13. Frank Lloyd Wright's Usonian Houses (Wright at a Glance Series) by Carla Lind 14. Frank Lloyd Wright's Prairie Houses (Wright at a Glance Series) by Carla Lind 15. Frank Lloyd Wright's Glass Designs (Wright at a Glance Series) by Carla Lind 16. Frank Lloyd Wright's California Houses (Wright at a Glance Series) by Carla Lind 17. Frank Lloyd Wright's Dining Rooms (Wright at a Glance Series) by Carla Lind 18. Frank Lloyd Wright's Fallingwater (Wright at a Glance Series) by Carla Lind 19. Frank Lloyd Wright's Public Buildings (Wright at a Glance Series) by Carla Lind 20. Fallingwater: A Frank Lloyd Wright Country House by Edgar Kaufmann, Jr.; Christopher
Little and Thomas A. Heinz (Photographers)
The following information is extracted from “Some Mathematical Principles of Architecture” written by Fred DiTallo and posted on Yale-New Haven Teachers Institute web site. It can be found at: http://www.yale.edu/ynhti/curriculum/units/1983/1/83.01.12.x.html
The Intangible
The two categories of architecture that I wish to discuss are the Intangible and the Tangible.
By the intangible, I mean something not immediately discernible to your reasoning powers. Something that is not quite clear in its meaning or effect. Something that causes an emotional response before you realize it.
Architecture has a story to tell. Sometimes it’s a nice cheerful story, and other times it’s a scary ghost story. Let’s examine the differences. Starting with space, the building encloses the space, and creates an effect on the remaining space around it. How this is handled is fundamental to the profession of architecture.
©2016 10 Association for Learning Environments
Is there lots of light, wide corridors, spacious rooms inside. Is the facade of the building pleasing and inviting? Or, are the halls narrow and poorly lighted? Are the windows too small, resulting in poor lighting and stuffy overheated conditions? Is the facade drab and uninviting? How about entrances. Is it easy to get into the building, or are things forbidding?
The intangible in architecture isn’t really intangible. Someone made it that way on purpose to cause the response that it causes. It was thought about, measured, and calculated. Someone decided that the door should be small or large, and if the corridors should be wide or narrow. All of this falls into mathematics also. Perhaps more on the engineering side of it. Absorption or refraction of light, noise level, sharp angles, etc.
Let’s talk about the response to this as the intangible aspect. If you go into a government building to pay taxes or maybe to get a license, the halls may be narrow and dingy; the floors may be marble and echo every footstep; there may be very dim lighting; the doors in the corridors all look alike; you step into the office you think you need and no one’s there or maybe lots of people are working behind desks with their backs to you. Kind of creepy? Yes, but no accident.
In his book “An Inquiry Into The Origins Of The Sublime And The Beautiful” Edmund Burke goes into quite a lot of detail as to what things cause certain reactions.
By the sublime, Burke means those things which connote danger and instill a feeling of fear and terror. By the beautiful, he means those things which connote a sense of joy.
Some things that are related to the sublime are: roughness, hardness, darkness, unpleasant smells, unpleasant tastes (bitterness), silence, vastness, uninterrupted repetitions, largeness of size, strong contrasts (such as coming into a dark building from bright daylight), loud sounds, deformity, and unpleasant proportions.
Some of the characteristics related to the beautiful are: smoothness, light, softness, color, pleasant smells and fragrances, brightness, gradual variation, gradual change, delicateness, fragility, gracefulness, elegance, and congruency in proportions. These characteristics are also related to ideals which are considered beautiful. Justice, Wisdom, Virtue, Love and Truth. Thus, the architecture itself can be used to communicate any of these things. It might be the terror of a mansion in a ghost story, or the serenity of a church.
The Intangible in architecture is the emotional impact that a building can have on a person.
As an experiment visit some buildings around New Haven. How does being in the Greyhound Bus Terminal make you feel? How about the Top of the Park Restaurant?
©2016 11 Association for Learning Environments
What are some of the differences experienced being at Teletrack or City Hall? How about a court of law or your favorite tavern?
The buildings themselves can affect you, and that is the intangible quality of architecture.
The Tangible
While the intangible is something that is aimed at an emotional response, the tangible involves the underlying laws of math and science that allows a building to be designed and constructed, things such as angles, length, width, height, arches, circles.
We will learn how the ancient Greeks designed all their structures and made all the geometric shapes and calculations using only the compass and straightedge. It is a great tribute to the Greek civilization that the average high school geometry text taught in today’s high school is based on Euclid’s “Elements” dating to 300 B.C.
While the total body of mathematical knowledge is vast when compared to the geometry of ancient Greece, it is still that geometry that serves as a foundation for higher math.
©2016 12 Association for Learning Environments
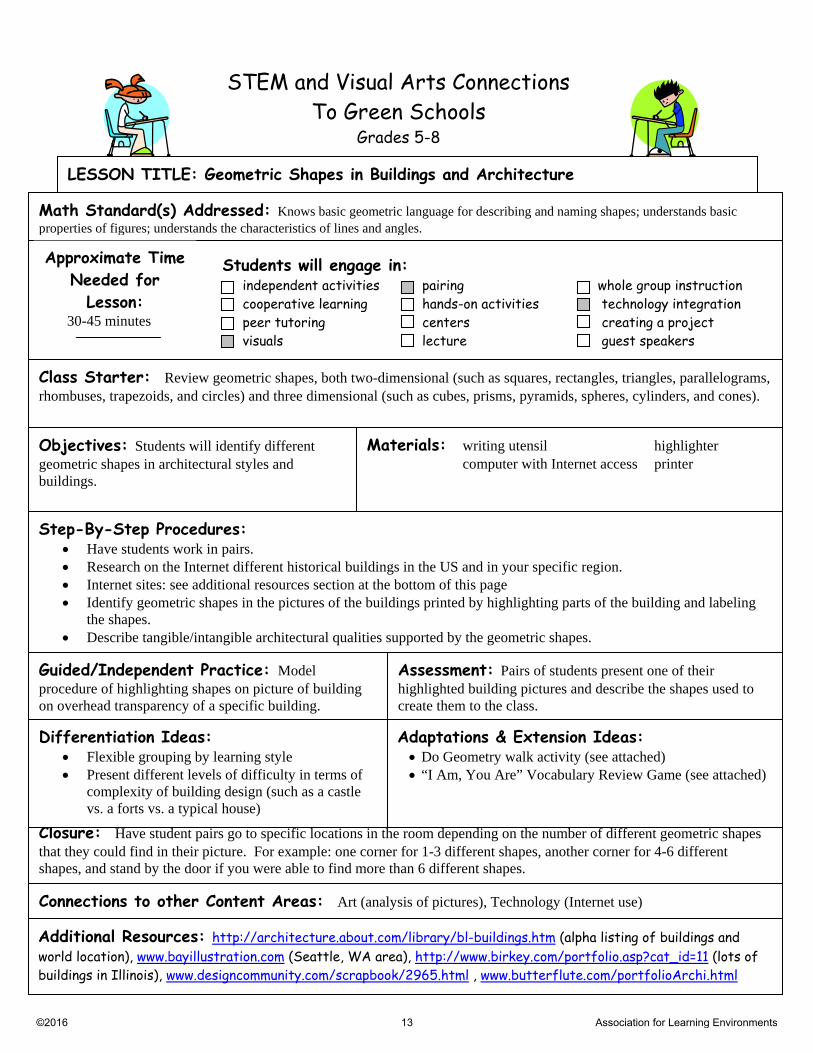
Math Standard(s) Addressed: Knows basic geometric language for describing and naming shapes; understands basic properties of figures; understands the characteristics of lines and angles.
Approximate Time Needed for
Lesson: 30-45 minutes
Students will engage in: independent activities pairing whole group instruction cooperative learning hands-on activities technology integration peer tutoring centers creating a project visuals lecture guest speakers
Class Starter: Review geometric shapes, both two-dimensional (such as squares, rectangles, triangles, parallelograms, rhombuses, trapezoids, and circles) and three dimensional (such as cubes, prisms, pyramids, spheres, cylinders, and cones).
Objectives: Students will identify different geometric shapes in architectural styles and buildings.
Materials: writing utensil highlighter computer with Internet access printer
Step-By-Step Procedures: Have students work in pairs. Research on the Internet different historical buildings in the US and in your specific region. Internet sites: see additional resources section at the bottom of this page Identify geometric shapes in the pictures of the buildings printed by highlighting parts of the building and labeling
the shapes. Describe tangible/intangible architectural qualities supported by the geometric shapes.
Guided/Independent Practice: Model procedure of highlighting shapes on picture of building on overhead transparency of a specific building.
Assessment: Pairs of students present one of their highlighted building pictures and describe the shapes used to create them to the class.
Closure: Have student pairs go to specific locations in the room depending on the number of different geometric shapes that they could find in their picture. For example: one corner for 1-3 different shapes, another corner for 4-6 different shapes, and stand by the door if you were able to find more than 6 different shapes.
Differentiation Ideas: Flexible grouping by learning style Present different levels of difficulty in terms of
complexity of building design (such as a castle vs. a forts vs. a typical house)
Adaptations & Extension Ideas: Do Geometry walk activity (see attached) “I Am, You Are” Vocabulary Review Game (see attached)
Connections to other Content Areas: Art (analysis of pictures), Technology (Internet use)
Additional Resources: http://architecture.about.com/library/bl-buildings.htm (alpha listing of buildings and world location), www.bayillustration.com (Seattle, WA area), http://www.birkey.com/portfolio.asp?cat_id=11 (lots of buildings in Illinois), www.designcommunity.com/scrapbook/2965.html , www.butterflute.com/portfolioArchi.html
STEM and Visual Arts Connections To Green Schools
Grades 5-8
LESSON TITLE: Geometric Shapes in Buildings and Architecture
©2016 13 Association for Learning Environments
The following activity is available on the internet at http://mathforum.org/workshops/sum98/participants/sanders/Geom3D.html.
3-D Drawing and Geometry by Cathi Sanders
A Math Forum Summer Institute Project
The Geometry of 3-D drawing
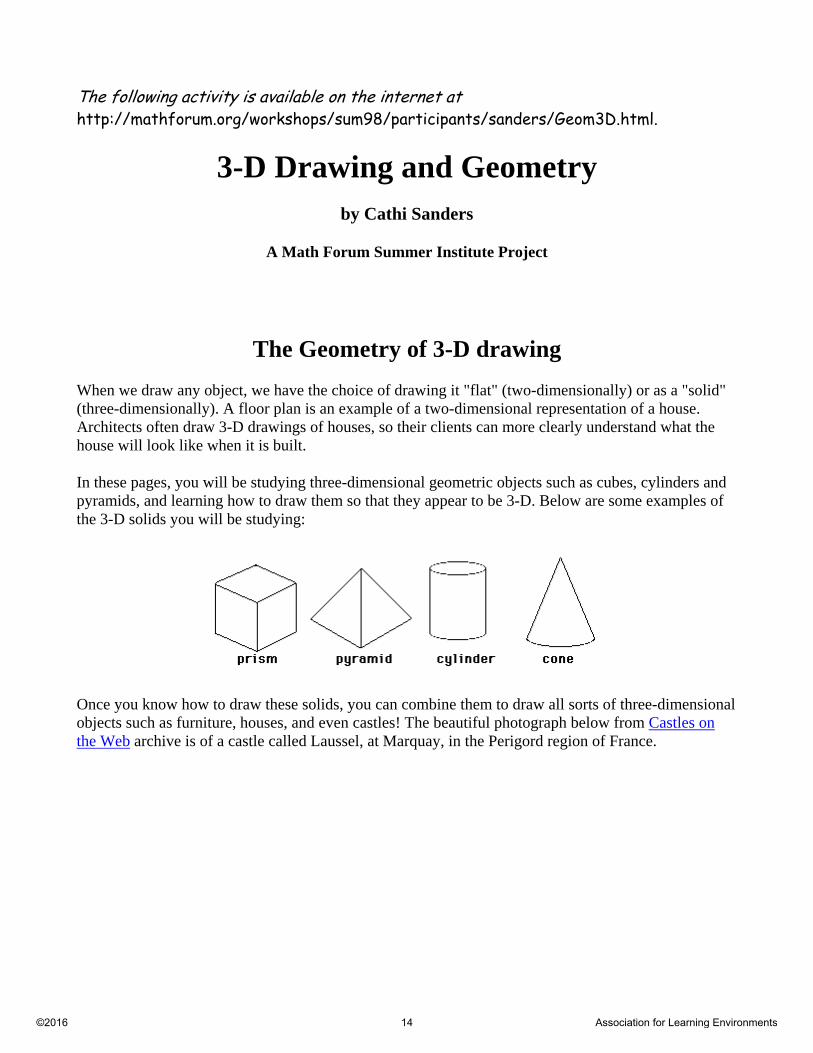
When we draw any object, we have the choice of drawing it "flat" (two-dimensionally) or as a "solid" (three-dimensionally). A floor plan is an example of a two-dimensional representation of a house. Architects often draw 3-D drawings of houses, so their clients can more clearly understand what the house will look like when it is built.
In these pages, you will be studying three-dimensional geometric objects such as cubes, cylinders and pyramids, and learning how to draw them so that they appear to be 3-D. Below are some examples of the 3-D solids you will be studying:
Once you know how to draw these solids, you can combine them to draw all sorts of three-dimensional objects such as furniture, houses, and even castles! The beautiful photograph below from Castles on the Web archive is of a castle called Laussel, at Marquay, in the Perigord region of France.
©2016 14 Association for Learning Environments
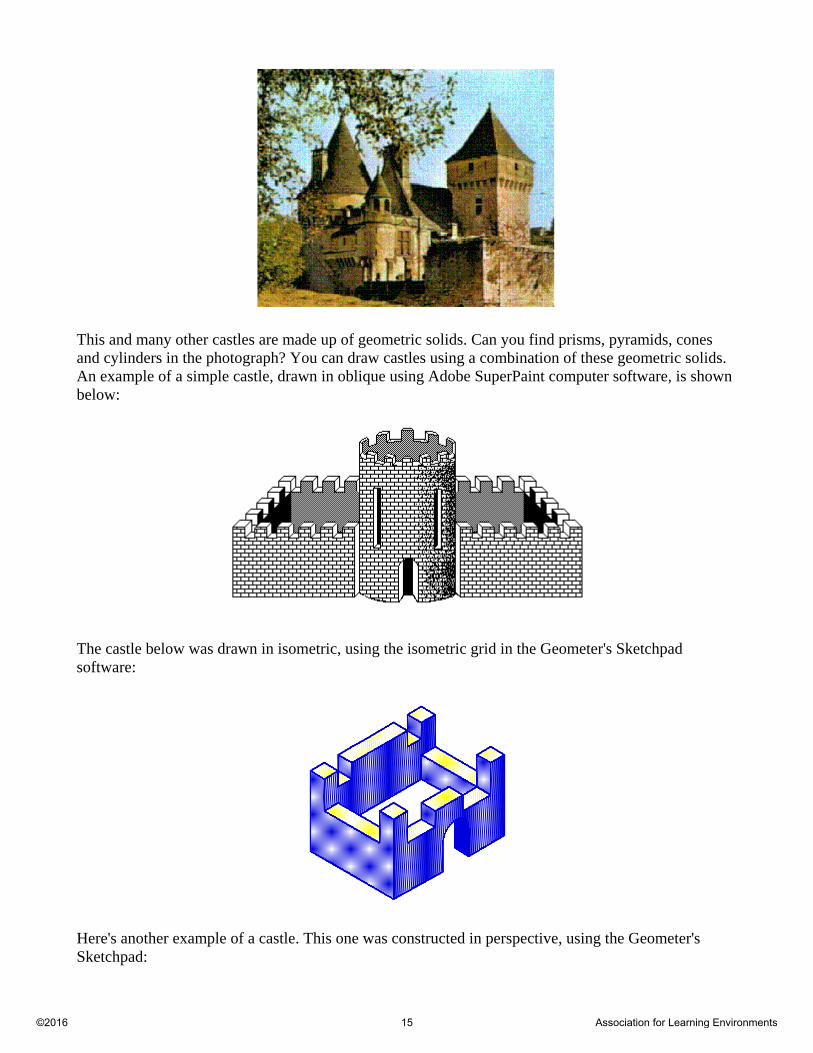
This and many other castles are made up of geometric solids. Can you find prisms, pyramids, cones and cylinders in the photograph? You can draw castles using a combination of these geometric solids. An example of a simple castle, drawn in oblique using Adobe SuperPaint computer software, is shown below:
The castle below was drawn in isometric, using the isometric grid in the Geometer's Sketchpad software:
Here's another example of a castle. This one was constructed in perspective, using the Geometer's Sketchpad:
©2016 15 Association for Learning Environments

©2016 16 Association for Learning Environments
The following activity is available on the Internet at http://wwwmath-kitecture.com/geometry.htm
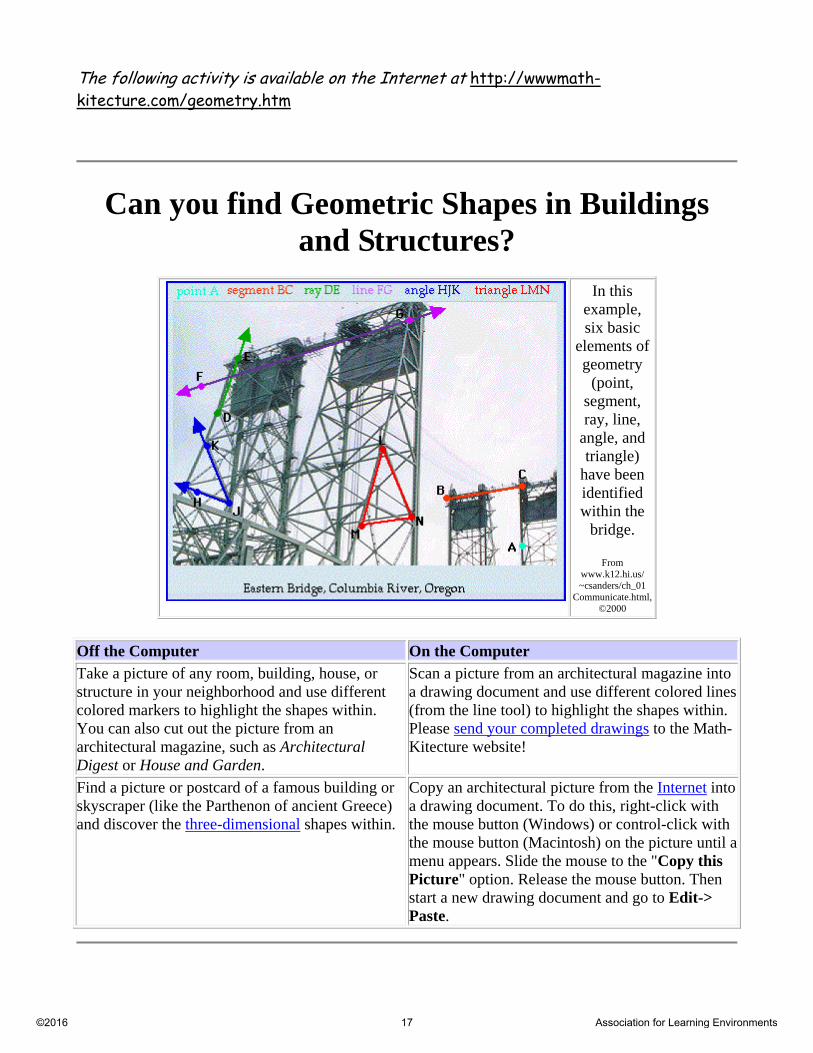
Can you find Geometric Shapes in Buildings and Structures?
In this example, six basic
elements of geometry
(point, segment, ray, line,
angle, and triangle)
have been identified within the
bridge.
From www.k12.hi.us/ ~csanders/ch_01
Communicate.html, ©2000
Off the Computer On the Computer
Take a picture of any room, building, house, or structure in your neighborhood and use different colored markers to highlight the shapes within. You can also cut out the picture from an architectural magazine, such as Architectural Digest or House and Garden.
Scan a picture from an architectural magazine into a drawing document and use different colored lines (from the line tool) to highlight the shapes within. Please send your completed drawings to the Math-Kitecture website!
Find a picture or postcard of a famous building or skyscraper (like the Parthenon of ancient Greece) and discover the three-dimensional shapes within.
Copy an architectural picture from the Internet into a drawing document. To do this, right-click with the mouse button (Windows) or control-click with the mouse button (Macintosh) on the picture until a menu appears. Slide the mouse to the "Copy this Picture" option. Release the mouse button. Then start a new drawing document and go to Edit-> Paste.
©2016 17 Association for Learning Environments
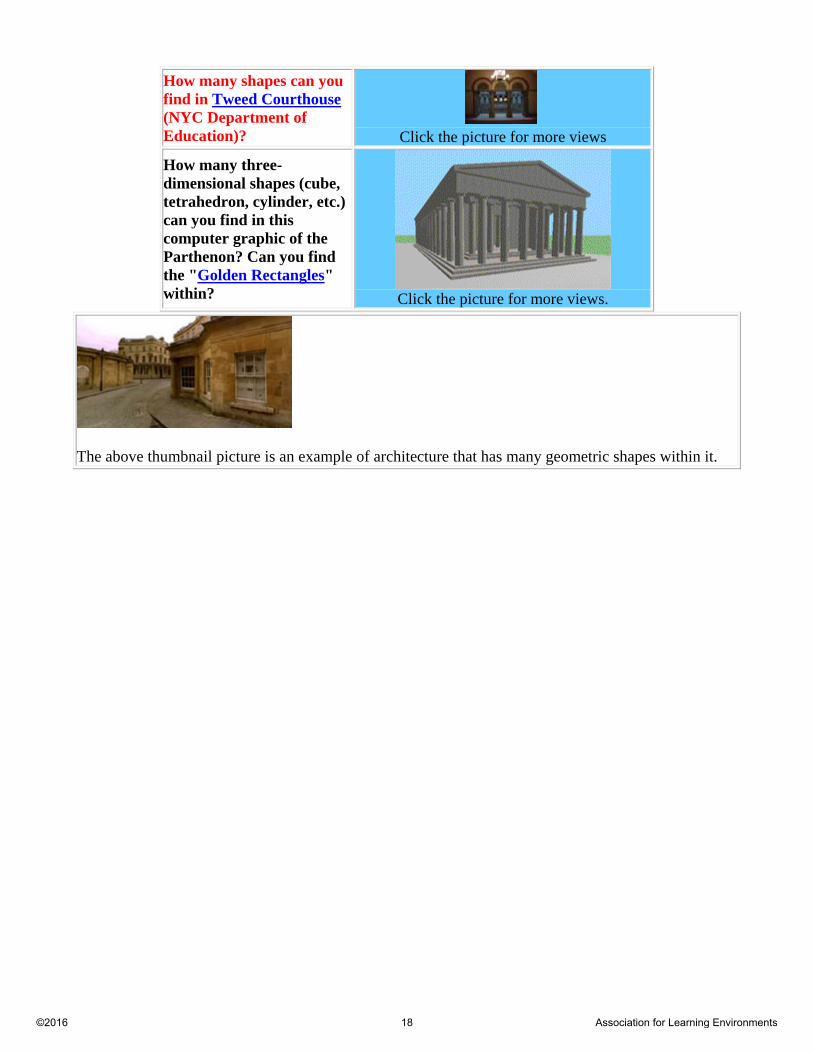
How many shapes can you find in Tweed Courthouse (NYC Department of Education)?
Click the picture for more views
How many three-dimensional shapes (cube, tetrahedron, cylinder, etc.) can you find in this computer graphic of the Parthenon? Can you find the "Golden Rectangles" within?
Click the picture for more views.
The above thumbnail picture is an example of architecture that has many geometric shapes within it.
©2016 18 Association for Learning Environments
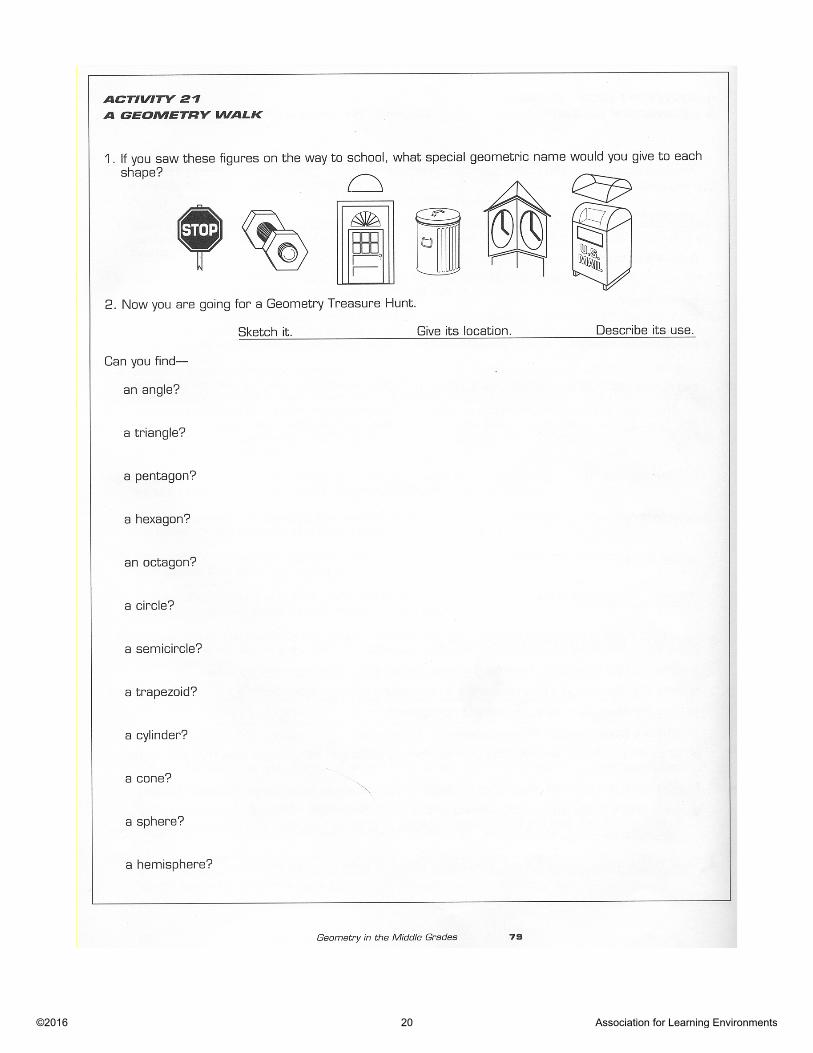
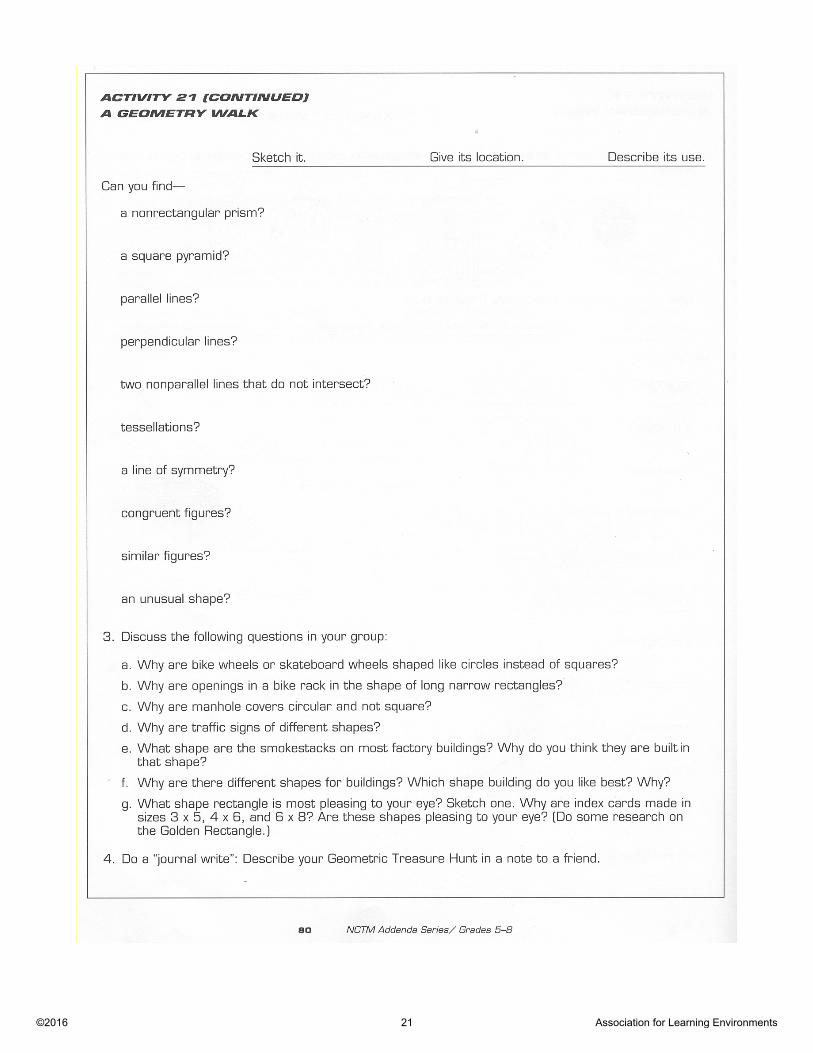
The following Geometry Walk activity is copied from the National Council of Teachers of Mathematics Curriculum and Evaluation Standards for School Mathematics Addenda Series Grades 5 – 8, Geometry in the Middle Grades written by Dorothy Geddes published in 1992.
©2016 19 Association for Learning Environments
©2016 20 Association for Learning Environments
©2016 21 Association for Learning Environments
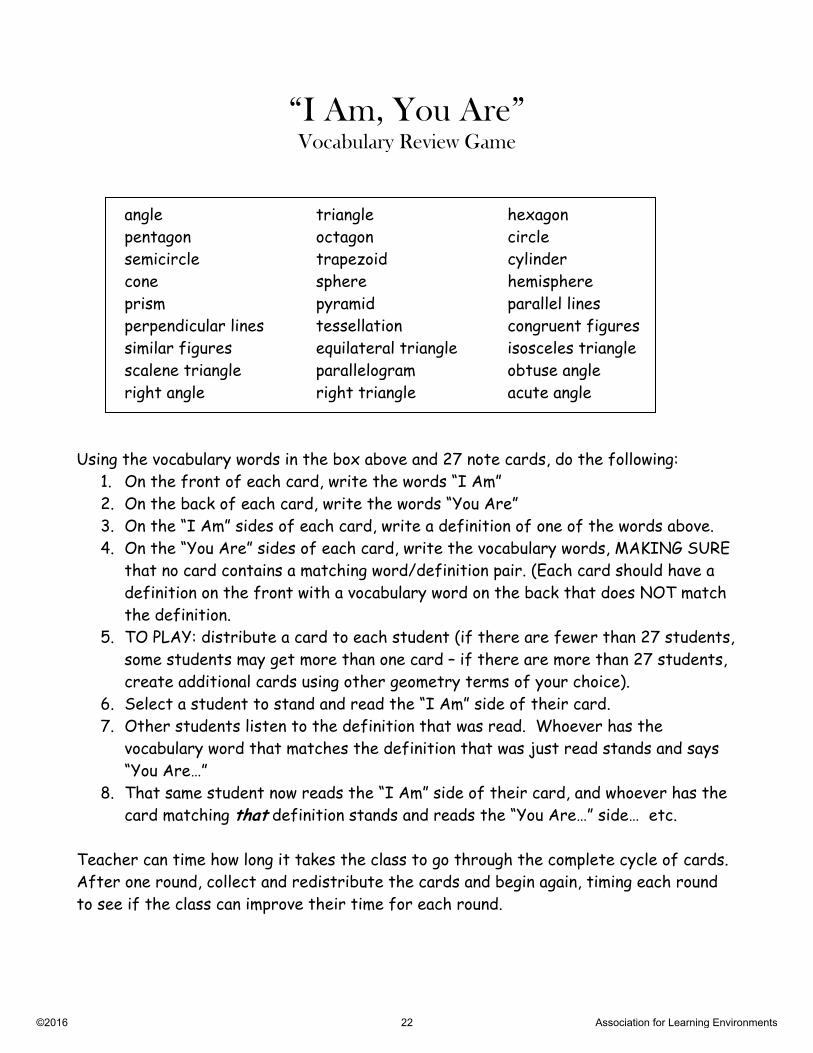
“I Am, You Are” Vocabulary Review Game
angle triangle hexagon pentagon octagon circle semicircle trapezoid cylinder cone sphere hemisphere prism pyramid parallel lines perpendicular lines tessellation congruent figures similar figures equilateral triangle isosceles triangle scalene triangle parallelogram obtuse angle right angle right triangle acute angle
Using the vocabulary words in the box above and 27 note cards, do the following:
1. On the front of each card, write the words “I Am” 2. On the back of each card, write the words “You Are” 3. On the “I Am” sides of each card, write a definition of one of the words above. 4. On the “You Are” sides of each card, write the vocabulary words, MAKING SURE
that no card contains a matching word/definition pair. (Each card should have a definition on the front with a vocabulary word on the back that does NOT match the definition.
5. TO PLAY: distribute a card to each student (if there are fewer than 27 students, some students may get more than one card – if there are more than 27 students, create additional cards using other geometry terms of your choice).
6. Select a student to stand and read the “I Am” side of their card. 7. Other students listen to the definition that was read. Whoever has the
vocabulary word that matches the definition that was just read stands and says “You Are…”
8. That same student now reads the “I Am” side of their card, and whoever has the card matching that definition stands and reads the “You Are…” side… etc.
Teacher can time how long it takes the class to go through the complete cycle of cards. After one round, collect and redistribute the cards and begin again, timing each round to see if the class can improve their time for each round.
©2016 22 Association for Learning Environments
Vocabulary
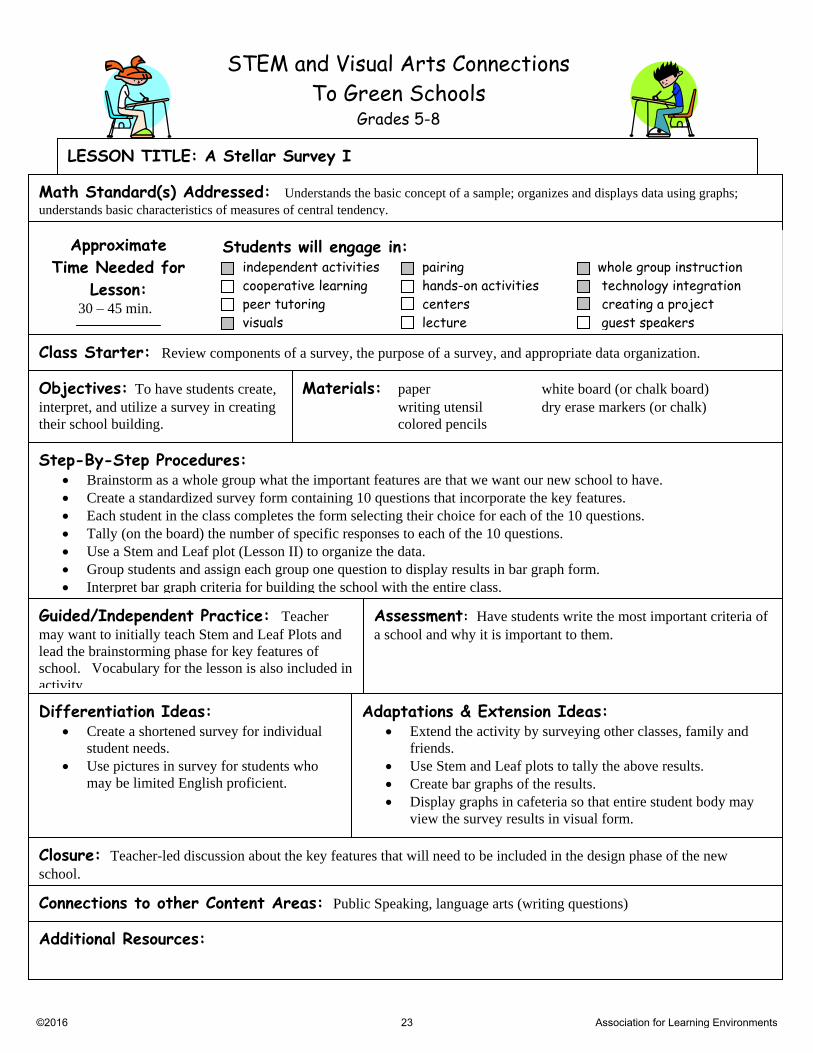
Math Standard(s) Addressed: Understands the basic concept of a sample; organizes and displays data using graphs; understands basic characteristics of measures of central tendency.
Approximate Time Needed for
Lesson: 30 – 45 min.
Students will engage in: independent activities pairing whole group instruction cooperative learning hands-on activities technology integration peer tutoring centers creating a project visuals lecture guest speakers
Class Starter: Review components of a survey, the purpose of a survey, and appropriate data organization.
Objectives: To have students create, interpret, and utilize a survey in creating their school building.
Materials: paper white board (or chalk board) writing utensil dry erase markers (or chalk) colored pencils
Step-By-Step Procedures: Brainstorm as a whole group what the important features are that we want our new school to have. Create a standardized survey form containing 10 questions that incorporate the key features. Each student in the class completes the form selecting their choice for each of the 10 questions. Tally (on the board) the number of specific responses to each of the 10 questions. Use a Stem and Leaf plot (Lesson II) to organize the data. Group students and assign each group one question to display results in bar graph form. Interpret bar graph criteria for building the school with the entire class.
Guided/Independent Practice: Teacher may want to initially teach Stem and Leaf Plots and lead the brainstorming phase for key features of school. Vocabulary for the lesson is also included in activity
Assessment: Have students write the most important criteria of a school and why it is important to them.
Closure: Teacher-led discussion about the key features that will need to be included in the design phase of the new school.
Differentiation Ideas: Create a shortened survey for individual
student needs. Use pictures in survey for students who
may be limited English proficient.
Adaptations & Extension Ideas: Extend the activity by surveying other classes, family and
friends. Use Stem and Leaf plots to tally the above results. Create bar graphs of the results. Display graphs in cafeteria so that entire student body may
view the survey results in visual form.
Connections to other Content Areas: Public Speaking, language arts (writing questions)
Additional Resources:
STEM and Visual Arts Connections To Green Schools
Grades 5-8
LESSON TITLE: A Stellar Survey I
©2016 23 Association for Learning Environments
4:27 PM
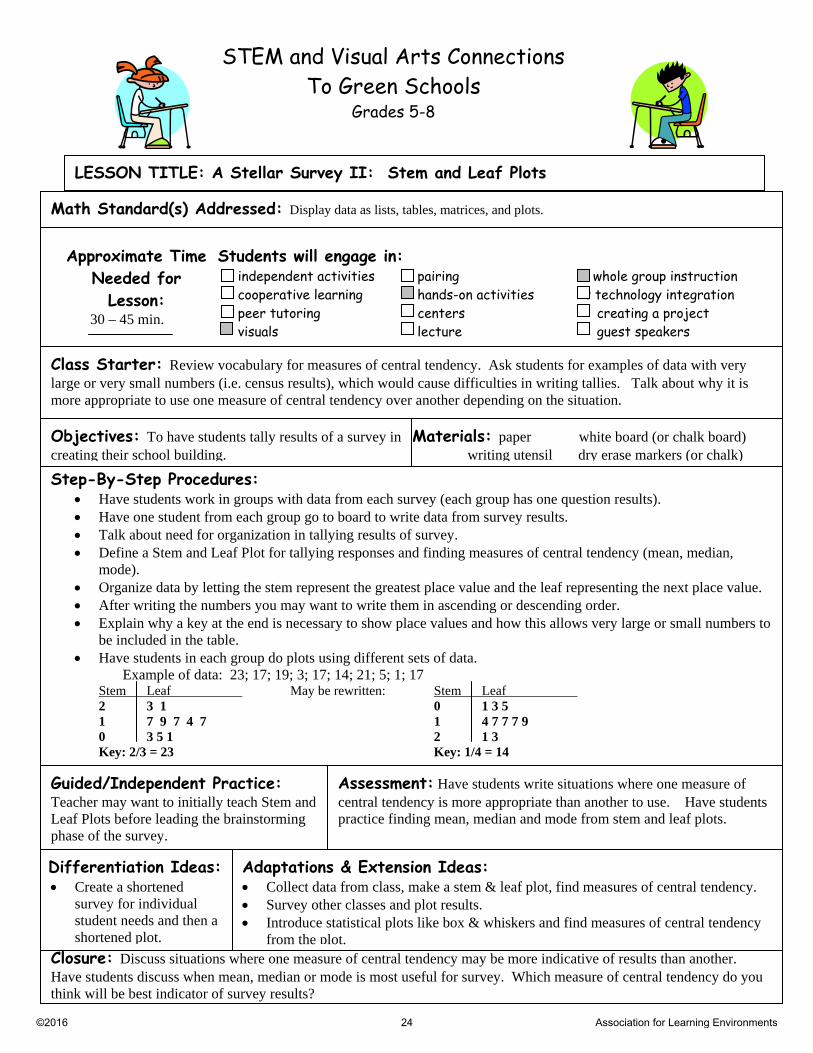
Math Standard(s) Addressed: Display data as lists, tables, matrices, and plots.
Approximate Time
Needed for Lesson:
30 – 45 min.
Students will engage in: independent activities pairing whole group instruction
cooperative learning hands-on activities t technology integration peer tutoring centers creating a project visuals lecture guest speakers
Class Starter: Review vocabulary for measures of central tendency. Ask students for examples of data with very large or very small numbers (i.e. census results), which would cause difficulties in writing tallies. Talk about why it is more appropriate to use one measure of central tendency over another depending on the situation.
Objectives: To have students tally results of a survey in creating their school building.
Materials: paper white board (or chalk board) writing utensil dry erase markers (or chalk)
Step-By-Step Procedures: Have students work in groups with data from each survey (each group has one question results). Have one student from each group go to board to write data from survey results. Talk about need for organization in tallying results of survey. Define a Stem and Leaf Plot for tallying responses and finding measures of central tendency (mean, median,
mode). Organize data by letting the stem represent the greatest place value and the leaf representing the next place value. After writing the numbers you may want to write them in ascending or descending order. Explain why a key at the end is necessary to show place values and how this allows very large or small numbers to
be included in the table. Have students in each group do plots using different sets of data.
Example of data: 23; 17; 19; 3; 17; 14; 21; 5; 1; 17 Stem Leaf May be rewritten: Stem Leaf 2 3 1 0 1 3 5 1 7 9 7 4 7 1 4 7 7 7 9 0 3 5 1 2 1 3 Key: 2/3 = 23 Key: 1/4 = 14
Guided/Independent Practice: Teacher may want to initially teach Stem and Leaf Plots before leading the brainstorming phase of the survey.
Assessment: Have students write situations where one measure of central tendency is more appropriate than another to use. Have students practice finding mean, median and mode from stem and leaf plots.
Closure: Discuss situations where one measure of central tendency may be more indicative of results than another. Have students discuss when mean, median or mode is most useful for survey. Which measure of central tendency do you think will be best indicator of survey results?
Differentiation Ideas: Create a shortened
survey for individual student needs and then a shortened plot.
Adaptations & Extension Ideas: Collect data from class, make a stem & leaf plot, find measures of central tendency. Survey other classes and plot results. Introduce statistical plots like box & whiskers and find measures of central tendency
from the plot.
STEM and Visual Arts Connections To Green Schools
Grades 5-8
LESSON TITLE: A Stellar Survey II: Stem and Leaf Plots
©2016 24 Association for Learning Environments
The following information and activities are copied from the National Council of Teachers of Mathematics Curriculum and Evaluation Standards for School Mathematics Addenda Series Grades 5 – 8, Dealing with Data and Chance written by Judith S. Zawojewski published in 1992.
©2016 25 Association for Learning Environments
©2016 26 Association for Learning Environments
©2016 27 Association for Learning Environments
©2016 28 Association for Learning Environments
©2016 29 Association for Learning Environments
©2016 30 Association for Learning Environments
©2016 31 Association for Learning Environments
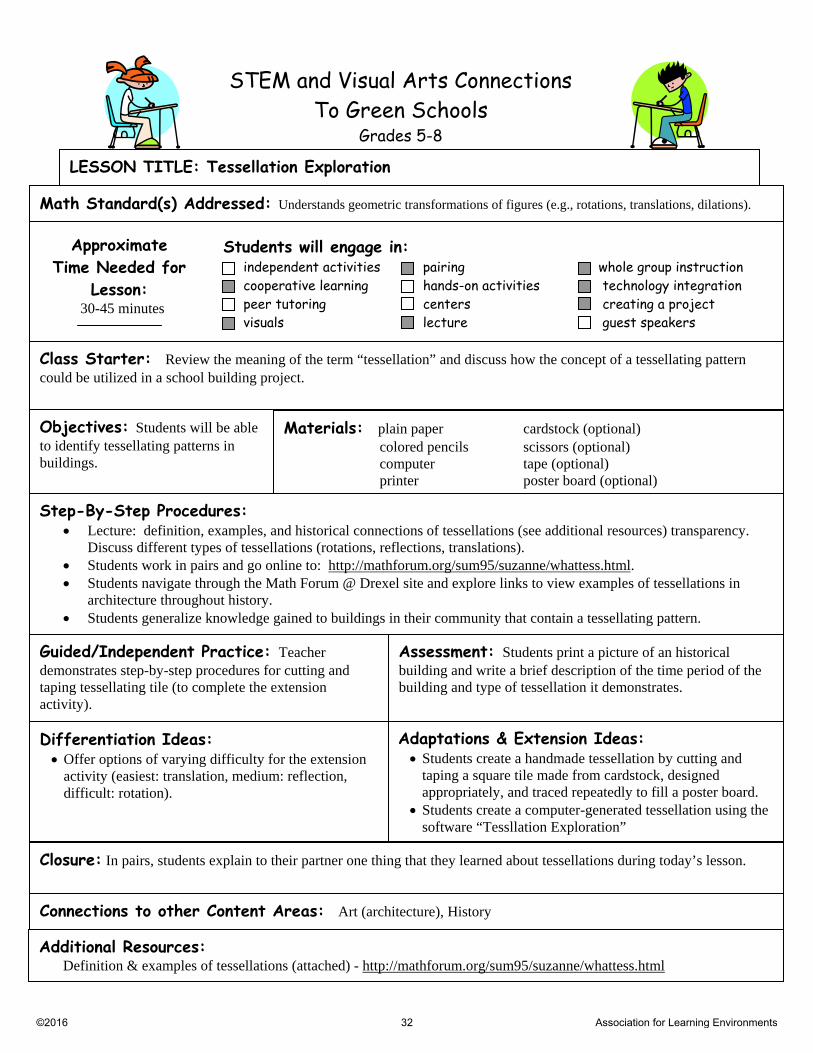
Math Standard(s) Addressed: Understands geometric transformations of figures (e.g., rotations, translations, dilations).
Approximate Time Needed for
Lesson: 30-45 minutes
Students will engage in: independent activities pairing whole group instruction cooperative learning hands-on activities technology integration peer tutoring centers creating a project visuals lecture guest speakers
Class Starter: Review the meaning of the term “tessellation” and discuss how the concept of a tessellating pattern could be utilized in a school building project.
Objectives: Students will be able to identify tessellating patterns in buildings.
Materials: plain paper cardstock (optional) colored pencils scissors (optional) computer tape (optional) printer poster board (optional)
Step-By-Step Procedures: Lecture: definition, examples, and historical connections of tessellations (see additional resources) transparency.
Discuss different types of tessellations (rotations, reflections, translations). Students work in pairs and go online to: http://mathforum.org/sum95/suzanne/whattess.html. Students navigate through the Math Forum @ Drexel site and explore links to view examples of tessellations in
architecture throughout history. Students generalize knowledge gained to buildings in their community that contain a tessellating pattern.
Guided/Independent Practice: Teacher demonstrates step-by-step procedures for cutting and taping tessellating tile (to complete the extension activity).
Assessment: Students print a picture of an historical building and write a brief description of the time period of the building and type of tessellation it demonstrates.
Closure: In pairs, students explain to their partner one thing that they learned about tessellations during today’s lesson.
Differentiation Ideas: Offer options of varying difficulty for the extension
activity (easiest: translation, medium: reflection, difficult: rotation).
Adaptations & Extension Ideas: Students create a handmade tessellation by cutting and
taping a square tile made from cardstock, designed appropriately, and traced repeatedly to fill a poster board.
Students create a computer-generated tessellation using the software “Tessllation Exploration”
Connections to other Content Areas: Art (architecture), History
Additional Resources: Definition & examples of tessellations (attached) - http://mathforum.org/sum95/suzanne/whattess.html
STEM and Visual Arts Connections To Green Schools
Grades 5-8
LESSON TITLE: Tessellation Exploration
©2016 32 Association for Learning Environments
The following activity is available on the Internet at http://mathforum.org/sum95/suzanne/whattess.html
TESSELLATIONS
Definition
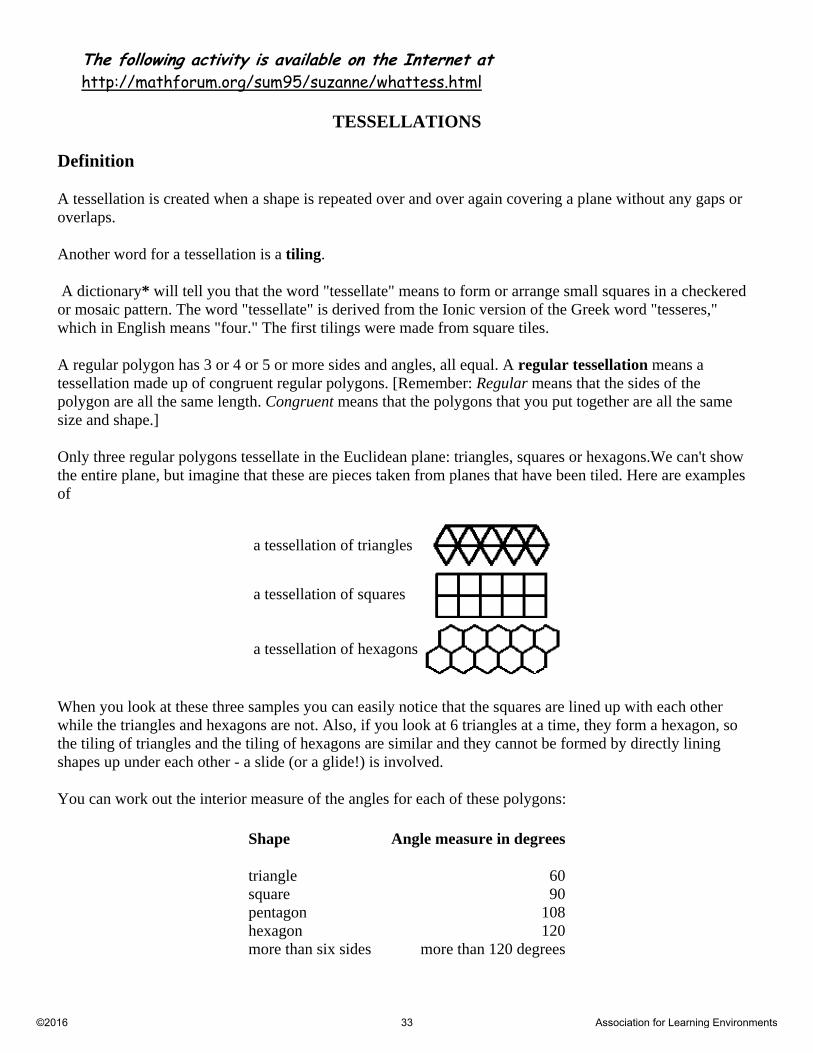
A tessellation is created when a shape is repeated over and over again covering a plane without any gaps or overlaps.
Another word for a tessellation is a tiling.
A dictionary* will tell you that the word "tessellate" means to form or arrange small squares in a checkered or mosaic pattern. The word "tessellate" is derived from the Ionic version of the Greek word "tesseres," which in English means "four." The first tilings were made from square tiles.
A regular polygon has 3 or 4 or 5 or more sides and angles, all equal. A regular tessellation means a tessellation made up of congruent regular polygons. [Remember: Regular means that the sides of the polygon are all the same length. Congruent means that the polygons that you put together are all the same size and shape.]
Only three regular polygons tessellate in the Euclidean plane: triangles, squares or hexagons.We can't show the entire plane, but imagine that these are pieces taken from planes that have been tiled. Here are examples of
a tessellation of triangles
a tessellation of squares
a tessellation of hexagons
When you look at these three samples you can easily notice that the squares are lined up with each other while the triangles and hexagons are not. Also, if you look at 6 triangles at a time, they form a hexagon, so the tiling of triangles and the tiling of hexagons are similar and they cannot be formed by directly lining shapes up under each other - a slide (or a glide!) is involved.
You can work out the interior measure of the angles for each of these polygons:
Shape
triangle square pentagon hexagon more than six sides
Angle measure in degrees
6090
108120
more than 120 degrees
©2016 33 Association for Learning Environments
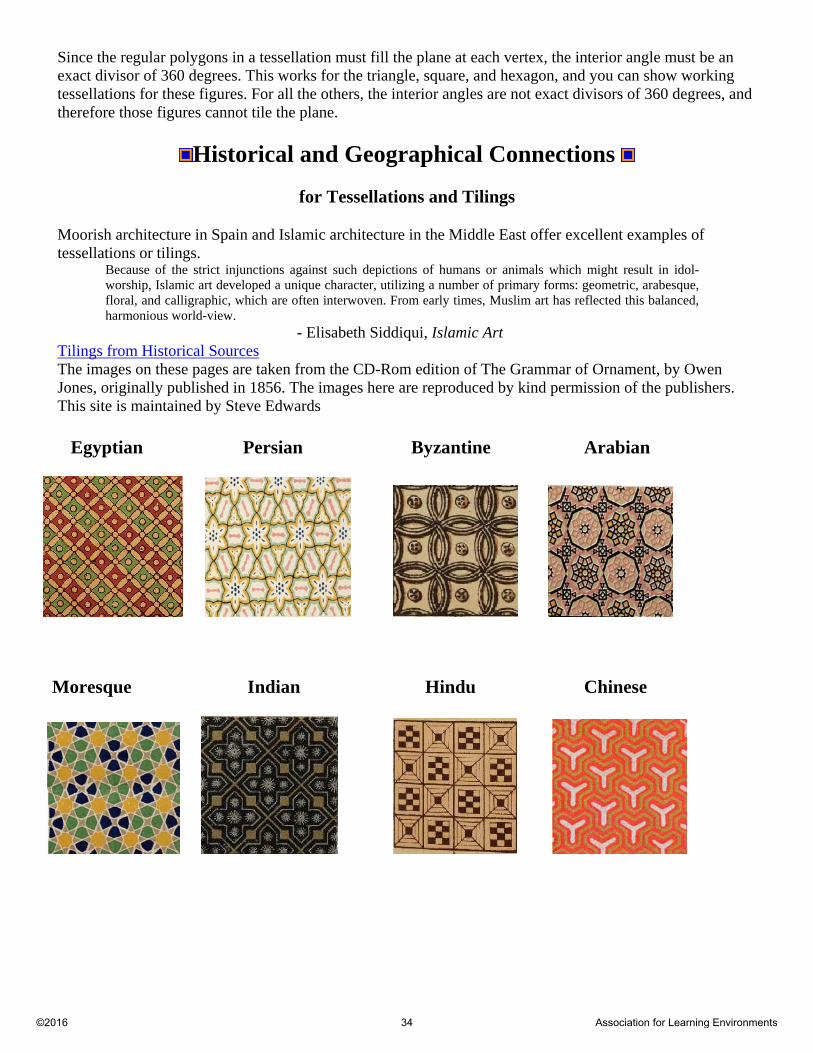
Since the regular polygons in a tessellation must fill the plane at each vertex, the interior angle must be an exact divisor of 360 degrees. This works for the triangle, square, and hexagon, and you can show working tessellations for these figures. For all the others, the interior angles are not exact divisors of 360 degrees, and therefore those figures cannot tile the plane.
Historical and Geographical Connections
for Tessellations and Tilings
Moorish architecture in Spain and Islamic architecture in the Middle East offer excellent examples of tessellations or tilings.
Because of the strict injunctions against such depictions of humans or animals which might result in idol-worship, Islamic art developed a unique character, utilizing a number of primary forms: geometric, arabesque, floral, and calligraphic, which are often interwoven. From early times, Muslim art has reflected this balanced, harmonious world-view.
- Elisabeth Siddiqui, Islamic Art Tilings from Historical Sources The images on these pages are taken from the CD-Rom edition of The Grammar of Ornament, by Owen Jones, originally published in 1856. The images here are reproduced by kind permission of the publishers. This site is maintained by Steve Edwards
Egyptian Persian Byzantine Arabian
Moresque Indian Hindu Chinese
©2016 34 Association for Learning Environments
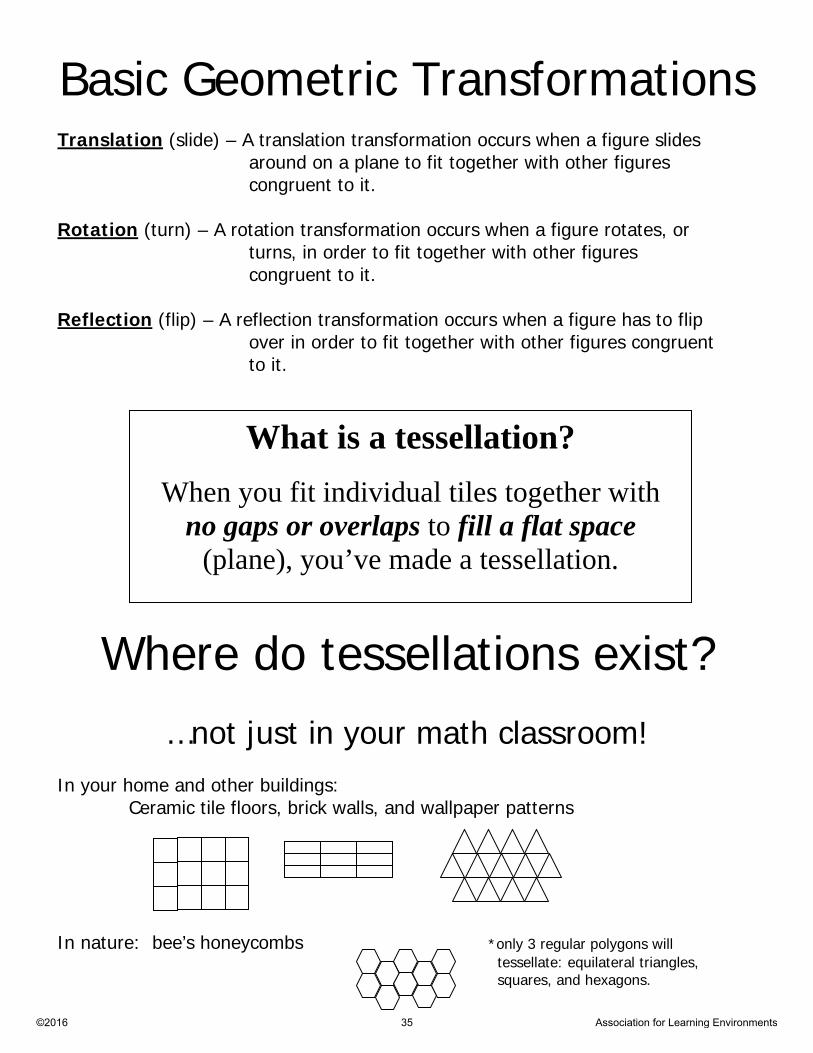
Basic Geometric Transformations Translation (slide) – A translation transformation occurs when a figure slides
around on a plane to fit together with other figures congruent to it.
Rotation (turn) – A rotation transformation occurs when a figure rotates, or
turns, in order to fit together with other figures congruent to it.
Reflection (flip) – A reflection transformation occurs when a figure has to flip
over in order to fit together with other figures congruent to it.
Where do tessellations exist?
…not just in your math classroom! In your home and other buildings: Ceramic tile floors, brick walls, and wallpaper patterns In nature: bee’s honeycombs *only 3 regular polygons will
tessellate: equilateral triangles, squares, and hexagons.
What is a tessellation?
When you fit individual tiles together with no gaps or overlaps to fill a flat space
(plane), you’ve made a tessellation.
©2016 35 Association for Learning Environments
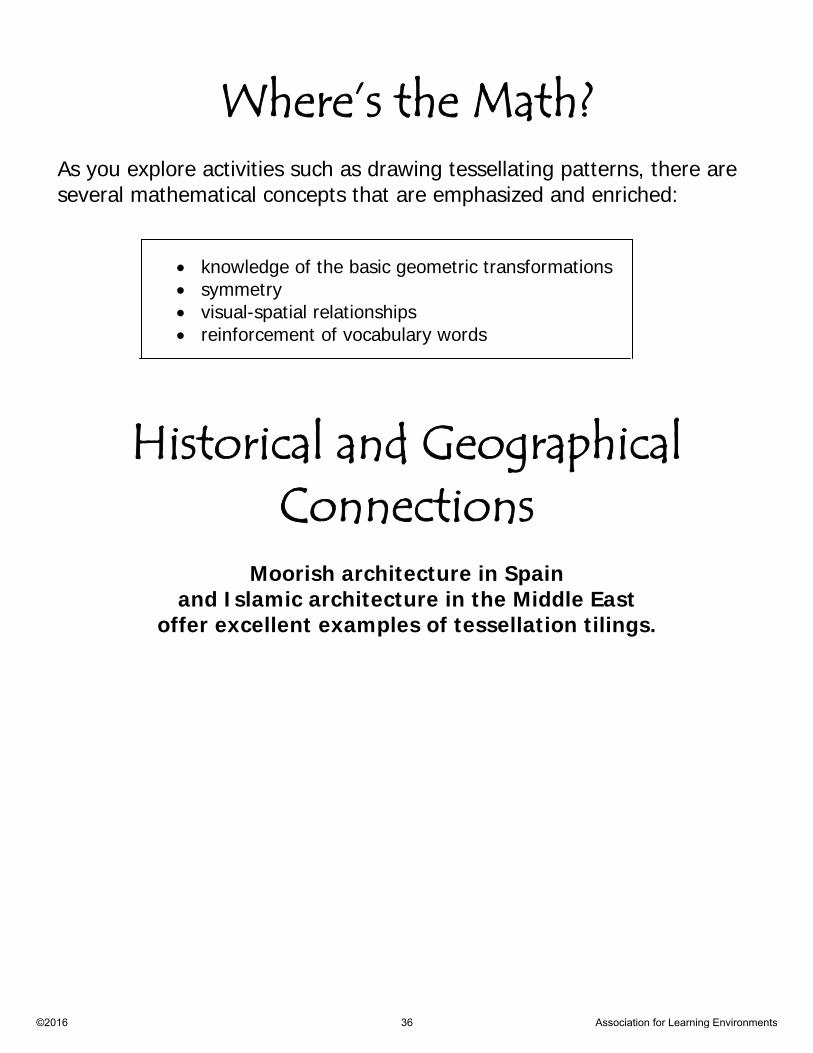
Where’s the Math? As you explore activities such as drawing tessellating patterns, there are several mathematical concepts that are emphasized and enriched:
knowledge of the basic geometric transformations symmetry visual-spatial relationships reinforcement of vocabulary words
Historical and Geographical Connections
Moorish architecture in Spain
and Islamic architecture in the Middle East offer excellent examples of tessellation tilings.
©2016 36 Association for Learning Environments

Association for Learning EnvironmentsEnhancing the Educational Experience
11445 East Via Linda, Suite 2-440 • Scottsdale, Arizona 85259
480.391.0840 • www.A4LE.org
DC Area Office Arlington, Virginia