Embed Size (px)
Citation preview
Powerful Information. Improved Outcomes.
EMSI
3050 Regent Blvd, Suite 100 | Irving, TX 75063
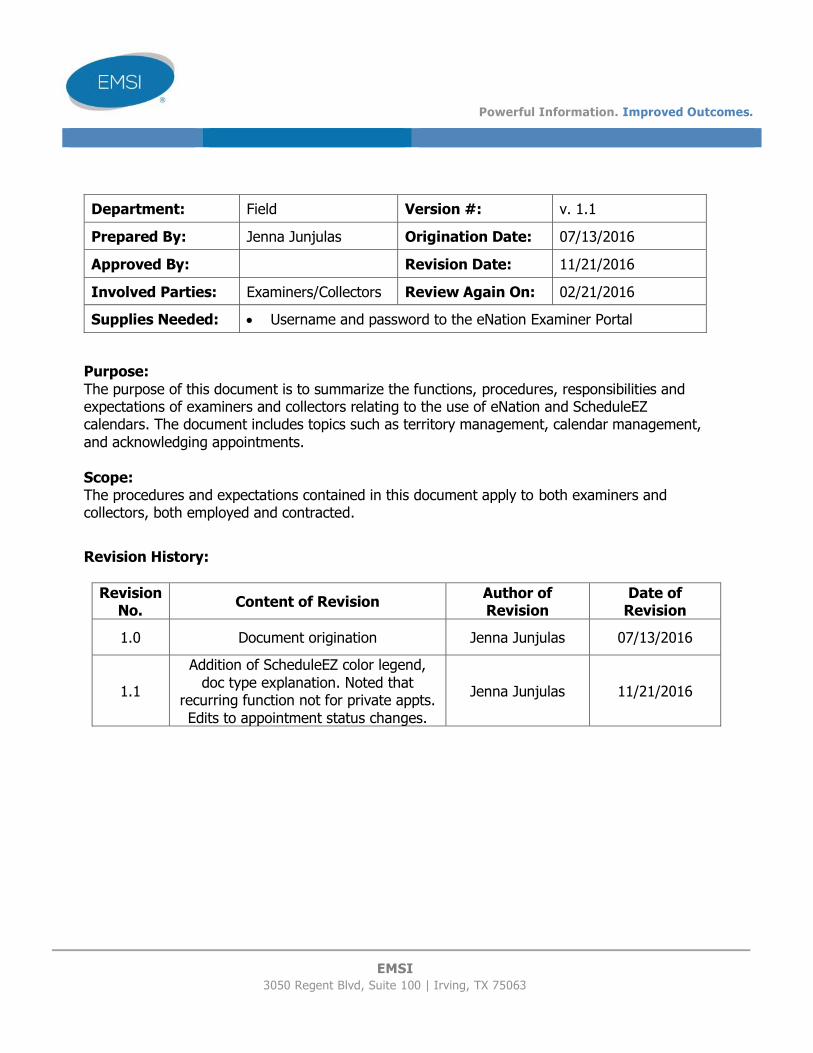
Department: Field Version #: v. 1.1
Prepared By: Jenna Junjulas Origination Date: 07/13/2016
Approved By: Revision Date: 11/21/2016
Involved Parties: Examiners/Collectors Review Again On: 02/21/2016
Supplies Needed: Username and password to the eNation Examiner Portal
Purpose:
The purpose of this document is to summarize the functions, procedures, responsibilities and expectations of examiners and collectors relating to the use of eNation and ScheduleEZ calendars. The document includes topics such as territory management, calendar management,
and acknowledging appointments.
Scope: The procedures and expectations contained in this document apply to both examiners and collectors, both employed and contracted.
Revision History:
Revision No.
Content of Revision Author of Revision
Date of Revision
1.0 Document origination Jenna Junjulas 07/13/2016
1.1
Addition of ScheduleEZ color legend,
doc type explanation. Noted that recurring function not for private appts.
Edits to appointment status changes.
Jenna Junjulas 11/21/2016

Powerful Information. Improved Outcomes.
Page 2 of 56
Table of Contents
SYSTEM REQUIREMENTS .......................................................................................................................................... 4
DEFINITIONS ............................................................................................................................................................. 4
EXPECTATIONS ......................................................................................................................................................... 4
ROUTINE RESPONSIBILITIES ..................................................................................................................................... 5
ENATION WEBSITE OVERVIEW ................................................................................................................................. 6
LOGGING INTO ENATION.......................................................................................................................................... 6
ENATION SITE NAVIGATION ..................................................................................................................................... 7
TABS ....................................................................................................................................................................... 7
LINKS ...................................................................................................................................................................... 8
5 STAR RANKING ....................................................................................................................................................... 8
TERRITORY MANAGEMENT ...................................................................................................................................... 9
ABOUT TERRITORY GROUPS ......................................................................................................................................... 9
CREATING TERRITORY GROUPS.................................................................................................................................... 10
CALENDAR MANAGEMENT..................................................................................................................................... 14
ACCESSING SCHEDULEEZ CALENDARS ........................................................................................................................... 14
SCHEDULEEZ CALENDAR LEGEND................................................................................................................................. 15
AVAILABILITY .......................................................................................................................................................... 15
ADDING AVAILABILITY ............................................................................................................................................... 17
ADDING RECURRING AVAILABILITY ............................................................................................................................... 19
ACKNOWLEDGING APPOINTMENTS ....................................................................................................................... 20
OTHER APPOINTMENT STATUS CHANGES .............................................................................................................. 21
OTHER CALENDAR EVENTS ..................................................................................................................................... 22
SPECIAL CIRCUMSTANCES ...................................................................................................................................... 23
HOW CAN AVAILABILITY BLOCKS BE DELETED? ................................................................................................................. 23
ENATION EXPECTATIONS FOR COLLECTORS ........................................................................................................... 24
ROUTINE RESPONSIBILITIES ................................................................................................................................... 25
ACCESSING THE S2 CASE LIST ................................................................................................................................. 26

Powerful Information. Improved Outcomes.
Page 3 of 56
VIEWING THE COLLECTOR’S PROFILE ..................................................................................................................... 27
ACCESSING FORMS ................................................................................................................................................. 28
EXAM FORM TIPS .................................................................................................................................................... 30
ENATION EXPECTATIONS FOR EXAMINERS ............................................................................................................ 31
ROUTINE RESPONSIBILITIES OF EXAMINERS .......................................................................................................... 32
ACCESSING AN EXAMINER’S ORDERS ..................................................................................................................... 33
SEARCH FOR AN EXAMINER’S ORDERS ................................................................................................................... 34
THE TABS OF AN EXAMINER’S ORDER .................................................................................................................... 35
RETRIEVING WORK ORDER TICKETS ....................................................................................................................... 37
UPDATING STATUS ................................................................................................................................................. 38
RETRIEVING APPLICATION PACKETS AND/OR SIGNATURE PAGES ......................................................................... 40
SCHEDULING AN APPOINTMENT ............................................................................................................................ 41
CANCELING AN APPOINTMENT .............................................................................................................................. 44
RESCHEDULING AN APPOINTMENT ........................................................................................................................ 45
IGO MOBILE EXAMS ............................................................................................................................................... 46
MARKING APPOINTMENTS MET ............................................................................................................................ 49
IMAGING COMPLETED PAPERWORK ...................................................................................................................... 51
DOC TYPES (DOCUMENT TYPES) .................................................................................................................................. 52 TO UPLOAD FROM A COMPUTER OR STORED FILE ............................................................................................................ 53
TO SCAN IMAGES TO AN ORDER .................................................................................................................................. 54
STORAGE OF PAPERWORK/FILES .................................................................................................................................. 55
ENATION MOBILE APP ............................................................................................................................................ 56
Powerful Information. Improved Outcomes.
Page 4 of 56
System Requirements
eNation and ScheduleEZ are supported by the standard EMSI web browser Internet Explorer
(IE) 10 or 11. Pop-up blockers should be turned off and compatibility view may need to be set.
If a user experiences any trouble, please contact the branch office. The branch may request
additional support from EMSI Support Desk, if necessary.
Definitions
Employer Services, or ES: Workplace, wellness and clinical business
Exams: Insurance business
Technicians: Collectively refers to both examiners and collectors
Expectations
Technicians will utilize eNation to interface with EMSI and case manage their exam and
employer services business
Technicians will provide a list of county or zip code coverage to their branch office
Technicians will manage their calendar–adding and editing availability as necessary
Technicians will acknowledge their booked appointments so customers and EMSI home
office knows that the examiner or collector is aware that the appointment exists
Technicians will make every effort to keep appointments as originally scheduled unless
extenuating circumstances apply, such as a flat tire or sudden illness
Technicians will notify their branch immediately if any donor or participant no shows,
cancels or refuses the service
Technicians will notify their branch immediately if they cannot cover a scheduled
appointment to avoid a no show
Powerful Information. Improved Outcomes.
Page 5 of 56
Routine Responsibilities
Establish Territory Groups. Technicians should categorize their zip codes so that
calendar availability can be created that applies only to a specific subset of their
coverage. Refer to Page 9 for details and instructions.
Add, maintain and monitor availability. EMSI does not dictate the exact hours
a contracted technician must begin and end work. It is each technician’s
responsibility to indicate when they can conduct appointments for EMSI and EMSI’s
responsibility is to secure business and book appointments that match the
technician’s availability. Refer to Page 15 for instructions.
Monitor unacknowledged appointments. Acknowledging appointments adds a
status to the case or ticket and may push the ticket into the next part of the
workflow. It is imperative that technicians acknowledge their booked appointments.
Refer to Page 20 for instructions.
Mark appointments met or completed. Insurance examiners must mark orders
as “Appointment Met” as soon as possible following the appointment. Collectors
must change the appointment on the calendar to a “Completed” status. The
process differs slightly for exams versus employer services. Refer to Page 21 for
instructions.
General case management. This includes ancillary tasks such as updating status
on insurance orders or ensuring forms, application packets and/or supplies are
ready in advance of appointments.
Powerful Information. Improved Outcomes.
Page 6 of 56
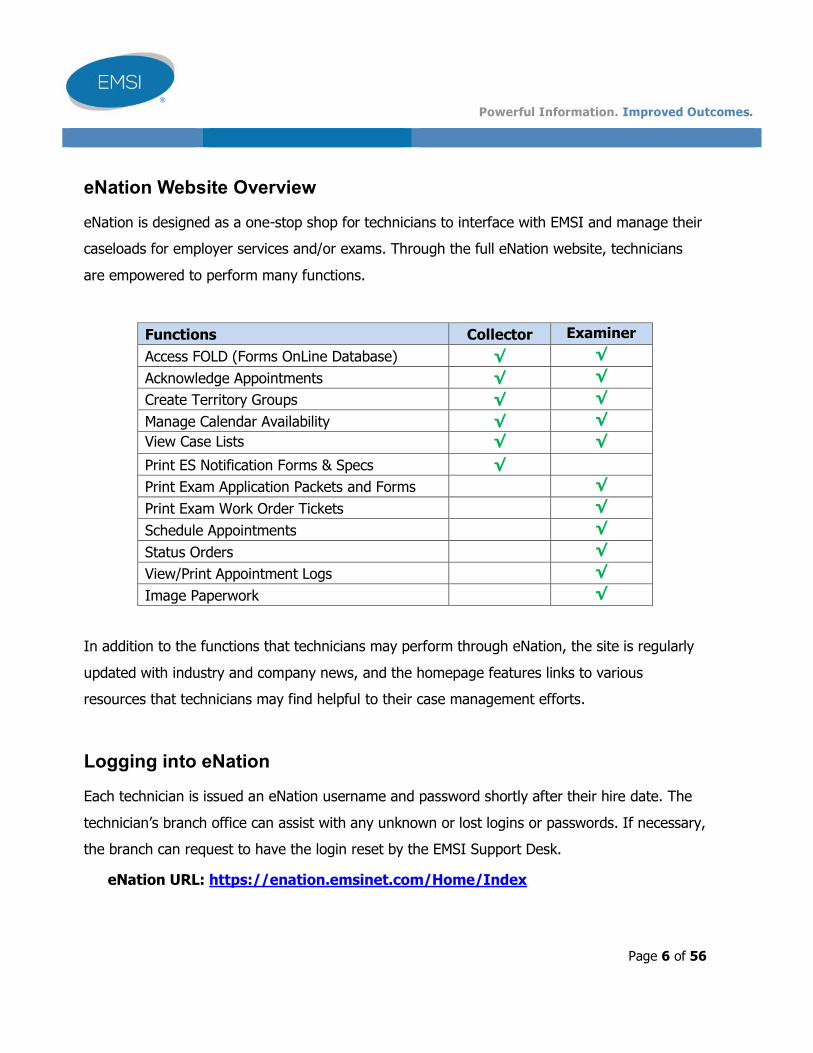
eNation Website Overview
eNation is designed as a one-stop shop for technicians to interface with EMSI and manage their
caseloads for employer services and/or exams. Through the full eNation website, technicians
are empowered to perform many functions.
Functions Collector Examiner
Access FOLD (Forms OnLine Database) √ √
Acknowledge Appointments √ √
Create Territory Groups √ √
Manage Calendar Availability √ √
View Case Lists √ √
Print ES Notification Forms & Specs √
Print Exam Application Packets and Forms √
Print Exam Work Order Tickets √
Schedule Appointments √
Status Orders √
View/Print Appointment Logs √
Image Paperwork √
In addition to the functions that technicians may perform through eNation, the site is regularly
updated with industry and company news, and the homepage features links to various
resources that technicians may find helpful to their case management efforts.
Logging into eNation
Each technician is issued an eNation username and password shortly after their hire date. The
technician’s branch office can assist with any unknown or lost logins or passwords. If necessary,
the branch can request to have the login reset by the EMSI Support Desk.
eNation URL: https://enation.emsinet.com/Home/Index
Powerful Information. Improved Outcomes.
Page 7 of 56
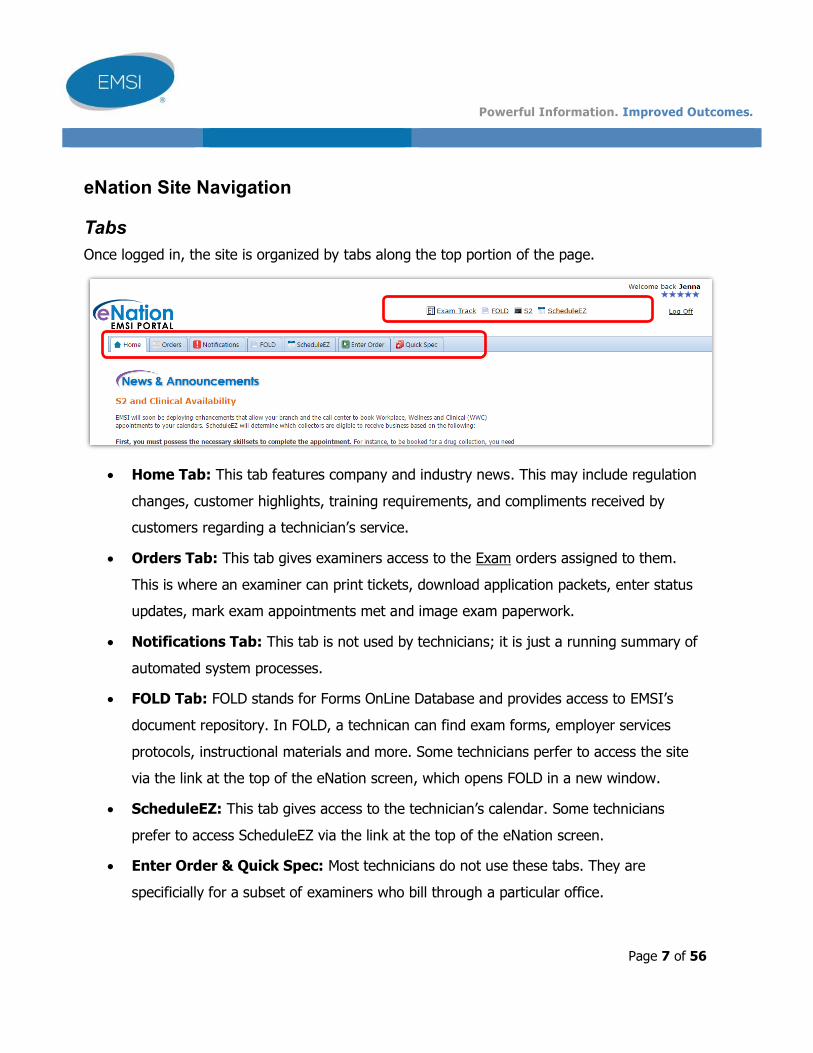
eNation Site Navigation
Tabs
Once logged in, the site is organized by tabs along the top portion of the page.
Home Tab: This tab features company and industry news. This may include regulation
changes, customer highlights, training requirements, and compliments received by
customers regarding a technician’s service.
Orders Tab: This tab gives examiners access to the Exam orders assigned to them.
This is where an examiner can print tickets, download application packets, enter status
updates, mark exam appointments met and image exam paperwork.
Notifications Tab: This tab is not used by technicians; it is just a running summary of
automated system processes.
FOLD Tab: FOLD stands for Forms OnLine Database and provides access to EMSI’s
document repository. In FOLD, a technican can find exam forms, employer services
protocols, instructional materials and more. Some technicians perfer to access the site
via the link at the top of the eNation screen, which opens FOLD in a new window.
ScheduleEZ: This tab gives access to the technician’s calendar. Some technicians
prefer to access ScheduleEZ via the link at the top of the eNation screen.
Enter Order & Quick Spec: Most technicians do not use these tabs. They are
specificially for a subset of examiners who bill through a particular office.

Powerful Information. Improved Outcomes.
Page 8 of 56
Links
The homepage also features several links along the top that allow users seamless entry into
related systems via a new window.
ExamTrack Link: This allows entry into ExamTrack, where users may visit the
Credentials link to view their profile and manage their Territory Groups.
FOLD Link: This opens FOLD in a new window, rather than through the tab.
S2 Link: This allows collectors to view their assigned employer services tickets,
notification forms and specs.
ScheduleEZ: This opens ScheduleEZ in a new window, rather than through the tab.
5 Star Ranking
As shown in the picture above, examiners can view their current 5 Star ranking just under their
name at the top right the homepage. Star rankings are routinely updated and based on the
examiner’s performance history and system adoption.
Powerful Information. Improved Outcomes.
Page 9 of 56
Territory Management
Zip codes must be added to a technician’s ECS (Enterprise Credentialing System) profile by the
branch office. They only need to be added one time unless a technician changes their coverage
area. Technicians should provide their office with every zip code they would ever possibly cover,
even remote zips or those for which they only cover a specific type of appointment or on certain
days. The technician can then use Territory Groups to categorize those zip codes and control
when and where they receive what types of appointments.
About Territory Groups
Branches and technicians alike asked for calendar customization, so EMSI developed Territory
Groups. Territory Groups allow technicians to group their zip codes into categories so that
calendar availability can be programmed that applies only to specific subset of zip codes.
Examples:
On weeknights, an examiner wants exam appointments but only near her home.
For several hours each morning, a collector wants Clinical and Wellness appointments
but only near his shift at the clinic.
A technician covers a remote location every other Saturday and wants to book as many
appointments as possible in that specific area to maximize travel time and limit cost.
EMSI gives technicians full control over their schedules, so they have the power to manage
their work in the most efficient, effective and profitable way possible.
Powerful Information. Improved Outcomes.
Page 10 of 56
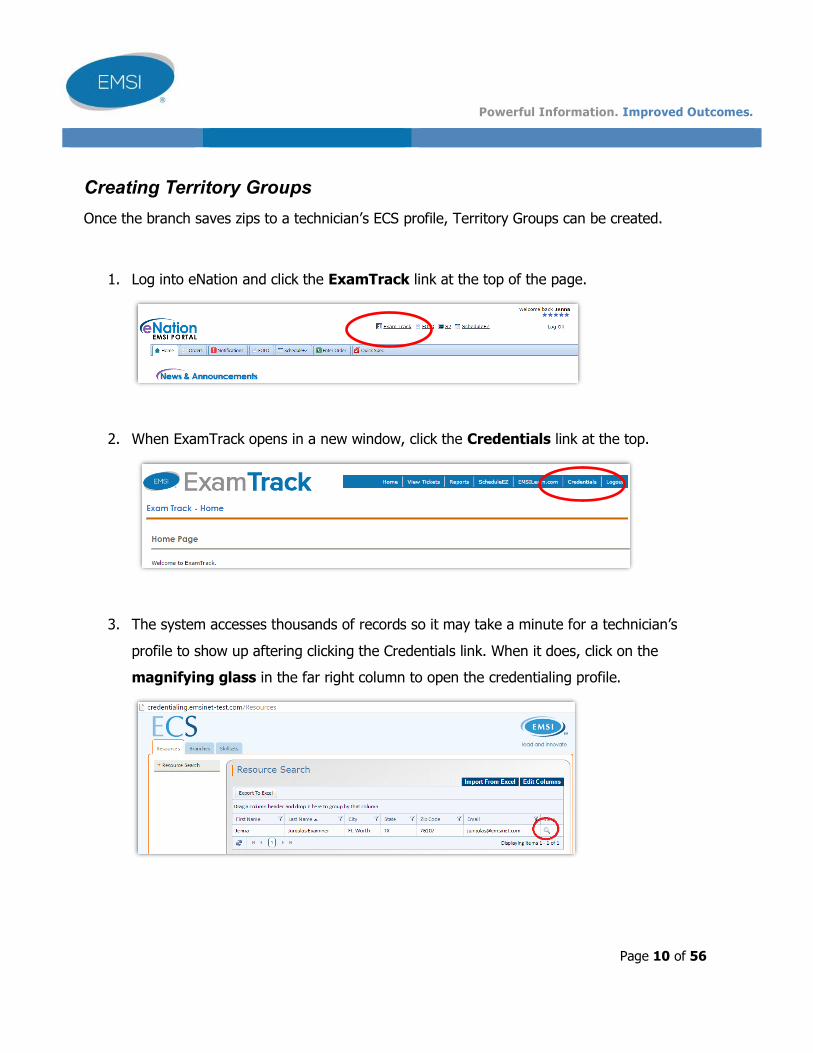
Creating Territory Groups
Once the branch saves zips to a technician’s ECS profile, Territory Groups can be created.
1. Log into eNation and click the ExamTrack link at the top of the page.
2. When ExamTrack opens in a new window, click the Credentials link at the top.
3. The system accesses thousands of records so it may take a minute for a technician’s
profile to show up aftering clicking the Credentials link. When it does, click on the
magnifying glass in the far right column to open the credentialing profile.
Powerful Information. Improved Outcomes.
Page 11 of 56
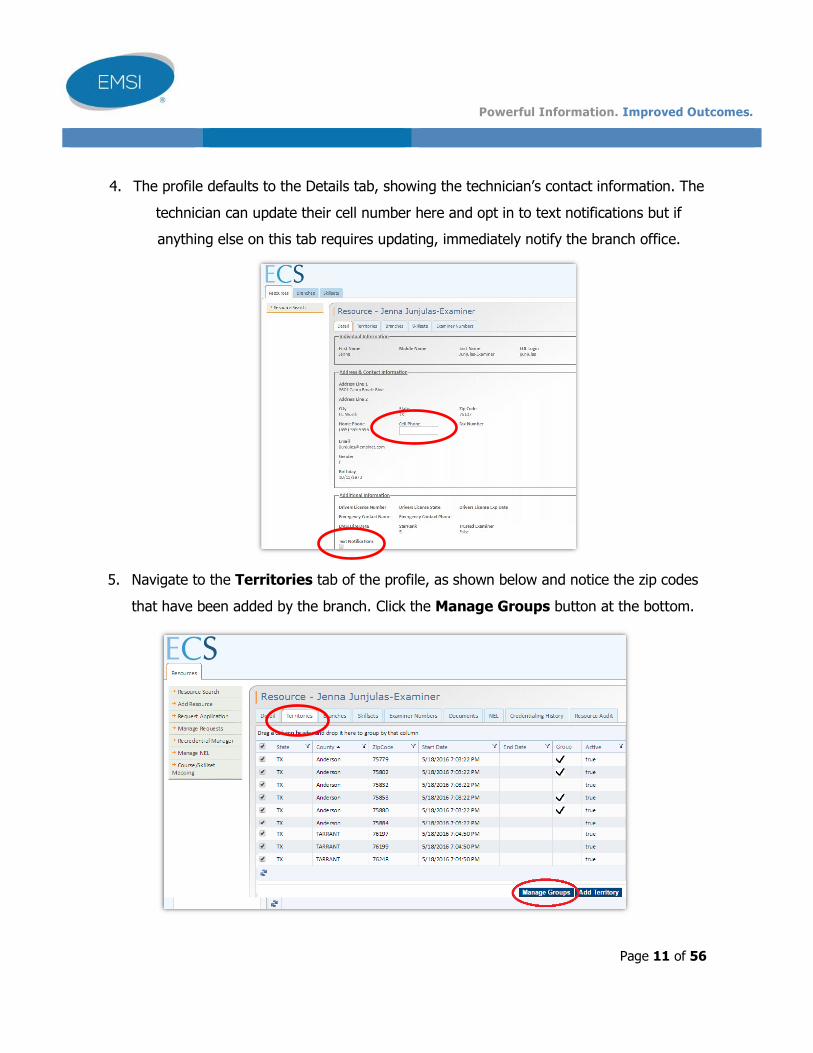
4. The profile defaults to the Details tab, showing the technician’s contact information. The
technician can update their cell number here and opt in to text notifications but if
anything else on this tab requires updating, immediately notify the branch office.
5. Navigate to the Territories tab of the profile, as shown below and notice the zip codes
that have been added by the branch. Click the Manage Groups button at the bottom.
Powerful Information. Improved Outcomes.
Page 12 of 56
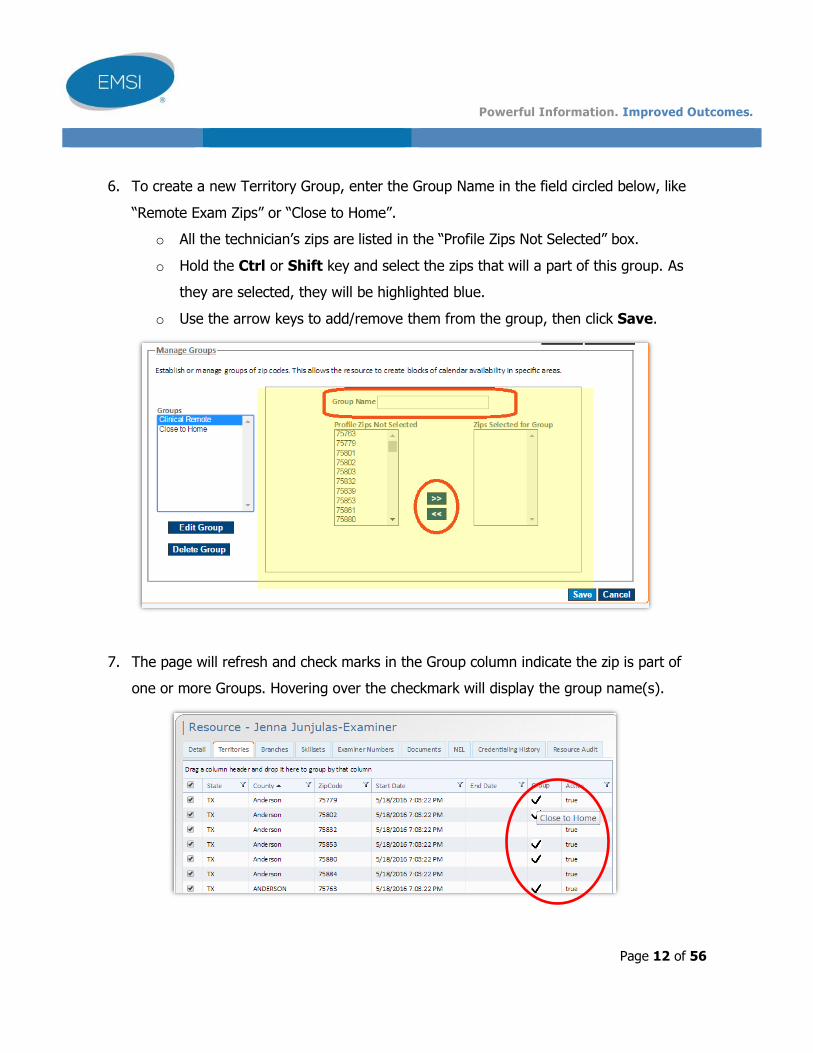
6. To create a new Territory Group, enter the Group Name in the field circled below, like
“Remote Exam Zips” or “Close to Home”.
o All the technician’s zips are listed in the “Profile Zips Not Selected” box.
o Hold the Ctrl or Shift key and select the zips that will a part of this group. As
they are selected, they will be highlighted blue.
o Use the arrow keys to add/remove them from the group, then click Save.
7. The page will refresh and check marks in the Group column indicate the zip is part of
one or more Groups. Hovering over the checkmark will display the group name(s).
Powerful Information. Improved Outcomes.
Page 13 of 56
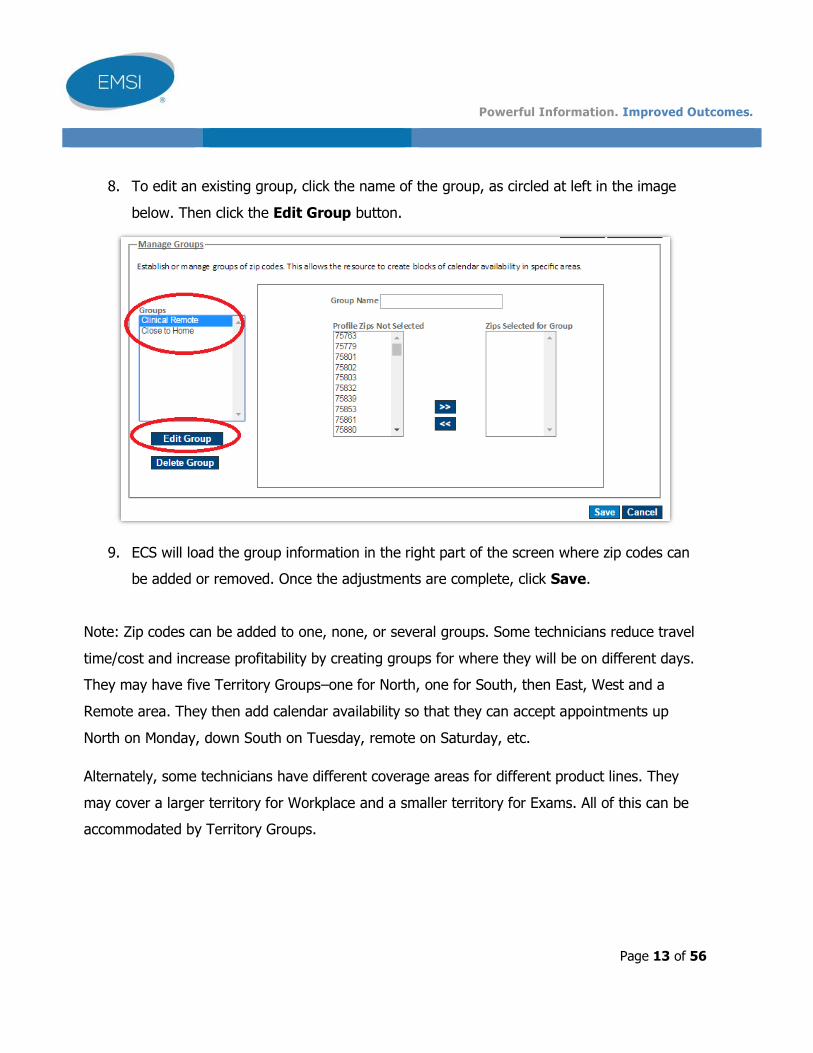
8. To edit an existing group, click the name of the group, as circled at left in the image
below. Then click the Edit Group button.
9. ECS will load the group information in the right part of the screen where zip codes can
be added or removed. Once the adjustments are complete, click Save.
Note: Zip codes can be added to one, none, or several groups. Some technicians reduce travel
time/cost and increase profitability by creating groups for where they will be on different days.
They may have five Territory Groups–one for North, one for South, then East, West and a
Remote area. They then add calendar availability so that they can accept appointments up
North on Monday, down South on Tuesday, remote on Saturday, etc.
Alternately, some technicians have different coverage areas for different product lines. They
may cover a larger territory for Workplace and a smaller territory for Exams. All of this can be
accommodated by Territory Groups.
Powerful Information. Improved Outcomes.
Page 14 of 56
Calendar Management
Three factors determine whether a technician can be booked to conduct an appointment:
1. The technician must have the skillsets (training) to complete the appointment’s services.
2. The technician must have the zip code stored in the Territories tab of their profile.
3. The technician must have calendar availability.
Some technicians have set schedules and add calendar availability every 90 days, only several
times per year. Others do not have set schedules and play a more active role in managing their
calendar–updating availability monthly, weekly or daily. Regardless of how often calendar
availability is updated, every technician should log in at least twice daily to acknowledge newly
booked appointments, review calendar changes, enter status, and perform general case
management.
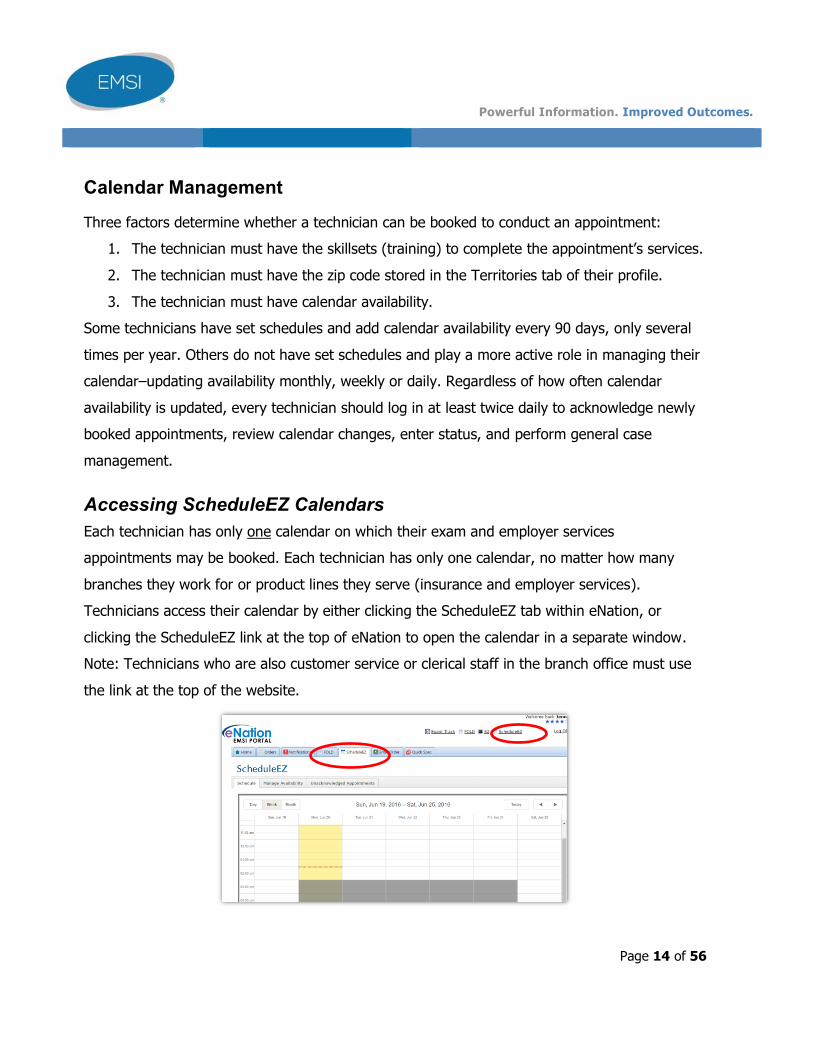
Accessing ScheduleEZ Calendars
Each technician has only one calendar on which their exam and employer services
appointments may be booked. Each technician has only one calendar, no matter how many
branches they work for or product lines they serve (insurance and employer services).
Technicians access their calendar by either clicking the ScheduleEZ tab within eNation, or
clicking the ScheduleEZ link at the top of eNation to open the calendar in a separate window.
Note: Technicians who are also customer service or clerical staff in the branch office must use
the link at the top of the website.
Powerful Information. Improved Outcomes.
Page 15 of 56
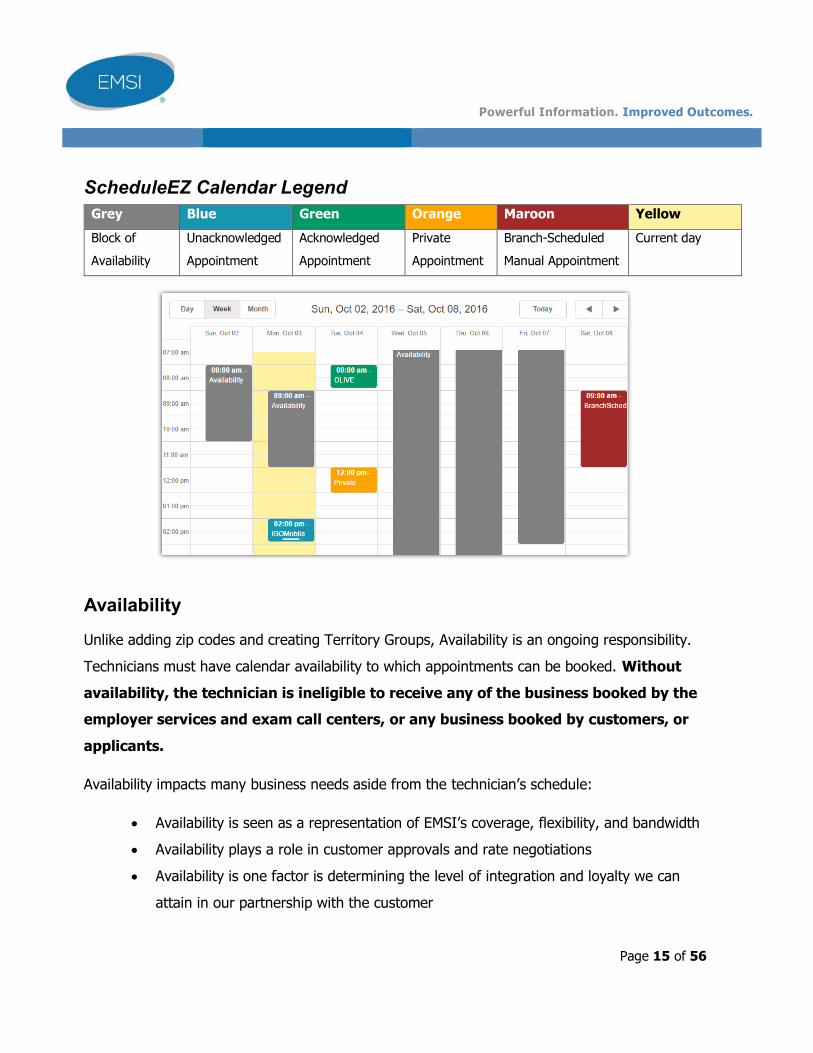
ScheduleEZ Calendar Legend
Availability
Unlike adding zip codes and creating Territory Groups, Availability is an ongoing responsibility.
Technicians must have calendar availability to which appointments can be booked. Without
availability, the technician is ineligible to receive any of the business booked by the
employer services and exam call centers, or any business booked by customers, or
applicants.
Availability impacts many business needs aside from the technician’s schedule:
Availability is seen as a representation of EMSI’s coverage, flexibility, and bandwidth
Availability plays a role in customer approvals and rate negotiations
Availability is one factor is determining the level of integration and loyalty we can
attain in our partnership with the customer
Grey Blue Green Orange Maroon Yellow
Block of
Availability
Unacknowledged
Appointment
Acknowledged
Appointment
Private
Appointment
Branch-Scheduled
Manual Appointment
Current day

Powerful Information. Improved Outcomes.
Page 16 of 56
Customers compare reporting from various companies–reports that evaluate ease of scheduling,
cycle time, reschedule rates, no shows, how many availability hours are on calendars, and many
other metrics on a granular level. If EMSI is to secure this business for the network, it is
imperative that we have the metrics to prove we can handle it.
Availability makes a technician’s business more profitable. Providing availability
eliminates back and forth conversations about coverage and reduces the need to coordinate
with the call center or repeatedly call applicants. A technician with availability eliminates much
of the “front-end” case management that occurs before scheduling–calling, and statusing,
coordinating. They just pick up their already-scheduled appointments and conduct the services,
making each case less time-consuming. The fewer times an order has to be “touched”, the
more profitable it is for the technician.
Powerful Information. Improved Outcomes.
Page 17 of 56
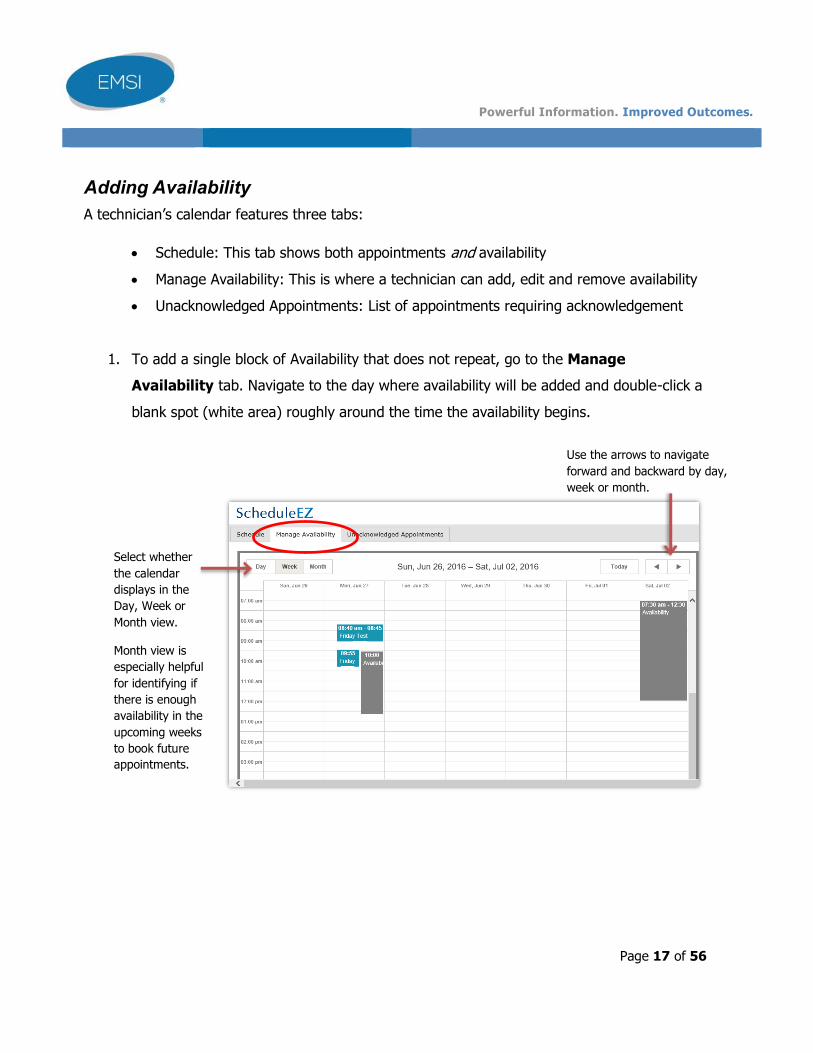
Adding Availability
A technician’s calendar features three tabs:
Schedule: This tab shows both appointments and availability
Manage Availability: This is where a technician can add, edit and remove availability
Unacknowledged Appointments: List of appointments requiring acknowledgement
1. To add a single block of Availability that does not repeat, go to the Manage
Availability tab. Navigate to the day where availability will be added and double-click a
blank spot (white area) roughly around the time the availability begins.
Select whether
the calendar
displays in the
Day, Week or
Month view.
Month view is
especially helpful
for identifying if
there is enough
availability in the
upcoming weeks
to book future
appointments.
Use the arrows to navigate
forward and backward by day,
week or month.
Powerful Information. Improved Outcomes.
Page 18 of 56
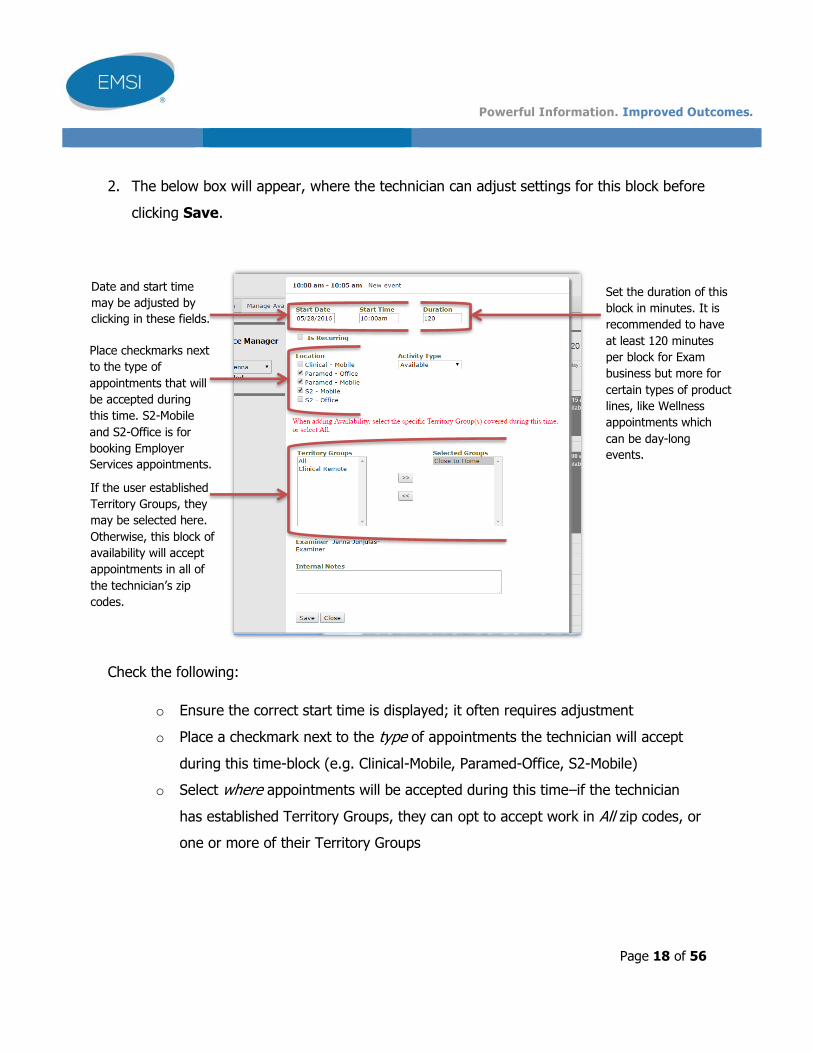
2. The below box will appear, where the technician can adjust settings for this block before
clicking Save.
Check the following:
o Ensure the correct start time is displayed; it often requires adjustment
o Place a checkmark next to the type of appointments the technician will accept
during this time-block (e.g. Clinical-Mobile, Paramed-Office, S2-Mobile)
o Select where appointments will be accepted during this time–if the technician
has established Territory Groups, they can opt to accept work in All zip codes, or
one or more of their Territory Groups
Date and start time
may be adjusted by
clicking in these fields.
Place checkmarks next
to the type of
appointments that will
be accepted during
this time. S2-Mobile
and S2-Office is for
booking Employer
Services appointments.
If the user established
Territory Groups, they
may be selected here.
Otherwise, this block of
availability will accept
appointments in all of
the technician’s zip
codes.
Set the duration of this
block in minutes. It is
recommended to have
at least 120 minutes
per block for Exam
business but more for
certain types of product
lines, like Wellness
appointments which
can be day-long
events.

Powerful Information. Improved Outcomes.
Page 19 of 56
Adding Recurring Availability
Recurring (Repeating) Availability can be added in a similar fashion. To add multiple blocks of
availability that have the same settings, place a checkmark in the Is Recurring box. Additional
fields will display that allow the user to repeat this availability on multiple days. This is
especially helpful for technicians who have set schedules.
In the example below, recurring blocks of calendar availability begin on the start date of
Saturday, May 28th and ending on the End By date of July 13th. The user selected all weekdays,
so this availability will be added Monday through Friday during the selected date range.
Check Is Recurring to
reveal the recurring
options.
Selecting All Days will
add this same
availability block at
10:00 AM for two
hours every single day
on the calendar from
the Start Date through
the End By date.
Selecting All
Weekdays will add
this block only on
weekdays.
Selecting This Day of
Every Week will add
it on the Start Date
and, for this example,
every Saturday until
July 13th.
IMPORTANT: When
creating Availability, especially recurring Availability, be
mindful of holidays and vacations. It is a common
mistake to create blocks of recurring availability indicating
that an examiner is working on Thanksgiving,
Memorial Day or New Years. Avoid no shows and above-average
reschedule rates by ensuring that the recurring availability
block does not conflict with a holiday or vacation.
Powerful Information. Improved Outcomes.
Page 20 of 56
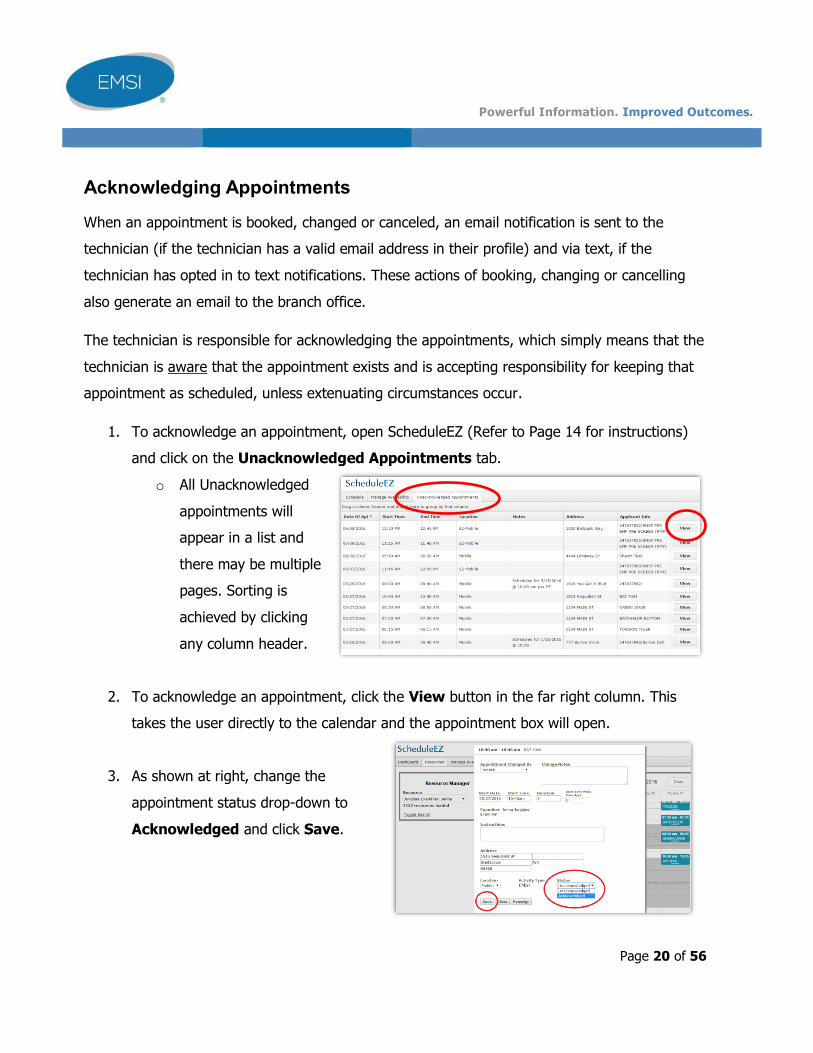
Acknowledging Appointments
When an appointment is booked, changed or canceled, an email notification is sent to the
technician (if the technician has a valid email address in their profile) and via text, if the
technician has opted in to text notifications. These actions of booking, changing or cancelling
also generate an email to the branch office.
The technician is responsible for acknowledging the appointments, which simply means that the
technician is aware that the appointment exists and is accepting responsibility for keeping that
appointment as scheduled, unless extenuating circumstances occur.
1. To acknowledge an appointment, open ScheduleEZ (Refer to Page 14 for instructions)
and click on the Unacknowledged Appointments tab.
o All Unacknowledged
appointments will
appear in a list and
there may be multiple
pages. Sorting is
achieved by clicking
any column header.
2. To acknowledge an appointment, click the View button in the far right column. This
takes the user directly to the calendar and the appointment box will open.
3. As shown at right, change the
appointment status drop-down to
Acknowledged and click Save.
Powerful Information. Improved Outcomes.
Page 21 of 56
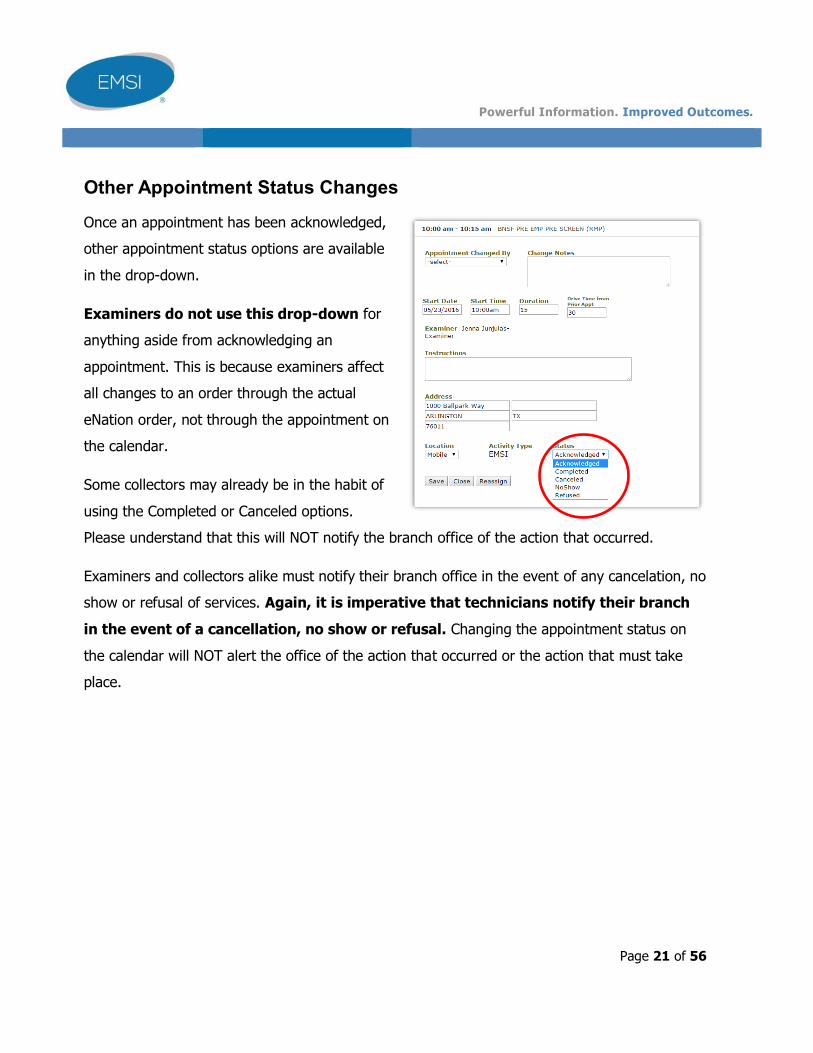
Other Appointment Status Changes
Once an appointment has been acknowledged,
other appointment status options are available
in the drop-down.
Examiners do not use this drop-down for
anything aside from acknowledging an
appointment. This is because examiners affect
all changes to an order through the actual
eNation order, not through the appointment on
the calendar.
Some collectors may already be in the habit of
using the Completed or Canceled options.
Please understand that this will NOT notify the branch office of the action that occurred.
Examiners and collectors alike must notify their branch office in the event of any cancelation, no
show or refusal of services. Again, it is imperative that technicians notify their branch
in the event of a cancellation, no show or refusal. Changing the appointment status on
the calendar will NOT alert the office of the action that occurred or the action that must take
place.
Powerful Information. Improved Outcomes.
Page 22 of 56
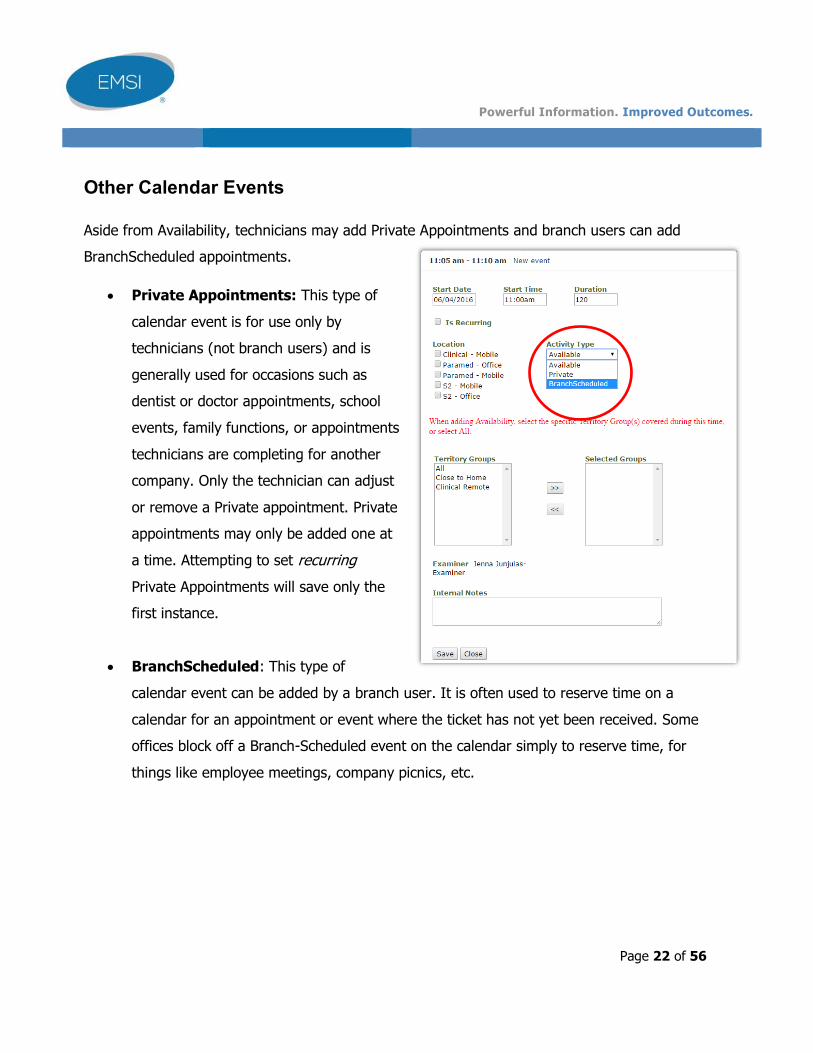
Other Calendar Events
Aside from Availability, technicians may add Private Appointments and branch users can add
BranchScheduled appointments.
Private Appointments: This type of
calendar event is for use only by
technicians (not branch users) and is
generally used for occasions such as
dentist or doctor appointments, school
events, family functions, or appointments
technicians are completing for another
company. Only the technician can adjust
or remove a Private appointment. Private
appointments may only be added one at
a time. Attempting to set recurring
Private Appointments will save only the
first instance.
BranchScheduled: This type of
calendar event can be added by a branch user. It is often used to reserve time on a
calendar for an appointment or event where the ticket has not yet been received. Some
offices block off a Branch-Scheduled event on the calendar simply to reserve time, for
things like employee meetings, company picnics, etc.
Powerful Information. Improved Outcomes.
Page 23 of 56
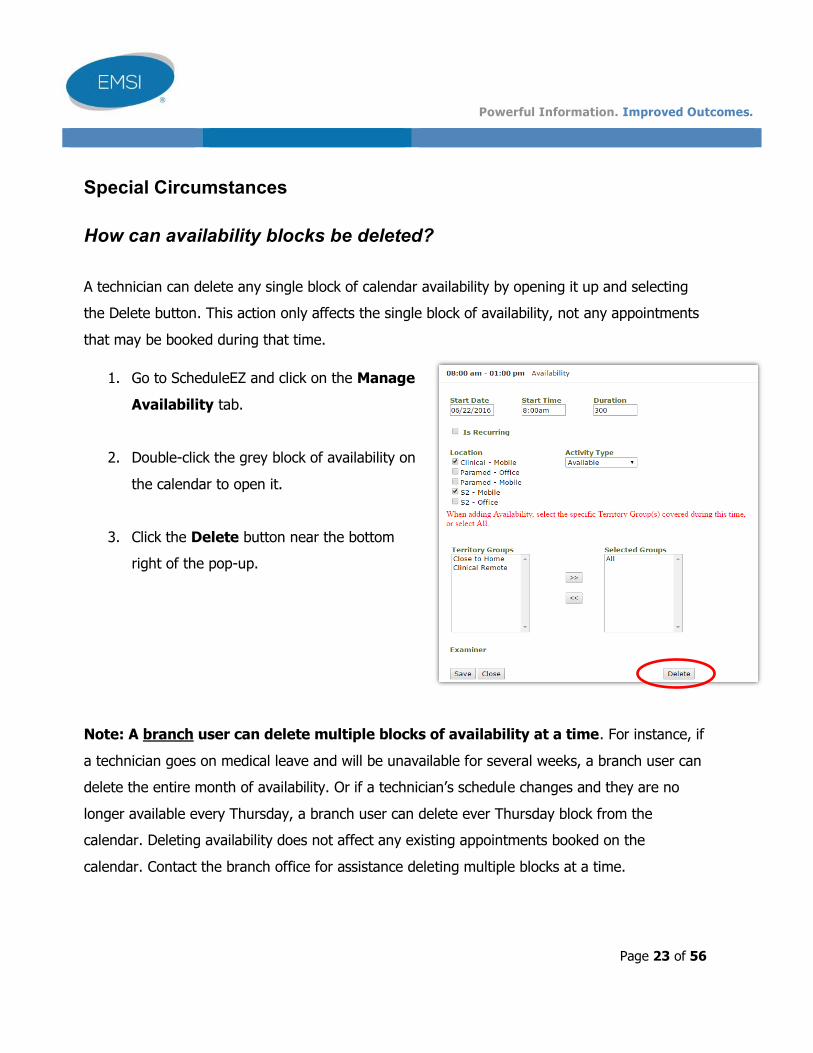
Special Circumstances
How can availability blocks be deleted?
A technician can delete any single block of calendar availability by opening it up and selecting
the Delete button. This action only affects the single block of availability, not any appointments
that may be booked during that time.
1. Go to ScheduleEZ and click on the Manage
Availability tab.
2. Double-click the grey block of availability on
the calendar to open it.
3. Click the Delete button near the bottom
right of the pop-up.
Note: A branch user can delete multiple blocks of availability at a time. For instance, if
a technician goes on medical leave and will be unavailable for several weeks, a branch user can
delete the entire month of availability. Or if a technician’s schedule changes and they are no
longer available every Thursday, a branch user can delete ever Thursday block from the
calendar. Deleting availability does not affect any existing appointments booked on the
calendar. Contact the branch office for assistance deleting multiple blocks at a time.

Powerful Information. Improved Outcomes.
Page 24 of 56
eNation Expectations for Collectors
Collectors are technicians who perform employer services (ES), which encompasses workplace,
wellness and clinical services. The expectations of collectors regarding eNation use is as follows:
Maintaining S2-Mobile and S2-Office ScheduleEZ calendar availability
Use FOLD to access Employer Services documents and protocols
Using the S2 Case List to view upcoming employer services appointments, and view
and/or print notification forms and specs
Acknowledging booked appointments
Marking appointments canceled or completed
Powerful Information. Improved Outcomes.
Page 25 of 56
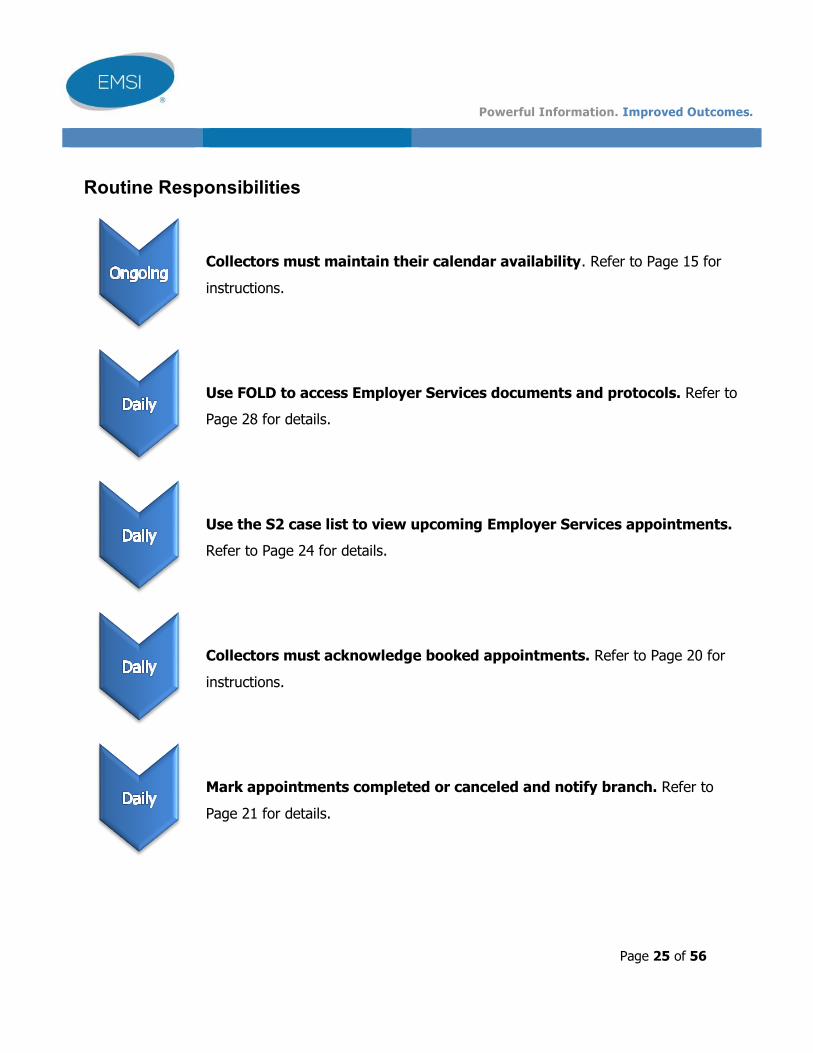
Routine Responsibilities
Collectors must maintain their calendar availability. Refer to Page 15 for
instructions.
Use FOLD to access Employer Services documents and protocols. Refer to
Page 28 for details.
Use the S2 case list to view upcoming Employer Services appointments.
Refer to Page 24 for details.
Collectors must acknowledge booked appointments. Refer to Page 20 for
instructions.
Mark appointments completed or canceled and notify branch. Refer to
Page 21 for details.
Powerful Information. Improved Outcomes.
Page 26 of 56
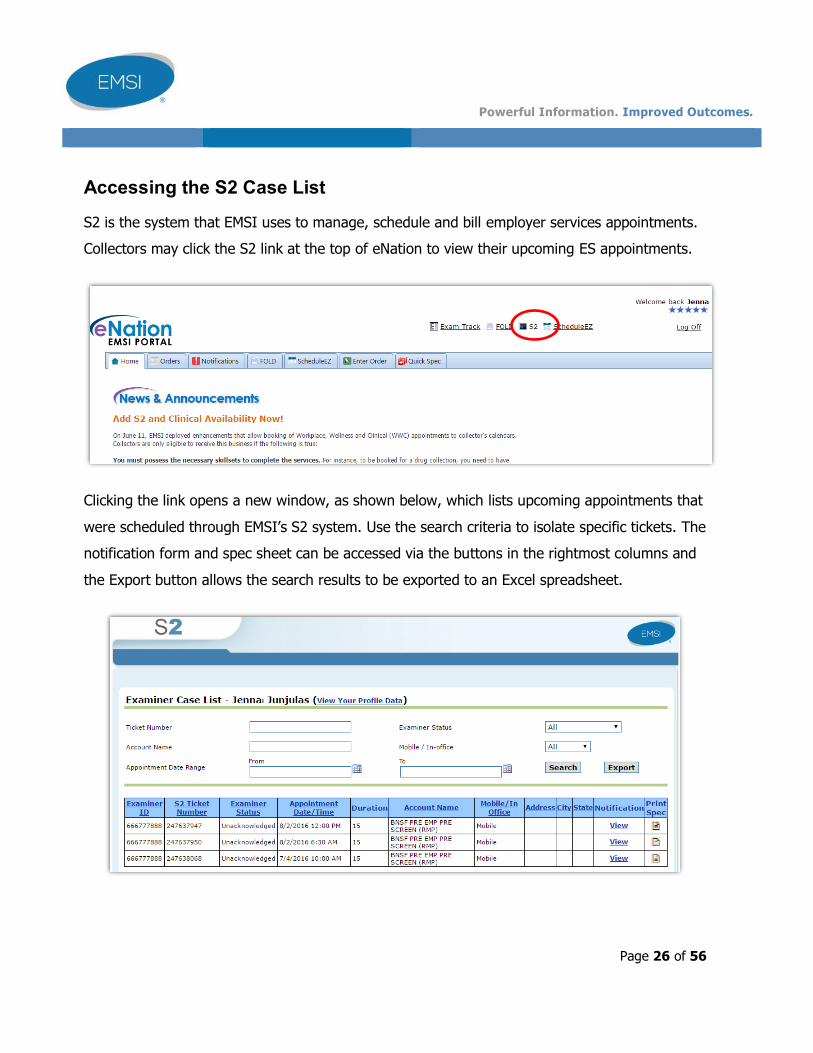
Accessing the S2 Case List
S2 is the system that EMSI uses to manage, schedule and bill employer services appointments.
Collectors may click the S2 link at the top of eNation to view their upcoming ES appointments.
Clicking the link opens a new window, as shown below, which lists upcoming appointments that
were scheduled through EMSI’s S2 system. Use the search criteria to isolate specific tickets. The
notification form and spec sheet can be accessed via the buttons in the rightmost columns and
the Export button allows the search results to be exported to an Excel spreadsheet.
Powerful Information. Improved Outcomes.
Page 27 of 56
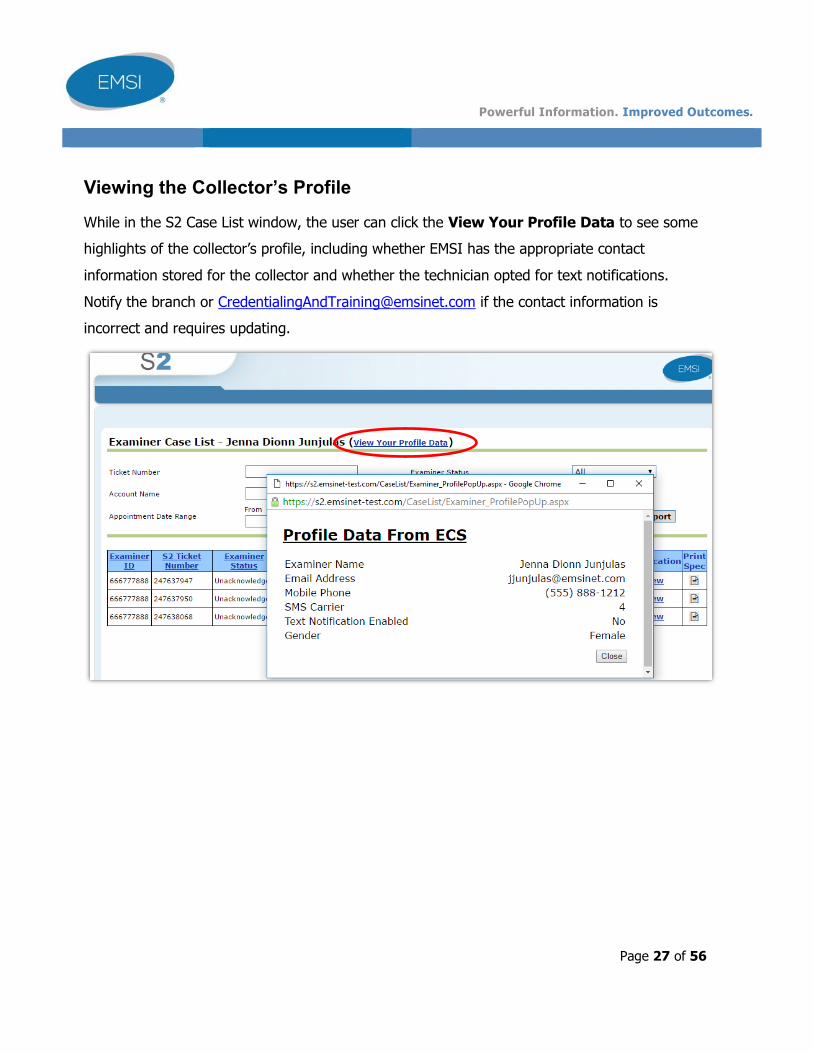
Viewing the Collector’s Profile
While in the S2 Case List window, the user can click the View Your Profile Data to see some
highlights of the collector’s profile, including whether EMSI has the appropriate contact
information stored for the collector and whether the technician opted for text notifications.
Notify the branch or [email protected] if the contact information is
incorrect and requires updating.
Powerful Information. Improved Outcomes.
Page 28 of 56
Accessing Forms
EMSI stores exam forms in FOLD, which stands for Forms OnLine Database. Many carriers allow
us to store their forms but some do not. For those that do not, the work order ticket may
provide direction, or a memo will be posted in FOLD that provides instructions on how to obtain
them from the carrier’s form site.
IMPORTANT: Forms are referred to by many names. A paramed exam form could be
called a “Medical History Questionnaire” a “Part II” Application, a “Med Exam” or “Basic
Paramed” among other terms. EMSI refers to them as “Paramed” forms but technicians
can expect to see variations among the different agents, agencies and carriers.
IMPORTANT: HIV Consent forms apply to blood draws only (not urine collections). If
blood is being collected at the exam and an HIV Consent form is posted in FOLD for the
account and state, it is required. Customers often refer to these as “Informed Consents”.
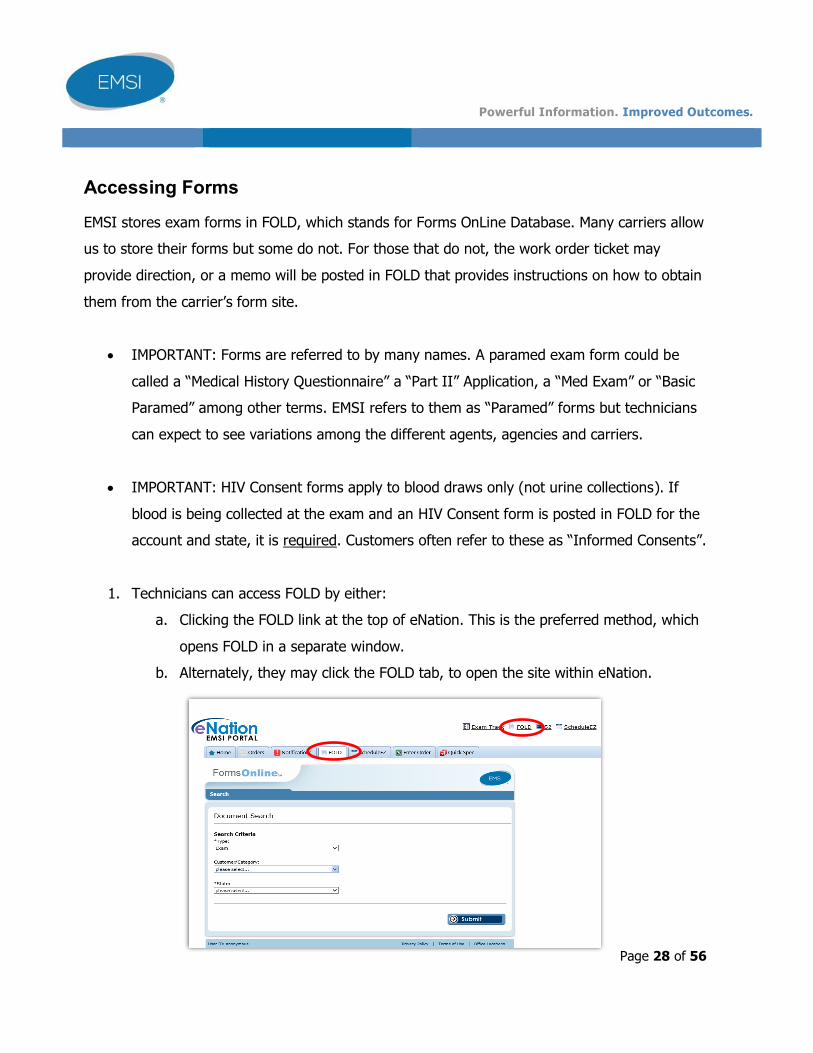
1. Technicians can access FOLD by either:
a. Clicking the FOLD link at the top of eNation. This is the preferred method, which
opens FOLD in a separate window.
b. Alternately, they may click the FOLD tab, to open the site within eNation.
Powerful Information. Improved Outcomes.
Page 29 of 56
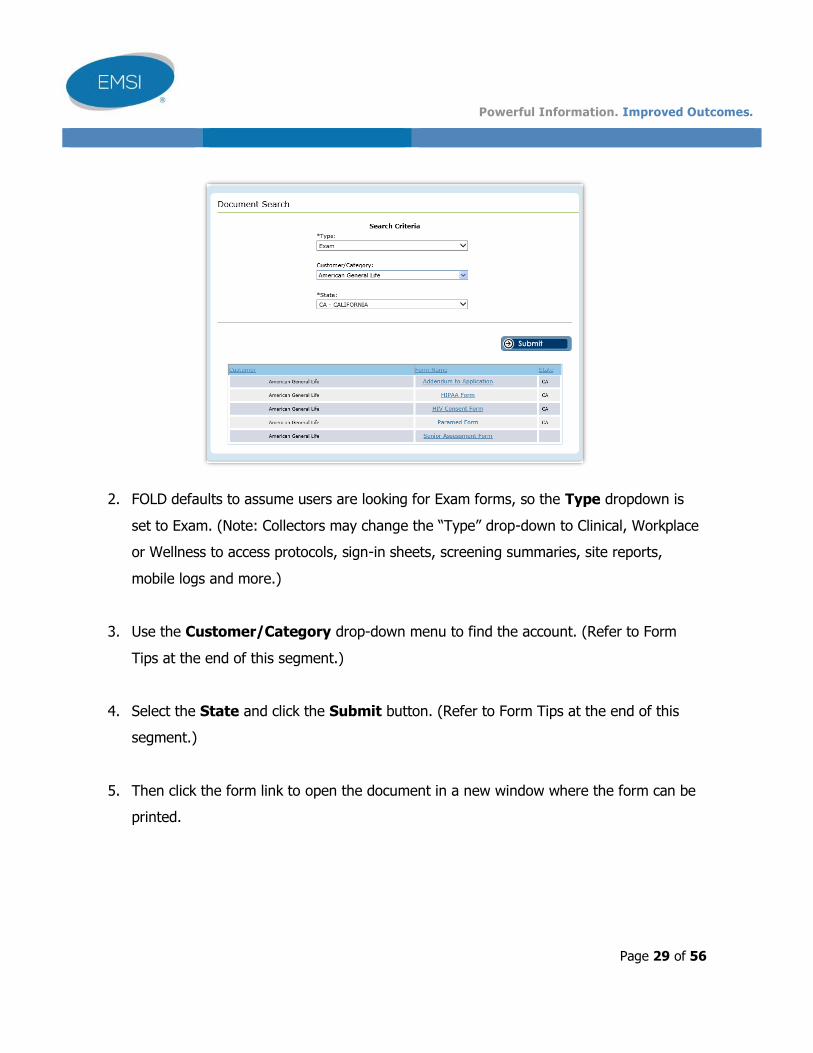
2. FOLD defaults to assume users are looking for Exam forms, so the Type dropdown is
set to Exam. (Note: Collectors may change the “Type” drop-down to Clinical, Workplace
or Wellness to access protocols, sign-in sheets, screening summaries, site reports,
mobile logs and more.)
3. Use the Customer/Category drop-down menu to find the account. (Refer to Form
Tips at the end of this segment.)
4. Select the State and click the Submit button. (Refer to Form Tips at the end of this
segment.)
5. Then click the form link to open the document in a new window where the form can be
printed.
Powerful Information. Improved Outcomes.
Page 30 of 56
Exam Form Tips
Which folder to I select in FOLD? Refer to the work order ticket or the eNation order
for the carrier name and account number. This will assist in matching the ticket to its
appropriate forms in FOLD. The ticket instructions or Instructions tab of the eNation
order sometimes also provide instruction, such as “Use EMSI generic exam forms,” or,
“Pull forms from the Genworth LTC 91031 folder in FOLD”.
What if multiple accounts use the same form? If multiple accounts use the same
forms, EMSI only posts those forms in one folder. It would be imprudent to have 50
folders featuring the exact same forms and one form change would mean updating all
50 folders. Example: There are many American General accounts but most of these
accounts use the same forms, so they are all found in the American General Life folder.
What if I can’t figure out which forms to use? Never guess! Reach out to the
branch office. Incorrect form usage is reported and tracked by customers. or it could
result in customer chargebacks and having to redo or transpose the data at no charge to
the customer.
What if a special instruction from the customer says, “Part I of the application for
life insurance was signed in [state].” The order placer is relaying that the applicant
signed/executed a part of their application in another state. This often means that the
paramed form (Part II) must be for that same state. Refer to the Instructions tab of the
eNation order for directions. If unsure, contact the branch office for further direction.

Powerful Information. Improved Outcomes.
Page 31 of 56
eNation Expectations for Examiners
Examiners are technicians that conduct appointments for insurance applicants. eNation gives
examiners the ability to manage their caseload from front to back, meaning examiners can print
work order tickets, status, schedule, mark appointments met, and even upload the completed
paperwork. The expectations of examiners regarding eNation use is as follows:
Maintaining Paramed-Office and/or Paramed-Mobile and Clinical calendar availability
Statusing pending cases
Acknowledging booked appointments
Retrieving work order tickets, exam forms and application packets
Conducting IGO Mobile Exams for carriers that require the completion of electronic
paramed exams
Marking appointments completed
Imaging completed exam paperwork
Powerful Information. Improved Outcomes.
Page 32 of 56
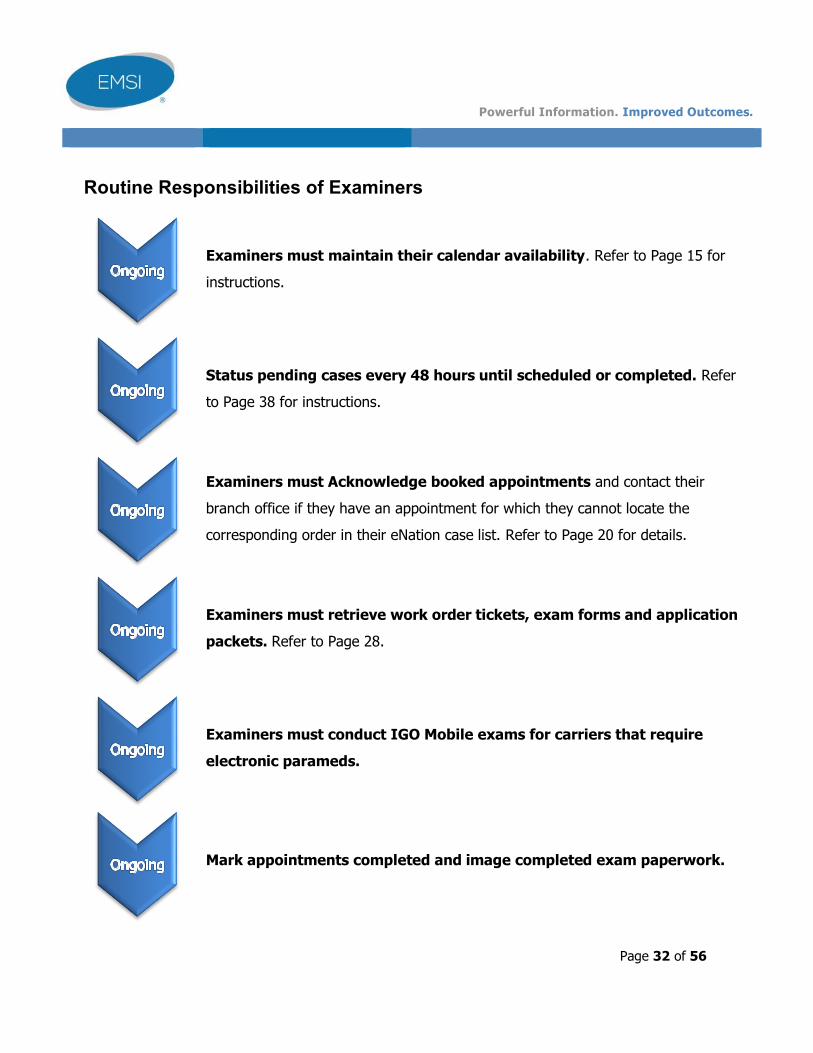
Routine Responsibilities of Examiners
Examiners must maintain their calendar availability. Refer to Page 15 for
instructions.
Status pending cases every 48 hours until scheduled or completed. Refer
to Page 38 for instructions.
Examiners must Acknowledge booked appointments and contact their
branch office if they have an appointment for which they cannot locate the
corresponding order in their eNation case list. Refer to Page 20 for details.
Examiners must retrieve work order tickets, exam forms and application
packets. Refer to Page 28.
Examiners must conduct IGO Mobile exams for carriers that require
electronic parameds.
Mark appointments completed and image completed exam paperwork.

Powerful Information. Improved Outcomes.
Page 33 of 56
Accessing an Examiner’s Orders
Examiners access their exam orders through the Orders tab on the eNation home page.
1. The Orders tab has three views–Unscheduled, Scheduled, and Scheduled with
Attachments. The button highlighted green indicates the current view.
a. By default, the system displays the list of Unscheduled orders, as shown below.
Notice the Unscheduled button is green to indicate that is the list being viewed.
b. Technicians may use the buttons circled in the below image to change this view.
Note: Examiners requested easy access to the cases they recently completed, so
the Scheduled list continues displaying completed cases for two weeks following
the appointment date.
2. The site displays 10 cases at a time and technicians may use the arrows and page links
near the bottom of the list to navigate to additional pages.
3. Technicians can sort the list by clicking any of the column headers.
a. For instance, a user may sort by the ZIP code column in an attempt to schedule
applicants in a similar geographic area at similar times.
b. A technician may sort by the Last Status Date column for quick visibility to the
cases most urgently in need of a status update.

Powerful Information. Improved Outcomes.
Page 34 of 56
4. To print a list of today or tomorrow’s appointments (with or without the accompanying
work order ticket), use the Print Appointment Log button and set the onscreen
options that appear.
Search for an Examiner’s Orders
1. There are several ways to search for an order.
a. Press the Unscheduled or Scheduled buttons to view the appropriate list, then
look for the case in the list or any subsequent pages of the list.
b. Filter lists using the funnel/filter icon in a column header. In the example below,
the user is searching Scheduled cases for any applicant name containing “russel”.
Powerful Information. Improved Outcomes.
Page 35 of 56
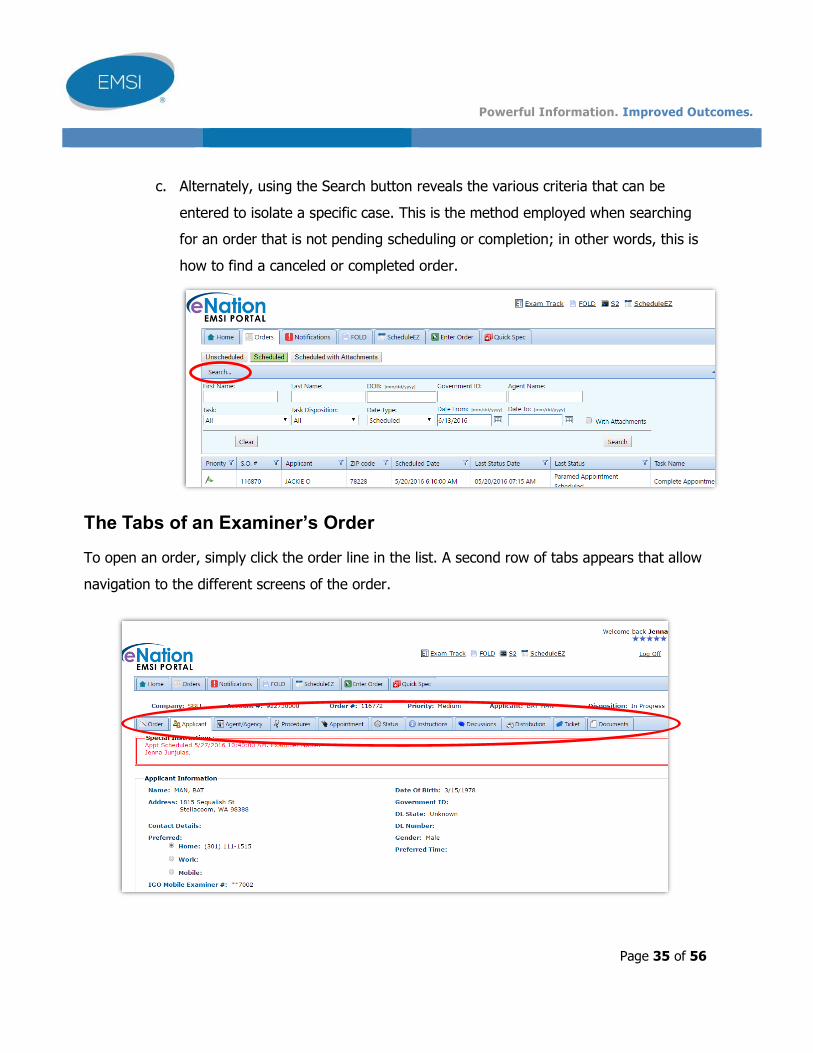
c. Alternately, using the Search button reveals the various criteria that can be
entered to isolate a specific case. This is the method employed when searching
for an order that is not pending scheduling or completion; in other words, this is
how to find a canceled or completed order.
The Tabs of an Examiner’s Order
To open an order, simply click the order line in the list. A second row of tabs appears that allow
navigation to the different screens of the order.
Powerful Information. Improved Outcomes.
Page 36 of 56
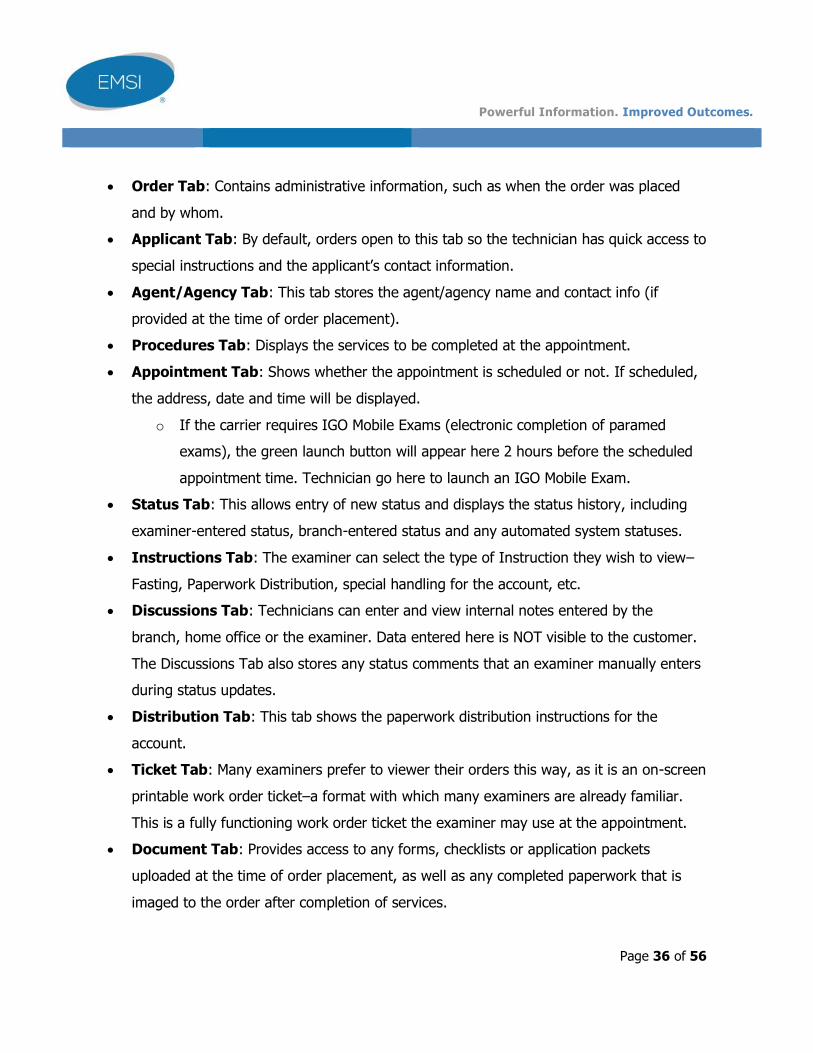
Order Tab: Contains administrative information, such as when the order was placed
and by whom.
Applicant Tab: By default, orders open to this tab so the technician has quick access to
special instructions and the applicant’s contact information.
Agent/Agency Tab: This tab stores the agent/agency name and contact info (if
provided at the time of order placement).
Procedures Tab: Displays the services to be completed at the appointment.
Appointment Tab: Shows whether the appointment is scheduled or not. If scheduled,
the address, date and time will be displayed.
o If the carrier requires IGO Mobile Exams (electronic completion of paramed
exams), the green launch button will appear here 2 hours before the scheduled
appointment time. Technician go here to launch an IGO Mobile Exam.
Status Tab: This allows entry of new status and displays the status history, including
examiner-entered status, branch-entered status and any automated system statuses.
Instructions Tab: The examiner can select the type of Instruction they wish to view–
Fasting, Paperwork Distribution, special handling for the account, etc.
Discussions Tab: Technicians can enter and view internal notes entered by the
branch, home office or the examiner. Data entered here is NOT visible to the customer.
The Discussions Tab also stores any status comments that an examiner manually enters
during status updates.
Distribution Tab: This tab shows the paperwork distribution instructions for the
account.
Ticket Tab: Many examiners prefer to viewer their orders this way, as it is an on-screen
printable work order ticket–a format with which many examiners are already familiar.
This is a fully functioning work order ticket the examiner may use at the appointment.
Document Tab: Provides access to any forms, checklists or application packets
uploaded at the time of order placement, as well as any completed paperwork that is
imaged to the order after completion of services.

Powerful Information. Improved Outcomes.
Page 37 of 56
Retrieving Work Order Tickets
Examiners should print their work order tickets directly from eNation. The ticket tab of each
orders allows for printing a fully-functioning work order ticket that can be used at exams.
1. Locate the order in the Orders tab and click to open it.
2. Navigate to the Ticket tab and click the small Print icon to print the ticket.
If an appointment notification is received and the technician cannot locate the order in their
eNation site, contact the branch office immediately. They need to ensure the ticket is
assigned to you in their system so you have visibility to it in eNation.
Powerful Information. Improved Outcomes.
Page 38 of 56
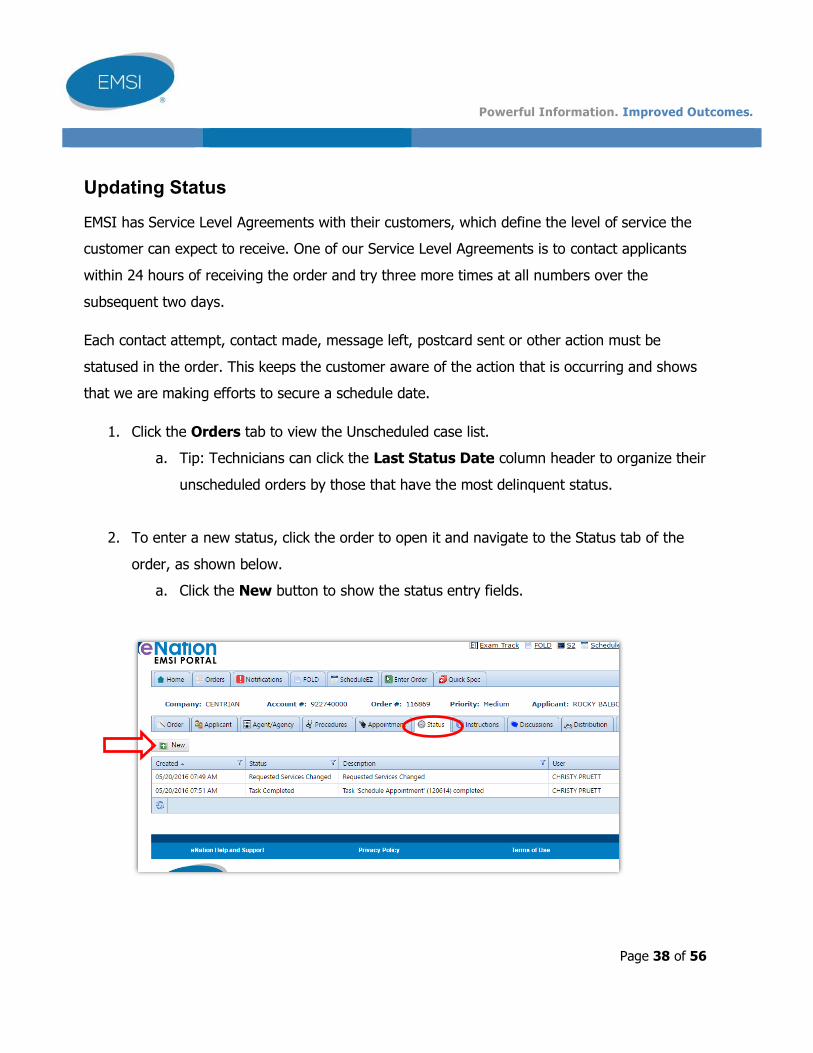
Updating Status
EMSI has Service Level Agreements with their customers, which define the level of service the
customer can expect to receive. One of our Service Level Agreements is to contact applicants
within 24 hours of receiving the order and try three more times at all numbers over the
subsequent two days.
Each contact attempt, contact made, message left, postcard sent or other action must be
statused in the order. This keeps the customer aware of the action that is occurring and shows
that we are making efforts to secure a schedule date.
1. Click the Orders tab to view the Unscheduled case list.
a. Tip: Technicians can click the Last Status Date column header to organize their
unscheduled orders by those that have the most delinquent status.
2. To enter a new status, click the order to open it and navigate to the Status tab of the
order, as shown below.
a. Click the New button to show the status entry fields.

Powerful Information. Improved Outcomes.
Page 39 of 56
3. The screen will display the status entry fields shown below. Select the most appropriate
status from the drop-down list. These are called “canned” statuses, a way to briefly
summarize the status update. Then select the date the action occurred and enter any
applicable comments.
a. Tip: Avoid abbreviations or other acronyms an agent or financial representative
may not understand. For instance, avoid abbreviating “Left Voicemail” as “LVM”,
which can confuse the order placer.
4. When the Save button is clicked, the “canned” status will apply to the order
immediately. Any manually entered comments will be saved to the Discussions tab and
emailed to the branch office so they may decide whether or not to apply the comments
to the order.

Powerful Information. Improved Outcomes.
Page 40 of 56
Retrieving Application Packets and/or Signature Pages
Application packets, examiner checklists and other account-specific or applicant-specific
documents that are uploaded at the time of order placement, are stored in the Document tab of
the order. This makes it easy for technicians to retrieve these documents at any time without
assistance from the branch office.
1. Open the eNation order and click on the Documents tab to see any documents attached
to the order.
2. The above example shows an examiner’s checklist is attached to the order. Clicking the
row will open the document in a new window, where it can be printed.
3. Always look to see if there are attachments. Not all orders have them but here are some
common examples:
a. An application packet that needs to be printed and taken to the appointment for
the applicant to review and sign.
b. An examiner checklist that lists critical steps and may require that the technician
record details about application packet handling.
c. A signature page, such as an anti-money laundering form, or a drug or alcohol
questionnaire.
Powerful Information. Improved Outcomes.
Page 41 of 56
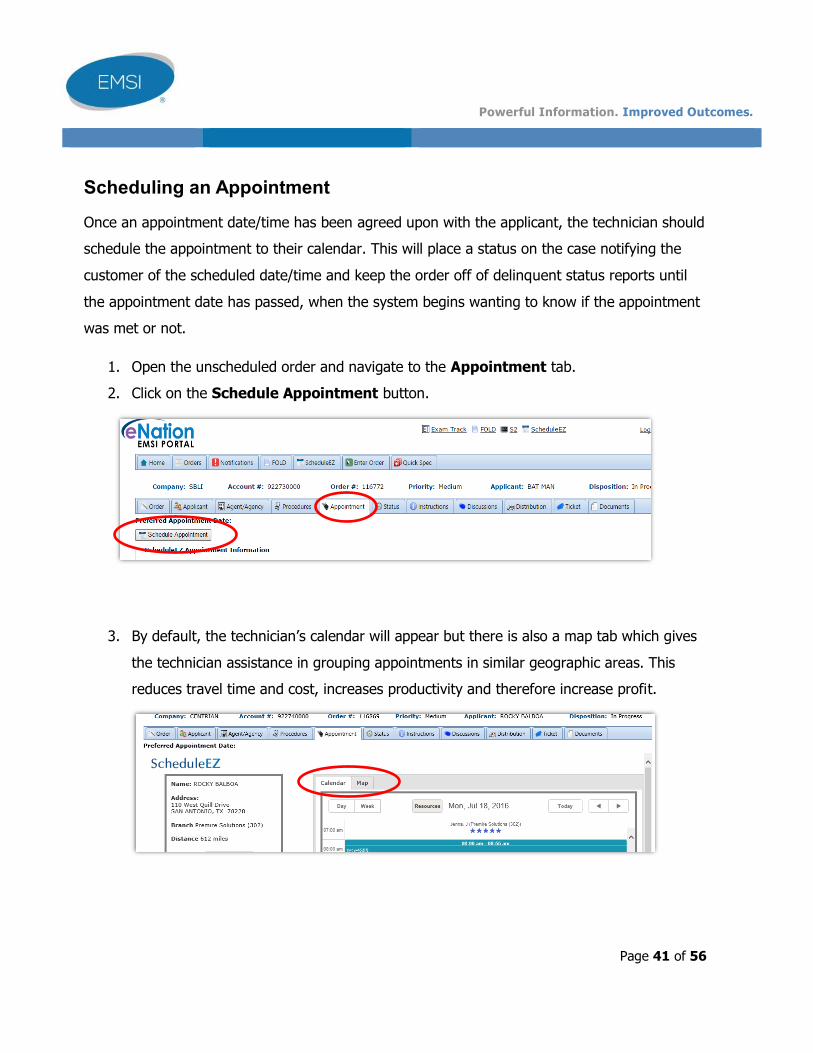
Scheduling an Appointment
Once an appointment date/time has been agreed upon with the applicant, the technician should
schedule the appointment to their calendar. This will place a status on the case notifying the
customer of the scheduled date/time and keep the order off of delinquent status reports until
the appointment date has passed, when the system begins wanting to know if the appointment
was met or not.
1. Open the unscheduled order and navigate to the Appointment tab.
2. Click on the Schedule Appointment button.
3. By default, the technician’s calendar will appear but there is also a map tab which gives
the technician assistance in grouping appointments in similar geographic areas. This
reduces travel time and cost, increases productivity and therefore increase profit.
Powerful Information. Improved Outcomes.
Page 42 of 56
4. To book via the calendar, navigate to the agreed upon date/time of the appointment.
a. Either within a block of Availability, or in a blank space on the calendar, double-
click roughly at the start-time of the appointment. The appointment box pops up.
b. Adjust the start time, if necessary, then click Save. Note: Do not enter
instructions in the Instructions space.
c. When Save is clicked, the calendar will close and the Appointment tab of the
eNation order will be updated to show the scheduled appointment date and time.
A status will automatically post to the order that is visible to the customer,
showing the appointment date and time.
Note: Appointments booked by examiners through eNation are automatically
acknowledged. The system recognizes that the examiner is the one booking and
therefore does not require the additional step of having the examiner
acknowledge it.
Powerful Information. Improved Outcomes.
Page 43 of 56
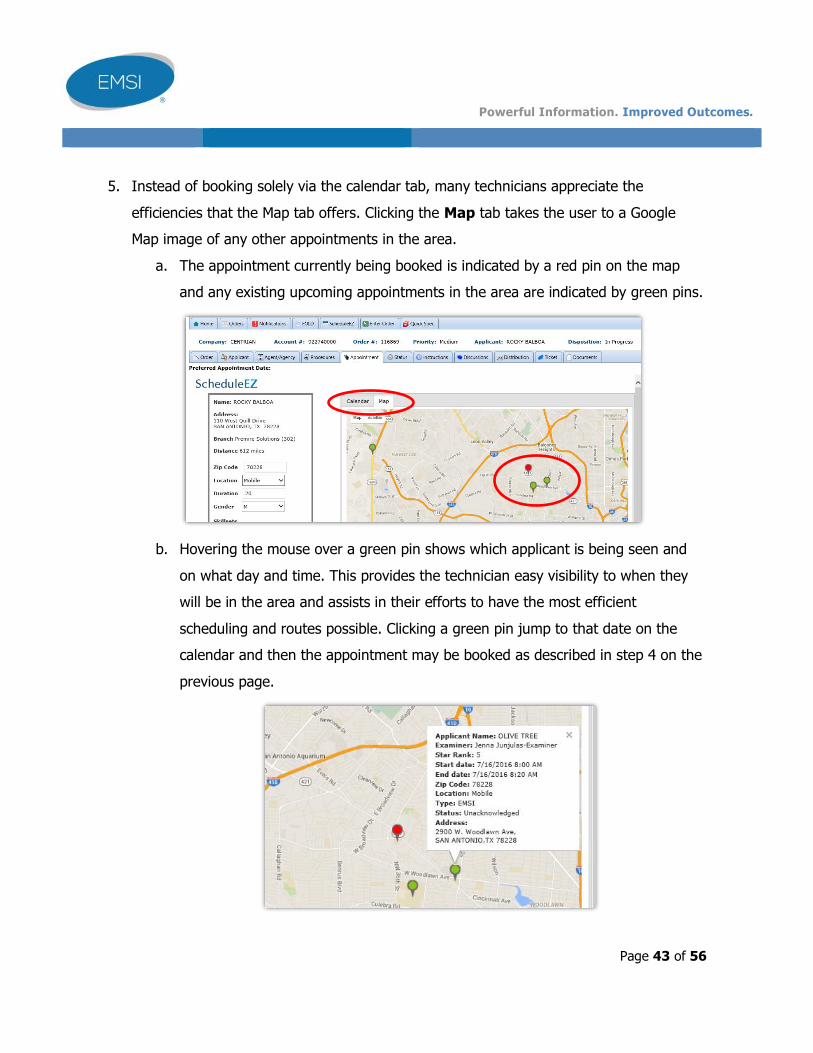
5. Instead of booking solely via the calendar tab, many technicians appreciate the
efficiencies that the Map tab offers. Clicking the Map tab takes the user to a Google
Map image of any other appointments in the area.
a. The appointment currently being booked is indicated by a red pin on the map
and any existing upcoming appointments in the area are indicated by green pins.
b. Hovering the mouse over a green pin shows which applicant is being seen and
on what day and time. This provides the technician easy visibility to when they
will be in the area and assists in their efforts to have the most efficient
scheduling and routes possible. Clicking a green pin jump to that date on the
calendar and then the appointment may be booked as described in step 4 on the
previous page.
Powerful Information. Improved Outcomes.
Page 44 of 56
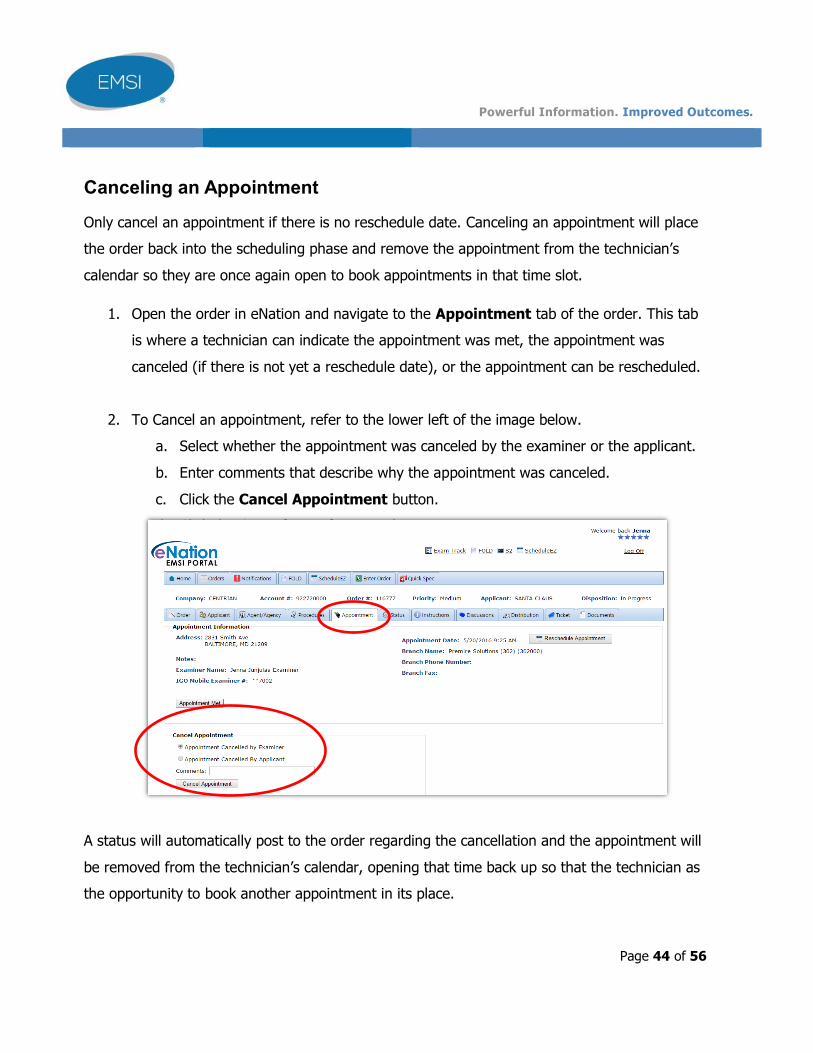
Canceling an Appointment
Only cancel an appointment if there is no reschedule date. Canceling an appointment will place
the order back into the scheduling phase and remove the appointment from the technician’s
calendar so they are once again open to book appointments in that time slot.
1. Open the order in eNation and navigate to the Appointment tab of the order. This tab
is where a technician can indicate the appointment was met, the appointment was
canceled (if there is not yet a reschedule date), or the appointment can be rescheduled.
2. To Cancel an appointment, refer to the lower left of the image below.
a. Select whether the appointment was canceled by the examiner or the applicant.
b. Enter comments that describe why the appointment was canceled.
c. Click the Cancel Appointment button.
d. Click the Cancel Appointment button.
A status will automatically post to the order regarding the cancellation and the appointment will
be removed from the technician’s calendar, opening that time back up so that the technician as
the opportunity to book another appointment in its place.
Powerful Information. Improved Outcomes.
Page 45 of 56
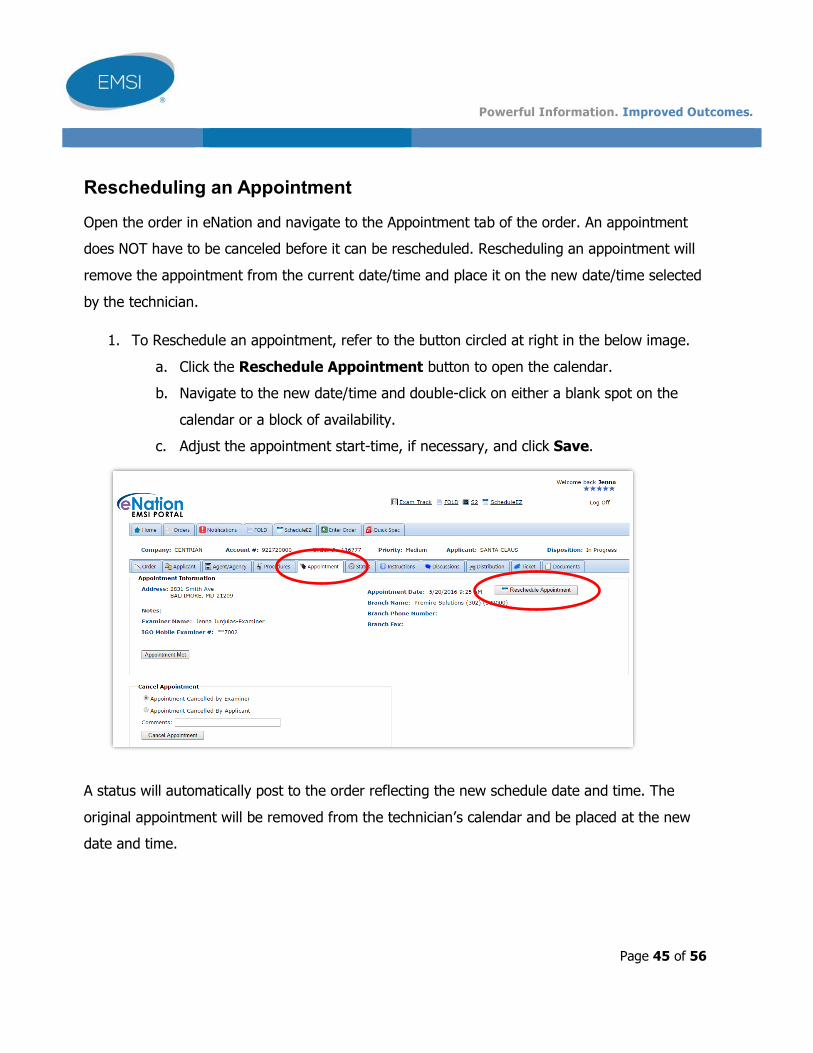
Rescheduling an Appointment
Open the order in eNation and navigate to the Appointment tab of the order. An appointment
does NOT have to be canceled before it can be rescheduled. Rescheduling an appointment will
remove the appointment from the current date/time and place it on the new date/time selected
by the technician.
1. To Reschedule an appointment, refer to the button circled at right in the below image.
a. Click the Reschedule Appointment button to open the calendar.
b. Navigate to the new date/time and double-click on either a blank spot on the
calendar or a block of availability.
c. Adjust the appointment start-time, if necessary, and click Save.
A status will automatically post to the order reflecting the new schedule date and time. The
original appointment will be removed from the technician’s calendar and be placed at the new
date and time.

Powerful Information. Improved Outcomes.
Page 46 of 56
IGO Mobile Exams
Some carriers require their paramed exams be completed electronically–on a computer, laptop
or tablet. These orders will list “IGO Mobile Eligible” as one of the procedures to remind the
technician that if a paramed is ordered, to complete it electronically. IGO stands for In Good
Order, meaning that when an exam is completed electronically, it is generally free from errors.
Questions cannot be skipped, so one must trace the examiner later for missing answers or
details. It also ensures that the paperwork is legible and most require no processing or imaging
by the technician or branch office, as it is transmitted to the carrier immediately upon
completion.
The customer gets an exam In Good Order, that is free from error and delivered immediately so
they can begin their underwriting process much faster than is possible with a traditional paper
paramed exam. It is a timelier and more efficient paramed exam for all parties involved.
1. If an order lists IGO MOBILE ELIGIBLE in the procedures, it an order requesting a
paramed exam and on an account that requires electronic exams.
2. The electronic exam form is only prepared once the appointment is scheduled and only
if the order has all the data the carrier requires. Check the status history of the order in
eNation and look for the IGO Mobile Order Ready for Interview status. This indicates the
paramed exam portion of the services can be completed electronically. (Always bring a
paper form as well, in case there are wireless internet issues.)
3. Two hours prior to the scheduled appointment time, a green button appears on the
Applicant tab of the eNation order that will allow the examiner to launch the paramed
exam. For security reasons, the IGO Mobile Exam is only available two hours before and
after the scheduled appointment time.
Powerful Information. Improved Outcomes.
Page 47 of 56
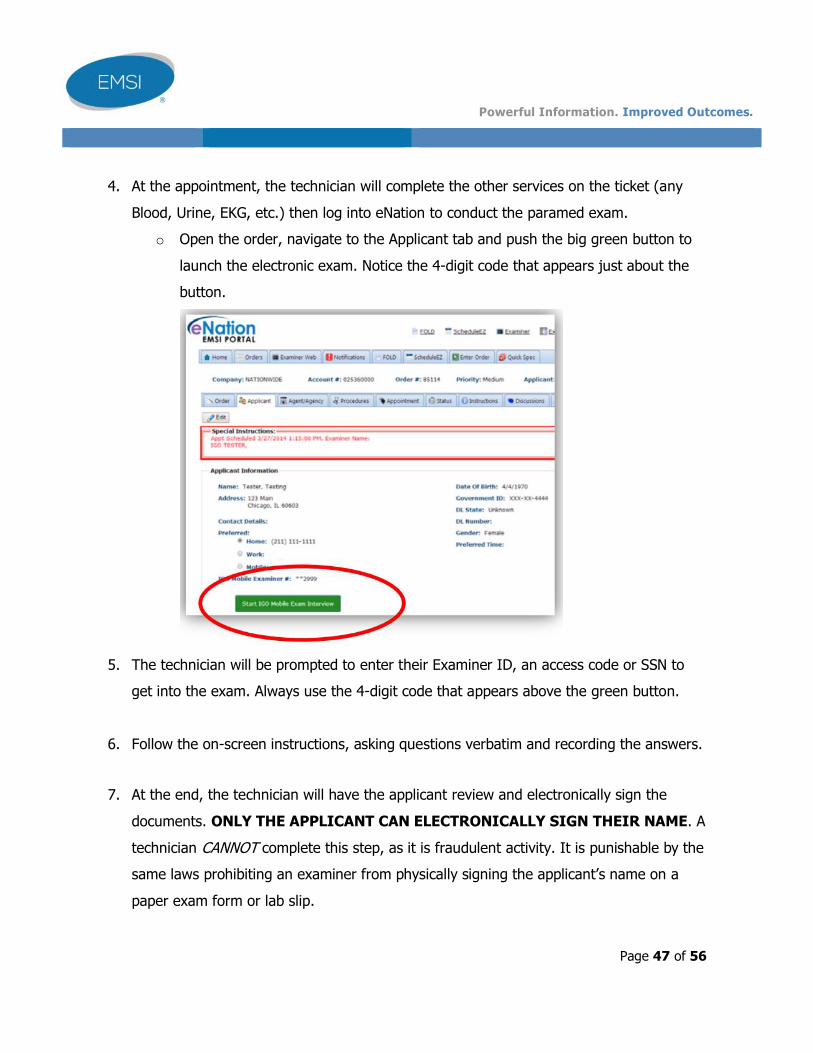
4. At the appointment, the technician will complete the other services on the ticket (any
Blood, Urine, EKG, etc.) then log into eNation to conduct the paramed exam.
o Open the order, navigate to the Applicant tab and push the big green button to
launch the electronic exam. Notice the 4-digit code that appears just about the
button.
5. The technician will be prompted to enter their Examiner ID, an access code or SSN to
get into the exam. Always use the 4-digit code that appears above the green button.
6. Follow the on-screen instructions, asking questions verbatim and recording the answers.
7. At the end, the technician will have the applicant review and electronically sign the
documents. ONLY THE APPLICANT CAN ELECTRONICALLY SIGN THEIR NAME. A
technician CANNOT complete this step, as it is fraudulent activity. It is punishable by the
same laws prohibiting an examiner from physically signing the applicant’s name on a
paper exam form or lab slip.

Powerful Information. Improved Outcomes.
Page 48 of 56
8. Last, the technician will electronically sign their name to the documents and click
Submit or Finish to submit the completed paramed exam.
Note: Be sure to click the Submit or Finish button. This final button is routinely missed
by new examiners and can significantly delay the process.

Powerful Information. Improved Outcomes.
Page 49 of 56
Marking Appointments Met
Following completion of an appointment, examiners will mark that the appointment was met
within the eNation order. This function is also available on the eNation mobile app and should
be done as soon as possible following completion of the appointment.
1. Open the order in eNation and navigate to the Appointment tab of the order. This tab
is where a technician can indicate the appointment was met, the appointment was
canceled (if there is not yet a reschedule date), or the appointment can be rescheduled.
2. Click the Appointment Met button shown circled at left in the picture below, then
follow the on-screen instructions.
NOTE: If the case was eligible for IGO Mobile (electronic paramed completion) but was not
done electronically, the technician will be prompted to indicate why. Insurance carriers will
prohibit examiners from conducting services on their applicants if the examiner consistently
fails to perform IGO Mobile exams for cases that are eligible.

Powerful Information. Improved Outcomes.
Page 50 of 56
Once the Appointment Met button is clicked, the screen reveals four segments requiring data:
Date Completed, Services Performed, Barcode/Shipping and Vitals. All of the data on this screen
must be 100% accurate. Dates are used to calculate cycle time, services affect billing and
barcode/shipping data is published in a status visible to the customer so they can track
specimens and shipping delays. Accuracy on this screen assists is refuting chargebacks.
3. Enter the date of exam completion.
4. Mark whether each requested
service was performed and by
whom.*
5. Carefully enter the lab barcode and
shipping information in the spaces
provided.
6. Enter vitals and measurements,
then click Submit at the bottom.
*If a specimen was missed, be sure to add one of the “Unable to void” or “Unable to obtain
blood” statuses with comments and notify the branch office so they can determine whether a second visit/attempt will be required.
The order will automatically close to process the updates. The technician can still locate the
order in their Scheduled case list for 2 weeks following completion.

Powerful Information. Improved Outcomes.
Page 51 of 56
Imaging Completed Paperwork
Examiners can expedite the billing of their exams by uploading the completed paperwork
directly into eNation. Imaging should be done as soon as possible following the appointment
and customers require images to be posted within 24 hours of exam completion. Imaging is a
function also available on the eNation mobile app and is actually a simpler and more intuitive
process than imaging through the full website.
1. Open the order in eNation and go to the Documents tab.
a. Note: Examiners may notice that some documents are already posted here,
including files that were uploaded at the time of order placement, like application
packets or signature pages. IGO Mobile Exams or data files that have been
transmitted to the customer may also appear here.
2. Click the green Acquire Documents button.
3. Depending on the device being used to access eNation, the next screen may prompt the
technician to allow pop-ups, or install TWAIN (scanner) software. The site is secure, so
select the affirmative answer: OK, Agree, Run, etc.

Powerful Information. Improved Outcomes.
Page 52 of 56
4. On this screen, the technician can either upload a file from a saved location, or scan
paperwork into the site.
Doc Types (Document Types)
Some customers require that all paperwork is imaged as one file and doc typed as “Exam
Requirements”. These images are generally electronically delivered to the customer in a single
PDF or TIF file regardless of how many services were completed or how many pages it
contains.
Other customers require separation of images. For example, the EKG must be labeled as an
EKG and the lab slip labeled as a LABTICK. These customers generally funnel these separated
pages to different locations within their underwriting department. Here are examples of the
common doc types and what would be imaged under them:
EKG – Electrocardiogram
EXAM – Paramed Exam Pages (Medical History, Application Part II, Examiner’s Report)
HIV Consent – HIV Consent Form
AUTH – HIPAA form, sometimes called Authorization Form
LABTICK – labslip
OTHER or INTERNAL – This is not used by examiners, only by branches
UPLOAD
SCAN

Powerful Information. Improved Outcomes.
Page 53 of 56
To Upload from a Computer or Stored File
1. Refer to the picture below. First, check the Document Type drop-down. This will indicate
whether the order allows all pages to be imaged together as Exam Requirements, or if
doc types must be separated. The work order ticket may also contain these instructions.
2. If the file is already stored locally, push the Browse button. In the window that pops
up, locate and highlight the stored file on the computer or storage device and double-
click it, or click Open. The user will revert back to the screen shown below.
3. Click Upload to add the image to the order. The user will return to the Document tab of
the eNation order and the file that was uploaded appears in the list. The branch has
access to this document immediately in their system, where they can pass or fail the
image after their quality review. Process the remaining paperwork per the paperwork
distribution instructions on the work order ticket.
If the file is saved, push Browse, find the file,
open it and click Upload.
For this order, the examiner completed a blood, urine and paramed
exam but this Document Type drop-down shows that the order wants all
paperwork bundled together and saved in a single file doc typed as
“Exam Requirements”. Keep Exam Requirements selected here and either
upload or scan all pages together for this order.
Powerful Information. Improved Outcomes.
Page 54 of 56
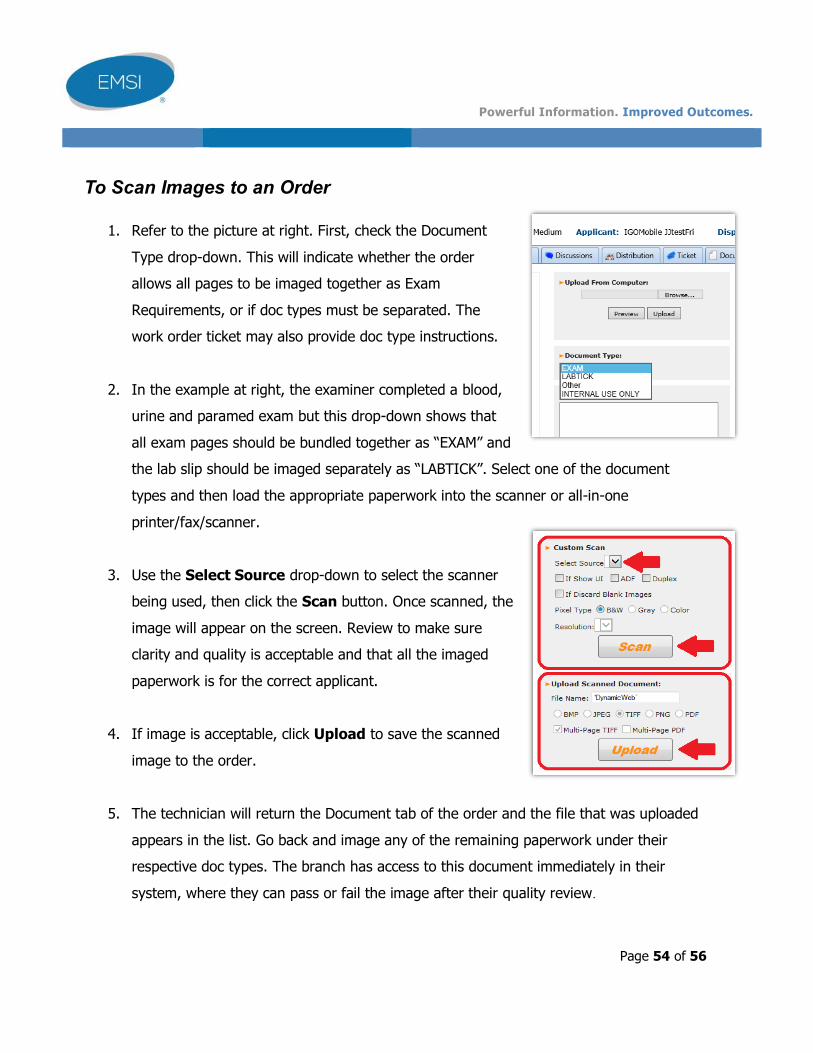
To Scan Images to an Order
1. Refer to the picture at right. First, check the Document
Type drop-down. This will indicate whether the order
allows all pages to be imaged together as Exam
Requirements, or if doc types must be separated. The
work order ticket may also provide doc type instructions.
2. In the example at right, the examiner completed a blood,
urine and paramed exam but this drop-down shows that
all exam pages should be bundled together as “EXAM” and
the lab slip should be imaged separately as “LABTICK”. Select one of the document
types and then load the appropriate paperwork into the scanner or all-in-one
printer/fax/scanner.
3. Use the Select Source drop-down to select the scanner
being used, then click the Scan button. Once scanned, the
image will appear on the screen. Review to make sure
clarity and quality is acceptable and that all the imaged
paperwork is for the correct applicant.
4. If image is acceptable, click Upload to save the scanned
image to the order.
5. The technician will return the Document tab of the order and the file that was uploaded
appears in the list. Go back and image any of the remaining paperwork under their
respective doc types. The branch has access to this document immediately in their
system, where they can pass or fail the image after their quality review.

Powerful Information. Improved Outcomes.
Page 55 of 56
The graphic below shows a more complete representation of scanning images into eNation.
Storage of Paperwork/Files
EMSI takes privacy and security very seriously and violations of EMSI privacy and security policies can
result in termination. Storing images of exams on a personal laptop or storage device is strictly
prohibited. Emailing of completed paperwork or anything containing PHI (Protected Health Information)
or PII (Personally Identifiable Information) is also strictly prohibited. This means that work order tickets,
applicant names/contact info, etc. cannot be discussed or sent via email, unless both sender AND
recipient have an email address ending with @emsinet.com.
An examiner may temporarily save or store a file while processing or uploading images to eNation but the
file must then be immediately deleted and recycle bin emptied. These steps ensure the data cannot be
retrieved if the device is stolen or compromised.
For this order, the examiner
completed a blood, urine, and paramed exam but this drop-down shows that it wants
most paperwork bundled together under “EXAM” and then lab slip separated out
under “LABTICK”. Select EXAM and image everything but the lab slip
and then push the Acquire button again, select LABTICK and image the lab slip.
To scan, select your scanner from the Source drop-down,
then click the Scan button.
Once the image appears in this space at left, click the Upload button to upload the
image to the order.
Powerful Information. Improved Outcomes.
Page 56 of 56
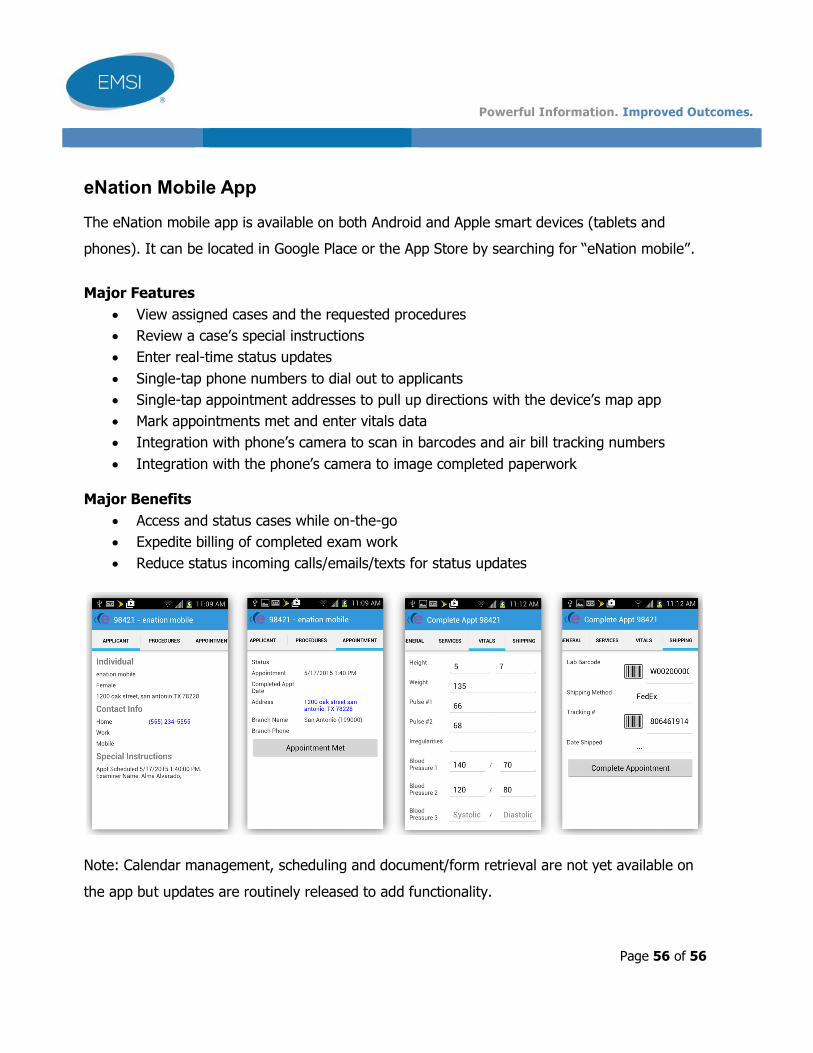
eNation Mobile App
The eNation mobile app is available on both Android and Apple smart devices (tablets and
phones). It can be located in Google Place or the App Store by searching for “eNation mobile”.
Major Features
View assigned cases and the requested procedures
Review a case’s special instructions
Enter real-time status updates
Single-tap phone numbers to dial out to applicants
Single-tap appointment addresses to pull up directions with the device’s map app
Mark appointments met and enter vitals data
Integration with phone’s camera to scan in barcodes and air bill tracking numbers
Integration with the phone’s camera to image completed paperwork Major Benefits
Access and status cases while on-the-go
Expedite billing of completed exam work
Reduce status incoming calls/emails/texts for status updates
Note: Calendar management, scheduling and document/form retrieval are not yet available on
the app but updates are routinely released to add functionality.