Embed Size (px)
Citation preview
Student Workbook
Dental Practices
Version 2.0May 2021
Installation version 2.0
This workbook was developed for use with the following products:Dental Manikin
Dentrix Learning Edition

Copyright © 2021 DEPCO. All Rights Reserved
Unauthorized Duplication Prohibited
The information contained in this workbook was accurate at the time of its printing. DEPCO.
reserves the right to change specifications and operational performance of its products without
notice. Any changes or corrections to the information in this publication will be incorporated in
the future issues. No part of this document or accompanying software may be reproduced or
modified in any manner without express written consent of DEPCO.
Dental Practices DS v2.0 Student Workbook 3e n t e r p r i s e s l l c
Table of Contents
Activities1 Introduction ..............................................................................................................52 Anatomy ....................................................................................................................93 Charting ..................................................................................................................134 Data Collection ......................................................................................................235 Dental Exam ...........................................................................................................436 Oral Hygiene ..........................................................................................................517 Radiographs ...........................................................................................................558 Bacterial Growth ...................................................................................................599 Dental Impressions ...............................................................................................6510 Post-Test and Wrap-Up .........................................................................................7311 Bonus Activities ......................................................................................................7512 Challenge ................................................................................................................7713 Open-Ended Challenge.........................................................................................9114 Careers ...................................................................................................................9315 Job Shadow ...........................................................................................................97 Reference Section ................................................................................................101 Glossary ............................................................................................................... 102
Instructor’s Section Instructor’s Section .............................................................................................107 Pages to Copy ..................................................................................................... 163

4 Dental Practices DS v2.0 Student Workbook
DEPCO
e n t e r p r i s e s l l c
Dental Practices DS v2.0 Student Workbook 5
Activity 1
e n t e r p r i s e s l l c
Introduction
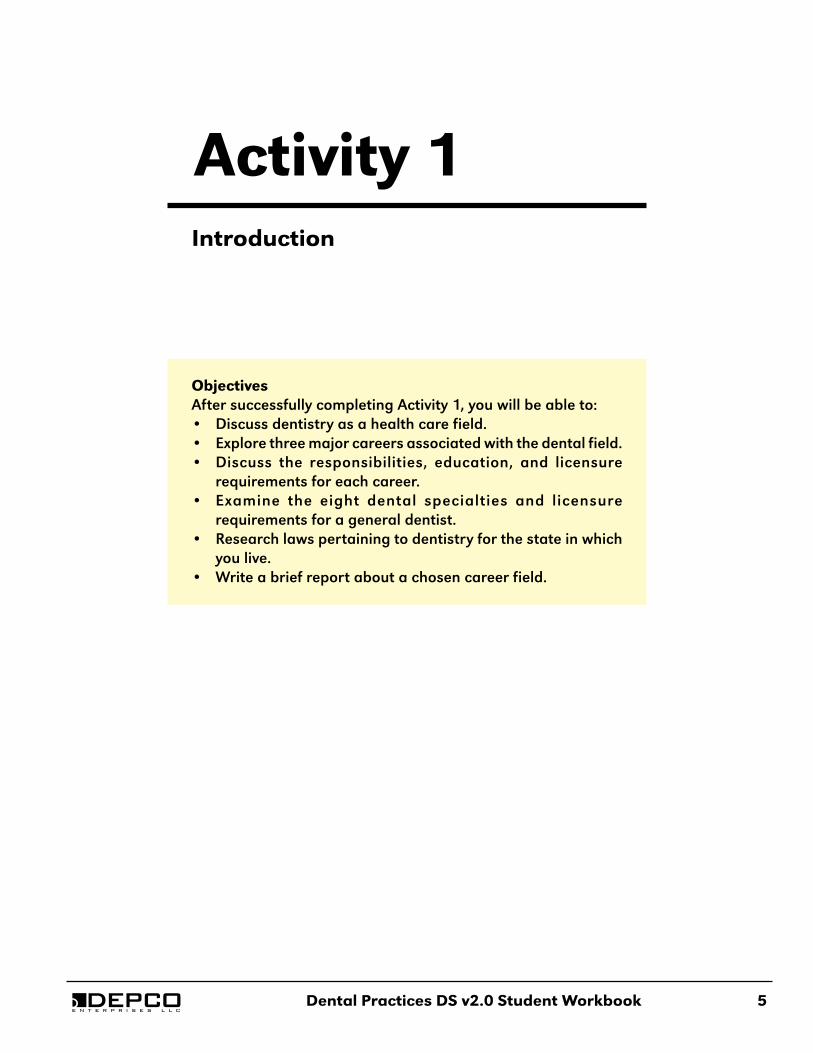
Objectives After successfully completing Activity 1, you will be able to:• Discuss dentistry as a health care field. • Explore three major careers associated with the dental field. • Discuss the responsibilities, education, and licensure
requirements for each career. • Examine the eight dental specialties and licensure
requirements for a general dentist. • Research laws pertaining to dentistry for the state in which
you live. • Write a brief report about a chosen career field.
6 Dental Practices DS v2.0 Student Workbook
Activity 1 Introduction
e n t e r p r i s e s l l c
Procedure
Step 1. Research careers related to dentistry
1. Follow the instructor’s directions to open a web browser program.
2. Using the internet, research laws for the state in which you live, pertinent to a career in dentistry such as dental assistants, hygienists, dental laboratory techs, or dentists.
3. Choose two careers that interest you the most and search for information concerning the following:
• Education and training requirements
• Average starting salary
• Trends in each career field (Will the career be around in 30 years? What kind of continuing education or training/certification is needed?)
• Advantages and disadvantages of each career
• Examples of the type of work in each career
Step 2. Write a report
1. Locate notebook paper and a pen or pencil.
2. Write a one-page summary for each career based on your research.
3. Write in complete sentences.
Step 3. Critical Thinking
1. Locate a piece of notebook paper and a pen or pencil.
2. Discuss the research you conducted. Were there any interesting facts you discovered? Explain.
3. Write in complete sentences, being specific with each answer.
4. When you have completed the activity, turn in your report and the journal to the instructor.
InstructorCheckpoint
InstructorCheckpoint

Introduction Activity 1
Dental Practices DS v2.0 Student Workbook 7e n t e r p r i s e s l l c
Step 4. Return to the media
Click the Next button on the media screen.

DEPCO
8 Dental Practices DS v2.0 Student Workbooke n t e r p r i s e s l l c
Dental Practices DS v2.0 Student Workbook 9
Activity 2
e n t e r p r i s e s l l c
Anatomy
Objectives After successfully completing Activity 2, you will be able to:• Discuss the anatomical position. • Identify anatomical planes. • Identify organizational levels of the body. • Discuss body systems. • Discuss the importance of teeth. • Identify the major components of the oral cavity. • Discuss dentition. • Identify the four types of teeth. • Identify tooth surfaces. • Identify and discuss the anatomy of a tooth. • Use the dental manikin to identify the four types of teeth. • Label tissues and surfaces of a tooth.
10 Dental Practices DS v2.0 Student Workbook
Activity 2 Anatomy
e n t e r p r i s e s l l c
figure 2-1
figure 2-2
Procedure
Step 1. Locate types of teeth
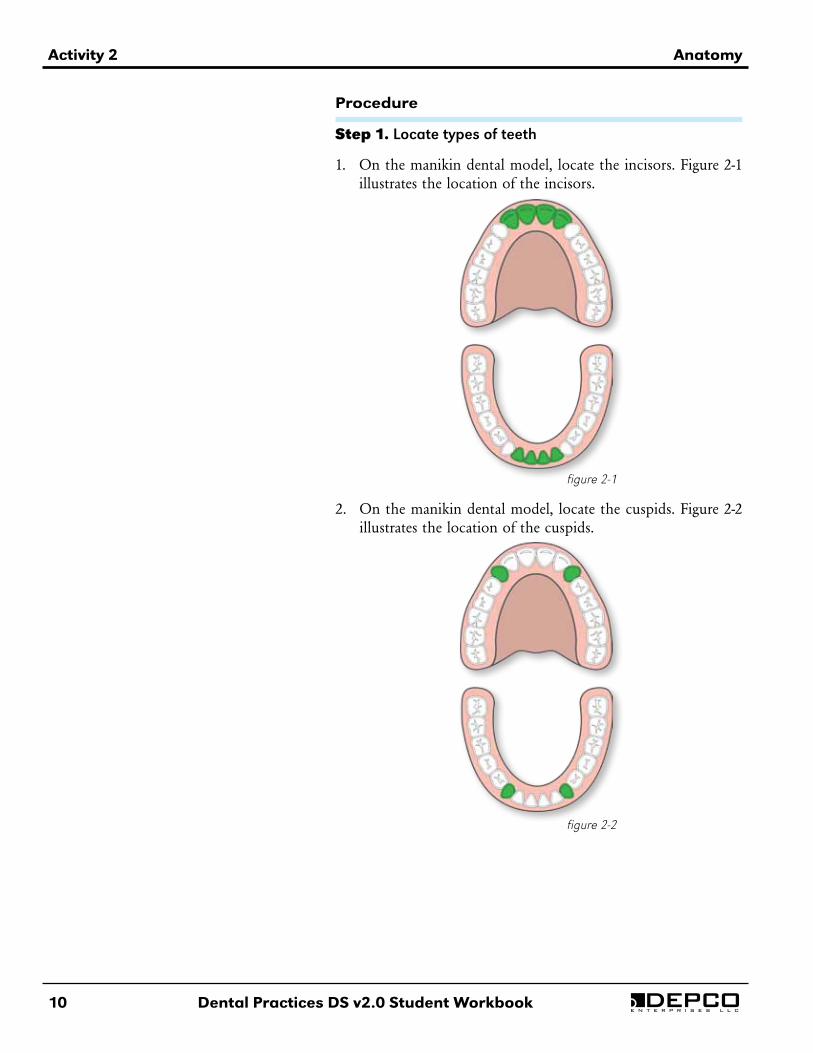
1. On the manikin dental model, locate the incisors. Figure 2-1 illustrates the location of the incisors.
2. On the manikin dental model, locate the cuspids. Figure 2-2 illustrates the location of the cuspids.
Anatomy Activity 2
Dental Practices DS v2.0 Student Workbook 11e n t e r p r i s e s l l c
figure 2-3
figure 2-4
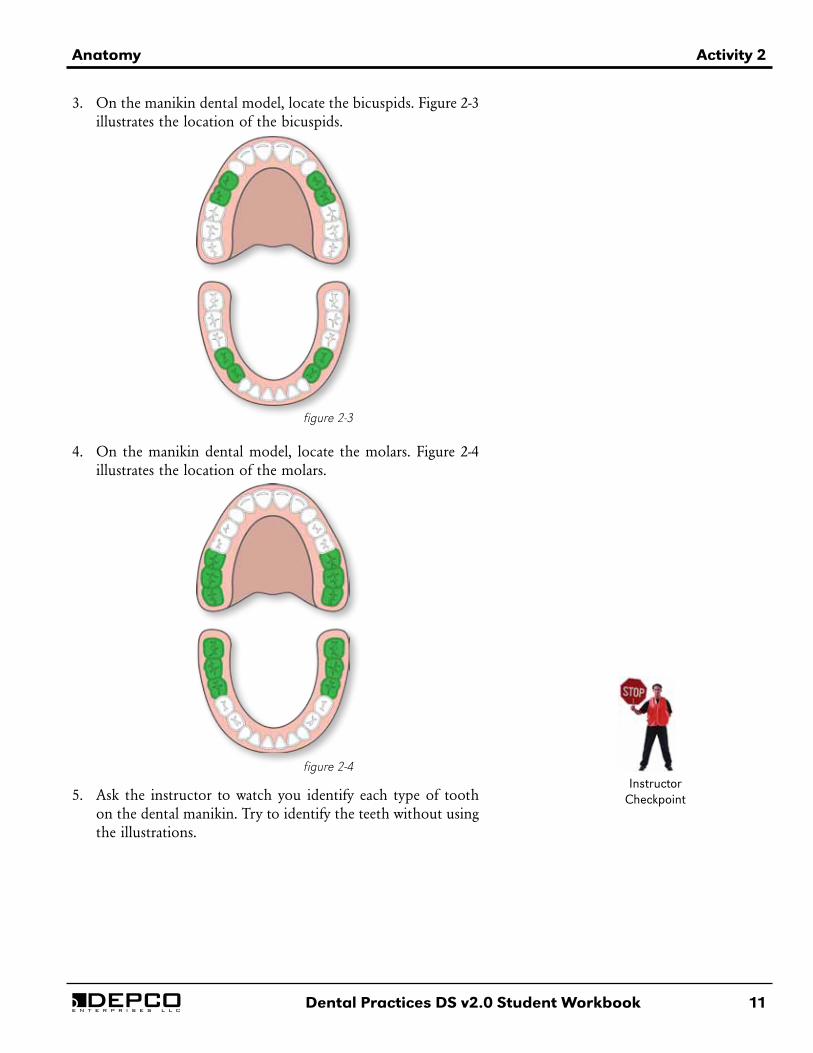
3. On the manikin dental model, locate the bicuspids. Figure 2-3 illustrates the location of the bicuspids.
4. On the manikin dental model, locate the molars. Figure 2-4 illustrates the location of the molars.
5. Ask the instructor to watch you identify each type of tooth on the dental manikin. Try to identify the teeth without using the illustrations.
InstructorCheckpoint
12 Dental Practices DS v2.0 Student Workbook
Activity 2 Anatomy
e n t e r p r i s e s l l c
Step 2. Complete the worksheet
1. Locate the Activity 2 Worksheet.
2. Complete Part I of the worksheet.
3. Complete Part II of the worksheet.
Step 3. Critical Thinking
1. Locate a piece of paper and a pen or pencil.
2. What are the four types of teeth? How many teeth are in the primary dentition? How many teeth are in the permanent dentition?
3. Write in complete sentences, being specific with your answers.
4. When you have completed the activity, turn in the Activity 2 Worksheet and the journal to the instructor.
Step 4. Return to the media
Click the Next button on the media screen.
InstructorCheckpoint
InstructorCheckpoint
Dental Practices DS v2.0 Student Workbook 13
Activity 3
e n t e r p r i s e s l l c
Charting
Objectives After successfully completing Activity 3, you will be able to:• Discuss how to chart missing teeth. • Discuss dental caries. • Discuss how to chart lesions. • Discuss dental arches. • Discuss anterior and posterior teeth. • Discuss tooth numbering systems. • Perform a basic assessment/charting of the dental manikin
using a paper chart. • Perform charting procedures using the practice management
software. • Identify the permanent dentition using the Universal National
System, ISO/FDI System, and Palmer Notation System.
14 Dental Practices DS v2.0 Student Workbook
Activity 3 Charting
e n t e r p r i s e s l l c
Procedure
Step 1. Chart missing teeth
1. Locate the Dental Chart Laminated Sheet and a black dry erase marker.
2. Examine the dental manikin, and then use proper procedures to chart any missing teeth.
Step 2. Chart dental caries
1. Examine the dental manikin, and then use proper procedures to chart any incipient or advanced carious lesions. See the “Reference Section” for a chart of common charting symbols.
Note: If necessary, use the dental mirror to gain a better view of all tooth surfaces.
2. When you have completed the activity, ask the instructor to review your work.
3. Use a paper towel or tissue to erase the laminated sheet.
Step 3. Start the program
1. On the taskbar, click Start.
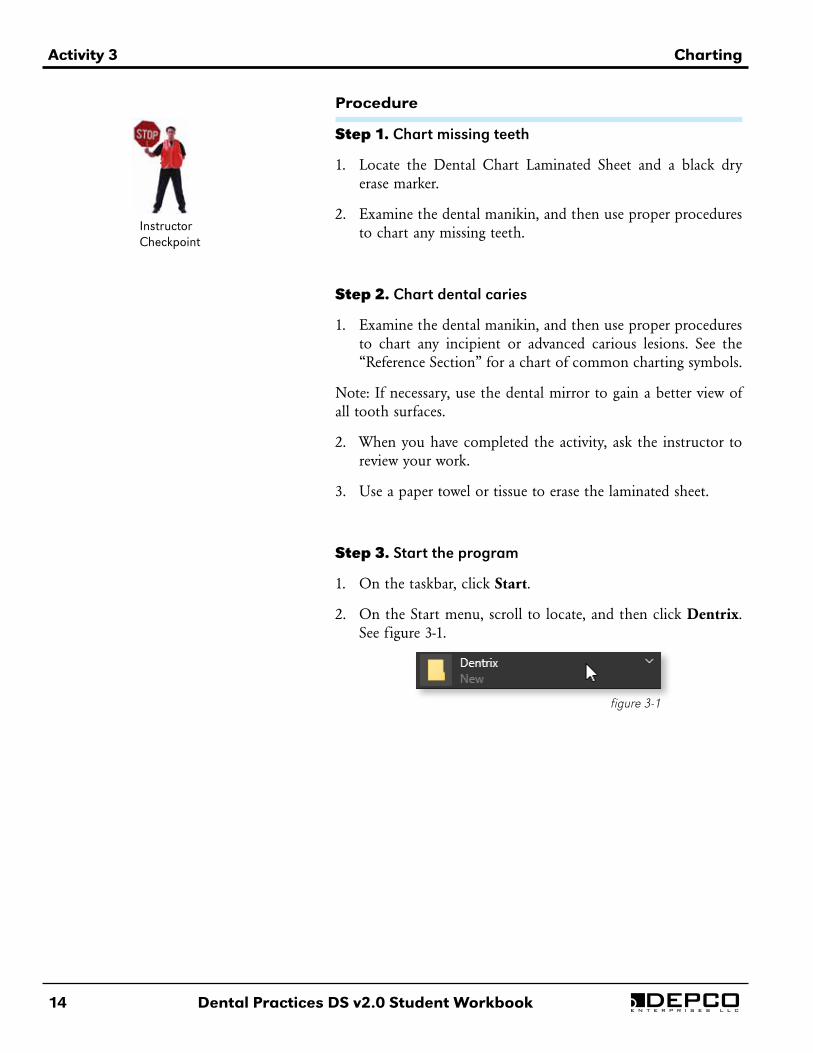
2. On the Start menu, scroll to locate, and then click Dentrix. See figure 3-1.
InstructorCheckpoint
figure 3-1
Charting Activity 3
Dental Practices DS v2.0 Student Workbook 15e n t e r p r i s e s l l c
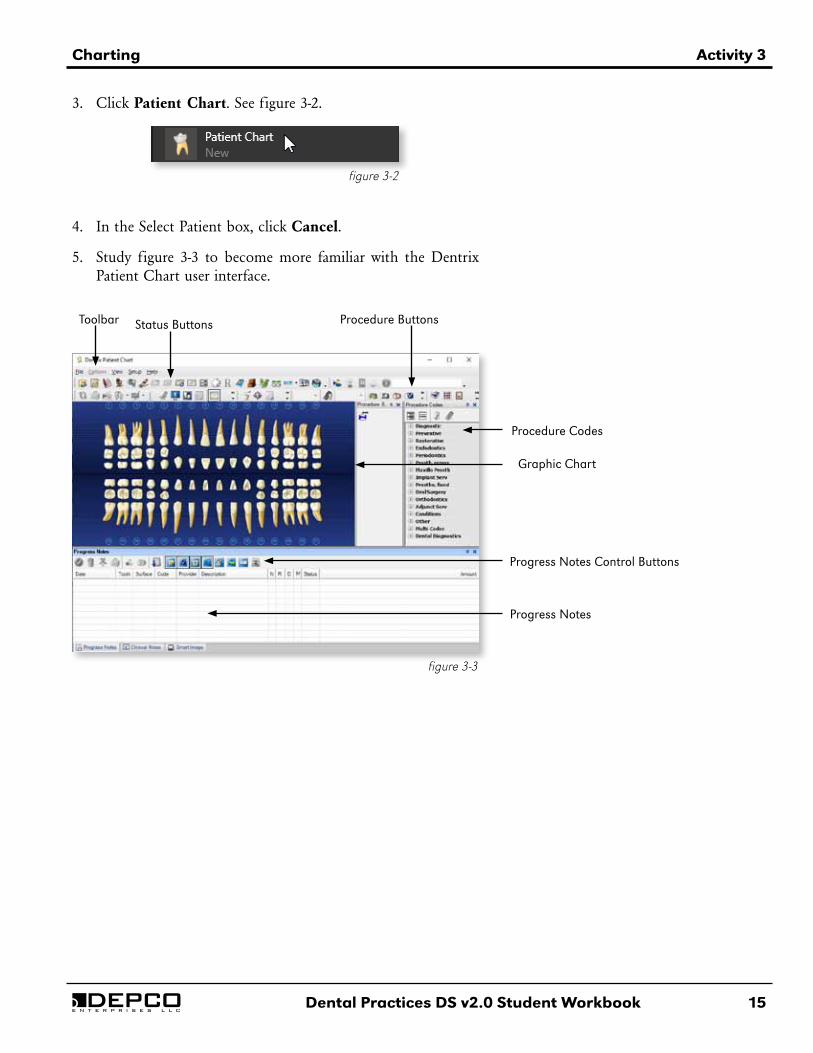
3. Click Patient Chart. See figure 3-2.
figure 3-2
figure 3-3
4. In the Select Patient box, click Cancel.
5. Study figure 3-3 to become more familiar with the Dentrix Patient Chart user interface.
Toolbar Status Buttons Procedure Buttons
Procedure Codes
Graphic Chart
Progress Notes Control Buttons
Progress Notes
16 Dental Practices DS v2.0 Student Workbook
Activity 3 Charting
e n t e r p r i s e s l l c
Step 4. Chart a missing tooth
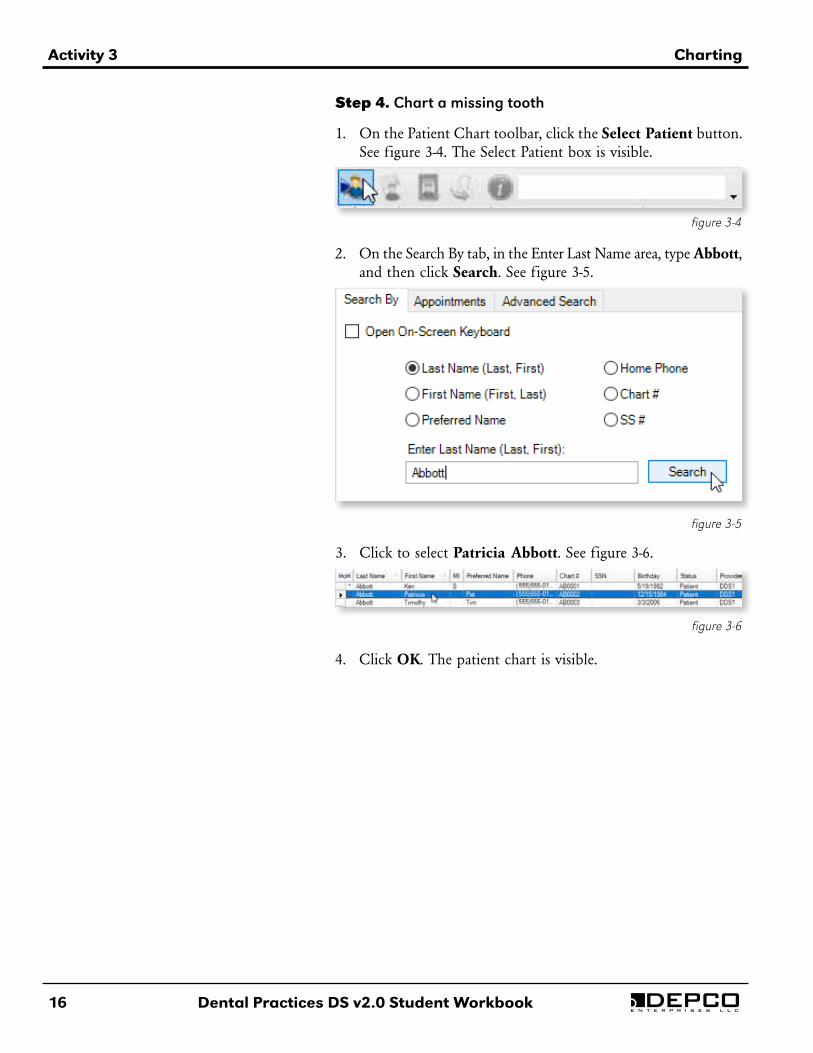
1. On the Patient Chart toolbar, click the Select Patient button. See figure 3-4. The Select Patient box is visible.
figure 3-4
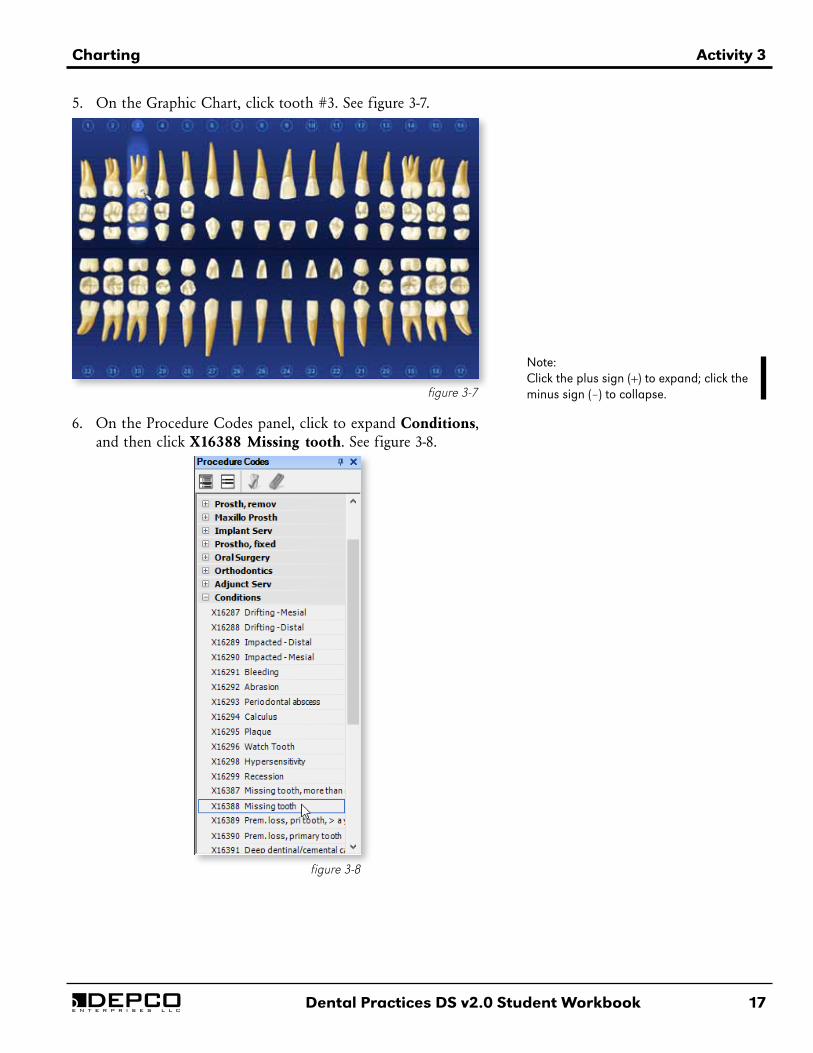
2. On the Search By tab, in the Enter Last Name area, type Abbott, and then click Search. See figure 3-5.
figure 3-5
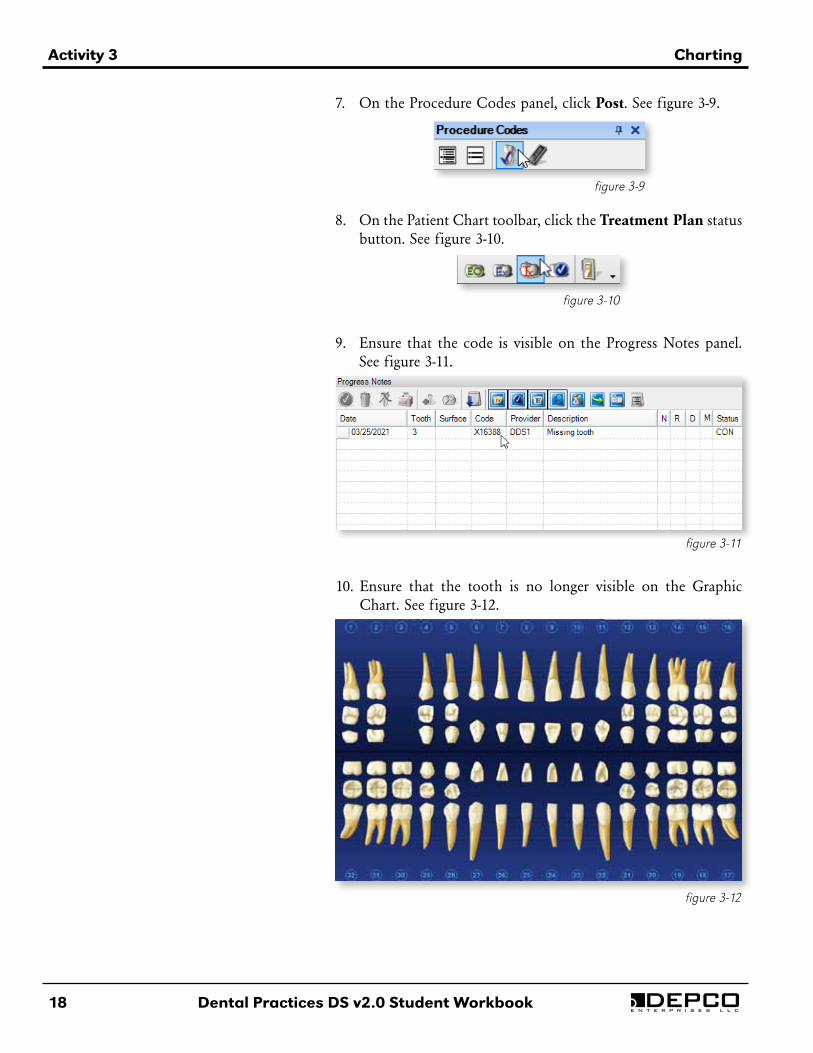
3. Click to select Patricia Abbott. See figure 3-6.
figure 3-6
4. Click OK. The patient chart is visible.
Charting Activity 3
Dental Practices DS v2.0 Student Workbook 17e n t e r p r i s e s l l c
5. On the Graphic Chart, click tooth #3. See figure 3-7.
figure 3-7
6. On the Procedure Codes panel, click to expand Conditions, and then click X16388 Missing tooth. See figure 3-8.
figure 3-8
Note: Click the plus sign (+) to expand; click the minus sign (–) to collapse.
18 Dental Practices DS v2.0 Student Workbook
Activity 3 Charting
e n t e r p r i s e s l l c
7. On the Procedure Codes panel, click Post. See figure 3-9.
figure 3-9
8. On the Patient Chart toolbar, click the Treatment Plan status button. See figure 3-10.
figure 3-10
9. Ensure that the code is visible on the Progress Notes panel. See figure 3-11.
figure 3-11
10. Ensure that the tooth is no longer visible on the Graphic Chart. See figure 3-12.
figure 3-12
Charting Activity 3
Dental Practices DS v2.0 Student Workbook 19e n t e r p r i s e s l l c
Step 5. Chart dental caries and a treatment plan
1. On the Graphic Chart, click tooth #32.
2. On the Procedure Codes panel, expand Conditions, and then click X16393 Incipient Caries.
3. Click Post.
4. On the Patient Chart toolbar, click the Treatment Plan status button.
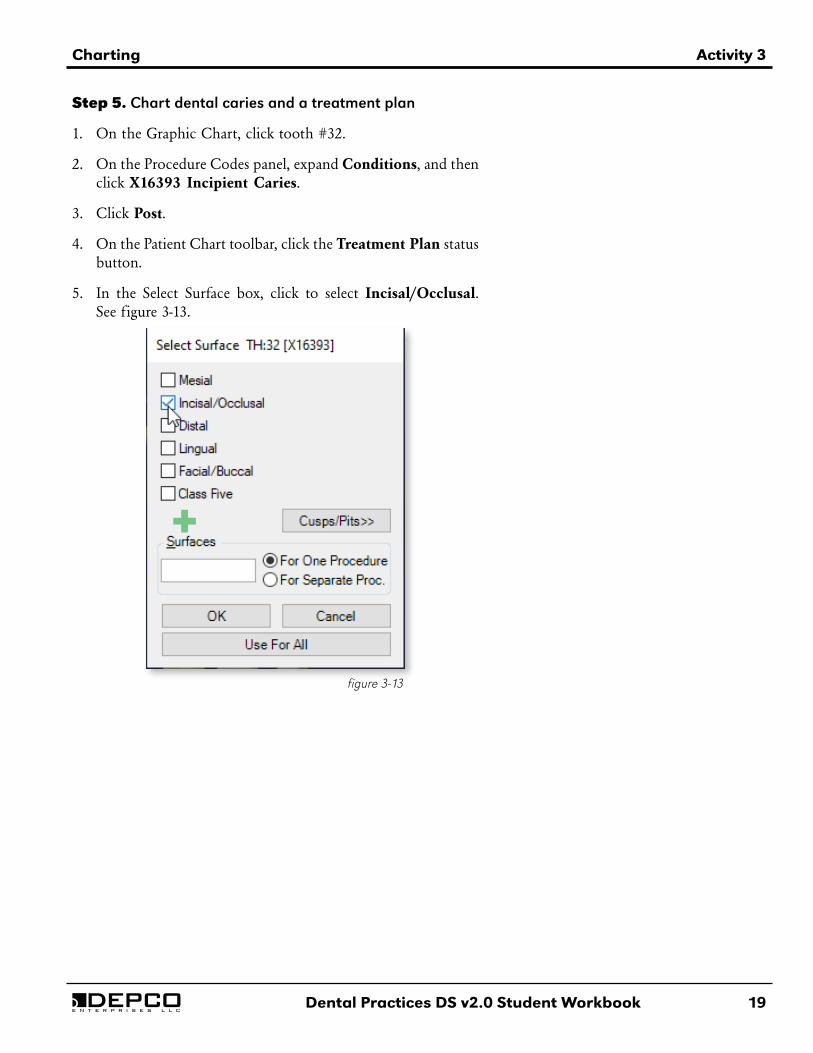
5. In the Select Surface box, click to select Incisal/Occlusal. See figure 3-13.
figure 3-13
20 Dental Practices DS v2.0 Student Workbook
Activity 3 Charting
e n t e r p r i s e s l l c
7. On the Graphic Chart, click tooth #32.
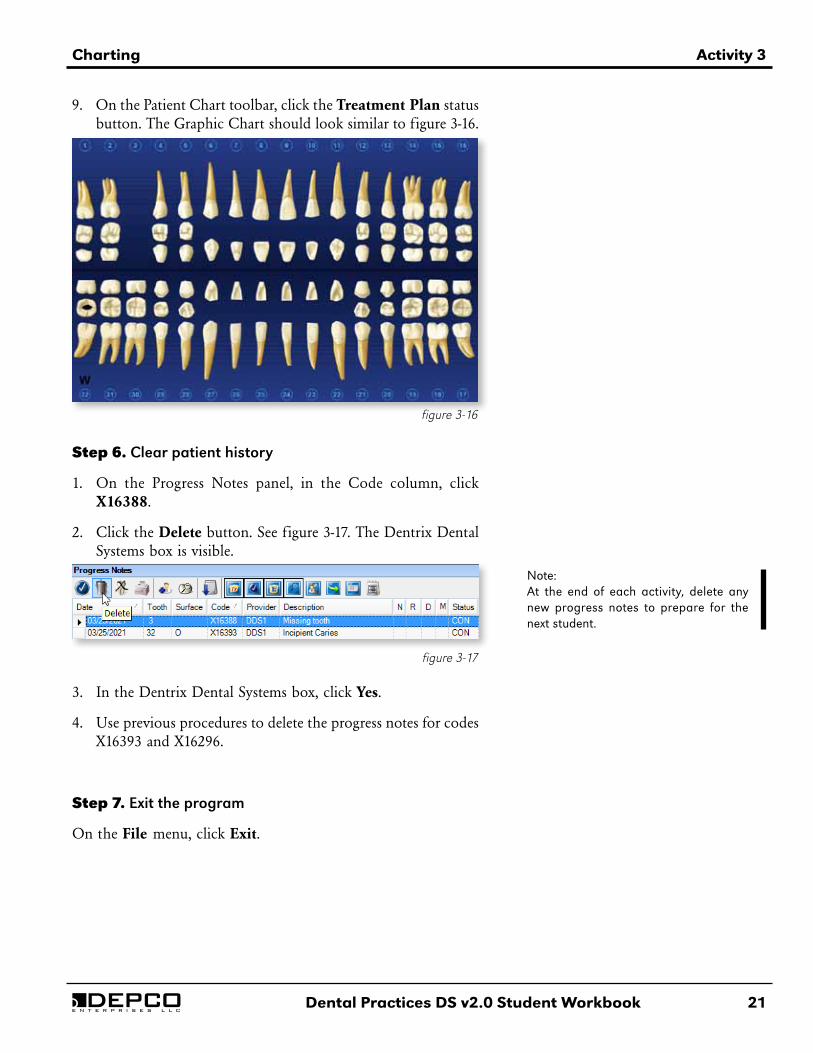
8. On the Procedure Buttons panel, click the Watch Tooth button. See figure 3-15.
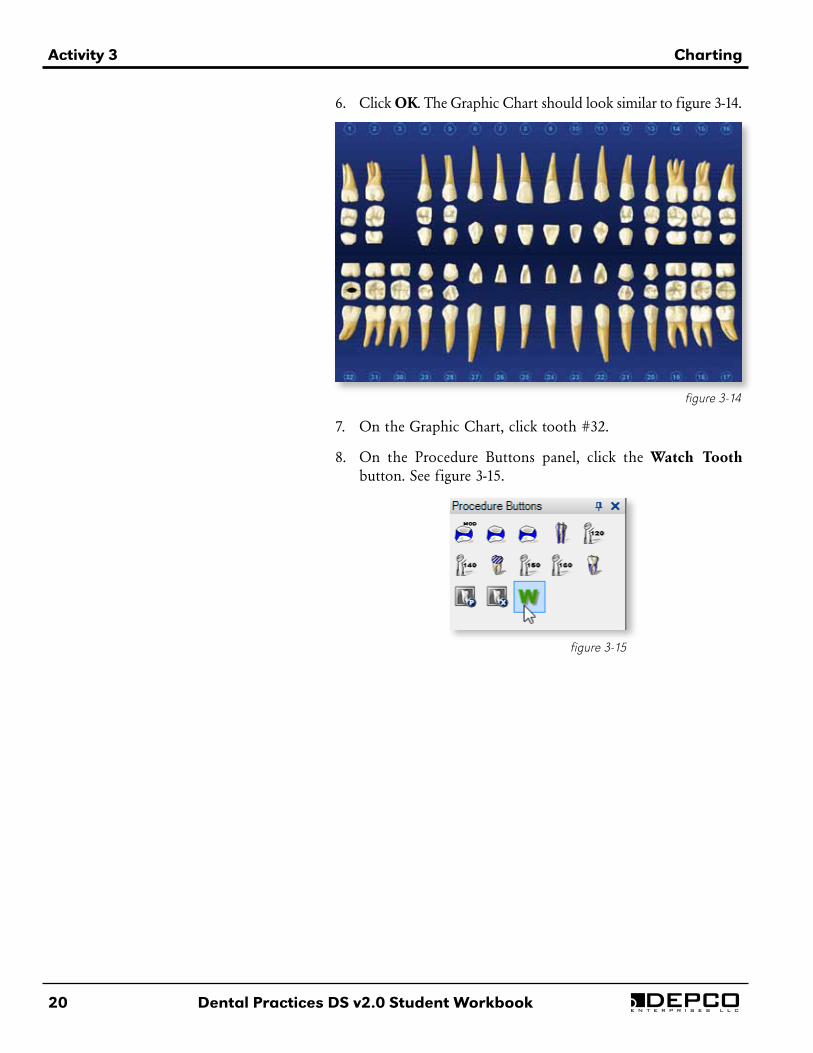
6. Click OK. The Graphic Chart should look similar to figure 3-14.
figure 3-14
figure 3-15
Charting Activity 3
Dental Practices DS v2.0 Student Workbook 21e n t e r p r i s e s l l c
9. On the Patient Chart toolbar, click the Treatment Plan status button. The Graphic Chart should look similar to figure 3-16.
figure 3-16
Step 6. Clear patient history
1. On the Progress Notes panel, in the Code column, click X16388.
2. Click the Delete button. See figure 3-17. The Dentrix Dental Systems box is visible.
figure 3-17
3. In the Dentrix Dental Systems box, click Yes.
4. Use previous procedures to delete the progress notes for codes X16393 and X16296.
Step 7. Exit the program
On the File menu, click Exit.
Note: At the end of each activity, delete any new progress notes to prepare for the next student.
22 Dental Practices DS v2.0 Student Workbook
Activity 3 Charting
e n t e r p r i s e s l l c
Step 8. Complete the worksheet
1. Locate the Activity 3 Worksheet.
2. Complete the worksheet.
Step 9. Critical Thinking
1. Locate a piece of paper and a pen or pencil.
2. Brief ly discuss the advantages and disadvantages of charting tooth information about a client on a paper chart. Do you think a computer program is better suited for charting purposes? Explain your answer.
3. Write in complete sentences, being specific with your answers.
4. When you have completed the activity, turn in the journal and Activity 3 Worksheet to the instructor.
Step 10. Return to the media
Click the Next button on the media screen.
InstructorCheckpoint
InstructorCheckpoint
Dental Practices DS v2.0 Student Workbook 23
Activity 4
e n t e r p r i s e s l l c
Data Collection
ObjectivesAfter successfully completing Activity 4, you will be able to:• Identify and discuss components of patient records. • Discuss HIPAA. • Discuss the importance of hygiene assessment. • Identify components of a personal profile assessment. • Identify the four major vital signs. • Identify common medical emergencies in the dental setting.• Practice proper procedures for scheduling a new patient
appointment. • Practice proper procedures for registering a new patient.
24 Dental Practices DS v2.0 Student Workbook
Activity 4 Data Collection
e n t e r p r i s e s l l c
Procedure
Step 1. Start the program
1. On the taskbar, click Start.
2. On the Start menu, scroll to locate, and then click Dentrix.
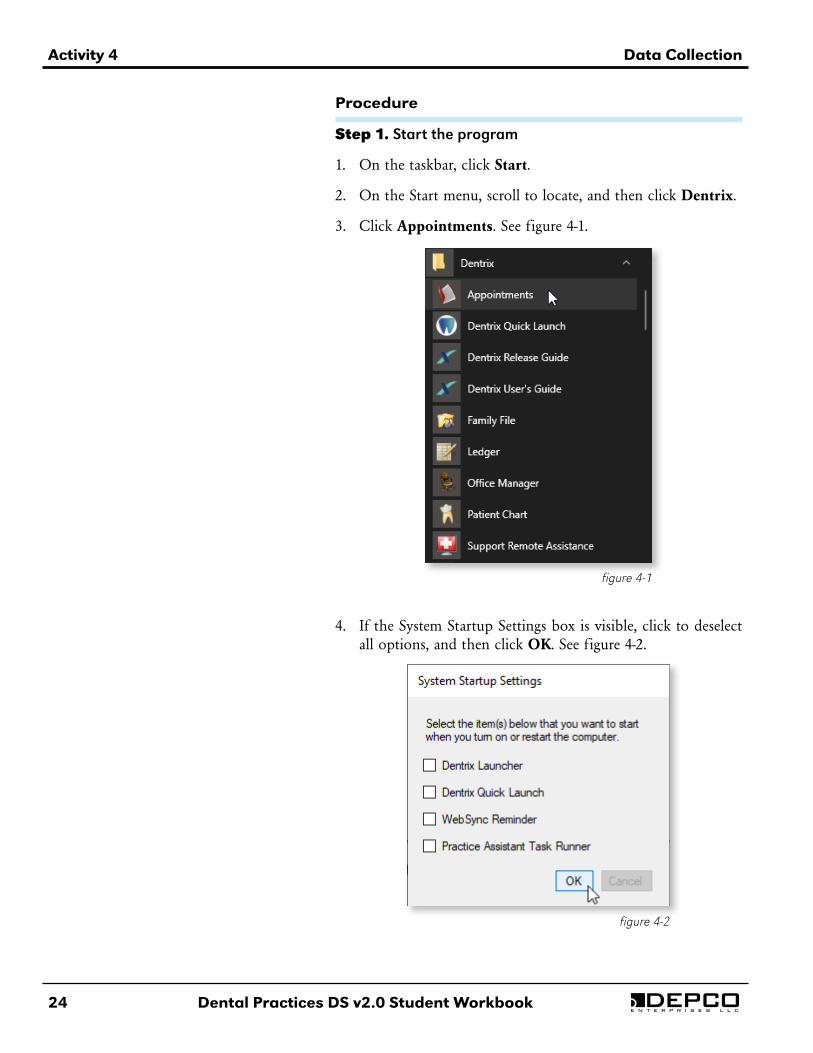
3. Click Appointments. See figure 4-1.
figure 4-1
figure 4-2
4. If the System Startup Settings box is visible, click to deselect all options, and then click OK. See figure 4-2.
Data Collection Activity 4
Dental Practices DS v2.0 Student Workbook 25e n t e r p r i s e s l l c
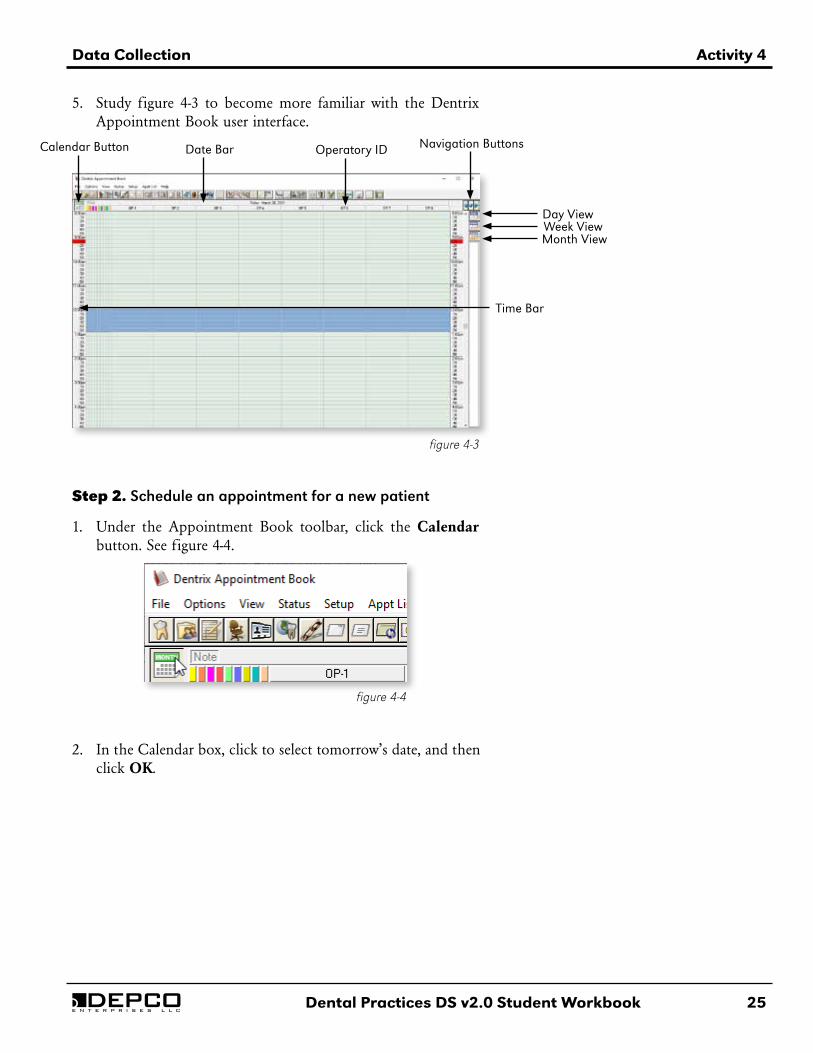
5. Study figure 4-3 to become more familiar with the Dentrix Appointment Book user interface.
figure 4-3
Time Bar
Day ViewWeek ViewMonth View
Calendar Button Date Bar Operatory ID Navigation Buttons
Step 2. Schedule an appointment for a new patient
1. Under the Appointment Book toolbar, click the Calendar button. See figure 4-4.
figure 4-4
2. In the Calendar box, click to select tomorrow’s date, and then click OK.
26 Dental Practices DS v2.0 Student Workbook
Activity 4 Data Collection
e n t e r p r i s e s l l c
3. On the Appointment Book toolbar, click the Find New Appointment Time button. See figure 4-5.
figure 4-5
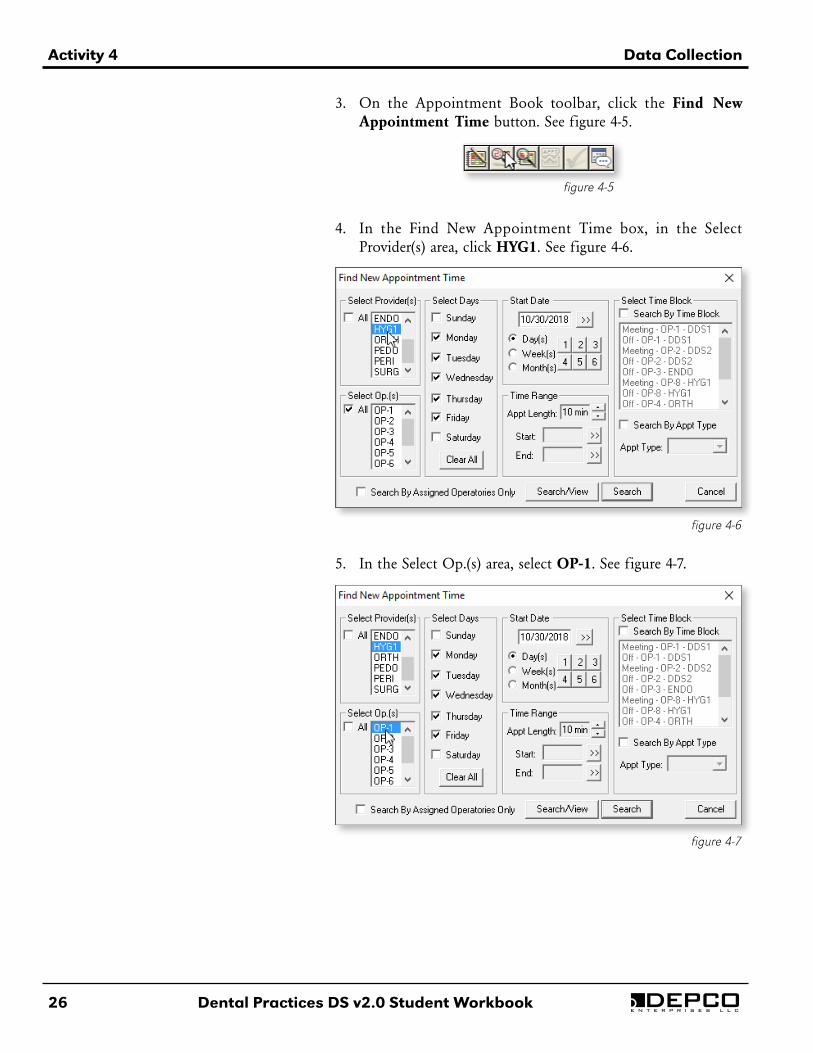
4. In the Find New Appointment Time box, in the Select Provider(s) area, click HYG1. See figure 4-6.
figure 4-6
5. In the Select Op.(s) area, select OP-1. See figure 4-7.
figure 4-7
Data Collection Activity 4
Dental Practices DS v2.0 Student Workbook 27e n t e r p r i s e s l l c
6. Click Search/View.
7. In the Available Appointment Times box, scroll to locate, and then click an available time.
8. Click View. The time is visible on the Appointment Book.
9. Click Select.
10. On the Appointment Book, double-click an available time. The Select Patient box is visible.
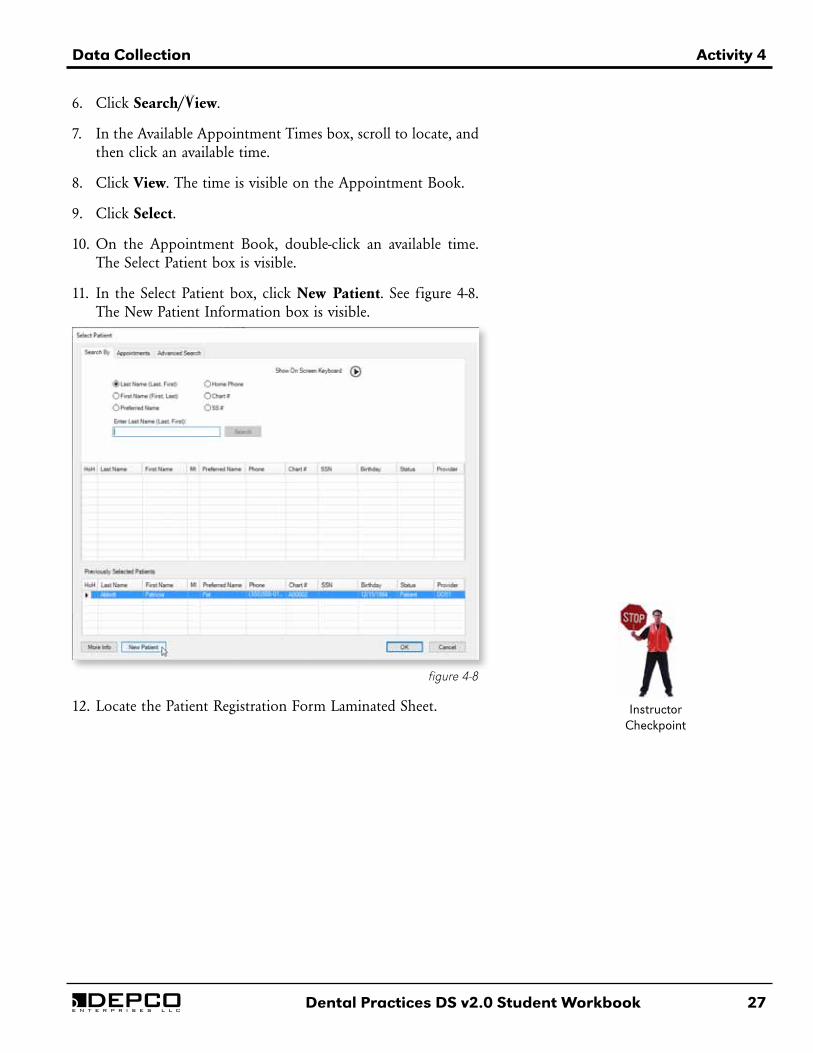
11. In the Select Patient box, click New Patient. See figure 4-8. The New Patient Information box is visible.
figure 4-8
12. Locate the Patient Registration Form Laminated Sheet. InstructorCheckpoint
28 Dental Practices DS v2.0 Student Workbook
Activity 4 Data Collection
e n t e r p r i s e s l l c
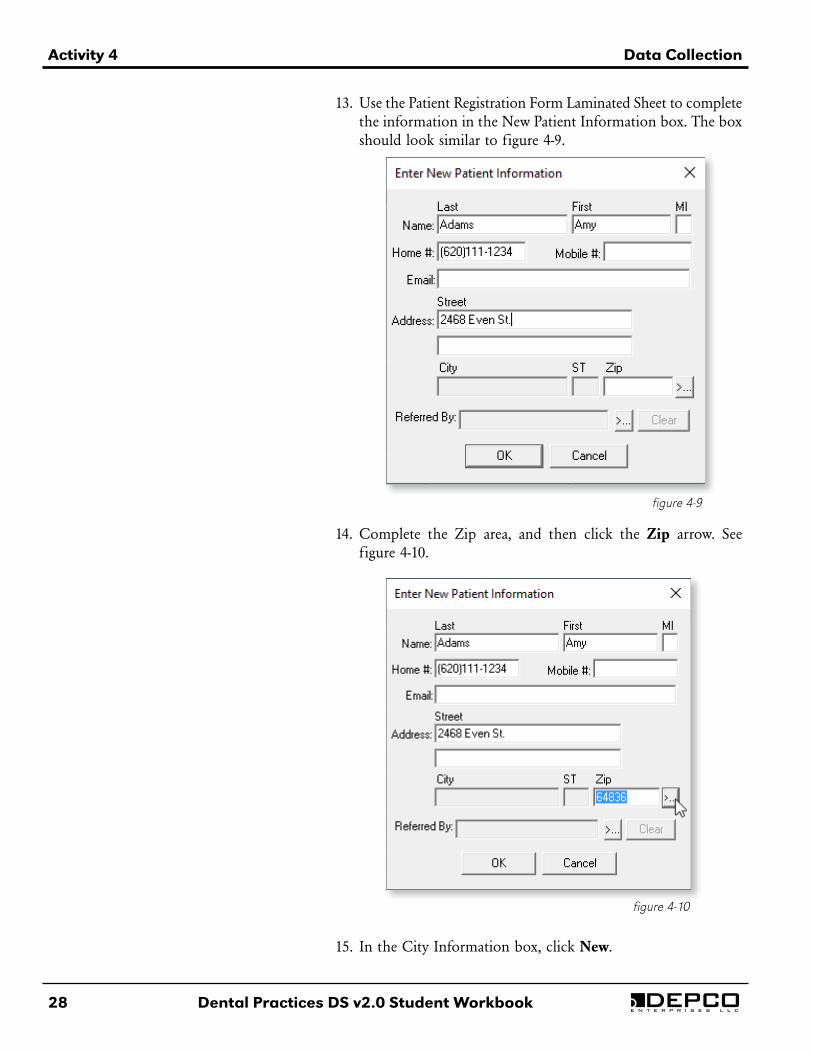
13. Use the Patient Registration Form Laminated Sheet to complete the information in the New Patient Information box. The box should look similar to figure 4-9.
figure 4-9
14. Complete the Zip area, and then click the Zip arrow. See figure 4-10.
figure 4-10
15. In the City Information box, click New.
Data Collection Activity 4
Dental Practices DS v2.0 Student Workbook 29e n t e r p r i s e s l l c
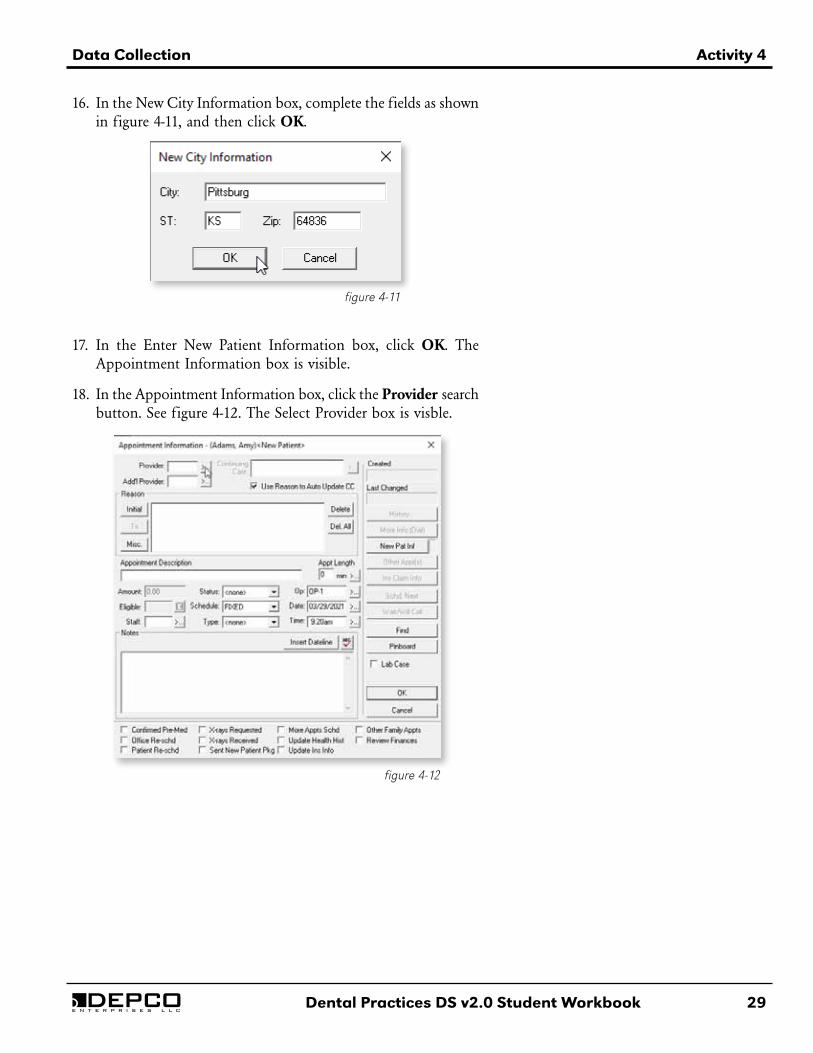
figure 4-12
figure 4-11
16. In the New City Information box, complete the fields as shown in figure 4-11, and then click OK.
17. In the Enter New Patient Information box, click OK. The Appointment Information box is visible.
18. In the Appointment Information box, click the Provider search button. See figure 4-12. The Select Provider box is visble.
30 Dental Practices DS v2.0 Student Workbook
Activity 4 Data Collection
e n t e r p r i s e s l l c
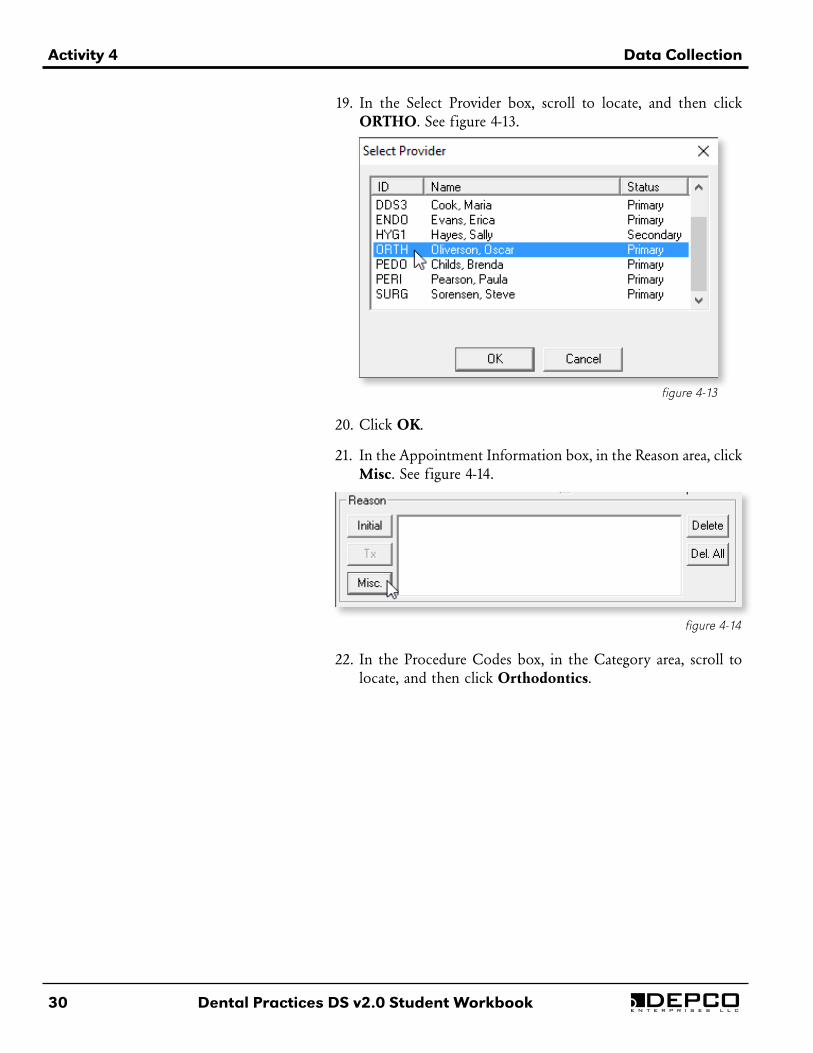
19. In the Select Provider box, scroll to locate, and then click ORTHO. See figure 4-13.
figure 4-13
20. Click OK.
21. In the Appointment Information box, in the Reason area, click Misc. See figure 4-14.
figure 4-14
22. In the Procedure Codes box, in the Category area, scroll to locate, and then click Orthodontics.

Data Collection Activity 4
Dental Practices DS v2.0 Student Workbook 31e n t e r p r i s e s l l c
23. In the Procedure Code List area, scroll to locate, and then click X9947 Pre-orthodontic treatment exam. See figure 4-15.
figure 4-15
24. Click OK.
25. In the Appointment Information box, under Appt Length, click the Length search button. See figure 4-16.
figure 4-16
26. In the Appointment Time Pattern box, in the Total Time area, type 40, and then press TAB on the keyboard. See figure 4-17.
figure 4-17
27. Click OK.
32 Dental Practices DS v2.0 Student Workbook
Activity 4 Data Collection
e n t e r p r i s e s l l c
28. In the Appointment Information box, click OK. The new appointment is visible on the Appointment Book. See figure 4-18.
figure 4-18
Step 3. Create a new patient file
1. On the Appointment Book toolbar, click the Family File button. See figure 4-19. The Dentrix Family File user interface is visible.
figure 4-19
2. On Family File toolbar, click the Select Patient/New Family button. See figure 4-20.
figure 4-20
3. In the Select Patient box, click New Family.
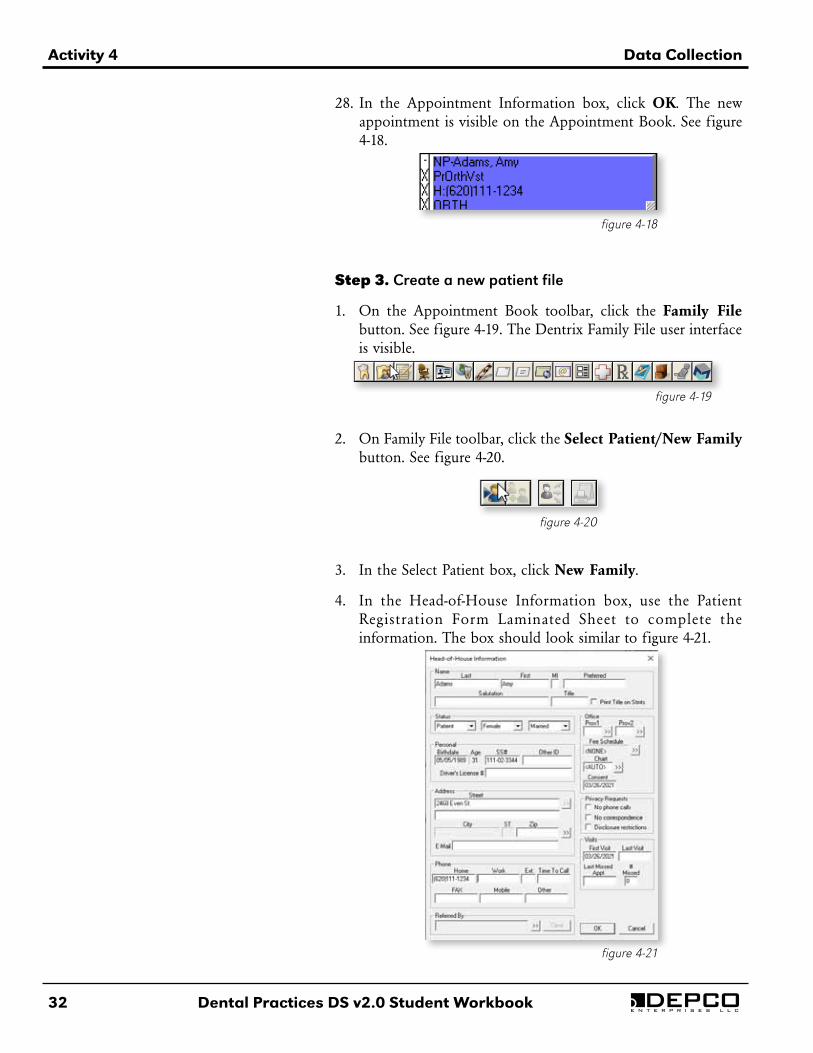
4. In the Head-of-House Information box, use the Patient Registration Form Laminated Sheet to complete the information. The box should look similar to figure 4-21.
figure 4-21
Data Collection Activity 4
Dental Practices DS v2.0 Student Workbook 33e n t e r p r i s e s l l c
5. In the Zip area, type 64836, and then press TAB on the keyboard.
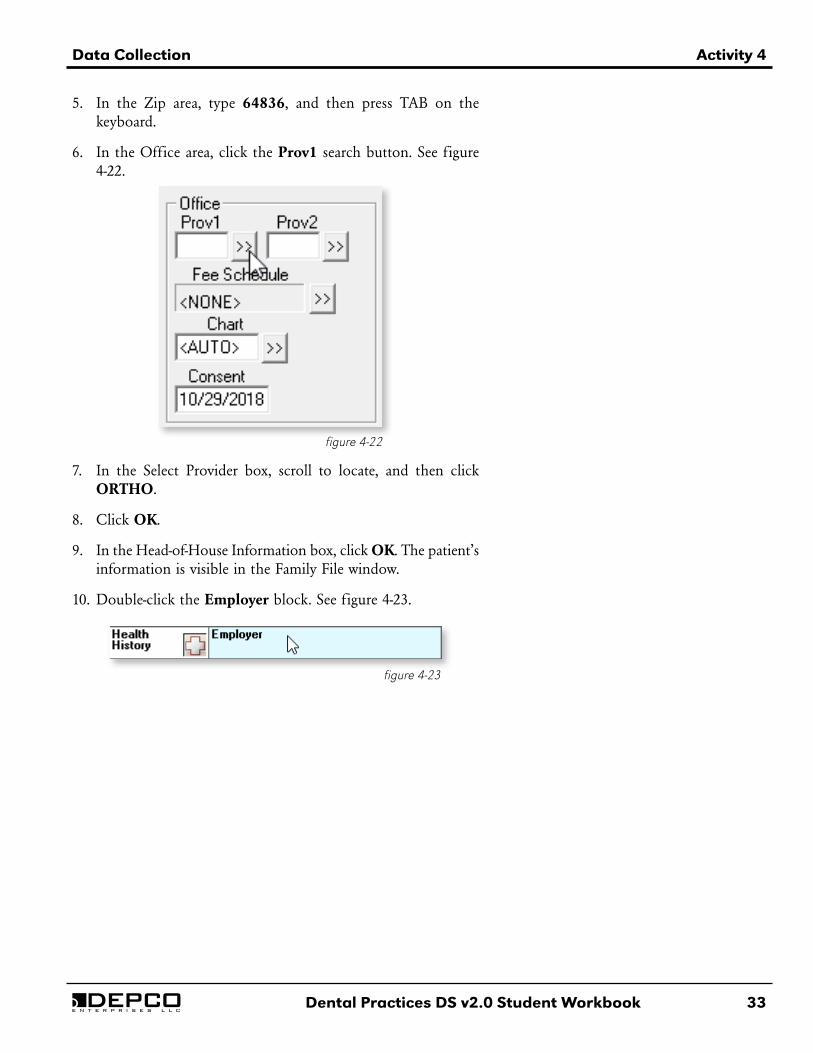
6. In the Office area, click the Prov1 search button. See figure 4-22.
figure 4-22
7. In the Select Provider box, scroll to locate, and then click ORTHO.
8. Click OK.
9. In the Head-of-House Information box, click OK. The patient’s information is visible in the Family File window.
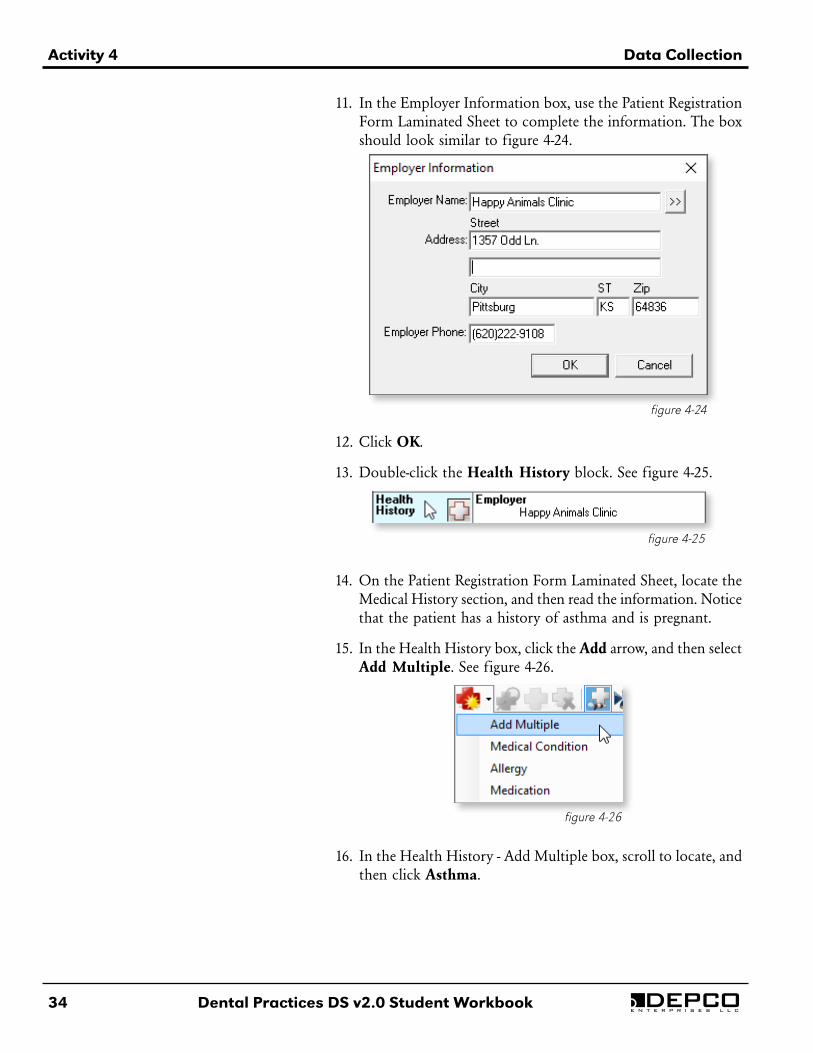
10. Double-click the Employer block. See figure 4-23.
figure 4-23
34 Dental Practices DS v2.0 Student Workbook
Activity 4 Data Collection
e n t e r p r i s e s l l c
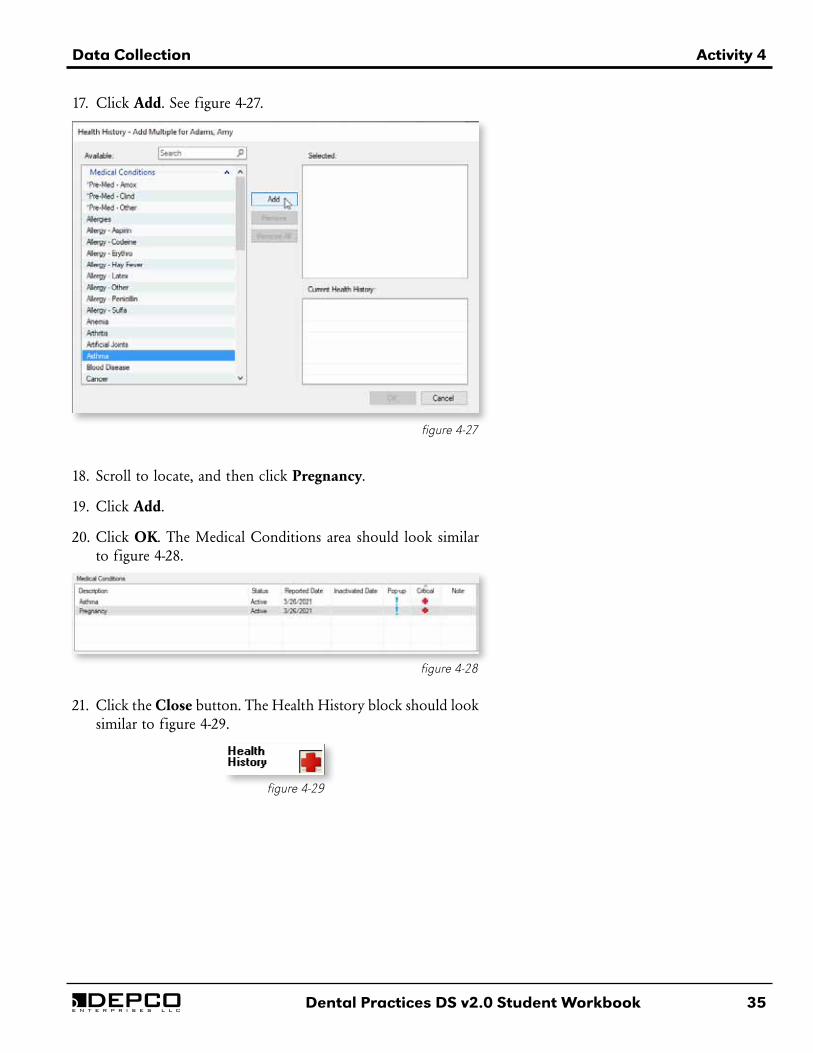
11. In the Employer Information box, use the Patient Registration Form Laminated Sheet to complete the information. The box should look similar to figure 4-24.
figure 4-24
12. Click OK.
13. Double-click the Health History block. See figure 4-25.
figure 4-25
figure 4-26
14. On the Patient Registration Form Laminated Sheet, locate the Medical History section, and then read the information. Notice that the patient has a history of asthma and is pregnant.
15. In the Health History box, click the Add arrow, and then select Add Multiple. See figure 4-26.
16. In the Health History - Add Multiple box, scroll to locate, and then click Asthma.
Data Collection Activity 4
Dental Practices DS v2.0 Student Workbook 35e n t e r p r i s e s l l c
figure 4-27
17. Click Add. See figure 4-27.
18. Scroll to locate, and then click Pregnancy.
19. Click Add.
20. Click OK. The Medical Conditions area should look similar to figure 4-28.
figure 4-28
21. Click the Close button. The Health History block should look similar to figure 4-29.
figure 4-29
36 Dental Practices DS v2.0 Student Workbook
Activity 4 Data Collection
e n t e r p r i s e s l l c
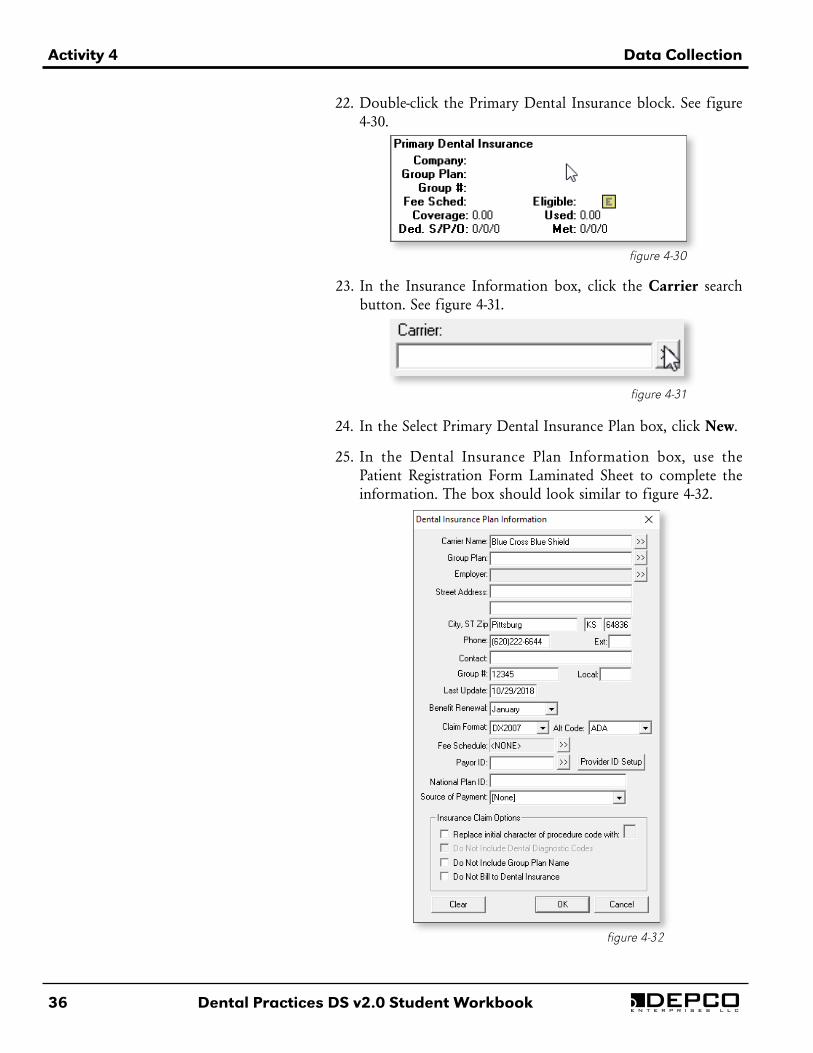
22. Double-click the Primary Dental Insurance block. See figure 4-30.
figure 4-30
23. In the Insurance Information box, click the Carrier search button. See figure 4-31.
figure 4-31
24. In the Select Primary Dental Insurance Plan box, click New.
25. In the Dental Insurance Plan Information box, use the Patient Registration Form Laminated Sheet to complete the information. The box should look similar to figure 4-32.
figure 4-32
Data Collection Activity 4
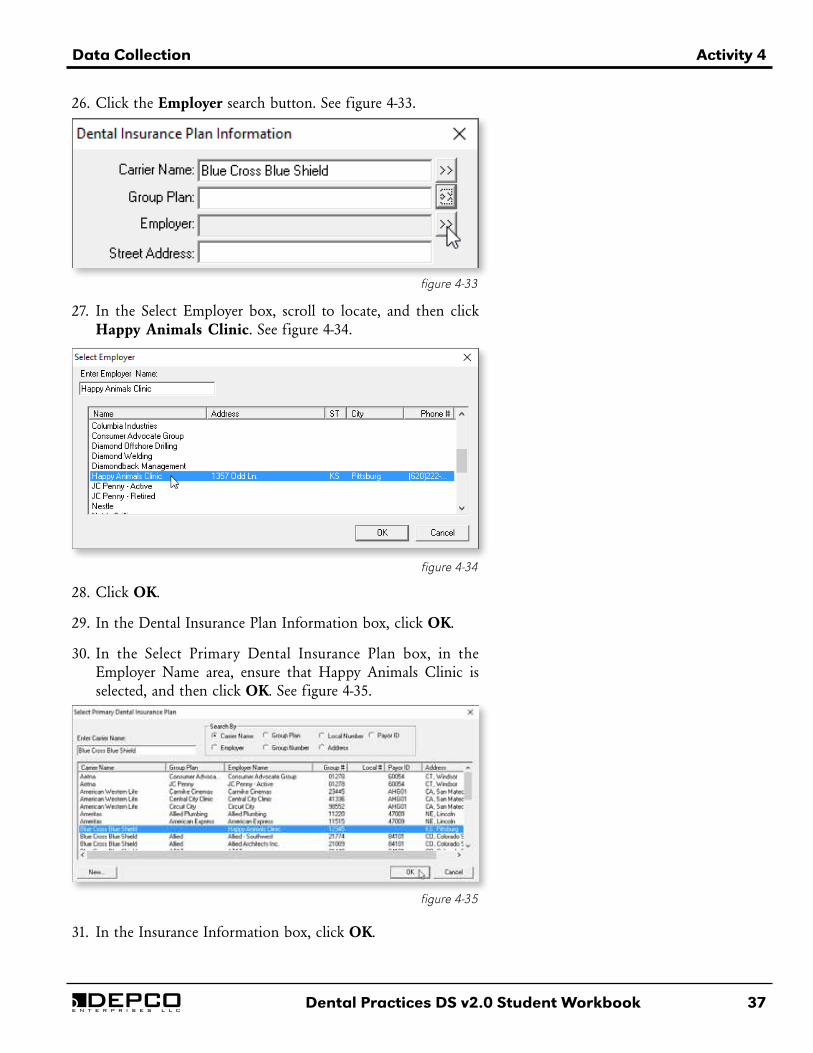
Dental Practices DS v2.0 Student Workbook 37e n t e r p r i s e s l l c
26. Click the Employer search button. See figure 4-33.
figure 4-33
27. In the Select Employer box, scroll to locate, and then click Happy Animals Clinic. See figure 4-34.
figure 4-34
28. Click OK.
29. In the Dental Insurance Plan Information box, click OK.
30. In the Select Primary Dental Insurance Plan box, in the Employer Name area, ensure that Happy Animals Clinic is selected, and then click OK. See figure 4-35.
figure 4-35
31. In the Insurance Information box, click OK.
38 Dental Practices DS v2.0 Student Workbook
Activity 4 Data Collection
e n t e r p r i s e s l l c
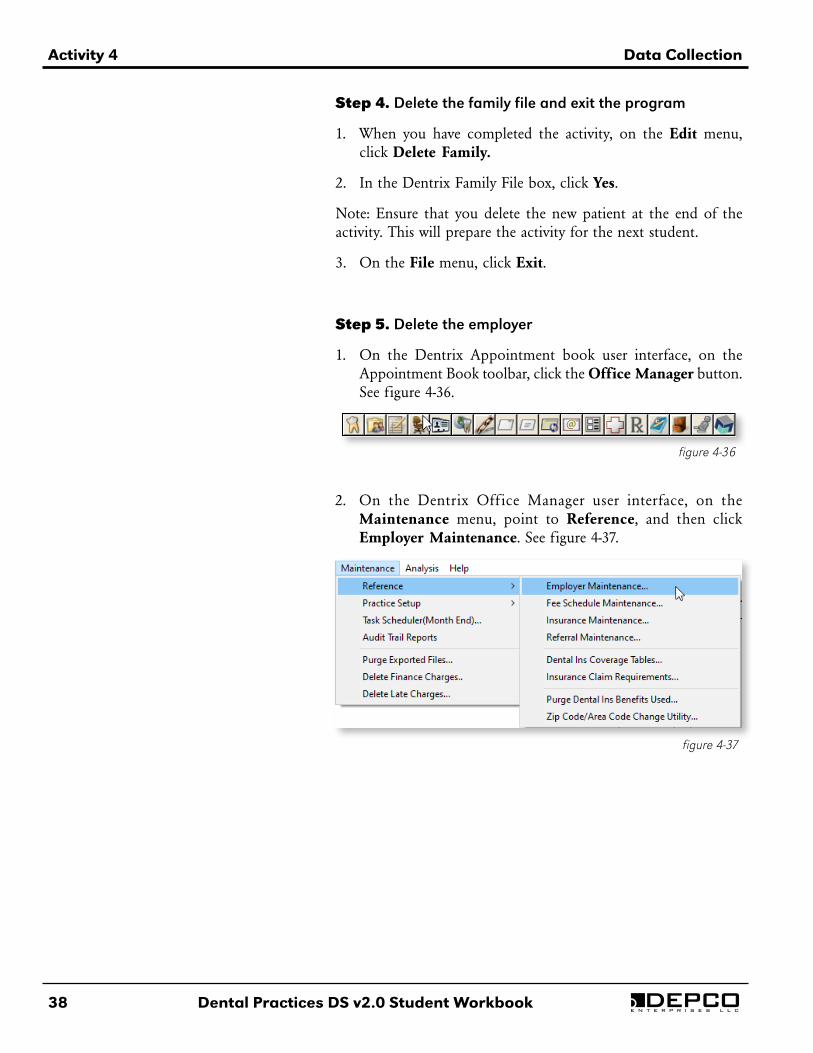
Step 4. Delete the family file and exit the program
1. When you have completed the activity, on the Edit menu, click Delete Family.
2. In the Dentrix Family File box, click Yes.
Note: Ensure that you delete the new patient at the end of the activity. This will prepare the activity for the next student.
3. On the File menu, click Exit.
Step 5. Delete the employer
1. On the Dentrix Appointment book user interface, on the Appointment Book toolbar, click the Office Manager button. See figure 4-36.
figure 4-36
figure 4-37
2. On the Dentrix Off ice Manager user interface, on the Maintenance menu, point to Reference, and then click Employer Maintenance. See figure 4-37.
Data Collection Activity 4
Dental Practices DS v2.0 Student Workbook 39e n t e r p r i s e s l l c
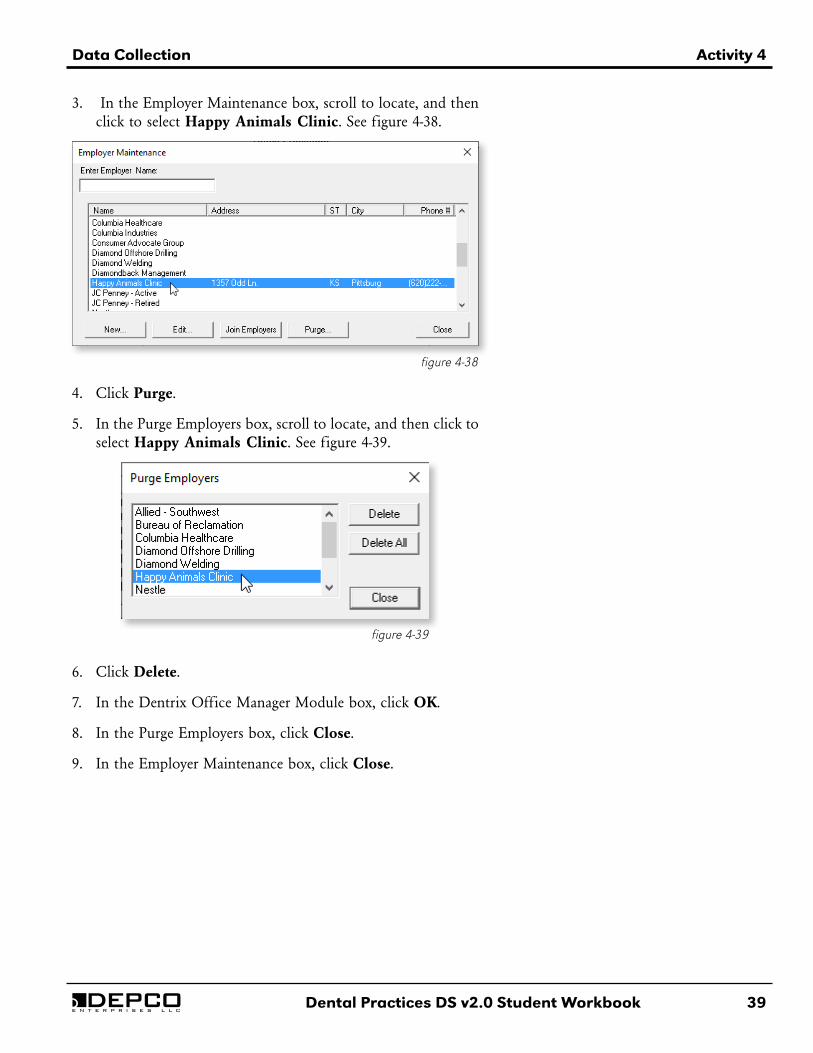
3. In the Employer Maintenance box, scroll to locate, and then click to select Happy Animals Clinic. See figure 4-38.
figure 4-38
figure 4-39
4. Click Purge.
5. In the Purge Employers box, scroll to locate, and then click to select Happy Animals Clinic. See figure 4-39.
6. Click Delete.
7. In the Dentrix Office Manager Module box, click OK.
8. In the Purge Employers box, click Close.
9. In the Employer Maintenance box, click Close.
40 Dental Practices DS v2.0 Student Workbook
Activity 4 Data Collection
e n t e r p r i s e s l l c
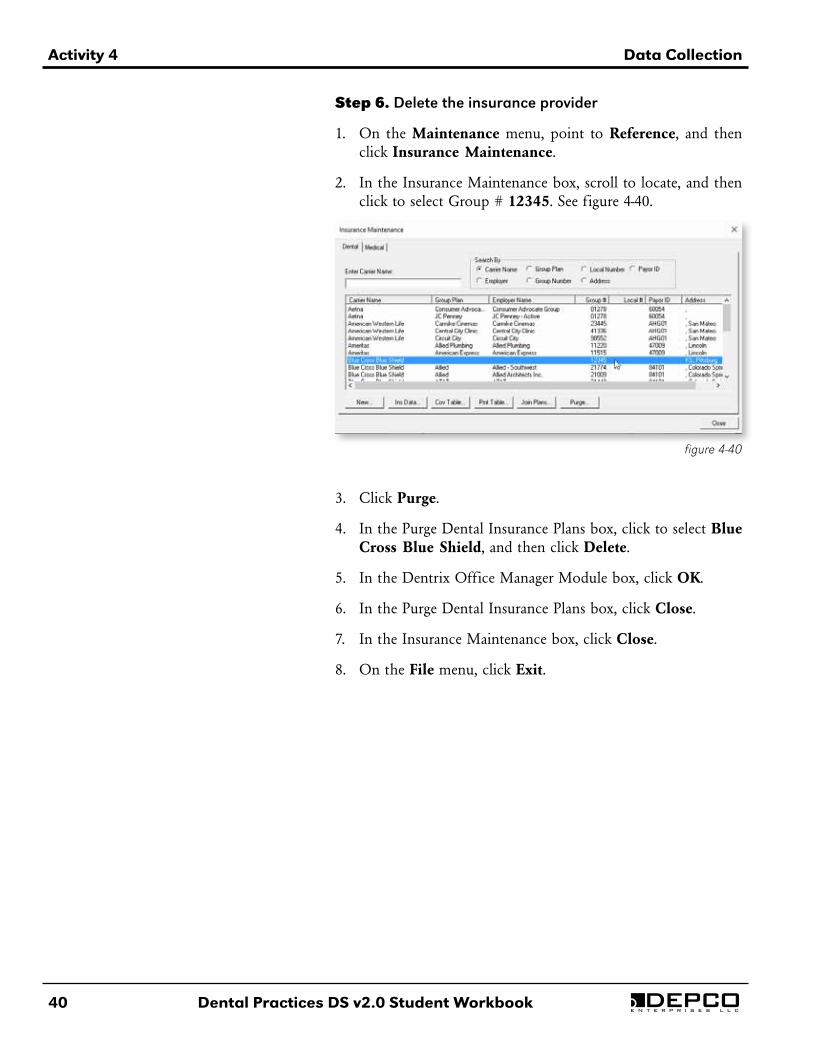
Step 6. Delete the insurance provider
1. On the Maintenance menu, point to Reference, and then click Insurance Maintenance.
2. In the Insurance Maintenance box, scroll to locate, and then click to select Group # 12345. See figure 4-40.
figure 4-40
3. Click Purge.
4. In the Purge Dental Insurance Plans box, click to select Blue Cross Blue Shield, and then click Delete.
5. In the Dentrix Office Manager Module box, click OK.
6. In the Purge Dental Insurance Plans box, click Close.
7. In the Insurance Maintenance box, click Close.
8. On the File menu, click Exit.
Data Collection Activity 4
Dental Practices DS v2.0 Student Workbook 41e n t e r p r i s e s l l c
Step 7. Delete the appointment and exit the program
1. On the Dentrix Appointment Book user interface, right-click the appointment for Amy Adams.
2. On the submenu, click Delete Appointment.
3. In the Dentrix Dental Systems box, click Yes. The appointment is no longer visible on the Appointment Book.
4. On the File menu, click Exit.
Step 8. Critical Thinking
1. Locate a piece of paper and a pen or pencil.
2. What would you do if a client appeared to be in distress about her visit to the dentist’s office? The client is scheduled for a filling and is new to the facility.
3. Write in complete sentences, being specific with your answer.
4. When you have completed the activity, turn in the journal to the instructor.
Step 9. Return to the media
Click the Next button on the media screen.
InstructorCheckpoint

42 Dental Practices DS v2.0 Student Workbook
DEPCO
e n t e r p r i s e s l l c
Dental Practices DS v2.0 Student Workbook 43
Activity 5
e n t e r p r i s e s l l c
Dental Exam
ObjectivesAfter successfully completing Activity 5, you will be able to:• Identify roles and responsibilities of OSHA. • Discuss OSHA’s bloodborne pathogen standard. • Discuss universal and standard precautions. • Identify types of personal protective equipment. • Discuss pre-cleaning and disinfection procedures. • Discuss surface barriers. • Discuss proper handwashing techniques. • Identify equipment in a dental treatment area. • Identify categories of dental instruments. • Identify types of hand instruments. • Identify proper steps for admitting a patient. • Identify dental chair positions. • Discuss the extraoral exam. • Discuss components of the dental exam. • Practice proper handwashing techniques. • Practice proper procedures for donning and removing
personal protective equipment. • Conduct a dental exam using the dental manikin. • Practice charting procedures using the practice management
software.
44 Dental Practices DS v2.0 Student Workbook
Activity 5 Dental Exam
e n t e r p r i s e s l l c
Procedure
Step 1. Equipment and supplies
Locate the following:
• bib
• dental manikin
• dental mirror
• disposable gloves
• procedure mask
• protective eyewear
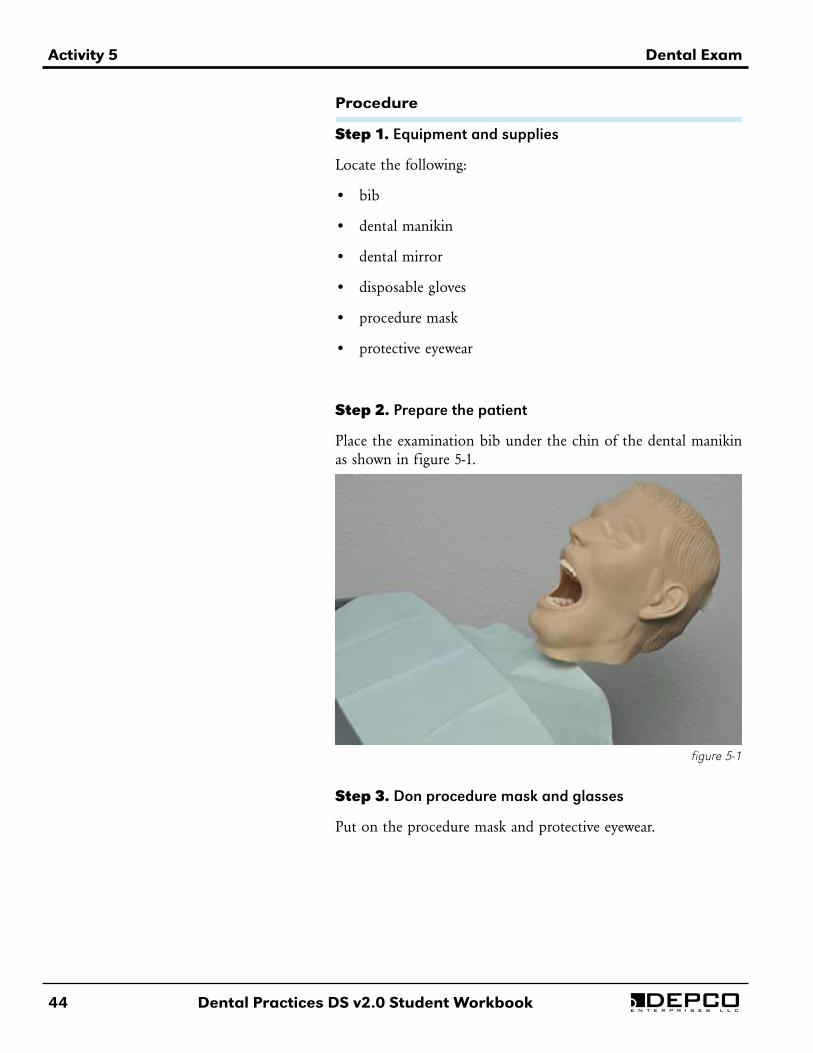
Step 2. Prepare the patient
Place the examination bib under the chin of the dental manikin as shown in figure 5-1.
figure 5-1
Step 3. Don procedure mask and glasses
Put on the procedure mask and protective eyewear.
Dental Exam Activity 5
Dental Practices DS v2.0 Student Workbook 45e n t e r p r i s e s l l c
Step 4. Wash hands and don gloves
1. Use water to wet your hands and forearms before applying the soap. Keep your hands lower than your arms during this procedure.
Note: If bar soap is being used, rinse the soap before using it and replacing it in the dish.
2. Apply the soap, and then using a circular motion, rub the surface of each write at least 2 inches (in.) above the hand.
3. Wash the palms and back of the hands after both wrists are cleaned.
Note: To prevent contamination by microorganisms, ensure that you do not touch the wrists after they are cleaned.
4. Clean each finger and thumb of each hand, ensuring that you thoroughly wash underneath the nails and between the fingers.
5. Rinse each hand from the wrist to the fingertips, keeping the hands below the level of the arms.
6. Using a circular motion, dry each hand thoroughly with a sterile towel.
Note: For this practice, a regular towel or paper towels will work.
7. Use a dry towel to turn off the faucet handle.
8. Put on the gloves.
Step 5. Examine the patient
1. Locate the Dental Chart Laminated Sheet.
2. Use previous procedures to document any extra or intra oral problems.
Note: If you are working with a partner, one student may act as the recorder, designating any information on the exam sheet, while the other student uses the dental mirror to perform the evaluation.
3. Ensure that you document any missing teeth or carious lesions.
4. When you have completed the activity, ask the instructor to review your work.
InstructorCheckpoint
Note: See the "Reference Section" for a chart of common charting symbols.
46 Dental Practices DS v2.0 Student Workbook
Activity 5 Dental Exam
e n t e r p r i s e s l l c
Step 6. Clean up
1. Use proper procedures to remove all personal protective equipment.
2. Return items to the proper storage locations.
Step 7. Start the program and select a patient
1. On the taskbar, click Start.
2. On the Start menu, scroll to locate, and then click Dentrix.
3. Click Patient Chart.
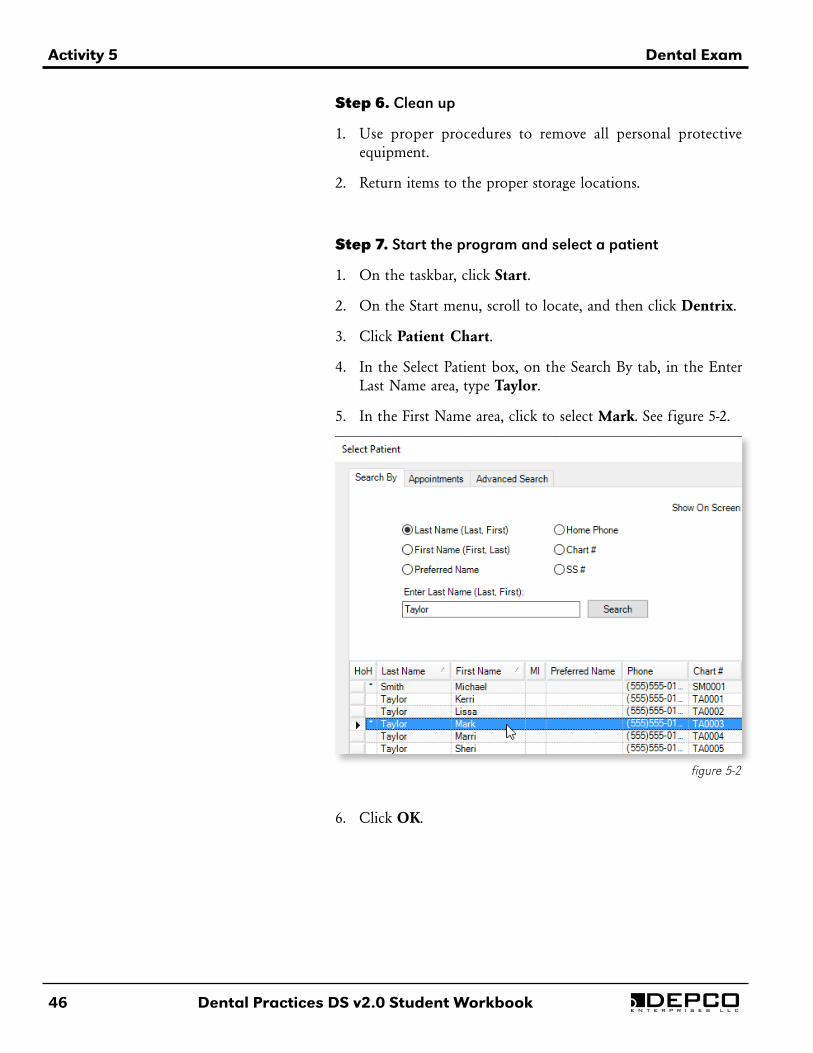
4. In the Select Patient box, on the Search By tab, in the Enter Last Name area, type Taylor.
5. In the First Name area, click to select Mark. See figure 5-2.
figure 5-2
6. Click OK.
Dental Exam Activity 5
Dental Practices DS v2.0 Student Workbook 47e n t e r p r i s e s l l c
Step 8. Chart missing teeth
1. Review the Dental Chart Laminated Sheet. Are there any missing teeth? If so, complete the following procedures to chart the missing teeth. Otherwise, proceed to Step 9.
2. On the Graphic Chart, click the missing teeth.
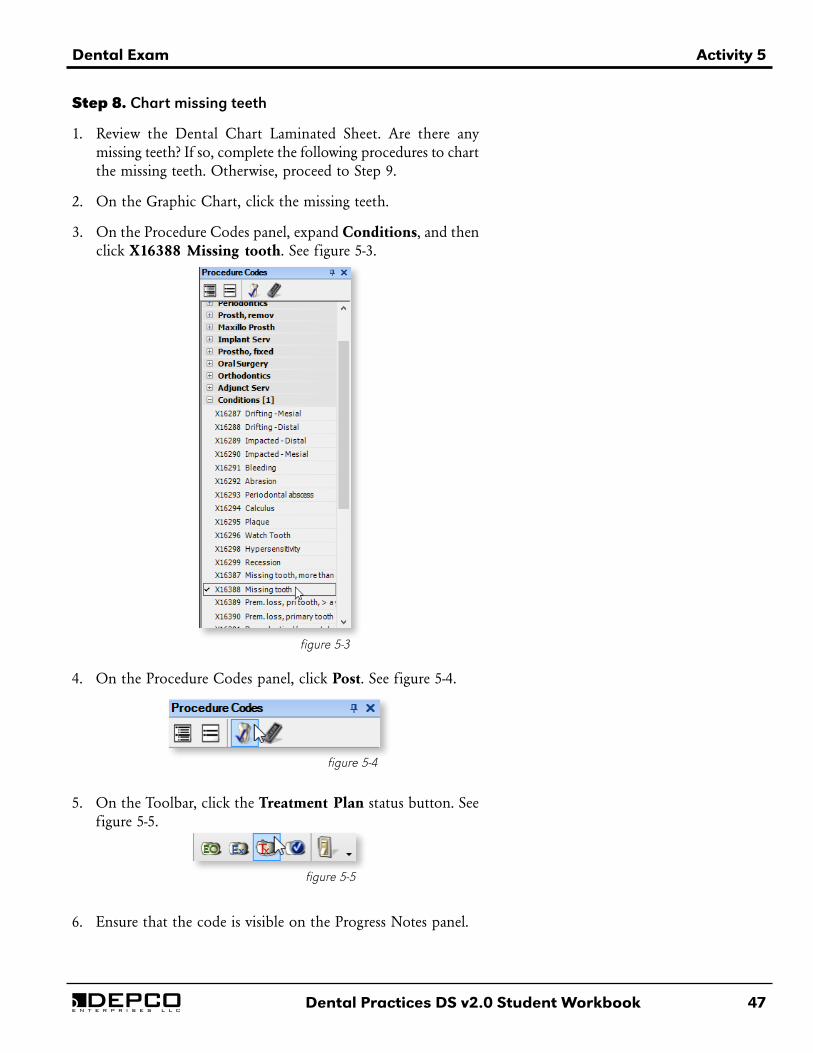
3. On the Procedure Codes panel, expand Conditions, and then click X16388 Missing tooth. See figure 5-3.
figure 5-3
4. On the Procedure Codes panel, click Post. See figure 5-4.
figure 5-4
5. On the Toolbar, click the Treatment Plan status button. See figure 5-5.
figure 5-5
6. Ensure that the code is visible on the Progress Notes panel.
48 Dental Practices DS v2.0 Student Workbook
Activity 5 Dental Exam
e n t e r p r i s e s l l c
7. Ensure that the teeth are no longer visible on the Graphic Chart.
Step 9. Chart dental caries
1. Review the Dental Chart Laminated Sheet. Are there any incipient caries? If so, complete procedural steps 2-8 to chart the incipient caries. Otherwise, proceed to procedural step 9.
2. On the Graphic Chart, click any teeth that have incipient caries.
3. On the Procedure Codes panel, expand Conditions, and then click X16393 Incipient Caries.
4. Click Post.
5. On the Toolbar, click the Treatment Plan status button.
6. In the Select Surface box, click to select the appropriate surface, and then click OK.
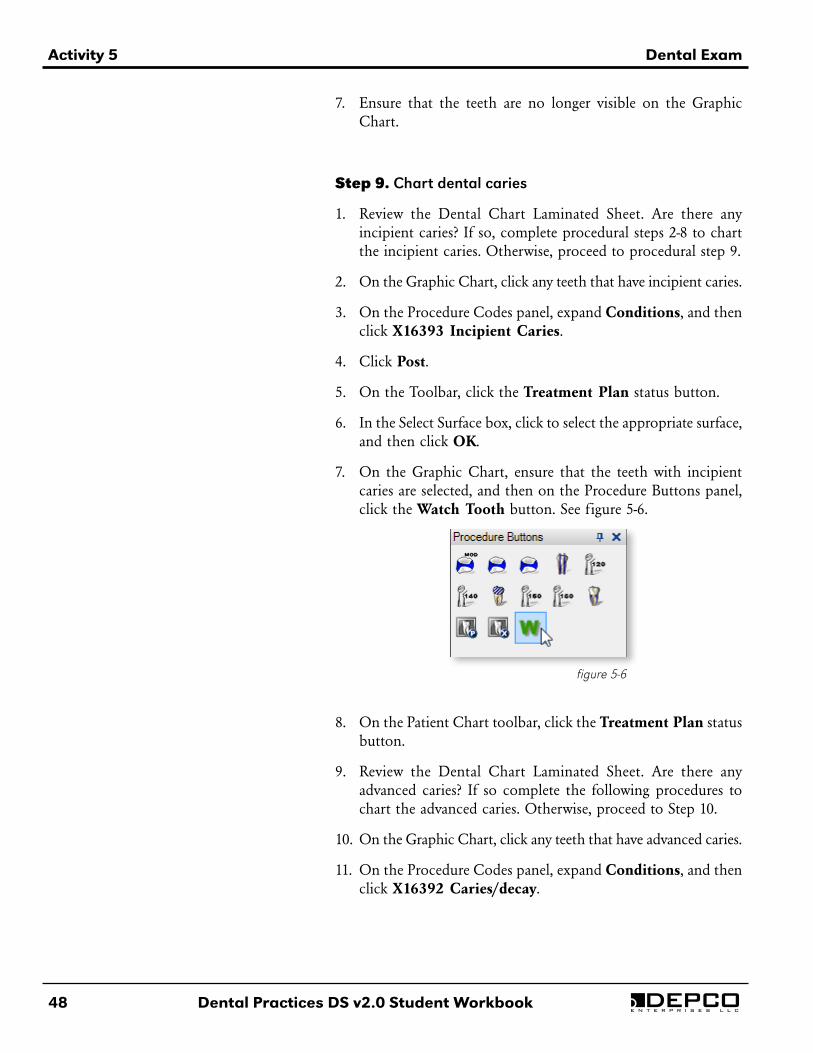
7. On the Graphic Chart, ensure that the teeth with incipient caries are selected, and then on the Procedure Buttons panel, click the Watch Tooth button. See figure 5-6.
figure 5-6
8. On the Patient Chart toolbar, click the Treatment Plan status button.
9. Review the Dental Chart Laminated Sheet. Are there any advanced caries? If so complete the following procedures to chart the advanced caries. Otherwise, proceed to Step 10.
10. On the Graphic Chart, click any teeth that have advanced caries.
11. On the Procedure Codes panel, expand Conditions, and then click X16392 Caries/decay.

Dental Exam Activity 5
Dental Practices DS v2.0 Student Workbook 49e n t e r p r i s e s l l c
12. Click Post.
13. On the Patient Chart toolbar, click the Treatment Plan status button.
14. In the Select Surface box, click to select the appropriate surface.
15. Click to select Class Five, and then click OK.
16. On the Graphic Chart, ensure that the teeth with advanced caries are selected, and then on Procedure Buttons panel, click the Extract button. See figure 5-7.
figure 5-7
17. On the Patient Chart toolbar, click the Treatment Plan status button.
Step 10. Chart other dental conditions and treatment
Review the Dental Chart Laminated Sheet. Are there any other dental conditions that need to be charted? If so, use what you have learned about the Dentrix practice management software to chart the dental conditions and treatment for each. Otherwise, proceed to Step 11.
Step 11. Clear patient history
1. On the Progress Notes panel, in the Code column, click the first code.
2. Click the Delete button. See figure 5-8.
figure 5-8
3. In the Dentrix Dental Systems box, click Yes.
Note: See the "Reference Section" for a chart of common charting symbols.
50 Dental Practices DS v2.0 Student Workbook
Activity 5 Dental Exam
e n t e r p r i s e s l l c
4. Use previous procedures to delete any new patient history created in this activity.
5. Use a paper towel or tissue to erase the laminated sheet.
Step 12. Critical Thinking
1. Locate a piece of paper and a pen or pencil.
2. Brief ly describe what is meant by the term “universal precautions.”
3. Write in complete sentences, being specific with your answer.
4. When you have completed the activity, turn in the journal to the instructor.
Step 13. Return to the media
Click the Next button on the media screen.
InstructorCheckpoint
Dental Practices DS v2.0 Student Workbook 51
Activity 6
e n t e r p r i s e s l l c
Oral Hygiene
ObjectivesAfter successfully completing Activity 6, you will be able to:• Identify the three factors considered in the oral hygiene
evaluation. • Discuss the relationship between plaque and gum disease,
periodontal disease, and tooth decay. • Conduct a plaque detection experiment. • Discuss proper brushing and flossing techniques. • Differentiate between intrinsic and extrinsic stains of the
teeth. • Develop a presentation on oral hygiene.
52 Dental Practices DS v2.0 Student Workbook
Activity 6 Oral Hygiene
e n t e r p r i s e s l l c
InstructorCheckpoint
InstructorCheckpoint
Procedure
Step 1. Equipment and supplies
Locate the following:
• disclosing tablet
• disposable pre-pasted toothbrush
Step 2. Complete the experiment
1. Ask the instructor where you may complete this activity.
Note: A sink and running water are required.
2. Brush your teeth following your normal routine.
3. After brushing and rinsing your teeth, open a packet containing a disclosing tablet.
4. Chew the tablet, but do not swallow.
Warning: Do not swallow any of the tablet.
5. Spit out any excess tablet in the sink or another appropriate location.
6. Examine your teeth in a mirror. Any areas stained with pink or red are indicators of plaque.
7. Brush your teeth again until no visible areas of plaque remain.
8. Dispose of the toothbrush in the proper location.
Step 3. Create a hygiene presentation
1. Conduct research and prepare a presentation for 1st grades on the importance of good oral hygiene, especially proper brushing and f lossing techniques.
2. Ask the instructor which resources you may use to research your topic.
Note: If internet access if available to you, the American Dental Association website (www.ada.org) is a great resource.
3. As you conduct your research, develop an outline to help you while you are giving your presentation.
Warning
Oral Hygiene Activity 6
Dental Practices DS v2.0 Student Workbook 53e n t e r p r i s e s l l c
InstructorCheckpoint
InstructorCheckpoint
4. Your presentation should include the following:
• Introduction – introduce yourself to the audience
• Summary – include a brief summary about why you are addressing the audience
• Information concerning hygiene that is important to the audience
• Information concerning dental diseases that is important to the audience
• Demonstration – demonstrate correct dental hygiene procedures
5. When you have completed your research, ask the instructor if you may present your work to the class.
Step 4. Critical Thinking
1. Locate a piece of paper and a pen or pencil.
2. Discuss the results of the Plaque Detection Experiment. Was there a lot of visible plaque after completing your normal brushing regimen? Is there something you could change about your brushing regimen to reduce the amount of plaque? Explain.
3. Write in complete sentences, being specific with your answers.
4. When you have completed the activity, turn in the journal to the instructor.
Step 5. Return to the media
Click the Next button on the media screen.

54 Dental Practices DS v2.0 Student Workbook
DEPCO
e n t e r p r i s e s l l c
Dental Practices DS v2.0 Student Workbook 55
Activity 7
e n t e r p r i s e s l l c
Radiographs
ObjectivesAfter successfully completing Activity 7, you will be able to:• Define x-ray and radiograph. • Discuss how radiographs are used in the field of dentistry. • Identify types of radiographs and their uses. • Discuss processes involved in developing x-ray film. • Identify safety issues surrounding radiation exposure. • Use an x-ray viewer to view bitewing radiographs.
56 Dental Practices DS v2.0 Student Workbook
Activity 7 Radiographs
e n t e r p r i s e s l l c
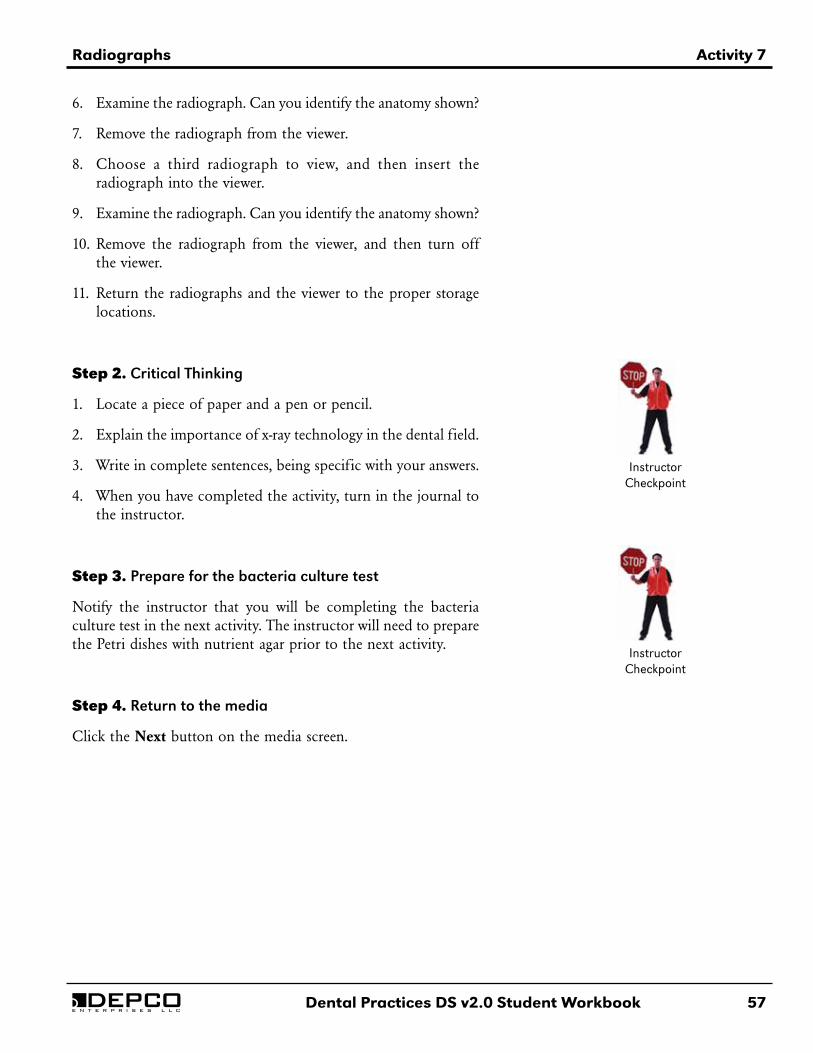
2. Choose a bitewing radiograph to view, and then insert the radiograph into the viewer. See figure 7-2.
figure 7-1
3. Turn the viewer on and examine the radiograph. Can you identify the anatomy shown?
4. Remove the radiograph from the viewer.
5. Choose another bitewing radiograph to view, and then insert the radiograph into the viewer.
figure 7-2
Procedure
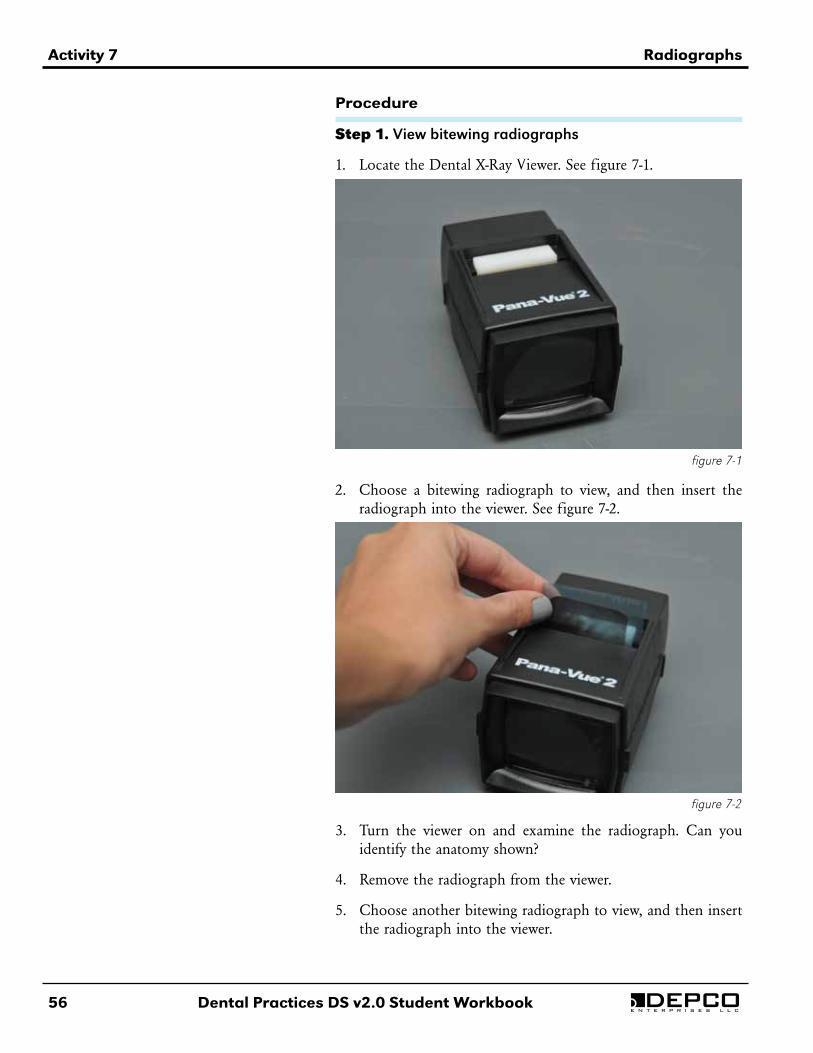
Step 1. View bitewing radiographs
1. Locate the Dental X-Ray Viewer. See figure 7-1.
Radiographs Activity 7
Dental Practices DS v2.0 Student Workbook 57e n t e r p r i s e s l l c
6. Examine the radiograph. Can you identify the anatomy shown?
7. Remove the radiograph from the viewer.
8. Choose a third radiograph to view, and then insert the radiograph into the viewer.
9. Examine the radiograph. Can you identify the anatomy shown?
10. Remove the radiograph from the viewer, and then turn off the viewer.
11. Return the radiographs and the viewer to the proper storage locations.
Step 2. Critical Thinking
1. Locate a piece of paper and a pen or pencil.
2. Explain the importance of x-ray technology in the dental field.
3. Write in complete sentences, being specific with your answers.
4. When you have completed the activity, turn in the journal to the instructor.
Step 3. Prepare for the bacteria culture test
Notify the instructor that you will be completing the bacteria culture test in the next activity. The instructor will need to prepare the Petri dishes with nutrient agar prior to the next activity.
Step 4. Return to the media
Click the Next button on the media screen.
InstructorCheckpoint
InstructorCheckpoint

58 Dental Practices DS v2.0 Student Workbook
DEPCO
e n t e r p r i s e s l l c
Dental Practices DS v2.0 Student Workbook 59
Activity 8
e n t e r p r i s e s l l c
Bacterial Growth
ObjectivesAfter successfully completing Activity 8, you will be able to:• Discuss pathogens and disease. • Discuss the chain of infection. • Identify the relationship between bacterial growth in the
mouth and the development of dental caries. • Conduct a bacteria culture test.
60 Dental Practices DS v2.0 Student Workbook
Activity 8 Bacterial Growth
e n t e r p r i s e s l l c
Procedure
Step 1. Equipment and supplies
Locate the following:
• dry erase marker
• Petri dish with agar medium
• pre-pasted toothbrush
• sterile swab (2)
Step 2. Label the Petri dish
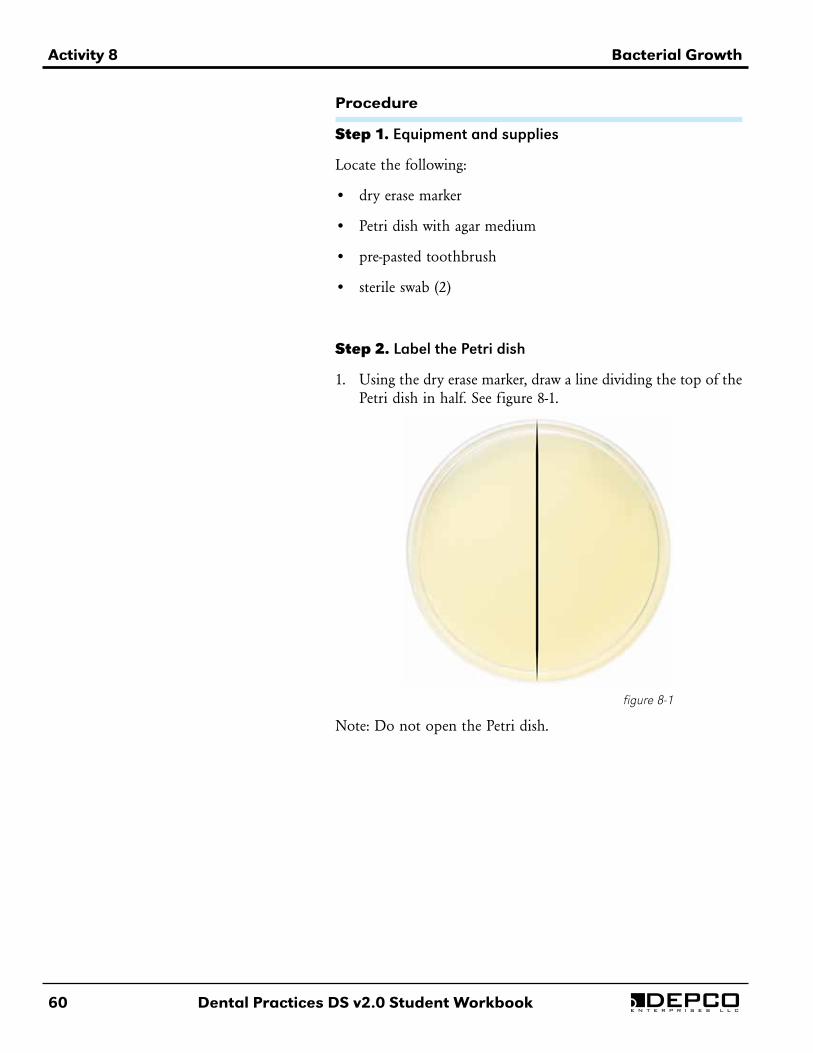
1. Using the dry erase marker, draw a line dividing the top of the Petri dish in half. See figure 8-1.
figure 8-1
Note: Do not open the Petri dish.
Bacterial Growth Activity 8
Dental Practices DS v2.0 Student Workbook 61e n t e r p r i s e s l l c
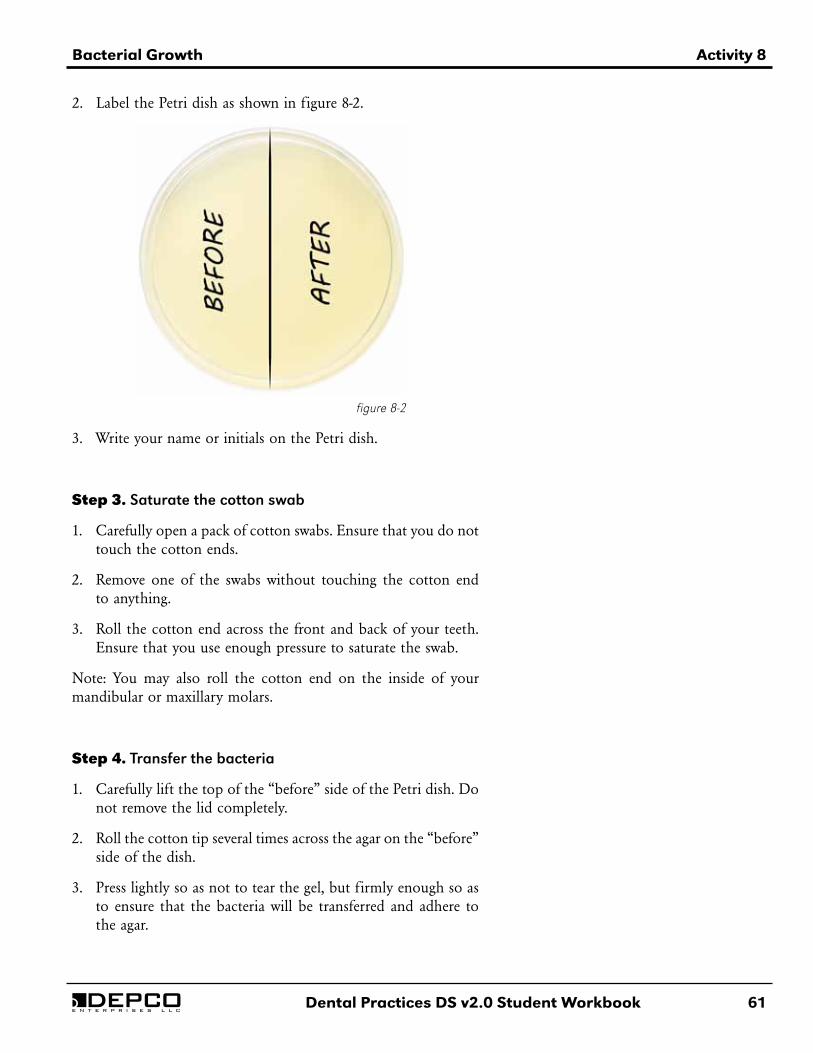
2. Label the Petri dish as shown in figure 8-2.
figure 8-2
3. Write your name or initials on the Petri dish.
Step 3. Saturate the cotton swab
1. Carefully open a pack of cotton swabs. Ensure that you do not touch the cotton ends.
2. Remove one of the swabs without touching the cotton end to anything.
3. Roll the cotton end across the front and back of your teeth. Ensure that you use enough pressure to saturate the swab.
Note: You may also roll the cotton end on the inside of your mandibular or maxillary molars.
Step 4. Transfer the bacteria
1. Carefully lift the top of the “before” side of the Petri dish. Do not remove the lid completely.
2. Roll the cotton tip several times across the agar on the “before” side of the dish.
3. Press lightly so as not to tear the gel, but firmly enough so as to ensure that the bacteria will be transferred and adhere to the agar.
62 Dental Practices DS v2.0 Student Workbook
Activity 8 Bacterial Growth
e n t e r p r i s e s l l c
4. Close the top of the Petri dish.
5. Dispose of the cotton swab in the appropriate location.
Step 5. Brush your teeth
1. Ask the instructor if it is ok to brush your teeth.
2. Brush your teeth using the pre-pasted toothbrush.
3. After brushing your teeth, remove a second sterile swab, and then roll the swab across your teeth.
4. Carefully lift the top of the “after” side of the Petri dish. Do not remove the lid completely.
5. Roll the cotton tip several times across the agar on the “after” side of the dish.
6. Press lightly so as not to tear the gel, but firmly enough so as to ensure that the bacteria will be transferred and adhere to the agar.
7. Close the top of the Petri dish.
8. Discard the cotton swab in the appropriate location.
Step 6. Initiate bacteria growth
1. Ask the instructor if an incubation box is available.
2. If an incubation box is available, turn the Petri dish upside down, and then place the dish in the incubation box.
3. If an incubation box is not available, turn the Petri dish upside down, and then place the dish in a safe place where it will not be disturbed.
Note: It may take several days at room temperature for the bacteria to become large enough to see. If the temperature in the room is too low, the bacterial growth will be much lower.
InstructorCheckpoint
Bacterial Growth Activity 8
Dental Practices DS v2.0 Student Workbook 63e n t e r p r i s e s l l c
Step 7. Critical Thinking
1. Locate a piece of paper and a pen or pencil.
2. Write a brief description of why viral infections have traditionally been difficult to control.
3. Write in complete sentences, being specific with your answer.
4. When you have completed the activity, turn in the journal to the instructor.
Step 8. Return to the media
Click the Next button on the media screen.
InstructorCheckpoint

64 Dental Practices DS v2.0 Student Workbook
DEPCO
e n t e r p r i s e s l l c

Dental Practices DS v2.0 Student Workbook 65
Activity 9
e n t e r p r i s e s l l c
Dental Impressions
ObjectiveAfter successfully completing Activity 9, you will be able to: • Identify the physical and chemical properties of alginate. • Discuss the factors that influence the stability of alginate. • Explain how dental impressions are used in the dental field. • Identify the correct procedures for mixing alginate, loading
alginate trays, and taking alginate impressions. • Discuss the field of forensic odontology. • Discuss different aspects prevalent to the impression process. • Practice mixing alginate, loading alginate trays, and taking
alginate impressions using a typodont.
66 Dental Practices DS v2.0 Student Workbook
Activity 9 Dental Impressions
e n t e r p r i s e s l l c
InstructorCheckpoint
Procedure
Step 1. Equipment and supplies
Locate the following:
• alginate impression material
• alginate spatula
• f lexible mixing bowl
• impression trays (upper and lower)
• measuring cup
• paper towels
• typodont model (dental manikin)
Note: Ensure that the facial covering is removed from the dental manikin prior to proceeding with the remainder of this activity.
Step 2. Prepare the mixture
1. Read Step 2 - Step 5 prior to completing the activity.
Note: The alginate used in this curriculum will set quickly. Ensure that you understand the mixing process prior to completing it.
2. Measure 60 milliliters (mL) of room temperature water.
Note: Fill the container to the “1” line.
3. Pour the water into the mixing bowl.
4. Roll the alginate container from side to side several times to f luff the alginate. Do not shake the container.
Warning: Do not immediately open the alginate container after rolling it. A hazardous aerosol cloud may form inside the container.
5. Carefully open the alginate container.
6. Dip the scoop into the powder.
7. Tap the scoop against the rim of the container to remove any air pockets, and then level the powder off with the spatula.
Warning
Dental Impressions Activity 9
Dental Practices DS v2.0 Student Workbook 67e n t e r p r i s e s l l c
8. Carefully sift the powder into the water.
Note: If you are using pre-measured packets of alginate, open the packet with scissors, and then gently pour the contents into the water.
9. Use previous procedures to add two more scoops of alginate to the water.
10. Carefully put the lid on the alginate container.
Step 3. Begin spatulation
1. Carefully stir the ingredients, and then begin spatulation in a stopping (back and forth) motion.
2. Rotate the bowl during spatulation while spreading the mixture against the side of the bowl to dissolve all the granules and eliminate air pockets.
Note: The spatulation process should last about 35-45 seconds in order to produce a smooth, creamy mixture.
Step 4. Load the tray
1. Using the spatula, remove the alginate from the bowl in one mass.
Note: If the alginate has begun to set (harden) before you load the tray, remove the alginate from the tray, discard it, and restart the mixing process.
2. Place all of the alginate in the posterior area of the upper tray, and then spread the alginate evenly over the entire tray.
3. Smooth the alginate into the tray.
4. Press the alginate material gently and remove any unwanted material from the boarder of the tray.

68 Dental Practices DS v2.0 Student Workbook
Activity 9 Dental Impressions
e n t e r p r i s e s l l c
Note: When inserting an impression tray, the tray is held in one hand and the other hand retracts the cheek of the patient. In this simulation, it is not necessary to retract the cheek of the typodont.
2. Seat the anterior portion of the tray. See figure 9-2.
figure 9-2
Step 5. Seat the impression trays
1. On the typodont, seat the posterior of the tray first to expel the material forward, instead of toward the throat. See figure 9-1.
figure 9-1
Dental Impressions Activity 9
Dental Practices DS v2.0 Student Workbook 69e n t e r p r i s e s l l c
figure 9-3
3. Hold the tray in place for 1 minute.
4. Carefully remove any unwanted material from the outside border of the tray.
Step 6. Remove the tray
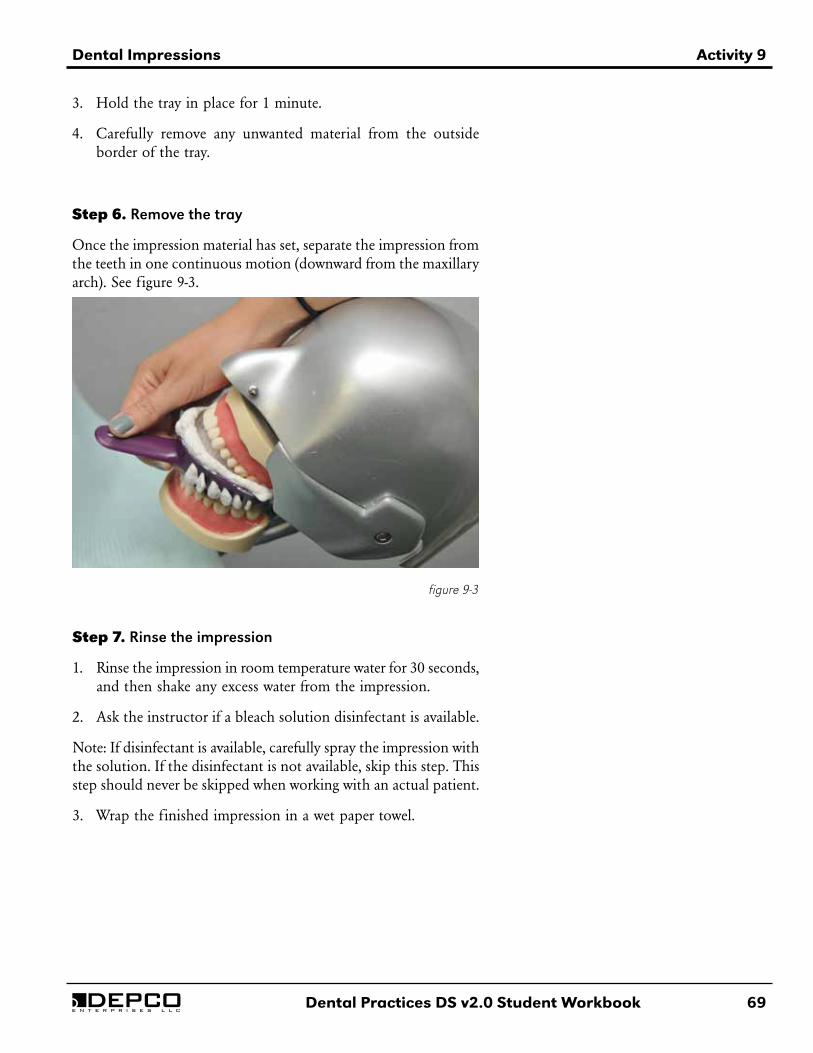
Once the impression material has set, separate the impression from the teeth in one continuous motion (downward from the maxillary arch). See figure 9-3.
Step 7. Rinse the impression
1. Rinse the impression in room temperature water for 30 seconds, and then shake any excess water from the impression.
2. Ask the instructor if a bleach solution disinfectant is available.
Note: If disinfectant is available, carefully spray the impression with the solution. If the disinfectant is not available, skip this step. This step should never be skipped when working with an actual patient.
3. Wrap the finished impression in a wet paper towel.
70 Dental Practices DS v2.0 Student Workbook
Activity 9 Dental Impressions
e n t e r p r i s e s l l c
Step 8. Complete a mandibular impression
1. Measure 40 mL of room temperature water.
Note: Fill the container to the “2/3” line.
2. Pour the water into the mixing bowl.
3. Carefully open the alginate container, and then use previous procedures to add 2 scoops of alginate to the water.
4. Carefully put the lid on the alginate container.
5. Use previous procedures to complete spatulation.
6. Locate the lower impression tray, and then use previous procedures to load the tray.
7. Use previous procedures to seat the impression tray on the mandibular arch.
8. Use previous procedures to remove and rinse the tray.
9. Ask the instructor to review your set of maxillary and mandibular impressions.
Step 9. Clean the trays
1. Clean off as much as possible of the remaining impression material left in both trays.
Note: The type of impression tray included with this curriculum is disposable. Normally, these are thrown away after use. Because you are not working with a “real patient” and there are no potential biological hazards, the impression tray will be used again. In a dental office, trays that are not disposable are inserted into an autoclave in order to kill any potentially hazardous microorganisms or bacteria.
2. If necessary, use dental f loss to remove any bits of impression material in between the teeth of the typodont model.
InstructorCheckpoint

Dental Impressions Activity 9
Dental Practices DS v2.0 Student Workbook 71e n t e r p r i s e s l l c
InstructorCheckpoint
Step 10. Critical Thinking
1. Locate a piece of paper and a pen or pencil.
2. Discuss why impressions are used in dentistry. What aspect of creating impressions did you find the most difficult? Why?
3. Write in complete sentences, being specific with your answers.
4. When you have completed the activity, turn in the journal to the instructor.
Step 11. Return to the media
Click the Next button on the media screen.

72 Dental Practices DS v2.0 Student Workbook
DEPCO
e n t e r p r i s e s l l c
Dental Practices DS v2.0 Student Workbook 73
Activity 10
e n t e r p r i s e s l l c
Post-Test and Wrap-Up
ObjectivesAfter successfully completing Activity 10, you will be able to:• Demonstrate your knowledge of dental practices by taking
the Post-Test.• Complete any unfinished activities.
74 Dental Practices DS v2.0 Student Workbook
Activity 10 Post-Test and Wrap-Up
e n t e r p r i s e s l l c
Procedure
Step 1. Take the Post-Test
1. Ask the instructor for the Post-Test.
2. Write the letter for the correct answer to each question on the Student Answer Sheet. Do not write on the test.
3. Return the test to the instructor.
Step 2. Complete unfinished activities
1. If there are any incomplete activities, finish them now.
2. You may also review any activities that were difficult or hard to remember.
3. If you are finished with the previous activities, proceed to the Bonus Activities in Activity 11.
Step 3. Return to the media
Click the Next button on the media screen.
InstructorCheckpoint
Dental Practices DS v2.0 Student Workbook 75
Activity 11
e n t e r p r i s e s l l c
Bonus Activities
ObjectiveAfter successfully completing Activity 11, you will be able to demonstrate your understanding of the concepts and terms related to Dental Practices.
76 Dental Practices DS v2.0 Student Workbook
Activity 11 Bonus Activities
e n t e r p r i s e s l l c
InstructorCheckpoint
InstructorCheckpoint
InstructorCheckpoint
Procedure
Step 1. Complete the Crossword Puzzle
1. Locate the Crossword Puzzle and Vocabulary Quiz Worksheet.
2. Complete the crossword puzzle.
Step 2. Complete the Vocabulary Quiz
1. Study the terms on the Vocabulary Quiz Worksheet.
2. On the Student Answer Sheet, match the terms on the left of the worksheet to the definitions on the right.
3. When you have completed the activity, turn in the worksheet to the instructor.
Step 3. Check the bacteria cultures
1. Locate and examine the bacteria growth on your own Petri dish.
2. Discuss the results of your experiment with the instructor. Compare the bacterial growth on the “Before” side to the “After” side.
3. Ask the instructor where to discard the Petri dish.
Step 4. Return to the media
Click the Next button on the media screen.

Dental Practices DS v2.0 Student Workbook 77
Activity 12Challenge
e n t e r p r i s e s l l c
ObjectiveAfter successfully completing Activity 12, you will be able to:• Complete a patient registration form. • Create a new patient file. • Schedule and modify an appointment for an existing patient.
78 Dental Practices DS v2.0 Student Workbook
Activity 12 Challenge
e n t e r p r i s e s l l c
Procedure
Step 1. Complete a patient registration form
1. Locate the Activity 12 Worksheet.
Note: If necessary, provide fictional information to complete as much of the Activity 12 Worksheet as possible. Do not record sensitive personal information such as your real social security number.
2. Complete the General Information portion of the patient registration form as if you were a new patient at a dental facility.
3. Write legibly so that your information can be evaluated by another student.
4. Complete the Insurance Information portion of the registration form.
5. Complete the Medical History portion of the registration form.
Step 2. Complete a dental history assessment
1. Working with a partner, take turns acting as a client and a health care provider. When acting as the dental health provider, ask the client for their patient registration form.
2. Read the information carefully, as it will help to determine what type of follow-up questions to ask.
3. Ask the client appropriate questions and complete the Dental History portion of the registration form.
Note: The Dental History includes such information as the chief complaint, present illness, past dental problems or treatment, oral habits, and dietary profile.
Instructor Checkpoint
Challenge Activity 12
Dental Practices DS v2.0 Student Workbook 79e n t e r p r i s e s l l c
Step 3. Complete a personal profile assessment
1. Working with a partner, take turns acting as a client and a health care provider.
2. As the dental health provider, collect personal information regarding the client. You may use a blank sheet of paper to record your answers or any notes regarding the conversation.
Note: Observe how the patient is behaving and ask questions to find out things such as attitude, socioeconomic status, and dental beliefs without being too direct.
Step 4. Start the program
1. On the taskbar, click Start.
2. On the Start menu, scroll to locate, and then click Dentrix.
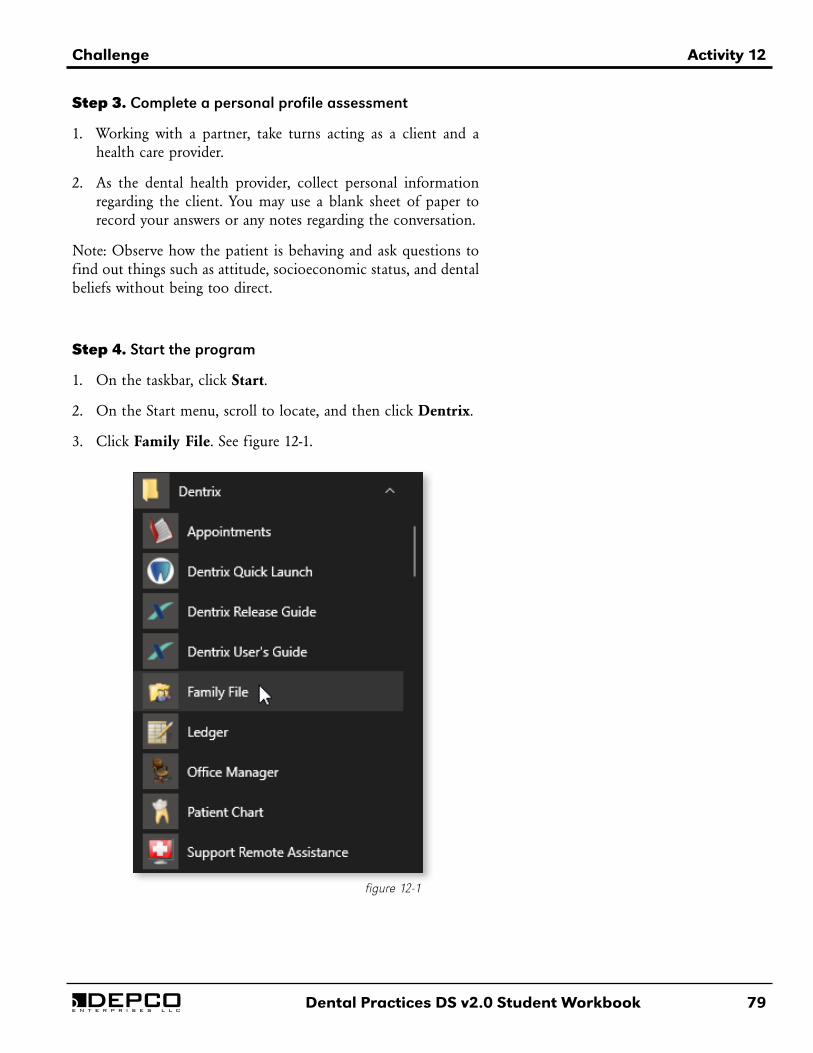
3. Click Family File. See figure 12-1.
figure 12-1
80 Dental Practices DS v2.0 Student Workbook
Activity 12 Challenge
e n t e r p r i s e s l l c
4. On the Family File toolbar, click the Select Patient/New Family button. See figure 12-2.
figure 12-2
Step 5. Create a new patient file
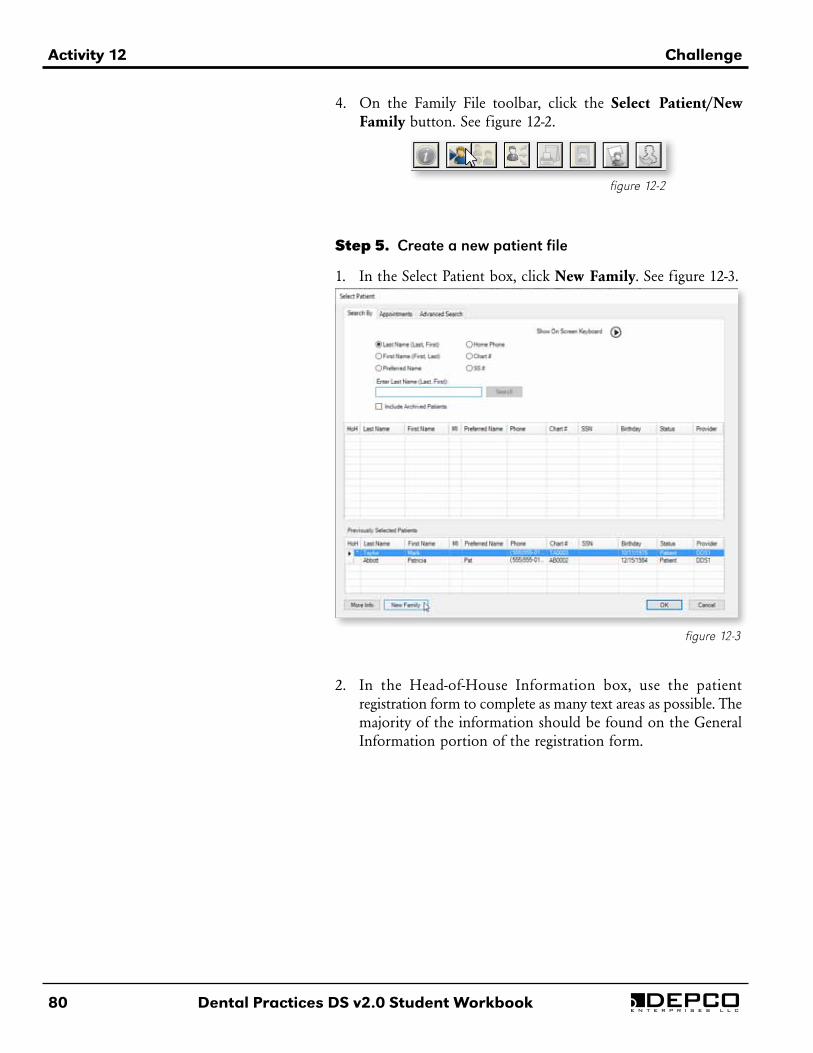
1. In the Select Patient box, click New Family. See figure 12-3.
figure 12-3
2. In the Head-of-House Information box, use the patient registration form to complete as many text areas as possible. The majority of the information should be found on the General Information portion of the registration form.
Challenge Activity 12
Dental Practices DS v2.0 Student Workbook 81e n t e r p r i s e s l l c
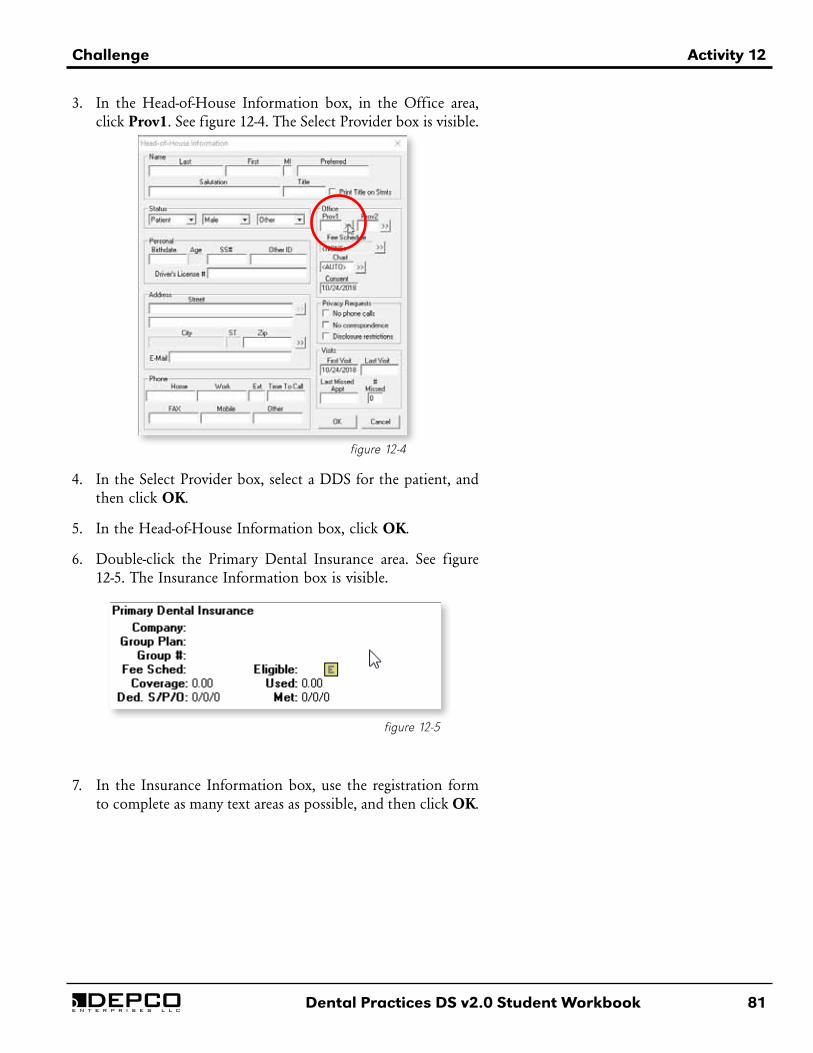
figure 12-4
3. In the Head-of-House Information box, in the Office area, click Prov1. See figure 12-4. The Select Provider box is visible.
4. In the Select Provider box, select a DDS for the patient, and then click OK.
5. In the Head-of-House Information box, click OK.
6. Double-click the Primary Dental Insurance area. See figure 12-5. The Insurance Information box is visible.
figure 12-5
7. In the Insurance Information box, use the registration form to complete as many text areas as possible, and then click OK.
82 Dental Practices DS v2.0 Student Workbook
Activity 12 Challenge
e n t e r p r i s e s l l c
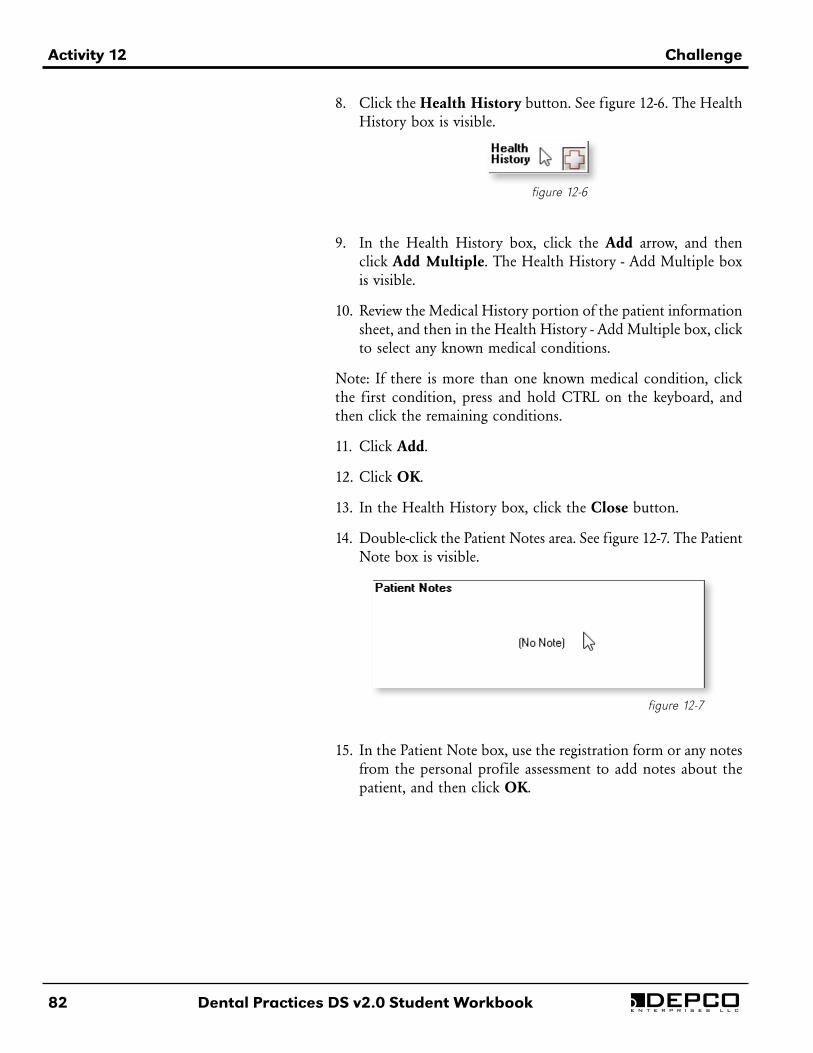
8. Click the Health History button. See figure 12-6. The Health History box is visible.
figure 12-6
9. In the Health History box, click the Add arrow, and then click Add Multiple. The Health History - Add Multiple box is visible.
10. Review the Medical History portion of the patient information sheet, and then in the Health History - Add Multiple box, click to select any known medical conditions.
Note: If there is more than one known medical condition, click the first condition, press and hold CTRL on the keyboard, and then click the remaining conditions.
11. Click Add.
12. Click OK.
13. In the Health History box, click the Close button.
14. Double-click the Patient Notes area. See figure 12-7. The Patient Note box is visible.
figure 12-7
15. In the Patient Note box, use the registration form or any notes from the personal profile assessment to add notes about the patient, and then click OK.
Challenge Activity 12
Dental Practices DS v2.0 Student Workbook 83e n t e r p r i s e s l l c
Step. 6 Delete the family and exit the program
1. When you have completed the activity, on the Edit menu, click Delete Family.
2. In the Dentrix Family File box, click Yes.
3. Allow your partner to complete previous procedures to register a new patient, and then delete the new patient.
Note: Ensure that you delete any new patients at the end of the activity. This will prepare the activity for the next student.
4. On the File menu, click Exit.
Step 7. Start the program
1. On the taskbar, click Start.
2. On the Start menu, scroll to locate, and then click Dentrix.
3. Click Appointments. The Dentrix Appointment Book user interface is visible.
Step 8. Delete the employer
1. On the Dentrix Appointment book user interface, on the Appointment Book toolbar, click the Office Manager button.
2. On the Dentrix Off ice Manager user interface, on the Maintenance menu, point to Reference, and then click Employer Maintenance.
3. Use previous procedures to delete the employer.
Note: For complete instructions on how to delete an employer, refer to Activity 4.
84 Dental Practices DS v2.0 Student Workbook
Activity 12 Challenge
e n t e r p r i s e s l l c
Step 9. Delete the insurance provider
1. On the Maintenance menu, point to Reference, and then click Insurance Maintenance.
2. Use previous procedures to delete the insurance provider.
Note: For complete instructions on how to delete an insurance provider, refer to Activity 4.
Step 10. Schedule an appointment for an existing patient
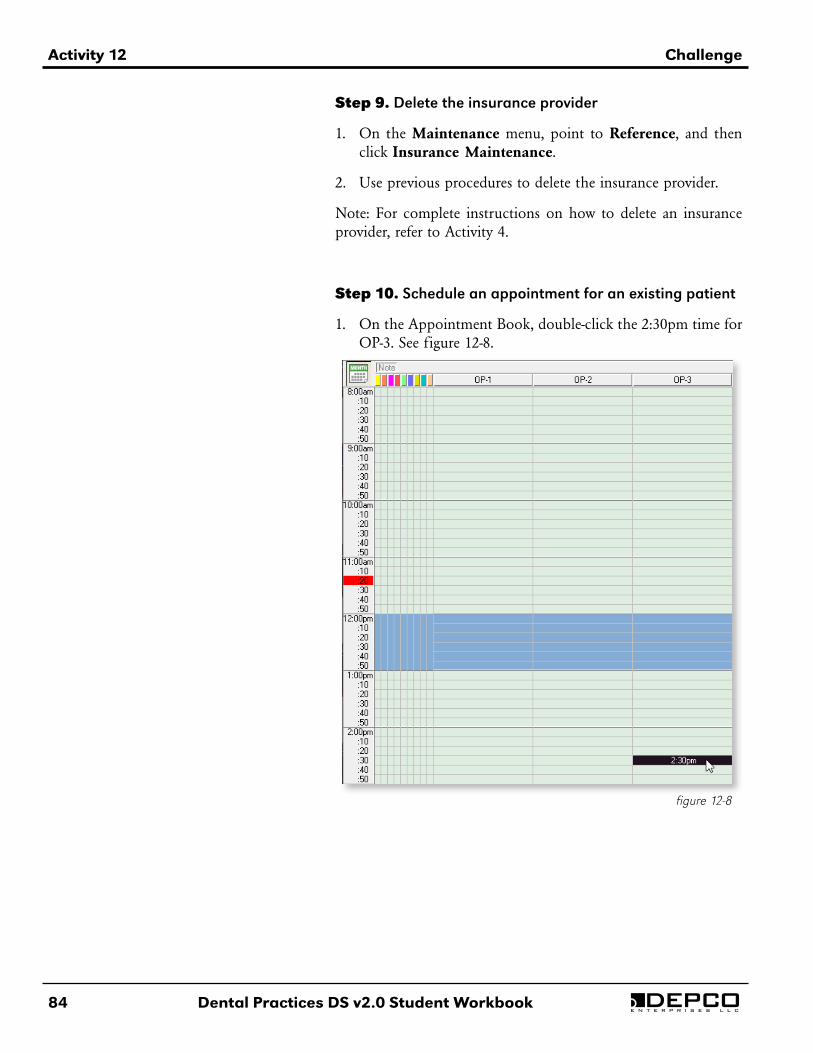
1. On the Appointment Book, double-click the 2:30pm time for OP-3. See figure 12-8.
figure 12-8
Challenge Activity 12
Dental Practices DS v2.0 Student Workbook 85e n t e r p r i s e s l l c
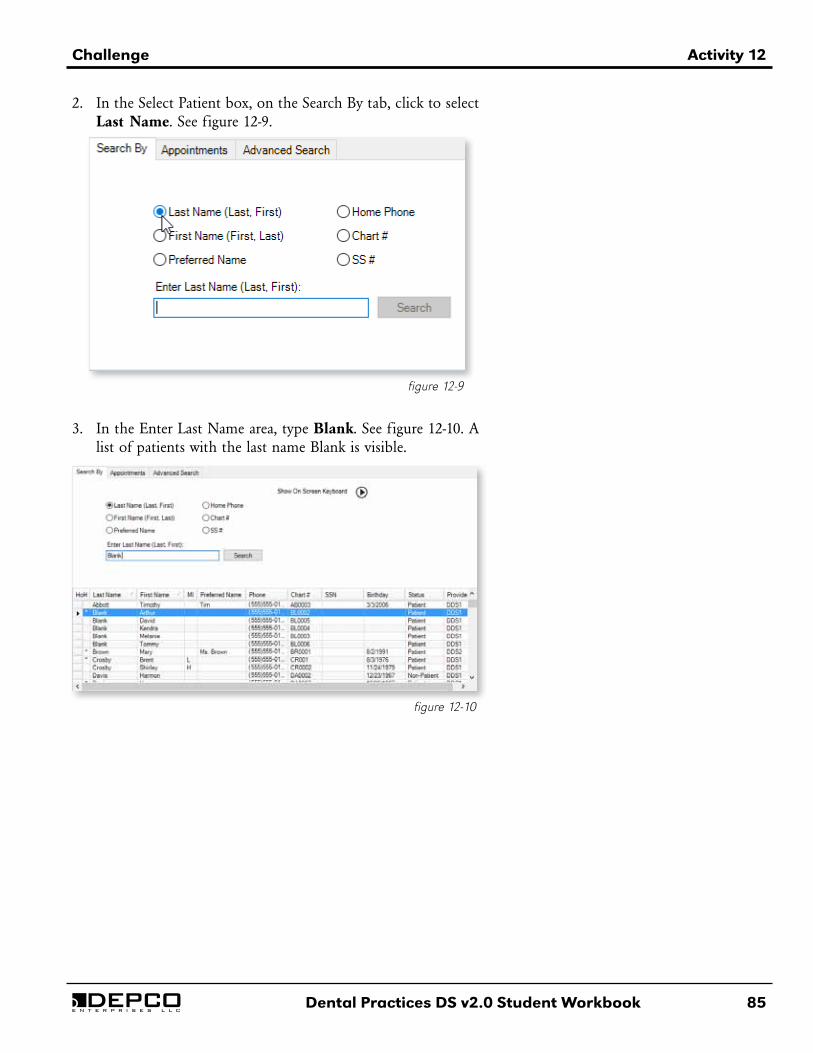
2. In the Select Patient box, on the Search By tab, click to select Last Name. See figure 12-9.
figure 12-9
3. In the Enter Last Name area, type Blank. See figure 12-10. A list of patients with the last name Blank is visible.
figure 12-10
86 Dental Practices DS v2.0 Student Workbook
Activity 12 Challenge
e n t e r p r i s e s l l c
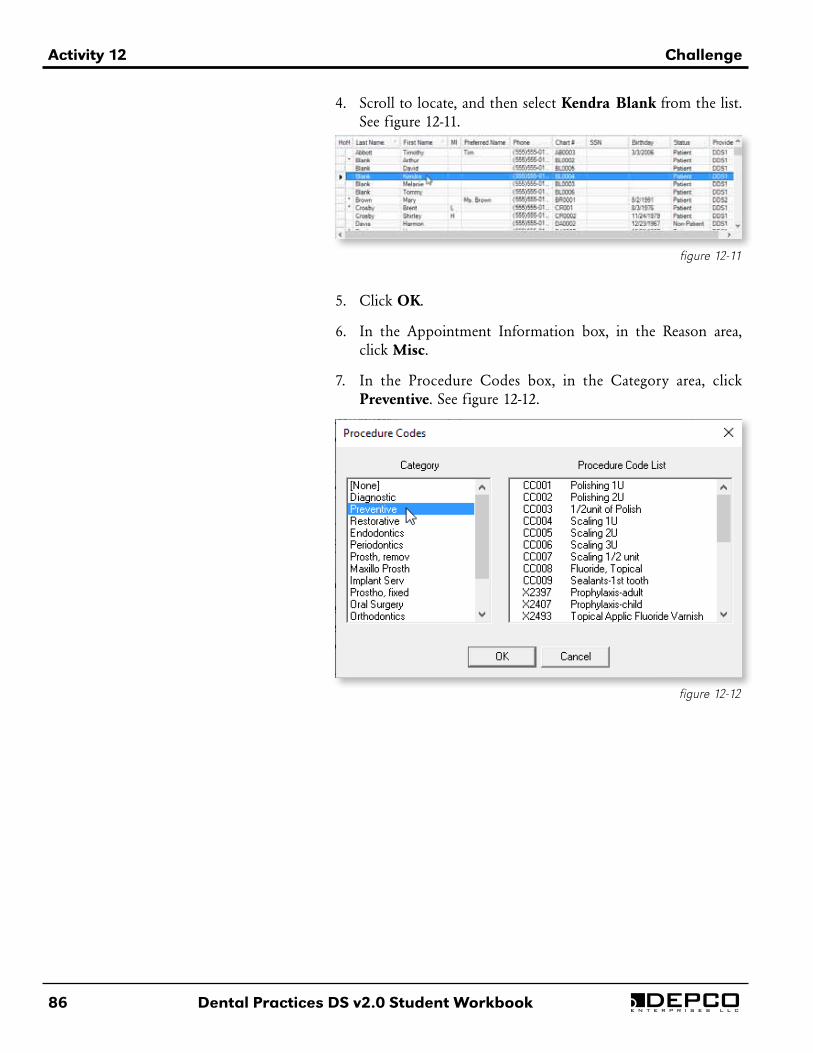
4. Scroll to locate, and then select Kendra Blank from the list. See figure 12-11.
figure 12-11
5. Click OK.
6. In the Appointment Information box, in the Reason area, click Misc.
7. In the Procedure Codes box, in the Category area, click Preventive. See figure 12-12.
figure 12-12
Challenge Activity 12
Dental Practices DS v2.0 Student Workbook 87e n t e r p r i s e s l l c
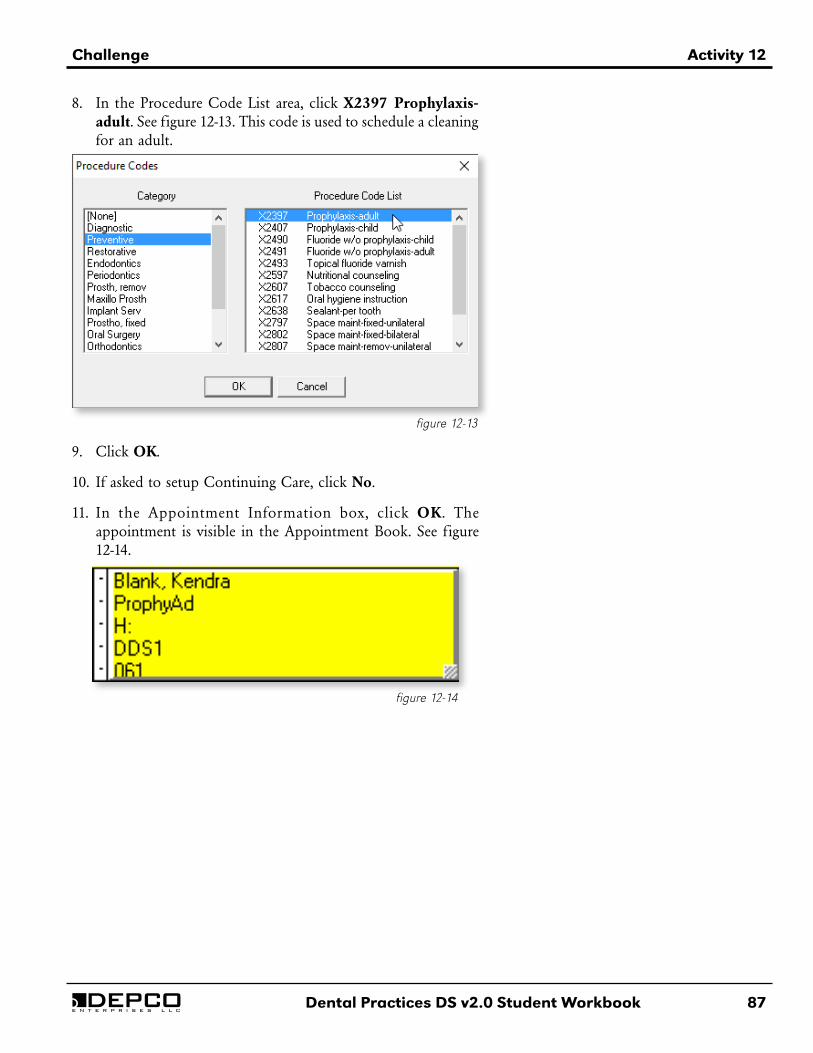
8. In the Procedure Code List area, click X2397 Prophylaxis-adult. See figure 12-13. This code is used to schedule a cleaning for an adult.
figure 12-13
9. Click OK.
10. If asked to setup Continuing Care, click No.
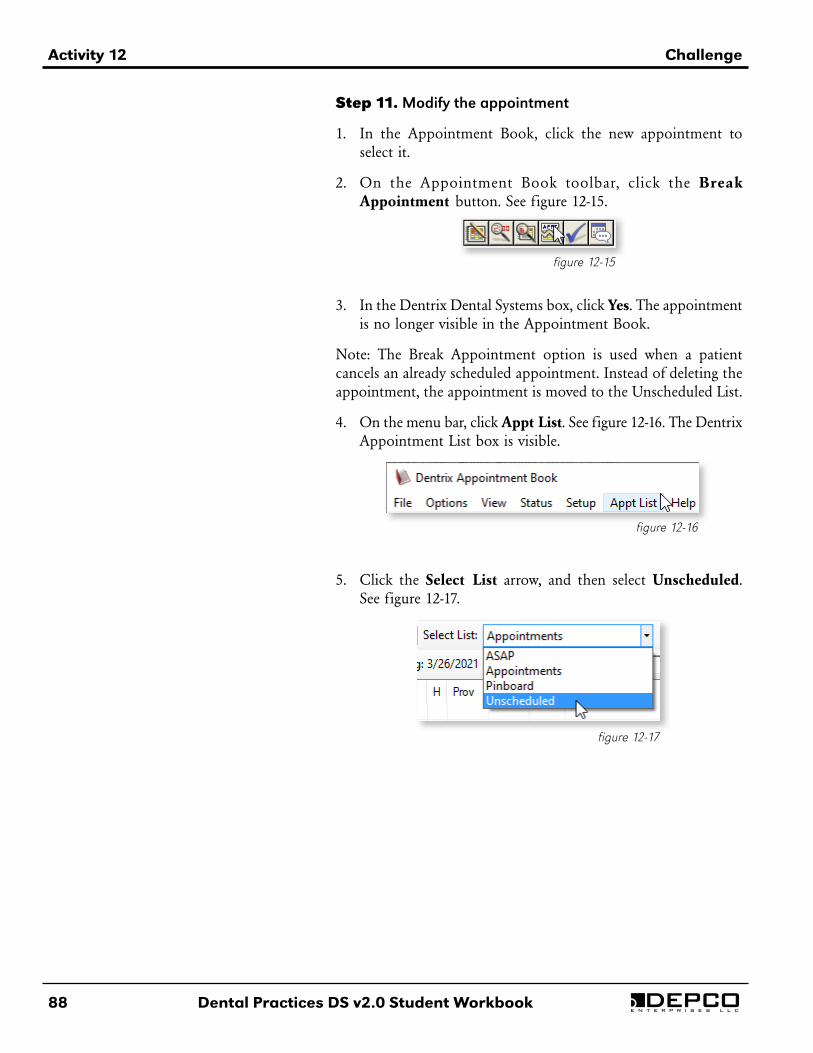
11. In the Appointment Information box, click OK. The appointment is visible in the Appointment Book. See figure 12-14.
figure 12-14
88 Dental Practices DS v2.0 Student Workbook
Activity 12 Challenge
e n t e r p r i s e s l l c
Step 11. Modify the appointment
1. In the Appointment Book, click the new appointment to select it.
2. On the Appointment Book toolbar, click the Break Appointment button. See figure 12-15.
figure 12-15
3. In the Dentrix Dental Systems box, click Yes. The appointment is no longer visible in the Appointment Book.
Note: The Break Appointment option is used when a patient cancels an already scheduled appointment. Instead of deleting the appointment, the appointment is moved to the Unscheduled List.
4. On the menu bar, click Appt List. See figure 12-16. The Dentrix Appointment List box is visible.
figure 12-16
figure 12-17
5. Click the Select List arrow, and then select Unscheduled. See figure 12-17.
Challenge Activity 12
Dental Practices DS v2.0 Student Workbook 89e n t e r p r i s e s l l c
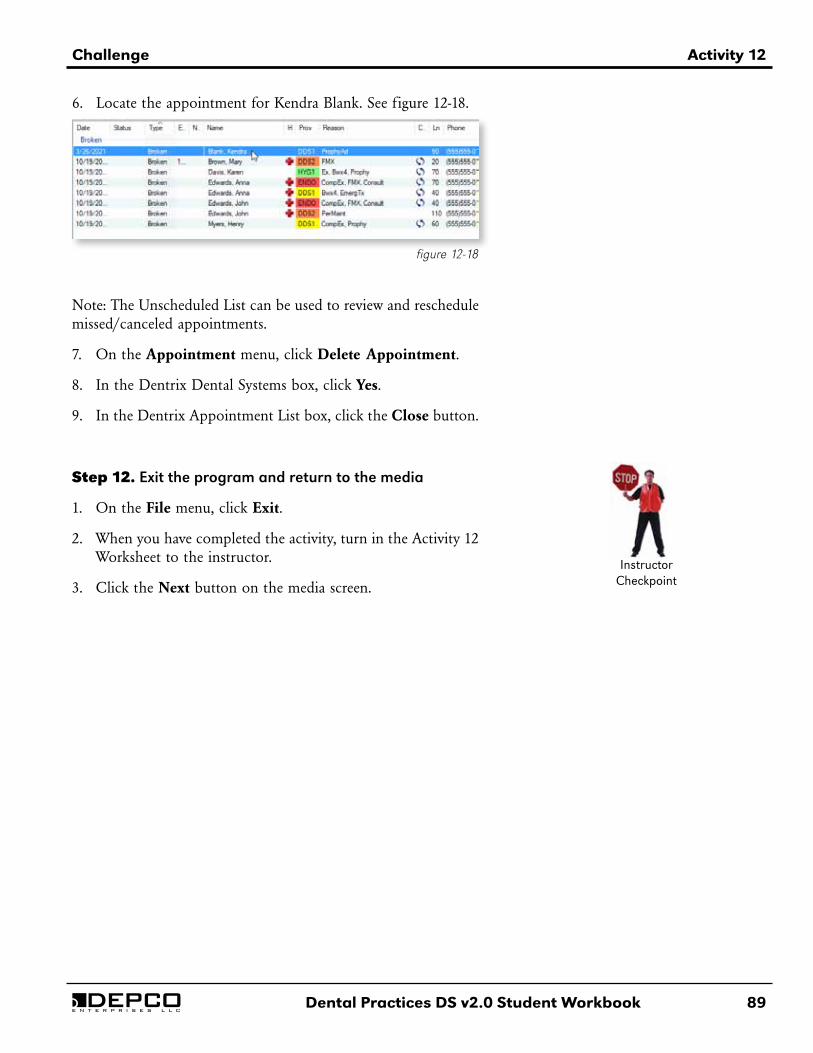
6. Locate the appointment for Kendra Blank. See figure 12-18.
figure 12-18
Instructor Checkpoint
Note: The Unscheduled List can be used to review and reschedule missed/canceled appointments.
7. On the Appointment menu, click Delete Appointment.
8. In the Dentrix Dental Systems box, click Yes.
9. In the Dentrix Appointment List box, click the Close button.
Step 12. Exit the program and return to the media
1. On the File menu, click Exit.
2. When you have completed the activity, turn in the Activity 12 Worksheet to the instructor.
3. Click the Next button on the media screen.

90 Dental Practices DS v2.0 Student Workbook
DEPCO
e n t e r p r i s e s l l c

Dental Practices DS v2.0 Student Workbook 91
Activity 13Open-Ended Challenge
e n t e r p r i s e s l l c
ObjectivesAfter successfully completing Activity 13, you will be able to:• Discuss HOSA and the various competitions related to
dentistry. • Complete an activity similar to a HOSA competitive event.

92 Dental Practices DS v2.0 Student Workbook
Activity 13 Open-Ended Challenge
e n t e r p r i s e s l l c
Procedure
Step 1. Choose a HOSA competitive event
1. Open a web browser program.
2. In the address bar, type http://www.hosa.org/guidelines, and then press ENTER.
3. On the HOSA website, scroll to locate a HOSA competitive event that interests you. You may choose an event previously discussed in this curriculum or you may explore other options.
4. Ask the instructor to approve the event.
Step 2. Complete the event
1. Read the instructions for the event, and then complete as much as possible.
2. If the instructions require you to complete a speech or presentation, ask the instructor if you may present your work to the class.
3. If you are interested in the HOSA organization or competing in a HOSA competitive event, ask the instructor for more information.
Step 3. Return to the media
Click the Next button on the media screen.
InstructorCheckpoint
InstructorCheckpoint
Dental Practices DS v2.0 Student Workbook 93
Activity 14
e n t e r p r i s e s l l c
Careers
ObjectivesAfter successfully completing Activity 14, you will be able to: • Research the certification, materials, and cost of becoming
a dental hygienist in your area. • Write a brief report on your research.
94 Dental Practices DS v2.0 Student Workbook
Activity 14 Careers
e n t e r p r i s e s l l c
Procedure
Step 1. Find DEPCO on the internet
1. Open a web browser program.
2. In the address bar, type http://www.depcollc.com, and then press ENTER. See figure 14-1.
3. On the DEPCO website, click Student Activities. See figure 14-2.
figure 14-2
figure 14-1
Careers Activity 14
Dental Practices DS v2.0 Student Workbook 95e n t e r p r i s e s l l c
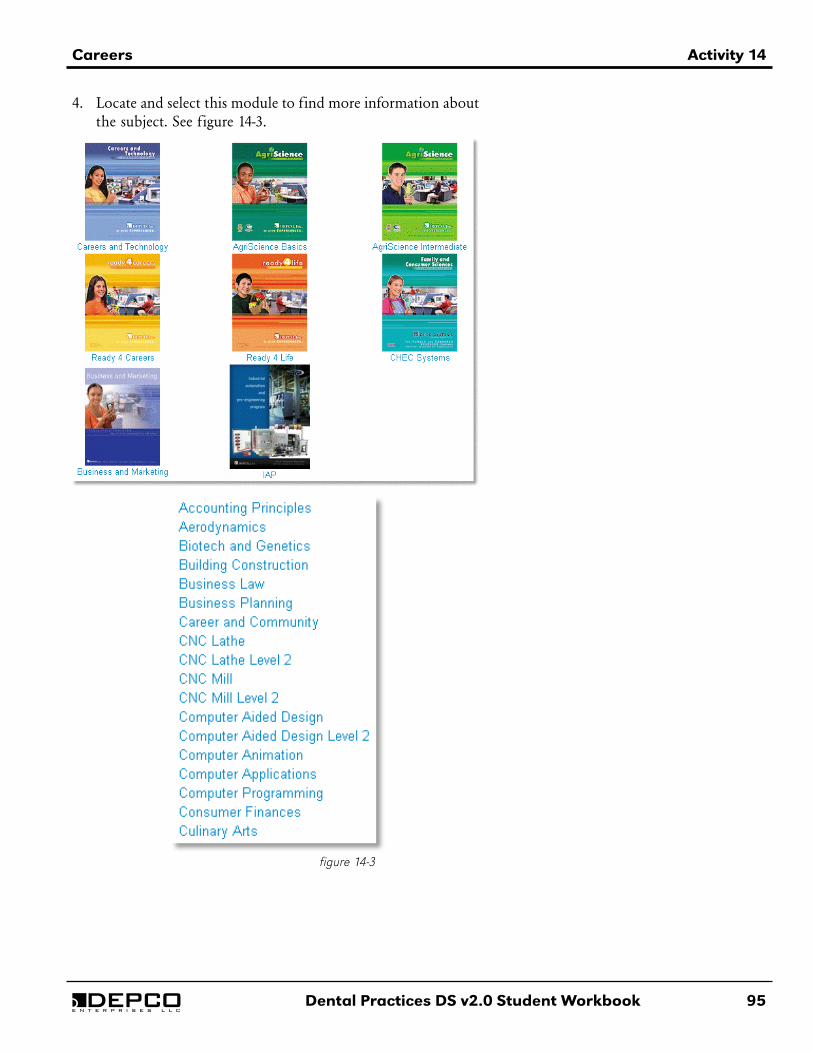
4. Locate and select this module to find more information about the subject. See figure 14-3.
figure 14-3
96 Dental Practices DS v2.0 Student Workbook
Activity 14 Careers
e n t e r p r i s e s l l c
5. Follow the on-screen instructions to select a keyword and search engine.
6. Click to go directly to selected websites or the online Occupational Outlook Handbook.
7. You may use the resources located on the DEPCO website in addition to your own findings in order to complete your report.
Step 2. Write a report
1. Locate notebook paper and a pen or pencil.
2. Research the process of becoming a dental hygienist in the state in which you live.
3. For the research, focus on the following:
• How many years of school are required? • Are there specific laws for EMTs? • How often, if at all, do EMTs need to be recertified?• Does your state require specific certifications? • What is the total cost for school and exams?
4. You might want to create a chart to keep all of the information organized.
5. Once you have all of the correct information, write a two-page report on your research.
6. Write in complete sentences.
7. When you have completed the report, turn in the report and your notes to the instructor.
Step 3. Exit the program and return to the media
1. Close the web browser program.
2. Click the Next button on the media screen.
InstructorCheckpoint
Dental Practices DS v2.0 Student Workbook 97
Activity 15
e n t e r p r i s e s l l c
ObjectiveAfter successfully completing Activity 15, you will have either performed a job shadow or researched and written a brief report about new technology used in the field of dentistry.
Job Shadow
98 Dental Practices DS v2.0 Student Workbook
Activity 15 Job Shadow
e n t e r p r i s e s l l c
InstructorCheckpoint
Procedure
Step 1. Complete a job shadow
1. Ask the instructor if you are able to job shadow. If the instructor was able to set up a job shadowing activity, follow their instructions for completing the job shadow.
2. After completing the job shadow, write a brief report discussing how your shadowing opportunity went. What types of things did you learn?
3. Write in complete sentences, being specific with your answers.
4. When you have completed the activity, turn in the journal to the instructor.
5. If job shadowing is unavailable, complete the following steps to research new technology used in the field of dentistry and write a brief report.
Step 2. Conduct research and write a report
1. If you are completing the research activity, you will need to ask the instructor about various sources for your research.
2. Conduct research and write a brief report about new technology used in the field of dentistry.
3. As you research, ensure that you document your sources.
4. You should use at least 3 different sources and your research should include information on the following:
• What the technology is
• How it is being used/will be used
• Advantages
• Disadvantages (if any)
• Availability
5. When you are finished with the report, turn in the report to the instructor.
InstructorCheckpoint

Job Shadow Activity 15
Dental Practices DS v2.0 Student Workbook 99e n t e r p r i s e s l l c
Step 3. Return to the media
Click the Next button on the media screen.

DEPCO
100 Dental Practices DS v2.0 Student Workbooke n t e r p r i s e s l l c
Dental Practices DS v2.0 Student Workbook 101
Reference
e n t e r p r i s e s l l c
Reference
Glossary ....................................................................102
Common Charting Symbols ..................................105
102 Dental Practices DS v2.0 Student Workbook
Reference Section
e n t e r p r i s e s l l c
Glossary
advanced carious lesion: A cavity that occurs when there is a large amount of dental decay.
alginate: An elastic material used to create dental impressions.
antiseptic: The product or method used to prevent or stop the growth of microorganisms.
asepsis: The method used in making or maintaining an environment that prevents infection.
aseptic: Free or freed from microorganisms that are capable of causing disease.
bacterium: Any of the unicellular prokaryotic microorganisms that are made up of cell walls but are missing a nucleus.
bicuspid: A type of tooth used to crush and tear food; located directly behind the cuspids. Also known as premolars.
bite registration: An impression that represents the mandibular and maxillary teeth when the mouth is closed.
calculus: Dental plaque that has mineralized.
cementum: A layer of bone-like tissues that covers the root of the tooth.
chief complaint: A simple statement identifying why the patient is seeking treatment.
crown: The portion of a tooth that is visible in the mouth and covered with enamel.
cuspid: A type of tooth used to tear food; located at the corners of the mouth. Also known as canines.
dental caries: A disease of the hard structures of the teeth that involves the decay or demineralization of the enamel and underlying tooth structures.
dental history: A section of the medical history form that includes information regarding the chief complaint, present illness, past dental problems or treatment, oral habits, and dietary profile.
dental impression: A replication of a patient’s teeth and surrounding tissues.
dental radiology: The art and science of recording oral structures on a receptor.
dentin: The tissue located directly beneath the enamel of the crown and the cementum of the tooth.
dentistry: The diagnosis and treatment of the teeth, mouth, and facial features associated with the mouth.
dentition: The natural teeth in their normal position in the mouth.
diagnosis: The act of identifying a disease or condition from its signs or symptoms.
disease: A pathological condition of an organism resulting from various causes and characterized by identifiable symptoms.
disinfection: The process of killing microorganisms that remain on the surface after pre-cleaning.
enamel: The shiny, hard, white tissue covering each tooth.
extrinsic stain: Staining of the tooth surface.
forensic odontology: The art and science of dentistry and paradental knowledge to the solution of legal issues in civil and criminal matters.
Dental Practices DS v2.0 Student Workbook 103
Reference Section
e n t e r p r i s e s l l c
Glossary
fungus: Any of numerous eukaryotic organisms of the kingdom Fungi.
gum: The tissue that covers the bone surrounding each tooth.
halitosis: Bad breath.
hard palate: The anterior portion of the upper roof of the mouth.
incipient carious lesion: An early or possible lesion area.
incisor: A type of tooth used to cut food; located in the center and front of the mouth.
intrinsic stain: Stain that occurs from within the tooth.
mandibular arch: The lower jaw; formed from the mandible bone.
maxillary arch: The upper jaw; formed from the maxilla bone.
mechanical property: A reference to the flexibility of a material.
molar: A type of tooth used to grind food; located in the back of the mouth.
Occupational Safety & Health Association (OSHA): A federal agency that is responsible for the creation of standards related to employee health in the United States.
orthostatic hypotension: A condition that is caused by a decrease in blood pressure when a patient is returned to a seated position after reclining.
panoramic: A type of radiograph that captures a broad area and has a relatively low exposure level.
papillae: Taste buds on the upper surface of the tongue.
parasite: An organism that grows, feeds, and is sheltered on or in a different organism while contributing nothing to the survival of its host.
pathogen: Any agent that causes disease, especially a living microorganism.
periapical: A type of radiograph that shows the entire tooth from the crown to the root apex.
periodontal ligament: A tissue that cushions the tooth and the surrounding bone against the shock of chewing and biting.
personal protective equipment (PPE): Equipment used to protect healthcare providers from the spread of pathogens.
plaque: The accumulation of bacteria, microorganisms, and their products which sticks to the tooth surfaces.
preventive dentistry: A group effort that involves personally caring for one’s teeth on a daily basis as well as visiting a dentist for routine care and dental emergencies.
pulp: The core of a tooth.
radiograph: An image resulting from an x-ray.
root: The portion of a tooth that supports the teeth when pressure is exerted upon them; located in the bone.
rugae: The ridges in the mucous membrane lining of the hard palate.
104 Dental Practices DS v2.0 Student Workbook
Reference Section
e n t e r p r i s e s l l c
setting property: A reference to the solidity of a material.
soft palate: The posterior portion of the upper roof of the mouth.
sterilization: Any means used to make something sterile (free from disease-causing microorganisms).
syncope: Momentary loss of consciousness due to decrease in blood flow to the brain.
universal precautions: Methods used to prevent the spread of microorganisms.
virus: Any one of various simple submicroscopic parasites or plants, animals, and bacteria that often cause disease and consist essentially of a core of RNA or DNA surrounded by a protein coat.
vital signs: Physiological statistics used to measure basic body functions.
x-ray: The radiation used to create a dental image (radiograph).
Glossary
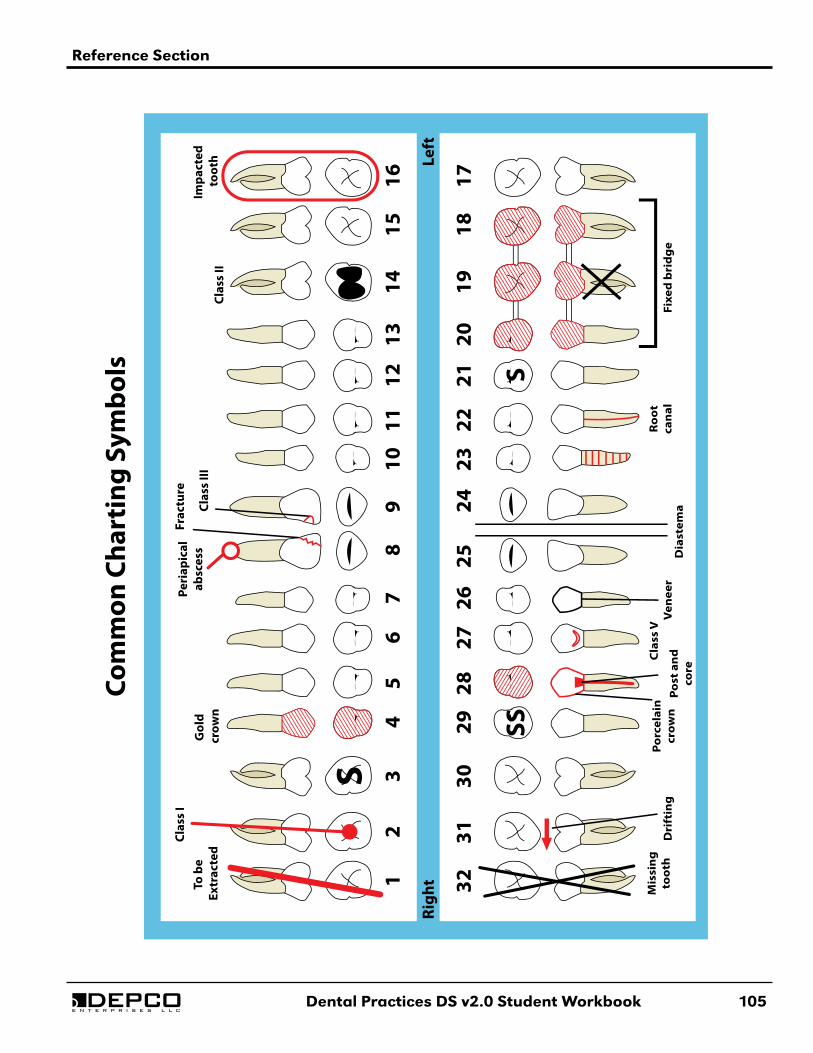
Dental Practices DS v2.0 Student Workbook 105
Reference Section
e n t e r p r i s e s l l c
Com
mon
Cha
rtin
g Sy
mbo
ls

106 Dental Practices DS v2.0 Student Workbook
DEPCO
e n t e r p r i s e s l l c