Embed Size (px)
Citation preview
Dell™ Archive Manager 5.0.1Retention Policy Guide
© 2014 Dell Inc. ALL RIGHTS RESERVED.
This guide contains proprietary information protected by copyright. The software described in this guide is furnished under a software license or nondisclosure agreement. This software may be used or copied only in accordance with the terms of the applicable agreement. No part of this guide may be reproduced or transmitted in any form or by any means, electronic or mechanical, including photocopying and recording for any purpose other than the purchaser’s personal use without the written permission of Dell Inc.
The information in this document is provided in connection with Dell products. No license, express or implied, by estoppel or otherwise, to any intellectual property right is granted by this document or in connection with the sale of Dell products. EXCEPT AS SET FORTH IN THE TERMS AND CONDITIONS AS SPECIFIED IN THE LICENSE AGREEMENT FOR THIS PRODUCT, DELL ASSUMES NO LIABILITY WHATSOEVER AND DISCLAIMS ANY EXPRESS, IMPLIED OR STATUTORY WARRANTY RELATING TO ITS PRODUCTS INCLUDING, BUT NOT LIMITED TO, THE IMPLIED WARRANTY OF MERCHANTABILITY, FITNESS FOR A PARTICULAR PURPOSE, OR NON-INFRINGEMENT. IN NO EVENT SHALL DELL BE LIABLE FOR ANY DIRECT, INDIRECT, CONSEQUENTIAL, PUNITIVE, SPECIAL OR INCIDENTAL DAMAGES (INCLUDING, WITHOUT LIMITATION, DAMAGES FOR LOSS OF PROFITS, BUSINESS INTERRUPTION OR LOSS OF INFORMATION) ARISING OUT OF THE USE OR INABILITY TO USE THIS DOCUMENT, EVEN IF DELL HAS BEEN ADVISED OF THE POSSIBILITY OF SUCH DAMAGES. Dell makes no representations or warranties with respect to the accuracy or completeness of the contents of this document and reserves the right to make changes to specifications and product descriptions at any time without notice. Dell does not make any commitment to update the information contained in this document.
If you have any questions regarding your potential use of this material, contact:
Dell Inc. Attn: LEGAL Dept 5 Polaris Way Aliso Viejo, CA 92656
Refer to our web site (software.dell.com) for regional and international office information.
Trademarks
Dell and the Dell logo are trademarks of Dell Inc. and/or its affiliates. Other trademarks and trade names may be used in this document to refer to either the entities claiming the marks and names or their products. Dell disclaims any proprietary interest in the marks and names of others.
Retention Policy Guide July 2014 Software Version - 5.0.1
Doc ID 170
Legend
CAUTION: A CAUTION icon indicates potential damage to hardware or loss of data if instructions are not followed.
WARNING: A WARNING icon indicates a potential for property damage, personal injury, or death.
IMPORTANT NOTE, NOTE, TIP, MOBILE, or VIDEO: An information icon indicates supporting information.
Contents
Dell Archive Manager 5.0.1Retention Policy Guide
3
Retention policy overview . . . . . . . . . . . . . . . . . . . . . . . . . . . . . . . . . . . . . . . . . . 4Before you install . . . . . . . . . . . . . . . . . . . . . . . . . . . . . . . . . . . . . . . . . . . . . . . . 5Installation . . . . . . . . . . . . . . . . . . . . . . . . . . . . . . . . . . . . . . . . . . . . . . . . . . . . 5After you install . . . . . . . . . . . . . . . . . . . . . . . . . . . . . . . . . . . . . . . . . . . . . . . . . 6Archive Manager Retention Policy Editor tabs . . . . . . . . . . . . . . . . . . . . . . . . . . . . . . 7Using the Retention Policy Editor . . . . . . . . . . . . . . . . . . . . . . . . . . . . . . . . . . . . . . 7
Adding a policy . . . . . . . . . . . . . . . . . . . . . . . . . . . . . . . . . . . . . . . . . . . . . . . 8Editing a policy . . . . . . . . . . . . . . . . . . . . . . . . . . . . . . . . . . . . . . . . . . . . . . . 8Removing a policy . . . . . . . . . . . . . . . . . . . . . . . . . . . . . . . . . . . . . . . . . . . . . 8Keep policy . . . . . . . . . . . . . . . . . . . . . . . . . . . . . . . . . . . . . . . . . . . . . . . . . 9Delete policy . . . . . . . . . . . . . . . . . . . . . . . . . . . . . . . . . . . . . . . . . . . . . . . .10Execution log . . . . . . . . . . . . . . . . . . . . . . . . . . . . . . . . . . . . . . . . . . . . . . . .12Change log . . . . . . . . . . . . . . . . . . . . . . . . . . . . . . . . . . . . . . . . . . . . . . . . . .12Legal Hold . . . . . . . . . . . . . . . . . . . . . . . . . . . . . . . . . . . . . . . . . . . . . . . . . .12Settings . . . . . . . . . . . . . . . . . . . . . . . . . . . . . . . . . . . . . . . . . . . . . . . . . . . .13
Repairing the Archive Manager Retention Policy Editor . . . . . . . . . . . . . . . . . . . . . . . .14Removing the Archive Manager Retention Policy Editor . . . . . . . . . . . . . . . . . . . . . . . .14Time range . . . . . . . . . . . . . . . . . . . . . . . . . . . . . . . . . . . . . . . . . . . . . . . . . . . .14Case study overview . . . . . . . . . . . . . . . . . . . . . . . . . . . . . . . . . . . . . . . . . . . . . .16Step 1. Setting the Safe Mode for the Retention Engine . . . . . . . . . . . . . . . . . . . . . . .16Step 2. Creating policies . . . . . . . . . . . . . . . . . . . . . . . . . . . . . . . . . . . . . . . . . . .17
Case One . . . . . . . . . . . . . . . . . . . . . . . . . . . . . . . . . . . . . . . . . . . . . . . . . . .17Case Two . . . . . . . . . . . . . . . . . . . . . . . . . . . . . . . . . . . . . . . . . . . . . . . . . . .17
Step 3. Viewing the Change Log . . . . . . . . . . . . . . . . . . . . . . . . . . . . . . . . . . . . . . .19Step 4. Viewing the Execution Log and switching to the Production Mode . . . . . . . . . . .19Summary . . . . . . . . . . . . . . . . . . . . . . . . . . . . . . . . . . . . . . . . . . . . . . . . . . . . . .19
About Dell . . . . . . . . . . . . . . . . . . . . . . . . . . . . . . . . . . . . . . . . . . . . . . . . . . . . 20Third-party contributions . . . . . . . . . . . . . . . . . . . . . . . . . . . . . . . . . . . . . . . . . . .20
Dell Archive Manager 5.0.1Retention Policy Guide
1
4
Overview
• Retention policy overview
Retention policy overviewThe Retention Policy Editor lets organizations concerned with compliance ensure that email messages are stored for an appropriate period of time, as some legislation specifies that messages are to be kept for a finite number of years.
Retention rules, or policies, determine how long email messages should remain in the archive. Using a variety of criteria, organizations can define how long the messages in the archive are to be retained.
The advanced retention capabilities of Archive Manager include:
• Flexible administration of retention rules - A hierarchical list of policies provides a powerful but simple way of designing your retention policy to determine the order in which policies are enforced when one or more policies reference the same message (conflict resolution).
• Schedule-based execution of retention policies - Policies are implemented at the times defined by the administrator.
• "Safe Mode" - This mode is used for testing retention policies before they are applied to the actual archive.
• Auditing of retention activities - All retention activity (policy change, add or delete) is logged to the Archive Manager UI and to the event log.
• Legal Hold - The organization can suspend the retention capabilities using the Legal Hold feature in the event of litigation or investigation. Administrators can "single lock" or "double lock" the retention engine, preventing it from running until granular keep policies are applied that protect required evidence.
For a case study to familiarize yourself with the Retention Policy Editor and its typical uses, see Appendix A: Case Study at the end of this Guide.
NOTE: Messages removed by retention for one user cannot subsequently be loaded by the Exchange Store Manager for another user. For example, if a message is sent to User A and User B and a retention policy deletes the message for User A before it is loaded into Archive Manager for User B, then the message is gone and the ESM cannot load the message for User B.
NOTE: Backloading message data into Archive Manager should be completed for all users for a single Archive Manager instance before retention is configured and implemented to ensure that message data for all users is archived.
2
Installing and Starting the Retention Policy Editor
• Before you install
• Installation
• After you install
Before you installBefore you install the Retention Policy Editor, you must install Dell Archive Manager. The default directory for the Archive Manager folder is C:\Program files\Dell\Archive ManagerC:\Program files\ScriptLogic Corporation\Archive Manager. (The path may change when upgrading from an earlier version of Archive Manager).
Make sure that Archive Manager Message Retention Policy Service is installed and started. This service is a component of Archive Manager and is installed during the Archive Manager Setup.
To check whether the service is installed and started, go to Start | Control Panel | Administrative tools | Services.
Locate the Archive Manager Message Retention Policy Service in the list and make sure it is started. (You can stop or pause and later restart the service if necessary).
InstallationTo install Dell Archive Manager Retention Policy Editor, perform the following:
• Go to C:\Program files\Dell\Archive Manager\WebSite\ToolsC:\Program files\ScriptLogic Corporation\Archive Manager\WebSite\Tools, locate the file RetentionPolicyEditor.msi and double click it.
Alternatively, the Archive Manager Retention Policy Editor can be downloaded from your Archive Manager Website. Administrator rights are required for this.
• Sign in to your Archive Manager Website as admin.
• Open the Archive Manager Administration page.
• Click the Download Tools link.
• Locate the Archive Manager Retention Policy Editor in the list and click the RetentionPolicyEditor.msi filename.
When the Download dialog box appears: Click Run to install Archive Manager Retention Policy Editor.
The Archive Manager Retention Policy Editor Setup Wizard guides you through the steps required to install the Archive Manager Retention Policy Editor on your computer:
1 On the Setup Wizard Welcome screen: Click the Next button to begin.
Dell Archive Manager 5.0.1Retention Policy Guide
5
2 Select the Folder where you want to install the Archive Manager Retention Policy Editor, and click Next. You can leave the Folder field set to its default value, or click the Browse button to locate and specify a different folder.
To see the drives to which you can install the Retention Policy Editor, and each drive's available and required disk space, click the Disk Cost button, and then the OK button to clear the Disk Space display.
3 In the Confirm Installation screen: Click the Next button to begin the installation process.
4 In the Installation Complete screen: Click the Close button to exit the Archive Manager Retention Policy Editor Setup Wizard.
The Archive Manager Retention Policy Editor is now installed on your computer.
After you install
To run the application, in the list of programs, go to Start | All Programs | Dell | Archive Manager | Retention Policy Editor.
The sign-in window is displayed. Use your Archive Manager credentials in the DOMAIN\UserName format.
Please note that NDS logons are supported for GroupWise users. (For example, NDS:\\Root\Organization\OrganizationalUnit\CommonName, which in GroupWise terms corresponds to Tree\Context\Group\User).
The permissions are based on the user security roles. (To learn more about the security roles, please refer to Archive Manager Administration Guide.)
Finally, enter the name of the server to connect to, and click Connect.
NOTE: The Retention Engine will generate an "Invalid object name" error if the default schema for ArchiveMgr_Service and ArchiveMgr_ESM users is not reset to dbo in the AfterMail_TEMP database after installing the Retention Engine and before running it. If the Retention Engine has already run and the "Invalid object name" has already occurred, reset the schema to dbo and delete the RE.CachedSearchDelete and RE.CachedSearchKeep tables from the AfterMail_TEMP database. Then run the Retention Engine again.
NOTE: The Retention Policy Editor version must match the version of your installed Archive Manager. If your Retention Policy Editor generates an error message and is an earlier version than Archive Manager, uninstall the Retention Policy Editor and install the current version.
NOTE: Users must have one or both of the following permissions to sign in:
• Edit Retention Policies
• Edit Legal Hold
NOTE: Click the Connect button only once. After you click the Connect button, it changes to a Cancel button.
NOTE: The first time that you sign in to the Retention Policy Editor, you need to expand the window of the application to view it.
Dell Archive Manager 5.0.1Retention Policy Guide
6
3
Retention Policy Editor Functions
• Archive Manager Retention Policy Editor tabs
• Using the Retention Policy Editor
• Repairing the Archive Manager Retention Policy Editor
• Removing the Archive Manager Retention Policy Editor
• Time range
Archive Manager Retention Policy Editor tabsThe main operations of the Archive Manager Retention Policy Editor are laid out in the top-level tabs. These allow you to:
• Design your retention policy ("Policy Editor" tab).
• View the activity of the Retention-Engine ("Execution Log" tab).
• View an audit history of changes made to the retention policies ("Change Log" tab).
• Temporarily suspend all retention policies to prevent the destruction of any email message ("Legal Hold" Tab).
• Define the Retention-Engine settings ("Settings" tab).
• View the information related to the Retention-Engine activity (whether it is running in Safe Mode or Production Mode, and whether Legal Hold is on).
The number and order of the tabs displayed vary depending on your permissions.
• If a user has 'Edit Retention Policies' rights, the only tabs displayed are Policy Editor, Execution Log, Change Log and Settings (in that order).
• If a user has 'Edit Legal Hold' rights, the only tabs displayed are Legal Hold, Execution Log and Change Log (in that order).
• If a user has both 'Edit Retention Policies' and 'Edit Legal Hold' rights, the tabs displayed are Policy Editor, Execution Log, Change Log, Legal Hold and Settings (in that order).
Using the Retention Policy EditorThe Retention Editor is the tool for designing your 'retention policy'.To design the retention policy a user has to have the 'Edit Retention Policies' permission.
A retention policy consists of a number of different Policy items that specify:
• The action: Keep/Delete,
NOTE: Searches conducted in the Retention Editor must follow the search syntax rules detailed in the Searching Email chapter of the User Guide.
Dell Archive Manager 5.0.1Retention Policy Guide
7
• The time-frame for performing the action,
• Criteria specifying which messages the policy pertains to.
These Policy items are listed in a hierarchal order that indicate the order of execution (top-to-bottom). The order of execution allows you to specify which policies override other policies.
Sometimes several Policy items might reference some of the same messages (for example, you may have one Policy that refers to all messages in mailbox "Bob Smith" and another Policy that refers to all messages in Mailstore "Store One" where the "Bob Smith" mailbox resides).
The Retention-Engine only executes a single policy item for each message - which is the first Policy it encounters (Policy 1 displayed at the top of the list). If the same message appears in another Policy item being executed further down the list, it is simply ignored.
The Retention Editor allows you to set up this execution order by dragging your Policy items around. Simply hold your cursor over the left corner of the Policy item ("Grip") and drag and drop to move the Policy.
Adding a policy1 To add a policy, go to the Add a new field at the bottom of the screen and click Keep Policy. A new
Policy item is inserted within the editor.
2 Specify the criteria for policies using the expanded view of the Policy item. When the next policy is added, the previous one/ones are in the collapsed view. For more information see the Keep Policy and Delete Policy sections of this guide.
The policies are color-coded: the Keep action is represented as a green policy item, Delete - as a red one.
Editing a policy1 To edit a policy, expand the view of the policy item by clicking arrows next to the Policy Action and the
Policy Acts Upon fields. The collapsed state of the item changes to the expanded state where you can edit the policy settings.
2 Modify the facet as required.
3 The Click here to Save link appears in the right bottom corner of the screen. Click the link to save your changes.
4 When the policy settings are defined, click the down arrow to use the collapsed state of the policy items with the descriptive overview of the settings. (The expanded view of the policy items also changes to the collapsed one when you move them using "drag-and-drop".)
The policies are executed in the hierarchal order top-to-bottom. You can reorder the process hierarchy by using "drag-and-drop" to move the policy items (click and drag the "Grip" at the left corner of a policy item). Messages pertaining to policies higher in the list are executed first and then subsequently ignored by policies lower down in the list. This provides a conflict resolution strategy allowing items to be kept safe by capturing them within a Keep policy and placing it at or near the top of the list.
Removing a policyTo remove a policy from the list:
1 Click the Close (X) button at the top right of the policy.
2 In the confirmation dialog box: Click Yes if you want to remove the policy.
Dell Archive Manager 5.0.1Retention Policy Guide
8
Keep policyWhen you select the Keep policy, you can either keep the messages forever or specify the period of time you want to keep them, after which they are no longer protected by the Keep policy and remain in the Archive Manager database as potential candidates for any other policies to act upon.
To set the Keep Policy:
1 Click Add a new: Keep Policy.
2 Click on the field next to the policy item number to enter the policy name.
3 By default the Keep Policy is set to Keep Forever. To specify the time to keep messages, click on the arrow pointing to the Policy Action and the edit controls will be revealed.
Select the Keep For radio button to define the time range and enter the value in the box. (The button is automatically selected when you enter a value in this box). You can choose to specify the time-range in Days, Weeks, Months or Years by clicking on the underlined options. The box allows four digits. The mode selected is highlighted. Switching between modes converts your value to the equivalent value in the new mode. When jumping between the modes rounding might occur as the conversion is standardized: 1 Week = 7 days, etc.
(For more information please see the Time range section below).
For example, if you choose to keep the messages for 210 days and later decide to use months, the editor will turn the specified number of days into 7 months:
4 Message criteria settings are defined in the Policy Acts Upon fields.
a Selecting the Everything (All Messages in Archive) checkbox means that the policy will be applied to all the items in the archive.
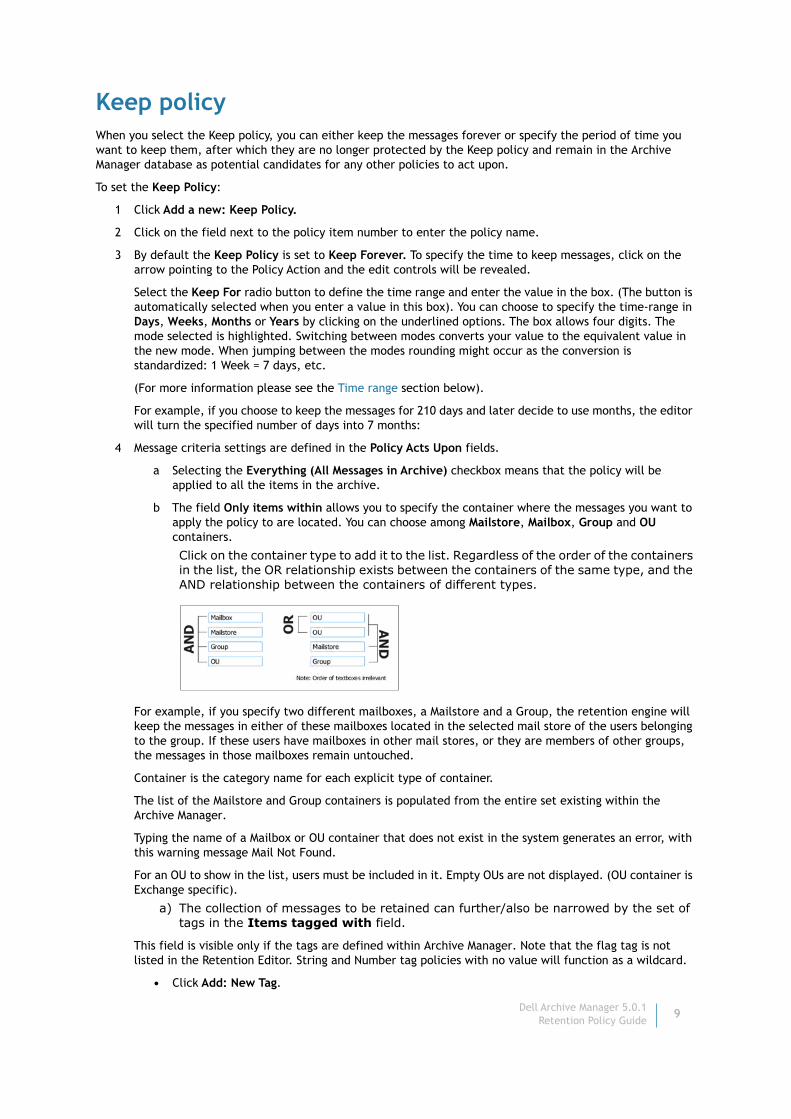
b The field Only items within allows you to specify the container where the messages you want to apply the policy to are located. You can choose among Mailstore, Mailbox, Group and OU containers.
Click on the container type to add it to the list. Regardless of the order of the containers in the list, the OR relationship exists between the containers of the same type, and the AND relationship between the containers of different types.
For example, if you specify two different mailboxes, a Mailstore and a Group, the retention engine will keep the messages in either of these mailboxes located in the selected mail store of the users belonging to the group. If these users have mailboxes in other mail stores, or they are members of other groups, the messages in those mailboxes remain untouched.
Container is the category name for each explicit type of container.
The list of the Mailstore and Group containers is populated from the entire set existing within the Archive Manager.
Typing the name of a Mailbox or OU container that does not exist in the system generates an error, with this warning message Mail Not Found.
For an OU to show in the list, users must be included in it. Empty OUs are not displayed. (OU container is Exchange specific).
a) The collection of messages to be retained can further/also be narrowed by the set of tags in the Items tagged with field.
This field is visible only if the tags are defined within Archive Manager. Note that the flag tag is not listed in the Retention Editor. String and Number tag policies with no value will function as a wildcard.
• Click Add: New Tag.
Dell Archive Manager 5.0.1Retention Policy Guide
9
• Select the tag from the drop-down list populated from the entire set of tags defined within Archive Manager.
• Specify the tag value in the next field.
Specifying an invalid value generates an Invalid Value warning.
• Multiple items can be added to the set using the Add: New tag button.
• To remove a tag from the set, use the "-" button.
b) Specify the key words that the messages to be retained should contain in the field Items that contain the words.
You can choose the message parts containing the words specified. By default the Editor sets the components containing the keywords to Subject and Body. If you wish to specify the component, i.e. the Subject, Body or Attachment, use the buttons below the box. The selected components are highlighted:
5 Click the link Click here to Save, in the right bottom corner of the screen, to save the policy.
6 When the policy settings are saved, the Click here to Save link is no longer visible.
You can click the down arrows next to Policy Action and Policy Acts Upon to use the collapsed state of the policy items with the overview of the settings.
When the time specified for the Keep Policy is over, the messages remain in the Archive Manager database, as potential candidates for any other policies to act upon.
Delete policyThe Delete policy specifies the criteria for the messages to be deleted.
The steps to set the Delete Policy are almost identical to those for the Keep Policy described above.
1 To add a Delete Policy click Add a new: Delete Policy.
2 Click on the field next to the policy item number to enter the policy name.
3 By default the time-range for the Delete Policy is not defined. To specify the period of time after which you want to delete messages, click on the arrow pointing to the Policy Action. Enter the value in the Delete After box to define the time range. You can choose between the Days, Weeks, Months or Years modes to set the time range. The mode selected is highlighted. The box allows four digits. Switching between modes converts to the equivalent difference. When jumping between the modes rounding might occur as the conversion is standardized: 1 Week = 7 days, etc.
For example, if you choose to delete the messages after 200 days and later decide to use months, the editor will turn the specified number of days into 7 months:
NOTE: To keep one or more attachments with a specific word in the file name, add an asterisk after the word in the Items that contain the words field (for example, invoice*).
NOTE: Note: When a single archived message is associated with multiple mailboxes (e.g., one message sent to six recipients), and a Delete policy applies to one or more but not all of the mailboxes, the message is simply unlinked from the mailboxes where it has been deleted, but is not deleted from the archive altogether. When a message is unlinked from a mailbox in this way, it is reported in the Retention Editor log file in this form:
NOTE: 12:47:21 PM (3) DeleteAfter3Years_Spam : 0 Items Unlinked
NOTE: Caution! Tags are set globally. When a delete policy is defined by a tag, the policy will delete all tagged messages in the database, in all mailbox locations— not just in the mailbox where the tag was added. That is, if a message is tagged in a particular mailbox, and then the same tag is used in a delete policy applied to a higher-level container (e.g., OU), the message will be deleted from the archive at the higher container level, in all mailboxes.
Dell Archive Manager 5.0.1Retention Policy Guide
10
(For more information see the Time range section below).
4 The message criteria settings are defined in the Policy Acts Upon fields. a) Selecting the Everything (All Messages in Archive) checkbox means that the policy
will be applied to all the items in the archive.
b) The field Only items within allows you to specify the container where the messages you want to apply the policy to are located. You can choose among Mailstore, Mailbox, Group and OU containers.
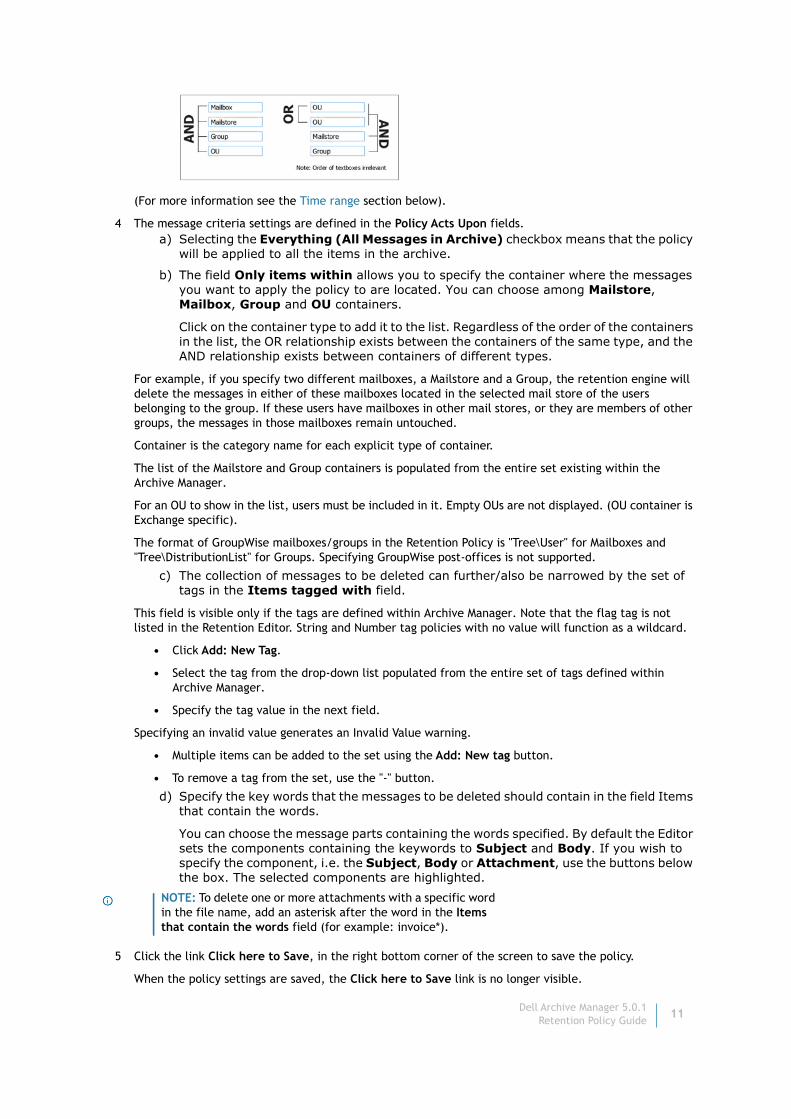
Click on the container type to add it to the list. Regardless of the order of the containers in the list, the OR relationship exists between the containers of the same type, and the AND relationship exists between containers of different types.
For example, if you specify two different mailboxes, a Mailstore and a Group, the retention engine will delete the messages in either of these mailboxes located in the selected mail store of the users belonging to the group. If these users have mailboxes in other mail stores, or they are members of other groups, the messages in those mailboxes remain untouched.
Container is the category name for each explicit type of container.
The list of the Mailstore and Group containers is populated from the entire set existing within the Archive Manager.
For an OU to show in the list, users must be included in it. Empty OUs are not displayed. (OU container is Exchange specific).
The format of GroupWise mailboxes/groups in the Retention Policy is "Tree\User" for Mailboxes and "Tree\DistributionList" for Groups. Specifying GroupWise post-offices is not supported.
c) The collection of messages to be deleted can further/also be narrowed by the set of tags in the Items tagged with field.
This field is visible only if the tags are defined within Archive Manager. Note that the flag tag is not listed in the Retention Editor. String and Number tag policies with no value will function as a wildcard.
• Click Add: New Tag.
• Select the tag from the drop-down list populated from the entire set of tags defined within Archive Manager.
• Specify the tag value in the next field.
Specifying an invalid value generates an Invalid Value warning.
• Multiple items can be added to the set using the Add: New tag button.
• To remove a tag from the set, use the "-" button.
d) Specify the key words that the messages to be deleted should contain in the field Items that contain the words.
You can choose the message parts containing the words specified. By default the Editor sets the components containing the keywords to Subject and Body. If you wish to specify the component, i.e. the Subject, Body or Attachment, use the buttons below the box. The selected components are highlighted.
5 Click the link Click here to Save, in the right bottom corner of the screen to save the policy.
When the policy settings are saved, the Click here to Save link is no longer visible.
NOTE: To delete one or more attachments with a specific word in the file name, add an asterisk after the word in the Items that contain the words field (for example: invoice*).
Dell Archive Manager 5.0.1Retention Policy Guide
11
6 You can click the down arrows next to Policy Action and Policy Acts Upon to use the collapsed state of the policy-items with the overview of the settings.
When the time specified for the Delete Policy is over, the messages are deleted from the indicated containers, and are completely removed from the Archive Manager database if they are no longer in any mailboxes.
Execution logAll retention activity is logged so that the administrator can review the process history of the Retention Policy engine, i.e. the events and the summaries of what the retention engine did each time it ran.
The Execution Log provides the following information:
• Started - the date and time when the retention engine began executing the policy set.
• Finished - the date and time when the retention engine completed executing the policy set.
• Execution Time - the amount of time it took the retention engine to execute the policy set.
• Ran in - the mode of retention policy execution (either Safe - used for testing purposes, or Production).
• Details: (for each Policy executed by the Retention-Engine)
• Time executed,
• Name of Policy,
• Number of message items processed by the policy.
Change logThe administrator or auditor can review the changes made to the retention policy.
The Change Log provides the following information:
• The name of the user who introduced the changes to the retention policy set and the User ID in parenthesis.
• The date and time the changes were introduced.
• The actual changes that were applied to the policy set. These can be either of the following:
• changing the Retention-Engine settings;
• the Running Mode of the Retention-Engine;
• saving a new version of the policy set;
• enabling Legal hold set: Single-lock;
• enabling Legal hold set: Double-lock
Legal HoldLegal Hold suspends all retention policies to prevent the destruction of any email messages that are the subject of pending, or potential, litigation or investigation. A single user with the 'Edit Legal Hold' permissions can
Dell Archive Manager 5.0.1Retention Policy Guide
12
invoke Legal Hold. Optionally a second user having the 'Edit Legal Hold' permissions can 'double-lock' the system, requiring both users to remove their locks before the retention engine resumes operation again.
Activating Legal HoldTo activate Legal Hold, select Legal Hold tab, enter a reason for placing the lock, click the Lock button.
The Legal Hold is activated, meaning the Retention-Engine will not process. This is known as a "single lock" because only one person locked it.
When Legal Hold is activated, the information visible is the name of the user who locked it, the date and time when Legal Hold was enabled and the reason for it. (The Unlock button is visible only to the user(s) who invoked the Legal Hold.)
As additional security the company may want to enforce a "double-lock." This is performed by another user with appropriate permissions signing in, and going through the same process of locking, however they will see that another person (in this case "Administrator") has already locked it.
After the second user enters a reason and presses Lock, the "double lock" Legal Hold is enforced, requiring both users to remove the Legal Hold before the retention engine will run again.
The Unlock button is visible only to the user(s) who invoked the Legal Hold. If other users with appropriate rights sign on, they can see by whom, when and why the Legal Hold was invoked but they cannot deactivate it.
The Retention-Engine activity related to Legal Hold is as follows:
If the Retention-Engine is running at the moment when the Legal Hold is activated, the engine finishes processing the current policy item and the execution of the policy set is terminated.
If the Legal Hold is enabled before the Retention-Engine is scheduled to start, the engine will ignore the schedule.
Deactivating Legal HoldOnly the user(s) who invoked the Legal Hold can deactivate it.
To restore normal retention activity, press the Unlock button.
(If "double lock" was enabled, it requires both administrators to remove their lock to restore normal retention activity.)
When Legal Hold is deactivated, the Retention engine will start executing the policy set in accordance with the schedule. The policy set will be processed starting from the first item in the list (not where the execution was terminated).
SettingsThe Settings tab allows the administrator to define Retention-Engine activity.
The Operation Mode box allows you to change the mode of Retention-Engine activity. By default, the Safe mode radio button is selected. Safe Mode is used for testing retention policies before they are applied to the actual archive.
NOTE: There can be various reasons for applying a Legal Hold, such as the nature of the customers’ business requiring accurate record keeping, litigation, etc.
NOTE: In the event of litigation, we recommend that the customer apply a Legal Hold unless/until it is determined that their legal obligations can be met with their retention policies.
NOTE: Safe Mode allows a set of retention policies to be designed without any changes being made to the system. The engine will run based on your policy-set design, and the results of what would have happened to the archive can be viewed in the output log.
Dell Archive Manager 5.0.1Retention Policy Guide
13
Production Mode executes the retention policies against the live production system.
The Schedule controls allow you to set the time for the Retention-Engine to start. The default value (upon installation) is midnight (12am) everyday.
Click the boxes to set the day and time for the retention policies to be executed.
Repairing the Archive Manager Retention Policy EditorTo repair the Archive Manager Retention Policy Editor, run the ArchiveManagerRetentionPolicyEditor.msi file. You can run it either from
• C:\Program Files\ScriptLogic Corporation\Archive Manager\RetentionPolicyEditor.msiC:\Program Files\Dell\Archive Manager\RetentionPolicyEditor.msi (or the folder in which you chose to install the Archive Manager)
• the Archive Manager Web client: Administration page | Download Tools | RetentionPolicyEditor.msi
Click Run to start Archive Manager Retention Policy Editor.
The Archive Manager Retention Policy Editor Setup Wizard is displayed. It guides you through the steps required to repair the Retention Policy Editor on your computer.
Removing the Archive Manager Retention Policy EditorTo remove the Archive Manager Retention Policy Editor, run the RetentionPolicyEditor.msi file:
• C:\Program files\ScriptLogic Corporation\Archive Manager\RetentionPolicyEditor.msiC:\Program files\Dell\Archive Manager\RetentionPolicyEditor.msi (or the folder in which you chose to install the Archive Manager)
• The Archive Manager Web client: Administration page | Download Tools | RetentionPolicyEditor.msi
Click Run to start Archive Manager Retention Policy Editor.
The Archive Manager Retention Policy Editor Setup Wizard is displayed. It guides you through the steps required to remove the Retention Policy Editor from your computer.
Time rangeYou can choose between the Days, Weeks, Months or Years modes to set the time range to specify the time you want the policy to be active. The mode selected is highlighted. The box allows four digits. Switching between modes converts to the equivalent difference. When jumping between the modes rounding might occur as the conversion is standardized as follows:
• Week to Days: 1 Week = 7 days
• Months to Days:1 Month = 31 days
NOTE: Retention policies are designed to keep and delete email messages after specified period of time. The incorrect use of these policies may result in data loss. Please ensure you have tested your policies in Safe mode before turning on Production Mode.
Dell Archive Manager 5.0.1Retention Policy Guide
14
• Months to Weeks: 1 Month = 4 weeks
• Years to Months: 1 Year = 12 months
• Years to Weeks: 1 Year = 52 Weeks.
To protect the user when jumping between modes, even when rounding occurs, the precise value for each mode is retained in memory. When the textbox value is explicitly changed by the user, the in-memory table is reset.
For example, if you enter a value of 100 days in the Days mode and then switch to the Weeks mode, the weeks will be rounded to a value of 15 weeks. When switching to the Months mode, the value is rounded to 4 months, with Years mode - to one year. Even though the value has been rounded, if you look at the Days mode again, your value remains set to 100 days.
However, if you then change the value to 4 months in the Months mode and then switch back to the Days mode, the value in the Days mode will automatically be changed to 124 days.
Dell Archive Manager 5.0.1Retention Policy Guide
15
A
Appendix A: Case Study
• Case study overview
• Step 1. Setting the Safe Mode for the Retention Engine
• Step 2. Creating policies
• Step 3. Viewing the Change Log
• Step 4. Viewing the Execution Log and switching to the Production Mode
• Summary
Case study overview
Case OneThis case is an example of setting up a single policy. The administrator creates a policy to delete automated messages after 1 month. These emails have the words "Welcome to Dell Software" in the Subject. The administrator has 'Edit Retention Policies' permissions.
Case TwoThis case is an example of setting up a policy-set consisting of several policy items. The administrator creates a policy-set for the Retention-Engine to perform the following:
1 Keep CEO's Emails Forever (Michael Black is the name of the company CEO).
2 Keep the records tagged "Financial" for 7 years (The tags are defined within Archive Manager).
3 Delete Records tagged "Sensitive" from the VPs' mailboxes after 6 months (The tags and three groups of VPs are defined within Archive Manager: VPs of Marketing, VPs of Engineering and VPs of TechComm).
4 Keep the rest of VP records forever.
5 Delete web-transaction records after 3 years (the records are contained in the "SiteOrders" mailbox).
6 Delete all messages from the archive after 7 years.
The administrator has 'Edit Retention Policies' permissions.
Step 1. Setting the Safe Mode for the Retention EngineIt is recommended that you set the Retention Engine to run in Safe Mode first for testing retention policies before they are applied to the actual archive. To do it, perform the following:
1 Sign in to the Archive Manager Retention Policy Editor.
2 Select the Settings Tab.
Dell Archive Manager 5.0.1Retention Policy Guide
16
3 Select the Safe Mode radio button.
4 Click the link in the right bottom corner of the screen to save your changes.
Before saving you changes, you can also set the running time for the retention engine using this tab. To do it, select the square that corresponds to the day and time you want the Retention Engine to start. In the example below the engine is scheduled to run every day at 12 AM.
Step 2. Creating policiesUse the Policy Editor tab to create policies.
Case One1 Click Add a new: Delete Policy button at the bottom of the screen.
2 Click on the field next to the policy item number to enter the policy name - Delete Welcome Messages.
3 Click on the arrow next to Policy Action to expand the view of the policy item and specify the time-range for the policy in the Delete After field. Click on the Months link and enter 1 in the box.
4 Check the Everything (All Messages in Archive) box in the Policy Acts Upon field.
5 Enter "Welcome to Dell Software" keywords in the Items that contain the words: field.
6 Click on the Look in: links to choose the component of the message. By default the Subject and Body are selected (highlighted). Click the Body link to deselect it.
7 Click the link in the right bottom corner of the screen to save your changes.
Case TwoTo create the first policy of the set - Keep CEO's Emails - perform the following:
1 Click Add a new: Keep Policy button at the bottom of the screen.
2 Click on the field next to the policy item number to enter the policy name - Keep CEO's Emails.
3 Click on the arrow next to Policy Action to expand the view of the policy item and specify the time-range for the policy - Select the Keep Forever radio button.
4 In the Policy Acts Upon field click the Add: Mailbox link in the Only Items within: and specify the mailbox name - Michael Black.
While you are typing, a warning message is displayed. When you finish typing, the message disappears and a green check appears next to the mailbox name to indicate that it exists within the Archive Manager.
To create the second policy in the list - Keep Financial Records - repeat the steps 1-3 above with appropriate changes: enter Keep Financial Records policy name and specify 7 years time-range in the Keep For: box.
5 In the Policy Acts Upon field check the Everything (All Messages in Archive) box.
6 Click the Add: New Tag link in the Items tagged with: field and select the Financial tag from the drop-down list. Select the Either radio button to specify the tag value.
Note that this field is visible only if the tags are defined within the Archive Manager system. For more information about tagging the items please refer to Archive Manager Administration Guide.
To create the policy to delete records tagged "Sensitive" from the VPs' mailboxes after 6 months, perform the following:
NOTE: The format of GroupWise mailboxes in the Retention Policy is "Tree\User".
Dell Archive Manager 5.0.1Retention Policy Guide
17
1 Click Add a new: Delete Policy button at the bottom of the screen.
2 Click on the field next to the policy item number to enter the policy name - Delete VP - Sensitive Records.
3 Click on the arrow next to Policy Action to expand the view of the policy item and specify the time-range for the policy in the Delete After field. Click on the Months link and enter 6 in the box.
4 The message criteria settings are defined in the Policy Acts Upon fields. Click the Add: Group link in the Only Items within: and specify the group name - VP Marketing.
While you type, a warning message is displayed. When you finish typing, the message disappears and a green check appears next to the group name to indicate that it exists within Archive Manager.
5 Repeat the above procedure for the VP Engineering and VP TechComm groups.
6 Click the Add: New Tag link in the Items Tagged with: field and select the Sensitive tag from the drop-down list. Select the True radio button to specify the tag value.
Note that the groups are defined within the Archive Manager system. The Tag field is visible only if the tags are defined within the Archive Manager system. For more information about groups and tagging items please refer to Archive Manager Administration Guide.
To set a policy to keep the rest of VP records forever, perform the following:
1 Click Add a new: Keep Policy button at the bottom of the screen.
2 Click on the field next to the policy item number to enter the policy name - Keep VP Records Forever.
3 Click on the arrow next to Policy Action to expand the view of the policy item and specify the time-range for the policy - Select the Keep Forever radio button.
4 The message criteria settings are defined in the Policy Acts Upon fields. Click the Add: Group link in the Only Items within: and specify the group name - VP Marketing.
While you type, a warning message is displayed. When you finish typing, the message disappears and a green check appears next to the group name to indicate that it exists within the Archive Manager.
5 Repeat the above procedure for the VP Engineering and VP TechComm groups.
The groups are defined within the Archive Manager system. For more information about user groups please refer to the Archive Manager Administration Guide.
To delete web-transaction records (contained in the "SiteOrders" mailbox) after 3 years create the following policy:
1 Click Add a new: Delete Policy button at the bottom of the screen.
2 Click on the field next to the policy item number to enter the policy name - Delete Web transaction records.
3 Click on the arrow next to Policy Action to expand the view of the policy item and specify the time-range for the policy in the Delete After field. Click on the Years link and enter 3 in the box.
4 The message criteria settings are defined in the Policy Acts Upon fields. Click the Add: Mailbox link in the Only Items within: and specify the mailbox name - SiteOrders.
While you type, a warning message is displayed. When you finish typing, the message disappears and a green check appears next to the mailbox name to indicate that it exists within the Archive Manager.
To Delete all messages from the archive after 7 years, create the policy repeating the steps 1-3 above with appropriate changes: enter Delete Everything After 7 years policy name and specify 7 years time-range in the Delete After: box.
• Check the Everything (All Messages in Archive) box in the Policy Acts Upon field.
NOTE: The format of GroupWise mailboxes in the Retention Policy is "Tree\User".
NOTE: The format of GroupWise mailboxes in the Retention Policy is "Tree\User".
Dell Archive Manager 5.0.1Retention Policy Guide
18
Now your policy set is created.
After your policy set is created, click the link in the right bottom corner of the screen to save your changes.
Step 3. Viewing the Change LogThe administrator can review the changes made to the retention policy to make sure the Retention-Engine processed them.
The Change Log provides the following information:
• The name of the user who introduced the changes to the retention policy-set and the User ID in brackets.
• The date and time the changed were introduced.
• The actual changes that were applied to the policy-set.
Step 4. Viewing the Execution Log and switching to the Production ModeThe administrator can review the process history of the Retention Policy engine, i.e. the events and the summaries of what the retention engine did each time it ran. The Execution Log provides the following information:
• Started - the date and time when the retention engine began executing the policy set.
• Finished - the date and time when the retention engine completed executing the policy set.
• Execution Time - the amount of time it took the retention engine to execute the policy set.
• Ran in - the mode of retention policy execution (either Safe - used for testing purposes, or Production).
• Details (for each Policy executed by the Retention-Engine):a) Time executed.
b) Name of Policy.
c) Number of message items processed by the policy.
When the engine has run in the Safe Mode, the administrator makes sure that the policy-set is defined properly and they can change the mode to Production using the Settings tab to apply the policies to the actual archive.
SummaryIn this appendix, we have run through two case studies to introduce the functionality of the Retention Policy, a Dell Archive Manager feature and demonstrated its main capabilities. The case studies included setting up the appropriate mode for the Retention-Engine and creating the policy set.
NOTE: You can save each of the policy items by clicking this link, or define the policy-set first and then save it.
Dell Archive Manager 5.0.1Retention Policy Guide
19
About Dell
Dell listens to customers and delivers worldwide innovative technology, business solutions and services they trust and value. For more information, visit www.software.dell.com.
Contacting DellTechnical support: Online support
Product questions and sales: (800) 306-9329
Email: [email protected]
Technical support resourcesTechnical support is available to customers who have purchased Dell software with a valid maintenance contract and to customers who have trial versions. To access the Support Portal, go to https://support.software.dell.com/.
The Support Portal provides self-help tools you can use to solve problems quickly and independently, 24 hours a day, 365 days a year. In addition, the portal provides direct access to product support engineers through an online Service Request system.
The site enables you to:
• Create, update, and manage Service Requests (cases)
• View Knowledge Base articles
• Obtain product notifications
• Download software. For trial software, go to Trial Downloads.
• View how-to videos
• Engage in community discussions
• Chat with a support engineer
Third-party contributionsThis product contains the third-party components listed below. For third-party license information, go to http://software.dell.com/legal/license-agreements.aspx. Source code for components marked with an asterisk (*) is available at http://opensource.dell.com.
Dell Archive Manager 5.0.1Retention Policy Guide
41
Table 1. List of third-party contributions
Component License or acknowledgement
AJAX Control TookKit 4.1.60501
Copyright © 2009 CodePlex Foundation
License: New BSD License (BSD)
HTML Agility Pack 1.3.1.0
Copyright © 2003-2005 Simon Mourier
License: Creative Commons 2.5
jCarousel 0.2.8 Copyright © 2006 Jan Sorgalla
License: MIT
JQuery 1.4.2 Copyright © 2010, John Resig
License: MIT
JQuery UI 1.8.12 Copyright © 2011 Paul Bakaus
License: MIT
JQuery 1.5.1 Copyright © 2011, John Resig
License: MIT
jquery.qtip 1.0.0-rc3 Copyright © 2009 Craig Thompson
License: MIT
Json.NET 4.5 Copyright © 2007 James Newton-King
License: MIT
Log4Net 1.2.10 Copyright © 2004 Apache Software Foundation
License: Apache 2.0
Lucene.Net 2.9.2 Copyright © 2009 Apache Software Foundation
License: Apache 2.0
NetApp Data ONTAP 4.0
Copyright © 2003 Network Appliance, Inc.
License: NetApp Manageability SDK 04-29-11
RegistryMonitor 1.0 Copyright © 2005 Thomas Freudenberg
License: Thomas Freudenberg RegistryMonitor
RestSharp 104.1 Copyright © 2010 John Sheehan
License: Apache 2.0
SharpZipLib 0.85.4.369 Copyright © 2001 Mike Krueger
Copyright © 2004 John Reilly
License: SharpZipLib License
Submodal 1.5 Copyright © Seth Banks
License: MIT
Backbone.js.10 Copyright © 2010-2012 Jeremy Ashkenas, DocumentCloud Inc.
License: MIT
JQuery 1.8.2 Copyright © 2012 jQuery Foundation and other contributors
License: MIT
jQuery-Placeholder 2.0.7
Copyright © Mathias Bynens
License: MIT
spin.js 1.2.4 Copyright © 2011 Felix Gnass
License: MIT
Twitter Bootstrap 2.0.3 Copyright © 2012 Twitter, Inc..
License: 2012 Twitter, Inc.
Dell Archive Manager 5.0.1Retention Policy Guide
42
Underscore.js 1.3.1 Copyright © 2009-2012 Jeremy Ashkenas, DocumentCloud Inc.
License: MIT
Underscore.string 2.0.0
Copyright © 2010 Esa-Matti Suuronen
License: MIT
Table 1. List of third-party contributions
Component License or acknowledgement
Dell Archive Manager 5.0.1Retention Policy Guide
43


![DR Series System Command Line Reference Guide - Questsupport-public.cfm.quest.com/39283_CLIGuidePublication=8=PDF_A4... · stats --fc [--iostat] ... [verify_data | verify_rda_metadata](https://img.pdfslide.us/doc/110x75/5ad57f837f8b9a075a8cf82f/dr-series-system-command-line-reference-guide-questsupport-8pdfa4stats-fc.jpg)