Embed Size (px)
Citation preview
DDMS
EDI
ManualApril 1994 Revision • Item # O-EDI

DDMS EDI Manual
© Copyrighted by D.D.M.S., Inc.Printed in the United States of America.
DDMS, P.O. Box 507, Keller, TX 76248: 817-431-0668. Sales: 1-800-366-3367.Service: 1-800-366-4778. Fax: 817-431-0956
CONTENTS AT A GLANCE
Chapters Screens
Introduction ................................................................................................................................................... N/A
1: Processing Functions .............................................................................................................................. (SG)
2: Communication Functions .................................................................................................................... (SG)
3: Releasing EDI Files ................................................................................................................................... (G)
4: Setting Up EDI Aliases ............................................................................................................................ (ES)
5: Using the EDI Reports ........................................................................................................................ (LT/T)
6: Setting Up EDI Parameters ................................................................................................................. (L6W)
7: Setting Up Customer EDI Parameters .............................................................................................. (SGA)
8: Cross-Referencing Trading Partners and Customer Accounts ...................................................(SGAR)

Rev. 4/94Page v
Introduction
INTRODUCTION
Electronic Data Interchange (EDI) is the exchange of transaction data between business organizationsusing a standard format. A group chartered by the American National Standards Institute (ANSI) hasdeveloped inter-industry standards for communicating business transactions between differentcomputer systems. This group, called the Accredited Standards Committee X12, is responsible fordeveloping and maintaining a collection of transaction sets for this purpose.
Transaction sets received through an EDI network are translated into a format that can be used bythe O/P Dealer system. Transaction sets are also automatically created for transmission from yoursystem to the network. Once you have established parameters for EDI communications, the processwill be virtually invisible to you.
With EDI, it is possible for your customers to transmit orders to your system from their non-DDMSsystems, and for you to transmit acknowledgments, shipping notices, and other information to theirsystems. This method of communication can eliminate the duplication of data entry, dramaticallyreduce errors that occur during keyboard entry, and make the procurement process much moreefficient for you and your customers.
Establishing parameters is as simple as the current procedure for creating communications param-eters for wholesalers. To set EDI communication parameters, refer to Chapter 6: Setting Up EDIParameters and Chapter 7: Setting Up Customer Parameters of this manual. The way you set upyour system parameters determines how information is processed through the network. Parametersmust be set before any information can be transmitted through the network.
Notes: If you use EDI with your vendors, they must be included in your customer database. Recordsare entered in the customer database through the (A) Customer Master screen. For moreinformation on entering customer records, see "Volume 1: The Customer Database" in Book 1:Customers, Vendors, and Salespersons.
In some chapters in this book, you will find numbers in parentheses, such as (810). Thesenumbers are the EDI names for certain documents discussed in the text, and are included foryour easy reference. For example, (850) is a purchase order, (855) is an acknowledgment, and(810) is an invoice.
USING WINDOWS IN DDMS PROGRAMS
The (SGAR) EDI Customer Cross Reference screen features interactive windows for some fields,messages, and prompts. Windowing allows you to display a wide variety of information. Thesedisplays overlay other information on the screen, which speeds up the cross-referencing process byeliminating time-consuming screen redraws.
One important feature of interactive windows is the highlighted key. Each option in a window,whether a “yes” or “no” answer to a prompt or a choice in a menu, has one character highlighted. Toselect an option, you simply type the highlighted character. This character is usually the first letterof the word; the number of the option, if they are numbered; or the letter of the option, if they are listedby letter.
Most terminals have the capability of highlighting these letters, but on a few terminals thesecharacters will look no different from any other character on the screen. If there is no apparentdifference between highlighted and plain characters on your terminal, try adjusting the terminal’s
Rev. 4/94Page vi
DDMS EDI Manual
contrast. If you still cannot see which characters are highlighted, your terminal may not be able todisplay the highlights.
For those whose terminals cannot differentiate the highlighted characters from the plain characters,the instructions throughout this book will tell you which key to type for the fastest system response.
You can also select options in another way. Each time a window containing a prompt appears, thedefault option will be bracketed, like this:
<Yes>
To select the default, press RETURN.
To select a different option, press TAB to move the brackets down, or press BACKSPACE to move thebrackets up. When the brackets move to the option you want, you select that option by pressingRETURN. With this method of selection, you do not need the highlighting capability on your terminalto select an option.
Note: To make the instructions simple and easy to follow, this manual will not tell you to select anitem by tabbing to it and pressing RETURN each time you select an option. Instead,instructions in the text for selecting an option cite only the fastest and easiest method, usuallythe single keystroke of a highlighted letter. However, tabbing to your choice and pressingRETURN is always a valid method of selection in interactive windows.
You may notice that when you use your monitor, the boxes look better than they do on your terminals.The monitor is using its graphic ability to display the windows. Most terminals cannot displaygraphics, and must therefore substitute text characters, such as dashes and plus signs.
Rev. 4/94Page vii
Introduction
CHECKLIST: SETTING UP THE EDI APPLICATION
Below is a list of the preliminary steps necessary to set up and use EDI on the DDMS system.
• Set the EDI Parameters. Call Don Morrison at (214) 778-2037 or Linda Boracci at (214) 778-2039at AT & T to obtain these parameters and then enter them in the appropriate fields in the (L6W)EDI Parameters screen.
• Set the Customer EDI Parameters. To do this, select the [A] Set Up Customer Parameters actioncode in the (SG) EDI Communications screen. The (SGA) Customer EDI Parameters screenis displayed. Refer to Chapter 7: Setting Up Customer Parameters for information about thefields in this screen.
• From the (ES) Inventory Alias screen, select the [E] EDI action code to set up aliases for yourEDI customers. Using a list or catalog supplied by the EDI customer, create an alias for everyitem that is referred to by the customer with a different item number or with a different unitof measure than the one in your inventory database. Refer to Chapter 4: Setting Up EDIAliases for information about how to do this.
• Set up a fixed or flexible contract for the EDI customer in the (ET) Inventory Contract Pricescreen. Refer to “Chapter 3: The Inventory Database” in the O/P Dealer Systems SoftwareManual for information about how to do this.
• Retrieve the customer record in the (A) Customer Master screen and specify the contracts inthe CONTRACTS fields.
• From the (A) screen, select the [R] Reindex action code. After entering the correct password(as specified in the (LA) Customer and A/R Parameters screen), select the [C] function toreindex using the EDI sort field. This will let you retrieve this customer's record using theReceivers Code ID number specified in the (SGA) Customer EDI Parameters screen.
• In the (LG) Order Entry Parameters screen, verify that the ARCHIVE SPECIALS field is set toY. If this is not the case, use the [C] Change function and set this field to Y.
This completes the preliminary instructions for setting up and using EDI with your customers. Onceyour customers have set up their computer systems for EDI communications, you will be able to offerthem this powerful advantage in today's competitive marketplace.

Rev. 4/94Page viii
DDMS EDI Manual
Rev. 4/94Page 1-1
Chapter 1: Processing Functions
CHAPTER 1: PROCESSING FUNCTIONS
Contents
Introduction ................................................................................................................................................... 1-2
Section 1: Building Files for Transmission ......................................................................................... 1-3Building Transmission Files for Purchase Orders (850) ................................................... 1-3Building Transmission Files for P/O Acknowledgments (855) ...................................... 1-7Building Transmission Files for Invoices (810) ................................................................ 1-11Building Transmission Files for Quotes (843) .................................................................. 1-14
Section 2: Processing Received Files .................................................................................................. 1-18
Rev. 4/94Page 1-2
DDMS EDI Manual
Introduction
This chapter describes the processing functions necessary to translate files that you send or receive.Files that are sent using EDI must be in the ANSI standard format to be sent accurately. However,before you send these files, and after you receive them, you work in them using the DDMS format.This chapter describes how to translate your files from DDMS format to ANSI format, and back again.
Rev. 4/94Page 1-3
Chapter 1: Processing Functions
Section 1: Building Files for Transmission
Before communications can take place through the EDI network, you must build the various files thatwill be transmitted. These files specify whether the information being transmitted is a purchaseorder, a purchase order acknowledgment, an invoice, or a quote. This section describes the stepsnecessary to do the following:
Build transmission files for purchase ordersBuild transmission files for purchase order acknowledgmentsBuild transmission files for invoicesBuild transmission files for quotes.
Files for EDI communication are created in the (SG) EDI Communications screen.
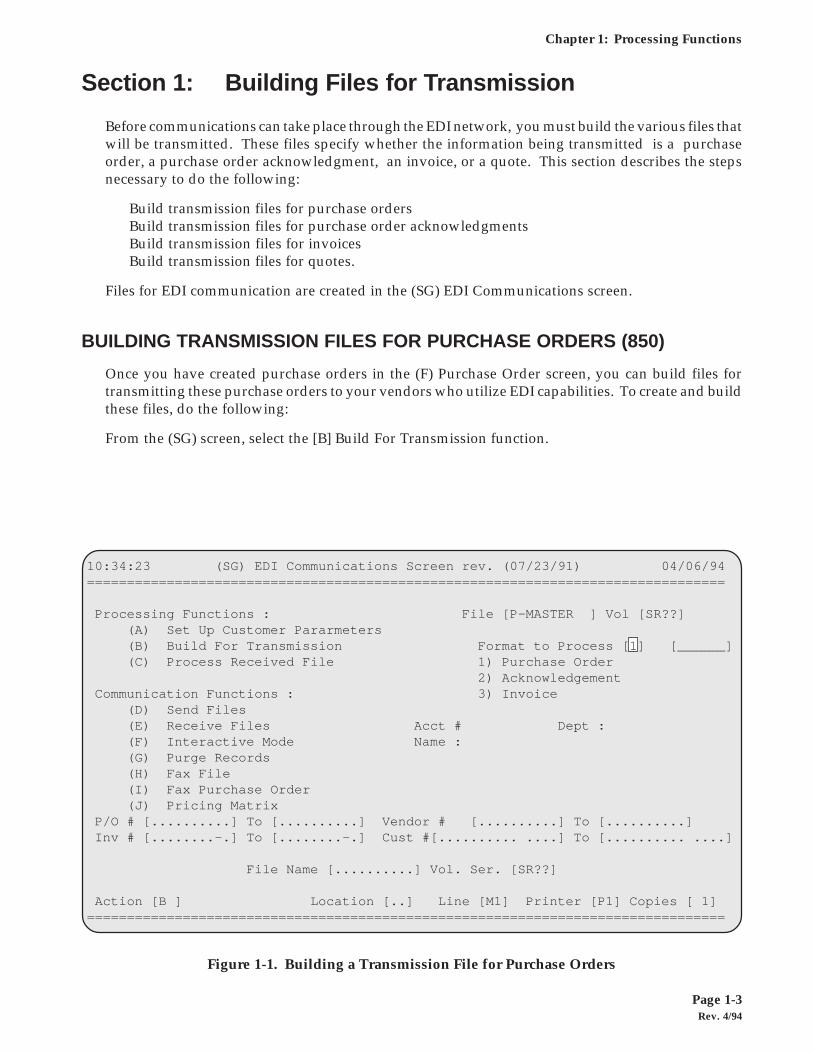
BUILDING TRANSMISSION FILES FOR PURCHASE ORDERS (850)
Once you have created purchase orders in the (F) Purchase Order screen, you can build files fortransmitting these purchase orders to your vendors who utilize EDI capabilities. To create and buildthese files, do the following:
From the (SG) screen, select the [B] Build For Transmission function.
Figure 1-1. Building a Transmission File for Purchase Orders
10:34:23 (SG) EDI Communications Screen rev. (07/23/91) 04/06/94================================================================================
Processing Functions : File [P-MASTER ] Vol [SR??] (A) Set Up Customer Pararmeters (B) Build For Transmission Format to Process [1] [______] (C) Process Received File 1) Purchase Order 2) Acknowledgement Communication Functions : 3) Invoice (D) Send Files (E) Receive Files Acct # Dept : (F) Interactive Mode Name : (G) Purge Records (H) Fax File (I) Fax Purchase Order (J) Pricing Matrix P/O # [..........] To [..........] Vendor # [..........] To [..........] Inv # [........-.] To [........-.] Cust #[.......... ....] To [.......... ....]
File Name [..........] Vol. Ser. [SR??]
Action [B ] Location [..] Line [M1] Printer [P1] Copies [ 1]================================================================================
Rev. 4/94Page 1-4
DDMS EDI Manual
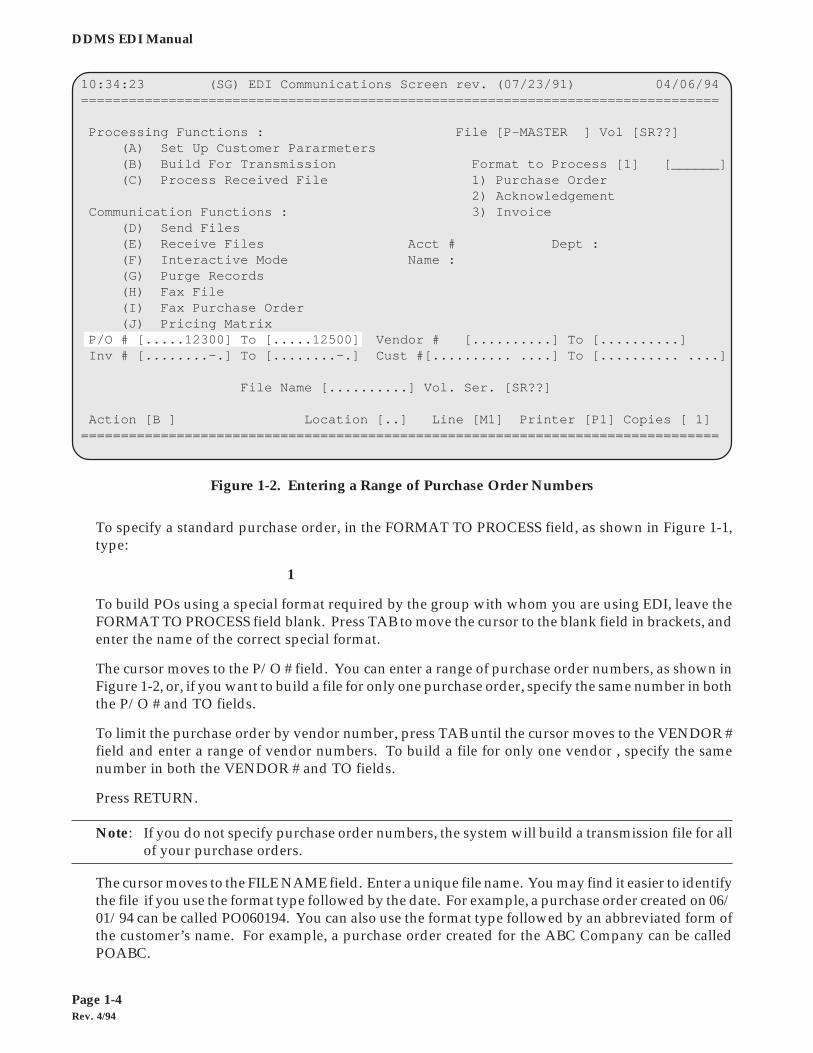
Figure 1-2. Entering a Range of Purchase Order Numbers
10:34:23 (SG) EDI Communications Screen rev. (07/23/91) 04/06/94================================================================================
Processing Functions : File [P-MASTER ] Vol [SR??] (A) Set Up Customer Pararmeters (B) Build For Transmission Format to Process [1] [______] (C) Process Received File 1) Purchase Order 2) Acknowledgement Communication Functions : 3) Invoice (D) Send Files (E) Receive Files Acct # Dept : (F) Interactive Mode Name : (G) Purge Records (H) Fax File (I) Fax Purchase Order (J) Pricing Matrix P/O # [.....12300] To [.....12500] Vendor # [..........] To [..........] Inv # [........-.] To [........-.] Cust #[.......... ....] To [.......... ....]
File Name [..........] Vol. Ser. [SR??]
Action [B ] Location [..] Line [M1] Printer [P1] Copies [ 1]================================================================================
To specify a standard purchase order, in the FORMAT TO PROCESS field, as shown in Figure 1-1,type:
1
To build POs using a special format required by the group with whom you are using EDI, leave theFORMAT TO PROCESS field blank. Press TAB to move the cursor to the blank field in brackets, andenter the name of the correct special format.
The cursor moves to the P/O # field. You can enter a range of purchase order numbers, as shown inFigure 1-2, or, if you want to build a file for only one purchase order, specify the same number in boththe P/O # and TO fields.
To limit the purchase order by vendor number, press TAB until the cursor moves to the VENDOR #field and enter a range of vendor numbers. To build a file for only one vendor , specify the samenumber in both the VENDOR # and TO fields.
Press RETURN.
Note: If you do not specify purchase order numbers, the system will build a transmission file for allof your purchase orders.
The cursor moves to the FILE NAME field. Enter a unique file name. You may find it easier to identifythe file if you use the format type followed by the date. For example, a purchase order created on 06/01/94 can be called PO060194. You can also use the format type followed by an abbreviated form ofthe customer’s name. For example, a purchase order created for the ABC Company can be calledPOABC.
Rev. 4/94Page 1-5
Chapter 1: Processing Functions
To specify the volume serial, press TAB to move the cursor to the VOL SER field. Enter the volumeserial for the unit on which the file will be created. Press RETURN.
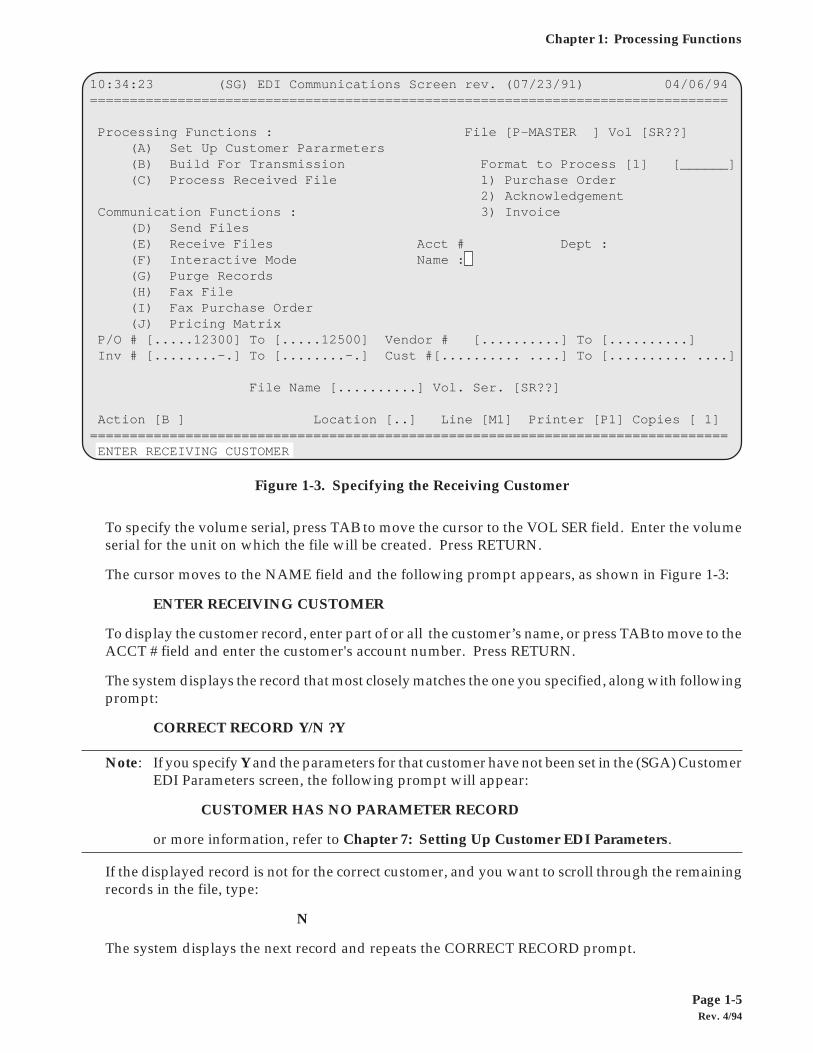
The cursor moves to the NAME field and the following prompt appears, as shown in Figure 1-3:
ENTER RECEIVING CUSTOMER
To display the customer record, enter part of or all the customer’s name, or press TAB to move to theACCT # field and enter the customer's account number. Press RETURN.
The system displays the record that most closely matches the one you specified, along with followingprompt:
CORRECT RECORD Y/N ?Y
Note: If you specify Y and the parameters for that customer have not been set in the (SGA) CustomerEDI Parameters screen, the following prompt will appear:
CUSTOMER HAS NO PARAMETER RECORD
or more information, refer to Chapter 7: Setting Up Customer EDI Parameters.
If the displayed record is not for the correct customer, and you want to scroll through the remainingrecords in the file, type:
N
The system displays the next record and repeats the CORRECT RECORD prompt.
Figure 1-3. Specifying the Receiving Customer
10:34:23 (SG) EDI Communications Screen rev. (07/23/91) 04/06/94================================================================================
Processing Functions : File [P-MASTER ] Vol [SR??] (A) Set Up Customer Pararmeters (B) Build For Transmission Format to Process [1] [______] (C) Process Received File 1) Purchase Order 2) Acknowledgement Communication Functions : 3) Invoice (D) Send Files (E) Receive Files Acct # Dept : (F) Interactive Mode Name : (G) Purge Records (H) Fax File (I) Fax Purchase Order (J) Pricing Matrix P/O # [.....12300] To [.....12500] Vendor # [..........] To [..........] Inv # [........-.] To [........-.] Cust #[.......... ....] To [.......... ....]
File Name [..........] Vol. Ser. [SR??]
Action [B ] Location [..] Line [M1] Printer [P1] Copies [ 1]================================================================================ ENTER RECEIVING CUSTOMER

Rev. 4/94Page 1-6
DDMS EDI Manual
Figure 1-4. The SORTING RECORDS Message
10:34:23 (SG) EDI Communications Screen rev. (07/23/91) 04/06/94================================================================================
Processing Functions : File [P-MASTER ] Vol [SR??] (A) Set Up Customer Pararmeters (B) Build For Transmission Format to Process [1] [______] (C) Process Received File 1) Purchase Order 2) Acknowledgement Communication Functions : 3) Invoice (D) Send Files (E) Receive Files Acct # Dept : (F) Interactive Mode Name :ABC Company (G) Purge Records (H) Fax File (I) Fax Purchase Order (J) Pricing Matrix P/O # [.....12300] To [.....12500] Vendor # [..........] To [..........] Inv # [........-.] To [........-.] Cust #[.......... ....] To [.......... ....]
File Name [..........] Vol. Ser. [SR??]
Action [B ] Location [..] Line [M1] Printer [P1] Copies [ 1]================================================================================ SORTING RECORDS ...........
If the displayed record is for the correct customer, press RETURN or type:
Y
The cursor moves to the LOCATION field. Enter the G/L location and press RETURN.
The following prompt appears:
ARE YOU SURE Y/N ?N
If you do not want to build this file, press RETURN or type:
N
The cursor returns to the action code field.
If you are ready to build the file as you specified, type:
Y
The system begins building the purchase order file. The following message appears, as shown inFigure 1-4:
SORTING RECORDS ...
If there are no records in the file matching those you specified, the system displays the followingprompt:
NO RECORDS MATCHING THE LIMITS SELECTEDEND OF FILE - ANY KEY TO CONTINUE
Rev. 4/94Page 1-7
Chapter 1: Processing Functions
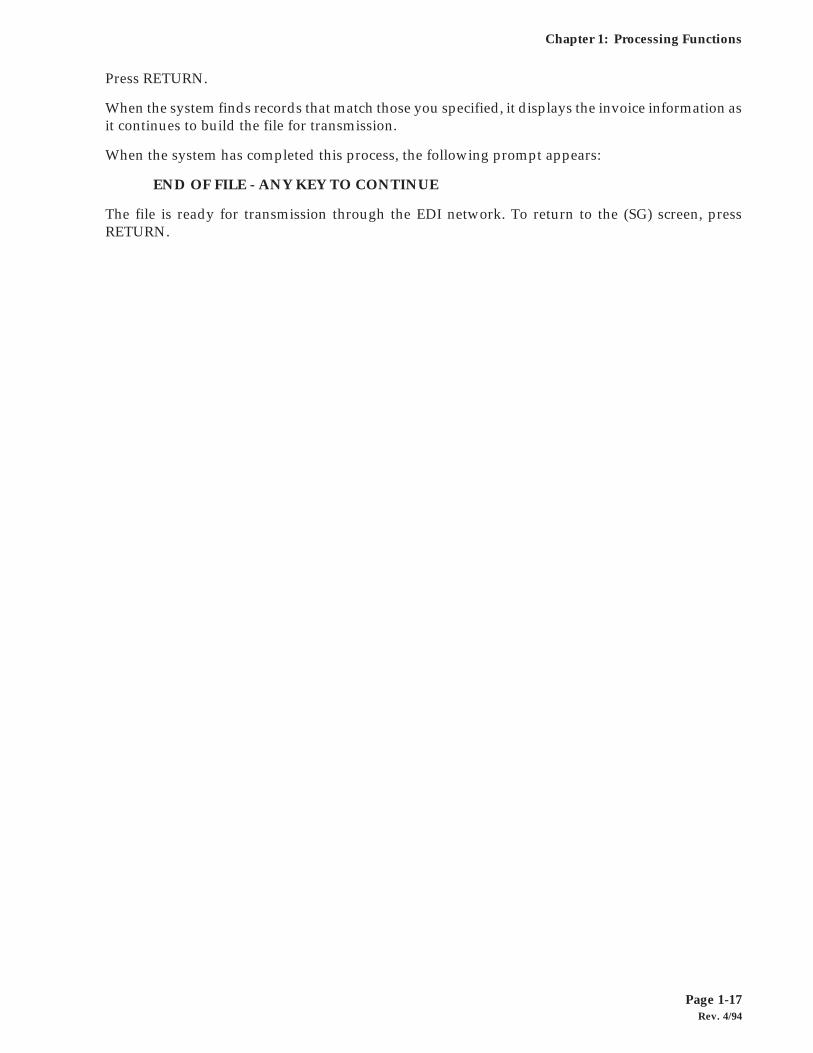
Press RETURN.
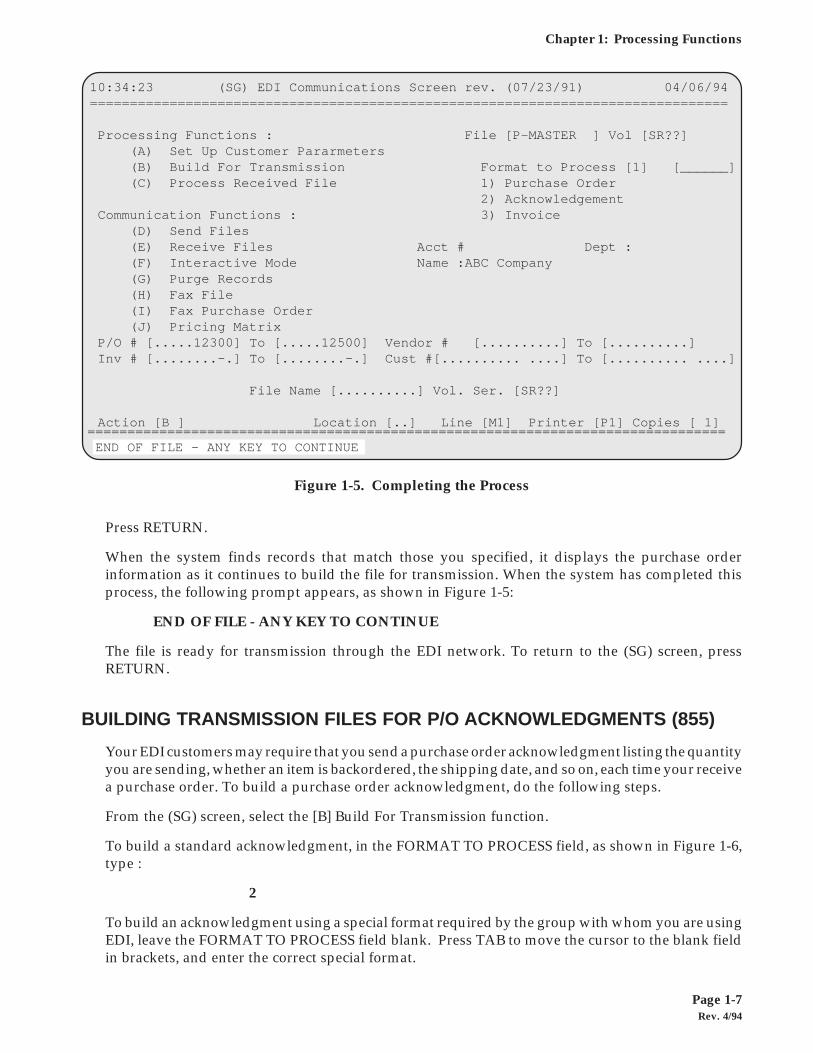
When the system finds records that match those you specified, it displays the purchase orderinformation as it continues to build the file for transmission. When the system has completed thisprocess, the following prompt appears, as shown in Figure 1-5:
END OF FILE - ANY KEY TO CONTINUE
The file is ready for transmission through the EDI network. To return to the (SG) screen, pressRETURN.
BUILDING TRANSMISSION FILES FOR P/O ACKNOWLEDGMENTS (855)
Your EDI customers may require that you send a purchase order acknowledgment listing the quantityyou are sending, whether an item is backordered, the shipping date, and so on, each time your receivea purchase order. To build a purchase order acknowledgment, do the following steps.
From the (SG) screen, select the [B] Build For Transmission function.
To build a standard acknowledgment, in the FORMAT TO PROCESS field, as shown in Figure 1-6,type :
2
To build an acknowledgment using a special format required by the group with whom you are usingEDI, leave the FORMAT TO PROCESS field blank. Press TAB to move the cursor to the blank fieldin brackets, and enter the correct special format.
Figure 1-5. Completing the Process
10:34:23 (SG) EDI Communications Screen rev. (07/23/91) 04/06/94================================================================================
Processing Functions : File [P-MASTER ] Vol [SR??] (A) Set Up Customer Pararmeters (B) Build For Transmission Format to Process [1] [______] (C) Process Received File 1) Purchase Order 2) Acknowledgement Communication Functions : 3) Invoice (D) Send Files (E) Receive Files Acct # Dept : (F) Interactive Mode Name :ABC Company (G) Purge Records (H) Fax File (I) Fax Purchase Order (J) Pricing Matrix P/O # [.....12300] To [.....12500] Vendor # [..........] To [..........] Inv # [........-.] To [........-.] Cust #[.......... ....] To [.......... ....]
File Name [..........] Vol. Ser. [SR??]
Action [B ] Location [..] Line [M1] Printer [P1] Copies [ 1]================================================================================ END OF FILE - ANY KEY TO CONTINUE
Rev. 4/94Page 1-8
DDMS EDI Manual
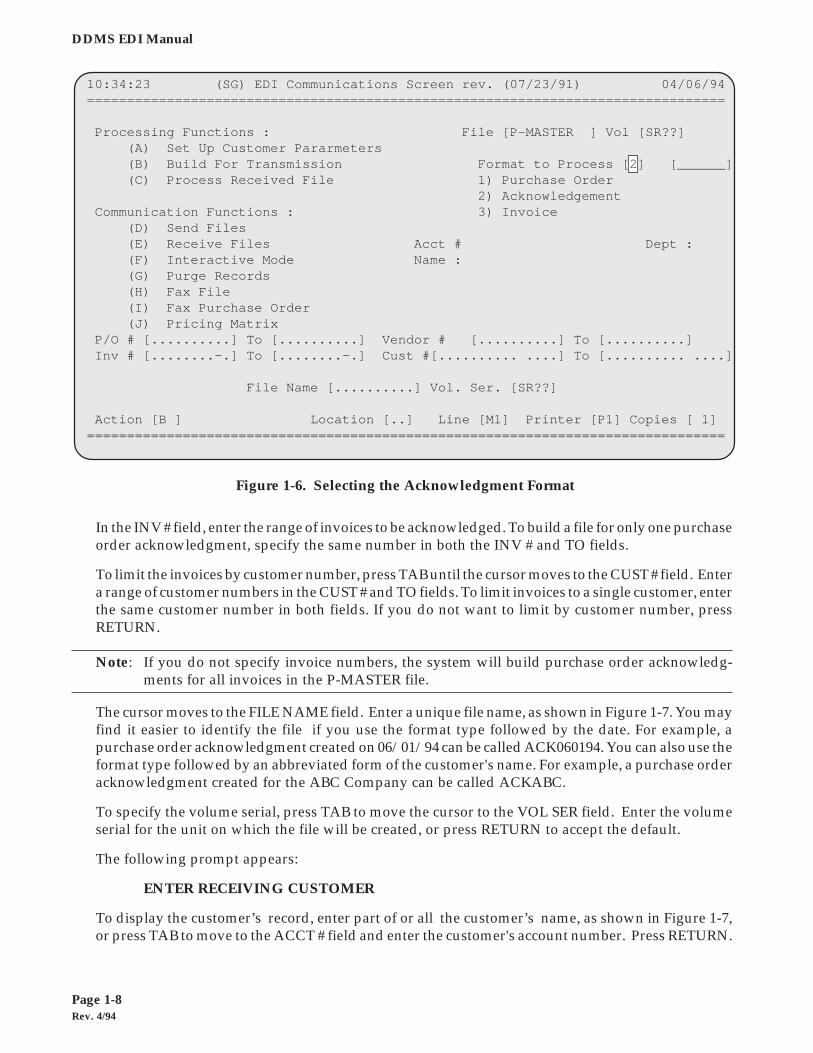
Figure 1-6. Selecting the Acknowledgment Format
10:34:23 (SG) EDI Communications Screen rev. (07/23/91) 04/06/94================================================================================
Processing Functions : File [P-MASTER ] Vol [SR??] (A) Set Up Customer Pararmeters (B) Build For Transmission Format to Process [2] [______] (C) Process Received File 1) Purchase Order 2) Acknowledgement Communication Functions : 3) Invoice (D) Send Files (E) Receive Files Acct # Dept : (F) Interactive Mode Name : (G) Purge Records (H) Fax File (I) Fax Purchase Order (J) Pricing Matrix P/O # [..........] To [..........] Vendor # [..........] To [..........] Inv # [........-.] To [........-.] Cust #[.......... ....] To [.......... ....]
File Name [..........] Vol. Ser. [SR??]
Action [B ] Location [..] Line [M1] Printer [P1] Copies [ 1]================================================================================
In the INV # field, enter the range of invoices to be acknowledged. To build a file for only one purchaseorder acknowledgment, specify the same number in both the INV # and TO fields.
To limit the invoices by customer number, press TAB until the cursor moves to the CUST # field. Entera range of customer numbers in the CUST # and TO fields. To limit invoices to a single customer, enterthe same customer number in both fields. If you do not want to limit by customer number, pressRETURN.
Note: If you do not specify invoice numbers, the system will build purchase order acknowledg-ments for all invoices in the P-MASTER file.
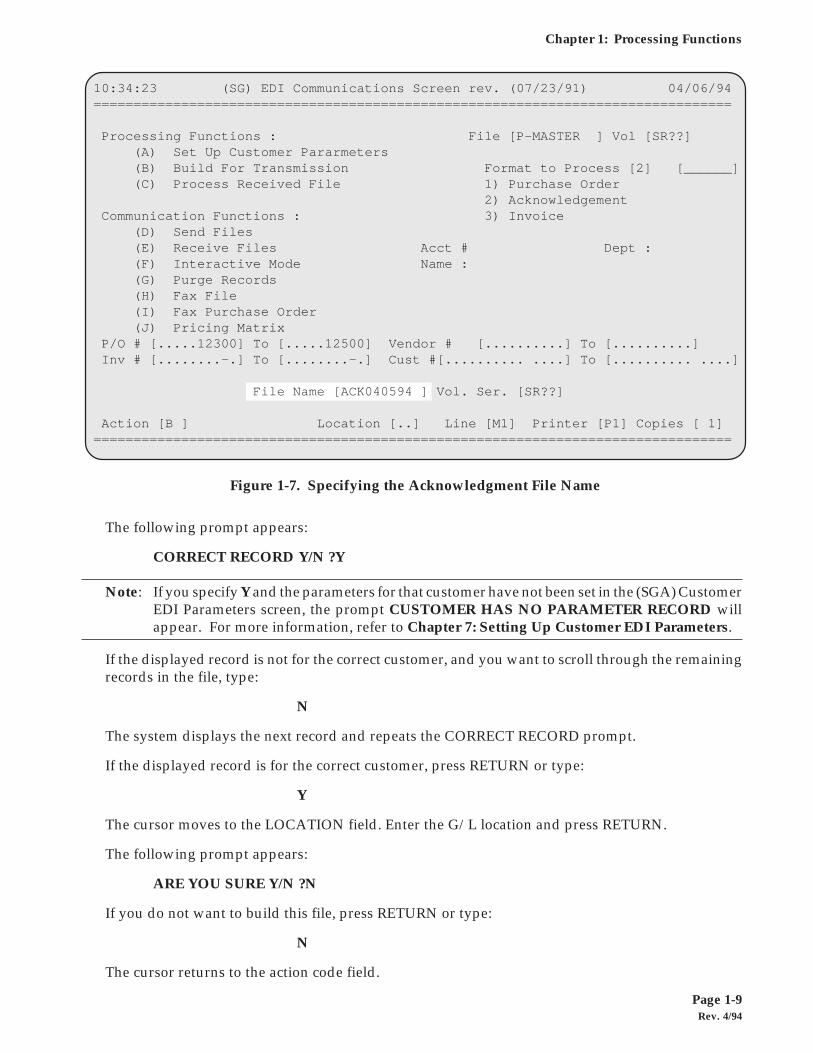
The cursor moves to the FILE NAME field. Enter a unique file name, as shown in Figure 1-7. You mayfind it easier to identify the file if you use the format type followed by the date. For example, apurchase order acknowledgment created on 06/01/94 can be called ACK060194. You can also use theformat type followed by an abbreviated form of the customer's name. For example, a purchase orderacknowledgment created for the ABC Company can be called ACKABC.
To specify the volume serial, press TAB to move the cursor to the VOL SER field. Enter the volumeserial for the unit on which the file will be created, or press RETURN to accept the default.
The following prompt appears:
ENTER RECEIVING CUSTOMER
To display the customer’s record, enter part of or all the customer’s name, as shown in Figure 1-7,or press TAB to move to the ACCT # field and enter the customer's account number. Press RETURN.
Rev. 4/94Page 1-9
Chapter 1: Processing Functions
The following prompt appears:
CORRECT RECORD Y/N ?Y
Note: If you specify Y and the parameters for that customer have not been set in the (SGA) CustomerEDI Parameters screen, the prompt CUSTOMER HAS NO PARAMETER RECORD willappear. For more information, refer to Chapter 7: Setting Up Customer EDI Parameters.
If the displayed record is not for the correct customer, and you want to scroll through the remainingrecords in the file, type:
N
The system displays the next record and repeats the CORRECT RECORD prompt.
If the displayed record is for the correct customer, press RETURN or type:
Y
The cursor moves to the LOCATION field. Enter the G/L location and press RETURN.
The following prompt appears:
ARE YOU SURE Y/N ?N
If you do not want to build this file, press RETURN or type:
N
The cursor returns to the action code field.
Figure 1-7. Specifying the Acknowledgment File Name
10:34:23 (SG) EDI Communications Screen rev. (07/23/91) 04/06/94================================================================================
Processing Functions : File [P-MASTER ] Vol [SR??] (A) Set Up Customer Pararmeters (B) Build For Transmission Format to Process [2] [______] (C) Process Received File 1) Purchase Order 2) Acknowledgement Communication Functions : 3) Invoice (D) Send Files (E) Receive Files Acct # Dept : (F) Interactive Mode Name : (G) Purge Records (H) Fax File (I) Fax Purchase Order (J) Pricing Matrix P/O # [.....12300] To [.....12500] Vendor # [..........] To [..........] Inv # [........-.] To [........-.] Cust #[.......... ....] To [.......... ....]
File Name [ACK040594 ] Vol. Ser. [SR??]
Action [B ] Location [..] Line [M1] Printer [P1] Copies [ 1]================================================================================
Rev. 4/94Page 1-10
DDMS EDI Manual
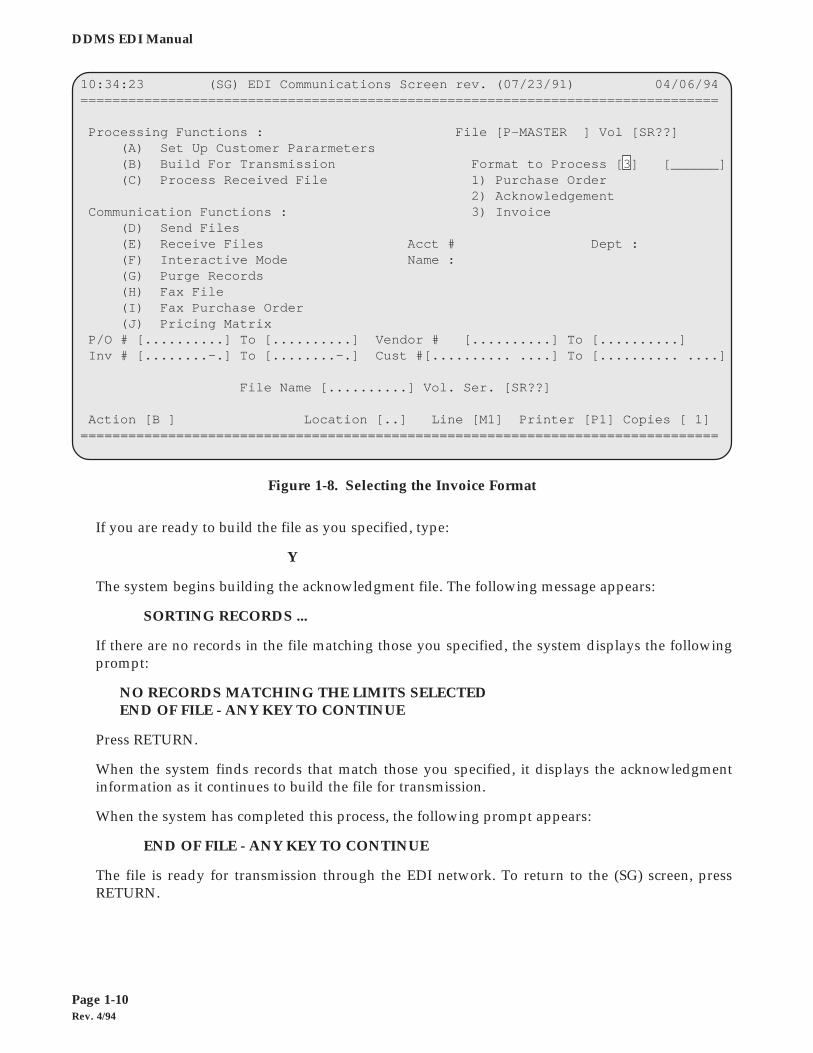
Figure 1-8. Selecting the Invoice Format
10:34:23 (SG) EDI Communications Screen rev. (07/23/91) 04/06/94================================================================================
Processing Functions : File [P-MASTER ] Vol [SR??] (A) Set Up Customer Pararmeters (B) Build For Transmission Format to Process [3] [______] (C) Process Received File 1) Purchase Order 2) Acknowledgement Communication Functions : 3) Invoice (D) Send Files (E) Receive Files Acct # Dept : (F) Interactive Mode Name : (G) Purge Records (H) Fax File (I) Fax Purchase Order (J) Pricing Matrix P/O # [..........] To [..........] Vendor # [..........] To [..........] Inv # [........-.] To [........-.] Cust #[.......... ....] To [.......... ....]
File Name [..........] Vol. Ser. [SR??]
Action [B ] Location [..] Line [M1] Printer [P1] Copies [ 1]================================================================================
If you are ready to build the file as you specified, type:
Y
The system begins building the acknowledgment file. The following message appears:
SORTING RECORDS ...
If there are no records in the file matching those you specified, the system displays the followingprompt:
NO RECORDS MATCHING THE LIMITS SELECTEDEND OF FILE - ANY KEY TO CONTINUE
Press RETURN.
When the system finds records that match those you specified, it displays the acknowledgmentinformation as it continues to build the file for transmission.
When the system has completed this process, the following prompt appears:
END OF FILE - ANY KEY TO CONTINUE
The file is ready for transmission through the EDI network. To return to the (SG) screen, pressRETURN.
Rev. 4/94Page 1-11
Chapter 1: Processing Functions
BUILDING TRANSMISSION FILES FOR INVOICES (810)
The EDI network lets you invoice your customers electronically. To create invoices for transmissionto your customers, do the following steps.
From the (SG) screen, select the [B] Build For Transmission function.
To build a standard format, in the FORMAT TO PROCESS field, as shown in Figure 1-8 type:
3
To build an invoice using a special format that is required by the group with whom you are using EDI,leave the FORMAT TO PROCESS field blank. Press TAB to move the cursor to the blank field inbrackets, and enter the correct special format.
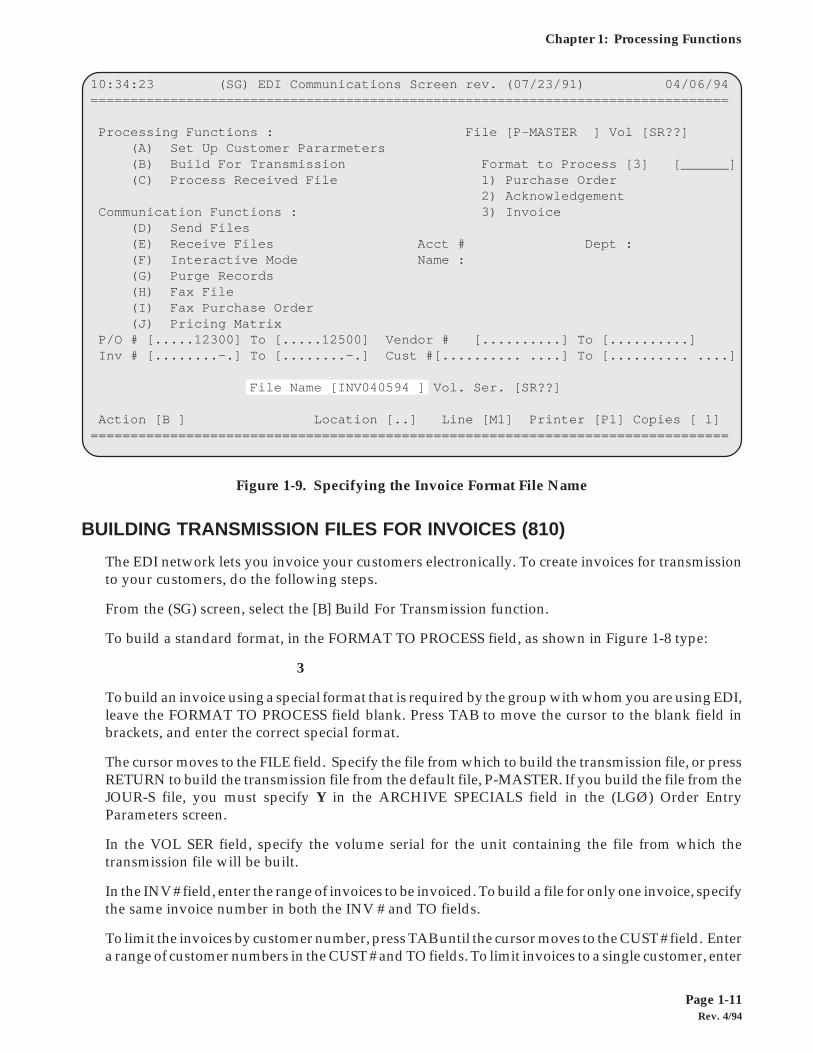
The cursor moves to the FILE field. Specify the file from which to build the transmission file, or pressRETURN to build the transmission file from the default file, P-MASTER. If you build the file from theJOUR-S file, you must specify Y in the ARCHIVE SPECIALS field in the (LGØ) Order EntryParameters screen.
In the VOL SER field, specify the volume serial for the unit containing the file from which thetransmission file will be built.
In the INV # field, enter the range of invoices to be invoiced. To build a file for only one invoice, specifythe same invoice number in both the INV # and TO fields.
To limit the invoices by customer number, press TAB until the cursor moves to the CUST # field. Entera range of customer numbers in the CUST # and TO fields. To limit invoices to a single customer, enter
Figure 1-9. Specifying the Invoice Format File Name
10:34:23 (SG) EDI Communications Screen rev. (07/23/91) 04/06/94================================================================================
Processing Functions : File [P-MASTER ] Vol [SR??] (A) Set Up Customer Pararmeters (B) Build For Transmission Format to Process [3] [______] (C) Process Received File 1) Purchase Order 2) Acknowledgement Communication Functions : 3) Invoice (D) Send Files (E) Receive Files Acct # Dept : (F) Interactive Mode Name : (G) Purge Records (H) Fax File (I) Fax Purchase Order (J) Pricing Matrix P/O # [.....12300] To [.....12500] Vendor # [..........] To [..........] Inv # [........-.] To [........-.] Cust #[.......... ....] To [.......... ....]
File Name [INV040594 ] Vol. Ser. [SR??]
Action [B ] Location [..] Line [M1] Printer [P1] Copies [ 1]================================================================================
Rev. 4/94Page 1-12
DDMS EDI Manual
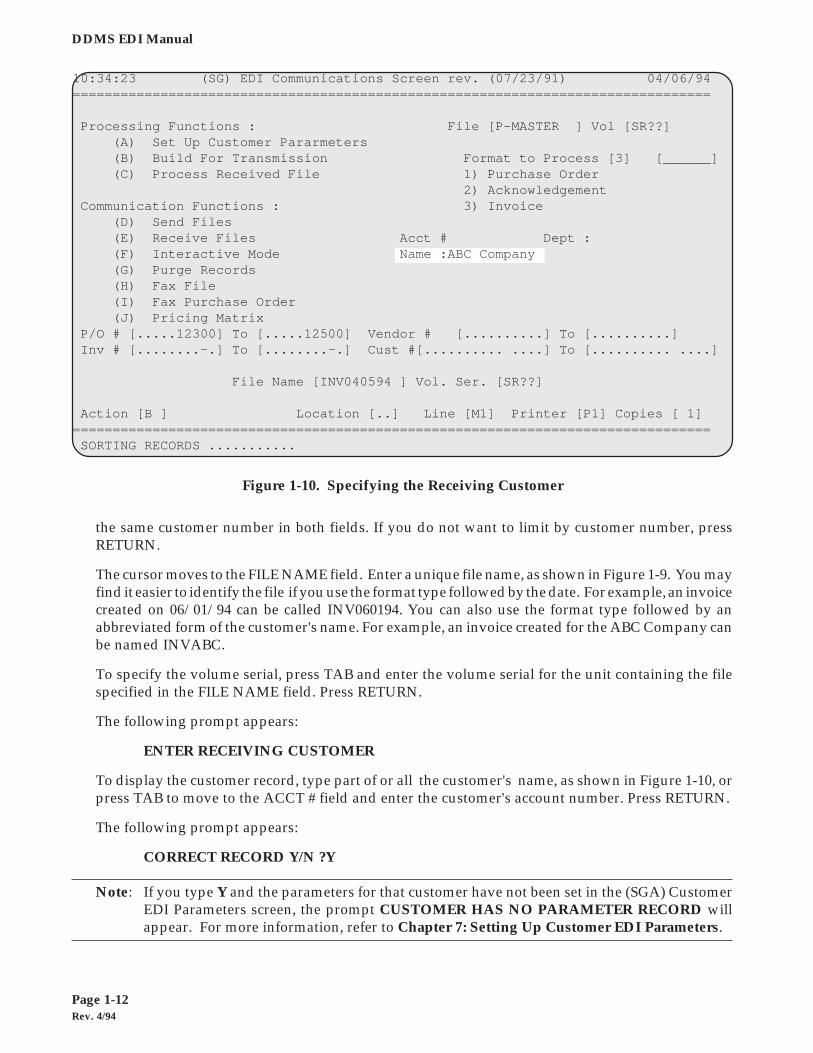
Figure 1-10. Specifying the Receiving Customer
the same customer number in both fields. If you do not want to limit by customer number, pressRETURN.
The cursor moves to the FILE NAME field. Enter a unique file name, as shown in Figure 1-9. You mayfind it easier to identify the file if you use the format type followed by the date. For example, an invoicecreated on 06/01/94 can be called INV060194. You can also use the format type followed by anabbreviated form of the customer's name. For example, an invoice created for the ABC Company canbe named INVABC.
To specify the volume serial, press TAB and enter the volume serial for the unit containing the filespecified in the FILE NAME field. Press RETURN.
The following prompt appears:
ENTER RECEIVING CUSTOMER
To display the customer record, type part of or all the customer's name, as shown in Figure 1-10, orpress TAB to move to the ACCT # field and enter the customer's account number. Press RETURN.
The following prompt appears:
CORRECT RECORD Y/N ?Y
Note: If you type Y and the parameters for that customer have not been set in the (SGA) CustomerEDI Parameters screen, the prompt CUSTOMER HAS NO PARAMETER RECORD willappear. For more information, refer to Chapter 7: Setting Up Customer EDI Parameters.
10:34:23 (SG) EDI Communications Screen rev. (07/23/91) 04/06/94================================================================================
Processing Functions : File [P-MASTER ] Vol [SR??] (A) Set Up Customer Pararmeters (B) Build For Transmission Format to Process [3] [______] (C) Process Received File 1) Purchase Order 2) Acknowledgement Communication Functions : 3) Invoice (D) Send Files (E) Receive Files Acct # Dept : (F) Interactive Mode Name :ABC Company (G) Purge Records (H) Fax File (I) Fax Purchase Order (J) Pricing Matrix P/O # [.....12300] To [.....12500] Vendor # [..........] To [..........] Inv # [........-.] To [........-.] Cust #[.......... ....] To [.......... ....]
File Name [INV040594 ] Vol. Ser. [SR??]
Action [B ] Location [..] Line [M1] Printer [P1] Copies [ 1]================================================================================ SORTING RECORDS ...........
Rev. 4/94Page 1-13
Chapter 1: Processing Functions
If the displayed record is not for the correct customer, and you want to scroll through the remainingrecords in the file, type:
N
The system displays the next record and repeats the CORRECT RECORD prompt.
If the displayed record is for the correct customer, press RETURN or type:
Y
The cursor moves to the LOCATION field. Enter the G/L location and press RETURN.
The following prompt appears:
ARE YOU SURE Y/N ?N
If you do not want to build this file, press RETURN or type:
N
The cursor returns to the action code field.
If you are ready to build the file as you specified, type:
Y
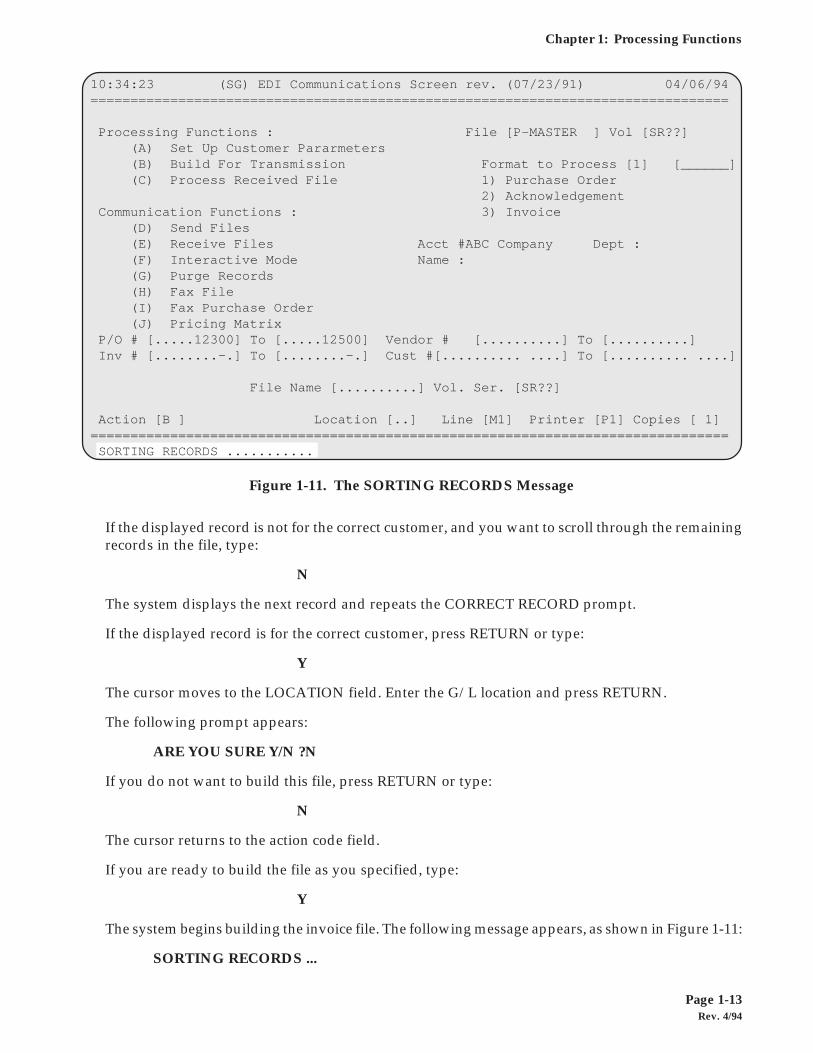
The system begins building the invoice file. The following message appears, as shown in Figure 1-11:
SORTING RECORDS ...
Figure 1-11. The SORTING RECORDS Message
10:34:23 (SG) EDI Communications Screen rev. (07/23/91) 04/06/94================================================================================
Processing Functions : File [P-MASTER ] Vol [SR??] (A) Set Up Customer Pararmeters (B) Build For Transmission Format to Process [1] [______] (C) Process Received File 1) Purchase Order 2) Acknowledgement Communication Functions : 3) Invoice (D) Send Files (E) Receive Files Acct #ABC Company Dept : (F) Interactive Mode Name : (G) Purge Records (H) Fax File (I) Fax Purchase Order (J) Pricing Matrix P/O # [.....12300] To [.....12500] Vendor # [..........] To [..........] Inv # [........-.] To [........-.] Cust #[.......... ....] To [.......... ....]
File Name [..........] Vol. Ser. [SR??]
Action [B ] Location [..] Line [M1] Printer [P1] Copies [ 1]================================================================================ SORTING RECORDS ...........
Rev. 4/94Page 1-14
DDMS EDI Manual
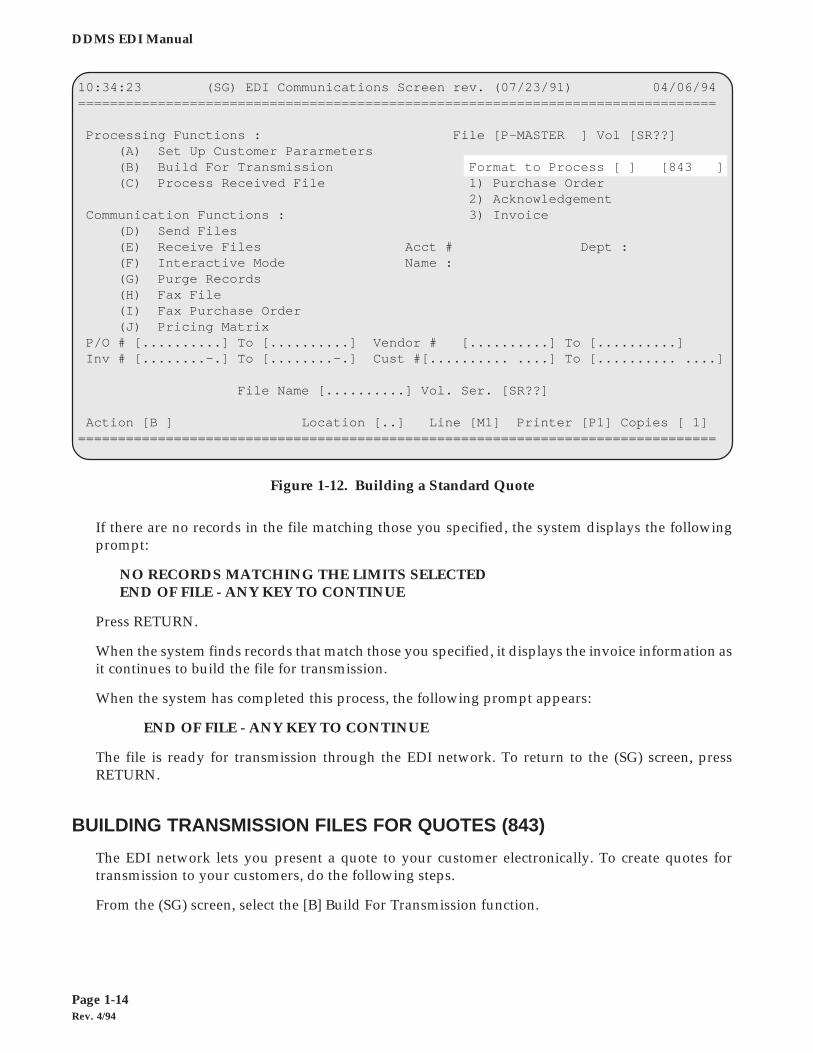
Figure 1-12. Building a Standard Quote
10:34:23 (SG) EDI Communications Screen rev. (07/23/91) 04/06/94================================================================================
Processing Functions : File [P-MASTER ] Vol [SR??] (A) Set Up Customer Pararmeters (B) Build For Transmission Format to Process [ ] [843 ] (C) Process Received File 1) Purchase Order 2) Acknowledgement Communication Functions : 3) Invoice (D) Send Files (E) Receive Files Acct # Dept : (F) Interactive Mode Name : (G) Purge Records (H) Fax File (I) Fax Purchase Order (J) Pricing Matrix P/O # [..........] To [..........] Vendor # [..........] To [..........] Inv # [........-.] To [........-.] Cust #[.......... ....] To [.......... ....]
File Name [..........] Vol. Ser. [SR??]
Action [B ] Location [..] Line [M1] Printer [P1] Copies [ 1]================================================================================
If there are no records in the file matching those you specified, the system displays the followingprompt:
NO RECORDS MATCHING THE LIMITS SELECTEDEND OF FILE - ANY KEY TO CONTINUE
Press RETURN.
When the system finds records that match those you specified, it displays the invoice information asit continues to build the file for transmission.
When the system has completed this process, the following prompt appears:
END OF FILE - ANY KEY TO CONTINUE
The file is ready for transmission through the EDI network. To return to the (SG) screen, pressRETURN.
BUILDING TRANSMISSION FILES FOR QUOTES (843)
The EDI network lets you present a quote to your customer electronically. To create quotes fortransmission to your customers, do the following steps.
From the (SG) screen, select the [B] Build For Transmission function.
Rev. 4/94Page 1-15
Chapter 1: Processing Functions
In the FORMAT TO PROCESS field, press TAB. The following prompt appears:
ENTER SELECTOR NAME
The cursor moves to the field to the right of the FORMAT TO PROCESS field. Enter the selector namefor an EDI quote.
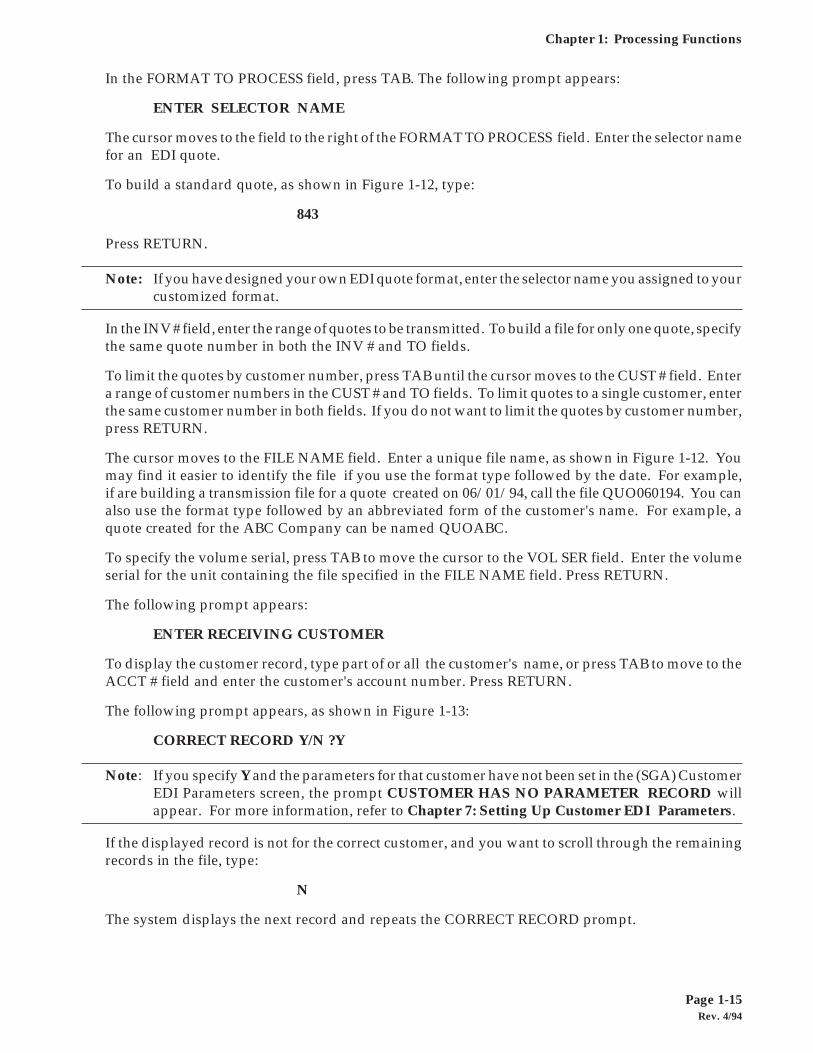
To build a standard quote, as shown in Figure 1-12, type:
843
Press RETURN.
Note: If you have designed your own EDI quote format, enter the selector name you assigned to yourcustomized format.
In the INV # field, enter the range of quotes to be transmitted. To build a file for only one quote, specifythe same quote number in both the INV # and TO fields.
To limit the quotes by customer number, press TAB until the cursor moves to the CUST # field. Entera range of customer numbers in the CUST # and TO fields. To limit quotes to a single customer, enterthe same customer number in both fields. If you do not want to limit the quotes by customer number,press RETURN.
The cursor moves to the FILE NAME field. Enter a unique file name, as shown in Figure 1-12. Youmay find it easier to identify the file if you use the format type followed by the date. For example,if are building a transmission file for a quote created on 06/01/94, call the file QUO060194. You canalso use the format type followed by an abbreviated form of the customer's name. For example, aquote created for the ABC Company can be named QUOABC.
To specify the volume serial, press TAB to move the cursor to the VOL SER field. Enter the volumeserial for the unit containing the file specified in the FILE NAME field. Press RETURN.
The following prompt appears:
ENTER RECEIVING CUSTOMER
To display the customer record, type part of or all the customer's name, or press TAB to move to theACCT # field and enter the customer's account number. Press RETURN.
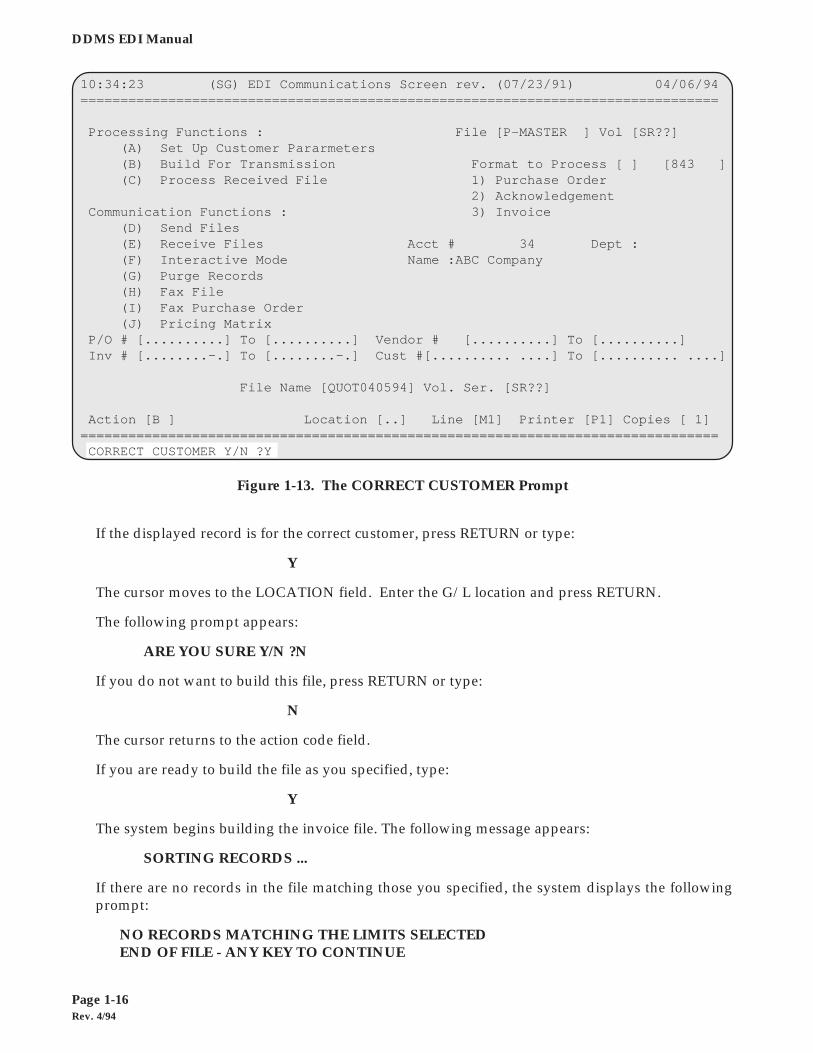
The following prompt appears, as shown in Figure 1-13:
CORRECT RECORD Y/N ?Y
Note: If you specify Y and the parameters for that customer have not been set in the (SGA) CustomerEDI Parameters screen, the prompt CUSTOMER HAS NO PARAMETER RECORD willappear. For more information, refer to Chapter 7: Setting Up Customer EDI Parameters.
If the displayed record is not for the correct customer, and you want to scroll through the remainingrecords in the file, type:
N
The system displays the next record and repeats the CORRECT RECORD prompt.
Rev. 4/94Page 1-16
DDMS EDI Manual
If the displayed record is for the correct customer, press RETURN or type:
Y
The cursor moves to the LOCATION field. Enter the G/L location and press RETURN.
The following prompt appears:
ARE YOU SURE Y/N ?N
If you do not want to build this file, press RETURN or type:
N
The cursor returns to the action code field.
If you are ready to build the file as you specified, type:
Y
The system begins building the invoice file. The following message appears:
SORTING RECORDS ...
If there are no records in the file matching those you specified, the system displays the followingprompt:
NO RECORDS MATCHING THE LIMITS SELECTEDEND OF FILE - ANY KEY TO CONTINUE
Figure 1-13. The CORRECT CUSTOMER Prompt
10:34:23 (SG) EDI Communications Screen rev. (07/23/91) 04/06/94================================================================================
Processing Functions : File [P-MASTER ] Vol [SR??] (A) Set Up Customer Pararmeters (B) Build For Transmission Format to Process [ ] [843 ] (C) Process Received File 1) Purchase Order 2) Acknowledgement Communication Functions : 3) Invoice (D) Send Files (E) Receive Files Acct # 34 Dept : (F) Interactive Mode Name :ABC Company (G) Purge Records (H) Fax File (I) Fax Purchase Order (J) Pricing Matrix P/O # [..........] To [..........] Vendor # [..........] To [..........] Inv # [........-.] To [........-.] Cust #[.......... ....] To [.......... ....]
File Name [QUOT040594] Vol. Ser. [SR??]
Action [B ] Location [..] Line [M1] Printer [P1] Copies [ 1]================================================================================ CORRECT CUSTOMER Y/N ?Y
Rev. 4/94Page 1-17
Chapter 1: Processing Functions
Press RETURN.
When the system finds records that match those you specified, it displays the invoice information asit continues to build the file for transmission.
When the system has completed this process, the following prompt appears:
END OF FILE - ANY KEY TO CONTINUE
The file is ready for transmission through the EDI network. To return to the (SG) screen, pressRETURN.
Rev. 4/94Page 1-18
DDMS EDI Manual
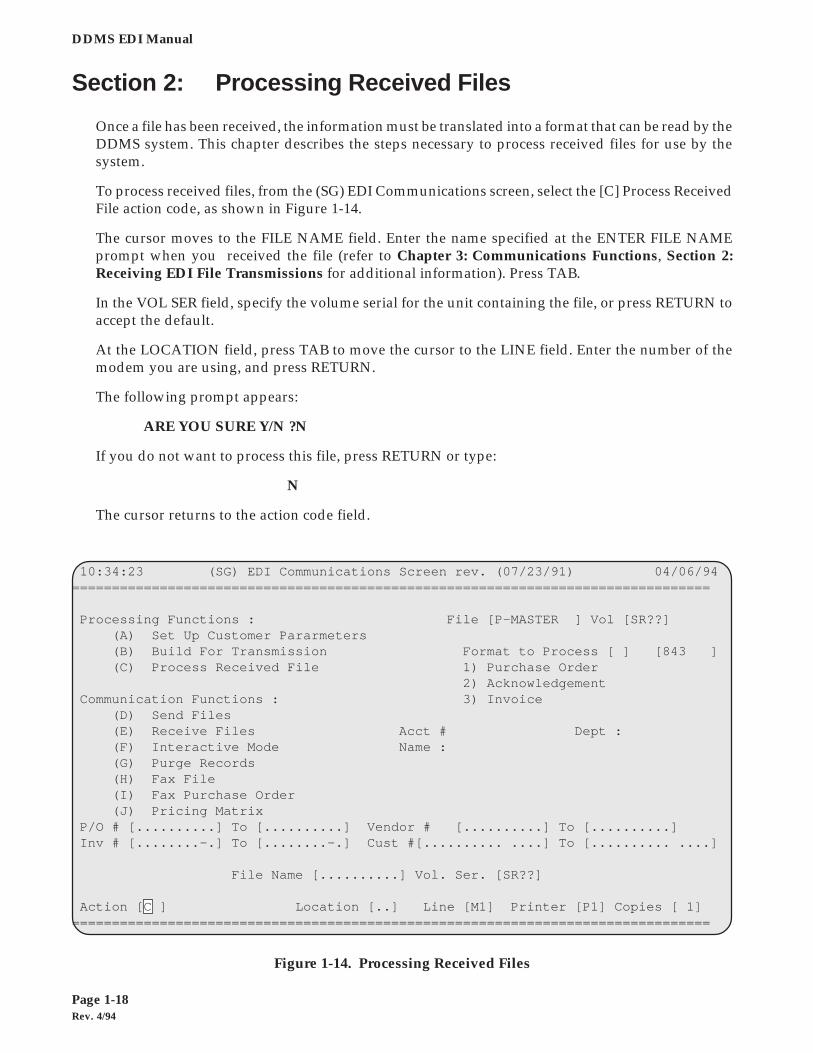
Section 2: Processing Received Files
Once a file has been received, the information must be translated into a format that can be read by theDDMS system. This chapter describes the steps necessary to process received files for use by thesystem.
To process received files, from the (SG) EDI Communications screen, select the [C] Process ReceivedFile action code, as shown in Figure 1-14.
The cursor moves to the FILE NAME field. Enter the name specified at the ENTER FILE NAMEprompt when you received the file (refer to Chapter 3: Communications Functions, Section 2:Receiving EDI File Transmissions for additional information). Press TAB.
In the VOL SER field, specify the volume serial for the unit containing the file, or press RETURN toaccept the default.
At the LOCATION field, press TAB to move the cursor to the LINE field. Enter the number of themodem you are using, and press RETURN.
The following prompt appears:
ARE YOU SURE Y/N ?N
If you do not want to process this file, press RETURN or type:
N
The cursor returns to the action code field.
Figure 1-14. Processing Received Files
10:34:23 (SG) EDI Communications Screen rev. (07/23/91) 04/06/94================================================================================
Processing Functions : File [P-MASTER ] Vol [SR??] (A) Set Up Customer Pararmeters (B) Build For Transmission Format to Process [ ] [843 ] (C) Process Received File 1) Purchase Order 2) Acknowledgement Communication Functions : 3) Invoice (D) Send Files (E) Receive Files Acct # Dept : (F) Interactive Mode Name : (G) Purge Records (H) Fax File (I) Fax Purchase Order (J) Pricing Matrix P/O # [..........] To [..........] Vendor # [..........] To [..........] Inv # [........-.] To [........-.] Cust #[.......... ....] To [.......... ....]
File Name [..........] Vol. Ser. [SR??]
Action [C ] Location [..] Line [M1] Printer [P1] Copies [ 1]================================================================================
Rev. 4/94Page 1-19
Chapter 1: Processing Functions
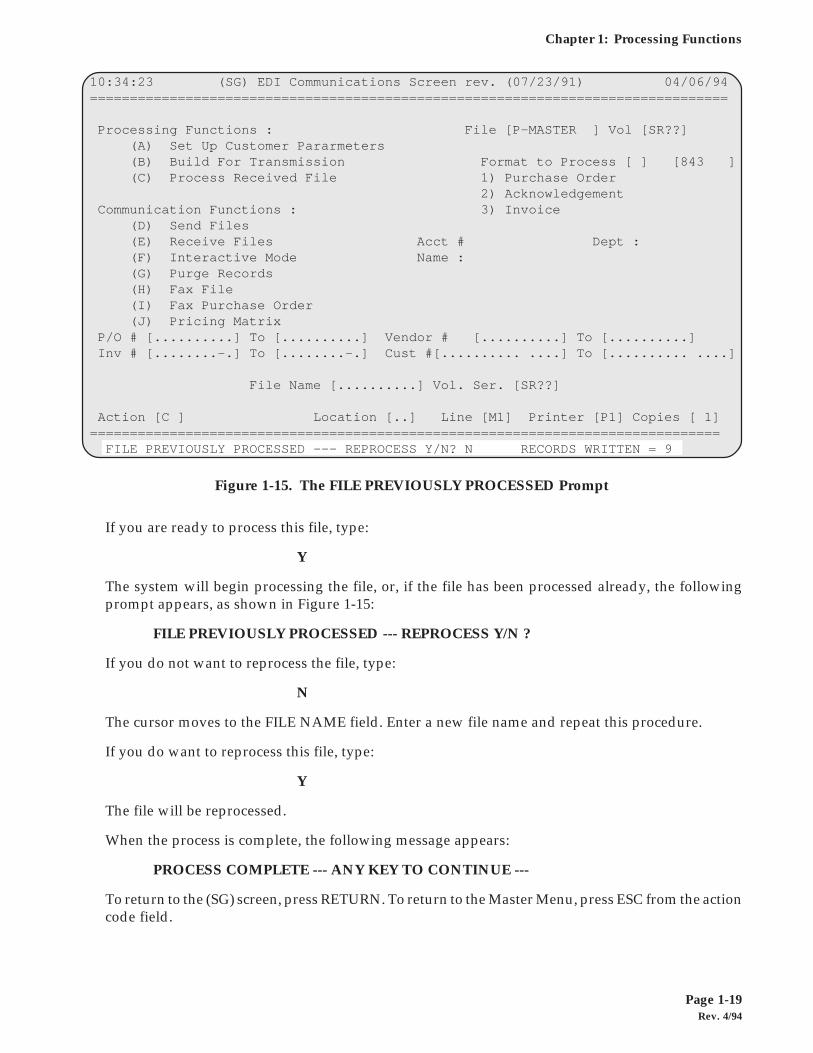
If you are ready to process this file, type:
Y
The system will begin processing the file, or, if the file has been processed already, the followingprompt appears, as shown in Figure 1-15:
FILE PREVIOUSLY PROCESSED --- REPROCESS Y/N ?
If you do not want to reprocess the file, type:
N
The cursor moves to the FILE NAME field. Enter a new file name and repeat this procedure.
If you do want to reprocess this file, type:
Y
The file will be reprocessed.
When the process is complete, the following message appears:
PROCESS COMPLETE --- ANY KEY TO CONTINUE ---
To return to the (SG) screen, press RETURN. To return to the Master Menu, press ESC from the actioncode field.
Figure 1-15. The FILE PREVIOUSLY PROCESSED Prompt
10:34:23 (SG) EDI Communications Screen rev. (07/23/91) 04/06/94================================================================================
Processing Functions : File [P-MASTER ] Vol [SR??] (A) Set Up Customer Pararmeters (B) Build For Transmission Format to Process [ ] [843 ] (C) Process Received File 1) Purchase Order 2) Acknowledgement Communication Functions : 3) Invoice (D) Send Files (E) Receive Files Acct # Dept : (F) Interactive Mode Name : (G) Purge Records (H) Fax File (I) Fax Purchase Order (J) Pricing Matrix P/O # [..........] To [..........] Vendor # [..........] To [..........] Inv # [........-.] To [........-.] Cust #[.......... ....] To [.......... ....]
File Name [..........] Vol. Ser. [SR??]
Action [C ] Location [..] Line [M1] Printer [P1] Copies [ 1]=============================================================================== FILE PREVIOUSLY PROCESSED --- REPROCESS Y/N? N RECORDS WRITTEN = 9

Rev. 4/94Page 1-20
DDMS EDI Manual
Rev. 4/94Page 2-1
Chapter 2: Communication Functions
CHAPTER 2: COMMUNICATION FUNCTIONS
Contents
Introduction ................................................................................................................................................... 2-2
Section 1: Sending EDI File Transmissions ........................................................................................ 2-3
Section 2: Receiving EDI File Transmissions ..................................................................................... 2-8
Section 3: Using Interactive Mode ...................................................................................................... 2-12
Section 4: Purging EDI Files ................................................................................................................ 2-17
Section 5: Faxing Files ........................................................................................................................... 2-20
Section 6: Faxing Purchase Orders ...................................................................................................... 2-25
Rev. 4/94Page 2-2
DDMS EDI Manual
Introduction
This chapter describes network transmissions and connections, and how to make them. Whether youare sending a file, receiving a file, faxing files, faxing purchase orders, or using interactive mode, youmust know how to communicate with the network and your EDI partner. This is described in thefollowing sections.
Also described in this chapter is how to purge EDI files you longer need.
Rev. 4/94Page 2-3
Chapter 2: Communication Functions
Section 1: Sending EDI File Transmissions
In order to transmit information to your customers or vendors through EDI, it is first necessary tobuild the transmission files. (To do this, refer to Chapter 1: Processing Functions, Section 1: BuildingFiles for Transmission.) The next step is to send the information. This chapter describes the necessarysteps for sending the transmission files through the EDI network.
To send the transmission files, from the (SG) EDI Communications screen, select the [D] Send Filesfunction.
The cursor moves to the NAME field and the following prompt appears:
ENTER RECEIVING CUSTOMER
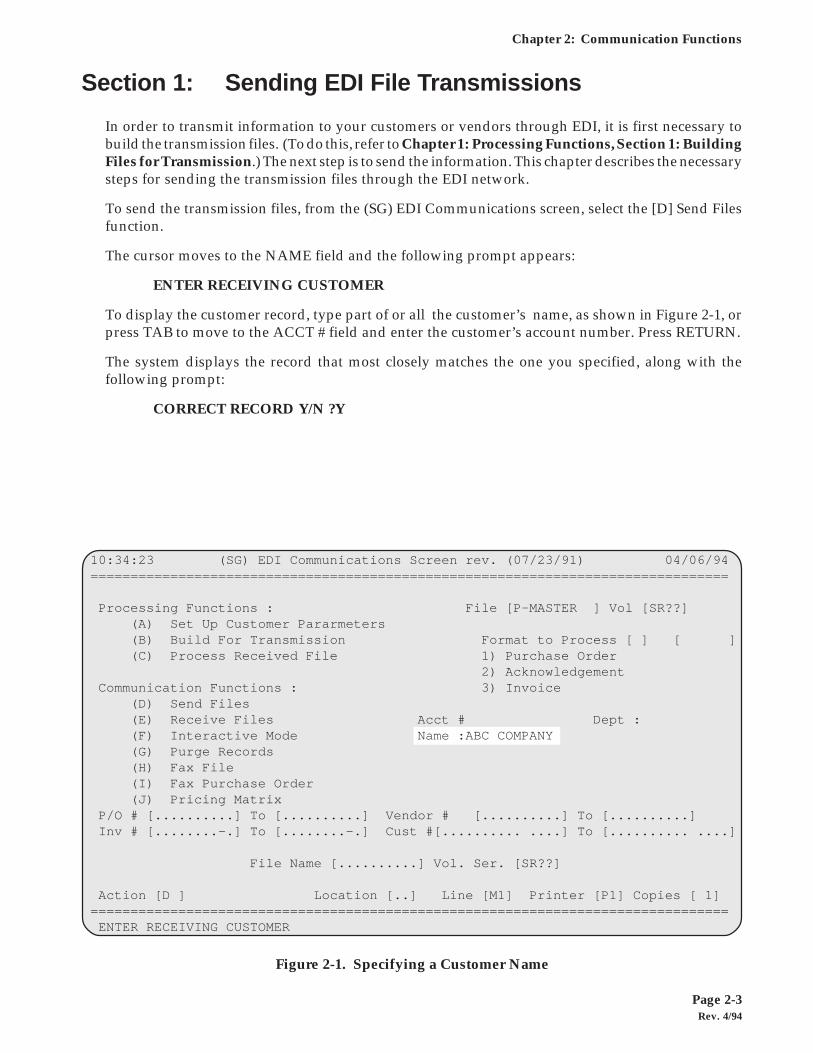
To display the customer record, type part of or all the customer’s name, as shown in Figure 2-1, orpress TAB to move to the ACCT # field and enter the customer’s account number. Press RETURN.
The system displays the record that most closely matches the one you specified, along with thefollowing prompt:
CORRECT RECORD Y/N ?Y
Figure 2-1. Specifying a Customer Name
10:34:23 (SG) EDI Communications Screen rev. (07/23/91) 04/06/94================================================================================
Processing Functions : File [P-MASTER ] Vol [SR??] (A) Set Up Customer Pararmeters (B) Build For Transmission Format to Process [ ] [ ] (C) Process Received File 1) Purchase Order 2) Acknowledgement Communication Functions : 3) Invoice (D) Send Files (E) Receive Files Acct # Dept : (F) Interactive Mode Name :ABC COMPANY (G) Purge Records (H) Fax File (I) Fax Purchase Order (J) Pricing Matrix P/O # [..........] To [..........] Vendor # [..........] To [..........] Inv # [........-.] To [........-.] Cust #[.......... ....] To [.......... ....]
File Name [..........] Vol. Ser. [SR??]
Action [D ] Location [..] Line [M1] Printer [P1] Copies [ 1]================================================================================ ENTER RECEIVING CUSTOMER
Rev. 4/94Page 2-4
DDMS EDI Manual
Note: If you type Y and the parameters for that customer have not been set in the (SGA) CustomerEDI Parameters screen, the following prompt appears:
CUSTOMER HAS NO PARAMETER RECORD
For more information, refer to Chapter 7: Setting Up Customer EDI Parameters.
If the displayed record is not the correct one and you want to scroll through the remaining recordsin the file, type:
N
The system displays the next record and repeats the CORRECT RECORD prompt.
If the displayed record is for the correct customer, press RETURN or type:
Y
If the customer you specified is not set up for EDI, the system displays the following prompt:
CUSTOMER HAS NO PARAMETER RECORD
Press RETURN. The cursor returns to the NAME field.
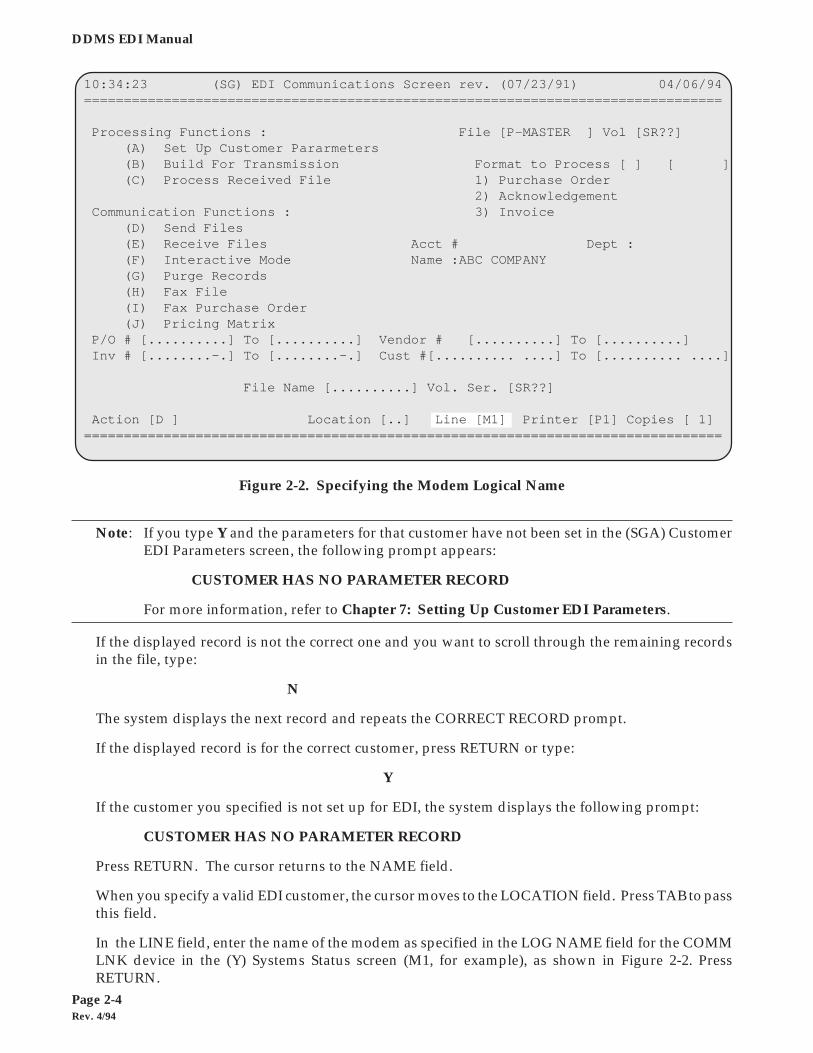
When you specify a valid EDI customer, the cursor moves to the LOCATION field. Press TAB to passthis field.
In the LINE field, enter the name of the modem as specified in the LOG NAME field for the COMMLNK device in the (Y) Systems Status screen (M1, for example), as shown in Figure 2-2. PressRETURN.
Figure 2-2. Specifying the Modem Logical Name
10:34:23 (SG) EDI Communications Screen rev. (07/23/91) 04/06/94================================================================================
Processing Functions : File [P-MASTER ] Vol [SR??] (A) Set Up Customer Pararmeters (B) Build For Transmission Format to Process [ ] [ ] (C) Process Received File 1) Purchase Order 2) Acknowledgement Communication Functions : 3) Invoice (D) Send Files (E) Receive Files Acct # Dept : (F) Interactive Mode Name :ABC COMPANY (G) Purge Records (H) Fax File (I) Fax Purchase Order (J) Pricing Matrix P/O # [..........] To [..........] Vendor # [..........] To [..........] Inv # [........-.] To [........-.] Cust #[.......... ....] To [.......... ....]
File Name [..........] Vol. Ser. [SR??]
Action [D ] Location [..] Line [M1] Printer [P1] Copies [ 1]================================================================================
Rev. 4/94Page 2-5
Chapter 2: Communication Functions
The following prompt appears:
ARE YOU SURE Y/N ?N
If you do not want to send this file, press RETURN or type:
N
The cursor returns to the action code field.
If you are ready to send this file, type:
Y
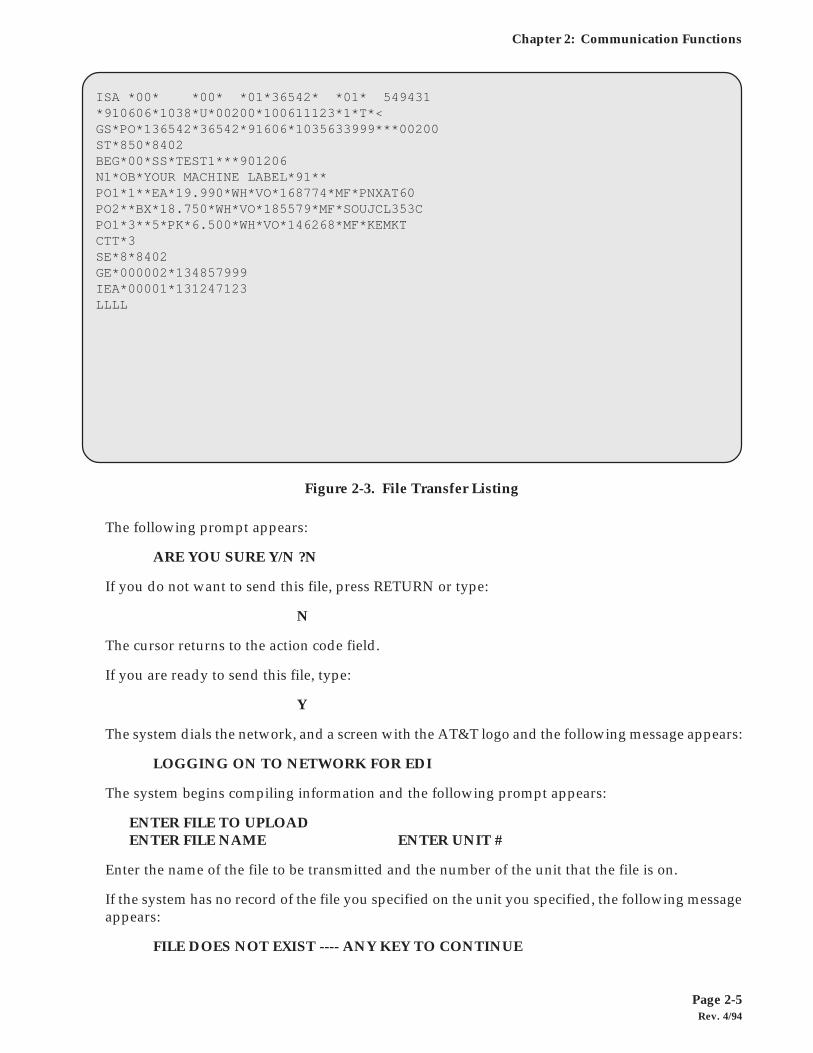
The system dials the network, and a screen with the AT&T logo and the following message appears:
LOGGING ON TO NETWORK FOR EDI
The system begins compiling information and the following prompt appears:
ENTER FILE TO UPLOADENTER FILE NAME ENTER UNIT #
Enter the name of the file to be transmitted and the number of the unit that the file is on.
If the system has no record of the file you specified on the unit you specified, the following messageappears:
FILE DOES NOT EXIST ---- ANY KEY TO CONTINUE
ISA *00* *00* *01*36542* *01* 549431*910606*1038*U*00200*100611123*1*T*<GS*PO*136542*36542*91606*1035633999***00200ST*850*8402BEG*00*SS*TEST1***901206N1*OB*YOUR MACHINE LABEL*91**PO1*1**EA*19.990*WH*VO*168774*MF*PNXAT60PO2**BX*18.750*WH*VO*185579*MF*SOUJCL353CPO1*3**5*PK*6.500*WH*VO*146268*MF*KEMKTCTT*3SE*8*8402GE*000002*134857999IEA*00001*131247123LLLL
Figure 2-3. File Transfer Listing
Rev. 4/94Page 2-6
DDMS EDI Manual
Press RETURN. The cursor returns to the ENTER FILE NAME field.
When you enter the name of an existing file, the following prompt appears:
START FILE TRANSFER
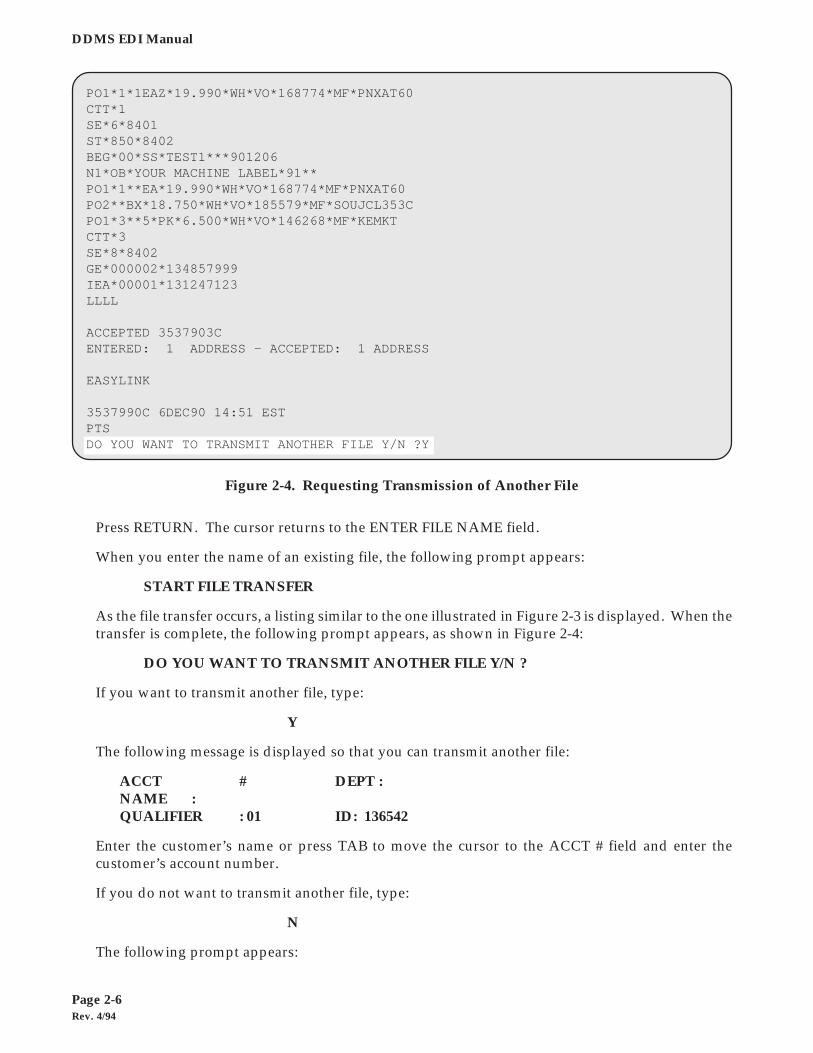
As the file transfer occurs, a listing similar to the one illustrated in Figure 2-3 is displayed. When thetransfer is complete, the following prompt appears, as shown in Figure 2-4:
DO YOU WANT TO TRANSMIT ANOTHER FILE Y/N ?
If you want to transmit another file, type:
Y
The following message is displayed so that you can transmit another file:
ACCT # DEPT :NAME :QUALIFIER : 01 ID: 136542
Enter the customer’s name or press TAB to move the cursor to the ACCT # field and enter thecustomer’s account number.
If you do not want to transmit another file, type:
N
The following prompt appears:
Figure 2-4. Requesting Transmission of Another File
PO1*1*1EAZ*19.990*WH*VO*168774*MF*PNXAT60CTT*1SE*6*8401ST*850*8402BEG*00*SS*TEST1***901206N1*OB*YOUR MACHINE LABEL*91**PO1*1**EA*19.990*WH*VO*168774*MF*PNXAT60PO2**BX*18.750*WH*VO*185579*MF*SOUJCL353CPO1*3**5*PK*6.500*WH*VO*146268*MF*KEMKTCTT*3SE*8*8402GE*000002*134857999IEA*00001*131247123LLLL
ACCEPTED 3537903CENTERED: 1 ADDRESS - ACCEPTED: 1 ADDRESS
EASYLINK
3537990C 6DEC90 14:51 ESTPTSDO YOU WANT TO TRANSMIT ANOTHER FILE Y/N ?Y
Rev. 4/94Page 2-7
Chapter 2: Communication Functions
DO YOU WISH TO GO INTERACTIVE Y/N ?
Note: Use interactive mode to view your electronic mailbox to determine whether additional fileshave been transmitted to you. For more information on interactive mode, see Section 3: UsingInteractive Mode, in this chapter. Otherwise, do not specify Y unless you have receivedspecific instruction about communicating interactively with the network.
If you want to use interactive mode, type:
Y
The system connects to the network to allow interactive communication.
If you do not want to use interactive mode, type:
N
The program ends.
To return to the Master Menu, press ESC.
Rev. 4/94Page 2-8
DDMS EDI Manual
Section 2: Receiving EDI File Transmissions
You should check your network mailbox periodically to see whether you have any purchase orders,purchase order acknowledgments, or invoices from customers or vendors. (Refer to Section 3: UsingInteractive Mode in this chapter for information about how to do this.) In order to use these files inthe DDMS system, you will need to use the [E] Receive Files function to move them from your mailboxand into a form that can be used by the system. This chapter describes the steps necessary for receivingfiles.
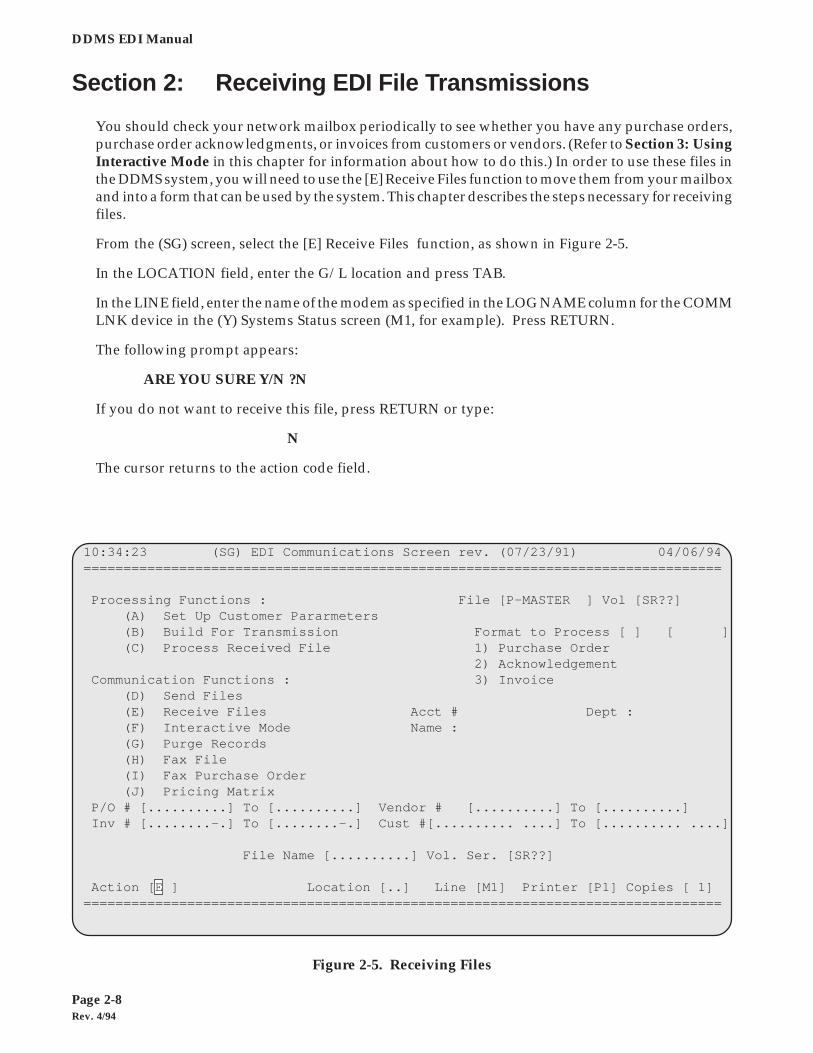
From the (SG) screen, select the [E] Receive Files function, as shown in Figure 2-5.
In the LOCATION field, enter the G/L location and press TAB.
In the LINE field, enter the name of the modem as specified in the LOG NAME column for the COMMLNK device in the (Y) Systems Status screen (M1, for example). Press RETURN.
The following prompt appears:
ARE YOU SURE Y/N ?N
If you do not want to receive this file, press RETURN or type:
N
The cursor returns to the action code field.
Figure 2-5. Receiving Files
10:34:23 (SG) EDI Communications Screen rev. (07/23/91) 04/06/94================================================================================
Processing Functions : File [P-MASTER ] Vol [SR??] (A) Set Up Customer Pararmeters (B) Build For Transmission Format to Process [ ] [ ] (C) Process Received File 1) Purchase Order 2) Acknowledgement Communication Functions : 3) Invoice (D) Send Files (E) Receive Files Acct # Dept : (F) Interactive Mode Name : (G) Purge Records (H) Fax File (I) Fax Purchase Order (J) Pricing Matrix P/O # [..........] To [..........] Vendor # [..........] To [..........] Inv # [........-.] To [........-.] Cust #[.......... ....] To [.......... ....]
File Name [..........] Vol. Ser. [SR??]
Action [E ] Location [..] Line [M1] Printer [P1] Copies [ 1]================================================================================
Rev. 4/94Page 2-9
Chapter 2: Communication Functions
If you are ready to receive this file, type:
Y
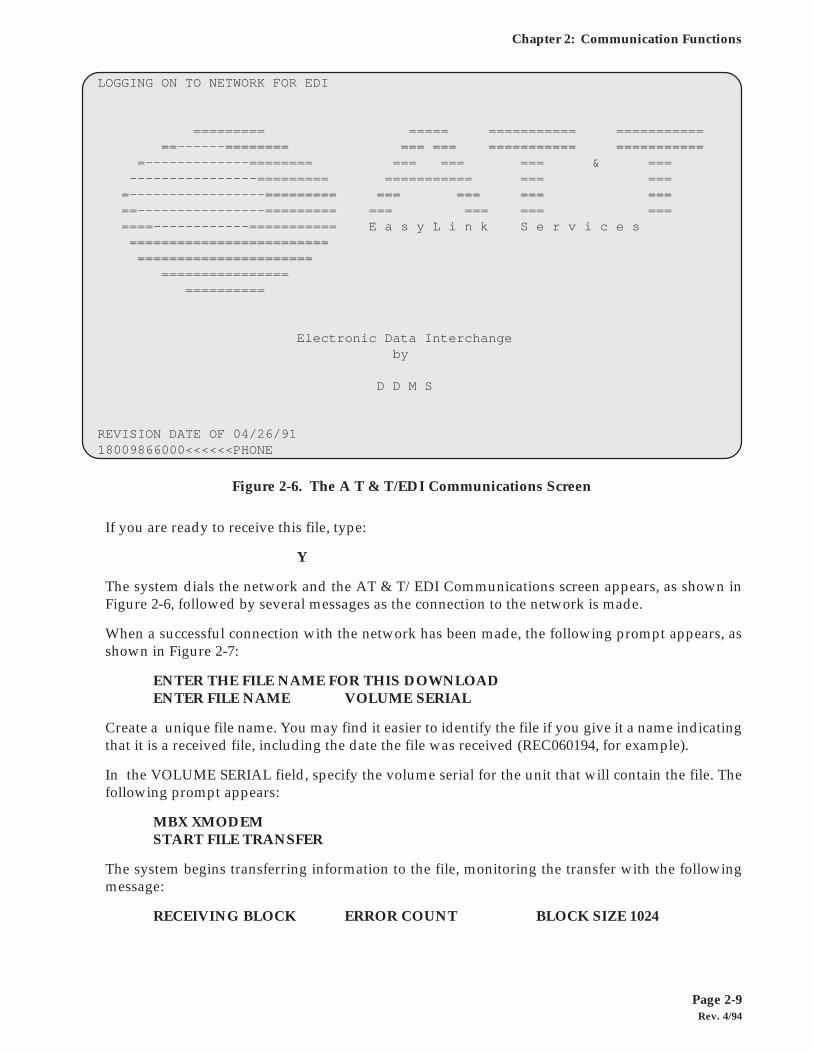
The system dials the network and the AT & T/EDI Communications screen appears, as shown inFigure 2-6, followed by several messages as the connection to the network is made.
When a successful connection with the network has been made, the following prompt appears, asshown in Figure 2-7:
ENTER THE FILE NAME FOR THIS DOWNLOADENTER FILE NAME VOLUME SERIAL
Create a unique file name. You may find it easier to identify the file if you give it a name indicatingthat it is a received file, including the date the file was received (REC060194, for example).
In the VOLUME SERIAL field, specify the volume serial for the unit that will contain the file. Thefollowing prompt appears:
MBX XMODEMSTART FILE TRANSFER
The system begins transferring information to the file, monitoring the transfer with the followingmessage:
RECEIVING BLOCK ERROR COUNT BLOCK SIZE 1024
Figure 2-6. The A T & T/EDI Communications Screen
LOGGING ON TO NETWORK FOR EDI
========= ===== =========== =========== ==------======== === === =========== =========== =-------------======== === === === & === ----------------========= =========== === === =-----------------========= === === === === ==----------------========= === === === === ====------------=========== E a s y L i n k S e r v i c e s ========================= ====================== ================ ==========
Electronic Data Interchange by
D D M S
REVISION DATE OF 04/26/91 18009866000<<<<<<PHONE
Rev. 4/94Page 2-10
DDMS EDI Manual
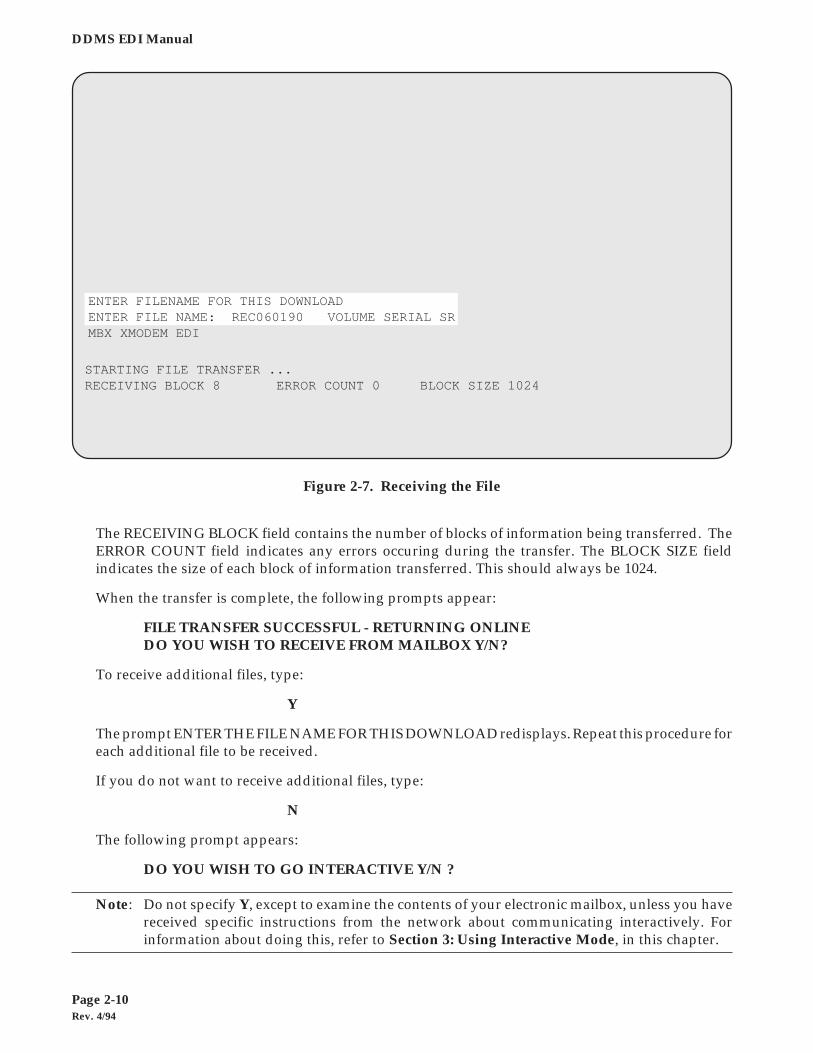
The RECEIVING BLOCK field contains the number of blocks of information being transferred. TheERROR COUNT field indicates any errors occuring during the transfer. The BLOCK SIZE fieldindicates the size of each block of information transferred. This should always be 1024.
When the transfer is complete, the following prompts appear:
FILE TRANSFER SUCCESSFUL - RETURNING ONLINEDO YOU WISH TO RECEIVE FROM MAILBOX Y/N?
To receive additional files, type:
Y
The prompt ENTER THE FILE NAME FOR THIS DOWNLOAD redisplays. Repeat this procedure foreach additional file to be received.
If you do not want to receive additional files, type:
N
The following prompt appears:
DO YOU WISH TO GO INTERACTIVE Y/N ?
Note: Do not specify Y, except to examine the contents of your electronic mailbox, unless you havereceived specific instructions from the network about communicating interactively. Forinformation about doing this, refer to Section 3: Using Interactive Mode, in this chapter.
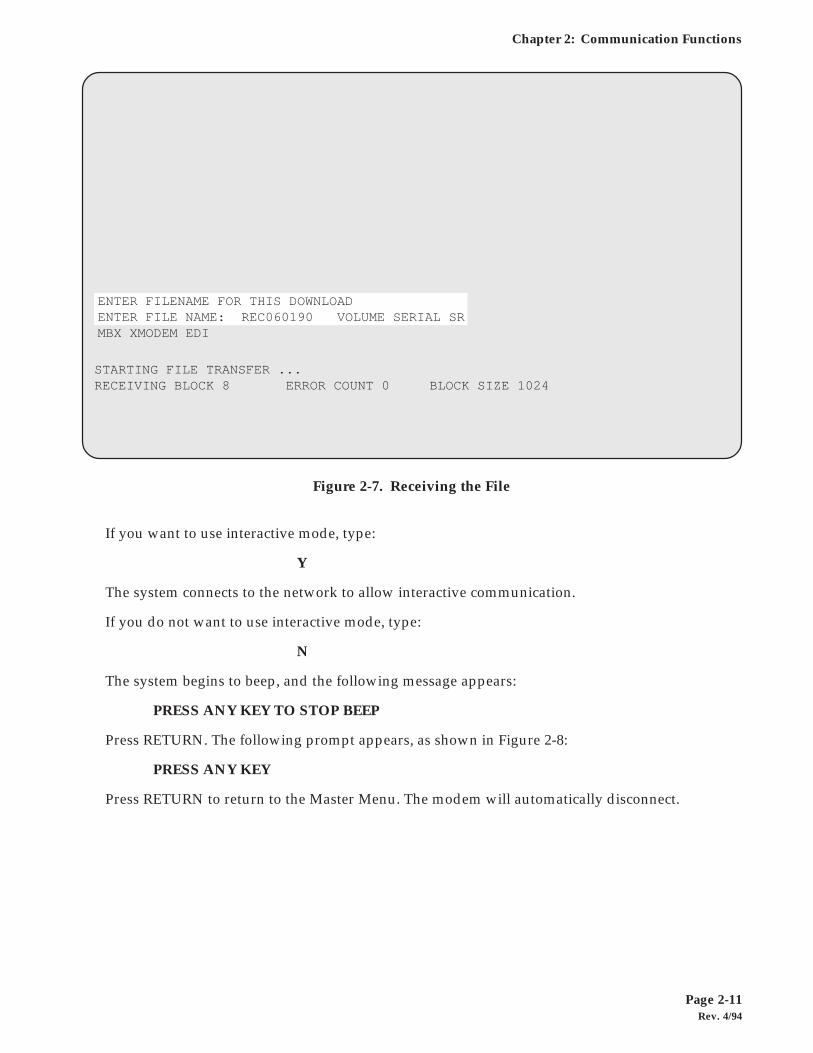
STARTING FILE TRANSFER ...RECEIVING BLOCK 8 ERROR COUNT 0 BLOCK SIZE 1024
Figure 2-7. Receiving the File
ENTER FILENAME FOR THIS DOWNLOADENTER FILE NAME: REC060190 VOLUME SERIAL SRMBX XMODEM EDI
Rev. 4/94Page 2-11
Chapter 2: Communication Functions
If you want to use interactive mode, type:
Y
The system connects to the network to allow interactive communication.
If you do not want to use interactive mode, type:
N
The system begins to beep, and the following message appears:
PRESS ANY KEY TO STOP BEEP
Press RETURN. The following prompt appears, as shown in Figure 2-8:
PRESS ANY KEY
Press RETURN to return to the Master Menu. The modem will automatically disconnect.
STARTING FILE TRANSFER ...RECEIVING BLOCK 8 ERROR COUNT 0 BLOCK SIZE 1024
Figure 2-7. Receiving the File
ENTER FILENAME FOR THIS DOWNLOADENTER FILE NAME: REC060190 VOLUME SERIAL SRMBX XMODEM EDI
Rev. 4/94Page 2-12
DDMS EDI Manual
Section 3: Using Interactive Mode
Use interactive mode to determine whether there are any documents in your electronic mailbox.There are two ways to go into interactive mode. If you are in the process of receiving files, at theprompt DO YOU WISH TO GO INTERACTIVE, you have the option of going into interactive mode.You can also go into interactive mode by selecting the [F] Interactive Mode function in the (SG) EDICommunications screen. This chapter describes the necessary steps for doing so.
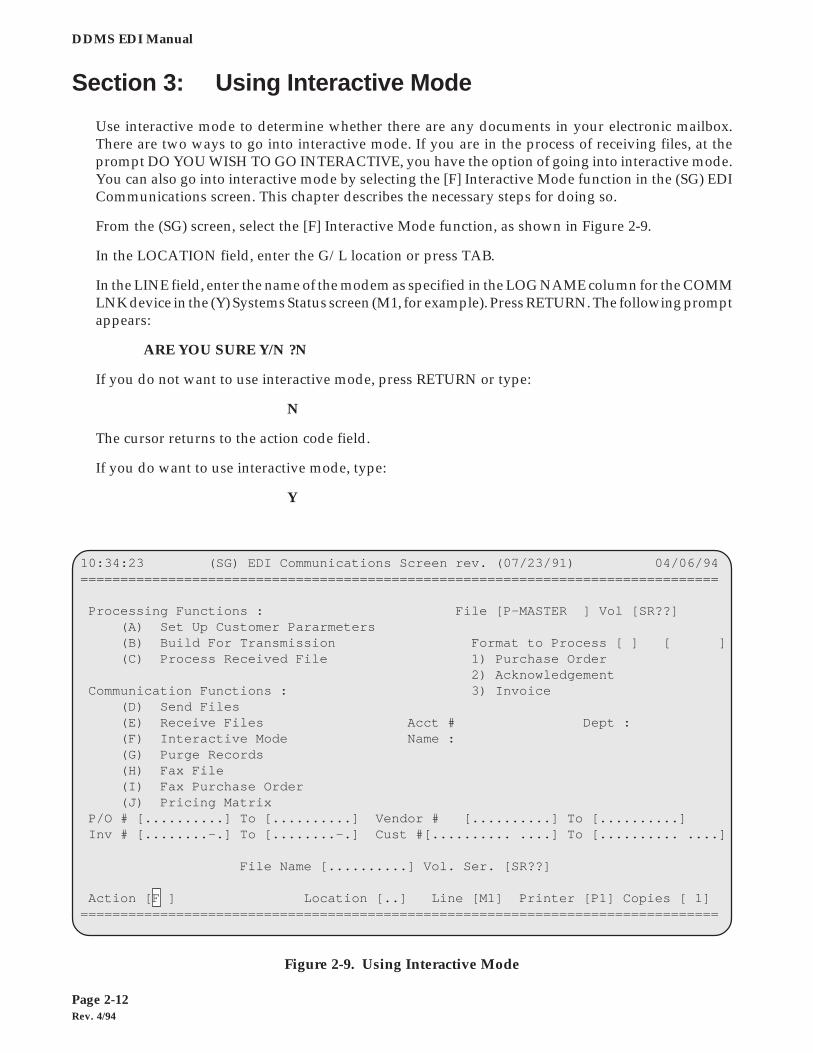
From the (SG) screen, select the [F] Interactive Mode function, as shown in Figure 2-9.
In the LOCATION field, enter the G/L location or press TAB.
In the LINE field, enter the name of the modem as specified in the LOG NAME column for the COMMLNK device in the (Y) Systems Status screen (M1, for example). Press RETURN. The following promptappears:
ARE YOU SURE Y/N ?N
If you do not want to use interactive mode, press RETURN or type:
N
The cursor returns to the action code field.
If you do want to use interactive mode, type:
Y
Figure 2-9. Using Interactive Mode
10:34:23 (SG) EDI Communications Screen rev. (07/23/91) 04/06/94================================================================================
Processing Functions : File [P-MASTER ] Vol [SR??] (A) Set Up Customer Pararmeters (B) Build For Transmission Format to Process [ ] [ ] (C) Process Received File 1) Purchase Order 2) Acknowledgement Communication Functions : 3) Invoice (D) Send Files (E) Receive Files Acct # Dept : (F) Interactive Mode Name : (G) Purge Records (H) Fax File (I) Fax Purchase Order (J) Pricing Matrix P/O # [..........] To [..........] Vendor # [..........] To [..........] Inv # [........-.] To [........-.] Cust #[.......... ....] To [.......... ....]
File Name [..........] Vol. Ser. [SR??]
Action [F ] Location [..] Line [M1] Printer [P1] Copies [ 1]================================================================================
Rev. 4/94Page 2-13
Chapter 2: Communication Functions
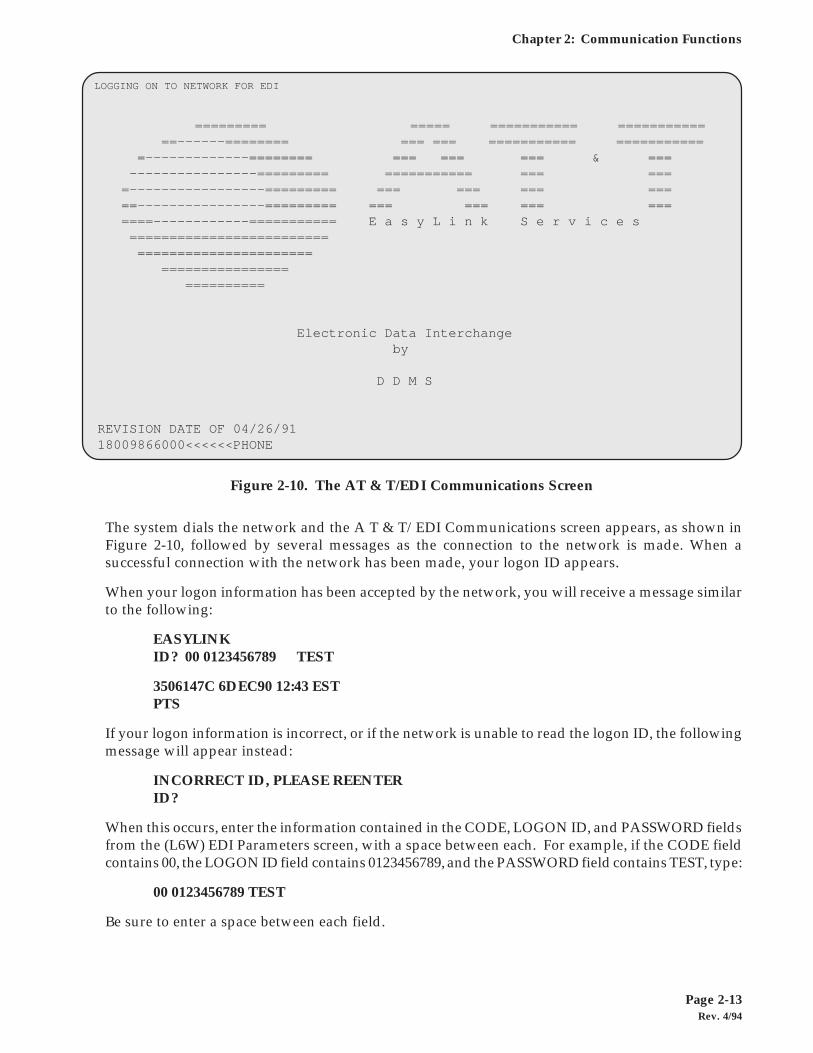
The system dials the network and the A T & T/EDI Communications screen appears, as shown inFigure 2-10, followed by several messages as the connection to the network is made. When asuccessful connection with the network has been made, your logon ID appears.
When your logon information has been accepted by the network, you will receive a message similarto the following:
EASYLINKID? 00 0123456789 TEST
3506147C 6DEC90 12:43 ESTPTS
If your logon information is incorrect, or if the network is unable to read the logon ID, the followingmessage will appear instead:
INCORRECT ID, PLEASE REENTERID?
When this occurs, enter the information contained in the CODE, LOGON ID, and PASSWORD fieldsfrom the (L6W) EDI Parameters screen, with a space between each. For example, if the CODE fieldcontains 00, the LOGON ID field contains 0123456789, and the PASSWORD field contains TEST, type:
00 0123456789 TEST
Be sure to enter a space between each field.
Figure 2-10. The AT & T/EDI Communications Screen
LOGGING ON TO NETWORK FOR EDI
========= ===== =========== =========== ==------======== === === =========== =========== =-------------======== === === === & === ----------------========= =========== === === =-----------------========= === === === === ==----------------========= === === === === ====------------=========== E a s y L i n k S e r v i c e s ========================= ====================== ================ ==========
Electronic Data Interchange by
D D M S
REVISION DATE OF 04/26/91 18009866000<<<<<<PHONE
Rev. 4/94Page 2-14
DDMS EDI Manual
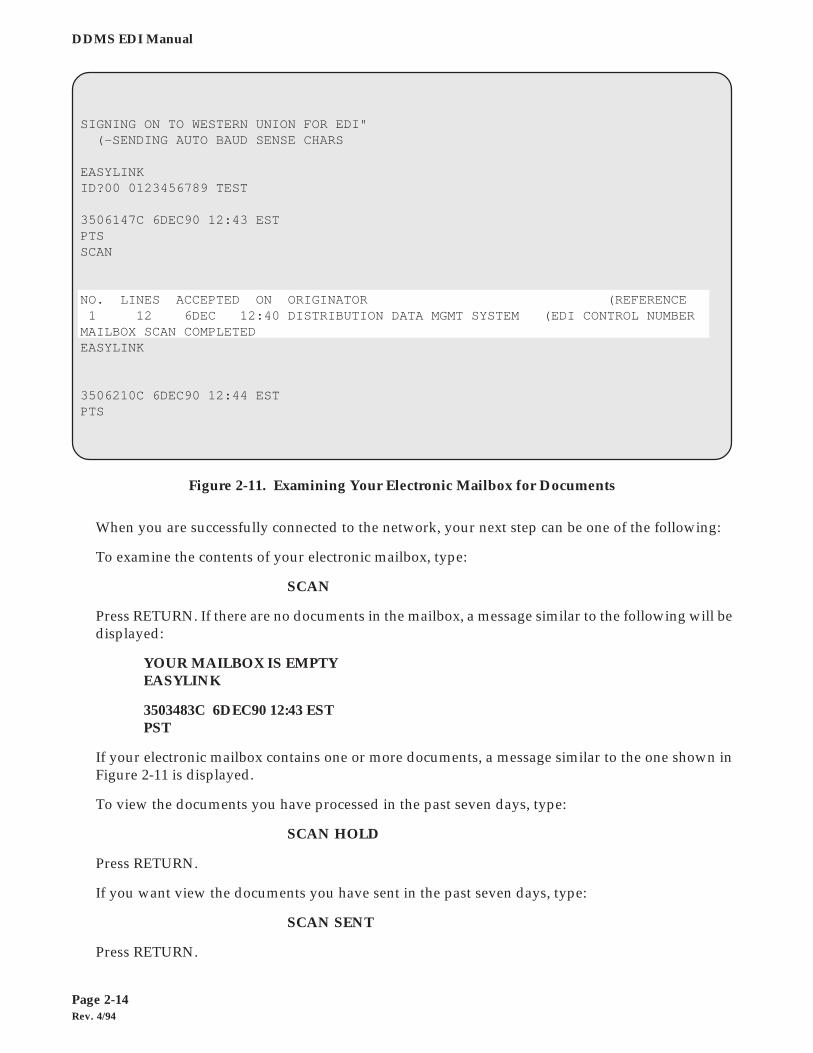
When you are successfully connected to the network, your next step can be one of the following:
To examine the contents of your electronic mailbox, type:
SCAN
Press RETURN. If there are no documents in the mailbox, a message similar to the following will bedisplayed:
YOUR MAILBOX IS EMPTYEASYLINK
3503483C 6DEC90 12:43 ESTPST
If your electronic mailbox contains one or more documents, a message similar to the one shown inFigure 2-11 is displayed.
To view the documents you have processed in the past seven days, type:
SCAN HOLD
Press RETURN.
If you want view the documents you have sent in the past seven days, type:
SCAN SENT
Press RETURN.
Figure 2-11. Examining Your Electronic Mailbox for Documents
SIGNING ON TO WESTERN UNION FOR EDI" (-SENDING AUTO BAUD SENSE CHARS
EASYLINKID?00 0123456789 TEST
3506147C 6DEC90 12:43 ESTPTSSCAN
NO. LINES ACCEPTED ON ORIGINATOR (REFERENCE 1 12 6DEC 12:40 DISTRIBUTION DATA MGMT SYSTEM (EDI CONTROL NUMBERMAILBOX SCAN COMPLETEDEASYLINK
3506210C 6DEC90 12:44 ESTPTS
Rev. 4/94Page 2-15
Chapter 2: Communication Functions
If you want to view the documents you have sent in the past hour, two hours, and so on, type:
STATUS _H
Replace the blank (_) with the number of hours you want to view. You can view up to 24 hours ofdocuments.
For example, if you want to view the documents you have sent in past three hours, you would enterSTATUS 3H. The documents and their status will be displayed as shown in the following example:
MSG 4183985C received 9OCT91 10:43 ESTADDR TO DELIVERED ANSWERBACK001 FAX 8174310668 9OCT91 10:45 EST002 FAX 8175551212 in transit003 FAX 8171234567 9OCT91 10:46 EST
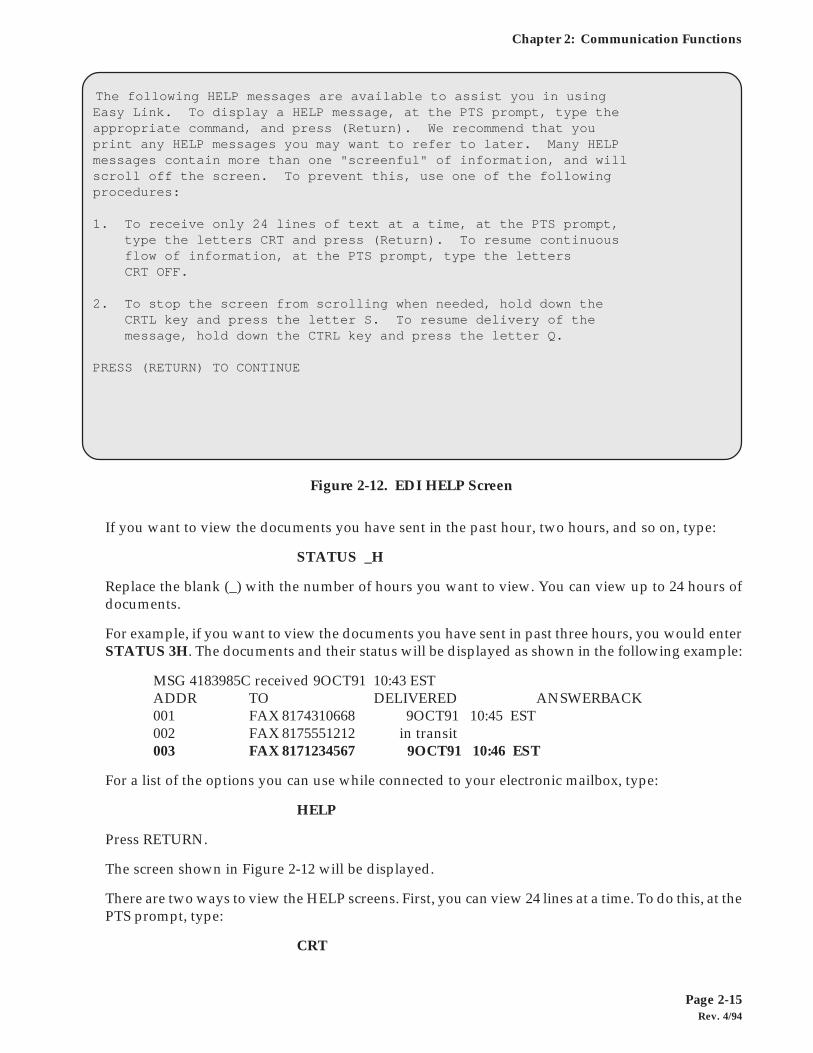
For a list of the options you can use while connected to your electronic mailbox, type:
HELP
Press RETURN.
The screen shown in Figure 2-12 will be displayed.
There are two ways to view the HELP screens. First, you can view 24 lines at a time. To do this, at thePTS prompt, type:
CRT
Figure 2-12. EDI HELP Screen
The following HELP messages are available to assist you in usingEasy Link. To display a HELP message, at the PTS prompt, type theappropriate command, and press (Return). We recommend that youprint any HELP messages you may want to refer to later. Many HELPmessages contain more than one "screenful" of information, and willscroll off the screen. To prevent this, use one of the followingprocedures:
1. To receive only 24 lines of text at a time, at the PTS prompt, type the letters CRT and press (Return). To resume continuous flow of information, at the PTS prompt, type the letters CRT OFF.
2. To stop the screen from scrolling when needed, hold down the CRTL key and press the letter S. To resume delivery of the message, hold down the CTRL key and press the letter Q.
PRESS (RETURN) TO CONTINUE
Rev. 4/94Page 2-16
DDMS EDI Manual
Press RETURN. This method will give you one screen at a time. Press RETURN after viewing eachscreen to display the next screen.
You can also stop scrolling through the screen when needed. To do this, press the CTRL and S keyssimultaneously. To resume scrolling through the screens, press the CTRL and Q keys simultaneously.
To return to the previous screen from the HELP screen, press RETURN.
To exit interactive mode, press CTRL and A simultaneously. The AT & T/EDI Communicationsscreen appears. Press RETURN twice to return to the Master Menu.
Rev. 4/94Page 2-17
Chapter 2: Communication Functions
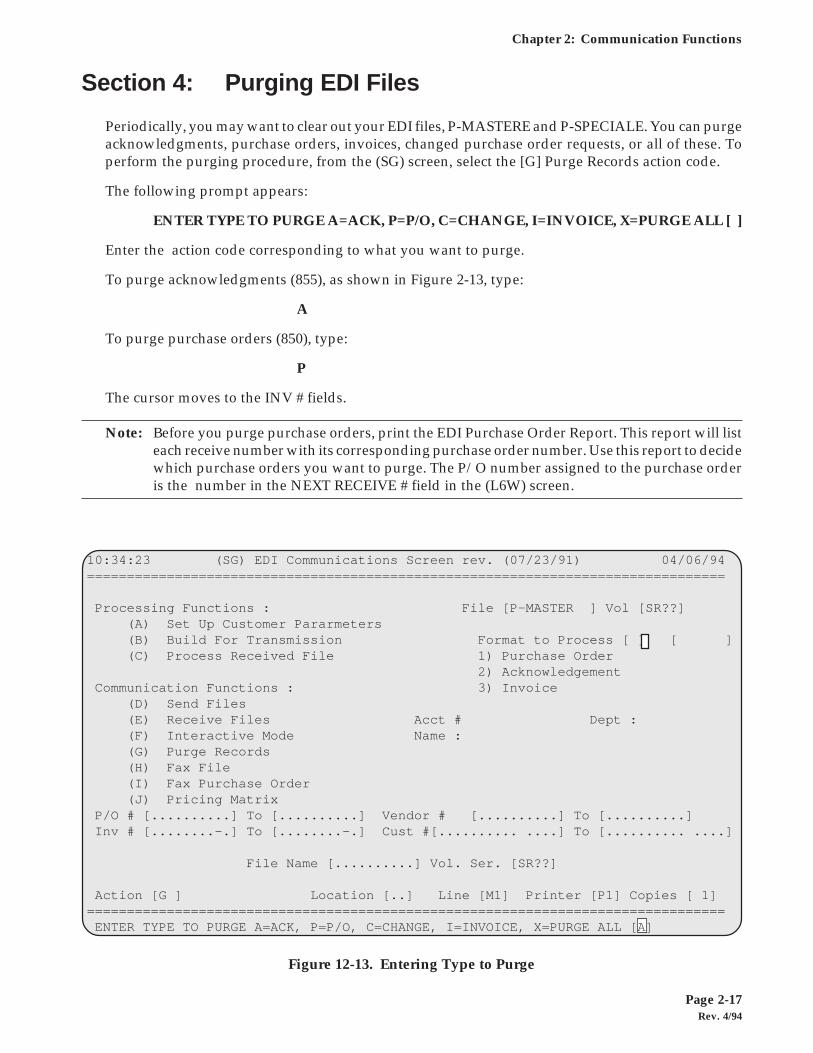
Section 4: Purging EDI Files
Periodically, you may want to clear out your EDI files, P-MASTERE and P-SPECIALE. You can purgeacknowledgments, purchase orders, invoices, changed purchase order requests, or all of these. Toperform the purging procedure, from the (SG) screen, select the [G] Purge Records action code.
The following prompt appears:
ENTER TYPE TO PURGE A=ACK, P=P/O, C=CHANGE, I=INVOICE, X=PURGE ALL [ ]
Enter the action code corresponding to what you want to purge.
To purge acknowledgments (855), as shown in Figure 2-13, type:
A
To purge purchase orders (850), type:
P
The cursor moves to the INV # fields.
Note: Before you purge purchase orders, print the EDI Purchase Order Report. This report will listeach receive number with its corresponding purchase order number. Use this report to decidewhich purchase orders you want to purge. The P/O number assigned to the purchase orderis the number in the NEXT RECEIVE # field in the (L6W) screen.
Figure 12-13. Entering Type to Purge
10:34:23 (SG) EDI Communications Screen rev. (07/23/91) 04/06/94================================================================================
Processing Functions : File [P-MASTER ] Vol [SR??] (A) Set Up Customer Pararmeters (B) Build For Transmission Format to Process [ ] [ ] (C) Process Received File 1) Purchase Order 2) Acknowledgement Communication Functions : 3) Invoice (D) Send Files (E) Receive Files Acct # Dept : (F) Interactive Mode Name : (G) Purge Records (H) Fax File (I) Fax Purchase Order (J) Pricing Matrix P/O # [..........] To [..........] Vendor # [..........] To [..........] Inv # [........-.] To [........-.] Cust #[.......... ....] To [.......... ....]
File Name [..........] Vol. Ser. [SR??]
Action [G ] Location [..] Line [M1] Printer [P1] Copies [ 1]================================================================================ ENTER TYPE TO PURGE A=ACK, P=P/O, C=CHANGE, I=INVOICE, X=PURGE ALL [A]

Rev. 4/94Page 2-18
DDMS EDI Manual
Enter the range of next receive numbers that correspond with the purchase order number of the P/Os youwant to purge, as shown in Figure 2-14. Press RETURN.
To purge only the changed purchase order requests (860), type:
C
To purge all invoices (810), type:
I
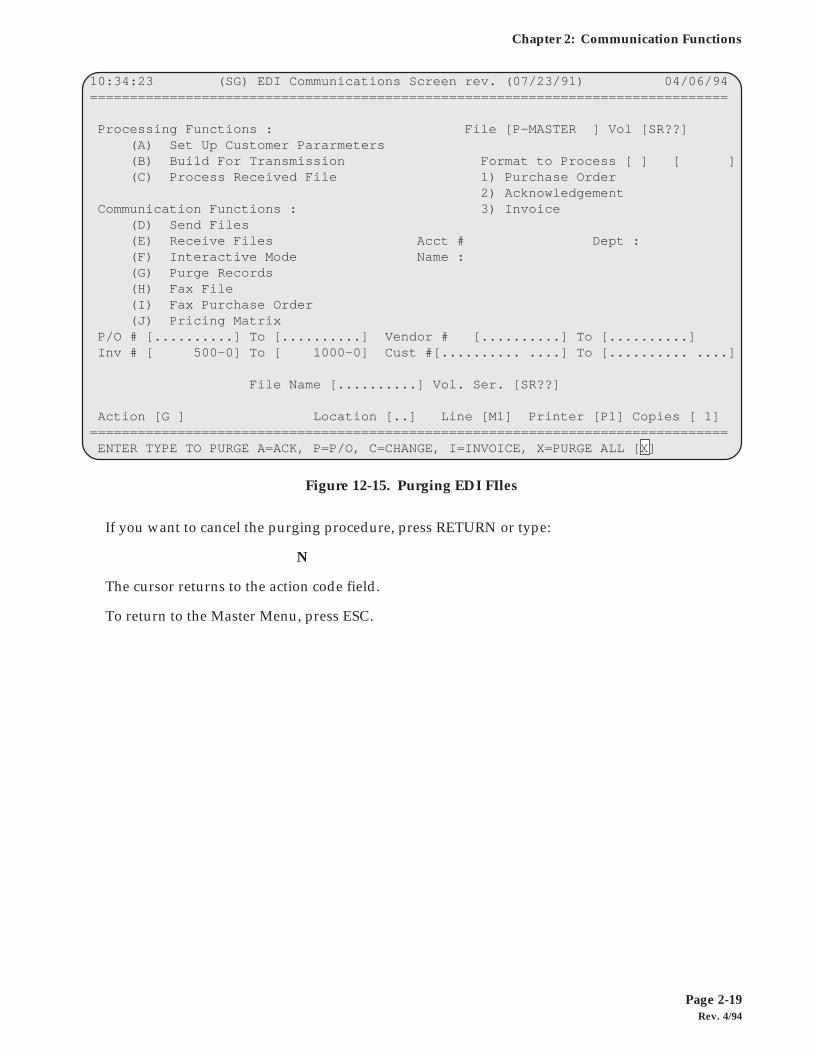
To purge acknowledgments, changed purchase order requests, and invoices, as shown in Figure 2-15, type:
X
Note: This will not purge purchase orders (850).
After you specify what you want to purge, the following prompt appears:
ARE YOU SURE Y/N ?N
If you want to continue with the purging procedure, type:
Y
Figure 12-14. Entering Purchase Orders to Purge
10:34:23 (SG) EDI Communications Screen rev. (07/23/91) 04/06/94================================================================================
Processing Functions : File [P-MASTER ] Vol [SR??] (A) Set Up Customer Pararmeters (B) Build For Transmission Format to Process [ ] [ ] (C) Process Received File 1) Purchase Order 2) Acknowledgement Communication Functions : 3) Invoice (D) Send Files (E) Receive Files Acct # Dept : (F) Interactive Mode Name : (G) Purge Records (H) Fax File (I) Fax Purchase Order (J) Pricing Matrix P/O # [..........] To [..........] Vendor # [..........] To [..........] Inv # [ 500-0] To [ 1000-0] Cust #[.......... ....] To [.......... ....]
File Name [..........] Vol. Ser. [SR??]
Action [G ] Location [..] Line [M1] Printer [P1] Copies [ 1]================================================================================ ENTER TYPE TO PURGE A=ACK, P=P/O, C=CHANGE, I=INVOICE, X=PURGE ALL [P]
Rev. 4/94Page 2-19
Chapter 2: Communication Functions
If you want to cancel the purging procedure, press RETURN or type:
N
The cursor returns to the action code field.
To return to the Master Menu, press ESC.
Figure 12-15. Purging EDI FIles
10:34:23 (SG) EDI Communications Screen rev. (07/23/91) 04/06/94================================================================================
Processing Functions : File [P-MASTER ] Vol [SR??] (A) Set Up Customer Pararmeters (B) Build For Transmission Format to Process [ ] [ ] (C) Process Received File 1) Purchase Order 2) Acknowledgement Communication Functions : 3) Invoice (D) Send Files (E) Receive Files Acct # Dept : (F) Interactive Mode Name : (G) Purge Records (H) Fax File (I) Fax Purchase Order (J) Pricing Matrix P/O # [..........] To [..........] Vendor # [..........] To [..........] Inv # [ 500-0] To [ 1000-0] Cust #[.......... ....] To [.......... ....]
File Name [..........] Vol. Ser. [SR??]
Action [G ] Location [..] Line [M1] Printer [P1] Copies [ 1]================================================================================ ENTER TYPE TO PURGE A=ACK, P=P/O, C=CHANGE, I=INVOICE, X=PURGE ALL [X]
Rev. 4/94Page 2-20
DDMS EDI Manual
Section 5: Faxing Files
Using the EDI network, you can fax files to your customers. Faxing files through your computereliminates the steps of getting up from your desk, dialing a fax number, hearing a busy signal andhaving to wait until the customers fax machine is clear. This function will also enhance yourtelemarketing. If you have a letter you need to fax to many customers, you can set up the fax numbersof the customers in a file. The system will automatically transmit the fax to each of the customers.
The fax file and the customer fax number file are created using the work processor. For moreinformation on creating word processing files, refer to Chapter 33: Word Processor and Text Editorin the O/P Dealer Systems Software Manual. To build the fax file and the customer fax number file, dothe following steps.
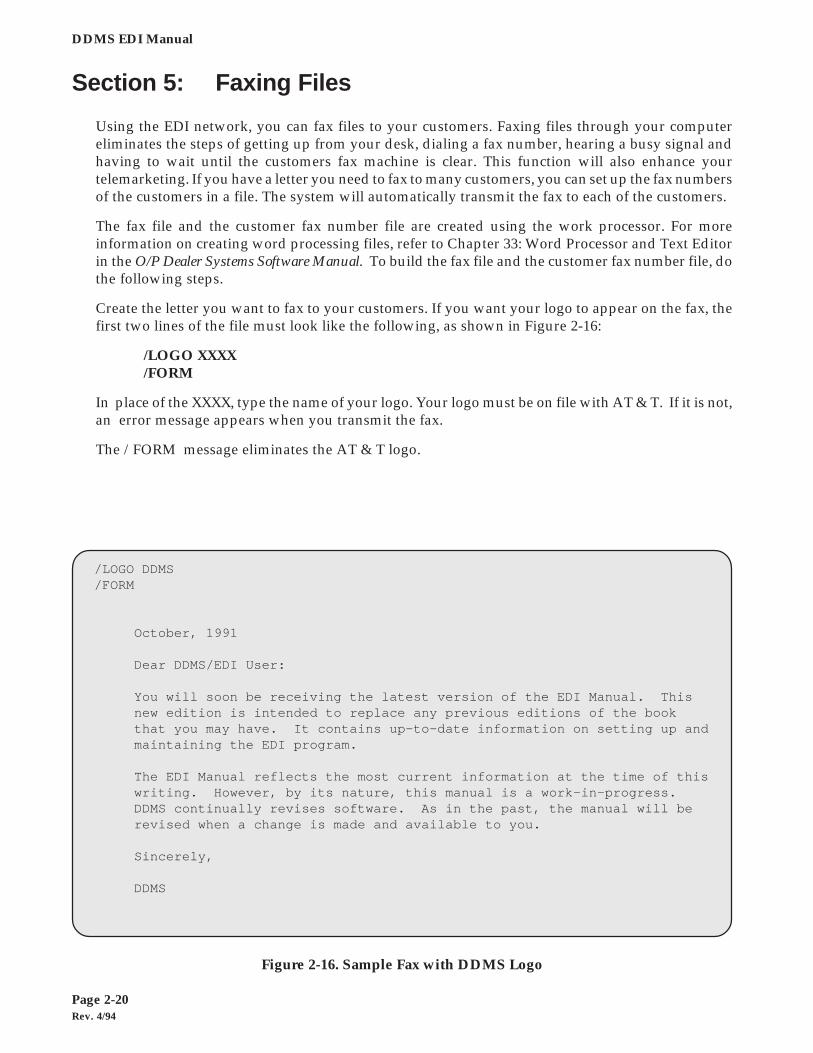
Create the letter you want to fax to your customers. If you want your logo to appear on the fax, thefirst two lines of the file must look like the following, as shown in Figure 2-16:
/LOGO XXXX/FORM
In place of the XXXX, type the name of your logo. Your logo must be on file with AT & T. If it is not,an error message appears when you transmit the fax.
The /FORM message eliminates the AT & T logo.
Figure 2-16. Sample Fax with DDMS Logo
/LOGO DDMS /FORM
October, 1991
Dear DDMS/EDI User:
You will soon be receiving the latest version of the EDI Manual. Thisnew edition is intended to replace any previous editions of the bookthat you may have. It contains up-to-date information on setting up andmaintaining the EDI program.
The EDI Manual reflects the most current information at the time of thiswriting. However, by its nature, this manual is a work-in-progress.DDMS continually revises software. As in the past, the manual will berevised when a change is made and available to you.
Sincerely,
DDMS
Rev. 4/94Page 2-21
Chapter 2: Communication Functions
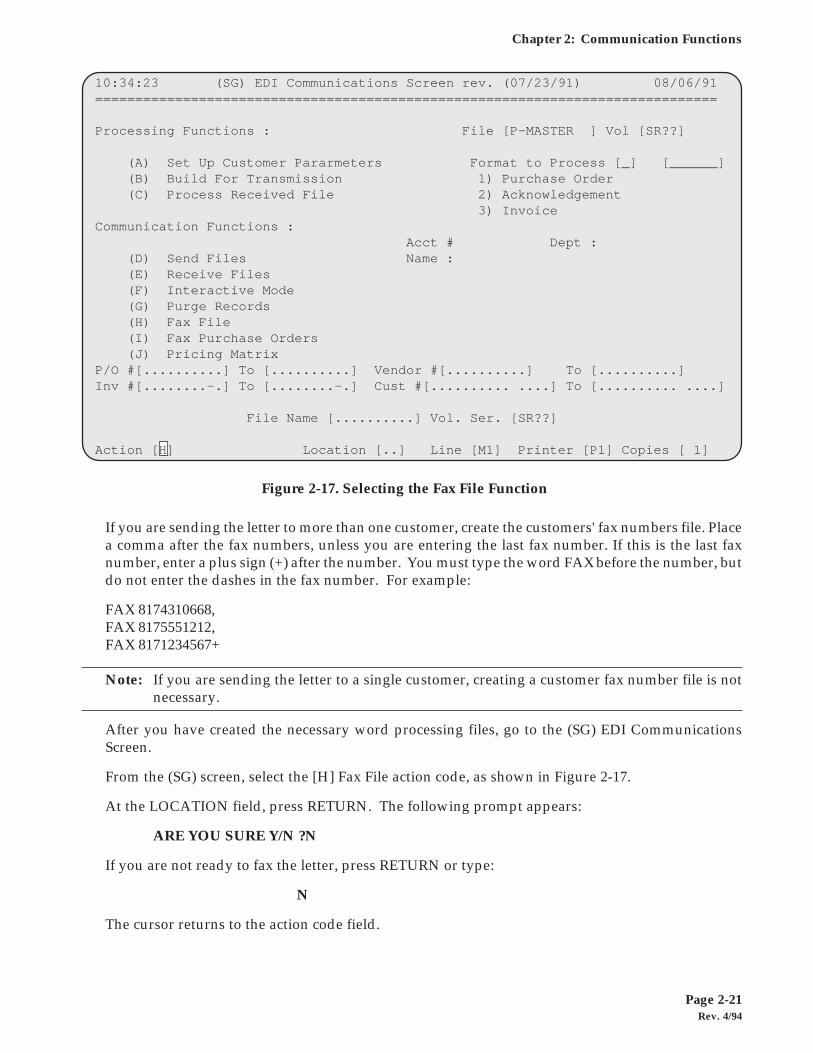
If you are sending the letter to more than one customer, create the customers' fax numbers file. Placea comma after the fax numbers, unless you are entering the last fax number. If this is the last faxnumber, enter a plus sign (+) after the number. You must type the word FAX before the number, butdo not enter the dashes in the fax number. For example:
FAX 8174310668,FAX 8175551212,FAX 8171234567+
Note: If you are sending the letter to a single customer, creating a customer fax number file is notnecessary.
After you have created the necessary word processing files, go to the (SG) EDI CommunicationsScreen.
From the (SG) screen, select the [H] Fax File action code, as shown in Figure 2-17.
At the LOCATION field, press RETURN. The following prompt appears:
ARE YOU SURE Y/N ?N
If you are not ready to fax the letter, press RETURN or type:
N
The cursor returns to the action code field.
Figure 2-17. Selecting the Fax File Function
10:34:23 (SG) EDI Communications Screen rev. (07/23/91) 08/06/91 ==============================================================================
Processing Functions : File [P-MASTER ] Vol [SR??]
(A) Set Up Customer Pararmeters Format to Process [_] [______] (B) Build For Transmission 1) Purchase Order (C) Process Received File 2) Acknowledgement 3) Invoice Communication Functions : Acct # Dept : (D) Send Files Name : (E) Receive Files (F) Interactive Mode (G) Purge Records (H) Fax File (I) Fax Purchase Orders (J) Pricing Matrix P/O #[..........] To [..........] Vendor #[..........] To [..........] Inv #[........-.] To [........-.] Cust #[.......... ....] To [.......... ....]
File Name [..........] Vol. Ser. [SR??]
Action [H] Location [..] Line [M1] Printer [P1] Copies [ 1]
Rev. 4/94Page 2-22
DDMS EDI Manual
LOGGING ON TO AT&T FOR FAX TRANSMISSION
========= ===== =========== =========== ==------======== === === =========== =========== =-------------======== === === === & === ----------------========= =========== === === =-----------------========= === === === === ==----------------========= === === === === ====------------=========== E a s y L i n k S e r v i c e s ========================= ====================== ================ ==========
Electronic Data Interchange by
D D M S
REVISION DATE OF 04/26/91 18009866000<<<<<<PHONE
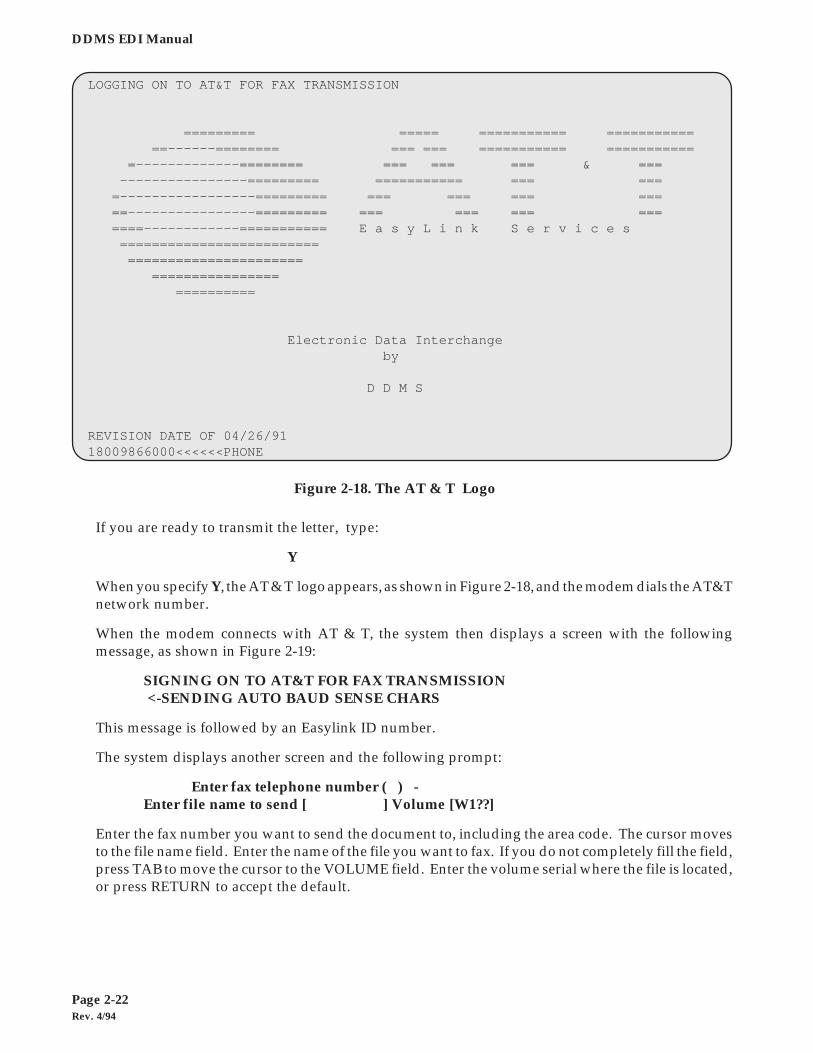
If you are ready to transmit the letter, type:
Y
When you specify Y, the AT & T logo appears, as shown in Figure 2-18, and the modem dials the AT&Tnetwork number.
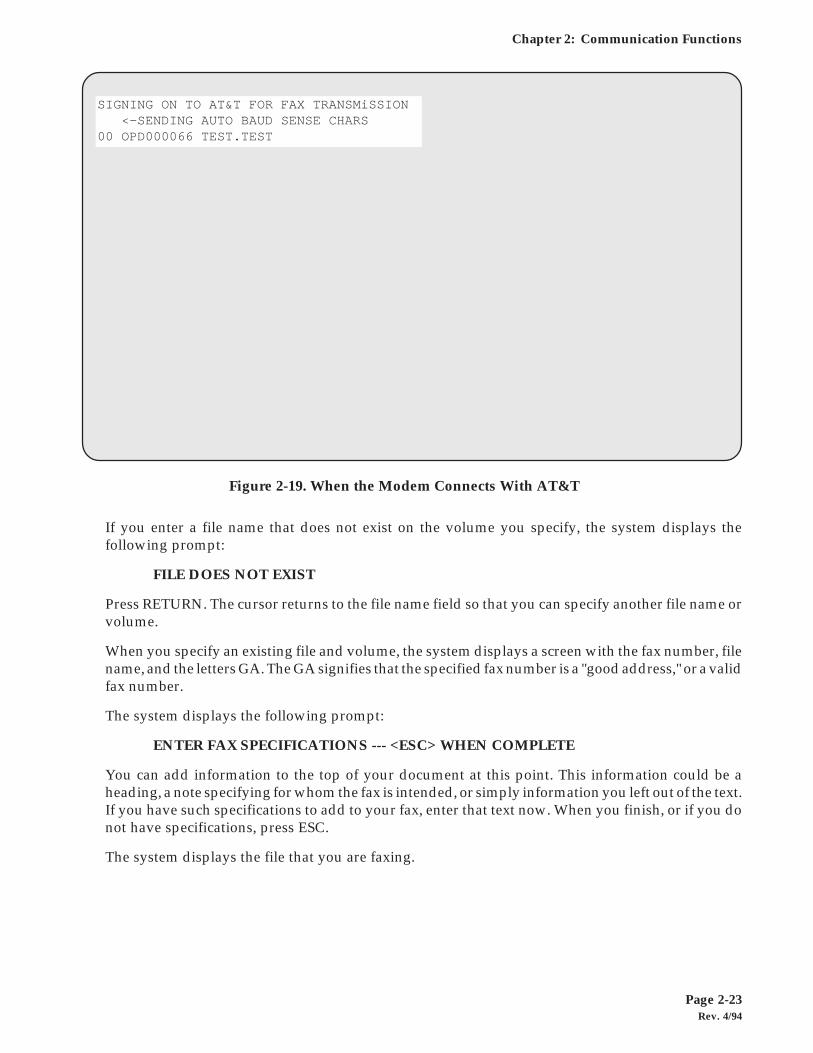
When the modem connects with AT & T, the system then displays a screen with the followingmessage, as shown in Figure 2-19:
SIGNING ON TO AT&T FOR FAX TRANSMISSION <-SENDING AUTO BAUD SENSE CHARS
This message is followed by an Easylink ID number.
The system displays another screen and the following prompt:
Enter fax telephone number ( ) -Enter file name to send [ ] Volume [W1??]
Enter the fax number you want to send the document to, including the area code. The cursor movesto the file name field. Enter the name of the file you want to fax. If you do not completely fill the field,press TAB to move the cursor to the VOLUME field. Enter the volume serial where the file is located,or press RETURN to accept the default.
Figure 2-18. The AT & T Logo
Rev. 4/94Page 2-23
Chapter 2: Communication Functions
If you enter a file name that does not exist on the volume you specify, the system displays thefollowing prompt:
FILE DOES NOT EXIST
Press RETURN. The cursor returns to the file name field so that you can specify another file name orvolume.
When you specify an existing file and volume, the system displays a screen with the fax number, filename, and the letters GA. The GA signifies that the specified fax number is a "good address," or a validfax number.
The system displays the following prompt:
ENTER FAX SPECIFICATIONS --- <ESC> WHEN COMPLETE
You can add information to the top of your document at this point. This information could be aheading, a note specifying for whom the fax is intended, or simply information you left out of the text.If you have such specifications to add to your fax, enter that text now. When you finish, or if you donot have specifications, press ESC.
The system displays the file that you are faxing.
Figure 2-19. When the Modem Connects With AT&T
SIGNING ON TO AT&T FOR FAX TRANSMiSSION <-SENDING AUTO BAUD SENSE CHARS 00 OPD000066 TEST.TEST
Rev. 4/94Page 2-24
DDMS EDI Manual
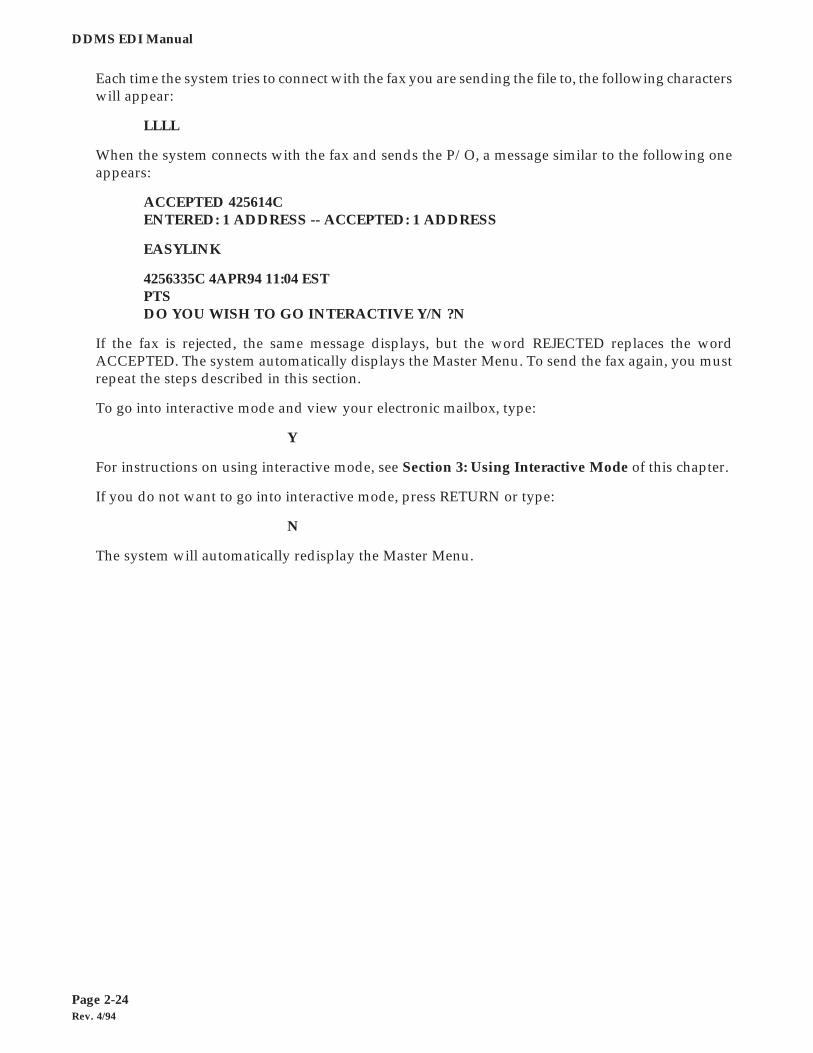
Each time the system tries to connect with the fax you are sending the file to, the following characterswill appear:
LLLL
When the system connects with the fax and sends the P/O, a message similar to the following oneappears:
ACCEPTED 425614CENTERED: 1 ADDRESS -- ACCEPTED: 1 ADDRESS
EASYLINK
4256335C 4APR94 11:04 ESTPTSDO YOU WISH TO GO INTERACTIVE Y/N ?N
If the fax is rejected, the same message displays, but the word REJECTED replaces the wordACCEPTED. The system automatically displays the Master Menu. To send the fax again, you mustrepeat the steps described in this section.
To go into interactive mode and view your electronic mailbox, type:
Y
For instructions on using interactive mode, see Section 3: Using Interactive Mode of this chapter.
If you do not want to go into interactive mode, press RETURN or type:
N
The system will automatically redisplay the Master Menu.
Rev. 4/94Page 2-25
Chapter 2: Communication Functions
Section 6: Faxing Purchase Orders
Using the EDI network, you can fax purchase orders to your customers. This is the simplest way ofsending a purchase order to a customer. To fax purchase orders to a customer, do the following:
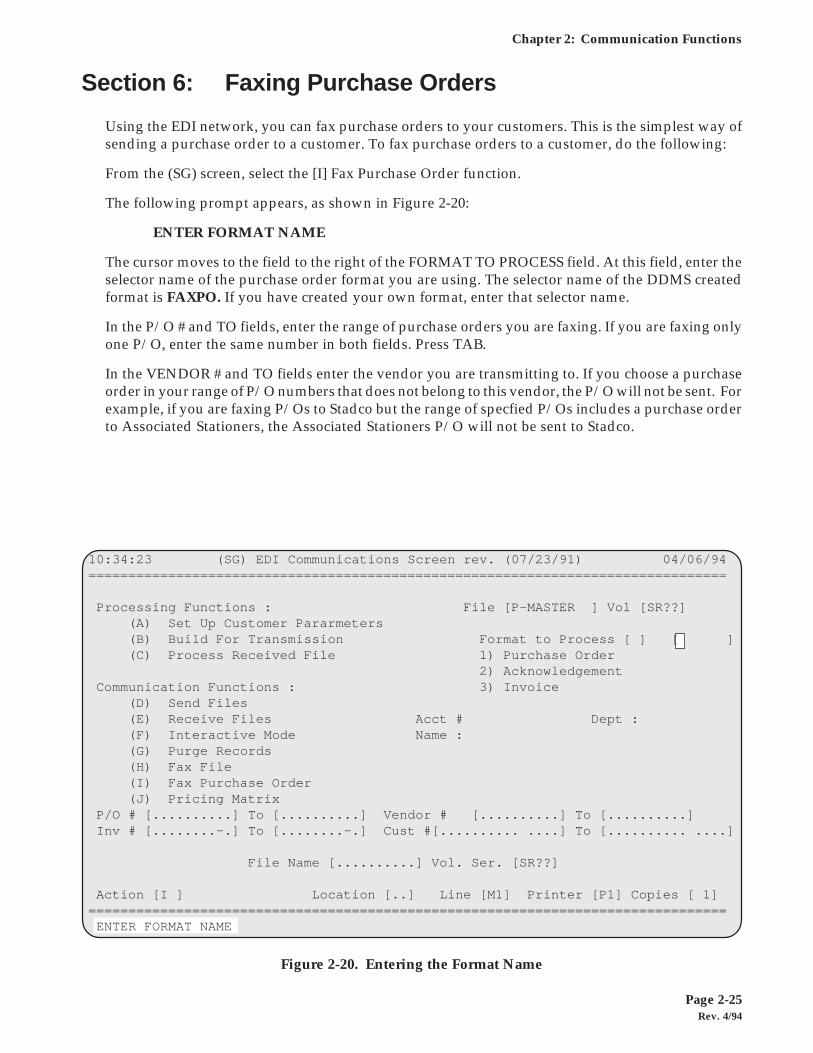
From the (SG) screen, select the [I] Fax Purchase Order function.
The following prompt appears, as shown in Figure 2-20:
ENTER FORMAT NAME
The cursor moves to the field to the right of the FORMAT TO PROCESS field. At this field, enter theselector name of the purchase order format you are using. The selector name of the DDMS createdformat is FAXPO. If you have created your own format, enter that selector name.
In the P/O # and TO fields, enter the range of purchase orders you are faxing. If you are faxing onlyone P/O, enter the same number in both fields. Press TAB.
In the VENDOR # and TO fields enter the vendor you are transmitting to. If you choose a purchaseorder in your range of P/O numbers that does not belong to this vendor, the P/O will not be sent. Forexample, if you are faxing P/Os to Stadco but the range of specfied P/Os includes a purchase orderto Associated Stationers, the Associated Stationers P/O will not be sent to Stadco.
Figure 2-20. Entering the Format Name
10:34:23 (SG) EDI Communications Screen rev. (07/23/91) 04/06/94================================================================================
Processing Functions : File [P-MASTER ] Vol [SR??] (A) Set Up Customer Pararmeters (B) Build For Transmission Format to Process [ ] [ ] (C) Process Received File 1) Purchase Order 2) Acknowledgement Communication Functions : 3) Invoice (D) Send Files (E) Receive Files Acct # Dept : (F) Interactive Mode Name : (G) Purge Records (H) Fax File (I) Fax Purchase Order (J) Pricing Matrix P/O # [..........] To [..........] Vendor # [..........] To [..........] Inv # [........-.] To [........-.] Cust #[.......... ....] To [.......... ....]
File Name [..........] Vol. Ser. [SR??]
Action [I ] Location [..] Line [M1] Printer [P1] Copies [ 1]================================================================================ ENTER FORMAT NAME
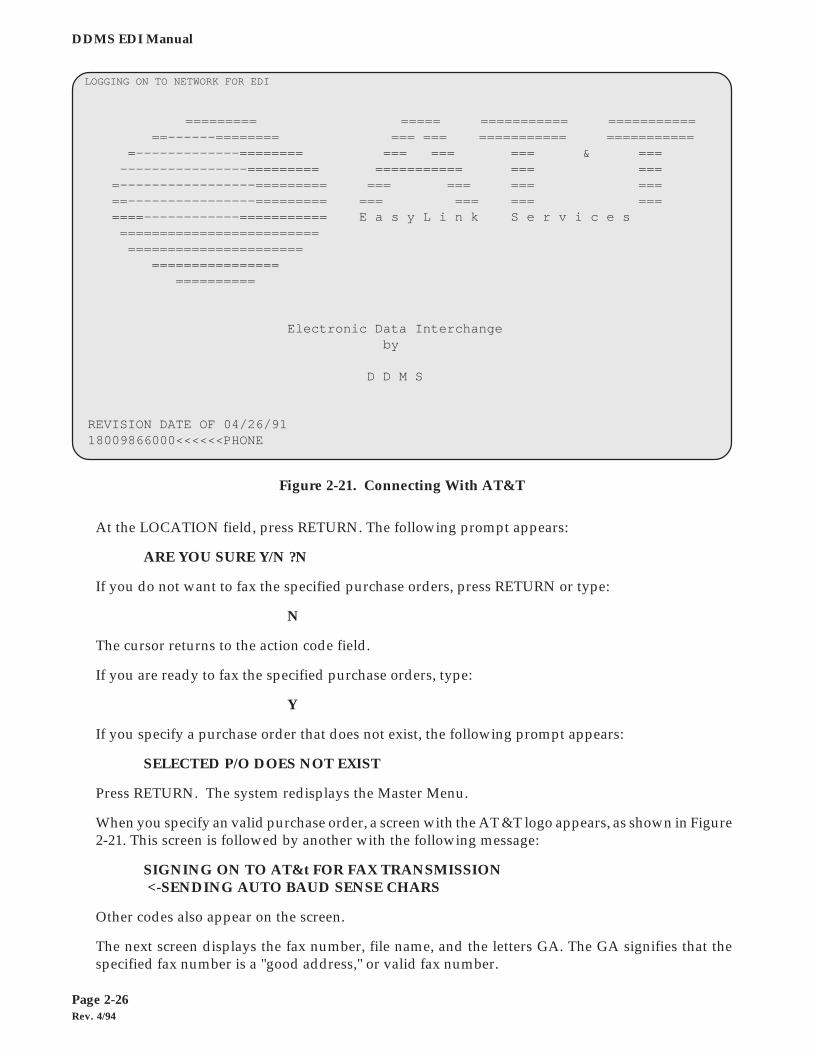
Rev. 4/94Page 2-26
DDMS EDI Manual
At the LOCATION field, press RETURN. The following prompt appears:
ARE YOU SURE Y/N ?N
If you do not want to fax the specified purchase orders, press RETURN or type:
N
The cursor returns to the action code field.
If you are ready to fax the specified purchase orders, type:
Y
If you specify a purchase order that does not exist, the following prompt appears:
SELECTED P/O DOES NOT EXIST
Press RETURN. The system redisplays the Master Menu.
When you specify an valid purchase order, a screen with the AT &T logo appears, as shown in Figure2-21. This screen is followed by another with the following message:
SIGNING ON TO AT&t FOR FAX TRANSMISSION <-SENDING AUTO BAUD SENSE CHARS
Other codes also appear on the screen.
The next screen displays the fax number, file name, and the letters GA. The GA signifies that thespecified fax number is a "good address," or valid fax number.
Figure 2-21. Connecting With AT&T
LOGGING ON TO NETWORK FOR EDI
========= ===== =========== =========== ==------======== === === =========== =========== =-------------======== === === === & === ----------------========= =========== === === =-----------------========= === === === === ==----------------========= === === === === ====------------=========== E a s y L i n k S e r v i c e s ========================= ====================== ================ ==========
Electronic Data Interchange by
D D M S
REVISION DATE OF 04/26/91 18009866000<<<<<<PHONE
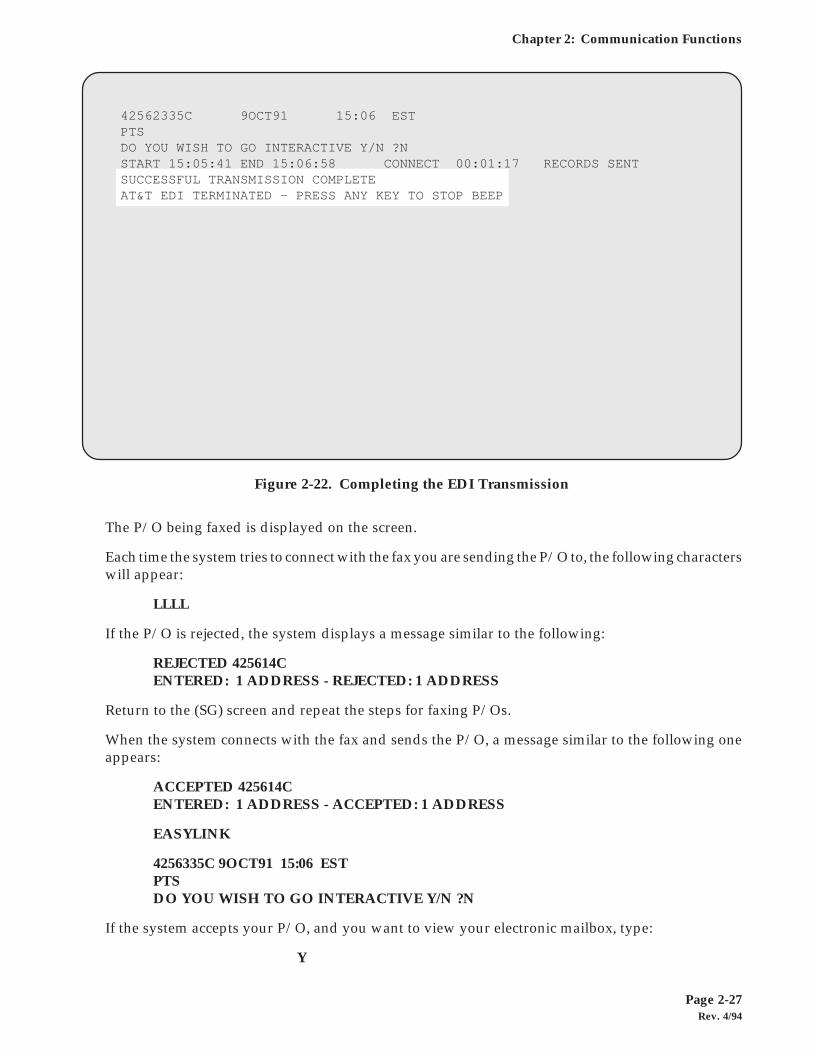
Rev. 4/94Page 2-27
Chapter 2: Communication Functions
The P/O being faxed is displayed on the screen.
Each time the system tries to connect with the fax you are sending the P/O to, the following characterswill appear:
LLLL
If the P/O is rejected, the system displays a message similar to the following:
REJECTED 425614CENTERED: 1 ADDRESS - REJECTED: 1 ADDRESS
Return to the (SG) screen and repeat the steps for faxing P/Os.
When the system connects with the fax and sends the P/O, a message similar to the following oneappears:
ACCEPTED 425614CENTERED: 1 ADDRESS - ACCEPTED: 1 ADDRESS
EASYLINK
4256335C 9OCT91 15:06 ESTPTSDO YOU WISH TO GO INTERACTIVE Y/N ?N
If the system accepts your P/O, and you want to view your electronic mailbox, type:
Y
Figure 2-22. Completing the EDI Transmission
42562335C 9OCT91 15:06 EST PTS DO YOU WISH TO GO INTERACTIVE Y/N ?N START 15:05:41 END 15:06:58 CONNECT 00:01:17 RECORDS SENT SUCCESSFUL TRANSMISSION COMPLETE AT&T EDI TERMINATED - PRESS ANY KEY TO STOP BEEP
For instructions on interactive mode, refer to Section 3: Using Interactive Mode in this chapter.
If you do not want to go into interactive mode, press RETURN or type:
N
A message similar to the one shown in Figure 2-22 appears.
The system will beep when the connection is terminated. Press RETURN to stop the beep.
To return to the Master Menu, press RETURN again.
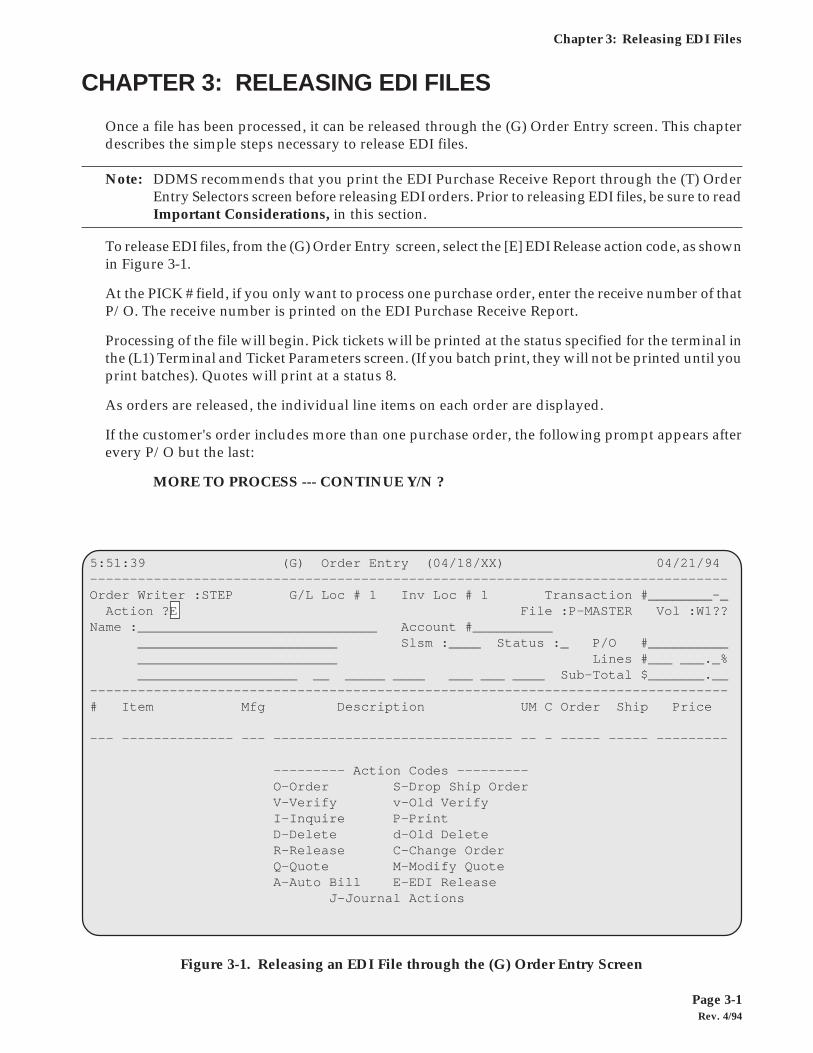
Rev. 4/94Page 3-1
Chapter 3: Releasing EDI Files
CHAPTER 3: RELEASING EDI FILES
Once a file has been processed, it can be released through the (G) Order Entry screen. This chapterdescribes the simple steps necessary to release EDI files.
Note: DDMS recommends that you print the EDI Purchase Receive Report through the (T) OrderEntry Selectors screen before releasing EDI orders. Prior to releasing EDI files, be sure to readImportant Considerations, in this section.
To release EDI files, from the (G) Order Entry screen, select the [E] EDI Release action code, as shownin Figure 3-1.
At the PICK # field, if you only want to process one purchase order, enter the receive number of thatP/O. The receive number is printed on the EDI Purchase Receive Report.
Processing of the file will begin. Pick tickets will be printed at the status specified for the terminal inthe (L1) Terminal and Ticket Parameters screen. (If you batch print, they will not be printed until youprint batches). Quotes will print at a status 8.
As orders are released, the individual line items on each order are displayed.
If the customer's order includes more than one purchase order, the following prompt appears afterevery P/O but the last:
MORE TO PROCESS --- CONTINUE Y/N ?
Figure 3-1. Releasing an EDI File through the (G) Order Entry Screen
5:51:39 (G) Order Entry (04/18/XX) 04/21/94--------------------------------------------------------------------------------Order Writer :STEP G/L Loc # 1 Inv Loc # 1 Transaction #________-_ Action ?E File :P-MASTER Vol :W1??Name :______________________________ Account #__________ _________________________ Slsm :____ Status :_ P/O #__________ _________________________ Lines #___ ___._% ____________________ __ _____ ____ ___ ___ ____ Sub-Total $_______.__--------------------------------------------------------------------------------# Item Mfg Description UM C Order Ship Price
--- -------------- --- ------------------------------ -- - ----- ----- ---------
--------- Action Codes --------- O-Order S-Drop Ship Order V-Verify v-Old Verify I-Inquire P-Print D-Delete d-Old Delete R-Release C-Change Order Q-Quote M-Modify Quote A-Auto Bill E-EDI Release J-Journal Actions
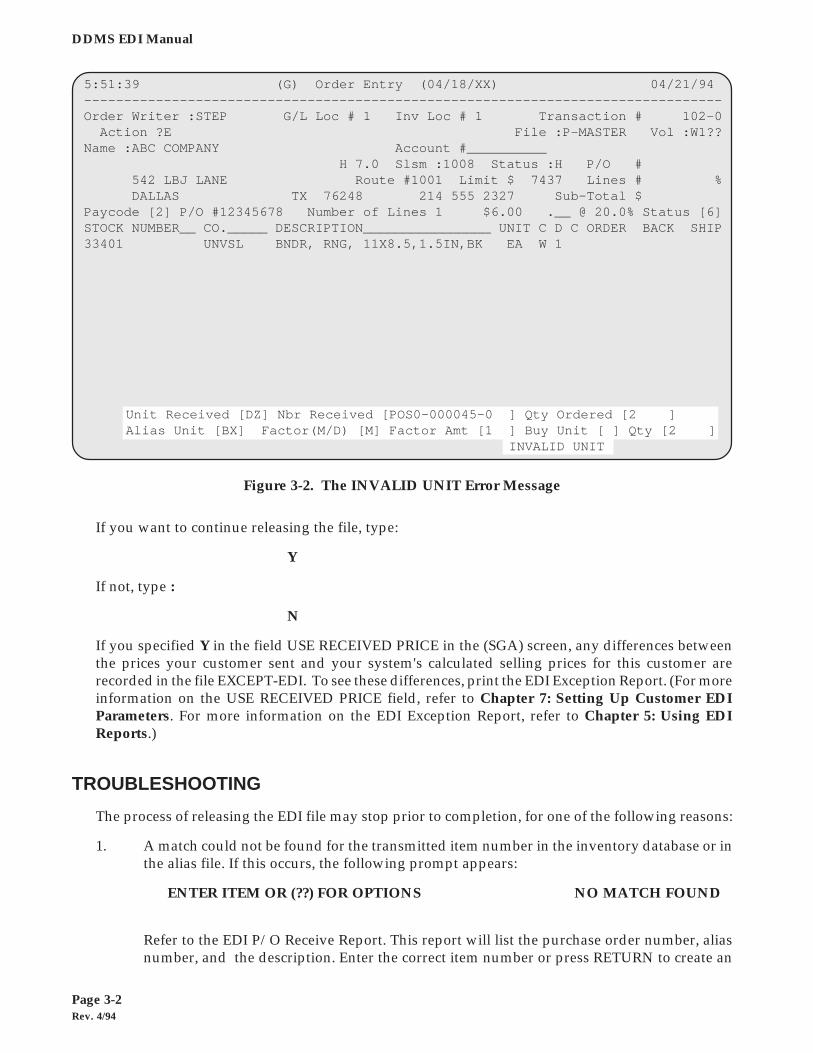
Rev. 4/94Page 3-2
DDMS EDI Manual
If you want to continue releasing the file, type:
Y
If not, type :
N
If you specified Y in the field USE RECEIVED PRICE in the (SGA) screen, any differences betweenthe prices your customer sent and your system's calculated selling prices for this customer arerecorded in the file EXCEPT-EDI. To see these differences, print the EDI Exception Report. (For moreinformation on the USE RECEIVED PRICE field, refer to Chapter 7: Setting Up Customer EDIParameters. For more information on the EDI Exception Report, refer to Chapter 5: Using EDIReports.)
TROUBLESHOOTING
The process of releasing the EDI file may stop prior to completion, for one of the following reasons:
1. A match could not be found for the transmitted item number in the inventory database or inthe alias file. If this occurs, the following prompt appears:
ENTER ITEM OR (??) FOR OPTIONS NO MATCH FOUND
Refer to the EDI P/O Receive Report. This report will list the purchase order number, aliasnumber, and the description. Enter the correct item number or press RETURN to create an
Figure 3-2. The INVALID UNIT Error Message
5:51:39 (G) Order Entry (04/18/XX) 04/21/94--------------------------------------------------------------------------------Order Writer :STEP G/L Loc # 1 Inv Loc # 1 Transaction # 102-0 Action ?E File :P-MASTER Vol :W1??Name :ABC COMPANY Account #__________ H 7.0 Slsm :1008 Status :H P/O # 542 LBJ LANE Route #1001 Limit $ 7437 Lines # % DALLAS TX 76248 214 555 2327 Sub-Total $Paycode [2] P/O #12345678 Number of Lines 1 $6.00 .__ @ 20.0% Status [6]STOCK NUMBER__ CO._____ DESCRIPTION________________ UNIT C D C ORDER BACK SHIP33401 UNVSL BNDR, RNG, 11X8.5,1.5IN,BK EA W 1
Unit Received [DZ] Nbr Received [POS0-000045-0 ] Qty Ordered [2 ]Alias Unit [BX] Factor(M/D) [M] Factor Amt [1 ] Buy Unit [ ] Qty [2 ]
INVALID UNIT
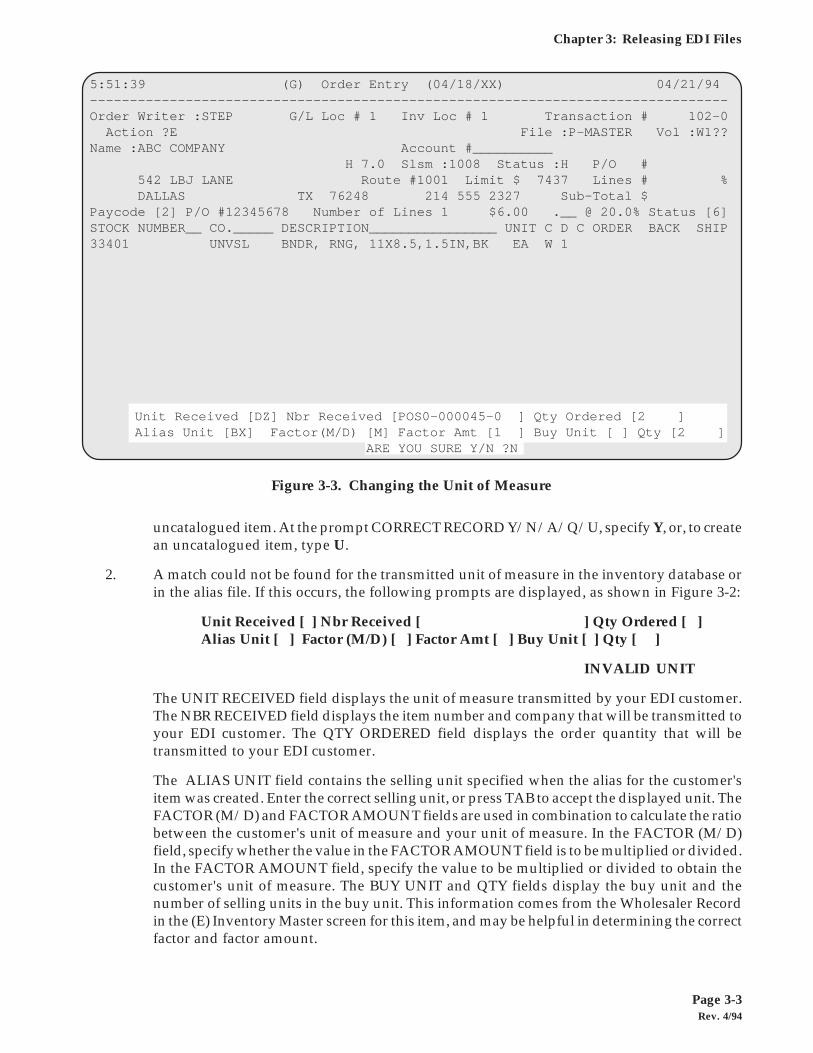
Rev. 4/94Page 3-3
Chapter 3: Releasing EDI Files
uncatalogued item. At the prompt CORRECT RECORD Y/N/A/Q/U, specify Y, or, to createan uncatalogued item, type U.
2. A match could not be found for the transmitted unit of measure in the inventory database orin the alias file. If this occurs, the following prompts are displayed, as shown in Figure 3-2:
Unit Received [ ] Nbr Received [ ] Qty Ordered [ ]Alias Unit [ ] Factor (M/D) [ ] Factor Amt [ ] Buy Unit [ ] Qty [ ]
INVALID UNIT
The UNIT RECEIVED field displays the unit of measure transmitted by your EDI customer.The NBR RECEIVED field displays the item number and company that will be transmitted toyour EDI customer. The QTY ORDERED field displays the order quantity that will betransmitted to your EDI customer.
The ALIAS UNIT field contains the selling unit specified when the alias for the customer'sitem was created. Enter the correct selling unit, or press TAB to accept the displayed unit. TheFACTOR (M/D) and FACTOR AMOUNT fields are used in combination to calculate the ratiobetween the customer's unit of measure and your unit of measure. In the FACTOR (M/D)field, specify whether the value in the FACTOR AMOUNT field is to be multiplied or divided.In the FACTOR AMOUNT field, specify the value to be multiplied or divided to obtain thecustomer's unit of measure. The BUY UNIT and QTY fields display the buy unit and thenumber of selling units in the buy unit. This information comes from the Wholesaler Recordin the (E) Inventory Master screen for this item, and may be helpful in determining the correctfactor and factor amount.
Figure 3-3. Changing the Unit of Measure
5:51:39 (G) Order Entry (04/18/XX) 04/21/94--------------------------------------------------------------------------------Order Writer :STEP G/L Loc # 1 Inv Loc # 1 Transaction # 102-0 Action ?E File :P-MASTER Vol :W1??Name :ABC COMPANY Account #__________ H 7.0 Slsm :1008 Status :H P/O # 542 LBJ LANE Route #1001 Limit $ 7437 Lines # % DALLAS TX 76248 214 555 2327 Sub-Total $Paycode [2] P/O #12345678 Number of Lines 1 $6.00 .__ @ 20.0% Status [6]STOCK NUMBER__ CO._____ DESCRIPTION________________ UNIT C D C ORDER BACK SHIP33401 UNVSL BNDR, RNG, 11X8.5,1.5IN,BK EA W 1
Unit Received [DZ] Nbr Received [POS0-000045-0 ] Qty Ordered [2 ]Alias Unit [BX] Factor(M/D) [M] Factor Amt [1 ] Buy Unit [ ] Qty [2 ]
ARE YOU SURE Y/N ?N
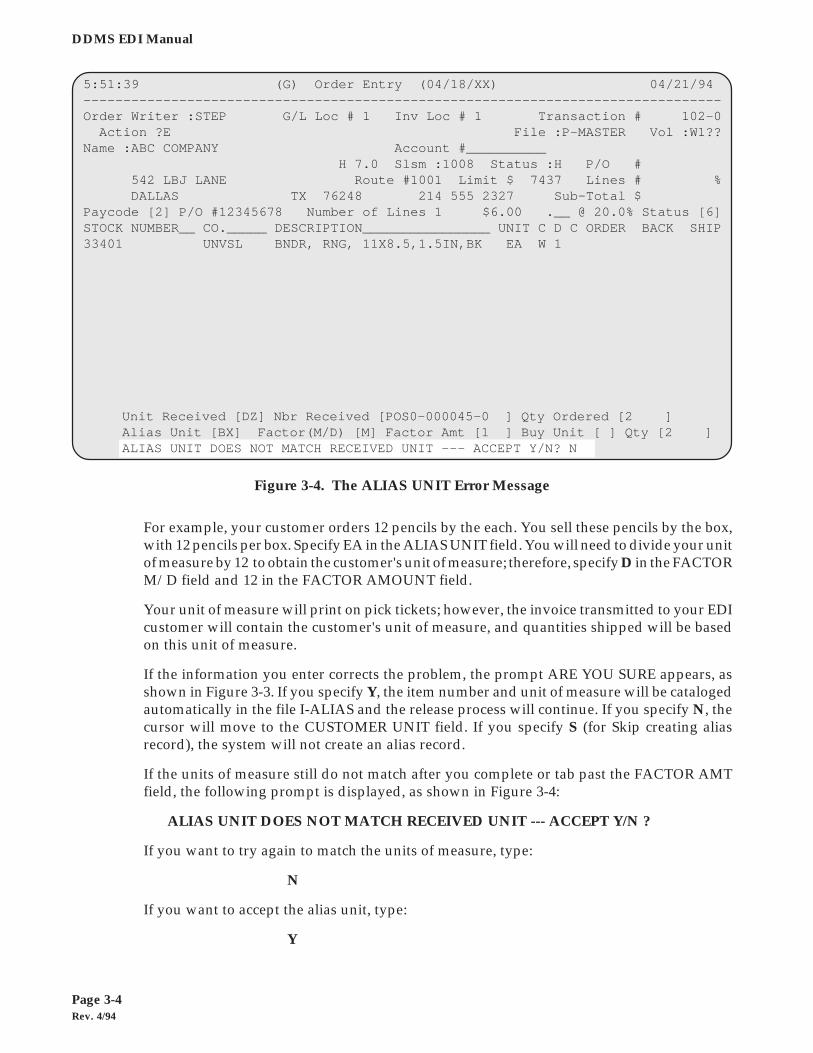
Rev. 4/94Page 3-4
DDMS EDI Manual
For example, your customer orders 12 pencils by the each. You sell these pencils by the box,with 12 pencils per box. Specify EA in the ALIAS UNIT field. You will need to divide your unitof measure by 12 to obtain the customer's unit of measure; therefore, specify D in the FACTORM/D field and 12 in the FACTOR AMOUNT field.
Your unit of measure will print on pick tickets; however, the invoice transmitted to your EDIcustomer will contain the customer's unit of measure, and quantities shipped will be basedon this unit of measure.
If the information you enter corrects the problem, the prompt ARE YOU SURE appears, asshown in Figure 3-3. If you specify Y, the item number and unit of measure will be catalogedautomatically in the file I-ALIAS and the release process will continue. If you specify N, thecursor will move to the CUSTOMER UNIT field. If you specify S (for Skip creating aliasrecord), the system will not create an alias record.
If the units of measure still do not match after you complete or tab past the FACTOR AMTfield, the following prompt is displayed, as shown in Figure 3-4:
ALIAS UNIT DOES NOT MATCH RECEIVED UNIT --- ACCEPT Y/N ?
If you want to try again to match the units of measure, type:
N
If you want to accept the alias unit, type:
Y
Figure 3-4. The ALIAS UNIT Error Message
5:51:39 (G) Order Entry (04/18/XX) 04/21/94--------------------------------------------------------------------------------Order Writer :STEP G/L Loc # 1 Inv Loc # 1 Transaction # 102-0 Action ?E File :P-MASTER Vol :W1??Name :ABC COMPANY Account #__________ H 7.0 Slsm :1008 Status :H P/O # 542 LBJ LANE Route #1001 Limit $ 7437 Lines # % DALLAS TX 76248 214 555 2327 Sub-Total $Paycode [2] P/O #12345678 Number of Lines 1 $6.00 .__ @ 20.0% Status [6]STOCK NUMBER__ CO._____ DESCRIPTION________________ UNIT C D C ORDER BACK SHIP33401 UNVSL BNDR, RNG, 11X8.5,1.5IN,BK EA W 1
Unit Received [DZ] Nbr Received [POS0-000045-0 ] Qty Ordered [2 ]Alias Unit [BX] Factor(M/D) [M] Factor Amt [1 ] Buy Unit [ ] Qty [2 ]ALIAS UNIT DOES NOT MATCH RECEIVED UNIT --- ACCEPT Y/N? N

Rev. 4/94Page 3-5
Chapter 3: Releasing EDI Files
3. The transmitted unit of measure matches the alias unit of measure, but the FACTOR (M/D)and FACTOR AMOUNT fields for the alias are blank. If this occurs, the following prompt isdisplayed:
Unit Received [ ] Nbr Received [ ] Qty Ordered [ ]Alias Unit [ ] Factor (M/D) [ ] Factor Amt [ ] Buy Unit [ ] Qty [ ]
INVALID UNIT
4. The customer's unit of measure is smaller than your unit of measure, but they order a quantitythat does not evenly divide into your unit of measure.
For example, you sell pens by the box, with 12 pens per box, but your customer buys themindividually. The customer therefore needs to order in multiples of 12. However, theytransmit an order for 15, which does not evenly divide into 12. If this occurs, the followingmessage appears, as shown in Figure 3-5:
INVALID MULTIPLE
Enter the item number of the item you are selling, if you know it, or press RETURN.
At the prompt CORRECT RECORD Y/N/A/Q/U, type U. The system will create anuncataloged item, and fill the order quantity to the nearest selling unit. Using the exampleabove, the order quantity would be one box.
5. A match could not be found because an item number was not sent. Only the description wastransmitted. If this occurs, the following message appears, as shown in Figure 3-6:
INVALID ITEM ITEM NOT ON FILE
Figure 3-5. The Error Message INVALID MULTIPLE
5:51:39 (G) Order Entry (04/18/XX) 04/21/94--------------------------------------------------------------------------------Order Writer :STEP G/L Loc # 1 Inv Loc # 1 Transaction # 102-0 Action ?E File :P-MASTER Vol :W1??Name :ABC COMPANY Account #__________ H 7.0 Slsm :1008 Status :H P/O # 542 LBJ LANE Route #1001 Limit $ 7437 Lines # % DALLAS TX 76248 214 555 2327 Sub-Total $Paycode [2] P/O #12345678 Number of Lines 1 $6.00 .__ @ 20.0% Status [6]STOCK NUMBER__ CO._____ DESCRIPTION________________ UNIT C D C ORDER BACK SHIP33401 UNVSL BNDR, RNG, 11X8.5,1.5IN,BK EA W 1
INVALID MULTIPLE
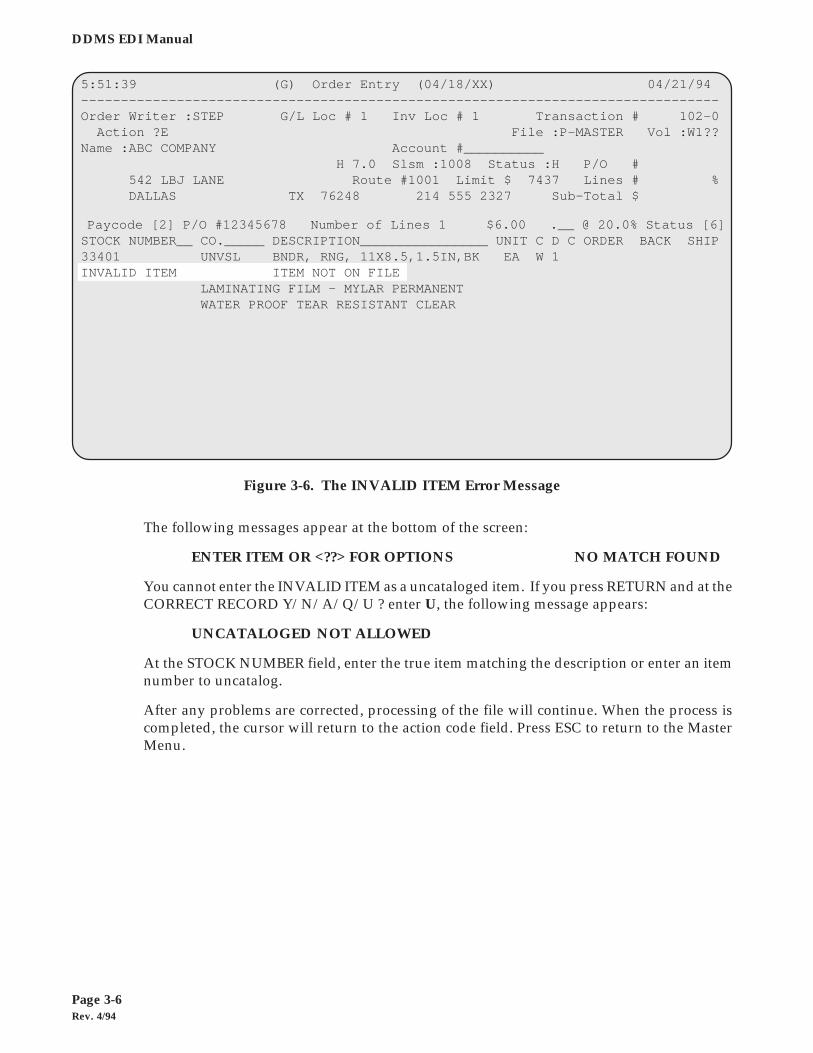
Rev. 4/94Page 3-6
DDMS EDI Manual
Figure 3-6. The INVALID ITEM Error Message
5:51:39 (G) Order Entry (04/18/XX) 04/21/94--------------------------------------------------------------------------------Order Writer :STEP G/L Loc # 1 Inv Loc # 1 Transaction # 102-0 Action ?E File :P-MASTER Vol :W1??Name :ABC COMPANY Account #__________ H 7.0 Slsm :1008 Status :H P/O # 542 LBJ LANE Route #1001 Limit $ 7437 Lines # % DALLAS TX 76248 214 555 2327 Sub-Total $
Paycode [2] P/O #12345678 Number of Lines 1 $6.00 .__ @ 20.0% Status [6]STOCK NUMBER__ CO._____ DESCRIPTION________________ UNIT C D C ORDER BACK SHIP33401 UNVSL BNDR, RNG, 11X8.5,1.5IN,BK EA W 1INVALID ITEM ITEM NOT ON FILE
LAMINATING FILM - MYLAR PERMANENT WATER PROOF TEAR RESISTANT CLEAR
The following messages appear at the bottom of the screen:
ENTER ITEM OR <??> FOR OPTIONS NO MATCH FOUND
You cannot enter the INVALID ITEM as a uncataloged item. If you press RETURN and at theCORRECT RECORD Y/N/A/Q/U ? enter U, the following message appears:
UNCATALOGED NOT ALLOWED
At the STOCK NUMBER field, enter the true item matching the description or enter an itemnumber to uncatalog.
After any problems are corrected, processing of the file will continue. When the process iscompleted, the cursor will return to the action code field. Press ESC to return to the MasterMenu.
Rev. 4/94Page 3-7
Chapter 3: Releasing EDI Files
IMPORTANT CONSIDERATIONS
The following information must be carefully considered when releasing EDI files:
1. If an item in the EDI file is not matched by an item or alias in the inventory database, or if theunit of measure of the item in the EDI file does not match the unit of measure of the item inthe inventory database, the process will stop at that item. You can enter the item so that itmatches the item in the inventory database, change the unit of measure to match the unit ofmeasure in the inventory database, or specify that the item is uncataloged. You can also createan item alias for this customer.
2. Do not delete line items or orders from EDI purchase orders. When orders are transmitted byyour customers, they contain sort codes which are transmitted back to the customer. These areused to match the items on the purchase order with the items on the invoice transmitted backto them. If you delete line items or orders, these will not match and the invoice will be rejected.
3. After you release an EDI file, the ticket that the system creates will go to the status specifiedfor your terminal in the (L1) Terminal and Tickets Parameters screen. If this status is a pickticket status, you need to verify the ticket. (Instructions for verifying tickets can be found in“Chapter 8: Order Entry,” in the O/P Dealer System Software Manual or in the O/P DealerVerification Manual.) When verifying, you may notice that the quantities on the order aredifferent from the quantities on the customer's order. These quantities differ because thesystem converts the customer's unit of measure to your unit of measure. For example, thecustomer may order 10 each of an item that you sell in boxes of 10. The invoice will show onebox. However, the invoice you transmit back to the customer will show 10 each.
If you change the quantity shipped during verification, you may see the prompt MUST BEA MULTIPLE OF [ ]. Adjust the quantity you are shipping so that it is a multiple of thenumber displayed between the brackets.
4. When you do the [MA] Execute Daily Backup Procedure function, if you specify Y to theUSING 810 field in the (SGA) screen, invoices with a status of B will not be sent to the SalesJournal until the file for transmitting invoices has been built. If you specify Y to the USING 855field in the (SGA) screen, invoices will not be sent to the Sales Journal until the file fortransmitting acknowledgments has been built.
Note: While it is necessary to build the invoice file, it does not have to be transmitted prior to doingthe [MA]. Once the file has been built, the invoices will be listed on the Daily Invoice Registerand Open Pick Report, and they will remain in the files P-MASTER and P-SPECIAL until the[MA] has been done.

Rev. 4/94Page 3-8
DDMS EDI Manual
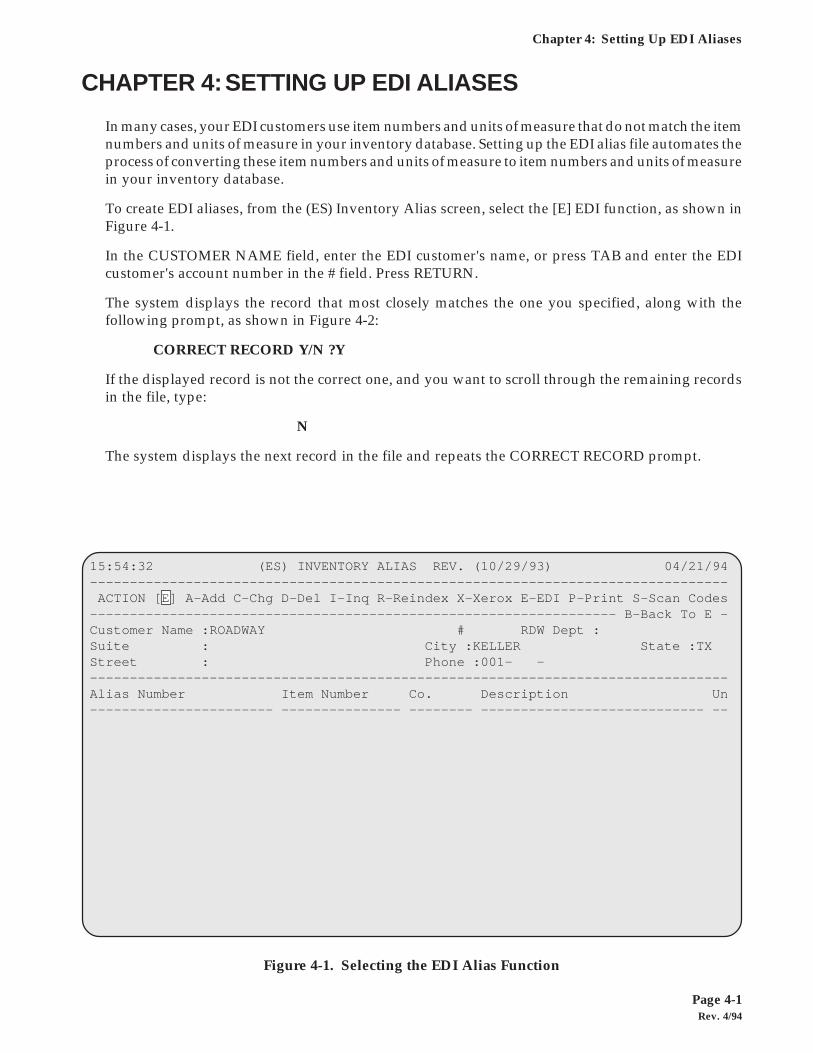
Rev. 4/94Page 4-1
Chapter 4: Setting Up EDI Aliases
CHAPTER 4:SETTING UP EDI ALIASES
In many cases, your EDI customers use item numbers and units of measure that do not match the itemnumbers and units of measure in your inventory database. Setting up the EDI alias file automates theprocess of converting these item numbers and units of measure to item numbers and units of measurein your inventory database.
To create EDI aliases, from the (ES) Inventory Alias screen, select the [E] EDI function, as shown inFigure 4-1.
In the CUSTOMER NAME field, enter the EDI customer's name, or press TAB and enter the EDIcustomer's account number in the # field. Press RETURN.
The system displays the record that most closely matches the one you specified, along with thefollowing prompt, as shown in Figure 4-2:
CORRECT RECORD Y/N ?Y
If the displayed record is not the correct one, and you want to scroll through the remaining recordsin the file, type:
N
The system displays the next record in the file and repeats the CORRECT RECORD prompt.
Figure 4-1. Selecting the EDI Alias Function
15:54:32 (ES) INVENTORY ALIAS REV. (10/29/93) 04/21/94-------------------------------------------------------------------------------- ACTION [E] A-Add C-Chg D-Del I-Inq R-Reindex X-Xerox E-EDI P-Print S-Scan Codes------------------------------------------------------------------ B-Back To E -Customer Name :ROADWAY # RDW Dept :Suite : City :KELLER State :TXStreet : Phone :001- ---------------------------------------------------------------------------------Alias Number Item Number Co. Description Un----------------------- --------------- -------- ---------------------------- --
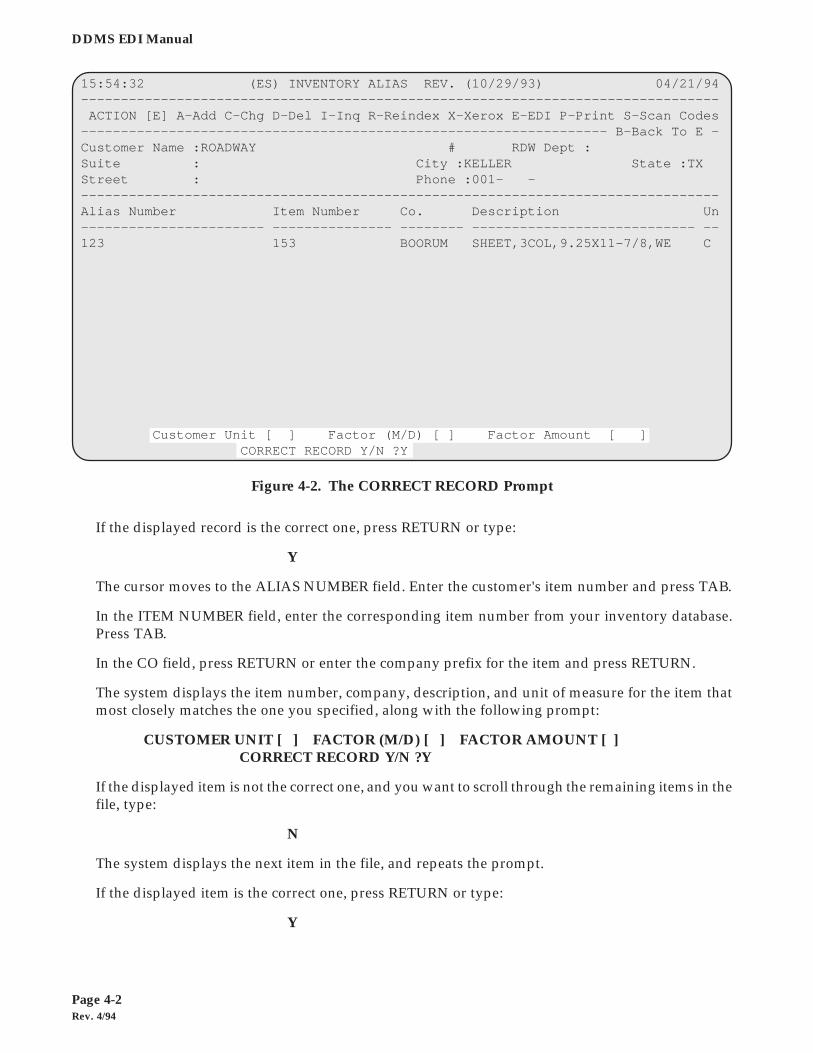
Rev. 4/94Page 4-2
DDMS EDI Manual
If the displayed record is the correct one, press RETURN or type:
Y
The cursor moves to the ALIAS NUMBER field. Enter the customer's item number and press TAB.
In the ITEM NUMBER field, enter the corresponding item number from your inventory database.Press TAB.
In the CO field, press RETURN or enter the company prefix for the item and press RETURN.
The system displays the item number, company, description, and unit of measure for the item thatmost closely matches the one you specified, along with the following prompt:
CUSTOMER UNIT [ ] FACTOR (M/D) [ ] FACTOR AMOUNT [ ]CORRECT RECORD Y/N ?Y
If the displayed item is not the correct one, and you want to scroll through the remaining items in thefile, type:
N
The system displays the next item in the file, and repeats the prompt.
If the displayed item is the correct one, press RETURN or type:
Y
Figure 4-2. The CORRECT RECORD Prompt
15:54:32 (ES) INVENTORY ALIAS REV. (10/29/93) 04/21/94-------------------------------------------------------------------------------- ACTION [E] A-Add C-Chg D-Del I-Inq R-Reindex X-Xerox E-EDI P-Print S-Scan Codes------------------------------------------------------------------ B-Back To E -Customer Name :ROADWAY # RDW Dept :Suite : City :KELLER State :TXStreet : Phone :001- ---------------------------------------------------------------------------------Alias Number Item Number Co. Description Un----------------------- --------------- -------- ---------------------------- --123 153 BOORUM SHEET,3COL,9.25X11-7/8,WE C
Customer Unit [ ] Factor (M/D) [ ] Factor Amount [ ] CORRECT RECORD Y/N ?Y
Rev. 4/94Page 4-3
Chapter 4: Setting Up EDI Aliases
The cursor moves to the CUSTOMER UNIT field. Enter the unit of measure transmitted by your EDIcustomer. Press TAB if you do not fill the field.
The FACTOR (M/D) and FACTOR AMOUNT fields are used in combination to calculate the ratiobetween the customer's unit of measure and your unit of measure. In the FACTOR (M/D) field,specify whether the value in the FACTOR AMOUNT field is to be multiplied or divided.
If the value is to be multiplied, type:
M
If the value is to be divided, type:
D
In the FACTOR AMOUNT field, specify the value to be multiplied or divided to obtain the customer'sunit of measure. Press TAB or RETURN if you do not fill the field.
For example, your customer orders 12 pencils by the each. You sell these pencils by the box, with 12pencils per box. Specify EA in the CUSTOMER UNIT field. You will need to divide your unit ofmeasure by 12 to obtain the customer's unit of measure; therefore, specify D in the FACTOR M/D fieldand 12 in the FACTOR AMOUNT field.
Your unit of measure will print on pick tickets; however, the invoice transmitted to your EDI customerwill contain the customer's unit of measure, and quantities shipped will be based on this unit ofmeasure.
When you complete the FACTOR AMOUNT field, the cursor returns to the ALIAS NUMBER fieldso that you can create another alias.
To return to the CUSTOMER NAME field to create aliases for another customer, press ESC.
To return to the Master Menu, press ESC until that screen appears.

Rev. 4/94Page 4-4
DDMS EDI Manual
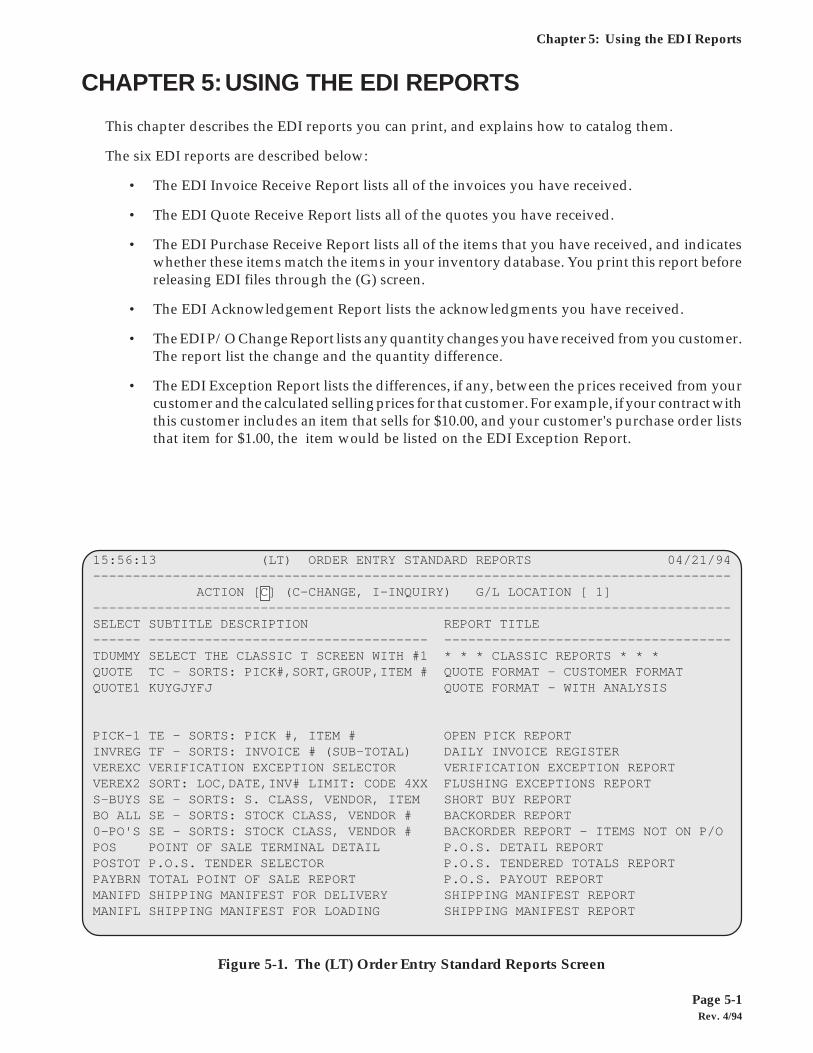
Rev. 4/94Page 5-1
Chapter 5: Using the EDI Reports
CHAPTER 5:USING THE EDI REPORTS
This chapter describes the EDI reports you can print, and explains how to catalog them.
The six EDI reports are described below:
• The EDI Invoice Receive Report lists all of the invoices you have received.
• The EDI Quote Receive Report lists all of the quotes you have received.
• The EDI Purchase Receive Report lists all of the items that you have received, and indicateswhether these items match the items in your inventory database. You print this report beforereleasing EDI files through the (G) screen.
• The EDI Acknowledgement Report lists the acknowledgments you have received.
• The EDI P/O Change Report lists any quantity changes you have received from you customer.The report list the change and the quantity difference.
• The EDI Exception Report lists the differences, if any, between the prices received from yourcustomer and the calculated selling prices for that customer. For example, if your contract withthis customer includes an item that sells for $10.00, and your customer's purchase order liststhat item for $1.00, the item would be listed on the EDI Exception Report.
Figure 5-1. The (LT) Order Entry Standard Reports Screen
15:56:13 (LT) ORDER ENTRY STANDARD REPORTS 04/21/94-------------------------------------------------------------------------------- ACTION [C] (C-CHANGE, I-INQUIRY) G/L LOCATION [ 1]--------------------------------------------------------------------------------SELECT SUBTITLE DESCRIPTION REPORT TITLE------ ----------------------------------- ------------------------------------TDUMMY SELECT THE CLASSIC T SCREEN WITH #1 * * * CLASSIC REPORTS * * *QUOTE TC - SORTS: PICK#,SORT,GROUP,ITEM # QUOTE FORMAT - CUSTOMER FORMATQUOTE1 KUYGJYFJ QUOTE FORMAT - WITH ANALYSIS
PICK-1 TE - SORTS: PICK #, ITEM # OPEN PICK REPORTINVREG TF - SORTS: INVOICE # (SUB-TOTAL) DAILY INVOICE REGISTERVEREXC VERIFICATION EXCEPTION SELECTOR VERIFICATION EXCEPTION REPORTVEREX2 SORT: LOC,DATE,INV# LIMIT: CODE 4XX FLUSHING EXCEPTIONS REPORTS-BUYS SE - SORTS: S. CLASS, VENDOR, ITEM SHORT BUY REPORTBO ALL SE - SORTS: STOCK CLASS, VENDOR # BACKORDER REPORT0-PO'S SE - SORTS: STOCK CLASS, VENDOR # BACKORDER REPORT - ITEMS NOT ON P/OPOS POINT OF SALE TERMINAL DETAIL P.O.S. DETAIL REPORTPOSTOT P.O.S. TENDER SELECTOR P.O.S. TENDERED TOTALS REPORTPAYBRN TOTAL POINT OF SALE REPORT P.O.S. PAYOUT REPORTMANIFD SHIPPING MANIFEST FOR DELIVERY SHIPPING MANIFEST REPORTMANIFL SHIPPING MANIFEST FOR LOADING SHIPPING MANIFEST REPORT
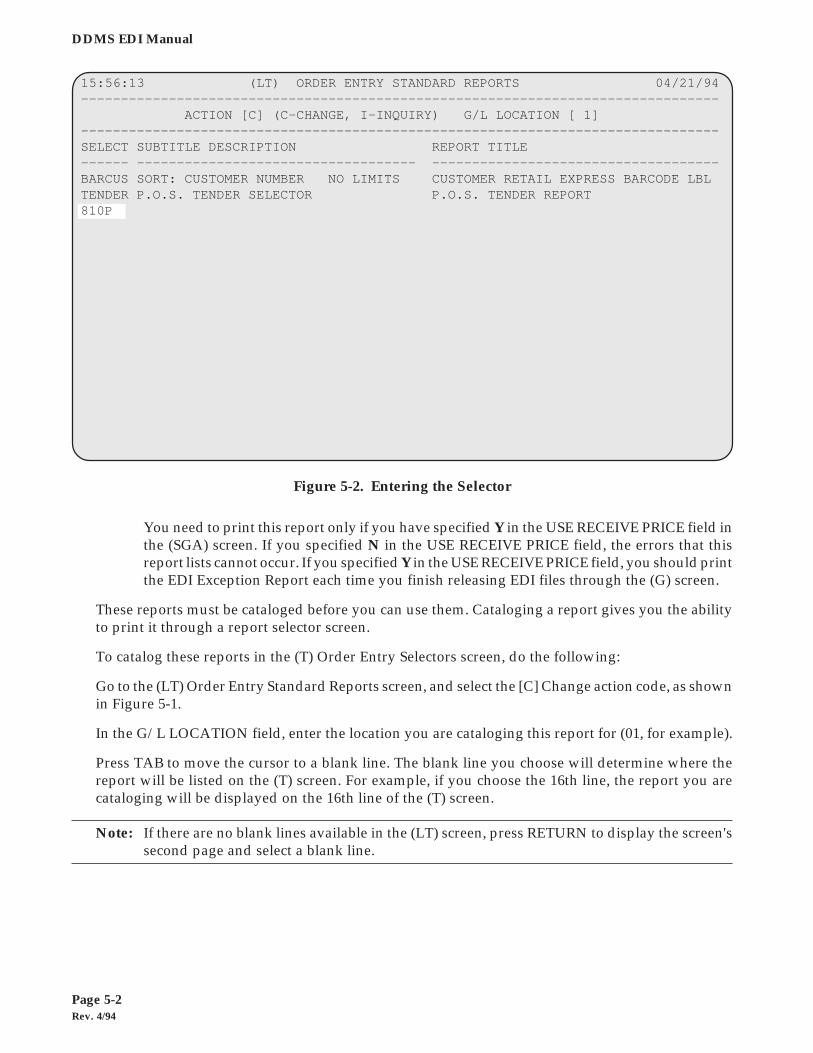
Rev. 4/94Page 5-2
DDMS EDI Manual
You need to print this report only if you have specified Y in the USE RECEIVE PRICE field inthe (SGA) screen. If you specified N in the USE RECEIVE PRICE field, the errors that thisreport lists cannot occur. If you specified Y in the USE RECEIVE PRICE field, you should printthe EDI Exception Report each time you finish releasing EDI files through the (G) screen.
These reports must be cataloged before you can use them. Cataloging a report gives you the abilityto print it through a report selector screen.
To catalog these reports in the (T) Order Entry Selectors screen, do the following:
Go to the (LT) Order Entry Standard Reports screen, and select the [C] Change action code, as shownin Figure 5-1.
In the G/L LOCATION field, enter the location you are cataloging this report for (01, for example).
Press TAB to move the cursor to a blank line. The blank line you choose will determine where thereport will be listed on the (T) screen. For example, if you choose the 16th line, the report you arecataloging will be displayed on the 16th line of the (T) screen.
Note: If there are no blank lines available in the (LT) screen, press RETURN to display the screen'ssecond page and select a blank line.
Figure 5-2. Entering the Selector
15:56:13 (LT) ORDER ENTRY STANDARD REPORTS 04/21/94-------------------------------------------------------------------------------- ACTION [C] (C-CHANGE, I-INQUIRY) G/L LOCATION [ 1]--------------------------------------------------------------------------------SELECT SUBTITLE DESCRIPTION REPORT TITLE------ ----------------------------------- ------------------------------------BARCUS SORT: CUSTOMER NUMBER NO LIMITS CUSTOMER RETAIL EXPRESS BARCODE LBLTENDER P.O.S. TENDER SELECTOR P.O.S. TENDER REPORT810P
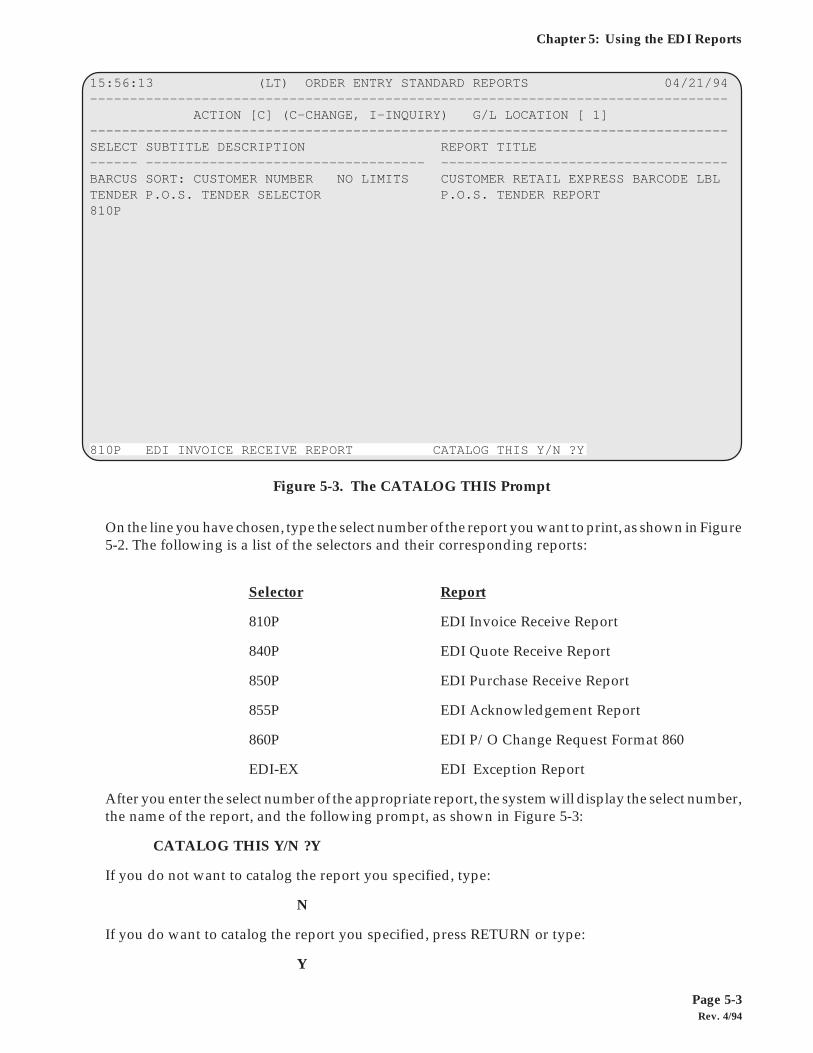
Rev. 4/94Page 5-3
Chapter 5: Using the EDI Reports
On the line you have chosen, type the select number of the report you want to print, as shown in Figure5-2. The following is a list of the selectors and their corresponding reports:
Selector Report
810P EDI Invoice Receive Report
840P EDI Quote Receive Report
850P EDI Purchase Receive Report
855P EDI Acknowledgement Report
860P EDI P/O Change Request Format 860
EDI-EX EDI Exception Report
After you enter the select number of the appropriate report, the system will display the select number,the name of the report, and the following prompt, as shown in Figure 5-3:
CATALOG THIS Y/N ?Y
If you do not want to catalog the report you specified, type:
N
If you do want to catalog the report you specified, press RETURN or type:
Y
Figure 5-3. The CATALOG THIS Prompt
15:56:13 (LT) ORDER ENTRY STANDARD REPORTS 04/21/94-------------------------------------------------------------------------------- ACTION [C] (C-CHANGE, I-INQUIRY) G/L LOCATION [ 1]--------------------------------------------------------------------------------SELECT SUBTITLE DESCRIPTION REPORT TITLE------ ----------------------------------- ------------------------------------BARCUS SORT: CUSTOMER NUMBER NO LIMITS CUSTOMER RETAIL EXPRESS BARCODE LBLTENDER P.O.S. TENDER SELECTOR P.O.S. TENDER REPORT810P
810P EDI INVOICE RECEIVE REPORT CATALOG THIS Y/N ?Y
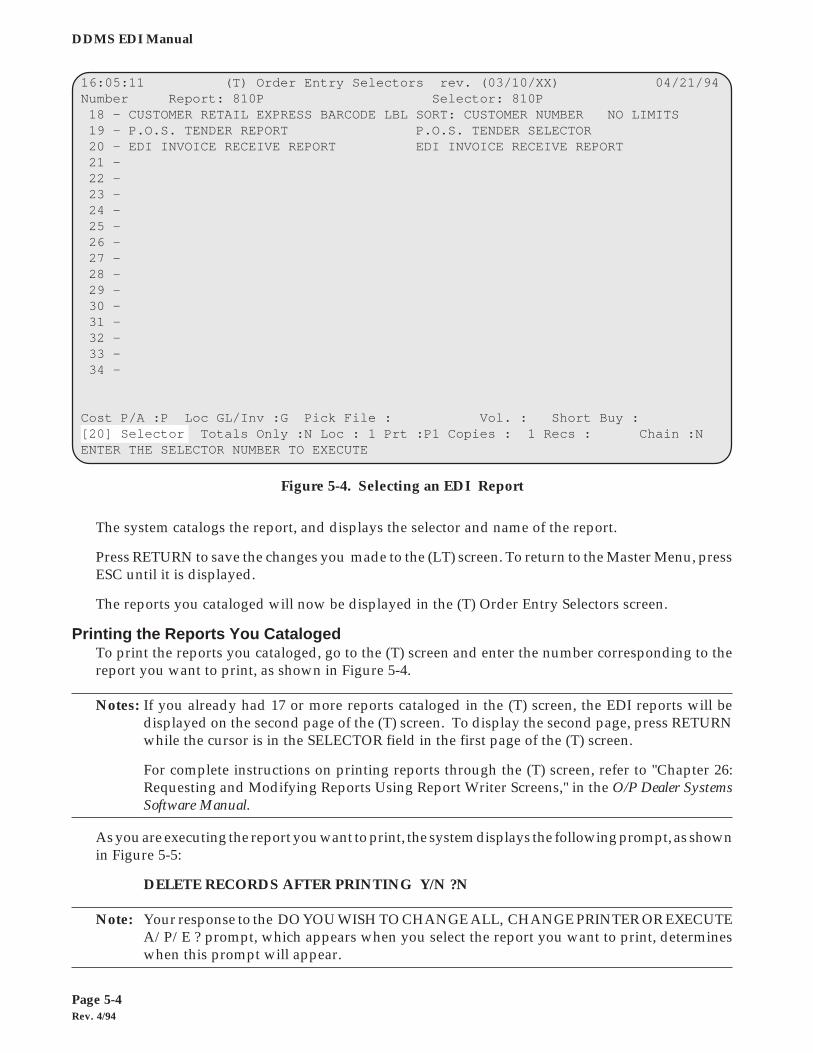
Rev. 4/94Page 5-4
DDMS EDI Manual
The system catalogs the report, and displays the selector and name of the report.
Press RETURN to save the changes you made to the (LT) screen. To return to the Master Menu, pressESC until it is displayed.
The reports you cataloged will now be displayed in the (T) Order Entry Selectors screen.
Printing the Reports You CatalogedTo print the reports you cataloged, go to the (T) screen and enter the number corresponding to thereport you want to print, as shown in Figure 5-4.
Notes: If you already had 17 or more reports cataloged in the (T) screen, the EDI reports will bedisplayed on the second page of the (T) screen. To display the second page, press RETURNwhile the cursor is in the SELECTOR field in the first page of the (T) screen.
For complete instructions on printing reports through the (T) screen, refer to "Chapter 26:Requesting and Modifying Reports Using Report Writer Screens," in the O/P Dealer SystemsSoftware Manual.
As you are executing the report you want to print, the system displays the following prompt, as shownin Figure 5-5:
DELETE RECORDS AFTER PRINTING Y/N ?N
Note: Your response to the DO YOU WISH TO CHANGE ALL, CHANGE PRINTER OR EXECUTEA/P/E ? prompt, which appears when you select the report you want to print, determineswhen this prompt will appear.
Figure 5-4. Selecting an EDI Report
16:05:11 (T) Order Entry Selectors rev. (03/10/XX) 04/21/94Number Report: 810P Selector: 810P 18 - CUSTOMER RETAIL EXPRESS BARCODE LBL SORT: CUSTOMER NUMBER NO LIMITS 19 - P.O.S. TENDER REPORT P.O.S. TENDER SELECTOR 20 - EDI INVOICE RECEIVE REPORT EDI INVOICE RECEIVE REPORT 21 - 22 - 23 - 24 - 25 - 26 - 27 - 28 - 29 - 30 - 31 - 32 - 33 - 34 -
Cost P/A :P Loc GL/Inv :G Pick File : Vol. : Short Buy :[20] Selector Totals Only :N Loc : 1 Prt :P1 Copies : 1 Recs : Chain :NENTER THE SELECTOR NUMBER TO EXECUTE

Rev. 4/94Page 5-5
Chapter 5: Using the EDI Reports
If you do not want to purge the report data when the report is printed, press RETURN or type:
N
If you want to purge the EDI report information out of your P-MASTERE and P-SPECIALE files, type:
Y
The report data will be deleted from these files. For example, if you are printing the EDI Acknowl-edgment Report, the acknowledgment data printed on the report will be purged.
Note: This will not clear out your purchase orders.
Finish printing the report as instructed in "Chapter 26: Requesting and Modifying Reports UsingReport Writer Screens," in the O/P Dealer Systems Software Manual.
Figure 5-5. Deleting Records After Printing an EDI Report
16:05:11 (T) Order Entry Selectors rev. (03/10/XX) 04/21/94Number Report: 810P Selector: 810P 18 - CUSTOMER RETAIL EXPRESS BARCODE LBL SORT: CUSTOMER NUMBER NO LIMITS 19 - P.O.S. TENDER REPORT P.O.S. TENDER SELECTOR 20 - EDI INVOICE RECEIVE REPORT EDI INVOICE RECEIVE REPORT 21 - 22 - 23 - 24 - 25 - 26 - 27 - 28 - 29 - 30 - 31 - 32 - 33 - 34 -
DELETE RECORDS AFTER PRINTING Y/N ?N

Rev. 4/94Page 5-6
DDMS EDI Manual
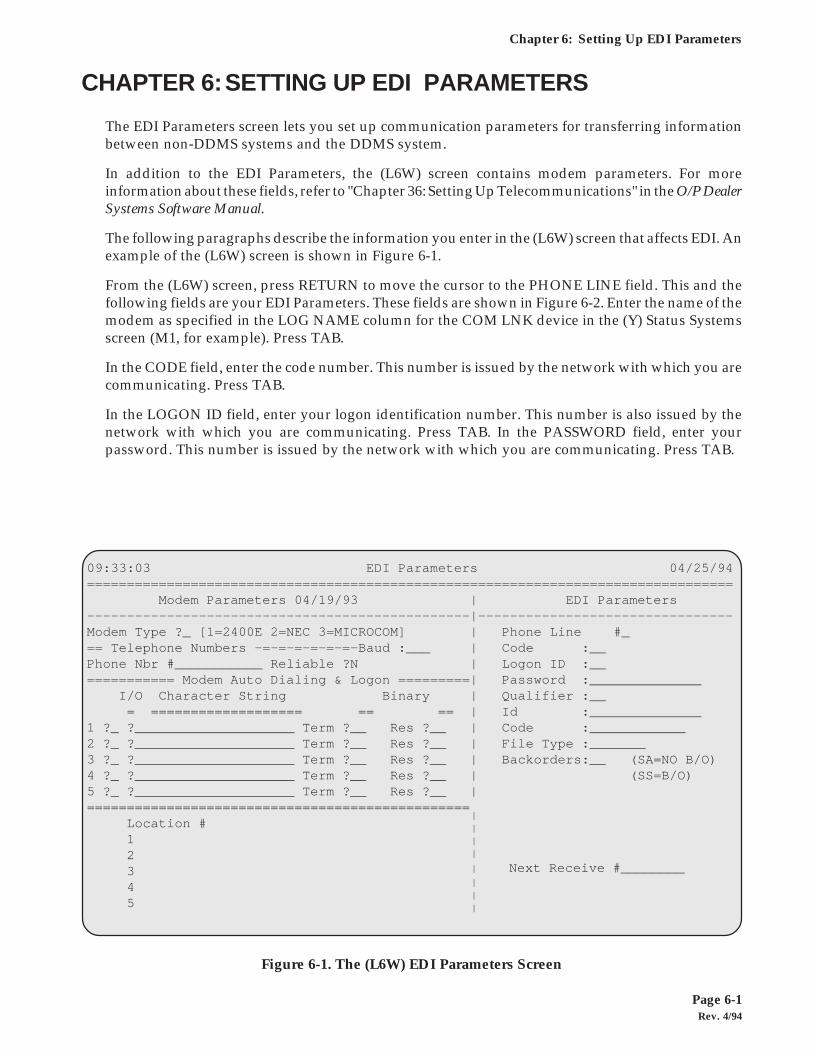
Rev. 4/94Page 6-1
Chapter 6: Setting Up EDI Parameters
CHAPTER 6:SETTING UP EDI PARAMETERS
The EDI Parameters screen lets you set up communication parameters for transferring informationbetween non-DDMS systems and the DDMS system.
In addition to the EDI Parameters, the (L6W) screen contains modem parameters. For moreinformation about these fields, refer to "Chapter 36: Setting Up Telecommunications" in the O/P DealerSystems Software Manual.
The following paragraphs describe the information you enter in the (L6W) screen that affects EDI. Anexample of the (L6W) screen is shown in Figure 6-1.
From the (L6W) screen, press RETURN to move the cursor to the PHONE LINE field. This and thefollowing fields are your EDI Parameters. These fields are shown in Figure 6-2. Enter the name of themodem as specified in the LOG NAME column for the COM LNK device in the (Y) Status Systemsscreen (M1, for example). Press TAB.
In the CODE field, enter the code number. This number is issued by the network with which you arecommunicating. Press TAB.
In the LOGON ID field, enter your logon identification number. This number is also issued by thenetwork with which you are communicating. Press TAB. In the PASSWORD field, enter yourpassword. This number is issued by the network with which you are communicating. Press TAB.
Figure 6-1. The (L6W) EDI Parameters Screen
| | | |
| Next Receive #________ | | |
09:33:03 EDI Parameters 04/25/94================================================================================= Modem Parameters 04/19/93 | EDI Parameters------------------------------------------------|--------------------------------Modem Type ?_ [1=2400E 2=NEC 3=MICROCOM] | Phone Line #_== Telephone Numbers -=-=-=-=-=-=-Baud :___ | Code :__Phone Nbr #___________ Reliable ?N | Logon ID :__=========== Modem Auto Dialing & Logon =========| Password :______________ I/O Character String Binary | Qualifier :__ = =================== == == | Id :______________1 ?_ ?____________________ Term ?__ Res ?__ | Code :____________2 ?_ ?____________________ Term ?__ Res ?__ | File Type :_______3 ?_ ?____________________ Term ?__ Res ?__ | Backorders:__ (SA=NO B/O)4 ?_ ?____________________ Term ?__ Res ?__ | (SS=B/O)5 ?_ ?____________________ Term ?__ Res ?__ |================================================ Location # 1 2 3 4 5
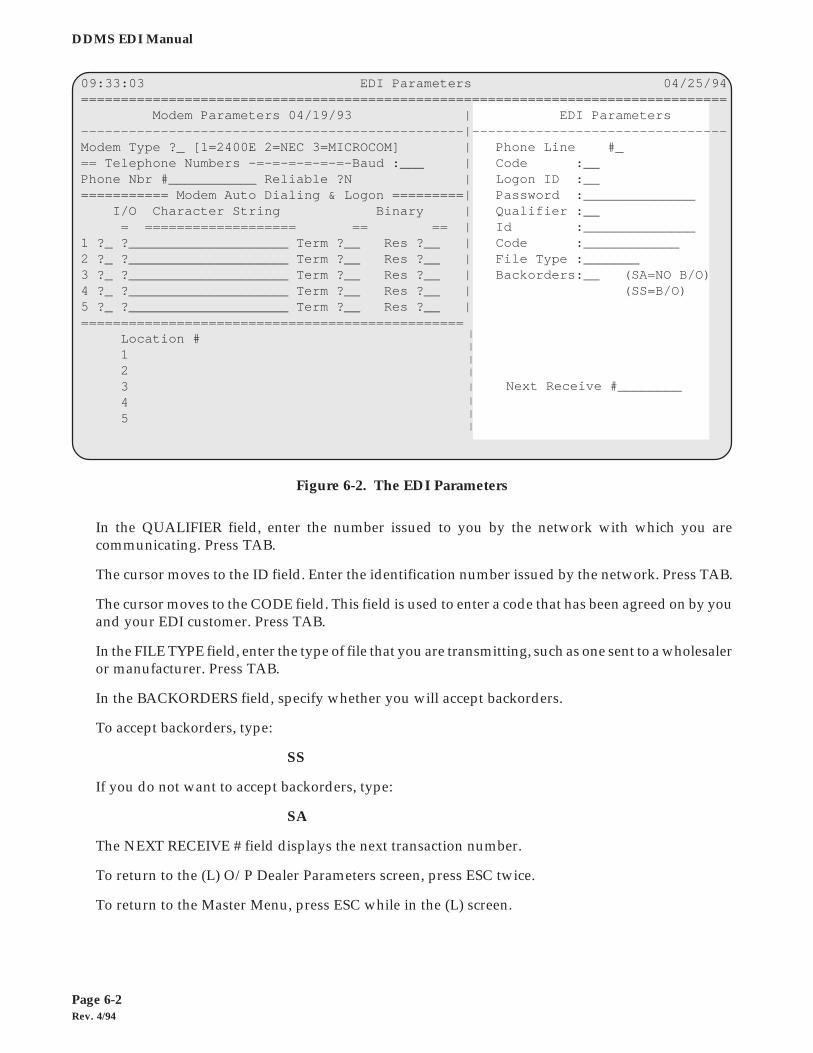
Rev. 4/94Page 6-2
DDMS EDI Manual
In the QUALIFIER field, enter the number issued to you by the network with which you arecommunicating. Press TAB.
The cursor moves to the ID field. Enter the identification number issued by the network. Press TAB.
The cursor moves to the CODE field. This field is used to enter a code that has been agreed on by youand your EDI customer. Press TAB.
In the FILE TYPE field, enter the type of file that you are transmitting, such as one sent to a wholesaleror manufacturer. Press TAB.
In the BACKORDERS field, specify whether you will accept backorders.
To accept backorders, type:
SS
If you do not want to accept backorders, type:
SA
The NEXT RECEIVE # field displays the next transaction number.
To return to the (L) O/P Dealer Parameters screen, press ESC twice.
To return to the Master Menu, press ESC while in the (L) screen.
Figure 6-2. The EDI Parameters
09:33:03 EDI Parameters 04/25/94================================================================================= Modem Parameters 04/19/93 | EDI Parameters------------------------------------------------|--------------------------------Modem Type ?_ [1=2400E 2=NEC 3=MICROCOM] | Phone Line #_== Telephone Numbers -=-=-=-=-=-=-Baud :___ | Code :__Phone Nbr #___________ Reliable ?N | Logon ID :__=========== Modem Auto Dialing & Logon =========| Password :______________ I/O Character String Binary | Qualifier :__ = =================== == == | Id :______________1 ?_ ?____________________ Term ?__ Res ?__ | Code :____________2 ?_ ?____________________ Term ?__ Res ?__ | File Type :_______3 ?_ ?____________________ Term ?__ Res ?__ | Backorders:__ (SA=NO B/O)4 ?_ ?____________________ Term ?__ Res ?__ | (SS=B/O)5 ?_ ?____________________ Term ?__ Res ?__ |================================================ Location # 1 2 3 4 5
| | | |
| Next Receive #________ | | |
Rev. 4/94Page 7-1
Chapter 7: Setting Up Customer EDI Parameters
CHAPTER 7:SETTING UP CUSTOMER EDI PARAMETERS
Contents
Introduction ................................................................................................................................................... 7-2
Section 1: Setting and Changing Customer EDI Parameters........................................................... 7-3
Section 2: Deleting the Customer EDI Parameters ............................................................................ 7-8
Section 3: Viewing the Customer EDI Parameters .......................................................................... 7-10
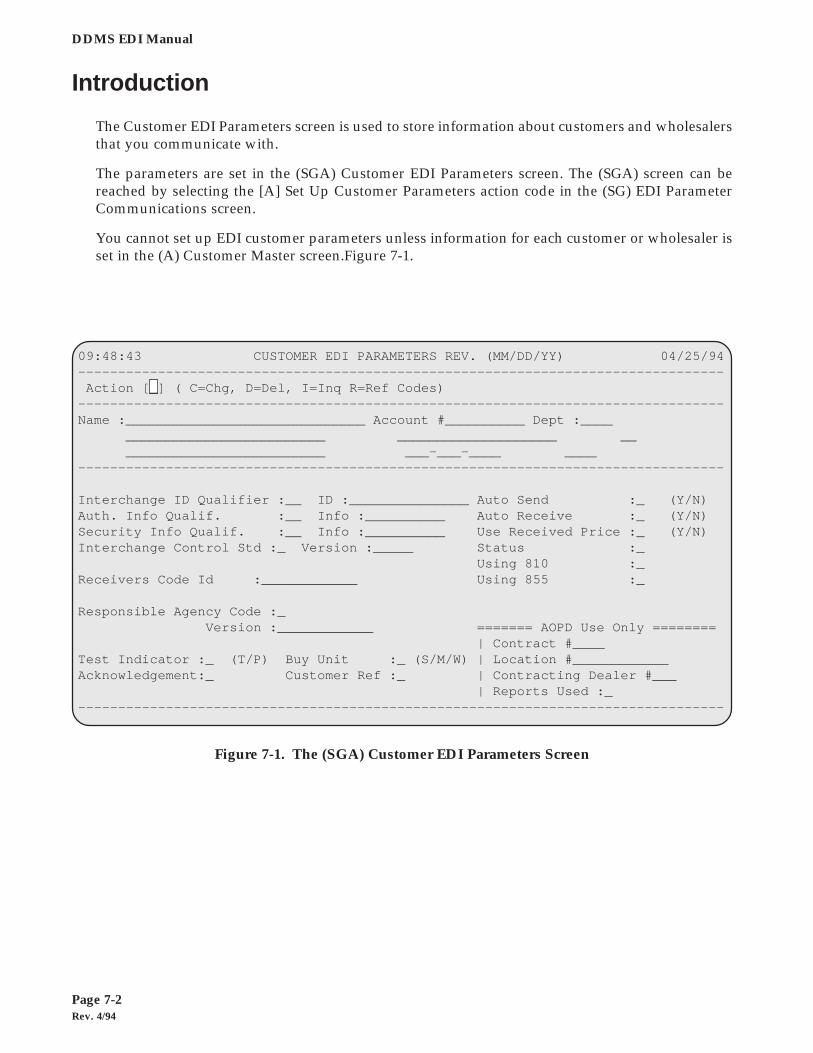
Rev. 4/94Page 7-2
DDMS EDI Manual
Introduction
The Customer EDI Parameters screen is used to store information about customers and wholesalersthat you communicate with.
The parameters are set in the (SGA) Customer EDI Parameters screen. The (SGA) screen can bereached by selecting the [A] Set Up Customer Parameters action code in the (SG) EDI ParameterCommunications screen.
You cannot set up EDI customer parameters unless information for each customer or wholesaler isset in the (A) Customer Master screen.Figure 7-1.
Figure 7-1. The (SGA) Customer EDI Parameters Screen
09:48:43 CUSTOMER EDI PARAMETERS REV. (MM/DD/YY) 04/25/94--------------------------------------------------------------------------------- Action [_] ( C=Chg, D=Del, I=Inq R=Ref Codes)---------------------------------------------------------------------------------Name :______________________________ Account #__________ Dept :____ _________________________ ____________________ __ _________________________ ___-___-____ ____---------------------------------------------------------------------------------
Interchange ID Qualifier :__ ID :_______________ Auto Send :_ (Y/N)Auth. Info Qualif. :__ Info :__________ Auto Receive :_ (Y/N)Security Info Qualif. :__ Info :__________ Use Received Price :_ (Y/N)Interchange Control Std :_ Version :_____ Status :_
Using 810 :_Receivers Code Id :____________ Using 855 :_
Responsible Agency Code :_ Version :____________ ======= AOPD Use Only ======== | Contract #____Test Indicator :_ (T/P) Buy Unit :_ (S/M/W) | Location #____________Acknowledgement:_ Customer Ref :_ | Contracting Dealer #___ | Reports Used :_---------------------------------------------------------------------------------
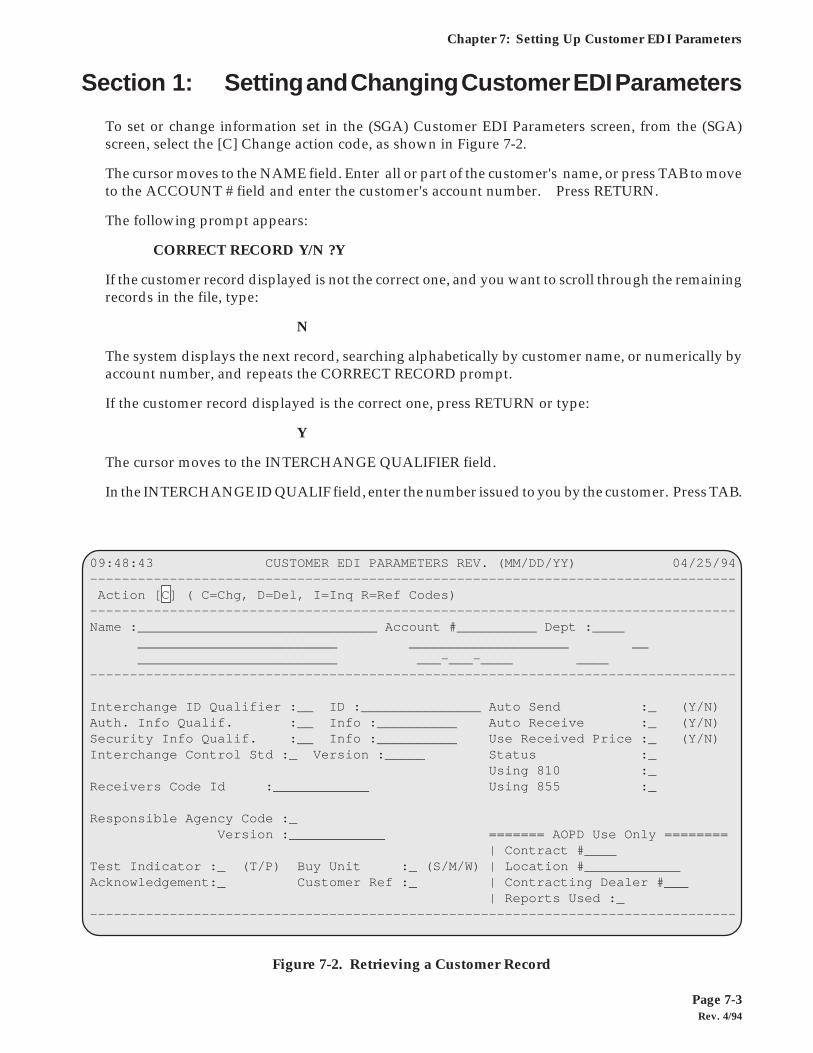
Rev. 4/94Page 7-3
Chapter 7: Setting Up Customer EDI Parameters
Section 1: Setting and Changing Customer EDI Parameters
To set or change information set in the (SGA) Customer EDI Parameters screen, from the (SGA)screen, select the [C] Change action code, as shown in Figure 7-2.
The cursor moves to the NAME field. Enter all or part of the customer's name, or press TAB to moveto the ACCOUNT # field and enter the customer's account number. Press RETURN.
The following prompt appears:
CORRECT RECORD Y/N ?Y
If the customer record displayed is not the correct one, and you want to scroll through the remainingrecords in the file, type:
N
The system displays the next record, searching alphabetically by customer name, or numerically byaccount number, and repeats the CORRECT RECORD prompt.
If the customer record displayed is the correct one, press RETURN or type:
Y
The cursor moves to the INTERCHANGE QUALIFIER field.
In the INTERCHANGE ID QUALIF field, enter the number issued to you by the customer. Press TAB.
Figure 7-2. Retrieving a Customer Record
09:48:43 CUSTOMER EDI PARAMETERS REV. (MM/DD/YY) 04/25/94--------------------------------------------------------------------------------- Action [C] ( C=Chg, D=Del, I=Inq R=Ref Codes)---------------------------------------------------------------------------------Name :______________________________ Account #__________ Dept :____ _________________________ ____________________ __ _________________________ ___-___-____ ____---------------------------------------------------------------------------------
Interchange ID Qualifier :__ ID :_______________ Auto Send :_ (Y/N)Auth. Info Qualif. :__ Info :__________ Auto Receive :_ (Y/N)Security Info Qualif. :__ Info :__________ Use Received Price :_ (Y/N)Interchange Control Std :_ Version :_____ Status :_
Using 810 :_Receivers Code Id :____________ Using 855 :_
Responsible Agency Code :_ Version :____________ ======= AOPD Use Only ======== | Contract #____Test Indicator :_ (T/P) Buy Unit :_ (S/M/W) | Location #____________Acknowledgement:_ Customer Ref :_ | Contracting Dealer #___ | Reports Used :_---------------------------------------------------------------------------------
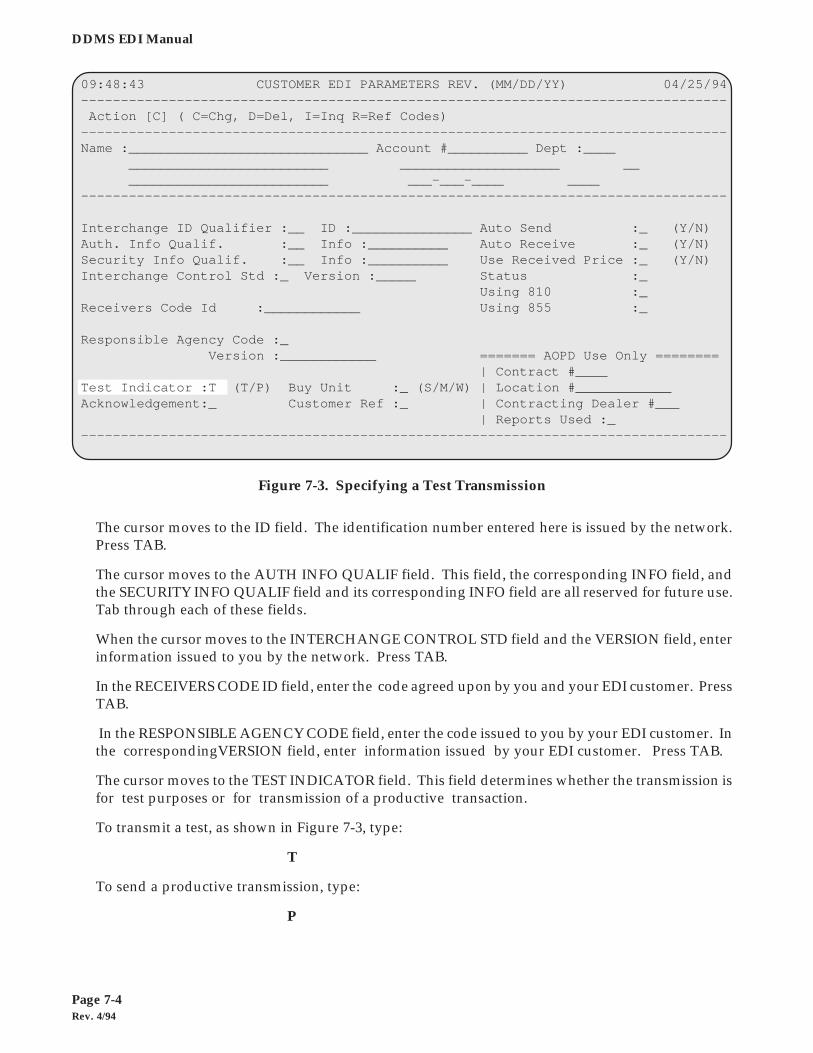
Rev. 4/94Page 7-4
DDMS EDI Manual
The cursor moves to the ID field. The identification number entered here is issued by the network.Press TAB.
The cursor moves to the AUTH INFO QUALIF field. This field, the corresponding INFO field, andthe SECURITY INFO QUALIF field and its corresponding INFO field are all reserved for future use.Tab through each of these fields.
When the cursor moves to the INTERCHANGE CONTROL STD field and the VERSION field, enterinformation issued to you by the network. Press TAB.
In the RECEIVERS CODE ID field, enter the code agreed upon by you and your EDI customer. PressTAB.
In the RESPONSIBLE AGENCY CODE field, enter the code issued to you by your EDI customer. Inthe correspondingVERSION field, enter information issued by your EDI customer. Press TAB.
The cursor moves to the TEST INDICATOR field. This field determines whether the transmission isfor test purposes or for transmission of a productive transaction.
To transmit a test, as shown in Figure 7-3, type:
T
To send a productive transmission, type:
P
Figure 7-3. Specifying a Test Transmission
09:48:43 CUSTOMER EDI PARAMETERS REV. (MM/DD/YY) 04/25/94--------------------------------------------------------------------------------- Action [C] ( C=Chg, D=Del, I=Inq R=Ref Codes)---------------------------------------------------------------------------------Name :______________________________ Account #__________ Dept :____ _________________________ ____________________ __ _________________________ ___-___-____ ____---------------------------------------------------------------------------------
Interchange ID Qualifier :__ ID :_______________ Auto Send :_ (Y/N)Auth. Info Qualif. :__ Info :__________ Auto Receive :_ (Y/N)Security Info Qualif. :__ Info :__________ Use Received Price :_ (Y/N)Interchange Control Std :_ Version :_____ Status :_
Using 810 :_Receivers Code Id :____________ Using 855 :_
Responsible Agency Code :_ Version :____________ ======= AOPD Use Only ======== | Contract #____Test Indicator :T (T/P) Buy Unit :_ (S/M/W) | Location #____________Acknowledgement:_ Customer Ref :_ | Contracting Dealer #___ | Reports Used :_---------------------------------------------------------------------------------

Rev. 4/94Page 7-5
Chapter 7: Setting Up Customer EDI Parameters
The cursor moves to the ACKNOWLEDGEMENT field. This field lets you send a functionalacknowledgment each time a transmission is received. A functional acknowledgment lets yourcustomer or vendor know that you have received the transmitted information. A functionalacknowledgement should be sent only if requested.
To request that a functional acknowledgment be sent, type:
Y
To send the AK2 segment on the acknowledgment, which explains the type of document that wasreceived, type:
2
If a functional acknowledgement has not been requested, type:
N
In the BUY UNIT field, specify where the buy unit comes from.
If the buy unit comes from the manufacturer, as listed in the Direct Buy Record in the (E) InventoryMaster screen, as shown in Figure 7-4, type:
M
If the buy unit comes from the Wholesaler Record in the (E) screen, type:
W
Figure 7-4. Specifying That the Buy Unit is From the Direct Buy Record
09:48:43 CUSTOMER EDI PARAMETERS REV. (MM/DD/YY) 04/25/94--------------------------------------------------------------------------------- Action [C] ( C=Chg, D=Del, I=Inq R=Ref Codes)---------------------------------------------------------------------------------Name :______________________________ Account #__________ Dept :____ _________________________ ____________________ __ _________________________ ___-___-____ ____---------------------------------------------------------------------------------
Interchange ID Qualifier :__ ID :_______________ Auto Send :_ (Y/N)Auth. Info Qualif. :__ Info :__________ Auto Receive :_ (Y/N)Security Info Qualif. :__ Info :__________ Use Received Price :_ (Y/N)Interchange Control Std :_ Version :_____ Status :_
Using 810 :_Receivers Code Id :____________ Using 855 :_
Responsible Agency Code :_ Version :____________ ======= AOPD Use Only ======== | Contract #____Test Indicator :T (T/P) Buy Unit :M (S/M/W) | Location #____________Acknowledgement:_ Customer Ref :_ | Contracting Dealer #___ | Reports Used :_---------------------------------------------------------------------------------
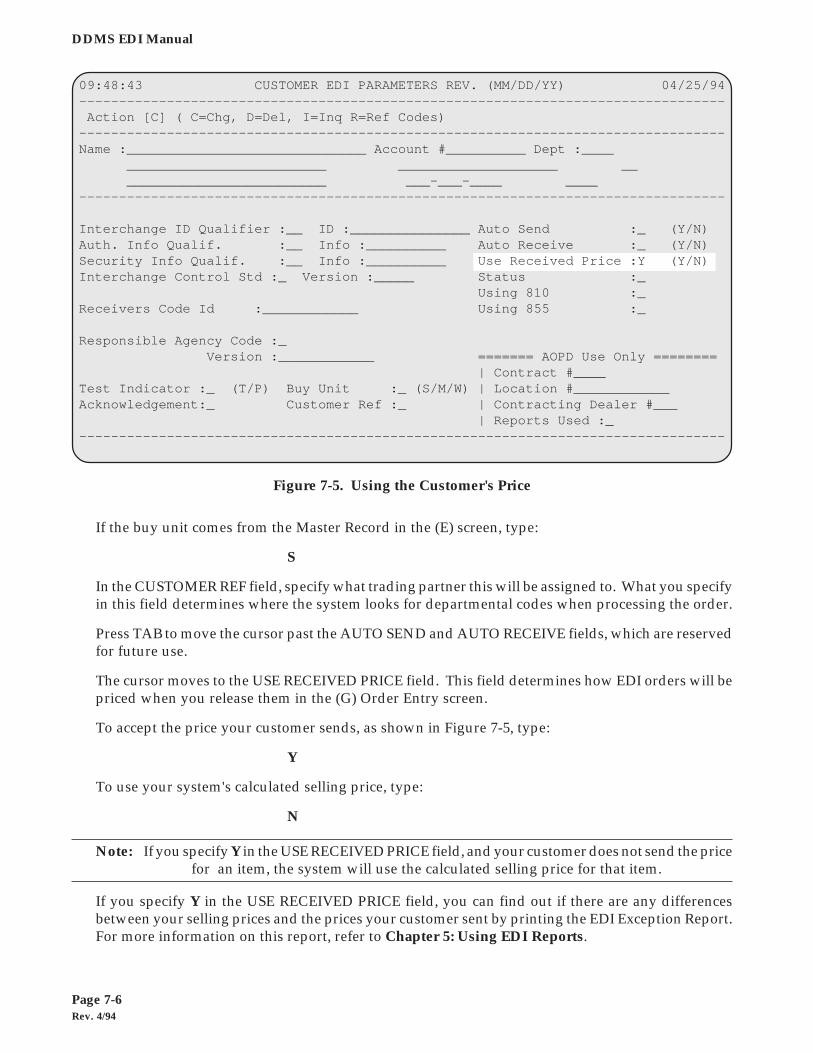
Rev. 4/94Page 7-6
DDMS EDI Manual
If the buy unit comes from the Master Record in the (E) screen, type:
S
In the CUSTOMER REF field, specify what trading partner this will be assigned to. What you specifyin this field determines where the system looks for departmental codes when processing the order.
Press TAB to move the cursor past the AUTO SEND and AUTO RECEIVE fields, which are reservedfor future use.
The cursor moves to the USE RECEIVED PRICE field. This field determines how EDI orders will bepriced when you release them in the (G) Order Entry screen.
To accept the price your customer sends, as shown in Figure 7-5, type:
Y
To use your system's calculated selling price, type:
N
Note: If you specify Y in the USE RECEIVED PRICE field, and your customer does not send the pricefor an item, the system will use the calculated selling price for that item.
If you specify Y in the USE RECEIVED PRICE field, you can find out if there are any differencesbetween your selling prices and the prices your customer sent by printing the EDI Exception Report.For more information on this report, refer to Chapter 5: Using EDI Reports.
Figure 7-5. Using the Customer's Price
09:48:43 CUSTOMER EDI PARAMETERS REV. (MM/DD/YY) 04/25/94--------------------------------------------------------------------------------- Action [C] ( C=Chg, D=Del, I=Inq R=Ref Codes)---------------------------------------------------------------------------------Name :______________________________ Account #__________ Dept :____ _________________________ ____________________ __ _________________________ ___-___-____ ____---------------------------------------------------------------------------------
Interchange ID Qualifier :__ ID :_______________ Auto Send :_ (Y/N)Auth. Info Qualif. :__ Info :__________ Auto Receive :_ (Y/N)Security Info Qualif. :__ Info :__________ Use Received Price :Y (Y/N)Interchange Control Std :_ Version :_____ Status :_
Using 810 :_Receivers Code Id :____________ Using 855 :_
Responsible Agency Code :_ Version :____________ ======= AOPD Use Only ======== | Contract #____Test Indicator :_ (T/P) Buy Unit :_ (S/M/W) | Location #____________Acknowledgement:_ Customer Ref :_ | Contracting Dealer #___ | Reports Used :_---------------------------------------------------------------------------------
Rev. 4/94Page 7-7
Chapter 7: Setting Up Customer EDI Parameters
Specifying N in the USE RECEIVED PRICE field will prevent you from selling an item at the wrongprice if your customer sends the price incorrectly. However, specifying N in this field can also causeyour customer's system to reject the invoices you send if the customer does not have your currentprices.
When the cursor moves to the STATUS field, press TAB. This field is reserved for future use.
The cursor moves to the USING 810 field. Enter Y if you want invoices to remain in the P-MASTERfile until the invoice transmission file is built. For more information on building an invoice file fortransmission, refer to Building Transmission Files for Invoices in Section 1: Building Files forTransmission, in Chapter 1: Processing Functions.
If you specify N or leave this field blank, each time you perform the (MA) Execute Daily BackupProcedures during the day-end procedures, the invoices will go to the file JOUR-S.
The cursor moves to the USING 855 field. Enter Y if you want invoices to remain in the P-MASTERfile until the acknowledgment file is built. For more information on building an acknowledgment filefor transmission, refer to Building Transmission Files for P/O Acknowledgment, in Section 1:Building Files for Transmission, in Chapter 1: Processing Functions.
Press RETURN to move the cursor past the remaining fields and record the parameters for thiscustomer.
To return to the NAME field, press ESC.
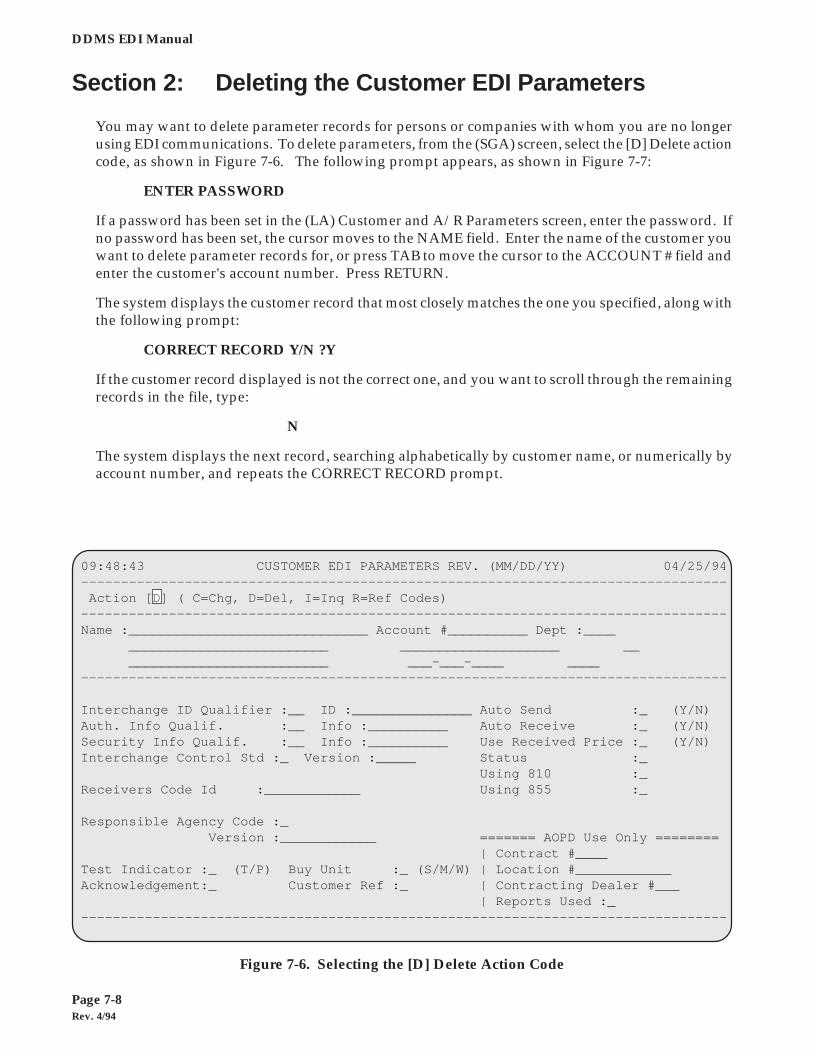
Rev. 4/94Page 7-8
DDMS EDI Manual
Section 2: Deleting the Customer EDI Parameters
You may want to delete parameter records for persons or companies with whom you are no longerusing EDI communications. To delete parameters, from the (SGA) screen, select the [D] Delete actioncode, as shown in Figure 7-6. The following prompt appears, as shown in Figure 7-7:
ENTER PASSWORD
If a password has been set in the (LA) Customer and A/R Parameters screen, enter the password. Ifno password has been set, the cursor moves to the NAME field. Enter the name of the customer youwant to delete parameter records for, or press TAB to move the cursor to the ACCOUNT # field andenter the customer's account number. Press RETURN.
The system displays the customer record that most closely matches the one you specified, along withthe following prompt:
CORRECT RECORD Y/N ?Y
If the customer record displayed is not the correct one, and you want to scroll through the remainingrecords in the file, type:
N
The system displays the next record, searching alphabetically by customer name, or numerically byaccount number, and repeats the CORRECT RECORD prompt.
Figure 7-6. Selecting the [D] Delete Action Code
09:48:43 CUSTOMER EDI PARAMETERS REV. (MM/DD/YY) 04/25/94--------------------------------------------------------------------------------- Action [D] ( C=Chg, D=Del, I=Inq R=Ref Codes)---------------------------------------------------------------------------------Name :______________________________ Account #__________ Dept :____ _________________________ ____________________ __ _________________________ ___-___-____ ____---------------------------------------------------------------------------------
Interchange ID Qualifier :__ ID :_______________ Auto Send :_ (Y/N)Auth. Info Qualif. :__ Info :__________ Auto Receive :_ (Y/N)Security Info Qualif. :__ Info :__________ Use Received Price :_ (Y/N)Interchange Control Std :_ Version :_____ Status :_
Using 810 :_Receivers Code Id :____________ Using 855 :_
Responsible Agency Code :_ Version :____________ ======= AOPD Use Only ======== | Contract #____Test Indicator :_ (T/P) Buy Unit :_ (S/M/W) | Location #____________Acknowledgement:_ Customer Ref :_ | Contracting Dealer #___ | Reports Used :_---------------------------------------------------------------------------------
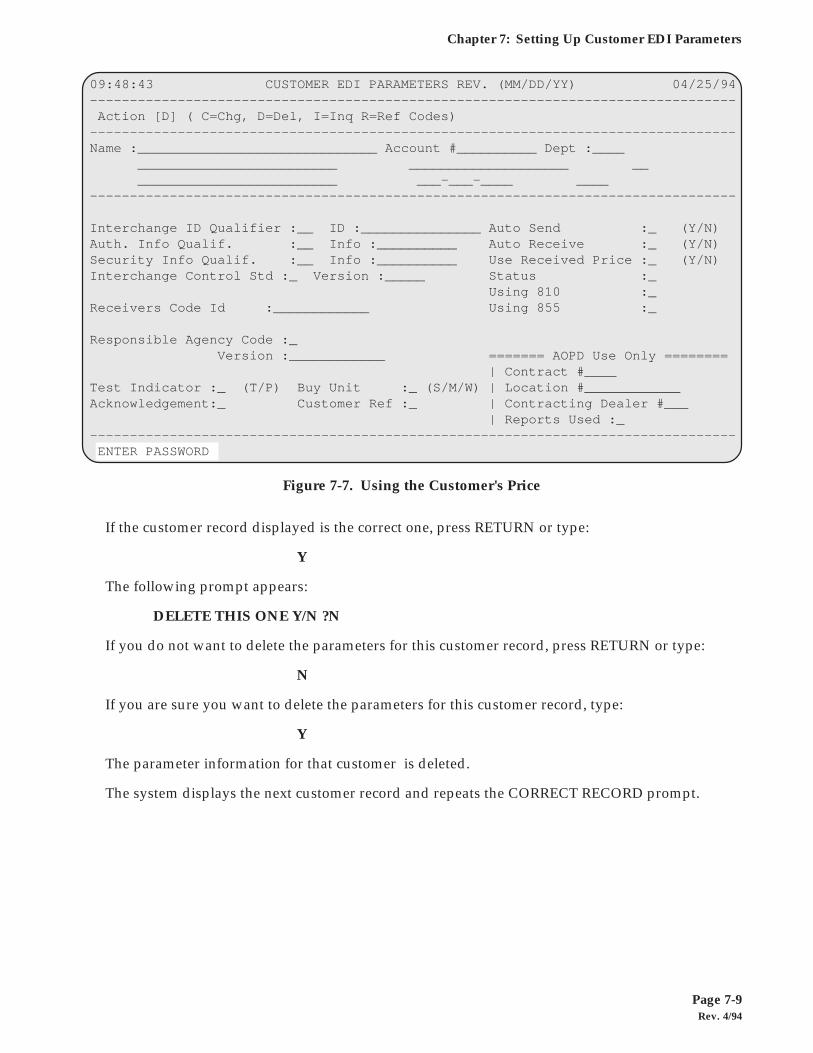
Rev. 4/94Page 7-9
Chapter 7: Setting Up Customer EDI Parameters
If the customer record displayed is the correct one, press RETURN or type:
Y
The following prompt appears:
DELETE THIS ONE Y/N ?N
If you do not want to delete the parameters for this customer record, press RETURN or type:
N
If you are sure you want to delete the parameters for this customer record, type:
Y
The parameter information for that customer is deleted.
The system displays the next customer record and repeats the CORRECT RECORD prompt.
Figure 7-7. Using the Customer's Price
09:48:43 CUSTOMER EDI PARAMETERS REV. (MM/DD/YY) 04/25/94--------------------------------------------------------------------------------- Action [D] ( C=Chg, D=Del, I=Inq R=Ref Codes)---------------------------------------------------------------------------------Name :______________________________ Account #__________ Dept :____ _________________________ ____________________ __ _________________________ ___-___-____ ____---------------------------------------------------------------------------------
Interchange ID Qualifier :__ ID :_______________ Auto Send :_ (Y/N)Auth. Info Qualif. :__ Info :__________ Auto Receive :_ (Y/N)Security Info Qualif. :__ Info :__________ Use Received Price :_ (Y/N)Interchange Control Std :_ Version :_____ Status :_
Using 810 :_Receivers Code Id :____________ Using 855 :_
Responsible Agency Code :_ Version :____________ ======= AOPD Use Only ======== | Contract #____Test Indicator :_ (T/P) Buy Unit :_ (S/M/W) | Location #____________Acknowledgement:_ Customer Ref :_ | Contracting Dealer #___ | Reports Used :_--------------------------------------------------------------------------------- ENTER PASSWORD
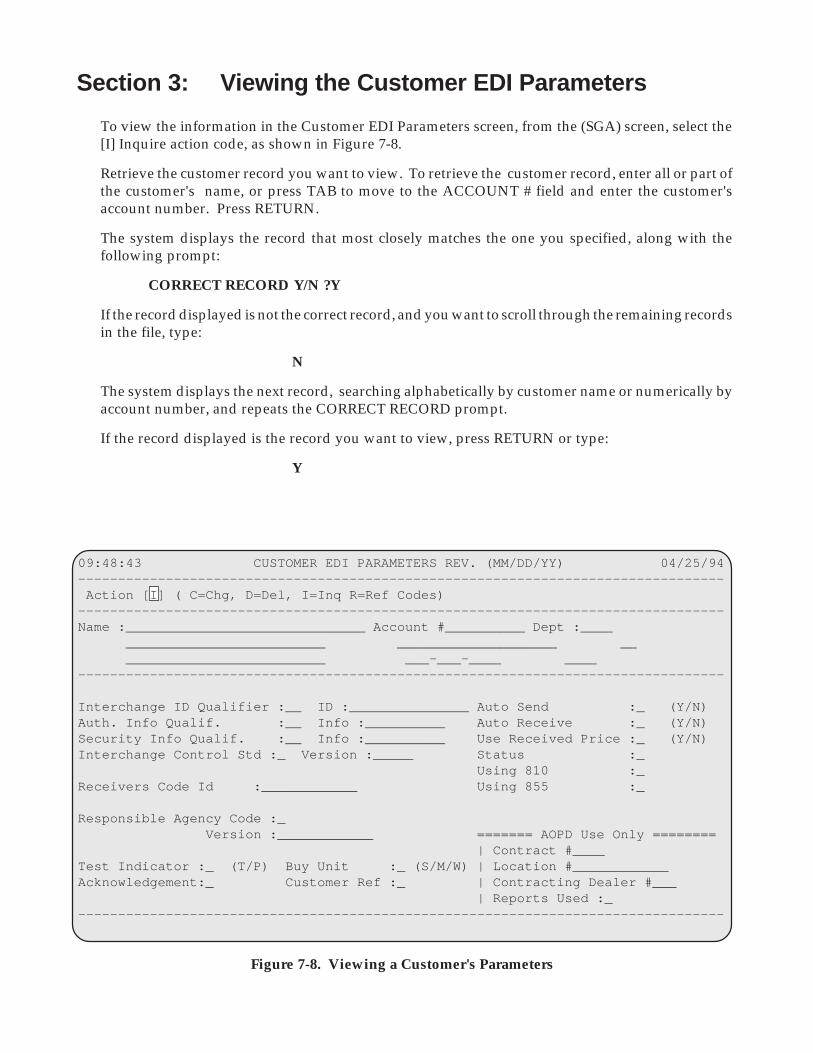
Rev. 4/94Page 7-10
DDMS EDI Manual
Section 3: Viewing the Customer EDI Parameters
To view the information in the Customer EDI Parameters screen, from the (SGA) screen, select the[I] Inquire action code, as shown in Figure 7-8.
Retrieve the customer record you want to view. To retrieve the customer record, enter all or part ofthe customer's name, or press TAB to move to the ACCOUNT # field and enter the customer'saccount number. Press RETURN.
The system displays the record that most closely matches the one you specified, along with thefollowing prompt:
CORRECT RECORD Y/N ?Y
If the record displayed is not the correct record, and you want to scroll through the remaining recordsin the file, type:
N
The system displays the next record, searching alphabetically by customer name or numerically byaccount number, and repeats the CORRECT RECORD prompt.
If the record displayed is the record you want to view, press RETURN or type:
Y
Figure 7-8. Viewing a Customer's Parameters
09:48:43 CUSTOMER EDI PARAMETERS REV. (MM/DD/YY) 04/25/94--------------------------------------------------------------------------------- Action [I] ( C=Chg, D=Del, I=Inq R=Ref Codes)---------------------------------------------------------------------------------Name :______________________________ Account #__________ Dept :____ _________________________ ____________________ __ _________________________ ___-___-____ ____---------------------------------------------------------------------------------
Interchange ID Qualifier :__ ID :_______________ Auto Send :_ (Y/N)Auth. Info Qualif. :__ Info :__________ Auto Receive :_ (Y/N)Security Info Qualif. :__ Info :__________ Use Received Price :_ (Y/N)Interchange Control Std :_ Version :_____ Status :_
Using 810 :_Receivers Code Id :____________ Using 855 :_
Responsible Agency Code :_ Version :____________ ======= AOPD Use Only ======== | Contract #____Test Indicator :_ (T/P) Buy Unit :_ (S/M/W) | Location #____________Acknowledgement:_ Customer Ref :_ | Contracting Dealer #___ | Reports Used :_---------------------------------------------------------------------------------
Rev. 4/94Page 7-11
Chapter 7: Setting Up Customer EDI Parameters
The system displays the parameter information for the specified customer.
To return to the NAME field, press ESC. To return to the (SG) screen, press ESC while the cursor isin the action code field.

Rev. 4/94Page 7-12
DDMS EDI Manual
Rev. 4/94Page 8-1
Chapter 8: Cross-Referencing Trading Partners and Customer Accounts
CHAPTER 8: CROSS-REFERENCING TRADINGPARTNERS AND CUSTOMER ACCOUNTS
Contents
Introduction ................................................................................................................................................... 8-2
Section 1: Selecting a Customer to Cross Reference ......................................................................... 8-3Scrolling Through the Remaining Records ............................................................... 8-5Specifying a Different Record ..................................................................................... 8-5Displaying Customer Information ............................................................................. 8-6Selecting the Correct Customer .................................................................................. 8-8
Section 2: Adding Reference Codes to a Trading Partner Record ................................................ 8-10Retrieving a Customer Account Record ........................................................................... 8-11
Scrolling Through the Remaining Records ............................................................. 8-12Specifying a Different Record ................................................................................... 8-13Selecting the Correct Customer ................................................................................ 8-13
Section 3: Changing the Customers Assigned to Reference Codes ............................................. 8-15
Section 4: Deleting a Reference Code ................................................................................................ 8-18Deleting Reference Codes Individually .................................................................. 8-18Deleting All Reference Codes for a Trading Partner ............................................ 8-20
Section 5: Viewing Reference Codes.................................................................................................. 8-22Viewing Reference Codes in Reference Code Order............................................. 8-23Viewing Reference Codes in Customer Order ....................................................... 8-24
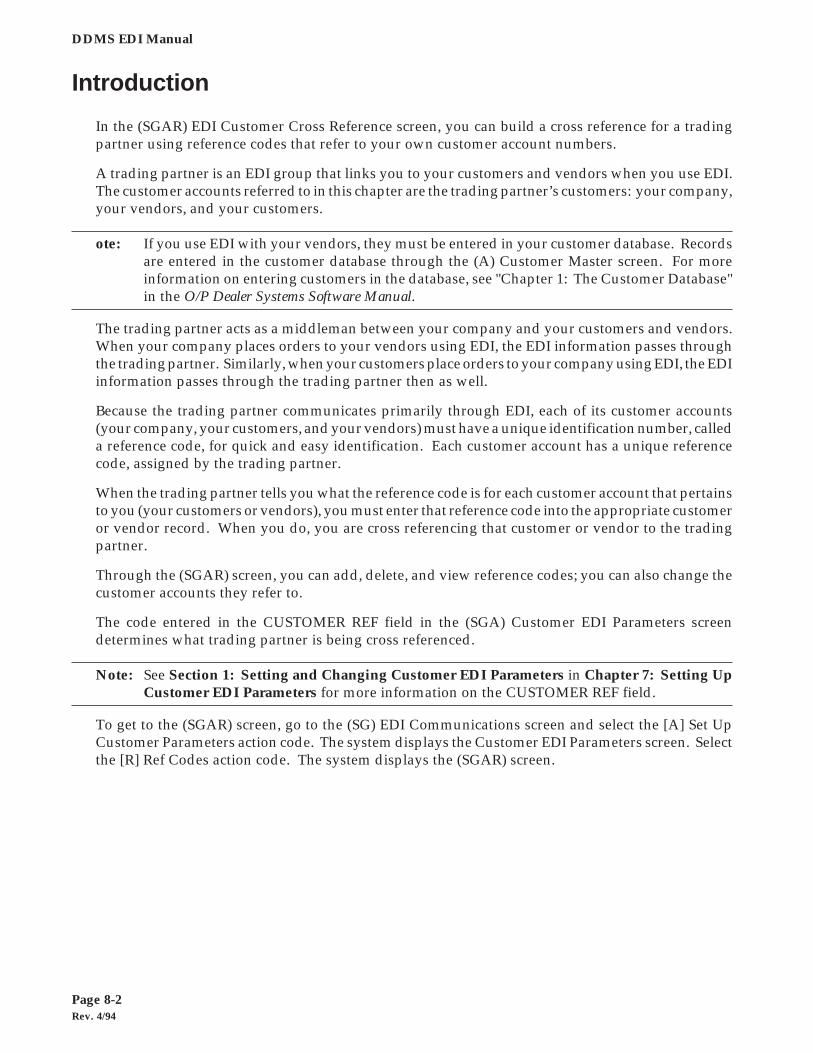
Rev. 4/94Page 8-2
DDMS EDI Manual
Introduction
In the (SGAR) EDI Customer Cross Reference screen, you can build a cross reference for a tradingpartner using reference codes that refer to your own customer account numbers.
A trading partner is an EDI group that links you to your customers and vendors when you use EDI.The customer accounts referred to in this chapter are the trading partner’s customers: your company,your vendors, and your customers.
ote: If you use EDI with your vendors, they must be entered in your customer database. Recordsare entered in the customer database through the (A) Customer Master screen. For moreinformation on entering customers in the database, see "Chapter 1: The Customer Database"in the O/P Dealer Systems Software Manual.
The trading partner acts as a middleman between your company and your customers and vendors.When your company places orders to your vendors using EDI, the EDI information passes throughthe trading partner. Similarly, when your customers place orders to your company using EDI, the EDIinformation passes through the trading partner then as well.
Because the trading partner communicates primarily through EDI, each of its customer accounts(your company, your customers, and your vendors) must have a unique identification number, calleda reference code, for quick and easy identification. Each customer account has a unique referencecode, assigned by the trading partner.
When the trading partner tells you what the reference code is for each customer account that pertainsto you (your customers or vendors), you must enter that reference code into the appropriate customeror vendor record. When you do, you are cross referencing that customer or vendor to the tradingpartner.
Through the (SGAR) screen, you can add, delete, and view reference codes; you can also change thecustomer accounts they refer to.
The code entered in the CUSTOMER REF field in the (SGA) Customer EDI Parameters screendetermines what trading partner is being cross referenced.
Note: See Section 1: Setting and Changing Customer EDI Parameters in Chapter 7: Setting UpCustomer EDI Parameters for more information on the CUSTOMER REF field.
To get to the (SGAR) screen, go to the (SG) EDI Communications screen and select the [A] Set UpCustomer Parameters action code. The system displays the Customer EDI Parameters screen. Selectthe [R] Ref Codes action code. The system displays the (SGAR) screen.
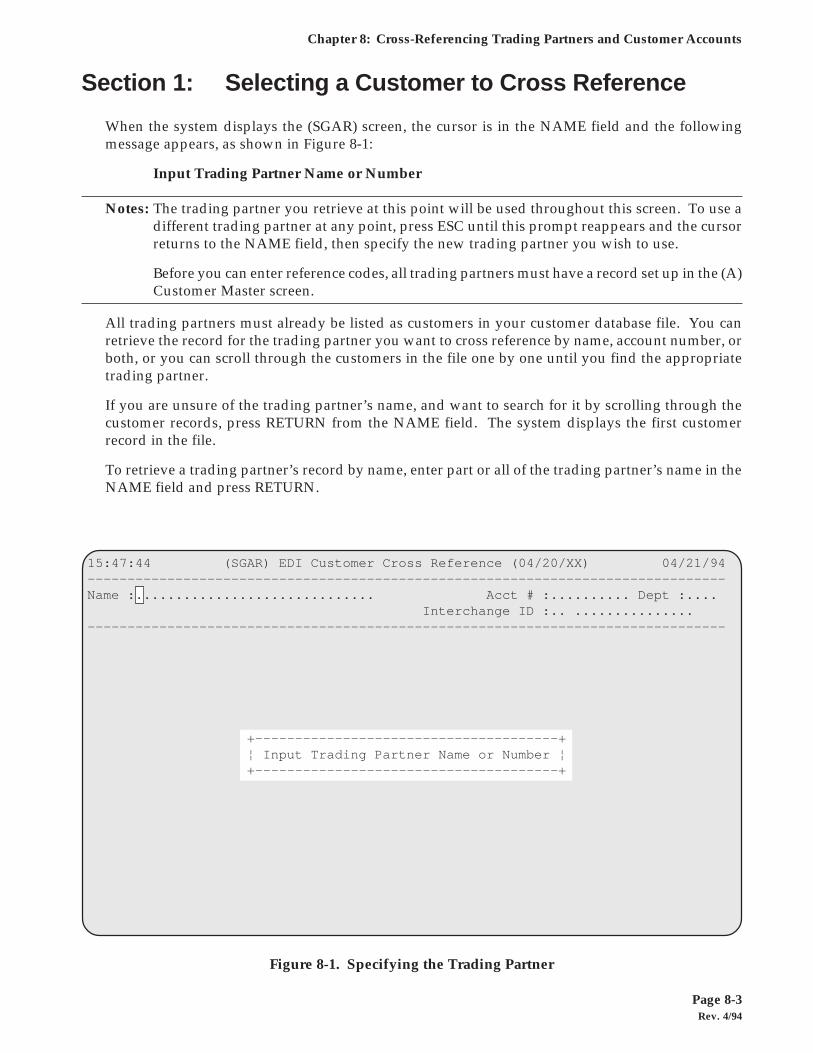
Rev. 4/94Page 8-3
Chapter 8: Cross-Referencing Trading Partners and Customer Accounts
Section 1: Selecting a Customer to Cross Reference
When the system displays the (SGAR) screen, the cursor is in the NAME field and the followingmessage appears, as shown in Figure 8-1:
Input Trading Partner Name or Number
Notes: The trading partner you retrieve at this point will be used throughout this screen. To use adifferent trading partner at any point, press ESC until this prompt reappears and the cursorreturns to the NAME field, then specify the new trading partner you wish to use.
Before you can enter reference codes, all trading partners must have a record set up in the (A)Customer Master screen.
All trading partners must already be listed as customers in your customer database file. You canretrieve the record for the trading partner you want to cross reference by name, account number, orboth, or you can scroll through the customers in the file one by one until you find the appropriatetrading partner.
If you are unsure of the trading partner’s name, and want to search for it by scrolling through thecustomer records, press RETURN from the NAME field. The system displays the first customerrecord in the file.
To retrieve a trading partner’s record by name, enter part or all of the trading partner’s name in theNAME field and press RETURN.
Figure 8-1. Specifying the Trading Partner
15:47:44 (SGAR) EDI Customer Cross Reference (04/20/XX) 04/21/94--------------------------------------------------------------------------------Name :.............................. Acct # :.......... Dept :.... Interchange ID :.. ...............--------------------------------------------------------------------------------
+--------------------------------------+ ¦ Input Trading Partner Name or Number ¦ +--------------------------------------+
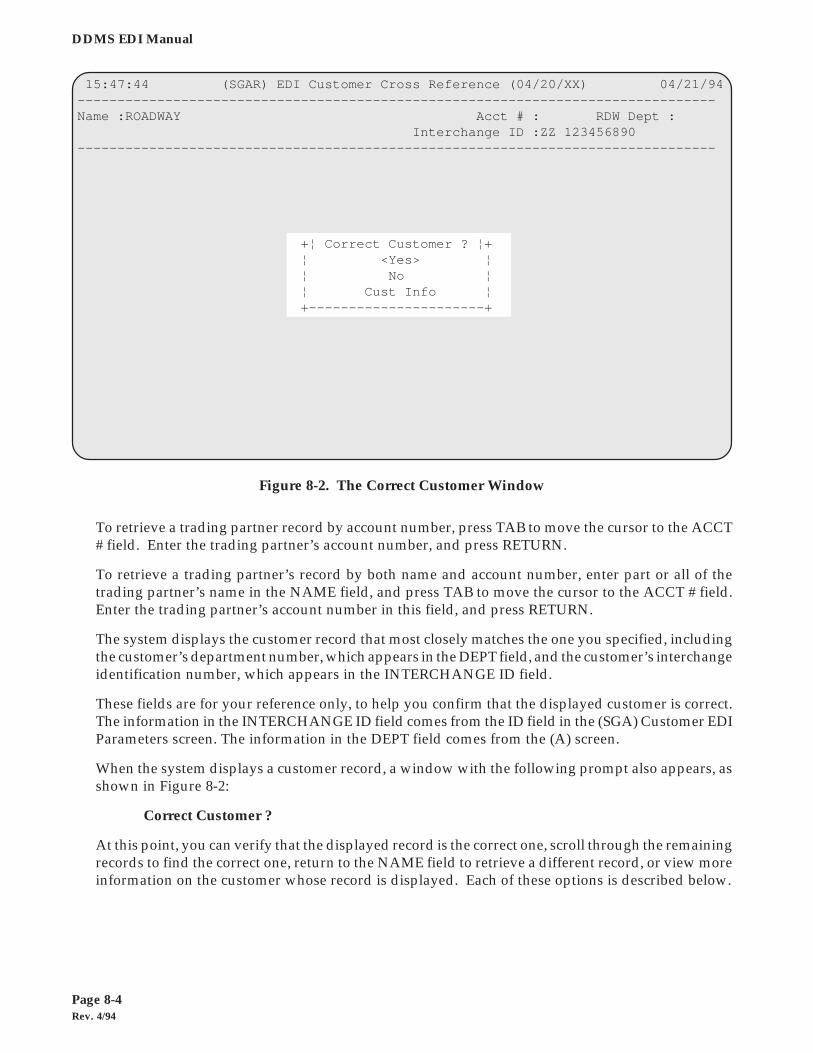
Rev. 4/94Page 8-4
DDMS EDI Manual
To retrieve a trading partner record by account number, press TAB to move the cursor to the ACCT# field. Enter the trading partner’s account number, and press RETURN.
To retrieve a trading partner’s record by both name and account number, enter part or all of thetrading partner’s name in the NAME field, and press TAB to move the cursor to the ACCT # field.Enter the trading partner’s account number in this field, and press RETURN.
The system displays the customer record that most closely matches the one you specified, includingthe customer’s department number, which appears in the DEPT field, and the customer’s interchangeidentification number, which appears in the INTERCHANGE ID field.
These fields are for your reference only, to help you confirm that the displayed customer is correct.The information in the INTERCHANGE ID field comes from the ID field in the (SGA) Customer EDIParameters screen. The information in the DEPT field comes from the (A) screen.
When the system displays a customer record, a window with the following prompt also appears, asshown in Figure 8-2:
Correct Customer ?
At this point, you can verify that the displayed record is the correct one, scroll through the remainingrecords to find the correct one, return to the NAME field to retrieve a different record, or view moreinformation on the customer whose record is displayed. Each of these options is described below.
Figure 8-2. The Correct Customer Window
15:47:44 (SGAR) EDI Customer Cross Reference (04/20/XX) 04/21/94--------------------------------------------------------------------------------Name :ROADWAY Acct # : RDW Dept : Interchange ID :ZZ 123456890--------------------------------------------------------------------------------
+¦ Correct Customer ? ¦+ ¦ <Yes> ¦ ¦ No ¦ ¦ Cust Info ¦ +----------------------+
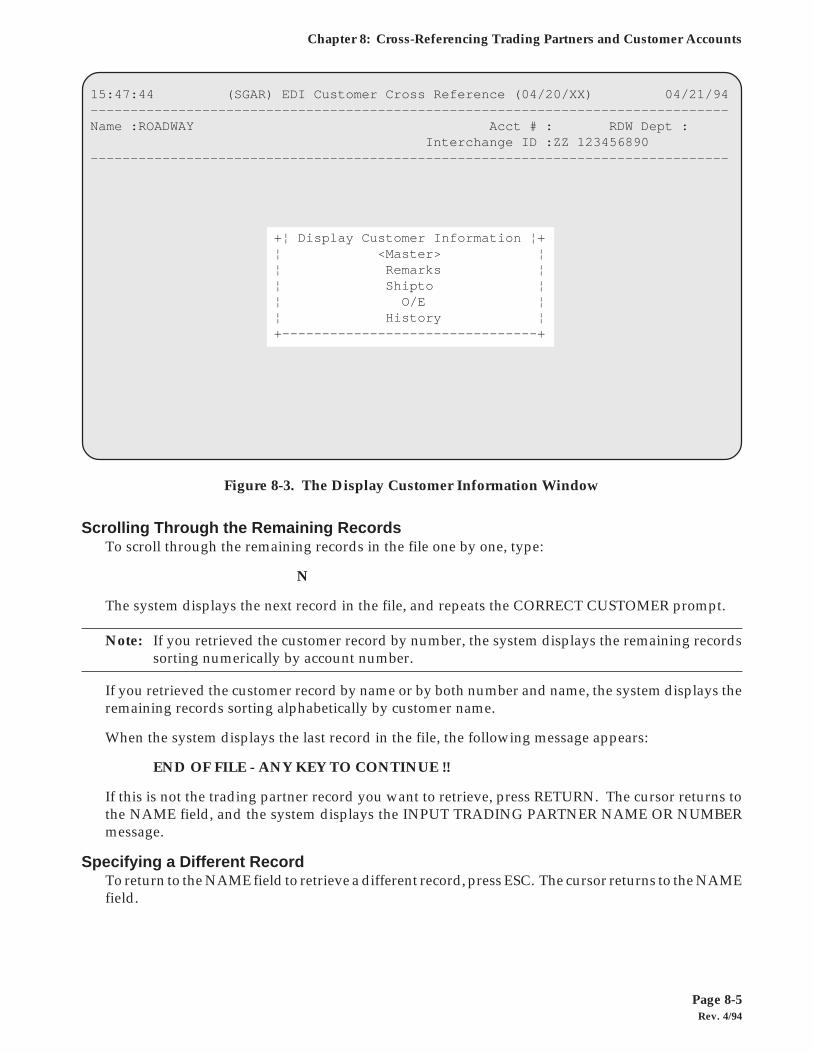
Rev. 4/94Page 8-5
Chapter 8: Cross-Referencing Trading Partners and Customer Accounts
Scrolling Through the Remaining RecordsTo scroll through the remaining records in the file one by one, type:
N
The system displays the next record in the file, and repeats the CORRECT CUSTOMER prompt.
Note: If you retrieved the customer record by number, the system displays the remaining recordssorting numerically by account number.
If you retrieved the customer record by name or by both number and name, the system displays theremaining records sorting alphabetically by customer name.
When the system displays the last record in the file, the following message appears:
END OF FILE - ANY KEY TO CONTINUE !!
If this is not the trading partner record you want to retrieve, press RETURN. The cursor returns tothe NAME field, and the system displays the INPUT TRADING PARTNER NAME OR NUMBERmessage.
Specifying a Different RecordTo return to the NAME field to retrieve a different record, press ESC. The cursor returns to the NAMEfield.
Figure 8-3. The Display Customer Information Window
15:47:44 (SGAR) EDI Customer Cross Reference (04/20/XX) 04/21/94--------------------------------------------------------------------------------Name :ROADWAY Acct # : RDW Dept : Interchange ID :ZZ 123456890--------------------------------------------------------------------------------
+¦ Display Customer Information ¦+ ¦ <Master> ¦ ¦ Remarks ¦ ¦ Shipto ¦ ¦ O/E ¦ ¦ History ¦ +--------------------------------+
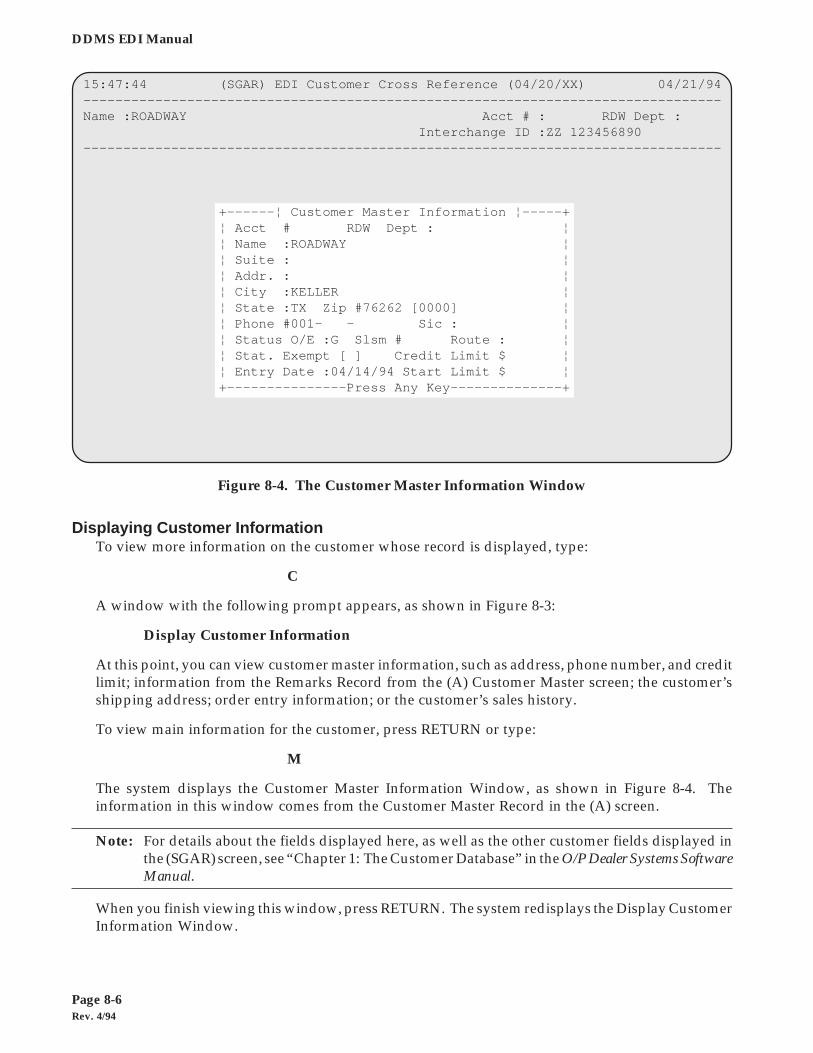
Rev. 4/94Page 8-6
DDMS EDI Manual
Displaying Customer InformationTo view more information on the customer whose record is displayed, type:
C
A window with the following prompt appears, as shown in Figure 8-3:
Display Customer Information
At this point, you can view customer master information, such as address, phone number, and creditlimit; information from the Remarks Record from the (A) Customer Master screen; the customer’sshipping address; order entry information; or the customer’s sales history.
To view main information for the customer, press RETURN or type:
M
The system displays the Customer Master Information Window, as shown in Figure 8-4. Theinformation in this window comes from the Customer Master Record in the (A) screen.
Note: For details about the fields displayed here, as well as the other customer fields displayed inthe (SGAR) screen, see “Chapter 1: The Customer Database” in the O/P Dealer Systems SoftwareManual.
When you finish viewing this window, press RETURN. The system redisplays the Display CustomerInformation Window.
Figure 8-4. The Customer Master Information Window
15:47:44 (SGAR) EDI Customer Cross Reference (04/20/XX) 04/21/94--------------------------------------------------------------------------------Name :ROADWAY Acct # : RDW Dept : Interchange ID :ZZ 123456890--------------------------------------------------------------------------------
+------¦ Customer Master Information ¦-----+ ¦ Acct # RDW Dept : ¦ ¦ Name :ROADWAY ¦ ¦ Suite : ¦ ¦ Addr. : ¦ ¦ City :KELLER ¦ ¦ State :TX Zip #76262 [0000] ¦ ¦ Phone #001- - Sic : ¦ ¦ Status O/E :G Slsm # Route : ¦ ¦ Stat. Exempt [ ] Credit Limit $ ¦ ¦ Entry Date :04/14/94 Start Limit $ ¦ +---------------Press Any Key--------------+
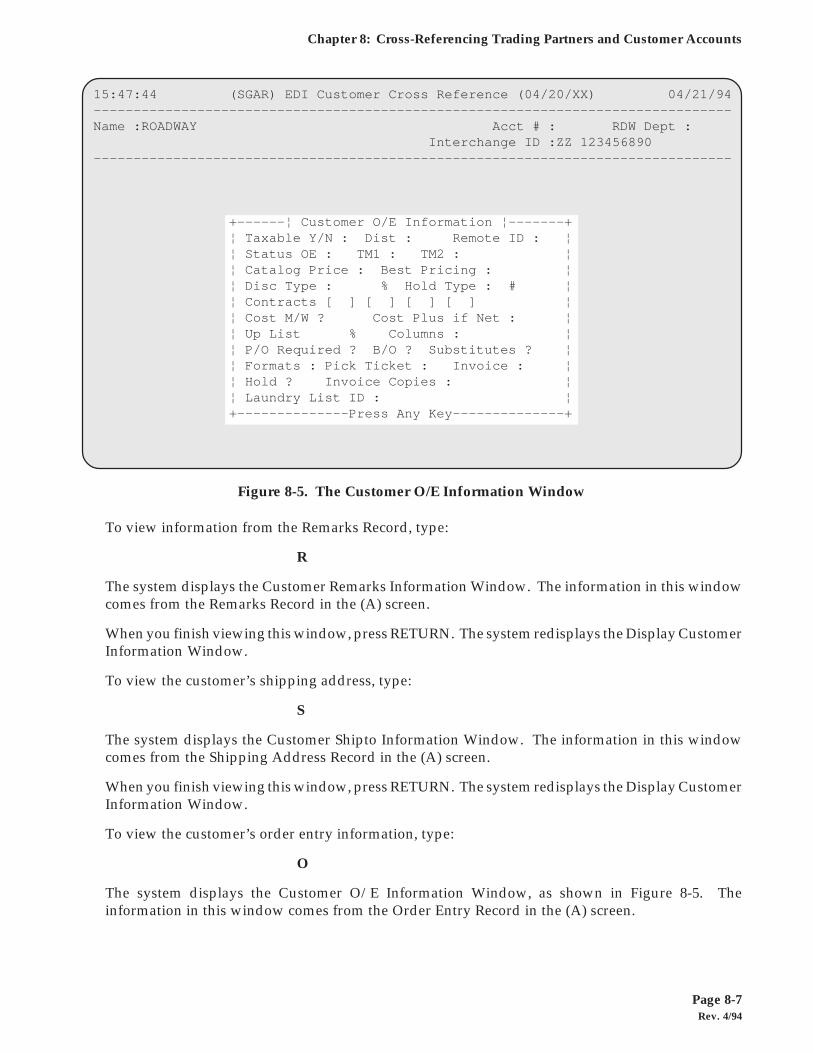
Rev. 4/94Page 8-7
Chapter 8: Cross-Referencing Trading Partners and Customer Accounts
To view information from the Remarks Record, type:
R
The system displays the Customer Remarks Information Window. The information in this windowcomes from the Remarks Record in the (A) screen.
When you finish viewing this window, press RETURN. The system redisplays the Display CustomerInformation Window.
To view the customer’s shipping address, type:
S
The system displays the Customer Shipto Information Window. The information in this windowcomes from the Shipping Address Record in the (A) screen.
When you finish viewing this window, press RETURN. The system redisplays the Display CustomerInformation Window.
To view the customer’s order entry information, type:
O
The system displays the Customer O/E Information Window, as shown in Figure 8-5. Theinformation in this window comes from the Order Entry Record in the (A) screen.
Figure 8-5. The Customer O/E Information Window
15:47:44 (SGAR) EDI Customer Cross Reference (04/20/XX) 04/21/94--------------------------------------------------------------------------------Name :ROADWAY Acct # : RDW Dept : Interchange ID :ZZ 123456890--------------------------------------------------------------------------------
+------¦ Customer O/E Information ¦-------+ ¦ Taxable Y/N : Dist : Remote ID : ¦ ¦ Status OE : TM1 : TM2 : ¦ ¦ Catalog Price : Best Pricing : ¦ ¦ Disc Type : % Hold Type : # ¦ ¦ Contracts [ ] [ ] [ ] [ ] ¦ ¦ Cost M/W ? Cost Plus if Net : ¦ ¦ Up List % Columns : ¦ ¦ P/O Required ? B/O ? Substitutes ? ¦ ¦ Formats : Pick Ticket : Invoice : ¦ ¦ Hold ? Invoice Copies : ¦ ¦ Laundry List ID : ¦ +--------------Press Any Key--------------+
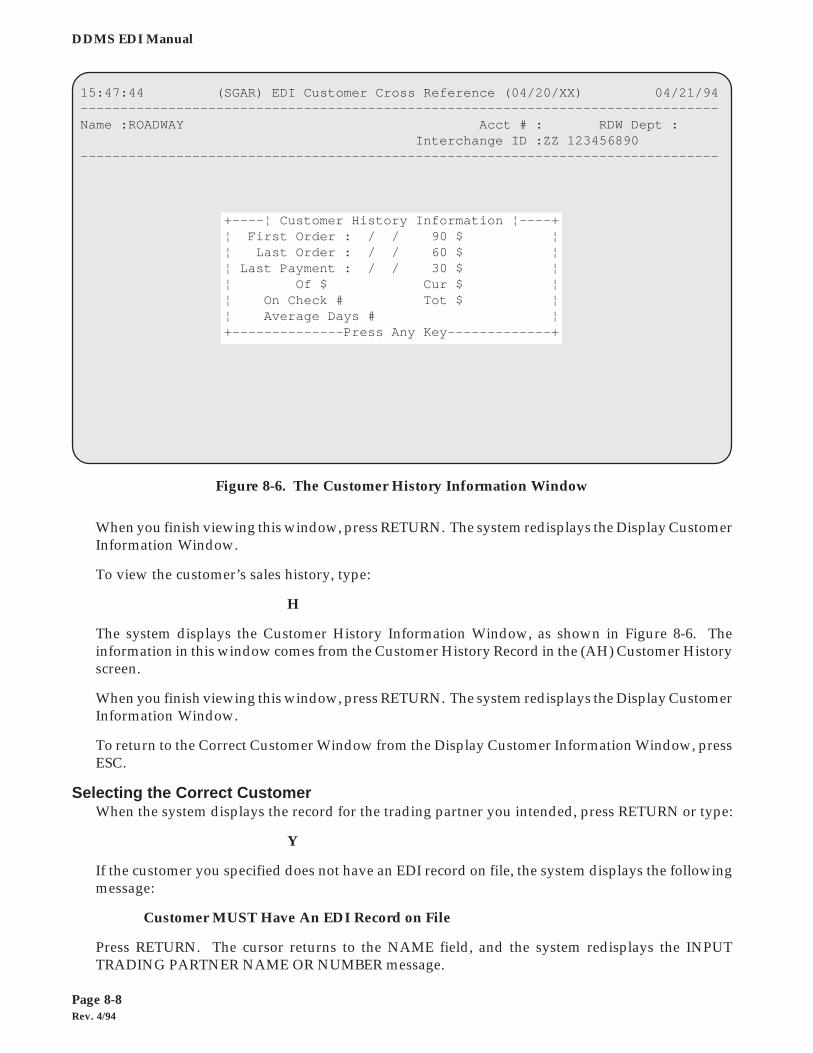
Rev. 4/94Page 8-8
DDMS EDI Manual
When you finish viewing this window, press RETURN. The system redisplays the Display CustomerInformation Window.
To view the customer’s sales history, type:
H
The system displays the Customer History Information Window, as shown in Figure 8-6. Theinformation in this window comes from the Customer History Record in the (AH) Customer Historyscreen.
When you finish viewing this window, press RETURN. The system redisplays the Display CustomerInformation Window.
To return to the Correct Customer Window from the Display Customer Information Window, pressESC.
Selecting the Correct CustomerWhen the system displays the record for the trading partner you intended, press RETURN or type:
Y
If the customer you specified does not have an EDI record on file, the system displays the followingmessage:
Customer MUST Have An EDI Record on File
Press RETURN. The cursor returns to the NAME field, and the system redisplays the INPUTTRADING PARTNER NAME OR NUMBER message.
Figure 8-6. The Customer History Information Window
15:47:44 (SGAR) EDI Customer Cross Reference (04/20/XX) 04/21/94--------------------------------------------------------------------------------Name :ROADWAY Acct # : RDW Dept : Interchange ID :ZZ 123456890--------------------------------------------------------------------------------
+----¦ Customer History Information ¦----+ ¦ First Order : / / 90 $ ¦ ¦ Last Order : / / 60 $ ¦ ¦ Last Payment : / / 30 $ ¦ ¦ Of $ Cur $ ¦ ¦ On Check # Tot $ ¦ ¦ Average Days # ¦ +--------------Press Any Key-------------+
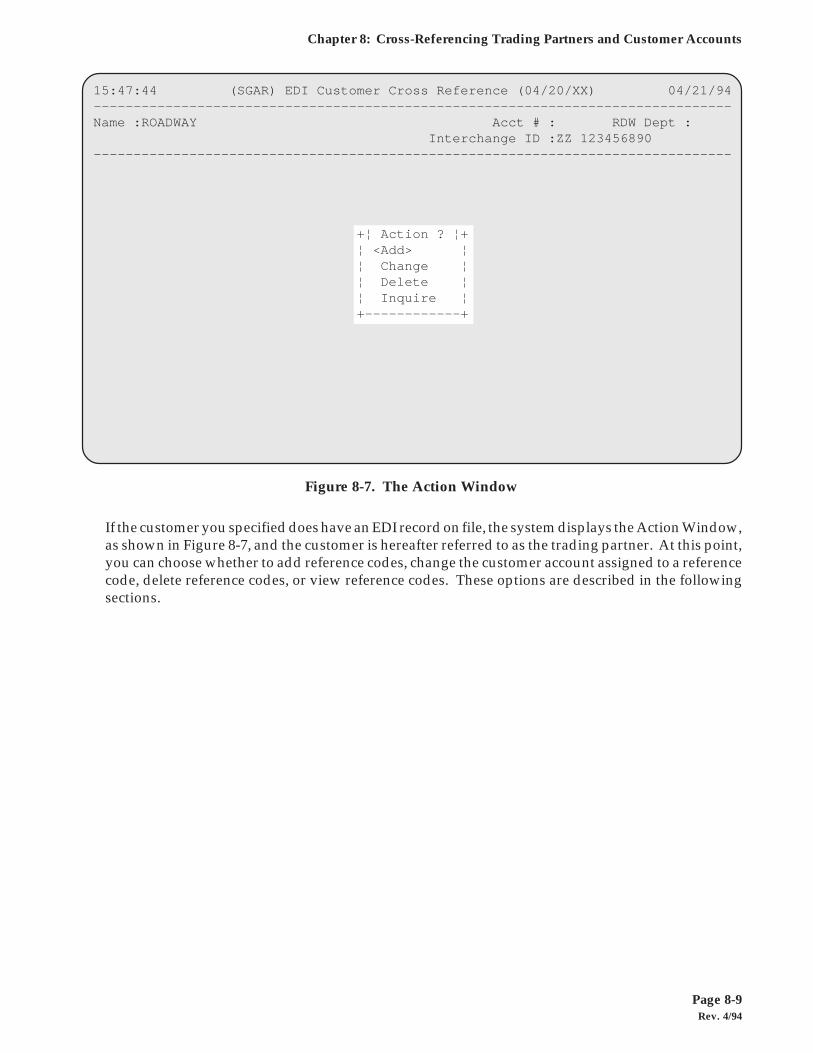
Rev. 4/94Page 8-9
Chapter 8: Cross-Referencing Trading Partners and Customer Accounts
If the customer you specified does have an EDI record on file, the system displays the Action Window,as shown in Figure 8-7, and the customer is hereafter referred to as the trading partner. At this point,you can choose whether to add reference codes, change the customer account assigned to a referencecode, delete reference codes, or view reference codes. These options are described in the followingsections.
Figure 8-7. The Action Window
15:47:44 (SGAR) EDI Customer Cross Reference (04/20/XX) 04/21/94--------------------------------------------------------------------------------Name :ROADWAY Acct # : RDW Dept : Interchange ID :ZZ 123456890--------------------------------------------------------------------------------
+¦ Action ? ¦+ ¦ <Add> ¦ ¦ Change ¦ ¦ Delete ¦ ¦ Inquire ¦ +------------+
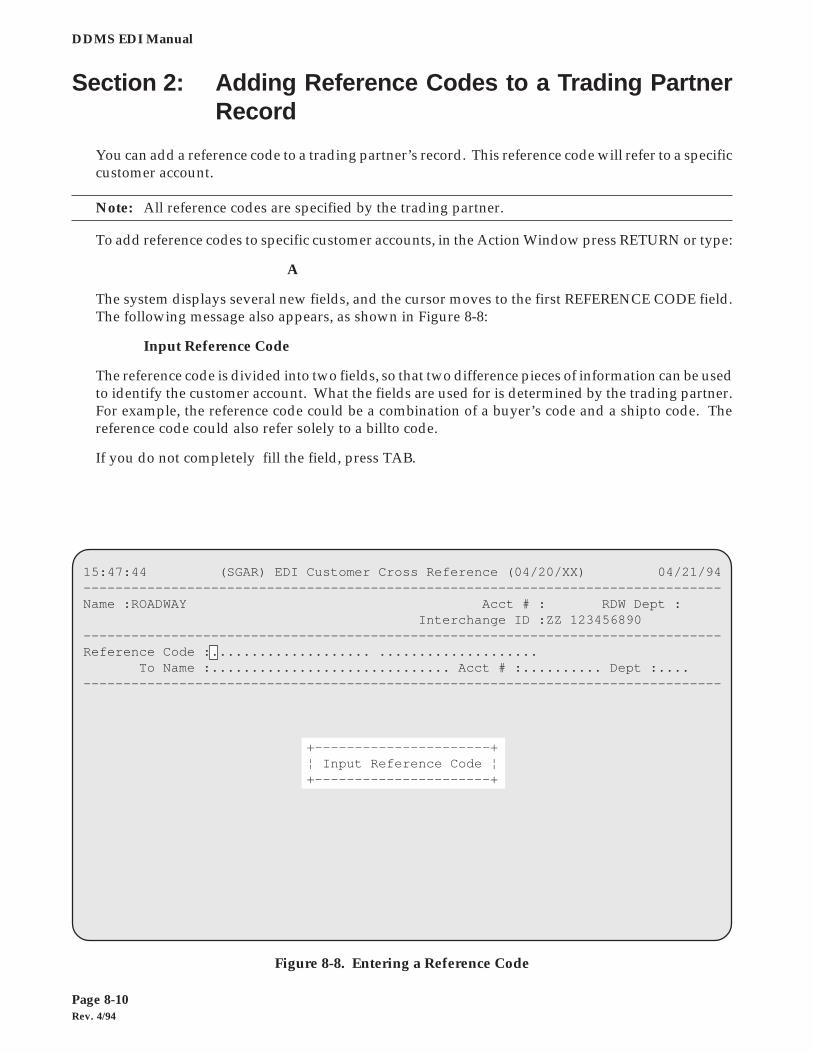
Rev. 4/94Page 8-10
DDMS EDI Manual
Section 2: Adding Reference Codes to a Trading PartnerRecord
You can add a reference code to a trading partner’s record. This reference code will refer to a specificcustomer account.
Note: All reference codes are specified by the trading partner.
To add reference codes to specific customer accounts, in the Action Window press RETURN or type:
A
The system displays several new fields, and the cursor moves to the first REFERENCE CODE field.The following message also appears, as shown in Figure 8-8:
Input Reference Code
The reference code is divided into two fields, so that two difference pieces of information can be usedto identify the customer account. What the fields are used for is determined by the trading partner.For example, the reference code could be a combination of a buyer’s code and a shipto code. Thereference code could also refer solely to a billto code.
If you do not completely fill the field, press TAB.
Figure 8-8. Entering a Reference Code
15:47:44 (SGAR) EDI Customer Cross Reference (04/20/XX) 04/21/94--------------------------------------------------------------------------------Name :ROADWAY Acct # : RDW Dept : Interchange ID :ZZ 123456890--------------------------------------------------------------------------------Reference Code :.................... .................... To Name :.............................. Acct # :.......... Dept :....--------------------------------------------------------------------------------
+----------------------+ ¦ Input Reference Code ¦ +----------------------+
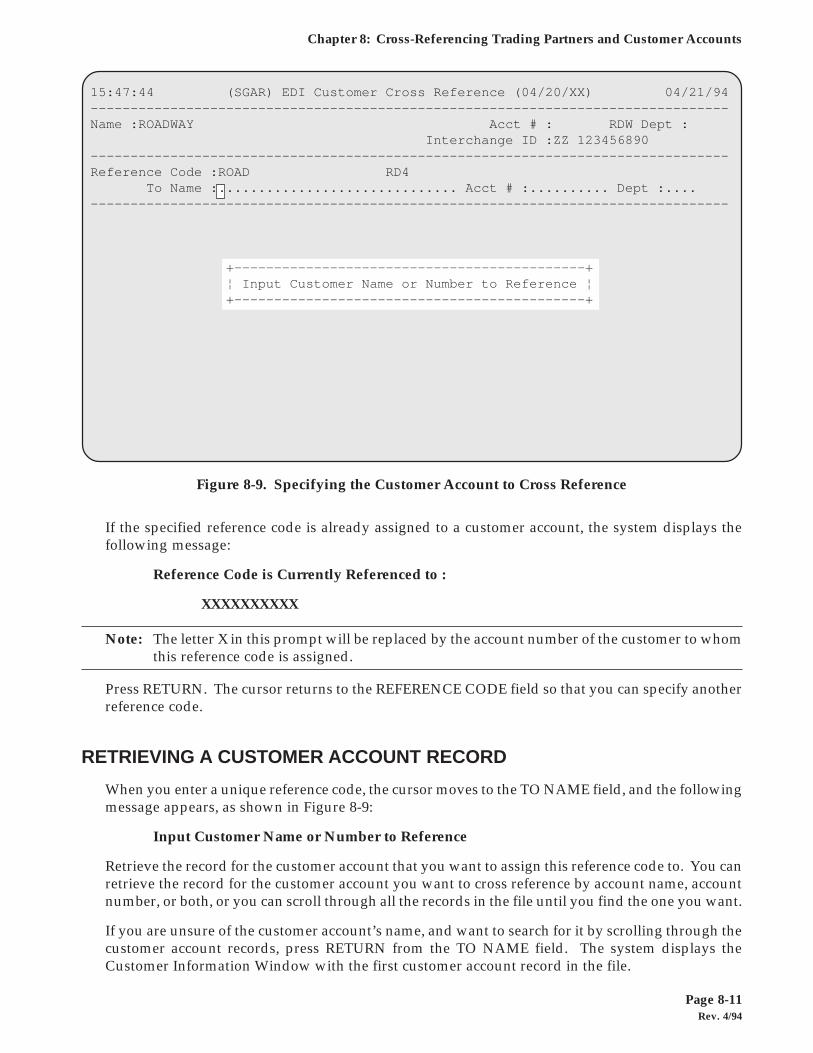
Rev. 4/94Page 8-11
Chapter 8: Cross-Referencing Trading Partners and Customer Accounts
If the specified reference code is already assigned to a customer account, the system displays thefollowing message:
Reference Code is Currently Referenced to :
XXXXXXXXXX
Note: The letter X in this prompt will be replaced by the account number of the customer to whomthis reference code is assigned.
Press RETURN. The cursor returns to the REFERENCE CODE field so that you can specify anotherreference code.
RETRIEVING A CUSTOMER ACCOUNT RECORD
When you enter a unique reference code, the cursor moves to the TO NAME field, and the followingmessage appears, as shown in Figure 8-9:
Input Customer Name or Number to Reference
Retrieve the record for the customer account that you want to assign this reference code to. You canretrieve the record for the customer account you want to cross reference by account name, accountnumber, or both, or you can scroll through all the records in the file until you find the one you want.
If you are unsure of the customer account’s name, and want to search for it by scrolling through thecustomer account records, press RETURN from the TO NAME field. The system displays theCustomer Information Window with the first customer account record in the file.
Figure 8-9. Specifying the Customer Account to Cross Reference
15:47:44 (SGAR) EDI Customer Cross Reference (04/20/XX) 04/21/94--------------------------------------------------------------------------------Name :ROADWAY Acct # : RDW Dept : Interchange ID :ZZ 123456890--------------------------------------------------------------------------------Reference Code :ROAD RD4 To Name :.............................. Acct # :.......... Dept :....--------------------------------------------------------------------------------
+--------------------------------------------+ ¦ Input Customer Name or Number to Reference ¦ +--------------------------------------------+

Rev. 4/94Page 8-12
DDMS EDI Manual
To retrieve a customer account record by name, enter part or all of the customer account’s name inthe TO NAME field and press RETURN.
To retrieve a customer account record by account number, press TAB to move the cursor to the ACCT# field. Enter the account number, and press RETURN.
To retrieve a customer account record by both name and account number, enter part or all of thecustomer account’s name in the TO NAME field, and press TAB to move the cursor to the ACCT #field. Enter the account number in this field, and press RETURN.
The system displays the Customer Information Window with the customer account record that mostclosely matches the one you specified. The fields in this window come from the (A) Customer Masterscreen. A window with the following prompt also appears, as shown in Figure 8-10:
Correct Customer ?
At this point, you can verify that the displayed record is the correct one, scroll through the remainingrecords to find the correct one, or return to the TO NAME field to retrieve a different customer record.Each of these options is described below.
Scrolling Through the Remaining RecordsTo scroll through the remaining records in the file one by one, type:
N
The system displays the next record in the file, and repeats the CORRECT CUSTOMER prompt.
Figure 8-10. The Customer Information and Correct Customer Windows
15:47:44 (SGAR) EDI Customer Cross Reference (04/20/XX) 04/21/94--------------------------------------------------------------------------------Name :ROADWAY Acct # : RDW Dept : Interchange ID :ZZ 123456890--------------------------------------------------------------------------------Reference Code :ROAD RD4 To Name :ABC COMPANY Acct # : 32 Dept :--------------------------------------------------------------------------------+--------------------------¦ Customer Information ¦---------------------------+¦ Acct # 32 Dept : Suite : ¦¦ Name :ABC COMPANY Addr. :542 LBJ LANE ¦¦ Suite : City :DALLAS ¦¦ Addr. :542 LBJ LANE State :TX Zip #76248 [ ] ¦¦ City :DALLAS Contact [ ] ¦¦ State :TX Zip #76248 [ ] ¦¦ Phone #214-555-2327 Sic : Fax Number #214-555-3452 ¦¦ Status O/E :H Slsm #3278 Route :1001 FORWARD FAX INFORMATION TO ¦¦ Stat. Exempt [ ] Credit Limit $ 7437 RALPH'S SECRETARY JEAN HILL ¦¦ Entry Date :03/05/93 Start Limit $ ¦+-----------------------------------------------------------------------------+ +¦ Correct Customer ? ¦+ ¦ <Yes> No ¦ +----------------------+

Rev. 4/94Page 8-13
Chapter 8: Cross-Referencing Trading Partners and Customer Accounts
Note: If you retrieve customer account records by number, the system displays the remainingrecords sorting numerically by account number.
If you retrieve customer account records by name or by both number and name, the system displaysthe remaining records sorting alphabetically by customer account name.
When the system displays the last record in the file, the following message appears:
END OF FILE - ANY KEY TO CONTINUE !!
If this is not the customer account record you want to retrieve, press RETURN. The cursor returns tothe TO NAME field, and the system displays the INPUT TRADING PARTNER NAME OR NUMBERmessage.
Specifying a Different RecordTo return to the TO NAME field to retrieve a different customer account record, press ESC. The cursorreturns to the TO NAME field.
Selecting the Correct CustomerIf the displayed record is the one you want to add a reference code for, press RETURN or type:
Y
If the specified customer is already assigned to a reference code, the system displays the followingmessage, as shown in Figure 8-11:
Customer Acct is Currently Referenced to :XXXXXXXXXXXXXXXXXXXX XXXXXXXXXXXXXXXXXXXX
Figure 8-11. Specifying an Account That is Already Cross Referenced
15:47:44 (SGAR) EDI Customer Cross Reference (04/20/XX) 04/21/94--------------------------------------------------------------------------------Name :ROADWAY Acct # : RDW Dept : Interchange ID :ZZ 123456890--------------------------------------------------------------------------------Reference Code :ROAD RD4 To Name :ABC COMPANY Acct # : 32 Dept :--------------------------------------------------------------------------------
+-----------------------------------------------+ ¦ Customer Account is Currently Referenced to : ¦ ¦ ROAD RD2 ¦ +----------------Press Any Key------------------+
Rev. 4/94Page 8-14
DDMS EDI Manual
Note: In this prompt, the letter X will be replaced by the reference code.
Press RETURN. The cursor returns to the REFERENCE CODE field so that you can specify anotherreference code.
When you specify Y, the cursor returns to the first REFERENCE CODE field, and the system displaysthe INPUT REFERENCE CODE message. At this point, you can add more reference codes the wayyou did for the first.
To return to the Action Window, press ESC.
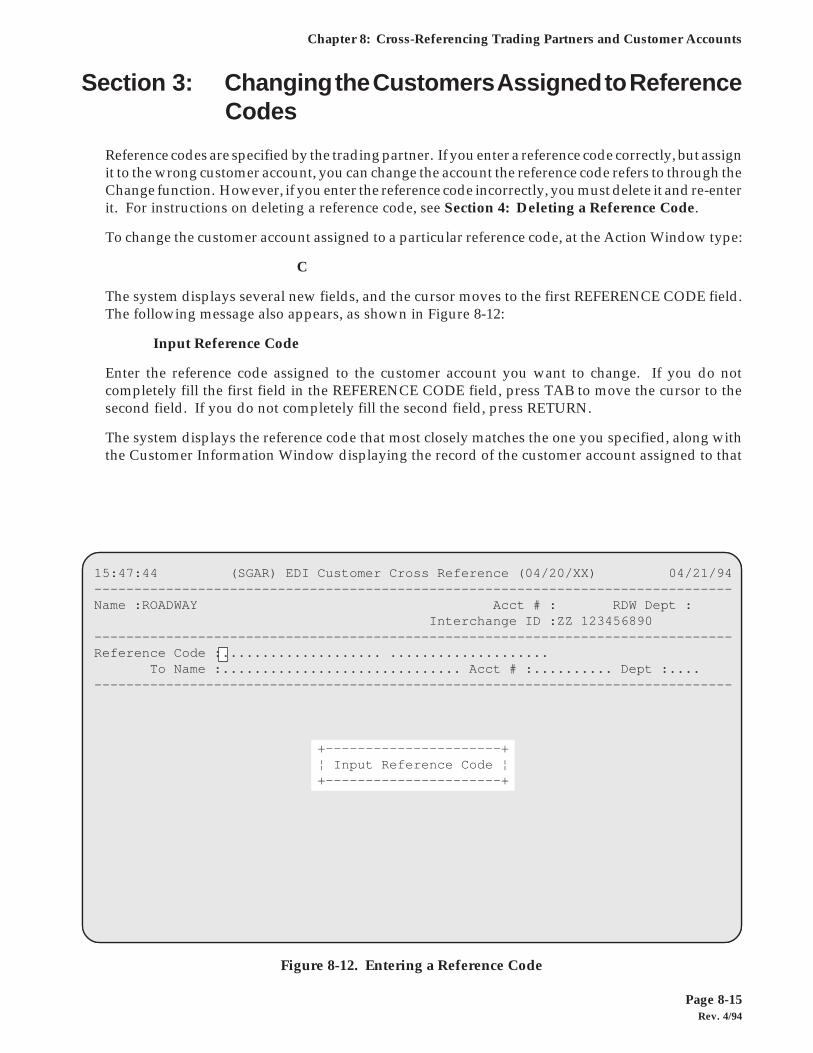
Rev. 4/94Page 8-15
Chapter 8: Cross-Referencing Trading Partners and Customer Accounts
Section 3: Changing the Customers Assigned to ReferenceCodes
Reference codes are specified by the trading partner. If you enter a reference code correctly, but assignit to the wrong customer account, you can change the account the reference code refers to through theChange function. However, if you enter the reference code incorrectly, you must delete it and re-enterit. For instructions on deleting a reference code, see Section 4: Deleting a Reference Code.
To change the customer account assigned to a particular reference code, at the Action Window type:
C
The system displays several new fields, and the cursor moves to the first REFERENCE CODE field.The following message also appears, as shown in Figure 8-12:
Input Reference Code
Enter the reference code assigned to the customer account you want to change. If you do notcompletely fill the first field in the REFERENCE CODE field, press TAB to move the cursor to thesecond field. If you do not completely fill the second field, press RETURN.
The system displays the reference code that most closely matches the one you specified, along withthe Customer Information Window displaying the record of the customer account assigned to that
Figure 8-12. Entering a Reference Code
15:47:44 (SGAR) EDI Customer Cross Reference (04/20/XX) 04/21/94--------------------------------------------------------------------------------Name :ROADWAY Acct # : RDW Dept : Interchange ID :ZZ 123456890--------------------------------------------------------------------------------Reference Code :.................... .................... To Name :.............................. Acct # :.......... Dept :....--------------------------------------------------------------------------------
+----------------------+ ¦ Input Reference Code ¦ +----------------------+
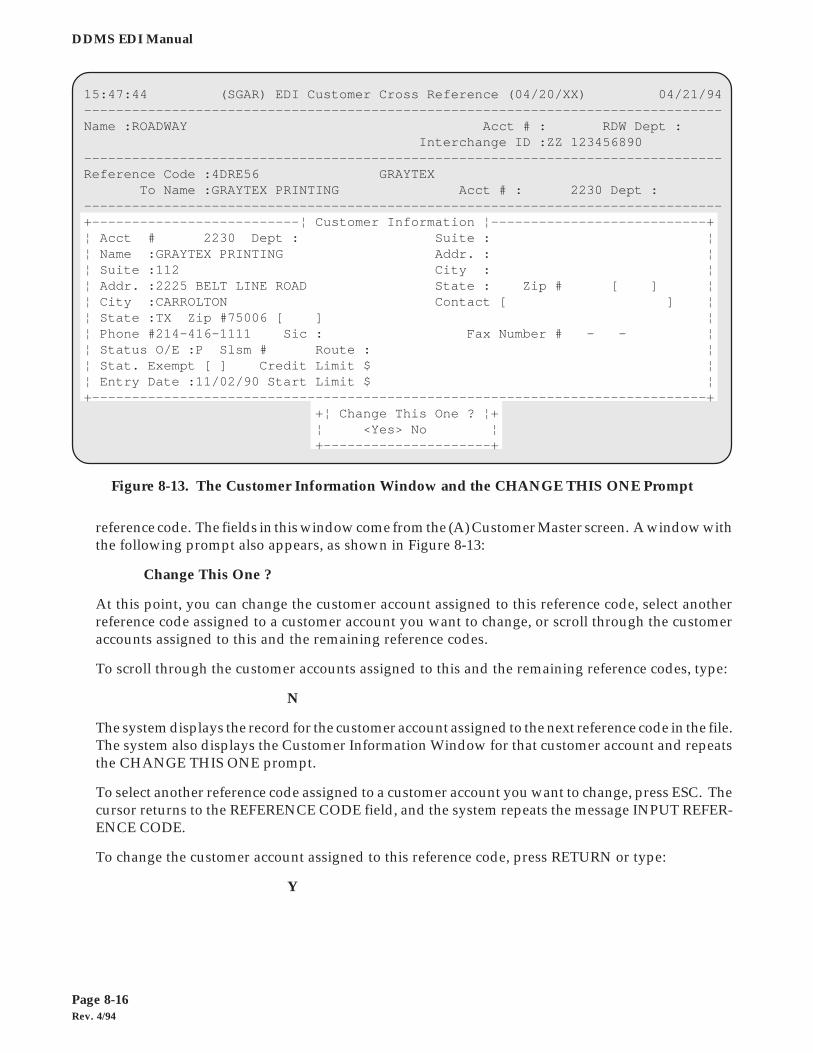
Rev. 4/94Page 8-16
DDMS EDI Manual
reference code. The fields in this window come from the (A) Customer Master screen. A window withthe following prompt also appears, as shown in Figure 8-13:
Change This One ?
At this point, you can change the customer account assigned to this reference code, select anotherreference code assigned to a customer account you want to change, or scroll through the customeraccounts assigned to this and the remaining reference codes.
To scroll through the customer accounts assigned to this and the remaining reference codes, type:
N
The system displays the record for the customer account assigned to the next reference code in the file.The system also displays the Customer Information Window for that customer account and repeatsthe CHANGE THIS ONE prompt.
To select another reference code assigned to a customer account you want to change, press ESC. Thecursor returns to the REFERENCE CODE field, and the system repeats the message INPUT REFER-ENCE CODE.
To change the customer account assigned to this reference code, press RETURN or type:
Y
Figure 8-13. The Customer Information Window and the CHANGE THIS ONE Prompt
15:47:44 (SGAR) EDI Customer Cross Reference (04/20/XX) 04/21/94--------------------------------------------------------------------------------Name :ROADWAY Acct # : RDW Dept : Interchange ID :ZZ 123456890--------------------------------------------------------------------------------Reference Code :4DRE56 GRAYTEX To Name :GRAYTEX PRINTING Acct # : 2230 Dept :--------------------------------------------------------------------------------+--------------------------¦ Customer Information ¦---------------------------+¦ Acct # 2230 Dept : Suite : ¦¦ Name :GRAYTEX PRINTING Addr. : ¦¦ Suite :112 City : ¦¦ Addr. :2225 BELT LINE ROAD State : Zip # [ ] ¦¦ City :CARROLTON Contact [ ] ¦¦ State :TX Zip #75006 [ ] ¦¦ Phone #214-416-1111 Sic : Fax Number # - - ¦¦ Status O/E :P Slsm # Route : ¦¦ Stat. Exempt [ ] Credit Limit $ ¦¦ Entry Date :11/02/90 Start Limit $ ¦+-----------------------------------------------------------------------------+ +¦ Change This One ? ¦+ ¦ <Yes> No ¦ +---------------------+
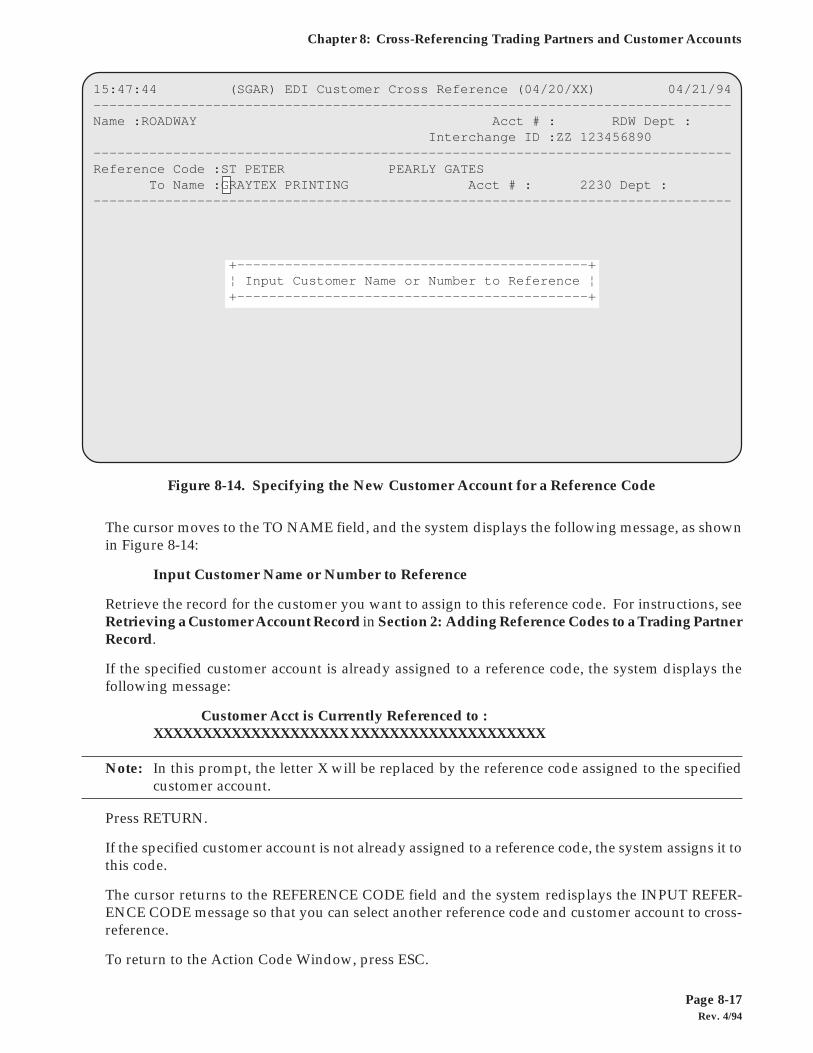
Rev. 4/94Page 8-17
Chapter 8: Cross-Referencing Trading Partners and Customer Accounts
The cursor moves to the TO NAME field, and the system displays the following message, as shownin Figure 8-14:
Input Customer Name or Number to Reference
Retrieve the record for the customer you want to assign to this reference code. For instructions, seeRetrieving a Customer Account Record in Section 2: Adding Reference Codes to a Trading PartnerRecord.
If the specified customer account is already assigned to a reference code, the system displays thefollowing message:
Customer Acct is Currently Referenced to :XXXXXXXXXXXXXXXXXXXX XXXXXXXXXXXXXXXXXXXX
Note: In this prompt, the letter X will be replaced by the reference code assigned to the specifiedcustomer account.
Press RETURN.
If the specified customer account is not already assigned to a reference code, the system assigns it tothis code.
The cursor returns to the REFERENCE CODE field and the system redisplays the INPUT REFER-ENCE CODE message so that you can select another reference code and customer account to cross-reference.
To return to the Action Code Window, press ESC.
Figure 8-14. Specifying the New Customer Account for a Reference Code
15:47:44 (SGAR) EDI Customer Cross Reference (04/20/XX) 04/21/94--------------------------------------------------------------------------------Name :ROADWAY Acct # : RDW Dept : Interchange ID :ZZ 123456890--------------------------------------------------------------------------------Reference Code :ST PETER PEARLY GATES To Name :GRAYTEX PRINTING Acct # : 2230 Dept :--------------------------------------------------------------------------------
+--------------------------------------------+ ¦ Input Customer Name or Number to Reference ¦ +--------------------------------------------+
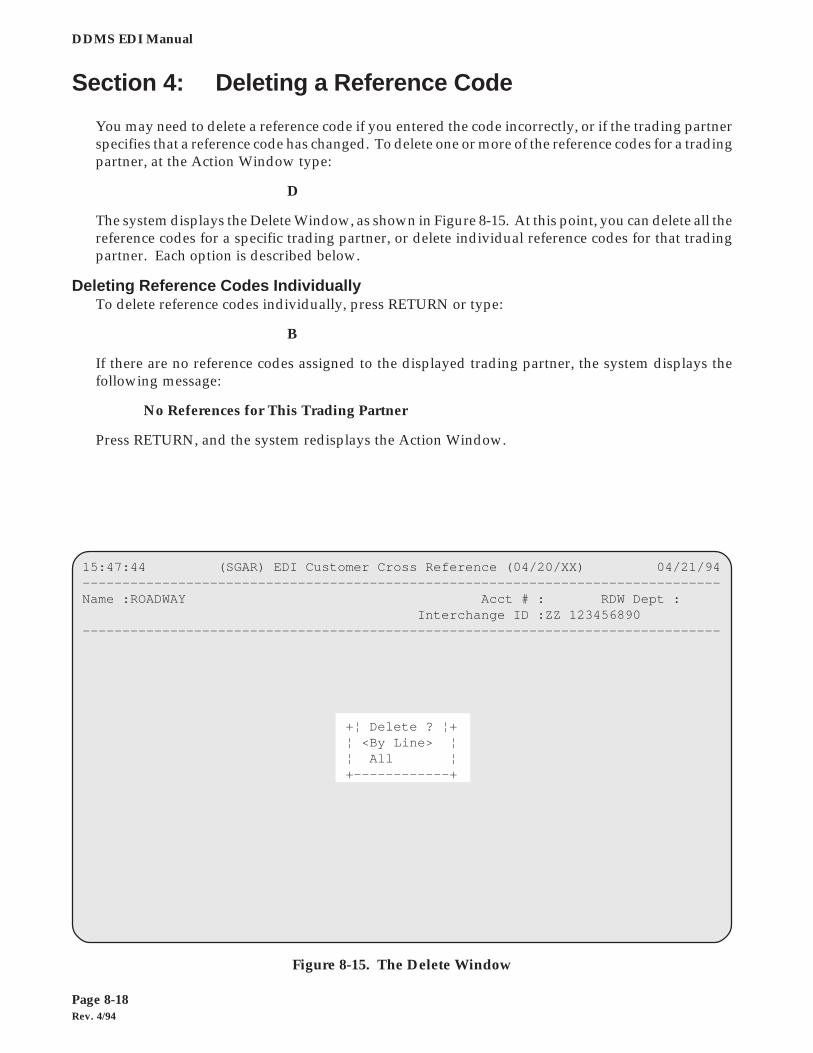
Rev. 4/94Page 8-18
DDMS EDI Manual
Section 4: Deleting a Reference Code
You may need to delete a reference code if you entered the code incorrectly, or if the trading partnerspecifies that a reference code has changed. To delete one or more of the reference codes for a tradingpartner, at the Action Window type:
D
The system displays the Delete Window, as shown in Figure 8-15. At this point, you can delete all thereference codes for a specific trading partner, or delete individual reference codes for that tradingpartner. Each option is described below.
Deleting Reference Codes IndividuallyTo delete reference codes individually, press RETURN or type:
B
If there are no reference codes assigned to the displayed trading partner, the system displays thefollowing message:
No References for This Trading Partner
Press RETURN, and the system redisplays the Action Window.
Figure 8-15. The Delete Window
15:47:44 (SGAR) EDI Customer Cross Reference (04/20/XX) 04/21/94--------------------------------------------------------------------------------Name :ROADWAY Acct # : RDW Dept : Interchange ID :ZZ 123456890--------------------------------------------------------------------------------
+¦ Delete ? ¦+ ¦ <By Line> ¦ ¦ All ¦ +------------+

Rev. 4/94Page 8-19
Chapter 8: Cross-Referencing Trading Partners and Customer Accounts
If there are reference codes assigned to the displayed trading partner, the system displays thefollowing message:
Input Starting Reference Code or Press Return for All
At this point, you can specify a reference code number to start the display with, or begin the displaywith the first reference code in the file.
To start the display with a particular reference code, enter part or all of that reference code and pressRETURN. The system displays the reference code that most closely matches the one you specified,along with the name and account number of the customer account to which it is assigned.
To begin the display with the first reference code in the file, press RETURN. The system displays thefirst reference code in the file, along with the name and account number of the customer account towhich it is assigned.
The system also displays the following prompt, as shown in Figure 8-16:
Delete This One ?
At this point, you can choose to delete the displayed reference code, choose not to delete the displayedreference code, or view more information on the customer account assigned to the displayedreference code.
To view more information on the customer account assigned to the displayed reference code, type:
D
Figure 8-16. The DELETE THIS ONE Prompt
15:47:44 (SGAR) EDI Customer Cross Reference (04/20/XX) 04/21/94--------------------------------------------------------------------------------Name :ROADWAY Acct # : RDW Dept : Interchange ID :ZZ 123456890--------------------------------------------------------------------------------Reference Code Account # Dept Name-------------------- ------------------- ---------- ---- -----------------------B123 OHENRY 428 O'HENRY, INC. +¦ Delete This One ? ¦+ ¦ Yes <No> Detail ¦ +---------------------+
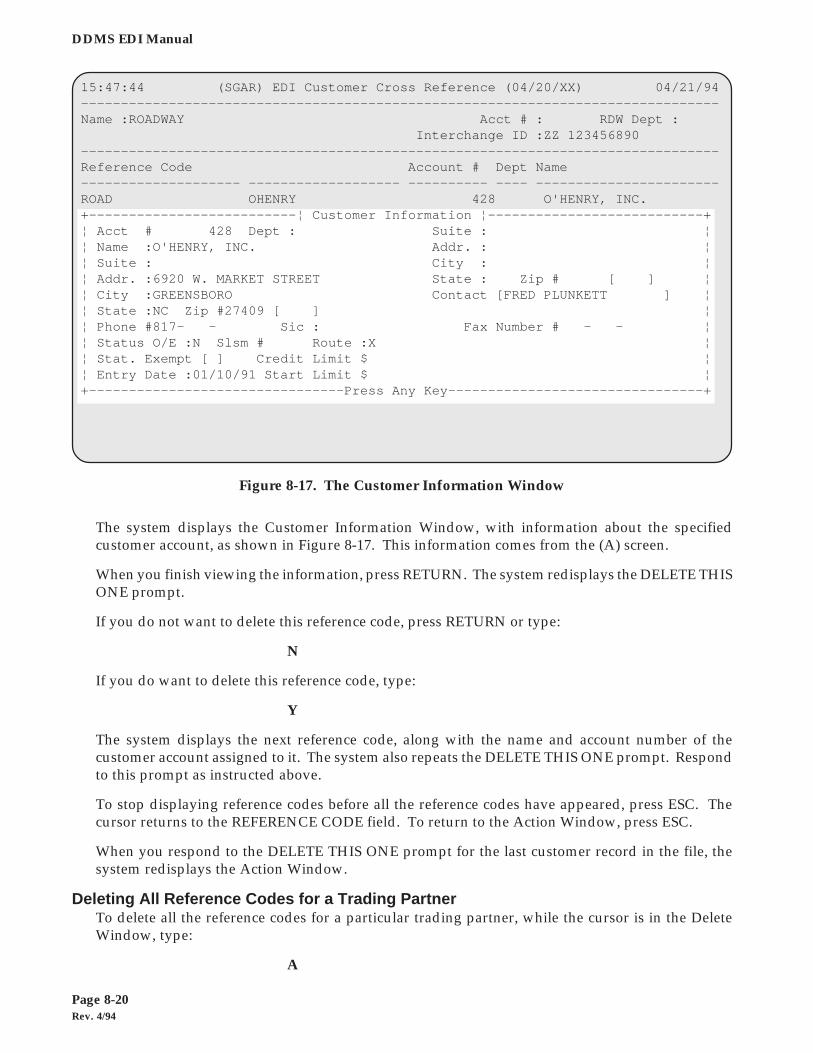
Rev. 4/94Page 8-20
DDMS EDI Manual
The system displays the Customer Information Window, with information about the specifiedcustomer account, as shown in Figure 8-17. This information comes from the (A) screen.
When you finish viewing the information, press RETURN. The system redisplays the DELETE THISONE prompt.
If you do not want to delete this reference code, press RETURN or type:
N
If you do want to delete this reference code, type:
Y
The system displays the next reference code, along with the name and account number of thecustomer account assigned to it. The system also repeats the DELETE THIS ONE prompt. Respondto this prompt as instructed above.
To stop displaying reference codes before all the reference codes have appeared, press ESC. Thecursor returns to the REFERENCE CODE field. To return to the Action Window, press ESC.
When you respond to the DELETE THIS ONE prompt for the last customer record in the file, thesystem redisplays the Action Window.
Deleting All Reference Codes for a Trading PartnerTo delete all the reference codes for a particular trading partner, while the cursor is in the DeleteWindow, type:
A
Figure 8-17. The Customer Information Window
15:47:44 (SGAR) EDI Customer Cross Reference (04/20/XX) 04/21/94--------------------------------------------------------------------------------Name :ROADWAY Acct # : RDW Dept : Interchange ID :ZZ 123456890--------------------------------------------------------------------------------Reference Code Account # Dept Name-------------------- ------------------- ---------- ---- -----------------------ROAD OHENRY 428 O'HENRY, INC.+--------------------------¦ Customer Information ¦---------------------------+¦ Acct # 428 Dept : Suite : ¦¦ Name :O'HENRY, INC. Addr. : ¦¦ Suite : City : ¦¦ Addr. :6920 W. MARKET STREET State : Zip # [ ] ¦¦ City :GREENSBORO Contact [FRED PLUNKETT ] ¦¦ State :NC Zip #27409 [ ] ¦¦ Phone #817- - Sic : Fax Number # - - ¦¦ Status O/E :N Slsm # Route :X ¦¦ Stat. Exempt [ ] Credit Limit $ ¦¦ Entry Date :01/10/91 Start Limit $ ¦+--------------------------------Press Any Key--------------------------------+
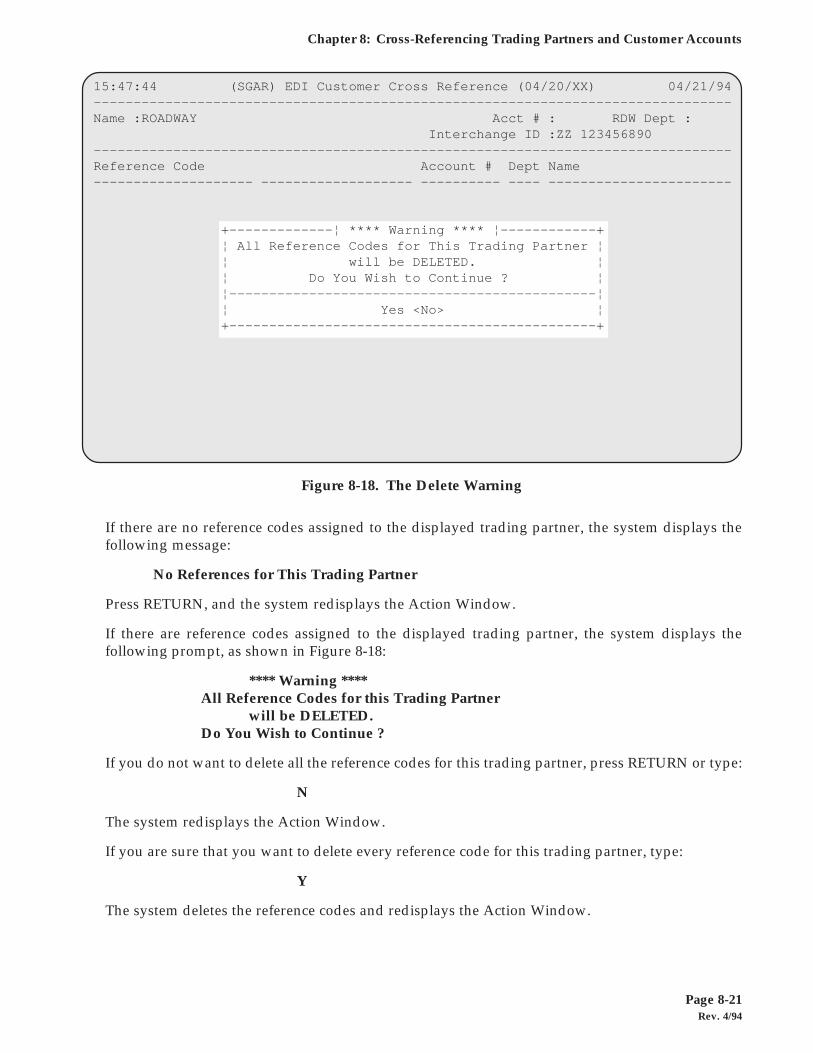
Rev. 4/94Page 8-21
Chapter 8: Cross-Referencing Trading Partners and Customer Accounts
If there are no reference codes assigned to the displayed trading partner, the system displays thefollowing message:
No References for This Trading Partner
Press RETURN, and the system redisplays the Action Window.
If there are reference codes assigned to the displayed trading partner, the system displays thefollowing prompt, as shown in Figure 8-18:
**** Warning ****All Reference Codes for this Trading Partner
will be DELETED.Do You Wish to Continue ?
If you do not want to delete all the reference codes for this trading partner, press RETURN or type:
N
The system redisplays the Action Window.
If you are sure that you want to delete every reference code for this trading partner, type:
Y
The system deletes the reference codes and redisplays the Action Window.
Figure 8-18. The Delete Warning
15:47:44 (SGAR) EDI Customer Cross Reference (04/20/XX) 04/21/94--------------------------------------------------------------------------------Name :ROADWAY Acct # : RDW Dept : Interchange ID :ZZ 123456890--------------------------------------------------------------------------------Reference Code Account # Dept Name-------------------- ------------------- ---------- ---- -----------------------
+-------------¦ **** Warning **** ¦------------+ ¦ All Reference Codes for This Trading Partner ¦ ¦ will be DELETED. ¦ ¦ Do You Wish to Continue ? ¦ ¦----------------------------------------------¦ ¦ Yes <No> ¦ +----------------------------------------------+
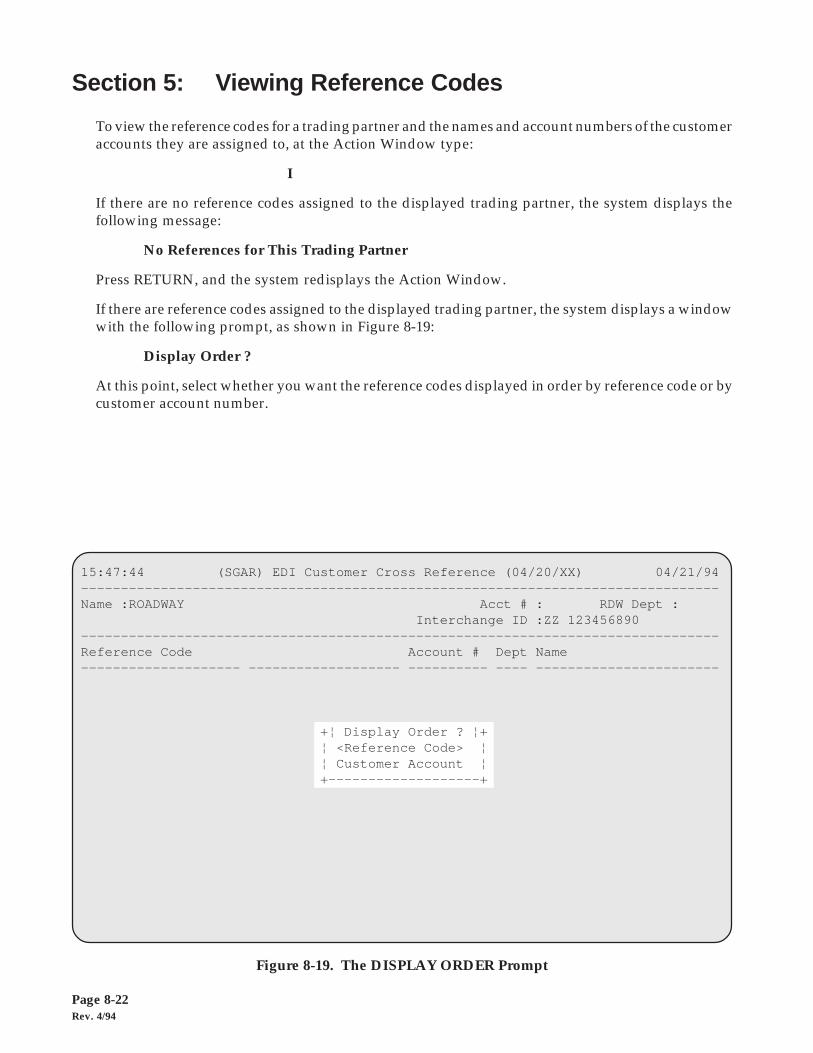
Rev. 4/94Page 8-22
DDMS EDI Manual
Section 5: Viewing Reference Codes
To view the reference codes for a trading partner and the names and account numbers of the customeraccounts they are assigned to, at the Action Window type:
I
If there are no reference codes assigned to the displayed trading partner, the system displays thefollowing message:
No References for This Trading Partner
Press RETURN, and the system redisplays the Action Window.
If there are reference codes assigned to the displayed trading partner, the system displays a windowwith the following prompt, as shown in Figure 8-19:
Display Order ?
At this point, select whether you want the reference codes displayed in order by reference code or bycustomer account number.
Figure 8-19. The DISPLAY ORDER Prompt
15:47:44 (SGAR) EDI Customer Cross Reference (04/20/XX) 04/21/94--------------------------------------------------------------------------------Name :ROADWAY Acct # : RDW Dept : Interchange ID :ZZ 123456890--------------------------------------------------------------------------------Reference Code Account # Dept Name-------------------- ------------------- ---------- ---- -----------------------
+¦ Display Order ? ¦+ ¦ <Reference Code> ¦ ¦ Customer Account ¦ +-------------------+
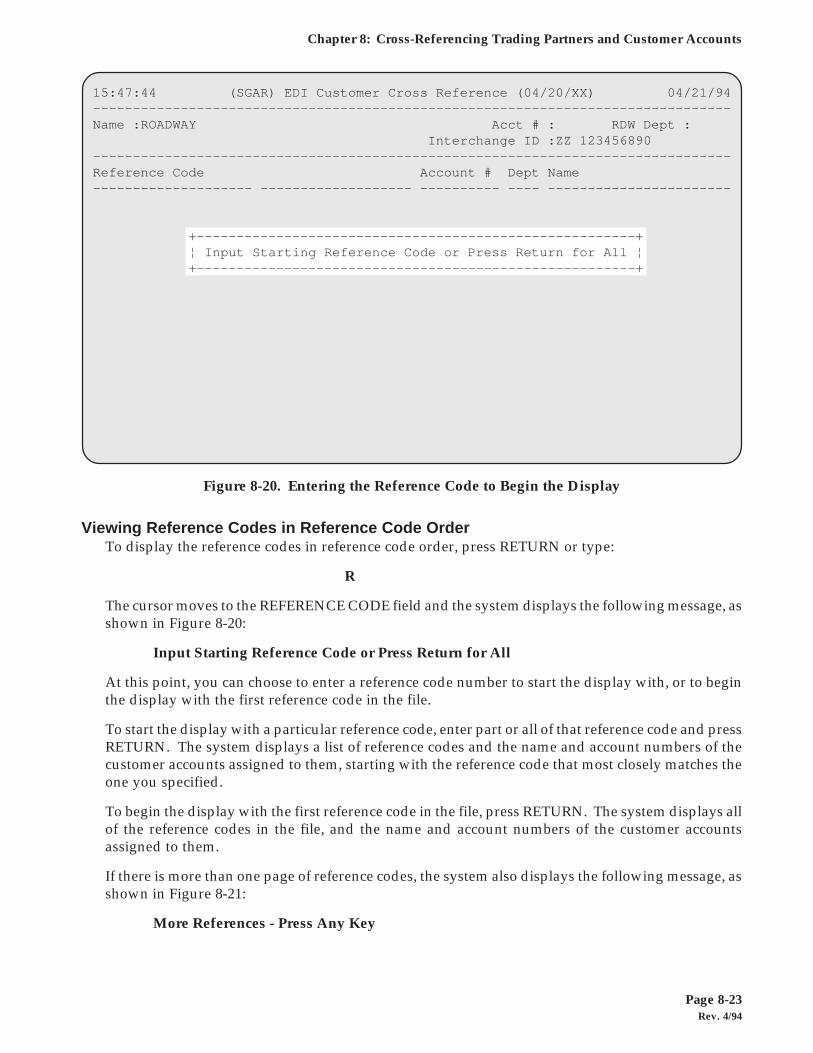
Rev. 4/94Page 8-23
Chapter 8: Cross-Referencing Trading Partners and Customer Accounts
Viewing Reference Codes in Reference Code OrderTo display the reference codes in reference code order, press RETURN or type:
R
The cursor moves to the REFERENCE CODE field and the system displays the following message, asshown in Figure 8-20:
Input Starting Reference Code or Press Return for All
At this point, you can choose to enter a reference code number to start the display with, or to beginthe display with the first reference code in the file.
To start the display with a particular reference code, enter part or all of that reference code and pressRETURN. The system displays a list of reference codes and the name and account numbers of thecustomer accounts assigned to them, starting with the reference code that most closely matches theone you specified.
To begin the display with the first reference code in the file, press RETURN. The system displays allof the reference codes in the file, and the name and account numbers of the customer accountsassigned to them.
If there is more than one page of reference codes, the system also displays the following message, asshown in Figure 8-21:
More References - Press Any Key
Figure 8-20. Entering the Reference Code to Begin the Display
15:47:44 (SGAR) EDI Customer Cross Reference (04/20/XX) 04/21/94--------------------------------------------------------------------------------Name :ROADWAY Acct # : RDW Dept : Interchange ID :ZZ 123456890--------------------------------------------------------------------------------Reference Code Account # Dept Name-------------------- ------------------- ---------- ---- -----------------------
+-------------------------------------------------------+ ¦ Input Starting Reference Code or Press Return for All ¦ +-------------------------------------------------------+
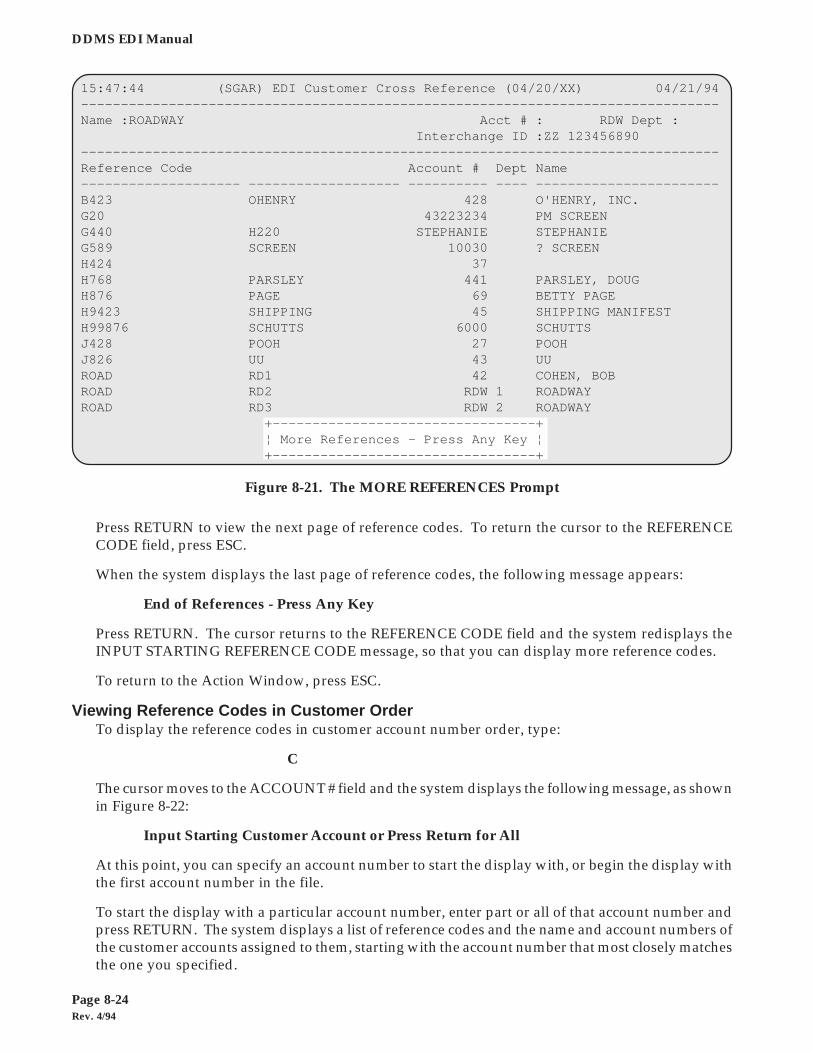
Rev. 4/94Page 8-24
DDMS EDI Manual
Press RETURN to view the next page of reference codes. To return the cursor to the REFERENCECODE field, press ESC.
When the system displays the last page of reference codes, the following message appears:
End of References - Press Any Key
Press RETURN. The cursor returns to the REFERENCE CODE field and the system redisplays theINPUT STARTING REFERENCE CODE message, so that you can display more reference codes.
To return to the Action Window, press ESC.
Viewing Reference Codes in Customer OrderTo display the reference codes in customer account number order, type:
C
The cursor moves to the ACCOUNT # field and the system displays the following message, as shownin Figure 8-22:
Input Starting Customer Account or Press Return for All
At this point, you can specify an account number to start the display with, or begin the display withthe first account number in the file.
To start the display with a particular account number, enter part or all of that account number andpress RETURN. The system displays a list of reference codes and the name and account numbers ofthe customer accounts assigned to them, starting with the account number that most closely matchesthe one you specified.
Figure 8-21. The MORE REFERENCES Prompt
15:47:44 (SGAR) EDI Customer Cross Reference (04/20/XX) 04/21/94--------------------------------------------------------------------------------Name :ROADWAY Acct # : RDW Dept : Interchange ID :ZZ 123456890--------------------------------------------------------------------------------Reference Code Account # Dept Name-------------------- ------------------- ---------- ---- -----------------------B423 OHENRY 428 O'HENRY, INC.G20 43223234 PM SCREENG440 H220 STEPHANIE STEPHANIEG589 SCREEN 10030 ? SCREENH424 37H768 PARSLEY 441 PARSLEY, DOUGH876 PAGE 69 BETTY PAGEH9423 SHIPPING 45 SHIPPING MANIFESTH99876 SCHUTTS 6000 SCHUTTSJ428 POOH 27 POOHJ826 UU 43 UUROAD RD1 42 COHEN, BOBROAD RD2 RDW 1 ROADWAYROAD RD3 RDW 2 ROADWAY +---------------------------------+ ¦ More References - Press Any Key ¦ +---------------------------------+
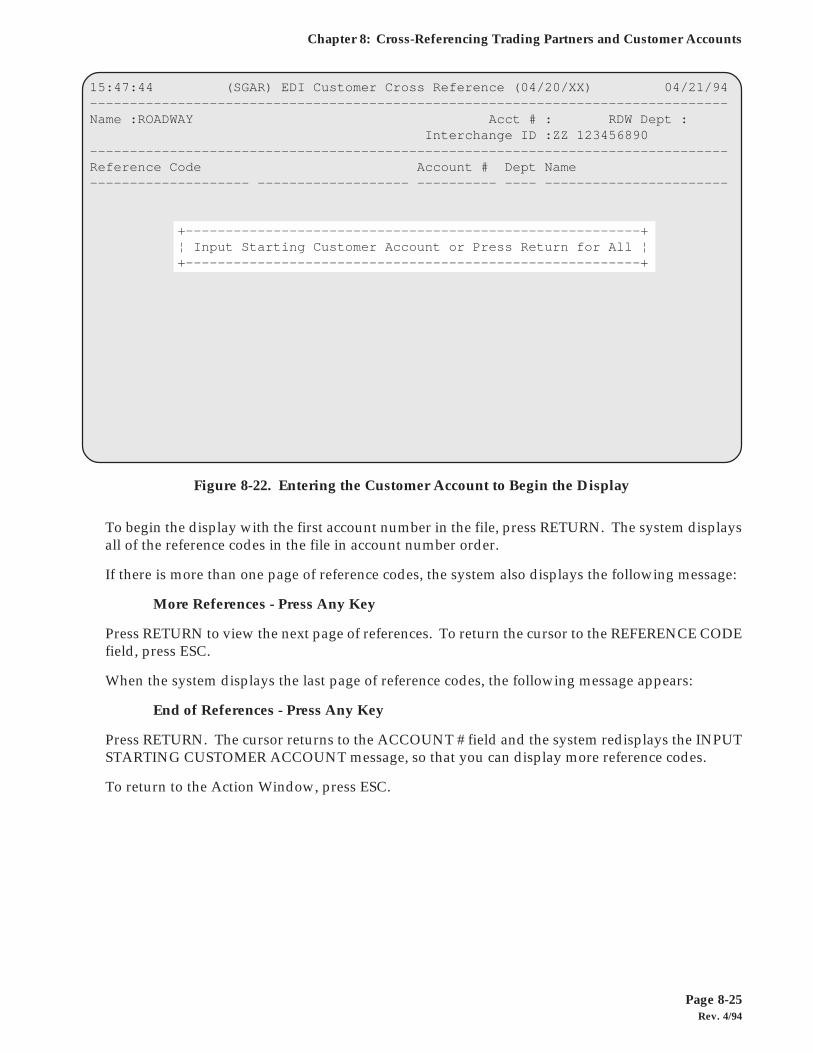
Rev. 4/94Page 8-25
Chapter 8: Cross-Referencing Trading Partners and Customer Accounts
To begin the display with the first account number in the file, press RETURN. The system displaysall of the reference codes in the file in account number order.
If there is more than one page of reference codes, the system also displays the following message:
More References - Press Any Key
Press RETURN to view the next page of references. To return the cursor to the REFERENCE CODEfield, press ESC.
When the system displays the last page of reference codes, the following message appears:
End of References - Press Any Key
Press RETURN. The cursor returns to the ACCOUNT # field and the system redisplays the INPUTSTARTING CUSTOMER ACCOUNT message, so that you can display more reference codes.
To return to the Action Window, press ESC.
Figure 8-22. Entering the Customer Account to Begin the Display
15:47:44 (SGAR) EDI Customer Cross Reference (04/20/XX) 04/21/94--------------------------------------------------------------------------------Name :ROADWAY Acct # : RDW Dept : Interchange ID :ZZ 123456890--------------------------------------------------------------------------------Reference Code Account # Dept Name-------------------- ------------------- ---------- ---- -----------------------
+---------------------------------------------------------+ ¦ Input Starting Customer Account or Press Return for All ¦ +---------------------------------------------------------+