Embed Size (px)
Citation preview
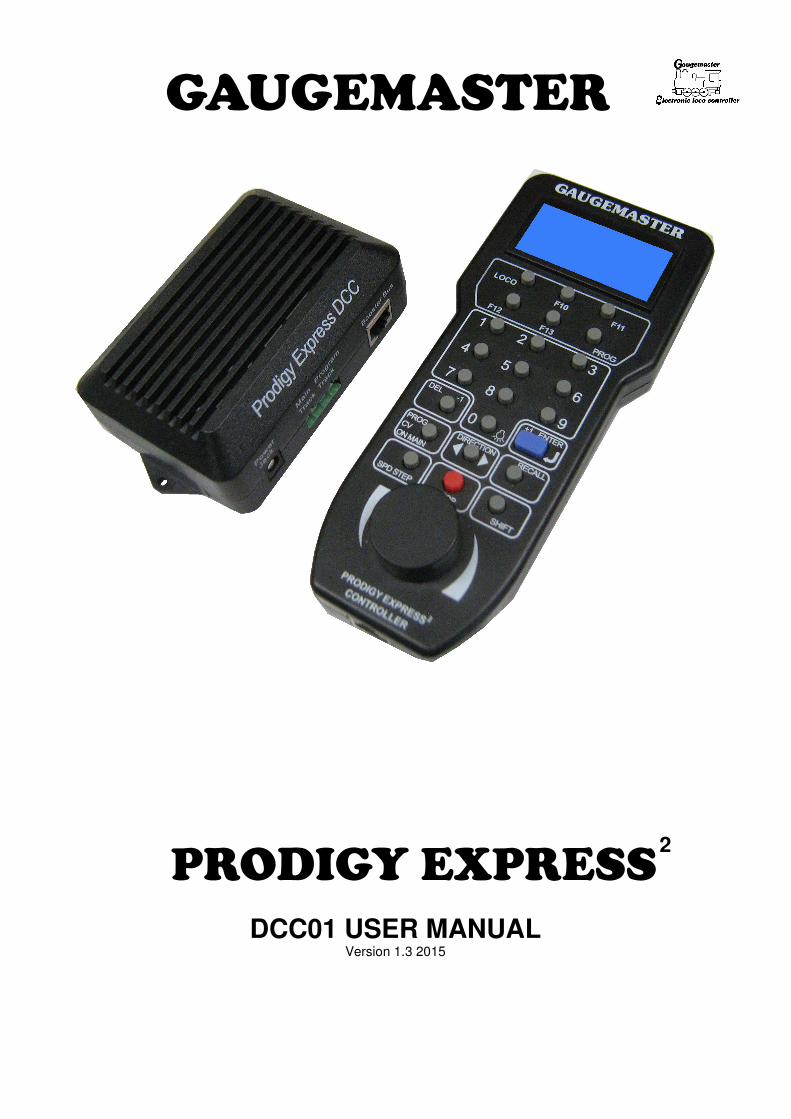
GAUGEMASTER
DCC01 USER MANUAL Version 1.3 2015
2
PRODIGY EXPRESS
T A B L E O F C O N T E N T S 1. Getting Started Introduction Specifications and Features Quick Start Connecting to Your Layout Running a Loco Controlling Accessory Functions 2. Recalling Locos Saving Locos Deleting Locos Emergency Stopping Speed Steps Overload and Short Circuit 3. Programming Decoders Programming Loco on the Program Track Programming Locos on the Main Track Reading Loco’s Decoder Values on the Program Track 4. Consisting Advanced Consisting Programming Advanced Consists Running Advanced Consists Clearing Advanced Consists 5. More About Decoder Read Back Configuration Variables – CVs Most Commonly Used CVs A Word About CV #29 More About Programming Locomotive Decoders 6. General Trouble Shooting Checklist for General Problems 7. Special Trouble Shooting Contact Details
The PROGRAMMING TRACK and MAIN TRACK must NEVER be CONNECTED TOGETHER as this will DAMAGE the unit
The PROG track output is un-powered and is not intended to be incorporated as part of the main layout, decoders can only be programmed and read but not run on this output. The READ facility on your Prodigy system can be impaired if used with older style de-coders with only basic CV support, some power connectors can also cause problems if not intended for digital layouts. The SMPS (power supply) is a precision piece of equipment and is ideally used at room temperature; avoid exposure to very cold environments as this might prevent the unit from powering up correctly.

Getting Started
Introduction Note Although there are Quick-start instructions on the back of the Cab/ Handheld, please read these instructions thoroughly to better understand and enjoy your Prodigy Express DCC system. Specifications and Features Input: 13-16 volts DC, 2 Amps. It comes with a universal switching power supply (good for USA and Europe) Output: DCC signal with 13.8 VA, for HO and N scales Maximum Current: 2 Amps Note Although you can draw more than 2 amps for short periods of time, it is not recommended Maximum number of Cabs: Use up to 20 Cabs Address Capability: 2-digit (1-127) or 4-digit (1-9,999) Speed Steps: 14/28/128 Accessory Functions: 29 (F0-F28) Advanced Consisting Program Loco on Program Track Program Loco on Main Track Read Loco on Program Track Quick Start Connecting to Your Layout 1. Using a small flat-bladed screwdriver attach two wires from the Main Track layout to the terminals marked Main Track and two wires from the Program Track to the terminals marked Program Track. 2. Plug one end of the Cab Lead into the Walkaround Controller and the other end into the base unit Cab Jack socket - DO NOT plug this lead into the Booster Bus socket 3. Plug the power supply into the base unit. 4. Plug the AC line cord into a wall outlet. 5. Double check all wiring, the power light should be on and you are ready to run your decoder equipped locos.
Running a Loco To run a loco, you have to first know its address. Most decoders you purchase have the factory default ad-dress #3. Read your decoder and/or loco manual for your decoder address. To select a loco, press the LOCO key. Using the numeric keypad (0 - 9), enter the loco address. Press ENTER. You have just acquired the loco. The Cab will automatically remember the loco address for later recall. Use the DIRECTION key to set the loco’s direction. Turn the THROTTLE knob slowly to increase the loco’s speed. The selected loco, or current loco, will begin moving. You can also tap the +1 or -1 to adjust the loco’s speed. Do not hold the -1 key, since this is also the DEL key and will delete the loco. To toggle the headlight (F0) on or off, press 0. Controlling Accessory Functions To control accessory functions F1 - F9, press 1 - 9. To control F10 – F28, press SHIFT, then input the two digit function number. Only functions up to F12 will show in the display, F13 to F28 will be activated but will not be displayed on the screen.
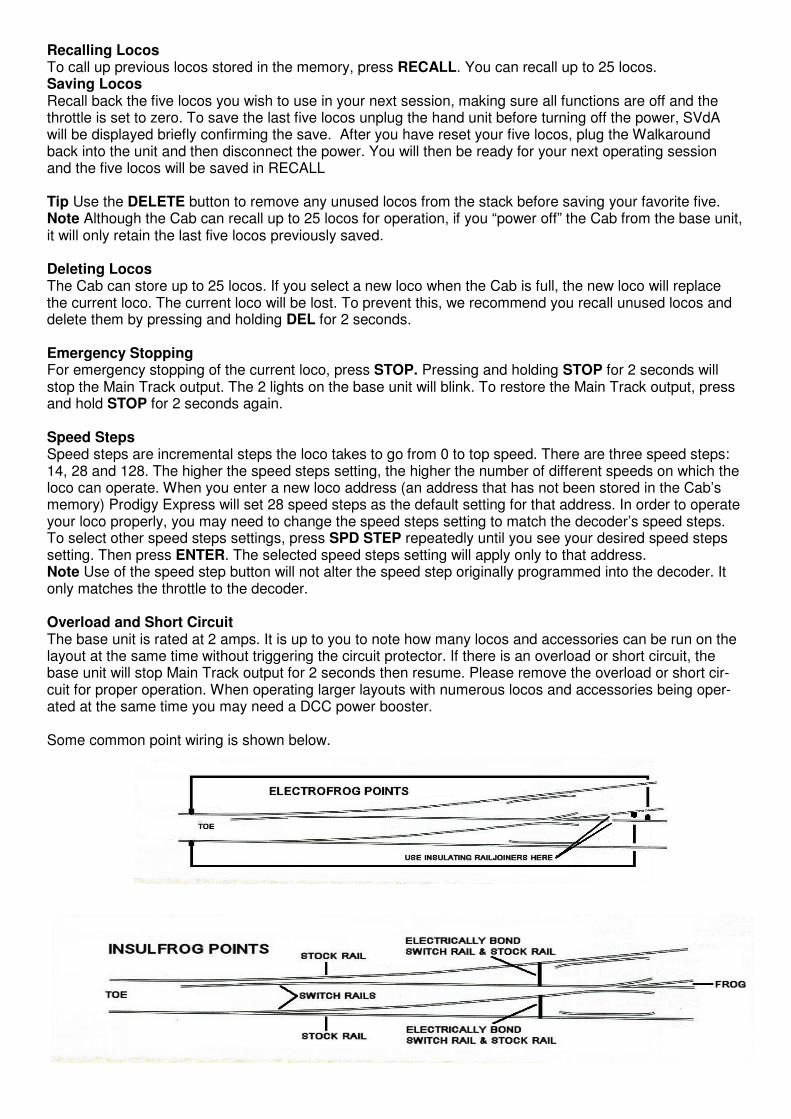
Recalling Locos To call up previous locos stored in the memory, press RECALL. You can recall up to 25 locos. Saving Locos Recall back the five locos you wish to use in your next session, making sure all functions are off and the throttle is set to zero. To save the last five locos unplug the hand unit before turning off the power, SVdA will be displayed briefly confirming the save. After you have reset your five locos, plug the Walkaround back into the unit and then disconnect the power. You will then be ready for your next operating session and the five locos will be saved in RECALL Tip Use the DELETE button to remove any unused locos from the stack before saving your favorite five. Note Although the Cab can recall up to 25 locos for operation, if you “power off” the Cab from the base unit, it will only retain the last five locos previously saved. Deleting Locos The Cab can store up to 25 locos. If you select a new loco when the Cab is full, the new loco will replace the current loco. The current loco will be lost. To prevent this, we recommend you recall unused locos and delete them by pressing and holding DEL for 2 seconds. Emergency Stopping For emergency stopping of the current loco, press STOP. Pressing and holding STOP for 2 seconds will stop the Main Track output. The 2 lights on the base unit will blink. To restore the Main Track output, press and hold STOP for 2 seconds again. Speed Steps Speed steps are incremental steps the loco takes to go from 0 to top speed. There are three speed steps: 14, 28 and 128. The higher the speed steps setting, the higher the number of different speeds on which the loco can operate. When you enter a new loco address (an address that has not been stored in the Cab’s memory) Prodigy Express will set 28 speed steps as the default setting for that address. In order to operate your loco properly, you may need to change the speed steps setting to match the decoder’s speed steps. To select other speed steps settings, press SPD STEP repeatedly until you see your desired speed steps setting. Then press ENTER. The selected speed steps setting will apply only to that address. Note Use of the speed step button will not alter the speed step originally programmed into the decoder. It only matches the throttle to the decoder. Overload and Short Circuit The base unit is rated at 2 amps. It is up to you to note how many locos and accessories can be run on the layout at the same time without triggering the circuit protector. If there is an overload or short circuit, the base unit will stop Main Track output for 2 seconds then resume. Please remove the overload or short cir-cuit for proper operation. When operating larger layouts with numerous locos and accessories being oper-ated at the same time you may need a DCC power booster. Some common point wiring is shown below.
Programming Decoders The Prodigy Express allows you to easily program most NMRA compatible decoders. It guides you step by step through the programming process. No hexadecimal numbers are needed, to program decoders with this system. The Prodigy Express allows you to program decoders on a separate Program Track or on the Main Track layout, all without affecting any other locos operating on the Main Track. Decoder Terminology Note: Before you start programming, please familiarize yourself with the following terminology. Loco Address: The address is the number assigned to a decoder to identify the decoder. Start Voltage: This is the voltage required to start the loco’s motor and overcome its weight and friction to make it begin to move. You can program your loco with a start voltage so that it will begin to move as soon as the throttle is turned. Top Voltage: The top voltage (top speed) is the voltage (speed) at full throttle. Acceleration Rate: This rate simulates the drag of a heavy load as the loco speeds up so when you in-crease the speed setting, the loco will gradually increase its speed. Deceleration Rate: This rate simulates the drag of a heavy load as the loco slows down so when you de-crease the speed setting, the loco will gradually decrease its speed. Programming Loco on the Program Track 1. Place the loco on the Program Track. Press PROG to select “Prog Prog Track”. Press ENTER. 2. First, “Adr” will flash, prompting you to program the loco address. Using 0 - 9, enter the loco address fol-lowed by ENTER, or press ENTER to skip. Note: For the beginner or if you want to only program the loco address, you can stop right here. Put the loco back on the Main Track. Select the loco by pressing LOCO then enter the loco address and press ENTER. Now you can run the loco. 3. Next, “SV” will flash, prompting you to program the Start Voltage. Input data and then press ENTER. 4. Next, “Acc” will flash, prompting you to program the acceleration rate. Input data and then press ENTER. 5. Next, “dEc” will flash, prompting you to program the deceleration rate. Input data and then press ENTER. 6. Next, “TV” will flash, prompting you to program the Top Voltage. Input data then press ENTER. 7. Finally, “CV#” will flash, prompting you to program a CV (Configuration Variable). At this point, you have already finished most of the decoder programming. You can stop programming here by pressing ENTER. 8. If you want to program a CV, enter a CV number. Press ENTER. Then enter CV data. Press ENTER. “CV#” will flash again, prompting you to program another CV. To skip, press ENTER. Note Programming a CV with incorrect data can cause a decoder malfunction. Read your decoder manual carefully before programming a CV Programming Locos on the Main Track Programming on the Main Track can save you the effort of moving a loco to the Program Track for pro-gramming. However, you have to know the loco address in order to program on the Main Track. Otherwise you have to program the loco on the Program Track. Not all decoders support the Program on Main feature. Please read your decoder’s manual to check whether the decoder supports this feature. 1. To program on the Main Track, press PROG to select “Prog Main Track”. Press ENTER. The current loco address will flash, prompting you to program the current loco. 2. To program the current loco, press ENTER; to program another loco, enter its address and press ENTER. 3. The rest of the programming procedures are the same as the Programming on Program Track proce-dures (see above). We recommend you bring the loco to a stop before programming because if the moving loco has a bad pickup, it may fail to receive the program command, causing a malfunction. PROG CV ON MAIN button will give you direct access to the current loco’s CV programming Reading Loco’s Decoder Values on the Program Track The Prodigy Express DCC system gives you the ability to read back CV values of a decoder equipped loco on the Program Track. This feature is useful if you do not remember the decoder address or what CV val-ues your decoder has. Not all decoders support this feature. Please read your decoder’s manual to check whether it supports this feature. 1. Place the loco on the Program Track. 2. Press PROG to select “rEAd Prog Track” then press ENTER. 3. First, “Adr” will flash, prompting you to read the loco address. Press ENTER to read, this might take several second. If the decoder does not support read back feature, you will receive an “Err” (Error message).

4.You can skip any option by using the SHIFT key up to “CV#” this will flash, prompting you to read a CV. To read a CV, enter a CV number and press ENTER. After reading a CV, press ENTER. “CV#” will flash again, prompting you to read another CV. To end the read process, press ENTER. Consisting Sometimes more than one loco is needed to haul heavy loads. These grouped locos are known as a multi-ple unit or a consist. The Prodigy Express DCC system allows you to build consists quickly and easily. Advanced Consisting You can only apply Advanced Consisting to a mobile decoder that has CV19 to support this feature. When you program a loco into an Advanced Consist, you actually program the consist number into the decoder’s CV19, which will override the decoder’s original address. Therefore, the loco will no longer respond to com-mands addressed to its original address, but rather only to commands addressed to the consist number. All decoders in the consist will receive the command addressed to the consist number at the same time and act as one until you clear the consist. The base unit does not hold the consist information. With Advanced Consists, always remember to clear the consist when you are finished or the locos will still run as part of the consist next time you use them. Programming Advanced Consists 1. Press PROG until “Cons SET” flashes in the LCD display. Then press ENTER. 2. “Cons #” will display, prompting you to enter a consist number. Enter a consist number, (a short address 1-127) followed by ENTER. Note Write down the consist number. You will need it later to clear the Advanced Consist. 3. “Add Loco” will display, prompting you to add a loco into the consist group. Enter the address of a loco you want to add. Press DIRECTION if you want the loco’s direction reversed (forward is the default setting). Then press ENTER. 4. “Add Loco” will display again, prompting you to add another loco into the consist group. You can add as many locos into your consist as you would like. To end programming, press ENTER. Running Advanced Consists Running Advanced Consist is just like running a single loco. After setting up your consist group, use the consist number to run the consist. 1. Press the LOCO key. Make sure “Loco” appears on the LCD. If not, press the LOCO key again. Enter the consist number and press ENTER. 2. Turn the throttle and all the locos in the consist will start moving together. To control an individual loco’s accessory functions use either the consist number or the loco’s original address. Read your decoder’s man-ual to find how to control the accessory functions. Clearing Advanced Consists 1. Press PROG until “Cons cLr” flashes in the display. Then press ENTER. 2. “Cons#” will display, prompting you to input the consist number. Enter number of the consist you want to clear and press ENTER. Once you clear the consist, each loco will respond immediately to its original speed command. Note If you forget the consist number, each loco’s address in the consist must be reprogrammed on the Program Track, or program CV19 to zero, in each loco. Many of our DCC manuals are available on-line in our Download section
www.gaugemaster.com
More about Decoder Read Back Not all decoders support the read back feature. Although Prodigy Express has read back functions, it may still fail to read back the decoders. This does not mean that your Prodigy Express is defective. No DCC sys-tem in the world is able to read all decoders 100%. This will not affect the operation of the decoder because you are always able to program your decoder. NOTE: The Prodigy Express will display the loco’s active address which could be it’s consist address if acti-vated. Configuration Variables – CVs Configuration Variables, also known as CVs, receive and hold entered data that allow the decoder to be tailored to a specific loco or accessory. Some CVs are also called registers. The Prodigy Express DCC sys-tem allows you to perform most basic programming without having to concern yourself with CVs or regis-ters. Of course, if you want to program CVs to custom tailor your decoders or select certain functions, the Prodigy Express has this capability. Most Commonly Used CVs The CVs listed on the chart are contained in almost all decoders, with additional CVs for extra functions – sound or light – in more specialized decoders. See the decoder manufacturer’s instruction manual for a list of CVs contained in that specific decoder and what values to enter for those CVs. A Word About CV #29 CV29 is the most important CV of the decoder. Improperly programming the CV29 may cause decoder mal-function. We do not recommend you program CV29 yourself because the unit will take care of it for you in most cases. When you program your decoder’s address with Prodigy Express, it will automatically program CV29. If you want to reverse the loco’s polarity or set 14 speed steps, you have to reprogram CV29 after programming the loco’s address. Please use the following table to reprogram CV29. More About Programming Locomotive Address on the Program Track or Main Track To program a locomotive address involves programming a series of CVs such as CV1, CV17, CV18, CV19 and CV29. This can be somewhat complicated. For most decoders, Prodigy Express automatically handles this for you when programming the loco address. However, it may fail to program some old decoders and some new sound decoders made by QSI®. It does not mean that you cannot program these decoders. It only means you cannot use the Prodigy Express’s easy address programming feature. For QSI® decoders please refer to your decoder’s manual and use CV programming to program the loco address. Prodigy Express' default setting CV29 = 2 CV29 = 34 Change polarity only CV29 = 3 CV29 = 35 Change to 14 speed steps only CV29 = 0 CV29 = 32 Change polarity & 14 speed steps CV29 = 1 CV29 = 33 CV # Register # Function 1 1 Short address 2 2 Start voltage 3 3 Acceleration rate (momentum) 4 4 Deceleration rate (momentum) 5 --- Top voltage 6 --- Mid voltage 7 --- Manufacturer version # 8 --- Manufacturer ID # 17 --- Extended address - upper & lower bytes, 4 digit addresses 18 --- Extended address - upper & lower bytes, 4 digit addresses 19 --- Advance consist 29 5 Configuration data #1 For some old decoders, you have to skip the Addr programming and use the CV program mode to program CV29 with a value of 2 and CV1 with a short address (1-127). Detailed steps are as follows: 1. Press Prog to select Prog Prog Track 2. Press Enter six times until CV# displays on the screen 3. To select CV29, press 29 and Enter 4. CV data displays. Press 2 and Enter 5. CV# displays again. Select CV1 by pressing 1 then press Enter 6. CV data displays. Press the loco address (1-127) and then Enter

General Trouble Shooting It takes the Command Station, the decoders and your layout to make the DCC system work. This Trouble Shooting Section has been arranged in a manner easiest for you to find the cause of your problem. Please go through this section in the exact order it appears because each following set of instructions assumes that the preceding set has been tested and that component of the DCC system found not defective. 1. Plug in the power supply of the base unit. The pilot light should turn on. If not, make sure the power supply is securely plugged into the base unit and into a working AC wall outlet. Then unplug the power, wait 3 seconds and plug back in. If power light still does not turn on, send the unit in for repair. 2. Check the Main Track output. Place an analog loco or test light on the Main Track. The loco should buzz or the test light should light. If not, check all connections and make sure the rear green plug is securely plugged in. Make sure the screws on the green plug are tightened on the wire and not on the wire cover (insulator). If the analog loco still does not buzz or the test light does not light, send the unit in for repair. It is better to use a V.O.M (multi-meter) on the A.C. scale to check for track power, as DCC track power is A.C., not D.C. 3. Check the communication between the base unit and the Cab. Press key 2. F2 should momentarily display on the LCD and the Link light should blink. If there is still no communication, send the unit in for repair. 4. Your loco may have a pickup problem. You should periodically clean your track and your loco’s wheels. Oxide coating or dirt on either the track or loco’s wheels often causes intermittent and jerky operation. If you pass the above steps, you’re Command Station and Cabs are fine. The problem may lie in the decoder. 5. Your decoder may have lost its memory or is in Advanced Consist mode (CV19 is not 0). Repro-gram the loco address and try again. 6. Your decoder may have too much momentum. Program the loco with zero acceleration and decelera-tion rates. 7. The current loco speed command may not match the decoder’s speed steps. Reprogram your decoder’s address. When you program the decoder with Prodigy Express it will automati-cally set the decoder’s speed steps to 28/128. Select 28 or 128 speed steps on the base unit and then try to run the loco. 8. Check the decoder wiring and make sure everything is correctly installed. 9. Remove the decoder and test it on a decoder tester to make sure the decoder is fine. 10. If the decoder is fine, check the loco to make sure the loco is fine before installing the decoder. Checklist for General Problems 1. Clean your layout and the loco’s wheels. 2. Check the layout’s wiring. 3. Reprogram loco address and other data. 4. Reset the base unit by unplugging power supply. 5. Check loco for proper decoder installation. 6. Check wiring from the base unit to your layout. 7. Check for short circuits and/or stray objects lying across track rails. 8. Make sure the Link light flashes when you press F2.

Special Trouble Shooting The loco’s headlight turns itself off When you press 0 to turn on the loco’s headlight, the base unit will send the command to the decoder to turn on the loco’s headlight. The base unit will not continuously send the accessory command to the de-coder like the speed command. When the loco hits a dirty track and loses its power, it will reset and lose the accessory command. You should clean the track and the loco’s wheel to improve the loco’s pickup. During operation all locos stop responding Unplug the power supply, wait 3 seconds and turn the power back on. If all the locos start to run and the system shuts down again, you may have too many locos and accessories connected to track power. Re-move some locos and try again. Your loco doesn’t work while other locos work The decoder may have lost its memory. Reprogram loco address. Your Cab operates locos but cannot program on the Program Track If the Link light flashes when you enter a data and press ENTER, then test the Program Track output. To test, place an analog loco on the Program Track. During the programming process, the Link light should be on and the analog loco should buzz. If the Link light is on and the analog loco does not buzz, it is a defec-tive Program Track output. Your Prodigy Express system is designed as a quick and easy introduction into DCC, replacing the hand set with any of the Prodigy Advance controllers will expand the system with additional features. This will include accessory decoder and route operation – fast clock and old style consisting – extended READ and system options. PC interface and wireless control is also available with some products. Your Prodigy Advance products carry a 1 YEAR GUARANTEE subject to the usual conditions
Your statutory rights are not affected If you believe your unit is faulty, please telephone us in the first instance. We will advise you of your best course of action. If it involves sending anything back, please send it to the address below via insured post
and packed securely.
Gaugemaster Controls Ltd, Gaugemaster House, Ford Road, Arundel, West Sussex BN18 OBN Tel. No: 01903 884321 Fax. No: 01903 884377 Email: [email protected]
Web: www.gaugemaster.com Registered in England. Reg. No: 2714470
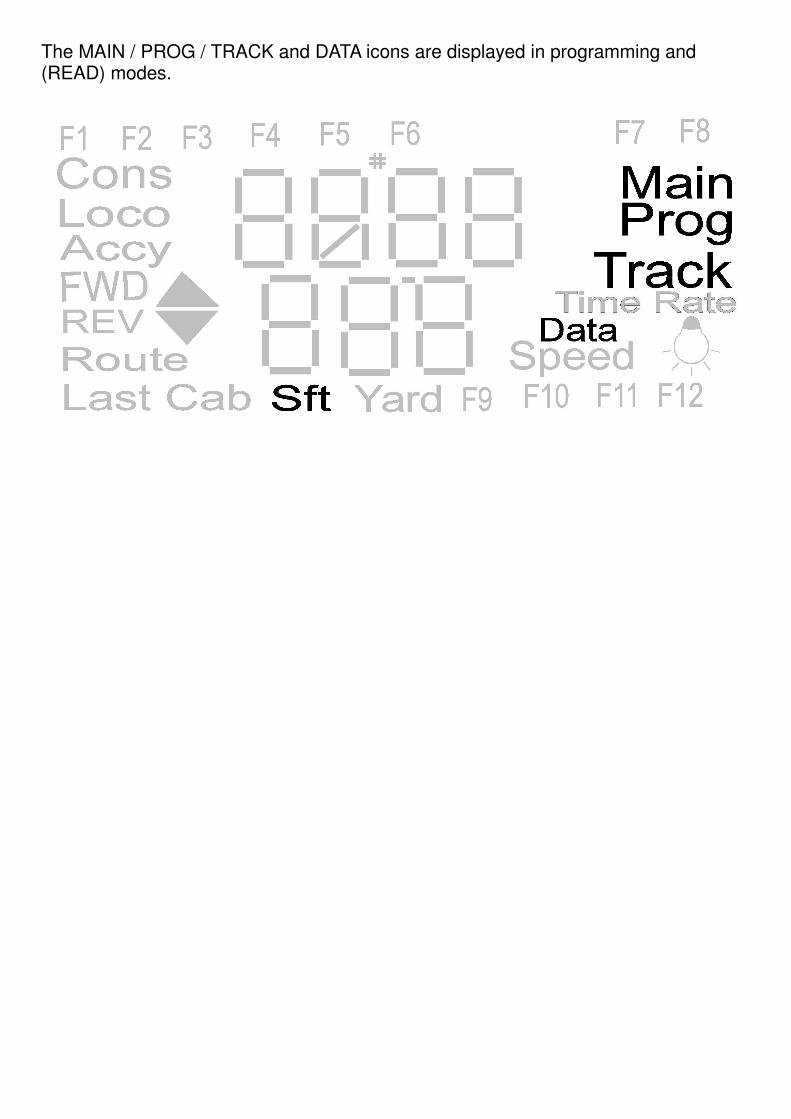
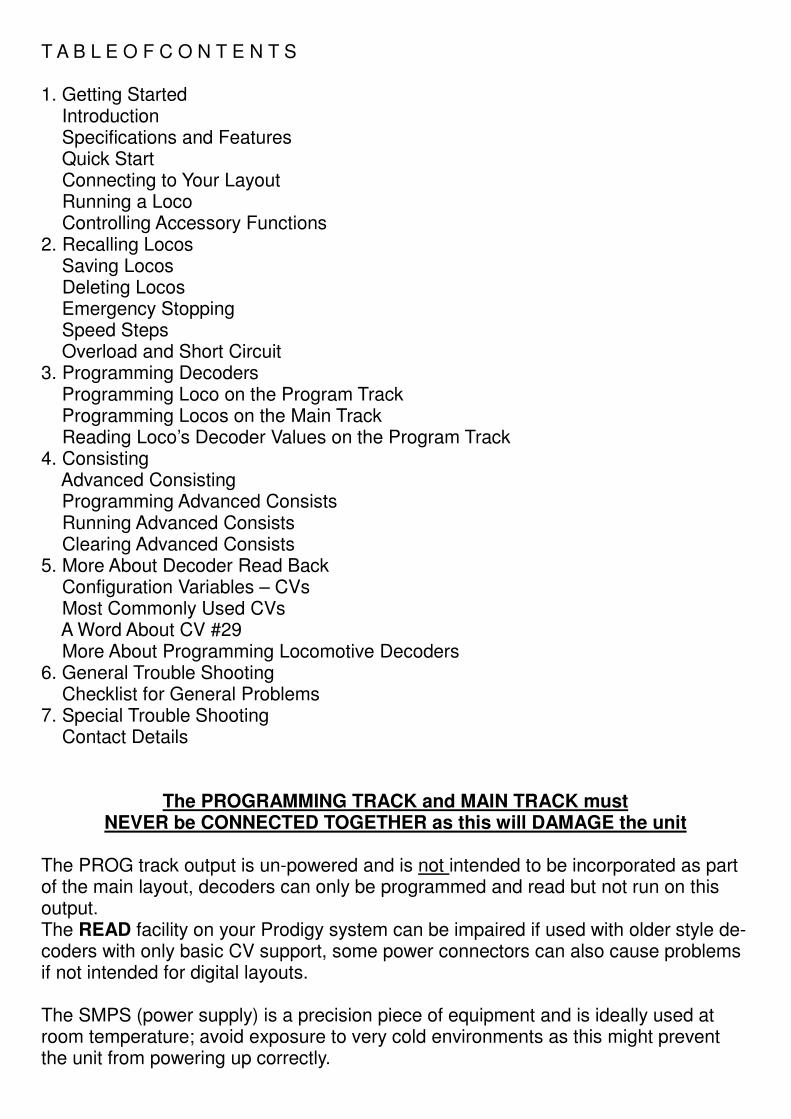
The MAIN / PROG / TRACK and DATA icons are displayed in programming and (READ) modes.
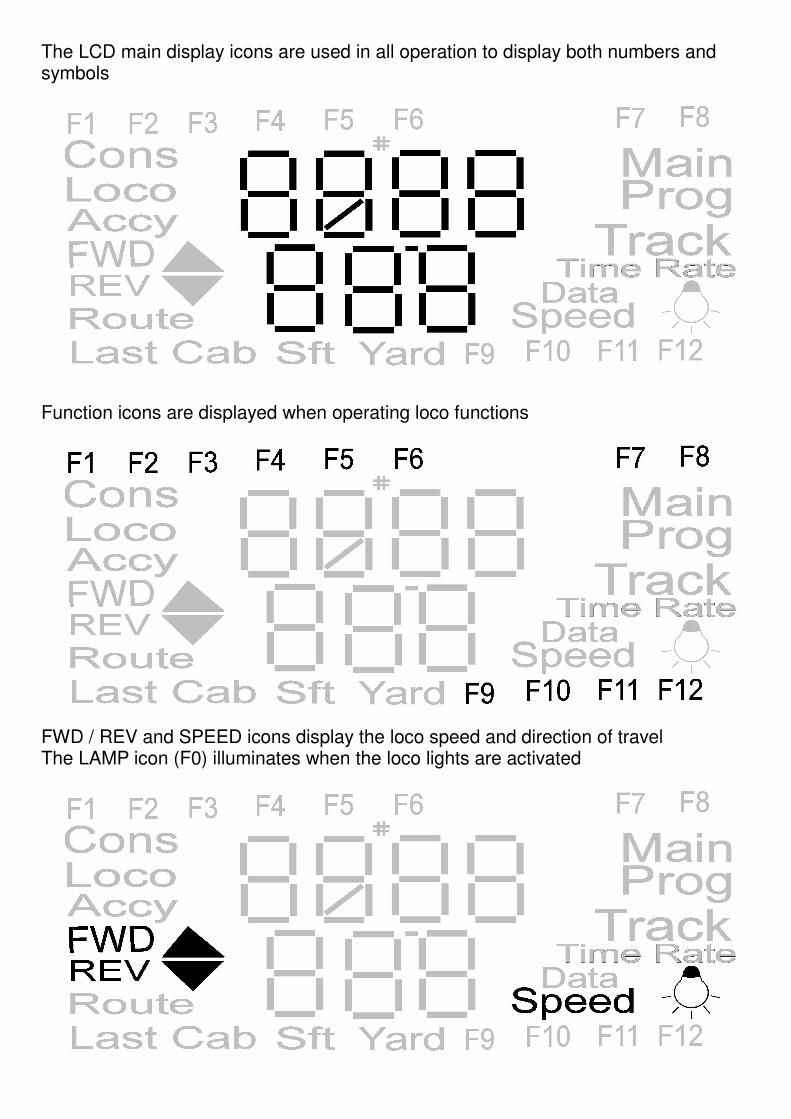
The LCD main display icons are used in all operation to display both numbers and symbols
Function icons are displayed when operating loco functions
FWD / REV and SPEED icons display the loco speed and direction of travel The LAMP icon (F0) illuminates when the loco lights are activated

The table below can be used to list loco address and special functions


![komatsu presentation v1 [Read-Only] · Microsoft PowerPoint - komatsu_presentation_v1 [Read-Only] Author: Kawakami Created Date: 5/16/2019 8:19:48 AM](https://img.pdfslide.us/doc/110x75/5f6851716a506a4b0c7b134c/komatsu-presentation-v1-read-only-microsoft-powerpoint-komatsupresentationv1.jpg)


![DOCS-#1388013-v1-LWHRA Leave (KNM).PPTX [Read-Only] · Title: Microsoft PowerPoint - DOCS-#1388013-v1-LWHRA_Leave_(KNM).PPTX [Read-Only] Author: kadletsa Created Date: 10/12/2016](https://img.pdfslide.us/doc/110x75/5fff2461b2f5a8730b4d4f75/docs-1388013-v1-lwhra-leave-knmpptx-read-only-title-microsoft-powerpoint.jpg)


![19626639-v1-LeadsCon LV2018 Ensuring Effective Compliance ... · Microsoft PowerPoint - 19626639-v1-LeadsCon LV2018 Ensuring Effective Compliance in Lead Generation [Read-Only] Author:](https://img.pdfslide.us/doc/110x75/5f31c5aa54530d51b76d3bd7/19626639-v1-leadscon-lv2018-ensuring-effective-compliance-microsoft-powerpoint.jpg)

![2012 Analyst Presentation v1 7 (3) [Read-Only]](https://img.pdfslide.us/doc/110x75/623fae31dc3ed0471605d5c3/2012-analyst-presentation-v1-7-3-read-only.jpg)
![USB005 User Guide v1 0.ppt [Read-Only]](https://img.pdfslide.us/doc/110x75/61e4acb597eebd090c41e425/usb005-user-guide-v1-0ppt-read-only.jpg)
![ESD Awareness Program _Subcon v1 0 [Read-Only]](https://img.pdfslide.us/doc/110x75/5533aa5d550346e1028b4990/esd-awareness-program-subcon-v1-0-read-only.jpg)