Embed Size (px)
Citation preview

1
David Reekie - Mould making and Glass Casting Methods
David says of his work that "through surreal uses of situation andperception. I have tried to illustra aspects of human behaviour. often Iused ironic. sometimes macabre humour to make a point!!. David talkedabout his sources of inspiration like newspaper photographs and theimportance of drawing in his work. He came with a sketch book stuffed fullof images.This section of the report will describe his mould making process usingboth clay and wax models, colouring techniques, and firing process.
Clay ModelWhen making an object it must first be decided if the model would be bestmade in clay or wax. For clay, only a form which allows the clay to beeasily removed from the mould should be used. Suitable forms are usuallybroad based. thick walled and have no undercuts.
2
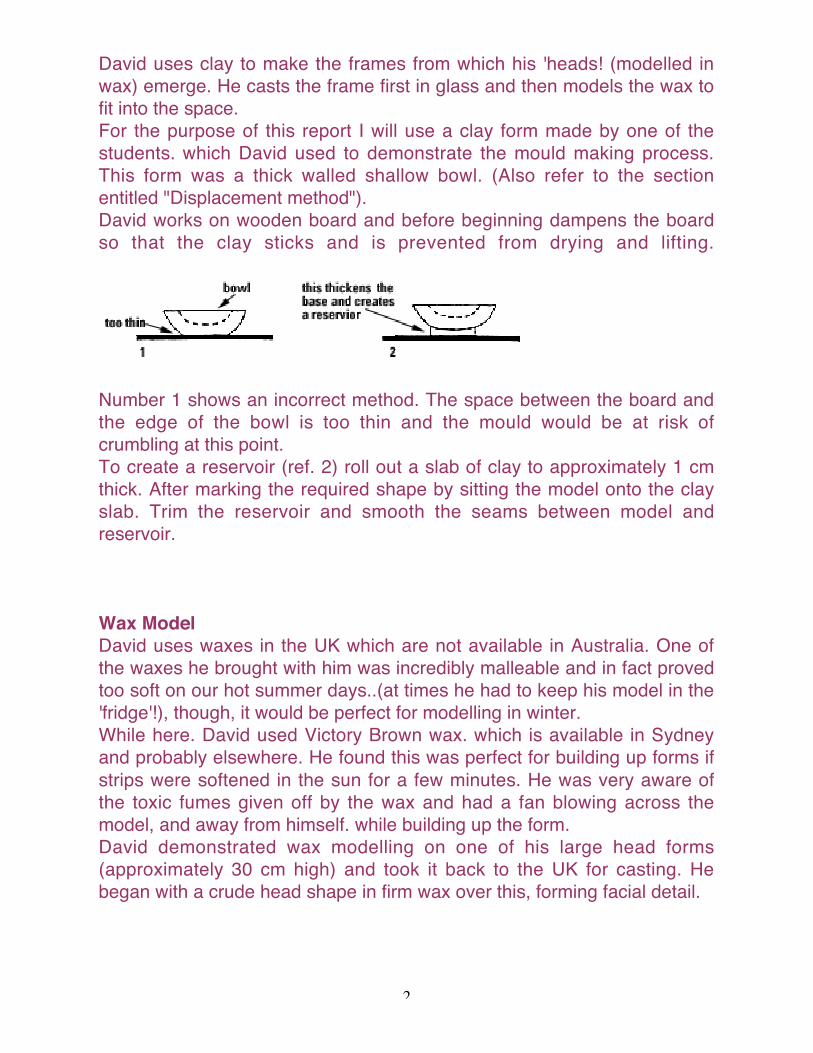
David uses clay to make the frames from which his 'heads! (modelled inwax) emerge. He casts the frame first in glass and then models the wax tofit into the space.For the purpose of this report I will use a clay form made by one of thestudents. which David used to demonstrate the mould making process.This form was a thick walled shallow bowl. (Also refer to the sectionentitled "Displacement method").David works on wooden board and before beginning dampens the boardso that the clay sticks and is prevented from drying and lifting.
Number 1 shows an incorrect method. The space between the board andthe edge of the bowl is too thin and the mould would be at risk ofcrumbling at this point.To create a reservoir (ref. 2) roll out a slab of clay to approximately 1 cmthick. After marking the required shape by sitting the model onto the clayslab. Trim the reservoir and smooth the seams between model andreservoir.
Wax ModelDavid uses waxes in the UK which are not available in Australia. One ofthe waxes he brought with him was incredibly malleable and in fact provedtoo soft on our hot summer days..(at times he had to keep his model in the'fridge'!), though, it would be perfect for modelling in winter.While here. David used Victory Brown wax. which is available in Sydneyand probably elsewhere. He found this was perfect for building up forms ifstrips were softened in the sun for a few minutes. He was very aware ofthe toxic fumes given off by the wax and had a fan blowing across themodel, and away from himself. while building up the form.David demonstrated wax modelling on one of his large head forms(approximately 30 cm high) and took it back to the UK for casting. Hebegan with a crude head shape in firm wax over this, forming facial detail.
3
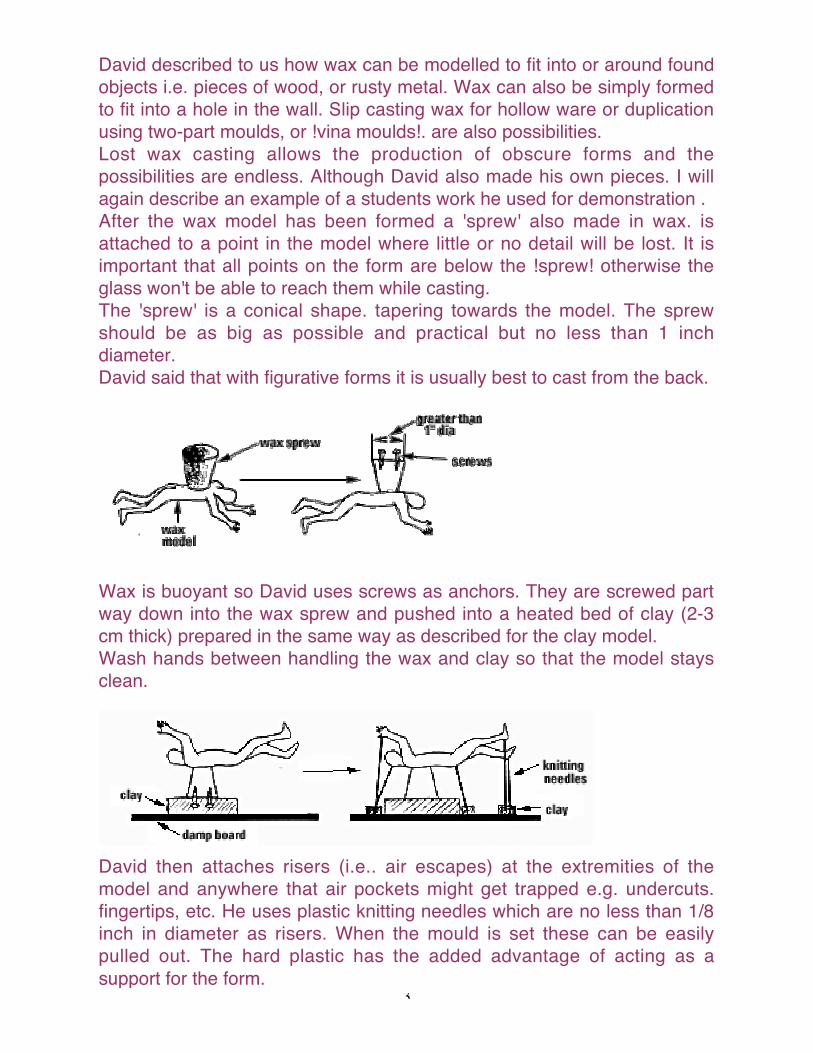
David described to us how wax can be modelled to fit into or around foundobjects i.e. pieces of wood, or rusty metal. Wax can also be simply formedto fit into a hole in the wall. Slip casting wax for hollow ware or duplicationusing two-part moulds, or !vina moulds!. are also possibilities.Lost wax casting allows the production of obscure forms and thepossibilities are endless. Although David also made his own pieces. I willagain describe an example of a students work he used for demonstration .After the wax model has been formed a 'sprew' also made in wax. isattached to a point in the model where little or no detail will be lost. It isimportant that all points on the form are below the !sprew! otherwise theglass won't be able to reach them while casting.The 'sprew' is a conical shape. tapering towards the model. The sprewshould be as big as possible and practical but no less than 1 inchdiameter.David said that with figurative forms it is usually best to cast from the back.
Wax is buoyant so David uses screws as anchors. They are screwed partway down into the wax sprew and pushed into a heated bed of clay (2-3cm thick) prepared in the same way as described for the clay model.Wash hands between handling the wax and clay so that the model staysclean.
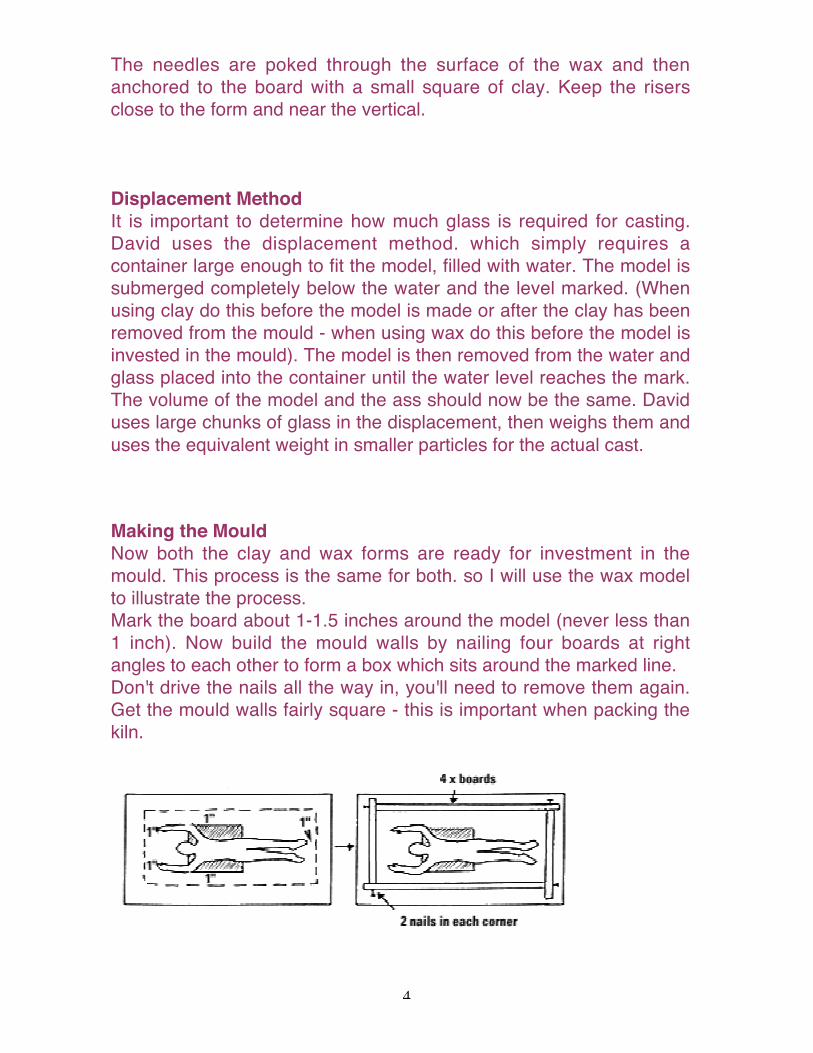
David then attaches risers (i.e.. air escapes) at the extremities of themodel and anywhere that air pockets might get trapped e.g. undercuts.fingertips, etc. He uses plastic knitting needles which are no less than 1/8inch in diameter as risers. When the mould is set these can be easilypulled out. The hard plastic has the added advantage of acting as asupport for the form.
4
The needles are poked through the surface of the wax and thenanchored to the board with a small square of clay. Keep the risersclose to the form and near the vertical.
Displacement MethodIt is important to determine how much glass is required for casting.David uses the displacement method. which simply requires acontainer large enough to fit the model, filled with water. The model issubmerged completely below the water and the level marked. (Whenusing clay do this before the model is made or after the clay has beenremoved from the mould - when using wax do this before the model isinvested in the mould). The model is then removed from the water andglass placed into the container until the water level reaches the mark.The volume of the model and the ass should now be the same. Daviduses large chunks of glass in the displacement, then weighs them anduses the equivalent weight in smaller particles for the actual cast.
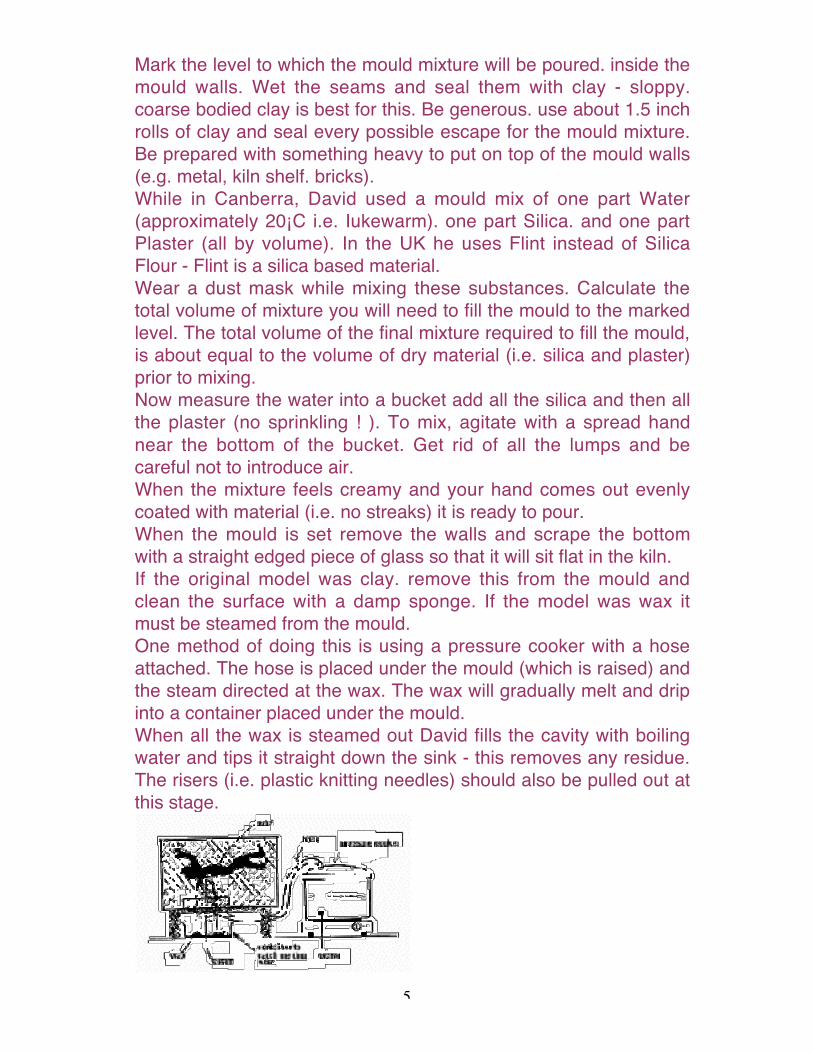
Making the MouldNow both the clay and wax forms are ready for investment in themould. This process is the same for both. so I will use the wax modelto illustrate the process.Mark the board about 1-1.5 inches around the model (never less than1 inch). Now build the mould walls by nailing four boards at rightangles to each other to form a box which sits around the marked line.Don't drive the nails all the way in, you'll need to remove them again.Get the mould walls fairly square - this is important when packing thekiln.
5
Mark the level to which the mould mixture will be poured. inside themould walls. Wet the seams and seal them with clay - sloppy.coarse bodied clay is best for this. Be generous. use about 1.5 inchrolls of clay and seal every possible escape for the mould mixture.Be prepared with something heavy to put on top of the mould walls(e.g. metal, kiln shelf. bricks).While in Canberra, David used a mould mix of one part Water(approximately 20¡C i.e. Iukewarm). one part Silica. and one partPlaster (all by volume). In the UK he uses Flint instead of SilicaFlour - Flint is a silica based material.Wear a dust mask while mixing these substances. Calculate thetotal volume of mixture you will need to fill the mould to the markedlevel. The total volume of the final mixture required to fill the mould,is about equal to the volume of dry material (i.e. silica and plaster)prior to mixing.Now measure the water into a bucket add all the silica and then allthe plaster (no sprinkling ! ). To mix, agitate with a spread handnear the bottom of the bucket. Get rid of all the lumps and becareful not to introduce air.When the mixture feels creamy and your hand comes out evenlycoated with material (i.e. no streaks) it is ready to pour.When the mould is set remove the walls and scrape the bottomwith a straight edged piece of glass so that it will sit flat in the kiln.If the original model was clay. remove this from the mould andclean the surface with a damp sponge. If the model was wax itmust be steamed from the mould.One method of doing this is using a pressure cooker with a hoseattached. The hose is placed under the mould (which is raised) andthe steam directed at the wax. The wax will gradually melt and dripinto a container placed under the mould.When all the wax is steamed out David fills the cavity with boilingwater and tips it straight down the sink - this removes any residue.The risers (i.e. plastic knitting needles) should also be pulled out atthis stage.
6
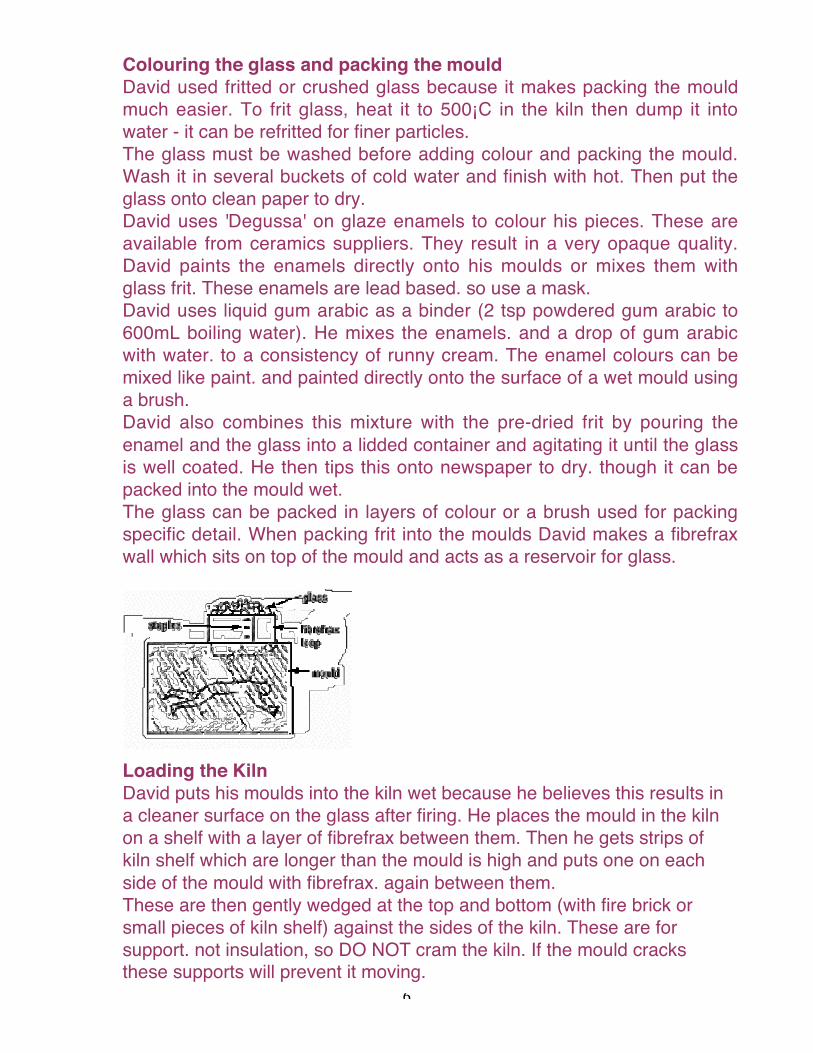
Colouring the glass and packing the mouldDavid used fritted or crushed glass because it makes packing the mouldmuch easier. To frit glass, heat it to 500¡C in the kiln then dump it intowater - it can be refritted for finer particles.The glass must be washed before adding colour and packing the mould.Wash it in several buckets of cold water and finish with hot. Then put theglass onto clean paper to dry.David uses 'Degussa' on glaze enamels to colour his pieces. These areavailable from ceramics suppliers. They result in a very opaque quality.David paints the enamels directly onto his moulds or mixes them withglass frit. These enamels are lead based. so use a mask.David uses liquid gum arabic as a binder (2 tsp powdered gum arabic to600mL boiling water). He mixes the enamels. and a drop of gum arabicwith water. to a consistency of runny cream. The enamel colours can bemixed like paint. and painted directly onto the surface of a wet mould usinga brush.David also combines this mixture with the pre-dried frit by pouring theenamel and the glass into a lidded container and agitating it until the glassis well coated. He then tips this onto newspaper to dry. though it can bepacked into the mould wet.The glass can be packed in layers of colour or a brush used for packingspecific detail. When packing frit into the moulds David makes a fibrefraxwall which sits on top of the mould and acts as a reservoir for glass.
Loading the KilnDavid puts his moulds into the kiln wet because he believes this results ina cleaner surface on the glass after firing. He places the mould in the kilnon a shelf with a layer of fibrefrax between them. Then he gets strips ofkiln shelf which are longer than the mould is high and puts one on eachside of the mould with fibrefrax. again between them.These are then gently wedged at the top and bottom (with fire brick orsmall pieces of kiln shelf) against the sides of the kiln. These are forsupport. not insulation, so DO NOT cram the kiln. If the mould cracksthese supports will prevent it moving.
7
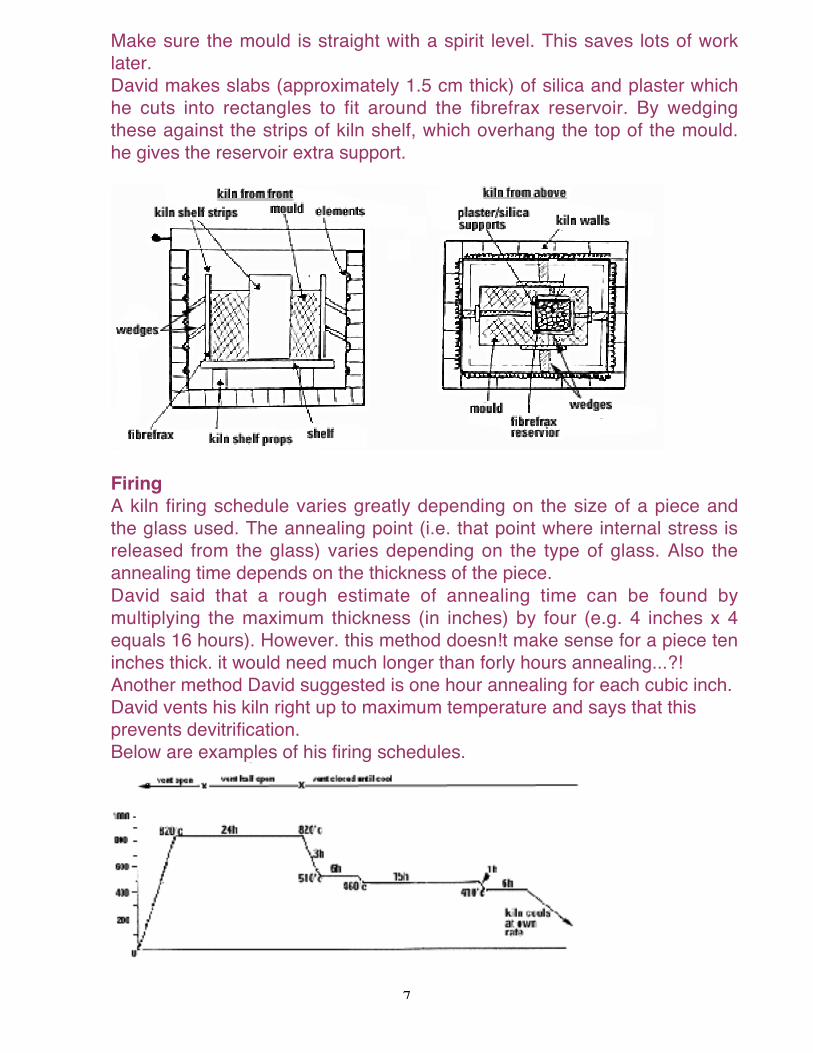
Make sure the mould is straight with a spirit level. This saves lots of worklater.David makes slabs (approximately 1.5 cm thick) of silica and plaster whichhe cuts into rectangles to fit around the fibrefrax reservoir. By wedgingthese against the strips of kiln shelf, which overhang the top of the mould.he gives the reservoir extra support.
FiringA kiln firing schedule varies greatly depending on the size of a piece andthe glass used. The annealing point (i.e. that point where internal stress isreleased from the glass) varies depending on the type of glass. Also theannealing time depends on the thickness of the piece.David said that a rough estimate of annealing time can be found bymultiplying the maximum thickness (in inches) by four (e.g. 4 inches x 4equals 16 hours). However. this method doesn!t make sense for a piece teninches thick. it would need much longer than forly hours annealing...?!Another method David suggested is one hour annealing for each cubic inch.David vents his kiln right up to maximum temperature and says that thisprevents devitrification.Below are examples of his firing schedules.
8
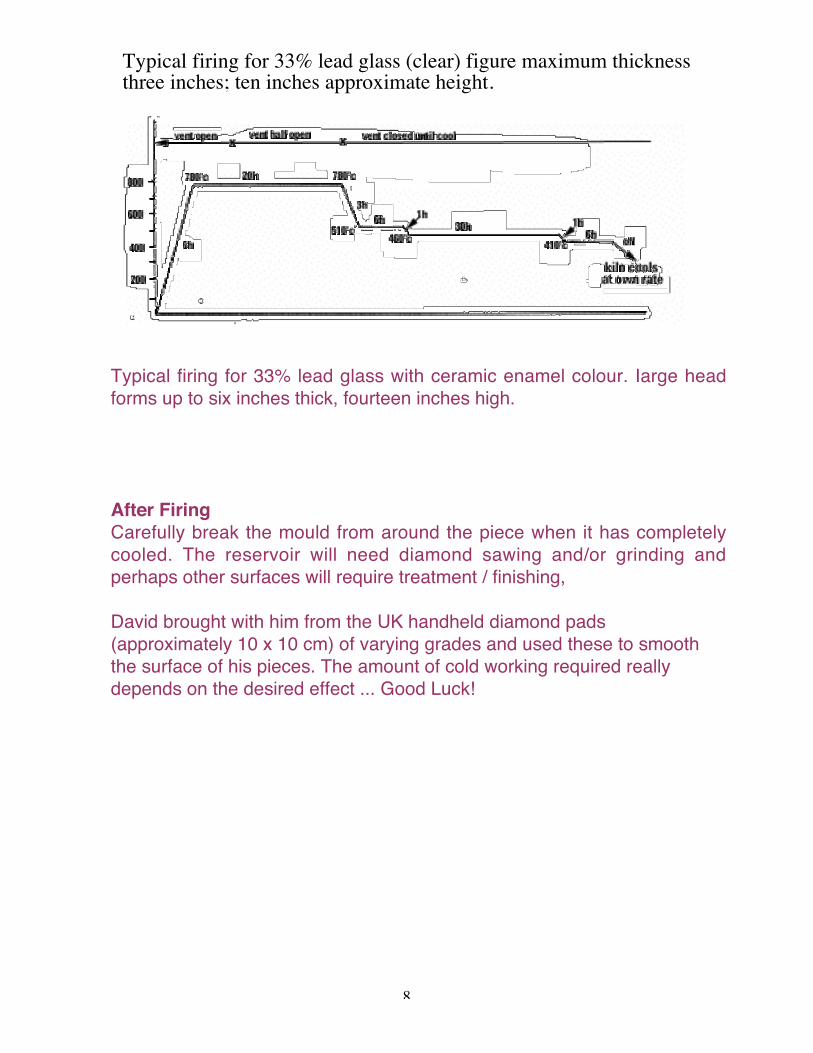
Typical firing for 33% lead glass (clear) figure maximum thicknessthree inches; ten inches approximate height.
Typical firing for 33% lead glass with ceramic enamel colour. Iarge headforms up to six inches thick, fourteen inches high.
After FiringCarefully break the mould from around the piece when it has completelycooled. The reservoir will need diamond sawing and/or grinding andperhaps other surfaces will require treatment / finishing,
David brought with him from the UK handheld diamond pads(approximately 10 x 10 cm) of varying grades and used these to smooththe surface of his pieces. The amount of cold working required reallydepends on the desired effect ... Good Luck!