Embed Size (px)
Citation preview
Oracle® DatabaseDatabase Client Installation Guide
19c for LinuxE96433-02April 2019

Oracle Database Database Client Installation Guide, 19c for Linux
E96433-02
Copyright © 2015, 2019, Oracle and/or its affiliates. All rights reserved.
Primary Author: Prakash Jashnani
Contributing Authors: Douglas Williams
Contributors: Mark Bauer, David Austin, Neha Avasthy, Prasad Bagal, Subhranshu Banerjee, TammyBednar, Eric Belden, Gavin Bowe, Robert Chang, Darcy Christensen, Kiran Chamala, Jonathan Creighton,Benoit Dageville, Sudip Datta, Jim Erickson, Marcus Fallen, Joseph Francis, Mark Fuller, Allan Graves,Barbara Glover, Asad Hasan, Thirumaleshwara Hasandka, Sagar Jadhav, Clara Jaeckel, AneeshKhandelwal, Joel Kallman, Eugene Karichkin, Jai Krishnani, Sangeeth Kumar, Ranjith Kundapur, KevinJernigan, Christopher Jones, Prasad Kuruvadi Nagaraj, Bryn Llewellyn, Saar Maoz, Sunil Surabhi, GopalMulagund, Sue Lee, Rich Long, Barb Lundhild, Rolly Lv, Rudregowda Mallegowda, PadmanabhanManavazhi, Mughees Minhas, Krishna Mohan, Matthew McKerley, John McHugh, Gurudas Pai, SatishPanchumarthy , Rajesh Prasad, Rajendra Pingte, Apparsamy Perumal, Srinivas Poovala, MohammedShahnawaz Quadri, Hanlin Qian, Gurumurthy Ramamurthy, Hema Ramamurthy, Sunil Ravindrachar, MarkRichwine, Dipak Saggi, Trivikrama Samudrala, Shachi Sanklecha, David Schreiner, Ara Shakian, MohitSinghal, Dharma Sirnapalli, Akshay Shah, James Spiller, Roy Swonger, Binoy Sukumaran, Kamal Tbeileh,Ravi Thammaiah, Shekhar Vaggu, Preethi Vallam, Ajesh Viswambharan, Peter Wahl, Terri Winters, SergiuszWolicki, Sivakumar Yarlagadda, Zakia Zerhouni
This software and related documentation are provided under a license agreement containing restrictions onuse and disclosure and are protected by intellectual property laws. Except as expressly permitted in yourlicense agreement or allowed by law, you may not use, copy, reproduce, translate, broadcast, modify,license, transmit, distribute, exhibit, perform, publish, or display any part, in any form, or by any means.Reverse engineering, disassembly, or decompilation of this software, unless required by law forinteroperability, is prohibited.
The information contained herein is subject to change without notice and is not warranted to be error-free. Ifyou find any errors, please report them to us in writing.
If this is software or related documentation that is delivered to the U.S. Government or anyone licensing it onbehalf of the U.S. Government, then the following notice is applicable:
U.S. GOVERNMENT END USERS: Oracle programs, including any operating system, integrated software,any programs installed on the hardware, and/or documentation, delivered to U.S. Government end users are"commercial computer software" pursuant to the applicable Federal Acquisition Regulation and agency-specific supplemental regulations. As such, use, duplication, disclosure, modification, and adaptation of theprograms, including any operating system, integrated software, any programs installed on the hardware,and/or documentation, shall be subject to license terms and license restrictions applicable to the programs.No other rights are granted to the U.S. Government.
This software or hardware is developed for general use in a variety of information management applications.It is not developed or intended for use in any inherently dangerous applications, including applications thatmay create a risk of personal injury. If you use this software or hardware in dangerous applications, then youshall be responsible to take all appropriate fail-safe, backup, redundancy, and other measures to ensure itssafe use. Oracle Corporation and its affiliates disclaim any liability for any damages caused by use of thissoftware or hardware in dangerous applications.
Oracle and Java are registered trademarks of Oracle and/or its affiliates. Other names may be trademarks oftheir respective owners.
Intel and Intel Xeon are trademarks or registered trademarks of Intel Corporation. All SPARC trademarks areused under license and are trademarks or registered trademarks of SPARC International, Inc. AMD, Opteron,the AMD logo, and the AMD Opteron logo are trademarks or registered trademarks of Advanced MicroDevices. UNIX is a registered trademark of The Open Group.
This software or hardware and documentation may provide access to or information about content, products,and services from third parties. Oracle Corporation and its affiliates are not responsible for and expresslydisclaim all warranties of any kind with respect to third-party content, products, and services unless otherwiseset forth in an applicable agreement between you and Oracle. Oracle Corporation and its affiliates will not beresponsible for any loss, costs, or damages incurred due to your access to or use of third-party content,products, or services, except as set forth in an applicable agreement between you and Oracle.
Contents
Preface
Audience vii
Documentation Accessibility vii
Set Up Java Access Bridge to Implement Java Accessibility viii
Command Syntax viii
Related Documentation ix
Conventions ix
1 Oracle Database Client Installation Checklist
Server Hardware Checklist for Oracle Database Client Installation 1-1
Operating System Checklist for Oracle Database Client on Linux 1-2
Server Configuration Checklist for Oracle Database Client 1-2
Oracle User Environment Configuration Checklist for Oracle Database Installation 1-4
Storage Checklist for Oracle Database Client 1-5
Installer Planning Checklist for Oracle Database Client 1-5
2 Checking and Configuring Server Hardware for Oracle DatabaseClient
Logging In to a Remote System Using X Window System 2-1
Checking Server Hardware and Memory Configuration 2-2
3 Configuring Operating Systems for Oracle Database Client on Linux
About Oracle Linux with the Unbreakable Enterprise Kernel 3-1
Reviewing Operating System Security Common Practices 3-2
About Operating System Requirements 3-2
Operating System Requirements for x86-64 Linux Platforms 3-2
Supported Oracle Linux 7 Distributions for x86-64 3-3
Supported Red Hat Enterprise Linux 7 Distributions for x86-64 3-6
Supported SUSE Linux Enterprise Server 12 Distributions for x86-64 3-8
Additional Drivers and Software Packages for Linux 3-10
iii
Installing PAM for Login Authentication on Linux 3-10
Installing Oracle Messaging Gateway 3-10
Installation Requirements for ODBC and LDAP 3-11
About ODBC Drivers and Oracle Database 3-11
Installing ODBC Drivers for Linux x86-64 3-11
About LDAP and Oracle Plug-ins 3-12
Installing the LDAP Package 3-12
Installation Requirements for Programming Environments for Linux 3-12
Installation Requirements for Programming Environments for Linux x86-64 3-12
Installation Requirements for Web Browsers 3-13
Checking Kernel and Package Requirements for Linux 3-13
4 Configuring Users, Groups and Environments for Oracle DatabaseClient
Required Operating System Groups and Users 4-1
Determining If an Oracle Inventory and Oracle Inventory Group Exist 4-2
Creating the Oracle Inventory Group If an Oracle Inventory Does Not Exist 4-2
About Oracle Installation Owner Accounts 4-3
Identifying an Oracle Software Owner User Account 4-3
Creating Operating System Oracle Installation User Accounts 4-4
Creating an Oracle Software Owner User 4-4
Environment Requirements for Oracle Software Owners 4-4
Procedure for Configuring Oracle Software Owner Environments 4-5
Setting Remote Display and X11 Forwarding Configuration 4-7
Unsetting Oracle Installation Owner Environment Variables 4-8
5 Installing Oracle Database Client
About Image-Based Oracle Database Client Installation 5-1
Accessing the Installation Software 5-2
Downloading Oracle Software 5-2
Downloading the Installation Archive Files from OTN 5-2
Downloading the Software from Oracle Software Delivery Cloud Portal 5-3
Copying the Software to the Hard Disk 5-4
Mounting Disks on Linux Systems 5-4
About Character Set Selection During Installation 5-5
Running the Installer in a Different Language 5-6
Installing the Oracle Database Client Software 5-6
Running Setup Wizard to Install Oracle Database Client 5-7
Installing Oracle Database Client Using Image File 5-8
iv
Using Oracle Net Configuration Assistant 5-9
Relinking Oracle Database Client Binaries After Installation 5-9
6 Oracle Database Client Postinstallation Tasks
Required Postinstallation Tasks 6-1
Downloading and Installing Release Update Patches 6-1
Recommended Postinstallation Tasks 6-2
Creating a Backup of the root.sh Script 6-2
Setting Language and Locale Preferences for Client Connections 6-3
7 Removing Oracle Database Software
About Oracle Deinstallation Options 7-1
Oracle Deinstallation (Deinstall) 7-3
Deinstallation Examples for Oracle Database Client 7-4
A Installing and Configuring Oracle Database Using Response Files
How Response Files Work A-1
Reasons for Using Silent Mode or Response File Mode A-2
Using Response Files A-2
Preparing Response Files A-3
Editing a Response File Template A-3
Recording Response Files A-4
Running Oracle Universal Installer Using a Response File A-5
Index
v
List of Tables
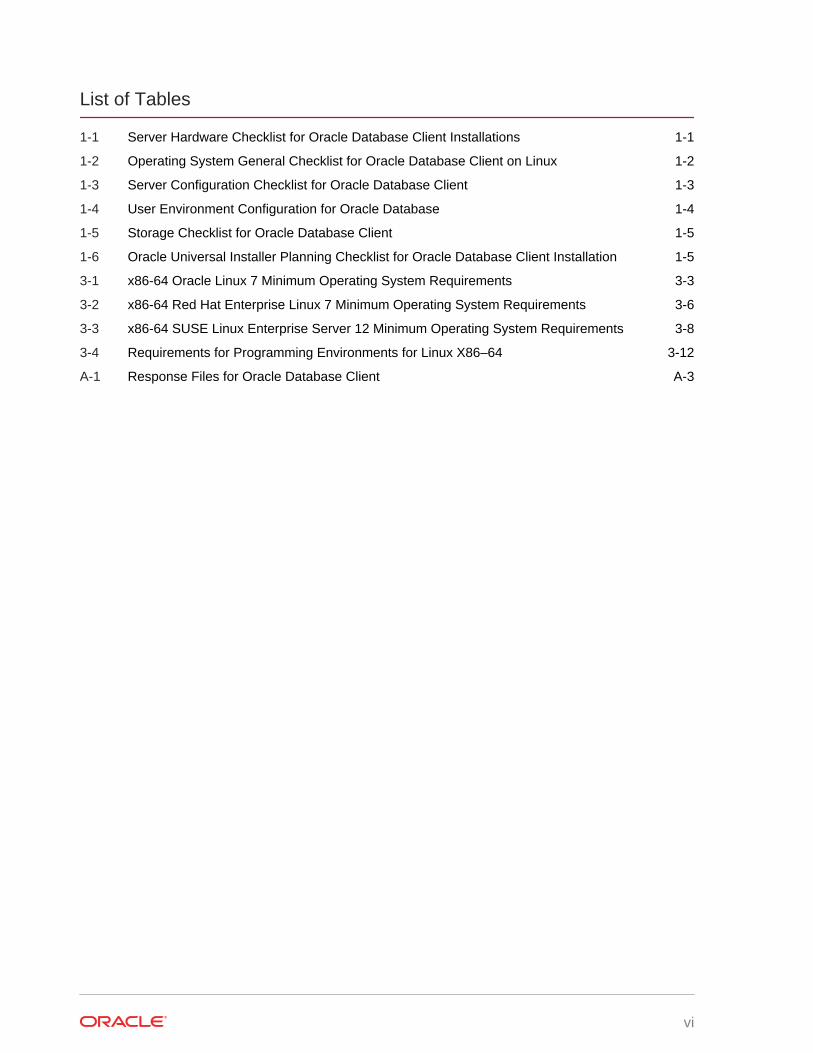
1-1 Server Hardware Checklist for Oracle Database Client Installations 1-1
1-2 Operating System General Checklist for Oracle Database Client on Linux 1-2
1-3 Server Configuration Checklist for Oracle Database Client 1-3
1-4 User Environment Configuration for Oracle Database 1-4
1-5 Storage Checklist for Oracle Database Client 1-5
1-6 Oracle Universal Installer Planning Checklist for Oracle Database Client Installation 1-5
3-1 x86-64 Oracle Linux 7 Minimum Operating System Requirements 3-3
3-2 x86-64 Red Hat Enterprise Linux 7 Minimum Operating System Requirements 3-6
3-3 x86-64 SUSE Linux Enterprise Server 12 Minimum Operating System Requirements 3-8
3-4 Requirements for Programming Environments for Linux X86–64 3-12
A-1 Response Files for Oracle Database Client A-3
vi
Preface
This guide explains how to install and configure Oracle Database Client.
This guide also provides information about postinstallation tasks and how to removethe database client software.
• AudienceThis guide is intended for anyone responsible for installing Oracle Database Client19c.
• Documentation Accessibility
• Set Up Java Access Bridge to Implement Java AccessibilityInstall Java Access Bridge so that assistive technologies on Microsoft Windowssystems can use the Java Accessibility API.
• Command SyntaxRefer to these command syntax conventions to understand command examples inthis guide.
• Related Documentation
• Conventions
AudienceThis guide is intended for anyone responsible for installing Oracle Database Client19c.
Additional installation guides for Oracle Database, Oracle Real Application Clusters,Oracle Clusterware, Oracle Database Examples, and Oracle Enterprise ManagerCloud Control are available at the following URL:
http://docs.oracle.com
Documentation AccessibilityFor information about Oracle's commitment to accessibility, visit the OracleAccessibility Program website at http://www.oracle.com/pls/topic/lookup?ctx=acc&id=docacc.
Access to Oracle Support
Oracle customers that have purchased support have access to electronic supportthrough My Oracle Support. For information, visit http://www.oracle.com/pls/topic/lookup?ctx=acc&id=info or visit http://www.oracle.com/pls/topic/lookup?ctx=acc&id=trsif you are hearing impaired.
vii
Set Up Java Access Bridge to Implement Java AccessibilityInstall Java Access Bridge so that assistive technologies on Microsoft Windowssystems can use the Java Accessibility API.
Java Access Bridge is a technology that enables Java applications and applets thatimplement the Java Accessibility API to be visible to assistive technologies onMicrosoft Windows systems.
Refer to Java Platform, Standard Edition Accessibility Guide for information about theminimum supported versions of assistive technologies required to use Java AccessBridge. Also refer to this guide to obtain installation and testing instructions, andinstructions for how to use Java Access Bridge.
Related Topics
• Java Platform, Standard Edition Java Accessibility Guide
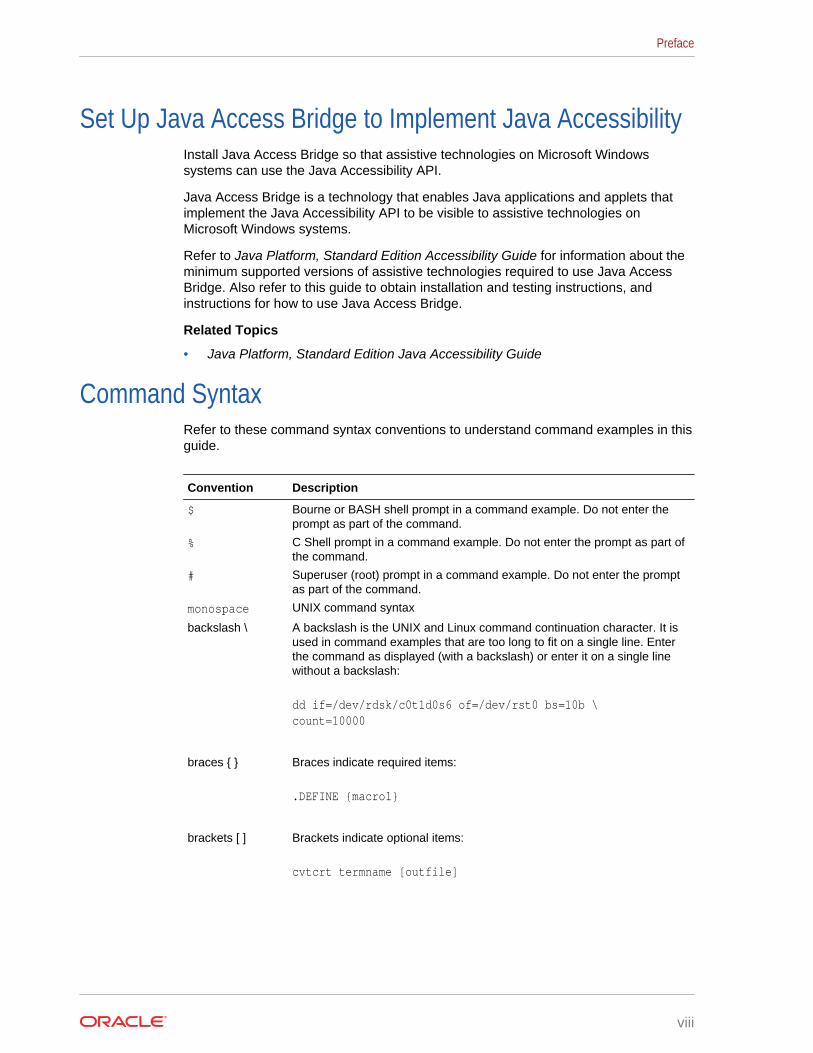
Command SyntaxRefer to these command syntax conventions to understand command examples in thisguide.
Convention Description
$ Bourne or BASH shell prompt in a command example. Do not enter theprompt as part of the command.
% C Shell prompt in a command example. Do not enter the prompt as part ofthe command.
# Superuser (root) prompt in a command example. Do not enter the promptas part of the command.
monospace UNIX command syntax
backslash \ A backslash is the UNIX and Linux command continuation character. It isused in command examples that are too long to fit on a single line. Enterthe command as displayed (with a backslash) or enter it on a single linewithout a backslash:
dd if=/dev/rdsk/c0t1d0s6 of=/dev/rst0 bs=10b \ count=10000
braces { } Braces indicate required items:
.DEFINE {macro1}
brackets [ ] Brackets indicate optional items:
cvtcrt termname [outfile]
Preface
viii
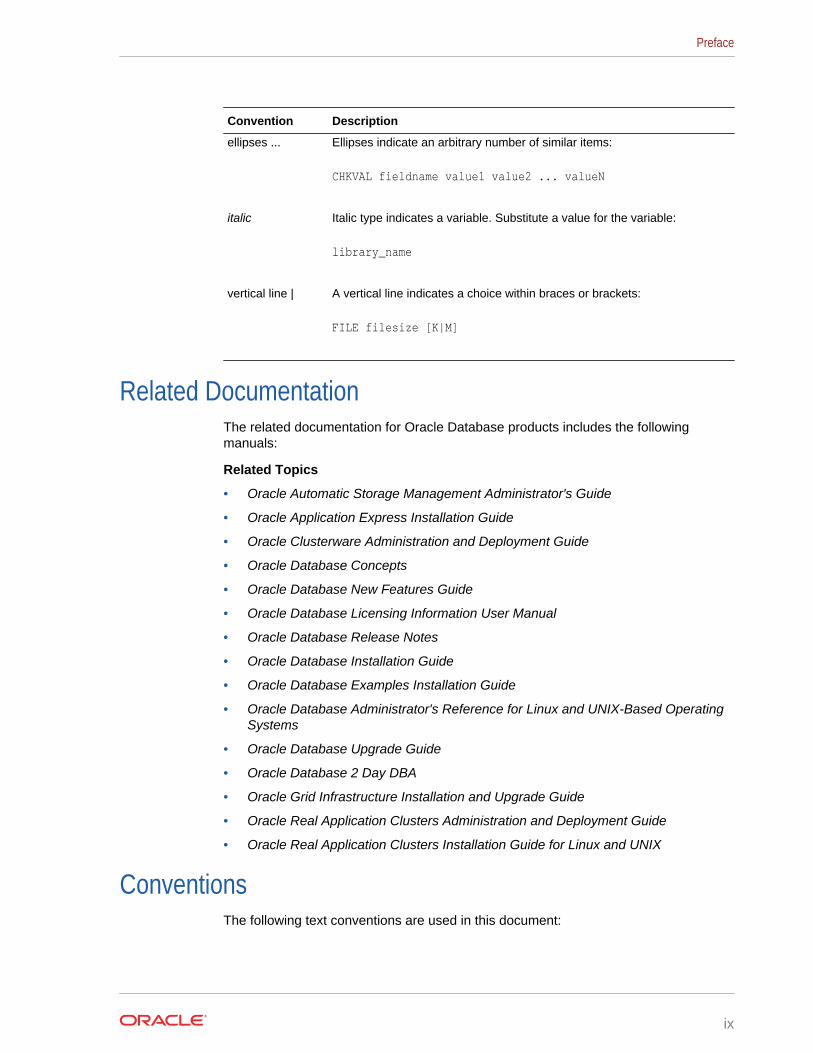
Convention Description
ellipses ... Ellipses indicate an arbitrary number of similar items:
CHKVAL fieldname value1 value2 ... valueN
italic Italic type indicates a variable. Substitute a value for the variable:
library_name
vertical line | A vertical line indicates a choice within braces or brackets:
FILE filesize [K|M]
Related DocumentationThe related documentation for Oracle Database products includes the followingmanuals:
Related Topics
• Oracle Automatic Storage Management Administrator's Guide
• Oracle Application Express Installation Guide
• Oracle Clusterware Administration and Deployment Guide
• Oracle Database Concepts
• Oracle Database New Features Guide
• Oracle Database Licensing Information User Manual
• Oracle Database Release Notes
• Oracle Database Installation Guide
• Oracle Database Examples Installation Guide
• Oracle Database Administrator's Reference for Linux and UNIX-Based OperatingSystems
• Oracle Database Upgrade Guide
• Oracle Database 2 Day DBA
• Oracle Grid Infrastructure Installation and Upgrade Guide
• Oracle Real Application Clusters Administration and Deployment Guide
• Oracle Real Application Clusters Installation Guide for Linux and UNIX
ConventionsThe following text conventions are used in this document:
Preface
ix
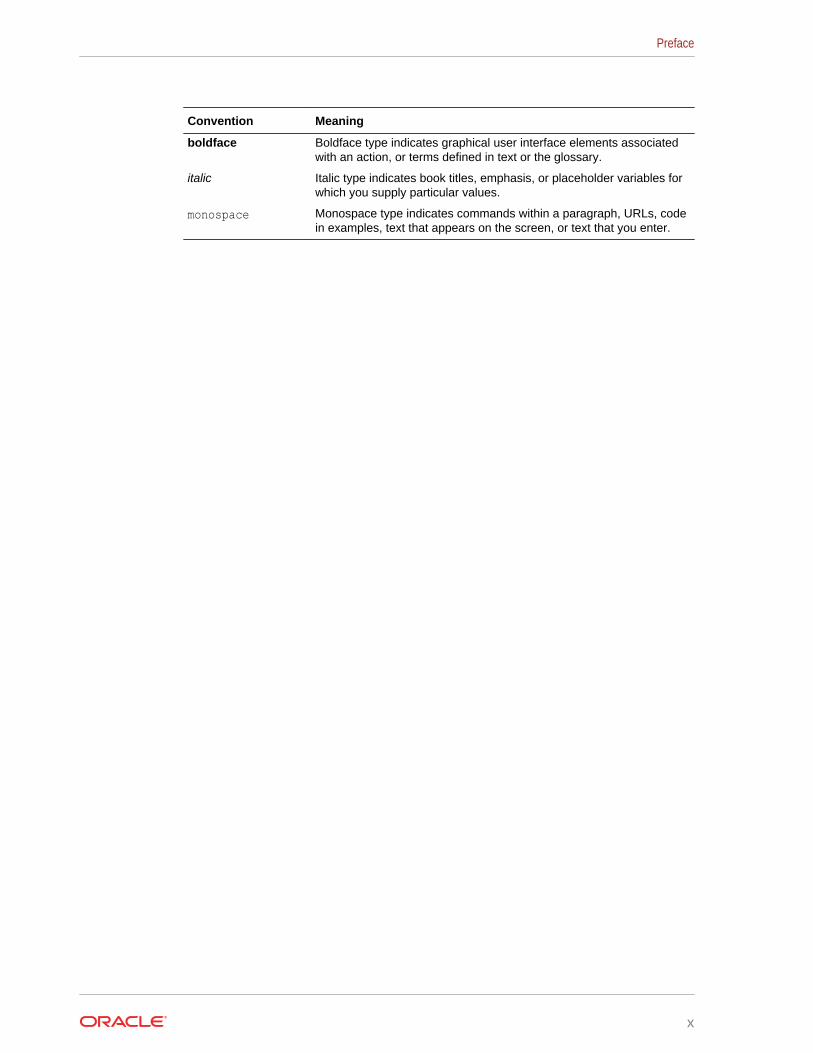
Convention Meaning
boldface Boldface type indicates graphical user interface elements associatedwith an action, or terms defined in text or the glossary.
italic Italic type indicates book titles, emphasis, or placeholder variables forwhich you supply particular values.
monospace Monospace type indicates commands within a paragraph, URLs, codein examples, text that appears on the screen, or text that you enter.
Preface
x
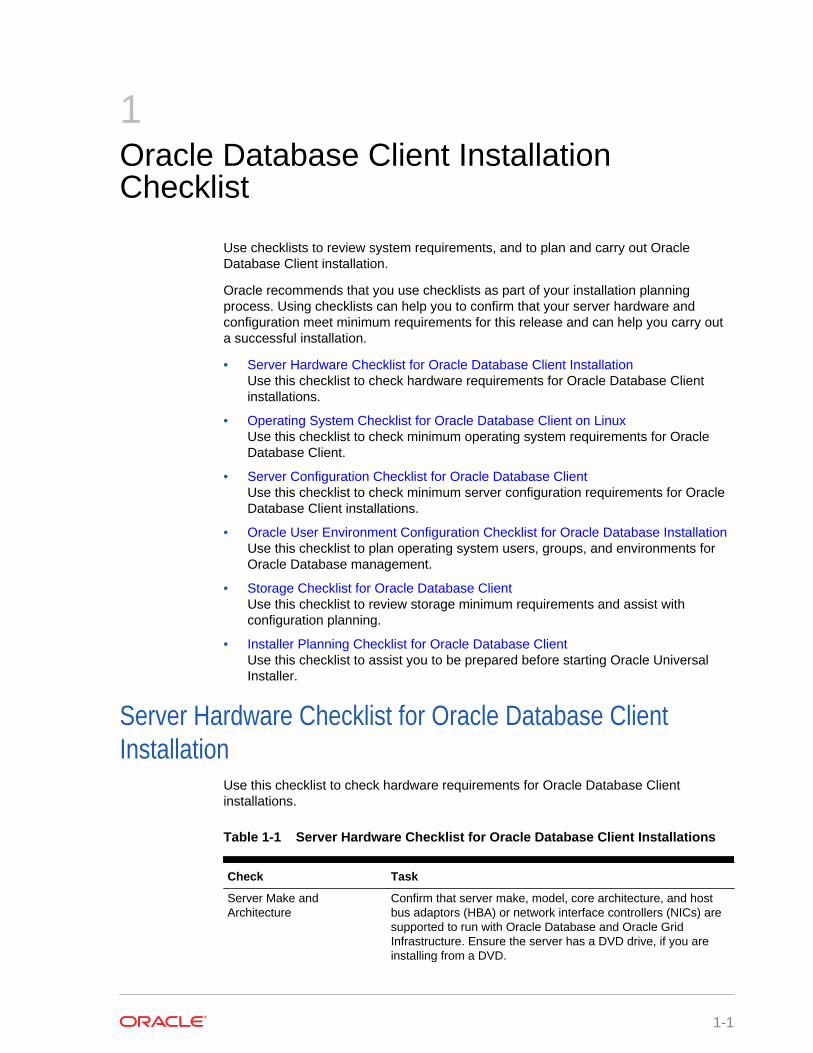
1Oracle Database Client InstallationChecklist
Use checklists to review system requirements, and to plan and carry out OracleDatabase Client installation.
Oracle recommends that you use checklists as part of your installation planningprocess. Using checklists can help you to confirm that your server hardware andconfiguration meet minimum requirements for this release and can help you carry outa successful installation.
• Server Hardware Checklist for Oracle Database Client InstallationUse this checklist to check hardware requirements for Oracle Database Clientinstallations.
• Operating System Checklist for Oracle Database Client on LinuxUse this checklist to check minimum operating system requirements for OracleDatabase Client.
• Server Configuration Checklist for Oracle Database ClientUse this checklist to check minimum server configuration requirements for OracleDatabase Client installations.
• Oracle User Environment Configuration Checklist for Oracle Database InstallationUse this checklist to plan operating system users, groups, and environments forOracle Database management.
• Storage Checklist for Oracle Database ClientUse this checklist to review storage minimum requirements and assist withconfiguration planning.
• Installer Planning Checklist for Oracle Database ClientUse this checklist to assist you to be prepared before starting Oracle UniversalInstaller.
Server Hardware Checklist for Oracle Database ClientInstallation
Use this checklist to check hardware requirements for Oracle Database Clientinstallations.
Table 1-1 Server Hardware Checklist for Oracle Database Client Installations
Check Task
Server Make andArchitecture
Confirm that server make, model, core architecture, and hostbus adaptors (HBA) or network interface controllers (NICs) aresupported to run with Oracle Database and Oracle GridInfrastructure. Ensure the server has a DVD drive, if you areinstalling from a DVD.
1-1
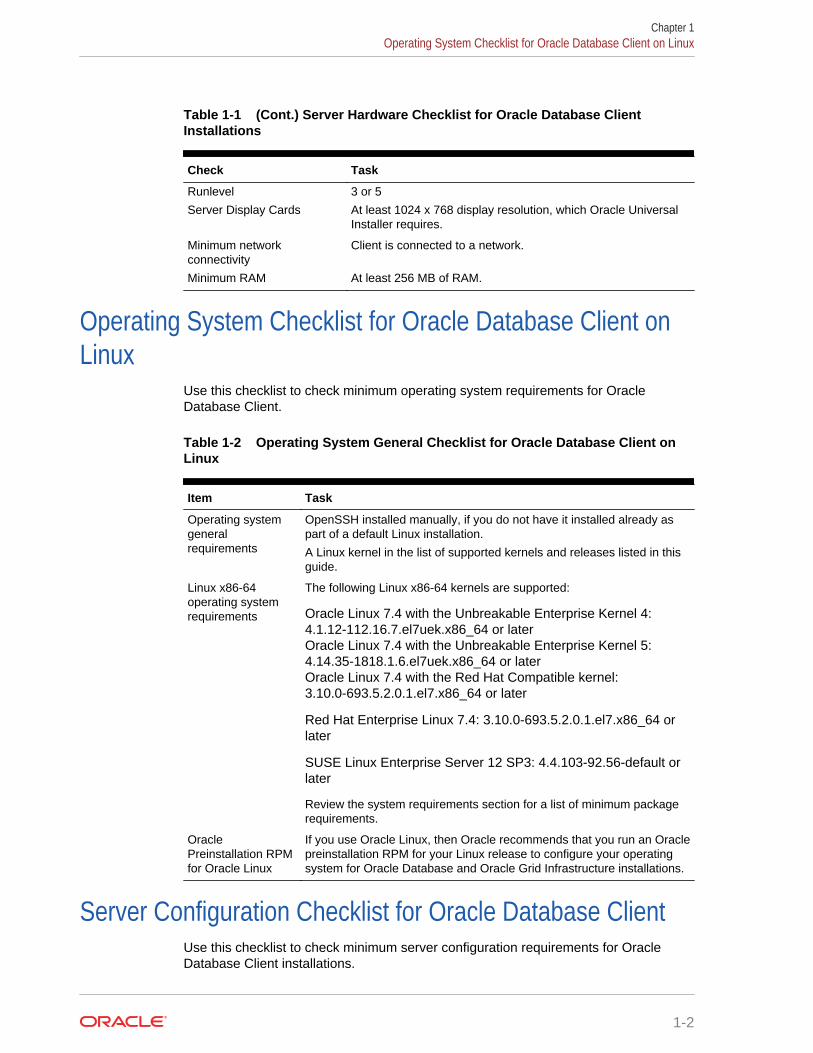
Table 1-1 (Cont.) Server Hardware Checklist for Oracle Database ClientInstallations
Check Task
Runlevel 3 or 5
Server Display Cards At least 1024 x 768 display resolution, which Oracle UniversalInstaller requires.
Minimum networkconnectivity
Client is connected to a network.
Minimum RAM At least 256 MB of RAM.
Operating System Checklist for Oracle Database Client onLinux
Use this checklist to check minimum operating system requirements for OracleDatabase Client.
Table 1-2 Operating System General Checklist for Oracle Database Client onLinux
Item Task
Operating systemgeneralrequirements
OpenSSH installed manually, if you do not have it installed already aspart of a default Linux installation.
A Linux kernel in the list of supported kernels and releases listed in thisguide.
Linux x86-64operating systemrequirements
The following Linux x86-64 kernels are supported:
Oracle Linux 7.4 with the Unbreakable Enterprise Kernel 4:4.1.12-112.16.7.el7uek.x86_64 or laterOracle Linux 7.4 with the Unbreakable Enterprise Kernel 5:4.14.35-1818.1.6.el7uek.x86_64 or laterOracle Linux 7.4 with the Red Hat Compatible kernel:3.10.0-693.5.2.0.1.el7.x86_64 or later
Red Hat Enterprise Linux 7.4: 3.10.0-693.5.2.0.1.el7.x86_64 orlater
SUSE Linux Enterprise Server 12 SP3: 4.4.103-92.56-default orlater
Review the system requirements section for a list of minimum packagerequirements.
OraclePreinstallation RPMfor Oracle Linux
If you use Oracle Linux, then Oracle recommends that you run an Oraclepreinstallation RPM for your Linux release to configure your operatingsystem for Oracle Database and Oracle Grid Infrastructure installations.
Server Configuration Checklist for Oracle Database ClientUse this checklist to check minimum server configuration requirements for OracleDatabase Client installations.
Chapter 1Operating System Checklist for Oracle Database Client on Linux
1-2
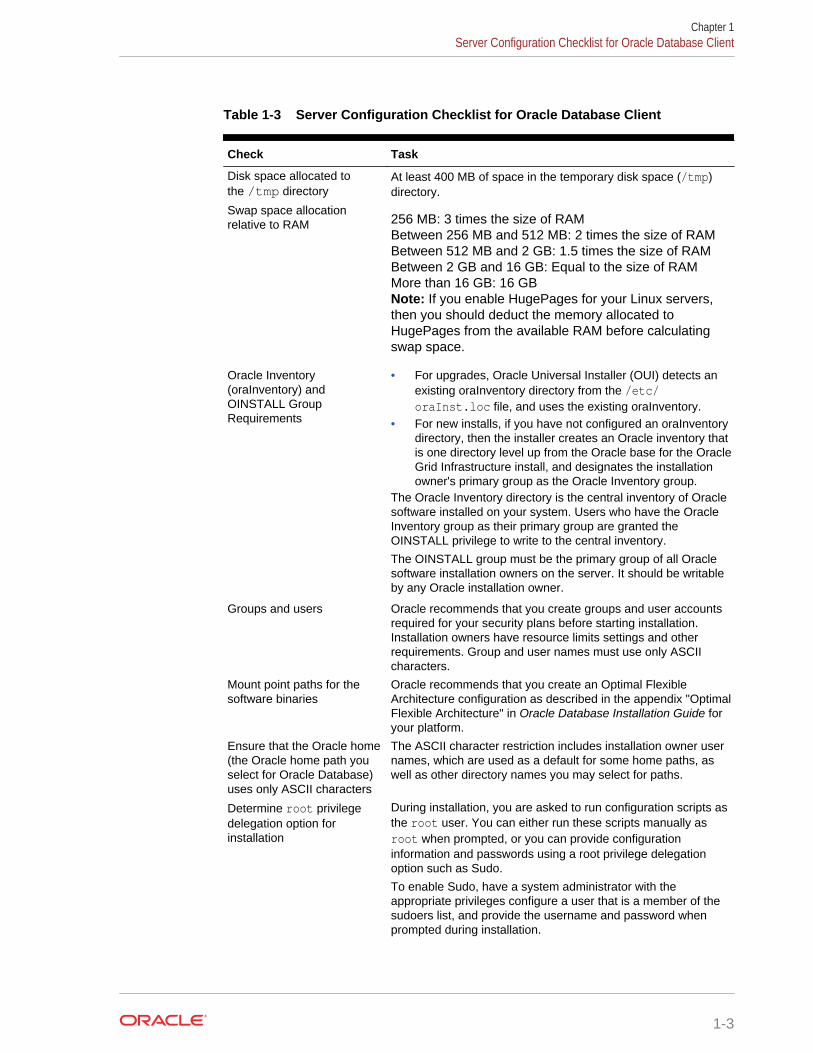
Table 1-3 Server Configuration Checklist for Oracle Database Client
Check Task
Disk space allocated tothe /tmp directory
At least 400 MB of space in the temporary disk space (/tmp)directory.
Swap space allocationrelative to RAM 256 MB: 3 times the size of RAM
Between 256 MB and 512 MB: 2 times the size of RAMBetween 512 MB and 2 GB: 1.5 times the size of RAMBetween 2 GB and 16 GB: Equal to the size of RAMMore than 16 GB: 16 GBNote: If you enable HugePages for your Linux servers,then you should deduct the memory allocated toHugePages from the available RAM before calculatingswap space.
Oracle Inventory(oraInventory) andOINSTALL GroupRequirements
• For upgrades, Oracle Universal Installer (OUI) detects anexisting oraInventory directory from the /etc/oraInst.loc file, and uses the existing oraInventory.
• For new installs, if you have not configured an oraInventorydirectory, then the installer creates an Oracle inventory thatis one directory level up from the Oracle base for the OracleGrid Infrastructure install, and designates the installationowner's primary group as the Oracle Inventory group.
The Oracle Inventory directory is the central inventory of Oraclesoftware installed on your system. Users who have the OracleInventory group as their primary group are granted theOINSTALL privilege to write to the central inventory.
The OINSTALL group must be the primary group of all Oraclesoftware installation owners on the server. It should be writableby any Oracle installation owner.
Groups and users Oracle recommends that you create groups and user accountsrequired for your security plans before starting installation.Installation owners have resource limits settings and otherrequirements. Group and user names must use only ASCIIcharacters.
Mount point paths for thesoftware binaries
Oracle recommends that you create an Optimal FlexibleArchitecture configuration as described in the appendix "OptimalFlexible Architecture" in Oracle Database Installation Guide foryour platform.
Ensure that the Oracle home(the Oracle home path youselect for Oracle Database)uses only ASCII characters
The ASCII character restriction includes installation owner usernames, which are used as a default for some home paths, aswell as other directory names you may select for paths.
Determine root privilegedelegation option forinstallation
During installation, you are asked to run configuration scripts asthe root user. You can either run these scripts manually asroot when prompted, or you can provide configurationinformation and passwords using a root privilege delegationoption such as Sudo.
To enable Sudo, have a system administrator with theappropriate privileges configure a user that is a member of thesudoers list, and provide the username and password whenprompted during installation.
Chapter 1Server Configuration Checklist for Oracle Database Client
1-3
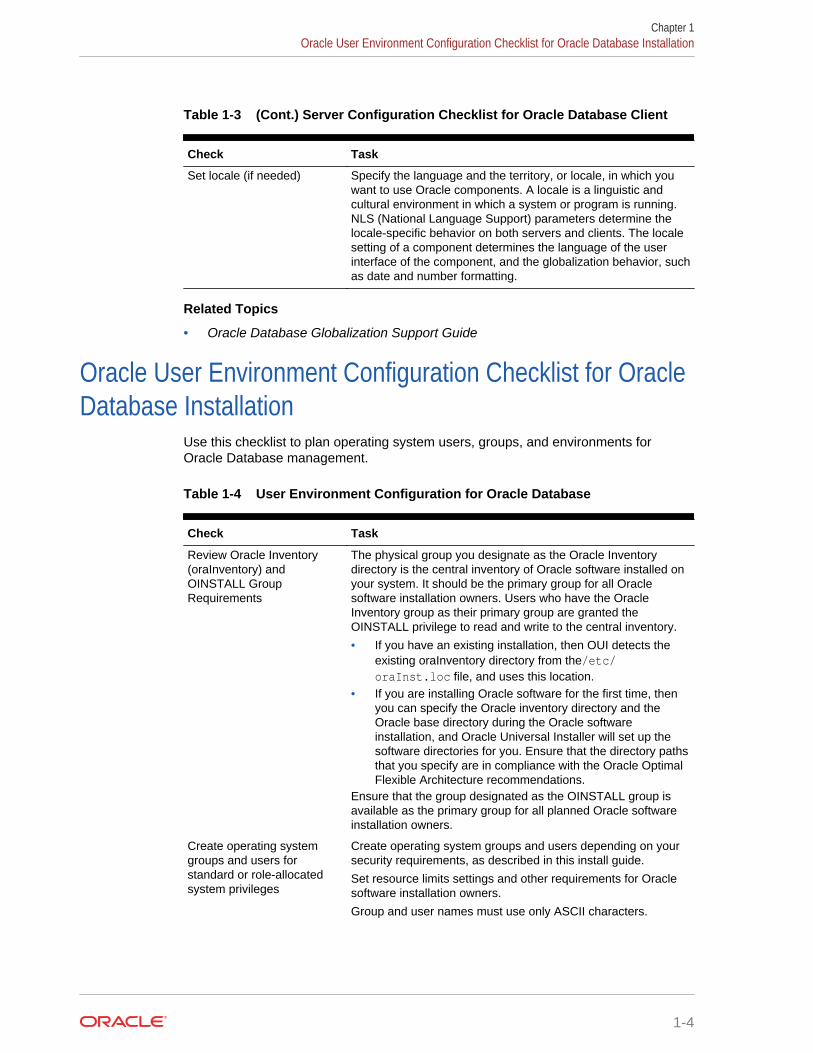
Table 1-3 (Cont.) Server Configuration Checklist for Oracle Database Client
Check Task
Set locale (if needed) Specify the language and the territory, or locale, in which youwant to use Oracle components. A locale is a linguistic andcultural environment in which a system or program is running.NLS (National Language Support) parameters determine thelocale-specific behavior on both servers and clients. The localesetting of a component determines the language of the userinterface of the component, and the globalization behavior, suchas date and number formatting.
Related Topics
• Oracle Database Globalization Support Guide
Oracle User Environment Configuration Checklist for OracleDatabase Installation
Use this checklist to plan operating system users, groups, and environments forOracle Database management.
Table 1-4 User Environment Configuration for Oracle Database
Check Task
Review Oracle Inventory(oraInventory) andOINSTALL GroupRequirements
The physical group you designate as the Oracle Inventorydirectory is the central inventory of Oracle software installed onyour system. It should be the primary group for all Oraclesoftware installation owners. Users who have the OracleInventory group as their primary group are granted theOINSTALL privilege to read and write to the central inventory.
• If you have an existing installation, then OUI detects theexisting oraInventory directory from the/etc/oraInst.loc file, and uses this location.
• If you are installing Oracle software for the first time, thenyou can specify the Oracle inventory directory and theOracle base directory during the Oracle softwareinstallation, and Oracle Universal Installer will set up thesoftware directories for you. Ensure that the directory pathsthat you specify are in compliance with the Oracle OptimalFlexible Architecture recommendations.
Ensure that the group designated as the OINSTALL group isavailable as the primary group for all planned Oracle softwareinstallation owners.
Create operating systemgroups and users forstandard or role-allocatedsystem privileges
Create operating system groups and users depending on yoursecurity requirements, as described in this install guide.
Set resource limits settings and other requirements for Oraclesoftware installation owners.
Group and user names must use only ASCII characters.
Chapter 1Oracle User Environment Configuration Checklist for Oracle Database Installation
1-4
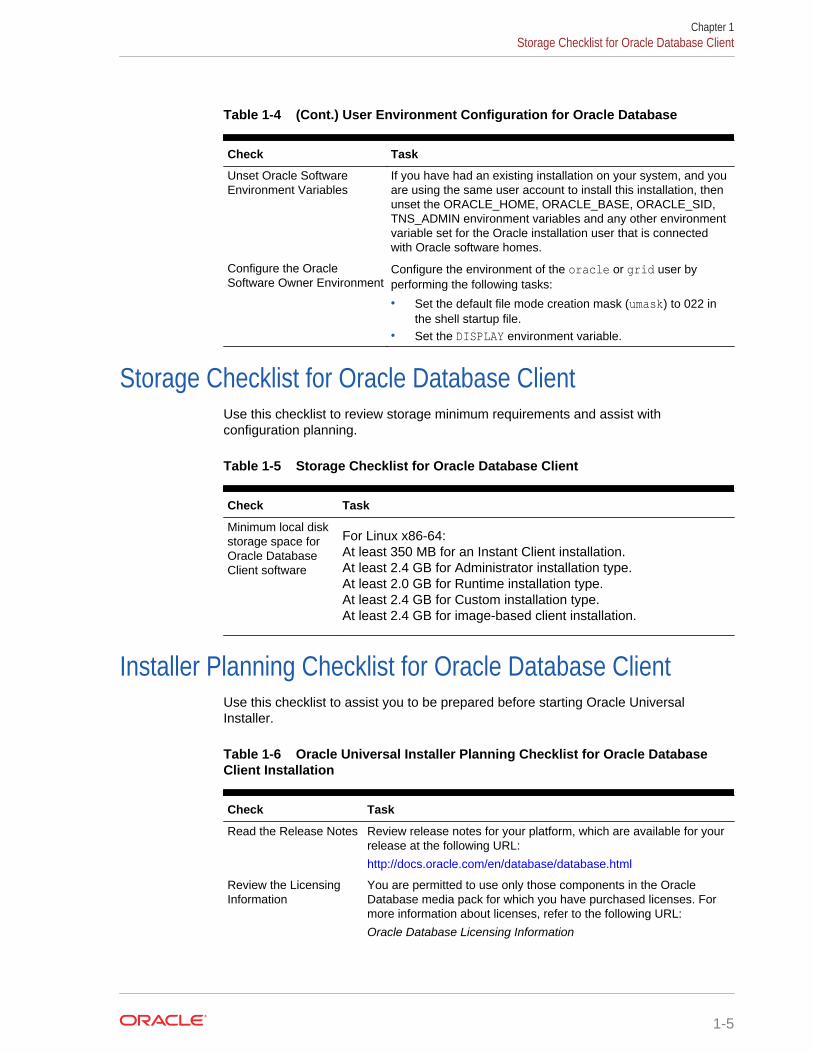
Table 1-4 (Cont.) User Environment Configuration for Oracle Database
Check Task
Unset Oracle SoftwareEnvironment Variables
If you have had an existing installation on your system, and youare using the same user account to install this installation, thenunset the ORACLE_HOME, ORACLE_BASE, ORACLE_SID,TNS_ADMIN environment variables and any other environmentvariable set for the Oracle installation user that is connectedwith Oracle software homes.
Configure the OracleSoftware Owner Environment
Configure the environment of the oracle or grid user byperforming the following tasks:
• Set the default file mode creation mask (umask) to 022 inthe shell startup file.
• Set the DISPLAY environment variable.
Storage Checklist for Oracle Database ClientUse this checklist to review storage minimum requirements and assist withconfiguration planning.
Table 1-5 Storage Checklist for Oracle Database Client
Check Task
Minimum local diskstorage space forOracle DatabaseClient software
For Linux x86-64:At least 350 MB for an Instant Client installation.At least 2.4 GB for Administrator installation type.At least 2.0 GB for Runtime installation type.At least 2.4 GB for Custom installation type.At least 2.4 GB for image-based client installation.
Installer Planning Checklist for Oracle Database ClientUse this checklist to assist you to be prepared before starting Oracle UniversalInstaller.
Table 1-6 Oracle Universal Installer Planning Checklist for Oracle DatabaseClient Installation
Check Task
Read the Release Notes Review release notes for your platform, which are available for yourrelease at the following URL:
http://docs.oracle.com/en/database/database.html
Review the LicensingInformation
You are permitted to use only those components in the OracleDatabase media pack for which you have purchased licenses. Formore information about licenses, refer to the following URL:
Oracle Database Licensing Information
Chapter 1Storage Checklist for Oracle Database Client
1-5
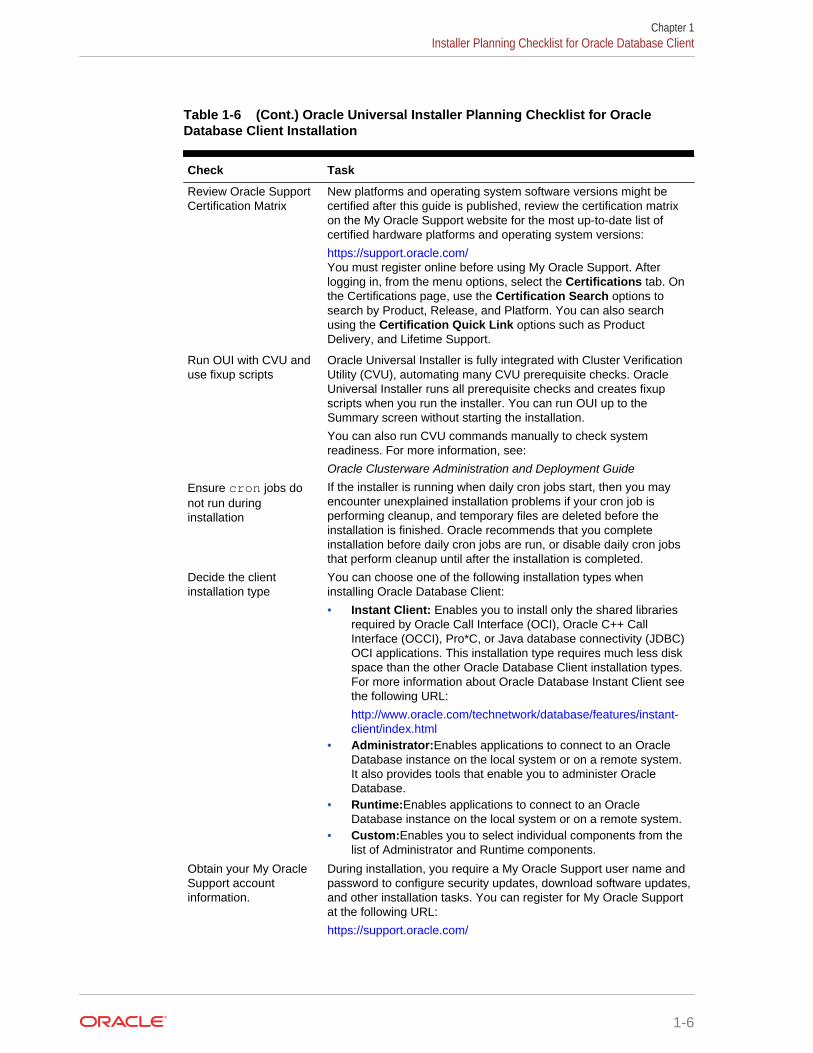
Table 1-6 (Cont.) Oracle Universal Installer Planning Checklist for OracleDatabase Client Installation
Check Task
Review Oracle SupportCertification Matrix
New platforms and operating system software versions might becertified after this guide is published, review the certification matrixon the My Oracle Support website for the most up-to-date list ofcertified hardware platforms and operating system versions:
https://support.oracle.com/You must register online before using My Oracle Support. Afterlogging in, from the menu options, select the Certifications tab. Onthe Certifications page, use the Certification Search options tosearch by Product, Release, and Platform. You can also searchusing the Certification Quick Link options such as ProductDelivery, and Lifetime Support.
Run OUI with CVU anduse fixup scripts
Oracle Universal Installer is fully integrated with Cluster VerificationUtility (CVU), automating many CVU prerequisite checks. OracleUniversal Installer runs all prerequisite checks and creates fixupscripts when you run the installer. You can run OUI up to theSummary screen without starting the installation.
You can also run CVU commands manually to check systemreadiness. For more information, see:
Oracle Clusterware Administration and Deployment GuideEnsure cron jobs donot run duringinstallation
If the installer is running when daily cron jobs start, then you mayencounter unexplained installation problems if your cron job isperforming cleanup, and temporary files are deleted before theinstallation is finished. Oracle recommends that you completeinstallation before daily cron jobs are run, or disable daily cron jobsthat perform cleanup until after the installation is completed.
Decide the clientinstallation type
You can choose one of the following installation types wheninstalling Oracle Database Client:
• Instant Client: Enables you to install only the shared librariesrequired by Oracle Call Interface (OCI), Oracle C++ CallInterface (OCCI), Pro*C, or Java database connectivity (JDBC)OCI applications. This installation type requires much less diskspace than the other Oracle Database Client installation types.For more information about Oracle Database Instant Client seethe following URL:
http://www.oracle.com/technetwork/database/features/instant-client/index.html
• Administrator:Enables applications to connect to an OracleDatabase instance on the local system or on a remote system.It also provides tools that enable you to administer OracleDatabase.
• Runtime:Enables applications to connect to an OracleDatabase instance on the local system or on a remote system.
• Custom:Enables you to select individual components from thelist of Administrator and Runtime components.
Obtain your My OracleSupport accountinformation.
During installation, you require a My Oracle Support user name andpassword to configure security updates, download software updates,and other installation tasks. You can register for My Oracle Supportat the following URL:
https://support.oracle.com/
Chapter 1Installer Planning Checklist for Oracle Database Client
1-6
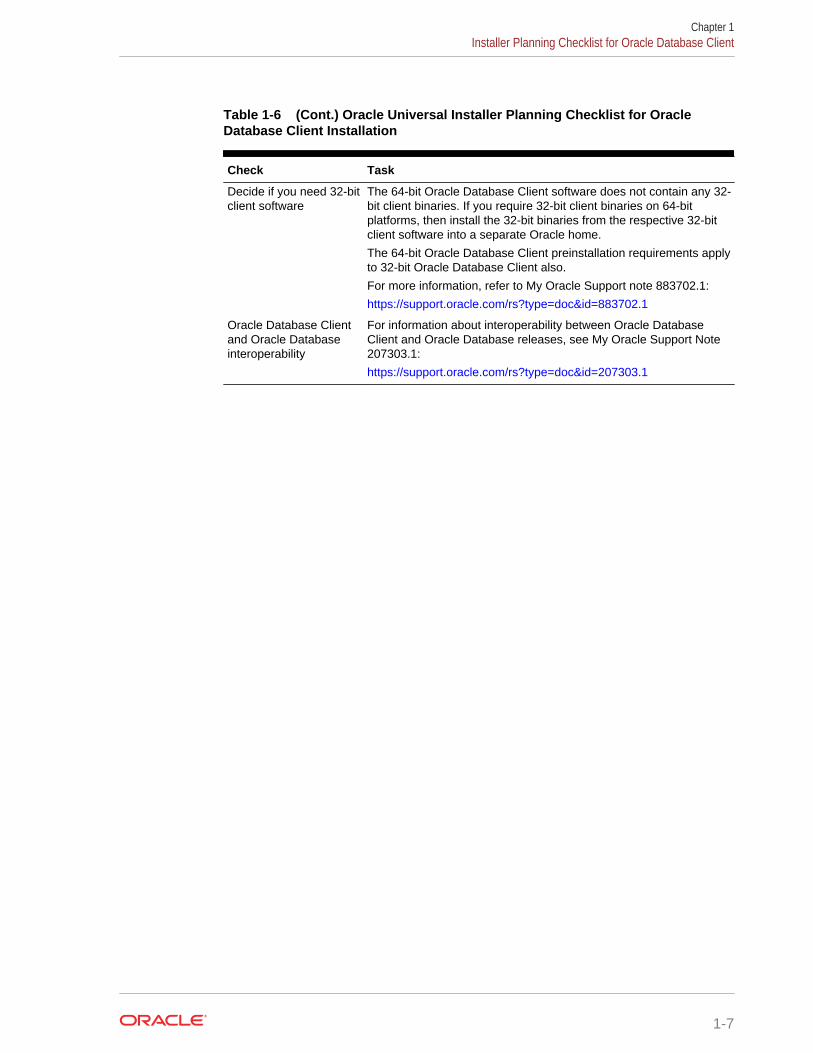
Table 1-6 (Cont.) Oracle Universal Installer Planning Checklist for OracleDatabase Client Installation
Check Task
Decide if you need 32-bitclient software
The 64-bit Oracle Database Client software does not contain any 32-bit client binaries. If you require 32-bit client binaries on 64-bitplatforms, then install the 32-bit binaries from the respective 32-bitclient software into a separate Oracle home.
The 64-bit Oracle Database Client preinstallation requirements applyto 32-bit Oracle Database Client also.
For more information, refer to My Oracle Support note 883702.1:
https://support.oracle.com/rs?type=doc&id=883702.1
Oracle Database Clientand Oracle Databaseinteroperability
For information about interoperability between Oracle DatabaseClient and Oracle Database releases, see My Oracle Support Note207303.1:
https://support.oracle.com/rs?type=doc&id=207303.1
Chapter 1Installer Planning Checklist for Oracle Database Client
1-7
2Checking and Configuring ServerHardware for Oracle Database Client
Verify that servers where you install Oracle Database Client meet the minimumrequirements for installation.
This section provides minimum server requirements to complete installation of OracleDatabase Client. It does not provide system resource guidelines, or other tuningguidelines for particular workloads.
• Logging In to a Remote System Using X Window SystemUse this procedure to run Oracle Universal Installer (OUI) by logging on to aremote system where the runtime setting prohibits logging in directly to a graphicaluser interface (GUI).
• Checking Server Hardware and Memory ConfigurationUse this procedure to gather information about your server configuration.
Logging In to a Remote System Using X Window SystemUse this procedure to run Oracle Universal Installer (OUI) by logging on to a remotesystem where the runtime setting prohibits logging in directly to a graphical userinterface (GUI).
OUI is a graphical user interface (GUI) application. On servers where the runtimesettings prevent GUI applications from running, you can redirect the GUI display to aclient system connecting to the server.
Note:
If you log in as another user (for example, oracle or grid), then repeat thisprocedure for that user as well.
1. Start an X Window System session. If you are using an X Window System terminalemulator from a PC or similar system, then you may need to configure securitysettings to permit remote hosts to display X applications on your local system.
2. Enter a command using the following syntax to enable remote hosts to display Xapplications on the local X server:
# xhost + RemoteHost
RemoteHost is the fully qualified remote host name. For example:
# xhost + somehost.example.comsomehost.example.com being added to the access control list
2-1

3. If you are not installing the software on the local system, then use the sshcommand to connect to the system where you want to install the software:
# ssh -Y RemoteHost
RemoteHost is the fully qualified remote host name. The -Y flag ("yes") enablesremote X11 clients to have full access to the original X11 display. For example:
# ssh -Y somehost.example.com
4. If you are not logged in as the root user, and you are performing configurationsteps that require root user privileges, then switch the user to root.
Note:
For more information about remote login using X Window System, refer toyour X server documentation, or contact your X server vendor or systemadministrator. Depending on the X server software that you are using, youmay have to complete the tasks in a different order.
Checking Server Hardware and Memory ConfigurationUse this procedure to gather information about your server configuration.
1. Use the following command to determine physical RAM size on the server:
# grep MemTotal /proc/meminfo
If the size of the physical RAM installed in the system is less than the requiredsize, then you must install more memory before continuing.
2. Determine the size of the configured swap space:
# grep SwapTotal /proc/meminfo
If necessary, see your operating system documentation for information about howto configure additional swap space.
3. Determine the amount of space available in the /tmp directory:
# df -h /tmp
If the free space available in the /tmp directory is less than what is required, thencomplete one of the following steps:
• Delete unnecessary files from the /tmp directory to meet the disk spacerequirement.
• When you set the Oracle user's environment, also set the TMP and TMPDIRenvironment variables to the directory you want to use instead of /tmp.
Chapter 2Checking Server Hardware and Memory Configuration
2-2
4. Determine the amount of free RAM and disk swap space on the system:
# free
5. Determine if the system architecture can run the software:
# uname -m
Verify that the processor architecture matches the Oracle software release toinstall. For example, you should see the following for a x86-64 bit system:
x86_64
If you do not see the expected output, then you cannot install the software on thissystem.
6. Verify that shared memory (/dev/shm) is mounted properly with sufficient size:
df -h /dev/shm
The df-h command displays the filesystem on which /dev/shm is mounted, andalso displays in GB the total size and free size of shared memory.
Chapter 2Checking Server Hardware and Memory Configuration
2-3
3Configuring Operating Systems for OracleDatabase Client on Linux
Complete operating system configuration requirements and checks for Linux operatingsystems before you start installation.
• About Oracle Linux with the Unbreakable Enterprise KernelThe Unbreakable Enterprise Kernel for Oracle Linux provides the latestinnovations from upstream development to customers who run Oracle Linux in thedata center.
• Reviewing Operating System Security Common PracticesSecure operating systems are an important basis for general system security.
• About Operating System RequirementsDepending on the products that you intend to install, verify that you have therequired operating system kernel and packages installed.
• Operating System Requirements for x86-64 Linux PlatformsThe Linux distributions and packages listed in this section are supported for thisrelease on x86-64.
• Additional Drivers and Software Packages for LinuxInformation about optional drivers and software packages.
• Checking Kernel and Package Requirements for LinuxVerify your kernel and packages to see if they meet minimum requirements forinstallation.
About Oracle Linux with the Unbreakable Enterprise KernelThe Unbreakable Enterprise Kernel for Oracle Linux provides the latest innovationsfrom upstream development to customers who run Oracle Linux in the data center.
Starting with Oracle Linux 5 Update 6 and later Oracle Linux kernels, the UnbreakableEnterprise Kernel is included and enabled by default. It is based on a recent stablemainline development Linux kernel, and also includes optimizations developed incollaboration with Oracle Database, Oracle middleware, and Oracle hardwareengineering teams to ensure stability and optimal performance for the mostdemanding enterprise workloads.
Oracle highly recommends deploying the Unbreakable Enterprise Kernel in yourOracle Linux environment, especially if you run enterprise applications. However,using Unbreakable Enterprise Kernel is optional. If you require strict Red HatEnterprise Linux (RHEL) kernel compatibility, then Oracle Linux also includes a kernelcompatible with the RHEL Linux kernel, compiled directly from the RHEL source code.
You can obtain more information about the Unbreakable Enterprise Kernel for OracleLinux at the following URL:
http://www.oracle.com/us/technologies/linux
3-1
The Unbreakable Enterprise Kernel for Oracle Linux is the standard kernel used withOracle products. The build and QA systems for Oracle Database and other Oracleproducts use the Unbreakable Enterprise Kernel for Oracle Linux exclusively. TheUnbreakable Enterprise Kernel for Oracle Linux is also the kernel used in OracleExadata and Oracle Exalogic systems. Unbreakable Enterprise Kernel for OracleLinux is used in all benchmark tests on Linux in which Oracle participates, as well as inthe Oracle Preinstallation RPM program for x86-64.
Oracle Ksplice, which is part of Oracle Linux, updates the Linux operating system (OS)kernel, while it is running, without requiring restarts or any interruption. Ksplice isavailable only with Oracle Linux.
Reviewing Operating System Security Common PracticesSecure operating systems are an important basis for general system security.
Ensure that your operating system deployment is in compliance with common securitypractices as described in your operating system vendor security guide.
About Operating System RequirementsDepending on the products that you intend to install, verify that you have the requiredoperating system kernel and packages installed.
Requirements listed in this document are current as of the date listed on the title page.To obtain the most current information about kernel requirements, see the onlineversion at the following URL:
http://docs.oracle.com
Oracle Universal Installer performs checks on your system to verify that it meets thelisted operating system package requirements. To ensure that these checks completesuccessfully, verify the requirements before you start OUI.
Note:
Oracle does not support running different operating system versions oncluster members, unless an operating system is being upgraded. You cannotrun different operating system version binaries on members of the samecluster, even if each operating system is supported.
Operating System Requirements for x86-64 Linux PlatformsThe Linux distributions and packages listed in this section are supported for thisrelease on x86-64.
Identify the requirements for your Linux distribution, and ensure that you have asupported kernel and required packages installed before starting installation.
Chapter 3Reviewing Operating System Security Common Practices
3-2
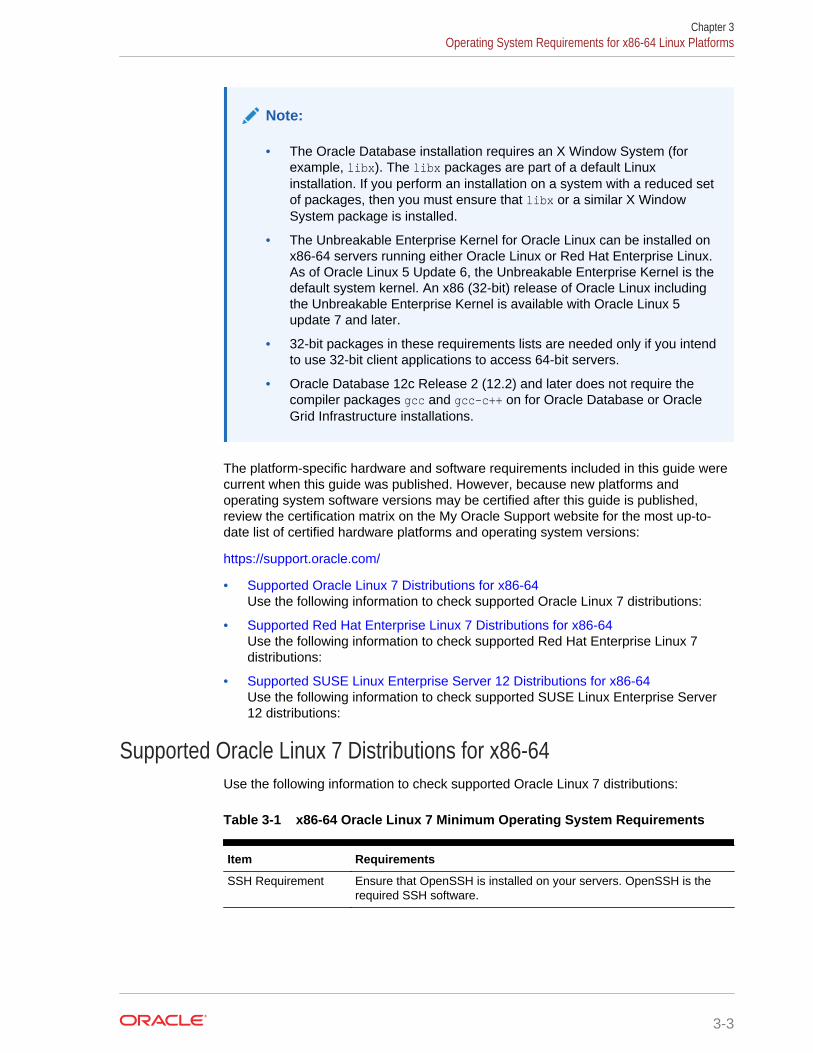
Note:
• The Oracle Database installation requires an X Window System (forexample, libx). The libx packages are part of a default Linuxinstallation. If you perform an installation on a system with a reduced setof packages, then you must ensure that libx or a similar X WindowSystem package is installed.
• The Unbreakable Enterprise Kernel for Oracle Linux can be installed onx86-64 servers running either Oracle Linux or Red Hat Enterprise Linux.As of Oracle Linux 5 Update 6, the Unbreakable Enterprise Kernel is thedefault system kernel. An x86 (32-bit) release of Oracle Linux includingthe Unbreakable Enterprise Kernel is available with Oracle Linux 5update 7 and later.
• 32-bit packages in these requirements lists are needed only if you intendto use 32-bit client applications to access 64-bit servers.
• Oracle Database 12c Release 2 (12.2) and later does not require thecompiler packages gcc and gcc-c++ on for Oracle Database or OracleGrid Infrastructure installations.
The platform-specific hardware and software requirements included in this guide werecurrent when this guide was published. However, because new platforms andoperating system software versions may be certified after this guide is published,review the certification matrix on the My Oracle Support website for the most up-to-date list of certified hardware platforms and operating system versions:
https://support.oracle.com/
• Supported Oracle Linux 7 Distributions for x86-64Use the following information to check supported Oracle Linux 7 distributions:
• Supported Red Hat Enterprise Linux 7 Distributions for x86-64Use the following information to check supported Red Hat Enterprise Linux 7distributions:
• Supported SUSE Linux Enterprise Server 12 Distributions for x86-64Use the following information to check supported SUSE Linux Enterprise Server12 distributions:
Supported Oracle Linux 7 Distributions for x86-64Use the following information to check supported Oracle Linux 7 distributions:
Table 3-1 x86-64 Oracle Linux 7 Minimum Operating System Requirements
Item Requirements
SSH Requirement Ensure that OpenSSH is installed on your servers. OpenSSH is therequired SSH software.
Chapter 3Operating System Requirements for x86-64 Linux Platforms
3-3
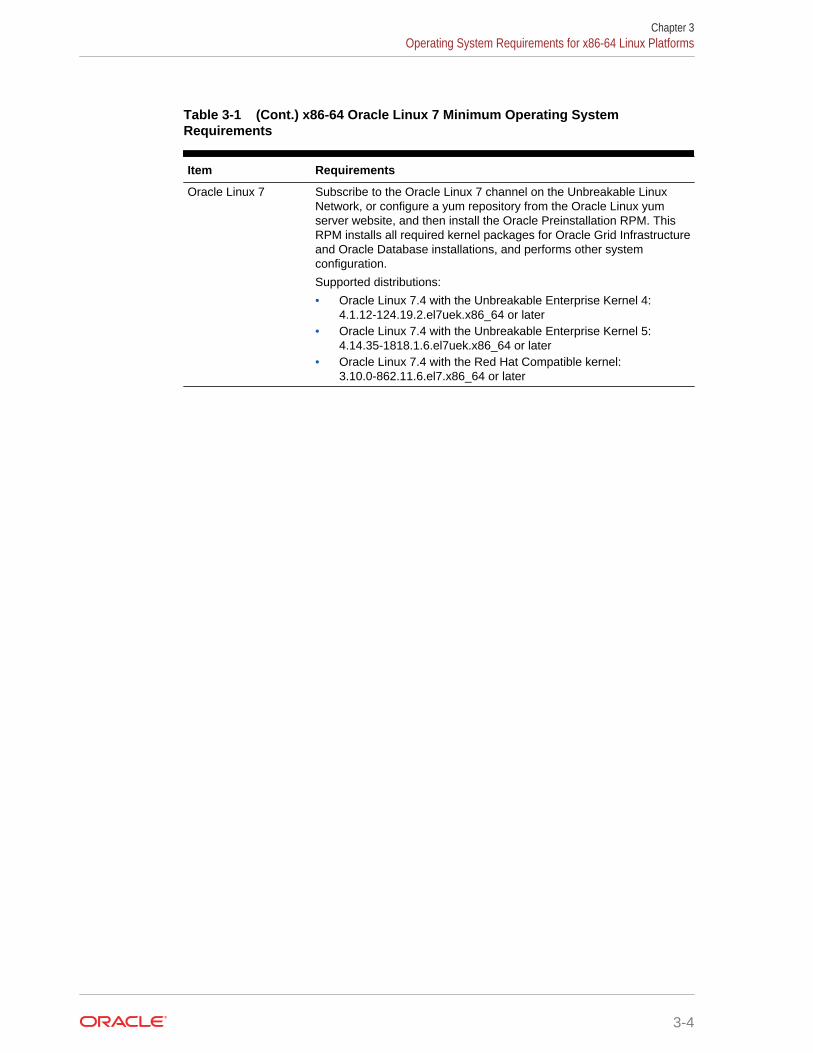
Table 3-1 (Cont.) x86-64 Oracle Linux 7 Minimum Operating SystemRequirements
Item Requirements
Oracle Linux 7 Subscribe to the Oracle Linux 7 channel on the Unbreakable LinuxNetwork, or configure a yum repository from the Oracle Linux yumserver website, and then install the Oracle Preinstallation RPM. ThisRPM installs all required kernel packages for Oracle Grid Infrastructureand Oracle Database installations, and performs other systemconfiguration.
Supported distributions:
• Oracle Linux 7.4 with the Unbreakable Enterprise Kernel 4:4.1.12-124.19.2.el7uek.x86_64 or later
• Oracle Linux 7.4 with the Unbreakable Enterprise Kernel 5:4.14.35-1818.1.6.el7uek.x86_64 or later
• Oracle Linux 7.4 with the Red Hat Compatible kernel:3.10.0-862.11.6.el7.x86_64 or later
Chapter 3Operating System Requirements for x86-64 Linux Platforms
3-4
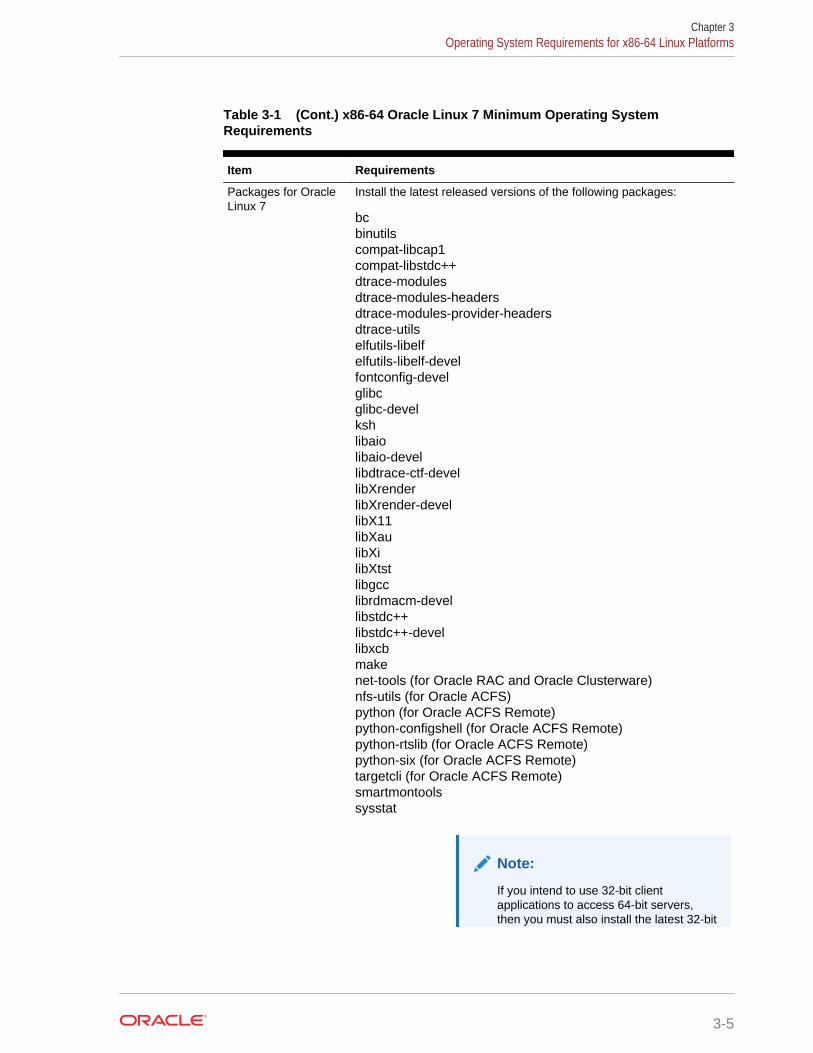
Table 3-1 (Cont.) x86-64 Oracle Linux 7 Minimum Operating SystemRequirements
Item Requirements
Packages for OracleLinux 7
Install the latest released versions of the following packages:
bcbinutilscompat-libcap1compat-libstdc++dtrace-modulesdtrace-modules-headersdtrace-modules-provider-headersdtrace-utilselfutils-libelfelfutils-libelf-develfontconfig-develglibcglibc-develkshlibaiolibaio-devellibdtrace-ctf-devellibXrenderlibXrender-devellibX11libXaulibXilibXtstlibgcclibrdmacm-devellibstdc++libstdc++-devellibxcbmakenet-tools (for Oracle RAC and Oracle Clusterware)nfs-utils (for Oracle ACFS)python (for Oracle ACFS Remote)python-configshell (for Oracle ACFS Remote)python-rtslib (for Oracle ACFS Remote)python-six (for Oracle ACFS Remote)targetcli (for Oracle ACFS Remote)smartmontoolssysstat
Note:
If you intend to use 32-bit clientapplications to access 64-bit servers,then you must also install the latest 32-bit
Chapter 3Operating System Requirements for x86-64 Linux Platforms
3-5
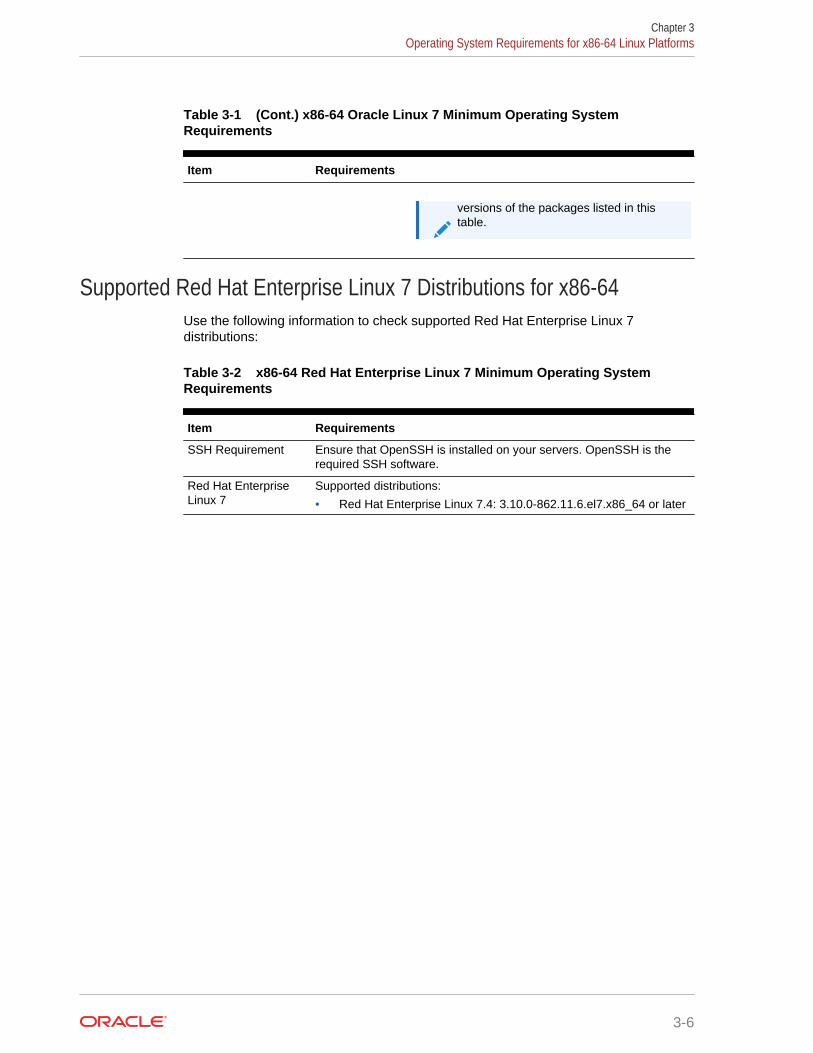
Table 3-1 (Cont.) x86-64 Oracle Linux 7 Minimum Operating SystemRequirements
Item Requirements
versions of the packages listed in thistable.
Supported Red Hat Enterprise Linux 7 Distributions for x86-64Use the following information to check supported Red Hat Enterprise Linux 7distributions:
Table 3-2 x86-64 Red Hat Enterprise Linux 7 Minimum Operating SystemRequirements
Item Requirements
SSH Requirement Ensure that OpenSSH is installed on your servers. OpenSSH is therequired SSH software.
Red Hat EnterpriseLinux 7
Supported distributions:
• Red Hat Enterprise Linux 7.4: 3.10.0-862.11.6.el7.x86_64 or later
Chapter 3Operating System Requirements for x86-64 Linux Platforms
3-6
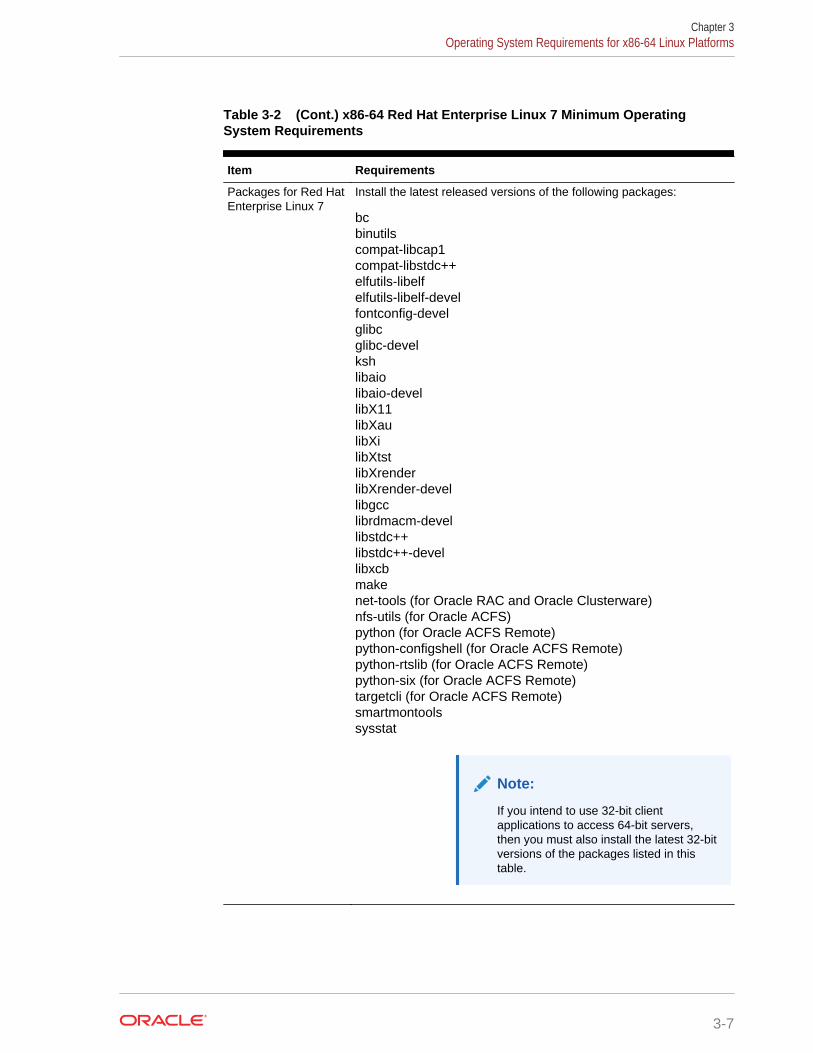
Table 3-2 (Cont.) x86-64 Red Hat Enterprise Linux 7 Minimum OperatingSystem Requirements
Item Requirements
Packages for Red HatEnterprise Linux 7
Install the latest released versions of the following packages:
bcbinutilscompat-libcap1compat-libstdc++elfutils-libelfelfutils-libelf-develfontconfig-develglibcglibc-develkshlibaiolibaio-devellibX11libXaulibXilibXtstlibXrenderlibXrender-devellibgcclibrdmacm-devellibstdc++libstdc++-devellibxcbmakenet-tools (for Oracle RAC and Oracle Clusterware)nfs-utils (for Oracle ACFS)python (for Oracle ACFS Remote)python-configshell (for Oracle ACFS Remote)python-rtslib (for Oracle ACFS Remote)python-six (for Oracle ACFS Remote)targetcli (for Oracle ACFS Remote)smartmontoolssysstat
Note:
If you intend to use 32-bit clientapplications to access 64-bit servers,then you must also install the latest 32-bitversions of the packages listed in thistable.
Chapter 3Operating System Requirements for x86-64 Linux Platforms
3-7
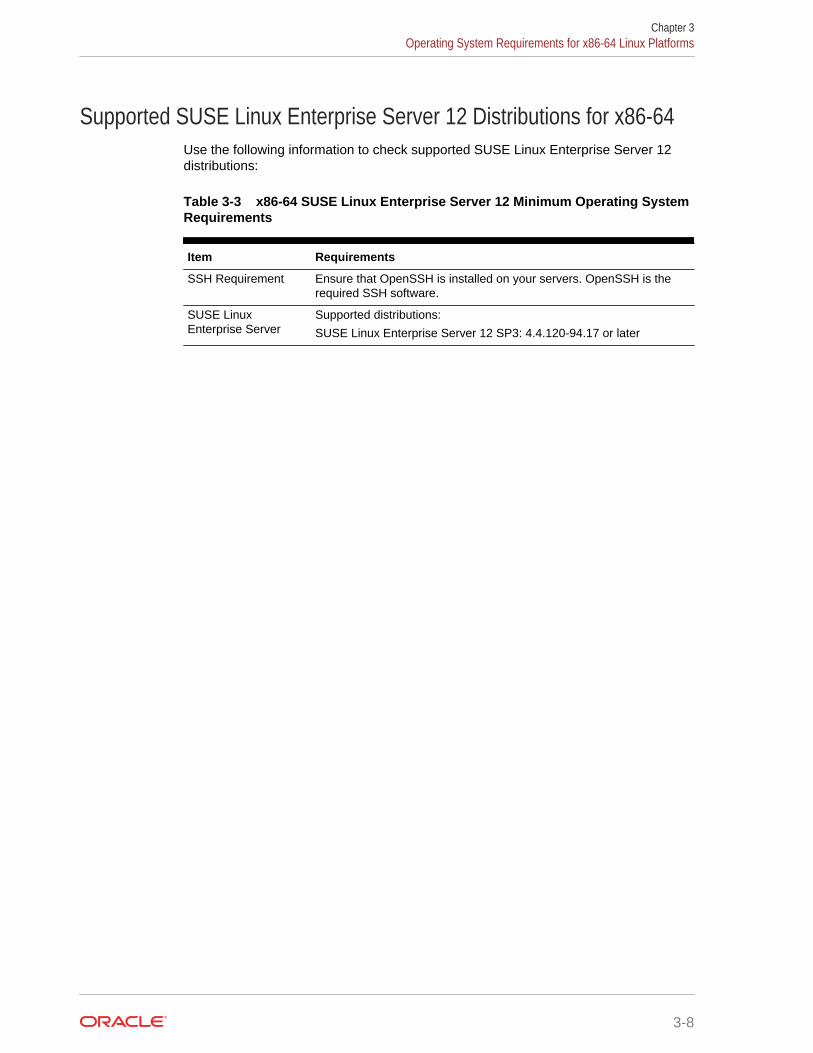
Supported SUSE Linux Enterprise Server 12 Distributions for x86-64Use the following information to check supported SUSE Linux Enterprise Server 12distributions:
Table 3-3 x86-64 SUSE Linux Enterprise Server 12 Minimum Operating SystemRequirements
Item Requirements
SSH Requirement Ensure that OpenSSH is installed on your servers. OpenSSH is therequired SSH software.
SUSE LinuxEnterprise Server
Supported distributions:
SUSE Linux Enterprise Server 12 SP3: 4.4.120-94.17 or later
Chapter 3Operating System Requirements for x86-64 Linux Platforms
3-8
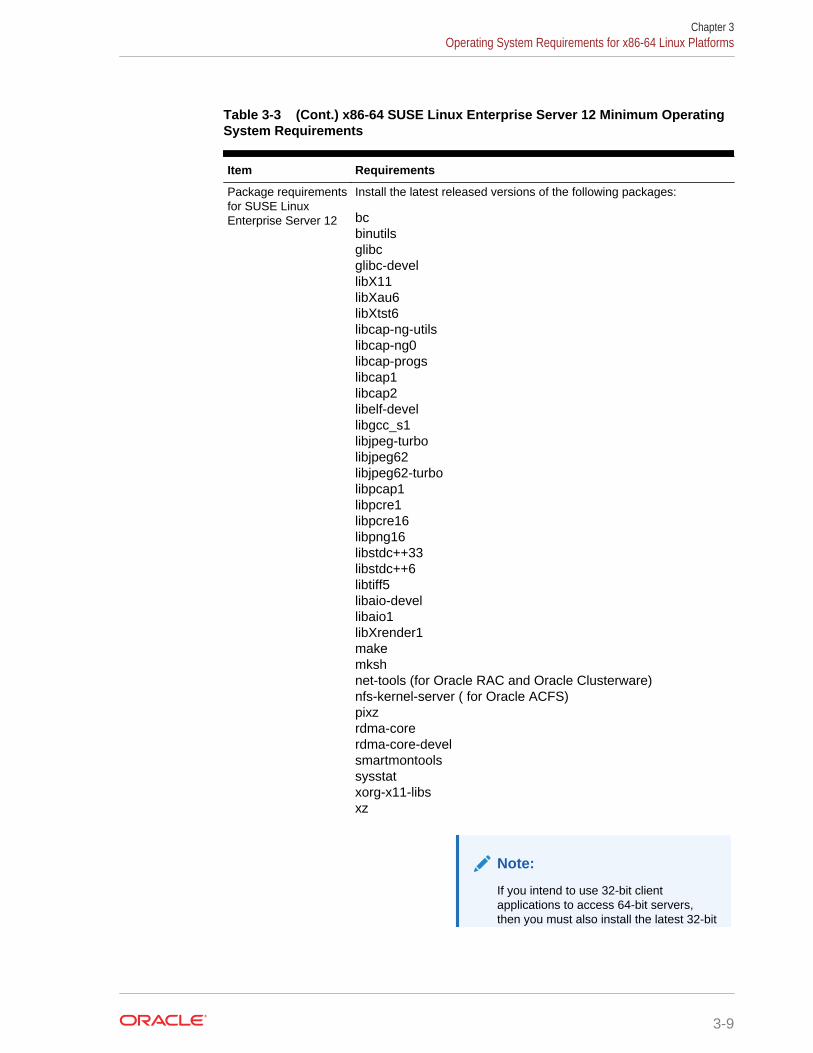
Table 3-3 (Cont.) x86-64 SUSE Linux Enterprise Server 12 Minimum OperatingSystem Requirements
Item Requirements
Package requirementsfor SUSE LinuxEnterprise Server 12
Install the latest released versions of the following packages:
bcbinutilsglibcglibc-devellibX11libXau6libXtst6libcap-ng-utilslibcap-ng0libcap-progslibcap1libcap2libelf-devellibgcc_s1libjpeg-turbolibjpeg62libjpeg62-turbolibpcap1libpcre1libpcre16libpng16libstdc++33libstdc++6libtiff5libaio-devellibaio1libXrender1makemkshnet-tools (for Oracle RAC and Oracle Clusterware)nfs-kernel-server ( for Oracle ACFS)pixzrdma-corerdma-core-develsmartmontoolssysstatxorg-x11-libsxz
Note:
If you intend to use 32-bit clientapplications to access 64-bit servers,then you must also install the latest 32-bit
Chapter 3Operating System Requirements for x86-64 Linux Platforms
3-9
Table 3-3 (Cont.) x86-64 SUSE Linux Enterprise Server 12 Minimum OperatingSystem Requirements
Item Requirements
versions of the packages listed in thistable.
Additional Drivers and Software Packages for LinuxInformation about optional drivers and software packages.
You are not required to install additional drivers and packages, but you may choose toinstall or configure these drivers and packages.
• Installing PAM for Login Authentication on LinuxPluggable Authentication Modules (PAM) is a system of libraries that handle userauthentication tasks for applications.
• Installing Oracle Messaging GatewayOracle Messaging Gateway is installed with Enterprise Edition of OracleDatabase. However, you may require a CSD or Fix Packs.
• Installation Requirements for ODBC and LDAPReview these topics to install Open Database Connectivity (ODBC) andLightweight Directory Access Protocol (LDAP).
• Installation Requirements for Programming Environments for LinuxReview the following section to install programming environments:
• Installation Requirements for Web BrowsersWeb browsers are required only if you intend to use Oracle Enterprise ManagerDatabase Express and Oracle Enterprise Manager Cloud Control. Web browsersmust support JavaScript, and the HTML 4.0 and CSS 1.0 standards.
Installing PAM for Login Authentication on LinuxPluggable Authentication Modules (PAM) is a system of libraries that handle userauthentication tasks for applications.
On Linux, external scheduler jobs require PAM. Oracle strongly recommends that youinstall the latest Linux-PAM library for your Linux distribution.
Use a package management system (yum, up2date, YaST) for your distribution to installthe latest pam (Pluggable Authentication Modules for Linux) library.
Installing Oracle Messaging GatewayOracle Messaging Gateway is installed with Enterprise Edition of Oracle Database.However, you may require a CSD or Fix Packs.
If you require a CSD or Fix Packs for IBM WebSphere MQ, then see the followingwebsite for more information:
Chapter 3Additional Drivers and Software Packages for Linux
3-10

https://www.ibm.com/support/
Note:
Oracle Messaging Gateway does not support the integration of AdvancedQueuing with TIBCO Rendezvous on IBM: Linux on System z.
Related Topics
• Oracle Database Advanced Queuing User's Guide
Installation Requirements for ODBC and LDAPReview these topics to install Open Database Connectivity (ODBC) and LightweightDirectory Access Protocol (LDAP).
• About ODBC Drivers and Oracle DatabaseOpen Database Connectivity (ODBC) is a set of database access APIs thatconnect to the database, prepare, and then run SQL statements on the database.
• Installing ODBC Drivers for Linux x86-64If you intend to use ODBC, then install the most recent ODBC Driver Manager forLinux.
• About LDAP and Oracle Plug-insLightweight Directory Access Protocol (LDAP) is an application protocol foraccessing and maintaining distributed directory information services over IPnetworks.
• Installing the LDAP PackageLDAP is included in a default Linux operating system installation.
About ODBC Drivers and Oracle DatabaseOpen Database Connectivity (ODBC) is a set of database access APIs that connect tothe database, prepare, and then run SQL statements on the database.
An application that uses an ODBC driver can access non-uniform data sources, suchas spreadsheets and comma-delimited files.
Installing ODBC Drivers for Linux x86-64If you intend to use ODBC, then install the most recent ODBC Driver Manager forLinux.
Download and install the ODBC Driver Manager and Linux RPMs from the followingwebsite:
http://www.unixodbc.org
Review the minimum supported ODBC driver releases, and install ODBC drivers of thefollowing or later releases for all Linux distributions:
unixODBC-2.3.4 or later
Chapter 3Additional Drivers and Software Packages for Linux
3-11
About LDAP and Oracle Plug-insLightweight Directory Access Protocol (LDAP) is an application protocol for accessingand maintaining distributed directory information services over IP networks.
You require the LDAP package if you want to use features requiring LDAP, includingthe Oracle Database scripts odisrvreg and oidca for Oracle Internet Directory, orschemasync for third-party LDAP directories.
Installing the LDAP PackageLDAP is included in a default Linux operating system installation.
If you did not perform a default Linux installation, and you intend to use Oracle scriptsrequiring LDAP, then use a package management system (up2date, YaST) for yourdistribution to install a supported LDAP package for your distribution, and install anyother required packages for that LDAP package.
Installation Requirements for Programming Environments for LinuxReview the following section to install programming environments:
• Installation Requirements for Programming Environments for Linux x86-64Ensure that your system meets the requirements for the programmingenvironment you want to configure:
Installation Requirements for Programming Environments for Linux x86-64Ensure that your system meets the requirements for the programming environmentyou want to configure:
Table 3-4 Requirements for Programming Environments for Linux X86–64
Programming Environments Support Requirements
Java Database Connectivity(JDBC) / JDBC Oracle CallInterface (JDBC OCI)
JDK 8 (Java SE Development Kit) with the JNDI extensionwith Oracle Java Database Connectivity.
Oracle Call Interface (OCI)
Oracle C++ Call Interface
Pro*C/C++
Intel C/C++ Compiler 17.0.2.174 or later, or the GNU C andC++ compilers listed in this table.
Oracle C++ Call Interface (OCCI) applications can be builtwith g++ and Intel C++ Compiler 17.0.2.174 used with thestandard template libraries of the gcc compilers listed inthis table.
Chapter 3Additional Drivers and Software Packages for Linux
3-12
Table 3-4 (Cont.) Requirements for Programming Environments for Linux X86–64
Programming Environments Support Requirements
gcc compiler packages Install the latest released versions of the gcc packageslisted here.
gccgcc-c++gcc-infogcc-localegcc48gcc48-infogcc48-localegcc48-c++
Note:
If you intend to use 32-bitclient applications to access64-bit servers, then you mustalso install the latest 32-bitversions of the packageslisted in this table.
Oracle XML Developer's Kit(XDK)
Oracle XML Developer's Kit is supported with the samecompilers as OCCI.
Pro*COBOL Micro Focus Visual COBOL for Eclipse 2.3 - Update 2
Installation Requirements for Web BrowsersWeb browsers are required only if you intend to use Oracle Enterprise ManagerDatabase Express and Oracle Enterprise Manager Cloud Control. Web browsers mustsupport JavaScript, and the HTML 4.0 and CSS 1.0 standards.
https://support.oracle.com
Related Topics
• Oracle Enterprise Manager Cloud Control Basic Installation Guide
Checking Kernel and Package Requirements for LinuxVerify your kernel and packages to see if they meet minimum requirements forinstallation.
1. To determine the distribution and version of Linux installed, enter one of thefollowing commands:
# cat /etc/oracle-release# cat /etc/redhat-release
Chapter 3Checking Kernel and Package Requirements for Linux
3-13
# cat /etc/SuSE-release# lsb_release -id
2. To determine if the required kernel errata is installed, enter the followingcommand:
# uname -r
The following is an example of the output this command displays on an OracleLinux 7 system:
4.1.12-112.16.7.el7uek.x86_64
Review the required errata level for your distribution. If the errata level is previousto the required minimum errata update, then obtain and install the latest kernelupdate from your Linux distributor.
3. To determine whether the required packages are installed, enter commandssimilar to the following:
# rpm -q package_name
Alternatively, if you require specific system architecture information, then enter thefollowing command:
# rpm -qa --queryformat "%{NAME}-%{VERSION}-%{RELEASE} (%{ARCH})\n" |grep package_name
You can also combine a query for multiple packages, and review the output for thecorrect versions. For example:
# rpm -q binutils compat-libstdc++ gcc glibc libaio libgcc libstdc++ \make sysstat unixodbc
If a package is not installed, then install it from your Linux distribution media ordownload the required package version from your Linux distributor's website.
Chapter 3Checking Kernel and Package Requirements for Linux
3-14
4Configuring Users, Groups andEnvironments for Oracle Database Client
Before installation, create operating system groups and users, and configure userenvironments.
• Required Operating System Groups and UsersOracle software installations require an installation owner, an Oracle Inventorygroup, which is the primary group of all Oracle installation owners, and at least onegroup designated as a system privileges group.
• Creating Operating System Oracle Installation User AccountsBefore starting installation, create Oracle software owner user accounts, andconfigure their environments.
• Unsetting Oracle Installation Owner Environment VariablesUnset Oracle installation owner environment variables before you start theinstallation.
Required Operating System Groups and UsersOracle software installations require an installation owner, an Oracle Inventory group,which is the primary group of all Oracle installation owners, and at least one groupdesignated as a system privileges group.
Review group and user options with your system administrator. If you have systemadministration privileges, then review the topics in this section and configure operatingsystem groups and users as needed.
• Determining If an Oracle Inventory and Oracle Inventory Group ExistDetermine if you have an existing Oracle central inventory, and ensure that youuse the same Oracle Inventory for all Oracle software installations. Also, ensurethat all Oracle software users you intend to use for installation have permissions towrite to this directory.
• Creating the Oracle Inventory Group If an Oracle Inventory Does Not ExistCreate an Oracle Inventory group manually as part of a planned installation,particularly where more than one Oracle software product is installed on servers.
• About Oracle Installation Owner AccountsSelect or create an Oracle installation owner for your installation, depending on thegroup and user management plan you want to use for your installations.
• Identifying an Oracle Software Owner User AccountYou must create at least one software owner user account the first time you installOracle software on the system. Either use an existing Oracle software useraccount, or create an Oracle software owner user account for your installation.
4-1
Determining If an Oracle Inventory and Oracle Inventory Group ExistDetermine if you have an existing Oracle central inventory, and ensure that you usethe same Oracle Inventory for all Oracle software installations. Also, ensure that allOracle software users you intend to use for installation have permissions to write tothis directory.
When you install Oracle software on the system for the first time, OUI creates theoraInst.loc file. This file identifies the name of the Oracle Inventory group (by default,oinstall), and the path of the Oracle central inventory directory. If you have anexisting Oracle central inventory, then ensure that you use the same Oracle Inventoryfor all Oracle software installations, and ensure that all Oracle software users youintend to use for installation have permissions to write to this directory.
oraInst.loccentral_inventory_locationgroup
inventory_loc=central_inventory_locationinst_group=group
Use the more command to determine if you have an Oracle central inventory on yoursystem. For example:
# more /etc/oraInst.loc
inventory_loc=/u01/app/oraInventoryinst_group=oinstall
Use the command grep groupname /etc/group to confirm that the groupspecified as the Oracle Inventory group still exists on the system. For example:
$ grep oinstall /etc/groupoinstall:x:54321:grid,oracle
Note:
Do not put the oraInventory directory under the Oracle base directory for anew installation, because that can result in user permission errors for otherinstallations.
Creating the Oracle Inventory Group If an Oracle Inventory Does NotExist
Create an Oracle Inventory group manually as part of a planned installation,particularly where more than one Oracle software product is installed on servers.
By default, if an oraInventory group does not exist, then the installer uses the primarygroup of the installation owner for the Oracle software being installed as theoraInventory group. Ensure that this group is available as a primary group for allplanned Oracle software installation owners.
Chapter 4Required Operating System Groups and Users
4-2

oraInst.loc
# /usr/sbin/groupadd -g 54321 oinstall
About Oracle Installation Owner AccountsSelect or create an Oracle installation owner for your installation, depending on thegroup and user management plan you want to use for your installations.
You must create a software owner for your installation in the following circumstances:
• If an Oracle software owner user does not exist; for example, if this is the firstinstallation of Oracle software on the system.
• If an Oracle software owner user exists, but you want to use a different operatingsystem user, with different group membership, to separate Oracle GridInfrastructure administrative privileges from Oracle Database administrativeprivileges.
In Oracle documentation, a user created to own only Oracle Grid Infrastructuresoftware installations is called the Grid user (grid). This user owns both the OracleClusterware and Oracle Automatic Storage Management binaries. A user created toown either all Oracle installations, or one or more Oracle database installations, iscalled the Oracle user (oracle). You can have only one Oracle Grid Infrastructureinstallation owner, but you can have different Oracle users to own differentinstallations.
Oracle software owners must have the Oracle Inventory group as their primary group,so that each Oracle software installation owner can write to the central inventory(oraInventory), and so that OCR and Oracle Clusterware resource permissions are setcorrectly. The database software owner must also have the OSDBA group and (if youcreate them) the OSOPER, OSBACKUPDBA, OSDGDBA, OSRACDBA, andOSKMDBA groups as secondary groups.
Identifying an Oracle Software Owner User AccountYou must create at least one software owner user account the first time you installOracle software on the system. Either use an existing Oracle software user account, orcreate an Oracle software owner user account for your installation.
To use an existing user account, obtain from you system administrator the name of anexisting Oracle installation owner. Confirm that the existing owner is a member of theOracle Inventory group.
oinstalloinstall
$ grep "oinstall" /etc/groupoinstall:x:54321:oracle
You can then use the ID command to verify that the Oracle installation owners youintend to use have the Oracle Inventory group as their primary group. For example:$id oracle
uid=54321(oracle) gid=54321(oinstall) groups=54321(oper),54322(dba)
Chapter 4Required Operating System Groups and Users
4-3
After you create operating system groups, create or modify Oracle user accounts inaccordance with your operating system authentication planning.
Creating Operating System Oracle Installation UserAccounts
Before starting installation, create Oracle software owner user accounts, and configuretheir environments.
Oracle software owner user accounts require resource settings and other environmentconfiguration. To protect against accidents, Oracle recommends that you create onesoftware installation owner account for each Oracle software program you install.
• Creating an Oracle Software Owner UserIf the Oracle software owner user (oracle ) does not exist, or if you require a newOracle software owner user, then create it as described in this section.
• Environment Requirements for Oracle Software OwnersYou must make the following changes to configure Oracle software ownerenvironments:
• Procedure for Configuring Oracle Software Owner EnvironmentsConfigure each Oracle installation owner user account environment:
• Setting Remote Display and X11 Forwarding ConfigurationIf you are on a remote terminal, and the local system has only one visual (which istypical), then use the following syntax to set your user account DISPLAYenvironment variable:
Creating an Oracle Software Owner UserIf the Oracle software owner user (oracle ) does not exist, or if you require a newOracle software owner user, then create it as described in this section.
The following example shows how to create the user oracle with the user ID 54321;with the primary group oinstall; and with secondary group dba.
# /usr/sbin/useradd -u 54321 -g oinstall -G dba, oracle
You must note the user ID number for installation users, because you need it duringpreinstallation.
For Oracle Grid Infrastructure Installations, user IDs and group IDs must be identicalon all candidate nodes.
Environment Requirements for Oracle Software OwnersYou must make the following changes to configure Oracle software ownerenvironments:
• Set the installation software owner user (grid, oracle) default file mode creationmask (umask) to 022 in the shell startup file. Setting the mask to 022 ensures thatthe user performing the software installation creates files with 644 permissions.
Chapter 4Creating Operating System Oracle Installation User Accounts
4-4
• Set ulimit settings for file descriptors and processes for the installation softwareowner (grid, oracle).
• Set the DISPLAY environment variable in preparation for running an OracleUniversal Installer (OUI) installation.
Caution:
If you have existing Oracle installations that you installed with the user IDthat is your Oracle Grid Infrastructure software owner, then unset all Oracleenvironment variable settings for that user.
Procedure for Configuring Oracle Software Owner EnvironmentsConfigure each Oracle installation owner user account environment:
1. Start an X terminal session (xterm) on the server where you are running theinstallation.
2. Enter the following command to ensure that X Window applications can display onthis system, where hostname is the fully qualified name of the local host fromwhich you are accessing the server:
$ xhost + hostname
3. If you are not logged in as the software owner user, then switch to the softwareowner user you are configuring. For example, with the user grid:
$ su - grid
On systems where you cannot run su commands, use sudo instead:
$ sudo -u grid -s
4. To determine the default shell for the user, enter the following command:
$ echo $SHELL
5. Open the user's shell startup file in any text editor:
• Bash shell (bash):
$ vi .bash_profile
• Bourne shell (sh) or Korn shell (ksh):
$ vi .profile
• C shell (csh or tcsh):
% vi .login
Chapter 4Creating Operating System Oracle Installation User Accounts
4-5
6. Enter or edit the following line, specifying a value of 022 for the default file modecreation mask:
umask 022
7. If the ORACLE_SID, ORACLE_HOME, or ORACLE_BASE environment variables are set inthe file, then remove these lines from the file.
8. Save the file, and exit from the text editor.
9. To run the shell startup script, enter one of the following commands:
• Bash shell:
$ . ./.bash_profile
• Bourne, Bash, or Korn shell:
$ . ./.profile
• C shell:
% source ./.login
10. Use the following command to check the PATH environment variable:
$ echo $PATH
Remove any Oracle environment variables.
11. If you are not installing the software on the local system, then enter a commandsimilar to the following to direct X applications to display on the local system:
• Bourne, Bash, or Korn shell:
$ export DISPLAY=local_host:0.0
• C shell:
% setenv DISPLAY local_host:0.0
In this example, local_host is the host name or IP address of the system (yourworkstation, or another client) on which you want to display the installer.
12. If the /tmp directory has less than 1 GB of free space, then identify a file systemwith at least 1 GB of free space and set the TMP and TMPDIR environment variablesto specify a temporary directory on this file system:
Note:
You cannot use a shared file system as the location of the temporary filedirectory (typically /tmp) for Oracle RAC installations. If you place /tmpon a shared file system, then the installation fails.
Chapter 4Creating Operating System Oracle Installation User Accounts
4-6
a. Use the df -h command to identify a suitable file system with sufficient freespace.
b. If necessary, enter commands similar to the following to create a temporarydirectory on the file system that you identified, and set the appropriatepermissions on the directory:
$ sudo - s# mkdir /mount_point/tmp# chmod 775 /mount_point/tmp# exit
c. Enter commands similar to the following to set the TMP and TMPDIRenvironment variables:
Bourne, Bash, or Korn shell:
$ TMP=/mount_point/tmp$ TMPDIR=/mount_point/tmp$ export TMP TMPDIR
C shell:
% setenv TMP /mount_point/tmp% setenv TMPDIR /mount_point/tmp
13. To verify that the environment has been set correctly, enter the followingcommands:
$ umask$ env | more
Verify that the umask command displays a value of 22, 022, or 0022 and that theenvironment variables you set in this section have the correct values.
Setting Remote Display and X11 Forwarding ConfigurationIf you are on a remote terminal, and the local system has only one visual (which istypical), then use the following syntax to set your user account DISPLAY environmentvariable:
Remote Display
Bourne, Korn, and Bash shells
$ export DISPLAY=hostname:0
C shell
% setenv DISPLAY hostname:0
Chapter 4Creating Operating System Oracle Installation User Accounts
4-7
For example, if you are using the Bash shell and if your host name is local_host, thenenter the following command:
$ export DISPLAY=node1:0
X11 Forwarding
To ensure that X11 forwarding does not cause the installation to fail, use the followingprocedure to create a user-level SSH client configuration file for Oracle installationowner user accounts:
1. Using any text editor, edit or create the software installation owner's ~/.ssh/config file.
2. Ensure that the ForwardX11 attribute in the ~/.ssh/config file is set to no. Forexample:
Host * ForwardX11 no
3. Ensure that the permissions on ~/.ssh are secured to the Oracle installationowner user account. For example:
$ ls -al .sshtotal 28drwx------ 2 grid oinstall 4096 Jun 21 2015drwx------ 19 grid oinstall 4096 Jun 21 2015-rw-r--r-- 1 grid oinstall 1202 Jun 21 2015 authorized_keys-rwx------ 1 grid oinstall 668 Jun 21 2015 id_dsa-rwx------ 1 grid oinstall 601 Jun 21 2015 id_dsa.pub-rwx------ 1 grid oinstall 1610 Jun 21 2015 known_hosts
Unsetting Oracle Installation Owner Environment VariablesUnset Oracle installation owner environment variables before you start the installation.
The environment variables you have set for the Oracle installation owner account youuse to run the installation can cause issues if they are set to values that conflict withthe values needed for installation.
If you have set ORA_CRS_HOME as an environment variable, following instructionsfrom Oracle Support, then unset it before starting an installation or upgrade. Youshould never use ORA_CRS_HOME as an environment variable except under explicitdirection from Oracle Support.
If you have had an existing installation on your system, and you are using the sameuser account to install this installation, then unset the following environment variables:ORA_CRS_HOME, ORACLE_HOME, ORA_NLS10, TNS_ADMIN, and any otherenvironment variable set for the Oracle installation user that is connected with Oraclesoftware homes.
Also, ensure that the $ORACLE_HOME/bin path is removed from your PATH environmentvariable.
Chapter 4Unsetting Oracle Installation Owner Environment Variables
4-8
5Installing Oracle Database Client
Oracle Database Client installation software is available in multiple media, and can beinstalled using several options.
The Oracle Database Client software is available on installation media, or you candownload it from the Oracle Technology Network website, or the Oracle SoftwareDelivery Cloud portal. In most cases, you use the graphical user interface (GUI)provided by Oracle Universal Installer (OUI) to install the software. However, you canalso use Oracle Universal Installer to complete silent mode installations, without usingthe GUI.
Note:
You cannot use Oracle Universal Installer from an earlier Oracle release toinstall components from this release.
• About Image-Based Oracle Database Client InstallationStarting with Oracle Database 19c, installation and configuration of OracleDatabase Client software is simplified with image-based installation.
• Accessing the Installation SoftwareYou can download Oracle Database software from the Oracle TechnologyNetwork website or the Oracle Software Delivery Cloud portal. In some cases,Oracle Database software may be available on installation media also.
• About Character Set Selection During InstallationBefore you create the database, decide the character set that you want to use.
• Running the Installer in a Different LanguageDescribes how to run the installer in other languages.
• Installing the Oracle Database Client SoftwareThese topics explain how to run the Setup Wizard to perform most database clientinstallations.
• Relinking Oracle Database Client Binaries After InstallationAfter an Oracle Database Client installation, if required, you can modify thebinaries using the relink as_installed option.
About Image-Based Oracle Database Client InstallationStarting with Oracle Database 19c, installation and configuration of Oracle DatabaseClient software is simplified with image-based installation.
To install Oracle Database Client, create the new Oracle home, extract the image fileinto the newly-created Oracle home, and run the setup wizard to register the OracleDatabase product.
5-1
You must extract the image software (client_home.zip) into the directory whereyou want your Oracle Database Client home to be located, and then run the SetupWizard to start the Oracle Database Client installation and configuration. Oraclerecommends that the Oracle home directory path you create is in compliance with theOracle Optimal Flexible Architecture recommendations.
Using image-based installation, you can install Oracle Database Client 32-bit and 64-bit configurations of the Administrator installation type.
As with Oracle Database and Oracle Grid Infrastructure image file installations, OracleDatabase Client image installations simplify Oracle Database Client installations andensure best practice deployments. Oracle Database Client installation binariescontinue to be available in the traditional format as non-image zip files.
Accessing the Installation SoftwareYou can download Oracle Database software from the Oracle Technology Networkwebsite or the Oracle Software Delivery Cloud portal. In some cases, Oracle Databasesoftware may be available on installation media also.
To install the software from the hard disk, you must either download it and unpack it,or copy it from the installation media, if you have it.
• Downloading Oracle SoftwareSelect the method you want to use to download the software.
• Downloading the Installation Archive Files from OTNDownload installation archive files from Oracle Technology Network (OTN).
• Downloading the Software from Oracle Software Delivery Cloud PortalYou can download the software from Oracle Software Delivery Cloud as MediaPacks.
• Copying the Software to the Hard DiskOracle recommends that you copy the installation software to the hard disk toenable the installation to run faster.
Downloading Oracle SoftwareSelect the method you want to use to download the software.
You can download the trial version of the installation files from the Oracle TechnologyNetwork (OTN) or the Oracle Software Delivery Cloud portal and extract them on yourhard disk. Ensure that you review and understand the terms of the license.
Downloading the Installation Archive Files from OTNDownload installation archive files from Oracle Technology Network (OTN).
1. Use any browser to access the software download page from Oracle TechnologyNetwork:
http://www.oracle.com/technetwork/indexes/downloads/index.html
2. Go to the download page for the product to install.
3. On the download page, identify the required disk space by adding the file sizes foreach required file.
Chapter 5Accessing the Installation Software
5-2
The file sizes are listed next to the file names.
4. Select a file system with enough free space to store and expand the archive files.
In most cases, the available disk space must be at least twice the size of all of thearchive files.
5. On the file system, create a parent directory for each product (for example,OraDB19c) to hold the installation directories.
6. Download all of the installation archive files to the directory you created for theproduct.
Note:
For Oracle Database Client installations, there are two installationarchive files available for download. The first file is the client installationbinary and the second file is a client gold image file. Download theappropriate zip file based on the type of installation you want to perform.
7. Verify that the files you downloaded are the same size as the corresponding fileson Oracle Technology Network. Also verify the checksums are the same as notedon Oracle Technology Network using a command similar to the following, wherefilename is the name of the file you downloaded:
cksum filename.zip
8. Extract the files in each directory that you just created.
Downloading the Software from Oracle Software Delivery Cloud PortalYou can download the software from Oracle Software Delivery Cloud as Media Packs.
A Media Pack is an electronic version of the software that is also available to Oraclecustomers on CD-ROM or DVD.
1. Use any browser to access the Oracle Software Delivery Cloud portal:
https://edelivery.oracle.com/
2. Complete the export validation process by entering information (name, company,email address, and country) in the online form.
3. In the Media Pack Search page, specify the product pack and platform to identifythe media pack that you want to download. If you do not know the name of theproduct pack, then you can search for it using the license list.
4. Optionally, select the relevant product to download from the Results list.
5. In the search results page, click Readme to download and review the readme filefor download instructions and product information.
6. After you review the readme file, select the media pack that you want to downloadfrom the search results to download the individual zip files for the media pack, andfollow the Download Notes instructions in this page. After you download andextract the contents of the zip files, you can install the software.
Chapter 5Accessing the Installation Software
5-3
Note:
Print the page with the list of downloadable files. It contains a list of partnumbers and their corresponding descriptions that you may refer duringthe installation process.
7. After you download the files, click View Digest to verify that the MD5 or SHA-1checksum matches the value listed on the media download page.
Copying the Software to the Hard DiskOracle recommends that you copy the installation software to the hard disk to enablethe installation to run faster.
Before copying the installation media content to the hard disk, you must mount thedisk. Review these sections if you need instructions for how to mount the installationmedia and copy its contents to the hard disk.
• Mounting Disks on Linux SystemsOn most Linux systems, the disk mounts automatically when you insert it into thedisk drive. If the disk does not mount automatically, then follow these steps tomount it.
Mounting Disks on Linux SystemsOn most Linux systems, the disk mounts automatically when you insert it into the diskdrive. If the disk does not mount automatically, then follow these steps to mount it.
1. If necessary, log in as the root user and enter a command similar to one of thefollowing to eject the currently mounted disk, then remove it from the drive:
• Oracle Linux and Red Hat Enterprise Linux:
# eject /mnt/dvd
• SUSE Linux Enterprise Server:
# eject /media/dvd
In these examples, /mnt/dvd and /media/dvd are the mount point directoriesfor the installation media.
2. Insert the appropriate installation media into the disk drive.
3. To verify if the disk is mounted automatically, enter one of the following commandsdepending on the platform:
• Oracle Linux and Red Hat Enterprise Linux:
# ls /mnt/dvd
• SUSE Linux Enterprise Server:
# ls /media/dvd
Chapter 5Accessing the Installation Software
5-4
If this command fails to display the contents of the installation media, then enter acommand similar to the following to mount it, depending on the platform:
• Oracle Linux and Red Hat Enterprise Linux:
# mount -t iso9660 /dev/dvd /mnt/dvd
• SUSE Linux Enterprise Server:
# mount -t iso9660 /dev/dvd /media/dvd
In these examples, /mnt/dvd and /media/dvd are the mount point directoriesfor the installation media.
Note:
Ensure that the /mnt/dvd directory exists on Red Hat Enterprise Linux. Ifit does not, then create the /mnt/dvd mount point to mount theinstallation media.
About Character Set Selection During InstallationBefore you create the database, decide the character set that you want to use.
After a database is created, changing its character set is usually very expensive interms of time and resources. Such operations may require converting all characterdata by exporting the whole database and importing it back. Therefore, it is importantthat you carefully select the database character set at installation time.
Oracle Database uses character sets for the following:
• Data stored in SQL character data types (CHAR, VARCHAR2, CLOB, and LONG).
• Identifiers such as table names, column names, and PL/SQL variables.
• Stored SQL and PL/SQL source code, including text literals embedded in thiscode.
Starting with Oracle Database 12c Release 2 (12.2), the default database characterset of a database created from the General Purpose/Transaction Processing or theData Warehousing template is Unicode AL32UTF8.
Unicode is the universal character set that supports most of the currently spokenlanguages of the world. It also supports many historical scripts (alphabets). Unicode isthe native encoding of many technologies, including Java, XML, XHTML, ECMAScript,and LDAP. Unicode is ideally suited for databases supporting the Internet and theglobal economy.
Because AL32UTF8 is a multibyte character set, database operations on character datamay be slightly slower when compared to single-byte database character sets, such asWE8ISO8859P1 or WE8MSWIN1252. Storage space requirements for text in mostlanguages that use characters outside of the ASCII repertoire are higher in AL32UTF8compared to legacy character sets supporting the language. English data may requiremore space only if stored in CLOB (character large object) columns. Storage for non-
Chapter 5About Character Set Selection During Installation
5-5
character data types, such as NUMBER or DATE, does not depend on a character set.The universality and flexibility of Unicode usually outweighs these additional costs.
Consider legacy character sets only when the database needs to support a singlegroup of languages and the use of a legacy character set is critical for fulfillingcompatibility, storage, or performance requirements. The database character set to beselected in this case is the character set of most clients connecting to this database.
The database character set of a multitenant container database (CDB) determineswhich databases can be plugged in later. Ensure that the character set you choose forthe CDB is compatible with the database character sets of the databases to beplugged into this CDB. If you use Unicode AL32UTF8 as your CDB character set, thenyou can plug in a pluggable database (PDB) in any database character set supportedby Oracle Database (with the exception of EBCDIC-based character sets).
See Also:
Oracle Database Globalization Support Guide for more information aboutchoosing a database character set for a multitenant container database(CDB)
Running the Installer in a Different LanguageDescribes how to run the installer in other languages.
Your operating system locale determines the language in which the database installerruns. You can run the installer in one of these languages:
• Brazilian Portuguese (pt_BR)
• French (fr)
• German (de)
• Italian (it)
• Japanese (ja)
• Korean (ko)
• Simplified Chinese (zh_CN)
• Spanish (es)
• Traditional Chinese (zh_TW)
To run the database installer in a supported language, change the locale in which youroperating system session is running before you start the installer.
If the selected language is not one of the supported languages, then the installer runsin English.
Installing the Oracle Database Client SoftwareThese topics explain how to run the Setup Wizard to perform most database clientinstallations.
Chapter 5Running the Installer in a Different Language
5-6
• Running Setup Wizard to Install Oracle Database ClientUse the runInstaller command to start the Oracle Database Client installation.
• Installing Oracle Database Client Using Image FileExtract the Oracle Database Client image files and use the runInstallercommand to start the Oracle Database Client installation.
• Using Oracle Net Configuration AssistantRun Oracle Net Configuration Assistant in standalone mode after the OracleDatabase Client installation is complete to configure the listener, naming methods,net service names, and directory server usage.
Running Setup Wizard to Install Oracle Database ClientUse the runInstaller command to start the Oracle Database Client installation.
Have all the information you need to provide regarding users groups, and storagepaths before you start the installation.
Oracle recommends that you have your My Oracle Support credentials availableduring installation.
During installation, you are asked to run configuration scripts as the root user. Youcan either run these scripts manually as root when prompted, or you can provideconfiguration information and passwords using a root privilege delegation option suchas sudo.
1. Log in as the Oracle installation owner user account (oracle).
2. On the installation media, or where you have downloaded the installation binaries,run the runInstaller command to start the Oracle setup wizard.
For example:
• On installation media:
/dev/dvd-rw/media/runInstaller
• On a hard disk:
$ cd /home/oracle_sw/$ ./runInstaller
Note:
Run the runInstaller command from the Oracle home directory only.Do not use the runInstaller command that residesat $ORACLE_HOME/oui/bin/, or any other location, to install OracleDatabase, Oracle Database Client, or Oracle Grid Infrastructure.
3. Select your installation type.
Installation screens vary depending on the installation option you select. Respondto the configuration prompts as needed.
Chapter 5Installing the Oracle Database Client Software
5-7
Note:
At any time during installation, if you have a question about what you arebeing asked to do, click Help.
Installing Oracle Database Client Using Image FileExtract the Oracle Database Client image files and use the runInstaller commandto start the Oracle Database Client installation.
Starting with 19c, the Oracle Database Client software is also available as an imagefile for download and installation.
Have all the information you need to provide regarding storage paths before you startthe installation. Oracle recommends that you have your My Oracle Support credentialsavailable during installation. During installation, you are asked to run configurationscripts as the root user. You must run these scripts manually as root when prompted.
1. Log in as the Oracle installation owner user account (oracle).
2. Download the Oracle Database Client installation image files(client_home.zip) to a directory of your choice. For example, you candownload the image files to the /tmp directory.
3. Create the Oracle home directory and extract the image files that you havedownloaded in to this Oracle home directory. For example:
$ mkdir -p /u01/app/oracle/product/19.0.0/client_1$ chgrp oinstall /u01/app/oracle/product/19.0.0/client_1$ cd /u01/app/oracle/product/19.0.0/client_1$ unzip -q /tmp/client_home.zip
Note:
Oracle recommends that the Oracle home directory path you create is incompliance with the Oracle Optimal Flexible Architecturerecommendations. Also, unzip the installation image files only in thisOracle home directory that you created.
4. From the Oracle home directory, run the runInstaller command to start theOracle Database Client Setup Wizard.
$ cd /u01/app/oracle/product/19.0.0/client_1$ ./runInstaller
Chapter 5Installing the Oracle Database Client Software
5-8
Note:
Run the runInstaller command from the Oracle home directory only.Do not use the runInstaller command that residesat $ORACLE_HOME/oui/bin/, or any other location, to install OracleDatabase, Oracle Database Client, or Oracle Grid Infrastructure.
5. The setup wizard starts an Administrator type installation of Oracle DatabaseClient.
Installation screens vary depending on the installation option you select. Respondto the configuration prompts as needed.
Note:
At any time during installation, if you have a question about what you arebeing asked to do, click Help.
Using Oracle Net Configuration AssistantRun Oracle Net Configuration Assistant in standalone mode after the Oracle DatabaseClient installation is complete to configure the listener, naming methods, net servicenames, and directory server usage.
Oracle recommends that you have information ready about the host name of thecomputer where the Oracle database is installed.
To start Oracle Net Configuration Assistant in standalone mode:
1. Run netca from the $ORACLE_HOME/bin directory.
2. Respond to the configuration prompts and screens as needed. The screens varydepending on the options you select. At any time during the configuration, if youhave a question about what you are being asked to do, click Help.
Related Topics
• Oracle Database Net Services Administrator's Guide
Relinking Oracle Database Client Binaries After InstallationAfter an Oracle Database Client installation, if required, you can modify the binariesusing the relink as_installed option.
For example, you might want to relink the Oracle Database Client binaries every timeyou apply an operating system patch or after an operating system upgrade.
Caution:
Before relinking executables, you must shut down all executables that run inthe Oracle home directory that you are relinking. In addition, shut downapplications linked with Oracle shared libraries.
Chapter 5Relinking Oracle Database Client Binaries After Installation
5-9
1. Login as the Oracle Database Client owner user (oracle).
2. Set the ORACLE_HOME environment variable
$ ORACLE_HOME=/u01/app/oracle/product/19.0.0/client_1
3. Go to the $ORACLE_HOME/bin directory:
$ cd $ORACLE_HOME/bin
4. Run the relink script with the as_installed option to relink the binaries.
$ ./relink as_installed
The relinking is complete and the log files are generated underthe $ORACLE_HOME/install directory.
Chapter 5Relinking Oracle Database Client Binaries After Installation
5-10
6Oracle Database Client PostinstallationTasks
Complete configuration tasks after you install Oracle Database.
You are required to complete some configuration tasks after Oracle Database Client isinstalled. In addition, Oracle recommends that you complete additional tasksimmediately after installation. You must also complete product-specific configurationtasks before you use those products.
Note:
This chapter describes basic configuration only. Refer to product-specificadministration and tuning guides for more detailed configuration and tuninginformation.
• Required Postinstallation TasksDownload and apply required patches for your software release after completingyour initial installation.
• Recommended Postinstallation TasksOracle recommends that you complete these tasks after installation.
Required Postinstallation TasksDownload and apply required patches for your software release after completing yourinitial installation.
• Downloading and Installing Release Update PatchesDownload and install Release Updates (RU) and Release Update Revisions(RUR) patches for your Oracle software after you complete installation.
Downloading and Installing Release Update PatchesDownload and install Release Updates (RU) and Release Update Revisions (RUR)patches for your Oracle software after you complete installation.
Starting with Oracle Database 18c, Oracle provides quarterly updates in the form ofRelease Updates (RU) and Release Update Revisions (RUR). Oracle no longerreleases patch sets. For more information, see My Oracle Support Note 2285040.1.
Check the My Oracle Support website for required updates for your installation.
1. Use a web browser to view the My Oracle Support website:
https://support.oracle.com
2. Log in to My Oracle Support website.
6-1
Note:
If you are not a My Oracle Support registered user, then click Registerfor My Oracle Support and register.
3. On the main My Oracle Support page, click Patches & Updates.
4. In the Patch Search region, select Product or Family (Advanced).
5. On the Product or Family (Advanced) display, provide information about theproduct, release, and platform for which you want to obtain patches, and clickSearch.
The Patch Search pane opens, displaying the results of your search.
6. Select the patch number and click ReadMe.
The README page is displayed. It contains information about the patch and howto apply the patches to your installation.
7. Uncompress the Oracle patch updates that you downloaded from My OracleSupport.
Note:
Do not delete or move the .patch_storage directory even after youhave successfully installed the latest release update or release updaterevision patch as OPatch stores the patch information inthe $ORACLE_HOME/.patch_storage directory.
Related Topics
• My Oracle Support note 2285040.1
Recommended Postinstallation TasksOracle recommends that you complete these tasks after installation.
• Creating a Backup of the root.sh ScriptOracle recommends that you back up the root.sh script after you complete aninstallation.
• Setting Language and Locale Preferences for Client ConnectionsConfigure client applications connecting to an Oracle Database according to yourlocale preferences and your I/O device character set.
Creating a Backup of the root.sh ScriptOracle recommends that you back up the root.sh script after you complete aninstallation.
If you install other products in the same Oracle home directory subsequent to thisinstallation, then Oracle Universal Installer updates the contents of the existingroot.sh script during the installation. If you require information contained in theoriginal root.sh script, then you can recover it from the backed up root.sh file.
Chapter 6Recommended Postinstallation Tasks
6-2
Setting Language and Locale Preferences for Client ConnectionsConfigure client applications connecting to an Oracle Database according to yourlocale preferences and your I/O device character set.
You must configure client applications connecting to an Oracle Database according toyour locale preferences and your I/O device character set. If your applications do nothave their own specific methods to configure locale preferences, then the method youuse to configure an Oracle database client connection depends on the access API youuse to connect to the database. Check your application documentation, before youconfigure locale preferences for your applications.
For applications that connect to Oracle Databases using Oracle Call Interface (OCI)use NLS_LANG and other client settings with names that start with NLS_ to set thelocale conventions and client character set for Oracle Database sessions. It isimportant that you set the character set part of the NLS_LANG value properly. Thecharacter set you set must correspond to the character set used by your I/O devices,which in case of Microsoft Windows is either the ANSI Code Page (for GUIapplications), such as WE8MSWIN1252, or the OEM Code Page (for Console modeapplications), such as US8PC437. By doing this, the OCI API is notified about thecharacter set of data that it receives from the application. OCI can then convert thisdata correctly to and from the database character set.
NLS_LANG and the other NLS settings can be specified either as environmentvariables or as Windows Registry settings. Environment variable values takeprecedence over Registry values.
Oracle Universal Installer sets a default value for the NLS_LANG setting in Registrywhen it creates a new Oracle home on Microsoft Windows. The NLS_LANG value isbased on the language of the Windows user interface, which is the language ofWindows menu items and dialog box labels.
Caution:
Failure to set the client character set correctly can cause data loss.
Java applications that connect to Oracle Databases by using Oracle JDBC do not useNLS_LANG. Instead, Oracle JDBC maps the default locale of the Java VM in whichthe application runs to the Oracle Database language and territory settings. OracleJDBC then configures the connected database session using these settings. BecauseJava works internally in Unicode, the client character set is always set to Unicode.Unless an application explicitly changes it, the default locale of the Java VM is setbased on the locale of the user operating system on which the Java VM runs. Checkyour Java VM documentation for information about configuring the Java VM defaultlocale.
Chapter 6Recommended Postinstallation Tasks
6-3
Note:
In 3-tier architecture deployments, application servers that are databaseclients can have settings in their configuration files that specify theNLS_LANG value or the Java VM locale. Check the documentationaccompanying these servers.
See Also:
Oracle Database Globalization Support Guide for more information aboutconfiguring user locale preferences
Chapter 6Recommended Postinstallation Tasks
6-4
7Removing Oracle Database Software
These topics describe how to remove Oracle software and configuration files.
Use the deinstall command that is included in Oracle homes to remove Oraclesoftware. Oracle does not support the removal of individual products or components.
Caution:
If you have a standalone database on a node in a cluster, and if you havemultiple databases with the same global database name (GDN), then youcannot use the deinstall command to remove one database only.
• About Oracle Deinstallation OptionsYou can stop and remove Oracle Database software and components in an OracleDatabase home with the deinstall command.
• Oracle Deinstallation (Deinstall)You can run the deinstall command from an Oracle home directory afterinstallation.
• Deinstallation Examples for Oracle Database ClientUse these examples to help you understand how to run the deinstallcommand.
About Oracle Deinstallation OptionsYou can stop and remove Oracle Database software and components in an OracleDatabase home with the deinstall command.
You can remove the following software using deinstall :
• Oracle Database
• Oracle Grid Infrastructure, which includes Oracle Clusterware and OracleAutomatic Storage Management (Oracle ASM)
• Oracle Real Application Clusters (Oracle RAC)
• Oracle Database Client
The deinstall command is available in Oracle home directories after installation. Itis located in the $ORACLE_HOME/deinstall directory.
deinstall creates a response file by using information in the Oracle home and usingthe information you provide. You can use a response file that you generated previouslyby running the deinstall command using the -checkonly option. You can alsoedit the response file template.
7-1
If you run deinstall to remove an Oracle Grid Infrastructure installation, then thedeinstaller prompts you to run the deinstall command as the root user. For OracleGrid Infrastructure for a cluster, the script is rootcrs.sh, and for Oracle GridInfrastructure for a standalone server (Oracle Restart), the script is roothas.sh.
Note:
• You must run the deinstall command from the same release toremove Oracle software. Do not run the deinstall command from alater release to remove Oracle software from an earlier release. Forexample, do not run the deinstall command from the 19c Oraclehome to remove Oracle software from an existing 11.2.0.4 Oracle home.
• Starting with Oracle Database 12c Release 1 (12.1.0.2), theroothas.sh script replaces the roothas.pl script in the Oracle GridInfrastructure home for Oracle Restart, and the rootcrs.sh scriptreplaces the rootcrs.pl script in the Grid home for Oracle GridInfrastructure for a cluster.
If the software in the Oracle home is not running (for example, after an unsuccessfulinstallation), then deinstall cannot determine the configuration, and you mustprovide all the configuration details either interactively or in a response file.
In addition, before you run deinstall for Oracle Grid Infrastructure installations:
• Dismount Oracle Automatic Storage Management Cluster File System (OracleACFS) and disable Oracle Automatic Storage Management Dynamic VolumeManager (Oracle ADVM).
• If Grid Naming Service (GNS) is in use, then notify your DNS administrator todelete the subdomain entry from the DNS.
Files Deleted by deinstall
When you run deinstall, if the central inventory (oraInventory) contains no otherregistered homes besides the home that you are deconfiguring and removing, thendeinstall removes the following files and directory contents in the Oracle basedirectory of the Oracle Database installation owner:
• admin
• cfgtoollogs
• checkpoints
• diag
• oradata
• fast_recovery_area
Oracle strongly recommends that you configure your installations using an OptimalFlexible Architecture (OFA) configuration, and that you reserve Oracle base andOracle home paths for exclusive use of Oracle software. If you have any user data inthese locations in the Oracle base that is owned by the user account that owns theOracle software, then deinstall deletes this data.
Chapter 7About Oracle Deinstallation Options
7-2
Caution:
deinstall deletes Oracle Database configuration files, user data, and fastrecovery area (FRA) files even if they are located outside of the Oracle basedirectory path.
Oracle Deinstallation (Deinstall)You can run the deinstall command from an Oracle home directory afterinstallation.
Purpose
deinstall stops Oracle software, and removes Oracle software and configurationfiles on the operating system for a specific Oracle home.
Syntax
The deinstall command uses the following syntax:
(./deinstall [-silent] [-checkonly] [-paramfile complete path of input response file] [-params name1=value name2=value . . .] [-o complete path of directory for saving files] [-tmpdir complete path of temporary directory to use] [-logdir complete path of log directory to use] [-help]
Parameters
Parameter Description
-silent Use this flag to run deinstall innoninteractive mode. This option requires oneof the following:
• A working system that it can access todetermine the installation andconfiguration information. The -silentflag does not work with failed installations.
• A response file that contains theconfiguration values for the Oracle homethat is being deinstalled or deconfigured.
You can generate a response file to use ormodify by running the deinstall commandwith the -checkonly flag. deinstall thendiscovers information from the Oracle home todeinstall and deconfigure. It generates theresponse file that you can then use with the -silent option.
You can also modify the template filedeinstall.rsp.tmpl, located inthe $ORACLE_HOME/deinstall/response directory.
Chapter 7Oracle Deinstallation (Deinstall)
7-3

Parameter Description
-checkonly Use this flag to check the status of the Oraclesoftware home configuration. Runningdeinstall with the -checkonly flag doesnot remove the Oracle configuration. The -checkonly flag generates a response file thatyou can use with the deinstall commandand -silent option.
-paramfile complete path of inputresponse file
Use this flag to run deinstall with aresponse file in a location other than thedefault. When you use this flag, provide thecomplete path where the response file islocated.
The default location of the response fileis $ORACLE_HOME/deinstall/response.
-params [name1=value name2=valuename3=value . . .]
Use this flag with a response file to overrideone or more values to change in a responsefile you have created.
-o complete path of directory for savingresponse files
Use this flag to provide a path other than thedefault location where the response file(deinstall.rsp.tmpl) is saved.
The default location of the response fileis $ORACLE_HOME/deinstall/response .
-tmpdircomplete path of temporarydirectory to use
Use this flag to specify a non-default locationwhere deinstall writes the temporary filesfor the deinstallation.
-logdircomplete path of log directory touse
Use this flag to specify a non-default locationwhere deinstall writes the log files for thedeinstallation.
-local Use this flag on a multinode environment todeinstall Oracle software in a cluster.
When you run deinstall with this flag, itdeconfigures and deinstalls the Oraclesoftware on the local node (the node wheredeinstall is run). On remote nodes, itdeconfigures Oracle software, but does notdeinstall the Oracle software.
-help Use this option to obtain additional informationabout the command option flags.
Deinstallation Examples for Oracle Database ClientUse these examples to help you understand how to run the deinstall command.
You can run deinstall from the $ORACLE_HOME/deinstall directory. Thedeinstallation starts without prompting you for the Oracle home path.
$ ./deinstall
Chapter 7Deinstallation Examples for Oracle Database Client
7-4
If you have a response file, then use the optional flag -paramfile to provide a pathto the response file.
You can generate a deinstallation response file by running the deinstall commandwith the -checkonly flag. Alternatively, you can use the response file templatelocated at $ORACLE_HOME/deinstall/response/deinstall.rsp.tmpl.
In the following example, the deinstall command is in the path/u01/app/oracle/product/19.0.0/client_1/deinstall. It uses a response file calledmy_db_paramfile.tmpl in the software owner location /home/usr/oracle:
$ cd /u01/app/oracle/product/19.0.0/client_1/deinstall$ ./deinstall -paramfile /home/usr/oracle/my_db_paramfile.tmpl
Chapter 7Deinstallation Examples for Oracle Database Client
7-5
AInstalling and Configuring Oracle DatabaseUsing Response Files
Review the following topics to install and configure Oracle products using responsefiles.
• How Response Files WorkResponse files can assist you with installing an Oracle product multiple times onmultiple computers.
• Reasons for Using Silent Mode or Response File ModeReview this section for use cases for running the installer in silent mode orresponse file mode.
• Using Response FilesReview this information to use response files.
• Preparing Response FilesReview this information to prepare response files for use during silent mode orresponse file mode installations.
• Running Oracle Universal Installer Using a Response FileAfter creating the response file, run Oracle Univeral Installer at the command line,specifying the response file you created, to perform the installation.
How Response Files WorkResponse files can assist you with installing an Oracle product multiple times onmultiple computers.
When you start Oracle Universal Installer (OUI), you can use a response file toautomate the installation and configuration of Oracle software, either fully or partially.OUI uses the values contained in the response file to provide answers to some or allinstallation prompts.
Typically, the installer runs in interactive mode, which means that it prompts you toprovide information in graphical user interface (GUI) screens. When you use responsefiles to provide this information, you run the installer from a command prompt usingeither of the following modes:
• Silent mode
If you include responses for all of the prompts in the response file and specify the-silent option when starting the installer, then it runs in silent mode. During asilent mode installation, the installer does not display any screens. Instead, itdisplays progress information in the terminal that you used to start it.
• Response file mode
If you include responses for some or all of the prompts in the response file andomit the -silent option, then the installer runs in response file mode. During aresponse file mode installation, the installer displays all the screens, screens for
A-1
which you specify information in the response file, and also screens for which youdid not specify the required information in the response file.
You define the settings for a silent or response file installation by entering values forthe variables listed in the response file. For example, to specify the Oracle homename, provide the Oracle home path for the ORACLE_HOME environment variable:
ORACLE_HOME=/u01/app/oracle/product/19.0.0/dbhome_1
Reasons for Using Silent Mode or Response File ModeReview this section for use cases for running the installer in silent mode or responsefile mode.
Mode Uses
Silent Use silent mode for the following installations:
• Complete an unattended installation, which you schedule usingoperating system utilities such as at.
• Complete several similar installations on multiple systems without userinteraction.
• Install the software on a system that does not have X Window Systemsoftware installed on it.
The installer displays progress information on the terminal that you used tostart it, but it does not display any of the installer screens.
Response file Use response file mode to complete similar Oracle software installations onmore than one system, providing default answers to some, but not all of theinstaller prompts.
Using Response FilesReview this information to use response files.
Use the following general steps to install and configure Oracle products using theinstaller in silent or response file mode:
Note:
You must complete all required preinstallation tasks on a system beforerunning the installer in silent or response file mode.
1. Prepare a response file.
2. Run the installer in silent or response file mode.
3. Run the root scripts as prompted by Oracle Universal Installer.
4. If you completed a software-only installation, then run Net Configuration Assistantand Oracle DBCA in silent or response file mode to create the database listenerand an Oracle Database instance respectively.
Appendix AReasons for Using Silent Mode or Response File Mode
A-2
Preparing Response FilesReview this information to prepare response files for use during silent mode orresponse file mode installations.
• Editing a Response File TemplateFor Oracle Database Client, response files are located in the $ORACLE_HOME/response directory.
• Recording Response FilesYou can use Oracle Universal Installer (OUI) in interactive mode to recordresponse files, which you can then edit and use to complete silent mode orresponse file mode installations.
Editing a Response File TemplateFor Oracle Database Client, response files are located in the $ORACLE_HOME/response directory.
All response file templates contain comment entries, sample formats, examples, andother useful instructions. Please read these instructions as they help you specifyvalues for the variables listed in the response files and customize your installation.
The following table lists the response files provided with this software:
Table A-1 Response Files for Oracle Database Client
Response File Description
client_install.rsp Silent installation of Oracle Database Client
netca.rsp Silent configuration of Oracle Net using Oracle Net ConfigurationAssistant.
Caution:
When you modify a response file template and save a file for use, theresponse file may contain plain text passwords. Ownership of the responsefile should be given to the Oracle software installation owner only, andpermissions on the response file should be changed to 600. Oracle stronglyrecommends that database administrators or other administrators delete orsecure response files when they are not in use.
To copy and modify a response file:
1. Copy the response file from the response file directory to a directory on yoursystem:
$ cp /directory_path/inventory/response/response_file.rsp local_directory
In this example, directory_path is the path of the directory where you havecopied the installation binaries.
Appendix APreparing Response Files
A-3
2. Open the response file in a text editor:
$ vi /local_dir/response_file.rsp
3. Follow the instructions in the file to edit it.
Note:
The installer or configuration assistant fails if you do not correctlyconfigure the response file. Also, ensure that your response file namehas the .rsp suffix.
4. Secure the response file by changing the permissions on the file to 600:
$ chmod 600 /local_dir/response_file.rsp
Ensure that only the Oracle software owner user can view or modify response filesor consider deleting them after the installation succeeds.
Note:
A fully-specified response file for an Oracle Database Client installationcontains the passwords for database administrative accounts and for auser who is a member of the OSDBA group (required for automatedbackups).
Recording Response FilesYou can use Oracle Universal Installer (OUI) in interactive mode to record responsefiles, which you can then edit and use to complete silent mode or response file modeinstallations.
You can save all the installation steps into a response file during installation by clickingSave Response File on the Summary page. You can use the generated response filefor a silent installation later.
When you record the response file, you can either complete the installation, or you canexit from the installer on the Summary page, before OUI starts to set up the softwareto the system.
If you use record mode during a response file mode installation, then the installerrecords the variable values that were specified in the original source response file intothe new response file.
Note:
OUI does not save passwords while recording the response file.
To record a response file:
1. Complete preinstallation tasks for an Oracle Database Client installation.
Appendix APreparing Response Files
A-4

When you run the installer to record a response file, it checks the system to verifythat it meets the requirements to install the software. For this reason, Oraclerecommends that you complete all of the required preinstallation tasks and recordthe response file while completing an installation.
2. Ensure that the Oracle software owner user (typically oracle) has permissions tocreate or write to the Oracle home path that you will specify when you run theinstaller.
3. On each installation screen, specify the required information.
4. When OUI displays the Summary screen, perform the following steps:
a. Click Save Response File. In the window, specify a file name and location forthe new response file. Click Save to write the responses you entered to theresponse file.
b. Click Finish to continue with the installation.
Click Cancel if you do not want to continue with the installation. Theinstallation stops, but the recorded response file is retained.
Note:
Ensure that your response file name has the .rsp suffix.
5. Before you use the saved response file on another system, edit the file and makeany required changes. Use the instructions in the file as a guide when editing it.
Running Oracle Universal Installer Using a Response FileAfter creating the response file, run Oracle Univeral Installer at the command line,specifying the response file you created, to perform the installation.
Run Oracle Universal Installer at the command line, specifying the response file youcreated. The Oracle Universal Installer executable, runInstaller, provides severaloptions. For help information on the full set of these options, run the runInstallercommand with the -help option. For example:
$ directory_path/runInstaller -help
The help information appears in a window after some time.
To run the installer using a response file:
1. Complete the preinstallation tasks as for a normal installation
2. Log in as the software installation owner user.
3. If you are completing a response file mode installation, then set the operatingsystem DISPLAY environment variable for the user running the installation.
Note:
You do not have to set the DISPLAY environment variable if you arecompleting a silent mode installation.
Appendix ARunning Oracle Universal Installer Using a Response File
A-5
4. To start the installer in silent or response file mode, enter a command similar tothe following:
$ /directory_path/runInstaller [-silent] [-noconfig] \ -responseFile responsefilename
Note:
Do not specify a relative path to the response file. If you specify arelative path, then the installer fails.
In this example:
• directory_pathis the path of the directory where you have copied theinstallation binaries.
• -silent runs the installer in silent mode.
• -noconfig suppresses running the configuration assistants during installation,and a software-only installation is performed instead.
• responsefilename is the full path and file name of the installation response filethat you configured.
5. If this is the first time you are installing Oracle software on your system, thenOracle Universal Installer prompts you to run the orainstRoot.sh script.
Log in as the root user and run the orainstRoot.sh script:
$ su rootpassword:# /u01/app/oraInventory/orainstRoot.sh
Note:
You do not have to manually create the oraInst.loc file. Running theorainstRoot.sh script is sufficient as it specifies the location of theOracle Inventory directory.
6. When the installation completes, log in as the root user and run the root.shscript. For example
$ su rootpassword:# /oracle_home_path/root.sh
Appendix ARunning Oracle Universal Installer Using a Response File
A-6
Index
Numerics32–bit client software, 1-5
BBash shell
default user startup file, 4-5bash_profile file, 4-5Bourne shell
default user startup file, 4-5
CC shell
default user startup file, 4-5CDBs
character sets, 5-5central inventory
See Oracle inventory directorycharacter sets, 5-5checklists
and installation planning, 1-1command syntax conventions, viiicommands
df -h, 2-2free, 2-2grep MemTotal, 2-2grep SwapTotal, 2-2root.sh, 6-2umask, 4-4uname —m, 2-2useradd, 4-4
cron jobs, 1-5
Ddbca.rsp file, A-3default file mode creation mask
setting, 4-4deinstall, 7-1
See also removing Oracle softwaredeinstall command, 7-1deinstallation, 7-1
examples, 7-4
df command, 4-5disks
mounting, 5-4display variable, 1-4
Eenterprise.rsp file, A-3environment variables
ORACLE_BASE, 4-5ORACLE_HOME, 4-5ORACLE_SID, 4-5removing from shell startup file, 4-5SHELL, 4-5TEMP and TMPDIR, 4-5
errorsX11 forwarding, 4-7
Ffile mode creation mask
setting, 4-4files
bash_profile, 4-5dbca.rsp, A-3editing shell startup file, 4-5enterprise.rsp, A-3login, 4-5profile, 4-5response files, A-3
filesets, 3-2
Gglobalization, 1-5
localization for client connections, 6-3NLS_LANG
and client connections, 6-3groups
creating an Oracle Inventory Group, 4-2OINSTALL group, 1-2
Index-1
Hhardware requirements, 1-1
display, 1-1
Iimage
install, 5-1installation, 5-8
accessing installation software, 5-2response files, A-3
preparing, A-3, A-4templates, A-3
silent mode, A-6installation planning, 1-1installation software, accessing, 5-2installer
supported languages, 5-6
JJDK requirements, 3-2
KKorn shell
default user startup file, 4-5
Llicensing, 1-5login file, 4-5
Mmask
setting default file mode creation mask, 4-4mixed binaries, 3-2mode
setting default file mode creation mask, 4-4multitenant container database
character sets, 5-5
Nnetca.rsp file, A-3noninteractive mode
See response file mode
Ooinstall group
creating, 4-2
OINSTALL groupl, 1-4See also Oracle Inventory directory
operating systemdifferent on cluster members, 3-2requirements, 3-2
operating system privileges groups, 1-4operating system requirements, 1-2ORAchk
and Upgrade Readiness Assessment, 1-5Oracle Database Client
image-based installation, 5-8installation, 5-1
Oracle Database Client, installation, 5-7, 5-8Oracle Database Client, relinking, 5-9Oracle Database Configuration Assistant
response file, A-3Oracle home
ASCII path restriction for, 1-2Oracle Inventory, 1-4
identifying existing, 4-2Oracle Net Configuration Assistant
response file, A-3Oracle Net Configuration Assistant, installation,
5-9Oracle Software Owner user
creating, 4-3, 4-4Oracle Software Owner users
determining default shell, 4-5Oracle Universal Installer
response fileslist of, A-3
oracle user, 1-4creating, 4-3
Oracle userdetermining default shell, 4-5
ORACLE_BASE environment variableremoving from shell startup file, 4-5
ORACLE_HOME environment variableremoving from shell startup file, 4-5
ORACLE_SID environment variableremoving from shell startup file, 4-5
OSDBA, 1-4OTN website
downloading installation software from, 5-2
Ppatch updates, 6-1postinstallation
recommended tasksroot.sh script, backing up, 6-2
profile file, 4-5
Index
Index-2
Rrelease update revisions, 6-1release updates, 6-1removing Oracle software, 7-1
examples, 7-4response file installation
preparing, A-3response files
templates, A-3silent mode, A-6
response file mode, A-1about, A-1reasons for using, A-2
See also response files, silent moderesponse files, A-1
about, A-1creating with template, A-3dbca.rsp, A-3enterprise.rsp, A-3general procedure, A-2netca.rsp, A-3passing values at command line, A-1specifying with Oracle Universal Installer, A-5
See also silent mode.root user
logging in as, 2-1root.sh script
backing up, 6-2rootcrs.sh, 7-1roothas.sh, 7-1
Sshell
determining default shell for Oracle user, 4-5SHELL environment variable
checking value of, 4-5shell startup file
editing, 4-5removing environment variables, 4-5
silent modeabout, A-1reasons for using, A-2
silent mode installation, A-6software requirements, 3-2ssh
and X11 Forwarding, 4-7startup file
for shell, 4-5supported languages
installer, 5-6
supported languages (continued)swap space
allocation, 1-2system requirements, 1-1
TTEMP environment variable
commandsenv, 4-5
env command, 4-5environment
checking settings, 4-5setting, 4-5umask, 4-5umask command, 4-5
TMPDIR environment variablesetting, 4-5
troubleshootingcron jobs and installation, 1-5disk space errors, 1-2environment path errors, 1-2installation owner environment variables and
installation errors, 4-8unset environment variables, 1-2
typographic conventions, ix
Uumask command, 4-4uninstall
See removing Oracle softwareUNIX commands
xhost, 2-1UNIX workstation
installing from, 2-1unset installation owners environment variables,
4-8upgrading
and ORAchk Upgrade ReadinessAssessment, 1-5
useradd command, 4-4users
creating the oracle user, 4-3
XX Window System
enabling remote hosts, 2-1X11 forwarding errors, 4-7xhost command, 2-1
Index
3