Embed Size (px)
Citation preview
8/7/2019 custom_transform_files
http://slidepdf.com/reader/full/customtransformfiles 1/20
QQuuiicck k SSttaarrtt TTrraaiinniinngg GGuuiiddee ttoo
CCrreeaattiinngg CCuussttoomm TTrraannssf f oorrmm FFiilleess f f oorr tthhee FFeeaattuurree RReelleeaassee 22 MMSSII PPaacck k aaggee
Citrix Systems, Inc.

8/7/2019 custom_transform_files
http://slidepdf.com/reader/full/customtransformfiles 2/20
Quick Start Training Guide toCreating Custom Transform Files forthe Feature Release 2 MSI Package
n ii
Notice
The information in this publication is subject to change without notice.
THIS PUBLICATION IS PROVIDED “AS IS” WITHOUT WARRANTIES OF ANY KIND, EXPRESS OR
IMPLIED, INCLUDING ANY WARRANTIES OF MERCHANTABILITY, FITNESS FOR A PARTICULARPURPOSE OR NON-INFRINGEMENT. CITRIX SYSTEMS, INC. (“CITRIX”), SHALL NOT BE LIABLE FORTECHNICAL OR EDITORIAL ERRORS OR OMISSIONS CONTAINED HEREIN, NOR FOR DIRECT,
INCIDENTAL, CONSEQUENTIAL, OR ANY OTHER DAMAGES RESULTING FROM THE FURNISHING,
PERFORMANCE, OR USE OF THIS PUBLICATION, EVEN IF CITRIX HAS BEEN ADVISED OF THEPOSSIBILITY OF SUCH DAMAGES IN ADVANCE.
This publication contains information protected by copyright. Except for internal distribution, no part of this
publication may be photocopied or reproduced in any form without prior written consent from Citrix.
The exclusive warranty for any Citrix products discussed in this publication, if any, is stated in the product
documentation accompanying such products. Citrix does not warrant products other than its own.
Product names mentioned herein may be trademarks and/or registered trademarks of their respective companies.
© 2002 Citrix Systems, Inc.
All rights reserved. Printed in the U.S.A.
Version History
May 2002 Original
8/7/2019 custom_transform_files
http://slidepdf.com/reader/full/customtransformfiles 3/20
Quick Start Training Guide toCreating Custom Transform Files forthe Feature Release 2 MSI Package
n iii
TABLE OF CONTENTS
Introduction.......................................................................................................................................................1
Prerequisites......................................................................................................................................................1
How to Obtain the Orca Editor and the Windows Installer 2.0 Update..... ..... ...... ...... ..... ...... ..... ...... ...... ..... ...... ..... ..... 2
Orca Editor....................................................................................................................................................2
Windows Installer 2.0................................................... ........................................................ ........................... 4
The Orca Editor ..................................................... ........................................................ .................................... 5
Modifying an MST File for a New Farm Using an Access Database...... ...... ..... ...... ..... ...... ...... ..... ...... ..... ...... ...... .. 5
Modifying an MST File for a New Farm Using a Third Party Database..... ...... ...... ..... ...... ..... ...... ...... ..... ...... ..... ..... 8
Installing Your Customized Package .................................................... ........................................................ ...... 10
If Installation Fails ....................................................... ........................................................ ......................... 11
Additional Information .................................................... ........................................................ ......................... 14
Citrix Resources................................................. ........................................................ .................................. 14
Microsoft Resources..................................................... ........................................................ ......................... 14
For Advanced Users ................................................. ........................................................ ......................... 15
Updates to Appendix B of the MetaFrame Administrator’s Guide ........ ..... ...... ..... ...... ..... ..... ...... ..... ...... ..... ...... ...... 16
8/7/2019 custom_transform_files
http://slidepdf.com/reader/full/customtransformfiles 4/20
Quick Start Training Guide to
Creating Custom Transform Files for
the Feature Release 2 MSI Package
n 1
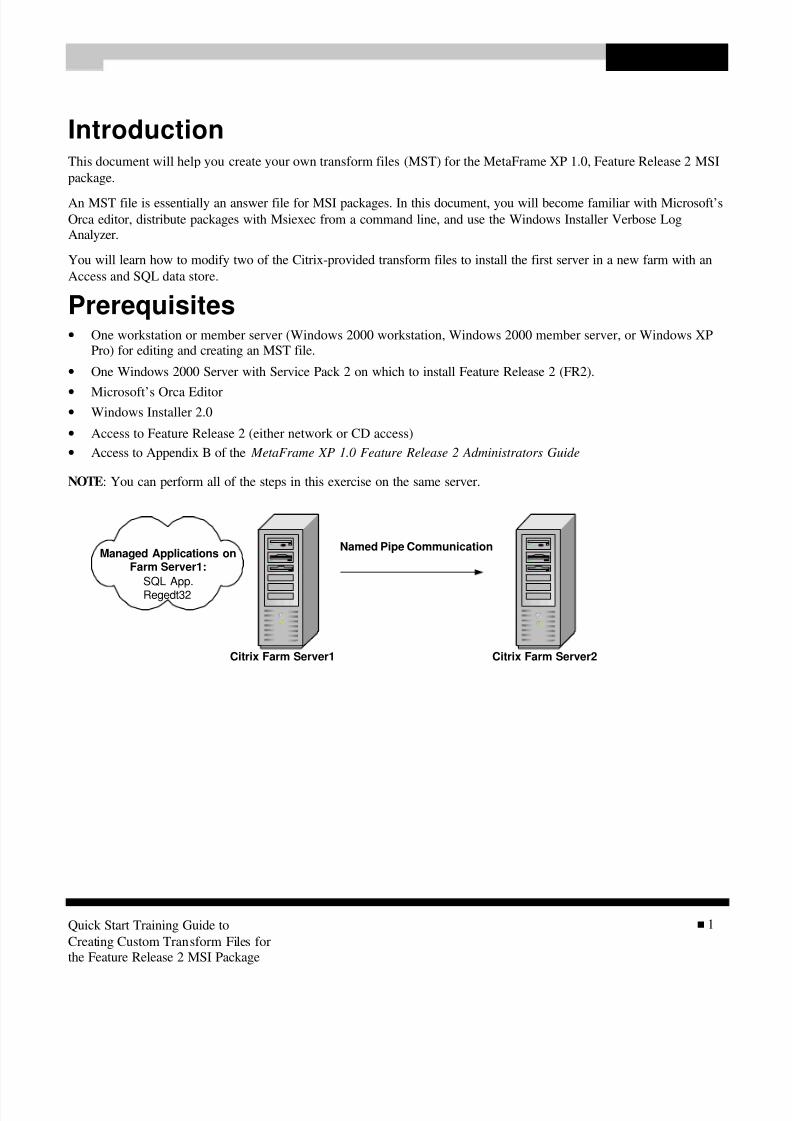
IntroductionThis document will help you create your own transform files (MST) for the MetaFrame XP 1.0, Feature Release 2 MSI
package.
An MST file is essentially an answer file for MSI packages. In this document, you will become familiar with Microsoft’s
Orca editor, distribute packages with Msiexec from a command line, and use the Windows Installer Verbose LogAnalyzer.
You will learn how to modify two of the Citrix-provided transform files to install the first server in a new farm with an
Access and SQL data store.
Prerequisites• One workstation or member server (Windows 2000 workstation, Windows 2000 member server, or Windows XP
Pro) for editing and creating an MST file.
• One Windows 2000 Server with Service Pack 2 on which to install Feature Release 2 (FR2).
• Microsoft’s Orca Editor• Windows Installer 2.0
• Access to Feature Release 2 (either network or CD access)
• Access to Appendix B of the MetaFrame XP 1.0 Feature Release 2 Administrators Guide
NOTE: You can perform all of the steps in this exercise on the same server.
Citrix Farm Server1 Citrix Farm Server2
Named Pipe CommunicationManaged Applications on
Farm Server1:
SQL App.Regedt32

8/7/2019 custom_transform_files
http://slidepdf.com/reader/full/customtransformfiles 5/20
Quick Start Training Guide to
Creating Custom Transform Files for
the Feature Release 2 MSI Package
n 2
How to Obtain the Orca Editor andthe Windows Installer 2.0 Update
Orca EditorThe Orca Editor is Microsoft’s MSI file editor. Other editors are available on the Internet but we used Orca. The Orca
Editor allows you to edit the MSI file directly, create new files, or change existing MST files. Follow these steps todownload and install the editor. For our purposes, we installed the Orca Editor on a Windows workstation.
1. Go to the MSDN Platform SDK download Web site at
http://www.microsoft.com/msdownload/platformsdk/sdkupdate/ . You may be prompted to install the SDK UpdateActiveX Control. If you do, install it.
2. In the left window pane, select Windows Installer SDK.
3. In the right window pane, select Install this SDK! After you select the link, you are redirected to the Confirm
Install Selections Web page. Your server is scanned for any existing components.
8/7/2019 custom_transform_files
http://slidepdf.com/reader/full/customtransformfiles 6/20
Quick Start Training Guide to
Creating Custom Transform Files for
the Feature Release 2 MSI Package
n 3
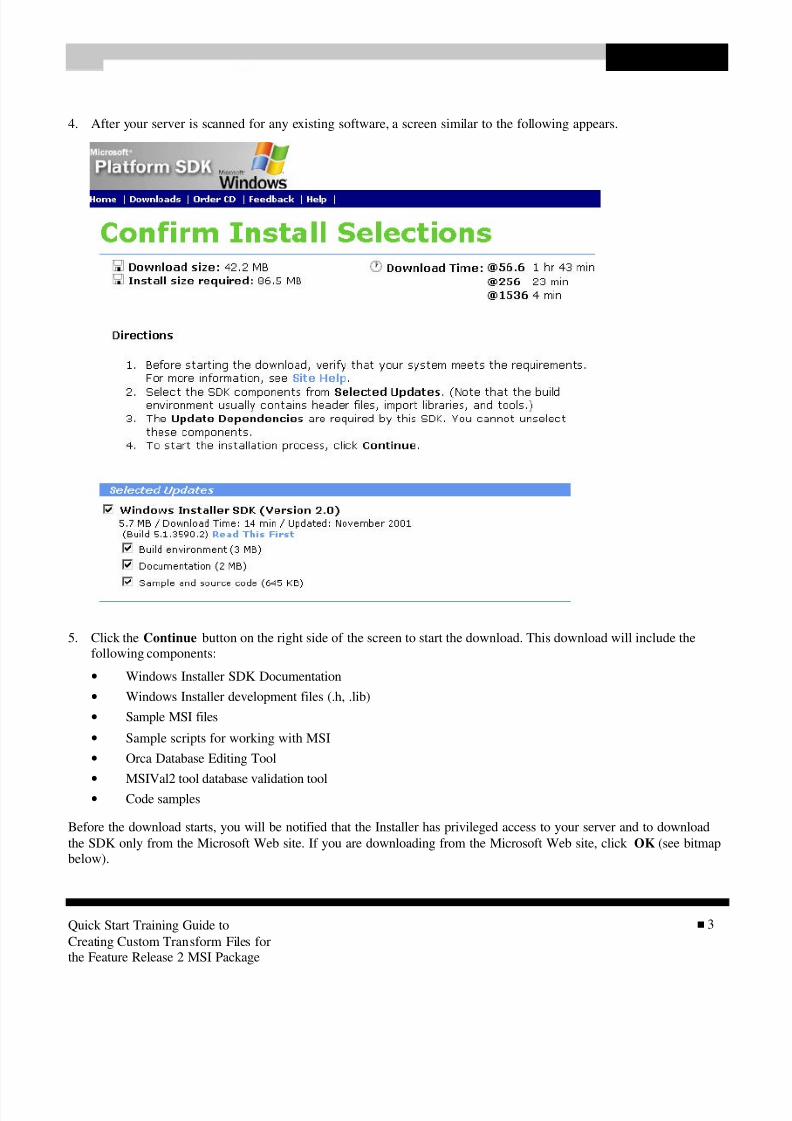
4. After your server is scanned for any existing software, a screen similar to the following appears.
5. Click the Continue button on the right side of the screen to start the download. This download will include the
following components:
• Windows Installer SDK Documentation
• Windows Installer development files (.h, .lib)
• Sample MSI files
• Sample scripts for working with MSI
• Orca Database Editing Tool
•
MSIVal2 tool database validation tool• Code samples
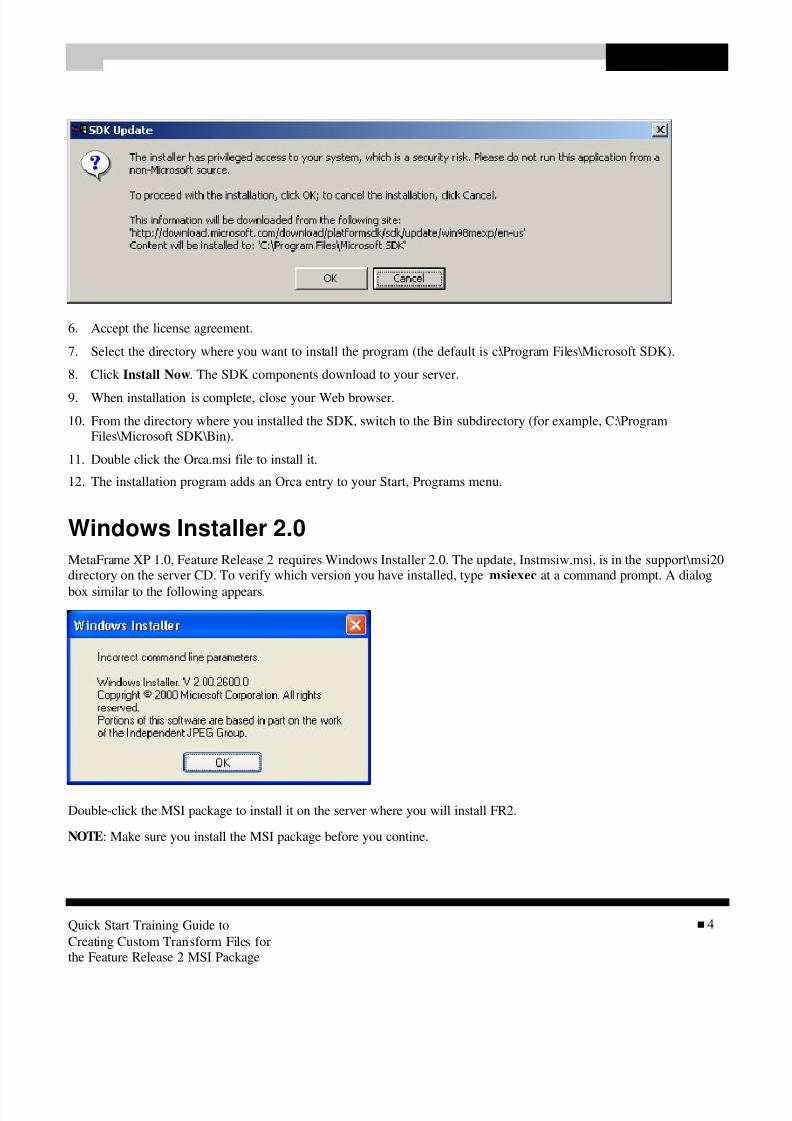
Before the download starts, you will be notified that the Installer has privileged access to your server and to download
the SDK only from the Microsoft Web site. If you are downloading from the Microsoft Web site, click OK (see bitmap
below).
8/7/2019 custom_transform_files
http://slidepdf.com/reader/full/customtransformfiles 7/20
Quick Start Training Guide to
Creating Custom Transform Files for
the Feature Release 2 MSI Package
n 4
6. Accept the license agreement.
7. Select the directory where you want to install the program (the default is c:\Program Files\Microsoft SDK).
8. Click Install Now. The SDK components download to your server.
9. When installation is complete, close your Web browser.
10. From the directory where you installed the SDK, switch to the Bin subdirectory (for example, C:\ProgramFiles\Microsoft SDK\Bin).
11. Double click the Orca.msi file to install it.
12. The installation program adds an Orca entry to your Start, Programs menu.
Windows Installer 2.0
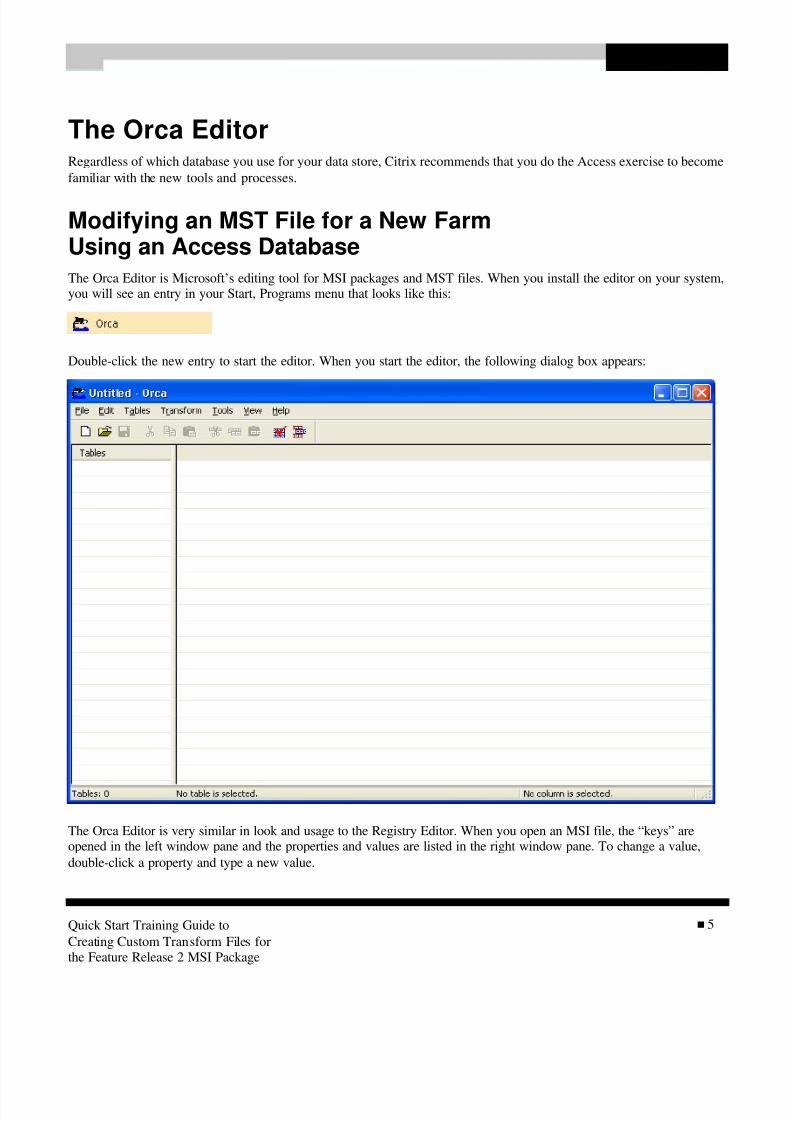
MetaFrame XP 1.0, Feature Release 2 requires Windows Installer 2.0. The update, Instmsiw.msi, is in the support\msi20directory on the server CD. To verify which version you have installed, type msiexec at a command prompt. A dialog
box similar to the following appears.
Double-click the MSI package to install it on the server where you will install FR2.
NOTE: Make sure you install the MSI package before you contine.
8/7/2019 custom_transform_files
http://slidepdf.com/reader/full/customtransformfiles 8/20
Quick Start Training Guide to
Creating Custom Transform Files for
the Feature Release 2 MSI Package
n 5
The Orca EditorRegardless of which database you use for your data store, Citrix recommends that you do the Access exercise to become
familiar with the new tools and processes.
Modifying an MST File for a New FarmUsing an Access Database
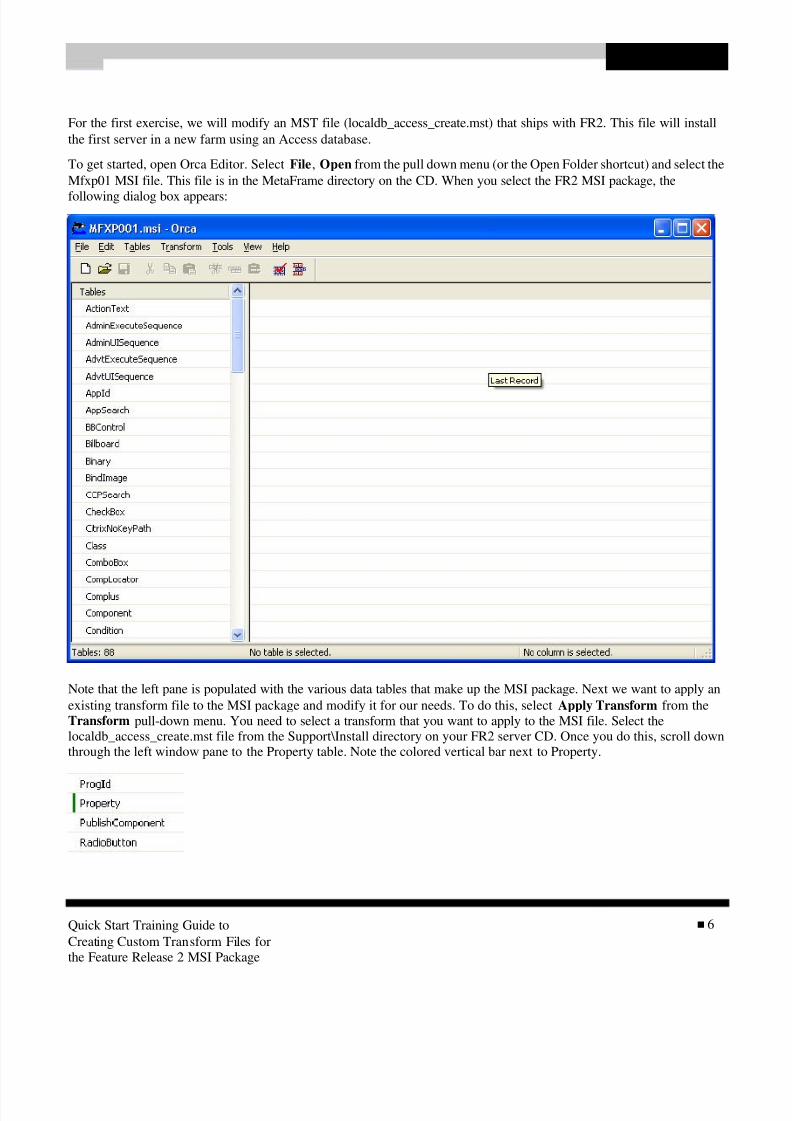
The Orca Editor is Microsoft’s editing tool for MSI packages and MST files. When you install the editor on your system,you will see an entry in your Start, Programs menu that looks like this:
Double-click the new entry to start the editor. When you start the editor, the following dialog box appears:
The Orca Editor is very similar in look and usage to the Registry Editor. When you open an MSI file, the “keys” areopened in the left window pane and the properties and values are listed in the right window pane. To change a value,
double-click a property and type a new value.
8/7/2019 custom_transform_files
http://slidepdf.com/reader/full/customtransformfiles 9/20
Quick Start Training Guide to
Creating Custom Transform Files for
the Feature Release 2 MSI Package
n 6
For the first exercise, we will modify an MST file (localdb_access_create.mst) that ships with FR2. This file will install
the first server in a new farm using an Access database.
To get started, open Orca Editor. Select File, Open from the pull down menu (or the Open Folder shortcut) and select the
Mfxp01 MSI file. This file is in the MetaFrame directory on the CD. When you select the FR2 MSI package, the
following dialog box appears:
Note that the left pane is populated with the various data tables that make up the MSI package. Next we want to apply an
existing transform file to the MSI package and modify it for our needs. To do this, select Apply Transform from theTransform pull-down menu. You need to select a transform that you want to apply to the MSI file. Select thelocaldb_access_create.mst file from the Support\Install directory on your FR2 server CD. Once you do this, scroll downthrough the left window pane to the Property table. Note the colored vertical bar next to Property.
8/7/2019 custom_transform_files
http://slidepdf.com/reader/full/customtransformfiles 10/20
Quick Start Training Guide to
Creating Custom Transform Files for
the Feature Release 2 MSI Package
n 7
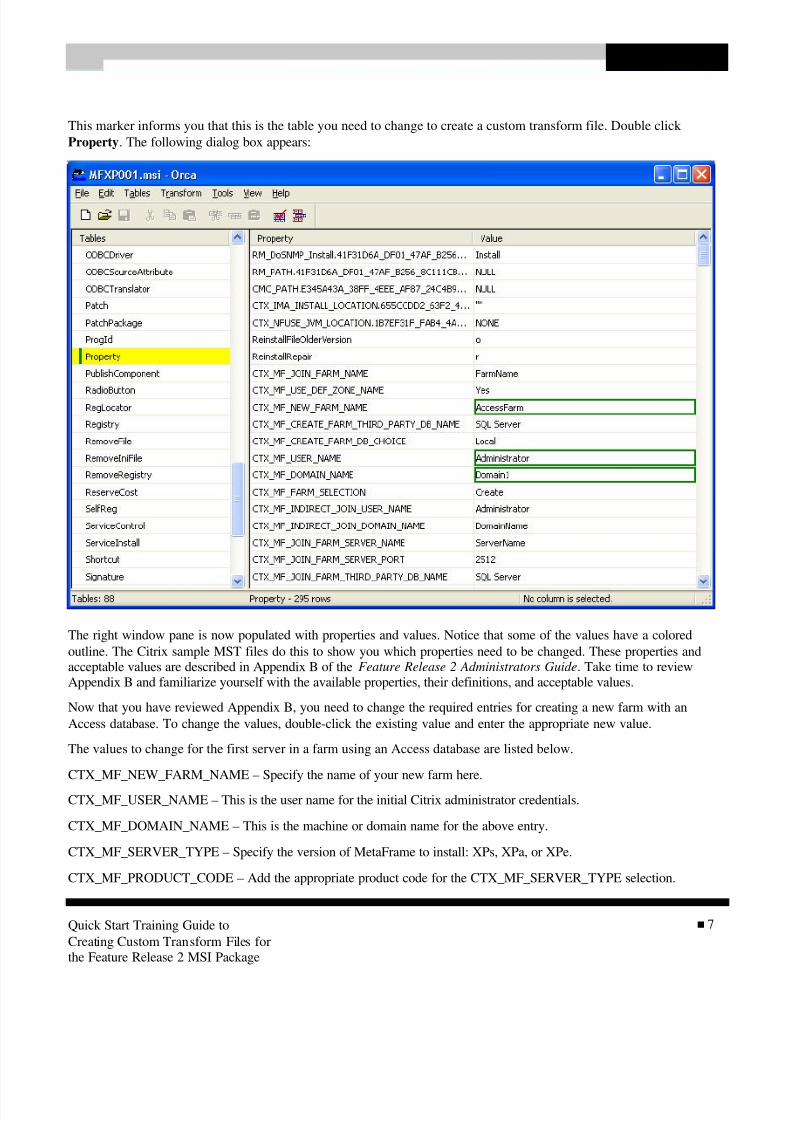
This marker informs you that this is the table you need to change to create a custom transform file. Double click
Property. The following dialog box appears:
The right window pane is now populated with properties and values. Notice that some of the values have a colored
outline. The Citrix sample MST files do this to show you which properties need to be changed. These properties andacceptable values are described in Appendix B of the Feature Release 2 Administrators Guide. Take time to reviewAppendix B and familiarize yourself with the available properties, their definitions, and acceptable values.
Now that you have reviewed Appendix B, you need to change the required entries for creating a new farm with an
Access database. To change the values, double-click the existing value and enter the appropriate new value.
The values to change for the first server in a farm using an Access database are listed below.
CTX_MF_NEW_FARM_NAME – Specify the name of your new farm here.
CTX_MF_USER_NAME – This is the user name for the initial Citrix administrator credentials.
CTX_MF_DOMAIN_NAME – This is the machine or domain name for the above entry.
CTX_MF_SERVER_TYPE – Specify the version of MetaFrame to install: XPs, XPa, or XPe.
CTX_MF_PRODUCT_CODE – Add the appropriate product code for the CTX_MF_SERVER_TYPE selection.
8/7/2019 custom_transform_files
http://slidepdf.com/reader/full/customtransformfiles 11/20
Quick Start Training Guide to
Creating Custom Transform Files for
the Feature Release 2 MSI Package
n 8
CTX_MF_CLIENT_CD_PATH – The location of your FR2 Client CD or image. You can use a UNC path to point to the
FR2 clients.
CTX_MF_LAUNCH_CLIENT_CD_WIZARD – Determines whether or not to launch the Client wizard. By default, this
setting is Yes.
Review all your changed entries for any errors. You can edit the transform file later if there is an error but it is easier to
check now.
After you verify all of the information, save the modified transform file. From the the Transform pull-down menu,
select Generate Transform. Citrix recommends that you give your modified transform file a new name so that you donot overwrite the original file. After you save your transform file, close the Orca Editor.
To install your FR2 package with your new transform file, see “Installing Your Customized Package” later in this
document.
Modifying an MST File for a New Farm
Using a Third Party DatabaseFor this example, we will modify a sample MST file, thirdpartydb_create_direct.mst, to create a new farm using SQL as
the data store. The process is essentially the same as described above for the Access database; however, there are a few
extra steps.
First, you need to create a database on your SQL server as outlined in Chapter 4 of the MetaFrame XP Feature Release 2
Administrator’s Guide.
Manually create a DSN file on the server where you will install MetaFrame FR2 to allow connectivity between the FR2
server and the SQL server. To do this, follow the steps below.
13. From the Windows toolbar, click Start , Administrative Tools, Data Source (ODBC).
14. From the File DSN tab, click the Add button.
15. Scroll through the list to SQL Server, select it, and click Next.
16. Give your DSN file a name (for example FR2Server), click Next, and then click Finish.
You now have the Properties wizard for your DSN file to specify the appropriate properties. These are the same dialog
boxes that appear during a manual installation of MetaFrame XP. Fill in the appropriate information and finish creating
the file.
NOTE: Click the Test Data Source button to verify the setting before you complete the DSN wizard.
Now you are ready to open the Orca Editor to create your custom transform file.
1. Open Orca Editor.
2. Click File, Open from the pull-down menu (or use the Open Folder shortcut) and select the Mfxp001 MSI file. Bydefault, this file is in the MetaFrame directory on the CD.
3. Now you want to apply an existing transform file to the MSI package and modify it for your needs. To do this, fromthe Transform pull-down menu, select Apply Transform.

8/7/2019 custom_transform_files
http://slidepdf.com/reader/full/customtransformfiles 12/20
Quick Start Training Guide to
Creating Custom Transform Files for
the Feature Release 2 MSI Package
n 9
4. Select a transform that you want to apply to the MSI file. For this portion of the exercise, select the
thirdpartydb_create_direct.mst file from the Support\Install directory on your FR2 server CD.
5. Scroll to the Properties table entry in the left window pane. As in the Access exercise, there is a colored vertical barnext to the Property entry.
6. Double-click the Property table. The fields you need to change are outlined in bold. Those entries are:
CTX_MF_NEW_FARM_NAME – Specify the name of your new farm here.
CTX_MF_CREATE_FARM_DB_CHOICE – The default is Third-Party. This does not need to be changed.
CTX_MF_USER_NAME – This is the user name for the initial Citrix administrator credentials.
CTX_MF_DOMAIN_NAME – This is the machine or domain name for the above entry.
CTX_MF_ODBC_USER_NAME – This is the name you specified when creating your database on the SQL server.
NOTE: The template supplied with FR2 uses the SQL sa account. If you want to use Windows NT authentication,
supply the user name and the domain name, <domainname>\<username>.
CTX_MF_ODBC_PASSWORD − This is the password you specified when creating your database on the SQL
server.
CTX_MF_ODBC_RE_ENTERED_PASSWORD – This verifies that you entered the same password as the first
time.
CTX_MF_SERVER_TYPE – Specify the server you will be installing: XPs, XPa, or Xpe-based.
CTX_MF_PRODUCT_CODE – Add the appropriate product code for the CTX_MF_SERVER_TYPE selection.
CTX_MF_CLIENT_CD_PATH – The location of your FR2 Client CD or image.
NOTE: You can use a UNC path to point to the FR2 client. Make sure the server and the client device are in the
same domain.
CTX_MF_LAUNCH_CLIENT_CD_WIZARD – Determines whether or not to launch the Client wizard. By default,
this setting is Yes.
CTX_MF_SILENT_DSNFILE – This is the location of the DSN file that you created on your target server at the
beginning of this exercise.
8/7/2019 custom_transform_files
http://slidepdf.com/reader/full/customtransformfiles 13/20
Quick Start Training Guide to
Creating Custom Transform Files for
the Feature Release 2 MSI Package
n 10
Installing Your Customized PackageNow you want to install the new transform. There are three ways to install an MSI file with a transform. You can use
Installation Manager, you can use Msiexec (the Windows Installer) from a command line, or use a policy in Active
Directory or SMS. For this exercise, we used msiexec.
A benefit of using Msiexec.exe is that you can specify a log file to record everything that occurs during installation,
including any errors that may occur. Verify that you have Windows Installer 2.0 installed by typing msiexec at acommand prompt.
To install FR2 with your modified MST file, type the following at a command prompt:
msiexec /i <path>\mfxp001.msi TRANSFORMS=<path>\YourRenamedMSTFile.mst /l*v c:\install.log
The /i variable tells Msiexec that you want to install a package. Adding TRANSFORMS indicates that you have a
transform file. Adding the /l*v denotes that you want verbose logging activated. This log file, in addition to Event
Viewer entries, will help you determine where a problem exists if the installation fails.
NOTE: Using the syntax above, as it is documented in the Feature Release 2 Administrator’s Guide, still prompts you
with UI panels that you must click through. The MST file inputs its answers in the UI, but you must still click past them.To avoid this, add one of the following undocumented switches:
For AddNO UI /q
BASIC UI /qb
BASIC UI NO MODAL /qb-BASIC UI MODAL /qb+REDUCED UI /qr
To have a truly silent install, add /q after the name of the FR2 package. For example,
msiexec /i <path>\mfxp001.msi /q TRANSFORMS=<path>\YourRenamedMSTFile.mst /l*v c:\install.log
NOTE: Even though the /q parameter is specified for NO UI, the Client CD Install UI panel still appears. It does notrequire any interaction and you can ignore it.
After entering the appropriate syntax, press Enter. Installation starts. If you select the NO UI installation option, you will
know that your installation is successful when the system reboots itself. If there is a problem, the install stops and thesystem does not reboot. Check the Event Viewer for any errors and make modifications to your MST file as warranted. If
no useful entries exist, check through the log file for any failures.
8/7/2019 custom_transform_files
http://slidepdf.com/reader/full/customtransformfiles 14/20
Quick Start Training Guide to
Creating Custom Transform Files for
the Feature Release 2 MSI Package
n 11
If Installation Fails
If installation fails, look in the Event Viewer for any entries. In most cases, issues where access is denied or incorrect
credentials are specified are in the Event Viewer.If there is no information in the Event Viewer, use the Windows Installer Verbose Log Analyzer (Wilogutl.exe).Wilogutl.exe assists in the analysis of log files from a Windows Installer installation and it displays suggested solutions
to errors found in the log file. For more details about this utility, read the information located athttp://msdn.microsoft.com/library/default.asp?url=/library/en-us/msi/app_3w11.asp.
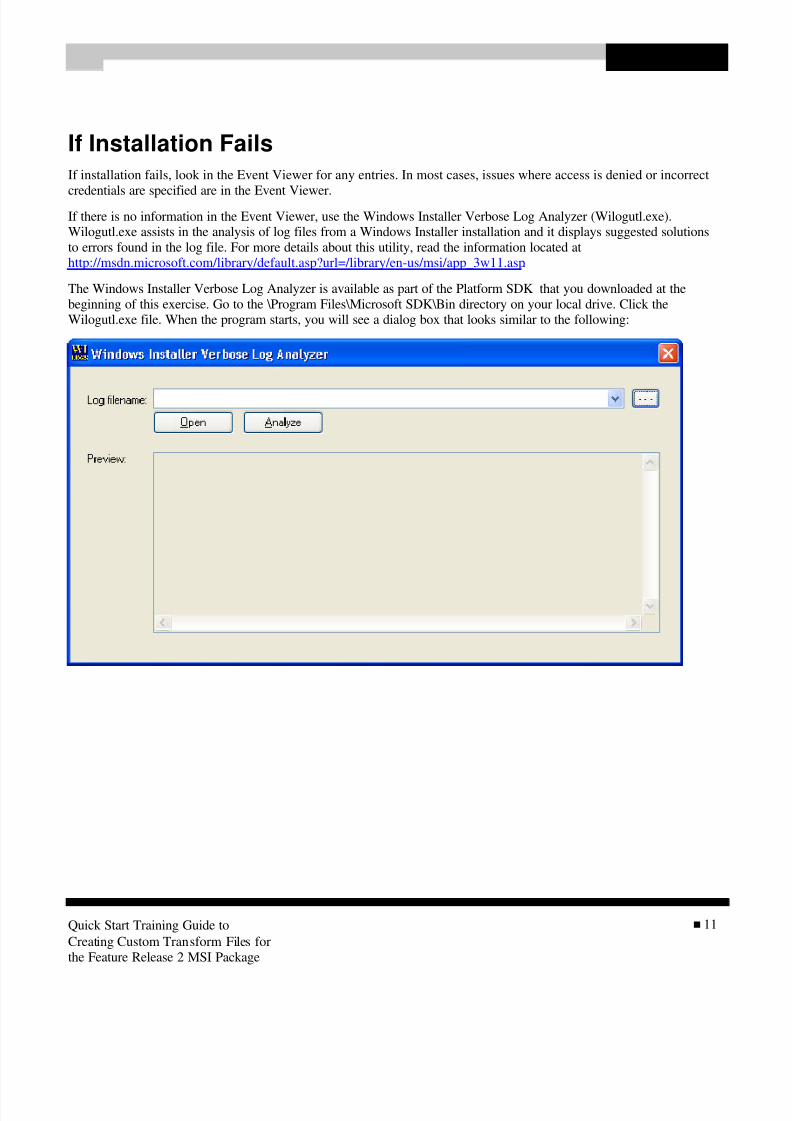
The Windows Installer Verbose Log Analyzer is available as part of the Platform SDK that you downloaded at the
beginning of this exercise. Go to the \Program Files\Microsoft SDK\Bin directory on your local drive. Click theWilogutl.exe file. When the program starts, you will see a dialog box that looks similar to the following:

8/7/2019 custom_transform_files
http://slidepdf.com/reader/full/customtransformfiles 15/20
Quick Start Training Guide to
Creating Custom Transform Files for
the Feature Release 2 MSI Package
n 12
Click the Browse button (button with three dots) and select the log file that was created during the failed installation.
Information appears from your log file.
When the file is loaded, click the Analyze button. This causes the utility to search for any errors in the file and
recommend potential solutions.

8/7/2019 custom_transform_files
http://slidepdf.com/reader/full/customtransformfiles 16/20
Quick Start Training Guide to
Creating Custom Transform Files for
the Feature Release 2 MSI Package
n 13
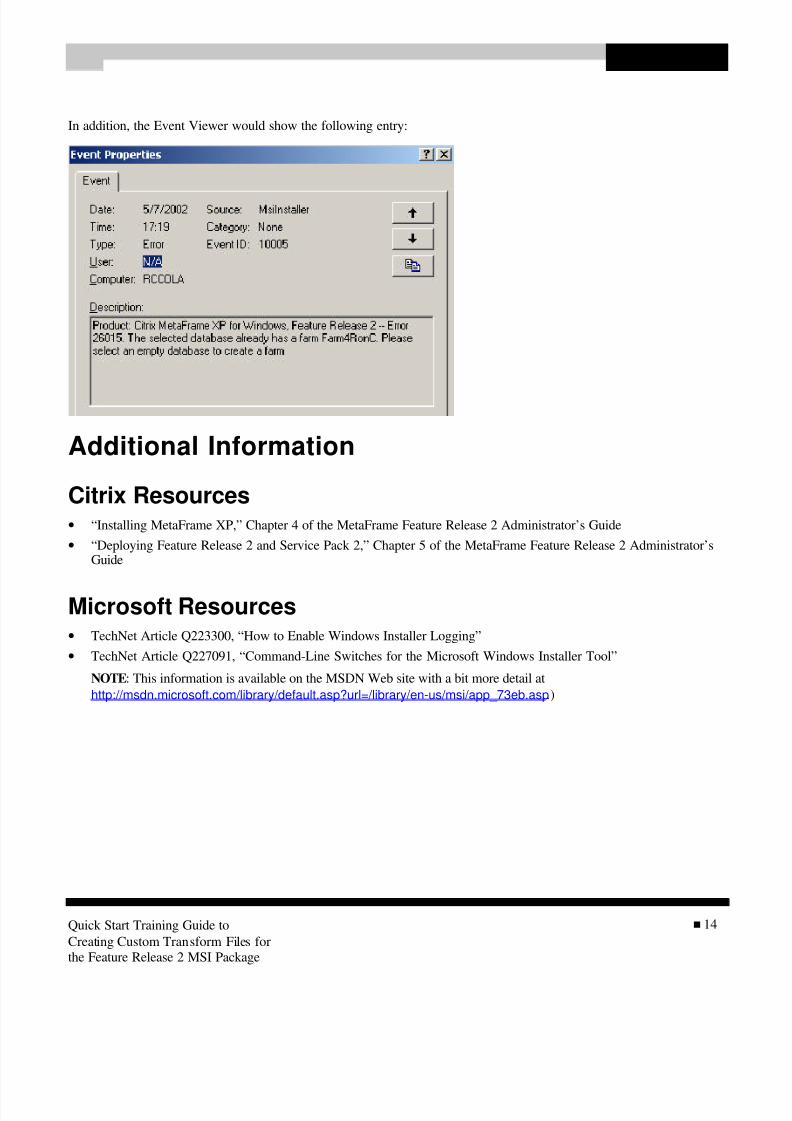
As you can see, the utility shows you how many errors were found along with the section of text in the log file. You can
easily scroll through the errors and review them. In the example above, you can see that the install tried using a SQLdatabase that was already in use. This points you back to the information specified in the MST file. The incorrect
database was specified.
8/7/2019 custom_transform_files
http://slidepdf.com/reader/full/customtransformfiles 17/20
Quick Start Training Guide to
Creating Custom Transform Files for
the Feature Release 2 MSI Package
n 14
In addition, the Event Viewer would show the following entry:
Additional Information
Citrix Resources• “Installing MetaFrame XP,” Chapter 4 of the MetaFrame Feature Release 2 Administrator’s Guide
• “Deploying Feature Release 2 and Service Pack 2,” Chapter 5 of the MetaFrame Feature Release 2 Administrator’sGuide
Microsoft Resources• TechNet Article Q223300, “How to Enable Windows Installer Logging”
• TechNet Article Q227091, “Command-Line Switches for the Microsoft Windows Installer Tool”
NOTE: This information is available on the MSDN Web site with a bit more detail at
http://msdn.microsoft.com/library/default.asp?url=/library/en-us/msi/app_73eb.asp .)
8/7/2019 custom_transform_files
http://slidepdf.com/reader/full/customtransformfiles 18/20
Quick Start Training Guide to
Creating Custom Transform Files for
the Feature Release 2 MSI Package
n 15
For Advanced Users
• TechNet Article Q257718, “HOW TO: Create Third-Party Microsoft Installer Package (MSI)”
• Microsoft White Paper, “Software Installation and Maintenance.” Download Siamwp.doc fromhttp://www.microsoft.com/windows2000/techinfo/administration/management/siamwp.asp.
This paper presents background and architectural information about the IntelliMirror Software Installation and
Maintenance feature. It is intended for Information Technology planners and administrators who want to understandhow their organizations can benefit from using this feature.
This paper does not provide information about how to use Software Installation and Maintenance. For information
about how to use the feature, see the Windows 2000 Server online Help and the Software Installation andMaintenance Walkthrough, both of which are available from the Microsoft Windows 2000 Server Web site.
• TechNet Article Q271957, “HOW TO: Determine the Differences Between Two Windows Installer .msi Packages”
8/7/2019 custom_transform_files
http://slidepdf.com/reader/full/customtransformfiles 19/20
Quick Start Training Guide to
Creating Custom Transform Files for
the Feature Release 2 MSI Package
n 16
Updates to Appendix B of theMetaFrame Administrator’s Guide
The following is a list of corrected entries and values for Appendix B of the MetaFrame Administrator’s Guide. Onlychanged items are listed; make sure you review Appendix B for a full listing of properties.
CTX_MF_ODBC_PASSWORD
Definition: Password for a third-party database
Possible values: User definedDefault value: “Password”
Update – The default value in the MSI package and MST files is citrix in lower case letters.
CTX_MF_SILENT_DSNFILEDefinition: DSN file for the silent install to be used for the data store
Possible values: Complete path to the DSN file
Default value: “” (null)
Update – The default value in the MSI package and MST files is C:\testsql.dsn.
CTX_MF_LAUNCH_CLIENT_CD_WIZARD
Definition: Specifies whether or not to launch the ICA Client Distribution wizard (to update the ICA Clients on theMetaFrame server)Possible values: Yes = launch wizard or No = do not launch wizard; that is, do not update clients
Default value: No
Update – The default value in the MSI package and MST files is Yes.

8/7/2019 custom_transform_files
http://slidepdf.com/reader/full/customtransformfiles 20/20
851 W. Cypress Creek Road Ft. Lauderdale, FL 33309 954-267-3000 http://www.citrix.com


