Embed Size (px)
Citation preview
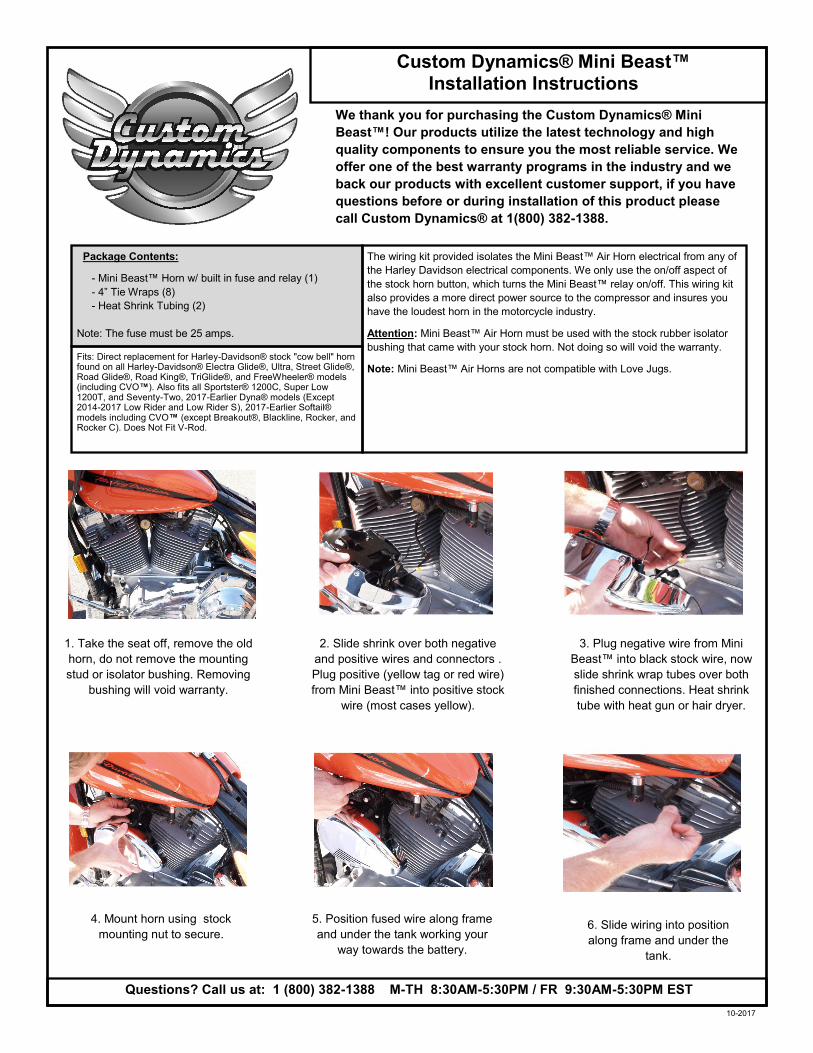
Custom Dynamics® Mini Beast™ Installation Instructions
We thank you for purchasing the Custom Dynamics® Mini
Beast™! Our products utilize the latest technology and high
quality components to ensure you the most reliable service. We
offer one of the best warranty programs in the industry and we
back our products with excellent customer support, if you have
questions before or during installation of this product please
call Custom Dynamics® at 1(800) 382-1388.
Questions? Call us at: 1 (800) 382-1388 M-TH 8:30AM-5:30PM / FR 9:30AM-5:30PM EST
10-2017
Package Contents:
- Mini Beast™ Horn w/ built in fuse and relay (1)
- 4” Tie Wraps (8)
- Heat Shrink Tubing (2)
Note: The fuse must be 25 amps.
1. Take the seat off, remove the old
horn, do not remove the mounting
stud or isolator bushing. Removing
bushing will void warranty.
2. Slide shrink over both negative
and positive wires and connectors .
Plug positive (yellow tag or red wire)
from Mini Beast™ into positive stock
wire (most cases yellow).
3. Plug negative wire from Mini
Beast™ into black stock wire, now
slide shrink wrap tubes over both
finished connections. Heat shrink
tube with heat gun or hair dryer.
4. Mount horn using stock
mounting nut to secure.
5. Position fused wire along frame
and under the tank working your
way towards the battery.
6. Slide wiring into position
along frame and under the
tank.
The wiring kit provided isolates the Mini Beast™ Air Horn electrical from any of
the Harley Davidson electrical components. We only use the on/off aspect of
the stock horn button, which turns the Mini Beast™ relay on/off. This wiring kit
also provides a more direct power source to the compressor and insures you
have the loudest horn in the motorcycle industry.
Attention: Mini Beast™ Air Horn must be used with the stock rubber isolator
bushing that came with your stock horn. Not doing so will void the warranty.
Note: Mini Beast™ Air Horns are not compatible with Love Jugs.
Fits: Direct replacement for Harley-Davidson® stock "cow bell" horn found on all Harley-Davidson® Electra Glide®, Ultra, Street Glide®, Road Glide®, Road King®, TriGlide®, and FreeWheeler® models (including CVO™). Also fits all Sportster® 1200C, Super Low 1200T, and Seventy-Two, 2017-Earlier Dyna® models (Except 2014-2017 Low Rider and Low Rider S), 2017-Earlier Softail® models including CVO™ (except Breakout®, Blackline, Rocker, and Rocker C). Does Not Fit V-Rod.
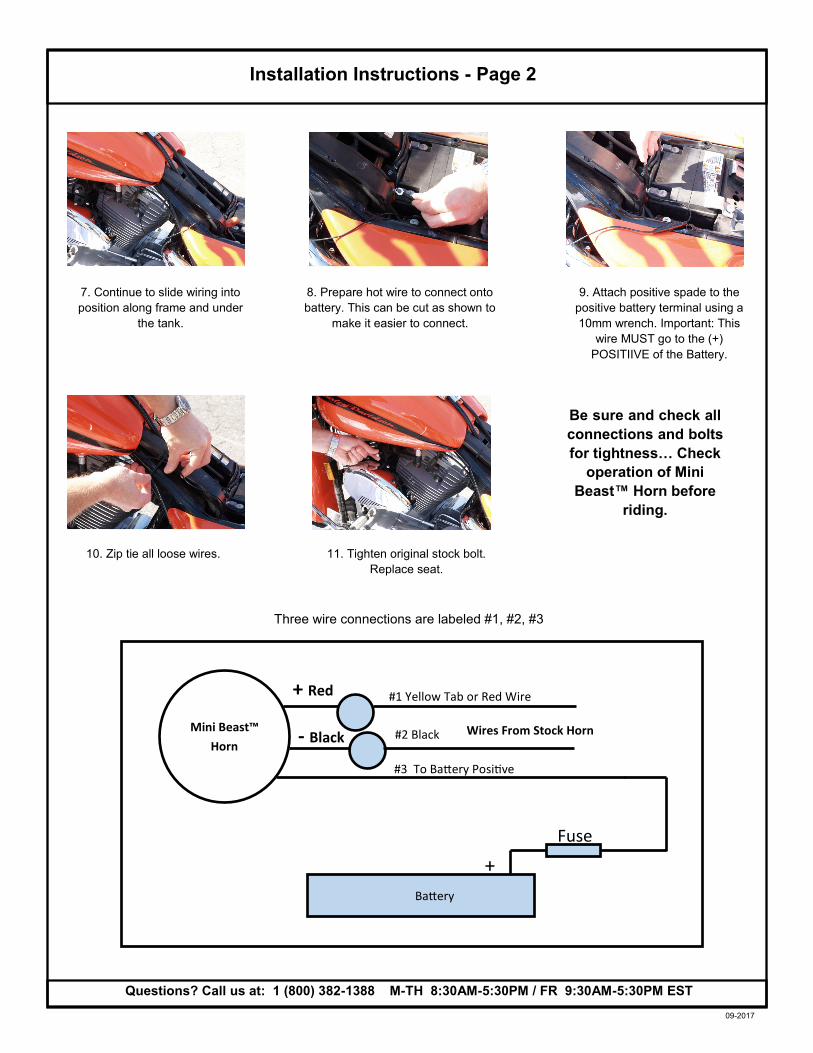
Installation Instructions - Page 2
Questions? Call us at: 1 (800) 382-1388 M-TH 8:30AM-5:30PM / FR 9:30AM-5:30PM EST
09-2017
7. Continue to slide wiring into
position along frame and under
the tank.
8. Prepare hot wire to connect onto
battery. This can be cut as shown to
make it easier to connect.
9. Attach positive spade to the
positive battery terminal using a
10mm wrench. Important: This
wire MUST go to the (+)
POSITIIVE of the Battery.
10. Zip tie all loose wires. 11. Tighten original stock bolt.
Replace seat.
Be sure and check all
connections and bolts
for tightness… Check
operation of Mini
Beast™ Horn before
riding.
Mini Beast™
Horn
Battery
+
Fuse
+ Red
- Black Wires From Stock Horn #2 Black
#1 Yellow Tab or Red Wire
#3 To Battery Positive
Three wire connections are labeled #1, #2, #3