Embed Size (px)
DESCRIPTION
Crossstitch June 2013
Citation preview

Weekend workbox
64 June 2013
Tempt your taste buds with these super-sweet cupcake designs from Angela Poole
These buttercream-loaded
cupcakes are so enticing, we
challenge any reader to stitch them and
not immediately head off to their nearest
bakery for a sugar fix! They all look so
good, if they were real we’d have to try
one of each. Luckily for our waistlines,
they’re not – but we know you’ll enjoy
stitching the cakes as much as you would
eating them. Then just make them up into
these gorgeous party accessories and ask
your friends round for afternoon tea!
Stitching the designsThe three designs are worked in the same way.
Fold your piece of linen in half both ways to find
the centre and start stitching at this point. All the
cross stitch is worked in two strands of stranded
cotton over two threads of the linen fabric. They
are worked in full cross stitch, so your stitching
will grow quickly.
Adding the detailsWhen the cross stitch is complete, you can
add the backstitch and long stitch outlines
and details. These are worked in one strand
of grey stranded cotton.
When working the long stitches, take care
to keep the tension correct, so they don’t sag
across the fabric.
Let them eat
Making the buntingStitch the number of cupcakes you need, each
on a separate piece of linen, to make your
required length of bunting.
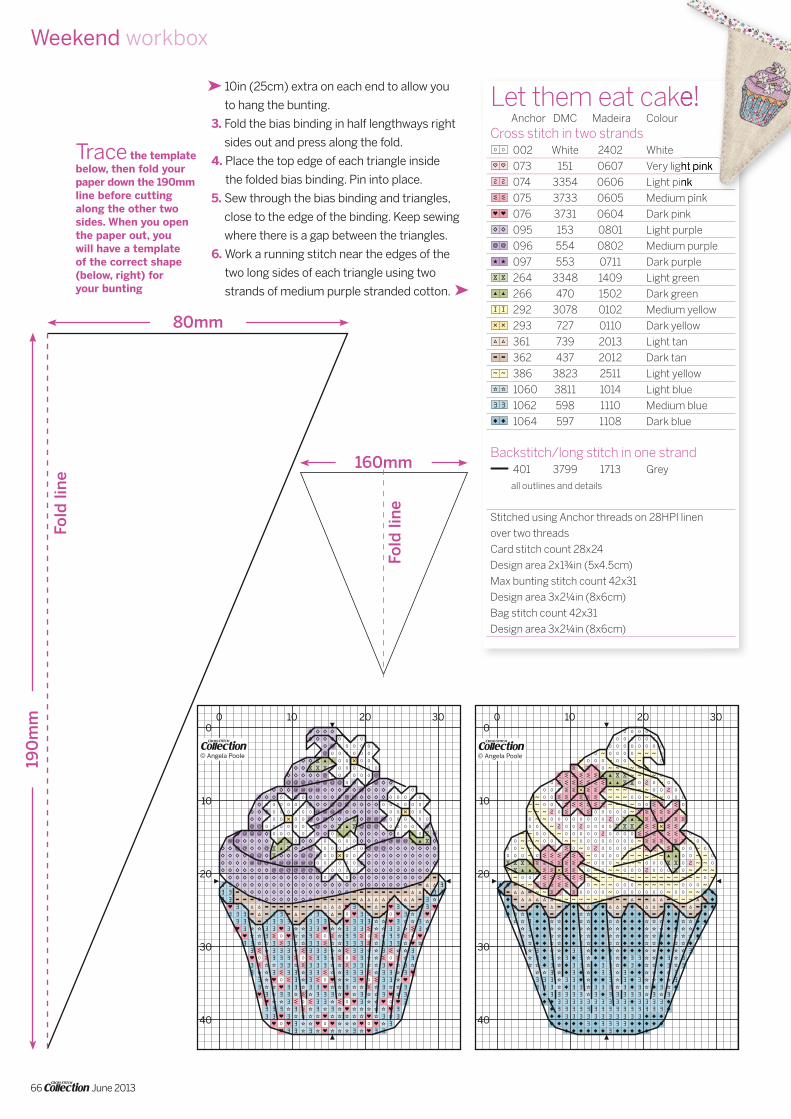
Creating the triangles
1. Trace around the large triangular template on
page 66. This is one half of the final template
you need, so fold your paper down the 190mm
side, then cut along the other two sides. Note,
this doesn’t include the seam allowance.
2. Position the template centrally over the back
of one stitched cupcake and draw around it.
3. Place the stitched linen right sides together
on your cotton backing fabric and pin. Stitch
✦ 28HPI linen (or 14HPI aida), flax, Zweigart Cashel Ref: 3281/52Bunting: 12x12in (30x30cm) for each triangleBag: 12x10in (30x25cm)Card: 8x8in (20x20cm) for each card
✦ Stranded cotton as listed in the key
Bunting:✦ Cotton backing
fabric 8x7in (20x18cm) for each triangle
✦ Cotton print bias binding see instructions for details
Bag:✦ Cotton backing
fabric 10x5in (25x13cm)
✦ Cotton print bias binding 16in (41cm)
✦ White cotton fabric small scrap for embroidered name
Cards:✦ Card 64mm circular
aperture Ref: AP54U-59, natural white, from Craft Creations – visit www.craftcreations.com or call ☎01992 781900
✦ Sewing kit – usual essential items plus matching thread
✦ Fabric for the stitched piece supplied by Willow Fabrics – visit www.willowfabrics.com or call ☎ 0800 0567811
✦ Turn to page 70 for hints and help!
Shopping list...
CSC223.wkend.indd 64 4/23/13 9:54 AM

June 2013 65
Let them eat cake!
➤
together down the two sides of the triangle
along the drawn lines, leaving the top open.
4. Trim the linen and cotton fabric ¼in (6mm)
outside the drawn lines down the sides. Then
cut along the drawn line across the top. Turn
right sides out and press.
5. Repeat this with all of your stitched cupcakes
to make individual triangles.
Assembling the bunting
1. Place your triangles in order on a flat surface.
We have left a 2in (5cm) gap between our
triangles but you can adjust this if you like.
2. Cut bias binding to the same length as the
line of triangles, including the gaps, with
The cakes are worked in full cross stitch, so your stitching will grow quickly. Take care to keep a good tension in the long stitches, so they don’t sag
t
t
t
t
0 10 20 30
10
20
30
40
0
© Angela Poole
CSC223.wkend.indd 65 4/23/13 9:54 AM
66 June 2013
Weekend workbox
Let them eat cake! Anchor DMC Madeira Colour
Cross stitch in two strands002 White 2402 White
073 151 0607 Very light pink
074 3354 0606 Light pink
075 3733 0605 Medium pink
076 3731 0604 Dark pink
095 153 0801 Light purple
096 554 0802 Medium purple
097 553 0711 Dark purple
264 3348 1409 Light green
266 470 1502 Dark green
292 3078 0102 Medium yellow
293 727 0110 Dark yellow
361 739 2013 Light tan
362 437 2012 Dark tan
386 3823 2511 Light yellow
1060 3811 1014 Light blue
1062 598 1110 Medium blue
1064 597 1108 Dark blue
Backstitch/long stitch in one strand401 3799 1713 Grey
all outlines and details
Stitched using Anchor threads on 28HPI linen
over two threads
Card stitch count 28x24
Design area 2x1¾in (5x4.5cm)
Max bunting stitch count 42x31
Design area 3x2¼in (8x6cm)
Bag stitch count 42x31
Design area 3x2¼in (8x6cm)
00
HH
ff
EE
hh
DD
@@
ss
KK
tt
II
xx
TT
FF
~~
SS
ee
dd
Let them eat cake!
073 151 0607 Very light pink
074 3354 0606 Light pink
075 3733 0605 Medium pink
➤
➤
Trace the template below, then fold your paper down the 190mm line before cutting along the other two sides. When you open the paper out, you will have a template of the correct shape (below, right) for your bunting
10in (25cm) extra on each end to allow you
to hang the bunting.
3. Fold the bias binding in half lengthways right
sides out and press along the fold.
4. Place the top edge of each triangle inside
the folded bias binding. Pin into place.
5. Sew through the bias binding and triangles,
close to the edge of the binding. Keep sewing
where there is a gap between the triangles.
6. Work a running stitch near the edges of the
two long sides of each triangle using two
strands of medium purple stranded cotton.
80mm
160mm
190
mm
Fold
lin
e
Fold
lin
e
t
t
t
t
0 10 20 30
10
20
30
40
0
© Angela Poole
t
t
t
t
0 10 20 30
10
20
30
40
0
© Angela Poole
CSC223.wkend.indd 66 4/23/13 9:54 AM

June 2013 67
Making these cakes up into bunting, cards and gift bags works so well, but they would look just as great decorating a variety of different accessories, so don’t be afraid to try other ideas
t
t
t
t
0 10 20
10
20
0
© Angela Poole
t
t
t
t0 10 20
10
20
0
© Angela Poole
t
t
t
t
0 10 20 30
10
20
30
40
0
© Angela Poole
t
t
t
t0 10 20 30
10
20
30
40
0
© Angela Poole
CSC223.wkend.indd 67 4/23/13 9:54 AM

Weekend workbox
68 June 2013
Making a drawstring bagWe have personalised our bag so it can be used
as a small gift bag or for party favours.
Personalising your bag
1. Draw or print out the name you want, then
place a piece of white cotton fabric on top
of the paper and trace over the name.
2. Using two strands of stranded cotton in a
co-ordinating colour, backstitch carefully
over the drawn lines. Make sure you keep
your stitches small, so they flow neatly round
the curves.
3. Trim the edges of the cotton fabric then turn
them over to the wrong side and pin the patch
to the linen ½in (1.5cm) centrally below the
cupcake. Stitch into place using a running
stitch and one strand of stranded cotton.
Making the bag
1. When you have finished stitching, trim the
linen to 10x5in (25x13cm), positioning the
bottom of the cake 2½in (6cm) up from
the lower edge and centrally widthways.
2. Place the linen and cotton backing fabric
right sides together and stitch down the sides
and across the bottom using a ½in (1.5cm)
seam allowance.
3. Turn the top edge over ½in (1.5cm) to the
wrong side, then fold it over again 1½in (4cm)
to form the top frill and casing.
4. Stitch the lower folded-over edge down, close
to the fold, then work another line of stitching
½in (1.5cm) above this to form a casing.
5. Turn the bag right sides out and press.
6. Fold the bias binding in half and stitch
together close to the edges, turning the
short ends under and stitching them down
to neaten.
7. Undo a few stitches on the seam between the
casing lines on the right side of the bag then
thread the bias binding through. Tie the two
ends in a knot and draw up to finish your bag.
Next month...Angela Poole’s fun fish bathroom
accessories feature in our July issue (224).
Find out more on page 72-73!
➤It’s easy to add a name to your gift bag – simply draw the letters onto a material scrap, backstitch over the lines and stitch your patch into place
t
t
t
t
0 10 20 30
10
20
30
40
0
© Angela Poole
CSC223.wkend.indd 68 4/23/13 9:54 AM