Embed Size (px)
Citation preview
Creating Accessible Documents with Adobe InDesignAuthor: InDesign Accessibility Community of Practice—State of MinnesotaDate: December 2, 2019This guide covers the basics for making documents accessible when using InDesign, an industry-standard page layout software offered as part of Adobe’s Creative Cloud software suite. This guide is not intended to be a comprehensive training resource for the software. No matter your preferred method for creating files using InDesign, be sure to implement each of the following methods at some point in your workflow to ensure your files are accessible.
Document File PropertiesUnder File> File Info you will find the File Information dialog box, where you can enter file properties and author information.Document Title should be your document’s title, Author should be your organization’s name, and Description is a short summary of your document. Keywords are a type of metadata are helpful in search functions. Be sure to check your organization’s policy on use and formatting of keywords.
Reading OrderReading order is the order in which everything in your document is read by assistive technology. Reading order includes text, tables, and images. It’s defined in two different InDesign panels: the Layers panel and the Articles panel;
This Layers panel includes three layers (text, images, and background).
The Articles panel includes both text and image elements.
LayersThe role of layers is to help define document reading order in InDesign and in PDFs generated from your InDesign file. In most cases, you should use at least three layers:
▪ Text (including images in-line with text) ▪ Images (not associated with text) ▪ Background artifacts
In the Layers panel, text must appear in reverse reading order. This means that what is read first in your document must appear at the bottom of your Text layer and what you want read last should appear at the top of the text layer. To arrange the elements in the proper reading order, select an element in the Layers panel and drag it to another spot. Best practice: follow this technique for images as well.
The text layer in the Layers panel contains all of the text for that page. The first text element that should be read on the page is the bottom element in the text layer, the last text element to be read on the page is the top element. In this example, “Best of Billy Joel’s Albums” is the title of the document, so that is the last item in the text layer; “Poll: The Ten Best...” text is the last text element to be read on the page, so it’s the first element in the text layer.
ArticlesIn addition to establishing correct reading order in the Layers panel, it’s important to define reading order in the Articles panel. Articles include text and associated elements like photos and graphics. Many users create articles just before exporting the document, after finalizing all of their content.To create an article, do the following:
1. Make sure the elements to be included are not locked or hidden on the page.2. Select your elements in the order you want them to be read (you can hold Control as you select
multiple items).3. Drag the selected items into the Articles panel. The drag and drop action can feel scary, but you aren’t
actually removing any elements from the layout.4. Enter the name of your article in the New Article dialogue box that appears and ensure that Include
When Exporting is selected.The elements you added to the Articles panel now appear as a single article, and will read in the order in which they appear in the panel.It’s important to add both text and graphics to the Articles panel, otherwise the elements won’t be tagged
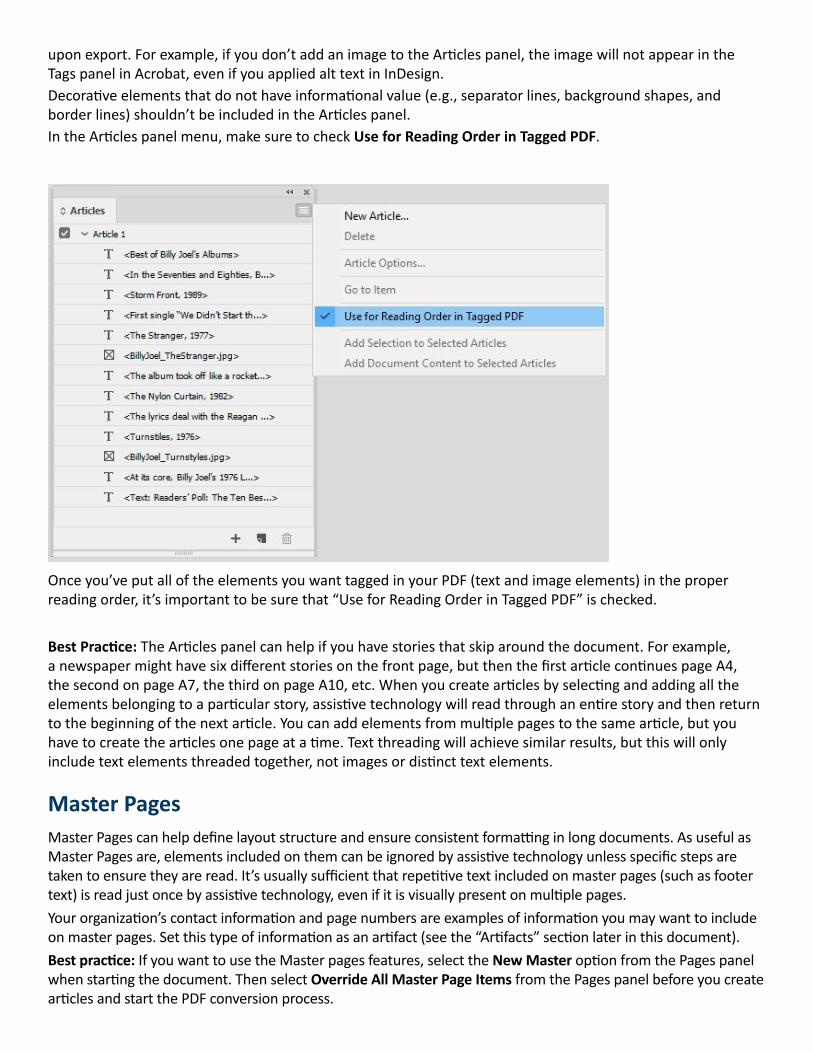
upon export. For example, if you don’t add an image to the Articles panel, the image will not appear in the Tags panel in Acrobat, even if you applied alt text in InDesign.Decorative elements that do not have informational value (e.g., separator lines, background shapes, and border lines) shouldn’t be included in the Articles panel. In the Articles panel menu, make sure to check Use for Reading Order in Tagged PDF.
Once you’ve put all of the elements you want tagged in your PDF (text and image elements) in the proper reading order, it’s important to be sure that “Use for Reading Order in Tagged PDF” is checked.
Best Practice: The Articles panel can help if you have stories that skip around the document. For example, a newspaper might have six different stories on the front page, but then the first article continues page A4, the second on page A7, the third on page A10, etc. When you create articles by selecting and adding all the elements belonging to a particular story, assistive technology will read through an entire story and then return to the beginning of the next article. You can add elements from multiple pages to the same article, but you have to create the articles one page at a time. Text threading will achieve similar results, but this will only include text elements threaded together, not images or distinct text elements.
Master PagesMaster Pages can help define layout structure and ensure consistent formatting in long documents. As useful as Master Pages are, elements included on them can be ignored by assistive technology unless specific steps are taken to ensure they are read. It’s usually sufficient that repetitive text included on master pages (such as footer text) is read just once by assistive technology, even if it is visually present on multiple pages.Your organization’s contact information and page numbers are examples of information you may want to include on master pages. Set this type of information as an artifact (see the “Artifacts” section later in this document).Best practice: If you want to use the Master pages features, select the New Master option from the Pages panel when starting the document. Then select Override All Master Page Items from the Pages panel before you create articles and start the PDF conversion process.
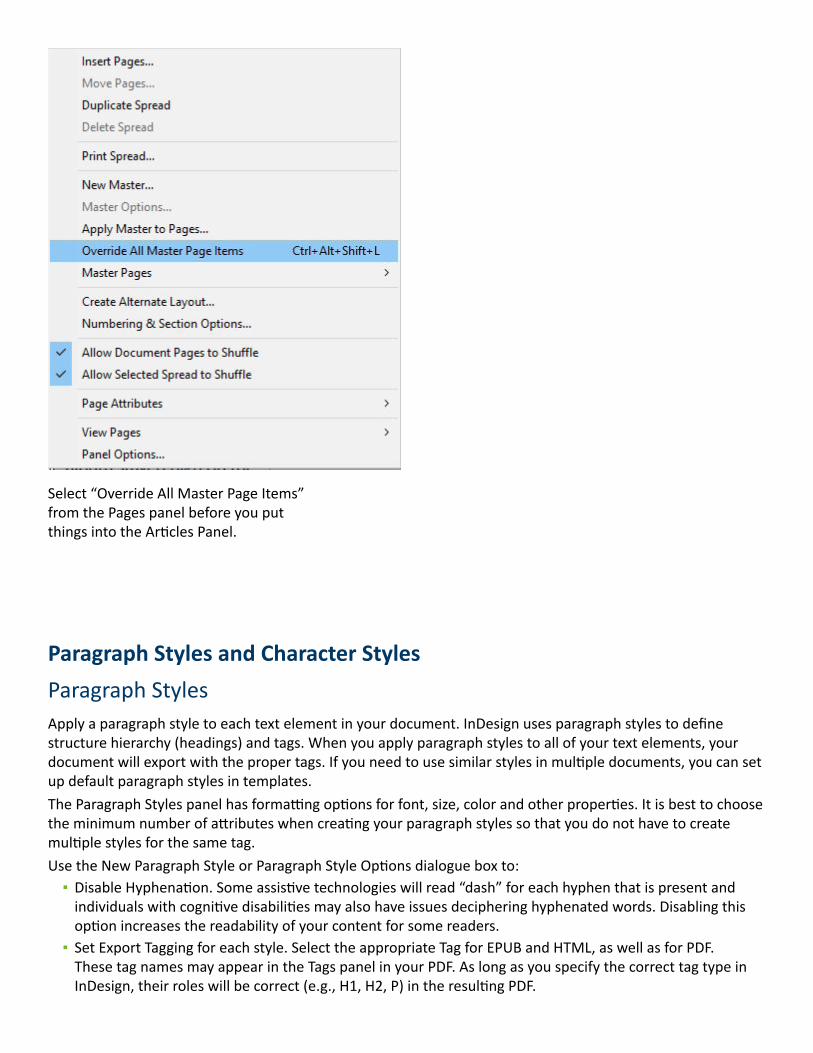
Select “Override All Master Page Items” from the Pages panel before you put things into the Articles Panel.
Paragraph Styles and Character StylesParagraph StylesApply a paragraph style to each text element in your document. InDesign uses paragraph styles to define structure hierarchy (headings) and tags. When you apply paragraph styles to all of your text elements, your document will export with the proper tags. If you need to use similar styles in multiple documents, you can set up default paragraph styles in templates.The Paragraph Styles panel has formatting options for font, size, color and other properties. It is best to choose the minimum number of attributes when creating your paragraph styles so that you do not have to create multiple styles for the same tag.Use the New Paragraph Style or Paragraph Style Options dialogue box to:
▪ Disable Hyphenation. Some assistive technologies will read “dash” for each hyphen that is present and individuals with cognitive disabilities may also have issues deciphering hyphenated words. Disabling this option increases the readability of your content for some readers.
▪ Set Export Tagging for each style. Select the appropriate Tag for EPUB and HTML, as well as for PDF. These tag names may appear in the Tags panel in your PDF. As long as you specify the correct tag type in InDesign, their roles will be correct (e.g., H1, H2, P) in the resulting PDF.
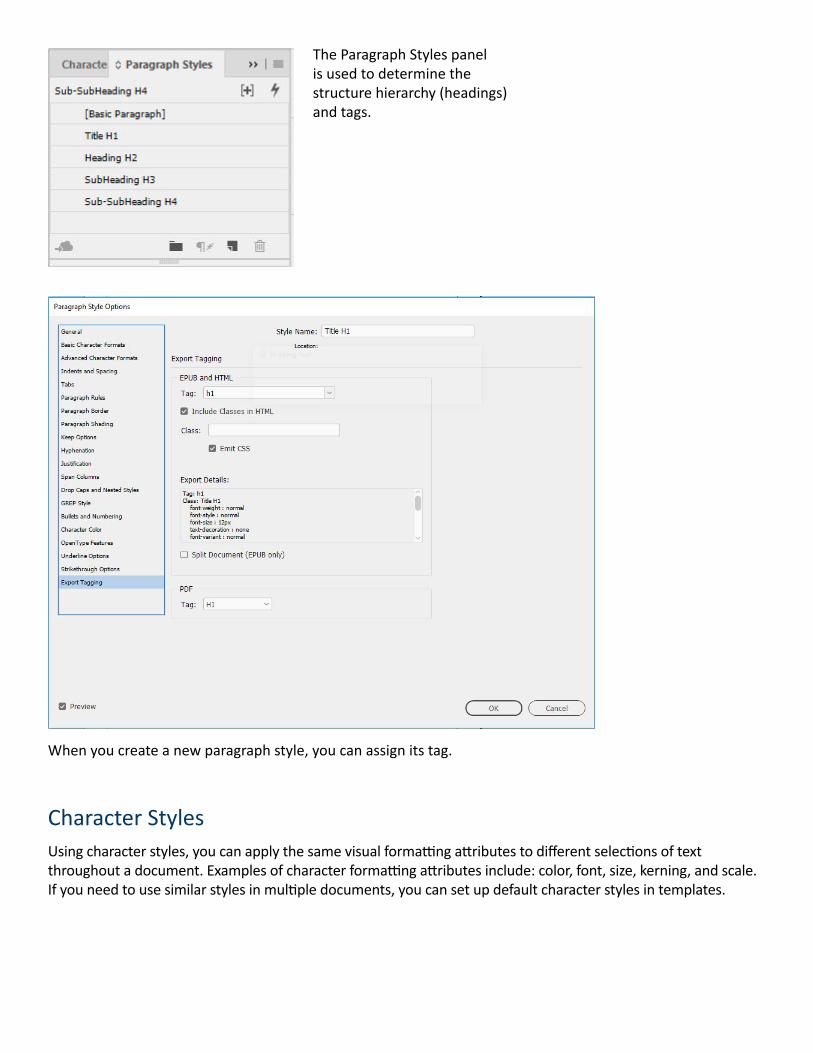
The Paragraph Styles panel is used to determine the structure hierarchy (headings) and tags.
When you create a new paragraph style, you can assign its tag.
Character StylesUsing character styles, you can apply the same visual formatting attributes to different selections of text throughout a document. Examples of character formatting attributes include: color, font, size, kerning, and scale. If you need to use similar styles in multiple documents, you can set up default character styles in templates.

You can create Character Styles to manage the visual aspect of your text.
The Character Styles panel is similar to the Paragraph Styles panel, however the Character Styles panel only includes attributes that apply to selected text within a paragraph. It is important to note that assigning new paragraph styles to text that is already formatted using character styles can alter the visual appearance of your text. To resolve any unintended changes, reapply the desired character style.
The Character Style Options menu allows you to determine the different character formats for your text (font family and style, size, color, etc.).
Best Practice: Create and use different character styles for each distinct attribute, such as text color. Using character styles will help prevent span tags in the final document, which can appear when you use the Character Formatting Controls ribbon to apply text attributes.
This article title uses a different character style for each text color, but uses a single paragraph style to create the appropriate structure hierarchy and export tagging.
ColorCheck color contrasts while you are creating documents. You can sample colors and check against WCAG 2.0 AA color contrast standards by using tools to such as:
▪ WebAIM: Color Contrast Checker ▪ Colour Contrast Analyser
Do not use color alone to convey information. This applies to charts, graphs, pictures that convey important data and text (e.g., warnings, headings, paragraph text, hyperlinks).
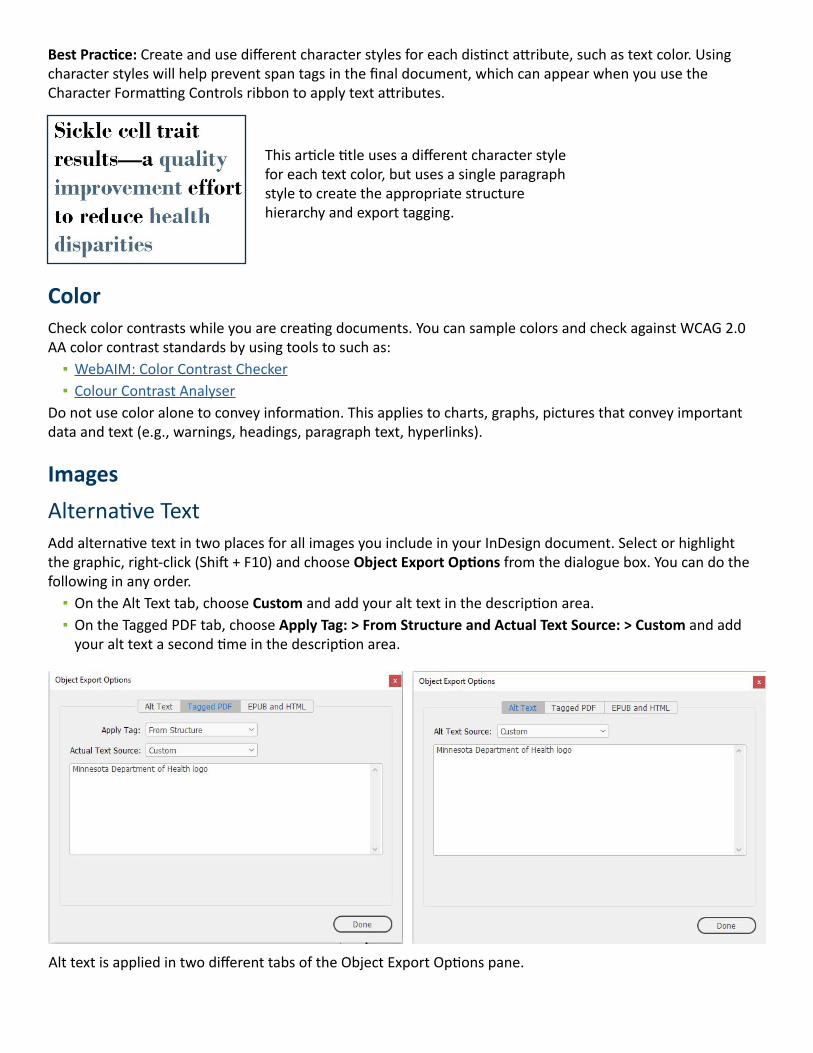
ImagesAlternative TextAdd alternative text in two places for all images you include in your InDesign document. Select or highlight the graphic, right-click (Shift + F10) and choose Object Export Options from the dialogue box. You can do the following in any order.
▪ On the Alt Text tab, choose Custom and add your alt text in the description area. ▪ On the Tagged PDF tab, choose Apply Tag: > From Structure and Actual Text Source: > Custom and add your alt text a second time in the description area.
Alt text is applied in two different tabs of the Object Export Options pane.
WebAIM’s article on alternative text is a great reference and has clear examples.Background graphics are images that are strictly for visual structure or appeal. Use your background layer to help you manage these items. Be sure to artifact all visual lines, shading, and boxes so they do not export.
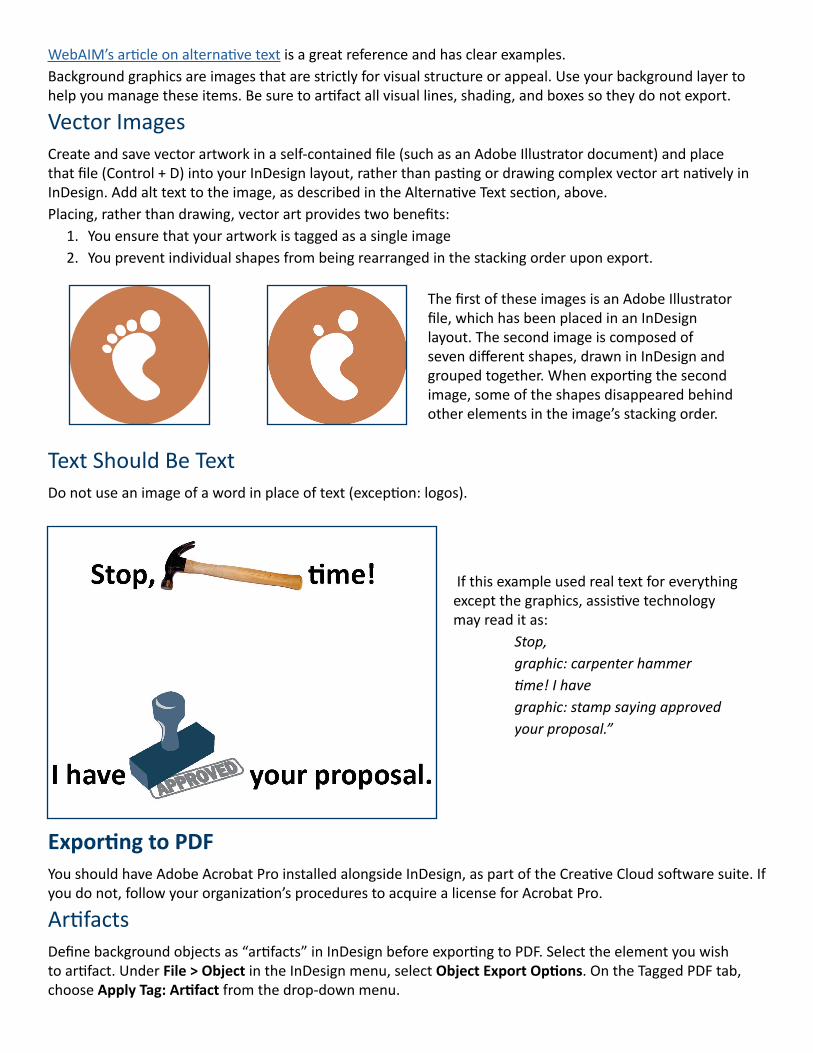
Vector ImagesCreate and save vector artwork in a self-contained file (such as an Adobe Illustrator document) and place that file (Control + D) into your InDesign layout, rather than pasting or drawing complex vector art natively in InDesign. Add alt text to the image, as described in the Alternative Text section, above.Placing, rather than drawing, vector art provides two benefits:
1. You ensure that your artwork is tagged as a single image 2. You prevent individual shapes from being rearranged in the stacking order upon export.
The first of these images is an Adobe Illustrator file, which has been placed in an InDesign layout. The second image is composed of seven different shapes, drawn in InDesign and grouped together. When exporting the second image, some of the shapes disappeared behind other elements in the image’s stacking order.
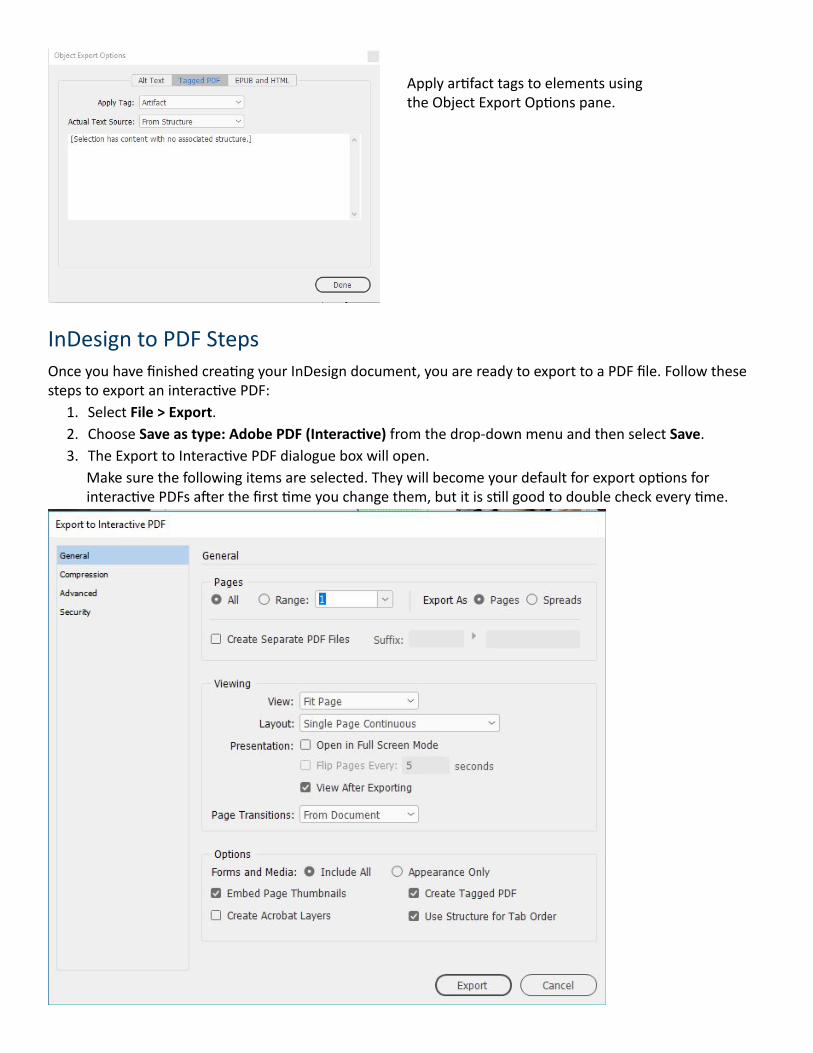
Text Should Be TextDo not use an image of a word in place of text (exception: logos).
If this example used real text for everything except the graphics, assistive technology may read it as:
Stop,graphic: carpenter hammertime! I havegraphic: stamp saying approvedyour proposal.”
Exporting to PDFYou should have Adobe Acrobat Pro installed alongside InDesign, as part of the Creative Cloud software suite. If you do not, follow your organization’s procedures to acquire a license for Acrobat Pro.
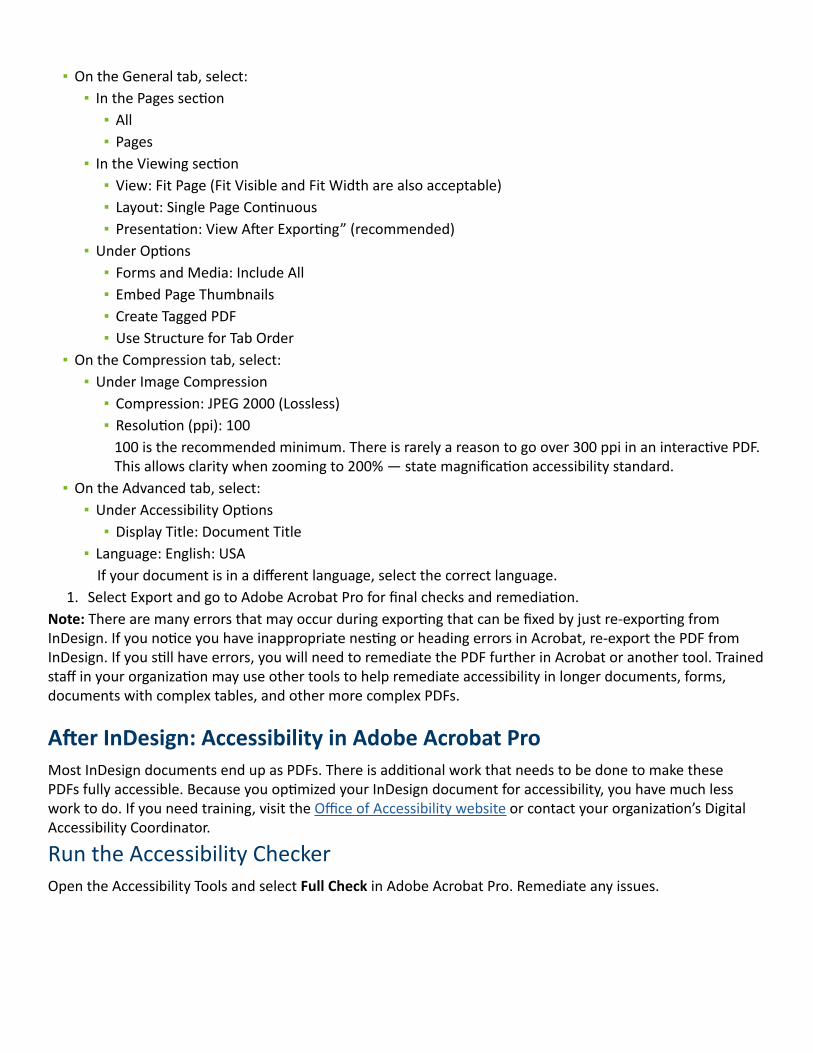
ArtifactsDefine background objects as “artifacts” in InDesign before exporting to PDF. Select the element you wish to artifact. Under File > Object in the InDesign menu, select Object Export Options. On the Tagged PDF tab, choose Apply Tag: Artifact from the drop-down menu.
Apply artifact tags to elements using the Object Export Options pane.
InDesign to PDF StepsOnce you have finished creating your InDesign document, you are ready to export to a PDF file. Follow these steps to export an interactive PDF:
1. Select File > Export.2. Choose Save as type: Adobe PDF (Interactive) from the drop-down menu and then select Save.3. The Export to Interactive PDF dialogue box will open.
Make sure the following items are selected. They will become your default for export options for interactive PDFs after the first time you change them, but it is still good to double check every time.
▪ On the General tab, select: ▪ In the Pages section
▪ All ▪ Pages
▪ In the Viewing section ▪ View: Fit Page (Fit Visible and Fit Width are also acceptable) ▪ Layout: Single Page Continuous ▪ Presentation: View After Exporting” (recommended)
▪ Under Options ▪ Forms and Media: Include All ▪ Embed Page Thumbnails ▪ Create Tagged PDF ▪ Use Structure for Tab Order
▪ On the Compression tab, select: ▪ Under Image Compression
▪ Compression: JPEG 2000 (Lossless) ▪ Resolution (ppi): 100100 is the recommended minimum. There is rarely a reason to go over 300 ppi in an interactive PDF. This allows clarity when zooming to 200% — state magnification accessibility standard.
▪ On the Advanced tab, select: ▪ Under Accessibility Options
▪ Display Title: Document Title ▪ Language: English: USA
If your document is in a different language, select the correct language.1. Select Export and go to Adobe Acrobat Pro for final checks and remediation.
Note: There are many errors that may occur during exporting that can be fixed by just re-exporting from InDesign. If you notice you have inappropriate nesting or heading errors in Acrobat, re-export the PDF from InDesign. If you still have errors, you will need to remediate the PDF further in Acrobat or another tool. Trained staff in your organization may use other tools to help remediate accessibility in longer documents, forms, documents with complex tables, and other more complex PDFs.
After InDesign: Accessibility in Adobe Acrobat ProMost InDesign documents end up as PDFs. There is additional work that needs to be done to make these PDFs fully accessible. Because you optimized your InDesign document for accessibility, you have much less work to do. If you need training, visit the Office of Accessibility website or contact your organization’s Digital Accessibility Coordinator.
Run the Accessibility CheckerOpen the Accessibility Tools and select Full Check in Adobe Acrobat Pro. Remediate any issues.
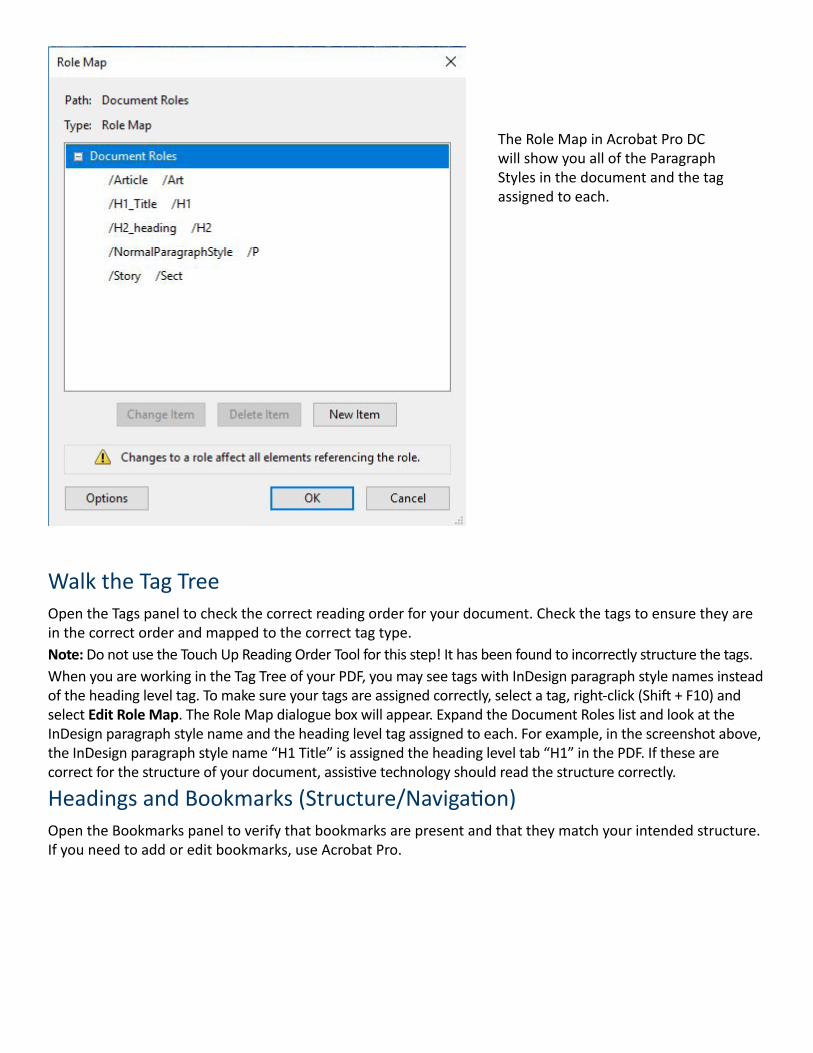
The Role Map in Acrobat Pro DC will show you all of the Paragraph Styles in the document and the tag assigned to each.
Walk the Tag TreeOpen the Tags panel to check the correct reading order for your document. Check the tags to ensure they are in the correct order and mapped to the correct tag type.Note: Do not use the Touch Up Reading Order Tool for this step! It has been found to incorrectly structure the tags.When you are working in the Tag Tree of your PDF, you may see tags with InDesign paragraph style names instead of the heading level tag. To make sure your tags are assigned correctly, select a tag, right-click (Shift + F10) and select Edit Role Map. The Role Map dialogue box will appear. Expand the Document Roles list and look at the InDesign paragraph style name and the heading level tag assigned to each. For example, in the screenshot above, the InDesign paragraph style name “H1 Title” is assigned the heading level tab “H1” in the PDF. If these are correct for the structure of your document, assistive technology should read the structure correctly.
Headings and Bookmarks (Structure/Navigation)Open the Bookmarks panel to verify that bookmarks are present and that they match your intended structure. If you need to add or edit bookmarks, use Acrobat Pro.


![filedb.experts-exchange.com · Web viewProcess: Adobe InDesign CS6 [285] Path: /Applications/Adobe InDesign CS6/Adobe InDesign CS6.app/Contents/MacOS/Adobe InDesign CS6](https://img.pdfslide.us/doc/110x75/602b38af6bf67e0d433498b2/web-view-process-adobe-indesign-cs6-285-path-applicationsadobe-indesign-cs6adobe.jpg)