Embed Size (px)
Citation preview

Adobe InDesignTutorial Part II

2
ContentsPrior to This Tutorial... 3Create and Define Styles 4To create paragraph style 4To create character styles 5To create object styles 6To create table styles 7
Apply, Edit, and Redefine Styles 9To apply a style 9To edit existing styles 9To update a style definition to match a selection 9To create a style based on another style 9
Create and Edit Master Pages 10To create a master page 10To edit a master page 11To apply a master page 12To create a master page based on another master page 12To unlock a master page 12
Section, Number, and Outline 13To add section markers 13Automatic Page Numbering 14Create a Table of Contents 15
Package a Document 17Tutorial in Review... 19

3
Prior to This Tutorial...In the previous tutorial, you learned InDesign’s interface and its most basic features. Now that you know how to create a document and input text, images, and shapes, you are ready to move on to formatting. InDesign offers many great tools to help users style their documents uniformly and appropriately. In this tutorial, you will learn how to use styles, master pages, section markers, and page numbers to make a well-designed and consistent document. Once you have those mastered, you can create a table of contents to outline your document. You will also learn how to professionally package your document for publishing.
Once you master the skills described here, you will be able to create well-designed and expertly formatted documents that will look as if a professional had made them!

4
Create and Define StylesStyles are an important feature in InDesign that help keep similar paragraphs, characters, objects, and tables in your document formatted uniformly. Use styles so that you do not have to manually format similar text, especially if the format may change later; it is much easier to redefine one style than reformat all your text because styles let you reformat similar sections simultaneously.
To create paragraph stylesParagraph styles are the type of styles you will use most frequently. They help you set up a format for large, similar sections of text. This format includes: font, color, indentation, justification, hyphenation, bullets and numbering, and other common formatting issues. Use paragraph styles to format large sections of text.
1. From the Window menu, select Styles.2. Select Paragraph Styles to open the Paragraph Styles panel.
3. Click on Create new style4. Double-click on your new style. The Paragraph Style Options panel should appear.

5
5. In the Style Name box, rename your style.
6. In the Basic Character Formats tab, select a Font Family, Font Style, and Size.7. Define your style the way you would like using Basic Character Formats, Indents and Spacing, and any other tabs you would like to define.8. Click OK to create your style.
To create character stylesUse character styles to format particular words. Character styles cover fonts, color, strikethrough, and other character formatting issues. Do not use character styles to format large sections of text, only words that need to be emphasized or phrases that are headings.
1. From the Window menu, select Styles.2. Select Character Styles to open the Character Styles panel.
3. Click on the Create new style button. 4. Double-click on your new style. The Character Style Options panel should appear.

6
5. In the Style Name box, rename your style.6. Define your style the way you would like using Basic Character Formats, Advanced Character Formats, Character Color, and any other features you would like to define.7. Click OK to create your style.
To create object stylesUse object styles when you want to format multiple objects in a nontraditional way. Object styles include text wrapping, shadows, gradient, text frames, and other object formatting issues.
1. From the Windows menu, select Styles.2. Select Object Styles to open the Objects Styles panel.3. Click Create new style button.4. Double-click your new style. The Object Style Options panel should appear.
5. In the Style Name box, rename your style.

7
6. Define your style the way you would like using the Basic Attributes menu.
7. Select or clear features to add or remove them as needed.8. Click OK to create your style.

8
5. In the Style Name box, rename your style.6. Define your style the way you would like using the General, Table Setup, Row Strokes, Column Strokes, and Fills tabs as needed.7. Click OK to create your style.
1. From the Windows menu, select Styles.2. Select Table Styles to open the Table Styles panel.3. Click Create new style.4. Double-click your new style. The Table Style Options panel should appear.
Use table styles to style and format tables uniformly. Table styles include columns, rows, and cell styles.
To create table styles

9
Apply, Edit, and Redefine StylesYou can apply, edit, and redefine all types of styles the same way. This section will use paragraph styles, but all styles can be manipulated the same way.
To apply a style 1. With the Selection tool select the textframe (or object or table) you want to apply the style to.2. In the Paragraph Styles panel, select the style you want to apply. The style has been applied.
To edit existing styles1. In the Paragraph Styles panel, double-click the style you want to edit.2. Edit the style accordingly.3. Click OK to save your edits.
To update a style definition to match a selection1. With the Selection tool select the textframe you want to redefine a style to match.2. In the Paragraph Styles panel, right-click the style you want to redefine.3. Select Redefine Style. The style has been updated.
To create a style based on another styleIf you want to create a new style, but don’t want to start from scratch, you can start from a base style you’ve already created.
1. In the Paragraph Styles panel, click Create a new style.2. Double-click your new style.3. In the Style Name box, rename your style.4. In the General tab, click the Based On dropdown menu.
5. Select the style you want to make the base style.6. Define your new style as you want.

10
Create and Edit Master PagesMaster pages are another tool to help keep your document styled uniformly. They create a template for all the successive pages to follow. Use them to template repeated layout elements so you don’t have to create those every time you create a new page.
To create a master page1. On the right panel, select the Pages panel.2. In the upper-right corner drop-down menu select New Master. The New Master panel should appear.
3. In the Name box, rename your master page.4. In the Prefix box, insert an appropriate prefix for your master page. This will be the prefix that appears on page the pages panel and differentiates between master pages.5. Click OK to create your new master page.

11
To edit a master page1. In the Pages panel, double-click the master page you want to edit.
2. Add any images, shapes, text frames, or other design elements you want to include on the master page.3. To exit, double-click a page in your document.

12
To apply a master page• In the Pages panel, click and drag the master page to the page in your document you want the master to apply to. A marker with the prefix of the master page should appear in the upper-right corner of your page in the Pages panel.
To create a master page based on another master page1. In the Pages panel, select New Master. The New Master panel should appear.2. In the Name box, rename your new master page.3. In the Based on Master menu, select the master you want to base the new master on.
4. Click OK to create your new master page based on another master page.
To unlock a master pageIn order to edit an object on your master page for a specific page in the document only, you will have to unlock or override your master page.
To override a particular object on a master page1. Press Ctrl+Shift or Command+Shift.2. Select the item you would like to override.
To unlock an entire master page
1. In the Pages panel, select the page you want to unlock.2. In the Pages panel menu , select Override All Master Page.

13
Section, Number, and OutlineAdd section markers to group sections of your document, add automatic page numbering to number your document, and add a table of contents to outline your document.
To add section markersSection markers are a great way to divide up distinct sections of a document into titled sections. They will act as a running header or footer on your master page so that you are able to distinguish the different sections of your document.
1. In the Pages panel, double-click the master you want to add a section marker to.2. Create a textframe where you would like the section marker to appear on the page.3. From the Type menu, go to Insert Special Character > Markers > Section Markers. The word “Section” should appear in your textbox.
4. Select a page which has that master page applied.5. From the Layout menu, select Numbering and Section Options. The Numbering & Section Options panel should appear.

14
6. Select Start Page Numbering at.
7. Insert the page where your new section begins.8. Under Page Numbering, in the Section Marker box, insert the title of your section.
9. Click OK. Your section marker title should now appear in the section marker text box.
Automatic Page NumberingInDesign can insert page numbers that automatically update if you delete or insert a new page. You will probably want to insert the automatic page numbers on master pages so they are uniform on all pages in your document.
1. In the Pages panel, double-click the master you want to add page numbering to.2. Create a textframe where you would like the page number to appear on the page.3. From the Type menu, go to Insert Special Character > Markers > Current Page Number. The prefix of the master page you are working on should appear in the textframe.
4. Select a page which has that master page applied. Your automatic numbering should appear in your textframe.

15
Create a Table of ContentsA table of contents is key to any long document. You can create an automatically updating table of contents in InDesign by including paragraph styles that will appear in the table of contents. This is especially helpful when you have a paragraph style for certain headings that you want your readers to be able to easily find in your document.
1. From the Layout menu, select Table of Contents. The Table of Contents panel will appear.
2. In the Title box, rename your Table of Contents.3. Under Other Styles, select the paragraph style you wish to include in your table of contents.4. Click Add to include the style.

16
5. Under Style, in the Entry Style menu, you can apply one of your paragraph styles to format your table of contents.
6. Click OK. Your table of contents is now loaded on your cursor.7. Click wherever you want on the page to insert your table of contents textframe.8. Format as necessary.

17
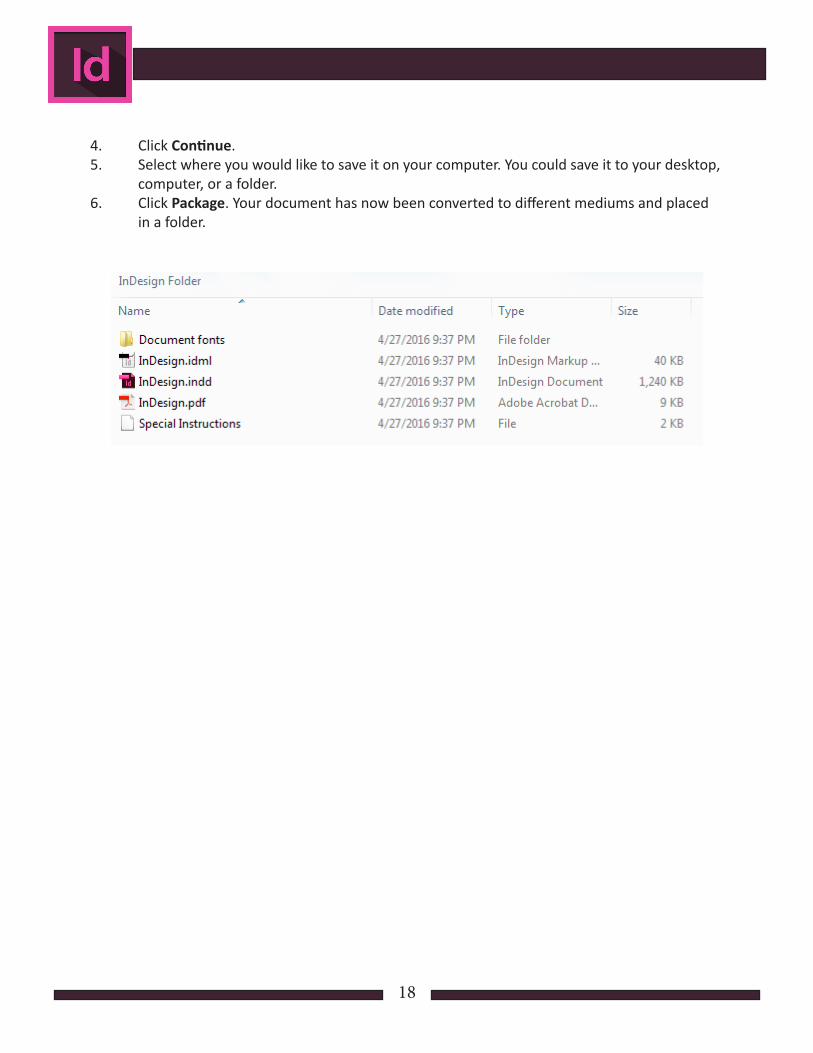
Package a DocumentA packaged document is a folder that includes Instructions, an InDesign document, and a pdf. The Package panel gives you access to a summary of your document, fonts, links and images, colors and inks, print settings, and external plug-ins—all things you may need for your publisher.
1. From the File menu, select Package. The Package panel should appear.
2. Select Package. The Printing Instructions panel should appear.
3. Insert any information you want to include in the package. This could include your contact information, company information, or special instructions.
18
4. Click Continue.5. Select where you would like to save it on your computer. You could save it to your desktop, computer, or a folder.6. Click Package. Your document has now been converted to different mediums and placed in a folder.
19
Tutorial in Review…You’ve learned a lot in this tutorial! The skills you mastered will help you to organize and format your document with ease.
Styles are a great way to format similar text, objects, and tables uniformly. Once you create and apply styles, it is easy to reformat large, similar sections of text at once, without having to manually update all your pages. Use paragraph styles for large sections of text, character styles for special words or phrases, object styles for nontraditional objects, and table styles for tables.
Master pages are the best and easiest way to create a template for your document to follow. You should use them to template repeated layout elements, including the section markers and page numbers you learned to create.
You also learned how to create a table of contents and how to package your document when you’re done.
With these new skills and the skills you learned in the last tutorial, you are well-equipped to tackle a project and produce professional documents in Adobe InDesign.


![filedb.experts-exchange.com · Web viewProcess: Adobe InDesign CS6 [285] Path: /Applications/Adobe InDesign CS6/Adobe InDesign CS6.app/Contents/MacOS/Adobe InDesign CS6](https://img.pdfslide.us/doc/110x75/602b38af6bf67e0d433498b2/web-view-process-adobe-indesign-cs6-285-path-applicationsadobe-indesign-cs6adobe.jpg)


![JACK RABBITS By: Isaac and Parker TABLE OF CONTENTS Introductory paragraph : Main idea Paragraph 2 : Anatomy/Physical Description Paragraph 3: Locomotion[movement]](https://img.pdfslide.us/doc/110x75/56649e6a5503460f94b67e41/jack-rabbits-by-isaac-and-parker-table-of-contents-introductory-paragraph.jpg)