Embed Size (px)
Citation preview

CQUBE SE12USER MANUAL
UM_ENPart No.: 1764155_01

CQube SE12
2
CONTENT
CONTENT ........................................................................................................................................................ 2
GENERAL ........................................................................................................................................................... 4Introduction ..............................................................................................................................................................4
Warnings ....................................................................................................................................................................4
Precautions ................................................................................................................................................................4
Intended use ..............................................................................................................................................................4
Facts & weight ...........................................................................................................................................................5
OVERVIEW OF COMPONENTS ........................................................................................................ 6Front exterior(Membrane switch) ......................................................................................................................6
Front exterior(Touchscreen) ...............................................................................................................................7
Front interior ............................................................................................................................................................8
Ingredient canisters .................................................................................................................................................8
Membrane switch navigation .................................................................................................................................9
Touchscreen navigation ........................................................................................................................................ 10
User card ................................................................................................................................................................ 11
Positioning............................................................................................................................................................... 12
Machine startup procedure ................................................................................................................................ 12
Fill ingredient canister and bean hopper ......................................................................................................... 13
OPERATION ................................................................................................................................................. 14Brewing a cup of espresso (Membrane switch) ............................................................................................. 14
Brewing a cup of espresso (Touchscreen) ....................................................................................................... 15
Brewing a jug (Membrane switch) ..................................................................................................................... 16
Brewing a jug (Touchscreen) .............................................................................................................................. 17
CLEANING PROGRAM ......................................................................................................................... 18Clean mixer ............................................................................................................................................................ 18
Clean vlaves ............................................................................................................................................................ 19
Clean brewer ......................................................................................................................................................... 20
Rinse brewer .......................................................................................................................................................... 21
CLEANING AND CARE ........................................................................................................................ 22Weekly cleaning ..................................................................................................................................................... 22
Disassemble the espresso group ....................................................................................................................... 22
Cleaning the espresso group .............................................................................................................................. 23
Reassemble the espresso group ........................................................................................................................ 24
Disassemble mixing system ................................................................................................................................ 25
Wash these parts .................................................................................................................................................. 26
Reassemble mixing system ................................................................................................................................ 26

CQube SE12
3
CONTENT
IMPORTANT!INFO.
CAUTION!INFO.
More INFO. INFO.
Some important information may appear in textboxes seen below
Note
Empty drip trays .................................................................................................................................................... 27
Exterior cleaning ................................................................................................................................................... 28
MESSAGE SHOWN ON DISPLAY .................................................................................................. 29
PROGRAMMING ....................................................................................................................................... 30Activate programming with the user card ...................................................................................................... 30
Jug beverage ............................................................................................................................................................ 30
Clean machine ....................................................................................................................................................... 31
Counters ................................................................................................................................................................. 32
DIMENSION SKETCH ............................................................................................................................. 34CQube SE12 ........................................................................................................................................................... 34

CQube SE12
4
GENERAL
Read the user guide before using the machine. This guide contains important instructions for
proper and safe use of the vending machine.
Always keep this guide close at hand for future reference.
Introduction
Thank you for choosing a CQube SE12 espresso vending machine. We hope you enjoy it !
Never immerse the machine, plug or mains cable in water because there is a danger of electric shock.
The appliance is not intended for use by persons (including children) with reduced physical, sensory or mental capabilities, or lack of experience and knowledge, unless they have been given supervision or instruction concerning the use of the appliance by a person responsible for their safety.
Children should be supervised to ensure they do not play with the appliance.
Do not use the machine if the mains cable, plug is damaged or the machine has fallen down.
If the mains cable is damaged it must be replaced by the manufacturer, service agent or similarly qualified persons in order to avoid a hazard.
Only plug the machine into a properly installed earthed safety socket whose line voltage matches the technical data for the machine.
Do not use the machine outdoors so it can be exposed to weather (rain, snow, frost). It will cause material damage to the machine.
Do not try to open the machine or repair it in any way. To avoid danger only have the machine repaired in a technical workshop, Service Centre or by a qualified person.
Remove the mains cable from the socket when the machine is not in use for longer periods. To do this, pull the plug not the cable.
This appliance must be placed in a horizontal position which is resistant to any water that may leak.
Place the machine out of the reach of children. Position the mains cable so that people cannot
trip over it. Keep it away from sharp edges and heat sources.
The new hose-sets supplied with this appliance are to be used, old hose-sets must not be re-used.
This appliance is not suitable for installation in an area where a pressure washer may be used.
This appliance must not be cleaned with a pressure washer.
This appliance is intended to be used in household and similar applications such as:
- Staff kitchen areas in shops. - Offices and other commercial working
environments. - On agricultural estates. - By clients in hotels, motels and other
residential type environments. - Bed and breakfast type environments.
For the optimal performance of the machine these parameters shall not be exceeded:
- Maximum permissible inlet water pressure : 800KPa (8Bar)
- Minimum permissible inlet water pressure: 200KPa (2Bar)
- Maximum working temperature: 40°ºC - Minimum working temperature: 10°ºC
Warnings
Precautions
Intended use
CQube SE12
5
GENERALFacts & weight
FACTS CQUBE SE12
Touchscreen Option
Drink options 1-12
Function for selecting jug Yes
Grinder type 1 x EK-7
Number of bean hoppers 1
Number of ingredient canisters 2
Brewer type Espresso
Espresso pump type Vibration pump
Drip tray size 0.5L
Waste box ~ 200 espresso pucks
Base cabinet Option
Tank volume 1.8L
Espresso boiler 0.7L
Power supply 220-230VAC/2200W 50-60Hz
Water connection 1/2” external thread
Water filter Option
Height, Width, Depth 818, 290, 532mm
MODEL/NAME WEIGHT
CQube SE12 37kg
Base cabinet 25kg

CQube SE12
6
OVERVIEW OF COMPONENTSFront exterior(Membrane switch)
Bean Hopper
Drink Menu
Display
Door Lock
Smart Card Reader
Outlet Hot Drinks
Cup Shelf
Drip Grids
Drip Tray

CQube SE12
7
OVERVIEW OF COMPONENTSFront exterior(Touchscreen)
Bean Hopper
Drink Menu
Touchscreen
Start Energy Save Mode
Door Lock
Smart Card Reader
Outlet Hot Drinks
Cup Shelf
Drip Grids
Drip Tray

CQube SE12
8
Ingredient canisters
Bean Hopper
Ingredient Canisters
Bean Stop
Grinder
Grinder Outlet
Grinder Adjustment Wheel
Mixing System
Espresso Group
Drink Outlets
Waste Box
DETAIL INGREDIENTS WIDTH DEPTH HEIGHT CAPACITY CUPS/UNIT
Hopper Beans ---- ---- ---- 1.25kg ~175 cups
Canister Chocolate 64mm 180mm 250mm 1.77kg ~90 cups
Canister Topping 64mm 180mm 250mm 1.45kg ~120 cups
OVERVIEW OF COMPONENTSFront interior

CQube SE12
9
Membrane switch navigation
Press the BACK button if you want to leave the submenu and go back in the menu.
Press the ENTER button to select a menu function, confirm a set value or a setting.
Press the MINUS button if you want to decrease a value or go back in the menu.
Press the STOP button if you want to return to the start menu.
To activate energy saving mode press and hold the STOP button for 5 seconds. Display will show Energy Saving Mode.
You can abort jug process by pressing STOP.
To return to normal mode press and hold the STOP button for 5 seconds while the machine is in energy saving mode.
Press the PLUS button if you want to increase a value or go forward in the menu.
The machine reduces the temperature in the water tank to 650C. ENERGY SAVING MODE
OVERVIEW OF COMPONENTS
CQube SE12
10
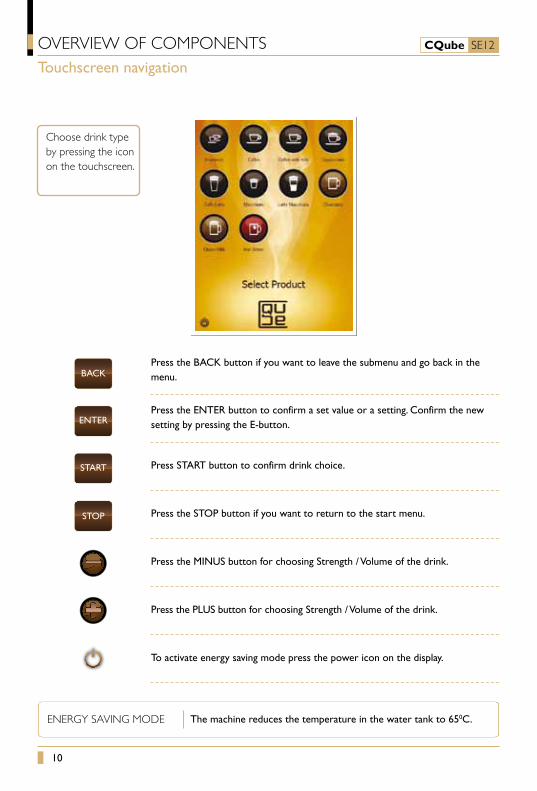
OVERVIEW OF COMPONENTSTouchscreen navigation
Choose drink type by pressing the icon on the touchscreen.
Press the BACK button if you want to leave the submenu and go back in the menu.
Press the ENTER button to confirm a set value or a setting. Confirm the new setting by pressing the E-button.
Press START button to confirm drink choice.
Press the STOP button if you want to return to the start menu.
Press the MINUS button for choosing Strength / Volume of the drink.
Press the PLUS button for choosing Strength / Volume of the drink.
To activate energy saving mode press the power icon on the display.
ENTER
START
STOP
BACK
The machine reduces the temperature in the water tank to 650C. ENERGY SAVING MODE
CQube SE12
11
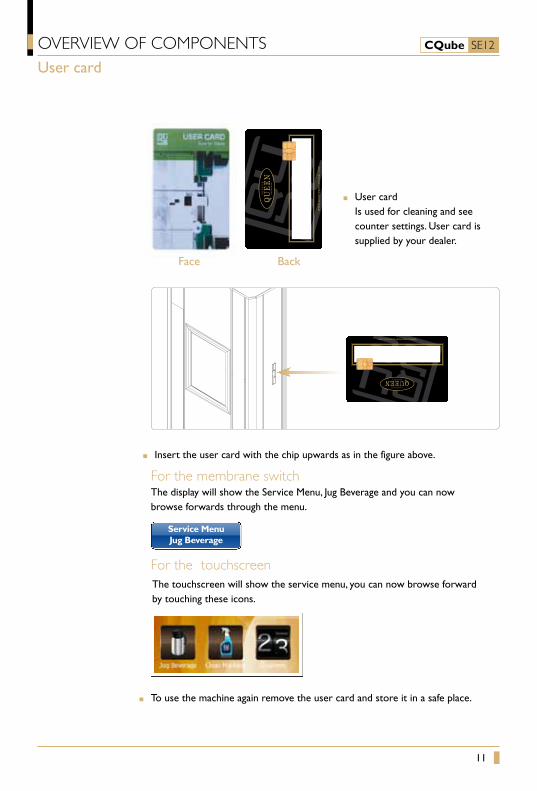
OVERVIEW OF COMPONENTSUser card
User card Is used for cleaning and see
counter settings. User card is supplied by your dealer.
Face Back
To use the machine again remove the user card and store it in a safe place.
Insert the user card with the chip upwards as in the figure above.
The display will show the Service Menu, Jug Beverage and you can now browse forwards through the menu.
The touchscreen will show the service menu, you can now browse forward by touching these icons.
For the membrane switch
For the touchscreen
Service MenuJug Beverage

CQube SE12
12
Place the machine on a flat horizontal surface that will support the weight of the machine.
Make sure air is able to circulate behind the machine (minimum 10cm).
Default temperatures: Water tank = 96°C, Espresso boiler =98°C
INSTALLATION AND START-UP
Positioning
Machine startup procedure
minimum 10cm
Note
Note
Connect the water to the top cabinet on the machine.
Connect the supplied water hose to the cold water connection using a ½’’ R-connection. When pushing the machine into position make sure there is no interference to the hose to ensure proper water flow.
If the inlet hose is new, flush the system with water first to remove copper shavings. These can damage the inlet valve.
The new tube set supplied with the appliance must be used. Old tubes may not be re-used. Connection to a closable valve is recommended.
Min. water pressure; 2 bar (200kPa). Max. water pressure: 8 bar (800kPa).
Switch
Open the water tap.
Connect the mains cable to the machine (A) and insert the plug to a earthed wall socket.
Switch on the power switch on the rear of the machine. See figure.
The display indicates Low Water LevelPress Enter Key Press the / ENTER button.
The main water tank will now automatically fill with 1.8 litres of water. Simultaneously the espresso water system will start to fill up. When espresso system is full, some water will be dispensed into the drip tray.
Once the heating is complete, “Low temperature” text will disappear from the display. The banner will start to alternate between “ESPRESSO DRINKS” and “SELECT PRODUCT”.
A
CQube SE12
13
C
INSTALLATION AND START-UP
01
B
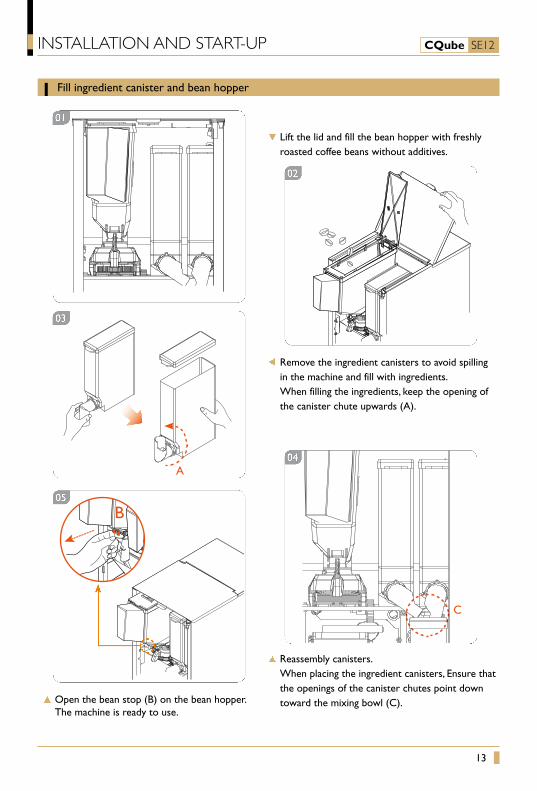
Fill ingredient canister and bean hopper
Lift the lid and fill the bean hopper with freshly roasted coffee beans without additives.
Remove the ingredient canisters to avoid spilling in the machine and fill with ingredients. When filling the ingredients, keep the opening of the canister chute upwards (A).
Reassembly canisters. When placing the ingredient canisters, Ensure that
the openings of the canister chutes point down toward the mixing bowl (C). Open the bean stop (B) on the bean hopper.
The machine is ready to use.
A
02
03
04
05

CQube SE12
14
OPERATION
A
Brewing a cup of espresso (Membrane switch)
Place a cup under the outlet for hot drinks.(A) The strength of the drink is set to default. If you would like to increase or
decrease the strength then follow the steps in the section below.
Stronger drink, Press the button or Weaker drink, Press the button
Select espresso by pressing the espresso button The display shows: Please wait... and the cup light goes on.
Wait until the cup light switches off and the text Please wait...
has disappeared from the display before removing the cup.
STOP
Espresso Cappuccino
Caffè Latte
Chocolate
Double Espresso Choco-Milk
Americano Latte Macchiato
Coffee with Milk
Hot Water
Macchiato

CQube SE12
15
OPERATIONBrewing a cup of espresso (Touchscreen)
Place a cup under the outlet for hot drinks. (A)
Choose drink by pressing the drink button on the display.
The strength of the drink is set to default. If you would like to increase or decrease the strength then follow the steps in the section below.
Stronger drink, Press the button
or
Weaker drink, Press the button
Confirm drink by pressing the START button
The display shows: and the cup light goes on.
Wait until the cup light switches off and the animation has
disappeared from the display before removing the cup.
A
CQube SE12
16
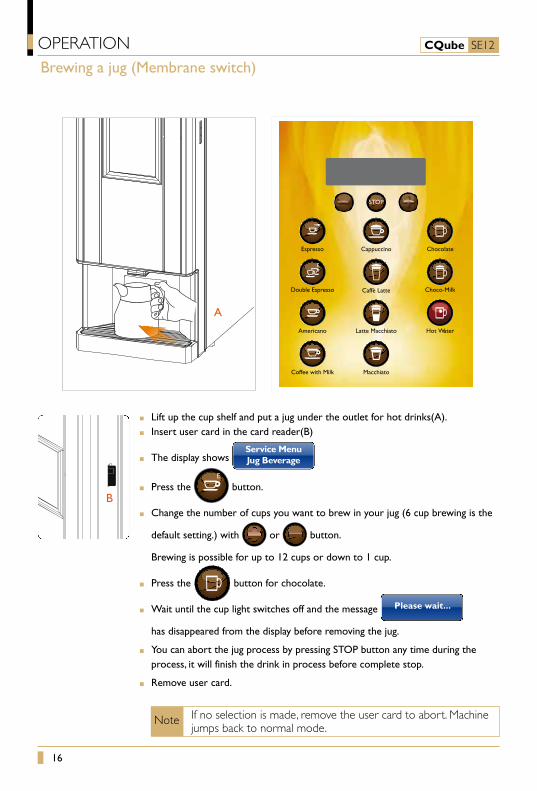
Brewing a jug (Membrane switch)
OPERATION
Lift up the cup shelf and put a jug under the outlet for hot drinks(A). Insert user card in the card reader(B)
The display shows Service MenuJug Beverage
Press the button.
Change the number of cups you want to brew in your jug (6 cup brewing is the
default setting.) with or button.
Brewing is possible for up to 12 cups or down to 1 cup.
Press the button for chocolate.
Wait until the cup light switches off and the message Please wait...
has disappeared from the display before removing the jug.
You can abort the jug process by pressing STOP button any time during the process, it will finish the drink in process before complete stop.
Remove user card.
If no selection is made, remove the user card to abort. Machine jumps back to normal mode.
Note
B
STOP
Espresso Cappuccino
Caffè Latte
Chocolate
Double Espresso Choco-Milk
Americano Latte Macchiato
Coffee with Milk
Hot Water
Macchiato
A
CQube SE12
17
A
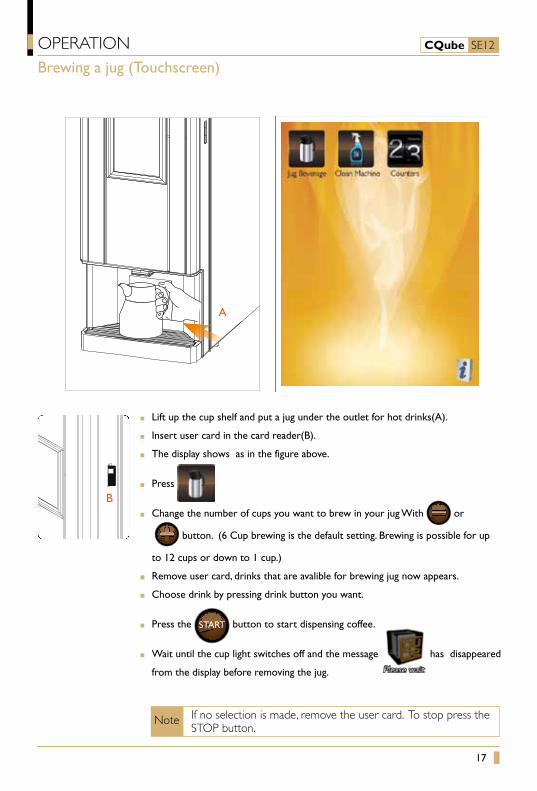
Lift up the cup shelf and put a jug under the outlet for hot drinks(A).
Insert user card in the card reader(B).
The display shows as in the figure above.
Press
Change the number of cups you want to brew in your jug With or
button. (6 Cup brewing is the default setting. Brewing is possible for up
to 12 cups or down to 1 cup.)
Remove user card, drinks that are avalible for brewing jug now appears.
Choose drink by pressing drink button you want.
Press the START button to start dispensing coffee.
Wait until the cup light switches off and the message has disappeared
from the display before removing the jug.
Brewing a jug (Touchscreen)
OPERATION
If no selection is made, remove the user card. To stop press the STOP button.
Note
B

CQube SE12
18
CLEANING PROGRAM
Repeat the cleaning procedures 2-3 times to get a better cleaning effect.
Cleaning means rinsing with water and rotating the whipper.
Cleaning of the mixing bowl should be performed once per day.
Note
Automatic Cleaning
Clean mixer
Open the door.
Press ENTER on the cleaning panel inside the door. (See fig. A)
Cleaning Hot key appears on the display (cleaning panel is now active).
the display shows: see fig. C or D.
Put a container that holds at least 0.5 litres under the outlet for hot drinks.
Press button 4 on the cleaning panel. (See fig. B)
The machine will now clean the mixing bowl for 5 seconds.
Close the door to exit cleaning mode and return to normal mode.
A
B
CFor touchscreen
For membrane switch
Cleaning hot keyD

CQube SE12
19
CLEANING PROGRAM
Repeat the cleaning procedures 2-3 times to get a better cleaning effect.Note
Automatic Cleaning
Clean vlaves
Open the door.
Press ENTER on the cleaning panel inside the door. (See fig. A)
Cleaning Hot key appears on the display (Cleaning panel is now active).
the display shows: see fig. C or D.
Put a container that holds at least 0.5 litres under the outlet for hot drinks.
Press button 5 on the cleaning panel. (See fig. B)
The machine will now clean the dispenser valves for 5 seconds.
Close the door to exit cleaning mode and return to normal mode.
Cleaning entails that the valves “knock” off any lime scale and other particles that may get stuck in the cylinders and flushing them with water.
A B
CFor touchscreen
For membrane switch
Cleaning hot keyD

CQube SE12
20
CLEANING PROGRAMAutomatic Cleaning
Clean brewer
Open the door. Press ENTER on the cleaning panel
inside the door. (See fig. A) Cleaning Hot key appears on the
display (cleaning panel is now active). the display shows: see fig. C or D. Put a container that holds at least 1
litres under the outlet for hot drinks. Press button 3 on the cleaning panel.
(See fig. B)
Display indicates: Place jug, Press ENTER to start Put a cleaning tablet in espresso group. (See fig. E) Press ENTER on the cleaning panel to start the cleaning process. Display indicates: Preparing Espresso group, Please Wait. Display indicates: Cleaning Espresso group, Time Left 60s. The machine counts
down from 60 seconds. Display indicates: Rinsing Espresso group, Cycles left 3.
Display indicates: Cleaning hot key when the cleaning is complete. Close the door to exit cleaning mode and return to normal mode.
AB
C
When the cleaning agent has been added, the process must not be interrupted but be allowed to run its course.
Note
For touchscreen
For membrane switch
Cleaning hot key D
Fig.E
Total cleaning time about 5 minutes.Espresso cleaning tablets are avalible from your dealer :Product no. 1104171
IMPORTANT!After cleaning of the espresso group is completed, dispense a cup of coffee and discard it to remove cleaning agent remains in thefilter and brew chamber.
CQube SE12
21
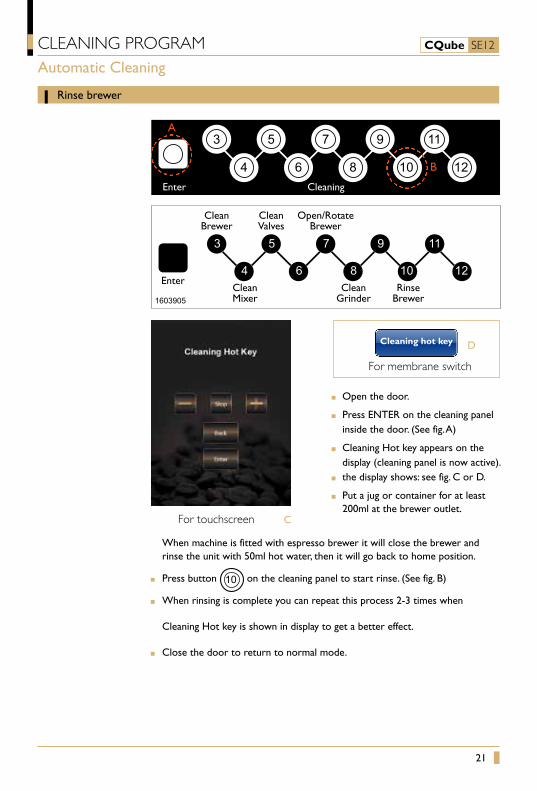
Open the door.
Press ENTER on the cleaning panel inside the door. (See fig. A)
Cleaning Hot key appears on the display (cleaning panel is now active).
the display shows: see fig. C or D.
Put a jug or container for at least 200ml at the brewer outlet.
When machine is fitted with espresso brewer it will close the brewer and rinse the unit with 50ml hot water, then it will go back to home position.
Press button on the cleaning panel to start rinse. (See fig. B)
When rinsing is complete you can repeat this process 2-3 times when
Cleaning Hot key is shown in display to get a better effect.
Close the door to return to normal mode.
A
B
CFor touchscreen
For membrane switch
Cleaning hot key D
Rinse brewer
Automatic Cleaning
CLEANING PROGRAM

CQube SE12
22
CLEANING AND CAREWeekly cleaning
Disassemble the espresso group
Loosen the fixation screw in an anticlockwise direction at the top of the espresso group.
Open the door. Press down the safty ring on the connector simultaneously pull the teflon tube straight up.
Take out the waste box.
Put your hand according to the picture, push up and forward at the same time until the espresso group is detached at the back. then pull it straight out.
01
03
02
04

CQube SE12
23
Cleaning the espresso group
First, remove the espresso group from the machine as explained earlier in this manual. Then proceed to clean it with neutral detergents (avoid solvents that could damage paint or plastics). Disinfectant products as chlorine-detergents are preferred.
The producer declines all responsibilities due to the use of caustic/aggressive detergents.
After this, proceed to clean the remaining surfaces of the group.
Dry up the espresso group using a soft rag. turn the espresso group upside down and shake it to force as much water out as possible. Make sure to pay extra attention when drying up the powder cone located above the brew chamber, as this is the one receiving the grinded coffee. If this cone is humid, it may cause the cone clog with coffee powder.
Once all cleaning is completed and the espresso group heve been put back in place, we recommend to perform an auto-cleaning cycle.
IMPORTANT!
Turn the group upside down to clean the upper filter of the espresso chamber. (See fig. A)
Whenever the quality or speed of the outgoing espresso changes, clean the upper filter thoroughly. It will be very likely partially clogged with tiny coffee particles. Cleaning this filter will solve the speed and quality issues.
Note
CLEANING AND CARE
CQube SE12
24
MAINTENANCE AND CARE
Reassemble the espresso group
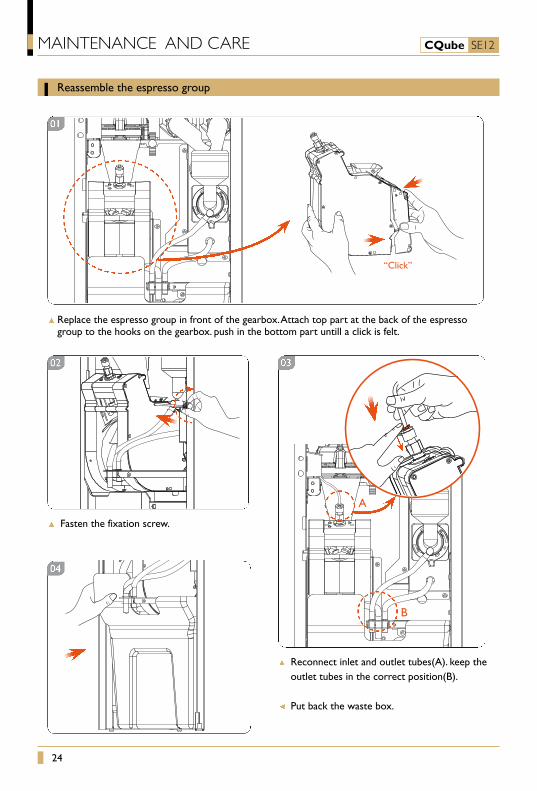
Replace the espresso group in front of the gearbox. Attach top part at the back of the espresso group to the hooks on the gearbox. push in the bottom part untill a click is felt.
Reconnect inlet and outlet tubes(A). keep the outlet tubes in the correct position(B).
Put back the waste box.
Fasten the fixation screw.
“Click”
04
01
02 03
B
A

CQube SE12
25
Weekly ceaning
CLEANING AND CARE
Disassemble mixing system
Turn the mounting plate lever anticlockwise.
Pull out the outlet hose.
Loosen the mixing bowl by pulling it straight out.
Loosen the whipper by pulling it straight out.
Loosen the mounting plate. Turn the lever anticlockwise, until it stops.
Reassemble mixing systemSee the next page
Pull the mounting plate straight out.
04
05
06
01
02
03

CQube SE12
26
Wash these parts
Reassemble mixing system
Check all seals(red) before reassembly of parts.
Weekly cleaning
CLEANING AND CARE
The flat side of the whipper shaft must correspond with the marked arrow on the whipper.
To fit the whipper push onto the shaft until a click sound can be heard. It is only possible to assemble the whipper in one way.
Fix the mixing bowl and condensation trap. Push-fit the mixing bowl and fix with lever.
Connect the outlet hose.
Ensure that all water hoses have been connected and fitted.
Note
01 02
All parts must be dry before reassembly.
Mixing Bowl Condensation Trap Mounting Plate Whipper Clean with a moist cloth and wipe dry.
03
04

CQube SE12
27
Door
Overpressure Water
If the madchine indicate Emty Drip Tray (A), there is two different trays that might need to be emptied. Check the trays shown below and empty the water.
Grab the drip tray with your hands and simply pull it straight out.
Open the machine door, take out the waste bin. grab the tray handle with your finger and pull it straight out.
Empty drip trays
A
CLEANING AND CARE
Empty Drip Tray

CQube SE12
28
Exterior cleaning
CLEANING AND CARE
Exterior cleaning when necessary
Clean the bean hopper
Clean the grinder
To clean the exterior of the machine, use a soft cloth and liquid cleaning agent that is non-abrasive.
If using machine equiped with touchscreen do not spray cleaning liquid directly on the display. Use only LCD screen cleaner designed for touchscreen cleaning.
Cleaning of grinder shall be performed once per month in conjunction with technical maintenance.
Close the bean stop. Lift the bean hopper up to remove it. Use a soft cloth
and liquid cleaning agent that is non-abrasive.
Ensure that the bean hopper is completely dry before refitting.Note

CQube SE12
29
MESSAGE SHOWN ON DISPLAY
Message on display Indication
The machine is in energy saving mode.
Drink can not be selected as jug.
Low temperature in the water tank, the machine is heating up (blocked).
Low water level in water tank. Press enter key to start filling up the water tank.
The machine is filling water.
Temperature is low, It is still possible to dispense drink.
Temperature is low, the machine is blocked.
The drip tray or espresso waste is full of water.
The water level in the water tank is low, it is not possible to dispense drink.
The water has not reached the correct level in the water tank, check the water inlet hose, restart the machine.
The waste box is full, open the door and empty out the grounds. When closing the door, press E to reset the counter. Selectable in main program.
The brewing filter is clogged. The filter needs replacing or to be cleaned.
The drink has been disabled.
The door is open.
The water filter needs replacing, press the button E to reset the counter.
Energy Saving Mode
Not Available
Heating WaterPlease Wait...
Low Water LevelPress Enter Key
Filling WaterPlease Wait...
WarningLow Temperature
Low temperatureBlocked
Empty Drip Tray
Low WaterLevel Blocked
CheckWater Supply
Empty Waste Box
Change Espresso group Filter
Bev. Disabled
Door Open
ChangeWater Filter

CQube SE12
30
PROGRAMMING
Activate programming with the user card
A
Insert user card in the card reader (A) The display will look like this for membrane switch:
Service MenuClean Machine Press to go forward
Service Menu
Counters Press to go forward
The display will look like this for touchscreen:
Jug beverage
Jug Beverage
Service MenuJug Beverage
Cups1-12
How to dispense a jug of a drink.
Select the number of cups to be brewed in the jug. Press the desired drink to start the brewing.
If no selection is made, remove user card to return to the default setting.
To stop, Press the STOP button.
Press
Press Press

CQube SE12
31
PROGRAMMING
Clean machine
Open the door. Press ENTER on the cleaning panel inside the door. Choose button X for each cleaning.
See the pages for cleaning programs in order to perform cleaning.
Cleaning hot key
Press
Press
Press
Press
Press
Press
Press
Clean Espresso group
Clean Mixer
Clean Valves
Open\Rotate Espresso group
Clean Grinder
Rinse Espresso group
Enter
3
4
5
7
8
10

CQube SE12
32
PROGRAMMING
Counters
Service MenuCounters
See the counter of each drink or total counters for all drinks. It’s also possible to reset the drink counters.
Press to go back in the menu
Service MenuCounters
CountersBeverages
Beverage CountersPer Beverage
Beverage CounterTotal Served
Beverage CounterClear Counters
Drink 1served xxx
Total BeveragesServed xxx
Hold Enter toClear Counters
Counters ClearedPress Back
Drink 2served xxx
Hold ENTER key for 3 seconds
Press
Press
Press
Press
Press Press
Press
Press
Press
Press to
go forward in the menu
Press
Press
Master TotalServed xxx
Beverage CounterMaster Total

CQube SE12
33
PROGRAMMING
Counters
CountersClean Counter
Counters Water Filter
Clean CounterEspresso group xxx
Clean CounterTotal xxx
Reset? NO/YESMonths Left 6
Water FilterInterval 1-12
Water FilterInterval 6
Water FilterReset Filter
Service MenuCounters
See the number of times cleaning has been performed or reset the clean counter.
Press to go back in the menu
Press to go back in the menu
Press
Press Press
Press
Standard=6 months
Press to go forward in the menu
Press to go forward in the menu
Press
CQube SE12
34
DIMENSION SKETCHA
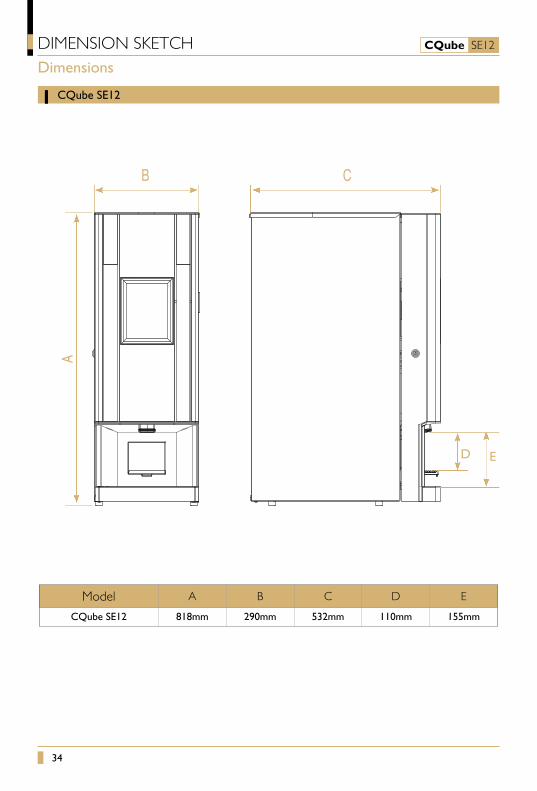
Model A B C D E
CQube SE12 818mm 290mm 532mm 110mm 155mm
B C
Dimensions
CQube SE12
D E


Your Dealer
FOR SERVICEPlease contact your dealer
www.creminternational.com
For the warranty to be valid the conditions for maintenance must have been followed according to our instructions, proper precaution has been made and warranty claim been issued without delay.
The affected equipment may not be used during awaiting service if there is any risk that the damage or defect would worsen.
The warranty will not cover consumption supplies such as glassware, normal maintenance such as cleaning of filters, contaminations in water, lime, incorrect voltages, pressure or adjustment of water amounts.
The warranty will not cover damages of defects caused by incorrect handling and operation of the appliance.