Embed Size (px)
Citation preview
Deployment Guide
Last updated: August 12, 2016
Deployment GuideIntroduction 1
Introduction
Welcome! This guide is intended to support you, the administrator, in deploying CorelDRAW® Technical Suite X7 to your network.
Are you new to network deployment? For a nontechnical introduction to the concepts and processes discussed in this guide, please see the companion Corel® Beginner’s Guide to Network Deployment.
Contents Stage 1: Preparing for deployment . . . . . . . . . . . . . . . . . . . . .2Stage 2: Creating the server image. . . . . . . . . . . . . . . . . . . . . .6Stage 3: Installing the software . . . . . . . . . . . . . . . . . . . . . . .11Stage 4: Maintaining the installations . . . . . . . . . . . . . . . . . .19Appendix: Specialized deployment scenarios . . . . . . . . . . . . .26
Conventions Please note the following conventions used in this guide.
For more information The following resources offer additional support.
Wherever you see this You’ll find
italicized text A placeholder for user-specified information, such as a path or filename
bold monospace text A reference to programming syntax
For information on See the following resource
deploying Corel® software: concepts and processes,general advice and best practices
Corel Beginner’s Guide to Network Deployment
Corel Corporation, or a specific Corel software product
Corel® website: www.corel.com
support for Corel software Corel® Support Services website: www.corel.com/support
the Microsoft® Windows® Installer (MSI) technology, which is used to install Corel software
Microsoft® website
Deployment GuideStage 1: Preparing for deployment 2
Stage 1: Preparing for deployment
Before beginning the deployment, take the time to familiarize yourself with your network and the software you want to deploy to it. Doing so can help your administrative duties run as smoothly as possible.
In this stage Getting to know your network. . . . . . . . . . . . . . . . . . . . . . . . .2Getting to know the software . . . . . . . . . . . . . . . . . . . . . . . . .2Setting up your network accordingly . . . . . . . . . . . . . . . . . . . .4
Getting to know your networkMake sure to consider your network requirements for the deployment.
Administrative factors Does your organization (or do you, as administrator) have any particular requirements for deploying and maintaining software?
Server factors Does your server have any special characteristics or constraints?
Workstation factors Do your workstations have any special characteristics or constraints?
User factors Do your workstation users have any special workflows?
For more information For general guidance on assessing your deployment needs, please refer to “Processes: Stage 1” in the Corel Beginner’s Guide to Network Deployment.
Getting to know the softwareMake sure that your server and workstations are eligible for the software.
Server requirements You can create an image of CorelDRAW Technical Suite X7 on a server that meets the following requirements:• Operating system with the latest service pack and critical updates:
Windows Server® 2008, Windows Server® 2008 R2, or Windows Server® 2012 R2
• 3 GB of server space (for a typical installation without extra content)• Microsoft Windows Installer 4.5
Windows® Terminal Server (2008, 2008 R2, or 2012 R2) is supported, but please note the following:
Highlights:Server requirements. . . . . . . 2Workstation requirements . . 3
Deployment GuideStage 1: Preparing for deployment 3
• You must use the CorelDRAW Technical Suite X7 DVD or the ISO file provided by Corel to install the software on the server.
• Windows Media® Player is required if you want workstation users to have access to the Hints docker and the Video Browser.
• Corel Corporation does not provide technical support for installing third-party software included with the product.
For details on server permissions, see “Server setup” on page 4.
Workstation requirements You can install CorelDRAW Technical Suite X7 on workstations that meet the following requirements:• Operating system with the latest service pack and critical updates:
32-bit or 64-bit version of Windows® 8/8.1 or Windows® 7• Intel Core 2 Duo or AMD Athlon 64 • 2 GB of RAM • 1.6 GB of hard-disk space (for a typical installation)• Mouse or tablet• 1280 x 768 screen resolution or greater• DVD drive• Microsoft® Internet Explorer® 8.0 (with the latest service pack) or later• Microsoft® .NET Framework 4.5• Microsoft Windows Installer 4.5• Windows Media Player 10 or later (for Hints docker and Video Browser)
For details on workstation permissions, see “Workstation setup” on page 4.
Software The software includes the following components:• CorelDRAW Technical Suite X7 Applications (DVD or ISO file)• Corel Website Creator (ISO file)
To use an ISO file, you can use one of the following options: • Mount the ISO file as a virtual drive.• Extract the ISO file contents by using third-party software.
Optionally, you can download the extra content and videos that are available online and can be accessed through the product. For more information, see “Server setup” on page 4.
For more information For important notes on installing and using the software, it’s a good idea to review the Readme file for the software.
To access the Readme file on the installation disc
• Run the following command line (where X: is the disc drive):
X:\x86\Lang\EN\Readme.html
X:\x64\Lang\EN\Readme.html
Deployment GuideStage 1: Preparing for deployment 4
Readme files for other languages can be accessed from their respective language folders on the DVD. Examples:• X:\x86\Lang\DE\Readme.html or
X:\x64\Lang\DE\Readme.html• X:\x86\Lang\FR\Readme.html or
X:\x64\Lang\FR\Readme.html• X:\x86\Lang\JP\Readme.html or
X:\x64\Lang\JP\Readme.html
Setting up your network accordinglyAfter familiarizing yourself with your network and the software you want to deploy to it, you can set up your network accordingly.
Server setup Do the following:• Make sure that you are either a local administrator or an administrator
for the domains and workgroups that you are managing.• Create a shared network location for the server image, and make sure
that you have read/write access to that location.
If you want to make extra content (such as clipart and videos) available to workstation users in an offline network environment, do the following:• Set up a shared network location, and make sure that users have access
to that location.• Download the content from the Downloads For Members and
Subscribers page in your corel.com account. The download consists of two Zip files that you must extract to the shared network location by using WinZip® or another compression tool.
The extracted content is 9 GB.
Workstation setup Do the following:• Make sure that you are — and anyone else who will be installing the
software is — either a local administrator or an administrator for the domains and workgroups that you are managing.
• Make sure that you have — and anyone else who will be installing the software has — read access to the server-image location.
• Make sure that the workstations have Microsoft .NET Framework 4.5 installed.
• Make sure that the workstations have Windows Installer 4.5 installed.
To run Bitstream® Font Navigator®, workstation users require administrator-level privileges.

Deployment GuideStage 1: Preparing for deployment 5
GPOs
To more easily manage the access rights of workstation users — especially for pull-installation scenarios — you may want to consider using Group Policy Objects (GPOs). The Corel Beginner’s Guide to Network Deployment offers basic information on GPOs. For more advanced information, please refer to the Software Development Kit (SDK) for Group Policy.
Deployment GuideStage 2: Creating the server image 6
Stage 2: Creating the server image
After preparing for deployment, you’re ready to create the server image.
To create a basic image, you run a standard command line. To create a customized image, you can modify this command line — or you can modify certain aspects of the server image or its setup. If you want to support multiple installation types, you can create multiple server images.
In this stage Creating a basic image . . . . . . . . . . . . . . . . . . . . . . . . . . . . . . .6Creating a customized image. . . . . . . . . . . . . . . . . . . . . . . . . .9Creating multiple images . . . . . . . . . . . . . . . . . . . . . . . . . . . .10
Creating a basic imageTo create a basic server image, you must initialize the setup. After setting up the image and tweaking it as necessary, you can use it for deployment.
In this section Initializing the setup. . . . . . . . . . . . . . . . . . . . . . . . . . . . . . . . .6Setting up the server image . . . . . . . . . . . . . . . . . . . . . . . . . . .7Finalizing the server image. . . . . . . . . . . . . . . . . . . . . . . . . . . .9
Initializing the setupTo initialize the setup for creating a server image, you use a command line. You can create either a 32-bit server image or a 64-bit image.
The following command line lets you create a basic 32-bit server image from the installation disc (where X: is the disc drive):
X:\x86\Setup.exe /a
The following command line lets you create a basic 64-bit server image:
X:\x64\Setup.exe /a
Event logging If you want to create a log file of installation events, include the /l switch in your command line. For details on this switch, see page 13.
Limited setup UI If you want to limit the amount of user interface (UI) encountered when creating a server image, include the /q switch in your command line. For details on this process, see “Limited setup UI” on page 8.
Highlights:Initializing the setup . . . . . . 6Setting up the server image . 7Finalizing the server image . 9
Deployment GuideStage 2: Creating the server image 7
Be careful to avoid suppressing (or “silencing”) a required user-interface field when introducing a /q switch into your command line — otherwise, you may fail to create a valid server image. You may need to include the following public property in your command line:• TARGETDIR="path" — to specify the desired location of the server
image. For best results, do not end the path with a backslash ( \ ).
Setting up the server imageIf your /a command line succeeds, the setup initializes in one of two ways:• with full UI — for the standard command line• with limited (or no) UI — for a command line customized to include /q
Full setup UI The setup UI takes you step-by-step through the process of setting up the server image.
A few notes on this process will suffice.
UI component Notes
Email address and password Your corel.com account information such as email address and password is required to access premium features, product updates, and the Content Exchange.
End-User License Agreement (EULA)
To create the server image, you must accept — on behalf of your organization — the terms in the license agreement. Installations deployed from the image will not prompt users to review the license agreement.
Image Location Type the full (UNC) path in the box provided, or click Change to browse to that location. To prevent installation problems, limit the path to 50 characters.
Content location If you have added extra content to a network shared folder, type the full path to the content folder, or click Change to browse to the folder.
Deployment GuideStage 2: Creating the server image 8
You must be online when creating the server image so that you can accept the term of service. In addition, when you enter your email and password when online, a PROFILEID is generated that allows users to be signed in automatically. For more information, see “PROFILEID” on page 15.
Limited setup UI If you want to limit the amount of user interface (UI) encountered when creating a server image, include the /q switch in your command line. For details on this switch, see page 13.
Be careful to avoid suppressing (or “silencing”) a required user-interface field when introducing a /q switch into your command line — otherwise, you may fail to create a valid server image. You may need to include the following public properties in your command line:• TARGETDIR="path" — to specify the desired location of the server
image. For best results, do not end the path with a backslash ( \ ).• ALLOW_PRODUCTUPDATES=0 — to disable automatic updates (and in-
product messaging) on the workstations. By default, automatic updates are enabled for workstations installed from a server image.
• ALLOW_INTERNETFEATURES=0 — to disable access to internet-based features such as the Content Exchange, ConceptShare and product updates.
• additional installation properties supported by the setup. For details, see “Using public properties” on page 14.
Product Updates Enabling this option automatically downloads product updates to the workstations and prompts users to install them. You can access this option only after entering your email address and password.
Internet features This option allows workstations to access Internet-based features such as the Content Exchange, QR code and ConceptShare. You can access this option only after entering your email address and password.
UI component Notes
Deployment GuideStage 2: Creating the server image 9
In the following example, there is no setup UI, automatic product updates and access to Internet-based features is disabled, the paths to the server image and extra content are set, and any errors are recorded in the specified log file:
\\server\path\Setup.exe /qn SERIALNUMBER=<SerialNumber> PROFILEID=<ProfileIDDigit> ALLOW_PRODUCTUPDATES=0 ALLOW_INTERNETFEATURES=0 TARGETDIR=<PathToAdminImage> NETWORKINSTALLDIR=<PathToExtraContent> /l D:\Log\MYlog.txt
Finalizing the server imageThis section describes recommended steps to take before deploying from the server image.
Optionally, you can finalize the image in the following ways:• Customize the registry settings you want to deploy (see page 33).• Customize the setup fileset (see page 35).
To avoid deploying the software twice, you may want to check for software updates and apply them to the image as necessary. For details, see page 22.
Testing the image You may want to test your finalized image with a small subset of workstations before rolling it out to your entire organization.
Moving the image To change the location of a server image after you create it, you can copy the image to a new location. However, after the software has been deployed to the workstations, the image cannot be moved.
Creating a customized imageIf you require a more customized server image than offered by command-line switches (see page 12) and public properties (see page 14), you may want to consider the specialized scenarios discussed in the Appendix.
MSI files You can modify the Microsoft Windows Installer (MSI) files used to install the software. See page 31.
MST files You can apply Microsoft® transformation (MST) files to the setup. See page 31.
Registry keys You can edit the registry settings for the server image. See page 33.
Setup fileset You can customize the setup fileset. See page 35.
Deployment GuideStage 2: Creating the server image 10
Installation settings You can customize the settings used to install the software on the workstations. See page 37.
Creating multiple imagesIf your workstations require different configurations of the software, you can create one server image for each installation type.
You can install either the 32-bit or 64-bit version of the software to a workstation, but not both.
Product updates When a product update becomes available, you will need to apply it to each server image. For details on image patching, see page 22.
Naming convention Use a naming convention that makes it easy to distinguish the server images from one other.
Deployment GuideStage 3: Installing the software 11
Stage 3: Installing the software
After creating the server image, you can use it to install the software on the workstations in one of two ways:• manually, by having users “pull” the software to their own workstations• automatically, by “pushing” the software to the workstations on their
users’ behalf
In this stage Pulling the software . . . . . . . . . . . . . . . . . . . . . . . . . . . . . . . .11Pushing the software . . . . . . . . . . . . . . . . . . . . . . . . . . . . . . .12Pushing the software . . . . . . . . . . . . . . . . . . . . . . . . . . . . . . .12
Pulling the softwareIf users have both access to the server and administrator-level rights to their workstations, they can install (or “pull”) the software themselves. To do this, they run the setup from the server image.
In this section Preparing for pull installation. . . . . . . . . . . . . . . . . . . . . . . . .11Carrying out a pull installation . . . . . . . . . . . . . . . . . . . . . . . .11
Preparing for pull installationTo ensure that the pull-installation process runs as smoothly as possible, take the time to prepare for it.
Requirements • Confirm that each workstation meets the minimum requirements for the software (see “Workstation requirements” on page 3).
• Confirm that each workstation user has read-only access to the server image and administrator-level access to the workstation (see also “Workstation setup” on page 4).
Recommendation Map the workstations to the server image, and set the workstations to log in to that server location at startup. Doing so ensures that users are always connected to the server image.
Carrying out a pull installationUsers pull the software to their workstations by running the setup from the server image.
The degree of user interaction required by the setup depends on how you’ve customized the server image and the deployment process.
Highlights:Using switches . . . . . . . . . 12Using public properties . . . 14
Deployment GuideStage 3: Installing the software 12
If you prefer to restrict user customization, you may want to offer multiple server images — one per set of installation options. For details, see page 10.
To pull the software to a workstation
1 Browse to the location of the server image, and double-click Setup.exe.
2 Carry out the installation, specifying any desired options, by following the on-screen instructions.
To prevent installation problems, limit the installation path to 50 characters.
Pushing the softwareTo “push” the software from the server image to the workstations, you must write a command line that includes the following:• the filename of the setup you want to use• any desired switches, to control how the setup runs• any desired public properties, to specify installation settings
Using this command line, you can install the software on the workstations by using any supported push method.
In this section Specifying the setup file . . . . . . . . . . . . . . . . . . . . . . . . . . . . .12Using switches . . . . . . . . . . . . . . . . . . . . . . . . . . . . . . . . . . . .12Using public properties . . . . . . . . . . . . . . . . . . . . . . . . . . . . .14Running your command line . . . . . . . . . . . . . . . . . . . . . . . . .16
Specifying the setup fileThe most important item to specify in your command line is the executable file for the setup: the Setup.exe file on the server image you want to use:• \\server\path\x86\Setup.exe — to push the 32-bit version of
the software to 32-bit or 64-bit operating systems• \\server\path\x64\Setup.exe — to push the 64-bit version of
the software to 64-bit operating systems
You cannot use the 64-bit version of the software on 32-bit operating systems.
Using switchesBy using switches in your command line, you can control the setup process. Listed in this section are the switches most commonly used when installing the software.
Deployment GuideStage 3: Installing the software 13
For general information on switches, along with details on switch syntax, please see “Switches” in the Corel Beginner’s Guide to Network Deployment.
For a list of all command-line switches for Microsoft Windows Installer, please see the Microsoft website.
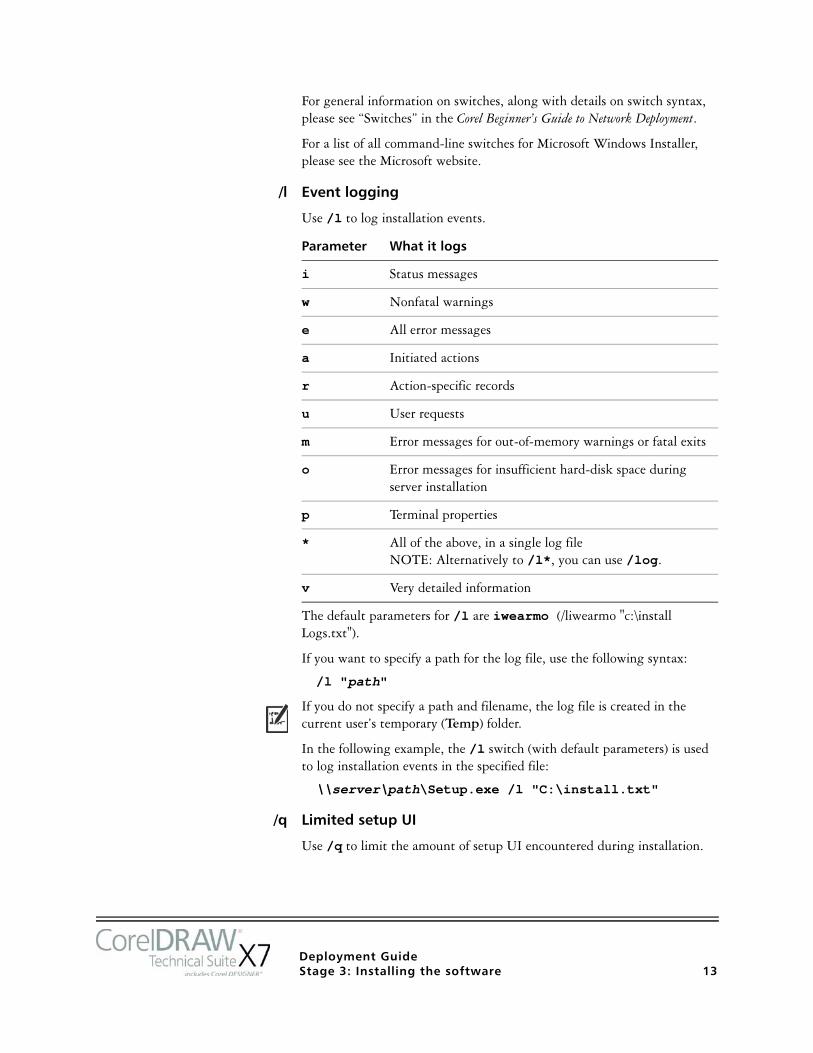
/l Event logging
Use /l to log installation events.
The default parameters for /l are iwearmo (/liwearmo "c:\install Logs.txt").
If you want to specify a path for the log file, use the following syntax:
/l "path"
If you do not specify a path and filename, the log file is created in the current user’s temporary (Temp) folder.
In the following example, the /l switch (with default parameters) is used to log installation events in the specified file:
\\server\path\Setup.exe /l "C:\install.txt"
/q Limited setup UI
Use /q to limit the amount of setup UI encountered during installation.
Parameter What it logs
i Status messages
w Nonfatal warnings
e All error messages
a Initiated actions
r Action-specific records
u User requests
m Error messages for out-of-memory warnings or fatal exits
o Error messages for insufficient hard-disk space during server installation
p Terminal properties
* All of the above, in a single log fileNOTE: Alternatively to /l*, you can use /log.
v Very detailed information
Deployment GuideStage 3: Installing the software 14
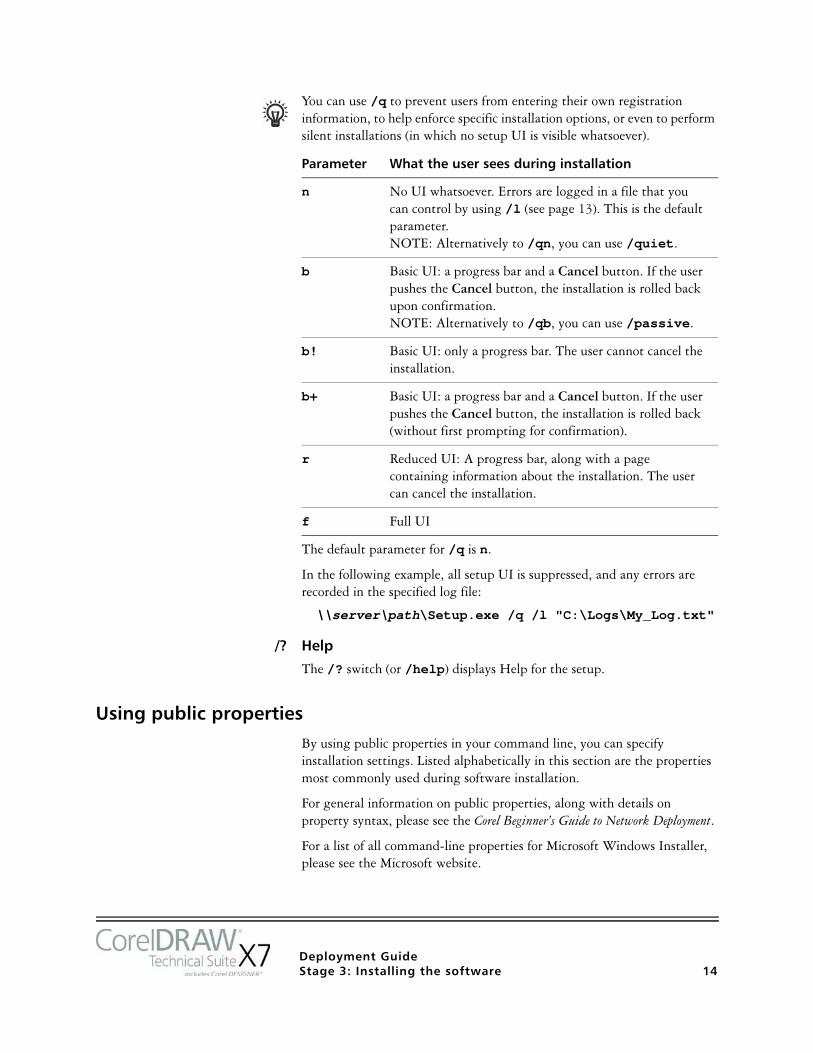
You can use /q to prevent users from entering their own registration information, to help enforce specific installation options, or even to perform silent installations (in which no setup UI is visible whatsoever).
The default parameter for /q is n.
In the following example, all setup UI is suppressed, and any errors are recorded in the specified log file:
\\server\path\Setup.exe /q /l "C:\Logs\My_Log.txt"
/? Help
The /? switch (or /help) displays Help for the setup.
Using public propertiesBy using public properties in your command line, you can specify installation settings. Listed alphabetically in this section are the properties most commonly used during software installation.
For general information on public properties, along with details on property syntax, please see the Corel Beginner’s Guide to Network Deployment.
For a list of all command-line properties for Microsoft Windows Installer, please see the Microsoft website.
Parameter What the user sees during installation
n No UI whatsoever. Errors are logged in a file that you can control by using /l (see page 13). This is the default parameter.NOTE: Alternatively to /qn, you can use /quiet.
b Basic UI: a progress bar and a Cancel button. If the user pushes the Cancel button, the installation is rolled back upon confirmation.NOTE: Alternatively to /qb, you can use /passive.
b! Basic UI: only a progress bar. The user cannot cancel the installation.
b+ Basic UI: a progress bar and a Cancel button. If the user pushes the Cancel button, the installation is rolled back (without first prompting for confirmation).
r Reduced UI: A progress bar, along with a page containing information about the installation. The user can cancel the installation.
f Full UI

Deployment GuideStage 3: Installing the software 15
ADDLOCAL Installing specific components
For details on this scenario, see the following topics in the appendix:• “Deploying specific features” on page 26• “Deploying specific languages” on page 29
ALLOW_INTERNETFEATURES Opting out of internet-based features
You can opt out of internet-based features by using the following property:
ALLOW_INTERNETFEATURES=0
ALLOW_PRODUCTUPDATES Opting out of product updates
You can opt out of automatic updates (and in-product messaging) by using the following property:
ALLOW_PRODUCTUPDATES=0
DESKTOPSHORTCUTS Opting out of desktop shortcuts
You can prevent the installation of desktop shortcuts by using the following property:
DESKTOPSHORTCUTS=0
INSTALLDIR Customizing the installation path
When deploying from the server image, use the following public property to customize the installation path of the software:
INSTALLDIR="path"
This property can only be used during an administrative installation ( /a ).
For best results, do not end the path with a backslash ( \ ).
NETWORKINSTALLDIR Pointing installations to the extra content
You can place extra content and videos at a shared location on the server so that users can access them. See “Server setup” on page 4.
To point the installations to this location, use the following property:
NETWORKINSTALLDIR="path"
For best results, do not end path with a backslash ( \ ).
PROFILEID Pushing down account credentials
The PROFILEID property is used to push down account credentials to the workstations and sign in all users to the account. This property enables users to use their membership privileges such as content and updates, without knowing the email address and password. Users must be online to access content and updates.
Deployment GuideStage 3: Installing the software 16
The PROFILEID value is a combination of letters and numbers. To access it, go to Your Account page on corel.com and click Memberships and Subscriptions in Your Products section (Support > Your Account > Memberships and Subscriptions). The Profile ID is in the lower-left corner of the page.
Example: Setup.exe /s PROFILEID=E9BBBZC091F861590331B12D63CA923
This property cannot be combined with any other properties.
This property is not required if you have entered the email address and password when creating the server image.
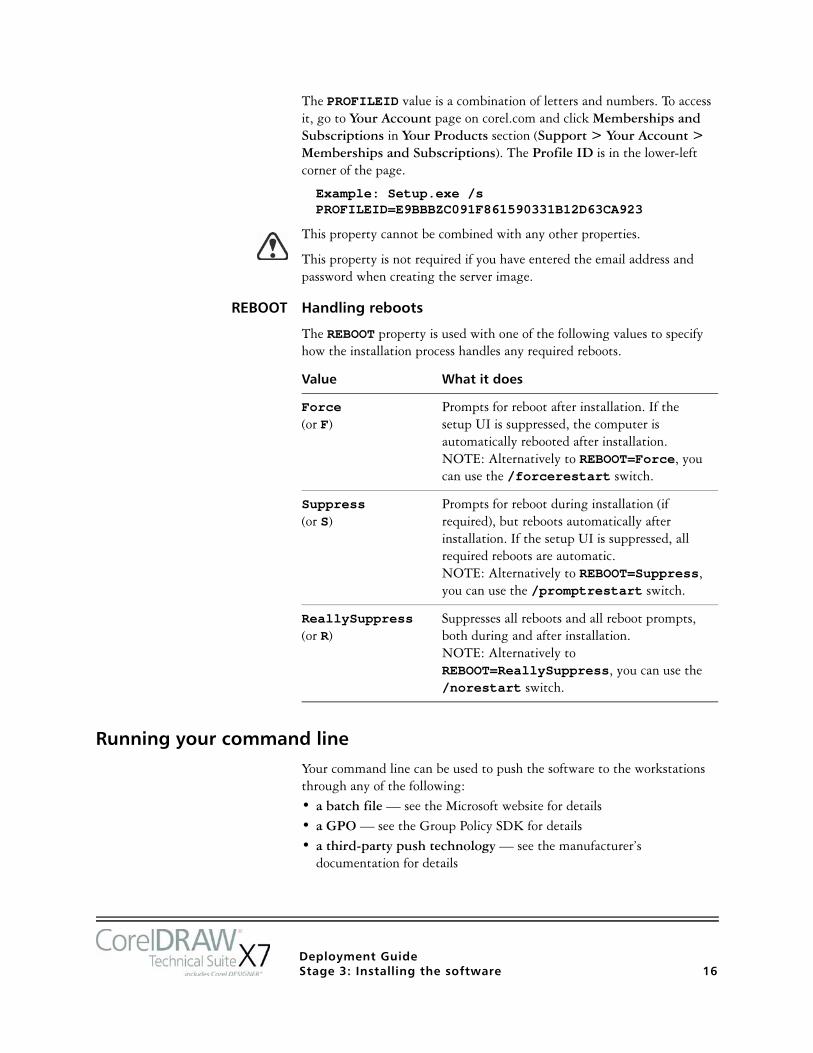
REBOOT Handling reboots
The REBOOT property is used with one of the following values to specify how the installation process handles any required reboots.
Running your command lineYour command line can be used to push the software to the workstations through any of the following:• a batch file — see the Microsoft website for details• a GPO — see the Group Policy SDK for details• a third-party push technology — see the manufacturer’s
documentation for details
Value What it does
Force(or F)
Prompts for reboot after installation. If the setup UI is suppressed, the computer is automatically rebooted after installation.NOTE: Alternatively to REBOOT=Force, you can use the /forcerestart switch.
Suppress(or S)
Prompts for reboot during installation (if required), but reboots automatically after installation. If the setup UI is suppressed, all required reboots are automatic.NOTE: Alternatively to REBOOT=Suppress, you can use the /promptrestart switch.
ReallySuppress(or R)
Suppresses all reboots and all reboot prompts, both during and after installation.NOTE: Alternatively to REBOOT=ReallySuppress, you can use the /norestart switch.

Deployment GuideStage 3: Installing the software 17
For many administrators, using a third-party push technology is the preferred push method. This section offers general guidelines on using a few such technologies.
SCCM At the time of this writing, Corel has verified support for Microsoft® System Center Configuration Manager (SCCM) only insofar as its Microsoft Systems Management Server (SMS) components.
For complete information on using SCCM, please see the Microsoft website.
SMS For deployment to the workstations on a “per-system” basis using package definition files (or “packages”), CorelDRAW Technical Suite X7 supports the use of Microsoft Systems Management Server (SMS).
You can create a package from scratch — or you can create one from the existing SMS files included with CorelDRAW Technical Suite X7 (in the Administrator folder on the installation disc or the server image).
For complete information on using SMS files, please refer to your resource kit for Microsoft Systems Management Server.
The recommendations posted on the Microsoft website have not been tested with CorelDRAW Technical Suite X7 and must therefore be used at your discretion.
IntelliMirror For deployment to the workstations, CorelDRAW Technical Suite X7 supports the use of the IntelliMirror technology, which is part of the Windows Server 2008 R2 operating system.
“Per-user” installations are not supported.
To make deployment with IntelliMirror as easy as possible, CorelDRAW Technical Suite X7 includes a ZAP file (in the Administrator folder on the installation disc or the server image).
For complete information on IntelliMirror, please see the Microsoft website.
Using membership privilegesTo take advantage of membership privileges after deployment, workstations must have Internet access the first time they launch the applications. Users can then work offline, but they won’t have access to the Content Exchange.
Users are automatically signed in to the corel.com account associated with your purchase provided you included account credentials (email and password) during the creation of the server image. This ensures that they can use their membership privileges.

Deployment GuideStage 3: Installing the software 18
For purchases that include more than 10 licenses, you can choose to remove specific workstations from Your Account page on corel.com. To sign in workstations that you previously signed out, you must provide account credentials.
Deployment GuideStage 4: Maintaining the installations 19
Stage 4: Maintaining the installations
An important part of administering a network is maintaining the software installed on its workstations.
In this stage Repairing the software . . . . . . . . . . . . . . . . . . . . . . . . . . . . . .19Modifying the software . . . . . . . . . . . . . . . . . . . . . . . . . . . . .21Updating the software . . . . . . . . . . . . . . . . . . . . . . . . . . . . . .22Removing the software . . . . . . . . . . . . . . . . . . . . . . . . . . . . .23Troubleshooting the software . . . . . . . . . . . . . . . . . . . . . . . .25
Repairing the softwareRepairing the software lets you install (or reinstall) missing (or corrupted) components. You can repair a single installation of the software by using the Windows Control Panel on that workstation, or you can repair multiple workstation installations by using a command line.
Repairing a single installationYou can use the Windows Control Panel to repair a single installation.
To repair an installation with the Windows Control Panel
1 In the Windows Control Panel, display the list of currently installed programs, and choose the program from the list.
2 Click Uninstall/Change.
3 Enable the Repair option, and then click Repair.
4 Follow the on-screen instructions.
Repairing multiple installationsYou can use a command line to repair multiple installations at a time.
/f Basic repair
Use the /f switch with the Setup.exe file on the server image:
\\server\path\Setup.exe /f
You cannot use the /f switch with public properties. For greater control over the repair process, use the REINSTALL and REINSTALLMODE properties instead of /f.
Deployment GuideStage 4: Maintaining the installations 20
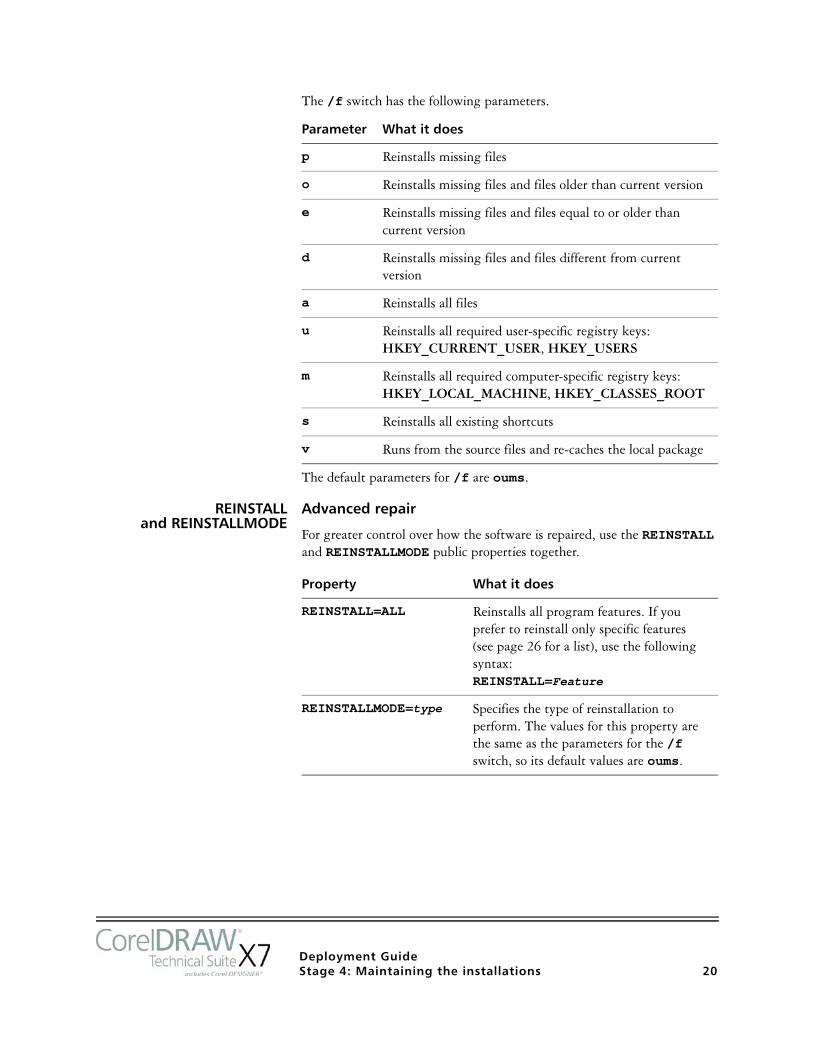
The /f switch has the following parameters.
The default parameters for /f are oums.
REINSTALL and REINSTALLMODE
Advanced repair
For greater control over how the software is repaired, use the REINSTALL and REINSTALLMODE public properties together.
Parameter What it does
p Reinstalls missing files
o Reinstalls missing files and files older than current version
e Reinstalls missing files and files equal to or older than current version
d Reinstalls missing files and files different from current version
a Reinstalls all files
u Reinstalls all required user-specific registry keys: HKEY_CURRENT_USER, HKEY_USERS
m Reinstalls all required computer-specific registry keys: HKEY_LOCAL_MACHINE, HKEY_CLASSES_ROOT
s Reinstalls all existing shortcuts
v Runs from the source files and re-caches the local package
Property What it does
REINSTALL=ALL Reinstalls all program features. If you prefer to reinstall only specific features (see page 26 for a list), use the following syntax:REINSTALL=Feature
REINSTALLMODE=type Specifies the type of reinstallation to perform. The values for this property are the same as the parameters for the /f switch, so its default values are oums.
Deployment GuideStage 4: Maintaining the installations 21
Modifying the softwareModifying the software lets you change which program features are installed. You can modify a single installation of the software by using the Windows Control Panel on that workstation, or you can modify multiple workstation installations by using a command line.
Modifying a single installationYou can use the Windows Control Panel to modify a single installation.
To modify an installation with the Windows Control Panel
1 In the Windows Control Panel, display the list of currently installed programs, and choose the program from the list.
2 Click Uninstall/Change.
3 Enable the Modify option, and then click Next.
4 Follow the instructions that appear.
Modifying multiple installationsYou can use a command line to modify multiple installations at a time.
ADDLOCAL Adding features
You can use the ADDLOCAL public property to add program features:
ADDLOCAL=Feature
For more than one feature, use a comma-separated list, with no spaces between the comma and the feature name:
ADDLOCAL=Feature1,Feature2
For a list of available features, see page 26.
REMOVE Removing features
You can use the REMOVE public property to remove a program feature:
REMOVE=Feature
For more than one feature, use a comma-separated list, with no spaces between the comma and the feature name:
REMOVE=Feature1,Feature2
For a list of available features, see page 26.
Deployment GuideStage 4: Maintaining the installations 22
If you want to add nearly all features and remove only a couple of features, you can use the ADDLOCAL public property in conjunction with the REMOVE public property. For more information, see “Deploying specific features” on page 26.
Updating the softwareCorel periodically releases Microsoft patch (MSP) files — also known as “patches” or “updates” — for its products. Installing updates helps keep the software up-to-date.
In this guide, Patch.exe is a placeholder for the filename of the update. The actual filename varies with each update.
Locating updatesMany network administrators keep their software up-to-date by monitoring the Corel Support Services website (www.corel.com/support). When an update is made available, these administrators download it and carry out the patching process themselves.
In this guide, \\server\path\Patch.exe is a placeholder for the location and filename of the downloaded patch.
If you prefer to have workstation users patch the software for themselves, you can set up the server image to enable the automatic detection of available patches. For details, see “Setting up the server image” on page 7.
Applying updatesAfter locating and downloading an update, you can apply it to the server image and then use the updated image to patch the installed software.
Corel will provide patches for any updates to Lattice3D Studio Corel Edition and Lattice3D Player, which are included with CorelDRAW Technical Suite X7. However, the process of applying an Lattice3D Studio Corel Edition patch to the server image may differ from the process described here. For guidance, please refer to the patch notes. For more information, see “Deploying Lattice3D Studio Corel Edition and Lattice3D Player” on page 31.
Image patching You can apply a an update to the server image. Optionally, you can begin by extracting the patch files to a specified location.
Deployment GuideStage 4: Maintaining the installations 23
To extract the update files to a specified location
To extract the update files to a specified location (instead of the default Temp folder), use the following command-line syntax:
\\server\path\Patch.exe /extract_all "location"
Be sure to apply all extracted update files to the server image. Applying only some of the update files may cause the installations to function incorrectly.
To apply the update files to the server image
Use a command line that includes the executable file for the update and the /a switch:
\\server\path\Patch.exe /a
Workstation patching After updating the server image, you can deploy the update to the workstations.
To update the workstations
Use the following command-line syntax:
\\server\path\Setup.exe REINSTALL=ALL
By default, the REINSTALLMODE=oums property is applied. For best results, you may want to specify REINSTALLMODE=vdm:
\\server\path\Setup.exe REINSTALL=ALL REINSTALLMODE=vdm
For details on REINSTALL (and REINSTALLMODE), see page 20.
To silently update the workstations
Use the following command line:
\\server\path\Setup.exe REINSTALL=ALL REINSTALLMODE=vdm /qn
Removing the softwareYou can remove the software from your network. Uninstalling the software cleanly is crucial when the time comes to upgrade to a newer version.
Image removal You cannot automate the removal of a server image. Instead, you must manually delete the image from the server.
For best results with deleting an image, begin by doing the following:
Deployment GuideStage 4: Maintaining the installations 24
• Make sure that the programs to be removed — and their associated files — are not currently in use on the workstations.
• If you are using Windows Terminal Server, make sure that all users are logged off.
The only way to recover a deleted server image is to re-create it by re-running the setup.
Workstation removal You can remove a single installation of the software by using the Windows Control Panel on that workstation, or you can remove multiple workstation installations by using a command line.
Removing a single installationYou can use the Windows Control Panel to remove a single installation.
To remove an installation with the Windows Control Panel
1 In the Windows Control Panel, display the list of currently installed programs, and choose the program from the list.
2 Click Uninstall/Change.
3 Enable the Remove option.
4 If you want to remove user files (such as presets, user-created fills, and customized files), enable the Remove user files check box.
5 Click Remove.
Removing multiple installationsYou can use a command line to remove multiple installations at a time.
/x Basic removal
You can use the /x switch (or the /uninstall switch) to silently remove the software:
\\server\path\Setup.exe /x
When you remove CorelDRAW Technical Suite X7, Lattice3D Studio Corel Edition and Lattice3D Player are removed by default. If you want to silently remove CorelDRAW Technical Suite X7 but not Lattice3D Studio Corel Edition and Lattice3D Player, use the following syntax:
\\server\path\Setup.exe /x /qb DO_NOT_REMOVE_XVL=1
You must use the b parameter with the q switch(/qb). Using either the n (/qn) or r parameter (/qr) will not work.
Deployment GuideStage 4: Maintaining the installations 25
REMOVE and REMOVEUSERFILES
Advanced removal
If you want more control over the removal process, use the following two public properties.
Troubleshooting the softwareFor help troubleshooting any issues with the software, please visit the Corel® Knowledge Base (www.corel.com/knowledgebase), an online repository of FAQs and articles.
Property What it does
REMOVE=ALL Removes all features
REMOVEUSERFILES=value Specifies whether to remove user files:• 0 — no• 1 — yes

Deployment GuideAppendix: Specialized deployment scenarios 26
Appendix: Specialized deployment scenarios
If you require a more specialized deployment scenario, the supplementary topics in this appendix may be of interest to you.
In this appendix Deploying specific features. . . . . . . . . . . . . . . . . . . . . . . . . . .26Deploying specific languages . . . . . . . . . . . . . . . . . . . . . . . . .29Deploying Lattice3D Studio Corel Edition and Lattice3D Player .31Working with MST files . . . . . . . . . . . . . . . . . . . . . . . . . . . . .31Working with MST files . . . . . . . . . . . . . . . . . . . . . . . . . . . . .31Working with registry keys . . . . . . . . . . . . . . . . . . . . . . . . . . .33Customizing the setup fileset . . . . . . . . . . . . . . . . . . . . . . . . .35Deploying customized installation settings . . . . . . . . . . . . . .37
Deploying specific featuresWhen performing a basic or silent installation with the /q switch (see page 13), you may want to use the ADDLOCAL property to specify which software features to install. You can specify a single feature:
ADDLOCAL=Feature
Or you can specify a comma-separated list of components:
ADDLOCAL=Feature1,Feature2
You can even specify all features:
ADDLOCAL=ALL
If you want to install nearly all features, naming them individually would be quite tedious. In this scenario, you can use the REMOVE public property to specify the features to subtract from ADDLOCAL=ALL:
ADDLOCAL=ALL REMOVE=Feature1,Feature2
Fore example, if you want to install all CorelDRAW Technical Suite features except CorelDRAW and Corel Capture:
ADDLOCAL=ALL REMOVE=Draw,Capture
Feature names are case-sensitive.
Specifying software features by feature nameCorelDRAW Technical Suite X7 components are organized into the following child features of MainApp.
Deployment GuideAppendix: Specialized deployment scenarios 27
Some editions of the software do not include certain features listed in this section.
When you specify a parent feature (such as MainApp) for programs other than Corel DESIGNER, only program files are included. To add other child features, you must specify them individually. And remember: Feature names are case-sensitive.
Corel PHOTO-PAINT The Corel PHOTO-PAINT component (feature name PP) contains the following child features.
Specifying PP includes only the Corel PHOTO-PAINT program files (PPPFiles). To include other child features, you must specify them individually.
Corel CONNECT The Connect feature adds or removes a shortcut on the Windows Start menu to the standalone Corel CONNECT application. All other files required to run the Connect docker and the standalone application are installed by default.
Utilities The utilities (feature name Utility) include the following child features.
Software component ”MainApp” child feature
Corel DESIGNER Designer
CorelDRAW Draw
Corel® PHOTO-PAINT™ PP
Corel CAPTURE™ Capture
Corel® CONNECT Connect
Lattice3D Studio Corel Edition STUDIO
Lattice3D Player PLAYER
Utilities Utility
Import/export filters Filters
Corel PHOTO-PAINT component “PP” child feature
Photo-enlarger plug-in Photozoom
Utility “Utility” child feature
Duplex wizard (for two-sided print jobs) DupWiz
Bitstream Font Navigator FontNav
Visual Basic® for Applications (VBA) VBAFiles
Deployment GuideAppendix: Specialized deployment scenarios 28
Specifying Utility does not include its child features. You must individually specify each desired utility.
Corel Graphics - Windows Shell Extension
This feature lets users view thumbnails of native Corel files such as CorelDRAW (CDR), Corel PHOTO-PAINT (CPT), pattern fill (FILL), and other native file. You can include Corel Graphics - Windows Shell Extension in the installation, or you can exclude it by adding the parameter SHELLEXT to the command line.
The following example shows how to include Corel Graphics - Windows Shell Extension in the installation:
Setup.exe /qn ADDLOCAL=Designer SHELLEXT=1
This command line will install silently only Corel DESIGNER and Corel Graphics - Windows Shell Extension.
To exclude Corel Graphics - Windows Shell Extension from the installation, simply set the SHELLTEXT parameter to 0: SHELLEXT=0.
The SHELLTEXT parameter cannot be used for including or excluding Corel Graphics - Windows Shell Extension if the ADDLOCAL property is set to ALL: ADDLOCAL=ALL.
Alternatively, you can exclude Corel Graphics - Windows Shell Extension by deleting the following Dbm nodes from setup.xml:• the node that references ShellExt.msi• the node that references 32BitKey.msi or 64BitKey.msi
GPL Ghostscript This feature lets users isolate and use individual elements of imported EPS files rather than only header images. It also improves the import of PDF files generated by third-party applications. You can include GPL Ghostscript in the installation, or you can exclude it by adding the parameter GPL to the command line.
The following example shows how to include GPL Ghostscript in the installation:
Setup.exe /qn ADDLOCAL=Designer GPL=1
This command line will install silently only Corel DESIGNER and GPL Ghostscript.
The following example shows how to exclude GPL Ghostscript from the installation:
Setup.exe /qn ADDLOCAL=Designer GPL=0
The GPL parameter cannot be used for including or excluding GPL Ghostscript if the ADDLOCAL property is set to ALL: ADDLOCAL=ALL.
Deployment GuideAppendix: Specialized deployment scenarios 29
Deploying specific languagesWhen performing a basic or silent installation with the /q switch (see page 13), you may want to use the ADDLOCAL property to specify which software languages to support. You can specify a single language:
ADDLOCAL=LanguageCode
Or you can specify a comma-separated list of languages:
ADDLOCAL=FEATURE1,LanguageCode1,LanguageCode2
Using language codes, you can specify language modules or writing tools.
Language codes are case-sensitive.
Specifying UI modules by language codeA language module includes both the software UI and the writing tools for that language. By installing multiple language modules, you can enable dynamic language switching — the ability to change the language of the software UI.
Corel DESIGNER, Lattice3D Studio Corel Edition, and Lattice3D Player. support only German (DE), English (EN), French (FR), and Japanese (JP).
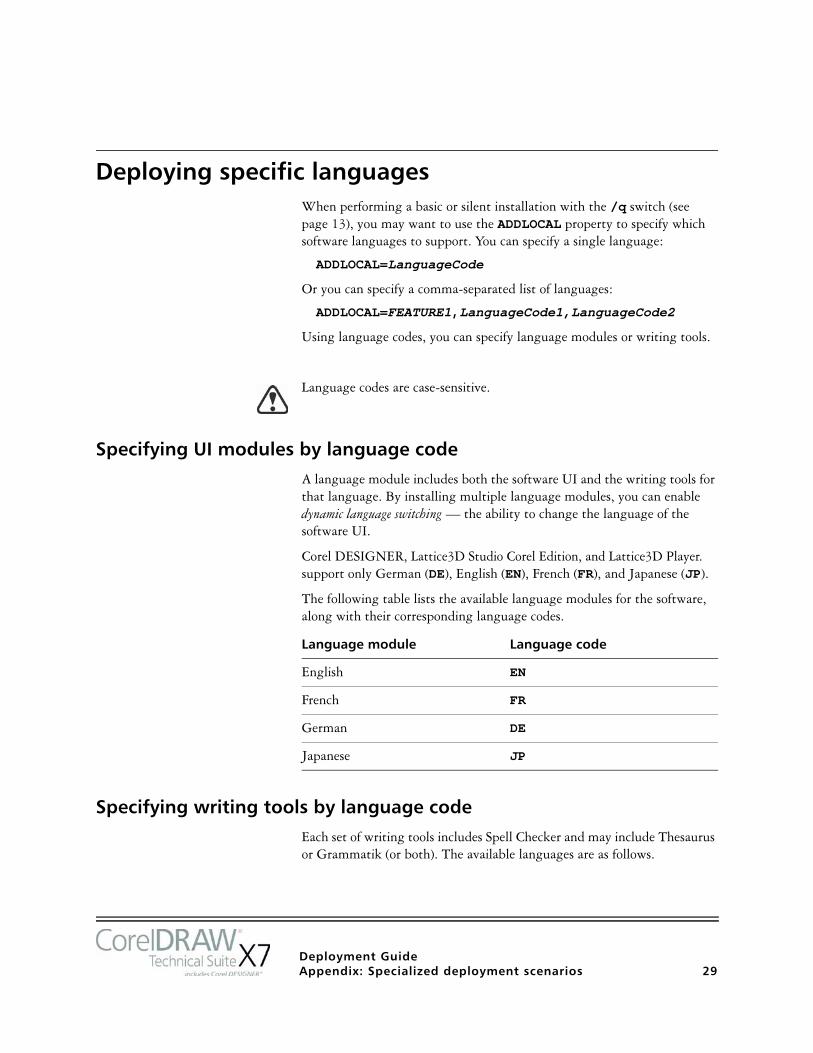
The following table lists the available language modules for the software, along with their corresponding language codes.
Specifying writing tools by language codeEach set of writing tools includes Spell Checker and may include Thesaurus or Grammatik (or both). The available languages are as follows.
Language module Language code
English EN
French FR
German DE
Japanese JP
Deployment GuideAppendix: Specialized deployment scenarios 30
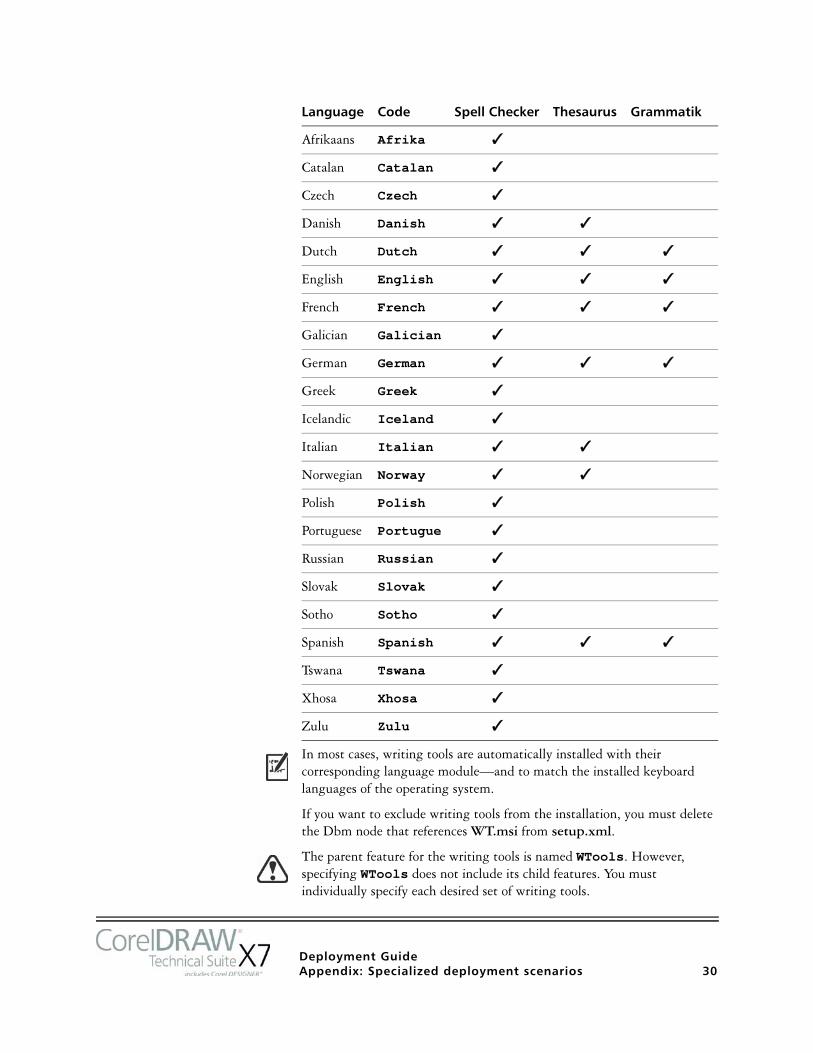
In most cases, writing tools are automatically installed with their corresponding language module—and to match the installed keyboard languages of the operating system.
If you want to exclude writing tools from the installation, you must delete the Dbm node that references WT.msi from setup.xml.
The parent feature for the writing tools is named WTools. However, specifying WTools does not include its child features. You must individually specify each desired set of writing tools.
Language Code Spell Checker Thesaurus Grammatik
Afrikaans Afrika T
Catalan Catalan T
Czech Czech T
Danish Danish T T
Dutch Dutch T T T
English English T T T
French French T T T
Galician Galician T
German German T T T
Greek Greek T
Icelandic Iceland T
Italian Italian T T
Norwegian Norway T T
Polish Polish T
Portuguese Portugue T
Russian Russian T
Slovak Slovak T
Sotho Sotho T
Spanish Spanish T T T
Tswana Tswana T
Xhosa Xhosa T
Zulu Zulu T
Deployment GuideAppendix: Specialized deployment scenarios 31
Deploying Lattice3D Studio Corel Edition and Lattice3D Player
A typical server image of CorelDRAW Technical Suite X7 includes the files required to deploy Lattice3D Studio Corel Edition and Lattice3D Player to the workstations.
With CorelDRAW Technical Suite X7.7, you can install silently Corel DESIGNER X7 together with Lattice3D Studio Corel Edition and Lattice3D Player by using the command line below:
Setup.exe /qn ADDLOCAL=Designer,STUDIO,PLAYER
If you want to install silently CorelDRAW Technical Suite X7.7 without Lattice3D Studio Corel Edition and Lattice3D Player, use the command line below:
Setup.exe /qn ADDLOCAL=ALL REMOVE=STUDIO,PLAYER
Updating Corel Corporation will provide patches for any updates to Lattice3D Studio Corel Edition and Lattice3D Player, which are included with CorelDRAW Technical Suite X7. Any such patches will update the server image of CorelDRAW Technical Suite X7 with the latest files for Lattice3D Studio Corel Edition and Lattice3D Player. The updated software can then be deployed to the workstations by manually repairing the installed software.
Repairing, modifying, or removing
Lattice3D Studio Corel Edition can be repaired, modified, or removed by using the Lattice3D Studio Corel Edition entry in the Add or remove programs dialog box of the Windows Control Panel.
Lattice3D Player can be repaired, modified, or removed by using the Lattice3D Player / Lattice3D Player Pro (Ver. 9 or later) entry in the Add or remove programs dialog box of the Windows Control Panel.
If you want to silently remove CorelDRAW Technical Suite X7 but not Lattice3D Studio Corel Edition and Lattice3D Player, you must use the following command line:
Setup.exe /x /qb DO_NOT_REMOVE_XVL=1
Working with MST filesIf you want to apply a Microsoft transformation (MST) file to the setup, simply apply it to your command line.
By default, MST files are applied to the Setup.msi file for the setup.
Deployment GuideAppendix: Specialized deployment scenarios 32
To apply a transformation to the setup
1 Store the MST file on the server image.
2 Use the TRANSFORMS property to specify that MST file, as shown here (where MST is the filename of the MST file):
Setup.exe TRANSFORMS="MST"
If the MST file is not in the same folder as Setup.exe, MST must specify the full path and filename of the MST file.
Applying a transformation to a specific MSI fileTo apply an MST file to a specific MSI file, use the following syntax (where MSI is the filename of the MSI file, not including its extension; and where MST is the filename of the MST file, including its extension):
Setup.exe TRANSFORMS_MSI="MST"
If the MST file is not in the same folder as the MSI file, MST must specify the full path and filename of the MST file.
Example 1 To apply my_draw.mst to Draw.msi (in the same folder), use the following syntax:
Setup.exe TRANSFORMS_Draw="my_draw.mst"
Example 2 To apply MyTransform.mst to PHOTO-PAINT.msi (in the same folder), use the following syntax:
Setup.exe TRANSFORMS_PHOTO-PAINT="MyTransform.mst"
Troubleshooting MST filesIf you have trouble applying an MST file, do the following:• Check the syntax of your command line — in particular, the path to the
MST file.• Check your permissions.• Make sure that the MST file was created correctly.• Check the associated MSI files.
For additional help with MST files, contact Corel Support Services (www.corel.com/support). Please note, however, that charges will apply.
Deployment GuideAppendix: Specialized deployment scenarios 33
Working with registry keysAfter creating the server image, you may want to edit its registry keys for deployment to the workstations. By doing so, you can avoid having to manually configure the registry keys of each individual workstation installation of the software.
Making extra content availableAs previously discussed (see page 4), you can make extra content available to workstation users by copying it to the server share.
You can set the path to the server content by using the public property (see page 15) — or, by editing the appropriate section in the following HKEY_LOCAL_MACHINE\Software\ registry key:• 32-bit OS — Corel\Media\Corel Content\Path=• 64-bit OS with (default) 64-bit build —
Corel\Media\Corel Content\Path=• 64-bit OS with 32-bit build —
Wow6432Node\Corel\Media\Corel Content\Path=
Configuring content for offline availabilityYou must first download the content from the Downloads For Members and Subscribers page in your corel.com account. The download consists of two Zip files that you must extract to the shared network location using a compression tool, such as WinZip®.
The extracted content is 9 GB.
Internet access is required.
To configure the content
1 Extract the content files from CorelDRAW Technical Suite X7 extra content zip file.
There are two main archive files: extra content and videos.
2 Using the compression tool, extract the archives files into separate folders.
3 On the server that you are going to make available to all workstations, create a main content folder.
4 Move the Content.db3 file from the extra content archive to the root of the main content folder.
5 Move the following folders from the extra content archive to the root of the main content folder.
Deployment GuideAppendix: Specialized deployment scenarios 34
• Clipart• Fills• Fonts• Image Lists• Interactive Frames• Objects• Photo Frames• Photos• Templates
In the main content folder, create a new folder, and name it Languages.
Move the content from video folder to the Languages folder.
To share the content folder to workstations
1 Using the Setup.exe /a command line, open the setup wizard.
2 On the last page of the wizard, type the UNC path for the main content folder in the box in the Content Location area.
3 Click Install Now.
You can also set the path to the server content by using the NETWORKINSTALLDIR. For more information, see “Pointing installations to the extra content” on page 15.
Setting up dynamic language switchingDynamic language switching allows the language of the user interface to be changed, both during and after installation. This feature requires the installation of multiple language modules for the software — one for each desired user-interface language (see page 29). The selection of languages you can implement depends on the license you have purchased.
Two sets of registry settings are required for dynamic language switching:• workstation settings• current user settings
Workstation settings Workstation settings affect all users. The registry setting for each workstation is as follows:
HKEY_LOCAL_MACHINE\SOFTWARE\Corel\Corel DESIGNER\17.0\Languages
Inside this key are language keys — three-letter codes that represent the available languages. These language keys are put in place by the setup, so no intervention is required. Corel DESIGNER, Lattice 3D Studio Corel Edition, and Lattice 3D Player support only German, English, French, and Japanese. Shown here (for reference only) are the three-letter codes for the available languages for the remaining components.

Deployment GuideAppendix: Specialized deployment scenarios 35
Under each language key are the following registry settings:• DirName — specifies the name of the folder for the language-specific
files, relative to InstallationPath\Languages• UIName — specifies the name to show in the startup dialog box and on
the Tools Options Global page
Current user settings The registry setting for each current user is as follows:
HKEY_CURRENT_USER\Software\Corel\Corel DESIGNER\17.0
The UILang setting is not initialized by the setup because the setup cannot determine which user will run the applications. After the user has run the application once, this setting changes to the three-letter code that corresponds to the user-specified language key at the following location:
HKEY_LOCAL_MACHINE\SOFTWARE\Corel\Corel DESIGNER\17.0\Languages
Customizing the setup filesetThe main configuration file Setup.xml, located in the x86 or x64 folder, lists all features included in the setup.
When you create a server image, a copy of the Setup.xml file is included. If you want to customize the setup fileset on the server image, you must edit the Setup.xml file to reflect your desired changes.
Understanding Setup.xmlThe Setup.xml file contains four main types of nodes. With an understanding of these four nodes, you can modify the Setup.xml file to create a customized server image.
<Msi/> nodes Each <Msi/> node specifies a main setup file, such an executable (EXE) file, a self-extracting ZIP file, or an MSI file that bundles (or “chains”) other MSI files.
Language Code
English ENU
French FRA
German DEU
Japanese JPN
Deployment GuideAppendix: Specialized deployment scenarios 36
For example, you can exclude Ghostscript from the installation by making the following modification.
<!--Msi productcode="Ghostscript" file="CDTS17\Ghostscript.msi" cmdline="ALLUSERS=1 ADDLOCAL=ALL" adminsupport="0" condition="GPL=1" progresstext="Str.ProgressText.Common" /-->
<Dbm/> nodes Each <Dbm/> node specifies a component of a <Msi/> node — typically, an MSI file. A <Dbm/> node has the following structure, where GUID is the associated product code, and MSI is the path and filename of the MSI file:
<Dbm productcode="{GUID}" file="MSI" />
Some <Dbm/> nodes also require a condition.
If you want to apply an MST file to the specified MSI file, you can use the following syntax (where MST is the path and filename of the MST file):
<Dbm productcode="{GUID}" file="MSI" cmdline="TRANSFORMS=MST"progresstext="Str.ProgressText.name" />
For a list of the available MSI files, see page 31.
<Feature/> nodes Each <Feature/> node specifies a feature that is associated with an MSI file. A <Feature/> node has the following format, where name is the name of the MSI file and feature is the name of the associated feature:
<Feature name="Str.Feature.name" desc="Str.Feature.name.Desc" property="feature">
Some <Feature/> nodes have subnodes.
For a list of the available features, see page 26.
<Property/> nodes Each <Property/> node specifies a property. A <Property/> node has the following structure, where property is the name of the public property and value is its value:
<Property name="property" value="value" />
For a list of available public properties, see page 14.
Creating a server image with a customized filesetYou can use Setup.xml to create a server image with a customized fileset.
To create a server image with a customized fileset
1 Copy the server image to a new location.
2 Add any desired language-module MSI files to the server image.
Deployment GuideAppendix: Specialized deployment scenarios 37
3 Edit Setup.xml to reflect the additions you’ve made to the fileset:• Add an <Msi/> node for each new setup file.• Add a <Dbm/> node for each new language-module MSI file.• Add the following <Property/> node for each new language-
module MSI file, where $$ is the language:<Property name="Include.$$" value="1" />
4 Remove any unwanted MSI files from the server image.
Some MSI files cannot be removed from the setup fileset. For details, see page 31.
5 Edit Setup.xml to reflect the removals you’ve made from the fileset:• Remove the corresponding <Msi/> node for each removed setup file.• Remove the corresponding <Dbm/> node for each removed MSI file.• Remove the corresponding <Feature/> node and subnode for each
removed MSI file.• Adjust any corresponding <Property/> nodes by changing their
value.
For example, let’s say that you’re creating a single-language setup from a multi-language setup. To record the fileset changes in the Setup.xml file, you must remove the corresponding <Dbm/> and <Feature/> nodes for each removed language module. Next, you must set each <Property/> node for Include.$$ to a value of 0, where $$ is a removed language module. The <Property/> node for ShowApplicationLanguageSelector is automatically set to a value of 0.
Deploying customized installation settingsTo modify the settings used to install the software on the workstations, you can use the Persist.xml file stored at the root of the server image.
Each entry in Persist.xml corresponds to a public property for the software (see page 14). The syntax of each entry is as follows:
<Property name="property" value="value" />
By modifying the value of an existing entry in Persist.xml — or by adding a new entry — you can customize the installation settings deployed from that server image. This deployment method offers an excellent alternative to creating a different server image or customizing a command line.
Example 1 The following Persist.xml entry specifies that automatic software updates are enabled:
<Property name="ALLOW_PRODUCTUPDATES" value="1" />

Deployment GuideAppendix: Specialized deployment scenarios 38
By changing the value of this entry from "1" to "0" (and saving this change to Persist.xml), you can disable automatic updates for the workstation installations.
Example 2 The following Persist.xml entry specifies the serial number for the installation:
<Property name="SERIALNUMBER" value="SN" />
By changing the "SN"value, you can specify a different serial number for the workstation installations.
Example 3 You can use the following Persist.xml entry to specify the PROFILEID and add account credentials to the server image:
<Property name="PROFILEID" value="XXXXXXX" />
Specifying a value for the PROFILEID will ensure that all workstations are automatically signed in to the account after installation. For more information, see “PROFILEID” on page 15.
Example 4 You can use the following Persist.xml entry to point the installations to the location of extra content and videos:
<Property name="NETWORKINSTALLDIR" value="path" />
For more information, see “NETWORKINSTALLDIR” on page 15.
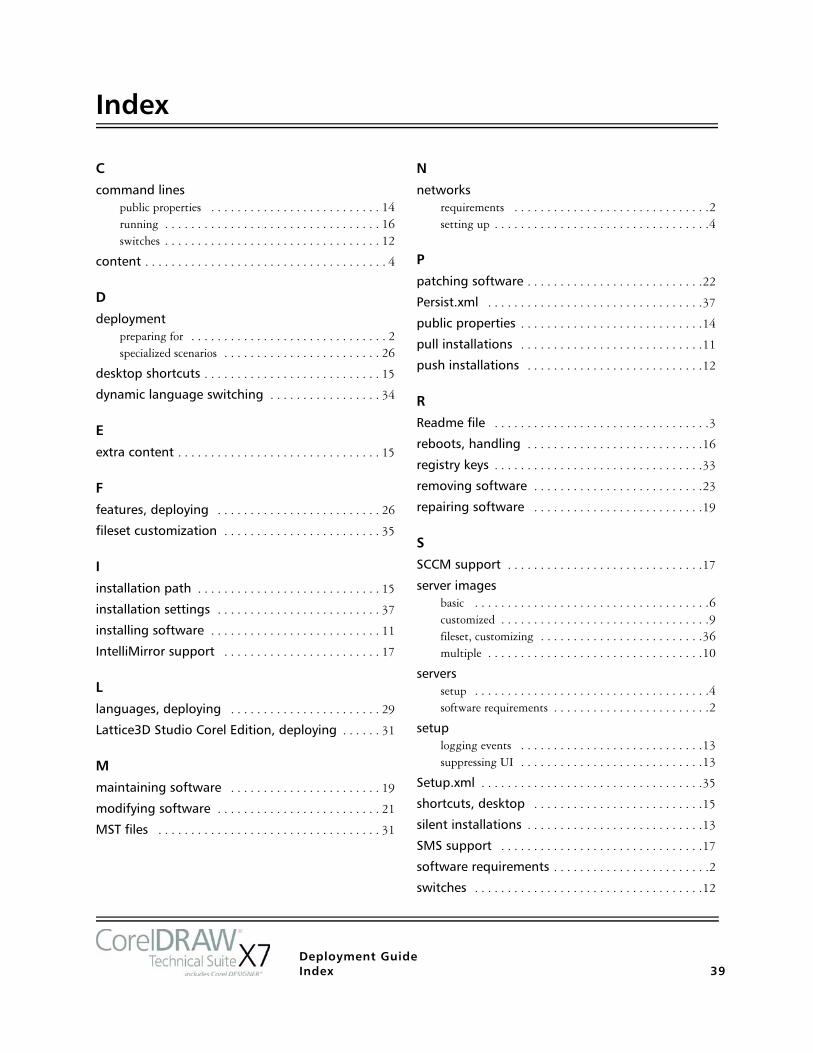
Deployment GuideIndex 39
Index
C
command linespublic properties . . . . . . . . . . . . . . . . . . . . . . . . . . 14running . . . . . . . . . . . . . . . . . . . . . . . . . . . . . . . . . 16switches . . . . . . . . . . . . . . . . . . . . . . . . . . . . . . . . . 12
content . . . . . . . . . . . . . . . . . . . . . . . . . . . . . . . . . . . . . 4
D
deploymentpreparing for . . . . . . . . . . . . . . . . . . . . . . . . . . . . . . 2specialized scenarios . . . . . . . . . . . . . . . . . . . . . . . . 26
desktop shortcuts . . . . . . . . . . . . . . . . . . . . . . . . . . . 15
dynamic language switching . . . . . . . . . . . . . . . . . 34
E
extra content . . . . . . . . . . . . . . . . . . . . . . . . . . . . . . . 15
F
features, deploying . . . . . . . . . . . . . . . . . . . . . . . . . 26
fileset customization . . . . . . . . . . . . . . . . . . . . . . . . 35
I
installation path . . . . . . . . . . . . . . . . . . . . . . . . . . . . 15
installation settings . . . . . . . . . . . . . . . . . . . . . . . . . 37
installing software . . . . . . . . . . . . . . . . . . . . . . . . . . 11
IntelliMirror support . . . . . . . . . . . . . . . . . . . . . . . . 17
L
languages, deploying . . . . . . . . . . . . . . . . . . . . . . . 29
Lattice3D Studio Corel Edition, deploying . . . . . . 31
M
maintaining software . . . . . . . . . . . . . . . . . . . . . . . 19
modifying software . . . . . . . . . . . . . . . . . . . . . . . . . 21
MST files . . . . . . . . . . . . . . . . . . . . . . . . . . . . . . . . . . 31
N
networksrequirements . . . . . . . . . . . . . . . . . . . . . . . . . . . . . .2setting up . . . . . . . . . . . . . . . . . . . . . . . . . . . . . . . . .4
P
patching software . . . . . . . . . . . . . . . . . . . . . . . . . . .22
Persist.xml . . . . . . . . . . . . . . . . . . . . . . . . . . . . . . . . .37
public properties . . . . . . . . . . . . . . . . . . . . . . . . . . . .14
pull installations . . . . . . . . . . . . . . . . . . . . . . . . . . . .11
push installations . . . . . . . . . . . . . . . . . . . . . . . . . . .12
R
Readme file . . . . . . . . . . . . . . . . . . . . . . . . . . . . . . . . .3
reboots, handling . . . . . . . . . . . . . . . . . . . . . . . . . . .16
registry keys . . . . . . . . . . . . . . . . . . . . . . . . . . . . . . . .33
removing software . . . . . . . . . . . . . . . . . . . . . . . . . .23
repairing software . . . . . . . . . . . . . . . . . . . . . . . . . .19
S
SCCM support . . . . . . . . . . . . . . . . . . . . . . . . . . . . . .17
server imagesbasic . . . . . . . . . . . . . . . . . . . . . . . . . . . . . . . . . . . .6customized . . . . . . . . . . . . . . . . . . . . . . . . . . . . . . . .9fileset, customizing . . . . . . . . . . . . . . . . . . . . . . . . .36multiple . . . . . . . . . . . . . . . . . . . . . . . . . . . . . . . . .10
serverssetup . . . . . . . . . . . . . . . . . . . . . . . . . . . . . . . . . . . .4software requirements . . . . . . . . . . . . . . . . . . . . . . . .2
setuplogging events . . . . . . . . . . . . . . . . . . . . . . . . . . . .13suppressing UI . . . . . . . . . . . . . . . . . . . . . . . . . . . .13
Setup.xml . . . . . . . . . . . . . . . . . . . . . . . . . . . . . . . . . .35
shortcuts, desktop . . . . . . . . . . . . . . . . . . . . . . . . . .15
silent installations . . . . . . . . . . . . . . . . . . . . . . . . . . .13
SMS support . . . . . . . . . . . . . . . . . . . . . . . . . . . . . . .17
software requirements . . . . . . . . . . . . . . . . . . . . . . . .2switches . . . . . . . . . . . . . . . . . . . . . . . . . . . . . . . . . . .12

Deployment GuideIndex 40
T
troubleshooting software . . . . . . . . . . . . . . . . . . . . 25
U
UI language modules . . . . . . . . . . . . . . . . . . . . . . . . 29
uninstalling software . . . . . . . . . . . . . . . . . . . . . . . . 23
updating software . . . . . . . . . . . . . . . . . . . . . . . . . . 22
V
videos . . . . . . . . . . . . . . . . . . . . . . . . . . . . . . . . . . . . . . 4
W
workstationssetup . . . . . . . . . . . . . . . . . . . . . . . . . . . . . . . . . . . . 4software requirements . . . . . . . . . . . . . . . . . . . . . . . 3
writing tools . . . . . . . . . . . . . . . . . . . . . . . . . . . . . . . 29

CorelDRAW® Technical Suite X7 Deployment Guide
Copyright © 2016 Corel Corporation. All rights reserved.
Product specifications, pricing, packaging, technical support and information (“specifications”) refer to the retail English version only. The specifications for all other versions (including other language versions) may vary.
Information is provided by Corel on an “as is” basis, without any other warranties or conditions, express or implied, including, but not limited to, warranties of merchantable quality, satisfactory quality, merchantability or fitness for a particular purpose, or those arising by law, statute, usage of trade, course of dealing or otherwise. The entire risk as to the results of the information provided or its use is assumed by you. Corel shall have no liability to you or any other person or entity for any indirect, incidental, special, or consequential damages whatsoever, including, but not limited to, loss of revenue or profit, lost or damaged data or other commercial or economic loss, even if Corel has been advised of the possibility of such damages, or they are foreseeable. Corel is also not liable for any claims made by any third party. Corel's maximum aggregate liability to you shall not exceed the costs paid by you to purchase the materials. Some states/countries do not allow exclusions or limitations of liability for consequential or incidental damages, so the above limitations may not apply to you.
Corel, CorelDRAW, the CorelDRAW balloon, CAPTURE, CONNECT, and PHOTO-PAINT are trademarks or registered trademarks of Corel Corporation and/or its subsidiaries in Canada, the U.S. and/or other countries. ConceptShare is a registered trademark of ConceptShare Inc., in Canada, the U.S. and/or other countries. Other product, font and company names and logos may be trademarks or registered trademarks of their respective companies. Patents: www.corel.com/patent
112086


![CorelDRAW Graphics Suite 2017 Datasheet | Solo Network€¦ · Visão geral do produto [ 2 ] Introdução ao CorelDRAW® Graphics Suite 2017 Nosso melhor ficou ainda melhor: o CorelDRAW®](https://img.pdfslide.us/doc/110x75/5fc476cd98f8f527c8730059/coreldraw-graphics-suite-2017-datasheet-solo-network-viso-geral-do-produto-.jpg)
![CorelDRAW Technical Suite X6 Reviewer's Guide · Reviewer’s Guide [ 1 ] Introducing CorelDRAW® Technical Suite X6 CorelDRAW® Technical Suite X6 is a complete and cost-effective](https://img.pdfslide.us/doc/110x75/5ae4c3877f8b9a90138f6609/coreldraw-technical-suite-x6-reviewers-guide-s-guide-1-introducing-coreldraw.jpg)


![Руководство обозревателя CorelDRAW Graphics Suite 2018 · 2019-03-21 · Руководство обозревателя [ 2 ] Представляем CorelDRAW®](https://img.pdfslide.us/doc/110x75/5fb273e1ba1d25225171afed/f-coreldraw-graphics-suite-2018-2019-03-21.jpg)
![CorelDRAW Graphics Suite X5 Reviewer's Guide - Corel Corporation · 2015-10-16 · Reviewer’s Guide [ 2 ] Introducing CorelDRAW® Graphics Suite X5 CorelDRAW® Graphics Suite X5](https://img.pdfslide.us/doc/110x75/5e2461ce2ff52e258930504e/coreldraw-graphics-suite-x5-reviewers-guide-corel-2015-10-16-revieweras-guide.jpg)
![CorelDRAW Graphics Suite 2020product.corel.com/help/CorelDRAW/540111137/Main/ES/Quick... · 2020. 3. 9. · Guía de inicio rápido [ 1 ] CorelDRAW Graphics Suite 2020 CorelDRAW®](https://img.pdfslide.us/doc/110x75/6131b8e41ecc51586944ea31/coreldraw-graphics-suite-2020-3-9-gua-de-inicio-rpido-1-coreldraw-graphics.jpg)

![CorelDRAW Premium Suite X5 Reviewer's Guide · Reviewer’s Guide [ 2 ] Introducing CorelDRAW® Premium Suite X5 CorelDRAW® Premium Suite X5 combines the trusted illustration and](https://img.pdfslide.us/doc/110x75/5e94d3c19009eb05534975b5/coreldraw-premium-suite-x5-reviewers-guide-revieweras-guide-2-introducing.jpg)
![CorelDRAW Graphics Suite X6 Reviewer's Guide (CT) · :JeYO1ó!2 [ 2 ] CorelDRAW® Graphics Suite X6 KÉ s CorelDRAW® Graphics Suite X6 5× ä/? \ F,! 5a õY](https://img.pdfslide.us/doc/110x75/5bb0baf109d3f2830e8ca57a/coreldraw-graphics-suite-x6-reviewers-guide-ct-jeyo1o2-2-coreldraw.jpg)
![CorelDRAW Graphics Suite X7 Reviewer's Guide...Reviewer’s Guide [ 2 ] Introducing CorelDRAW® Graphics Suite X7 CorelDRAW® Graphics Suite X7 is an intuitive graphics solution that](https://img.pdfslide.us/doc/110x75/5e76ba50cbe2a2059b41a5b3/coreldraw-graphics-suite-x7-reviewers-revieweras-guide-2-introducing.jpg)
![CorelDRAW Technical Suite X7 Reviewer's Guidea Tecnica.pdf · 2016-06-15 · Reviewer’s Guide [ 1 ] Introducing CorelDRAW® Technical Suite X7 CorelDRAW® Technical Suite X7 is](https://img.pdfslide.us/doc/110x75/5e9703176a3a465cb03e867e/coreldraw-technical-suite-x7-reviewers-guide-a-tecnicapdf-2016-06-15-revieweras.jpg)


![CorelDRAW Technical Suite 2017 Reviewer's Guide (EMEA) · Reviewer’s Guide [ 1 ] Introducing CorelDRAW® Technical Suite 2017 CorelDRAW® Technical Suite 2017 is the complete solution](https://img.pdfslide.us/doc/110x75/6044cfcb5d85d2004438c946/coreldraw-technical-suite-2017-reviewers-guide-emea-revieweras-guide-1-.jpg)


![CorelDRAW Graphics Suite X5 Reviewer's Guide (IT) · Guida di valutazione [ 2 ] Introduzione a CorelDRAW® Graphics Suite X5 CorelDRAW® Graphics Suite X5 è un software di design](https://img.pdfslide.us/doc/110x75/5bb4558f09d3f2c5168d634a/coreldraw-graphics-suite-x5-reviewers-guide-it-guida-di-valutazione-2-.jpg)