Embed Size (px)
Citation preview

CorelDRAW 9
Advanced
™
™
™
Includes Corel Trace
and Photo-Paint
Training Manual
A N Z A I !
A

CURRICULUMAPPROVED
www.anzai.com
CorelDRAW 9 Advanced
Product Information Support InformationAnzai! Inc. Ziff-Davis EducationP.O. Box 23100 (716) 240-7334, option 1Ottawa, Ontario Web: http://support.zdeducation.comCanada K2A 4E2 Email: [email protected]: (613) 724-3773Fax: (613) 724-3092Web: www.anzai.comEmail: [email protected]
Course number: 9902Manual Revision: 1.0 (July, 1999)Version of software: 9.337
CopyrightCopyright ©1999 by Anzai! Inc.
All rights reserved. No part of this book may be reproduced or transmitted in any form or byany means, electronic or mechanical, including photocopying, recording, or by anyinformation storage or retrieval system, without prior written permission from Anzai! Inc.
Photocopying any part of this book without the prior written consent of Anzai! Inc. is aviolation of federal law. If you believe that Anzai! training manuals are being photocopiedwithout permission, please call 1-800-816-6339.
DisclaimerThe contents of this book are distributed on an “As is” basis, without warranty. The publisherand authors assume no responsibility whatsoever for the uses of this material or for decisionsbased on its use. Neither the author nor anyone else who has been involved with the creation,production, or delivery of this material shall be liable for any reason.
TrademarksAll product names and services identified throughout this book are trademarks or registeredtrademarks of their respective companies. They are used throughout this book in editorialfashion only and for the benefit of such companies. No such use, or the use of any trade name,is intended to convey endorsement or other affiliation with this book.

Table of Contents
Section 1, Introduction..................................................................1Course Objectives.................................................................2How to Use This Manual.....................................................3How to Install the Exercise Files ........................................4CorelDRAW Screen Elements.............................................5
Section 2, Customizing Options ................................................13Using Multiple Workspaces ..............................................14Customizing the Toolbars..................................................17Using Shortcuts .................................................................22Setting Document Defaults ...............................................26Setting File Backups..........................................................32Section Exercise: ................................................................34Section Questionnaire .......................................................36
Section 3, Working With Paragraph Text ..................................37Importing Paragraph Text ................................................38Flowing Text Between Frames .........................................41Formatting Paragraph Frames.........................................44Wrapping Objects Around Paragraph Text......................46Applying Drop Caps...........................................................48Typing Text into Objects ...................................................50Section Exercise: ................................................................53Section Questionnaire .......................................................54
Section 4, Special Text Effects...................................................55Converting Text to Curves ................................................56Creating Blended Text Shadows.......................................58Special Text Effects ...........................................................63Section Exercise: ................................................................77Section Questionnaire .......................................................78
Table of Contents i
©1999 Anzai! Inc. CorelDRAW 9 Advanced

Section 5, Special Page Layouts................................................79Choosing a Page Layout ...............................................80Print Previewing the Layout........................................80Creating Labels.............................................................83Section Exercise: ...........................................................85Section Questionnaire ..................................................86
Section 6, Arranging Objects .....................................................87Group and Child Objects ..............................................88Combining and Breaking Objects ................................90Welding Objects ............................................................94Using Intersection ........................................................96Using Trim ....................................................................97Section Exercise: ...........................................................99Section Questionnaire ................................................100Self-Check Assessment...............................................101
Section 7, Using Layers ............................................................103About Layers...............................................................104Editing Layers ............................................................106Setting Up a Master Layer.........................................108Moving, Copying, and Locking Layers ......................111Reordering the Layers ................................................113Section Exercise: .........................................................115Section Questionnaire ................................................116
Section 8, Using Styles and Templates...................................117About Styles and Templates ......................................118Creating a Style ..........................................................121Applying a Style..........................................................123Copying Properties .....................................................127Section Exercise: .........................................................129Section Questionnaire ................................................130
Section 9, Special Interactive Effects ......................................131Using the Interactive Fill Tool...................................132Using the Distortion Tool ...........................................134Using the Interactive Transparency Tool .................135Applying Mesh Fills....................................................138
ii Table of Contents
CorelDRAW 9 Advanced ©1999 Anzai! Inc.

Section Exercise: ..............................................................142Section Questionnaire .....................................................144
Section 10, Custom Creation Tools .........................................145Creating Custom Patterns ..............................................146Creating Symbols.............................................................149Using the Scrapbook........................................................152Working With Scripts and Presets .................................156Section Exercise: ..............................................................159Section Questionnaire .....................................................160
Section 11, Working With Bitmaps ..........................................161What Is a Bitmap? ...........................................................162Importing Bitmap Options ..............................................163Adjusting Color ................................................................167Hiding Certain Colors In a Bitmap.................................169Applying Special Effects..................................................171Creating Web Images ......................................................173Advanced GIF Options ....................................................174Section Exercise: ..............................................................178Section Questionnaire .....................................................180
Section 12, Using Corel Trace..................................................181Types of Graphic Formats ...............................................182About Corel Trace ............................................................183Exploring the Corel Trace Screen ...................................185Types of Tracing Methods ...............................................186Tracing Images ................................................................187Importing Traced Files into CorelDRAW .......................190Section Exercise: ..............................................................193Section Questionnaire .....................................................194
Section 13, Using Corel Photo-Paint .......................................195About Corel Photo-Paint..................................................196Startup Tips .....................................................................198Exploring the Corel Photo-Paint Screen ........................199Displaying Image Information ........................................200Sizing Image Windows ....................................................200Viewing Image Windows .................................................201Saving Images in Specific Formats.................................202
Table of Contents iii
©1999 Anzai! Inc. CorelDRAW 9 Advanced

Masking Objects .........................................................205Combining Objects......................................................206Using the Objects Docker ...........................................209Feathering Objects .....................................................214Creating and Modifying Text .....................................216Special Text Effects ....................................................218Saving Web Images ....................................................225Creating Simple Animation .......................................227Retouching and Fixing Photos ...................................232Section Exercise: .........................................................236Section Questionnaire ................................................239Self-Check Assessment...............................................240
Appendix A, Publishing to PDF and the Internet....................243Publishing to PDF ......................................................244Publishing to the Internet..........................................248
Appendix B, Keyboard Shortcuts ............................................251
Appendix C, Section Questionnaire Answers ........................257
Appendix D, Web Resources....................................................263
iv Table of Contents
CorelDRAW 9 Advanced ©1999 Anzai! Inc.

S e c t i o n 6
A r r a n g i n g O b j e c t s
äIn this section, you will learn how to:
❑ Work with group and child objects
❑ Differentiate between group and combine
❑ Use combine for special effects
❑ Weld
❑ Intersect
❑ Trim
Section 6, Arranging Objects 87
©1999 Anzai! Inc. CorelDRAW 9 Advanced

Group and Child ObjectsGrouping lets you group objects so that they can beselected, moved, and sized as a single entity. Each objectretains its individual attributes such as outlines and fills.For example, you can group all objects of a logo and movethem without disturbing their relative positioning. Youcan also create nested groups that form subgroups.
äTo group objects:
1. Select the objects you want to group.
2. Do one of the following:
❑ Click the Group button in the Property Bar.
❑ Select Arrange, Group.
To ungroup, select the objects and click Ungroup in theProperty Bar, or select Arrange, Ungroup.
Selecting Child ObjectsObjects that are grouped together are called child objects.If you want to select any object in the group to change itsattributes:
äTo select a child object of a group:
1. Press the [Ctrl] key and click on the object with thePick tool to select it. Circle selection handles appeararound the object.
2. Make the desired changes (size, color, position, etc.).
3. Click any white area on the page when finished.
88 Section 6, Arranging Objects
CorelDRAW 9 Advanced ©1999 Anzai! Inc.
» Note:You can group up to tensubgroups.
» Shortcut:To progressively selectchild objects, press [CtrlTab].

Exercise: Modifying Child Objects
Steps to Follow Comments
1. Open Combine in the Learnfolder.
2. Select both the square and circle. Marquee select both.
3. Click the Group button in theProperty Bar.
Both objects are grouped together.
4. Press [Ctrl] and click on the circleto select this child.
Round selection handles appeararound the circle.
5. Choose a new color from the colorpalette. Try sizing bigger.
Modifications are only made to theselected circle.
6. Deselect all objects and select theentire group.
7. Click on Shape tool and try clickingon the group.
The Shape tool cannot be used toshape grouped objects. Objects mustfirst be either ungrouped orcombined.
8. Use the Pick tool to select thegroup and click the Ungroupbutton in the Property Bar.
To ungroup back to individualobjects.
9. Save the file. To update Combine.
Section 6, Arranging Objects 89
©1999 Anzai! Inc. CorelDRAW 9 Advanced
Round selection handlesindicate that the child of thegroup is selected

Combining and Breaking ObjectsCombining and grouping are somewhat related, althoughthey both have very different results and uses. They bothhave the ability to arrange multiple objects into a singleentity. However, combining will not retain the object’sindividual fill color even if you break them apart.
Group Versus CombineGrouping objects is the most used method of the two totreat multiple objects as a single entity. Each objectmaintains its individual characteristics such as outline,color, and text attributes.
The Combine feature combines selected lines and curvesinto a single curved object, even if they are not connected.When you combine objects with different outlines andfills, CorelDRAW will use the attributes of the last-selectedobject. Therefore, using Combine will result in the objectslosing their individual attributes.
Reasons why you may want to combine:
❑ To create special effects.
❑ To use the Shape tool to join objects together attheir nodes.
❑ To create clipping holes or masks.
❑ To conserve memory for drawings that containnumerous lines and curves.
90 Section 6, Arranging Objects
CorelDRAW 9 Advanced ©1999 Anzai! Inc.
» Note:When you combineobjects, the attributes ofthe last-selected objectwill be used.
Overlapping objectsbecome transparent whencombined

äTo combine objects:
1. Select the objects you want to combine. Select last theobject whose fill and outline attributes you want topreserve.
2. Do one of the following:
❑ Click the Combine button in the Property Bar.
❑ Select Arrange, Combine.
To un-combine, select the objects and select Arrange,Break Apart.
Exercise: Reasons for Using Combine
Steps to Follow Comments
1. Go to page two of Combine. Press the [PgDn] key.
2. Select the oval.
3. Select Arrange, Transformation. The Transformation docker appears.
4. Click the Rotation button.
5. Enter an angle of 10 degrees.
Click Apply To Duplicate.
6. Keep clicking Apply to Duplicateseveral times until it repeats 360degrees.
Requires 16 additional clicks.
7. Close the Transformation docker.
8. Select all ellipses. Double click on the Pick tool.
9. Click Combine in the PropertyBar.
Clipping holes are created whereverthe ellipses intersect.
Section 6, Arranging Objects 91
©1999 Anzai! Inc. CorelDRAW 9 Advanced

10. Go to page three of Combine.
11. Use the Shape tool and click on oneline at a time.
You have access only to one line’snodes at a time. You will have tocombine the lines so that you will beable to connect them.
12. Use the Pick tool and select all fourlines.
Drag a marquee box around thelines to select them all.
13. Select Arrange, Combine.
14. Select the Shape tool.
15. With the Shape tool, marqueeselect the two nodes in the upperleft corner.
The nodes are selected.
16. Click the Join Two Nodes button inthe Property Bar.
17. Repeat the steps above and join allnodes in the corners.
18. When finished, fill the closed boxwith any color of your choice.
The closed shape can now be filled.
19. Go to page four of Combine. You will recreate this fish masklogo. (Text has a hole, ortransparent overlap, through itmaking the fish visible.)
92 Section 6, Arranging Objects
CorelDRAW 9 Advanced ©1999 Anzai! Inc.
Marquee select thesetwo nodes

20. Draw a rectangle below theoriginal logo about the same size.
21. Fill with a fountain fill of yourchoice.
22. Select the Text tool.
23. Type FISH! on top of the rectangle.
24. Format the text as Arial, 175points, bold points.
25. Size and stretch as big as possiblein the rectangle and position asnecessary.
Color is unimportant.
26. Press [Shift] and click on therectangle.
To select both objects with therectangle selected last.
27. Click the Combine button in theProperty Bar to create the mask.
The word FISH! is now transparent.
28. Import Clwnfish in the Learnfolder.
To place the fish on the page.
29. Position and size the fish in thecenter of the rectangle.
30. Click the To Back button in theProperty Bar.
The logo is now complete.
31. Save the file. To update Combine.
Section 6, Arranging Objects 93
©1999 Anzai! Inc. CorelDRAW 9 Advanced
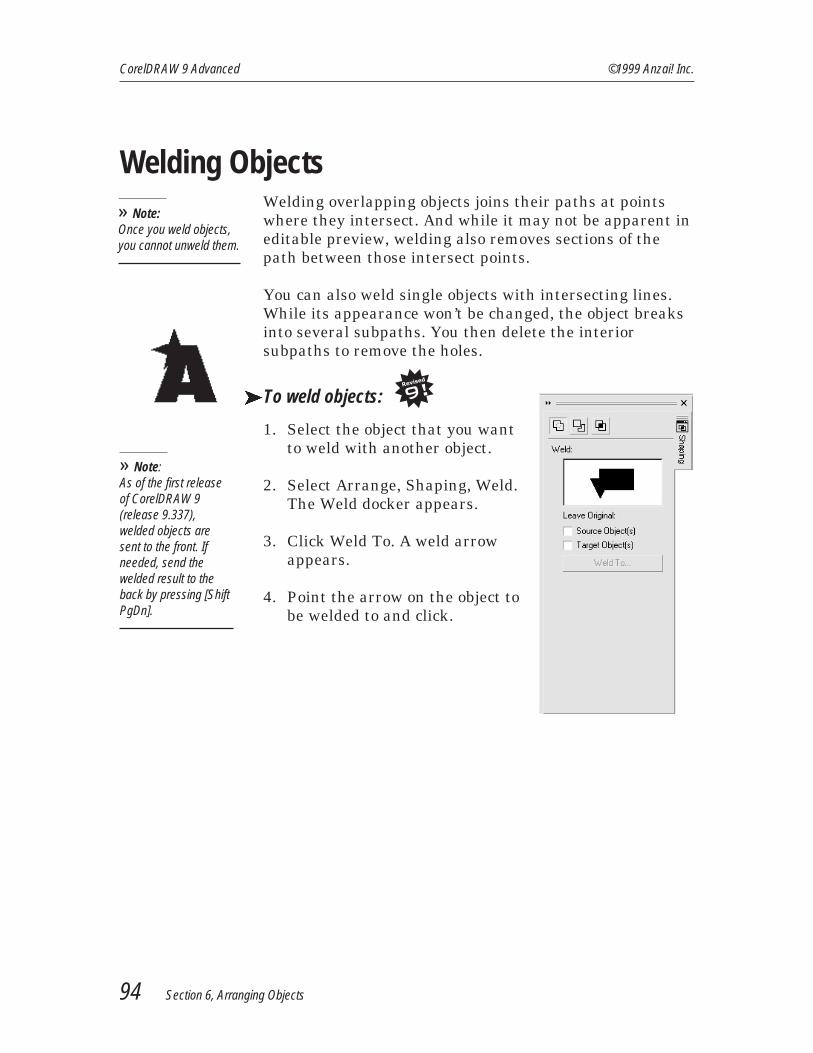
Welding ObjectsWelding overlapping objects joins their paths at pointswhere they intersect. And while it may not be apparent ineditable preview, welding also removes sections of thepath between those intersect points.
You can also weld single objects with intersecting lines.While its appearance won’t be changed, the object breaksinto several subpaths. You then delete the interiorsubpaths to remove the holes.
äTo weld objects:
1. Select the object that you wantto weld with another object.
2. Select Arrange, Shaping, Weld.The Weld docker appears.
3. Click Weld To. A weld arrowappears.
4. Point the arrow on the object tobe welded to and click.
94 Section 6, Arranging Objects
CorelDRAW 9 Advanced ©1999 Anzai! Inc.
» Note:Once you weld objects,you cannot unweld them.
» Note:As of the first releaseof CorelDRAW 9(release 9.337),welded objects aresent to the front. Ifneeded, send thewelded result to theback by pressing [ShiftPgDn].

Exercise: Welding Objects
Steps to Follow Comments
1. Go to page five of Combine.
2. Select the oval at the top of thedrawing.
3. Select Arrange, Shaping, Weld. The Weld docker appears.
4. Click Weld To. A weld arrow appears.
5. Point the arrow on the orangerectangle and click.
Press [Shift PgDn].
The oval is welded to the rectangleto create an arched window shape.
To send to the back.
6. Select the four buildings.
7. Click Weld To. A weld arrow appears.
8. Point the arrow on the graybuilding and click.
All the buildings have been joined attheir intersecting points making onecomplete closed polygon.
9. Press [Shift PgDn]. To send the object to the back.
10. Close the Weld docker.
11. Select the Fill tool and select theFountain Fill tool.
The Fountain Fill dialog boxappears.
12. Choose Blue Wash in the Presetlist and click OK.
The fountain fill spreads between allbuildings.
13. Save the file to update Combine.
Section 6, Arranging Objects 95
©1999 Anzai! Inc. CorelDRAW 9 Advanced

Using IntersectionThe Intersection command creates a new object where twoor more objects overlap. The difference betweenintersecting and combining objects is that combiningcreates a transparent overlap. Intersecting allows you tofill the area with one of the overlapping objects. Anyclosed path can be used to create an intersect object,including grouped objects. The new intersect object takeson the fill and outline attributes of the object you click on.
äTo intersect objects:
1. Select the object that you wantto intersect with anotherobject.
2. Select Arrange, Shaping,Intersect. The Intersect dockerappears.
3. Click Intersect With. An arrowappears.
4. Point the arrow on the object tobe intersected to and click.
5. Change the properties of thenew object (e.g., color, outline).
96 Section 6, Arranging Objects
CorelDRAW 9 Advanced ©1999 Anzai! Inc.
» Note:You can also selectWindow, Dockers,Shaping, Intersect toactivate the docker.

Using TrimThe Trim command removes the overlapping area ofobjects. Its use is much like using a cookie cutter. Thisfeature allows you to draw complex shapes quickly bytrimming with simple shapes. Any closed path can beused to trim or can be trimmed itself, including groupedobjects.
To see the effect of the trim, remove the original objectand view the effect below the overlapping area.
äTo trim objects:
1. Select the object that you wantto use to trim another object.Make sure that it overlaps theobject.
2. Select Arrange, Shaping, Trim.The Trim docker appears.
3. Click Trim. An arrow appears.
4. Point the arrow on the object tobe trimmed to and click.
Section 6, Arranging Objects 97
©1999 Anzai! Inc. CorelDRAW 9 Advanced
» Note:As of the first releaseof CorelDRAW 9(release 9.337),trimmed objects aresent to the front. Ifneeded, send thetrimmed result to theback by pressing [ShiftPgDn].
Exercise: Intersecting and Trimming Objects
Steps to Follow Comments
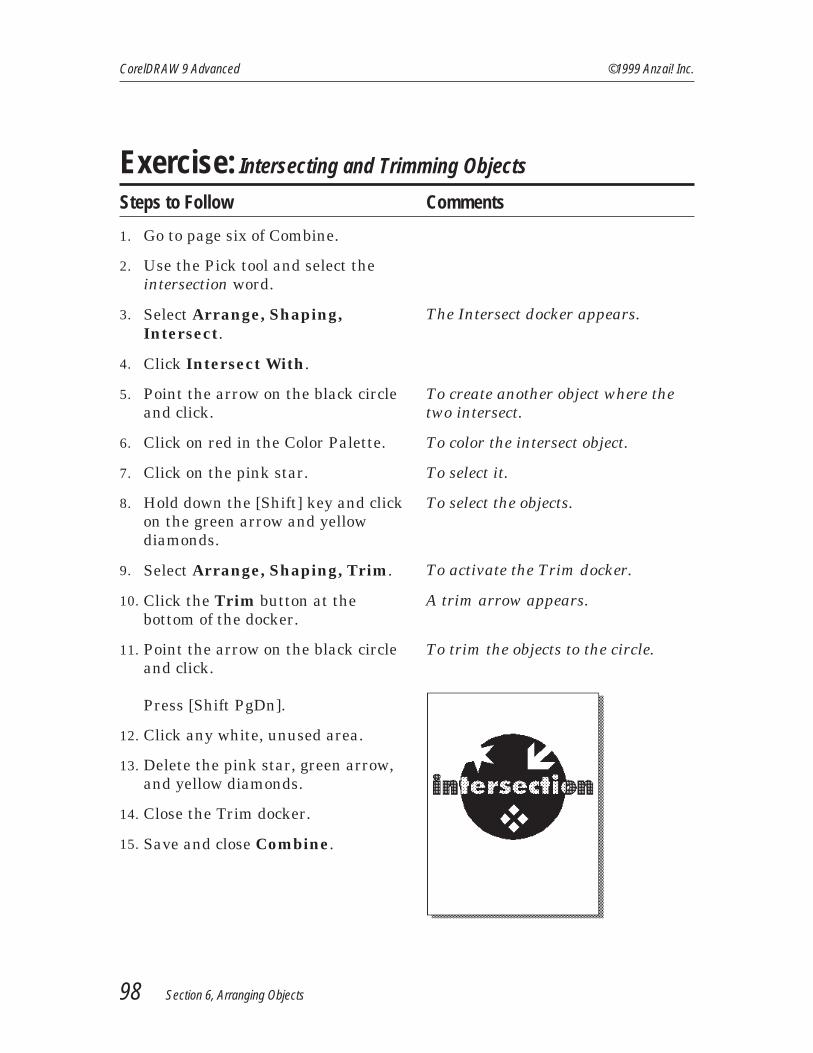
1. Go to page six of Combine.
2. Use the Pick tool and select theintersection word.
3. Select Arrange, Shaping,Intersect.
The Intersect docker appears.
4. Click Intersect With.
5. Point the arrow on the black circleand click.
To create another object where thetwo intersect.
6. Click on red in the Color Palette. To color the intersect object.
7. Click on the pink star. To select it.
8. Hold down the [Shift] key and clickon the green arrow and yellowdiamonds.
To select the objects.
9. Select Arrange, Shaping, Trim. To activate the Trim docker.
10. Click the Trim button at thebottom of the docker.
A trim arrow appears.
11. Point the arrow on the black circleand click.
Press [Shift PgDn].
To trim the objects to the circle.
12. Click any white, unused area.
13. Delete the pink star, green arrow,and yellow diamonds.
14. Close the Trim docker.
15. Save and close Combine.
98 Section 6, Arranging Objects
CorelDRAW 9 Advanced ©1999 Anzai! Inc.

SectionExercise: Transparent Overlaps, Intersecting, and Trimming
Steps to Follow Comments
1. Open Uarrange in the Learnfolder.
2. Create a transparent overlap sothat you can see through the CAKEtext overlapping the circle.
3. Import Bcake.
4. Size and place the cake behind allobjects.
5. Use the Intersection feature tointersect the BIRTHDAY text tothe yellow circle.
6. Color the intersect result red andbring to the front.
7. Trim the arrowhead at the bottomto the yellow circle.
Send the result to the back.
8. Delete the arrowhead and leave thetrim result.
9. Close the Trim docker.
10. Save and close the document.
Section 6, Arranging Objects 99
©1999 Anzai! Inc. CorelDRAW 9 Advanced
B I R T H D AY
Intersection
Trim
Combine

Section QuestionnaireA. What key do you press to select a child of a group?
B. List two reasons why you might need to combineobjects.
C. What happens when you combine overlapping objects?
D. What happens when you weld objects?
E. You can intersect and trim grouped objects. True orfalse?
100 Section 6, Arranging Objects
CorelDRAW 9 Advanced ©1999 Anzai! Inc.
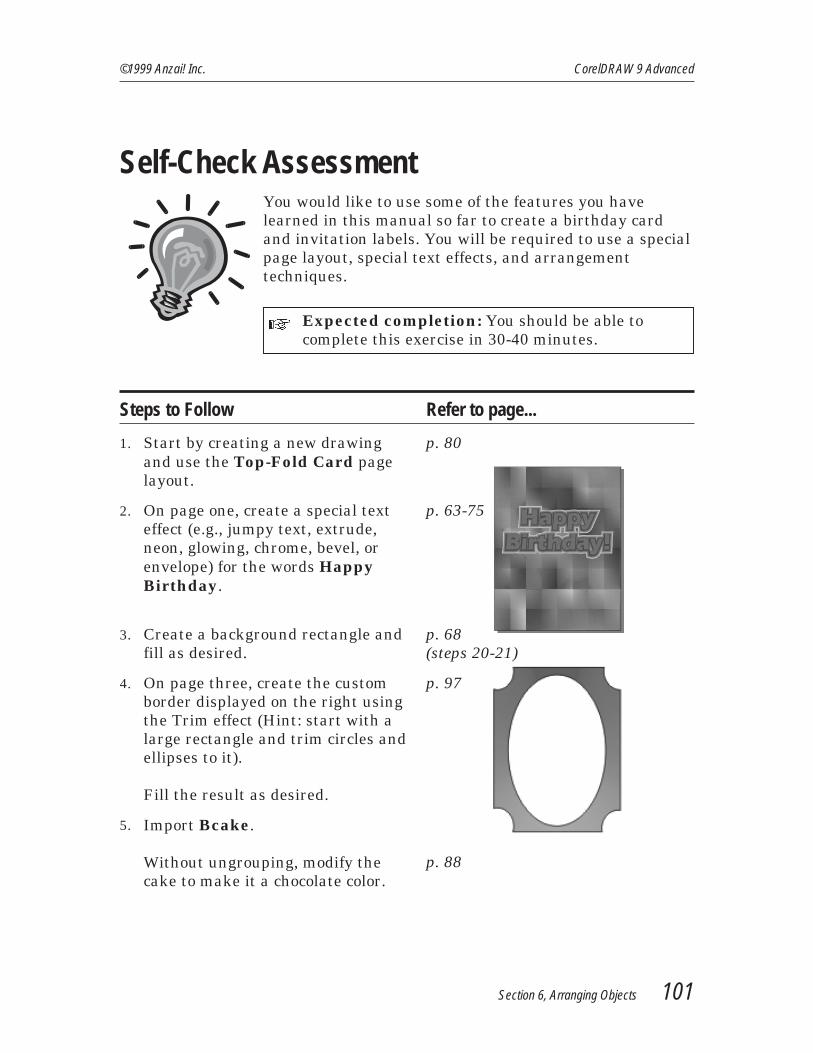
Self-Check AssessmentYou would like to use some of the features you havelearned in this manual so far to create a birthday cardand invitation labels. You will be required to use a specialpage layout, special text effects, and arrangementtechniques.
+ Expected completion: You should be able tocomplete this exercise in 30-40 minutes.
Steps to Follow Refer to page...
1. Start by creating a new drawingand use the Top-Fold Card pagelayout.
p. 80
2. On page one, create a special texteffect (e.g., jumpy text, extrude,neon, glowing, chrome, bevel, orenvelope) for the words HappyBirthday.
p. 63-75
3. Create a background rectangle andfill as desired.
p. 68(steps 20-21)
4. On page three, create the customborder displayed on the right usingthe Trim effect (Hint: start with alarge rectangle and trim circles andellipses to it).
Fill the result as desired.
p. 97
5. Import Bcake.
Without ungrouping, modify thecake to make it a chocolate color.
p. 88
Section 6, Arranging Objects 101
©1999 Anzai! Inc. CorelDRAW 9 Advanced

6. Apply a Bottom Perspective dropshadow below the cake.
p. 60
7. On page three, use an Envelopetext effect for the words Have aswell birthday!.
Apply a drop shadow of your choiceand place the text where desired.
p. 75
p. 60
8. Do a print preview to observe theresult.
p. 80
9. Save as My card.
10. Create a new drawing using theLabels paper size and an AVERY5163-2x4 Shippg label type.
p. 83
11. Import the Clouds image.
Size and stretch to the full page.
12. Type It’s a Party! and a suggestedaddress for the party. Format thetext as desired.
13. Do a print preview to observe theresult.
p. 80
14. Save as My address.
15. Customize the Standard toolbar byadding the Print Preview buttonbeside the Print button.
Test out the new button.
p. 18
16. Close all documents.
102 Section 6, Arranging Objects
CorelDRAW 9 Advanced ©1999 Anzai! Inc.

S e c t i o n 1 3
U s i n g C o r e l P h o t o - P a i n t
äIn this section, you will learn how to:
❑ Work with images
❑ Use the mask tools
❑ Combine objects
❑ Feather objects
❑ Add special text effects
❑ Save JPEG images
❑ Create simple animations
❑ Convert and filter images
❑ Use special editing tools
❑ Retouch color images
Section 13, Using Corel Photo-Paint 195
©1999 Anzai! Inc. CorelDRAW 9 Advanced

Masking ObjectsMasking is an important feature in Corel Photo-Paintthat allows you to alter or protect an area in the image.Masks can be used to protect areas from change or toisolate an area and limit the effects to within theboundaries of the mask. Think of a mask as a stencil thatcontains holes that allow the image areas showingthrough to be changed.
For example, if you are using the Paint tool, the paint isapplied only to area within the confines of the mask. Youcan invert the mask by selecting Mask, Invert so that thepaint is applied outside of the boundaries.
There are two types of masks. Regular masks define aselection within an image that has a distinct shape.Color-sensitive masks create selection based on the colorof the pixels in the image.
Mask ToolsListed below are the grouped mask tools:
Section 13, Using Corel Photo-Paint 205
©1999 Anzai! Inc. CorelDRAW 9 Advanced
Circle
Mask BrushScissors
Lasso
Rectangle
Magic Wand
Freehand
» Tip:Use the Mask, Mode,Additive command tocreate multiple masks.Conversely, theSubtractive mode letsyou expand masks byremoving parts ofexisting selections. Or,use the XOR mode toadd new areas whileexcluding regions thatoverlap within theoriginal selection.

Combining ObjectsYou can paste or drag-and-drop images from other filesonto the current image. This enables you to combinemultiple images into one. For example, you could paste apicture of yourself onto an image of a beach as if you werereally there in person.
Images that are pasted or drag-and-dropped to anotherimage are considered objects. These objects must becombined with the original image if you intend to save thefile. Working with multiple objects may require you to usethe Objects docker.
äTo paste objects onto other images:
1. Using the Mask tools, mask an area of the image.
2. Click on the Copy button in the Standard toolbar.
3. Activate the target image window.
4. Click on the Paste button in the Standard toolbar.
äTo move and size objects:
Use the Object Picker tool and drag the object to move it.Or, drag the selection handles to size the object. ClickApply in the Property Bar.
äTo flip, stretch, rotate, distort, and skew:
1. Use the Object Picker tool and select the object.
2. Select object and choose the desired command (e.g.,Flip, Rotate, Transform). Or, you can successivelydouble click on the object with the Object Picker tooland drag the selection handles.
3. Click Apply in the Property Bar.
206 Section 13, Using Corel Photo-Paint
CorelDRAW 9 Advanced ©1999 Anzai! Inc.

Exercise: Using Masks and Special Effects
Steps to Follow Comments
1. Open Clouds. In the Learn folder.
2. Select Image, Resample. The Resample dialog box appears.
3. Enter 4.5 inches for the Width.
Leave the Height as displayed.
Observe the new image sizedisplayed at the bottom.
It automatically changes.
Increasing the dimensions, increasesthe resulting file size.
4. Click OK.
5. Size the window to the bottom ofthe screen and press [F4].
To view the entire Clouds image.
6. Save the file as a CPT-CorelPHOTO-PAINT Image file calledFinal in the Learn folder.
The native format for CorelPhoto-Paint.
7. Open Earth in the Learn folder.
8. Select the Magic Wand mask fromthe toolbox.
9. Click on any of the red in the Earthwindow.
The magic wand will mask all redareas.
10. Select Mask, Invert. To invert the mask so that just theearth image is masked.
11. Select Effects, 3D Effects,Emboss.
The Emboss dialog box appears.
12. Drag the Depth slider to 3.
Observe the Earth imageunderneath the dialog box.
It interactively displays the embosseffect.
13. Experiment with the Depth, Level,and Direction.
To experiment with the embosseffect.
Section 13, Using Corel Photo-Paint 207
©1999 Anzai! Inc. CorelDRAW 9 Advanced

14. Click OK. Only the masked area is embossed,not the red area outside.
15. Click the Copy button in theStandard toolbar.
Activate the Final image.
Click the Paste button.
To copy the image to the clipboard.
To paste the image onto the Finalimage.
16. Move the Earth image to the topleft area of the window.
Drag it.
17. Save the document. To update Final.
208 Section 13, Using Corel Photo-Paint
CorelDRAW 9 Advanced ©1999 Anzai! Inc.

Using the Objects DockerThe Objects docker displays all objects in the currentimage and provides a thumbnail representation of eachobject. The docker is used to facilitate object managementand editing. Controls allow you to hide objects from view,lock them to protect them from change, change theiroverall opacity, and choose the editable object.
Several menu commands thatare related to objects are alsoprovided as buttons at thebottom of the docker. Thesecommands include the LockObject Transparency, CreateMask From Object, CreateObject From Mask, CombineObjects With Background, NewLens, New Object, and Delete.
The Objects docker also allowsyou to choose the merge modeyou want to use when youcombine an object with theimage background. The mergemode determines how the colorof the object mixes with thecolor of the background.
äTo activate the Objects docker:
Select Window, Dockers, Objects.
äTo arrange objects:
In the Objects docker, drag the thumbnail image toarrange the stacking order of the objects.
Section 13, Using Corel Photo-Paint 209
©1999 Anzai! Inc. CorelDRAW 9 Advanced
» Tip:If you want to create asingle object frommultiple objects, youmust select Object,Combine to merge theobjects together.

äTo change the object’s opacity:
1. In the Objects docker, click on the object's thumbnailimage.
2. Drag the Opacity slider at the top.
äTo merge objects with the background:
1. Do one of the following:
❑ Use the Object Picker tool and click on the object.
❑ Activate the Objects docker and click on the object’sthumbnail image.
2. Select Object, Combine, Combine Objects WithBackground.
210 Section 13, Using Corel Photo-Paint
CorelDRAW 9 Advanced ©1999 Anzai! Inc.
» Shortcut:Press [Ctrl DnArrow] tocombine objects withthe background.

Exercise: Using the Objects Docker
Steps to Follow Comments
1. Using the Final image, select theEarth image in the top left corner.
Selection handles appear around it.
2. Select Window, Dockers,Objects.
The Objects docker appears.
3. Observe the objects listed in thedocker.
Background and Object 1.
4. With the Earth thumbnail selectedin the docker, drag the Opacityslider at the top to 50%.
To allow the clouds background toshow through.
5. Open Face in the Learn folder.
6. Use the Circle Mask tool and drawa circle mask around the face.
7. Click and hold down on the ObjectPicker tool and select the MaskTransform tool (far right side offlyout).
8. Drag the selection handles to resizethe mask as desired.
Place the cursor within the maskand drag to move the maskwithinthe model’s face.
9. Click Apply in the Property Bar. This step is often forgotten.
10. Select Effects, Texture, Plastic.
11. Experiment with the Highlight,Depth, and Smoothness values.
Click OK. The plastic effect is applied.
12. Copy and paste the masked area tothe Final image.
To paste the Face image.
Section 13, Using Corel Photo-Paint 211
©1999 Anzai! Inc. CorelDRAW 9 Advanced
13. Move the Face object to the bottomright area of the image window.
Drag it.
14. Select Object, Flip,Horizontally.
To mirror the face.
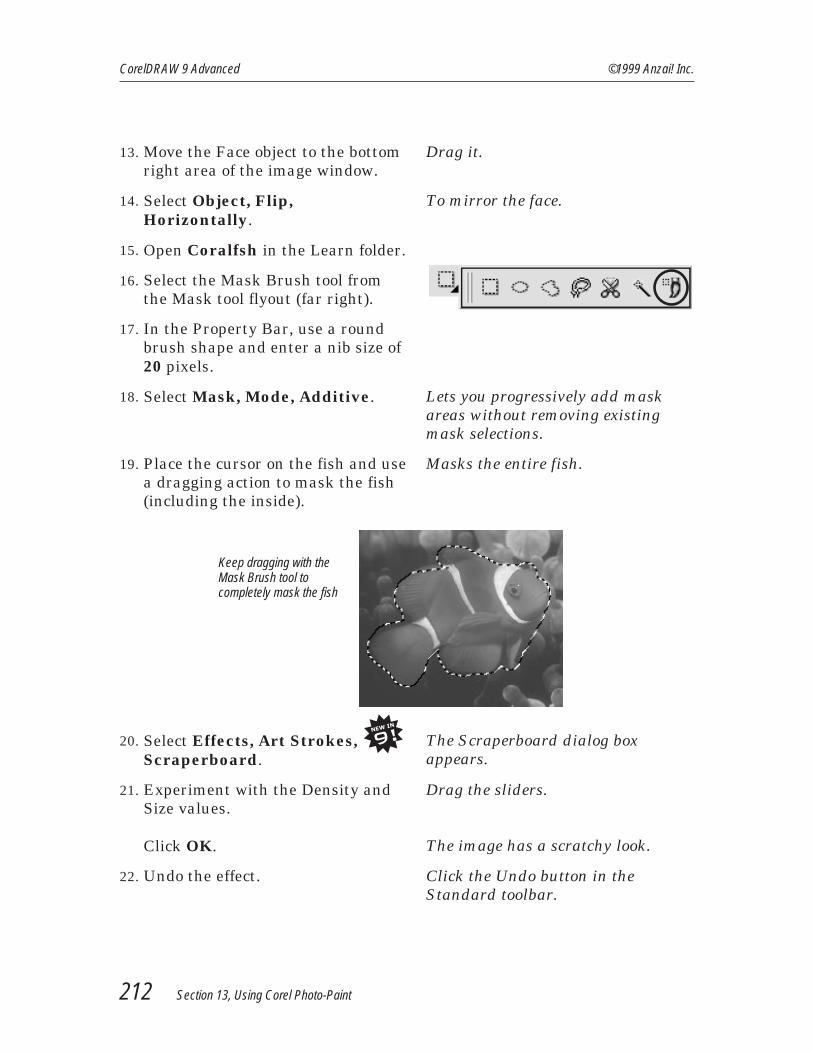
15. Open Coralfsh in the Learn folder.
16. Select the Mask Brush tool fromthe Mask tool flyout (far right).
17. In the Property Bar, use a roundbrush shape and enter a nib size of20 pixels.
18. Select Mask, Mode, Additive. Lets you progressively add maskareas without removing existingmask selections.
19. Place the cursor on the fish and usea dragging action to mask the fish(including the inside).
Masks the entire fish.
20. Select Effects, Art Strokes,Scraperboard.
The Scraperboard dialog boxappears.
21. Experiment with the Density andSize values.
Click OK.
Drag the sliders.
The image has a scratchy look.
22. Undo the effect. Click the Undo button in theStandard toolbar.
212 Section 13, Using Corel Photo-Paint
CorelDRAW 9 Advanced ©1999 Anzai! Inc.
Keep dragging with theMask Brush tool tocompletely mask the fish
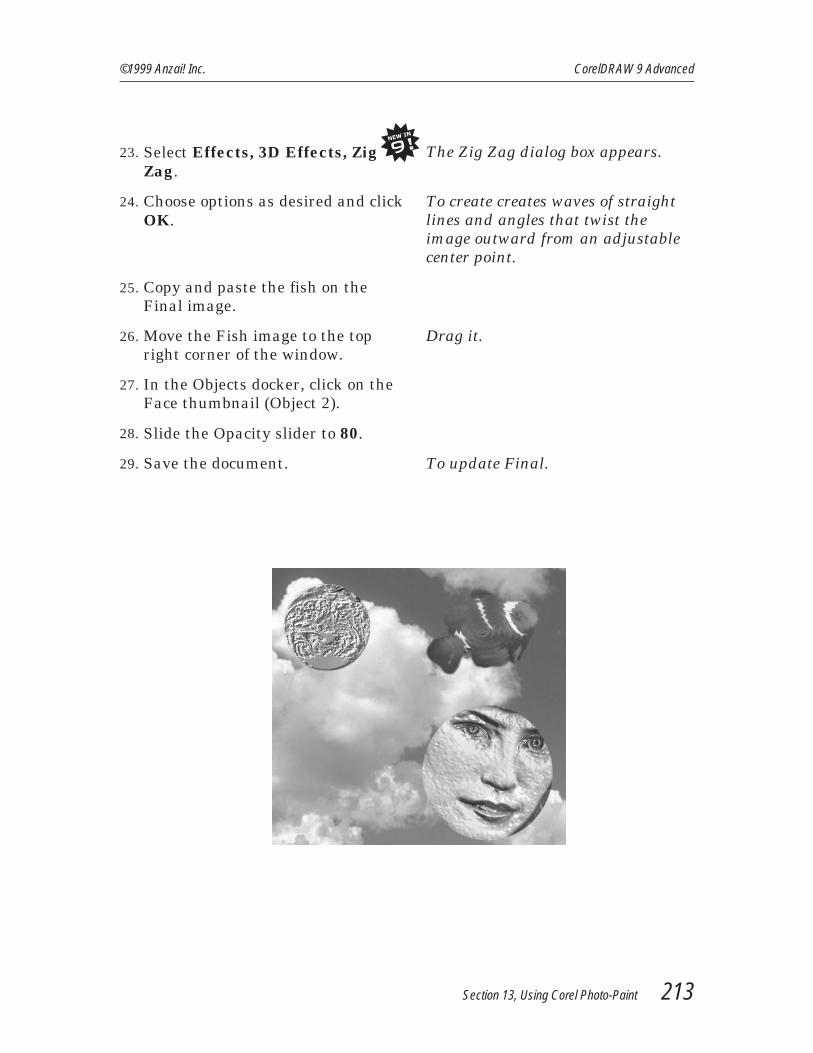
23. Select Effects, 3D Effects, ZigZag.
The Zig Zag dialog box appears.
24. Choose options as desired and clickOK.
To create creates waves of straightlines and angles that twist theimage outward from an adjustablecenter point.
25. Copy and paste the fish on theFinal image.
26. Move the Fish image to the topright corner of the window.
Drag it.
27. In the Objects docker, click on theFace thumbnail (Object 2).
28. Slide the Opacity slider to 80.
29. Save the document. To update Final.
Section 13, Using Corel Photo-Paint 213
©1999 Anzai! Inc. CorelDRAW 9 Advanced

Self-Check AssessmentWorking With CorelDRAW and Corel Photo-Paint ToCreate a Business Card and LogoYou have been asked to use what you have learned so farin this manual to design a logo in CorelDRAW and createa business card. You will then use Corel Photo-Paint toincorporate bitmap effects to create a web image.
+ Expected completion: You should be able tocomplete this exercise in 40-60 minutes dependingon your design.
Steps to Follow Refer to page...
1. In CorelDRAW, start by typingWind Travel and choose a thickfont and large size.
E.g., Futura Extra Black, 100points.
2. Apply a Distortion effect of yourchoice (e.g., Twister distortion).
p. 134
3. Activate the Pattern Fill dialog boxand load Land in the Learn folderas a custom bitmap pattern.
Choose pattern options (e.g., size,offsets) as desired.
p.146
240 Section 13, Using Corel Photo-Paint
CorelDRAW 9 Advanced ©1999 Anzai! Inc.

4. Export the image as a paletted,8-bit GIF image at 96 dpi calledWind logo.
Activate the antialiasing anddithered options.
Make white the transparent color.
p. 175
p. 176
p. 176
5. Use the Labels feature and choosea suitable business card layout(e.g., Avery Lsr/Ink 5371).
p. 83
6. Use Paragraph text to add yourname and address on the businesscard. Format as desired.
7. Use a combination of theInteractive Fill and Transparencytools to create a background.
p. 132, p. 135
8. Draw a small shape (e.g., triangle)and run the Replica script in theScript and Preset Manager dockerto repeat horizontally across thepage.
p. 157
9. Activate the Print Preview andcheck the result.
Close the Print Preview.
p. 80
10. Save the document as Wind travelcard in the Learn folder.
11. Use Photo-Paint to open the Windlogo GIF image that you created inCorelDRAW.
p. 198
12. Use the Paper Size command inthe Image menu and add about aninch to the Width and Height.
13. Create an object from the mask bycutting the selection.
p. 223, step 14
Section 13, Using Corel Photo-Paint 241
©1999 Anzai! Inc. CorelDRAW 9 Advanced

14. Apply a drop shadow and chooseoptions as desired.
p. 220
15. Crop out the extra white spacearound the image.
p. 234, step 23
16. Combine all objects with thebackground.
p. 210
17. Export as a progressive JPG filecalled Windlogo_JPG.
p. 225
18. Close and do not save thedocument.
242 Section 13, Using Corel Photo-Paint
CorelDRAW 9 Advanced ©1999 Anzai! Inc.

A p p e n d i x A
P u b l i s h i n g t o P D F a n d
t h e I n t e r n e t
Appendix A, Publishing to PDF and the Internet 243
©1999 Anzai! Inc. CorelDRAW 9 Advanced

Publishing to PDFPDF is a portable document format designed to preservefonts, images, graphics, and formatting of an originalapplication file. By using Acrobat Reader and AcrobatExchange, the PDF file can be viewed, shared, andprinted by PC, Unix, and Macintosh users. It can also beplaced on an Intranet or the World Wide Web.
CorelDRAW’s Publish To PDF feature lets you adjust aPDF file by using bitmap compression, embedding fonts,and compressing text. There are four preset PDF styles:
❑ PDF for Document Distribution is used forgeneral publishing needs and is designed fordocuments that are to be printed on a laser ordesktop printer.
❑ PDF for Editing is used for editing the file withAdobe Exchange and is set up for LZW bitmapcompression, embedded fonts, and preserved spotcolor options.
❑ PDF for Prepress uses settings recommended forhigh-end printing and is set up for LZW bitmapcompression, embedded fonts, and preserved spotcolor options.
❑ PDF for the Web uses low-resolution settings bestdesigned for Internet viewing and is set up forJPEG bitmap compression, embedded fonts, andcompressed text.
The preset styles are general guidelines and can be editedor deleted. You can also create, edit, or delete custom PDFstyles.
äTo save a document as a PDF file:
1. Click File, Publish To PDF.
2. Type the desired filename and location to which tosave the PDF file.
244 Appendix A, Publishing to PDF and the Internet
CorelDRAW 9 Advanced ©1999 Anzai! Inc.
» Tip:If you choose the PDFFor Prepress style,consult your servicebureau for theirpreferred settings.
» Note:CorelDRAW createsthe actual PDF. You donot need AdobeDistiller.
3. Choose options as desired such as the PDF style.
4. Click OK.
Adding Hyperlinks, Bookmarks, and ThumbnailsYou can include hyperlinks, generate bookmarks, andthumbnails in a PDF document. Hyperlinks are useful foradding jumps to other pages or Internet web pages.Generating bookmarks and thumbnails can be useful inlarge documents. When you open a document in AcrobatReader or Acrobat Exchange, you can choose to display apage, a full screen, all the bookmarks, or all thethumbnails.
äTo set hyperlinks:
1. Right-click the object and select Properties.
2. Click the Internet tab.
3. Type a page location or URL in the Location (URL)box.
4. Click the Apply button.
Appendix A, Publishing to PDF and the Internet 245
©1999 Anzai! Inc. CorelDRAW 9 Advanced

Exercise: Publishing to PDF
The following exercise demonstrates how to create a PDFdesigned for the Internet. By posting a PDF file on yourweb site, visitors can either view or download the file.Viewing the PDF file requires Adobe Reader (freedownload at www.adobe.com).
Steps to Follow Comments
1. Using CorelDRAW, openWeb_PDF in the Learn folder.
2. Right-click on Four Steps to CreateSlides and select Properties.
The Properties dialog box appears.
3. Click on the Internet tab. To display the Internet options.
4. In the Location (URL) list, chooseTop Of Page 4.
Click Apply.
To create a hyperlink to page 4.
5. On page one, click the ABC logoand enter http://www.corel.comin the Location (URL) list.
Click Apply.
To create a hyperlink to Corel’s website.
6. Go to page four and click on SpecialText Effects.
In the Location (URL) list, chooseTop of Page 1.
Click Apply.
To create a hyperlink to page 1.
7. Close the Properties dialog box. Click the x at the top right corner.
8. Select File, Publish To PDF. The Publish To PDF dialog boxappears.
9. In the File name box, enterc:\corel\learn\abcpres.pdf.
246 Appendix A, Publishing to PDF and the Internet
CorelDRAW 9 Advanced ©1999 Anzai! Inc.

10. In the PDF style list, choose PDFfor the Web.
11. Click the Objects tab and checkEmbed fonts in document.
So the fonts do not have to reside onthe viewer’s system.
12. Click on the Advanced tab andobserve the settings.
13. Click on the Document tab andcheck Generate thumbnails.
Thumbnails are low resolutionminiatures of each page.
14. Click the General tab and click the+ sign beside the PDF style list.
The Save PDF Style dialog boxappears.
15. In the Save PDF style as, enter Myweb settings and click OK.
To save the style for future use.
16. Click OK. To save the PDF file.
17. If you have Adobe Reader installedon your system, open the abcpresPDF file and check the result.
Each page you view should closelyresemble the images in CorelDRAW.
18. On page one, click Four Steps toCreate Slides.
To hyperlink to page four.
19. On page four, click Special TextEffects.
To hyperlink back to page one.
20. If you have an Internet connectionand a browser installed on yoursystem, click the ABC logo.
To hyperlink to the www.corel.comweb site.
21. Close Adobe Reader and yourInternet browser.
Appendix A, Publishing to PDF and the Internet 247
©1999 Anzai! Inc. CorelDRAW 9 Advanced

Index
A
Alpha channel, 222Animation, 227
Exercise, 229Auto backup, 32Autotrace, 187
B
Backups, 32Beveled text, 73Bitmap
Color types, 197Cropping, 163Defined, 162Formats, 196Hiding colors, 169Import options, 163Linking, 163Resampling, 163Special effects, 171
Blended effect, 58Bookmarks, 245Break apart, 90
C
Child objects, 88Chrome text, 71Clipping hole, 92Clone tool, 233Color adjusting, 167Columns, 44Combining, 90Combining images, 206Connector Line tool, 50Converting outline to object, 71Copying properties, 127Corel Trace
About, 183
Compatible file formats, 184How to trace, 187Screen elements, 185Trace methods, 186
Course objectives, 2Cropping
Bitmaps, 163
D
DefaultSetting outline and fill defaults, 27Setting text defaults, 27
Distortion, 134Removing, 134
Document defaultsSaving, 26
Drop caps, 48Drop shadow
Removing, 61Using Corel Photo-Paint, 220Using CorelDRAW, 60
E
Emboss, 223Envelope text, 75
F
Feathering, 214Fill
Interactive, 132Mesh, 138Transparency, 135
Index i
©1999 Anzai! Inc. CorelDRAW 9 Advanced

G
Gamma, 233Gaussian blur, 223GIF, 173
Advanced options, 174Animation, 227Saving, 176
Glowing text, 69Graphic and Text docker, 119Graphic formats, 182Grouping, 88Guidelines, 7
H
HidingColors, 169
How to use this guide, 3HTML, 248Hue, 233Hyperlinks, 245
I
Image information, 200Image sprayer tool, 235Importing
Bitmap options, 163Text, 38Trace files, 190
Installing exercise files, 4Interactive
Connector tool, 50Distortion tool, 134Drop shadow, 60Fill, 132Fill tool, 132Mesh tool, 138Transparency tool, 135
Interlacing, 174Internet
Publishing to, 248Saving images, 173, 225
Intersection, 96
J
JPEG, 173Jumpy text, 63
K
Keyboard shortcuts, 252
L
Labels, 83 - 84Layer Manager View button, 111Layers, 104
Editing, 106Moving, copying, and locking, 111Reordering, 113
LinkingBitmaps, 163
M
Mask tools, 205Masking, 205Master layer, 108Menu command shortcuts, 23Mesh Fill tool, 138Movies, 227
N
Neon text, 67
O
Objects docker, 209Outline to object, 71
ii Index
CorelDRAW 9 Advanced ©1999 Anzai! Inc.

P
Page layout, 80Paragraph text
Flowing, 41Moving, 38
PatternsCreating custom, 146
PDF publishing, 244Photo-Paint
About, 196Adding text, 216Retouching bad photos, 232Screen elements, 199Special text effects, 218Startup tips, 198
Pop-Up menu, 22Presets, 156Print previewing, 80Publishing to PDF, 244Puffy text, 222Push and Pull distortion, 134
R
Raised text, 218Resampling
Bitmaps, 163Retouching bad photos, 232
S
Scrapbook, 152Screen elements, 5Scripts, 156Section questionnaire answers, 257 - 262Shadows
Using Photo-Paint, 220Side-fold card, 81Smear tool, 234Soft shadow
Creating, 60Special effects
Bitmap, 171Text using CorelDRAW, 63Text using Photo-Paint, 218
Styles, 118
Applying, 123Creating new, 121
SymbolsCreating custom, 149
T
Templates, 118Creating new, 119
TextAdding in Photo-Paint, 216Beveled, 73Chrome text, 71Converting to curves, 56Glowing, 69Jumpy effect, 63Neon effect, 67Puffy, 222Shadows, 58Shadows in Photo-Paint, 220Special effects, 63Typing into objects, 50
The Boss filter, 219Thumbnails, 245Tone, 232Toolbars
Customizing, 17Toolbox, 6
Shortcut keys, 6Tracing
How to use Corel Trace, 187Transparency, 174Transparency tool, 135Trim, 97Twister distortion, 134
V
Vector, 162Vertical alignment, 50
W
Web images, 173Saving GIF, 174Saving JPEG, 225
Welding, 94
Index iii
©1999 Anzai! Inc. CorelDRAW 9 Advanced

Workspaces, 14
Z
Zipper distortion, 134Zoom shortcuts, 22
iv Index
CorelDRAW 9 Advanced ©1999 Anzai! Inc.