Embed Size (px)
Citation preview
abcde
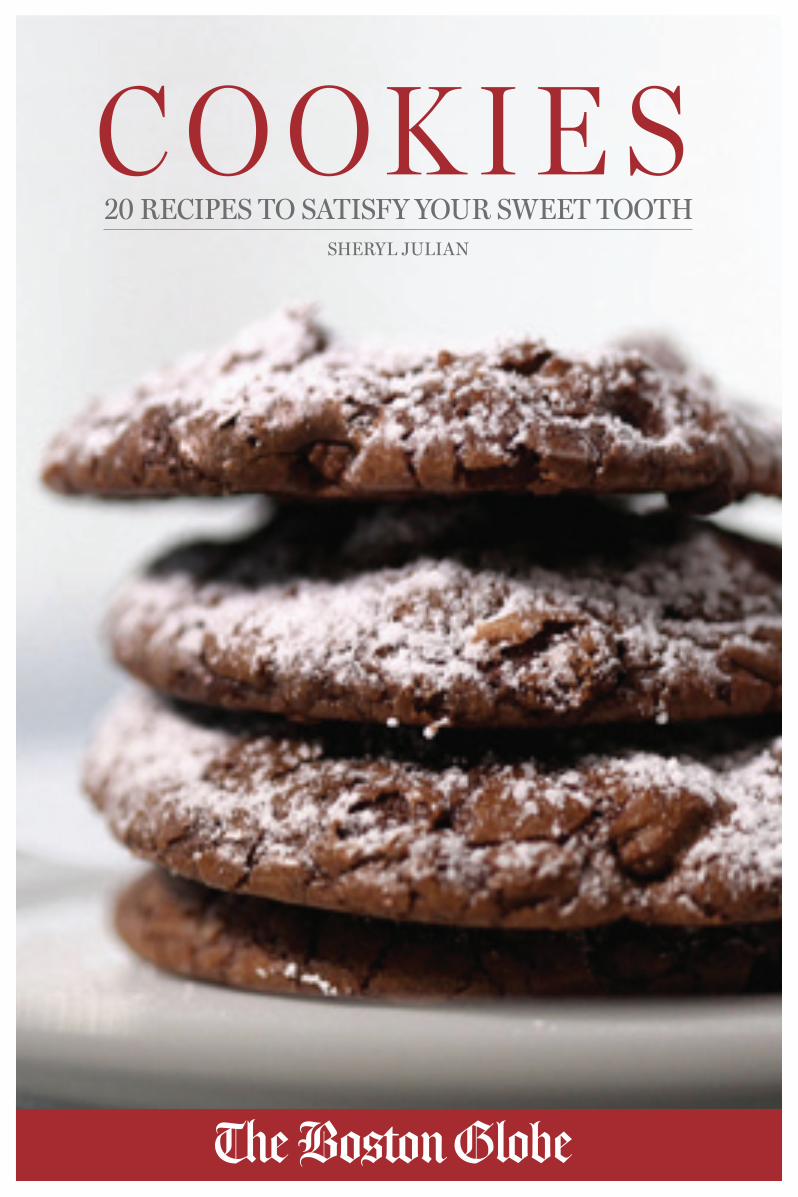
cookies20 recipes to satisfy your sweet tooth
sheryl Julian
©2012 by The Boston Globe
All rights reserved under the Pan-AMerican and International
Copyright Conventions.
The book may not be reporduced in whole or in part, in any form or by any
means, electronic or mechanical, including photocopying, recording, or by any
information storage and retrieval system now known or hereafter invented,
without written permission from the publisher.
ISBN: 978-1-939287-00-7
Alice Medrich’s chocolate chip cookies excerpted from “Chewy Gooey Crispy
Crunchy Melt-in-Your-Mouth Cookies,” by Alice Medrich (Artisan Books).
© 2010. Photographs by Deborah Jones
Dorie Greenspan’s salted butter break-ups excerpted from “Around My
French Table,” by Dorie Greenspan (Houghton Mifflin) © 2010

table of contentsSugar cookies 6
My mother’s sugar cookies 8
Kourambiethes (Greek sugar cookies) 10
Dorie Greenspan’s salted butter break-ups 12
Chocolate-chunk shortbread triangles 14
Salty-topped chocolate cookies 16
Alice Medrich’s chocolate-chip cookies 20
Lisa Yockelson’s dark-chocolate brownies 22
Double-chocolate cookies 24
Bittersweet-chocolate brownie cookies 26
Oatmeal-raisin-walnut cookies 28
Jillian Greene’s almond squares 30
Suzanne Lombardi’s molasses-clove cookies 32
Old-fashioned hermits 34
Peanut butter cookies 36
Peanut butter pretzel cookies 38
Fork Cookies 40
Date-nut bars 42
Rugelach 44

Everyone loves a good cookie. You
can see that from the sales of cook-
ies in bakeries and at specialty mar-
kets. So you can only imagine how
pleased every guest is to be served
a plate of homemade confections --
crisp, sugary, chewy, lovely sweet
treats.
Some cookie recipes we make
have been around for a long time
and have humble roots. Bakers
have been making shortbread for hundreds of years, perhaps with
different flours than we have now. My mother’s sugar cookies, origi-
nally intended for a cookie press, came from the back of a box and
are so easy, a child can mix the dough. Brownies became popular in
this country in the middle of the last century, thanks to chocolate
companies giving out recipes that used their brand.
Good home cooks are always looking for dependable recipes, so
we offer these hoping there is something for everyone: exception-
ally crisp chocolate-chip cookies, all manner of sugar cookies and
shortbread, fudgy brownie cookies, sugar-coated Greek cookies,
old-fashioned hermits, peanut butter cookies and another PB ver-
sion made with salted pretzels, oatmeal-raisin cookies, tender ru-
gelach, and more.
We wish you many contended hours with a whirring mixer, bak-
ing sheets full of delicious cookies, and family and guests with big
smiles.
Happy baking.
Sheryl Julian
Food Editor
The Boston Globe
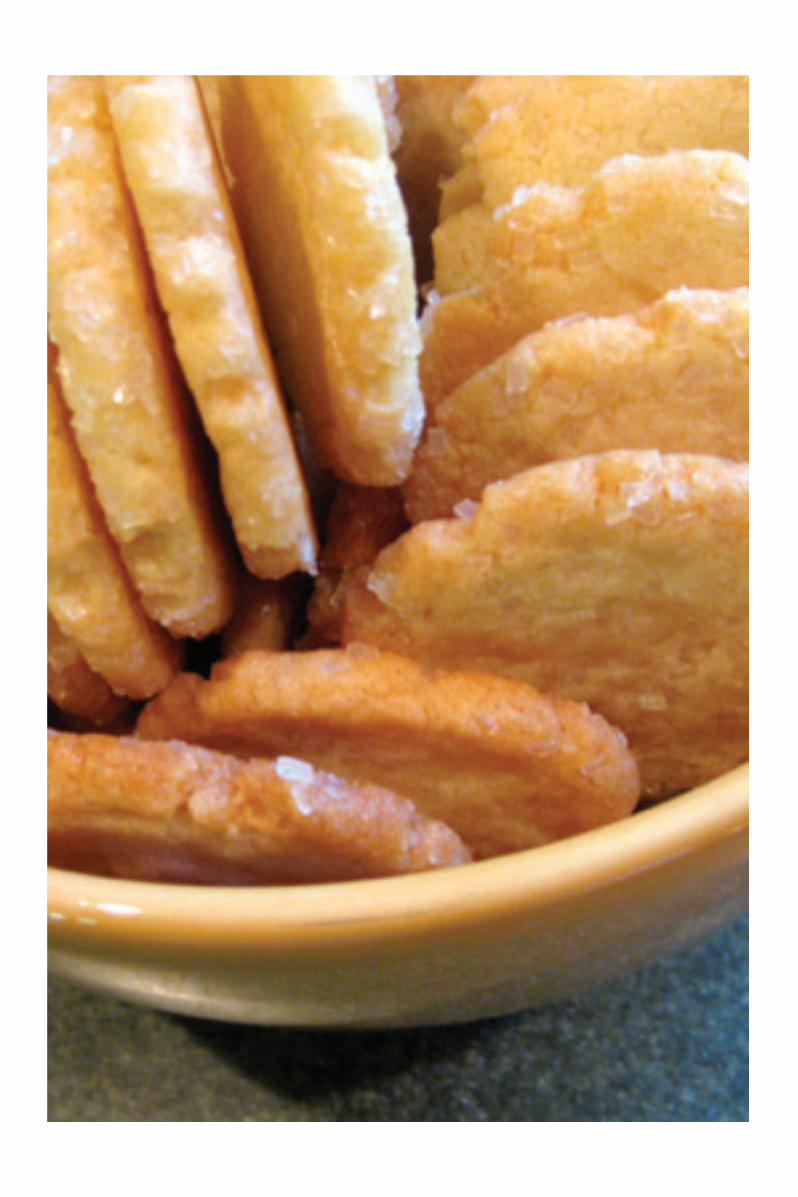
sugar cookies
Makes enough to spell out the alphabet or 35 rectangular
cookies.
1/2 cup (1 stick) unsalted butter, at room temperature
1/3 cup sugar
1 egg white, lightly beaten
1/4 teaspoon salt
1 1/2 cups flour
Extra flour (for shaping)
Extra sugar (for rolling)
1. In an electric mixer, beat the butter until light. Gradually
beat in the sugar, scraping down the sides of the bowl several
times. Beat in the egg white a little at a time, then the salt.
With the mixer set on its lowest speed, beat in the flour, 1/2
cup at a time, scraping down the sides of the bowl. When the
mixture is smooth, turn it out onto a lightly floured counter.
2. Shape the dough into a smooth flat cake. Wrap in foil, and
refrigerate for 1 hour.
3. Set the oven at 375 degrees. Line a baking sheet with parch-
ment paper.
4. On a lightly sugared board, roll the dough to a 1/4-inch
thickness. Cut out letters and transfer them to the baking
sheet. Reshape and reroll the scraps and stamp out more let-
ters. Alternatively, make 6 horizontal cuts and 4 vertical cuts
to form rectangles. Transfer to the baking sheet and prick each
one twice with a fork.
5. Bake the letters for 5 minutes or until they are set and
beginning to turn golden at the edges. Bake the cookies for 12
to 14 minutes or until they are golden at the edges. Transfer to
wire racks to cool. Sheryl Julian
One June at the
Boston Globe,
we were trying
to figure out how to write
the word “congratulations”
so it looked festive. Sheryl
Julian went into the kitch-
en, made this dough, and
with the help of a young
page designer, rolled it out
and stamped out the let-
ters. If you want to spell
out “congratulations,” start
at the edge of the dough so
you don’t waste any. After-
wards, reshape, reroll, and
stamp out more letters or
cookies. Or use this dough
to stamp out whatever let-
ters or shapes you like.


My Mother’s sugar cookies
Makes about 4 dozen.
1 cup (2 sticks) unsalted butter, at room temperature
2/3 cup granulated sugar
1 egg, lightly beaten
1 teaspoon vanilla extract
2 1/2 cups flour
Pinch of salt
Extra sugar (for rolling)
1. In an electric mixer, cream the butter until soft. Add the
sugar and beat until it is incorporated.
2. Beat in the egg, followed by the vanilla. With the mixer set
on its lowest speed, beat in the flour and salt.
3. Scrape down the sides of the bowl and press a piece of plas-
tic wrap directly onto the batter. Refrigerate for 10 minutes.
4. Set the oven at 350 degrees. Line 2 baking sheets with
parchment paper.
5. Spread enough sugar on a deep plate to make a thin layer.
Using a teaspoon, scoop up a mound of dough and roll it
in your hands into a ball. Drop it onto the sugar and roll it
around to coat it all over. With the bottom of a glass, press
the ball to flatten it. Turn it over in the sugar and press again.
Transfer to a baking sheet. Continue rolling dough in sugar
until all the cookies are done.
6. Bake the cookies for 14 minutes or until the edges are just
beginning to color. Check the baking sheets after 12 minutes
to make sure cookies at the edges have not browned. Transfer
to a wire rack to cool. Store in an airtight container for up to 2
weeks. Sheryl Julian
Sheryl Julian’s moth-
er made these from
the back of a box
that came with a cookie
press. After some years,
she discarded the press and
began rolling balls of dough
by hand, pressing them
with a juice glass dipped
into sugar, and baking
them until quite crisp. They
have no leavening agent, so
they’re wafer-like.

kouraMbiethes (greek sugar cookies)
Makes about 2 dozen
1 cup (2 sticks) unsalted butter, at room temperature
1/4 cup confectioners’ sugar
1 tablespoon vanilla extract
2 1/2 cups flour
Extra confectioners’ sugar (for rolling cookies)
1. Set the oven at 350 degrees. Line 2 baking sheets with
parchment paper.
2. In an electric mixer, beat the butter until creamy. Add the
1/4 cup of sugar and vanilla.
3. With the mixer on low speed, beat in the flour until com-
bined. The batter will be crumbly. Press the dough into a large
ball, wrap in plastic wrap, and refrigerate for 30 minutes.
4. Pinch off small pieces of the dough and roll them into
1-inch balls. Set them on the sheets. Bake for 20 to 25 minutes
or until they are pale golden.
5. Place about 1 cup of confectioners’ sugar in a shallow bowl.
Roll the warm cookies in the sugar until they are coated all
over. Transfer to a rack to cool. Lisa Zwirn. Adapted from
Zesto Kafe
These Greek wed-
ding cookies are
rich and buttery
and melt in your mouth.
You roll the warm cook-
ies in lots of confectioners’
sugar so they’re coated all
over.
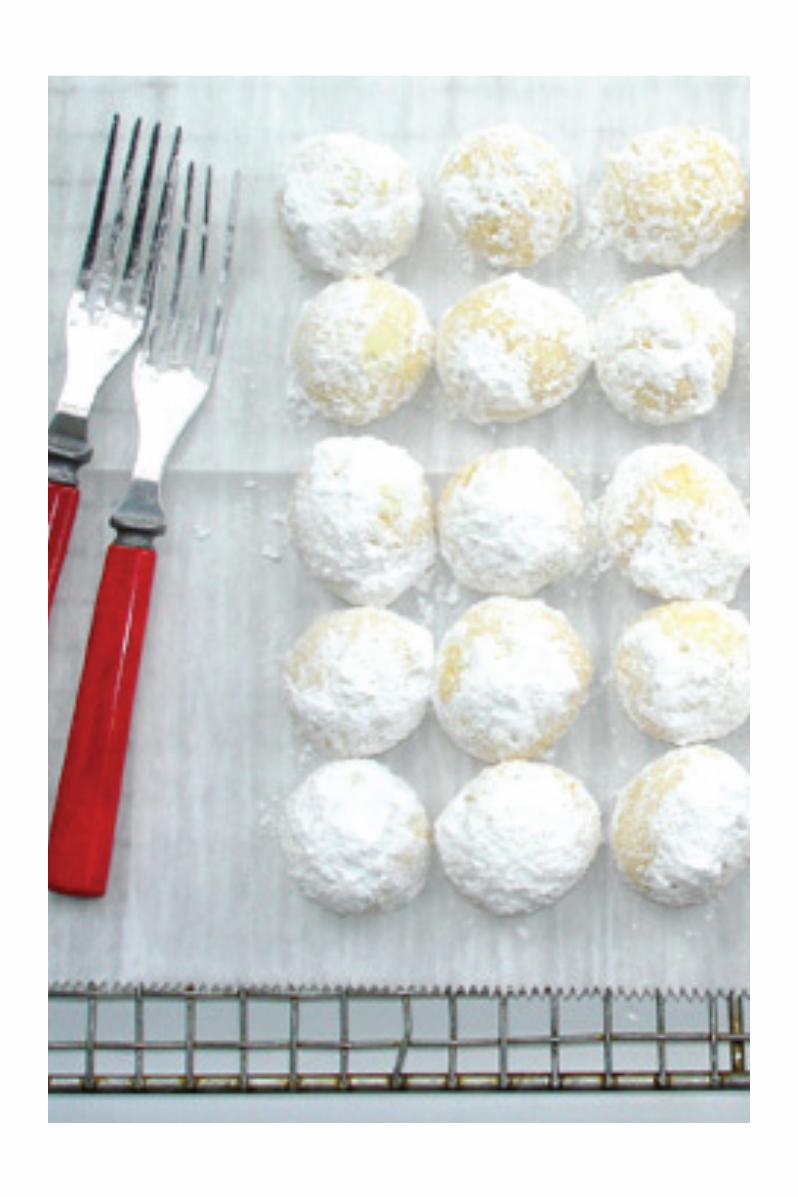
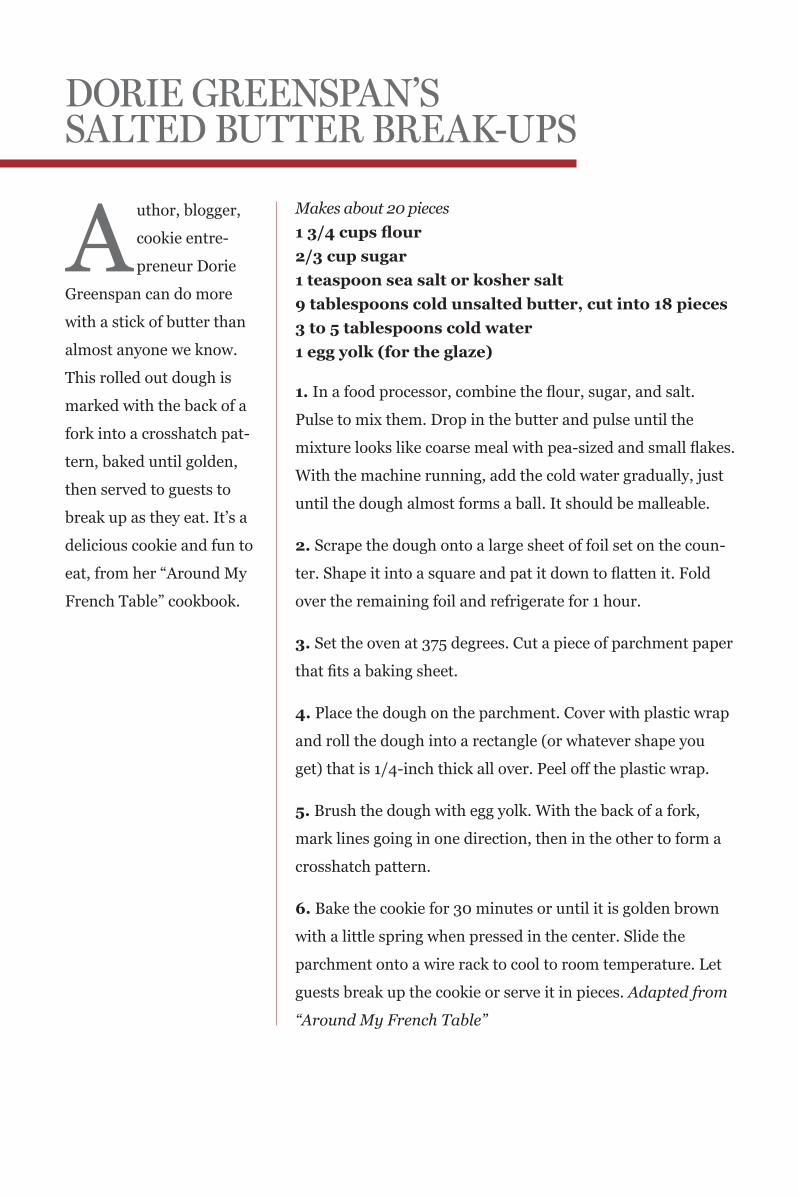
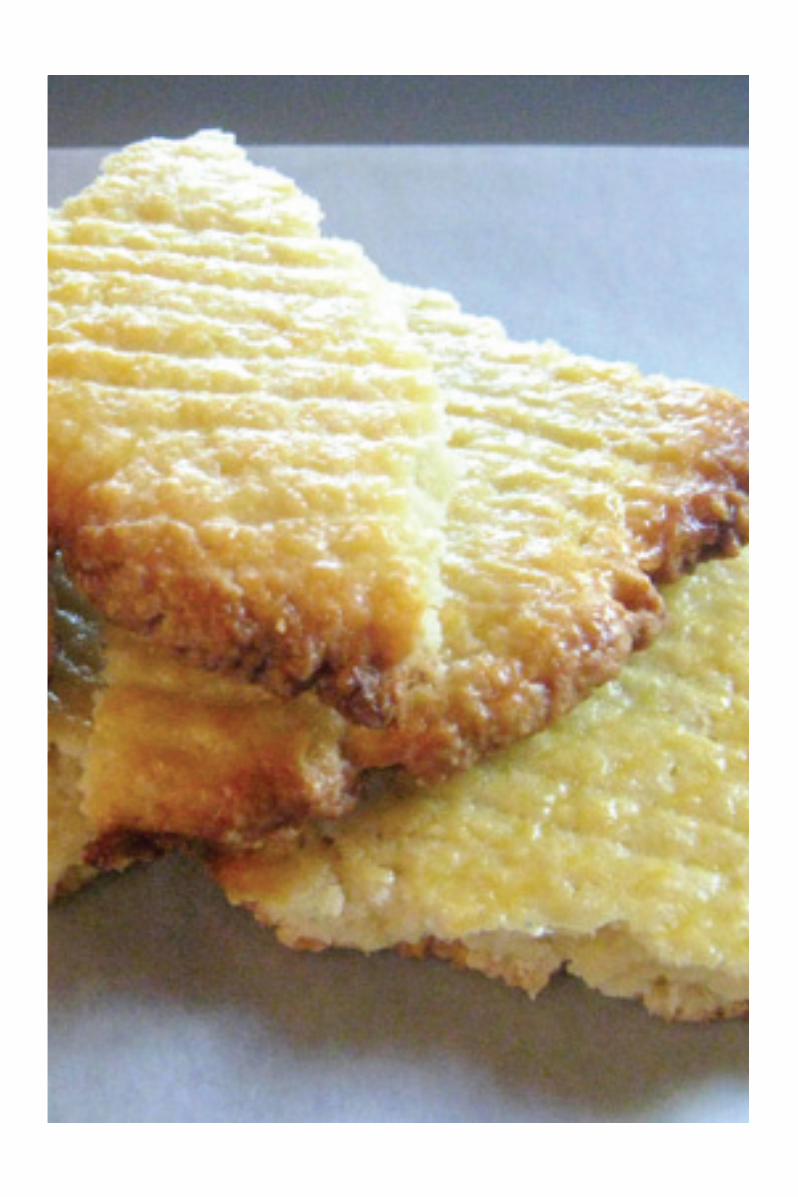
Dorie greenspan’s salteD butter break-ups
Makes about 20 pieces
1 3/4 cups flour
2/3 cup sugar
1 teaspoon sea salt or kosher salt
9 tablespoons cold unsalted butter, cut into 18 pieces
3 to 5 tablespoons cold water
1 egg yolk (for the glaze)
1. In a food processor, combine the flour, sugar, and salt.
Pulse to mix them. Drop in the butter and pulse until the
mixture looks like coarse meal with pea-sized and small flakes.
With the machine running, add the cold water gradually, just
until the dough almost forms a ball. It should be malleable.
2. Scrape the dough onto a large sheet of foil set on the coun-
ter. Shape it into a square and pat it down to flatten it. Fold
over the remaining foil and refrigerate for 1 hour.
3. Set the oven at 375 degrees. Cut a piece of parchment paper
that fits a baking sheet.
4. Place the dough on the parchment. Cover with plastic wrap
and roll the dough into a rectangle (or whatever shape you
get) that is 1/4-inch thick all over. Peel off the plastic wrap.
5. Brush the dough with egg yolk. With the back of a fork,
mark lines going in one direction, then in the other to form a
crosshatch pattern.
6. Bake the cookie for 30 minutes or until it is golden brown
with a little spring when pressed in the center. Slide the
parchment onto a wire rack to cool to room temperature. Let
guests break up the cookie or serve it in pieces. Adapted from
“Around My French Table”
Author, blogger,
cookie entre-
preneur Dorie
Greenspan can do more
with a stick of butter than
almost anyone we know.
This rolled out dough is
marked with the back of a
fork into a crosshatch pat-
tern, baked until golden,
then served to guests to
break up as they eat. It’s a
delicious cookie and fun to
eat, from her “Around My
French Table” cookbook.

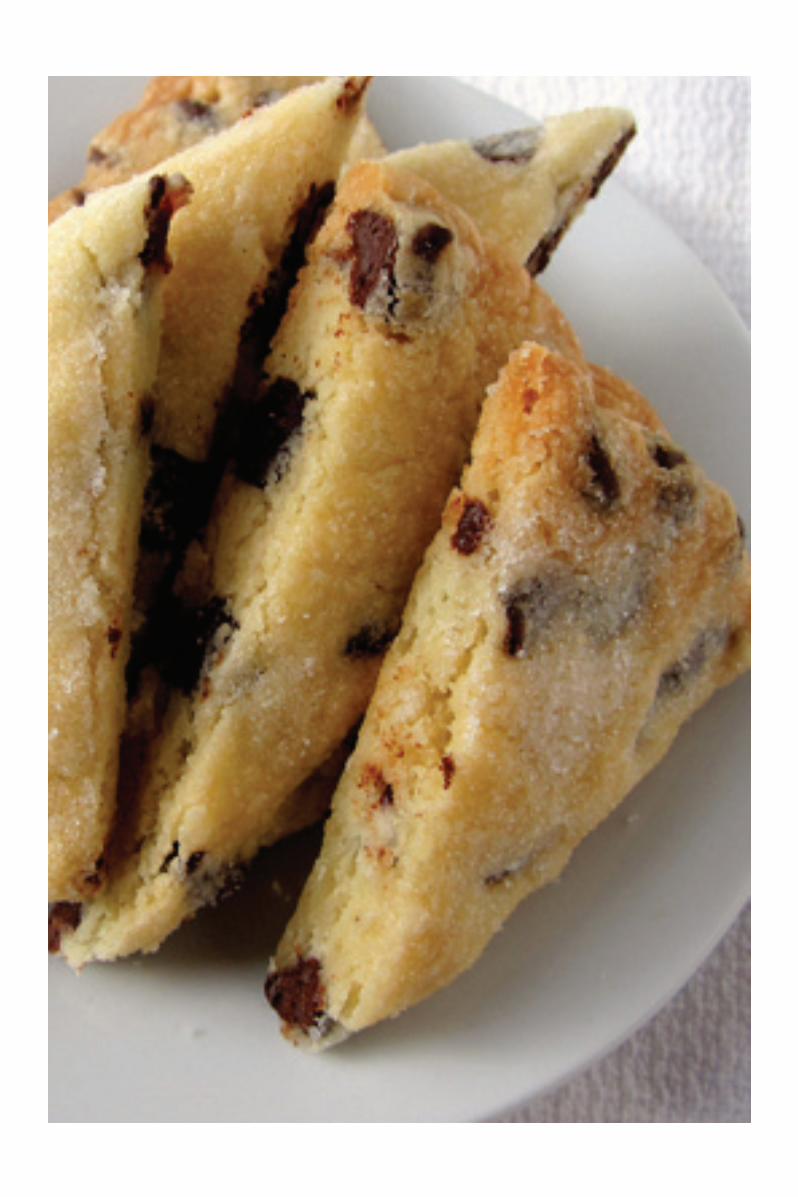
chocolate-chunk shortbreaD triangles
Makes 24
1 cup (2 sticks) unsalted butter, at room temperature
1 cup confectioners’ sugar, sifted
2 cups flour
1/4 teaspoon salt
1 cup chopped bittersweet chocolate (60 percent co-
coa) or chocolate chips
Granulated sugar (for sprinkling)
1. Set the oven at 350 degrees. Line 2 baking sheets with parch-
ment paper. Use a pie pan or plate and a pencil to draw three
6-inch rounds on the papers. Turn the papers over.
2. In an electric mixer on medium speed, with the paddle at-
tachment, if you have one, beat the butter for 1 minute or until
smooth. Add the confectioners’ sugar and beat until the mix-
ture is creamy.
3. Add the flour and salt. Continue beating, scraping down
the sides of the bowl, until the mixture is smooth. Remove the
bowl from the mixer stand. With a rubber spatula, stir in the
chopped chocolate.
4. Set 1/3 of the dough in the center of each round. With the
heel of your hand, press the dough evenly to fill the circles.
5. Sprinkle the dough generously with granulated sugar. With
a large straight-edged knife, cut one of the rounds evenly into
quarters. Cut each quarter in half to make 8 triangles. Repeat
with the other rounds.
6. Bake the rounds for 25 minutes or until they are pale golden,
turning the sheets from back to front halfway through baking.
7. Slide the parchment papers onto wire racks and let the
rounds sit for a few minutes to cool. Carefully transfer the
papers to a board. Use a clean knife to cut the rounds along the
same lines you made before baking. Set the triangles on a wire
rack to cool completely. Store in an airtight container for up to
2 weeks. Sheryl Julian
One way to make
shortbread look
professional is
to draw circles with pencil
on parchment paper, then
turn the paper over and
press the dough inside the
rounds. These are made
with chocolate chunks or
chips, then dredged with
sugar, baked, and cut into
triangles.

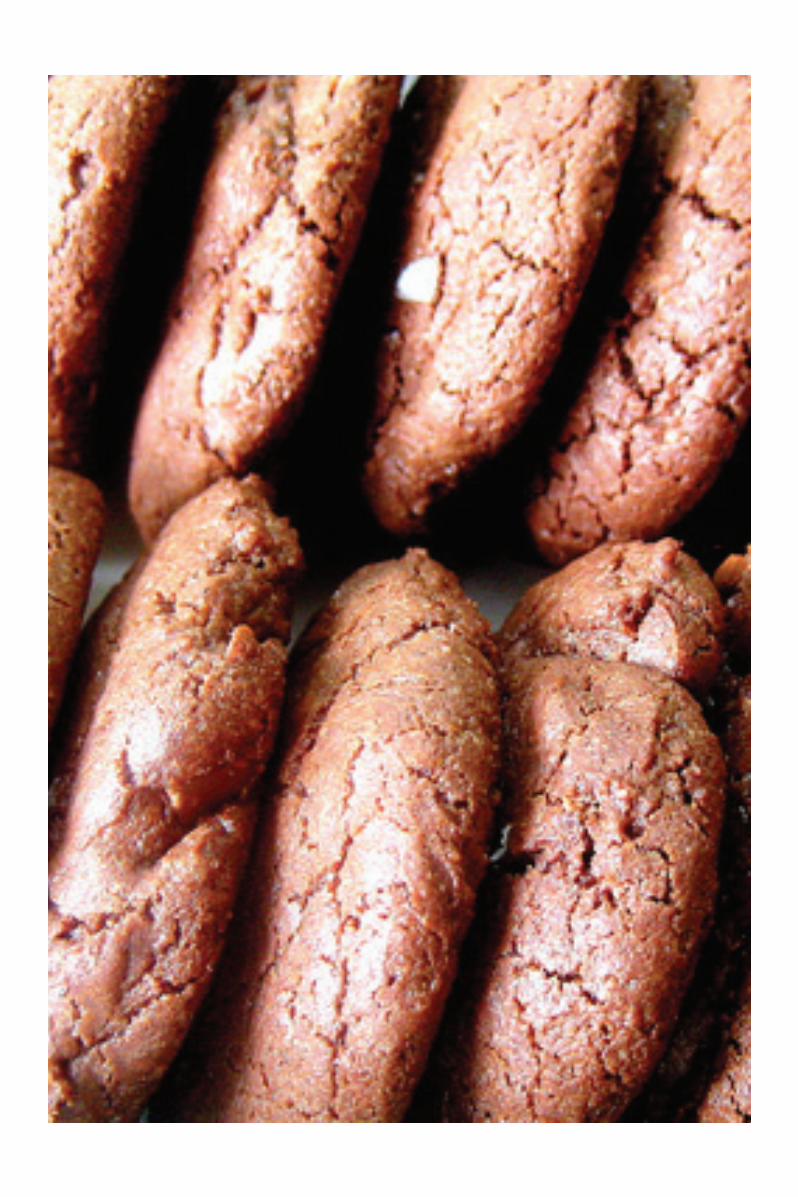
salty-toppeD chocolate cookies
Makes 3 dozen
3 1/2 ounces unsweetened chocolate
1 tablespoon butter
1 1/2 cups flour
1/4 cup unsweetened cocoa powder
1 1/2 teaspoons baking powder
1/2 teaspoon salt
1 ounce milk chocolate, chopped
1 1/2 cups sugar
1/4 cup canola oil
1 teaspoon vanilla extract
3 eggs
Sea salt, such as Malden (for sprinkling)
1. Set the oven at 350 degrees. Line 2 baking sheets with
parchment paper.
2. In a bowl over a saucepan of hot water, melt the unsweet-
ened chocolate and butter, stirring often. When it is almost
melted, turn off the heat and let the remaining chocolate melt
in the heat of the pan. Remove the bowl from the water and
wipe the bottom of the bowl.
3. In another bowl, whisk the flour, cocoa powder, baking
powder, salt, and chopped milk chocolate.
4. In a third bowl with a wooden spoon, stir together the sugar
and oil; the mixture will be dry. Stir in the melted chocolate
mixture and vanilla. Add the eggs, one at a time, mixing well
after each addition. Stir in the cocoa mixture in 3 addition.
The mixture will thicken as you work.
5. Spoon the batter in walnut-sized mounds onto the baking
sheets, setting them 2 inches apart. Flatten with wet fingers.
Sprinkle very lightly with sea salt.
6. Bake for 12 minutes or until the tops crack and are just firm
to the touch when pressed with a fingertip. Slide the parch-
ment paper with the cookies onto wire racks to cool. Catherine
Smart. Adapted from A-Frame restaurant
These large, intense
chocolate cookies,
dusted lightly with
coarse salt, are great for a
last-minute dessert, filled
with any flavor of store-
bought ice cream. Pastry
chef Beth Kellerhals of
A-Frame restaurant in Los
Angeles devised these salty-
sweet sandwiches for those
moments when her “choco-
late craving has an identity
crisis,” she says, and she
can’t decide whether she
wants a brownie or a cook-
ie. She uses them to make
ice cream sandwiches.

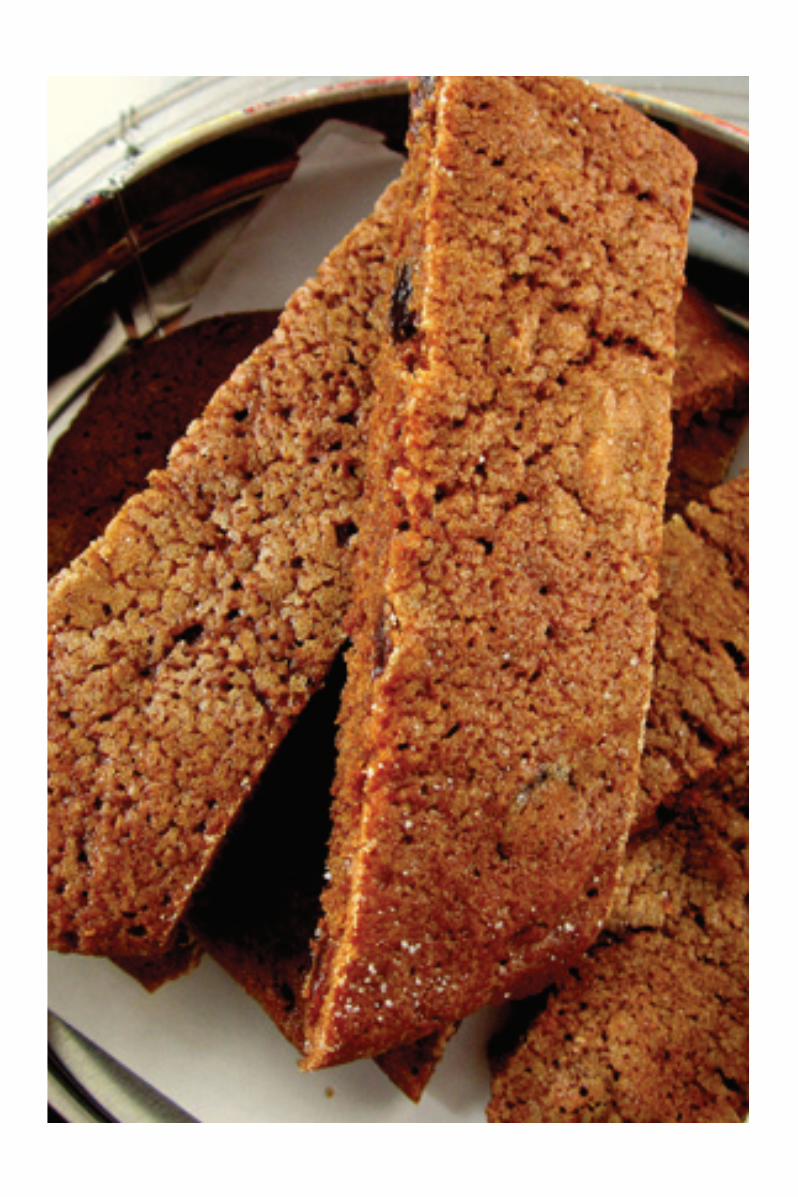
chocolate-chip cinnaMon ManDelbrot
Makes 48
Butter (for the pan)
3 cups flour
2 teaspoons baking powder
1/8 teaspoon salt
3 eggs, lightly beaten
1 cup canola oil
1 cup sugar
1 teaspoon vanilla extract
1 package (12 ounces) chocolate chips
Cinnamon-sugar made with 1 teaspoon ground cinna-
mon mixed with 3 tablespoons sugar (for sprinkling)
1. Set the oven at 350 degrees. Have on hand a rimmed bak-
ing sheet (11-by-17 inches) or jelly roll pan (10 1/2-by-15 1/2
inches). Butter the pan. If using the larger sheet, you’ll need a
15-inch sheet of foil. Fold up the foil to make a thick 1-inch wide
band; butter the band on one side.
2. In a bowl, whisk the flour, baking powder, and salt to blend
them.
3. In another larger bowl, combine the eggs, oil, sugar, and
vanilla. Use a wooden spoon to stir them well. Add the flour
mixture and stir until smooth.
4. Stir in the chips.
5. With a rubber spatula, spoon the batter into 6 mounds onto
the baking sheet. With an offset metal spatula, spread the bat-
ter to cover the entire jelly roll pan or all but 2 inches of the
larger sheet. The rectangle of dough will cover the smaller sheet
or almost all of the larger sheet). For the larger sheet, press
the buttered side of the foil against the empty edge of dough to
keep it in place.
6. Sprinkle the dough with the cinnamon-sugar mixture.
continued on next page
Something like
biscotti, mandelbrot
are usually made by
Jewish cooks in logs, then
cut up and baked a second
time. In this version, the
batter is spread in a rimmed
baking sheet, baked, then
cut up and baked again.
They’re a cross between a
biscotti and a bar cookie,
but easier to handle than
biscotti, and delicious
with chocolate chips and a
cinnamon-sugar topping.
Old-fashioned rimmed bak-
ing sheets (used to make
jelly rolls) usually measure
10 1/2-by-15 1/2 inches.
Newer ones measure 11-by-
17 inches. The dough will
cover the smaller sheets,
but not the larger ones. To
use the larger sheets, spread
the dough to within 2 inches
of one short end and use a
piece of foil, pressed against
the dough, to keep that edge
in place. If you have a non-
stick baking sheet, there’s
no need to butter the pan.
If you keep to the Jewish
dietary laws, use margarine
on the pan.
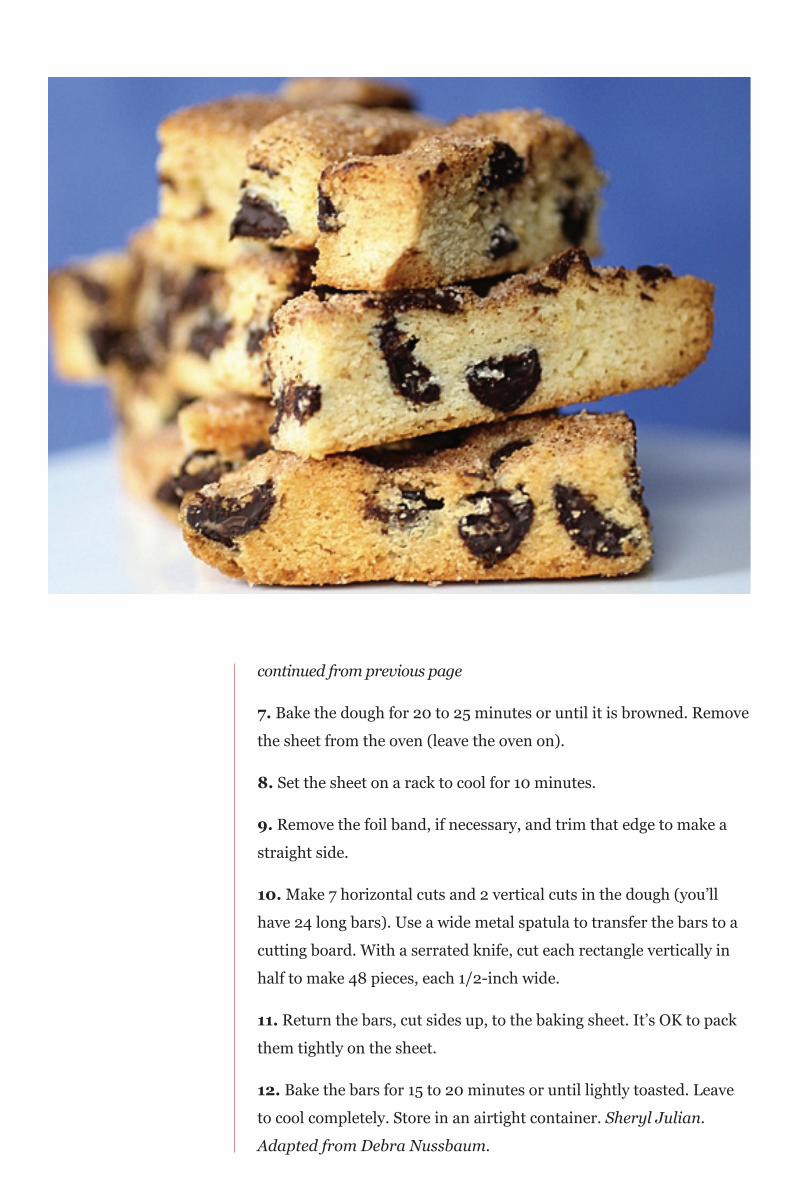
continued from previous page
7. Bake the dough for 20 to 25 minutes or until it is browned. Remove
the sheet from the oven (leave the oven on).
8. Set the sheet on a rack to cool for 10 minutes.
9. Remove the foil band, if necessary, and trim that edge to make a
straight side.
10. Make 7 horizontal cuts and 2 vertical cuts in the dough (you’ll
have 24 long bars). Use a wide metal spatula to transfer the bars to a
cutting board. With a serrated knife, cut each rectangle vertically in
half to make 48 pieces, each 1/2-inch wide.
11. Return the bars, cut sides up, to the baking sheet. It’s OK to pack
them tightly on the sheet.
12. Bake the bars for 15 to 20 minutes or until lightly toasted. Leave
to cool completely. Store in an airtight container. Sheryl Julian.
Adapted from Debra Nussbaum.
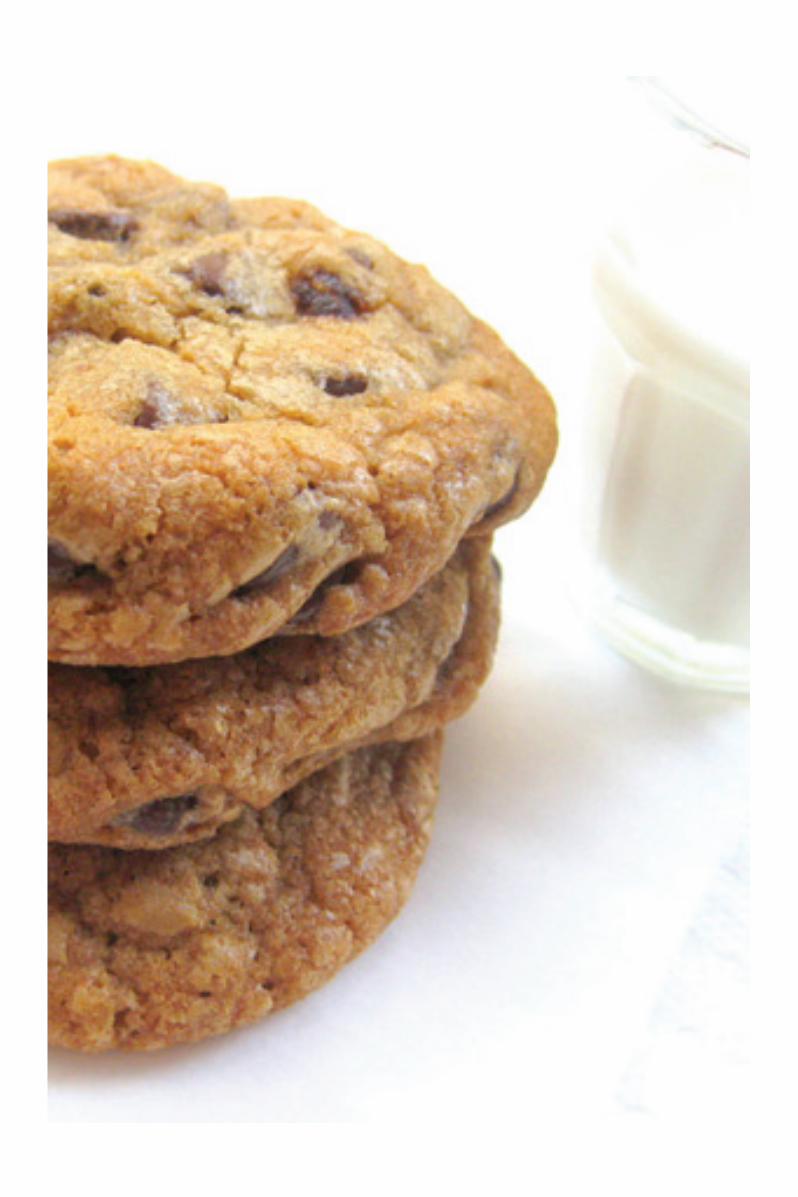
alice MeDrich’s chocolate-chip cookies
Makes 3 dozen
2 1/4 cups flour
1 teaspoon baking soda
1 teaspoon salt
1 cup (2 sticks) unsalted butter
3/4 cup granulated sugar
3/4 cup brown sugar
2 eggs
1 teaspoon vanilla extract
2 cups chocolate chips plus 1 cup chopped walnuts or 3
cups chocolate chips
1. In a bowl, whisk the flour, baking soda, and salt to blend
them.
2. In a large saucepan, melt the butter. Set it aside to cool.
3. Add the granulated and brown sugars to the butter. Stir in
the eggs, one by one, followed by the vanilla.
4. Stir in the flour mixture. Stir in the chips and nuts, if using.
5. Transfer the batter to a plastic container, cover, and refriger-
ate for 1 day.
6. Let the dough sit out for 30 minutes to soften.
7. Set the oven at 375 degrees. Line 2 baking sheets with parch-
ment paper.
8. Scoop the dough onto the baking sheets in walnut-sized
balls. Bake the cookies for 12 to 14 minutes, rotating the sheets,
or until they are firm to the touch.
9. Slide the parchment paper onto wire racks to cool. Store
in an airtight container. Adapted from “Chewy Gooey Crispy
Crunchy Melt-in-Your-Mouth Cookies”
Author Alice
Medrich takes
cooking-making
to an art form. Of the many
(many!) chocolate-chip
cookies we have made,
none touch this recipe
from “Chewy Gooey Crispy
Crunchy Melt-in-Your-
Mouth Cookies.” One secret
is that you melt the but-
ter, then let the batter sit
overnight until the butter
really soaks into the dry
ingredients. The resulting
batter turns out super crisp
cookies.
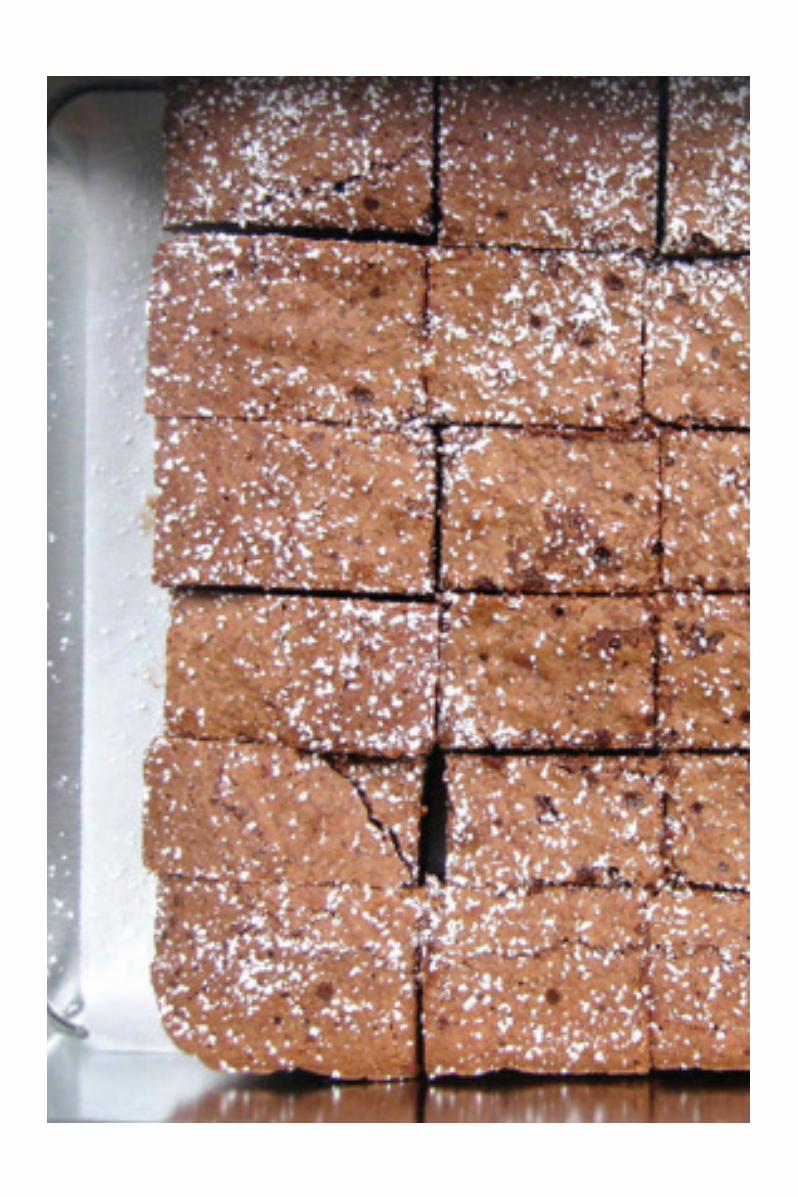
lisa yockelson’s Dark-chocolate brownies
Makes 30
Butter (for the pan)
1 1/2 cups (3 sticks) unsalted butter, cut up
8 ounces unsweetened chocolate, cut up
1 1/2 cups flour
1/3 cup unsweetened alkalized cocoa powder (such as
Droste)
1/2 teaspoon baking powder
1/2 teaspoon salt, preferably fine sea salt
3 cups granulated sugar
5 eggs, lightly beaten
1 tablespoon vanilla extract
4 ounces bittersweet chocolate, chopped
Confectioners’ sugar (for sprinkling)
1. Set the oven at 325 degrees. Lightly butter a 9-by-13-inch
baking pan.
2. In a saucepan over low heat, melt the butter and chocolate,
stirring often. Pour into a large bowl; cool.
3. In a bowl, whisk the flour, cocoa powder, baking powder,
and salt to blend them.
4. To the chocolate mixture, add the sugar, the eggs, one by
one, and the vanilla. Stir in the flour mixture and chopped
chocolate.
5. Transfer the batter to the baking pan, spreading it evenly.
6. Bake for 40 minutes or until the top does not tremble when
the pan is lightly jiggled and the edges are slightly puffed.
7. Let the pan cool on a wire rack for 1 hour, then refrigerate for
3 hours.
8. To cut bars: With a long sharp knife, make 5 horizontal cuts
and 4 vertical cuts to form 30 rectangles. Use an offset spatula to
remove the bars from the pan. Store in an airtight tin. Just before
serving, sprinkle with confectioners’ sugar. Lisa Yockelson
Dark as night,
with an inten-
sity to match,
these brownies are worth
a permanent place in your
baking file. They announce
chocolate front and cen-
ter, with a fudgy texture to
match the bold flavor. The
recipe comes from talented
Boston Globe contributor
Lisa Yockelson, an award-
winning author of many
books, including “Baking
Style,” “ChocolateChoco-
late,” and “Baking by Fla-
vor.”

Double-chocolate cookies
Makes 2 dozen
1 cup unsweetened Dutch-process cocoa powder
1 1/4 cups flour
1/4 teaspoon salt
1 1/4 cups semisweet chocolate chips
3/4 teaspoon instant espresso or coffee
1 1/2 teaspoons warm water
3/4 cup (1 1/2 sticks) salted butter, at room tempera-
ture
1 cup sugar
1 egg
1/2 teaspoon vanilla extract
1. In a bowl, mix together cocoa, flour, salt, and chocolate
chips.
2. In a cup, stir the coffee and water until the coffee dissolves.
3. In an electric mixer, cream the butter, sugar, and coffee
mixture until fluffy. Beat in the egg and vanilla.
4. Remove the bowl from the mixer stand. Add the cocoa mix-
ture, and stir just until thoroughly combined.
5. Turn the dough out onto a flat surface. Form it into a log
that is 9 inches long. Flatten the ends and wrap the log tightly
in plastic wrap. Refrigerate for at least 2 hours.
6. Set the oven at 350 degrees. Line a baking sheet with parch-
ment paper.
7. Unwrap the dough and use a long knife to slice the log into
⅜-inch-thick rounds. You should get 24. The chocolate chips
are easier to cut through if you use both hands, pressing down
on the ends of the knife. Transfer the rounds to the baking
sheet. Cookies will not spread out while baking.
8. Bake for 12 minutes or until just set (do not overcook or the
cookies will be dry). Carefully transfer the parchment to a wire
rack to cool. Adapted from ButterGirl Baking Co.
Use high-quality
cocoa and choco-
late chips, since
those are the dominant
flavors here.


bittersweet-chocolate brownie cookies
Makes 42
1 cup flour
1/2 teaspoon salt
1 teaspoon baking powder
1/2 cup (1 stick) unsalted butter, cut up
8 ounces semisweet chocolate, coarsely chopped
4 ounces unsweetened chocolate, coarsely chopped
4 eggs
1 cup light brown sugar
1/2 cup granulated sugar
1 teaspoon vanilla extract
1 cup semisweet chocolate chips
Confectioners’ sugar (for sprinkling)
1. In a bowl, whisk the flour, salt, and baking powder to blend
them.
2. In a bowl over a saucepan of hot water, melt the butter and
semisweet and unsweetened chocolates.. Remove the bowl
from the water and wipe the bottom; cool.
3. In another large bowl with a wooden spoon, beat the eggs
and brown and granulated sugars for 1 minute. Beat in the va-
nilla and chocolate mixture. Stir in the flour mixture, then the
chips.
4. Scrape down the sides of the bowl; cover with plastic wrap
and refrigerate for up to 2 hours.
5. Set the oven at 350 degrees. Line 2 baking sheets with parch-
ment paper. Have on hand a small ice cream scoop with a
2-tablespoon capacity or 2 soup spoons.
6. Scoop mounds of batter onto the sheets, leaving 2 inches
between them. Bake the cookies for 14 minutes or until the tops
are just firm when pressed with a fingertip.
7. Transfer the cookies to wire racks to cool completely. Before
serving, sprinkle with confectioners’ sugar. Julie Riven
Refrigerate the
dough for at least
30 minutes and
for up to 2 hours before
baking. These cookies are
like brownies -- dense and
rich. If you have a small ice
cream scoop (2 tablespoon
capacity), getting the batter
onto the baking sheets is
easy.


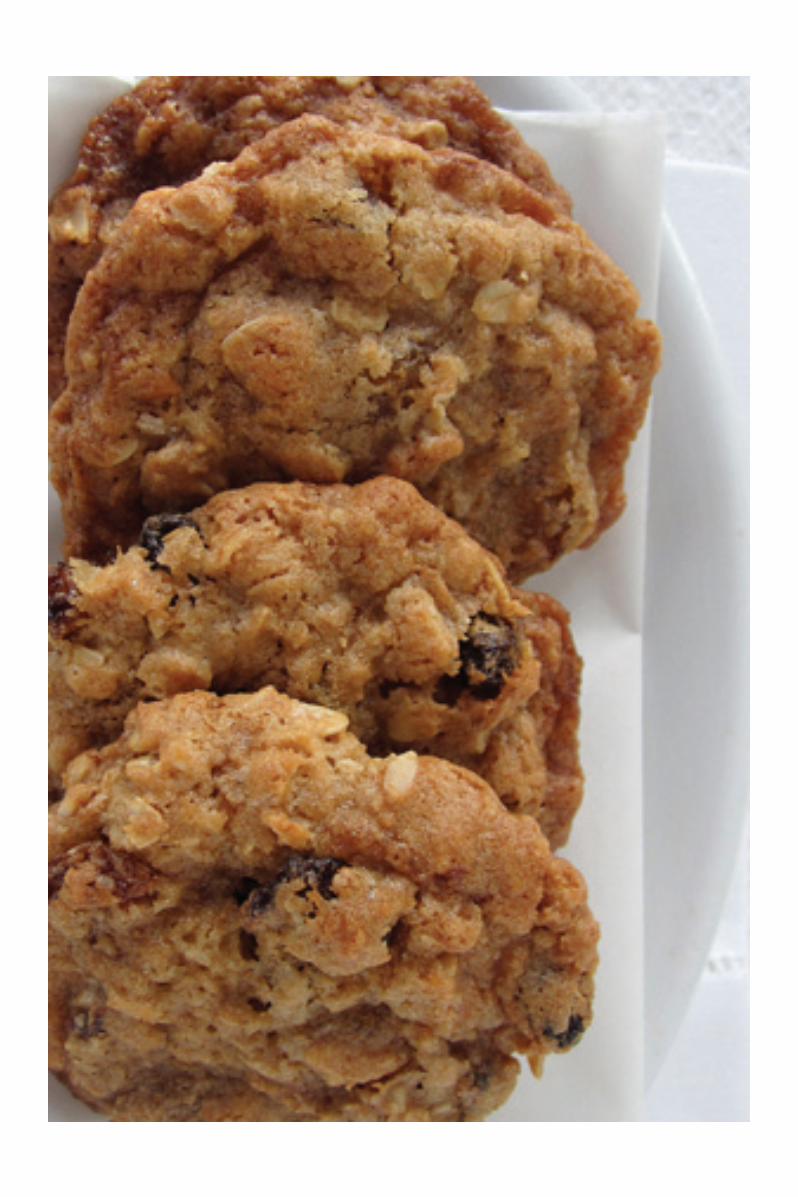
oatMeal-raisin-walnut cookies
Makes about 4 dozen
3/4 cup walnuts, chopped
1 3/4 cups flour
1/2 teaspoon salt
1/2 teaspoon baking powder
1/2 teaspoon baking soda
1 cup (2 sticks) butter, at room temperature
1 cup granulated sugar
1 cup brown sugar
2 eggs
1 teaspoon vanilla extract
2 1/2 cups old-fashioned oats
1 1/2 cups dark raisins
1. Set the oven at 375 degrees. Line 2 baking sheets with
parchment paper.
2. Spread the nuts in a baking dish. Toast them for 8 to 10
minutes or until lightly browned; set aside to cool.
3. In a bowl, whisk the flour, salt, baking powder, and baking
soda to blend them.
4. In an electric mixer, cream the butter with the granulated
and brown sugars until fluffy. Beat in the eggs, one at a time,
followed by the vanilla. With the mixer set on its lowest speed,
blend in the flour mixture just until incorporated.
5. Remove the bowl from the mixer stand. With a wooden
spoon, mix in the oats, raisins, and walnuts.
6. Drop the batter onto the baking sheets in walnut-sized
balls, leaving 2 inches between them. Bake for 12 minutes or
until the edges are lightly browned. Slide the cookies, still on
the parchment paper, onto wire racks to cool. Store in an air-
tight container. Jill Gibson
The finished cookies
will be crisper if
you leave the bat-
ter in the refrigerator for 1
to 2 hours before scooping
onto baking sheets.
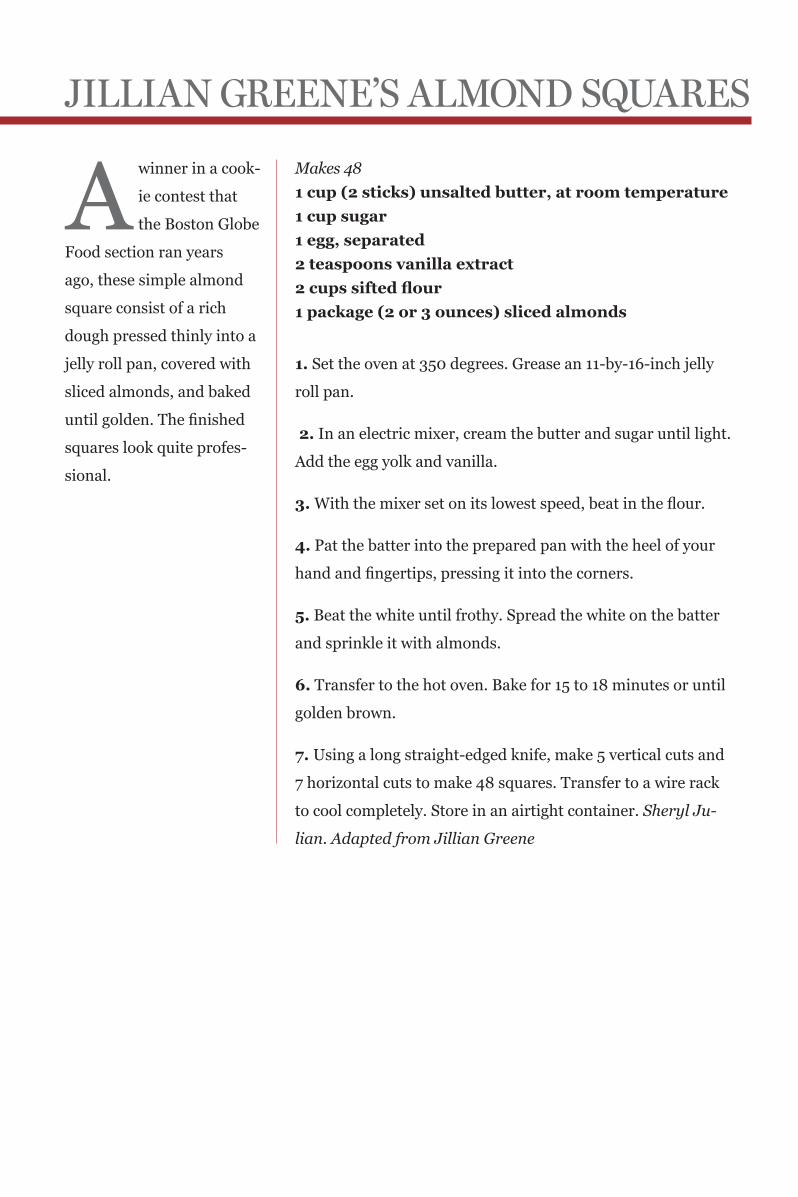
Jillian greene’s alMonD squares
Makes 48
1 cup (2 sticks) unsalted butter, at room temperature
1 cup sugar
1 egg, separated
2 teaspoons vanilla extract
2 cups sifted flour
1 package (2 or 3 ounces) sliced almonds
1. Set the oven at 350 degrees. Grease an 11-by-16-inch jelly
roll pan.
2. In an electric mixer, cream the butter and sugar until light.
Add the egg yolk and vanilla.
3. With the mixer set on its lowest speed, beat in the flour.
4. Pat the batter into the prepared pan with the heel of your
hand and fingertips, pressing it into the corners.
5. Beat the white until frothy. Spread the white on the batter
and sprinkle it with almonds.
6. Transfer to the hot oven. Bake for 15 to 18 minutes or until
golden brown.
7. Using a long straight-edged knife, make 5 vertical cuts and
7 horizontal cuts to make 48 squares. Transfer to a wire rack
to cool completely. Store in an airtight container. Sheryl Ju-
lian. Adapted from Jillian Greene
A winner in a cook-
ie contest that
the Boston Globe
Food section ran years
ago, these simple almond
square consist of a rich
dough pressed thinly into a
jelly roll pan, covered with
sliced almonds, and baked
until golden. The finished
squares look quite profes-
sional.

suzanne loMbarDi’s Molasses-clove cookies
Makes 3 dozen
2 1/4 cups flour
1/2 teaspoon salt
1 teaspoon baking soda
1 tablespoon ground cinnamon
1 1/2 teaspoons ground cloves
1 cup sugar
3/4 cup canola oil
1/3 cup molasses
1 egg
Extra sugar (for sprinkling)
1. Set the oven at 350 degrees. Line 2 baking sheets with parch-
ment paper.
2. In a bowl, whisk the flour, salt, baking soda, cinnamon, and
cloves to blend them.
3. In an electric mixer with the paddle attachment, if you have
one, beat the sugar, oil, and molasses for 3 minutes on medi-
um-low speed.
4. With the mixer running, add the egg and beat 1 minute
more. Turn the mixer to its lowest setting and blend in the flour
mixture in four additions, letting each one mix thoroughly be-
fore adding the next. Let the final dough mix for a few seconds
on medium-high speed to finish the dough.
5. Spoon the cookies into walnut-sized balls on the baking
sheet, setting them 2-inches apart. Sprinkle with extra sugar.
6. Bake the cookies for 12 to 14 minutes or until the tops are
cracked. Remove from the oven and slide the parchment paper
onto wire racks. Cool completely. Store in an airtight container.
Adapted from Suzanne Lombardi
Hard, chewy, not
too sweet, and
loaded with
flavor, these molasses-clove
cookies are something like
the cookie with which Mil-
ton native Suzanne Lom-
bardi launched Dancing
Deer Baking Co. When she
sold it, and founded Tiny
Trapeze Confections, she
made this version of the
cookie home. Measure the
oil first, and use that cup
to measure the molasses,
the molasses will not stick
to the cup. Now Suzanne, a
former food stylist for the
Boston Globe, owns The
Plate, a breakfast and lunch
spot in Milton.


olD-fashioneD herMits
Makes 40
3 1/2 cups flour
1 teaspoon salt
1/2 teaspoon baking powder
1 teaspoon baking soda
1 teaspoon ground cinnamon
1 teaspoon ground allspice
1/2 cup (1 stick) butter, at room temperature
1 cup granulated sugar
1 cup molasses
3 eggs
1 cup raisins
Extra granulated sugar (for sprinkling)
1. Set the oven at 350 degrees. Line 2 large baking sheets with
parchment paper.
2. In a bowl, whisk the flour, salt, baking powder, baking soda,
cinnamon, and allspice.
3. In an electric mixer, cream the butter and sugar. Beat in
the molasses, then the eggs, one by one. The batter will look
curdled; that’s OK.
4. With the mixer set on its lowest speed, beat in the dry in-
gredients.Remove the bowl from the mixer.
5. Stir in the raisins. The dough will be sticky.
6. Spoon the dough onto the sheets in 4 log shapes (2 on
each). Use an offset spatula dipped often into cold water to
smooth them. Each log should be 12-inches long and no wider
than 2 1/2 inches.
7. Sprinkle generously with sugar. Bake for 25 to 30 minutes
or until they are firm when pressed with a fingertip (the logs
spread and flatten during baking).
8. Transfer the logs on the parchment paper to wire racks to
cool completely. Cut each into 10 slices. Sheryl Julian. Adapt-
ed from Elaine “Cookie” McGinn
There are many
versions of her-
mits today, most
baked in a rectangular pan
and cut into bars. We like
to shape and bake them
as long logs, then cut the
logs into bars after baking.
The original recipe comes
from a cookie contest the
Boston Globe Food section
ran some years ago. This
was one of the winners,
sent in by Elaine “Cookie”
McGinn.
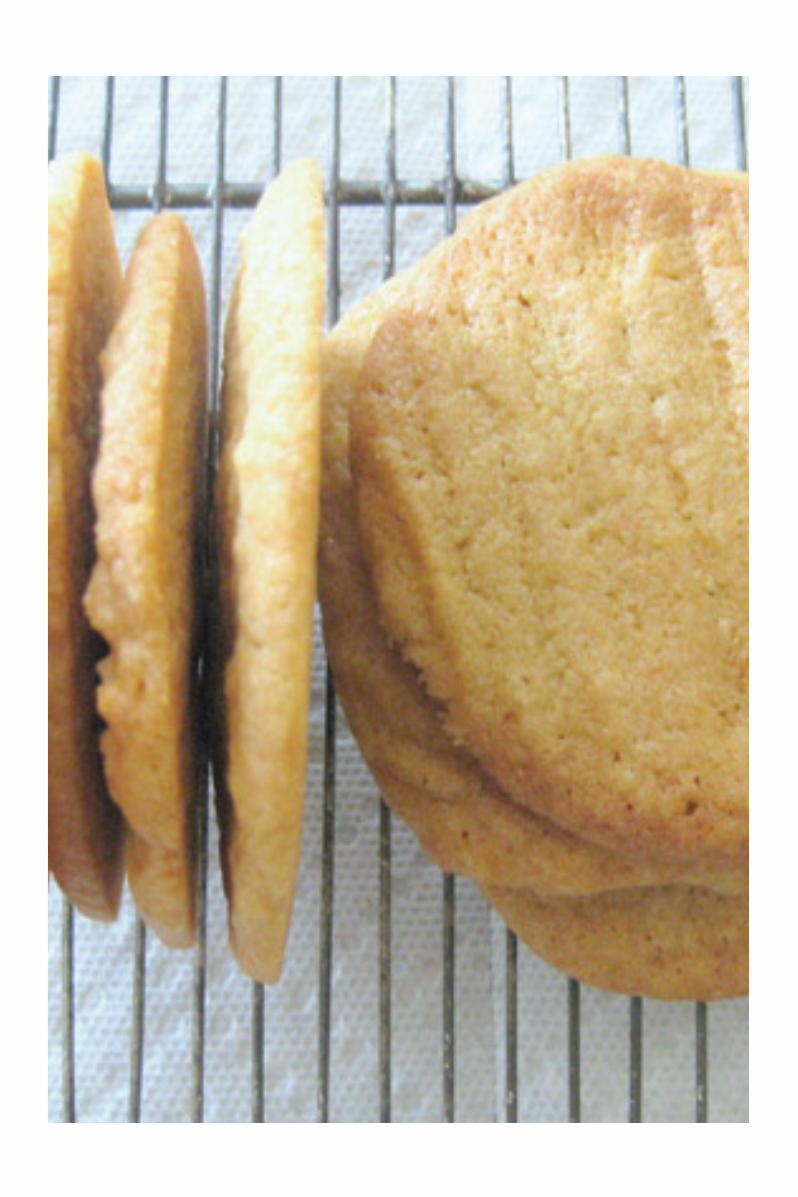
peanut butter cookies
Makes 2 1/2 dozen
1 3/4 cups flour
1/4 teaspoon salt
1/2 teaspoon baking soda
1/2 teaspoon baking powder
1/2 cup (1 stick) unsalted butter, at room temperature
1 cup creamy peanut butter
1/2 cup granulated sugar
1/2 cup dark brown sugar
1 egg
1 teaspoon vanilla extract
Extra granulated sugar (for sprinkling)
1. Set the oven at 350 degrees. Line 2 baking sheets with
parchment paper.
2. In a bowl, whisk the flour, salt, baking soda, and baking
powder to blend them.
3. In an electric mixer, cream the butter and peanut butter for
1 minute. Beat in the granulated and brown sugars and con-
tinue beating for 2 minutes. Add the egg and vanilla and beat 1
minute more.
4. With the mixer set on its lowest speed, beat in the flour
mixture just until it is blended.
5. Remove the bowl from the mixer stand. Drop the dough
into walnut-sized balls and set them 2-inches apart on the
sheets. Sprinkle with granulated sugar.
6. Sprinkle a small plate with extra granulated sugar. Dipping
the tines of a fork repeatedly in the sugar, make fork marks
across the cookies. Make a second set of marks perpendicular
to the first set.
7. Bake the cookies for 15 minutes or until golden at the edges.
Remove from the oven and transfer the cookies, still on the
parchment paper, to wire racks to cool. Store in an airtight tin.
Sheryl Julian
Use good-quality
smooth peanut
butter in this
classic lunch-box cookie.
The cross-hatched tops
are the baker’s way of an-
nouncing the peanut butter
taste.

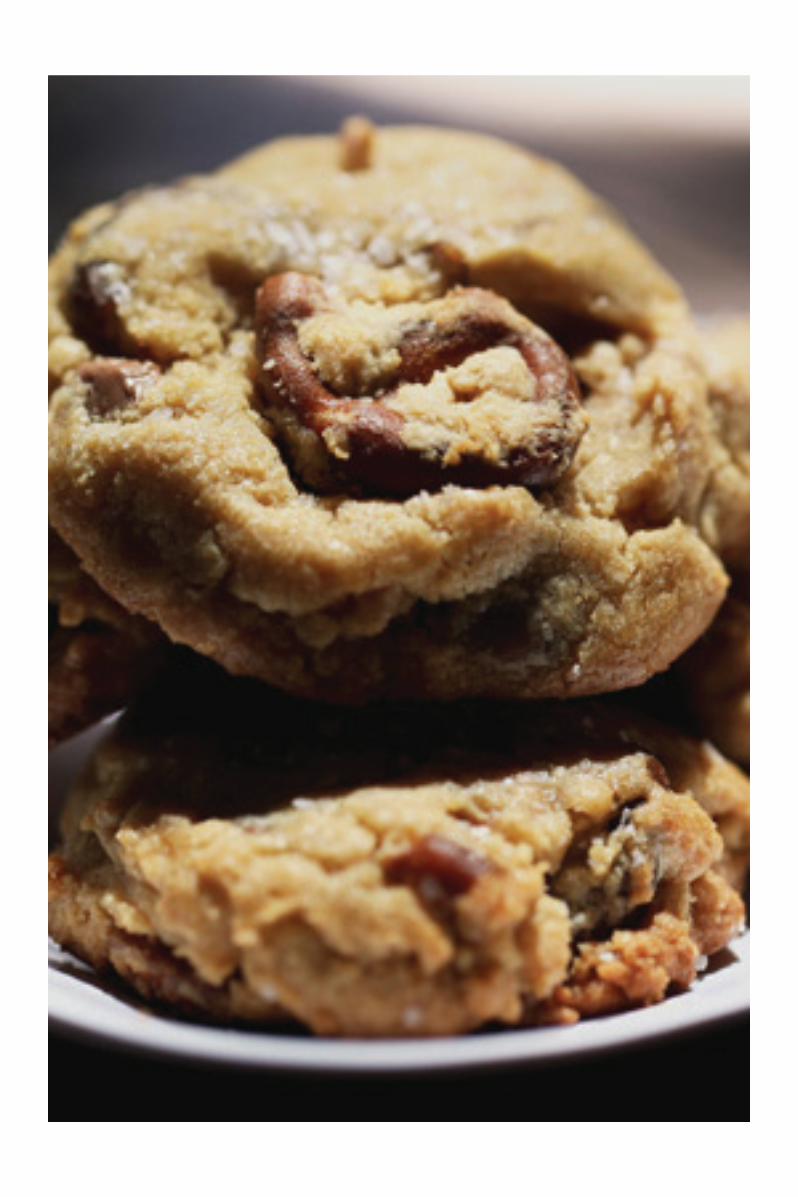
peanut butter pretzel cookies
Makes 2 dozen
2 cups flour
1 teaspoon baking soda
1/2 teaspoon salt
1/2 cup (1 stick) unsalted butter, cold and cut up
2 cups light brown sugar
1 cup creamy peanut butter
2 eggs
1 teaspoon vanilla extract
3 cups mini salted pretzels, broken up into 6 pieces
each
Kosher salt (for sprinkling)
1. Set the oven at 300 degrees. Line 2 baking sheets with
parchment paper.
2. In a bowl, mix the flour, baking soda, salt, and pretzel
pieces.
3. In an electric mixer with the paddle attachment, if you have
one, cream the butter and sugar on medium speed. Add the
peanut butter and blend until smooth. Add the eggs one at
time, then the vanilla. Turn the speed to medium-high. Beat
for 2 minutes more.
4. With the mixer set on its lowest speed, beat in the flour
mixture to incorporate most of it. Remove the bowl from the
mixer stand, add the pretzels, and finish mixing by hand. The
dough will be sticky.
5. Scrape down the sides of the bowl, cover the dough with
plastic wrap, and refrigerate for 20 minutes or until firm.
6. Using a small ice cream scoop or a heaping tablespoon,
form cookies into balls, then flatten slightly into disks with the
palm of your hand (about 1 1/2 inches in diameter). Sprinkle
tops lightly with kosher salt.
7. Bake for 14 to 16 minutes or until golden. Cool on wire
racks. Adapted from Cow & Crumb
Cow & Crumb Bak-
ery owner Hilary
Koloski believes
that “everybody should
have one good cookie reci-
pe up their sleeve.” In fact,
she has many, which she
sells at farmers’ markets
and ships (www.cowand-
crumb.com), these among
them.

fork cookies
Makes 26
2 cups flour
1/2 teaspoon salt
1/2 teaspoon baking soda
1 teaspoon cream of tartar
1 cup (2 sticks) unsalted butter, at room temperature
3/4 cup light brown sugar
1 egg, separated
1 teaspoon vanilla extract
1. Set the oven at 350 degrees. Line 2 baking sheets with
parchment paper.
2. In a bowl, whisk the flour, salt, baking soda, and cream of
tartar to blend them.
3. In an electric mixer, cream the butter and sugar until thor-
oughly blended. Beat in the egg yolk, then the vanilla. Add the
flour mixture half at a time. Remove the bowl from the mixer
stand.
4. In a bowl with a whisk, beat the egg white until it starts to
hold its shape. With a rubber spatula, fold the white into the
batter until well blended.
5. Spoon heaping teaspoonfuls of the batter onto the baking
sheets. Using a fork dipped repeatedly into water, flatten the
mounds with the fork.
6. Bake the cookies for 15 to 16 minutes or until they are
golden. Transfer the cookies on the parchment to wire racks to
cool. Store in an airtight container. Sheryl Julian
Sheryl Julian’s
mother made these
crisp brown-sugar
cookies, sometimes called
butterscotch cookies, from
a family recipe. The simple
batter is beaten with an
egg yolk, then the softly
whipped white is folded in
at the end. You press the
tops of the cookies with a
fork dipped in water, which
flattens them and makes a
pattern.

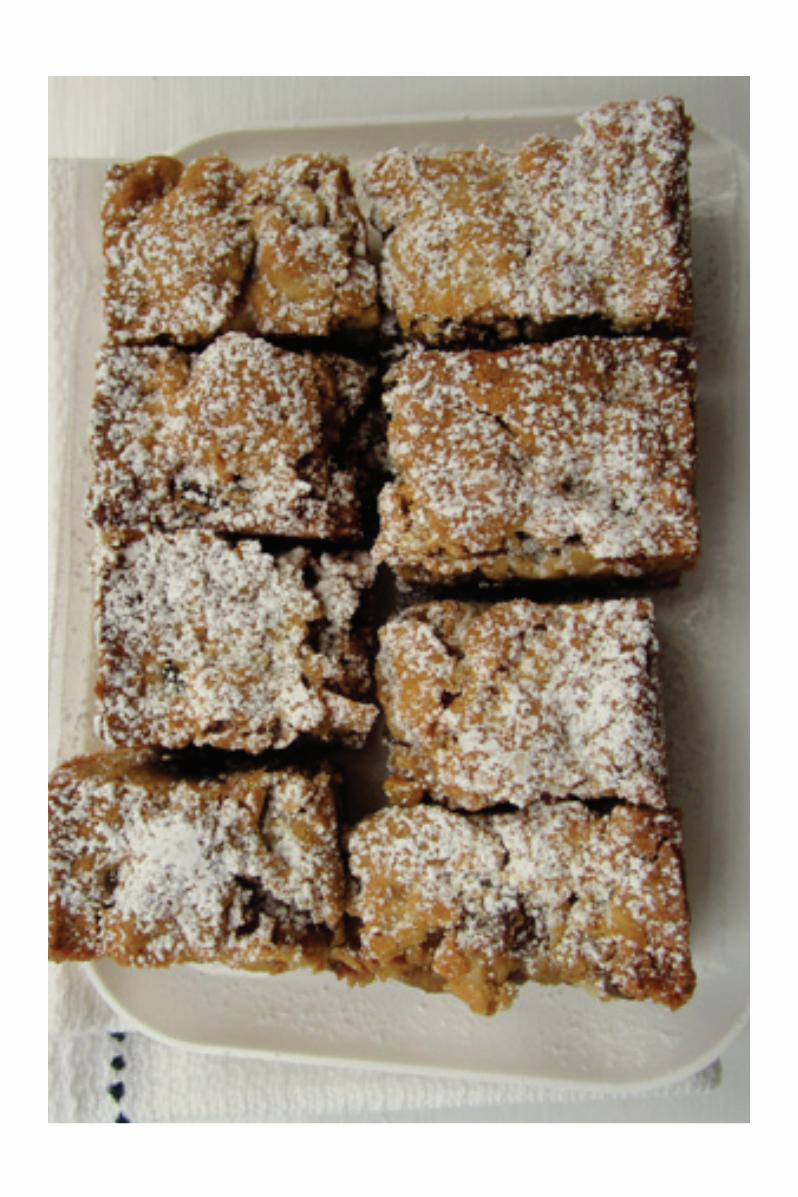
Date-nut bars
Makes 24
Butter (for the pan)
1 cup flour
1/2 teaspoon salt
2 teaspoons baking powder
2 eggs
1/2 cup canola oil
1/2 cup granulated sugar
1/2 cup brown sugar
1 teaspoon vanilla extract
1 cup dates, pitted and snipped with a scissors
2 heaping cups walnut pieces, coarsely chopped
Confectioners’ sugar (for sprinkling)
1. Set the oven at 325 degrees. Butter a 9-inch square baking
pan. Line the bottom with parchment paper and grease the
paper.
2. In a bowl, whisk the flour, salt, and baking powder to blend
them.
3. In an electric mixer, beat the eggs thoroughly. Beat in the
oil, granulated and brown sugars, and vanilla. Beat for 1 min-
ute. With the mixer set on its lowest speed, gradually add the
flour, baking powder, and salt.
4. Remove the bowl from the mixer stand and use a large rub-
ber spatula to fold in the dates and walnuts.
5. Turn the batter into the pan and smooth the top. Bake the
for 45 to 50 minutes or until the cake is set in the middle.
6. Remove the pan from the oven and let it cool on a wire
rack. Using a serrated edge knife, ease the square of cake from
the edges of the pan. Turn it out onto a board. Cut the square
into quarters. Cut each in half, then each half into 3 bars to
make 24.
7. Store in an airtight container for up to 1 week. Sprinkle with
confectioners’ sugar before serving. Sheryl Julian
Anything made
with dried fruits
and nuts keeps
well, which is probably
why date-nut bars have
long been a staple in New
England kitchens. Though
you can buy pitted dates,
we prefer to begin with
whole dates and pit them
(this is easy to do: just slit
them on one side and pull
out the pit), then snip with
a scissors into pieces. The
dates are moister and the
finished bars deliciously
chewy.
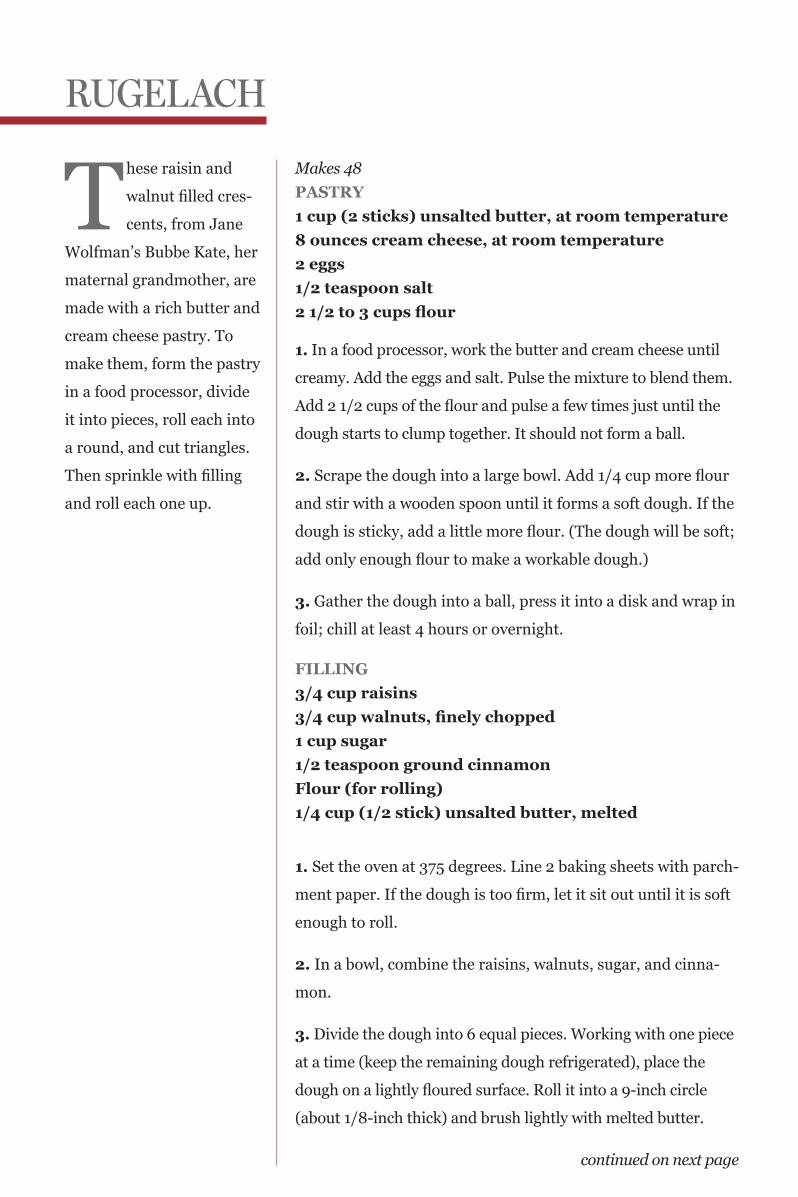
rugelach
Makes 48
PASTRY
1 cup (2 sticks) unsalted butter, at room temperature
8 ounces cream cheese, at room temperature
2 eggs
1/2 teaspoon salt
2 1/2 to 3 cups flour
1. In a food processor, work the butter and cream cheese until
creamy. Add the eggs and salt. Pulse the mixture to blend them.
Add 2 1/2 cups of the flour and pulse a few times just until the
dough starts to clump together. It should not form a ball.
2. Scrape the dough into a large bowl. Add 1/4 cup more flour
and stir with a wooden spoon until it forms a soft dough. If the
dough is sticky, add a little more flour. (The dough will be soft;
add only enough flour to make a workable dough.)
3. Gather the dough into a ball, press it into a disk and wrap in
foil; chill at least 4 hours or overnight.
FILLING
3/4 cup raisins
3/4 cup walnuts, finely chopped
1 cup sugar
1/2 teaspoon ground cinnamon
Flour (for rolling)
1/4 cup (1/2 stick) unsalted butter, melted
1. Set the oven at 375 degrees. Line 2 baking sheets with parch-
ment paper. If the dough is too firm, let it sit out until it is soft
enough to roll.
2. In a bowl, combine the raisins, walnuts, sugar, and cinna-
mon.
3. Divide the dough into 6 equal pieces. Working with one piece
at a time (keep the remaining dough refrigerated), place the
dough on a lightly floured surface. Roll it into a 9-inch circle
(about 1/8-inch thick) and brush lightly with melted butter.
continued on next page
These raisin and
walnut filled cres-
cents, from Jane
Wolfman’s Bubbe Kate, her
maternal grandmother, are
made with a rich butter and
cream cheese pastry. To
make them, form the pastry
in a food processor, divide
it into pieces, roll each into
a round, and cut triangles.
Then sprinkle with filling
and roll each one up.
continued from previous page
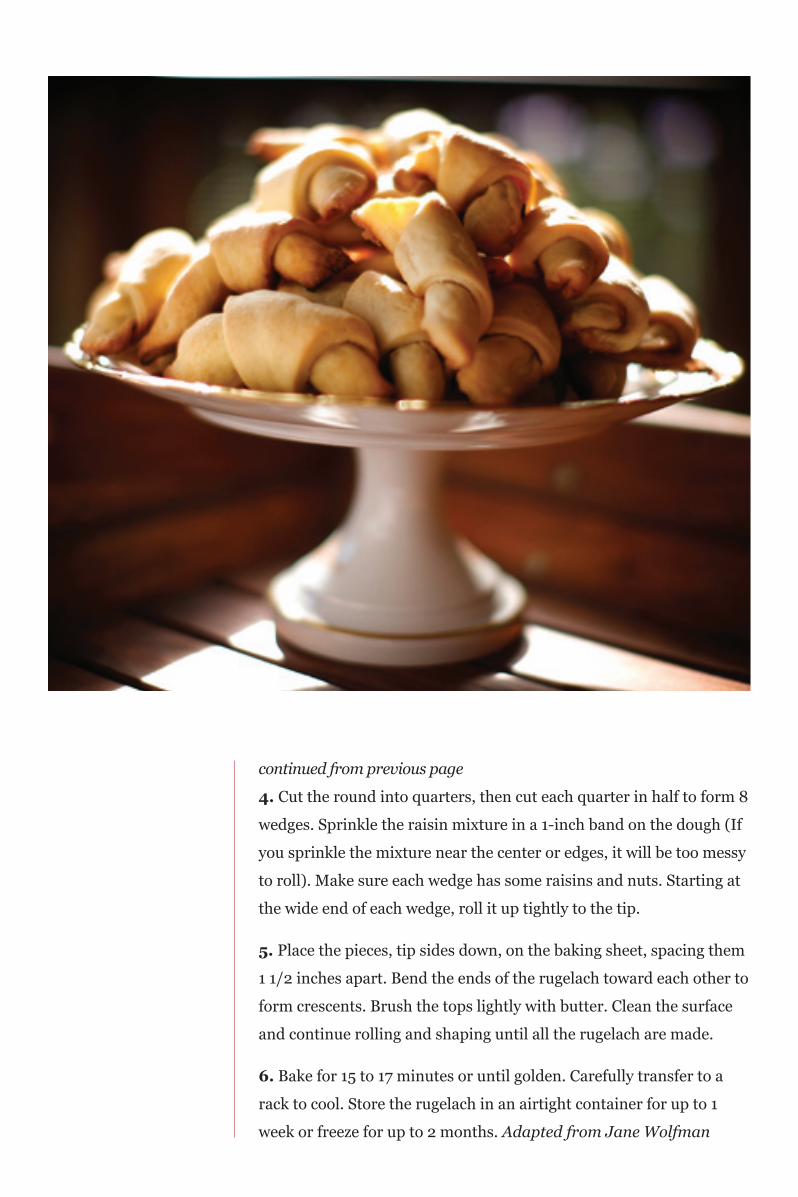
4. Cut the round into quarters, then cut each quarter in half to form 8
wedges. Sprinkle the raisin mixture in a 1-inch band on the dough (If
you sprinkle the mixture near the center or edges, it will be too messy
to roll). Make sure each wedge has some raisins and nuts. Starting at
the wide end of each wedge, roll it up tightly to the tip.
5. Place the pieces, tip sides down, on the baking sheet, spacing them
1 1/2 inches apart. Bend the ends of the rugelach toward each other to
form crescents. Brush the tops lightly with butter. Clean the surface
and continue rolling and shaping until all the rugelach are made.
6. Bake for 15 to 17 minutes or until golden. Carefully transfer to a
rack to cool. Store the rugelach in an airtight container for up to 1
week or freeze for up to 2 months. Adapted from Jane Wolfman