Embed Size (px)
Citation preview
Latex Knowledge Center
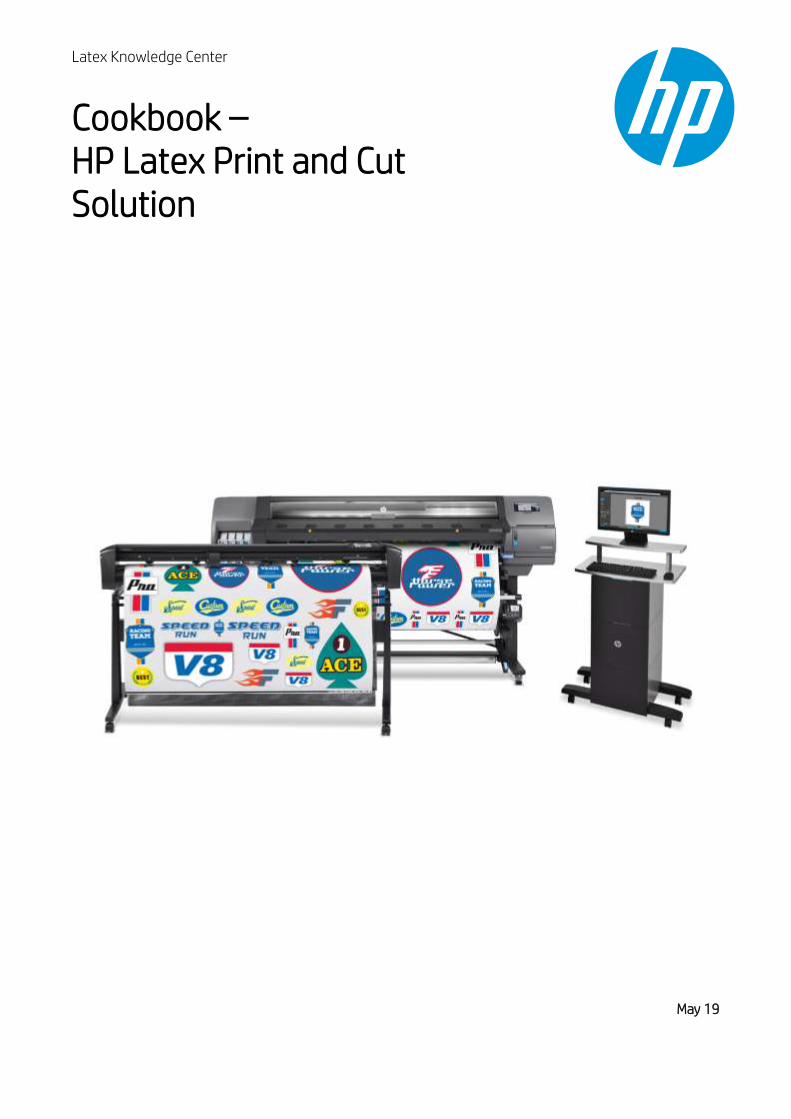
Cookbook – HP Latex Print and Cut Solution
May 19
Cookbook - HP Latex Print and Cut Solution
Latex Knowledge Center, May 14, 2019 2
1 Table of contents 1 Table of contents ............................................................................................................................................... 2
2 Overview ............................................................................................................................................................. 4
2.1 Who can benefit from reading this document? ........................................................................................ 4
3 The HP Latex Print and Cut Solution ................................................................................................................. 5
3.1 HP Latex Print and Cut Portfolio ................................................................................................................. 5
3.2 Multiple applications for print and cut ....................................................................................................... 5
4 How to get the best results from the HP Latex Print and Cut Solution ........................................................... 6
4.1 Workflow ....................................................................................................................................................... 6
4.2 Job creation ................................................................................................................................................... 6
4.2.1 HP Applications Center overview ............................................................................................................ 6
4.2.2 Benefits of HP Applications Center ........................................................................................................ 7
4.2.3 Example ..................................................................................................................................................... 7
4.2.4 How to create an HP Applications Center account ............................................................................... 8
4.3 Job edition and management – RIP............................................................................................................ 8
4.3.1 Job workflows ........................................................................................................................................... 8
4.3.2 Adding contour marks ............................................................................................................................. 9
4.3.3 HP barcode ................................................................................................................................................ 9
4.3.4 Job alignment ........................................................................................................................................ 10
4.3.5 Printing parameters .............................................................................................................................. 11
4.3.6 Cutting parameters ............................................................................................................................... 14
4.4 Print ..............................................................................................................................................................16
4.4.1 Printer setup .......................................................................................................................................... 16
4.4.2 Send job .................................................................................................................................................. 16
4.5 Cutting ..........................................................................................................................................................17
4.5.1 Loading the substrate ........................................................................................................................... 17
4.5.2 Cutting tool ............................................................................................................................................ 17
4.5.3 User configurations ............................................................................................................................... 18
4.5.4 Calibrations ............................................................................................................................................ 18
4.5.5 Finding the cutting settings for your material ................................................................................... 20
4.6 Cutting presets ............................................................................................................................................22
5 Tips for materials ............................................................................................................................................. 23
5.1 Get the right cutting accuracy ...................................................................................................................23
5.2 Self-adhesive vinyls ...................................................................................................................................25
5.3 Transfer media ............................................................................................................................................26
5.4 Transparent / translucent films ................................................................................................................26

Cookbook - HP Latex Print and Cut Solution
Latex Knowledge Center, May 14, 2019 3
5.5 Laminates ....................................................................................................................................................26
5.6 Perforated SAV............................................................................................................................................27
5.7 Self-adhesive textiles ................................................................................................................................29
5.8 Reflective graphic films ..............................................................................................................................29
6 Tips for lettering ............................................................................................................................................... 31
7 Useful links ....................................................................................................................................................... 33
Cookbook - HP Latex Print and Cut Solution
Latex Knowledge Center, May 14, 2019 4
2 Overview
2.1 Who can benefit from reading this document?
This document is intended for:
• Owners and operators of the HP Latex 115 Print and Cut Solution, the HP Latex 315 Print and Cut Solution and the HP Latex 335 Print and Cut Solution.
This document provides information about:
• The main HP Latex Print and Cut Solution features and possibilities.
• The HP Latex Print and Cut workflow.
• How to get the best results for a wide range of applications and materials.
Cookbook - HP Latex Print and Cut Solution
Latex Knowledge Center, May 14, 2019 5
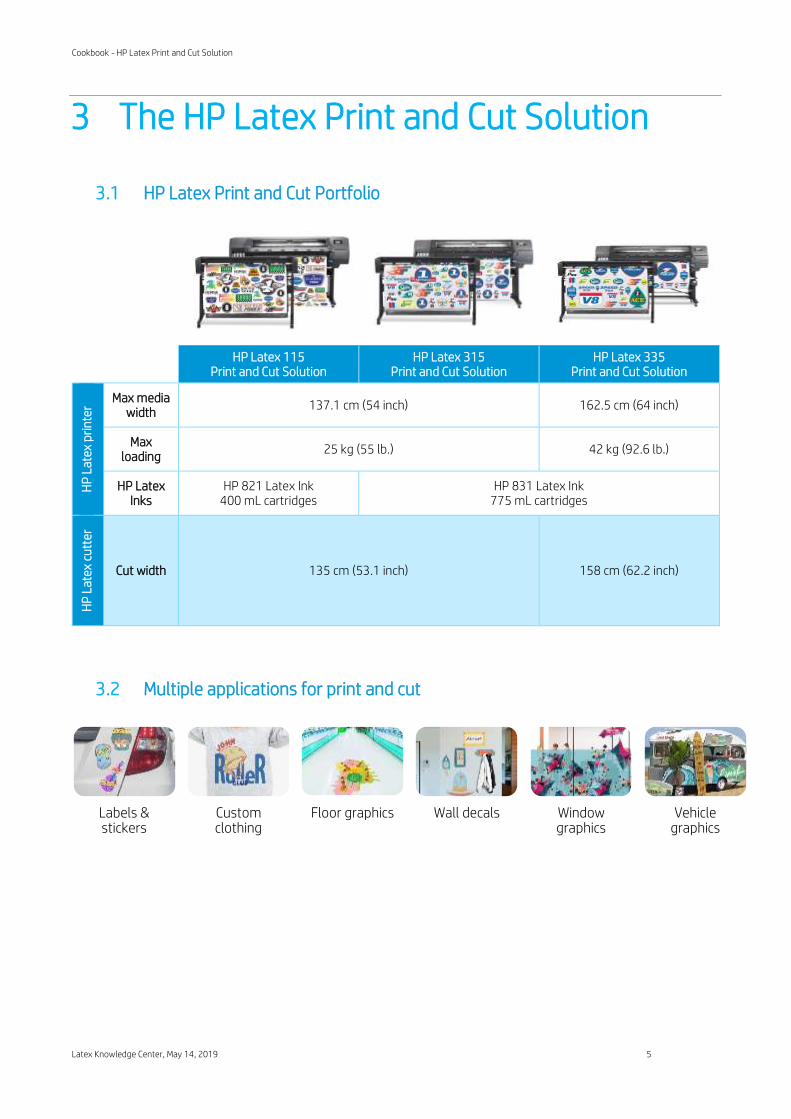
3 The HP Latex Print and Cut Solution
3.1 HP Latex Print and Cut Portfolio
HP Latex 115 Print and Cut Solution
HP Latex 315 Print and Cut Solution
HP Latex 335 Print and Cut Solution
HP
Lat
ex p
rin
ter
Max media width
137.1 cm (54 inch) 162.5 cm (64 inch)
Max loading
25 kg (55 lb.) 42 kg (92.6 lb.)
HP Latex Inks
HP 821 Latex Ink 400 mL cartridges
HP 831 Latex Ink 775 mL cartridges
HP
Lat
ex c
utt
er
Cut width 135 cm (53.1 inch) 158 cm (62.2 inch)
3.2 Multiple applications for print and cut
Labels & stickers
Custom clothing
Floor graphics Wall decals Window graphics
Vehicle graphics
Cookbook - HP Latex Print and Cut Solution
Latex Knowledge Center, May 14, 2019 6
4 How to get the best results from the HP Latex Print and Cut Solution
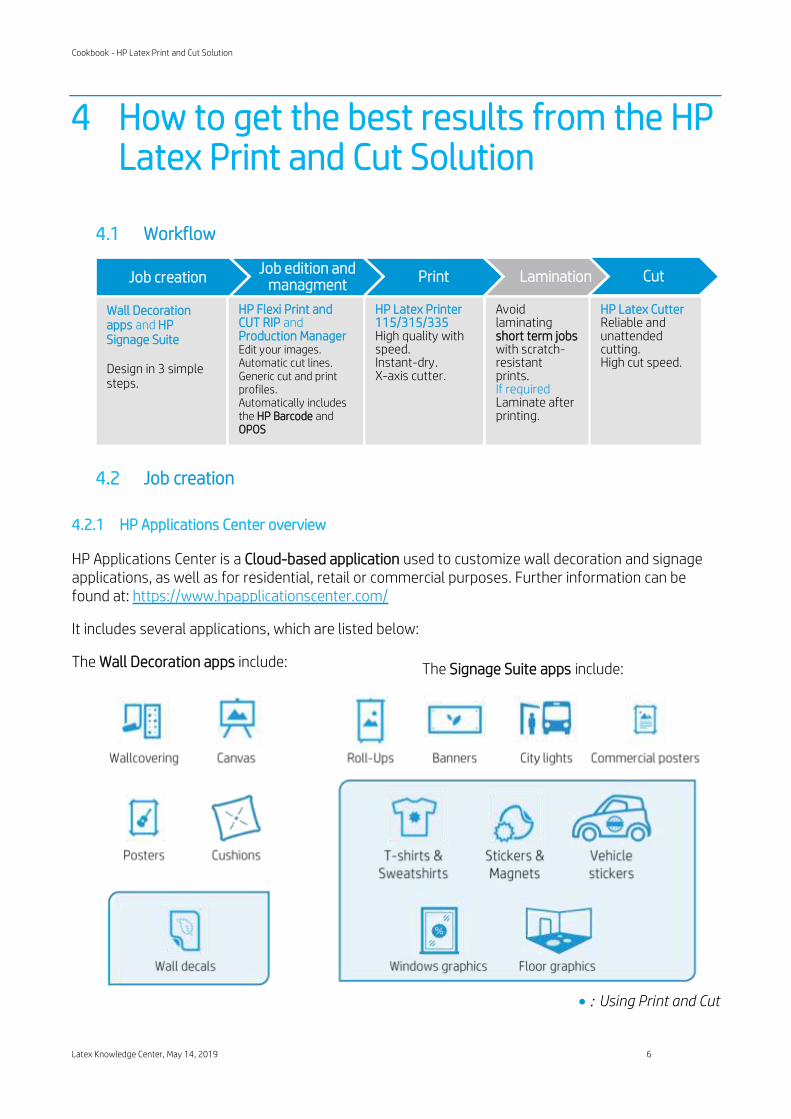
4.1 Workflow
4.2 Job creation
4.2.1 HP Applications Center overview
HP Applications Center is a Cloud-based application used to customize wall decoration and signage applications, as well as for residential, retail or commercial purposes. Further information can be found at: https://www.hpapplicationscenter.com/
It includes several applications, which are listed below:
The Wall Decoration apps include: The Signage Suite apps include:
• Using Print and Cut
Job creationJob edition and
managmentPrint Lamination Cut
HP Latex Cutter Reliable and unattended cutting. High cut speed.
Wall Decoration apps and HP Signage Suite Design in 3 simple steps.
HP Flexi Print and CUT RIP and Production Manager Edit your images. Automatic cut lines. Generic cut and print profiles. Automatically includes the HP Barcode and OPOS
Avoid laminating short term jobs with scratch-resistant prints. If required Laminate after printing.
HP Latex Printer 115/315/335 High quality with speed. Instant-dry. X-axis cutter.
Cookbook - HP Latex Print and Cut Solution
Latex Knowledge Center, May 14, 2019 7
4.2.2 Benefits of HP Applications Center
These are some of the outstanding features offered by the HP Applications Center:
• Friendly 3–step design tool designed for non-expert users.
• 3D visualization for applications requiring it.
• Access to content libraries.
• Predefined templates.
• Easy management of production, customers and content.
• Automatic ready to print PDF generation, which saves time and reduces errors.
• Automatic job download with JDF support and PDF file versioning control.
• Easy integration into PSP websites: External hyperlinks, CRM plugins based on pre-defined templates or API website integration.
• Print and Cut technology used in several apps.
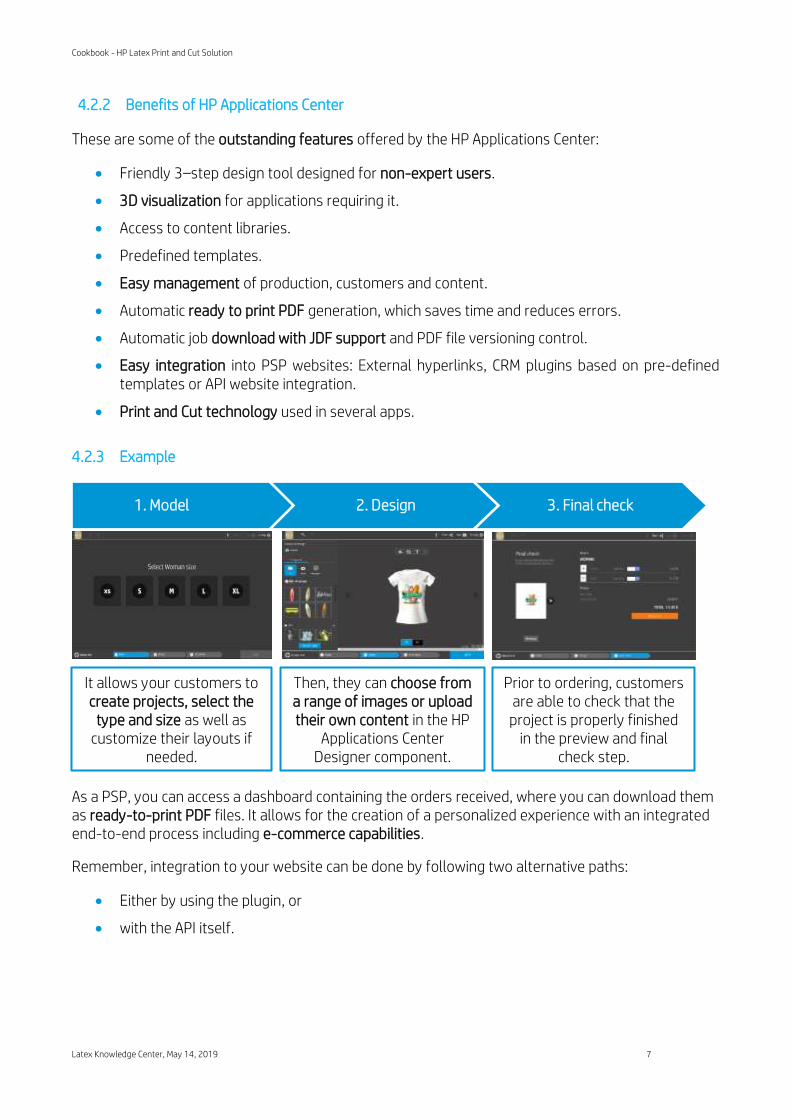
4.2.3 Example
As a PSP, you can access a dashboard containing the orders received, where you can download them as ready-to-print PDF files. It allows for the creation of a personalized experience with an integrated end-to-end process including e-commerce capabilities.
Remember, integration to your website can be done by following two alternative paths:
• Either by using the plugin, or
• with the API itself.
1. Model 2. Design 3. Final check
It allows your customers to create projects, select the
type and size as well as customize their layouts if
needed.
Then, they can choose from a range of images or upload their own content in the HP
Applications Center Designer component.
Prior to ordering, customers are able to check that the
project is properly finished in the preview and final
check step.
Cookbook - HP Latex Print and Cut Solution
Latex Knowledge Center, May 14, 2019 8
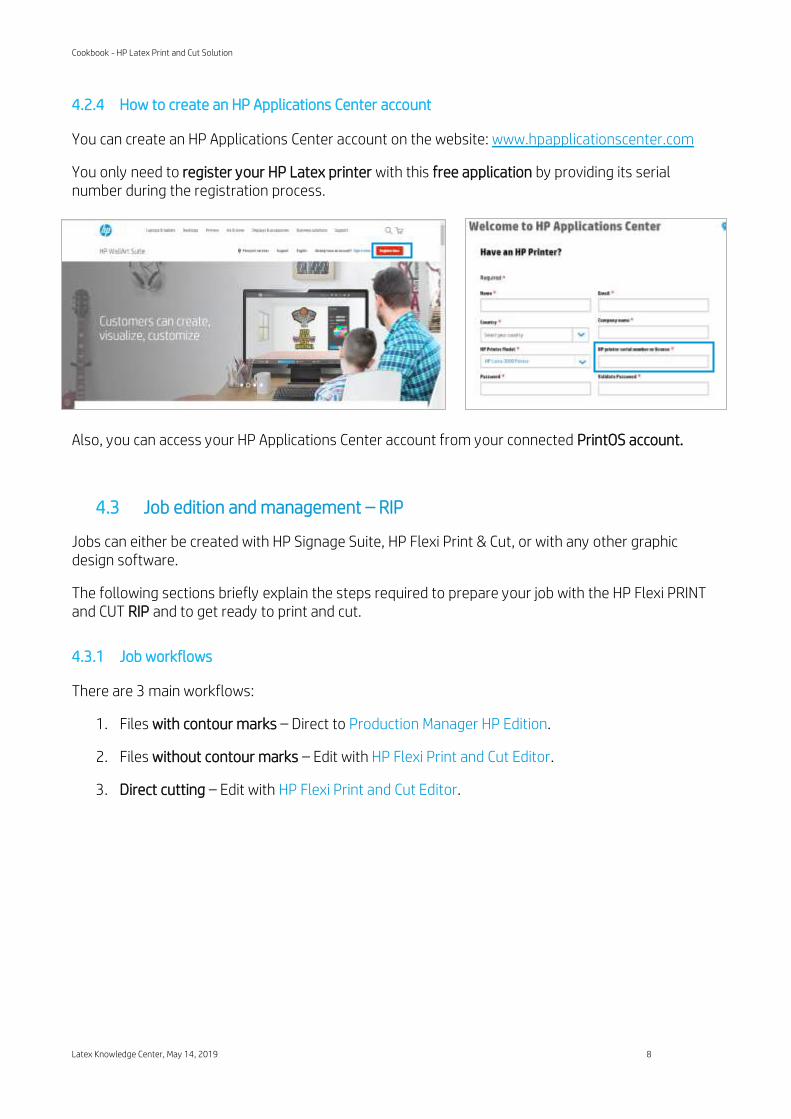
4.2.4 How to create an HP Applications Center account
You can create an HP Applications Center account on the website: www.hpapplicationscenter.com
You only need to register your HP Latex printer with this free application by providing its serial number during the registration process.
Also, you can access your HP Applications Center account from your connected PrintOS account.
4.3 Job edition and management – RIP
Jobs can either be created with HP Signage Suite, HP Flexi Print & Cut, or with any other graphic design software.
The following sections briefly explain the steps required to prepare your job with the HP Flexi PRINT and CUT RIP and to get ready to print and cut.
4.3.1 Job workflows
There are 3 main workflows:
1. Files with contour marks – Direct to Production Manager HP Edition.
2. Files without contour marks – Edit with HP Flexi Print and Cut Editor.
3. Direct cutting – Edit with HP Flexi Print and Cut Editor.
Cookbook - HP Latex Print and Cut Solution
Latex Knowledge Center, May 14, 2019 9
4.3.2 Adding contour marks
HP Flexi PRINT and Cut Editor allows you to select the paths in your image file and to add the contour marks:
Add contour lines – Effects menu > Contour cut.
Some image types may require further steps:
Vectors / masks Bitmaps / color traces Direct cut
Remove any unnecessary background, and select only the outline paths you want to add a contour line to
For bitmaps, make the background transparent.
The Color Trace option helps to create a higher quality contour cut.
In this case, no contour lines are needed.
Create your design and Cut/Plot.
You can find further details in the HP Flexi Print and Cut Editor tutorial: Help menu > Flexi Tutorial.
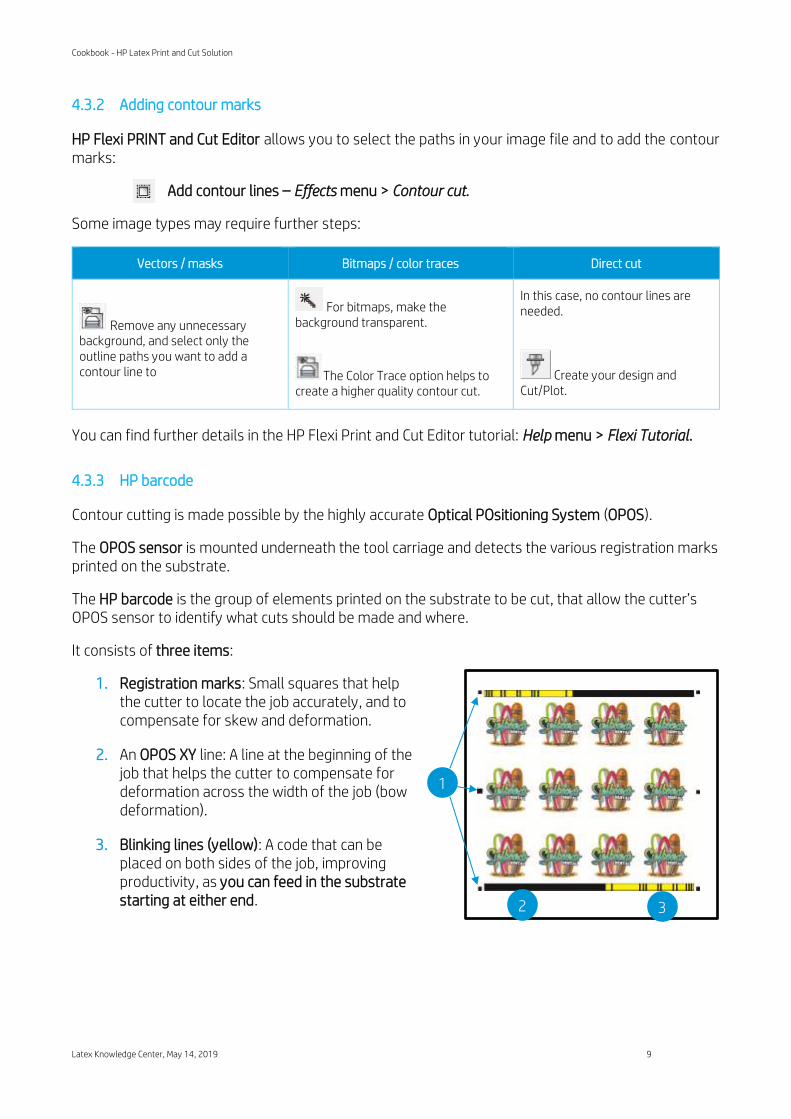
4.3.3 HP barcode
Contour cutting is made possible by the highly accurate Optical POsitioning System (OPOS).
The OPOS sensor is mounted underneath the tool carriage and detects the various registration marks printed on the substrate.
The HP barcode is the group of elements printed on the substrate to be cut, that allow the cutter’s OPOS sensor to identify what cuts should be made and where.
It consists of three items:
1. Registration marks: Small squares that help the cutter to locate the job accurately, and to compensate for skew and deformation.
2. An OPOS XY line: A line at the beginning of the job that helps the cutter to compensate for deformation across the width of the job (bow deformation).
3. Blinking lines (yellow): A code that can be placed on both sides of the job, improving productivity, as you can feed in the substrate starting at either end.
1
2 3
Cookbook - HP Latex Print and Cut Solution
Latex Knowledge Center, May 14, 2019 10
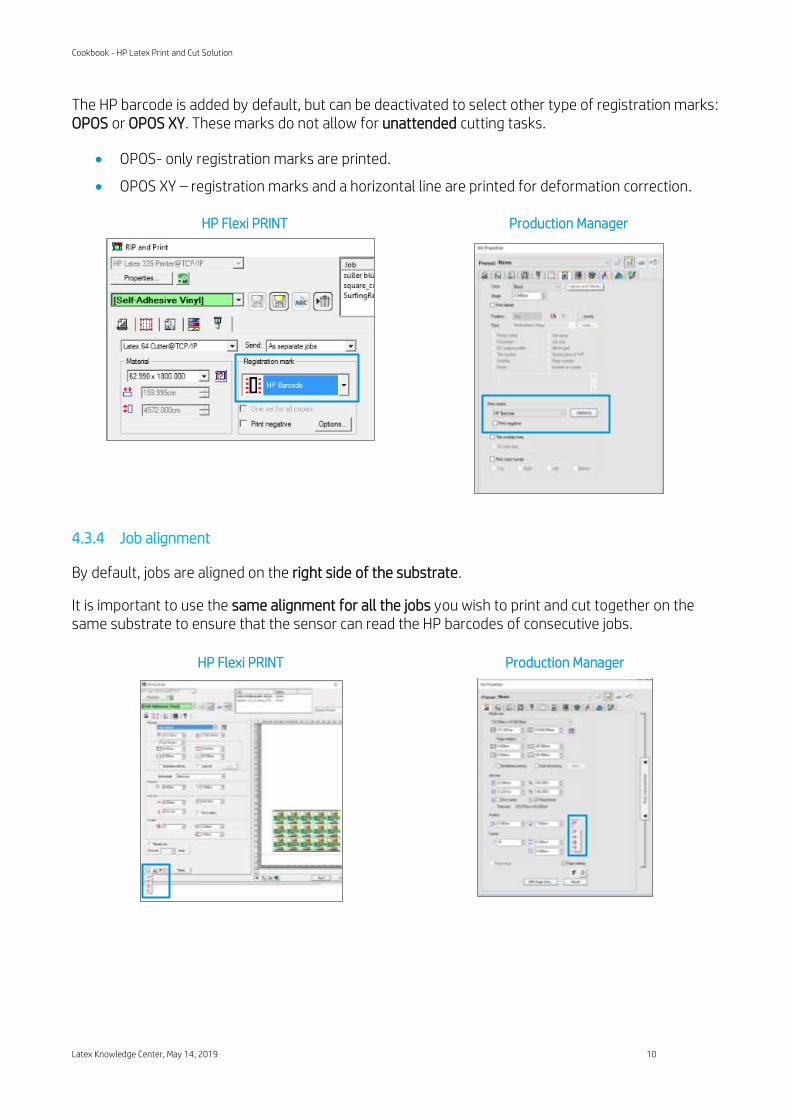
The HP barcode is added by default, but can be deactivated to select other type of registration marks: OPOS or OPOS XY. These marks do not allow for unattended cutting tasks.
• OPOS- only registration marks are printed.
• OPOS XY – registration marks and a horizontal line are printed for deformation correction.
HP Flexi PRINT Production Manager
4.3.4 Job alignment
By default, jobs are aligned on the right side of the substrate.
It is important to use the same alignment for all the jobs you wish to print and cut together on the same substrate to ensure that the sensor can read the HP barcodes of consecutive jobs.
HP Flexi PRINT Production Manager

Cookbook - HP Latex Print and Cut Solution
Latex Knowledge Center, May 14, 2019 11
4.3.5 Printing parameters
In order to get the best results from your substrate, printer and cutter, set up your printer options as follows. Please note that words substrate and media are used indistinctively.
Set substrate presets
Option 1. Using HP Flexi Print and Cut Editor
1a. Go to RIP and Print.
1b. Go to the Advanced Options menu.
1c. Choose Use color correction.
1d. Select the correct Output profile.
1e. Select the Media you have loaded in the printer.
1f. Select the highest resolution: 600x600 dpi.
Option 2. Using Production Manager HP Edition
2a. Select your job, and go to Job Properties.
2b. In the Printer Options menu:
2c. Click on Read media from printer.
2d. Click Download ICC.
2e. Choose the correct Category, Media and Print Mode.
d
c
a
b
e
f
c d
e
a
b
Cookbook - HP Latex Print and Cut Solution
Latex Knowledge Center, May 14, 2019 12
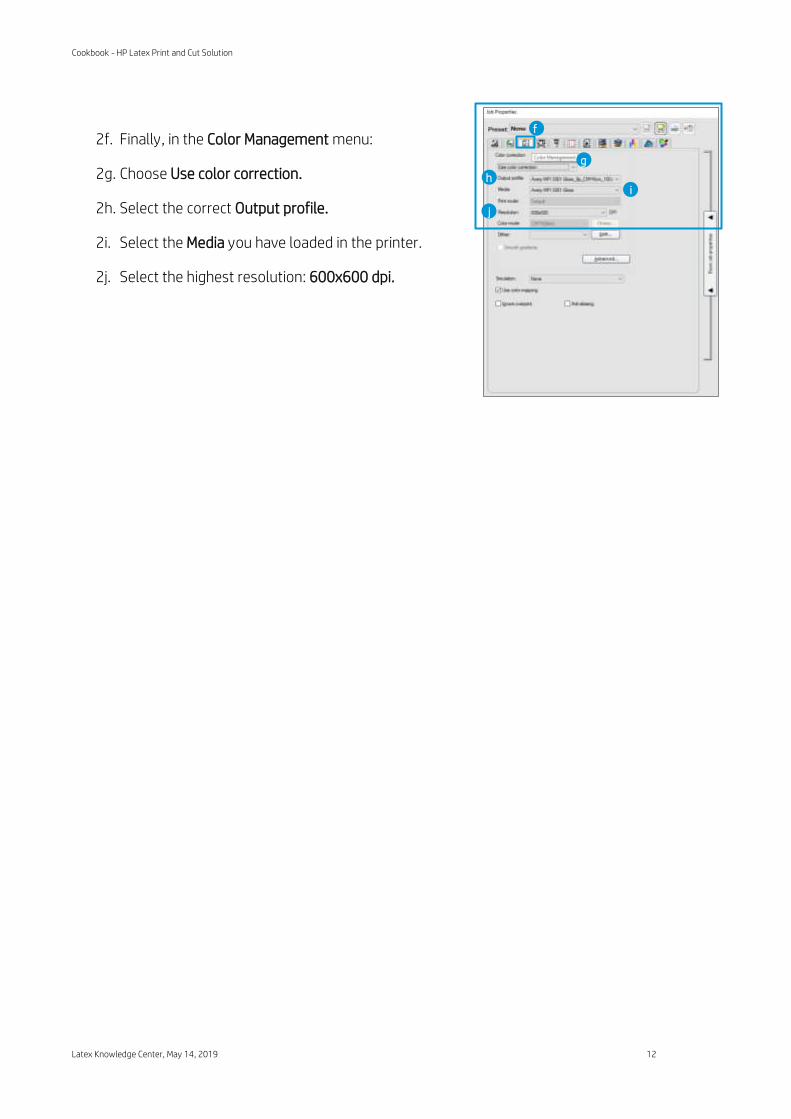
2f. Finally, in the Color Management menu:
2g. Choose Use color correction.
2h. Select the correct Output profile.
2i. Select the Media you have loaded in the printer.
2j. Select the highest resolution: 600x600 dpi.
f
g
h i
j
Cookbook - HP Latex Print and Cut Solution
Latex Knowledge Center, May 14, 2019 13
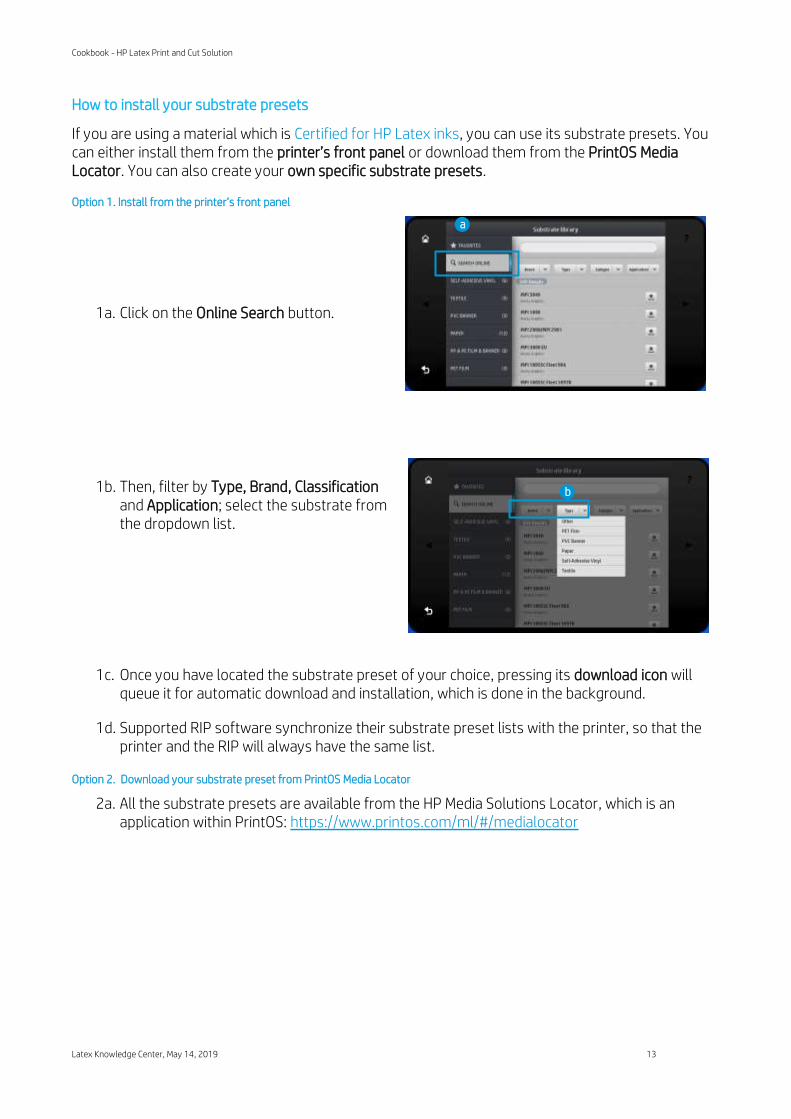
How to install your substrate presets
If you are using a material which is Certified for HP Latex inks, you can use its substrate presets. You can either install them from the printer’s front panel or download them from the PrintOS Media Locator. You can also create your own specific substrate presets.
Option 1. Install from the printer’s front panel
1a. Click on the Online Search button.
1b. Then, filter by Type, Brand, Classification and Application; select the substrate from the dropdown list.
1c. Once you have located the substrate preset of your choice, pressing its download icon will queue it for automatic download and installation, which is done in the background.
1d. Supported RIP software synchronize their substrate preset lists with the printer, so that the printer and the RIP will always have the same list.
Option 2. Download your substrate preset from PrintOS Media Locator
2a. All the substrate presets are available from the HP Media Solutions Locator, which is an application within PrintOS: https://www.printos.com/ml/#/medialocator
a
b
Cookbook - HP Latex Print and Cut Solution
Latex Knowledge Center, May 14, 2019 14
Create your own substrate preset
• Finally, if you cannot find a ready-made preset for your substrate, and if you prefer not to use a generic preset or edit an existing one, you can make your own preset from scratch.
• The Add New Substrate wizard in the printer’s front panel guides you in establishing the best settings for your substrate.
• Full instructions can be found in the printer’s User Guide.
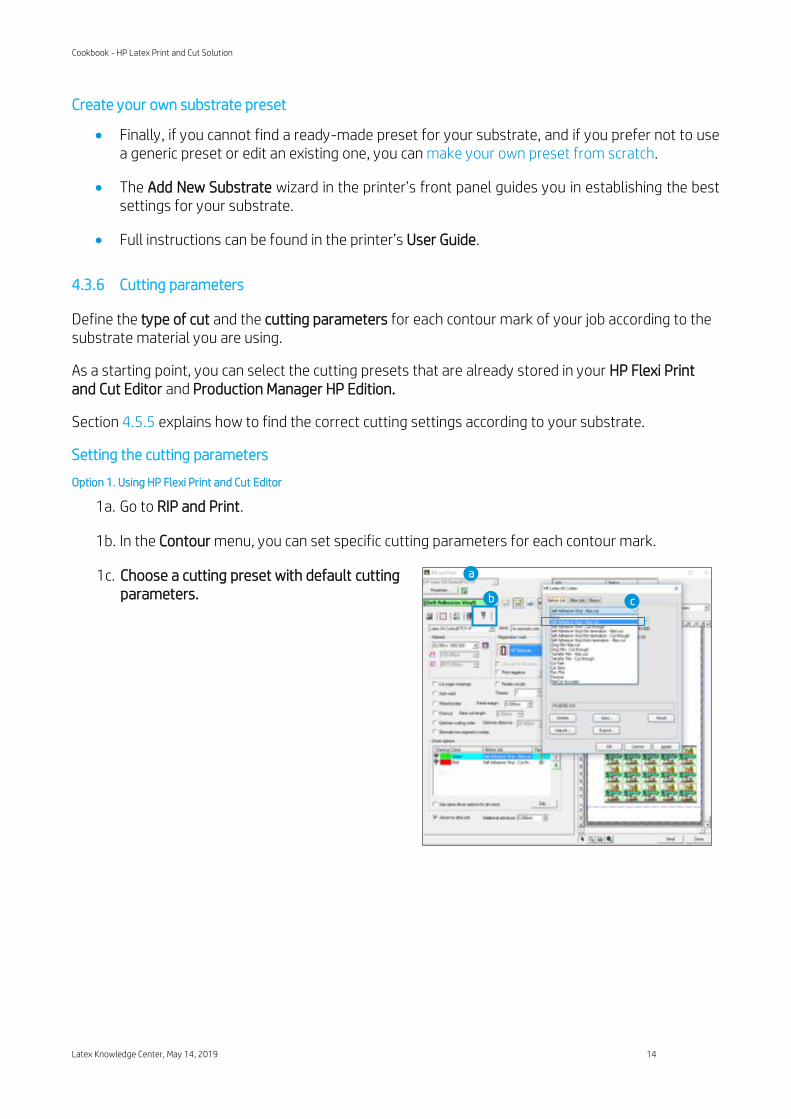
4.3.6 Cutting parameters
Define the type of cut and the cutting parameters for each contour mark of your job according to the substrate material you are using.
As a starting point, you can select the cutting presets that are already stored in your HP Flexi Print and Cut Editor and Production Manager HP Edition.
Section 4.5.5 explains how to find the correct cutting settings according to your substrate.
Setting the cutting parameters
Option 1. Using HP Flexi Print and Cut Editor
1a. Go to RIP and Print.
1b. In the Contour menu, you can set specific cutting parameters for each contour mark.
1c. Choose a cutting preset with default cutting parameters.
b
a
c
Cookbook - HP Latex Print and Cut Solution
Latex Knowledge Center, May 14, 2019 15
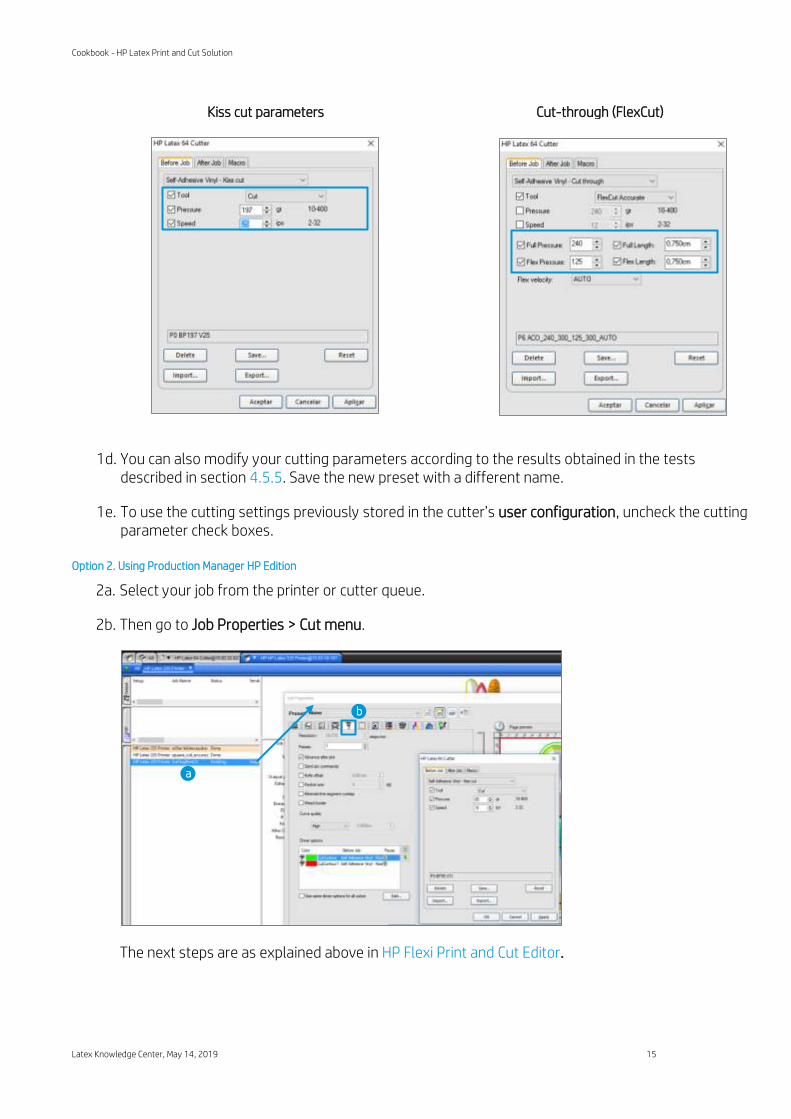
Kiss cut parameters Cut-through (FlexCut)
1d. You can also modify your cutting parameters according to the results obtained in the tests described in section 4.5.5. Save the new preset with a different name.
1e. To use the cutting settings previously stored in the cutter’s user configuration, uncheck the cutting parameter check boxes.
Option 2. Using Production Manager HP Edition
2a. Select your job from the printer or cutter queue.
2b. Then go to Job Properties > Cut menu.
The next steps are as explained above in HP Flexi Print and Cut Editor.
a
b
Cookbook - HP Latex Print and Cut Solution
Latex Knowledge Center, May 14, 2019 16
4.4 Print
4.4.1 Printer setup
Please consider using HP Latex Certified substrates in order to get the best printing performance.
Make sure that the substrate type that you select on the front panel and in your RIP software is the same as the substrate type that is loaded in the printer.
Make sure that the substrate has been calibrated:
• Substrate-advance calibration (if needed)
• Printhead alignment
• Color calibration
Please refer to the printer’s User Guide for an extended explanation on How to handle the substrate and Substrate settings.
Important: Some materials may deform when they have been loaded in the printer for several hours and not printed on. In order to prevent possible printhead crashes during loading, advance the substrate forward until the deformed area passes the printing zone.
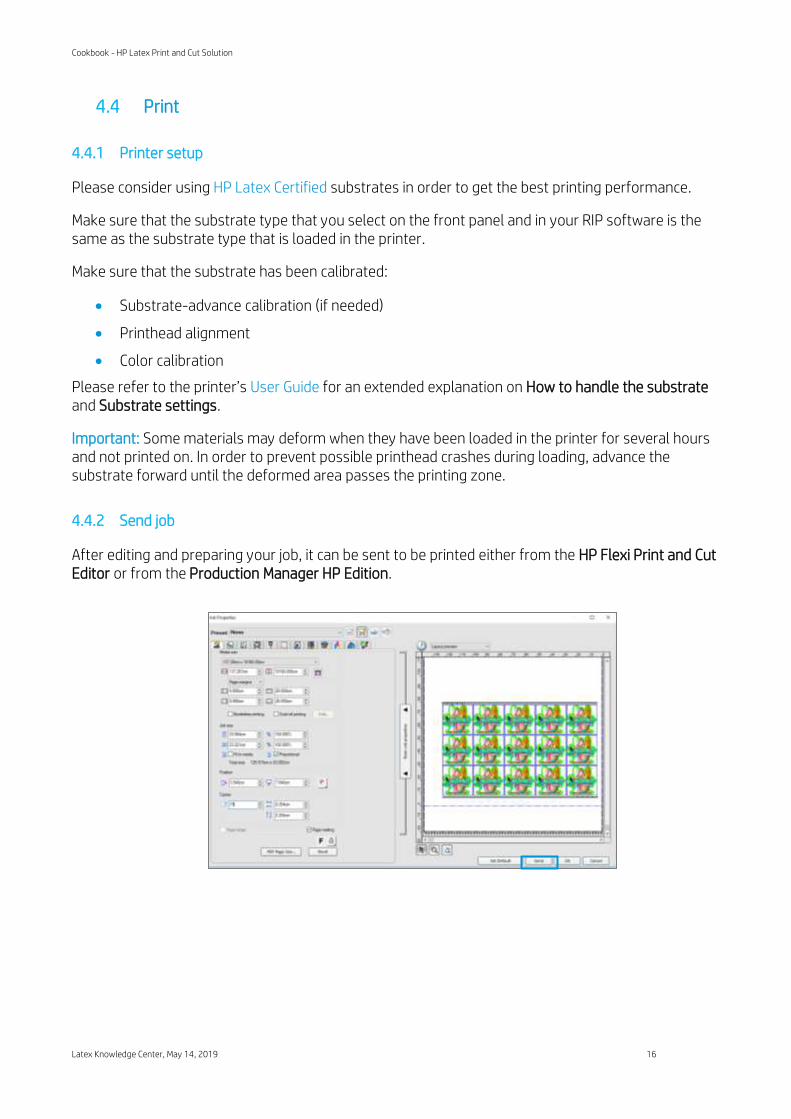
4.4.2 Send job
After editing and preparing your job, it can be sent to be printed either from the HP Flexi Print and Cut Editor or from the Production Manager HP Edition.
Cookbook - HP Latex Print and Cut Solution
Latex Knowledge Center, May 14, 2019 17
4.5 Cutting
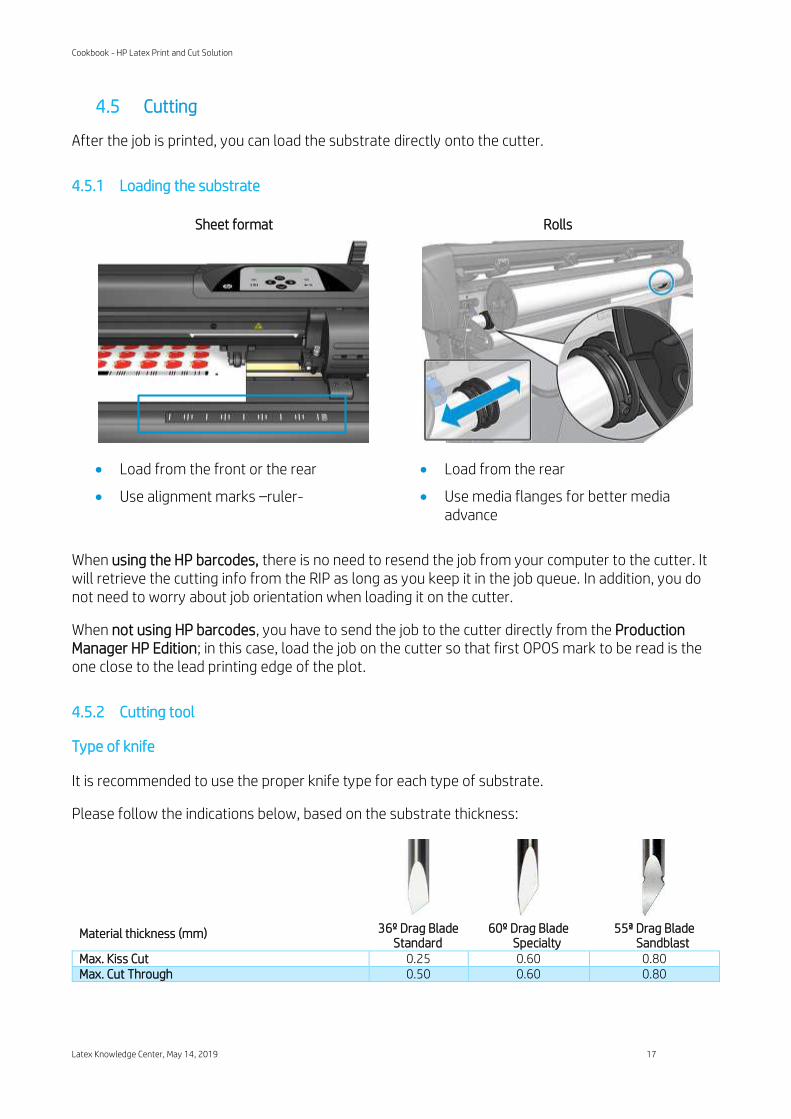
After the job is printed, you can load the substrate directly onto the cutter.
4.5.1 Loading the substrate
Sheet format Rolls
• Load from the front or the rear
• Use alignment marks –ruler-
• Load from the rear
• Use media flanges for better media advance
When using the HP barcodes, there is no need to resend the job from your computer to the cutter. It will retrieve the cutting info from the RIP as long as you keep it in the job queue. In addition, you do not need to worry about job orientation when loading it on the cutter.
When not using HP barcodes, you have to send the job to the cutter directly from the Production Manager HP Edition; in this case, load the job on the cutter so that first OPOS mark to be read is the one close to the lead printing edge of the plot.
4.5.2 Cutting tool
Type of knife
It is recommended to use the proper knife type for each type of substrate.
Please follow the indications below, based on the substrate thickness:
36º Drag Blade Standard
60º Drag Blade Specialty
55ª Drag Blade Sandblast
Material thickness (mm)
Max. Kiss Cut 0.25 0.60 0.80 Max. Cut Through 0.50 0.60 0.80
Cookbook - HP Latex Print and Cut Solution
Latex Knowledge Center, May 14, 2019 18
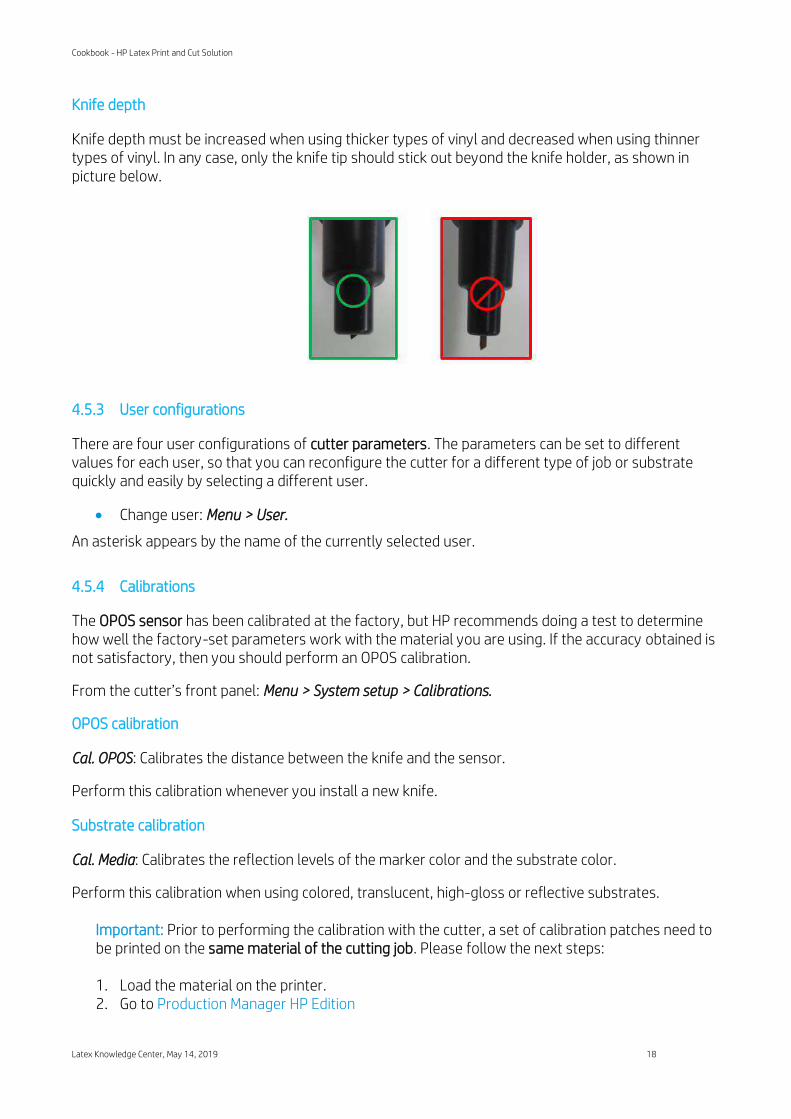
Knife depth
Knife depth must be increased when using thicker types of vinyl and decreased when using thinner types of vinyl. In any case, only the knife tip should stick out beyond the knife holder, as shown in picture below.
4.5.3 User configurations
There are four user configurations of cutter parameters. The parameters can be set to different values for each user, so that you can reconfigure the cutter for a different type of job or substrate quickly and easily by selecting a different user.
• Change user: Menu > User.
An asterisk appears by the name of the currently selected user.
4.5.4 Calibrations
The OPOS sensor has been calibrated at the factory, but HP recommends doing a test to determine how well the factory-set parameters work with the material you are using. If the accuracy obtained is not satisfactory, then you should perform an OPOS calibration.
From the cutter’s front panel: Menu > System setup > Calibrations.
OPOS calibration
Cal. OPOS: Calibrates the distance between the knife and the sensor.
Perform this calibration whenever you install a new knife.
Substrate calibration
Cal. Media: Calibrates the reflection levels of the marker color and the substrate color.
Perform this calibration when using colored, translucent, high-gloss or reflective substrates.
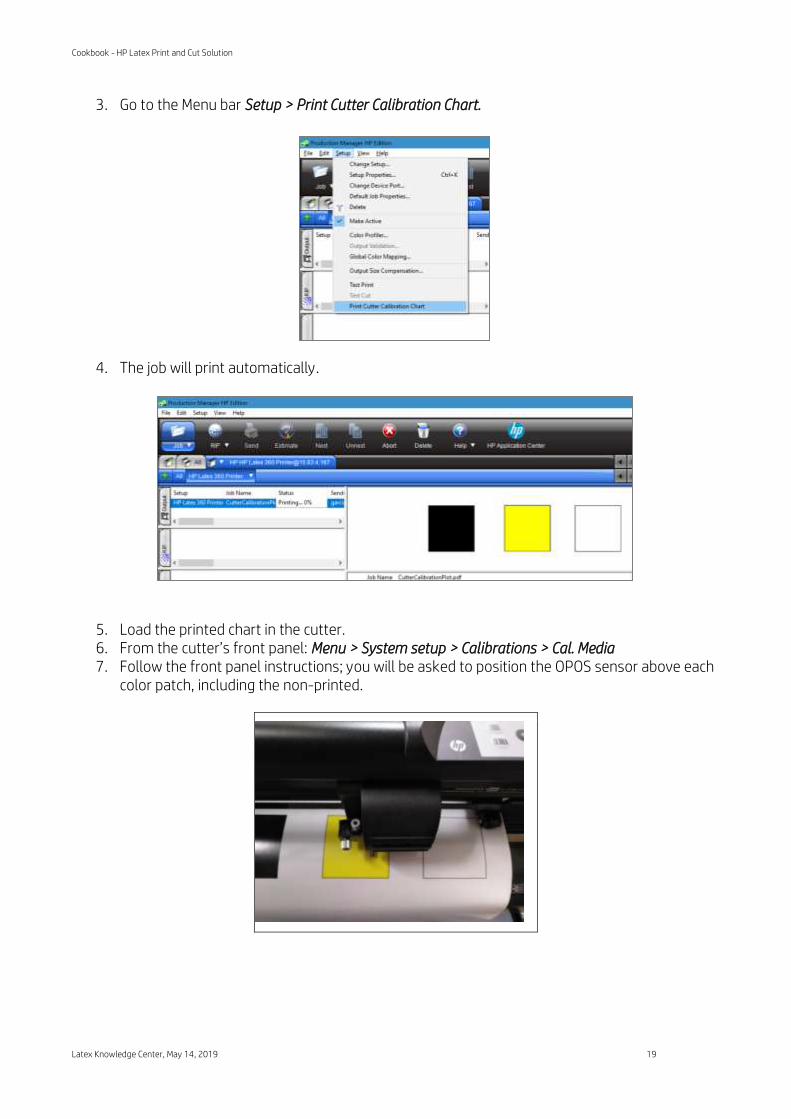
Important: Prior to performing the calibration with the cutter, a set of calibration patches need to be printed on the same material of the cutting job. Please follow the next steps:
1. Load the material on the printer. 2. Go to Production Manager HP Edition
Cookbook - HP Latex Print and Cut Solution
Latex Knowledge Center, May 14, 2019 19
3. Go to the Menu bar Setup > Print Cutter Calibration Chart.
4. The job will print automatically.
5. Load the printed chart in the cutter. 6. From the cutter’s front panel: Menu > System setup > Calibrations > Cal. Media 7. Follow the front panel instructions; you will be asked to position the OPOS sensor above each
color patch, including the non-printed.
Cookbook - HP Latex Print and Cut Solution
Latex Knowledge Center, May 14, 2019 20
Length calibration
Cal. Length: Allows the length of the cut lines to be adjusted within specifications.
Perform this calibration when using multiple vinyls and match-up is needed between them.
4.5.5 Finding the cutting settings for your material
The cutting presets are given for a limited number of media categories that may not include your specific substrate. Also, the wear on the knife can affect the cutting result.
For these reasons, it is highly recommended to find the cutting settings prior to sending a print-and-cut job.
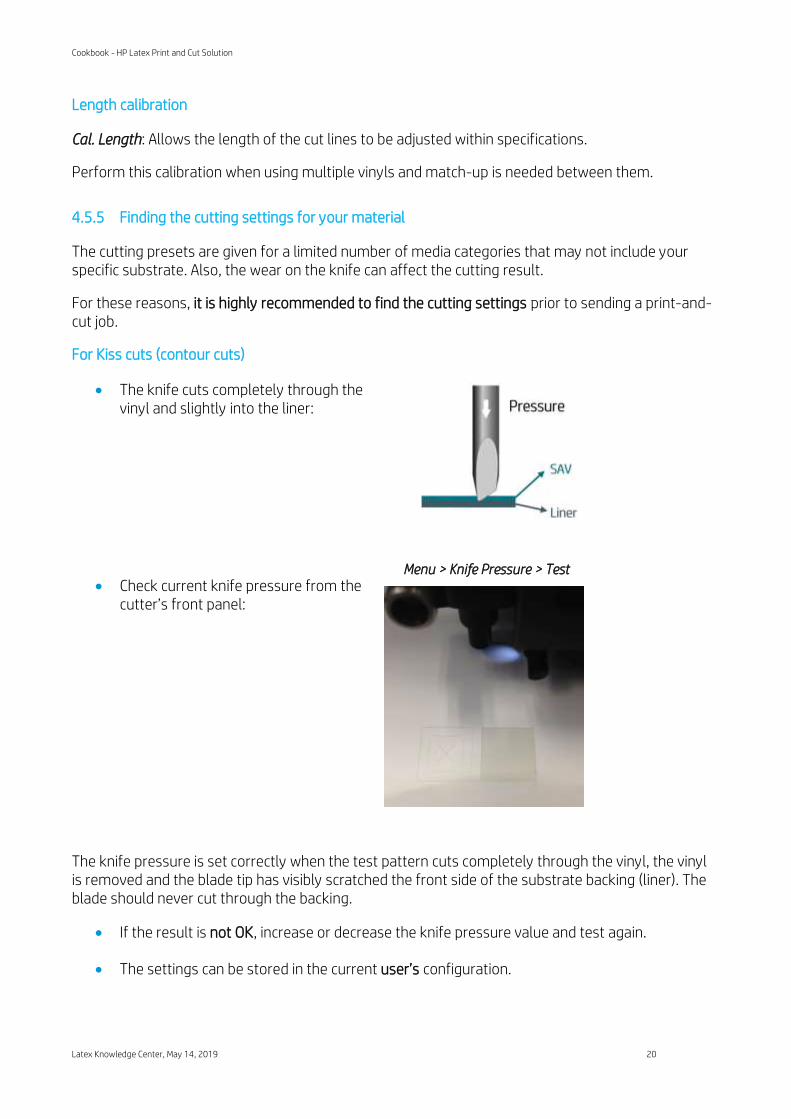
For Kiss cuts (contour cuts)
• The knife cuts completely through the vinyl and slightly into the liner:
• Check current knife pressure from the cutter’s front panel:
Menu > Knife Pressure > Test
The knife pressure is set correctly when the test pattern cuts completely through the vinyl, the vinyl is removed and the blade tip has visibly scratched the front side of the substrate backing (liner). The blade should never cut through the backing.
• If the result is not OK, increase or decrease the knife pressure value and test again.
• The settings can be stored in the current user’s configuration.
Cookbook - HP Latex Print and Cut Solution
Latex Knowledge Center, May 14, 2019 21
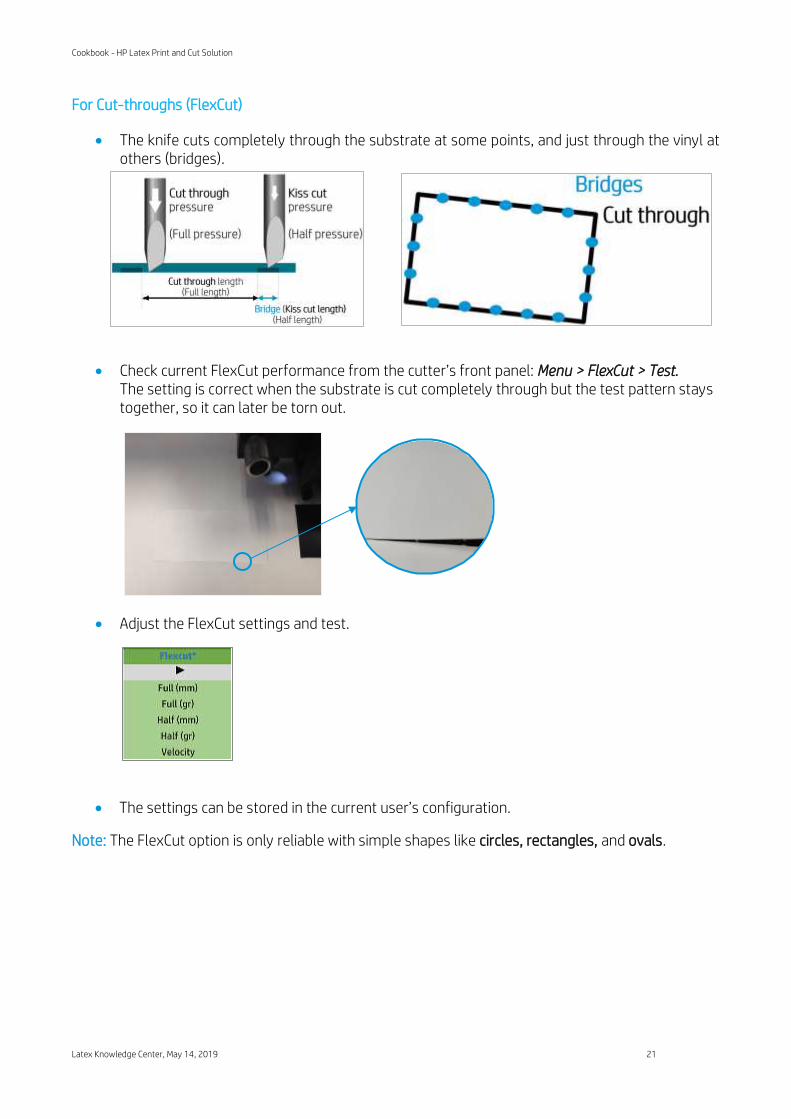
For Cut-throughs (FlexCut)
• The knife cuts completely through the substrate at some points, and just through the vinyl at others (bridges).
• Check current FlexCut performance from the cutter’s front panel: Menu > FlexCut > Test. The setting is correct when the substrate is cut completely through but the test pattern stays together, so it can later be torn out.
• Adjust the FlexCut settings and test.
• The settings can be stored in the current user’s configuration.
Note: The FlexCut option is only reliable with simple shapes like circles, rectangles, and ovals.
Cookbook - HP Latex Print and Cut Solution
Latex Knowledge Center, May 14, 2019 22
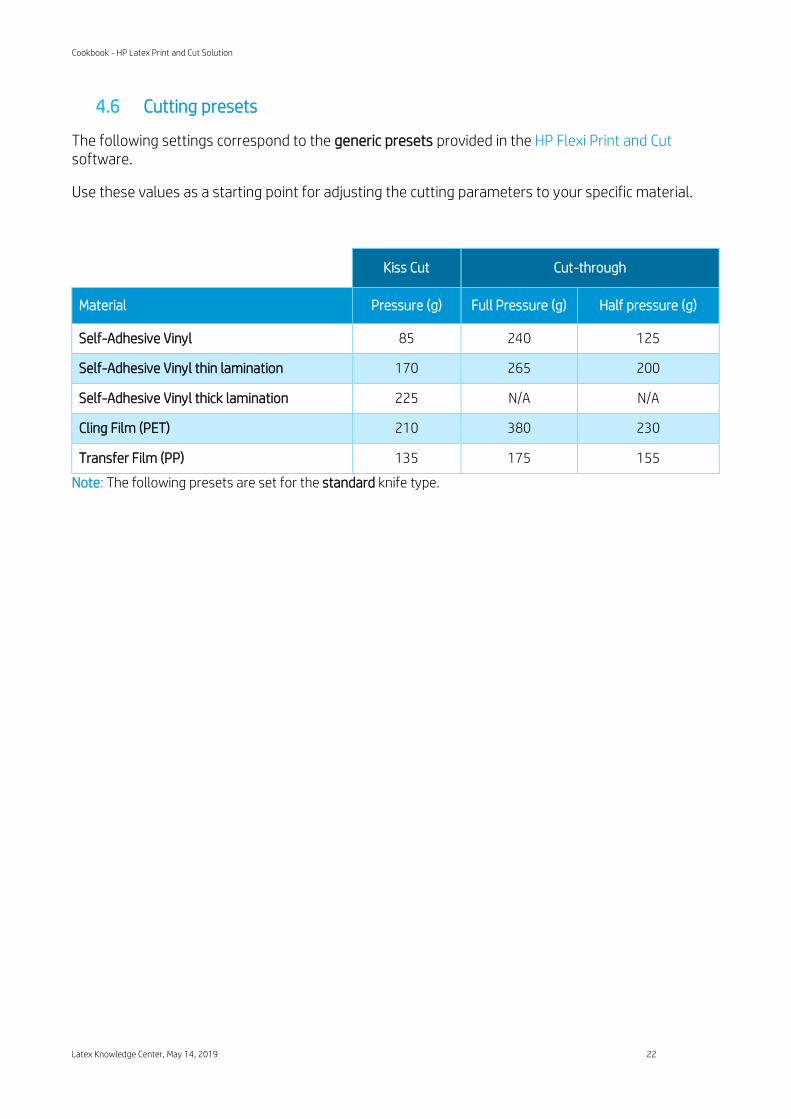
4.6 Cutting presets
The following settings correspond to the generic presets provided in the HP Flexi Print and Cut software.
Use these values as a starting point for adjusting the cutting parameters to your specific material.
Kiss Cut Cut-through
Material Pressure (g) Full Pressure (g) Half pressure (g)
Self-Adhesive Vinyl 85 240 125
Self-Adhesive Vinyl thin lamination 170 265 200
Self-Adhesive Vinyl thick lamination 225 N/A N/A
Cling Film (PET) 210 380 230
Transfer Film (PP) 135 175 155
Note: The following presets are set for the standard knife type.
Cookbook - HP Latex Print and Cut Solution
Latex Knowledge Center, May 14, 2019 23
5 Tips for materials
5.1 Get the right cutting accuracy
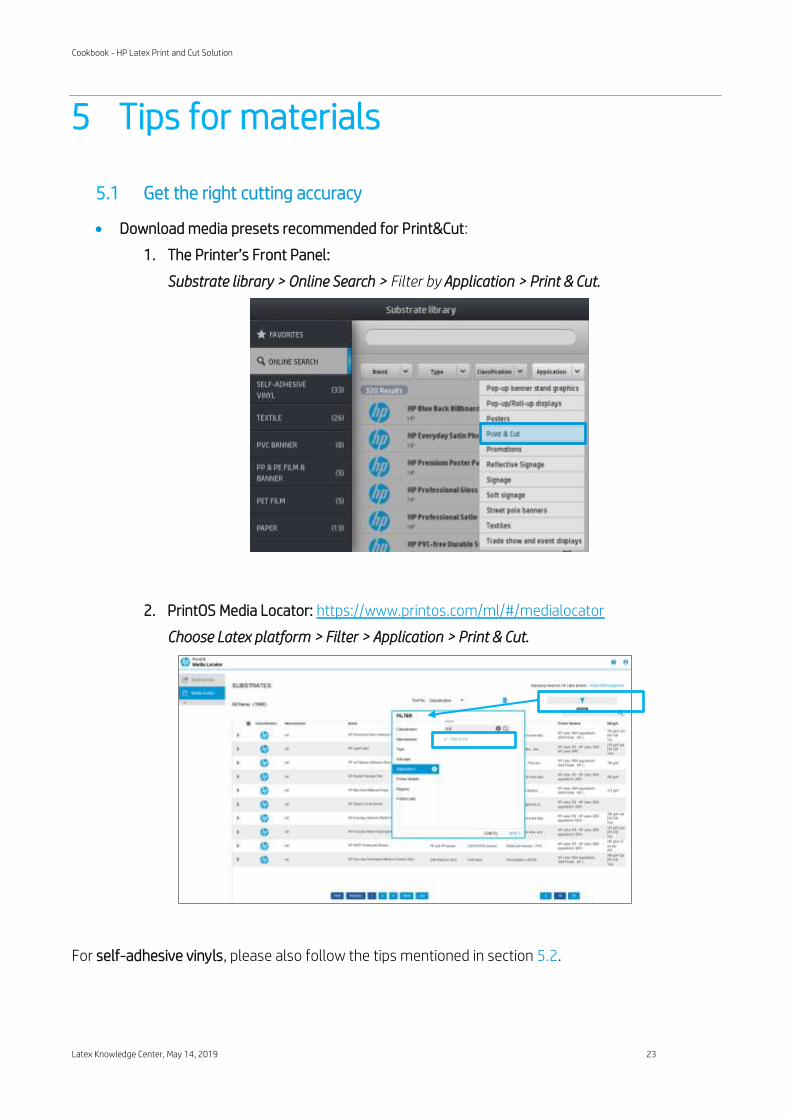
• Download media presets recommended for Print&Cut:
1. The Printer’s Front Panel:
Substrate library > Online Search > Filter by Application > Print & Cut.
2. PrintOS Media Locator: https://www.printos.com/ml/#/medialocator
Choose Latex platform > Filter > Application > Print & Cut.
For self-adhesive vinyls, please also follow the tips mentioned in section 5.2.
Cookbook - HP Latex Print and Cut Solution
Latex Knowledge Center, May 14, 2019 24
• If possible, always use the OPOS mark HP barcode.
• Set OPOS panels ON, from the cutter’s front panel:
Menu > System setup > Configuration > OPOS parameters > Panels.
When ON, this option allows the markers to be read in panels; the OPOS sensor reads markers according to panel size, instead of loading them all. When set to ON, the sensor will load only two markers in the X direction when loading OPOS. Other markers will be read when unrolling the substrate.
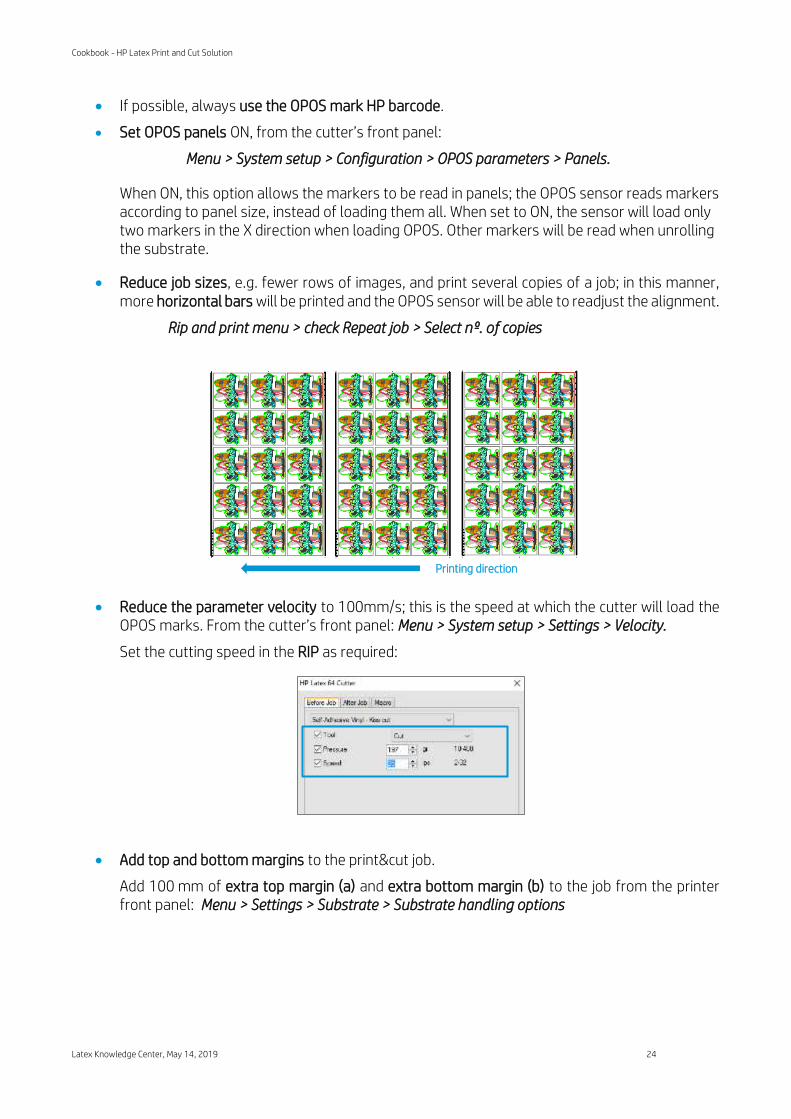
• Reduce job sizes, e.g. fewer rows of images, and print several copies of a job; in this manner, more horizontal bars will be printed and the OPOS sensor will be able to readjust the alignment.
Rip and print menu > check Repeat job > Select nº. of copies
• Reduce the parameter velocity to 100mm/s; this is the speed at which the cutter will load the OPOS marks. From the cutter’s front panel: Menu > System setup > Settings > Velocity.
Set the cutting speed in the RIP as required:
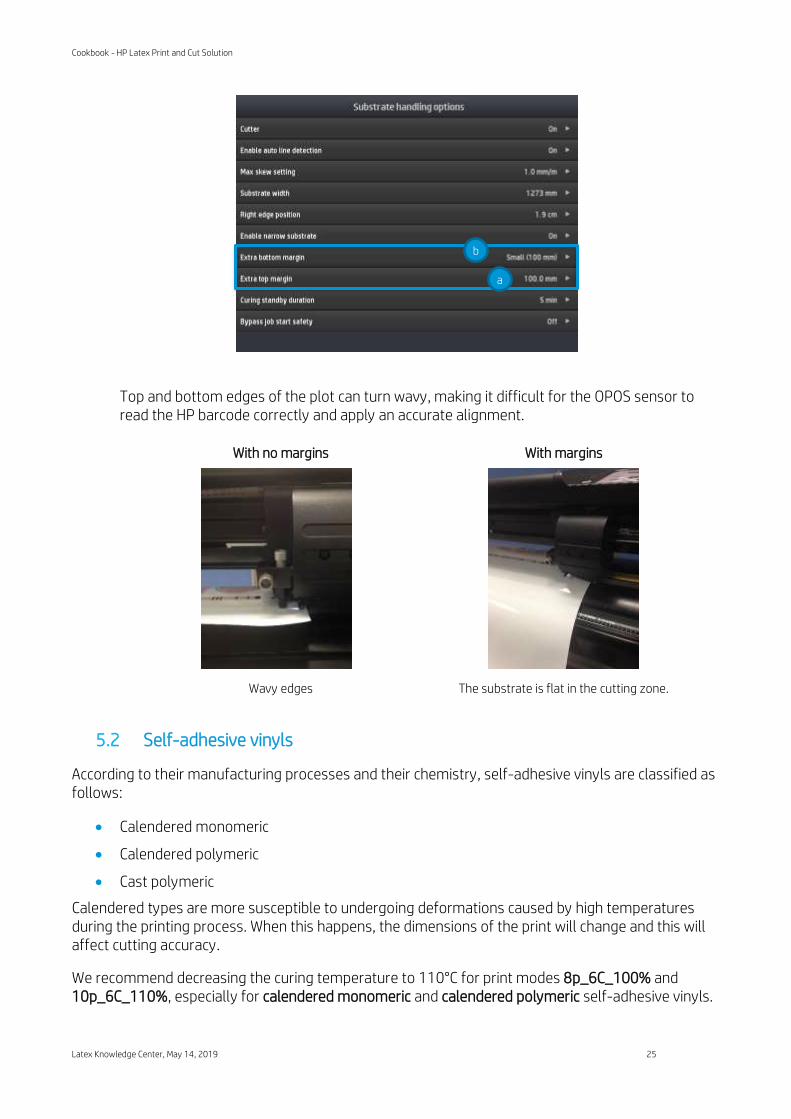
• Add top and bottom margins to the print&cut job.
Add 100 mm of extra top margin (a) and extra bottom margin (b) to the job from the printer front panel: Menu > Settings > Substrate > Substrate handling options
Printing direction
Cookbook - HP Latex Print and Cut Solution
Latex Knowledge Center, May 14, 2019 25
Top and bottom edges of the plot can turn wavy, making it difficult for the OPOS sensor to read the HP barcode correctly and apply an accurate alignment.
With no margins With margins
Wavy edges The substrate is flat in the cutting zone.
5.2 Self-adhesive vinyls
According to their manufacturing processes and their chemistry, self-adhesive vinyls are classified as follows:
• Calendered monomeric
• Calendered polymeric
• Cast polymeric
Calendered types are more susceptible to undergoing deformations caused by high temperatures during the printing process. When this happens, the dimensions of the print will change and this will affect cutting accuracy.
We recommend decreasing the curing temperature to 110°C for print modes 8p_6C_100% and 10p_6C_110%, especially for calendered monomeric and calendered polymeric self-adhesive vinyls.
b
a
Cookbook - HP Latex Print and Cut Solution
Latex Knowledge Center, May 14, 2019 26
Important: It is possible to go below 110°C but, depending on the media used and image’s characteristics, it may require reducing the ink density as well in order to guarantee sufficient ink curing.
5.3 Transfer media
Find a detailed description and guidance on how to customize your clothing in the following document: Customized Clothing with HP Latex Printers.
5.4 Transparent / translucent films
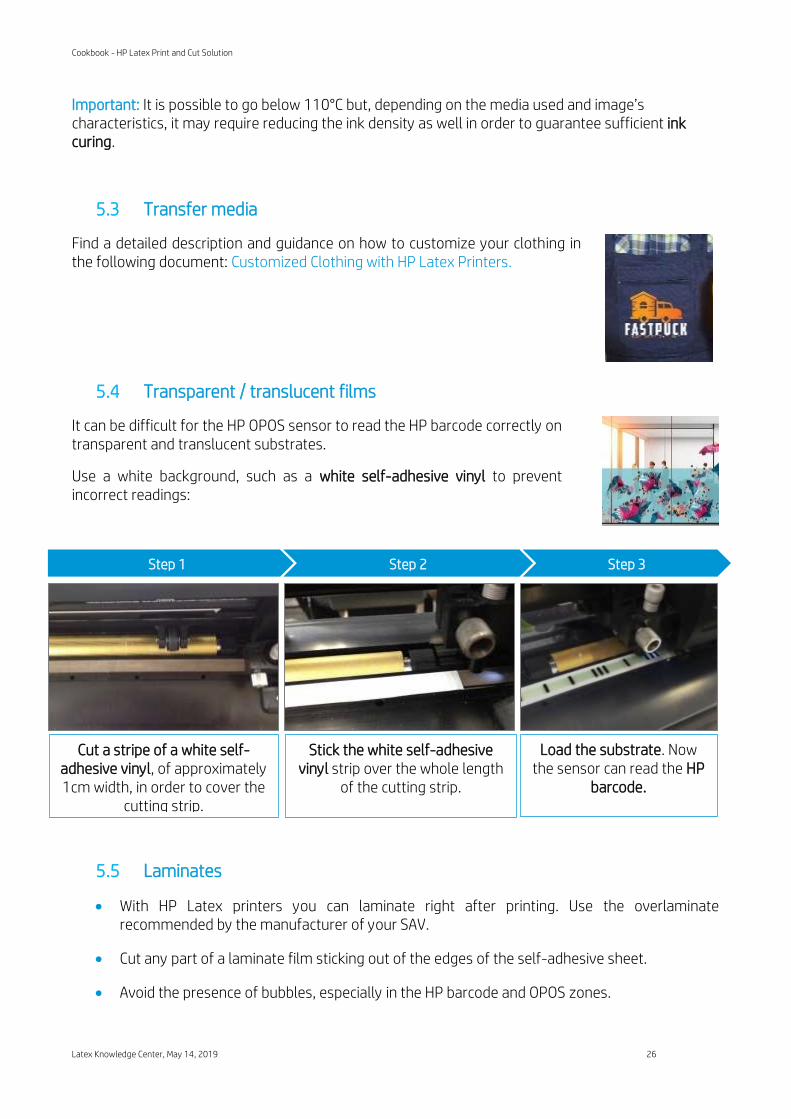
It can be difficult for the HP OPOS sensor to read the HP barcode correctly on transparent and translucent substrates.
Use a white background, such as a white self-adhesive vinyl to prevent incorrect readings:
5.5 Laminates
• With HP Latex printers you can laminate right after printing. Use the overlaminate recommended by the manufacturer of your SAV.
• Cut any part of a laminate film sticking out of the edges of the self-adhesive sheet.
• Avoid the presence of bubbles, especially in the HP barcode and OPOS zones.
Cut a stripe of a white self-adhesive vinyl, of approximately 1cm width, in order to cover the
cutting strip.
Stick the white self-adhesive vinyl strip over the whole length
of the cutting strip.
Load the substrate. Now the sensor can read the HP
barcode.
Step 2 Step 3 Step 1
Cookbook - HP Latex Print and Cut Solution
Latex Knowledge Center, May 14, 2019 27
5.6 Perforated SAV
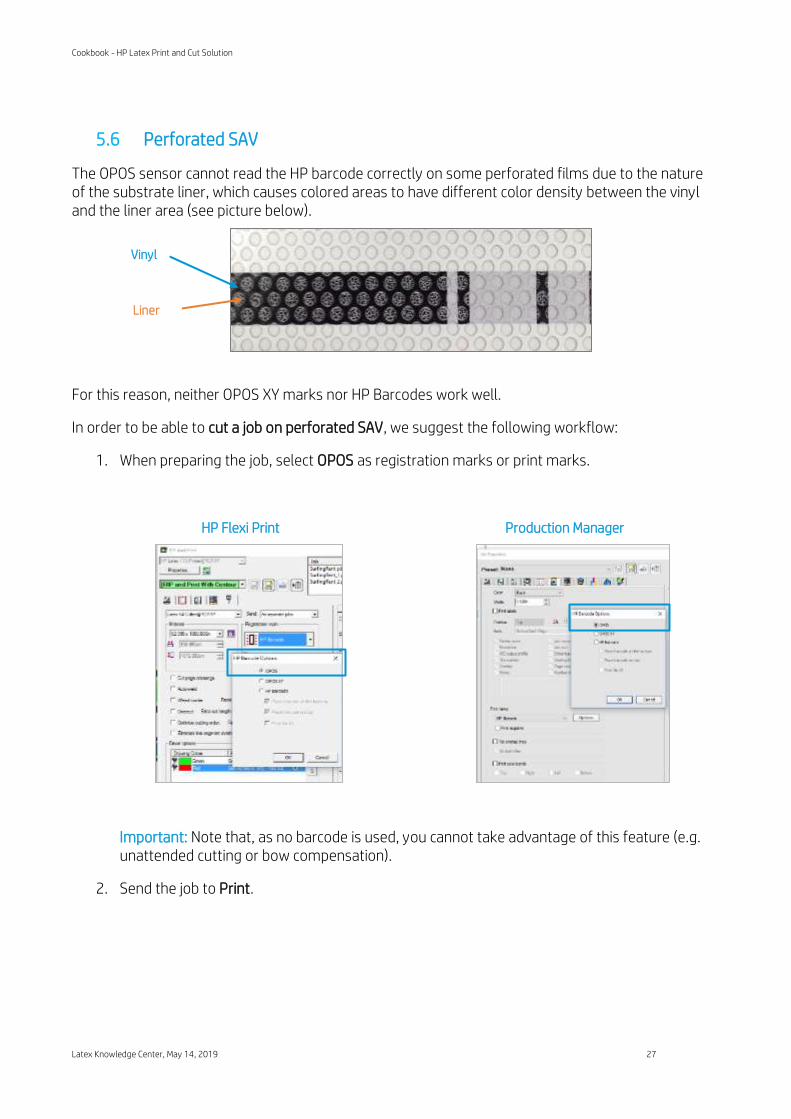
The OPOS sensor cannot read the HP barcode correctly on some perforated films due to the nature of the substrate liner, which causes colored areas to have different color density between the vinyl and the liner area (see picture below).
For this reason, neither OPOS XY marks nor HP Barcodes work well.
In order to be able to cut a job on perforated SAV, we suggest the following workflow:
1. When preparing the job, select OPOS as registration marks or print marks.
HP Flexi Print Production Manager
v
Important: Note that, as no barcode is used, you cannot take advantage of this feature (e.g. unattended cutting or bow compensation).
2. Send the job to Print.
Vinyl
Liner
Cookbook - HP Latex Print and Cut Solution
Latex Knowledge Center, May 14, 2019 28
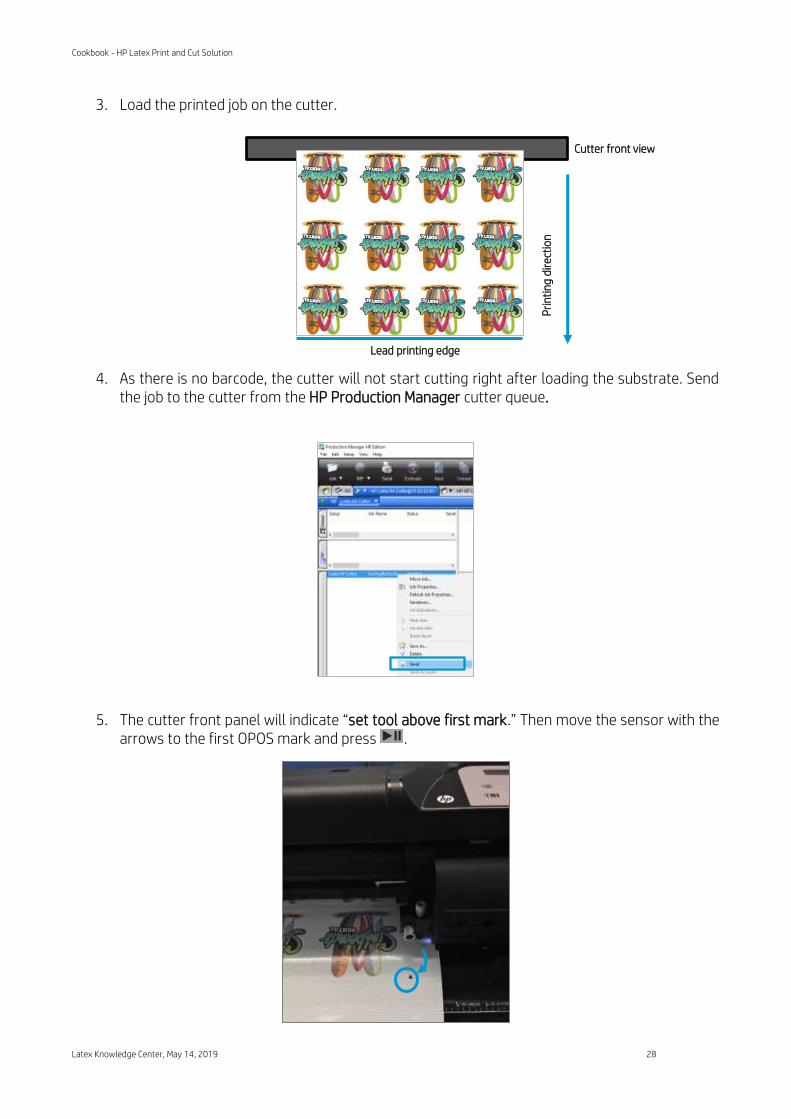
3. Load the printed job on the cutter.
4. As there is no barcode, the cutter will not start cutting right after loading the substrate. Send the job to the cutter from the HP Production Manager cutter queue.
5. The cutter front panel will indicate “set tool above first mark.” Then move the sensor with the arrows to the first OPOS mark and press .
Cutter front view
Pri
nti
ng
dir
ecti
on
Lead printing edge
Cookbook - HP Latex Print and Cut Solution
Latex Knowledge Center, May 14, 2019 29
The OPOS sensor will search and read all OPOS marks and start cutting.
Important: Note that, as no barcode is used, each job that has to be cut will have to be sent separately from the Production Manager cutter queue.
5.7 Self-adhesive textiles
These materials are used for interior decoration, in-store construction and property design, in gastronomy and hostelry, and in the private sector as well. One example of such materials is Mediatex® WallCover Textile, from Junkers and Müllers (HP latex ink certified).
For printing on this material, use the certified substrate preset, found in the printer’s online search or from the PrintOS Media Locator website:
https://www.printos.com/ml/#/medialocator
When cutting, you can follow the settings below as a starting point to setting the cutting parameters (using the standard knife type):
Kiss cut
Cut through (FlexCut) Full Half Knife pressure 190 g Velocity 400 mm/s Pressure 260 g 150 g Length 10 mm 0.8 mm Velocity Auto
Check if the result is satisfactory. If not, change any of the above parameters. Reducing the velocity can improve the result. Avoid using cutting speeds greater than 400 mm/s (16 ips) with cutting pressures above 170 g.
Important: HP Latex Cutter cannot cut textiles other than self-adhesive textiles that have a liner. For regular soft signage textiles other types of cutters should be used.
5.8 Reflective graphic films
Reflective graphic films offer nighttime and daytime visibility for graphics and advertising. Their uses may include:
• Wraps for vehicles, straight trucks, semi-trucks and semi-trailers
• Smooth and textured wall graphics, indoor and outdoor signs, including point-of-purchase and displays
• Bus graphics
• Small format original equipment manufacturer’s (OEM) decorative and identification graphics, cautionary and safety labeling
Cookbook - HP Latex Print and Cut Solution
Latex Knowledge Center, May 14, 2019 30
Important: The following recommendations are limited to flexible, enclosed lens, retroreflective films, not thicker than 0.5mm (0.8mm with optional sandblast blade), and not prismatic reflective films. Check the cutting instructions for your specific graphic material.
• Make sure the material is compatible with HP Latex inks and printers (PrintOS Media Locator)
• From cutter’s front panel, select a new User to save the new configuration specific for your reflective material: Menu > User
• Check and modify accordingly the cutting settings for kiss-cut and cut-through (FlexCut) (view 4.5.5). Note that some films may require the use of sandblast knife or may not be recommended for cut-through jobs.
• Very important: Perform Cal. Media calibration (view 4.5.5); this calibrates the reflection levels of the marker color and the substrate color.
Cookbook - HP Latex Print and Cut Solution
Latex Knowledge Center, May 14, 2019 31
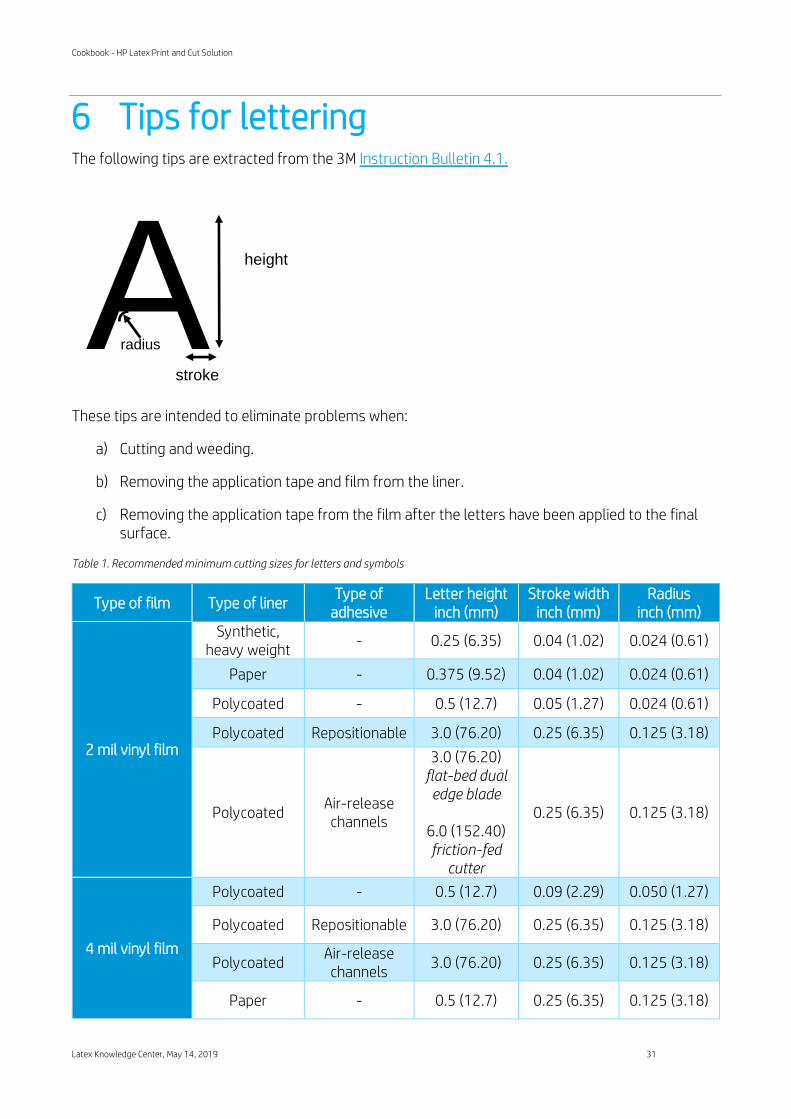
6 Tips for lettering The following tips are extracted from the 3M Instruction Bulletin 4.1.
These tips are intended to eliminate problems when:
a) Cutting and weeding.
b) Removing the application tape and film from the liner.
c) Removing the application tape from the film after the letters have been applied to the final surface.
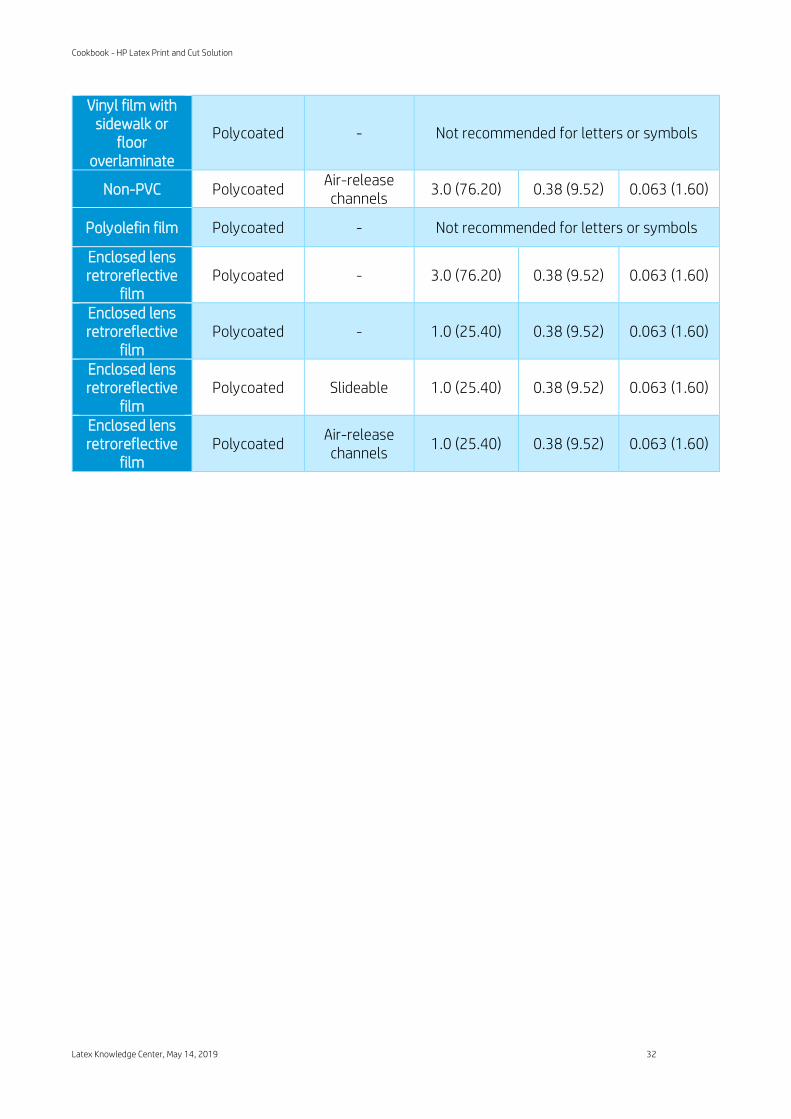
Table 1. Recommended minimum cutting sizes for letters and symbols
Type of film Type of liner Type of
adhesive Letter height
inch (mm) Stroke width
inch (mm) Radius
inch (mm)
2 mil vinyl film
Synthetic, heavy weight
- 0.25 (6.35) 0.04 (1.02) 0.024 (0.61)
Paper - 0.375 (9.52) 0.04 (1.02) 0.024 (0.61)
Polycoated - 0.5 (12.7) 0.05 (1.27) 0.024 (0.61)
Polycoated Repositionable 3.0 (76.20) 0.25 (6.35) 0.125 (3.18)
Polycoated Air-release channels
3.0 (76.20) flat-bed dual
edge blade
6.0 (152.40) friction-fed
cutter
0.25 (6.35) 0.125 (3.18)
4 mil vinyl film
Polycoated - 0.5 (12.7) 0.09 (2.29) 0.050 (1.27)
Polycoated Repositionable 3.0 (76.20) 0.25 (6.35) 0.125 (3.18)
Polycoated Air-release channels
3.0 (76.20) 0.25 (6.35) 0.125 (3.18)
Paper - 0.5 (12.7) 0.25 (6.35) 0.125 (3.18)
A
height
stroke
radius
Cookbook - HP Latex Print and Cut Solution
Latex Knowledge Center, May 14, 2019 32
Vinyl film with sidewalk or
floor overlaminate
Polycoated - Not recommended for letters or symbols
Non-PVC Polycoated Air-release channels
3.0 (76.20) 0.38 (9.52) 0.063 (1.60)
Polyolefin film Polycoated - Not recommended for letters or symbols
Enclosed lens retroreflective
film Polycoated - 3.0 (76.20) 0.38 (9.52) 0.063 (1.60)
Enclosed lens retroreflective
film Polycoated - 1.0 (25.40) 0.38 (9.52) 0.063 (1.60)
Enclosed lens retroreflective
film Polycoated Slideable 1.0 (25.40) 0.38 (9.52) 0.063 (1.60)
Enclosed lens retroreflective
film Polycoated
Air-release channels
1.0 (25.40) 0.38 (9.52) 0.063 (1.60)
Cookbook - HP Latex Print and Cut Solution
Latex Knowledge Center, May 14, 2019 33
7 Useful links Product documentation:
• http://www.hp.com/go/latex115printandcut/
• http://www.hp.com/go/latex315printandcut/
• http://www.hp.com/go/latex335printandcut/
User manuals:
• http://www.hp.com/go/latex300/manuals/
• HP Latex cutter
Print and Cut training:
• https://hplatexknowledgecenter.com/printers/hp-latex-115-pc/blog/hp-latex-cutter-series-training
Print and Cut videos:
• Print and Cut Solution
• Customizable clothing
• Floor graphics
• Window graphics
Further information:
• http://www.hp.com/supportvideos
• http://www.youtube.com/HPSupportAdvanced