Embed Size (px)
Citation preview

CRA Unit File Upload Procedure for Windows Vista and/or Windows 7 12 August 2010 Page 1 of 18
Contribution Reporting Application (CRA) Unit File Upload Procedure
After you have saved your CRA File to your computer or network, you will need to transfer it to the RSA via the CRA file upload application.
Security Notice: The CRA File Upload Website is owned and maintained by the Retirement Systems of Alabama. This site provides a mechanism for employer units to upload contribution reporting files over a secure channel. Currently, there is no other functionality for member units to login and download reports or make individual employee changes regarding contributions to the retirement system. For security purposes, data can only be uploaded to this site.
Logging in to the application
Step 1. Open your web browser, type https://cra.rsa-al.gov/ in the address bar, and press the Enter key to go to the CRA Login page:

CRA Unit File Upload Procedure for Windows Vista and/or Windows 7 12 August 2010 Page 2 of 18
Please note that you need to be running either Microsoft Internet Explorer 7.0 or higher or Firefox 2.0 or higher in order to use this application. Additionally, if your computer does not have the minimum required version of Adobe Flash Player (9.0.24), you will receive the following prompt:
Click OK to go to Adobe’s website and install the latest (required) version of the Adobe Flash Player:
Click Agree and install now, then follow the installation prompts.
Once the software is installed, or if you did not receive the software prompt), you should be able to proceed with your login:

CRA Unit File Upload Procedure for Windows Vista and/or Windows 7 12 August 2010 Page 3 of 18
Step 2. Enter your User Name and Password:
• User Name—CRA-Upload Note the “0” following the uppercase “L” in the password is a zero :
• Password— R$@upL0@d
Step 3. Click the Log In button.
Note: The phone number for site or technical questions is 1-877-517-0020, ext. 7411.

CRA Unit File Upload Procedure for Windows Vista and/or Windows 7 12 August 2010 Page 4 of 18
Step 4. Click the Upload CRA File button to begin the file upload process.
Note: If at any time you wish to exit the application, click Logout.
Step 5. In the file upload dialog box, navigate to the place on your computer (or network) where your file is stored. (The file name should be formatted PUUUYYMM.EXT, as outlined in the note on the screen above.)

CRA Unit File Upload Procedure for Windows Vista and/or Windows 7 12 August 2010 Page 5 of 18
Uploading a Retirement (.ret) file
Note: To see instructions/screens for an RSA-1 (.rsa) file, go to page 10.
Step 6. Select (click on) the appropriate file and click the Open button.
The dialog box will close and the web page will reflect the name of the file and its upload progress:
Once the upload is complete, the application will read the file:

CRA Unit File Upload Procedure for Windows Vista and/or Windows 7 12 August 2010 Page 6 of 18
Step 7. Verify the following information:
• Filename—the name of the file you selected
• Number of Records—the number of records in the file
• Employee Totals—the employee out-of-pocket contributions
Note: File Size and Hash information is for RSA Internal Use.
Step 8. Enter your Sum of checks remitted:
CRA Unit File Upload Procedure for Windows Vista and/or Windows 7 12 August 2010 Page 7 of 18
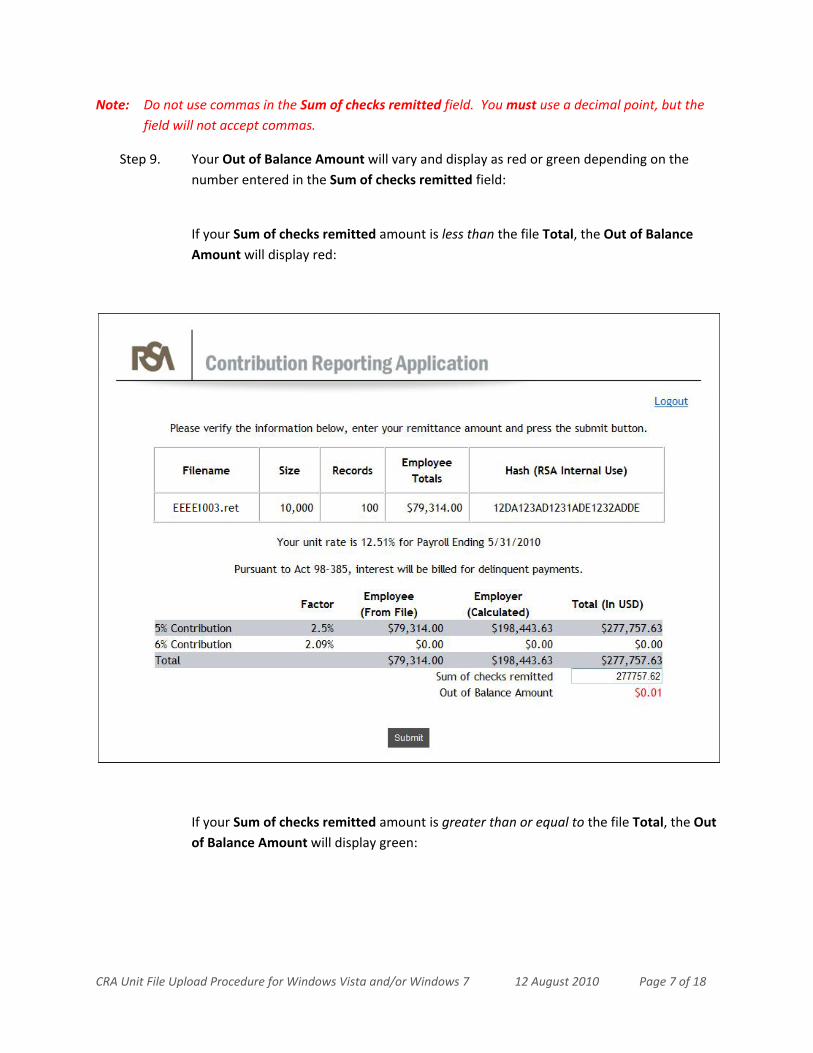
Note: Do not use commas in the Sum of checks remitted field. You must use a decimal point, but the field will not accept commas.
Step 9. Your Out of Balance Amount will vary and display as red or green depending on the number entered in the Sum of checks remitted field:
If your Sum of checks remitted amount is less than the file Total, the Out of Balance Amount will display red:
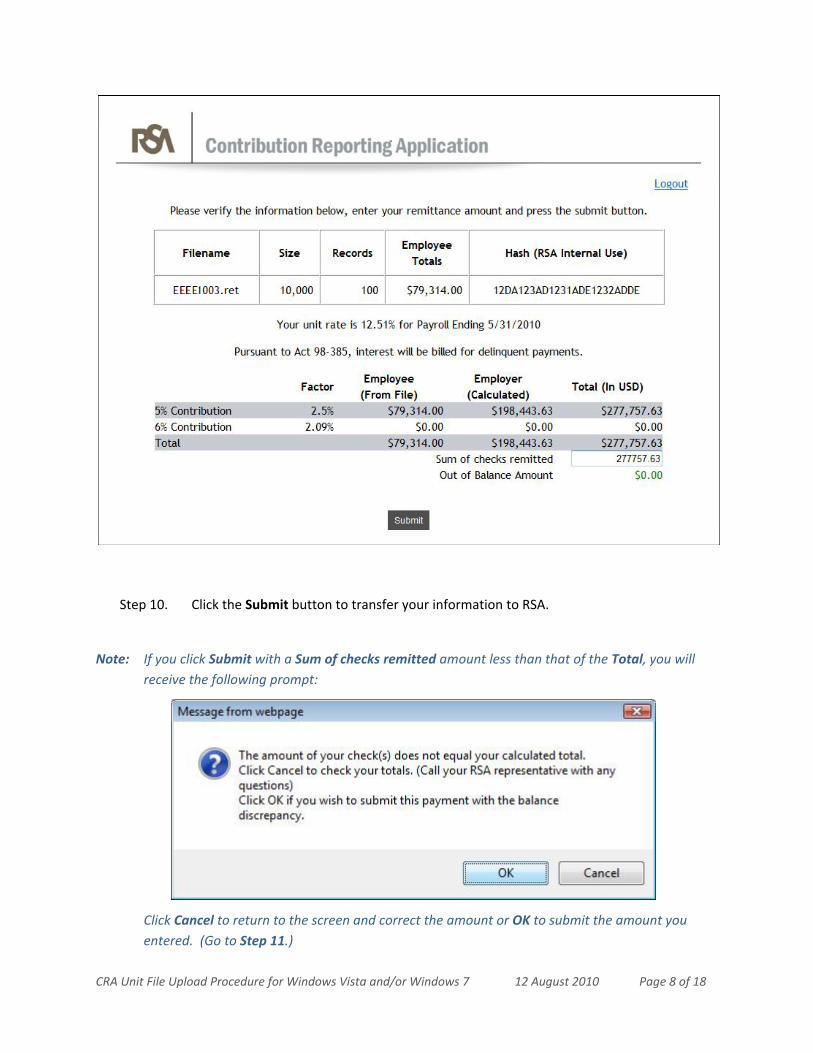
If your Sum of checks remitted amount is greater than or equal to the file Total, the Out of Balance Amount will display green:
CRA Unit File Upload Procedure for Windows Vista and/or Windows 7 12 August 2010 Page 8 of 18
Step 10. Click the Submit button to transfer your information to RSA.
Note: If you click Submit with a Sum of checks remitted amount less than that of the Total, you will receive the following prompt:
Click Cancel to return to the screen and correct the amount or OK to submit the amount you entered. (Go to Step 11.)

CRA Unit File Upload Procedure for Windows Vista and/or Windows 7 12 August 2010 Page 9 of 18
Step 11. Make sure you receive the green “success” message at the top of your page:
Step 12. Click the Print button to print a copy of this page to include with your remittance check. (Keep a copy for your files.)
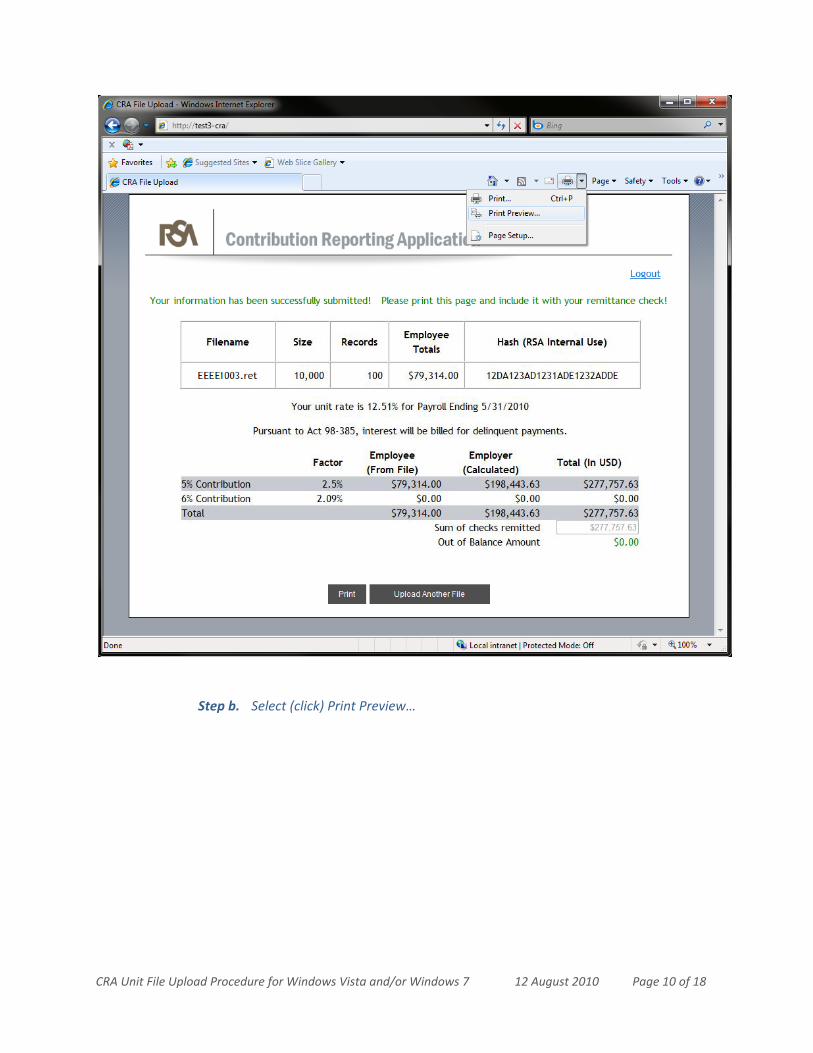
Important: Ensure that your printed copy contains all of the information on the screen. If any of the information is “cut off,” follow these directions to reprint the page.
Step a. Click the arrow next to the printer icon in your web browser:
CRA Unit File Upload Procedure for Windows Vista and/or Windows 7 12 August 2010 Page 10 of 18
Step b. Select (click) Print Preview…

CRA Unit File Upload Procedure for Windows Vista and/or Windows 7 12 August 2010 Page 11 of 18
Step c. Click the arrow next to the current percentage:

CRA Unit File Upload Procedure for Windows Vista and/or Windows 7 12 August 2010 Page 12 of 18
Step d. Select (click) Shrink To Fit:

CRA Unit File Upload Procedure for Windows Vista and/or Windows 7 12 August 2010 Page 13 of 18
Step e. Click the printer icon to print the page:
The Print Preview window will close and return you to the CRA File Upload screen:

CRA Unit File Upload Procedure for Windows Vista and/or Windows 7 12 August 2010 Page 14 of 18
Step 13. If you have another file to upload, click the Upload Another File button and repeat the file upload process for it. If you do not have another file to upload, click Logout to exit the application, close your web browser, and return to your other work.
Note: If, at any time during the process, you enter incorrect amounts, click Logout. You will be able to log back in to the application, re-upload your file, and enter the correct amount.
If you forget to print this page, you may log back into the application, re-upload your file, re-enter your Sum of checks remitted, and print then.
Each time you upload the same file, it will “overwrite” the previous entry. You will be able to re-upload until the RSA receives your remittance check and processes it (and, therefore, your file with it) for deposit.

CRA Unit File Upload Procedure for Windows Vista and/or Windows 7 12 August 2010 Page 15 of 18
Uploading an RSA-1 (.rsa) file
Note: To see instructions/screens for a regular (.ret) file, go to page 5.
Step 6. Select (click on) the appropriate file and click the Open button.
The dialog box will close and the web page will reflect the name of the file and its upload progress:

CRA Unit File Upload Procedure for Windows Vista and/or Windows 7 12 August 2010 Page 16 of 18
Once the upload is complete, the application will read the file:
Step 7. Verify the following information:
• Filename—the name of the file you selected
• Number of Records—the number of records in the file
• Totals—the total contributions
Note: File Size and Hash information is for RSA Internal Use.
Step 8. Enter your remittance amount (Sum of checks remitted):

CRA Unit File Upload Procedure for Windows Vista and/or Windows 7 12 August 2010 Page 17 of 18
Note: The Sum of checks remitted amount should ALWAYS equal the file Totals.
Step 9. Click Submit.
Step 10. Make sure you receive the green “success” message at the top of your page:

CRA Unit File Upload Procedure for Windows Vista and/or Windows 7 12 August 2010 Page 18 of 18
Step 11. Click the Print button to print a copy of this page to include with your remittance check. (Keep a copy for your files.)
Step 12. If you have another file to upload, click the Upload Another File button and repeat the file upload process for it. If you do not have another file to upload, click Logout to exit the application, close your web browser, and return to your other work.
Note: If, at any time during the process, you enter incorrect amounts, click Logout. You will be able to log back in to the application, re-upload your file, and enter the correct amount.
If you forget to print this page, you may log back into the application, re-upload your file, re-enter your Sum of checks remitted, and print then.
Each time you upload the same file, it will “overwrite” the previous entry. You will be able to re-upload until the RSA receives your remittance check and processes it (and, therefore, your file with it) for deposit.