Embed Size (px)
Citation preview
1
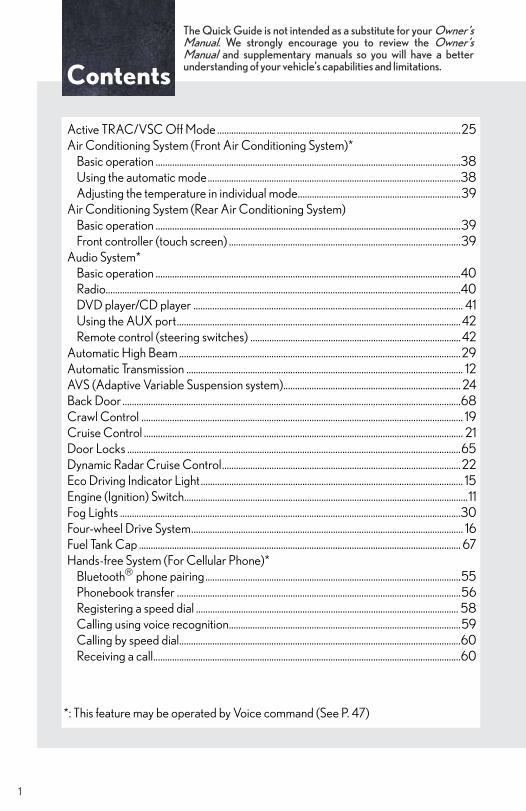
The Quick Guide is not intended as a substitute for your Owner’sManual. We strongly encourage you to review the Owner’sManual and supplementary manuals so you will have a better
Contentsunderstanding of your vehicle’s capabilities and limitations.
Active TRAC/VSC Off Mode .......................................................................................................25Air Conditioning System (Front Air Conditioning System)*
Basic operation .................................................................................................................................38Using the automatic mode...........................................................................................................38Adjusting the temperature in individual mode.....................................................................39
Air Conditioning System (Rear Air Conditioning System)Basic operation .................................................................................................................................39Front controller (touch screen) ..................................................................................................39
Audio System*Basic operation .................................................................................................................................40Radio......................................................................................................................................................40DVD player/CD player .................................................................................................................. 41Using the AUX port........................................................................................................................ 42Remote control (steering switches) ......................................................................................... 42
Automatic High Beam .......................................................................................................................29Automatic Transmission ..................................................................................................................... 12AVS (Adaptive Variable Suspension system)........................................................................... 24Back Door ...............................................................................................................................................68Crawl Control ........................................................................................................................................ 19Cruise Control ....................................................................................................................................... 21Door Locks .............................................................................................................................................65Dynamic Radar Cruise Control.....................................................................................................22Eco Driving Indicator Light............................................................................................................... 15Engine (Ignition) Switch........................................................................................................................11Fog Lights ................................................................................................................................................30Four-wheel Drive System................................................................................................................... 16Fuel Tank Cap ........................................................................................................................................ 67Hands-free System (For Cellular Phone)*
Bluetooth phone pairing............................................................................................................55Phonebook transfer ........................................................................................................................56Registering a speed dial ............................................................................................................... 58Calling using voice recognition..................................................................................................59Calling by speed dial.......................................................................................................................60Receiving a call..................................................................................................................................60
*: This feature may be operated by Voice command (See P. 47)

Headlights ............................................................................................................................................... 27Intuitive Parking Assist ........................................................................................................................ 17Keys...............................................................................................................................................................8Lexus Enform with Safety Connect ..............................................................................................63List of Warning/Indicator Lights ..................................................................................................... 71Mode Select Switch ............................................................................................................................. 13Moon Roof ..............................................................................................................................................66Multi-Information Display.................................................................................................................. 14Multi-terrain Select .............................................................................................................................. 18Navigation System*
Register home ...................................................................................................................................49Destination input Search by address .......................................................................... 50Destination input Search points of interest by name.............................................52Destination input Search points of interest by telephone number..................54
Overview....................................................................................................................................................3Portable Audio Device Port.............................................................................................................42Power Windows ....................................................................................................................................66Rear Seat Entertainment System...................................................................................................43Roll Sensing of Curtain Shield Airbags Off Switch ...............................................................25Safety Connect ...................................................................................................................................... 61Smart Access System with Push-button Start.............................................................................9Theft Deterrent System ...................................................................................................................... 10Tire Pressure Warning Reset Switch.............................................................................................26Touch Screen..........................................................................................................................................34Turn Signal Lever ................................................................................................................................... 15Voice Command System*
Basic operation ................................................................................................................................. 47Natural speech information (English only)............................................................................48
Wide View Front & Side Monitor ................................................................................................... 17Windshield Wipers and Washers ................................................................................................... 314-Wheel AHC (Active Height Control Suspension) ........................................................... 24
*: This feature may be operated by Voice command (See P. 47)
2
Depending on specifications, the vehicle shown in the illustration maydiffer from your vehicle in terms of color and equipment.

3
Overview Instrument Panel
Headlight switch Turn signal lever Fog light switch
P.27
P.15
P.30
See P.5
Inside door lock button P.65
Door lock switch P.65
Power window switches P.66
Window lock switch P.66
Multi-informationdisplay P.14
Driving position memory switches*
Fuel filler door opener P.67
See P. 6
Hood lock release lever*
Tire pressure warning resetswitch P.26
Rear window wiper and washer switch Windshield wipers and washer switch
P.33
P.31
Cruise control switch P.21, 22
Distance switch P.22
Tilt and telescopic steeringcontrol switch*
Telephone switch P.55
“DISP” switch P.14
Audio remote controls P.42
4
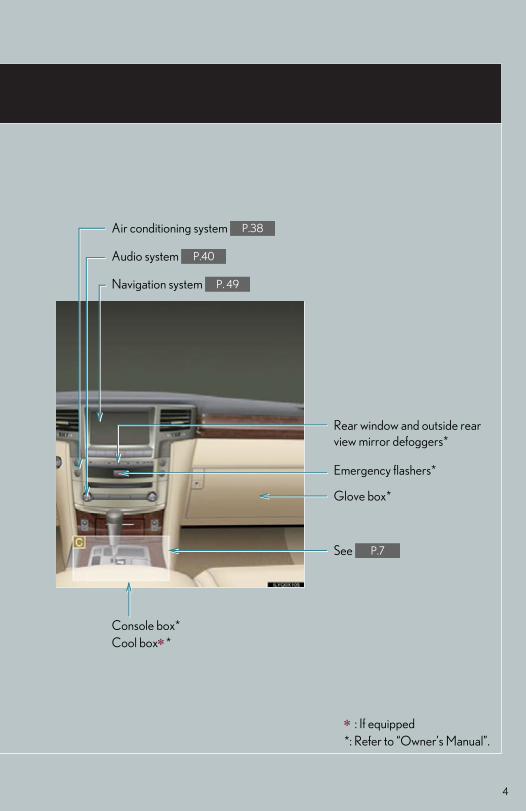
Air conditioning system P.38
Emergency flashers*
Rear window and outside rear view mirror defoggers*
Audio system P.40
Glove box*
See P.7
: If equipped*: Refer to “Owner’s Manual”.
Console box*Cool box*
Navigation system P. 49
5
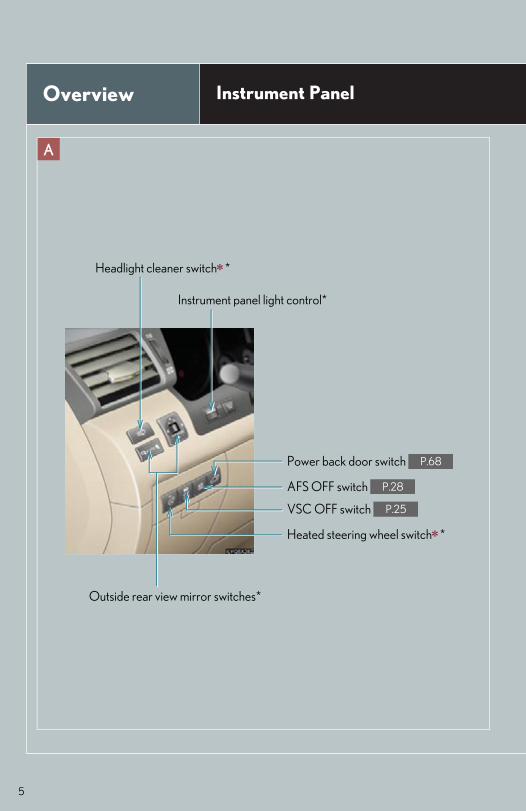
A
Overview Instrument Panel
Instrument panel light control*
Headlight cleaner switch*
AFS OFF switch P.28
Outside rear view mirror switches*
VSC OFF switch P.25
Power back door switch P.68
Heated steering wheel switch*
6
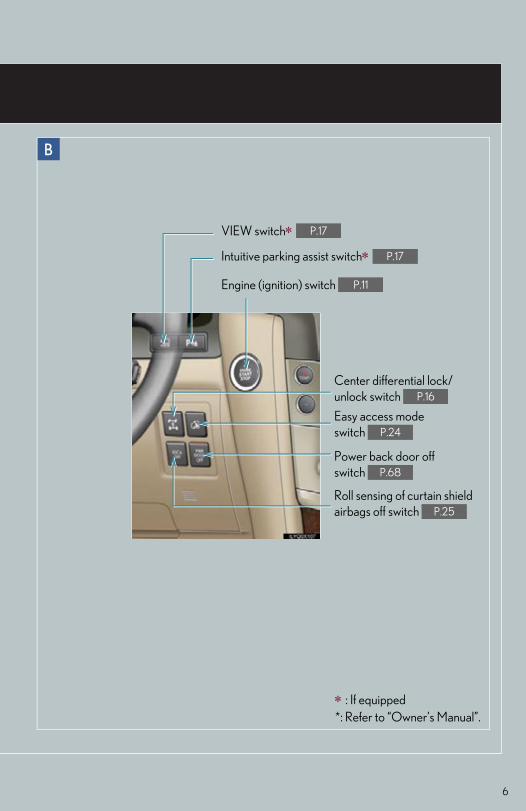
B
: If equipped*: Refer to “Owner’s Manual”.
Intuitive parking assist switch P.17
Easy access mode switch P.24
VIEW switch P.17
Center differential lock/unlock switch P.16
Power back door off switch P.68
Roll sensing of curtain shield airbags off switch P.25
Engine (ignition) switch P.11
7
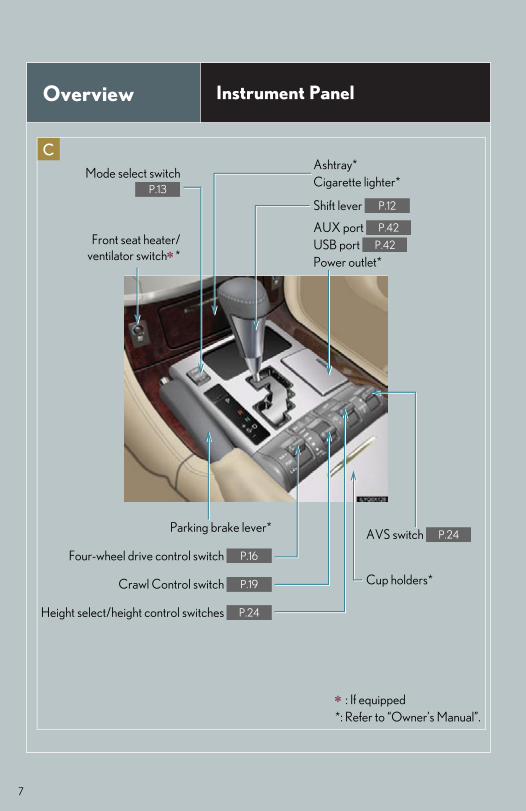
C
Overview Instrument Panel
Front seat heater/ventilator switch*
Mode select switchP.13
Shift lever P.12
Ashtray*Cigarette lighter*
Parking brake lever*
AUX port USB port Power outlet*
P.42
P.42
Four-wheel drive control switch P.16
AVS switch P.24
Crawl Control switch P.19
Height select/height control switches P.24
Cup holders*
: If equipped*: Refer to “Owner’s Manual”.
8
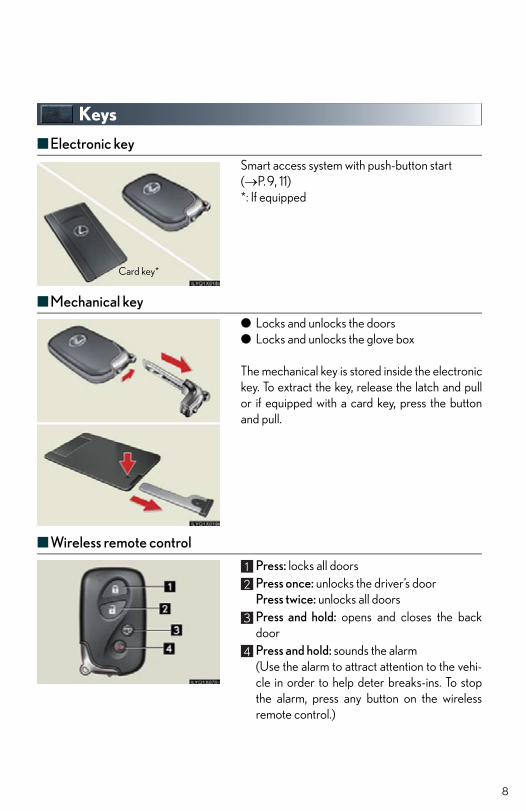
Keys
■ Electronic keySmart access system with push-button start (P.9, 11)*: If equipped
■ Mechanical key● Locks and unlocks the doors● Locks and unlocks the glove box
The mechanical key is stored inside the electronickey. To extract the key, release the latch and pullor if equipped with a card key, press the buttonand pull.
■ Wireless remote control
Press: locks all doors Press once: unlocks the driver’s door Press twice: unlocks all doors Press and hold: opens and closes the backdoorPress and hold: sounds the alarm (Use the alarm to attract attention to the vehi-cle in order to help deter breaks-ins. To stopthe alarm, press any button on the wirelessremote control.)
Card key*
9
Smart Access System with Push-button Start
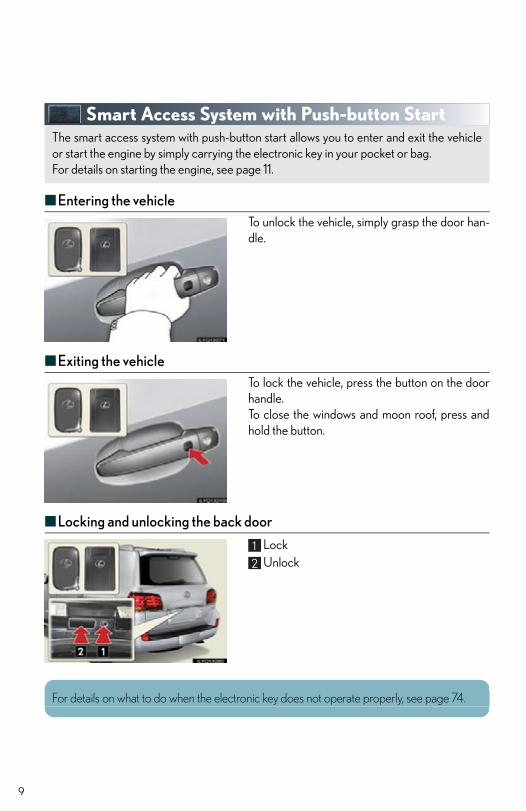
■Entering the vehicleTo unlock the vehicle, simply grasp the door han-dle.
■Exiting the vehicleTo lock the vehicle, press the button on the doorhandle.To close the windows and moon roof, press andhold the button.
■Locking and unlocking the back door
LockUnlock
The smart access system with push-button start allows you to enter and exit the vehicleor start the engine by simply carrying the electronic key in your pocket or bag.For details on starting the engine, see page 11.
For details on what to do when the electronic key does not operate properly, see page 74.
Theft Deterrent System
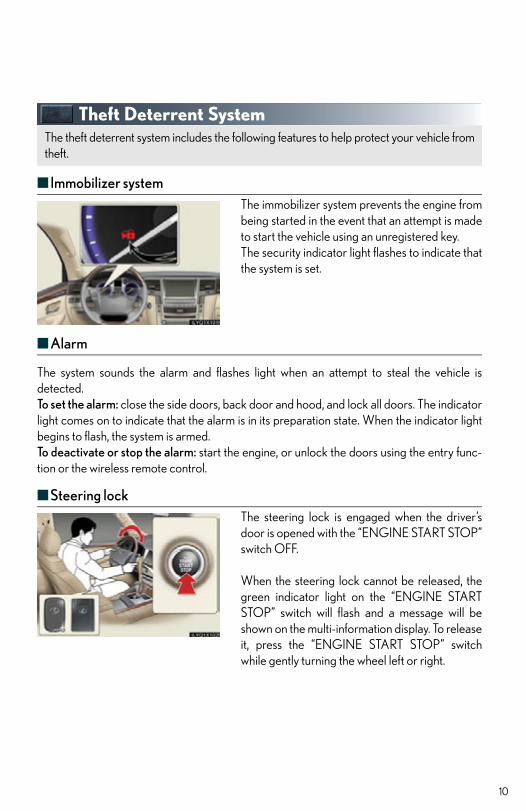
■ Immobilizer systemThe immobilizer system prevents the engine frombeing started in the event that an attempt is madeto start the vehicle using an unregistered key. The security indicator light flashes to indicate thatthe system is set.
■ Alarm
The system sounds the alarm and flashes light when an attempt to steal the vehicle isdetected.To set the alarm: close the side doors, back door and hood, and lock all doors. The indicatorlight comes on to indicate that the alarm is in its preparation state. When the indicator lightbegins to flash, the system is armed.To deactivate or stop the alarm: start the engine, or unlock the doors using the entry func-tion or the wireless remote control.
■ Steering lockThe steering lock is engaged when the driver’sdoor is opened with the “ENGINE START STOP”switch OFF.
When the steering lock cannot be released, thegreen indicator light on the “ENGINE STARTSTOP” switch will flash and a message will beshown on the multi-information display. To releaseit, press the “ENGINE START STOP” switchwhile gently turning the wheel left or right.
The theft deterrent system includes the following features to help protect your vehicle fromtheft.
10
11
Engine (Ignition) Switch
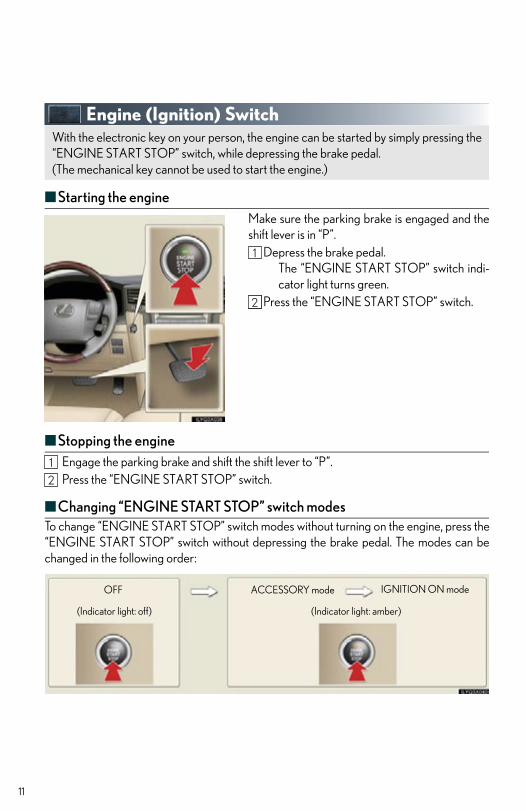
■Starting the engineMake sure the parking brake is engaged and theshift lever is in “P”.
Depress the brake pedal.The “ENGINE START STOP” switch indi-cator light turns green.
Press the “ENGINE START STOP” switch.
■Stopping the engine Engage the parking brake and shift the shift lever to “P”. Press the “ENGINE START STOP” switch.
■Changing “ENGINE START STOP” switch modesTo change “ENGINE START STOP” switch modes without turning on the engine, press the“ENGINE START STOP” switch without depressing the brake pedal. The modes can bechanged in the following order:
With the electronic key on your person, the engine can be started by simply pressing the“ENGINE START STOP” switch, while depressing the brake pedal.(The mechanical key cannot be used to start the engine.)
ACCESSORY mode IGNITION ON mode
(Indicator light: amber)
OFF
(Indicator light: off)
Automatic Transmission
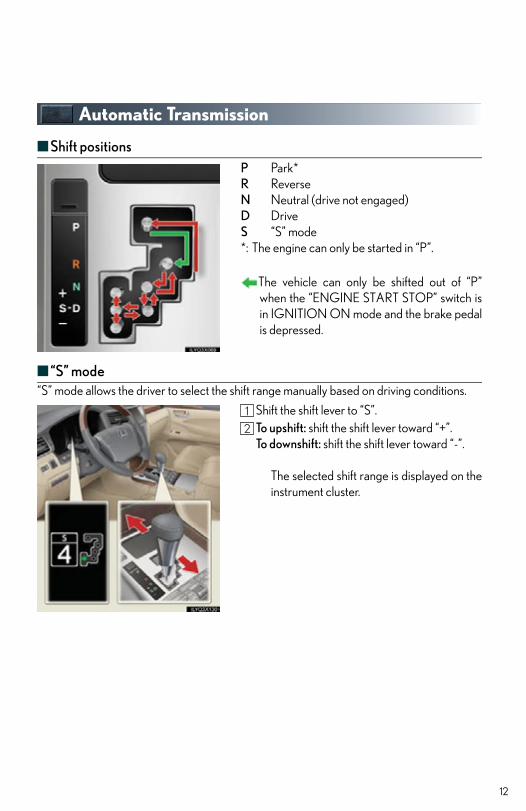
■ Shift positionsP Park*R ReverseN Neutral (drive not engaged)D DriveS “S” mode*: The engine can only be started in “P”.
The vehicle can only be shifted out of “P”when the “ENGINE START STOP” switch isin IGNITION ON mode and the brake pedalis depressed.
■ “S” mode“S” mode allows the driver to select the shift range manually based on driving conditions.
Shift the shift lever to “S”.To upshift: shift the shift lever toward “+”.To downshift: shift the shift lever toward “-”.
The selected shift range is displayed on theinstrument cluster.
12

13
ECT Switch
Power modeFor more powerful acceleration and uphilldriving.
Normal mode“2nd STRT” (second start) mode
For starting or accelerating on snow-coveredroads or other slippery surfaces.
An indicator comes on when in power or sec-ond start mode.
Use the mode select switch to select the driving mode that best suits the driving and roadconditions.
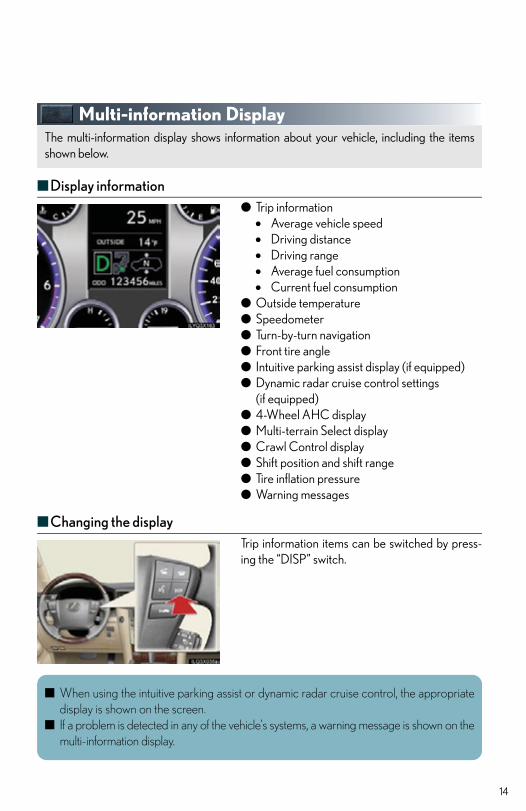
Multi-information Display
■ Display information● Trip information
Average vehicle speed Driving distance Driving range Average fuel consumption Current fuel consumption
● Outside temperature ● Speedometer ● Turn-by-turn navigation ● Front tire angle ● Intuitive parking assist display (if equipped)● Dynamic radar cruise control settings
(if equipped)● 4-Wheel AHC display● Multi-terrain Select display ● Crawl Control display● Shift position and shift range● Tire inflation pressure● Warning messages
■ Changing the displayTrip information items can be switched by press-ing the “DISP” switch.
The multi-information display shows information about your vehicle, including the itemsshown below.
■ When using the intuitive parking assist or dynamic radar cruise control, the appropriatedisplay is shown on the screen.
■ If a problem is detected in any of the vehicle’s systems, a warning message is shown on themulti-information display.
14

15
Eco Driving IndicatorEco Driving Indicator LightDuring Eco-friendly acceleration (Eco driv-ing), Eco Driving Indicator Light will turn on.Eco Driving Indicator Zone DisplaySuggests Zone of Eco driving with currentEco driving ratio based on acceleration.Zone of Eco drivingEco driving ratio based on accelerationIf the vehicle exceeds Zone of Eco driving, theright side of Eco Driving Indicator Zone Dis-play will blink and Eco Driving Indicator Lightwill turn off.
Turn Signal LeverLeft turn signalRight turn signalLane change to the right (move the lever part-way and then release it)The right hand signals will flash 3 times.Lane change to the left (move the lever part-way and then release it)The right hand signals will flash 3 times.
16
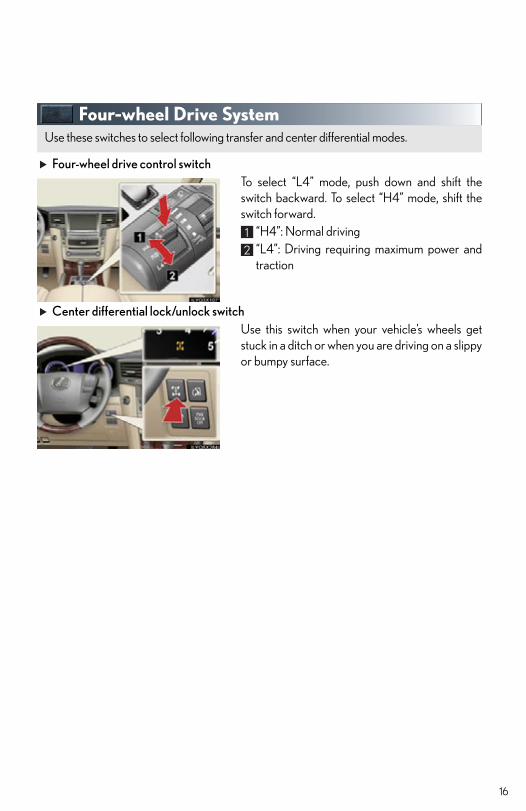
Four-wheel Drive System
Four-wheel drive control switchTo select “L4” mode, push down and shift theswitch backward. To select “H4” mode, shift theswitch forward.
“H4”: Normal driving“L4”: Driving requiring maximum power andtraction
Center differential lock/unlock switchUse this switch when your vehicle’s wheels getstuck in a ditch or when you are driving on a slippyor bumpy surface.
Use these switches to select following transfer and center differential modes.
17
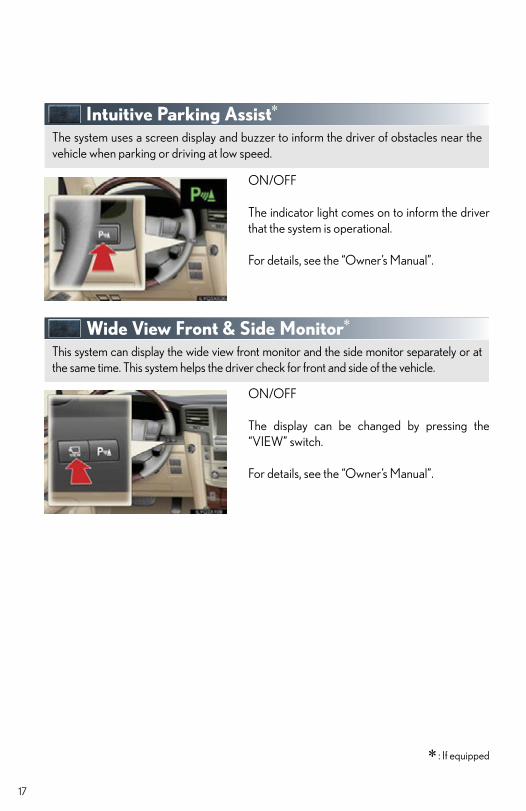
Intuitive Parking Assist
ON/OFF
The indicator light comes on to inform the driverthat the system is operational.
For details, see the “Owner’s Manual”.
Wide View Front & Side Monitor
ON/OFF
The display can be changed by pressing the“VIEW” switch.
For details, see the “Owner’s Manual”.
: If equipped
The system uses a screen display and buzzer to inform the driver of obstacles near thevehicle when parking or driving at low speed.
This system can display the wide view front monitor and the side monitor separately or atthe same time. This system helps the driver check for front and side of the vehicle.
18
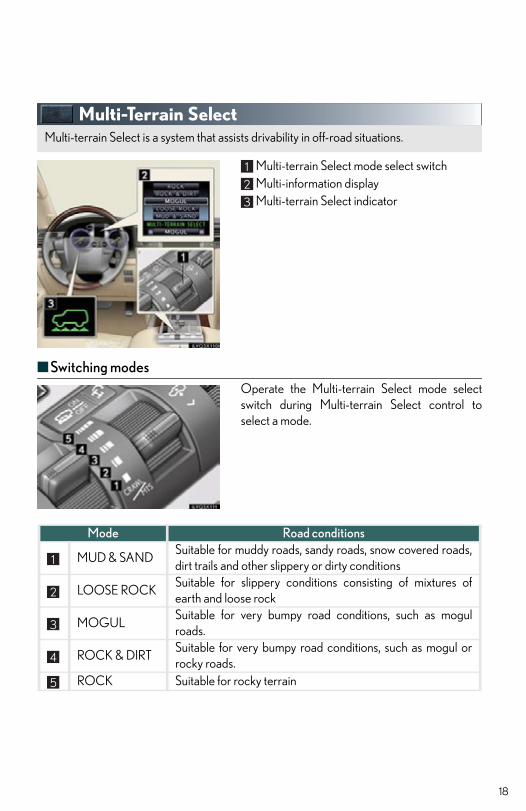
Multi-Terrain Select
Multi-terrain Select mode select switchMulti-information displayMulti-terrain Select indicator
■ Switching modesOperate the Multi-terrain Select mode selectswitch during Multi-terrain Select control toselect a mode.
Multi-terrain Select is a system that assists drivability in off-road situations.
Mode Road conditions
MUD & SANDSuitable for muddy roads, sandy roads, snow covered roads,dirt trails and other slippery or dirty conditions
LOOSE ROCKSuitable for slippery conditions consisting of mixtures ofearth and loose rock
MOGULSuitable for very bumpy road conditions, such as mogulroads.
ROCK & DIRTSuitable for very bumpy road conditions, such as mogul orrocky roads.
ROCK Suitable for rocky terrain
19
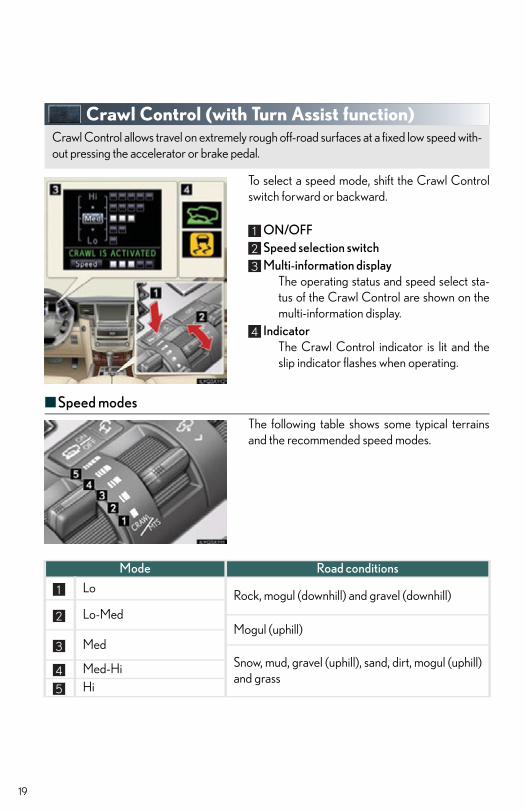
Crawl Control (with Turn Assist function)
To select a speed mode, shift the Crawl Controlswitch forward or backward.
ON/OFFSpeed selection switchMulti-information display
The operating status and speed select sta-tus of the Crawl Control are shown on themulti-information display.
IndicatorThe Crawl Control indicator is lit and theslip indicator flashes when operating.
■Speed modesThe following table shows some typical terrainsand the recommended speed modes.
Crawl Control allows travel on extremely rough off-road surfaces at a fixed low speed with-out pressing the accelerator or brake pedal.
Mode Road conditions
LoRock, mogul (downhill) and gravel (downhill)
Lo-MedMogul (uphill)
MedSnow, mud, gravel (uphill), sand, dirt, mogul (uphill)and grass
Med-HiHi
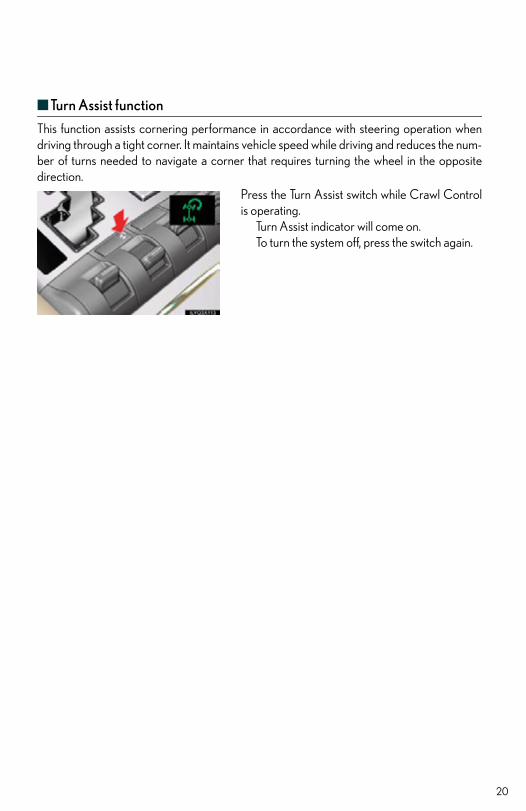
■ Turn Assist function
This function assists cornering performance in accordance with steering operation whendriving through a tight corner. It maintains vehicle speed while driving and reduces the num-ber of turns needed to navigate a corner that requires turning the wheel in the oppositedirection.
Press the Turn Assist switch while Crawl Controlis operating.
Turn Assist indicator will come on.To turn the system off, press the switch again.
20
21
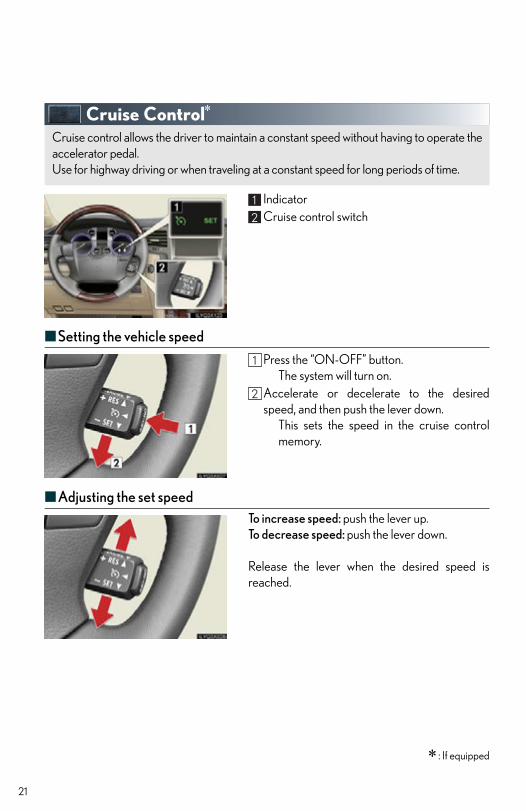
Cruise Control
IndicatorCruise control switch
■Setting the vehicle speed
Press the “ON-OFF” button.The system will turn on.
Accelerate or decelerate to the desiredspeed, and then push the lever down.
This sets the speed in the cruise controlmemory.
■Adjusting the set speedTo increase speed: push the lever up.To decrease speed: push the lever down.
Release the lever when the desired speed isreached.
: If equipped
Cruise control allows the driver to maintain a constant speed without having to operate theaccelerator pedal.Use for highway driving or when traveling at a constant speed for long periods of time.
22
■ Canceling and resuming the constant speed control
To temporarily cancel the constant speed con-trol, pull the lever toward you. To resume theconstant speed control, push the lever up.To turn the system off, press the “ON-OFF”button.
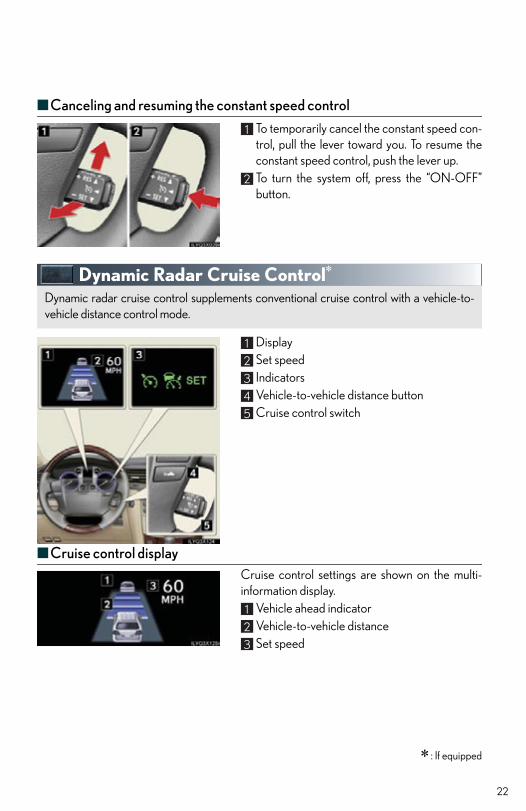
Dynamic Radar Cruise Control
DisplaySet speedIndicatorsVehicle-to-vehicle distance buttonCruise control switch
■ Cruise control displayCruise control settings are shown on the multi-information display.
Vehicle ahead indicatorVehicle-to-vehicle distanceSet speed
: If equipped
Dynamic radar cruise control supplements conventional cruise control with a vehicle-to-vehicle distance control mode.
23
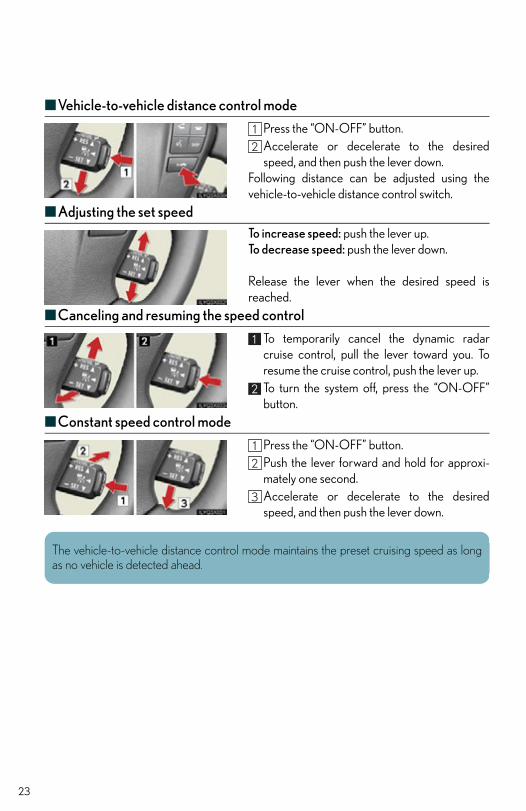
■Vehicle-to-vehicle distance control mode
Press the “ON-OFF” button.Accelerate or decelerate to the desiredspeed, and then push the lever down.
Following distance can be adjusted using thevehicle-to-vehicle distance control switch.
■Adjusting the set speedTo increase speed: push the lever up.To decrease speed: push the lever down.
Release the lever when the desired speed isreached.
■Canceling and resuming the speed control
To temporarily cancel the dynamic radarcruise control, pull the lever toward you. Toresume the cruise control, push the lever up.To turn the system off, press the “ON-OFF”button.
■Constant speed control mode
Press the “ON-OFF” button.Push the lever forward and hold for approxi-mately one second.Accelerate or decelerate to the desiredspeed, and then push the lever down.
The vehicle-to-vehicle distance control mode maintains the preset cruising speed as longas no vehicle is detected ahead.
24
AVS (Adaptive Variable Suspension system)
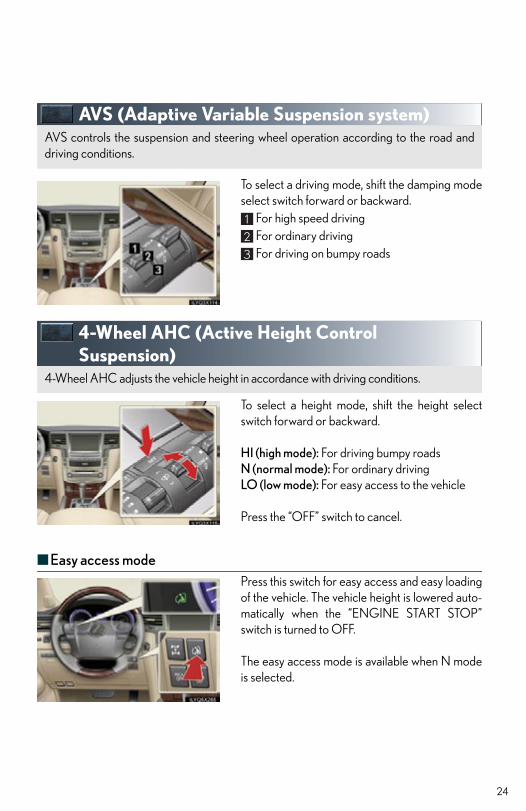
To select a driving mode, shift the damping modeselect switch forward or backward.
For high speed drivingFor ordinary drivingFor driving on bumpy roads
4-Wheel AHC (Active Height Control Suspension)
To select a height mode, shift the height selectswitch forward or backward.
HI (high mode): For driving bumpy roadsN (normal mode): For ordinary drivingLO (low mode): For easy access to the vehicle
Press the “OFF” switch to cancel.
■ Easy access modePress this switch for easy access and easy loadingof the vehicle. The vehicle height is lowered auto-matically when the “ENGINE START STOP”switch is turned to OFF.
The easy access mode is available when N modeis selected.
AVS controls the suspension and steering wheel operation according to the road anddriving conditions.
4-Wheel AHC adjusts the vehicle height in accordance with driving conditions.
25
Active TRAC/VSC Off Mode
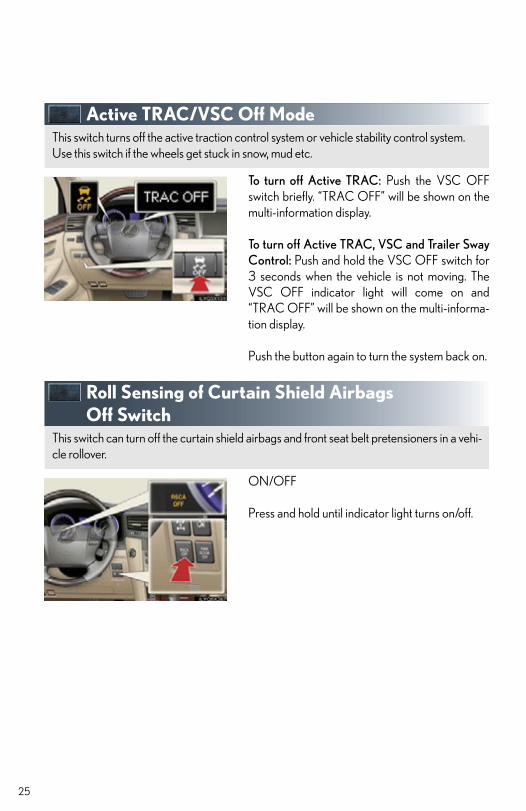
To turn off Active TRAC: Push the VSC OFFswitch briefly. “TRAC OFF” will be shown on themulti-information display.
To turn off Active TRAC, VSC and Trailer SwayControl: Push and hold the VSC OFF switch for3 seconds when the vehicle is not moving. TheVSC OFF indicator light will come on and“TRAC OFF” will be shown on the multi-informa-tion display.
Push the button again to turn the system back on.
Roll Sensing of Curtain Shield Airbags Off Switch
ON/OFF
Press and hold until indicator light turns on/off.
This switch turns off the active traction control system or vehicle stability control system.Use this switch if the wheels get stuck in snow, mud etc.
This switch can turn off the curtain shield airbags and front seat belt pretensioners in a vehi-cle rollover.
Tire Pressure Warning Reset Switch
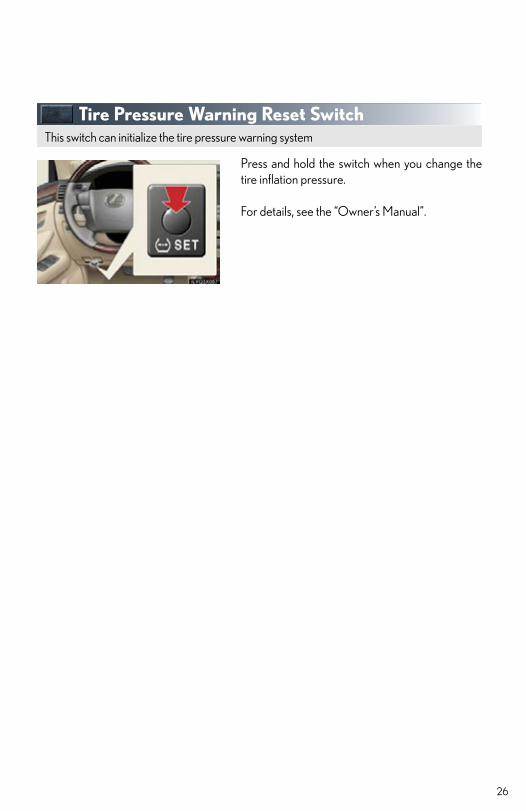
Press and hold the switch when you change thetire inflation pressure.
For details, see the “Owner’s Manual”.
This switch can initialize the tire pressure warning system
26
27
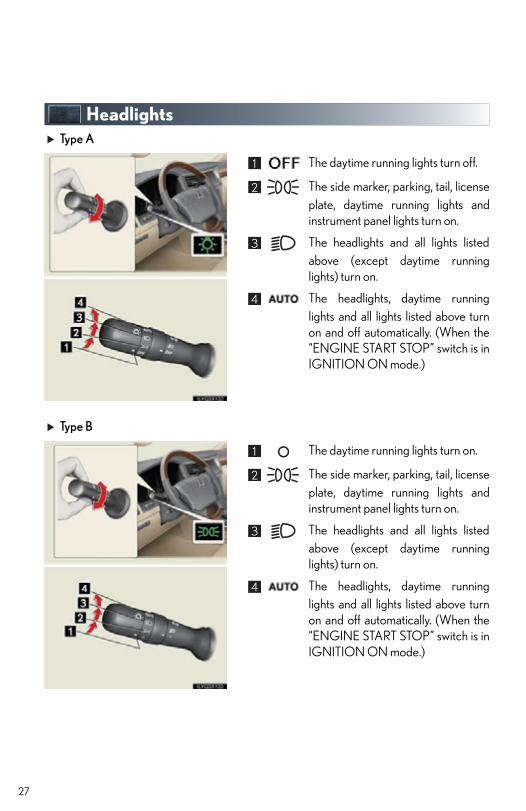
HeadlightsType A
The daytime running lights turn off.
The side marker, parking, tail, licenseplate, daytime running lights andinstrument panel lights turn on.
The headlights and all lights listedabove (except daytime runninglights) turn on.
The headlights, daytime runninglights and all lights listed above turnon and off automatically. (When the“ENGINE START STOP” switch is inIGNITION ON mode.)
Type B
The daytime running lights turn on.
The side marker, parking, tail, licenseplate, daytime running lights andinstrument panel lights turn on.
The headlights and all lights listedabove (except daytime runninglights) turn on.
The headlights, daytime runninglights and all lights listed above turnon and off automatically. (When the“ENGINE START STOP” switch is inIGNITION ON mode.)
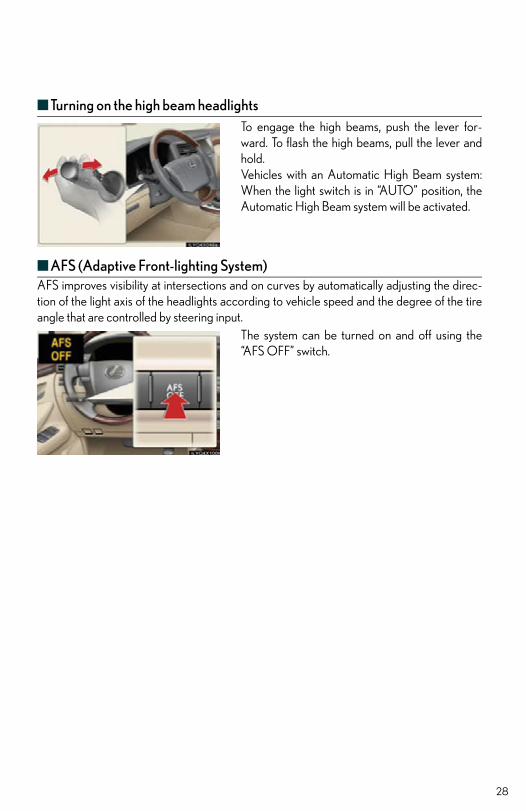
■ Turning on the high beam headlights To engage the high beams, push the lever for-ward. To flash the high beams, pull the lever andhold.Vehicles with an Automatic High Beam system:When the light switch is in “AUTO” position, theAutomatic High Beam system will be activated.
■ AFS (Adaptive Front-lighting System)AFS improves visibility at intersections and on curves by automatically adjusting the direc-tion of the light axis of the headlights according to vehicle speed and the degree of the tireangle that are controlled by steering input.
The system can be turned on and off using the“AFS OFF” switch.
28
29
Automatic High Beam
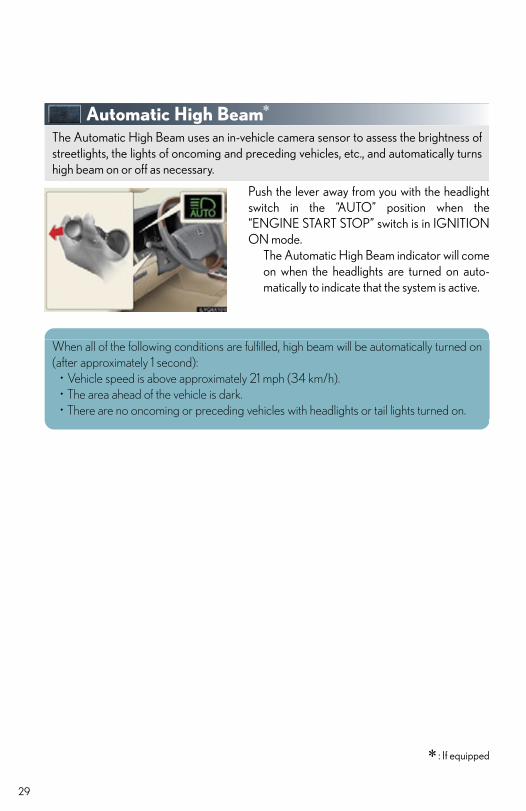
Push the lever away from you with the headlightswitch in the “AUTO” position when the“ENGINE START STOP” switch is in IGNITIONON mode.
The Automatic High Beam indicator will comeon when the headlights are turned on auto-matically to indicate that the system is active.
: If equipped
The Automatic High Beam uses an in-vehicle camera sensor to assess the brightness ofstreetlights, the lights of oncoming and preceding vehicles, etc., and automatically turnshigh beam on or off as necessary.
When all of the following conditions are fulfilled, high beam will be automatically turned on(after approximately 1 second):
• Vehicle speed is above approximately 21 mph (34 km/h).• The area ahead of the vehicle is dark.• There are no oncoming or preceding vehicles with headlights or tail lights turned on.
30
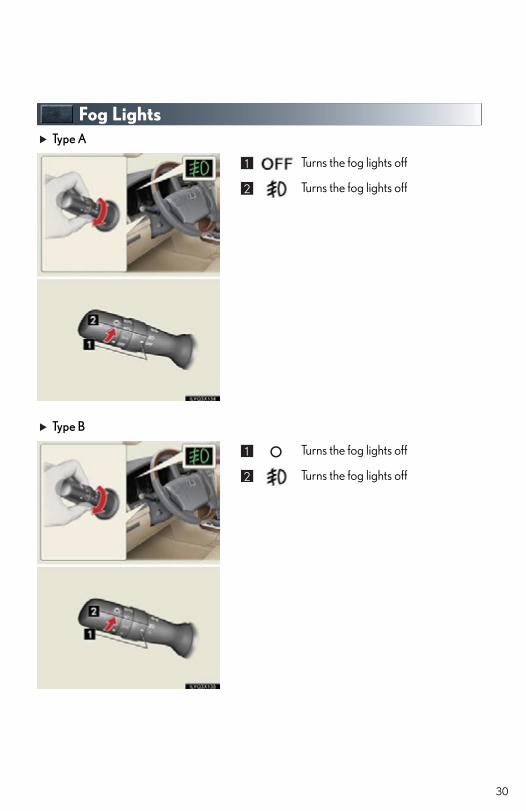
Fog LightsType A
Turns the fog lights off
Turns the fog lights off
Type B
Turns the fog lights off
Turns the fog lights off
31
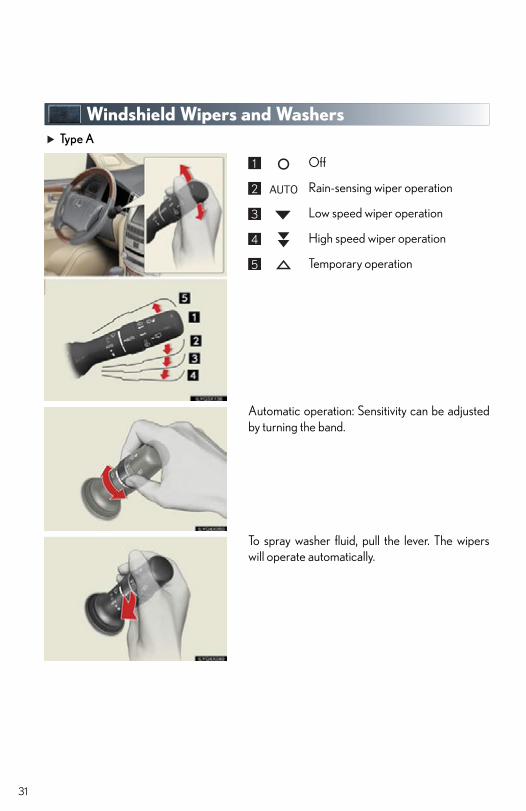
Windshield Wipers and WashersType A
Off
Rain-sensing wiper operation
Low speed wiper operation
High speed wiper operation
Temporary operation
Automatic operation: Sensitivity can be adjustedby turning the band.
To spray washer fluid, pull the lever. The wiperswill operate automatically.
32
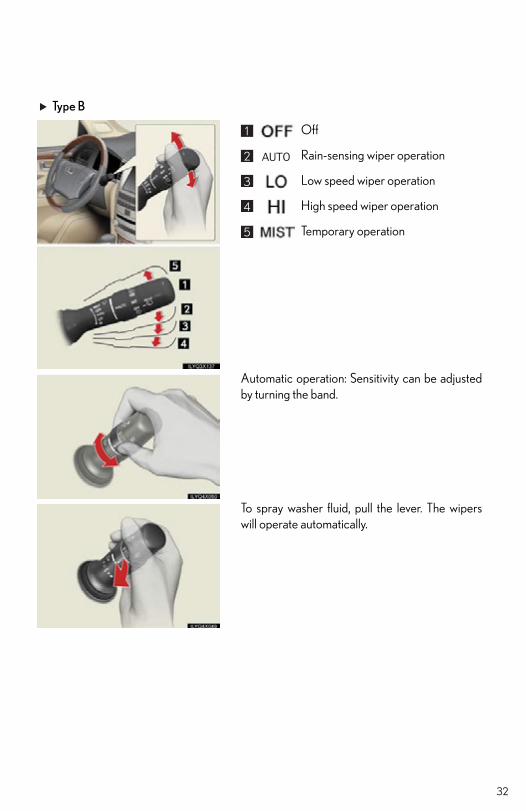
Type B
Off
Rain-sensing wiper operation
Low speed wiper operation
High speed wiper operation
Temporary operation
Automatic operation: Sensitivity can be adjustedby turning the band.
To spray washer fluid, pull the lever. The wiperswill operate automatically.
33
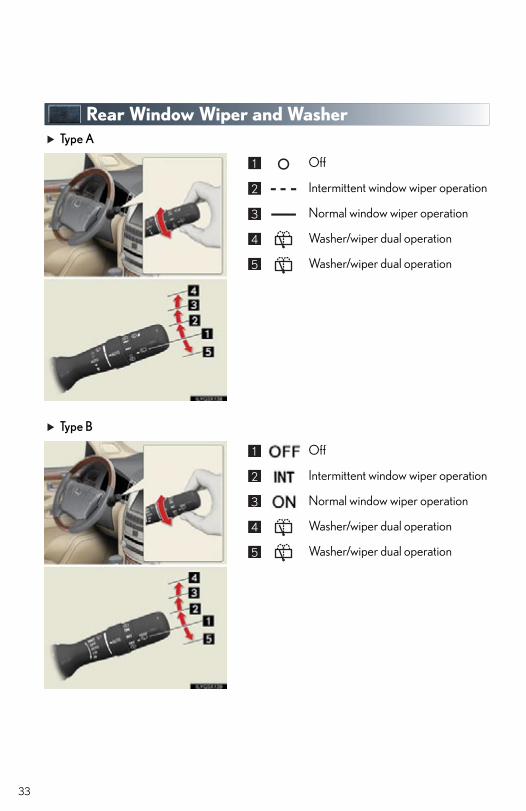
Rear Window Wiper and WasherType A
Off
Intermittent window wiper operation
Normal window wiper operation
Washer/wiper dual operation
Washer/wiper dual operation
Type B
Off
Intermittent window wiper operation
Normal window wiper operation
Washer/wiper dual operation
Washer/wiper dual operation
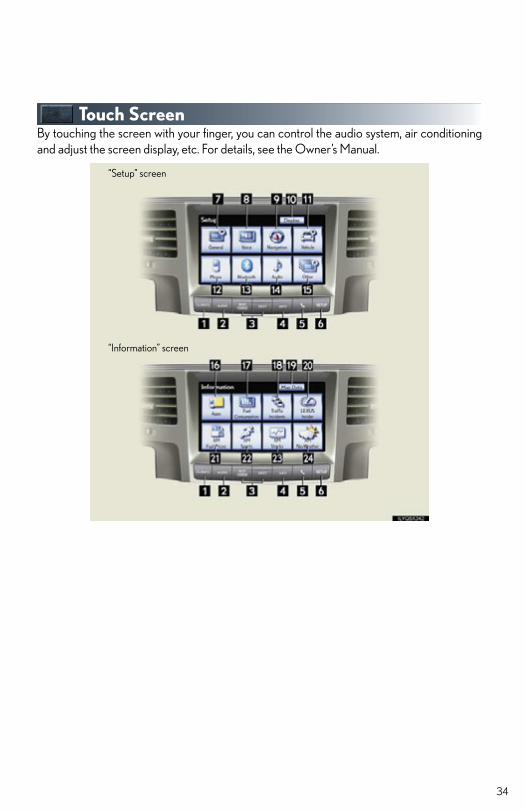
Touch ScreenBy touching the screen with your finger, you can control the audio system, air conditioningand adjust the screen display, etc. For details, see the Owner’s Manual.
“Setup” screen
“Information” screen
34
35
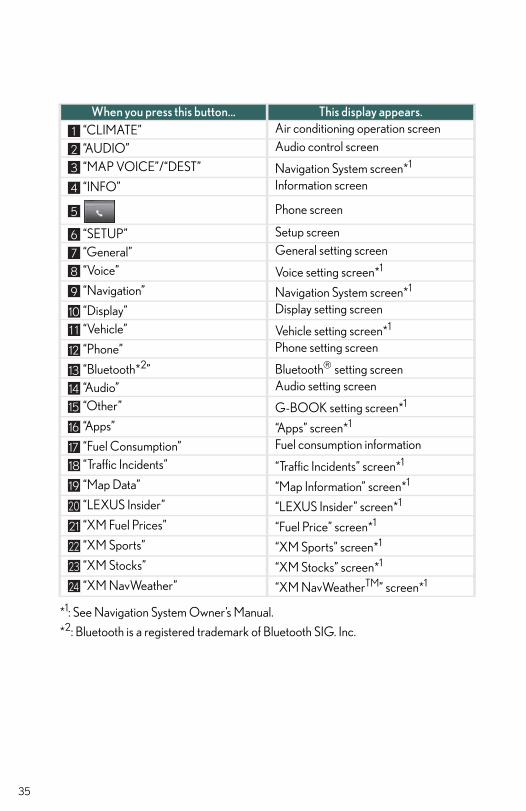
*1: See Navigation System Owner’s Manual.
*2: Bluetooth is a registered trademark of Bluetooth SIG. Inc.
When you press this button... This display appears.“CLIMATE” Air conditioning operation screen
“AUDIO” Audio control screen
“MAP VOICE”/“DEST” Navigation System screen*1
“INFO” Information screen
Phone screen
“SETUP” Setup screen
“General” General setting screen
“Voice” Voice setting screen*1
“Navigation” Navigation System screen*1
“Display” Display setting screen
“Vehicle” Vehicle setting screen*1
“Phone” Phone setting screen
“Bluetooth*2” Bluetooth setting screen“Audio” Audio setting screen
“Other” G-BOOK setting screen*1
“Apps” “Apps” screen*1
“Fuel Consumption” Fuel consumption information
“Traffic Incidents” “Traffic Incidents” screen*1
“Map Data” “Map Information” screen*1
“LEXUS Insider” “LEXUS Insider” screen*1
“XM Fuel Prices” “Fuel Price” screen*1
“XM Sports” “XM Sports” screen*1
“XM Stocks” “XM Stocks” screen*1
“XM NavWeather” “XM NavWeatherTM” screen*1
36
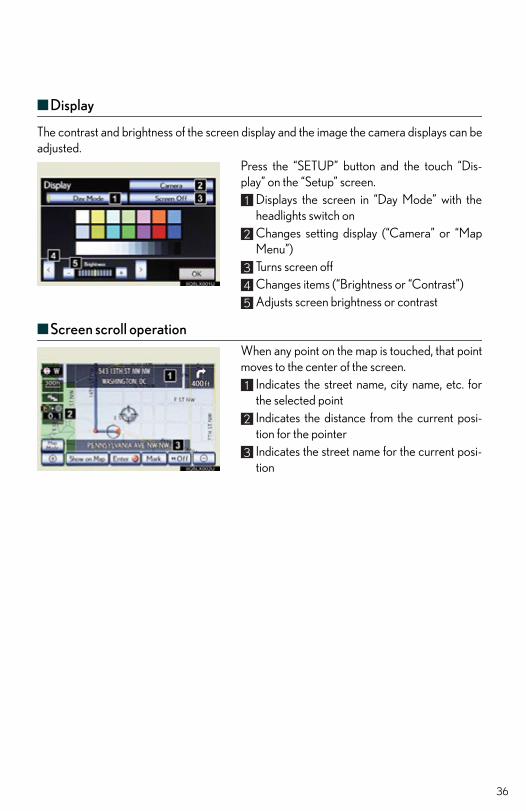
■ Display
The contrast and brightness of the screen display and the image the camera displays can beadjusted.
Press the “SETUP” button and the touch “Dis-play” on the “Setup” screen.
Displays the screen in “Day Mode” with theheadlights switch onChanges setting display (“Camera” or “MapMenu”)Turns screen offChanges items (“Brightness or “Contrast”)Adjusts screen brightness or contrast
■ Screen scroll operationWhen any point on the map is touched, that pointmoves to the center of the screen.
Indicates the street name, city name, etc. forthe selected pointIndicates the distance from the current posi-tion for the pointerIndicates the street name for the current posi-tion

37
■Setting a route
While route guidance is operating, you can change the route using the following method.Touch “Route”The following settings can be accessed
Add destinationDelete destinationChange the arrival oder of the destinationsDetour settingRoute overviewRoute preferencesPause and resume route guidance
Some functions are unavailable while the vehicle is in motion. Refer to the “Navigation Sys-tem Owner’s Manual”.

38
Front Air Conditioning SystemPress “CLIMATE” button to display the air conditioning operation screen. For details, refer tothe Owner’s Manual.
■ Using the automatic mode
Press the “AUTO” button.
Press to increase the temperature
and to decrease the temperature.
Air conditioning operation screen display buttonDriver’s side temperature controlAutomatic mode4-zone operation switchRear air conditioning operation screen display switchPassenger’s side temperature controlRear air conditioning operation mode
39
■Adjusting the temperature in individual mode
In individual mode, the temperature for the driver’s, front passenger’s and rear seats can beadjusted separately.
Touch “4-ZONE” on the operation screen if its indicator is off.Press the passenger’s side temperature control buttons to adjust the temperature for thepassenger’s side. To adjust the temperature for the rear seats, see below.
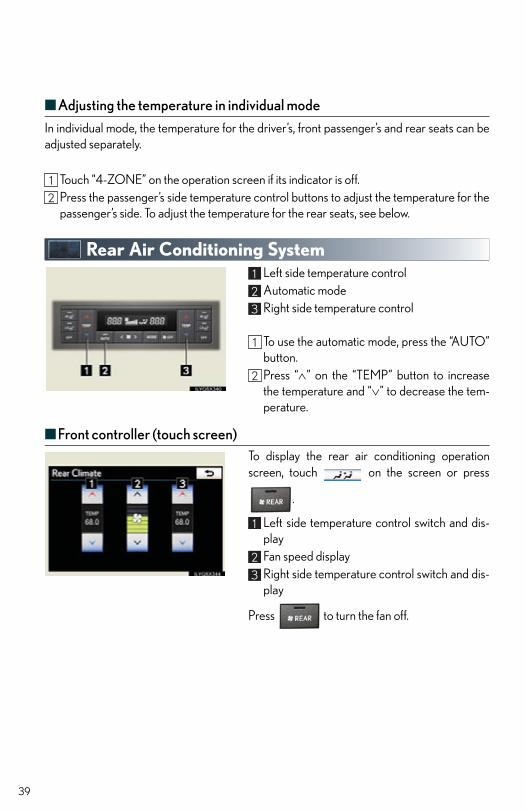
Rear Air Conditioning SystemLeft side temperature controlAutomatic modeRight side temperature control
To use the automatic mode, press the “AUTO”button.Press “” on the “TEMP” button to increasethe temperature and “” to decrease the tem-perature.
■Front controller (touch screen)To display the rear air conditioning operationscreen, touch on the screen or press
.
Left side temperature control switch and dis-playFan speed displayRight side temperature control switch and dis-play
Press to turn the fan off.
40
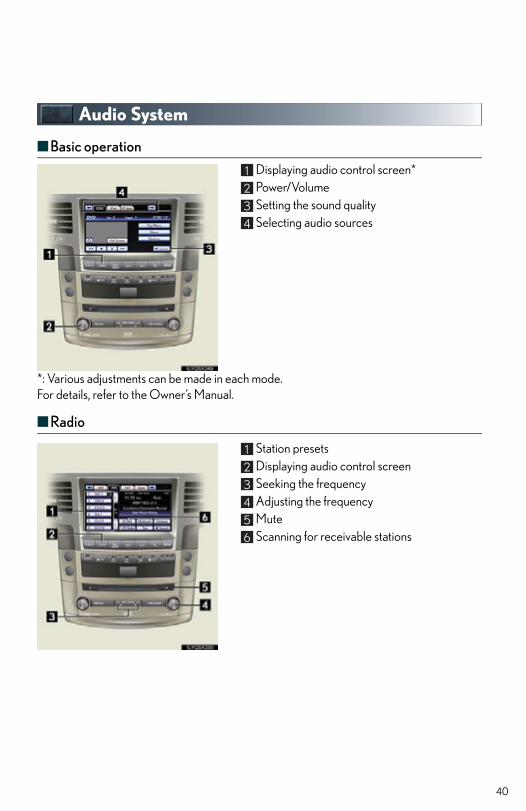
Audio System
■ Basic operation
Displaying audio control screen*Power/VolumeSetting the sound qualitySelecting audio sources
*: Various adjustments can be made in each mode.For details, refer to the Owner’s Manual.
■ Radio
Station presetsDisplaying audio control screenSeeking the frequencyAdjusting the frequencyMuteScanning for receivable stations
41
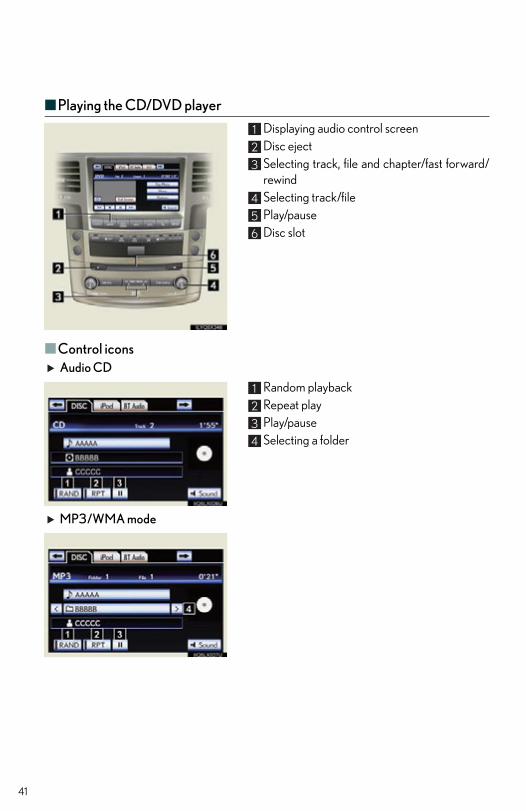
■Playing the CD/DVD player
Displaying audio control screenDisc eject Selecting track, file and chapter/fast forward/rewindSelecting track/filePlay/pauseDisc slot
■Control iconsAudio CD
Random playbackRepeat playPlay/pauseSelecting a folder
MP3/WMA mode

42
DVD video mode
Menu screenDVD option screenImage display (full screen)DVD operation
■ Using the AUX port
Push the lid to open.Open the cover and connect the portableaudio device.Touch the “AUX” tab on the screen or pressthe “AUDIO” button repeatedly to change toAUX mode.
■ Remote control (steering switches)“MODE”: Turns the audio system on/off, orchanges the audio mode.
“+” or “-”: Adjusts the volume.“” or “”:
Radio mode Radio tunerCD mode Disc/track/file(MP3/WMA)
selectionDVD mode Track/chapter/disc selection
Bluetooth audio mode Selects a track and album
iPod mode Selects a trackUSB memory mode
Selects a file and folder
43
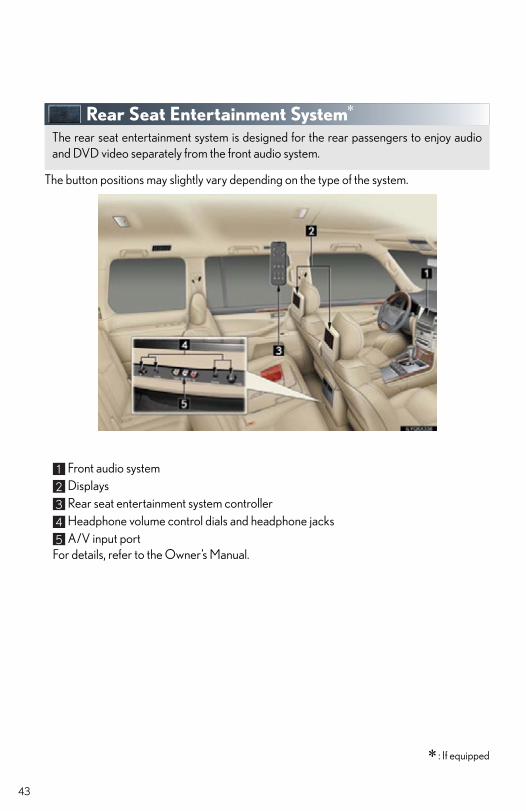
Rear Seat Entertainment System
The button positions may slightly vary depending on the type of the system.
: If equipped
The rear seat entertainment system is designed for the rear passengers to enjoy audioand DVD video separately from the front audio system.
Front audio systemDisplaysRear seat entertainment system controllerHeadphone volume control dials and headphone jacksA/V input port
For details, refer to the Owner’s Manual.
44
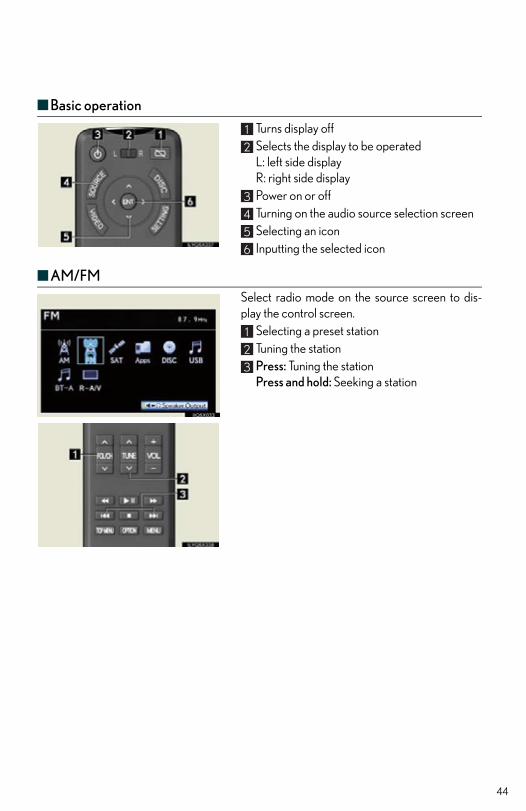
■ Basic operation
Turns display offSelects the display to be operatedL: left side displayR: right side displayPower on or offTurning on the audio source selection screenSelecting an iconInputting the selected icon
■ AM/FMSelect radio mode on the source screen to dis-play the control screen.
Selecting a preset stationTuning the stationPress: Tuning the stationPress and hold: Seeking a station
45
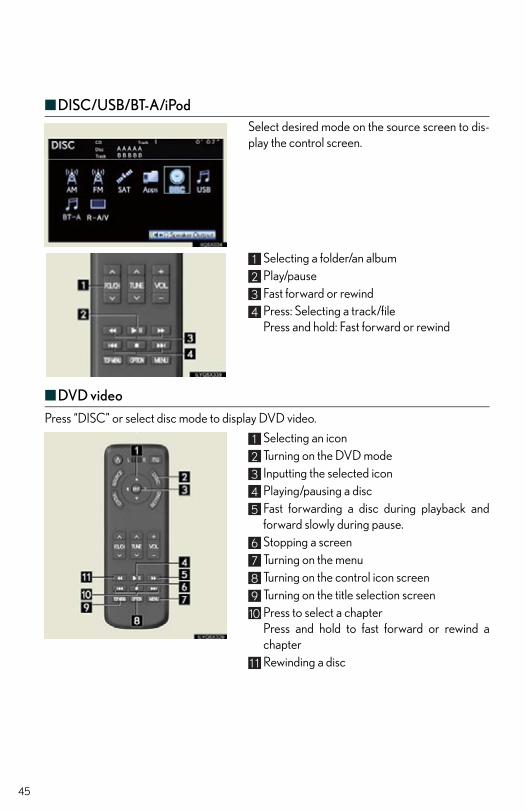
■DISC/USB/BT-A/iPodSelect desired mode on the source screen to dis-play the control screen.
Selecting a folder/an albumPlay/pauseFast forward or rewindPress: Selecting a track/filePress and hold: Fast forward or rewind
■DVD video
Press “DISC” or select disc mode to display DVD video.
Selecting an iconTurning on the DVD modeInputting the selected iconPlaying/pausing a discFast forwarding a disc during playback andforward slowly during pause.Stopping a screenTurning on the menuTurning on the control icon screenTurning on the title selection screenPress to select a chapterPress and hold to fast forward or rewind achapterRewinding a disc

46
■ Headphone jacksTo listen to the rear audio, use headphones.
Headphone jacksVolume:Turn the knob clockwise to increase.
Turn the knob counterclockwise todecrease.
47
Voice Command System
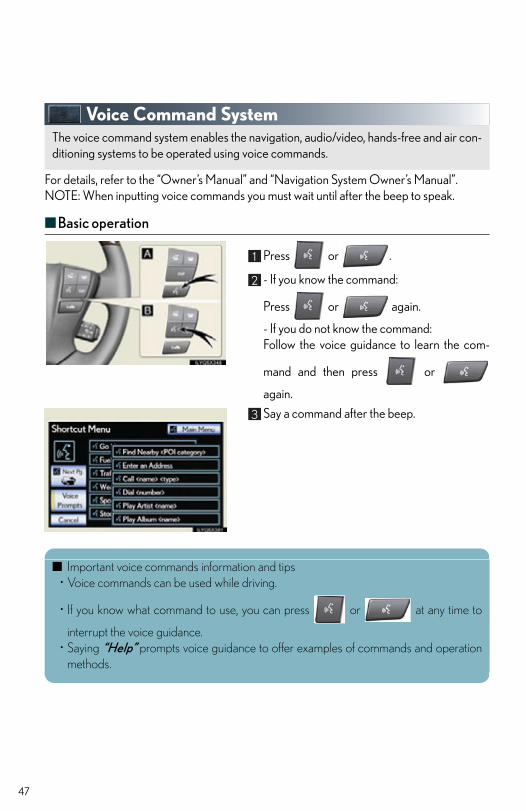
For details, refer to the “Owner’s Manual” and “Navigation System Owner’s Manual”.NOTE: When inputting voice commands you must wait until after the beep to speak.
■Basic operation
Press or .
- If you know the command:
Press or again.
- If you do not know the command:Follow the voice guidance to learn the com-
mand and then press or
again.
Say a command after the beep.
The voice command system enables the navigation, audio/video, hands-free and air con-ditioning systems to be operated using voice commands.
■ Important voice commands information and tips• Voice commands can be used while driving.
• If you know what command to use, you can press or at any time to
interrupt the voice guidance.• Saying “Help” prompts voice guidance to offer examples of commands and operation
methods.
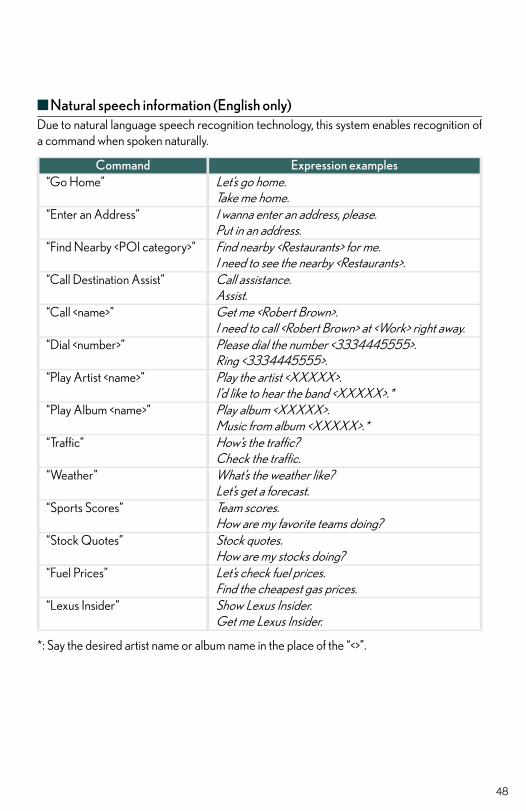
■ Natural speech information (English only)Due to natural language speech recognition technology, this system enables recognition ofa command when spoken naturally.
*: Say the desired artist name or album name in the place of the “<>”.
Command Expression examples“Go Home” Let’s go home.
Take me home.“Enter an Address” I wanna enter an address, please.
Put in an address.“Find Nearby <POI category>” Find nearby <Restaurants> for me.
I need to see the nearby <Restaurants>.“Call Destination Assist” Call assistance.
Assist.“Call <name>” Get me <Robert Brown>.
I need to call <Robert Brown> at <Work> right away.“Dial <number>” Please dial the number <3334445555>.
Ring <3334445555>.“Play Artist <name>” Play the artist <XXXXX>.
I’d like to hear the band <XXXXX>.*“Play Album <name>” Play album <XXXXX>.
Music from album <XXXXX>.*“Traffic” How’s the traffic?
Check the traffic.“Weather” What’s the weather like?
Let’s get a forecast.“Sports Scores” Team scores.
How are my favorite teams doing?“Stock Quotes” Stock quotes.
How are my stocks doing?“Fuel Prices” Let’s check fuel prices.
Find the cheapest gas prices.“Lexus Insider” Show Lexus Insider.
Get me Lexus Insider.
48
49
Navigation System
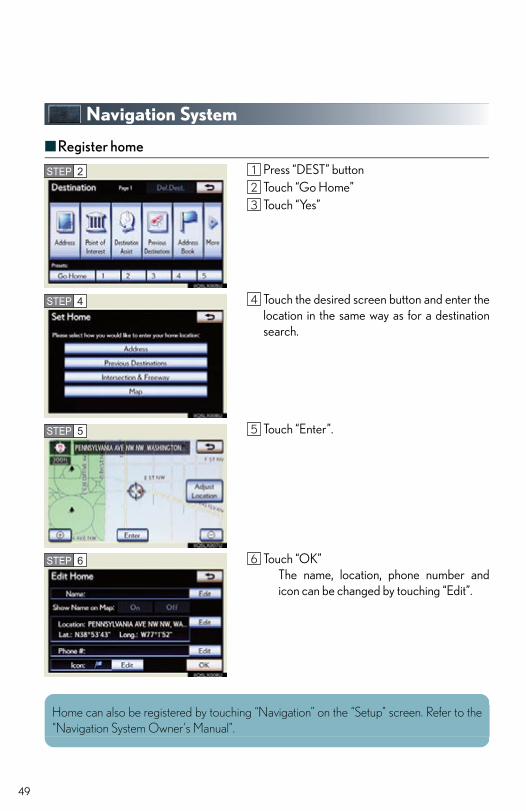
■Register home
Press “DEST” buttonTouch “Go Home”Touch “Yes”
Touch the desired screen button and enter thelocation in the same way as for a destinationsearch.
Touch “Enter”.
Touch “OK”The name, location, phone number andicon can be changed by touching “Edit”.
STEP 2
STEP 4
STEP 5
STEP 6
Home can also be registered by touching “Navigation” on the “Setup” screen. Refer to the“Navigation System Owner’s Manual”.
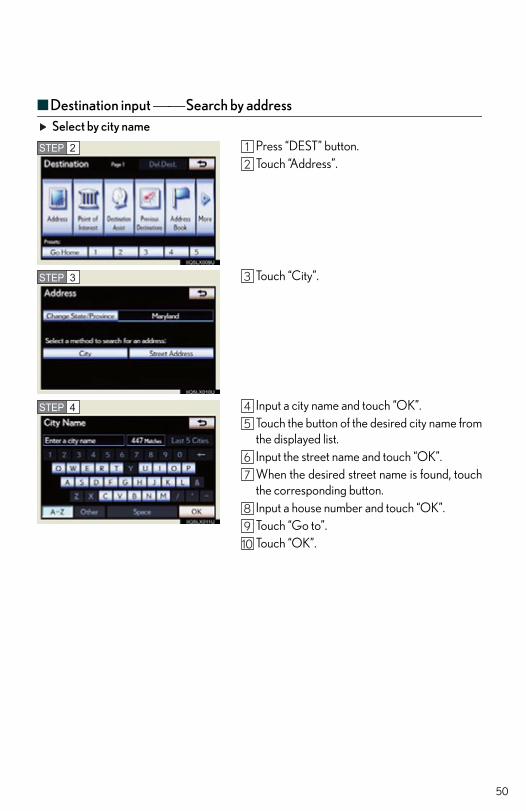
■ Destination input Search by addressSelect by city name
Press “DEST” button.Touch “Address”.
Touch “City”.
Input a city name and touch “OK”.Touch the button of the desired city name fromthe displayed list.Input the street name and touch “OK”.When the desired street name is found, touchthe corresponding button.Input a house number and touch “OK”.Touch “Go to”.Touch “OK”.
STEP 2
STEP 3
STEP 4
50
51
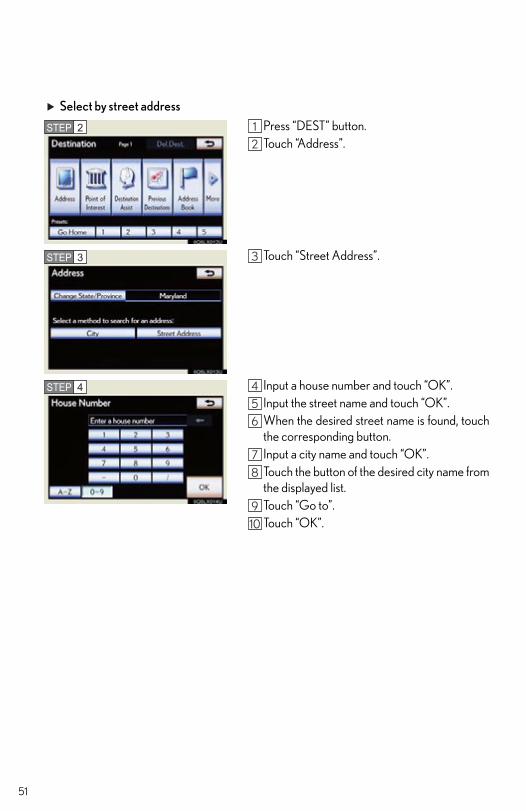
Select by street address
Press “DEST” button.Touch “Address”.
Touch “Street Address”.
Input a house number and touch “OK”.Input the street name and touch “OK”.When the desired street name is found, touchthe corresponding button.Input a city name and touch “OK”.Touch the button of the desired city name fromthe displayed list.Touch “Go to”.Touch “OK”.
STEP 2
STEP 3
STEP 4
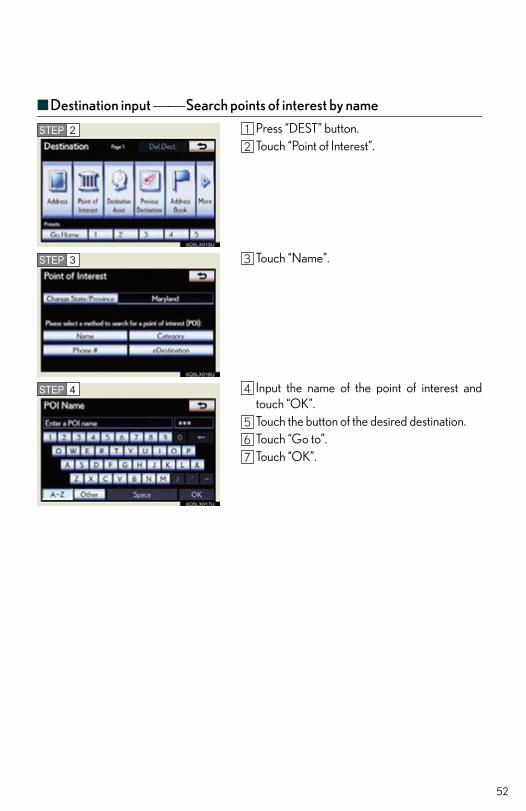
■ Destination input Search points of interest by name
Press “DEST” button.Touch “Point of Interest”.
Touch “Name”.
Input the name of the point of interest andtouch “OK”.Touch the button of the desired destination.Touch “Go to”.Touch “OK”.
STEP 2
STEP 3
STEP 4
52
53
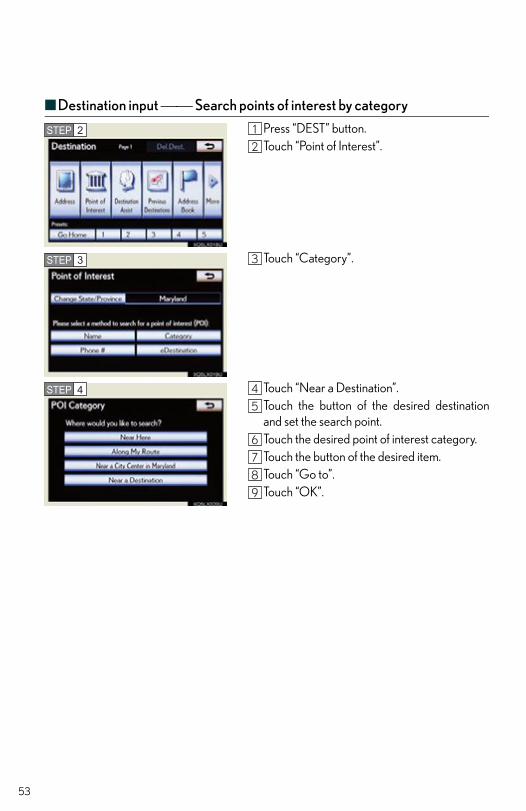
■Destination input Search points of interest by category
Press “DEST” button.Touch “Point of Interest”.
Touch “Category”.
Touch “Near a Destination”.Touch the button of the desired destinationand set the search point.Touch the desired point of interest category.Touch the button of the desired item.Touch “Go to”.Touch “OK”.
STEP 2
STEP 3
STEP 4
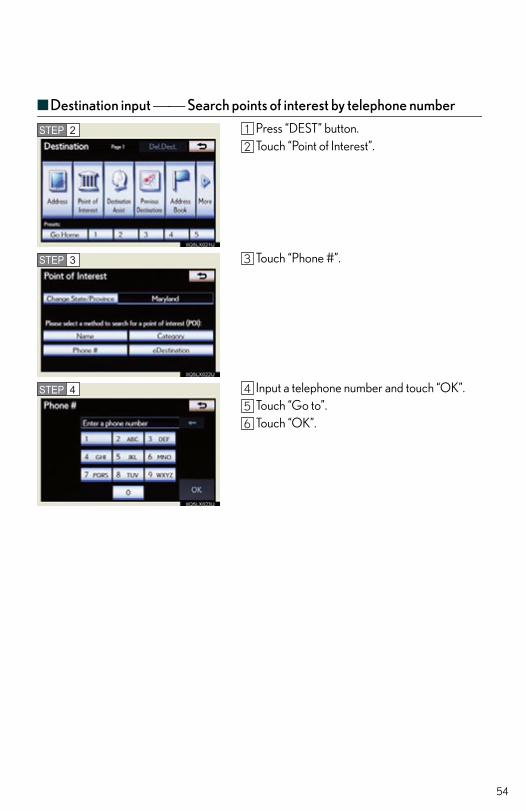
■ Destination input Search points of interest by telephone number
Press “DEST” button.Touch “Point of Interest”.
Touch “Phone #”.
Input a telephone number and touch “OK”.Touch “Go to”.Touch “OK”.
STEP 2
STEP 3
STEP 4
54
55
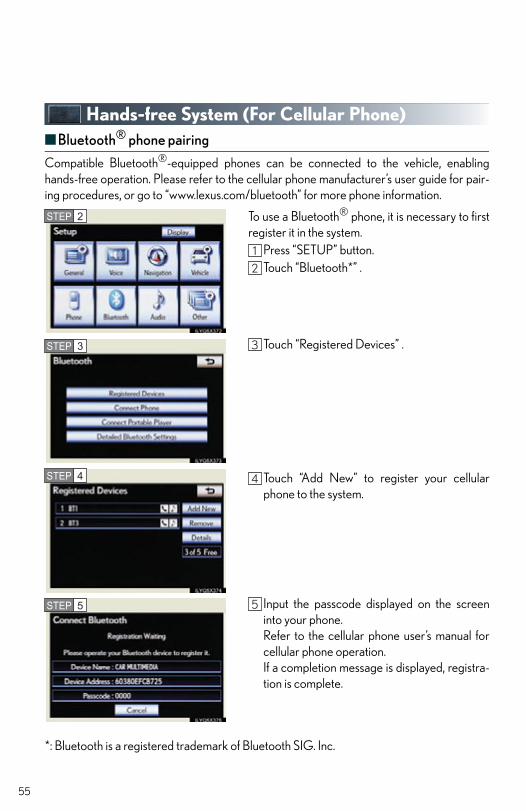
Hands-free System (For Cellular Phone)■Bluetooth® phone pairing
Compatible Bluetooth®-equipped phones can be connected to the vehicle, enablinghands-free operation. Please refer to the cellular phone manufacturer’s user guide for pair-ing procedures, or go to “www.lexus.com/bluetooth” for more phone information.
To use a Bluetooth® phone, it is necessary to firstregister it in the system.
Press “SETUP” button.Touch “Bluetooth*” .
Touch “Registered Devices” .
Touch “Add New” to register your cellularphone to the system.
Input the passcode displayed on the screeninto your phone.Refer to the cellular phone user’s manual forcellular phone operation.If a completion message is displayed, registra-tion is complete.
*: Bluetooth is a registered trademark of Bluetooth SIG. Inc.
STEP 2
STEP 3
STEP 4
STEP 5
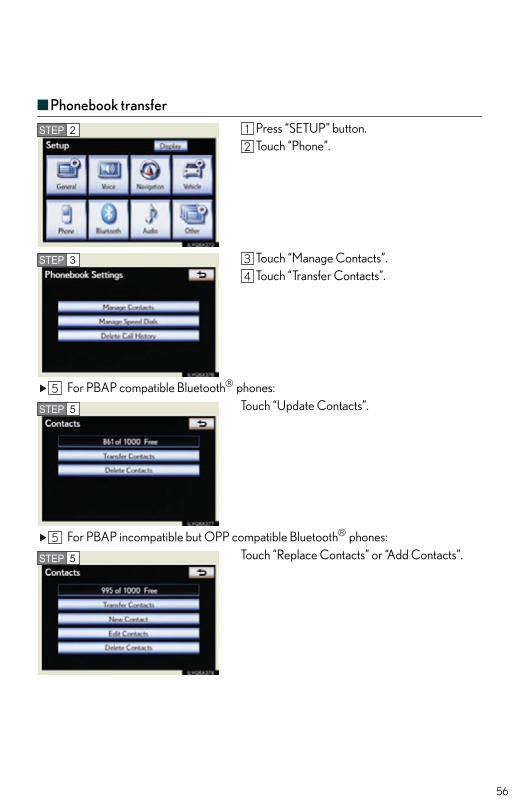
■ Phonebook transfer
Press “SETUP” button.Touch “Phone”.
Touch “Manage Contacts”.Touch “Transfer Contacts”.
For PBAP compatible Bluetooth phones: Touch “Update Contacts”.
For PBAP incompatible but OPP compatible Bluetooth phones: Touch “Replace Contacts” or “Add Contacts”.
STEP 2
STEP 3
STEP 5
STEP 5
56
57
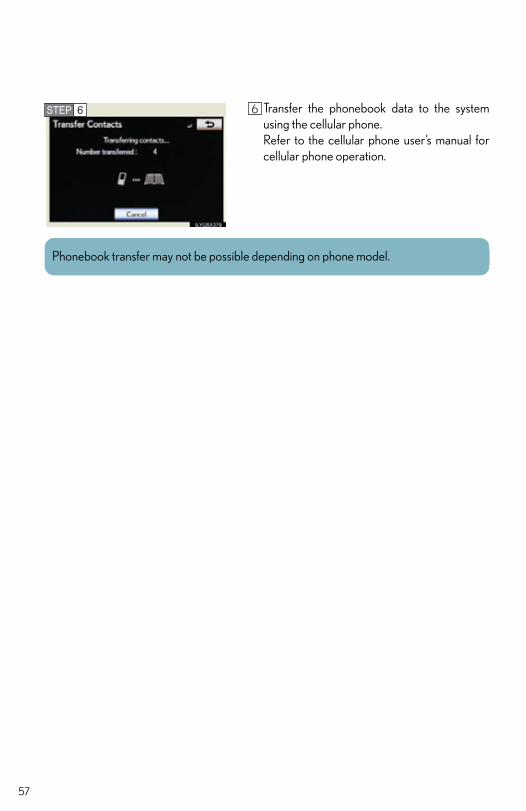
Transfer the phonebook data to the systemusing the cellular phone.Refer to the cellular phone user’s manual forcellular phone operation.
STEP 6
Phonebook transfer may not be possible depending on phone model.
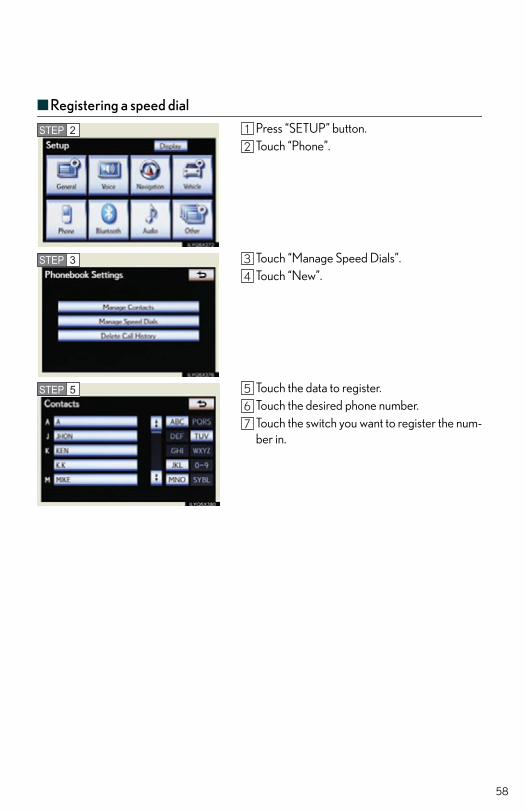
■ Registering a speed dial
Press “SETUP” button.Touch “Phone”.
Touch “Manage Speed Dials”.Touch “New”.
Touch the data to register.Touch the desired phone number.Touch the switch you want to register the num-ber in.
STEP 2
STEP 3
STEP 5
58
59
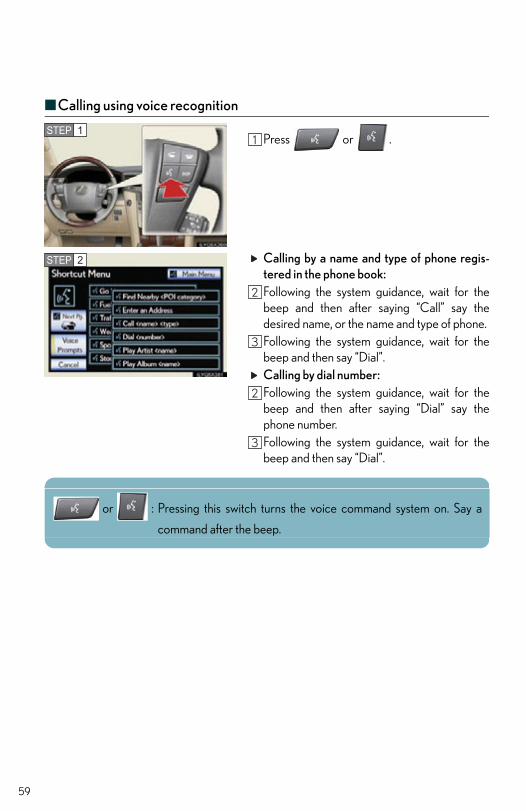
■Calling using voice recognition
Press or .
Calling by a name and type of phone regis-tered in the phone book: Following the system guidance, wait for thebeep and then after saying “Call” say thedesired name, or the name and type of phone. Following the system guidance, wait for thebeep and then say “Dial”. Calling by dial number: Following the system guidance, wait for thebeep and then after saying “Dial” say thephone number. Following the system guidance, wait for thebeep and then say “Dial”.
STEP 1
STEP 2
or : Pressing this switch turns the voice command system on. Say a
command after the beep.
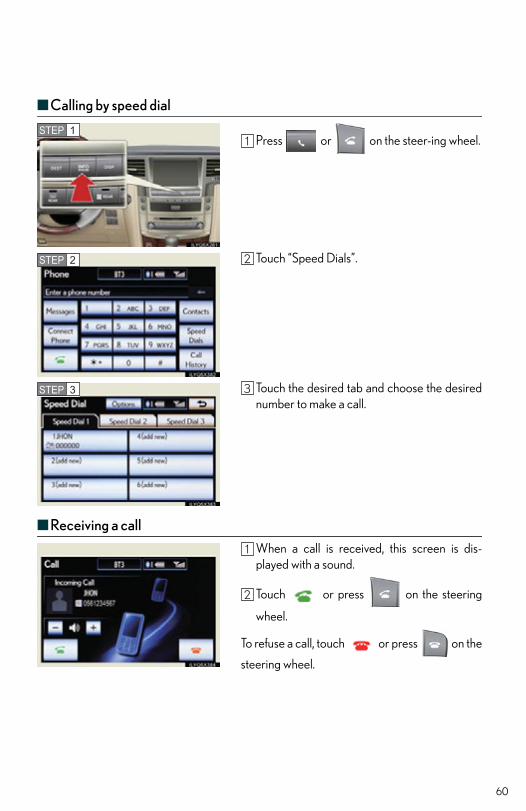
■ Calling by speed dial
Press or on the steer-ing wheel.
Touch “Speed Dials”.
Touch the desired tab and choose the desirednumber to make a call.
■ Receiving a call
When a call is received, this screen is dis-played with a sound.
Touch or press on the steering
wheel.
To refuse a call, touch or press on the
steering wheel.
STEP 1
STEP 2
STEP 3
60
61
Safety Connect
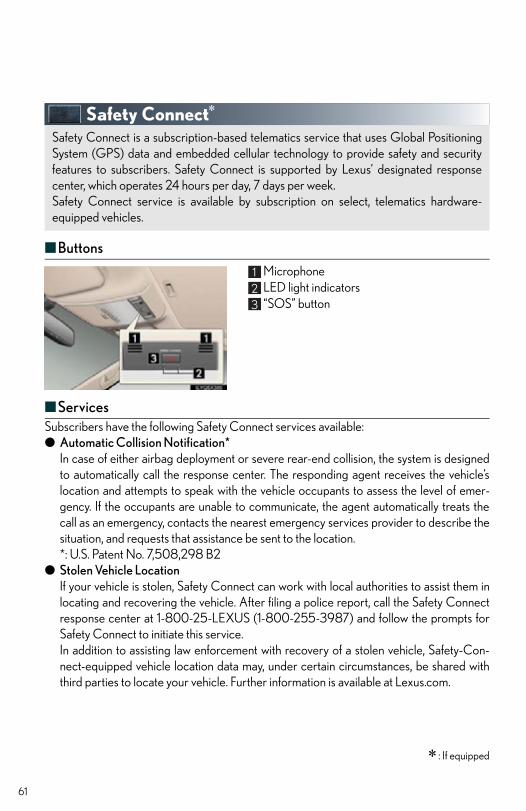
■Buttons
MicrophoneLED light indicators“SOS” button
■ServicesSubscribers have the following Safety Connect services available:● Automatic Collision Notification*
In case of either airbag deployment or severe rear-end collision, the system is designedto automatically call the response center. The responding agent receives the vehicle’slocation and attempts to speak with the vehicle occupants to assess the level of emer-gency. If the occupants are unable to communicate, the agent automatically treats thecall as an emergency, contacts the nearest emergency services provider to describe thesituation, and requests that assistance be sent to the location.*: U.S. Patent No. 7,508,298 B2
● Stolen Vehicle LocationIf your vehicle is stolen, Safety Connect can work with local authorities to assist them inlocating and recovering the vehicle. After filing a police report, call the Safety Connectresponse center at 1-800-25-LEXUS (1-800-255-3987) and follow the prompts forSafety Connect to initiate this service.In addition to assisting law enforcement with recovery of a stolen vehicle, Safety-Con-nect-equipped vehicle location data may, under certain circumstances, be shared withthird parties to locate your vehicle. Further information is available at Lexus.com.
: If equipped
Safety Connect is a subscription-based telematics service that uses Global PositioningSystem (GPS) data and embedded cellular technology to provide safety and securityfeatures to subscribers. Safety Connect is supported by Lexus’ designated responsecenter, which operates 24 hours per day, 7 days per week.Safety Connect service is available by subscription on select, telematics hardware-equipped vehicles.
● Emergency Assistance Button (SOS)In the event of an emergency on the road, push the “SOS” button to reach the SafetyConnect response center. The answering agent will determine your vehicle’s location,assess the emergency, and dispatch the necessary assistance required.If you accidentally press the “SOS” button, tell the response-center agent that you arenot experiencing an emergency.
● Enhanced Roadside AssistanceEnhanced Roadside Assistance adds GPS data to the already included warranty-basedLexus roadside service.Subscribers can press the “SOS” button to reach a Safety Connect response-centeragent, who can help with a wide range of needs, such as: towing, flat tire, fuel delivery, etc.For a description of the Roadside Assistance services and their limitations, please see theSafety Connect Terms and Conditions, which are available at Lexus.com.
■ SubscriptionAfter you have signed the Telematics Subscription Service Agreement and are enrolled,you can begin receiving services.A variety of subscription terms is available for purchase. Contact your Lexus dealer, call1-800-25-LEXUS (1-800-255-3987) or push the “SOS” button in your vehicle for fur-ther subscription details.
62
63
Lexus Enform with Safety Connect
For details, refer to the “Owner’s Manual” and “Navigation System Owner’s Manual”.
■Services● Apps
Apps is a service that enables the usable contents of a cellular phone to be displayedon and operated from the navigation screen. Before Apps can be used, a few settingsneed to be performed.
● Safety Connect features (P. 61)
• Automatic collision notification*• Stolen vehicle location• Emergency assistance button (SOS)• Enhanced Roadside Assistance*: U.S. Patent No. 7,508,298 B2
● Destination AssistDestination Assist provides you with live assistance for finding destinations via the LexusEnform response center. You can request either a specific business, address, or ask forhelp locating your desired destination by category, such as restaurants, gas stations,shopping centers or other points of interest (POI).After you tell the agent your choice of destination, its coordinates are sent wirelessly toyour vehicle’s navigation system.
: If equipped
Lexus Enform and Safety Connect are subscription-based telematics services that use
Global Positioning System (GPS) data, embedded cellular technology an XM® satellitedata services to provide safety and security as well as convenience features to subscribers.Lexus Enform and Safety Connect services are supported by Lexus’ designatedresponse center, which operates 24 hours per day, 7 days per week.Lexus Enform service is available by subscription on select, telematics hardware-equipped vehicles.
● eDestinationWith the eDestination feature, you can go online, via the Lexus.com owner’s Web site, toselect and organize destinations of your choice and then wirelessly send them to yourvehicle’s navigation system.You can store up to 200 locations online to access and update at any time.Your locations can be organized into up to 20 personalized folders.You must first go online at www.lexus.com/drivers/ to view the Owners site where youwill need to register and log in. After this, you can create your personalized folders con-taining the locations you wish to send to your vehicle.(See Lexus Enform with Safety Connect Guide for more information.)
● Lexus InsiderLexus Insider is an optional service that can send audio messages, or articles, to partici-pating owner’s vehicles via the navigation system. Potential Lexus Insider subjects mightinclude, for example, Lexus vehicle technology tips, updates on regional Lexus events, oraudio excerpts from Lexus Magazine articles. Up to 20 articles can be stored at a time.
■ SubscriptionAfter you have signed the Telematics Subscription Service Agreement and are enrolled,you can begin receiving services. A variety of subscription terms is available for purchase.Contact your Lexus dealer, call 1-800-25-LEXUS (1-800-255-3987), or push the “Desti-nation Assist” button in your vehicle for further subscription details.
64
65
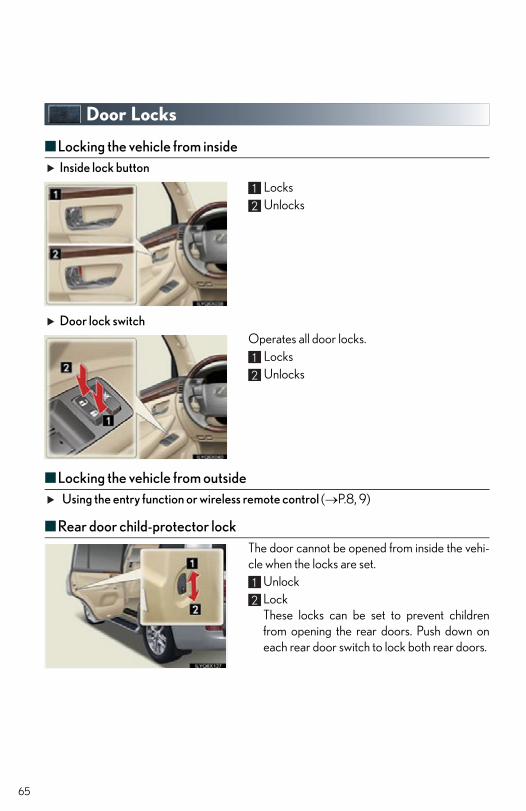
Door Locks
■Locking the vehicle from insideInside lock button
Locks Unlocks
Door lock switchOperates all door locks.
Locks Unlocks
■Locking the vehicle from outside Using the entry function or wireless remote control (P.8, 9)
■Rear door child-protector lockThe door cannot be opened from inside the vehi-cle when the locks are set.
UnlockLockThese locks can be set to prevent childrenfrom opening the rear doors. Push down oneach rear door switch to lock both rear doors.
66
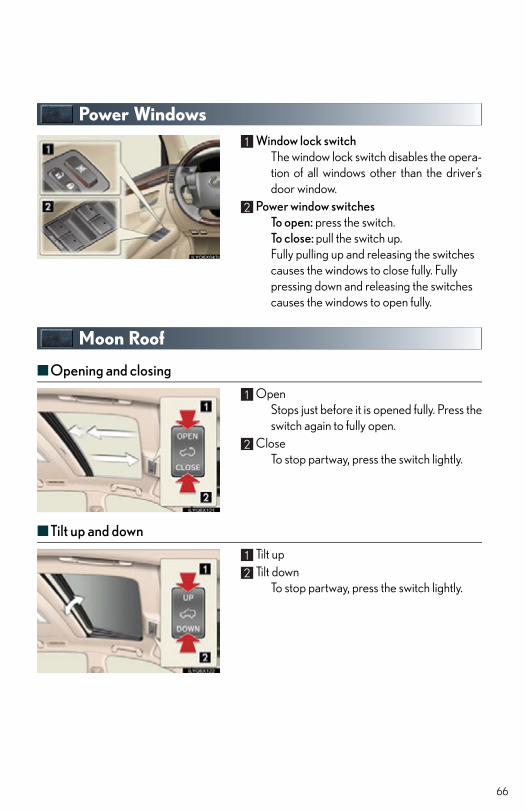
Power WindowsWindow lock switch
The window lock switch disables the opera-tion of all windows other than the driver’sdoor window.
Power window switchesTo open: press the switch.To close: pull the switch up.Fully pulling up and releasing the switchescauses the windows to close fully. Fullypressing down and releasing the switchescauses the windows to open fully.
Moon Roof
■ Opening and closing
OpenStops just before it is opened fully. Press theswitch again to fully open.
CloseTo stop partway, press the switch lightly.
■ Tilt up and down
Tilt upTilt down
To stop partway, press the switch lightly.

67
Fuel Tank CapPull the fuel filler door opener.
Slowly remove the cap by turning it counter-clockwise.
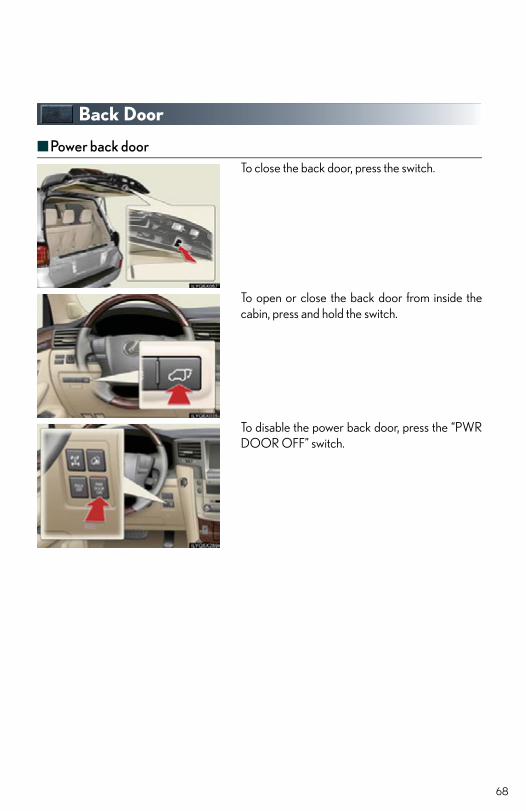
Back Door
■ Power back doorTo close the back door, press the switch.
To open or close the back door from inside thecabin, press and hold the switch.
To disable the power back door, press the “PWRDOOR OFF” switch.
68
69
■Back door easy closer
If the back door is left slightly open, it will close automatically.
■Entry function and wireless remote control
P.8,9

70

What to do if ...
71
List of Warning/Indicator Lights
Stop the vehicle immediately. Continuing to drive the vehicle may be dangerous.
(U.S.A.)
(Canada)Brake system warning light
Stop the vehicle immediately.
Charging system warning light
For further information, refer to the Owner’s Manual.
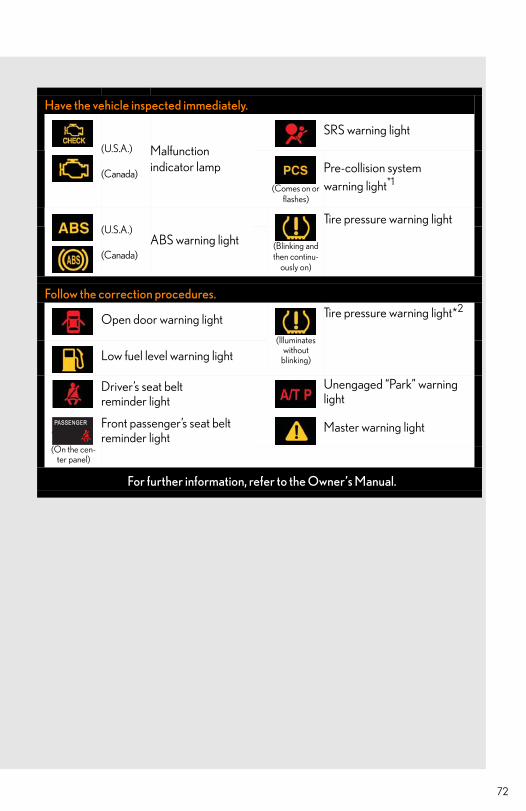
Have the vehicle inspected immediately.
(U.S.A.)
(Canada)
Malfunction indicator lamp
SRS warning light
(Comes on or flashes)
Pre-collision system warning light*1
(U.S.A.)
(Canada)ABS warning light (Blinking and
then continu-ously on)
Tire pressure warning light
Follow the correction procedures.
Open door warning light
(Illuminates without
blinking)
Tire pressure warning light*2
Low fuel level warning light
a
Driver’s seat beltreminder light
Unengaged “Park” warning light
(On the cen-ter panel)
Front passenger’s seat belt reminder light
Master warning light
For further information, refer to the Owner’s Manual.
72
What to do if ...
73
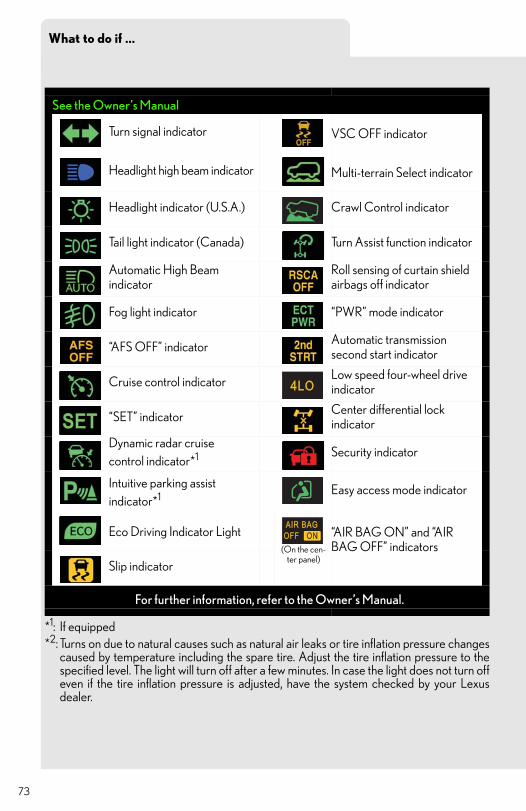
*1: If equipped*2: Turns on due to natural causes such as natural air leaks or tire inflation pressure changes
caused by temperature including the spare tire. Adjust the tire inflation pressure to thespecified level. The light will turn off after a few minutes. In case the light does not turn offeven if the tire inflation pressure is adjusted, have the system checked by your Lexusdealer.
See the Owner’s Manual
Turn signal indicator VSC OFF indicator
Headlight high beam indicator Multi-terrain Select indicator
Headlight indicator (U.S.A.) Crawl Control indicator
Tail light indicator (Canada) Turn Assist function indicator
Automatic High Beam indicator
Roll sensing of curtain shield airbags off indicator
Fog light indicator “PWR” mode indicator
“AFS OFF” indicator Automatic transmission second start indicator
Cruise control indicator Low speed four-wheel drive indicator
“SET” indicator Center differential lock indicator
Dynamic radar cruise control indicator*1 Security indicator
Intuitive parking assist indicator*1
Easy access mode indicator
Eco Driving Indicator Light(On the cen-
ter panel)
“AIR BAG ON” and “AIR BAG OFF” indicators
Slip indicator
For further information, refer to the Owner’s Manual.
74
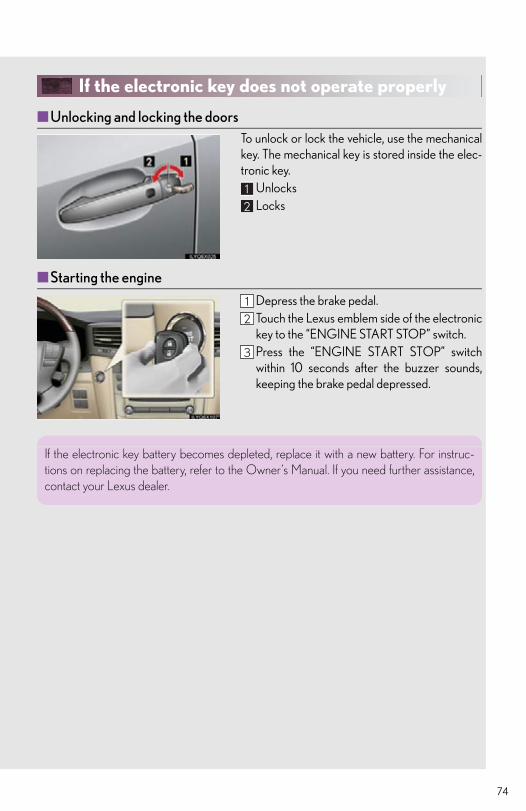
If the electronic key does not operate properly
■ Unlocking and locking the doorsTo unlock or lock the vehicle, use the mechanicalkey. The mechanical key is stored inside the elec-tronic key.
UnlocksLocks
■ Starting the engine
Depress the brake pedal.Touch the Lexus emblem side of the electronickey to the “ENGINE START STOP” switch.Press the “ENGINE START STOP” switchwithin 10 seconds after the buzzer sounds,keeping the brake pedal depressed.
If the electronic key battery becomes depleted, replace it with a new battery. For instruc-tions on replacing the battery, refer to the Owner’s Manual. If you need further assistance,contact your Lexus dealer.
What to do if ...
75
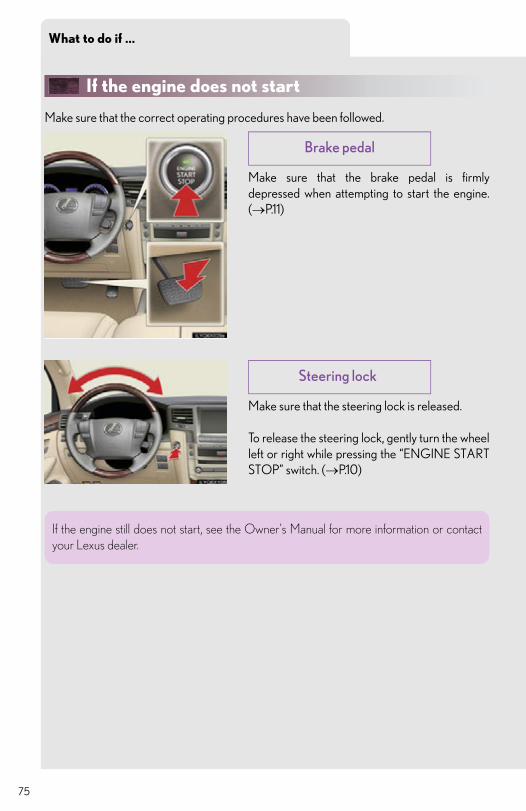
If the engine does not start
Make sure that the correct operating procedures have been followed.
Make sure that the brake pedal is firmlydepressed when attempting to start the engine.(P.11)
u
Make sure that the steering lock is released.
To release the steering lock, gently turn the wheelleft or right while pressing the “ENGINE STARTSTOP” switch. (P.10)
Brake pedal
Steering lock
If the engine still does not start, see the Owner’s Manual for more information or contactyour Lexus dealer.
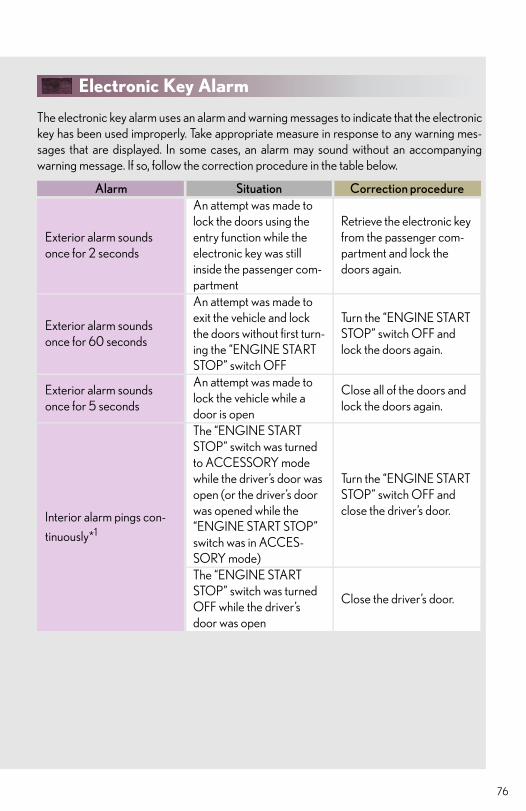
Electronic Key Alarm
The electronic key alarm uses an alarm and warning messages to indicate that the electronickey has been used improperly. Take appropriate measure in response to any warning mes-sages that are displayed. In some cases, an alarm may sound without an accompanyingwarning message. If so, follow the correction procedure in the table below.
Alarm Situation Correction procedure
Exterior alarm sounds once for 2 seconds
An attempt was made to lock the doors using the entry function while the electronic key was still inside the passenger com-partment
Retrieve the electronic key from the passenger com-partment and lock the doors again.
Exterior alarm sounds once for 60 seconds
An attempt was made to exit the vehicle and lock the doors without first turn-ing the “ENGINE START STOP” switch OFF
Turn the “ENGINE START STOP” switch OFF and lock the doors again.
Exterior alarm sounds once for 5 seconds
An attempt was made to lock the vehicle while a door is open
Close all of the doors and lock the doors again.
Interior alarm pings con-
tinuously*1
The “ENGINE START STOP” switch was turnedto ACCESSORY mode while the driver’s door was open (or the driver’s door was opened while the “ENGINE START STOP” switch was in ACCES-SORY mode)
Turn the “ENGINE START STOP” switch OFF and close the driver’s door.
The “ENGINE START STOP” switch was turned OFF while the driver’s door was open
Close the driver’s door.
76
What to do if ...
77
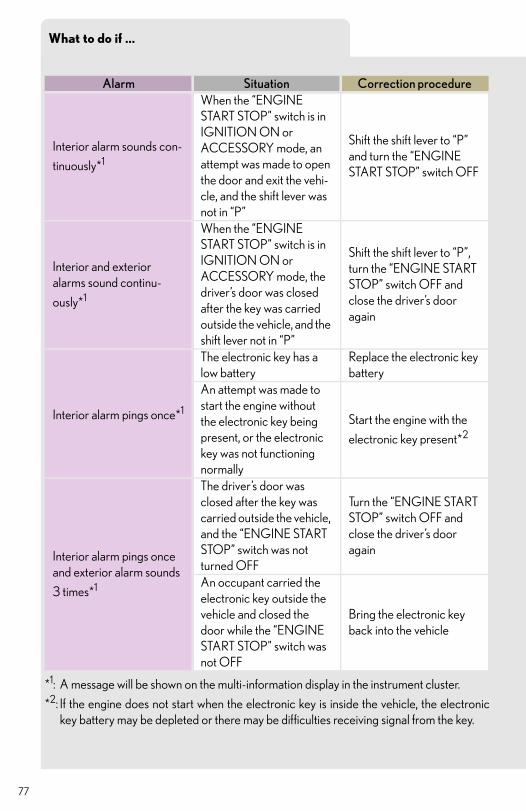
*1: A message will be shown on the multi-information display in the instrument cluster.
*2: If the engine does not start when the electronic key is inside the vehicle, the electronickey battery may be depleted or there may be difficulties receiving signal from the key.
Alarm Situation Correction procedure
Interior alarm sounds con-
tinuously*1
When the “ENGINE START STOP” switch is in IGNITION ON or ACCESSORY mode, an attempt was made to open the door and exit the vehi-cle, and the shift lever was not in “P”
Shift the shift lever to “P” and turn the “ENGINE START STOP” switch OFF
Interior and exterior alarms sound continu-
ously*1
When the “ENGINE START STOP” switch is in IGNITION ON or ACCESSORY mode, the driver’s door was closed after the key was carried outside the vehicle, and the shift lever not in “P”
Shift the shift lever to “P”, turn the “ENGINE START STOP” switch OFF and close the driver’s door again
Interior alarm pings once*1
The electronic key has a low battery
Replace the electronic key battery
An attempt was made to start the engine without the electronic key being present, or the electronic key was not functioning normally
Start the engine with the
electronic key present*2
Interior alarm pings once and exterior alarm sounds
3 times*1
The driver’s door was closed after the key was carried outside the vehicle, and the “ENGINE START STOP” switch was not turned OFF
Turn the “ENGINE START STOP” switch OFF and close the driver’s door again
An occupant carried the electronic key outside the vehicle and closed the door while the “ENGINE START STOP” switch was not OFF
Bring the electronic key back into the vehicle

78
Customizing Your Lexus
79
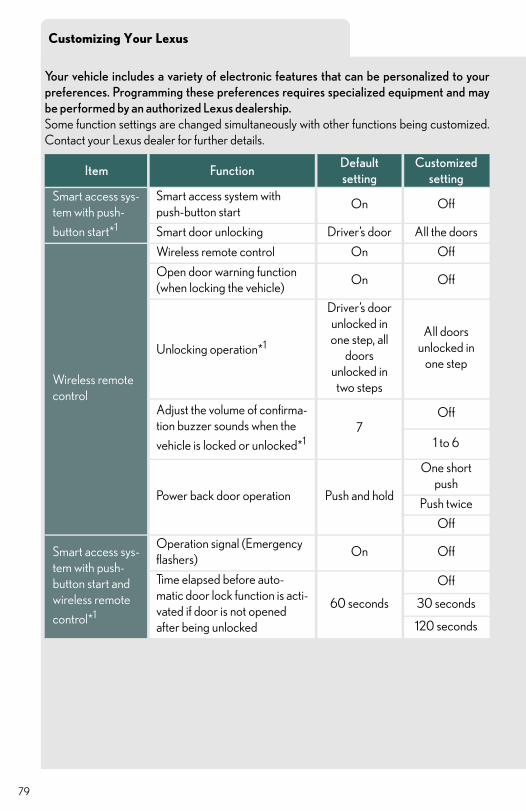
Your vehicle includes a variety of electronic features that can be personalized to yourpreferences. Programming these preferences requires specialized equipment and maybe performed by an authorized Lexus dealership.Some function settings are changed simultaneously with other functions being customized.Contact your Lexus dealer for further details.
Item FunctionDefault setting
Customizedsetting
Smart access sys-tem with push-
button start*1
Smart access system with push-button start
On Off
Smart door unlocking Driver’s door All the doors
Wireless remote control
Wireless remote control On Off
Open door warning function (when locking the vehicle)
On Off
Unlocking operation*1
Driver’s door unlocked in one step, all
doors unlocked in
two steps
All doors unlocked in
one step
Adjust the volume of confirma-tion buzzer sounds when the
vehicle is locked or unlocked*17
Off
1 to 6
Power back door operation Push and hold
One short push
Push twice
Off
Smart access sys-tem with push-button start and wireless remote
control*1
Operation signal (Emergency flashers)
On Off
Time elapsed before auto-matic door lock function is acti-vated if door is not opened after being unlocked
60 seconds
Off
30 seconds
120 seconds
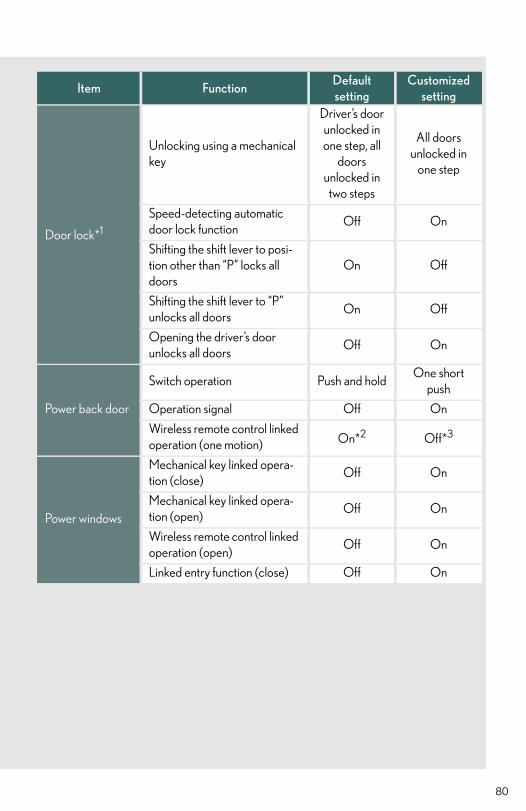
Door lock*1
Unlocking using a mechanical key
Driver’s door unlocked in one step, all
doors unlocked in
two steps
All doors unlocked in
one step
Speed-detecting automatic door lock function
Off On
Shifting the shift lever to posi-tion other than “P” locks all doors
On Off
Shifting the shift lever to “P” unlocks all doors
On Off
Opening the driver’s door unlocks all doors
Off On
Power back door
Switch operation Push and holdOne short
push
Operation signal Off On
Wireless remote control linked operation (one motion) On*2 Off*3
Power windows
Mechanical key linked opera-tion (close)
Off On
Mechanical key linked opera-tion (open)
Off On
Wireless remote control linked operation (open)
Off On
Linked entry function (close) Off On
Item FunctionDefault setting
Customizedsetting
80
Customizing Your Lexus
81
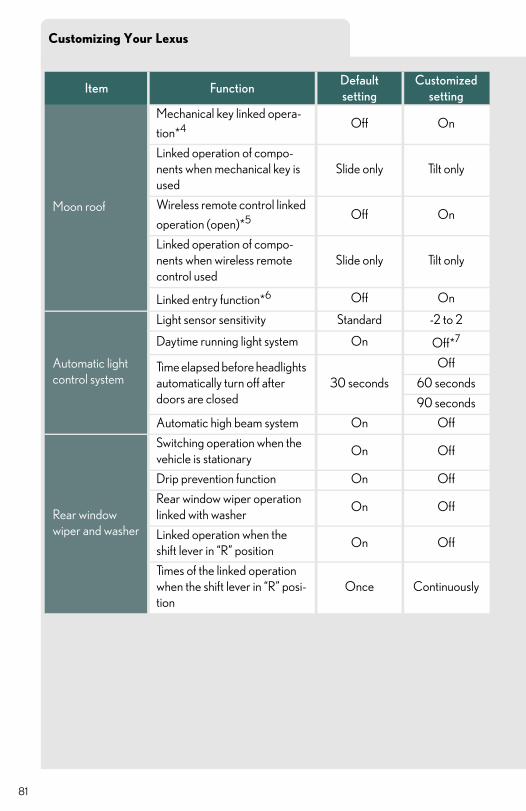
Moon roof
Mechanical key linked opera-
tion*4 Off On
Linked operation of compo-nents when mechanical key is used
Slide only Tilt only
Wireless remote control linked
operation (open)*5 Off On
Linked operation of compo-nents when wireless remote control used
Slide only Tilt only
Linked entry function*6 Off On
Automatic light control system
Light sensor sensitivity Standard -2 to 2
Daytime running light system On Off*7
Time elapsed before headlights automatically turn off after doors are closed
30 seconds
Off
60 seconds
90 seconds
Automatic high beam system On Off
Rear window wiper and washer
Switching operation when the vehicle is stationary
On Off
Drip prevention function On Off
Rear window wiper operation linked with washer
On Off
Linked operation when the shift lever in “R” position
On Off
Times of the linked operation when the shift lever in “R” posi-tion
Once Continuously
Item FunctionDefault setting
Customizedsetting
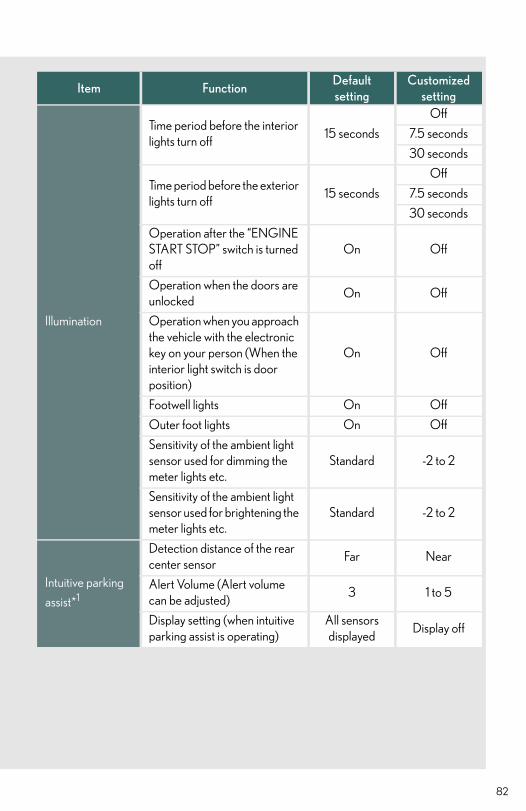
Illumination
Time period before the interior lights turn off
15 seconds
Off
7.5 seconds
30 seconds
Time period before the exterior lights turn off
15 seconds
Off
7.5 seconds
30 seconds
Operation after the “ENGINE START STOP” switch is turned off
On Off
Operation when the doors are unlocked
On Off
Operation when you approach the vehicle with the electronic key on your person (When the interior light switch is door position)
On Off
Footwell lights On Off
Outer foot lights On Off
Sensitivity of the ambient light sensor used for dimming the meter lights etc.
Standard -2 to 2
Sensitivity of the ambient light sensor used for brightening the meter lights etc.
Standard -2 to 2
Intuitive parking
assist*1
Detection distance of the rear center sensor
Far Near
Alert Volume (Alert volume can be adjusted)
3 1 to 5
Display setting (when intuitive parking assist is operating)
All sensors displayed
Display off
Item FunctionDefault setting
Customizedsetting
82
Customizing Your Lexus
83
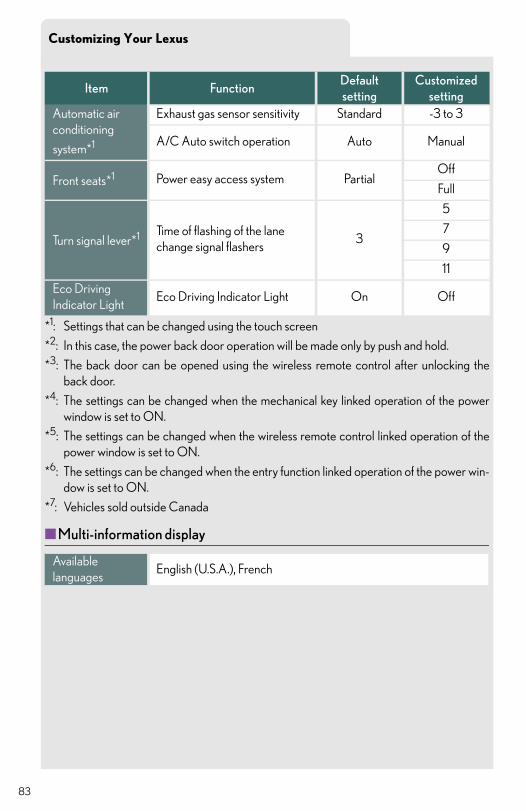
*1: Settings that can be changed using the touch screen
*2: In this case, the power back door operation will be made only by push and hold.
*3: The back door can be opened using the wireless remote control after unlocking theback door.
*4: The settings can be changed when the mechanical key linked operation of the powerwindow is set to ON.
*5: The settings can be changed when the wireless remote control linked operation of thepower window is set to ON.
*6: The settings can be changed when the entry function linked operation of the power win-dow is set to ON.
*7: Vehicles sold outside Canada
■Multi-information display
Automatic air conditioning
system*1
Exhaust gas sensor sensitivity Standard -3 to 3
A/C Auto switch operation Auto Manual
Front seats*1 Power easy access system PartialOff
Full
Turn signal lever*1 Time of flashing of the lane change signal flashers
3
5
7
9
11
Eco Driving Indicator Light
Eco Driving Indicator Light On Off
Item FunctionDefault setting
Customizedsetting
Available languages
English (U.S.A.), French

Memo
84

Memo
85
86
Your Lexus dealerYour Lexus dealer will provide quality maintenance and any other assistanceyou may require.If there is not a Lexus dealer near you, please call the following number:
■U.S. OWNERS●In the U.S. mainland or Canada:
Lexus Roadside Assistance1-800-25-LEXUS or 1-800-255-3987 (Toll-Free)
●In Hawaii: Servco Automotive Roadside Assistance/Customer Services1-800-25-LEXUS or 1-800-255-3987 (Toll-Free)
■CANADIAN OWNERS●In Canada or the U.S. mainland:
Lexus Roadside Assistance/Customer Service1-800-26-LEXUS or 1-800-265-3987 (Toll-Free)
Please access our websites for further information.●The U.S. mainland: www.lexus.com●Hawaii: www.servcolexus.com●Canada: www.lexus.ca
©2012 TOYOTA MOTOR CORPORATIONAll rights reserved. This material may not be reproduced or copied, in whole or in part, without the written permission of Toyota Motor Corporation.