Embed Size (px)
Citation preview

82210720
SUP 324
K68604401/9
4
3
2
STEP 1
STEP 4
STEP 2
STEP 3
Thoroughly clean and dry the hood prior to installation. Open the hood and trial-fit the Hood Protector centrally onto hood. Note the slots in the Hood Protector. Using a pencil or non-permanent marker, accurately mark the centers of each slot onto the hood. Remove Hood Protector. See FIGURE 1.
At the previously noted positions corresponding to the Hood Protector tags, remove the two noted rubber seal retaining plugs that affix the rubber seal to the hood. Leave the remaining retaining plugs in hood. See FIGURE 2.
Insert the screw plugs provided into the now vacant holes, as shown. Ensure the boss heads of the screwplugs are parallel with the edge of the hood. See FIGURE 3.
Install the Hood Protector onto hood, ensuring the Hood Protector tags fit between the hood and rubber seal. IMPORTANT: The Hood Protector tags must be fitted under the rubber seal in the underside of the Hood.See FIGURE 4.
CONTENTS1x Hood Protector2x Screw plugs2x Self Tapping Screws4x Washers1x Alcohol Wipe
2x Nut Inserts2x Metal Wing Clips2x Small Screws3x Small Abrasive Resistant Tape Strips2x Large Abrasive Resistant Tape Strips
IMPORTANT: Read all instructions carefully before beginning the installation.
Helpful HintA trial fit is recommended to ensure proper positioning, as abrasive resistant tape will be fitted to avoid permanent paint damage.
1
RUBBERSEAL
HOODPROTECTOR
UNDERSIDE VIEW OF HOOD
REMOVE RUBBER SEALRETAINING PLUGS
SCREW PLUG
HOOD EDGE
BOSS HEAD
BOSS HEAD

82210720
SUP 324
K68604402/9
5
7
6
STEP 5
STEP 6
STEP 7
Ensure the boss head of the screw plugs locate into the slots in the Hood Protector tags, as shown. See FIGURE 5.
Slice the outer layer of the rubber seal directly above the hole left by the removed retaining plugs. Insert the self-tapping screws and washers through the holes in the rubber seal and into the screw plugs, securing the rubber seal and Hood Protector to the hood. See FIGURE 6.
Clean the noted areas under the wing clip locations with alcohol wipe provided. Wipe off any residue with a dry clean cloth. Adhere the large abrasive resistant tape strips over the hood lip, as shown. See FIGURE 7.
CLEANEDAREA
SURFACEHOOD
HOODPROTECTOR
ABRASIVELARGE
RESISTANTTAPE
HOOD PROTECTOR
RUBBERSEAL
UNDERSIDE VIEW OF HOOD
RUBBERSEAL
SCREW
WASHER
SLICE
UNDERSIDE VIEW OF HOOD
HOOD PROTECTOR
CENTER OF SLOT BOSS HEAD BOSS HEAD
SCREW PLUGS
RUBBERSEAL

82210720
SUP 324
K68604403/9
8
10
9
STEP 8
STEP 9
STEP 10
Position the nut insert into clips. Slide clips over the abrasive resistant tape on hood lip, as shown. Ensure that the clips are positioned over the abrasive resistant tape and do not come in contact with hood paint work. Failure to do this may result in permanent paint damage. Secure Hood Protector to clips with small screws and washers provided.TO REMOVE: Reverse the above procedure.See FIGURE 8.
Note the three rubber bumpon’s on the Hood Protector. Using a pencil or non-permanent marker, carefully mark the corresponding bumpon locations onto the hoods surface. See FIGURE 9.
Using the alcohol wipe provided, clean the noted and marked areas beneath the rubber bumpon’s. Wipe away any residue with a clean dry cloth. Adhere the small abrasive resistant tape strips provided, to these locations. See FIGURE 10.
FAILURE TO ADHERE THE TAPE STRIPS MAY RESULT IN PERMANENT PAINT DAMAGE TO YOUR VEHICLE’S PAINTWORK.
HOODPROTECTOR
SMALLSCREW
BUMPON
WASHER
NUTINSERT
NUTINSERT
ABRASIVESMALL
RESISTANTTAPE

Assurez-vous de bien nettoyer et essuyer le capot avant l'installation. Ouvrez le capot et ajustez le protège-capot au centre du capot. Marquez les trous sur le protège-capot. À l’aide d’un crayon ou d’un marqueur non-permanent, indiquez avec précision les centres de chaque fente sur le capot. Voir FIGURE 1.
82210720
SUP 324
K68604404/9
4
3
2
ÉTAPE 1
ÉTAPE 4
ÉTAPE 2
ÉTAPE 3
Enlevez les deux chevilles de retenue de joint en caoutchouc qui attachent le joint en caoutchouc au capot aux endroits précédemment marqués qui correspondent aux languettes du protège-capot. Laissez les autres chevilles de retenue dans le capot. Voir FIGURE 2.
Insérez les vis de fermeture fournies dans les trous maintenant vides, tel qu’illustré. Assurez-vous que les têtes des vis de fermeture soient parallèles au bord du capot. Voir FIGURE 3.
Installez le protège-capot sur le capot, as s’assurant que les languettes du protège-capot s’insèrent entre le capot et le joint en caoutchouc. IMPORTANT: Les languettes du protège-capot doivent être insérées sous le joint en caoutchouc en dessous du capot. Voir FIGURE 4.
CONTENTS1x Protège-capot 2x Vis de fermeture 2x Vis autotaraudeuse 4x Rondelle 1x Lingette imbibée d’alcool2x écrous à insertion
2x Attaches à ailes en métal 2x Petites vis 3x Petites bandes de ruban résistant à l’abrasion 2x Larges bandes de ruban résistant à l’abrasion
IMPORTANT: Lisez attentivement toutes les instructions avant de commencer l'installation.
Conseil utileComme il faudra apposer du ruban résistant à l’abrasion pour éviter des dommages permanents à la peinture, il est recommandé d’effectuer un ajustement d’essai pour s’assurer du positionnement correct.
1
ENLEVEZ LES CHEVILLES DE RETENUE DU JOINT ENCAOUTCHOUC
VIS DE FERMETURE
BORD DU CAPOT
TÊTE DE VIS
TÊTE DE VIS
PROTÈGE-CAPOT
JOINT EN CAOUTCHOU
VUE DU DESSOUS DU CAPOT

82210720
SUP 324
K68604405/9
5
7
6
ÉTAPE 5
ÉTAPE 6
ÉTAPE 7
Assurez-vous d’insérer les têtes des vis de fermetures dansles fentes des languettes du protège-capot, tel qu'illustré. Voir FIGURE 5.
Coupez la couche extérieure du joint en caoutchouc directement au-dessus des trous laissés par les chevilles de retenue enlevées. Insérez les vis autotaraudeuses et les rondelles à travers les trous dans le joint de caoutchouc dans les vis de fermeture, en attachant le joint en caoutchouc et le protège-capot au capot. Voir FIGURE 6.
À l'aide de la lingette imbibée d'alcool fournie, nettoyez les endroits marqués au-dessous des attaches à ailes. Enlevez tout résidu avec un chiffon propre et sec. Collez les larges bandes de ruban résistant à l’abrasion au bord du capot, tel qu’illustré. Voir FIGURE 7.
ENDROITNETTOYÉ
SURFACE DU CAPOT
PROTÈGE-CAPOT
LARGE RUBANRÉSISTANTÀ L’ABRASION
COUPEZ LE JOINT EN CAOUTCHOUC
PROTÈGE-CAPOT JOINT EN CAOUTCHOUC
RONDELLE
VIS
TÊTE DE VIS VIS DE FERMETURE
TÊTE DE VIS
JOIN EN CAOUTCHOUC
PROTÈGE-CAPOT
VUE DU DESSOUS DU CAPOT

82210720
SUP 324
K68604406/9
8
10
9
ÉTAPE 8
ÉTAPE 9
ÉTAPE 10
Placez l’écrou à insertion dans les attaches. Glissez les attaches par-dessus le ruban résistant à l’abrasion sur le bord du protège-capot, tel qu’illustré. Assurez-vous que les attaches soient placées par-dessus le ruban résistant à l’abrasion et qu’elles ne touchent pas à la peinture. Le non respect de cette consigne peut résulter en un dommage permanent à la peinture. Fixez le protège-capot aux attaches avec de petites vis et des rondelles fourniesPOUR ENLEVER: Renversez la procédure décrite ci-haut. Voir FIGURE 8.
Notez les trois bosses en caoutchouc sur le protège-capot. À l’aide d’un crayon ou d’un marqueur non-permament, marquez soigneusement les emplacements correspondants aux bosses sur la surface du capot. Voir FIGURE 9.
À l'aide de la lingette imbibée d'alcool fournie, nettoyez les emplacements marqués au-dessous des bosses en caoutchouc. Enlevez tout résidu avec un chiffon propre et sec. Collez les bandes de ruban résistant à l’abrasion à ces emplacements. Voir FIGURE 10.
LE FAIT DE NE PAS UTILISER LES BANDES DE RUBAN PEUT RÉSULTER EN UN DOMMAGE PERMANENT À LA PEINTURE DE VOTRE VÉHICULE.
NUTINSERT
PROTÈGE-CAPOT
ÉCROU PETITE VIS
RONDELLE
ÉCROUÀ INSERTION
BOSSE
PETIT RUBAN RÉSISTANT À L’ABRASION

PASO 1Limpie y seque completamente el capó antes de la instalación. Abra el capó y realice una prueba de encaje del protector de capó, centrando el protector en el capó. Observe las ranuras del protector de capó. Con un lápiz o un marcador no permanente, marque en forma precisa los centros de cada ranura sobre el capó. Quite el protector de capó. Consulte la FIGURA 1.
82210720
SUP 324
K68604407/9
4
3
2
PASO 4
PASO 2
PASO 3
Quite de las posiciones marcadas anteriormente, que corresponden a las etiquetas del protector de capó, los dos tapones retenedores de sello de goma marcados que fijan el sello de goma al capó. Deje los demás tapones retenedores en el capó. Consulte la FIGURA 2.
Inserte los tapones roscados que se proporcionan en los orificios que ahora están vacíos, como se muestra. Asegúrese de que los cabezales de los salientes de los tapones roscados estén en paralelo con el borde del capó. Consulte la FIGURA 3.
Instale el protector de capó en el capó, asegurándose de que las etiquetas del protector de capó queden instaladas entre el capó y el sello de goma. IMPORTANTE: Las etiquetas del protector de capó se deben colocar bajo el sello de goma, en la parte inferior del capó. Consulte la FIGURA 4.
IMPORTANTE: Lea detenidamente todas las instrucciones antes de comenzar la instalación.
Se recomienda realizar una prueba de encaje para garantizar la ubicación correcta, ya que se colocará cinta resistente al desgaste para evitar daños permanentes a la pintura.
1
SELLO DE GOMA
PROTECTOR DE CAPÓ
VISTA DE LA PARTE INFERIOR DEL CAPÓ
QUITE LOS TAPONES RETENEDORES DEL SELLO DE GOMA
TAPÓN ROSCADO
BORDE DEL CAPÓ
CABEZAL DEL SALIENTE
CONTENIDOS 1 protector de capó 2 insertos para tuerca2 tapones roscados 2 sujetadores mariposa metálicos2 tornillos autorroscantes 2 tornillos pequeños4 arandelas 3 tiras pequeñas de cinta resistente al
desgaste 1 paño con alcohol 2 tiras grandes de cinta resistente al
desgaste
Consejo útil
82210720
SUP 324
K68604408/9
5
7
6
PASO 5
PASO 6
PASO 7
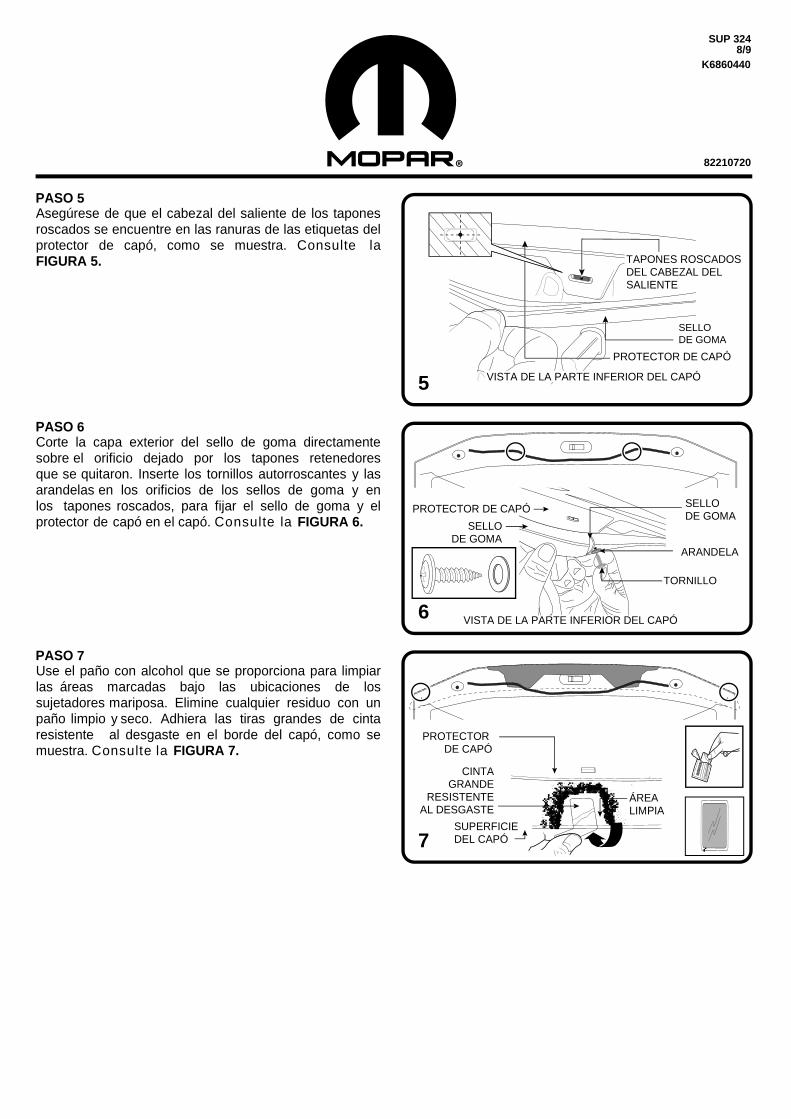
Asegúrese de que el cabezal del saliente de los tapones roscados se encuentre en las ranuras de las etiquetas del protector de capó, como se muestra. Consulte la FIGURA 5.
Corte la capa exterior del sello de goma directamente sobre el orificio dejado por los tapones retenedores que se quitaron. Inserte los tornillos autorroscantes y las arandelas en los orificios de los sellos de goma y en los tapones roscados, para fijar el sello de goma y el protector de capó en el capó. Consulte la FIGURA 6.
Use el paño con alcohol que se proporciona para limpiar las áreas marcadas bajo las ubicaciones de los sujetadores mariposa. Elimine cualquier residuo con un paño limpio y seco. Adhiera las tiras grandes de cinta resistente al desgaste en el borde del capó, como se muestra. Consulte la FIGURA 7.
ÁREA LIMPIA
CINTA GRANDE
RESISTENTE AL DESGASTE
PROTECTOR DE CAPÓ
SELLODE GOMA
TORNILLO
ARANDELA
VISTA DE LA PARTE INFERIOR DEL CAPÓ
PROTECTOR DE CAPÓ
TAPONES ROSCADOS DEL CABEZAL DEL SALIENTE
SELLO DE GOMA
SELLODE GOMA
VISTA DE LA PARTE INFERIOR DEL CAPÓ
PROTECTOR DE CAPÓ
SUPERFICIEDEL CAPÓ

82210720
SUP 324
K68604409/9
8
10
9
PASO 8
PASO 9
PASO 10
Coloque el inserto para tuerca en los sujetadores. Deslice los sujetadores sobre la cinta resistente al desgaste que se encuentra sobre el borde del capó, como se muestra. Asegúrese de que los sujetadores estén instalados encima de la cinta resistente al desgaste y de que no entren en contacto con la pintura del capó. Si no lo hace, se pueden producir daños permanentes a la pintura. Fije el protector de capó a los sujetadores con los tornillos pequeños y las arandelas que se proporcionan.PARA RETIRAR: Invierta el procedimiento anterior. Consulte la FIGURA 8.
Observe los tres dispositivos Bumpon de goma que seencuentran en el protector de capó. Con un lápiz de grafito o un marcador no permanente marque cuidadosamente los lugares de los dispositivos Bumpon correspondientes sobre la superficie del capó. Consulte la FIGURA 9.
Use el paño con alcohol que se proporciona para limpiar las áreas marcadas debajo de los dispositivos Bumpon de goma. Elimine cualquier residuo con un paño limpio y seco. Adhiera en estos lugares las tiras pequeñas de cinta resistente al desgaste que se proporcionan.Consulte la FIGURA 10. SI NO PEGA LAS TIRAS DE CINTA, SE PODRÍAN PRODUCIR DAÑOS PERMANENTES A LA PINTURA DE SU VEHÍCULO.
NUTINSERT
PROTECTOR DE CAPÓ
TORNILLOPEQUEÑO
ARANDELA
INSERTO PARA TUERCA
DISPOSITIVO BUMPON
CINTA RESISTENTE AL DESGASTE PEQUEÑA
INSERTO PARATUERCA