Embed Size (px)
Citation preview

Content Producer Installation and Upgrade Guide
Release 10 SP6April 2011
© 2007 - 2011 Verint Systems Inc. Confidential and Proprietary Information of Verint Systems Inc. All rights reserved, worldwide.
The Verint Systems Inc. products are protected by one or more of the following U.S., European or International Patents: USPN 5,659,768; USPN 5,790,798; USPN 6,278,978; USPN 6,370,574; USPN 6,404,857; USPN 6,510,220; USPN 6,757,361; USPN 6,782,093; USPN 6,952,732; USPN 6,959,405; USPN 7,047,296; USPN 7,149,788; USPN 7,155,399; USPN 7,203,285; USPN 6,959,078; USPN 6,724,887; USPN 7,216,162; European Patent 0 833 489; GB 2374249; and other provisional rights from one or more of the following Published US Patent Applications: US 10/061,469; US 10/061,489; US 10/061,491; US 11/388,854; US 11/388,944; US 11/389,471; US 10/818,787; US 11/166,630; US 11/129,811; US 11/477,124; US 11/509,553; US 11/509,550; US 11/509,554; US 11/509,552; US 11/509,549; US 11/509,551; US 11/583,381; US 10/181,103; US 09/825,589; US 09/899,895; US 11/037,604; US 11/237,456; US 09/680,131; US 11/359,356; US 11/359,319; US 11/359,532; US 11/359,359; US 11/359,358; US 11/359,357; US 11/359,195; US 11/385,499; US 11/394,496; US 11/393,286; US 11/396,061; US 11/395,992; US 11/394,410; US 11/394,794; US 11/395,350; US 11/395,759; US 60/799,228; US 11/479,926; US 11/479,841; US 11/479,925; US 11/479,056; US 11/478,714; US 11/479,899; US 11/479,506; US 11/479,267; US 60/837,816; US 11/528,267; US 11/529,132; US 11/540,281; US 11/540,322; US 11/529,947; US 11/540,902; US 11/541,056; US 11/529,942; US 11/540,282; US 11/529,946; US 11/540,320; US 11/529,842; US 11/540,904; US 11/541,252; US 11/541,313; US 11/540,086; US 11/540,739; US 11/540,185; US 11/540,107; US 11/540,900; US 10/610,780; US 10/832,509; US 11/608,340; US 11/608,350; US 11/608,358; US 10/771,315; US 10/771,409. Other U.S. and International Patents Pending.
VERINT, the VERINT logo, ACTIONABLE INTELLIGENCE, POWERING ACTIONABLE INTELLIGENCE, STAR-GATE, RELIANT, VANTAGE, X-TRACT, NEXTIVA, ULTRA, AUDIOLOG, WITNESS, the WITNESS logo, IMPACT 360, the IMPACT 360 logo, IMPROVE EVERYTHING, EQUALITY, CONTACTSTORE, and CLICK2STAFF are trademarks or registered trademarks of Verint Systems Inc. or its subsidiaries. Other trademarks mentioned are the property of their respective owners.

About This Guide . . . . . . . . . . . . . . . . . . . . . . . . . . . . . . . . . . . . . . . 4Intended Audience for This Guide . . . . . . . . . . . . . . . . . . . . . . . 5Related Documents . . . . . . . . . . . . . . . . . . . . . . . . . . . . 5Conventions Used in This Guide . . . . . . . . . . . . . . . . . . . . . . . . 6
Standard Conventions . . . . . . . . . . . . . . . . . . . . . . . . . . 6Information Icons . . . . . . . . . . . . . . . . . . . . . . . . . . . 7
If You Need Help . . . . . . . . . . . . . . . . . . . . . . . . . . . . . 8Before You Contact Technical Support. . . . . . . . . . . . . . . . . . . . . . . . . . . . . 8
Contacting Technical Support . . . . . . . . . . . . . . . . . . . . . . . . . 9Verint Witness Actionable Solutions Website and the Customer Interaction Center (CIC) . . . . . 9Telephone. . . . . . . . . . . . . . . . . . . . . . . . . . . . . . . . . . . . . . . . . . 9Email . . . . . . . . . . . . . . . . . . . . . . . . . . . . . . . . . . . . . . . . . . . . 10Direct Internet FTP . . . . . . . . . . . . . . . . . . . . . . . . . . . . . . . . . . . . . 10Other Support and Training Alternatives . . . . . . . . . . . . . . . . . . . . . . . . . . . 10
1 Pre-Installation Requirements and Prerequisites . . . . . . . . . . . . . . . . . . . . . 11
Overview . . . . . . . . . . . . . . . . . . . . . . . . . . . . . . . . 12Content Producer Components . . . . . . . . . . . . . . . . . . . . . . . . 12System Requirements . . . . . . . . . . . . . . . . . . . . . . . . . . . 12Browsers supported: . . . . . . . . . . . . . . . . . . . . . . . . . . . . . . . . . . . . 13Media formats supported . . . . . . . . . . . . . . . . . . . . . . . . . . . . . . . . . . 13
Installation Prerequisites . . . . . . . . . . . . . . . . . . . . . . . . . . 13
2 Installing Content Producer . . . . . . . . . . . . . . . . . . . . . . . . . . . . . . . . 14
Installing Content Producer . . . . . . . . . . . . . . . . . . . . . . . . . 15Installing Content Producer . . . . . . . . . . . . . . . . . . . . . . . . . . . . . . . . . 15
Installing Microsoft DirectX . . . . . . . . . . . . . . . . . . . . . . . . 17Activating and Registering Your License . . . . . . . . . . . . . . . . . . . . . . . . . . . . 18
Activating and Registering a License on a Desktop with an Internet Connection . . . . . . 18Activating and Registering a License on a Desktop without an Internet Connection. . . . . 20
Setting Preferences in Content Producer . . . . . . . . . . . . . . . . . . . . . . . . . . . 22
3 Upgrading Content Producer . . . . . . . . . . . . . . . . . . . . . . . . . . . . . . . . 24
Checking For and Upgrading to the Most Recent Content Producer Release . . . . . . . . . 25Checking for and upgrading to the most recent Content Producer release . . . . . . . . . . . . 25
Upgrading From Pre-10 SP6 Versions of Content Producer. . . . . . . . . . . . . . . 27
C o n t e n t s
The Content Producer Installation/Upgrade Guide describes how to install or update the Content Producer application. Content Producer is used to create slides and clips for use as training material that can be used with eLearning systems in your organization.
This introductory section to the guide describes the following topics:
Intended Audience for This Guide, page 5
Related Documents, page 5
Conventions Used in This Guide, page 6
If You Need Help, page 8
Contacting Technical Support, page 9
A b o u t T h i s G u i d e

Preface - Intended Audience for This Guide
Content Producer Installation and Upgrade Guide 5
© 2007 - 2011 Verint Systems Inc. Confidential and Proprietary Information of Verint Systems Inc. All rights reserved, worldwide.
Intended Audience for This GuideThis guide is designed to be used by:
Instructional Content developers
Managers and supervisors.
eLearning Administrators
Related DocumentsThe following documents are referenced in this document
Content Producer User Guide.
The guide can be accessed from the Help menu in Content Producer Author and Editor.
Preface - Conventions Used in This Guide
Content Producer Installation and Upgrade Guide 6
© 2007 - 2011 Verint Systems Inc. Confidential and Proprietary Information of Verint Systems Inc. All rights reserved, worldwide.
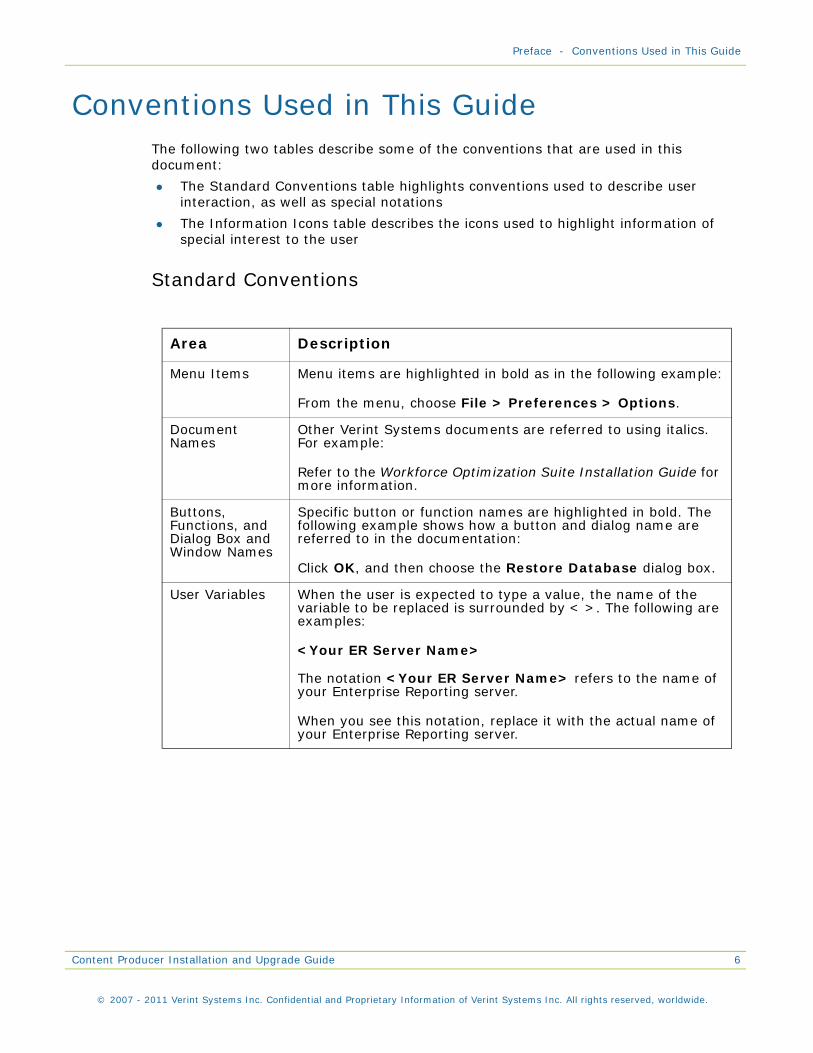
Conventions Used in This GuideThe following two tables describe some of the conventions that are used in this document:
The Standard Conventions table highlights conventions used to describe user interaction, as well as special notations
The Information Icons table describes the icons used to highlight information of special interest to the user
Standard Conventions
Area Description
Menu Items Menu items are highlighted in bold as in the following example:
From the menu, choose File > Preferences > Options.
Document Names
Other Verint Systems documents are referred to using italics. For example:
Refer to the Workforce Optimization Suite Installation Guide for more information.
Buttons, Functions, and Dialog Box and Window Names
Specific button or function names are highlighted in bold. The following example shows how a button and dialog name are referred to in the documentation:
Click OK, and then choose the Restore Database dialog box.
User Variables When the user is expected to type a value, the name of the variable to be replaced is surrounded by < >. The following are examples:
<Your ER Server Name>
The notation <Your ER Server Name> refers to the name of your Enterprise Reporting server.
When you see this notation, replace it with the actual name of your Enterprise Reporting server.

Preface - Conventions Used in This Guide
Content Producer Installation and Upgrade Guide 7
© 2007 - 2011 Verint Systems Inc. Confidential and Proprietary Information of Verint Systems Inc. All rights reserved, worldwide.
Information Icons
Icon Type Function
Note Important details that we want to make sure that you do not overlook.
Tip Helpful hints that can improve the efficiency or effectiveness of your work.
Caution Advice that can help you avoid undesirable results.
Warning Situations that can result in:• Harm to software• Loss of data• An interruption in service

Preface - If You Need Help
Content Producer Installation and Upgrade Guide 8
© 2007 - 2011 Verint Systems Inc. Confidential and Proprietary Information of Verint Systems Inc. All rights reserved, worldwide.
If You Need HelpOur goal at Verint Systems is to provide you with the best products backed by a high quality support network with a variety of resource options. These include:
Verint Systems website and Customer Interaction Center (CIC)
Telephone
Direct Internet FTP
Other support and training alternatives
Before You Contact Technical SupportHelp from Technical Support is as near as your keyboard or telephone. However, before you contact us, read this section carefully. We can provide faster and better service if you have certain information available when you contact us.
You can solve many problems quickly with the information in this manual. If you are unable to solve a problem and you need help from Technical Support, use the guidelines in the following checklist before you contact us:
1 Write down the problem and details that may help us solve the problem. If you can consistently reproduce the problem, list the steps to reproduce it.
2 Have at least the following information available when you contact Technical Support.
Your name and customer site number, and identify yourself as a customer, Verint Systems partner, or Verint Systems employee. Customer-initiated CIC contact is restricted to customers that are one of the designated support contacts on your company’s service level agreement.
Product name and version number.
Server and client operating systems and service pack version numbers
Supporting files and screenshots (if available)
ACD type and reporting package (for ACD-related issues)
The wording of any error messages from the product and/or operating system
Has this problem occurred previously? If it is new, did you change your system configuration recently?
Preface - Contacting Technical Support
Content Producer Installation and Upgrade Guide 9
© 2007 - 2011 Verint Systems Inc. Confidential and Proprietary Information of Verint Systems Inc. All rights reserved, worldwide.
Contacting Technical SupportOnce you have determined that you need technical support, and you have gathered as much information as you can based on the checklist, the following provides a list of the various support options and alternatives:
Verint Witness Actionable Solutions Website and the Customer Interaction Center (CIC)
This facility allows users worldwide fast access to product information, marketing and sales information, information about the company, technical documentation, support case management, and support solutions information.
You can access the Verint Witness Actionable Solutions Customer Interaction Center (CIC) support site at www.witness.com/support, or through www.witness.com by clicking the Support Login link from the Home page.
Once you have successfully logged on to the CIC, use the navigation tree on the right to access available user manuals, troubleshooting guides, FAQs, and more.
For help using the site, refer to the CIC Support Website Navigation Guide. To access this document, click the link at the right on the CIC Home page. The guide is a PDF file that you can save or print locally for future reference.
TelephoneVerint Systems' Customer Interaction Center (CIC) provides the self-service tools and information you need to get the most out of your investment.
Americas:+1 800 4 WITNESS (USA toll-free)+1 770 754 1870
Europe/Middle East/Africa:+ (0) 845 843 7333
Hong Kong/Asia Pacific:+852 8103 0104
Australia:1 800 600 806
New Zealand:+61 2 8223 9493
Japan:+81 (0)3 5919 1875
For geographic locations and hours of operation, refer to www.witness.com\support\ and click on Contact Centers.
Preface - Contacting Technical Support
Content Producer Installation and Upgrade Guide 10
© 2007 - 2011 Verint Systems Inc. Confidential and Proprietary Information of Verint Systems Inc. All rights reserved, worldwide.
EmailIf you are a new customer and need a logon ID and password, you can e-mail [email protected] to obtain your new logon information.
Direct Internet FTPThis facility greatly speeds up transfer of new and upgraded software to all Verint Systems customers. Contact us for more information about access to Direct Internet FTP services.
Other Support and Training AlternativesIn addition to documentation, online Help, and support services, Verint Systems also offers both classroom-based and online learning alternatives to suit your specific needs. Contact us for more information about other support and training alternatives.
C h a p t e r 1
Pre-Installation Requirements and Prerequisites
This chapter provides a brief overview of the Content Producer application, and describes system requirements and installation prerequisites, to ensure the successful installation and operation of the application.
This chapter contains the following sections:
Overview, page 12
Content Producer Components, page 12
System Requirements, page 12
Installation Prerequisites, page 13
Chapter 1 - Pre-Installation Requirements and Prerequisites Overview
Content Producer Installation and Upgrade Guide 12
© 2007 - 2011 Verint Systems Inc. Confidential and Proprietary Information of Verint Systems Inc. All rights reserved, worldwide.
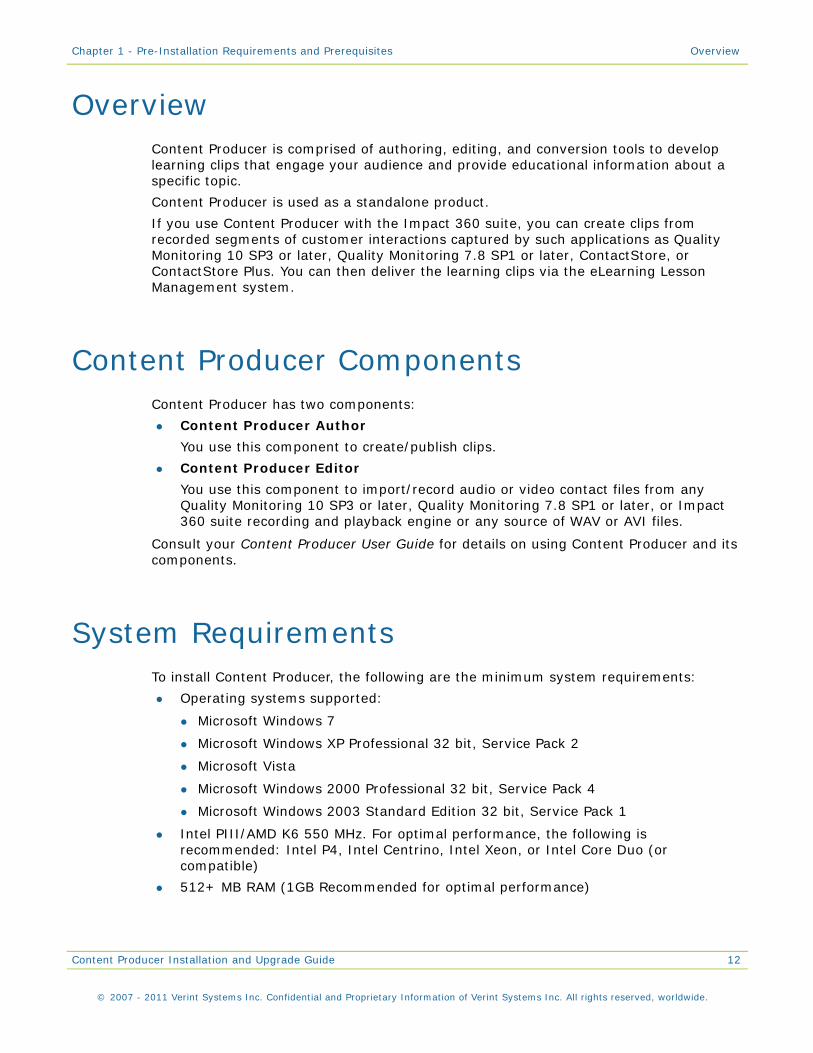
OverviewContent Producer is comprised of authoring, editing, and conversion tools to develop learning clips that engage your audience and provide educational information about a specific topic.
Content Producer is used as a standalone product.
If you use Content Producer with the Impact 360 suite, you can create clips from recorded segments of customer interactions captured by such applications as Quality Monitoring 10 SP3 or later, Quality Monitoring 7.8 SP1 or later, ContactStore, or ContactStore Plus. You can then deliver the learning clips via the eLearning Lesson Management system.
Content Producer ComponentsContent Producer has two components:
Content Producer Author
You use this component to create/publish clips.
Content Producer Editor
You use this component to import/record audio or video contact files from any Quality Monitoring 10 SP3 or later, Quality Monitoring 7.8 SP1 or later, or Impact 360 suite recording and playback engine or any source of WAV or AVI files.
Consult your Content Producer User Guide for details on using Content Producer and its components.
System RequirementsTo install Content Producer, the following are the minimum system requirements:
Operating systems supported:
Microsoft Windows 7
Microsoft Windows XP Professional 32 bit, Service Pack 2
Microsoft Vista
Microsoft Windows 2000 Professional 32 bit, Service Pack 4
Microsoft Windows 2003 Standard Edition 32 bit, Service Pack 1
Intel PIII/AMD K6 550 MHz. For optimal performance, the following is recommended: Intel P4, Intel Centrino, Intel Xeon, or Intel Core Duo (or compatible)
512+ MB RAM (1GB Recommended for optimal performance)
Chapter 1 - Pre-Installation Requirements and Prerequisites Installation Prerequisites
Content Producer Installation and Upgrade Guide 13
© 2007 - 2011 Verint Systems Inc. Confidential and Proprietary Information of Verint Systems Inc. All rights reserved, worldwide.
16bit+ Video card - 800x600 minimum resolution (1024x768 recommended)
5+ Gb Hard Drive with 500+ MB free disk space
Microsoft® DirectX® (will automatically install if needed)
SWF files created in Adobe® Flash® Editor version 8 or earlier for importing to Content Producer Author
Adobe® Flash® plugin version 7 or later (version 10.x) for viewing Content Producer clips
Browsers supported:Microsoft Internet Explorer 8.0
Microsoft Internet Explorer 7.0
Microsoft Internet Explorer 6.0, Service Pack 2 for Windows XP
Microsoft Internet Explorer 6.0, Service Pack 1 for Windows 2003
Media formats supportedMedia formats supported in Content Producer Author: JPG, GIF, TIFF, BMP, PNG, MP3, AIFF, AU, SWF(Created in Adobe® Flash® Editor version 8 or earlier)
Media formats supported in Content Producer Editor: AVI, WAV
Installation PrerequisitesTo install Content Producer, the following is required:
Content Producer installation file
License code to activate Content Producer
Internet access for registering Content Producer, and for product upgrades
You acquire the installation file and license code in one of the following ways:
You receive the Content Producer installation file and the license code with your Impact 360 fulfillment package.
Alternatively, you can download the latest version from the customer support site http://producerservices.verint.com and click the Content Producer 10.0.6 Installer link. In the event you do not have the installation code, contact your Verint consultant.
C h a p t e r 2
Installing Content Producer
This chapter describes how to install Content Producer, once you have received a licensed version of the product.
This chapter contains the following sections:
Installing Content Producer, page 15
Activating and Registering Your License, page 18
Activating and Registering a License on a Desktop without an Internet Connection, page 20
Chapter 2 - Installing Content Producer Installing Content Producer
Content Producer Installation and Upgrade Guide 15
© 2007 - 2011 Verint Systems Inc. Confidential and Proprietary Information of Verint Systems Inc. All rights reserved, worldwide.
Installing Content ProducerThe Content Producer installation file and the license code are included with your Impact 360 fulfillment package or, alternatively, you can download the installation file from our support site at this URL address: http://producerservices.verint.com.
For more details on system requirements and prerequisites prior to installation, see Chapter 1, Pre-Installation Requirements and Prerequisites.
Once the installation is complete, you must activate Content Producer’s license. You can also use Content Producer’s Preferences options to configure the application.
See:
Installing Content Producer on page 15
Activating and Registering Your License on page 18
Activating and Registering a License on a Desktop without an Internet Connection on page 20
Installing Content Producer
Note:
If you have the Verint Multimedia Support Package 9.3 application installed on your system, uninstall the application before commencing with the Content Producer installation. If you do not, you will be prompted during the Content Producer installation to remove Verint Multimedia Support Package 9.3 before continuing with the installation.
Note:
If, during the course of the installation, Content Producer detects that you do not have Microsoft DirectX installed, you are prompted to install the Microsoft DirectX. For details, see Installing Microsoft DirectX on page 17
1 Access the Content Producer license file in your fulfillment package DVD and select the Content Producer installer file.
Note:
Alternatively, you can open the support site at http://producerservices.verint.com/ and click the Content Producer 10.0.6 Installer link.
2 In the DVD’s file directory, locate and double-click the ContentProducer10.0.6.exe file. The Installation Wizard window opens on the Setup - Content Producer screen. Click Next. The License Agreement screen opens.
3 On the License Agreement screen, click I accept the agreement option, and then click Next. The Select Destination Directory screen opens.

Chapter 2 - Installing Content Producer Installing Content Producer
Content Producer Installation and Upgrade Guide 16
© 2007 - 2011 Verint Systems Inc. Confidential and Proprietary Information of Verint Systems Inc. All rights reserved, worldwide.
4 If you want to change the default destination, click the Browse button, navigate to and then select another directory in which you want to store the program files. Click Next. The Select My Clips Directory screen opens.
5 If you want to change the default destination for clip files generated by Content Producer, navigate to and select another directory in which you want to store the clips. Click Next. The Select Start Menu Folder screen opens.
6 If you want to change the default Start Menu folder in which Content Producer’s shortcuts are saved, select a folder from the list box. Click Next. The File Associations screen opens.
Click Next. The Select Additional Tasks screen opens.
7 Click Next. The installation process begins, and its progress is displayed on the Installing screen. When the process is complete, click Finish to end the installation.

Chapter 2 - Installing Content Producer Installing Content Producer
Content Producer Installation and Upgrade Guide 17
© 2007 - 2011 Verint Systems Inc. Confidential and Proprietary Information of Verint Systems Inc. All rights reserved, worldwide.
Note:
If your system has the Verint Multimedia Support Package 9.3 application installed, a warning message appears during the installation to indicate that you must first uninstall this application before resuming your installation.
Once the installation is complete, shortcuts for Content Producer components appear on your desktop, as follows:
Content Producer Author
Content Producer Editor
You can also access Content Producer components by clicking Start > Content Producer.
8 To activate your license, see Activating and Registering Your License on page 18.
9 To configure Content Producer by setting preferences, see Activating and Registering a License on a Desktop without an Internet Connection on page 20.
Installing Microsoft DirectX
If Producer detects you do not have Microsoft DirectX installed or your system requires an updated version of DirectX, the Welcome to setup for DirectX screen opens:
To install Microsoft DirectX
1 Click the I accept the agreement button to confirm you accept the terms of the licensing agreement, and then click Next. The Installing Microsoft DirectX screen opens, indicating that components are downloading, and showing the time left for the process to complete. It may take several minutes.
2 When the process is complete, click Next to open the Restart Computer screen.
3 When you are ready to restart your computer, click Finish.
Chapter 2 - Installing Content Producer Installing Content Producer
Content Producer Installation and Upgrade Guide 18
© 2007 - 2011 Verint Systems Inc. Confidential and Proprietary Information of Verint Systems Inc. All rights reserved, worldwide.
Activating and Registering Your LicenseOnce you install Content Producer, you need to activate and register your license:
If you are activating and registering your license on a desktop that has an internet connection, see Activating and Registering a License on a Desktop with an Internet Connection on page 18.
If you are activating and registering your license on a desktop without an internet connection, see Activating and Registering a License on a Desktop without an Internet Connection on page 20.
Note:
If you are accessing the internet using a proxy server, you need to set proxy server preferences first, so that you can activate your license, receive updates and access Content Producer Help and support site. For details, see step 5 in the procedure Activating and Registering a License on a Desktop without an Internet Connection on page 20.
Activating and Registering a License on a Desktop with an Internet Connection
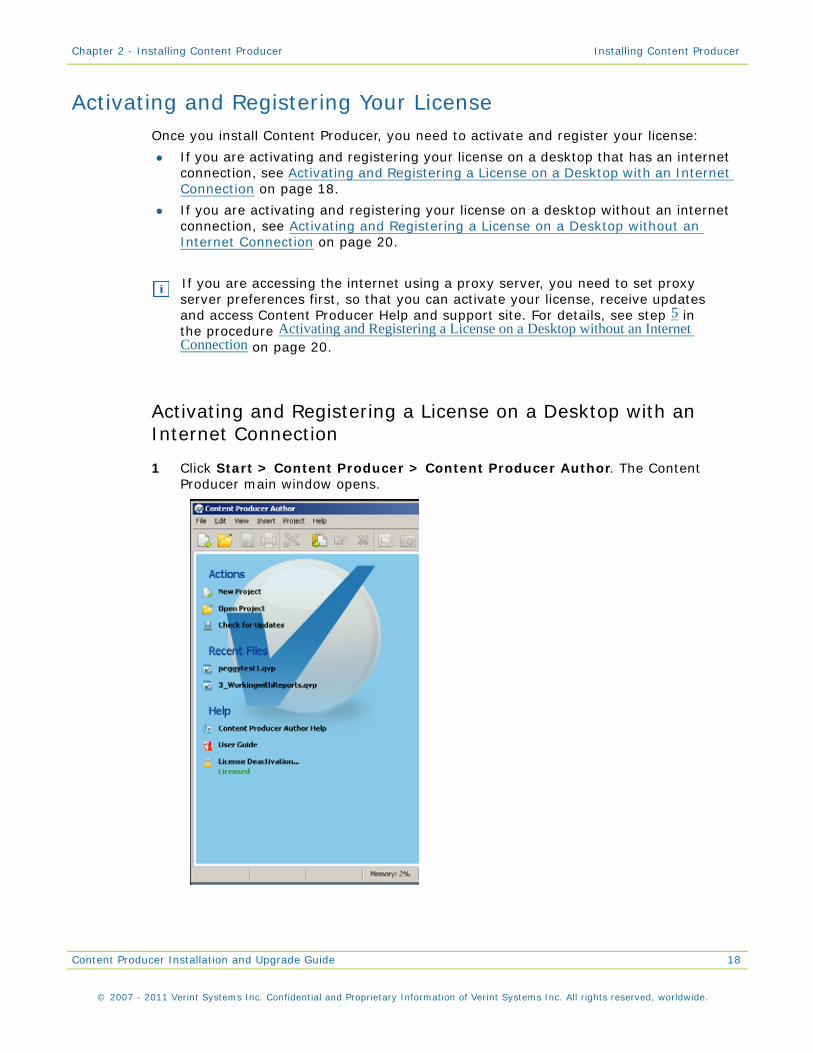
1 Click Start > Content Producer > Content Producer Author. The Content Producer main window opens.

Chapter 2 - Installing Content Producer Installing Content Producer
Content Producer Installation and Upgrade Guide 19
© 2007 - 2011 Verint Systems Inc. Confidential and Proprietary Information of Verint Systems Inc. All rights reserved, worldwide.
2 In the Help area on the left panel, select License Activation. The License Activation dialog box opens.
3 In the License Code box, type the license code that you received, and then click Next. If you entered the code correctly, the Registration dialog box opens.
4 Type the appropriate details in the dialog box, and then click Next. A progress screen appears, and if the activation is successful, the screen refreshes with the Successful dialog box.
5 Click Finish to complete the process and close the dialog box. In the Content Producer main window, in the Help area, Licensed appears under the License Deactivation item. You are now ready to use Content Producer.
Note:
If the license activation process is not successful, though you entered the correct license key, contact your Verint support consultant.
Chapter 2 - Installing Content Producer Installing Content Producer
Content Producer Installation and Upgrade Guide 20
© 2007 - 2011 Verint Systems Inc. Confidential and Proprietary Information of Verint Systems Inc. All rights reserved, worldwide.
Activating and Registering a License on a Desktop without an Internet Connection
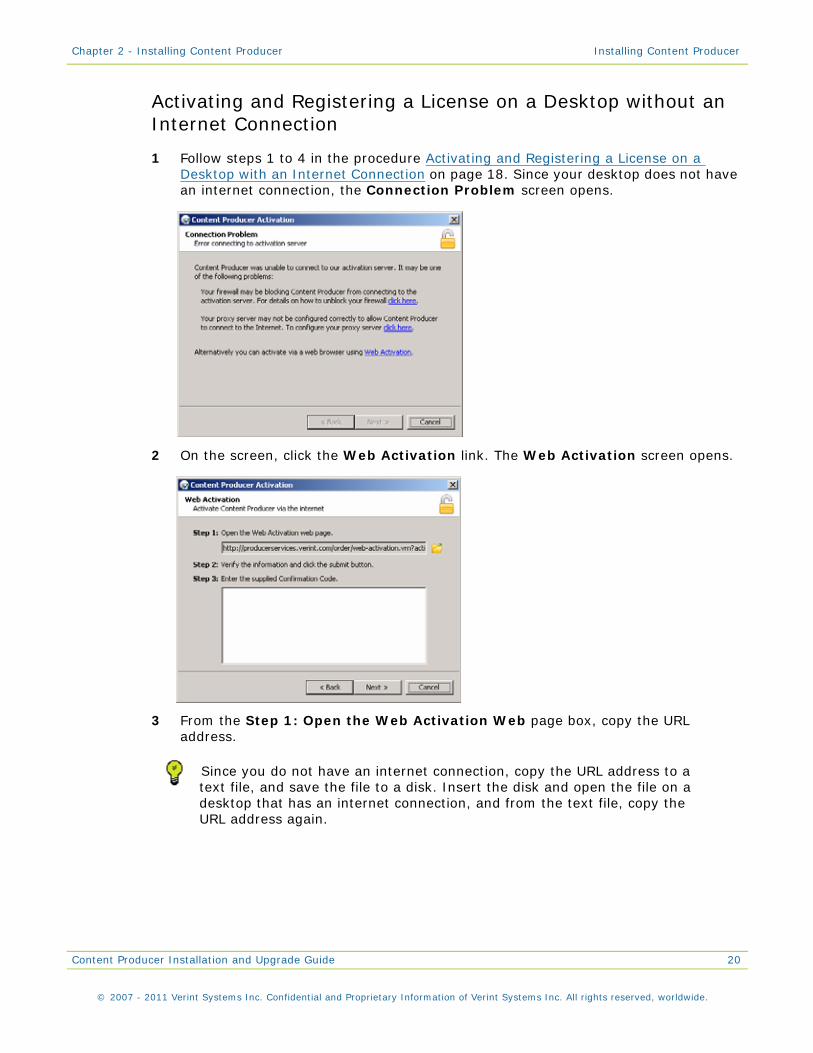
1 Follow steps 1 to 4 in the procedure Activating and Registering a License on a Desktop with an Internet Connection on page 18. Since your desktop does not have an internet connection, the Connection Problem screen opens.
2 On the screen, click the Web Activation link. The Web Activation screen opens.
3 From the Step 1: Open the Web Activation Web page box, copy the URL address.
Note:
Since you do not have an internet connection, copy the URL address to a text file, and save the file to a disk. Insert the disk and open the file on a desktop that has an internet connection, and from the text file, copy the URL address again.
Chapter 2 - Installing Content Producer Installing Content Producer
Content Producer Installation and Upgrade Guide 21
© 2007 - 2011 Verint Systems Inc. Confidential and Proprietary Information of Verint Systems Inc. All rights reserved, worldwide.
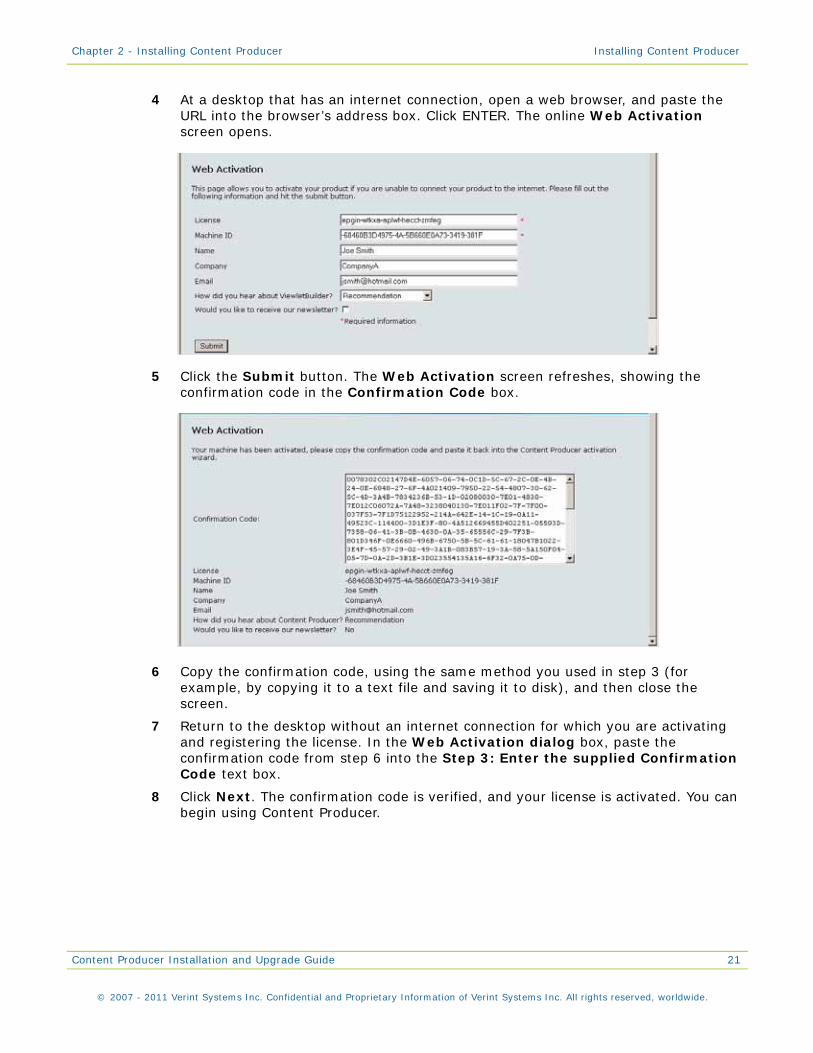
4 At a desktop that has an internet connection, open a web browser, and paste the URL into the browser’s address box. Click ENTER. The online Web Activation screen opens.
5 Click the Submit button. The Web Activation screen refreshes, showing the confirmation code in the Confirmation Code box.
6 Copy the confirmation code, using the same method you used in step 3 (for example, by copying it to a text file and saving it to disk), and then close the screen.
7 Return to the desktop without an internet connection for which you are activating and registering the license. In the Web Activation dialog box, paste the confirmation code from step 6 into the Step 3: Enter the supplied Confirmation Code text box.
8 Click Next. The confirmation code is verified, and your license is activated. You can begin using Content Producer.
Chapter 2 - Installing Content Producer Installing Content Producer
Content Producer Installation and Upgrade Guide 22
© 2007 - 2011 Verint Systems Inc. Confidential and Proprietary Information of Verint Systems Inc. All rights reserved, worldwide.
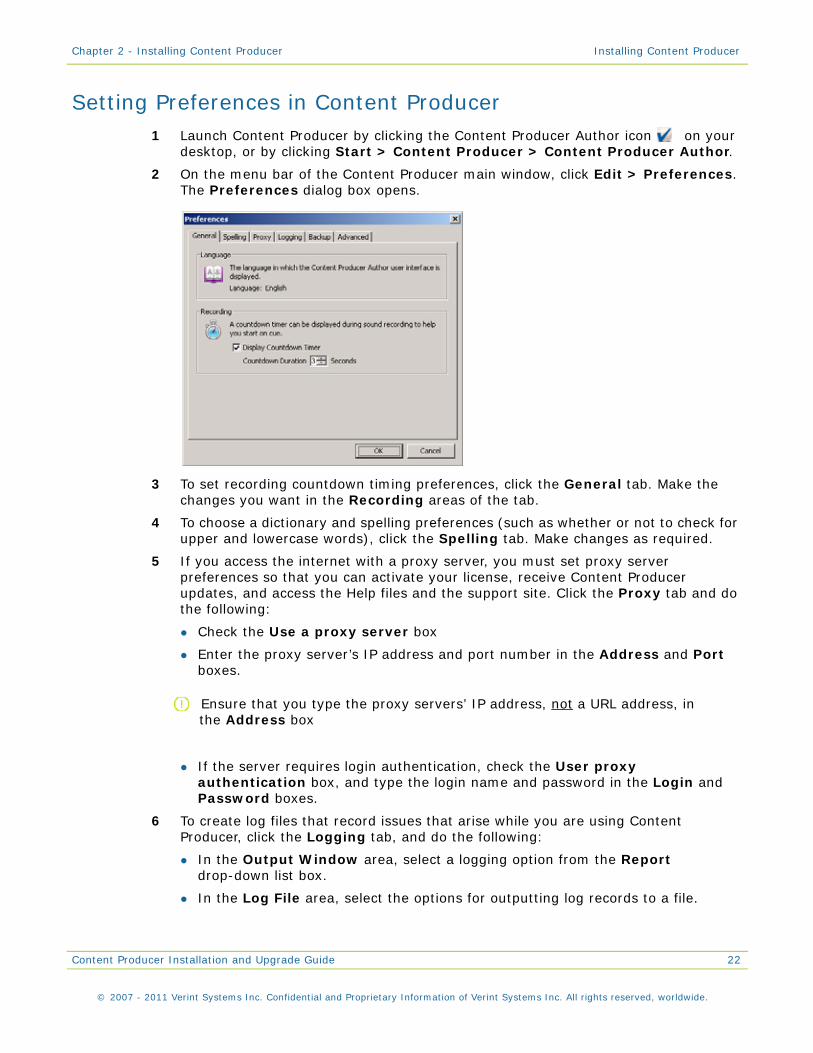
Setting Preferences in Content Producer1 Launch Content Producer by clicking the Content Producer Author icon on your
desktop, or by clicking Start > Content Producer > Content Producer Author.
2 On the menu bar of the Content Producer main window, click Edit > Preferences. The Preferences dialog box opens.
3 To set recording countdown timing preferences, click the General tab. Make the changes you want in the Recording areas of the tab.
4 To choose a dictionary and spelling preferences (such as whether or not to check for upper and lowercase words), click the Spelling tab. Make changes as required.
5 If you access the internet with a proxy server, you must set proxy server preferences so that you can activate your license, receive Content Producer updates, and access the Help files and the support site. Click the Proxy tab and do the following:
Check the Use a proxy server box
Enter the proxy server’s IP address and port number in the Address and Port boxes.
Note:
Ensure that you type the proxy servers’ IP address, not a URL address, in the Address box
If the server requires login authentication, check the User proxy authentication box, and type the login name and password in the Login and Password boxes.
6 To create log files that record issues that arise while you are using Content Producer, click the Logging tab, and do the following:
In the Output Window area, select a logging option from the Report drop-down list box.
In the Log File area, select the options for outputting log records to a file.

Chapter 2 - Installing Content Producer Installing Content Producer
Content Producer Installation and Upgrade Guide 23
© 2007 - 2011 Verint Systems Inc. Confidential and Proprietary Information of Verint Systems Inc. All rights reserved, worldwide.
7 To enable backup file options, click the Backup tab.
8 To change Java virtual machine settings, click the Advanced tab.
9 Click OK to save your preferences and close the dialog box.

C h a p t e r 3
Upgrading Content Producer
Once you have installed Content Producer, you find out about and upgrade to new releases.
This chapter contains this section:
Checking For and Upgrading to the Most Recent Content Producer Release, page 25
Upgrading From Pre-10 SP6 Versions of Content Producer, page 27
Chapter 3 - Upgrading Content Producer Checking For and Upgrading to the Most Recent Content Producer Release
Content Producer Installation and Upgrade Guide 25
© 2007 - 2011 Verint Systems Inc. Confidential and Proprietary Information of Verint Systems Inc. All rights reserved, worldwide.
Checking For and Upgrading to the Most Recent Content Producer Release
You can check for the latest Content Producer release from the Content Producer Author Welcome window.
Note that if your company’s firewall prevents automatic registration or updates, you must first configure the appropriate proxy information, as described in step 5 in the procedure Setting Preferences in Content Producer on page 22.
To successfully upgrade to the most recent Content Producer release, see:
Checking for and upgrading to the most recent Content Producer release on page 25
Checking for and upgrading to the most recent Content Producer release
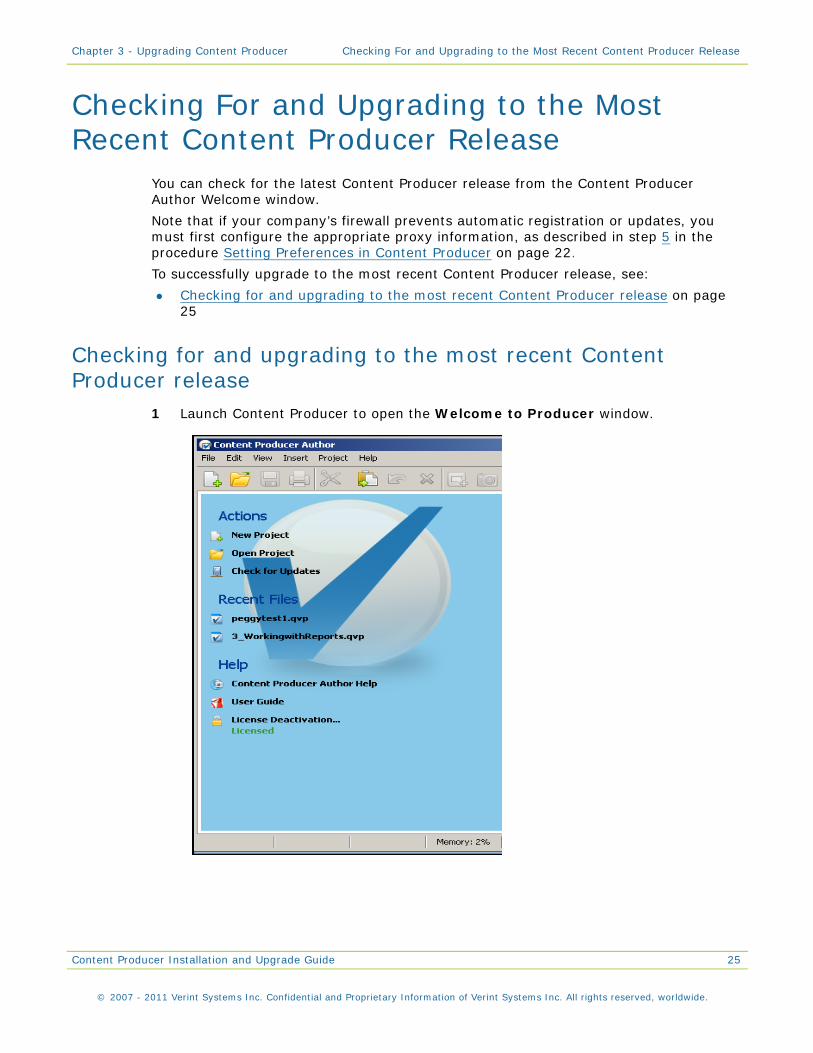
1 Launch Content Producer to open the Welcome to Producer window.
Chapter 3 - Upgrading Content Producer Checking For and Upgrading to the Most Recent Content Producer Release
Content Producer Installation and Upgrade Guide 26
© 2007 - 2011 Verint Systems Inc. Confidential and Proprietary Information of Verint Systems Inc. All rights reserved, worldwide.
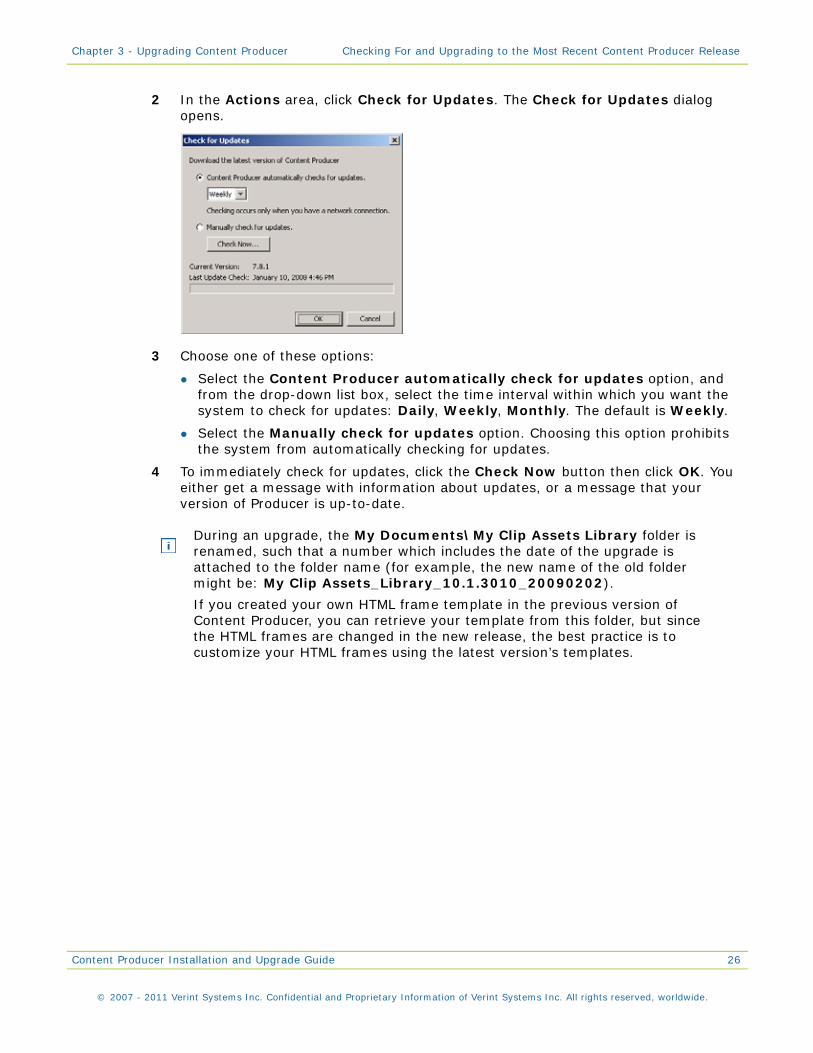
2 In the Actions area, click Check for Updates. The Check for Updates dialog opens.
3 Choose one of these options:
Select the Content Producer automatically check for updates option, and from the drop-down list box, select the time interval within which you want the system to check for updates: Daily, Weekly, Monthly. The default is Weekly.
Select the Manually check for updates option. Choosing this option prohibits the system from automatically checking for updates.
4 To immediately check for updates, click the Check Now button then click OK. You either get a message with information about updates, or a message that your version of Producer is up-to-date.
During an upgrade, the My Documents\My Clip Assets Library folder is renamed, such that a number which includes the date of the upgrade is attached to the folder name (for example, the new name of the old folder might be: My Clip Assets_Library_10.1.3010_20090202).
If you created your own HTML frame template in the previous version of Content Producer, you can retrieve your template from this folder, but since the HTML frames are changed in the new release, the best practice is to customize your HTML frames using the latest version’s templates.
Chapter 3 - Upgrading Content Producer Upgrading From Pre-10 SP6 Versions of Content Producer
Content Producer Installation and Upgrade Guide 27
© 2007 - 2011 Verint Systems Inc. Confidential and Proprietary Information of Verint Systems Inc. All rights reserved, worldwide.
Upgrading From Pre-10 SP6 Versions of Content Producer
1 Click Start > Settings > Control Panel > Add or Remove Programs.
2 In the Add or Remove Programs window, navigate to the pre-10 SP6 version of Producer that you want to remove, and select it.
3 Click the Remove button. Once the uninstall process ends, the pre-10 SP6 version of Producer is removed from your system.
4 Install the new release of Content Producer, as described in the procedure Installing Content Producer on page 15.