Embed Size (px)
Citation preview
Confidential and Proprietary Information of Verint Systems Inc.
Content Producer
Installation and Upgrade Guide
Version 11.1
Document Revision 1.00
© 1992–2012 Verint Systems Inc. All Rights Reserved Worldwide. Confidential and Proprietary Information of Verint Systems Inc.
All materials (regardless of form and including, without limitation, software applications, documentation, and any other information relating to Verint Systems, its products or services) are the exclusive property of Verint Systems Inc. Only expressly authorized individuals under obligations of confidentiality are permitted to review materials in this document. By reviewing these materials, you agree to not disclose these materials to any third party unless expressly authorized by Verint Systems, and to protect the materials as confidential and trade secret information. Any unauthorized review, retransmission, dissemination or other use of these materials is strictly prohibited. If you are not authorized to review these materials, please return these materials (and any copies) from where they were obtained. All materials found herein are provided “AS IS” and without warranty of any kind. The Verint Systems Inc. products are protected by one or more of the following U.S., European or International Patents: USPN 5,659,768; USPN 5,790,798; USPN 6,278,978; USPN 6,370,574; USPN 6,404,857; USPN 6,510,220; USPN 6,724,887; USPN 6,751,297; USPN 6,757,361; USPN 6,782,093; USPN 6,952,732; USPN 6,959,078; USPN 6,959,405; USPN 7,047,296; USPN 7,149,788; USPN 7,155,399; USPN 7,203,285; USPN 7,216,162; USPN 7,219,138; USPN 7,254,546; USPN 7,281,173; USPN 7,284,049; USPN 7,325,190; USPN 7,376,735; USPN 7,424,715; USPN 7,424,718; USPN 7,466,816; USPN 7,478,051; USPN 7,558,322; USPN 7,570,755; USPN 7,574,000; USPN 7,587,041; USPN 7,613,290; USPN 7,633,930; USPN 7,634,422; USPN 7,650,293; USPN 7,660,307; USPN 7,660,406; USPN 7,660,407; USPN 7,672,746; USPN 7,680,264; USPN 7,701,972; USPN 7,734,783; USPN 7,752,043; USPN 7,752,508; USPN 7,769,176; USPN 7,774,854; USPN 7,787,974; USPN 7,788,286; USPN 7,792,278; USPN 7,792,671; USPN 7,801,055; USPN 7,817,795; USPN 7,822,018; USPN 7,826,608; USPN 7,836,171; USPN 7,848,524; USPN 7,853,006; USPN 7,852,994; USPN 7,853,800; USPN 7,853,753; USPN 7,864,946; USPN 7,873,156; USPN 7,881,216; USPN 7,881,471; USPN 7,882,212; USPN 7,882,217; USPN 7,885,813; USPN 7,899,178; USPN 7,899,180; USPN 7,899,176; USPN 7,904,481; USPN 7,903,568; USPN 7,904,325; USPN 7,907,142; USPN 7,913,063; USPN 7,920,482; USPN 7,925,889; USPN 7,930,314; USPN 7,949,552; USPN 7,953,621; USPN 7,953,719; USPN 7,953,750; USPN 7,965,828; USPN 7,966,397; USPN 7,991,613; USPN 7,995,612; USPN 8,000,465; USPN 8,005,676; USPN 8,015,042; USPN D606,983; USPN RE40,634; USPN RE41,534; USPN RE41,608; AU 2003214926; CA 2,474,735; CA 2,563,960; CA 2,564,127; CA 2,564,760; CA 2,567,232; CA 2,623,178; CA 2,627,060; CA 2,627,064; CA 2,628,553; EP 1096382; EP 1248449; EP 1284077; DE 1284077; FR 1284077; DE 833489; FR 833489; GB 833,489; GB 2374249; IE 84821; IE 85519; IL 13532400; NZ 534642; ZL 200520118289.3; ZL 200520118288.9; ZL 200520118287.4; USPN D606,983; USPN RE40,634; USPN RE41,534; USPN RE41,608; AU 2003214926; CA 2,474,735; CA 2,563,960; CA 2,564,127; CA 2,564,760; CA 2,567,232; CA 2,623,178; CA 2,627,060; CA 2,627,064; CA 2,628,553; EP 1096382; EP 1248449; EP 1284077; DE 1284077; FR 1284077; DE 833489; FR 833489; GB 833,489; GB 2374249; IE 84821; IE85519; IL 13532400; NZ 534642; ZL 200520118289.3; ZL 200520118288.9; ZL 200520118287.4; and other provisional rights from one or more of the following Published U.S. Patent Applications: US 10/061,491; US 10/467,899; US 10/633,357; US 11/166,630; US 11/345,587; US 11/359,195; US 11/359,319; US 11/359,356; US 11/359,357; US 11/359,358; US 11/359,532; US 11/361,208; US 11/388,944; US 11/394,408; US 11/394,410; US 11/394,794; US 11/395,759; US 11/475,683; US 11/477,124; US 11/478,714; US 11/479,056; US 11/479,267; US 11/479,506; US 11/479,899; US 11/509,549; US 11/509,550; US 11/540,107; US
11/540,185; US 11/540,320; US 11/540,900; US 11/540,902; US 11/567,808; US 11/567,852; US 11/583,381; US 11/608,340; US 11/608,350; US 11/608,358; US 11/616,490; US 11/621,134; US 11/691,530; US 11/692,983; US 11/693,828; US 11/693,923; US 11/693,933; US 11/712,933; US 11/723,010; US 11/742,733; US 11/752,458; US 11/776,659; US 11/824,980; US 11/831,250; US 11/831,257; US 11/831,260; US 11/831,634; US 11/844,759; US 11/872,575; US 11/924,201; US 11/937,553; US 11/959,650; US 11/968,428; US 12/015,375; US 12/015,621; US 12/053,788; US 12/055,102; US 12/057,442; US 12/057,476; US 12/107,976; US 12/118,789; US 12/118,792; US 12/164,480; US 12/245,781; US 12/326,205; US 12/351,370; US 12/416,906; US 12/464,694; US 12/466,673; US 12/483,075; US 12/497,793; US 12/497,799; US 12/504,492; US 12/539,640; US 12/608,474; US 12/628,089; US 12/630,030; US 12/684,027; US 12/686,213; US 12/708,558; US 12/725,127; US 12/753,137; US 12/762,402; US 12/768,194; US 12/792,796; US 12/840,227; US 12/840,233; US 12/852,144; US 12/879,868; US 12/887,059; US 12/887,089; US 12/888,445; US 12/891,620; US 12/915,868; US 12/915,941; US 12/916,006; US 12/940,508; US 12/942,111; US 12/964,891; US 13/005,996; US 13/008,283; US 13/011,870; US 13/011,871; US 13/016,998; US 13/036,923; US 13/096,145; US 13/096,148; US 13/096,153; US 13/114,620; US 13/149,655; US 13/155,343; US 13/182,672; US 13/187,438; US 13/189,514; and other U.S. and International Patents and Patents Pending. Certain components of this Software or software contained in this Product (collectively, “Software”) may be covered by so-called “free or open source” software licenses (“Open Source Components”), which includes any software licenses approved as open source licenses by the Open Source Initiative or any similar licenses, including without limitation any license that, as a condition of distribution of the Open Source Components licensed, requires that the distributor make the Open Source Components available in source code format. A license in each Open Source Component is provided to you in accordance with the specific license terms specified in their respective license terms. EXCEPT WITH REGARD TO ANY WARRANTIES OR OTHER RIGHTS AND OBLIGATIONS EXPRESSLY PROVIDED DIRECTLY TO YOU FROM VERINT, ALL OPEN SOURCE COMPONENTS ARE PROVIDED "AS IS'' AND ANY EXPRESSED OR IMPLIED WARRANTIES, INCLUDING, BUT NOT LIMITED TO, THE IMPLIED WARRANTIES OF MERCHANTABILITY AND FITNESS FOR A PARTICULAR PURPOSE ARE DISCLAIMED. Any third party technology that may be appropriate or necessary for use with the Verint Product is licensed to you only for use with the Verint Product under the terms of the third party license agreement specified in the Documentation, the Software or as provided online at http://verint.com/thirdpartylicense. You may not take any action that would separate the third party technology from the Verint Product. Unless otherwise permitted under the terms of the third party license agreement, you agree to only use the third party technology in conjunction with the Verint Product.
VERINT, the VERINT logo, ACTIONABLE INTELLIGENCE, POWERING ACTIONABLE INTELLIGENCE, INTELLIGENCE IN ACTION, ACTIONABLE INTELLIGENCE FOR A SMARTER WORKFORCE, VERINT VERIFIED, ENTERPRISE INTELLIGENCE SOLUTIONS, WITNESS ACTIONABLE SOLUTIONS, VOVICI, STAR-GATE, RELIANT, VANTAGE, X-TRACT, NEXTIVA, EDGEVR, ULTRA, AUDIOLOG, WITNESS, the WITNESS logo, IMPACT 360, the IMPACT 360 logo, IMPROVE EVERYTHING, EQUALITY, CONTACTSTORE, CLICK2STAFF, BLUE PUMPKIN, GMT, and GMT Planet are trademarks or registered trademarks of Verint Systems Inc. or its subsidiaries. Other trademarks mentioned are the property of their respective owners.
Visit our website at www.verint.com/intellectualpropertynotice for updated information on Verint Intellectual Property.
Document Revision 1.00Published February 21, 2012
About This Guide . . . . . . . . . . . . . . . . . . . . . . . . . . . . . . . . . . . . . . . 4
1 Pre-Installation Requirements and Prerequisites . . . . . . . . . . . . . . . . . . . . . . 6
Overview . . . . . . . . . . . . . . . . . . . . . . . . . . . . . . . . . . . . . . . . . . . 7Content Producer Components . . . . . . . . . . . . . . . . . . . . . . . . . . . . . . . . . 7System Requirements . . . . . . . . . . . . . . . . . . . . . . . . . . . . . . . . . . . . . 7Installation Prerequisites . . . . . . . . . . . . . . . . . . . . . . . . . . . . . . . . . . . . 8
2 Installing Content Producer . . . . . . . . . . . . . . . . . . . . . . . . . . . . . . . . . 10
Installing Content Producer . . . . . . . . . . . . . . . . . . . . . . . . . . . . . . . . . . 11Installing Content Producer . . . . . . . . . . . . . . . . . . . . . . . . . . . . . . . . 12
Installing Microsoft DirectX . . . . . . . . . . . . . . . . . . . . . . . . . . . . . . . 16Activating and Registring Your License . . . . . . . . . . . . . . . . . . . . . . . . . . . 17
Activating and Registering a License on a Desktop with an Internet Connection . . . . . . . 18Activating and Registering a License on a Desktop without an Internet Connection . . . . . 20
Setting Preferences in Content Producer . . . . . . . . . . . . . . . . . . . . . . . . . . 22
3 Upgrading Content Producer . . . . . . . . . . . . . . . . . . . . . . . . . . . . . . . . 24
Checking For and Upgrading to the Most Recent Content Producer Release. . . . . . . . . . . . 25Checking for and upgrading to the most recent Content Producer release . . . . . . . . . . . 26
Upgrading From Pre-7.8.x Versions of Content Producer . . . . . . . . . . . . . . . . . . . . 27
C o n t e n t s
P r e f a c e
About This Guide
The Content Producer Installation and Upgrade Guide describes how to install or upgrade the Content Producer application. Content Producer is used to create slides and clips for use as training material that can be used with your organization’s eLearning system.
Intended Audience
This guide is designed to be used by:
Verint and Business Partner professional services staff responsible for planning and setting up systems.
Customers’ IT staff responsible for system maintenance.
Instructional Content Developers
Managers and Supervisors
eLearning Administrators
Related Documents
The following documents are referenced in this document:
Content Producer User Guide
The following documents are related to this document:
eLearning Administration Guide
eLearning Student Guide
Preface About This Guide
Impact 360 Content Producer Installation and Upgrade Guide 5
Confidential and Proprietary Information of Verint Systems Inc.
Documentation Feedback
We strive to produce the highest quality documentation products and welcome your feedback. If you have comments or suggestions about our guides or online help, you can email us. Please include the following information with your feedback:
Product name and version number
Name of online help or guide
Topic name and page number (if applicable)
Brief description of content
Your suggestion for correcting or improving the documentation
Please send your messages to [email protected].
The email address is only for documentation feedback. If you have a technical question, please contact Technical Support.
Technical Support
Our goal at Verint Systems is to provide you with the best products backed by a high-quality support network with a variety of resource options. Verint Systems Technical Support services include email and telephone support.
To learn more about the support options that best suit your needs, visit us at verint.com/EISsupport.
Verint University
In addition to documentation, online Help, and support services, Verint Systems also offers both classroom-based and online learning alternatives to suit your specific needs.
To learn more about available training options from Verint Systems, visit us at verint.com/training.
C h a p t e r 1
Pre-Installation Requirements and Prerequisites
This chapter provides a brief overview of the Content Producer application, and describes system requirements and installation prerequisites to ensure the successful installation and operation of the application.
This chapter contains the following sections:
Overview, page 7
Content Producer Components, page 7
System Requirements, page 7
Installation Prerequisites, page 8
Chapter 1 - Pre-Installation Requirements and Prerequisites Overview
Impact 360 Content Producer Installation and Upgrade Guide 7
Confidential and Proprietary Information of Verint Systems Inc.
OverviewContent Producer is comprised of authoring, editing, and conversion tools to develop learning clips that engage your audience and provide educational information about a specific topic.
Content Producer is used as a standalone product.
If you use Content Producer with the Impact 360 suite, you can create clips from recorded segments of customer interactions captured by such applications as Quality Monitoring 10 SP3 or later, Impact 360 Recording, or Quality Monitoring 11. You can then deliver the learning clips via the eLearning Lesson Management system.
Content Producer ComponentsContent Producer has two components:
Content Producer Author
Use this component to create/publish clips.
Content Producer Editor
Use this component to import/record audio or video contact files (WAV or AVI).
Consult your Content Producer User Guide for details on using Content Producer and its components.
System RequirementsSoftware Requirements
- Operating systems supported:
Microsoft Windows 7
Microsoft Vista
Microsoft Windows XP Professional 32-bit version, Service Pack 2
Microsoft Windows 2003 Standard Edition 32-bit version, Service Pack 2
Microsoft Windows 2000 Professional 32-bit version, Service Pack 4
- Other software
Microsoft DirectX9C - Will be installed as part of Windows XP Service 2 or later. For earlier OS versions, you will need to manually install DirectX.
Adobe® Flash® Player plugin version 7 or later (version 10.x) for viewing Content Producer clips
Chapter 1 - Pre-Installation Requirements and Prerequisites Installation Prerequisites
Impact 360 Content Producer Installation and Upgrade Guide 8
Confidential and Proprietary Information of Verint Systems Inc.
Verint Playback: Required if you want to produce clips with interactions from Quality Monitoring 10 SP3 or Quality Monitoring 11. (This package is not required for interactions from Quality Monitoring 7.8 SP1.) Prior to installing this package, you must install:
- Microsoft Visual C+++ 2008 runtime (not SP1)
- Microsoft .NET Framework 2.0
- Microsoft XML (MSXML) 4.0 SP3
- Microsoft DirectX 9C or later
Harware Requirements
- Intel PIII/AMD K6 550 MHz. For optimal performance, the following is recommended: Intel P4, Intel Centrino, Intel Xeon, or Intel Core Duo (or compatible)
- 512+ MB RAM (1GB Recommended for optimal performance)
- 16 Bit+ Video card - 800x600 minimum resolution (1024x768 recommended)
- 5+ GB Hard Drive with 500+ MB free disk space
Browsers Supported
- Microsoft Internet Explorer 8.0
- Microsoft Internet Explorer 7.0
- Microsoft Internet Explorer 6.0, Service Pack 2 for Windows XP
- Microsoft Internet Explorer 6.0, Service Pack 1 for Windows 2003
Media Formats Supported
- Content Producer Author supports the following formats: JPG, GIF, TIFF, BMP, PNG, MP3, AIFF, AU, SWF(Created in Adobe® Flash® Editor version 8 or earlier)
- Content Producer Editor supports the following formats: AVI, WAV
Installation PrerequisitesTo install Content Producer, the following is required:
Content Producer installation file
Available on the Impact 360 Desktop Applications Installation media or from the Verint Portal’s Impact 360 Version 11 Tools folder.
Alternatively, you can download the latest version from the customer support site at http://producerservices.verint.com/ and click the Content Producer 11.1.0 Installer link.
SEE ALSO For information about how to install the Verint Playback, see the Impact 360 Desktop Deployment Reference and Installation Guide.
Chapter 1 - Pre-Installation Requirements and Prerequisites Installation Prerequisites
Impact 360 Content Producer Installation and Upgrade Guide 9
Confidential and Proprietary Information of Verint Systems Inc.
License code
The license code is required to activate Content Producer after installation. You will receive the code with your Impact 360 Version fulfillment package.
Internet access for registering Content Producer and upgrading to newer versions
C h a p t e r 2
Installing Content Producer
This chapter describes how to install Content Producer, once you have received a licensed version of the product.
This chapter contains the following sections:
Installing Content Producer, page 11
Activating and Registring Your License, page 17
Activating and Registering a License on a Desktop without an Internet Connection, page 20
Chapter 2 - Installing Content Producer Installing Content Producer
Impact 360 Content Producer Installation and Upgrade Guide 11
Confidential and Proprietary Information of Verint Systems Inc.
Installing Content ProducerThe Content Producer installation file and the license code are included with your Impact 360 fulfillment package or, alternatively, you can download the installation file from our support site at this URL address: http://producerservices.verint.com.
For more details on system requirements and prerequisites prior to installation, see Chapter 1 “Pre-Installation Requirements and Prerequisites”.
Once the installation is complete, you must activate Content Producer’s license. You can also use Content Producer’s Preferences options to configure the application.
See:
Installing Content Producer, page 12
Activating and Registring Your License, page 17
Activating and Registering a License on a Desktop without an Internet Connection, page 20
Chapter 2 - Installing Content Producer Installing Content Producer
Impact 360 Content Producer Installation and Upgrade Guide 12
Confidential and Proprietary Information of Verint Systems Inc.
Installing Content Producer
1 Access the Content Producer license file in your fulfillment package DVD and select the Content Producer installer file.
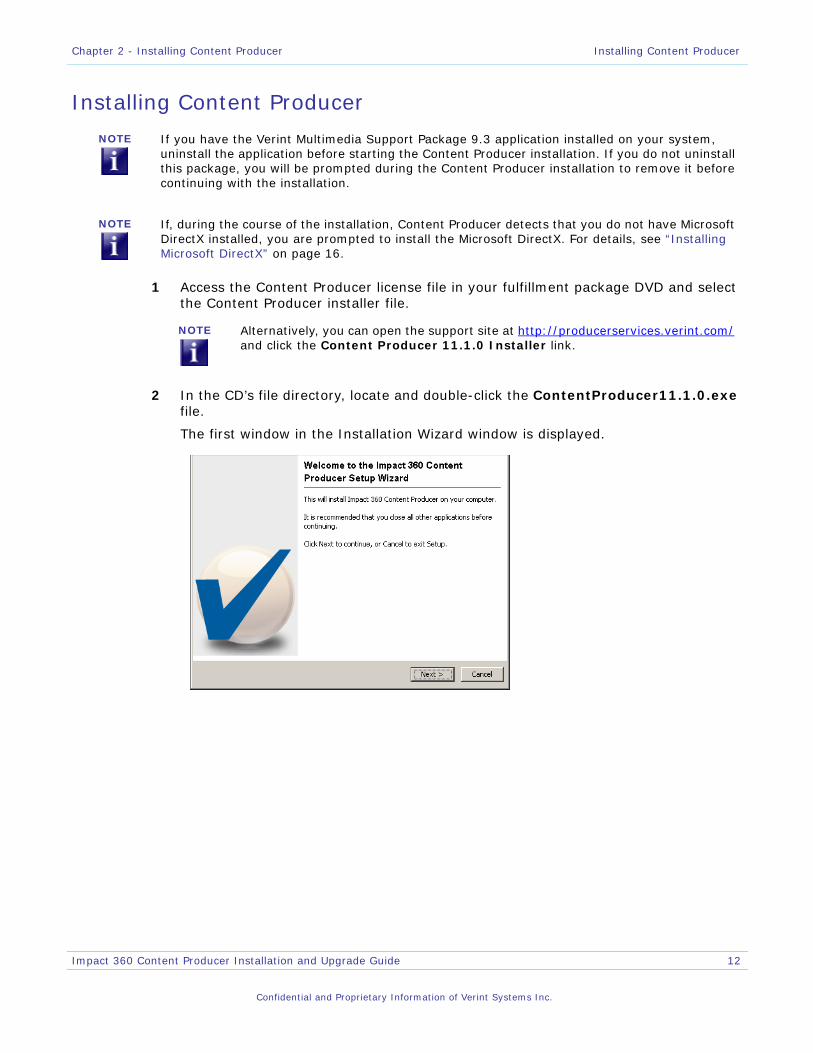
2 In the CD’s file directory, locate and double-click the ContentProducer11.1.0.exe file.
The first window in the Installation Wizard window is displayed.
NOTE If you have the Verint Multimedia Support Package 9.3 application installed on your system, uninstall the application before starting the Content Producer installation. If you do not uninstall this package, you will be prompted during the Content Producer installation to remove it before continuing with the installation.
NOTE If, during the course of the installation, Content Producer detects that you do not have Microsoft DirectX installed, you are prompted to install the Microsoft DirectX. For details, see “Installing Microsoft DirectX” on page 16.
NOTE Alternatively, you can open the support site at http://producerservices.verint.com/ and click the Content Producer 11.1.0 Installer link.
Chapter 2 - Installing Content Producer Installing Content Producer
Impact 360 Content Producer Installation and Upgrade Guide 13
Confidential and Proprietary Information of Verint Systems Inc.
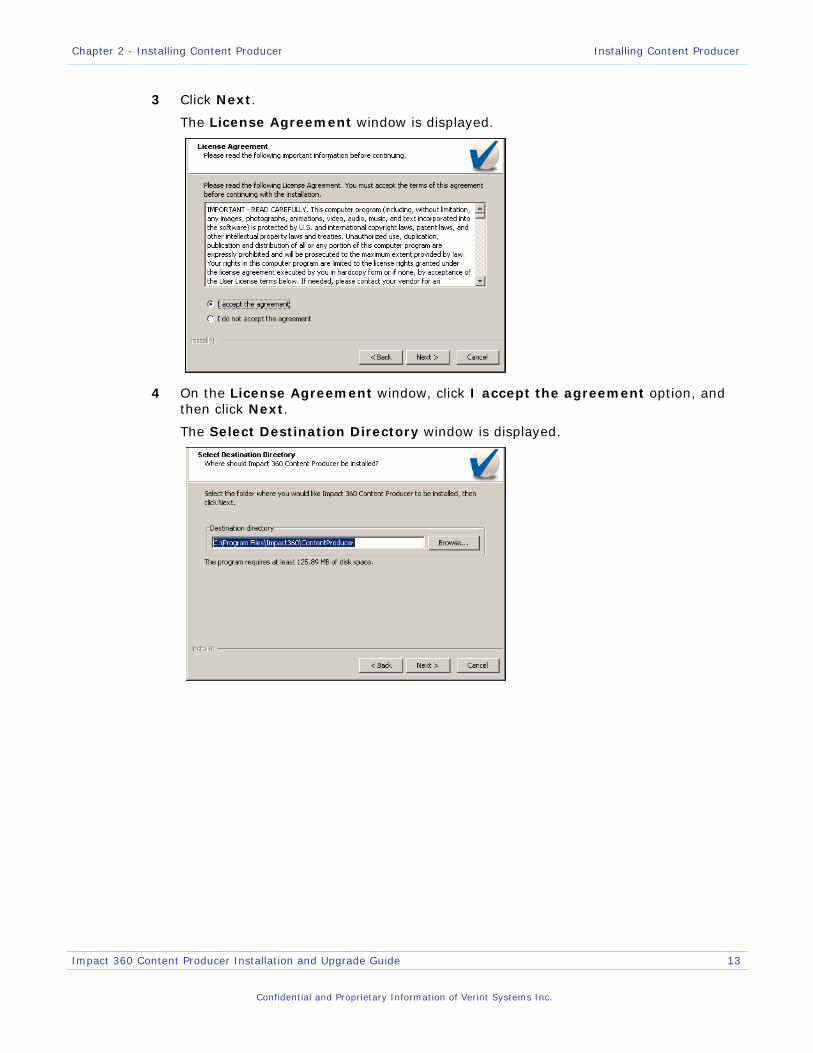
3 Click Next.
The License Agreement window is displayed.
4 On the License Agreement window, click I accept the agreement option, and then click Next.
The Select Destination Directory window is displayed.
Chapter 2 - Installing Content Producer Installing Content Producer
Impact 360 Content Producer Installation and Upgrade Guide 14
Confidential and Proprietary Information of Verint Systems Inc.
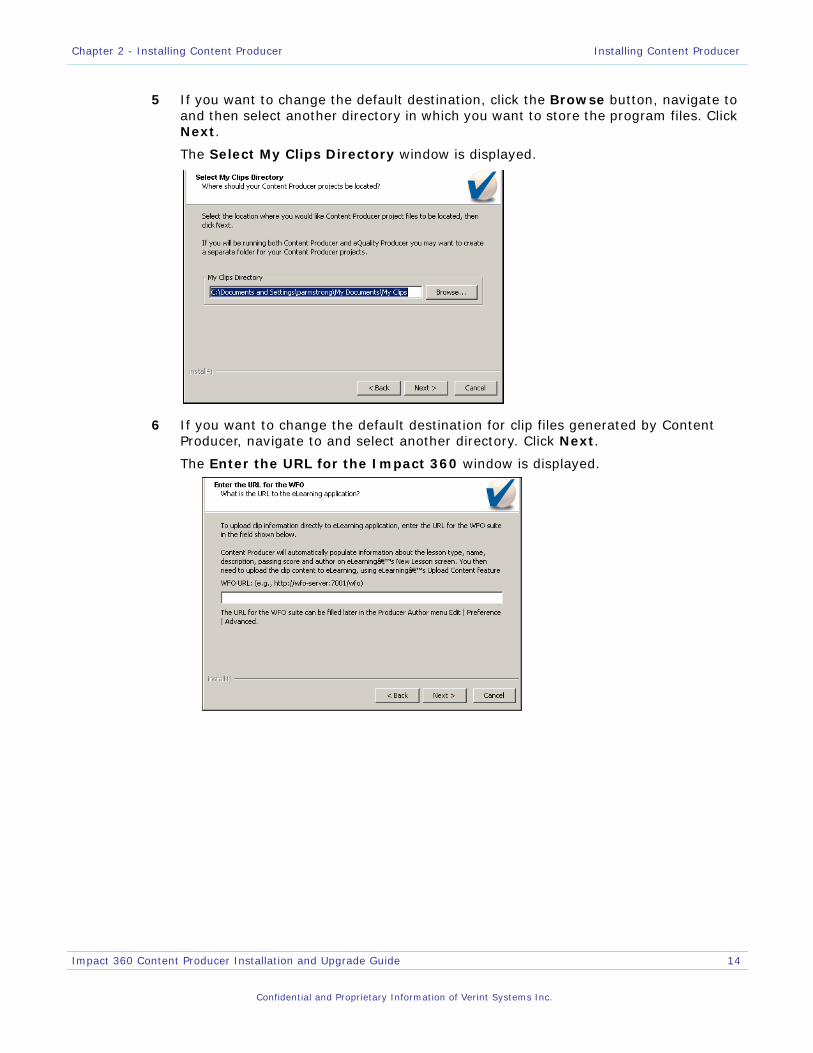
5 If you want to change the default destination, click the Browse button, navigate to and then select another directory in which you want to store the program files. Click Next.
The Select My Clips Directory window is displayed.
6 If you want to change the default destination for clip files generated by Content Producer, navigate to and select another directory. Click Next.
The Enter the URL for the Impact 360 window is displayed.
Chapter 2 - Installing Content Producer Installing Content Producer
Impact 360 Content Producer Installation and Upgrade Guide 15
Confidential and Proprietary Information of Verint Systems Inc.
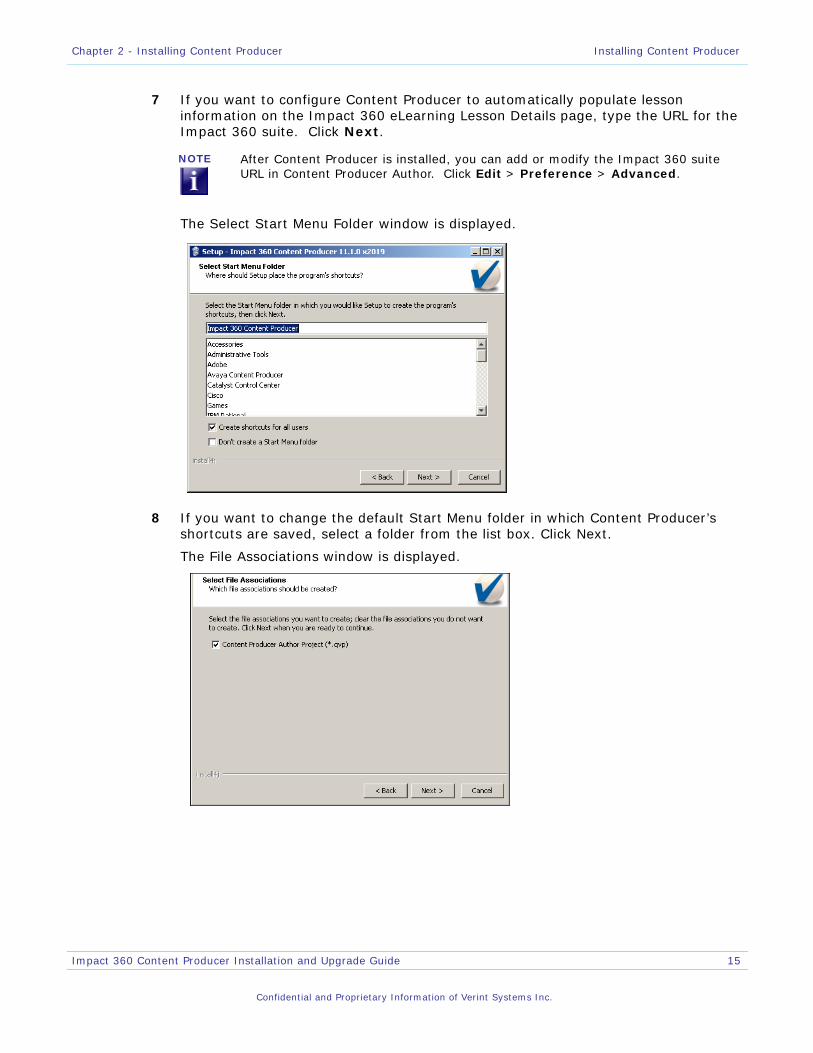
7 If you want to configure Content Producer to automatically populate lesson information on the Impact 360 eLearning Lesson Details page, type the URL for the Impact 360 suite. Click Next.
The Select Start Menu Folder window is displayed.
8 If you want to change the default Start Menu folder in which Content Producer’s shortcuts are saved, select a folder from the list box. Click Next.
The File Associations window is displayed.
NOTE After Content Producer is installed, you can add or modify the Impact 360 suite URL in Content Producer Author. Click Edit > Preference > Advanced.
Chapter 2 - Installing Content Producer Installing Content Producer
Impact 360 Content Producer Installation and Upgrade Guide 16
Confidential and Proprietary Information of Verint Systems Inc.
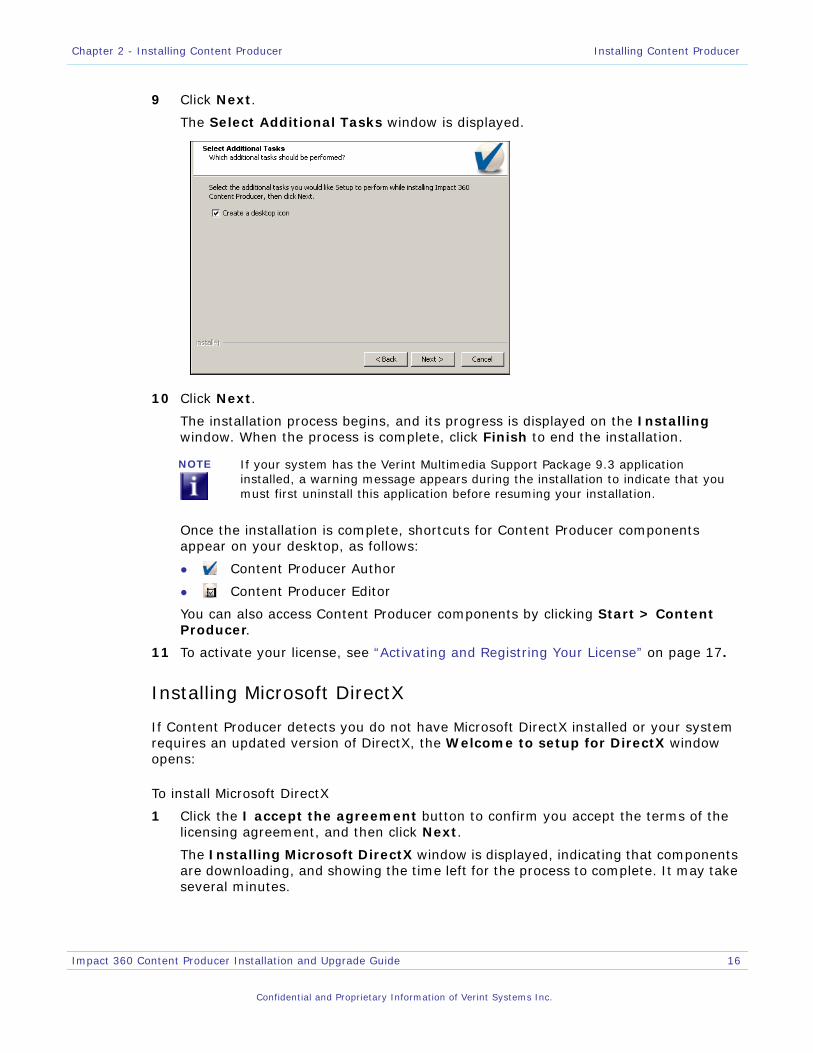
9 Click Next.
The Select Additional Tasks window is displayed.
10 Click Next.
The installation process begins, and its progress is displayed on the Installing window. When the process is complete, click Finish to end the installation.
Once the installation is complete, shortcuts for Content Producer components appear on your desktop, as follows:
Content Producer Author
Content Producer Editor
You can also access Content Producer components by clicking Start > Content Producer.
11 To activate your license, see “Activating and Registring Your License” on page 17.
Installing Microsoft DirectX
If Content Producer detects you do not have Microsoft DirectX installed or your system requires an updated version of DirectX, the Welcome to setup for DirectX window opens:
To install Microsoft DirectX
1 Click the I accept the agreement button to confirm you accept the terms of the licensing agreement, and then click Next.
The Installing Microsoft DirectX window is displayed, indicating that components are downloading, and showing the time left for the process to complete. It may take several minutes.
NOTE If your system has the Verint Multimedia Support Package 9.3 application installed, a warning message appears during the installation to indicate that you must first uninstall this application before resuming your installation.
Chapter 2 - Installing Content Producer Installing Content Producer
Impact 360 Content Producer Installation and Upgrade Guide 17
Confidential and Proprietary Information of Verint Systems Inc.
2 When the process is complete, click Next to open the Restart Computer window.
3 When you are ready to restart your computer, click Finish.
Activating and Registring Your LicenseOnce you install Content Producer, you need to activate and register your license.
If you are activating and registering your license on a desktop...
See...
with an Internet connection “Activating and Registering a License on a Desktop with an Internet Connection” on page 18.
without an Internet connection “Activating and Registering a License on a Desktop without an Internet Connection” on page 20.
NOTE If you are accessing the Internet using a proxy server, you need to set proxy server preferences first, so that you can activate your license, receive updates, and access Content Producer Help and support site. For details, see Step 5 in the procedure “Setting Preferences in Content Producer” on page 22.
Chapter 2 - Installing Content Producer Installing Content Producer
Impact 360 Content Producer Installation and Upgrade Guide 18
Confidential and Proprietary Information of Verint Systems Inc.
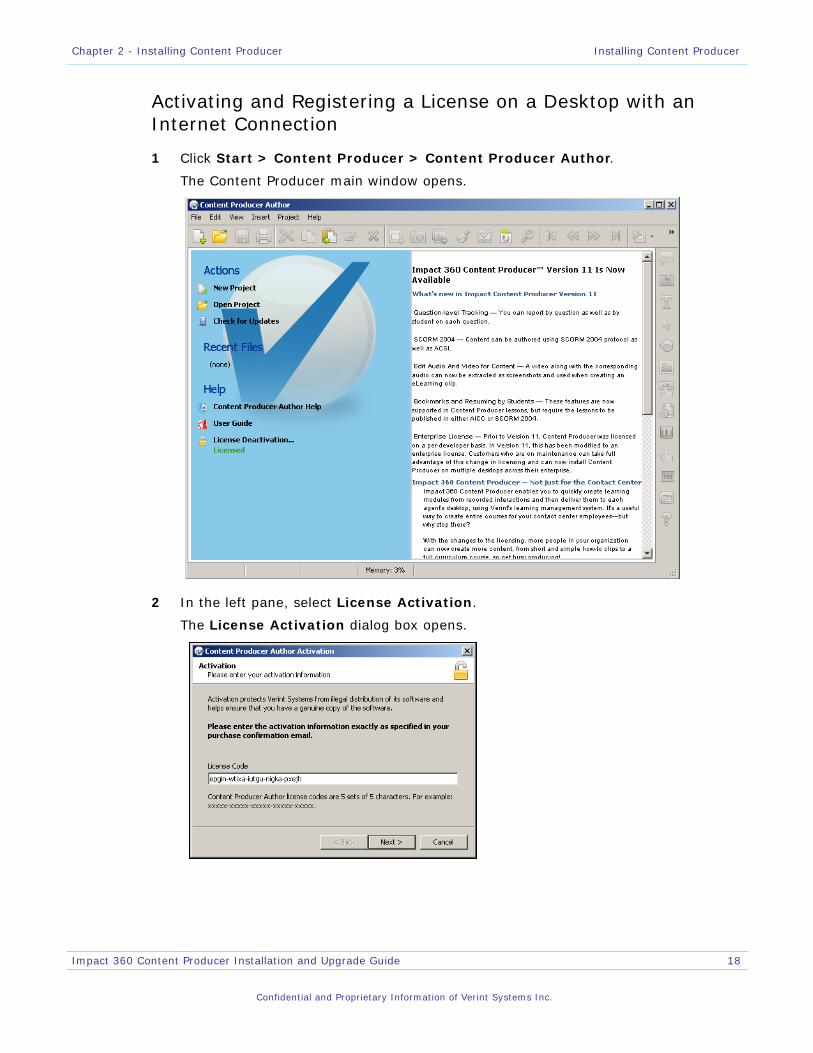
Activating and Registering a License on a Desktop with an Internet Connection
1 Click Start > Content Producer > Content Producer Author.
The Content Producer main window opens.
2 In the left pane, select License Activation.
The License Activation dialog box opens.
Chapter 2 - Installing Content Producer Installing Content Producer
Impact 360 Content Producer Installation and Upgrade Guide 19
Confidential and Proprietary Information of Verint Systems Inc.
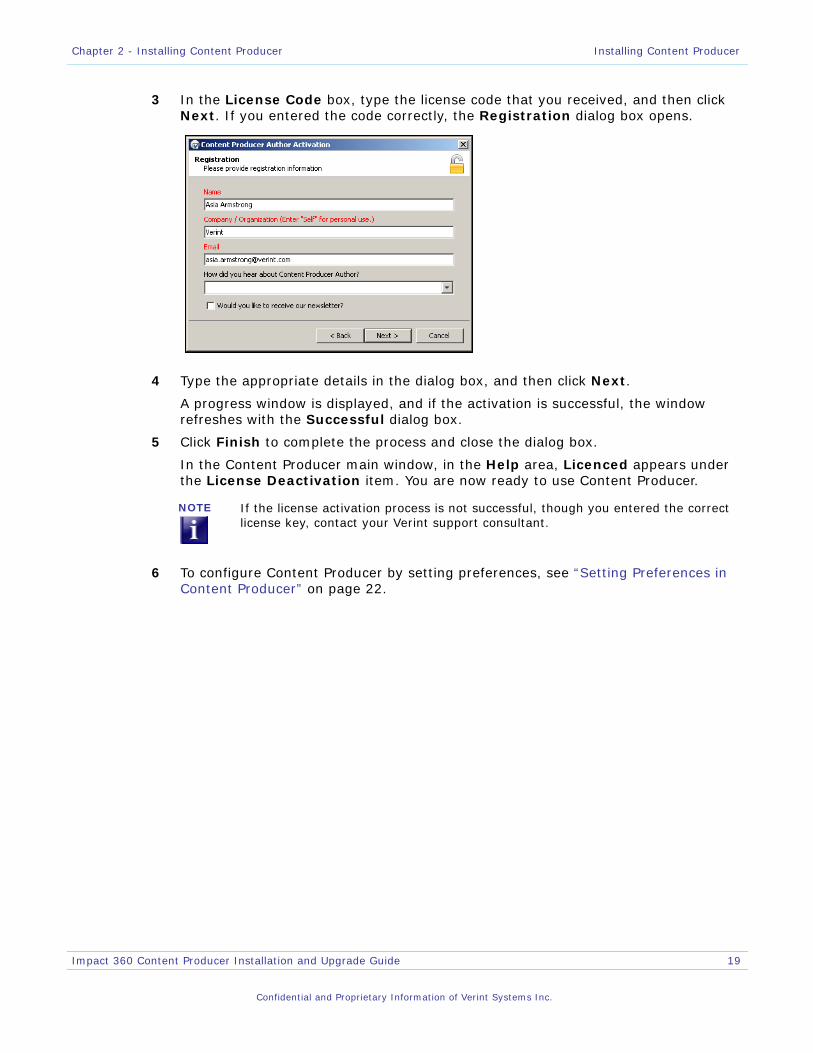
3 In the License Code box, type the license code that you received, and then click Next. If you entered the code correctly, the Registration dialog box opens.
4 Type the appropriate details in the dialog box, and then click Next.
A progress window is displayed, and if the activation is successful, the window refreshes with the Successful dialog box.
5 Click Finish to complete the process and close the dialog box.
In the Content Producer main window, in the Help area, Licenced appears under the License Deactivation item. You are now ready to use Content Producer.
6 To configure Content Producer by setting preferences, see “Setting Preferences in Content Producer” on page 22.
NOTE If the license activation process is not successful, though you entered the correct license key, contact your Verint support consultant.
Chapter 2 - Installing Content Producer Installing Content Producer
Impact 360 Content Producer Installation and Upgrade Guide 20
Confidential and Proprietary Information of Verint Systems Inc.
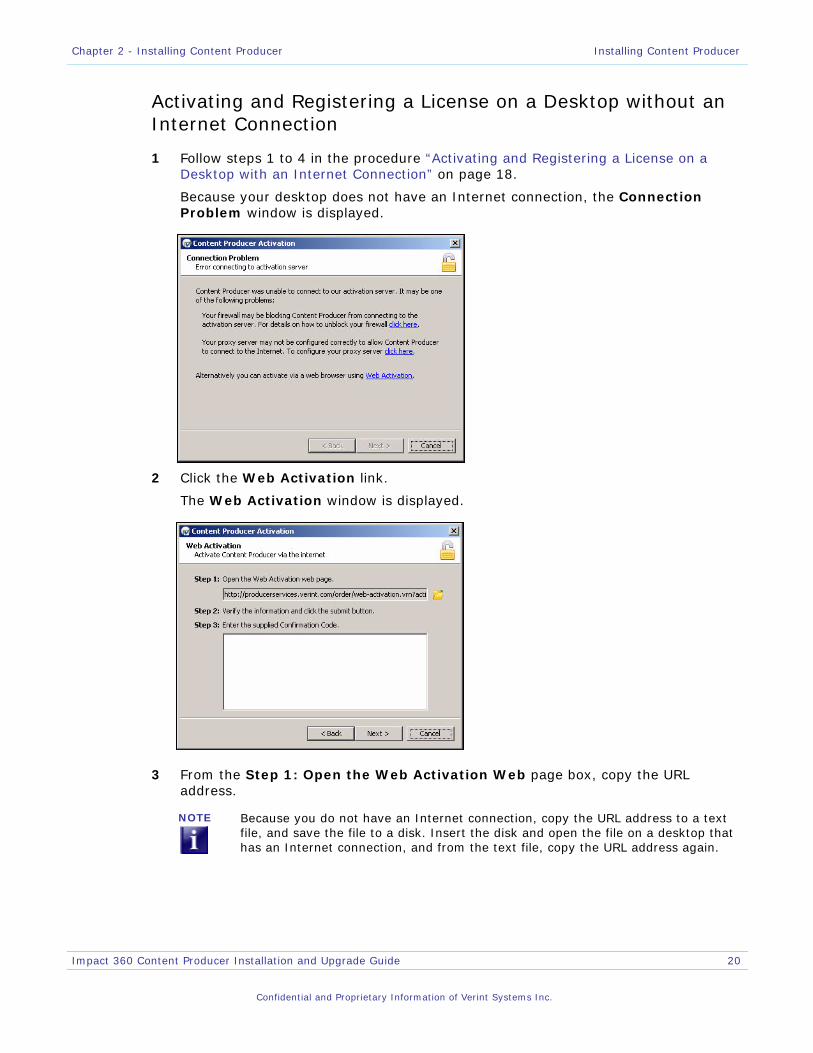
Activating and Registering a License on a Desktop without an Internet Connection
1 Follow steps 1 to 4 in the procedure “Activating and Registering a License on a Desktop with an Internet Connection” on page 18.
Because your desktop does not have an Internet connection, the Connection Problem window is displayed.
2 Click the Web Activation link.
The Web Activation window is displayed.
3 From the Step 1: Open the Web Activation Web page box, copy the URL address.
NOTE Because you do not have an Internet connection, copy the URL address to a text file, and save the file to a disk. Insert the disk and open the file on a desktop that has an Internet connection, and from the text file, copy the URL address again.
Chapter 2 - Installing Content Producer Installing Content Producer
Impact 360 Content Producer Installation and Upgrade Guide 21
Confidential and Proprietary Information of Verint Systems Inc.
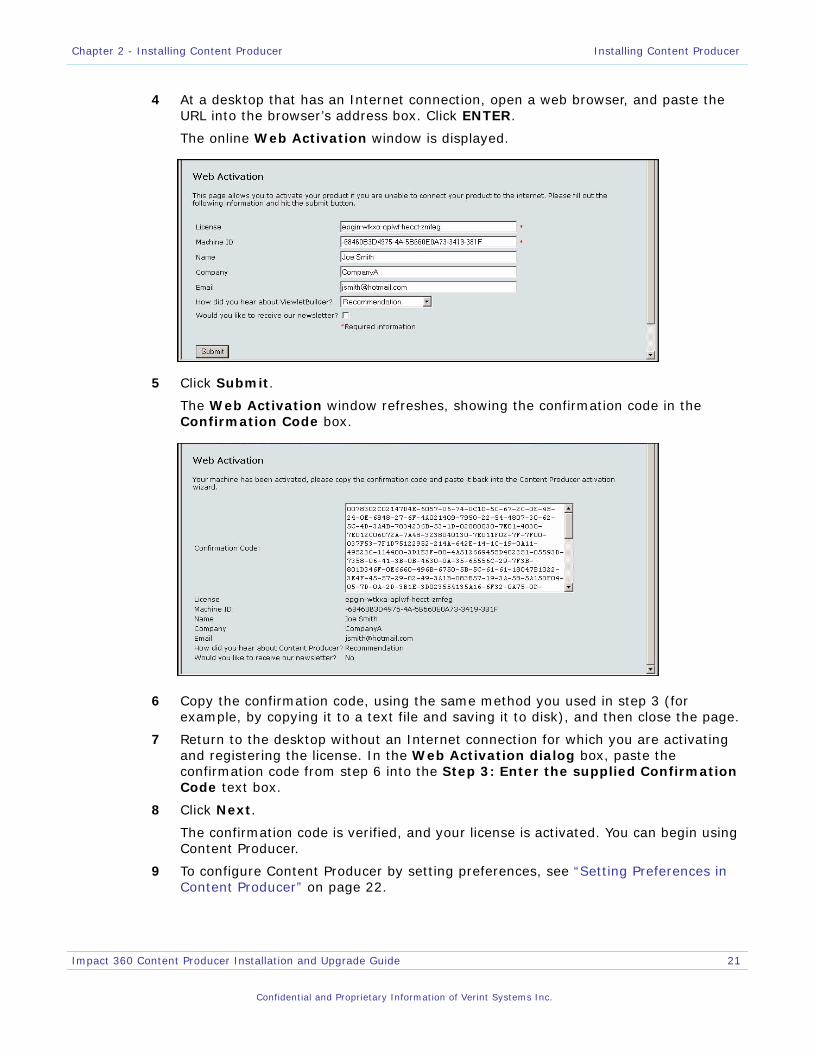
4 At a desktop that has an Internet connection, open a web browser, and paste the URL into the browser’s address box. Click ENTER.
The online Web Activation window is displayed.
5 Click Submit.
The Web Activation window refreshes, showing the confirmation code in the Confirmation Code box.
6 Copy the confirmation code, using the same method you used in step 3 (for example, by copying it to a text file and saving it to disk), and then close the page.
7 Return to the desktop without an Internet connection for which you are activating and registering the license. In the Web Activation dialog box, paste the confirmation code from step 6 into the Step 3: Enter the supplied Confirmation Code text box.
8 Click Next.
The confirmation code is verified, and your license is activated. You can begin using Content Producer.
9 To configure Content Producer by setting preferences, see “Setting Preferences in Content Producer” on page 22.
Chapter 2 - Installing Content Producer Installing Content Producer
Impact 360 Content Producer Installation and Upgrade Guide 22
Confidential and Proprietary Information of Verint Systems Inc.
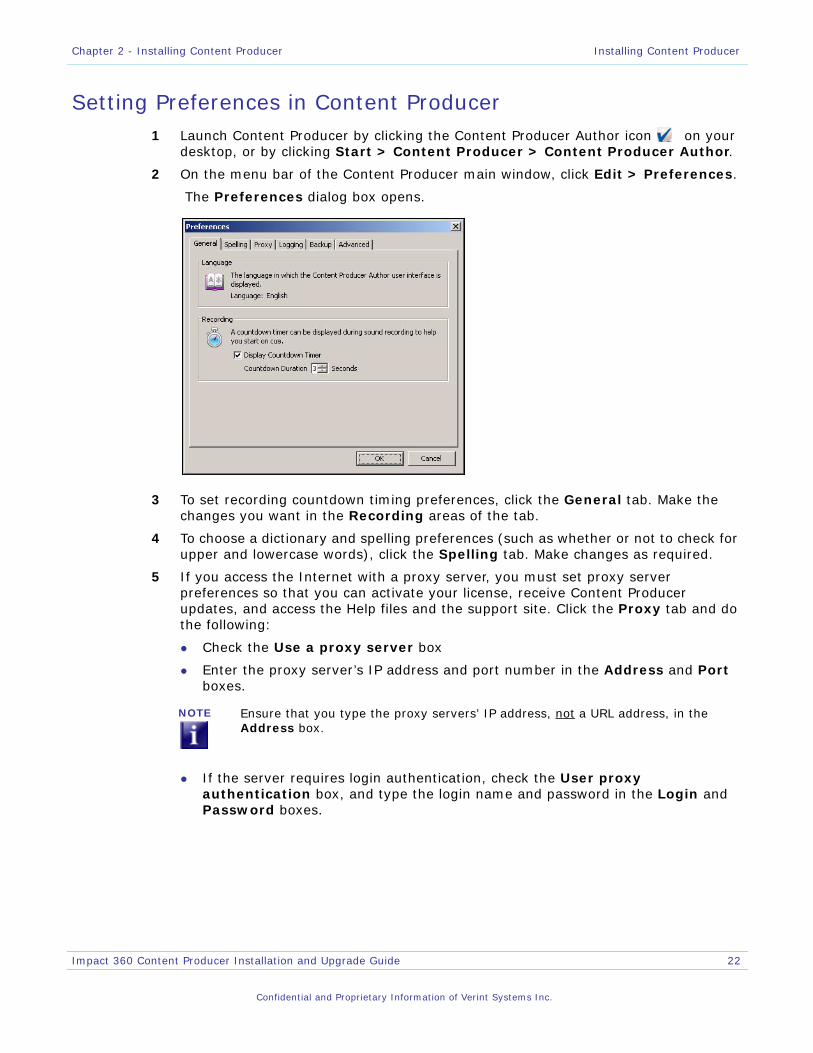
Setting Preferences in Content Producer1 Launch Content Producer by clicking the Content Producer Author icon on your
desktop, or by clicking Start > Content Producer > Content Producer Author.
2 On the menu bar of the Content Producer main window, click Edit > Preferences.
The Preferences dialog box opens.
3 To set recording countdown timing preferences, click the General tab. Make the changes you want in the Recording areas of the tab.
4 To choose a dictionary and spelling preferences (such as whether or not to check for upper and lowercase words), click the Spelling tab. Make changes as required.
5 If you access the Internet with a proxy server, you must set proxy server preferences so that you can activate your license, receive Content Producer updates, and access the Help files and the support site. Click the Proxy tab and do the following:
Check the Use a proxy server box
Enter the proxy server’s IP address and port number in the Address and Port boxes.
If the server requires login authentication, check the User proxy authentication box, and type the login name and password in the Login and Password boxes.
NOTE Ensure that you type the proxy servers’ IP address, not a URL address, in the Address box.
Chapter 2 - Installing Content Producer Installing Content Producer
Impact 360 Content Producer Installation and Upgrade Guide 23
Confidential and Proprietary Information of Verint Systems Inc.
6 To create log files that record issues that arise while you are using Content Producer, click the Logging tab, and do the following:
In the Output Window area, select a logging option from the Report drop-down list box.
In the Log File area, select the options for outputting log records to a file.
7 To enable backup file options, click the Backup tab.
8 To change Java virtual machine settings, click the Advanced tab.
9 Click OK to save your preferences and close the dialog box.
For... Select...
normal day-to-day application use
Display Errors Only
This option only logs application error events.
troubleshooting issues Display All Information
This option logs all application event types including information events for successful operations. It impacts application performance.
C h a p t e r 3
Upgrading Content Producer
Once you have installed Content Producer, you can find out about and upgrade to new releases.
This chapter contains this section:
Checking For and Upgrading to the Most Recent Content Producer Release, page 25
Upgrading From Pre-7.8.x Versions of Content Producer, page 27
Chapter 3 - Upgrading Content Producer Checking For and Upgrading to the Most Recent Content Producer Release
Impact 360 Content Producer Installation and Upgrade Guide 25
Confidential and Proprietary Information of Verint Systems Inc.
Checking For and Upgrading to the Most Recent Content Producer Release
You can check for the latest Content Producer release from the Content Producer Author Welcome window.
Note that if your company’s firewall prevents automatic registration or updates, you must first configure the appropriate proxy information, as described in step Step 5 in the procedure “Setting Preferences in Content Producer” on page 22.
To successfully upgrade to the most recent Content Producer release, see “Checking for and upgrading to the most recent Content Producer release” on page 26.
Chapter 3 - Upgrading Content Producer Checking For and Upgrading to the Most Recent Content Producer Release
Impact 360 Content Producer Installation and Upgrade Guide 26
Confidential and Proprietary Information of Verint Systems Inc.
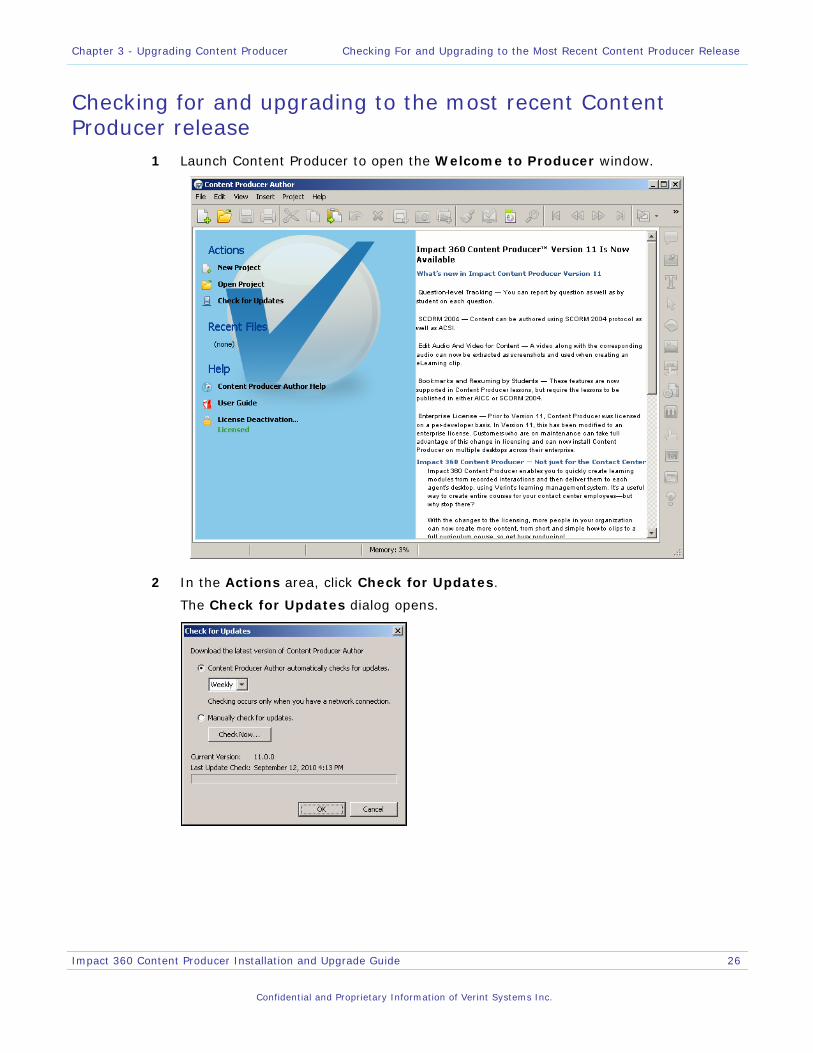
Checking for and upgrading to the most recent Content Producer release
1 Launch Content Producer to open the Welcome to Producer window.
2 In the Actions area, click Check for Updates.
The Check for Updates dialog opens.
Chapter 3 - Upgrading Content Producer Upgrading From Pre-7.8.x Versions of Content Producer
Impact 360 Content Producer Installation and Upgrade Guide 27
Confidential and Proprietary Information of Verint Systems Inc.
3 Choose one of these options:
Select the Content Producer automatically check for updates option, and from the drop-down list box, select the time interval within which you want the system to check for updates: Daily, Weekly, Monthly. The default is Weekly.
Select the Manually check for updates option. Choosing this option prohibits the system from automatically checking for updates.
4 To immediately check for updates, click Check Now then click OK.
5 You either get a message with information about updates, or a message that your version of Producer is up-to-date.
Upgrading From Pre-7.8.x Versions of Content Producer
1 Click Start > Settings > Control Panel > Add or Remove Programs.
2 In the Add or Remove Programs window, locate the pre-7.8.x version of Producer that you want to remove, and select it.
3 Click Remove.
Once the uninstall process ends, the pre-7.8.x version of Producer is removed from your system.
4 Install the new release of Content Producer, as described in the procedure “Installing Content Producer” on page 11.
NOTE During an upgrade, the My Documents\My Clip Assets Library folder is renamed, such that a number which includes the date of the upgrade is attached to the folder name (for example, the new name of the old folder might be: My Clip Assets_Library_11.1.3010_20110802) .
If you created your own HTML frame template in the previous version of Content Producer, you can retrieve your template from this folder. Because the HTML frames are changed in the new release, the best practice is to customize your HTML frames using the latest version’s templates.
© 2012 Verint Systems Inc.
All Rights Reserved Worldwide.
Confidential and Proprietary Information of Verint Systems Inc.
The contents of this material are confidential and proprietary to Verint Systems Inc. and may not be reproduced, published, or disclosed to others without express authorization of Verint Systems Inc.
Verint Global Headquarters330 South Service RoadMelville, NY 11747 USA
www.verint.com


![[ know me ] engagement€¦ · Verint. ®Powering Actionable Intelligence Verint ® Systems Inc. (NASDAQ: VRNT) is a global leader in Actionable Intelligence solutions for customer](https://img.pdfslide.us/doc/110x75/5f46aa84d41e9f61d9634dd9/-know-me-engagement-verint-powering-actionable-intelligence-verint-systems.jpg)