Embed Size (px)
Citation preview
1
NTT Communications
Cloudⁿ
CDN
Operation Manual
Ver.1.1
Please refrain from secondary use such as distributing, reproducing,
and transferring this document.
2
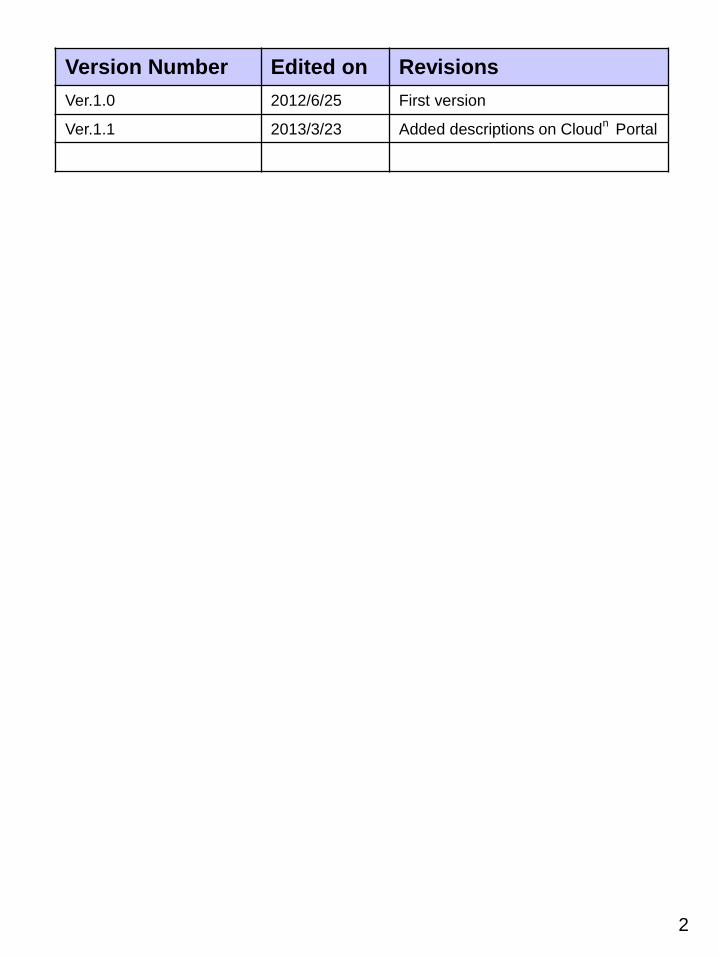
Version Number Edited on Revisions
Ver.1.0 2012/6/25 First version
Ver.1.1 2013/3/23 Added descriptions on Cloudn Portal
3
Table of Contents
1. Introduction P4 1) Service Overview
2) Prerequisites
3. To Operate CSN Control Panel P10 1) To start up CDN control panel
2) To close CDN control panel
2. To Subscribe to CDN Service P6 1) To subscribe to CDN service
2) To cancel CDN service
4. To Control Content P13 1) To register content
2) To delete content
3) To register cache
5. To Display Reports P21 1) To display data transfer amount
2) To display cache hit rates
3) To set up log in information for log servers
Appendix P24 1) To set up DNS servers (To register CNAME)
2) To set up distribution web servers
3) To check cache server connections
4) Format of distribution logs
5) Sample code for JW Player
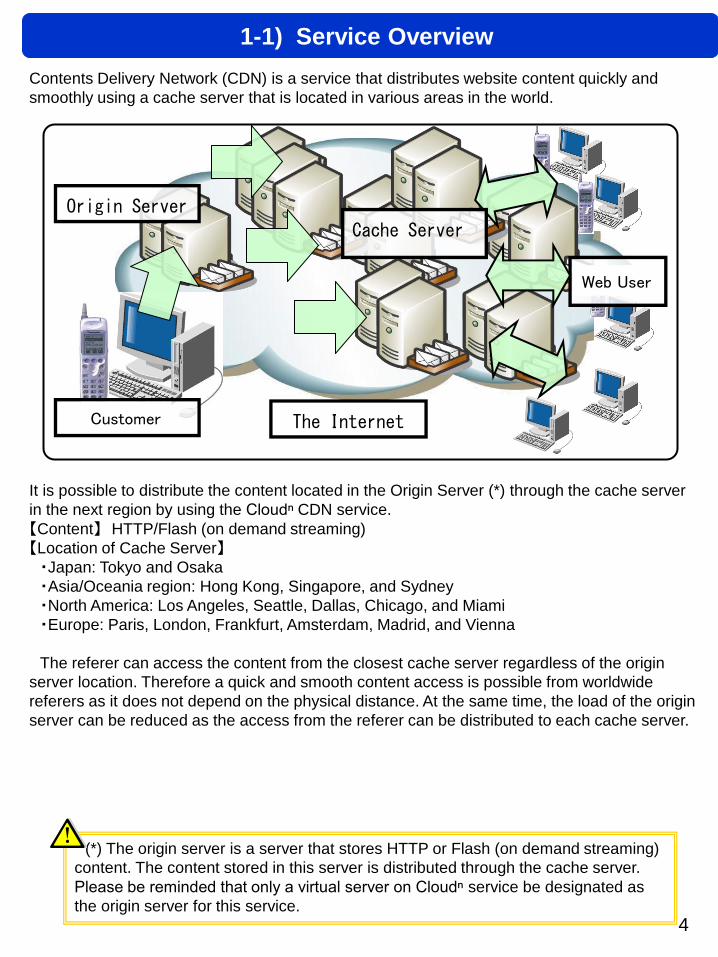
Contents Delivery Network (CDN) is a service that distributes website content quickly and
smoothly using a cache server that is located in various areas in the world.
4
参照者
The Internet
Cache Server
Origin Server
お客さま
It is possible to distribute the content located in the Origin Server (*) through the cache server
in the next region by using the Cloudⁿ CDN service.
【Content】 HTTP/Flash (on demand streaming)
【Location of Cache Server】
・Japan: Tokyo and Osaka
・Asia/Oceania region: Hong Kong, Singapore, and Sydney
・North America: Los Angeles, Seattle, Dallas, Chicago, and Miami
・Europe: Paris, London, Frankfurt, Amsterdam, Madrid, and Vienna
The referer can access the content from the closest cache server regardless of the origin
server location. Therefore a quick and smooth content access is possible from worldwide
referers as it does not depend on the physical distance. At the same time, the load of the origin
server can be reduced as the access from the referer can be distributed to each cache server.
(*) The origin server is a server that stores HTTP or Flash (on demand streaming)
content. The content stored in this server is distributed through the cache server.
Please be reminded that only a virtual server on Cloudⁿ service be designated as
the origin server for this service.
1-1) Service Overview
Customer
Web User
Cloudⁿ Usage Guidance
Please have the Cloudⁿ Usage Guidance, that is sent when applying for the Cloudⁿ that will be used as the Origin Server, at hand.
Browser Software (to Browse the Control Panel)
Firefox18.0.1 and onwards is recommended.
Please be reminded that there may be partial glitches with other browsers.
Internet Access Service
Please have an internet access service.
Eg: An always-on service such as OCN dial access service, OCN ADSL connection service, and super OCN
* Internet access services by other companies can be used.
* When using a proxy server located within our company, please check that the https (-port number 443) and FTP (port number 20, 21) are open.
Domain Service for Content Distribution URL
For an OPENURL, please subscribe to a domain service beforehand to distribute the
content stored in the above said Origin Server. To use this service, it is necessary to
separately register the designated CNAME for the acquired domain name.
Eg. OCN.com domain registration service and so on.
* Domain services by other companies can also be used.
Please prepare the following before using our Cloudⁿ CDN service.
A Cloudⁿ Virtual Server
Please prepare a Cloudⁿ virtual server as a server to store the distributed content of the
Cloudⁿ CDN service (hereinafter referred to as “Origin Server”).
Please refer to the Cloudⁿ Compute Operation Manual on how to create a virtual server.
5
* The following are the prerequisites for the client PC when setting up this CDN service.
1-2) Prerequisites
6
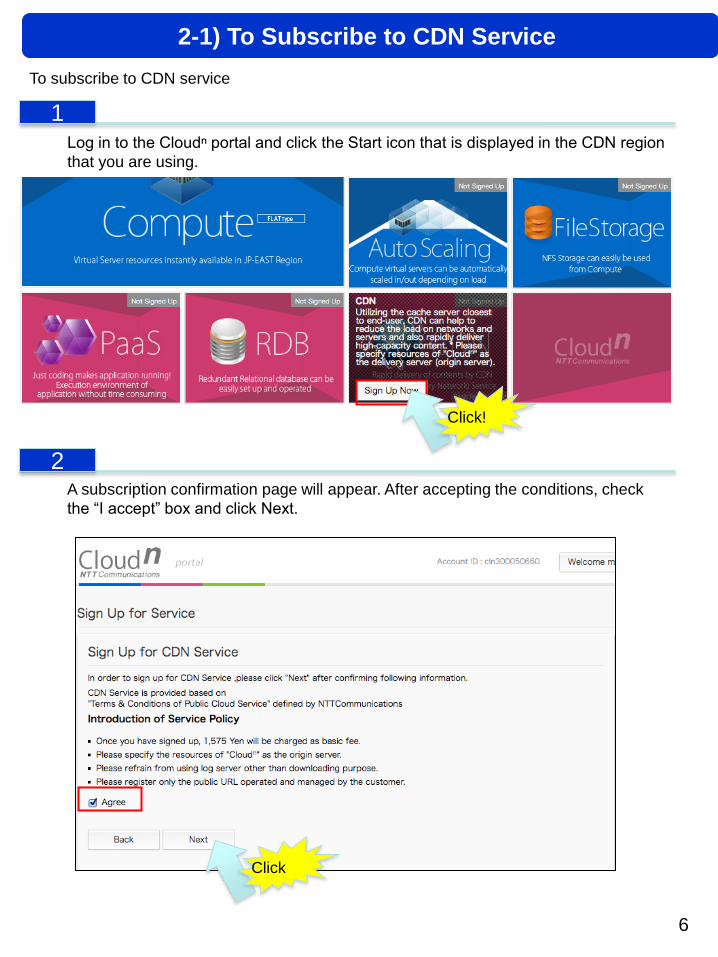
To subscribe to CDN service
A subscription confirmation page will appear. After accepting the conditions, check
the “I accept” box and click Next.
2-1) To Subscribe to CDN Service
1
Click!
2
Click
Log in to the Cloudⁿ portal and click the Start icon that is displayed in the CDN region
that you are using.
7
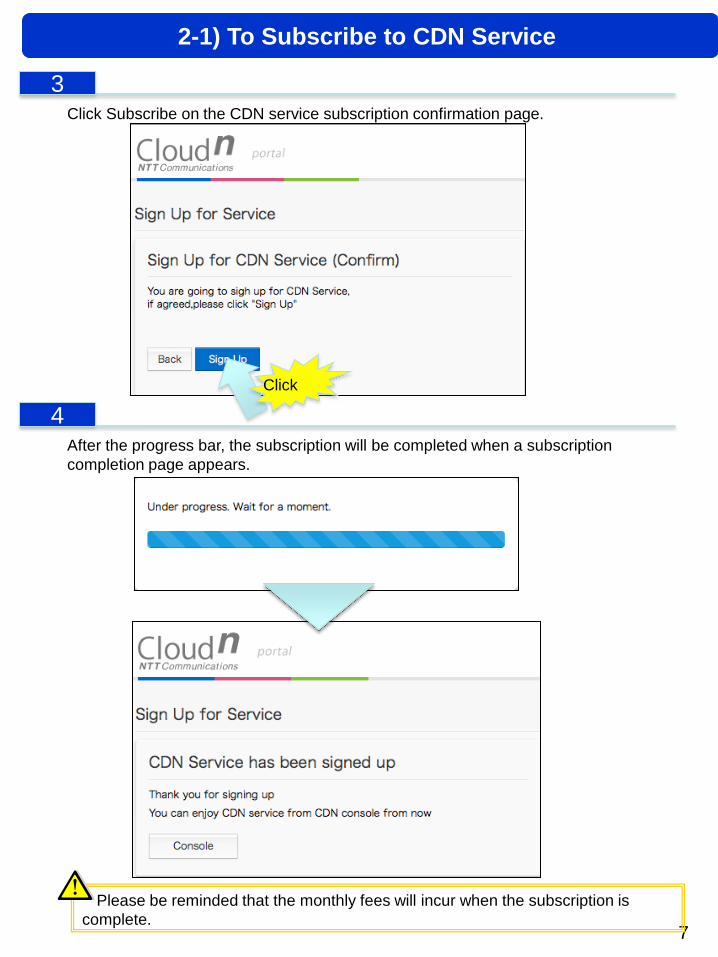
Click Subscribe on the CDN service subscription confirmation page.
Please be reminded that the monthly fees will incur when the subscription is
complete.
2-1) To Subscribe to CDN Service
3
Click
After the progress bar, the subscription will be completed when a subscription
completion page appears.
4
8
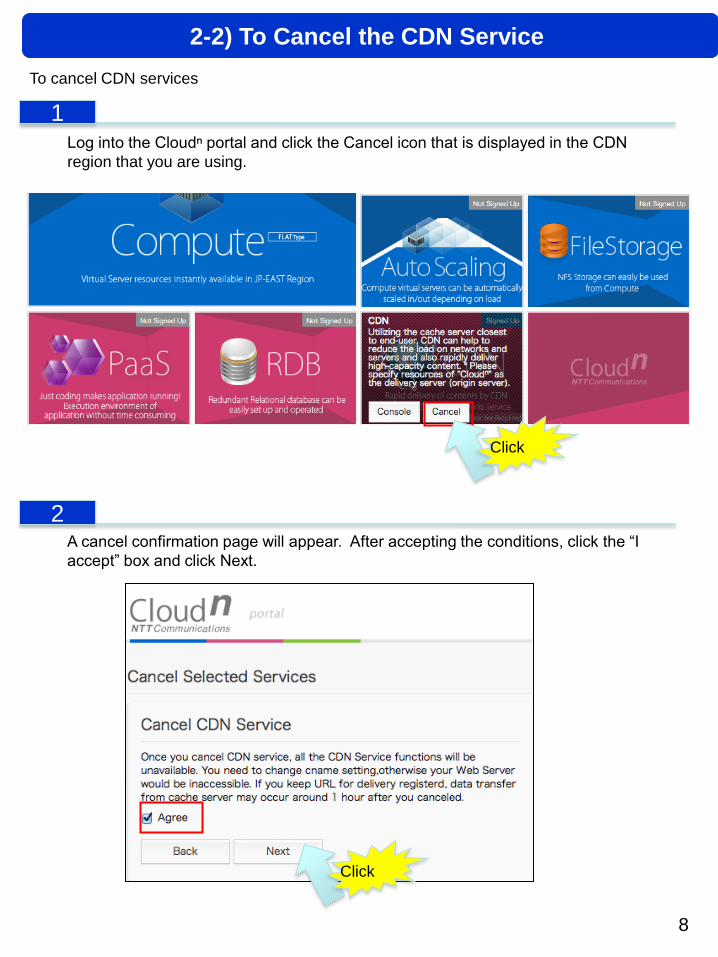
To cancel CDN services
2-2) To Cancel the CDN Service
1
2
Log into the Cloudⁿ portal and click the Cancel icon that is displayed in the CDN
region that you are using.
Click
A cancel confirmation page will appear. After accepting the conditions, click the “I
accept” box and click Next.
Click
9
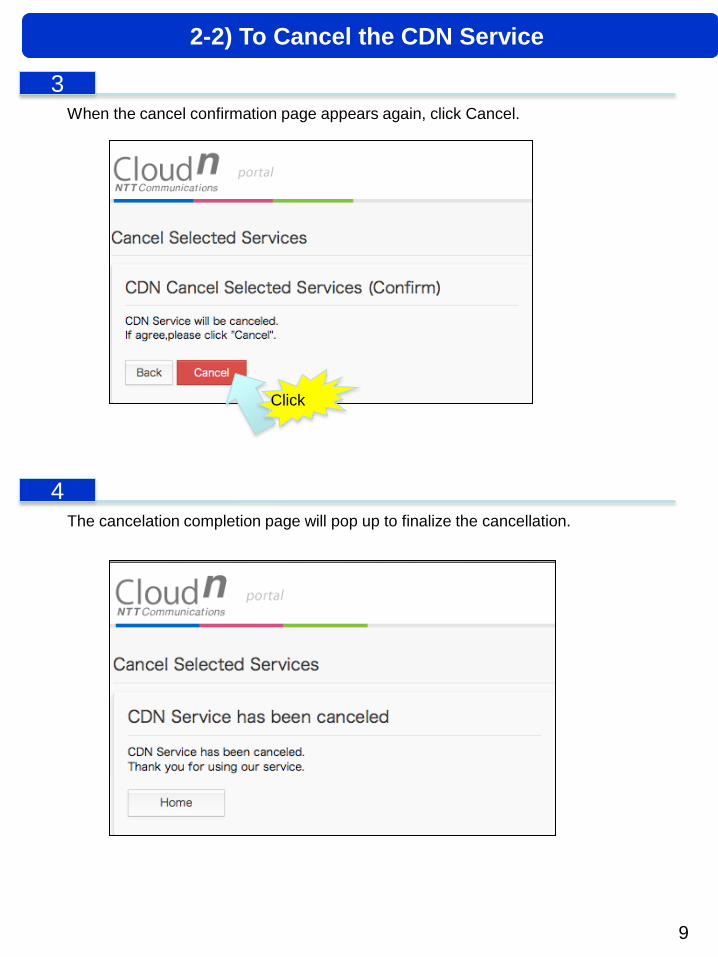
When the cancel confirmation page appears again, click Cancel.
The cancelation completion page will pop up to finalize the cancellation.
2-2) To Cancel the CDN Service
3
4
Click
10
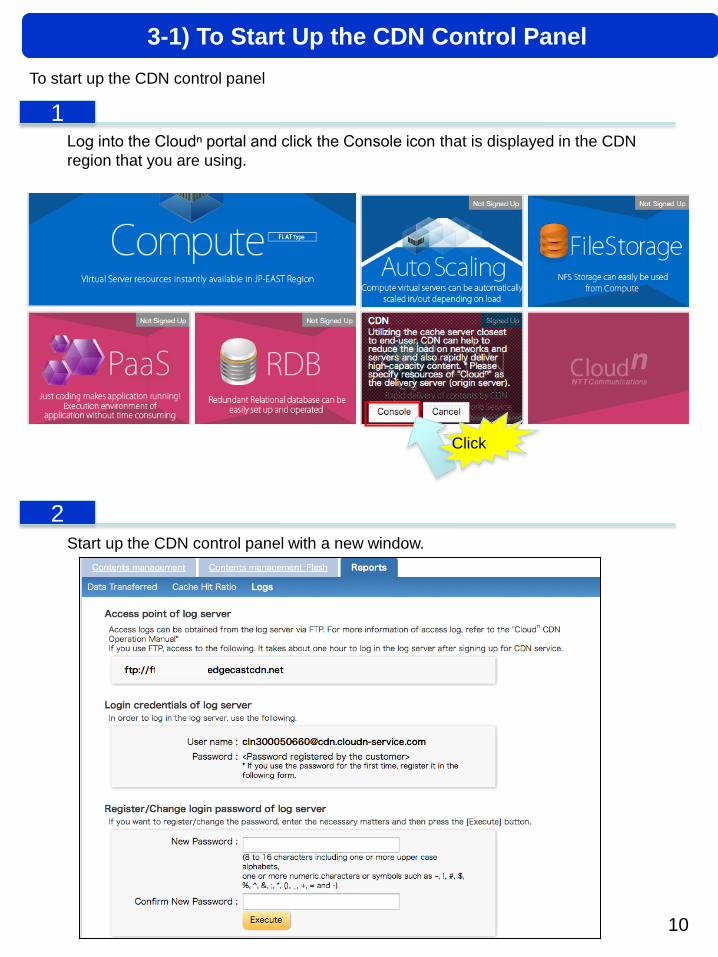
To start up the CDN control panel
Start up the CDN control panel with a new window.
3-1) To Start Up the CDN Control Panel
1 Log into the Cloudⁿ portal and click the Console icon that is displayed in the CDN
region that you are using.
2
Click
11
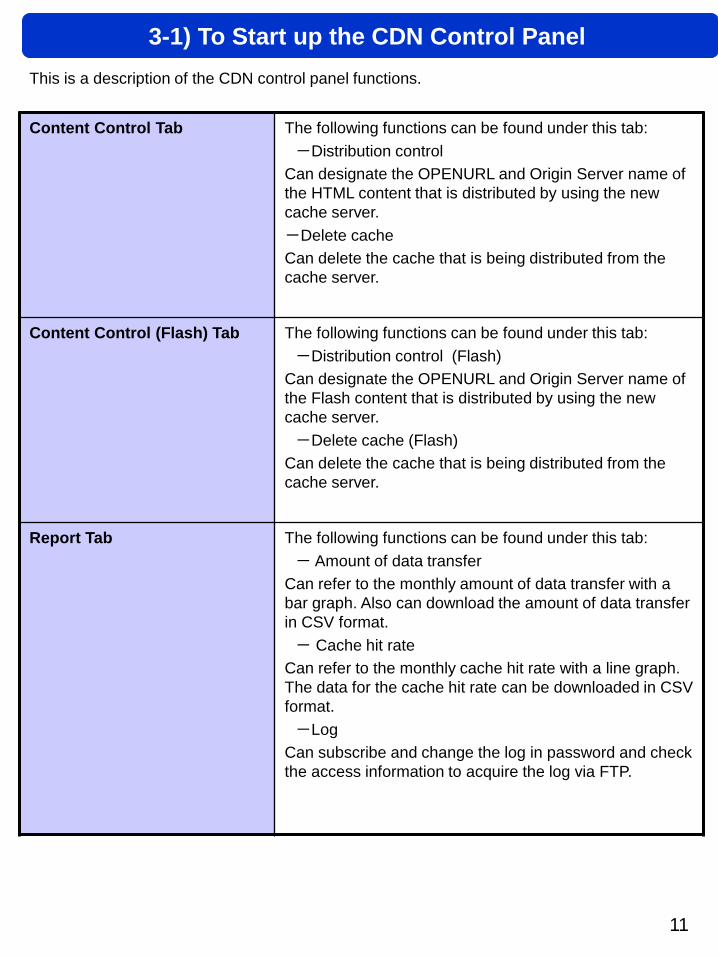
This is a description of the CDN control panel functions.
Content Control Tab The following functions can be found under this tab:
-Distribution control
Can designate the OPENURL and Origin Server name of
the HTML content that is distributed by using the new
cache server.
-Delete cache
Can delete the cache that is being distributed from the
cache server.
Content Control (Flash) Tab The following functions can be found under this tab:
-Distribution control (Flash)
Can designate the OPENURL and Origin Server name of
the Flash content that is distributed by using the new
cache server.
-Delete cache (Flash)
Can delete the cache that is being distributed from the
cache server.
Report Tab The following functions can be found under this tab:
- Amount of data transfer
Can refer to the monthly amount of data transfer with a
bar graph. Also can download the amount of data transfer
in CSV format.
- Cache hit rate
Can refer to the monthly cache hit rate with a line graph.
The data for the cache hit rate can be downloaded in CSV
format.
-Log
Can subscribe and change the log in password and check
the access information to acquire the log via FTP.
3-1) To Start up the CDN Control Panel
12
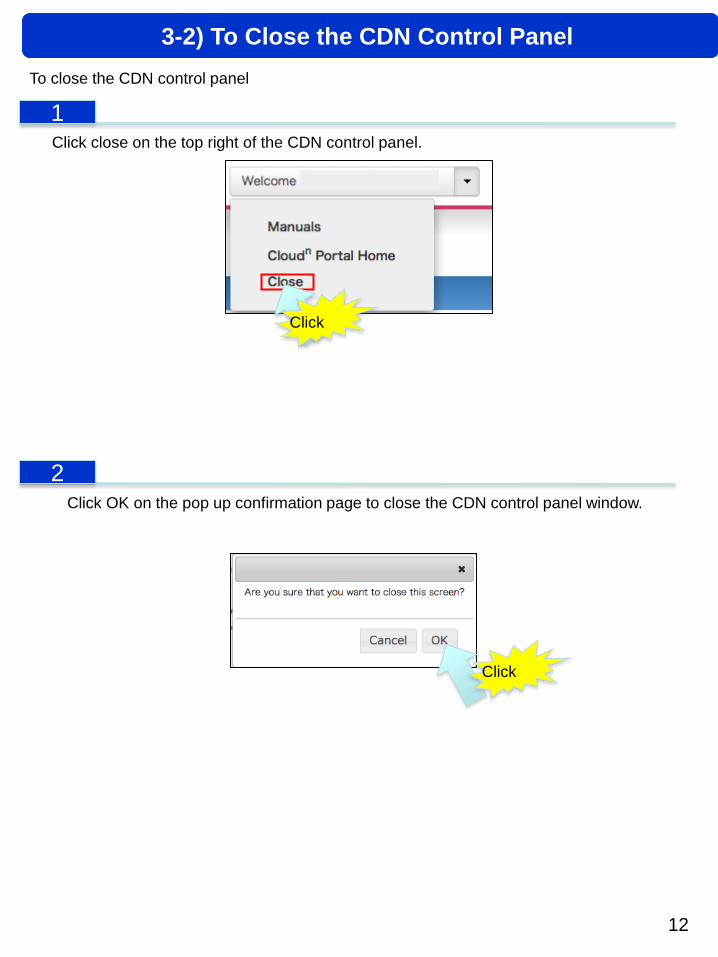
To close the CDN control panel
Click close on the top right of the CDN control panel.
Click OK on the pop up confirmation page to close the CDN control panel window.
3-2) To Close the CDN Control Panel
1
Click
2
Click
13
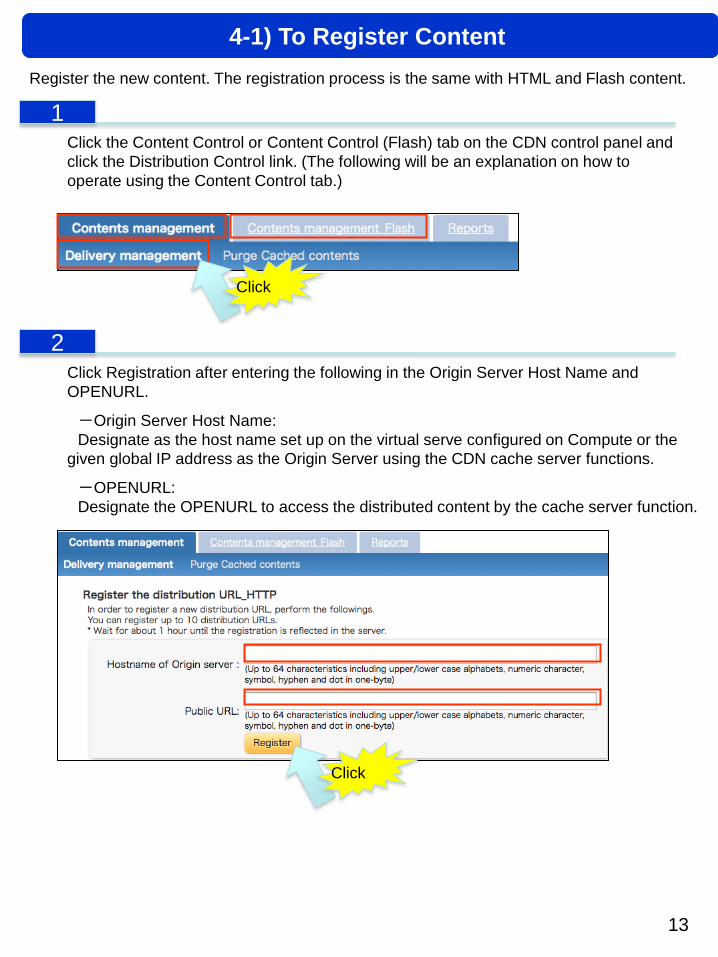
Register the new content. The registration process is the same with HTML and Flash content.
Click Registration after entering the following in the Origin Server Host Name and
OPENURL.
-Origin Server Host Name:
Designate as the host name set up on the virtual serve configured on Compute or the
given global IP address as the Origin Server using the CDN cache server functions.
-OPENURL:
Designate the OPENURL to access the distributed content by the cache server function.
Click the Content Control or Content Control (Flash) tab on the CDN control panel and
click the Distribution Control link. (The following will be an explanation on how to
operate using the Content Control tab.)
1
Click
2
4-1) To Register Content
Click
14
The OPENURL domain name will be the arbitrary domain serve that was acquired
before subscribing to the service. In addition, please register the OPENURL without
the protocol name (scheme name) (eg. Register http://www1.example.com as
www1.example.com)
4-1) To Register Content
When using “PaaS Service”, please register the Origin Server Host Name as
“userapp.cloudnpaas.com”. It is also necessary to assign the registered
OPENURL domain name to PaaS application by “vmc map” command.
When you want to distribute content on Object Storage via CDN cache server,
please register the Origin Server Host Name as “ YourBucketName.str.cloudn-service.com”.
15
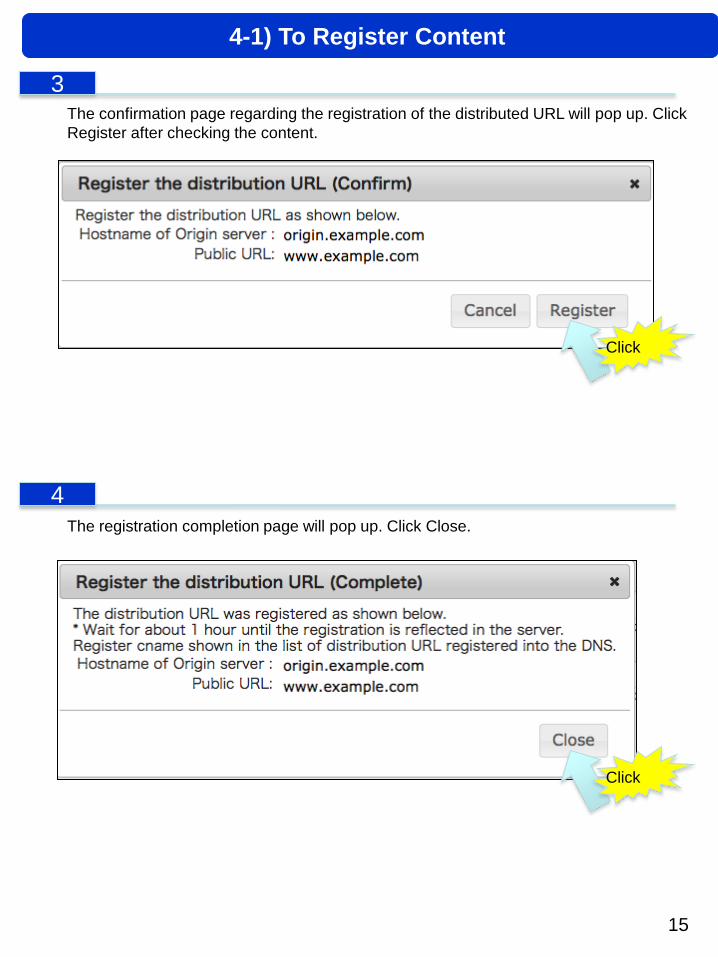
The confirmation page regarding the registration of the distributed URL will pop up. Click
Register after checking the content.
3
Click
The registration completion page will pop up. Click Close.
4
4-1) To Register Content
Click
16
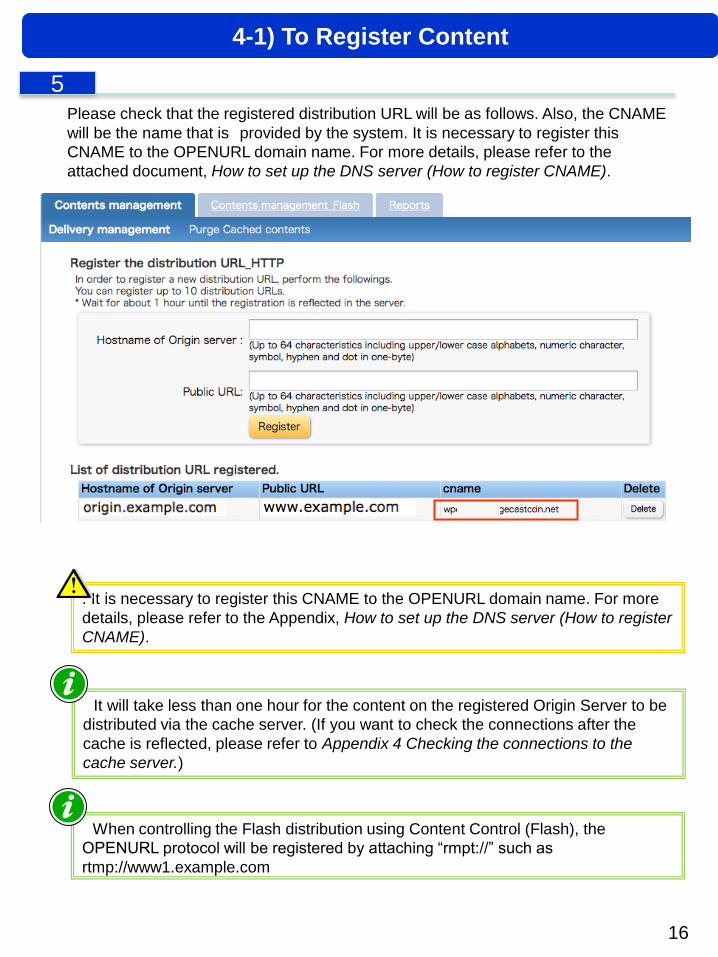
Please check that the registered distribution URL will be as follows. Also, the CNAME
will be the name that is provided by the system. It is necessary to register this
CNAME to the OPENURL domain name. For more details, please refer to the
attached document, How to set up the DNS server (How to register CNAME).
. It is necessary to register this CNAME to the OPENURL domain name. For more
details, please refer to the Appendix, How to set up the DNS server (How to register
CNAME).
5
4-1) To Register Content
When controlling the Flash distribution using Content Control (Flash), the
OPENURL protocol will be registered by attaching “rmpt://” such as
rtmp://www1.example.com
It will take less than one hour for the content on the registered Origin Server to be
distributed via the cache server. (If you want to check the connections after the
cache is reflected, please refer to Appendix 4 Checking the connections to the
cache server.)
17
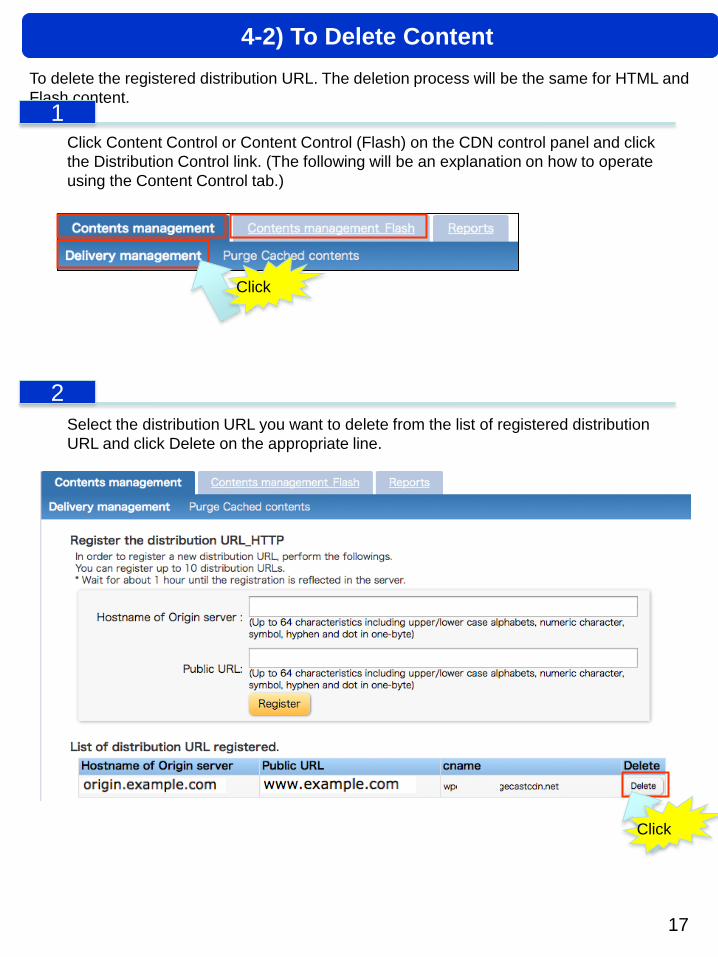
To delete the registered distribution URL. The deletion process will be the same for HTML and
Flash content.
Select the distribution URL you want to delete from the list of registered distribution
URL and click Delete on the appropriate line.
Click Content Control or Content Control (Flash) on the CDN control panel and click
the Distribution Control link. (The following will be an explanation on how to operate
using the Content Control tab.)
1
4-2) To Delete Content
2
Click
Click
18
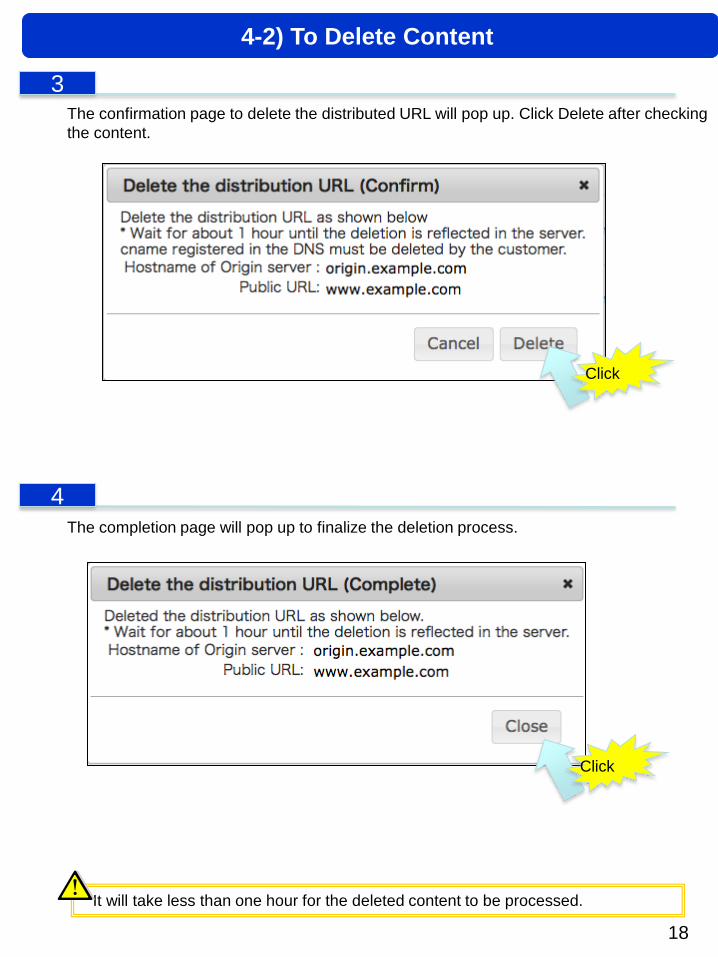
The confirmation page to delete the distributed URL will pop up. Click Delete after checking
the content.
The completion page will pop up to finalize the deletion process.
It will take less than one hour for the deleted content to be processed.
4-2) To Delete Content
3
4
Click
Click
19
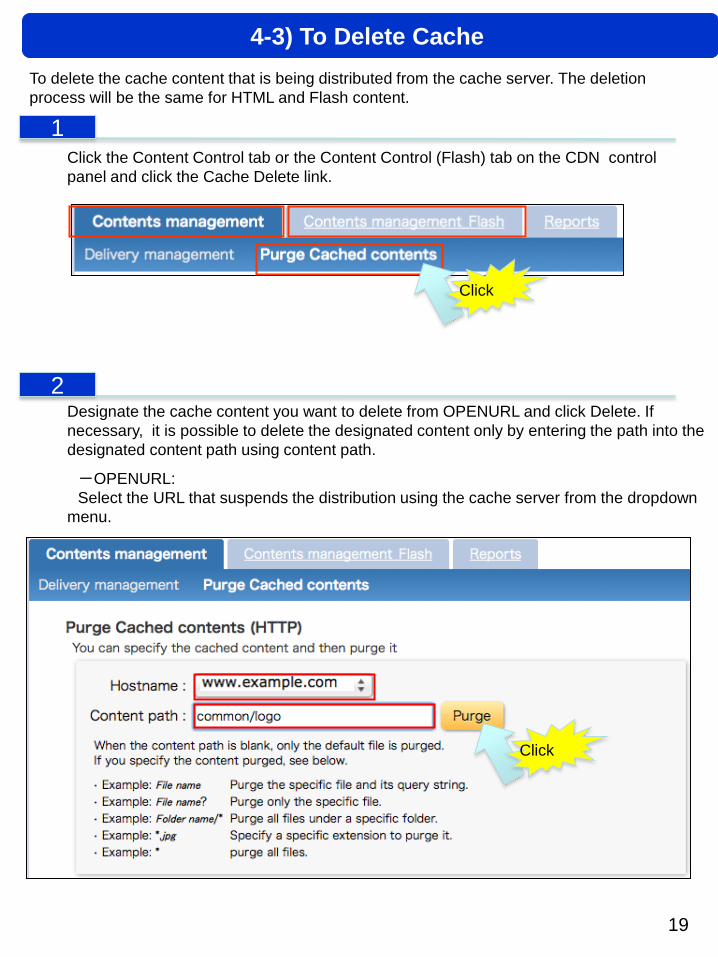
To delete the cache content that is being distributed from the cache server. The deletion
process will be the same for HTML and Flash content.
Designate the cache content you want to delete from OPENURL and click Delete. If
necessary, it is possible to delete the designated content only by entering the path into the
designated content path using content path.
-OPENURL:
Select the URL that suspends the distribution using the cache server from the dropdown
menu.
Click the Content Control tab or the Content Control (Flash) tab on the CDN control
panel and click the Cache Delete link.
4-3) To Delete Cache
1
Click
2
Click
20
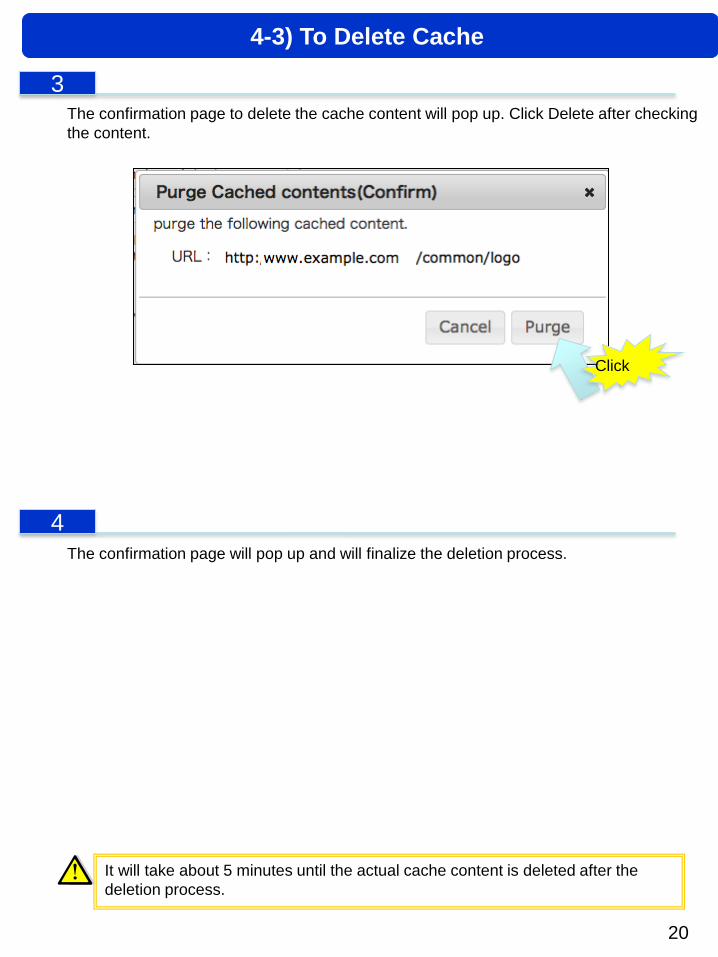
The confirmation page to delete the cache content will pop up. Click Delete after checking
the content.
The confirmation page will pop up and will finalize the deletion process.
It will take about 5 minutes until the actual cache content is deleted after the
deletion process.
3
4-3) To Delete Cache
Click
4
21
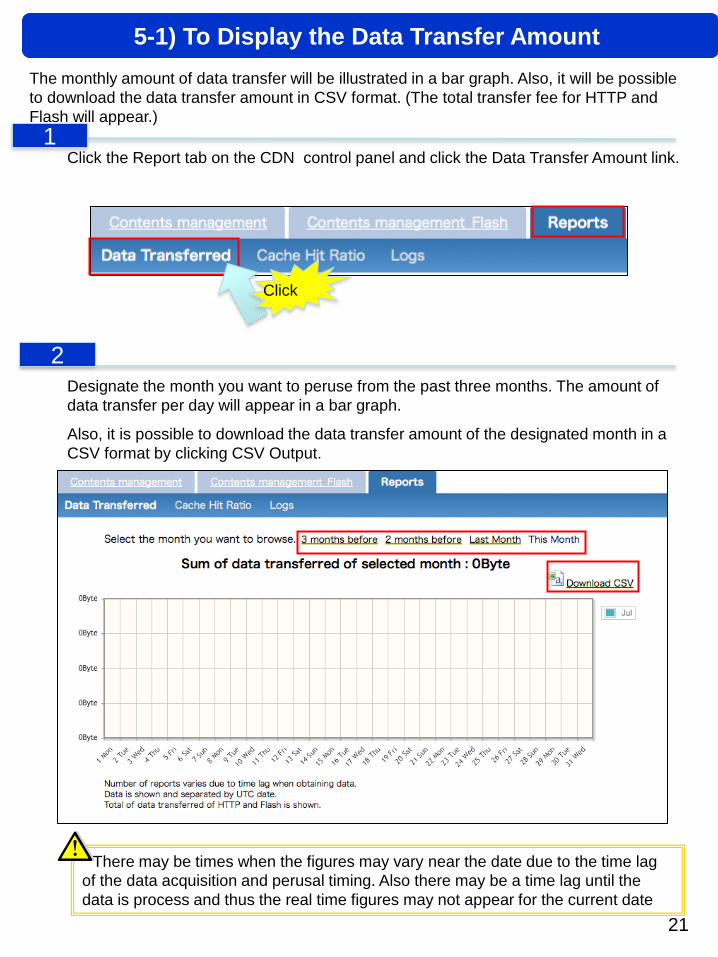
The monthly amount of data transfer will be illustrated in a bar graph. Also, it will be possible
to download the data transfer amount in CSV format. (The total transfer fee for HTTP and
Flash will appear.)
Designate the month you want to peruse from the past three months. The amount of
data transfer per day will appear in a bar graph.
Also, it is possible to download the data transfer amount of the designated month in a
CSV format by clicking CSV Output.
Click the Report tab on the CDN control panel and click the Data Transfer Amount link.
There may be times when the figures may vary near the date due to the time lag
of the data acquisition and perusal timing. Also there may be a time lag until the
data is process and thus the real time figures may not appear for the current date
5-1) To Display the Data Transfer Amount
1
Click
2
22
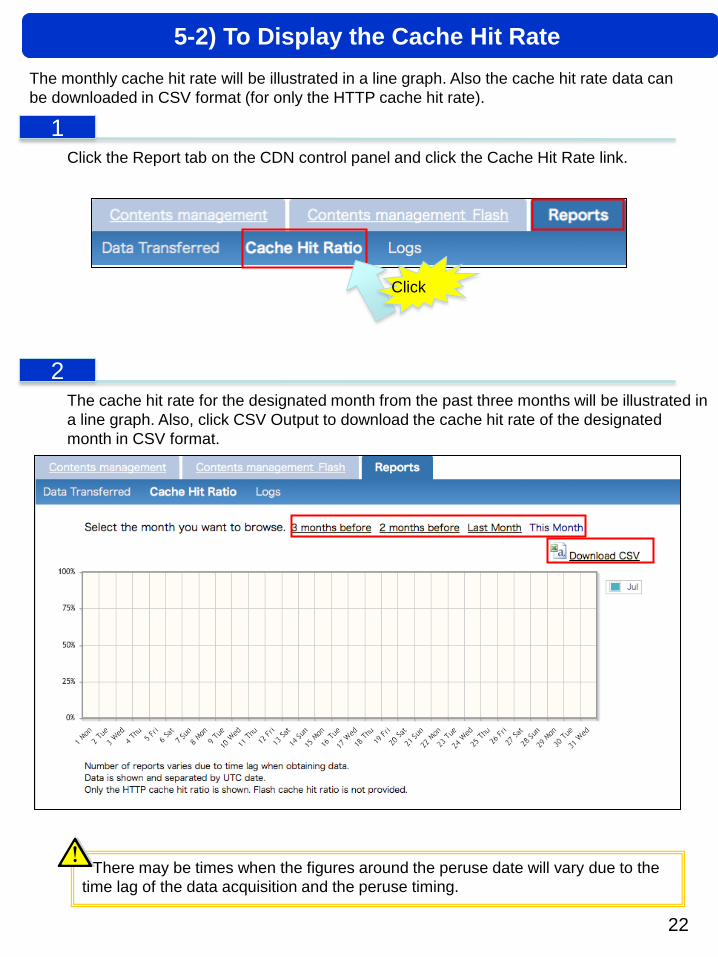
The monthly cache hit rate will be illustrated in a line graph. Also the cache hit rate data can
be downloaded in CSV format (for only the HTTP cache hit rate).
The cache hit rate for the designated month from the past three months will be illustrated in
a line graph. Also, click CSV Output to download the cache hit rate of the designated
month in CSV format.
Click the Report tab on the CDN control panel and click the Cache Hit Rate link.
There may be times when the figures around the peruse date will vary due to the
time lag of the data acquisition and the peruse timing.
5-2) To Display the Cache Hit Rate
1
2
Click
23
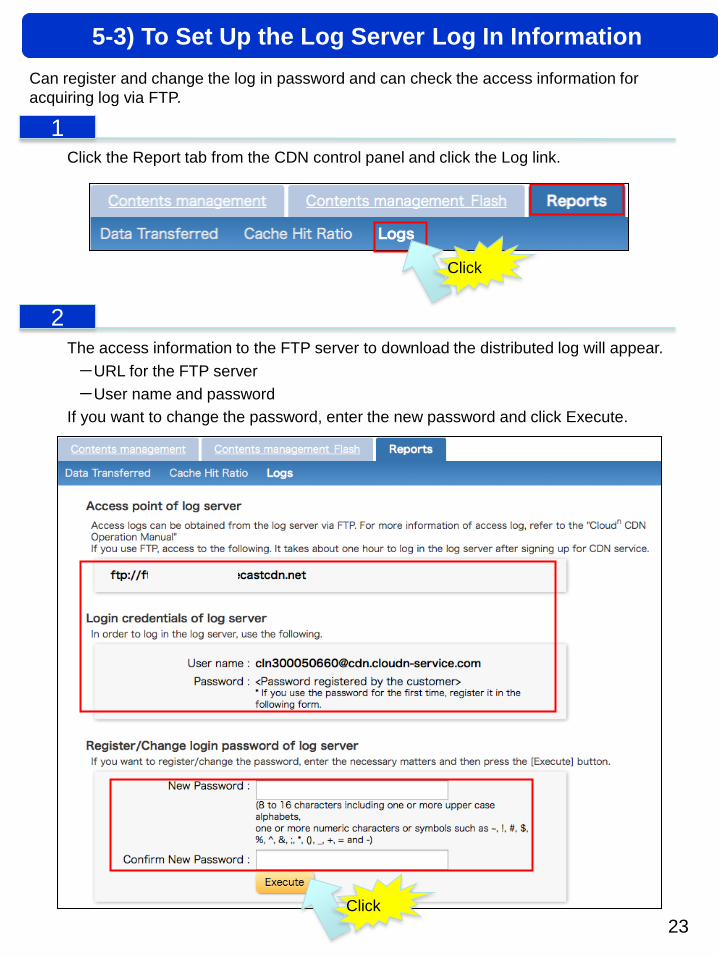
Can register and change the log in password and can check the access information for
acquiring log via FTP.
The access information to the FTP server to download the distributed log will appear.
-URL for the FTP server
-User name and password
If you want to change the password, enter the new password and click Execute.
Click the Report tab from the CDN control panel and click the Log link.
5-3) To Set Up the Log Server Log In Information
1
2
Click
Click
24
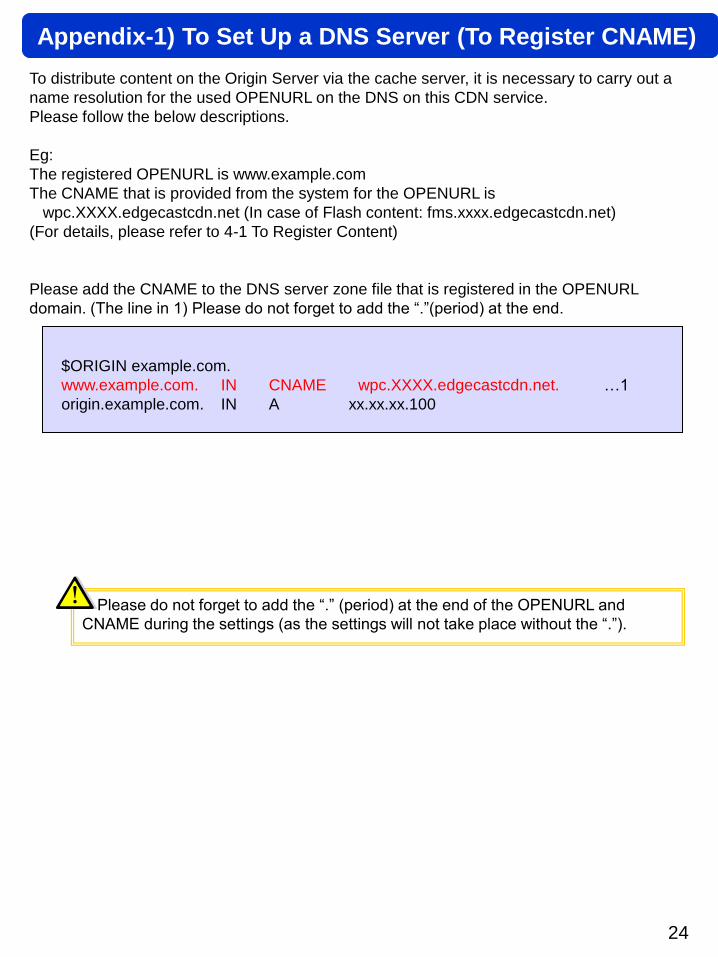
To distribute content on the Origin Server via the cache server, it is necessary to carry out a
name resolution for the used OPENURL on the DNS on this CDN service.
Please follow the below descriptions.
Eg:
The registered OPENURL is www.example.com
The CNAME that is provided from the system for the OPENURL is
wpc.XXXX.edgecastcdn.net (In case of Flash content: fms.xxxx.edgecastcdn.net)
(For details, please refer to 4-1 To Register Content)
Please add the CNAME to the DNS server zone file that is registered in the OPENURL
domain. (The line in 1) Please do not forget to add the “.”(period) at the end.
$ORIGIN example.com.
www.example.com. IN CNAME wpc.XXXX.edgecastcdn.net. …1
origin.example.com. IN A xx.xx.xx.100
Please do not forget to add the “.” (period) at the end of the OPENURL and
CNAME during the settings (as the settings will not take place without the “.”).
Appendix-1) To Set Up a DNS Server (To Register CNAME)
25
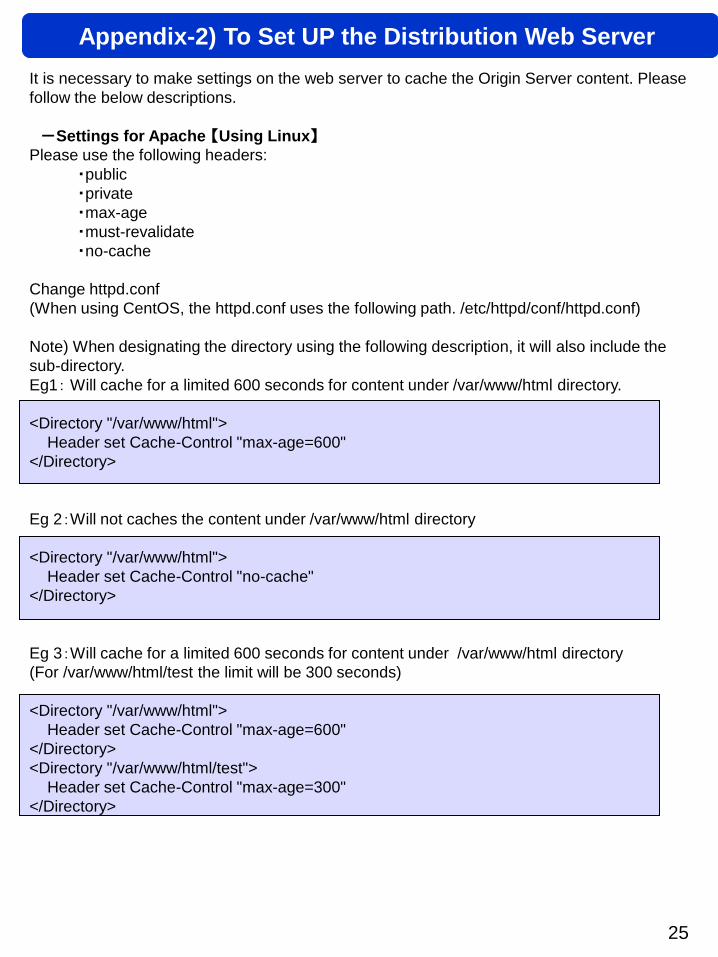
It is necessary to make settings on the web server to cache the Origin Server content. Please
follow the below descriptions.
-Settings for Apache 【Using Linux】
Please use the following headers:
・public
・private
・max-age
・must-revalidate
・no-cache
Change httpd.conf
(When using CentOS, the httpd.conf uses the following path. /etc/httpd/conf/httpd.conf)
Note) When designating the directory using the following description, it will also include the
sub-directory.
Eg1: Will cache for a limited 600 seconds for content under /var/www/html directory.
<Directory "/var/www/html">
Header set Cache-Control "max-age=600"
</Directory>
Eg 2:Will not caches the content under /var/www/html directory
<Directory "/var/www/html">
Header set Cache-Control "no-cache"
</Directory>
Eg 3:Will cache for a limited 600 seconds for content under /var/www/html directory
(For /var/www/html/test the limit will be 300 seconds)
<Directory "/var/www/html">
Header set Cache-Control "max-age=600"
</Directory>
<Directory "/var/www/html/test">
Header set Cache-Control "max-age=300"
</Directory>
Appendix-2) To Set UP the Distribution Web Server
26
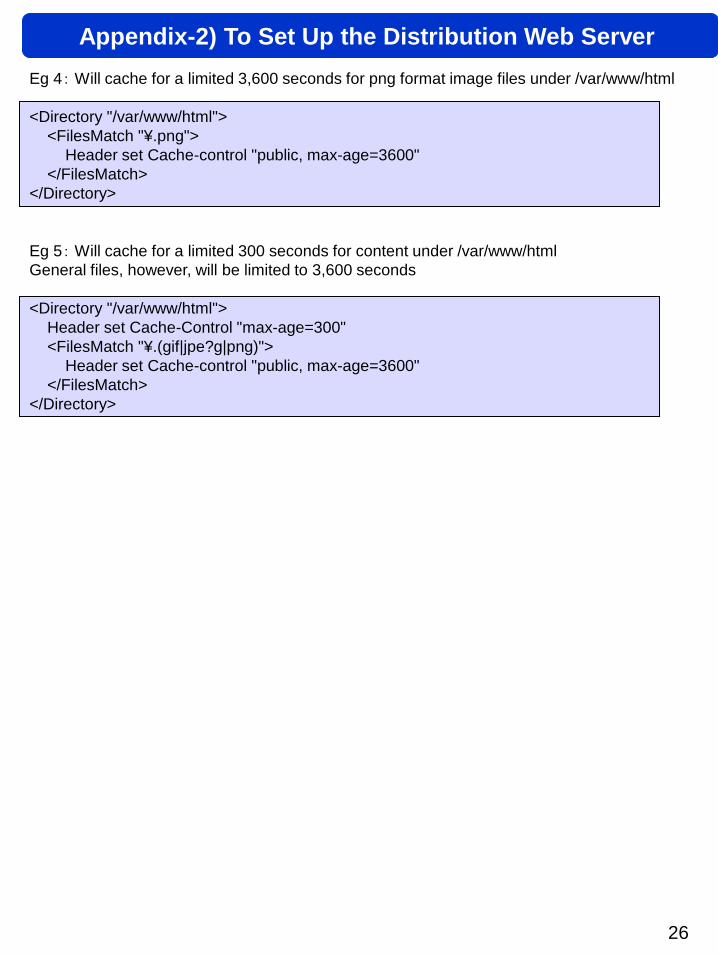
Eg 4: Will cache for a limited 3,600 seconds for png format image files under /var/www/html
<Directory "/var/www/html">
<FilesMatch "¥.png">
Header set Cache-control "public, max-age=3600"
</FilesMatch>
</Directory>
Eg 5: Will cache for a limited 300 seconds for content under /var/www/html
General files, however, will be limited to 3,600 seconds
<Directory "/var/www/html">
Header set Cache-Control "max-age=300"
<FilesMatch "¥.(gif|jpe?g|png)">
Header set Cache-control "public, max-age=3600"
</FilesMatch>
</Directory>
Appendix-2) To Set Up the Distribution Web Server
27
-Setting for IIS 【Using Windows】
1. Click Start in the task bar Control tools Internet information service (IIS) Manager
2. Transfer to the site, application or directory where setting cache using the connection
window.
3. Double click HTTP Response Header in the Home window.
4. Click Operate Common Header Settings on the HTTP Response Header
5. Place a check in On in Expired Web Content in the Common HTTP Response Header
Setting dialogue box
6. 6-A). When designating the cache valid period
Enter the figure in Until Expiring Date
6-B). When designating the date of a valid cache date
Enter a figure for a Valid Coordinated Universal Time (UTC)
Note) Use Japan standard time for UTC
If the Japan standard time is 20:00, it would be 11:00 UTC
If the Japan standard time is 11th 03:00, it would be 10th 18:00 UTC
7. Click OK in the Common HTTP Response Header Settings dialogue box
Appendix-2) To Set Up the Distribution Web Server
28
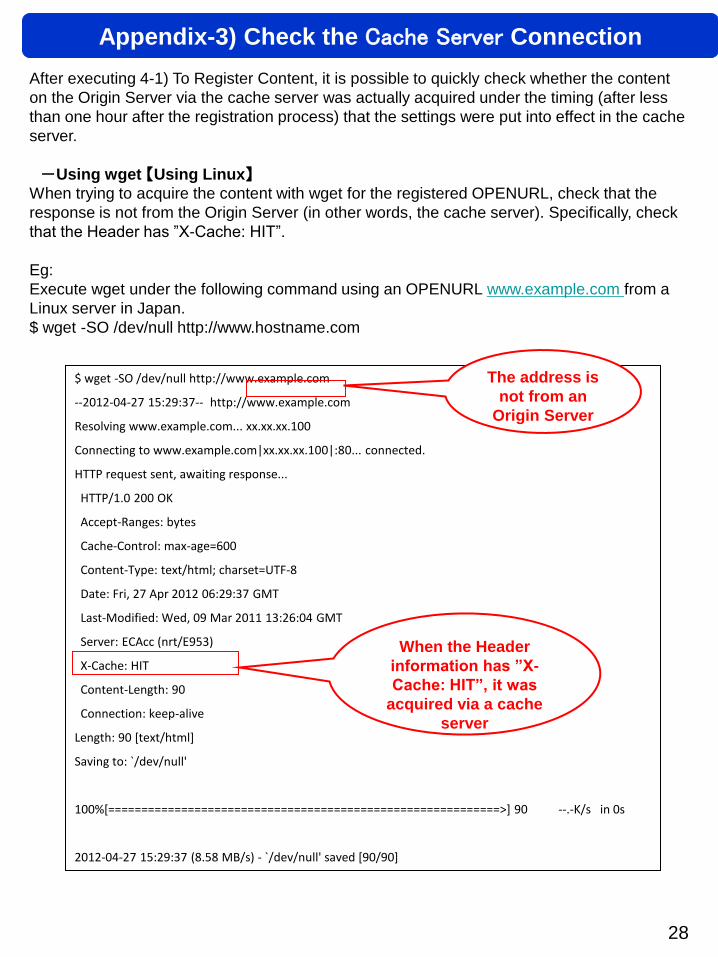
After executing 4-1) To Register Content, it is possible to quickly check whether the content
on the Origin Server via the cache server was actually acquired under the timing (after less
than one hour after the registration process) that the settings were put into effect in the cache
server.
-Using wget 【Using Linux】
When trying to acquire the content with wget for the registered OPENURL, check that the
response is not from the Origin Server (in other words, the cache server). Specifically, check
that the Header has ”X-Cache: HIT”.
Eg:
Execute wget under the following command using an OPENURL www.example.com from a
Linux server in Japan.
$ wget -SO /dev/null http://www.hostname.com
$ wget -SO /dev/null http://www.example.com
--2012-04-27 15:29:37-- http://www.example.com
Resolving www.example.com... xx.xx.xx.100
Connecting to www.example.com|xx.xx.xx.100|:80... connected.
HTTP request sent, awaiting response...
HTTP/1.0 200 OK
Accept-Ranges: bytes
Cache-Control: max-age=600
Content-Type: text/html; charset=UTF-8
Date: Fri, 27 Apr 2012 06:29:37 GMT
Last-Modified: Wed, 09 Mar 2011 13:26:04 GMT
Server: ECAcc (nrt/E953)
X-Cache: HIT
Content-Length: 90
Connection: keep-alive
Length: 90 [text/html]
Saving to: `/dev/null'
100%[===========================================================>] 90 --.-K/s in 0s
2012-04-27 15:29:37 (8.58 MB/s) - `/dev/null' saved [90/90]
The address is
not from an
Origin Server
When the Header
information has ”X-
Cache: HIT”, it was
acquired via a cache
server
Appendix-3) Check the Cache Server Connection
29
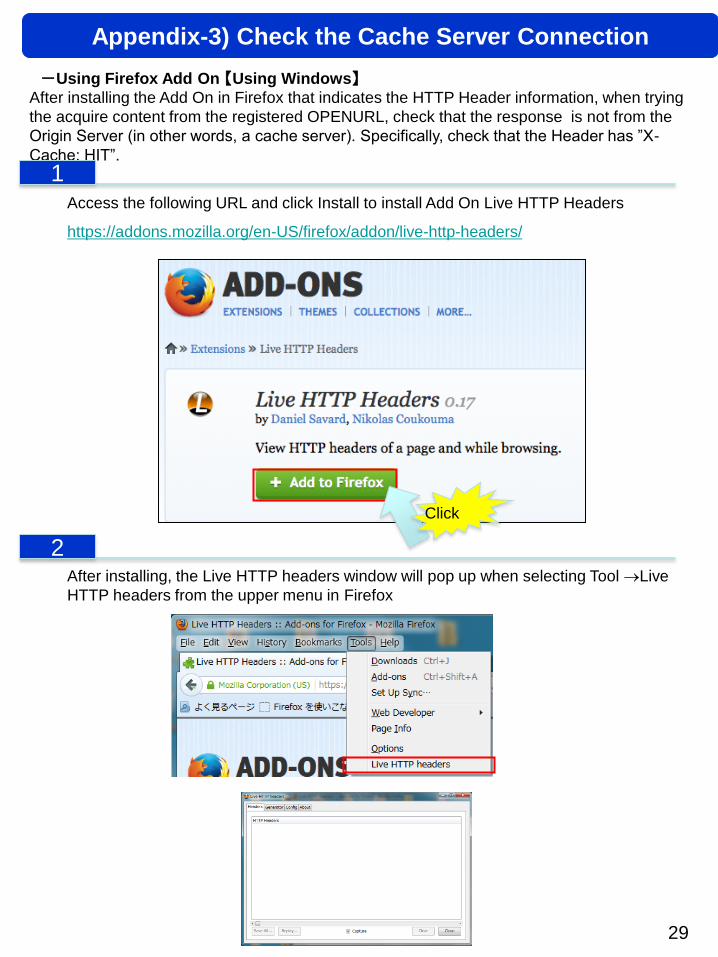
-Using Firefox Add On 【Using Windows】
After installing the Add On in Firefox that indicates the HTTP Header information, when trying
the acquire content from the registered OPENURL, check that the response is not from the
Origin Server (in other words, a cache server). Specifically, check that the Header has ”X-
Cache: HIT”.
Access the following URL and click Install to install Add On Live HTTP Headers
https://addons.mozilla.org/en-US/firefox/addon/live-http-headers/
After installing, the Live HTTP headers window will pop up when selecting Tool Live
HTTP headers from the upper menu in Firefox
Appendix-3) Check the Cache Server Connection
1
Click
2
http://www.example.com/test/contents.png HTTP/1.1
www.example.com
http://www.example.com/index.html
xxxxx
30
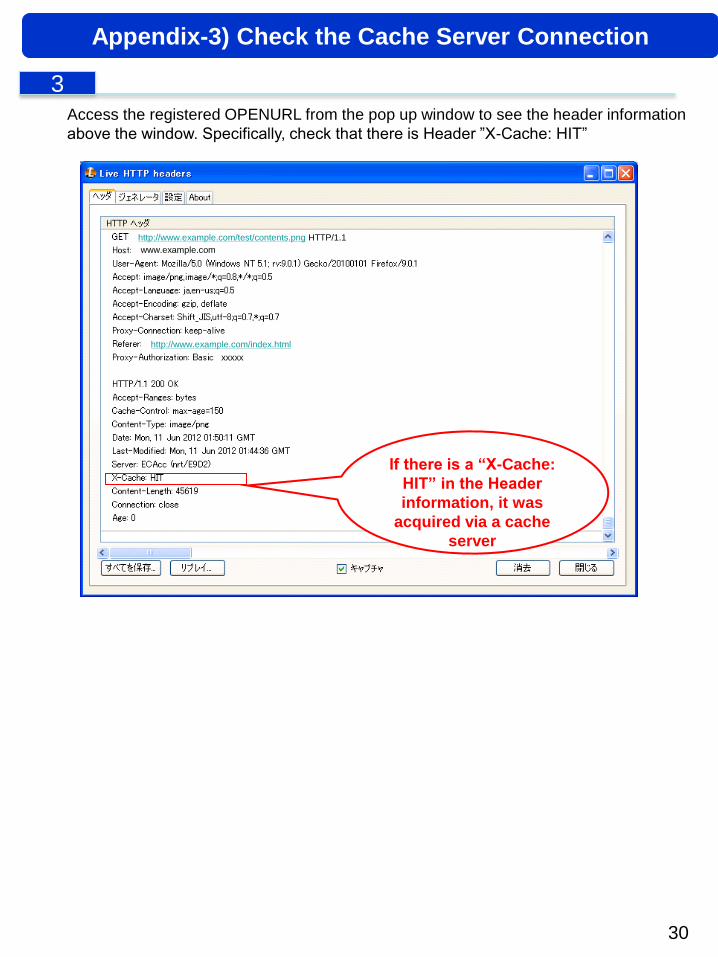
Access the registered OPENURL from the pop up window to see the header information
above the window. Specifically, check that there is Header ”X-Cache: HIT”
If there is a “X-Cache:
HIT” in the Header
information, it was
acquired via a cache
server
Appendix-3) Check the Cache Server Connection
3
31
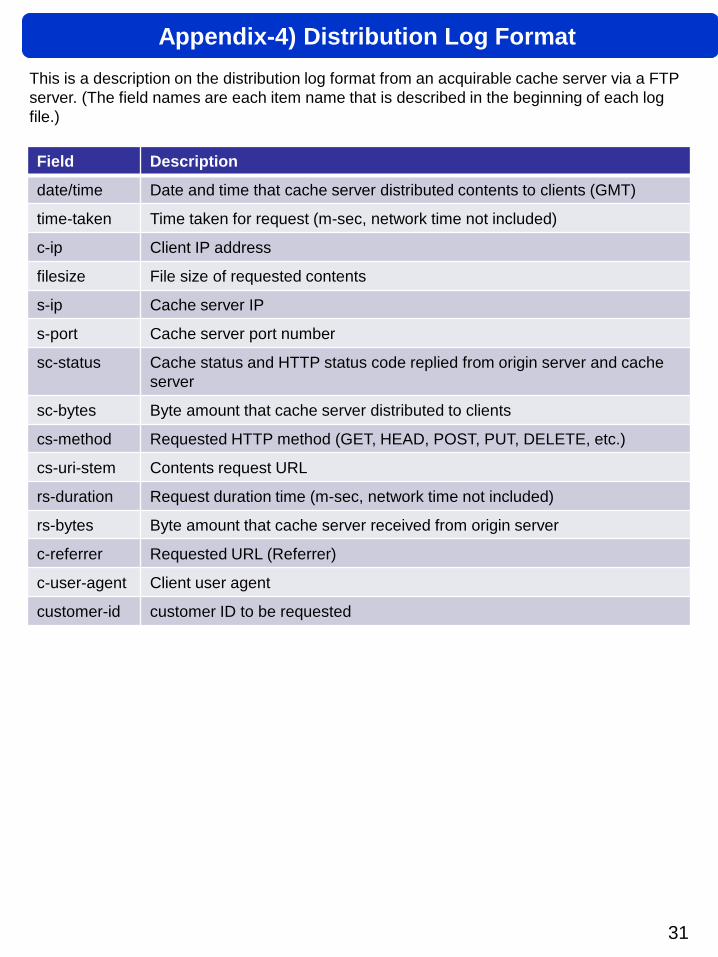
This is a description on the distribution log format from an acquirable cache server via a FTP
server. (The field names are each item name that is described in the beginning of each log
file.)
Appendix-4) Distribution Log Format
Field Description
date/time Date and time that cache server distributed contents to clients (GMT)
time-taken Time taken for request (m-sec, network time not included)
c-ip Client IP address
filesize File size of requested contents
s-ip Cache server IP
s-port Cache server port number
sc-status Cache status and HTTP status code replied from origin server and cache
server
sc-bytes Byte amount that cache server distributed to clients
cs-method Requested HTTP method (GET, HEAD, POST, PUT, DELETE, etc.)
cs-uri-stem Contents request URL
rs-duration Request duration time (m-sec, network time not included)
rs-bytes Byte amount that cache server received from origin server
c-referrer Requested URL (Referrer)
c-user-agent Client user agent
customer-id customer ID to be requested
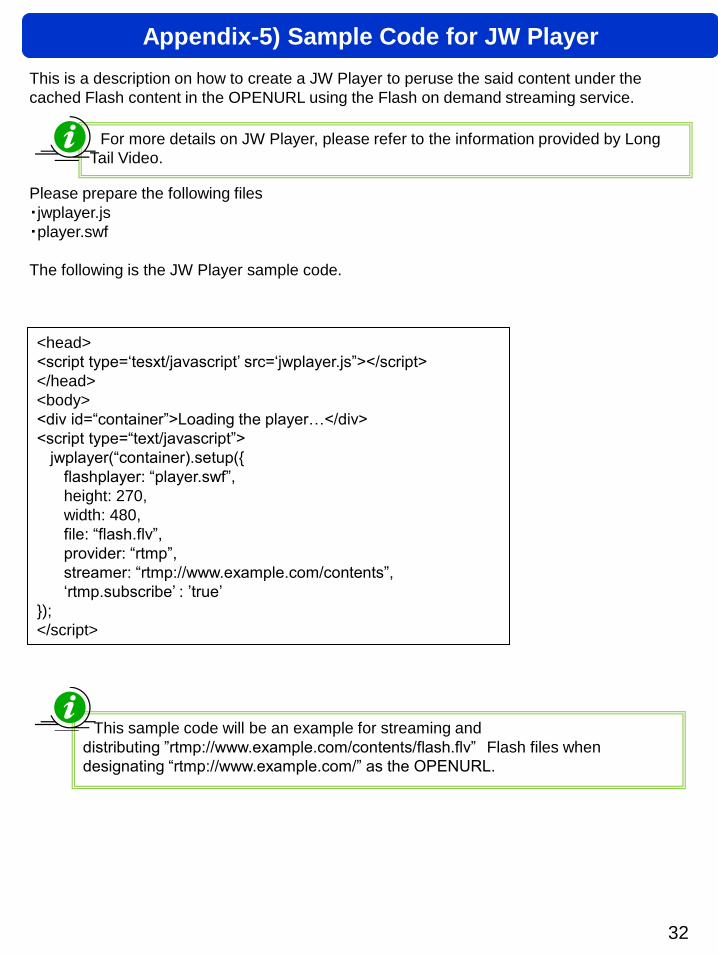
<head>
<script type=‘tesxt/javascript’ src=‘jwplayer.js”></script>
</head>
<body>
<div id=“container”>Loading the player…</div>
<script type=“text/javascript”>
jwplayer(“container).setup({
flashplayer: “player.swf”,
height: 270,
width: 480,
file: “flash.flv”,
provider: “rtmp”,
streamer: “rtmp://www.example.com/contents”,
‘rtmp.subscribe’ : ’true’
});
</script>
32
This is a description on how to create a JW Player to peruse the said content under the
cached Flash content in the OPENURL using the Flash on demand streaming service.
Please prepare the following files
・jwplayer.js
・player.swf
The following is the JW Player sample code.
Appendix-5) Sample Code for JW Player
This sample code will be an example for streaming and
distributing ”rtmp://www.example.com/contents/flash.flv” Flash files when
designating “rtmp://www.example.com/” as the OPENURL.
For more details on JW Player, please refer to the information provided by Long
Tail Video.