Embed Size (px)
Citation preview
iSeries
Consolidating i5/OS, AIX, and Linux
partitions on your IBM eServer i5 system
���

iSeries
Consolidating i5/OS, AIX, and Linux
partitions on your IBM eServer i5 system
���

© Copyright International Business Machines Corporation 2005. All rights reserved.
US Government Users Restricted Rights – Use, duplication or disclosure restricted by GSA ADP Schedule Contract
with IBM Corp.
Contents
Benefits of server consolidation . . . . 1
An example server consolidation of i5/OS, AIX,
Linux, and Windows(R) servers onto an IBM eServer
i5 system . . . . . . . . . . . . . . . 3
Migrating your i5/OS, AIX(R), Linux, and
Windows(R) systems to your IBM eServer i5 . . . . 4
Summary . . . . . . . . . . . . . . . 19
Disclaimer . . . . . . . . . . . . . 21
© Copyright IBM Corp. 2005 iii

iv iSeries: Consolidating i5/OS, AIX, and Linux partitions on your IBM eServer i5 system
Benefits of server consolidation
The eServer i5 system is significantly enhanced from previous models. The intent of this report is to
outline the general server consolidation process on the eServer i5 system and provide important tips,
techniques, and findings we discovered while working with the new system. Specifically, this report
focuses on the following:
1. The many benefits of server consolidation
v Lower total cost of ownership (TCO)
v Simplified hardware infrastructure
v Hardware virtualization
v Maximum resource utilization
v Simplified backup and recovery2. Example server consolidation scenario
3. Example server consolidation process for migrating i5/OS, AIX, Linux, and Windows(R) onto the
eServer i5 system, including:
v Explanations of new concepts and terminology for the eServer i5 system
v Important things to consider while doing server consolidation
v Key findings we discovered while working on the new eServer i5 system
The advent of the Internet has had a tremendous impact on businesses. Virtually every business, no
matter its size, has a presence on the Internet. But this presence comes at a cost. Typically, a business has
several firewalls, routers, switches, Web servers, email servers, Domain Name Servers (DNS) , file servers,
and database application servers as a part of their Internet presence. More often than not, the business’
servers are running heterogeneous operating systems that are expensive to maintain, including: hardware
maintenance contracts, software support contracts, software licenses, software upgrades, and separate
administrative staff for the different operating environments. The eServer i5 system has advanced
partitioning capabilities that allow a business to consolidate i5/OS, AIX, Linux, and Windows servers
(Windows requires optional integrated xSeries(R) adapters) onto one system to reduce, if not eliminate,
these excessive costs.
Consolidating i5/OS, AIX, Linux, and Windows servers onto an eServer i5 system allows for maximum
resource utilization. The eServer i5 system allows dynamic allocation of processors, memory, and storage
to i5/OS, AIX, and Linux. Windows servers on an eServer i5 system support dynamic allocation of
storage. In an environment with many different physical servers, there will always be systems that are
under utilized and systems that are over utilized. For example, your email servers may only be utilizing
50% of its processing capacity while your Web servers are struggling to keep up with all your Web
transactions during peak business times. By consolidating your servers onto an eServer i5, you can
dynamically move processing power between partitions without bringing them down or interrupting any
of their workload. You can decide where the processing power is needed most and you can change it
dynamically anytime it is needed elsewhere.
In addition to dynamic allocation of processing power, i5/OS, Linux, and AIX servers support dynamic
allocation of memory. AIX and i5/OS allow allocating additional memory and removing excess memory
on the fly. Linux has the same capability to add and remove memory, except the Linux partition must be
shut down and restarted for the memory change to take effect. This flexibility for moving memory
resources ensures all the servers have the right amount of memory when they need it.
Storage is assigned to each i5/OS, Linux, AIX, and Windows server when they are created on the eServer
i5 system. Linux and AIX support either physical disk units or virtual disks units. The virtual disk units
are carved out from an i5/OS partition’s storage. Windows servers support only virtual disk units that
© Copyright IBM Corp. 2005 1

are carved out from an i5/OS partition’s storage. Virtual disk units that are created from an i5/OS
partition have several advantages over physical disk units, including:
v Single backup and recovery solution
Virtual disk units that are created for AIX/Linux/Windows servers are network server storage objects
(NWSSTG objects) that reside on the hosting i5/OS partition. That allows a single backup solution for
the hosting i5/OS partition and all the hosted servers. Backup the i5/OS hosting partition and the
virtual disk units will get backed up also. The NWSSTG objects can be restored individually at any
time or restored with the hosting i5/OS partition in case of a disaster recovery situation. However, it is
important to realize that if any physical disk units are assigned in addition to the virtual disk units,
only the virtual disk units are backed up when the hosting i5/OS system is saved. For this reason,
partitions that have physical disk units require a separate backup solution for data residing on the
physical disk units.
v Automatic RAID
Since the NWSSTG objects reside on the i5/OS partition, they will automatically take advantage of the
eServer i5 system disk mirroring and RAID-5 capabilities without having to configure any disk
protection on the AIX, Linux, or Windows servers themselves.
v Dynamic creation and allocation of virtual disks
Additional virtual disk units can be created and dynamically added to AIX, Linux, and Windows
servers while they are up and running. The only consideration is the hosting i5/OS must have enough
free storage available to create the additional virtual disk units. Physical disk units can also be
dynamically added to AIX and Linux servers while they are up and running. However, this would
require that the eServer i5 system has physical disk units that are not assigned to any other partition.
Also, AIX and Linux cannot utilize any storage adapter that is on the same bus as a Combined
Function IOP. The one exception to this restriction, is if the storage adapter comes before the IOP on
that bus.
v Increased availability for AIX/Linux servers
Utilizing virtual disks in a specific configuration allows for AIX and Linux servers to be backed up
without having to shut them down. This is accomplished by using software RAID 1 (disk mirroring)
across virtual disks hosted by separate i5/OS partitions.
Beyond maximum resource utilization, consolidating servers onto the eServer i5 system also allows the
use of virtual Ethernet for high speed communication between partitions. The eServer i5 system allows
the creation of up to 4094 virtual Ethernet local area networks (LAN) that run at bus speeds. Partitions on
the eServer i5 system can utilize any of these virtual Ethernet LANs to communicate with other
partitions. Not only is the virtual Ethernet fast, it is also secure as it is a virtual entity contained entirely
within the eServer i5 system. There is no external switch or hub that could be compromised to monitor
traffic. In fact, by consolidating all AIX/Linux servers onto the eServer i5 system, it is possible to replace
some existing switches or hubs. This would allow the elimination of any support/maintenance contracts
associated with that network hardware. Alternatively, that hardware could be utilized elsewhere in the
network infrastructure. The consolidation would also help simplify any existing physical network by
removing Ethernet cables and reducing congestion.
2 iSeries: Consolidating i5/OS, AIX, and Linux partitions on your IBM eServer i5 system
An example server consolidation of i5/OS, AIX, Linux, and Windows(R)
servers onto an IBM eServer i5 system
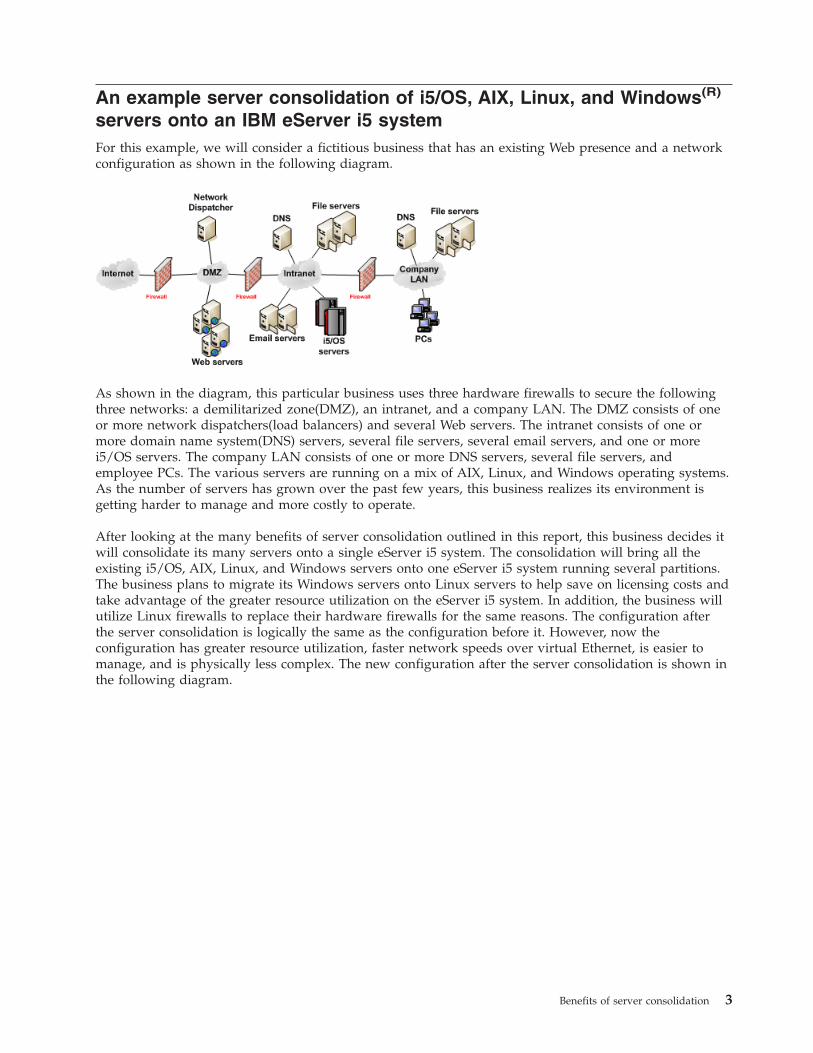
For this example, we will consider a fictitious business that has an existing Web presence and a network
configuration as shown in the following diagram.
As shown in the diagram, this particular business uses three hardware firewalls to secure the following
three networks: a demilitarized zone(DMZ), an intranet, and a company LAN. The DMZ consists of one
or more network dispatchers(load balancers) and several Web servers. The intranet consists of one or
more domain name system(DNS) servers, several file servers, several email servers, and one or more
i5/OS servers. The company LAN consists of one or more DNS servers, several file servers, and
employee PCs. The various servers are running on a mix of AIX, Linux, and Windows operating systems.
As the number of servers has grown over the past few years, this business realizes its environment is
getting harder to manage and more costly to operate.
After looking at the many benefits of server consolidation outlined in this report, this business decides it
will consolidate its many servers onto a single eServer i5 system. The consolidation will bring all the
existing i5/OS, AIX, Linux, and Windows servers onto one eServer i5 system running several partitions.
The business plans to migrate its Windows servers onto Linux servers to help save on licensing costs and
take advantage of the greater resource utilization on the eServer i5 system. In addition, the business will
utilize Linux firewalls to replace their hardware firewalls for the same reasons. The configuration after
the server consolidation is logically the same as the configuration before it. However, now the
configuration has greater resource utilization, faster network speeds over virtual Ethernet, is easier to
manage, and is physically less complex. The new configuration after the server consolidation is shown in
the following diagram.
Benefits of server consolidation 3

As you can see in the picture, the first Linux firewall separates the Internet from the HTTP servers on
virtual Ethernet LAN zero (VLAN0). A second Linux firewall is connected to virtual Ethernet LANs one
(VLAN1) and two (VLAN2) and separates the HTTP servers from the application servers, email servers,
and file servers. The third Linux firewall utilizes virtual Ethernet LAN three (VLAN3) and separates the
application servers, email servers, and file servers from the company’s own LAN.
This single example illustrates the powerful partitioning capabilities of the eServer i5 system. This is just
one example of what server consolidation can do for a business. In the next few sections of this report,
we will focus on how to perform this server consolidation, and we will give you additional resources and
useful tips on how to do it for your own environment.
Migrating your i5/OS, AIX(R), Linux, and Windows(R) systems to your
IBM eServer i5
Step 1. Plan your logical partitioning
The first step in planning is to get a rough idea of the size of the partitions and the size of the server you
need. You should collect performance data from all the servers involved in the consolidation. Your IBM
business partner or IBM representative may assist you in evaluating this performance data. You can also
obtain sizing estimates using the eServer Workload Estimator (WLE)
. The tool is currently capable
4 iSeries: Consolidating i5/OS, AIX, and Linux partitions on your IBM eServer i5 system
of estimating the computer resources required for Domino(TM), WebSphere(R) Commerce, WebSphere
Application Server, Web serving and traditional workloads. The Workload Estimator projects the most
current eServer models meeting the capacity requirements within the CPU percent utilization objectives.
The next step in planning your logical partitioning is to use the information gathered from the WLE to
help you use the Logical Partitioning Validation Tool (LVT)
. The LVT is a PC based tool intended to
be a standalone Java(TM) application. Use this tool to create a blueprint of how the system will be
partitioned. The output from this application can be used to help order your system, or for a system you
already have, you can input the hardware configuration manually. The LVT will allow you to configure
your partitions and assign resources. This information is vital when creating the partitions using the
Hardware Management Console (HMC).
Here are some considerations when planning your logical partitioning:
v The HMC uses a Resource Management and Control (RMC) connection to talk to each partition for
certain operations. AIX, Linux, and i5/OS each use this RMC connection to send problem and error
reports that have been logged on the partition to the HMC to be reported for service. AIX and Linux
partitions require an RMC connection for several HMC functions including, but not limited to,
dynamic logical partitioning and operating system shutdown and restart. Linux does not come with
the software packages that provide the client piece of the RMC connection. You can download the
packages for the RMC connection from the Service and productivity tools for Linux on POWER
Web site.
For the RMC connection to work successfully a physical LAN adapter is recommended for each
partition. If you do not have a physical LAN adapter for each partition, it is possible to configure your
network so that a virtual Ethernet LAN can access a physical LAN, This would allow the HMC on the
physical network to obtain an RMC connection to a partition on a virtual Ethernet LAN. For
information on configuring your network to allow a virtual Ethernet LAN to access a physical LAN,
see section 2.5.1 Virtual LAN configuration in the IBM Redbook Linux on the IBM eServer iSeries(TM)
Server: An Implementation Guide, SG24-6232
. Note that any method discussed in this Redbook
may be used except Network Address Translation (NAT). The reason NAT may not be used is the
HMC RMC connection tries to connect to the actual IP address of a partition and not the NAT IP
address.
v As you use the LVT to plan your partitions, it is important to realize that AIX and Linux partitions
cannot utilize any storage adapter that is on the same bus as a Combined Function IOP. The one
exception to this restriction is if the storage adapter comes before the IOP on that bus. This restriction
is not enforced when you create your profile on the HMC, but it will be enforced when you attempt to
activate a given profile for a Linux or AIX partition. This will prevent the partition from activating.
Step 2. Upgrade software and hardware to proper levels
AIX servers should be at the latest AIX 5L(TM) version 5.3 so they can take full advantage of virtual
devices and dynamic partitioning on your i5 server. AIX 5L version 5.2 is supported on the eServer i5
system, but it does not support virtual devices and does not have many of the dynamic partitioning
capabilities of AIX version 5.3.
If you have any existing hosted Linux partitions on an iSeries server, you will need to upgrade to a
version of Linux that supports the new eServer i5 system’s hardware. The supported Linux versions are
SuSE SLES9 and Red Hat Enterprise Linux AS. After you have successfully completed this upgrade, you
can restore your hosted Linux partition onto the eServer i5 system. However, Linux partitions on eServer
i5 system require a different kernel than on iSeries servers, so you will have to replace the kernel after
you have restored the hosted Linux partition on the eServer i5 system. For information on migrating
Linux from existing iSeries hardware to the new eServer i5 system see the topic Upgrading and preparing
Linux for server upgrade
in the IBM eServer Hardware Information Center and the IBM Redbook
Benefits of server consolidation 5

draft Linux on i5: Implementation Guide
. For any Linux servers you cannot or do not want to
upgrade, you will need to perform a new installation of SLES9 or Red Hat Enterprise Linux AS on the
new hardware and migrate any existing data or applications.
You can migrate any existing iSeries operating system, user data, and software to the new eServer i5
system from OS/400(R) V5R1, V5R2, or V5R3. Before migrating iSeries software, please see the V5R3
Software Upgrade Planning Web site. The migration process involves upgrading your existing server to
V5R3, performing a complete save of your existing server, and restoring the system onto the new eServer
i5 system. If you cannot or do not want to upgrade to V5R3 on your existing server, you can still migrate
user data and applications from a V5R1/V5R2 source server onto a newly installed i5/OS server. For
complete details on migrating from an iSeries server to the eServer i5 system see the topic Migrating or
upgrading your server->iSeries servers
in the IBM eServer Hardware Information Center.
Step 3. Perform logical partitioning on eServer i5 system
Some eServer i5 system models and configurations require a Hardware Management Console (HMC) to
partition your server. This report assumes the use of an HMC for all logical partitioning functions. For
more information on using the HMC and performing logical partitioning, see the section Partitioning the
Server in the eServer Hardware Information Center
.
Because logical partitioning on the eServer i5 system requires an HMC, the process is significantly
different from previous iSeries models. The following sections summarize the important terminology and
concepts to understand before creating any logical partitions.
v Understanding profiles for partitions and the system
There are two types of profiles, partition profiles and system profiles. A partition profile specifies a
configuration that you want the partition to use upon activation. This is a convenient way to start your
partition with different configurations. A system profile contains an ordered list of partition profiles to
attempt to start. A system profile can be activated when turning on your hardware, or used to
manually activate a group of partitions. A system profile is convenient for starting a group of partition
profiles since the HMC graphical user interface (GUI) only allows activation of one profile at a time.
Multiple partition profiles can exist for each partition, and multiple system profiles can exist for a
system. For more information concerning profiles see the eServer Hardware Information Center -
Components of a partition > Profiles
.
Note that when you make changes to a partition using dynamic logical partitioning operations, no
changes are made to any partition profile. For this reason, the next time you activate your partition
you will not have any of the dynamic changes. Instead it will use the unchanged configuration from
the profile. Make sure that you also change the profile if you use dynamic logical partitioning and
want that change to be in effect the next time the partition is activated.
v Understanding processor resources
Processors can be assigned to partitions as dedicated or shared. If a partition uses dedicated processors,
then the processors must be assigned in whole numbers. This includes adding and removing
processors using dynamic logical partitioning. By default, when a partition using dedicated processors
is turned off, those idle processors are utilized by partitions that are uncapped and using shared
processors. You can use dynamic logical partitioning to dynamically change a running partition
processor mode to either shared or dedicated. If a partition uses shared processors, you can assign
fractions of a processor to that partition in increments of one-hundredth (.01) of a processor, with a
minimum value of one-tenth (.10) of a processor. This allows multiple partitions to share a physical
processor. When configuring shared processors, you also need to configure virtual processors. A virtual
processor represents a single physical processor to the operating system. For every virtual processor, at
least one-tenth (.10) shared processor is required for the partition. However, you should always allocate
the minimum number of virtual processors needed to support the workload in the partition. The
number of virtual processors for a partition should never be larger than the number of physical
6 iSeries: Consolidating i5/OS, AIX, and Linux partitions on your IBM eServer i5 system
processors that are available for it to use. For example, suppose you have a 4-way system and will be
defining 3 shared-processor partitions. Then, the maximum number of virtual processors you should
configure for any of the partitions is 4 virtual processors. If one of the partitions does not need to use
more than 1 physical processor, then you should allocated only one virtual processor.
Partitions that use shared processors can be configured as capped or uncapped. This is a new concept
for the eServer i5 system. Partitions using shared processors, regardless of their designation as
uncapped or capped, share unused processor cycles with other shared processor partitions. This
unused processor resource can then be utilized by other partitions that use shared processor resources
and are uncapped. A capped partition is limited to using the number of shared processor units that it
has been assigned. It is never allowed to exceed that processing capacity. Uncapped partitions can have
their processor resource increased based on the activity of the processors. If an uncapped partition
requires more processor resource than it currently has that partition will be able to grab unused
processor resource from other partitions that utilize shared processors. The key factor in determining
whether or not an uncapped partition gets extra processor resource is the weight. The weight is
defined for each uncapped partition and has a value between 0 to 255 (default is 128). When more than
one partition needs extra processor resource, unused processor capacity is distributed in proportion to
the weight values of each partition. The higher the weight, the more unused processor resource a
partition will receive.
v Understanding the differences and implications for required and desired designation
When assigning hardware to partitions make sure to utilize the required or desired options. If the
required flag is checked, then that hardware will not be accessible to any other partition, even when
that partition is turned off. Usually, a required flag will be used for storage adapters, LAN adapters,
and other resources deemed absolutely necessary for partition operation. Hardware that is not required
and assigned to a partition is considered desired. This hardware is not required to operate the
partition. An example would be a CD-ROM drive attached to a storage adapter that you want multiple
partitions to utilize. The first partition to activate when that desired resource is not being used will get
that resource for its partition. If another partition needs to utilize that resource there are two ways to
reassign it. The first way is to use dynamic logical partitioning to remove the physical adapter resource
from the owning partition, then activate the partition that needs to utilize that hardware. Use this
option if the partition that needs the resource is not currently turned on. The second way is to use
dynamic logical partitioning to move the physical adapter resource from a running partition to another
running partition.
v Understanding Virtual Adapters
On IBM eServer hardware systems you can create virtual adapters including Ethernet, Small Computer
Systems Interface (SCSI), and serial, The virtual adapters interact with the operating system like any
other adapter card, except that they are not physically present. This allows multiple partitions to use
limited resources virtually. Each virtual adapter is assigned a slot number that must be unique for the
partition. Before you create virtual adapters for a partition, it is important to specify the value for the
field Number of virtual adapters on the HMC. This field indicates the maximum number of virtual
devices this partition can have and must be greater than or equal to the actual number of virtual
adapters assigned. This value cannot be modified using dynamic logical partitioning. To change the
value, you need to shut down your partition and activate it again from the HMC. You do not want to
set this value significantly higher than the actual number of virtual adapters, because the higher this
number, the more memory is reserved by the partition for virtual adapters. You will need to plan up
front how many virtual adapters you may need and possibly increase that number slightly to allow for
a few dynamic logical partitioning operations.
The following sections discuss each type of virtual adapter.
– Virtual Ethernet provides similar function as a 1 Gigabit (Gb) Ethernet adapter. A logical partition
can use virtual Ethernet to establish multiple high-speed connections to other logical partitions. AIX,
i5/OS, and Linux partitions can communicate with each other using TCP/IP over the virtual
Ethernet communication ports. AIX requires a level of 5.3 or greater to recognize the virtual Ethernet
adapters.
The HMC allows you to create multiple virtual Ethernet adapters on a partition that can either be
for the same virtual LAN or a separate virtual LAN. This is done using the Port virtual LAN ID
Benefits of server consolidation 7
field. To create multiple virtual Ethernet adapters on separate LANs, you will need to change the
Port virtual LAN ID field to specify a different virtual LAN. These virtual LANs are unique based
on the port virtual LAN ID. Each LAN ID can be considered a separate virtual LAN and does not
have access to another virtual LAN unless some type of IP forwarding is configured. Each partition
on an eServer i5 system has the potential to use any virtual LAN.
– Virtual SCSI provides a client and server relationship. For i5/OS you can carve out storage from
available resources in your disk pool or pools, assign this to a server and allow a client partition to
have access to this storage resource. These virtual SCSI adapters are created using the HMC. When
creating these Virtual SCSI adapters, make sure to only allow the selected remote partition to
connect. If this is not done, then any other partition could connect to the Virtual SCSI Server and
have access to that partition’s data. This is also an advantage to create a read-only file system of
static data, which can be used on multiple partitions.
The Virtual SCSI server owns the physical resources and acts as a server to a client partition. i5/OS
allows the creation of network storage spaces up to 1 TB in size. The creation of these network
storage spaces is done using the CRTNWSSTG command from the i5/OS command line. When the
network storage space is created, it can be linked to a network server description, which acts as the
Virtual SCSI Server and allows authorized clients to connect to it to access to the network storage
space linked to it.
The Virtual SCSI client acts as a client to the Virtual SCSI server on i5/OS. This client will be able to
see the network storage spaces linked to the network server description object when the network
server description object is varied on. AIX and Linux both see these linked network storage spaces
as regular SCSI disks and allow you to partition them.
The sequence of steps to configure the virtual SCSI client and virtual SCSI server are extremely
important. The first thing to realize when you create a virtual SCSI adapter is you must select a
remote partition from a drop-down list on the HMC. For this reason, the remote partition must
already exist before you can create the virtual SCSI adapter. The second key aspect of the virtual
SCSI configuration is matching the slot numbers. You need to make sure the slot numbers specified
for the remote partition field match the actual slot number that the remote partition is using. This is
necessary for both the client and server virtual SCSI adapters. The following shows how to
configure the virtual SCSI client and virtual SCSI server and includes a diagram that illustrates how
the slot numbers must match.
- Desired virtual SCSI configuration: Configure Partition A with a virtual SCSI server and allow
only Partition B access to it. Configure Partition B with a virtual SCSI client pointing to the virtual
SCSI server on Partition A.
Assumptions: Partition A and Partition B do not exist
1. Create Partition ANote: You cannot create the virtual SCSI server at this time because Partition B does not exist
to allow only Partition B access to that virtual SCSI server.
2. Create Partition B, and create the virtual SCSI client adapter. Note the slot number and
Remote partition virtual slot number values. These values are needed to get a successful
connection from the virtual SCSI server to the virtual SCSI client.
3. Change the profile for Partition A to include a virtual SCSI server. Set the virtual SCSI server
to allow only Partition B to access it. Make sure you set the slot number for the virtual SCSI
server adapter to be the same as the value you previously set for the Remote partition
virtual slot number when you created the virtual SCSI client adapter. For this virtual SCSI
server adapter you must also make sure to set the Remote partition virtual slot number to
the value of the slot number of the virtual SCSI client adapter on the remote system.
This diagram depicts how the server and client virtual SCSI adapters should look. Notice the
slot number of each and how it is the same as the other Remote partition virtual slot
8 iSeries: Consolidating i5/OS, AIX, and Linux partitions on your IBM eServer i5 system
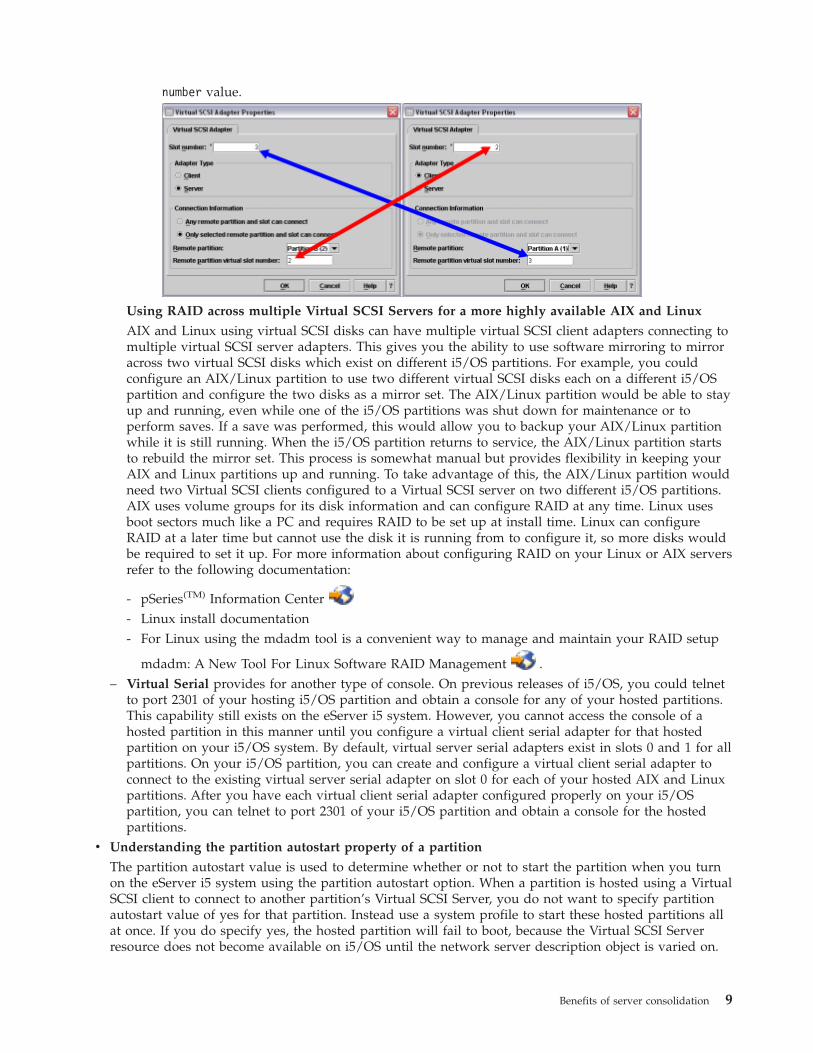
number value.
Using RAID across multiple Virtual SCSI Servers for a more highly available AIX and Linux
AIX and Linux using virtual SCSI disks can have multiple virtual SCSI client adapters connecting to
multiple virtual SCSI server adapters. This gives you the ability to use software mirroring to mirror
across two virtual SCSI disks which exist on different i5/OS partitions. For example, you could
configure an AIX/Linux partition to use two different virtual SCSI disks each on a different i5/OS
partition and configure the two disks as a mirror set. The AIX/Linux partition would be able to stay
up and running, even while one of the i5/OS partitions was shut down for maintenance or to
perform saves. If a save was performed, this would allow you to backup your AIX/Linux partition
while it is still running. When the i5/OS partition returns to service, the AIX/Linux partition starts
to rebuild the mirror set. This process is somewhat manual but provides flexibility in keeping your
AIX and Linux partitions up and running. To take advantage of this, the AIX/Linux partition would
need two Virtual SCSI clients configured to a Virtual SCSI server on two different i5/OS partitions.
AIX uses volume groups for its disk information and can configure RAID at any time. Linux uses
boot sectors much like a PC and requires RAID to be set up at install time. Linux can configure
RAID at a later time but cannot use the disk it is running from to configure it, so more disks would
be required to set it up. For more information about configuring RAID on your Linux or AIX servers
refer to the following documentation:
- pSeries(TM) Information Center
- Linux install documentation
- For Linux using the mdadm tool is a convenient way to manage and maintain your RAID setup
mdadm: A New Tool For Linux Software RAID Management
.– Virtual Serial provides for another type of console. On previous releases of i5/OS, you could telnet
to port 2301 of your hosting i5/OS partition and obtain a console for any of your hosted partitions.
This capability still exists on the eServer i5 system. However, you cannot access the console of a
hosted partition in this manner until you configure a virtual client serial adapter for that hosted
partition on your i5/OS system. By default, virtual server serial adapters exist in slots 0 and 1 for all
partitions. On your i5/OS partition, you can create and configure a virtual client serial adapter to
connect to the existing virtual server serial adapter on slot 0 for each of your hosted AIX and Linux
partitions. After you have each virtual client serial adapter configured properly on your i5/OS
partition, you can telnet to port 2301 of your i5/OS partition and obtain a console for the hosted
partitions.v Understanding the partition autostart property of a partition
The partition autostart value is used to determine whether or not to start the partition when you turn
on the eServer i5 system using the partition autostart option. When a partition is hosted using a Virtual
SCSI client to connect to another partition’s Virtual SCSI Server, you do not want to specify partition
autostart value of yes for that partition. Instead use a system profile to start these hosted partitions all
at once. If you do specify yes, the hosted partition will fail to boot, because the Virtual SCSI Server
resource does not become available on i5/OS until the network server description object is varied on.
Benefits of server consolidation 9
Step 4. Restore existing iSeries systems onto partitions on an eServer i5 system
If the source server you are migrating is V5R3, perform a complete restore of the source server onto the
target eServer i5 system. For complete details on restoring a V5R3 system onto a new eServer i5 system
see the topic Completing the data migration with i5/OS V5R3 on the source server
in the eServer
Hardware Information Center.
If the source server is not at V5R3, restore user data and supported applications onto the new eServer i5
system. For complete details see the topic Completing the data migration from OS/400 V5R1 or V5R2
in the eServer Hardware Information Center.
Step 5. Create i5/OS Network Server Description objects
Create Network Server Description (NWSD) objects on your i5/OS server or servers for each hosted
partition on your eServer i5 system. To create a NWSD object, use the i5/OS command line on your
hosting i5/OS server, and type the command CRTNWSD and press F4 for prompts. Specify the following
information at the Create Network Server Description screen:
NWSD (Provide a name for the NWSD)
RSRCNAME (*AUTO)
TYPE (*GUEST)
ONLINE (*NO or *YES)
PARTITION (’Provide the name of your AIX or Linux logical partition’)
CODEPAGE (437)
RSTDDEVRSC (Options are *NONE, *ALL, *ALLTAPE, *ALLOPT, or tape/optical device name)
IPLSRC (*STMF, *NWSSTG, or *PANEL)
IPLSTMF (Path to stream file if IPLSRC is *STMF)
PWRCTL (*YES or *NO)
For details on most of the parameters of the CRTNWSD command see the topic Network server description
(NWSD) parameters and descriptions in the iSeries Information Center. See the following sections for
important notes on the CRTNWSD command.
v Resource Name (RSRCNAME) parameter
You need to determine if you need to specify an actual resource name in the RSRCNAME parameter. If
you configured a single virtual SCSI server on your hosting partition to only allow a single virtual
SCSI client to connect, you can specify *AUTO for the resource name. For any other configuration, you
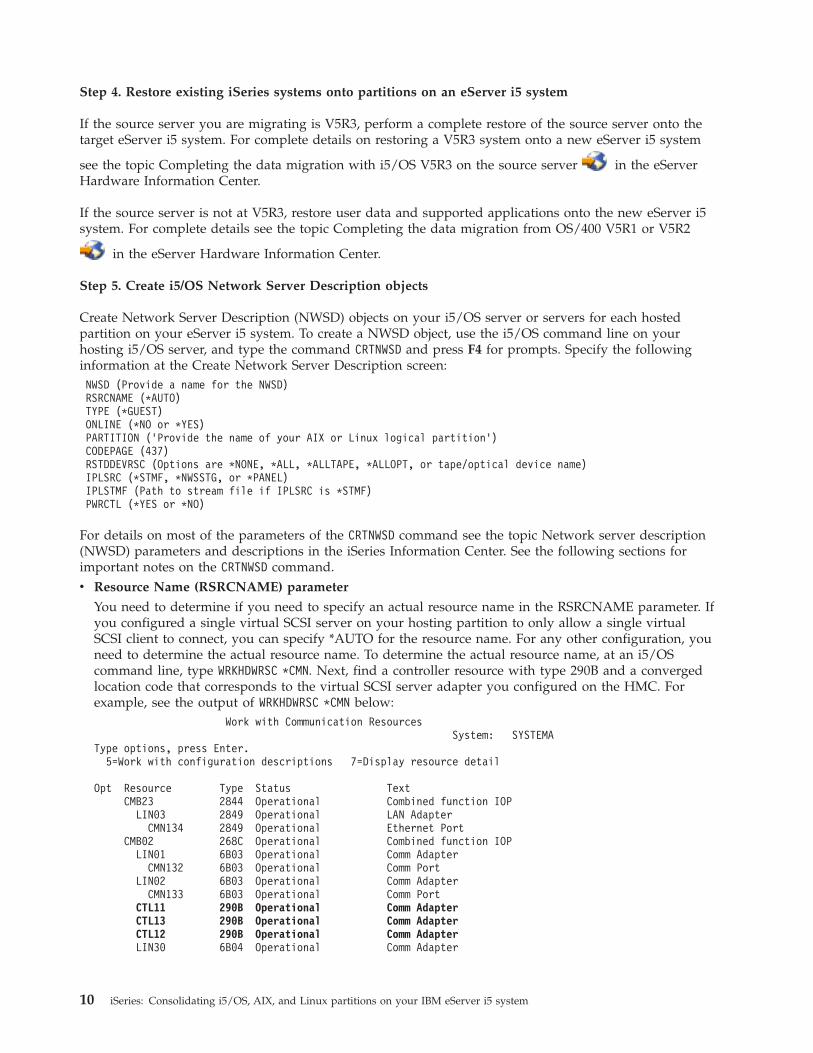
need to determine the actual resource name. To determine the actual resource name, at an i5/OS
command line, type WRKHDWRSC *CMN. Next, find a controller resource with type 290B and a converged
location code that corresponds to the virtual SCSI server adapter you configured on the HMC. For
example, see the output of WRKHDWRSC *CMN below:
Work with Communication Resources
System: SYSTEMA
Type options, press Enter.
5=Work with configuration descriptions 7=Display resource detail
Opt Resource Type Status Text
CMB23 2844 Operational Combined function IOP
LIN03 2849 Operational LAN Adapter
CMN134 2849 Operational Ethernet Port
CMB02 268C Operational Combined function IOP
LIN01 6B03 Operational Comm Adapter
CMN132 6B03 Operational Comm Port
LIN02 6B03 Operational Comm Adapter
CMN133 6B03 Operational Comm Port
CTL11 290B Operational Comm Adapter
CTL13 290B Operational Comm Adapter
CTL12 290B Operational Comm Adapter
LIN30 6B04 Operational Comm Adapter
10 iSeries: Consolidating i5/OS, AIX, and Linux partitions on your IBM eServer i5 system

In this example, there are three controller resources, CTL11, CTL12, and CTL13. Using Option 7,
Display resource detail on CTL11 gives the following output:
Display Resource Detail
System: SYSTEMA
Resource name . . . . . . . : CTL11
Text . . . . . . . . . . . . : Comm Adapter
Type-model . . . . . . . . . : 290B-001
Serial number . . . . . . . : 00-00000
Part number . . . . . . . . :
Location: U9406.570.106A78E-V1-C2
Logical address:
SPD bus:
System bus 255
System board 0
System card 0
Communications:
I/O bus 208
Adapter 2
From the Display Resource Detail screen, you can see the value of Adapter, which in this example has
a value of two. This corresponds to the slot number of the virtual SCSI server that you configured on
your HMC.
v Online at IPL (ONLINE) parameter
There is one important thing to realize about the NWSD parameter ONLINE(*YES). If you specify *YES,
the NWSD is not guaranteed to vary on at initial program load (IPL) time. If your i5/OS server has
more than one NWSD object, only one NWSD object should specify ONLINE(*YES). If more than one
NWSD object specifies ONLINE(*YES), only the first description, in alphabetical order, is varied on
during the IPL. If you have more than one NWSD object that you wish to vary on at IPL time, you
need to write a program that will start them and call this program after IPL processing has completed.
v Restricted Device Resources (RSTDDEVRSC) parameter
The NWSD parameter Restricted Device Resource (RSTDDEVRSC) specifies the virtual devices, if any,
the hosted partition is restricted from using. This parameter is important if you have hosted Linux
partitions and tape devices attached to your hosting iSeries partition . When Linux is turned on, it will
allocate all tape and optical (CD/DVD) resources of the hosting iSeries partition for the Linux partition
to use. When Linux allocates the tape devices, the hosting iSeries partition cannot use them until Linux
relinquishes them (by using the command sg_reset -d /dev/sgXXXXX, where /dev/sgXXXXX is the
correct /dev/sg device corresponding to your tape drive. ) or until Linux is turned off. If you do not
want Linux to use any of the tape devices, you can prevent this situation with the RSTDDEVRSC
parameter. By using the value RSTDDEVRSC(*ALLTAPE) you can restrict the Linux partition from
allocating any of the tape devices. Additionally, you can specify individual tape devices such as
RSTDDEVRSC(TAP01) to restrict only the TAP01 tape device. This is not an issue with the virtual optical
devices, as Linux and the hosting iSeries can share the optical device.
v Power Control (PWRCTL) parameter
The Power Controlling (PWRCTL) option is a new option on NWSD objects for eServer i5 systems. If
you specify PWRCTL(*YES), then the hosted partition associated with the NWSD object will be turned off
when the NWSD object is varied off, and turned on when the NWSD object is varied on. If you specify
PWRCTL(*NO) then the partition associated with the NWSD object will not be turned on or off when the
NWSD object is varied on/off. Instead, varying on the NWSD object will only affect the availability of
the network server storage space (NWSSTG). If you vary on the NWSD object with PWRCTL(*NO), then
the storage space or spaces linked to that NWSD object will be available for the hosted partition
associated with that NWSD object. If you vary off the NWSD object with PWRCTL(*NO), then the storage
space or spaces linked to that NWSD object will not be available for the hosted partition associated
with that NWSD object.
Be careful if you use the PWRCTL(*YES) option. If you wish to change the logical partitioning
configuration of a hosted partition, you must change the partition profile associated with that partition
Benefits of server consolidation 11
on the HMC. For that partitioning change to take effect, you must do an activate from the HMC. If you
just turn off your hosted partition by varying off the associated NWSD and then turn it back on by
varying on the associated NWSD object, it will not pick up any changes to the partition profile in the
HMC. For this reason, you may wish to use the PWRCTL(*NO) option so that you always activate the
partition from the HMC. This will ensure that you always have any changes to the partition profile
take effect each time you start the hosted partition.
Step 6. Restore previously hosted Linux partitions
For any existing hosted Linux partitions on V5R1, V5R2, and V5R3, you can save the network server
storage (NWSSTG) objects and restore them onto your new eServer i5 system.
NOTE: Linux partitions on eServer i5 systems require a different kernel than on iSeries servers. For this
reason you will have to replace the kernel after you have restored the hosted Linux partition on the
eServer i5 system. For information on migrating Linux from existing iSeries hardware to the new eServer
i5 system see the topic Upgrading and preparing Linux for server upgrade
in the IBM eServer
Hardware Information Center and the IBM Redbook draft titled Linux on i5: Implementation Guide
.
You can save NWSSTG objects to external media or to a save file (SAVF). To save a NWSSTG object to a
save file on the hosting iSeries server do the following:
1. Power down any hosted partitions that are using the NWSSTG object or objects you wish to save.
2. Create a library where you will store the save file with the command CRTLIB LNXBACKUP.
3. Create a SAVF where you will save off your NWSSTG object or objects with the command CRTSAVF
FILE(LNXBACKUP/LINUXSAVF).
4. Save off your NWSSTG object or objects with the command SAV
DEV(’QSYS.LIB/LNXBACKUP.LIB/LINUXSAVF.FILE’) OBJ((’/QFPNWSSTG/*’)). All NWSSTG objects are
stored in /QFPNWSSTG and the asterisk (*) is a special character that will match any character. For
this specific command where only the asterisk is used after the directory name, all NWSSTG objects
would be saved. If you only wanted to save the NWSSTG object named “LINUX” then specify the
parameter OBJ((’/QFPNWSSTG/LINUX’)).
Saving your NWSSTG object or objects to external media would work the same way except you would
change the DEV parameter on the SAV command. For example, to save all NWSSTG objects to your first
tape device use the command SAV DEV(’/QSYS.LIB/TAP01.DEVD’) OBJ((’/QFPNWSSTG/*’))
After you have saved your NWSSTG object or objects, you can restore them onto your new IBM i5 server.
If you saved the NWSSTG object to SAVF, you can FTP the SAVF to your target server for the restore. For
information on how to FTP a SAVF from a source server to a target server, see the topic Transfer *SAVF
files in the IBM eServer iSeries Information Center Version 5 Release 3(V5R3). If you used external media,
then you must connect the appropriate external device to your target server and place the save media
into the device. To restore your NWSSTG object or objects from a SAVF, type the command RST
DEV(’QSYS.LIB/LNXBACKUP.LIB/LINUXSAVF.FILE’) OBJ((’/QFPNWSSTG/*’)). For external media, change the
DEV parameter to specify the appropriate device. For example, to restore from the first tape device type
the command RST DEV(’/QSYS.LIB/TAP01.DEVD’) OBJ((’/QFPNWSSTG/*’)). As with the SAV command, you
can use the asterisk (*) character to match any NWSSTG object or you can enter in the name of the
NWSSTG object.
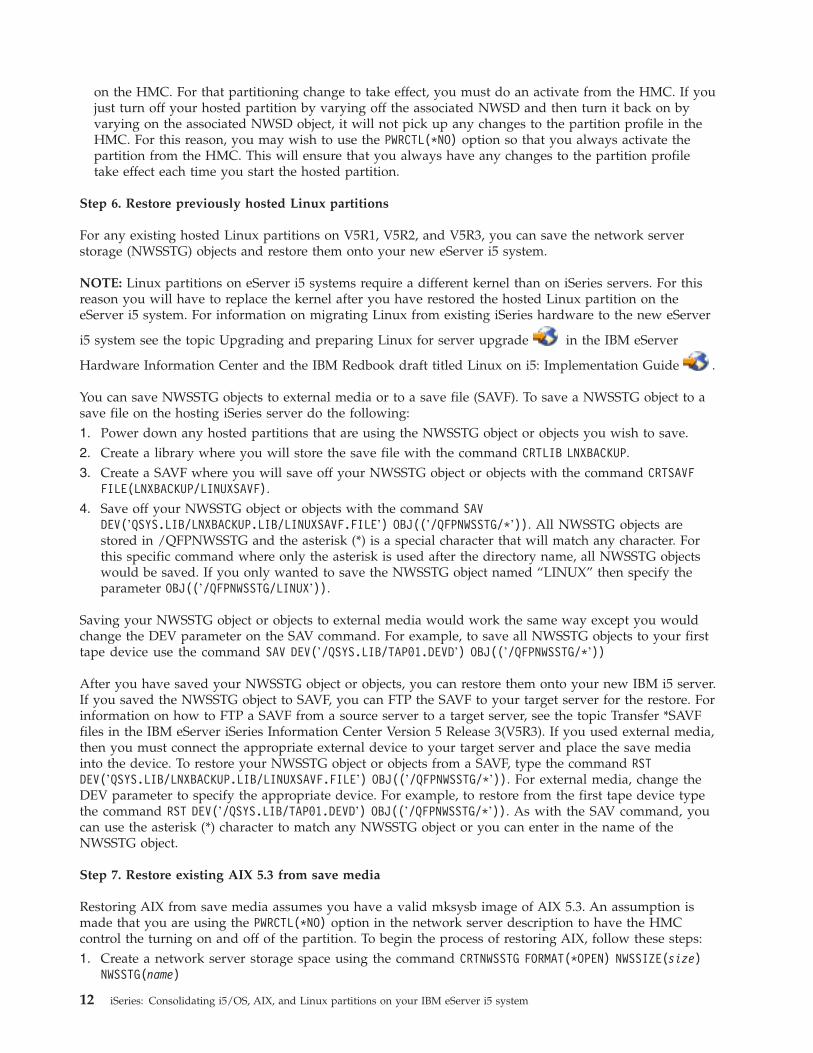
Step 7. Restore existing AIX 5.3 from save media
Restoring AIX from save media assumes you have a valid mksysb image of AIX 5.3. An assumption is
made that you are using the PWRCTL(*NO) option in the network server description to have the HMC
control the turning on and off of the partition. To begin the process of restoring AIX, follow these steps:
1. Create a network server storage space using the command CRTNWSSTG FORMAT(*OPEN) NWSSIZE(size)
NWSSTG(name)
12 iSeries: Consolidating i5/OS, AIX, and Linux partitions on your IBM eServer i5 system

2. Add a link from the appropriate network storage space created in Step 5 Create i5/OS Network
Server Description to the network server description using the command ADDNWSSTGL NWSSTG(nwsstg
name) NWSD(nwsd name)
For more information on creating a network server storage space and linking it to a network server
description see the eServer Hardware Information Center
.
3. Vary on the network server description to make the virtual SCSI server available to the partition using
the command WRKCFGSTS *NWS, and type a 1 next to the network server description you want to make
available.
4. Now that the Virtual SCSI Server is available on the i5/OS partition we can activate the AIX partition
from the HMC. Right-click the partition and choose activate, then select the profile to activate and
choose Advanced to set the boot mode to boot directly to SMS. At that point we can tell the system
how to boot from our save media.
5. In SMS use the following options to determine and set your tape device to boot from:
a. Select 5. Select Boot Options
b. Select 1. Select Install/Boot Device
c. Select 2. Tape
d. Select 1. SCSI
e. Select the adapter and port to which you have a tape device attached.
f. Select the device name of SCSI Tape from which to boot your AIX mksysb image.
Alternatively, you can perform the first two options above, and then select 7. List all Devices to
give you a list of all devices that SMS can see. Then from here locate the SCSI Tape device that points
to the tape device you are planning on using.
Step 8. Perform new installs of hosted AIX and Linux partitions
1. Create a network server storage space using the command CRTNWSSTG FORMAT(*OPEN) NWSSIZE(size)
NWSSTG(name)
2. Add a link from the appropriate network storage space created in Step 5 Create i5/OS Network
Server Description to the network server description using the command ADDNWSSTGL NWSSTG(nwsstg
name) NWSD(nwsd name)
For more information on creating a network server storage space and linking it to a network server
description see the eServer Hardware Information Center
.
3. Determine how you want to boot your Linux or AIX partitions to install them, the following are the
supported ways of booting each:
v AIX
a. Boot from a CD-ROM drive available for the partitions use. Note that currently AIX does not
support booting from a virtual CD-ROM drive. A virtual CD-ROM drive is a CD-ROM drive
that may be shared with AIX using the Virtual SCSI client. AIX must have a physical CD-ROM
drive available to its partition to perform the install from CD.
b. NIM server. This option allows a predefined image to be installed onto a NIM Master and
multiple partitions can install from this image.v Linux
a. Boot from a CD-ROM drive available for the partitions to use. This can include a virtual
CD-ROM drive from the Virtual SCSI Server partition, or a physical drive that Linux owns.
b. NIM server. This option allows a predefined image to be installed onto a NIM Master and
multiple partitions can install from this image.
c. BOOTP server. A BOOTP server can be set up to serve the bootable kernel image for Linux.
Within SMS, you would use the Remote IPL feature and set up a network adapter to reach the
BOOTP server.
Benefits of server consolidation 13
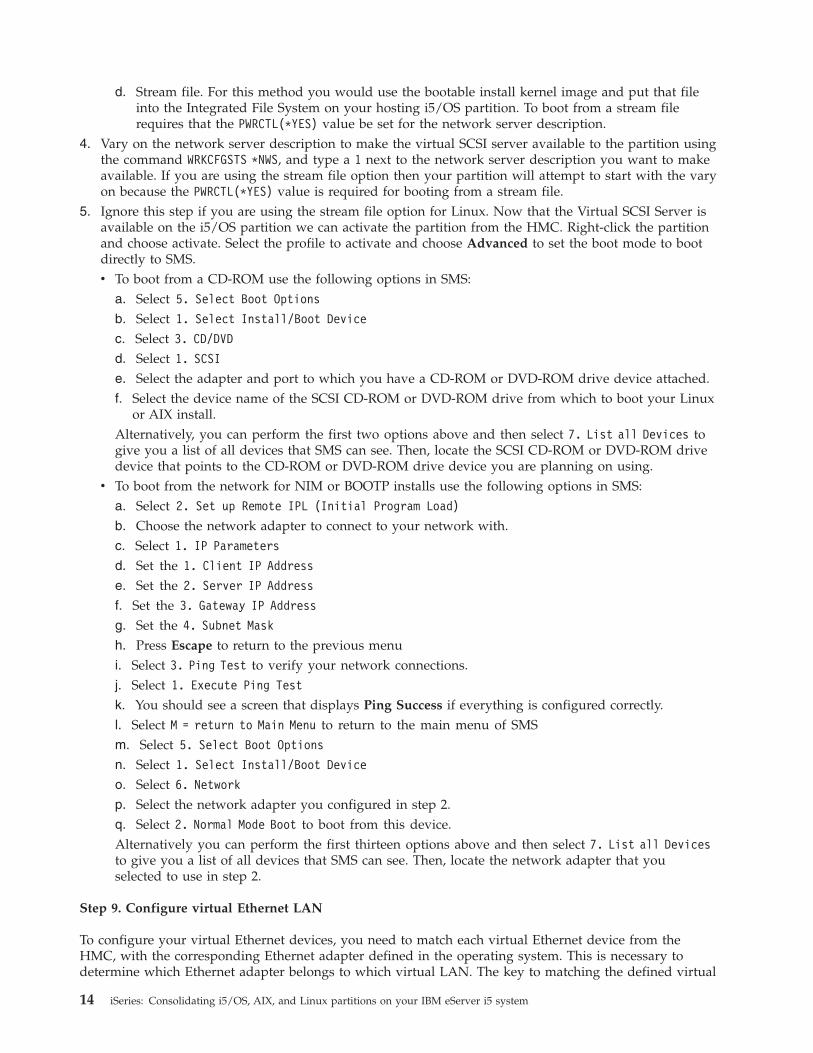
d. Stream file. For this method you would use the bootable install kernel image and put that file
into the Integrated File System on your hosting i5/OS partition. To boot from a stream file
requires that the PWRCTL(*YES) value be set for the network server description.4. Vary on the network server description to make the virtual SCSI server available to the partition using
the command WRKCFGSTS *NWS, and type a 1 next to the network server description you want to make
available. If you are using the stream file option then your partition will attempt to start with the vary
on because the PWRCTL(*YES) value is required for booting from a stream file.
5. Ignore this step if you are using the stream file option for Linux. Now that the Virtual SCSI Server is
available on the i5/OS partition we can activate the partition from the HMC. Right-click the partition
and choose activate. Select the profile to activate and choose Advanced to set the boot mode to boot
directly to SMS.
v To boot from a CD-ROM use the following options in SMS:
a. Select 5. Select Boot Options
b. Select 1. Select Install/Boot Device
c. Select 3. CD/DVD
d. Select 1. SCSI
e. Select the adapter and port to which you have a CD-ROM or DVD-ROM drive device attached.
f. Select the device name of the SCSI CD-ROM or DVD-ROM drive from which to boot your Linux
or AIX install.
Alternatively, you can perform the first two options above and then select 7. List all Devices to
give you a list of all devices that SMS can see. Then, locate the SCSI CD-ROM or DVD-ROM drive
device that points to the CD-ROM or DVD-ROM drive device you are planning on using.
v To boot from the network for NIM or BOOTP installs use the following options in SMS:
a. Select 2. Set up Remote IPL (Initial Program Load)
b. Choose the network adapter to connect to your network with.
c. Select 1. IP Parameters
d. Set the 1. Client IP Address
e. Set the 2. Server IP Address
f. Set the 3. Gateway IP Address
g. Set the 4. Subnet Mask
h. Press Escape to return to the previous menu
i. Select 3. Ping Test to verify your network connections.
j. Select 1. Execute Ping Test
k. You should see a screen that displays Ping Success if everything is configured correctly.
l. Select M = return to Main Menu to return to the main menu of SMS
m. Select 5. Select Boot Options
n. Select 1. Select Install/Boot Device
o. Select 6. Network
p. Select the network adapter you configured in step 2.
q. Select 2. Normal Mode Boot to boot from this device.
Alternatively you can perform the first thirteen options above and then select 7. List all Devices
to give you a list of all devices that SMS can see. Then, locate the network adapter that you
selected to use in step 2.
Step 9. Configure virtual Ethernet LAN
To configure your virtual Ethernet devices, you need to match each virtual Ethernet device from the
HMC, with the corresponding Ethernet adapter defined in the operating system. This is necessary to
determine which Ethernet adapter belongs to which virtual LAN. The key to matching the defined virtual
14 iSeries: Consolidating i5/OS, AIX, and Linux partitions on your IBM eServer i5 system
Ethernet devices on the HMC to the Ethernet adapters in the operating system is the slot number of the
virtual Ethernet device on the HMC. The following sections help you match an Ethernet adapter in the
operating system (i5/OS, AIX, or Linux) to the corresponding slot number of the virtual Ethernet device
on the HMC.
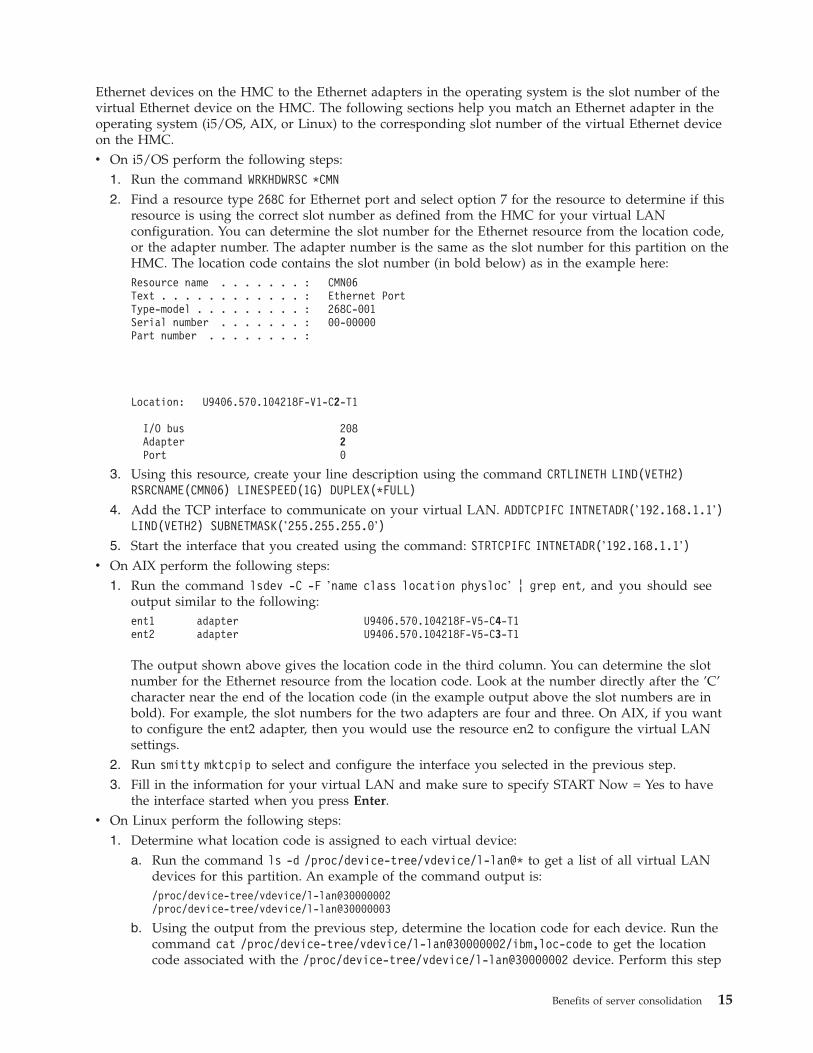
v On i5/OS perform the following steps:
1. Run the command WRKHDWRSC *CMN
2. Find a resource type 268C for Ethernet port and select option 7 for the resource to determine if this
resource is using the correct slot number as defined from the HMC for your virtual LAN
configuration. You can determine the slot number for the Ethernet resource from the location code,
or the adapter number. The adapter number is the same as the slot number for this partition on the
HMC. The location code contains the slot number (in bold below) as in the example here:
Resource name . . . . . . . : CMN06
Text . . . . . . . . . . . . : Ethernet Port
Type-model . . . . . . . . . : 268C-001
Serial number . . . . . . . : 00-00000
Part number . . . . . . . . :
Location: U9406.570.104218F-V1-C2-T1
I/O bus 208
Adapter 2
Port 0
3. Using this resource, create your line description using the command CRTLINETH LIND(VETH2)
RSRCNAME(CMN06) LINESPEED(1G) DUPLEX(*FULL)
4. Add the TCP interface to communicate on your virtual LAN. ADDTCPIFC INTNETADR(’192.168.1.1’)
LIND(VETH2) SUBNETMASK(’255.255.255.0’)
5. Start the interface that you created using the command: STRTCPIFC INTNETADR(’192.168.1.1’)
v On AIX perform the following steps:
1. Run the command lsdev -C -F ’name class location physloc’ ¦ grep ent, and you should see
output similar to the following:
ent1 adapter U9406.570.104218F-V5-C4-T1
ent2 adapter U9406.570.104218F-V5-C3-T1
The output shown above gives the location code in the third column. You can determine the slot
number for the Ethernet resource from the location code. Look at the number directly after the ’C’
character near the end of the location code (in the example output above the slot numbers are in
bold). For example, the slot numbers for the two adapters are four and three. On AIX, if you want
to configure the ent2 adapter, then you would use the resource en2 to configure the virtual LAN
settings.
2. Run smitty mktcpip to select and configure the interface you selected in the previous step.
3. Fill in the information for your virtual LAN and make sure to specify START Now = Yes to have
the interface started when you press Enter.v On Linux perform the following steps:
1. Determine what location code is assigned to each virtual device:
a. Run the command ls -d /proc/device-tree/vdevice/l-lan@* to get a list of all virtual LAN
devices for this partition. An example of the command output is:
/proc/device-tree/vdevice/l-lan@30000002
/proc/device-tree/vdevice/l-lan@30000003
b. Using the output from the previous step, determine the location code for each device. Run the
command cat /proc/device-tree/vdevice/l-lan@30000002/ibm,loc-code to get the location
code associated with the /proc/device-tree/vdevice/l-lan@30000002 device. Perform this step
Benefits of server consolidation 15
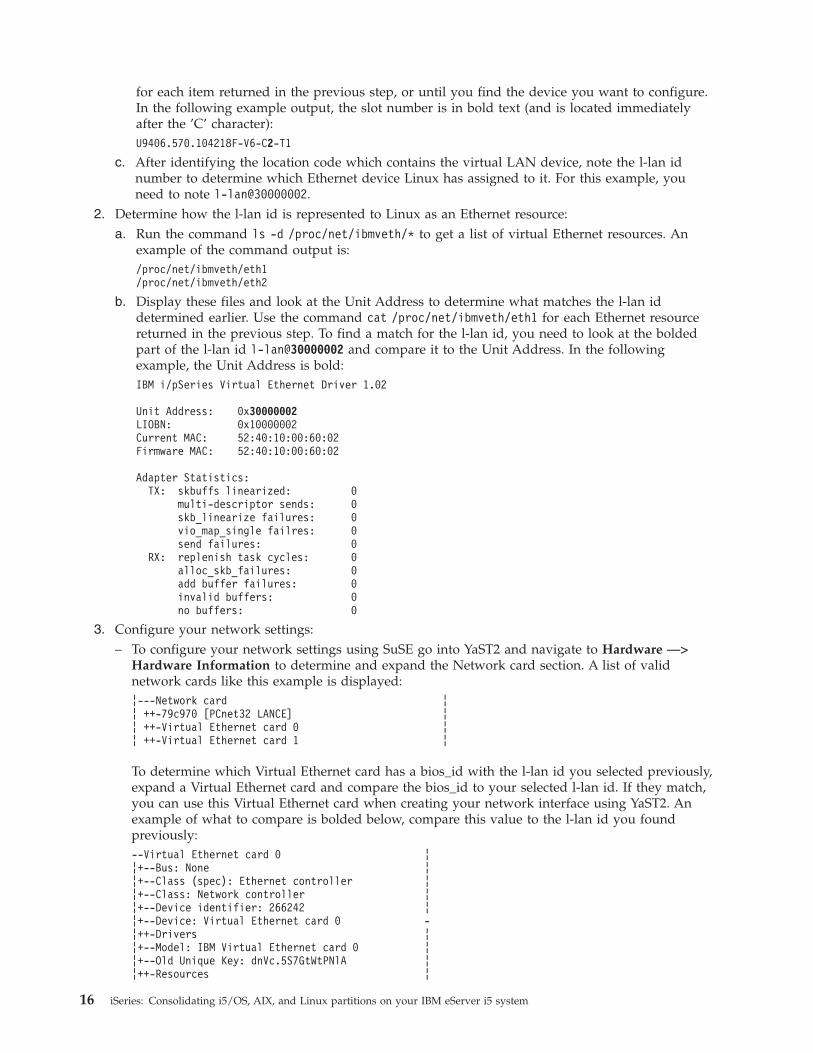
for each item returned in the previous step, or until you find the device you want to configure.
In the following example output, the slot number is in bold text (and is located immediately
after the ’C’ character):
U9406.570.104218F-V6-C2-T1
c. After identifying the location code which contains the virtual LAN device, note the l-lan id
number to determine which Ethernet device Linux has assigned to it. For this example, you
need to note [email protected]. Determine how the l-lan id is represented to Linux as an Ethernet resource:
a. Run the command ls -d /proc/net/ibmveth/* to get a list of virtual Ethernet resources. An
example of the command output is:
/proc/net/ibmveth/eth1
/proc/net/ibmveth/eth2
b. Display these files and look at the Unit Address to determine what matches the l-lan id
determined earlier. Use the command cat /proc/net/ibmveth/eth1 for each Ethernet resource
returned in the previous step. To find a match for the l-lan id, you need to look at the bolded
part of the l-lan id l-lan@30000002 and compare it to the Unit Address. In the following
example, the Unit Address is bold:
IBM i/pSeries Virtual Ethernet Driver 1.02
Unit Address: 0x30000002
LIOBN: 0x10000002
Current MAC: 52:40:10:00:60:02
Firmware MAC: 52:40:10:00:60:02
Adapter Statistics:
TX: skbuffs linearized: 0
multi-descriptor sends: 0
skb_linearize failures: 0
vio_map_single failres: 0
send failures: 0
RX: replenish task cycles: 0
alloc_skb_failures: 0
add buffer failures: 0
invalid buffers: 0
no buffers: 0
3. Configure your network settings:
– To configure your network settings using SuSE go into YaST2 and navigate to Hardware —>
Hardware Information to determine and expand the Network card section. A list of valid
network cards like this example is displayed:
¦---Network card ¦
¦ ++-79c970 [PCnet32 LANCE] ¦
¦ ++-Virtual Ethernet card 0 ¦
¦ ++-Virtual Ethernet card 1 ¦
To determine which Virtual Ethernet card has a bios_id with the l-lan id you selected previously,
expand a Virtual Ethernet card and compare the bios_id to your selected l-lan id. If they match,
you can use this Virtual Ethernet card when creating your network interface using YaST2. An
example of what to compare is bolded below, compare this value to the l-lan id you found
previously:
--Virtual Ethernet card 0 ¦
¦+--Bus: None ¦
¦+--Class (spec): Ethernet controller ¦
¦+--Class: Network controller ¦
¦+--Device identifier: 266242 ¦
¦+--Device: Virtual Ethernet card 0 -
¦++-Drivers ¦
¦+--Model: IBM Virtual Ethernet card 0 ¦
¦+--Old Unique Key: dnVc.5S7GtWtPNlA ¦
¦++-Resources ¦
16 iSeries: Consolidating i5/OS, AIX, and Linux partitions on your IBM eServer i5 system
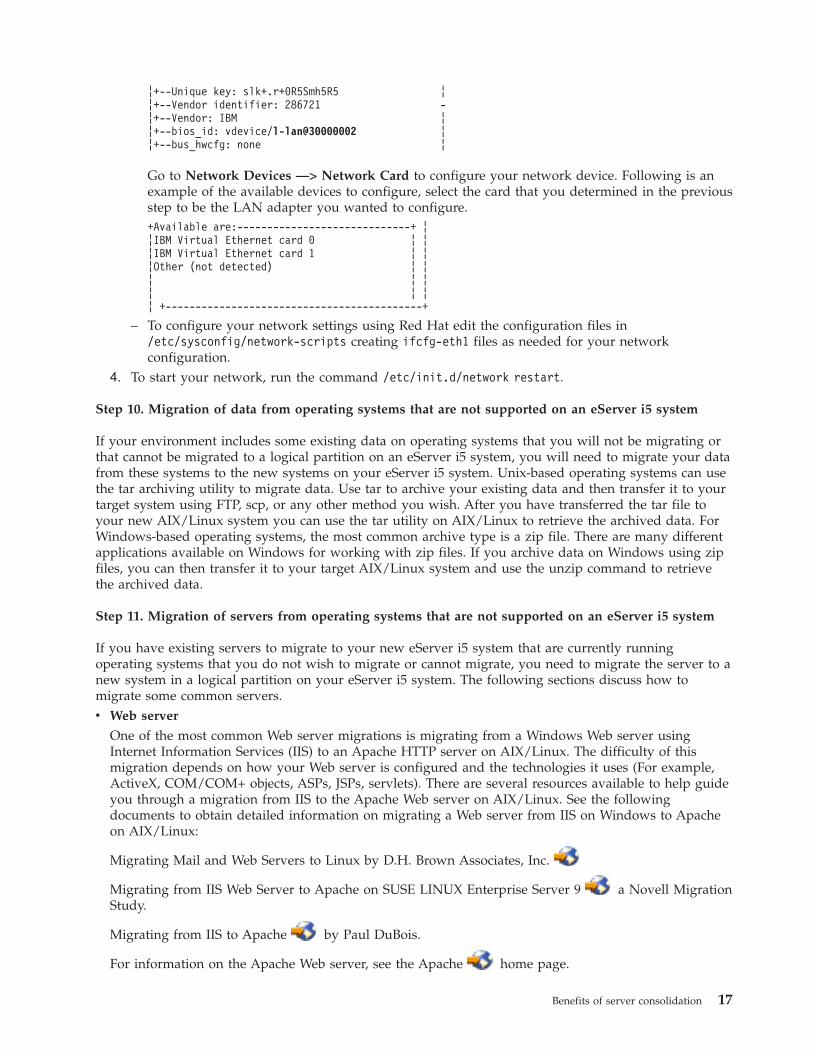
¦+--Unique key: slk+.r+0R5Smh5R5 ¦
¦+--Vendor identifier: 286721 -
¦+--Vendor: IBM ¦
¦+--bios_id: vdevice/l-lan@30000002 ¦
¦+--bus_hwcfg: none ¦
Go to Network Devices —> Network Card to configure your network device. Following is an
example of the available devices to configure, select the card that you determined in the previous
step to be the LAN adapter you wanted to configure.
+Available are:-----------------------------+ ¦
¦IBM Virtual Ethernet card 0 ¦ ¦
¦IBM Virtual Ethernet card 1 ¦ ¦
¦Other (not detected) ¦ ¦
¦ ¦ ¦
¦ ¦ ¦
¦ +-------------------------------------------+
– To configure your network settings using Red Hat edit the configuration files in
/etc/sysconfig/network-scripts creating ifcfg-eth1 files as needed for your network
configuration.4. To start your network, run the command /etc/init.d/network restart.
Step 10. Migration of data from operating systems that are not supported on an eServer i5 system
If your environment includes some existing data on operating systems that you will not be migrating or
that cannot be migrated to a logical partition on an eServer i5 system, you will need to migrate your data
from these systems to the new systems on your eServer i5 system. Unix-based operating systems can use
the tar archiving utility to migrate data. Use tar to archive your existing data and then transfer it to your
target system using FTP, scp, or any other method you wish. After you have transferred the tar file to
your new AIX/Linux system you can use the tar utility on AIX/Linux to retrieve the archived data. For
Windows-based operating systems, the most common archive type is a zip file. There are many different
applications available on Windows for working with zip files. If you archive data on Windows using zip
files, you can then transfer it to your target AIX/Linux system and use the unzip command to retrieve
the archived data.
Step 11. Migration of servers from operating systems that are not supported on an eServer i5 system
If you have existing servers to migrate to your new eServer i5 system that are currently running
operating systems that you do not wish to migrate or cannot migrate, you need to migrate the server to a
new system in a logical partition on your eServer i5 system. The following sections discuss how to
migrate some common servers.
v Web server
One of the most common Web server migrations is migrating from a Windows Web server using
Internet Information Services (IIS) to an Apache HTTP server on AIX/Linux. The difficulty of this
migration depends on how your Web server is configured and the technologies it uses (For example,
ActiveX, COM/COM+ objects, ASPs, JSPs, servlets). There are several resources available to help guide
you through a migration from IIS to the Apache Web server on AIX/Linux. See the following
documents to obtain detailed information on migrating a Web server from IIS on Windows to Apache
on AIX/Linux:
Migrating Mail and Web Servers to Linux by D.H. Brown Associates, Inc.
Migrating from IIS Web Server to Apache on SUSE LINUX Enterprise Server 9
a Novell Migration
Study.
Migrating from IIS to Apache
by Paul DuBois.
For information on the Apache Web server, see the Apache
home page.
Benefits of server consolidation 17
v Mail server
For information on migrating mail servers from Unix to Linux and from Windows to Linux, see the
report Migrating Mail and Web Servers to Linux
by D.H. Brown Associates, Inc. For information
on migrating from Windows Exchange to Domino on Linux, refer to pages 44 - 59 of the presentation
Replacing Windows Servers with Linux
by IBM DeveloperWorks.
v File server
Linux running Samba can replace Windows file servers, print servers, and primary domain controllers
(PDCs). For information on replacing Windows file and print servers with Samba refer to pages 6 - 24
of the presentation Replacing Windows Servers with Linux
by IBM DeveloperWorks. You can also
read Migrating File and Print Services from Windows to SUSE LINUX Enterprise Server 9
, by
Novell on how to replace Windows file and print servers with Samba on SuSE SLES9. For additional
information on Samba, see the Samba Web site
.
v DNS server
To migrate DNS servers to Linux, first you configure your new Linux DNS server to be a DNS slave to
your current DNS master server. Next, startup your DNS slave server on the AIX/Linux system. The
DNS slave server automatically contacts the DNS master and transfer all the DNS information for you.
After this is complete, shut down the DNS slave on the AIX/Linux system and reconfigure it as a DNS
master. Turn on your DNS master server on your AIX/Linux system and turn off your former DNS
master. You will either have to update each client with a new IP address for the new DNS master
server, or reuse the IP address from your old DNS master server.
To configure Linux as a DNS server, you need to install the Berkeley Internet Name Domain (BIND)
software from the Internet Systems Consortium’s (ISC)
Web site. Many Linux distributions
already include this software for you. Then configure the DNS server by editing the file
/etc/named.conf. For complete details on configuring the named DNS server on Linux you can see
Configuring DNS
on the Linux Home Networking Web site and the Linux DNS HOWTO
on
the Linux Documentation Project Web site.
v Firewall
Unless you are already using iptables on Linux for your firewalls, migrating your existing firewalls to
Linux involves manual reconfiguration. You need to carefully examine your current configurations and
configure the new Linux firewall to behave identically. Using iptables, on Linux you can configure a
Linux system to do basic IP filtering, Network Address Translation (NAT), stateful packet inspection,
traffic logging, and more. For more details on iptables and to find HOWTO documents on configuring
a Linux firewall using iptables, see the Netfilter/iptables project homepage
.
If you do not wish to replace existing firewalls, you can still benefit from a Linux firewall. Network
security should be implemented in several layers. By adding a small logical partition for a Linux
firewall, you can easily add another layer of network security and strengthen the security of your
existing environment.
Step 12. Verifying your new system
After you have completed consolidation, it is important to verify your new system. Test any new Web
servers to make sure they are functioning correctly. Check your Web servers for any broken links or
missing data. Send test e-mails with any new mail servers to ensure email handling works as expected.
Check any new file servers to make sure users are authenticated correctly and can reach the files they
need. Also, make sure that they are denied access to files they should not be able to read. Send DNS
requests to any new DNS servers to ensure it is configured properly and providing correct responses.
Perform extensive security probing and testing of any new firewalls to make sure they are configured
properly.
18 iSeries: Consolidating i5/OS, AIX, and Linux partitions on your IBM eServer i5 system
Summary
With the release of i5/OS V5R3 and the eServer i5 system, server consolidation has never been easier.
Never before could you run i5/OS, AIX, Linux, and Windows(R) on the same server. In addition, you can
dynamically manage processor, memory, and disk resources for all your i5/OS, AIX, and Linux partitions.
The advanced logical partitioning capabilities of the eServer i5 system provide virtually unlimited
flexibility for consolidating servers. This report explains the many benefits of server consolidation and the
general process of server consolidation. Throughout the section on the general process of server
consolidation, key concepts, terminology, and tips are provided. The concepts, terminology, and tips
provided are based on actual experiences with the new eServer i5 system. It is this information that we
feel would have been most beneficial to us when we began working with the eServer i5 system.
Additionally, we want to emphasize the following:
v Planning is crucial
Planning for server consolidation is the most critical step. Make sure to take plenty of time to plan out
the entire process.
v Create and implement a backup and recovery strategy
If you do not already have one, it is important to create and use a good backup and recovery strategy.
For assistance on a backup and recovery strategy for your eServer i5 system, see the section Systems
management —> Backup and recovery —> Plan a backup and recovery strategy in the IBM eServer
iSeries(TM) Information Center.
v Learn the HMC
The Hardware Management Console (HMC) is the device used to perform many key system
management operations and logical partitioning. By taking the time to learn about the HMC you can
greatly enhance your eServer i5 system. For detailed information on the HMC, see the section
Managing your server > Managing your server using the Hardware Management Console in the IBM
eServer Hardware Information Center.
The following links provide additional information on i5/OS, the eServer i5 system, and server
consolidation:
v iSeries Information Center V5R3
v eServer Hardware Information Center
v IBM Midrange servers - eServer i5 and iSeries
v Linux on the IBM eServer iSeries Server: An Implementation Guide, SG24-6232
v Workload Estimator Tool
v Logical Partitioning Validation Tool
v Service and productivity tools for Linux on POWER (including RMC packages)
Benefits of server consolidation 19

20 iSeries: Consolidating i5/OS, AIX, and Linux partitions on your IBM eServer i5 system
Disclaimer
Information is provided ″AS IS″ without warranty of any kind. Mention or reference to non-IBM products
is for informational purposes only and does not constitute an endorsement of such products by IBM.
Performance is based on measurements and projections using standard IBM benchmarks in a controlled
environment. The actual throughput or performance that any user will experience will vary depending
upon considerations such as the amount of multiprogramming in the user’s job stream, the I/O
configuration, the storage configuration, and the workload processed. Therefore, no assurance can be
given that an individual user will achieve throughput or performance improvements equivalent to the
ratios stated here.
© Copyright IBM Corp. 2005 21

22 iSeries: Consolidating i5/OS, AIX, and Linux partitions on your IBM eServer i5 system


����
Printed in USA