Embed Size (px)
Citation preview
Configuring the HP iLO on ArcSight Appliances
Background ArcSight provides limited support and assistance for an embedded management feature, HP iLO (Integrated Lights-Out Management), which comes standard with select ArcSight appliances. This document describes the procedures for enabling, setting up and accessing iLO using the web interface. Since this feature is provided through the hardware vendor directly, no additional support or assistance from ArcSight other than what is described below should be inferred.
The iLO web functionality can only be accessed via the procedures outlined below and cannot be configured or administered through the ArcSight web interface.
Supported Models This feature is supported only on the following ArcSight products: C5400, C3400, E7400, L7400, L7400-SAN, N5400, M7400, V7400, and L3400.
Description of HP iLO Functionality The iLO on ArcSight appliances enables out-of-band management of ArcSight appliances. This capability can be helpful when physical access to the appliance is difficult, e.g. a remote location, or a data center with strict access restrictions. It gives administrators secure remote management capabilities regardless of server status or location. iLO is available whenever the appliance is connected to a power source even if the server main power switch is in the OFF position.
Multiple methods are available to access iLO. However, Arcsight has documented the process using the web graphical user interface (GUI) to set up iLO for a remote KVM connection. Further details for this procedure can be found at: http://bizsupport2.austin.hp.com/bc/docs/support/SupportManual/c02111169/c02111169.pdf
The iLO has a LAN port that is separate from the system LAN port. It is labeled “ilo”. The method by which iLO acquires an IP address is dependent upon whether DHCP is enabled or disabled on the server.
• For users with DHCP enabled (RECOMMENDED), you will not require the BIOS password to initially configure iLO. However you will need the host name (located on the machine) before proceeding.. The detailed procedure for configuring HP iLO using DHCP is found on page 20 in the following manual: http://bizsupport2.austin.hp.com/bc/docs/support/SupportManual/c02111169/c02111169.pdf
Once you have set up access to iLO, you will also be able to configure a static IP address from web interface if desired.
• For user with DHCP disabled, you will need to contact ArcSight support and obtain the BIOS password before proceeding with the steps below for initially setting up a static IP address.
This iLO network interface needs to be configured and assigned a valid network configuration. Furthermore, access to the iLO is protected using a user name and password. Integrity iLO comes preconfigured with an Administrator account and a randomly generated password. Arcsight recommends creating additional users if desired (see below). The default login information with all rights (Administrator level) is:
• login = Administrator
• password = randomly generated password found on the iLO Network Information Tag (located on the front panel)
Once configured, the iLO offers the following features that are most relevant for ArcSight appliances:
• Power Management allows a user to control the power on the appliance. Turn on, off or reboot the appliance.
• Remote Console allows a user to access the system console remotely and perform tasks that would normally require physically attaching a keyboard, monitor and mouse to the system.
ArcSight highly recommends configuring iLO when the appliance is originally deployed, if you intend to use this troubleshooting and debugging functionality. This will ensure that it is available for use when you need it.
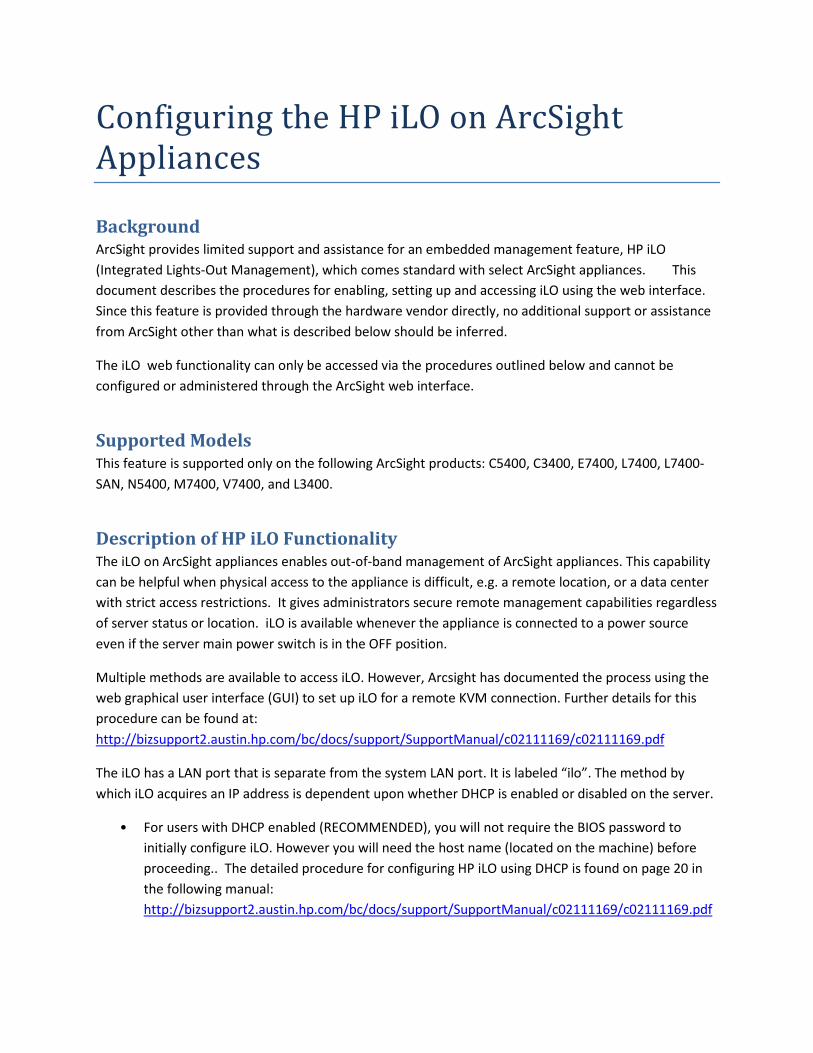
Configuring HP iLO For the initial configuration of iLO on an appliance, a keyboard and monitor attached to the appliance are required. It is also necessary to reboot the appliance during this process.
1. Reboot the appliance, following the directions in the product documentation.
2. Closely watch the POST (Power On Self Test) on the monitor.
3. Once you see the following prompt Press F8 to launch Integrated Lights Out menu.
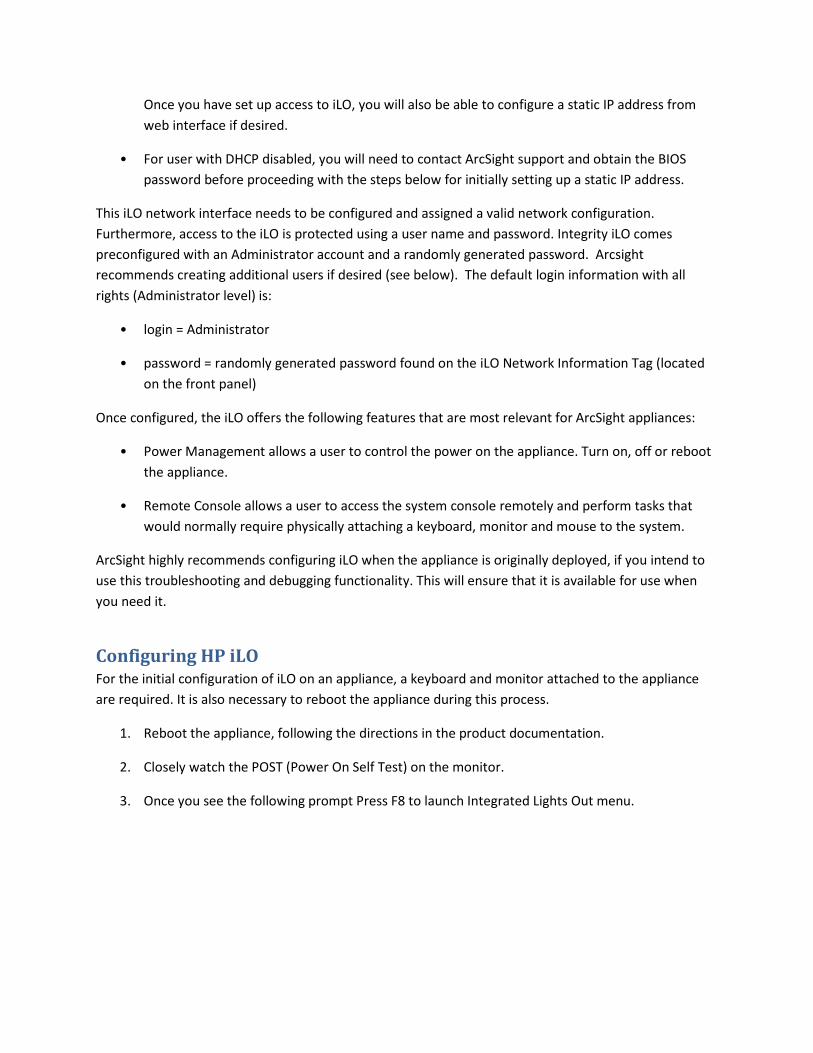
4. Enter the Setup Password when prompted (Skip if DHCP enabled and go to Step 10)
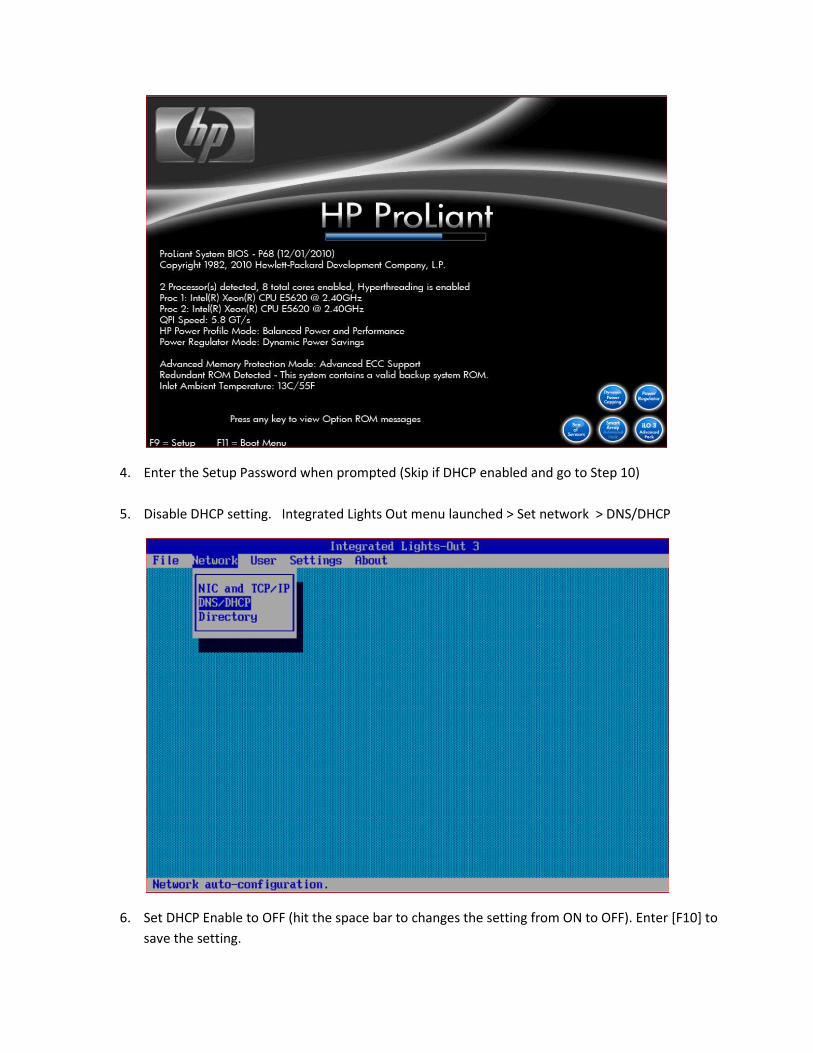
5. Disable DHCP setting. Integrated Lights Out menu launched > Set network > DNS/DHCP
6. Set DHCP Enable to OFF (hit the space bar to changes the setting from ON to OFF). Enter [F10] to save the setting.
7. For more advanced options for setting up name, like configuring DNS server, you can enter [F1] to configure more network options.
8. Configuring the network setting for the iLO interface. Select Network NIC and TCP/ IP option from the menu.
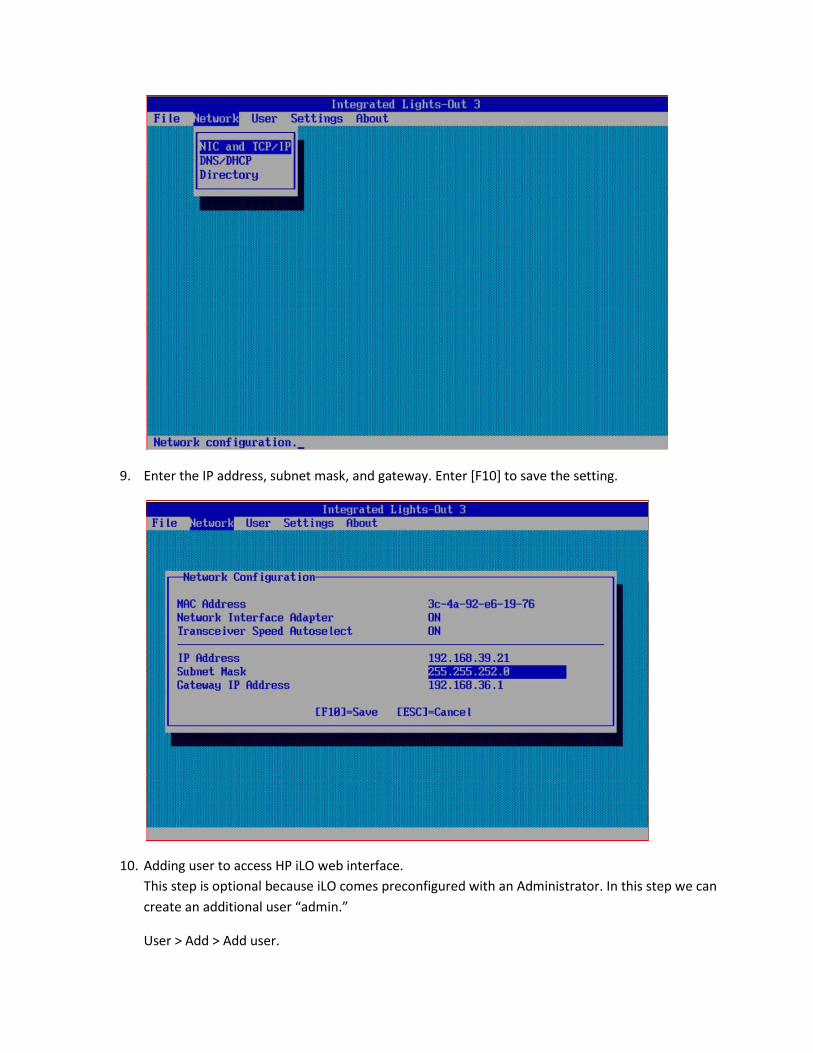
9. Enter the IP address, subnet mask, and gateway. Enter [F10] to save the setting.
10. Adding user to access HP iLO web interface. This step is optional because iLO comes preconfigured with an Administrator. In this step we can create an additional user “admin.”
User > Add > Add user.
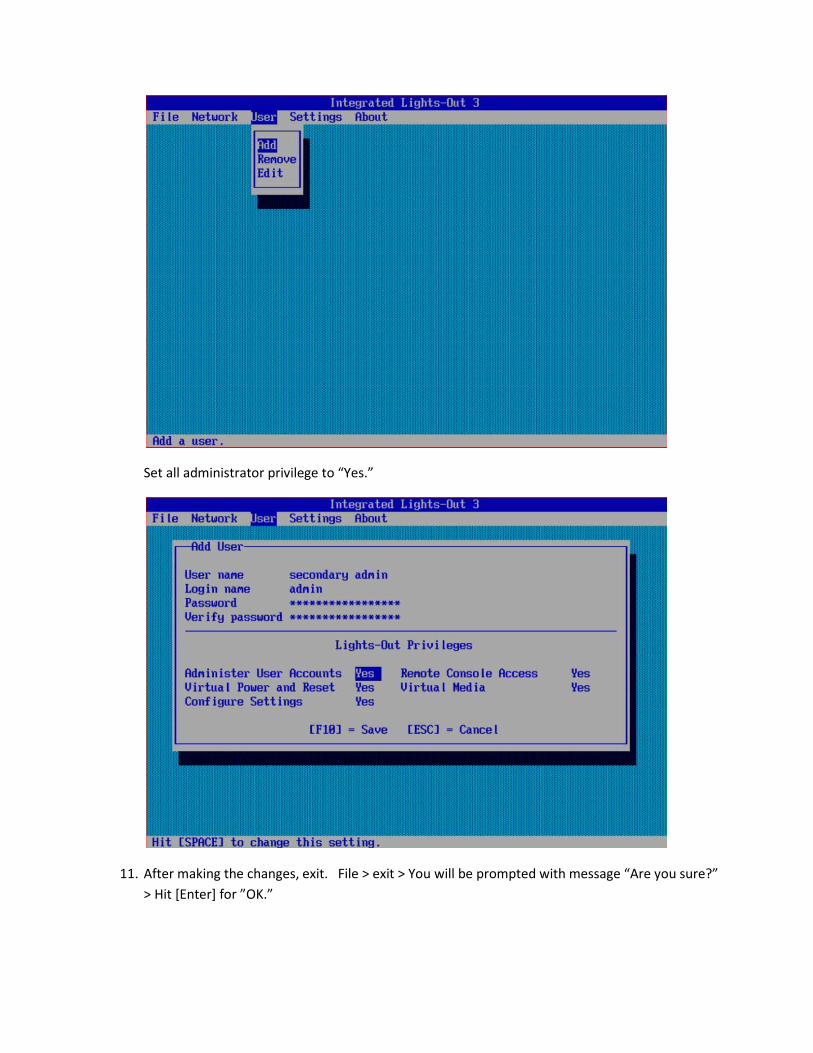
Set all administrator privilege to “Yes.”
11. After making the changes, exit. File > exit > You will be prompted with message “Are you sure?” > Hit [Enter] for ”OK.”
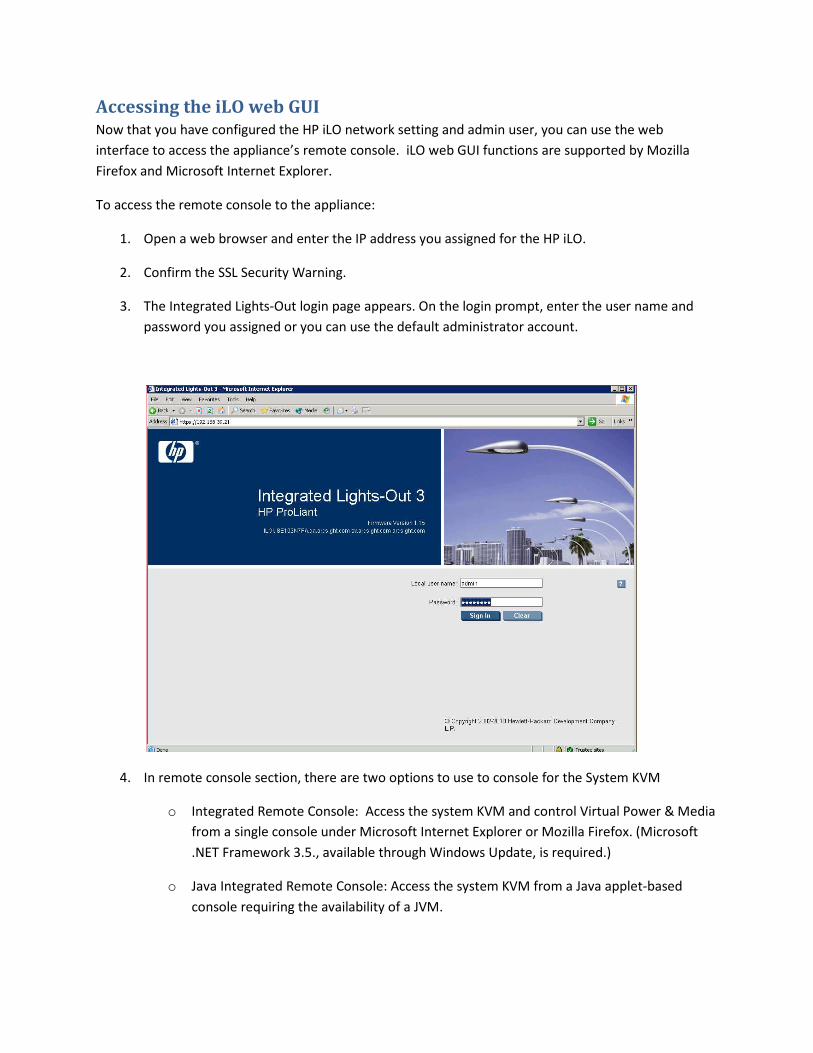
Accessing the iLO web GUI Now that you have configured the HP iLO network setting and admin user, you can use the web interface to access the appliance’s remote console. iLO web GUI functions are supported by Mozilla Firefox and Microsoft Internet Explorer.
To access the remote console to the appliance:
1. Open a web browser and enter the IP address you assigned for the HP iLO.
2. Confirm the SSL Security Warning.
3. The Integrated Lights-Out login page appears. On the login prompt, enter the user name and password you assigned or you can use the default administrator account.
4. In remote console section, there are two options to use to console for the System KVM
o Integrated Remote Console: Access the system KVM and control Virtual Power & Media from a single console under Microsoft Internet Explorer or Mozilla Firefox. (Microsoft .NET Framework 3.5., available through Windows Update, is required.)
o Java Integrated Remote Console: Access the system KVM from a Java applet-based console requiring the availability of a JVM.
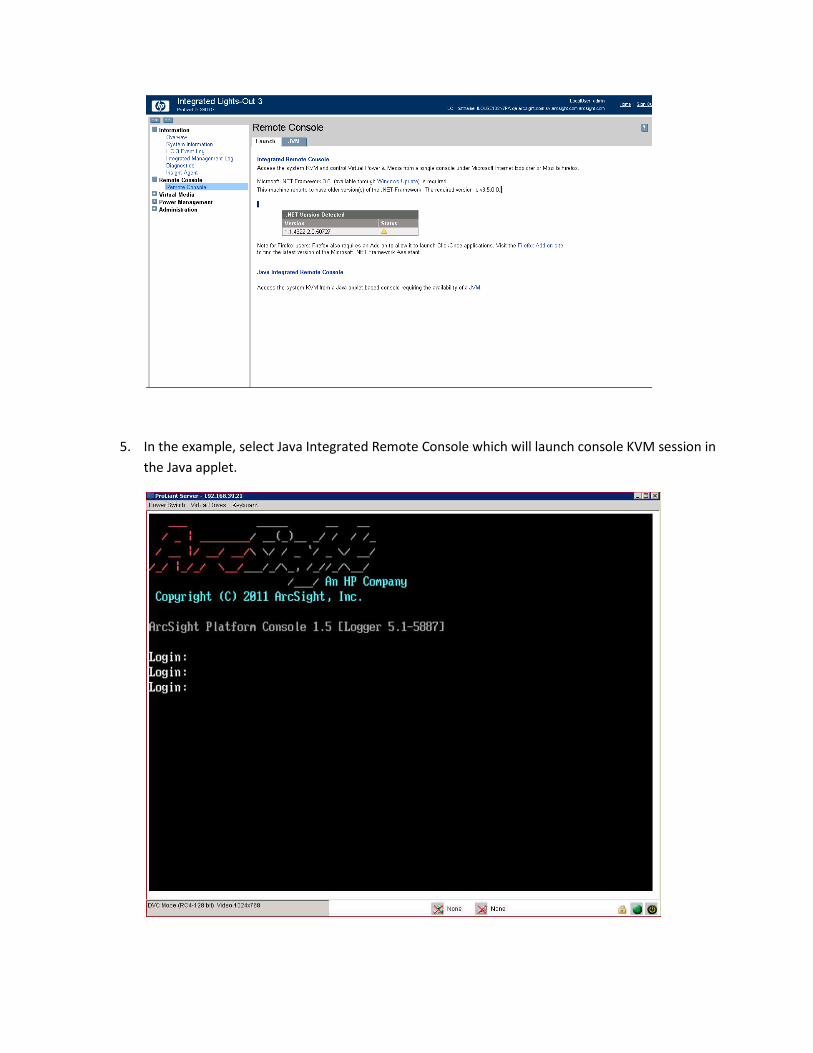
5. In the example, select Java Integrated Remote Console which will launch console KVM session in the Java applet.

Further Information For further information, please refer to the iLO documentation, available online at:
http://bizsupport2.austin.hp.com/bc/docs/support/SupportManual/c02111169/c02111169.pdf
The ArcSight 3400 and 5400 series are based on the HP ProLiant DL360 G7 servers and the ArcSight 7400 series are based on the HP ProLiant DL360 G7 and DL380 G7 servers.
_____________________________________________________________________________________
Copyright © 2011 ArcSight, Inc., an HP Company, ArcSight, the ArcSight logo, ArcSight TRM, ArcSight NCM, ArcSight Enterprise Security Alliance, ArcSight Enterprise Security Alliance logo, ArcSight Interactive Discovery, ArcSight Pattern Discovery, ArcSight Logger, FlexConnector, SmartConnector, SmartStorage and CounterACT are trademarks of ArcSight, Inc. All other brands, products and company names used herein may be trademarks of their respective owners. Follow this link to see a complete statement of ArcSight's copyrights, trademarks, and acknowledgements: http://www.arcsight.com/company/copyright/ The network information used in the examples in this document (including IP addresses and hostnames) is for illustration purposes only. This document is ArcSight Confidential.