Embed Size (px)
Citation preview

Configure WSA to Upload Log Files to CTA System Last updated: May 14, 2018
Conventions
Introduction
Prerequisites Requirements Components Used
Configure Configure the Proxy Connect to Active Directory to Resolve Usernames Using SMA to Configure a Set of WSAs
Deployment Scenarios
Next Steps
Troubleshooting
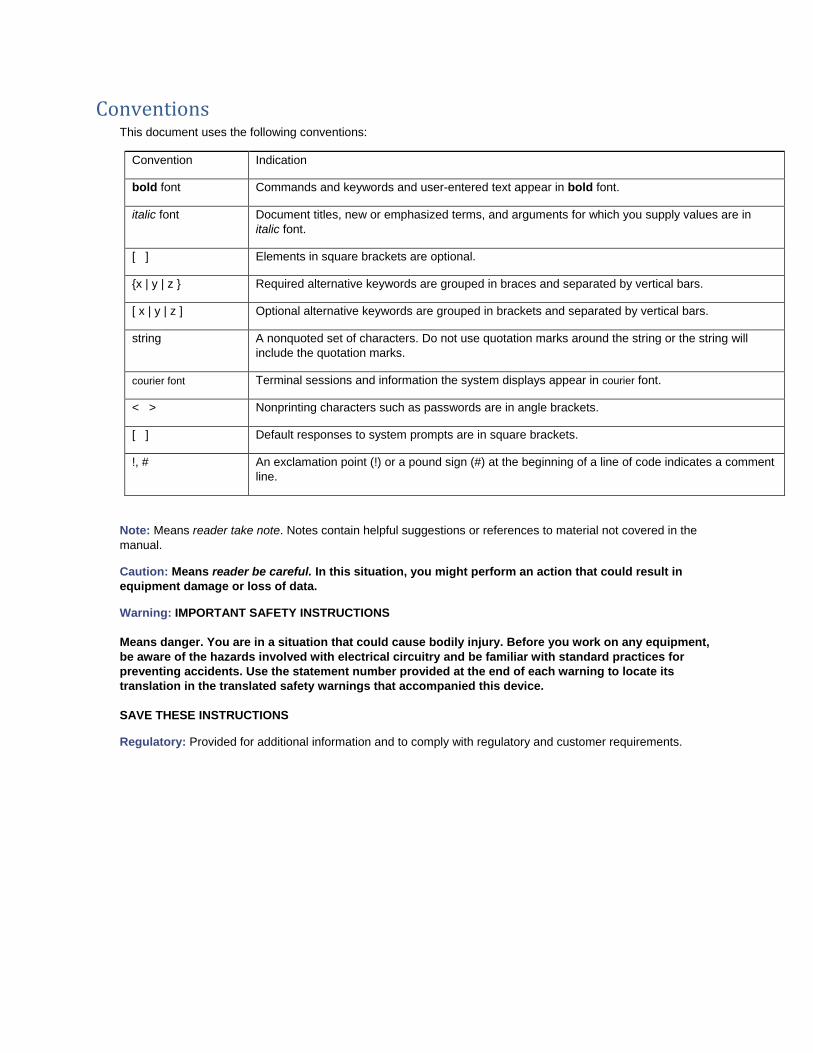
Conventions This document uses the following conventions:
Convention Indication
bold font Commands and keywords and user-entered text appear in bold font.
italic font Document titles, new or emphasized terms, and arguments for which you supply values are in italic font.
[ ] Elements in square brackets are optional.
{x | y | z } Required alternative keywords are grouped in braces and separated by vertical bars.
[ x | y | z ] Optional alternative keywords are grouped in brackets and separated by vertical bars.
string A nonquoted set of characters. Do not use quotation marks around the string or the string will include the quotation marks.
courier font Terminal sessions and information the system displays appear in courier font.
< > Nonprinting characters such as passwords are in angle brackets.
[ ] Default responses to system prompts are in square brackets.
!, # An exclamation point (!) or a pound sign (#) at the beginning of a line of code indicates a comment line.
Note: Means reader take note. Notes contain helpful suggestions or references to material not covered in the manual.
Caution: Means reader be careful. In this situation, you might perform an action that could result in equipment damage or loss of data.
Warning: IMPORTANT SAFETY INSTRUCTIONS Means danger. You are in a situation that could cause bodily injury. Before you work on any equipment, be aware of the hazards involved with electrical circuitry and be familiar with standard practices for preventing accidents. Use the statement number provided at the end of each warning to locate its translation in the translated safety warnings that accompanied this device. SAVE THESE INSTRUCTIONS
Regulatory: Provided for additional information and to comply with regulatory and customer requirements.
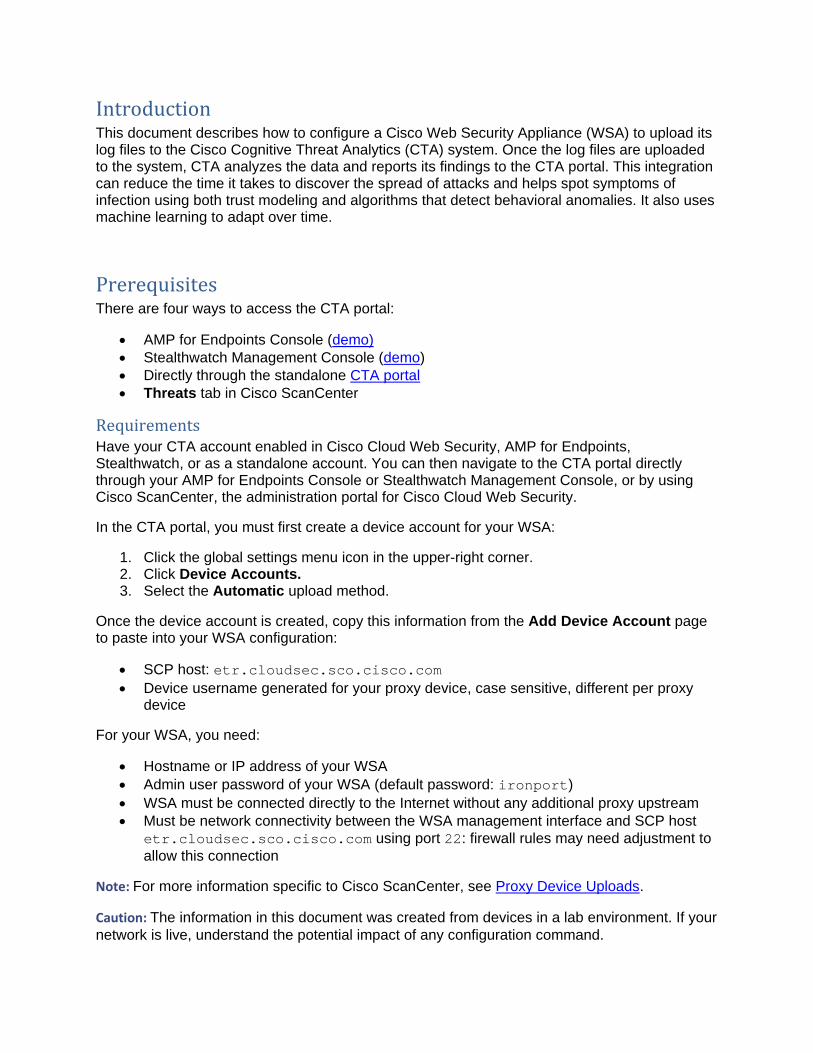
Introduction This document describes how to configure a Cisco Web Security Appliance (WSA) to upload its log files to the Cisco Cognitive Threat Analytics (CTA) system. Once the log files are uploaded to the system, CTA analyzes the data and reports its findings to the CTA portal. This integration can reduce the time it takes to discover the spread of attacks and helps spot symptoms of infection using both trust modeling and algorithms that detect behavioral anomalies. It also uses machine learning to adapt over time.
Prerequisites There are four ways to access the CTA portal:
• AMP for Endpoints Console (demo) • Stealthwatch Management Console (demo) • Directly through the standalone CTA portal • Threats tab in Cisco ScanCenter
Requirements Have your CTA account enabled in Cisco Cloud Web Security, AMP for Endpoints, Stealthwatch, or as a standalone account. You can then navigate to the CTA portal directly through your AMP for Endpoints Console or Stealthwatch Management Console, or by using Cisco ScanCenter, the administration portal for Cisco Cloud Web Security.
In the CTA portal, you must first create a device account for your WSA:
1. Click the global settings menu icon in the upper-right corner. 2. Click Device Accounts. 3. Select the Automatic upload method.
Once the device account is created, copy this information from the Add Device Account page to paste into your WSA configuration:
• SCP host: etr.cloudsec.sco.cisco.com • Device username generated for your proxy device, case sensitive, different per proxy
device
For your WSA, you need:
• Hostname or IP address of your WSA • Admin user password of your WSA (default password: ironport) • WSA must be connected directly to the Internet without any additional proxy upstream • Must be network connectivity between the WSA management interface and SCP host
etr.cloudsec.sco.cisco.com using port 22: firewall rules may need adjustment to allow this connection
Note: For more information specific to Cisco ScanCenter, see Proxy Device Uploads.
Caution: The information in this document was created from devices in a lab environment. If your network is live, understand the potential impact of any configuration command.

Note: When creating subscription logs on the WSA for CTA, the proxy process will restart and the authentication cache will be cleared. Therefore, we recommend you make the changes during a scheduled maintenance window.
Components Used All WSA hardware and virtual platforms are supported.
The information in this document was tested on these software versions:
• WSA AsyncOS 11.5 • WSA AsyncOS 11.0 • WSA AsyncOS 8.5.1 GD • WSA AsyncOS 8.0.8 • WSA AsyncOS 7.7.5
Configure Configure the Proxy
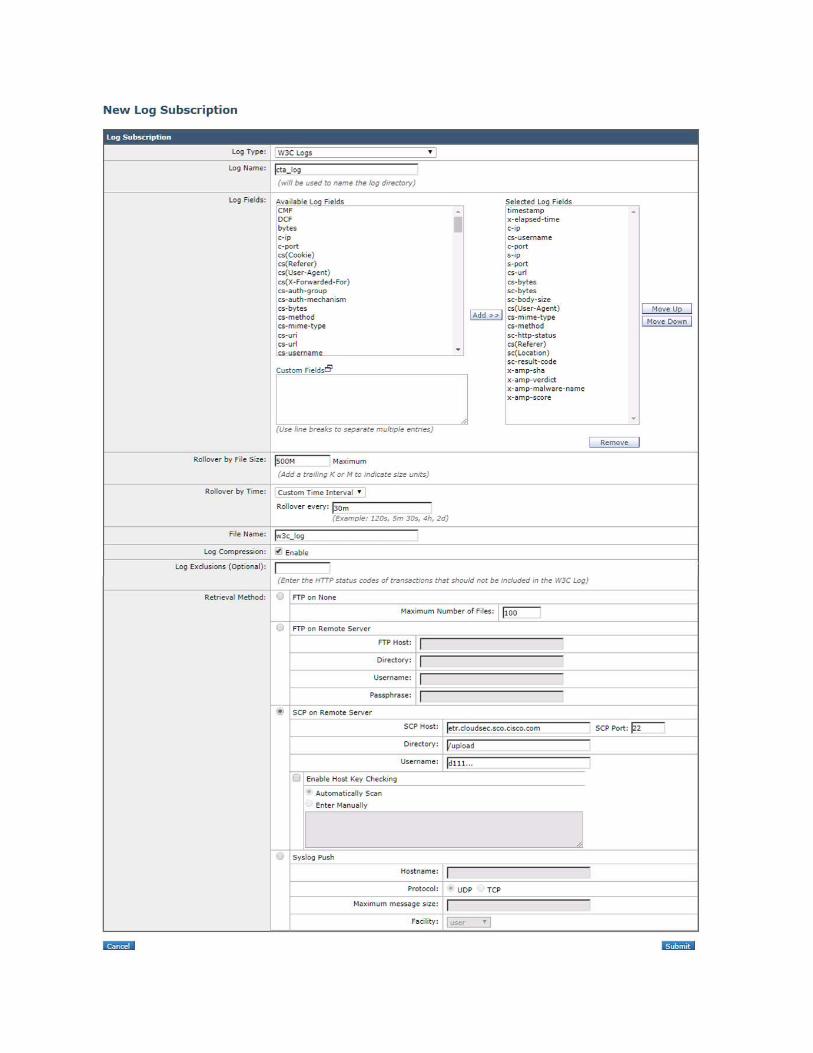
1. Point your web browser to your WSA: http://wsa_hostname:8080/ 2. If needed, accept the insecure HTTPS certificate to proceed. 3. Sign in as admin. 4. Navigate to System Administration > Log Subscriptions. 5. Click Add Log Subscription. 6. In the Log Type pull-down, select W3C Logs. 7. In the Log Name field, enter a descriptive name for the log directory such as cta_log.
Caution: Do not use any spaces or special characters in the name or the log upload will not work.
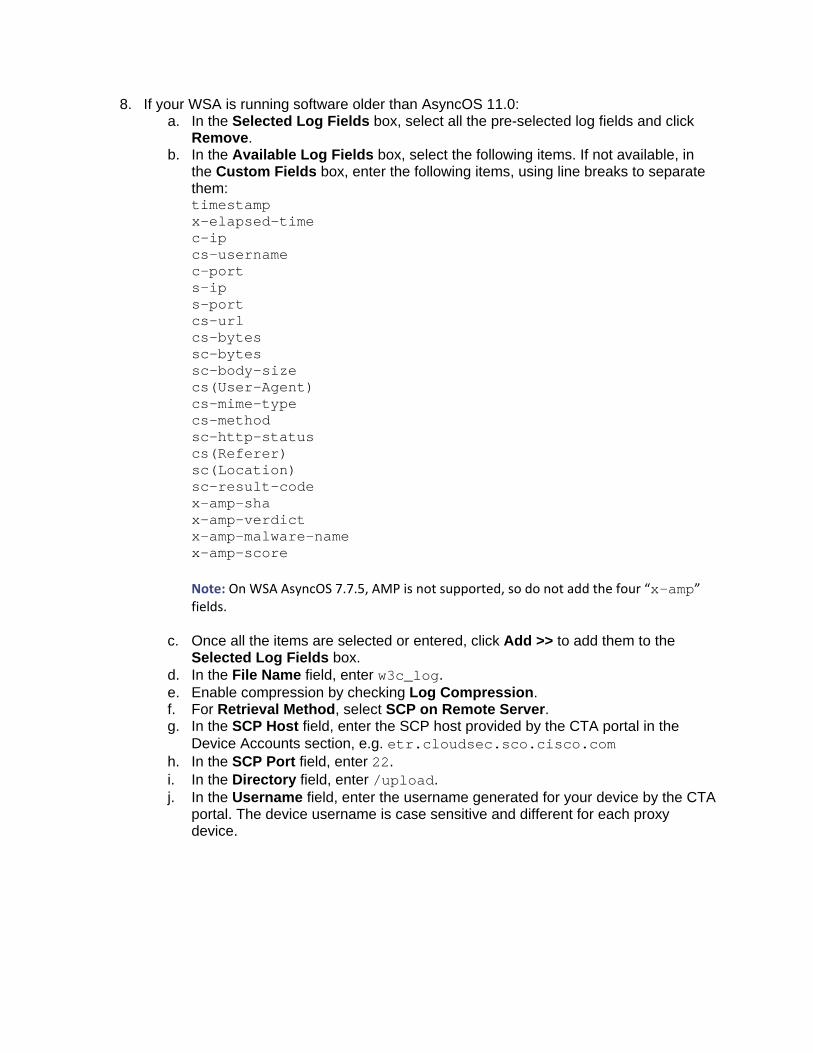
8. If your WSA is running software older than AsyncOS 11.0: a. In the Selected Log Fields box, select all the pre-selected log fields and click
Remove. b. In the Available Log Fields box, select the following items. If not available, in
the Custom Fields box, enter the following items, using line breaks to separate them: timestamp x-elapsed-time c-ip cs-username c-port s-ip s-port cs-url cs-bytes sc-bytes sc-body-size cs(User-Agent) cs-mime-type cs-method sc-http-status cs(Referer) sc(Location) sc-result-code x-amp-sha x-amp-verdict x-amp-malware-name x-amp-score
Note: On WSA AsyncOS 7.7.5, AMP is not supported, so do not add the four “x-amp” fields.
c. Once all the items are selected or entered, click Add >> to add them to the Selected Log Fields box.
d. In the File Name field, enter w3c_log. e. Enable compression by checking Log Compression. f. For Retrieval Method, select SCP on Remote Server. g. In the SCP Host field, enter the SCP host provided by the CTA portal in the
Device Accounts section, e.g. etr.cloudsec.sco.cisco.com h. In the SCP Port field, enter 22. i. In the Directory field, enter /upload. j. In the Username field, enter the username generated for your device by the CTA
portal. The device username is case sensitive and different for each proxy device.

k. Proceed to Step 11. 9. If your WSA is running AsyncOS 11.0:
a. Select the CTA Template check box to automatically configure most of the remaining settings:
b. Ensure that the following fields appear in the Selected Log Fields box: timestamp x-elapsed-time c-ip cs-username c-port s-ip s-port cs-url cs-bytes sc-bytes sc-body-size cs(User-Agent) cs-mime-type cs-method sc-http-status cs(Referer) sc(Location) sc-result-code x-amp-sha x-amp-verdict x-amp-malware-name x-amp-score
c. For Retrieval Method, in the Username field, enter the username generated for your device by the CTA portal. The device username is case sensitive and different for each proxy device.
d. Proceed to Step 11. 10. If your WSA is running AsyncOS 11.5:
a. Select the Cisco Cognitive Threat Analytics Subscription radio button to automatically configure most of the remaining settings:
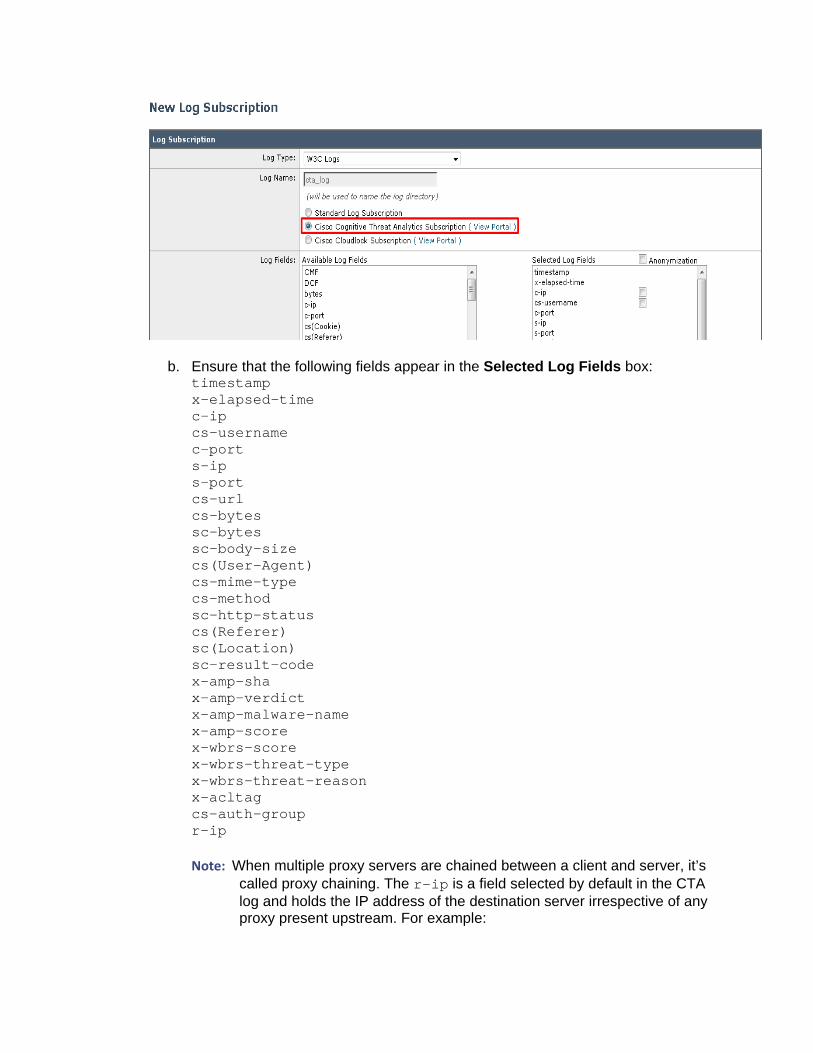
b. Ensure that the following fields appear in the Selected Log Fields box: timestamp x-elapsed-time c-ip cs-username c-port s-ip s-port cs-url cs-bytes sc-bytes sc-body-size cs(User-Agent) cs-mime-type cs-method sc-http-status cs(Referer) sc(Location) sc-result-code x-amp-sha x-amp-verdict x-amp-malware-name x-amp-score x-wbrs-score x-wbrs-threat-type x-wbrs-threat-reason x-acltag cs-auth-group r-ip Note: When multiple proxy servers are chained between a client and server, it’s
called proxy chaining. The r-ip is a field selected by default in the CTA log and holds the IP address of the destination server irrespective of any proxy present upstream. For example:
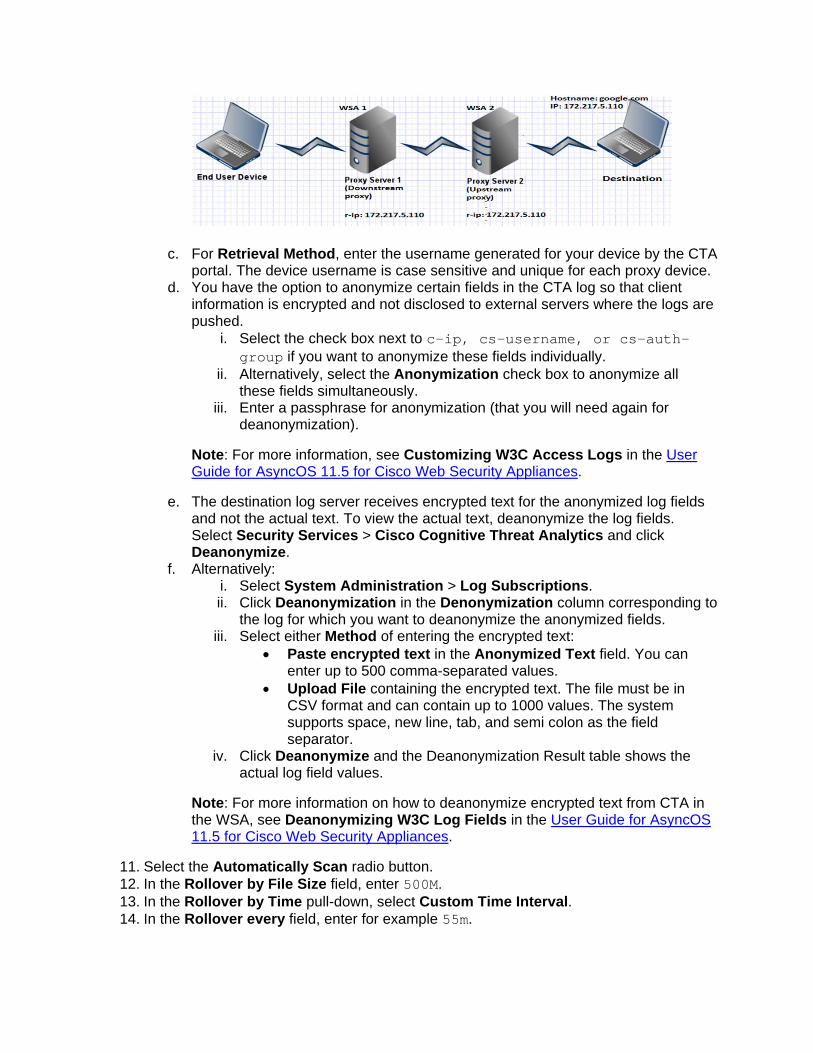
c. For Retrieval Method, enter the username generated for your device by the CTA portal. The device username is case sensitive and unique for each proxy device.
d. You have the option to anonymize certain fields in the CTA log so that client information is encrypted and not disclosed to external servers where the logs are pushed.
i. Select the check box next to c-ip, cs-username, or cs-auth-group if you want to anonymize these fields individually.
ii. Alternatively, select the Anonymization check box to anonymize all these fields simultaneously.
iii. Enter a passphrase for anonymization (that you will need again for deanonymization).
Note: For more information, see Customizing W3C Access Logs in the User Guide for AsyncOS 11.5 for Cisco Web Security Appliances.
e. The destination log server receives encrypted text for the anonymized log fields and not the actual text. To view the actual text, deanonymize the log fields. Select Security Services > Cisco Cognitive Threat Analytics and click Deanonymize.
f. Alternatively: i. Select System Administration > Log Subscriptions. ii. Click Deanonymization in the Denonymization column corresponding to
the log for which you want to deanonymize the anonymized fields. iii. Select either Method of entering the encrypted text:
• Paste encrypted text in the Anonymized Text field. You can enter up to 500 comma-separated values.
• Upload File containing the encrypted text. The file must be in CSV format and can contain up to 1000 values. The system supports space, new line, tab, and semi colon as the field separator.
iv. Click Deanonymize and the Deanonymization Result table shows the actual log field values.
Note: For more information on how to deanonymize encrypted text from CTA in the WSA, see Deanonymizing W3C Log Fields in the User Guide for AsyncOS 11.5 for Cisco Web Security Appliances.
11. Select the Automatically Scan radio button. 12. In the Rollover by File Size field, enter 500M. 13. In the Rollover by Time pull-down, select Custom Time Interval. 14. In the Rollover every field, enter for example 55m.

Number of Users Behind Proxy Recommended Upload Period Unknown or less than 2000 55 minutes 2000 to 4000 30 minutes 4000 to 6000 20 minutes More than 6000 10 minutes
15. Click Submit. 16. The WSA Management Console displays two public SSH keys using DSS and RSA
algorithms. You can use either one. This document shows the use of the DSS algorithm. Copy and paste the whole key, including ssh-dss at the beginning, into the device account in the CTA portal. Successful authentication between your proxy device and CTA system allows log files from your proxy device to be uploaded to the CTA system for analysis.
17. Click Commit Changes. Caution: In order to process these changes, the proxy process will restart after you commit changes. This will cause a brief interruption in service. Additionally, the authentication cache will be cleared, which might require some users to authenticate again. We recommended you configure the WSA during an off-hour maintenance window to avoid impacting users during production hours.
18. To test your connection, force the WSA to attempt an immediate upload: a. Navigate to the Log Subscriptions page. b. For the subscription you want to test, select the Rollover check box. c. Click Rollover Now.
19. To check the status of the file upload in the CTA portal: a. Navigate to and reload the Device Accounts page. b. Expand the handle next to the device name.
c. Click Activity Log and confirm that there are no error messages. d. Verify that each file upload has a timestamp indicating when the activity started
and completed, a time to upload that’s not too long, and an appropriate file size. e. After the configured Rollover by Time has passed, check the status again to
verify that log file uploads are working without being forced.
Connect to Active Directory to Resolve Usernames Setting up an Active Directory is not required for creating a log subscription, and you may already have it configured, but this helps in identifying affected devices. In order to see user names on the CTA system, the WSA needs to be able to authenticate all users. This can be accomplished by using the Transparent User Identification feature. For additional information, see Chapter 5 “Acquire End-User Credentials” in the Cisco Web Security Appliances User Guide.
1. Navigate to Network > Authentication. 2. Add a Realm connecting to your Active Directory:
a. Active Directory Server is the name of your domain, not the hostname. b. Active Directory Domain is the name of your domain in capitalized letters. c. After clicking Join Domain, enter the credentials of a user with domain
administrator rights; the WSA will create its own user in the Active Directory. d. Check Enable Transparent User Identification using Active Directory agent.
There must be a Cisco Active Directory agent running and able to connect to Active Directory. Enter its server hostname and shared secret.
3. Navigate to Web Security Manager > Identities. 4. Edit Global Identity Policy. Set Identification and Authentication to Identify Users
Transparently and pick the realm created in the previous step. 5. In Network Authentication Global Authentication Settings click on Edit Global
Settings and set the Action if Authentication Service Unavailable to Block all traffic if authentication fails. This will prevent the addition of “*” in the userid access log field, which is added for non-authenticated users.
Using SMA to Configure Multiple WSAs The Cisco Content Security Management Appliance (SMA) centralizes management functions across multiple WSAs. However, the SMA does not help when setting up log uploading. Since configuration settings vary between WSAs, and the SMA does not support W3C logs, each WSA must be configured individually.
Deployment Scenarios Single WSA, Explicit or Transparent Mode, Single Routing Table
• Ensure you can reach the CTA server on port 22. • Control the interface to be used for the logs by the routing table.
Single WSA, Explicit Mode, Separate Routing Tables for DATA and MGMT Traffic • Ensure you can reach the CTA server on port 22 over the MGMT interface. • SCP traffic is considered MGMT traffic and is sent out the MGMT port. Ensure the
MGMT port can reach the CTA server on port 22.
Upstream and Downstream Proxy Typical configuration:
• Downstream proxy responsibilities: authentication, URL filtering • Upstream proxy responsibilities: anti-malware scanning • Client Downstream Upstream Internet • Separate routing tables for data and management (MGMT) traffic
In this scenario, the downstream proxy has username and client IP address, but not the destination IP address, which is a required field. Destination IP address is always known to the upstream proxy, but username is only seen by the downstream proxy.
In this case, activate the XFF (X-Forwarded-For) header on the downstream proxy and evaluate it on the upstream proxy. This way the upstream proxy knowns the client IP address. Configure the upstream proxy to send log files to the CTA server via the MGMT interface.
Troubleshooting Check Connectivity Follow these steps to check connectivity:
1. Log in to the CLI of the WSA. 2. Enter the logconfig command. 3. Enter the hostkeyconfig command. 4. Enter the scan command. 5. Enter the CTA server hostname: etr.cloudsec.sco.cisco.com 6. Choose All when asked for the SSH protocol type. 7. Enter Y when asked whether the CTA host key should be added.
No RSA host key is known for etr.cloudsec.sco.cisco.com If your telemetry data did not upload, check the WSA log. If you received this message:
“No RSA host key is known for etr.cloudsec.sco.cisco.com and you have requested strict checking. Host key verification failed. Lost connection.”
Follow these steps to resolve:
1. Log in to the CLI of the WSA. 2. Enter the logconfig command. 3. Enter the hostkeyconfig command. 4. Delete the host key. 5. Press the Enter key to return to the main CLI.
6. Enter the commit command. 7. Repeat the configuration steps to add a log subscription. Ensure you select the Enable
Host Key Checking check box, and select the Automatically Scan radio button.
Obtaining Documentation and Submitting a Service Request For information on obtaining documentation, using the Cisco Bug Search Tool (BST), submitting a service request, and gathering additional information, see What’s New in Cisco Product Documentation at: http://www.cisco.com/c/en/us/td/docs/general/whatsnew/whatsnew.html.
Subscribe to What’s New in Cisco Product Documentation, which lists all new and revised Cisco technical documentation, as an RSS feed and deliver content directly to your desktop using a reader application. The RSS feeds are a free service.
Cisco and the Cisco logo are trademarks or registered trademarks of Cisco and/or its affiliates in the U.S. and other countries. To view a list of Cisco trademarks, go to this URL: www.cisco.com/go/trademarks. Third-party trademarks mentioned are the property of their respective owners. The use of the word partner does not imply a partnership relationship between Cisco and any other company. (1110R)
© 2018 Cisco Systems, Inc. All rights reserved.