Embed Size (px)
Citation preview

Cone & Plate Viscometer
Thank you for purchasing this Rhopoint product. Please read these instructions carefully before operating this product and retain them for future reference. The images shown in this manual are for illustrative purposes only.
English
Operating Instructions

1
This instruction manual contains important information about the setup and use of the PAINTLAB+ Cone & Plate Viscometer. It is therefore essential that the contents be read before powering up and using the instrument. If this instrument is passed to other users you must ensure that the instruction manual is supplied with the instrument. If you have any questions or require additional information about this product please contact the Rhopoint Authorised Distributor for your region. The technology and components used in the device are based on state-of-the art optic and electronics. As part of Rhopoint Instruments commitment to continually improving the technologies used in their products, they reserve the right to change information included in this document without prior notice. © Copyright 2014 Rhopoint Instruments Ltd. All Rights Reserved. PaintLab+ and Rhopoint are registered trademarks or trademarks of Rhopoint Instruments Ltd. in the UK and other countries. Other product and company names mentioned herein may be trademarks of their respective owner. No portion of the software, documentation or other accompanying materials may be translated, modified, reproduced, copied or otherwise duplicated (with the exception of a backup copy), or distributed to a third party, without prior written authorization from Rhopoint Instruments Ltd.
Rhopoint Instruments Ltd.
Rhopoint House
Enviro 21 Business Park
Queensway Avenue South
St Leonards on Sea TN38 9AG UK Tel: +44 (0)1424 739622 Email: [email protected] Website: www.rhopointinstruments.com Revision A May 2015

2
Contents
Storage and Handling ........................................................................................................... 3
About the PAINTLAB+ Cone & Plate Viscometer .................................................................. 3
Accessories .......................................................................................................................... 4
Cone kits ............................................................................................................................... 4
Functional overview .............................................................................................................. 5
Power ................................................................................................................................... 6
Switching on the unit ............................................................................................................. 6
Setup Menus ......................................................................................................................... 8
Making a measurement ....................................................................................................... 10
Data transfer ....................................................................................................................... 12
Calibration Check ................................................................................................................ 13
Viscosity Calibration ............................................................................................................ 14

3
Storage and Handling
• To ensure safe and reliable operation of this instrument it should be placed on a rigid, flat level surface.
• The measurement head of this instrument lowers and lifts into the sample plate. No obstructions should therefore be placed in its path to prevent or restrict normal operation.
• The instruments screen, housing and base are resistant to a variety of solvents and therefore can be safely cleaned without damage.
• Prevent exposure of the instrument to direct sunlight for prolonged periods and to continuous humidity and condensation.
About the PAINTLAB+ Cone & Plate Viscometer The PAINTLAB+ Cone & Plate Viscometer is specially designed for the
measurement of liquid coatings that change viscosity under high shear conditions;
such real life conditions include application by brush, by roller or using a spray gun.
In order to achieve the best possible formulation it is essential that the flow behavior
of these coatings is quantified and understood to ensure trouble free production and
application.
Numerous international standards define the Cone & Plate test method including
ASTM D4287 and BS3900-A7-1. A cone with an
accurately defined angle rotates at a fixed speed of 750
rpm (BS) or 900 rpm (ASTM) on a temperature controlled
plate generating a fixed shear rate of 10,000 s¯ ¹ (BS) or
12,000 s¯ ¹ (ASTM) to a sample under test; the natural
circular wedge angle of the cone holding the sample
underneath. Before measurement the sample is pre-
conditioned to the required test temperature via the
temperature controlled plate ensuring that any thermal gradients between the cone
and plate are eliminated which could affect results. During the measurement the
amount of torque, required to maintain the fixed speed, is monitored and displayed
graphically on the display. After a pre-configured test time the result is calculated
and displayed in Poise.

4
Accessories
The instrument is supplied as a standard package as follows - PAINTLAB+ Cone & Plate Viscometer
DC Power Supply USB Data stick Micro USB to USB converter
Cone kits
Cone kits are not supplied as part of the standard package and must be ordered separately. Kits containing 1 x cone according to range and 5 x certified standard calibration oils
are available as follows:-CONE K I T
Description Order code
Cone No. 1 0 - 5 poise Cone Kit RL-B-CONEKIT/0-5
Cone No. 2 0 - 10 poise Cone Kit RL-B-CONEKIT/0-10
Cone No. 3 0 - 20 poise Cone Kit RL-B-CONEKIT/0-20
Cone No. 4 5 - 50 poise Cone Kit RL-B-CONEKIT/5-50
Cone No. 5 10 - 100 poise Cone Kit RL-B-CONEKIT/10-100

5
Functional overview
Figure 1
Label No. Function
1 Data display
2 Cone raising / lowering arm
3 Touchscreen display 4 Cone holder
5 Cone
6 Temperature controlled plate
7 Power input connector
8 Cooling exhaust vents
9 USB data connector
3
9 7
1
6
5
2
8
4
1

6
Power
The PAINTLAB+ Cone & Plate Viscometer is powered by a low voltage DC (16v)
power supply connected to the instruments power input connector (7).
Switching on the unit
With the power supply connected the instrument is switched on by pressing any of the
button indicators on the front screen. Once activated the display will show the
instruments serial number along with the last calibration date and firmware version
details.

7
By pressing the touch buttons again the main measurement screen will be displayed as
shown below –
During the measurement a real-time graph (1) is displayed allowing analysis of the
material under test and displays the measurement in Poise (2). Actual plate temperature
(7) is also displayed alongside set temperature (4) including the cone number being used
(6).
Should no button be pressed for 60 seconds the display will change to standby mode
displaying the time and date. By pressing any button the instrument returns to the
measurement screen above.
Label No. Function
1 Graphical display
2 Measured value
3 Setup button 4 Plate Target Temperature
5 Measurement button
6 Cone number (range)
7 Plate Temperature
3
Figure 2
7
5
1
4
2
6
8
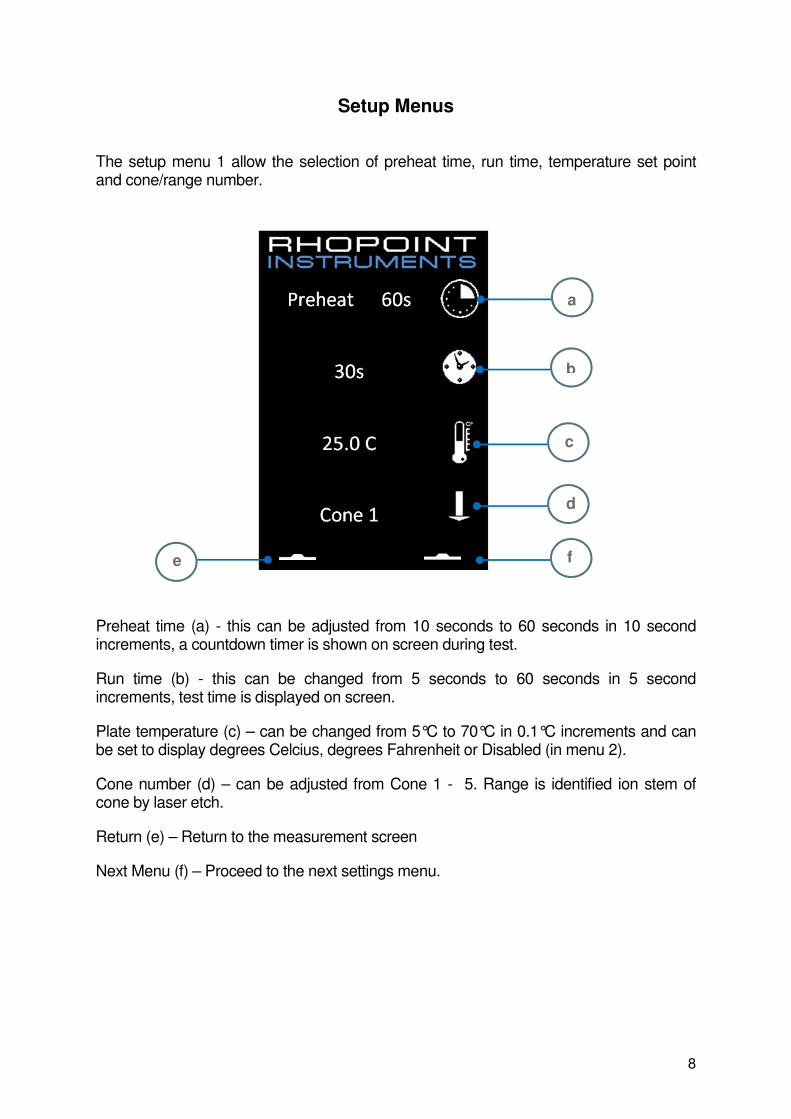
Setup Menus
The setup menu 1 allow the selection of preheat time, run time, temperature set point and cone/range number.
Preheat time (a) - this can be adjusted from 10 seconds to 60 seconds in 10 second increments, a countdown timer is shown on screen during test.
Run time (b) - this can be changed from 5 seconds to 60 seconds in 5 second increments, test time is displayed on screen.
Plate temperature (c) – can be changed from 5°C to 70°C in 0.1°C increments and can be set to display degrees Celcius, degrees Fahrenheit or Disabled (in menu 2).
Cone number (d) – can be adjusted from Cone 1 - 5. Range is identified ion stem of cone by laser etch.
Return (e) – Return to the measurement screen
Next Menu (f) – Proceed to the next settings menu.
d
c
a
b
e f
9
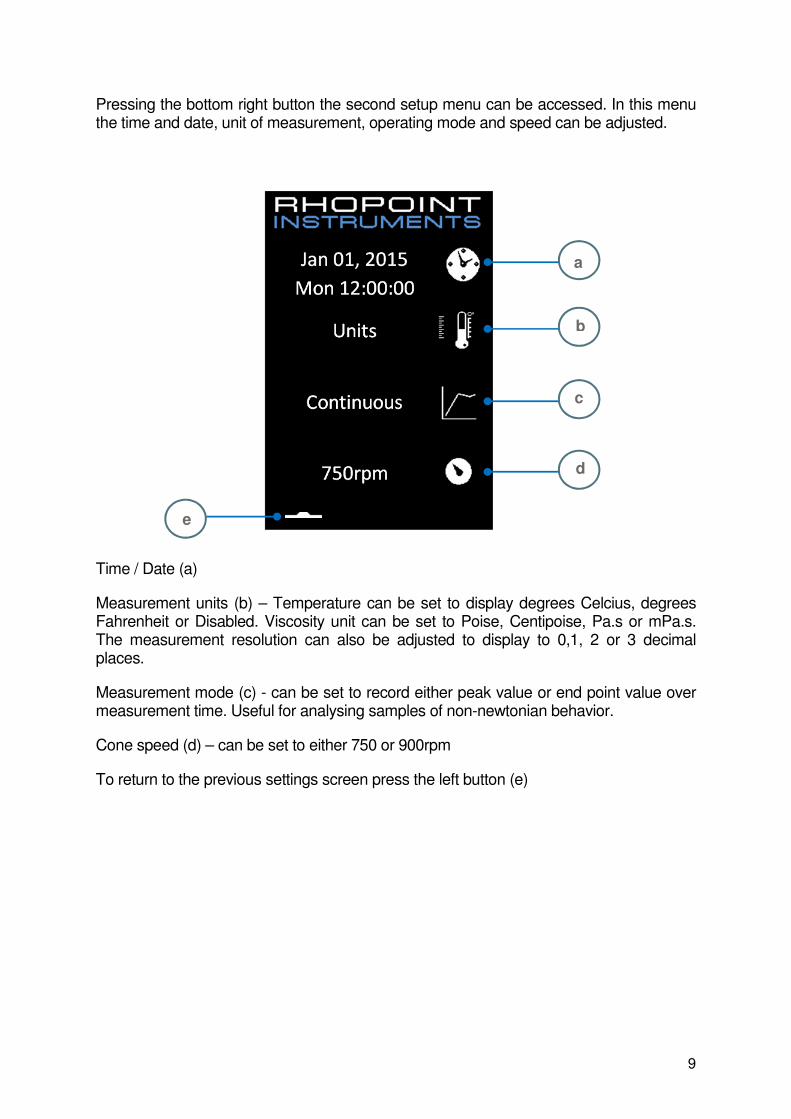
Pressing the bottom right button the second setup menu can be accessed. In this menu the time and date, unit of measurement, operating mode and speed can be adjusted.
Time / Date (a)
Measurement units (b) – Temperature can be set to display degrees Celcius, degrees Fahrenheit or Disabled. Viscosity unit can be set to Poise, Centipoise, Pa.s or mPa.s. The measurement resolution can also be adjusted to display to 0,1, 2 or 3 decimal places.
Measurement mode (c) - can be set to record either peak value or end point value over measurement time. Useful for analysing samples of non-newtonian behavior.
Cone speed (d) – can be set to either 750 or 900rpm
To return to the previous settings screen press the left button (e)
e
c
a
b
d
10
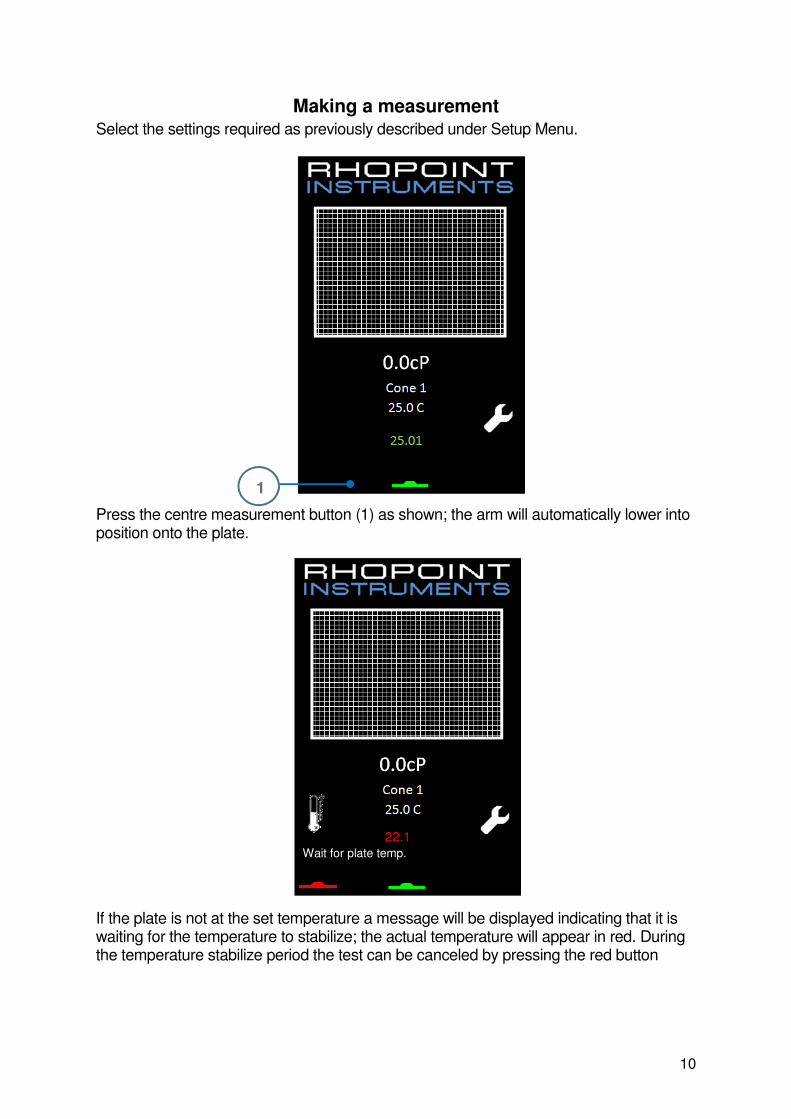
Making a measurement Select the settings required as previously described under Setup Menu. Press the centre measurement button (1) as shown; the arm will automatically lower into position onto the plate. If the plate is not at the set temperature a message will be displayed indicating that it is waiting for the temperature to stabilize; the actual temperature will appear in red. During the temperature stabilize period the test can be canceled by pressing the red button
1
22.1 Wait for plate temp.
11
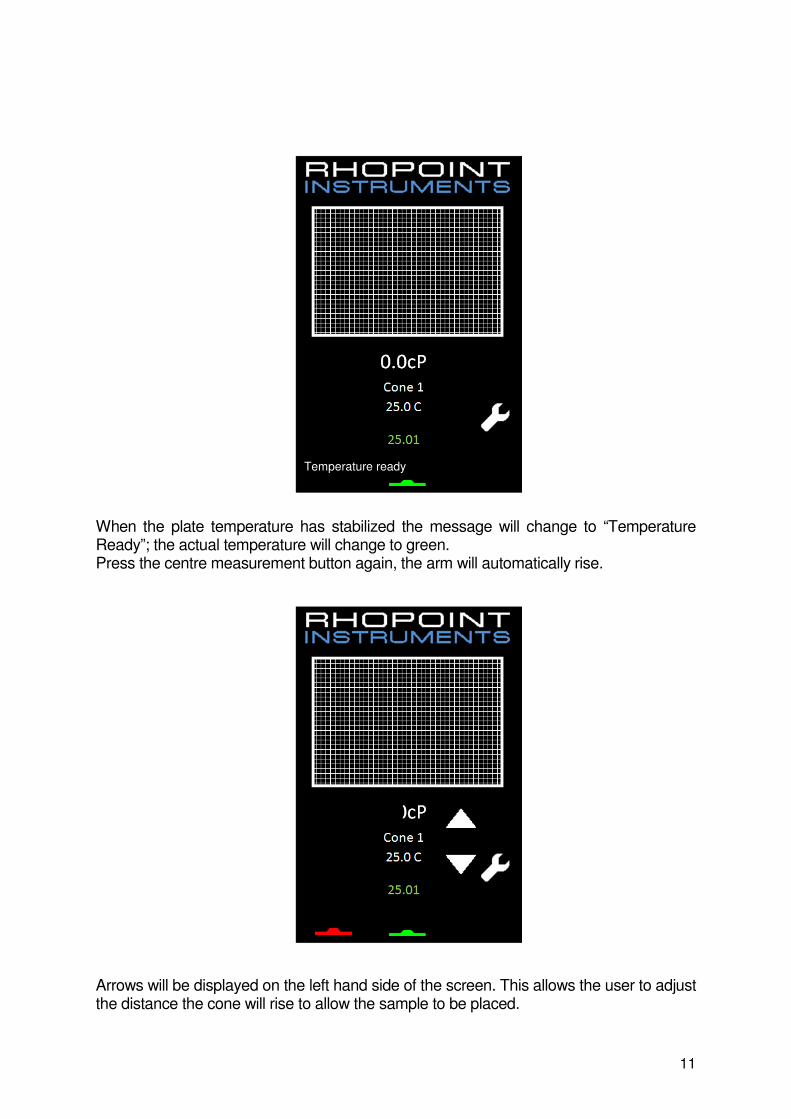
When the plate temperature has stabilized the message will change to “Temperature Ready”; the actual temperature will change to green. Press the centre measurement button again, the arm will automatically rise. Arrows will be displayed on the left hand side of the screen. This allows the user to adjust the distance the cone will rise to allow the sample to be placed.
Temperature ready
12
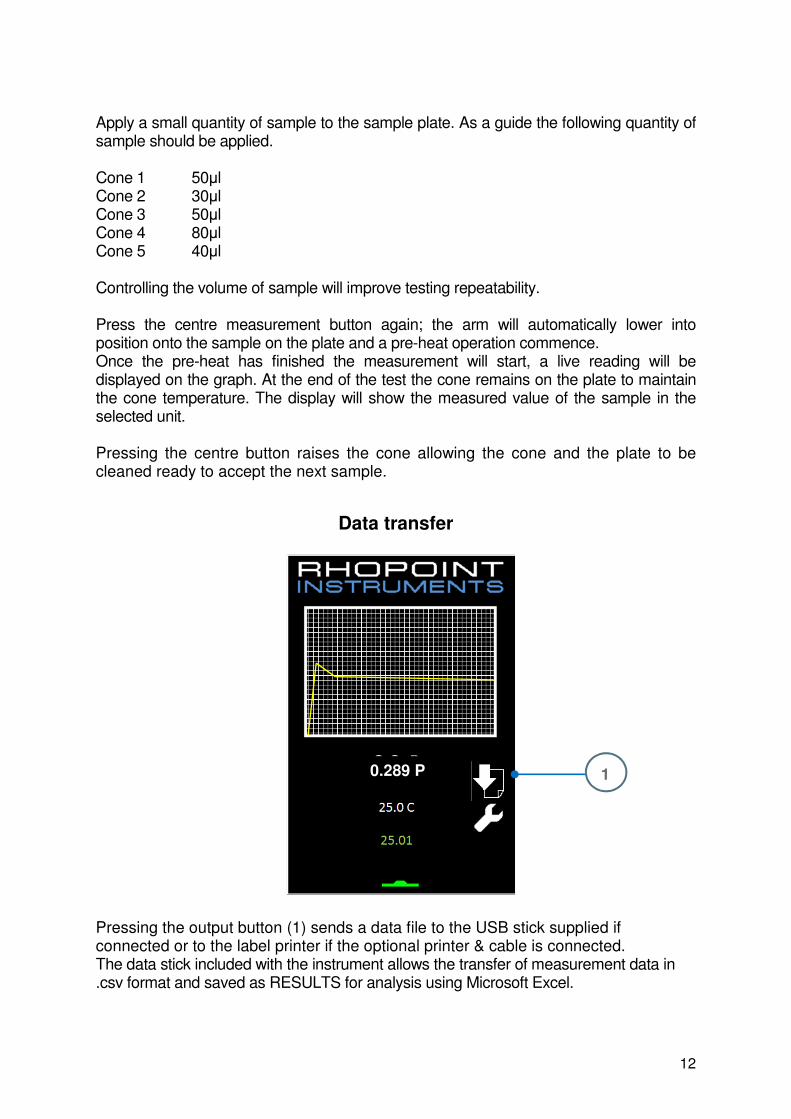
Apply a small quantity of sample to the sample plate. As a guide the following quantity of sample should be applied. Cone 1 50µl Cone 2 30µl Cone 3 50µl Cone 4 80µl Cone 5 40µl Controlling the volume of sample will improve testing repeatability. Press the centre measurement button again; the arm will automatically lower into position onto the sample on the plate and a pre-heat operation commence. Once the pre-heat has finished the measurement will start, a live reading will be displayed on the graph. At the end of the test the cone remains on the plate to maintain the cone temperature. The display will show the measured value of the sample in the selected unit. Pressing the centre button raises the cone allowing the cone and the plate to be cleaned ready to accept the next sample.
Data transfer
Pressing the output button (1) sends a data file to the USB stick supplied if connected or to the label printer if the optional printer & cable is connected. The data stick included with the instrument allows the transfer of measurement data in .csv format and saved as RESULTS for analysis using Microsoft Excel.
1 0.289 P

13
An example of the exported file is shown below. Each time the export button is pressed a new line is written to the file.
Calibration Check
The accuracy of the PaintLab+ Cone & Plate Viscometer is verified using viscosity
standard certified oils calibrated in cP. These oils are available from Rhopoint Instruments or your local Rhopoint distributor.
Viscosity Standard information, including part numbers, is detailed below.
Rhopoint re-calibration kits Order Code
0 – 5 Poise re-calibration pack RL-B-CONEKIT/0-5
0 – 10 Poise re-calibration pack RL-B-CONEKIT/0-10
0 – 20 Poise re-calibration pack RL-B-CONEKIT/0-20
5 – 50 Poise re-calibration pack RL-B-CONEKIT/5-50
10 – 100 Poise re-calibration pack RL-B-CONEKIT/10-100
In order to ensure the highest accuracy we recommend that viscosity standards should be replaced on an annual basis, one year from the date of first use.
Performing a calibration check
The frequency of a calibration check should be based on your QA requirements for the test and calibration of instruments.
Before performing a calibration check it is recommended that the cone is left in
contact with the sample plate set to 25deg C for 30mins to ensure temperature equilibrium.
1) In the settings menus select a preheat time of 60seconds and a run time of 15seconds.
2) Select two viscosity standards from the cone kit purchased with the instrument to perform the calibration check. Ideally ones that match the viscosity of the samples under test.
3) Use a precision dispensing syringe to apply the correct volume of calibration oil to the
sample plate.
14
Cone 1 50µl Cone 2 30µl Cone 3 50µl Cone 4 80µl Cone 5 40µl
4) Continue as described under the “Making a measurement” section of this manual
5) Repeat with the second viscosity standard.
6) Verify the measurements are within the instrument measuring tolerances +/-2% FSR. 3 tests per calibration oil is recommend, toughly clean the cone and plate between
each test.
Viscosity Calibration
If the calibration check returns values outside the specification of the instrument the cone and plate viscometer can be re-calibrated by the user. All 5 calibration points must be set during a calibration. After calibration, the readings should be checked by following the calibration check instructions above.
Before performing a calibration it is recommended that the cone is left in contact with the sample plate set to 25deg C for 30mins to ensure temperature equilibrium. To enable the calibration menu a programmed USB drive must be used. A calibration file for your instrument is available from Rhopoint. Calibration files are matched to the instruments serial number and 1 per cone/range is required.
1) In the settings menus select a preheat time of 60seconds, a run time of 15seconds
and a test temperature of 25 C.
2) Use the micro USB to USB adaptor supplied to plug the USB drive with calibration file into the instrument. The instrument screen will turn blue, press the middle green button to lower the cone onto the plate. Leave the cone in contact with the plate for 30mins before commencing the calibration. Pressing the red button at any time will cancel the calibration.
15
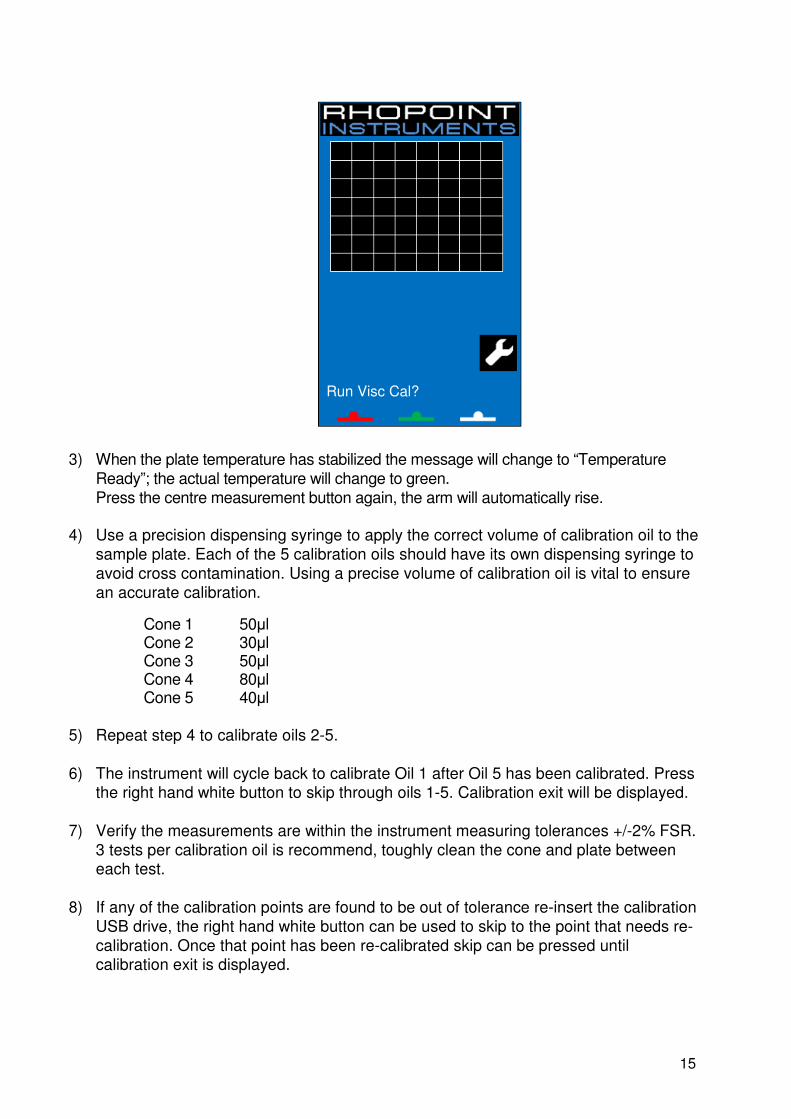
3) When the plate temperature has stabilized the message will change to “Temperature Ready”; the actual temperature will change to green. Press the centre measurement button again, the arm will automatically rise.
4) Use a precision dispensing syringe to apply the correct volume of calibration oil to the sample plate. Each of the 5 calibration oils should have its own dispensing syringe to avoid cross contamination. Using a precise volume of calibration oil is vital to ensure an accurate calibration.
Cone 1 50µl Cone 2 30µl Cone 3 50µl Cone 4 80µl Cone 5 40µl
5) Repeat step 4 to calibrate oils 2-5.
6) The instrument will cycle back to calibrate Oil 1 after Oil 5 has been calibrated. Press the right hand white button to skip through oils 1-5. Calibration exit will be displayed.
7) Verify the measurements are within the instrument measuring tolerances +/-2% FSR. 3 tests per calibration oil is recommend, toughly clean the cone and plate between each test.
8) If any of the calibration points are found to be out of tolerance re-insert the calibration
USB drive, the right hand white button can be used to skip to the point that needs re-
calibration. Once that point has been re-calibrated skip can be pressed until calibration exit is displayed.
Run Visc Cal?