Embed Size (px)
Citation preview
CONCURRENT DOS 8-16 INSTALLATION GUIDECopyright 1985 Viasyn CorporationHayward, CA 94545
r
First Edition: December, 1984Latest Printing: March, 1985
Document No: 15372Filename: CDOS.MANVersion 3.1x
DISCLAIMER - Viasyn Corporation makes no representations orwarranties with respect to the contents hereof and specificallydisclaims any implied warranties of merchantability or fitnessfor any particular purpose. Further, VIASYN reserves the rightto revise this publication and to make any changes from time totime in the content hereof without obligation of VIASYN to notifyany person of such revision or changes.
Registered Trademarks: MDRIVE, Viasyn Corporation. IBM, Inter-national Business Machines, Inc. Televideo, Televideo, Inc. 'Zenith, Zenith Radio Corporation.
Compound Trademarks: Concurrent DOS 8-16 is a compound trademarkof Digital Research, Inc. and Viasyn Corporation.
Trademarks: Concurrent CP/M, CP/M 80, Digital Research Inc.
All rights reserved. No part of this publication may bereproduced or transmitted in any form, or by any means, withoutthe written permission of VIASYN. Printed and assembled in theUnited States of America.
TABLE OF CONTENTS
1. INTRODUCTION .......................................... 1
2. HARDWARE REQUIREMENTS .................................. 2-3
3. CONNECT, SET UP AND TEST YOUR SYSTEM .................... 3Unpacking the System ........................................... 3Unpacking the Floppy Disk Drives ................................ 4Unpacking the Hard Disk Drive ........................ ........... 4Repacking the System .................................. ......... 4
4. INSTALLING YOUR HARDWARE ............................... 4Connecting the Terminals and Serial Printers ............... ......... 5Connecting the Floppy Disk Drives ............................... 6Connecting the Hard Disk - Disk 3 ............................... 6Connecting the Hard Disk - Disk 2 ............................... 6Connection Test .............................................. 6-7
5. BOOTING A FLOPPY SYSTEM ................................. 7-8
6. COPYING YOUR MASTER DISKETTES (Making a "Backup") ........... 8Format a Diskette ............................................. 8-10Copy a Diskette .............................................. 10-11
7. CREATING A BOOT DISKETTE FOR A FLOPPY-ONLY SYSTEM ...... 11-12
8. FORMATTING YOUR HARD DISK .............................. 13-14
9. BOOTING A HARD DISK SYSTEM ............................... 14DISK 2 Systems ............................................... 14-15
Booting Off of a Floppy ....................................... 15-16Booting Directly Off of the Hard Disk ........................... 17
DISK 3 Systems ............................................... 18-19Booting Off of a Floppy ....................................... 19-20Booting Directly Off of the Hard Disk ............................ 20-21
10. INSTALLING SETUP FILES ...................................... 21Terminal Setup File (TTYS) ...................................... 21-24Printer Setup File (LPRS) ...................................... 24-25User Setup File (PASSWD) ...................................... 25-26
11. RELATIVE USER TO LOGICAL I/O DEVICE MAPPING ............. 26-27
12. HISTORY REPORTING ........................................ 27
13. LOGGING ON TO A PRINTER .................................. 27
14. SETMEM COMMAND .......................................... 28
15. AUTO.SUB COMMAND ........................................ 28
16. THE "WHO" COMMAND ....................................... 28
17. MESSAGE OF THE DAY (MOTD) 28
18. AUTOMATIC EXECUTION OF SUBMIT FILES 28
19. FEATURES OF CONCURRENT DOS 8-16 29Screen Switching 29Changing Buffer Size - VCMODE 29-30Using the DISK 1A and 5.25" Drives - NEWMEDIA 30-31Changing Diskettes 32
20. SOFTWARE ENHANCEMENTS 32Terminal Message Process (TMP) 32The SWITCH Program 33
Using SWITCH with the PC Shell 33-34Using SWITCH with the Non-PC Shell 34-35
21. USING CPU 8086 OR CPU 286 TO RUN 8-BIT PROGRAM INEMULATION MODE 35
22. NEED HELP? 35-36
23. HOW TO CUSTOMIZE YOUR OPERATING SYSTEM 36Building a Multi-user System 36-37Choosing Your XIOS File 37-38GENerating a SYStem - GENCCPM 38-39
24. ERROR MESSAGES (INTERPRETATION OF MESSAGES) 40-43
25. TROUBLESHOOTING YOUR SYSTEM 44-47i !J
26. HARDWARE SETTINGS FOR CONCURRENT DOS 8-16 48CPU 8085/88 48CPU 8085/88 - 10 MHz 48-49CPU 8086 49CPU 286 50System Support 1 51RAM 23 Memory Board - 64K Version 52RAM 23 Memory Board - 128K Version 52RAM 22 Memory Board 52RAM 21 Memory Board 53RAM 17 Memory Board 53RAM 16 Memory Board 54Disk 1 - Floppy Disk Controller 55Disk 1A - Floppy Disk Controller 55-58Disk 2/Selector Channel - Hard Disk Controller 59Disk 3 - Hard Disk Controller 60Interfacer 3 61Additional Interfacer 3 61Interfacer 4 62Additional Interfacer 4 62-63MDRIVE/H 63
27. APPENDIX ...................................................................................................... 64
LIST OF FIGURES
4-1 Computer Enclosure Back Panel ...............................................5
LIST OF TABLES
10-1 Baud Rates 2210-2 Hardware Handshaking 2210-3 Serial Communication Parameters 22
WARRANTY INFORMATION .69
1. INTRODUCTION
When you purchase Concurrent DOS 8-16 from VIASYN, you get anoperating system with the following features:
Built-in directory buffering reads the directory from diskinto memory improving disk access.
Built-in LRU (least recently used) caching lists files inmemory in order according to frequency of use for quickeraccess time.
Shared code support allows several users access to the samecode segment in memory. Each user creates their own datasegment while sharing one code segment.
Multi-user 8087/287 support uses the 8087/287 math processorand allows for several users to share the same registersclearing data out to memory for each user.
Full record and file lock out so more than one person at atime can use the same data file without corrupting the file.
File password protection sets up a system in which users needa password to access certain commands or data files withinConcurrent DOS 8-16.
User log on/log off password and accounting is a featureof the CompuPro Concurrent DOS. Passwords are kept in anencrypted file so they can not be read by anyone trying to getinto your system.
Password utili ty is provided to set up the system passwordsfor log on/log off of the Concurrent DOS operating system.(This keeps unauthorized users off of the system and canrestrict users to certain parts of the system, commands, anduser numbers.)
User start-up files sets up start-up files unique for eachconsole.
Support for networking systems with the aid of the CompuProNet 100 network board.
"Who" command gives the name of those users logged on.will also tell who is on which console.
It
Status line update feature displays the current programand current active drives. (This feature will not work withall terminals. Refer to your System Center for informationon the proper terminals.)
Virtual screen switching is supported with one keystroke.(This feature is also terminal dependent.)
Automatic detection of drive door opening, so you can changedisks without having to remember to tell the system you'vedone so. Concurrent DOS 8-16 will read the current disk.
Supports MDRIVE/H RAM Disk
System can directly boot off the hard disk in a system witha DISK 3 and a DISK 1A with EPROM #291 or greater (no floppydisk is needed.)
Some IBM® -PC compatibility is provided. Using the CompuProDisk 1A, you can execute some DOS l.X-type programs. With theoptional PC Video board, you can execute many screen dependentprograms. Refer to the "PC Video Installation Guide" includedwith your PC Video board.
2. HARDWARE REQUIREMENTS
To use a basic Concurrent DOS 8-16 system, you need Compupro'sIEEE 696/S-100 components in the following minimum configuration:
Enclosure: Computer Enclosure with 20 or 21-slot motherboard
Processor: Either a CPU 8085/88, CPU 8086 or CPU 286
Support: System Support 1 featuring one serial port forconnection to system console, interruptcontroller, real-time calendar/clock, threeinterval timers, EPROM sockets with "GO 86"EPROM or 6116 RAM chip installed.
Memory: RAM 16, 17, 21, 22 or 23 to provide 256K ormore of RAM.
I/O Control: Interfacer 3 or 4 board for console and printerI/O control.
Mass Storage: Disk 1 or 1A floppy disk controller with two8-inch double-sided, double-density floppy diskdrives that will support 3 msec, step rate.
Recommended Options:
Terminal: Any terminal that supports cursor addressing,user writable status line, extra pagingcapability. (For example, Televideo 925/950,Qume 108.)
Hard Disk: Disk 2 or Disk 3 hard disk controllers and ahard disk drive. (CompuPro supports Quantumhard disk models Q520, Q540, and Q2080; Seagate
ST506 and Fujitsu 20 and 40 megabyte hard diskdrives.)
Suggested Options:
Memory: As much memory as you can get (up to 1 mega-byte). You'll find that with Concurrent DOS8-16, you'll want to run more programs, andthis will require more memory. (With 256K,one user with one console, and no networking,approximately 112K of free space remains.Each additional console requires approximately4K of memory. Networking uses approximately64K of memory.)
MDRIVE/H: Disk drive emulator.
Additional For connecting up to 14 users.Interfacer3 or 4:
5.25" FloppyDrives: 96 TPI double-sided drives, equivalent to
Mitsubishi M4853 drives. (These drives requirea Disk 1A).
If your CompuPro system has not been connected, installed (setup) and tested, continue with these instructions. If it has beenset up, turn to Section 5 for instructions on how to copy yourmaster diskette.
3. CONNECT, SET UP AND TEST YOUR SYSTEM
Unpacking the System
Carefully consider where you want to place your computer. Makesure you have an adequate amount of power outlets for the plugs andenough space surrounding your system for ventilation. You willalso need to work at both the back and f ront of the computer toinstall your system. Allow yourself enough room to get to boththese areas.
Your computer has been shipped in packing materials that helpprevent damage during shipping. Save these packing materials incase you have to return any equipment to your SystemCenter/Dealer. Repacking the system in the original containersgives you the best shipping protection.
An invoice is shipped with each system. Use it to verify that allcomponents have been received. We suggest you file the invoice awaywith your records for future reference.
Open all boxes and carefully remove each unit from the packingmaterial. Place the units on a flat surface and inspect thecabinets for any signs of shipping damage. Find and remove all thecables, cords, and system diskettes and put them aside for themoment.
Unpacking the Floppy Disk Drives
To prevent shipping damage, the floppy disk drives are shipped witha cardboard shipping diskette inserted in the drive slots. Be sureto remove this diskette before using the drive. Save thesecardboard diskettes and packing materials in case the disk drivesneed to be re-shipped.
Unpacking the Hard Disk Drive
Some hard disk storage heads are manually locked in place forshipping. Some heads are locked automatically. If you have aQuantum Q520, Q540 or Q2080 hard disk drive, there is no externallocking. The hardware will unlock when the power is turned on.
If you have a Pragmatic Design 20 Mbyte or 40 Mbyte hard disk, inorder to unlock the heads, remove the cover, then find the LOCKEDand UNLOCKED label on the drive. There is a lever underneaththis label. Unlock the drive by switching the lever to theUNLOCKED position. This lever is held in place in two notchedareas. Hold the lever down, pulling it out of the first notchedarea marked LOCKED, then slide it across and up to the secondnotched area marked UNLOCKED. Your hard disk is now unlocked.
NOTE: Allow the system to power up or down for at least 20 secondsbefore turning the system on or off again.
Repacking the System
If it is necessary to repack your system, make sure it is packed asit was originally shipped. Take special care in repacking the diskdrives. It is important that both the floppy and hard disk drivesbe secured before moving or shipping. Reverse the procedure in thesection above so that your hard disk is LOCKED.
4. INSTALLING YOUR HARDWARE
This section describes the hardware setup for Concurrent DOS 8-16.It is assumed at this point that all necessary boards areinstalled within the enclosure and all necessary jumper andswitch settings have been made. The jumper and switch settingsfor each board can be found in the back of this manual.
Use the following illustration as a guide for making the externalconnections to your system.
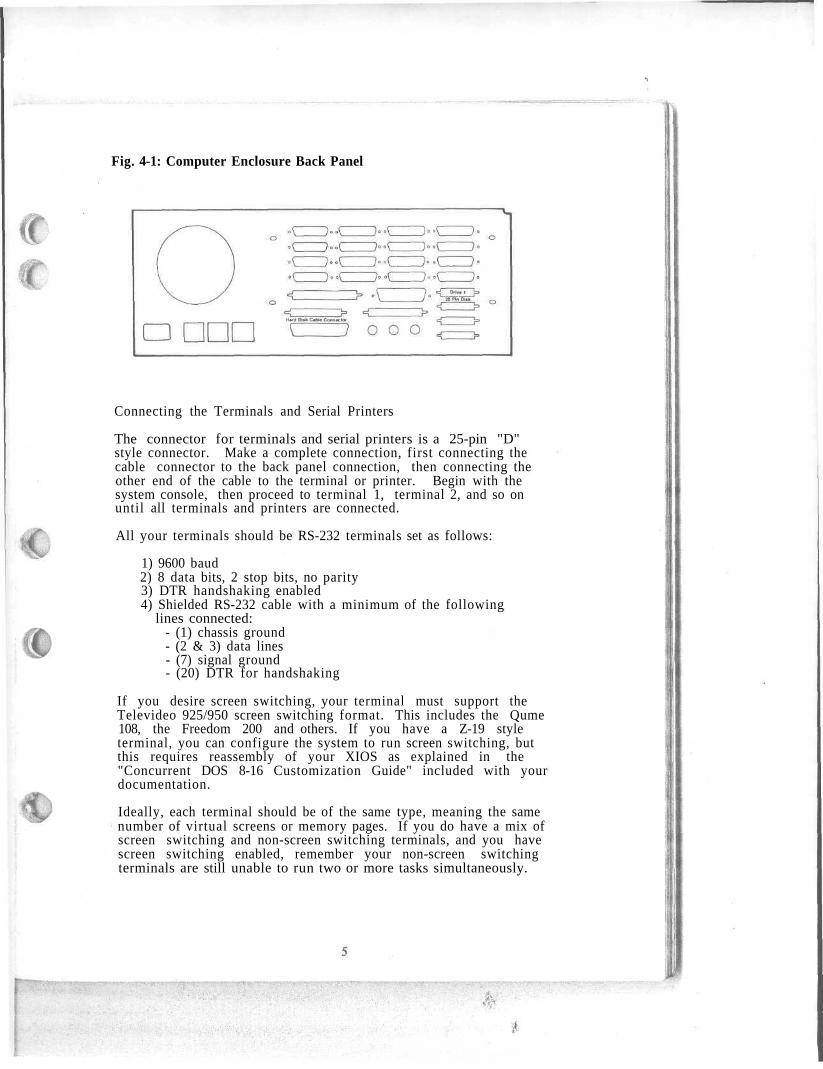
Fig. 4-1: Computer Enclosure Back Panel
Connecting the Terminals and Serial Printers
The connector for terminals and serial printers is a 25-pin "D"style connector. Make a complete connection, first connecting thecable connector to the back panel connection, then connecting theother end of the cable to the terminal or printer. Begin with thesystem console, then proceed to terminal 1, terminal 2, and so onuntil all terminals and printers are connected.
All your terminals should be RS-232 terminals set as follows:
1) 9600 baud2) 8 data bits, 2 stop bits, no parity3) DTR handshaking enabled4) Shielded RS-232 cable with a minimum of the following
lines connected:- (1) chassis ground- (2 & 3) data lines- (7) signal ground- (20) DTR for handshaking
If you desire screen switching, your terminal must support theTelevideo 925/950 screen switching format. This includes the Qume108, the Freedom 200 and others. If you have a Z-19 styleterminal, you can configure the system to run screen switching, butthis requires reassembly of your XIOS as explained in the"Concurrent DOS 8-16 Customization Guide" included with yourdocumentation.
Ideally, each terminal should be of the same type, meaning the samenumber of virtual screens or memory pages. If you do have a mix ofscreen switching and non-screen switching terminals, and you havescreen switching enabled, remember your non-screen switchingterminals are still unable to run two or more tasks simultaneously.
Connecting the Floppy Disk Drives
The 8" floppy disk drives are connected internally to the floppycontroller board with one 50-pin cable connected to the left 50-pin connector (rear view). Double-check that the board and cableconnections are securely installed. The external connection ismade with a 50-pin cable.
Connect the end of this cable to the back panel of the floppy diskdrive enclosure. Take care not to bend the pins, and be sure thatall the pins are included when you plug in the cable.
The 5.25" floppy disk drives are connected in the sameusing a 34-pin cable.
manner,
Connecting the Hard Disk - DISK 3
If you are using the DISK 3, the internal connections are made tothe hard disk controller board by a 34-pin control cable and a20-pin data cable, connected to the leftmost 20-pin connector.
The external connections are made with a 34-pin and a 20-pin cable.Connect the end of these cables to the back panel of the hard disk.Take care not to bend the pins and be sure that all the pins areincluded when you plug in the cable.
Connecting the Hard Disk - DISK 2
Two cable connections are made for the hard disk. If you are usingthe DISK 2, the internal connections are made to the hard diskcontroller board by a 50-pin control cable and a 20-pin data cable,connected to the leftmost 20-pin connector.
The external connections are made with a 50-pin and a 20-pin cable.Connect the end of these cables to the back panelof the hard disk. Take care not to bend the pins and be sure thatall the pins are included when you plug in the cable.
Connection Test
Test your connections now. Plug in all power cables. The computerenclosure has provisions on the rear panel for plugging in diskdrives, terminals or printers. These AC utility outlets areswitched by the main power switch, located on the front of thecomputer enclosure. Each outlet is rated for a maximum of 120watts.
1) Turn on power to the computer enclosure by pressing downthe top portion of the red power switch on the front panel.
2) Turn on power to the floppy disk system by flipping upthe toggle switch on the back panel.
3) Turn on power to the hard disk system by flipping upthe power switch on the rear panel.
4) Go to the front of the system now and check for thefollowing:
- The red RESET button on the computer enclosure is lit.
- The red indicatorblinking.
light on one of the floppy disk drives is
If the indicator light on a floppy drive is lit but not blinking,and pressing the RESET button does not start it blinking, you mayhave installed the cable backwards, or a switch may have been setincorrectly. Turn off all power to all systems before going anyfurther.
If the floppy light(s) are on brightly, flip the cable over. Firsttry correcting the problem by unplugging the rear panel connectionon the floppy disk. Turn the ribbon cable connector over and re-connect it. Changing this cable will not correct the problem ifnone of the lights are on. If none of the lights on the floppydrives are on, the cable itself may be bad. First try connecting adifferent cable. If a new cable does not solve the problem, checkyour switch settings again.
Turn on power to the systems and go over the above check again.If the system still does not power up correctly, make sure thatyou followed previous connection instructions correctly. Atroubleshooting chart follows in Section 25 of this manual; checkthis out also.
If you are satisfied that all connections are made properly, butare still unable to get your system to operate correctly, contactyour dealer.
5. BOOTING A FLOPPY SYSTEM
Connect the cable of your system console to the serial port of yourSystem Support 1 board. Set the terminal to work at 9600 baud, asdescribed in Section 4 of this manual.
Insert your Concurrent DOS 8-16 boot diskette into the leftmost ortop floppy drive on your system. If you have a CPU 8085/88, yourboot floppy is labeled "Master Diskette Number 1 of 4". If you areusing a CPU 8086 or a CPU 286, your boot diskette is labeled"Master Diskette Number 2 of 4.
The following system message will appear on your screen:
CP/M 8-16 1.1Sb loader -
Can't open CCPM.SYSWhat CCPM*.SYS Do You Want To Read?:
To get your system up and running, use the floppy only system file,FLPY, located on disk #1 of 4. Type in FLPY. The system willdisplay something similar to the following message:
CompuPro XIOS Ver 3.1C0.5 Megabyte MDRIVE/H active as M:Disk 1A Controller present:
8" Drives on A: B:5 1/4" Drives on C: D:
Concurrent CP/M-86 3.1Copyright (C) 1983, Digital ResearchConcurrent CP/M 8-16 Copyright (C) 1984, CompuProPC Mode
XIOS, LOADER, SW, SHELL, Copyright (C) 1981, 1982 CompuPro
14:27:16 A:MFORM.CMD
CompuPro Concurrent-CP/M 8-16PC Mode
OA>
Later you will choose the SYS file which is more appropriate toyour system. In addition 14 XIOS files have been provided to helpcustomize your operating system to your needs. These are listedtoward the back of the manual.
If you are running a hard disk on your system, skip to Section 8,"Formatting Your Hard Disk".
6. COPYING YOUR MASTER DISKETTES (Making a "Backup")
Before you go any further, make a backup copy of your ConcurrentDOS 8-16 system diskettes. Use the backup copies to run the systemand put the original masters in a safe place.
EXCEPTION: If you have a hard disk with your system, ignore thissection and skip ahead to the section on formatting your hard disk.
The CompuPro FORMAT and COPY utilities are on Master Diskette #2 of4. Insert this diskette into a drive and log onto that drive.Locate several blank diskettes and use the CompuPro FORMAT utilityto format a blank diskette (must be single sided and 1024bytes/sector) and the COPY utility to make a track by track copy.
A. Format a Diskette
STEP 1. Insert a write-enabled single-sided blank diskette into anempty floppy drive and shut the drive's door.
STEP 2. Type the command: FORMAT x:3 (where x is the logical

drive letter A - P) and press the return key.
NOTE: From now on, when you see the symbol[RET], it means to press the RETURN, orENTER key.
The drive will make some noise, its light will flash, andthe following message (or one which is similar) will appearon the screen.
CompuPro Disk FORMAT Version 4.x8 inch disk: 77 track, 1 sided, not formattedConfirm ready to format disk in drive X: (Y/N):
anytime by pressing ^C. (Hold down thecontrol [CTRL] key and press the "C" key.)
STEP 3. Because formatting a diskette erases any existing files onthe diskette, the system gives you a last chance toreconsider.
If you are sure you are ready, type: Y
Do not press the return key, as the program does thisautomatically. The screen will display symbols of thetracks of the diskette. These tracks are the actuallocations of the stored information. The formattingprogram looks at each of these tracks, and makes surethat each track is in perfect condition. Here is whatyou will see on the screen after the operation iscomplete; it does not all appear at once, but rather"builds" sequentially.
1 2012345678901234567890FFFFFFFFFFFFFFFFFFFFFVVVVVVVVVVVVVVVVVVVVV
. 6 7
.01234567890123456789
.FFFFFFFFFFFFFFFFFFFF
.vvvvvvvvvvvvvvvvvvvv
NOTE: 8" diskettes have 77 tracks (0-76) to beformatted and 5.25" diskettes have 80 tracks (0-79)to be formatted.
If an E or S appears in the bottom row, something isphysically wrong with a track. Insert another diskette andtry the formatting procedure again.
After the bottom row is completed, the following messageappears:
FORMAT complete.Do you want to FORMAT another disk?R - request new parameters.cr - duplicate last FORMATN - exit back to system
When these messages appear, it means you have a formatteddiskette.
STEP 4. Type: N (unless you want to format more diskettes.)
If you want to format more diskettes, press the return key,replace the diskette you just formatted with another blankdiskette, and continue from STEP 2.
When you reach STEP 4 after formatting the last diskette,type N. The OA> symbol will appear on the screen toindicate that the formatting process is complete.
B. Copy a Diskette
STEP 1. Insert a formatted diskette into an available drive. (Makesure that the format of the diskette you insert is the sameas the diskette already in your system. It should be, ifyou followed the instructions above.)
STEP 2. Type: COPY [RET]
The selection screen will appear:
Select one:(A) All tracks(D) Data tracks only(S) System tracks only(X) Return to Concurrent DOS operating system(?) Provide helpful information
Selection:
STEP 3. Type: A to copy all tracks.
The following screen will appear:
Source drive (a - p):Destination drive (a - p):Enter newline to start copying (cr)
STEP 4. Enter the names of your source and destination drives. Thesource drive is the one you want to copy from. Thedestination drive is the one you want to copy to. Pressthe return key and an updating message will appear on thescreen. When the copy is finished, you will be asked:
Are there any more copies to make?
STEP 5. Answer Y if you want to make another copy of the diskette.
You will be shown your choices again. If you are not goingto make another copy, enter an N and you will be returnedto the system prompt.
To put your system on a double-sided diskette or one withdifferent sectoring (256 or 512 bytes/sector), format a disketteas above. Then, to copy the system tracks over, use the SYSGENutility provided with Concurrent DOS 8-16. After copying thesystem tracks onto the diskette with the SYSGEN utility, you mustPIP the remainder of the files onto the new diskette.
7. CREATING A BOOT DISK FOR A FLOPPY ONLY SYSTEM
This section is for those of you with no hard disk included withyour system. If you do have a hard disk on your system, skip aheadto Section 8 of this manual.
Most of the files on your four Concurrent DOS 8-16 Master Diskettesare not necessary for everyday use. We need to create a disketteto boot your system with only the files necessary to get you up andrunning and doing work.
The necessary files to put on your boot diskette are:
CCPMFLPY.SYS LPRS*.CMD *.HLPTTYS AUTO.SUB (optional)
where '*' includes all names.
Use the PIP command to put these files on a boot diskette. InsertDisk #1 of 4 into your 'A' drive. Insert one of the diskettes youhave just formatted into your 'B' drive. Enter into the PIPcommand by typing:
OA>PIP [RET]
In the PIP command, a '*' will appear each time PIP has completed atask and is ready for the next entry. To exit PIP, press thereturn key at the '*' prompt. PIP the necessary files by typing:
* B:=A:CCPMFLPY.SYS[VROW] [RET]* B:=A:*.CMD[VROW] [RET]* B:=A:LPRS[VROW] [RET]* B:=A:TTYS[VROW] [RET]
where B: is the drive containing your newly formatted diskette andA: is the drive containing Disk #1 of 4.
Remove Disk #1 of 4 from the floppy drive. Insert Disk #2 of 4.Leave the diskette in drive B and type:
* B:=A:*.CMD[VROW] [RET]* B:=A:*.SUB[VROW] [RET]
Remove Disk #2 of 4 from the floppy drive. Insert Disk #3 of 4and type:
11
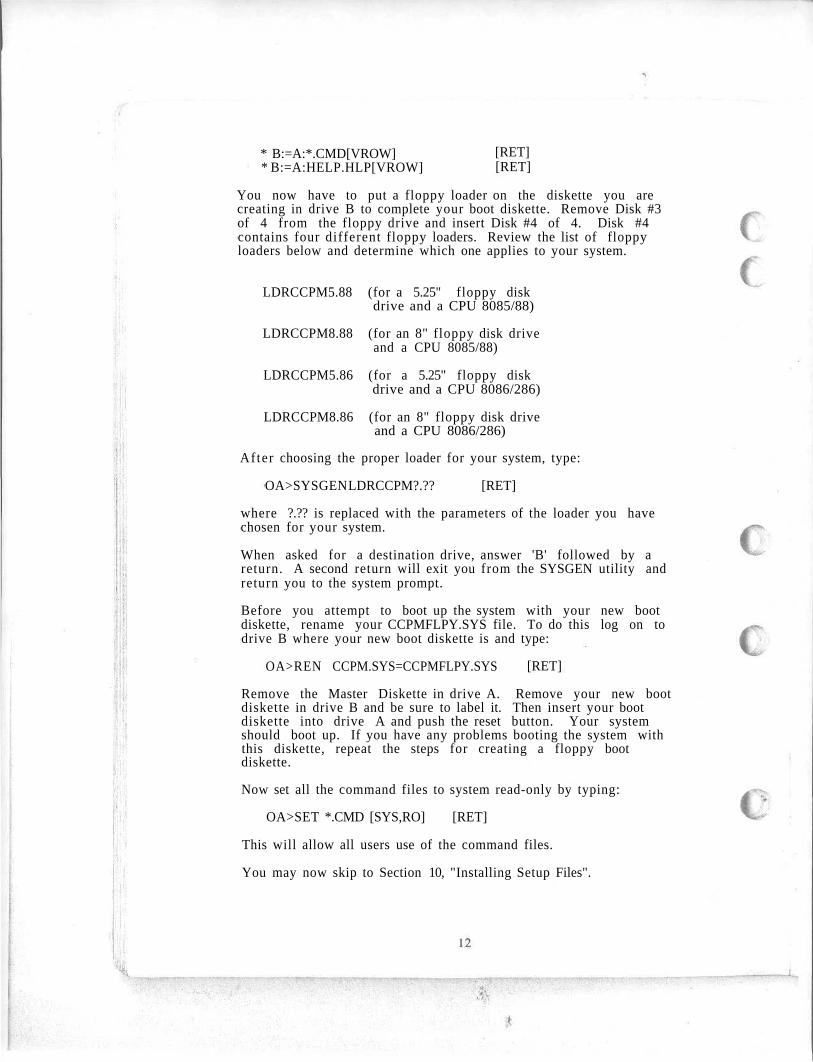
* B:=A:*.CMD[VROW]* B:=A:HELP.HLP[VROW]
[RET][RET]
You now have to put a floppy loader on the diskette you arecreating in drive B to complete your boot diskette. Remove Disk #3of 4 from the floppy drive and insert Disk #4 of 4. Disk #4contains four different floppy loaders. Review the list of floppyloaders below and determine which one applies to your system.
LDRCCPM5.88 (for a 5.25" floppy diskdrive and a CPU 8085/88)
LDRCCPM8.88 (for an 8" floppy disk driveand a CPU 8085/88)
LDRCCPM5.86 (for a 5.25" floppy diskdrive and a CPU 8086/286)
LDRCCPM8.86 (for an 8" floppy disk driveand a CPU 8086/286)
After choosing the proper loader for your system, type:
OA>SYSGEN LDRCCPM?.?? [RET]
where ?.?? is replaced with the parameters of the loader you havechosen for your system.
When asked for a destination drive, answer 'B' followed by areturn. A second return will exit you from the SYSGEN utility andreturn you to the system prompt.
Before you attempt to boot up the system with your new bootdiskette, rename your CCPMFLPY.SYS file. To do this log on todrive B where your new boot diskette is and type:
OA>REN CCPM.SYS=CCPMFLPY.SYS [RET]
Remove the Master Diskette in drive A. Remove your new bootdiskette in drive B and be sure to label it. Then insert your bootdiskette into drive A and push the reset button. Your systemshould boot up. If you have any problems booting the system withthis diskette, repeat the steps for creating a floppy bootdiskette.
Now set all the command files to system read-only by typing:
OA>SET *.CMD [SYS,RO] [RET]
This will allow all users use of the command files.
You may now skip to Section 10, "Installing Setup Files".
8. FORMATTING YOUR HARD DISK
Boot your system using your Concurrent DOS 8-16 diskette #1 of 4 ifyou have a CPU 8085/88 or diskette #2 of 4 if you are using a CPU8086 or CPU 286. Use the FLPY SYS file to bring up your system,as described in Section 5. If you have been using the hard diskon your system, you will need to back up the files on your harddisk before formatting. Formatting your hard disk will erase all thefiles on it, so be sure everything is backed up first.
If you are using Concurrent DOS 8-16 with a hard disk or disks, youmust run the DISK2 or DISK3 formatter/diagnostic. The DISK2 andDISK3 programs are included on your Concurrent DOS 8-16 Disk #2 of4. Insert this diskette into a floppy drive and log onto it.
To run the formatter/diagnostic on a system with a DISK 2 hard diskcontroller, type:
OA>DISK2 [drive type] ALL
DISK 2 drive types:
[RET]
M20 (Fujitsu 20 megabyte drive (default value))M40BE (Fujitsu 40 megabyte drive with Pragmatic
modification)
To run the formatter/diagnostic on a system with a DISK 3 hard diskcontroller, type:
OA>DISK3 [drive type] ALL [RET]
DISK 3 drive types:
Q520 (Quantum 20 megabyte drive)Q540 (Quantum 40 megabyte drive)Q2080 (Quantum 80 megabyte drive)ST506 (Seagate 5 megabyte drive)
Both the DISK 2 and the DISK 3 formatter can take up to 17 hoursto complete. It begins by formatting the tracks, which is evidencedby something like the following display:
Formatting Track : NNN Hard NNN Soft NNN
The track number (NNN) and number (NNN) of hard and soft sectorerrors are displayed to the right of each entry. If 12 or moreerrors are reported, consult the DISK 2 or DISK 3 TechnicalManuals.
The test continues with:
Verifying Track
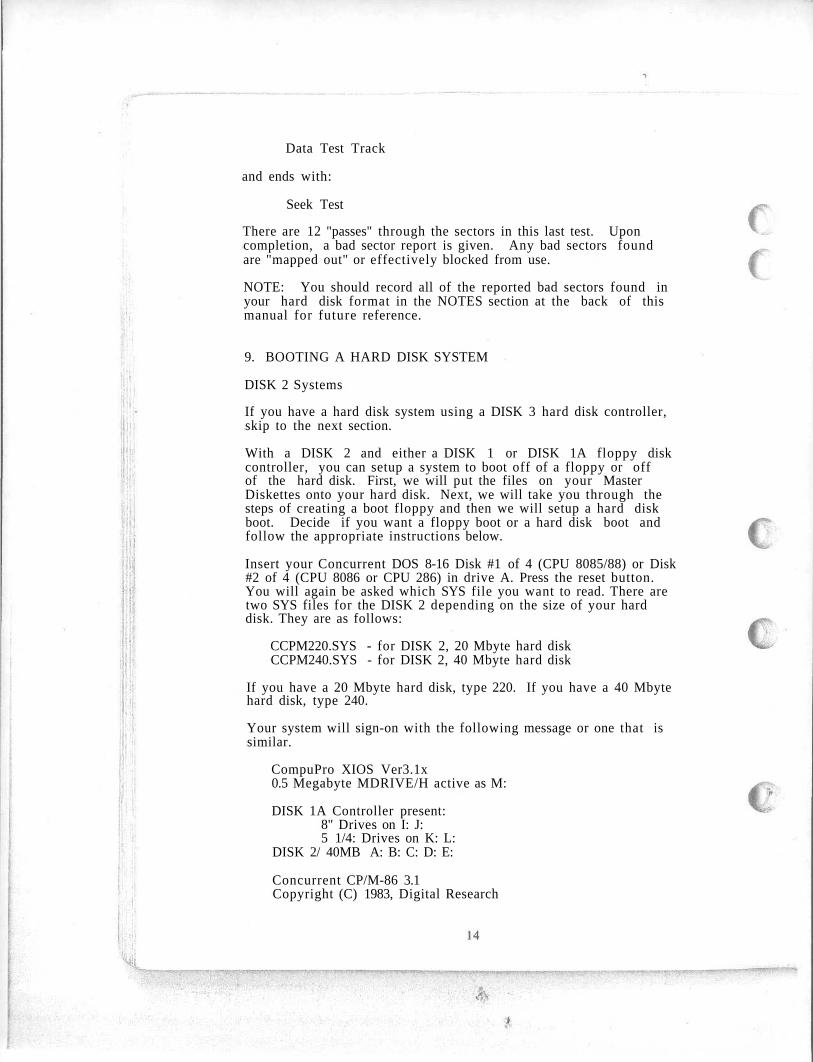
Data Test Track
and ends with:
Seek Test
There are 12 "passes" through the sectors in this last test. Uponcompletion, a bad sector report is given. Any bad sectors foundare "mapped out" or effectively blocked from use.
NOTE: You should record all of the reported bad sectors found inyour hard disk format in the NOTES section at the back of thismanual for future reference.
9. BOOTING A HARD DISK SYSTEM
DISK 2 Systems
If you have a hard disk system using a DISK 3 hard disk controller,skip to the next section.
With a DISK 2 and either a DISK 1 or DISK 1A floppy diskcontroller, you can setup a system to boot off of a floppy or offof the hard disk. First, we will put the files on your MasterDiskettes onto your hard disk. Next, we will take you through thesteps of creating a boot floppy and then we will setup a hard diskboot. Decide if you want a floppy boot or a hard disk boot andfollow the appropriate instructions below.
Insert your Concurrent DOS 8-16 Disk #1 of 4 (CPU 8085/88) or Disk#2 of 4 (CPU 8086 or CPU 286) in drive A. Press the reset button.You will again be asked which SYS file you want to read. There aretwo SYS files for the DISK 2 depending on the size of your harddisk. They are as follows:
CCPM220.SYS - for DISK 2, 20 Mbyte hard diskCCPM240.SYS - for DISK 2, 40 Mbyte hard disk
If you have a 20 Mbyte hard disk, type 220. If you have a 40 Mbytehard disk, type 240.
Your system will sign-on with the following message or one that issimilar.
CompuPro XIOS Ver3.1x0.5 Megabyte MDRIVE/H active as M:
DISK 1A Controller present:8" Drives on I: J:5 1/4: Drives on K: L:
DISK 2/ 40MB A: B: C: D: E:
Concurrent CP/M-86 3.1Copyright (C) 1983, Digital Research
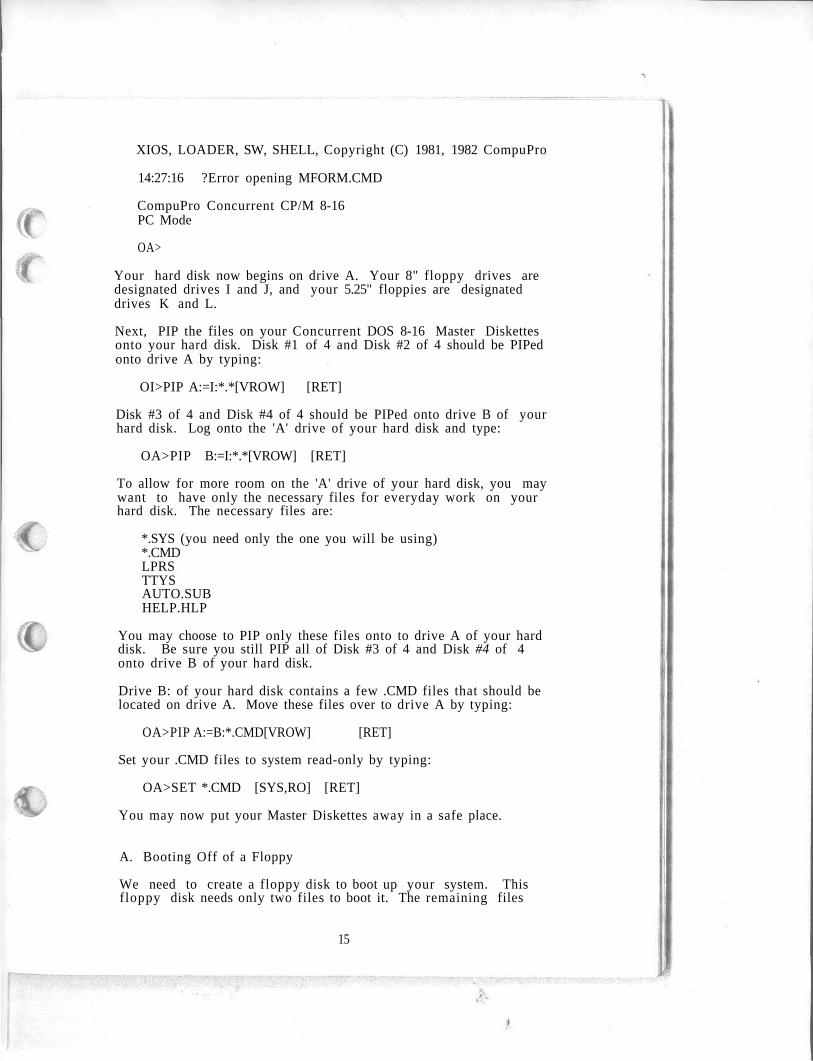
XIOS, LOADER, SW, SHELL, Copyright (C) 1981, 1982 CompuPro
14:27:16 ?Error opening MFORM.CMD
CompuPro Concurrent CP/M 8-16PC Mode
OA>
Your hard disk now begins on drive A. Your 8" floppy drives aredesignated drives I and J, and your 5.25" floppies are designateddrives K and L.
Next, PIP the files on your Concurrent DOS 8-16 Master Diskettesonto your hard disk. Disk #1 of 4 and Disk #2 of 4 should be PIPedonto drive A by typing:
OI>PIP A:=I:*.*[VROW] [RET]
Disk #3 of 4 and Disk #4 of 4 should be PIPed onto drive B of yourhard disk. Log onto the 'A' drive of your hard disk and type:
OA>PIP B:=I:*.*[VROW] [RET]
To allow for more room on the 'A' drive of your hard disk, you maywant to have only the necessary files for everyday work on yourhard disk. The necessary files are:
*.SYS (you need only the one you will be using)*.CMDLPRSTTYSAUTO.SUBHELP.HLP
You may choose to PIP only these files onto to drive A of your harddisk. Be sure you still PIP all of Disk #3 of 4 and Disk #4 of 4onto drive B of your hard disk.
Drive B: of your hard disk contains a few .CMD files that should belocated on drive A. Move these files over to drive A by typing:
OA>PIP A:=B:*.CMD[VROW] [RET]
Set your .CMD files to system read-only by typing:
OA>SET *.CMD [SYS,RO] [RET]
You may now put your Master Diskettes away in a safe place.
A. Booting Off of a Floppy
We need to create a floppy disk to boot up your system. Thisfloppy disk needs only two files to boot it. The remaining files
15
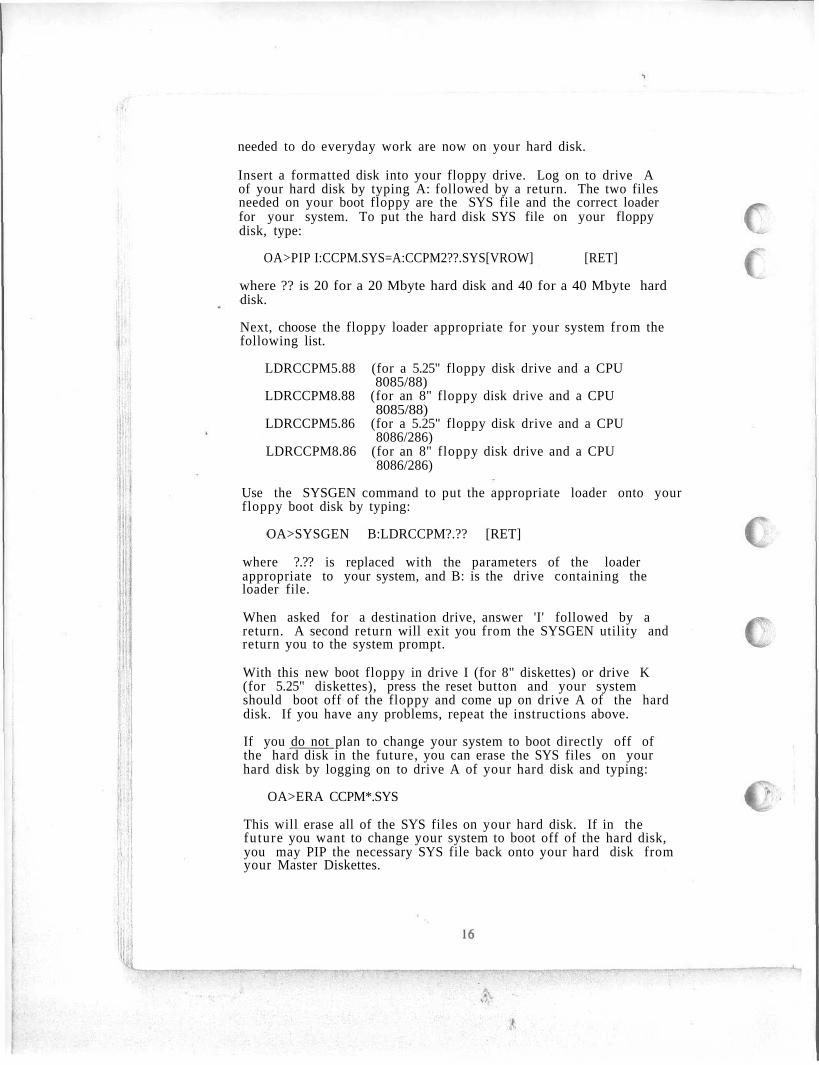
needed to do everyday work are now on your hard disk.
Insert a formatted disk into your floppy drive. Log on to drive Aof your hard disk by typing A: followed by a return. The two filesneeded on your boot floppy are the SYS file and the correct loaderfor your system. To put the hard disk SYS file on your floppydisk, type:
OA>PIP I:CCPM.SYS=A:CCPM2??.SYS[VROW] [RET]
where ?? is 20 for a 20 Mbyte hard disk and 40 for a 40 Mbyte harddisk.
Next, choose the floppy loader appropriate for your system from thefollowing list.
LDRCCPM5.88 (for a 5.25" floppy disk drive and a CPU8085/88)
LDRCCPM8.88 (for an 8" floppy disk drive and a CPU8085/88)
LDRCCPM5.86 (for a 5.25" floppy disk drive and a CPU8086/286)
LDRCCPM8.86 (for an 8" floppy disk drive and a CPU8086/286)
Use the SYSGEN command to put the appropriate loader onto yourfloppy boot disk by typing:
OA>SYSGEN B:LDRCCPM?.?? [RET]
where ?.?? is replaced with the parameters of the loaderappropriate to your system, and B: is the drive containing theloader file.
When asked for a destination drive, answer 'I' followed by areturn. A second return will exit you from the SYSGEN utility andreturn you to the system prompt.
With this new boot floppy in drive I (for 8" diskettes) or drive K(for 5.25" diskettes), press the reset button and your systemshould boot off of the floppy and come up on drive A of the harddisk. If you have any problems, repeat the instructions above.
If you do not plan to change your system to boot directly off ofthe hard disk in the future, you can erase the SYS files on yourhard disk by logging on to drive A of your hard disk and typing:
OA>ERA CCPM*.SYS
This will erase all of the SYS files on your hard disk. If in thefuture you want to change your system to boot off of the hard disk,you may PIP the necessary SYS file back onto your hard disk fromyour Master Diskettes.
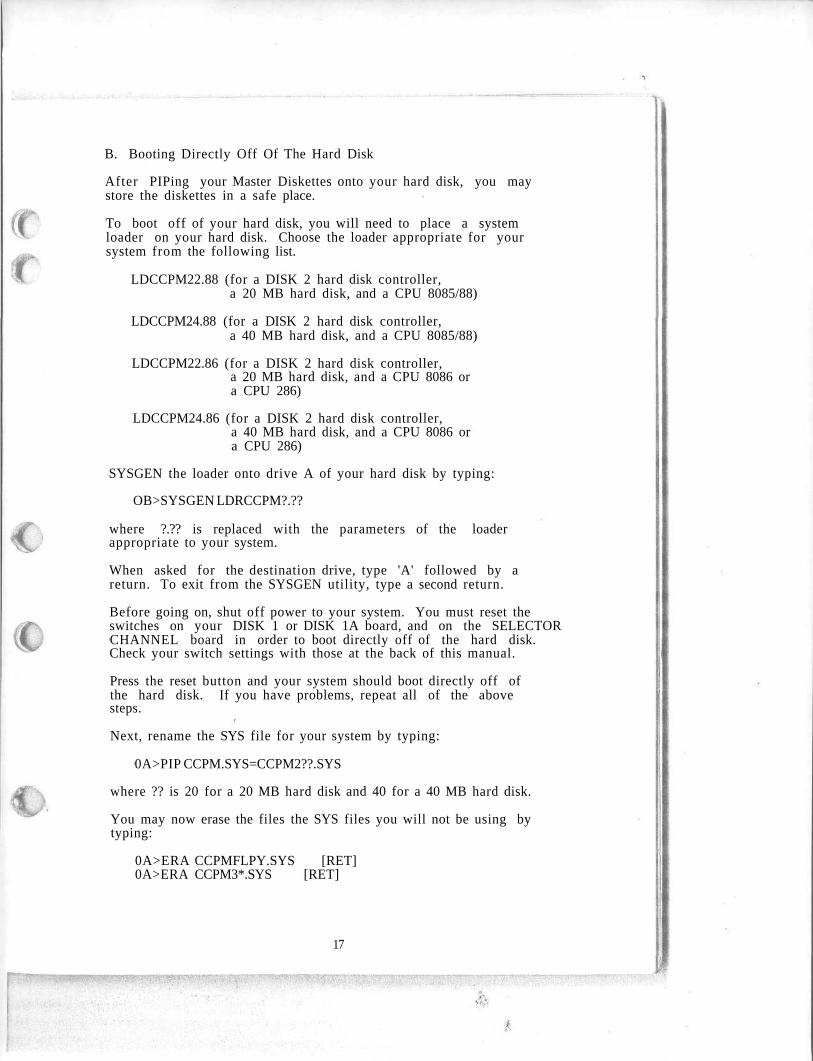
B. Booting Directly Off Of The Hard Disk
After PIPing your Master Diskettes onto your hard disk, you maystore the diskettes in a safe place.
To boot off of your hard disk, you will need to place a systemloader on your hard disk. Choose the loader appropriate for yoursystem from the following list.
LDCCPM22.88 (for a DISK 2 hard disk controller,a 20 MB hard disk, and a CPU 8085/88)
LDCCPM24.88 (for a DISK 2 hard disk controller,a 40 MB hard disk, and a CPU 8085/88)
LDCCPM22.86 (for a DISK 2 hard disk controller,a 20 MB hard disk, and a CPU 8086 ora CPU 286)
LDCCPM24.86 (for a DISK 2 hard disk controller,a 40 MB hard disk, and a CPU 8086 ora CPU 286)
SYSGEN the loader onto drive A of your hard disk by typing:
OB>SYSGEN LDRCCPM?.??
where ?.?? is replaced with the parameters of the loaderappropriate to your system.
When asked for the destination drive, type 'A' followed by areturn. To exit from the SYSGEN utility, type a second return.
Before going on, shut off power to your system. You must reset theswitches on your DISK 1 or DISK 1A board, and on the SELECTORCHANNEL board in order to boot directly off of the hard disk.Check your switch settings with those at the back of this manual.
Press the reset button and your system should boot directly off ofthe hard disk. If you have problems, repeat all of the abovesteps.
Next, rename the SYS file for your system by typing:
0A>PIP CCPM.SYS=CCPM2??.SYS
where ?? is 20 for a 20 MB hard disk and 40 for a 40 MB hard disk.
You may now erase the files the SYS files you will not be using bytyping:
0A>ERA CCPMFLPY.SYS [RET]0A>ERA CCPM3*.SYS [RET]
17
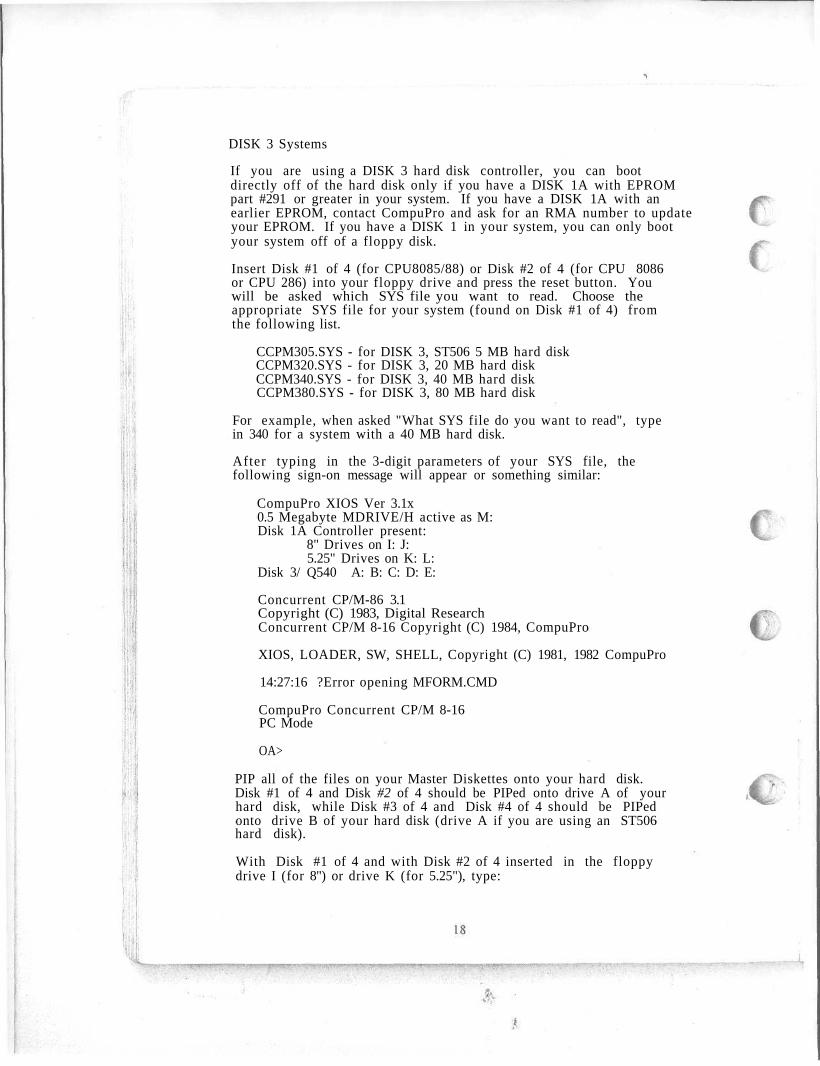
DISK 3 Systems
If you are using a DISK 3 hard disk controller, you can bootdirectly off of the hard disk only if you have a DISK 1A with EPROMpart #291 or greater in your system. If you have a DISK 1A with anearlier EPROM, contact CompuPro and ask for an RMA number to updateyour EPROM. If you have a DISK 1 in your system, you can only bootyour system off of a floppy disk.
Insert Disk #1 of 4 (for CPU8085/88) or Disk #2 of 4 (for CPU 8086or CPU 286) into your floppy drive and press the reset button. Youwill be asked which SYS file you want to read. Choose theappropriate SYS file for your system (found on Disk #1 of 4) fromthe following list.
CCPM305.SYS - for DISK 3, ST506 5 MB hard diskCCPM320.SYS - for DISK 3, 20 MB hard diskCCPM340.SYS - for DISK 3, 40 MB hard diskCCPM380.SYS - for DISK 3, 80 MB hard disk
For example, when asked "What SYS file do you want to read", typein 340 for a system with a 40 MB hard disk.
After typing in the 3-digit parameters of your SYS file, thefollowing sign-on message will appear or something similar:
CompuPro XIOS Ver 3.1x0.5 Megabyte MDRIVE/H active as M:Disk 1A Controller present:
8" Drives on I: J:5.25" Drives on K: L:
Disk 3/ Q540 A: B: C: D: E:
Concurrent CP/M-86 3.1Copyright (C) 1983, Digital ResearchConcurrent CP/M 8-16 Copyright (C) 1984, CompuPro
XIOS, LOADER, SW, SHELL, Copyright (C) 1981, 1982 CompuPro
14:27:16 ?Error opening MFORM.CMD
CompuPro Concurrent CP/M 8-16PC Mode
OA>
PIP all of the files on your Master Diskettes onto your hard disk.Disk #1 of 4 and Disk #2 of 4 should be PIPed onto drive A of yourhard disk, while Disk #3 of 4 and Disk #4 of 4 should be PIPedonto drive B of your hard disk (drive A if you are using an ST506hard disk).
With Disk #1 of 4 and with Disk #2 of 4 inserted in the floppydrive I (for 8") or drive K (for 5.25"), type:
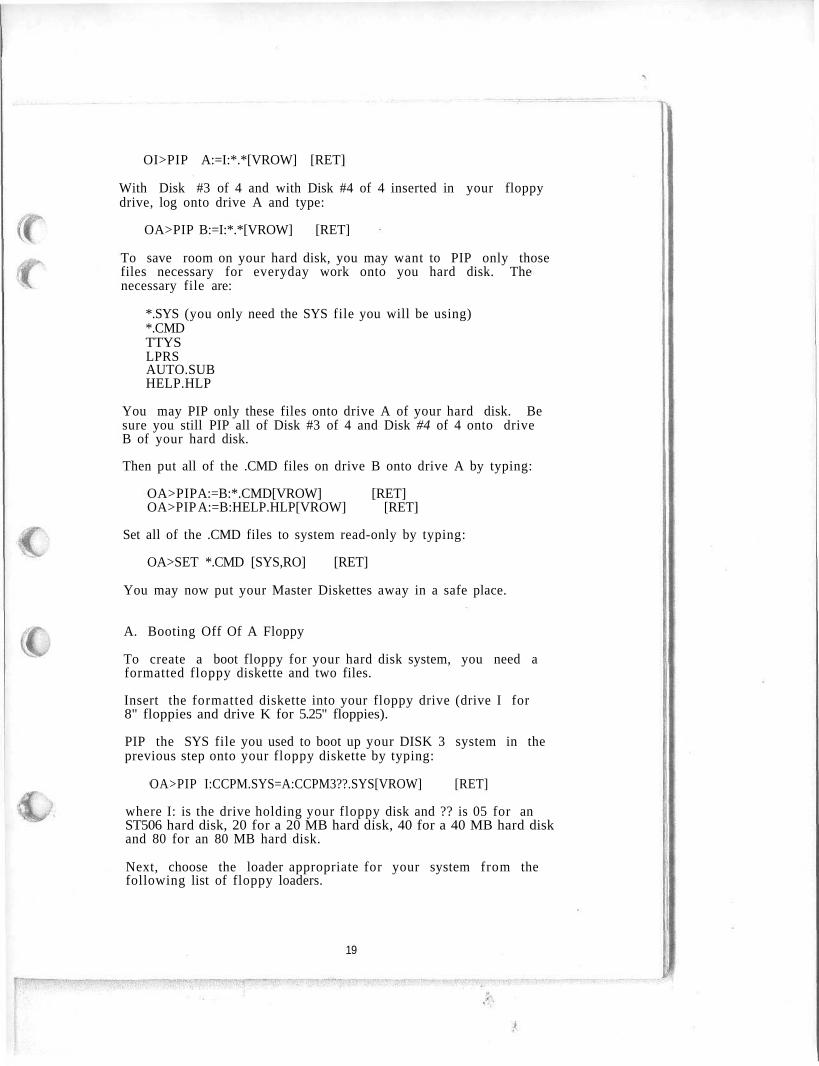
OI>PIP A:=I:*.*[VROW] [RET]
With Disk #3 of 4 and with Disk #4 of 4 inserted in your floppydrive, log onto drive A and type:
OA>PIP B:=I:*.*[VROW] [RET]
To save room on your hard disk, you may want to PIP only thosefiles necessary for everyday work onto you hard disk. Thenecessary file are:
*.SYS (you only need the SYS file you will be using)*.CMDTTYSLPRSAUTO.SUBHELP.HLP
You may PIP only these files onto drive A of your hard disk. Besure you still PIP all of Disk #3 of 4 and Disk #4 of 4 onto driveB of your hard disk.
Then put all of the .CMD files on drive B onto drive A by typing:
OA>PIP A:=B:*.CMD[VROW] [RET]OA>PIP A:=B:HELP.HLP[VROW] [RET]
Set all of the .CMD files to system read-only by typing:
OA>SET *.CMD [SYS,RO] [RET]
You may now put your Master Diskettes away in a safe place.
A. Booting Off Of A Floppy
To create a boot floppy for your hard disk system, you need aformatted floppy diskette and two files.
Insert the formatted diskette into your floppy drive (drive I for8" floppies and drive K for 5.25" floppies).
PIP the SYS file you used to boot up your DISK 3 system in theprevious step onto your floppy diskette by typing:
OA>PIP I:CCPM.SYS=A:CCPM3??.SYS[VROW] [RET]
where I: is the drive holding your floppy disk and ?? is 05 for anST506 hard disk, 20 for a 20 MB hard disk, 40 for a 40 MB hard diskand 80 for an 80 MB hard disk.
Next, choose the loader appropriate for your system from thefollowing list of floppy loaders.
19
LDRCCPM5.88 (for 5.25" floppy disk drives with a CPU8085/88)
LDRCCPM8.88 (for 8" floppy disk drives with a CPU8085/88)
LDRCCPM5.86 (for 5.25" floppy disk drives with a CPU8086/286)
LDRCCPM8.86 (for 8" floppy disk drives with a CPU8086/286)
Use the SYSGEN utility to put the loader appropriate to your systemon your floppy disk by typing:
OA>SYSGEN B:LDRCCPM?.?? [RET]
where ?.?? are the parameters of the floppy loader you have chosenfor your system.
When asked for the destination drive, type 'I' if your bootfloppy is on an 8" drive and 'K' if your floppy is on a 5.25"drive, followed by a return. To exit from the SYSGEN utility,type a second return.
Press the reset button and your system should boot coming up on thehard disk as drive A. If you have any problems, repeat the stepsabove.
If you do not plan on booting your system directly off of the harddisk you may erase the SYS files on your hard disk by typing:
OA>ERA CCPM*.SYS
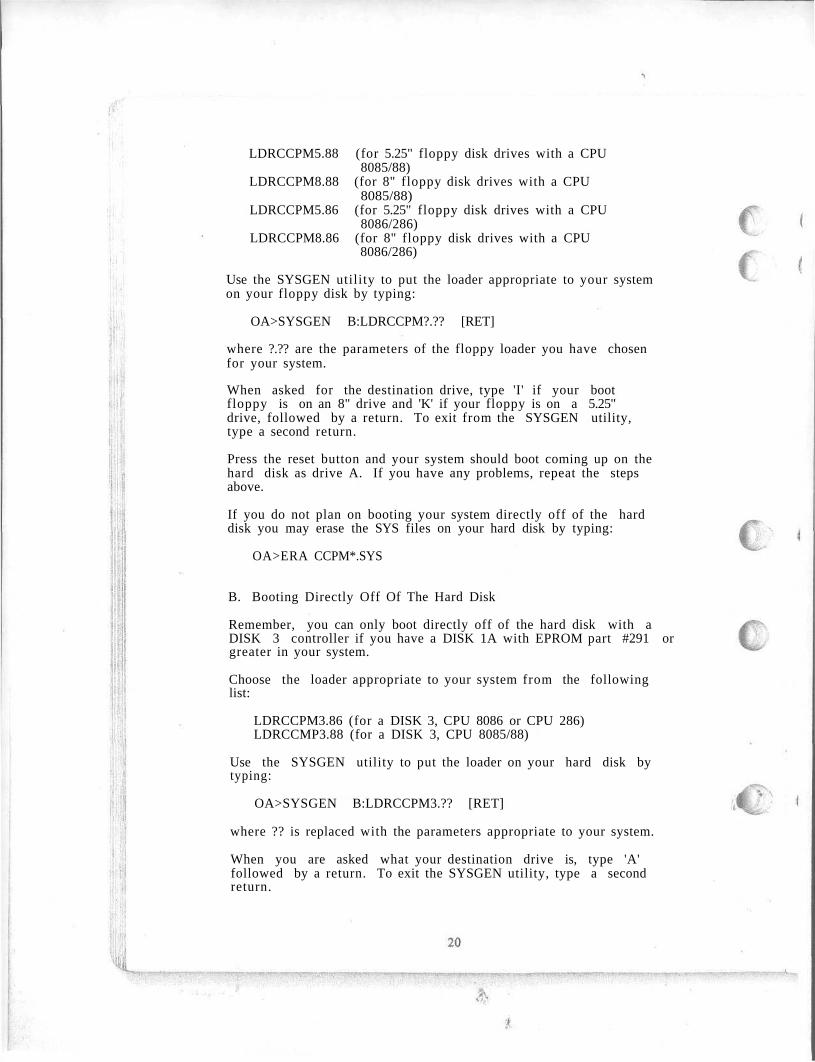
B. Booting Directly Off Of The Hard Disk
Remember, you can only boot directly off of the hard disk with aDISK 3 controller if you have a DISK 1A with EPROM part #291 orgreater in your system.
Choose the loader appropriate to your system from the followinglist:
LDRCCPM3.86 (for a DISK 3, CPU 8086 or CPU 286)LDRCCMP3.88 (for a DISK 3, CPU 8085/88)
Use the SYSGEN utility to put the loader on your hard disk bytyping:
OA>SYSGEN B:LDRCCPM3.?? [RET]
where ?? is replaced with the parameters appropriate to your system.
When you are asked what your destination drive is, type 'A'followed by a return. To exit the SYSGEN utility, type a secondreturn.
NOTE: Make sure you have set the switches on your DISK 1A to allowa DISK 3 boot.
Press the reset button and your system should now boot directly offof the hard disk. If you have any problems, repeat all of theabove steps.
Rename your SYS file by typing:
OA>REN CCPM.SYS=CCPM3??.SYS
where ?? is the number of megabytes of your hard disk (05, 20, 40,or 80).
To create more room on your hard disk, you may want to erase theSYS files you do not need. Be sure not to erase CCPM.SYS.
10. INSTALLING SETUP FILES
In order to use Concurrent DOS 8-16, you must install several"setup" files. There are three files: the terminal setup (TTYS),the printer setup (LPRS), and the password (PASSWD) files. Thesefiles are organized so you enter information in each field. Makesure you put these files remain on Drive A, User 0.
Terminal Setup File (TTYS)
The TTYS file establishes information on each terminal used inthe system, and whether or not the system will come up in singleuser mode or directly in multi-user mode. Information for thisfile may be entered with any text editor program. Call up thettys file with a text editor.
The first line of the TTYS file tells the system whether to come upin single user or multi-user mode. If the first line of the TTYSlooks like:
MULTI
the system will come up directly in multi-user mode with all of theconsoles active, so there is no need to type "logout". If the firstline is:
SINGLE
or anything else but "MULTI", the system will come up with only thesystem console active, and "logout" must be typed to invoke multi-user.
Adding HISTORY to the second line of the TTYS file will activatethe HISTORY.DAT file. This gives a constant update of when userslog on and off the system. Refer to Section 12 for more discussionon the HISTORY.DAT file.

Table 10-1: Baud Rates
0 = 96001 = 1102 = 3003 = 6004 = 12005 = 18006 = 24007 = 48008 = 96009 = 19200
Handshaking is shown in its binary form. The binary value must beconverted to its hexadecimal value for the TTYS file.
Table 10-3: Serial Communication Parameters
#DATA BITS - can be: 8 or 7#STOP BITS - can be: 2 or 1
PARITY - can be: N = No parityE = Even parity0 = Odd parity
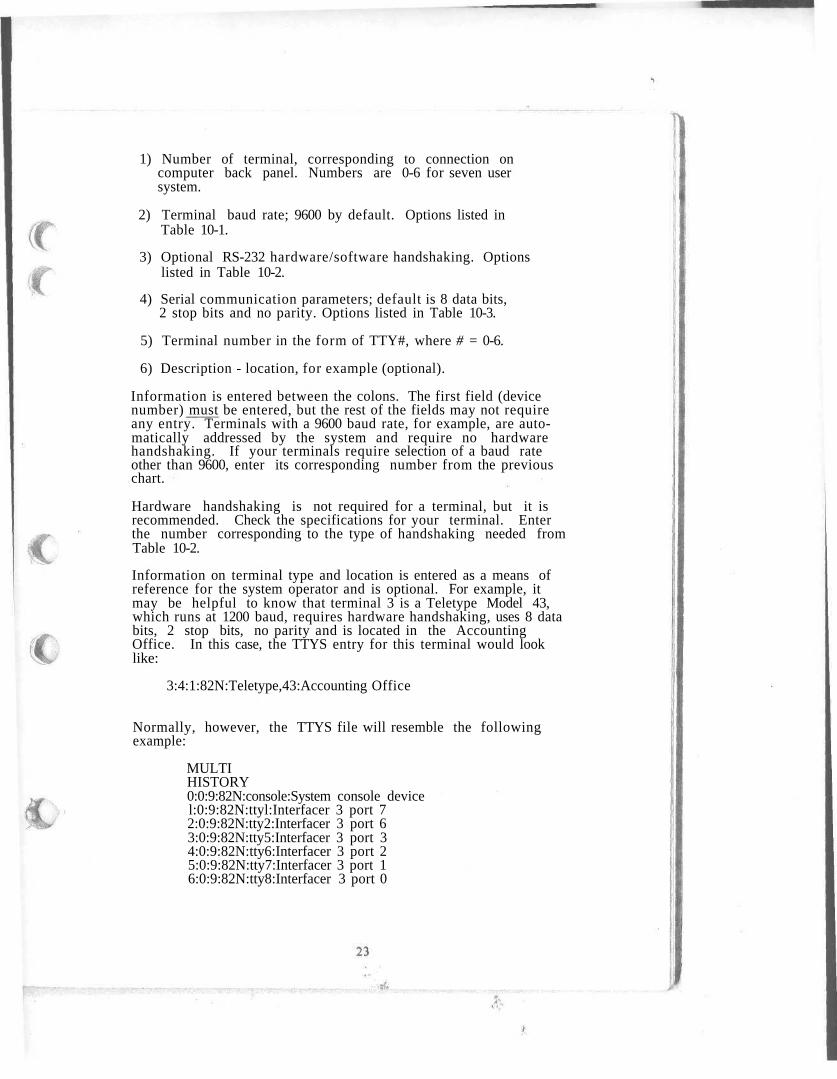
1) Number of terminal, corresponding to connection oncomputer back panel. Numbers are 0-6 for seven usersystem.
2) Terminal baud rate; 9600 by default. Options listed inTable 10-1.
3) Optional RS-232 hardware/software handshaking. Optionslisted in Table 10-2.
4) Serial communication parameters; default is 8 data bits,2 stop bits and no parity. Options listed in Table 10-3.
5) Terminal number in the form of TTY#, where # = 0-6.
6) Description - location, for example (optional).
Information is entered between the colons. The first field (devicenumber) must be entered, but the rest of the fields may not requireany entry. Terminals with a 9600 baud rate, for example, are auto-matically addressed by the system and require no hardwarehandshaking. If your terminals require selection of a baud rateother than 9600, enter its corresponding number from the previouschart.
Hardware handshaking is not required for a terminal, but it isrecommended. Check the specifications for your terminal. Enterthe number corresponding to the type of handshaking needed fromTable 10-2.
Information on terminal type and location is entered as a means ofreference for the system operator and is optional. For example, itmay be helpful to know that terminal 3 is a Teletype Model 43,which runs at 1200 baud, requires hardware handshaking, uses 8 databits, 2 stop bits, no parity and is located in the AccountingOffice. In this case, the TTYS entry for this terminal would looklike:
3:4:1:82N:Teletype,43:Accounting Office
Normally, however, the TTYS file will resemble the followingexample:
MULTIHISTORY0:0:9:82N:console:System console devicel:0:9:82N:ttyl:Interfacer 3 port 72:0:9:82N:tty2:Interfacer 3 port 63:0:9:82N:tty5:Interfacer 3 port 34:0:9:82N:tty6:Interfacer 3 port 25:0:9:82N:tty7:Interfacer 3 port 16:0:9:82N:tty8:Interfacer 3 port 0
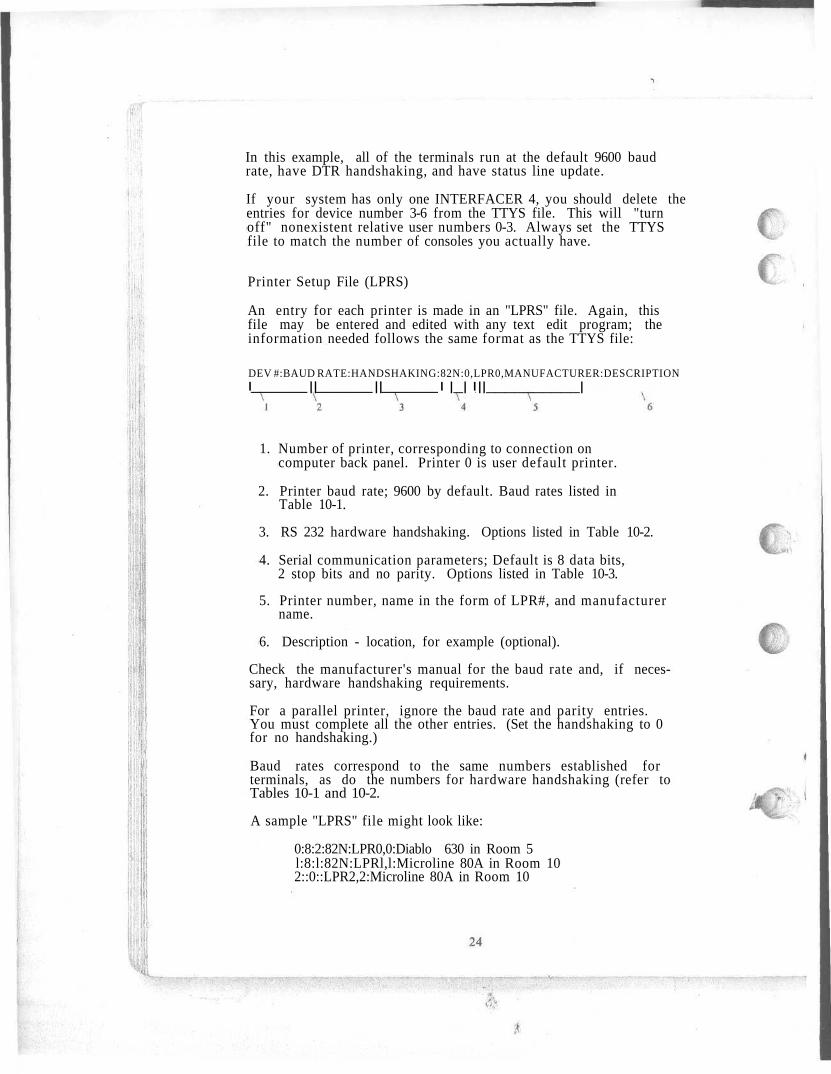
In this example, all of the terminals run at the default 9600 baudrate, have DTR handshaking, and have status line update.
If your system has only one INTERFACER 4, you should delete theentries for device number 3-6 from the TTYS file. This will "turnoff" nonexistent relative user numbers 0-3. Always set the TTYSfile to match the number of consoles you actually have.
Printer Setup File (LPRS)
An entry for each printer is made in an "LPRS" file. Again, thisfile may be entered and edited with any text edit program; theinformation needed follows the same format as the TTYS file:
DEV #:BAUD RATE:HANDSHAKING:82N:0,LPR0,MANUFACTURER:DESCRIPTIONI || || I |_| I ||__________|
1. Number of printer, corresponding to connection oncomputer back panel. Printer 0 is user default printer.
2. Printer baud rate; 9600 by default. Baud rates listed inTable 10-1.
3. RS 232 hardware handshaking. Options listed in Table 10-2.
4. Serial communication parameters; Default is 8 data bits,2 stop bits and no parity. Options listed in Table 10-3.
5. Printer number, name in the form of LPR#, and manufacturername.
6. Description - location, for example (optional).
Check the manufacturer's manual for the baud rate and, if neces-sary, hardware handshaking requirements.
For a parallel printer, ignore the baud rate and parity entries.You must complete all the other entries. (Set the handshaking to 0for no handshaking.)
Baud rates correspond to the same numbers established forterminals, as do the numbers for hardware handshaking (refer toTables 10-1 and 10-2.
A sample "LPRS" file might look like:
0:8:2:82N:LPR0,0:Diablo 630 in Room 5l:8:l:82N:LPRl,l:Microline 80A in Room 102::0::LPR2,2:Microline 80A in Room 10
In this sample, printer 0 is a Diablo 630 that runs at 9600 baud,has XON/XOFF is located in Room 5. Printer 1 is a Microline 80Athat runs at 9600 baud with DTR, and is located in Room 10.Printer 2 is a Microline 80A parallel printer that runs at 9600baud, has no handshaking and is in Room 10.
User Setup File - PASSWD (optional)
User passwords are set with the "PASS" utility. This program canbe password protected with Concurrent DOS' file passwordcapability. (See Digital Research's Concurrent CP/M OperatingSystem User Guide for further information.) PASS will prompt youfor needed information about each user on the system and save theinformation in an encrypted file called "PASSWD".
NOTE: We recommend that the program PASS.CMD be passwordprotected to keep users from modifying passwords.
Type:
OA>PASS [RET]
The following will appear:
•CompuPro Concurrent DOS 8-16 Password Maintenance Program Vl.x
0 - Return to Concurrent DOS 8-16 without saving passwords1 - Return to Concurrent DOS 8-16 with saving passwords2 - Display passwords3 - Add a password4 - Delete a password5 - Print this menu6 - Modify a password
Selection: _
To add a password, enter a "3", press the carriage return andfollow the prompts on the screen.
Name (must have one):
Password:
Default drive:
Default user:
Enter no more than eight characterswith no spaces. (Lower case only.)
Enter no more than eight characterswith no spaces (lower case only) ora return for no password.
Enter one character drive name.Default is A: if a return ispressed.
Enter a user number (0-15).Default is 0 if a return is pressed.
Default printer:
User enable:
Terminals:
Command:
Comment:
Selection:
Enter a printer number (0-4).Default is 0 if a return is pressed.
"Y" if you want this user to be ableto run the user command, "N" if not.
Enter the number of the console(s)this user can use, separating them bya comma. (Example: 0,2)Default to all consoles if a returnis pressed.
Enter command of first program to beexecuted. This command field willallow you to bring the user directlyinto a program. NOTE: If theprogram you want to run is an 8-bitprogram, you must put SW! in front ofthe command.Defaults to operating system promptif a return is pressed.
40 characters maximum. This commentis for information use only.
Enter a number from 0-6 (seeselection menu above).
A user name must be entered in lower case for each person using thesystem. By default, all users enter on drive A as user 0, and mayaccess all terminals and programs and printer 0. Use the formatexample above as a guide for entering specific information on userentry and access defaults. When you have finished choosing yourpasswords, choose selection 1 to save your passwords and return tothe operating system.
In addition, Concurrent DOS 8-16 will automatically execute submitfiles titled using the log on name. For example, if you createsubmit file "JOE.SUB", each time Joe signs on to the system, thesubmit file "JOE.SUB" will automatically be executed. This submitfile must be on the log on drive letter and user number tooperate.
11. RELATIVE USER TO LOGICAL I/O DEVICE MAPPING
The mapping of Concurrent DOS 8-16 physical console number tophysical device numbers is given in the table below:
NOTE: Pcon 0 is on the System Support 1 board.
26
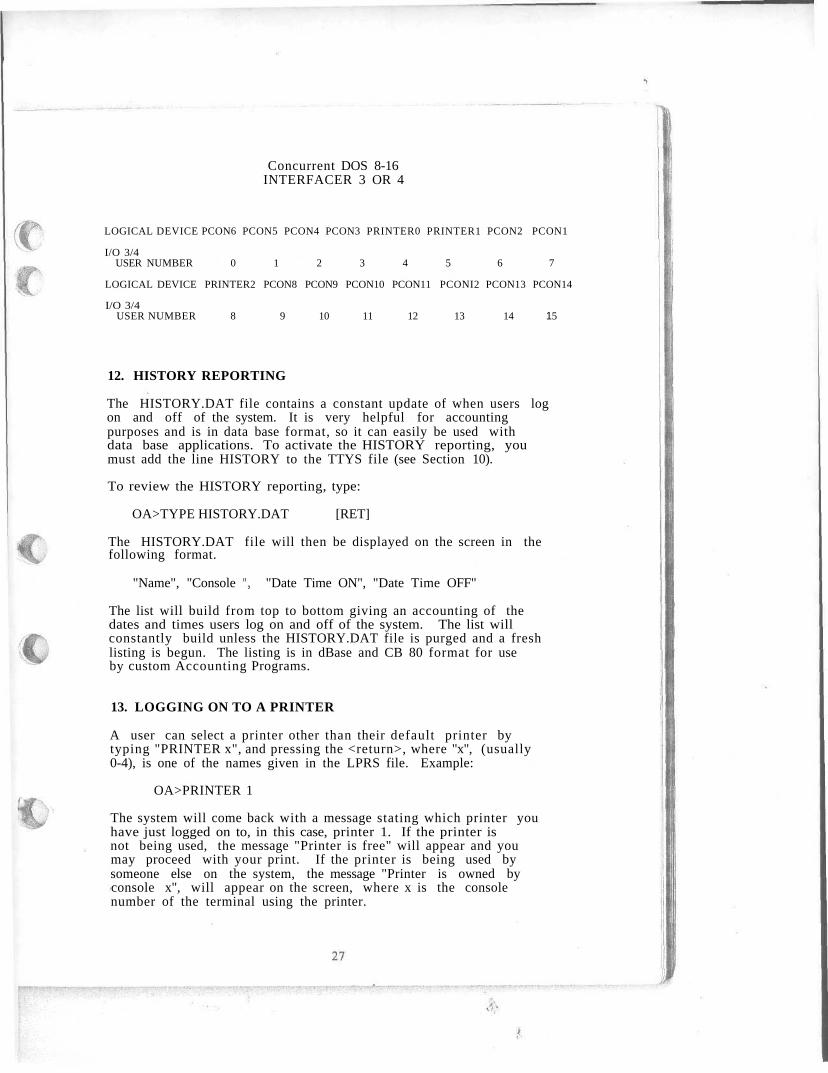
Concurrent DOS 8-16INTERFACER 3 OR 4
LOGICAL DEVICE PCON6 PCON5 PCON4 PCON3 PRINTER0 PRINTER1 PCON2 PCON1
I/O 3/4USER NUMBER 0 1 2 3 4 5 6 7
LOGICAL DEVICE PRINTER2 PCON8 PCON9 PCON10 PCON11 PCONI2 PCON13 PCON14
I/O 3/4USER NUMBER 8 9 10 11 12 13 14 15
12. HISTORY REPORTING
The HISTORY.DAT file contains a constant update of when users logon and off of the system. It is very helpful for accountingpurposes and is in data base format, so it can easily be used withdata base applications. To activate the HISTORY reporting, youmust add the line HISTORY to the TTYS file (see Section 10).
To review the HISTORY reporting, type:
OA>TYPE HISTORY.DAT [RET]
The HISTORY.DAT file will then be displayed on the screen in thefollowing format.
"Name", "Console #", "Date Time ON", "Date Time OFF"
The list will build from top to bottom giving an accounting of thedates and times users log on and off of the system. The list willconstantly build unless the HISTORY.DAT file is purged and a freshlisting is begun. The listing is in dBase and CB 80 format for useby custom Accounting Programs.
13. LOGGING ON TO A PRINTER
A user can select a printer other than their default printer bytyping "PRINTER x", and pressing the <return>, where "x", (usually0-4), is one of the names given in the LPRS file. Example:
OA>PRINTER 1
The system will come back with a message stating which printer youhave just logged on to, in this case, printer 1. If the printer isnot being used, the message "Printer is free" will appear and youmay proceed with your print. If the printer is being used bysomeone else on the system, the message "Printer is owned byconsole x", will appear on the screen, where x is the consolenumber of the terminal using the printer.
14. SETMEM COMMAND
The SETMEM command allows you to set the amount of memory allottedto each process. The memory size must be 128K to 512K. Thestandard system default is 256K. The format for the SETMEM commandis as follows:
0A>SETMEM n [RET]
where n is the desired memory size allowed each process. To checkthe present setting, enter SETMEM alone without specifying 'n' anda message on the screen will display the present setting.
SETMEM is temporary and must be run each time the system is reset.SETMEM sets allowable memory for all users.
15. AUTO.SUB
If the file "AUTO.SUB" exists on the system drive, at boot up the"SUBMIT" command will be invoked in the following form:
SUBMIT AUTO
This will execute the files listed in AUTO.SUB.
Submit files can be run by typing only the name of the submit file.For example, if you have a file called SAVE.SUB, you only need totype SAVE to run the submit file. (See Digital Research'sdocumentation of "Submit Files".)
16. THE "WHO" COMMAND
If you want to see if anyone is signed on to the system, or who isusing which terminal, type "WHO" at the system prompt. Consolenumbers and the sign on name will appear.
17. MESSAGE OF THE DAY (MOTD)
When you are using passwords, the MOTD file enables a system-widemessage to appear on the terminal screens upon log on. Thecontents of this file may be edited with your word processingprogram. This file is not included on your diskettes, you mustcreate it.
18. AUTOMATIC EXECUTION OF SUBMIT FILES
Submit files can be run by typing only the name of the submit file.For example, if you have a file called SAVE.SUB, you only need totype SAVE to run the submit file.
See the CONCURRENT CP/M USER'S GUIDE for more information on usingsubmit files.
NOTE: 8 bit command lines can be used in submit files by putting"sw!" at the begining of the command line. For instance if youwanted a submit file execute the file "FOO.COM", the submit filewould include the following line:
SW! FOO
19. FEATURES OF CONCURRENT DOS 8-16
Screen Switching
Concurrent DOS 8-16 allows you to use one terminal and switchbetween several different screens. Be sure the terminal you areworking with supports screen switching. The console you areworking on is called the current, or "switched-in" console and theprogram you are working on operates in the "foreground". The"background" is where the other programs from the other consolesare working. The function keys Fl through F4 are used to switchscreens.
The background can operate in either of two modes: Dynamic, orBuffered. You can change modes by using the VCMODE commandexplained in the next section.
Dynamic mode: If the screen fills with more than the allocatedmemory space, the oldest data is lost as the new data is writtenin, so, some data may be lost on the screen when you switch back tothis console.
Buffered mode: Data output from a running program goes into abuffer file on disk rather than to the screen storage area inmemory. When you switch to this console, the system gets the datastored in the buffer file on the temporary disk and writes it ontothe screen. These files disappear after their data appears on thescreen. If the temporary disk becomes full and cannot store anymore output from the program, the program hibernates until youswitch in to the console.
Changing Buffer Size - VCMODE
Use the VCMODE command to specify the maximum size of the diskbuffer file. If a buffer file fills up, Concurrent DOS 8-16suspends that console's program operation; no data is lost.Operation begins when you switch this console in again. You cannotspecify a buffer size for a console set to Dynamic mode since nobuffer is used in Dynamic mode. If you try to use a buffer,Concurrent DOS 8-16 will report that the console is set to DynamicMode, and nothing else happens.
To be reminded of VCMODES capabilities and parameters, type:
0A>VCMODE HELP [RET]
To see the background mode for your current console, type:
0A>VCMODE [RET]
To set the background mode to DYNAMIC, type:
0A>VCMODE DYNAMIC [RET]
To set the background mode to BUFFERED, type:
0A>VCMODE BUFFERED [RET]
The screen will show you the maximum file size.
To set the maximum file size, type:
0A>VCMODE SIZE=N [RET]
(where N = any number representing the file size in Kbytes) If youtry to specify the maximum file size when the current console is inDynamic mode, you will see a message that tells you the console isset to Dynamic. (See below.)
0A>VCMODE SIZE=10
Background Mode for Virtual Console 0 set to Dynamic
NOTE: You must be in the particular virtual consoleto set its mode. For more information, see yourDigital Research documentation.
Using the Disk 1A and 5.25" Disk Drives - NEWMEDIA
With the CompuPro Disk 1A board you have the option of including5.25" drives in your system. Concurrent DOS 8-16 contains aprogram called NEWMEDIA to be used with the Disk 1A board whichsets up a system to read a variety of 5.25" floppy disk formats.In addition, the format program can be invoked to format 96 TPI5.25" floppy disks. Drives formatted for 96 TPI write narrowtracks, 48 TPI formats read and write every other of these tracklocations. Since these two formats are not always compatible, wecannot guarantee that you will be able to write to 48 TPI disks.
NEWMEDIA sets the same type of format for both 5.25" floppy diskdrives. To reset the default state, just run NEWMEDIA again,select the default, and the drives will return to their defaultstate.
We recommend that you format 48 tpi diskettes on the targetmachine. If you format a 48 tpi disk on CompuPro drives, the diskmust first be bulk erased. Diskettes may be bulk erased by
purchasing a bulk eraser. The format program may be used to setmore than one type of format at one time because each may have adifferent sector size. Try each format type yourself; we can makeno guarantees on formatting every type. Using the CompuProstandard will yield the most efficient results.
To learn how to use NEWMEDIA, type:
OA>NEWMEDIA ? [RET]
This will bring up the help menu.
NEWMEDIA works in two ways. It can be used as an interactiveprogram, bringing up a menu, or, you can use it as a command lineinterpreter that accepts data in Number, Letter format pairsseparated by spaces where:
Number = 1 or 2 (for the number of sides of the formattype)
Letter = A - Z (for selecting a specific format fromeither the single- or double-sided menutable provided in NEWMEDIA)
This would allow you to skip the menu in order to choose the typeof format you want NEWMEDIA to read.
Example: A>NEWMEDIA 2C 2H [RET]
would install a CompuPro two-sided, 80-track format andthe IBM-PC CP/M-86 formats.
Typing NEWMEDIA at the system prompt will display the Active BIOS5.25" formats with choices available to you. The screen will looklike:
Active BIOS 5.25" formats:type # title sides sector size
(0) CompuPro default Single 128 byte(1) CompuPro default Double 256 byte(2) IBM-PC CP/M-86 Double 512 byte(3) CompuPro default Double 1024 byte
The double-sided options menu will also appear offering multipleformat choices. Pressing a "1" at any point will bring up thesingle-sided options menu with additional format choices.
Below the options menu you will be asked to select the format youwant to install. Type in the letter corresponding to your choice.
A control C (^C) will exit you from NEWMEDIA at any time.
The format program will format most 5.25" floppy disks in multipleformats. CompuPro gives no guarantees on formatting diskettes orwriting to diskettes.
Changing Diskettes
Concurrent DOS 8-16 can recognize that you've changed thediskette. Simply remove the diskette and replace it with anotherone. Concurrent DOS 8-16 will automatically read off of the newdiskette. There is no "dskreset" program.
20. SOFTWARE ENHANCEMENTS
This section describes the enhancements to Digital Research'sConcurrent CP/M-86 operating system that are incorporated inConcurrent DOS 8-16 for your CompuPro system. If you have readthrough the manuals from Digital Research, you know thatConcurrent CP/M-86 is a sophisticated operating system.Basically, it has three levels of interface:
1) The user interface, which is a Resident System Process(RSP) called the TERMINAL MESSAGE PROCESS (TMP);
2) The logically invariant interface, consisting of theConcurrent DOS 8-16 system function calls; and
3) The physical interface, which communicates with thehardware environment and receives transient and residentcommands from the invariant interface.
Under Concurrent DOS 8-16 for CompuPro systems, the interfacelevels and basic structure of the operating system, as designedby Digital Research, Inc., remain intact. The only differencesare enhancements made to areas that Digital Research, Inc.designed to be user-modified. Several of these modificationswere made in the TMP, and these will be described first.
Terminal Message Process Enhancements
Under Concurrent DOS 8-16, the TMP has been modified as the system"Shell". The Shell has nine main functions:
1) Terminal, printer, user and drive assignment during log on.2) Changes in printer default assignment.3) Changes in user default number.4) Changes in user default drives.5) Acceptance and execution of user command lines.6) User log on and logout functions.7) Execution of the "WHO" command.8) Invoking SWITCH to run 8-bit programs.9) Invoking IBM-PC mode.

The SWITCH Program
The SWITCH program is the most innovative part of CompuPro'senhancements to Digital Research's Concurrent CP/M-86. Thisprogram enables the system's 8- and 16-bit file accesscapability. The SWITCH program is transparent to the user;there is nothing you need to do in order to have the program upand running.
When the user wishes to execute an 8-bit program, the operatingsystem first searches for the 16-bit version of that program. Whenit is unable to find the 16-bit program, it then searches forthe 8-bit .COM file. When this file is found, the program SW!.CMD(SWITCH) is loaded. Switch sets up a 64K block of memory to looklike a CP/M 2.2 environment. The 8-bit .COM program is loadedinto the 64K block and execution is started. When the 8-bitprogram makes operating system calls, the processor switching codetranslates it to the 16-bit equivalent, and passes it to theConcurrent DOS 8-16 operating system for execution.
The processor switching code switches to the 8088 environment ontwo conditions:
1) a CP/M system call, and2) an interrupt.
Otherwise, it simulates CP/M 80 calls to let programs believe theyare in a CP/M 80 environment.
Using SWITCH with the PC Shell
As released from CompuPro, Concurrent DOS 8-16 uses the PC Shell.The PC Shell allows the execution of PC DOS 1.x files underConcurrent DOS 8-16. The PC SHELL will search for executableprograms in the following pattern:
.CMD --> PC .COM --> .EXE --> .BAT --> 8-bit .COM --> .SUB
where the first .COM files are PC .COM files; the second searchfinds 8-bit CP/M .COM files.
If you are using the PC mode, you will have to renameyour 8-bit COM files to the command name preceeded by thenumber 8.
Example: If you want to use the Proteus Engineering'sWRITE word processing program, rename WRITE.COM to8WRITE.COM by typing:
REN 8WRITE.COM=WRITE.COM [RET]
In order to use the program, just type WRITE. You do nothave to type 8 before the command of any of your renamedfiles.
NOTE: If WRITE.COM is not first renamed, it will be runas a PC .COM file and crash!
To illustrate, suppose that you are using the PC Shell and want toexecute an 8-bit version of the WRITE program and open the"user.txt" file, The user enters:
3A>WRITE USER.TXT [RET]
If WRITE.COM has not been renamed to 8WRITE.COM, the Shell firstsearches for the "WRITE.CMD" file. When it can't find that, itruns "WRITE.COM" as a PC file. Since "WRITE.COM" is not a PC file,the system will crash.
If "WRITE.COM" has been renamed to "8WRITE.COM", the Shell firstsearches for the "WRITE.CMD" file. When it can't find that, itsearches for the PC file, "WRITE.COM". When it can't find that, itsearches for "WRITE.EXE", then "WRITE.BAT" and finally, it finds"8WRITE.COM".
If the file does exist, SWITCH then allocates a 64K block of memoryinto which it moves processor switching code. It loads the .COMfile into that segment then jumps to this 64K block to set up aCP/M 2.2 environment.
SWITCH intercepts all system calls, sets up the proper operatingenvironment (8-bit or 16-bit), switches the CPUs, then invokes theappropriate Concurrent DOS 8-16 function.
If the 8-bit .COM file did not exist, it looks for the .SUB file.When it can't find that, it returns an error message saying thefile cannot be found.
Using SWITCH with the Non-PC Shell
When a command is executed, the non-PC Shell first checks thedefault user directory for 16-bit files with a .CMD extension. Ifthat file is not found, the Shell searches for an 8-bit file withthe same file name, but with a .COM extension.
If the file does exist, SW!.CMD is loaded. SWITCH then allocates a64K block of memory into which it moves processor switching codeand sets up a CP/M 2.2 environment. It then loads the .COM fileinto that segment and then jumps to this 64K block.
SWITCH intercepts all system calls, sets up the proper operatingenvironment (8-bit or 16-bit), switches the CPUs, then invokes theappropriate Concurrent DOS 8-16 function.
To illustrate, suppose that you are using the non-PC Shell and wantto execute an 8-bit version of the WRITE program and open the"user.txt" file. The user enters:
3A>WRITE USER.TXT [RET]
The Shell first searches for the "WRITE.CMD" file. When it can'tfind that, it searches for WRITE.COM. SWITCH then loads theWRITE.COM file into the 64K memory bank and executes it.
If the 8-bit .COM file does not exist, it looks for WRITE.SUB.When it cannot find that, it returns an error message saying thefile cannot be found.
NOTE: When using the non-PC Shell, you do not need torename your 8-bit programs!
The Concurrent DOS 8-16 enhancements made by CompuPro do notinterfere with the normal operation of Digital Research'sConcurrent CP/M-86 operating system. All functions as describedin the accompanying manuals by Digital Research are valid.Concurrent DOS 8-16 simply makes a good multi-user operatingsystem great, by adding dual processor capability and user-oriented utilities.
21. USING CPU 8086 or CPU 286 to RUN 8-BIT PROGRAMS inEMULATION MODE
This section tells you how to use the CPU 8086 or CPU 286processor board with the optional EM8080.CMD program to run 8-bitprograms under Concurrent DOS 8-16. If you are using the CPU8085/88 processor board you may skip this section.
CompuPro has provided an 8080 emulator called EM8080.CMD that iswritten in 8086 code. It allows you to run many 8-bit programs onyour 16-bit processor.
You may run 8-bit programs like WRITE by typing:
OA>EM8080 WRITE [RET]
Or you may change the name of EM8080.CMD to SW!.CMD and have theprogram execute directly by typing:
OA>REN SW!.CMD=EM8080.CMD [RET]OA>SET SW!.CMD [SYS,RO] [RET]
To run an 8-bit program, you would just type the program namefollowed by a return.
NOTE: If you are running the PC Shell, you must rename the8-bit program as described in the previous section.
22. NEED HELP?
Type "HELP" at the system prompt (OA>) and on the screen willappear:
HELP UTILITY V1.x
At "HELP>" enter topic {,subtopic}...
EXAMPLE: HELP> DIR EXAMPLES
The topics available for you to explore will appear on the screen.They may include:
ABORT ASM86 BUFFERED CHSET CNTRLCHARS COMMANDSCONVENTIONS DATE DDT86 DIR DYNAMIC EDERA ERAQ FILESPEC GENCMD HELP INITDIRPIP (COPY) PRINT PRINTER REN SDIR SETSHOW SUBMIT SYSTAT TYPE USER VCMODE
If you enter "DIR" and press the return key, you will see:
FORMAT:
DIR {filespec}
PURPOSE:
Displays the names of non-system (DIR) files in thedirectory of an on-line disk.
EXAMPLES:
A>DIRA>DIR B:A>DIR C:MYFILE.DATA>DIR * CMDA>DIR A*.A86A>DIR PROG???.H86A>DIR PROGRAM.*
23. HOW TO CUSTOMIZE YOUR OPERATING SYSTEM
Up to this point, you have been running a version of Concurrent DOS8-16 set for one user with one virtual console. This section willshow you how to customize your system to run in multi-user mode.
A. Building a Multi-user System
To enter multi-user mode, type the "logout" command at theconsole terminal after the initial boot sequence:
OA>logout [RET]
Once this is done, the Shell reads a terminal set-up file (called"ttys") and a printer set-up file (called "lprs") and initializesthe terminals and printers according to information contained inthese files. The system returns in multi-user mode.
36
If you have set up passwords, you will see the Name: prompt. Ifpasswords have not been set up, you will see the OA> prompt. (Toset up passwords, see the section in this manual on setting up apassword file).
NOTE: Your system can also be set up to automatically go intomulti-user mode. See the section in this manual on setting upyour TTYS file.
If the OA> prompt is on the screen, you can enter the system. Ifyou see the Name: prompt, enter your log on name and password(lower case). To log out of the system, enter "logout" at thesystem prompt.
B. Choosing a XIOS File
The XIOS is the extended input/output system that handles thephysical interface to a hardware environment. The Fourteendifferent XIOS files provided will help to adapt your CCPM.SYS fileto your particular hardware. Choose the one appropriate to yourneeds. If none of the XIOS files provided satisfies your systemsetup, you may customize your operating system with the help of the"CUSTOMIZATION GUIDE" included with your operating systemdocumentation. However, be sure one of the XIOS files providedwill not fill your needs before deciding to customize.
The XIOS files provided come in two different formats. The generic('G') XIOS files are setup for 1 hard disk, 7 physical consoles, 1virtual console per physical console, no status line and 2printers. The Televideo ('T') XIOS files are setup for 1 harddisk, 7 physical consoles, 2 virtual consoles per physical console,status update and 2 printers. Check the documentation that camewith your terminal to see if your terminal emulates one of the onesoffered in the XIOS files. A description of each XIOS filefollows.
Generic='G'
XIOS305G -XIOS320G -XIOS340G -XIOS380G -XIOS220G -XIOS240G -XIOSFLPG
DISK 3, ST506 5 Mbyte hard diskDISK 3, 20 Mbyte hard diskDISK 3, 40 Mbyte hard diskDISK 3, 80 Mbyte hard diskDISK 2, 20 Mbyte hard diskDISK 2, 40 Mbyte hard disk• DISK 1 or DISK 1A, floppy only system
Televideo='T'
XIOS305T - DISK 3, ST506 5 Mbyte hard diskXIOS320T - DISK 3, 20 Mbyte hard diskXIOS340T - DISK 3, 40 Mbyte hard diskXIOS380T - DISK 3, 80 Mbyte hard diskXIOS220T - DISK 2, 20 Mbyte hard diskXIOS240T - DISK 2, 40 Mbyte hard diskXIOSFLPT - DISK 1 or DISK 1A, floppy only system
Pick the XIOS file that best corresponds to your system. Thenfollow the instructions below for setting up your XIOS. If yoursystem requires changes to the XIOS file, you may change some ofthe parameters of the XIOS with the help of the "CUSTOMIZATIONGUIDE" later, after you have set up your system using one of theXIOS files provided.
After deciding which XIOS file you are going to use, log on todrive B and type:
OB>PIP XIOS.CON=XIOS????.CON [RET]
where XIOS????.CON is the XIOS file of your choice.
Next, pick the appropriate SHELL for your needs. If you want PCcompatability, leave SHELL.RSP as it is. If you don't want PCcompatability, you must rename the Shell files as follows:
OB>REN SHELL.PC=SHELL.RSP [RET]OB>PIP SHELL.RSP=SHELL.NPC[V] [RET]
C. GENerating a SYStem - GENCCPM
You are now ready to do a GENCCPM to GENerate a new SYStemThe necessary files to do a GENCCPM are:
file.
GENCCPM.CMDXIOS.CONABORT.RSPPIN.RSPSTATLINE.RSPSHELL.RSPVOUT.RSPDIR.RSP (optional)
SUP.CONMEM.CONSYSDAT.CONBDOS.CONCIO.CONRTM.CONCOMPUPRO.IN
NOTE: DIR.RSP does not work over a network. This is a bug fromDigital Research, Inc. If you are using networking, ERAse DIR.RSPand use only DIR.CMD across the network.
Then type:
OB>GENCCPM <COMPUPRO.IN
This will load in the default values for GENCCPM and automatically
finish the GENCCPM. If you want to patch values in GENCCPM, removethe word GENSYS from the end of the COMPUPRO.IN file first. TheGENCCPM command is covered in the Concurrent CP/M-86 User's Guideand the Concurrent CP/M-86 Operating System System Guide fromDigital Research, Inc. You should familiarize yourself withsection before proceeding.
that
You can patch any of the GENSYS values you require. When you arefinished patching values, type in GENSYS. This will create yournew CCPM.SYS file. Install your new CCPM.SYS file on your A: drive(hard or floppy disk) by typing:
OB>PIP A:=B:CCPM.SYS[VROW] [RET]
where B: is the drive that has your new CCPM.SYS file on it.
NOTE: When you do a GENCCPM, you can radically improve theperformance of your system, if you have the optional MDRIVE/Hboard, by setting Drive M: to be the temporary drive.
If the XIOS files provided do not match your requirements, you maycustom configure your system using the "Concurrent DOS 8-16Customization Guide" included with your documentation.
24. ERROR MESSAGES (INTERPRETATION OF MESSAGES)
This list contains possible error messages that may be generatedby Concurrent DOS 8-16. They are arranged alphabetically.Additional errors may be generated by the Digital ResearchConcurrent CP/M-86 modules. These errors may be found in theConcurrent CP/M-86 System User's Guide and Concurrent CP/M-86System Programmers Guide.
MESSAGE | PROBABLE CAUSE & RESULT | REMEDY
BIOS Calls NotSupported
An 8-bit programattempted to do a"direct" BIOS call.
8-bit program will abort.
(Program will not rununder Concurrent DOS 8-16.)
Use anotherprogram.
Disk 3 Error #,Unit #
Disk 3 controller error. Refer to Disk 3manual.
Drive X: NotReady
Floppy drive is notready or no disk is inthe drive.
Current process isaborted.
Keep driveloaded. Workmostly withthe systemdrive
ERROR: Divide byZero
Assembly language divideby 0.
Current process willabort.
This is anapplicationsprogram error.Call yourSystem Center/Dealer.
UninitializedInterrupt: Interruptcode OxxH wherexx is a number 0-255
Either a software orhardware interrupt.
Call your SystemCenter/Dealer.
Format Error Hardware failure in thecontroller or drive.
Format program willabort.
Invalid DriveSpecified
An attempt was made toformat a non-existentfloppy drive, a hard diskor a memory disk.
You are asked for anotherdrive.
ImpossibleError!
Many possible causes.For example, You triedto use the NETWORK.SYSfile to boot the systemwhen there is no networkboard present.
NETWORK ERROR:Unable to verifyPower-Up code
You tried to use thenetwork .SYS file to bootthe system when there isno network board present.
No Program orBad Copy
Program requested is noton the default drive oris unreadable.
PANIC:
Panic trap:
Wild interrupt!
Something has happenedthat the system softwarecannot deal with.
System will HALT.
Name of XIOS routine willalso be printed.
Check diskcontrollerboard,diskdrives, ordiskette.
Retry.
Enter anotherdrive name.
Use another .SYSfile.
Use another .SYSfile.
Put program ondisk andretry.
Make sure allperipherals arepowered up.
Make a note ofwhere the "panic"happened. Haveyou performedthis routine
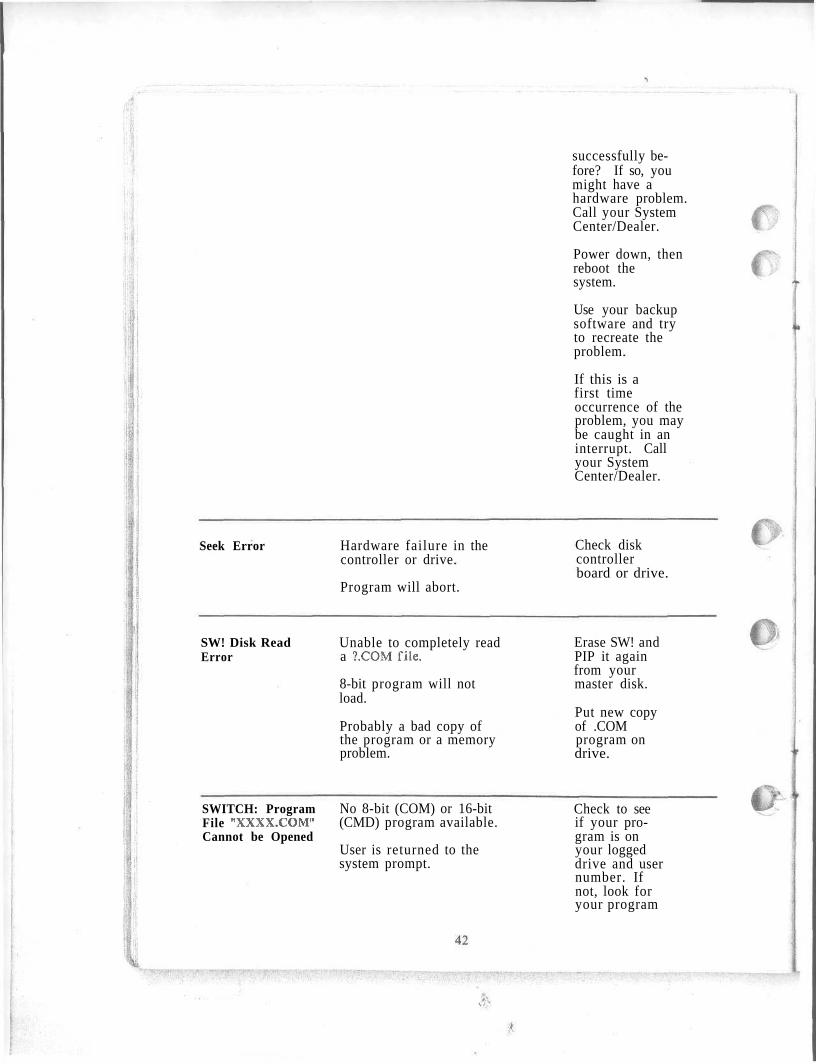
Seek Error Hardware failure in thecontroller or drive.
Program will abort.
SW! Disk ReadError
Unable to completely reada 7.COM file.
8-bit program will notload.
Probably a bad copy ofthe program or a memoryproblem.
SWITCH: ProgramFile "XXXX.COM"Cannot be Opened
No 8-bit (COM) or 16-bit(CMD) program available.
User is returned to thesystem prompt.
successfully be-fore? If so, youmight have ahardware problem.Call your SystemCenter/Dealer.
Power down, thenreboot thesystem.
Use your backupsoftware and tryto recreate theproblem.
If this is afirst timeoccurrence of theproblem, you maybe caught in aninterrupt. Callyour SystemCenter/Dealer.
Check diskcontrollerboard or drive.
Erase SW! andPIP it againfrom yourmaster disk.
Put new copyof .COMprogram ondrive.
Check to seeif your pro-gram is onyour loggeddrive and usernumber. Ifnot, look foryour program
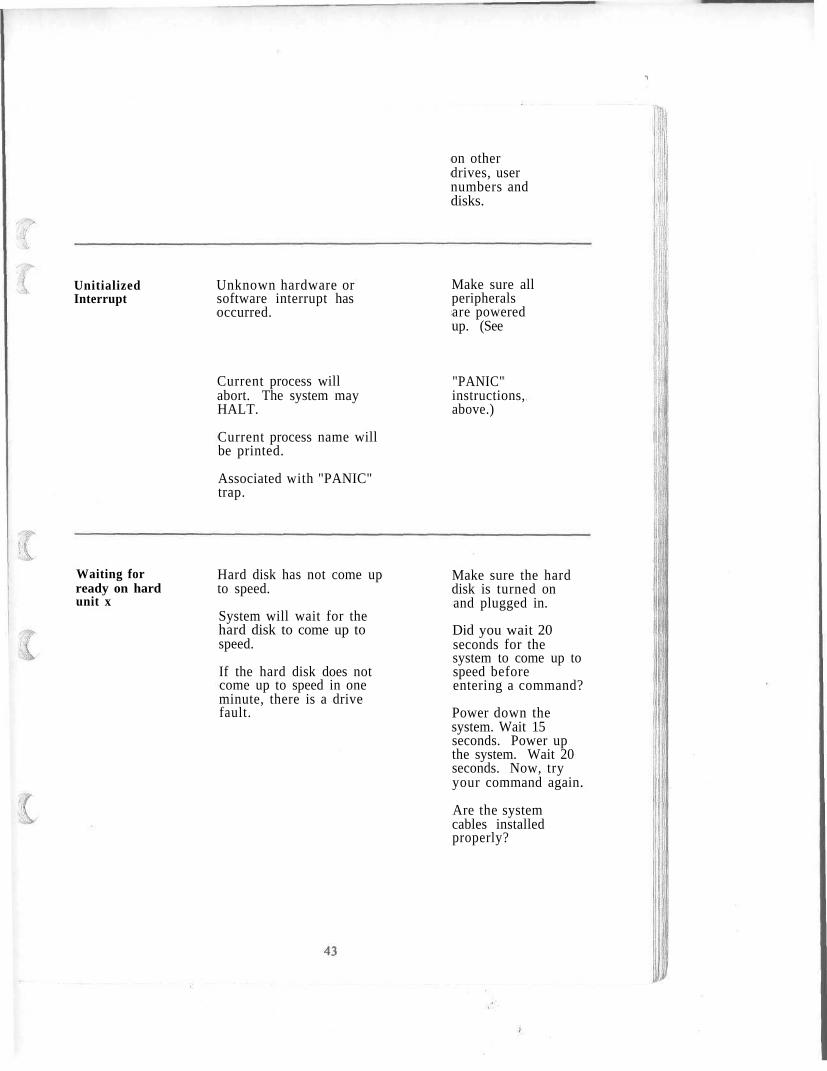
UnitializedInterrupt
Unknown hardware orsoftware interrupt hasoccurred.
on otherdrives, usernumbers anddisks.
Make sure allperipheralsare poweredup. (See
Current process willabort. The system mayHALT.
Current process name willbe printed.
Associated with "PANIC"trap.
Waiting forready on hardunit x
Hard disk has not come upto speed.
System will wait for thehard disk to come up tospeed.
If the hard disk does notcome up to speed in oneminute, there is a drivefault.
"PANIC"instructions,above.)
Make sure the harddisk is turned onand plugged in.
Did you wait 20seconds for thesystem to come up tospeed beforeentering a command?
Power down thesystem. Wait 15seconds. Power upthe system. Wait 20seconds. Now, tryyour command again.
Are the systemcables installedproperly?
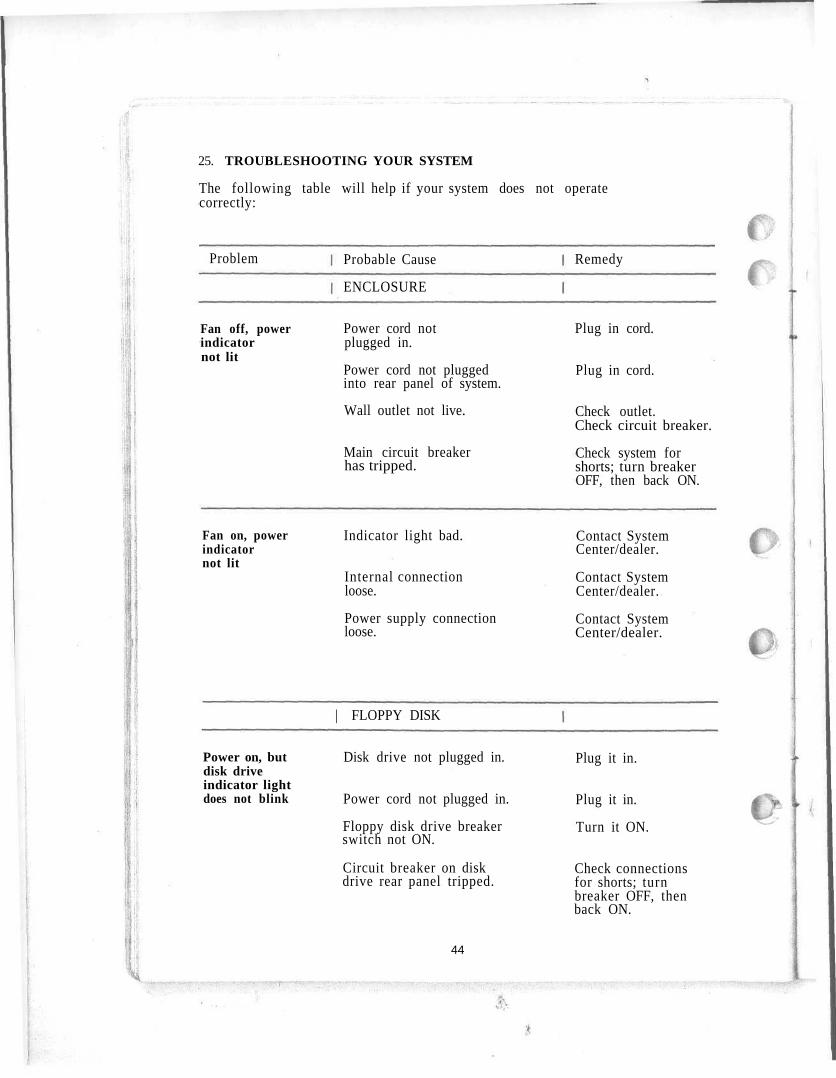
25. TROUBLESHOOTING YOUR SYSTEM
The following table will help if your system does not operatecorrectly:
Problem Probable Cause Remedy
ENCLOSURE
Fan off, powerindicatornot lit
Fan on, powerindicatornot lit
Power on, butdisk driveindicator lightdoes not blink
Power cord notplugged in.
Power cord not pluggedinto rear panel of system.
Wall outlet not live.
Main circuit breakerhas tripped.
Indicator light bad.
Internal connectionloose.
Power supply connectionloose.
| FLOPPY DISK
Disk drive not plugged in.
Power cord not plugged in.
Floppy disk drive breakerswitch not ON.
Circuit breaker on diskdrive rear panel tripped.
44
Plug in cord.
Plug in cord.
Check outlet.Check circuit breaker.
Check system forshorts; turn breakerOFF, then back ON.
Contact SystemCenter/dealer.
Contact SystemCenter/dealer.
Contact SystemCenter/dealer.
Plug it in.
Plug it in.
Turn it ON.
Check connectionsfor shorts; turnbreaker OFF, thenback ON.
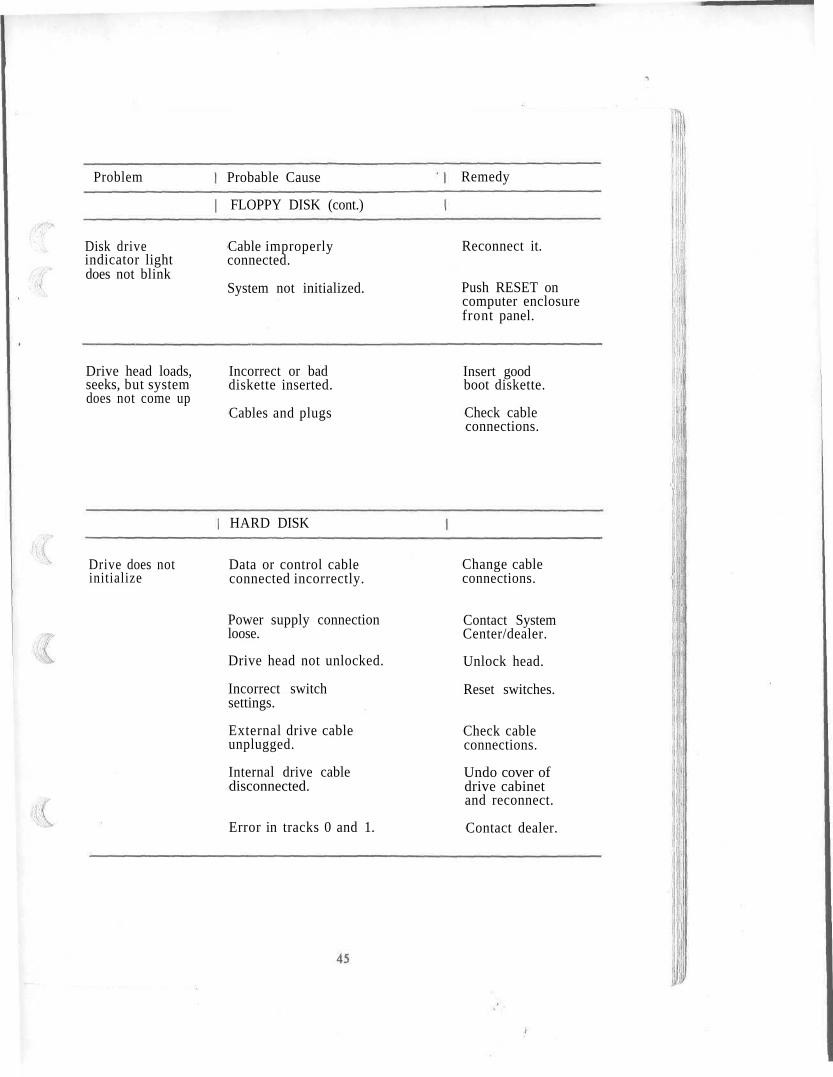
Problem
Disk driveindicator lightdoes not blink
Probable Cause
| FLOPPY DISK (cont.)
Drive head loads,seeks, but systemdoes not come up
Cable improperlyconnected.
System not initialized.
Incorrect or baddiskette inserted.
Cables and plugs
Remedy
Reconnect it.
Push RESET oncomputer enclosurefront panel.
Insert goodboot diskette.
Check cableconnections.
HARD DISK
Drive does notinitialize
Data or control cableconnected incorrectly.
Power supply connectionloose.
Drive head not unlocked.
Incorrect switchsettings.
External drive cableunplugged.
Internal drive cabledisconnected.
Error in tracks 0 and 1.
Change cableconnections.
Contact SystemCenter/dealer.
Unlock head.
Reset switches.
Check cableconnections.
Undo cover ofdrive cabinetand reconnect.
Contact dealer.
I
Problem Probable Cause
| TERMINAL I/O
System soundslike it booted upbut no message onthe terminal
System hangsin middle ofsign-onmessage
Cable incorrectlyconnected.
Terminalincorrectly set.
Terminal notpowered up.
I/O board switchesnot set properly.
I/O board headersnot wired correctly.
Bad RS232 cable.
| SYSTEM
Interrupt jumpernot connected onDisk 1, Disk 1A,Disk 2, or theInterfacer 3 or 4.
Interrupts notconnected on SystemSupport 1.
Shunt J13 notjumpered on SystemSupport 1.
Malfunctioning SystemSupport 1 board.
| Remedy
Check cableconnections.
Check baud rateand word sizesettings.
Plug in terminaland turn on.
Reset switches.
Recheck connectionson headers.
Try another cable.
Reconnect it.
Install shuntin J8.
Install J13 on 8 andC or send board in tofactory for upgrade.
Contact dealer.
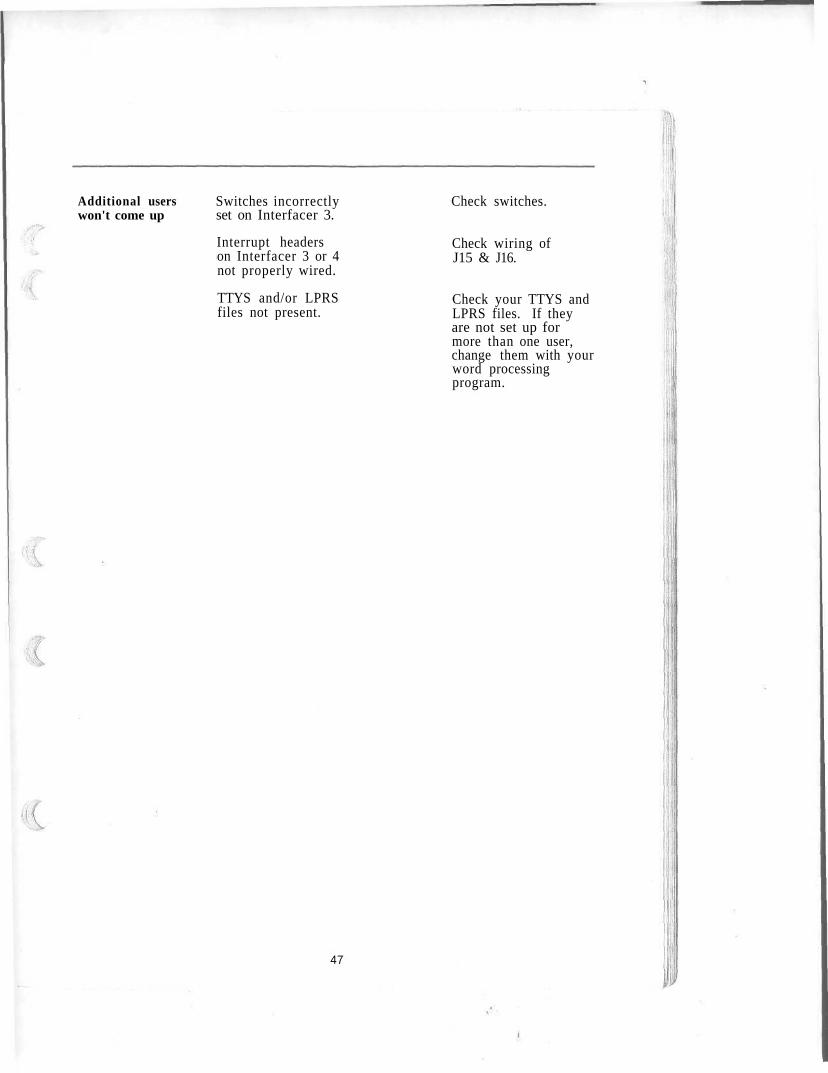
Additional userswon't come up
Switches incorrectlyset on Interfacer 3.
Interrupt headerson Interfacer 3 or 4not properly wired.
TTYS and/or LPRSfiles not present.
Check switches.
Check wiring ofJ15 & J16.
Check your TTYS andLPRS files. If theyare not set up formore than one user,change them with yourword processingprogram.
47
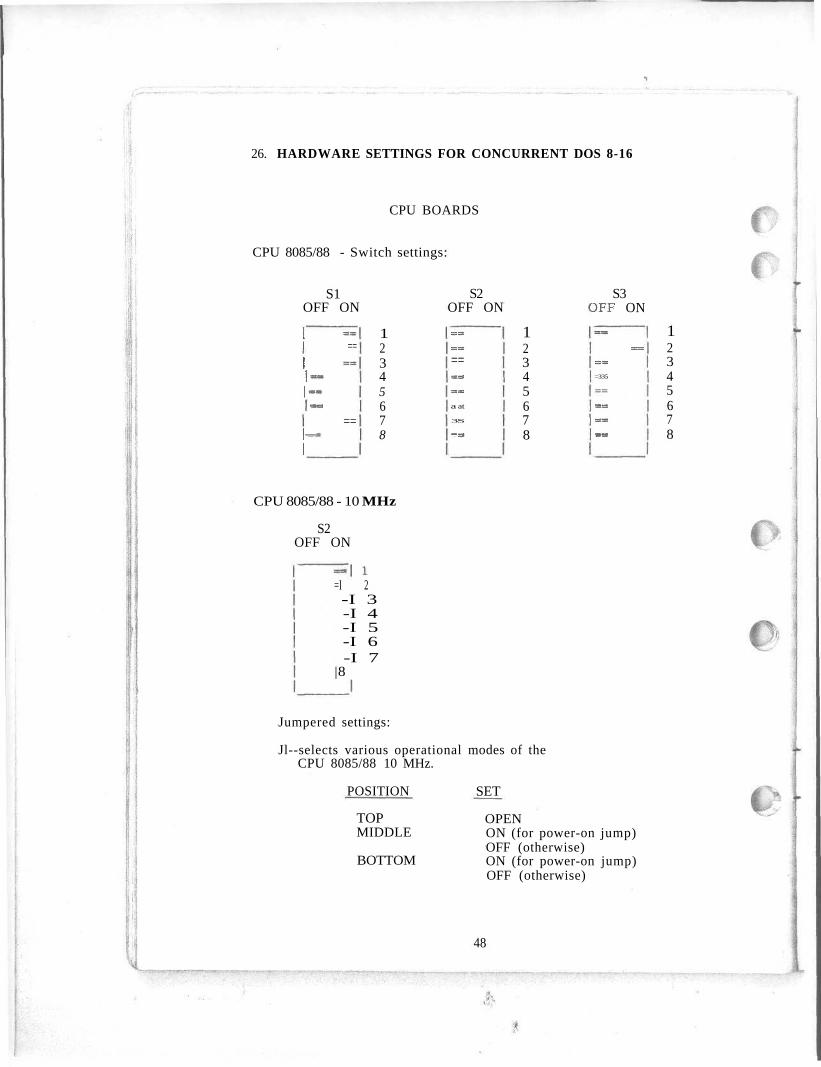
26. HARDWARE SETTINGS FOR CONCURRENT DOS 8-16
CPU BOARDS
CPU 8085/88 - Switch settings:
S1OFF ON
11 ==11-|==1-
==1i1
12345678
S2OFF ON
SSSB
==s
====s
=«
a at
3S
— -i
12345678
S3DFF ON
==
==
S=SK
=335
==SS
==S
ava
12345678
CPU 8085/88 - 10 MHz
S2OFF ON
=I 2-I 3-I 4-I 5-I 6-I 7
| 8
Jumpered settings:
Jl--selects various operational modes of theCPU 8085/88 10 MHz.
POSITION
TOPMIDDLE
BOTTOM
SET
OPENON (for power-on jump)OFF (otherwise)ON (for power-on jump)OFF (otherwise)
48
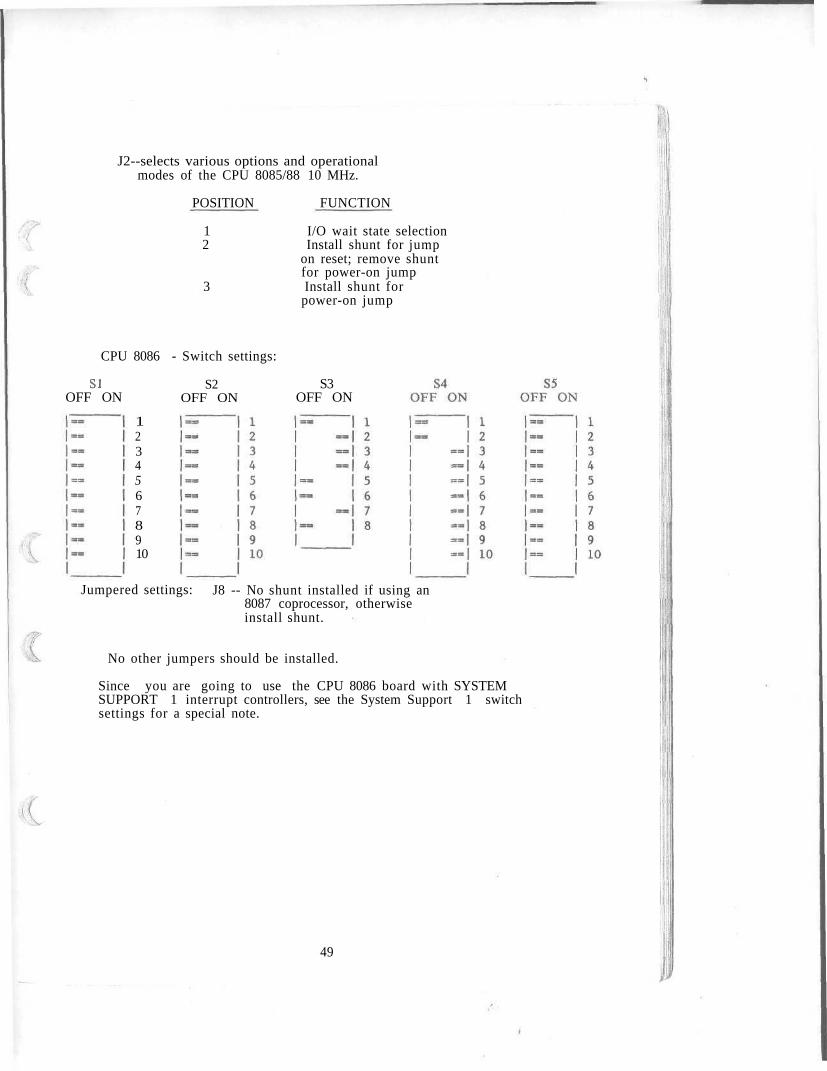
J2--selects various options and operationalmodes of the CPU 8085/88 10 MHz.
POSITION FUNCTION
1 I/O wait state selection2 Install shunt for jump
on reset; remove shuntfor power-on jump
3 Install shunt forpower-on jump
CPU 8086 - Switch settings:
SIOFF ON
12345678910
S2OFF ON
S3OFF ON
Jumpered settings: J8 -- No shunt installed if using an8087 coprocessor, otherwiseinstall shunt.
No other jumpers should be installed.
Since you are going to use the CPU 8086 board with SYSTEMSUPPORT 1 interrupt controllers, see the System Support 1 switchsettings for a special note.
49
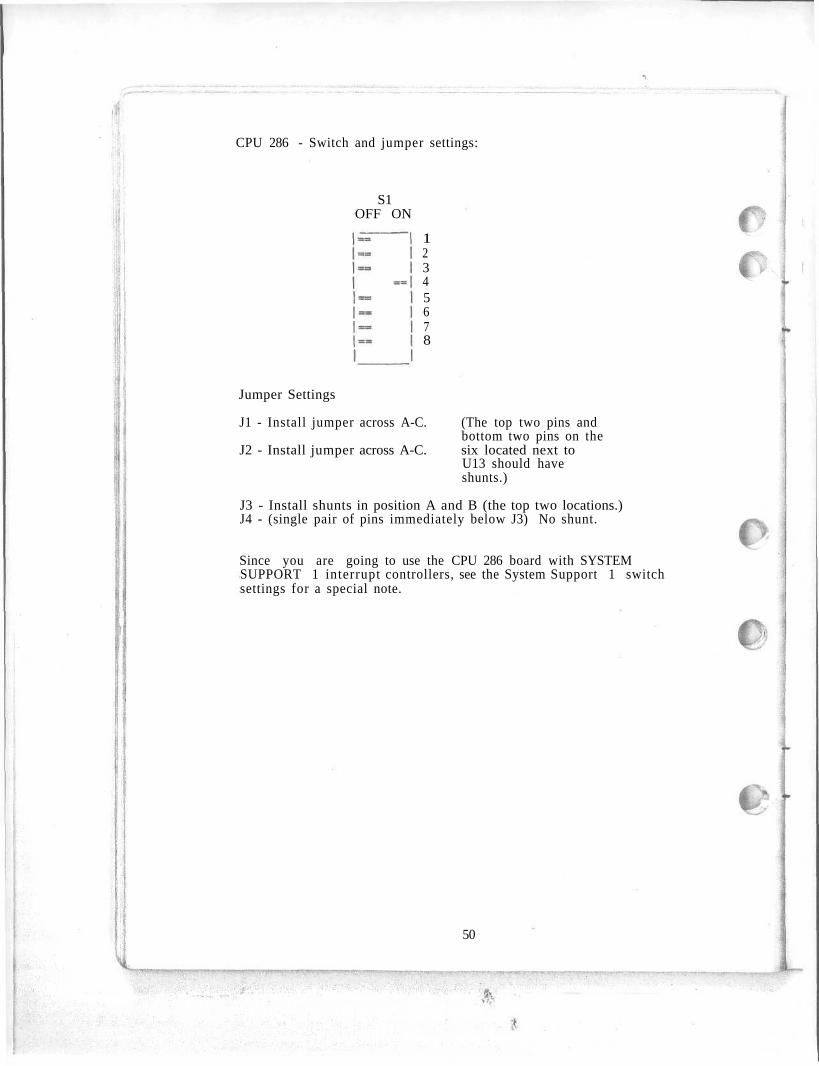
CPU 286 - Switch and jumper settings:
S1OFF ON
12345678
Jumper Settings
J1 - Install jumper across A-C.
J2 - Install jumper across A-C.
(The top two pins andbottom two pins on thesix located next toU13 should haveshunts.)
J3 - Install shunts in position A and B (the top two locations.)J4 - (single pair of pins immediately below J3) No shunt.
Since you are going to use the CPU 286 board with SYSTEMSUPPORT 1 interrupt controllers, see the System Support 1 switchsettings for a special note.
50
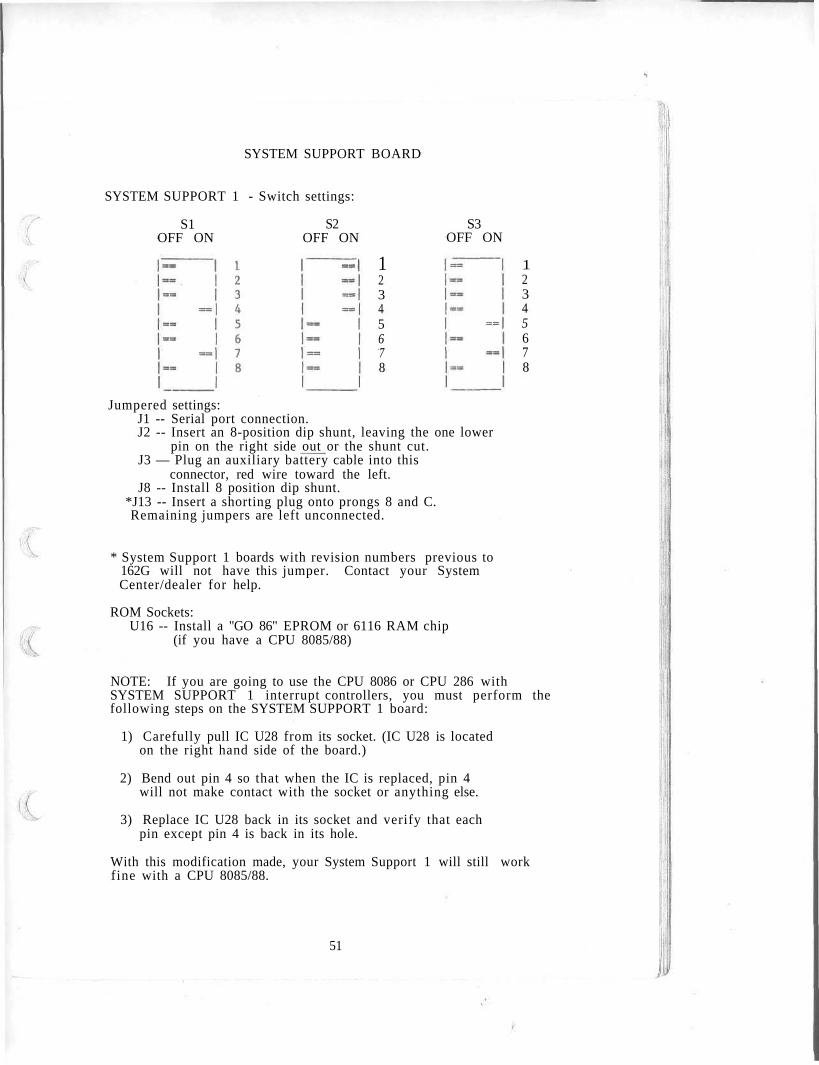
SYSTEM SUPPORT BOARD
SYSTEM SUPPORT 1 - Switch settings:
S1OFF ON
S2OFF ON
S3OFF ON
12345678
12345678
Jumpered settings:J1 -- Serial port connection.J2 -- Insert an 8-position dip shunt, leaving the one lower
pin on the right side out or the shunt cut.J3 — Plug an auxiliary battery cable into this
connector, red wire toward the left.J8 -- Install 8 position dip shunt.
*J13 -- Insert a shorting plug onto prongs 8 and C.Remaining jumpers are left unconnected.
* System Support 1 boards with revision numbers previous to162G will not have this jumper. Contact your SystemCenter/dealer for help.
ROM Sockets:U16 -- Install a "GO 86" EPROM or 6116 RAM chip
(if you have a CPU 8085/88)
NOTE: If you are going to use the CPU 8086 or CPU 286 withSYSTEM SUPPORT 1 interrupt controllers, you must perform thefollowing steps on the SYSTEM SUPPORT 1 board:
1) Carefully pull IC U28 from its socket. (IC U28 is locatedon the right hand side of the board.)
2) Bend out pin 4 so that when the IC is replaced, pin 4will not make contact with the socket or anything else.
3) Replace IC U28 back in its socket and verify that eachpin except pin 4 is back in its hole.
With this modification made, your System Support 1 will still workfine with a CPU 8085/88.
51
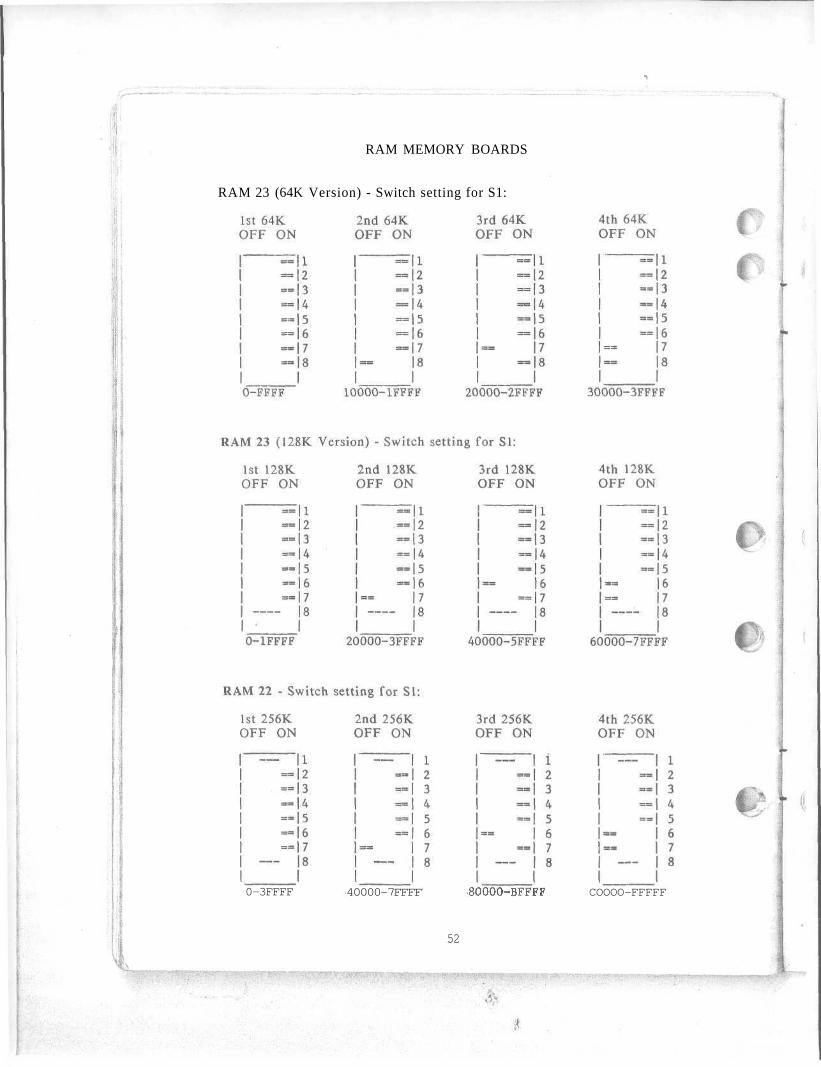
RAM MEMORY BOARDS
RAM 23 (64K Version) - Switch setting for S1:
0-3FFFF 40000-7FFFF 80000-BFFFF COOOO-FFFFF
52
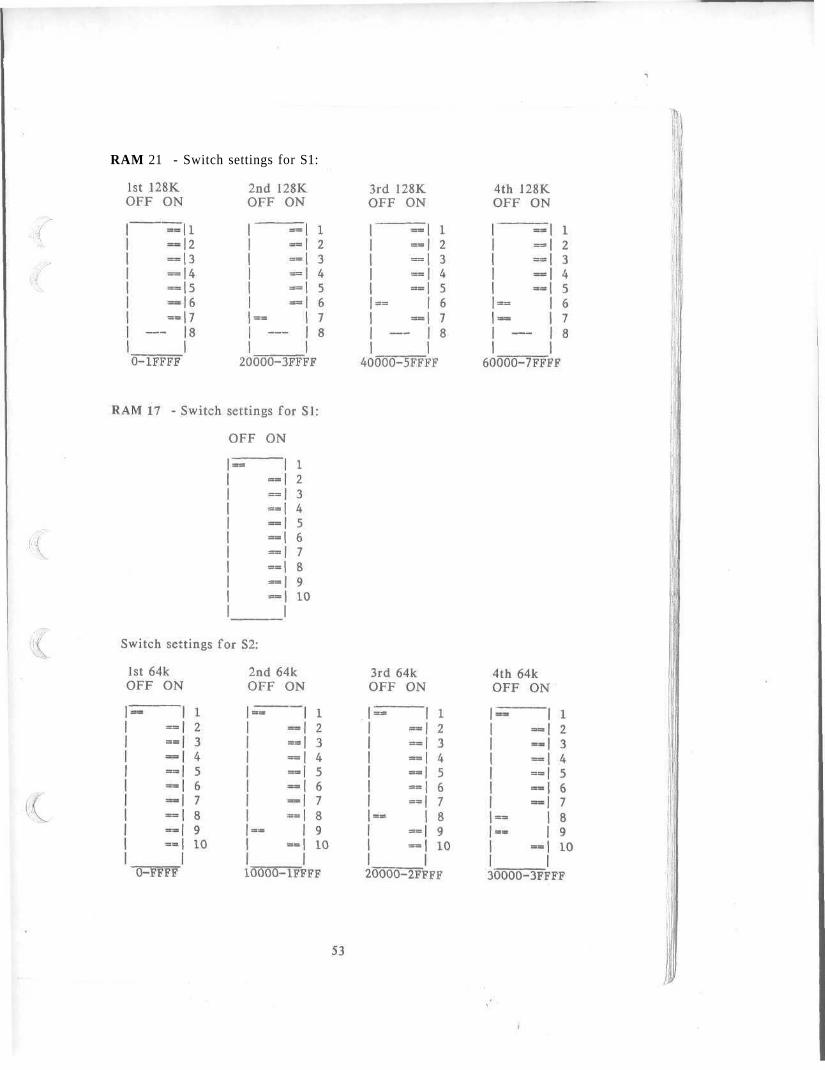
RAM 21 - Switch settings for S1:
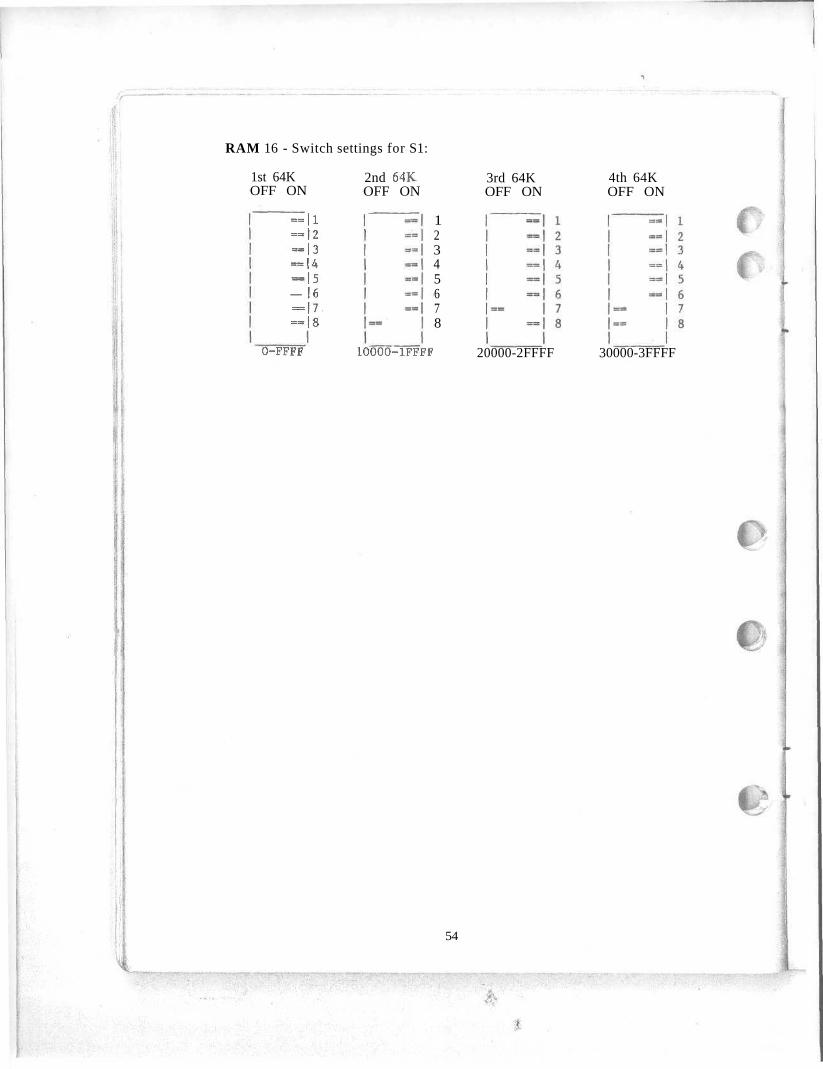
RAM 16 - Switch settings for S1:
1st 64KOFF ON
-H-12-13==|4-15— 16-17.-18
2nd 64KOFF ON
12345678
3rd 64KOFF ON
4th 64KOFF ON
0-FFFF 10000-1FFFF 20000-2FFFF 30000-3FFFF
54
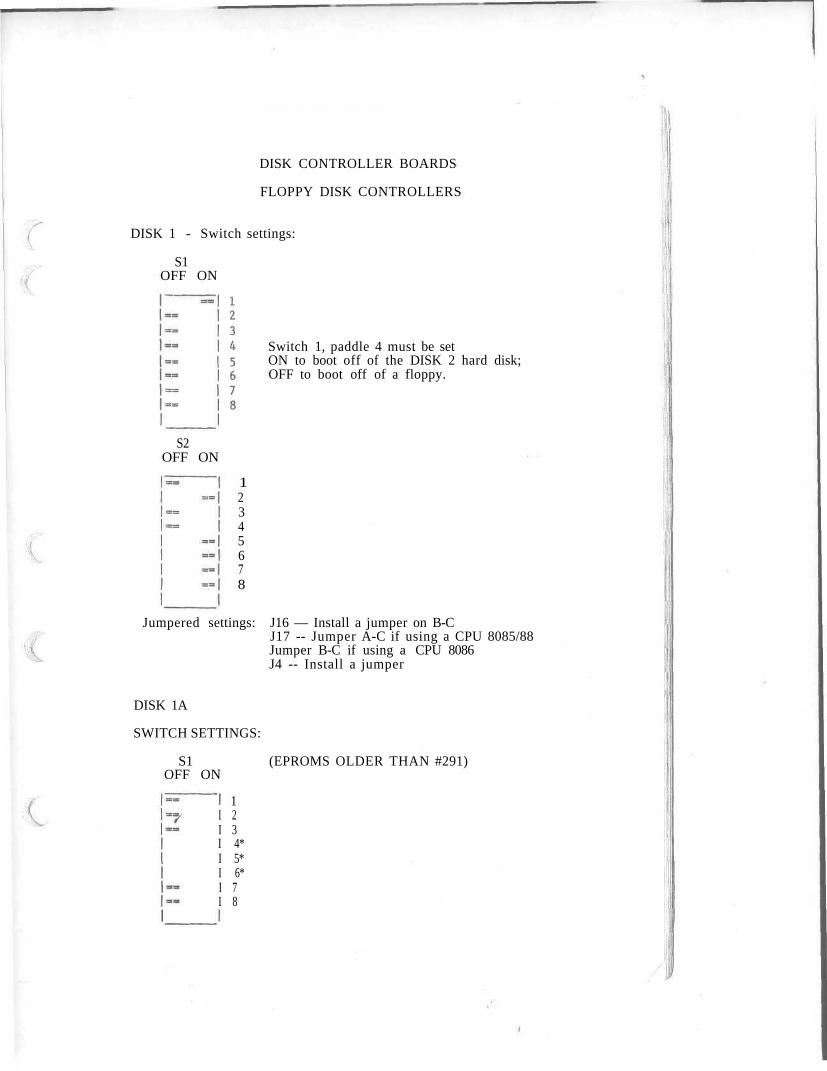
DISK CONTROLLER BOARDS
FLOPPY DISK CONTROLLERS
DISK 1 - Switch settings:
S1OFF ON
Switch 1, paddle 4 must be setON to boot off of the DISK 2 hard disk;OFF to boot off of a floppy.
S2OFF ON
12345678
Jumpered settings: J16 — Install a jumper on B-CJ17 -- Jumper A-C if using a CPU 8085/88Jumper B-C if using a CPU 8086J4 -- Install a jumper
DISK 1A
SWITCH SETTINGS:
S1OFF ON
(EPROMS OLDER THAN #291)
"I 1I 2I 3I 4*I 5*I 6*I 7I 8
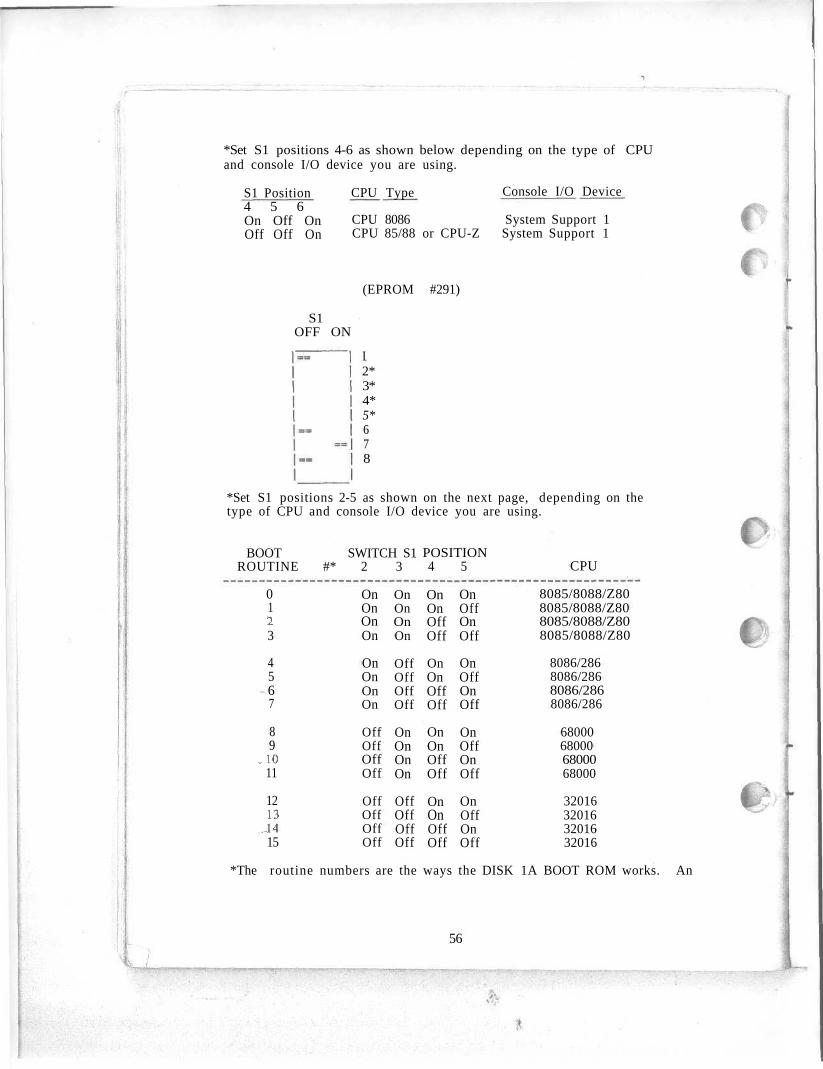
*Set S1 positions 4-6 as shown below depending on the type of CPUand console I/O device you are using.
S1 Position4 5 6On Off OnOff Off On
CPU Type Console I/O Device
CPU 8086 System Support 1CPU 85/88 or CPU-Z System Support 1
S1OFF ON
(EPROM #291)
I2*3*4*5*678
*Set S1 positions 2-5 as shown on the next page, depending on thetype of CPU and console I/O device you are using.
BOOT SWITCH S1ROUTINE #* 2 3
0123
4567
89
.1011
1213
J415
OnOnOnOn
OnOnOnOn
OffOffOffOff
OffOffOffOff
OnOnOnOn
OffOffOffOff
OnOnOnOn
OffOffOffOff
POSITION4 5
OnOnOffOff
OnOnOffOff
OnOnOffOff
OnOnOffOff
OnOffOnOff
OnOffOnOff
OnOffOnOff
OnOffOnOff
CPU
8085/8088/Z808085/8088/Z808085/8088/Z808085/8088/Z80
8086/2868086/2868086/2868086/286
68000680006800068000
32016320163201632016
*The routine numbers are the ways the DISK 1A BOOT ROM works. An
56

explanation of the routine numbers follows.
Routines 0, 4, 8 and 12
Routines 1, 5, 9 and 13
Routines 2, 6, 10 and 14
Routines 3, 7, 11 and 15
look for an 8" drive as drive 0. Ifit is ready, it will boot from it.If the 8" drive is not ready, it willtry to boot from the DISK 3.
will always boot off of the DISK 3and never look for any floppies.
will attempt to boot off an 8" driveas drive 0. If it is not ready, itwill loop and look for a 5.25" driveas physical drive 2, if that is notready it will go look for the 8",then the 5.25" drive.
will attempt to boot from a 5.25"drive as drive 0. If it is notready, it will look for a DISK 3. Itwill continue to loop as in the firstroutine.
cSet Switch 3, position 1 ON to use the System Support 1 as theconsole. Set Switch 3, position 8 ON to boot off of a floppy, andOFF to boot off of a DISK 2 hard disk.
JUMPER SHUNTS
For the standard CompuPro configuration:
J1 Position 8 for 8" drives, 5 for 5.25" drives.J2 Position 8 for 8" drives, 5 for 5.25" drives.J3 Position 5 for 5.25" drives, 8 for 8" drives.J4 Position 5 for 5.25" drives, 8 for 8" drives.J5 Removed.J6 A-CJ7 Removed
57
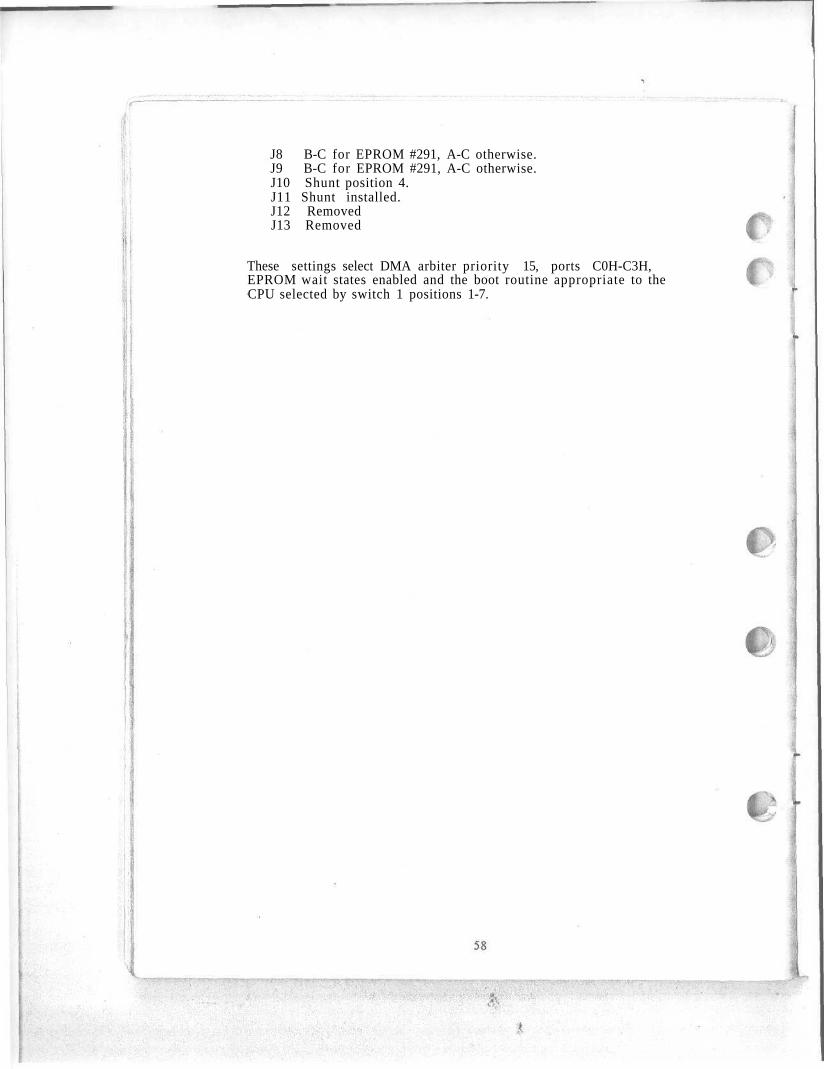
J8 B-C for EPROM #291, A-C otherwise.J9 B-C for EPROM #291, A-C otherwise.J10 Shunt position 4.J11 Shunt installed.J12 RemovedJ13 Removed
These settings select DMA arbiter priority 15, ports C0H-C3H,EPROM wait states enabled and the boot routine appropriate to theCPU selected by switch 1 positions 1-7.
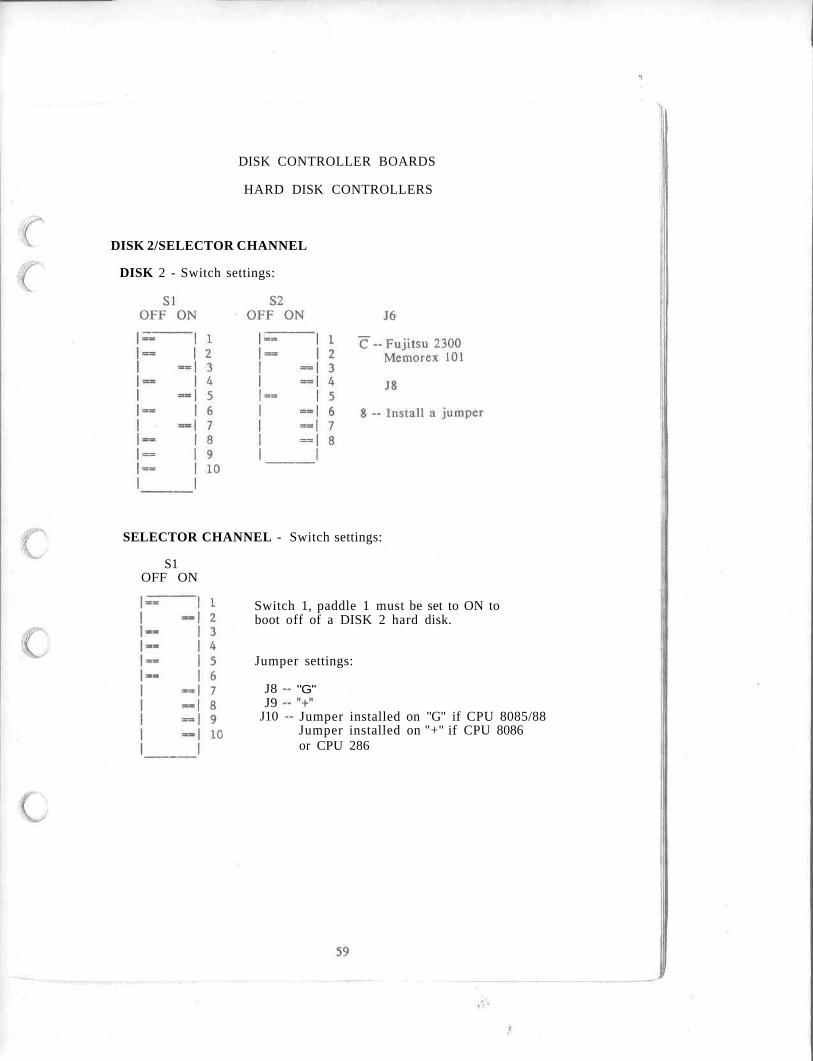
DISK CONTROLLER BOARDS
HARD DISK CONTROLLERS
DISK 2/SELECTOR CHANNEL
DISK 2 - Switch settings:
SELECTOR CHANNEL - Switch settings:
S1OFF ON
Switch 1, paddle 1 must be set to ON toboot off of a DISK 2 hard disk.
Jumper settings:
J8J9
J10
"G"
Jumper installed on "G" if CPU 8085/88Jumper installed on "+" if CPU 8086or CPU 286
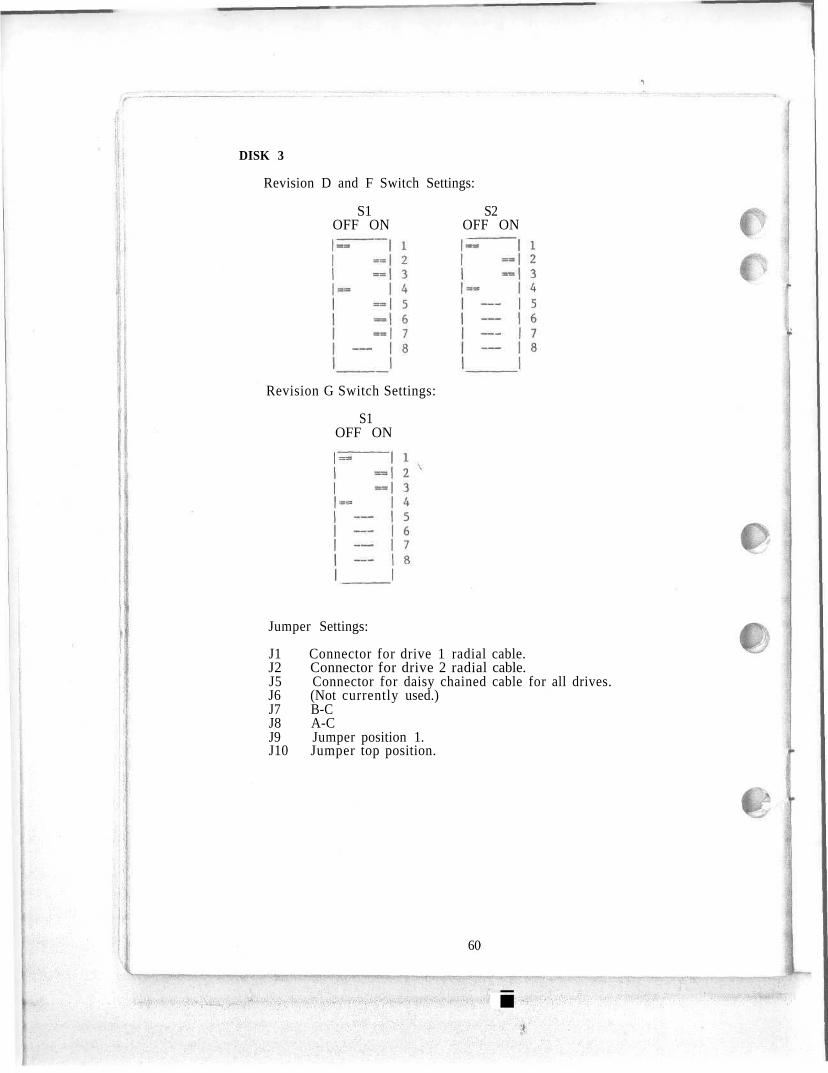
DISK 3
Revision D and F Switch Settings:
S1OFF ON
S2OFF ON
Revision G Switch Settings:
S1OFF ON
Jumper Settings:
J1 Connector for drive 1 radial cable.J2 Connector for drive 2 radial cable.J5 Connector for daisy chained cable for all drives.J6 (Not currently used.)J7 B-CJ8 A-CJ9 Jumper position 1.J10 Jumper top position.
60
i
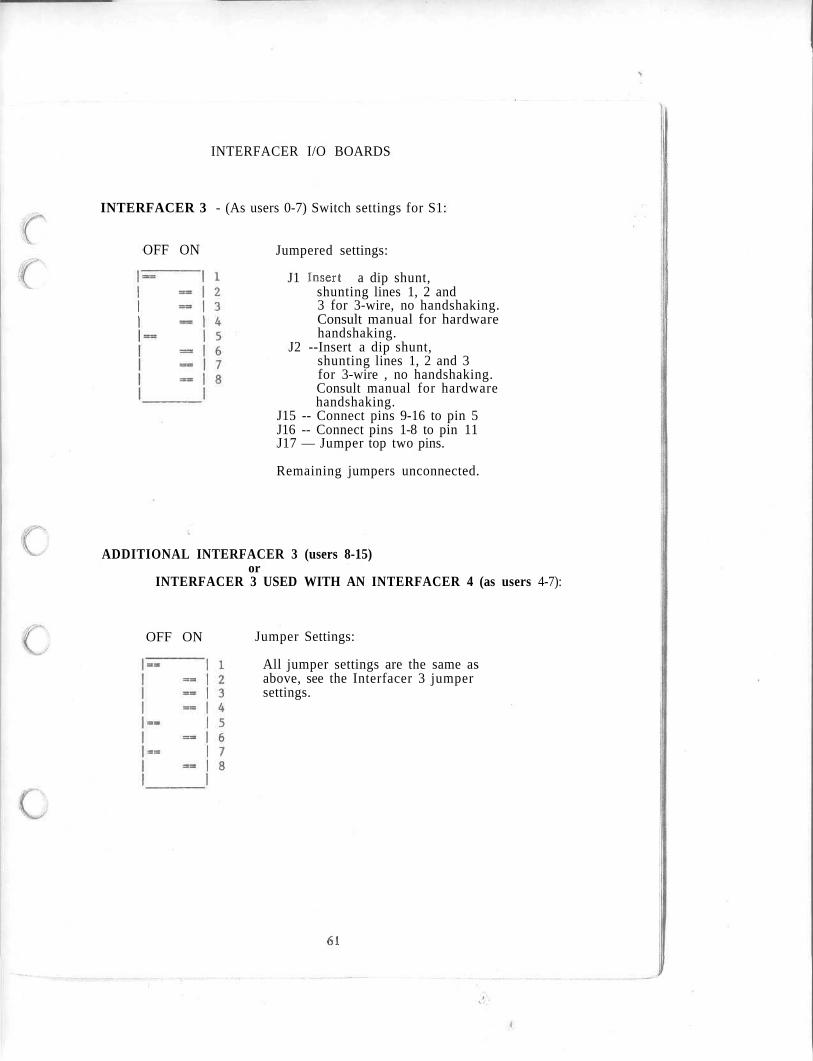
INTERFACER I/O BOARDS
INTERFACER 3 - (As users 0-7) Switch settings for S1:
OFF ON Jumpered settings:
J1 --Insert a dip shunt,shunting lines 1, 2 and3 for 3-wire, no handshaking.Consult manual for hardwarehandshaking.
J2 --Insert a dip shunt,shunting lines 1, 2 and 3for 3-wire , no handshaking.Consult manual for hardwarehandshaking.
J15 -- Connect pins 9-16 to pin 5J16 -- Connect pins 1-8 to pin 11J17 — Jumper top two pins.
Remaining jumpers unconnected.
ADDITIONAL INTERFACER 3 (users 8-15)or
INTERFACER 3 USED WITH AN INTERFACER 4 (as users 4-7):
OFF ON Jumper Settings:
All jumper settings are the same asabove, see the Interfacer 3 jumpersettings.
61
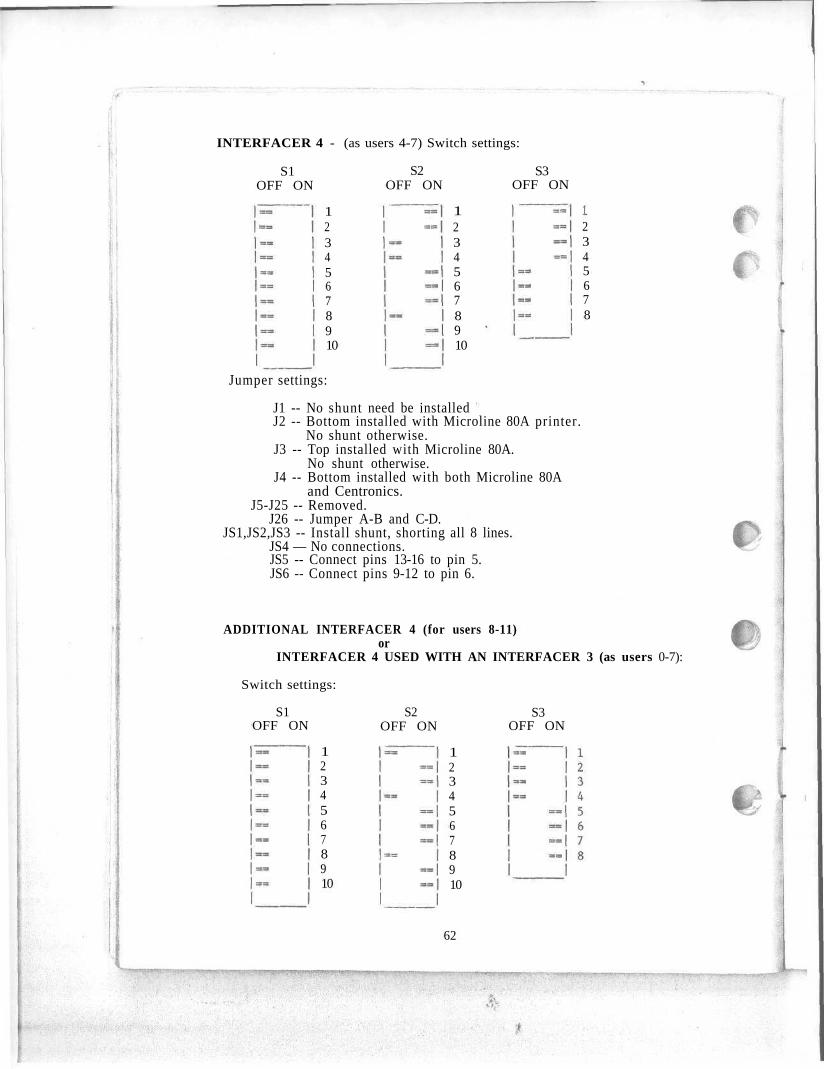
INTERFACER 4 - (as users 4-7) Switch settings:
S1OFF ON
S2OFF ON
S3OFF ON
12345678910
12345678910
I2345678
Jumper settings:
J1 -- No shunt need be installedJ2 -- Bottom installed with Microline 80A printer.
No shunt otherwise.J3 -- Top installed with Microline 80A.
No shunt otherwise.J4 -- Bottom installed with both Microline 80A
and Centronics.J5-J25 -- Removed.
J26 -- Jumper A-B and C-D.JS1,JS2,JS3 -- Install shunt, shorting all 8 lines.
JS4 — No connections.JS5 -- Connect pins 13-16 to pin 5.JS6 -- Connect pins 9-12 to pin 6.
ADDITIONAL INTERFACER 4 (for users 8-11)or
INTERFACER 4 USED WITH AN INTERFACER 3 (as users 0-7):
Switch settings:
S1OFF ON
12345678910
S2OFF ON
12345678910
62
S3OFF ON
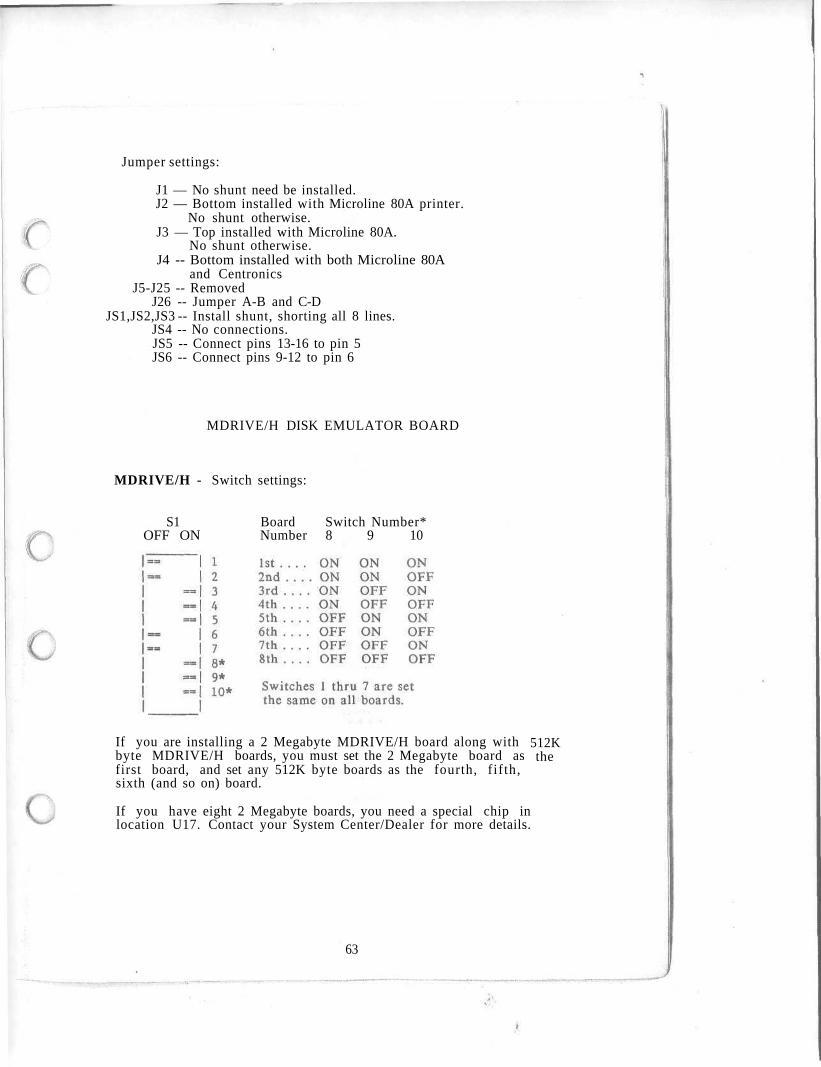
Jumper settings:
J1 — No shunt need be installed.J2 — Bottom installed with Microline 80A printer.
No shunt otherwise.J3 — Top installed with Microline 80A.
No shunt otherwise.J4 -- Bottom installed with both Microline 80A
and CentronicsJ5-J25 -- Removed
J26 -- Jumper A-B and C-DJS1,JS2,JS3 -- Install shunt, shorting all 8 lines.
JS4 -- No connections.JS5 -- Connect pins 13-16 to pin 5JS6 -- Connect pins 9-12 to pin 6
MDRIVE/H DISK EMULATOR BOARD
MDRIVE/H - Switch settings:
S1OFF ON
Board Switch Number*Number 8 9 10
If you are installing a 2 Megabyte MDRIVE/H board along withbyte MDRIVE/H boards, you must set the 2 Megabyte board asfirst board, and set any 512K byte boards as the fourth, f if th,sixth (and so on) board.
512Kthe
If you have eight 2 Megabyte boards, you need a special chip inlocation U17. Contact your System Center/Dealer for more details.
63
27. APPENDIX
This section contains technical notes from Digital Research whichwere not included in the Digital Research documentation youreceived with Concurrent DOS 8-16.
Utility Notes
CHSET:
The correct command line syntax is:
Chset filespec [Shared=0n | Off | 8087=0n | 0 f f |Suspend=0n | 0ff ]
DATE:
"DATE SET" will default to a date of 01/00/78 if a valid timeis not entered and a carriage return is given for the date.
DIR:
"Control S" has been disabled to allow type-ahead. The fullsyntax of the DIR command is as follows:
DIR ([S]) (d:) (filespec) ([Gn])
This is not listed fully in the Concurrent CP/M User'sGuide.
Ed will not allow underbar characters (_) in the filename.
ED reports a checksum error when there is no directory spaceleft on the disk.
If the CP is in the first 23 lines of text and the -nP (PageBackwards) command is issued, ED will page through the first 23lines n times instead of once as would be expected.
The Concurrent CP/M User's Guide states that the P command,when issued alone, will display the 23 lines of text followingthe CP and then move the CP 23 lines. In fact, ED moves the CPforward 23 lines and then displays the next 23 lines of text.
When the CP is positioned at the end of a file of more than 23lines through the -B command, a preceding -nP command will movethrough one page of text rather than n pages.
64
Concurrent CP/M Technical Note Utility Notes
GENCCPM:
If the total memory space specified is not evenly divisible bythe partition size, GENCCPM will issue a warning.
A leading zero may not be used in the operating system startaddress.
If other parameters to GENCCPM force the RSP's beyond 64K ofthe System Data Area, the RSP queue buffers will be allocatedfrom the system queue buffer area. The queue buffer parameterto GENCCPM should be adjusted accordingly.
INITDIR:
You may not run an application (an editor, for example) whichtries to own the MXdisk queue while INITDIR is running.
INITDIR will not respond if you press the carriage return inplace of the drive name.
PIP and PRINT:
Neither utility will prompt you for a password. You must enterthe password at the command line.
SDIR:
SDIR will not accept an unambiguous file name that begins witha non-alphanumeric character. SDIR will not accept filenamescontaining a pound sign (#) .
SHOW:
"SHOW [label]" will display "labelname = off" even after
SET [labelname = on]
has been executed.
SUBMIT:
If a Submit file's command chain is terminated by a trailingspace (instead of a carriage return/line feed) , the Submit filewill fail. Every command chain should be terminated with acarriage return/line feed.
VCMODE:
"VCMODE [buffered]" will not execute in the background. Thisfeature was not made clear in the Concurrent CP/M User's Guide.
General System Information
There is a new BDOS Function for setting Time and Date Stamps thatis not documented in the Concurrent CP/M Programmer's Guide.
BDOS Function 116 F SETDATE
Set File Time and Date Stamps
Entry Parameters:
Register CL: 74H (116)DX: FCB Address - OffsetDS: FCB Address - Segment
Return Values:
Register AL: Directory CodeAH: Physical ErrorBX: Same as AX
The F_SETDATE function sets the time and date stamp fields for thespecified file to the time and date stamp values specified in thefirst eight bytes of the DMA buffer. The specified file must becurrently open in Locked Mode by the calling process.
The first four-byte field in the DMA buffer contains the Access orCreate stamp field. This field is copied into the file's Access orCreate stamp field if the Directory Label has activated Accessand/or Creation time and date stamping on the file's drive.
The second four-byte field of the DMA buffer contains the Updatestamp field. This field is copied into the file's Update stampfield if the Directory Label has activated Update time and datestamping on the file's drive.
Upon return from a successful operation, the function sets registerAL to O0H. If the referenced FCB does not specify a file opened bythe calling process in Locked Mode, register AL will be set to O0AH.Register AH is set to OOH in both cases.
If a physical or extended error was encountered, F_SETDATE performsdifferent actions, depending upon the BDOS Error mode (see
F_ERRMODE). In the Default Error mode, the system displays an errormessage and terminates the calling process. Otherwise, F_TIMEDATEreturns to the calling process with register AL set to OFFH andregister AH set to one of the following physical error codes:
• 01H - Disk I/O Error — Permanent Error• 02H - R/0 — Read/Only Disk• 04H - Select — Drive Select Error• 09H - Illegal ? in FCB

Concurrent CP/M-86™Version 2.0
Application Note 01SYSTAT 6 GENCCPM Cursor Addressing
Copyright © 1983 by Digital ResearchConcurrent CP/M-86 and DDT-86 aretrademarks of Digital Research.
Compiled April 1983
Two Concurrent CP/M-86™ utilities perform screen manipulationthat can be terminal dependent: GENCCPM and SYSTAT. These utilitiesassume they are running on VT52 consoles. If your terminal has adifferent cursor handling sequence, you will need to patch theseutilities.
If you must patch GENCCPM, first make sure you have a back-upcopy of GENCCPM.CMD. The sample DDT-86™ session below patches theclear screen command of GENCCPM into a sequence of line feeds (ASCII0AH) . There is a region of 24 characters available at location 02EH(offset from the beginning of the program's data area) which isprinted to clear the screen. Whatever escape sequence you enterhere must be terminated by an ASCII 00.
A>ddt86DDT86 1.1-rgenccpm.cmdSTART END
nnnn:0000 nnnn:BB7F-s9e4ennnn:9e4E 1B Oannnn:9e4F 48 Oannnn:9e50 1B Oannnn:9e51 45 Oannnn:9e52 00 Oannnn:9e53 OA .-wgenccpm.cmd
For SYSTAT, make sure you have a copy of SYSTAT.CMD beforeinstalling the patch. SYSTAT uses two cursor sequences, ClearScreen and Home Cursor. There are 6 bytes reserved for eachsequence. The first byte of each sequence is the number ofcharacters to print in the sequence. The following patch willdisable these code sequences entirely. You should modify this patchappropriately for the terminal you will be running SYSTAT on.
67
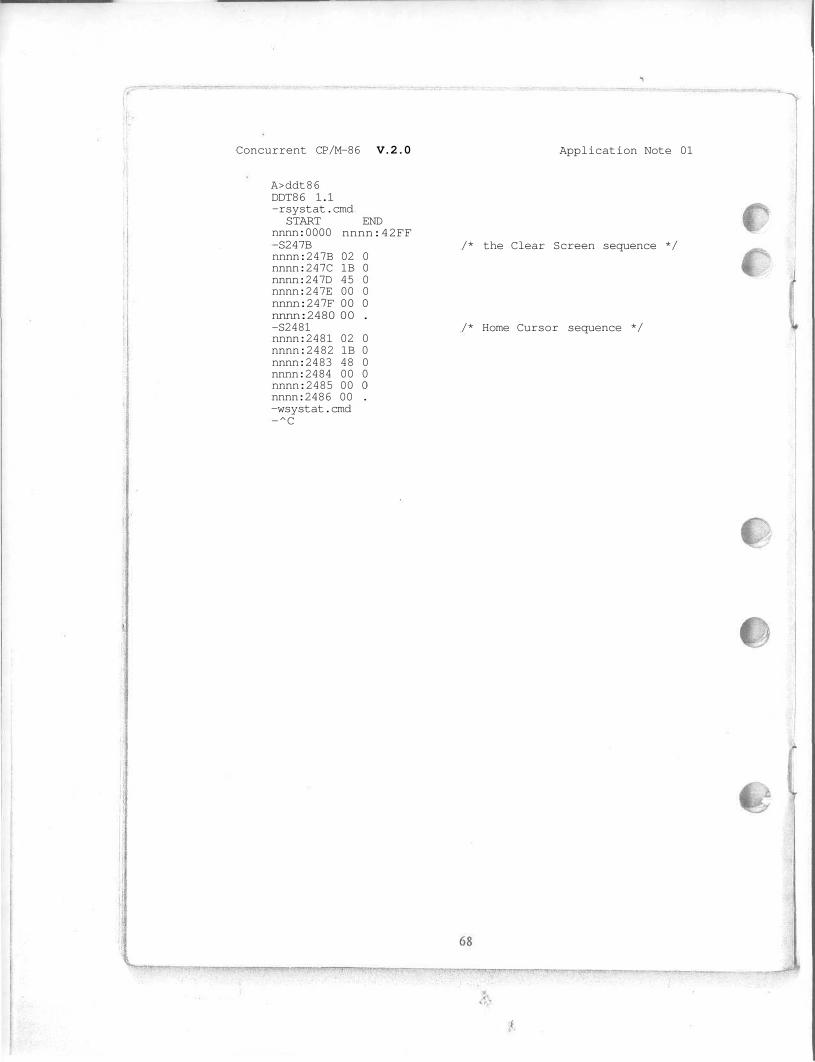
Concurrent CP/M-86 V.2.0 Application Note 01
A>ddt86DDT86 1.1-rsystat.cmdSTART
nnnn:0000-S247Bnnnn:247B 02 0nnnn:247C 1B 0nnnn:247D 45 0nnnn:247E 00 0nnnn:247F 00 0nnnn:2480 00 .-S2481nnnn:2481 02 0nnnn:2482 1B 0nnnn:2483 48 0nnnn:2484 00 0nnnn:2485 00 0nnnn:2486 00 .-wsystat.cmd-^C
ENDnnnn:42FF
/* the Clear Screen sequence */
/* Home Cursor sequence */
NOTES
69


![No. COMPUTER ORGANIZATION AND ARCHITECTURE S.E. … · (a) Draw and explain the functional block diagram of 8086.[7] (b) Explain the use of the following registers of 8086 CPU :[6]](https://img.pdfslide.us/doc/110x75/5e99f874f5d1e13acb780316/no-computer-organization-and-architecture-se-a-draw-and-explain-the-functional.jpg)


![[Ruxcon] Breaking virtualization by switching the cpu to virtual 8086 mode](https://img.pdfslide.us/doc/110x75/5584c76cd8b42ae0138b496c/ruxcon-breaking-virtualization-by-switching-the-cpu-to-virtual-8086-mode.jpg)