Embed Size (px)
Citation preview

1 Last Updated 01/10/17 S. Kaufman
Concur Travel Training
California State University, Stanislaus
Financial Services
Traveler and Delegate Handbook
Accounts Payable- Travel
2 Last Updated 01/10/17 S. Kaufman
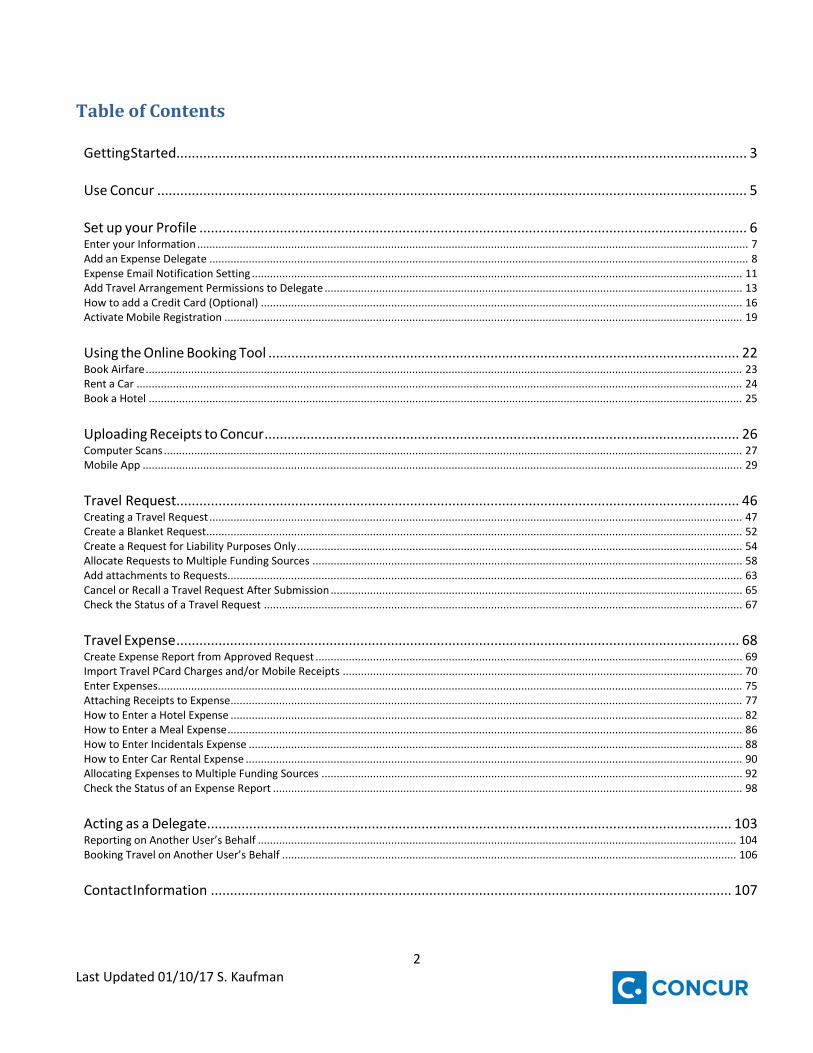
Table of Contents
Getting Started..................................................................................................................................................... 3
Use Concur .......................................................................................................................................................... 5
Set up your Profile ............................................................................................................................................... 6 Enter your Information ...................................................................................................................................................................................... 7 Add an Expense Delegate .................................................................................................................................................................................. 8 Expense Email Notification Setting .................................................................................................................................................................. 11 Add Travel Arrangement Permissions to Delegate .......................................................................................................................................... 13 How to add a Credit Card (Optional) ............................................................................................................................................................... 16 Activate Mobile Registration ........................................................................................................................................................................... 19
Using the Online Booking Tool ........................................................................................................................... 22 Book Airfare ..................................................................................................................................................................................................... 23 Rent a Car ........................................................................................................................................................................................................ 24 Book a Hotel .................................................................................................................................................................................................... 25
Uploading Receipts to Concur ............................................................................................................................ 26 Computer Scans ............................................................................................................................................................................................... 27 Mobile App ...................................................................................................................................................................................................... 29
Travel Request ................................................................................................................................................... 46 Creating a Travel Request ................................................................................................................................................................................ 47 Create a Blanket Request................................................................................................................................................................................. 52 Create a Request for Liability Purposes Only ................................................................................................................................................... 54 Allocate Requests to Multiple Funding Sources .............................................................................................................................................. 58 Add attachments to Requests.......................................................................................................................................................................... 63 Cancel or Recall a Travel Request After Submission ........................................................................................................................................ 65 Check the Status of a Travel Request .............................................................................................................................................................. 67
Travel Expense ................................................................................................................................................... 68 Create Expense Report from Approved Request ............................................................................................................................................. 69 Import Travel PCard Charges and/or Mobile Receipts .................................................................................................................................... 70 Enter Expenses................................................................................................................................................................................................. 75 Attaching Receipts to Expense ......................................................................................................................................................................... 77 How to Enter a Hotel Expense ......................................................................................................................................................................... 82 How to Enter a Meal Expense .......................................................................................................................................................................... 86 How to Enter Incidentals Expense ................................................................................................................................................................... 88 How to Enter Car Rental Expense .................................................................................................................................................................... 90 Allocating Expenses to Multiple Funding Sources ........................................................................................................................................... 92 Check the Status of an Expense Report ........................................................................................................................................................... 98
Acting as a Delegate ......................................................................................................................................... 103 Reporting on Another User’s Behalf .............................................................................................................................................................. 104 Booking Travel on Another User’s Behalf ...................................................................................................................................................... 106
Contact Information ........................................................................................................................................ 107

3 Last Updated 01/10/17 S. Kaufman
Getting Started
Log-in:
Located CSU Stanislaus Travel Webpage at:
https://www.csustan.edu/travel
Step 1:
Select the first link: Concur Log In
Step 2:
4 Last Updated 01/10/17 S. Kaufman
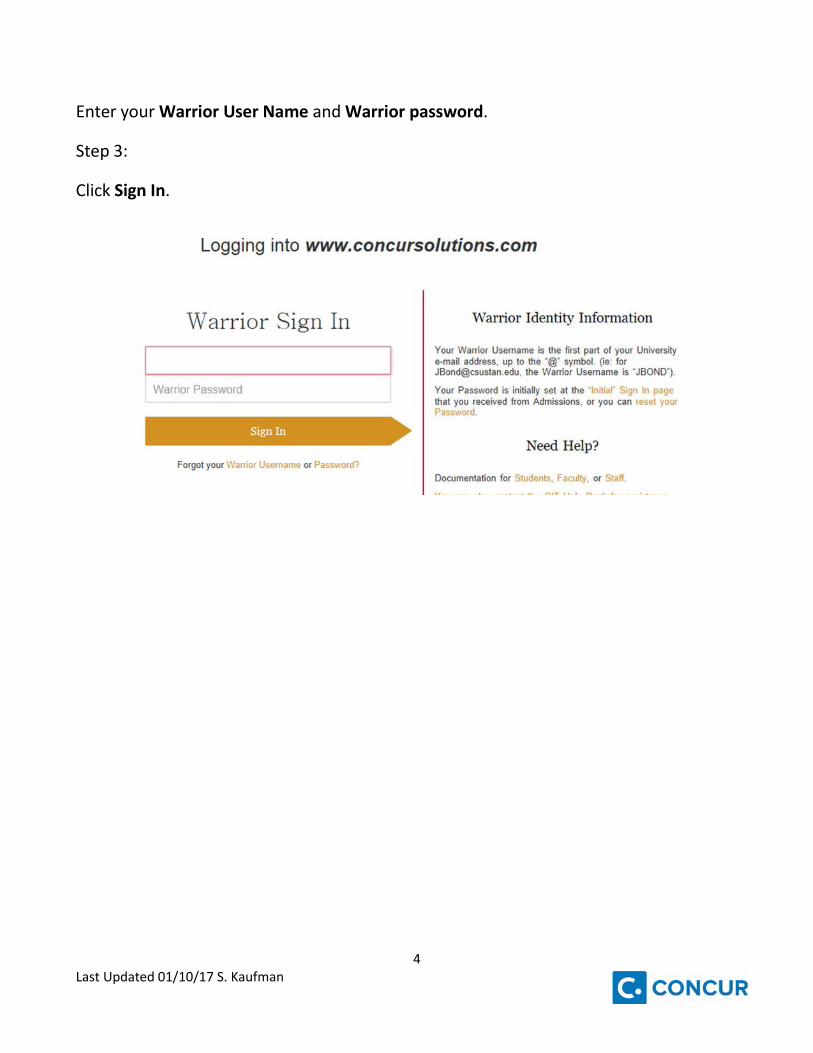
Enter your Warrior User Name and Warrior password.
Step 3:
Click Sign In.
5 Last Updated 01/10/17 S. Kaufman
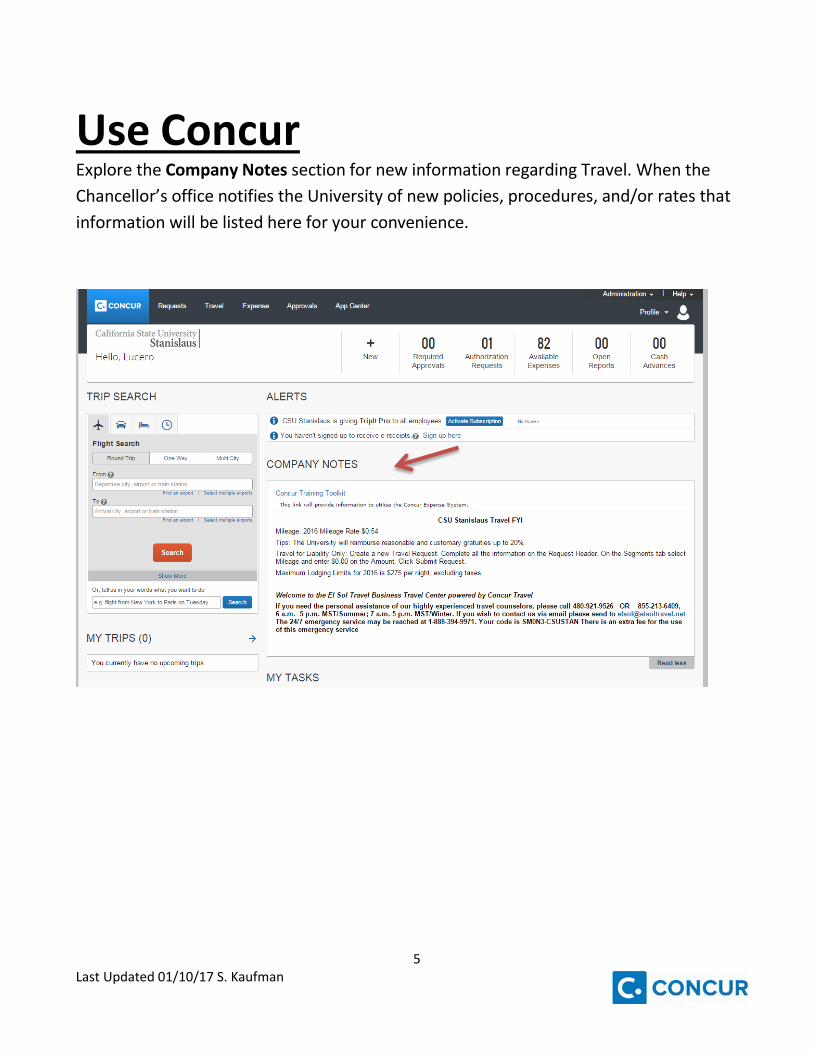
Use Concur Explore the Company Notes section for new information regarding Travel. When the Chancellor’s office notifies the University of new policies, procedures, and/or rates that information will be listed here for your convenience.
6 Last Updated 01/10/17 S. Kaufman
Set up your Profile Enter your information:
Why is this important?
Setting up your profile information is important so that all the information in Concur is up to date and accurate for booking Travel.
Step 1:
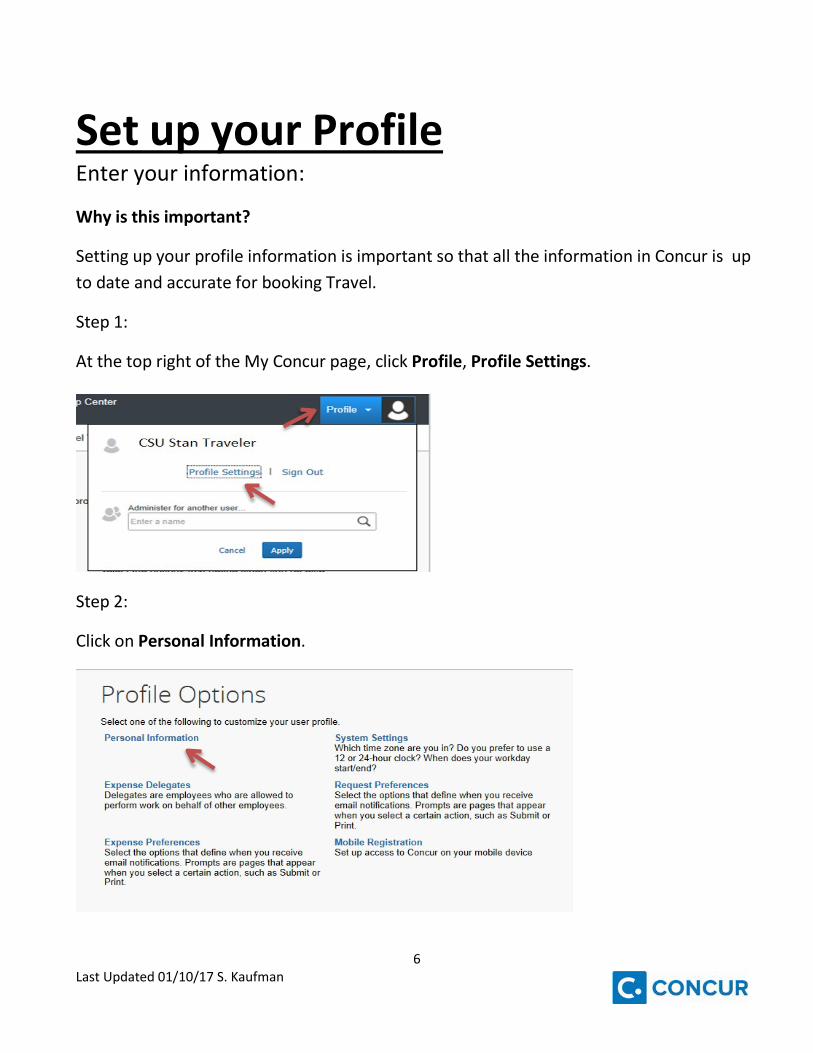
At the top right of the My Concur page, click Profile, Profile Settings.
Step 2:
Click on Personal Information.
7 Last Updated 01/10/17 S. Kaufman
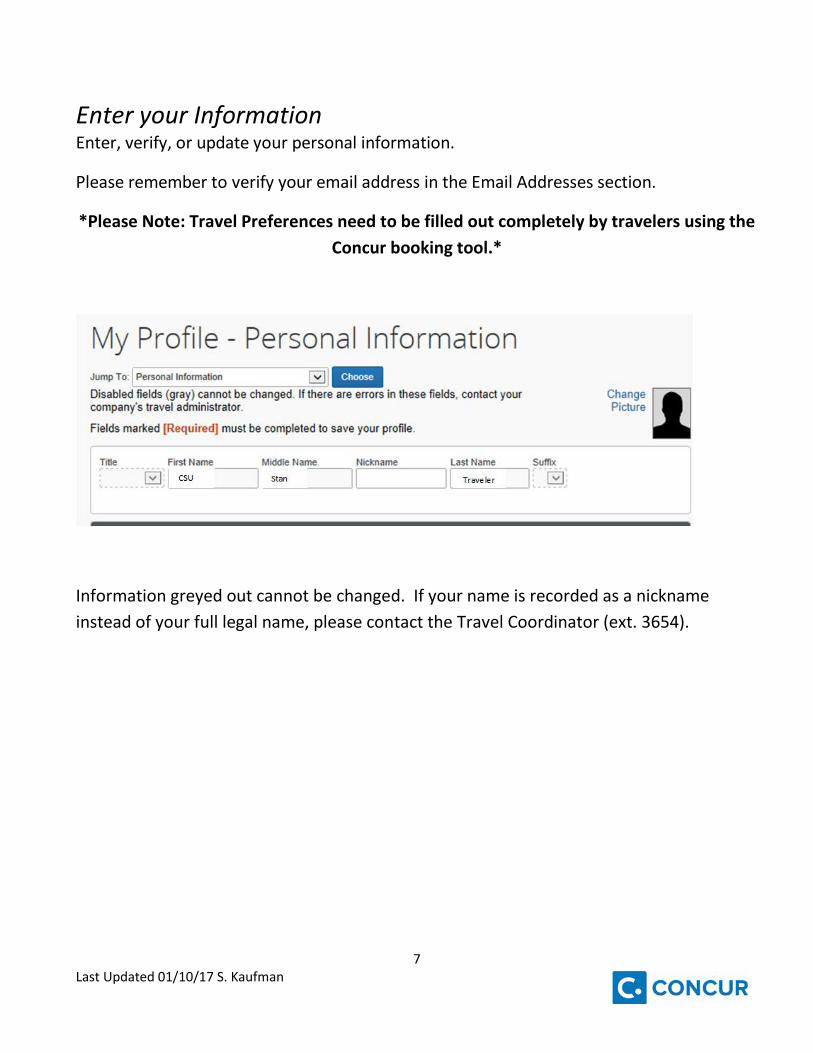
Enter your Information Enter, verify, or update your personal information.
Please remember to verify your email address in the Email Addresses section.
*Please Note: Travel Preferences need to be filled out completely by travelers using the Concur booking tool.*
Information greyed out cannot be changed. If your name is recorded as a nickname instead of your full legal name, please contact the Travel Coordinator (ext. 3654).
8 Last Updated 01/10/17 S. Kaufman
Add an Expense Delegate What is this?
A delegate is an individual authorized to process expense reports on behalf of another Concur user.
Why is this important?
Adding a Request & Expense Delegate will authorize that delegate to prepare expense reports or travel requests on your behalf. Request Delegates will only be necessary if you will be traveling internationally. Please follow the same steps outlined for setting up an Expense Delegate in the Request Delegates section under Request Settings.
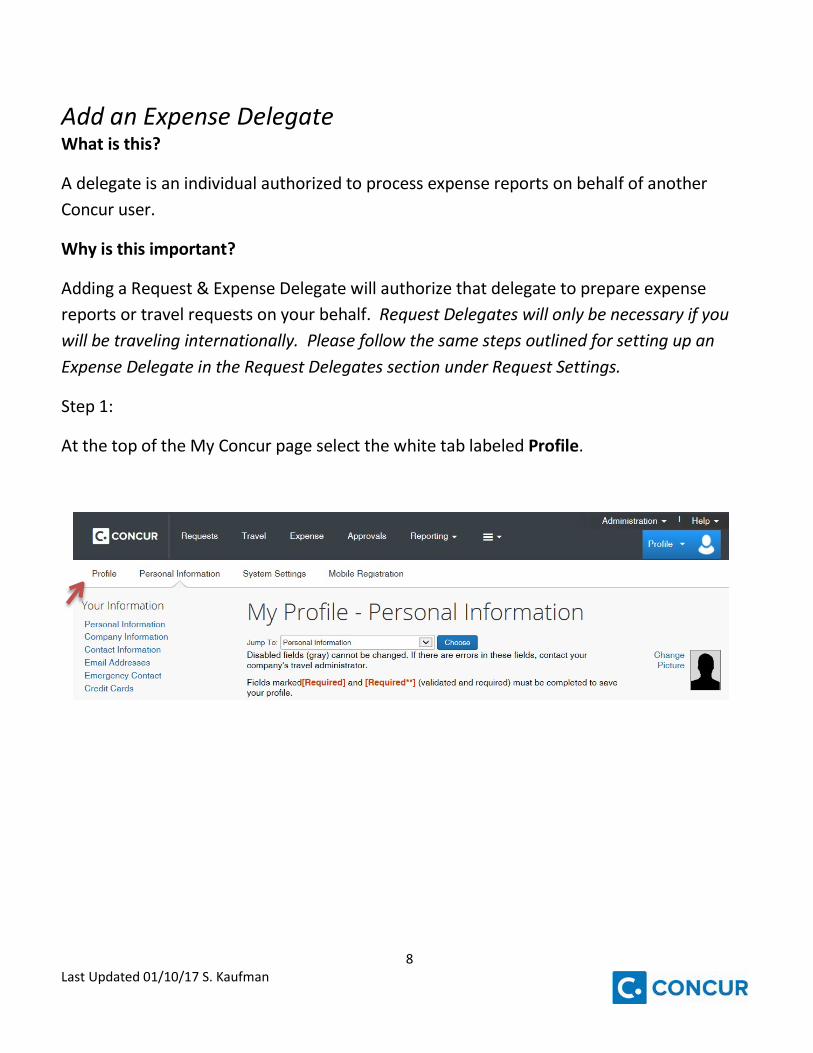
Step 1:
At the top of the My Concur page select the white tab labeled Profile.
9 Last Updated 01/10/17 S. Kaufman
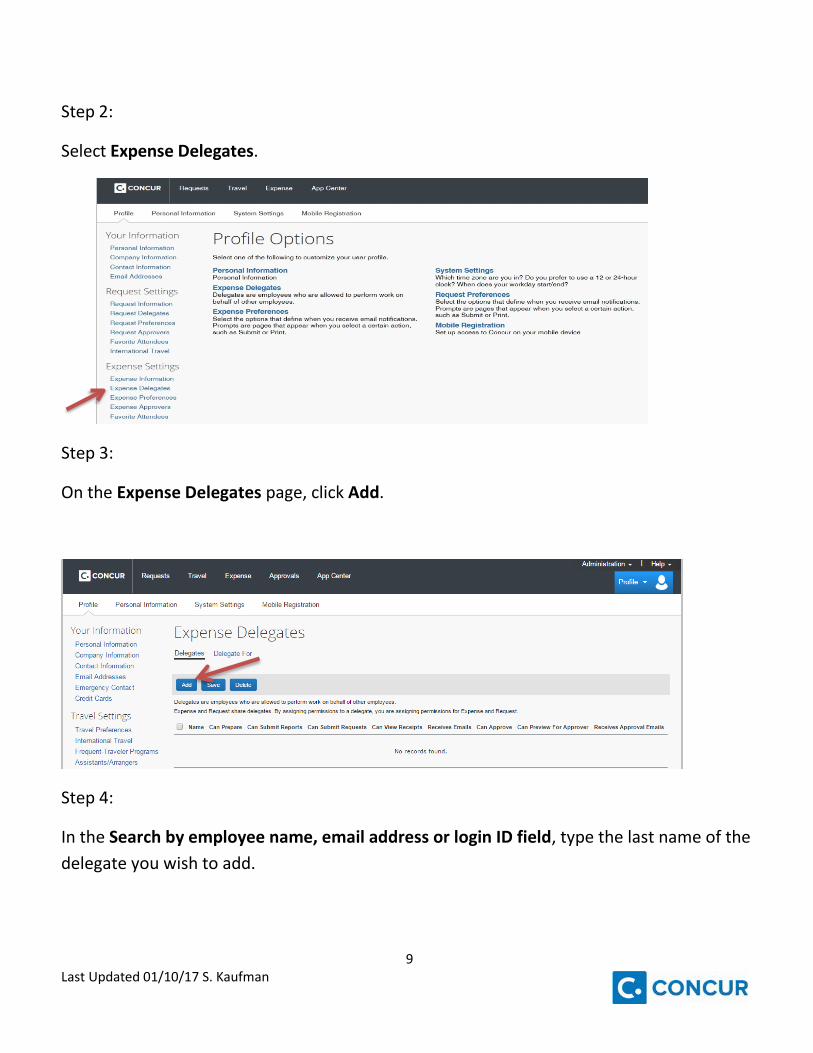
Step 2:
Select Expense Delegates.
Step 3:
On the Expense Delegates page, click Add.
Step 4:
In the Search by employee name, email address or login ID field, type the last name of the delegate you wish to add.
10 Last Updated 01/10/17 S. Kaufman
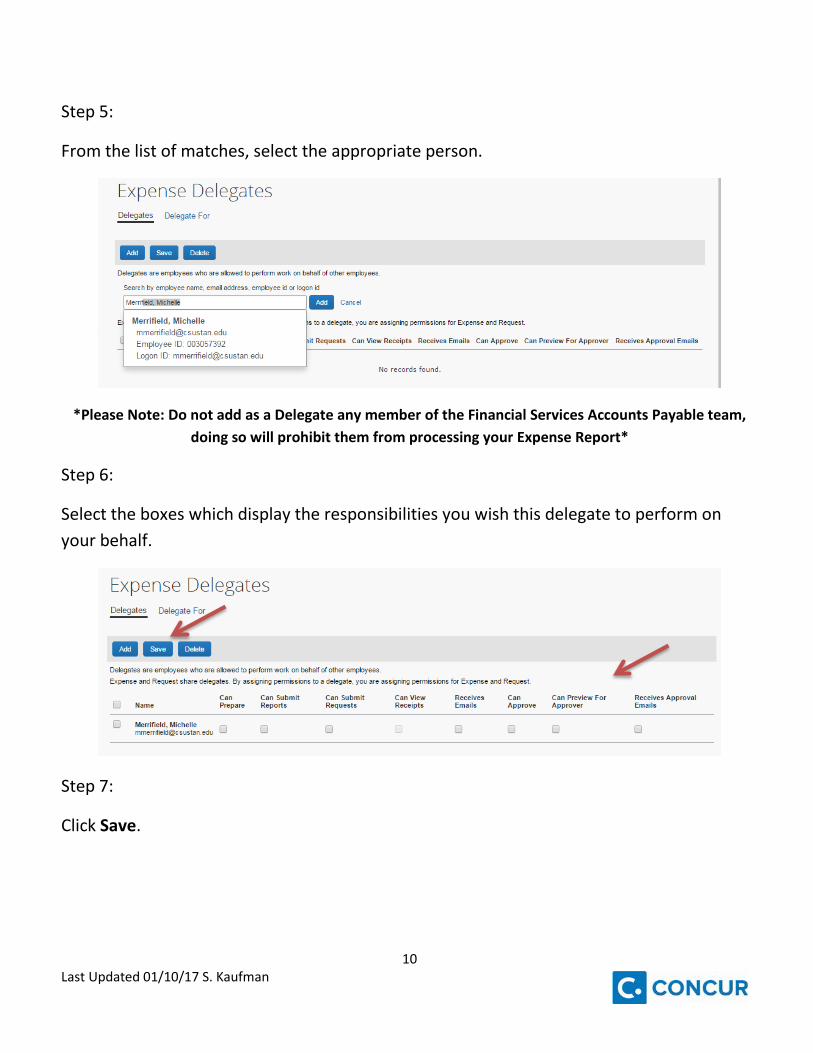
Step 5:
From the list of matches, select the appropriate person.
*Please Note: Do not add as a Delegate any member of the Financial Services Accounts Payable team, doing so will prohibit them from processing your Expense Report*
Step 6:
Select the boxes which display the responsibilities you wish this delegate to perform on your behalf.
Step 7:
Click Save.
11 Last Updated 01/10/17 S. Kaufman
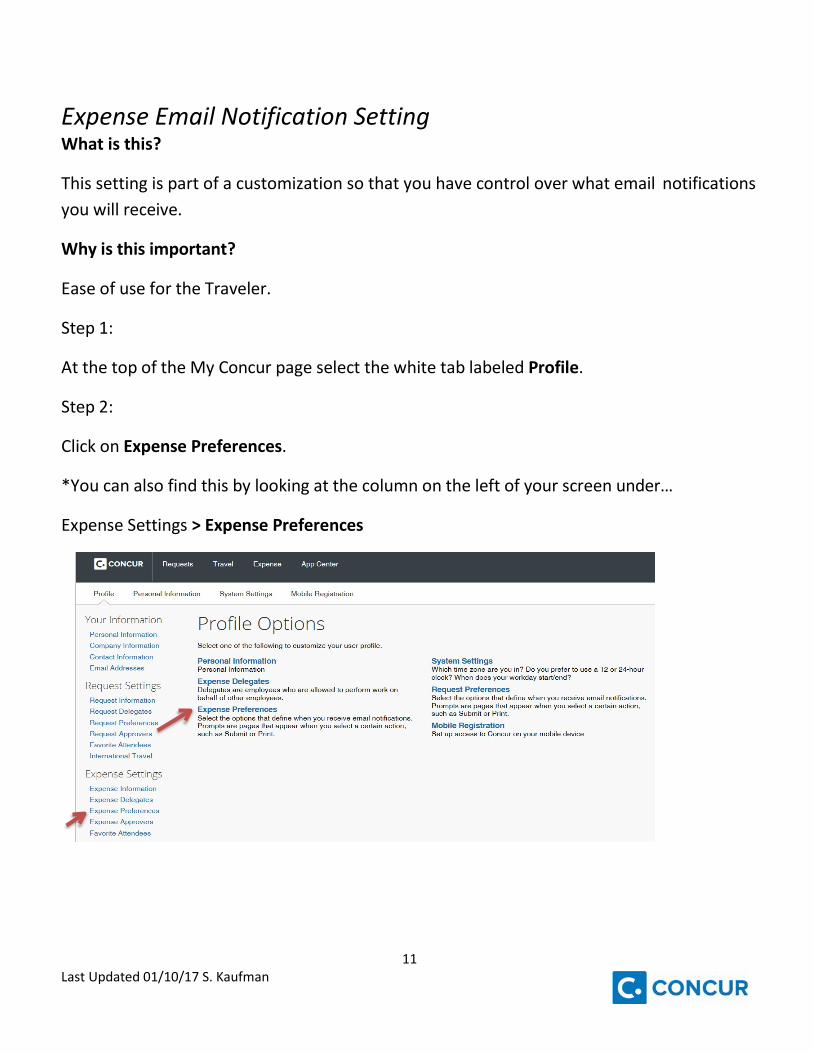
Expense Email Notification Setting What is this?
This setting is part of a customization so that you have control over what email notifications you will receive.
Why is this important?
Ease of use for the Traveler.
Step 1:
At the top of the My Concur page select the white tab labeled Profile.
Step 2:
Click on Expense Preferences.
*You can also find this by looking at the column on the left of your screen under…
Expense Settings > Expense Preferences
12 Last Updated 01/10/17 S. Kaufman
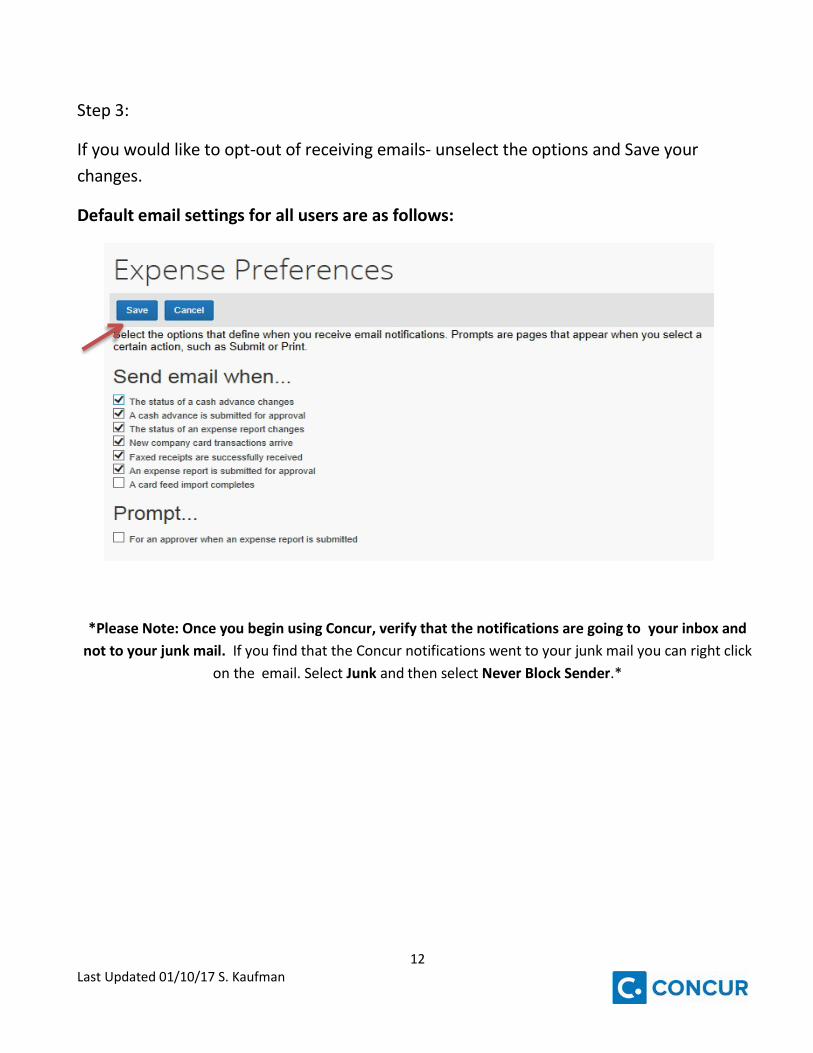
Step 3:
If you would like to opt-out of receiving emails- unselect the options and Save your changes.
Default email settings for all users are as follows:
*Please Note: Once you begin using Concur, verify that the notifications are going to your inbox and not to your junk mail. If you find that the Concur notifications went to your junk mail you can right click
on the email. Select Junk and then select Never Block Sender.*
13 Last Updated 01/10/17 S. Kaufman
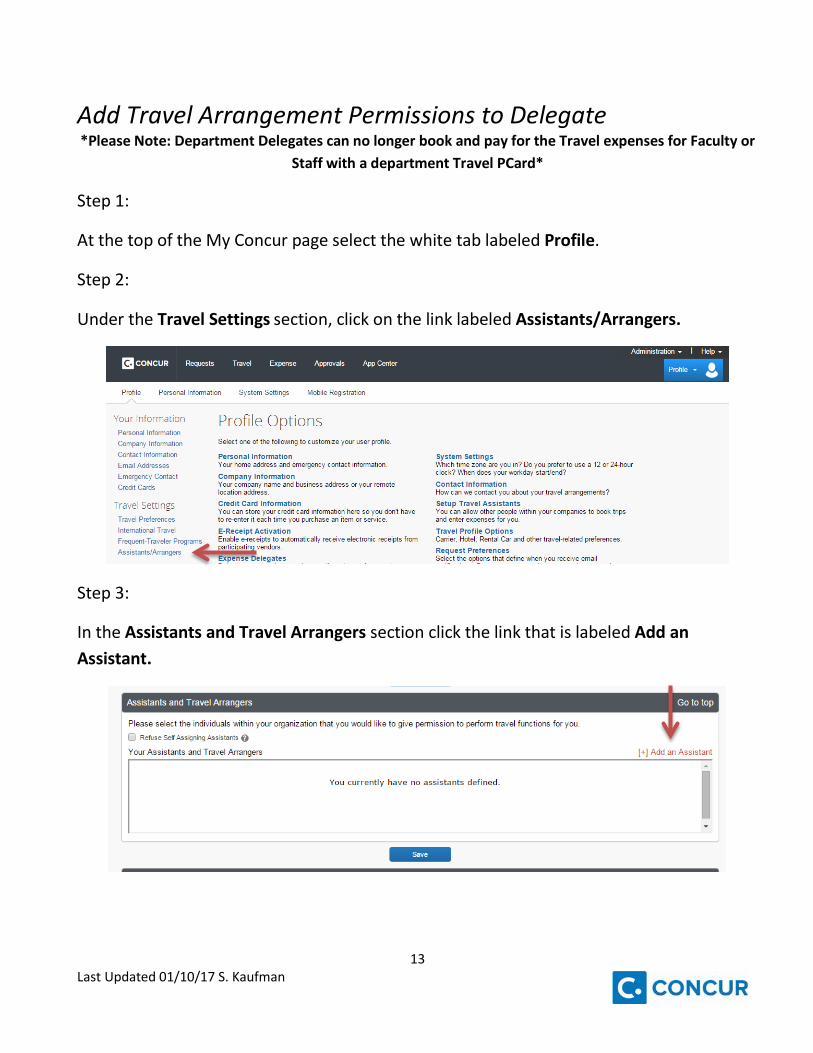
Add Travel Arrangement Permissions to Delegate *Please Note: Department Delegates can no longer book and pay for the Travel expenses for Faculty or
Staff with a department Travel PCard*
Step 1:
At the top of the My Concur page select the white tab labeled Profile.
Step 2:
Under the Travel Settings section, click on the link labeled Assistants/Arrangers.
Step 3:
In the Assistants and Travel Arrangers section click the link that is labeled Add an Assistant.

14 Last Updated 01/10/17 S. Kaufman
Step 4:
A pop-up will appear that will prompt you to enter the name for the Assistant you wish to add.
Step 5:
In the Assistant field box enter the name of the person you wish to add, then select the boxes that apply.
15 Last Updated 01/10/17 S. Kaufman
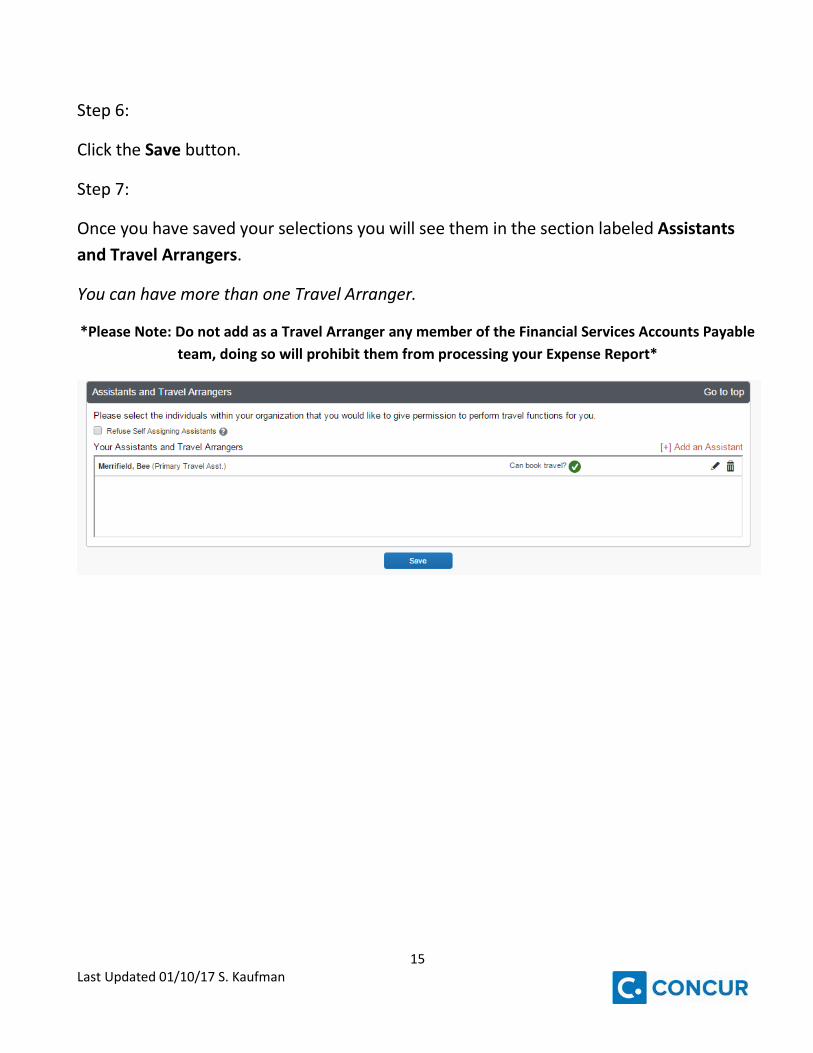
Step 6:
Click the Save button.
Step 7:
Once you have saved your selections you will see them in the section labeled Assistants and Travel Arrangers.
You can have more than one Travel Arranger.
*Please Note: Do not add as a Travel Arranger any member of the Financial Services Accounts Payable team, doing so will prohibit them from processing your Expense Report*

16 Last Updated 01/10/17 S. Kaufman
How to add a Credit Card (Optional) Step 1:
At the top right of the My Concur page, click Profile, Profile Settings.
Step 2:
Under the Travel Settings section, click on the link labeled Assistants/Arrangers.
17 Last Updated 01/10/17 S. Kaufman
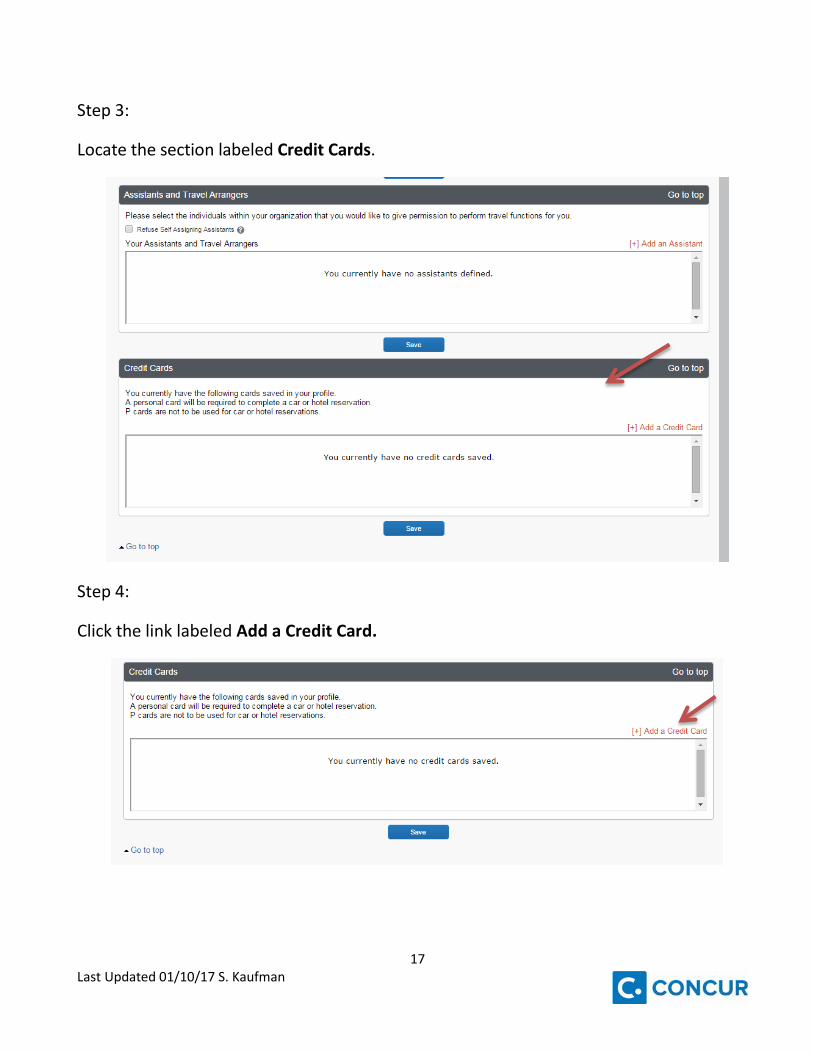
Step 3:
Locate the section labeled Credit Cards.
Step 4:
Click the link labeled Add a Credit Card.

18 Last Updated 01/10/17 S. Kaufman
Step 5:
A pop-up will appear that will prompt you to enter the Credit Card information.
Step 6:
Once you have entered your credit card information click the Save button.
Step 7:
Once you have saved your selections you will see them in the section labeled Credit Cards. You can have more than one Credit Card on file.
19 Last Updated 01/10/17 S. Kaufman
Activate Mobile Registration What is this?
This setting is part of a customization that allows you to add the Concur app to your mobile device.
Why is this important?
The mobile application allows travelers to take a picture of their receipt at the time of the expense using an iOS, Android, Blackberry or Windows mobile device.
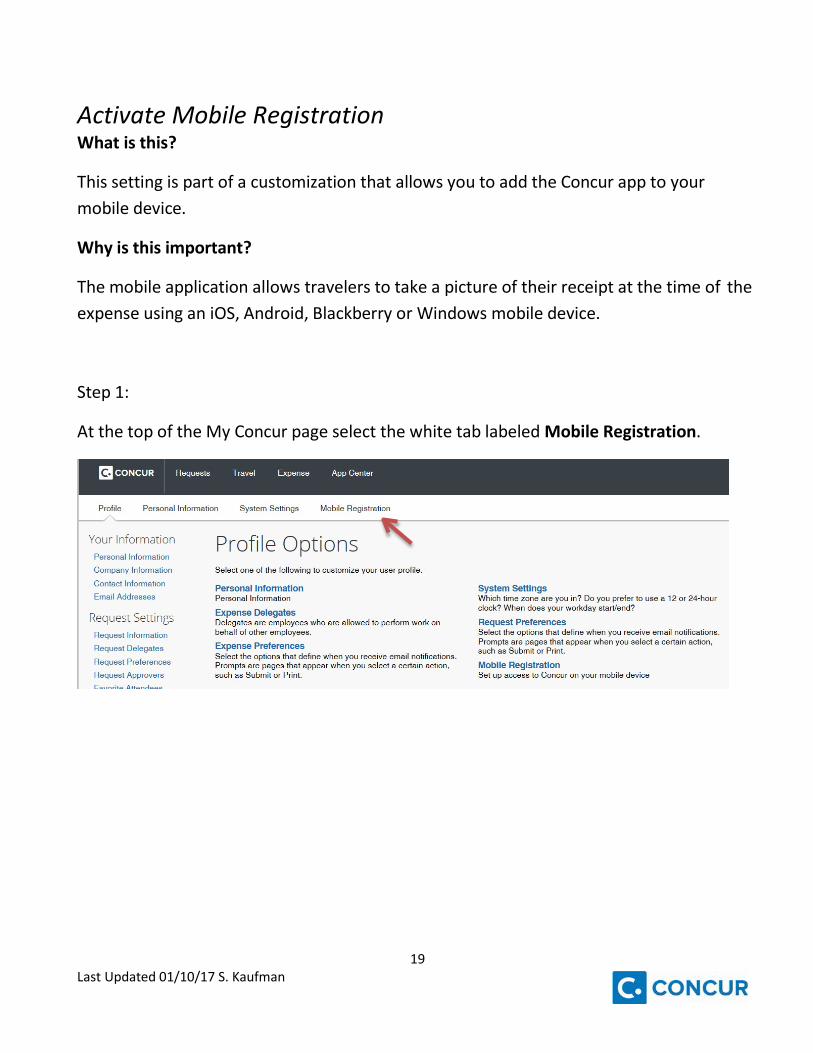
Step 1:
At the top of the My Concur page select the white tab labeled Mobile Registration.
20 Last Updated 01/10/17 S. Kaufman
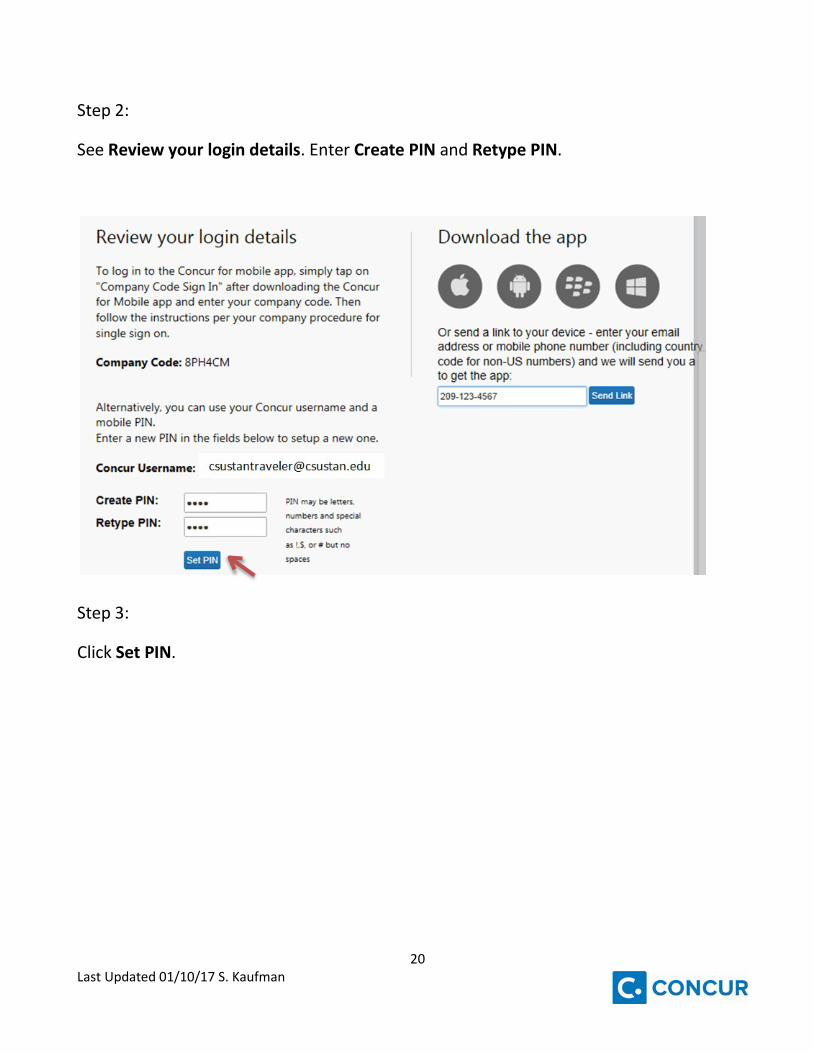
Step 2:
See Review your login details. Enter Create PIN and Retype PIN.
Step 3:
Click Set PIN.
21 Last Updated 01/10/17 S. Kaufman
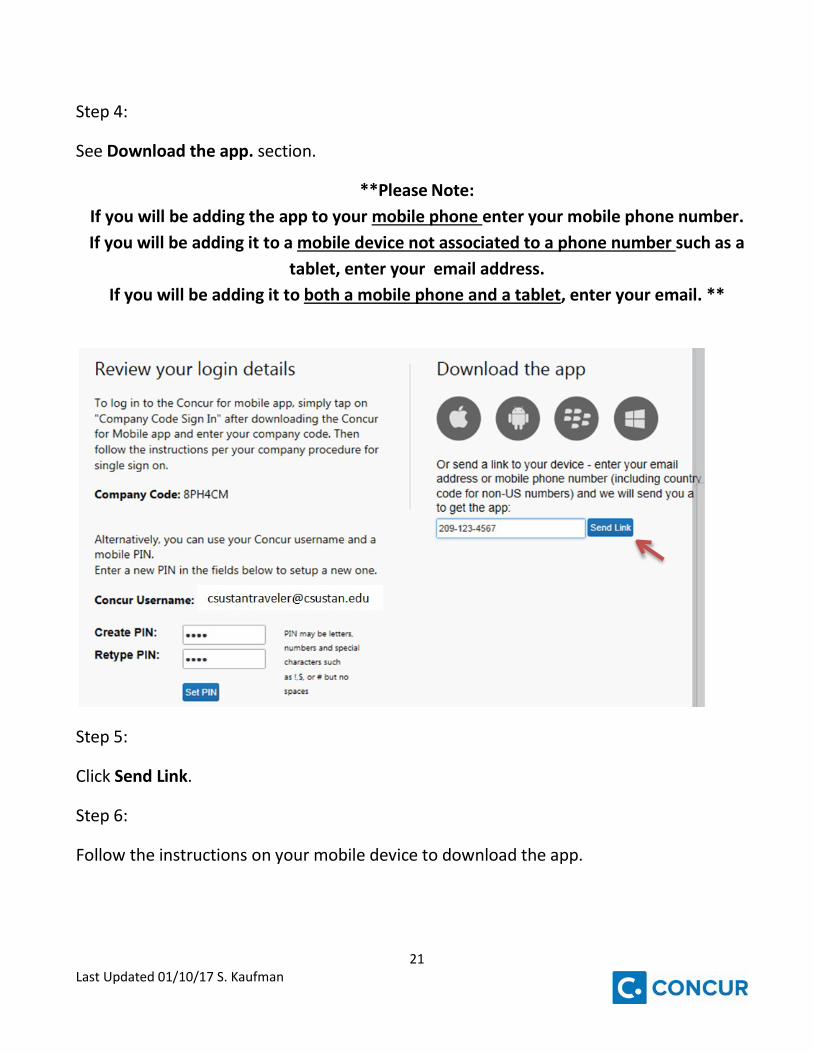
Step 4:
See Download the app. section.
**Please Note: If you will be adding the app to your mobile phone enter your mobile phone number. If you will be adding it to a mobile device not associated to a phone number such as a
tablet, enter your email address. If you will be adding it to both a mobile phone and a tablet, enter your email. **
Step 5:
Click Send Link.
Step 6:
Follow the instructions on your mobile device to download the app.

22 Last Updated 01/10/17 S. Kaufman
Using the Online Booking Tool What is this?
You may book travel including flights, hotel, and car rentals using the Online Booking Tool in Concur.
University employees should use the contracted Travel Booking Agency; you are able to book airfare, lodging and vehicle rentals through the booking tool in Concur which will flow through to the Travel Booking Agency.
Why is this important?
Through this online booking tool, you will have one go-to place for everything related to your University travel. The online booking tool has integrated all of the CSU special pricing contracts such as South West and Enterprise.
*Please Note: Travel Preferences need to be filled out completely by travelers using the Concur booking tool.*

23 Last Updated 01/10/17 S. Kaufman
Book Airfare Step 1:
On the Flight tab of the Travel page, select one of the following options:
Round Trip/ One Way / Multi-Segment
Step 2: In the Departure City and Arrival City fields, enter the cities for your travel. As you begin typing, a list of possible matches will appear. Select your choice from the list.
Step 3: Click Show More. In the Departure and Return fields, select the appropriate dates and time.
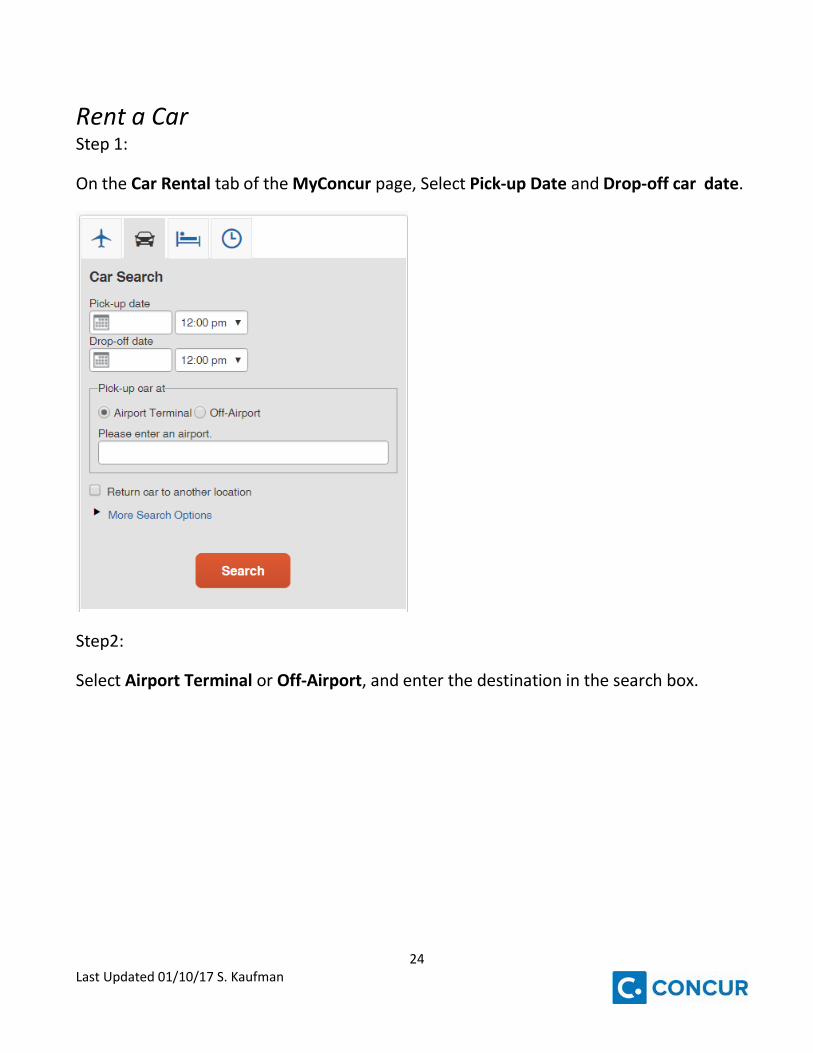
24 Last Updated 01/10/17 S. Kaufman
Rent a Car Step 1:
On the Car Rental tab of the MyConcur page, Select Pick-up Date and Drop-off car date.
Step2:
Select Airport Terminal or Off-Airport, and enter the destination in the search box.
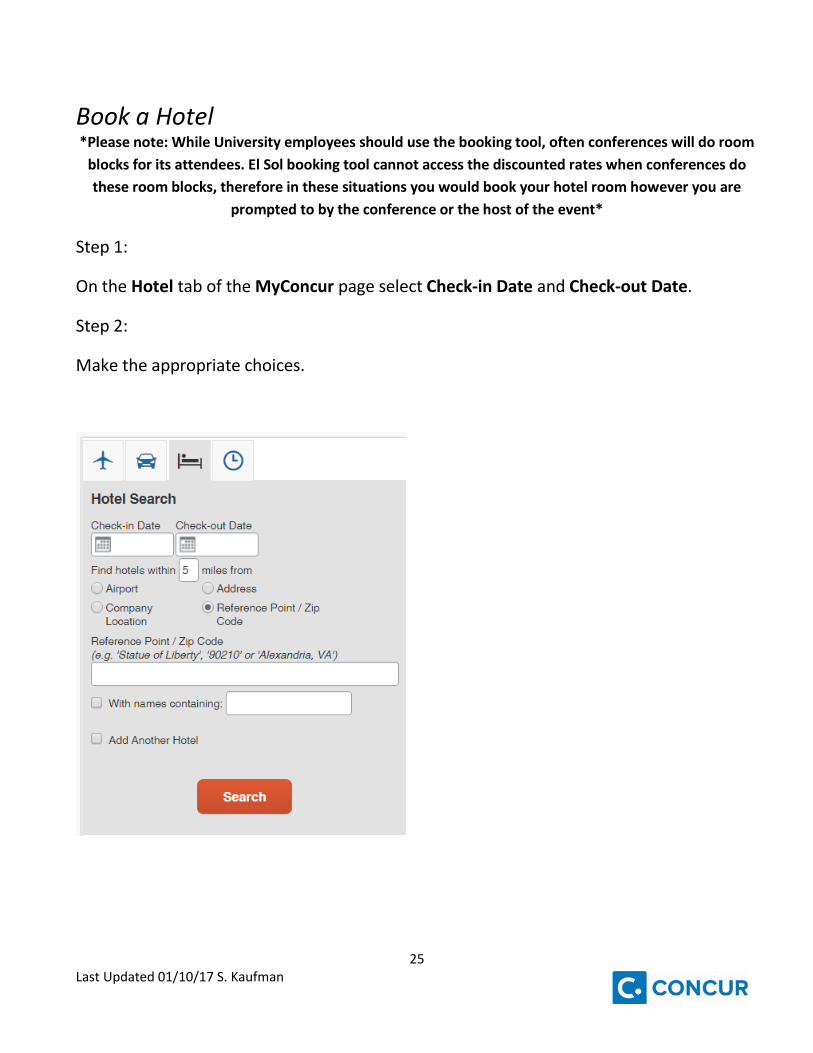
25 Last Updated 01/10/17 S. Kaufman
Book a Hotel *Please note: While University employees should use the booking tool, often conferences will do room
blocks for its attendees. El Sol booking tool cannot access the discounted rates when conferences do these room blocks, therefore in these situations you would book your hotel room however you are
prompted to by the conference or the host of the event*
Step 1:
On the Hotel tab of the MyConcur page select Check-in Date and Check-out Date.
Step 2:
Make the appropriate choices.
26 Last Updated 01/10/17 S. Kaufman
Uploading Receipts to Concur What is this?
Concur is a paperless Travel Software and virtual receipts must be submitted with your Travel Expense Report. There are many benefits to a paperless Travel Software.
Transitioning from paper intensive Travel processes to paperless is cost saving and eco- friendly. Receipts are often lost in transit during Travel and submitting receipts in Concur can reduce the chance of a receipt being lost. This saves the traveler time by eliminating the need to contact the vendor for a receipt copy or submitting Missing Receipt Verification forms.
Why is this important?
CSU Travel Procedures and Regulations states that itemized receipts are required for reimbursement for items purchased over $75. Itemized receipts demonstrate the cost (shows what was purchased), and provide proof of payment (shows how was it paid).
Receipts under $75 are not required by Financial Services unless they were paid by Travel PCard. However, you do not need to submit them in your Expense Report. If you incur any charge on your Travel PCard you must submit receipts for all items purchased with your Travel PCard monthly statement.
There are two ways to submit your receipts in Concur, through your mobile device (mobile phone or tablet) or your computer.

27 Last Updated 01/10/17 S. Kaufman
Computer Scans Step 1:
Go to the Expense section of Concur. Then select the tab Manage Expenses.
Step 2:
Scroll to the bottom of the page to Available Receipts and click Upload New Receipt.
28 Last Updated 01/10/17 S. Kaufman
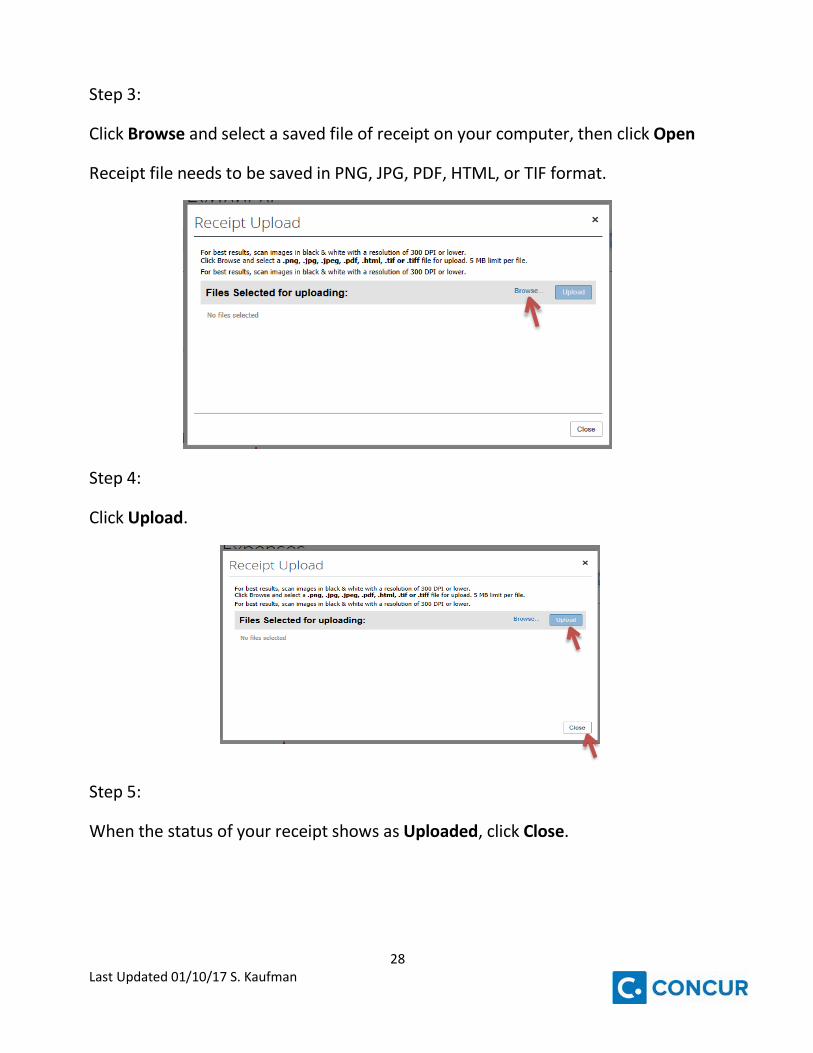
Step 3:
Click Browse and select a saved file of receipt on your computer, then click Open
Receipt file needs to be saved in PNG, JPG, PDF, HTML, or TIF format.
Step 4:
Click Upload.
Step 5:
When the status of your receipt shows as Uploaded, click Close.
29 Last Updated 01/10/17 S. Kaufman
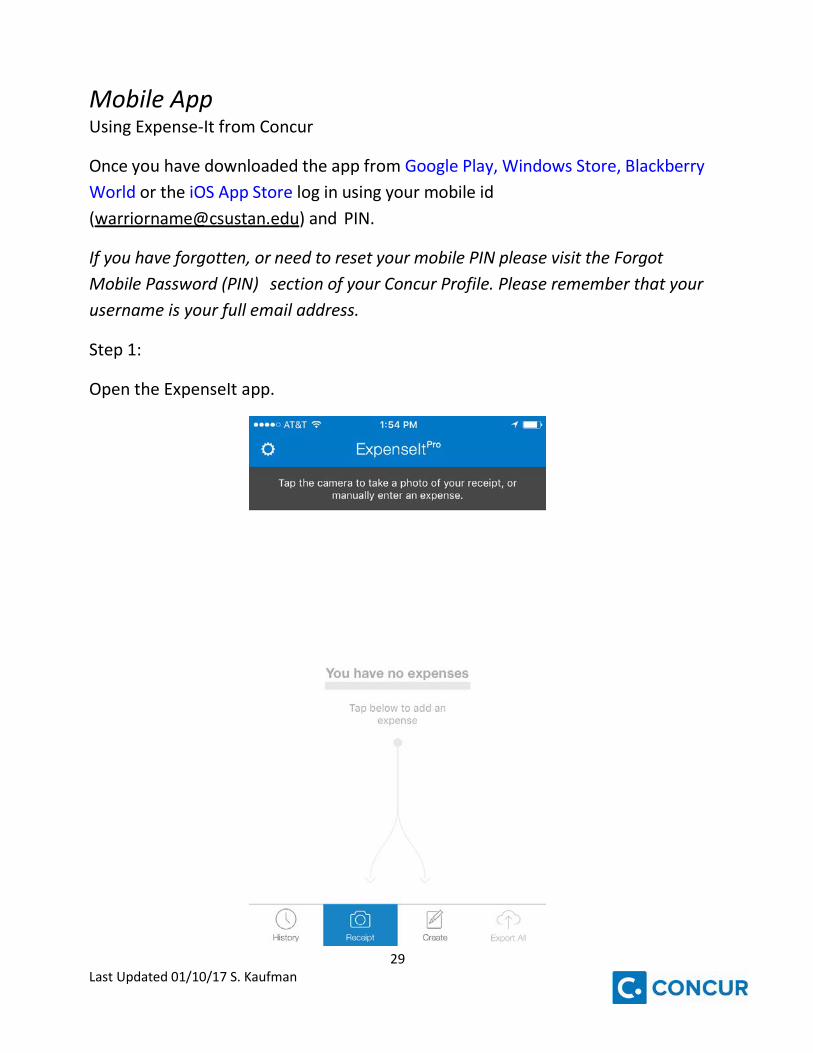
Mobile App Using Expense-It from Concur
Once you have downloaded the app from Google Play, Windows Store, Blackberry World or the iOS App Store log in using your mobile id ([email protected]) and PIN.
If you have forgotten, or need to reset your mobile PIN please visit the Forgot Mobile Password (PIN) section of your Concur Profile. Please remember that your username is your full email address.
Step 1:
Open the ExpenseIt app.
30 Last Updated 01/10/17 S. Kaufman
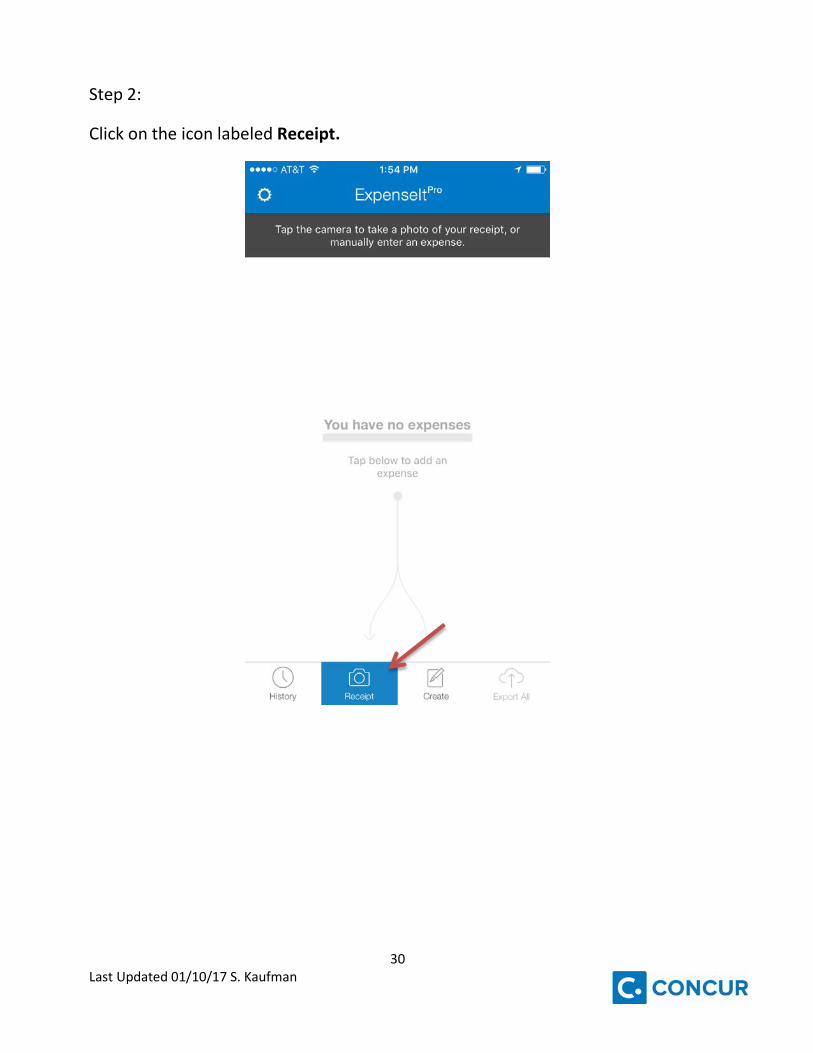
Step 2:
Click on the icon labeled Receipt.
31 Last Updated 01/10/17 S. Kaufman
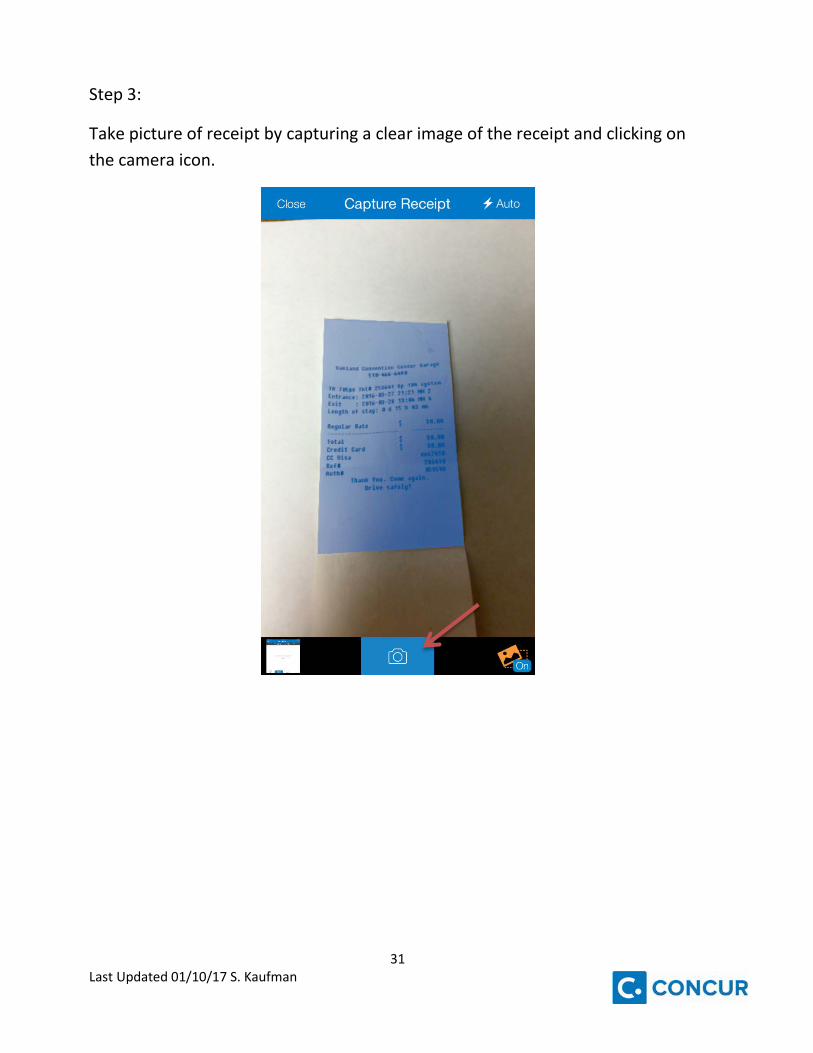
Step 3:
Take picture of receipt by capturing a clear image of the receipt and clicking on the camera icon.
32 Last Updated 01/10/17 S. Kaufman
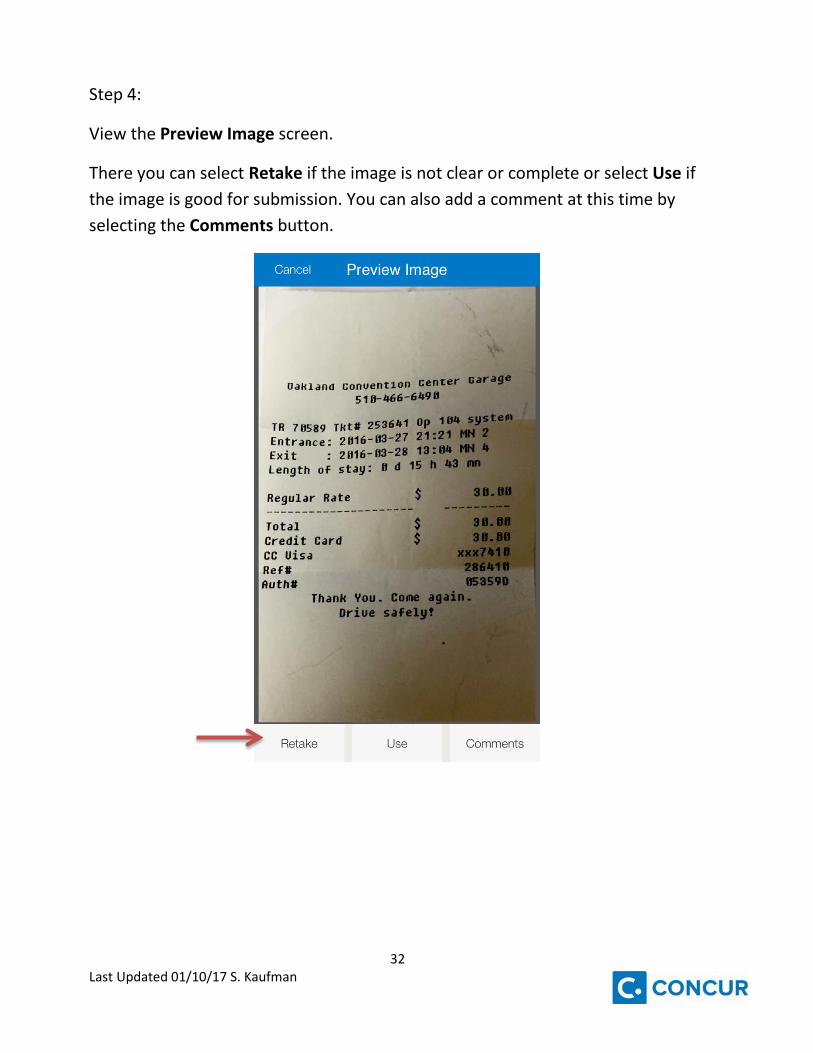
Step 4:
View the Preview Image screen.
There you can select Retake if the image is not clear or complete or select Use if the image is good for submission. You can also add a comment at this time by selecting the Comments button.
33 Last Updated 01/10/17 S. Kaufman
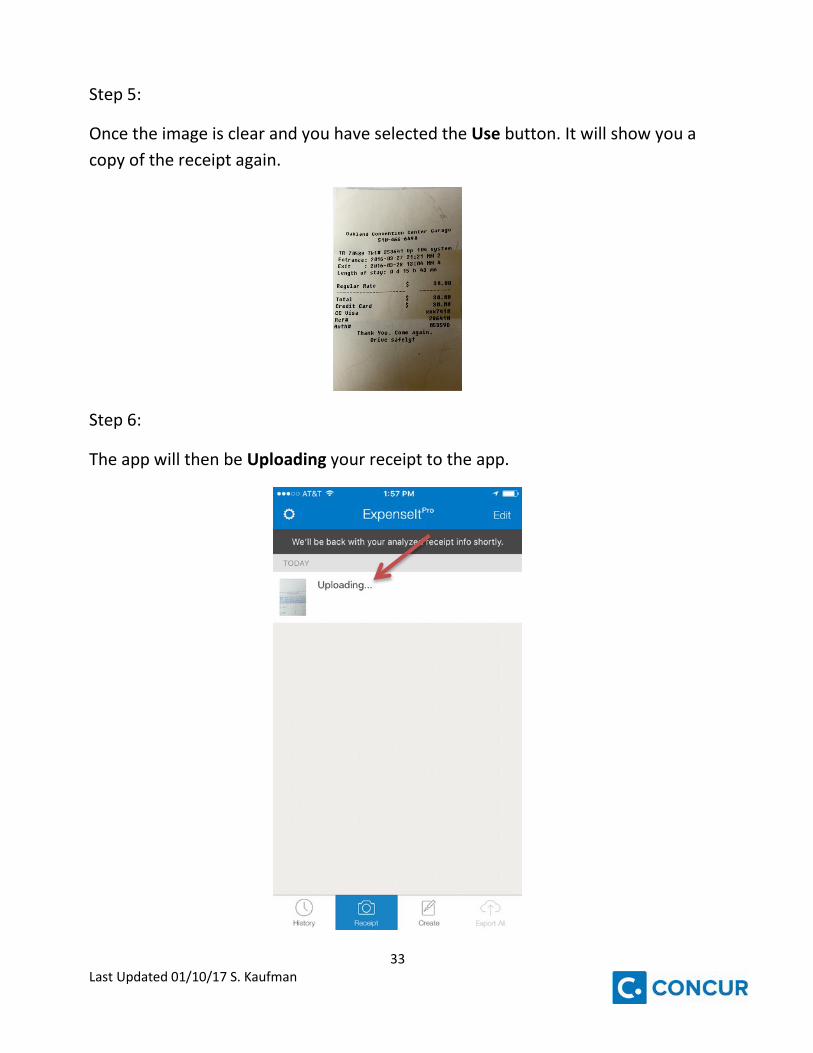
Step 5:
Once the image is clear and you have selected the Use button. It will show you a copy of the receipt again.
Step 6:
The app will then be Uploading your receipt to the app.
34 Last Updated 01/10/17 S. Kaufman
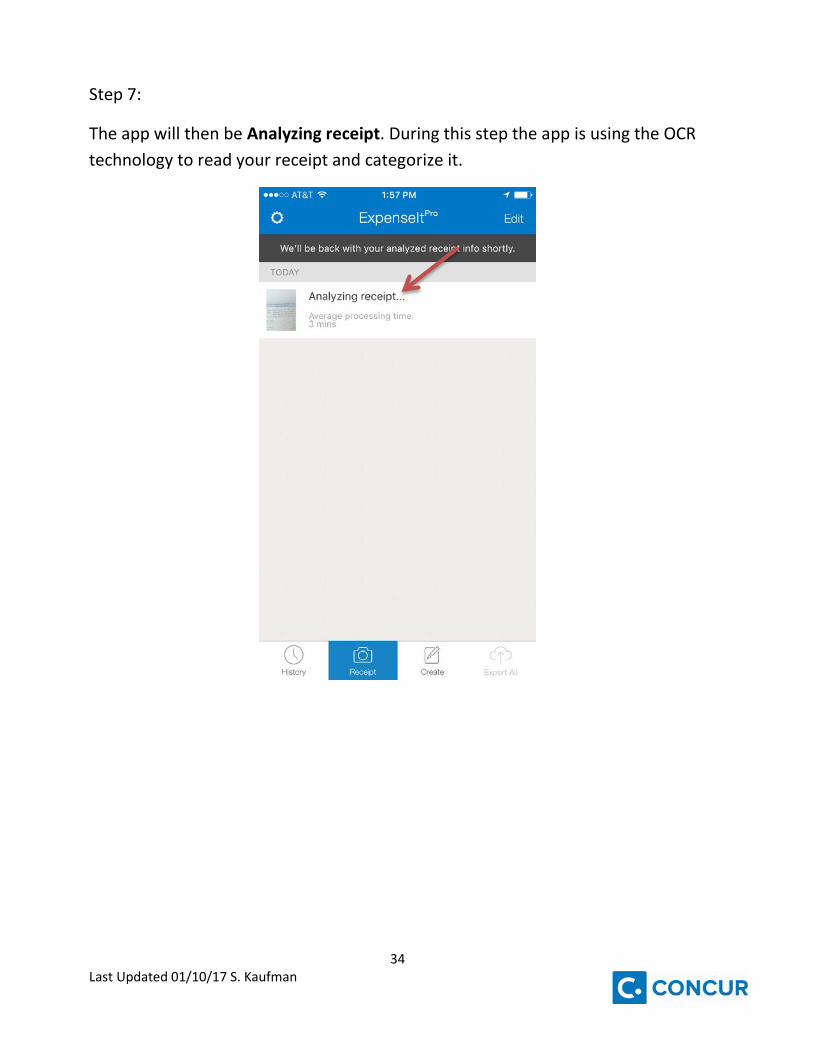
Step 7:
The app will then be Analyzing receipt. During this step the app is using the OCR technology to read your receipt and categorize it.
35 Last Updated 01/10/17 S. Kaufman
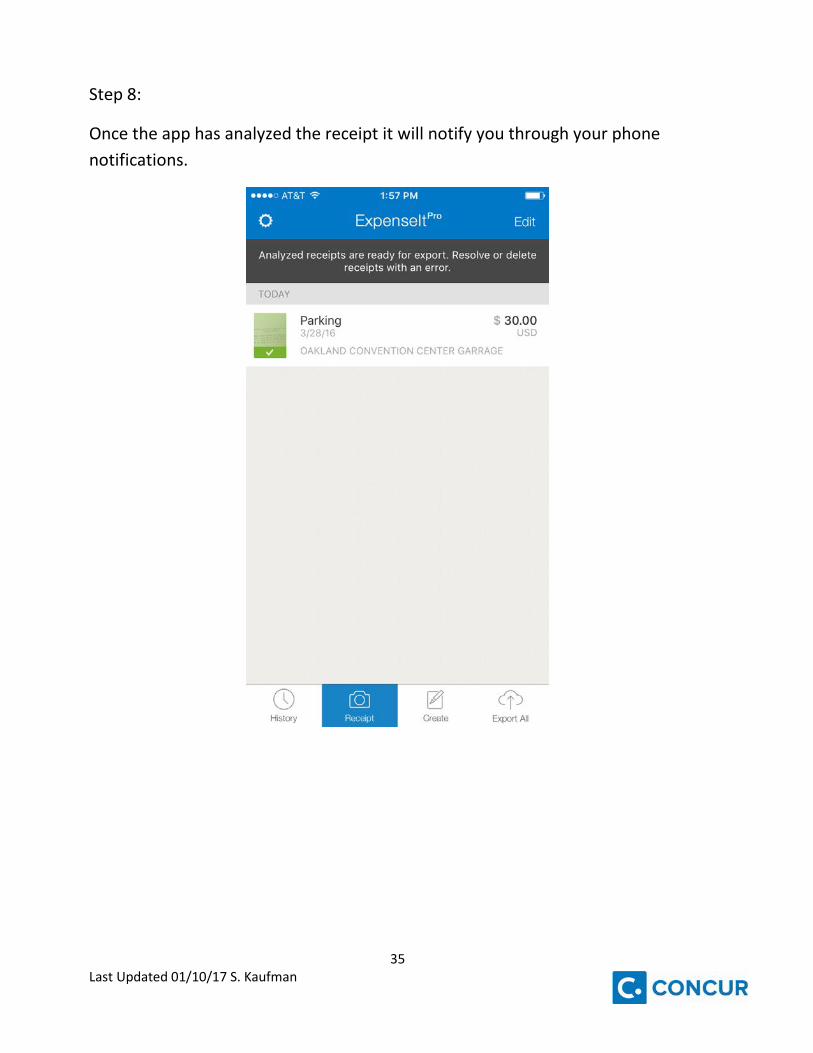
Step 8:
Once the app has analyzed the receipt it will notify you through your phone notifications.
36 Last Updated 01/10/17 S. Kaufman
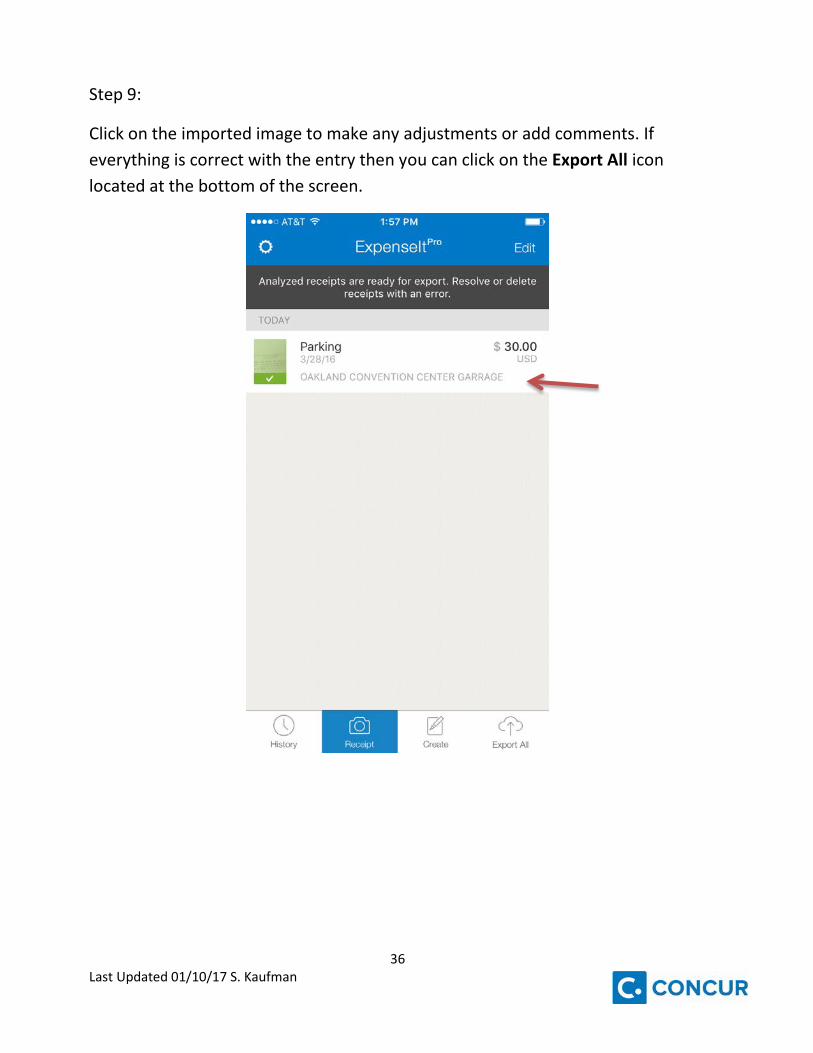
Step 9:
Click on the imported image to make any adjustments or add comments. If everything is correct with the entry then you can click on the Export All icon located at the bottom of the screen.
37 Last Updated 01/10/17 S. Kaufman
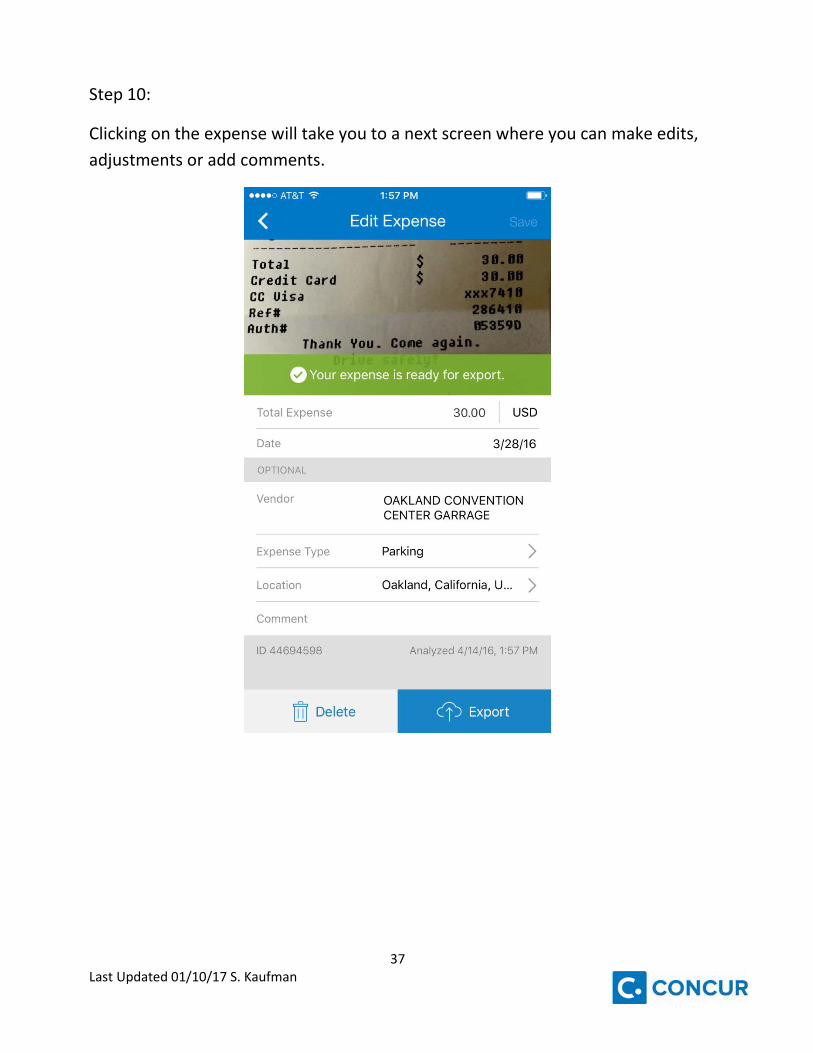
Step 10:
Clicking on the expense will take you to a next screen where you can make edits, adjustments or add comments.
38 Last Updated 01/10/17 S. Kaufman
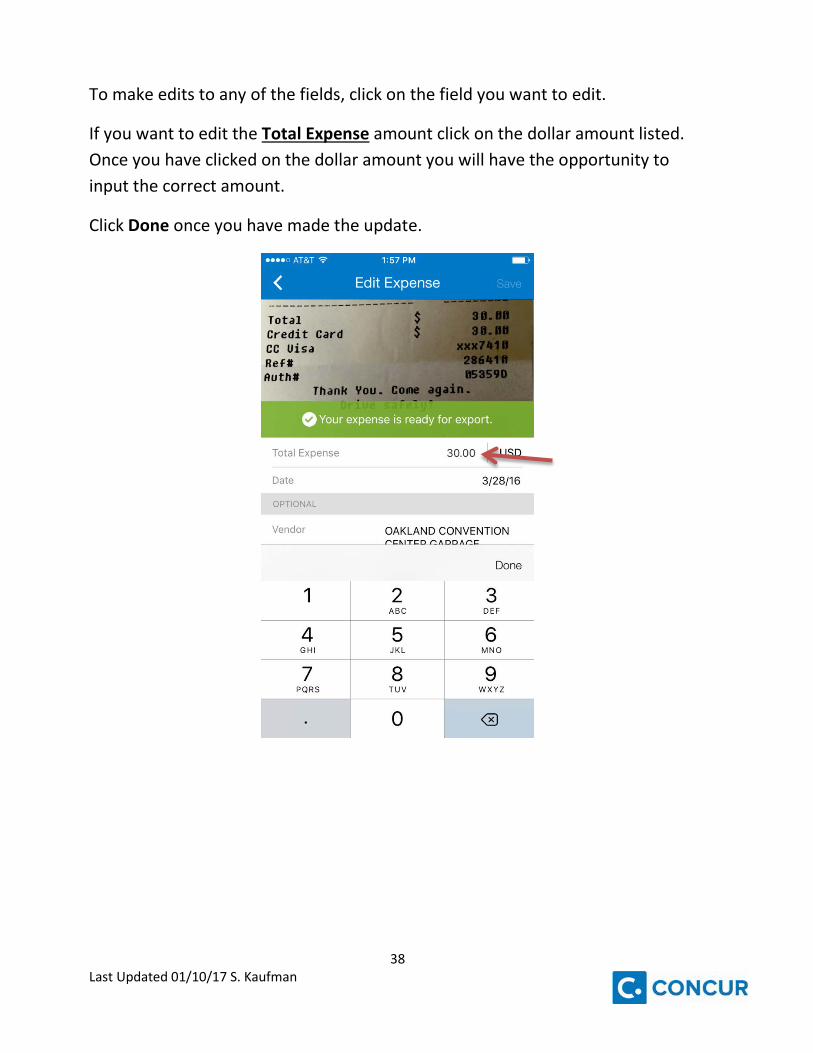
To make edits to any of the fields, click on the field you want to edit.
If you want to edit the Total Expense amount click on the dollar amount listed. Once you have clicked on the dollar amount you will have the opportunity to input the correct amount.
Click Done once you have made the update.
39 Last Updated 01/10/17 S. Kaufman
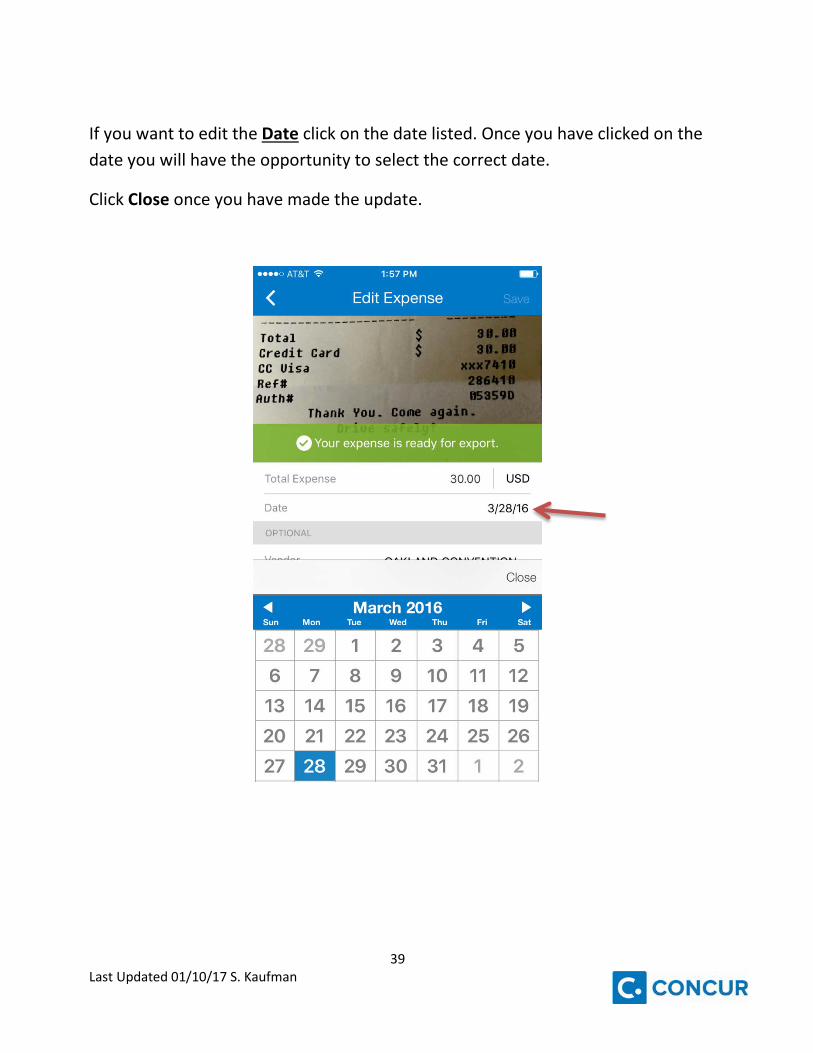
If you want to edit the Date click on the date listed. Once you have clicked on the date you will have the opportunity to select the correct date.
Click Close once you have made the update.

40 Last Updated 01/10/17 S. Kaufman
If you want to edit the Vendor name click on the vendor name listed. Once you have clicked on the vendor name you will have the opportunity to enter the correct vendor name.
Click Done once you have made the update.

41 Last Updated 01/10/17 S. Kaufman
If you want to edit the Expense Type click on the expense type listed. Once you have clicked on the expense type you will be taken to another screen where you can select the correct expense type. Once you have made your selection it will take you back to the original Edit Expense page.
42 Last Updated 01/10/17 S. Kaufman
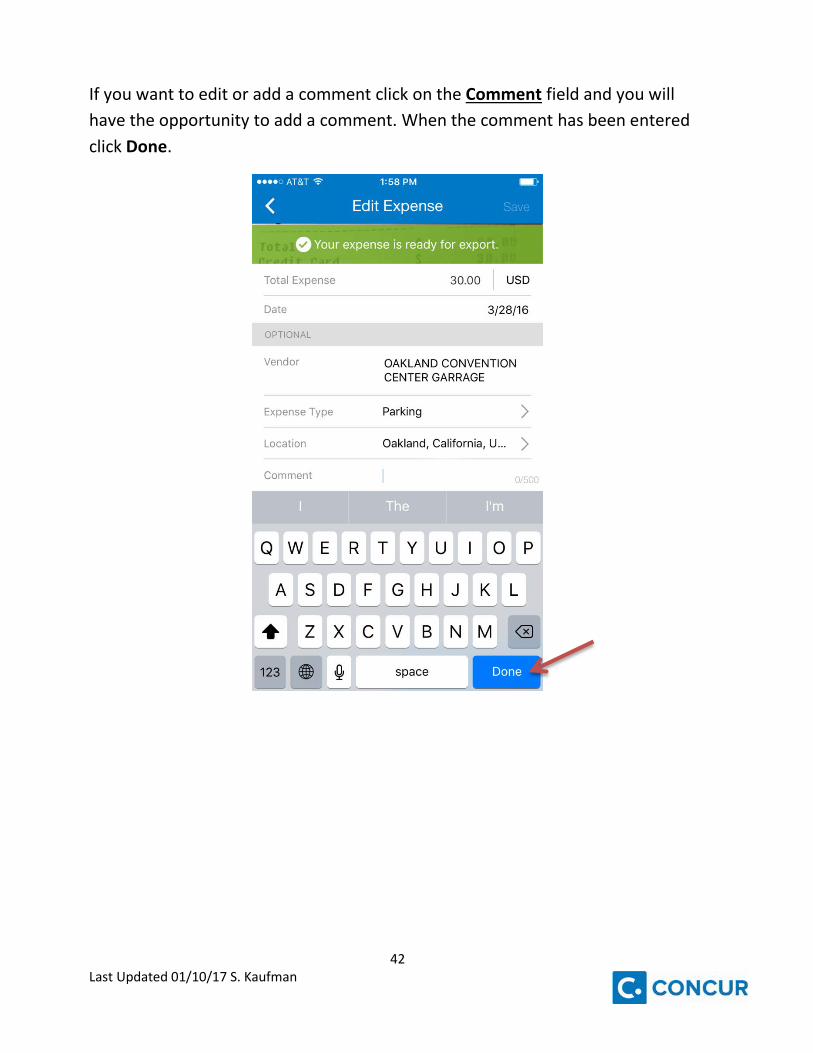
If you want to edit or add a comment click on the Comment field and you will have the opportunity to add a comment. When the comment has been entered click Done.

43 Last Updated 01/10/17 S. Kaufman
Step 11:
Once you have made the edits or corrections and your screen says Your expense is ready for export click on the Export button.
44 Last Updated 01/10/17 S. Kaufman
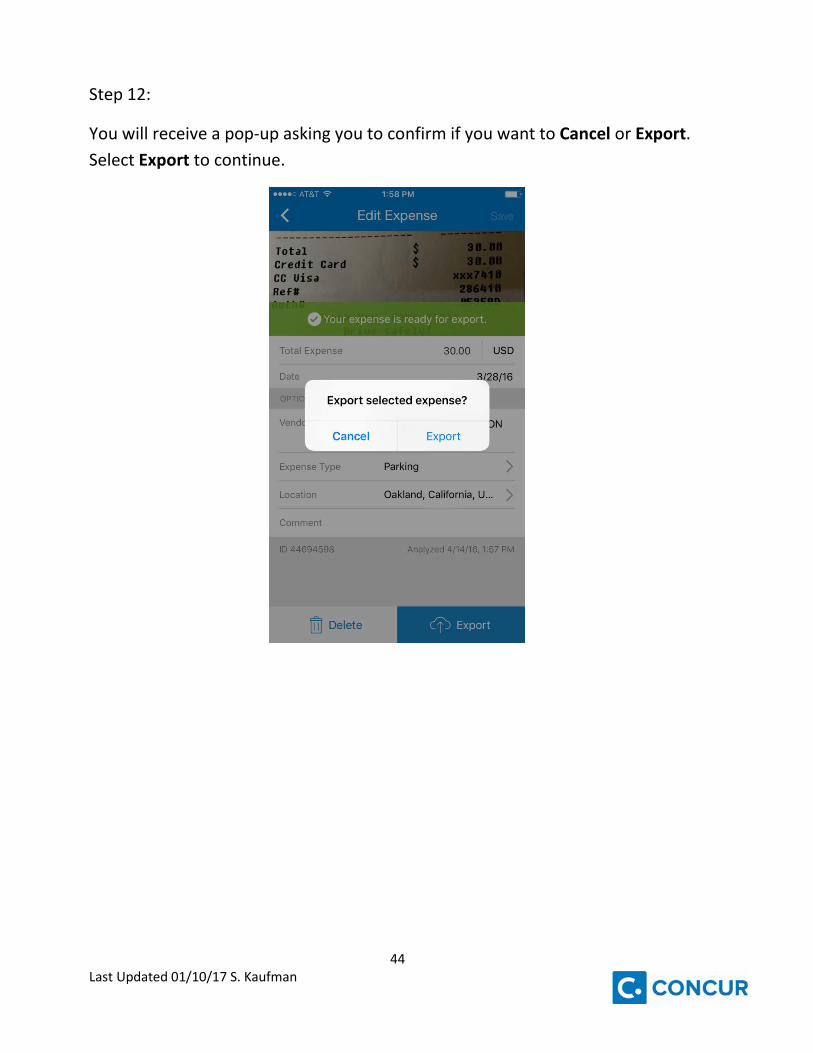
Step 12:
You will receive a pop-up asking you to confirm if you want to Cancel or Export. Select Export to continue.
45 Last Updated 01/10/17 S. Kaufman
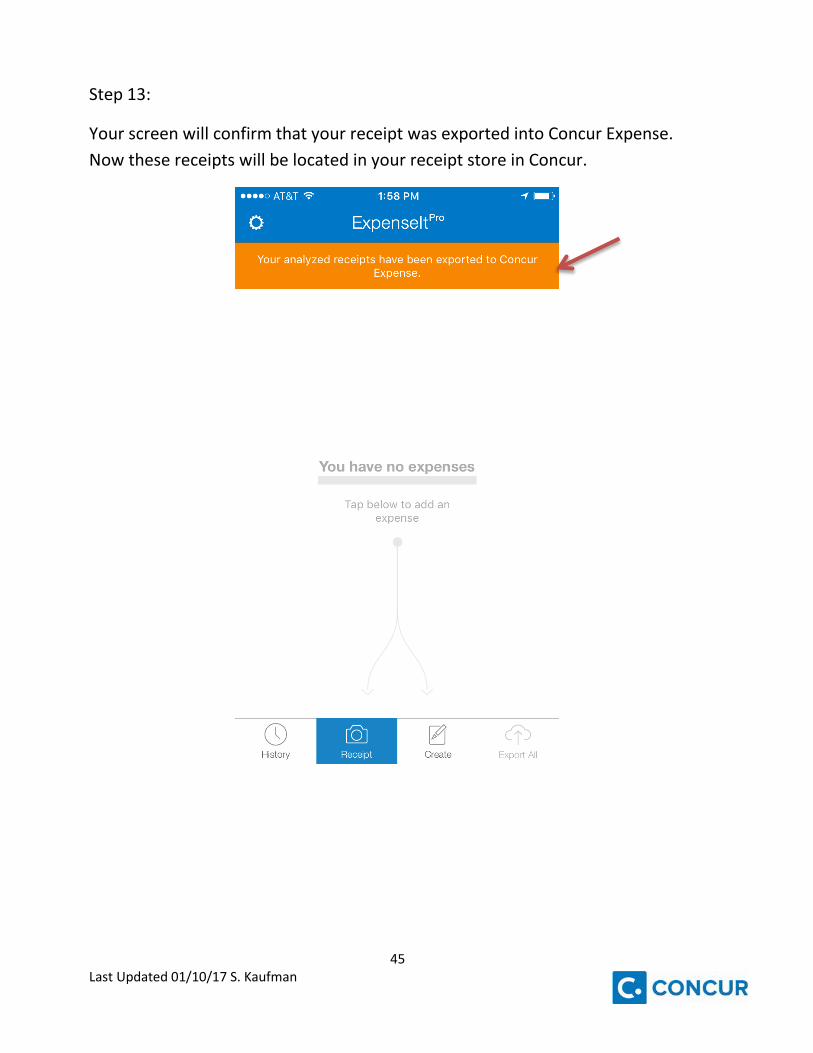
Step 13:
Your screen will confirm that your receipt was exported into Concur Expense. Now these receipts will be located in your receipt store in Concur.
46 Last Updated 01/10/17 S. Kaufman
Travel Request About Travel Requests in Concur All university travel must be approved through an authorization by the appropriate authorities. This process requires completing the Travel Request in Concur. The Travel Request identifies what travel costs can be paid or reimbursed to the traveler using University funds. Travel Requests must be submitted and approved prior to the travel occurring. Individuals traveling for University business that have not submitted the Travel Request may not be covered by University Insurance Policies and may be traveling at their own risk. Traveler Responsibility
• Travelers should make certain that the business related expenses they incur are ordinary, reasonable, not extravagant, and necessary for the purpose of the trip.
• Traveler will utilize CSU preferred vendors and CSU negotiated terms and conditions whenever possible. Use of additional waivers and discounts available to governmental employees is strongly encouraged.
• Traveler will take all steps to minimize risk to themselves and the University. This includes utilizing safe transportation and lodging options and acquiring appropriate insurance coverage.
47 Last Updated 01/10/17 S. Kaufman
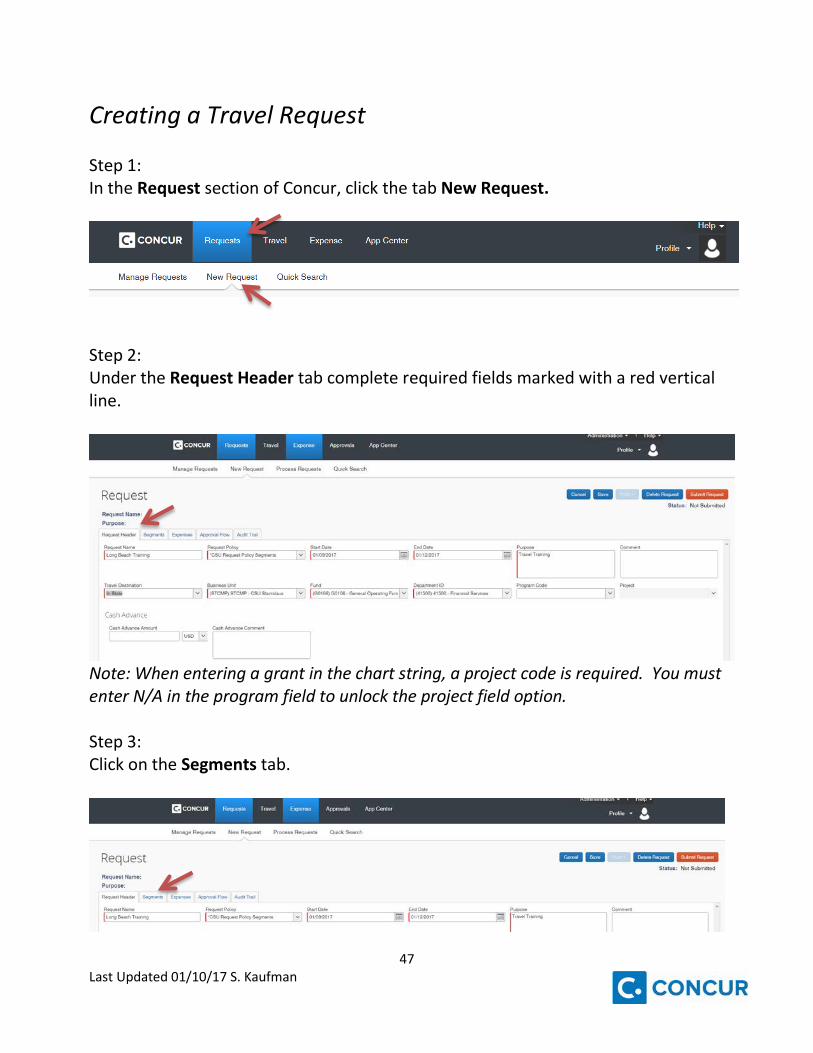
Creating a Travel Request Step 1: In the Request section of Concur, click the tab New Request.
Step 2: Under the Request Header tab complete required fields marked with a red vertical line.
Note: When entering a grant in the chart string, a project code is required. You must enter N/A in the program field to unlock the project field option. Step 3: Click on the Segments tab.
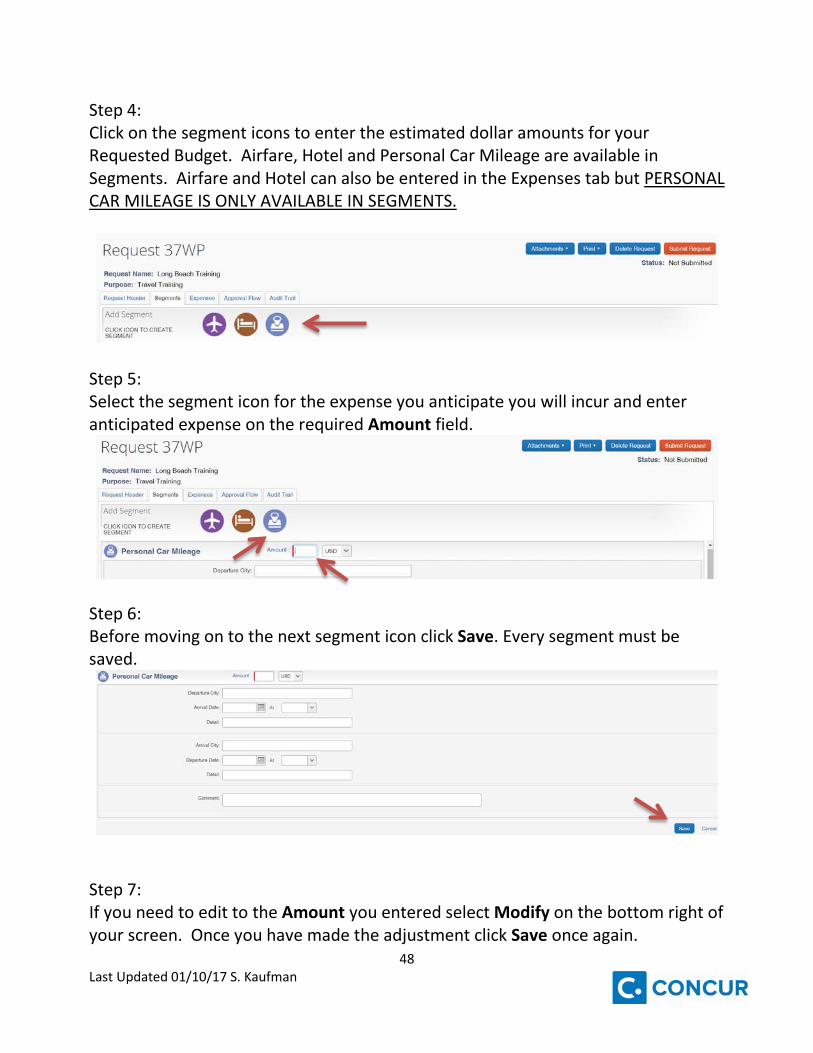
48 Last Updated 01/10/17 S. Kaufman
Step 4: Click on the segment icons to enter the estimated dollar amounts for your Requested Budget. Airfare, Hotel and Personal Car Mileage are available in Segments. Airfare and Hotel can also be entered in the Expenses tab but PERSONAL CAR MILEAGE IS ONLY AVAILABLE IN SEGMENTS.
Step 5: Select the segment icon for the expense you anticipate you will incur and enter anticipated expense on the required Amount field.
Step 6: Before moving on to the next segment icon click Save. Every segment must be saved.
Step 7: If you need to edit to the Amount you entered select Modify on the bottom right of your screen. Once you have made the adjustment click Save once again.
49 Last Updated 01/10/17 S. Kaufman
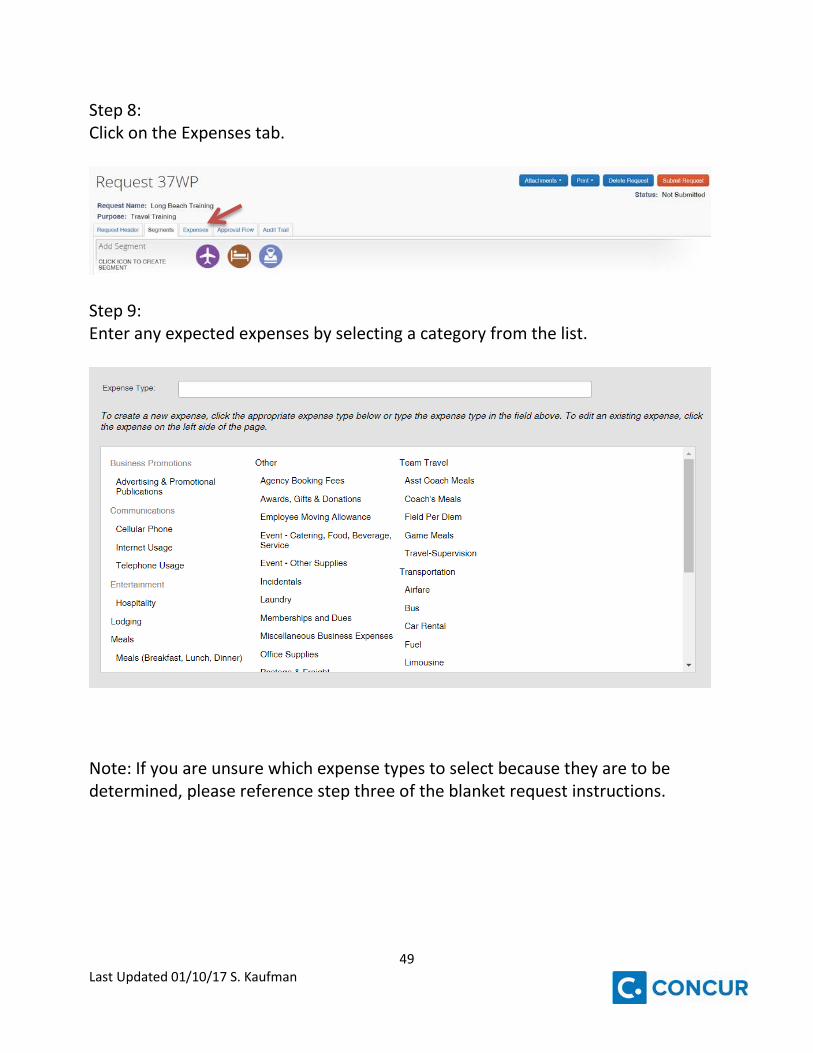
Step 8: Click on the Expenses tab.
Step 9: Enter any expected expenses by selecting a category from the list.
Note: If you are unsure which expense types to select because they are to be determined, please reference step three of the blanket request instructions.
50 Last Updated 01/10/17 S. Kaufman
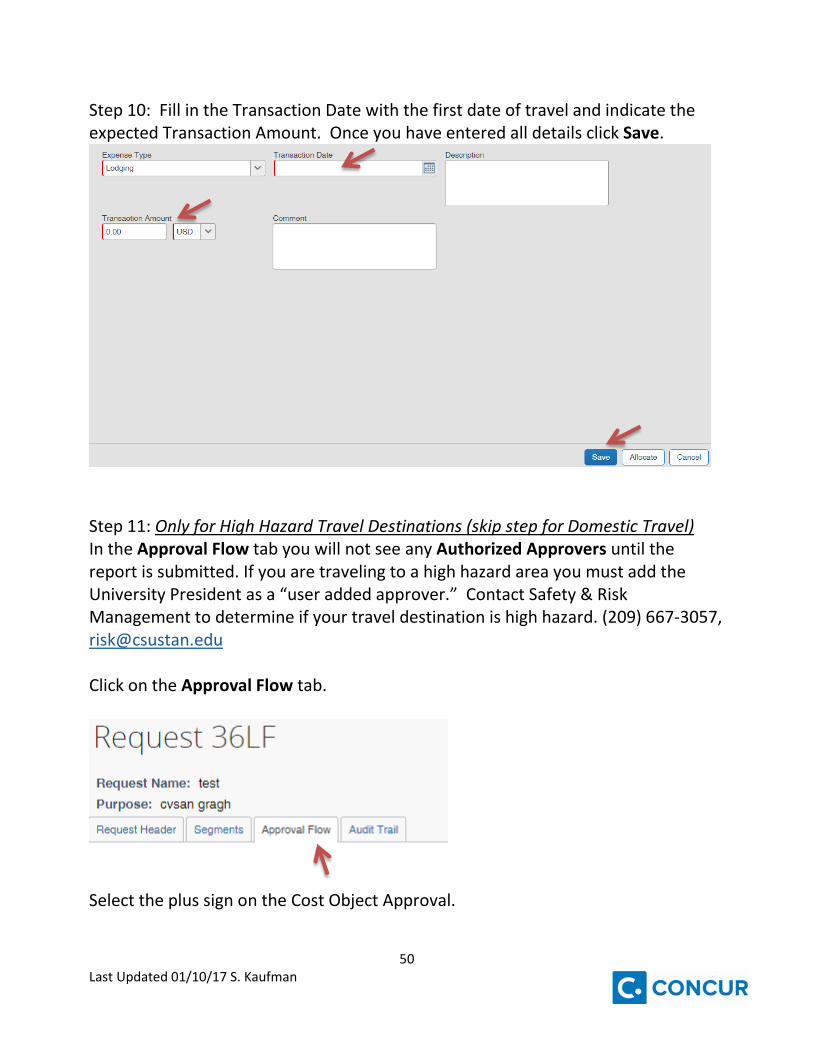
Step 10: Fill in the Transaction Date with the first date of travel and indicate the expected Transaction Amount. Once you have entered all details click Save.
Step 11: Only for High Hazard Travel Destinations (skip step for Domestic Travel) In the Approval Flow tab you will not see any Authorized Approvers until the report is submitted. If you are traveling to a high hazard area you must add the University President as a “user added approver.” Contact Safety & Risk Management to determine if your travel destination is high hazard. (209) 667-3057, [email protected] Click on the Approval Flow tab.
Select the plus sign on the Cost Object Approval.

51 Last Updated 01/10/17 S. Kaufman
Now you will see an option for a User-Added Approver.
Start typing the name of the University President and it will populate for your selection. Step 12: Verify the total amount you are requesting is correct and Submit Request in the upper right corner.
52 Last Updated 01/10/17 S. Kaufman
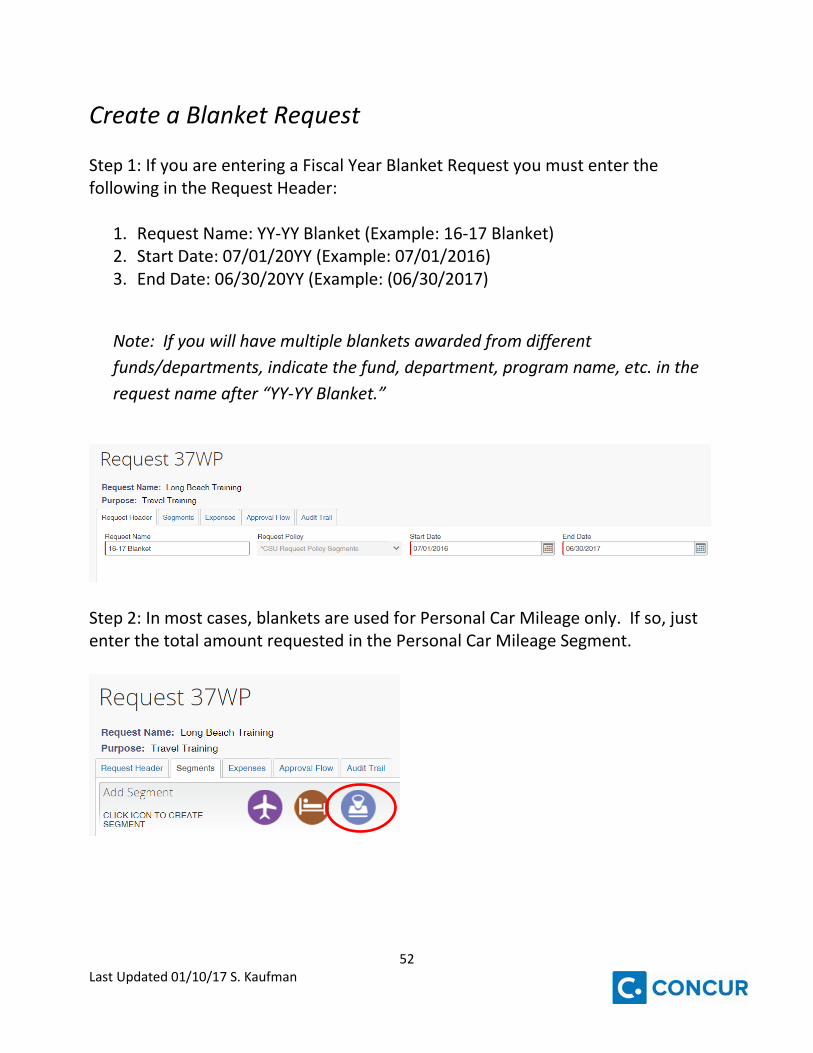
Create a Blanket Request Step 1: If you are entering a Fiscal Year Blanket Request you must enter the following in the Request Header:
1. Request Name: YY-YY Blanket (Example: 16-17 Blanket) 2. Start Date: 07/01/20YY (Example: 07/01/2016) 3. End Date: 06/30/20YY (Example: (06/30/2017)
Note: If you will have multiple blankets awarded from different funds/departments, indicate the fund, department, program name, etc. in the request name after “YY-YY Blanket.”
Step 2: In most cases, blankets are used for Personal Car Mileage only. If so, just enter the total amount requested in the Personal Car Mileage Segment.
53 Last Updated 01/10/17 S. Kaufman
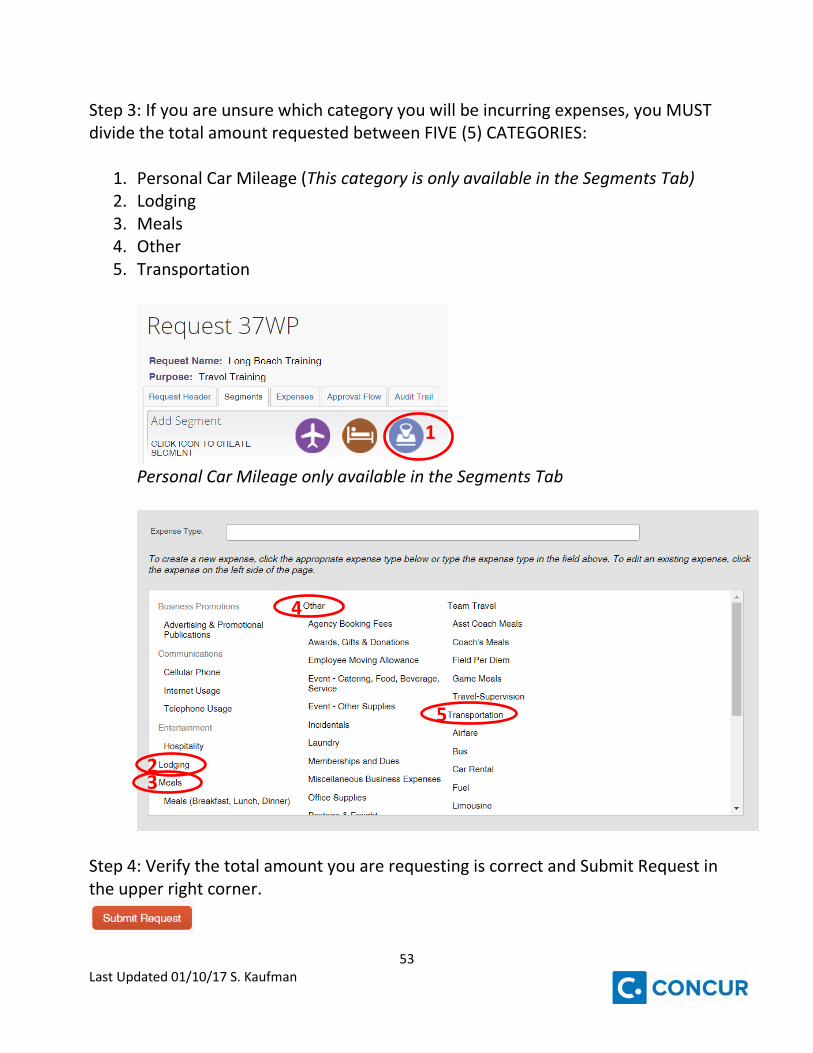
Step 3: If you are unsure which category you will be incurring expenses, you MUST divide the total amount requested between FIVE (5) CATEGORIES:
1. Personal Car Mileage (This category is only available in the Segments Tab) 2. Lodging 3. Meals 4. Other 5. Transportation
Personal Car Mileage only available in the Segments Tab
Step 4: Verify the total amount you are requesting is correct and Submit Request in the upper right corner.
1
2 3
4
5
54 Last Updated 01/10/17 S. Kaufman
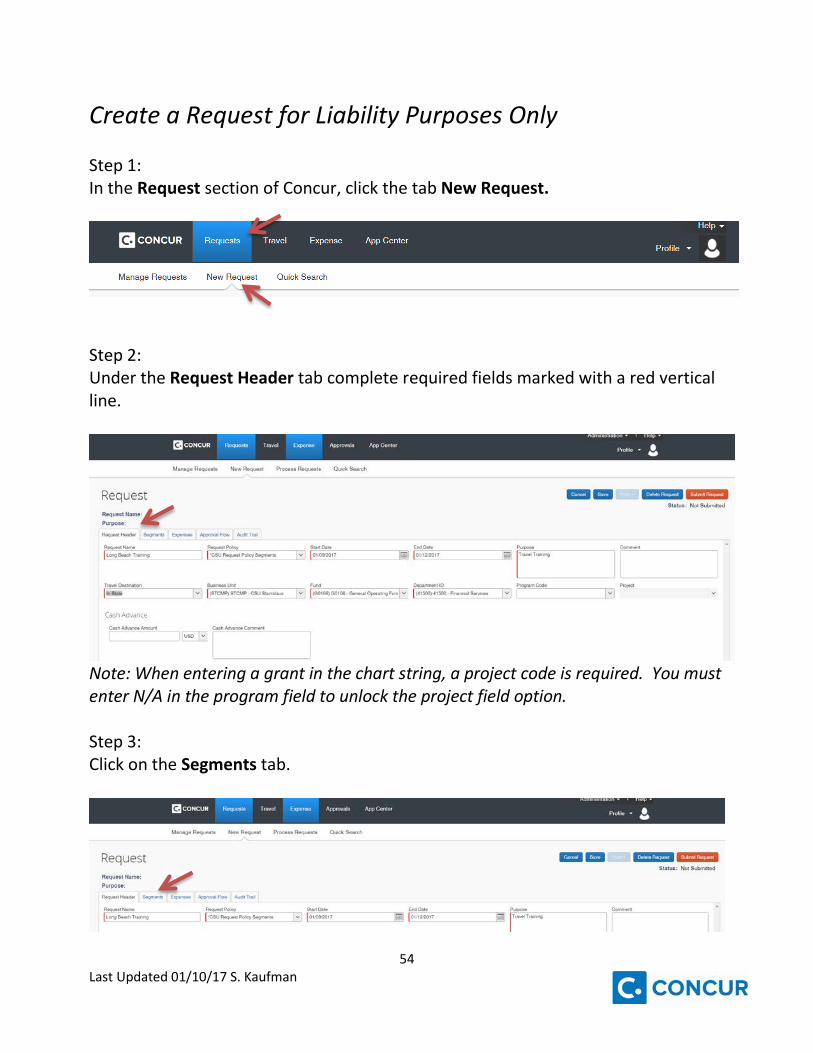
Create a Request for Liability Purposes Only Step 1: In the Request section of Concur, click the tab New Request.
Step 2: Under the Request Header tab complete required fields marked with a red vertical line.
Note: When entering a grant in the chart string, a project code is required. You must enter N/A in the program field to unlock the project field option. Step 3: Click on the Segments tab.
55 Last Updated 01/10/17 S. Kaufman
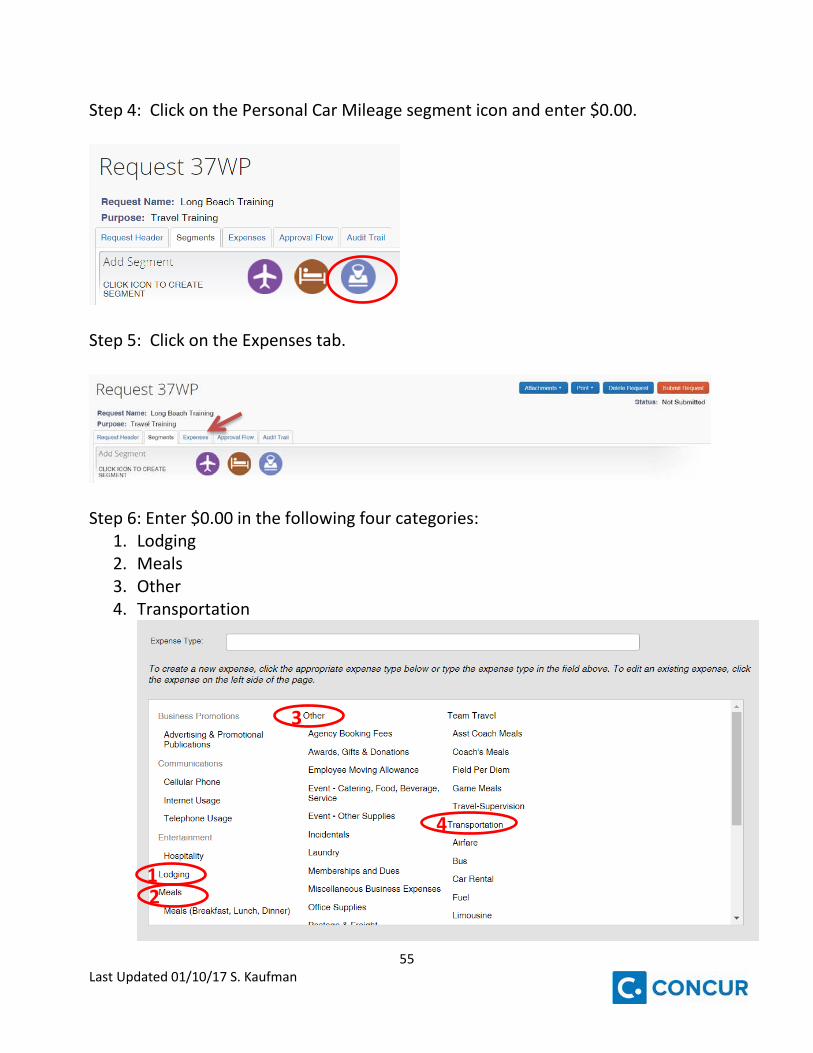
Step 4: Click on the Personal Car Mileage segment icon and enter $0.00.
Step 5: Click on the Expenses tab.
Step 6: Enter $0.00 in the following four categories:
1. Lodging 2. Meals 3. Other 4. Transportation
1 2
3
4
56 Last Updated 01/10/17 S. Kaufman
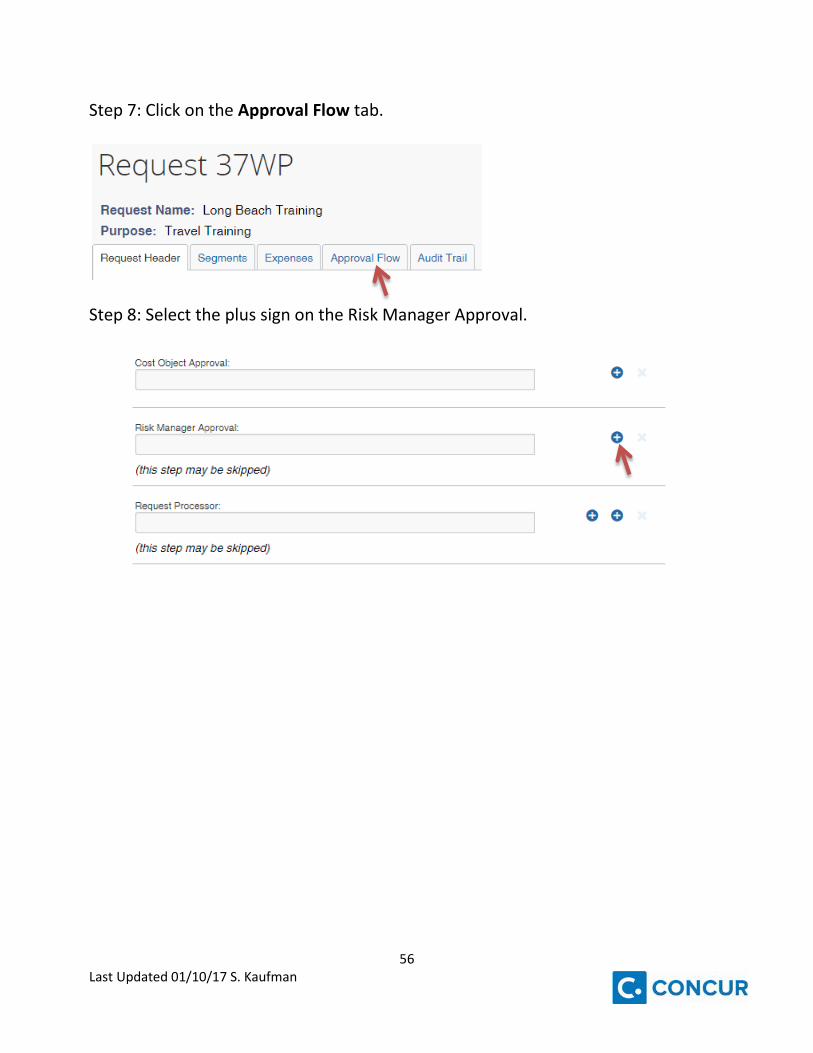
Step 7: Click on the Approval Flow tab.
Step 8: Select the plus sign on the Risk Manager Approval.
57 Last Updated 01/10/17 S. Kaufman
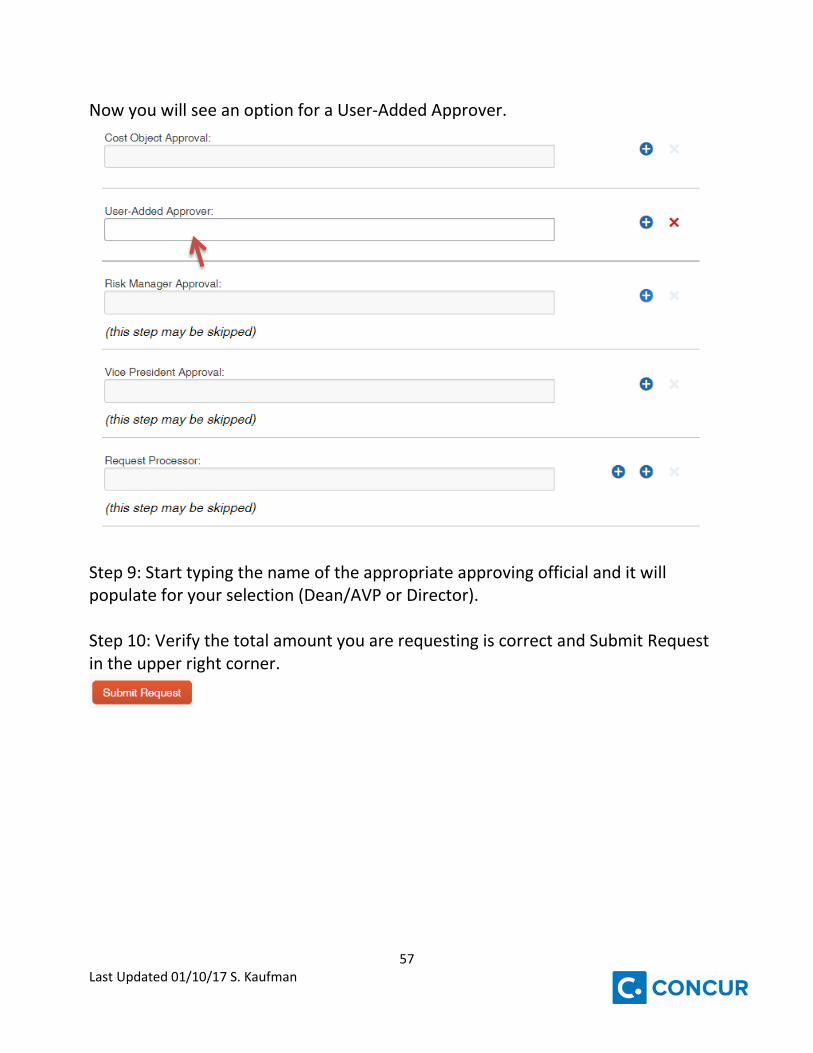
Now you will see an option for a User-Added Approver.
Step 9: Start typing the name of the appropriate approving official and it will populate for your selection (Dean/AVP or Director). Step 10: Verify the total amount you are requesting is correct and Submit Request in the upper right corner.
58 Last Updated 01/10/17 S. Kaufman
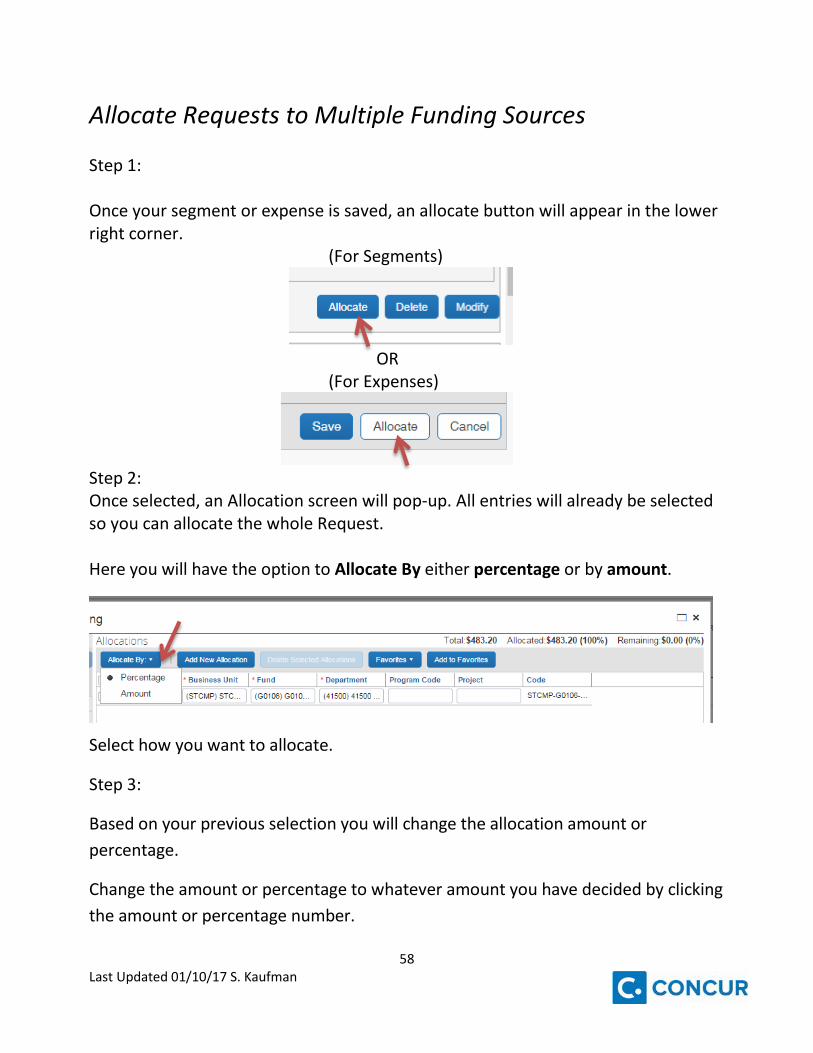
Allocate Requests to Multiple Funding Sources Step 1: Once your segment or expense is saved, an allocate button will appear in the lower right corner.
(For Segments)
OR
(For Expenses)
Step 2: Once selected, an Allocation screen will pop-up. All entries will already be selected so you can allocate the whole Request. Here you will have the option to Allocate By either percentage or by amount.
Select how you want to allocate.
Step 3:
Based on your previous selection you will change the allocation amount or percentage.
Change the amount or percentage to whatever amount you have decided by clicking the amount or percentage number.
59 Last Updated 01/10/17 S. Kaufman
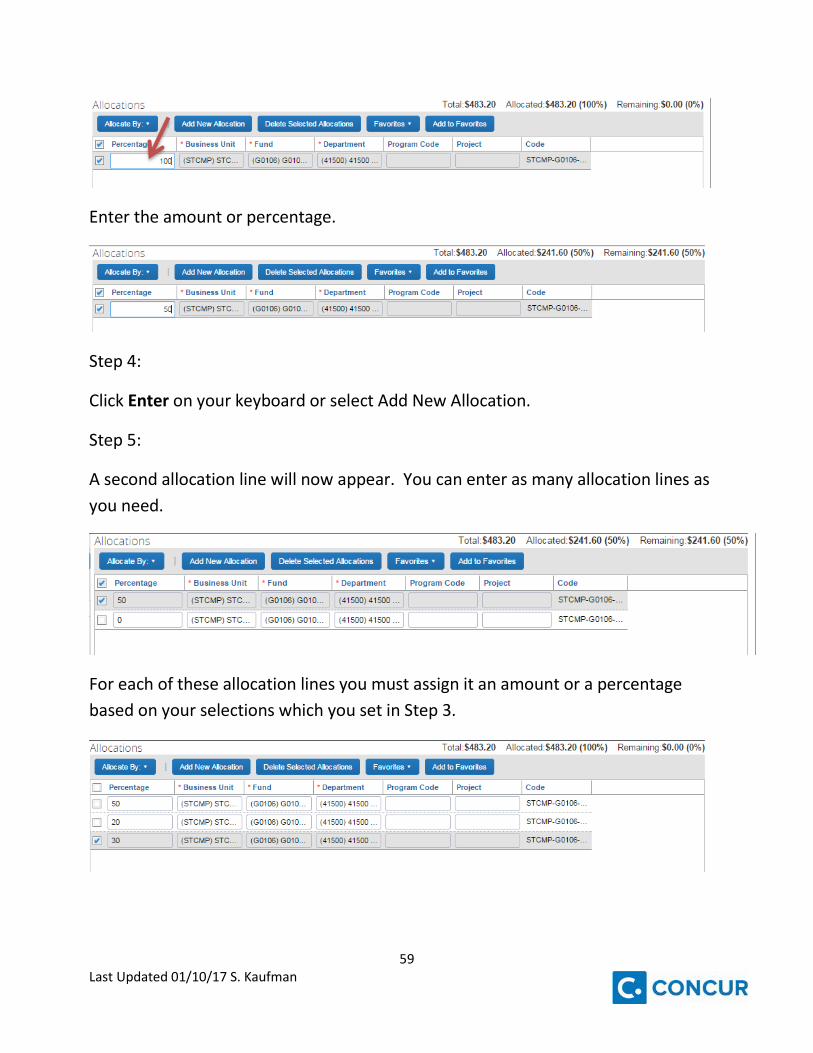
Enter the amount or percentage.
Step 4:
Click Enter on your keyboard or select Add New Allocation.
Step 5:
A second allocation line will now appear. You can enter as many allocation lines as you need.
For each of these allocation lines you must assign it an amount or a percentage based on your selections which you set in Step 3.
60 Last Updated 01/10/17 S. Kaufman
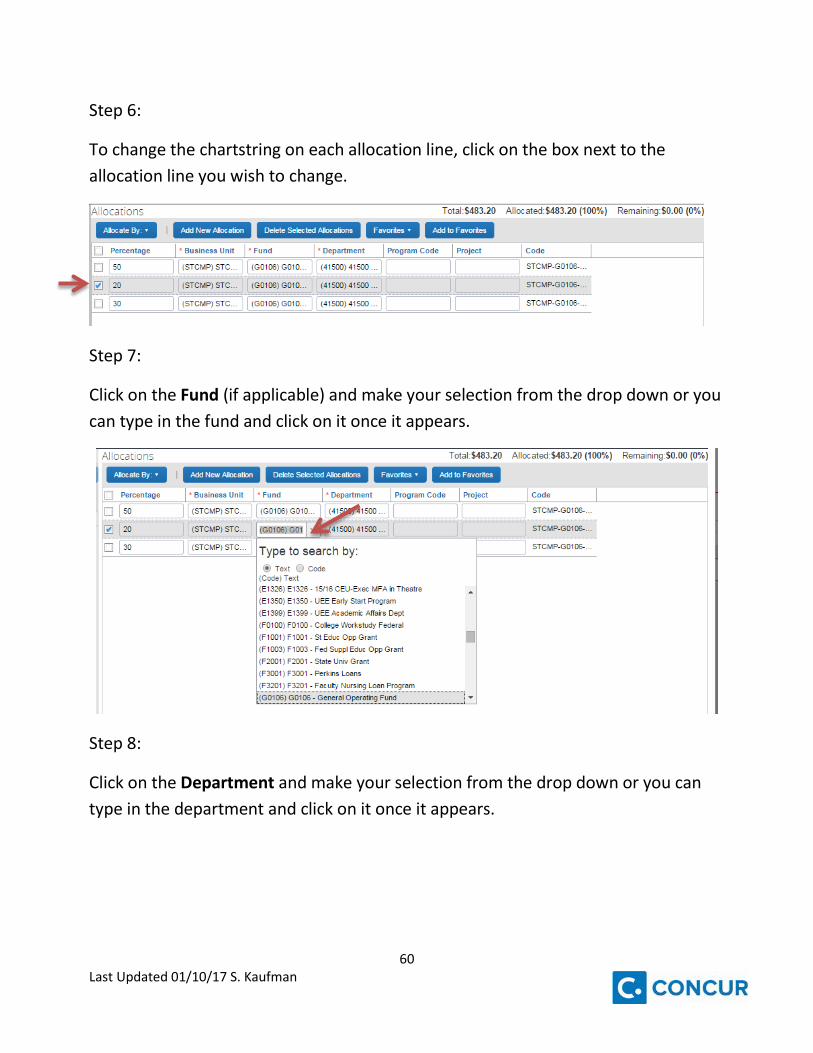
Step 6:
To change the chartstring on each allocation line, click on the box next to the allocation line you wish to change.
Step 7:
Click on the Fund (if applicable) and make your selection from the drop down or you can type in the fund and click on it once it appears.
Step 8:
Click on the Department and make your selection from the drop down or you can type in the department and click on it once it appears.
61 Last Updated 01/10/17 S. Kaufman
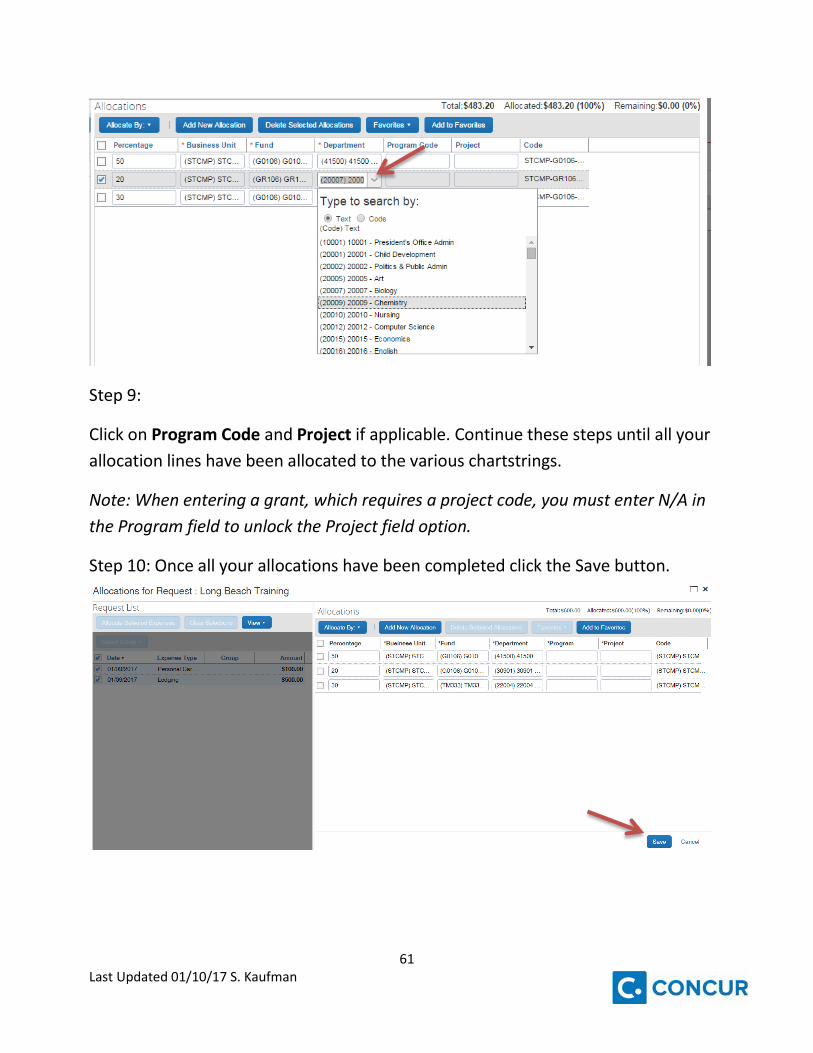
Step 9:
Click on Program Code and Project if applicable. Continue these steps until all your allocation lines have been allocated to the various chartstrings.
Note: When entering a grant, which requires a project code, you must enter N/A in the Program field to unlock the Project field option.
Step 10: Once all your allocations have been completed click the Save button.

62 Last Updated 01/10/17 S. Kaufman
Step 11:
You will receive a pop-up that will notify you of errors or to confirm that your allocations were saved.
Step 12:
If you received an error, please make the changes in the allocations. If your changes were successfully saved click the Done button.
63 Last Updated 01/10/17 S. Kaufman
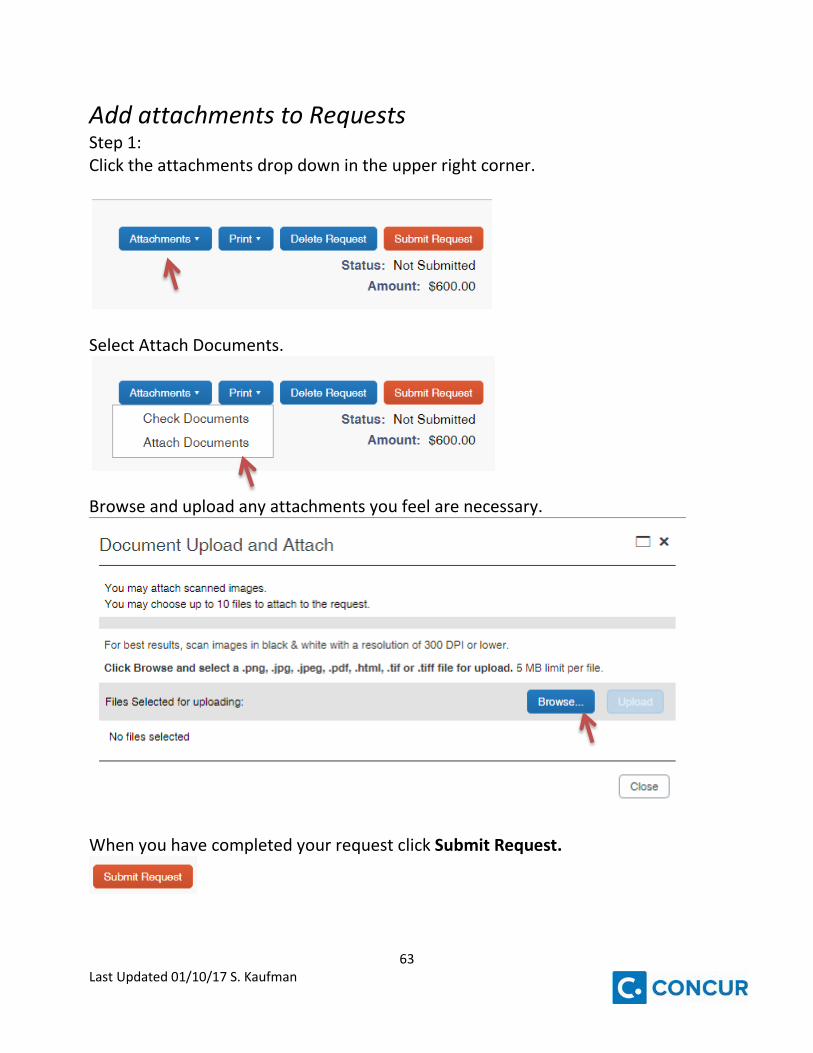
Add attachments to Requests Step 1: Click the attachments drop down in the upper right corner.
Select Attach Documents.
Browse and upload any attachments you feel are necessary.
When you have completed your request click Submit Request.
64 Last Updated 01/10/17 S. Kaufman
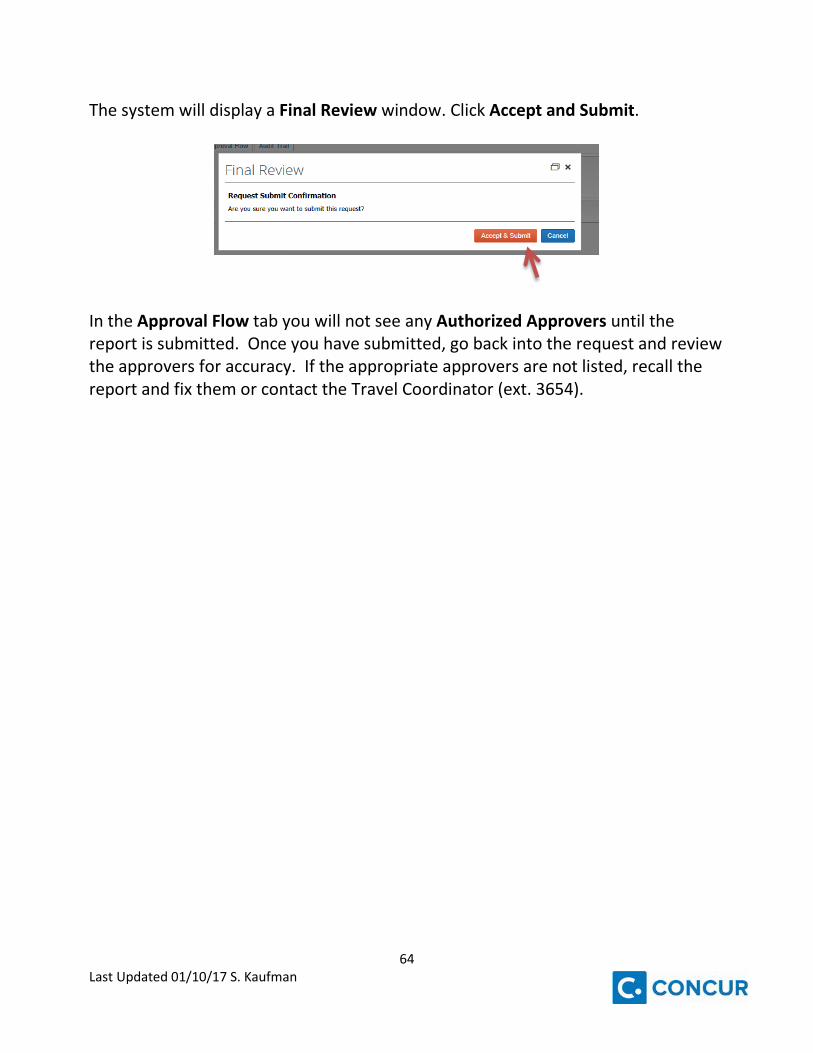
The system will display a Final Review window. Click Accept and Submit.
In the Approval Flow tab you will not see any Authorized Approvers until the report is submitted. Once you have submitted, go back into the request and review the approvers for accuracy. If the appropriate approvers are not listed, recall the report and fix them or contact the Travel Coordinator (ext. 3654).
65 Last Updated 01/10/17 S. Kaufman
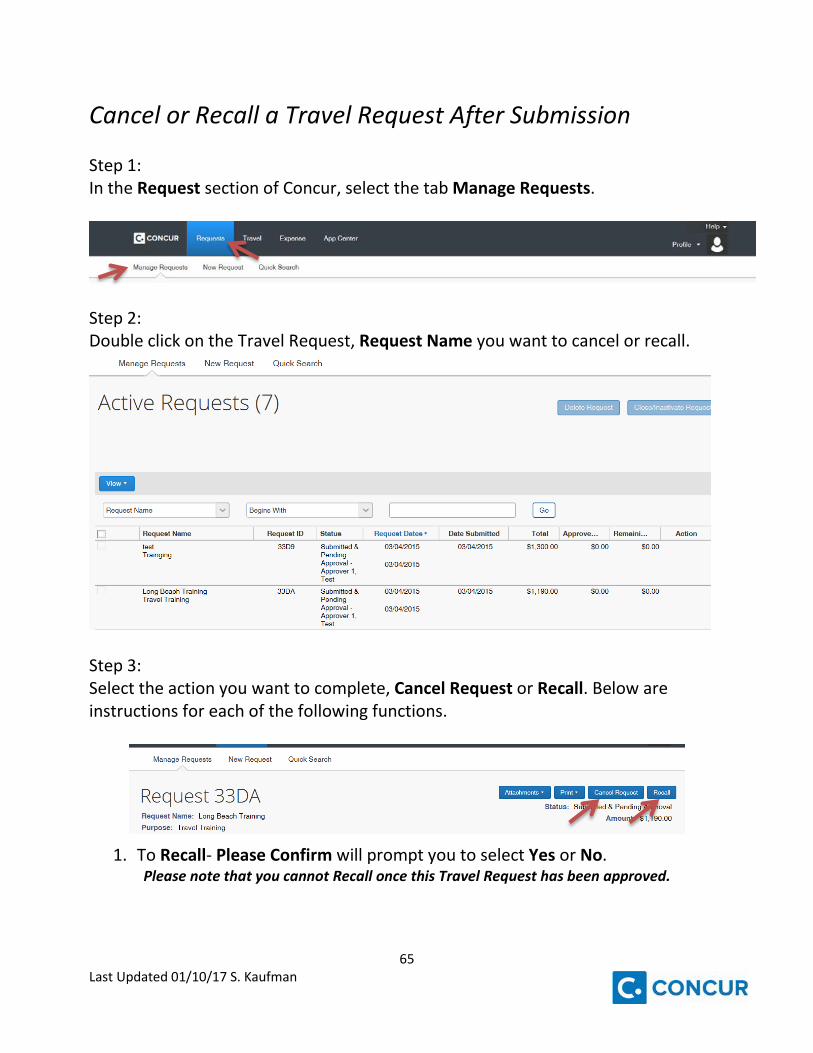
Cancel or Recall a Travel Request After Submission Step 1: In the Request section of Concur, select the tab Manage Requests.
Step 2: Double click on the Travel Request, Request Name you want to cancel or recall.
Step 3: Select the action you want to complete, Cancel Request or Recall. Below are instructions for each of the following functions.
1. To Recall- Please Confirm will prompt you to select Yes or No. Please note that you cannot Recall once this Travel Request has been approved.
66 Last Updated 01/10/17 S. Kaufman
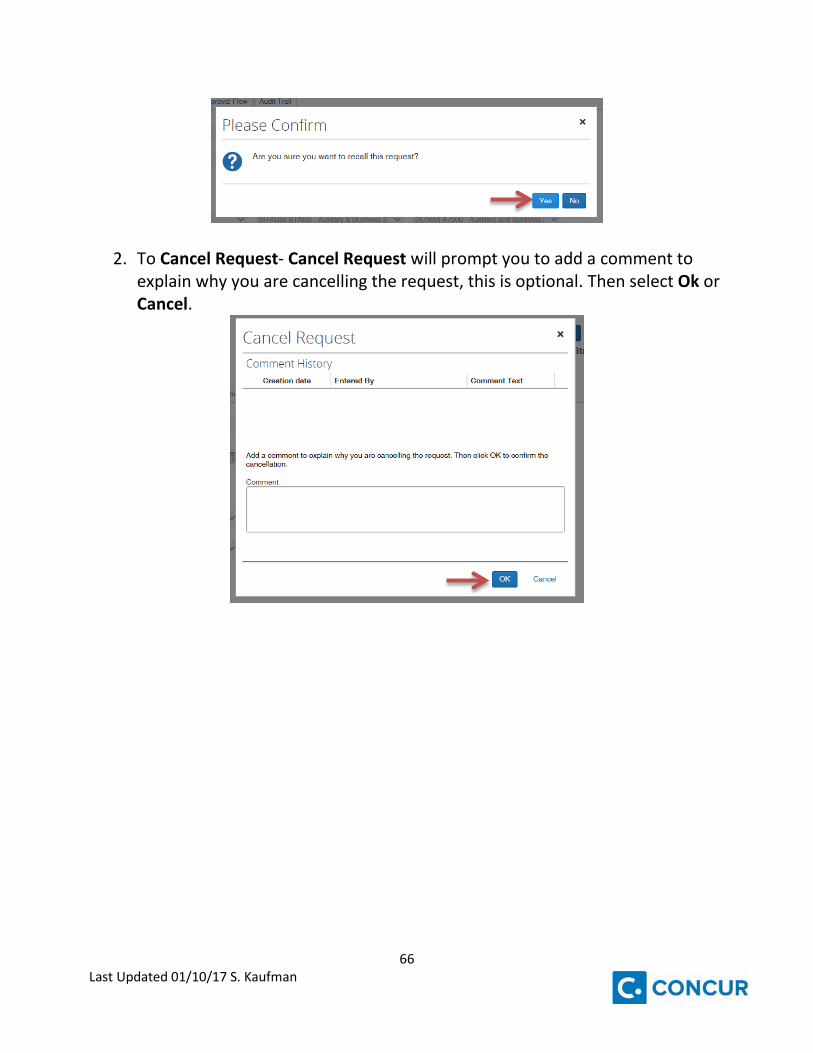
2. To Cancel Request- Cancel Request will prompt you to add a comment to explain why you are cancelling the request, this is optional. Then select Ok or Cancel.
67 Last Updated 01/10/17 S. Kaufman
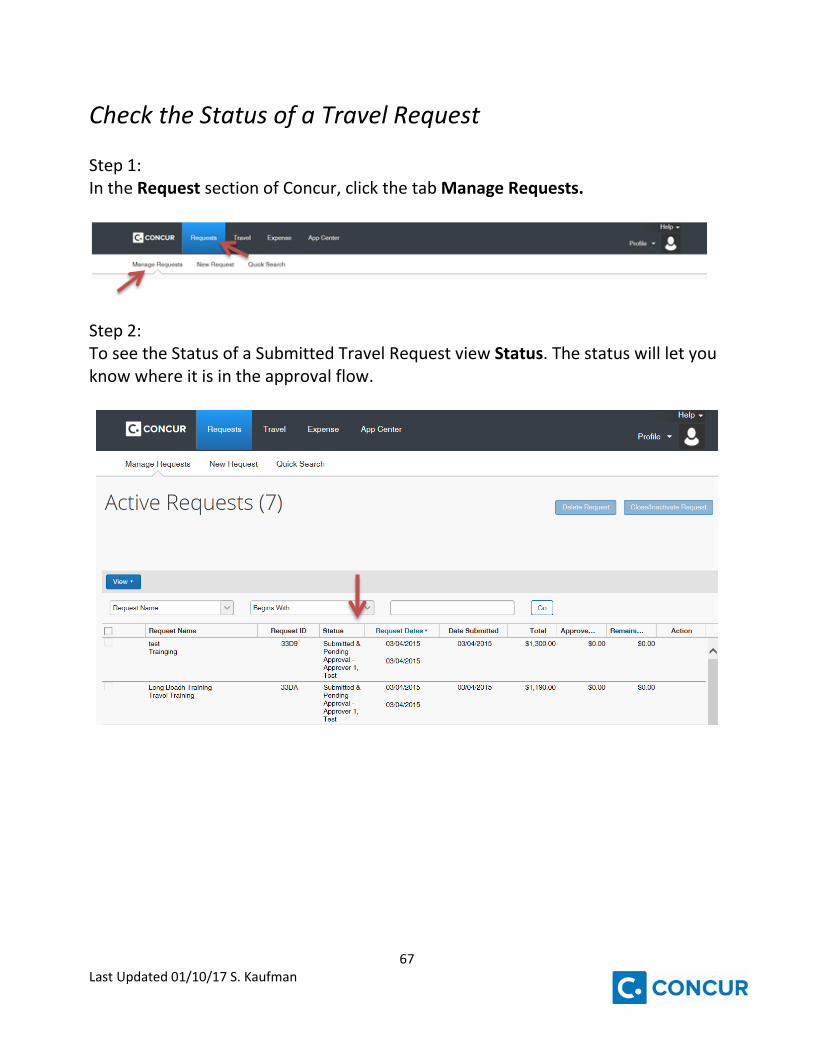
Check the Status of a Travel Request Step 1: In the Request section of Concur, click the tab Manage Requests.
Step 2: To see the Status of a Submitted Travel Request view Status. The status will let you know where it is in the approval flow.
68 Last Updated 01/10/17 S. Kaufman
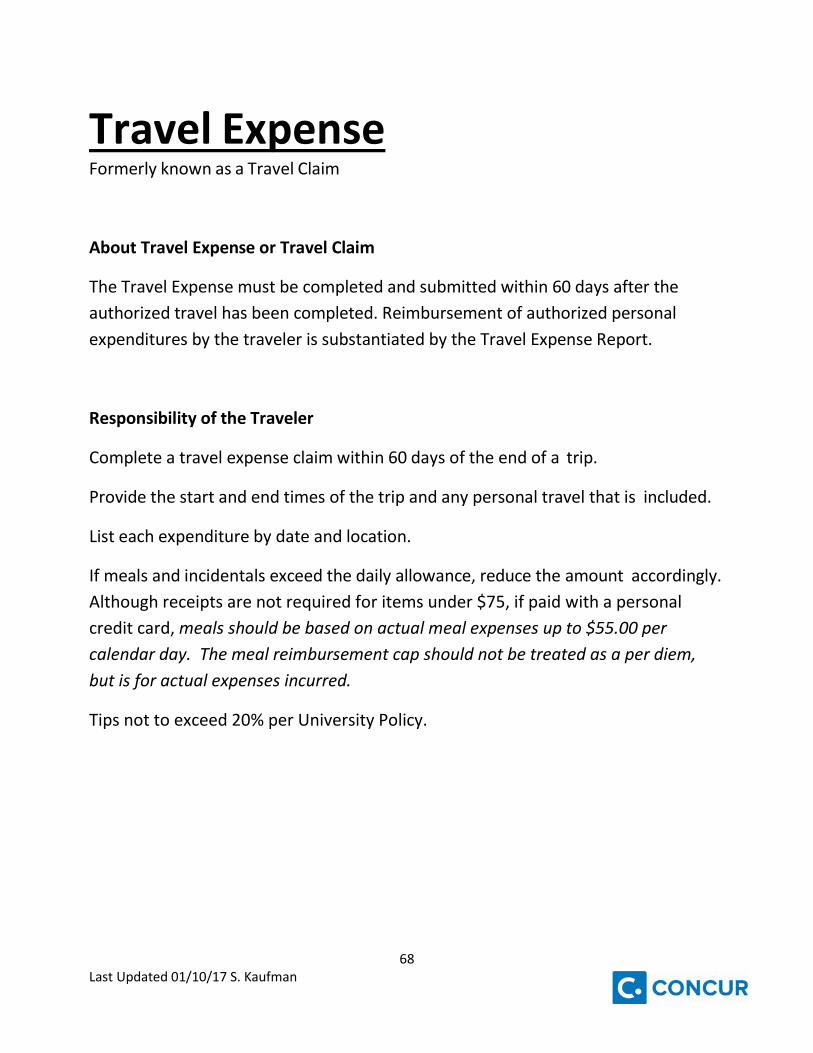
Travel Expense Formerly known as a Travel Claim
About Travel Expense or Travel Claim
The Travel Expense must be completed and submitted within 60 days after the authorized travel has been completed. Reimbursement of authorized personal expenditures by the traveler is substantiated by the Travel Expense Report.
Responsibility of the Traveler
Complete a travel expense claim within 60 days of the end of a trip.
Provide the start and end times of the trip and any personal travel that is included.
List each expenditure by date and location.
If meals and incidentals exceed the daily allowance, reduce the amount accordingly. Although receipts are not required for items under $75, if paid with a personal credit card, meals should be based on actual meal expenses up to $55.00 per calendar day. The meal reimbursement cap should not be treated as a per diem, but is for actual expenses incurred.
Tips not to exceed 20% per University Policy.

69 Last Updated 01/10/17 S. Kaufman
Create Expense Report from Approved Request Step 1:
Go to the Request section of Concur.
An approved travel request is REQUIRED prior to all University Travel.
Step 2:
Under the Active Requests you will find an Action column on the far right side of your list.
Select the Expense hyperlink for the approved request you need to generate an expense report for.
Step 3:
Complete the fields of the Report Header (fields should copy from the approved Request). These fields include Report Name, Report Date, Travel Destination, Business Unit, Fund, Department, Program Code, Project. The Comment field is optional. You should also see the appropriate approved request selected in the Requests box.
Once these fields are completed click on the Next button located at the bottom of the screen.
70 Last Updated 01/10/17 S. Kaufman
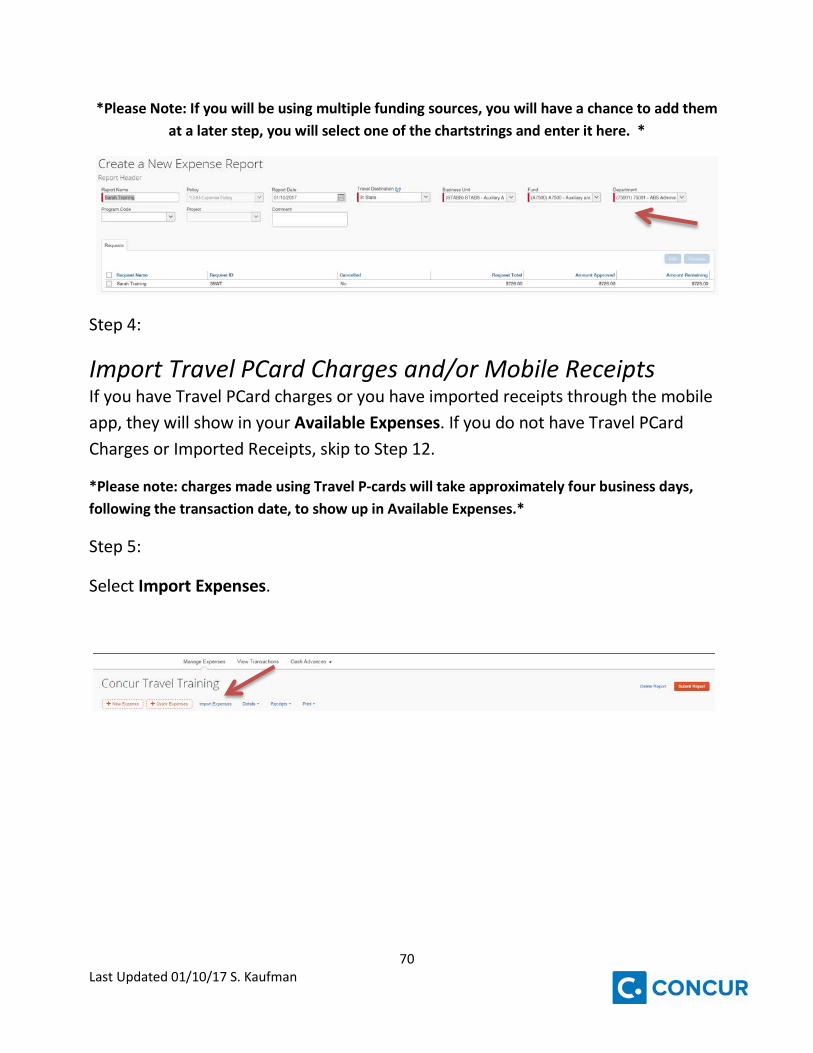
*Please Note: If you will be using multiple funding sources, you will have a chance to add them at a later step, you will select one of the chartstrings and enter it here. *
Step 4:
Import Travel PCard Charges and/or Mobile Receipts If you have Travel PCard charges or you have imported receipts through the mobile app, they will show in your Available Expenses. If you do not have Travel PCard Charges or Imported Receipts, skip to Step 12.
*Please note: charges made using Travel P-cards will take approximately four business days, following the transaction date, to show up in Available Expenses.*
Step 5:
Select Import Expenses.
71 Last Updated 01/10/17 S. Kaufman
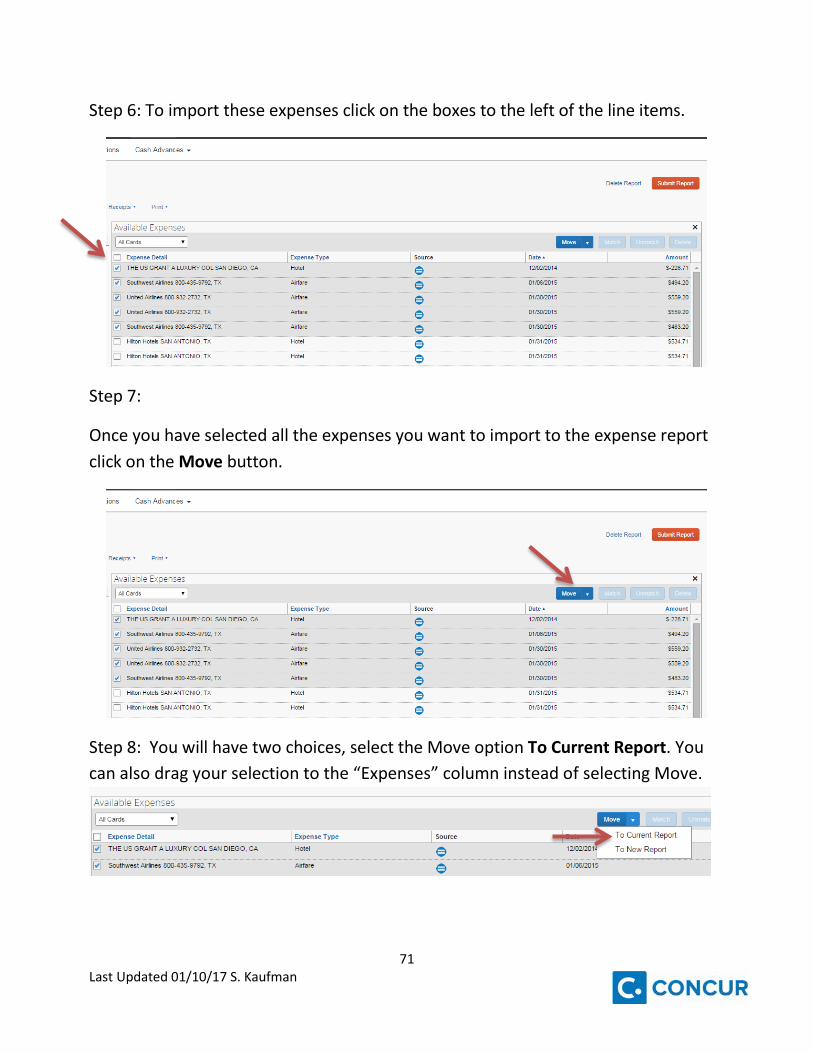
Step 6: To import these expenses click on the boxes to the left of the line items.
Step 7:
Once you have selected all the expenses you want to import to the expense report click on the Move button.
Step 8: You will have two choices, select the Move option To Current Report. You can also drag your selection to the “Expenses” column instead of selecting Move.

72 Last Updated 01/10/17 S. Kaufman
Step 9:
Now these charges will appear in your Expense report.
Step 10:
To make edits or attach receipts, click on the Expense by clicking anywhere within the expense line.
73 Last Updated 01/10/17 S. Kaufman
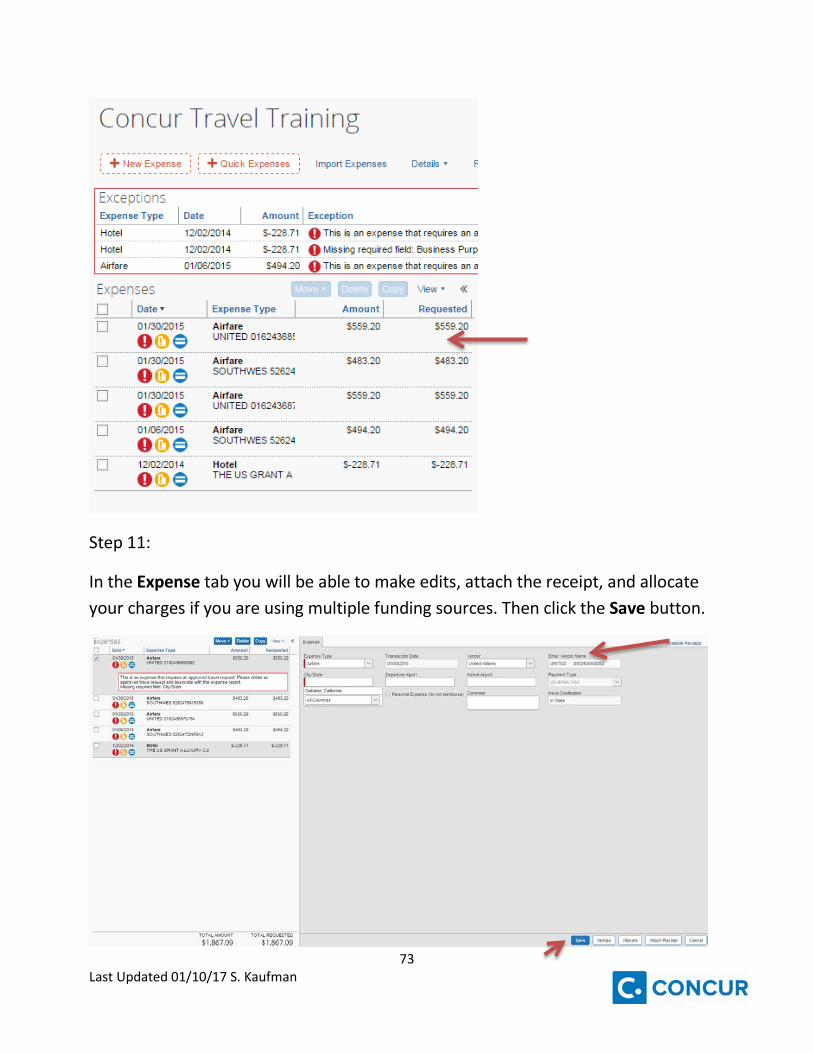
Step 11:
In the Expense tab you will be able to make edits, attach the receipt, and allocate your charges if you are using multiple funding sources. Then click the Save button.
74 Last Updated 01/10/17 S. Kaufman
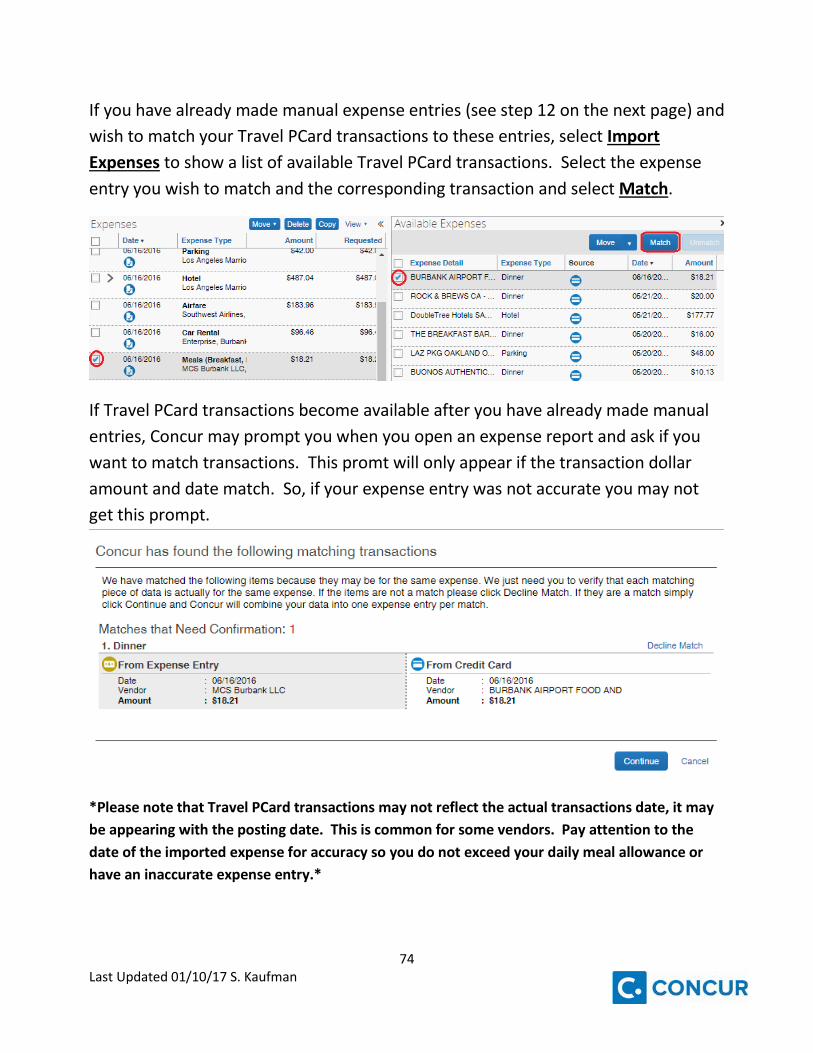
If you have already made manual expense entries (see step 12 on the next page) and wish to match your Travel PCard transactions to these entries, select Import Expenses to show a list of available Travel PCard transactions. Select the expense entry you wish to match and the corresponding transaction and select Match.
If Travel PCard transactions become available after you have already made manual entries, Concur may prompt you when you open an expense report and ask if you want to match transactions. This promt will only appear if the transaction dollar amount and date match. So, if your expense entry was not accurate you may not get this prompt.
*Please note that Travel PCard transactions may not reflect the actual transactions date, it may be appearing with the posting date. This is common for some vendors. Pay attention to the date of the imported expense for accuracy so you do not exceed your daily meal allowance or have an inaccurate expense entry.*

75 Last Updated 01/10/17 S. Kaufman
Step 12:
Enter Expenses If you do not have Travel PCard charges or imported receipts you will need to add expenses manually. To do so, select an expense from the New Expense tab.
76 Last Updated 01/10/17 S. Kaufman
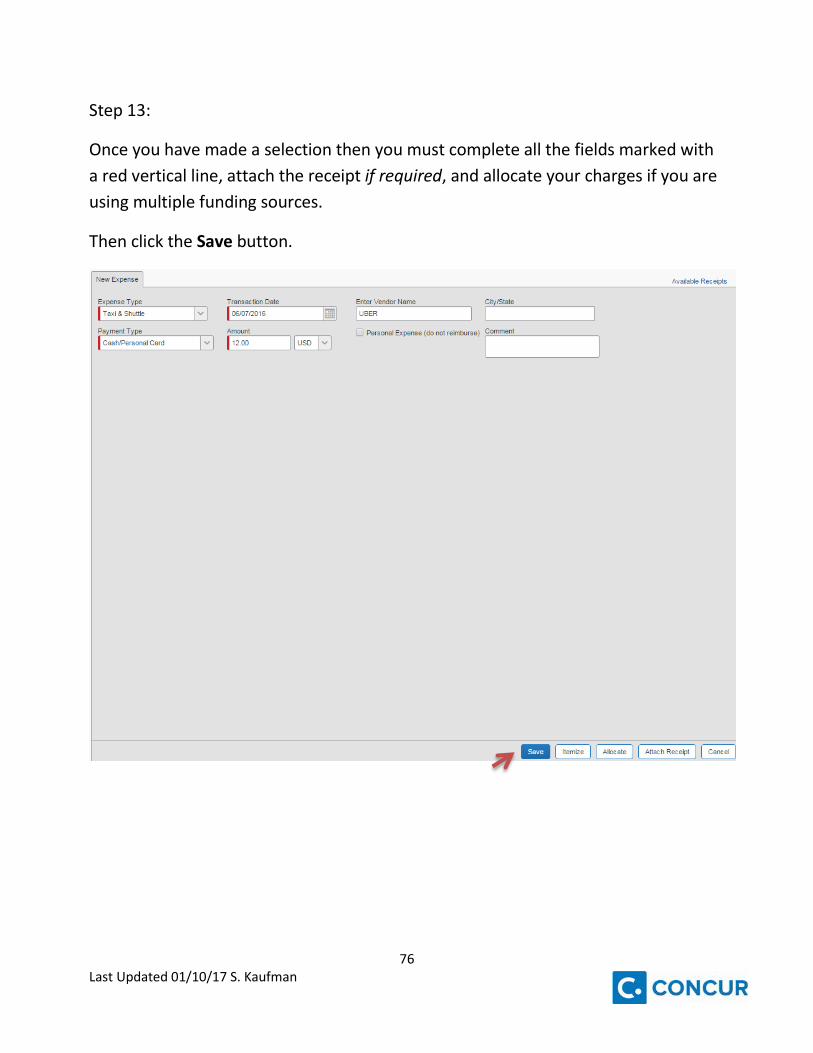
Step 13:
Once you have made a selection then you must complete all the fields marked with a red vertical line, attach the receipt if required, and allocate your charges if you are using multiple funding sources.
Then click the Save button.
77 Last Updated 01/10/17 S. Kaufman
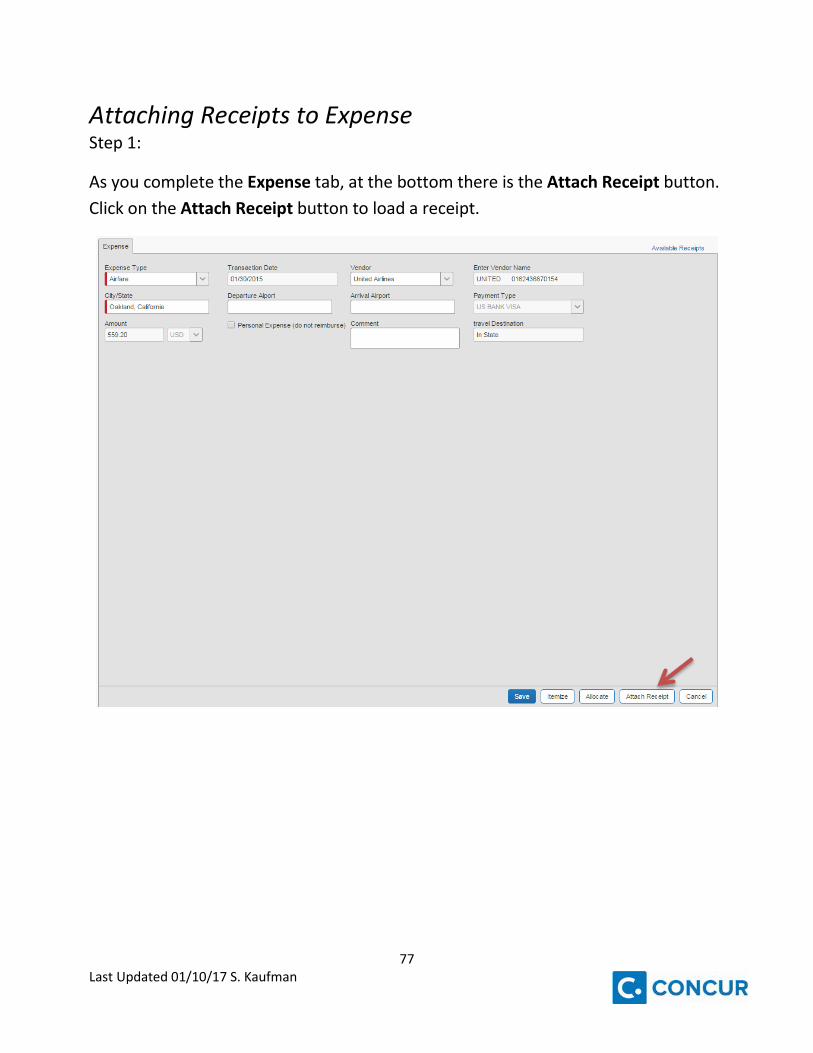
Attaching Receipts to Expense Step 1:
As you complete the Expense tab, at the bottom there is the Attach Receipt button. Click on the Attach Receipt button to load a receipt.
78 Last Updated 01/10/17 S. Kaufman
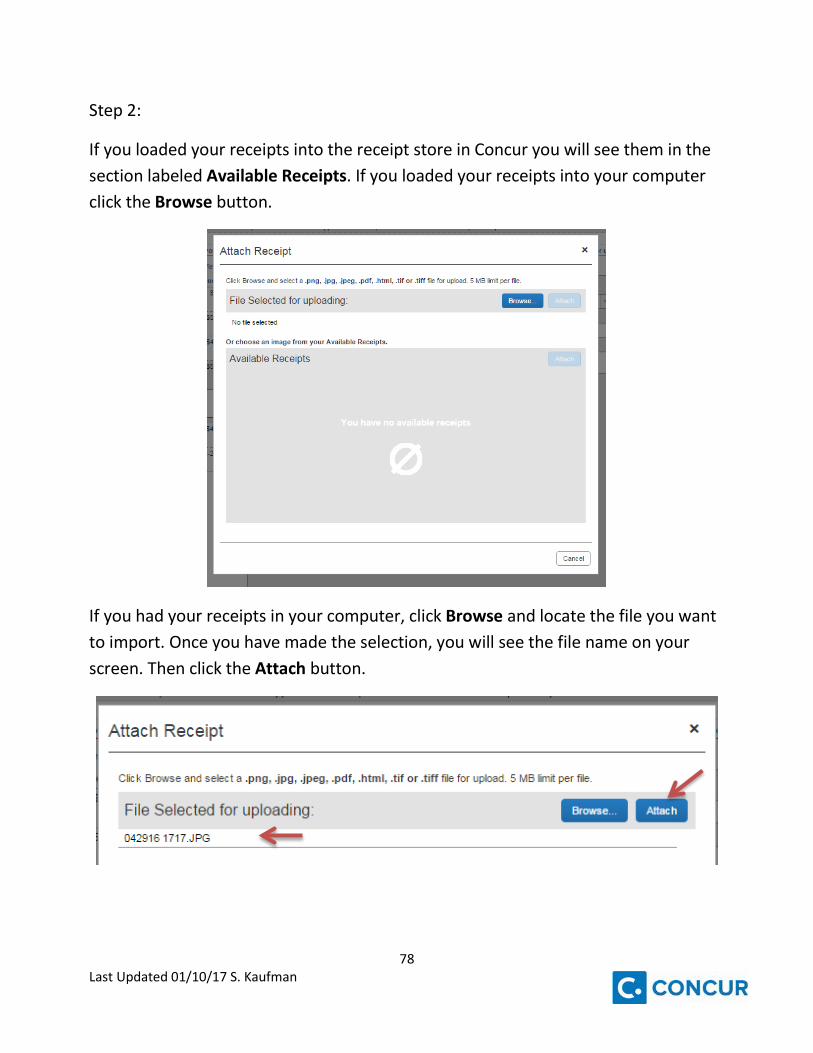
Step 2:
If you loaded your receipts into the receipt store in Concur you will see them in the section labeled Available Receipts. If you loaded your receipts into your computer click the Browse button.
If you had your receipts in your computer, click Browse and locate the file you want to import. Once you have made the selection, you will see the file name on your screen. Then click the Attach button.
79 Last Updated 01/10/17 S. Kaufman
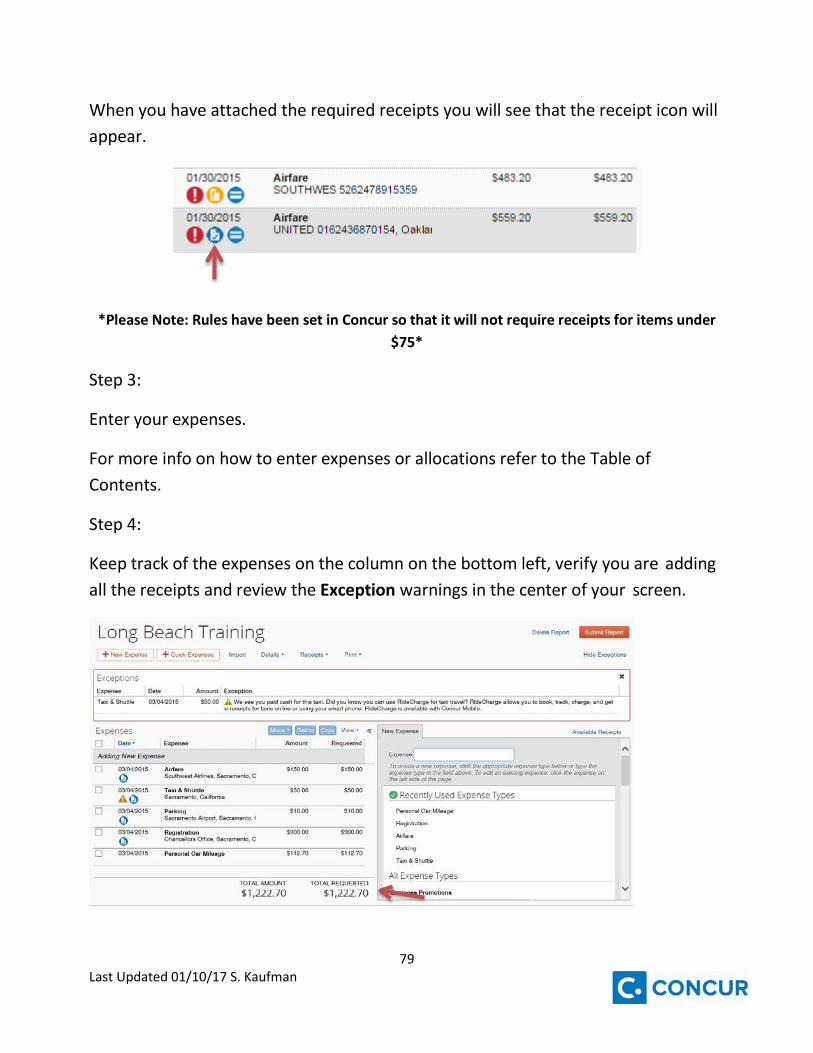
When you have attached the required receipts you will see that the receipt icon will appear.
*Please Note: Rules have been set in Concur so that it will not require receipts for items under $75*
Step 3:
Enter your expenses.
For more info on how to enter expenses or allocations refer to the Table of Contents.
Step 4:
Keep track of the expenses on the column on the bottom left, verify you are adding all the receipts and review the Exception warnings in the center of your screen.
80 Last Updated 01/10/17 S. Kaufman
Step 5:
Once all expenses have been included select Submit Report on the top right.
Step 6:
On the Final Review notification select Submit Report to submit.
Step 7:
Once you select Submit Report you will receive a Report Successfully Submitted
notification that summarizes your Expense Report and Company Disbursements.
81 Last Updated 01/10/17 S. Kaufman
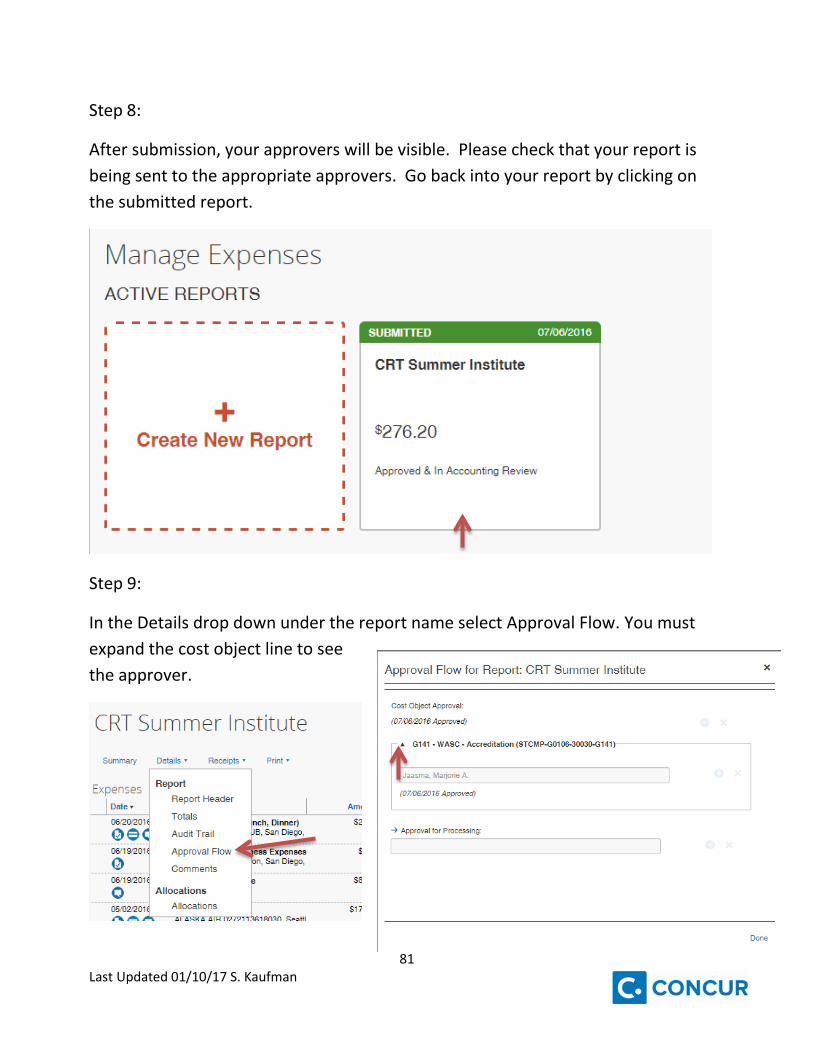
Step 8:
After submission, your approvers will be visible. Please check that your report is being sent to the appropriate approvers. Go back into your report by clicking on the submitted report.
Step 9:
In the Details drop down under the report name select Approval Flow. You must expand the cost object line to see the approver.

82 Last Updated 01/10/17 S. Kaufman
How to Enter a Hotel Expense Step 1:
From the New Expense type select Hotel.
If this was an imported Travel PCard Charge select the charge under the Expense list on the left of the screen.
Step 2:
Complete the required fields.
Step 3:
Click on the Itemize button at the bottom of the screen.
83 Last Updated 01/10/17 S. Kaufman
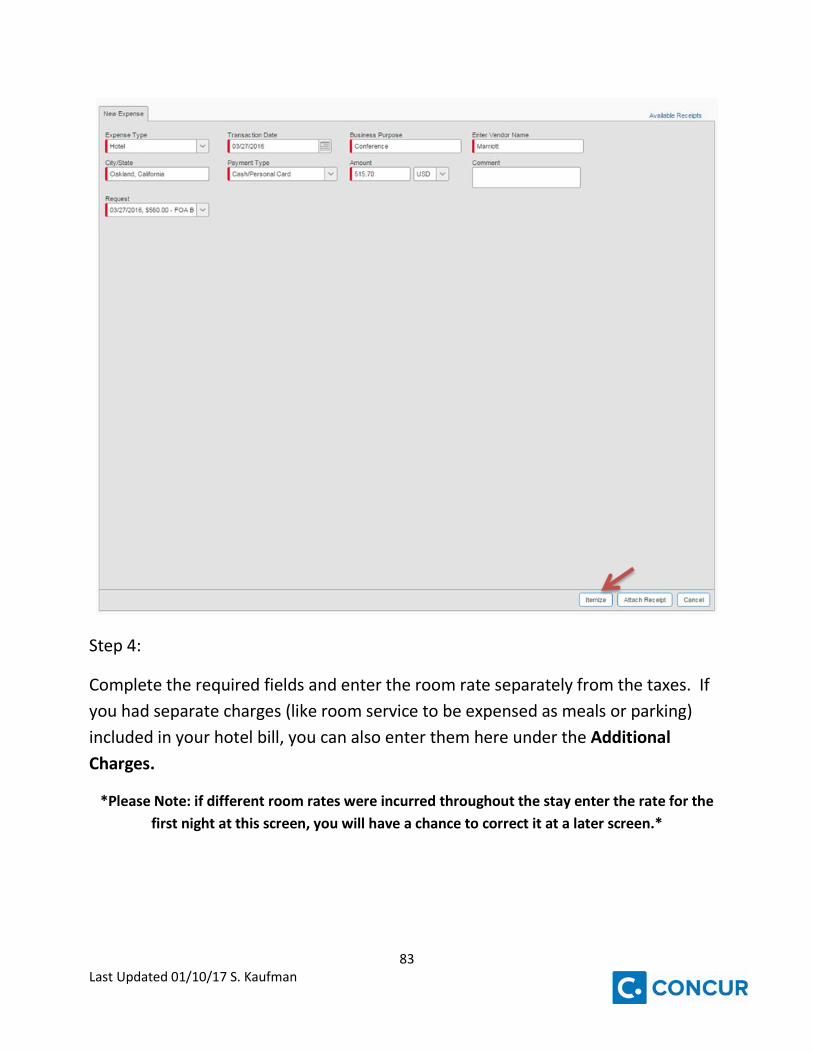
Step 4:
Complete the required fields and enter the room rate separately from the taxes. If you had separate charges (like room service to be expensed as meals or parking) included in your hotel bill, you can also enter them here under the Additional Charges.
*Please Note: if different room rates were incurred throughout the stay enter the rate for the first night at this screen, you will have a chance to correct it at a later screen.*
84 Last Updated 01/10/17 S. Kaufman
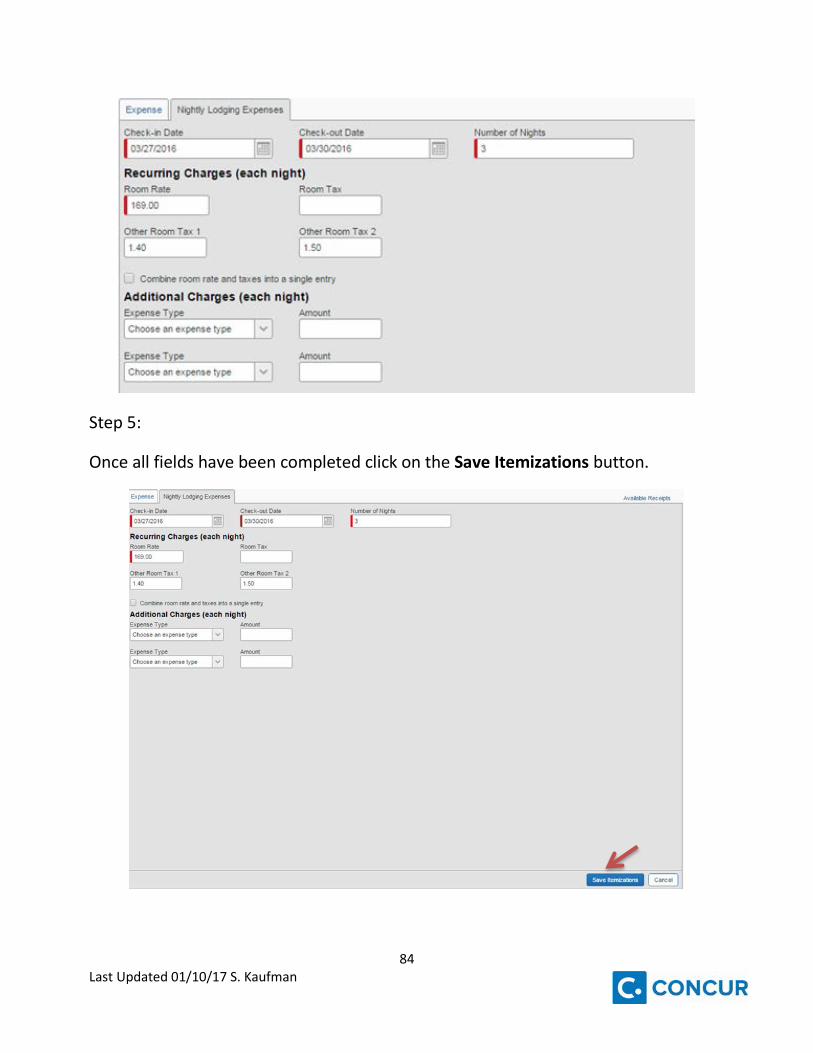
Step 5:
Once all fields have been completed click on the Save Itemizations button.
85 Last Updated 01/10/17 S. Kaufman
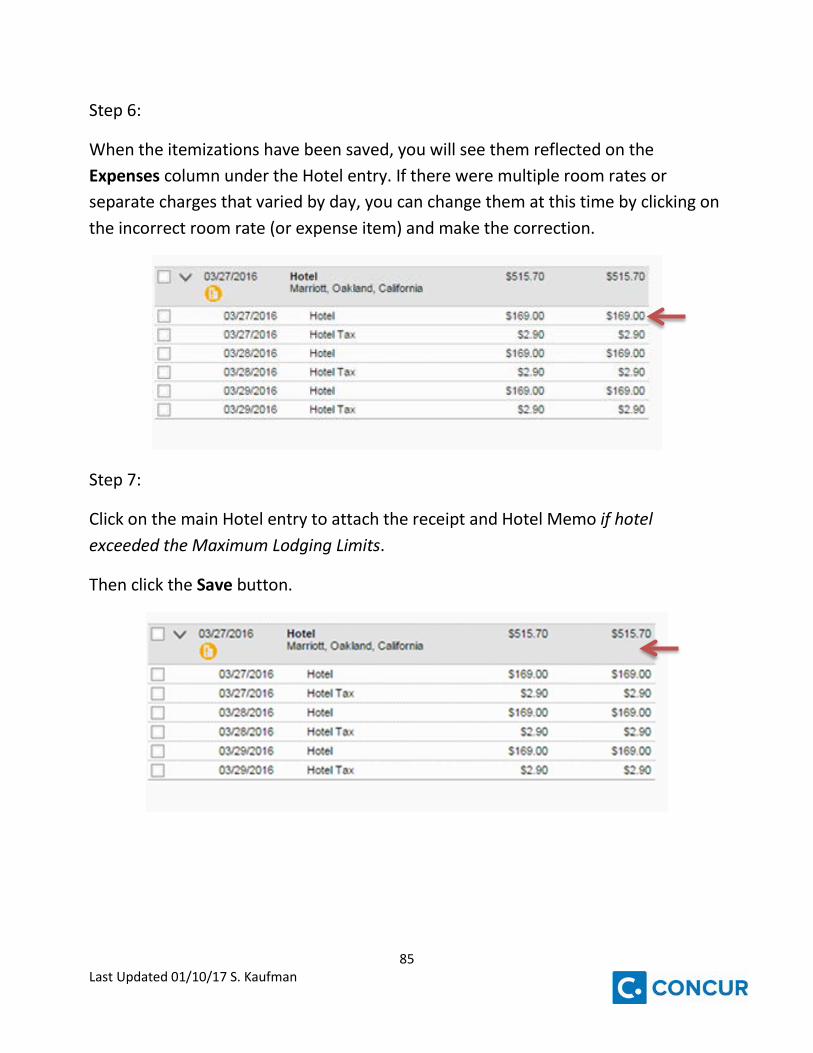
Step 6:
When the itemizations have been saved, you will see them reflected on the Expenses column under the Hotel entry. If there were multiple room rates or separate charges that varied by day, you can change them at this time by clicking on the incorrect room rate (or expense item) and make the correction.
Step 7:
Click on the main Hotel entry to attach the receipt and Hotel Memo if hotel exceeded the Maximum Lodging Limits.
Then click the Save button.
86 Last Updated 01/10/17 S. Kaufman
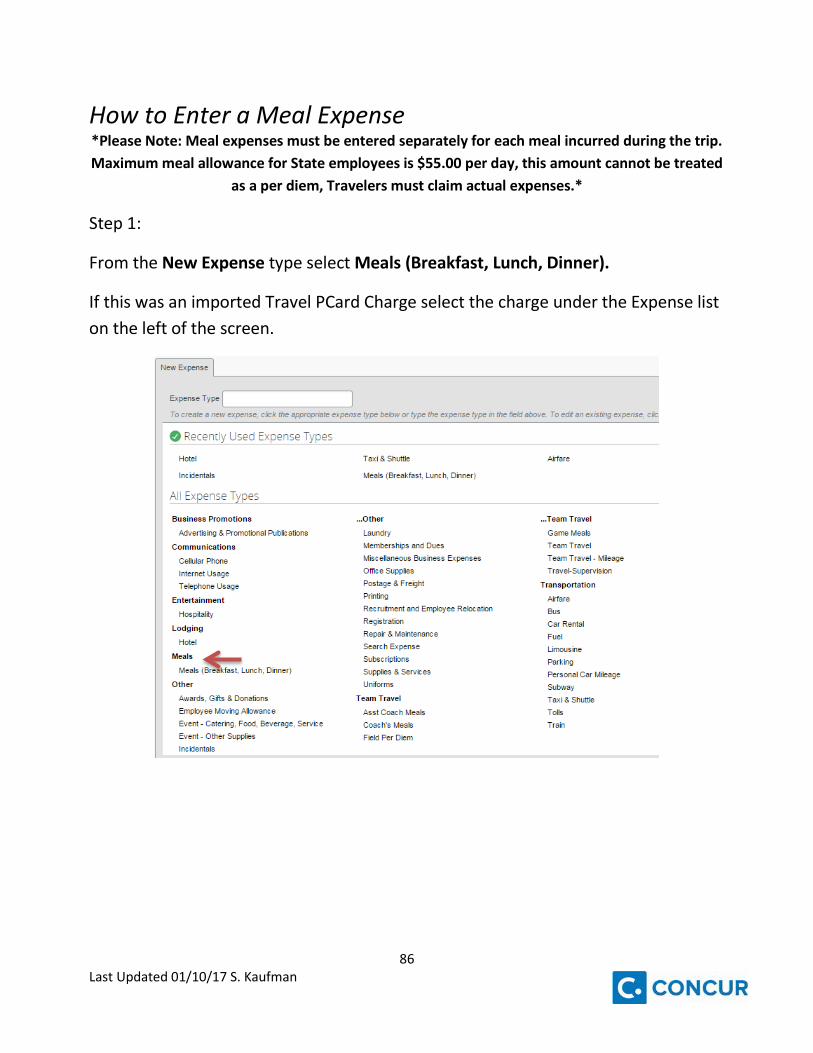
How to Enter a Meal Expense *Please Note: Meal expenses must be entered separately for each meal incurred during the trip. Maximum meal allowance for State employees is $55.00 per day, this amount cannot be treated
as a per diem, Travelers must claim actual expenses.*
Step 1:
From the New Expense type select Meals (Breakfast, Lunch, Dinner).
If this was an imported Travel PCard Charge select the charge under the Expense list on the left of the screen.
87 Last Updated 01/10/17 S. Kaufman
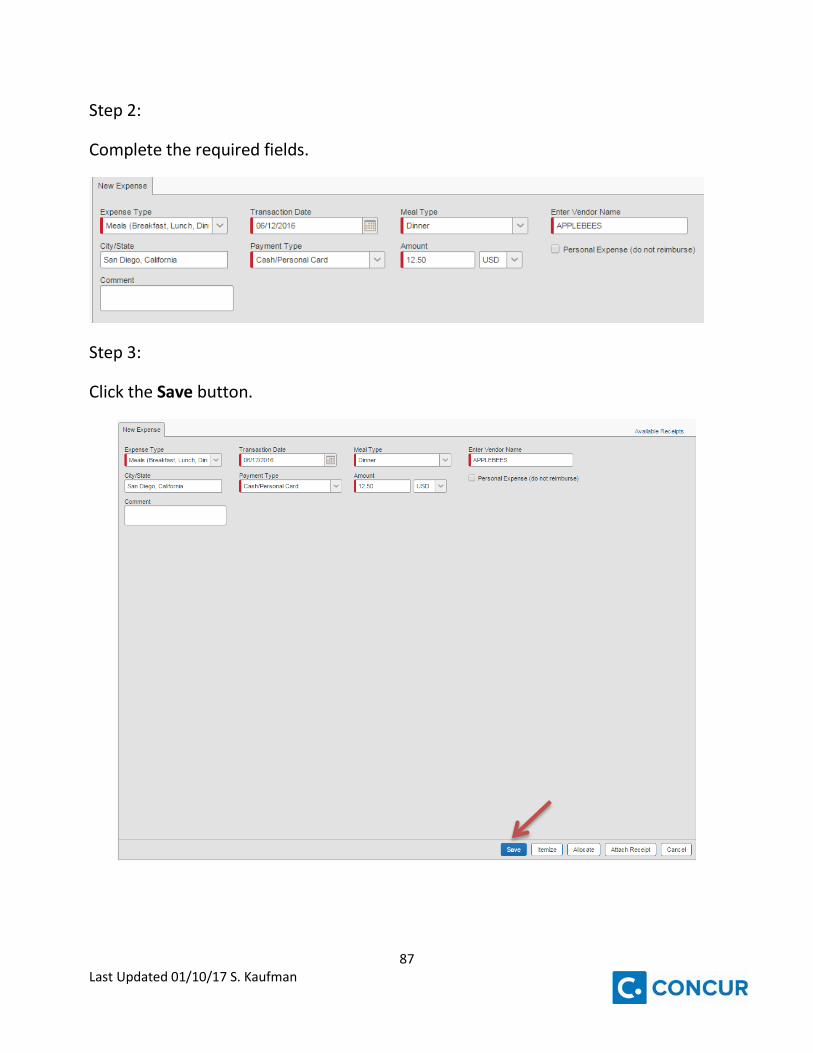
Step 2:
Complete the required fields.
Step 3:
Click the Save button.
88 Last Updated 01/10/17 S. Kaufman
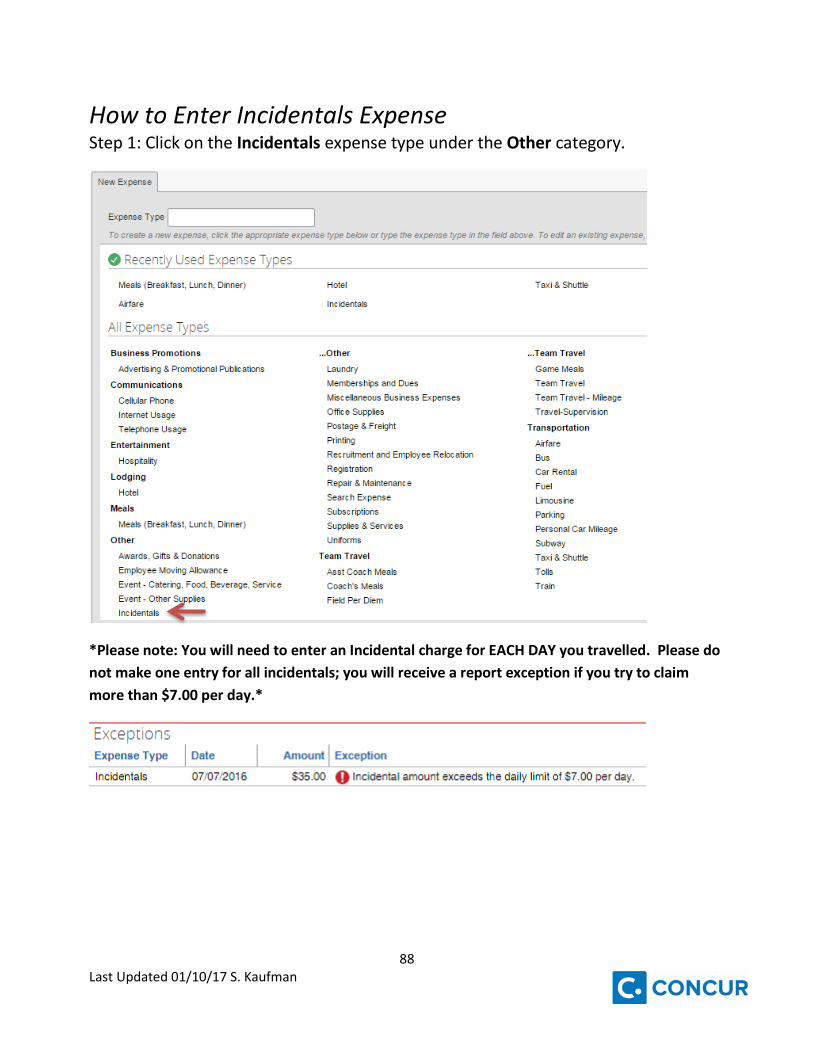
How to Enter Incidentals Expense Step 1: Click on the Incidentals expense type under the Other category.
*Please note: You will need to enter an Incidental charge for EACH DAY you travelled. Please do not make one entry for all incidentals; you will receive a report exception if you try to claim more than $7.00 per day.*

89 Last Updated 01/10/17 S. Kaufman
Step 2:
Complete the required fields.
Step 3:
Click the Save button.
90 Last Updated 01/10/17 S. Kaufman
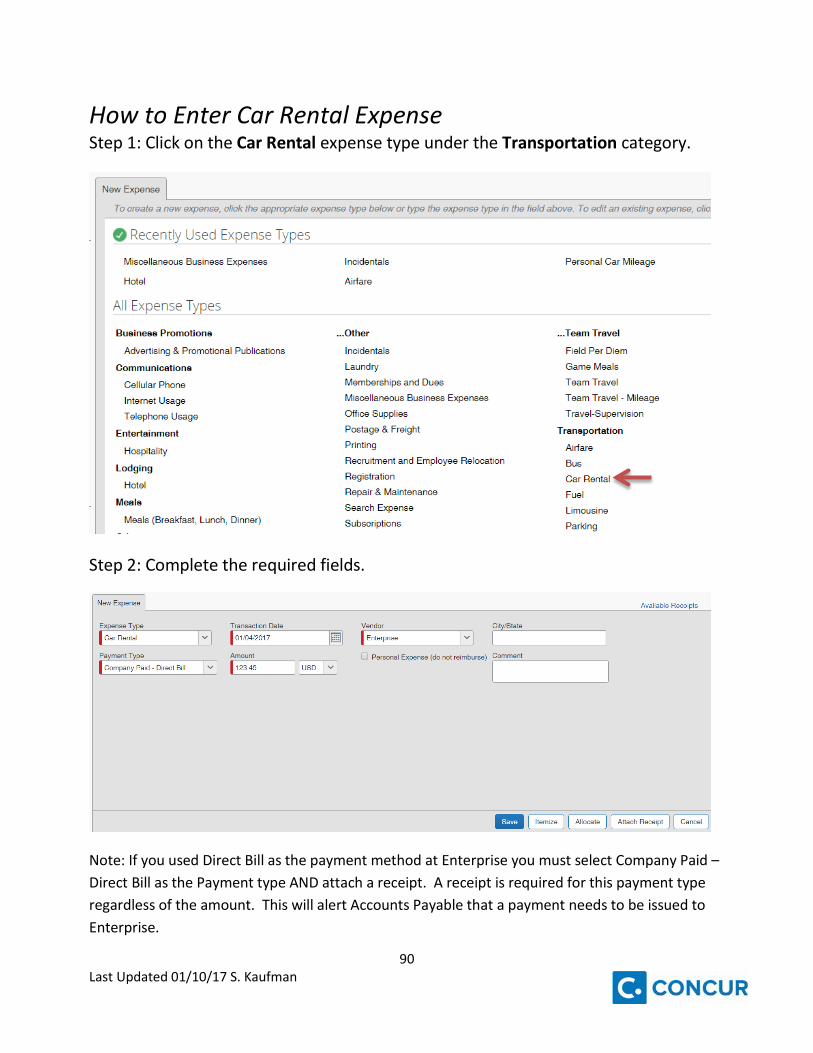
How to Enter Car Rental Expense Step 1: Click on the Car Rental expense type under the Transportation category.
Step 2: Complete the required fields.
Note: If you used Direct Bill as the payment method at Enterprise you must select Company Paid – Direct Bill as the Payment type AND attach a receipt. A receipt is required for this payment type regardless of the amount. This will alert Accounts Payable that a payment needs to be issued to Enterprise.

91 Last Updated 01/10/17 S. Kaufman
Step 3:
Click the Save button.
92 Last Updated 01/10/17 S. Kaufman
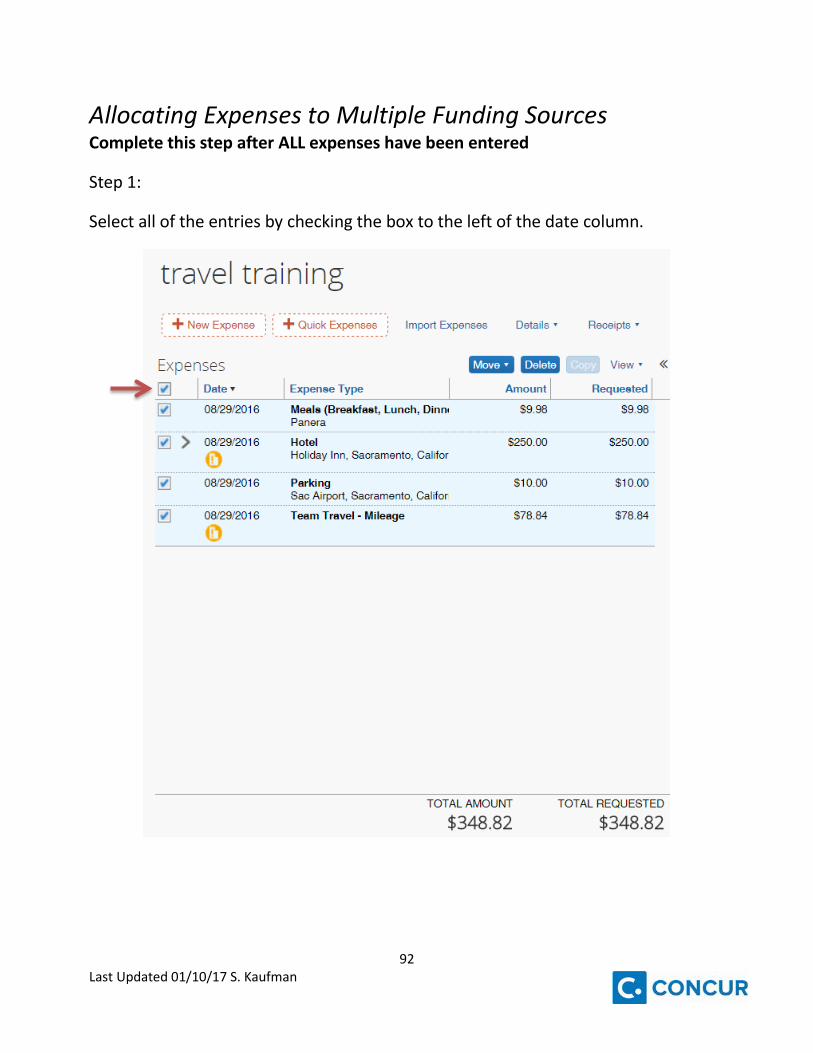
Allocating Expenses to Multiple Funding Sources Complete this step after ALL expenses have been entered
Step 1:
Select all of the entries by checking the box to the left of the date column.
93 Last Updated 01/10/17 S. Kaufman
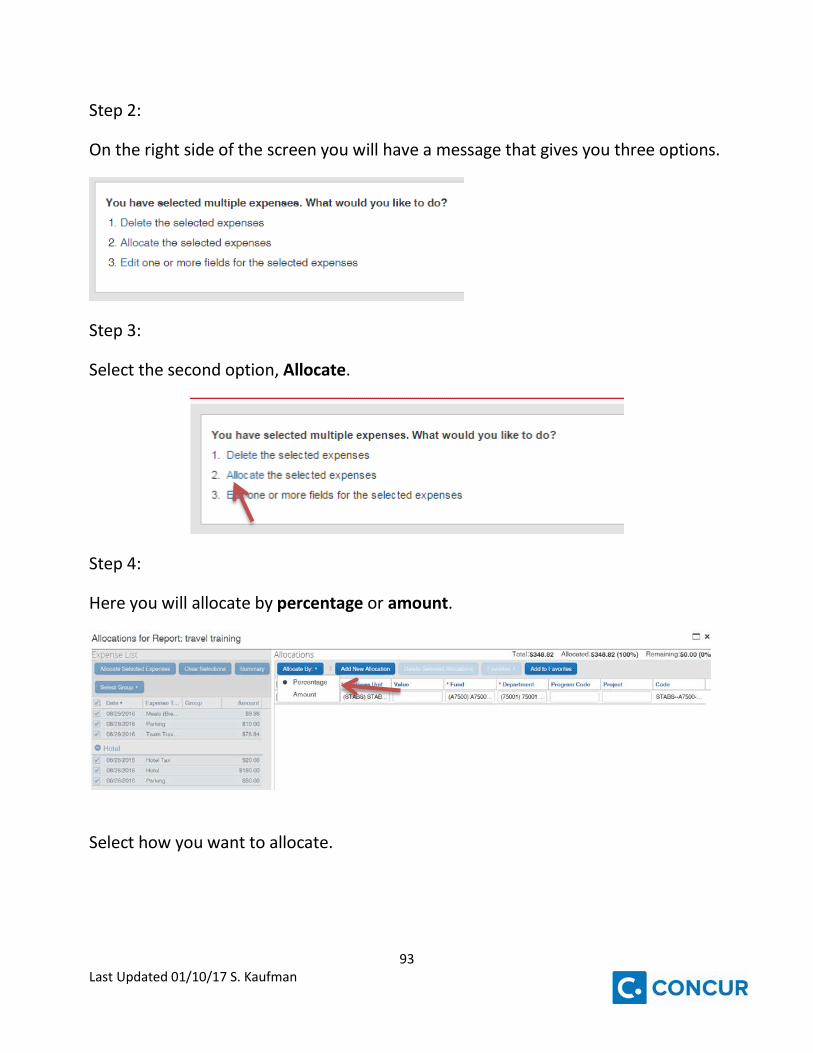
Step 2:
On the right side of the screen you will have a message that gives you three options.
Step 3:
Select the second option, Allocate.
Step 4:
Here you will allocate by percentage or amount.
Select how you want to allocate.
94 Last Updated 01/10/17 S. Kaufman
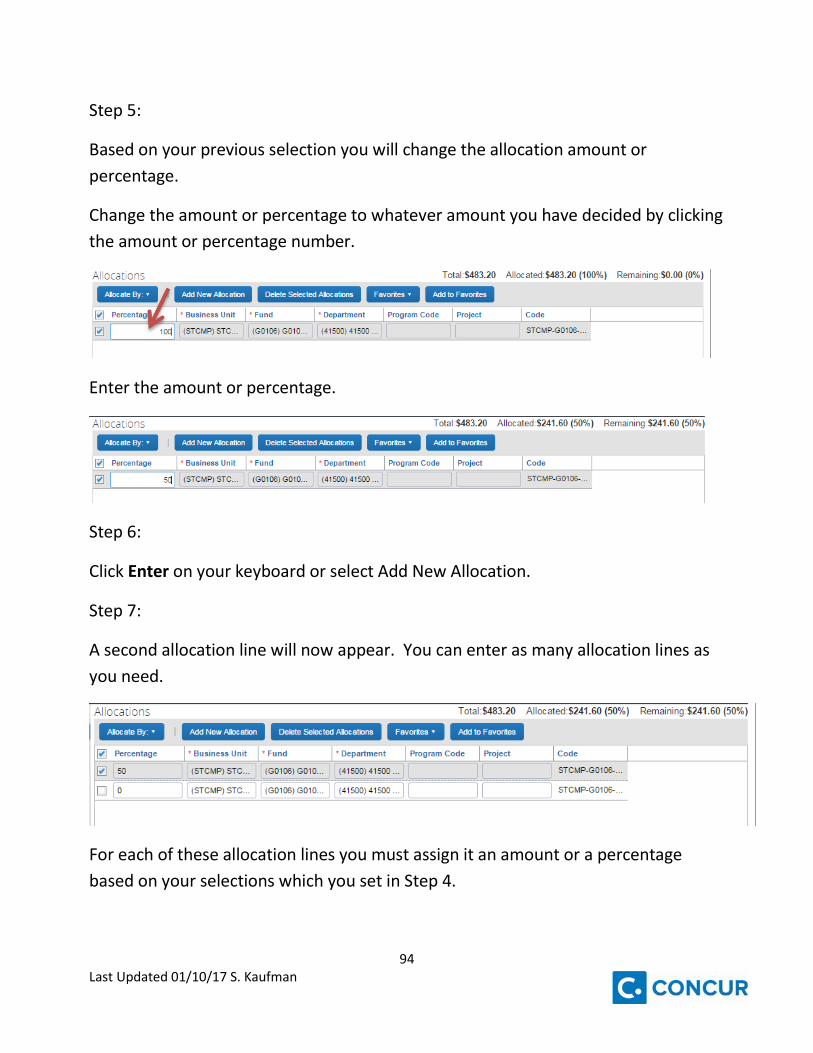
Step 5:
Based on your previous selection you will change the allocation amount or percentage.
Change the amount or percentage to whatever amount you have decided by clicking the amount or percentage number.
Enter the amount or percentage.
Step 6:
Click Enter on your keyboard or select Add New Allocation.
Step 7:
A second allocation line will now appear. You can enter as many allocation lines as you need.
For each of these allocation lines you must assign it an amount or a percentage based on your selections which you set in Step 4.

95 Last Updated 01/10/17 S. Kaufman
Step 8:
To change the chartstring on each allocation line, click on the box next to the allocation line you wish to change.
Step 9:
Click on the Fund (if applicable) and make your selection from the drop down or you can type in the fund and click on it once it appears.
Step 10:
Click on the Department and make your selection from the drop down or you can type in the department and click on it once it appears.

96 Last Updated 01/10/17 S. Kaufman
Step 11:
Click on Program Code and Project if applicable. Continue these steps until all your allocation lines have been allocated to the various chartstrings.
Note: When entering a grant, which requires a project code, you must enter N/A in the Program field to unlock the Project field option.
Step 12: Once all your allocations have been completed click the Save button.

97 Last Updated 01/10/17 S. Kaufman
Step 13:
You will receive a pop-up that will notify you of errors or to confirm that your allocations were saved.
Step 14:
If you received an error, please make the changes in the allocations. If your changes were successfully saved click the Done button.
You will see a little icon next to allocated charges, see example below:
98 Last Updated 01/10/17 S. Kaufman
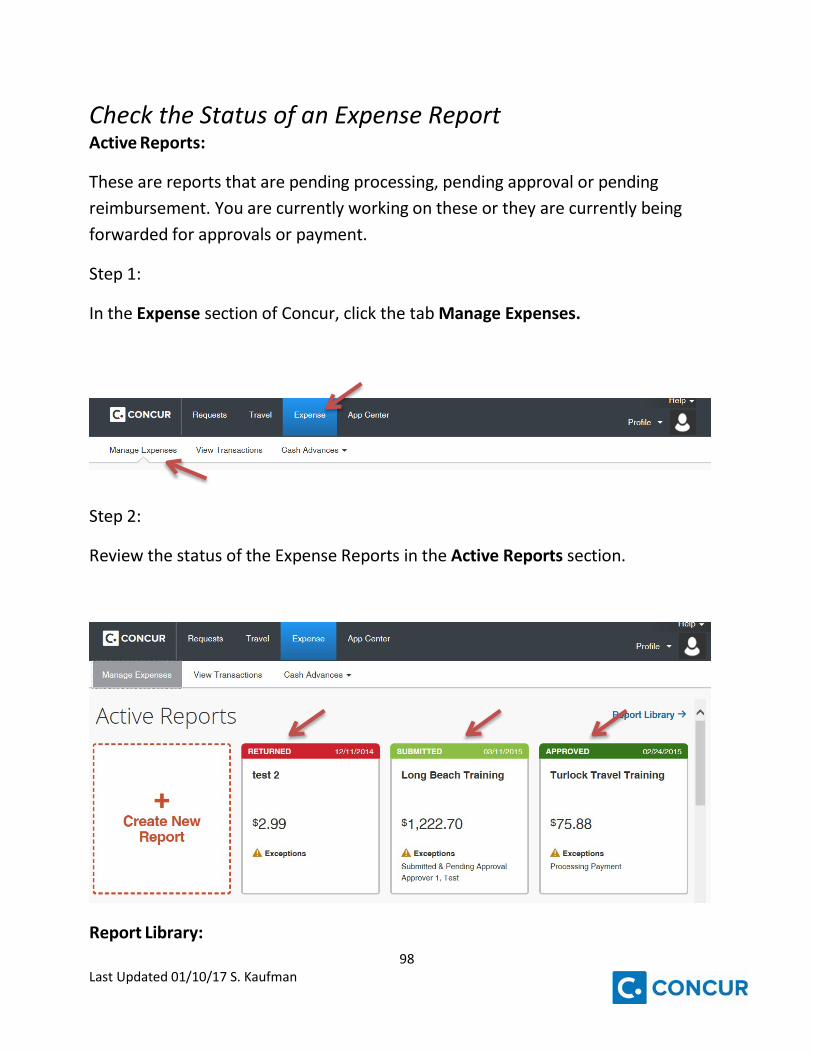
Check the Status of an Expense Report Active Reports:
These are reports that are pending processing, pending approval or pending reimbursement. You are currently working on these or they are currently being forwarded for approvals or payment.
Step 1:
In the Expense section of Concur, click the tab Manage Expenses.
Step 2:
Review the status of the Expense Reports in the Active Reports section.
Report Library:
99 Last Updated 01/10/17 S. Kaufman
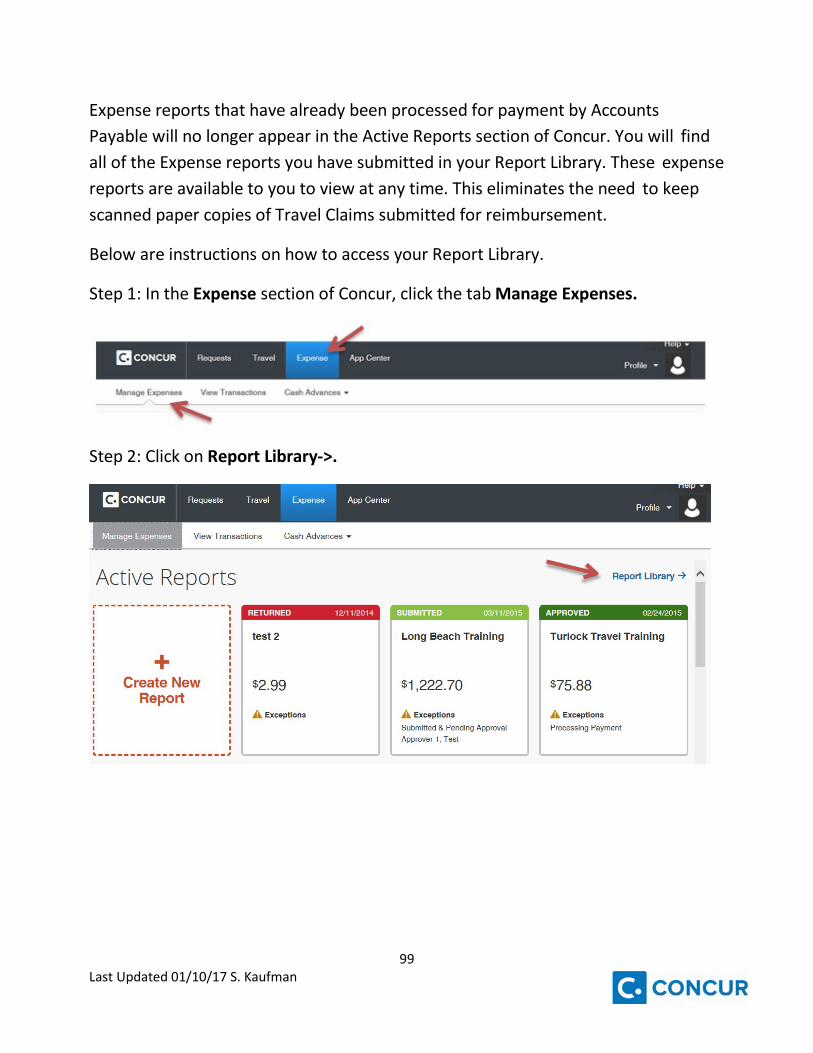
Expense reports that have already been processed for payment by Accounts Payable will no longer appear in the Active Reports section of Concur. You will find all of the Expense reports you have submitted in your Report Library. These expense reports are available to you to view at any time. This eliminates the need to keep scanned paper copies of Travel Claims submitted for reimbursement.
Below are instructions on how to access your Report Library.
Step 1: In the Expense section of Concur, click the tab Manage Expenses.
Step 2: Click on Report Library->.
100 Last Updated 01/10/17 S. Kaufman
Step 3:
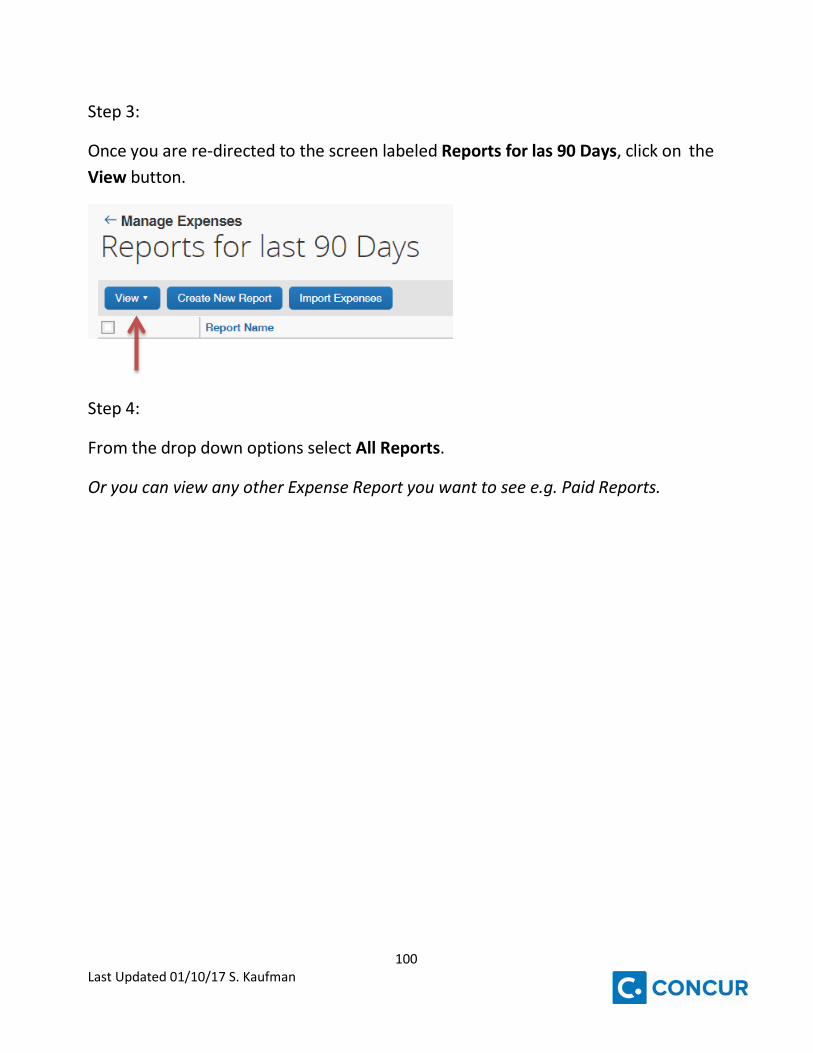
Once you are re-directed to the screen labeled Reports for las 90 Days, click on the View button.
Step 4:
From the drop down options select All Reports.
Or you can view any other Expense Report you want to see e.g. Paid Reports.
101 Last Updated 01/10/17 S. Kaufman
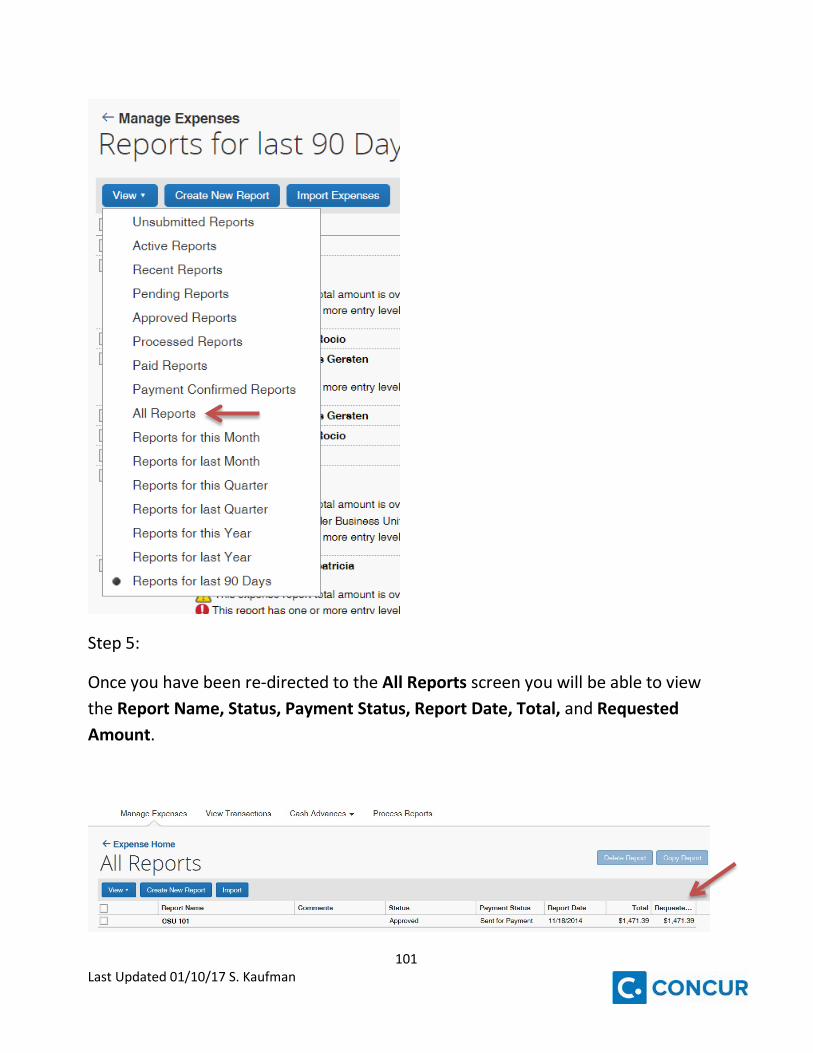
Step 5:
Once you have been re-directed to the All Reports screen you will be able to view the Report Name, Status, Payment Status, Report Date, Total, and Requested Amount.
102 Last Updated 01/10/17 S. Kaufman
Step 6:
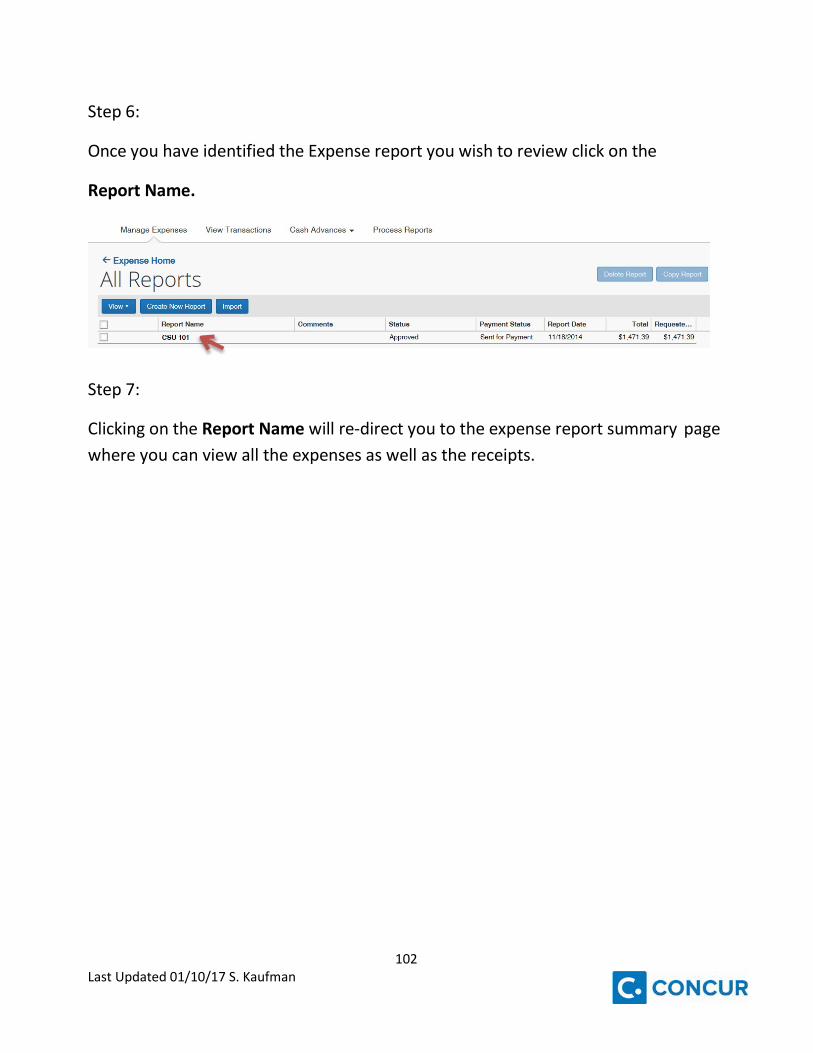
Once you have identified the Expense report you wish to review click on the
Report Name.
Step 7:
Clicking on the Report Name will re-direct you to the expense report summary page where you can view all the expenses as well as the receipts.
103 Last Updated 01/10/17 S. Kaufman
Acting as a Delegate What is this?
A delegate is an individual authorized to process expense reports or requests on behalf of another Concur user.
Why is this important?
Adding a Request & Expense Delegate will authorize that delegate to prepare expense reports or travel requests on your behalf.
Travel Custodian or Delegate Responsibility:
Each University Department assigns at least one person (can be more than one) to be the travel custodian for the department, and each Grant Principal Investigator (PI) assigns a custodian for their grant travel documents.
The travel custodian is responsible for:
Reading, understanding, and conforming to the CSU Stanislaus Travel Policy and Travel Procedures.
Preparing Travel Expense and submitting within 60 days after the date of travel.
Be the departmental liaison with the Travel Office regarding all travel matters.
104 Last Updated 01/10/17 S. Kaufman
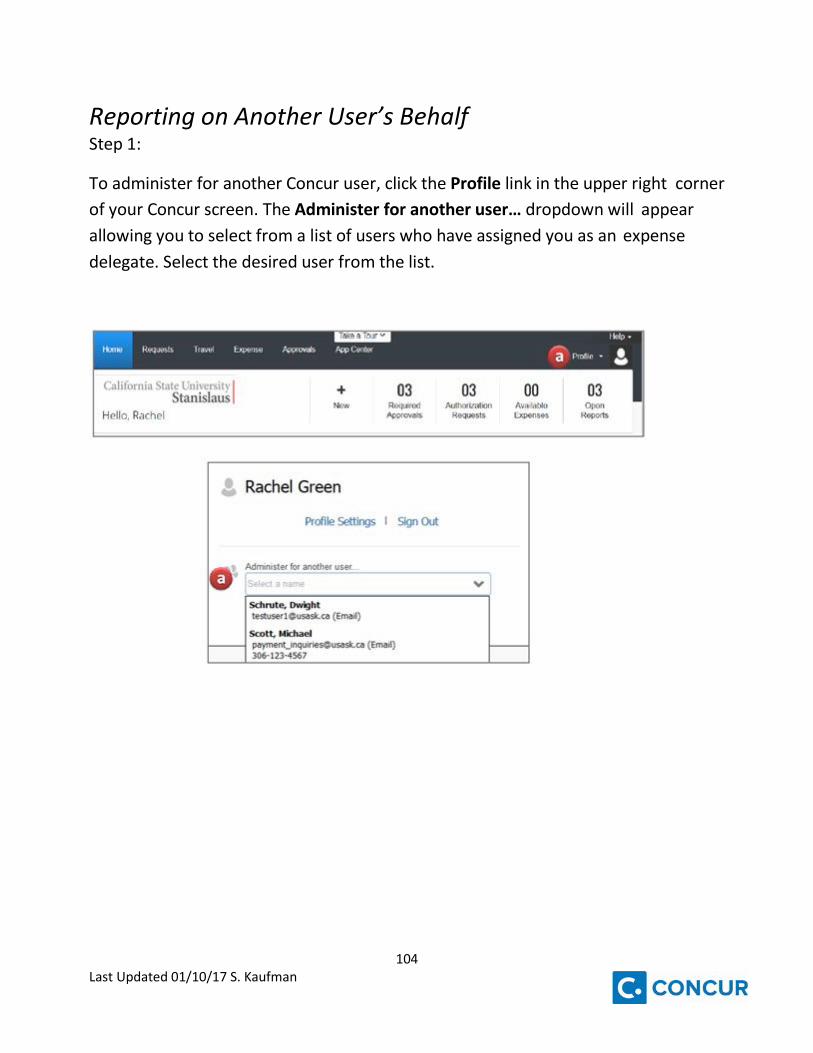
Reporting on Another User’s Behalf Step 1:
To administer for another Concur user, click the Profile link in the upper right corner of your Concur screen. The Administer for another user… dropdown will appear allowing you to select from a list of users who have assigned you as an expense delegate. Select the desired user from the list.
105 Last Updated 01/10/17 S. Kaufman
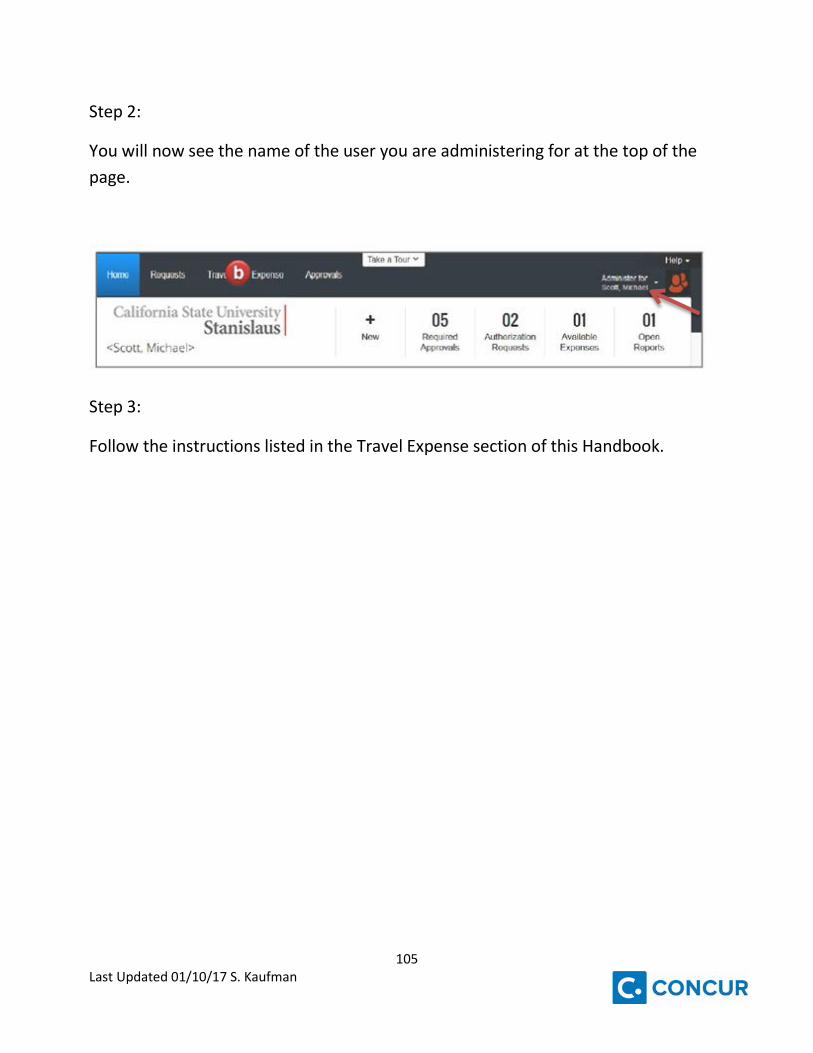
Step 2:
You will now see the name of the user you are administering for at the top of the page.
Step 3:
Follow the instructions listed in the Travel Expense section of this Handbook.
106 Last Updated 01/10/17 S. Kaufman
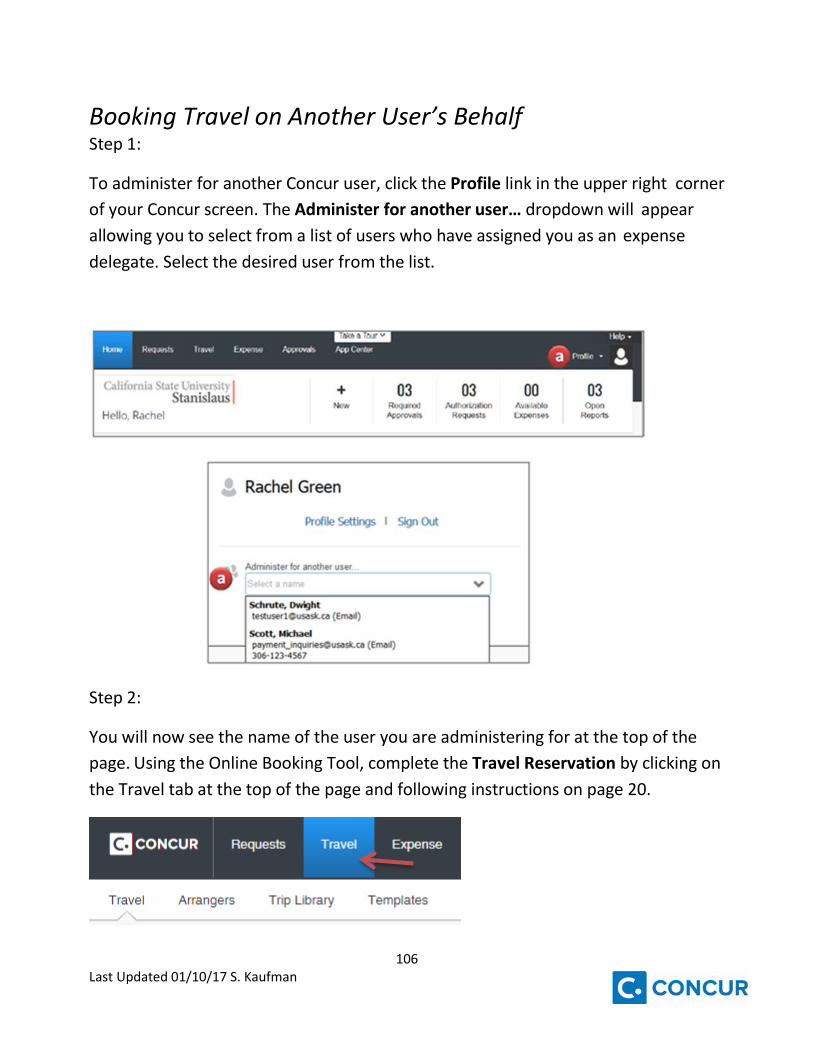
Booking Travel on Another User’s Behalf Step 1:
To administer for another Concur user, click the Profile link in the upper right corner of your Concur screen. The Administer for another user… dropdown will appear allowing you to select from a list of users who have assigned you as an expense delegate. Select the desired user from the list.
Step 2:
You will now see the name of the user you are administering for at the top of the page. Using the Online Booking Tool, complete the Travel Reservation by clicking on the Travel tab at the top of the page and following instructions on page 20.
107 Last Updated 01/10/17 S. Kaufman
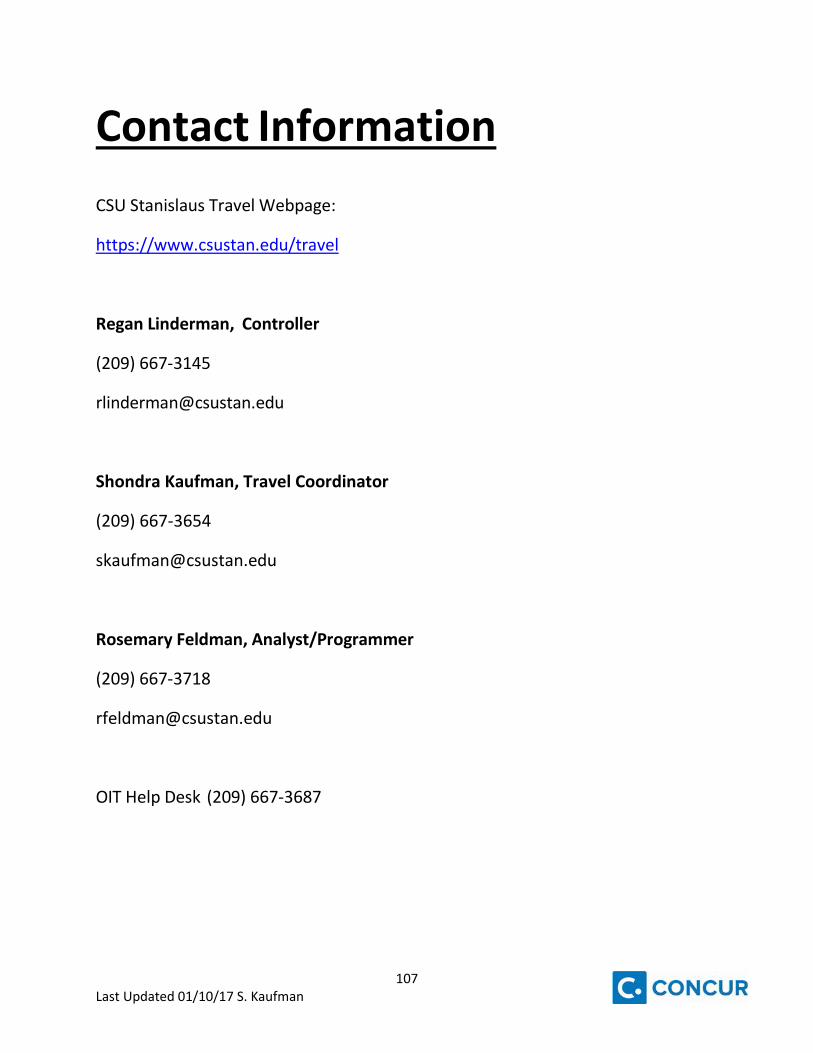
Contact Information
CSU Stanislaus Travel Webpage:
https://www.csustan.edu/travel
Regan Linderman, Controller
(209) 667-3145
Shondra Kaufman, Travel Coordinator
(209) 667-3654
Rosemary Feldman, Analyst/Programmer
(209) 667-3718
OIT Help Desk (209) 667-3687