Embed Size (px)
Citation preview
SAP Concur
Travel and Expense Manual
REV 10/29/2018
REV 10/29/2018 2
Table of Contents Table of Contents .......................................................................................................................................... 2
Welcome to SAP Concur ............................................................................................................................... 4
Exploring the SAP Concur Home Page .......................................................................................................... 6
Updating Your Profile .................................................................................................................................... 8
Verifying Personal Information ............................................................................................................... 9
Updating Travel Preferences.................................................................................................................. 10
Adding Expense Delegates ..................................................................................................................... 12
Viewing Your Fund Center Information ................................................................................................. 13
Activating E-Receipts .............................................................................................................................. 14
Acting as a Delegate .................................................................................................................................... 15
Submitting a Travel Request ....................................................................................................................... 16
Submitting a Travel Request ................................................................................................................... 16
Recall a Request ...................................................................................................................................... 19
Cancel a Request ..................................................................................................................................... 20
Close/Inactivate Request ........................................................................................................................ 20
Viewing Requests .................................................................................................................................... 20
Using SAP Concur Travel ............................................................................................................................. 21
Flight Reservations .................................................................................................................................. 21
Car Reservations ..................................................................................................................................... 24
Hotel Reservations .................................................................................................................................. 25
Completing the Reservation ................................................................................................................... 26
Cancelling or Changing a Reservation ..................................................................................................... 27
Acting as a Travel Assistant or Arranger ................................................................................................. 27
Creating a Travel Expense Report ............................................................................................................... 28
Creating a Non-Travel Expense Report ....................................................................................................... 29
Adding Expenses to a Report ...................................................................................................................... 31
Itemizing Expenses .................................................................................................................................. 32
REV 10/29/2018 3
Allocating Expenses................................................................................................................................. 32
Entering Personal Car Mileage ................................................................................................................ 32
Adding Attendees to Business Meals ...................................................................................................... 32
Converting Currency ............................................................................................................................... 33
Missing Receipt Affidavit ........................................................................................................................ 33
Exceptions ............................................................................................................................................... 33
Attaching Receipts to an Expense Report ............................................................................................... 34
Submitting an Expense Report .................................................................................................................... 35
Recalling a Report ................................................................................................................................... 35
Returned Expense Report ....................................................................................................................... 35
Viewing Expense Reports ............................................................................................................................ 36
Support Contacts ........................................................................................................................................ 36
REV 10/29/2018 4
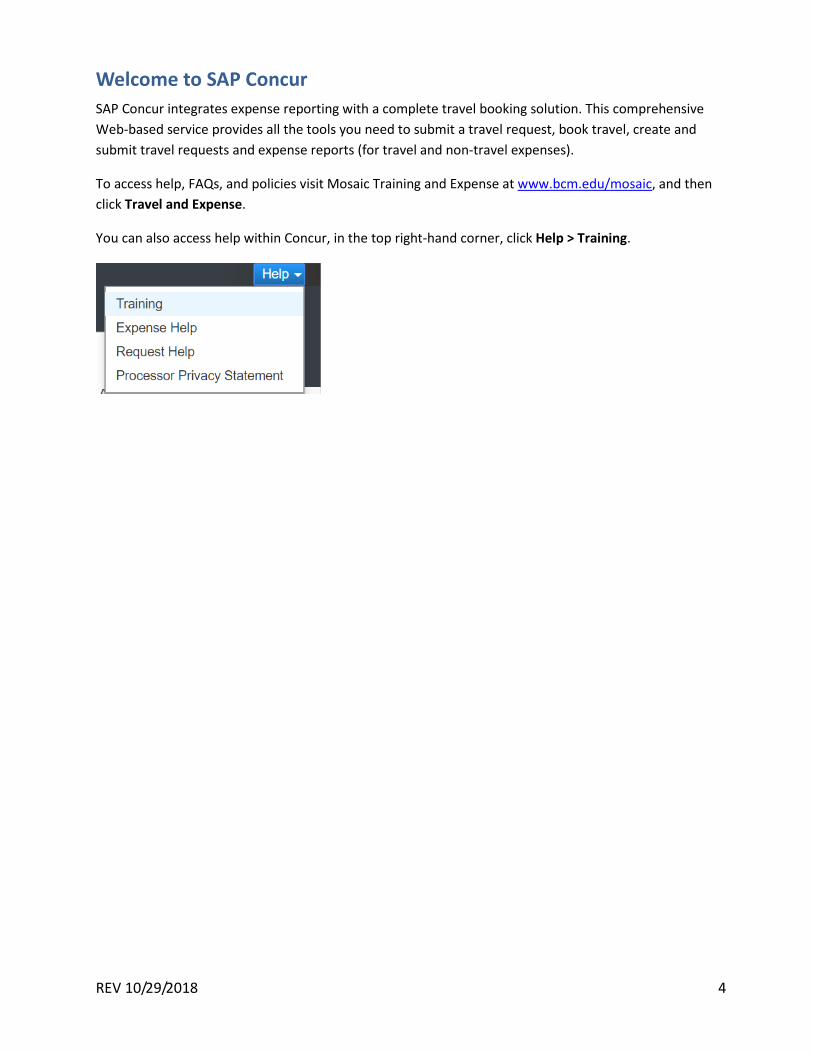
Welcome to SAP Concur SAP Concur integrates expense reporting with a complete travel booking solution. This comprehensive Web-based service provides all the tools you need to submit a travel request, book travel, create and submit travel requests and expense reports (for travel and non-travel expenses).
To access help, FAQs, and policies visit Mosaic Training and Expense at www.bcm.edu/mosaic, and then click Travel and Expense.
You can also access help within Concur, in the top right-hand corner, click Help > Training.

REV 10/29/2018 5
Signing in to SAP Concur
Login to www.bcm.edu/concur-solutions or click Concur Logon from the Travel and Expense website (www.bcm.edu/mosaic > Travel and Expense).
SAP Concur uses Single Sign-On (SSO), if prompted, log in with your BCM account.
Policies, FAQs and training are available on the Travel and Expense web page.
Depending on which web browser you use, there will be some slight system differences and functionality. The preferred web browsers are Internet Explorer and Chrome.
REV 10/29/2018 6
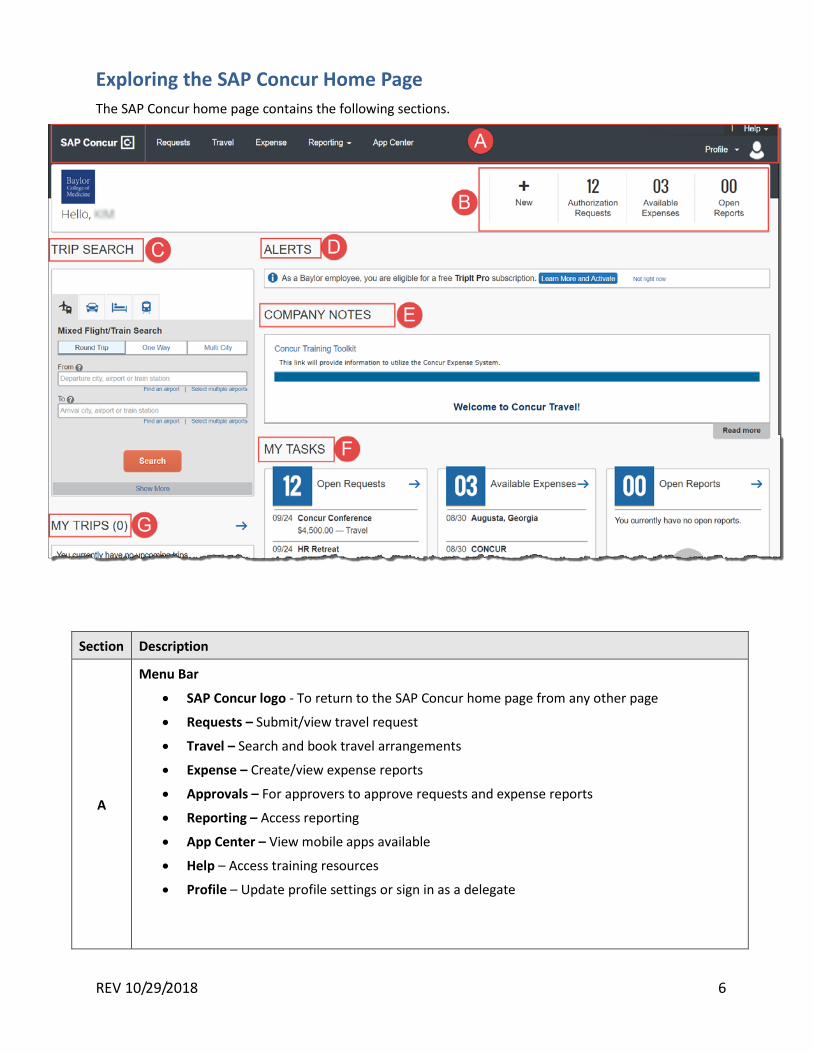
Exploring the SAP Concur Home Page The SAP Concur home page contains the following sections.
Section Description
A
Menu Bar
• SAP Concur logo - To return to the SAP Concur home page from any other page
• Requests – Submit/view travel request
• Travel – Search and book travel arrangements
• Expense – Create/view expense reports
• Approvals – For approvers to approve requests and expense reports
• Reporting – Access reporting
• App Center – View mobile apps available
• Help – Access training resources
• Profile – Update profile settings or sign in as a delegate
REV 10/29/2018 7
B
Quick Task Bar
• Start a new request and report
• Open requests and reports
• Manage available expenses
C
Trip Search
• Flight: Use to book a flight. You can also book hotel and reserve a car at the same time.
• Car, Hotel, Limo, or Rail: Use to book hotels, reserve rental cars, etc. if not including them while booking a flight (Flight tab).
D Alerts - Displays informational alerts
E Company Notes – Displays informational content
F My Tasks – Lists open requests, available expenses, open reports, and approvals requiring attention
G My Trips - Lists your upcoming trips
REV 10/29/2018 8
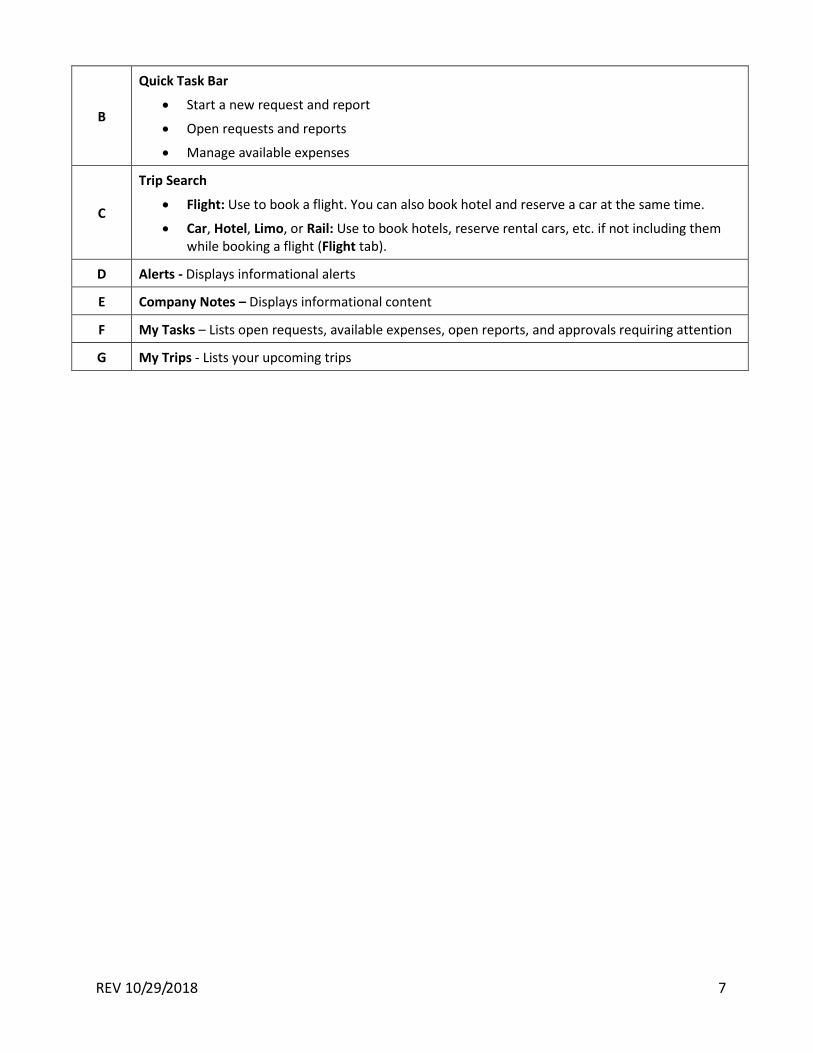
Updating Your Profile You use the Profile Options page to customize your user profile. To avoid re-entering personal and permanent information about yourself (phone number, contacts, credit card information, etc.), complete your profile after logging onto SAP Concur for the first time and update it whenever your information changes.
• Your Information – View/update personal information, verify name matches government issue ID, complete your email address verification, and add credit card information.
• Travel Settings - Enter travel preferences, add international travel information, Frequent-Traveler programs and add passport information. You can also add your travel assistants and arrangers (assist with booking travel).
• Request Settings – View your default request fund center information. Add or remove delegates, and view your permissions if assigned as a delegate for another employee (from the Delegate For tab). Update request email preferences, and add or remove attendees.
• Expense Settings - View your default expense fund center information. Add or remove delegates, and view your permissions if assigned as a delegate for another employee (from the Delegate For tab). Update expense email preferences, and add or remove attendees.
• Other Settings – Provides settings such as E-Receipts Activation and Concur Mobile Registration that you can set up a mobile PIN to sign in.
To access your Profile page 1. Click Profile > Profile Settings.
2. On the Profile Options page, review your information, and select the appropriate links to update your profile
information. You can use the menus on the top of left to select a setting to update.
REV 10/29/2018 9
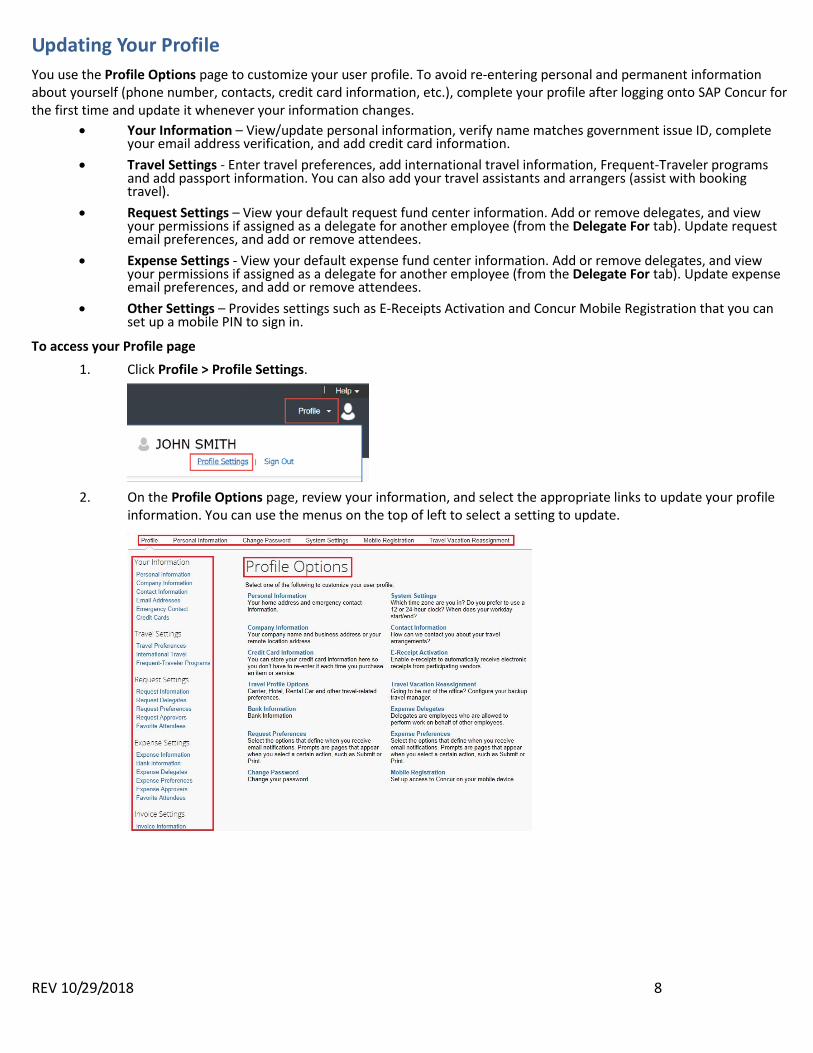
Verifying Personal Information 1. Click Personal Information.
2. In the My Profile – Personal Information section, make sure that the first, middle, and last names shown are
identical to those on the photo identification that you will be presenting at the airport. If you do not have a middle name, select the No Middle Name checkbox.
3. Scroll down and verify your Work and Home Address, and your Contact Information (required fields are
labeled in red).
REV 10/29/2018 10
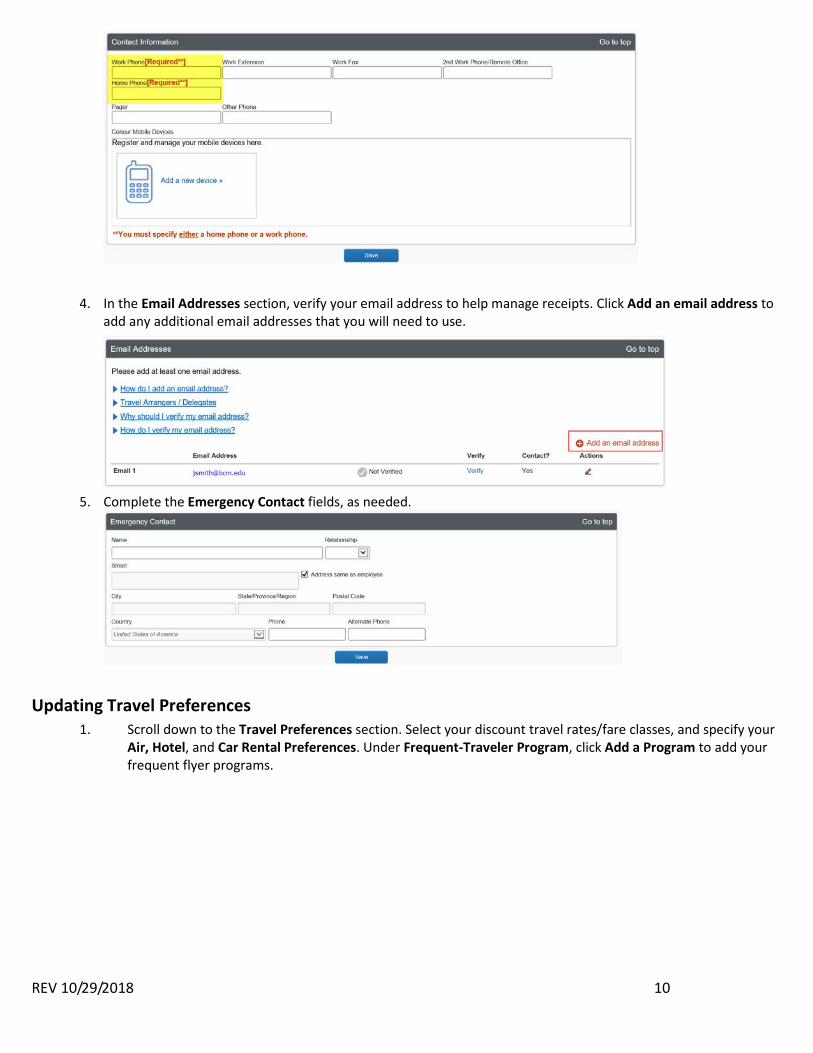
4. In the Email Addresses section, verify your email address to help manage receipts. Click Add an email address to add any additional email addresses that you will need to use.
5. Complete the Emergency Contact fields, as needed.
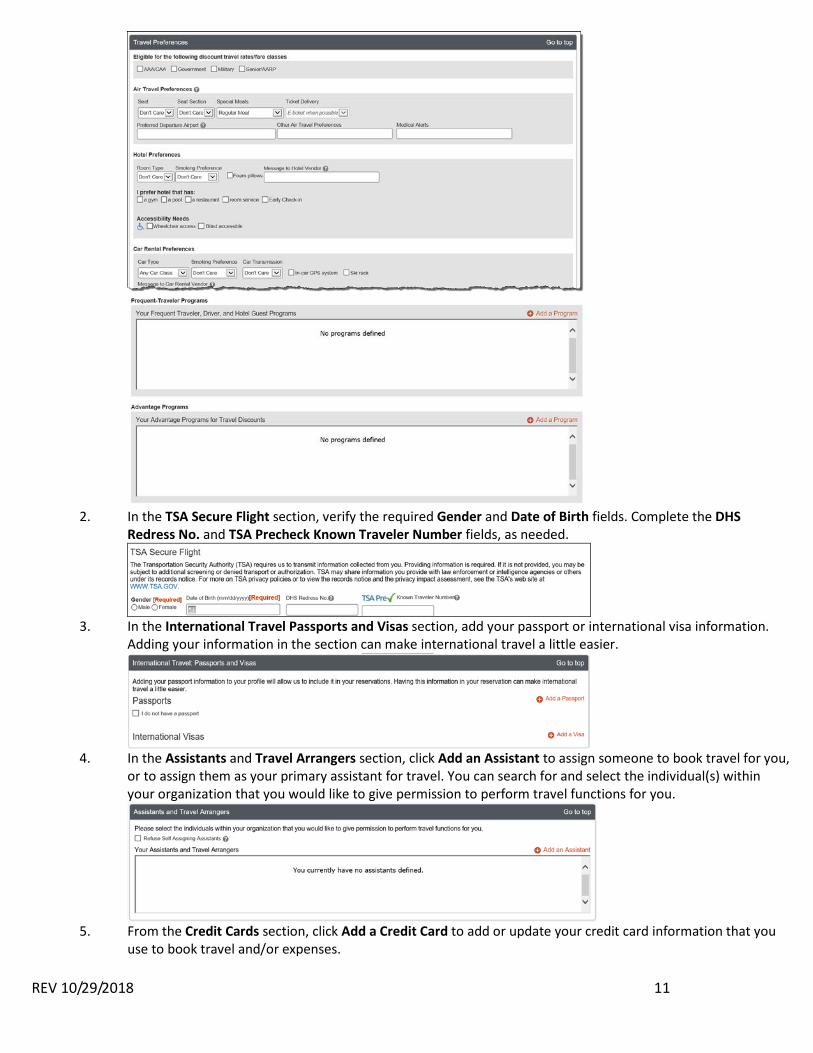
Updating Travel Preferences 1. Scroll down to the Travel Preferences section. Select your discount travel rates/fare classes, and specify your
Air, Hotel, and Car Rental Preferences. Under Frequent-Traveler Program, click Add a Program to add your frequent flyer programs.
REV 10/29/2018 11
2. In the TSA Secure Flight section, verify the required Gender and Date of Birth fields. Complete the DHS
Redress No. and TSA Precheck Known Traveler Number fields, as needed.
3. In the International Travel Passports and Visas section, add your passport or international visa information.
Adding your information in the section can make international travel a little easier.
4. In the Assistants and Travel Arrangers section, click Add an Assistant to assign someone to book travel for you,
or to assign them as your primary assistant for travel. You can search for and select the individual(s) within your organization that you would like to give permission to perform travel functions for you.
5. From the Credit Cards section, click Add a Credit Card to add or update your credit card information that you
use to book travel and/or expenses.

REV 10/29/2018 12
6. After you have completed your Travel Profile updates, click Save .
Adding Expense Delegates
Delegates are employees who you have assigned to work on your behalf for requests, expenses and/or approval. A delegate will share permissions for requests and expense reports. Delegates cannot submit the Missing Receipt Affidavit on behalf of the requestor.
1. Click Request Delegates or Expense Delegates.
2. From the Delegates tab, click the Add button. 3. Search by employee name, email address, employee ID or login ID. 4. Select their name.
5. Specify which tasks you want the delegate to perform on your behalf, and then click the Save button. If you
are an approver, assign the desired approver access (preview or approve).
6. If you have been assigned as a delegate for someone, to view your permissions, click the Delegate For tab.

REV 10/29/2018 13
Viewing Your Fund Center Information
Your funds center will be populated in the Request screen, but the Expense report will need to be completed. You can view your funds center information from the Request screen or Profile Setting under Request Information or Expense Information. If you are unsure which funds center to use, contact your approver or add a comment to the approver.

REV 10/29/2018 14
Activating E-Receipts
E-receipts are an electronic version of receipt data that can be sent directly to SAP Concur to replace imaged paper receipts. The availability and content of e-receipts vary depending on the vendor. BCM is enabled to accept e-receipts from some vendors, and you must opt-in from your Profile before e-receipts activate in Expense. Some vendors require additional paperwork before they can send e-receipt data.
Enabling E-Receipts To sign up for e-receipts
1. Either:
• On the SAP Concur home page, click Sign up here. The E-Receipt Activation page appears. - or -
• Click Profile > Profile Settings > E-Receipts Activation (in the Other Settings section of the left-side menu). 2. Click E-Receipt Activation. The E-Receipt Activation and User Agreement appears.
3. Click I Accept. The E-Receipts confirmation appears. 4. Once you have accepted the user agreement, all your corporate cards are opted-in. You can choose to opt-out
a particular card in Profile > Credit Cards. Select the Edit icon for the card and uncheck the Receive e-receipts for this card check box.
REV 10/29/2018 15
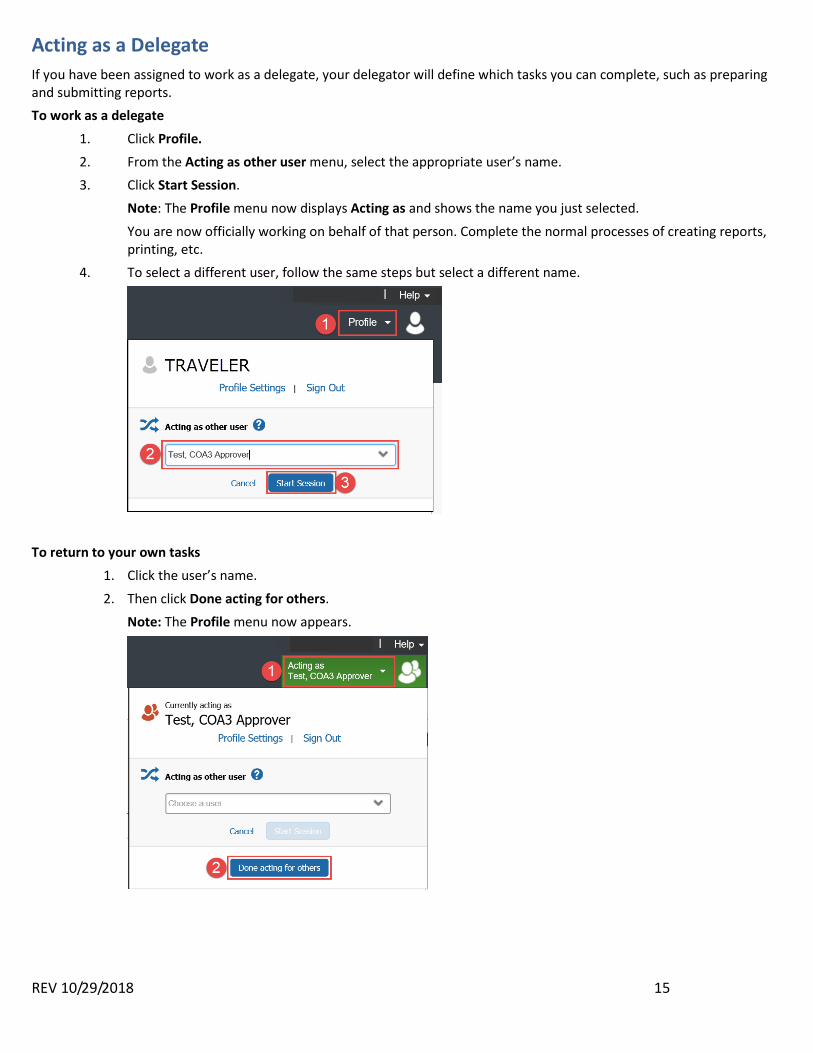
Acting as a Delegate If you have been assigned to work as a delegate, your delegator will define which tasks you can complete, such as preparing and submitting reports. To work as a delegate
1. Click Profile. 2. From the Acting as other user menu, select the appropriate user’s name. 3. Click Start Session.
Note: The Profile menu now displays Acting as and shows the name you just selected.
You are now officially working on behalf of that person. Complete the normal processes of creating reports, printing, etc.
4. To select a different user, follow the same steps but select a different name.
To return to your own tasks
1. Click the user’s name.
2. Then click Done acting for others. Note: The Profile menu now appears.
REV 10/29/2018 16
Submitting a Travel Request Prior to your business trip, submit a travel request for approval. An approved travel request is required for an expense report.
Note: Your profile settings should be completely set up prior to submitting a request and booking travel.
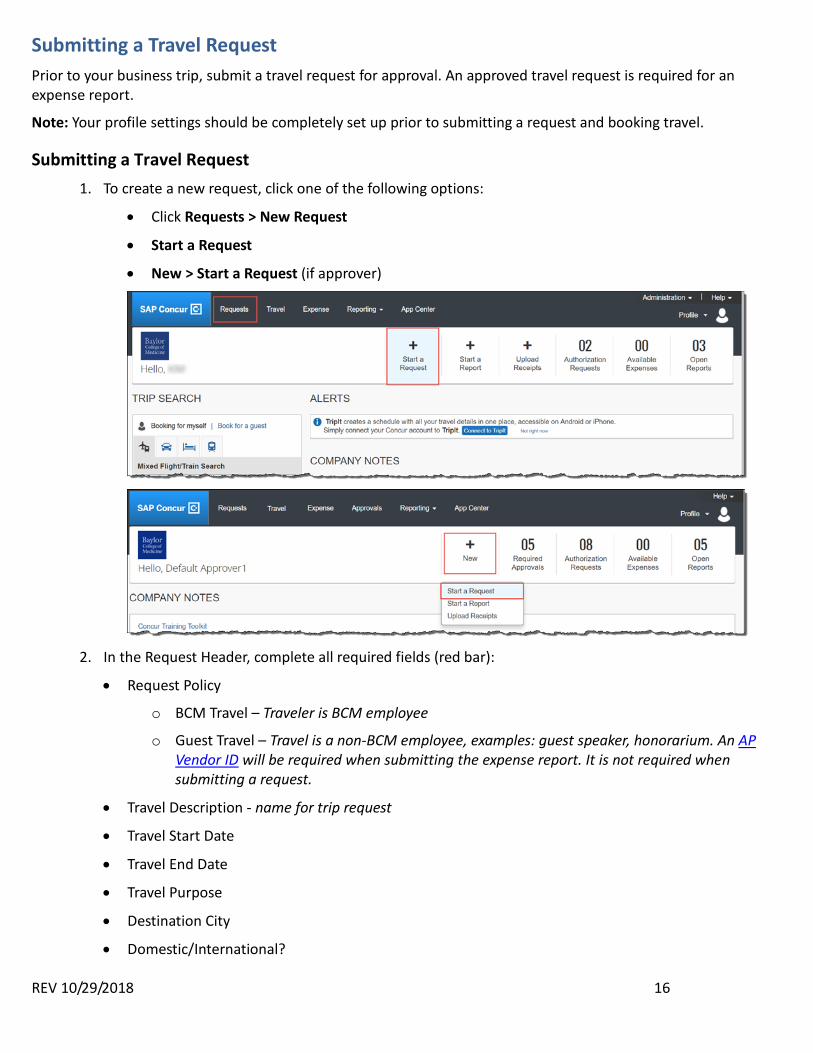
Submitting a Travel Request 1. To create a new request, click one of the following options:
• Click Requests > New Request
• Start a Request
• New > Start a Request (if approver)
2. In the Request Header, complete all required fields (red bar):
• Request Policy
o BCM Travel – Traveler is BCM employee
o Guest Travel – Travel is a non-BCM employee, examples: guest speaker, honorarium. An AP Vendor ID will be required when submitting the expense report. It is not required when submitting a request.
• Travel Description - name for trip request
• Travel Start Date
• Travel End Date
• Travel Purpose
• Destination City
• Domestic/International?
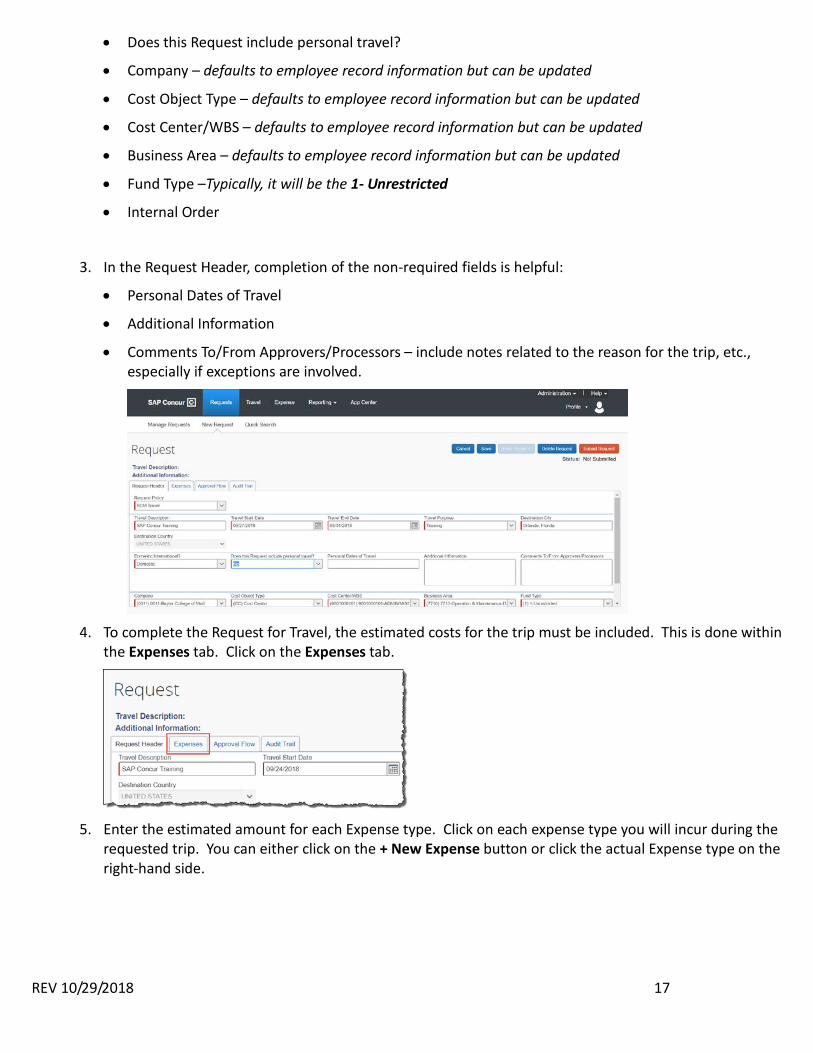
REV 10/29/2018 17
• Does this Request include personal travel?
• Company – defaults to employee record information but can be updated
• Cost Object Type – defaults to employee record information but can be updated
• Cost Center/WBS – defaults to employee record information but can be updated
• Business Area – defaults to employee record information but can be updated
• Fund Type –Typically, it will be the 1- Unrestricted
• Internal Order
3. In the Request Header, completion of the non-required fields is helpful:
• Personal Dates of Travel
• Additional Information
• Comments To/From Approvers/Processors – include notes related to the reason for the trip, etc., especially if exceptions are involved.
4. To complete the Request for Travel, the estimated costs for the trip must be included. This is done within
the Expenses tab. Click on the Expenses tab.
5. Enter the estimated amount for each Expense type. Click on each expense type you will incur during the
requested trip. You can either click on the + New Expense button or click the actual Expense type on the right-hand side.
REV 10/29/2018 18
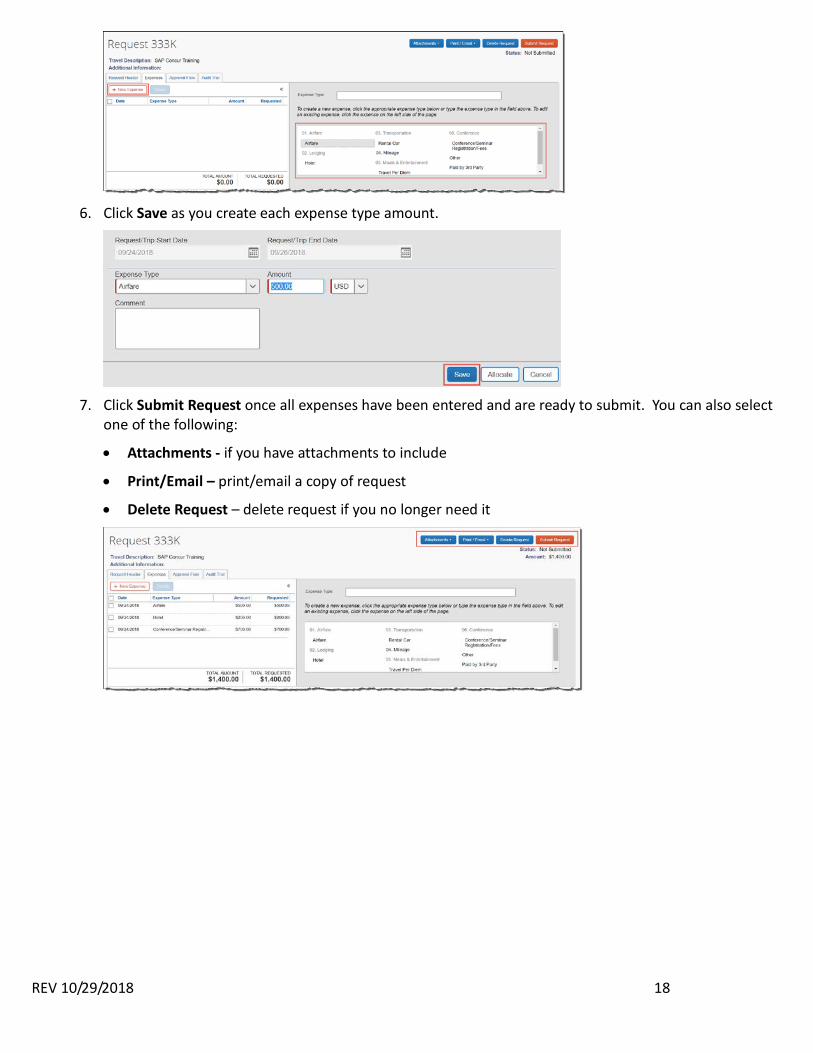
6. Click Save as you create each expense type amount.
7. Click Submit Request once all expenses have been entered and are ready to submit. You can also select
one of the following:
• Attachments - if you have attachments to include
• Print/Email – print/email a copy of request
• Delete Request – delete request if you no longer need it
REV 10/29/2018 19
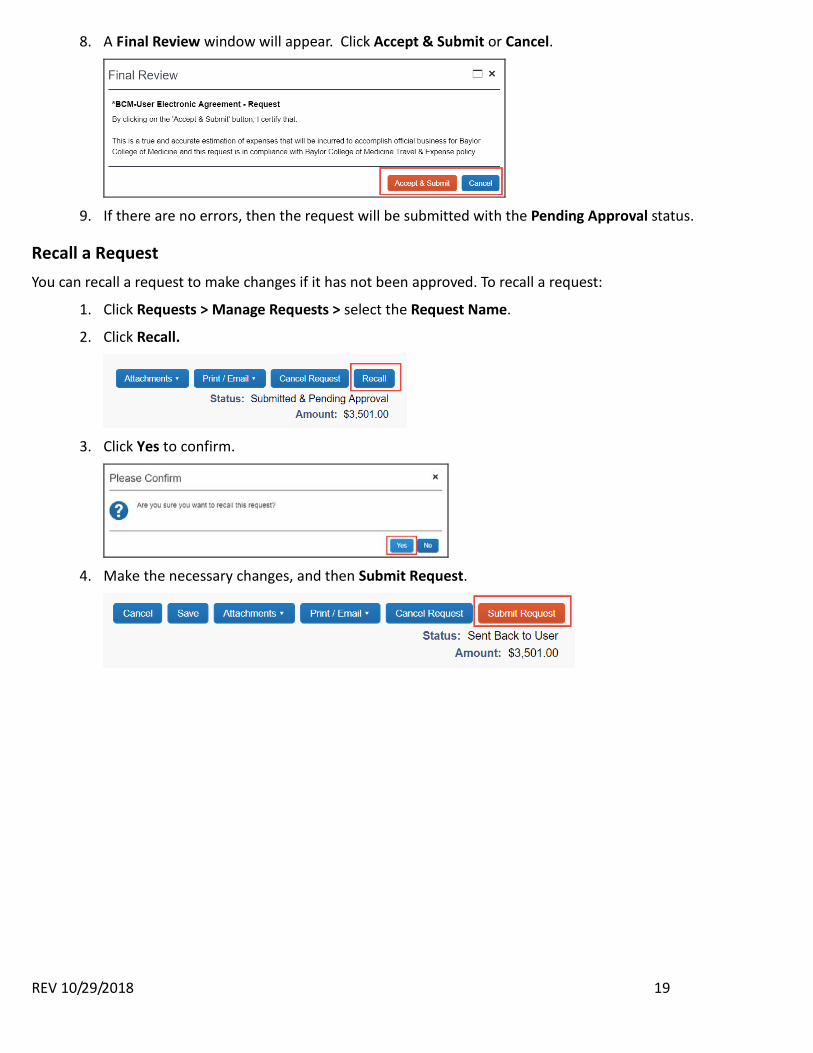
8. A Final Review window will appear. Click Accept & Submit or Cancel.
9. If there are no errors, then the request will be submitted with the Pending Approval status.
Recall a Request You can recall a request to make changes if it has not been approved. To recall a request:
1. Click Requests > Manage Requests > select the Request Name.
2. Click Recall.
3. Click Yes to confirm.
4. Make the necessary changes, and then Submit Request.
REV 10/29/2018 20
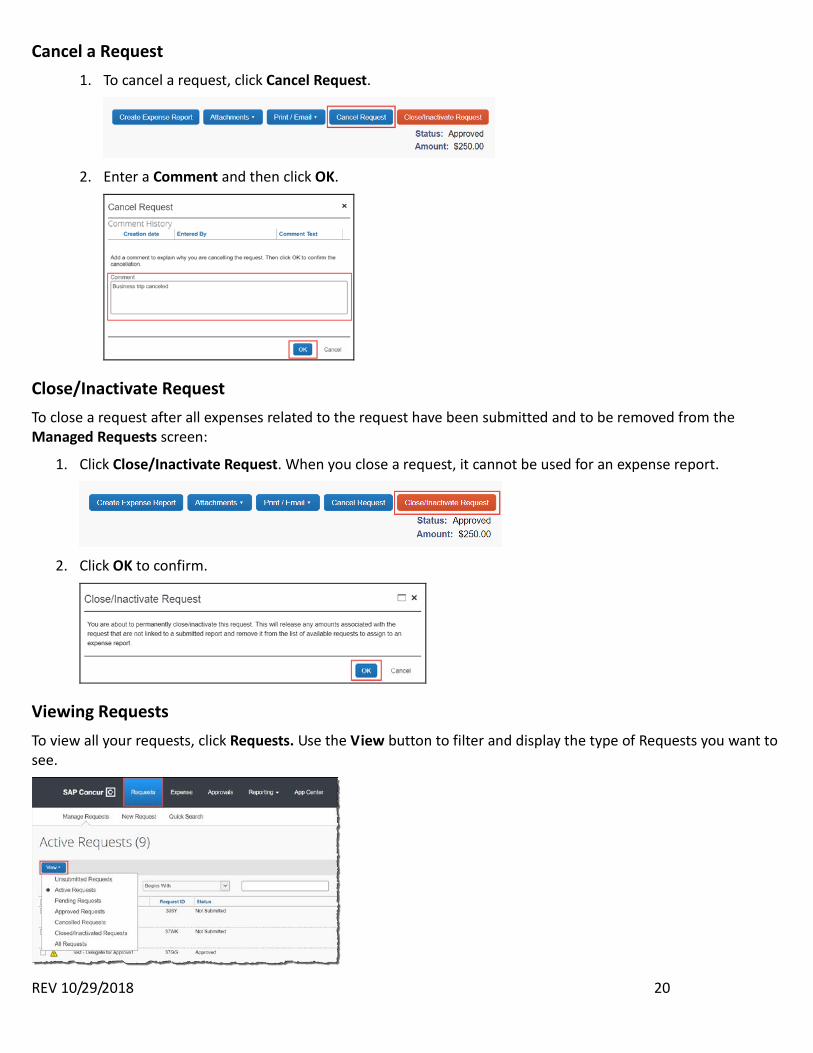
Cancel a Request 1. To cancel a request, click Cancel Request.
2. Enter a Comment and then click OK.
Close/Inactivate Request To close a request after all expenses related to the request have been submitted and to be removed from the Managed Requests screen:
1. Click Close/Inactivate Request. When you close a request, it cannot be used for an expense report.
2. Click OK to confirm.
Viewing Requests To view all your requests, click Requests. Use the View button to filter and display the type of Requests you want to see.
REV 10/29/2018 21
Using SAP Concur Travel You can book airfare, hotel and car rental from our dedicated travel agency FROSCH. From the SAP Concur home page, use the Flight tab to book a flight by itself or with car rental and/or hotel reservations. To book car and hotel reservations without a flight, use the Hotel and Car Search tabs, respectively.
Flight Reservations
You can access the Flight tab (or Air / Rail ) on the left side of the SAP Concur home page.
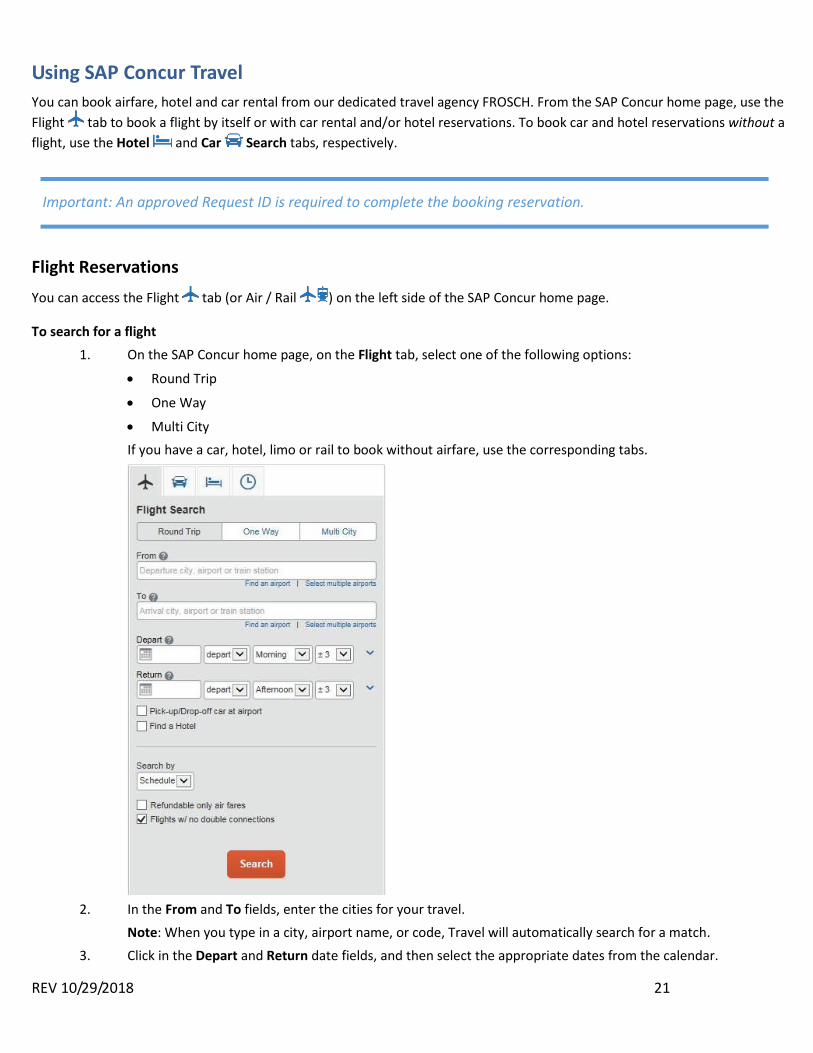
To search for a flight 1. On the SAP Concur home page, on the Flight tab, select one of the following options:
• Round Trip
• One Way
• Multi City If you have a car, hotel, limo or rail to book without airfare, use the corresponding tabs.
2. In the From and To fields, enter the cities for your travel.
Note: When you type in a city, airport name, or code, Travel will automatically search for a match. 3. Click in the Depart and Return date fields, and then select the appropriate dates from the calendar.
Important: An approved Request ID is required to complete the booking reservation.
REV 10/29/2018 22
4. Select depart or arrive, the time of day you want to fly, and time range from the dropdown arrows. Note: Travel will automatically search before and after the time you select.
5. If you need a car, select the Pick-up/Drop-off car at airport check box. Note: You can automatically reserve a car, which allows you to bypass viewing the car results. After you select a vendor and car type, a car is automatically added to your reservation.
6. If you need a hotel, select the Find a Hotel check box. You can choose to search for the hotel by the number of miles you specify from the following:
• Airport
• Address
• Company Location
• Reference Point / Zip Code (a city or neighborhood) 7. Select Schedule or Price from the Search by dropdown arrow. 8. To search only fully refundable fares, select the Refundable only air fares check box. 9. If you do not want a flight with a double connection, select the Flights w/ no double connections check box.
10. Click Search.
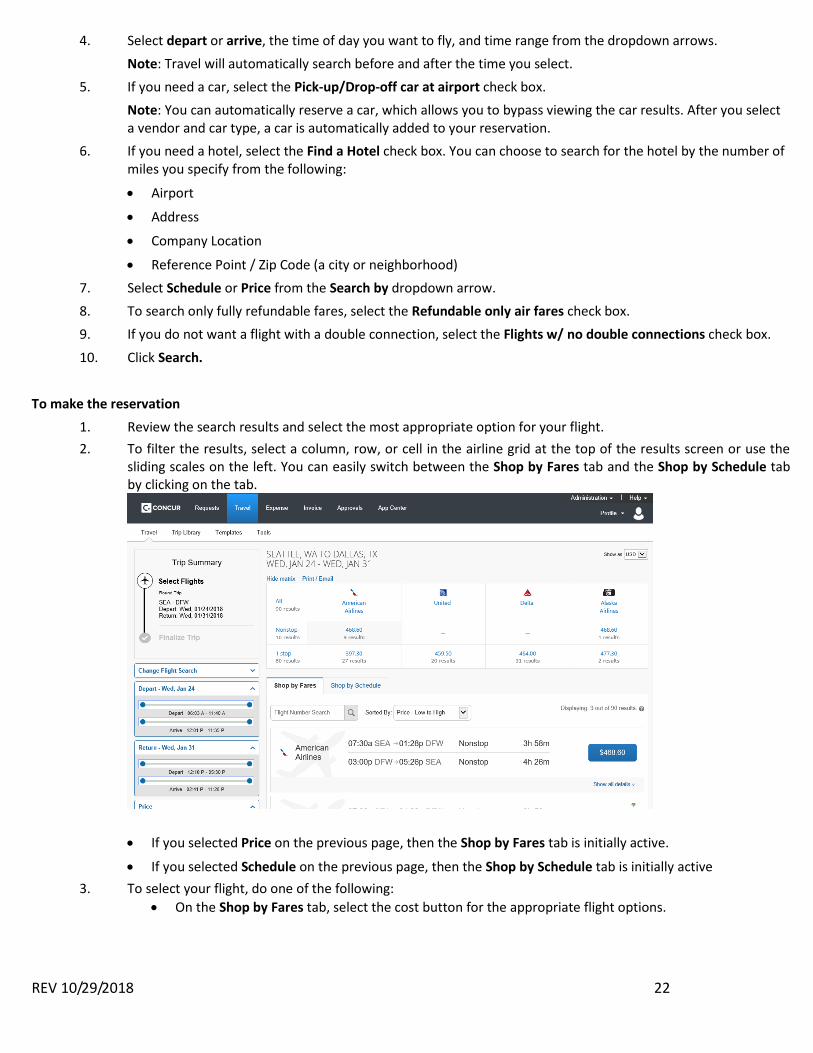
To make the reservation 1. Review the search results and select the most appropriate option for your flight. 2. To filter the results, select a column, row, or cell in the airline grid at the top of the results screen or use the
sliding scales on the left. You can easily switch between the Shop by Fares tab and the Shop by Schedule tab by clicking on the tab.
• If you selected Price on the previous page, then the Shop by Fares tab is initially active.
• If you selected Schedule on the previous page, then the Shop by Schedule tab is initially active 3. To select your flight, do one of the following:
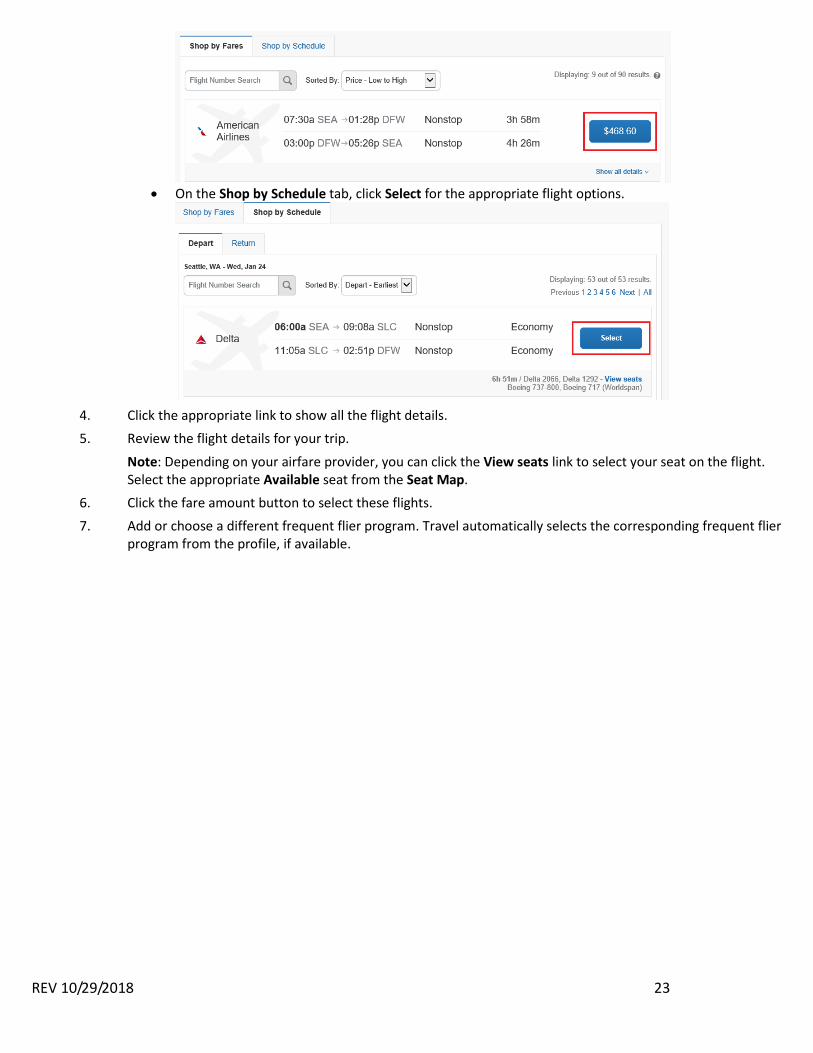
• On the Shop by Fares tab, select the cost button for the appropriate flight options.
REV 10/29/2018 23
• On the Shop by Schedule tab, click Select for the appropriate flight options.
4. Click the appropriate link to show all the flight details. 5. Review the flight details for your trip.
Note: Depending on your airfare provider, you can click the View seats link to select your seat on the flight. Select the appropriate Available seat from the Seat Map.
6. Click the fare amount button to select these flights. 7. Add or choose a different frequent flier program. Travel automatically selects the corresponding frequent flier
program from the profile, if available.
REV 10/29/2018 24
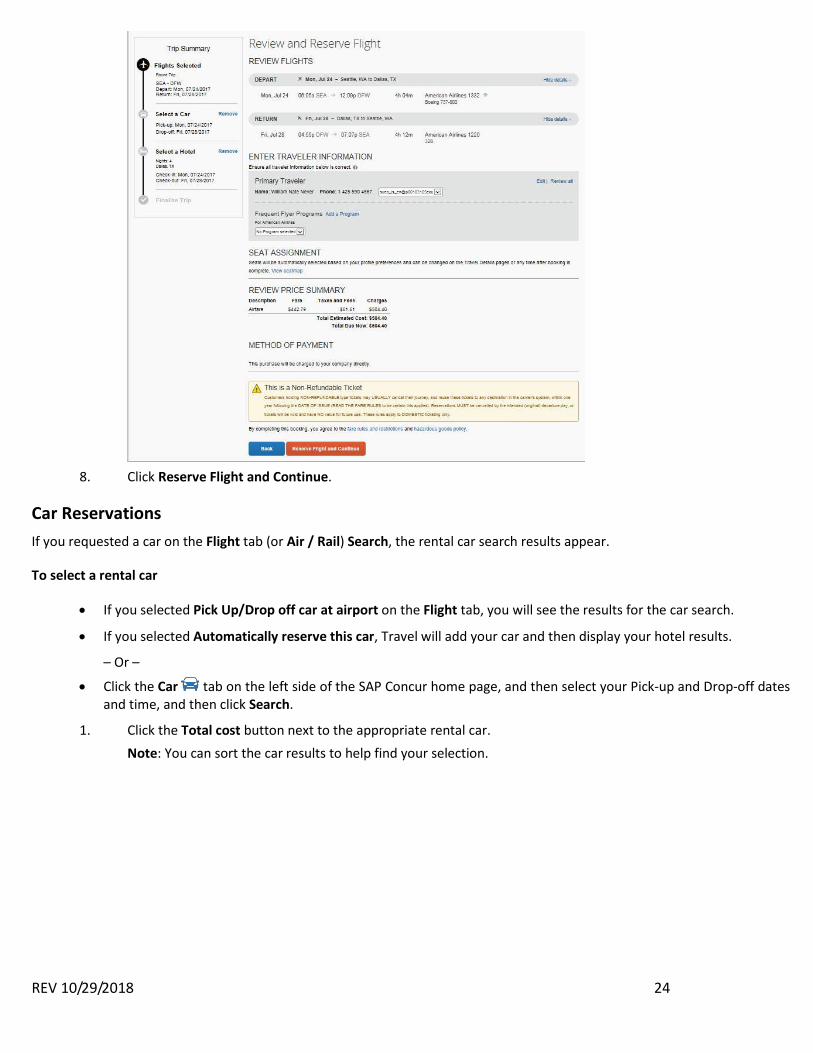
8. Click Reserve Flight and Continue.
Car Reservations If you requested a car on the Flight tab (or Air / Rail) Search, the rental car search results appear.
To select a rental car
• If you selected Pick Up/Drop off car at airport on the Flight tab, you will see the results for the car search.
• If you selected Automatically reserve this car, Travel will add your car and then display your hotel results.
– Or –
• Click the Car tab on the left side of the SAP Concur home page, and then select your Pick-up and Drop-off dates and time, and then click Search.
1. Click the Total cost button next to the appropriate rental car. Note: You can sort the car results to help find your selection.
REV 10/29/2018 25
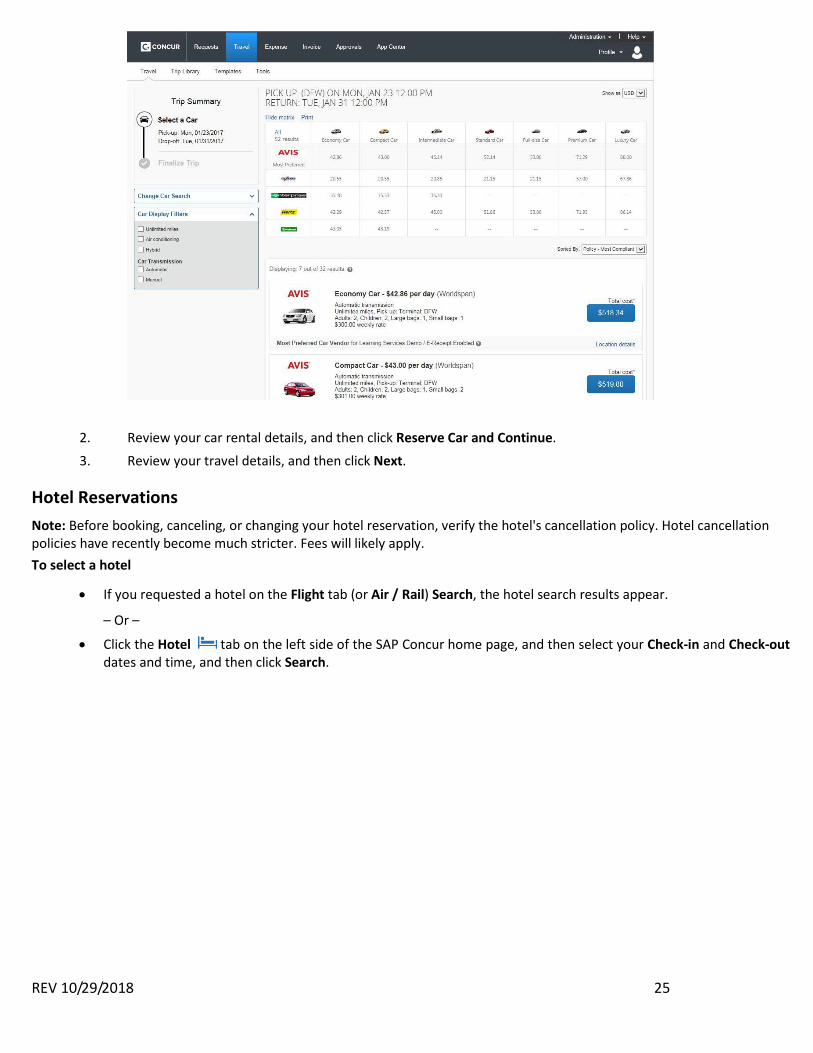
2. Review your car rental details, and then click Reserve Car and Continue. 3. Review your travel details, and then click Next.
Hotel Reservations Note: Before booking, canceling, or changing your hotel reservation, verify the hotel's cancellation policy. Hotel cancellation policies have recently become much stricter. Fees will likely apply. To select a hotel
• If you requested a hotel on the Flight tab (or Air / Rail) Search, the hotel search results appear.
– Or –
• Click the Hotel tab on the left side of the SAP Concur home page, and then select your Check-in and Check-out dates and time, and then click Search.
REV 10/29/2018 26
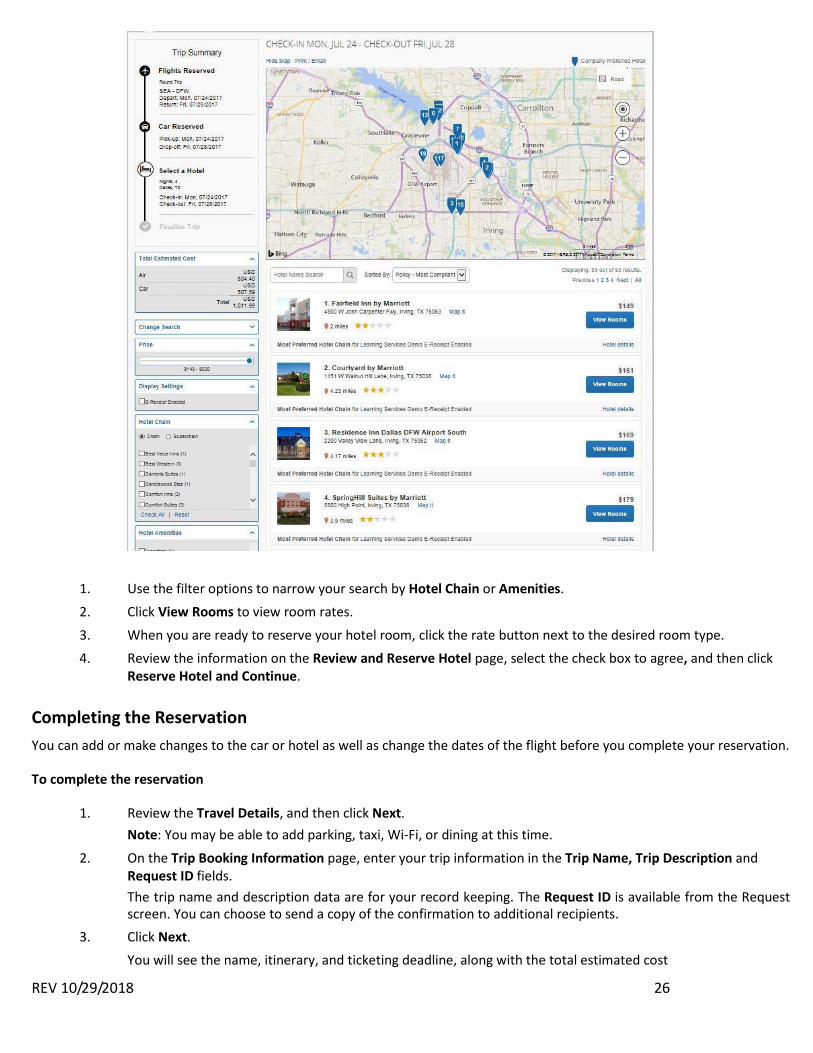
1. Use the filter options to narrow your search by Hotel Chain or Amenities. 2. Click View Rooms to view room rates.
3. When you are ready to reserve your hotel room, click the rate button next to the desired room type. 4. Review the information on the Review and Reserve Hotel page, select the check box to agree, and then click
Reserve Hotel and Continue.
Completing the Reservation You can add or make changes to the car or hotel as well as change the dates of the flight before you complete your reservation.
To complete the reservation
1. Review the Travel Details, and then click Next. Note: You may be able to add parking, taxi, Wi-Fi, or dining at this time.
2. On the Trip Booking Information page, enter your trip information in the Trip Name, Trip Description and Request ID fields. The trip name and description data are for your record keeping. The Request ID is available from the Request screen. You can choose to send a copy of the confirmation to additional recipients.
3. Click Next. You will see the name, itinerary, and ticketing deadline, along with the total estimated cost
REV 10/29/2018 27
4. Click Confirm Booking to finalize your trip. 5. On the Pre-populating Your Expense Report page, you can add transportation and parking expenses, and then
click Finish.
Cancelling or Changing a Reservation To change an airline, car rental, or hotel reservation
1. At the top of the SAP Concur home page, click Travel. 2. On the Upcoming Trips tab, click the name of the trip you want to change.
Notes: • Flight changes are available for e-tickets that include a single carrier. • If the trip is already ticketed but has not occurred, you can change the time and/or date of the flight. Your
change options will be with the same airline and routing. • Directly contact your travel agency, the appropriate Website, or vendor if you did not book your trip using
Travel.
3. To change a trip, in the Action column, click Change Trip. 4. On the Itinerary page, select the portion of the trip you want to change. 5. To cancel your entire trip, in the Action column, click Cancel Trip, and then click OK.
Note: When you cancel a trip, if your ticket is refundable, your ticket will be voided or refunded, as applicable. If your ticket is non-refundable, and you cancel it in accordance with the airline rules, an e-ticket will be retained that you can apply to future trips
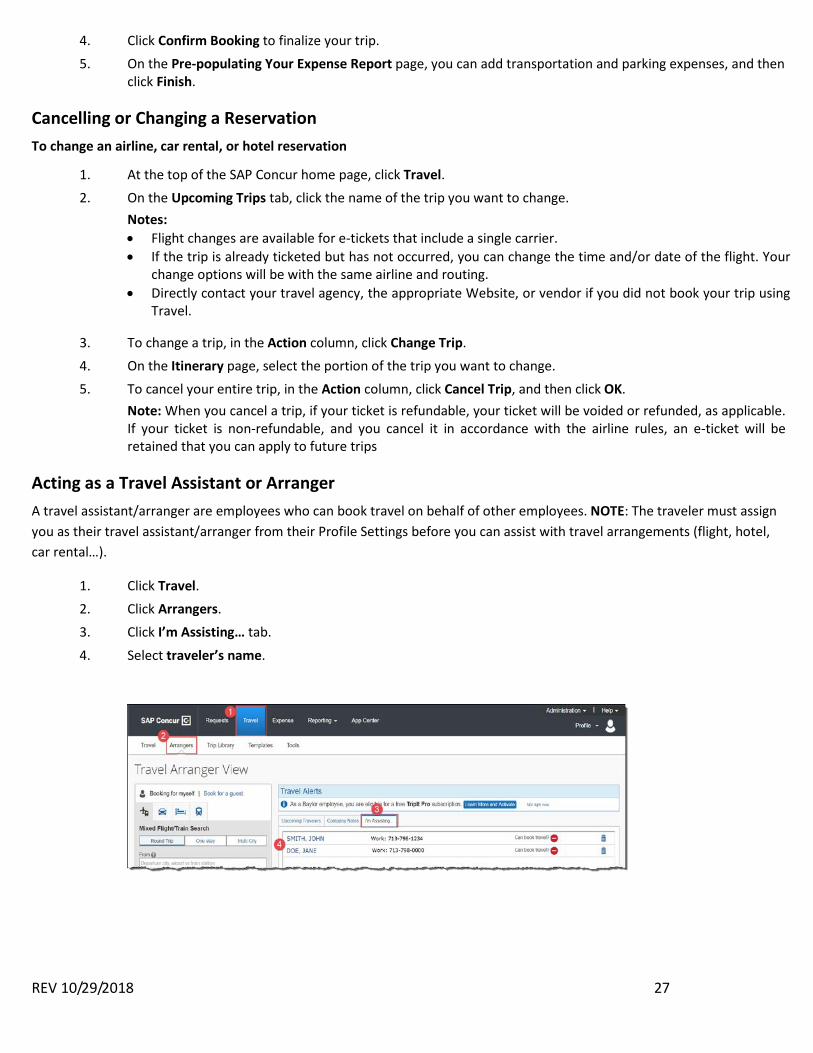
Acting as a Travel Assistant or Arranger A travel assistant/arranger are employees who can book travel on behalf of other employees. NOTE: The traveler must assign you as their travel assistant/arranger from their Profile Settings before you can assist with travel arrangements (flight, hotel, car rental…).
1. Click Travel. 2. Click Arrangers. 3. Click I’m Assisting… tab.
4. Select traveler’s name.
REV 10/29/2018 28
Creating a Travel Expense Report A travel expense report requires an approved request. All expenses related to the trip should be added to one report. To create a travel expense report:
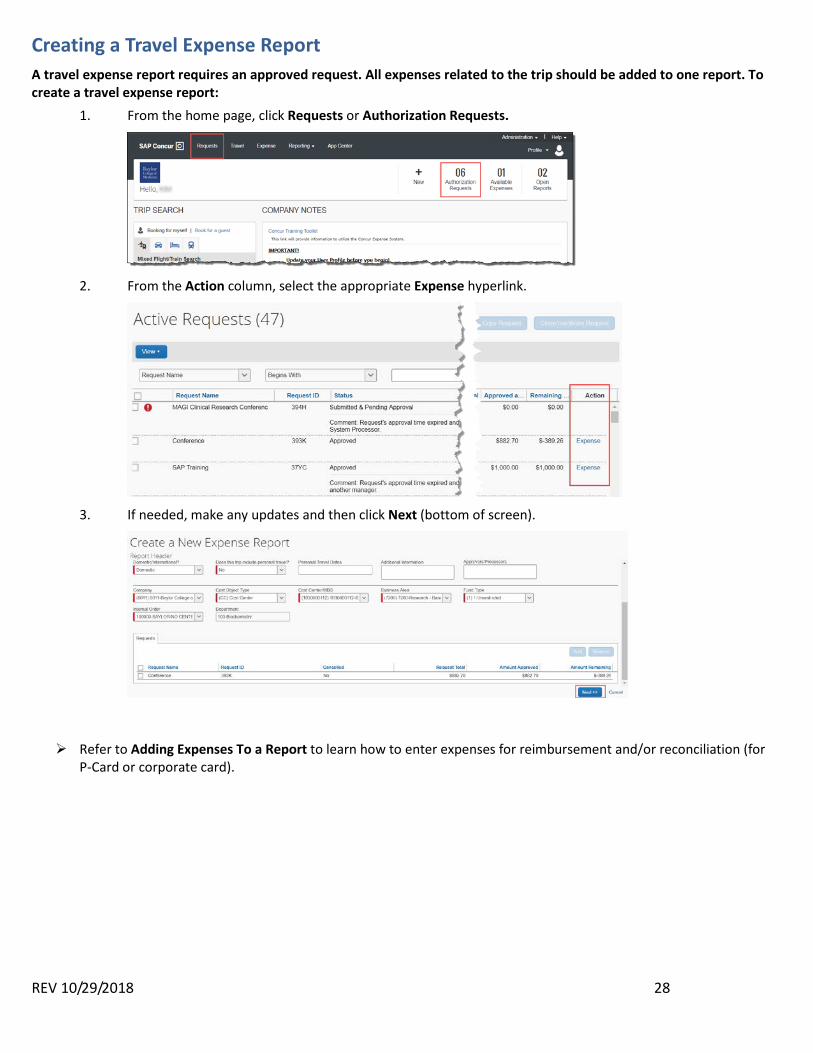
1. From the home page, click Requests or Authorization Requests.
2. From the Action column, select the appropriate Expense hyperlink.
3. If needed, make any updates and then click Next (bottom of screen).
Refer to Adding Expenses To a Report to learn how to enter expenses for reimbursement and/or reconciliation (for P-Card or corporate card).
REV 10/29/2018 29
Creating a Non-Travel Expense Report To create a non-travel expense report
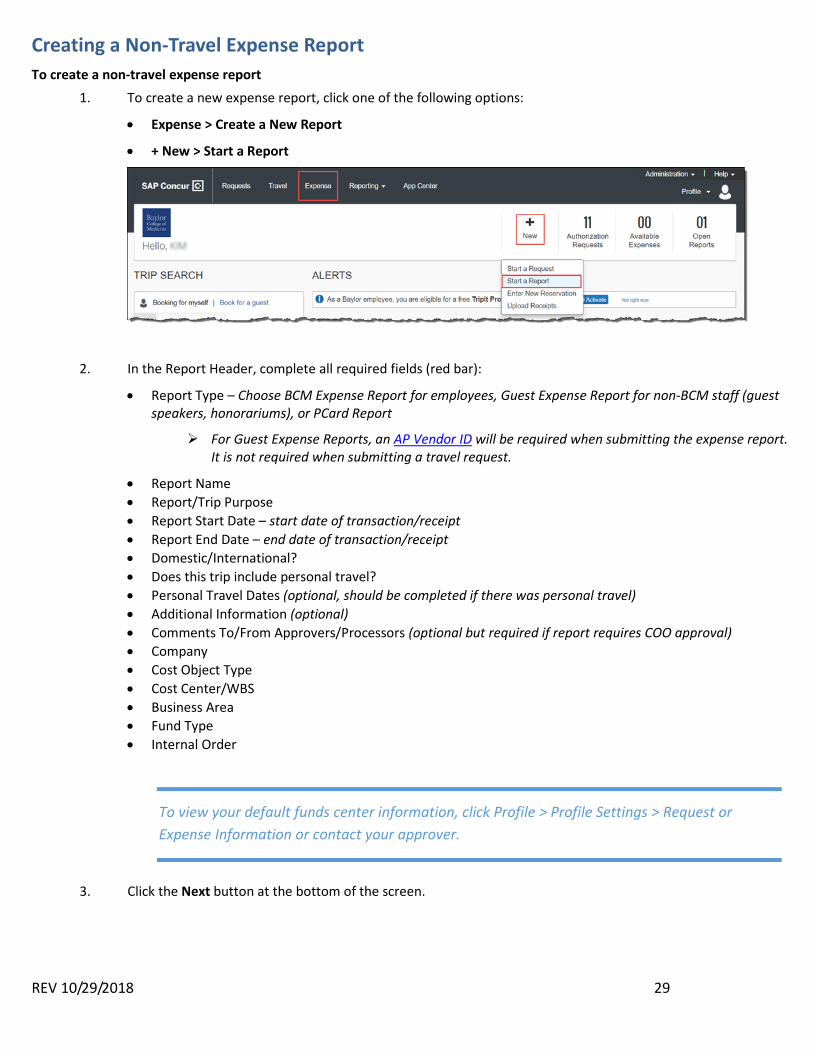
1. To create a new expense report, click one of the following options:
• Expense > Create a New Report
• + New > Start a Report
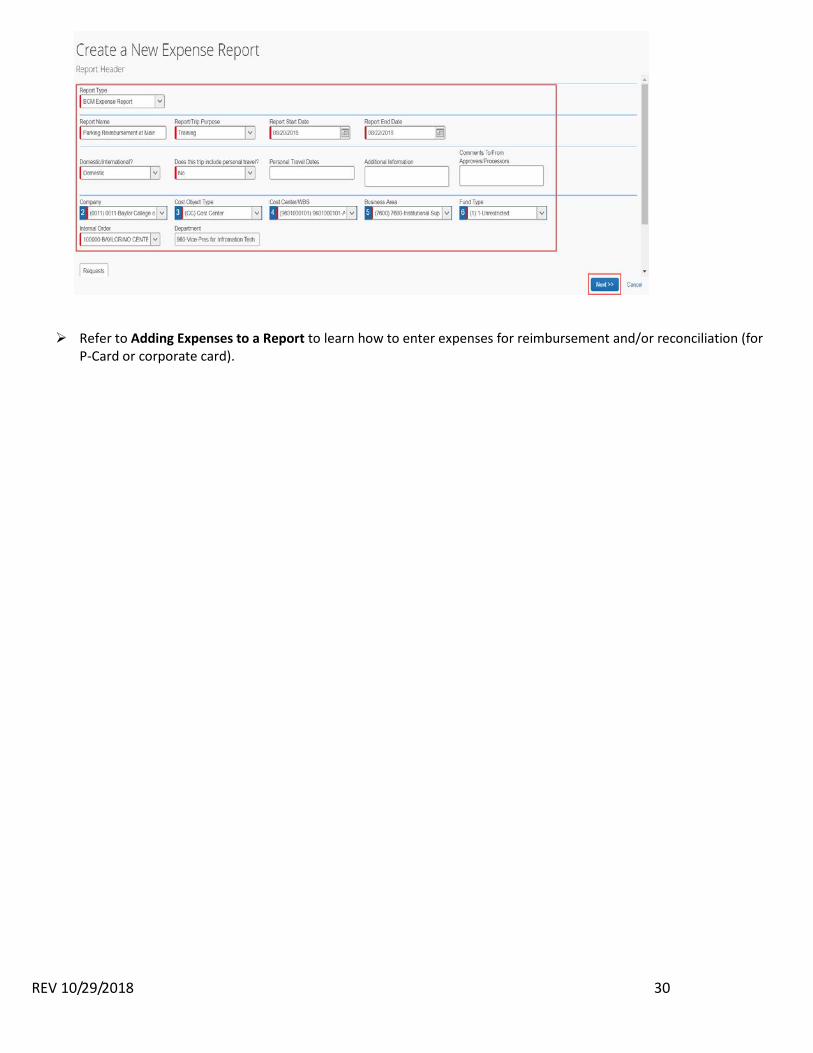
2. In the Report Header, complete all required fields (red bar):
• Report Type – Choose BCM Expense Report for employees, Guest Expense Report for non-BCM staff (guest speakers, honorariums), or PCard Report
For Guest Expense Reports, an AP Vendor ID will be required when submitting the expense report. It is not required when submitting a travel request.
• Report Name • Report/Trip Purpose • Report Start Date – start date of transaction/receipt • Report End Date – end date of transaction/receipt • Domestic/International? • Does this trip include personal travel? • Personal Travel Dates (optional, should be completed if there was personal travel) • Additional Information (optional) • Comments To/From Approvers/Processors (optional but required if report requires COO approval) • Company • Cost Object Type • Cost Center/WBS • Business Area • Fund Type • Internal Order
3. Click the Next button at the bottom of the screen.
To view your default funds center information, click Profile > Profile Settings > Request or Expense Information or contact your approver.
REV 10/29/2018 30
Refer to Adding Expenses to a Report to learn how to enter expenses for reimbursement and/or reconciliation (for P-Card or corporate card).
REV 10/29/2018 31
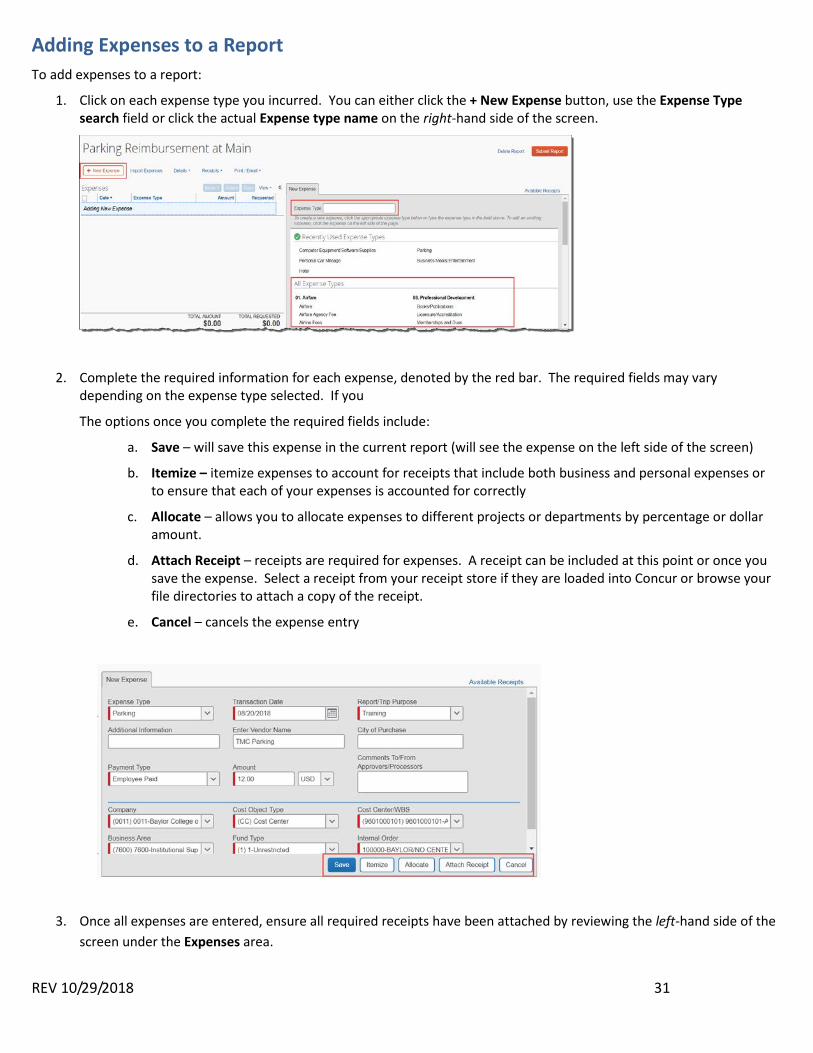
Adding Expenses to a Report To add expenses to a report:
1. Click on each expense type you incurred. You can either click the + New Expense button, use the Expense Type search field or click the actual Expense type name on the right-hand side of the screen.
2. Complete the required information for each expense, denoted by the red bar. The required fields may vary depending on the expense type selected. If you
The options once you complete the required fields include:
a. Save – will save this expense in the current report (will see the expense on the left side of the screen)
b. Itemize – itemize expenses to account for receipts that include both business and personal expenses or to ensure that each of your expenses is accounted for correctly
c. Allocate – allows you to allocate expenses to different projects or departments by percentage or dollar amount.
d. Attach Receipt – receipts are required for expenses. A receipt can be included at this point or once you save the expense. Select a receipt from your receipt store if they are loaded into Concur or browse your file directories to attach a copy of the receipt.
e. Cancel – cancels the expense entry
3. Once all expenses are entered, ensure all required receipts have been attached by reviewing the left-hand side of the screen under the Expenses area.
REV 10/29/2018 32
If the required receipt icon displays, a receipt is required and has not been attached. Select the Attach Receipts button from the bottom right-hand side of the screen or select the Attach Receipt Images from the Receipts drop-down.
Itemizing Expenses 1. Click on the expense that you want to Itemize by selecting the expense on the left side of the report or
select from the Expense Types.
2. Complete the Expense detail information.
3. Click Itemize at the bottom right of the screen.
4. Fill in the required information and click Save Itemizations.
5. All itemizations will appear on the left side of the expense report.
6. To edit an Itemization, click the Itemization on the left side of the screen and make changes on the right side of the screen.
7. To delete an Itemization, click the Itemization on the left side of the screen and click the Delete button at the top of the expense report.
Allocating Expenses 1. To allocate expenses, on the Manage Expenses page, click Details, and then click Allocations or the Allocate
button. 2. Or, you can Allocate expenses as you create a new expense. The Allocate button will be seen at the bottom of
the right-hand screen. If completing while completing a New Expense, complete the required fields, then click Allocate.
3. In the Allocations for Report window, use the check boxes to select individual expenses, or select the first check box to select all the expenses.
4. Click Add New Allocation. The total expense amount, the amount allocated, and the amount remaining appear in the Allocations section. You can adjust the amounts and percentages. The total amount must be 100 percent allocated, otherwise an audit rule is flagged, and you will not be able to submit the report.
5. Select from the lists or type the appropriate information in the fields, and then click Save. 6. Click Done to return to your expense report. The fully allocated icon appears with each allocated expense in
the expense list. The partially allocated icon appears if there is a remaining amount.
Entering Personal Car Mileage 1. With the expense report open, on the New Expenses tab, select Mileage. 2. Goggle Mileage Calculator window automatically displays. Enter Waypoints – Actual starting point and
Destination. 3. Click Calculate Route. 4. If applicable, click Make Round Trip. 5. Click Add Mileage to Expense.
Adding Attendees to Business Meals 1. With the expense report open, on the New Expenses tab, select Business Meals/Entertainment.
REV 10/29/2018 33
2. Click Advanced Search to search for attendees by type. Check the appropriate box for each attendee to add. 3. Click Add to Expense. 4. Check appropriate attendees. 5. Click Save.
Converting Currency
To account for an expense incurred in another currency:
1. With the report open, click New Expense, and then enter the appropriate information in the required and optional fields.
2. Enter the Amount of the expense. Select the appropriate currency in the drop down. If the currency is other than USD, the conversion rate will automatically populate based on the Transaction Date.
3. The Concur system calculates the amount in US dollars.
Missing Receipt Affidavit If you do not have a receipt, you can complete the Missing Receipts Affidavits except for the following expense: airfare, hotels, car rentals, and conference registrations. In addition, an Expense Delegate cannot submit the Missing Receipt Affidavit on behalf of the requestor.
1. From your expense report, click Receipts > Missing Receipt Affidavit or Attach Receipt > Missing Receipt Affidavit.
2. Select the expense for which you are missing a required receipt. 3. Review the attestation then click Accept & Create.
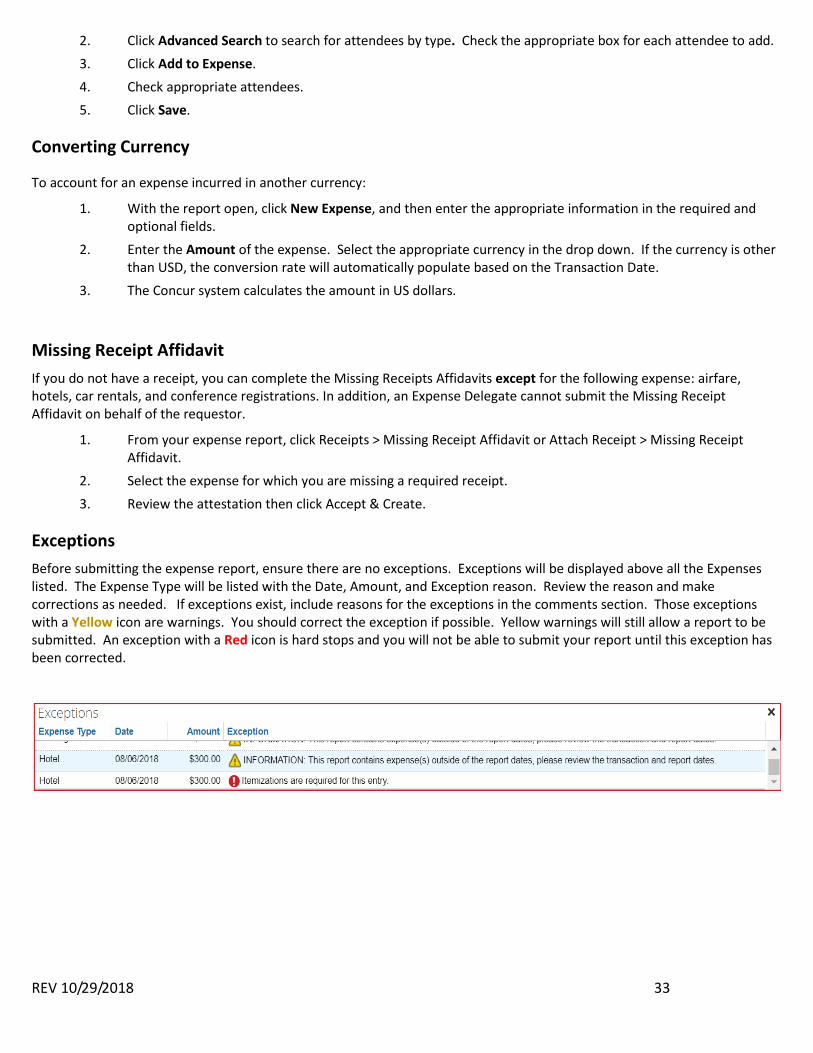
Exceptions Before submitting the expense report, ensure there are no exceptions. Exceptions will be displayed above all the Expenses listed. The Expense Type will be listed with the Date, Amount, and Exception reason. Review the reason and make corrections as needed. If exceptions exist, include reasons for the exceptions in the comments section. Those exceptions with a Yellow icon are warnings. You should correct the exception if possible. Yellow warnings will still allow a report to be submitted. An exception with a Red icon is hard stops and you will not be able to submit your report until this exception has been corrected.

REV 10/29/2018 34
Attaching Receipts to an Expense Report
Travelers are expected to keep receipts and documentation of business-related travel and non-travel expenses. Receipts are required for:
• For all expenses charged to sponsored agreements, regardless of dollar amount. • For all expenses $25 or greater charged to all other funding sources • For all entertainment meals or engagements, regardless of dollar amount or funding source • For travel expenses of airfare, hotel, car rental, and registration fees
Uploading receipts using Available Receipts Available Receipts work with the SAP Concur Imaging Service to provide receipt images that the user can either email or upload images to, and then use to attach images at the line item expense entry level (only). Images in supported format are uploaded using an SAP Concur-verified email address provided by the user during signup, and these images are then available to that user (only) for the purpose of attaching to report expense entries. To attach a receipt image to an expense entry using Available Receipts
1. Select an entry to open it in Details view.
2. Click Attach Receipt Image. 3. Select the receipt image you want to attach, and then click Attach. 4. The receipt image is attached to the expense entry and displays on the right side of the screen.
Note: You can Detach or Append the image from the receipt pane.
Concur Mobile App:
• Within the app, use the camera icon to take a picture of your receipt. • An expense will be created from the receipt, and the expense details and receipt image will display under
Available Expenses. Scanned Images:
• Scan your receipts and save the file(s) to your computer. • Click on the line item that requires a receipt, then click Attach Receipt on the right side of the screen. • Click Browse to locate the file on your computer, then Attach and Close.
Email:
• Email your receipt images as attachments to [email protected]. The receipts will be added to your Available Expenses.
• From your expense report, click Import Expense > Available Expenses.
Your email address must be verified in your Concur Profile Settings.
REV 10/29/2018 35
Submitting an Expense Report To submit your expense report
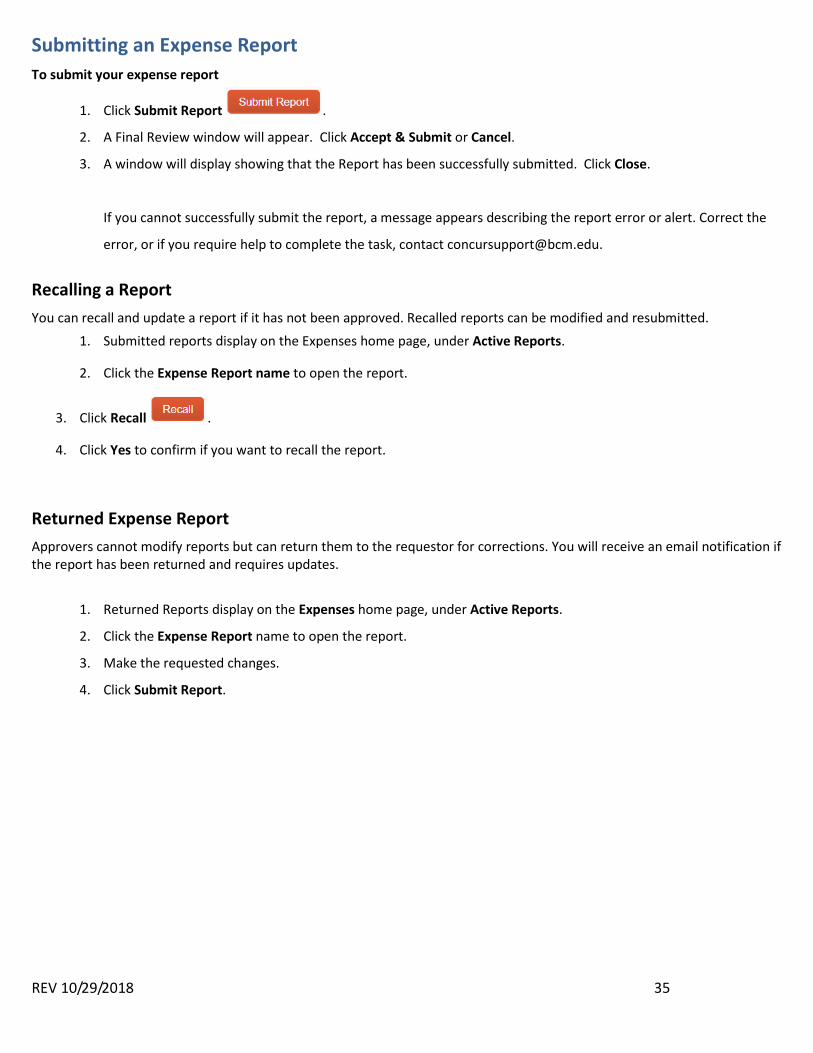
1. Click Submit Report .
2. A Final Review window will appear. Click Accept & Submit or Cancel.
3. A window will display showing that the Report has been successfully submitted. Click Close.
If you cannot successfully submit the report, a message appears describing the report error or alert. Correct the
error, or if you require help to complete the task, contact [email protected].
Recalling a Report You can recall and update a report if it has not been approved. Recalled reports can be modified and resubmitted.
1. Submitted reports display on the Expenses home page, under Active Reports.
2. Click the Expense Report name to open the report.
3. Click Recall .
4. Click Yes to confirm if you want to recall the report.
Returned Expense Report Approvers cannot modify reports but can return them to the requestor for corrections. You will receive an email notification if the report has been returned and requires updates.
1. Returned Reports display on the Expenses home page, under Active Reports.
2. Click the Expense Report name to open the report.
3. Make the requested changes.
4. Click Submit Report.
REV 10/29/2018 36
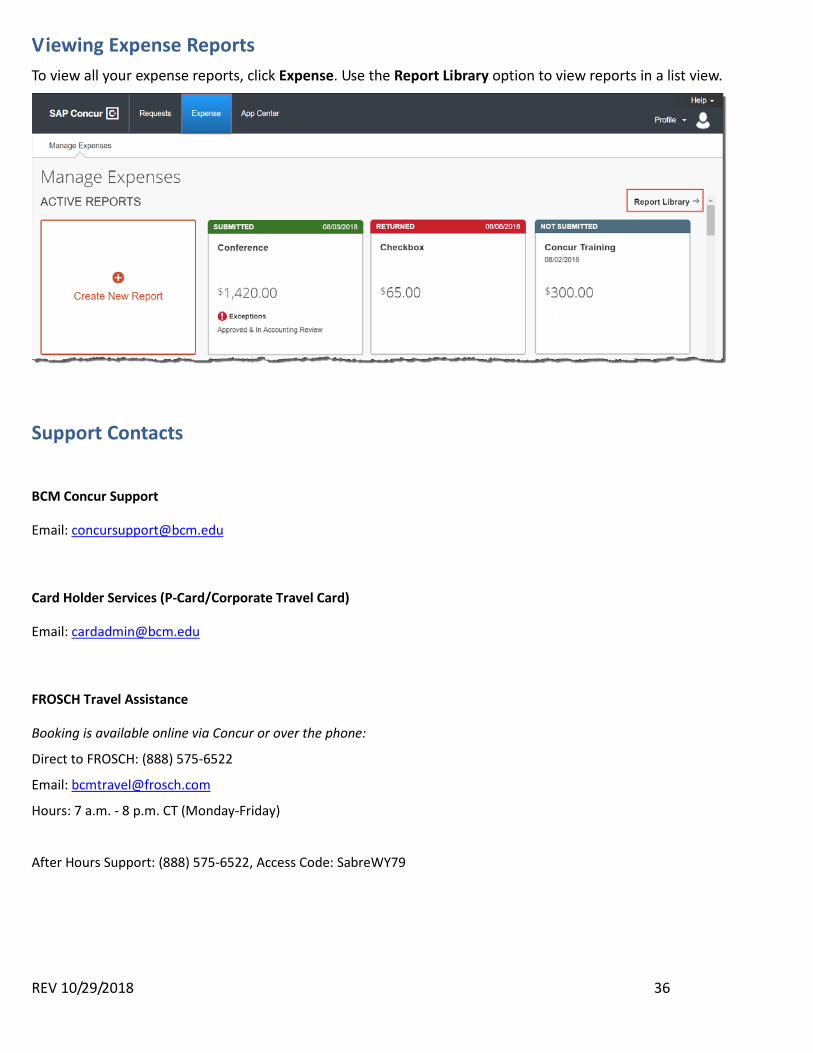
Viewing Expense Reports To view all your expense reports, click Expense. Use the Report Library option to view reports in a list view.
Support Contacts
BCM Concur Support
Email: [email protected]
Card Holder Services (P-Card/Corporate Travel Card)
Email: [email protected]
FROSCH Travel Assistance
Booking is available online via Concur or over the phone:
Direct to FROSCH: (888) 575-6522
Email: [email protected]
Hours: 7 a.m. - 8 p.m. CT (Monday-Friday)
After Hours Support: (888) 575-6522, Access Code: SabreWY79