Embed Size (px)
Citation preview
1
Computer Fundamentals CONTENT
1. What is Computer? 2. The Basic Advantages of a Computer 3. Disadvantages of a Computer 4. Size of Computers 5. Historical Development of Computers 6. Types of Computers 7. Add-on Devices of a Computer 8. Processing Unit 9. ASCII 10. Bit & Byte 11. Memory 12. Primary Storage and Secondary Storage 13. Special Types of Memory 14. Different Type of Disks 15. Hardware and Software 16. Functions of an Operating System 17. Application Software: 18. Relation Between Hardware and Software 19. Graphical User Interface (GUI) 20. Multitasking 21. Linking and Embedding 22. Plug 'n' Play 23. Number System and Computer Arithmetic 24. Files and Folders 25. About Drives 26. My Computer 27. Wildcards 28. Microsoft Disk Operating System (MS-DOS) 29. DOS Commands
TUTORIAL What is Computer? The answer to this question has a variety of pictures in our mind. It may be a super computer, central processing unit, mainframe, processor, workstation, personal computer (PC), laptop, notebook, etc. But the basic fact is it is neither magic nor a miracle box. Then what is it? Computer is normally considered to be a calculating device that can perform arithmetic operation and logical functions. Basically a computer is an electronic device working at a tremendous speed with very high accuracy. The Basic Advantages of a Computer
2
Speed: Computer can perform huge amount of work in a few seconds, where human being worked a particular work for whole day, computer does the same in very short time. Computer speeds are measured in Microseconds, Nanoseconds and even in Pico seconds. Accuracy: It is hundred % accurate and capable to perform arithmetical calculation and logical operations with the same accuracy. A computer can commit errors but at the fault of human beings. It may be due to inaccurate feeding of data or due to wrong setting of the programs. Diligence: If we work continuously for 3 hours, we feel lack of concentration, tiresome and monotonous but a computer is free from these and we will get the result with the same speed and same accuracy. Versatility: Computer can do multiple works. It is used in data processing jobs, weather forecasting, ticket-reservation purpose, multimedia designing, animation etc. Disadvantages of a Computer
1. Computer is incapable to take any decisions by itself, it cannot judge by itself for any valid or invalid data.
2. Requires regular maintenance.
Size of Computers The Computer systems are often categorized into Super computers, Mainframes, Minis and Micros. Super Computers: These are the largest and fastest computers available but are typically not used for commercial data processing. They are used in specialized areas such as defense, aircraft designing and computer generated movies, weather research etc. Prediction of weather involves analyzing thousands of variables gathered by satellites, aircraft and other meteorological stations on the ground. This analysis has to be done in a very short time. A super computer can handle such situations efficiently. In the medical field, super computers are used to study the structure of viruses, such as those causing AIDS. Designing an aircraft involves simulating and analyzing the aircraft sound. The first super computer was the ILLIAC made by Burroughs. Super computers process 64 bit or more at a time. The range of their processing speed starts from 10,000 million instructions per second (MIPS) to 1.2 billion instructions per second (BIPS). They can support up to 10,000 terminals at a time.
3
Mainframe Computers: Mainframe computers are less powerful and cheaper than super computers. Mainframe computers are generally 32-bit machines or on the higher side. However, they are big general-purpose computers capable of handling all kinds of scientific and business application. Mainframe can process at several million instructions per second. A main frame can support more than 1,000 remote terminals. Few of popular mainframe series are MEDHA, DEC, IBM, HP, and ICL etc. Workstation: Between minicomputer and microcomputer - in terms of processing power - a class of computers introduced known as, WORKSTATIONS. A workstation looks like a personal computer and is typically used by one person. Although workstations are still more powerful than the average personal computer, the difference in the capabilities of these types of machines is growing smaller. Micro Computers: A microcomputer is a full-fledged computer system that uses a microprocessor as its CPU; these are also called Personal Computer systems. Microcomputers were first available for widespread use in the 1970s; the first microcomputers were built around 8-bit microprocessor chips. 8-bit chip means it can retrieve instruction/data from storage, manipulate, and process an 8-bit data at a time or you can say that the chip has a built - in 8-bit data transfer path. When it became possible to put the entire circuitry of computer CPU onto a small silicon chip called microprocessor. 8-bit microprocessors are Intel 8080 and MC 6089. An improvement on 8-bit chip technology was seen in early 1980s, when Intel Corporation introduced a series of 16 bit chips namely 8086 and 8088. An advancement of 16 bit chips are the 32 bit chips, some of the popular 32-bit chips are Intel's 80386. Historical Development of Computers The modern computer is the end result of countless inventions, ideas, and developments contributed by many people throughout the last several decades. The history of automatic data processing begins with Charles Babbage's attempt to build an automatic mechanical calculator at Cambridge, England, in 1830. The entire computer evaluation has been divided into certain number of generations. First Generation Computers: UNIVAC (Universal Automatic Computer) was the first general purpose electrical computer to be available and marked the beginning of the first generation of electrical computers. The first generation electrical computers employed vacuum tubes. These computers were large in size and required air conditioning. The input and output units were the punched card reader and the cardpunches. Second Generation Computers:
4
These computers employed transistors and other solid-state devices. Their circuits were smaller than the vacuum tubes, and generated less heat. Hence the second-generation computers required less power, were faster and more reliable. IBM 1401 was the most popular second generation computer. Third Generation Computers: These employed Integrated Circuits (IC) in which all the elements of an electronic circuit are, contained in a tiny silicon wafer. The third generation computers are much cheaper and more reliable than the second-generation computers. The third generation computers permit use of such high level languages as FORTRAN and COBOL. The mini computers are also one of the developments in the third generation computers. Fourth Generation Computers: Fourth generation machines appeared in 1970's utilizing still newer electronic technology, which enable them to be even smaller and faster than those of the third generation. Many new types of terminals and means of computer access were also developed at this time. One of the major inventions, which led to the fourth generation, was the Large Scale Integrated Circuits (LSI). The LSI is a small "chip" which contains thousands of small electronic components which functions as a complete system. Micro computers: ln July 1977, at National Computer Conference in Dallas, Commodore Ltd. started the computing world by announcing a fully assembled microcomputer in a single housing called the Personal Electronic Transact or (PET). Later in 1977, Radio Shack Corporation announced the TRS 80 computer. The IBM family of personal computers: In 1981 International Business Machines (IBM) made its first appearance in the field of microcomputer with the announcement of the IBM Personal Computers. The term personal computer captured the notion that an individual can have her or his own computer. With the advent of IBM PC, computers had stepped out of large organizations and entered into the home. However, instead of adopting 8-bit microprocessor, IBM selected Intel 8088 - a 16-bit microprocessor that made the IBM PC "an overnight success". In 1983, IBM's first addition to the PC-family - XT model was introduced. AT model, which has a much greater computing speed than the PC and XT or even the new Desk Pro? When software vendors began to orient their products to the IBM PC, many microcomputer manufacturers created and sold clones of it. These clones called IBM PC compatibles run most or all the software designed for the IBM PC. Fifth Generation Computers: Defining the fifth generation of computers is somewhat difficult because the field is in its infancy. The most famous example of a fifth generation computer is the fictional HAL9000 from Arthur C. Clarke's novel, 2001: A Space Odyssey. HAL performed all of the functions currently envisioned for real-life fifth generation computers. With artificial intelligence, HAL could reason well enough to hold conversations with its human operators, use visual input, and learn from its own experiences.
5
Types of Computers Computers are distinguishable by the way in which they receive and process data. Some systems process data of continuous nature, other process numeric values represented by discrete electronic pulses Analog computers: Analog of computers process data input in a continuous form. Data such as voltage, resistance or temperature and pressure are represented in the computer as a continuous, unbroken flow of information. In engineering and scientific applications where quantities to be processed exist on waveforms or continually rising and falling voltages, pressure and so on, analog computers are very useful. The main disadvantage of an analog computer is its accuracy factor, and the limited storage capacity. Hence it is not suitable for processing business data. Digital Computers: These computers on the other hand, count and accept letters or numbers through various input devices that convert the data into electronic pulses, and perform arithmetic operations on numbers in discrete form. In addition to performing arithmetic operations, they are also capable of (1) storing data for processing, (2) performing logical operations, (3) editing or deleting the input data and (4) printing out the result of its processed routine at high speed. Since we tire concerned mainly with business data processing in this and the subsequent chapters, computer will now be understood to mean the digital computer. Add-on Devices of a Computer Input Device Accepting information from the user is an important part of a computer. The device through which the user can enter those information and instructions is called input device. Some of the input devices are keyboard, mouse, scanner, light pen, MICA, OCA, BCA, trackball, microphone etc. All input devices must provide data in the form of Binary Codes that are Primary memory of a computer is designed to accept Units called input interface accomplish this transformation. Magnetic Ink Character Reader (MICR): An MICA a special type of magnetic ink is required for encoding the characters to be read by the machine. The reading process is called MICR. MICR used in banking industry to read the Cheque. The major advantage of these characters is that they are machine-readable; only numerical characters are used by bank no alphabetic characters available. With this special ink that contains magnetized particles of iron oxide are pre-printed into all Cheque. The Cheque number, bank code number etc. are written in MICR. Optical Character Reader (OCR): These devices are capable of reading numeric and alphabetic characters. Typewriter or hand may write characters but in case of handwriting the characters should be maintained standard size in line and in case of typewriter the characters should be written in special type of font called OCR.
6
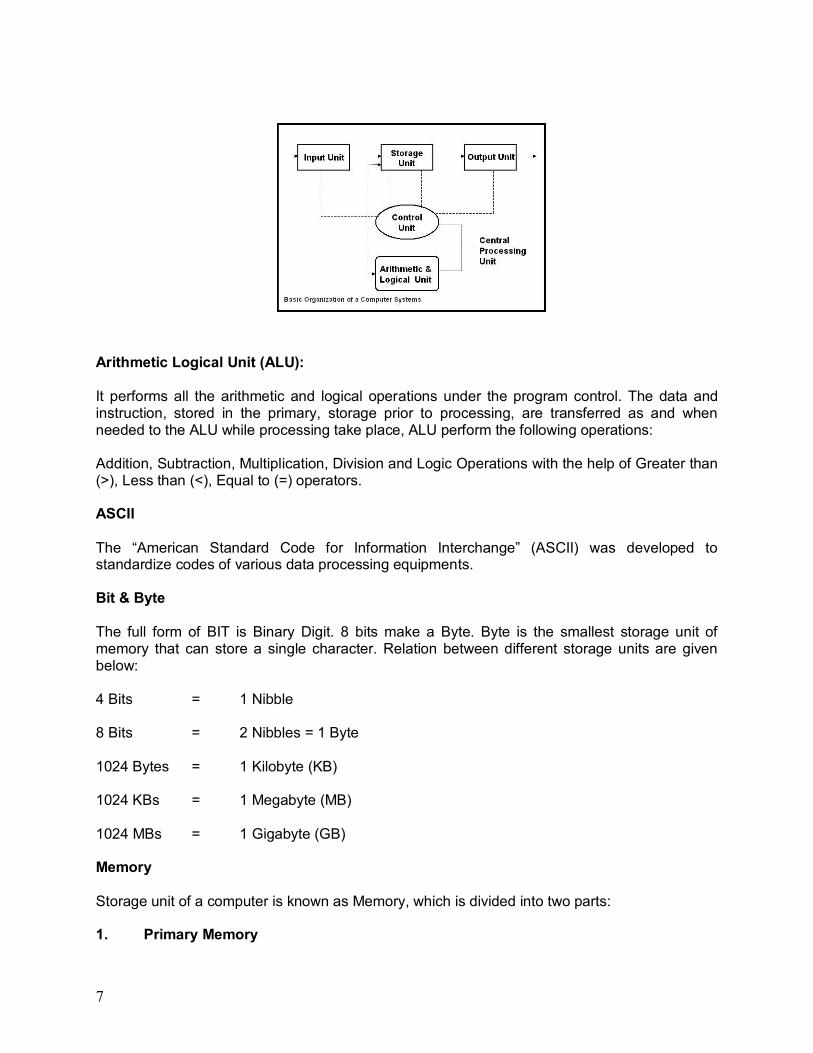
Bar Code Reader (BCR): Bar codes are used particularly in retail shop for labeling goods. A laser-beam scanner performs these devices reading. As the item having the code is passed over the bar code reader, the reader automatically decodes the strips and passes the data to the computer. Scanner: Scanners are used to store image digitally as well as text into the computer. It can be retrieved later in same format, which is originally scanned. Trackball: This is used in notebook and laptop computer instead of mouse; by running your finger on the ball you can change the pointer. Output Device Communication between the user (means the person who is operating the computer) and the computer is done through the output devices. Some of the output devices are monitor, printer, plotter, etc. It is a medium between the user and the computer. After accepting information from the input device and before supplying the result to the output device it must be converted to human acceptable (readable) form. This task is performed by output interfaces. Processing Unit The main brain of a computer system is the Central Processing Unit (CPU). It can be divided into three segments:
1. Control Unit (CU)
2. Arithmetic Logic Unit (ALU) Control Unit (CU): It monitors the flow of data from one area to the other. It acts as central nervous system for the other component of a computer further monitoring the overall transfer of data in and out of the various devices, the control unit is able to maintain order and direct the operation of the entire system. It does not perform any actual processing on the data. It obtains instructions from the Program stored in main memory, interprets the instructions and issue signals that cause other units of the system to execute them.
7
Arithmetic Logical Unit (ALU): It performs all the arithmetic and logical operations under the program control. The data and instruction, stored in the primary, storage prior to processing, are transferred as and when needed to the ALU while processing take place, ALU perform the following operations: Addition, Subtraction, Multiplication, Division and Logic Operations with the help of Greater than (>), Less than (<), Equal to (=) operators. ASCII The “American Standard Code for Information Interchange” (ASCII) was developed to standardize codes of various data processing equipments. Bit & Byte The full form of BIT is Binary Digit. 8 bits make a Byte. Byte is the smallest storage unit of memory that can store a single character. Relation between different storage units are given below: 4 Bits = 1 Nibble 8 Bits = 2 Nibbles = 1 Byte 1024 Bytes = 1 Kilobyte (KB) 1024 KBs = 1 Megabyte (MB) 1024 MBs = 1 Gigabyte (GB) Memory Storage unit of a computer is known as Memory, which is divided into two parts: 1. Primary Memory
8
2. Secondary Memory Any storage unit of a computer system is ranked depends on Access time, Storage capacity, and Cost per bit of storage. Primary Storage: Primary storage units or the main memory has faster access time, smaller storage capacity, and higher cost per bit of storage. It is made up of several small storage areas called locations or cells. Each of these locations can store a fixed number of bits. Primary storage is usually referred to as Random Access Memory (RAM) because it; is possible to randomly select and access any location of this memory to directly store and retrieve data and instructions. Primary memories are two types: ROM and RAM. ROM ROM means Read Only Memory where information is permanently stored. You can only read those information which are stored but you can't modify the information or write fresh information into it. ROM is nonvolatile because when the power supply is off; the information stored inside ROM will not be lost. Actually the manufacturers use ROM to keep micro programs which are required to startup a computer, so that this is highly protected from. the modification of the users. Types of ROM: Computer System manufacturers supply ROM chip, so user has no right to modify it. However it is possible for a user to "customize" a system by converting the options of micro programs, which are known as PROM (Programmable Read Only Memory). Once information stored within ROM can't be changed; to overcome this problem there is another type of ROM chip called EPROM (Erasable Programmable Read Only Memory). It is possible to erase information stored in an EPROM chip, which can be reprogrammed to store new information using a special prom-programmer facility. Even in EPROM, there are some hurdles. To overcome this, another variation of ROM named EEPROM (Electronic Erasable Programmable Read Only Memory) emerged. . RAM Ram means Random Access Memory. Every computer system has a specified storage capacity. Suppose we have a 64 MB RAM means it has 64 * 1024 * 1024 location, each capable of storing one byte. Each location has a unique address and, in a RAM, the memory can be accessed randomly. Ram allows us to read form, as well as to write to, the memory. So it is called the read write memory. RAM is volatile, when switch off all the content of the memory will be lost; it is used to store the data, information and instruction temporarily. Secondary Storage: Primary storage of a computer is as fast as possible because most of the data transmission to and from the processing unit is via the main memory. Primary storage device has very fast access time because it is an electronic device, for this reason semiconductors are chosen for the designing of main memory. But this storage is very expensive, cost per bit of storage high
9
and storage capacity is limited, Often it is necessary to store many millions, billion of bytes of data and as a result additional memory called Secondary Memory or Storage is used for most of the computer systems. Secondary storage generally has an operating speed slower than that of the primary storage because it is not purely electronics, it is electromechanical but it can store a large volume of data as permanent basis which can be partially transferred to the primary storage as and when required for processing. Examples are: CD ROM, Floppy Disk, Hard Disk, Pen Drive, etc. Special Types of Memory Cache Memory: Cache memory is a very high-speed memory. It is logically positioned between the internal memory (registers) and main memory. It stores or catches some of the content of the main memory, which is currently in use by the processor. In many situations the performance of the processor are limited due to the slow speed of the main memory, A technique has been used to compensate for the mismatch in operating speeds is to employ an extremely fast special type of memory. It's a small memory whose access time is very close to the processing speed of the CPU. The memory's read and write operations first check the cache whether the desired data is available there or not otherwise go for the CPU directly. Cache memory is hidden and it is not addressable by the user. Virtual Memory: Few years ago, the problem persisted for a programmer in how to fit a large program into a small memory. The solution developed to break programs into small pieces called Overlays. The first overlays would be loaded and executed first, which in turn call another overlays. The overlays used to be on hard disk and swapped in and out of memory by as. The swapping will be done by the operating system. The virtual memory is a memory management technique, which does splitting of a program into number of pieces as well as swapping. Different Type of Disks Information is always stored on the disk surface in a series of concentric circles, called "Track" Each track is further divided into segments called "Sector". Each track divided into 8 parts. This process of dividing the disk into Tracks and Sectors is called "Formatting of Disk". Any new disk has to be first formatted before writing any information to it. Data are recorded on the tracks of a spinning disk surface. Floppy Disk: Floppy disk is a flexible plastic disk, coated with magnetic material and enclosed within a plastic casing. The plastic casing gives handling protection to the disk surface. The read write heads of a floppy disk unit make direct contact with the disk surface during the process of reading and writing. The standard size and capacity is 1.44 MB in current but previously was (1.2 MB) 5.25 inch, in diameter but due to large size, constancy and storage capacity 5.25" floppy drive are not used today. IBM introduced them in 1972. CD ROM:
10
The CD-ROM (Compact Disk.- Read Only Memory) can store digital data. The advantages of this storage media are its high capacity and durability. In general two types of CD available in the market are: WORM (Write Once Read Many times) and RW CD (Re-Write able Compact Disk). Hard Disks (HDD): A hard disk is a secondary storage device kept inside the cabinet that can store large amount of data. Hard disk is the main device that a computer uses to store information; it contains many disks, each of which is divided into tracks and sectors. Data are transferred magnetically to and from the hard disk by read/write head located within the hard disk drive. Hard Disk can store large amount of data, typically 20GB, 40G8, 80G8, 160G8 capacities of Hard Disks are available. Hardware It refers to the physical or we can say mechanical devices of the computer system like monitor, keyboard, cabinet etc. that form a computer. Software It means an integrated set of programs, which supplies instructions to a computer. It is further classified into two categories namely:
1. System Software
2. Application Software System Software: It controls the computer system and its resources like the memory, input and output device, the disk drives and the. Microprocessor schedules the work within the machine and enables the hardware to understand our commands that are given in English like language. Examples are Windows 9x, 2000, ME, NT, XP, Vista version, etc. Vista is the latest System Software or Operating System. Operating System Since the computer cannot understand users' command, intermediate software is required to act as a translator between the machine and user. This purpose is served by the operating system (OS). An operating system is an integral set of specialized program that used to manage the resources such as memory, processor, and file system and input/output devices and overall operations of a computer. The primary objective of an operating system is to make computer system convenient to use and utilize computer hardware in an efficient manner. OS plays the most prominent role in the system software. From this diagram it is clear that OS directly controls computer hardware resources. Other programs are used to take facility/which are provided by an operating system.
11
Functions of an Operating System The following are the main functions of an operating system:
Resource Management Memory Management Command Interpretation
Application Software: Application software is a set of one or more programs or instructions designed to carry out operations for a specified application. The application software always runs based on any System Software or Operating System. In general you can say it creates an interface for the user to perform a specific type of job. For example, WORD for word-processing, EXCEL for database management, Photoshop for drawing any graphics, TALLY to maintain Hospital's accounts etc. Relation Between Hardware and Software Hardware and Software both are complementary to each other, like buyer & seller (both are dependent at on each other). Hardware can't do anything on its own without Software and vice-versa. For example: Suppose you purchased some peripherals (hardware components) from market to assemble a computer and after having assembled you need an Operating System (System software) as a driving force to operate the machine otherwise it is valueless. Another point is that hardware is a one-time expense but software is a repetitive/recurring expense. You can run different types of software on the same hardware unit. Graphical User Interface (GUI) Now a day everywhere you are getting pictorial representation of each item, like hoarding, banner, parking instructions, traffic signals etc. Because pictorial presentations are independent from language so that any kind of person can understand the matter very easily and quickly without the help of interpreter. Software developers have opted the advantage of this graphical representation to make understandable software or file or folder to the user. An presently all most all software have been developing based on this advantage which provides very user friendly environment to the user and most of the US8TS are going for the same. This feature is known as Graphical User Interface (GUI). Some common Operating Systems are there that support GUI feature, like different versions Windows, Open Server UNIX, OS/2, Novell Operating System (NOS) version 4.1 etc. Multitasking Multitasking refers to run multiple tasks simultaneously. In Windows XP you are able to open multiple software as well as more than one documents within same or different software simultaneously. You can easily move from one document/software to another using Taskbar or using Alt + Tab keys together. The number of software/documents could be opened depends on the memory (RAM) capacity. This feature is known as Multitasking.

12
Linking By this feature you can create a relation between two files so that when you change anything within source file, the target file will get affected as well as you can make any changes within source content by accessing directly the source file from the text file by double-clicking on the target area. The source file will be opened; whatever changes you are making should be saved under the original source file, the effect of which will also invariably come within target file. Embedding As the word suggests, using feature you can get a copy of the object within text document. But there will be no such relation with the original source file. As such, when you change anything within the source file, the same will not reflect the target file. . Plug 'n' Play This feature helps to active any new hardware device by supplying proper device from the drive list of Window XP, if the corresponding device driver is not available within Windows XP, operating system itself will give a prompt message to supply corresponding device driver to run the device. This unique process of Windows XP is known as Plug 'n’ Play. To run this process, attach the hardware component and turn on the PC. Immediately operating system will check the new attachment through Plug 'n' Play program. If Windows XP is unable to provide the device driver to run the hardware, you have to supply this device driver externally, either by using CD or Floppy, which is supplied by the vendor at time of purchase of device. If your PC is in working mode you can attach any new device with it or can replace any existing one, soon after attachment this Plug 'n' Play feature will start immediately. Context Sensitive Menu Windows XP provides a very flexible popup menu system, which is known as Context Sensitive Menu. This menu appears when you right click on any object or area of the Windows XP. Menu options will be different depending on the context where you click. As for example, if you are right clicking on the Start button a small popup menu with some options will appear, similarly if you click on the Taskbar a popup will appear having different options. Number System and Computer Arithmetic The binary numeral system, or base-2 number system, is a numeral system that represents numeric values using two symbols, usually 0 and 1. More specifically, the usual base-2 system is a positional notation with a radix of 2. Owing to its straightforward implementation in electronic circuitry, the binary system is used internally by virtually all modern computers. Representation A binary number can be represented by any sequence of bits (binary digits), which in turn may be represented by any mechanism capable of being in two mutually exclusive states. The following sequences of symbols could all be interpreted as the same binary numeric value of love: 0 1 1 0 1 1 0 0 0 1 1 0 1 1 1 1 0 1 1 1 0 1 1 0 0 1 1 0 0 1 0 1 | - - | - - | | | - - | - - - - | - - - | - - | | - - | | - | -
13
x o o x o o x x x o o x o o o o x o o o x o o x x o o x x o x o a z z a z z a a a z z a z z z z a z z z a z z a a z z a a z z z Format Menu Font It allows to format text with the help of different option available under the Font box. Here you can change the Font face, Font size, Font style (like Normal Bold, Italic etc.) color etc. Font is the graphical representation of the character .You can give same effect using Formatting toolbar, which provides Font drop down color button etc. Bullet Style This option turns on/off bullets. Bullets generally come as prefix of the paragraphs. These are identified by some graphics. Normally it is giving a counting feature as well as decoration to the paragraphs. You can also use Bullet button from the Formatting toolbar. Paragraph This option provides a dialog box to change the indentation and Alignment of the paragraphs. Indentation is extra space that can be generated on the left side, right side or only on first line of paragraph(s). Those spaces are known as left Indentation Right Indentation and First line Indentation respectively .The space between left margin of the document and left edge of the paragraph is known as Right indentation The space between left edge of the paragraph and starting position of the first line of the paragraph is known as First Indentation. Alignment is a process to arrange lines of a paragraph(s) within margins. There are three types of alignments; (i) Left, (ii) Centre and (Right). All lines of a paragraph will be parallel to the margin due to left alignment all lines will be parallel to the right margin due to Right Alignment and all line will be centered from left and right margin i.e. equally leave space for each line from the left and right margin due to Right Alignment. Tabs This feature of any word processor is used to arrange text in multiple columns having different alignment where each columns maintains a certain distance from the one Based on their required areas you have to set tabs after defiling the Tab stop position. In this regard the following dialog box will help .In case of word pad you can’t define alignment for a particular tab position but in Microsoft Word this feature is available and hence you can define alignments as you need . Clear all button of this dialog box is used to remove all existing tab the current paragraph(s). Creating a Folder 1. Select the drive on which we want to place our new folder. To create a subfolder, select the folder into which we want our new folder placed, e.g. select the my documents folder to create a subfolder for it.
14
2. Open the file menu and select new. 3. Select new folder from the cascading menu that appears. A folder is created in the current directory. 4. Type a name for the folder and press enter. We can give the folder any name, up to 243 characters long, including spaces but exclude desktop, it will support up to 199 Character including all. Deleting a File or Folder When we delete a file or folder. it's placed in the Recycle Bin. This gives us a chance to get a deleted file back. We'll learn bow to use the Recycle Bin in the next section. When we delete a folder. We delete all files contained in it, as well as the folder itself. 1. Select the file(s) or folder(s) we want to delete. 2. Click the delete button on the standard buttons toolbar, or press the delete key on the keyboard. The confirm file delete, dialog box appears. 3. Click yes to delete the file(s) or folders(s). Renaming Files and Folders We might want to rename a file or folder if it turns out that the original name we chose does not clearly identify the purpose of the file or folder. To rename a file or folder, follow these steps: 1. Select the file or folder we want to rename. We can rename only one object at a time. 2. Open the file menu and select rename (or select the file by clicking the right button and chose the rename). 3. Type the new name for the selected file or folder and press enter. Be sure to type the same file extension as before, e.g. if the filename ended in. DOC, be sure to use. DOC at the end of the filename we type. Attributes of Files and Folders Windows XP provides different file and folder attributes to change their access rights. Mainly four types of attributes are there: (i) Read-only, (ii) Archive, (iii) Hidden and (iv) System. . Read-only Shows whether the file or folder is read-only, if it is, the content of the file/folder cannot be changed or accidentally deleted, right-click on any file or folder icon and select this check box to turn on the Read-only attribute on, to prevent such abrupt happenings. Click to clear this check box to turn off the Read-only attribute. If multiple files are selected, single check mark means that all the files are in read-only mode. You can select the multiple files/folders for activating the attribute "read-only" at once.

15
Consequently each such file will be found having selected with the attribute individually. A shared check box means that some files are read-only and some are not. Archive Archive is also an attribute found in the properties of file/folder selecting this attribute will help in controlling/segregating the backed up files. If multiple files are selected with the check mark it will enable all the files to have archived. However, while selecting some files/folders if shaded check box is seen, it indicates some files are having selected with the attribute and some are not. Hidden The hidden attribute of files/folders is meant to hide files/folders. One can't view them unless one knows their name(s). Select this check box to turn on the Hidden attribute, or click to clear this check box to turn it off: Its main purpose is not to disclose the files/folders you create for direct access by other, users. Thus though it may not maintain the, fool proof secrecy to some extent secrecy can be maintained. If multiple files are selected, single check mark means that all the files are hidden. A shaded check box means that some files are hidden and some are not. Shortcut Creation for Files and Folders Select the folder from the Folder pane to keep a new shortcut within it. Use any one of the following steps: 1. Choose File menu > New> Shortcut, the following dialog box will appear. Either type the filename along with the path to get the shortcut or click on Browse button to select the: proper path for the filename, e.g., C:\Windows\Pbrush.EXE for Paint. Click Next button to define the, name of the shortcut and finally click on Finish. 2. Right click on the blank area of the Content pane for the current folder to get the Context Sensitive Menu. Choose Shortcut option from the popup and do the above. To create a shortcut for a folder right click on the folder icon, from the Context Sensitive Menu select Create Shortcut. A shortcut will be generated within the parent, folder of the original one. Rename the shortcut using Rename option. Now you can move the shortcut and can keep at your required area by moving it using Cut and Paste option or drag the icon with the help of Shift key. Searching for a File With the large hard drives in use today, it's easy to lose location of a single file. In explorer we can search for our lost files by entering a complete or partial name, the date the f ile was created, the file type, or the file's size. We can even look for some matching text within the file.
16
If we are unsure of the exact spelling of a filename, we can use wildcards when entering a filename to search for. There are two wildcards we can use; an asterisk represents multiple characters, and a question mark represents a single character in the filename. To search for a file or folder, follow these steps: 1. Then select files or folders from the cascading menu that appears. (Or from the taskbar right click on start menu, select search. The Search Results dialog box appears. 2. Type the name we want to search click on all or part of the file name. We can use wildcards if we like. If we’ve searched for this file recently, we can select it from the drop-down list box. We can search different file like extension .doc, .xls, .mdb with the help of “,” sign. 3. If we want to search for a file that contains a particular phrase, type that phrase in the 'A word or phrase in the file text box. 4. Select the folder in which we want to search from the look in drop-down list box, or click look in option to select it from a list. To search a drive; such as drive C:, select it instead. To search an entire drive, make sure that the include subfolders option is selected. 5. To search for a file with a particular creation diode or last modification date, click the when was it modified. If we select specify dates then this option will enable and give the date range. 6. To search for a file of particular type or size, click what size is it and select the options we need. 7. To search a particular hidden files and folders, case sensitive file or folder type the folder or file name into file name box from more advanced option. 8. When we are through selecting options, click search now. The results appear in a window. 9. If we did not get the results we wanted, we can modify our search criteria and click search now again. Or, to erase the criteria and start over, click new search. Compressed Zip Folders Windows XP has built in support for compressed folders in both the ubiquitous Zip format and the Microsoft Cabinet (CAB) format. To create a Zip folder Right Click on Start Menu ––> Explorer ––> File ––> New ––> Compressed zipped folder ––> Now drag the file and drop into compressed zip folder. About Drives Most computers come with at least two disk drives: the hard disk drive and the floppy disk drive. The hard disk drive provides large-capacity storage for your programs and the data files you create. Windows itself is stored on the hard disk drive. The floppy disk drive lets you transfer a limited small amount of data from one computer to another easily.
17
Typically the hard disk drive is called C and the floppy disk drive is A. Your PC might have more than one hard disk, or the hard disk might be divided into separate partitions. If so, the additional drives are labeled as D, E, and so on. If your PC has more than one disk drive, it is labeled B. If your PC has a CD-ROM drive, it is assigned with drive letters such as E or F. Pen drive are assigned G or H. My Computer Windows XP offers this program to get direct access to My Computer folder that consists of all components of the PC. My Computer is working same as Windows Explorer. Normally, it contains all the available drives on the machine, Printers folder, Control Panel, Shared documents, Administrator documents etc. This program can also be used to manage files and folders. The following figure will come after opening the My Computer either from Desktop or from Windows Explorer. Changing Views of Windows Explorer After loading or Windows Explorer, usually it displays both folder pane and content pane. This view of Explorer is known as Double Paned Window view. But when you open My Computer for files and folders manipulations, you get only one window that contains all components. This view is known as Single Paned Window view. But both of the cases can be changed from Double to Single paned window or vice versa. To change this view, use View menu > Explorer Bar > Folders. This option activates or deactivates Folder pane to make it double or single paned window. File and Folder Manipulations Manipulation means creation, renaming, deletion, location changing, and duplicate coy creation etc. for files as well as folders. Wildcards Wildcards are some special characters used to define a group of filenames. Normally MS-DOS and Windows XP support two types of wildcards i.e. (Interrogative sign) and * (Asterisk sign). Note of interrogation or Question mark (?) The? Wildcard is used to match any single letter in a filename. It can be used by itself or in multiples of as many characters as you want them to match. For example: the expression???S.TXT represents all files having “S” as the fourth character in the primary name where first three positions are unknown or can be any characters or numbers and “TXT” as the extensions. You can also use the? Wildcard in the second part of a filename. The wildcard filename BOOK.D?? Matches all filenames starting with “BOOK” and having “D” as the first letter of the extension. All of these wildcard combinations can be used with DOS file exploitation commands: DIR, DEL, COPY, REN and many more.
18
Asterisk (*) "The * wildcard is more powerful than the single-character? Wildcard. The asterisk is used to match groups of one or more characters in a filename. You can use asterisk in the primary and in the extension part also. As for example, if you define as asterisk sign at the first position of the primary or extension, then entire eight characters of primary or three characters of extension will be assigned as unknown characters, so that if any such character declaration is there after the asterisk mark, it will be ignored. Suppose you are giving the command to find out those files having "COM" as first three characters and "N" as sixth character in the primary where extension can be anything, so the command will be DIR COM??N*.*, but DIR COM*N*.* command will ignore "N" from sixth position. Remove Existing Folder or Shortcut from the Start menu To remove any existing folder or shortcut, call the Taskbar Properties dialog box. Select Remove button. Remove Shortcuts/Folders dialog box will appear, select the desired one and confirm by clicking on Remove button. Customization within Start Menu If you want to change the position of any such folder or subfolder or shortcut from one location to another location of Start menu, access Right click on Start menu> Properties> Start menu tab> Customize >Advanced button of the Taskbar Properties dialog box. Using Cut and Paste options from Edit menu or simply by dragging of icon you can shift them location-to-location. Taskbar Options Taskbar components can be customized through Right click on Start menu> Properties Lock the taskbar Lock the taskbar so you can't increase the size, and position of any toolbar which are currently displayed on toolbar also not to moved any new locations. Auto Hide the task bar By turning on this option you can provide entire Desktop area for the current application window, otherwise Taskbar always appears at the bottom most area of the screen and occupies a certain area, so that current program window will not be able to get entire screen area, If this option is on, then Taskbar will be invisible on the screen. To access the Taskbar place mouse pointer at the bottom most area of the screen, immediately Taskbar will appear. This option by default is off. Keep the taskbar on top of other window This option allows the Taskbar always in front of the current program, So that any time you can access Taskbar as well as Start menu. If this option is off then you have to minimize tile current program to access Taskbar and Start button. By default this option is on.
19
Group similar taskbar button Display taskbar icon for file of the same program in the same area of the taskbar, When you open multiple files the buttons are shrink for the certain width and if you open more then open file from the same program then the buttons will collapsed in a single buttons. Show quick launch Display quick launch bar is a customizable toolbar that's lets you display the windows taskbar or start a program to launch quick with a single click. . Hide inactive icons Keeps the taskbar notification area from displaying unused icons. You can also change the behavior. Show Small Icons in Start Menu This option changes the view of the Start Menu. It hides the Windows XP logo from the left-hand side of the Start Menu popup and the options are coming very closer, their sizes also get reduced to make it a small size of popup. This option by default is off. Show the clock By default this option is on. For this, you can get system clock on the right-hand side of the Taskbar, which gives you System Date and Time. If this option is off then you have to access. System Date and Time either turning on the option Show Clock from Taskbar window or using Start Menu> Control Panel> Date/Time. Control Panel Using this tool of Windows XP you can change system setting of the PC. It is consisting of several types of components, which gives the facility to change the default setting of the computer to access Control Panel, go for Start menu>Control Panel or My Computer> Click on Control Panel in the left hand side. Display Using this feature of Control Panel you can change overall view of Windows XP. It contains different types of Control tabs. Theme Desktop theme a overall appearance of your desktop and providing a predefined set of icons, colour, sound, font, Background picture, Screen saver and other element of windows. Desktop In Background, click the background you want to use or click Position and color to choose or modify the background.
20
Click Apply to see the changes before you close the dialog box, or click OK to accept the changes and close the dialog box. Notes: You can use mostly used graphic files, such as Bitmaps (.bmp), GIFs (.gif), and JPEG (.jpeg) images. To cover entire screen with a small wallpaper image, click Tile. To center a' wallpaper image, click Center. Screen Saver Tab 1. In Screen Saver, click the screen saver you want to use. 2. To customize the screen saver, click Settings. Notes: The screen saver starts if your computer is idle for the number of minutes specified in Wait. To clear the screen saver after it has started, move your mouse or press any key. By default, only a limited set of screen savers is installed during Windows Setup. Protect your files by assigning a Screen Saver Password 1. In Screen Saver, click the screen saver you want to use. 2. To protect with a password click on On Resume Password protect check box and then apply. Click on Preview to display the screensaver on the full screen, move the mouse or press any key to end the test. Setting the my picture slide show screen saver My picture slide show is the new features of windows XP. Windows XP automatically display a slide show of the pictures in a specified folder where you are not using the computer. Before setting up my picture slide show group all the picture into a specified folder, the default setting is my picture folder; you can copy or move the files into another folder. Appearance Tab 1. If you want to change the appearance of only one screen element, At first click on Windows and buttons and select windows XP styles or windows classic styles (this version is similar to earlier version of windows) then click in advance buttons and select menu in Item, and change the settings in Size and Colour for the item and its font size, colour, bold and italic. If you want to change the appearance of all screen elements simultaneously, click an appearance scheme in Scheme. Effects Tab Methods to smooth edges of screen fonts is use to better readability of large screen fonts select standard type for desktop monitor and clear type for flat screen, Laptop. Click on Use large icon and you will see the files, folders icons are displayed large.
21
To see only the window content when you drag a icon, click the Show window contents while dragging check box. Click on Show shadow under menu and specifies whether menus cast a slight shadow and its looks a three dimension. Click on Hide underline letters for keyword navigation until I press the ALT key, to specify whether to suppress the drawings of keyboard shortcuts (Use underlined characters in menus and controls) and input focus indicators (the dotted rectangles around object), Until you actually start using the keyboard to navigate in windows, generally with the ALT, Tab, or arrow keys. Settings Tab To calibrate display to actual dimensions, do the following steps: In Screen area, make sure the setting is higher than 640 by 480 pixels. If 640 by 480 pixels is the only setting available to you, you cannot calibrate the display to actual dimensions. Click Advanced to open the properties page for your computer. On .the General tab, in Font Size, click other. Hold a ruler up to the ruler on your screen, and then drag the screen ruler until it matches the ruler you are holding. In colours, click the number of colours that you want your monitor to display. Mouse Using this option you are able to change Mouse properties. To explore mouse setting do the following: - Choose Start Control Panel Click printers and other hardware In the printers and others hardware window click Mouse Switch Primary and Secondary Buttons: - If you are left handed and you want to use your strongest finger for the primary mouse button, you - might want to switch the button functions. Buttons Tab Mouse buttons can be swapped as per way of handling. If any person is left-handed, he can change the normal use of left button to right that will be easier to operate for him. In that case you have to select Left-handed option in Button configuration. To adjust the Double-click speed for your mouse drag the slider. To test the speed double click the image in the test area. Click on Click lock option for just highlight the file or folders and drag it for 1 second not to hold down the mouse button and drop to your destination.
22
Pointers Tab Using this control tab, you can change mouse pointer shapes for different process. There are some predefined schemes for pointer shapes, which can be selected instead of individual change. Pointer Option Tab
Motion This control tab is used to adjust Pointer Movement. Snap to When a new dialog box is open, automatically the pointer stay on the Ok or Apply buttons. Visibility Adds the trial to the mouse pointer click on Display pointer trials, To change the pointer trail drag the slider. This option is especially useful if you are using a screen for any such of demonstration. . Hide the mouse pointer when you are typing click Hide pointer while typing. At the time of typing if you press CTRL key you can see the pointer. Show location the pointer when I press CTRL key. Wheel Tab Click on this Roll the wheel one notch to scroll for scrolling one line and also scroll page wise, this is similar to the page up and page down key. Hardware Tab From this option you can see in which port you mouse are attached and display the list of device. Regional and language Options This feature of, Control Panel allows changing default settings of Numbers, Currency, Date and Time as per currently selected region. Regional Settings Tab On the Regional Settings tab, click the name of the region you want and set date, time, number, and currency format as you wish to suit your requirement from customize option.
23
Number Tab This control tab allows changing the display of numbers in the computer. Here you can change Decimal symbol, number of decimal places, digit-grouping symbol, and number of digits in-group, appearance of negative values etc. Currency Tab Using this control tab you can set the Currency symbol, position of the currency symbol, appearance of negative values etc. Time Tab Time style, Time separator etc. can be change using this control tab. Date Tab Here you can declare Date style and Date separator for Short date and Long date types. Also you can define a certain range of years that can be interpreted by the computer when you are using two digits for year. Altering System Date and Time The time that appears on the taskbar is based Oil the clock setting for our computer? To adjust the computer clock go for Start menu> Control Panel> Date/time. To change the System Date, click on a new date. To change the System Time, use the spinner that appears under the clock. Click OK. Note: To display the Date/Time properties dialog box quickly, double-dick the Time Icon on the: right end of the taskbar. Recycle Bin It is a very useful program of Windows. Normally all the deleted files and folders come to this component for reprocessing. This is just like a container to keep only deleted components of Windows, which can be restored to their previous area or can be removed permanently. It has been assigned with certain percentage of different hard disk drives to store their corresponding deleted items. For this reason, when a file or folder is deleted from any specific drive it can be restored back to the concerned drive location. . Change the Capacity of the Recycle Bin Right-click on the Recycle Bin Icon, and select Properties. Drag the slider to increase or decrease the amount of disk space that is reserved for storing deleted files. If you want to use different settings for different drives, on the Recycle Bin Properties dialog box, click Configure drives independently, and then click the drive tab to change settings for a particular drive. If you want to use the same settings for all drives, click Use one setting for all drives. Permanently remove files when you delete them
24
Right-click on the Recycle Bin Icon, and click Properties. Select the Do not mode files to the Recycle Bin check box, If this check box is selected, you will be unable to retrieve any files you delete. Prevent delete confirmation messages from appearing Right-click on the Recycle Bin, and click Properties. If necessary, click to clear the Display delete confirmation dialog check box. This setting applies when you move files to the Recycle Bin, not from it. This setting is unavailable if the Do not move files to the Recycle Bin check box is selected. Retrieve deleted files or shortcuts Click the file or Shortcut you want to retrieve. On the File menu, click Restore. If you restore a file that was originally located in a deleted folder, the folder is recreated, and then the file is restored in the folder. Files deleted at the command prompt, files deleted from network locations, and files deleted from removable media (such as floppy or CD) are not moved to the Recycle Bin. They are permanently removed when you delete them. To open a file that is in the Recycle Bin, drag the icon onto the desktop, and then click it. To retrieve several files at once, hold down Ctrl key, click each file you want to retrieve, and then click Restore on the File menu. Empty the Recycle Bin On the File menu, click Empty Recycle Bin. If you want to remove only some of the files in the Recycle Bin, hold down the Ctrl key and click each file you want to remove, then click Delete on the File menu. Microsoft Disk Operating System (MS-DOS) DOS stands for Disk Operating system. DOS is such an operating system, which contains the disk-oriented commands and uses disk devices for permanent storage. MS-DOS is a character-based single user operating system where issuing a command using its proper syntax can perform each and every operation. It is much more cryptic than Windows. It is the most popular operating system for the 16 bit microprocessors due to its speed. Difference Between MS-DOS and Windows
1. MS-DOS supports Character User Interface (CUI) where Windows supports Graphical User Interface (GUI).
2. MS-DOS is very much cryptic to memorize proper syntax of each and every command,
but Windows provides user-friendly menu driven easy interface to interact.
3. MS-DOS supports Single Task means at a time you can execute only one application, but Windows allows running Multiple Tasks simultaneously.
4. MS-DOS does not support Plug 'n' Play and OLE (Object Linking and Embedding), but
Windows supports the same. DOS Prompt
25
To load MS-DOS program, use any one of the following options: Choose Start menu >All Programs >Accessories >Command-Prompt. Select Start menu> Run, type Command or cmd in the Open text box and click OK. During booting press F8, a list of options will come select Safe Mode with Command prompt. After selecting the option, a black screen will appear select the operating system a press Enter. Wait for some time then select the user and password (if necessary a Click on Ok. After that the screen looks like C:\Ddcuments And Setting\Administrator> or C:\>, this prompt is known as MS-DOS Prompt Press Alt + Enter for full screen. On the right hand side of this prompt a cursor is seen to write any command at the prompt. Press Enter key to execute the command. Useful terms of DOS Before going to know the DOS commands, you should acquaint with the following nomenclature: Directory It is a container to keep a collection of files. Every disk drive has one main directory, i.e., the root directory of the drive. It can also have other directories or subdirectories. File It is a container to keep a collection of data. DOS stores information on disk in the form of a file. Each and every such file identifies with a unique name. The name of the file is of two parts; first part is known as Primary Name and second part is known as Secondary Name or Extension. The primary name can be with a maximum of 8 characters and extension can be of 3 characters. DOS Commands DOS is totally command-based software. Hence, commands with proper syntax only can execute, so that whatever things you want to do with it you have to execute some commands with their proper syntax. The DOS commands are divided into two categories: (i) Internal Commands and (ii) External Commands. Some important Commands are discussed below PROMPT Specifies a new command prompt. Syntax: PROMPT <parameter(s)> Prompt can be made up of normal characters and some special characters as given below. $T - to get Current Time to get Current Date
26
$D - to get Current Date $P - to get Current Drive and Path $G - to get Greater-than sign (>) $L - to get less-than sign (<) Example : PROMPT $P $D$G <Press Enter key> Result: C:\Wed 01-29-2007> Type PROMPT without parameters to reset the prompt to the default setting i.e. C> or D>. DIR Display a list of files and subdirectories in a directory. Syntax: DIR [Drive:][Path][Filename(s}] <parameters> Parameters are: /P - Pauses after screen full of information3 /S - Displays file in specified directory and all subdirectories /W - Uses wide list format /AD - Displays subdirectories only of a specified directory. To display only files use the parameter as / A-D /ON - List by files in a sorted order by Primary Name /OE - List by files in a sorted order by Extension/Secondary Name /OS - List by files in a sorted order by Size (smallest first) /OD - List by files in a sorted order by Date & Time (earliest first) Example: DIR/AD/P <Press Enter key> Result: Only subdirectories of current directory will be displayed having a pause option for screen full display. CLS Clear the screen. Syntax: CLS
27
DATE Display or sets the System Date. Syntax: DATE [date] Result: Syntax date Will be changed to the specified date. Type DATE without parameters to display the current date setting and a prompt for a new one. Current date is Wed 10-29-2004 Enter new date (mm-dd-yy): On the prompt either give a new date to change the current date or press enter to keep the same date. TIME Display or sets the System Time. Syntax: TIME [time] Result: System time will be changed to the specified time. Type TIME without parameters to display the current time setting and a prompt for a new one. _ Current time is 11:49:00.23 a Enter new time: On the prompt either give a new time to change the current time using a color: separator or press enter to keep the same time. . VER Displays the version of the operating system. System: VER TYPE Displays the contents of text files. Syntax: TYPE [Drive:][Path] Filename Example: TYPE ABC.TXT <Press Enter key> Result: The content of the ABC. TXT file will be displayed. REN Renames a file/directory or files/directories. Instead of REN command you can use RENAME. Syntax: REN [Drive] [Path] <Source Directory name(s)/File name(s) <Target Directory name(s)/File name(s)
28
Example: REN ABC.TXT XYZ.DOC <Press Enter key> Result: Name of the ABC.TXT file will be changed to XYZ.DOC. Note that you cannot specify a new drive or path for the destination/target name(s). VOL Displays the disk volume label and serial number, if they exist. Syntax: VOL [Drive:] Example: VOL C: <Press Enter key> Result: It will show the current label for the drive C as: Volume in drive C is ICA Volume Serial Number is 1 A2B-ODFB DEL Deletes one or more files using wildcards. Instead of DEL command you can use ERASE. . I Syntax: DEL [Drive:] [Path] Filename(s) [/P] /P - Prompts for confirmation before deleting each file. Example: DEL C:\*.TXT <Press Enter key> Result : Removes all TXT files from root directory of drive C. Copy Copies one or more files to another location. Syntax: Copy <Source> <Destination/Target> Source - Specifies the file or files to be copied Destination - Specifies the directory and/or filename for the new file(s) To append files, specify a single file for destination, but multiple files for source (using wildcards or File1 +File2+File3 format). Copy CON <Filename> The above command keeps console or information directly coming from keyboard into a file. This file can be a new one or existing one. If it is an existing file, new information will overwrite the previous matter, but in case of a new file the content will be added to the file. After keeping the matter save it by pressing Ctrl + Z, then press Enter key.
29
CHANGE DRIVE (A: / B: / C: / D:) It is used to change the control from one drive to another. Syntax: [Drive:] Example: A: <Press Enter key> Result : The prompt will be changed to access the drive A, i.e., A:\>. MD Creates a directory. Syntax: MD [Drive:] [Path] <Directory Name> Example: MD D:\Students <Press Enter key> Result: A directory STUDENTS will be created under the root directory of the drive D. CD Changes the control to a specific directory. Syntax: CD [Drive:] [Path] <Directory Name> CD [..] .. Specifies that you want to change to the parent directory. Example: CD D:\Students <Press Enter key> Result: Control will move to the Students directory of the drive D and the prompt will indicate the same as D:\STUDENTS>. Note that CD without parameters displays the current drive and directory. RD Removes (Deletes) a directory. Syntax: RD [Drive:] [Path] <Directory Name> Note that before removing the directory you have to make it empty means the directory should not contain any subdirectory or file and control should be kept within its any parent directory. LABEL Creates, changes, or deletes the volume label of a disk. Syntax: LABEL [Drive:] <Label Name> Example: LABEL D:Hospital <Press Enter key> Result: The label of the drive D will be HOSPITAL. You can check it by issuing VOL command for the D drive. EDIT It provides MS-DOS Editor to create/modify any file. Syntax: EDIT [Drive:] [Path] <Filename> To save the file use Alt + F, S. To close the editor use Alt + F, X. Example: EDIT D:\ABC.TXT <Press Enter key> Result: The editor will be opened alognwith the file ABC.TXT. Keep the contents and save the same.
30
RMDIR Deletes a directory and all the subdirectories and files in it. Instead of RMDIR command you can use RD command. Syntax: RMDIR [/S] [Drive:] [Path] <Directory 1> <Direc1ory 2> ... <Directory n> /S - Remove all directories and files in the specified directory in addition to the directory itself. Used to remove a directory tree. Example: RMDIR/S D:\Students <Press Enter key> Result: Removes Students directory alognwith its all subdirectories and files from the drive D. Note: Use cautiously. It ensures the deletion of every file and subdirectory within the specified directory. X Copy Copies files and directory trees. . Syntax: XCOPY <Source> <Destination> [/S] [/E] [/T] [/H] [/P] /S - Copies directories and subdirectories except empty ones. /E Copies directories and subdirectories including empty ones. /T Creates directory structure, but does not copy files. Does not include empty directories of subdirectories /H Copies hidden and system files also. IP Prompts you before creating each destination file. Example: XCOPY C:\Doctors D:\ /E <Press Enter key> Result: The directory structure of Doctors directory along with its empty subdirectories if any, will be copied to the root directory of the drive D. FORMAT Formats a disk for use with MS-DOS. Basically, this operation creates Tracks, Sectors, Root Directory and File Allocation Table (FAT) on the disk, so that you can keep files and/or folders on proper Track and Sector. Syntax: FORMAT <Drive:> [/Q] /Q - Performs a quick format. Example: FORMAT A: <Press Enter key> Result: The floppy in the drive A will be formatted without system files of the Operating System MOVE: Moves files and renames files and directories. To move one or more files, the Syntax will be: MOVE [/Y | /-Y] [Drive:] [Path] <Source Filename(s) <Destination> To rename files or directories, the Syntax will be:
31
MOVE [/Y | /-Y] [Drive:] [Path] <Filename 1/Directory 1> <Filename 2/Directory 2> /Y Suppresses prompting to confirm creation of a directory or overwriting of the destination /Y - Causes prompting to confirm creation of a directory or overwriting of the destination Example: MOVE D:\ABC.TXT C:\ <Press Enter key> Result: Moves the file ABC.TXT from the root directory of the drive D to the root directory of the drive C. TREE Graphically displays the directory structure of a path or of the disk in a drive. Syntax: Tree [Drive:] [Path] Batch File It is a special file to keep some valid DOS commands for a sequential execution. File extension should be .BAT and keep each command in a separate line. Astor example: COPY CON PRACTICE.BAT <Press Enter key> OR, EDIT PRACTICE.BAT <Press Enter key> Keep the following commands as given below: DATE TIME VER DIR/W Save the file. To execute the same, type the primary name only of the file on the prompt and press Enter key. C:\DOCTORS> PRACTICE <Press Enter key> Serially one by one command will be executed as per their sequence.