Embed Size (px)
Citation preview

Compute Manager 1 .
Administrator’s Guide

Compute Manager 13.0 Administrator’s Guide
Compute Manager 13.0 Administrator’s Guide Updated: October 8, 2015
Intellectual Property Rights Notice:
Copyrights, Trademarks, Trade Secrets, Patents & Third Party Software Licenses
Altair® PBS Works™
Enabling On-Demand Computing™
Copyright© 1994-2015 Altair Engineering Inc. All Rights Reserved.
Special Notice: Pre-release versions of Altair software are provided ‘as is’, without warranty of any kind. Usage is strictly limited to non-production purposes.
Compute Manager™ 2007-2015; Display Manager™ 2007-2015; PBS™ 1994-2015; PBS Professional® 1994-2015; PBS Application Services™ 2008-2015; PBS Analytics™ 2007-2015; and PBS Desktop™ 2007-2012; PBS Portal™ 2007-2011; e-BioChem ™ 2007-2013; e-Compute™ 2000-2007; e-Render™ 2006-2010; OpenPBS® 1994-2003 and Personal PBS® 2007-2012.
Other Altair software applications include:
Altair Simulation Cloud Suite: Simulation Manager™ 2003-2015; Compute Manager™ 2003-2015; Display Manager™ 2003–2015; and Process Manager™ 2003-2015.
Altair HyperWorks®: HyperMesh® 1990-2015; HyperCrash® 2001-2015; OptiStruct® 1996-2015; RADIOSS®1986-2015; HyperView® 1999-2015; HyperView Player® 2001-2015; HyperStudy® 1999-2015; HyperGraph® 1995-2015; MotionView® 1993-2015; MotionSolve® 2002-2015; HyperForm® 1998-2015; HyperXtrude® 1999- 2015; Process Manager™ 2003-2015; Templex™ 1990-2015; TextView™ 1996-2015; MediaView™ 1999-2015; TableView™ 2013-2015; BatchMesher™ 2003-2015; HyperMath® 2007-2015; HyperWeld® 2009-2015; HyperMold® 2009-2015; Manufacturing Solutions™ 2005-2015; solidThinking® 1993-2015; solidThinking Inspire® 2009-2015; solidThinking Evolve® 1993-2015; Durability Director™ 2009-2015; Suspension Director™ 2009-2015; AcuSolve® 1997-2015; AcuConsole® 2006-2015; SimLab® 2004-2015; Virtual Wind Tunnel™ 2012-2015; FEKO™ 1999-2015 and VisSim™ 1989-2015.
Altair Packaged Solution Offerings (PSOs) Copyright© 2008-2015 Automated Reporting Director™ 2008-2015; Impact Simulation Director™ 2010-2015; Model Mesher Director™ 2010-2015; Model Verification Director™ 2013-2015; and Squeak and Rattle Director™ 2012-2015.
Altair intellectual property rights are protected under U.S. and international laws and treaties. Additionally, Altair software is protected under patent #6,859,792 and other patents pending. All other marks are the property of their respective owners.ALTAIR ENGINEERING INC. Proprietary and Confidential. Contains Trade Secret Information. Not for use or disclosure outside of Altair and its licensed clients. Information contained in Altair software shall not be decompiled, disassembled, “unlocked”, reverse translated, reverse engineered, or publicly displayed or publicly performed in any manner. Usage of the software is only as explicitly permitted in the end user software license agreement.
ii

Compute Manager 13.0 Administrator’s Guide
Copyright notice does not imply publication.
Third Party Licenses
Software Security Measures:
Altair Engineering Inc. and its subsidiaries and affiliates reserve the right to embed software security mechanisms in the Software for the purpose of detecting the installation and/or use of illegal copies of the Software. The Software may collect and transmit non-proprietary data about those illegal copies. Data collected will not include any customer data created by or used in connection with the Software and will not be provided to any third party, except as may be required by law or legal process or to enforce our rights with respect to the use of any illegal copies of the Software. By using the Software, each user consents to such detection and collection of data, as well as its transmission and use if an illegal copy of the Software is detected. No steps may be taken to avoid or detect the purpose of any such security mechanisms.
iii

Compute Manager 13.0 Administrator’s Guide
Technical Support
This document is proprietary information of Altair Engineering, Inc.
Location Telephone EmailAustralia +1 800 174 396 [email protected] +86 21 6117 1666 [email protected] +33 1 4133 0992 [email protected] +49 7031 6208 22 [email protected] +91 80 66 29 4500
+1 800 425 0234 (Toll Free)[email protected]
Italy +39 800 905595 [email protected] +81 3 5396 2881 [email protected] +82 70 4050 9200 [email protected] +91 80 66 29 4500
+1 800 425 0234 (Toll Free)[email protected]
North America +1 248 614 2425 [email protected] +49 7031 6208 22 [email protected] +46 46 460 2828 [email protected] +91 80 66 29 4500
+1 800 425 0234 (Toll Free)[email protected]
South America +55 11 3884 0414 [email protected] +44 1926 468 600 [email protected]
iv

Contents
Chapter 1: Introduction to Compute Manager 1
Introduction . . . . . . . . . . . . . . . . . . . . . . . . . . . . . . . . . . . . . . . . . . . . . . . . . . . . . . . . . . . . . . . . . . . . . . . 1Supported Platforms . . . . . . . . . . . . . . . . . . . . . . . . . . . . . . . . . . . . . . . . . . . . . . . . . . . . . . . . . . . . . . 3Supported Browsers . . . . . . . . . . . . . . . . . . . . . . . . . . . . . . . . . . . . . . . . . . . . . . . . . . . . . . . . . . . . . . . 3Pre-installation planning . . . . . . . . . . . . . . . . . . . . . . . . . . . . . . . . . . . . . . . . . . . . . . . . . . . . . . . . . . . 4
Hardware Requirements for CM . . . . . . . . . . . . . . . . . . . . . . . . . . . . . . . . . . . . . . . . . . . . . . . . . . . . . . . . 4Prerequisites for Using CM . . . . . . . . . . . . . . . . . . . . . . . . . . . . . . . . . . . . . . . . . . . . . . . . . . . . . . . . . . . . . 4Google Chrome Frame plug-in . . . . . . . . . . . . . . . . . . . . . . . . . . . . . . . . . . . . . . . . . . . . . . . . . . . . . . . . . 4Licensing . . . . . . . . . . . . . . . . . . . . . . . . . . . . . . . . . . . . . . . . . . . . . . . . . . . . . . . . . . . . . . . . . . . . . . . . . . . . . . 5Authentication, Authorization and Profile Sharing . . . . . . . . . . . . . . . . . . . . . . . . . . . . . . . . . . . . . . . 5
Authentication . . . . . . . . . . . . . . . . . . . . . . . . . . . . . . . . . . . . . . . . . . . . . . . . . . . . . . . . . . . . . . . . . . . . . . . . . . . . . 5Authorization . . . . . . . . . . . . . . . . . . . . . . . . . . . . . . . . . . . . . . . . . . . . . . . . . . . . . . . . . . . . . . . . . . . . . . . . . . . . . . 5Profile Sharing . . . . . . . . . . . . . . . . . . . . . . . . . . . . . . . . . . . . . . . . . . . . . . . . . . . . . . . . . . . . . . . . . . . . . . . . . . . . . 6Options for Populating AMS with Users and Groups . . . . . . . . . . . . . . . . . . . . . . . . . . . . . . . . . . . . . . . . . 6
PBS Works Database . . . . . . . . . . . . . . . . . . . . . . . . . . . . . . . . . . . . . . . . . . . . . . . . . . . . . . . . . . . . . . . . . . . 6
Chapter 2: Post-Installation Steps 7
Configuring the License Server . . . . . . . . . . . . . . . . . . . . . . . . . . . . . . . . . . . . . . . . . . . . . . . . . . . . . 8Adding the License Server in Console . . . . . . . . . . . . . . . . . . . . . . . . . . . . . . . . . . . . . . . . . . . . . . . . . . . 8Adding the License Server in the Application . . . . . . . . . . . . . . . . . . . . . . . . . . . . . . . . . . . . . . . . . . . 9
Changing the AMS Administrator’s Password . . . . . . . . . . . . . . . . . . . . . . . . . . . . . . . . . . . . . . . 10Migrating the AMS Datastore . . . . . . . . . . . . . . . . . . . . . . . . . . . . . . . . . . . . . . . . . . . . . . . . . . . . . . 11Populating AMS . . . . . . . . . . . . . . . . . . . . . . . . . . . . . . . . . . . . . . . . . . . . . . . . . . . . . . . . . . . . . . . . . . . 13
Logging into AMS . . . . . . . . . . . . . . . . . . . . . . . . . . . . . . . . . . . . . . . . . . . . . . . . . . . . . . . . . . . . . . . . . . . . . . 13Adding Users and Groups . . . . . . . . . . . . . . . . . . . . . . . . . . . . . . . . . . . . . . . . . . . . . . . . . . . . . . . . . . . . . . 14
Managing User Accounts . . . . . . . . . . . . . . . . . . . . . . . . . . . . . . . . . . . . . . . . . . . . . . . . . . . . . . . . . . . . . . . . . . . 14Managing User Groups . . . . . . . . . . . . . . . . . . . . . . . . . . . . . . . . . . . . . . . . . . . . . . . . . . . . . . . . . . . . . . . . . . . . . 17
Defining Access Policies . . . . . . . . . . . . . . . . . . . . . . . . . . . . . . . . . . . . . . . . . . . . . . . . . . . . . . . . . . . . . . . . 20PAS Server Level Access Policies . . . . . . . . . . . . . . . . . . . . . . . . . . . . . . . . . . . . . . . . . . . . . . . . . . . . . . . . . . . . 21UI Level Access Policies . . . . . . . . . . . . . . . . . . . . . . . . . . . . . . . . . . . . . . . . . . . . . . . . . . . . . . . . . . . . . . . . . . . . . 22Updating Default Access Policies . . . . . . . . . . . . . . . . . . . . . . . . . . . . . . . . . . . . . . . . . . . . . . . . . . . . . . . . . . . . 23Creating Access Policies . . . . . . . . . . . . . . . . . . . . . . . . . . . . . . . . . . . . . . . . . . . . . . . . . . . . . . . . . . . . . . . . . . . . 25
Configuring Custom Resources . . . . . . . . . . . . . . . . . . . . . . . . . . . . . . . . . . . . . . . . . . . . . . . . . . . . 29Configuring CM for RVS . . . . . . . . . . . . . . . . . . . . . . . . . . . . . . . . . . . . . . . . . . . . . . . . . . . . . . . . . . . . 33Configuring Notifications for a Job State Change . . . . . . . . . . . . . . . . . . . . . . . . . . . . . . . . . . . 34Logging into CM . . . . . . . . . . . . . . . . . . . . . . . . . . . . . . . . . . . . . . . . . . . . . . . . . . . . . . . . . . . . . . . . . . . 36Adding and Registering PAS Servers . . . . . . . . . . . . . . . . . . . . . . . . . . . . . . . . . . . . . . . . . . . . . . . . 37
Adding a PAS Server . . . . . . . . . . . . . . . . . . . . . . . . . . . . . . . . . . . . . . . . . . . . . . . . . . . . . . . . . . . . . . . . . . . 38
v

Registering a PAS Server . . . . . . . . . . . . . . . . . . . . . . . . . . . . . . . . . . . . . . . . . . . . . . . . . . . . . . . . . . . . . . . . 42
Chapter 3: Starting and Stopping PBS Works 43
Starting the PBS Works Service . . . . . . . . . . . . . . . . . . . . . . . . . . . . . . . . . . . . . . . . . . . . . . . . . . . . . 43Stopping the PBS Works Service . . . . . . . . . . . . . . . . . . . . . . . . . . . . . . . . . . . . . . . . . . . . . . . . . . . . 44Restarting the PBS Works Service . . . . . . . . . . . . . . . . . . . . . . . . . . . . . . . . . . . . . . . . . . . . . . . . . . . 44Determining the Status of the PBS Works Service . . . . . . . . . . . . . . . . . . . . . . . . . . . . . . . . . . . 44
Chapter 4: Compute Manager Advanced Configuration 45
Adding a Generic Action for a PAS server . . . . . . . . . . . . . . . . . . . . . . . . . . . . . . . . . . . . . . . . . . . 46Defining a Generic Action . . . . . . . . . . . . . . . . . . . . . . . . . . . . . . . . . . . . . . . . . . . . . . . . . . . . . . . . . . . . . . 48Defining a generic action execution script . . . . . . . . . . . . . . . . . . . . . . . . . . . . . . . . . . . . . . . . . . . . . . 49
Mapping Help Topics and Icons to an Application . . . . . . . . . . . . . . . . . . . . . . . . . . . . . . . . . . 50Mapping a File Extensions to an Icon . . . . . . . . . . . . . . . . . . . . . . . . . . . . . . . . . . . . . . . . . . . . . . . 52Installing and Configuring Google Chrome Frame . . . . . . . . . . . . . . . . . . . . . . . . . . . . . . . . . . 54Enabling a Secure Connection between CM and PAS . . . . . . . . . . . . . . . . . . . . . . . . . . . . . . . . 55Mapping a MIME type to a File Extension . . . . . . . . . . . . . . . . . . . . . . . . . . . . . . . . . . . . . . . . . . . 55Setting Maximum Page Size for Files . . . . . . . . . . . . . . . . . . . . . . . . . . . . . . . . . . . . . . . . . . . . . . . 56Changing the Job Refresh Rate . . . . . . . . . . . . . . . . . . . . . . . . . . . . . . . . . . . . . . . . . . . . . . . . . . . . . 57Changing the PAS Staging Directory . . . . . . . . . . . . . . . . . . . . . . . . . . . . . . . . . . . . . . . . . . . . . . . 57Refreshing Application Definitions . . . . . . . . . . . . . . . . . . . . . . . . . . . . . . . . . . . . . . . . . . . . . . . . . 58Configuring JVM Performance . . . . . . . . . . . . . . . . . . . . . . . . . . . . . . . . . . . . . . . . . . . . . . . . . . . . . 58Improving CM Response Time . . . . . . . . . . . . . . . . . . . . . . . . . . . . . . . . . . . . . . . . . . . . . . . . . . . . . 59Changing the Scheduled Time for Job Deletion . . . . . . . . . . . . . . . . . . . . . . . . . . . . . . . . . . . . . 61Changing the Location of the Monitoring Action Bar . . . . . . . . . . . . . . . . . . . . . . . . . . . . . . . . 62Changing the Communication Timeout between CM and PAS . . . . . . . . . . . . . . . . . . . . . . . 64Customizing the Available Job Monitoring Properties . . . . . . . . . . . . . . . . . . . . . . . . . . . . . . . 66Changing the PAS Application Retrieval Timeout . . . . . . . . . . . . . . . . . . . . . . . . . . . . . . . . . . . 69Enabling RVS Traffic through CM . . . . . . . . . . . . . . . . . . . . . . . . . . . . . . . . . . . . . . . . . . . . . . . . . . . 70Configuring RVS Admin Auto Refresh Interval . . . . . . . . . . . . . . . . . . . . . . . . . . . . . . . . . . . . . . 71Configuring the Default Home Path . . . . . . . . . . . . . . . . . . . . . . . . . . . . . . . . . . . . . . . . . . . . . . . . 72Adding Site Specific Web Pages to CM . . . . . . . . . . . . . . . . . . . . . . . . . . . . . . . . . . . . . . . . . . . . . . 73Launching an Application Installed on a Remote Server . . . . . . . . . . . . . . . . . . . . . . . . . . . . . 77
Configuring the Client to Open a Remote Application . . . . . . . . . . . . . . . . . . . . . . . . . . . . . . . . . . . 77Configuring Cross Mount . . . . . . . . . . . . . . . . . . . . . . . . . . . . . . . . . . . . . . . . . . . . . . . . . . . . . . . . . . . . . . . 77Server Configuration . . . . . . . . . . . . . . . . . . . . . . . . . . . . . . . . . . . . . . . . . . . . . . . . . . . . . . . . . . . . . . . . . . . 78
vi Contents

Modifying Application Launch Framework Client Location . . . . . . . . . . . . . . . . . . . . . . . . . . . . . . 78
Configuring Local Dynamic Application . . . . . . . . . . . . . . . . . . . . . . . . . . . . . . . . . . . . . . . . . . . . 79Setting the Popup Timeout . . . . . . . . . . . . . . . . . . . . . . . . . . . . . . . . . . . . . . . . . . . . . . . . . . . . . . . . 80Configuring the Advance Upload . . . . . . . . . . . . . . . . . . . . . . . . . . . . . . . . . . . . . . . . . . . . . . . . . . 81Configuration for Larger Sites . . . . . . . . . . . . . . . . . . . . . . . . . . . . . . . . . . . . . . . . . . . . . . . . . . . . . . 81
Setting the Maximum Active Connections . . . . . . . . . . . . . . . . . . . . . . . . . . . . . . . . . . . . . . . . . . . . . . 81Setting the Work Memory . . . . . . . . . . . . . . . . . . . . . . . . . . . . . . . . . . . . . . . . . . . . . . . . . . . . . . . . . . . . . . 82Changing the Shared Buffer Size . . . . . . . . . . . . . . . . . . . . . . . . . . . . . . . . . . . . . . . . . . . . . . . . . . . . . . . . 82Setting the Effective Cache Size . . . . . . . . . . . . . . . . . . . . . . . . . . . . . . . . . . . . . . . . . . . . . . . . . . . . . . . . 83Changing Java Heap Memory . . . . . . . . . . . . . . . . . . . . . . . . . . . . . . . . . . . . . . . . . . . . . . . . . . . . . . . . . . 83
CM Configuration Files . . . . . . . . . . . . . . . . . . . . . . . . . . . . . . . . . . . . . . . . . . . . . . . . . . . . . . . . . . . . . 84
Chapter 5: PBS Works Log Files 87
Chapter 6: Troubleshooting 89
Refresh Button Error . . . . . . . . . . . . . . . . . . . . . . . . . . . . . . . . . . . . . . . . . . . . . . . . . . . . . . . . . . . . . . . 89
Contents vii

viii Contents

1. Introduction to Compute Manager
IntroductionCompanies who have invested in high-performance computing (HPC) resources -- like clusters, supercomputers and cloud environments -- need these resources operating reliably around the clock. And just as importantly, the systems need to be easy to use, manage, and scale while still being cost-effective.
Altair’s PBS Works™ addresses these challenges with the most comprehensive suite of integrated HPC workload management products available from a single vendor. PBS Works simplifies and streamlines the management of HPC resources with powerful policy-based job scheduling, user-friendly web portals for job submission and remote visualization.
Components available through the installation of PBS Works:• Compute Manager™• Display Manager™• Access Management Services• Results Visualization Service
Compute Manager
Compute Manager™ (CM) is a job submission and monitoring portal which enables users to run, monitor and manage workloads on distributed resources remotely. Compute Manager uses the High Performance Computing (HPC) workload management capability of Altair's PBS Applica-tion Services (PAS) and PBS Professional for efficient resource utilization, access to the cloud for job sub- mission, and subsequent accounting.
CM provides a web-based user interface and with minimal configuration. Compute Manager automates the job submission process, allowing users to spend more time creating better models and simulations. End user productivity improves since there are no complicated commands to learn or complex scripts to create and maintain. PBS Application Services allows you to tailor Compute Manager to fit your applications and user preferences, making job submission simple and error free.
1

Compute Manager 13.0 Administrator’s Guide
Display Manager
Display Manager (DM) is a platform for collaboration and remote visualization of applications and data. It enables high performance remote display of applications over the networks using a web browser. It fosters team work and communications by allowing to share the sessions among users. Authorized users can all view and control a single session without downloading any files. This vir-tual-team productivity feature can save the costs associated with expensive face-to-face meetings and eliminate the need for multiple users in different sites to download Big Data files.
Results Visualization Service
Results Visualization Service (RVS) provides features to access, process and visualize CAE results remotely, through a web browser, without installing any post-processing desktop applications. RVS is available as part of the PBS Works suite and after installation it is available through the Compute Manager web applications. CAE analysts can monitor simulations in real-time by tracking and visualizing relevant parameters from solver log files. Plots and animations can be created remotely without downloading huge raw results files from compute clusters or remote networks locations. A variety of Finite Element Analysis (FEA) and Multi Body Dynamics (MBD) solvers are supported.
For more information about Results Visualization Service see the Results Visualization Service Installation and Administration Guide.
Access Management Service
Access Management Service (AMS) provides a centralized configuration system for authentication and authorization. With AMS administrators can manage users and groups, as well as access con-trol policies.
2 Introduction to Compute Manager

Compute Manager 13.0 Administrator’s Guide
Supported PlatformsCompute Manager is supported on the following platforms:
Windows 64bit• Windows Server 2008 R2 • Windows Server 2012
Linux 64bit • Red Hat Enterprise Linux 5, 6, and 7• Cent OS 5, 6 and 7• Suse Linux Enterprise Server 10, 11, and 12
Supported BrowsersWindows
• Firefox 17, 24, 31, and 38 ESR (Only Extended Support Release is supported. Please refer to https://www.mozilla.org/en-US/firefox/organizations/)
• Google Chrome 40 and 41• Internet Explorer 8, 9, 10, and 11
Linux • Firefox 17, 24, 31, and 38 ESR (Only Extended Support Release is supported. Please refer to
https://www.mozilla.org/en-US/firefox/organizations/)• Google Chrome 40 and 41
OSX • Safari 8
Introduction to Compute Manager 3

Compute Manager 13.0 Administrator’s Guide
Pre-installation planningPlease review the following sections before installing Compute Manager:
• Hardware Requirements for CM• Prerequisites for Using CM• Google Chrome Frame plug-in• Licensing• Authentication, Authorization and Profile Sharing• PBS Works Database
Hardware Requirements for CM Please review the following hardware requirements for Compute Manager.
Prerequisites for Using CMIn order to register a user session of Compute Manager 13.0 to an Enterprise PBS Professional complex, the complex head node must be running PBS Application Services 12.0.2 or later. Please contact your site administrator for further information.
Google Chrome Frame plug-inInternet Explorer versions 8, 9, 10, and 11 do not natively support the multi-file upload mecha-nisms for local files nor the file upload progress meter in Compute Manager. It has been observed that many times installing the Chromium projects Google Chrome Frame plug-in on Windows XP, Vista and Windows 7 has provided indirect support for this. However, this configuration has not formally been tested, so it is not fully supported by Altair. Please use the Chromium projects at your own discretion.
Table 1. Hardware requirements for CM
Hardware Minimum Requirement RecommendedCPU 2 CPU cores with a minimum
speed of 2.5 GHz4 CPU cores with a minimum speed of 2.5 GHz
Memory (Physical) 2 GB 8 GBDisk Space 2 GB 4 GB
4 Introduction to Compute Manager

Compute Manager 13.0 Administrator’s Guide
LicensingFor users to log into any of the PBS Works products, PBS Works must have access to an activated and running Altair License Management System (ALM) that allows a PBS Works product to draw license units. During the installation of PBS Works, you will be prompted to supply information about the license server (port and hostname/IP address). You may supply the information at this time, or PBS Works can be configured with this information post-installation.
The following HyperWorks Units (HWUs) are drawn for Computer Manager:• 2 HWUs are checked out at CM/DM server startup and stay locked all the time.• 1 additional HWU per concurrently logged in user is required.
Authentication, Authorization and Profile Sharing
Authentication
Authentication is the process of verifying the identity of an entity who attempts to access a PBS Works application. During installation, PBS Works products can be configured to use either Win-dows based or SSH based authentication, or can be configured to authenticate against the AMS datastore.
The AMS datastore is an internal repository automatically installed with PBS Works. It is used for storing users, groups, and access policies. If authentication is performed against the AMS data-store, then the datastore must be populated with users and/or groups before users can log into the CM web application.
Authorization
Authentication is the process of verifying someone's identity. Authorization is the process of spec-ifying the access permissions for that identity. Access policies are defined through AMS. Com-puter Manager and Display Manager supports specific authorization policies. By default, users who login to CM have authorization to access:
• all PAS servers• all applications installed on the PAS servers
AMS can be used to change this default authorization. Use AMS to control things, such as: • who can register a PAS server• which applications are available for job submission• who can browse local or remote files
Introduction to Compute Manager 5

Compute Manager 13.0 Administrator’s Guide
• which modules are available for the users
Profile Sharing
Job submission profiles are customized shortcuts for submitting jobs with CM. If multiple jobs are submitted to the same application with the same arguments, it makes sense to create a profile that has these arguments pre-populated. Job submission profiles can be shared among users and groups, however to share job submission profiles, users and groups must be added to AMS.
Options for Populating AMS with Users and Groups
There are two options available for populating AMS with users and groups:• During installation of PBS Works products, there is an option to connect AMS to a Win-
dows Active Directory (AD), or a Lightweight Directory Access Protocol (LDAP) compat-ible server. AMS will automatically be populated with those users and groups stored in the LDAP/AD. However, adding and deleting users via the AMS console is restricted when an LDAP/AD is being used. AMS can only be used to define access policies.
• Populate AMS with users and groups using the AMS console.
PBS Works DatabasePostgres will be installed by the PBS Works installer. The installer creates a database super user, “pbsworksuser”, if one is not supplied during installation.
The PBS Works database is installed and configured to use port 6767. If this port is not available during installation, then the PBS Works installer will increment the port number and try again. This will continue until a free port is found, or until 100 consecutive ports are refused at which point the installer will ask for a port.
6 Introduction to Compute Manager

2. Post-Installation Steps
Once the installation of all Compute Manager is complete, the following post-installation steps are required:
1. Configuring the License Server when a license server was not supplied during installation.2. Changing the AMS Administrator’s Password.3. Setting up authentication, authorization and profile sharing by performing one of the fol-
lowing steps:- Migrating the AMS Datastore. - Populating AMS for authentication, authorization and profile sharing.
4. Configuring Custom Resources. 5. Configuring CM for RVS when RVS is installed. 6. Configuring Notifications for a Job State Change. This step is not required, but is highly
recommended.7. Logging into CM.8. Adding and Registering PAS Servers for Compute Manager.
There are other advanced configuration topics. For more information see Compute Manager Advanced Configuration.
7

Compute Manager 13.0 Administrator’s Guide
Configuring the License Server A license server must be configured during the installation of PBS Works, you will be prompted to supply information about the license server (port and hostname/IP address). You may supply the information at this time, or PBS Works can be configured with this information post-installation.
You can configure the license servers after installation in console mode or in the application.
Adding the License Server in ConsoleThe license server information is stored in the adminSettings.xml file.
The location of this file for a typical installation of a PBS Works product is:
on Windows: C:\altair\pbsworks\13.0\binaries\framework\data
on Linux: /opt/altair/pbsworks/13.0/binaries/framework/data
Change the port and hostname of the XML element <value> to the port and hostname of the license server in the format port@hostname.
The PBS Works service must be restarted for these changes to take effect.
You must have administrative privileges to configure the Compute Man-ager license server.
Separate multiple server details with a colon (:) in Linux and with a semi-colon ( ; ) in Windows.
<Category name="License Server"> <Setting name="Location" preference="true"> <value>6200@trlicsrv03</value> <class>com.altair.awpf.services.preferences.model.StringPreference</class> <displayName>Server Location</displayName> <isEnforced>true</isEnforced> <private>false</private> </Setting></Category>
8 Post-Installation Steps

Compute Manager 13.0 Administrator’s Guide
Adding the License Server in the ApplicationYou can update the license server in the application as follows:
1. Click the Settings button . 2. Click Settings > License Server.3. Enter the details of the license server. You can provide multiple license server details.
4. Click the Apply. 5. Click Ok.6. Restart the PBS Works service.
Separate multiple server details with a colon ( : ) in Linux and with a semicolon ( ; ) in Windows.
Post-Installation Steps 9

Compute Manager 13.0 Administrator’s Guide
Changing the AMS Administrator’s Password Once a PBS Works product is installed, changing the AMS administrator password from the default of "adminadmin" to a secure site-specific password is highly recommended.
To change the AMS administrator password:
1. Navigate to the following directory:
on Windows: C:\altair\pbsworks\13.0\binaries\common
on Linux: /opt/altair/pbsworks/13.0/binaries/common
2. Issue the following command to change the AMS administrator password:
<PBS_WORKS_INSTALL_DIR>/thirdparty/java/bin/java -jar AccessManagerInstalla-tion.jar update-admin-password <oldpassword> <newpassword>
3. Encrypt the new password by issuing the following command (this command will output the password in its encrypted format):
<PBS_WORKS_INSTALL_DIR>/thirdparty/java/bin/java -jar AccessManagerInstalla-tion.jar encrypt <newpassword>
4. Edit the file following file:
on Windows: C:\altair\pbsworks\13.0\services\cm\config\authzlogin.properties
on Linux: /opt/altair/pbsworks/13.0/services/cm/config/authzlogin.properties
5. Change <ENCRYPTED_AMS_PASSWORD> to the encrypted format of the new password.
password=<ENCRYPTED_AMS_PASSWORD>
6. Restart the PBS Works service.
10 Post-Installation Steps

Compute Manager 13.0 Administrator’s Guide
Migrating the AMS DatastoreMigrating the AMS datastore from your previous version of CM avoids having to re-enter users, groups, and authorization policies into AMS. To migrate the AMS datastore from your previous version of CM to 13.0, you will need to merge the previous version of the AMS datastore files with the 13.0 versions.
The previous version of the AMS datastore files should have been saved prior to installing a PBS Works 13.0 product. For more information see "AMS migration from previous versions of CM" in the PBS Works 13.0 Installation Guide.
The files that will need to be merged are those that were saved prior to installing PBS Works 13.0 and the following files that are located in the PBS Works installation 13.0 directory:
• config/AAServiceHome/applications/cm/cmPolicy.xml
• config/AAServiceHome/resources/AA_Users.xml • config/AAServiceHome/resources/AA_Groups.xml
After installing PBS Works 13.0, follow these instructions for merging the files:
1. Copy all <user></user> tags from the previous version of AA_Users.xml to the 13.0 version of AA_Users.xml, except the users amadmin and portal_admin. Do not overwrite these users in the 13.0 version of AA_Users.xml:
The user amadmin is the AMS administrator and the user portal_admin is the PBS Works portal administrator entered during installation.
The xmllint command line tool may have to be used to reformat the XML files in a more readable format. Use the following command:xmllint --format <file_name> > temp_file
<?xml version="1.0" encoding="UTF-8"?><users> <user userName="amadmin"> <password>fnGbROpp3kCV65tCw52RBcsUmMnJfhuMnkgfm23UAQs=</password> </user> <user userName="<portal_admin"> <password>9z1WNgdMqjh42kPr7gGhbbKKlzVOWfeeVvQX00fRVc0=</password> </user></users>
Post-Installation Steps 11

Compute Manager 13.0 Administrator’s Guide
2. Copy all <group></group> tags from the previous version of AA_Groups.xml to the 13.0 ver-sion of AA_Groups.xml, but do not overwrite the altairadmin group in the 13.0 version of AA_Groups.xml:
3. As the PBS Works portal administrator, log into Compute Manager.
4. Add all previous PBS Professional servers. It is VERY important to add a server with the same CM server name that was used for the previous CM release. You can determine those names by viewing the previous version of the cmPolicy.xml file, and searching for the tag Resource name="CM/Server”. You will see something similar to:
where hwe1 and hwe2 are the CM server names.
5. Once all servers have been added, copy the previous version of the cmPolicy.xmlfile to the location of the 13.0 version.
6. Restart the PBS Works service.
<?xml version="1.0" encoding="UTF-8" standalone="yes"?><groups> <group name="altairadmin" privilegeType="TRUE"> <user>portal_admin</user> </group></groups>
<Resource name="CM/Server"> <Resource name="CM/Server/hwe1"> <Resource name="CM/Server"> <Resource name="CM/Server/hwe2">
12 Post-Installation Steps

Compute Manager 13.0 Administrator’s Guide
Populating AMS AMS must be populated with users and groups when any of the following conditions are met:
• AMS was chosen as the mechanism for authentication and is not connected to a LDAP/AD• your site wants to use the profile sharing functionality of CM• your site wants to define user or group access policies
For more information about authentication, authorization, or profile sharing see Authentication, Authorization and Profile Sharing on page 5.
Populating AMS requires the following steps:1. Logging into AMS.2. Adding Users and Groups when AMS is not connected to a LDAP/AD.3. Defining Access Policies for CM. This step is not required, but is highly recommended.
Logging into AMS To log into AMS, enter the following in the address bar of any supported browsers.
<PBS_WORKS_HOSTNAME:PORT>/pbsworks/ui/ams/
For more information about supported browsers see Supported Browsers on page 3.
The AMS login page will open in the browser as shown below:
Post-Installation Steps 13
Compute Manager 13.0 Administrator’s Guide
Use the PBS Works portal administrator credentials to log into AMS. These credentials are speci-fied during the installation of PBS Works.
Adding Users and Groups
Managing User Accounts
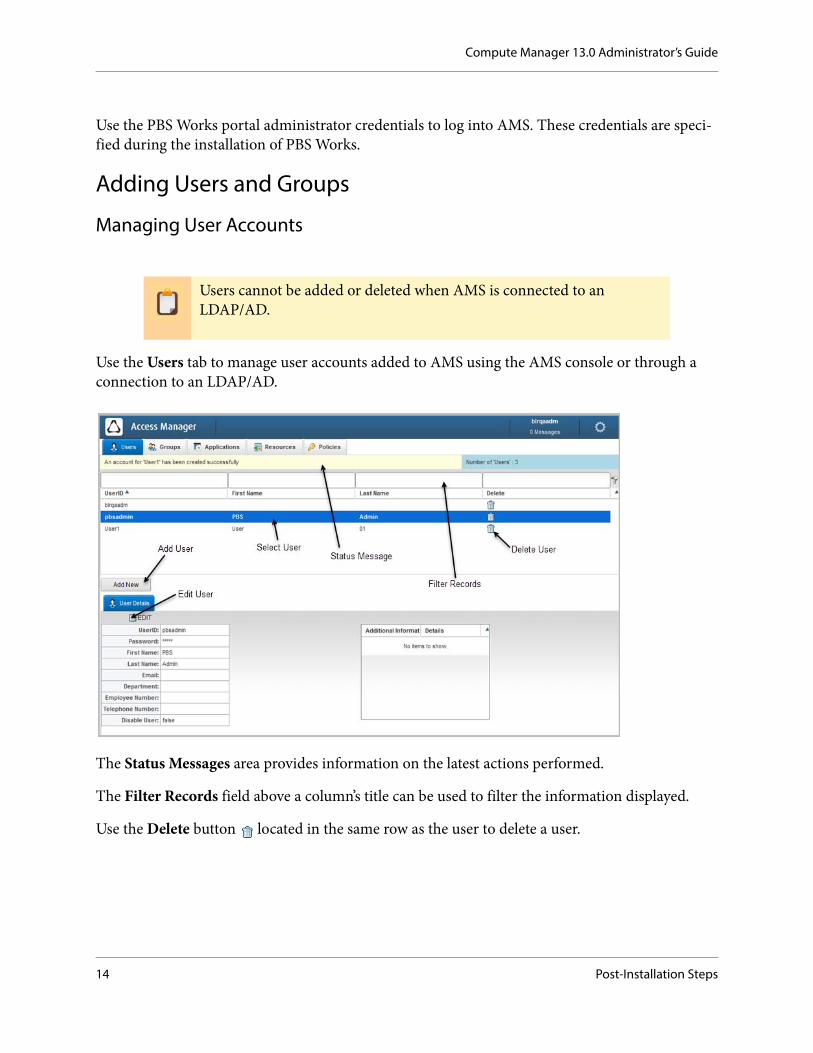
Use the Users tab to manage user accounts added to AMS using the AMS console or through a connection to an LDAP/AD.
The Status Messages area provides information on the latest actions performed.
The Filter Records field above a column’s title can be used to filter the information displayed.
Use the Delete button located in the same row as the user to delete a user.
Users cannot be added or deleted when AMS is connected to an LDAP/AD.
14 Post-Installation Steps

Compute Manager 13.0 Administrator’s Guide
Click Add New to add a new user. Enter the user account information. The required fields are marked with an asterisk (*). Click Save to create the new user account.
Post-Installation Steps 15

Compute Manager 13.0 Administrator’s Guide
Select a user in the list to view details of the user account.
Click the Edit tab to edit the user account details.
Once all updates to the user account information are complete, click Save.
16 Post-Installation Steps

Compute Manager 13.0 Administrator’s Guide
Managing User Groups
Click the Groups tab to manage groups added to AMS using the AMS console or through a con-nection to an LDAP/AD.
The Status Messages area provides information on the latest actions performed.
The Filter Records field above a column’s title can be used to filter the information displayed.
Use the Delete button located in the same row as the group to delete a group.
User Groups cannot be added or deleted when AMS is connected to an LDAP/AD.
Post-Installation Steps 17

Compute Manager 13.0 Administrator’s Guide
Click Add New to add a new group. Enter the group information. The required fields are marked with an asterisk (*). Click Save to create the new group.
Select a group in the list to view details of the group account.
18 Post-Installation Steps

Compute Manager 13.0 Administrator’s Guide
Click the Edit tab to edit members of a group.
Select a user from the Available Users list and click to add the user to the group.
Select a user from the Users in the group list and click to remove the user from the group.
You can set administrator privileges for a group by enabling the Set Admin Privilege check box.
Once all updates are complete, click Save.
Post-Installation Steps 19

Compute Manager 13.0 Administrator’s Guide
Defining Access PoliciesAccess policies determine which users or groups are granted access to perform certain activities. For instance, user1 can access the application Optistruct or the CFD group can access the Job Monitoring page.
To access the policies1. Click the Policies tab.
A list of available applications will be displayed. In this example, the only application available is Compute Manager (cm).
2. Click the cm application name.
20 Post-Installation Steps

Compute Manager 13.0 Administrator’s Guide
Two categories of access policies are available:• PAS Server Level Access Policies on page 21• UI Level Access Policies on page 22
PAS Server Level Access Policies
The following default policies are established for each PAS server added to CM. You may modify these default policies to further restrict access.
• REGISTER_SERVER_POLICY - allows access to the PAS server for all authenticated users.• JS_LOCAL_BROWSE_POLICY - allows all authenticated users the ability to access local
files. • JS_REMOTE_BROWSE_POLICY - allows all authenticated users the ability to access
remote files located on the PAS server.• REGISTER_WITH_CUSTOM_CREDENTIALS - allows all authenticated users to register
the PAS server using custom credentials.• DISPLAY_APP_POLICY - allows all authenticated users to display all applications
installed on the PAS server.• DISPLAY_PROFILE_POLICY - restricts all authenticated users to view the shared pro-
files.
Post-Installation Steps 21

Compute Manager 13.0 Administrator’s Guide
Click the expand/collapse icon next to Server to view PAS server level access policies.
UI Level Access Policies
UI level access policies can be established to restrict access to specific components of the CM user interface such as CM modules or web pages (Job Monitoring, Remote File Operations, and Job Submission), or specific UI components (buttons, panes, tool bars, etc.) within a module.
The following default policies are established for the UI. You may modify these default policies to further restrict access.
• CM_UI_DISPLAY_POLICY - allows access by all authenticated users to all modules and associated UI components.
• RFB_COMPONENTS_DISPLAY_POLICY - allows access by all authenticated users to all components of the Remote File Browsing web page.
Click the expand/collapse icon next to UI to view UI level access policies.
22 Post-Installation Steps

Compute Manager 13.0 Administrator’s Guide
Updating Default Access Policies
The default policies can be modified to further restrict access.
To change access for a default policy:1. Select a default access policy in the Resource-Policy Names area.
Once a policy has been selected, the policy detail will be displayed. In this example, the default policy CM/Server/PAS Server/REGISTER_SERVER_POLICY has been selected. Currently, all authenticated users are allowed to register with this PAS server.
2. Enable the Edit checkbox.
3. Select users and/or groups.
To allow or deny access for all authenticated users enable the All Authen-ticated Users checkbox. To set access policies for a specific user/group or a set of users/groups, disable the All Authenticated Users checkbox.
Post-Installation Steps 23
Compute Manager 13.0 Administrator’s Guide
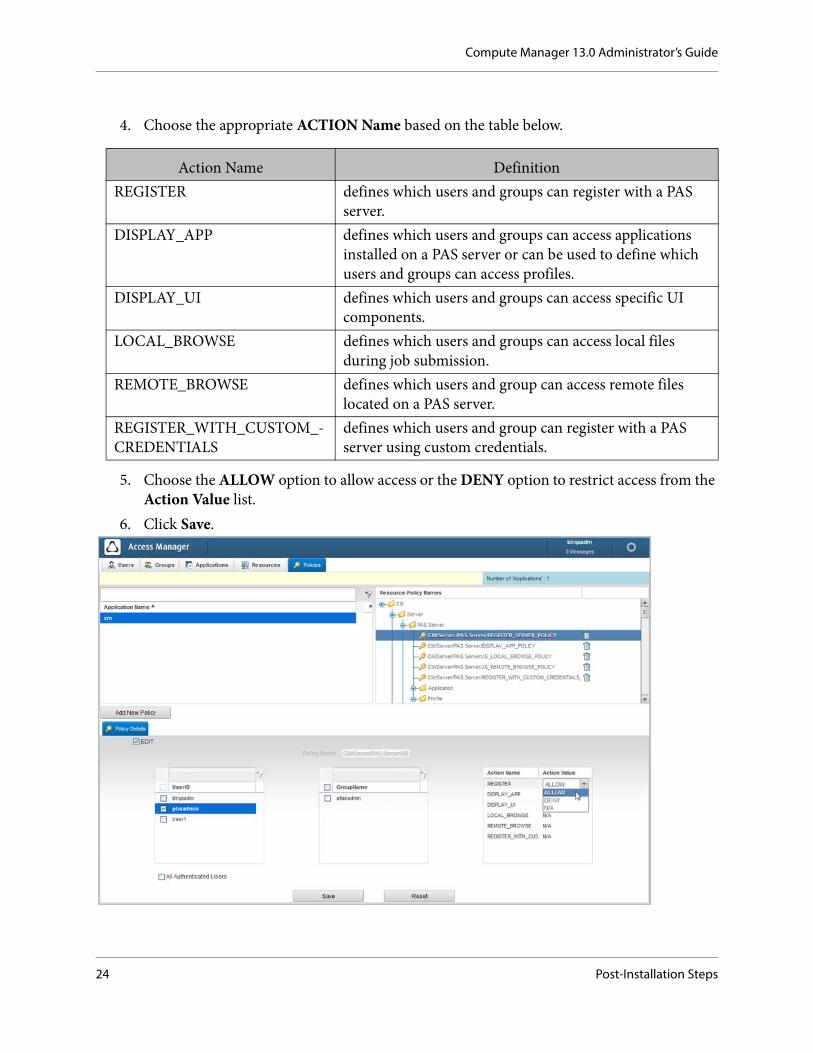
4. Choose the appropriate ACTION Name based on the table below.
5. Choose the ALLOW option to allow access or the DENY option to restrict access from the Action Value list.
6. Click Save.
Action Name DefinitionREGISTER defines which users and groups can register with a PAS
server.DISPLAY_APP defines which users and groups can access applications
installed on a PAS server or can be used to define which users and groups can access profiles.
DISPLAY_UI defines which users and groups can access specific UI components.
LOCAL_BROWSE defines which users and groups can access local files during job submission.
REMOTE_BROWSE defines which users and group can access remote files located on a PAS server.
REGISTER_WITH_CUSTOM_-CREDENTIALS
defines which users and group can register with a PAS server using custom credentials.
24 Post-Installation Steps

Compute Manager 13.0 Administrator’s Guide
Creating Access Policies
If you want to further restrict access to applications or specific components of the CM user inter-face, you will have to create some additional access policies using the following two categories:
• Application - restricts access to specific application installed on the PAS server.• MODULES - restricts access to specific UI components such as web pages, buttons, etc.
Managing Access to a Specific Application
You can create policies to restrict access to specific applications. By default, all authenticated users have access to view all application.
To add an access policy for an application:1. Click Application in the Resource-Policy Names area.2. Select the application from the list.
3. Click the Add New Policy button.4. Enter the policy name in the Policy Name text box. 5. Select the appropriate users and/or groups.
The policies created under applications or specific components of the CM user interface will override the default policy.
Post-Installation Steps 25

Compute Manager 13.0 Administrator’s Guide
6. To allow access to the application, select the ALLOW option from the DISPLAY_APP Action Value list. To deny access to the application, select the DENY option from the DIS-PLAY_APP Action Value list.
7. Click Save.
Managing Access to UI Components
You can create policies to restrict access to certain UI components such as web pages, buttons, and tool bars. The Modules tree breaks each CM web page into its separate components and you may create policies that restrict access to these components.
For example, if you want to restrict access to the Job Monitoring page, then you would create an access policy by selecting MONITOR_MODULE. If you want to restrict access to the action bar of the Job Monitoring page, then you would create an access policy by selecting ACTION_BAR under MONITOR_MODULE.
26 Post-Installation Steps

Compute Manager 13.0 Administrator’s Guide
To add an access policy for a UI component:1. Click on a UI component in the Resource-Policy Names area. In this example, an access
policy will be created for the Job Monitoring page.
2. Click the Add New Policy button.3. Enter the policy name in the Policy Name text box. 4. Select the appropriate users and/or groups.5. To allow access to the UI component, select the ALLOW option from the DISPLAY_UI
Action Value list . To deny access to the UI component, select the DENY option from the from the DISPLAY_UI Action Value list.
Post-Installation Steps 27

Compute Manager 13.0 Administrator’s Guide
6. Click Save.
28 Post-Installation Steps

Compute Manager 13.0 Administrator’s Guide
Configuring Custom ResourcesFor CM to support PBS Professional custom resources the custom resources must be defined to CM. This information is stored in the jobAttrib.xml file. The location of the file for a typical installation of CM is:
on Windows: C:\altair\pbsworks\13.0\services\cm\config
on Linux: /opt/altair/pbsworks/13.0/services/cm/config
After this file is modified, the PBS Works service must be restarted for the changes to take effect.
The following XML defines the custom resource to CM:
The following table describes the XML attributes of the custom resource definition:
<resources> <resource name="string" displayName="string" resourceType="string" visible="true/false" type="string" detailOnly="true/false"/></resources>
Table 1. Attributes of the custom resource definition
Attribute Description Valid Valuesname Name of the resource as
defined by PBS Profes-sional in the <PBS_HOME>/server_priv/resourcedef file, where <PBS_HOME> is the PBS Professional home directory.
Must be alphanumeric [A-Z], [a-z], [0-9], and can include an underscore.
displayName The name of the custom resource as it will be dis-played on the Job Moni-toring page of the CM web application.
Must be alphanumeric [A-Z], [a-z], [0-9], and can include an underscore and spaces.
Post-Installation Steps 29

Compute Manager 13.0 Administrator’s Guide
resourceType Determines whether the custom resource is a PBS Professional resource list type or a resource used type. By default, custom resources are of resource list type.
list custom resource is a resource list type
used custom resource is a resource used type
visible Enables or disables the display of the custom resource on the CM Job Monitoring page. If this property is dis-abled, then the detai-lOnly attribute is ignored.
true enable display of the custom resource
false disable the display of the custom resource
type The data type of the cus-tom resource as it is defined in CM.
duration supports duration which is stored as a long value in PBS. To use the CM data type of duration, the value of the PBS custom resource should be stored in an epoch date format.
long supports PBS resource type long.float supports PBS resource type float.string supports PBS resource type string
and string_array.boolean supports PBS resource type Bool-
ean.size supports PBS resource type size.
detailOnly Enables or disables the availability of the custom resource as a displayable column in the job grid of the CM Job Monitoring page.
true The custom resource will only be displayed on the Property tab of the Job Monitoring page.
false The custom resource can be added as a displayable column in the job grid, and will also be dis-played on the Property tab of the Job Monitoring page.
Table 1. Attributes of the custom resource definition
Attribute Description Valid Values
30 Post-Installation Steps
Compute Manager 13.0 Administrator’s Guide
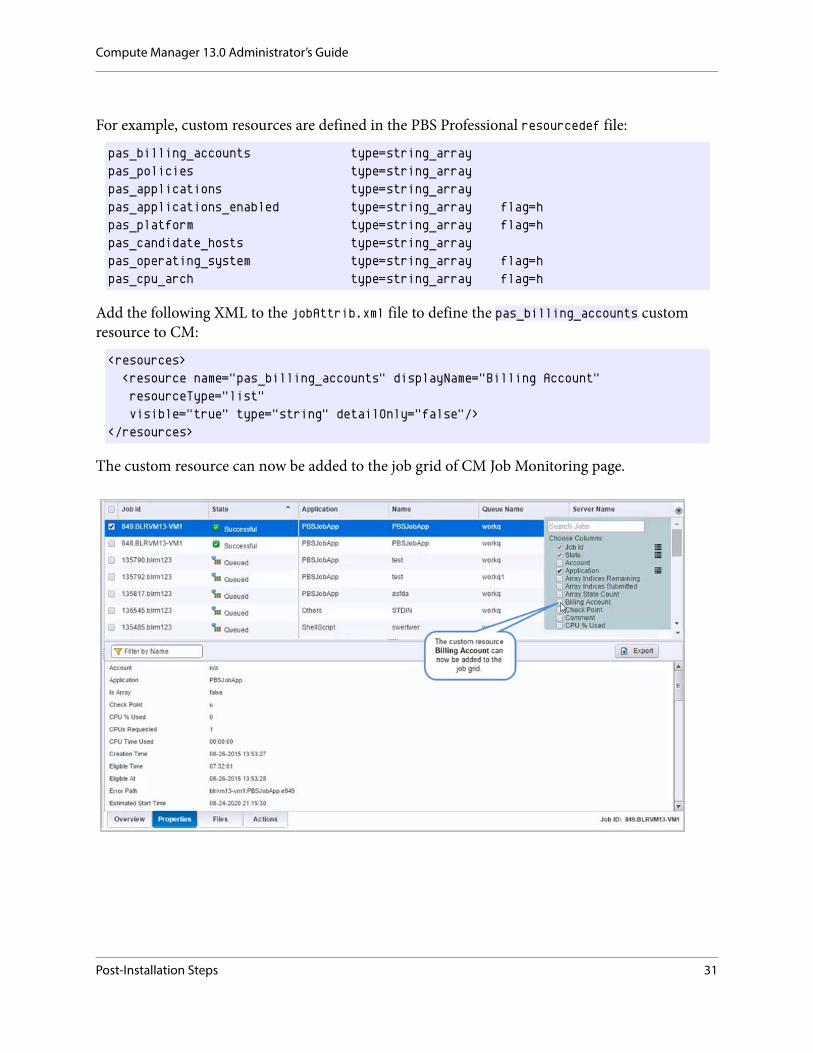
For example, custom resources are defined in the PBS Professional resourcedef file:
Add the following XML to the jobAttrib.xml file to define the pas_billing_accounts custom resource to CM:
The custom resource can now be added to the job grid of CM Job Monitoring page.
pas_billing_accounts type=string_arraypas_policies type=string_arraypas_applications type=string_arraypas_applications_enabled type=string_array flag=hpas_platform type=string_array flag=hpas_candidate_hosts type=string_arraypas_operating_system type=string_array flag=hpas_cpu_arch type=string_array flag=h
<resources> <resource name="pas_billing_accounts" displayName="Billing Account" resourceType="list" visible="true" type="string" detailOnly="false"/></resources>
Post-Installation Steps 31
Compute Manager 13.0 Administrator’s Guide
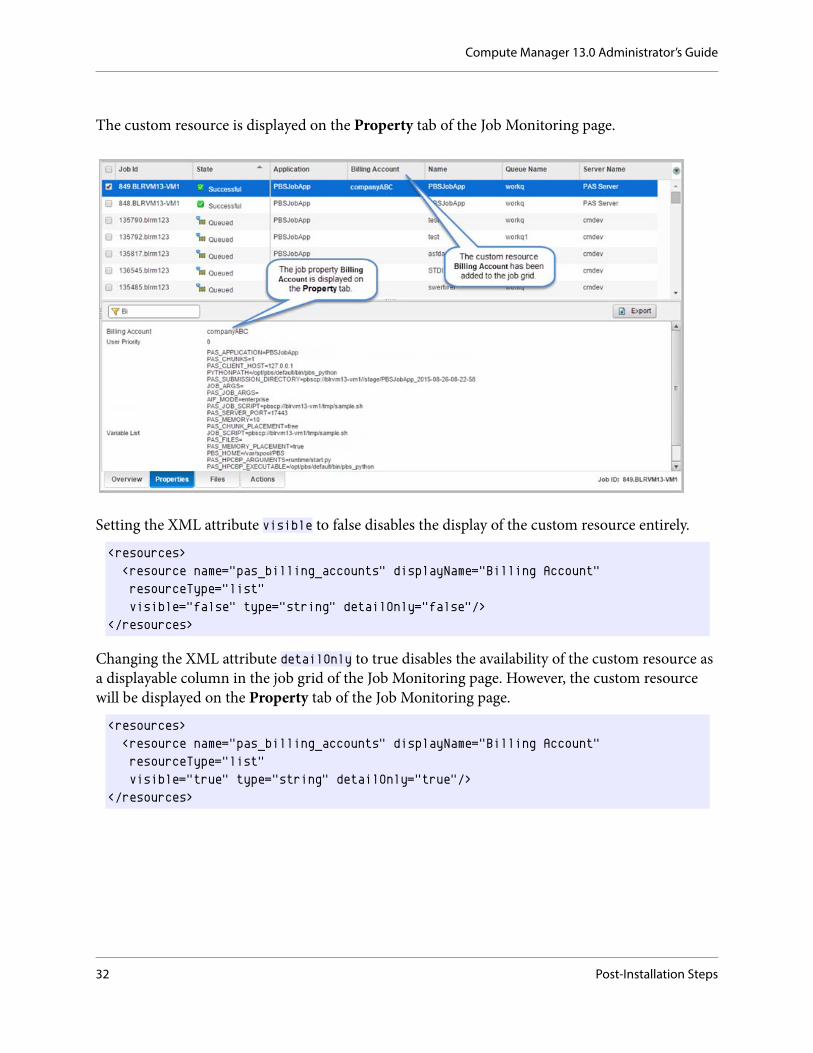
The custom resource is displayed on the Property tab of the Job Monitoring page.
Setting the XML attribute visible to false disables the display of the custom resource entirely.
Changing the XML attribute detailOnly to true disables the availability of the custom resource as a displayable column in the job grid of the Job Monitoring page. However, the custom resource will be displayed on the Property tab of the Job Monitoring page.
<resources> <resource name="pas_billing_accounts" displayName="Billing Account" resourceType="list" visible="false" type="string" detailOnly="false"/></resources>
<resources> <resource name="pas_billing_accounts" displayName="Billing Account" resourceType="list" visible="true" type="string" detailOnly="true"/></resources>
32 Post-Installation Steps

Compute Manager 13.0 Administrator’s Guide
Configuring CM for RVSDue to a known problem with the RVS cache, the following configuration must be performed for the 12.0 and later releases of CM. This configuration is necessary only when RVS is installed.
1. If the cache.manifest file does not exist, start the PBS Works service. The file is located in the following directory for a typical installation of CM:
on Windows: C:\altair\pbsworks\13.0\binaries\framework\applica-tions\login\resources\<LOCALE_NAME>\manifest\framework
on Unix/Linux: /opt/altair/pbsworks/13.0/binaries/framework/applications/login/resources/<LOCALE_NAME>/manifest/framework
2. Edit the cache.manifest file and add the following to the end of the file:
plugins/rm/plugin.js
The contents of the cache.manifest file should now look like this:
3. Edit the file platform.xml. The location of this file for a typical installation of CM is:
on Windows: C:\altair\pbsworks\13.0\config
on Linux: /opt/altair/pbsworks/13.0/config
4. Disable the generation of the cache.manifest file on server startup by modifying the follow-ing line, setting the value to false:
<generate-manifest-on-startup>false</generate-manifest-on-startup>
5. Restart the PBS Works service.
CACHE MANIFEST#Version 23243423423342
CACHE:../framework/login/login/resources/images/login/btn_login.png../framework/login/login/resources/images/login/icnUsername.png../framework/login/login/resources/images/login/icnPassword.png../framework/login/login/resources/images/login/btn_help.png../framework/login/login/resources/images/login/icnLogin.png../framework/login/login/resources/images/login/imgLoader.gifplugins/rm/plugin.js
Post-Installation Steps 33

Compute Manager 13.0 Administrator’s Guide
Configuring Notifications for a Job State ChangeUsers of CM can configure email notifications when a job's state changes, including who will receive the email notification, and when the email will be sent. Currently, Computer Manager sup-ports sending email notifications for the following job state changes:
• job is aborted• job begins execution• job finishes execution
However, the email will not be sent unless the application associated with the job has been config-ured accordingly. This is done through the application definition.
Configuring email notifications requires two steps:
1. Each CM user must set their email preferences through the CM web application.
a. Click the Settings button . b. Click Settings > Compute Manager. c. Enter an e-mail id in the Email field to indicate to whom the e-mail will be sent. d. Select any or all of the options in the Notify when job state changes to list to indicate
when the e-mail will be sent.
34 Post-Installation Steps

Compute Manager 13.0 Administrator’s Guide
2. The application definition must be modified to support the email notification. This is accomplished by modifying the application definition submittime script, presubmit.py, with the following lines of code:
This code captures the mail preferences entered through Compute Manager, and sets the job's mail options so that PBS Professional knows to send an email when a particular job state is reached.
import re
''' Mail Options '''
if userInputs['MAIL_USERS']: job.attr_mail_list = userInputs['MAIL_USERS']
if userInputs['MAIL_POINTS']:
mail_points = userInputs['MAIL_POINTS']
if re.match(r"[abe]", mail_points): job.attr_mail_options = mail_points
Post-Installation Steps 35

Compute Manager 13.0 Administrator’s Guide
Logging into CMUse any of the Supported Browsers to login to CM through the URL:
http://<hostname>:<port>/pbsworks
Once the PBS Works login screen is displayed, enter your Username and Password and click Login.
36 Post-Installation Steps

Compute Manager 13.0 Administrator’s Guide
Adding and Registering PAS ServersCompute Manager communicates with your PBS Professional workload manager through PBS Application Services (PAS). PAS is software that sits on top of your PBS Professional complex, exposing a collection of web services that allow Compute Manager to submit, monitor and manage jobs on your remote PBS Professional complex. PAS is installed on the PBS Professional headnode.
A PAS server must be added to CM before non-administrative users can submit jobs to its associ-ated PBS Professional Complex. Once the PAS server is added, all CM users, including the admin-istrator, must establish a connection to the PBS Professional complex by registering the PAS server.
Submitting jobs to a PBS Professional complex requires the following steps:• Adding a PAS Server - The PAS server, installed on the headnode of the PBS complex,
must be added to CM by a PBS Works administrator.• Registering a PAS Server - Users must register with the PAS server to establish a connec-
tion to the PBS complex.
Once a user registers the PAS server, CM automatically populates itself with the available PBS complex queues, jobs, and applications. The user is now able to submit and manage their jobs.
Auto Register is a new feature of CM 13.0, which allows the administra-tor to register the server(s) to all the users while Adding a PAS Server.
Post-Installation Steps 37

Compute Manager 13.0 Administrator’s Guide
Adding a PAS ServerThe following information will be requested when a PAS server is added:
• the hostname of the machine where PAS is installed (typically the PBS Professional head-node)
• the administrator's login credentials• the home location path for the users• whether to enable communication between CM and PAS over https• whether to automatically register the PAS server for all users?
To add a PAS Server:
1. Click the Settings button .
2. Click Manage.
38 Post-Installation Steps

Compute Manager 13.0 Administrator’s Guide
3. Click Add.
The Add Server dialog box is displayed:
Post-Installation Steps 39
Compute Manager 13.0 Administrator’s Guide
4. Enter the following information and click Add to add the server:- name of the PAS server as it will be known in Compute Manager in the Server Name
field.- hostname of the machine where PAS is installed (typically the PBS Professional head-
node) in the Host field.- the login credentials of the machine where PAS installed in the Username and Pass-
word fields.- configure the user's default home location in the Home Path filed. By default, the
home path location is $Home. Compute Manager displays the contents of this home directory path from the Remote Files web page, Job Submission web page, and in the Files Contents tab in the Monitoring web page. Refer to Configuring the Default Home Path.
- for a secure connection between Compute Manager and the PAS server, enable the Connect over SSL check box.
- enable the Auto Register check box to register the PAS server automatically for all users.
5. Click Add to add the server.
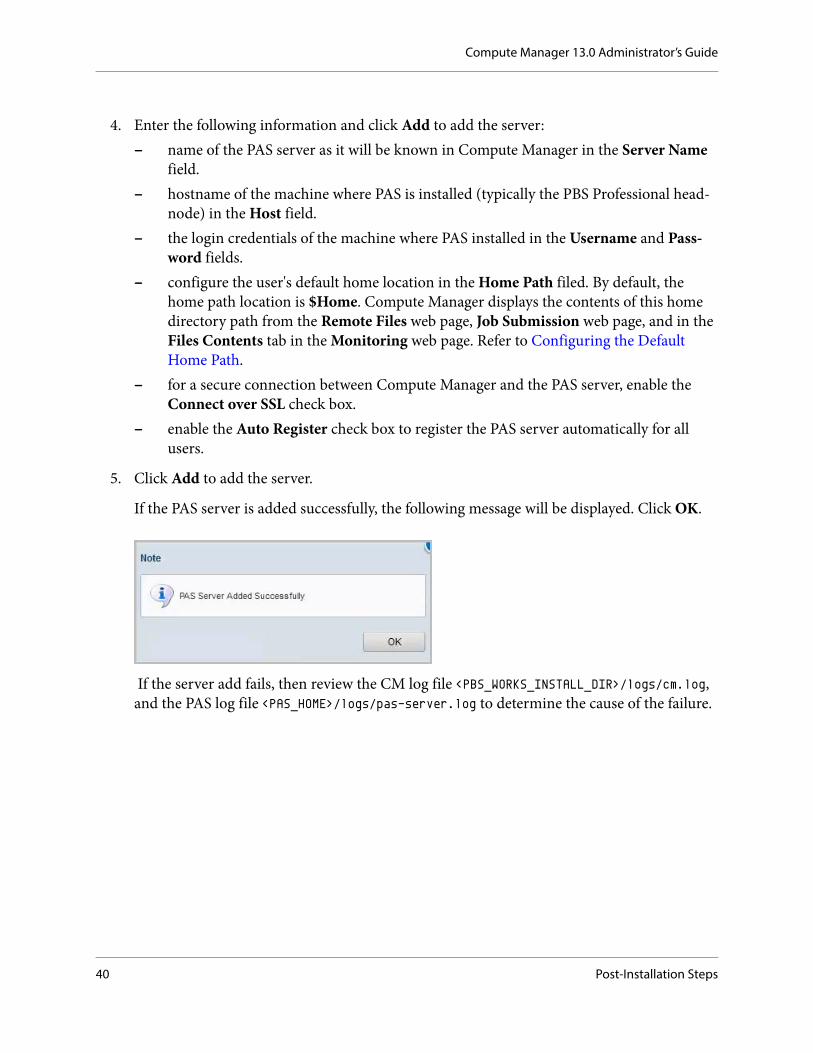
If the PAS server is added successfully, the following message will be displayed. Click OK.
If the server add fails, then review the CM log file <PBS_WORKS_INSTALL_DIR>/logs/cm.log, and the PAS log file <PAS_HOME>/logs/pas-server.log to determine the cause of the failure.
40 Post-Installation Steps

Compute Manager 13.0 Administrator’s Guide
PAS servers that were successfully added will now be displayed.
6. Click Add, if you want to add another PAS servers. When you are done adding servers, click Close.
Post-Installation Steps 41

Compute Manager 13.0 Administrator’s Guide
Registering a PAS Server
1. To register a PAS server, click the Settings button .
2. Click Register.
3. Choose a PAS server from the Servers list by selecting the server name and click Save.
A notification of the successful registration of the server can be viewed by clicking the Messages link in the Compute Manager toolbar.
By default, Use CM Credentials check box is enabled to log into Com-puter Manager (this only works if your PAS credentials are the same as your CM credentials). If you want to register with the PAS Server other than the CM credentials, then disable the Use CM Credentials check box and enter the Username and Password credentials which is available in the PAS Server.
42 Post-Installation Steps

3. Starting and Stopping PBS Works
Use the information in this chapter to start, stop, and restart the PBS Works service.
Typically, the PBS Works service is installed and configured to use port 8086. If this port is not available during installation, then the PBS Works installer will increment the port number and try again. This will continue until a free port is found, or until 100 consecutive ports are refused at which point the installer will ask for a port.
If PBS Works is installed on a Windows platform, then a separate service is registered specifically for the PBS Works database. This service will automatically be started when the PBS Works service is started.
Starting the PBS Works ServiceLinux
At the Linux command line prompt enter:/etc/init.d/pbsworks start
Windows
1. Navigate to Control Panel -> Administrative Tools -> Services.
2. Right-click PBSWorks Service
3. Select Start.
43

Compute Manager 13.0 Administrator’s Guide
Stopping the PBS Works ServiceLinux
At the Linux command line prompt enter:/etc/init.d/pbsworks stop
Windows
1. Navigate to Control Panel -> Administrative Tools -> Services.
2. Right-click PBSWorks Service
3. Select Stop.
Restarting the PBS Works ServiceLinux
At the Linux command line prompt enter:/etc/init.d/pbsworks restart
Windows
1. Navigate to Control Panel -> Administrative Tools -> Services.
2. Right-click PBSWorks Service
3. Select Restart.
Determining the Status of the PBS Works ServiceLinux
At the Linux command line prompt enter:/etc/init.d/pbsworks status
Windows
1. Navigate to Control Panel -> Administrative Tools -> Services.
2. View the Status column of the PBSWorks Service to determine the status of the service.
44 Starting and Stopping PBS Works

4. Compute Manager Advanced Configuration
This chapter contains advanced configuration options for Compute Manager. Changes to the default settings associated with the following topics is NOT necessary to use Compute Manager. For an overview of CM configuration files see CM Configuration Files.
• Adding a Generic Action for a PAS server• Mapping Help Topics and Icons to an Application• Mapping a File Extensions to an Icon• Installing and Configuring Google Chrome Frame• Enabling a Secure Connection between CM and PAS• Mapping a MIME type to a File Extension• Setting Maximum Page Size for Files• Changing the Job Refresh Rate• Changing the PAS Staging Directory• Refreshing Application Definitions• Configuring JVM Performance• Improving CM Response Time• Changing the Scheduled Time for Job Deletion• Changing the Location of the Monitoring Action Bar• Changing the Communication Timeout between CM and PAS• Customizing the Available Job Monitoring Properties• Changing the PAS Application Retrieval Timeout• Enabling RVS Traffic through CM• Configuring RVS Admin Auto Refresh Interval• Configuring the Default Home Path• Adding Site Specific Web Pages to CM• Launching an Application Installed on a Remote Server• Configuring Local Dynamic Application• Setting the Popup Timeout
45
Compute Manager 13.0 Administrator’s Guide
• Configuring the Advance Upload• Configuration for Larger Sites
- Setting the Maximum Active Connections- Setting the Work Memory- Changing the Shared Buffer Size- Setting the Effective Cache Size- Changing Java Heap Memory
Adding a Generic Action for a PAS serverA generic action is similar to an application definition's application action. The main difference is that an application action is associated with particular application, while generic actions are simple python scripts that run on a PAS server irrespective of the job or application.
An XML file is used to define generic actions. Since generic actions are associated with a PAS server, a separate XML file must be maintained for each PAS server. For a typical installation of CM, these XML files are located in:
on Windows: C:\altair\pbsworks\13.0\services\cm\config\genericActions
on Linux: /opt/altair/pbsworks/13.0/services/cm/config/genericActions
The naming convention of a generic action XML file is servername.xml where servername is the name of the server as it is known to CM (the PBS Works portal administrator chooses this name when the PAS server is added to CM).
46 Compute Manager Advanced Configuration
Compute Manager 13.0 Administrator’s Guide
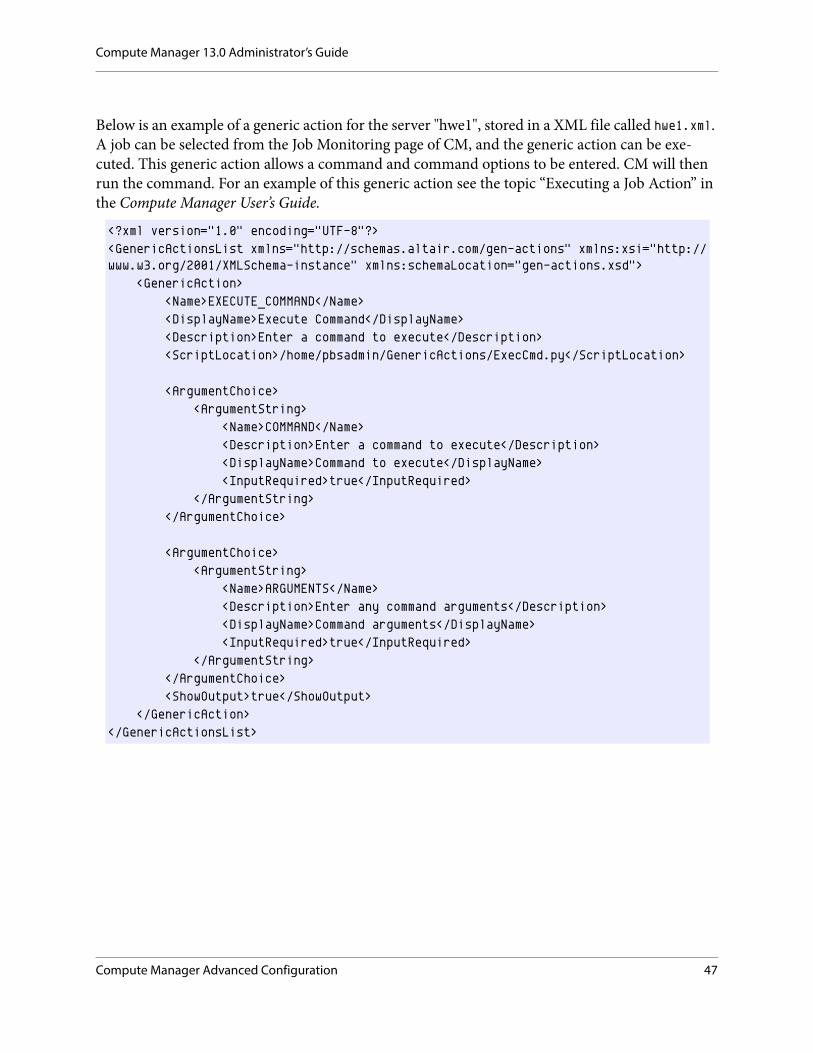
Below is an example of a generic action for the server "hwe1", stored in a XML file called hwe1.xml. A job can be selected from the Job Monitoring page of CM, and the generic action can be exe-cuted. This generic action allows a command and command options to be entered. CM will then run the command. For an example of this generic action see the topic “Executing a Job Action” in the Compute Manager User’s Guide.
<?xml version="1.0" encoding="UTF-8"?><GenericActionsList xmlns="http://schemas.altair.com/gen-actions" xmlns:xsi="http://www.w3.org/2001/XMLSchema-instance" xmlns:schemaLocation="gen-actions.xsd"> <GenericAction> <Name>EXECUTE_COMMAND</Name> <DisplayName>Execute Command</DisplayName> <Description>Enter a command to execute</Description> <ScriptLocation>/home/pbsadmin/GenericActions/ExecCmd.py</ScriptLocation> <ArgumentChoice> <ArgumentString> <Name>COMMAND</Name> <Description>Enter a command to execute</Description> <DisplayName>Command to execute</DisplayName> <InputRequired>true</InputRequired> </ArgumentString> </ArgumentChoice> <ArgumentChoice> <ArgumentString> <Name>ARGUMENTS</Name> <Description>Enter any command arguments</Description> <DisplayName>Command arguments</DisplayName> <InputRequired>true</InputRequired> </ArgumentString> </ArgumentChoice> <ShowOutput>true</ShowOutput> </GenericAction></GenericActionsList>
Compute Manager Advanced Configuration 47

Compute Manager 13.0 Administrator’s Guide
Defining a Generic ActionThe following XML elements provide a way of identifying and describing the generic action:
• <Name> is the internal name of the generic action.• <DisplayName> is the name of the generic action that will be displayed to the user via CM. • <Description> is the description of the generic action. • <ScriptLocation> is the location of the execution script.
<ArgumentChoice> defines arguments (input fields) that a user will enter prior to executing the generic action.
The following elements define an argument:• <Name> defines the internal name of the generic action argument.• <Description> is a description displayed when a rollover of the field is triggered in CM.• <DisplayName> is the name of the argument that will be displayed by CM. • <InputRequired> indicates a required field (a true value indicates a required argument).
<GenericAction> <Name>EXECUTE_COMMAND</Name> <DisplayName>Execute Command</DisplayName> <Description>Enter a command to execute</Description> <ScriptLocation>/home/pbsadmin/GenericActions/ExecCmd.py</ScriptLocation></GenericAction>
<ArgumentChoice> <ArgumentString> <Name>COMMAND</Name> <Description>Enter a command to execute</Description> <DisplayName>Command to execute</DisplayName> <InputRequired>true</InputRequired> </ArgumentString></ArgumentChoice><ArgumentChoice> <ArgumentString> <Name>ARGUMENTS</Name> <Description>Enter any command arguments</Description> <DisplayName>Command arguments</DisplayName> <InputRequired>true</InputRequired> </ArgumentString></ArgumentChoice>
48 Compute Manager Advanced Configuration

Compute Manager 13.0 Administrator’s Guide
The last element, <ShowOutput>, enables or disables the display of the generic action output. If the value is set to true, then the output of the generic action can be viewed by selecting the Actions tab on the Job Monitoring page of CM.
Defining a generic action execution scriptThe generic action script is a python script that is responsible for executing the generic action, using the information entered by the user (defined by the generic action XML file). You can directly edit this script, taking full advantage of Python to add further inspection and complexity to the execution of the generic action. In this example, the python script will create a subprocess to execute the command entered by the user.
import subprocess, sys, os
def execcmd(cmd): try: p = subprocess.Popen(cmd, shell=True, stdout=subprocess.PIPE, stderr=subprocess.STDOUT) data = "" for line in p.stdout.readlines(): data = data + line except: errTtype = sys.exc_type try: errName = errTtype.__name__ except AttributeError: errName = errType data = "Error: " + str(errName) + " --- " + str(sys.exc_value) return data
cmd = sys.argv[1]cmd = cmd + " " + sys.argv[2]print (cmd)print execcmd(cmd)sys.stdout.flush()
Compute Manager Advanced Configuration 49

Compute Manager 13.0 Administrator’s Guide
Mapping Help Topics and Icons to an ApplicationHelp topics can be added to CM and these topics can be mapped to a specific application. Access to the help topic is through the Job Submission page. In addition, application icons can be mapped to an application.
The XML file, app-helper.xml, is where application help topics and application icons are mapped to an application. The location of this file for a typical installation of CM is:
on Windows: C:\altair\pbsworks\13.0\services\cm\config
on Linux: /opt/altair/pbsworks/13.0/services/cm/config
The help topic is stored in an HTML file. For a typical installation of Compute Manager, the help topics must be placed in the following directory:
on Windows: C:\altair\pbsworks\13.0\applications\cm\binaries\ui\applicationHelp
on Linux: /opt/altair/pbsworks/13.0/applications/cm/binaries/ui/applicationHelp
Create applicationHelp folder to place the HTML files, if the folder does not exists in the specified location.
50 Compute Manager Advanced Configuration

Compute Manager 13.0 Administrator’s Guide
For a typical installation of Compute Manager, the icon image file must be placed in the following directory:
on Windows: C:\altair\pbsworks\13.0\applications\cm\binaries\ui\images\appicons
on Linux: /opt/altair/pbsworks/13.0/applications/cm/binaries/ui/images/appicons
This is an example of a help topic and icon that has been mapped to an application:
The following table describes the XML attributes of the application help and icon mapping file:
Create appicons folder to place the icons, if the folder does not exists in the specified location.
<applications>
<application id="SampleApp" helpUrl="ui/cm/applicationHelp/SampleApp.html" icon="appicons/SampleApp.png" />
</applications>
Table 1. Attributes of the application help and icon mapping file
XML Attribute Descriptionid The name of the application as it is defined through the PAS application
definition.helpURL Location of the help topic.icon Location of the icon image file.
Compute Manager Advanced Configuration 51

Compute Manager 13.0 Administrator’s Guide
Mapping a File Extensions to an IconIcons can be mapped to a file extension. This information is used by CM to display customized file types and icons when viewing remote files.
The XML file, file-extension.xml, is where file extensions are mapped to an icon. The location of this file for a typical installation of CM is:
on Windows: C:\altair\pbsworks\13.0\services\cm\config
on Linux: /opt/altair/pbsworks/13.0/services/cm/config
52 Compute Manager Advanced Configuration

Compute Manager 13.0 Administrator’s Guide
These are examples of file extensions that have been mapped to an icon:
The following table describes the XML attributes of the file extension mapping file:
<fileextensions> <fileextension name="pdf" displayText="Acrobat" icon="icon_pdf.png" ></fileexten-sion> <fileextension name="xml" displayText="XML" icon="icon_xml.png" ></fileextension> <fileextension name="zip" displayText="Archive" icon="icon_zip.png" ></fileexten-sion> <fileextension name="doc" displayText="Word" icon="icon_word.png" ></fileexten-sion> <fileextension name="docx" displayText="Word" icon="icon_word.png" ></fileexten-sion> <fileextension name="txt" displayText="Text" icon="icon_text.png" ></fileexten-sion> </fileextensions>
Table 2. Attributes of the file extension mapping file
XML Attribute Description name The file extension.displayText CM will display this as the files type.icon Icon image file.
Compute Manager Advanced Configuration 53
Compute Manager 13.0 Administrator’s Guide
Installing and Configuring Google Chrome FrameInstalling Google Chrome Frame on IE 8 and 9 can significantly improve the performance of RVS, especially plotting use cases. However, the plug-in appears to have some random issues with the Hyperview Player plug-in, which sometimes leads to unexpected behavior during animation data viewing. In these instances, the generated animation file (h3d) can be downloaded and viewed locally using the standalone version of HyperView player. This configuration (Google Chrome Frame + IE 8/9/10/11) has not been formally tested, so it is not fully supported by Altair. If issues arise, it may be recommended to uninstall the plug-in.
To install Google Chrome Frame:
1. Open Internet Explorer 8, 9, 10, or 11.
2. Go to http://www.google.com/chromeframe/.
3. Download Google Chrome Frame.
4. Close Internet Explorer.
5. Open Internet Explorer.
6. Go to Manage Add-ons to verify that the Google Chrome Frame plug-in is installed and enabled. If it is not enabled, then enable the plug-in.
To configure Google Chrome Frame, modify the cm.html file. The location of the file for a typical installation of CM is:
on Windows: C:\altair\pbsworks\13.0\applications\cm\binaries\ui
on Linux: /opt/altair/pbsworks/13.0/applications/cm/binaries/ui
1. Edit the cm.html file.
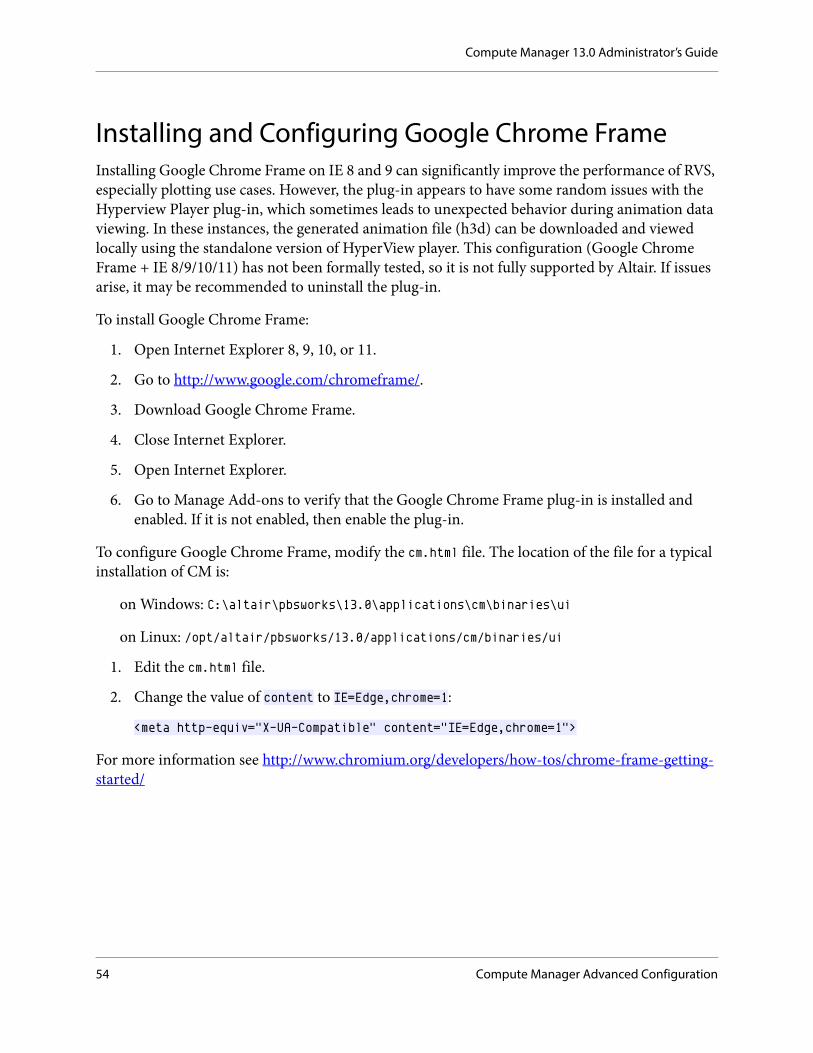
2. Change the value of content to IE=Edge,chrome=1:
<meta http-equiv="X-UA-Compatible" content="IE=Edge,chrome=1">
For more information see http://www.chromium.org/developers/how-tos/chrome-frame-getting-started/
54 Compute Manager Advanced Configuration
Compute Manager 13.0 Administrator’s Guide
Enabling a Secure Connection between CM and PASEnabling a secure connection (SSL) between CM and PAS can be done while adding a PAS server to CM. A check box is available that enables the secure connection between CM and the PAS server. No other special configuration is required for CM.
Mapping a MIME type to a File ExtensionMIME (Multipurpose Internet Mail Extensions) is a specification for formatting non-ASCII mes-sages so that they can be sent over the Internet. In addition to e-mail applications, web browsers also support various MIME types. This enables the browser to display files that are not in HTML format.
The file, mimetypes.default, is where MIME types are mapped to a file extension. The location of this file for a typical installation of CM is:
on Windows: C:\altair\pbsworks\13.0\services\cm\config
on Linux: /opt/altair/pbsworks/13.0/services/cm/config
The format of the file is:
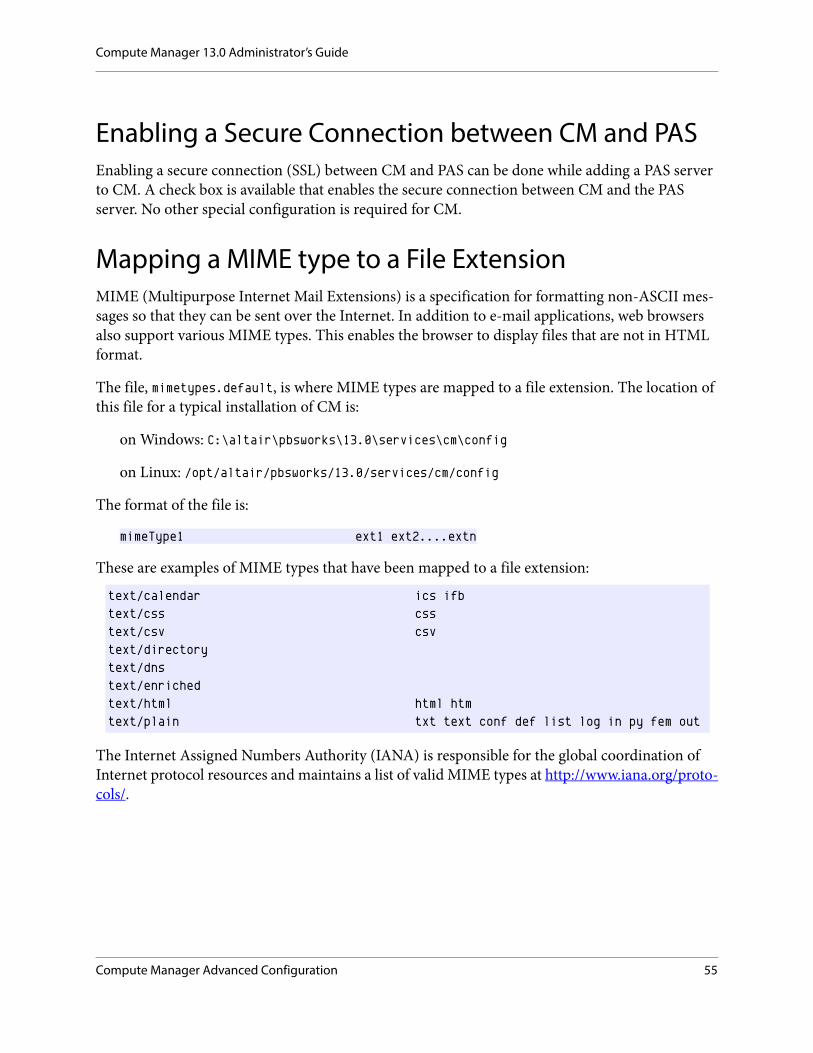
mimeType1 ext1 ext2....extn
These are examples of MIME types that have been mapped to a file extension:
The Internet Assigned Numbers Authority (IANA) is responsible for the global coordination of Internet protocol resources and maintains a list of valid MIME types at http://www.iana.org/proto-cols/.
text/calendar ics ifbtext/css csstext/csv csvtext/directorytext/dnstext/enrichedtext/html html htmtext/plain txt text conf def list log in py fem out
Compute Manager Advanced Configuration 55

Compute Manager 13.0 Administrator’s Guide
Setting Maximum Page Size for FilesCM allows the systems administrator to set the maximum file size (in bytes) for displaying a file in a single page. This information is stored in the file config.properties. The location of this file for a typical installation of CM is:
on Windows: C:\altair\pbsworks\13.0\services\cm\config
on Linux: /opt/altair/pbsworks/13.0/services/cm/config
Two parameter in this file are responsible for setting the maximum page size for a file:• maxFileSize - Any files larger than this value will have an option to be viewed in multiple
pages having a page size of pageSize. • pageSize - Determines the page size to display.
When CM displays a file greater in size than maxFileSize, the user will be presented with four options:
1. Download the file2. Show the file in one page3. Show the file in multiple pages4. Edit the file
The PBS Works service must be restarted for these changes to take effect.
# The values below are in bytes# Default max is set to 1000k i.e. 1000*1024maxFileSize=1024000# Default page size is set to 500k i.e 500*1024pageSize=512000
56 Compute Manager Advanced Configuration

Compute Manager 13.0 Administrator’s Guide
Changing the Job Refresh RateThe default time interval for the CM scheduler to refresh the job details on the Job Monitoring page of CM is ten (10) seconds after the minute. This time interval can be changed by updating the cron expression in the spring-config.xml file. The location of the file for a typical installation of CM is:
on Windows: C:\altair\pbsworks\13.0\services\cm\config
on Linux: /opt/altair/pbsworks/13.0/services/cm/config
This is the area of the file that will need to be modified:
The PBS Works service must be restarted for these changes to take effect.
Changing the PAS Staging DirectoryAfter job submission, CM copies the job files to the PAS staging directory before the job is trans-ferred to PBS Professional for execution. When PBS Professional selects the job for execution, the files are staged-in to the execution host from the staging directory. Upon job completion, any files the job wants to retain are staged-out by PBS Professional to the staging directory, and CM retrieves them from there.
Changing the stage directory must be done through PAS. For more information see “Configuring PBS Application Services” in the PBS Application Services Administrator's Guide. This guide can be downloaded from the PBS Works documentation user area.
All CM users will have to unregister and re-register with the PAS server to use the new staging directory.
<bean id="updateJobsTrigger" class="org.springframework.scheduling.quartz.CronTrig-gerBean"> <property name="jobDetail"> <ref bean="updateJobsBean" /> </property> <property name="cronExpression">
<value>0/10 * * * * ?</value> </property> <property name="name" value="updateJob" /> <property name="group" value="jobGroup" /></bean>
Compute Manager Advanced Configuration 57
Compute Manager 13.0 Administrator’s Guide
Refreshing Application DefinitionsPBS Application Services requires a predefined set of instructions, called application definitions, to describe application parameters to users, store their responses, and prepare those responses for job execution via PBS Professional. These application definitions are stored in a central repository and PAS will make PBS Professional aware of each of them upon server startup.
When a user selects an application on the Job Submission page of CM, CM makes a call to PAS to retrieve the application definition information. Prior to CM 12.1, this information was cached by CM. If an application definition was updated at the PBS Application Services layer, then CM had to be refreshed by restarting the PAS server, and then waiting for CM to refresh the application.
In CM 12.1 or later, the application information is no longer cached. If an application definition is updated at the PBS Application Services layer, CM can be refreshed by clicking on F5 to refresh the CM session. This reduces the wait time necessary for modifications to an application definition to appear in CM, greatly improving the development cycle for application definition authors.
Configuring JVM PerformanceTo ensure the proper scalability of larger job history counts, you may want to adjust the Java Vir-tual Machine (JVM) memory heap size of the portal. See “Configuring JVM Performance” in the PBS Works Administrator's Guide for more details. This guide can be downloaded from the PBS Works documentation user area.
58 Compute Manager Advanced Configuration

Compute Manager 13.0 Administrator’s Guide
Improving CM Response TimeThere are several parameters that can be adjusted to improve CM response time. These parameters are located in the config.properties file. For a typical installation of CM, this file is stored at:
on Windows: C:\altair\pbsworks\13.0\services\cm\config
on Linux: /opt/altair/pbsworks/13.0/services/cm/config
The recommended values for these parameters are based on the following factors and need to be considered before making any adjustments:
1. Deployment configuration of CM, PAS, and PBS Professional2. Hardware configuration3. Memory4. Number of jobs5. Number of concurrent users
Before any changes are made to improve the response time of CM, it is important to understand how CM communicates with PAS.
Periodically, CM communicates with PAS to synchronize job information. CM queries PAS for a summary of job information for all jobs. The information supplied by PAS provides CM with enough information to determine whether there are any new jobs since the last synchronization, or if anything has changed in reference to any known jobs, for instance, job status or job details.
Once CM determines which jobs have changed or are new, it again queries PAS for full job infor-mation (the equivalent of qstat -fx) for those jobs. Depending on how may jobs are currently being processed by PAS, the information returned in this query can be extremely large. Therefore, CM requests this data in chunks. Each chunk represents a certain number of jobs. Currently, CM is configured to make these requests in chunks of 1000 jobs. If 5000 jobs have changed since the last synchronization, then the full job information is returned in 5 chunks of 1000 jobs.
The parameter that determines the chunk size is jobBatchUpdateChunkSize:
jobBatchUpdateChunkSize=1000
In addition, during the synchronization, CM determines if any jobs have been removed from PAS (qdel), and will delete these jobs from CM. The job deletion activity can degrade CM response
Contact Altair site support before making changes to these parameters.
Compute Manager Advanced Configuration 59

Compute Manager 13.0 Administrator’s Guide
time, so a configurable parameter is available that allows the deletion of the jobs to be done via a cron job that is scheduled to run once a day, rather than deleting the jobs during the synchroniza-tion. The parameter that determines the deletion activity is deleteJobsByScheduler:
deleteJobsByScheduler=true
If this parameter is set to true, the job deletion will be performed as a cron job. The scheduling of this cron job is done via the spring-config.xml file. For more information see Changing the Scheduled Time for Job Deletion. If this parameter is set to false, the job deletion will be per-formed during the CM/PAS synchronization.
Communication between CM and PAS is multi-threaded. CM implements a thread pool to reduce the overhead of creating and destroying threads, and to limit the amount of threads to avoid exces-sive memory consumption due to resource thrashing. CM by default has a thread pool size of 4, however this is configurable and can be changed via the threadPoolSize parameter. When JobUp-dateThreadEnabled=false, then it is assumed that threadPoolSize=1.
JobUpdateThreadEnabled=true
threadPoolSize=4
60 Compute Manager Advanced Configuration

Compute Manager 13.0 Administrator’s Guide
Changing the Scheduled Time for Job DeletionBy default, jobs that have been deleted from PAS are removed from the CM database every 30 minutes. This can be changed by updating the cron expression in the spring-config.xml file. The location of the file for a typical installation of CM is:
on Windows: C:\altair\pbsworks\13.0\services\cm\config
on Linux: /opt/altair/pbsworks/13.0/services/cm/config
This is the area of the file that will need to be modified:
The PBS Works service must be restarted for these changes to take effect.
<bean id="deleteJobsTrigger" class="org.springframework.scheduling.quartz.CronTrig-gerBean"> <property name="jobDetail"> <ref bean="deleteJobsBean" /> </property> <property name="cronExpression">
<value>0 0/30 * * * ?</value> </property></bean>
Compute Manager Advanced Configuration 61

Compute Manager 13.0 Administrator’s Guide
Changing the Location of the Monitoring Action BarCM allows the systems administrator to choose where to locate the CM Monitoring job action bar. This information is stored in a file called config.properties. The location of this file for a typical installation of CM is:
on Windows: C:\altair\pbsworks\13.0\services\cm\config
on Linux: /opt/altair/pbsworks/13.0/services/cm/config
The job action bar can be located at the top of the Monitoring page by setting the value of jobActionBarOnTop to true:
jobActionBarOnTop=true
62 Compute Manager Advanced Configuration

Compute Manager 13.0 Administrator’s Guide
Or, it can be placed in the middle of the CM Monitoring page (default location) by setting the value of jobActionBarOnTop to false:
jobActionBarOnTop=false:
The PBS Works service must be restarted for these changes to take effect.
Compute Manager Advanced Configuration 63

Compute Manager 13.0 Administrator’s Guide
Changing the Communication Timeout between CM and PASCM provides the following connection timeout values for communication between CM and PBS Application Services. There are three categories and the timeout values vary depending on the type of operation that is being performed:
• Short• Long• Extra long
Exceptions are the job submission operations GetApplicationDefinition and RefreshApplica-tionDefinition. The timeout value for these operations can be configured by updating a parame-ter in the config.properties file - for more information see Changing the PAS Application Retrieval Timeout.
Operations for Job Submission & Job Monitoring Timeout Category Default length of timeout
GetApplicationActions Short 300000 ms (5 min)MoveJob Short 300000 ms (5 min)OrderJobs Short 300000 ms (5 min)TerminateJob Short 300000 ms (5 min)SubmitJob Short 300000 ms (5 min)GetJobSummary Long 600000 ms (10 min)deleteFinishedJob Long 600000 ms (10 min)GetJobs Long 600000 ms (10 min)ExecuteApplicationAction Extra Long 5 X Long timeout value
Operations for Remote Files Timeout Category Default length of timeoutdirectoryCreate Short 300000 ms (5 min)directoryDelete Short 300000 ms (5 min)fileList Short 300000 ms (5 min)fileRead Short 300000 ms (5 min)fileDelete Short 300000 ms (5 min)
64 Compute Manager Advanced Configuration

Compute Manager 13.0 Administrator’s Guide
To change the default values for the timeout categories, edit the script file server-start.sh on Linux or PBSWorksService.bat on Windows. The location of this file for a typical installation of a PBS Works product is:
on Windows: C:\altair\pbsworks\13.0\scripts
on Linux: /opt/altair/pbsworks/13.0/scripts
Add these two lines (XXXXX values are in milliseconds):
JAVA_OPTS="$JAVA_OPTS -DPAS_REQUEST_LONG_TIMOUT=XXXXXX"
JAVA_OPTS="$JAVA_OPTS -DPAS_REQUEST_SHORT_TIMOUT=XXXXXX"
After these lines:
#--- CM Specific Pararmeters
echo "Setting CM Paramters"
The PBS Works service must be restarted for these changes to take effect.
getHomeDirectory Short 300000 ms (5 min)compress Short 300000 ms (5 min)uncompress Short 300000 ms (5 min)fileRenameMove Short 300000 ms (5 min)fileCopy Short 300000 ms (5 min)fileDataReplace Short 300000 ms (5 min)fileWrite Extra Long 5 X Long timeout valueRunPythonScript Extra Long 5 X Long timeout value
Operations for Remote Files Timeout Category Default length of timeout
Compute Manager Advanced Configuration 65

Compute Manager 13.0 Administrator’s Guide
Customizing the Available Job Monitoring Properties CM has the ability to enable and disable the job properties that will be displayed on the Job Moni-toring page of the CM web application. This information is stored in the jobPropertiesDef.xml file. The location of the file for a typical installation of CM is:
on Windows: C:\altair\pbsworks\13.0\services\cm\config
on Linux: /opt/altair/pbsworks/13.0/services/cm/config
By default, CM displays all job properties on the Property tab, and allows all job properties to be added as columns to the job grid of the Job Monitoring page.
For example, the following image of the Job Monitoring page shows that the job property Account can be added as a column to the job grid, and is also is displayed on the job Property tab.
66 Compute Manager Advanced Configuration

Compute Manager 13.0 Administrator’s Guide
The following is an example of the content of the jobPropertiesDef.xml file:
The following table describes the XML attributes of the job properties definition file:
For example, the following XML configures CM to display a job property called queueName on the Property tab of the Job Monitoring page, and also makes it available to add as a column of the job grid. By default, all job properties are configured in this way.
<property name="queueName" type="string" visible="true" detailOnly="false" />
Changing the XML attribute visible to false disables the display of the job property entirely.
<property name="queueName" type="string" visible="false" detailOnly="false" />
<?xml version="1.0" encoding="iso-8859-1" ?><properties> <property name="jobName" type="string" visible="true" detailOnly="false" /> <property name="jobDirectory" type="string" visible="true" detailOnly="false" /> <property name="queueName" type="string" visible="true" detailOnly="false" /></properties>
Table 3. Attributes of the job properties definition file
Attribute Description Value Valuesname The name of the job property as
it is defined within CM.The value of this attribute should NOT be changed.
type The data type of the job property as it is defined in CM.
The value of this attribute should NOT be changed.
visible Enables or disables the display of the job property on the CM Job Monitoring page. If this property is set to false, then the detai-lOnly attribute is not necessary.
true enable the display of the job property
false disable the display of the job property
detailOnly Enables or disables the availabil-ity of the job property as a dis-playable column in the job grid of the CM Job Monitoring page.
true The job property will only be dis-played on the Property tab of the Job Monitoring page.
false The job property can be added as a displayable column in the job grid, and will also be displayed on the Property tab of the Job Moni-toring page.
Compute Manager Advanced Configuration 67
Compute Manager 13.0 Administrator’s Guide
Changing the XML attribute detailOnly to true disables the availability of the job property as a displayable column in the job grid of the Job Monitoring page. However, the job property will be displayed in the Property tab of the Job Monitoring page.
<property name="queueName" type="string" visible="true" detailOnly="false" />
The PBS Works service must be restarted for these changes to take effect.
68 Compute Manager Advanced Configuration

Compute Manager 13.0 Administrator’s Guide
Changing the PAS Application Retrieval TimeoutDynamic applications are a special type of application that allows the job submission form to react to information entered by a CM user. For example, two versions of the application Optistruct are available. The newest version (Optistruct 11.0) contains a new application argument called TURBO BOOST. The dynamic application feature allows the job submission form to change depending on the selection of the Optistruct version.
With the introduction of dynamic applications, CM is no longer caching applications and their associated arguments. Therefore, any time you select an application and display its job submission form, a call is made to PAS to get the latest version of the application.
After making the call to PAS to retrieve the application, by default, CM will wait for ten (10) sec-onds for a response from PAS. If there is no response within 10 seconds, the call times out and the following error message is displayed:
Failed to refresh application definition
The default timeout value of 10 seconds can be changed, and this information is stored in a file called config.properties. The location of this file for a typical installation of CM is:
on Windows: C:\altair\pbsworks\13.0\services\cm\config
on Linux: /opt/altair/pbsworks/13.0/services/cm/config
Compute Manager Advanced Configuration 69

Compute Manager 13.0 Administrator’s Guide
The parameter refreshAppDefTimeOut determines the timeout value. The timeout value is in milli-seconds (10000 milliseconds is 10 seconds):
# time-out setting for PAS refresh-app-def service call (in milliseconds)
refreshAppDefTimeOut=10000
The PBS Works service must be restarted for these changes to take effect.
Enabling RVS Traffic through CMResults Visualization Service traffic can be routed through Compute Manager, eliminating the need for RVS to be directly accessible to a client through the URL http://<rvsServer>:<rvsPort>.
Enabling RVS traffic through Compute Manager is done by modifying the file rvs_data_pro-vider.xml. The location of this file for a typical installation of RVS is:
on Windows: C:\altair\pbsworks\13.0\services\rm\config
on Linux: /opt/altair/pbsworks/13.0/services/rm/config
Change the value of host from RVS_SERVER to CM_SERVER:
<FileProvider host="CM_SERVER" />
The PBS Works service must be restarted for these changes to take effect.
70 Compute Manager Advanced Configuration

Compute Manager 13.0 Administrator’s Guide
Configuring RVS Admin Auto Refresh IntervalCompute Manager allows you to set the RVS plot refresh time ie., minimum time interval for refreshing the plot while a job is running.
To specify the RVS admin auto refresh interval:
1. Click the Settings button . 2. Click Settings > Compute Manager. 3. Enter the value for RVS Admin Auto Refresh Interval.
4. Click Apply. 5. Click Ok.
The RVS Admin Auto Refresh Interval value set by the admin will over-ride the RVS Auto Refresh Interval value specified by the user.
Compute Manager Advanced Configuration 71

Compute Manager 13.0 Administrator’s Guide
Configuring the Default Home PathCompute Manager allows the system administrators to configure the default home location of all users when a PAS server is added to CM. Compute Manager displays the contents of this home directory path from the Remote Files web page, Job Submission web page, and in the Files Con-tents tab in the Monitoring web page.
You can configure the default home path while Adding a PAS Server.
If home location path is configured as /home/pbsworks/Documents, then when the user clicks on the Home icon from the web pages it will display the directory structure of the home location path (in this case /home/pbsworks/Documents) defined while adding the PAS server.
You can also mention the home location path as /home/$USER_Home or /home/%U. This will display the directory structure of the user when the Home icon is clicked from the web pages.
Some examples for setting the user's home directory:• /home/tsmith• /home/$USER_HOME which translates to /home/tsmith• /home/%U which translates to /home/tsmith• /stage/%U which translates to /stage/tsmith
Variables that can be used to define the user's default home location are $HOME which represents the PAS home directory and $USER_HOME or %U which represents the user name.
The user’s credentials should be available in the PAS server when you define the home location path with the user ($USER_HOME or %U).
An error message will be displayed if the custom path defined is not available.
72 Compute Manager Advanced Configuration

Compute Manager 13.0 Administrator’s Guide
Adding Site Specific Web Pages to CMThree default web pages are available with CM after installation:
• Monitoring• Remote Files• Job Submission
You can add site specific pages to CM and link to those pages just as you would link to the default web pages.
Compute Manager allows the system administrators to configure custom pages. You can create custom pages providing a URL link or by providing web application.
To create a custom page with a URL link update the information in the customization.xml file.
The location of this file for a typical installation of CM is:
on Windows: C:\altair\pbsworks\13.0\services\cm\config
on Linux: /opt/altair/pbsworks/13.0/services/cm/config
The format of the file is:
The following table describes the XML attributes of the application help and icon mapping file:
<page pageName="page" pageIcon="page_icon.png"> <links> <link linkName="link" linkIcon="link_icon.png" url="url link"></link> <link linkName="link1" linkIcon="link_icon1.png" url="url link1"></link> </links></page>
Table 4. Attributes of the application help and icon mapping file
XML Attribute DescriptionpageName The name of the site specific web page.page_icon Location of the site specific icon image file.linkName The name of the link in the site specific webpage.
Compute Manager Advanced Configuration 73

Compute Manager 13.0 Administrator’s Guide
To create a custom page with web application, update the URL location in the following format:
Following is an example of the custom pages created in the application. The Altair custom pages is created by updating the customization.xml file available in C:\altair\pbsworks\13.0\ser-vices\cm\config:
icon Location of the link icon image file.url Location of the help topic. This can be a web page URL or a location of the
html file.
Update the page icons and the link icons in the folder: C:\altair\pbsworks\13.0\applications\cm\binaries\ui\images\cus-tom_pages
The icon size should be 16x16 pixels
<link linkName="link1" linkIcon="link_icon1.png" url="custom_pages/<web_app_pro-ject_folder_name>/<file_name_to_be_invoked>"></link>
The web application has to be placed in the folder: C:\altair\pbsworks\13.0\applications\cm\binaries\ui\images\cus-tom_pages
<pages>
<page pageName="Altair" pageIcon="altair_icon.png">
<links>
<link linkName="Altair Product Design" linkIcon="altair_icon.png" url="http://www.altairproductdesign.com/"></link>
<link linkName="Altair Process Automation" linkIcon="altair_icon_1.png" url="custom_pages/process/AltairProcess.htm"></link>
</links>
</page>
</pages>
Table 4. Attributes of the application help and icon mapping file
XML Attribute Description
74 Compute Manager Advanced Configuration

Compute Manager 13.0 Administrator’s Guide
In the above example, the first link created for the Altair page is the URL link and the second one is the web application that is placed in the C:\altair\pbsworks\13.0\applications\cm\bina-ries\ui\custom_pages.
The icons mentioned in the pages and links are placed in the C:\altair\pbsworks\13.0\applica-tions\cm\binaries\ui\images\custom_pages
When you login to the application, the following screen is displayed with the Altair page being added:
Compute Manager Advanced Configuration 75

Compute Manager 13.0 Administrator’s Guide
The Altair web page created will be displayed. Click on Altair tab and Altair Product Design website URL will be displayed:
Click on Altair Process Automation tab and the web application will be displayed:
76 Compute Manager Advanced Configuration

Compute Manager 13.0 Administrator’s Guide
Launching an Application Installed on a Remote ServerA new feature of PBS Works 13.0 is the ability to launch an application installed on a remote server (usually the PBS execution host) from the Compute Manager file context menu.
This feature is only available when DM is installed and configured with the application to be launched.
Refer to Display Manager Administrator’s Guide for more information on Managing Applications.
Configuring the Client to Open a Remote ApplicationThe Java Runtime Environment (JRE) must be installed on the client machine to open a remote application. Follow these instructions to install and configure the JRE:
• Download and install the latest JRE from https://java.com/en/downloads.• Configure JRE by opening the Java control panel and adding the server URL as an excep-
tion in the site exception list.• When the browser prompts to run the Java applet, choose To Allow and Remember.
Configuring Cross MountThe cross mount is required in a situation where the execution directory and the hosts are cross mounted. When you enable the cross mount, then the transfer of files between them does not hap-pen when you open a remote display session.
To enable the cross mount, change the status of the crossMount variable to true in the con-fig.properties.
By default, the crossMount is disabled. The location of this file for a typical installation of CM is:
on Windows: C:\altair\pbsworks\13.0\services\cm\config
on Linux: /opt/altair/pbsworks/13.0/services/cm/config
# Cross Connection - If set then there all the PBS server's and mom's are sharedcrossMount=false
The PBS Works service must be restarted for these changes to take effect.
Compute Manager Advanced Configuration 77

Compute Manager 13.0 Administrator’s Guide
Server ConfigurationTo open or launch an application installed on a remote server, then configure Compute Manager with those applications.
To configure applications for all the users, open appregistry.xml located at
C:\altair\pbsworks\13.0\services\alf\config\users\global\remote\
For example:
<appresource> <name>HyperMeshALF</name> <id>HyperMeshALF</id> <args> <argument> <name>FILE_INPUT</name> <value></value> <prefix></prefix> </argument> </args></appresource>
Modifying Application Launch Framework Client LocationYou can modify the Application Launch Framwork (ALF) client location in the application as fol-lows:
1. Click the Settings icon, and choose the Settings option from the drop down menu as shown below:
78 Compute Manager Advanced Configuration

Compute Manager 13.0 Administrator’s Guide
A Settings dialog box will be displayed.
2. Click Application Launch Framework and update the ALF Client Location.
Configuring Local Dynamic ApplicationThe dynamic applications are a special type of application that allows the job submission form to react to information entered by a CM user. The local dynamic application allows the user to access their machine to provide these information.
By default, the local dynamic application is disabled. This can be changed in a file called con-fig.properties. The location of this file for a typical installation of CM is:
on Windows: C:\altair\pbsworks\13.0\services\cm\config
on Linux: /opt/altair/pbsworks/13.0/services/cm/config
Compute Manager Advanced Configuration 79

Compute Manager 13.0 Administrator’s Guide
The parameter localdynamicapp determines if the local dynamic application is enabled or dis-abled. To enable the local dynamic application, change the value of to true.
# master file analyzer - enabled flag
localdynamicapp=false
The PBS Works service must be restarted for these changes to take effect.
Setting the Popup TimeoutCM has introduced non-intrusive popup message on successful job submission. A popup message will be displayed within the Compute Manager toolbar indicating the job was submitted success-fully along with the Job ID. You can click the Job ID in the popup message to monitor the status of the job.
The popup message will disappear after the configured timeout value.
An example of the popup message is as follows:
The default popup message timeout value of 10 seconds (10000 milliseconds) can be changed, and this information is stored in a file called config.properties. The location of this file for a typical installation of CM is:
on Windows: C:\altair\pbsworks\13.0\services\cm\config
on Linux: /opt/altair/pbsworks/13.0/services/cm/config
The parameter popupTimeout determines the popup message timeout value. The popup timeout value is in milliseconds (10000 milliseconds is 10 seconds):
# popup Timeout (in milliseconds)
popupTimeout=10000
The PBS Works service must be restarted for these changes to take effect.
80 Compute Manager Advanced Configuration

Compute Manager 13.0 Administrator’s Guide
Configuring the Advance UploadCM allows the systems administrator to configure uploading a folder in the Files panel.
By default, the advance upload is disabled. This can be changed in a file called config.properties. The location of this file for a typical installation of CM is:
on Windows: C:\altair\pbsworks\13.0\services\cm\config
on Linux: /opt/altair/pbsworks/13.0/services/cm/config
The parameter advanceUploadEnabled determines if the advance upload is enabled or disabled. To enable the advance upload, change the value to true.
# property to enable/disable the advance upload feature. Default : false
advanceUploadEnabled=false
The PBS Works service must be restarted for these changes to take effect.
Configuration for Larger SitesYou have to perform the following configuration changes if your site is handling more than Fifty Thousand (50,000) jobs.
Setting the Maximum Active ConnectionsCM allows the systems administrator to set the maximum number of active connections that can be allocated at the same time.
The default number of active connections is set to 8. This can be changed by updating the maxAc-tive property in the spring-config.xml file. The location of this file for a typical installation of CM is:
on Windows: C:\altair\pbsworks\13.0\services\cm\config
on Linux: /opt/altair/pbsworks/13.0/services/cm/config
Even if the advance upload is enabled, this feature will be available to each individual users only if the Enable local dynamic app. def. is enabled in the Settings.
Compute Manager Advanced Configuration 81
Compute Manager 13.0 Administrator’s Guide
This is the area of the file that will need to be modified:
<property name="maxActive" value="8" />
You can change this value to the 50 which is the maximum number of active connections.
The PBS Works service must be restarted for these changes to take effect.
Setting the Work MemoryThe work memory specifies the amount of memory to be used by internal sort operations and hash tables before writing to temporary disk files.
The default work memory value is four megabytes (4MB). This information is stored in a file called postgresql.conf. The location of this file for a typical installation of CM is:
on Windows: C:\altair\pbsworks\13.0\thirdparty\postgres\pbsworksdata
on Linux: /opt/altair/pbsworks/13.0/thirdparty/postgres/pbsworksdata
The parameter work_mem determines the amount of work memory to be used and it is commented by default:
# work_mem = 4MB
Remove the comment mark (#) from the line and update the value to 32 megabytes (32MB):
work_mem = 32MB
For more information on the work memory, refer http://www.postgresql.org/docs/9.4/static/run-time-config-resource.html
The PBS Works service must be restarted for these changes to take effect.
Changing the Shared Buffer SizeThe shared buffer size sets the amount of memory the database server uses for shared memory buffers.
The default value is typically 128 megabytes (128MB). This information is stored in a file called postgresql.conf. The location of this file for a typical installation of CM is:
on Windows: C:\altair\pbsworks\13.0\thirdparty\postgres\pbsworksdata
on Linux: /opt/altair/pbsworks/13.0/thirdparty/postgres/pbsworksdata
82 Compute Manager Advanced Configuration
Compute Manager 13.0 Administrator’s Guide
The parameter shared_buffers determines the amount of memory the database server uses for shared memory buffers.
Change the value from 128MB to four gigabytes (4GB):
shared_buffers = 4GB
For more information on the shared buffer size, refer http://www.postgresql.org/docs/9.4/static/runtime-config-resource.html
The PBS Works service must be restarted for these changes to take effect.
Setting the Effective Cache SizeSets the planner's assumption about the effective size of the disk cache that is available to a single query.
The default is 128 megabytes (128MB). This information is stored in a file called postgresql.conf. The location of this file for a typical installation of CM is:
on Windows: C:\altair\pbsworks\13.0\thirdparty\postgres\pbsworksdata
on Linux: /opt/altair/pbsworks/13.0/thirdparty/postgres/pbsworksdata
The parameter effective_cache_size determines the disk cache that is available to a single query and it is commented by default:
# effective_cache_size = 128MB
Remove the comment mark (#) from the line and update the value to 12 gigabytes (12GB):
effective_cache_size = 12GB
For more information on the effective cache size, refer http://www.postgresql.org/docs/9.1/static/runtime-config-query.html
The PBS Works service must be restarted for these changes to take effect.
Changing Java Heap MemoryEdit the CM start up script server-start.sh located in the directory:
on Windows: C:\altair\pbsworks\13.0\scripts
on Linux: /opt/altair/pbsworks/13.0/scripts
Change the script to set the Tomcat maximum memory limit to 4096MB.
Compute Manager Advanced Configuration 83

Compute Manager 13.0 Administrator’s Guide
SET CATALINA_OPTS="-Xmx4096m -XX:PermSize=128m -XX:MaxPermSize=256m -D${prodid}"
The PBS Works service must be restarted for these changes to take effect.
CM Configuration FilesThe files in the table below can be modified to customize Compute Manager. These files are located in the PBS Works installation directory. By default, PBS Works products are installed in the following directory.
on Windows: C:\altair\pbsworks\13.0
on Linux: /opt/altair/pbsworks/13.0
Table 5. Computer Manager Configuration Files
File Name Customizationservices/cm/config/config.properties • Setting Maximum Page Size for Files
• Improving CM Response Time• Changing the Location of the Moni-
toring Action Bar• Changing the PAS Application
Retrieval Timeout• Configuring Local Dynamic Appli-
cation• Setting the Popup Timeout• Configuring Cross Mount• Configuring the Advance Upload
services/cm/config/spring-config.xml • Changing the Job Refresh Rate• Changing the Scheduled Time for
Job Deletion• Setting the Maximum Active Con-
nectionsservices/cm/config/mimetypes.default Mapping a MIME type to a File Exten-
sionservices/cm/config/genericActions/<server>.xml Adding a Generic Action for a PAS
server
84 Compute Manager Advanced Configuration

Compute Manager 13.0 Administrator’s Guide
services/cm/config/app-helper.xml Mapping Help Topics and Icons to an Application
services/cm/config/file-extension.xml Mapping a File Extensions to an IconWindows: scripts\PBSWorksService.bat Linux: scripts/server-start.sh
• Changing the Communication Tim-eout between CM and PAS
• Changing Java Heap Memoryservices/cm/config/jobPropertiesDef.xml Customizing the Available Job Moni-
toring Propertiesapplications/cm/binaries/ui/cm.html Installing and Configuring Google
Chrome Frameservices/rm/config/rvs_data_provider.xml Enabling RVS Traffic through CMservices/cm/config/customization.xml Adding Site Specific Web Pages to CMthirdparty/postgres/pbsworksdata • Setting the Work Memory
• Changing the Shared Buffer Size• Setting the Effective Cache Size
Table 5. Computer Manager Configuration Files
File Name Customization
Compute Manager Advanced Configuration 85

Compute Manager 13.0 Administrator’s Guide
86 Compute Manager Advanced Configuration

5. PBS Works Log Files
Compute Manager Log File
The Compute Manager log file can be found at <PBS_WORKS_INSTALL_DIR>/logs/cmlog.log
Apache Tomcat Log File
The Apache Tomcat log file can be found at <PBS_WORKS_INSTALL_DIR>/thirdparty/apache/tom-cat/logs/catalina.out
Postgres Server Log File
The Postgres server log file can be found at <PBS_WORKS_INSTALL_DIR>/thirdparty/postgres/pbsworksdata/postgres_server.log
87

Compute Manager 13.0 Administrator’s Guide
88 PBS Works Log Files
6. Troubleshooting
Refresh Button ErrorProblem: The Refresh button is displayed after upgrading to CM 13.0 from previous version.
Solution: With CM 13.0, the Refresh button should not be displayed. Try clearing your browser's cache.
To clear the browser cache in: • Chrome: Refer to https://support.google.com/chrome/answer/95582?hl=en• FireFox: Refer to https://support.mozilla.org/en-US/kb/how-clear-firefox-cache• IE 9 and above: Refer to http://windows.microsoft.com/en-us/windows7/how-to-delete-
your-browsing-history-in-internet-explorer-9• Safari 8: Refer to https://support.apple.com/kb/PH19215?viewlo-
cale=en_US&locale=en_US
89

Compute Manager 13.0 Administrator’s Guide
90 Troubleshooting