Embed Size (px)
Citation preview
County of San Diego
DEPARTMENT OF ENVIRONMENTAL HEALTH
HAZARDOUS MATERIALS DIVISION
P .O . B OX 1 2 9 26 1 , S AN D IE G O, C A 9 2 11 2 - 92 6 1
( 85 8 ) 5 0 5 - 6 8 8 0 f ax ( 85 8 ) 5 0 5 - 68 4 8 1 -8 0 0 -2 5 3 - 99 3 3
h t t p : / / ww w. sd c d eh . o r g
California Environmental Reporting System (CERS)
Business User Guide
Table of Contents
I. Creating a CERS Business Account
II. Linking Your CERS Profile to a Facility/Business
A. Requesting Access to an Existing Facility
B. Adding a New Facility to CERS
III. Electronic Submissions & Submittal Elements
A. Facility Information (Business Activities & Owner Information)
B. Draft Submittal Commands
C. Hazardous Materials Inventory
i. Manual Entry Using “Add Material” tool
ii. Uploading Hazardous Materials Inventory
iii. Other Inventory Actions
iv. Site Maps/ Facility Maps/Site Plans
D. Emergency Response and Training Plans
E. Underground Storage Tanks
F. Tiered Permitting
G. Recyclable Materials Report
H. Remote Waste Consolidation Sites
I. Hazardous Waste Tank Closure Certification
J. Aboveground Petroleum Storage Act
IV. Navigating CERS and Managing Your Business Home Page
A. Common Tasks
B. Submittals
C. Facilities
D. Compliance
E. My Business
F. Additional Help [Back to Table of Contents]
I. Creating a CERS Business Account
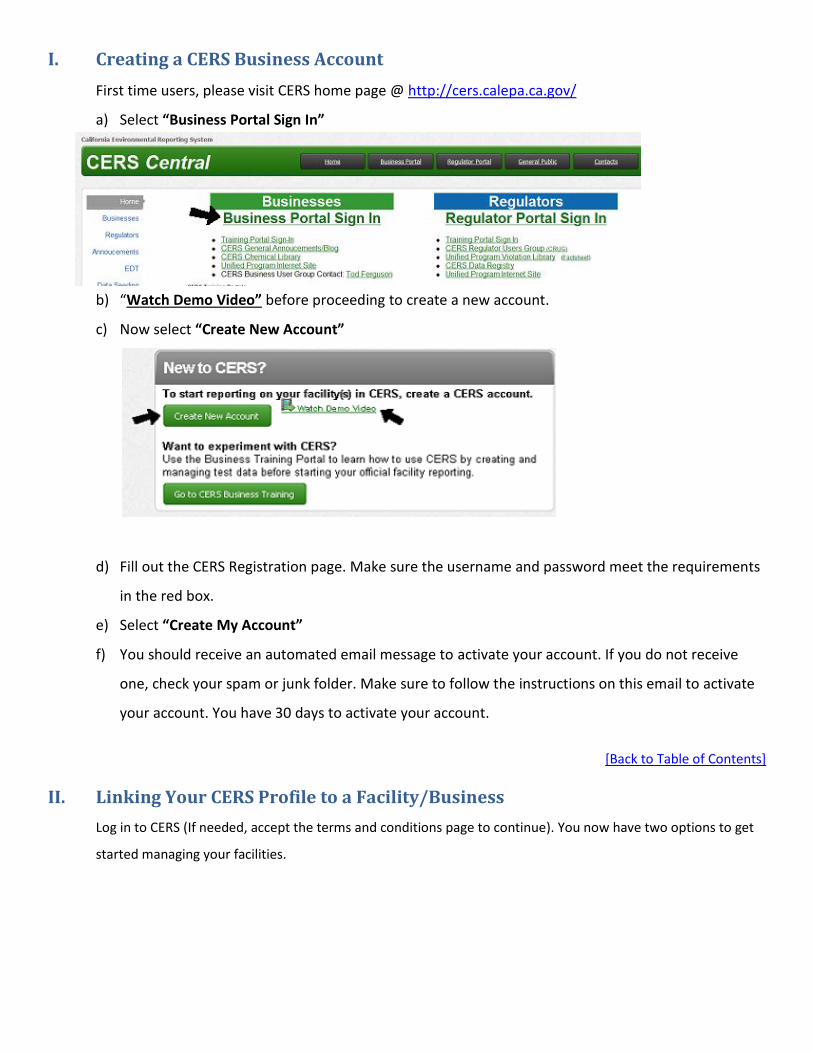
First time users, please visit CERS home page @ http://cers.calepa.ca.gov/
a) Select “Business Portal Sign In”
b) “Watch Demo Video” before proceeding to create a new account.
c) Now select “Create New Account”
d) Fill out the CERS Registration page. Make sure the username and password meet the requirements
in the red box.
e) Select “Create My Account”
f) You should receive an automated email message to activate your account. If you do not receive
one, check your spam or junk folder. Make sure to follow the instructions on this email to activate
your account. You have 30 days to activate your account.
[Back to Table of Contents]
II. Linking Your CERS Profile to a Facility/Business
Log in to CERS (If needed, accept the terms and conditions page to continue). You now have two options to get
started managing your facilities.
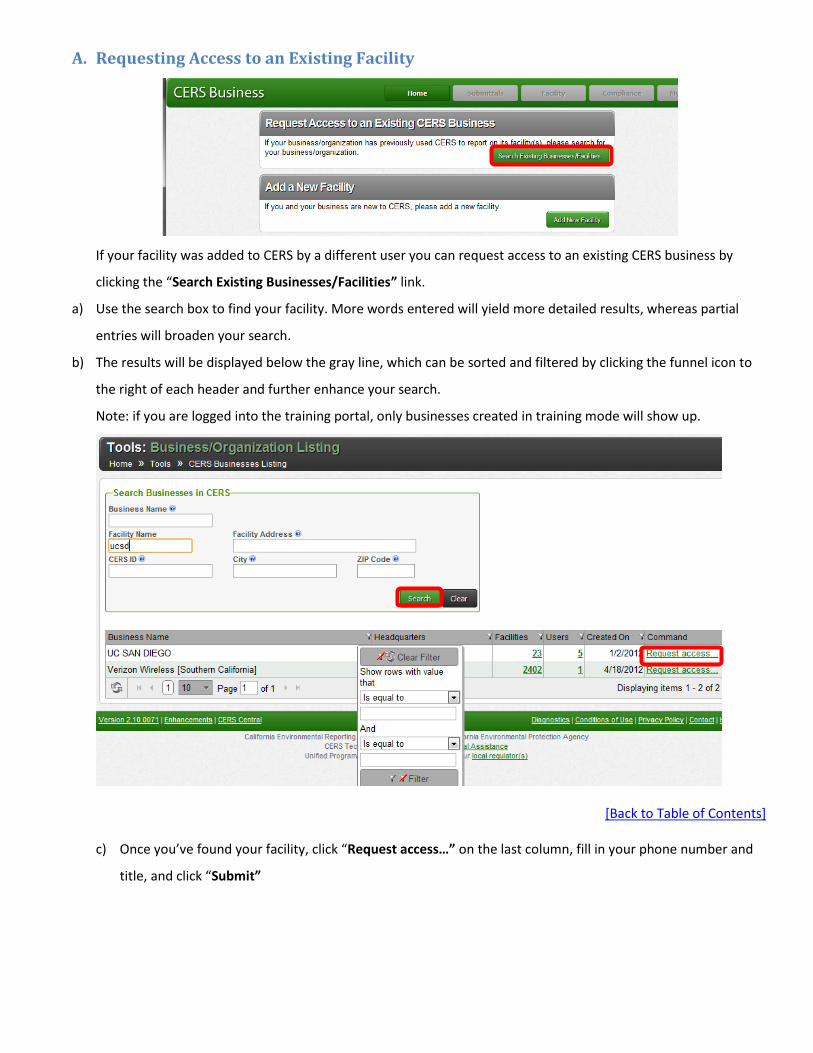
A. Requesting Access to an Existing Facility
If your facility was added to CERS by a different user you can request access to an existing CERS business by
clicking the “Search Existing Businesses/Facilities” link.
a) Use the search box to find your facility. More words entered will yield more detailed results, whereas partial
entries will broaden your search.
b) The results will be displayed below the gray line, which can be sorted and filtered by clicking the funnel icon to
the right of each header and further enhance your search.
Note: if you are logged into the training portal, only businesses created in training mode will show up.
[Back to Table of Contents]
c) Once you’ve found your facility, click “Request access…” on the last column, fill in your phone number and
title, and click “Submit”
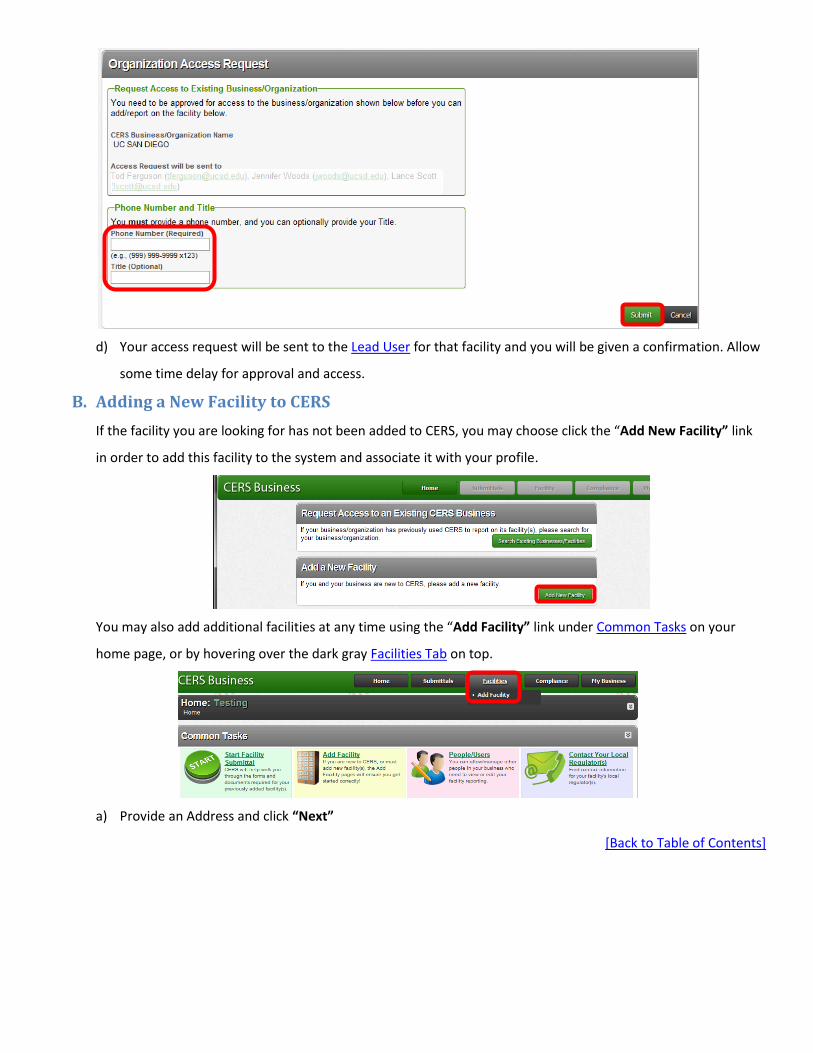
d) Your access request will be sent to the Lead User for that facility and you will be given a confirmation. Allow
some time delay for approval and access.
B. Adding a New Facility to CERS
If the facility you are looking for has not been added to CERS, you may choose click the “Add New Facility” link
in order to add this facility to the system and associate it with your profile.
You may also add additional facilities at any time using the “Add Facility” link under Common Tasks on your
home page, or by hovering over the dark gray Facilities Tab on top.
a) Provide an Address and click “Next”
[Back to Table of Contents]
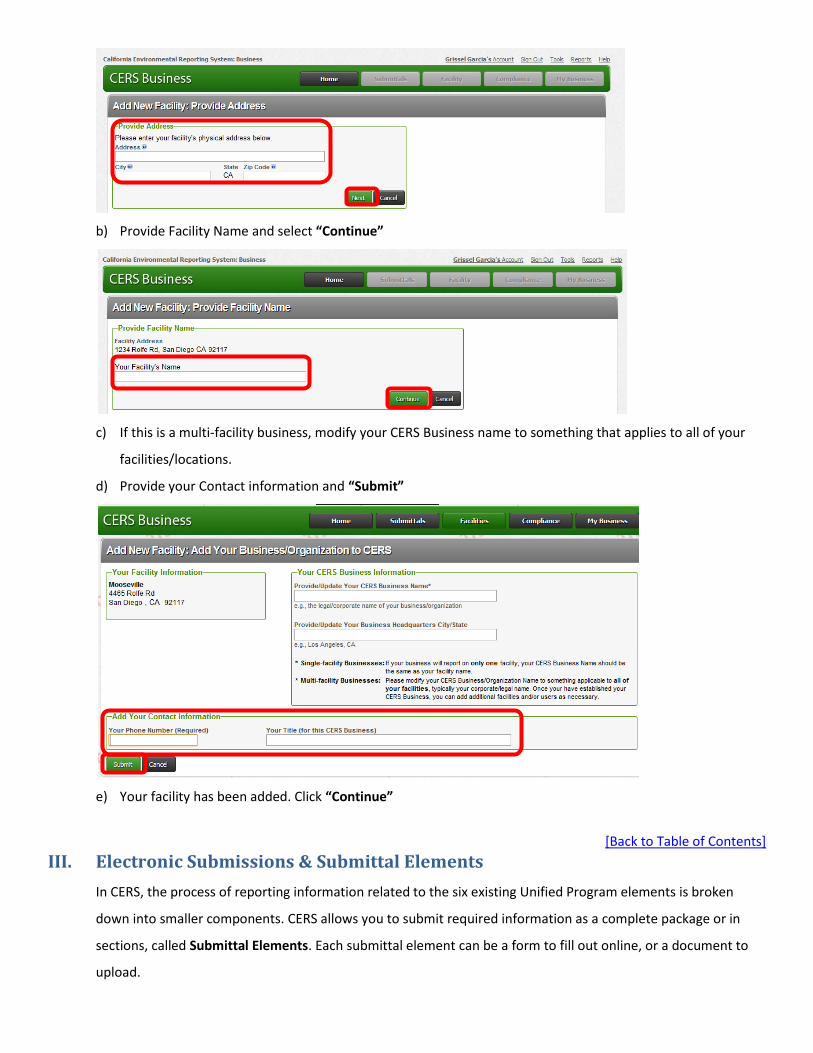
b) Provide Facility Name and select “Continue”
c) If this is a multi-facility business, modify your CERS Business name to something that applies to all of your
facilities/locations.
d) Provide your Contact information and “Submit”
e) Your facility has been added. Click “Continue”
[Back to Table of Contents]
III. Electronic Submissions & Submittal Elements
In CERS, the process of reporting information related to the six existing Unified Program elements is broken
down into smaller components. CERS allows you to submit required information as a complete package or in
sections, called Submittal Elements. Each submittal element can be a form to fill out online, or a document to
upload.
A. Facility Information (Business Activities and Owner/Operator Information)
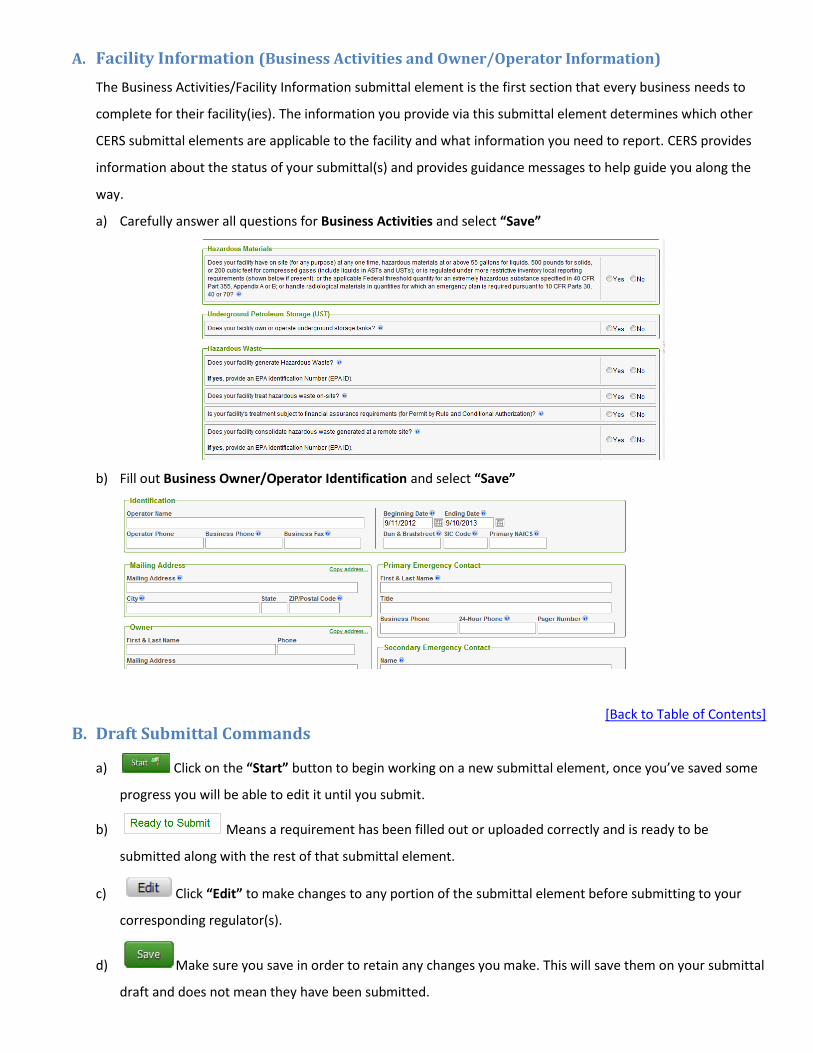
The Business Activities/Facility Information submittal element is the first section that every business needs to
complete for their facility(ies). The information you provide via this submittal element determines which other
CERS submittal elements are applicable to the facility and what information you need to report. CERS provides
information about the status of your submittal(s) and provides guidance messages to help guide you along the
way.
a) Carefully answer all questions for Business Activities and select “Save”
b) Fill out Business Owner/Operator Identification and select “Save”
[Back to Table of Contents]
B. Draft Submittal Commands
a) Click on the “Start” button to begin working on a new submittal element, once you’ve saved some
progress you will be able to edit it until you submit.
b) Means a requirement has been filled out or uploaded correctly and is ready to be
submitted along with the rest of that submittal element.
c) Click “Edit” to make changes to any portion of the submittal element before submitting to your
corresponding regulator(s).
d) Make sure you save in order to retain any changes you make. This will save them on your submittal
draft and does not mean they have been submitted.
e) You can revert to a previously saved version of any submittal element by clicking discard on a line
item in a submittal element.
f) Once you are ready to submit all portions of a submittal element, hit submit to transmit them to
your local regulator(s).
g) If you believe a submittal element is no longer relevant, (i.e., closed UST tank) select “Not
Applicable”
C. Hazardous Materials Inventory
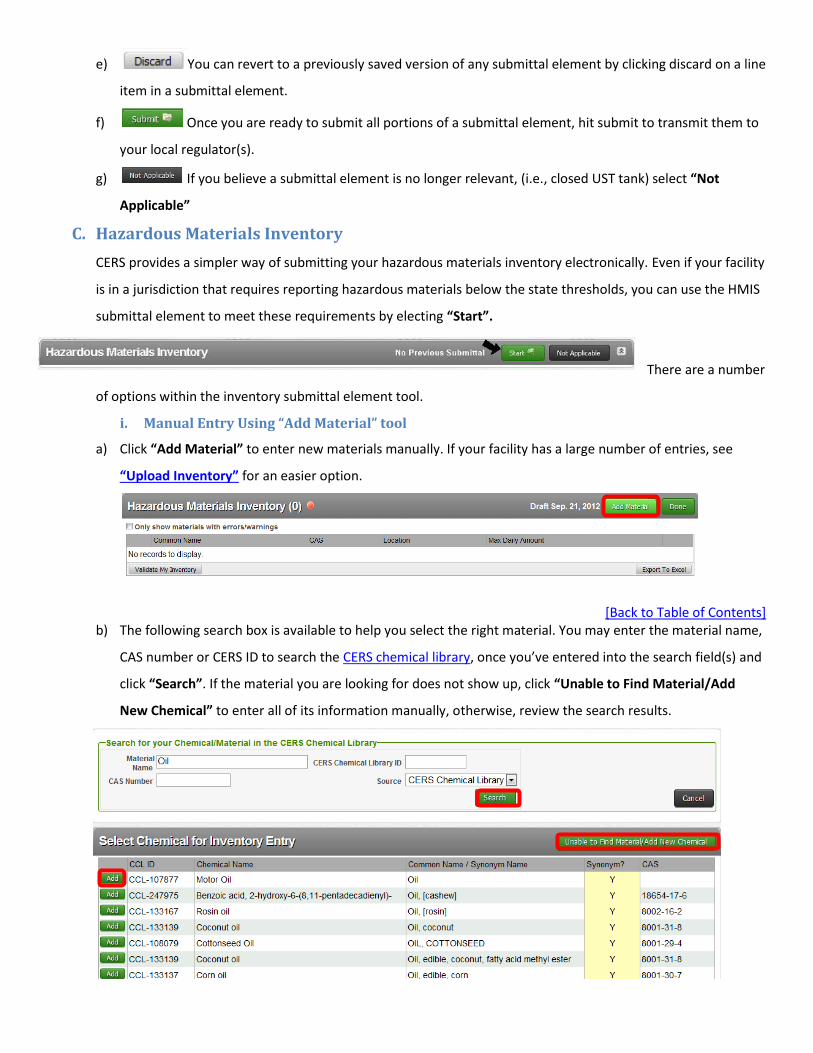
CERS provides a simpler way of submitting your hazardous materials inventory electronically. Even if your facility
is in a jurisdiction that requires reporting hazardous materials below the state thresholds, you can use the HMIS
submittal element to meet these requirements by electing “Start”.
There are a number
of options within the inventory submittal element tool.
i. Manual Entry Using “Add Material” tool
a) Click “Add Material” to enter new materials manually. If your facility has a large number of entries, see
“Upload Inventory” for an easier option.
[Back to Table of Contents]
b) The following search box is available to help you select the right material. You may enter the material name,
CAS number or CERS ID to search the CERS chemical library, once you’ve entered into the search field(s) and
click “Search”. If the material you are looking for does not show up, click “Unable to Find Material/Add
New Chemical” to enter all of its information manually, otherwise, review the search results.
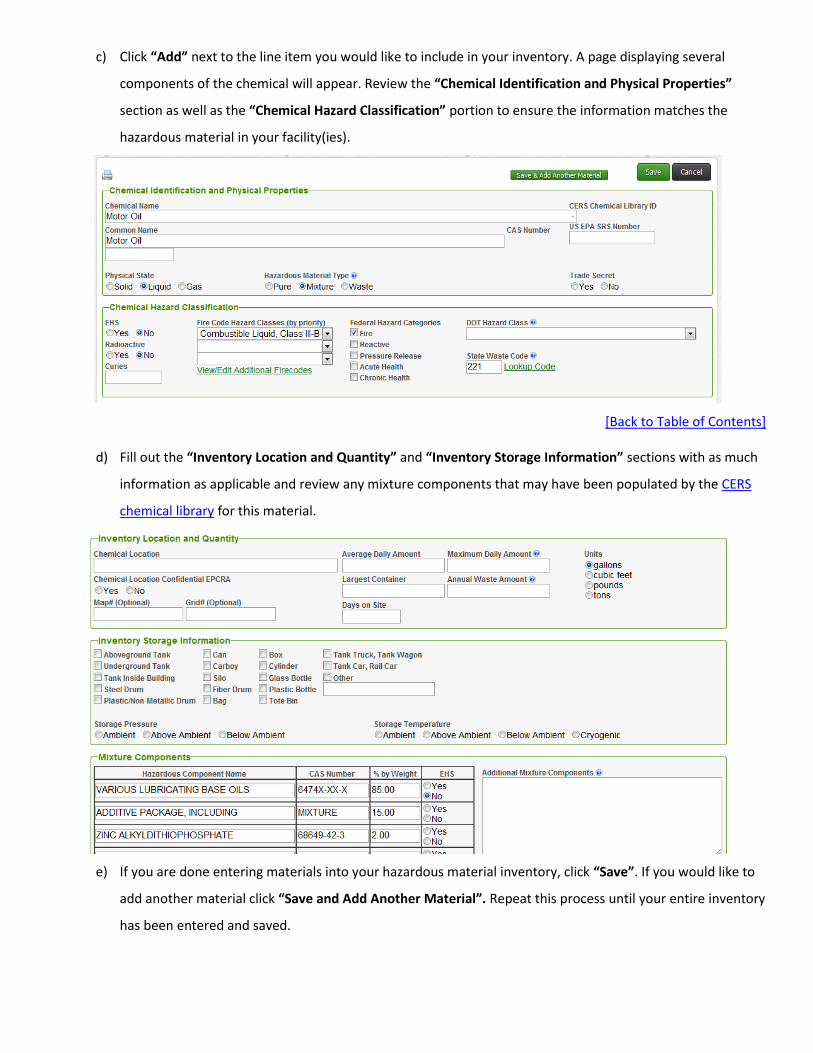
c) Click “Add” next to the line item you would like to include in your inventory. A page displaying several
components of the chemical will appear. Review the “Chemical Identification and Physical Properties”
section as well as the “Chemical Hazard Classification” portion to ensure the information matches the
hazardous material in your facility(ies).
[Back to Table of Contents]
d) Fill out the “Inventory Location and Quantity” and “Inventory Storage Information” sections with as much
information as applicable and review any mixture components that may have been populated by the CERS
chemical library for this material.
e) If you are done entering materials into your hazardous material inventory, click “Save”. If you would like to
add another material click “Save and Add Another Material”. Repeat this process until your entire inventory
has been entered and saved.
ii. Uploading Hazardous Materials Inventory
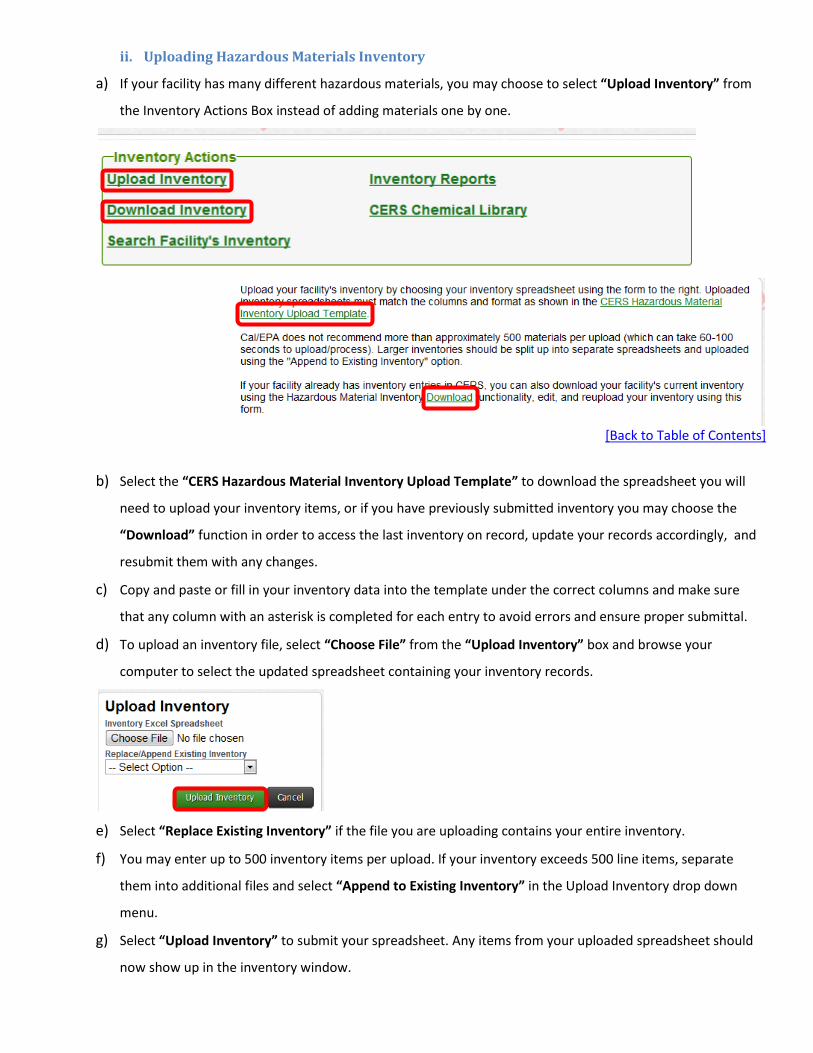
a) If your facility has many different hazardous materials, you may choose to select “Upload Inventory” from
the Inventory Actions Box instead of adding materials one by one.
[Back to Table of Contents]
b) Select the “CERS Hazardous Material Inventory Upload Template” to download the spreadsheet you will
need to upload your inventory items, or if you have previously submitted inventory you may choose the
“Download” function in order to access the last inventory on record, update your records accordingly, and
resubmit them with any changes.
c) Copy and paste or fill in your inventory data into the template under the correct columns and make sure
that any column with an asterisk is completed for each entry to avoid errors and ensure proper submittal.
d) To upload an inventory file, select “Choose File” from the “Upload Inventory” box and browse your
computer to select the updated spreadsheet containing your inventory records.
e) Select “Replace Existing Inventory” if the file you are uploading contains your entire inventory.
f) You may enter up to 500 inventory items per upload. If your inventory exceeds 500 line items, separate
them into additional files and select “Append to Existing Inventory” in the Upload Inventory drop down
menu.
g) Select “Upload Inventory” to submit your spreadsheet. Any items from your uploaded spreadsheet should
now show up in the inventory window.
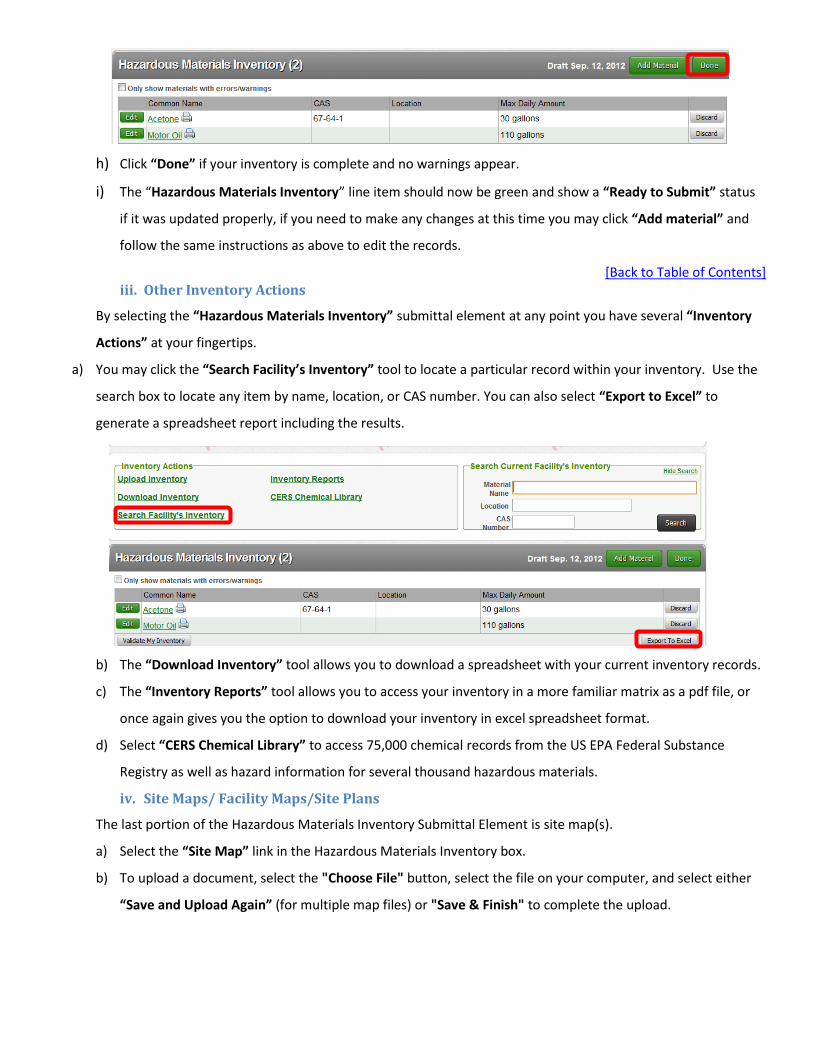
h) Click “Done” if your inventory is complete and no warnings appear.
i) The “Hazardous Materials Inventory” line item should now be green and show a “Ready to Submit” status
if it was updated properly, if you need to make any changes at this time you may click “Add material” and
follow the same instructions as above to edit the records.
[Back to Table of Contents] iii. Other Inventory Actions
By selecting the “Hazardous Materials Inventory” submittal element at any point you have several “Inventory
Actions” at your fingertips.
a) You may click the “Search Facility’s Inventory” tool to locate a particular record within your inventory. Use the
search box to locate any item by name, location, or CAS number. You can also select “Export to Excel” to
generate a spreadsheet report including the results.
b) The “Download Inventory” tool allows you to download a spreadsheet with your current inventory records.
c) The “Inventory Reports” tool allows you to access your inventory in a more familiar matrix as a pdf file, or
once again gives you the option to download your inventory in excel spreadsheet format.
d) Select “CERS Chemical Library” to access 75,000 chemical records from the US EPA Federal Substance
Registry as well as hazard information for several thousand hazardous materials.
iv. Site Maps/ Facility Maps/Site Plans
The last portion of the Hazardous Materials Inventory Submittal Element is site map(s).
a) Select the “Site Map” link in the Hazardous Materials Inventory box.
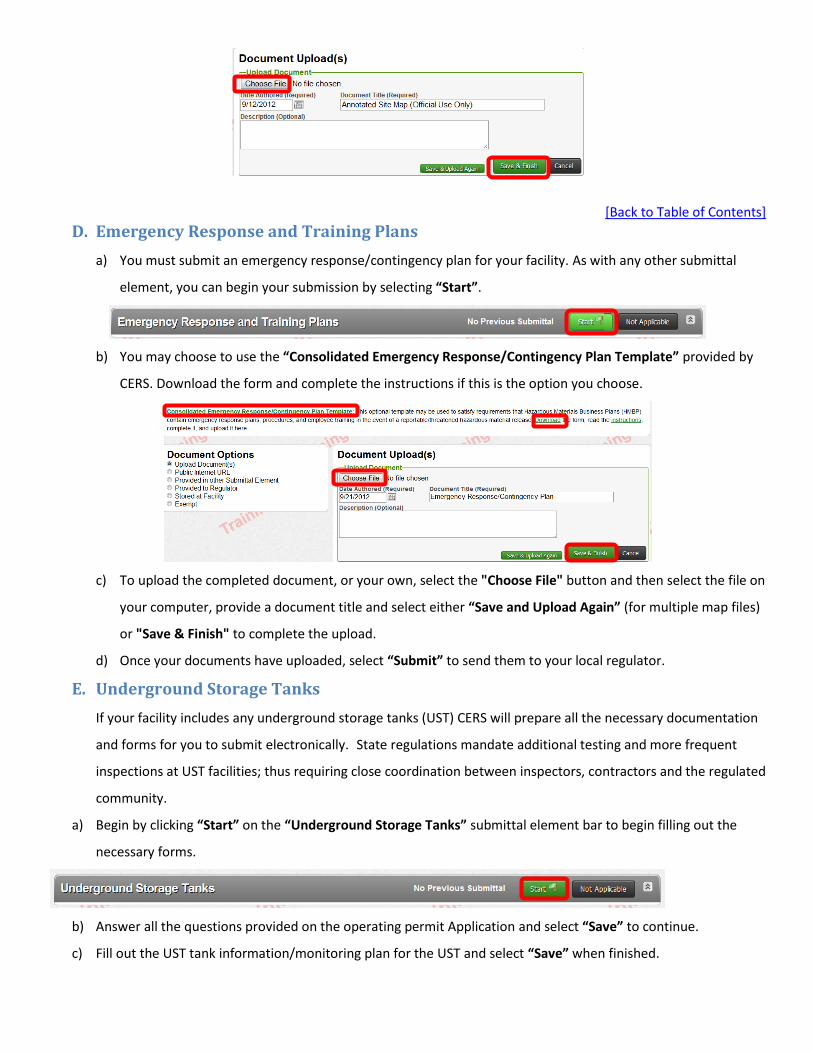
b) To upload a document, select the "Choose File" button, select the file on your computer, and select either
“Save and Upload Again” (for multiple map files) or "Save & Finish" to complete the upload.
[Back to Table of Contents]
D. Emergency Response and Training Plans
a) You must submit an emergency response/contingency plan for your facility. As with any other submittal
element, you can begin your submission by selecting “Start”.
b) You may choose to use the “Consolidated Emergency Response/Contingency Plan Template” provided by
CERS. Download the form and complete the instructions if this is the option you choose.
c) To upload the completed document, or your own, select the "Choose File" button and then select the file on
your computer, provide a document title and select either “Save and Upload Again” (for multiple map files)
or "Save & Finish" to complete the upload.
d) Once your documents have uploaded, select “Submit” to send them to your local regulator.
E. Underground Storage Tanks
If your facility includes any underground storage tanks (UST) CERS will prepare all the necessary documentation
and forms for you to submit electronically. State regulations mandate additional testing and more frequent
inspections at UST facilities; thus requiring close coordination between inspectors, contractors and the regulated
community.
a) Begin by clicking “Start” on the “Underground Storage Tanks” submittal element bar to begin filling out the
necessary forms.
b) Answer all the questions provided on the operating permit Application and select “Save” to continue.
c) Fill out the UST tank information/monitoring plan for the UST and select “Save” when finished.
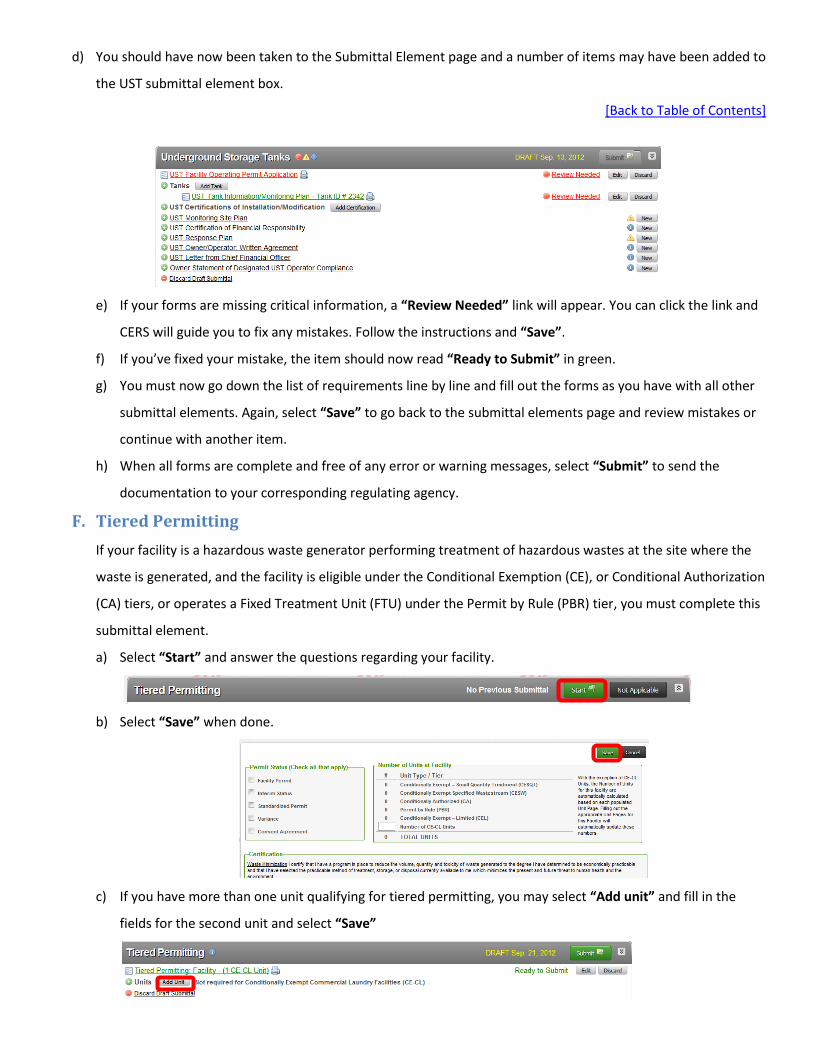
d) You should have now been taken to the Submittal Element page and a number of items may have been added to
the UST submittal element box.
[Back to Table of Contents]
e) If your forms are missing critical information, a “Review Needed” link will appear. You can click the link and
CERS will guide you to fix any mistakes. Follow the instructions and “Save”.
f) If you’ve fixed your mistake, the item should now read “Ready to Submit” in green.
g) You must now go down the list of requirements line by line and fill out the forms as you have with all other
submittal elements. Again, select “Save” to go back to the submittal elements page and review mistakes or
continue with another item.
h) When all forms are complete and free of any error or warning messages, select “Submit” to send the
documentation to your corresponding regulating agency.
F. Tiered Permitting
If your facility is a hazardous waste generator performing treatment of hazardous wastes at the site where the
waste is generated, and the facility is eligible under the Conditional Exemption (CE), or Conditional Authorization
(CA) tiers, or operates a Fixed Treatment Unit (FTU) under the Permit by Rule (PBR) tier, you must complete this
submittal element.
a) Select “Start” and answer the questions regarding your facility.
b) Select “Save” when done.
c) If you have more than one unit qualifying for tiered permitting, you may select “Add unit” and fill in the
fields for the second unit and select “Save”
[Back to Table of Contents]
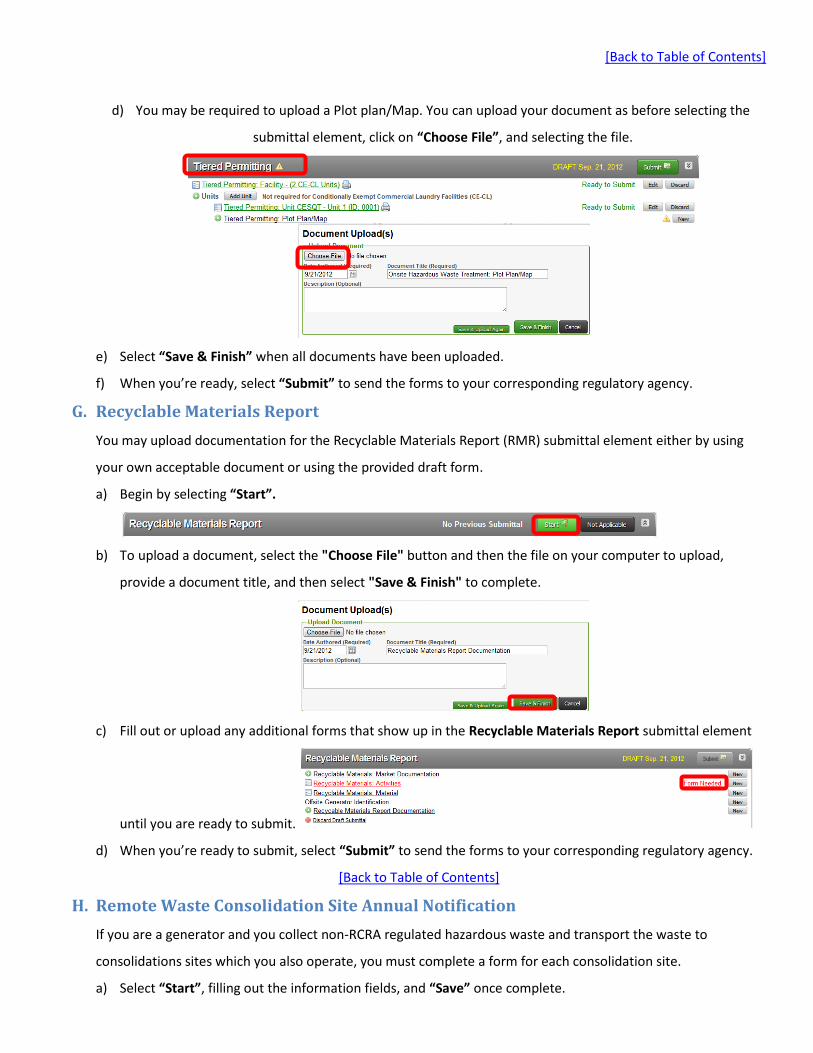
d) You may be required to upload a Plot plan/Map. You can upload your document as before selecting the
submittal element, click on “Choose File”, and selecting the file.
e) Select “Save & Finish” when all documents have been uploaded.
f) When you’re ready, select “Submit” to send the forms to your corresponding regulatory agency.
G. Recyclable Materials Report
You may upload documentation for the Recyclable Materials Report (RMR) submittal element either by using
your own acceptable document or using the provided draft form.
a) Begin by selecting “Start”.
b) To upload a document, select the "Choose File" button and then the file on your computer to upload,
provide a document title, and then select "Save & Finish" to complete.
c) Fill out or upload any additional forms that show up in the Recyclable Materials Report submittal element
until you are ready to submit.
d) When you’re ready to submit, select “Submit” to send the forms to your corresponding regulatory agency.
[Back to Table of Contents]
H. Remote Waste Consolidation Site Annual Notification
If you are a generator and you collect non-RCRA regulated hazardous waste and transport the waste to
consolidations sites which you also operate, you must complete a form for each consolidation site.
a) Select “Start”, filling out the information fields, and “Save” once complete.
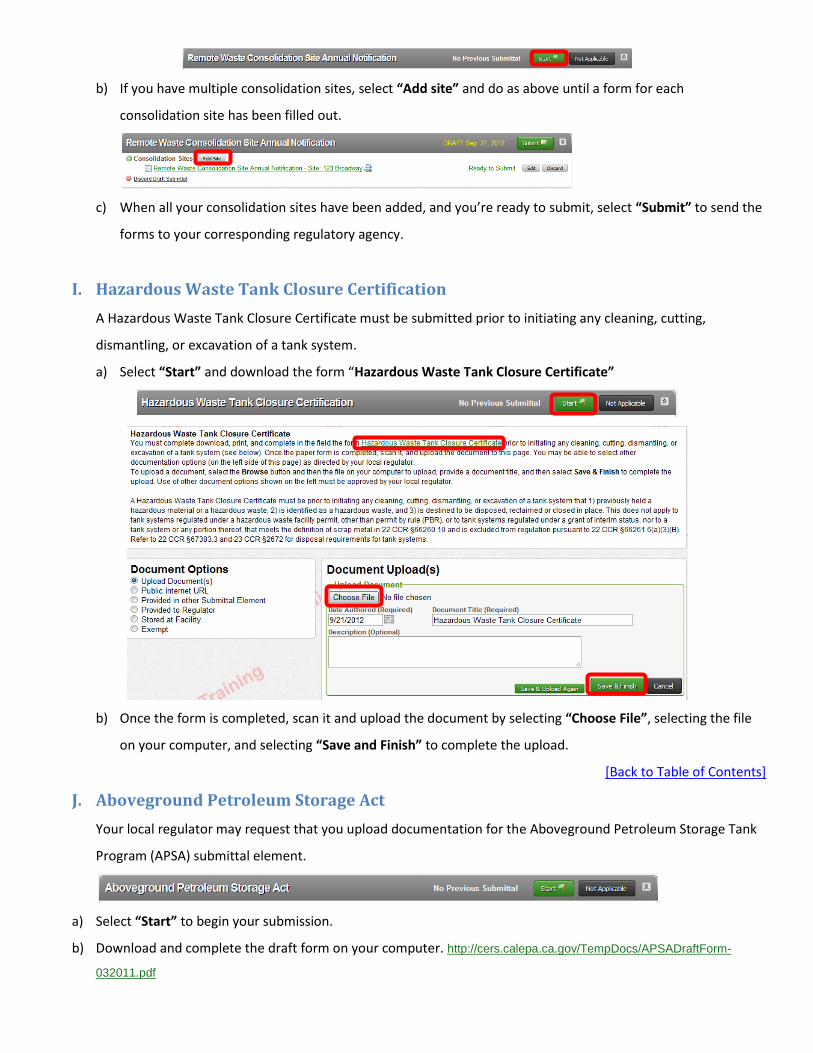
b) If you have multiple consolidation sites, select “Add site” and do as above until a form for each
consolidation site has been filled out.
c) When all your consolidation sites have been added, and you’re ready to submit, select “Submit” to send the
forms to your corresponding regulatory agency.
I. Hazardous Waste Tank Closure Certification
A Hazardous Waste Tank Closure Certificate must be submitted prior to initiating any cleaning, cutting,
dismantling, or excavation of a tank system.
a) Select “Start” and download the form “Hazardous Waste Tank Closure Certificate”
b) Once the form is completed, scan it and upload the document by selecting “Choose File”, selecting the file
on your computer, and selecting “Save and Finish” to complete the upload.
[Back to Table of Contents]
J. Aboveground Petroleum Storage Act
Your local regulator may request that you upload documentation for the Aboveground Petroleum Storage Tank
Program (APSA) submittal element.
a) Select “Start” to begin your submission.
b) Download and complete the draft form on your computer. http://cers.calepa.ca.gov/TempDocs/APSADraftForm-
032011.pdf
c) Upload the document by selecting “Choose File”, selecting the form on your computer, and selecting “Save and
Finish” to complete the upload.
IV. Navigating CERS and Managing Your Business Home Page
A. Common Tasks
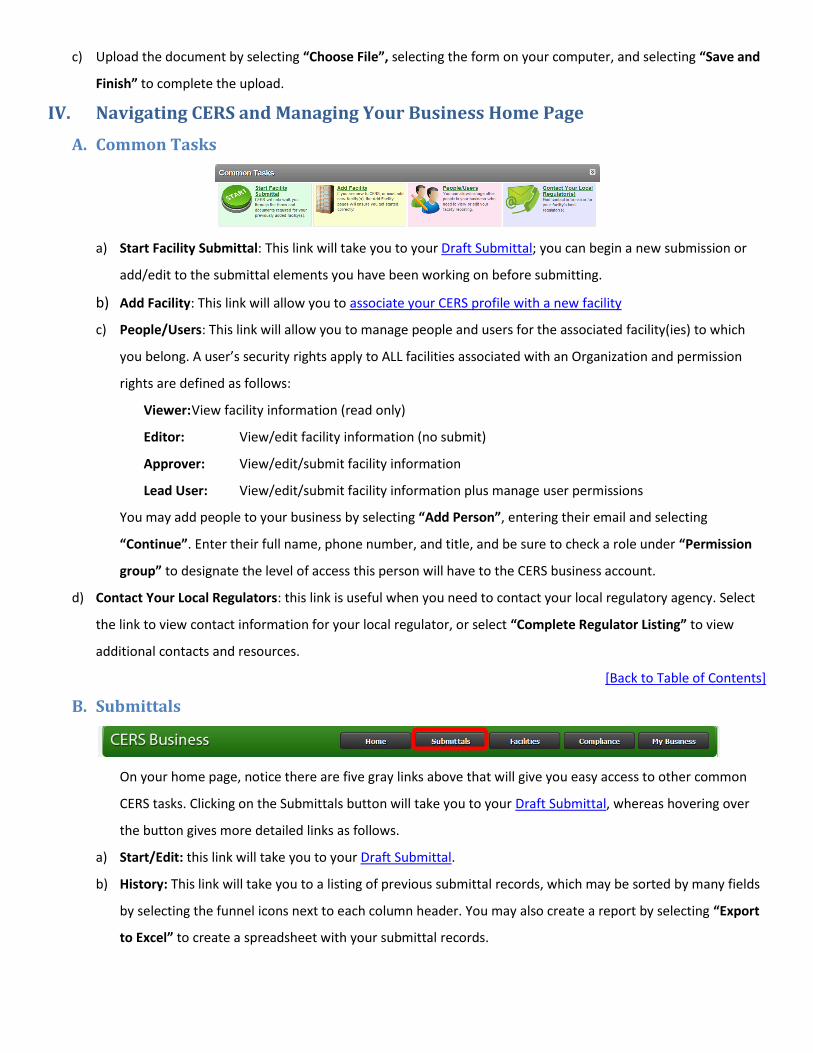
a) Start Facility Submittal: This link will take you to your Draft Submittal; you can begin a new submission or
add/edit to the submittal elements you have been working on before submitting.
b) Add Facility: This link will allow you to associate your CERS profile with a new facility
c) People/Users: This link will allow you to manage people and users for the associated facility(ies) to which
you belong. A user’s security rights apply to ALL facilities associated with an Organization and permission
rights are defined as follows:
Viewer: View facility information (read only)
Editor: View/edit facility information (no submit)
Approver: View/edit/submit facility information
Lead User: View/edit/submit facility information plus manage user permissions
You may add people to your business by selecting “Add Person”, entering their email and selecting
“Continue”. Enter their full name, phone number, and title, and be sure to check a role under “Permission
group” to designate the level of access this person will have to the CERS business account.
d) Contact Your Local Regulators: this link is useful when you need to contact your local regulatory agency. Select
the link to view contact information for your local regulator, or select “Complete Regulator Listing” to view
additional contacts and resources.
[Back to Table of Contents]
B. Submittals
On your home page, notice there are five gray links above that will give you easy access to other common
CERS tasks. Clicking on the Submittals button will take you to your Draft Submittal, whereas hovering over
the button gives more detailed links as follows.
a) Start/Edit: this link will take you to your Draft Submittal.
b) History: This link will take you to a listing of previous submittal records, which may be sorted by many fields
by selecting the funnel icons next to each column header. You may also create a report by selecting “Export
to Excel” to create a spreadsheet with your submittal records.
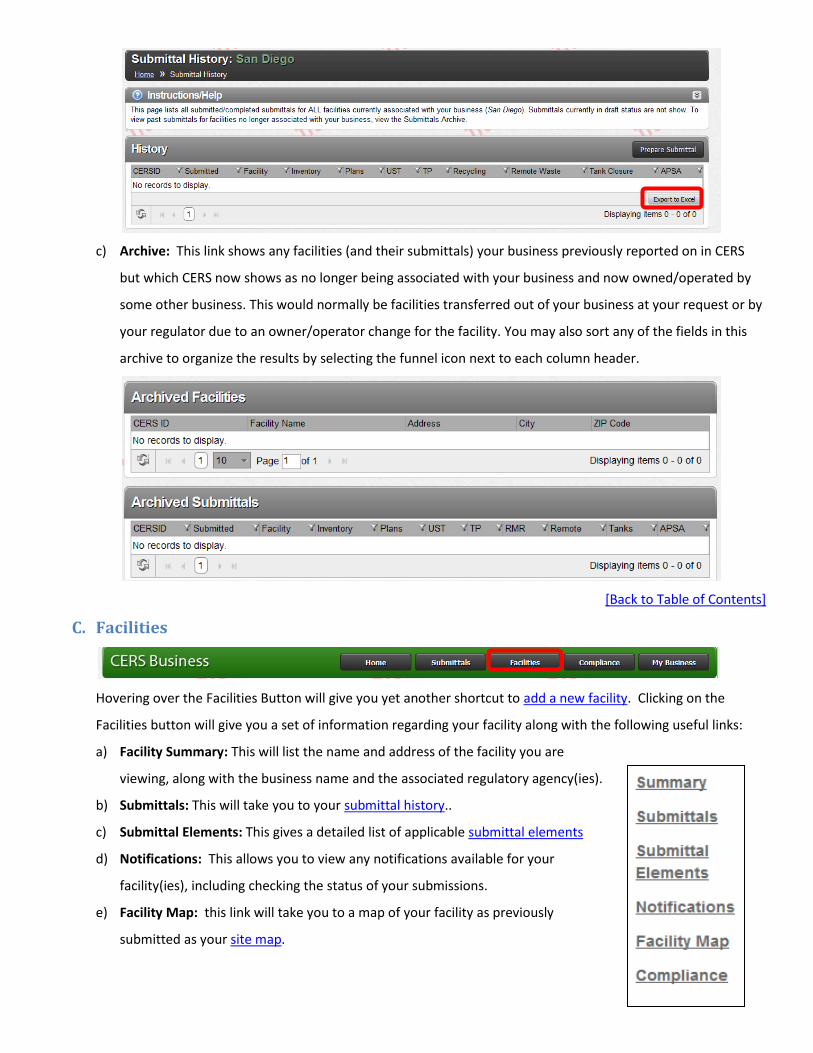
c) Archive: This link shows any facilities (and their submittals) your business previously reported on in CERS
but which CERS now shows as no longer being associated with your business and now owned/operated by
some other business. This would normally be facilities transferred out of your business at your request or by
your regulator due to an owner/operator change for the facility. You may also sort any of the fields in this
archive to organize the results by selecting the funnel icon next to each column header.
[Back to Table of Contents]
C. Facilities
Hovering over the Facilities Button will give you yet another shortcut to add a new facility. Clicking on the
Facilities button will give you a set of information regarding your facility along with the following useful links:
a) Facility Summary: This will list the name and address of the facility you are
viewing, along with the business name and the associated regulatory agency(ies).
b) Submittals: This will take you to your submittal history..
c) Submittal Elements: This gives a detailed list of applicable submittal elements
d) Notifications: This allows you to view any notifications available for your
facility(ies), including checking the status of your submissions.
e) Facility Map: this link will take you to a map of your facility as previously
submitted as your site map.
f) Compliance: This link will allow you to see and filter inspection and enforcement records associated with
your facility.
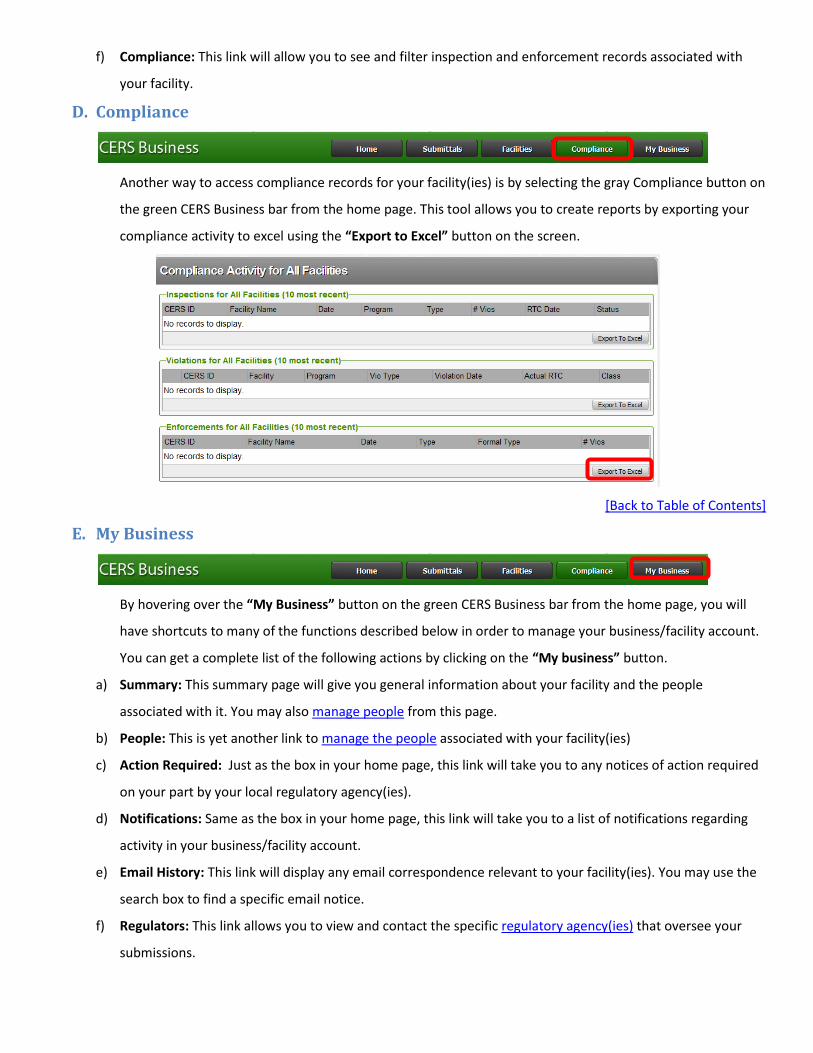
D. Compliance
Another way to access compliance records for your facility(ies) is by selecting the gray Compliance button on
the green CERS Business bar from the home page. This tool allows you to create reports by exporting your
compliance activity to excel using the “Export to Excel” button on the screen.
[Back to Table of Contents]
E. My Business
By hovering over the “My Business” button on the green CERS Business bar from the home page, you will
have shortcuts to many of the functions described below in order to manage your business/facility account.
You can get a complete list of the following actions by clicking on the “My business” button.
a) Summary: This summary page will give you general information about your facility and the people
associated with it. You may also manage people from this page.
b) People: This is yet another link to manage the people associated with your facility(ies)
c) Action Required: Just as the box in your home page, this link will take you to any notices of action required
on your part by your local regulatory agency(ies).
d) Notifications: Same as the box in your home page, this link will take you to a list of notifications regarding
activity in your business/facility account.
e) Email History: This link will display any email correspondence relevant to your facility(ies). You may use the
search box to find a specific email notice.
f) Regulators: This link allows you to view and contact the specific regulatory agency(ies) that oversee your
submissions.
g) Manage Facilities: this link allows you to transfer, merge, or delete facilities, as well as view any archived
facilities for which no longer have an association with.
h) Archive: This page shows any facilities (and their submittals) your business previously reported on in CERS
but which CERS now shows as no longer being associated with your business and now owned/operated by
some other business. This would normally be facilities transferred out of your business at your request or by
your regulator due to an owner/operator change for the facility.
F. Additional Help
If you have technical issues with the application, you can make a technical support request.
If you have questions regarding your submittal elements contact your local regulator.
For additional training documents visit http://cers.calepa.ca.gov/business/training
[Back to Table of Contents]