Embed Size (px)
Citation preview
Communicate: SymWriter
Please write your registration number here. You may need it in the future.
When you register your product, please enter your email address to be informed of FREE program updates, help sheets and downloadable resources. You can also get this information at www.widgit.com/symwritersupport
With Getting Started Guides
Communicate: SymWriter © Widgit Software 2007-8 Published by Widgit Software
Widgit Literacy Symbols © Widgit Software 2004-2008
A statement about the copyright conditions for using the Widgit Literacy Symbols (WLS) is included in Appendix 2 Copyright p89 of this manual.
These conditions also apply to the use ofPicture Communication Symbols (PCS) © Mayer-Johnson LLC in the UK.
Widgit Software is a brand of Logotron Ltd
Part number: SYMWRI2
Documentation version 1.10
Widgit SoftwareDenny Lodge Business ParkChitteringCambridgeshireCB25 9PHUKTel: +44 (0) 1223 815210Fax: +44 (0) 1223 864962
Communicate: SymWriter User Guide
3
ContentsIntroduction 8 What is SymWriter 8 Using this guide 8 Typical writing screen 9 Environment designer screen 10
A. Writing into the document 12
A1. Starting the program 12
A2. Symbolising what you write 13 A2.1 Using the smart symboliser 13 A2.2 Changing the symbol from the symbol chooser 13 A2.3 Changing the words for a symbol 14 A2.4 Changing the image on a word 15 A2.5 Changing the colours in a symbol 16 A2.6 Skin tones 17 A2.7 Switching between colour and monochrome 17 A2.8 Changing properties of the whole document 18 A2.9 Qualifi ers 19 A2.10 Symbol sets 21 A2.11 Languages 21
A3. Text and symbol formatting 22 A3.1 Changing font 22 A3.2 Changing the font and symbol size together 22 A3.3 Changing the symbol size 23 A3.4 Changing the graphic size 23 A3.5 Paragraph alignment, word and line spacing 24 A3.6 Tabs 25 A3.7 Bullets 25 A3.8 Indents 25 A3.9 Aligning 26 A3.10 Text position 26 A3.11 Text colour 27 A3.12 Line colour of symbols 28
A4. Writing in text 29 A4.1 Writing in text 29 A4.2 Seeing the meaning – the symbol chooser 29 A4.3 Mixing symbol and text writing 30 A4.4 Marking verbs and nouns 30
A5. Putting in pictures 31 A5.1 Adding pictures – the graphics browser 31 A5.2 Aligning 33 A5.3 Finding symbols 34 A5.4 Storing your own pictures 34
Communicate: SymWriter User Guide
4
A6. Screen layouts 35 A6.1 Page presentation 35 A6.2 Zooming 35 A6.3 Page navigation 36 A6.4 Page set-up, margins and paper colour 36
A7. Saving and opening documents 37 A7.1 Auto-saving 37
A8. Printing 38
A9. Speech 39 A9.1 Speech on demand 39 A9.2 Auto speech 39 A9.3 Voice selection 40 A9.4 Setting Sapi4 voices 40
A10. Spelling 41 A10.1 Marking errors 41 A10.2 Using the simple checker 41 A10.3 Using the full checker 42 A10.4 Deleting extra ‘correct’ words 43 A10.5 Adding extra spelling suggestions 43
A11. More advanced features 44 A11.1 Wordlists 45 A11.2 Choosing how to symbolise 46 A11.3 Loading a wordlist 46 A11.4 Setting default wordlists 46 A11.5 Creating an empty topic wordlist 47 A11.6 Saving symbol changes 47 A11.7 Transferring wordlists and graphics 48
Communicate: SymWriter User Guide
5
B. Writing with grids 49
B1. Examples of what you can do 50 B1.1 Example fi les 50
B2. Getting Started Guides for Making Environments B2.1 Making a single grid for writing 52 B2.2 Sequence of grids for structured writing 57 B2.3 Complex sequence of grids for structured writing 61 B2.4 Grids for writing with text 66
B3. Switch scanning 72 B3.1 Setting up switch scanning 72 B3.2 Types of switching 73 B3.3 Auditory Scan 74 B3.4 Setting what happens after selection (regular grids) 75 B3.5 Setting the scan order 76
C. Symbols 77
C1. Issues of symbolisations 77
C2. Five golden rules 78
C3. The Widgit Literacy Symbols 80
D. Glossary 85
Appendix 1 Location of Files 87
Appendix 2 Copyright 89
Communicate: SymWriter User Guide
6
Reference sheets (found under Help menu)
R1. Making a grid R1.1 Starting in Design-mode 1 R1.2 Choosing the layout of a grid 2 R1.3 Highlighting cells 3 R1.4 Moving and resizing 3 R1.5 Moving cell boundaries 4 R1.6 Merging cells 4 R1.7 Breaking up cells 4 R1.8 Putting in content 5 R1.9 Tidy cells function 5 R1.10 Expand to fi t 6 R1.11 Rows and columns 6 R1.12 Simple cell actions 7 R1.13 Testing a grid 8 R1.14 Grid appearance 9 R1.15 Altering the appearance of a stage 10
R2. Environments R2.1 Documents and Environments 1 R2.2 Saving and Opening environments 2 R2.3 Templates 2 R2.4 Editing an environment from write-mode 2
R3. Linked grids R3.1 Auto linked grids 1 R3.2 Making a sequence of linked grids 3 R3.3 Using two separate grids 7 R3.4 Storing information about a grid 11 R3.5 Miscellaneous 11
R4. Using actions R4.1 Basic actions 1 R4.2 Range of actions 2 R4.3 Example showing how to send picture 4 R4.4 Changing actions in multiple cells 5 R4.5 Sound feedback in cells 5
R5. Tray and buttons R5.1 What is a tray - overview 1 R5.2 Making a single tray 1 R5.3 Altering the appearance of a tray 5 R5.4 Linking trays 6 R5.5 Using buttons direct on a stage 6 R5.6 Using multiple stages 7
Communicate: SymWriter User Guide
7
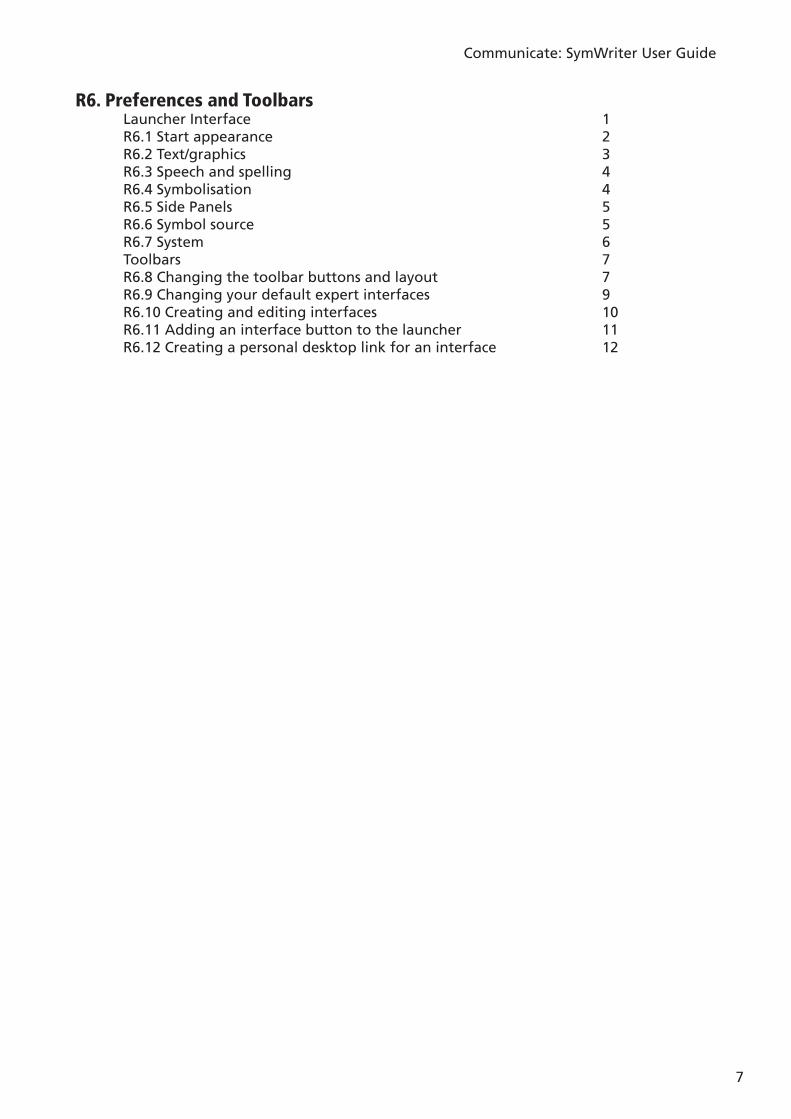
R6. Preferences and Toolbars Launcher Interface 1 R6.1 Start appearance 2 R6.2 Text/graphics 3 R6.3 Speech and spelling 4 R6.4 Symbolisation 4 R6.5 Side Panels 5 R6.6 Symbol source 5 R6.7 System 6 Toolbars 7 R6.8 Changing the toolbar buttons and layout 7 R6.9 Changing your default expert interfaces 9 R6.10 Creating and editing interfaces 10 R6.11 Adding an interface button to the launcher 11 R6.12 Creating a personal desktop link for an interface 12
Communicate: SymWriter User Guide
8
Introduction
What is SymWriter?
SymWriter is a tool designed to help students and older people who have diffi culty writing text. This includes students in primary school who are struggling with literacy, pupils in special schools and adults with a learning disability, including acquired problems. It is the modern successor to Widgit’s ‘Writing with Symbols’.
SymWriter can also help teachers and carers produce symbol supported literature for display and other purposes. Widgit also have more sophisticated software for those who require more elaborate layouts – see www.widgit.com/inprint
Users with a measure of text ability may choose to write using the keyboard. Automatic symbolisation gives immediate feedback on the meaning of the word whether symbols are chosen to be visible in the main writing document or not. There is speech support and a spell checker with symbol support.
The symbolisation uses Widgit’s new ‘smart symbolising technology’. This is designed to increase the accuracy of symbolisation, analysing the grammar of the sentence and so choosing the symbol that illustrates the correct part of speech.
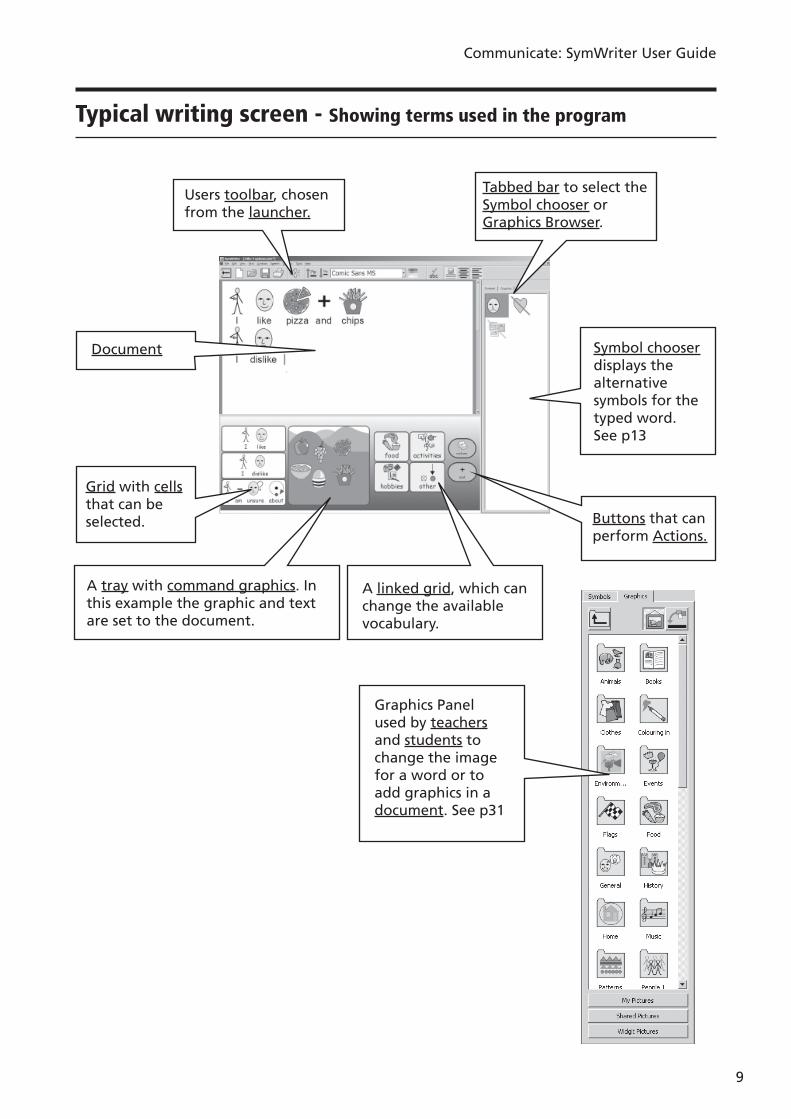
Those for whom text is more diffi cult may write by selecting cells which display symbols. Selecting a cell can send the contents of the cell to the writing document. You can see a screen layout showing a typical writing screen on p9 .
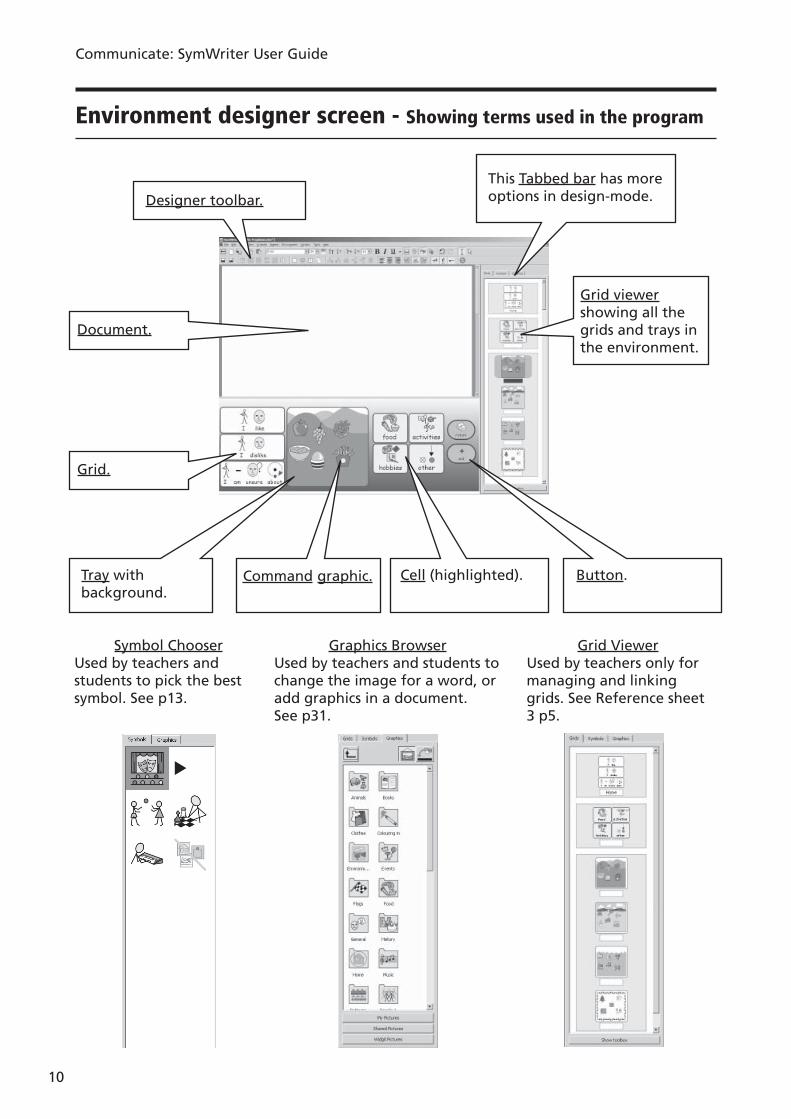
To create larger vocabularies, grids of cells can be linked to access more words and phrases. Cells can also be selected by switch users with a range of scanning options. Sets of grids and buttons used for writing are called Environments which can be created by the teacher. A screen showing a typical layout in the Designer is shown on p10 .
Using this guide
This guide is divided into two main sections. The fi rst describes the features of the writing document, and the use of the symboliser. The second shows how students can write from grids and the way that the grids can be created.
Each sub section has a main topic with short, easy to follow instructions for the relevant features. Those who are familiar with Writing with Symbols or Communicate: In Print will fi nd many similarities. In this guide the word teacher will be used to mean a teacher, carer or parent who is using the program to create and edit activities. Student will be used to mean the person who uses the grids or the writing tools. Terms which are underlined have specifi c meanings in SymWriter. They are explained in the text, but also are described in section D. Glossary p85 .
Communicate: SymWriter User Guide
9
Users toolbar, chosen from the launcher.
Tabbed bar to select the Symbol chooser or Graphics Browser.
Symbol chooser displays the alternative symbols for the typed word. See p13
Document
Grid with cells that can be selected.
A tray with command graphics. In this example the graphic and text are set to the document.
A linked grid, which can change the available vocabulary.
Buttons that can perform Actions.
Graphics Panel used by teachers and students to change the image for a word or to add graphics in a document. See p31
Typical writing screen - Showing terms used in the program
Communicate: SymWriter User Guide
10
Designer toolbar.
This Tabbed bar has more options in design-mode.
Grid viewer showing all the grids and trays in the environment.
Document.
Grid.
Cell (highlighted). Button.Tray with background.
Command graphic.
Symbol ChooserUsed by teachers and students to pick the best symbol. See p13 .
Graphics BrowserUsed by teachers and students to change the image for a word, or add graphics in a document.See p31 .
Grid ViewerUsed by teachers only for managing and linking grids. See Reference sheet 3 p5.
Environment designer screen - Showing terms used in the program
Communicate: SymWriter User Guide
11
Important Note
A copy of this documentation in pdf format is available by selecting the Help menu and choosing View on-line help (or press F1). It is also possible to produce the documentation by selecting the Pdf manual button from the launcher, p12 .
This means that you can have access to the manual at any time and you can print more copies of the documentation for your own use if you wish.
Communicate: SymWriter User Guide
12
A. Writing into the document
A1. Starting the program
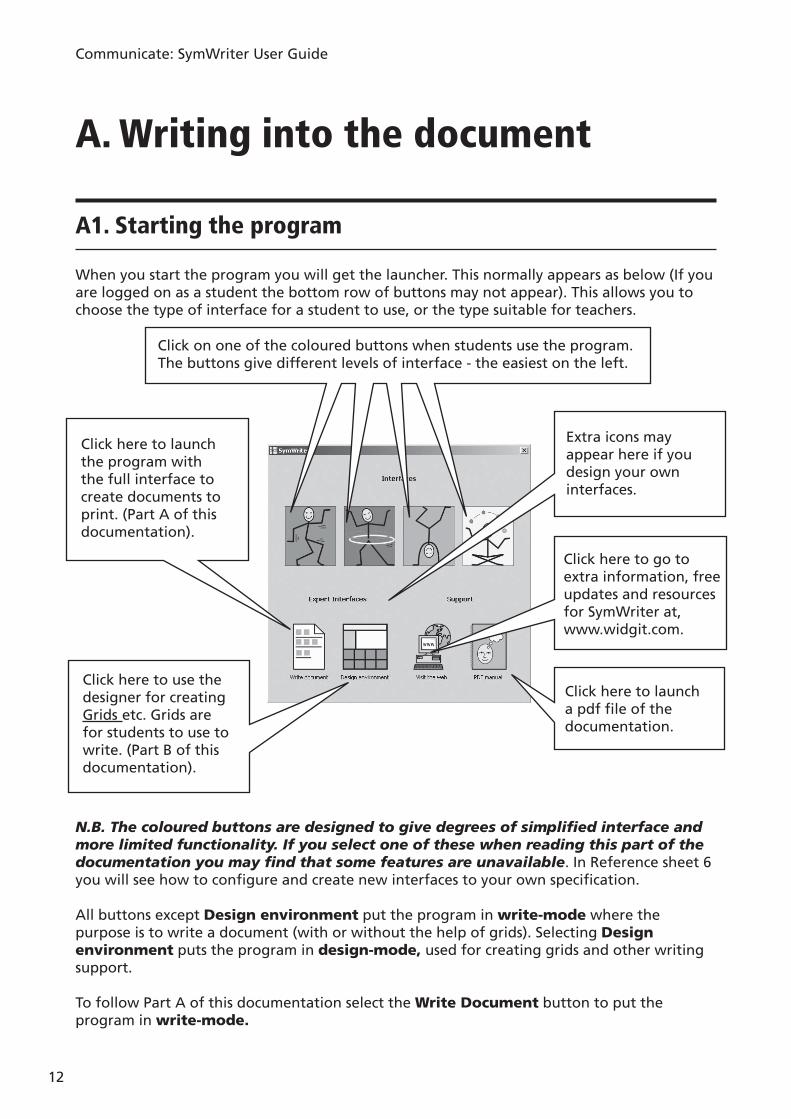
When you start the program you will get the launcher. This normally appears as below (If you are logged on as a student the bottom row of buttons may not appear). This allows you to choose the type of interface for a student to use, or the type suitable for teachers.
Click on one of the coloured buttons when students use the program. The buttons give different levels of interface - the easiest on the left.
Click here to launch the program with the full interface to create documents to print. (Part A of this documentation).
Extra icons may appear here if you design your own interfaces.
Click here to go to extra information, free updates and resources for SymWriter at, www.widgit.com.
Click here to launch a pdf fi le of the documentation.
Click here to use the designer for creating Grids etc. Grids are for students to use to write. (Part B of this documentation).
N.B. The coloured buttons are designed to give degrees of simplifi ed interface and more limited functionality. If you select one of these when reading this part of the documentation you may fi nd that some features are unavailable. In Reference sheet 6 you will see how to confi gure and create new interfaces to your own specifi cation.
All buttons except Design environment put the program in write-mode where the purpose is to write a document (with or without the help of grids). Selecting Design environment puts the program in design-mode, used for creating grids and other writing support.
To follow Part A of this documentation select the Write Document button to put the program in write-mode.
Communicate: SymWriter User Guide
13
A2. Symbolising what you write
A2.1 Using the smart symboliser
Start the program using the Write document button on the launcher. Type “Drink your drink” watching what happens. As soon as the symboliser has enough information to realise the fi rst word is a verb it changes the symbol.
Try typing other sentences.
A2.2 Changing the symbol from the symbol chooser
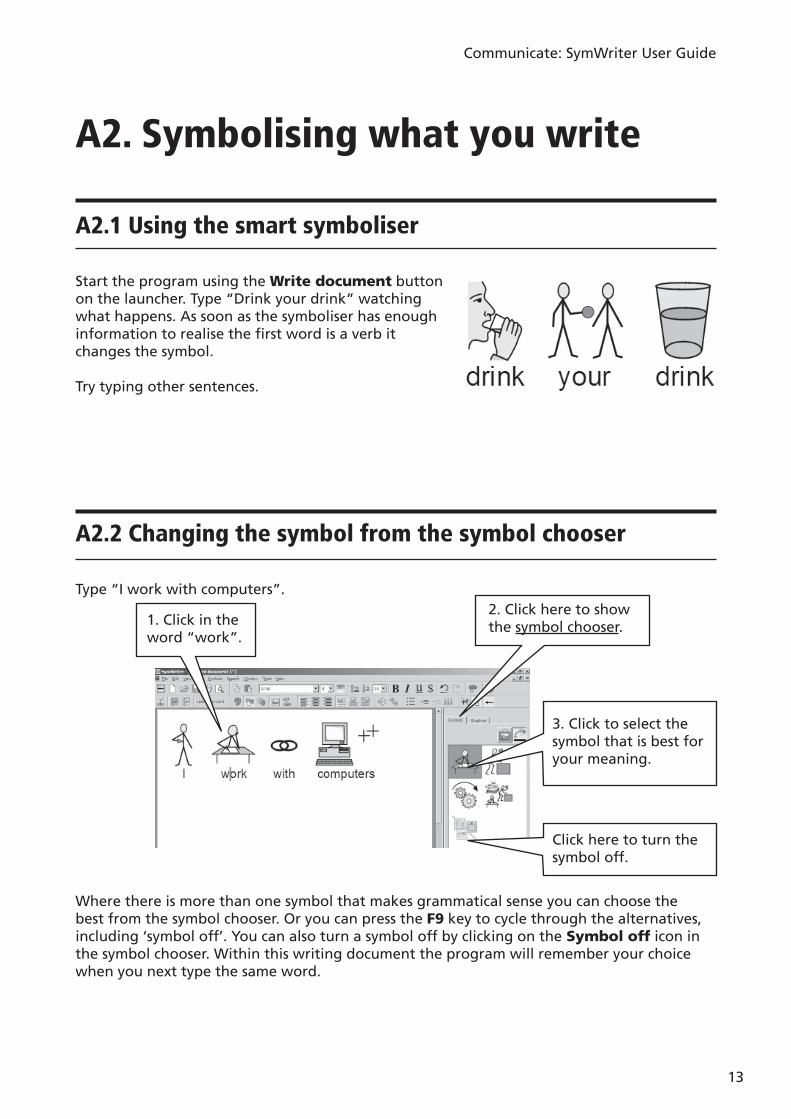
Type “I work with computers”.
1. Click in the word “work”.
2. Click here to show the symbol chooser.
3. Click to select the symbol that is best for your meaning.
Click here to turn the symbol off.
Where there is more than one symbol that makes grammatical sense you can choose the best from the symbol chooser. Or you can press the F9 key to cycle through the alternatives, including ‘symbol off’. You can also turn a symbol off by clicking on the Symbol off icon in the symbol chooser. Within this writing document the program will remember your choice when you next type the same word.
Communicate: SymWriter User Guide
14
A2.3 Changing the words for a symbol
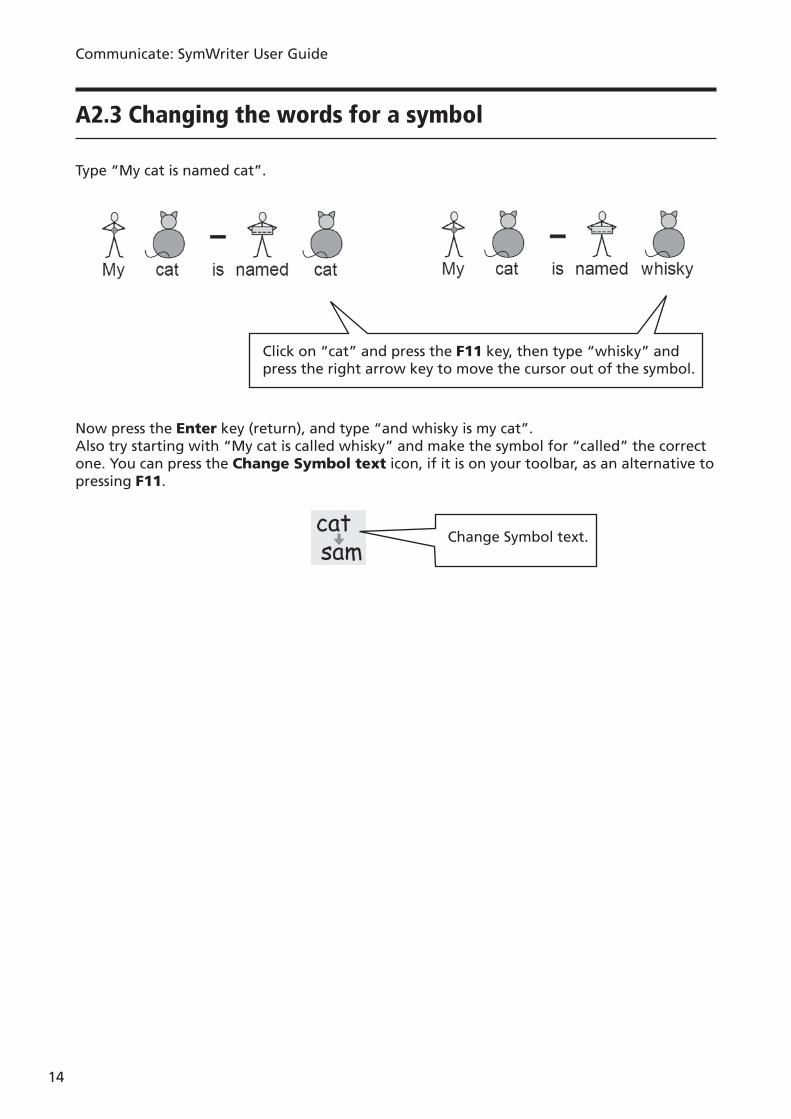
Type “My cat is named cat”.
Click on “cat” and press the F11 key, then type “whisky” and press the right arrow key to move the cursor out of the symbol.
Change Symbol text.
Now press the Enter key (return), and type “and whisky is my cat”.Also try starting with “My cat is called whisky” and make the symbol for “called” the correct one. You can press the Change Symbol text icon, if it is on your toolbar, as an alternative to pressing F11.
Communicate: SymWriter User Guide
15
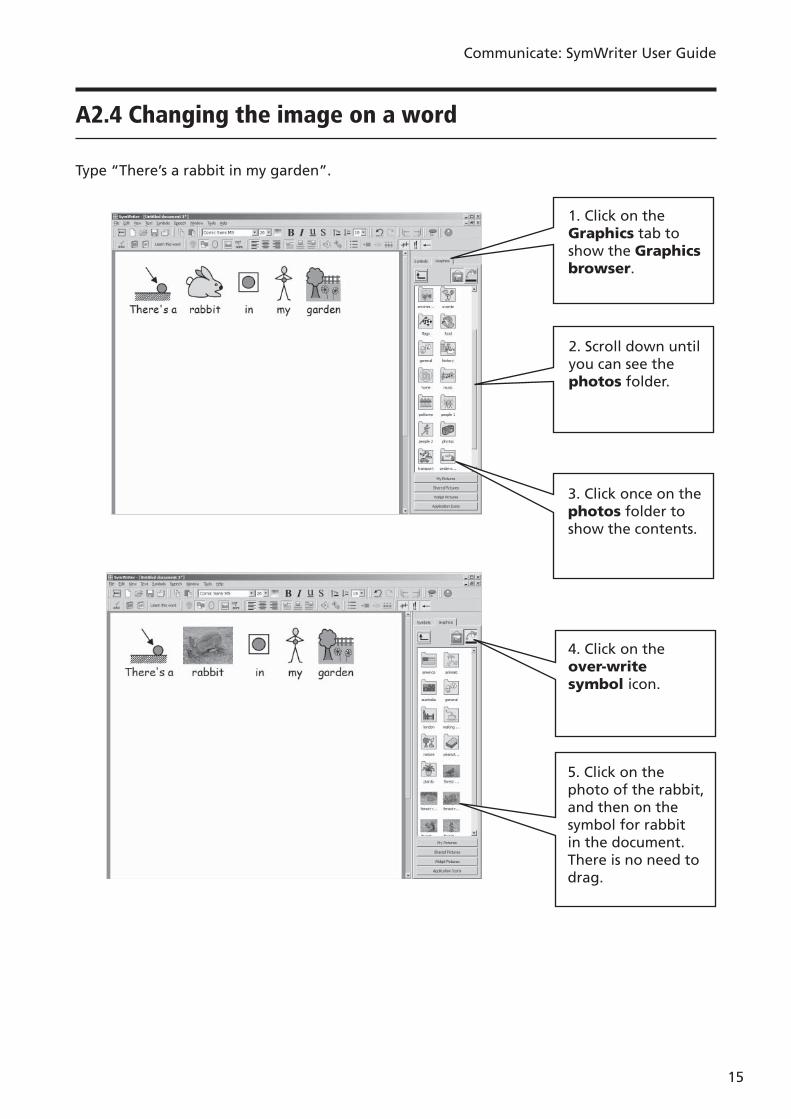
A2.4 Changing the image on a word
Type “There’s a rabbit in my garden”.
1. Click on the Graphics tab to show the Graphics browser.
2. Scroll down until you can see the photos folder.
3. Click once on the photos folder to show the contents.
4. Click on the over-write symbol icon.
5. Click on the photo of the rabbit, and then on the symbol for rabbit in the document. There is no need to drag.
Communicate: SymWriter User Guide
16
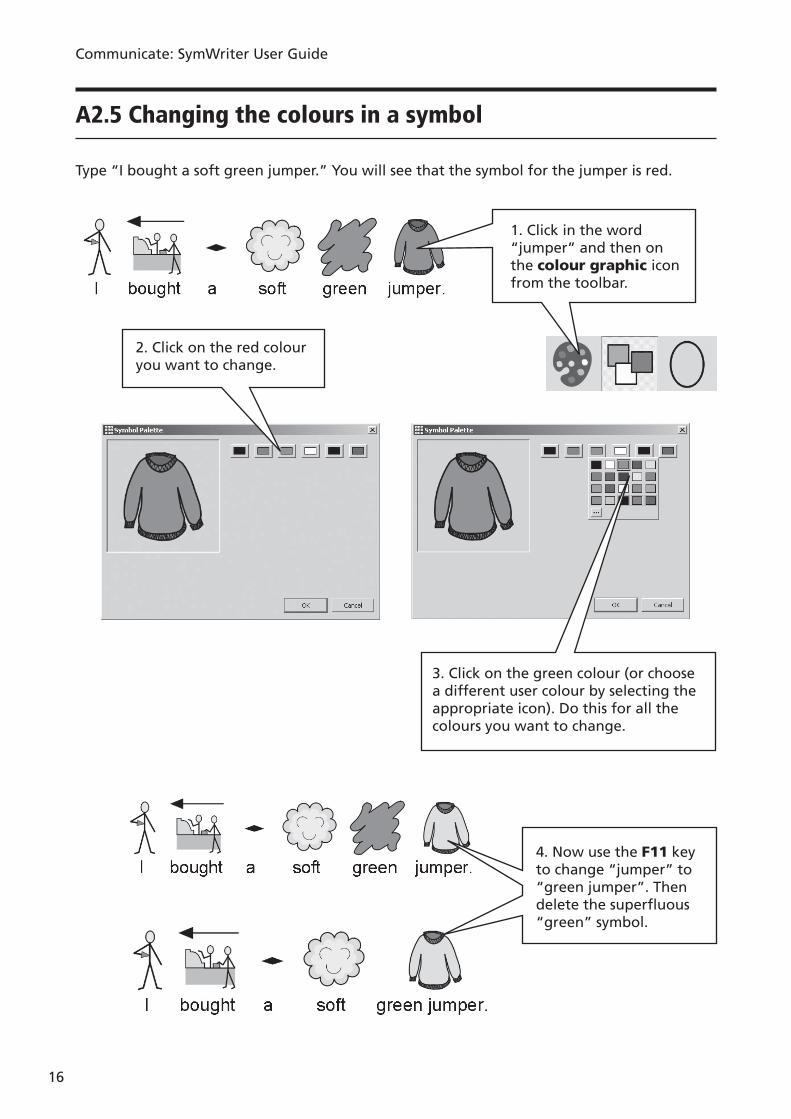
A2.5 Changing the colours in a symbol
Type “I bought a soft green jumper.” You will see that the symbol for the jumper is red.
1. Click in the word “jumper” and then on the colour graphic icon from the toolbar.
2. Click on the red colour you want to change.
3. Click on the green colour (or choose a different user colour by selecting the appropriate icon). Do this for all the colours you want to change.
4. Now use the F11 key to change “jumper” to “green jumper”. Then delete the superfl uous “green” symbol.
Communicate: SymWriter User Guide
17
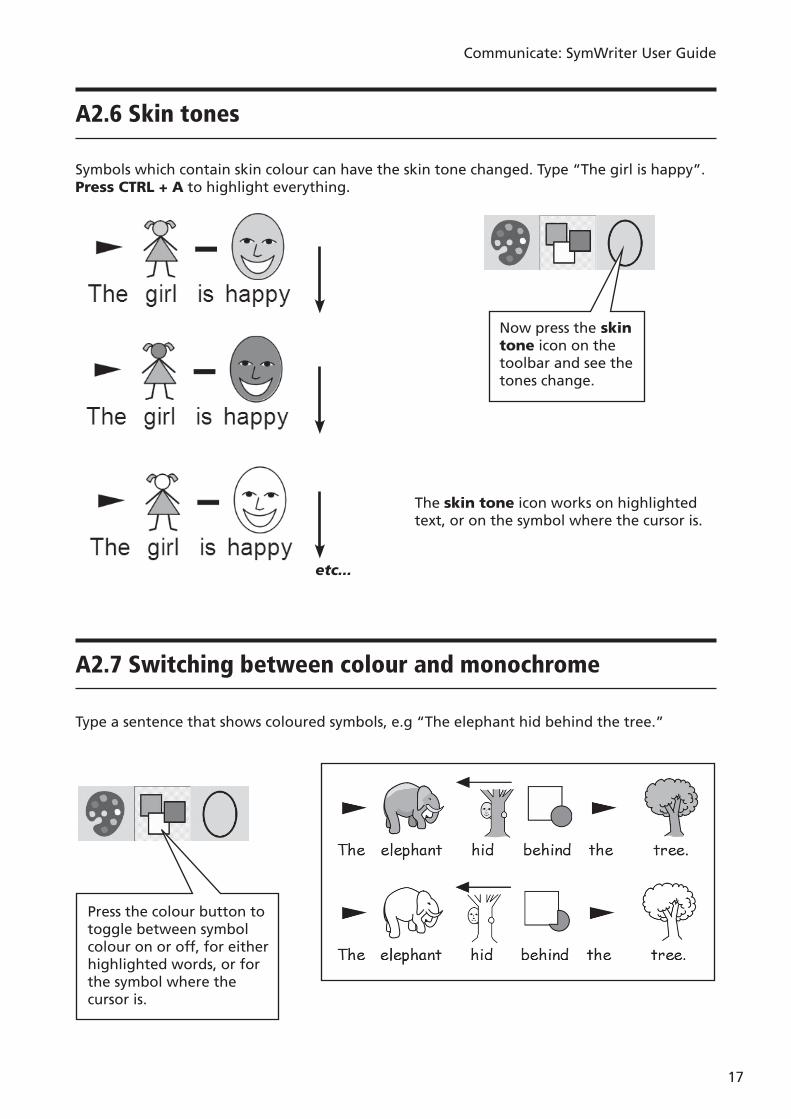
A2.6 Skin tones
Symbols which contain skin colour can have the skin tone changed. Type “The girl is happy”. Press CTRL + A to highlight everything.
etc...
Now press the skin tone icon on the toolbar and see the tones change.
Press the colour button to toggle between symbol colour on or off, for either highlighted words, or for the symbol where the cursor is.
A2.7 Switching between colour and monochrome
Type a sentence that shows coloured symbols, e.g “The elephant hid behind the tree.”
The skin tone icon works on highlighted text, or on the symbol where the cursor is.

Communicate: SymWriter User Guide
18
A2.8 Changing properties of the whole document
You can change the way symbols appear in the whole of the main document. Also you can control these properties in the stages ( p49 ) that hold the grids for writing. From the Symbols menu select Symbol display…
Select whether you want symbols in colour or monochome, or if you want to, leave the current settings unchanged.
Select whether you want symbols on or off, or if you want to, leave the current settings unchanged.
Click here to apply to everything.
Select the skin tone, or if you want to, leave the current settings unchanged. Click in the radio button under the colour you want.
Click on this button to select the line colour of symbols, or if you want to, leave the setting unchanged.
Click here to apply the settings to the document.
Click on any stages where you want the settings to operate.
If you open the symbol display when you are in the designer, you will have an extra section to set the display on stages as well as the document. The grey areas show the position of the stages.
Communicate: SymWriter User Guide
19
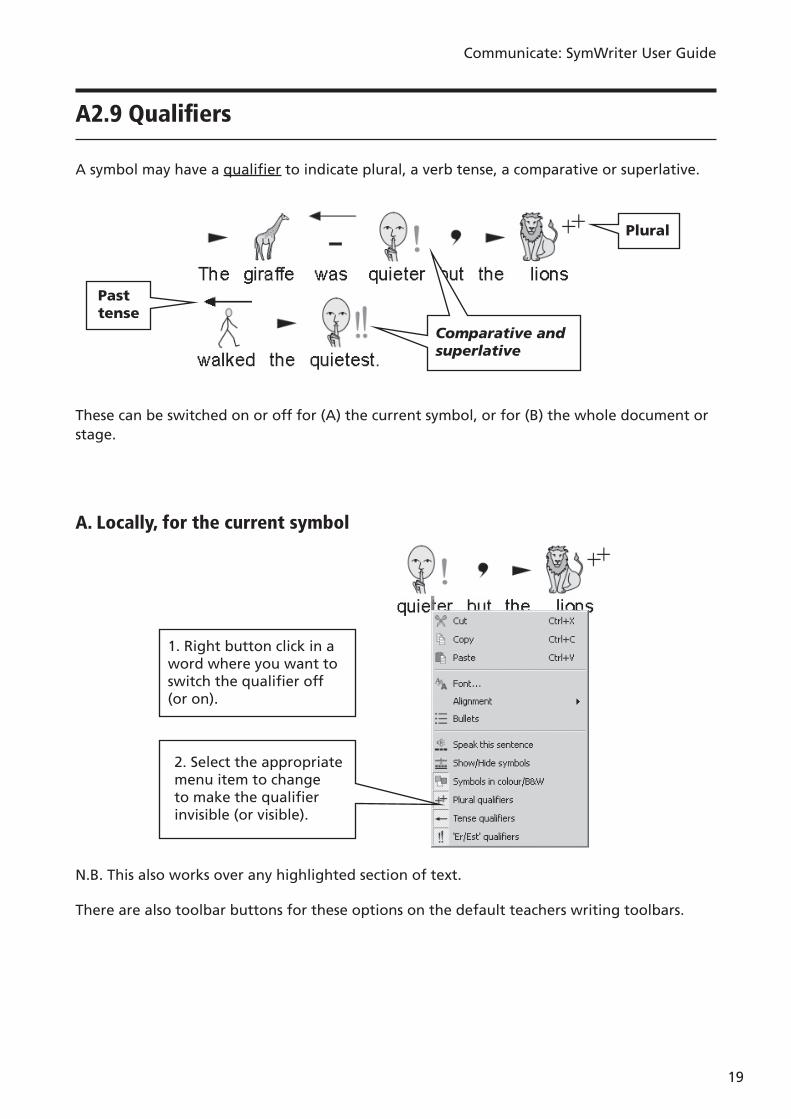
A2.9 Qualifi ers
A symbol may have a qualifi er to indicate plural, a verb tense, a comparative or superlative.
These can be switched on or off for (A) the current symbol, or for (B) the whole document or stage.
A. Locally, for the current symbol
N.B. This also works over any highlighted section of text.
There are also toolbar buttons for these options on the default teachers writing toolbars.
Pasttense
Plural
Comparative and superlative
1. Right button click in a word where you want to switch the qualifi er off (or on).
2. Select the appropriate menu item to change to make the qualifi er invisible (or visible).
Communicate: SymWriter User Guide
20
B. More Generally
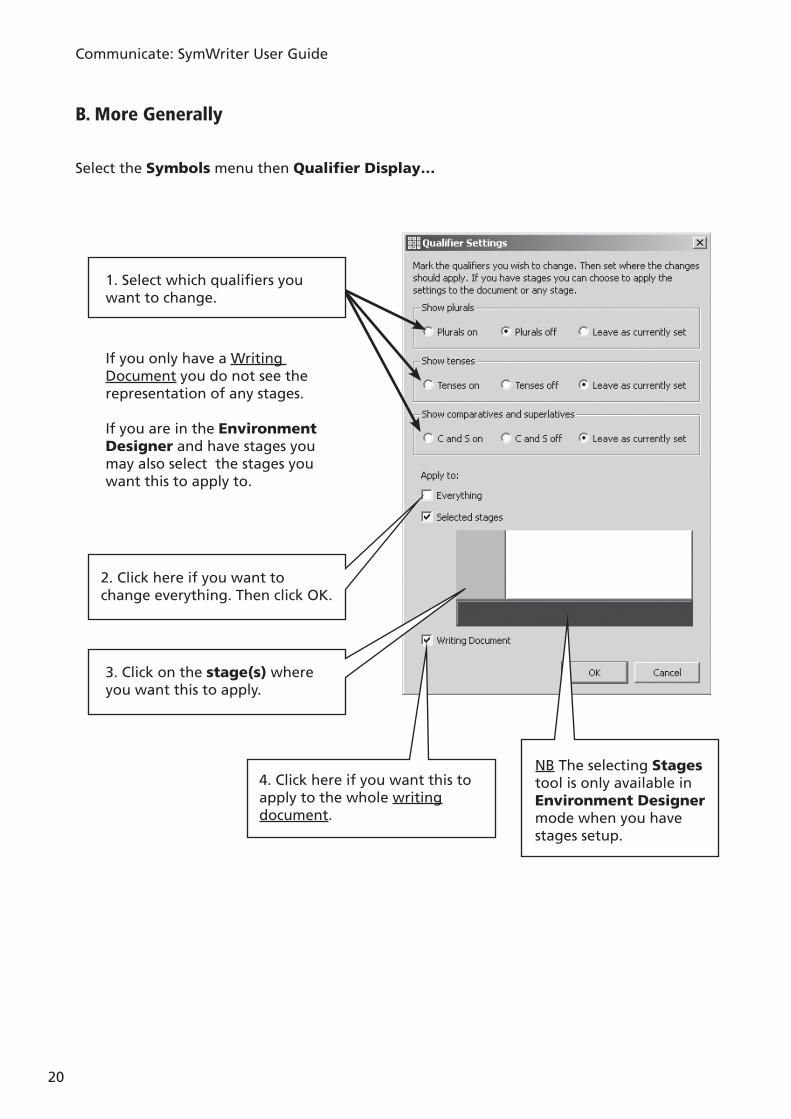
Select the Symbols menu then Qualifi er Display…
If you only have a Writing Document you do not see the representation of any stages.
If you are in the Environment Designer and have stages you may also select the stages you want this to apply to.
2. Click here if you want to change everything. Then click OK.
3. Click on the stage(s) where you want this to apply.
4. Click here if you want this to apply to the whole writingdocument.
1. Select which qualifi ers you want to change.
NB The selecting Stages tool is only available in Environment Designer mode when you have stages setup.
Communicate: SymWriter User Guide
21
A2.10 Symbol sets
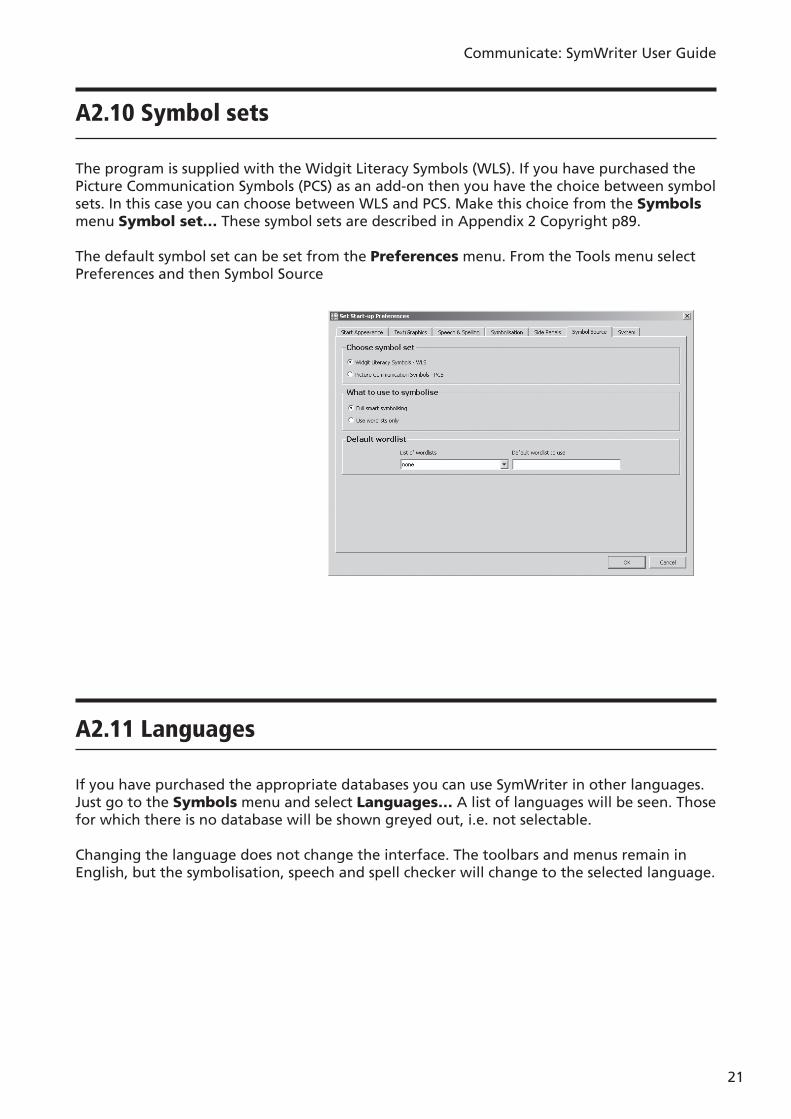
The program is supplied with the Widgit Literacy Symbols (WLS). If you have purchased the Picture Communication Symbols (PCS) as an add-on then you have the choice between symbol sets. In this case you can choose between WLS and PCS. Make this choice from the Symbols menu Symbol set… These symbol sets are described in Appendix 2 Copyright p89 .
The default symbol set can be set from the Preferences menu. From the Tools menu select Preferences and then Symbol Source
A2.11 Languages
If you have purchased the appropriate databases you can use SymWriter in other languages. Just go to the Symbols menu and select Languages… A list of languages will be seen. Those for which there is no database will be shown greyed out, i.e. not selectable.
Changing the language does not change the interface. The toolbars and menus remain in English, but the symbolisation, speech and spell checker will change to the selected language.
Communicate: SymWriter User Guide
22
A3. Text and symbol formatting
Reminder:There are a variety of toolbar arrangements supplied with the program to deal with users at different levels. Not all functions are available on any particular arrangement. In this section we show a range of toolbar buttons that can be used. It is possible to make your own arrangement of toolbars as described in Reference sheet 6. If you enter the program through the Teachers’ Write document button on the launcher, then most of the toolbar icons in this section will be available.
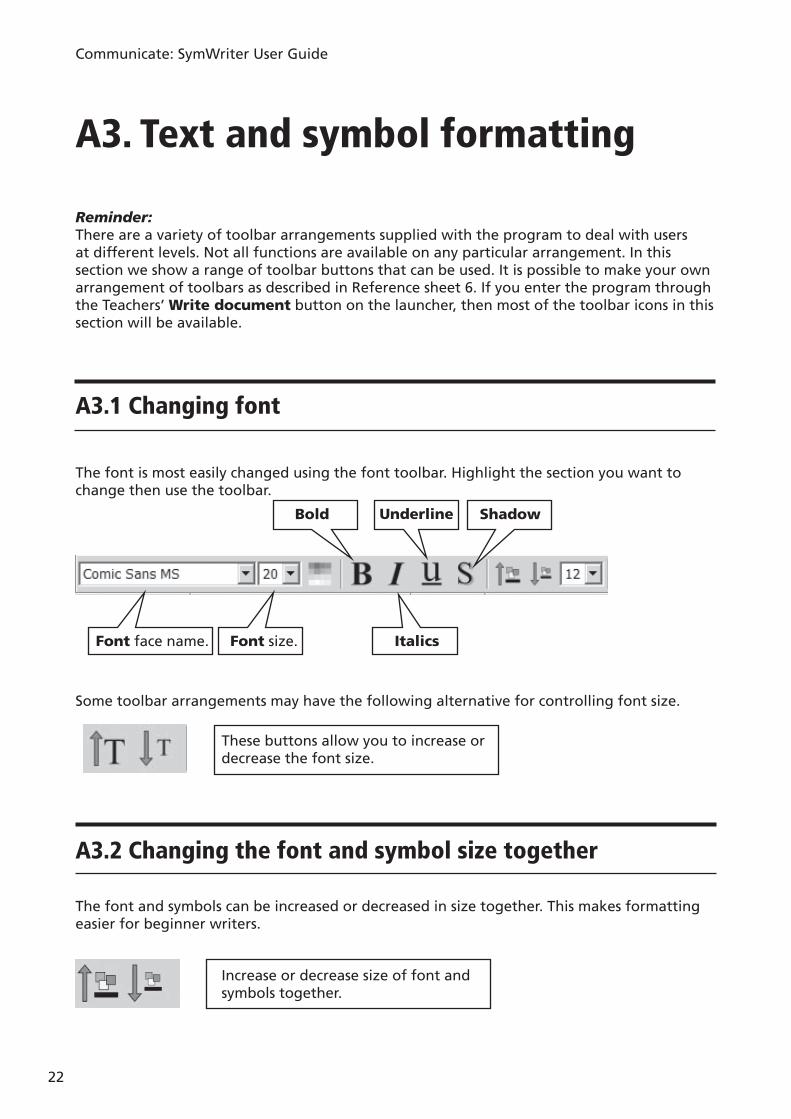
A3.1 Changing font
The font is most easily changed using the font toolbar. Highlight the section you want to change then use the toolbar.
Some toolbar arrangements may have the following alternative for controlling font size.
Bold Underline Shadow
ItalicsFont size.Font face name.
These buttons allow you to increase or decrease the font size.
Increase or decrease size of font and symbols together.
A3.2 Changing the font and symbol size together
The font and symbols can be increased or decreased in size together. This makes formatting easier for beginner writers.
Communicate: SymWriter User Guide
23
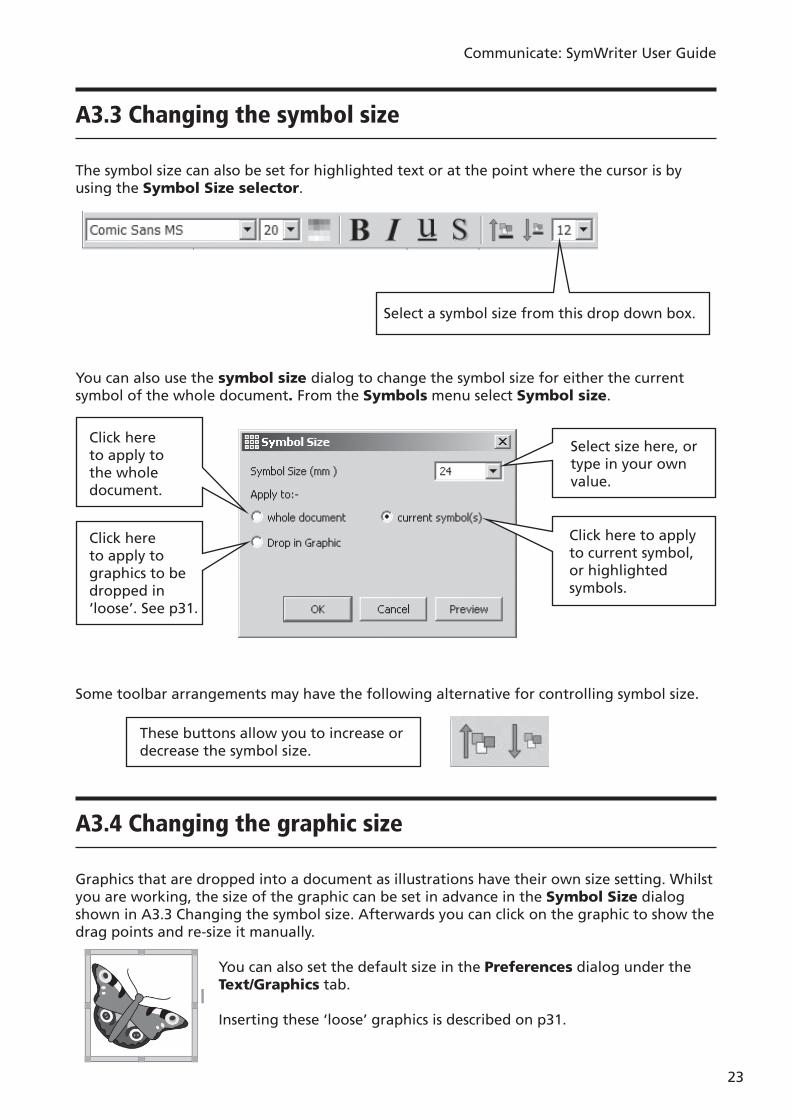
A3.3 Changing the symbol size
The symbol size can also be set for highlighted text or at the point where the cursor is by using the Symbol Size selector.
You can also use the symbol size dialog to change the symbol size for either the current symbol of the whole document. From the Symbols menu select Symbol size.
Some toolbar arrangements may have the following alternative for controlling symbol size.
Select size here, or type in your own value.
Click here to apply to the whole document.
Click here to apply to graphics to be dropped in ‘loose’. See p31 .
Click here to apply to current symbol, or highlighted symbols.
These buttons allow you to increase or decrease the symbol size.
Select a symbol size from this drop down box.
A3.4 Changing the graphic size
Graphics that are dropped into a document as illustrations have their own size setting. Whilst you are working, the size of the graphic can be set in advance in the Symbol Size dialog shown in A3.3 Changing the symbol size . Afterwards you can click on the graphic to show the drag points and re-size it manually.
You can also set the default size in the Preferences dialog under the Text/Graphics tab.
Inserting these ‘loose’ graphics is described on p31 .
Communicate: SymWriter User Guide
24
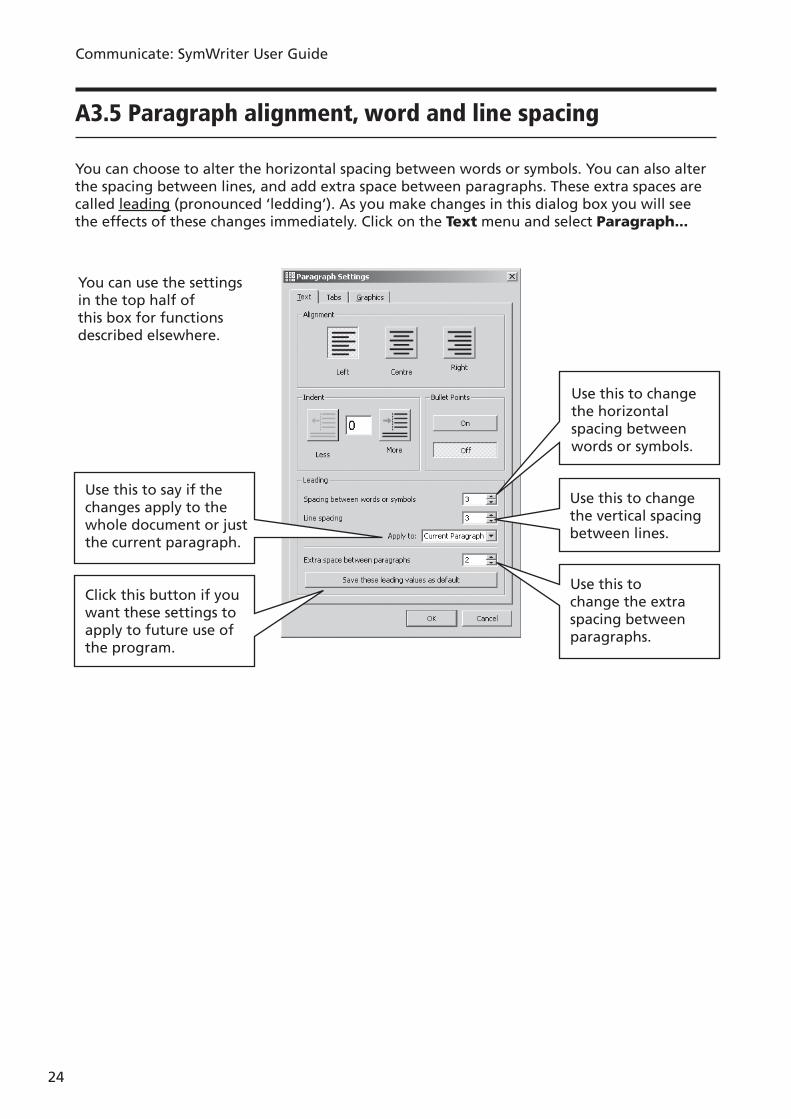
A3.5 Paragraph alignment, word and line spacing
You can choose to alter the horizontal spacing between words or symbols. You can also alter the spacing between lines, and add extra space between paragraphs. These extra spaces are called leading (pronounced ‘ledding’). As you make changes in this dialog box you will see the effects of these changes immediately. Click on the Text menu and select Paragraph...
You can use the settings in the top half of this box for functions described elsewhere.
Use this to change the horizontal spacing between words or symbols.
Use this to change the vertical spacing between lines.
Use this to change the extra spacing between paragraphs.
Click this button if you want these settings to apply to future use of the program.
Use this to say if the changes apply to the whole document or just the current paragraph.
Communicate: SymWriter User Guide
25
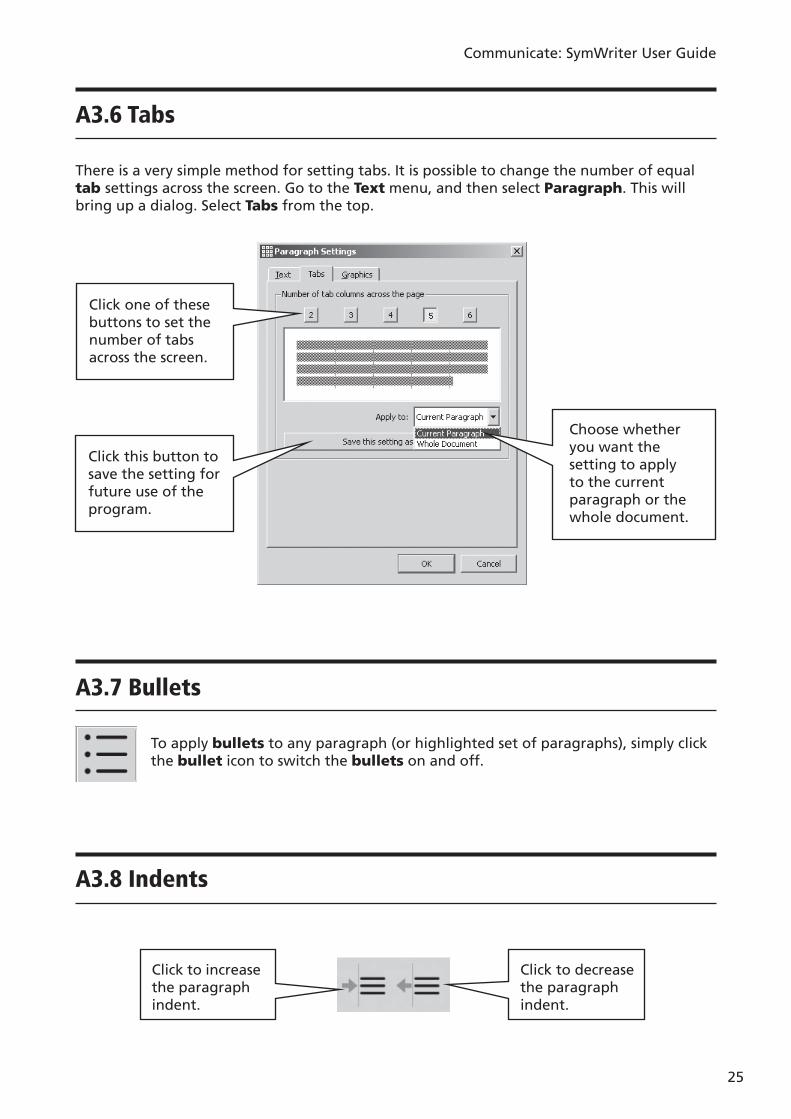
A3.6 Tabs
There is a very simple method for setting tabs. It is possible to change the number of equal tab settings across the screen. Go to the Text menu, and then select Paragraph. This will bring up a dialog. Select Tabs from the top.
Choose whether you want the setting to apply to the current paragraph or the whole document.
Click this button to save the setting for future use of the program.
Click one of these buttons to set the number of tabs across the screen.
Click to increase the paragraph indent.
Click to decrease the paragraph indent.
A3.7 Bullets
To apply bullets to any paragraph (or highlighted set of paragraphs), simply click the bullet icon to switch the bullets on and off.
A3.8 Indents
Communicate: SymWriter User Guide
26
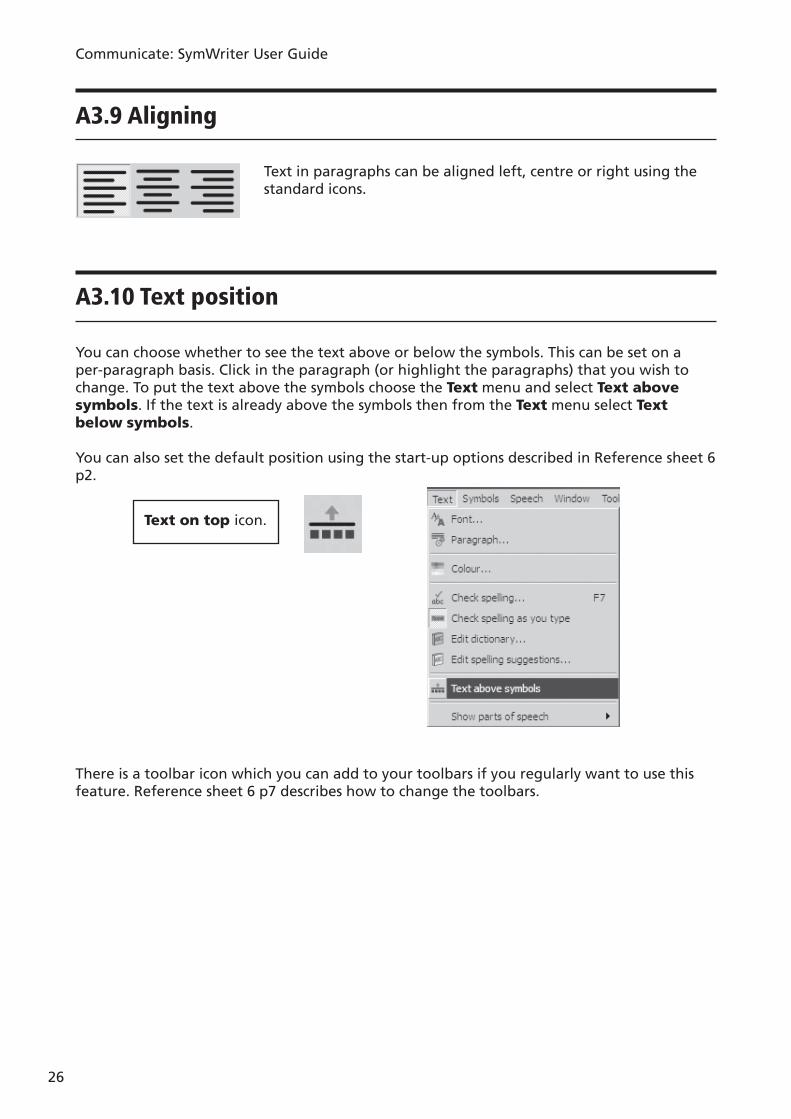
A3.9 Aligning
Text in paragraphs can be aligned left, centre or right using the standard icons.
Text on top icon.
A3.10 Text position
You can choose whether to see the text above or below the symbols. This can be set on a per-paragraph basis. Click in the paragraph (or highlight the paragraphs) that you wish to change. To put the text above the symbols choose the Text menu and select Text above symbols. If the text is already above the symbols then from the Text menu select Text below symbols.
You can also set the default position using the start-up options described in Reference sheet 6 p2.
There is a toolbar icon which you can add to your toolbars if you regularly want to use this feature. Reference sheet 6 p7 describes how to change the toolbars.
Communicate: SymWriter User Guide
27
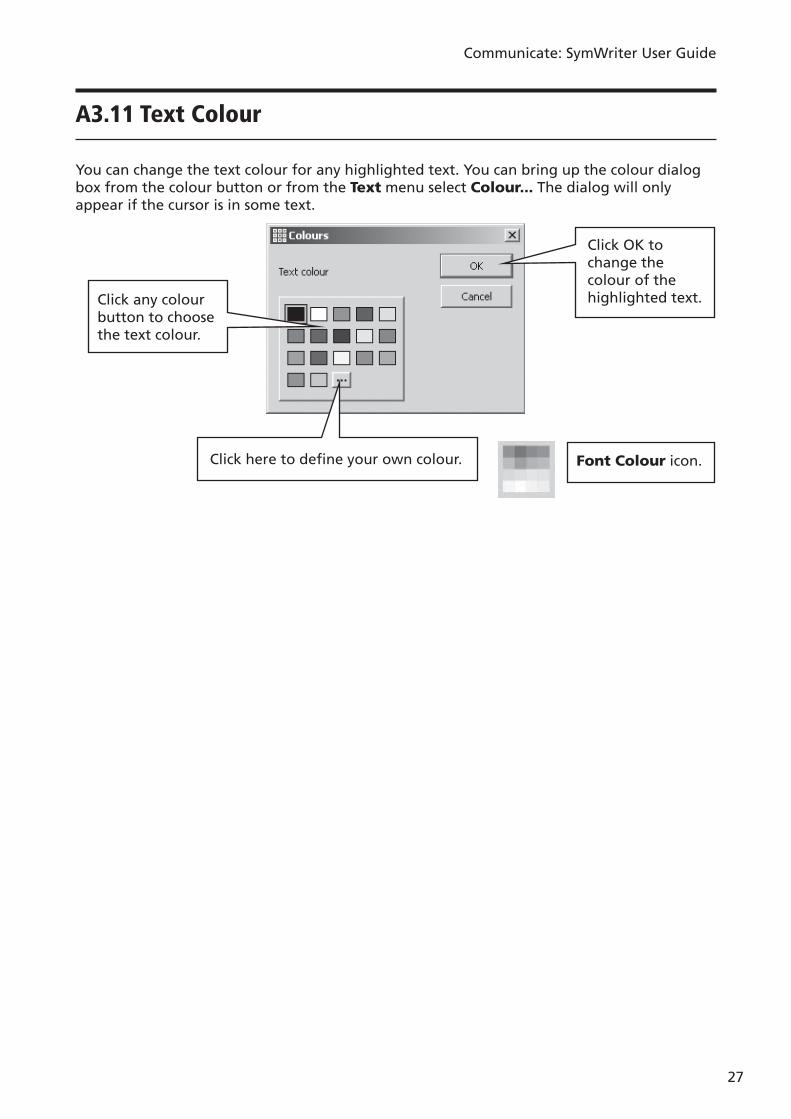
Font Colour icon.
Click any colour button to choose the text colour.
Click here to defi ne your own colour.
Click OK to change the colour of the highlighted text.
A3.11 Text Colour
You can change the text colour for any highlighted text. You can bring up the colour dialog box from the colour button or from the Text menu select Colour... The dialog will only appear if the cursor is in some text.
Communicate: SymWriter User Guide
28
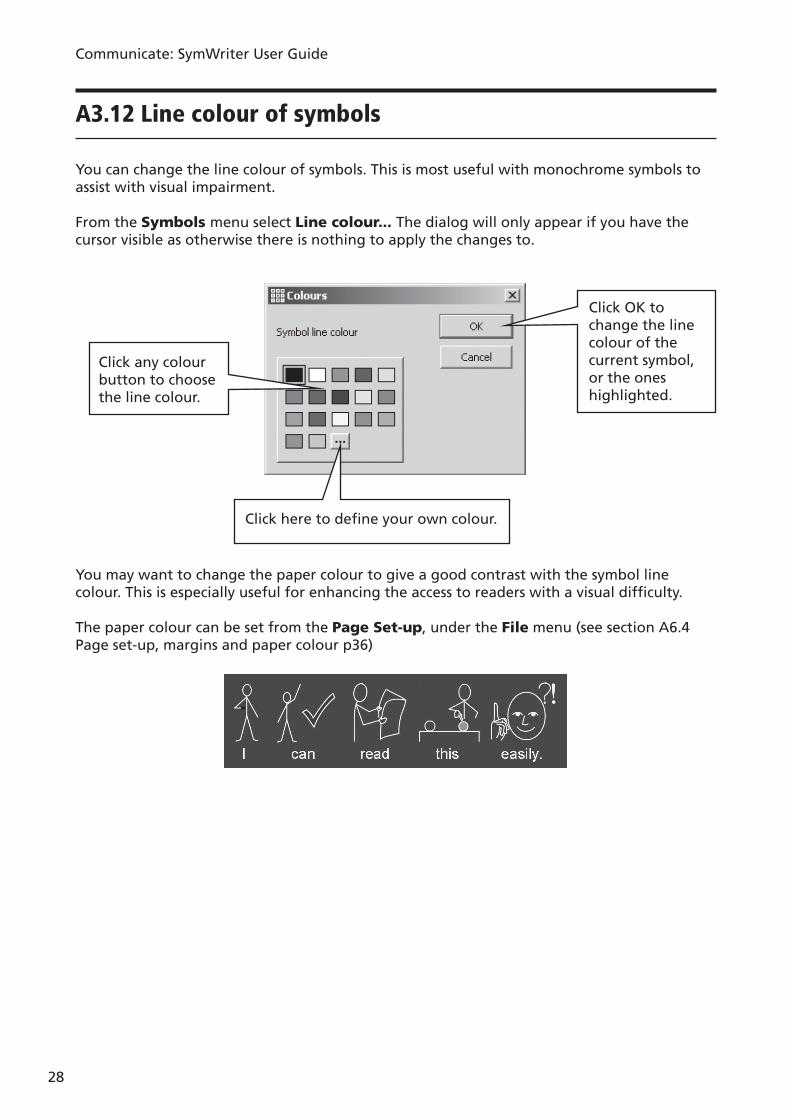
A3.12 Line colour of symbols
You can change the line colour of symbols. This is most useful with monochrome symbols to assist with visual impairment.
From the Symbols menu select Line colour... The dialog will only appear if you have the cursor visible as otherwise there is nothing to apply the changes to.
Click any colour button to choose the line colour.
Click here to defi ne your own colour.
Click OK to change the line colour of the current symbol, or the ones highlighted.
You may want to change the paper colour to give a good contrast with the symbol line colour. This is especially useful for enhancing the access to readers with a visual diffi culty.
The paper colour can be set from the Page Set-up, under the File menu (see section A6.4 Page set-up, margins and paper colour p36 )

Communicate: SymWriter User Guide
29
A4. Writing in text
A4.1 Writing in text
To write a paragraph in text without symbols, press the F10 key before starting to write in that paragraph. Alternatively if the text/symbol button is on a toolbar, then you can use that instead.
Now type and you will see no symbols in the paragraph. Also there will be no space for symbols. (You can, however, switch symbols back on for any word - See section A4.3 Mixing symbol and text writing ).
Click in “voltage” and see a symbol that provides a reminder of the meaning.
Click in “current” and see a symbol that provides a reminder of the meaning.
A4.2 Seeing the meaning – the symbol chooser
Students who do not need full symbol support may benefi t from seeing the meanings of words illustrated either as they write, or by later clicking in a word.
Into a blank document type “Voltage is the electrical “push” trying to send the current round the circuit”.
Communicate: SymWriter User Guide
30
A4.3 Mixing symbol and text writing
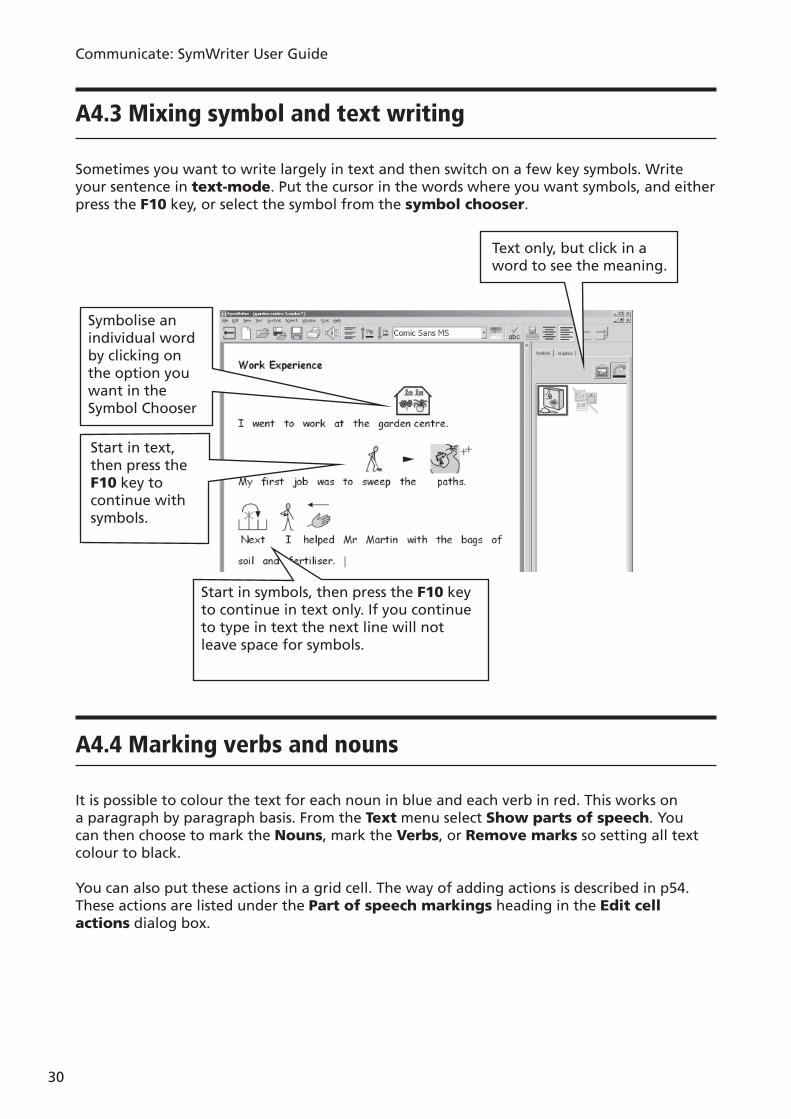
Sometimes you want to write largely in text and then switch on a few key symbols. Write your sentence in text-mode. Put the cursor in the words where you want symbols, and either press the F10 key, or select the symbol from the symbol chooser.
Text only, but click in a word to see the meaning.
Start in text, then press the F10 key to continue with symbols.
Start in symbols, then press the F10 key to continue in text only. If you continue to type in text the next line will not leave space for symbols.
A4.4 Marking verbs and nouns
It is possible to colour the text for each noun in blue and each verb in red. This works on a paragraph by paragraph basis. From the Text menu select Show parts of speech. You can then choose to mark the Nouns, mark the Verbs, or Remove marks so setting all text colour to black.
You can also put these actions in a grid cell. The way of adding actions is described in p54 . These actions are listed under the Part of speech markings heading in the Edit cell actions dialog box.
Symbolise an individual word by clicking on the option you want in the Symbol Chooser
Communicate: SymWriter User Guide
31
A5. Putting in pictures
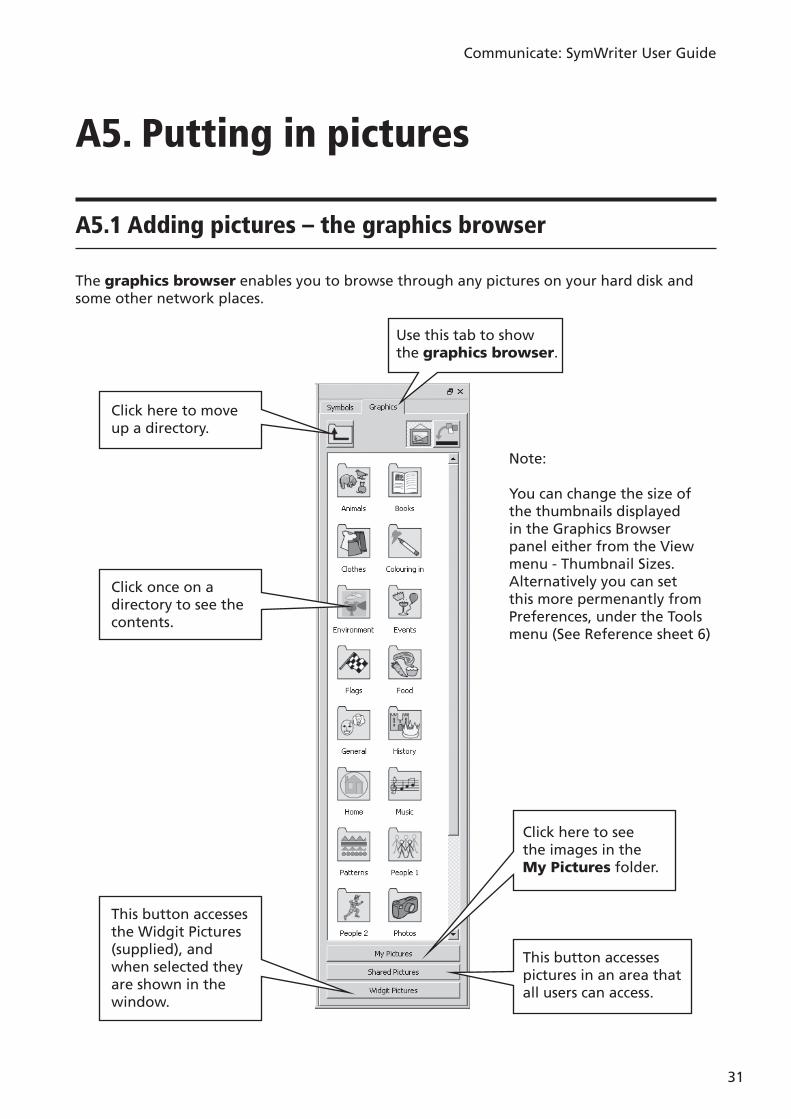
A5.1 Adding pictures – the graphics browser
The graphics browser enables you to browse through any pictures on your hard disk and some other network places.
Use this tab to show the graphics browser.
Click here to move up a directory.
Click once on a directory to see the contents.
This button accesses the Widgit Pictures (supplied), and when selected they are shown in the window.
This button accesses pictures in an area that all users can access.
Click here to see the images in the My Pictures folder.
Note:
You can change the size of the thumbnails displayed in the Graphics Browser panel either from the View menu - Thumbnail Sizes. Alternatively you can set this more permenantly from Preferences, under the Tools menu (See Reference sheet 6)
Communicate: SymWriter User Guide
32
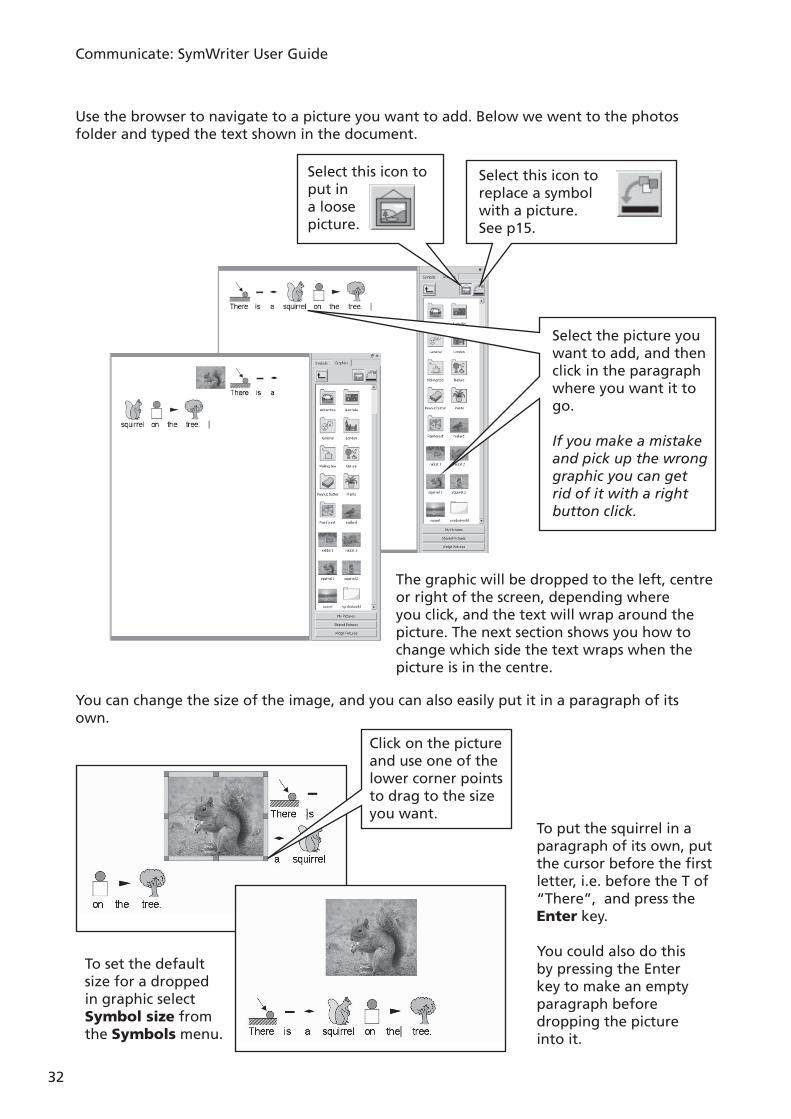
Use the browser to navigate to a picture you want to add. Below we went to the photos folder and typed the text shown in the document.
Select this icon to put ina loose picture.
Select this icon toreplace a symbol with a picture. See p15 .
Select the picture you want to add, and then click in the paragraph where you want it to go.
If you make a mistake and pick up the wrong graphic you can get rid of it with a right button click.
The graphic will be dropped to the left, centre or right of the screen, depending where you click, and the text will wrap around the picture. The next section shows you how to change which side the text wraps when the picture is in the centre.
You can change the size of the image, and you can also easily put it in a paragraph of its own.
Click on the picture and use one of the lower corner points to drag to the size you want.
To put the squirrel in a paragraph of its own, put the cursor before the fi rst letter, i.e. before the T of “There”, and press the Enter key.
You could also do this by pressing the Enter key to make an empty paragraph before dropping the picture into it.
To set the default size for a dropped in graphic select Symbol size from the Symbols menu.
Communicate: SymWriter User Guide
33
A5.2 Aligning
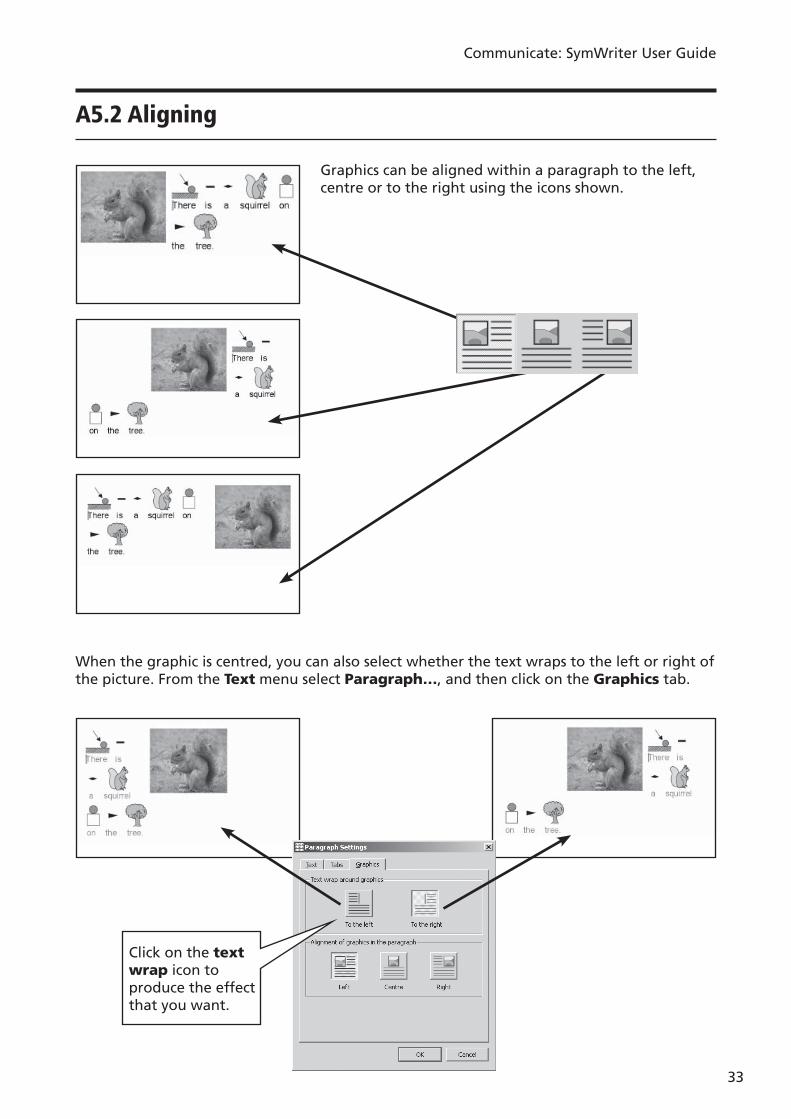
Graphics can be aligned within a paragraph to the left, centre or to the right using the icons shown.
Click on the text wrap icon to produce the effect that you want.
When the graphic is centred, you can also select whether the text wraps to the left or right of the picture. From the Text menu select Paragraph…, and then click on the Graphics tab.
Communicate: SymWriter User Guide
34
A5.3 Finding symbols
You may want to fi nd a symbol to use in a document, either to replace another symbol, or to put as a separate image in a paragraph.
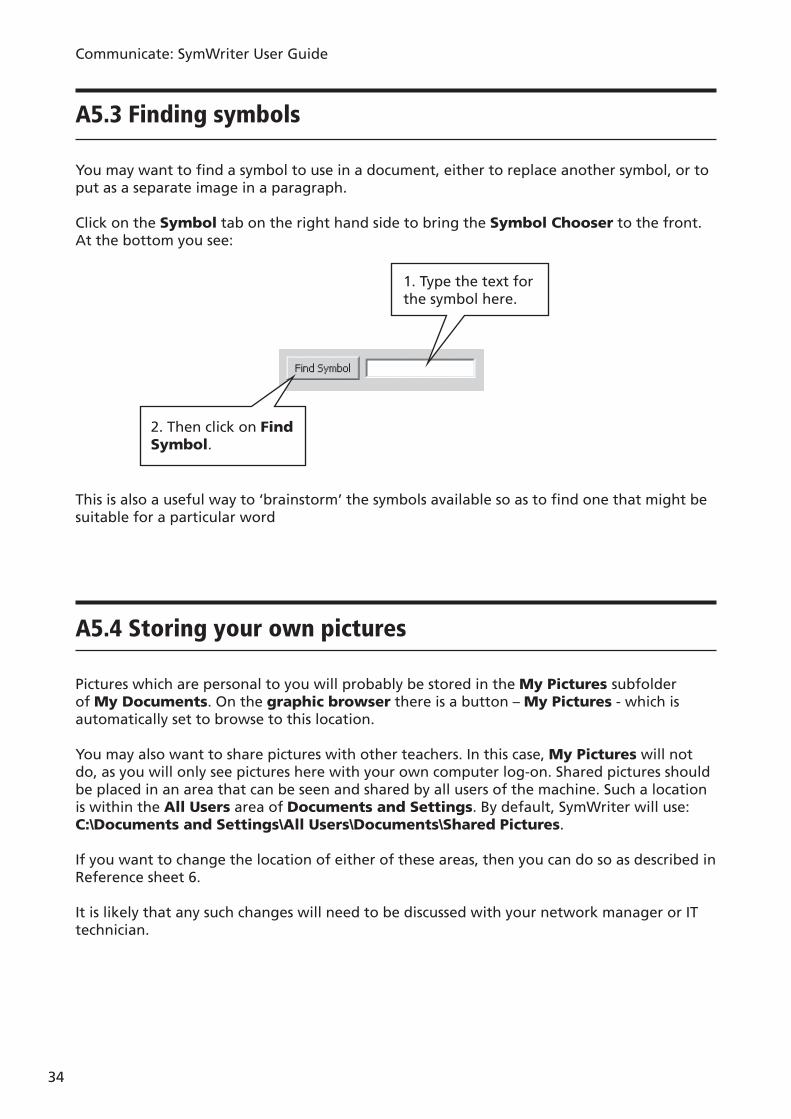
Click on the Symbol tab on the right hand side to bring the Symbol Chooser to the front. At the bottom you see:
1. Type the text for the symbol here.
2. Then click on Find Symbol.
A5.4 Storing your own pictures
Pictures which are personal to you will probably be stored in the My Pictures subfolder of My Documents. On the graphic browser there is a button – My Pictures - which is automatically set to browse to this location.
You may also want to share pictures with other teachers. In this case, My Pictures will not do, as you will only see pictures here with your own computer log-on. Shared pictures should be placed in an area that can be seen and shared by all users of the machine. Such a location is within the All Users area of Documents and Settings. By default, SymWriter will use:C:\Documents and Settings\All Users\Documents\Shared Pictures.
If you want to change the location of either of these areas, then you can do so as described in Reference sheet 6.
It is likely that any such changes will need to be discussed with your network manager or IT technician.
This is also a useful way to ‘brainstorm’ the symbols available so as to fi nd one that might be suitable for a particular word
Communicate: SymWriter User Guide
35
A6. Screen layouts
A6.1 Page presentation
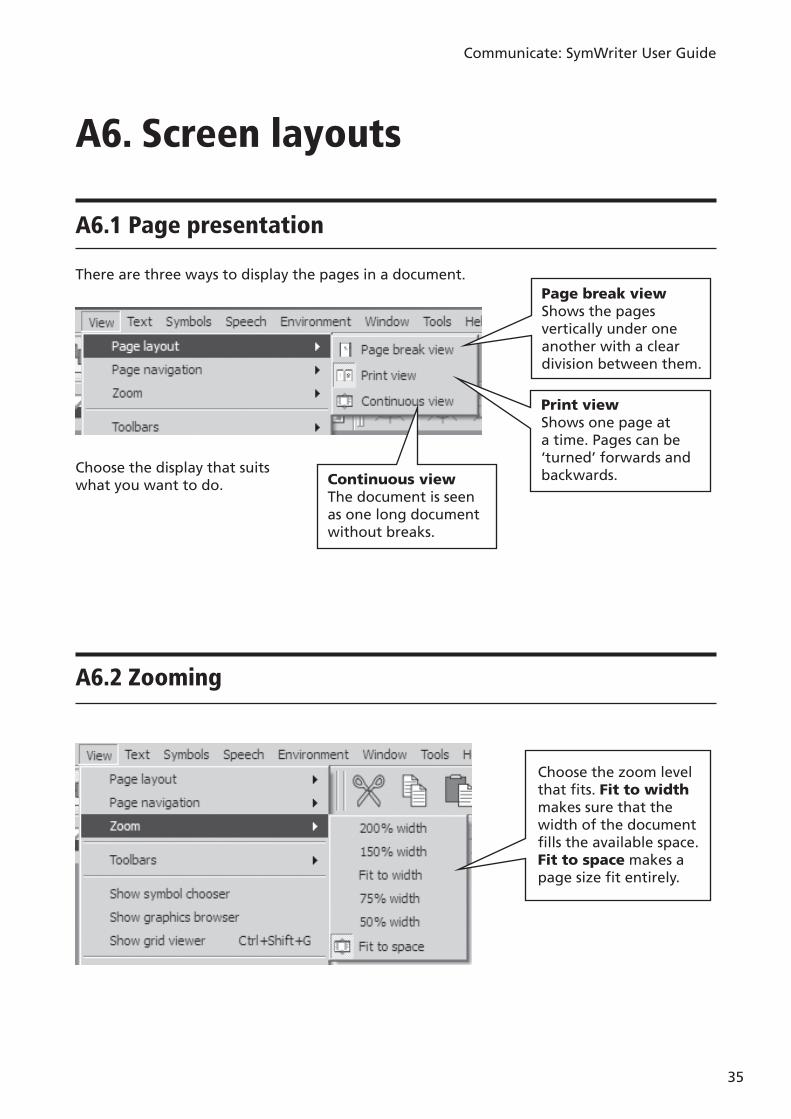
There are three ways to display the pages in a document.
Choose the display that suits what you want to do.
Page break view Shows the pages vertically under one another with a clear division between them.
Print viewShows one page at a time. Pages can be ‘turned’ forwards and backwards.Continuous view
The document is seen as one long document without breaks.
Choose the zoom level that fi ts. Fit to width makes sure that the width of the document fi lls the available space. Fit to space makes a page size fi t entirely.
A6.2 Zooming
Communicate: SymWriter User Guide
36
A6.3 Page Navigation
Operates in Print View only.
Use these items to navigate the pages. These items can also be placed on toolbars. See Reference sheet 6 p7
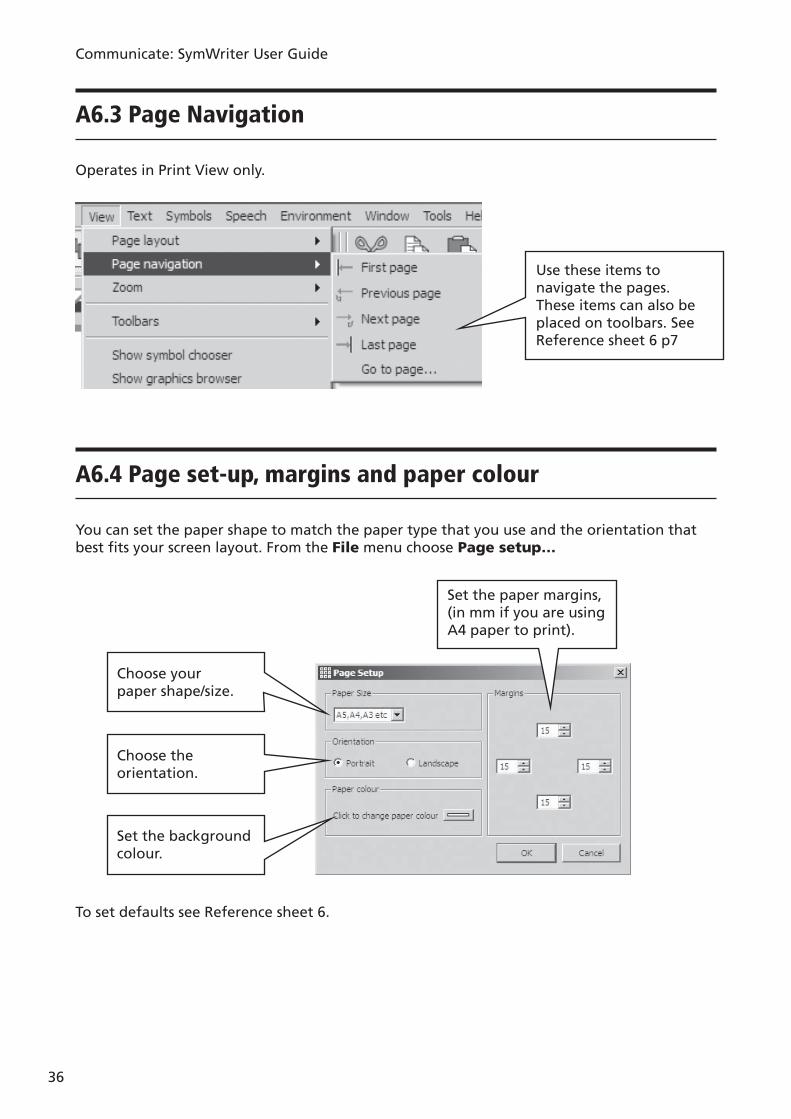
Set the paper margins, (in mm if you are using A4 paper to print).
Choose your paper shape/size.
Choose the orientation.
Set the background colour.
To set defaults see Reference sheet 6.
A6.4 Page set-up, margins and paper colour
You can set the paper shape to match the paper type that you use and the orientation that best fi ts your screen layout. From the File menu choose Page setup…
Communicate: SymWriter User Guide
37
A7. Saving and opening documents
The distinction between documents and environments is described in p49 . In this section we are only concerned with the writing document area. The usual icons are available on the File menu and on toolbars for Open…, Save and Save As.Documents are saved in the My Documents area for the currently logged-on user.
A7.1 Auto-saving
You can choose to auto-save your document or environment periodically. If you are in write-mode then auto-save will save the document. If you are in design-mode then the environment will be saved.
Should anything go wrong with your computer or work, then when you next run the program you will be asked if you want to load the last saved version.
If you say “no” at this time then this last saved version is deleted immediately.If you say “yes” then the last saved version is loaded and then deleted. You should then go to Save As... and re-save your work with a name you choose.
The auto-saving is a back-up and should not deter you from saving your work regularly under its proper name.
You can set the times between such saves. The saving of complex environments or documents with large graphic fi les takes a few moments so it is advisable not to make this too frequent. The time can be set from the Tools menu, then select Preferences, then click on the System tab.
Communicate: SymWriter User Guide
38
A8. Printing
If you have a continuous document and want to see the page breaks, then switch to Page break view, or Print View as described in section A6.1 Page presentation p35 .
To print, go to the File menu and select Print… or select the print icon from the toolbar.
If your page has been set up to be portrait then the printer will automatically be set up to print that way, similarly if your paper is landscape. If you deliberately set the printer shape to be different from your document then the program will scale and centre the document to produce the best fi t.
Communicate: SymWriter User Guide
39
A9. Speech
A9.1 Speech on demand
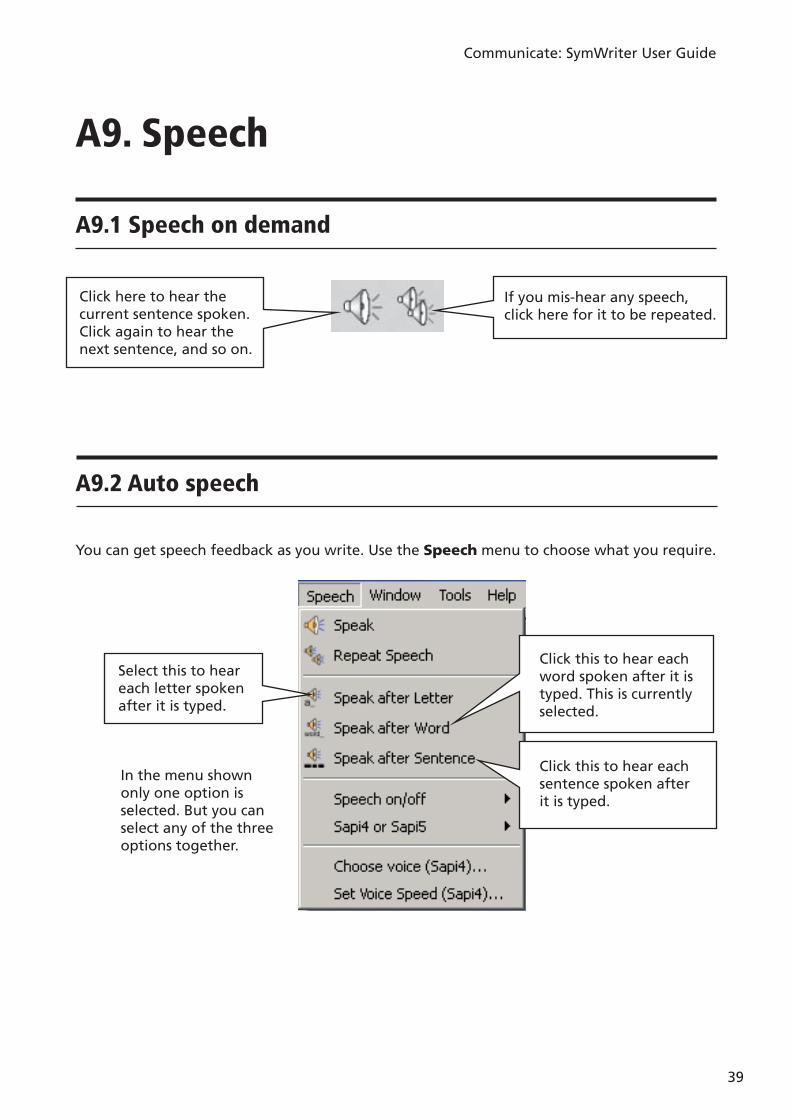
Select this to hear each letter spoken after it is typed.
Click this to hear each word spoken after it is typed. This is currently selected.
Click this to hear each sentence spoken after it is typed.
In the menu shown only one option is selected. But you can select any of the three options together.
Click here to hear the current sentence spoken. Click again to hear the next sentence, and so on.
If you mis-hear any speech, click here for it to be repeated.
A9.2 Auto speech
You can get speech feedback as you write. Use the Speech menu to choose what you require.
Communicate: SymWriter User Guide
40
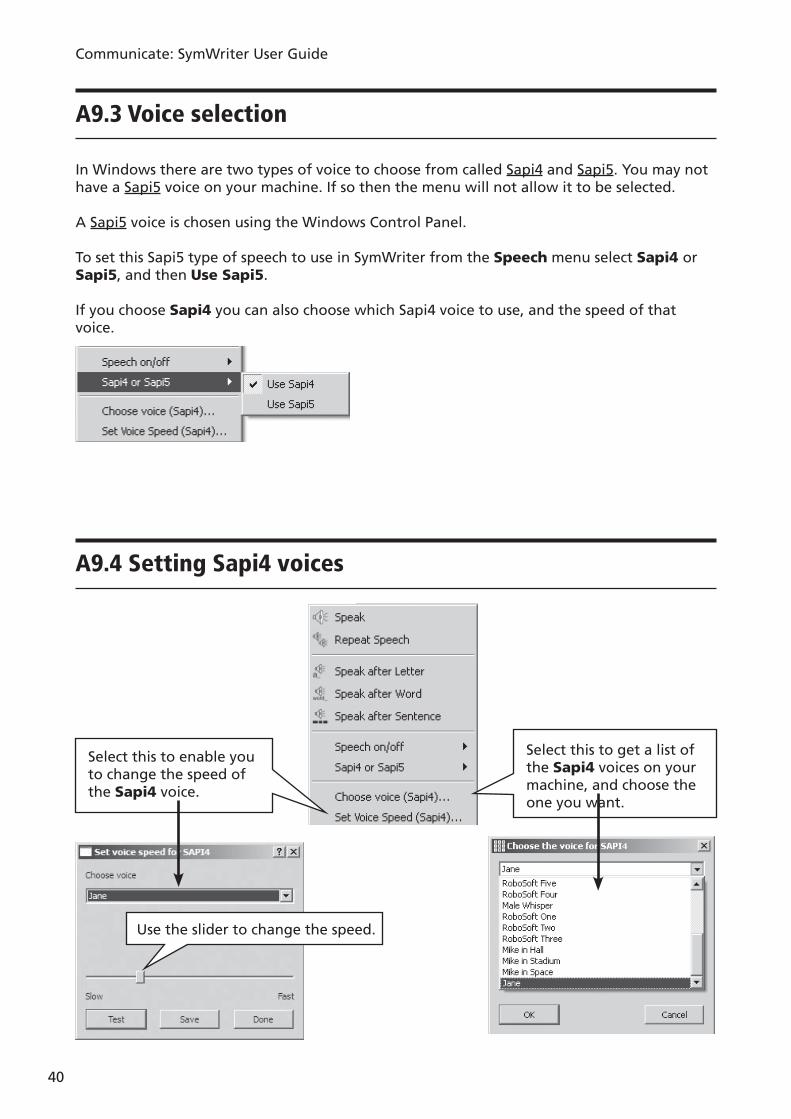
A9.3 Voice selection
In Windows there are two types of voice to choose from called Sapi4 and Sapi5. You may not have a Sapi5 voice on your machine. If so then the menu will not allow it to be selected.
A Sapi5 voice is chosen using the Windows Control Panel.
To set this Sapi5 type of speech to use in SymWriter from the Speech menu select Sapi4 or Sapi5, and then Use Sapi5.
If you choose Sapi4 you can also choose which Sapi4 voice to use, and the speed of that voice.
Select this to enable you to change the speed of the Sapi4 voice.
Select this to get a list of the Sapi4 voices on your machine, and choose the one you want.
Use the slider to change the speed.
A9.4 Setting Sapi4 voices

Communicate: SymWriter User Guide
41
A10. Spelling
A10.1 Marking errors
You can choose whether to show spelling errors or not. Simply go to the Text menu and click on Check spelling. When there is a tick by this menu item mistakes will be shown by a pink rectangle behind a misspelled word.
Select the correct word from the list.
Click here if you want the program not to mark this word as a mistake.
A10.2 Using the simple checker
To see suggestions for a spelling error, click with the right mouse button on the word. After a short pause you will see a list of suggested words illustrated by symbols where possible.
Communicate: SymWriter User Guide
42
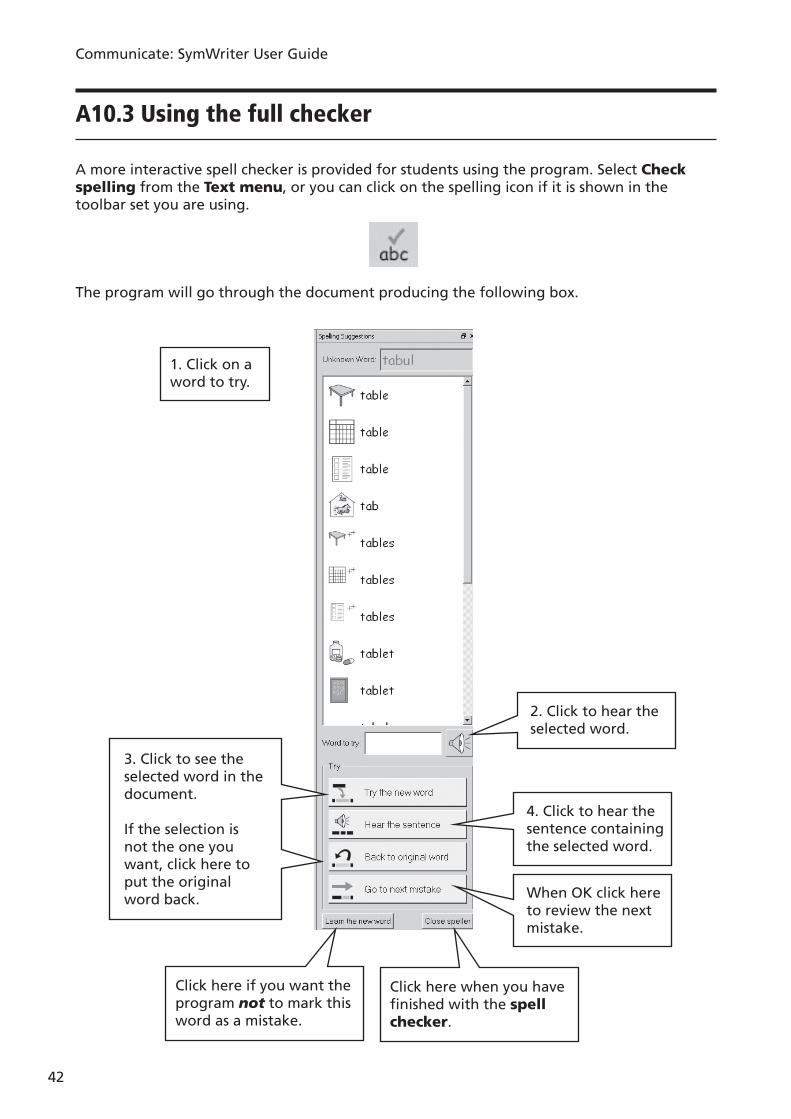
A10.3 Using the full checker
A more interactive spell checker is provided for students using the program. Select Check spelling from the Text menu, or you can click on the spelling icon if it is shown in the toolbar set you are using.
The program will go through the document producing the following box.
1. Click on a word to try.
2. Click to hear the selected word.
3. Click to see the selected word in the document.
If the selection is not the one you want, click here to put the original word back.
4. Click to hear the sentence containing the selected word.
When OK click here to review the next mistake.
Click here if you want the program not to mark this word as a mistake.
Click here when you have fi nished with the spell checker.

Communicate: SymWriter User Guide
43
A10.4 Deleting extra ‘correct’ words
Sometimes a word may be accidentally marked as correct when it is not and so added to the list of correct words. You can delete items from the list of additional words that have been added. From the Text menu select Edit dictionary…
Select an item that has been added in error.
Click on Delete to remove the entry.
This shows a list of entries that have been added as ‘correct’.
If there are many entries, you can type in this box to help fi nd the one you want.
Click here when you have fi nished removing entries.
Type the misspelled word.
Enter any suggestions for this word separated by a comma.
Click here when you are fi nished.
This will put your new suggestion in the list.
Click here to delete an entry.
Type in here to help fi nd an entry.
A10.5 Adding extra spelling suggestions
It is possible to offer suggestions for words that are commonly misspelled. For some predictable spellings, the spell checker cannot make a sensible suggestion. “Muvver” for “mother” is an example. To add suggestions for such spelling, from the Text menu select Edit spelling suggestions….
Communicate: SymWriter User Guide
44
A11. More advanced features
A11.1 Wordlists
In SymWriter, you can personalise the vocabulary by renaming an existing graphic, using F11, or by adding a different graphic to a word. These changes can be saved to a wordlist for future use.
A wordlist is a fi le that can link extra words to images that the symboliser does not produce on its own. These are usually for specialised personal vocabulary, but can also provide vocabulary for a specifi c topic.
There are three types of wordlist:(a) Symbol Set wordlist
A Symbol Set wordlist is a large wordlist that is either supplied by a third party symbol publisher, or it may be a large wordlist that you have created and wish to use instead of the smart symboliser, such as from Communicate: In Print.
Symbol Set wordlist are not saved with a document. If you want to share a document that uses a Symbol Set wordlist then you will need to manually share this wordlist fi le.
(b) Topic wordlistsA topic wordlist normally relates to a specifi c topic or purpose and supplements the standard symbolisation, and so these lists are normally short.
Topic wordlists are stored in a shared area and are available to anyone who uses that computer. A topic wordlist includes any graphics in the list that are not part of the Widgit area and the list is saved with the document that uses it. This means that when passing documents from one machine to another you do not need to worry about any non-standard items that may be included.
(c) User wordlist.This is a set of wordlist changes that are personal to the currently logged-on user. This list is automatically loaded when the program opens.
Communicate: SymWriter User Guide
45
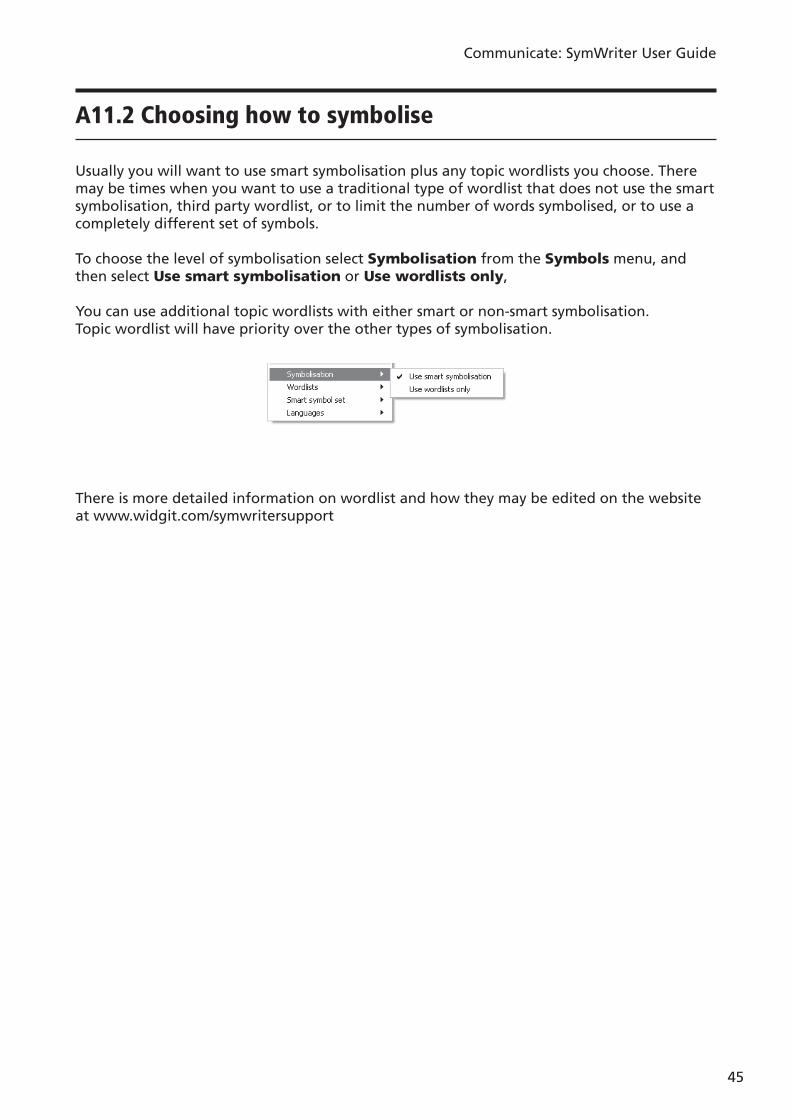
A11.2 Choosing how to symbolise
Usually you will want to use smart symbolisation plus any topic wordlists you choose. There may be times when you want to use a traditional type of wordlist that does not use the smart symbolisation, third party wordlist, or to limit the number of words symbolised, or to use a completely different set of symbols.
To choose the level of symbolisation select Symbolisation from the Symbols menu, and then select Use smart symbolisation or Use wordlists only,
You can use additional topic wordlists with either smart or non-smart symbolisation.Topic wordlist will have priority over the other types of symbolisation.
There is more detailed information on wordlist and how they may be edited on the website at www.widgit.com/symwritersupport
Communicate: SymWriter User Guide
46
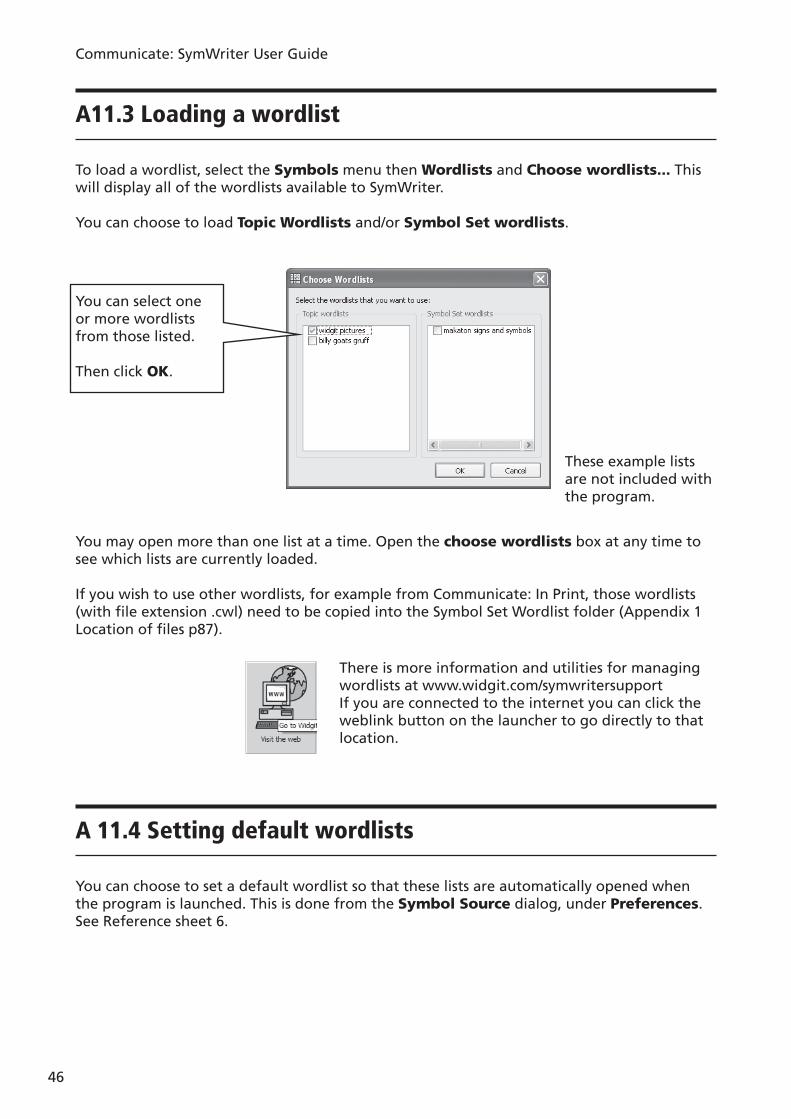
You can select one or more wordlists from those listed.
Then click OK.
A11.3 Loading a wordlist
To load a wordlist, select the Symbols menu then Wordlists and Choose wordlists... This will display all of the wordlists available to SymWriter.
You can choose to load Topic Wordlists and/or Symbol Set wordlists.
A 11.4 Setting default wordlists
You can choose to set a default wordlist so that these lists are automatically opened when the program is launched. This is done from the Symbol Source dialog, under Preferences. See Reference sheet 6.
You may open more than one list at a time. Open the choose wordlists box at any time to see which lists are currently loaded.
If you wish to use other wordlists, for example from Communicate: In Print, those wordlists (with fi le extension .cwl) need to be copied into the Symbol Set Wordlist folder ( Appendix 1 Location of fi les p87 ).
There is more information and utilities for managing wordlists at www.widgit.com/symwritersupport If you are connected to the internet you can click the weblink button on the launcher to go directly to that location.
These example lists are not included with the program.
Communicate: SymWriter User Guide
47
A11.6 Saving symbol changes
Any symbol changes or added graphics that are not part of the Widgit resources are saved with the document. There is no need to save symbol changes unless you wish to have these extra words available for creating other documents. You can, however save any word/symbol changes to a wordlist for future use if you wish.
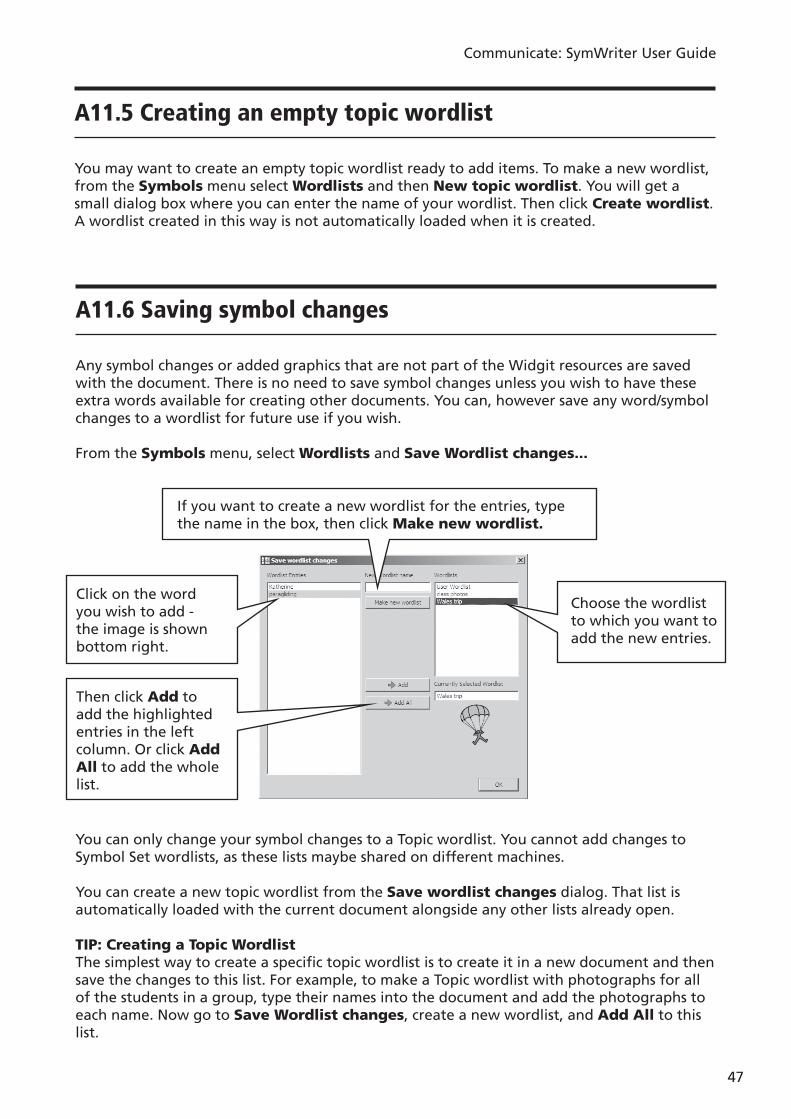
From the Symbols menu, select Wordlists and Save Wordlist changes...
If you want to create a new wordlist for the entries, type the name in the box, then click Make new wordlist.
Click on the word you wish to add - the image is shown bottom right.
Then click Add to add the highlighted entries in the left column. Or click Add All to add the whole list.
Choose the wordlist to which you want to add the new entries.
You can only change your symbol changes to a Topic wordlist. You cannot add changes to Symbol Set wordlists, as these lists maybe shared on different machines.
You can create a new topic wordlist from the Save wordlist changes dialog. That list is automatically loaded with the current document alongside any other lists already open.
TIP: Creating a Topic WordlistThe simplest way to create a specifi c topic wordlist is to create it in a new document and then save the changes to this list. For example, to make a Topic wordlist with photographs for all of the students in a group, type their names into the document and add the photographs to each name. Now go to Save Wordlist changes, create a new wordlist, and Add All to this list.
A11.5 Creating an empty topic wordlist
You may want to create an empty topic wordlist ready to add items. To make a new wordlist, from the Symbols menu select Wordlists and then New topic wordlist. You will get a small dialog box where you can enter the name of your wordlist. Then click Create wordlist. A wordlist created in this way is not automatically loaded when it is created.
Communicate: SymWriter User Guide
48
A11.7 Transferring wordlists and graphics
Transferring wordlists and personal graphics from one machine to another
(a) Symbol Set wordlistsSymbol Set wordlists are not saved with SymWriter fi les so you will need to manually share these fi les with other machines. The Symbol Set wordlists must be placed in the following directory: “Documents and Settings\All Users\Application Data\Widgit\Common Files\Symbol Set wordlists”. On Windows Vista Documents and Settings is replaced by ‘\Users’.
NB: You must share the wordlist with the extension .cfwl NOT the .cwl fi le. See helpsheet symbol_set_wordlists.pdf from the help menu for more information.
(b) Topic wordlistsOnce you have used at least one word from a Topic wordlist that wordlist is linked to that document and will be saved with the document.
Topic wordlists that have been saved with the document are automatically transferred to the new machine. If such a wordlist is already on the new machine, the two lists are merged.
If the topic wordlist includes new graphics that are not part of the Widgit area, then these graphics are included as part of the wordlist. This means that you will not normally have to think about transferring any additional items along with a document (or environment). However, if your wordlist includes a lot of large images, such as photographs, then the document fi le can get quite large. It is advisable, therefore, to keep topic wordlists to small specifi cally focused content.
(c) User wordlistsAny specifi c items from the user wordlist is saved in the document, so any personal photos used in that document are available on a new machine if the document is transferred. However, no other items from the user’s personal list are included.
The user list is designed specifi cally for the personal user. If you want to make any symbol/word changes available to other users, then these should be saved to a Topic wordlist and not to the User list.
Note: if you need to copy this User list to another machine, this list is stored in Documents and Settings\[User]\Application Data\Widgit\Common Files.
NOTE: Graphic fi le size for images used in wordlists
Photographs that are attached to words in a document are physically quite small on the paper and so the fi les really do not need to have very high resolution. In order to keep the fi le size to sensible proportions, it is a good idea to reduce the fi le size of the images before you link them into a document or wordlist. You can do this in your camera imaging software.
Wordlists that reference graphics that are part of the Widgit system are not included in the document, and so these wordlists remain quite small, even with fairly large numbers of entries.
Communicate: SymWriter User Guide
49
B. Writing with grids
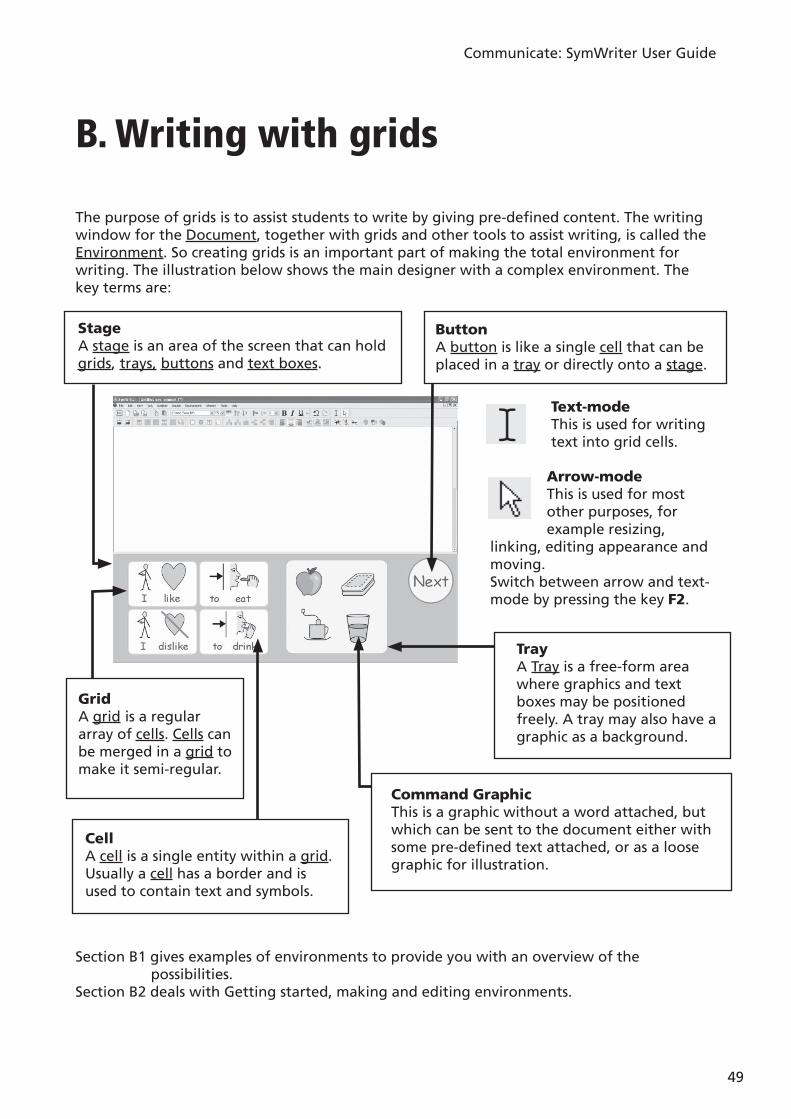
The purpose of grids is to assist students to write by giving pre-defi ned content. The writing window for the Document, together with grids and other tools to assist writing, is called the Environment. So creating grids is an important part of making the total environment for writing. The illustration below shows the main designer with a complex environment. The key terms are:
StageA stage is an area of the screen that can hold grids, trays, buttons and text boxes.
ButtonA button is like a single cell that can be placed in a tray or directly onto a stage.
Section B1 gives examples of environments to provide you with an overview of the possibilities.
Section B2 deals with Getting started, making and editing environments.
Text-modeThis is used for writing text into grid cells.
Arrow-modeThis is used for most other purposes, for example resizing,
linking, editing appearance and moving.Switch between arrow and text-mode by pressing the key F2.
TrayA Tray is a free-form area where graphics and text boxes may be positioned freely. A tray may also have a graphic as a background.
Command GraphicThis is a graphic without a word attached, but which can be sent to the document either with some pre-defi ned text attached, or as a loose graphic for illustration.
GridA grid is a regular array of cells. Cells can be merged in a grid to make it semi-regular.
CellA cell is a single entity within a grid. Usually a cell has a border and is used to contain text and symbols.
Communicate: SymWriter User Guide
50
B1. Examples of what you can do
This section shows some fi nished examples to help provide an overview of types of environment and the grids they contain. Also on your CD are some step-by-step instructions for making some examples based around the theme of holidays. Later sections will describe how such activities are created.
B1.1 Example fi les
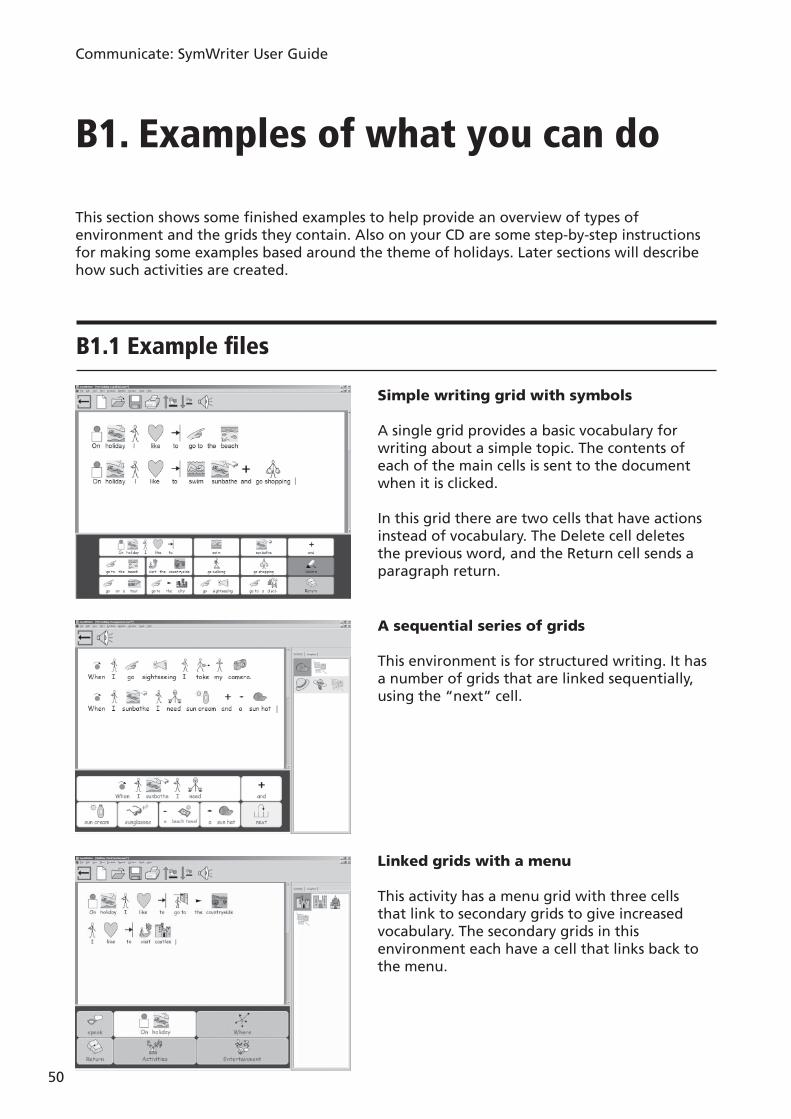
Simple writing grid with symbols
A single grid provides a basic vocabulary for writing about a simple topic. The contents of each of the main cells is sent to the document when it is clicked.
In this grid there are two cells that have actions instead of vocabulary. The Delete cell deletes the previous word, and the Return cell sends a paragraph return.
A sequential series of grids
This environment is for structured writing. It has a number of grids that are linked sequentially, using the “next” cell.
Linked grids with a menu
This activity has a menu grid with three cells that link to secondary grids to give increased vocabulary. The secondary grids in this environment each have a cell that links back to the menu.

Communicate: SymWriter User Guide
51
Text grids
This environment is to stimulate creative writing. It has a set of 3 grids with a separate menu. Two of the grids have words and the third has a number of pictures that can easily be added to illustrate writing.
Free form layout with pictures
This environment has pictures without words, but when these pictures are selected, they are added to the document with pre-defi ned text.
The next section describes how grids and environments are made.
This environment is for a tray holding a number of individual text boxes. If the picture in the centre is chosen it will be sent to the left of the writing. The small grid on the right gives punctuation.
Communicate: SymWriter User Guide
52
B2. Making environments.The next four sections are a series of getting started guide that will take you through the essential features in making environments. More detail and more advanced features can be found in the reference sheets R1 to R6 which will be found as PDF documents under the help menu in SymWriter.
B2.1 Making a single grid for writing
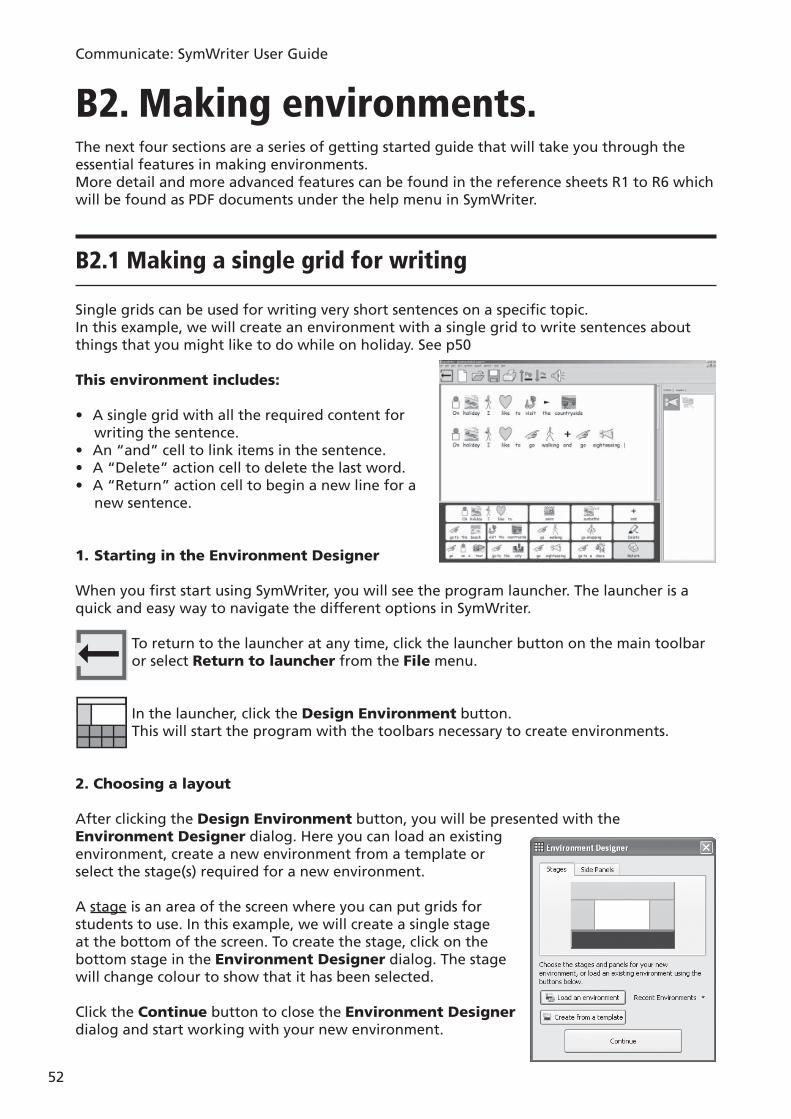
Single grids can be used for writing very short sentences on a specifi c topic.In this example, we will create an environment with a single grid to write sentences about things that you might like to do while on holiday. See p50
This environment includes:
• A single grid with all the required content for writing the sentence.
• An “and” cell to link items in the sentence. • A “Delete” action cell to delete the last word.• A “Return” action cell to begin a new line for a
new sentence.
1. Starting in the Environment Designer
When you fi rst start using SymWriter, you will see the program launcher. The launcher is a quick and easy way to navigate the different options in SymWriter.
To return to the launcher at any time, click the launcher button on the main toolbar or select Return to launcher from the File menu.
In the launcher, click the Design Environment button.This will start the program with the toolbars necessary to create environments.
2. Choosing a layout
After clicking the Design Environment button, you will be presented with the Environment Designer dialog. Here you can load an existing environment, create a new environment from a template or select the stage(s) required for a new environment.
A stage is an area of the screen where you can put grids for students to use. In this example, we will create a single stage at the bottom of the screen. To create the stage, click on the bottom stage in the Environment Designer dialog. The stage will change colour to show that it has been selected.
Click the Continue button to close the Environment Designer dialog and start working with your new environment.

Communicate: SymWriter User Guide
53
You should now see a blank environment with a single dark-blue stage at the bottom of the screen.
3. Adding a grid
Click the New Grid button on the toolbar to create a new grid.
The Create Grid dialog will appear. You can use this dialog to set the properties of your new grid.
Select 5 columns and 3 rows. In the Size Cells for option, make sure that Symbols and text is selected. Click the Create button.
When you click Create, the Create Grid dialog will disappear and a small preview of your new grid will be attached to the mouse pointer.
Move the mouse over the stage and click once to “drop” the grid onto the stage. It will expand vertically to fi ll the available space.
Use the blue handles around the edge of the grid to resize the grid to fi t the stage. If you cannot see the blue handles, click once anywhere on the grid to select it.
4. Merging cells
For the fi rst part of the sentence, we are going to need a larger cell. We can create a new, larger cell by merging two existing cells.
Select the fi rst two cells on the fi rst row of the grid by clicking in one of the cells and dragging into the other. Alternatively, press the ‘Ctrl’ key while clicking in each cell.
With these cells highlighted, click the Merge Cells button on the toolbar.
Document
Stage
HINT: You can adjust the size of the stage by dragging the bar dividing the stage from the document.
Communicate: SymWriter User Guide
54
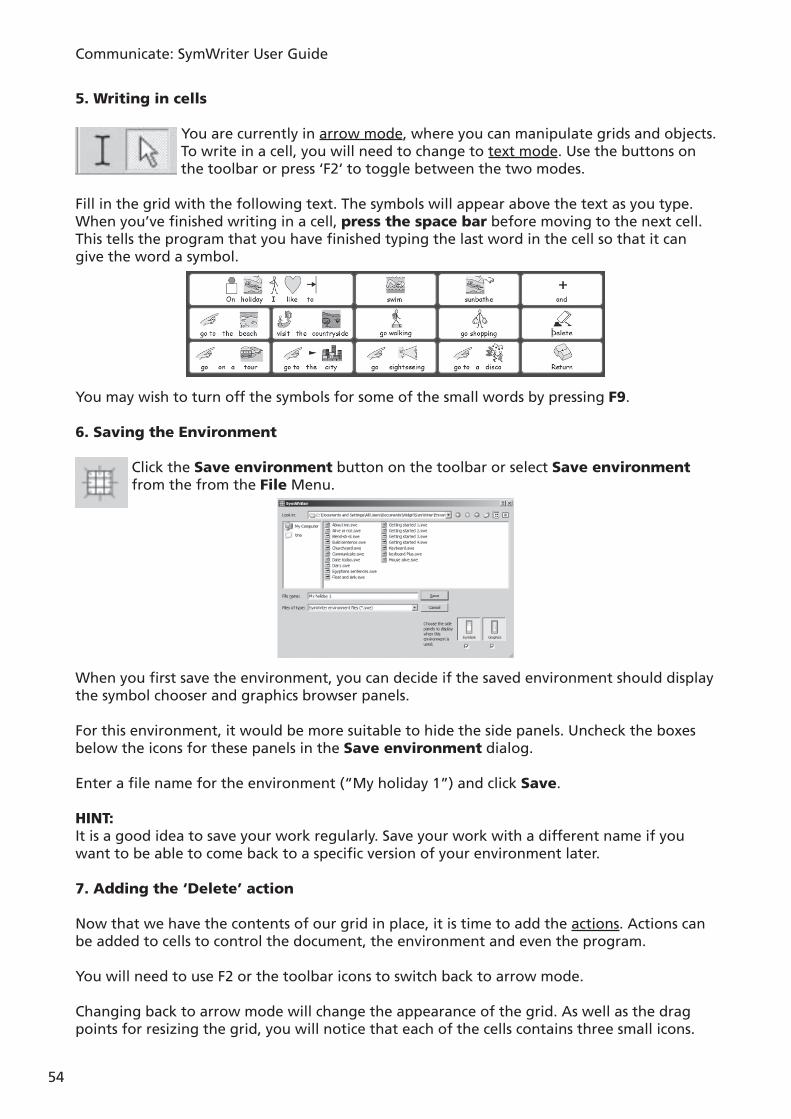
5. Writing in cells
You are currently in arrow mode, where you can manipulate grids and objects. To write in a cell, you will need to change to text mode. Use the buttons on the toolbar or press ‘F2‘ to toggle between the two modes.
Fill in the grid with the following text. The symbols will appear above the text as you type. When you’ve fi nished writing in a cell, press the space bar before moving to the next cell. This tells the program that you have fi nished typing the last word in the cell so that it can give the word a symbol.
You may wish to turn off the symbols for some of the small words by pressing F9.
6. Saving the Environment
Click the Save environment button on the toolbar or select Save environment from the from the File Menu.
When you fi rst save the environment, you can decide if the saved environment should display the symbol chooser and graphics browser panels.
For this environment, it would be more suitable to hide the side panels. Uncheck the boxes below the icons for these panels in the Save environment dialog.
Enter a fi le name for the environment (“My holiday 1”) and click Save.
HINT: It is a good idea to save your work regularly. Save your work with a different name if you want to be able to come back to a specifi c version of your environment later.
7. Adding the ‘Delete’ action
Now that we have the contents of our grid in place, it is time to add the actions. Actions can be added to cells to control the document, the environment and even the program.
You will need to use F2 or the toolbar icons to switch back to arrow mode.
Changing back to arrow mode will change the appearance of the grid. As well as the drag points for resizing the grid, you will notice that each of the cells contains three small icons.
Communicate: SymWriter User Guide
55
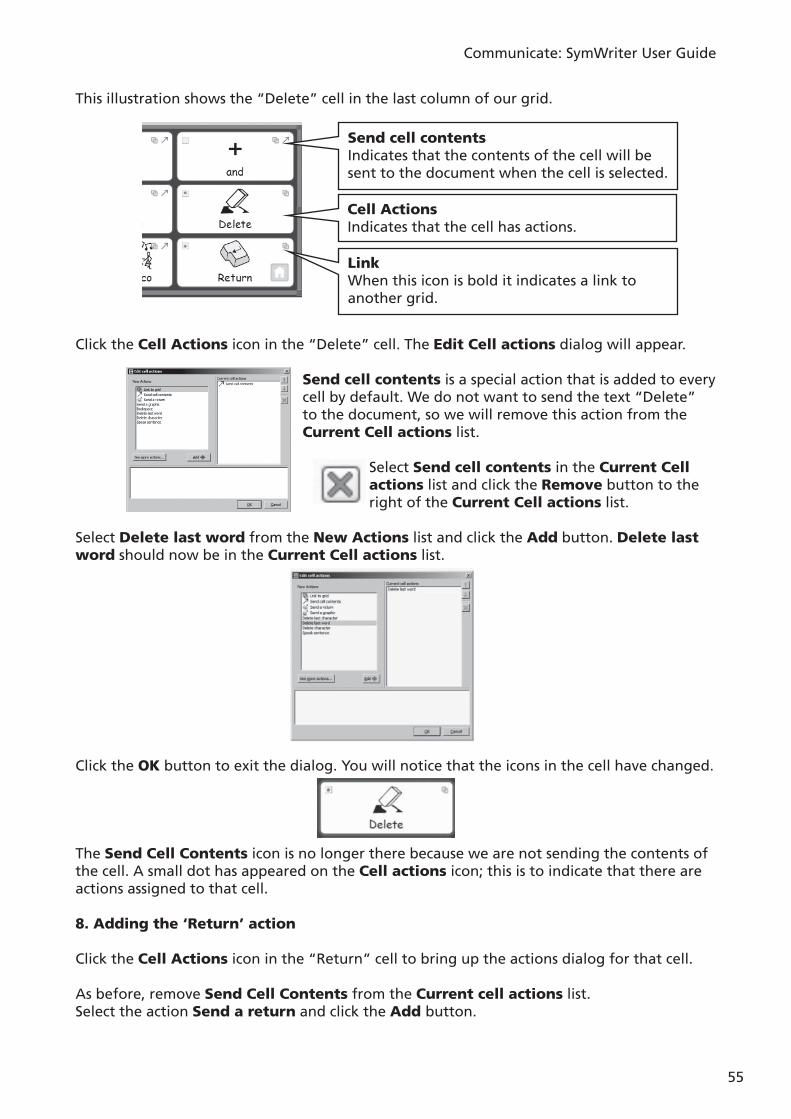
This illustration shows the “Delete” cell in the last column of our grid.
Click the Cell Actions icon in the “Delete” cell. The Edit Cell actions dialog will appear.
Send cell contents is a special action that is added to every cell by default. We do not want to send the text “Delete” to the document, so we will remove this action from the Current Cell actions list.
Select Send cell contents in the Current Cell actions list and click the Remove button to the right of the Current Cell actions list.
Select Delete last word from the New Actions list and click the Add button. Delete last word should now be in the Current Cell actions list.
Click the OK button to exit the dialog. You will notice that the icons in the cell have changed.
The Send Cell Contents icon is no longer there because we are not sending the contents of the cell. A small dot has appeared on the Cell actions icon; this is to indicate that there are actions assigned to that cell.
8. Adding the ‘Return’ action
Click the Cell Actions icon in the “Return” cell to bring up the actions dialog for that cell.
As before, remove Send Cell Contents from the Current cell actions list.Select the action Send a return and click the Add button.
Send cell contentsIndicates that the contents of the cell will be sent to the document when the cell is selected.
Cell ActionsIndicates that the cell has actions.
LinkWhen this icon is bold it indicates a link to another grid.
Communicate: SymWriter User Guide
56
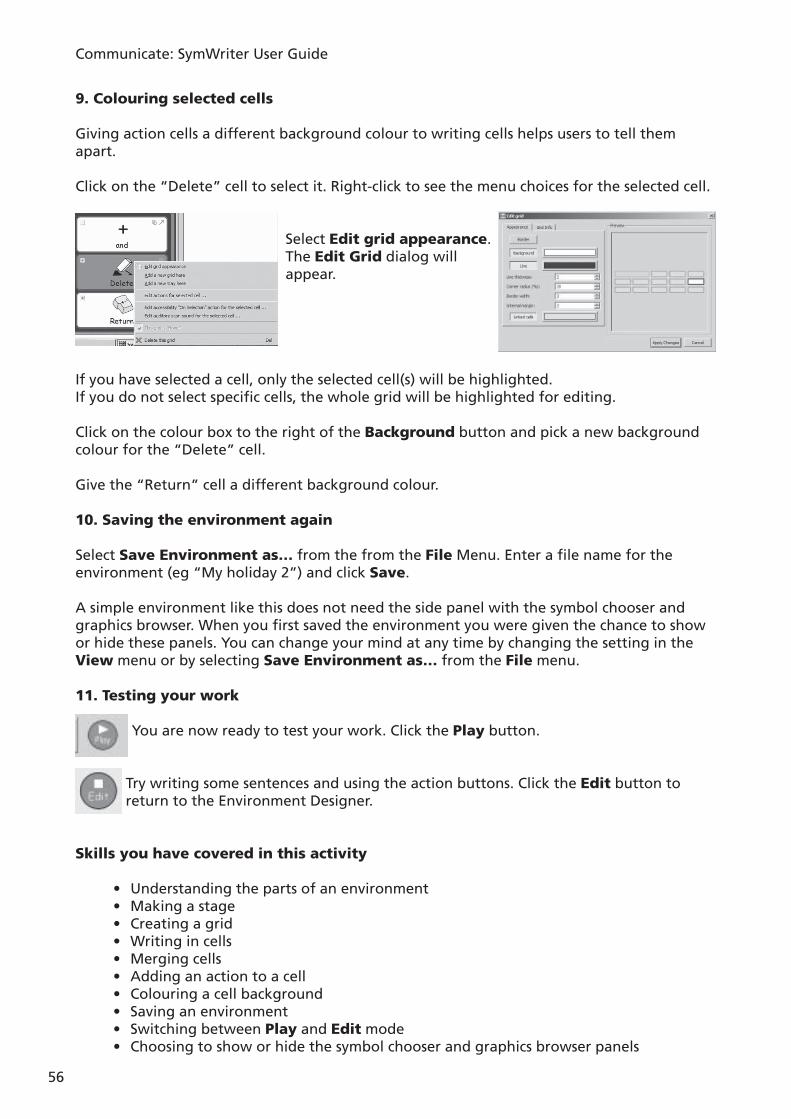
9. Colouring selected cells
Giving action cells a different background colour to writing cells helps users to tell them apart.
Click on the “Delete” cell to select it. Right-click to see the menu choices for the selected cell.
Select Edit grid appearance. The Edit Grid dialog will appear.
If you have selected a cell, only the selected cell(s) will be highlighted.If you do not select specifi c cells, the whole grid will be highlighted for editing.
Click on the colour box to the right of the Background button and pick a new background colour for the “Delete” cell.
Give the “Return” cell a different background colour.
10. Saving the environment again
Select Save Environment as… from the from the File Menu. Enter a fi le name for the environment (eg “My holiday 2”) and click Save.
A simple environment like this does not need the side panel with the symbol chooser and graphics browser. When you fi rst saved the environment you were given the chance to show or hide these panels. You can change your mind at any time by changing the setting in the View menu or by selecting Save Environment as… from the File menu.
11. Testing your work
You are now ready to test your work. Click the Play button.
Try writing some sentences and using the action buttons. Click the Edit button to return to the Environment Designer.
Skills you have covered in this activity
• Understanding the parts of an environment• Making a stage• Creating a grid• Writing in cells• Merging cells• Adding an action to a cell• Colouring a cell background• Saving an environment• Switching between Play and Edit mode• Choosing to show or hide the symbol chooser and graphics browser panels
Communicate: SymWriter User Guide
57
B2.2 Sequence of grids for structured writing
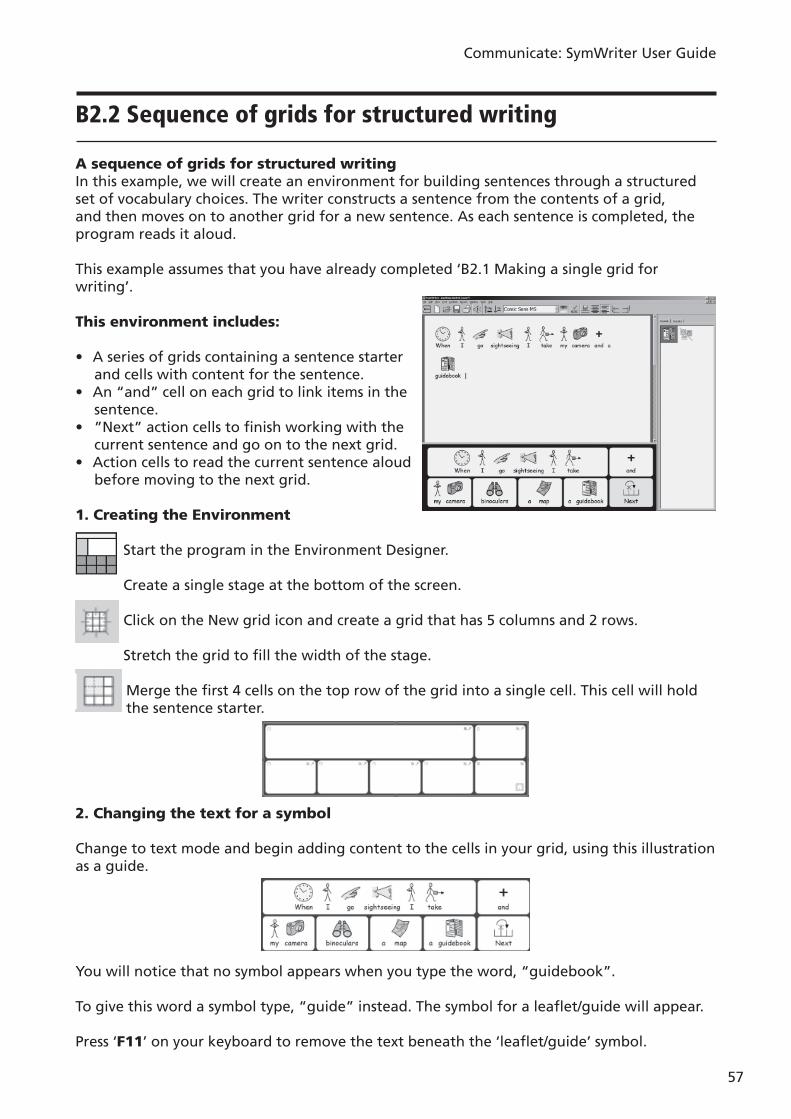
A sequence of grids for structured writingIn this example, we will create an environment for building sentences through a structured set of vocabulary choices. The writer constructs a sentence from the contents of a grid, and then moves on to another grid for a new sentence. As each sentence is completed, the program reads it aloud.
This example assumes that you have already completed ‘ B2.1 Making a single grid for writing ’.
This environment includes:
• A series of grids containing a sentence starter and cells with content for the sentence.
• An “and” cell on each grid to link items in the sentence.
• ”Next” action cells to fi nish working with the current sentence and go on to the next grid.
• Action cells to read the current sentence aloud before moving to the next grid.
1. Creating the Environment
Start the program in the Environment Designer.
Create a single stage at the bottom of the screen.
Click on the New grid icon and create a grid that has 5 columns and 2 rows.
Stretch the grid to fi ll the width of the stage.
Merge the fi rst 4 cells on the top row of the grid into a single cell. This cell will hold the sentence starter.
2. Changing the text for a symbol
Change to text mode and begin adding content to the cells in your grid, using this illustration as a guide.
You will notice that no symbol appears when you type the word, “guidebook”.
To give this word a symbol type, “guide” instead. The symbol for a leafl et/guide will appear.
Press ‘F11’ on your keyboard to remove the text beneath the ‘leafl et/guide’ symbol.
Communicate: SymWriter User Guide
58
Type “guidebook” - but instead of pressing the spacebar on your keyboard to fi nish the word, press the right arrow key. This will tell the program that you have fi nished replacing the text for a symbol.
Finish adding the content from the illustration to the cells in your grid.
3. Adding actions to the “Next” cell
In a moment, we will use the “Next” cell to link to another grid. Before we do that, there are some other actions that need to be added to the “Next” cell.
Press F2 or click on the text/arrow mode button to change to arrow mode, and then select the “Next” cell.
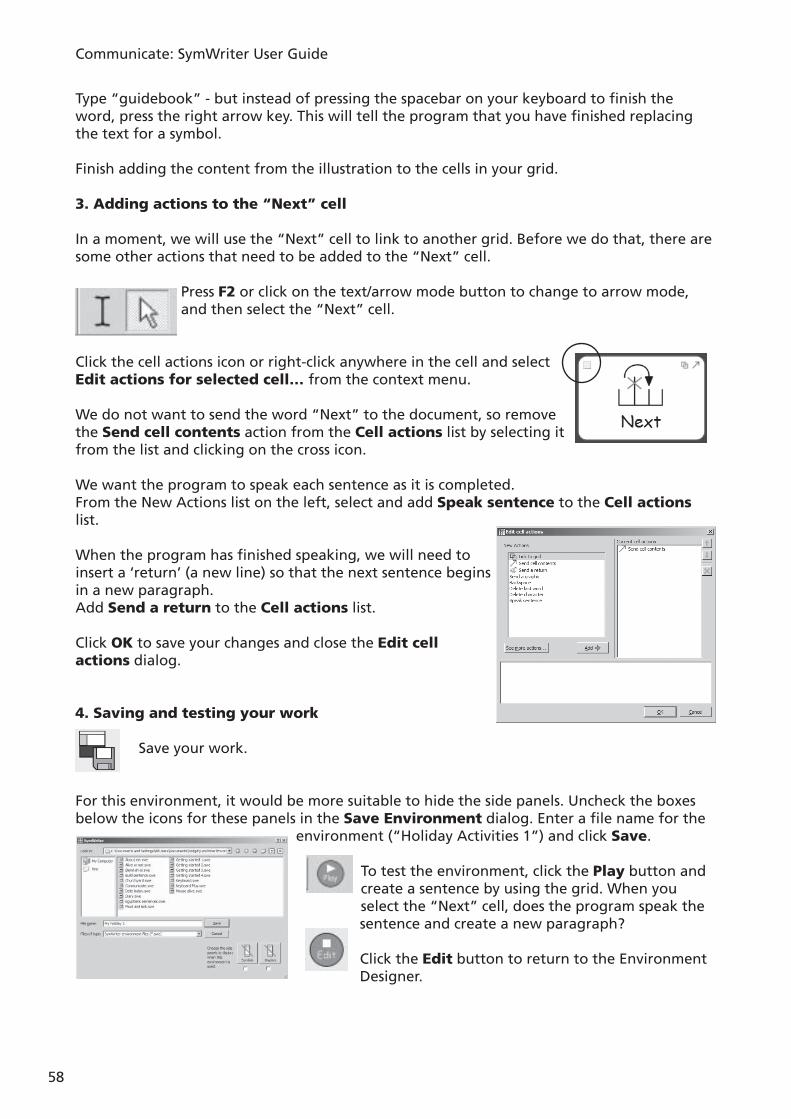
Click the cell actions icon or right-click anywhere in the cell and select Edit actions for selected cell… from the context menu.
We do not want to send the word “Next” to the document, so remove the Send cell contents action from the Cell actions list by selecting it from the list and clicking on the cross icon.
We want the program to speak each sentence as it is completed.From the New Actions list on the left, select and add Speak sentence to the Cell actions list.
When the program has fi nished speaking, we will need to insert a ‘return’ (a new line) so that the next sentence begins in a new paragraph.Add Send a return to the Cell actions list.
Click OK to save your changes and close the Edit cell actions dialog.
4. Saving and testing your work
Save your work.
For this environment, it would be more suitable to hide the side panels. Uncheck the boxes below the icons for these panels in the Save Environment dialog. Enter a fi le name for the
environment (“Holiday Activities 1”) and click Save.
To test the environment, click the Play button and create a sentence by using the grid. When you select the “Next” cell, does the program speak the sentence and create a new paragraph?
Click the Edit button to return to the Environment Designer.
Communicate: SymWriter User Guide
59
5. Adding the next grid
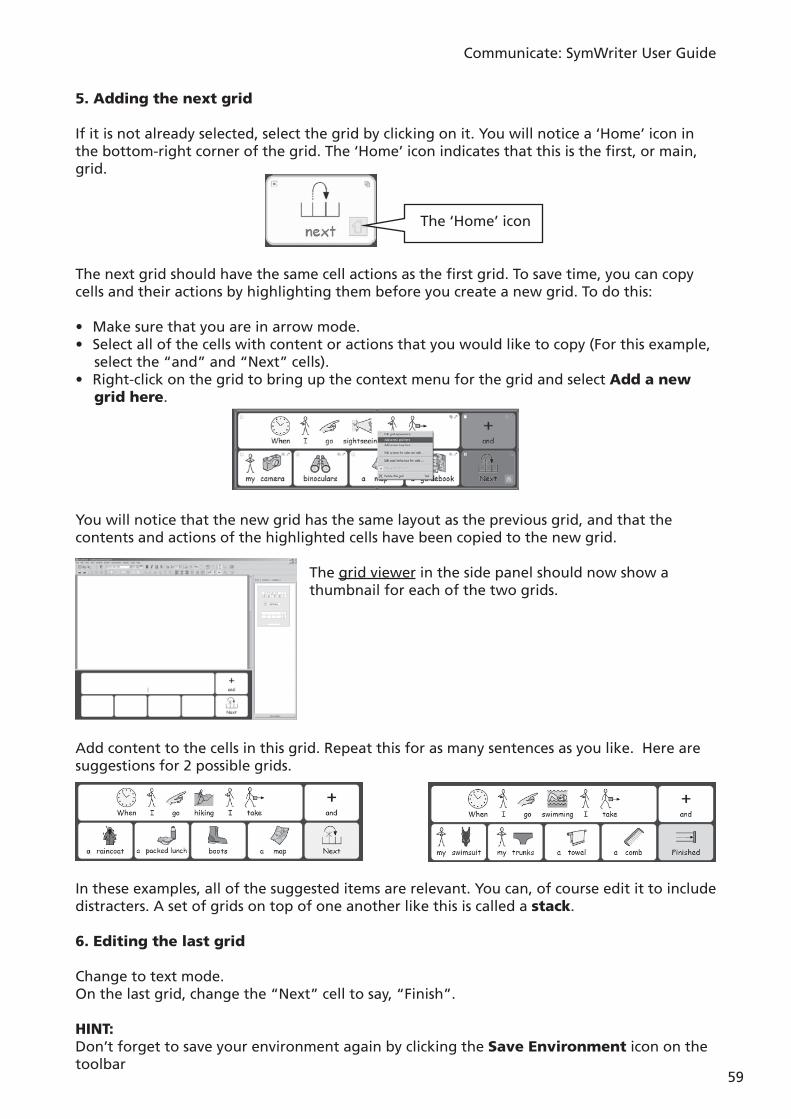
If it is not already selected, select the grid by clicking on it. You will notice a ‘Home’ icon in the bottom-right corner of the grid. The ‘Home’ icon indicates that this is the fi rst, or main, grid.
The next grid should have the same cell actions as the fi rst grid. To save time, you can copy cells and their actions by highlighting them before you create a new grid. To do this:
• Make sure that you are in arrow mode.• Select all of the cells with content or actions that you would like to copy (For this example,
select the “and” and “Next” cells).• Right-click on the grid to bring up the context menu for the grid and select Add a new
grid here.
You will notice that the new grid has the same layout as the previous grid, and that the contents and actions of the highlighted cells have been copied to the new grid.
The grid viewer in the side panel should now show a thumbnail for each of the two grids.
Add content to the cells in this grid. Repeat this for as many sentences as you like. Here are suggestions for 2 possible grids.
In these examples, all of the suggested items are relevant. You can, of course edit it to include distracters. A set of grids on top of one another like this is called a stack.
6. Editing the last grid
Change to text mode.On the last grid, change the “Next” cell to say, “Finish”.
HINT: Don’t forget to save your environment again by clicking the Save Environment icon on the toolbar
The ‘Home’ icon
Communicate: SymWriter User Guide
60
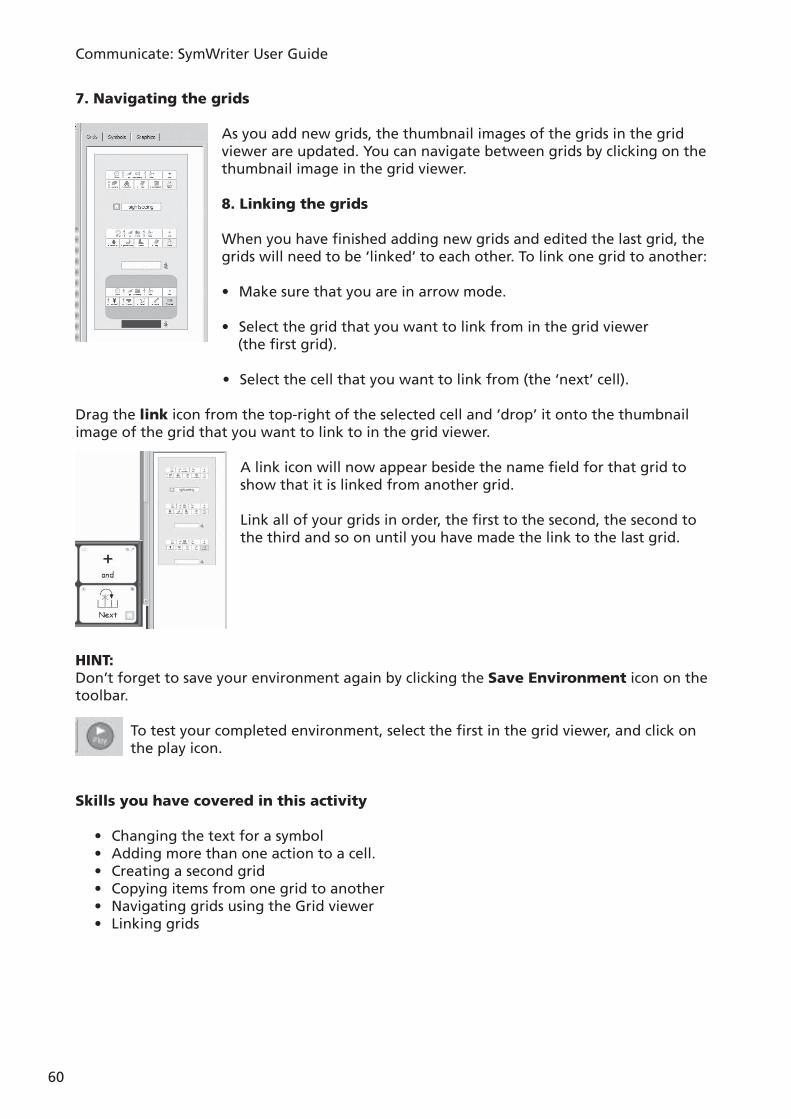
7. Navigating the grids
As you add new grids, the thumbnail images of the grids in the grid viewer are updated. You can navigate between grids by clicking on the thumbnail image in the grid viewer.
8. Linking the grids
When you have fi nished adding new grids and edited the last grid, the grids will need to be ‘linked’ to each other. To link one grid to another:
• Make sure that you are in arrow mode.
• Select the grid that you want to link from in the grid viewer (the fi rst grid).
• Select the cell that you want to link from (the ‘next’ cell).
Drag the link icon from the top-right of the selected cell and ‘drop’ it onto the thumbnail image of the grid that you want to link to in the grid viewer.
A link icon will now appear beside the name fi eld for that grid to show that it is linked from another grid.
Link all of your grids in order, the fi rst to the second, the second to the third and so on until you have made the link to the last grid.
HINT: Don’t forget to save your environment again by clicking the Save Environment icon on the toolbar.
To test your completed environment, select the fi rst in the grid viewer, and click on the play icon.
Skills you have covered in this activity
• Changing the text for a symbol• Adding more than one action to a cell.• Creating a second grid• Copying items from one grid to another• Navigating grids using the Grid viewer• Linking grids
Communicate: SymWriter User Guide
61
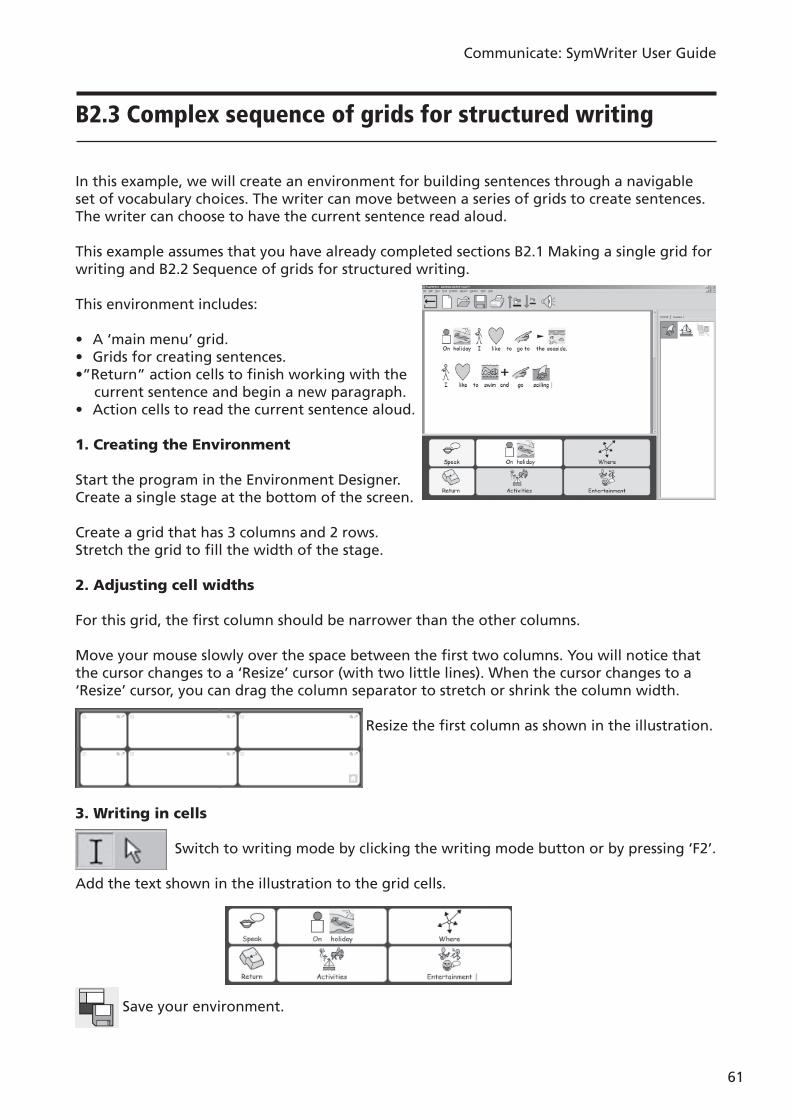
B2.3 Complex sequence of grids for structured writing
In this example, we will create an environment for building sentences through a navigable set of vocabulary choices. The writer can move between a series of grids to create sentences. The writer can choose to have the current sentence read aloud.
This example assumes that you have already completed sections B2.1 Making a single grid for writing and B2.2 Sequence of grids for structured writing .
This environment includes:
• A ‘main menu’ grid.• Grids for creating sentences.•”Return” action cells to fi nish working with the
current sentence and begin a new paragraph.• Action cells to read the current sentence aloud.
1. Creating the Environment
Start the program in the Environment Designer.Create a single stage at the bottom of the screen.
Create a grid that has 3 columns and 2 rows. Stretch the grid to fi ll the width of the stage.
2. Adjusting cell widths
For this grid, the fi rst column should be narrower than the other columns.
Move your mouse slowly over the space between the fi rst two columns. You will notice that the cursor changes to a ‘Resize’ cursor (with two little lines). When the cursor changes to a ‘Resize’ cursor, you can drag the column separator to stretch or shrink the column width.
Resize the fi rst column as shown in the illustration.
3. Writing in cells
Switch to writing mode by clicking the writing mode button or by pressing ‘F2’.
Add the text shown in the illustration to the grid cells.
Save your environment.
Communicate: SymWriter User Guide
62
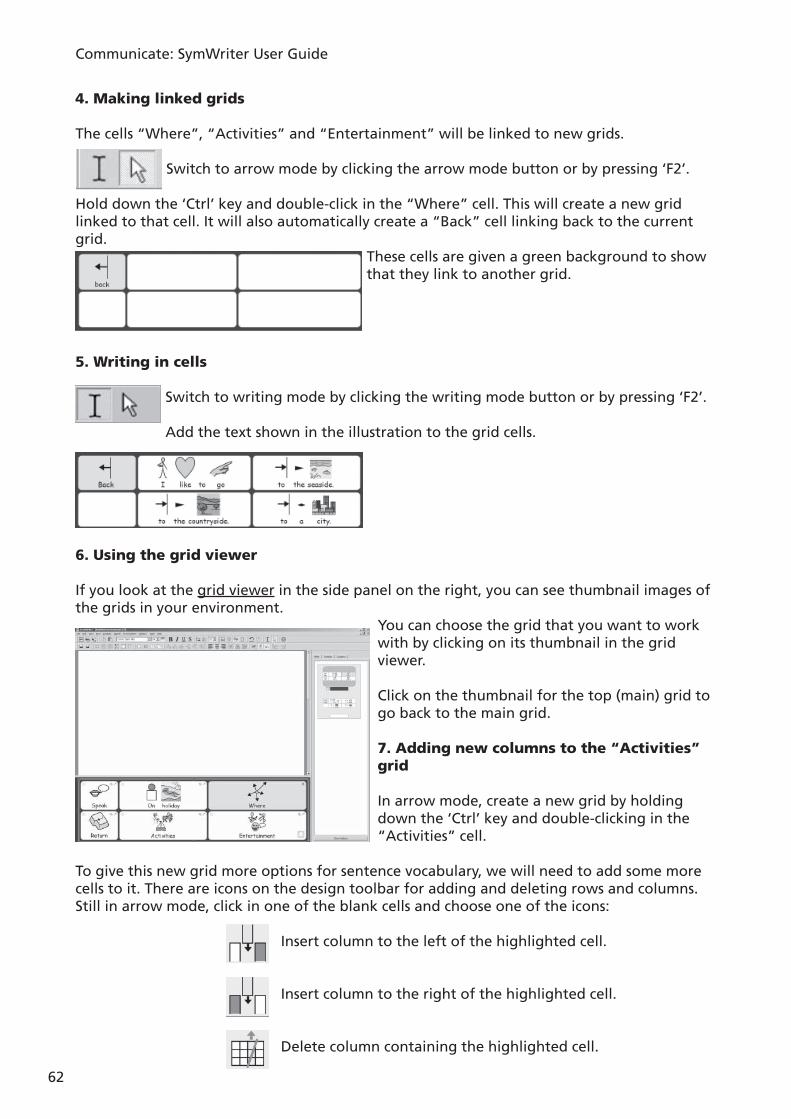
4. Making linked grids
The cells “Where”, “Activities” and “Entertainment” will be linked to new grids.
Switch to arrow mode by clicking the arrow mode button or by pressing ‘F2’.
Hold down the ‘Ctrl’ key and double-click in the “Where” cell. This will create a new grid linked to that cell. It will also automatically create a “Back” cell linking back to the current grid.
These cells are given a green background to show that they link to another grid.
5. Writing in cells
Switch to writing mode by clicking the writing mode button or by pressing ‘F2’.
Add the text shown in the illustration to the grid cells.
6. Using the grid viewer
If you look at the grid viewer in the side panel on the right, you can see thumbnail images of the grids in your environment.
You can choose the grid that you want to work with by clicking on its thumbnail in the grid viewer.
Click on the thumbnail for the top (main) grid to go back to the main grid.
7. Adding new columns to the “Activities” grid
In arrow mode, create a new grid by holding down the ‘Ctrl’ key and double-clicking in the “Activities” cell.
To give this new grid more options for sentence vocabulary, we will need to add some more cells to it. There are icons on the design toolbar for adding and deleting rows and columns. Still in arrow mode, click in one of the blank cells and choose one of the icons:
Insert column to the left of the highlighted cell.
Insert column to the right of the highlighted cell.
Delete column containing the highlighted cell.
Communicate: SymWriter User Guide
63
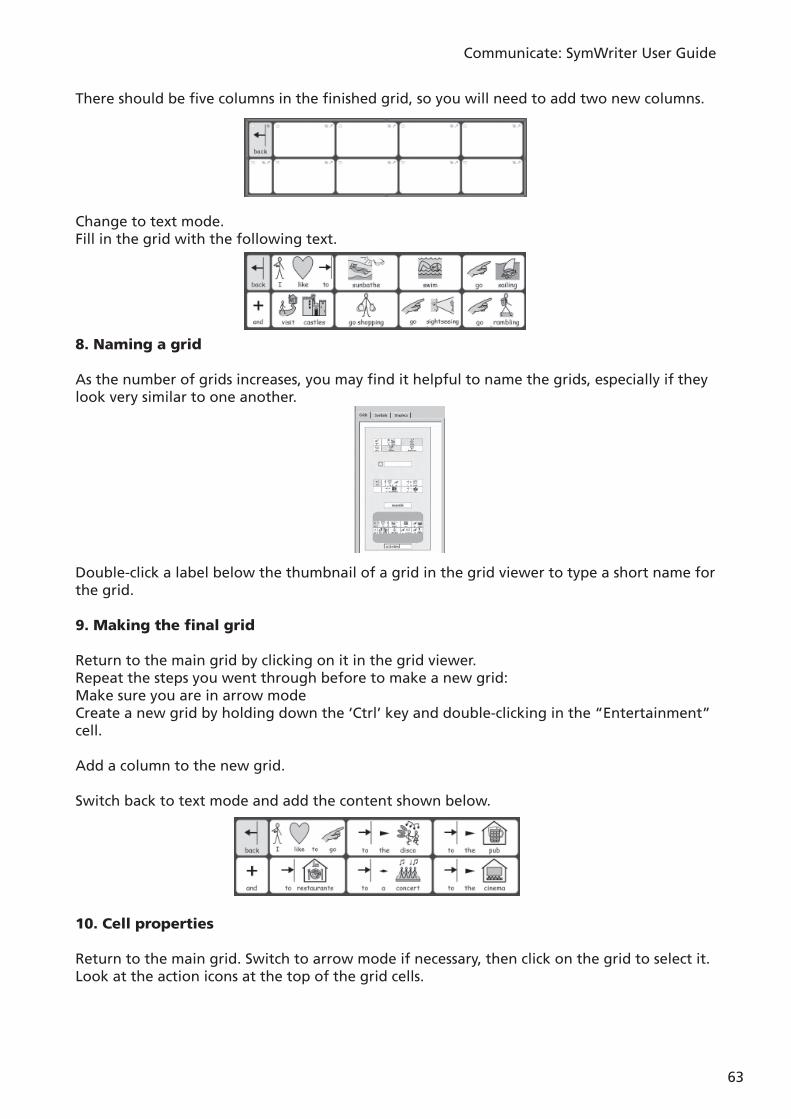
There should be fi ve columns in the fi nished grid, so you will need to add two new columns.
Change to text mode.Fill in the grid with the following text.
8. Naming a grid
As the number of grids increases, you may fi nd it helpful to name the grids, especially if they look very similar to one another.
Double-click a label below the thumbnail of a grid in the grid viewer to type a short name for the grid.
9. Making the fi nal grid
Return to the main grid by clicking on it in the grid viewer.Repeat the steps you went through before to make a new grid: Make sure you are in arrow mode Create a new grid by holding down the ‘Ctrl’ key and double-clicking in the “Entertainment” cell.
Add a column to the new grid.
Switch back to text mode and add the content shown below.
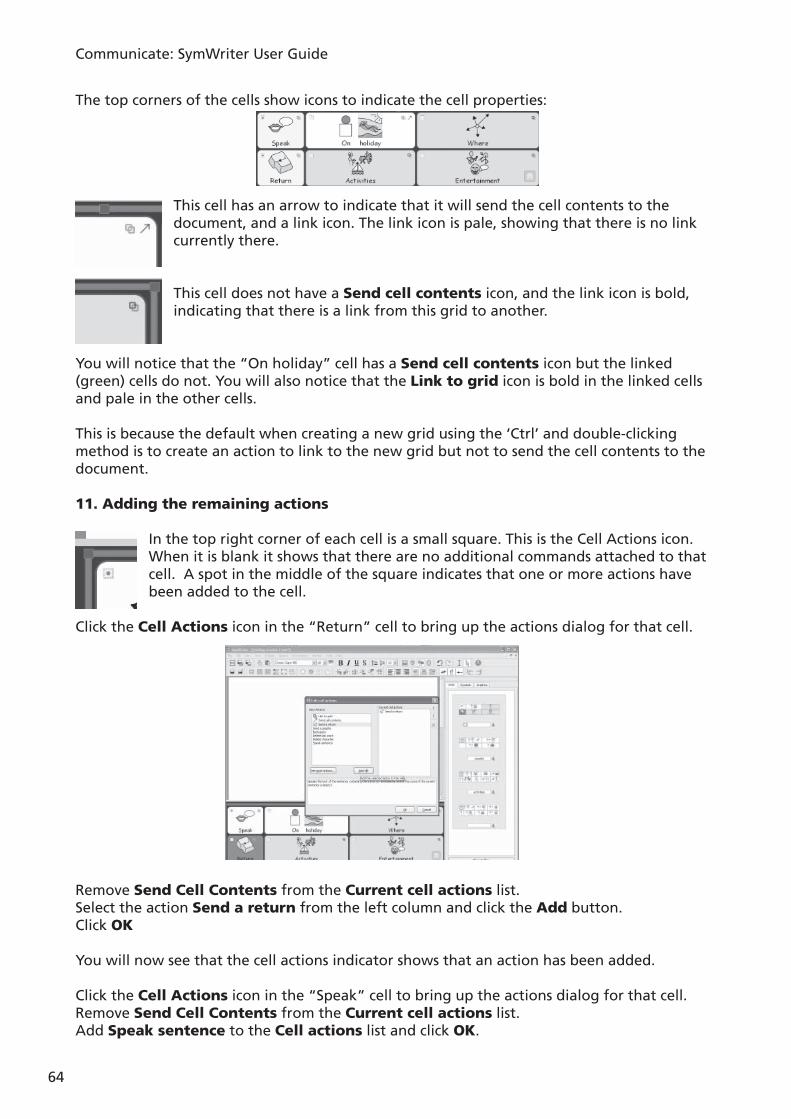
10. Cell properties
Return to the main grid. Switch to arrow mode if necessary, then click on the grid to select it. Look at the action icons at the top of the grid cells.
Communicate: SymWriter User Guide
64
The top corners of the cells show icons to indicate the cell properties:
This cell has an arrow to indicate that it will send the cell contents to the document, and a link icon. The link icon is pale, showing that there is no link currently there.
This cell does not have a Send cell contents icon, and the link icon is bold, indicating that there is a link from this grid to another.
You will notice that the “On holiday” cell has a Send cell contents icon but the linked (green) cells do not. You will also notice that the Link to grid icon is bold in the linked cells and pale in the other cells.
This is because the default when creating a new grid using the ‘Ctrl’ and double-clicking method is to create an action to link to the new grid but not to send the cell contents to the document.
11. Adding the remaining actions
In the top right corner of each cell is a small square. This is the Cell Actions icon. When it is blank it shows that there are no additional commands attached to that cell. A spot in the middle of the square indicates that one or more actions have been added to the cell.
Click the Cell Actions icon in the “Return” cell to bring up the actions dialog for that cell.
Remove Send Cell Contents from the Current cell actions list.Select the action Send a return from the left column and click the Add button.Click OK
You will now see that the cell actions indicator shows that an action has been added.
Click the Cell Actions icon in the “Speak” cell to bring up the actions dialog for that cell.Remove Send Cell Contents from the Current cell actions list.Add Speak sentence to the Cell actions list and click OK.
Communicate: SymWriter User Guide
65
12. Colouring selected cells
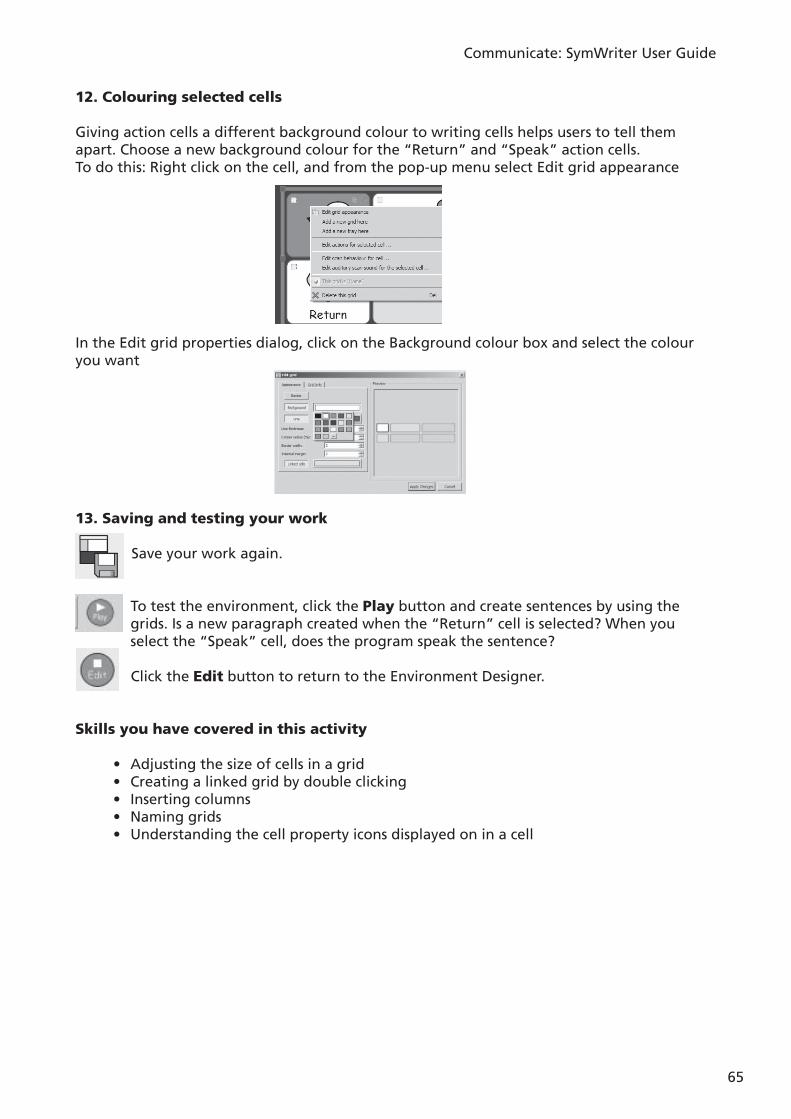
Giving action cells a different background colour to writing cells helps users to tell them apart. Choose a new background colour for the “Return” and “Speak” action cells.To do this: Right click on the cell, and from the pop-up menu select Edit grid appearance
In the Edit grid properties dialog, click on the Background colour box and select the colour you want
13. Saving and testing your work
Save your work again.
To test the environment, click the Play button and create sentences by using the grids. Is a new paragraph created when the “Return” cell is selected? When you select the “Speak” cell, does the program speak the sentence?
Click the Edit button to return to the Environment Designer.
Skills you have covered in this activity
• Adjusting the size of cells in a grid• Creating a linked grid by double clicking• Inserting columns• Naming grids • Understanding the cell property icons displayed on in a cell
Communicate: SymWriter User Guide
66
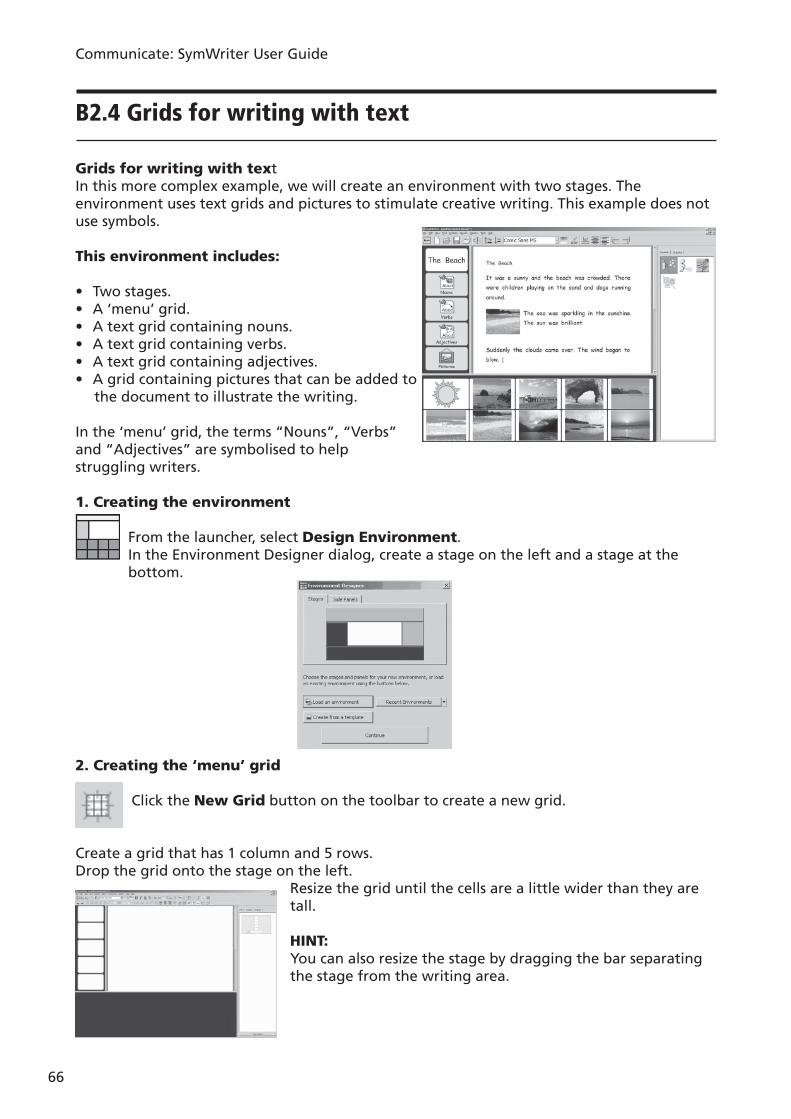
B2.4 Grids for writing with text
Grids for writing with textIn this more complex example, we will create an environment with two stages. The environment uses text grids and pictures to stimulate creative writing. This example does not use symbols.
This environment includes:
• Two stages.• A ‘menu’ grid.• A text grid containing nouns.• A text grid containing verbs.• A text grid containing adjectives.• A grid containing pictures that can be added to
the document to illustrate the writing.
In the ‘menu’ grid, the terms “Nouns”, “Verbs” and “Adjectives” are symbolised to help struggling writers.
1. Creating the environment
From the launcher, select Design Environment.In the Environment Designer dialog, create a stage on the left and a stage at the bottom.
2. Creating the ‘menu’ grid
Click the New Grid button on the toolbar to create a new grid.
Create a grid that has 1 column and 5 rows.Drop the grid onto the stage on the left.
Resize the grid until the cells are a little wider than they are tall.
HINT: You can also resize the stage by dragging the bar separating the stage from the writing area.
Communicate: SymWriter User Guide
67
3. Adding the contents of the ‘menu’ grid
Press F2, or use the text/arrow mode icons to change to text mode.
The fi rst cell in the menu grid will contain text. The other cells in the grid will contain both text and symbols. Switch to text mode.
Click in the fi rst cell then click the Show/Hide symbols button on the toolbar. Clicking the Show/Hide symbols button will toggle between showing and hiding symbols for the selected cell.
Add the content shown in the illustration to the ‘menu’ grid. You may need to remove the plural qualifi ers in the grid. Click in the word and then on the plural qualifi ers icon on the toolbar.
4. Creating the ‘nouns’ grid
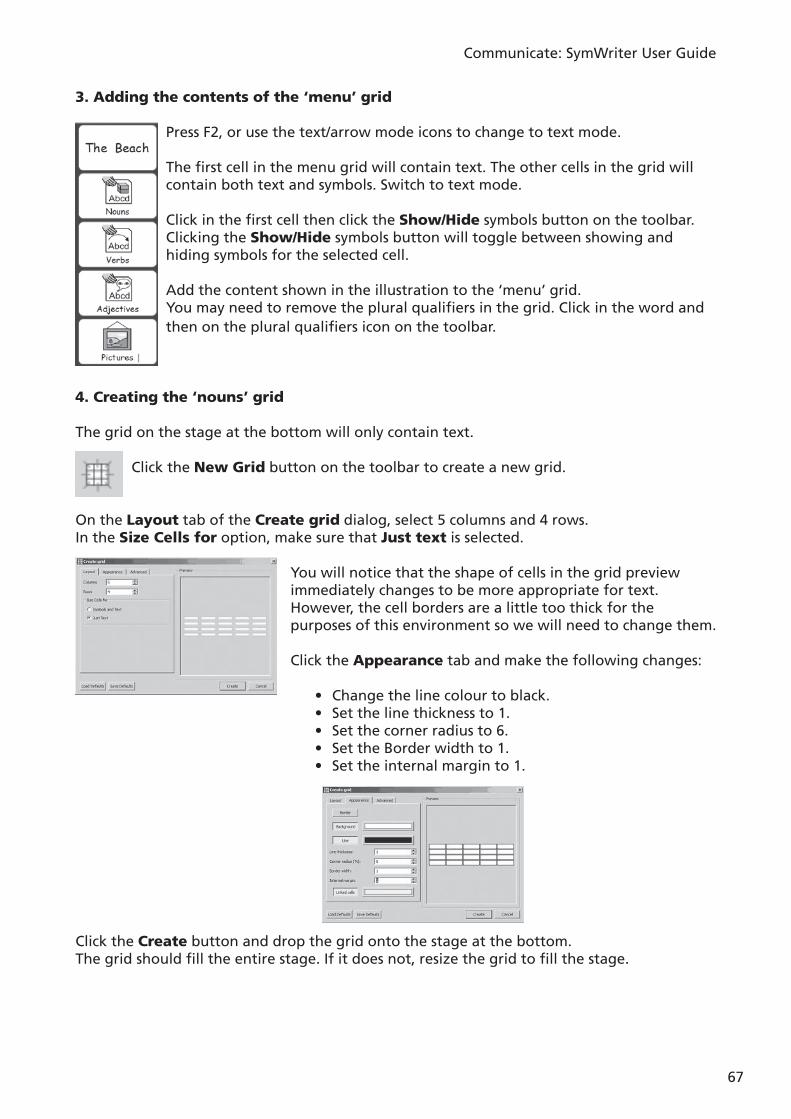
The grid on the stage at the bottom will only contain text.
Click the New Grid button on the toolbar to create a new grid.
On the Layout tab of the Create grid dialog, select 5 columns and 4 rows.In the Size Cells for option, make sure that Just text is selected.
You will notice that the shape of cells in the grid preview immediately changes to be more appropriate for text. However, the cell borders are a little too thick for the purposes of this environment so we will need to change them.
Click the Appearance tab and make the following changes:
• Change the line colour to black. • Set the line thickness to 1.
• Set the corner radius to 6. • Set the Border width to 1. • Set the internal margin to 1.
Click the Create button and drop the grid onto the stage at the bottom.The grid should fi ll the entire stage. If it does not, resize the grid to fi ll the stage.
Communicate: SymWriter User Guide
68
5. Adding content to the ‘nouns’ grid
Fill in the grid with nouns about the sea and the seaside. Here are some suggestions:
Don’t forget to type a space after each word so that the words don’t join together when they are sent to the document.
You may notice that as you type, the text in some cells changes size to make the word fi t into the available space. When you have fi nished adding all of the text, click the Tidy cells button on the toolbar to make the font size in all of the cells the same.
6. Creating the ‘verbs’ grid
In arrow mode, right-click on the ‘nouns’ grid to bring up the context menu for the grid.
Select Add a new grid here to create a blank grid on top of the ‘nouns’ grid.
7. Adding content to the ‘verbs’ grid
In text mode, fi ll in the grid with verbs that writers can use when creating sentences about their time at the seaside. Here are some suggestions:
Repeat this process by clicking on the ‘verbs’ grid to add a new grid for the ‘adjectives’ and add in content.
8. Creating the ‘pictures’ grid
The fi nal grid will be used to send pictures to the document as illustrations. The pictures can be photographs, symbols or other pictures from your computer.
Create a new grid as described above. This grid only needs 2 rows, so we will need to delete two rows.
Click in a cell on the grid to select it and then click the Delete row button on the toolbar.
The fi nished grid should have 5 columns and 2 rows.

Communicate: SymWriter User Guide
69
9. Adding pictures to the ‘pictures’ grid
Click on the Graphics tab in the side panel to open the graphics browser.If you cannot see the Graphics tab in the side panel, select Graphics browser from the View menu.
There are 3 buttons at the top of the Graphics tab. The fi rst is for moving between folders. The other two buttons toggle between the Insert pictures option and the Replace symbol option.
Insert pictures will allow you to add supporting graphics to your environment.
Replace symbols will allow you to replace the symbol above a word with a picture or another symbol.
Make sure that the Insert pictures option is selected.
A number of photographs are supplied with the program. You can fi nd them in the “Widgit Pictures” folder. There is a shortcut button for the “Widgit Pictures” folder at the bottom of the graphics browser. Open the “Widgit Pictures” folder, then open the “Photos” folder. The “sunset” picture is in this place. The other photos in this example are from the “Nature” folder, within “Photos.
To add a picture to a cell in the grid, click once on one of the photos and then on the cell in the ‘pictures’ grid.
If you would like to use symbols as well as pictures:
• Click on the Symbols tab in the side panel to show the symbol browser.
• Make sure that the Insert pictures option is selected.
• Type the name of the symbol that you would like to use, e.g. “wind break”, into the box at the bottom of the symbol browser and press the Find symbol button.
To add a symbol to a cell in the grid, click once on the symbol in the symbol browser and then on the cell in the ‘pictures’ grid.
Finish fi lling the ‘pictures’ grid with pictures or symbols.
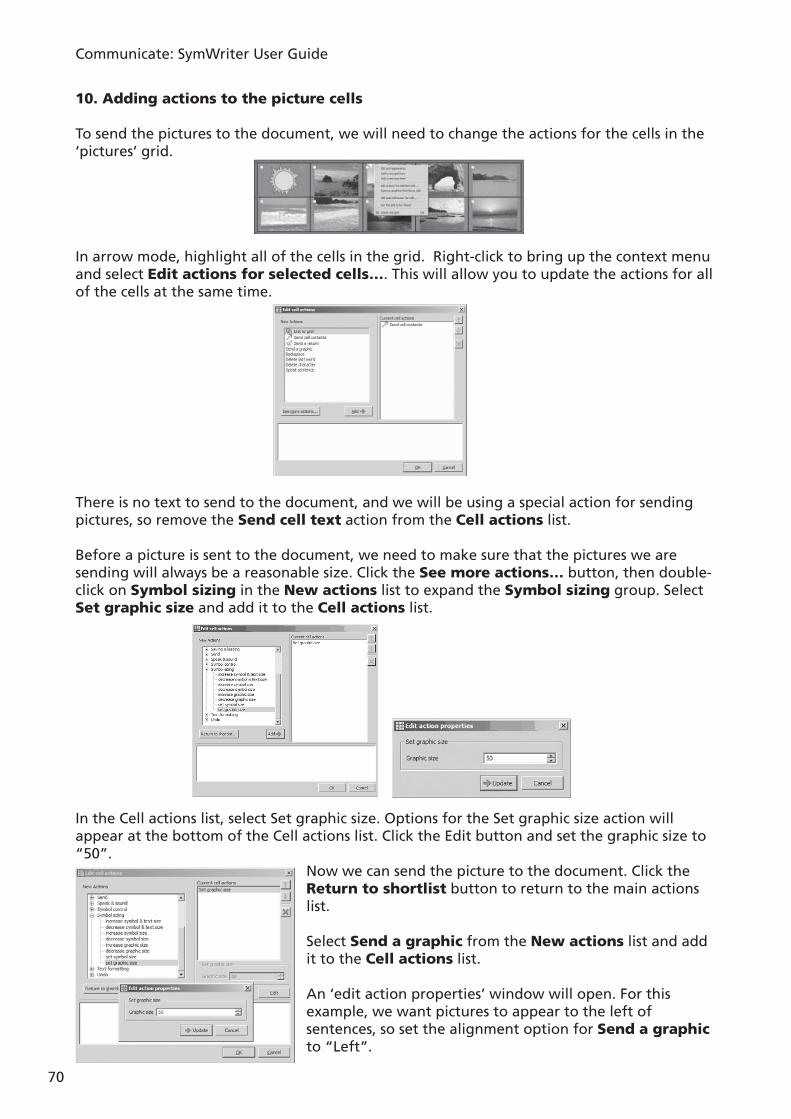
Communicate: SymWriter User Guide
70
10. Adding actions to the picture cells
To send the pictures to the document, we will need to change the actions for the cells in the ‘pictures’ grid.
In arrow mode, highlight all of the cells in the grid. Right-click to bring up the context menu and select Edit actions for selected cells…. This will allow you to update the actions for all of the cells at the same time.
There is no text to send to the document, and we will be using a special action for sending pictures, so remove the Send cell text action from the Cell actions list.
Before a picture is sent to the document, we need to make sure that the pictures we are sending will always be a reasonable size. Click the See more actions… button, then double-click on Symbol sizing in the New actions list to expand the Symbol sizing group. Select Set graphic size and add it to the Cell actions list.
In the Cell actions list, select Set graphic size. Options for the Set graphic size action will appear at the bottom of the Cell actions list. Click the Edit button and set the graphic size to “50”.
Now we can send the picture to the document. Click the Return to shortlist button to return to the main actions list.
Select Send a graphic from the New actions list and add it to the Cell actions list.
An ‘edit action properties’ window will open. For this example, we want pictures to appear to the left of sentences, so set the alignment option for Send a graphic to “Left”.
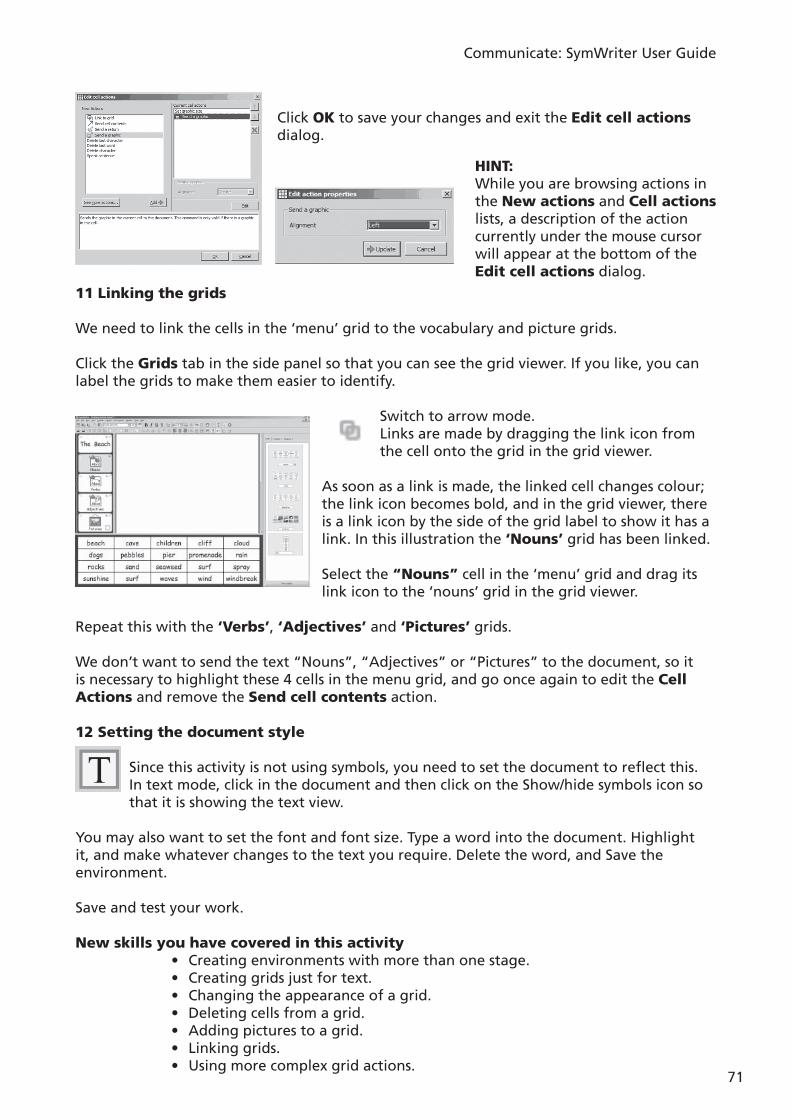
Communicate: SymWriter User Guide
71
Click OK to save your changes and exit the Edit cell actions dialog.
11 Linking the grids
We need to link the cells in the ‘menu’ grid to the vocabulary and picture grids.
Click the Grids tab in the side panel so that you can see the grid viewer. If you like, you can label the grids to make them easier to identify.
Switch to arrow mode.Links are made by dragging the link icon from the cell onto the grid in the grid viewer.
As soon as a link is made, the linked cell changes colour; the link icon becomes bold, and in the grid viewer, there is a link icon by the side of the grid label to show it has a link. In this illustration the ‘Nouns’ grid has been linked.
Select the “Nouns” cell in the ‘menu’ grid and drag its link icon to the ‘nouns’ grid in the grid viewer.
Repeat this with the ‘Verbs’, ‘Adjectives’ and ‘Pictures’ grids.
We don’t want to send the text “Nouns”, “Adjectives” or “Pictures” to the document, so it is necessary to highlight these 4 cells in the menu grid, and go once again to edit the Cell Actions and remove the Send cell contents action.
12 Setting the document style
Since this activity is not using symbols, you need to set the document to refl ect this. In text mode, click in the document and then click on the Show/hide symbols icon so that it is showing the text view.
You may also want to set the font and font size. Type a word into the document. Highlight it, and make whatever changes to the text you require. Delete the word, and Save the environment.
Save and test your work.
New skills you have covered in this activity • Creating environments with more than one stage. • Creating grids just for text. • Changing the appearance of a grid. • Deleting cells from a grid. • Adding pictures to a grid. • Linking grids. • Using more complex grid actions.
HINT:While you are browsing actions in the New actions and Cell actions lists, a description of the action currently under the mouse cursor will appear at the bottom of the Edit cell actions dialog.
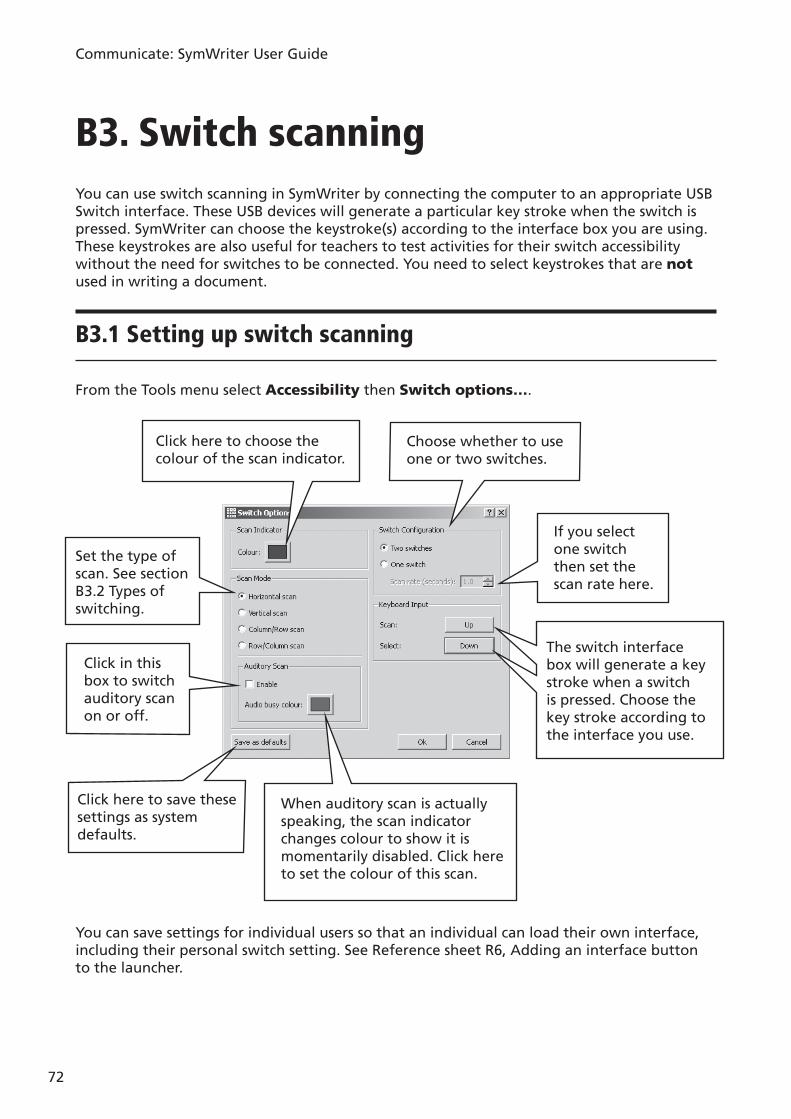
Communicate: SymWriter User Guide
72
B3.1 Setting up switch scanning
From the Tools menu select Accessibility then Switch options….
B3. Switch scanningYou can use switch scanning in SymWriter by connecting the computer to an appropriate USB Switch interface. These USB devices will generate a particular key stroke when the switch is pressed. SymWriter can choose the keystroke(s) according to the interface box you are using. These keystrokes are also useful for teachers to test activities for their switch accessibility without the need for switches to be connected. You need to select keystrokes that are not used in writing a document.
Choose whether to use one or two switches.
If you select one switch then set the scan rate here.
The switch interface box will generate a key stroke when a switch is pressed. Choose the key stroke according to the interface you use.
Click here to choose the colour of the scan indicator.
Set the type of scan. See section B3.2 Types of switching .
Click in this box to switch auditory scan on or off.
When auditory scan is actually speaking, the scan indicator changes colour to show it is momentarily disabled. Click here to set the colour of this scan.
Click here to save these settings as system defaults.
You can save settings for individual users so that an individual can load their own interface, including their personal switch setting. See Reference sheet R6, Adding an interface button to the launcher.

Communicate: SymWriter User Guide
73
B3.2 Types of switching
1. Horizontal scan. The scan indicator moves horizontally, and after the last cell in the row it moves to the left of the next row.
2. Vertical scan. The scan indicator moves vertically, and after the last cell in the column it moves to the top of the next column.
3. Column/row scan. The scan indicator indicates a whole column and moves to the next whole column with a single “beep”. When a selection is made, the scan moves down the individual cells in the column, after the bottom cell the scan indicator disappears and a double “beep” is heard. A selection at this time enables continuation of the scanning of whole columns in case a mistake in selecting that column has been made. Otherwise the scan continues at the top of the same column.
4. Row/column scan. The scan indicator indicates a whole row and moves to the next whole row with a single “beep”. When a selection is made, the scan moves along the individual cells in the row. After the right hand cell the scan indicator disappears and a double “beep” is heard. A selection at this time enables continuation of the scanning of whole rows, in case a mistake in selecting that row has been made. Otherwise the scan continues at the left of the same row.
These scans apply to regular grids. You can also scan irregular grids and other items in trays or on a stage. In these cases you must set the order of scanning by hand, as the computer has no information as to what is sensible. See section B3.4 Setting what happens after selection (regular grids) p75 .
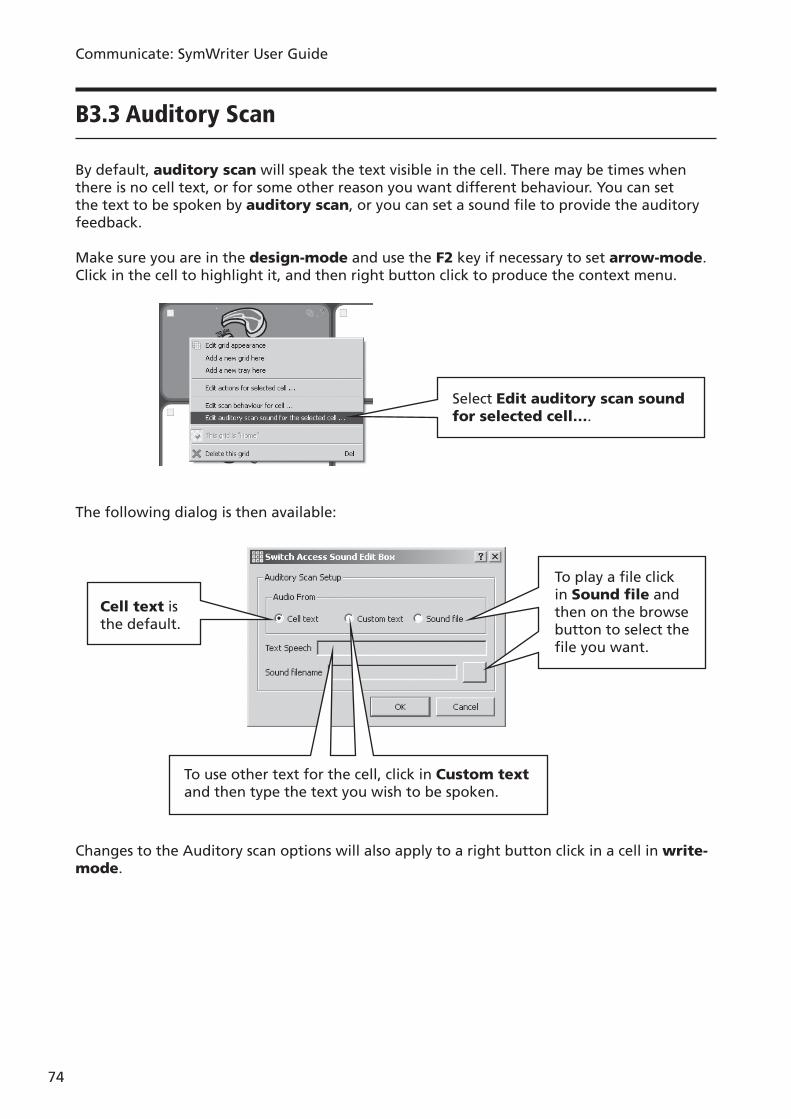
Communicate: SymWriter User Guide
74
B3.3 Auditory Scan
By default, auditory scan will speak the text visible in the cell. There may be times when there is no cell text, or for some other reason you want different behaviour. You can set the text to be spoken by auditory scan, or you can set a sound fi le to provide the auditory feedback.
Make sure you are in the design-mode and use the F2 key if necessary to set arrow-mode. Click in the cell to highlight it, and then right button click to produce the context menu.
Select Edit auditory scan sound for selected cell….
The following dialog is then available:
Cell text is the default.
To use other text for the cell, click in Custom text and then type the text you wish to be spoken.
To play a fi le click in Sound fi le and then on the browse button to select the fi le you want.
Changes to the Auditory scan options will also apply to a right button click in a cell in write-mode.
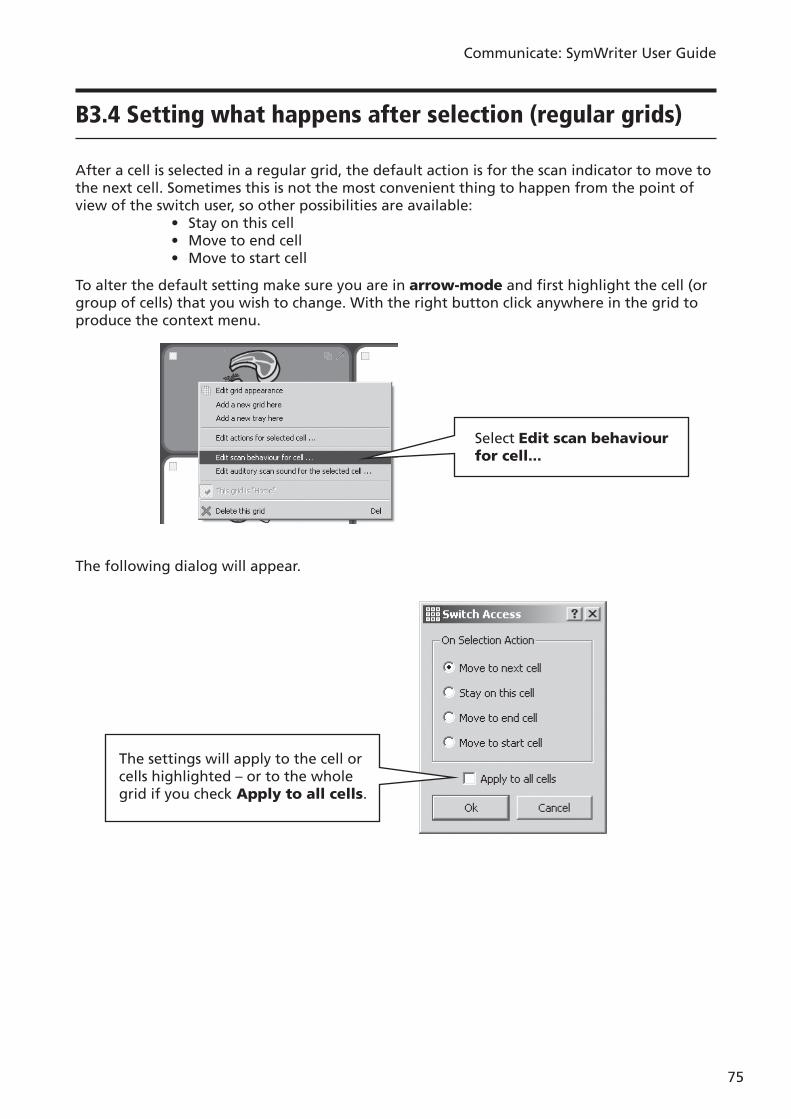
Communicate: SymWriter User Guide
75
B3.4 Setting what happens after selection (regular grids)
After a cell is selected in a regular grid, the default action is for the scan indicator to move to the next cell. Sometimes this is not the most convenient thing to happen from the point of view of the switch user, so other possibilities are available: • Stay on this cell • Move to end cell • Move to start cell
To alter the default setting make sure you are in arrow-mode and fi rst highlight the cell (or group of cells) that you wish to change. With the right button click anywhere in the grid to produce the context menu.
The following dialog will appear.
Select Edit scan behaviour for cell...
The settings will apply to the cell or cells highlighted – or to the whole grid if you check Apply to all cells.
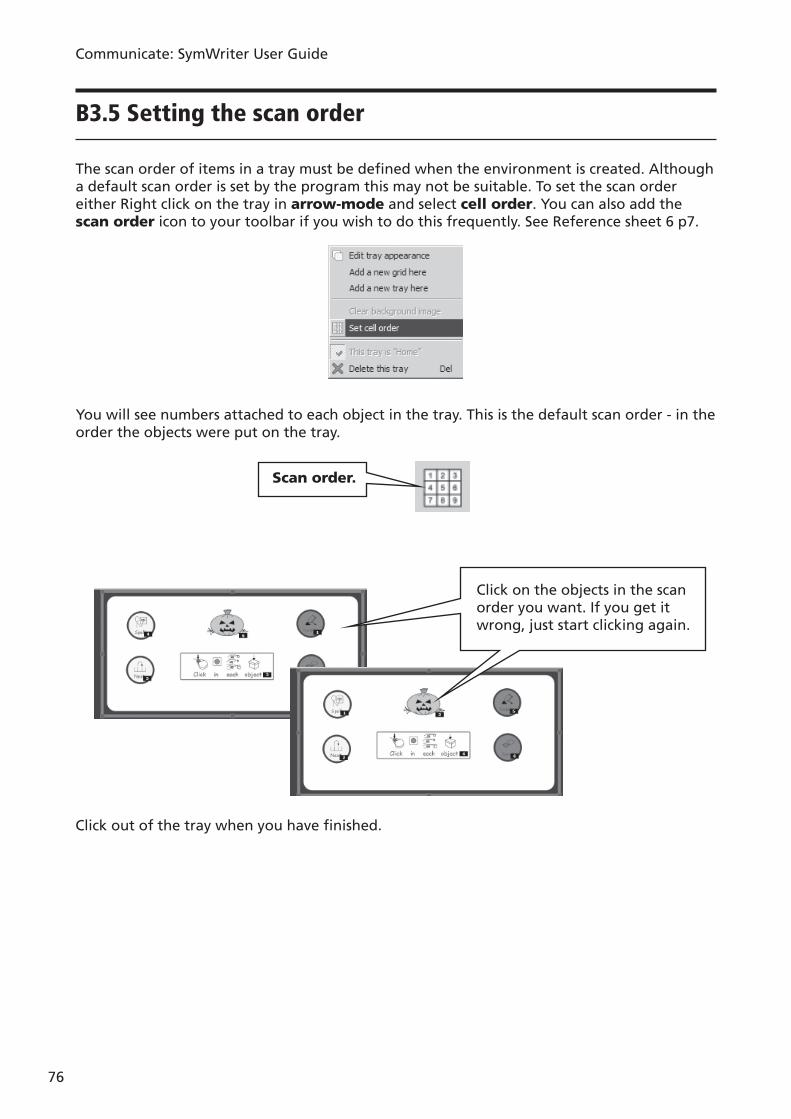
Communicate: SymWriter User Guide
76
B3.5 Setting the scan order
The scan order of items in a tray must be defi ned when the environment is created. Although a default scan order is set by the program this may not be suitable. To set the scan order either Right click on the tray in arrow-mode and select cell order. You can also add the scan order icon to your toolbar if you wish to do this frequently. See Reference sheet 6 p7.
You will see numbers attached to each object in the tray. This is the default scan order - in the order the objects were put on the tray.
Scan order.
Click on the objects in the scan order you want. If you get it wrong, just start clicking again.
Click out of the tray when you have fi nished.
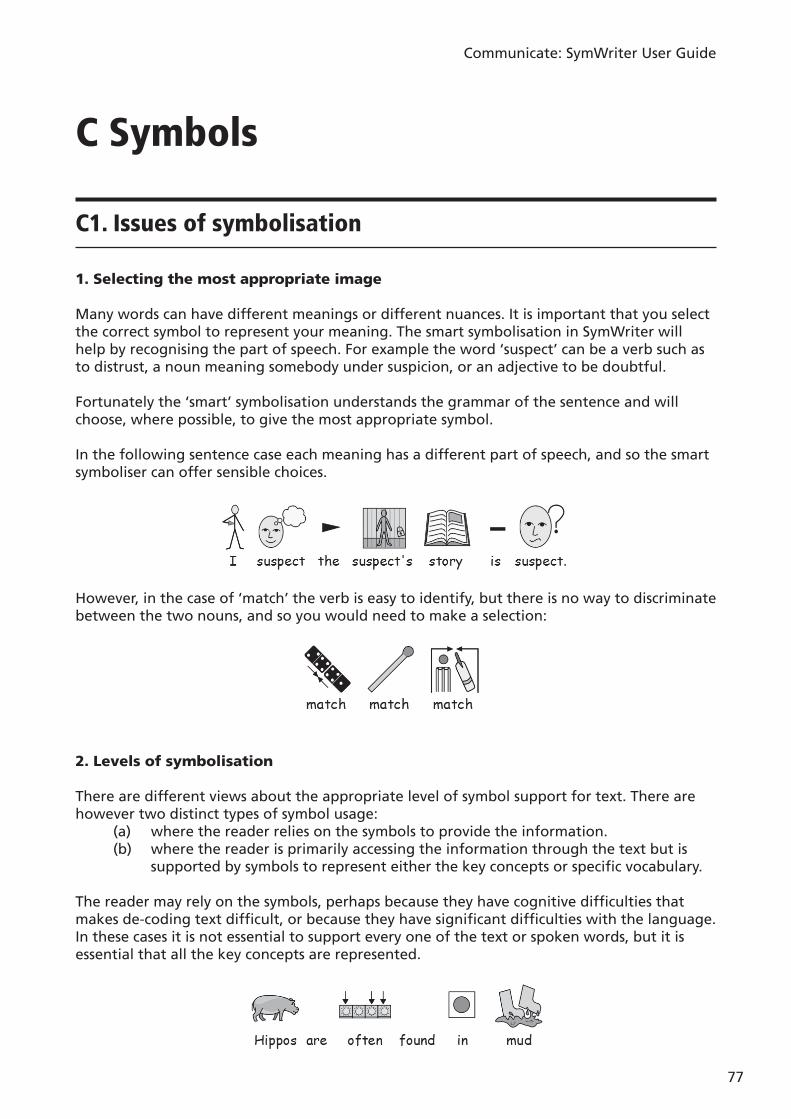
Communicate: SymWriter User Guide
77
C Symbols
C1. Issues of symbolisation
1. Selecting the most appropriate image
Many words can have different meanings or different nuances. It is important that you select the correct symbol to represent your meaning. The smart symbolisation in SymWriter will help by recognising the part of speech. For example the word ‘suspect’ can be a verb such as to distrust, a noun meaning somebody under suspicion, or an adjective to be doubtful.
Fortunately the ‘smart’ symbolisation understands the grammar of the sentence and will choose, where possible, to give the most appropriate symbol.
In the following sentence case each meaning has a different part of speech, and so the smart symboliser can offer sensible choices.
However, in the case of ‘match’ the verb is easy to identify, but there is no way to discriminate between the two nouns, and so you would need to make a selection:
2. Levels of symbolisation
There are different views about the appropriate level of symbol support for text. There are however two distinct types of symbol usage:
(a) where the reader relies on the symbols to provide the information.(b) where the reader is primarily accessing the information through the text but is
supported by symbols to represent either the key concepts or specifi c vocabulary.
The reader may rely on the symbols, perhaps because they have cognitive diffi culties that makes de-coding text diffi cult, or because they have signifi cant diffi culties with the language. In these cases it is not essential to support every one of the text or spoken words, but it is essential that all the key concepts are represented.
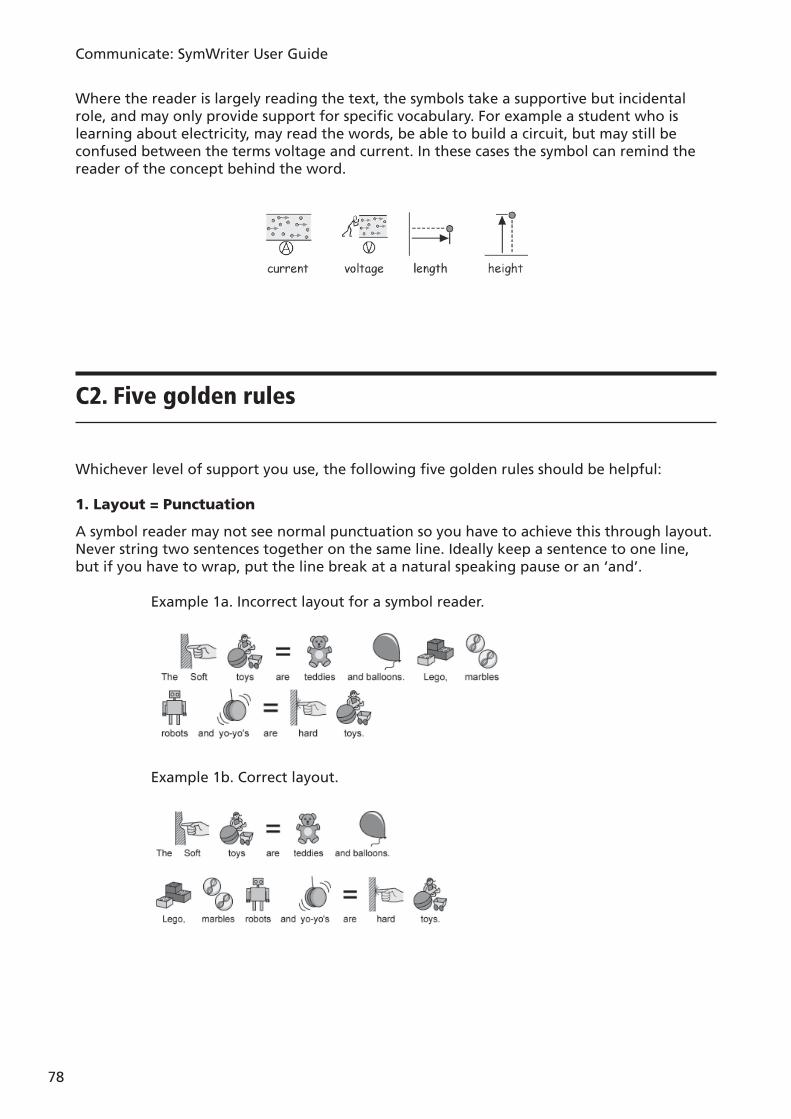
Communicate: SymWriter User Guide
78
Where the reader is largely reading the text, the symbols take a supportive but incidental role, and may only provide support for specifi c vocabulary. For example a student who is learning about electricity, may read the words, be able to build a circuit, but may still be confused between the terms voltage and current. In these cases the symbol can remind the reader of the concept behind the word.
C2. Five golden rules
Whichever level of support you use, the following fi ve golden rules should be helpful:
1. Layout = Punctuation
A symbol reader may not see normal punctuation so you have to achieve this through layout. Never string two sentences together on the same line. Ideally keep a sentence to one line, but if you have to wrap, put the line break at a natural speaking pause or an ‘and’.
Example 1a. Incorrect layout for a symbol reader.
Example 1b. Correct layout.
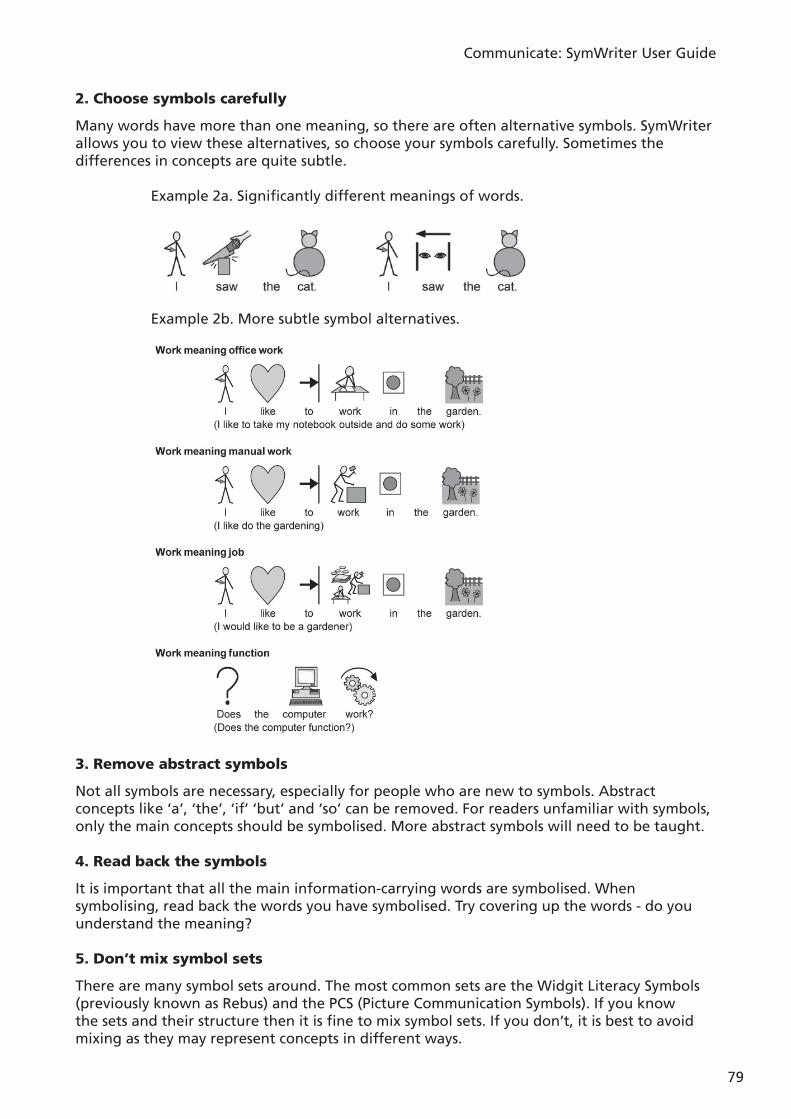
Communicate: SymWriter User Guide
79
2. Choose symbols carefully
Many words have more than one meaning, so there are often alternative symbols. SymWriter allows you to view these alternatives, so choose your symbols carefully. Sometimes the differences in concepts are quite subtle.
Example 2a. Signifi cantly different meanings of words.
Example 2b. More subtle symbol alternatives.
3. Remove abstract symbols
Not all symbols are necessary, especially for people who are new to symbols. Abstract concepts like ‘a’, ‘the’, ‘if’ ‘but’ and ‘so’ can be removed. For readers unfamiliar with symbols, only the main concepts should be symbolised. More abstract symbols will need to be taught.
4. Read back the symbols
It is important that all the main information-carrying words are symbolised. When symbolising, read back the words you have symbolised. Try covering up the words - do you understand the meaning?
5. Don’t mix symbol sets
There are many symbol sets around. The most common sets are the Widgit Literacy Symbols (previously known as Rebus) and the PCS (Picture Communication Symbols). If you know the sets and their structure then it is fi ne to mix symbol sets. If you don’t, it is best to avoid mixing as they may represent concepts in different ways.
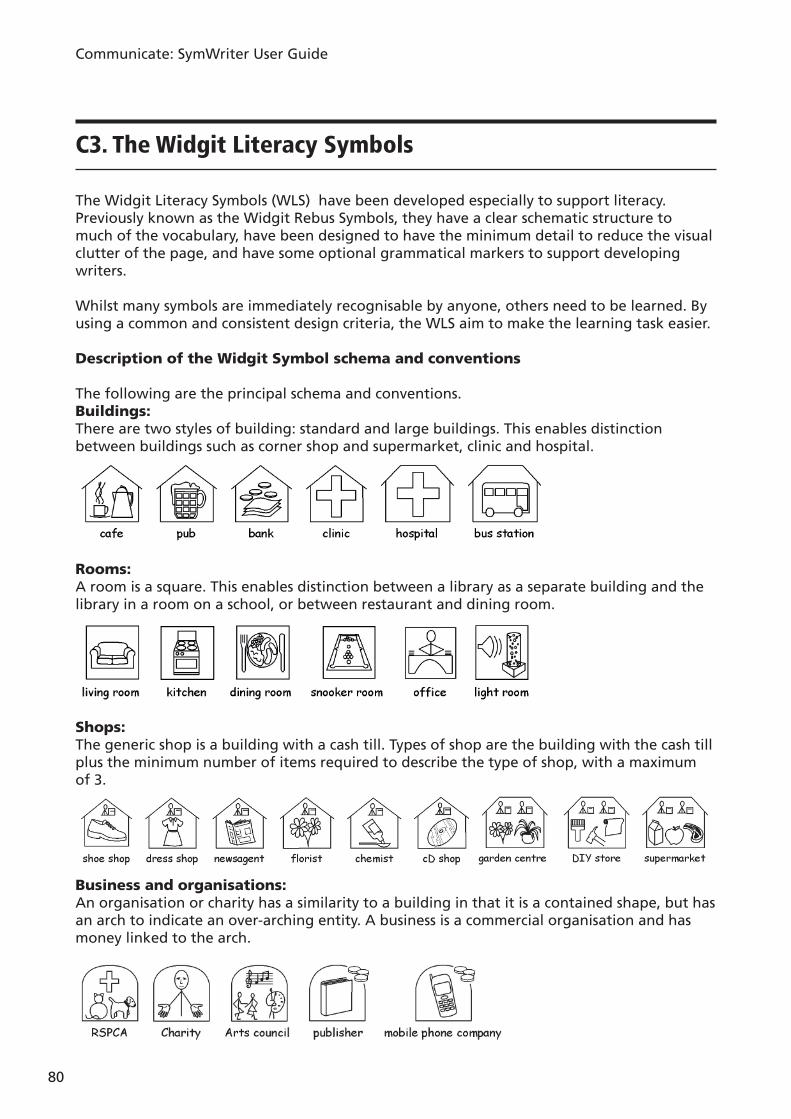
Communicate: SymWriter User Guide
80
C3. The Widgit Literacy Symbols
The Widgit Literacy Symbols (WLS) have been developed especially to support literacy. Previously known as the Widgit Rebus Symbols, they have a clear schematic structure to much of the vocabulary, have been designed to have the minimum detail to reduce the visual clutter of the page, and have some optional grammatical markers to support developing writers.
Whilst many symbols are immediately recognisable by anyone, others need to be learned. By using a common and consistent design criteria, the WLS aim to make the learning task easier.
Description of the Widgit Symbol schema and conventions
The following are the principal schema and conventions.Buildings: There are two styles of building: standard and large buildings. This enables distinction between buildings such as corner shop and supermarket, clinic and hospital.
Rooms: A room is a square. This enables distinction between a library as a separate building and the library in a room on a school, or between restaurant and dining room.
Shops: The generic shop is a building with a cash till. Types of shop are the building with the cash till plus the minimum number of items required to describe the type of shop, with a maximum of 3.
Business and organisations:An organisation or charity has a similarity to a building in that it is a contained shape, but has an arch to indicate an over-arching entity. A business is a commercial organisation and has money linked to the arch.
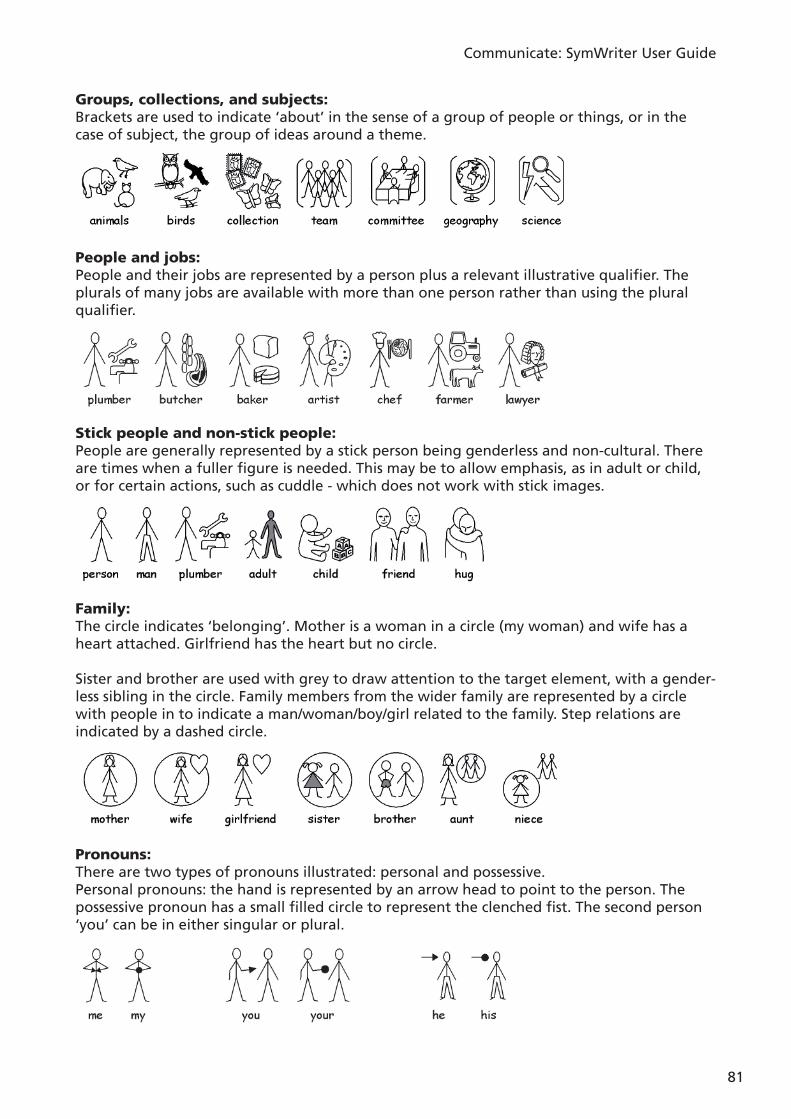
Communicate: SymWriter User Guide
81
Groups, collections, and subjects:Brackets are used to indicate ‘about’ in the sense of a group of people or things, or in the case of subject, the group of ideas around a theme.
People and jobs:People and their jobs are represented by a person plus a relevant illustrative qualifi er. The plurals of many jobs are available with more than one person rather than using the plural qualifi er.
Stick people and non-stick people:People are generally represented by a stick person being genderless and non-cultural. There are times when a fuller fi gure is needed. This may be to allow emphasis, as in adult or child, or for certain actions, such as cuddle - which does not work with stick images.
Family: The circle indicates ‘belonging’. Mother is a woman in a circle (my woman) and wife has a heart attached. Girlfriend has the heart but no circle.
Sister and brother are used with grey to draw attention to the target element, with a gender-less sibling in the circle. Family members from the wider family are represented by a circle with people in to indicate a man/woman/boy/girl related to the family. Step relations are indicated by a dashed circle.
Pronouns:There are two types of pronouns illustrated: personal and possessive. Personal pronouns: the hand is represented by an arrow head to point to the person. The possessive pronoun has a small fi lled circle to represent the clenched fi st. The second person ‘you’ can be in either singular or plural.
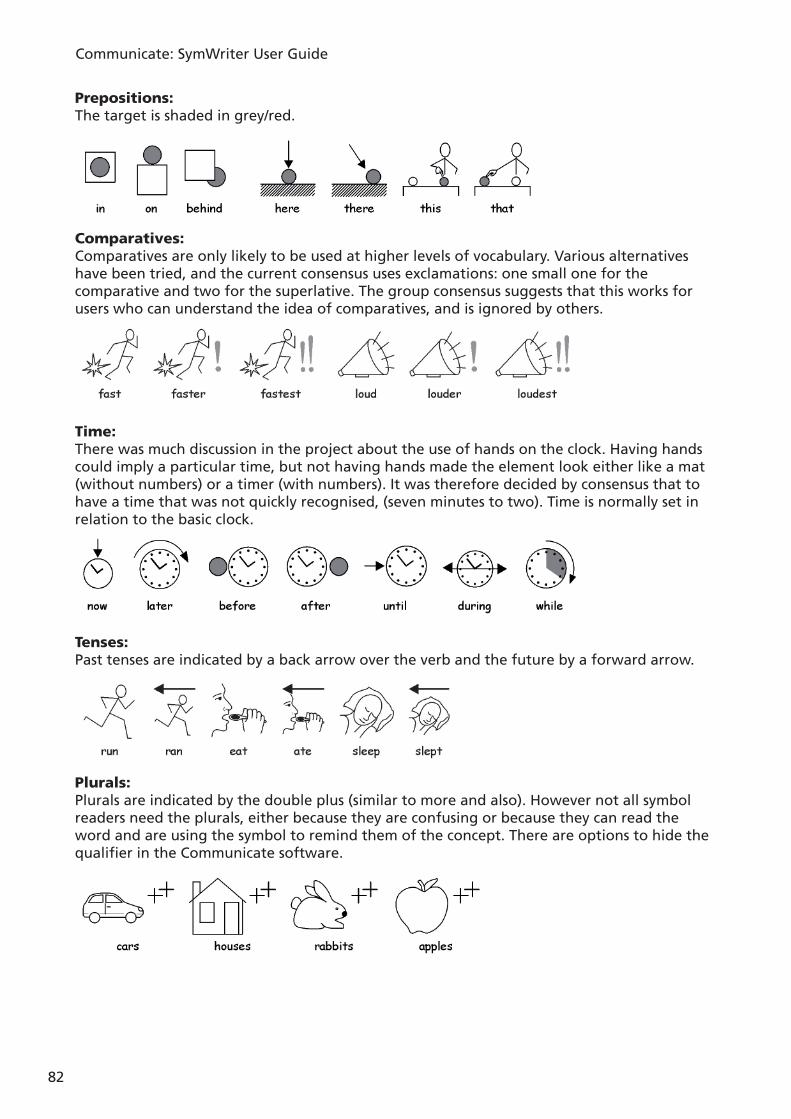
Communicate: SymWriter User Guide
82
Prepositions:The target is shaded in grey/red.
Comparatives:Comparatives are only likely to be used at higher levels of vocabulary. Various alternatives have been tried, and the current consensus uses exclamations: one small one for the comparative and two for the superlative. The group consensus suggests that this works for users who can understand the idea of comparatives, and is ignored by others.
Time:There was much discussion in the project about the use of hands on the clock. Having hands could imply a particular time, but not having hands made the element look either like a mat (without numbers) or a timer (with numbers). It was therefore decided by consensus that to have a time that was not quickly recognised, (seven minutes to two). Time is normally set in relation to the basic clock.
Tenses:Past tenses are indicated by a back arrow over the verb and the future by a forward arrow.
Plurals: Plurals are indicated by the double plus (similar to more and also). However not all symbol readers need the plurals, either because they are confusing or because they can read the word and are using the symbol to remind them of the concept. There are options to hide the qualifi er in the Communicate software.
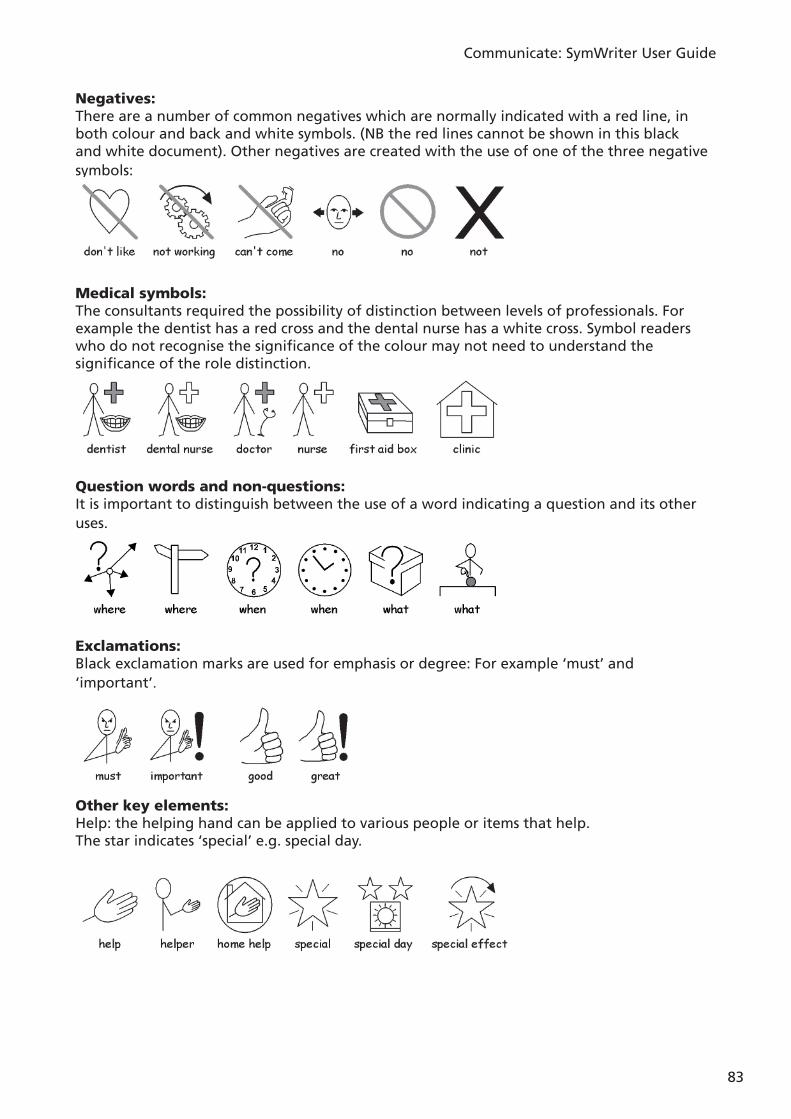
Communicate: SymWriter User Guide
83
Negatives:There are a number of common negatives which are normally indicated with a red line, in both colour and back and white symbols. (NB the red lines cannot be shown in this black and white document). Other negatives are created with the use of one of the three negative symbols:
Medical symbols:The consultants required the possibility of distinction between levels of professionals. For example the dentist has a red cross and the dental nurse has a white cross. Symbol readers who do not recognise the signifi cance of the colour may not need to understand the signifi cance of the role distinction.
Question words and non-questions:It is important to distinguish between the use of a word indicating a question and its other uses.
Exclamations:Black exclamation marks are used for emphasis or degree: For example ‘must’ and ‘important’.
Other key elements:Help: the helping hand can be applied to various people or items that help.The star indicates ‘special’ e.g. special day.
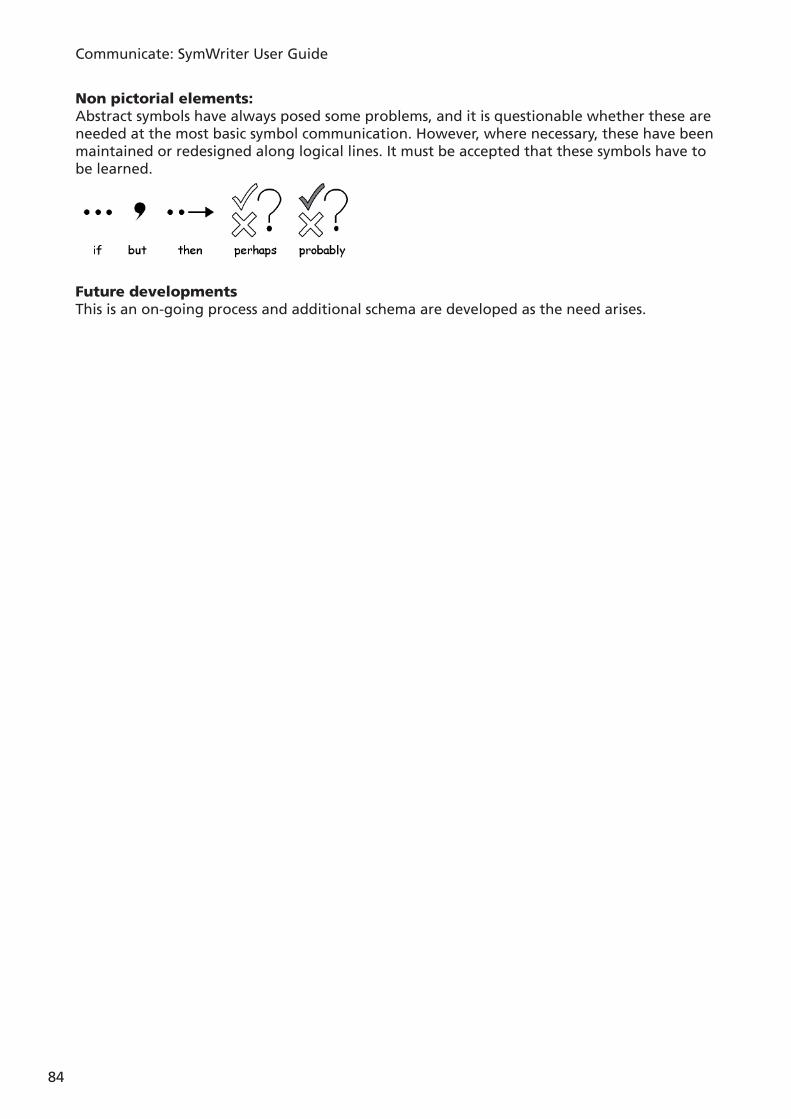
Communicate: SymWriter User Guide
84
Non pictorial elements:Abstract symbols have always posed some problems, and it is questionable whether these are needed at the most basic symbol communication. However, where necessary, these have been maintained or redesigned along logical lines. It must be accepted that these symbols have to be learned.
Future developmentsThis is an on-going process and additional schema are developed as the need arises.
Communicate: SymWriter User Guide
85
D. Glossary
Arrow-mode ( B2.1 Making a single grid for writing p52 )When working with grids and stages, arrow-mode is used for most purposes other than writing into cells. Examples are resizing, linking, editing appearance and moving. Compare with text-mode.
Button (Section B. Writing with grids p49 )Specifi cally within SymWriter a button is like a single cell that can be placed in a tray or directly onto a stage. In the documentation the term is underlined to distinguish between this meaning of button and more regular uses (like mouse button). Cell (Section B. Writing with grids p49 )A cell is a single entity within a grid. Usually a cell has a border and is used to contain text and symbols that can either be sent to the writing document, or used to perform other functions.
Command Graphic (Section B. Writing with grids p49 )A command graphic is an mage that when clicked can send actions to the document.
Document (The window layout p9 ).The document (or writing window) is the area of the screen where you can type directly into, and which can receive input from the grids.
Design-mode (Section B2.1 Making a single grid for writing p52 )This is the normal mode when creating an environment. You can go to test-mode to try the activity and return to edit-mode with the stop button on the toolbar.
Environment (Section B. Writing with grids p49 )The writing window together with any other grids and objects to assist writing is called an environment.
Grid (Section B. Writing with grids p49 )A grid is a regular array of cells. Cells can be merged in a grid to make it semi-regular.
Home grid ( B2.2 Sequence of grids for structured writing p57 ) After loading an environment the home grid is the one which shows before the activity is started. It can be set using the context menu for a grid.
Launcher (Section A1. Starting the program p12 )The launcher is a screen containing buttons that appears when the program is started. The launcher has buttons that can be used to start the program with a range of confi gurations.
Leading (Section A3.5 Paragraph alignment, word and line spacing p24 )You can choose to alter the horizontal spacing between words or symbols. Also you can alter the spacing between lines, and add extra space between paragraphs. These extra spaces are called leading.
Qualifi er (Section A2.9 Qualifi ers p19 )A symbol may have a qualifi er to indicate a plural, a tense, or a comparative or superlative.
Communicate: SymWriter User Guide
86
Stack (Reference sheet R3.1 Auto linked grids)This is a set of grids or trays on top of one another, occupying the same space on the stage.
Stage (Section B – introduction p49 , Section B2.1 Making a single grid for writing p52 )A stage is an area of the screen that can hold grids, trays, buttons and text boxes.
Student (Introduction – Using this guide p8 )The word student will be used to mean the person who uses the grids or the writing tools to enable them to have greater literacy access, whatever their age, or educational status.
Teacher (Introduction – Using this guide p8 )The word teacher will be used to mean a teacher, carer or parent who is using the program to create and edit activities for others to use.
Test-mode (Section B2.1 Making a single grid for writing p52 )When designing an environment you can go to test-mode (click the Play button) to try it out.
Text box (Reference sheet R5 Trays and buttons)A text box is like a single cell that can be placed in a tray or directly onto a stage. It is rather like a button, but has different default visual settings.
Text-mode (Section B2.1 Making a single grid for writing p52 )When working with grids and stages in the designer, text-mode is used for writing text into grid cells. Compare with arrow-mode
Tray (Reference sheet R5 Trays and buttons)A tray is a holder for a group of objects such as buttons, text boxes and command graphics.
Wordlist (Section A11.1 Wordlists p44 )A wordlist is a fi le that can link extra words to images that the symboliser does not produce on its own. These are usually for specialised or personal vocabulary.
Communicate: SymWriter User Guide
87
Appendix 1 Location of fi les
This data is provided to assist the network manager or IT coordinator.
The installer for SymWriter puts fi les in three areas. These areas are defi ned by the way Windows has been set up either on a stand alone machine or on a network.
1. Program Files area.
On stand alone machine this defaults to C:\Program Files. The SymWriter program fi les are placed in subdirectories \Widgit\Common Files\bin. In this area is the program itself and the basic database used for symbolisation. We will provide updates on our web site and to install these you will need to have administrative access to the machine.
The symbol and graphic resources are installed in:\Program Files\Widgit\Widgit Pictures
Contains the pictures supplied with the program seen in the Graphic Browser, see Section A2.4 Changing the image on a word (p15)
\Program Files \Widgit\Widresources Contains the symbol dataGenerally, other user access will not be able to update fi les in this area.
Key fact: It is necessary to have write access to this area when updating the program itself or the symbol graphics.
2. The All Users Application Data area.
On a stand alone machine this defaults to C:\Documents and Settings\All Users\Application Data. Data for SymWriter is placed in the following subdirectories:
\Widgit\Common Files\Internal Data\ This contains private data installed by Widgit Software\Widgit\Common Files\Topic Wordlists Contains any Topic wordlists, see Section A11.3 Loading a wordlist p46 \Widgit\Common Files\Symbol Set wordlists Contains any Symbol Set wordlists, see Section A11.3 Loading a wordlist p46
When you download or install any low-cost/free Resources to use with SymWriter these are likely to contain Topic wordlists and extra graphic resources. So it will be necessary to have write-access to this area to install these. These Resources will not generally need to update anything in the Program Files area.
Teachers who want to add Topic wordlists created by In Print 2, will need to navigate to (by default):C:\Documents and Settings\All Users\Application Data\Widgit\ Common Files\Topic Wordlists
Communicate: SymWriter User Guide
88
3. The All Users Documents area
On a stand alone machine this defaults to C:\Documents and Settings\All Users\Documents. (Sometimes this will show as “Shared Documents”) Data for SymWriter is placed in the following subdirectories:
\Widgit\Symwriter\Interface\ This contains interface data created by the teacher to add extra buttons to the launcher, or to add other choices of interface. It also contains a fi le used for extra information in the spelling interface.
Documents created with environments are saved into a subdirectory of the My Documents area appropriate to the user who is currently logged on.
\Widgit\Symwriter\EnvironmentsThis contains the environments and template environments to be used by students and shared by students.
Key facts: It is necessary for students to have read access to this area so that they can
load and use environment fi les created for shared use. It is necessary for teachers to have write access to this area if they wish
to create environments for others to use. i.e. write access for teachers is essential.
4. Installation of add-on Resource packs It is necessary to have full administrative access when installing Resource
packs for use with SymWriter if those packs contain environments, wordlists and additional graphics.
Communicate: SymWriter User Guide
89
Appendix 2 Copyright
Copyright conditions on distribution of materials containing Widgit Literacy Symbols (WLS) (formerly known as Widgit Rebus Symbols) or Mayer Johnson Picture Communication Symbols (PCS).
Widgit Software (as a division of Logotron Ltd) is authorised to manage the copyright permissions and compliance on behalf of Mayer-Johnson for symbols used within the UK and the Republic of Ireland.
This document refers to the use of symbols from either of the WLS or PCS symbol sets.
Printed documents (books, materials, leafl ets, posters etc).
1. Documents to print where symbols are embedded in third party applications (e.g. PDF, MSWord and Clicker 5 fi les).
2. In signage and notices.
3. On Websites, where the symbols are embedded into the web page (i.e. not using Webwide or other Widgit technology).
Symbols are copyright and cost a great deal to develop and maintain. We therefore have to ensure that people who use symbols pay an appropriate amount for their use.
Where the user already has a licence for the symbols, and the fi les can only be accessed through licensed copies of the software, there is no additional charge for the use of the symbols. E.g. a fi le for Communicate: In Print or Boardmaker. Where the symbols are provided in a different form, either in print or electronically, including on a website, the customer must pay for the use of the symbols.
Small Scale DistributionThis covers distribution within a single authority/organisation, where the distribution is less than 500 copies, or the website is specifi cally created for a local group such as school or college.
Where the supplier is an individual, small organisation or small business, the resource provider is required to pay Widgit a royalty on the following basis:
Allowance for non-chargable distribution of documents containing symbols:A small amount of printed or web based symbol documents may be provided without any payment provided the total number of symbols included in ALL resources distributed by the organisation does not exceed 100 different symbols.
The exception to this are resources printed or shared amongst members of the local organisation that has purchased the symbol software (e.g. Communicate: In Print or Communicate: SymWriter). A single school, day-centre or hospital is regarded as the purchasing organisation and not the larger authority such as Local Authority or Health Authority e.g. pupils and teachers in a school are regarded as the members and in this instance, materials may also be sent home with the pupil. There is no restriction on the number of symbols that can be distributed between members of this effective purchasing organisation.
Communicate: SymWriter User Guide
90
Widgit does not wish to prevent people with reading diffi culties gaining access to materials and information, and there may be other circumstances where it is possible to negotiate reduced terms or permission to distribute with a zero royalty rate.
Small scale distribution beyond the non-chargable distribution allowance
1. Materials supplied in printed format the rate is 2p per unique symbol used in the pack.
2. Files that are distributed electronically, (eg as PDF, MsWord) the rate is 4p per unique symbol. This rate is required whether the pack is sold or provided free by the creator. There is an allowance for small numbers of symbols that may be distributed without charge, detailed in the note below.
3. Symbols included in a website Small scale usage, sites aimed at a local user group or members of a small organisation:
First 100 symbols free, subsequent symbols 12p per symbol.
Larger scale distributionWhere the symbols are included in corporate documents, are for national distribution by companies or national organisations, or are for sale outside of the not-for-profi t area, then specifi c copyright permission MUST be obtained through Widgit Software.
Distribution of materials on a larger scale, or by commercially viable organisations, by national organisations, are for sale outside of the not-for-profi t area or where more than 500 copies of the resource are likely to be distributed, needs specifi c approval with prices on application.
AcknowledgementEach resource, whether free or for sale, must carry an appropriate acknowledgement on each separate document or individual sheet that might be used separately, prominently stating that the symbols are:
Widgit Literacy Symbols © Widgit Software 2007 (or the current year) plus the web address www.widgit.com. Or PCS symbols © Mayer-Johnson LLC 2007 (or the current year) plus the web address www.mayer-johnson.com
[Note: Widgit has changed the name of their symbol set from the Widgit Rebus Symbols to Widgit Literacy Symbols. All acknowledgements are required to use the new inscription.]
RegistrationAll resource providers distributing symbols free or for sale, which falls outside of the allowance for non-chargable distribution of documents containing symbols, must register and complete an application form available to download from www.widgit.com/copyright or by contacting the copyright team.
All enquiries on copyright or a paper version of this registration form can be obtained from Widgit Software (copyright enquiries)26 Queen Street, Cubbington, Leamington Spa CV32 7NA, or by email from [email protected]