Embed Size (px)
DESCRIPTION
Table of contents2 How to prepare RGB files for CMYK4 Soft proofing and gamut warning13 Final image sizing15 Image sharpening19 Converting to CMYK21 What about providing RGB files?24 The proof26 Marking your territory27 File formats for delivery32 Check list for file delivery32 Additional resources
Citation preview
Technical paper
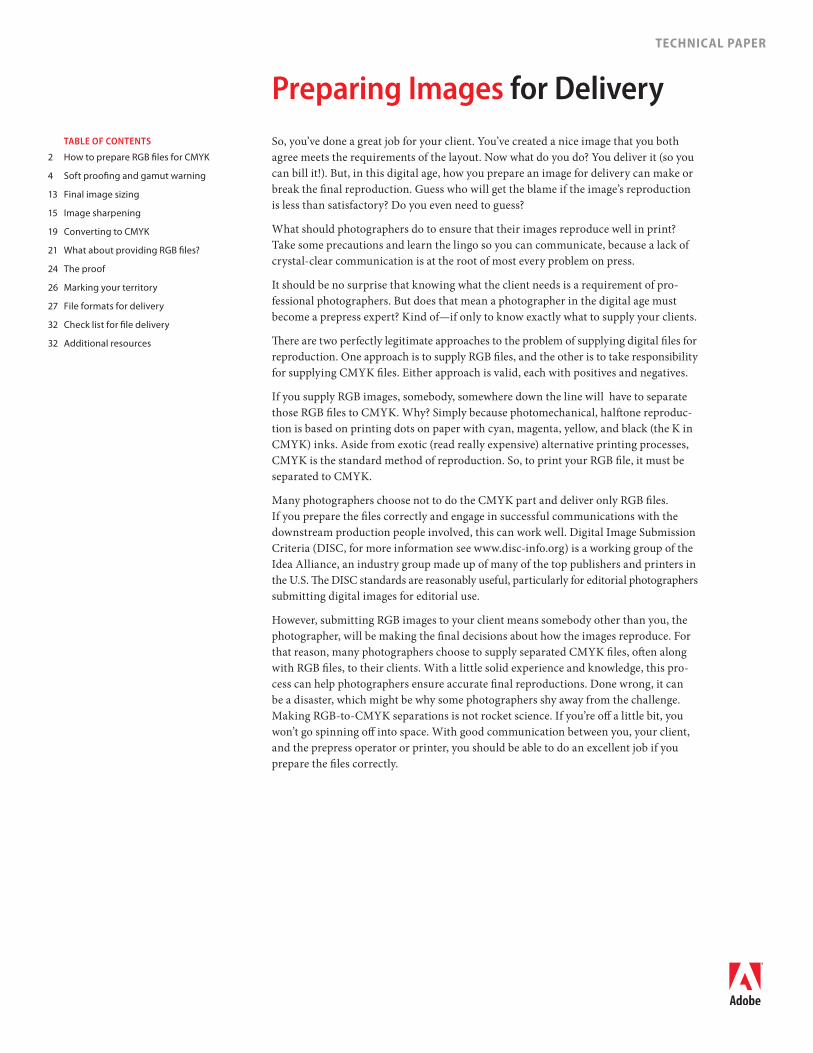
Preparing Images for DeliverySo yoursquove done a great job for your client Yoursquove created a nice image that you both agree meets the requirements of the layout Now what do you do You deliver it (so you can bill it) But in this digital age how you prepare an image for delivery can make or break the final reproduction Guess who will get the blame if the imagersquos reproduction is less than satisfactory Do you even need to guess
What should photographers do to ensure that their images reproduce well in print Take some precautions and learn the lingo so you can communicate because a lack of crystal-clear communication is at the root of most every problem on press
It should be no surprise that knowing what the client needs is a requirement of pro-fessional photographers But does that mean a photographer in the digital age must become a prepress expert Kind ofmdashif only to know exactly what to supply your clients
There are two perfectly legitimate approaches to the problem of supplying digital files for reproduction One approach is to supply RGB files and the other is to take responsibility for supplying CMYK files Either approach is valid each with positives and negatives
If you supply RGB images somebody somewhere down the line will have to separate those RGB files to CMYK Why Simply because photomechanical halftone reproduc-tion is based on printing dots on paper with cyan magenta yellow and black (the K in CMYK) inks Aside from exotic (read really expensive) alternative printing processes CMYK is the standard method of reproduction So to print your RGB file it must be separated to CMYK
Many photographers choose not to do the CMYK part and deliver only RGB files If you prepare the files correctly and engage in successful communications with the downstream production people involved this can work well Digital Image Submission Criteria (DISC for more information see wwwdisc-infoorg) is a working group of the Idea Alliance an industry group made up of many of the top publishers and printers in the US The DISC standards are reasonably useful particularly for editorial photographers submitting digital images for editorial use
However submitting RGB images to your client means somebody other than you the photographer will be making the final decisions about how the images reproduce For that reason many photographers choose to supply separated CMYK files often along with RGB files to their clients With a little solid experience and knowledge this pro-cess can help photographers ensure accurate final reproductions Done wrong it can be a disaster which might be why some photographers shy away from the challenge Making RGB-to-CMYK separations is not rocket science If yoursquore off a little bit you wonrsquot go spinning off into space With good communication between you your client and the prepress operator or printer you should be able to do an excellent job if you prepare the files correctly
Table of conTenTs
2 HowtoprepareRGBfilesforCMYK
4 Softproofingandgamutwarning
13 Finalimagesizing
15 Imagesharpening
19 ConvertingtoCMYK
21 WhataboutprovidingRGBfiles
24 Theproof
26 Markingyourterritory
27 Fileformatsfordelivery
32 Checklistforfiledelivery
32 Additionalresources
PreparingImagesforDelivery
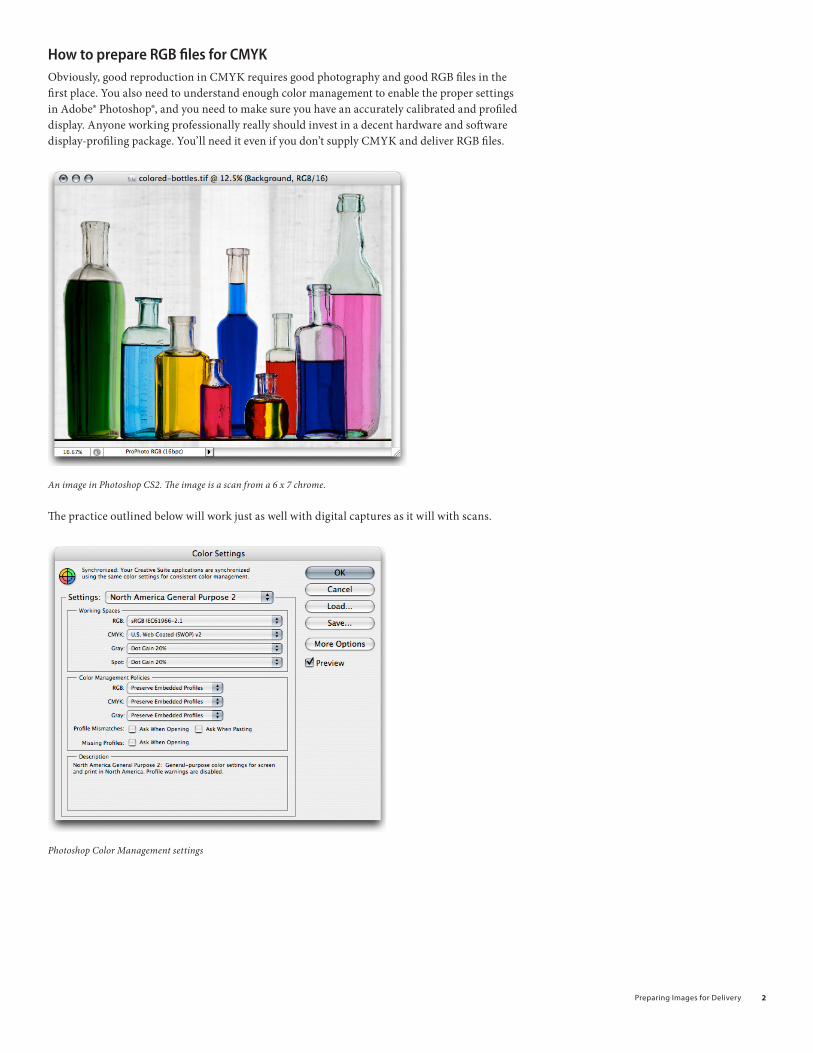
How to prepare RGb files for cMYKObviously good reproduction in CMYK requires good photography and good RGB files in the first place You also need to understand enough color management to enable the proper settings in Adobereg Photoshopreg and you need to make sure you have an accurately calibrated and profiled display Anyone working professionally really should invest in a decent hardware and software display-profiling package Yoursquoll need it even if you donrsquot supply CMYK and deliver RGB files
An image in Photoshop CS2 The image is a scan from a 6 x 7 chrome
The practice outlined below will work just as well with digital captures as it will with scans
Photoshop Color Management settings
PreparingImagesforDelivery
By default the color settings in Photoshop CS2 are set to North American General Purpose 2 (NAGP2) which for separating RGB files to CMYK is less than optimal I would strongly suggest changing the default to North America Prepress 2 (NAPP2) or the setting that best reflects your countryrsquos standards if you are outside of the US
NAPP2 color settings in Photoshop CS2
You can customize any of the default color settings
PreparingImagesforDelivery
I would suggest two additional changes to the NAPP2 settings First deselect Ask When Opening and Ask When Pasting Since you already have the policies set to Always Preserve Embedded Profiles you donrsquot need to worry about seeing these warnings Photoshop will always preserve the embedded profile when opening and pasting image data The only time itrsquos useful to see a warning is when there is no profile in the image
I personally go even further and generally work with ProPhoto RGB as my RGB color space but leave the rest of the settings the same
Note To load ProPhoto RGB as a working space click More Options If you have the entire Adobe Creative Suite installed and change your Photoshop CS2 color settings the Color Settings dialog box will indicate that your Adobe Creative Suite color settings are no longer synchronized If you save your custom settings you can synchronize your Adobe Creative Suite applications in Adobe Bridge by using your named custom settings
soft proofing and gamut warning
Choose View gt Proof Setup gt Working CMYK to see a soft proof of your RGB image
When you have an RGB image open particularly one in a wide gamut such as ProPhoto RGB yoursquoll see many colors that simply cannot be photomechanically reproduced in CMYK The gamut or the total colors that can be reproduced is much smaller in CMYK than it is in RGB As a result you need to deal with the reduction of the gamut either by compressing or clipping the colors that wonrsquot reproduce If you choose View gt Proof Setup gtWorking CMYK you can
PreparingImagesforDelivery
view your RGB image through the soft proof of your working CMYK which in this case is US Web Coated (SWOP) v2 SWOP which is a fancy way of stating standard web offset printing is the standard method of printing for magazine work in the US If you are supplying what is called sheet fed the job can get a little more complicated since many printers tweak their presses and use alternative inks and paper when printing sheet fed In the case of sheet fed itrsquos optimal to obtain an ICC profile directly from the printer something that because of politics more than technical reasons is often not available
Once you turn on soft proofing yoursquoll often notice some colors change either in saturation or in density An RGB file has to go through some pretty extensive changes to end up as CMYK and vivid saturated colors are always a challenge to reproduce
Choose View gt Gamut warning to see which colors in your image wonrsquot reproduce well
One method of checking what colors will and wonrsquot reproduce is to turn on Gamut Warning in Photoshop When Gamut Warning is turned on the colors that are out of gamut or not repro-ducible are shown in a gray overlay as shown below
Gray overlays indicate which colors in an image wonrsquot reproduce well
PreparingImagesforDelivery
In this image the out-of-gamut warning pretty much covers all of the vivid colors There are steps you can take to alter the colors to bring them into gamut One of the more direct methods is to use the Color Range selection tool in Photoshop
Choose Out Of Gamut from the Select pop-up menu in the Color Range dialog box to select all out-of-gamut colors in the image
One of the options in the Select pop-up menu is to select Out Of Gamut colors The resulting selection will represent all out-of-gamut colors in your image as shown below
Out-of-gamut color selected in an image in Photoshop
PreparingImagesforDelivery
You can adjust the amount of out-of-gamut areas by reducing the saturation in the image However a reduction of 33 is a pretty major move and may not really help your image The one rather severe limitation with the Out Of Gamut warning is that it doesnrsquot tell you how far out of gamut your colors are It can only show what colors are out of gamut even if by the tiniest amounts So to completely remove the gamut warning gray areas is not really a useful goal A far more useful method is to look at how your image will appear when reproduced and see what happens to the colors directly on the computer display
Reducing the saturation of the image reduces the amount of out-of-gamut areas
To really make use of soft proofing takes a bit more effort than just turning on the working space soft proof
To make the best use of soft proofing work with both the original image and a duplicate
PreparingImagesforDelivery
The trick is to work with both your original image as well as a duplicate Choose Image gt Duplicate to make a copy of your working file Yoursquoll end up with two images side-by-side
The original image (left) and the duplicate (right)
Place your original image on the left and the duplicate on the right Click the window containing the original image to make it active
Instead of simply using the Working CMYK option choose Custom to open the Customize Proof Condition dialog box Ensure that Device To Simulate is set to your correct CMYK profile (or in this case the Working CMYK)
Proof Setup is on the View menu (left) But I prefer to control the proof condition by choosing Custom (right)
Additionally yoursquoll need to set the Rendering Intent The rendering intent is the method by which the colors in the image will be compressed or clipped when separated to CMYK In general Relative Colorimetric is often the best intent but that will depend entirely on your specific image and output profile So itrsquos useful to actually see which intent is optimal For photographic images either Perceptual or Relative Colorimetric is considered to be the best
Choose the rendering intent from the pop-up menu in the Proof Conditions dialog box
PreparingImagesforDelivery
The Perceptual intent tries to compress the out-of-gamut colors to fit within the maximum colors contained in the output profile The method of compression is to try to maintain a perceptual uniformity to the relationships of the colors The Relative Colorimetric intent will in essence clip or chop off those colors that cannot be reproduced The usefulness of Relative Colorimetric is that while colors can be reduced the luminance values of the image wonrsquot change much
The Display Options radio buttons are shown above
One other important setting for soft proofing is whether or not to use Display Options (On-Screen) If you havenrsquot used soft proofing extensively I would not suggest starting with the Simulate options (Simulate Paper Color and Simulate Black Ink) on These options are useful to see the effects of the reduction of the dynamic range (or contrast ratio) of the final printed reproduction However yoursquoll need to practice to learn how to adjust for the reduced contrast range of the final paper
If you save your soft proof setting you can choose the named setting from the Proof Setup menu and yoursquoll be able to use it later if you want to use it to produce a printed proof of the image
Save your soft proof settings (left) so that you can choose them quickly from the Proof Setup menu (right)
PreparingImagesforDelivery 10
In the image below the magenta is less saturated and the two blue bottles have lost a lot of color and saturation Blues often turn too purple (too much magenta) that can be helped a bit by mak-ing adjustments However there is nothing that can be done to make up for the loss of a deep saturated royal blue color Deep blues and purples are particularly limited in the CMYK color gamut because cyan and magenta simply cannot produce a super vibrant bluemdashthis is a fact of life that you must deal with I just never show my clients the original RGB file
The image on the left shows the result of soft proofing
When a client is looking over my shoulder to examine an RGB image I turn on CMYK soft proofing before he ever gets to see the RGB version Why show him something he can never attain in reproduction That RGB gt CMYK conversion not only will depress you but your client will see the colors change when going to CMYK and who will he blame Probably not the limita-tion of the photomechanical process So my clients really never see anything they canrsquot get in print
On the left two adjustment layers have been added to try to get the CMYK soft proof to look as close as possible to the original image on the right
PreparingImagesforDelivery 11
While not perfect Irsquove improved the result through using a couple of adjustment layers a Selective Color and a HueSaturation adjustment
The actual adjustments made to the image above The left and middle images show two separate Selective Color Options adjustments and the right image shows the HueSaturation adjustment
In Selective Color I adjusted the magenta to have a relative percentage boost as well as boosts to the Cyan Magenta and Black in the blue color The Saturation adjustment increased the blue saturation as much as possible without breaking the colors
While it doesnrsquot have the same brilliance of the ProPhoto RGB original the soft proof is an accu-rate preview of what the colors will look like on press Adding the tweaks will help the color as much as you can with traditional CMYK separations
Another factor that is going to happen when your image hits the printed page is a severe reduc-tion in the dynamic range of the image meaning the blacks will be a lot less black and the whites a lot less white There is a way of previewing this loss of dynamic range but a warning it will make your image look even worse Why Because the printed page simply canrsquot compete with todayrsquos bright CRT or LCD displays for dynamic range
When soft proofing select the Simulate options to soft proof the dynamic range of the printed reproduction
To soft proof the dynamic range of the printed reproduction go into the Customize Proof Condition dialog box again and select both Simulate Paper Color and Simulate Black Ink Selecting these options will make an Absolute Colorimetric rendering from the image to your screen matching both the dimness and yellowed looking color of standard commercial printing paper as well as the reduced black attainable with CMYK inks
PreparingImagesforDelivery 1
A soft proof with Simulate Paper Color and Simulate Black Ink selected
Well I told you it would look bad And it does But the soft proof is pretty darn accurate in its prediction of what the image will look like reproduced on press Sad huh But thatrsquos life However it really wonrsquot look this bad Because the eye adapts to the whitest portion of your field of vision your eyes are not using the white of the paper as the identifier of the white point of a scene When looking at an actual printed piece the eye will identify the brightest and whitest portion of what you see as white and adjust all the other colors and luminosity accordingly So you need to eliminate as much white before your eyes as possible when soft proofing to adjust the effects of the reduction of dynamic range and the yellowing of the whites
By switching your viewing mode in Photoshop to full screen mode either with the dark gray or better yet the black canvas background you can cut down on the amount of the surrounding white elements on screen so the image will look a little less bad (but only a little)
Change the screen mode by using the toolbar or pressing the F key On the right the image is shown against a black background
PreparingImagesforDelivery 1
Often a slight tweak in the contrast of an image will help punch the image back toward the way it looked before the CMYK process soft proof made it look so bad
A Curve dialog showing a slight increase in contrast to adjust the image for the reduced dynamic range of the printed image
final image sizingOnce your RGB image is prepped for CMYK separation you should to final image sizing Obviously if you do not know the exact final reproduction size you canrsquot do any final exacting resizing but you can make sure the image is in the correct resolution realm
The image size and resolution of the original scan Both the resolution and image size need to be corrected
PreparingImagesforDelivery 1
For this particular image scan itrsquos important to set the units to match the final usage In this case the scan was done at 1800 pixelsinch (ppi) while the dimensions were in centimeters Photoshop doesnrsquot particularly care what the units are you can change the ratio of the units and dimensions by deselecting Resample Image and changing the units of the image You donrsquot need to resample the image just change the units and dimension The actual pixel count remains the same However for page layout applications the dimensions and units do matter
The Resample Image option is deselected and the Resolution has been changed to 300 pixelsinch There is no resampling involved only the ratio of the pixel density has changed
Here the pixel dimensions have been changed to inches The image dimension of 1548rdquo x 1204rdquo is too large for the intended 85rdquo x 11rdquo paper If delivered at this dimension somebody down-stream will need to resample the image Also note that only images sized to their final dimen-sions can be accurately and properly sharpened for reproduction
The image size and resolution have been resampled for the final reproduction size
PreparingImagesforDelivery 1
The image has been set to the correct units and the resample option is selected The image will be sized correctly for 85rdquo x 11rdquo full-bleed reproduction (the outer dimensions have been set to 1125rdquo x 875rdquo to allow for a 18rdquo bleed) If the image were to be placed in an image box in a page layout application the image could have been sized to that of the image box But allowing for bleed is yet another small service that the photographer can provide setting the final image crop
Note For downsizing the Bicubic Sharper option improves resampling
Once set to the final image dimension you can use guides in Photoshop to double-check where the image will be cropped While these guides will not be used by a page layout application itrsquos still useful to indicate the guides in the event that somebody downstream opens the image in Photoshop Guides are saved in Photoshop files as metadata and can be preserved for later use
Use guides in Photoshop to double-check where the image will be cropped
Image sharpeningOnce an image is set to the final size and resolution one additional step is required for optimal reproductionmdashimage sharpening for output There is a lot of mystery surrounding image sharp-ening While Photoshop has many tools to apply sharpening routines knowing how to sharpen and by how much can be a problem since viewing an image on a computer display is a rather poor indicator of the requirements needed for halftone reproduction
There are some generalities Bruce Fraser co-author of Real World Photoshop has indicated that the required sharpening should produce an edge halo of between 150 ndash 1100 of an image The halo is an increase of the apparent edge contrast of an image At between 150 ndash 1100 of an image the halo should be invisible to the naked eye and yet produce a crisp edge in reproduction
PreparingImagesforDelivery 1
The other problem inherent with determining image sharpening is the fact that a computer display is a poor tool to evaluate image sharpening If you deliver an image whose pixel resolution is twice that of the halftone line screen ruling four image pixels will be dithered to produce one halftone dot However many ldquoexpertsrdquo tell people to view their images at a 100 zoom inside Photoshop to evaluate the effects of sharpening Yes you need to view your images at 100 or larger to see the actual effects of sharpening on the pixels yet the resulting image in Photoshop will be too large to evaluate the amount of sharpening required To more accurately predict the amount of sharpening required a more useful screen zoom of 50 will simulate the effect of the halftone screening At 50 four image pixels are dithered to produce one screen display pixel
An image without output sharpening When printed the image wonrsquot be crisp
The image above at a zoom of 50 has no additional output sharpening applied If delivered like this the resultant halftone reproduction will be less than crisp The dithering of the halftone dots will introduce a softening effect further softening the image So output sharpening needs to be applied even for what may appear in Photoshop to be a sharp image
PreparingImagesforDelivery 1
While the Unsharp Mask filter in Photoshop is a useful sharpening tool there is an alternative that provides a bit more control while reducing some of the undesirable artifacts of Unsharp Mask
Use the High Pass filter to sharpen an image
By duplicating the imagersquos background layer and setting the blending mode to Overlay you can use the High Pass filter (choose Filter gt Other gtHigh Pass)
The High Pass filter is rather hidden away under ldquoOtherrdquo in the Filter menu
PreparingImagesforDelivery 1
This High Pass filter produces an apparent edge enhancement based on a pixel radius that allows the Overlay blend mode to increase the light edge while darkening the dark edge of image edges Setting the radius to 3 for a 300ppi image will enhance the edge halo approximately 1100 of an inch which happens to match the recommendations of Bruce Fraser
The results of using High Pass on an overlay blend mode layer The image edges snap at 50 zoom
There are third-party solutions specially designed for doing image sharpening that can increase the accuracy and predictability of output sharpening Nik Sharpener Pro by Nik Software Inc and PhotoKit Sharpener by PixelGenius are two such products Bruce Fraser was the primary product designer of PhotoKit Shapener and for disclosure purposes I must also indicate my involvement with PixelGenius Both products are designed to provide optimal output sharpening
But the caveat again final output sharpening can only be done on images whose final reproduc-tion size has been set Any resizing on the part of a downstream process will reintroduce soften-ing and thus mitigate the output sharpening Resharpening an already sharpened image that has been resized is not optimal
PreparingImagesforDelivery 1
converting to cMYKOnce the image has been optimized for the reproduction process in terms of tone color resolu-tion and image sharpness the final processing step is to convert the RGB image to CMYK This step can be as simple as doing a mode change from RGB to CMYK (assuming your Photoshop Color Settings are properly set up) or can involve a Convert To Profile transform
This figure shows the Mode change to CMYK I prefer to use the Convert to Profile command
Changing the mode from RGB to CMYK (by choosing Edit gt Mode gt CMYK Color) results in an image conversion from RGB to CMYK based on the current color settings in Photoshop While fine to do it contains a slight risk that the color settings may not be exactly what you expect When there are multiple users of Photoshop or if you havenrsquot produced a CMYK separation recently using the Convert To Profile command in the Edit menu allows for total control and clarity in the settings
In the Convert To Profile dialog box you can confirm the source space the destination space and the parameters on which the conversion will take place
PreparingImagesforDelivery 0
In the Convert to Profile dialog you must set the correct options I suggest using the Adobe (Ace) CMM (left) and use the same rendering intent I used to soft proof (right)
In the Convert To Profile dialog box you can set the CMM transform engine as well as confirm the rendering intent In general with Photoshop CS or CS2 you can always be assured of getting proper results when selecting Use Black Compensation to map image black to output black Itrsquos also generally a good idea to flatten all adjustment layers during conversion since some adjust-ment layers either will not work on CMYK layered files or will produce different results than their RGB counterparts
Another point to note if you are working in 16-bit-per-channel depth is that you should not only flatten while in 16 bit to make sure your adjustments are being completed in 16 bit but also transform from RGB to CMYK while still in 16 bit to receive the benefit of the higher bit depth during conversion
The final CMYK-separated and optimized file
PreparingImagesforDelivery 1
What about providing RGb filesTo offer greater flexibility to your clients you can also consider providing RGB files in addition to the CMYK files yoursquove separated However providing RGB files can be a problem If yoursquove used a large color space such as ProPhoto RGB delivering your RGB file to somebody who is not well versed in color management can result in some pretty ugly interpretations of your image
An image in ProPhoto RGB (left) and a duplicate of the image with sRGB assigned as the embedded profile (right)
The improper use of Photoshop Color Settings and policies can result in a misunderstanding of the use of profiles If the client or printer did not honor the embedded profile and merely assumed the image to be in sRGB the resulting display would be less than desirable
So if you want to work with your originals in a large gamut color space and deliver files to your clients that run a lower risk of miscommunication of color what do you do Well I can only tell you what I do and suggest you test it yourself for your own work
I take the final CMYK file and reconvert it to RGB Why Once the filersquos colors have been reduced to the gamut of CMYK converting the file back to RGB will not do any additional harmmdashpar-ticularly if you are working in 16 bit But it will result in an RGB file that would be pretty hard to misinterpret
Using Convert to Profile you select the RGB color space you want to convert the CMYK file to Adobe RGB on the left or I suggest sRGB shown on the right
PreparingImagesforDelivery
You can either convert to Adobe RGB or sRGB The advantage of providing an sRGB version of the file is that in the event the usage of the image also includes the Web yoursquoll have an image converted from CMYK to sRGB so the web image will match the CMYK rendering of the file
To better illustrate the process of converting from ProPhoto RGB to SWOP CMYK and back to sRGB Irsquove done screen shots of both the color space gamuts as well as plotted actual colors of the images in a program called ColorThink by CHROMIX (wwwchromixcom)
The gamuts and image plots have been done by plotting in Lab coordinates and in 3D It should be noted that the best way to see color space gamuts and image plots is in motion ColorThink allows you rotate the graph to better evaluate the relationships between color spaces and image plots
The gamut map on the left is ProPhoto RGB In the middle is sRGB and on the right is SWOP as contained in the Photoshop CS2 CMYK profile named US Web Coated (SWOP) v2 Note the screen shots are to scale
The figures above show the relative size and volume of the three color spaces ProPhoto RGB is huge and SWOP is tiny The challenge is to get the colors of the image to look good in the color space of the final output
On the left is the original Colored Bottle image mapped into the ProPhoto RGB color space The dots represent actual color samples from the image On the right is the image mapped into the SWOP color space As you can see a lot of the colors in the image are well outside of the printable range of the CMYK press
PreparingImagesforDelivery
Somehow the colors of the image must be mapped into the color space of the output The method of either compression or clipping will be dictated by the process you use to make the color conversion In the preceding mode change and convert to profile examples I showed two methods using Color Range to desaturate the image and using soft proofing to adjust for the resulting color transform
But why go from a super-huge color space such as ProPhoto RGB to SWOP and then back to sRGB Itrsquos really a matter of exercising your color control over the way delivered files are prepared for reproduction By using your eyes to evaluate the way in which colors will be reproduced you are able to dictate how your images reproduce on paper
On the left the final CMYK image colors are shown mapped in the SWOP color space notice the colors are now within the gamut of CMYK On the right the image has been converted back to sRGB from CMYK All of the CMYK colors (with the possible exception of a tiny amount of cyan) will fit within the sRGB color space
Going from ProPhoto RGB to CMYK and then back to sRGB gives you the control over how the image colors will look not only in CMYK but also when you are delivering RGB images Since the converted sRGB image has already had its total volume of colors clamped to the gamut of CMYK there is less chance that somebody down the ldquoprepress roadrdquo from you will mess up the colors of the image
PreparingImagesforDelivery
The proofWhen supplying digital files itrsquos important to also provide an aim print or actual proof that confirms on paper what the image should look like when reproduced In the past Irsquove resorted to actually sending the CMYK file to a service bureau for expensive contract proofs While the result is an unequivocal proof of the CMYK file it can be both costly and time consuming If you have a quality ink jet printer and accurate profiles for the printer you can print out from Photoshop and produce a cross-rendered proof A cross-rendered proof is made by using both the original CMYK profile as well as the printer profile to render in the print the accurate results of proofing to the final output device Again this presupposes that you have an accurate display and printer profile and that you follow the cross-rendering recipe for printing from Photoshop
This figure shows the Photoshop Print dialog box with a preview of the image Irsquove selected Let Photoshop Determine Colors from the Color Handling pop-up menu and selected the correct printer profile
PreparingImagesforDelivery
In the Print dialog box in Photoshop yoursquoll need to alter the settings you may normally use Rather than setting the Print space to your RGB or CMYK space you use the Proof option instead Under Options choose Let Photoshop Determine Colors from the Color Handling pop-up menu and select your particular printerrsquos profile However selecting the proof option in print allows the use of the Proof Setup Preset (shown below) which if yoursquove saved your soft proofing setups makes doing cross-rendered proofs a bit more efficient
To produce a cross-rendered proof select the saved soft proof settings Here Irsquove selected the SWOP-V2-BW-Off proof setup
You will definitely want to select the Simulate Black Ink option Whether you select Simulate Paper Color depends on your intent for the resulting print If you merely want to provide an aim print you may choose not to use this option
To produce an accurate cross-rendered proof select the Simulate Paper Color and the Simulate Black Ink options
However if you wish to provide a very accurate cross-rendered proof that could act as a con-tract proof for color you should select Simulate Paper Color It should be noted that just as the on-screen results will show a marked reduction in dynamic range so will a cross-rendered proof with this option turned on When reviewing the final print the paper white of the actual CMYK output profile will produce a scum tone over the image This preview will be a rather accurate reproduction of the final printed piece but it wonrsquot look very good which is actually what you want in an accurate proof Photographers should really only concern themselves with proofing the image not the final design of the page layout Note that even a highly accurate cross-rendered proof from an inkjet will not show the results of the halftone screening process so only the color can essentially be proofed
PreparingImagesforDelivery
Here Irsquove set the media settings (left) and the Printer Color Management settings (right)
Marking your territoryBefore actually saving your files for client delivery there is one additional step that is important to fulfill properly marking your images with proper metadatamdashmarking your territory if you will Most professional photographers would never send film to their clients without some sort of identification and the importance of marking your images is no less in the digital age Arguably itrsquos even more important now
Enter metadata about your image in the File Info dialog box in Photoshop or Adobe Bridge
PreparingImagesforDelivery
In Photoshop (or Bridge) you should complete the relevant metadata fields in the File Info dialog box All editable fields that are useful for downstream organization and identification should be employed
The four main IPTC metadata panels
New to Photoshop CS2 are the XMP for IPTC panels for expanded metadata support Itrsquos relatively simple to complete all the general fields with standard information such as contact copyright status and usage and save the completed forms as a template that can be applied to all images destined for delivery to third parties Communicate with your clients to get all the necessary information There really is no excuse not to do this critical step in preparing files for delivery
file formats for deliverySo you are ready to save the files for delivery However you arenrsquot quite done yet in making some important decisions The choice of file format and the final image naming is still a critical step
When delivering files to clients itrsquos important to adhere to proper naming conventions When naming files itrsquos critical to stick to an alphanumeric series of letters and numbers and use only approved special characters such as underscores or dashes for spaces You should not use any of the special symbols such as $ ^ amp ( ) + in a file name Depending on the final output device and the operating system it runs under special symbols can lead to unpredictable results
PreparingImagesforDelivery
Additionally even though recent operating systems such as Mac OS X and Windows XP may allow extended characters in a file name there are enough systems in use in the industry that cannot understand long file names Therefore you should use only a safe length for Mac OS 31 characters plus a period separating the file name and extension or 11 characters plus period and extension for MS DOS machines
The file format you supply is also an important consideration
File format options in Photoshop
If you are supplying 16-bit-per-channel CMYK files there is only a single optimal file format to use TIFF
TIFF file options when working with a 16-bit-per-channel image
When selecting the format options for a TIFF file it should be noted that some output devices cannot handle TIFF files with any compression such as LZW or ZIP Also when delivering for clients itrsquos generally not a good idea to supply layered files Unless you can be assured that the client will treat the layered files properly flattening is always the safest option
PreparingImagesforDelivery
If you are supplying 8-bit-per-channel CMYK files the format options grow
By changing the bit depth to 8 BitsChannel (left) you can select more file formats for delivery (right)
Mode changing to 8 bits and saving as a CMYK file will offer a variety of additional file formats However unless you have instructions to the contrary the safest file format is still TIFF
The Save As dialog box with the Embed Color Profile option deselected
There is an additional consideration when saving files intended for CMYK reproduction Unless yoursquove had direct and successful communications with the prepress personnel saving a CMYK file with an embedded profile might not be such a good idea While saving RGB files with embedded profiles is pretty much a universal good idea to avoid ambiguous color in graphic arts and print-ing embedded profiles can sometimes lead to problems for both technical and political reasons
Until the political realities change and RIPs can be updated to ensure they wonrsquot choke on embedded profilesmdashthis is actually rare but can happenmdashI provide CMYK files with no profiles I do note in the accompanying Read Me text files an indication of how the files were prepared If I have been fortunate enough to be working with a color management savvy prepress supplier I would be happy to embed the profile in the CMYK filemdashideally the profile they supplied me But until color management gets wider adoption in the graphic arts itrsquos easier and safer to strip the CMYK profile
If you need to transmit files instead of delivering them on a CD or DVD you can use either a zipped TIFF file or use JPG compression for the final file delivery In either case the file should be opened by the recipient and resaved as a standard TIFF file for final use Saving a final CMYK file as a JPEG file with Maximum Quality will rarely if ever produce any visible changes to the file However your client should be warned not to open the file or make changes and resave the file while in the JPEG format Multiple resaving in JPEG format is to be avoided
PreparingImagesforDelivery 0
Also you should alert your client if you have chosen not to embed a profile in the CMYK file that opening the image in Photoshop might prompt a warning dialog box
Photoshop returns a warning dialog box when you open a file that doesnrsquot have an embedded profile
Depending on the color management settings in your clientrsquos Photoshop setup they may see a warning when they open a file without an embedded profile If so you can tell them to assign the profile yoursquove used to convert the filemdashif itrsquos a profile included in Photoshop that is a simple solution If yoursquove stripped the profile and used a custom CMYK profile you should consider supplying the profile separately on disk or in the file transmission
If you are asked to supply files that are sized For Position Only (FPO) yoursquoll need to make sure the final image dimensions match the final high-resolution files exactly Only the pixel resolution should be downsampled Be sure to save the FPO version with an unambiguous file name that relates but would not be confused with the high-resolution file
The Image Size dialog showing a reduced resolution version of the original CMYK file (left) and selecting Save As (right) In the FPO version be sure to give it a noticible designation
PreparingImagesforDelivery 1
While it may seem that nobody actually reads Read Me files it is still an important practice to provide documentation and identification of images delivered to clients If nothing else you can point to the text file they failed to read as explaining any miscommunication on their part
Itrsquos good practice to include a Read Me file when you deliver your images to your clients
Regardless of whether you are burning to disk or transmitting over the net itrsquos important to include an organized file folder structure to help avoid confusion I place files inside named fold-ers that help explain their contents and segregate high-resolution CMYK files from FPOs from RGB files Particularly if you are burning to CD or DVD itrsquos useful to export the browsed cache from Adobe Bridge to make browsing from the CD or DVD quicker
When delivering files it helps to put them in an organized file folder structure
abouT THe auTHoR
JeffScheweasummacumlaudegraduateofRochesterInstituteofTechnologyhasbeenanadvertisingphotographerinChicagoforover25yearsHehasbeendoingdigitalimagingforover14yearsandiswidelyknownandrespectedinthedigitalimagingcommunityasaleadingpioneerinthefieldJeffisafeatureconsultantandalphatesterforPhotoshop
foR MoRe InfoRMaTIon
ForacomprehensiveoverviewofPhotoshopCS2pleasevisitwwwadobecomproductsphotoshopmainhtml
Adobe Systems Incorporated345ParkAvenueSanJoseCA95110-2704USAwwwadobecom
AdobetheAdobelogoAcrobatIllustratorInDesignandPhotoshopareeitherregisteredtrademarksortrademarksofAdobeSystemsIncorporatedintheUnitedStatesandorothercountriesAllothertrademarksarethepropertyoftheirrespectiveowners
copy2006JeffScheweAllrightsreserved
My personal preference even if you supply files initially via transmission is to burn the delivered files to CD or DVD I do this for several reasons to give the client a tangible result from the project that they can store and to burn a read-only version of the final delivered files that cannot be altered If at some point something happens to the file (for example somebody changes it poorly) therersquos always the original starting point image burned into the disc that cannot be changed While it doesnrsquot happen often it has happened that somebody made a mistake downstream of my file delivery and itrsquos useful to be able to point to a version of a file that represents the state of the delivered image before any additional changes were made
checklist for file deliveryConfirm final file specifications and requirements
Open a secure line of communication with client and prepress provider
Confirm final reproduction process (SWOP or Sheet Fed)
Confirm final output color space ideally with printer-supplied ICC profile
Confirm delivery of RGB CMYK or RGB plus CMYK
Tone and color correct with soft proofing for the final output
Confirm final file size and resolution
Provide image sharpening for output
Provide aim print or proof print for color
Embed image metadata for identification
Confirm final delivery file format
Provide Read Me file with documentation file list and contact information
Organize and segregate file types separate high-resolution files FPO RGB and CMYK
Provide read-only final files on CD or DVD
additional resourcesDigital Image Submission Guidelines (DISC) wwwdisc-infoorg
Universal Photographic Digital Imaging Guidelines (UPDIG) wwwupdigorg
Real World Color Management by Bruce Fraser Chris Murphy and Fred Bunting Published by Peachpit Press ISBN 0321267222
Color Management for Photographers by Andrew Rodney Published by Focal Press ISBN 0-240-80649-2
PixelGenius by PhotoKit Sharpener wwwpixelgeniuscom
Nik Software by Nik Sharpener Pro wwwniksoftwarecom
bull
bull
bull
bull
bull
bull
bull
bull
bull
bull
bull
bull
bull
bull
PreparingImagesforDelivery
How to prepare RGb files for cMYKObviously good reproduction in CMYK requires good photography and good RGB files in the first place You also need to understand enough color management to enable the proper settings in Adobereg Photoshopreg and you need to make sure you have an accurately calibrated and profiled display Anyone working professionally really should invest in a decent hardware and software display-profiling package Yoursquoll need it even if you donrsquot supply CMYK and deliver RGB files
An image in Photoshop CS2 The image is a scan from a 6 x 7 chrome
The practice outlined below will work just as well with digital captures as it will with scans
Photoshop Color Management settings
PreparingImagesforDelivery
By default the color settings in Photoshop CS2 are set to North American General Purpose 2 (NAGP2) which for separating RGB files to CMYK is less than optimal I would strongly suggest changing the default to North America Prepress 2 (NAPP2) or the setting that best reflects your countryrsquos standards if you are outside of the US
NAPP2 color settings in Photoshop CS2
You can customize any of the default color settings
PreparingImagesforDelivery
I would suggest two additional changes to the NAPP2 settings First deselect Ask When Opening and Ask When Pasting Since you already have the policies set to Always Preserve Embedded Profiles you donrsquot need to worry about seeing these warnings Photoshop will always preserve the embedded profile when opening and pasting image data The only time itrsquos useful to see a warning is when there is no profile in the image
I personally go even further and generally work with ProPhoto RGB as my RGB color space but leave the rest of the settings the same
Note To load ProPhoto RGB as a working space click More Options If you have the entire Adobe Creative Suite installed and change your Photoshop CS2 color settings the Color Settings dialog box will indicate that your Adobe Creative Suite color settings are no longer synchronized If you save your custom settings you can synchronize your Adobe Creative Suite applications in Adobe Bridge by using your named custom settings
soft proofing and gamut warning
Choose View gt Proof Setup gt Working CMYK to see a soft proof of your RGB image
When you have an RGB image open particularly one in a wide gamut such as ProPhoto RGB yoursquoll see many colors that simply cannot be photomechanically reproduced in CMYK The gamut or the total colors that can be reproduced is much smaller in CMYK than it is in RGB As a result you need to deal with the reduction of the gamut either by compressing or clipping the colors that wonrsquot reproduce If you choose View gt Proof Setup gtWorking CMYK you can
PreparingImagesforDelivery
view your RGB image through the soft proof of your working CMYK which in this case is US Web Coated (SWOP) v2 SWOP which is a fancy way of stating standard web offset printing is the standard method of printing for magazine work in the US If you are supplying what is called sheet fed the job can get a little more complicated since many printers tweak their presses and use alternative inks and paper when printing sheet fed In the case of sheet fed itrsquos optimal to obtain an ICC profile directly from the printer something that because of politics more than technical reasons is often not available
Once you turn on soft proofing yoursquoll often notice some colors change either in saturation or in density An RGB file has to go through some pretty extensive changes to end up as CMYK and vivid saturated colors are always a challenge to reproduce
Choose View gt Gamut warning to see which colors in your image wonrsquot reproduce well
One method of checking what colors will and wonrsquot reproduce is to turn on Gamut Warning in Photoshop When Gamut Warning is turned on the colors that are out of gamut or not repro-ducible are shown in a gray overlay as shown below
Gray overlays indicate which colors in an image wonrsquot reproduce well
PreparingImagesforDelivery
In this image the out-of-gamut warning pretty much covers all of the vivid colors There are steps you can take to alter the colors to bring them into gamut One of the more direct methods is to use the Color Range selection tool in Photoshop
Choose Out Of Gamut from the Select pop-up menu in the Color Range dialog box to select all out-of-gamut colors in the image
One of the options in the Select pop-up menu is to select Out Of Gamut colors The resulting selection will represent all out-of-gamut colors in your image as shown below
Out-of-gamut color selected in an image in Photoshop
PreparingImagesforDelivery
You can adjust the amount of out-of-gamut areas by reducing the saturation in the image However a reduction of 33 is a pretty major move and may not really help your image The one rather severe limitation with the Out Of Gamut warning is that it doesnrsquot tell you how far out of gamut your colors are It can only show what colors are out of gamut even if by the tiniest amounts So to completely remove the gamut warning gray areas is not really a useful goal A far more useful method is to look at how your image will appear when reproduced and see what happens to the colors directly on the computer display
Reducing the saturation of the image reduces the amount of out-of-gamut areas
To really make use of soft proofing takes a bit more effort than just turning on the working space soft proof
To make the best use of soft proofing work with both the original image and a duplicate
PreparingImagesforDelivery
The trick is to work with both your original image as well as a duplicate Choose Image gt Duplicate to make a copy of your working file Yoursquoll end up with two images side-by-side
The original image (left) and the duplicate (right)
Place your original image on the left and the duplicate on the right Click the window containing the original image to make it active
Instead of simply using the Working CMYK option choose Custom to open the Customize Proof Condition dialog box Ensure that Device To Simulate is set to your correct CMYK profile (or in this case the Working CMYK)
Proof Setup is on the View menu (left) But I prefer to control the proof condition by choosing Custom (right)
Additionally yoursquoll need to set the Rendering Intent The rendering intent is the method by which the colors in the image will be compressed or clipped when separated to CMYK In general Relative Colorimetric is often the best intent but that will depend entirely on your specific image and output profile So itrsquos useful to actually see which intent is optimal For photographic images either Perceptual or Relative Colorimetric is considered to be the best
Choose the rendering intent from the pop-up menu in the Proof Conditions dialog box
PreparingImagesforDelivery
The Perceptual intent tries to compress the out-of-gamut colors to fit within the maximum colors contained in the output profile The method of compression is to try to maintain a perceptual uniformity to the relationships of the colors The Relative Colorimetric intent will in essence clip or chop off those colors that cannot be reproduced The usefulness of Relative Colorimetric is that while colors can be reduced the luminance values of the image wonrsquot change much
The Display Options radio buttons are shown above
One other important setting for soft proofing is whether or not to use Display Options (On-Screen) If you havenrsquot used soft proofing extensively I would not suggest starting with the Simulate options (Simulate Paper Color and Simulate Black Ink) on These options are useful to see the effects of the reduction of the dynamic range (or contrast ratio) of the final printed reproduction However yoursquoll need to practice to learn how to adjust for the reduced contrast range of the final paper
If you save your soft proof setting you can choose the named setting from the Proof Setup menu and yoursquoll be able to use it later if you want to use it to produce a printed proof of the image
Save your soft proof settings (left) so that you can choose them quickly from the Proof Setup menu (right)
PreparingImagesforDelivery 10
In the image below the magenta is less saturated and the two blue bottles have lost a lot of color and saturation Blues often turn too purple (too much magenta) that can be helped a bit by mak-ing adjustments However there is nothing that can be done to make up for the loss of a deep saturated royal blue color Deep blues and purples are particularly limited in the CMYK color gamut because cyan and magenta simply cannot produce a super vibrant bluemdashthis is a fact of life that you must deal with I just never show my clients the original RGB file
The image on the left shows the result of soft proofing
When a client is looking over my shoulder to examine an RGB image I turn on CMYK soft proofing before he ever gets to see the RGB version Why show him something he can never attain in reproduction That RGB gt CMYK conversion not only will depress you but your client will see the colors change when going to CMYK and who will he blame Probably not the limita-tion of the photomechanical process So my clients really never see anything they canrsquot get in print
On the left two adjustment layers have been added to try to get the CMYK soft proof to look as close as possible to the original image on the right
PreparingImagesforDelivery 11
While not perfect Irsquove improved the result through using a couple of adjustment layers a Selective Color and a HueSaturation adjustment
The actual adjustments made to the image above The left and middle images show two separate Selective Color Options adjustments and the right image shows the HueSaturation adjustment
In Selective Color I adjusted the magenta to have a relative percentage boost as well as boosts to the Cyan Magenta and Black in the blue color The Saturation adjustment increased the blue saturation as much as possible without breaking the colors
While it doesnrsquot have the same brilliance of the ProPhoto RGB original the soft proof is an accu-rate preview of what the colors will look like on press Adding the tweaks will help the color as much as you can with traditional CMYK separations
Another factor that is going to happen when your image hits the printed page is a severe reduc-tion in the dynamic range of the image meaning the blacks will be a lot less black and the whites a lot less white There is a way of previewing this loss of dynamic range but a warning it will make your image look even worse Why Because the printed page simply canrsquot compete with todayrsquos bright CRT or LCD displays for dynamic range
When soft proofing select the Simulate options to soft proof the dynamic range of the printed reproduction
To soft proof the dynamic range of the printed reproduction go into the Customize Proof Condition dialog box again and select both Simulate Paper Color and Simulate Black Ink Selecting these options will make an Absolute Colorimetric rendering from the image to your screen matching both the dimness and yellowed looking color of standard commercial printing paper as well as the reduced black attainable with CMYK inks
PreparingImagesforDelivery 1
A soft proof with Simulate Paper Color and Simulate Black Ink selected
Well I told you it would look bad And it does But the soft proof is pretty darn accurate in its prediction of what the image will look like reproduced on press Sad huh But thatrsquos life However it really wonrsquot look this bad Because the eye adapts to the whitest portion of your field of vision your eyes are not using the white of the paper as the identifier of the white point of a scene When looking at an actual printed piece the eye will identify the brightest and whitest portion of what you see as white and adjust all the other colors and luminosity accordingly So you need to eliminate as much white before your eyes as possible when soft proofing to adjust the effects of the reduction of dynamic range and the yellowing of the whites
By switching your viewing mode in Photoshop to full screen mode either with the dark gray or better yet the black canvas background you can cut down on the amount of the surrounding white elements on screen so the image will look a little less bad (but only a little)
Change the screen mode by using the toolbar or pressing the F key On the right the image is shown against a black background
PreparingImagesforDelivery 1
Often a slight tweak in the contrast of an image will help punch the image back toward the way it looked before the CMYK process soft proof made it look so bad
A Curve dialog showing a slight increase in contrast to adjust the image for the reduced dynamic range of the printed image
final image sizingOnce your RGB image is prepped for CMYK separation you should to final image sizing Obviously if you do not know the exact final reproduction size you canrsquot do any final exacting resizing but you can make sure the image is in the correct resolution realm
The image size and resolution of the original scan Both the resolution and image size need to be corrected
PreparingImagesforDelivery 1
For this particular image scan itrsquos important to set the units to match the final usage In this case the scan was done at 1800 pixelsinch (ppi) while the dimensions were in centimeters Photoshop doesnrsquot particularly care what the units are you can change the ratio of the units and dimensions by deselecting Resample Image and changing the units of the image You donrsquot need to resample the image just change the units and dimension The actual pixel count remains the same However for page layout applications the dimensions and units do matter
The Resample Image option is deselected and the Resolution has been changed to 300 pixelsinch There is no resampling involved only the ratio of the pixel density has changed
Here the pixel dimensions have been changed to inches The image dimension of 1548rdquo x 1204rdquo is too large for the intended 85rdquo x 11rdquo paper If delivered at this dimension somebody down-stream will need to resample the image Also note that only images sized to their final dimen-sions can be accurately and properly sharpened for reproduction
The image size and resolution have been resampled for the final reproduction size
PreparingImagesforDelivery 1
The image has been set to the correct units and the resample option is selected The image will be sized correctly for 85rdquo x 11rdquo full-bleed reproduction (the outer dimensions have been set to 1125rdquo x 875rdquo to allow for a 18rdquo bleed) If the image were to be placed in an image box in a page layout application the image could have been sized to that of the image box But allowing for bleed is yet another small service that the photographer can provide setting the final image crop
Note For downsizing the Bicubic Sharper option improves resampling
Once set to the final image dimension you can use guides in Photoshop to double-check where the image will be cropped While these guides will not be used by a page layout application itrsquos still useful to indicate the guides in the event that somebody downstream opens the image in Photoshop Guides are saved in Photoshop files as metadata and can be preserved for later use
Use guides in Photoshop to double-check where the image will be cropped
Image sharpeningOnce an image is set to the final size and resolution one additional step is required for optimal reproductionmdashimage sharpening for output There is a lot of mystery surrounding image sharp-ening While Photoshop has many tools to apply sharpening routines knowing how to sharpen and by how much can be a problem since viewing an image on a computer display is a rather poor indicator of the requirements needed for halftone reproduction
There are some generalities Bruce Fraser co-author of Real World Photoshop has indicated that the required sharpening should produce an edge halo of between 150 ndash 1100 of an image The halo is an increase of the apparent edge contrast of an image At between 150 ndash 1100 of an image the halo should be invisible to the naked eye and yet produce a crisp edge in reproduction
PreparingImagesforDelivery 1
The other problem inherent with determining image sharpening is the fact that a computer display is a poor tool to evaluate image sharpening If you deliver an image whose pixel resolution is twice that of the halftone line screen ruling four image pixels will be dithered to produce one halftone dot However many ldquoexpertsrdquo tell people to view their images at a 100 zoom inside Photoshop to evaluate the effects of sharpening Yes you need to view your images at 100 or larger to see the actual effects of sharpening on the pixels yet the resulting image in Photoshop will be too large to evaluate the amount of sharpening required To more accurately predict the amount of sharpening required a more useful screen zoom of 50 will simulate the effect of the halftone screening At 50 four image pixels are dithered to produce one screen display pixel
An image without output sharpening When printed the image wonrsquot be crisp
The image above at a zoom of 50 has no additional output sharpening applied If delivered like this the resultant halftone reproduction will be less than crisp The dithering of the halftone dots will introduce a softening effect further softening the image So output sharpening needs to be applied even for what may appear in Photoshop to be a sharp image
PreparingImagesforDelivery 1
While the Unsharp Mask filter in Photoshop is a useful sharpening tool there is an alternative that provides a bit more control while reducing some of the undesirable artifacts of Unsharp Mask
Use the High Pass filter to sharpen an image
By duplicating the imagersquos background layer and setting the blending mode to Overlay you can use the High Pass filter (choose Filter gt Other gtHigh Pass)
The High Pass filter is rather hidden away under ldquoOtherrdquo in the Filter menu
PreparingImagesforDelivery 1
This High Pass filter produces an apparent edge enhancement based on a pixel radius that allows the Overlay blend mode to increase the light edge while darkening the dark edge of image edges Setting the radius to 3 for a 300ppi image will enhance the edge halo approximately 1100 of an inch which happens to match the recommendations of Bruce Fraser
The results of using High Pass on an overlay blend mode layer The image edges snap at 50 zoom
There are third-party solutions specially designed for doing image sharpening that can increase the accuracy and predictability of output sharpening Nik Sharpener Pro by Nik Software Inc and PhotoKit Sharpener by PixelGenius are two such products Bruce Fraser was the primary product designer of PhotoKit Shapener and for disclosure purposes I must also indicate my involvement with PixelGenius Both products are designed to provide optimal output sharpening
But the caveat again final output sharpening can only be done on images whose final reproduc-tion size has been set Any resizing on the part of a downstream process will reintroduce soften-ing and thus mitigate the output sharpening Resharpening an already sharpened image that has been resized is not optimal
PreparingImagesforDelivery 1
converting to cMYKOnce the image has been optimized for the reproduction process in terms of tone color resolu-tion and image sharpness the final processing step is to convert the RGB image to CMYK This step can be as simple as doing a mode change from RGB to CMYK (assuming your Photoshop Color Settings are properly set up) or can involve a Convert To Profile transform
This figure shows the Mode change to CMYK I prefer to use the Convert to Profile command
Changing the mode from RGB to CMYK (by choosing Edit gt Mode gt CMYK Color) results in an image conversion from RGB to CMYK based on the current color settings in Photoshop While fine to do it contains a slight risk that the color settings may not be exactly what you expect When there are multiple users of Photoshop or if you havenrsquot produced a CMYK separation recently using the Convert To Profile command in the Edit menu allows for total control and clarity in the settings
In the Convert To Profile dialog box you can confirm the source space the destination space and the parameters on which the conversion will take place
PreparingImagesforDelivery 0
In the Convert to Profile dialog you must set the correct options I suggest using the Adobe (Ace) CMM (left) and use the same rendering intent I used to soft proof (right)
In the Convert To Profile dialog box you can set the CMM transform engine as well as confirm the rendering intent In general with Photoshop CS or CS2 you can always be assured of getting proper results when selecting Use Black Compensation to map image black to output black Itrsquos also generally a good idea to flatten all adjustment layers during conversion since some adjust-ment layers either will not work on CMYK layered files or will produce different results than their RGB counterparts
Another point to note if you are working in 16-bit-per-channel depth is that you should not only flatten while in 16 bit to make sure your adjustments are being completed in 16 bit but also transform from RGB to CMYK while still in 16 bit to receive the benefit of the higher bit depth during conversion
The final CMYK-separated and optimized file
PreparingImagesforDelivery 1
What about providing RGb filesTo offer greater flexibility to your clients you can also consider providing RGB files in addition to the CMYK files yoursquove separated However providing RGB files can be a problem If yoursquove used a large color space such as ProPhoto RGB delivering your RGB file to somebody who is not well versed in color management can result in some pretty ugly interpretations of your image
An image in ProPhoto RGB (left) and a duplicate of the image with sRGB assigned as the embedded profile (right)
The improper use of Photoshop Color Settings and policies can result in a misunderstanding of the use of profiles If the client or printer did not honor the embedded profile and merely assumed the image to be in sRGB the resulting display would be less than desirable
So if you want to work with your originals in a large gamut color space and deliver files to your clients that run a lower risk of miscommunication of color what do you do Well I can only tell you what I do and suggest you test it yourself for your own work
I take the final CMYK file and reconvert it to RGB Why Once the filersquos colors have been reduced to the gamut of CMYK converting the file back to RGB will not do any additional harmmdashpar-ticularly if you are working in 16 bit But it will result in an RGB file that would be pretty hard to misinterpret
Using Convert to Profile you select the RGB color space you want to convert the CMYK file to Adobe RGB on the left or I suggest sRGB shown on the right
PreparingImagesforDelivery
You can either convert to Adobe RGB or sRGB The advantage of providing an sRGB version of the file is that in the event the usage of the image also includes the Web yoursquoll have an image converted from CMYK to sRGB so the web image will match the CMYK rendering of the file
To better illustrate the process of converting from ProPhoto RGB to SWOP CMYK and back to sRGB Irsquove done screen shots of both the color space gamuts as well as plotted actual colors of the images in a program called ColorThink by CHROMIX (wwwchromixcom)
The gamuts and image plots have been done by plotting in Lab coordinates and in 3D It should be noted that the best way to see color space gamuts and image plots is in motion ColorThink allows you rotate the graph to better evaluate the relationships between color spaces and image plots
The gamut map on the left is ProPhoto RGB In the middle is sRGB and on the right is SWOP as contained in the Photoshop CS2 CMYK profile named US Web Coated (SWOP) v2 Note the screen shots are to scale
The figures above show the relative size and volume of the three color spaces ProPhoto RGB is huge and SWOP is tiny The challenge is to get the colors of the image to look good in the color space of the final output
On the left is the original Colored Bottle image mapped into the ProPhoto RGB color space The dots represent actual color samples from the image On the right is the image mapped into the SWOP color space As you can see a lot of the colors in the image are well outside of the printable range of the CMYK press
PreparingImagesforDelivery
Somehow the colors of the image must be mapped into the color space of the output The method of either compression or clipping will be dictated by the process you use to make the color conversion In the preceding mode change and convert to profile examples I showed two methods using Color Range to desaturate the image and using soft proofing to adjust for the resulting color transform
But why go from a super-huge color space such as ProPhoto RGB to SWOP and then back to sRGB Itrsquos really a matter of exercising your color control over the way delivered files are prepared for reproduction By using your eyes to evaluate the way in which colors will be reproduced you are able to dictate how your images reproduce on paper
On the left the final CMYK image colors are shown mapped in the SWOP color space notice the colors are now within the gamut of CMYK On the right the image has been converted back to sRGB from CMYK All of the CMYK colors (with the possible exception of a tiny amount of cyan) will fit within the sRGB color space
Going from ProPhoto RGB to CMYK and then back to sRGB gives you the control over how the image colors will look not only in CMYK but also when you are delivering RGB images Since the converted sRGB image has already had its total volume of colors clamped to the gamut of CMYK there is less chance that somebody down the ldquoprepress roadrdquo from you will mess up the colors of the image
PreparingImagesforDelivery
The proofWhen supplying digital files itrsquos important to also provide an aim print or actual proof that confirms on paper what the image should look like when reproduced In the past Irsquove resorted to actually sending the CMYK file to a service bureau for expensive contract proofs While the result is an unequivocal proof of the CMYK file it can be both costly and time consuming If you have a quality ink jet printer and accurate profiles for the printer you can print out from Photoshop and produce a cross-rendered proof A cross-rendered proof is made by using both the original CMYK profile as well as the printer profile to render in the print the accurate results of proofing to the final output device Again this presupposes that you have an accurate display and printer profile and that you follow the cross-rendering recipe for printing from Photoshop
This figure shows the Photoshop Print dialog box with a preview of the image Irsquove selected Let Photoshop Determine Colors from the Color Handling pop-up menu and selected the correct printer profile
PreparingImagesforDelivery
In the Print dialog box in Photoshop yoursquoll need to alter the settings you may normally use Rather than setting the Print space to your RGB or CMYK space you use the Proof option instead Under Options choose Let Photoshop Determine Colors from the Color Handling pop-up menu and select your particular printerrsquos profile However selecting the proof option in print allows the use of the Proof Setup Preset (shown below) which if yoursquove saved your soft proofing setups makes doing cross-rendered proofs a bit more efficient
To produce a cross-rendered proof select the saved soft proof settings Here Irsquove selected the SWOP-V2-BW-Off proof setup
You will definitely want to select the Simulate Black Ink option Whether you select Simulate Paper Color depends on your intent for the resulting print If you merely want to provide an aim print you may choose not to use this option
To produce an accurate cross-rendered proof select the Simulate Paper Color and the Simulate Black Ink options
However if you wish to provide a very accurate cross-rendered proof that could act as a con-tract proof for color you should select Simulate Paper Color It should be noted that just as the on-screen results will show a marked reduction in dynamic range so will a cross-rendered proof with this option turned on When reviewing the final print the paper white of the actual CMYK output profile will produce a scum tone over the image This preview will be a rather accurate reproduction of the final printed piece but it wonrsquot look very good which is actually what you want in an accurate proof Photographers should really only concern themselves with proofing the image not the final design of the page layout Note that even a highly accurate cross-rendered proof from an inkjet will not show the results of the halftone screening process so only the color can essentially be proofed
PreparingImagesforDelivery
Here Irsquove set the media settings (left) and the Printer Color Management settings (right)
Marking your territoryBefore actually saving your files for client delivery there is one additional step that is important to fulfill properly marking your images with proper metadatamdashmarking your territory if you will Most professional photographers would never send film to their clients without some sort of identification and the importance of marking your images is no less in the digital age Arguably itrsquos even more important now
Enter metadata about your image in the File Info dialog box in Photoshop or Adobe Bridge
PreparingImagesforDelivery
In Photoshop (or Bridge) you should complete the relevant metadata fields in the File Info dialog box All editable fields that are useful for downstream organization and identification should be employed
The four main IPTC metadata panels
New to Photoshop CS2 are the XMP for IPTC panels for expanded metadata support Itrsquos relatively simple to complete all the general fields with standard information such as contact copyright status and usage and save the completed forms as a template that can be applied to all images destined for delivery to third parties Communicate with your clients to get all the necessary information There really is no excuse not to do this critical step in preparing files for delivery
file formats for deliverySo you are ready to save the files for delivery However you arenrsquot quite done yet in making some important decisions The choice of file format and the final image naming is still a critical step
When delivering files to clients itrsquos important to adhere to proper naming conventions When naming files itrsquos critical to stick to an alphanumeric series of letters and numbers and use only approved special characters such as underscores or dashes for spaces You should not use any of the special symbols such as $ ^ amp ( ) + in a file name Depending on the final output device and the operating system it runs under special symbols can lead to unpredictable results
PreparingImagesforDelivery
Additionally even though recent operating systems such as Mac OS X and Windows XP may allow extended characters in a file name there are enough systems in use in the industry that cannot understand long file names Therefore you should use only a safe length for Mac OS 31 characters plus a period separating the file name and extension or 11 characters plus period and extension for MS DOS machines
The file format you supply is also an important consideration
File format options in Photoshop
If you are supplying 16-bit-per-channel CMYK files there is only a single optimal file format to use TIFF
TIFF file options when working with a 16-bit-per-channel image
When selecting the format options for a TIFF file it should be noted that some output devices cannot handle TIFF files with any compression such as LZW or ZIP Also when delivering for clients itrsquos generally not a good idea to supply layered files Unless you can be assured that the client will treat the layered files properly flattening is always the safest option
PreparingImagesforDelivery
If you are supplying 8-bit-per-channel CMYK files the format options grow
By changing the bit depth to 8 BitsChannel (left) you can select more file formats for delivery (right)
Mode changing to 8 bits and saving as a CMYK file will offer a variety of additional file formats However unless you have instructions to the contrary the safest file format is still TIFF
The Save As dialog box with the Embed Color Profile option deselected
There is an additional consideration when saving files intended for CMYK reproduction Unless yoursquove had direct and successful communications with the prepress personnel saving a CMYK file with an embedded profile might not be such a good idea While saving RGB files with embedded profiles is pretty much a universal good idea to avoid ambiguous color in graphic arts and print-ing embedded profiles can sometimes lead to problems for both technical and political reasons
Until the political realities change and RIPs can be updated to ensure they wonrsquot choke on embedded profilesmdashthis is actually rare but can happenmdashI provide CMYK files with no profiles I do note in the accompanying Read Me text files an indication of how the files were prepared If I have been fortunate enough to be working with a color management savvy prepress supplier I would be happy to embed the profile in the CMYK filemdashideally the profile they supplied me But until color management gets wider adoption in the graphic arts itrsquos easier and safer to strip the CMYK profile
If you need to transmit files instead of delivering them on a CD or DVD you can use either a zipped TIFF file or use JPG compression for the final file delivery In either case the file should be opened by the recipient and resaved as a standard TIFF file for final use Saving a final CMYK file as a JPEG file with Maximum Quality will rarely if ever produce any visible changes to the file However your client should be warned not to open the file or make changes and resave the file while in the JPEG format Multiple resaving in JPEG format is to be avoided
PreparingImagesforDelivery 0
Also you should alert your client if you have chosen not to embed a profile in the CMYK file that opening the image in Photoshop might prompt a warning dialog box
Photoshop returns a warning dialog box when you open a file that doesnrsquot have an embedded profile
Depending on the color management settings in your clientrsquos Photoshop setup they may see a warning when they open a file without an embedded profile If so you can tell them to assign the profile yoursquove used to convert the filemdashif itrsquos a profile included in Photoshop that is a simple solution If yoursquove stripped the profile and used a custom CMYK profile you should consider supplying the profile separately on disk or in the file transmission
If you are asked to supply files that are sized For Position Only (FPO) yoursquoll need to make sure the final image dimensions match the final high-resolution files exactly Only the pixel resolution should be downsampled Be sure to save the FPO version with an unambiguous file name that relates but would not be confused with the high-resolution file
The Image Size dialog showing a reduced resolution version of the original CMYK file (left) and selecting Save As (right) In the FPO version be sure to give it a noticible designation
PreparingImagesforDelivery 1
While it may seem that nobody actually reads Read Me files it is still an important practice to provide documentation and identification of images delivered to clients If nothing else you can point to the text file they failed to read as explaining any miscommunication on their part
Itrsquos good practice to include a Read Me file when you deliver your images to your clients
Regardless of whether you are burning to disk or transmitting over the net itrsquos important to include an organized file folder structure to help avoid confusion I place files inside named fold-ers that help explain their contents and segregate high-resolution CMYK files from FPOs from RGB files Particularly if you are burning to CD or DVD itrsquos useful to export the browsed cache from Adobe Bridge to make browsing from the CD or DVD quicker
When delivering files it helps to put them in an organized file folder structure
abouT THe auTHoR
JeffScheweasummacumlaudegraduateofRochesterInstituteofTechnologyhasbeenanadvertisingphotographerinChicagoforover25yearsHehasbeendoingdigitalimagingforover14yearsandiswidelyknownandrespectedinthedigitalimagingcommunityasaleadingpioneerinthefieldJeffisafeatureconsultantandalphatesterforPhotoshop
foR MoRe InfoRMaTIon
ForacomprehensiveoverviewofPhotoshopCS2pleasevisitwwwadobecomproductsphotoshopmainhtml
Adobe Systems Incorporated345ParkAvenueSanJoseCA95110-2704USAwwwadobecom
AdobetheAdobelogoAcrobatIllustratorInDesignandPhotoshopareeitherregisteredtrademarksortrademarksofAdobeSystemsIncorporatedintheUnitedStatesandorothercountriesAllothertrademarksarethepropertyoftheirrespectiveowners
copy2006JeffScheweAllrightsreserved
My personal preference even if you supply files initially via transmission is to burn the delivered files to CD or DVD I do this for several reasons to give the client a tangible result from the project that they can store and to burn a read-only version of the final delivered files that cannot be altered If at some point something happens to the file (for example somebody changes it poorly) therersquos always the original starting point image burned into the disc that cannot be changed While it doesnrsquot happen often it has happened that somebody made a mistake downstream of my file delivery and itrsquos useful to be able to point to a version of a file that represents the state of the delivered image before any additional changes were made
checklist for file deliveryConfirm final file specifications and requirements
Open a secure line of communication with client and prepress provider
Confirm final reproduction process (SWOP or Sheet Fed)
Confirm final output color space ideally with printer-supplied ICC profile
Confirm delivery of RGB CMYK or RGB plus CMYK
Tone and color correct with soft proofing for the final output
Confirm final file size and resolution
Provide image sharpening for output
Provide aim print or proof print for color
Embed image metadata for identification
Confirm final delivery file format
Provide Read Me file with documentation file list and contact information
Organize and segregate file types separate high-resolution files FPO RGB and CMYK
Provide read-only final files on CD or DVD
additional resourcesDigital Image Submission Guidelines (DISC) wwwdisc-infoorg
Universal Photographic Digital Imaging Guidelines (UPDIG) wwwupdigorg
Real World Color Management by Bruce Fraser Chris Murphy and Fred Bunting Published by Peachpit Press ISBN 0321267222
Color Management for Photographers by Andrew Rodney Published by Focal Press ISBN 0-240-80649-2
PixelGenius by PhotoKit Sharpener wwwpixelgeniuscom
Nik Software by Nik Sharpener Pro wwwniksoftwarecom
bull
bull
bull
bull
bull
bull
bull
bull
bull
bull
bull
bull
bull
bull

PreparingImagesforDelivery
By default the color settings in Photoshop CS2 are set to North American General Purpose 2 (NAGP2) which for separating RGB files to CMYK is less than optimal I would strongly suggest changing the default to North America Prepress 2 (NAPP2) or the setting that best reflects your countryrsquos standards if you are outside of the US
NAPP2 color settings in Photoshop CS2
You can customize any of the default color settings
PreparingImagesforDelivery
I would suggest two additional changes to the NAPP2 settings First deselect Ask When Opening and Ask When Pasting Since you already have the policies set to Always Preserve Embedded Profiles you donrsquot need to worry about seeing these warnings Photoshop will always preserve the embedded profile when opening and pasting image data The only time itrsquos useful to see a warning is when there is no profile in the image
I personally go even further and generally work with ProPhoto RGB as my RGB color space but leave the rest of the settings the same
Note To load ProPhoto RGB as a working space click More Options If you have the entire Adobe Creative Suite installed and change your Photoshop CS2 color settings the Color Settings dialog box will indicate that your Adobe Creative Suite color settings are no longer synchronized If you save your custom settings you can synchronize your Adobe Creative Suite applications in Adobe Bridge by using your named custom settings
soft proofing and gamut warning
Choose View gt Proof Setup gt Working CMYK to see a soft proof of your RGB image
When you have an RGB image open particularly one in a wide gamut such as ProPhoto RGB yoursquoll see many colors that simply cannot be photomechanically reproduced in CMYK The gamut or the total colors that can be reproduced is much smaller in CMYK than it is in RGB As a result you need to deal with the reduction of the gamut either by compressing or clipping the colors that wonrsquot reproduce If you choose View gt Proof Setup gtWorking CMYK you can
PreparingImagesforDelivery
view your RGB image through the soft proof of your working CMYK which in this case is US Web Coated (SWOP) v2 SWOP which is a fancy way of stating standard web offset printing is the standard method of printing for magazine work in the US If you are supplying what is called sheet fed the job can get a little more complicated since many printers tweak their presses and use alternative inks and paper when printing sheet fed In the case of sheet fed itrsquos optimal to obtain an ICC profile directly from the printer something that because of politics more than technical reasons is often not available
Once you turn on soft proofing yoursquoll often notice some colors change either in saturation or in density An RGB file has to go through some pretty extensive changes to end up as CMYK and vivid saturated colors are always a challenge to reproduce
Choose View gt Gamut warning to see which colors in your image wonrsquot reproduce well
One method of checking what colors will and wonrsquot reproduce is to turn on Gamut Warning in Photoshop When Gamut Warning is turned on the colors that are out of gamut or not repro-ducible are shown in a gray overlay as shown below
Gray overlays indicate which colors in an image wonrsquot reproduce well
PreparingImagesforDelivery
In this image the out-of-gamut warning pretty much covers all of the vivid colors There are steps you can take to alter the colors to bring them into gamut One of the more direct methods is to use the Color Range selection tool in Photoshop
Choose Out Of Gamut from the Select pop-up menu in the Color Range dialog box to select all out-of-gamut colors in the image
One of the options in the Select pop-up menu is to select Out Of Gamut colors The resulting selection will represent all out-of-gamut colors in your image as shown below
Out-of-gamut color selected in an image in Photoshop
PreparingImagesforDelivery
You can adjust the amount of out-of-gamut areas by reducing the saturation in the image However a reduction of 33 is a pretty major move and may not really help your image The one rather severe limitation with the Out Of Gamut warning is that it doesnrsquot tell you how far out of gamut your colors are It can only show what colors are out of gamut even if by the tiniest amounts So to completely remove the gamut warning gray areas is not really a useful goal A far more useful method is to look at how your image will appear when reproduced and see what happens to the colors directly on the computer display
Reducing the saturation of the image reduces the amount of out-of-gamut areas
To really make use of soft proofing takes a bit more effort than just turning on the working space soft proof
To make the best use of soft proofing work with both the original image and a duplicate
PreparingImagesforDelivery
The trick is to work with both your original image as well as a duplicate Choose Image gt Duplicate to make a copy of your working file Yoursquoll end up with two images side-by-side
The original image (left) and the duplicate (right)
Place your original image on the left and the duplicate on the right Click the window containing the original image to make it active
Instead of simply using the Working CMYK option choose Custom to open the Customize Proof Condition dialog box Ensure that Device To Simulate is set to your correct CMYK profile (or in this case the Working CMYK)
Proof Setup is on the View menu (left) But I prefer to control the proof condition by choosing Custom (right)
Additionally yoursquoll need to set the Rendering Intent The rendering intent is the method by which the colors in the image will be compressed or clipped when separated to CMYK In general Relative Colorimetric is often the best intent but that will depend entirely on your specific image and output profile So itrsquos useful to actually see which intent is optimal For photographic images either Perceptual or Relative Colorimetric is considered to be the best
Choose the rendering intent from the pop-up menu in the Proof Conditions dialog box
PreparingImagesforDelivery
The Perceptual intent tries to compress the out-of-gamut colors to fit within the maximum colors contained in the output profile The method of compression is to try to maintain a perceptual uniformity to the relationships of the colors The Relative Colorimetric intent will in essence clip or chop off those colors that cannot be reproduced The usefulness of Relative Colorimetric is that while colors can be reduced the luminance values of the image wonrsquot change much
The Display Options radio buttons are shown above
One other important setting for soft proofing is whether or not to use Display Options (On-Screen) If you havenrsquot used soft proofing extensively I would not suggest starting with the Simulate options (Simulate Paper Color and Simulate Black Ink) on These options are useful to see the effects of the reduction of the dynamic range (or contrast ratio) of the final printed reproduction However yoursquoll need to practice to learn how to adjust for the reduced contrast range of the final paper
If you save your soft proof setting you can choose the named setting from the Proof Setup menu and yoursquoll be able to use it later if you want to use it to produce a printed proof of the image
Save your soft proof settings (left) so that you can choose them quickly from the Proof Setup menu (right)
PreparingImagesforDelivery 10
In the image below the magenta is less saturated and the two blue bottles have lost a lot of color and saturation Blues often turn too purple (too much magenta) that can be helped a bit by mak-ing adjustments However there is nothing that can be done to make up for the loss of a deep saturated royal blue color Deep blues and purples are particularly limited in the CMYK color gamut because cyan and magenta simply cannot produce a super vibrant bluemdashthis is a fact of life that you must deal with I just never show my clients the original RGB file
The image on the left shows the result of soft proofing
When a client is looking over my shoulder to examine an RGB image I turn on CMYK soft proofing before he ever gets to see the RGB version Why show him something he can never attain in reproduction That RGB gt CMYK conversion not only will depress you but your client will see the colors change when going to CMYK and who will he blame Probably not the limita-tion of the photomechanical process So my clients really never see anything they canrsquot get in print
On the left two adjustment layers have been added to try to get the CMYK soft proof to look as close as possible to the original image on the right
PreparingImagesforDelivery 11
While not perfect Irsquove improved the result through using a couple of adjustment layers a Selective Color and a HueSaturation adjustment
The actual adjustments made to the image above The left and middle images show two separate Selective Color Options adjustments and the right image shows the HueSaturation adjustment
In Selective Color I adjusted the magenta to have a relative percentage boost as well as boosts to the Cyan Magenta and Black in the blue color The Saturation adjustment increased the blue saturation as much as possible without breaking the colors
While it doesnrsquot have the same brilliance of the ProPhoto RGB original the soft proof is an accu-rate preview of what the colors will look like on press Adding the tweaks will help the color as much as you can with traditional CMYK separations
Another factor that is going to happen when your image hits the printed page is a severe reduc-tion in the dynamic range of the image meaning the blacks will be a lot less black and the whites a lot less white There is a way of previewing this loss of dynamic range but a warning it will make your image look even worse Why Because the printed page simply canrsquot compete with todayrsquos bright CRT or LCD displays for dynamic range
When soft proofing select the Simulate options to soft proof the dynamic range of the printed reproduction
To soft proof the dynamic range of the printed reproduction go into the Customize Proof Condition dialog box again and select both Simulate Paper Color and Simulate Black Ink Selecting these options will make an Absolute Colorimetric rendering from the image to your screen matching both the dimness and yellowed looking color of standard commercial printing paper as well as the reduced black attainable with CMYK inks
PreparingImagesforDelivery 1
A soft proof with Simulate Paper Color and Simulate Black Ink selected
Well I told you it would look bad And it does But the soft proof is pretty darn accurate in its prediction of what the image will look like reproduced on press Sad huh But thatrsquos life However it really wonrsquot look this bad Because the eye adapts to the whitest portion of your field of vision your eyes are not using the white of the paper as the identifier of the white point of a scene When looking at an actual printed piece the eye will identify the brightest and whitest portion of what you see as white and adjust all the other colors and luminosity accordingly So you need to eliminate as much white before your eyes as possible when soft proofing to adjust the effects of the reduction of dynamic range and the yellowing of the whites
By switching your viewing mode in Photoshop to full screen mode either with the dark gray or better yet the black canvas background you can cut down on the amount of the surrounding white elements on screen so the image will look a little less bad (but only a little)
Change the screen mode by using the toolbar or pressing the F key On the right the image is shown against a black background
PreparingImagesforDelivery 1
Often a slight tweak in the contrast of an image will help punch the image back toward the way it looked before the CMYK process soft proof made it look so bad
A Curve dialog showing a slight increase in contrast to adjust the image for the reduced dynamic range of the printed image
final image sizingOnce your RGB image is prepped for CMYK separation you should to final image sizing Obviously if you do not know the exact final reproduction size you canrsquot do any final exacting resizing but you can make sure the image is in the correct resolution realm
The image size and resolution of the original scan Both the resolution and image size need to be corrected
PreparingImagesforDelivery 1
For this particular image scan itrsquos important to set the units to match the final usage In this case the scan was done at 1800 pixelsinch (ppi) while the dimensions were in centimeters Photoshop doesnrsquot particularly care what the units are you can change the ratio of the units and dimensions by deselecting Resample Image and changing the units of the image You donrsquot need to resample the image just change the units and dimension The actual pixel count remains the same However for page layout applications the dimensions and units do matter
The Resample Image option is deselected and the Resolution has been changed to 300 pixelsinch There is no resampling involved only the ratio of the pixel density has changed
Here the pixel dimensions have been changed to inches The image dimension of 1548rdquo x 1204rdquo is too large for the intended 85rdquo x 11rdquo paper If delivered at this dimension somebody down-stream will need to resample the image Also note that only images sized to their final dimen-sions can be accurately and properly sharpened for reproduction
The image size and resolution have been resampled for the final reproduction size
PreparingImagesforDelivery 1
The image has been set to the correct units and the resample option is selected The image will be sized correctly for 85rdquo x 11rdquo full-bleed reproduction (the outer dimensions have been set to 1125rdquo x 875rdquo to allow for a 18rdquo bleed) If the image were to be placed in an image box in a page layout application the image could have been sized to that of the image box But allowing for bleed is yet another small service that the photographer can provide setting the final image crop
Note For downsizing the Bicubic Sharper option improves resampling
Once set to the final image dimension you can use guides in Photoshop to double-check where the image will be cropped While these guides will not be used by a page layout application itrsquos still useful to indicate the guides in the event that somebody downstream opens the image in Photoshop Guides are saved in Photoshop files as metadata and can be preserved for later use
Use guides in Photoshop to double-check where the image will be cropped
Image sharpeningOnce an image is set to the final size and resolution one additional step is required for optimal reproductionmdashimage sharpening for output There is a lot of mystery surrounding image sharp-ening While Photoshop has many tools to apply sharpening routines knowing how to sharpen and by how much can be a problem since viewing an image on a computer display is a rather poor indicator of the requirements needed for halftone reproduction
There are some generalities Bruce Fraser co-author of Real World Photoshop has indicated that the required sharpening should produce an edge halo of between 150 ndash 1100 of an image The halo is an increase of the apparent edge contrast of an image At between 150 ndash 1100 of an image the halo should be invisible to the naked eye and yet produce a crisp edge in reproduction
PreparingImagesforDelivery 1
The other problem inherent with determining image sharpening is the fact that a computer display is a poor tool to evaluate image sharpening If you deliver an image whose pixel resolution is twice that of the halftone line screen ruling four image pixels will be dithered to produce one halftone dot However many ldquoexpertsrdquo tell people to view their images at a 100 zoom inside Photoshop to evaluate the effects of sharpening Yes you need to view your images at 100 or larger to see the actual effects of sharpening on the pixels yet the resulting image in Photoshop will be too large to evaluate the amount of sharpening required To more accurately predict the amount of sharpening required a more useful screen zoom of 50 will simulate the effect of the halftone screening At 50 four image pixels are dithered to produce one screen display pixel
An image without output sharpening When printed the image wonrsquot be crisp
The image above at a zoom of 50 has no additional output sharpening applied If delivered like this the resultant halftone reproduction will be less than crisp The dithering of the halftone dots will introduce a softening effect further softening the image So output sharpening needs to be applied even for what may appear in Photoshop to be a sharp image
PreparingImagesforDelivery 1
While the Unsharp Mask filter in Photoshop is a useful sharpening tool there is an alternative that provides a bit more control while reducing some of the undesirable artifacts of Unsharp Mask
Use the High Pass filter to sharpen an image
By duplicating the imagersquos background layer and setting the blending mode to Overlay you can use the High Pass filter (choose Filter gt Other gtHigh Pass)
The High Pass filter is rather hidden away under ldquoOtherrdquo in the Filter menu
PreparingImagesforDelivery 1
This High Pass filter produces an apparent edge enhancement based on a pixel radius that allows the Overlay blend mode to increase the light edge while darkening the dark edge of image edges Setting the radius to 3 for a 300ppi image will enhance the edge halo approximately 1100 of an inch which happens to match the recommendations of Bruce Fraser
The results of using High Pass on an overlay blend mode layer The image edges snap at 50 zoom
There are third-party solutions specially designed for doing image sharpening that can increase the accuracy and predictability of output sharpening Nik Sharpener Pro by Nik Software Inc and PhotoKit Sharpener by PixelGenius are two such products Bruce Fraser was the primary product designer of PhotoKit Shapener and for disclosure purposes I must also indicate my involvement with PixelGenius Both products are designed to provide optimal output sharpening
But the caveat again final output sharpening can only be done on images whose final reproduc-tion size has been set Any resizing on the part of a downstream process will reintroduce soften-ing and thus mitigate the output sharpening Resharpening an already sharpened image that has been resized is not optimal
PreparingImagesforDelivery 1
converting to cMYKOnce the image has been optimized for the reproduction process in terms of tone color resolu-tion and image sharpness the final processing step is to convert the RGB image to CMYK This step can be as simple as doing a mode change from RGB to CMYK (assuming your Photoshop Color Settings are properly set up) or can involve a Convert To Profile transform
This figure shows the Mode change to CMYK I prefer to use the Convert to Profile command
Changing the mode from RGB to CMYK (by choosing Edit gt Mode gt CMYK Color) results in an image conversion from RGB to CMYK based on the current color settings in Photoshop While fine to do it contains a slight risk that the color settings may not be exactly what you expect When there are multiple users of Photoshop or if you havenrsquot produced a CMYK separation recently using the Convert To Profile command in the Edit menu allows for total control and clarity in the settings
In the Convert To Profile dialog box you can confirm the source space the destination space and the parameters on which the conversion will take place
PreparingImagesforDelivery 0
In the Convert to Profile dialog you must set the correct options I suggest using the Adobe (Ace) CMM (left) and use the same rendering intent I used to soft proof (right)
In the Convert To Profile dialog box you can set the CMM transform engine as well as confirm the rendering intent In general with Photoshop CS or CS2 you can always be assured of getting proper results when selecting Use Black Compensation to map image black to output black Itrsquos also generally a good idea to flatten all adjustment layers during conversion since some adjust-ment layers either will not work on CMYK layered files or will produce different results than their RGB counterparts
Another point to note if you are working in 16-bit-per-channel depth is that you should not only flatten while in 16 bit to make sure your adjustments are being completed in 16 bit but also transform from RGB to CMYK while still in 16 bit to receive the benefit of the higher bit depth during conversion
The final CMYK-separated and optimized file
PreparingImagesforDelivery 1
What about providing RGb filesTo offer greater flexibility to your clients you can also consider providing RGB files in addition to the CMYK files yoursquove separated However providing RGB files can be a problem If yoursquove used a large color space such as ProPhoto RGB delivering your RGB file to somebody who is not well versed in color management can result in some pretty ugly interpretations of your image
An image in ProPhoto RGB (left) and a duplicate of the image with sRGB assigned as the embedded profile (right)
The improper use of Photoshop Color Settings and policies can result in a misunderstanding of the use of profiles If the client or printer did not honor the embedded profile and merely assumed the image to be in sRGB the resulting display would be less than desirable
So if you want to work with your originals in a large gamut color space and deliver files to your clients that run a lower risk of miscommunication of color what do you do Well I can only tell you what I do and suggest you test it yourself for your own work
I take the final CMYK file and reconvert it to RGB Why Once the filersquos colors have been reduced to the gamut of CMYK converting the file back to RGB will not do any additional harmmdashpar-ticularly if you are working in 16 bit But it will result in an RGB file that would be pretty hard to misinterpret
Using Convert to Profile you select the RGB color space you want to convert the CMYK file to Adobe RGB on the left or I suggest sRGB shown on the right
PreparingImagesforDelivery
You can either convert to Adobe RGB or sRGB The advantage of providing an sRGB version of the file is that in the event the usage of the image also includes the Web yoursquoll have an image converted from CMYK to sRGB so the web image will match the CMYK rendering of the file
To better illustrate the process of converting from ProPhoto RGB to SWOP CMYK and back to sRGB Irsquove done screen shots of both the color space gamuts as well as plotted actual colors of the images in a program called ColorThink by CHROMIX (wwwchromixcom)
The gamuts and image plots have been done by plotting in Lab coordinates and in 3D It should be noted that the best way to see color space gamuts and image plots is in motion ColorThink allows you rotate the graph to better evaluate the relationships between color spaces and image plots
The gamut map on the left is ProPhoto RGB In the middle is sRGB and on the right is SWOP as contained in the Photoshop CS2 CMYK profile named US Web Coated (SWOP) v2 Note the screen shots are to scale
The figures above show the relative size and volume of the three color spaces ProPhoto RGB is huge and SWOP is tiny The challenge is to get the colors of the image to look good in the color space of the final output
On the left is the original Colored Bottle image mapped into the ProPhoto RGB color space The dots represent actual color samples from the image On the right is the image mapped into the SWOP color space As you can see a lot of the colors in the image are well outside of the printable range of the CMYK press
PreparingImagesforDelivery
Somehow the colors of the image must be mapped into the color space of the output The method of either compression or clipping will be dictated by the process you use to make the color conversion In the preceding mode change and convert to profile examples I showed two methods using Color Range to desaturate the image and using soft proofing to adjust for the resulting color transform
But why go from a super-huge color space such as ProPhoto RGB to SWOP and then back to sRGB Itrsquos really a matter of exercising your color control over the way delivered files are prepared for reproduction By using your eyes to evaluate the way in which colors will be reproduced you are able to dictate how your images reproduce on paper
On the left the final CMYK image colors are shown mapped in the SWOP color space notice the colors are now within the gamut of CMYK On the right the image has been converted back to sRGB from CMYK All of the CMYK colors (with the possible exception of a tiny amount of cyan) will fit within the sRGB color space
Going from ProPhoto RGB to CMYK and then back to sRGB gives you the control over how the image colors will look not only in CMYK but also when you are delivering RGB images Since the converted sRGB image has already had its total volume of colors clamped to the gamut of CMYK there is less chance that somebody down the ldquoprepress roadrdquo from you will mess up the colors of the image
PreparingImagesforDelivery
The proofWhen supplying digital files itrsquos important to also provide an aim print or actual proof that confirms on paper what the image should look like when reproduced In the past Irsquove resorted to actually sending the CMYK file to a service bureau for expensive contract proofs While the result is an unequivocal proof of the CMYK file it can be both costly and time consuming If you have a quality ink jet printer and accurate profiles for the printer you can print out from Photoshop and produce a cross-rendered proof A cross-rendered proof is made by using both the original CMYK profile as well as the printer profile to render in the print the accurate results of proofing to the final output device Again this presupposes that you have an accurate display and printer profile and that you follow the cross-rendering recipe for printing from Photoshop
This figure shows the Photoshop Print dialog box with a preview of the image Irsquove selected Let Photoshop Determine Colors from the Color Handling pop-up menu and selected the correct printer profile
PreparingImagesforDelivery
In the Print dialog box in Photoshop yoursquoll need to alter the settings you may normally use Rather than setting the Print space to your RGB or CMYK space you use the Proof option instead Under Options choose Let Photoshop Determine Colors from the Color Handling pop-up menu and select your particular printerrsquos profile However selecting the proof option in print allows the use of the Proof Setup Preset (shown below) which if yoursquove saved your soft proofing setups makes doing cross-rendered proofs a bit more efficient
To produce a cross-rendered proof select the saved soft proof settings Here Irsquove selected the SWOP-V2-BW-Off proof setup
You will definitely want to select the Simulate Black Ink option Whether you select Simulate Paper Color depends on your intent for the resulting print If you merely want to provide an aim print you may choose not to use this option
To produce an accurate cross-rendered proof select the Simulate Paper Color and the Simulate Black Ink options
However if you wish to provide a very accurate cross-rendered proof that could act as a con-tract proof for color you should select Simulate Paper Color It should be noted that just as the on-screen results will show a marked reduction in dynamic range so will a cross-rendered proof with this option turned on When reviewing the final print the paper white of the actual CMYK output profile will produce a scum tone over the image This preview will be a rather accurate reproduction of the final printed piece but it wonrsquot look very good which is actually what you want in an accurate proof Photographers should really only concern themselves with proofing the image not the final design of the page layout Note that even a highly accurate cross-rendered proof from an inkjet will not show the results of the halftone screening process so only the color can essentially be proofed
PreparingImagesforDelivery
Here Irsquove set the media settings (left) and the Printer Color Management settings (right)
Marking your territoryBefore actually saving your files for client delivery there is one additional step that is important to fulfill properly marking your images with proper metadatamdashmarking your territory if you will Most professional photographers would never send film to their clients without some sort of identification and the importance of marking your images is no less in the digital age Arguably itrsquos even more important now
Enter metadata about your image in the File Info dialog box in Photoshop or Adobe Bridge
PreparingImagesforDelivery
In Photoshop (or Bridge) you should complete the relevant metadata fields in the File Info dialog box All editable fields that are useful for downstream organization and identification should be employed
The four main IPTC metadata panels
New to Photoshop CS2 are the XMP for IPTC panels for expanded metadata support Itrsquos relatively simple to complete all the general fields with standard information such as contact copyright status and usage and save the completed forms as a template that can be applied to all images destined for delivery to third parties Communicate with your clients to get all the necessary information There really is no excuse not to do this critical step in preparing files for delivery
file formats for deliverySo you are ready to save the files for delivery However you arenrsquot quite done yet in making some important decisions The choice of file format and the final image naming is still a critical step
When delivering files to clients itrsquos important to adhere to proper naming conventions When naming files itrsquos critical to stick to an alphanumeric series of letters and numbers and use only approved special characters such as underscores or dashes for spaces You should not use any of the special symbols such as $ ^ amp ( ) + in a file name Depending on the final output device and the operating system it runs under special symbols can lead to unpredictable results
PreparingImagesforDelivery
Additionally even though recent operating systems such as Mac OS X and Windows XP may allow extended characters in a file name there are enough systems in use in the industry that cannot understand long file names Therefore you should use only a safe length for Mac OS 31 characters plus a period separating the file name and extension or 11 characters plus period and extension for MS DOS machines
The file format you supply is also an important consideration
File format options in Photoshop
If you are supplying 16-bit-per-channel CMYK files there is only a single optimal file format to use TIFF
TIFF file options when working with a 16-bit-per-channel image
When selecting the format options for a TIFF file it should be noted that some output devices cannot handle TIFF files with any compression such as LZW or ZIP Also when delivering for clients itrsquos generally not a good idea to supply layered files Unless you can be assured that the client will treat the layered files properly flattening is always the safest option
PreparingImagesforDelivery
If you are supplying 8-bit-per-channel CMYK files the format options grow
By changing the bit depth to 8 BitsChannel (left) you can select more file formats for delivery (right)
Mode changing to 8 bits and saving as a CMYK file will offer a variety of additional file formats However unless you have instructions to the contrary the safest file format is still TIFF
The Save As dialog box with the Embed Color Profile option deselected
There is an additional consideration when saving files intended for CMYK reproduction Unless yoursquove had direct and successful communications with the prepress personnel saving a CMYK file with an embedded profile might not be such a good idea While saving RGB files with embedded profiles is pretty much a universal good idea to avoid ambiguous color in graphic arts and print-ing embedded profiles can sometimes lead to problems for both technical and political reasons
Until the political realities change and RIPs can be updated to ensure they wonrsquot choke on embedded profilesmdashthis is actually rare but can happenmdashI provide CMYK files with no profiles I do note in the accompanying Read Me text files an indication of how the files were prepared If I have been fortunate enough to be working with a color management savvy prepress supplier I would be happy to embed the profile in the CMYK filemdashideally the profile they supplied me But until color management gets wider adoption in the graphic arts itrsquos easier and safer to strip the CMYK profile
If you need to transmit files instead of delivering them on a CD or DVD you can use either a zipped TIFF file or use JPG compression for the final file delivery In either case the file should be opened by the recipient and resaved as a standard TIFF file for final use Saving a final CMYK file as a JPEG file with Maximum Quality will rarely if ever produce any visible changes to the file However your client should be warned not to open the file or make changes and resave the file while in the JPEG format Multiple resaving in JPEG format is to be avoided
PreparingImagesforDelivery 0
Also you should alert your client if you have chosen not to embed a profile in the CMYK file that opening the image in Photoshop might prompt a warning dialog box
Photoshop returns a warning dialog box when you open a file that doesnrsquot have an embedded profile
Depending on the color management settings in your clientrsquos Photoshop setup they may see a warning when they open a file without an embedded profile If so you can tell them to assign the profile yoursquove used to convert the filemdashif itrsquos a profile included in Photoshop that is a simple solution If yoursquove stripped the profile and used a custom CMYK profile you should consider supplying the profile separately on disk or in the file transmission
If you are asked to supply files that are sized For Position Only (FPO) yoursquoll need to make sure the final image dimensions match the final high-resolution files exactly Only the pixel resolution should be downsampled Be sure to save the FPO version with an unambiguous file name that relates but would not be confused with the high-resolution file
The Image Size dialog showing a reduced resolution version of the original CMYK file (left) and selecting Save As (right) In the FPO version be sure to give it a noticible designation
PreparingImagesforDelivery 1
While it may seem that nobody actually reads Read Me files it is still an important practice to provide documentation and identification of images delivered to clients If nothing else you can point to the text file they failed to read as explaining any miscommunication on their part
Itrsquos good practice to include a Read Me file when you deliver your images to your clients
Regardless of whether you are burning to disk or transmitting over the net itrsquos important to include an organized file folder structure to help avoid confusion I place files inside named fold-ers that help explain their contents and segregate high-resolution CMYK files from FPOs from RGB files Particularly if you are burning to CD or DVD itrsquos useful to export the browsed cache from Adobe Bridge to make browsing from the CD or DVD quicker
When delivering files it helps to put them in an organized file folder structure
abouT THe auTHoR
JeffScheweasummacumlaudegraduateofRochesterInstituteofTechnologyhasbeenanadvertisingphotographerinChicagoforover25yearsHehasbeendoingdigitalimagingforover14yearsandiswidelyknownandrespectedinthedigitalimagingcommunityasaleadingpioneerinthefieldJeffisafeatureconsultantandalphatesterforPhotoshop
foR MoRe InfoRMaTIon
ForacomprehensiveoverviewofPhotoshopCS2pleasevisitwwwadobecomproductsphotoshopmainhtml
Adobe Systems Incorporated345ParkAvenueSanJoseCA95110-2704USAwwwadobecom
AdobetheAdobelogoAcrobatIllustratorInDesignandPhotoshopareeitherregisteredtrademarksortrademarksofAdobeSystemsIncorporatedintheUnitedStatesandorothercountriesAllothertrademarksarethepropertyoftheirrespectiveowners
copy2006JeffScheweAllrightsreserved
My personal preference even if you supply files initially via transmission is to burn the delivered files to CD or DVD I do this for several reasons to give the client a tangible result from the project that they can store and to burn a read-only version of the final delivered files that cannot be altered If at some point something happens to the file (for example somebody changes it poorly) therersquos always the original starting point image burned into the disc that cannot be changed While it doesnrsquot happen often it has happened that somebody made a mistake downstream of my file delivery and itrsquos useful to be able to point to a version of a file that represents the state of the delivered image before any additional changes were made
checklist for file deliveryConfirm final file specifications and requirements
Open a secure line of communication with client and prepress provider
Confirm final reproduction process (SWOP or Sheet Fed)
Confirm final output color space ideally with printer-supplied ICC profile
Confirm delivery of RGB CMYK or RGB plus CMYK
Tone and color correct with soft proofing for the final output
Confirm final file size and resolution
Provide image sharpening for output
Provide aim print or proof print for color
Embed image metadata for identification
Confirm final delivery file format
Provide Read Me file with documentation file list and contact information
Organize and segregate file types separate high-resolution files FPO RGB and CMYK
Provide read-only final files on CD or DVD
additional resourcesDigital Image Submission Guidelines (DISC) wwwdisc-infoorg
Universal Photographic Digital Imaging Guidelines (UPDIG) wwwupdigorg
Real World Color Management by Bruce Fraser Chris Murphy and Fred Bunting Published by Peachpit Press ISBN 0321267222
Color Management for Photographers by Andrew Rodney Published by Focal Press ISBN 0-240-80649-2
PixelGenius by PhotoKit Sharpener wwwpixelgeniuscom
Nik Software by Nik Sharpener Pro wwwniksoftwarecom
bull
bull
bull
bull
bull
bull
bull
bull
bull
bull
bull
bull
bull
bull
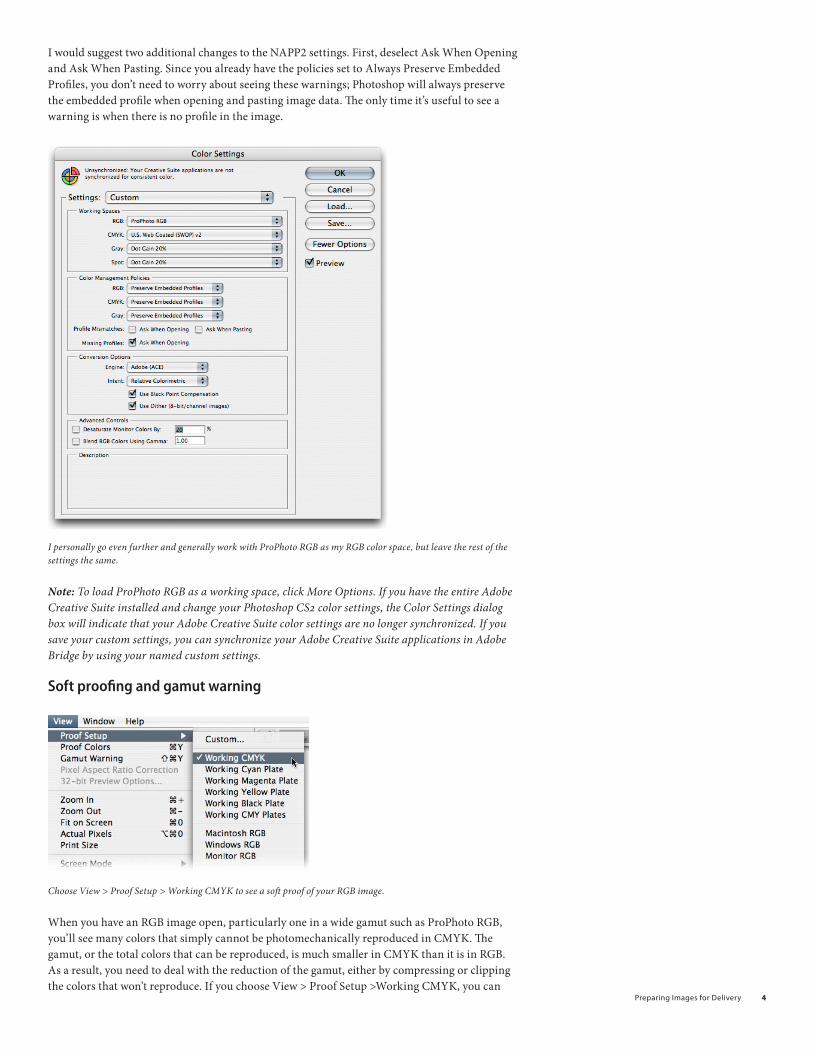
PreparingImagesforDelivery
view your RGB image through the soft proof of your working CMYK which in this case is US Web Coated (SWOP) v2 SWOP which is a fancy way of stating standard web offset printing is the standard method of printing for magazine work in the US If you are supplying what is called sheet fed the job can get a little more complicated since many printers tweak their presses and use alternative inks and paper when printing sheet fed In the case of sheet fed itrsquos optimal to obtain an ICC profile directly from the printer something that because of politics more than technical reasons is often not available
Once you turn on soft proofing yoursquoll often notice some colors change either in saturation or in density An RGB file has to go through some pretty extensive changes to end up as CMYK and vivid saturated colors are always a challenge to reproduce
Choose View gt Gamut warning to see which colors in your image wonrsquot reproduce well
One method of checking what colors will and wonrsquot reproduce is to turn on Gamut Warning in Photoshop When Gamut Warning is turned on the colors that are out of gamut or not repro-ducible are shown in a gray overlay as shown below
Gray overlays indicate which colors in an image wonrsquot reproduce well
PreparingImagesforDelivery
In this image the out-of-gamut warning pretty much covers all of the vivid colors There are steps you can take to alter the colors to bring them into gamut One of the more direct methods is to use the Color Range selection tool in Photoshop
Choose Out Of Gamut from the Select pop-up menu in the Color Range dialog box to select all out-of-gamut colors in the image
One of the options in the Select pop-up menu is to select Out Of Gamut colors The resulting selection will represent all out-of-gamut colors in your image as shown below
Out-of-gamut color selected in an image in Photoshop
PreparingImagesforDelivery
You can adjust the amount of out-of-gamut areas by reducing the saturation in the image However a reduction of 33 is a pretty major move and may not really help your image The one rather severe limitation with the Out Of Gamut warning is that it doesnrsquot tell you how far out of gamut your colors are It can only show what colors are out of gamut even if by the tiniest amounts So to completely remove the gamut warning gray areas is not really a useful goal A far more useful method is to look at how your image will appear when reproduced and see what happens to the colors directly on the computer display
Reducing the saturation of the image reduces the amount of out-of-gamut areas
To really make use of soft proofing takes a bit more effort than just turning on the working space soft proof
To make the best use of soft proofing work with both the original image and a duplicate
PreparingImagesforDelivery
The trick is to work with both your original image as well as a duplicate Choose Image gt Duplicate to make a copy of your working file Yoursquoll end up with two images side-by-side
The original image (left) and the duplicate (right)
Place your original image on the left and the duplicate on the right Click the window containing the original image to make it active
Instead of simply using the Working CMYK option choose Custom to open the Customize Proof Condition dialog box Ensure that Device To Simulate is set to your correct CMYK profile (or in this case the Working CMYK)
Proof Setup is on the View menu (left) But I prefer to control the proof condition by choosing Custom (right)
Additionally yoursquoll need to set the Rendering Intent The rendering intent is the method by which the colors in the image will be compressed or clipped when separated to CMYK In general Relative Colorimetric is often the best intent but that will depend entirely on your specific image and output profile So itrsquos useful to actually see which intent is optimal For photographic images either Perceptual or Relative Colorimetric is considered to be the best
Choose the rendering intent from the pop-up menu in the Proof Conditions dialog box
PreparingImagesforDelivery
The Perceptual intent tries to compress the out-of-gamut colors to fit within the maximum colors contained in the output profile The method of compression is to try to maintain a perceptual uniformity to the relationships of the colors The Relative Colorimetric intent will in essence clip or chop off those colors that cannot be reproduced The usefulness of Relative Colorimetric is that while colors can be reduced the luminance values of the image wonrsquot change much
The Display Options radio buttons are shown above
One other important setting for soft proofing is whether or not to use Display Options (On-Screen) If you havenrsquot used soft proofing extensively I would not suggest starting with the Simulate options (Simulate Paper Color and Simulate Black Ink) on These options are useful to see the effects of the reduction of the dynamic range (or contrast ratio) of the final printed reproduction However yoursquoll need to practice to learn how to adjust for the reduced contrast range of the final paper
If you save your soft proof setting you can choose the named setting from the Proof Setup menu and yoursquoll be able to use it later if you want to use it to produce a printed proof of the image
Save your soft proof settings (left) so that you can choose them quickly from the Proof Setup menu (right)
PreparingImagesforDelivery 10
In the image below the magenta is less saturated and the two blue bottles have lost a lot of color and saturation Blues often turn too purple (too much magenta) that can be helped a bit by mak-ing adjustments However there is nothing that can be done to make up for the loss of a deep saturated royal blue color Deep blues and purples are particularly limited in the CMYK color gamut because cyan and magenta simply cannot produce a super vibrant bluemdashthis is a fact of life that you must deal with I just never show my clients the original RGB file
The image on the left shows the result of soft proofing
When a client is looking over my shoulder to examine an RGB image I turn on CMYK soft proofing before he ever gets to see the RGB version Why show him something he can never attain in reproduction That RGB gt CMYK conversion not only will depress you but your client will see the colors change when going to CMYK and who will he blame Probably not the limita-tion of the photomechanical process So my clients really never see anything they canrsquot get in print
On the left two adjustment layers have been added to try to get the CMYK soft proof to look as close as possible to the original image on the right
PreparingImagesforDelivery 11
While not perfect Irsquove improved the result through using a couple of adjustment layers a Selective Color and a HueSaturation adjustment
The actual adjustments made to the image above The left and middle images show two separate Selective Color Options adjustments and the right image shows the HueSaturation adjustment
In Selective Color I adjusted the magenta to have a relative percentage boost as well as boosts to the Cyan Magenta and Black in the blue color The Saturation adjustment increased the blue saturation as much as possible without breaking the colors
While it doesnrsquot have the same brilliance of the ProPhoto RGB original the soft proof is an accu-rate preview of what the colors will look like on press Adding the tweaks will help the color as much as you can with traditional CMYK separations
Another factor that is going to happen when your image hits the printed page is a severe reduc-tion in the dynamic range of the image meaning the blacks will be a lot less black and the whites a lot less white There is a way of previewing this loss of dynamic range but a warning it will make your image look even worse Why Because the printed page simply canrsquot compete with todayrsquos bright CRT or LCD displays for dynamic range
When soft proofing select the Simulate options to soft proof the dynamic range of the printed reproduction
To soft proof the dynamic range of the printed reproduction go into the Customize Proof Condition dialog box again and select both Simulate Paper Color and Simulate Black Ink Selecting these options will make an Absolute Colorimetric rendering from the image to your screen matching both the dimness and yellowed looking color of standard commercial printing paper as well as the reduced black attainable with CMYK inks
PreparingImagesforDelivery 1
A soft proof with Simulate Paper Color and Simulate Black Ink selected
Well I told you it would look bad And it does But the soft proof is pretty darn accurate in its prediction of what the image will look like reproduced on press Sad huh But thatrsquos life However it really wonrsquot look this bad Because the eye adapts to the whitest portion of your field of vision your eyes are not using the white of the paper as the identifier of the white point of a scene When looking at an actual printed piece the eye will identify the brightest and whitest portion of what you see as white and adjust all the other colors and luminosity accordingly So you need to eliminate as much white before your eyes as possible when soft proofing to adjust the effects of the reduction of dynamic range and the yellowing of the whites
By switching your viewing mode in Photoshop to full screen mode either with the dark gray or better yet the black canvas background you can cut down on the amount of the surrounding white elements on screen so the image will look a little less bad (but only a little)
Change the screen mode by using the toolbar or pressing the F key On the right the image is shown against a black background
PreparingImagesforDelivery 1
Often a slight tweak in the contrast of an image will help punch the image back toward the way it looked before the CMYK process soft proof made it look so bad
A Curve dialog showing a slight increase in contrast to adjust the image for the reduced dynamic range of the printed image
final image sizingOnce your RGB image is prepped for CMYK separation you should to final image sizing Obviously if you do not know the exact final reproduction size you canrsquot do any final exacting resizing but you can make sure the image is in the correct resolution realm
The image size and resolution of the original scan Both the resolution and image size need to be corrected
PreparingImagesforDelivery 1
For this particular image scan itrsquos important to set the units to match the final usage In this case the scan was done at 1800 pixelsinch (ppi) while the dimensions were in centimeters Photoshop doesnrsquot particularly care what the units are you can change the ratio of the units and dimensions by deselecting Resample Image and changing the units of the image You donrsquot need to resample the image just change the units and dimension The actual pixel count remains the same However for page layout applications the dimensions and units do matter
The Resample Image option is deselected and the Resolution has been changed to 300 pixelsinch There is no resampling involved only the ratio of the pixel density has changed
Here the pixel dimensions have been changed to inches The image dimension of 1548rdquo x 1204rdquo is too large for the intended 85rdquo x 11rdquo paper If delivered at this dimension somebody down-stream will need to resample the image Also note that only images sized to their final dimen-sions can be accurately and properly sharpened for reproduction
The image size and resolution have been resampled for the final reproduction size
PreparingImagesforDelivery 1
The image has been set to the correct units and the resample option is selected The image will be sized correctly for 85rdquo x 11rdquo full-bleed reproduction (the outer dimensions have been set to 1125rdquo x 875rdquo to allow for a 18rdquo bleed) If the image were to be placed in an image box in a page layout application the image could have been sized to that of the image box But allowing for bleed is yet another small service that the photographer can provide setting the final image crop
Note For downsizing the Bicubic Sharper option improves resampling
Once set to the final image dimension you can use guides in Photoshop to double-check where the image will be cropped While these guides will not be used by a page layout application itrsquos still useful to indicate the guides in the event that somebody downstream opens the image in Photoshop Guides are saved in Photoshop files as metadata and can be preserved for later use
Use guides in Photoshop to double-check where the image will be cropped
Image sharpeningOnce an image is set to the final size and resolution one additional step is required for optimal reproductionmdashimage sharpening for output There is a lot of mystery surrounding image sharp-ening While Photoshop has many tools to apply sharpening routines knowing how to sharpen and by how much can be a problem since viewing an image on a computer display is a rather poor indicator of the requirements needed for halftone reproduction
There are some generalities Bruce Fraser co-author of Real World Photoshop has indicated that the required sharpening should produce an edge halo of between 150 ndash 1100 of an image The halo is an increase of the apparent edge contrast of an image At between 150 ndash 1100 of an image the halo should be invisible to the naked eye and yet produce a crisp edge in reproduction
PreparingImagesforDelivery 1
The other problem inherent with determining image sharpening is the fact that a computer display is a poor tool to evaluate image sharpening If you deliver an image whose pixel resolution is twice that of the halftone line screen ruling four image pixels will be dithered to produce one halftone dot However many ldquoexpertsrdquo tell people to view their images at a 100 zoom inside Photoshop to evaluate the effects of sharpening Yes you need to view your images at 100 or larger to see the actual effects of sharpening on the pixels yet the resulting image in Photoshop will be too large to evaluate the amount of sharpening required To more accurately predict the amount of sharpening required a more useful screen zoom of 50 will simulate the effect of the halftone screening At 50 four image pixels are dithered to produce one screen display pixel
An image without output sharpening When printed the image wonrsquot be crisp
The image above at a zoom of 50 has no additional output sharpening applied If delivered like this the resultant halftone reproduction will be less than crisp The dithering of the halftone dots will introduce a softening effect further softening the image So output sharpening needs to be applied even for what may appear in Photoshop to be a sharp image
PreparingImagesforDelivery 1
While the Unsharp Mask filter in Photoshop is a useful sharpening tool there is an alternative that provides a bit more control while reducing some of the undesirable artifacts of Unsharp Mask
Use the High Pass filter to sharpen an image
By duplicating the imagersquos background layer and setting the blending mode to Overlay you can use the High Pass filter (choose Filter gt Other gtHigh Pass)
The High Pass filter is rather hidden away under ldquoOtherrdquo in the Filter menu
PreparingImagesforDelivery 1
This High Pass filter produces an apparent edge enhancement based on a pixel radius that allows the Overlay blend mode to increase the light edge while darkening the dark edge of image edges Setting the radius to 3 for a 300ppi image will enhance the edge halo approximately 1100 of an inch which happens to match the recommendations of Bruce Fraser
The results of using High Pass on an overlay blend mode layer The image edges snap at 50 zoom
There are third-party solutions specially designed for doing image sharpening that can increase the accuracy and predictability of output sharpening Nik Sharpener Pro by Nik Software Inc and PhotoKit Sharpener by PixelGenius are two such products Bruce Fraser was the primary product designer of PhotoKit Shapener and for disclosure purposes I must also indicate my involvement with PixelGenius Both products are designed to provide optimal output sharpening
But the caveat again final output sharpening can only be done on images whose final reproduc-tion size has been set Any resizing on the part of a downstream process will reintroduce soften-ing and thus mitigate the output sharpening Resharpening an already sharpened image that has been resized is not optimal
PreparingImagesforDelivery 1
converting to cMYKOnce the image has been optimized for the reproduction process in terms of tone color resolu-tion and image sharpness the final processing step is to convert the RGB image to CMYK This step can be as simple as doing a mode change from RGB to CMYK (assuming your Photoshop Color Settings are properly set up) or can involve a Convert To Profile transform
This figure shows the Mode change to CMYK I prefer to use the Convert to Profile command
Changing the mode from RGB to CMYK (by choosing Edit gt Mode gt CMYK Color) results in an image conversion from RGB to CMYK based on the current color settings in Photoshop While fine to do it contains a slight risk that the color settings may not be exactly what you expect When there are multiple users of Photoshop or if you havenrsquot produced a CMYK separation recently using the Convert To Profile command in the Edit menu allows for total control and clarity in the settings
In the Convert To Profile dialog box you can confirm the source space the destination space and the parameters on which the conversion will take place
PreparingImagesforDelivery 0
In the Convert to Profile dialog you must set the correct options I suggest using the Adobe (Ace) CMM (left) and use the same rendering intent I used to soft proof (right)
In the Convert To Profile dialog box you can set the CMM transform engine as well as confirm the rendering intent In general with Photoshop CS or CS2 you can always be assured of getting proper results when selecting Use Black Compensation to map image black to output black Itrsquos also generally a good idea to flatten all adjustment layers during conversion since some adjust-ment layers either will not work on CMYK layered files or will produce different results than their RGB counterparts
Another point to note if you are working in 16-bit-per-channel depth is that you should not only flatten while in 16 bit to make sure your adjustments are being completed in 16 bit but also transform from RGB to CMYK while still in 16 bit to receive the benefit of the higher bit depth during conversion
The final CMYK-separated and optimized file
PreparingImagesforDelivery 1
What about providing RGb filesTo offer greater flexibility to your clients you can also consider providing RGB files in addition to the CMYK files yoursquove separated However providing RGB files can be a problem If yoursquove used a large color space such as ProPhoto RGB delivering your RGB file to somebody who is not well versed in color management can result in some pretty ugly interpretations of your image
An image in ProPhoto RGB (left) and a duplicate of the image with sRGB assigned as the embedded profile (right)
The improper use of Photoshop Color Settings and policies can result in a misunderstanding of the use of profiles If the client or printer did not honor the embedded profile and merely assumed the image to be in sRGB the resulting display would be less than desirable
So if you want to work with your originals in a large gamut color space and deliver files to your clients that run a lower risk of miscommunication of color what do you do Well I can only tell you what I do and suggest you test it yourself for your own work
I take the final CMYK file and reconvert it to RGB Why Once the filersquos colors have been reduced to the gamut of CMYK converting the file back to RGB will not do any additional harmmdashpar-ticularly if you are working in 16 bit But it will result in an RGB file that would be pretty hard to misinterpret
Using Convert to Profile you select the RGB color space you want to convert the CMYK file to Adobe RGB on the left or I suggest sRGB shown on the right
PreparingImagesforDelivery
You can either convert to Adobe RGB or sRGB The advantage of providing an sRGB version of the file is that in the event the usage of the image also includes the Web yoursquoll have an image converted from CMYK to sRGB so the web image will match the CMYK rendering of the file
To better illustrate the process of converting from ProPhoto RGB to SWOP CMYK and back to sRGB Irsquove done screen shots of both the color space gamuts as well as plotted actual colors of the images in a program called ColorThink by CHROMIX (wwwchromixcom)
The gamuts and image plots have been done by plotting in Lab coordinates and in 3D It should be noted that the best way to see color space gamuts and image plots is in motion ColorThink allows you rotate the graph to better evaluate the relationships between color spaces and image plots
The gamut map on the left is ProPhoto RGB In the middle is sRGB and on the right is SWOP as contained in the Photoshop CS2 CMYK profile named US Web Coated (SWOP) v2 Note the screen shots are to scale
The figures above show the relative size and volume of the three color spaces ProPhoto RGB is huge and SWOP is tiny The challenge is to get the colors of the image to look good in the color space of the final output
On the left is the original Colored Bottle image mapped into the ProPhoto RGB color space The dots represent actual color samples from the image On the right is the image mapped into the SWOP color space As you can see a lot of the colors in the image are well outside of the printable range of the CMYK press
PreparingImagesforDelivery
Somehow the colors of the image must be mapped into the color space of the output The method of either compression or clipping will be dictated by the process you use to make the color conversion In the preceding mode change and convert to profile examples I showed two methods using Color Range to desaturate the image and using soft proofing to adjust for the resulting color transform
But why go from a super-huge color space such as ProPhoto RGB to SWOP and then back to sRGB Itrsquos really a matter of exercising your color control over the way delivered files are prepared for reproduction By using your eyes to evaluate the way in which colors will be reproduced you are able to dictate how your images reproduce on paper
On the left the final CMYK image colors are shown mapped in the SWOP color space notice the colors are now within the gamut of CMYK On the right the image has been converted back to sRGB from CMYK All of the CMYK colors (with the possible exception of a tiny amount of cyan) will fit within the sRGB color space
Going from ProPhoto RGB to CMYK and then back to sRGB gives you the control over how the image colors will look not only in CMYK but also when you are delivering RGB images Since the converted sRGB image has already had its total volume of colors clamped to the gamut of CMYK there is less chance that somebody down the ldquoprepress roadrdquo from you will mess up the colors of the image
PreparingImagesforDelivery
The proofWhen supplying digital files itrsquos important to also provide an aim print or actual proof that confirms on paper what the image should look like when reproduced In the past Irsquove resorted to actually sending the CMYK file to a service bureau for expensive contract proofs While the result is an unequivocal proof of the CMYK file it can be both costly and time consuming If you have a quality ink jet printer and accurate profiles for the printer you can print out from Photoshop and produce a cross-rendered proof A cross-rendered proof is made by using both the original CMYK profile as well as the printer profile to render in the print the accurate results of proofing to the final output device Again this presupposes that you have an accurate display and printer profile and that you follow the cross-rendering recipe for printing from Photoshop
This figure shows the Photoshop Print dialog box with a preview of the image Irsquove selected Let Photoshop Determine Colors from the Color Handling pop-up menu and selected the correct printer profile
PreparingImagesforDelivery
In the Print dialog box in Photoshop yoursquoll need to alter the settings you may normally use Rather than setting the Print space to your RGB or CMYK space you use the Proof option instead Under Options choose Let Photoshop Determine Colors from the Color Handling pop-up menu and select your particular printerrsquos profile However selecting the proof option in print allows the use of the Proof Setup Preset (shown below) which if yoursquove saved your soft proofing setups makes doing cross-rendered proofs a bit more efficient
To produce a cross-rendered proof select the saved soft proof settings Here Irsquove selected the SWOP-V2-BW-Off proof setup
You will definitely want to select the Simulate Black Ink option Whether you select Simulate Paper Color depends on your intent for the resulting print If you merely want to provide an aim print you may choose not to use this option
To produce an accurate cross-rendered proof select the Simulate Paper Color and the Simulate Black Ink options
However if you wish to provide a very accurate cross-rendered proof that could act as a con-tract proof for color you should select Simulate Paper Color It should be noted that just as the on-screen results will show a marked reduction in dynamic range so will a cross-rendered proof with this option turned on When reviewing the final print the paper white of the actual CMYK output profile will produce a scum tone over the image This preview will be a rather accurate reproduction of the final printed piece but it wonrsquot look very good which is actually what you want in an accurate proof Photographers should really only concern themselves with proofing the image not the final design of the page layout Note that even a highly accurate cross-rendered proof from an inkjet will not show the results of the halftone screening process so only the color can essentially be proofed
PreparingImagesforDelivery
Here Irsquove set the media settings (left) and the Printer Color Management settings (right)
Marking your territoryBefore actually saving your files for client delivery there is one additional step that is important to fulfill properly marking your images with proper metadatamdashmarking your territory if you will Most professional photographers would never send film to their clients without some sort of identification and the importance of marking your images is no less in the digital age Arguably itrsquos even more important now
Enter metadata about your image in the File Info dialog box in Photoshop or Adobe Bridge
PreparingImagesforDelivery
In Photoshop (or Bridge) you should complete the relevant metadata fields in the File Info dialog box All editable fields that are useful for downstream organization and identification should be employed
The four main IPTC metadata panels
New to Photoshop CS2 are the XMP for IPTC panels for expanded metadata support Itrsquos relatively simple to complete all the general fields with standard information such as contact copyright status and usage and save the completed forms as a template that can be applied to all images destined for delivery to third parties Communicate with your clients to get all the necessary information There really is no excuse not to do this critical step in preparing files for delivery
file formats for deliverySo you are ready to save the files for delivery However you arenrsquot quite done yet in making some important decisions The choice of file format and the final image naming is still a critical step
When delivering files to clients itrsquos important to adhere to proper naming conventions When naming files itrsquos critical to stick to an alphanumeric series of letters and numbers and use only approved special characters such as underscores or dashes for spaces You should not use any of the special symbols such as $ ^ amp ( ) + in a file name Depending on the final output device and the operating system it runs under special symbols can lead to unpredictable results
PreparingImagesforDelivery
Additionally even though recent operating systems such as Mac OS X and Windows XP may allow extended characters in a file name there are enough systems in use in the industry that cannot understand long file names Therefore you should use only a safe length for Mac OS 31 characters plus a period separating the file name and extension or 11 characters plus period and extension for MS DOS machines
The file format you supply is also an important consideration
File format options in Photoshop
If you are supplying 16-bit-per-channel CMYK files there is only a single optimal file format to use TIFF
TIFF file options when working with a 16-bit-per-channel image
When selecting the format options for a TIFF file it should be noted that some output devices cannot handle TIFF files with any compression such as LZW or ZIP Also when delivering for clients itrsquos generally not a good idea to supply layered files Unless you can be assured that the client will treat the layered files properly flattening is always the safest option
PreparingImagesforDelivery
If you are supplying 8-bit-per-channel CMYK files the format options grow
By changing the bit depth to 8 BitsChannel (left) you can select more file formats for delivery (right)
Mode changing to 8 bits and saving as a CMYK file will offer a variety of additional file formats However unless you have instructions to the contrary the safest file format is still TIFF
The Save As dialog box with the Embed Color Profile option deselected
There is an additional consideration when saving files intended for CMYK reproduction Unless yoursquove had direct and successful communications with the prepress personnel saving a CMYK file with an embedded profile might not be such a good idea While saving RGB files with embedded profiles is pretty much a universal good idea to avoid ambiguous color in graphic arts and print-ing embedded profiles can sometimes lead to problems for both technical and political reasons
Until the political realities change and RIPs can be updated to ensure they wonrsquot choke on embedded profilesmdashthis is actually rare but can happenmdashI provide CMYK files with no profiles I do note in the accompanying Read Me text files an indication of how the files were prepared If I have been fortunate enough to be working with a color management savvy prepress supplier I would be happy to embed the profile in the CMYK filemdashideally the profile they supplied me But until color management gets wider adoption in the graphic arts itrsquos easier and safer to strip the CMYK profile
If you need to transmit files instead of delivering them on a CD or DVD you can use either a zipped TIFF file or use JPG compression for the final file delivery In either case the file should be opened by the recipient and resaved as a standard TIFF file for final use Saving a final CMYK file as a JPEG file with Maximum Quality will rarely if ever produce any visible changes to the file However your client should be warned not to open the file or make changes and resave the file while in the JPEG format Multiple resaving in JPEG format is to be avoided
PreparingImagesforDelivery 0
Also you should alert your client if you have chosen not to embed a profile in the CMYK file that opening the image in Photoshop might prompt a warning dialog box
Photoshop returns a warning dialog box when you open a file that doesnrsquot have an embedded profile
Depending on the color management settings in your clientrsquos Photoshop setup they may see a warning when they open a file without an embedded profile If so you can tell them to assign the profile yoursquove used to convert the filemdashif itrsquos a profile included in Photoshop that is a simple solution If yoursquove stripped the profile and used a custom CMYK profile you should consider supplying the profile separately on disk or in the file transmission
If you are asked to supply files that are sized For Position Only (FPO) yoursquoll need to make sure the final image dimensions match the final high-resolution files exactly Only the pixel resolution should be downsampled Be sure to save the FPO version with an unambiguous file name that relates but would not be confused with the high-resolution file
The Image Size dialog showing a reduced resolution version of the original CMYK file (left) and selecting Save As (right) In the FPO version be sure to give it a noticible designation
PreparingImagesforDelivery 1
While it may seem that nobody actually reads Read Me files it is still an important practice to provide documentation and identification of images delivered to clients If nothing else you can point to the text file they failed to read as explaining any miscommunication on their part
Itrsquos good practice to include a Read Me file when you deliver your images to your clients
Regardless of whether you are burning to disk or transmitting over the net itrsquos important to include an organized file folder structure to help avoid confusion I place files inside named fold-ers that help explain their contents and segregate high-resolution CMYK files from FPOs from RGB files Particularly if you are burning to CD or DVD itrsquos useful to export the browsed cache from Adobe Bridge to make browsing from the CD or DVD quicker
When delivering files it helps to put them in an organized file folder structure
abouT THe auTHoR
JeffScheweasummacumlaudegraduateofRochesterInstituteofTechnologyhasbeenanadvertisingphotographerinChicagoforover25yearsHehasbeendoingdigitalimagingforover14yearsandiswidelyknownandrespectedinthedigitalimagingcommunityasaleadingpioneerinthefieldJeffisafeatureconsultantandalphatesterforPhotoshop
foR MoRe InfoRMaTIon
ForacomprehensiveoverviewofPhotoshopCS2pleasevisitwwwadobecomproductsphotoshopmainhtml
Adobe Systems Incorporated345ParkAvenueSanJoseCA95110-2704USAwwwadobecom
AdobetheAdobelogoAcrobatIllustratorInDesignandPhotoshopareeitherregisteredtrademarksortrademarksofAdobeSystemsIncorporatedintheUnitedStatesandorothercountriesAllothertrademarksarethepropertyoftheirrespectiveowners
copy2006JeffScheweAllrightsreserved
My personal preference even if you supply files initially via transmission is to burn the delivered files to CD or DVD I do this for several reasons to give the client a tangible result from the project that they can store and to burn a read-only version of the final delivered files that cannot be altered If at some point something happens to the file (for example somebody changes it poorly) therersquos always the original starting point image burned into the disc that cannot be changed While it doesnrsquot happen often it has happened that somebody made a mistake downstream of my file delivery and itrsquos useful to be able to point to a version of a file that represents the state of the delivered image before any additional changes were made
checklist for file deliveryConfirm final file specifications and requirements
Open a secure line of communication with client and prepress provider
Confirm final reproduction process (SWOP or Sheet Fed)
Confirm final output color space ideally with printer-supplied ICC profile
Confirm delivery of RGB CMYK or RGB plus CMYK
Tone and color correct with soft proofing for the final output
Confirm final file size and resolution
Provide image sharpening for output
Provide aim print or proof print for color
Embed image metadata for identification
Confirm final delivery file format
Provide Read Me file with documentation file list and contact information
Organize and segregate file types separate high-resolution files FPO RGB and CMYK
Provide read-only final files on CD or DVD
additional resourcesDigital Image Submission Guidelines (DISC) wwwdisc-infoorg
Universal Photographic Digital Imaging Guidelines (UPDIG) wwwupdigorg
Real World Color Management by Bruce Fraser Chris Murphy and Fred Bunting Published by Peachpit Press ISBN 0321267222
Color Management for Photographers by Andrew Rodney Published by Focal Press ISBN 0-240-80649-2
PixelGenius by PhotoKit Sharpener wwwpixelgeniuscom
Nik Software by Nik Sharpener Pro wwwniksoftwarecom
bull
bull
bull
bull
bull
bull
bull
bull
bull
bull
bull
bull
bull
bull
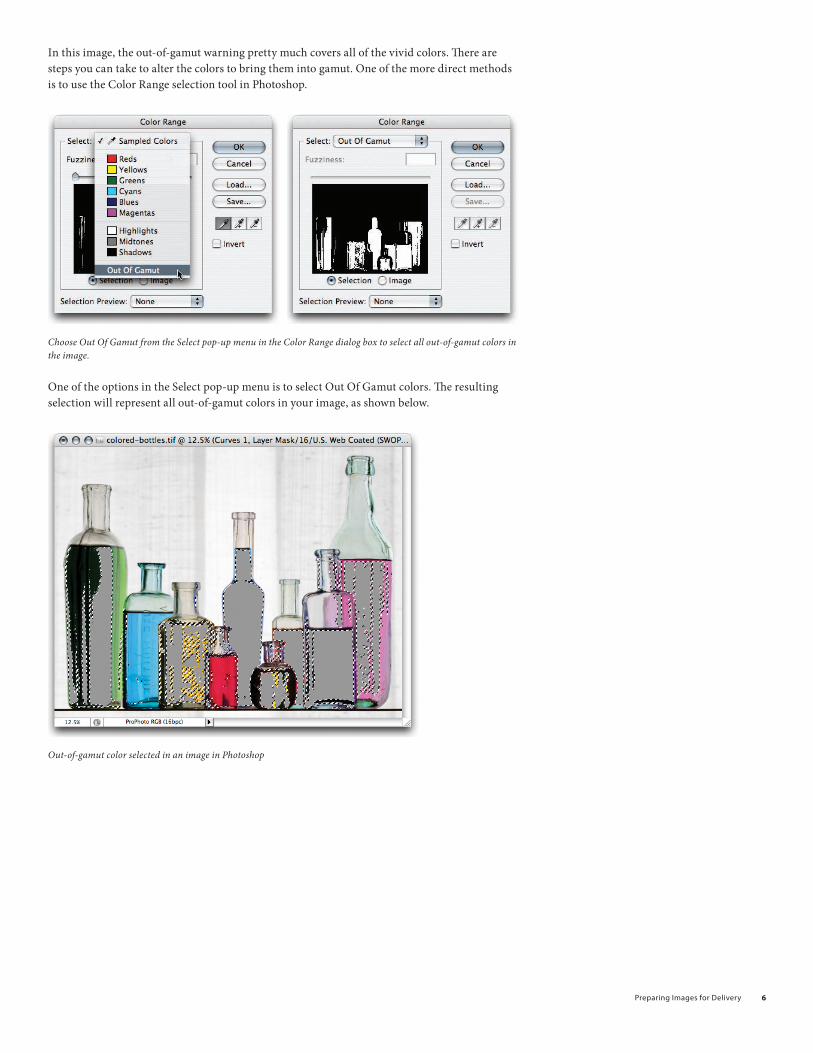
PreparingImagesforDelivery
In this image the out-of-gamut warning pretty much covers all of the vivid colors There are steps you can take to alter the colors to bring them into gamut One of the more direct methods is to use the Color Range selection tool in Photoshop
Choose Out Of Gamut from the Select pop-up menu in the Color Range dialog box to select all out-of-gamut colors in the image
One of the options in the Select pop-up menu is to select Out Of Gamut colors The resulting selection will represent all out-of-gamut colors in your image as shown below
Out-of-gamut color selected in an image in Photoshop
PreparingImagesforDelivery
You can adjust the amount of out-of-gamut areas by reducing the saturation in the image However a reduction of 33 is a pretty major move and may not really help your image The one rather severe limitation with the Out Of Gamut warning is that it doesnrsquot tell you how far out of gamut your colors are It can only show what colors are out of gamut even if by the tiniest amounts So to completely remove the gamut warning gray areas is not really a useful goal A far more useful method is to look at how your image will appear when reproduced and see what happens to the colors directly on the computer display
Reducing the saturation of the image reduces the amount of out-of-gamut areas
To really make use of soft proofing takes a bit more effort than just turning on the working space soft proof
To make the best use of soft proofing work with both the original image and a duplicate
PreparingImagesforDelivery
The trick is to work with both your original image as well as a duplicate Choose Image gt Duplicate to make a copy of your working file Yoursquoll end up with two images side-by-side
The original image (left) and the duplicate (right)
Place your original image on the left and the duplicate on the right Click the window containing the original image to make it active
Instead of simply using the Working CMYK option choose Custom to open the Customize Proof Condition dialog box Ensure that Device To Simulate is set to your correct CMYK profile (or in this case the Working CMYK)
Proof Setup is on the View menu (left) But I prefer to control the proof condition by choosing Custom (right)
Additionally yoursquoll need to set the Rendering Intent The rendering intent is the method by which the colors in the image will be compressed or clipped when separated to CMYK In general Relative Colorimetric is often the best intent but that will depend entirely on your specific image and output profile So itrsquos useful to actually see which intent is optimal For photographic images either Perceptual or Relative Colorimetric is considered to be the best
Choose the rendering intent from the pop-up menu in the Proof Conditions dialog box
PreparingImagesforDelivery
The Perceptual intent tries to compress the out-of-gamut colors to fit within the maximum colors contained in the output profile The method of compression is to try to maintain a perceptual uniformity to the relationships of the colors The Relative Colorimetric intent will in essence clip or chop off those colors that cannot be reproduced The usefulness of Relative Colorimetric is that while colors can be reduced the luminance values of the image wonrsquot change much
The Display Options radio buttons are shown above
One other important setting for soft proofing is whether or not to use Display Options (On-Screen) If you havenrsquot used soft proofing extensively I would not suggest starting with the Simulate options (Simulate Paper Color and Simulate Black Ink) on These options are useful to see the effects of the reduction of the dynamic range (or contrast ratio) of the final printed reproduction However yoursquoll need to practice to learn how to adjust for the reduced contrast range of the final paper
If you save your soft proof setting you can choose the named setting from the Proof Setup menu and yoursquoll be able to use it later if you want to use it to produce a printed proof of the image
Save your soft proof settings (left) so that you can choose them quickly from the Proof Setup menu (right)
PreparingImagesforDelivery 10
In the image below the magenta is less saturated and the two blue bottles have lost a lot of color and saturation Blues often turn too purple (too much magenta) that can be helped a bit by mak-ing adjustments However there is nothing that can be done to make up for the loss of a deep saturated royal blue color Deep blues and purples are particularly limited in the CMYK color gamut because cyan and magenta simply cannot produce a super vibrant bluemdashthis is a fact of life that you must deal with I just never show my clients the original RGB file
The image on the left shows the result of soft proofing
When a client is looking over my shoulder to examine an RGB image I turn on CMYK soft proofing before he ever gets to see the RGB version Why show him something he can never attain in reproduction That RGB gt CMYK conversion not only will depress you but your client will see the colors change when going to CMYK and who will he blame Probably not the limita-tion of the photomechanical process So my clients really never see anything they canrsquot get in print
On the left two adjustment layers have been added to try to get the CMYK soft proof to look as close as possible to the original image on the right
PreparingImagesforDelivery 11
While not perfect Irsquove improved the result through using a couple of adjustment layers a Selective Color and a HueSaturation adjustment
The actual adjustments made to the image above The left and middle images show two separate Selective Color Options adjustments and the right image shows the HueSaturation adjustment
In Selective Color I adjusted the magenta to have a relative percentage boost as well as boosts to the Cyan Magenta and Black in the blue color The Saturation adjustment increased the blue saturation as much as possible without breaking the colors
While it doesnrsquot have the same brilliance of the ProPhoto RGB original the soft proof is an accu-rate preview of what the colors will look like on press Adding the tweaks will help the color as much as you can with traditional CMYK separations
Another factor that is going to happen when your image hits the printed page is a severe reduc-tion in the dynamic range of the image meaning the blacks will be a lot less black and the whites a lot less white There is a way of previewing this loss of dynamic range but a warning it will make your image look even worse Why Because the printed page simply canrsquot compete with todayrsquos bright CRT or LCD displays for dynamic range
When soft proofing select the Simulate options to soft proof the dynamic range of the printed reproduction
To soft proof the dynamic range of the printed reproduction go into the Customize Proof Condition dialog box again and select both Simulate Paper Color and Simulate Black Ink Selecting these options will make an Absolute Colorimetric rendering from the image to your screen matching both the dimness and yellowed looking color of standard commercial printing paper as well as the reduced black attainable with CMYK inks
PreparingImagesforDelivery 1
A soft proof with Simulate Paper Color and Simulate Black Ink selected
Well I told you it would look bad And it does But the soft proof is pretty darn accurate in its prediction of what the image will look like reproduced on press Sad huh But thatrsquos life However it really wonrsquot look this bad Because the eye adapts to the whitest portion of your field of vision your eyes are not using the white of the paper as the identifier of the white point of a scene When looking at an actual printed piece the eye will identify the brightest and whitest portion of what you see as white and adjust all the other colors and luminosity accordingly So you need to eliminate as much white before your eyes as possible when soft proofing to adjust the effects of the reduction of dynamic range and the yellowing of the whites
By switching your viewing mode in Photoshop to full screen mode either with the dark gray or better yet the black canvas background you can cut down on the amount of the surrounding white elements on screen so the image will look a little less bad (but only a little)
Change the screen mode by using the toolbar or pressing the F key On the right the image is shown against a black background
PreparingImagesforDelivery 1
Often a slight tweak in the contrast of an image will help punch the image back toward the way it looked before the CMYK process soft proof made it look so bad
A Curve dialog showing a slight increase in contrast to adjust the image for the reduced dynamic range of the printed image
final image sizingOnce your RGB image is prepped for CMYK separation you should to final image sizing Obviously if you do not know the exact final reproduction size you canrsquot do any final exacting resizing but you can make sure the image is in the correct resolution realm
The image size and resolution of the original scan Both the resolution and image size need to be corrected
PreparingImagesforDelivery 1
For this particular image scan itrsquos important to set the units to match the final usage In this case the scan was done at 1800 pixelsinch (ppi) while the dimensions were in centimeters Photoshop doesnrsquot particularly care what the units are you can change the ratio of the units and dimensions by deselecting Resample Image and changing the units of the image You donrsquot need to resample the image just change the units and dimension The actual pixel count remains the same However for page layout applications the dimensions and units do matter
The Resample Image option is deselected and the Resolution has been changed to 300 pixelsinch There is no resampling involved only the ratio of the pixel density has changed
Here the pixel dimensions have been changed to inches The image dimension of 1548rdquo x 1204rdquo is too large for the intended 85rdquo x 11rdquo paper If delivered at this dimension somebody down-stream will need to resample the image Also note that only images sized to their final dimen-sions can be accurately and properly sharpened for reproduction
The image size and resolution have been resampled for the final reproduction size
PreparingImagesforDelivery 1
The image has been set to the correct units and the resample option is selected The image will be sized correctly for 85rdquo x 11rdquo full-bleed reproduction (the outer dimensions have been set to 1125rdquo x 875rdquo to allow for a 18rdquo bleed) If the image were to be placed in an image box in a page layout application the image could have been sized to that of the image box But allowing for bleed is yet another small service that the photographer can provide setting the final image crop
Note For downsizing the Bicubic Sharper option improves resampling
Once set to the final image dimension you can use guides in Photoshop to double-check where the image will be cropped While these guides will not be used by a page layout application itrsquos still useful to indicate the guides in the event that somebody downstream opens the image in Photoshop Guides are saved in Photoshop files as metadata and can be preserved for later use
Use guides in Photoshop to double-check where the image will be cropped
Image sharpeningOnce an image is set to the final size and resolution one additional step is required for optimal reproductionmdashimage sharpening for output There is a lot of mystery surrounding image sharp-ening While Photoshop has many tools to apply sharpening routines knowing how to sharpen and by how much can be a problem since viewing an image on a computer display is a rather poor indicator of the requirements needed for halftone reproduction
There are some generalities Bruce Fraser co-author of Real World Photoshop has indicated that the required sharpening should produce an edge halo of between 150 ndash 1100 of an image The halo is an increase of the apparent edge contrast of an image At between 150 ndash 1100 of an image the halo should be invisible to the naked eye and yet produce a crisp edge in reproduction
PreparingImagesforDelivery 1
The other problem inherent with determining image sharpening is the fact that a computer display is a poor tool to evaluate image sharpening If you deliver an image whose pixel resolution is twice that of the halftone line screen ruling four image pixels will be dithered to produce one halftone dot However many ldquoexpertsrdquo tell people to view their images at a 100 zoom inside Photoshop to evaluate the effects of sharpening Yes you need to view your images at 100 or larger to see the actual effects of sharpening on the pixels yet the resulting image in Photoshop will be too large to evaluate the amount of sharpening required To more accurately predict the amount of sharpening required a more useful screen zoom of 50 will simulate the effect of the halftone screening At 50 four image pixels are dithered to produce one screen display pixel
An image without output sharpening When printed the image wonrsquot be crisp
The image above at a zoom of 50 has no additional output sharpening applied If delivered like this the resultant halftone reproduction will be less than crisp The dithering of the halftone dots will introduce a softening effect further softening the image So output sharpening needs to be applied even for what may appear in Photoshop to be a sharp image
PreparingImagesforDelivery 1
While the Unsharp Mask filter in Photoshop is a useful sharpening tool there is an alternative that provides a bit more control while reducing some of the undesirable artifacts of Unsharp Mask
Use the High Pass filter to sharpen an image
By duplicating the imagersquos background layer and setting the blending mode to Overlay you can use the High Pass filter (choose Filter gt Other gtHigh Pass)
The High Pass filter is rather hidden away under ldquoOtherrdquo in the Filter menu
PreparingImagesforDelivery 1
This High Pass filter produces an apparent edge enhancement based on a pixel radius that allows the Overlay blend mode to increase the light edge while darkening the dark edge of image edges Setting the radius to 3 for a 300ppi image will enhance the edge halo approximately 1100 of an inch which happens to match the recommendations of Bruce Fraser
The results of using High Pass on an overlay blend mode layer The image edges snap at 50 zoom
There are third-party solutions specially designed for doing image sharpening that can increase the accuracy and predictability of output sharpening Nik Sharpener Pro by Nik Software Inc and PhotoKit Sharpener by PixelGenius are two such products Bruce Fraser was the primary product designer of PhotoKit Shapener and for disclosure purposes I must also indicate my involvement with PixelGenius Both products are designed to provide optimal output sharpening
But the caveat again final output sharpening can only be done on images whose final reproduc-tion size has been set Any resizing on the part of a downstream process will reintroduce soften-ing and thus mitigate the output sharpening Resharpening an already sharpened image that has been resized is not optimal
PreparingImagesforDelivery 1
converting to cMYKOnce the image has been optimized for the reproduction process in terms of tone color resolu-tion and image sharpness the final processing step is to convert the RGB image to CMYK This step can be as simple as doing a mode change from RGB to CMYK (assuming your Photoshop Color Settings are properly set up) or can involve a Convert To Profile transform
This figure shows the Mode change to CMYK I prefer to use the Convert to Profile command
Changing the mode from RGB to CMYK (by choosing Edit gt Mode gt CMYK Color) results in an image conversion from RGB to CMYK based on the current color settings in Photoshop While fine to do it contains a slight risk that the color settings may not be exactly what you expect When there are multiple users of Photoshop or if you havenrsquot produced a CMYK separation recently using the Convert To Profile command in the Edit menu allows for total control and clarity in the settings
In the Convert To Profile dialog box you can confirm the source space the destination space and the parameters on which the conversion will take place
PreparingImagesforDelivery 0
In the Convert to Profile dialog you must set the correct options I suggest using the Adobe (Ace) CMM (left) and use the same rendering intent I used to soft proof (right)
In the Convert To Profile dialog box you can set the CMM transform engine as well as confirm the rendering intent In general with Photoshop CS or CS2 you can always be assured of getting proper results when selecting Use Black Compensation to map image black to output black Itrsquos also generally a good idea to flatten all adjustment layers during conversion since some adjust-ment layers either will not work on CMYK layered files or will produce different results than their RGB counterparts
Another point to note if you are working in 16-bit-per-channel depth is that you should not only flatten while in 16 bit to make sure your adjustments are being completed in 16 bit but also transform from RGB to CMYK while still in 16 bit to receive the benefit of the higher bit depth during conversion
The final CMYK-separated and optimized file
PreparingImagesforDelivery 1
What about providing RGb filesTo offer greater flexibility to your clients you can also consider providing RGB files in addition to the CMYK files yoursquove separated However providing RGB files can be a problem If yoursquove used a large color space such as ProPhoto RGB delivering your RGB file to somebody who is not well versed in color management can result in some pretty ugly interpretations of your image
An image in ProPhoto RGB (left) and a duplicate of the image with sRGB assigned as the embedded profile (right)
The improper use of Photoshop Color Settings and policies can result in a misunderstanding of the use of profiles If the client or printer did not honor the embedded profile and merely assumed the image to be in sRGB the resulting display would be less than desirable
So if you want to work with your originals in a large gamut color space and deliver files to your clients that run a lower risk of miscommunication of color what do you do Well I can only tell you what I do and suggest you test it yourself for your own work
I take the final CMYK file and reconvert it to RGB Why Once the filersquos colors have been reduced to the gamut of CMYK converting the file back to RGB will not do any additional harmmdashpar-ticularly if you are working in 16 bit But it will result in an RGB file that would be pretty hard to misinterpret
Using Convert to Profile you select the RGB color space you want to convert the CMYK file to Adobe RGB on the left or I suggest sRGB shown on the right
PreparingImagesforDelivery
You can either convert to Adobe RGB or sRGB The advantage of providing an sRGB version of the file is that in the event the usage of the image also includes the Web yoursquoll have an image converted from CMYK to sRGB so the web image will match the CMYK rendering of the file
To better illustrate the process of converting from ProPhoto RGB to SWOP CMYK and back to sRGB Irsquove done screen shots of both the color space gamuts as well as plotted actual colors of the images in a program called ColorThink by CHROMIX (wwwchromixcom)
The gamuts and image plots have been done by plotting in Lab coordinates and in 3D It should be noted that the best way to see color space gamuts and image plots is in motion ColorThink allows you rotate the graph to better evaluate the relationships between color spaces and image plots
The gamut map on the left is ProPhoto RGB In the middle is sRGB and on the right is SWOP as contained in the Photoshop CS2 CMYK profile named US Web Coated (SWOP) v2 Note the screen shots are to scale
The figures above show the relative size and volume of the three color spaces ProPhoto RGB is huge and SWOP is tiny The challenge is to get the colors of the image to look good in the color space of the final output
On the left is the original Colored Bottle image mapped into the ProPhoto RGB color space The dots represent actual color samples from the image On the right is the image mapped into the SWOP color space As you can see a lot of the colors in the image are well outside of the printable range of the CMYK press
PreparingImagesforDelivery
Somehow the colors of the image must be mapped into the color space of the output The method of either compression or clipping will be dictated by the process you use to make the color conversion In the preceding mode change and convert to profile examples I showed two methods using Color Range to desaturate the image and using soft proofing to adjust for the resulting color transform
But why go from a super-huge color space such as ProPhoto RGB to SWOP and then back to sRGB Itrsquos really a matter of exercising your color control over the way delivered files are prepared for reproduction By using your eyes to evaluate the way in which colors will be reproduced you are able to dictate how your images reproduce on paper
On the left the final CMYK image colors are shown mapped in the SWOP color space notice the colors are now within the gamut of CMYK On the right the image has been converted back to sRGB from CMYK All of the CMYK colors (with the possible exception of a tiny amount of cyan) will fit within the sRGB color space
Going from ProPhoto RGB to CMYK and then back to sRGB gives you the control over how the image colors will look not only in CMYK but also when you are delivering RGB images Since the converted sRGB image has already had its total volume of colors clamped to the gamut of CMYK there is less chance that somebody down the ldquoprepress roadrdquo from you will mess up the colors of the image
PreparingImagesforDelivery
The proofWhen supplying digital files itrsquos important to also provide an aim print or actual proof that confirms on paper what the image should look like when reproduced In the past Irsquove resorted to actually sending the CMYK file to a service bureau for expensive contract proofs While the result is an unequivocal proof of the CMYK file it can be both costly and time consuming If you have a quality ink jet printer and accurate profiles for the printer you can print out from Photoshop and produce a cross-rendered proof A cross-rendered proof is made by using both the original CMYK profile as well as the printer profile to render in the print the accurate results of proofing to the final output device Again this presupposes that you have an accurate display and printer profile and that you follow the cross-rendering recipe for printing from Photoshop
This figure shows the Photoshop Print dialog box with a preview of the image Irsquove selected Let Photoshop Determine Colors from the Color Handling pop-up menu and selected the correct printer profile
PreparingImagesforDelivery
In the Print dialog box in Photoshop yoursquoll need to alter the settings you may normally use Rather than setting the Print space to your RGB or CMYK space you use the Proof option instead Under Options choose Let Photoshop Determine Colors from the Color Handling pop-up menu and select your particular printerrsquos profile However selecting the proof option in print allows the use of the Proof Setup Preset (shown below) which if yoursquove saved your soft proofing setups makes doing cross-rendered proofs a bit more efficient
To produce a cross-rendered proof select the saved soft proof settings Here Irsquove selected the SWOP-V2-BW-Off proof setup
You will definitely want to select the Simulate Black Ink option Whether you select Simulate Paper Color depends on your intent for the resulting print If you merely want to provide an aim print you may choose not to use this option
To produce an accurate cross-rendered proof select the Simulate Paper Color and the Simulate Black Ink options
However if you wish to provide a very accurate cross-rendered proof that could act as a con-tract proof for color you should select Simulate Paper Color It should be noted that just as the on-screen results will show a marked reduction in dynamic range so will a cross-rendered proof with this option turned on When reviewing the final print the paper white of the actual CMYK output profile will produce a scum tone over the image This preview will be a rather accurate reproduction of the final printed piece but it wonrsquot look very good which is actually what you want in an accurate proof Photographers should really only concern themselves with proofing the image not the final design of the page layout Note that even a highly accurate cross-rendered proof from an inkjet will not show the results of the halftone screening process so only the color can essentially be proofed
PreparingImagesforDelivery
Here Irsquove set the media settings (left) and the Printer Color Management settings (right)
Marking your territoryBefore actually saving your files for client delivery there is one additional step that is important to fulfill properly marking your images with proper metadatamdashmarking your territory if you will Most professional photographers would never send film to their clients without some sort of identification and the importance of marking your images is no less in the digital age Arguably itrsquos even more important now
Enter metadata about your image in the File Info dialog box in Photoshop or Adobe Bridge
PreparingImagesforDelivery
In Photoshop (or Bridge) you should complete the relevant metadata fields in the File Info dialog box All editable fields that are useful for downstream organization and identification should be employed
The four main IPTC metadata panels
New to Photoshop CS2 are the XMP for IPTC panels for expanded metadata support Itrsquos relatively simple to complete all the general fields with standard information such as contact copyright status and usage and save the completed forms as a template that can be applied to all images destined for delivery to third parties Communicate with your clients to get all the necessary information There really is no excuse not to do this critical step in preparing files for delivery
file formats for deliverySo you are ready to save the files for delivery However you arenrsquot quite done yet in making some important decisions The choice of file format and the final image naming is still a critical step
When delivering files to clients itrsquos important to adhere to proper naming conventions When naming files itrsquos critical to stick to an alphanumeric series of letters and numbers and use only approved special characters such as underscores or dashes for spaces You should not use any of the special symbols such as $ ^ amp ( ) + in a file name Depending on the final output device and the operating system it runs under special symbols can lead to unpredictable results
PreparingImagesforDelivery
Additionally even though recent operating systems such as Mac OS X and Windows XP may allow extended characters in a file name there are enough systems in use in the industry that cannot understand long file names Therefore you should use only a safe length for Mac OS 31 characters plus a period separating the file name and extension or 11 characters plus period and extension for MS DOS machines
The file format you supply is also an important consideration
File format options in Photoshop
If you are supplying 16-bit-per-channel CMYK files there is only a single optimal file format to use TIFF
TIFF file options when working with a 16-bit-per-channel image
When selecting the format options for a TIFF file it should be noted that some output devices cannot handle TIFF files with any compression such as LZW or ZIP Also when delivering for clients itrsquos generally not a good idea to supply layered files Unless you can be assured that the client will treat the layered files properly flattening is always the safest option
PreparingImagesforDelivery
If you are supplying 8-bit-per-channel CMYK files the format options grow
By changing the bit depth to 8 BitsChannel (left) you can select more file formats for delivery (right)
Mode changing to 8 bits and saving as a CMYK file will offer a variety of additional file formats However unless you have instructions to the contrary the safest file format is still TIFF
The Save As dialog box with the Embed Color Profile option deselected
There is an additional consideration when saving files intended for CMYK reproduction Unless yoursquove had direct and successful communications with the prepress personnel saving a CMYK file with an embedded profile might not be such a good idea While saving RGB files with embedded profiles is pretty much a universal good idea to avoid ambiguous color in graphic arts and print-ing embedded profiles can sometimes lead to problems for both technical and political reasons
Until the political realities change and RIPs can be updated to ensure they wonrsquot choke on embedded profilesmdashthis is actually rare but can happenmdashI provide CMYK files with no profiles I do note in the accompanying Read Me text files an indication of how the files were prepared If I have been fortunate enough to be working with a color management savvy prepress supplier I would be happy to embed the profile in the CMYK filemdashideally the profile they supplied me But until color management gets wider adoption in the graphic arts itrsquos easier and safer to strip the CMYK profile
If you need to transmit files instead of delivering them on a CD or DVD you can use either a zipped TIFF file or use JPG compression for the final file delivery In either case the file should be opened by the recipient and resaved as a standard TIFF file for final use Saving a final CMYK file as a JPEG file with Maximum Quality will rarely if ever produce any visible changes to the file However your client should be warned not to open the file or make changes and resave the file while in the JPEG format Multiple resaving in JPEG format is to be avoided
PreparingImagesforDelivery 0
Also you should alert your client if you have chosen not to embed a profile in the CMYK file that opening the image in Photoshop might prompt a warning dialog box
Photoshop returns a warning dialog box when you open a file that doesnrsquot have an embedded profile
Depending on the color management settings in your clientrsquos Photoshop setup they may see a warning when they open a file without an embedded profile If so you can tell them to assign the profile yoursquove used to convert the filemdashif itrsquos a profile included in Photoshop that is a simple solution If yoursquove stripped the profile and used a custom CMYK profile you should consider supplying the profile separately on disk or in the file transmission
If you are asked to supply files that are sized For Position Only (FPO) yoursquoll need to make sure the final image dimensions match the final high-resolution files exactly Only the pixel resolution should be downsampled Be sure to save the FPO version with an unambiguous file name that relates but would not be confused with the high-resolution file
The Image Size dialog showing a reduced resolution version of the original CMYK file (left) and selecting Save As (right) In the FPO version be sure to give it a noticible designation
PreparingImagesforDelivery 1
While it may seem that nobody actually reads Read Me files it is still an important practice to provide documentation and identification of images delivered to clients If nothing else you can point to the text file they failed to read as explaining any miscommunication on their part
Itrsquos good practice to include a Read Me file when you deliver your images to your clients
Regardless of whether you are burning to disk or transmitting over the net itrsquos important to include an organized file folder structure to help avoid confusion I place files inside named fold-ers that help explain their contents and segregate high-resolution CMYK files from FPOs from RGB files Particularly if you are burning to CD or DVD itrsquos useful to export the browsed cache from Adobe Bridge to make browsing from the CD or DVD quicker
When delivering files it helps to put them in an organized file folder structure
abouT THe auTHoR
JeffScheweasummacumlaudegraduateofRochesterInstituteofTechnologyhasbeenanadvertisingphotographerinChicagoforover25yearsHehasbeendoingdigitalimagingforover14yearsandiswidelyknownandrespectedinthedigitalimagingcommunityasaleadingpioneerinthefieldJeffisafeatureconsultantandalphatesterforPhotoshop
foR MoRe InfoRMaTIon
ForacomprehensiveoverviewofPhotoshopCS2pleasevisitwwwadobecomproductsphotoshopmainhtml
Adobe Systems Incorporated345ParkAvenueSanJoseCA95110-2704USAwwwadobecom
AdobetheAdobelogoAcrobatIllustratorInDesignandPhotoshopareeitherregisteredtrademarksortrademarksofAdobeSystemsIncorporatedintheUnitedStatesandorothercountriesAllothertrademarksarethepropertyoftheirrespectiveowners
copy2006JeffScheweAllrightsreserved
My personal preference even if you supply files initially via transmission is to burn the delivered files to CD or DVD I do this for several reasons to give the client a tangible result from the project that they can store and to burn a read-only version of the final delivered files that cannot be altered If at some point something happens to the file (for example somebody changes it poorly) therersquos always the original starting point image burned into the disc that cannot be changed While it doesnrsquot happen often it has happened that somebody made a mistake downstream of my file delivery and itrsquos useful to be able to point to a version of a file that represents the state of the delivered image before any additional changes were made
checklist for file deliveryConfirm final file specifications and requirements
Open a secure line of communication with client and prepress provider
Confirm final reproduction process (SWOP or Sheet Fed)
Confirm final output color space ideally with printer-supplied ICC profile
Confirm delivery of RGB CMYK or RGB plus CMYK
Tone and color correct with soft proofing for the final output
Confirm final file size and resolution
Provide image sharpening for output
Provide aim print or proof print for color
Embed image metadata for identification
Confirm final delivery file format
Provide Read Me file with documentation file list and contact information
Organize and segregate file types separate high-resolution files FPO RGB and CMYK
Provide read-only final files on CD or DVD
additional resourcesDigital Image Submission Guidelines (DISC) wwwdisc-infoorg
Universal Photographic Digital Imaging Guidelines (UPDIG) wwwupdigorg
Real World Color Management by Bruce Fraser Chris Murphy and Fred Bunting Published by Peachpit Press ISBN 0321267222
Color Management for Photographers by Andrew Rodney Published by Focal Press ISBN 0-240-80649-2
PixelGenius by PhotoKit Sharpener wwwpixelgeniuscom
Nik Software by Nik Sharpener Pro wwwniksoftwarecom
bull
bull
bull
bull
bull
bull
bull
bull
bull
bull
bull
bull
bull
bull
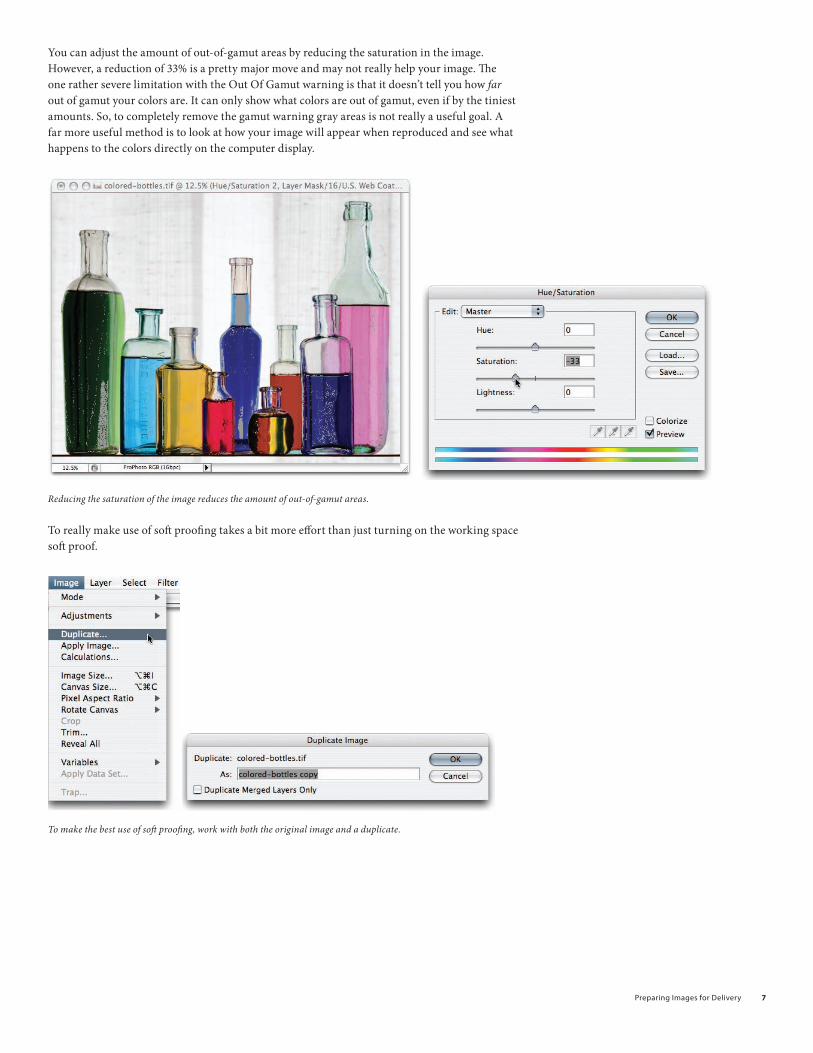
PreparingImagesforDelivery
The trick is to work with both your original image as well as a duplicate Choose Image gt Duplicate to make a copy of your working file Yoursquoll end up with two images side-by-side
The original image (left) and the duplicate (right)
Place your original image on the left and the duplicate on the right Click the window containing the original image to make it active
Instead of simply using the Working CMYK option choose Custom to open the Customize Proof Condition dialog box Ensure that Device To Simulate is set to your correct CMYK profile (or in this case the Working CMYK)
Proof Setup is on the View menu (left) But I prefer to control the proof condition by choosing Custom (right)
Additionally yoursquoll need to set the Rendering Intent The rendering intent is the method by which the colors in the image will be compressed or clipped when separated to CMYK In general Relative Colorimetric is often the best intent but that will depend entirely on your specific image and output profile So itrsquos useful to actually see which intent is optimal For photographic images either Perceptual or Relative Colorimetric is considered to be the best
Choose the rendering intent from the pop-up menu in the Proof Conditions dialog box
PreparingImagesforDelivery
The Perceptual intent tries to compress the out-of-gamut colors to fit within the maximum colors contained in the output profile The method of compression is to try to maintain a perceptual uniformity to the relationships of the colors The Relative Colorimetric intent will in essence clip or chop off those colors that cannot be reproduced The usefulness of Relative Colorimetric is that while colors can be reduced the luminance values of the image wonrsquot change much
The Display Options radio buttons are shown above
One other important setting for soft proofing is whether or not to use Display Options (On-Screen) If you havenrsquot used soft proofing extensively I would not suggest starting with the Simulate options (Simulate Paper Color and Simulate Black Ink) on These options are useful to see the effects of the reduction of the dynamic range (or contrast ratio) of the final printed reproduction However yoursquoll need to practice to learn how to adjust for the reduced contrast range of the final paper
If you save your soft proof setting you can choose the named setting from the Proof Setup menu and yoursquoll be able to use it later if you want to use it to produce a printed proof of the image
Save your soft proof settings (left) so that you can choose them quickly from the Proof Setup menu (right)
PreparingImagesforDelivery 10
In the image below the magenta is less saturated and the two blue bottles have lost a lot of color and saturation Blues often turn too purple (too much magenta) that can be helped a bit by mak-ing adjustments However there is nothing that can be done to make up for the loss of a deep saturated royal blue color Deep blues and purples are particularly limited in the CMYK color gamut because cyan and magenta simply cannot produce a super vibrant bluemdashthis is a fact of life that you must deal with I just never show my clients the original RGB file
The image on the left shows the result of soft proofing
When a client is looking over my shoulder to examine an RGB image I turn on CMYK soft proofing before he ever gets to see the RGB version Why show him something he can never attain in reproduction That RGB gt CMYK conversion not only will depress you but your client will see the colors change when going to CMYK and who will he blame Probably not the limita-tion of the photomechanical process So my clients really never see anything they canrsquot get in print
On the left two adjustment layers have been added to try to get the CMYK soft proof to look as close as possible to the original image on the right
PreparingImagesforDelivery 11
While not perfect Irsquove improved the result through using a couple of adjustment layers a Selective Color and a HueSaturation adjustment
The actual adjustments made to the image above The left and middle images show two separate Selective Color Options adjustments and the right image shows the HueSaturation adjustment
In Selective Color I adjusted the magenta to have a relative percentage boost as well as boosts to the Cyan Magenta and Black in the blue color The Saturation adjustment increased the blue saturation as much as possible without breaking the colors
While it doesnrsquot have the same brilliance of the ProPhoto RGB original the soft proof is an accu-rate preview of what the colors will look like on press Adding the tweaks will help the color as much as you can with traditional CMYK separations
Another factor that is going to happen when your image hits the printed page is a severe reduc-tion in the dynamic range of the image meaning the blacks will be a lot less black and the whites a lot less white There is a way of previewing this loss of dynamic range but a warning it will make your image look even worse Why Because the printed page simply canrsquot compete with todayrsquos bright CRT or LCD displays for dynamic range
When soft proofing select the Simulate options to soft proof the dynamic range of the printed reproduction
To soft proof the dynamic range of the printed reproduction go into the Customize Proof Condition dialog box again and select both Simulate Paper Color and Simulate Black Ink Selecting these options will make an Absolute Colorimetric rendering from the image to your screen matching both the dimness and yellowed looking color of standard commercial printing paper as well as the reduced black attainable with CMYK inks
PreparingImagesforDelivery 1
A soft proof with Simulate Paper Color and Simulate Black Ink selected
Well I told you it would look bad And it does But the soft proof is pretty darn accurate in its prediction of what the image will look like reproduced on press Sad huh But thatrsquos life However it really wonrsquot look this bad Because the eye adapts to the whitest portion of your field of vision your eyes are not using the white of the paper as the identifier of the white point of a scene When looking at an actual printed piece the eye will identify the brightest and whitest portion of what you see as white and adjust all the other colors and luminosity accordingly So you need to eliminate as much white before your eyes as possible when soft proofing to adjust the effects of the reduction of dynamic range and the yellowing of the whites
By switching your viewing mode in Photoshop to full screen mode either with the dark gray or better yet the black canvas background you can cut down on the amount of the surrounding white elements on screen so the image will look a little less bad (but only a little)
Change the screen mode by using the toolbar or pressing the F key On the right the image is shown against a black background
PreparingImagesforDelivery 1
Often a slight tweak in the contrast of an image will help punch the image back toward the way it looked before the CMYK process soft proof made it look so bad
A Curve dialog showing a slight increase in contrast to adjust the image for the reduced dynamic range of the printed image
final image sizingOnce your RGB image is prepped for CMYK separation you should to final image sizing Obviously if you do not know the exact final reproduction size you canrsquot do any final exacting resizing but you can make sure the image is in the correct resolution realm
The image size and resolution of the original scan Both the resolution and image size need to be corrected
PreparingImagesforDelivery 1
For this particular image scan itrsquos important to set the units to match the final usage In this case the scan was done at 1800 pixelsinch (ppi) while the dimensions were in centimeters Photoshop doesnrsquot particularly care what the units are you can change the ratio of the units and dimensions by deselecting Resample Image and changing the units of the image You donrsquot need to resample the image just change the units and dimension The actual pixel count remains the same However for page layout applications the dimensions and units do matter
The Resample Image option is deselected and the Resolution has been changed to 300 pixelsinch There is no resampling involved only the ratio of the pixel density has changed
Here the pixel dimensions have been changed to inches The image dimension of 1548rdquo x 1204rdquo is too large for the intended 85rdquo x 11rdquo paper If delivered at this dimension somebody down-stream will need to resample the image Also note that only images sized to their final dimen-sions can be accurately and properly sharpened for reproduction
The image size and resolution have been resampled for the final reproduction size
PreparingImagesforDelivery 1
The image has been set to the correct units and the resample option is selected The image will be sized correctly for 85rdquo x 11rdquo full-bleed reproduction (the outer dimensions have been set to 1125rdquo x 875rdquo to allow for a 18rdquo bleed) If the image were to be placed in an image box in a page layout application the image could have been sized to that of the image box But allowing for bleed is yet another small service that the photographer can provide setting the final image crop
Note For downsizing the Bicubic Sharper option improves resampling
Once set to the final image dimension you can use guides in Photoshop to double-check where the image will be cropped While these guides will not be used by a page layout application itrsquos still useful to indicate the guides in the event that somebody downstream opens the image in Photoshop Guides are saved in Photoshop files as metadata and can be preserved for later use
Use guides in Photoshop to double-check where the image will be cropped
Image sharpeningOnce an image is set to the final size and resolution one additional step is required for optimal reproductionmdashimage sharpening for output There is a lot of mystery surrounding image sharp-ening While Photoshop has many tools to apply sharpening routines knowing how to sharpen and by how much can be a problem since viewing an image on a computer display is a rather poor indicator of the requirements needed for halftone reproduction
There are some generalities Bruce Fraser co-author of Real World Photoshop has indicated that the required sharpening should produce an edge halo of between 150 ndash 1100 of an image The halo is an increase of the apparent edge contrast of an image At between 150 ndash 1100 of an image the halo should be invisible to the naked eye and yet produce a crisp edge in reproduction
PreparingImagesforDelivery 1
The other problem inherent with determining image sharpening is the fact that a computer display is a poor tool to evaluate image sharpening If you deliver an image whose pixel resolution is twice that of the halftone line screen ruling four image pixels will be dithered to produce one halftone dot However many ldquoexpertsrdquo tell people to view their images at a 100 zoom inside Photoshop to evaluate the effects of sharpening Yes you need to view your images at 100 or larger to see the actual effects of sharpening on the pixels yet the resulting image in Photoshop will be too large to evaluate the amount of sharpening required To more accurately predict the amount of sharpening required a more useful screen zoom of 50 will simulate the effect of the halftone screening At 50 four image pixels are dithered to produce one screen display pixel
An image without output sharpening When printed the image wonrsquot be crisp
The image above at a zoom of 50 has no additional output sharpening applied If delivered like this the resultant halftone reproduction will be less than crisp The dithering of the halftone dots will introduce a softening effect further softening the image So output sharpening needs to be applied even for what may appear in Photoshop to be a sharp image
PreparingImagesforDelivery 1
While the Unsharp Mask filter in Photoshop is a useful sharpening tool there is an alternative that provides a bit more control while reducing some of the undesirable artifacts of Unsharp Mask
Use the High Pass filter to sharpen an image
By duplicating the imagersquos background layer and setting the blending mode to Overlay you can use the High Pass filter (choose Filter gt Other gtHigh Pass)
The High Pass filter is rather hidden away under ldquoOtherrdquo in the Filter menu
PreparingImagesforDelivery 1
This High Pass filter produces an apparent edge enhancement based on a pixel radius that allows the Overlay blend mode to increase the light edge while darkening the dark edge of image edges Setting the radius to 3 for a 300ppi image will enhance the edge halo approximately 1100 of an inch which happens to match the recommendations of Bruce Fraser
The results of using High Pass on an overlay blend mode layer The image edges snap at 50 zoom
There are third-party solutions specially designed for doing image sharpening that can increase the accuracy and predictability of output sharpening Nik Sharpener Pro by Nik Software Inc and PhotoKit Sharpener by PixelGenius are two such products Bruce Fraser was the primary product designer of PhotoKit Shapener and for disclosure purposes I must also indicate my involvement with PixelGenius Both products are designed to provide optimal output sharpening
But the caveat again final output sharpening can only be done on images whose final reproduc-tion size has been set Any resizing on the part of a downstream process will reintroduce soften-ing and thus mitigate the output sharpening Resharpening an already sharpened image that has been resized is not optimal
PreparingImagesforDelivery 1
converting to cMYKOnce the image has been optimized for the reproduction process in terms of tone color resolu-tion and image sharpness the final processing step is to convert the RGB image to CMYK This step can be as simple as doing a mode change from RGB to CMYK (assuming your Photoshop Color Settings are properly set up) or can involve a Convert To Profile transform
This figure shows the Mode change to CMYK I prefer to use the Convert to Profile command
Changing the mode from RGB to CMYK (by choosing Edit gt Mode gt CMYK Color) results in an image conversion from RGB to CMYK based on the current color settings in Photoshop While fine to do it contains a slight risk that the color settings may not be exactly what you expect When there are multiple users of Photoshop or if you havenrsquot produced a CMYK separation recently using the Convert To Profile command in the Edit menu allows for total control and clarity in the settings
In the Convert To Profile dialog box you can confirm the source space the destination space and the parameters on which the conversion will take place
PreparingImagesforDelivery 0
In the Convert to Profile dialog you must set the correct options I suggest using the Adobe (Ace) CMM (left) and use the same rendering intent I used to soft proof (right)
In the Convert To Profile dialog box you can set the CMM transform engine as well as confirm the rendering intent In general with Photoshop CS or CS2 you can always be assured of getting proper results when selecting Use Black Compensation to map image black to output black Itrsquos also generally a good idea to flatten all adjustment layers during conversion since some adjust-ment layers either will not work on CMYK layered files or will produce different results than their RGB counterparts
Another point to note if you are working in 16-bit-per-channel depth is that you should not only flatten while in 16 bit to make sure your adjustments are being completed in 16 bit but also transform from RGB to CMYK while still in 16 bit to receive the benefit of the higher bit depth during conversion
The final CMYK-separated and optimized file
PreparingImagesforDelivery 1
What about providing RGb filesTo offer greater flexibility to your clients you can also consider providing RGB files in addition to the CMYK files yoursquove separated However providing RGB files can be a problem If yoursquove used a large color space such as ProPhoto RGB delivering your RGB file to somebody who is not well versed in color management can result in some pretty ugly interpretations of your image
An image in ProPhoto RGB (left) and a duplicate of the image with sRGB assigned as the embedded profile (right)
The improper use of Photoshop Color Settings and policies can result in a misunderstanding of the use of profiles If the client or printer did not honor the embedded profile and merely assumed the image to be in sRGB the resulting display would be less than desirable
So if you want to work with your originals in a large gamut color space and deliver files to your clients that run a lower risk of miscommunication of color what do you do Well I can only tell you what I do and suggest you test it yourself for your own work
I take the final CMYK file and reconvert it to RGB Why Once the filersquos colors have been reduced to the gamut of CMYK converting the file back to RGB will not do any additional harmmdashpar-ticularly if you are working in 16 bit But it will result in an RGB file that would be pretty hard to misinterpret
Using Convert to Profile you select the RGB color space you want to convert the CMYK file to Adobe RGB on the left or I suggest sRGB shown on the right
PreparingImagesforDelivery
You can either convert to Adobe RGB or sRGB The advantage of providing an sRGB version of the file is that in the event the usage of the image also includes the Web yoursquoll have an image converted from CMYK to sRGB so the web image will match the CMYK rendering of the file
To better illustrate the process of converting from ProPhoto RGB to SWOP CMYK and back to sRGB Irsquove done screen shots of both the color space gamuts as well as plotted actual colors of the images in a program called ColorThink by CHROMIX (wwwchromixcom)
The gamuts and image plots have been done by plotting in Lab coordinates and in 3D It should be noted that the best way to see color space gamuts and image plots is in motion ColorThink allows you rotate the graph to better evaluate the relationships between color spaces and image plots
The gamut map on the left is ProPhoto RGB In the middle is sRGB and on the right is SWOP as contained in the Photoshop CS2 CMYK profile named US Web Coated (SWOP) v2 Note the screen shots are to scale
The figures above show the relative size and volume of the three color spaces ProPhoto RGB is huge and SWOP is tiny The challenge is to get the colors of the image to look good in the color space of the final output
On the left is the original Colored Bottle image mapped into the ProPhoto RGB color space The dots represent actual color samples from the image On the right is the image mapped into the SWOP color space As you can see a lot of the colors in the image are well outside of the printable range of the CMYK press
PreparingImagesforDelivery
Somehow the colors of the image must be mapped into the color space of the output The method of either compression or clipping will be dictated by the process you use to make the color conversion In the preceding mode change and convert to profile examples I showed two methods using Color Range to desaturate the image and using soft proofing to adjust for the resulting color transform
But why go from a super-huge color space such as ProPhoto RGB to SWOP and then back to sRGB Itrsquos really a matter of exercising your color control over the way delivered files are prepared for reproduction By using your eyes to evaluate the way in which colors will be reproduced you are able to dictate how your images reproduce on paper
On the left the final CMYK image colors are shown mapped in the SWOP color space notice the colors are now within the gamut of CMYK On the right the image has been converted back to sRGB from CMYK All of the CMYK colors (with the possible exception of a tiny amount of cyan) will fit within the sRGB color space
Going from ProPhoto RGB to CMYK and then back to sRGB gives you the control over how the image colors will look not only in CMYK but also when you are delivering RGB images Since the converted sRGB image has already had its total volume of colors clamped to the gamut of CMYK there is less chance that somebody down the ldquoprepress roadrdquo from you will mess up the colors of the image
PreparingImagesforDelivery
The proofWhen supplying digital files itrsquos important to also provide an aim print or actual proof that confirms on paper what the image should look like when reproduced In the past Irsquove resorted to actually sending the CMYK file to a service bureau for expensive contract proofs While the result is an unequivocal proof of the CMYK file it can be both costly and time consuming If you have a quality ink jet printer and accurate profiles for the printer you can print out from Photoshop and produce a cross-rendered proof A cross-rendered proof is made by using both the original CMYK profile as well as the printer profile to render in the print the accurate results of proofing to the final output device Again this presupposes that you have an accurate display and printer profile and that you follow the cross-rendering recipe for printing from Photoshop
This figure shows the Photoshop Print dialog box with a preview of the image Irsquove selected Let Photoshop Determine Colors from the Color Handling pop-up menu and selected the correct printer profile
PreparingImagesforDelivery
In the Print dialog box in Photoshop yoursquoll need to alter the settings you may normally use Rather than setting the Print space to your RGB or CMYK space you use the Proof option instead Under Options choose Let Photoshop Determine Colors from the Color Handling pop-up menu and select your particular printerrsquos profile However selecting the proof option in print allows the use of the Proof Setup Preset (shown below) which if yoursquove saved your soft proofing setups makes doing cross-rendered proofs a bit more efficient
To produce a cross-rendered proof select the saved soft proof settings Here Irsquove selected the SWOP-V2-BW-Off proof setup
You will definitely want to select the Simulate Black Ink option Whether you select Simulate Paper Color depends on your intent for the resulting print If you merely want to provide an aim print you may choose not to use this option
To produce an accurate cross-rendered proof select the Simulate Paper Color and the Simulate Black Ink options
However if you wish to provide a very accurate cross-rendered proof that could act as a con-tract proof for color you should select Simulate Paper Color It should be noted that just as the on-screen results will show a marked reduction in dynamic range so will a cross-rendered proof with this option turned on When reviewing the final print the paper white of the actual CMYK output profile will produce a scum tone over the image This preview will be a rather accurate reproduction of the final printed piece but it wonrsquot look very good which is actually what you want in an accurate proof Photographers should really only concern themselves with proofing the image not the final design of the page layout Note that even a highly accurate cross-rendered proof from an inkjet will not show the results of the halftone screening process so only the color can essentially be proofed
PreparingImagesforDelivery
Here Irsquove set the media settings (left) and the Printer Color Management settings (right)
Marking your territoryBefore actually saving your files for client delivery there is one additional step that is important to fulfill properly marking your images with proper metadatamdashmarking your territory if you will Most professional photographers would never send film to their clients without some sort of identification and the importance of marking your images is no less in the digital age Arguably itrsquos even more important now
Enter metadata about your image in the File Info dialog box in Photoshop or Adobe Bridge
PreparingImagesforDelivery
In Photoshop (or Bridge) you should complete the relevant metadata fields in the File Info dialog box All editable fields that are useful for downstream organization and identification should be employed
The four main IPTC metadata panels
New to Photoshop CS2 are the XMP for IPTC panels for expanded metadata support Itrsquos relatively simple to complete all the general fields with standard information such as contact copyright status and usage and save the completed forms as a template that can be applied to all images destined for delivery to third parties Communicate with your clients to get all the necessary information There really is no excuse not to do this critical step in preparing files for delivery
file formats for deliverySo you are ready to save the files for delivery However you arenrsquot quite done yet in making some important decisions The choice of file format and the final image naming is still a critical step
When delivering files to clients itrsquos important to adhere to proper naming conventions When naming files itrsquos critical to stick to an alphanumeric series of letters and numbers and use only approved special characters such as underscores or dashes for spaces You should not use any of the special symbols such as $ ^ amp ( ) + in a file name Depending on the final output device and the operating system it runs under special symbols can lead to unpredictable results
PreparingImagesforDelivery
Additionally even though recent operating systems such as Mac OS X and Windows XP may allow extended characters in a file name there are enough systems in use in the industry that cannot understand long file names Therefore you should use only a safe length for Mac OS 31 characters plus a period separating the file name and extension or 11 characters plus period and extension for MS DOS machines
The file format you supply is also an important consideration
File format options in Photoshop
If you are supplying 16-bit-per-channel CMYK files there is only a single optimal file format to use TIFF
TIFF file options when working with a 16-bit-per-channel image
When selecting the format options for a TIFF file it should be noted that some output devices cannot handle TIFF files with any compression such as LZW or ZIP Also when delivering for clients itrsquos generally not a good idea to supply layered files Unless you can be assured that the client will treat the layered files properly flattening is always the safest option
PreparingImagesforDelivery
If you are supplying 8-bit-per-channel CMYK files the format options grow
By changing the bit depth to 8 BitsChannel (left) you can select more file formats for delivery (right)
Mode changing to 8 bits and saving as a CMYK file will offer a variety of additional file formats However unless you have instructions to the contrary the safest file format is still TIFF
The Save As dialog box with the Embed Color Profile option deselected
There is an additional consideration when saving files intended for CMYK reproduction Unless yoursquove had direct and successful communications with the prepress personnel saving a CMYK file with an embedded profile might not be such a good idea While saving RGB files with embedded profiles is pretty much a universal good idea to avoid ambiguous color in graphic arts and print-ing embedded profiles can sometimes lead to problems for both technical and political reasons
Until the political realities change and RIPs can be updated to ensure they wonrsquot choke on embedded profilesmdashthis is actually rare but can happenmdashI provide CMYK files with no profiles I do note in the accompanying Read Me text files an indication of how the files were prepared If I have been fortunate enough to be working with a color management savvy prepress supplier I would be happy to embed the profile in the CMYK filemdashideally the profile they supplied me But until color management gets wider adoption in the graphic arts itrsquos easier and safer to strip the CMYK profile
If you need to transmit files instead of delivering them on a CD or DVD you can use either a zipped TIFF file or use JPG compression for the final file delivery In either case the file should be opened by the recipient and resaved as a standard TIFF file for final use Saving a final CMYK file as a JPEG file with Maximum Quality will rarely if ever produce any visible changes to the file However your client should be warned not to open the file or make changes and resave the file while in the JPEG format Multiple resaving in JPEG format is to be avoided
PreparingImagesforDelivery 0
Also you should alert your client if you have chosen not to embed a profile in the CMYK file that opening the image in Photoshop might prompt a warning dialog box
Photoshop returns a warning dialog box when you open a file that doesnrsquot have an embedded profile
Depending on the color management settings in your clientrsquos Photoshop setup they may see a warning when they open a file without an embedded profile If so you can tell them to assign the profile yoursquove used to convert the filemdashif itrsquos a profile included in Photoshop that is a simple solution If yoursquove stripped the profile and used a custom CMYK profile you should consider supplying the profile separately on disk or in the file transmission
If you are asked to supply files that are sized For Position Only (FPO) yoursquoll need to make sure the final image dimensions match the final high-resolution files exactly Only the pixel resolution should be downsampled Be sure to save the FPO version with an unambiguous file name that relates but would not be confused with the high-resolution file
The Image Size dialog showing a reduced resolution version of the original CMYK file (left) and selecting Save As (right) In the FPO version be sure to give it a noticible designation
PreparingImagesforDelivery 1
While it may seem that nobody actually reads Read Me files it is still an important practice to provide documentation and identification of images delivered to clients If nothing else you can point to the text file they failed to read as explaining any miscommunication on their part
Itrsquos good practice to include a Read Me file when you deliver your images to your clients
Regardless of whether you are burning to disk or transmitting over the net itrsquos important to include an organized file folder structure to help avoid confusion I place files inside named fold-ers that help explain their contents and segregate high-resolution CMYK files from FPOs from RGB files Particularly if you are burning to CD or DVD itrsquos useful to export the browsed cache from Adobe Bridge to make browsing from the CD or DVD quicker
When delivering files it helps to put them in an organized file folder structure
abouT THe auTHoR
JeffScheweasummacumlaudegraduateofRochesterInstituteofTechnologyhasbeenanadvertisingphotographerinChicagoforover25yearsHehasbeendoingdigitalimagingforover14yearsandiswidelyknownandrespectedinthedigitalimagingcommunityasaleadingpioneerinthefieldJeffisafeatureconsultantandalphatesterforPhotoshop
foR MoRe InfoRMaTIon
ForacomprehensiveoverviewofPhotoshopCS2pleasevisitwwwadobecomproductsphotoshopmainhtml
Adobe Systems Incorporated345ParkAvenueSanJoseCA95110-2704USAwwwadobecom
AdobetheAdobelogoAcrobatIllustratorInDesignandPhotoshopareeitherregisteredtrademarksortrademarksofAdobeSystemsIncorporatedintheUnitedStatesandorothercountriesAllothertrademarksarethepropertyoftheirrespectiveowners
copy2006JeffScheweAllrightsreserved
My personal preference even if you supply files initially via transmission is to burn the delivered files to CD or DVD I do this for several reasons to give the client a tangible result from the project that they can store and to burn a read-only version of the final delivered files that cannot be altered If at some point something happens to the file (for example somebody changes it poorly) therersquos always the original starting point image burned into the disc that cannot be changed While it doesnrsquot happen often it has happened that somebody made a mistake downstream of my file delivery and itrsquos useful to be able to point to a version of a file that represents the state of the delivered image before any additional changes were made
checklist for file deliveryConfirm final file specifications and requirements
Open a secure line of communication with client and prepress provider
Confirm final reproduction process (SWOP or Sheet Fed)
Confirm final output color space ideally with printer-supplied ICC profile
Confirm delivery of RGB CMYK or RGB plus CMYK
Tone and color correct with soft proofing for the final output
Confirm final file size and resolution
Provide image sharpening for output
Provide aim print or proof print for color
Embed image metadata for identification
Confirm final delivery file format
Provide Read Me file with documentation file list and contact information
Organize and segregate file types separate high-resolution files FPO RGB and CMYK
Provide read-only final files on CD or DVD
additional resourcesDigital Image Submission Guidelines (DISC) wwwdisc-infoorg
Universal Photographic Digital Imaging Guidelines (UPDIG) wwwupdigorg
Real World Color Management by Bruce Fraser Chris Murphy and Fred Bunting Published by Peachpit Press ISBN 0321267222
Color Management for Photographers by Andrew Rodney Published by Focal Press ISBN 0-240-80649-2
PixelGenius by PhotoKit Sharpener wwwpixelgeniuscom
Nik Software by Nik Sharpener Pro wwwniksoftwarecom
bull
bull
bull
bull
bull
bull
bull
bull
bull
bull
bull
bull
bull
bull
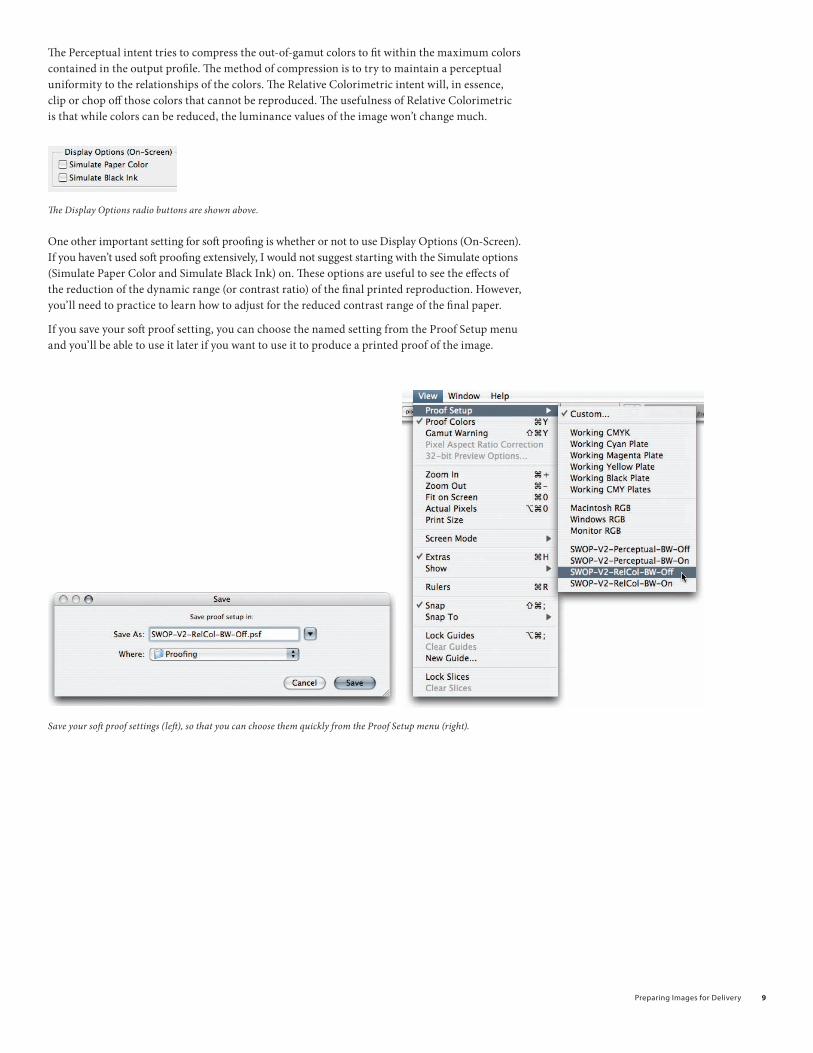
PreparingImagesforDelivery
The Perceptual intent tries to compress the out-of-gamut colors to fit within the maximum colors contained in the output profile The method of compression is to try to maintain a perceptual uniformity to the relationships of the colors The Relative Colorimetric intent will in essence clip or chop off those colors that cannot be reproduced The usefulness of Relative Colorimetric is that while colors can be reduced the luminance values of the image wonrsquot change much
The Display Options radio buttons are shown above
One other important setting for soft proofing is whether or not to use Display Options (On-Screen) If you havenrsquot used soft proofing extensively I would not suggest starting with the Simulate options (Simulate Paper Color and Simulate Black Ink) on These options are useful to see the effects of the reduction of the dynamic range (or contrast ratio) of the final printed reproduction However yoursquoll need to practice to learn how to adjust for the reduced contrast range of the final paper
If you save your soft proof setting you can choose the named setting from the Proof Setup menu and yoursquoll be able to use it later if you want to use it to produce a printed proof of the image
Save your soft proof settings (left) so that you can choose them quickly from the Proof Setup menu (right)
PreparingImagesforDelivery 10
In the image below the magenta is less saturated and the two blue bottles have lost a lot of color and saturation Blues often turn too purple (too much magenta) that can be helped a bit by mak-ing adjustments However there is nothing that can be done to make up for the loss of a deep saturated royal blue color Deep blues and purples are particularly limited in the CMYK color gamut because cyan and magenta simply cannot produce a super vibrant bluemdashthis is a fact of life that you must deal with I just never show my clients the original RGB file
The image on the left shows the result of soft proofing
When a client is looking over my shoulder to examine an RGB image I turn on CMYK soft proofing before he ever gets to see the RGB version Why show him something he can never attain in reproduction That RGB gt CMYK conversion not only will depress you but your client will see the colors change when going to CMYK and who will he blame Probably not the limita-tion of the photomechanical process So my clients really never see anything they canrsquot get in print
On the left two adjustment layers have been added to try to get the CMYK soft proof to look as close as possible to the original image on the right
PreparingImagesforDelivery 11
While not perfect Irsquove improved the result through using a couple of adjustment layers a Selective Color and a HueSaturation adjustment
The actual adjustments made to the image above The left and middle images show two separate Selective Color Options adjustments and the right image shows the HueSaturation adjustment
In Selective Color I adjusted the magenta to have a relative percentage boost as well as boosts to the Cyan Magenta and Black in the blue color The Saturation adjustment increased the blue saturation as much as possible without breaking the colors
While it doesnrsquot have the same brilliance of the ProPhoto RGB original the soft proof is an accu-rate preview of what the colors will look like on press Adding the tweaks will help the color as much as you can with traditional CMYK separations
Another factor that is going to happen when your image hits the printed page is a severe reduc-tion in the dynamic range of the image meaning the blacks will be a lot less black and the whites a lot less white There is a way of previewing this loss of dynamic range but a warning it will make your image look even worse Why Because the printed page simply canrsquot compete with todayrsquos bright CRT or LCD displays for dynamic range
When soft proofing select the Simulate options to soft proof the dynamic range of the printed reproduction
To soft proof the dynamic range of the printed reproduction go into the Customize Proof Condition dialog box again and select both Simulate Paper Color and Simulate Black Ink Selecting these options will make an Absolute Colorimetric rendering from the image to your screen matching both the dimness and yellowed looking color of standard commercial printing paper as well as the reduced black attainable with CMYK inks
PreparingImagesforDelivery 1
A soft proof with Simulate Paper Color and Simulate Black Ink selected
Well I told you it would look bad And it does But the soft proof is pretty darn accurate in its prediction of what the image will look like reproduced on press Sad huh But thatrsquos life However it really wonrsquot look this bad Because the eye adapts to the whitest portion of your field of vision your eyes are not using the white of the paper as the identifier of the white point of a scene When looking at an actual printed piece the eye will identify the brightest and whitest portion of what you see as white and adjust all the other colors and luminosity accordingly So you need to eliminate as much white before your eyes as possible when soft proofing to adjust the effects of the reduction of dynamic range and the yellowing of the whites
By switching your viewing mode in Photoshop to full screen mode either with the dark gray or better yet the black canvas background you can cut down on the amount of the surrounding white elements on screen so the image will look a little less bad (but only a little)
Change the screen mode by using the toolbar or pressing the F key On the right the image is shown against a black background
PreparingImagesforDelivery 1
Often a slight tweak in the contrast of an image will help punch the image back toward the way it looked before the CMYK process soft proof made it look so bad
A Curve dialog showing a slight increase in contrast to adjust the image for the reduced dynamic range of the printed image
final image sizingOnce your RGB image is prepped for CMYK separation you should to final image sizing Obviously if you do not know the exact final reproduction size you canrsquot do any final exacting resizing but you can make sure the image is in the correct resolution realm
The image size and resolution of the original scan Both the resolution and image size need to be corrected
PreparingImagesforDelivery 1
For this particular image scan itrsquos important to set the units to match the final usage In this case the scan was done at 1800 pixelsinch (ppi) while the dimensions were in centimeters Photoshop doesnrsquot particularly care what the units are you can change the ratio of the units and dimensions by deselecting Resample Image and changing the units of the image You donrsquot need to resample the image just change the units and dimension The actual pixel count remains the same However for page layout applications the dimensions and units do matter
The Resample Image option is deselected and the Resolution has been changed to 300 pixelsinch There is no resampling involved only the ratio of the pixel density has changed
Here the pixel dimensions have been changed to inches The image dimension of 1548rdquo x 1204rdquo is too large for the intended 85rdquo x 11rdquo paper If delivered at this dimension somebody down-stream will need to resample the image Also note that only images sized to their final dimen-sions can be accurately and properly sharpened for reproduction
The image size and resolution have been resampled for the final reproduction size
PreparingImagesforDelivery 1
The image has been set to the correct units and the resample option is selected The image will be sized correctly for 85rdquo x 11rdquo full-bleed reproduction (the outer dimensions have been set to 1125rdquo x 875rdquo to allow for a 18rdquo bleed) If the image were to be placed in an image box in a page layout application the image could have been sized to that of the image box But allowing for bleed is yet another small service that the photographer can provide setting the final image crop
Note For downsizing the Bicubic Sharper option improves resampling
Once set to the final image dimension you can use guides in Photoshop to double-check where the image will be cropped While these guides will not be used by a page layout application itrsquos still useful to indicate the guides in the event that somebody downstream opens the image in Photoshop Guides are saved in Photoshop files as metadata and can be preserved for later use
Use guides in Photoshop to double-check where the image will be cropped
Image sharpeningOnce an image is set to the final size and resolution one additional step is required for optimal reproductionmdashimage sharpening for output There is a lot of mystery surrounding image sharp-ening While Photoshop has many tools to apply sharpening routines knowing how to sharpen and by how much can be a problem since viewing an image on a computer display is a rather poor indicator of the requirements needed for halftone reproduction
There are some generalities Bruce Fraser co-author of Real World Photoshop has indicated that the required sharpening should produce an edge halo of between 150 ndash 1100 of an image The halo is an increase of the apparent edge contrast of an image At between 150 ndash 1100 of an image the halo should be invisible to the naked eye and yet produce a crisp edge in reproduction
PreparingImagesforDelivery 1
The other problem inherent with determining image sharpening is the fact that a computer display is a poor tool to evaluate image sharpening If you deliver an image whose pixel resolution is twice that of the halftone line screen ruling four image pixels will be dithered to produce one halftone dot However many ldquoexpertsrdquo tell people to view their images at a 100 zoom inside Photoshop to evaluate the effects of sharpening Yes you need to view your images at 100 or larger to see the actual effects of sharpening on the pixels yet the resulting image in Photoshop will be too large to evaluate the amount of sharpening required To more accurately predict the amount of sharpening required a more useful screen zoom of 50 will simulate the effect of the halftone screening At 50 four image pixels are dithered to produce one screen display pixel
An image without output sharpening When printed the image wonrsquot be crisp
The image above at a zoom of 50 has no additional output sharpening applied If delivered like this the resultant halftone reproduction will be less than crisp The dithering of the halftone dots will introduce a softening effect further softening the image So output sharpening needs to be applied even for what may appear in Photoshop to be a sharp image
PreparingImagesforDelivery 1
While the Unsharp Mask filter in Photoshop is a useful sharpening tool there is an alternative that provides a bit more control while reducing some of the undesirable artifacts of Unsharp Mask
Use the High Pass filter to sharpen an image
By duplicating the imagersquos background layer and setting the blending mode to Overlay you can use the High Pass filter (choose Filter gt Other gtHigh Pass)
The High Pass filter is rather hidden away under ldquoOtherrdquo in the Filter menu
PreparingImagesforDelivery 1
This High Pass filter produces an apparent edge enhancement based on a pixel radius that allows the Overlay blend mode to increase the light edge while darkening the dark edge of image edges Setting the radius to 3 for a 300ppi image will enhance the edge halo approximately 1100 of an inch which happens to match the recommendations of Bruce Fraser
The results of using High Pass on an overlay blend mode layer The image edges snap at 50 zoom
There are third-party solutions specially designed for doing image sharpening that can increase the accuracy and predictability of output sharpening Nik Sharpener Pro by Nik Software Inc and PhotoKit Sharpener by PixelGenius are two such products Bruce Fraser was the primary product designer of PhotoKit Shapener and for disclosure purposes I must also indicate my involvement with PixelGenius Both products are designed to provide optimal output sharpening
But the caveat again final output sharpening can only be done on images whose final reproduc-tion size has been set Any resizing on the part of a downstream process will reintroduce soften-ing and thus mitigate the output sharpening Resharpening an already sharpened image that has been resized is not optimal
PreparingImagesforDelivery 1
converting to cMYKOnce the image has been optimized for the reproduction process in terms of tone color resolu-tion and image sharpness the final processing step is to convert the RGB image to CMYK This step can be as simple as doing a mode change from RGB to CMYK (assuming your Photoshop Color Settings are properly set up) or can involve a Convert To Profile transform
This figure shows the Mode change to CMYK I prefer to use the Convert to Profile command
Changing the mode from RGB to CMYK (by choosing Edit gt Mode gt CMYK Color) results in an image conversion from RGB to CMYK based on the current color settings in Photoshop While fine to do it contains a slight risk that the color settings may not be exactly what you expect When there are multiple users of Photoshop or if you havenrsquot produced a CMYK separation recently using the Convert To Profile command in the Edit menu allows for total control and clarity in the settings
In the Convert To Profile dialog box you can confirm the source space the destination space and the parameters on which the conversion will take place
PreparingImagesforDelivery 0
In the Convert to Profile dialog you must set the correct options I suggest using the Adobe (Ace) CMM (left) and use the same rendering intent I used to soft proof (right)
In the Convert To Profile dialog box you can set the CMM transform engine as well as confirm the rendering intent In general with Photoshop CS or CS2 you can always be assured of getting proper results when selecting Use Black Compensation to map image black to output black Itrsquos also generally a good idea to flatten all adjustment layers during conversion since some adjust-ment layers either will not work on CMYK layered files or will produce different results than their RGB counterparts
Another point to note if you are working in 16-bit-per-channel depth is that you should not only flatten while in 16 bit to make sure your adjustments are being completed in 16 bit but also transform from RGB to CMYK while still in 16 bit to receive the benefit of the higher bit depth during conversion
The final CMYK-separated and optimized file
PreparingImagesforDelivery 1
What about providing RGb filesTo offer greater flexibility to your clients you can also consider providing RGB files in addition to the CMYK files yoursquove separated However providing RGB files can be a problem If yoursquove used a large color space such as ProPhoto RGB delivering your RGB file to somebody who is not well versed in color management can result in some pretty ugly interpretations of your image
An image in ProPhoto RGB (left) and a duplicate of the image with sRGB assigned as the embedded profile (right)
The improper use of Photoshop Color Settings and policies can result in a misunderstanding of the use of profiles If the client or printer did not honor the embedded profile and merely assumed the image to be in sRGB the resulting display would be less than desirable
So if you want to work with your originals in a large gamut color space and deliver files to your clients that run a lower risk of miscommunication of color what do you do Well I can only tell you what I do and suggest you test it yourself for your own work
I take the final CMYK file and reconvert it to RGB Why Once the filersquos colors have been reduced to the gamut of CMYK converting the file back to RGB will not do any additional harmmdashpar-ticularly if you are working in 16 bit But it will result in an RGB file that would be pretty hard to misinterpret
Using Convert to Profile you select the RGB color space you want to convert the CMYK file to Adobe RGB on the left or I suggest sRGB shown on the right
PreparingImagesforDelivery
You can either convert to Adobe RGB or sRGB The advantage of providing an sRGB version of the file is that in the event the usage of the image also includes the Web yoursquoll have an image converted from CMYK to sRGB so the web image will match the CMYK rendering of the file
To better illustrate the process of converting from ProPhoto RGB to SWOP CMYK and back to sRGB Irsquove done screen shots of both the color space gamuts as well as plotted actual colors of the images in a program called ColorThink by CHROMIX (wwwchromixcom)
The gamuts and image plots have been done by plotting in Lab coordinates and in 3D It should be noted that the best way to see color space gamuts and image plots is in motion ColorThink allows you rotate the graph to better evaluate the relationships between color spaces and image plots
The gamut map on the left is ProPhoto RGB In the middle is sRGB and on the right is SWOP as contained in the Photoshop CS2 CMYK profile named US Web Coated (SWOP) v2 Note the screen shots are to scale
The figures above show the relative size and volume of the three color spaces ProPhoto RGB is huge and SWOP is tiny The challenge is to get the colors of the image to look good in the color space of the final output
On the left is the original Colored Bottle image mapped into the ProPhoto RGB color space The dots represent actual color samples from the image On the right is the image mapped into the SWOP color space As you can see a lot of the colors in the image are well outside of the printable range of the CMYK press
PreparingImagesforDelivery
Somehow the colors of the image must be mapped into the color space of the output The method of either compression or clipping will be dictated by the process you use to make the color conversion In the preceding mode change and convert to profile examples I showed two methods using Color Range to desaturate the image and using soft proofing to adjust for the resulting color transform
But why go from a super-huge color space such as ProPhoto RGB to SWOP and then back to sRGB Itrsquos really a matter of exercising your color control over the way delivered files are prepared for reproduction By using your eyes to evaluate the way in which colors will be reproduced you are able to dictate how your images reproduce on paper
On the left the final CMYK image colors are shown mapped in the SWOP color space notice the colors are now within the gamut of CMYK On the right the image has been converted back to sRGB from CMYK All of the CMYK colors (with the possible exception of a tiny amount of cyan) will fit within the sRGB color space
Going from ProPhoto RGB to CMYK and then back to sRGB gives you the control over how the image colors will look not only in CMYK but also when you are delivering RGB images Since the converted sRGB image has already had its total volume of colors clamped to the gamut of CMYK there is less chance that somebody down the ldquoprepress roadrdquo from you will mess up the colors of the image
PreparingImagesforDelivery
The proofWhen supplying digital files itrsquos important to also provide an aim print or actual proof that confirms on paper what the image should look like when reproduced In the past Irsquove resorted to actually sending the CMYK file to a service bureau for expensive contract proofs While the result is an unequivocal proof of the CMYK file it can be both costly and time consuming If you have a quality ink jet printer and accurate profiles for the printer you can print out from Photoshop and produce a cross-rendered proof A cross-rendered proof is made by using both the original CMYK profile as well as the printer profile to render in the print the accurate results of proofing to the final output device Again this presupposes that you have an accurate display and printer profile and that you follow the cross-rendering recipe for printing from Photoshop
This figure shows the Photoshop Print dialog box with a preview of the image Irsquove selected Let Photoshop Determine Colors from the Color Handling pop-up menu and selected the correct printer profile
PreparingImagesforDelivery
In the Print dialog box in Photoshop yoursquoll need to alter the settings you may normally use Rather than setting the Print space to your RGB or CMYK space you use the Proof option instead Under Options choose Let Photoshop Determine Colors from the Color Handling pop-up menu and select your particular printerrsquos profile However selecting the proof option in print allows the use of the Proof Setup Preset (shown below) which if yoursquove saved your soft proofing setups makes doing cross-rendered proofs a bit more efficient
To produce a cross-rendered proof select the saved soft proof settings Here Irsquove selected the SWOP-V2-BW-Off proof setup
You will definitely want to select the Simulate Black Ink option Whether you select Simulate Paper Color depends on your intent for the resulting print If you merely want to provide an aim print you may choose not to use this option
To produce an accurate cross-rendered proof select the Simulate Paper Color and the Simulate Black Ink options
However if you wish to provide a very accurate cross-rendered proof that could act as a con-tract proof for color you should select Simulate Paper Color It should be noted that just as the on-screen results will show a marked reduction in dynamic range so will a cross-rendered proof with this option turned on When reviewing the final print the paper white of the actual CMYK output profile will produce a scum tone over the image This preview will be a rather accurate reproduction of the final printed piece but it wonrsquot look very good which is actually what you want in an accurate proof Photographers should really only concern themselves with proofing the image not the final design of the page layout Note that even a highly accurate cross-rendered proof from an inkjet will not show the results of the halftone screening process so only the color can essentially be proofed
PreparingImagesforDelivery
Here Irsquove set the media settings (left) and the Printer Color Management settings (right)
Marking your territoryBefore actually saving your files for client delivery there is one additional step that is important to fulfill properly marking your images with proper metadatamdashmarking your territory if you will Most professional photographers would never send film to their clients without some sort of identification and the importance of marking your images is no less in the digital age Arguably itrsquos even more important now
Enter metadata about your image in the File Info dialog box in Photoshop or Adobe Bridge
PreparingImagesforDelivery
In Photoshop (or Bridge) you should complete the relevant metadata fields in the File Info dialog box All editable fields that are useful for downstream organization and identification should be employed
The four main IPTC metadata panels
New to Photoshop CS2 are the XMP for IPTC panels for expanded metadata support Itrsquos relatively simple to complete all the general fields with standard information such as contact copyright status and usage and save the completed forms as a template that can be applied to all images destined for delivery to third parties Communicate with your clients to get all the necessary information There really is no excuse not to do this critical step in preparing files for delivery
file formats for deliverySo you are ready to save the files for delivery However you arenrsquot quite done yet in making some important decisions The choice of file format and the final image naming is still a critical step
When delivering files to clients itrsquos important to adhere to proper naming conventions When naming files itrsquos critical to stick to an alphanumeric series of letters and numbers and use only approved special characters such as underscores or dashes for spaces You should not use any of the special symbols such as $ ^ amp ( ) + in a file name Depending on the final output device and the operating system it runs under special symbols can lead to unpredictable results
PreparingImagesforDelivery
Additionally even though recent operating systems such as Mac OS X and Windows XP may allow extended characters in a file name there are enough systems in use in the industry that cannot understand long file names Therefore you should use only a safe length for Mac OS 31 characters plus a period separating the file name and extension or 11 characters plus period and extension for MS DOS machines
The file format you supply is also an important consideration
File format options in Photoshop
If you are supplying 16-bit-per-channel CMYK files there is only a single optimal file format to use TIFF
TIFF file options when working with a 16-bit-per-channel image
When selecting the format options for a TIFF file it should be noted that some output devices cannot handle TIFF files with any compression such as LZW or ZIP Also when delivering for clients itrsquos generally not a good idea to supply layered files Unless you can be assured that the client will treat the layered files properly flattening is always the safest option
PreparingImagesforDelivery
If you are supplying 8-bit-per-channel CMYK files the format options grow
By changing the bit depth to 8 BitsChannel (left) you can select more file formats for delivery (right)
Mode changing to 8 bits and saving as a CMYK file will offer a variety of additional file formats However unless you have instructions to the contrary the safest file format is still TIFF
The Save As dialog box with the Embed Color Profile option deselected
There is an additional consideration when saving files intended for CMYK reproduction Unless yoursquove had direct and successful communications with the prepress personnel saving a CMYK file with an embedded profile might not be such a good idea While saving RGB files with embedded profiles is pretty much a universal good idea to avoid ambiguous color in graphic arts and print-ing embedded profiles can sometimes lead to problems for both technical and political reasons
Until the political realities change and RIPs can be updated to ensure they wonrsquot choke on embedded profilesmdashthis is actually rare but can happenmdashI provide CMYK files with no profiles I do note in the accompanying Read Me text files an indication of how the files were prepared If I have been fortunate enough to be working with a color management savvy prepress supplier I would be happy to embed the profile in the CMYK filemdashideally the profile they supplied me But until color management gets wider adoption in the graphic arts itrsquos easier and safer to strip the CMYK profile
If you need to transmit files instead of delivering them on a CD or DVD you can use either a zipped TIFF file or use JPG compression for the final file delivery In either case the file should be opened by the recipient and resaved as a standard TIFF file for final use Saving a final CMYK file as a JPEG file with Maximum Quality will rarely if ever produce any visible changes to the file However your client should be warned not to open the file or make changes and resave the file while in the JPEG format Multiple resaving in JPEG format is to be avoided
PreparingImagesforDelivery 0
Also you should alert your client if you have chosen not to embed a profile in the CMYK file that opening the image in Photoshop might prompt a warning dialog box
Photoshop returns a warning dialog box when you open a file that doesnrsquot have an embedded profile
Depending on the color management settings in your clientrsquos Photoshop setup they may see a warning when they open a file without an embedded profile If so you can tell them to assign the profile yoursquove used to convert the filemdashif itrsquos a profile included in Photoshop that is a simple solution If yoursquove stripped the profile and used a custom CMYK profile you should consider supplying the profile separately on disk or in the file transmission
If you are asked to supply files that are sized For Position Only (FPO) yoursquoll need to make sure the final image dimensions match the final high-resolution files exactly Only the pixel resolution should be downsampled Be sure to save the FPO version with an unambiguous file name that relates but would not be confused with the high-resolution file
The Image Size dialog showing a reduced resolution version of the original CMYK file (left) and selecting Save As (right) In the FPO version be sure to give it a noticible designation
PreparingImagesforDelivery 1
While it may seem that nobody actually reads Read Me files it is still an important practice to provide documentation and identification of images delivered to clients If nothing else you can point to the text file they failed to read as explaining any miscommunication on their part
Itrsquos good practice to include a Read Me file when you deliver your images to your clients
Regardless of whether you are burning to disk or transmitting over the net itrsquos important to include an organized file folder structure to help avoid confusion I place files inside named fold-ers that help explain their contents and segregate high-resolution CMYK files from FPOs from RGB files Particularly if you are burning to CD or DVD itrsquos useful to export the browsed cache from Adobe Bridge to make browsing from the CD or DVD quicker
When delivering files it helps to put them in an organized file folder structure
abouT THe auTHoR
JeffScheweasummacumlaudegraduateofRochesterInstituteofTechnologyhasbeenanadvertisingphotographerinChicagoforover25yearsHehasbeendoingdigitalimagingforover14yearsandiswidelyknownandrespectedinthedigitalimagingcommunityasaleadingpioneerinthefieldJeffisafeatureconsultantandalphatesterforPhotoshop
foR MoRe InfoRMaTIon
ForacomprehensiveoverviewofPhotoshopCS2pleasevisitwwwadobecomproductsphotoshopmainhtml
Adobe Systems Incorporated345ParkAvenueSanJoseCA95110-2704USAwwwadobecom
AdobetheAdobelogoAcrobatIllustratorInDesignandPhotoshopareeitherregisteredtrademarksortrademarksofAdobeSystemsIncorporatedintheUnitedStatesandorothercountriesAllothertrademarksarethepropertyoftheirrespectiveowners
copy2006JeffScheweAllrightsreserved
My personal preference even if you supply files initially via transmission is to burn the delivered files to CD or DVD I do this for several reasons to give the client a tangible result from the project that they can store and to burn a read-only version of the final delivered files that cannot be altered If at some point something happens to the file (for example somebody changes it poorly) therersquos always the original starting point image burned into the disc that cannot be changed While it doesnrsquot happen often it has happened that somebody made a mistake downstream of my file delivery and itrsquos useful to be able to point to a version of a file that represents the state of the delivered image before any additional changes were made
checklist for file deliveryConfirm final file specifications and requirements
Open a secure line of communication with client and prepress provider
Confirm final reproduction process (SWOP or Sheet Fed)
Confirm final output color space ideally with printer-supplied ICC profile
Confirm delivery of RGB CMYK or RGB plus CMYK
Tone and color correct with soft proofing for the final output
Confirm final file size and resolution
Provide image sharpening for output
Provide aim print or proof print for color
Embed image metadata for identification
Confirm final delivery file format
Provide Read Me file with documentation file list and contact information
Organize and segregate file types separate high-resolution files FPO RGB and CMYK
Provide read-only final files on CD or DVD
additional resourcesDigital Image Submission Guidelines (DISC) wwwdisc-infoorg
Universal Photographic Digital Imaging Guidelines (UPDIG) wwwupdigorg
Real World Color Management by Bruce Fraser Chris Murphy and Fred Bunting Published by Peachpit Press ISBN 0321267222
Color Management for Photographers by Andrew Rodney Published by Focal Press ISBN 0-240-80649-2
PixelGenius by PhotoKit Sharpener wwwpixelgeniuscom
Nik Software by Nik Sharpener Pro wwwniksoftwarecom
bull
bull
bull
bull
bull
bull
bull
bull
bull
bull
bull
bull
bull
bull
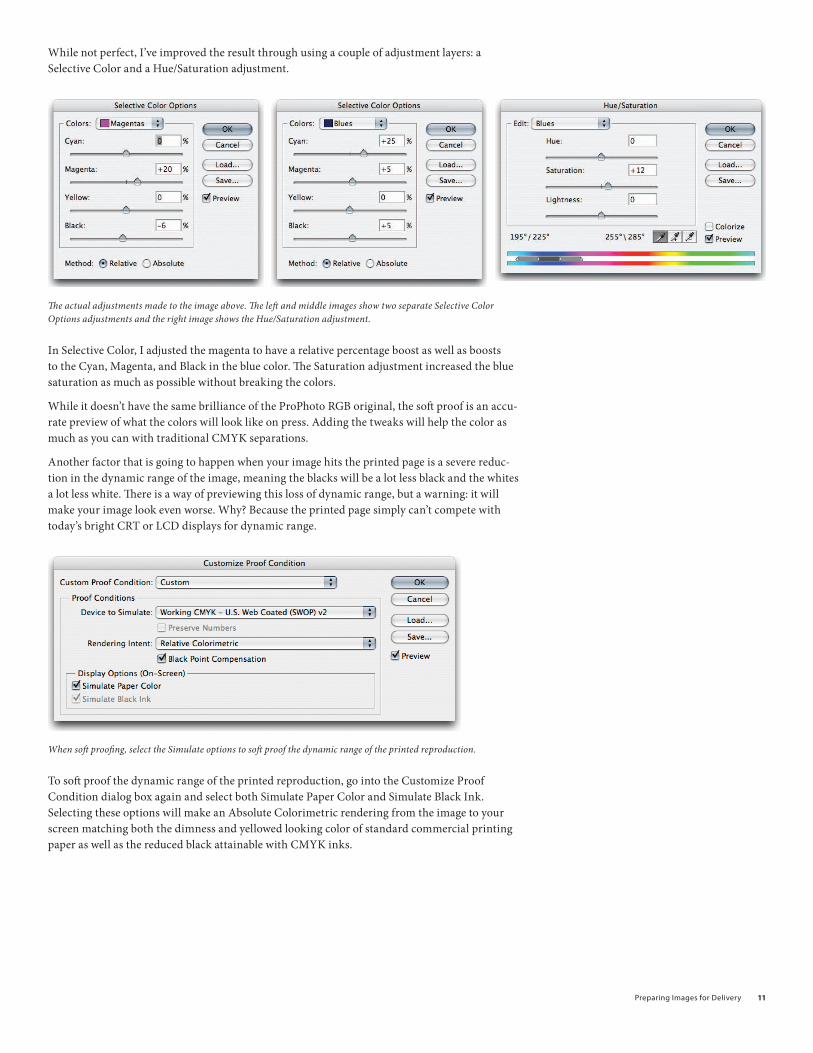

PreparingImagesforDelivery 1
A soft proof with Simulate Paper Color and Simulate Black Ink selected
Well I told you it would look bad And it does But the soft proof is pretty darn accurate in its prediction of what the image will look like reproduced on press Sad huh But thatrsquos life However it really wonrsquot look this bad Because the eye adapts to the whitest portion of your field of vision your eyes are not using the white of the paper as the identifier of the white point of a scene When looking at an actual printed piece the eye will identify the brightest and whitest portion of what you see as white and adjust all the other colors and luminosity accordingly So you need to eliminate as much white before your eyes as possible when soft proofing to adjust the effects of the reduction of dynamic range and the yellowing of the whites
By switching your viewing mode in Photoshop to full screen mode either with the dark gray or better yet the black canvas background you can cut down on the amount of the surrounding white elements on screen so the image will look a little less bad (but only a little)
Change the screen mode by using the toolbar or pressing the F key On the right the image is shown against a black background
PreparingImagesforDelivery 1
Often a slight tweak in the contrast of an image will help punch the image back toward the way it looked before the CMYK process soft proof made it look so bad
A Curve dialog showing a slight increase in contrast to adjust the image for the reduced dynamic range of the printed image
final image sizingOnce your RGB image is prepped for CMYK separation you should to final image sizing Obviously if you do not know the exact final reproduction size you canrsquot do any final exacting resizing but you can make sure the image is in the correct resolution realm
The image size and resolution of the original scan Both the resolution and image size need to be corrected
PreparingImagesforDelivery 1
For this particular image scan itrsquos important to set the units to match the final usage In this case the scan was done at 1800 pixelsinch (ppi) while the dimensions were in centimeters Photoshop doesnrsquot particularly care what the units are you can change the ratio of the units and dimensions by deselecting Resample Image and changing the units of the image You donrsquot need to resample the image just change the units and dimension The actual pixel count remains the same However for page layout applications the dimensions and units do matter
The Resample Image option is deselected and the Resolution has been changed to 300 pixelsinch There is no resampling involved only the ratio of the pixel density has changed
Here the pixel dimensions have been changed to inches The image dimension of 1548rdquo x 1204rdquo is too large for the intended 85rdquo x 11rdquo paper If delivered at this dimension somebody down-stream will need to resample the image Also note that only images sized to their final dimen-sions can be accurately and properly sharpened for reproduction
The image size and resolution have been resampled for the final reproduction size
PreparingImagesforDelivery 1
The image has been set to the correct units and the resample option is selected The image will be sized correctly for 85rdquo x 11rdquo full-bleed reproduction (the outer dimensions have been set to 1125rdquo x 875rdquo to allow for a 18rdquo bleed) If the image were to be placed in an image box in a page layout application the image could have been sized to that of the image box But allowing for bleed is yet another small service that the photographer can provide setting the final image crop
Note For downsizing the Bicubic Sharper option improves resampling
Once set to the final image dimension you can use guides in Photoshop to double-check where the image will be cropped While these guides will not be used by a page layout application itrsquos still useful to indicate the guides in the event that somebody downstream opens the image in Photoshop Guides are saved in Photoshop files as metadata and can be preserved for later use
Use guides in Photoshop to double-check where the image will be cropped
Image sharpeningOnce an image is set to the final size and resolution one additional step is required for optimal reproductionmdashimage sharpening for output There is a lot of mystery surrounding image sharp-ening While Photoshop has many tools to apply sharpening routines knowing how to sharpen and by how much can be a problem since viewing an image on a computer display is a rather poor indicator of the requirements needed for halftone reproduction
There are some generalities Bruce Fraser co-author of Real World Photoshop has indicated that the required sharpening should produce an edge halo of between 150 ndash 1100 of an image The halo is an increase of the apparent edge contrast of an image At between 150 ndash 1100 of an image the halo should be invisible to the naked eye and yet produce a crisp edge in reproduction
PreparingImagesforDelivery 1
The other problem inherent with determining image sharpening is the fact that a computer display is a poor tool to evaluate image sharpening If you deliver an image whose pixel resolution is twice that of the halftone line screen ruling four image pixels will be dithered to produce one halftone dot However many ldquoexpertsrdquo tell people to view their images at a 100 zoom inside Photoshop to evaluate the effects of sharpening Yes you need to view your images at 100 or larger to see the actual effects of sharpening on the pixels yet the resulting image in Photoshop will be too large to evaluate the amount of sharpening required To more accurately predict the amount of sharpening required a more useful screen zoom of 50 will simulate the effect of the halftone screening At 50 four image pixels are dithered to produce one screen display pixel
An image without output sharpening When printed the image wonrsquot be crisp
The image above at a zoom of 50 has no additional output sharpening applied If delivered like this the resultant halftone reproduction will be less than crisp The dithering of the halftone dots will introduce a softening effect further softening the image So output sharpening needs to be applied even for what may appear in Photoshop to be a sharp image
PreparingImagesforDelivery 1
While the Unsharp Mask filter in Photoshop is a useful sharpening tool there is an alternative that provides a bit more control while reducing some of the undesirable artifacts of Unsharp Mask
Use the High Pass filter to sharpen an image
By duplicating the imagersquos background layer and setting the blending mode to Overlay you can use the High Pass filter (choose Filter gt Other gtHigh Pass)
The High Pass filter is rather hidden away under ldquoOtherrdquo in the Filter menu
PreparingImagesforDelivery 1
This High Pass filter produces an apparent edge enhancement based on a pixel radius that allows the Overlay blend mode to increase the light edge while darkening the dark edge of image edges Setting the radius to 3 for a 300ppi image will enhance the edge halo approximately 1100 of an inch which happens to match the recommendations of Bruce Fraser
The results of using High Pass on an overlay blend mode layer The image edges snap at 50 zoom
There are third-party solutions specially designed for doing image sharpening that can increase the accuracy and predictability of output sharpening Nik Sharpener Pro by Nik Software Inc and PhotoKit Sharpener by PixelGenius are two such products Bruce Fraser was the primary product designer of PhotoKit Shapener and for disclosure purposes I must also indicate my involvement with PixelGenius Both products are designed to provide optimal output sharpening
But the caveat again final output sharpening can only be done on images whose final reproduc-tion size has been set Any resizing on the part of a downstream process will reintroduce soften-ing and thus mitigate the output sharpening Resharpening an already sharpened image that has been resized is not optimal
PreparingImagesforDelivery 1
converting to cMYKOnce the image has been optimized for the reproduction process in terms of tone color resolu-tion and image sharpness the final processing step is to convert the RGB image to CMYK This step can be as simple as doing a mode change from RGB to CMYK (assuming your Photoshop Color Settings are properly set up) or can involve a Convert To Profile transform
This figure shows the Mode change to CMYK I prefer to use the Convert to Profile command
Changing the mode from RGB to CMYK (by choosing Edit gt Mode gt CMYK Color) results in an image conversion from RGB to CMYK based on the current color settings in Photoshop While fine to do it contains a slight risk that the color settings may not be exactly what you expect When there are multiple users of Photoshop or if you havenrsquot produced a CMYK separation recently using the Convert To Profile command in the Edit menu allows for total control and clarity in the settings
In the Convert To Profile dialog box you can confirm the source space the destination space and the parameters on which the conversion will take place
PreparingImagesforDelivery 0
In the Convert to Profile dialog you must set the correct options I suggest using the Adobe (Ace) CMM (left) and use the same rendering intent I used to soft proof (right)
In the Convert To Profile dialog box you can set the CMM transform engine as well as confirm the rendering intent In general with Photoshop CS or CS2 you can always be assured of getting proper results when selecting Use Black Compensation to map image black to output black Itrsquos also generally a good idea to flatten all adjustment layers during conversion since some adjust-ment layers either will not work on CMYK layered files or will produce different results than their RGB counterparts
Another point to note if you are working in 16-bit-per-channel depth is that you should not only flatten while in 16 bit to make sure your adjustments are being completed in 16 bit but also transform from RGB to CMYK while still in 16 bit to receive the benefit of the higher bit depth during conversion
The final CMYK-separated and optimized file
PreparingImagesforDelivery 1
What about providing RGb filesTo offer greater flexibility to your clients you can also consider providing RGB files in addition to the CMYK files yoursquove separated However providing RGB files can be a problem If yoursquove used a large color space such as ProPhoto RGB delivering your RGB file to somebody who is not well versed in color management can result in some pretty ugly interpretations of your image
An image in ProPhoto RGB (left) and a duplicate of the image with sRGB assigned as the embedded profile (right)
The improper use of Photoshop Color Settings and policies can result in a misunderstanding of the use of profiles If the client or printer did not honor the embedded profile and merely assumed the image to be in sRGB the resulting display would be less than desirable
So if you want to work with your originals in a large gamut color space and deliver files to your clients that run a lower risk of miscommunication of color what do you do Well I can only tell you what I do and suggest you test it yourself for your own work
I take the final CMYK file and reconvert it to RGB Why Once the filersquos colors have been reduced to the gamut of CMYK converting the file back to RGB will not do any additional harmmdashpar-ticularly if you are working in 16 bit But it will result in an RGB file that would be pretty hard to misinterpret
Using Convert to Profile you select the RGB color space you want to convert the CMYK file to Adobe RGB on the left or I suggest sRGB shown on the right
PreparingImagesforDelivery
You can either convert to Adobe RGB or sRGB The advantage of providing an sRGB version of the file is that in the event the usage of the image also includes the Web yoursquoll have an image converted from CMYK to sRGB so the web image will match the CMYK rendering of the file
To better illustrate the process of converting from ProPhoto RGB to SWOP CMYK and back to sRGB Irsquove done screen shots of both the color space gamuts as well as plotted actual colors of the images in a program called ColorThink by CHROMIX (wwwchromixcom)
The gamuts and image plots have been done by plotting in Lab coordinates and in 3D It should be noted that the best way to see color space gamuts and image plots is in motion ColorThink allows you rotate the graph to better evaluate the relationships between color spaces and image plots
The gamut map on the left is ProPhoto RGB In the middle is sRGB and on the right is SWOP as contained in the Photoshop CS2 CMYK profile named US Web Coated (SWOP) v2 Note the screen shots are to scale
The figures above show the relative size and volume of the three color spaces ProPhoto RGB is huge and SWOP is tiny The challenge is to get the colors of the image to look good in the color space of the final output
On the left is the original Colored Bottle image mapped into the ProPhoto RGB color space The dots represent actual color samples from the image On the right is the image mapped into the SWOP color space As you can see a lot of the colors in the image are well outside of the printable range of the CMYK press
PreparingImagesforDelivery
Somehow the colors of the image must be mapped into the color space of the output The method of either compression or clipping will be dictated by the process you use to make the color conversion In the preceding mode change and convert to profile examples I showed two methods using Color Range to desaturate the image and using soft proofing to adjust for the resulting color transform
But why go from a super-huge color space such as ProPhoto RGB to SWOP and then back to sRGB Itrsquos really a matter of exercising your color control over the way delivered files are prepared for reproduction By using your eyes to evaluate the way in which colors will be reproduced you are able to dictate how your images reproduce on paper
On the left the final CMYK image colors are shown mapped in the SWOP color space notice the colors are now within the gamut of CMYK On the right the image has been converted back to sRGB from CMYK All of the CMYK colors (with the possible exception of a tiny amount of cyan) will fit within the sRGB color space
Going from ProPhoto RGB to CMYK and then back to sRGB gives you the control over how the image colors will look not only in CMYK but also when you are delivering RGB images Since the converted sRGB image has already had its total volume of colors clamped to the gamut of CMYK there is less chance that somebody down the ldquoprepress roadrdquo from you will mess up the colors of the image
PreparingImagesforDelivery
The proofWhen supplying digital files itrsquos important to also provide an aim print or actual proof that confirms on paper what the image should look like when reproduced In the past Irsquove resorted to actually sending the CMYK file to a service bureau for expensive contract proofs While the result is an unequivocal proof of the CMYK file it can be both costly and time consuming If you have a quality ink jet printer and accurate profiles for the printer you can print out from Photoshop and produce a cross-rendered proof A cross-rendered proof is made by using both the original CMYK profile as well as the printer profile to render in the print the accurate results of proofing to the final output device Again this presupposes that you have an accurate display and printer profile and that you follow the cross-rendering recipe for printing from Photoshop
This figure shows the Photoshop Print dialog box with a preview of the image Irsquove selected Let Photoshop Determine Colors from the Color Handling pop-up menu and selected the correct printer profile
PreparingImagesforDelivery
In the Print dialog box in Photoshop yoursquoll need to alter the settings you may normally use Rather than setting the Print space to your RGB or CMYK space you use the Proof option instead Under Options choose Let Photoshop Determine Colors from the Color Handling pop-up menu and select your particular printerrsquos profile However selecting the proof option in print allows the use of the Proof Setup Preset (shown below) which if yoursquove saved your soft proofing setups makes doing cross-rendered proofs a bit more efficient
To produce a cross-rendered proof select the saved soft proof settings Here Irsquove selected the SWOP-V2-BW-Off proof setup
You will definitely want to select the Simulate Black Ink option Whether you select Simulate Paper Color depends on your intent for the resulting print If you merely want to provide an aim print you may choose not to use this option
To produce an accurate cross-rendered proof select the Simulate Paper Color and the Simulate Black Ink options
However if you wish to provide a very accurate cross-rendered proof that could act as a con-tract proof for color you should select Simulate Paper Color It should be noted that just as the on-screen results will show a marked reduction in dynamic range so will a cross-rendered proof with this option turned on When reviewing the final print the paper white of the actual CMYK output profile will produce a scum tone over the image This preview will be a rather accurate reproduction of the final printed piece but it wonrsquot look very good which is actually what you want in an accurate proof Photographers should really only concern themselves with proofing the image not the final design of the page layout Note that even a highly accurate cross-rendered proof from an inkjet will not show the results of the halftone screening process so only the color can essentially be proofed
PreparingImagesforDelivery
Here Irsquove set the media settings (left) and the Printer Color Management settings (right)
Marking your territoryBefore actually saving your files for client delivery there is one additional step that is important to fulfill properly marking your images with proper metadatamdashmarking your territory if you will Most professional photographers would never send film to their clients without some sort of identification and the importance of marking your images is no less in the digital age Arguably itrsquos even more important now
Enter metadata about your image in the File Info dialog box in Photoshop or Adobe Bridge
PreparingImagesforDelivery
In Photoshop (or Bridge) you should complete the relevant metadata fields in the File Info dialog box All editable fields that are useful for downstream organization and identification should be employed
The four main IPTC metadata panels
New to Photoshop CS2 are the XMP for IPTC panels for expanded metadata support Itrsquos relatively simple to complete all the general fields with standard information such as contact copyright status and usage and save the completed forms as a template that can be applied to all images destined for delivery to third parties Communicate with your clients to get all the necessary information There really is no excuse not to do this critical step in preparing files for delivery
file formats for deliverySo you are ready to save the files for delivery However you arenrsquot quite done yet in making some important decisions The choice of file format and the final image naming is still a critical step
When delivering files to clients itrsquos important to adhere to proper naming conventions When naming files itrsquos critical to stick to an alphanumeric series of letters and numbers and use only approved special characters such as underscores or dashes for spaces You should not use any of the special symbols such as $ ^ amp ( ) + in a file name Depending on the final output device and the operating system it runs under special symbols can lead to unpredictable results
PreparingImagesforDelivery
Additionally even though recent operating systems such as Mac OS X and Windows XP may allow extended characters in a file name there are enough systems in use in the industry that cannot understand long file names Therefore you should use only a safe length for Mac OS 31 characters plus a period separating the file name and extension or 11 characters plus period and extension for MS DOS machines
The file format you supply is also an important consideration
File format options in Photoshop
If you are supplying 16-bit-per-channel CMYK files there is only a single optimal file format to use TIFF
TIFF file options when working with a 16-bit-per-channel image
When selecting the format options for a TIFF file it should be noted that some output devices cannot handle TIFF files with any compression such as LZW or ZIP Also when delivering for clients itrsquos generally not a good idea to supply layered files Unless you can be assured that the client will treat the layered files properly flattening is always the safest option
PreparingImagesforDelivery
If you are supplying 8-bit-per-channel CMYK files the format options grow
By changing the bit depth to 8 BitsChannel (left) you can select more file formats for delivery (right)
Mode changing to 8 bits and saving as a CMYK file will offer a variety of additional file formats However unless you have instructions to the contrary the safest file format is still TIFF
The Save As dialog box with the Embed Color Profile option deselected
There is an additional consideration when saving files intended for CMYK reproduction Unless yoursquove had direct and successful communications with the prepress personnel saving a CMYK file with an embedded profile might not be such a good idea While saving RGB files with embedded profiles is pretty much a universal good idea to avoid ambiguous color in graphic arts and print-ing embedded profiles can sometimes lead to problems for both technical and political reasons
Until the political realities change and RIPs can be updated to ensure they wonrsquot choke on embedded profilesmdashthis is actually rare but can happenmdashI provide CMYK files with no profiles I do note in the accompanying Read Me text files an indication of how the files were prepared If I have been fortunate enough to be working with a color management savvy prepress supplier I would be happy to embed the profile in the CMYK filemdashideally the profile they supplied me But until color management gets wider adoption in the graphic arts itrsquos easier and safer to strip the CMYK profile
If you need to transmit files instead of delivering them on a CD or DVD you can use either a zipped TIFF file or use JPG compression for the final file delivery In either case the file should be opened by the recipient and resaved as a standard TIFF file for final use Saving a final CMYK file as a JPEG file with Maximum Quality will rarely if ever produce any visible changes to the file However your client should be warned not to open the file or make changes and resave the file while in the JPEG format Multiple resaving in JPEG format is to be avoided
PreparingImagesforDelivery 0
Also you should alert your client if you have chosen not to embed a profile in the CMYK file that opening the image in Photoshop might prompt a warning dialog box
Photoshop returns a warning dialog box when you open a file that doesnrsquot have an embedded profile
Depending on the color management settings in your clientrsquos Photoshop setup they may see a warning when they open a file without an embedded profile If so you can tell them to assign the profile yoursquove used to convert the filemdashif itrsquos a profile included in Photoshop that is a simple solution If yoursquove stripped the profile and used a custom CMYK profile you should consider supplying the profile separately on disk or in the file transmission
If you are asked to supply files that are sized For Position Only (FPO) yoursquoll need to make sure the final image dimensions match the final high-resolution files exactly Only the pixel resolution should be downsampled Be sure to save the FPO version with an unambiguous file name that relates but would not be confused with the high-resolution file
The Image Size dialog showing a reduced resolution version of the original CMYK file (left) and selecting Save As (right) In the FPO version be sure to give it a noticible designation
PreparingImagesforDelivery 1
While it may seem that nobody actually reads Read Me files it is still an important practice to provide documentation and identification of images delivered to clients If nothing else you can point to the text file they failed to read as explaining any miscommunication on their part
Itrsquos good practice to include a Read Me file when you deliver your images to your clients
Regardless of whether you are burning to disk or transmitting over the net itrsquos important to include an organized file folder structure to help avoid confusion I place files inside named fold-ers that help explain their contents and segregate high-resolution CMYK files from FPOs from RGB files Particularly if you are burning to CD or DVD itrsquos useful to export the browsed cache from Adobe Bridge to make browsing from the CD or DVD quicker
When delivering files it helps to put them in an organized file folder structure
abouT THe auTHoR
JeffScheweasummacumlaudegraduateofRochesterInstituteofTechnologyhasbeenanadvertisingphotographerinChicagoforover25yearsHehasbeendoingdigitalimagingforover14yearsandiswidelyknownandrespectedinthedigitalimagingcommunityasaleadingpioneerinthefieldJeffisafeatureconsultantandalphatesterforPhotoshop
foR MoRe InfoRMaTIon
ForacomprehensiveoverviewofPhotoshopCS2pleasevisitwwwadobecomproductsphotoshopmainhtml
Adobe Systems Incorporated345ParkAvenueSanJoseCA95110-2704USAwwwadobecom
AdobetheAdobelogoAcrobatIllustratorInDesignandPhotoshopareeitherregisteredtrademarksortrademarksofAdobeSystemsIncorporatedintheUnitedStatesandorothercountriesAllothertrademarksarethepropertyoftheirrespectiveowners
copy2006JeffScheweAllrightsreserved
My personal preference even if you supply files initially via transmission is to burn the delivered files to CD or DVD I do this for several reasons to give the client a tangible result from the project that they can store and to burn a read-only version of the final delivered files that cannot be altered If at some point something happens to the file (for example somebody changes it poorly) therersquos always the original starting point image burned into the disc that cannot be changed While it doesnrsquot happen often it has happened that somebody made a mistake downstream of my file delivery and itrsquos useful to be able to point to a version of a file that represents the state of the delivered image before any additional changes were made
checklist for file deliveryConfirm final file specifications and requirements
Open a secure line of communication with client and prepress provider
Confirm final reproduction process (SWOP or Sheet Fed)
Confirm final output color space ideally with printer-supplied ICC profile
Confirm delivery of RGB CMYK or RGB plus CMYK
Tone and color correct with soft proofing for the final output
Confirm final file size and resolution
Provide image sharpening for output
Provide aim print or proof print for color
Embed image metadata for identification
Confirm final delivery file format
Provide Read Me file with documentation file list and contact information
Organize and segregate file types separate high-resolution files FPO RGB and CMYK
Provide read-only final files on CD or DVD
additional resourcesDigital Image Submission Guidelines (DISC) wwwdisc-infoorg
Universal Photographic Digital Imaging Guidelines (UPDIG) wwwupdigorg
Real World Color Management by Bruce Fraser Chris Murphy and Fred Bunting Published by Peachpit Press ISBN 0321267222
Color Management for Photographers by Andrew Rodney Published by Focal Press ISBN 0-240-80649-2
PixelGenius by PhotoKit Sharpener wwwpixelgeniuscom
Nik Software by Nik Sharpener Pro wwwniksoftwarecom
bull
bull
bull
bull
bull
bull
bull
bull
bull
bull
bull
bull
bull
bull
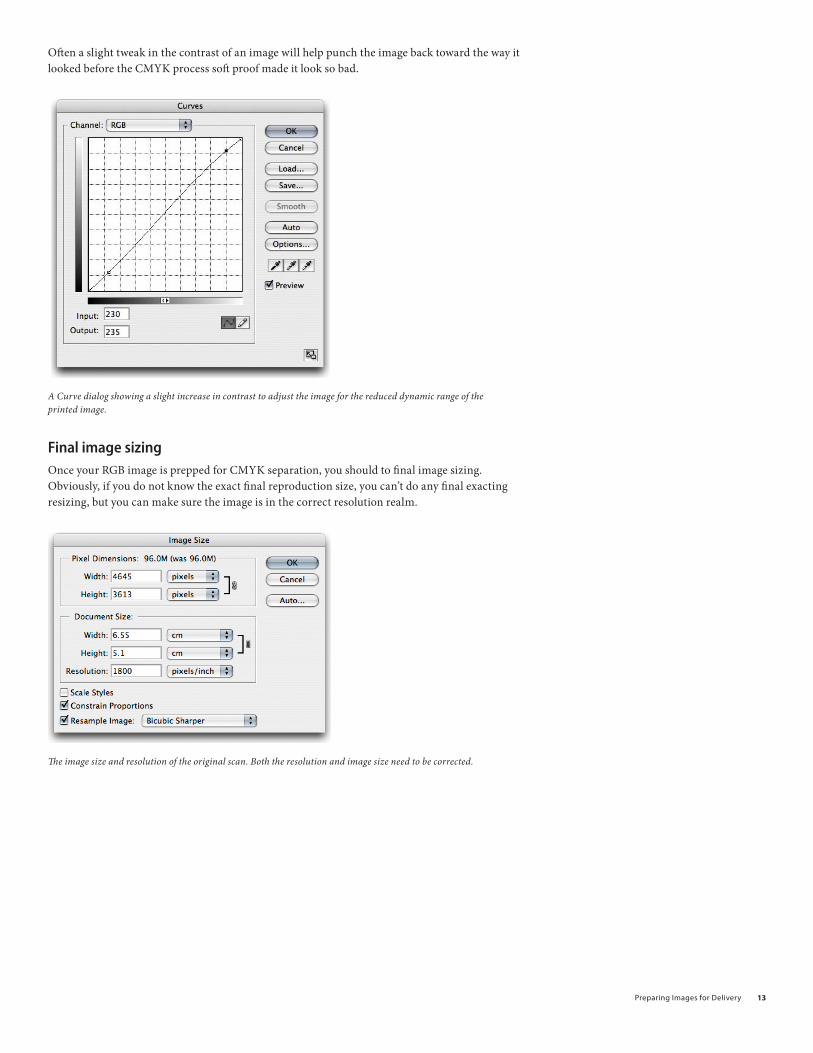
PreparingImagesforDelivery 1
For this particular image scan itrsquos important to set the units to match the final usage In this case the scan was done at 1800 pixelsinch (ppi) while the dimensions were in centimeters Photoshop doesnrsquot particularly care what the units are you can change the ratio of the units and dimensions by deselecting Resample Image and changing the units of the image You donrsquot need to resample the image just change the units and dimension The actual pixel count remains the same However for page layout applications the dimensions and units do matter
The Resample Image option is deselected and the Resolution has been changed to 300 pixelsinch There is no resampling involved only the ratio of the pixel density has changed
Here the pixel dimensions have been changed to inches The image dimension of 1548rdquo x 1204rdquo is too large for the intended 85rdquo x 11rdquo paper If delivered at this dimension somebody down-stream will need to resample the image Also note that only images sized to their final dimen-sions can be accurately and properly sharpened for reproduction
The image size and resolution have been resampled for the final reproduction size
PreparingImagesforDelivery 1
The image has been set to the correct units and the resample option is selected The image will be sized correctly for 85rdquo x 11rdquo full-bleed reproduction (the outer dimensions have been set to 1125rdquo x 875rdquo to allow for a 18rdquo bleed) If the image were to be placed in an image box in a page layout application the image could have been sized to that of the image box But allowing for bleed is yet another small service that the photographer can provide setting the final image crop
Note For downsizing the Bicubic Sharper option improves resampling
Once set to the final image dimension you can use guides in Photoshop to double-check where the image will be cropped While these guides will not be used by a page layout application itrsquos still useful to indicate the guides in the event that somebody downstream opens the image in Photoshop Guides are saved in Photoshop files as metadata and can be preserved for later use
Use guides in Photoshop to double-check where the image will be cropped
Image sharpeningOnce an image is set to the final size and resolution one additional step is required for optimal reproductionmdashimage sharpening for output There is a lot of mystery surrounding image sharp-ening While Photoshop has many tools to apply sharpening routines knowing how to sharpen and by how much can be a problem since viewing an image on a computer display is a rather poor indicator of the requirements needed for halftone reproduction
There are some generalities Bruce Fraser co-author of Real World Photoshop has indicated that the required sharpening should produce an edge halo of between 150 ndash 1100 of an image The halo is an increase of the apparent edge contrast of an image At between 150 ndash 1100 of an image the halo should be invisible to the naked eye and yet produce a crisp edge in reproduction
PreparingImagesforDelivery 1
The other problem inherent with determining image sharpening is the fact that a computer display is a poor tool to evaluate image sharpening If you deliver an image whose pixel resolution is twice that of the halftone line screen ruling four image pixels will be dithered to produce one halftone dot However many ldquoexpertsrdquo tell people to view their images at a 100 zoom inside Photoshop to evaluate the effects of sharpening Yes you need to view your images at 100 or larger to see the actual effects of sharpening on the pixels yet the resulting image in Photoshop will be too large to evaluate the amount of sharpening required To more accurately predict the amount of sharpening required a more useful screen zoom of 50 will simulate the effect of the halftone screening At 50 four image pixels are dithered to produce one screen display pixel
An image without output sharpening When printed the image wonrsquot be crisp
The image above at a zoom of 50 has no additional output sharpening applied If delivered like this the resultant halftone reproduction will be less than crisp The dithering of the halftone dots will introduce a softening effect further softening the image So output sharpening needs to be applied even for what may appear in Photoshop to be a sharp image
PreparingImagesforDelivery 1
While the Unsharp Mask filter in Photoshop is a useful sharpening tool there is an alternative that provides a bit more control while reducing some of the undesirable artifacts of Unsharp Mask
Use the High Pass filter to sharpen an image
By duplicating the imagersquos background layer and setting the blending mode to Overlay you can use the High Pass filter (choose Filter gt Other gtHigh Pass)
The High Pass filter is rather hidden away under ldquoOtherrdquo in the Filter menu
PreparingImagesforDelivery 1
This High Pass filter produces an apparent edge enhancement based on a pixel radius that allows the Overlay blend mode to increase the light edge while darkening the dark edge of image edges Setting the radius to 3 for a 300ppi image will enhance the edge halo approximately 1100 of an inch which happens to match the recommendations of Bruce Fraser
The results of using High Pass on an overlay blend mode layer The image edges snap at 50 zoom
There are third-party solutions specially designed for doing image sharpening that can increase the accuracy and predictability of output sharpening Nik Sharpener Pro by Nik Software Inc and PhotoKit Sharpener by PixelGenius are two such products Bruce Fraser was the primary product designer of PhotoKit Shapener and for disclosure purposes I must also indicate my involvement with PixelGenius Both products are designed to provide optimal output sharpening
But the caveat again final output sharpening can only be done on images whose final reproduc-tion size has been set Any resizing on the part of a downstream process will reintroduce soften-ing and thus mitigate the output sharpening Resharpening an already sharpened image that has been resized is not optimal
PreparingImagesforDelivery 1
converting to cMYKOnce the image has been optimized for the reproduction process in terms of tone color resolu-tion and image sharpness the final processing step is to convert the RGB image to CMYK This step can be as simple as doing a mode change from RGB to CMYK (assuming your Photoshop Color Settings are properly set up) or can involve a Convert To Profile transform
This figure shows the Mode change to CMYK I prefer to use the Convert to Profile command
Changing the mode from RGB to CMYK (by choosing Edit gt Mode gt CMYK Color) results in an image conversion from RGB to CMYK based on the current color settings in Photoshop While fine to do it contains a slight risk that the color settings may not be exactly what you expect When there are multiple users of Photoshop or if you havenrsquot produced a CMYK separation recently using the Convert To Profile command in the Edit menu allows for total control and clarity in the settings
In the Convert To Profile dialog box you can confirm the source space the destination space and the parameters on which the conversion will take place
PreparingImagesforDelivery 0
In the Convert to Profile dialog you must set the correct options I suggest using the Adobe (Ace) CMM (left) and use the same rendering intent I used to soft proof (right)
In the Convert To Profile dialog box you can set the CMM transform engine as well as confirm the rendering intent In general with Photoshop CS or CS2 you can always be assured of getting proper results when selecting Use Black Compensation to map image black to output black Itrsquos also generally a good idea to flatten all adjustment layers during conversion since some adjust-ment layers either will not work on CMYK layered files or will produce different results than their RGB counterparts
Another point to note if you are working in 16-bit-per-channel depth is that you should not only flatten while in 16 bit to make sure your adjustments are being completed in 16 bit but also transform from RGB to CMYK while still in 16 bit to receive the benefit of the higher bit depth during conversion
The final CMYK-separated and optimized file
PreparingImagesforDelivery 1
What about providing RGb filesTo offer greater flexibility to your clients you can also consider providing RGB files in addition to the CMYK files yoursquove separated However providing RGB files can be a problem If yoursquove used a large color space such as ProPhoto RGB delivering your RGB file to somebody who is not well versed in color management can result in some pretty ugly interpretations of your image
An image in ProPhoto RGB (left) and a duplicate of the image with sRGB assigned as the embedded profile (right)
The improper use of Photoshop Color Settings and policies can result in a misunderstanding of the use of profiles If the client or printer did not honor the embedded profile and merely assumed the image to be in sRGB the resulting display would be less than desirable
So if you want to work with your originals in a large gamut color space and deliver files to your clients that run a lower risk of miscommunication of color what do you do Well I can only tell you what I do and suggest you test it yourself for your own work
I take the final CMYK file and reconvert it to RGB Why Once the filersquos colors have been reduced to the gamut of CMYK converting the file back to RGB will not do any additional harmmdashpar-ticularly if you are working in 16 bit But it will result in an RGB file that would be pretty hard to misinterpret
Using Convert to Profile you select the RGB color space you want to convert the CMYK file to Adobe RGB on the left or I suggest sRGB shown on the right
PreparingImagesforDelivery
You can either convert to Adobe RGB or sRGB The advantage of providing an sRGB version of the file is that in the event the usage of the image also includes the Web yoursquoll have an image converted from CMYK to sRGB so the web image will match the CMYK rendering of the file
To better illustrate the process of converting from ProPhoto RGB to SWOP CMYK and back to sRGB Irsquove done screen shots of both the color space gamuts as well as plotted actual colors of the images in a program called ColorThink by CHROMIX (wwwchromixcom)
The gamuts and image plots have been done by plotting in Lab coordinates and in 3D It should be noted that the best way to see color space gamuts and image plots is in motion ColorThink allows you rotate the graph to better evaluate the relationships between color spaces and image plots
The gamut map on the left is ProPhoto RGB In the middle is sRGB and on the right is SWOP as contained in the Photoshop CS2 CMYK profile named US Web Coated (SWOP) v2 Note the screen shots are to scale
The figures above show the relative size and volume of the three color spaces ProPhoto RGB is huge and SWOP is tiny The challenge is to get the colors of the image to look good in the color space of the final output
On the left is the original Colored Bottle image mapped into the ProPhoto RGB color space The dots represent actual color samples from the image On the right is the image mapped into the SWOP color space As you can see a lot of the colors in the image are well outside of the printable range of the CMYK press
PreparingImagesforDelivery
Somehow the colors of the image must be mapped into the color space of the output The method of either compression or clipping will be dictated by the process you use to make the color conversion In the preceding mode change and convert to profile examples I showed two methods using Color Range to desaturate the image and using soft proofing to adjust for the resulting color transform
But why go from a super-huge color space such as ProPhoto RGB to SWOP and then back to sRGB Itrsquos really a matter of exercising your color control over the way delivered files are prepared for reproduction By using your eyes to evaluate the way in which colors will be reproduced you are able to dictate how your images reproduce on paper
On the left the final CMYK image colors are shown mapped in the SWOP color space notice the colors are now within the gamut of CMYK On the right the image has been converted back to sRGB from CMYK All of the CMYK colors (with the possible exception of a tiny amount of cyan) will fit within the sRGB color space
Going from ProPhoto RGB to CMYK and then back to sRGB gives you the control over how the image colors will look not only in CMYK but also when you are delivering RGB images Since the converted sRGB image has already had its total volume of colors clamped to the gamut of CMYK there is less chance that somebody down the ldquoprepress roadrdquo from you will mess up the colors of the image
PreparingImagesforDelivery
The proofWhen supplying digital files itrsquos important to also provide an aim print or actual proof that confirms on paper what the image should look like when reproduced In the past Irsquove resorted to actually sending the CMYK file to a service bureau for expensive contract proofs While the result is an unequivocal proof of the CMYK file it can be both costly and time consuming If you have a quality ink jet printer and accurate profiles for the printer you can print out from Photoshop and produce a cross-rendered proof A cross-rendered proof is made by using both the original CMYK profile as well as the printer profile to render in the print the accurate results of proofing to the final output device Again this presupposes that you have an accurate display and printer profile and that you follow the cross-rendering recipe for printing from Photoshop
This figure shows the Photoshop Print dialog box with a preview of the image Irsquove selected Let Photoshop Determine Colors from the Color Handling pop-up menu and selected the correct printer profile
PreparingImagesforDelivery
In the Print dialog box in Photoshop yoursquoll need to alter the settings you may normally use Rather than setting the Print space to your RGB or CMYK space you use the Proof option instead Under Options choose Let Photoshop Determine Colors from the Color Handling pop-up menu and select your particular printerrsquos profile However selecting the proof option in print allows the use of the Proof Setup Preset (shown below) which if yoursquove saved your soft proofing setups makes doing cross-rendered proofs a bit more efficient
To produce a cross-rendered proof select the saved soft proof settings Here Irsquove selected the SWOP-V2-BW-Off proof setup
You will definitely want to select the Simulate Black Ink option Whether you select Simulate Paper Color depends on your intent for the resulting print If you merely want to provide an aim print you may choose not to use this option
To produce an accurate cross-rendered proof select the Simulate Paper Color and the Simulate Black Ink options
However if you wish to provide a very accurate cross-rendered proof that could act as a con-tract proof for color you should select Simulate Paper Color It should be noted that just as the on-screen results will show a marked reduction in dynamic range so will a cross-rendered proof with this option turned on When reviewing the final print the paper white of the actual CMYK output profile will produce a scum tone over the image This preview will be a rather accurate reproduction of the final printed piece but it wonrsquot look very good which is actually what you want in an accurate proof Photographers should really only concern themselves with proofing the image not the final design of the page layout Note that even a highly accurate cross-rendered proof from an inkjet will not show the results of the halftone screening process so only the color can essentially be proofed
PreparingImagesforDelivery
Here Irsquove set the media settings (left) and the Printer Color Management settings (right)
Marking your territoryBefore actually saving your files for client delivery there is one additional step that is important to fulfill properly marking your images with proper metadatamdashmarking your territory if you will Most professional photographers would never send film to their clients without some sort of identification and the importance of marking your images is no less in the digital age Arguably itrsquos even more important now
Enter metadata about your image in the File Info dialog box in Photoshop or Adobe Bridge
PreparingImagesforDelivery
In Photoshop (or Bridge) you should complete the relevant metadata fields in the File Info dialog box All editable fields that are useful for downstream organization and identification should be employed
The four main IPTC metadata panels
New to Photoshop CS2 are the XMP for IPTC panels for expanded metadata support Itrsquos relatively simple to complete all the general fields with standard information such as contact copyright status and usage and save the completed forms as a template that can be applied to all images destined for delivery to third parties Communicate with your clients to get all the necessary information There really is no excuse not to do this critical step in preparing files for delivery
file formats for deliverySo you are ready to save the files for delivery However you arenrsquot quite done yet in making some important decisions The choice of file format and the final image naming is still a critical step
When delivering files to clients itrsquos important to adhere to proper naming conventions When naming files itrsquos critical to stick to an alphanumeric series of letters and numbers and use only approved special characters such as underscores or dashes for spaces You should not use any of the special symbols such as $ ^ amp ( ) + in a file name Depending on the final output device and the operating system it runs under special symbols can lead to unpredictable results
PreparingImagesforDelivery
Additionally even though recent operating systems such as Mac OS X and Windows XP may allow extended characters in a file name there are enough systems in use in the industry that cannot understand long file names Therefore you should use only a safe length for Mac OS 31 characters plus a period separating the file name and extension or 11 characters plus period and extension for MS DOS machines
The file format you supply is also an important consideration
File format options in Photoshop
If you are supplying 16-bit-per-channel CMYK files there is only a single optimal file format to use TIFF
TIFF file options when working with a 16-bit-per-channel image
When selecting the format options for a TIFF file it should be noted that some output devices cannot handle TIFF files with any compression such as LZW or ZIP Also when delivering for clients itrsquos generally not a good idea to supply layered files Unless you can be assured that the client will treat the layered files properly flattening is always the safest option
PreparingImagesforDelivery
If you are supplying 8-bit-per-channel CMYK files the format options grow
By changing the bit depth to 8 BitsChannel (left) you can select more file formats for delivery (right)
Mode changing to 8 bits and saving as a CMYK file will offer a variety of additional file formats However unless you have instructions to the contrary the safest file format is still TIFF
The Save As dialog box with the Embed Color Profile option deselected
There is an additional consideration when saving files intended for CMYK reproduction Unless yoursquove had direct and successful communications with the prepress personnel saving a CMYK file with an embedded profile might not be such a good idea While saving RGB files with embedded profiles is pretty much a universal good idea to avoid ambiguous color in graphic arts and print-ing embedded profiles can sometimes lead to problems for both technical and political reasons
Until the political realities change and RIPs can be updated to ensure they wonrsquot choke on embedded profilesmdashthis is actually rare but can happenmdashI provide CMYK files with no profiles I do note in the accompanying Read Me text files an indication of how the files were prepared If I have been fortunate enough to be working with a color management savvy prepress supplier I would be happy to embed the profile in the CMYK filemdashideally the profile they supplied me But until color management gets wider adoption in the graphic arts itrsquos easier and safer to strip the CMYK profile
If you need to transmit files instead of delivering them on a CD or DVD you can use either a zipped TIFF file or use JPG compression for the final file delivery In either case the file should be opened by the recipient and resaved as a standard TIFF file for final use Saving a final CMYK file as a JPEG file with Maximum Quality will rarely if ever produce any visible changes to the file However your client should be warned not to open the file or make changes and resave the file while in the JPEG format Multiple resaving in JPEG format is to be avoided
PreparingImagesforDelivery 0
Also you should alert your client if you have chosen not to embed a profile in the CMYK file that opening the image in Photoshop might prompt a warning dialog box
Photoshop returns a warning dialog box when you open a file that doesnrsquot have an embedded profile
Depending on the color management settings in your clientrsquos Photoshop setup they may see a warning when they open a file without an embedded profile If so you can tell them to assign the profile yoursquove used to convert the filemdashif itrsquos a profile included in Photoshop that is a simple solution If yoursquove stripped the profile and used a custom CMYK profile you should consider supplying the profile separately on disk or in the file transmission
If you are asked to supply files that are sized For Position Only (FPO) yoursquoll need to make sure the final image dimensions match the final high-resolution files exactly Only the pixel resolution should be downsampled Be sure to save the FPO version with an unambiguous file name that relates but would not be confused with the high-resolution file
The Image Size dialog showing a reduced resolution version of the original CMYK file (left) and selecting Save As (right) In the FPO version be sure to give it a noticible designation
PreparingImagesforDelivery 1
While it may seem that nobody actually reads Read Me files it is still an important practice to provide documentation and identification of images delivered to clients If nothing else you can point to the text file they failed to read as explaining any miscommunication on their part
Itrsquos good practice to include a Read Me file when you deliver your images to your clients
Regardless of whether you are burning to disk or transmitting over the net itrsquos important to include an organized file folder structure to help avoid confusion I place files inside named fold-ers that help explain their contents and segregate high-resolution CMYK files from FPOs from RGB files Particularly if you are burning to CD or DVD itrsquos useful to export the browsed cache from Adobe Bridge to make browsing from the CD or DVD quicker
When delivering files it helps to put them in an organized file folder structure
abouT THe auTHoR
JeffScheweasummacumlaudegraduateofRochesterInstituteofTechnologyhasbeenanadvertisingphotographerinChicagoforover25yearsHehasbeendoingdigitalimagingforover14yearsandiswidelyknownandrespectedinthedigitalimagingcommunityasaleadingpioneerinthefieldJeffisafeatureconsultantandalphatesterforPhotoshop
foR MoRe InfoRMaTIon
ForacomprehensiveoverviewofPhotoshopCS2pleasevisitwwwadobecomproductsphotoshopmainhtml
Adobe Systems Incorporated345ParkAvenueSanJoseCA95110-2704USAwwwadobecom
AdobetheAdobelogoAcrobatIllustratorInDesignandPhotoshopareeitherregisteredtrademarksortrademarksofAdobeSystemsIncorporatedintheUnitedStatesandorothercountriesAllothertrademarksarethepropertyoftheirrespectiveowners
copy2006JeffScheweAllrightsreserved
My personal preference even if you supply files initially via transmission is to burn the delivered files to CD or DVD I do this for several reasons to give the client a tangible result from the project that they can store and to burn a read-only version of the final delivered files that cannot be altered If at some point something happens to the file (for example somebody changes it poorly) therersquos always the original starting point image burned into the disc that cannot be changed While it doesnrsquot happen often it has happened that somebody made a mistake downstream of my file delivery and itrsquos useful to be able to point to a version of a file that represents the state of the delivered image before any additional changes were made
checklist for file deliveryConfirm final file specifications and requirements
Open a secure line of communication with client and prepress provider
Confirm final reproduction process (SWOP or Sheet Fed)
Confirm final output color space ideally with printer-supplied ICC profile
Confirm delivery of RGB CMYK or RGB plus CMYK
Tone and color correct with soft proofing for the final output
Confirm final file size and resolution
Provide image sharpening for output
Provide aim print or proof print for color
Embed image metadata for identification
Confirm final delivery file format
Provide Read Me file with documentation file list and contact information
Organize and segregate file types separate high-resolution files FPO RGB and CMYK
Provide read-only final files on CD or DVD
additional resourcesDigital Image Submission Guidelines (DISC) wwwdisc-infoorg
Universal Photographic Digital Imaging Guidelines (UPDIG) wwwupdigorg
Real World Color Management by Bruce Fraser Chris Murphy and Fred Bunting Published by Peachpit Press ISBN 0321267222
Color Management for Photographers by Andrew Rodney Published by Focal Press ISBN 0-240-80649-2
PixelGenius by PhotoKit Sharpener wwwpixelgeniuscom
Nik Software by Nik Sharpener Pro wwwniksoftwarecom
bull
bull
bull
bull
bull
bull
bull
bull
bull
bull
bull
bull
bull
bull
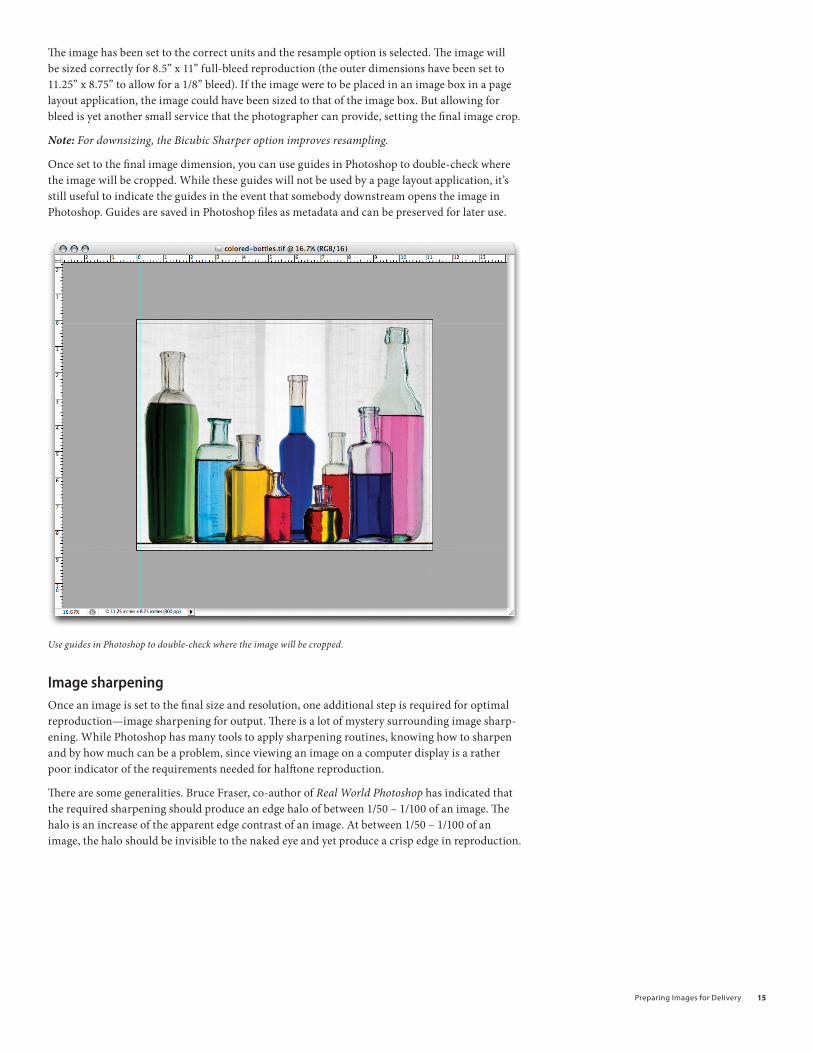
PreparingImagesforDelivery 1
The image has been set to the correct units and the resample option is selected The image will be sized correctly for 85rdquo x 11rdquo full-bleed reproduction (the outer dimensions have been set to 1125rdquo x 875rdquo to allow for a 18rdquo bleed) If the image were to be placed in an image box in a page layout application the image could have been sized to that of the image box But allowing for bleed is yet another small service that the photographer can provide setting the final image crop
Note For downsizing the Bicubic Sharper option improves resampling
Once set to the final image dimension you can use guides in Photoshop to double-check where the image will be cropped While these guides will not be used by a page layout application itrsquos still useful to indicate the guides in the event that somebody downstream opens the image in Photoshop Guides are saved in Photoshop files as metadata and can be preserved for later use
Use guides in Photoshop to double-check where the image will be cropped
Image sharpeningOnce an image is set to the final size and resolution one additional step is required for optimal reproductionmdashimage sharpening for output There is a lot of mystery surrounding image sharp-ening While Photoshop has many tools to apply sharpening routines knowing how to sharpen and by how much can be a problem since viewing an image on a computer display is a rather poor indicator of the requirements needed for halftone reproduction
There are some generalities Bruce Fraser co-author of Real World Photoshop has indicated that the required sharpening should produce an edge halo of between 150 ndash 1100 of an image The halo is an increase of the apparent edge contrast of an image At between 150 ndash 1100 of an image the halo should be invisible to the naked eye and yet produce a crisp edge in reproduction
PreparingImagesforDelivery 1
The other problem inherent with determining image sharpening is the fact that a computer display is a poor tool to evaluate image sharpening If you deliver an image whose pixel resolution is twice that of the halftone line screen ruling four image pixels will be dithered to produce one halftone dot However many ldquoexpertsrdquo tell people to view their images at a 100 zoom inside Photoshop to evaluate the effects of sharpening Yes you need to view your images at 100 or larger to see the actual effects of sharpening on the pixels yet the resulting image in Photoshop will be too large to evaluate the amount of sharpening required To more accurately predict the amount of sharpening required a more useful screen zoom of 50 will simulate the effect of the halftone screening At 50 four image pixels are dithered to produce one screen display pixel
An image without output sharpening When printed the image wonrsquot be crisp
The image above at a zoom of 50 has no additional output sharpening applied If delivered like this the resultant halftone reproduction will be less than crisp The dithering of the halftone dots will introduce a softening effect further softening the image So output sharpening needs to be applied even for what may appear in Photoshop to be a sharp image
PreparingImagesforDelivery 1
While the Unsharp Mask filter in Photoshop is a useful sharpening tool there is an alternative that provides a bit more control while reducing some of the undesirable artifacts of Unsharp Mask
Use the High Pass filter to sharpen an image
By duplicating the imagersquos background layer and setting the blending mode to Overlay you can use the High Pass filter (choose Filter gt Other gtHigh Pass)
The High Pass filter is rather hidden away under ldquoOtherrdquo in the Filter menu
PreparingImagesforDelivery 1
This High Pass filter produces an apparent edge enhancement based on a pixel radius that allows the Overlay blend mode to increase the light edge while darkening the dark edge of image edges Setting the radius to 3 for a 300ppi image will enhance the edge halo approximately 1100 of an inch which happens to match the recommendations of Bruce Fraser
The results of using High Pass on an overlay blend mode layer The image edges snap at 50 zoom
There are third-party solutions specially designed for doing image sharpening that can increase the accuracy and predictability of output sharpening Nik Sharpener Pro by Nik Software Inc and PhotoKit Sharpener by PixelGenius are two such products Bruce Fraser was the primary product designer of PhotoKit Shapener and for disclosure purposes I must also indicate my involvement with PixelGenius Both products are designed to provide optimal output sharpening
But the caveat again final output sharpening can only be done on images whose final reproduc-tion size has been set Any resizing on the part of a downstream process will reintroduce soften-ing and thus mitigate the output sharpening Resharpening an already sharpened image that has been resized is not optimal
PreparingImagesforDelivery 1
converting to cMYKOnce the image has been optimized for the reproduction process in terms of tone color resolu-tion and image sharpness the final processing step is to convert the RGB image to CMYK This step can be as simple as doing a mode change from RGB to CMYK (assuming your Photoshop Color Settings are properly set up) or can involve a Convert To Profile transform
This figure shows the Mode change to CMYK I prefer to use the Convert to Profile command
Changing the mode from RGB to CMYK (by choosing Edit gt Mode gt CMYK Color) results in an image conversion from RGB to CMYK based on the current color settings in Photoshop While fine to do it contains a slight risk that the color settings may not be exactly what you expect When there are multiple users of Photoshop or if you havenrsquot produced a CMYK separation recently using the Convert To Profile command in the Edit menu allows for total control and clarity in the settings
In the Convert To Profile dialog box you can confirm the source space the destination space and the parameters on which the conversion will take place
PreparingImagesforDelivery 0
In the Convert to Profile dialog you must set the correct options I suggest using the Adobe (Ace) CMM (left) and use the same rendering intent I used to soft proof (right)
In the Convert To Profile dialog box you can set the CMM transform engine as well as confirm the rendering intent In general with Photoshop CS or CS2 you can always be assured of getting proper results when selecting Use Black Compensation to map image black to output black Itrsquos also generally a good idea to flatten all adjustment layers during conversion since some adjust-ment layers either will not work on CMYK layered files or will produce different results than their RGB counterparts
Another point to note if you are working in 16-bit-per-channel depth is that you should not only flatten while in 16 bit to make sure your adjustments are being completed in 16 bit but also transform from RGB to CMYK while still in 16 bit to receive the benefit of the higher bit depth during conversion
The final CMYK-separated and optimized file
PreparingImagesforDelivery 1
What about providing RGb filesTo offer greater flexibility to your clients you can also consider providing RGB files in addition to the CMYK files yoursquove separated However providing RGB files can be a problem If yoursquove used a large color space such as ProPhoto RGB delivering your RGB file to somebody who is not well versed in color management can result in some pretty ugly interpretations of your image
An image in ProPhoto RGB (left) and a duplicate of the image with sRGB assigned as the embedded profile (right)
The improper use of Photoshop Color Settings and policies can result in a misunderstanding of the use of profiles If the client or printer did not honor the embedded profile and merely assumed the image to be in sRGB the resulting display would be less than desirable
So if you want to work with your originals in a large gamut color space and deliver files to your clients that run a lower risk of miscommunication of color what do you do Well I can only tell you what I do and suggest you test it yourself for your own work
I take the final CMYK file and reconvert it to RGB Why Once the filersquos colors have been reduced to the gamut of CMYK converting the file back to RGB will not do any additional harmmdashpar-ticularly if you are working in 16 bit But it will result in an RGB file that would be pretty hard to misinterpret
Using Convert to Profile you select the RGB color space you want to convert the CMYK file to Adobe RGB on the left or I suggest sRGB shown on the right
PreparingImagesforDelivery
You can either convert to Adobe RGB or sRGB The advantage of providing an sRGB version of the file is that in the event the usage of the image also includes the Web yoursquoll have an image converted from CMYK to sRGB so the web image will match the CMYK rendering of the file
To better illustrate the process of converting from ProPhoto RGB to SWOP CMYK and back to sRGB Irsquove done screen shots of both the color space gamuts as well as plotted actual colors of the images in a program called ColorThink by CHROMIX (wwwchromixcom)
The gamuts and image plots have been done by plotting in Lab coordinates and in 3D It should be noted that the best way to see color space gamuts and image plots is in motion ColorThink allows you rotate the graph to better evaluate the relationships between color spaces and image plots
The gamut map on the left is ProPhoto RGB In the middle is sRGB and on the right is SWOP as contained in the Photoshop CS2 CMYK profile named US Web Coated (SWOP) v2 Note the screen shots are to scale
The figures above show the relative size and volume of the three color spaces ProPhoto RGB is huge and SWOP is tiny The challenge is to get the colors of the image to look good in the color space of the final output
On the left is the original Colored Bottle image mapped into the ProPhoto RGB color space The dots represent actual color samples from the image On the right is the image mapped into the SWOP color space As you can see a lot of the colors in the image are well outside of the printable range of the CMYK press
PreparingImagesforDelivery
Somehow the colors of the image must be mapped into the color space of the output The method of either compression or clipping will be dictated by the process you use to make the color conversion In the preceding mode change and convert to profile examples I showed two methods using Color Range to desaturate the image and using soft proofing to adjust for the resulting color transform
But why go from a super-huge color space such as ProPhoto RGB to SWOP and then back to sRGB Itrsquos really a matter of exercising your color control over the way delivered files are prepared for reproduction By using your eyes to evaluate the way in which colors will be reproduced you are able to dictate how your images reproduce on paper
On the left the final CMYK image colors are shown mapped in the SWOP color space notice the colors are now within the gamut of CMYK On the right the image has been converted back to sRGB from CMYK All of the CMYK colors (with the possible exception of a tiny amount of cyan) will fit within the sRGB color space
Going from ProPhoto RGB to CMYK and then back to sRGB gives you the control over how the image colors will look not only in CMYK but also when you are delivering RGB images Since the converted sRGB image has already had its total volume of colors clamped to the gamut of CMYK there is less chance that somebody down the ldquoprepress roadrdquo from you will mess up the colors of the image
PreparingImagesforDelivery
The proofWhen supplying digital files itrsquos important to also provide an aim print or actual proof that confirms on paper what the image should look like when reproduced In the past Irsquove resorted to actually sending the CMYK file to a service bureau for expensive contract proofs While the result is an unequivocal proof of the CMYK file it can be both costly and time consuming If you have a quality ink jet printer and accurate profiles for the printer you can print out from Photoshop and produce a cross-rendered proof A cross-rendered proof is made by using both the original CMYK profile as well as the printer profile to render in the print the accurate results of proofing to the final output device Again this presupposes that you have an accurate display and printer profile and that you follow the cross-rendering recipe for printing from Photoshop
This figure shows the Photoshop Print dialog box with a preview of the image Irsquove selected Let Photoshop Determine Colors from the Color Handling pop-up menu and selected the correct printer profile
PreparingImagesforDelivery
In the Print dialog box in Photoshop yoursquoll need to alter the settings you may normally use Rather than setting the Print space to your RGB or CMYK space you use the Proof option instead Under Options choose Let Photoshop Determine Colors from the Color Handling pop-up menu and select your particular printerrsquos profile However selecting the proof option in print allows the use of the Proof Setup Preset (shown below) which if yoursquove saved your soft proofing setups makes doing cross-rendered proofs a bit more efficient
To produce a cross-rendered proof select the saved soft proof settings Here Irsquove selected the SWOP-V2-BW-Off proof setup
You will definitely want to select the Simulate Black Ink option Whether you select Simulate Paper Color depends on your intent for the resulting print If you merely want to provide an aim print you may choose not to use this option
To produce an accurate cross-rendered proof select the Simulate Paper Color and the Simulate Black Ink options
However if you wish to provide a very accurate cross-rendered proof that could act as a con-tract proof for color you should select Simulate Paper Color It should be noted that just as the on-screen results will show a marked reduction in dynamic range so will a cross-rendered proof with this option turned on When reviewing the final print the paper white of the actual CMYK output profile will produce a scum tone over the image This preview will be a rather accurate reproduction of the final printed piece but it wonrsquot look very good which is actually what you want in an accurate proof Photographers should really only concern themselves with proofing the image not the final design of the page layout Note that even a highly accurate cross-rendered proof from an inkjet will not show the results of the halftone screening process so only the color can essentially be proofed
PreparingImagesforDelivery
Here Irsquove set the media settings (left) and the Printer Color Management settings (right)
Marking your territoryBefore actually saving your files for client delivery there is one additional step that is important to fulfill properly marking your images with proper metadatamdashmarking your territory if you will Most professional photographers would never send film to their clients without some sort of identification and the importance of marking your images is no less in the digital age Arguably itrsquos even more important now
Enter metadata about your image in the File Info dialog box in Photoshop or Adobe Bridge
PreparingImagesforDelivery
In Photoshop (or Bridge) you should complete the relevant metadata fields in the File Info dialog box All editable fields that are useful for downstream organization and identification should be employed
The four main IPTC metadata panels
New to Photoshop CS2 are the XMP for IPTC panels for expanded metadata support Itrsquos relatively simple to complete all the general fields with standard information such as contact copyright status and usage and save the completed forms as a template that can be applied to all images destined for delivery to third parties Communicate with your clients to get all the necessary information There really is no excuse not to do this critical step in preparing files for delivery
file formats for deliverySo you are ready to save the files for delivery However you arenrsquot quite done yet in making some important decisions The choice of file format and the final image naming is still a critical step
When delivering files to clients itrsquos important to adhere to proper naming conventions When naming files itrsquos critical to stick to an alphanumeric series of letters and numbers and use only approved special characters such as underscores or dashes for spaces You should not use any of the special symbols such as $ ^ amp ( ) + in a file name Depending on the final output device and the operating system it runs under special symbols can lead to unpredictable results
PreparingImagesforDelivery
Additionally even though recent operating systems such as Mac OS X and Windows XP may allow extended characters in a file name there are enough systems in use in the industry that cannot understand long file names Therefore you should use only a safe length for Mac OS 31 characters plus a period separating the file name and extension or 11 characters plus period and extension for MS DOS machines
The file format you supply is also an important consideration
File format options in Photoshop
If you are supplying 16-bit-per-channel CMYK files there is only a single optimal file format to use TIFF
TIFF file options when working with a 16-bit-per-channel image
When selecting the format options for a TIFF file it should be noted that some output devices cannot handle TIFF files with any compression such as LZW or ZIP Also when delivering for clients itrsquos generally not a good idea to supply layered files Unless you can be assured that the client will treat the layered files properly flattening is always the safest option
PreparingImagesforDelivery
If you are supplying 8-bit-per-channel CMYK files the format options grow
By changing the bit depth to 8 BitsChannel (left) you can select more file formats for delivery (right)
Mode changing to 8 bits and saving as a CMYK file will offer a variety of additional file formats However unless you have instructions to the contrary the safest file format is still TIFF
The Save As dialog box with the Embed Color Profile option deselected
There is an additional consideration when saving files intended for CMYK reproduction Unless yoursquove had direct and successful communications with the prepress personnel saving a CMYK file with an embedded profile might not be such a good idea While saving RGB files with embedded profiles is pretty much a universal good idea to avoid ambiguous color in graphic arts and print-ing embedded profiles can sometimes lead to problems for both technical and political reasons
Until the political realities change and RIPs can be updated to ensure they wonrsquot choke on embedded profilesmdashthis is actually rare but can happenmdashI provide CMYK files with no profiles I do note in the accompanying Read Me text files an indication of how the files were prepared If I have been fortunate enough to be working with a color management savvy prepress supplier I would be happy to embed the profile in the CMYK filemdashideally the profile they supplied me But until color management gets wider adoption in the graphic arts itrsquos easier and safer to strip the CMYK profile
If you need to transmit files instead of delivering them on a CD or DVD you can use either a zipped TIFF file or use JPG compression for the final file delivery In either case the file should be opened by the recipient and resaved as a standard TIFF file for final use Saving a final CMYK file as a JPEG file with Maximum Quality will rarely if ever produce any visible changes to the file However your client should be warned not to open the file or make changes and resave the file while in the JPEG format Multiple resaving in JPEG format is to be avoided
PreparingImagesforDelivery 0
Also you should alert your client if you have chosen not to embed a profile in the CMYK file that opening the image in Photoshop might prompt a warning dialog box
Photoshop returns a warning dialog box when you open a file that doesnrsquot have an embedded profile
Depending on the color management settings in your clientrsquos Photoshop setup they may see a warning when they open a file without an embedded profile If so you can tell them to assign the profile yoursquove used to convert the filemdashif itrsquos a profile included in Photoshop that is a simple solution If yoursquove stripped the profile and used a custom CMYK profile you should consider supplying the profile separately on disk or in the file transmission
If you are asked to supply files that are sized For Position Only (FPO) yoursquoll need to make sure the final image dimensions match the final high-resolution files exactly Only the pixel resolution should be downsampled Be sure to save the FPO version with an unambiguous file name that relates but would not be confused with the high-resolution file
The Image Size dialog showing a reduced resolution version of the original CMYK file (left) and selecting Save As (right) In the FPO version be sure to give it a noticible designation
PreparingImagesforDelivery 1
While it may seem that nobody actually reads Read Me files it is still an important practice to provide documentation and identification of images delivered to clients If nothing else you can point to the text file they failed to read as explaining any miscommunication on their part
Itrsquos good practice to include a Read Me file when you deliver your images to your clients
Regardless of whether you are burning to disk or transmitting over the net itrsquos important to include an organized file folder structure to help avoid confusion I place files inside named fold-ers that help explain their contents and segregate high-resolution CMYK files from FPOs from RGB files Particularly if you are burning to CD or DVD itrsquos useful to export the browsed cache from Adobe Bridge to make browsing from the CD or DVD quicker
When delivering files it helps to put them in an organized file folder structure
abouT THe auTHoR
JeffScheweasummacumlaudegraduateofRochesterInstituteofTechnologyhasbeenanadvertisingphotographerinChicagoforover25yearsHehasbeendoingdigitalimagingforover14yearsandiswidelyknownandrespectedinthedigitalimagingcommunityasaleadingpioneerinthefieldJeffisafeatureconsultantandalphatesterforPhotoshop
foR MoRe InfoRMaTIon
ForacomprehensiveoverviewofPhotoshopCS2pleasevisitwwwadobecomproductsphotoshopmainhtml
Adobe Systems Incorporated345ParkAvenueSanJoseCA95110-2704USAwwwadobecom
AdobetheAdobelogoAcrobatIllustratorInDesignandPhotoshopareeitherregisteredtrademarksortrademarksofAdobeSystemsIncorporatedintheUnitedStatesandorothercountriesAllothertrademarksarethepropertyoftheirrespectiveowners
copy2006JeffScheweAllrightsreserved
My personal preference even if you supply files initially via transmission is to burn the delivered files to CD or DVD I do this for several reasons to give the client a tangible result from the project that they can store and to burn a read-only version of the final delivered files that cannot be altered If at some point something happens to the file (for example somebody changes it poorly) therersquos always the original starting point image burned into the disc that cannot be changed While it doesnrsquot happen often it has happened that somebody made a mistake downstream of my file delivery and itrsquos useful to be able to point to a version of a file that represents the state of the delivered image before any additional changes were made
checklist for file deliveryConfirm final file specifications and requirements
Open a secure line of communication with client and prepress provider
Confirm final reproduction process (SWOP or Sheet Fed)
Confirm final output color space ideally with printer-supplied ICC profile
Confirm delivery of RGB CMYK or RGB plus CMYK
Tone and color correct with soft proofing for the final output
Confirm final file size and resolution
Provide image sharpening for output
Provide aim print or proof print for color
Embed image metadata for identification
Confirm final delivery file format
Provide Read Me file with documentation file list and contact information
Organize and segregate file types separate high-resolution files FPO RGB and CMYK
Provide read-only final files on CD or DVD
additional resourcesDigital Image Submission Guidelines (DISC) wwwdisc-infoorg
Universal Photographic Digital Imaging Guidelines (UPDIG) wwwupdigorg
Real World Color Management by Bruce Fraser Chris Murphy and Fred Bunting Published by Peachpit Press ISBN 0321267222
Color Management for Photographers by Andrew Rodney Published by Focal Press ISBN 0-240-80649-2
PixelGenius by PhotoKit Sharpener wwwpixelgeniuscom
Nik Software by Nik Sharpener Pro wwwniksoftwarecom
bull
bull
bull
bull
bull
bull
bull
bull
bull
bull
bull
bull
bull
bull
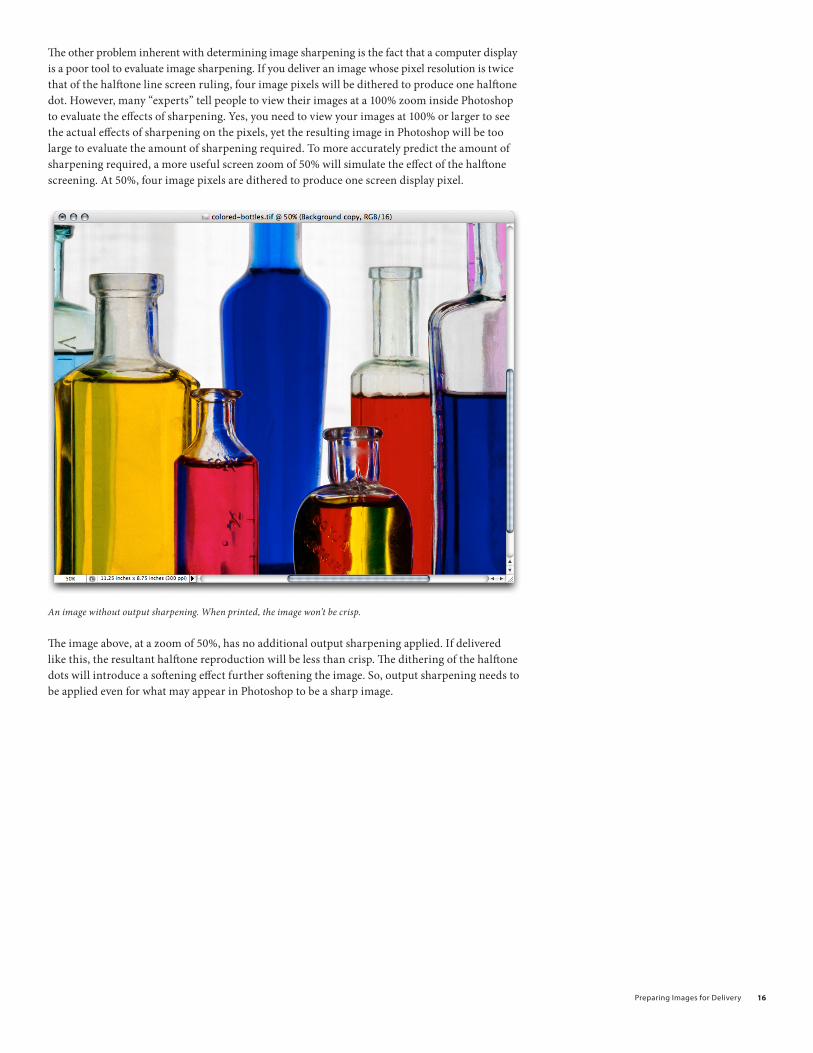
PreparingImagesforDelivery 1
The other problem inherent with determining image sharpening is the fact that a computer display is a poor tool to evaluate image sharpening If you deliver an image whose pixel resolution is twice that of the halftone line screen ruling four image pixels will be dithered to produce one halftone dot However many ldquoexpertsrdquo tell people to view their images at a 100 zoom inside Photoshop to evaluate the effects of sharpening Yes you need to view your images at 100 or larger to see the actual effects of sharpening on the pixels yet the resulting image in Photoshop will be too large to evaluate the amount of sharpening required To more accurately predict the amount of sharpening required a more useful screen zoom of 50 will simulate the effect of the halftone screening At 50 four image pixels are dithered to produce one screen display pixel
An image without output sharpening When printed the image wonrsquot be crisp
The image above at a zoom of 50 has no additional output sharpening applied If delivered like this the resultant halftone reproduction will be less than crisp The dithering of the halftone dots will introduce a softening effect further softening the image So output sharpening needs to be applied even for what may appear in Photoshop to be a sharp image
PreparingImagesforDelivery 1
While the Unsharp Mask filter in Photoshop is a useful sharpening tool there is an alternative that provides a bit more control while reducing some of the undesirable artifacts of Unsharp Mask
Use the High Pass filter to sharpen an image
By duplicating the imagersquos background layer and setting the blending mode to Overlay you can use the High Pass filter (choose Filter gt Other gtHigh Pass)
The High Pass filter is rather hidden away under ldquoOtherrdquo in the Filter menu
PreparingImagesforDelivery 1
This High Pass filter produces an apparent edge enhancement based on a pixel radius that allows the Overlay blend mode to increase the light edge while darkening the dark edge of image edges Setting the radius to 3 for a 300ppi image will enhance the edge halo approximately 1100 of an inch which happens to match the recommendations of Bruce Fraser
The results of using High Pass on an overlay blend mode layer The image edges snap at 50 zoom
There are third-party solutions specially designed for doing image sharpening that can increase the accuracy and predictability of output sharpening Nik Sharpener Pro by Nik Software Inc and PhotoKit Sharpener by PixelGenius are two such products Bruce Fraser was the primary product designer of PhotoKit Shapener and for disclosure purposes I must also indicate my involvement with PixelGenius Both products are designed to provide optimal output sharpening
But the caveat again final output sharpening can only be done on images whose final reproduc-tion size has been set Any resizing on the part of a downstream process will reintroduce soften-ing and thus mitigate the output sharpening Resharpening an already sharpened image that has been resized is not optimal
PreparingImagesforDelivery 1
converting to cMYKOnce the image has been optimized for the reproduction process in terms of tone color resolu-tion and image sharpness the final processing step is to convert the RGB image to CMYK This step can be as simple as doing a mode change from RGB to CMYK (assuming your Photoshop Color Settings are properly set up) or can involve a Convert To Profile transform
This figure shows the Mode change to CMYK I prefer to use the Convert to Profile command
Changing the mode from RGB to CMYK (by choosing Edit gt Mode gt CMYK Color) results in an image conversion from RGB to CMYK based on the current color settings in Photoshop While fine to do it contains a slight risk that the color settings may not be exactly what you expect When there are multiple users of Photoshop or if you havenrsquot produced a CMYK separation recently using the Convert To Profile command in the Edit menu allows for total control and clarity in the settings
In the Convert To Profile dialog box you can confirm the source space the destination space and the parameters on which the conversion will take place
PreparingImagesforDelivery 0
In the Convert to Profile dialog you must set the correct options I suggest using the Adobe (Ace) CMM (left) and use the same rendering intent I used to soft proof (right)
In the Convert To Profile dialog box you can set the CMM transform engine as well as confirm the rendering intent In general with Photoshop CS or CS2 you can always be assured of getting proper results when selecting Use Black Compensation to map image black to output black Itrsquos also generally a good idea to flatten all adjustment layers during conversion since some adjust-ment layers either will not work on CMYK layered files or will produce different results than their RGB counterparts
Another point to note if you are working in 16-bit-per-channel depth is that you should not only flatten while in 16 bit to make sure your adjustments are being completed in 16 bit but also transform from RGB to CMYK while still in 16 bit to receive the benefit of the higher bit depth during conversion
The final CMYK-separated and optimized file
PreparingImagesforDelivery 1
What about providing RGb filesTo offer greater flexibility to your clients you can also consider providing RGB files in addition to the CMYK files yoursquove separated However providing RGB files can be a problem If yoursquove used a large color space such as ProPhoto RGB delivering your RGB file to somebody who is not well versed in color management can result in some pretty ugly interpretations of your image
An image in ProPhoto RGB (left) and a duplicate of the image with sRGB assigned as the embedded profile (right)
The improper use of Photoshop Color Settings and policies can result in a misunderstanding of the use of profiles If the client or printer did not honor the embedded profile and merely assumed the image to be in sRGB the resulting display would be less than desirable
So if you want to work with your originals in a large gamut color space and deliver files to your clients that run a lower risk of miscommunication of color what do you do Well I can only tell you what I do and suggest you test it yourself for your own work
I take the final CMYK file and reconvert it to RGB Why Once the filersquos colors have been reduced to the gamut of CMYK converting the file back to RGB will not do any additional harmmdashpar-ticularly if you are working in 16 bit But it will result in an RGB file that would be pretty hard to misinterpret
Using Convert to Profile you select the RGB color space you want to convert the CMYK file to Adobe RGB on the left or I suggest sRGB shown on the right
PreparingImagesforDelivery
You can either convert to Adobe RGB or sRGB The advantage of providing an sRGB version of the file is that in the event the usage of the image also includes the Web yoursquoll have an image converted from CMYK to sRGB so the web image will match the CMYK rendering of the file
To better illustrate the process of converting from ProPhoto RGB to SWOP CMYK and back to sRGB Irsquove done screen shots of both the color space gamuts as well as plotted actual colors of the images in a program called ColorThink by CHROMIX (wwwchromixcom)
The gamuts and image plots have been done by plotting in Lab coordinates and in 3D It should be noted that the best way to see color space gamuts and image plots is in motion ColorThink allows you rotate the graph to better evaluate the relationships between color spaces and image plots
The gamut map on the left is ProPhoto RGB In the middle is sRGB and on the right is SWOP as contained in the Photoshop CS2 CMYK profile named US Web Coated (SWOP) v2 Note the screen shots are to scale
The figures above show the relative size and volume of the three color spaces ProPhoto RGB is huge and SWOP is tiny The challenge is to get the colors of the image to look good in the color space of the final output
On the left is the original Colored Bottle image mapped into the ProPhoto RGB color space The dots represent actual color samples from the image On the right is the image mapped into the SWOP color space As you can see a lot of the colors in the image are well outside of the printable range of the CMYK press
PreparingImagesforDelivery
Somehow the colors of the image must be mapped into the color space of the output The method of either compression or clipping will be dictated by the process you use to make the color conversion In the preceding mode change and convert to profile examples I showed two methods using Color Range to desaturate the image and using soft proofing to adjust for the resulting color transform
But why go from a super-huge color space such as ProPhoto RGB to SWOP and then back to sRGB Itrsquos really a matter of exercising your color control over the way delivered files are prepared for reproduction By using your eyes to evaluate the way in which colors will be reproduced you are able to dictate how your images reproduce on paper
On the left the final CMYK image colors are shown mapped in the SWOP color space notice the colors are now within the gamut of CMYK On the right the image has been converted back to sRGB from CMYK All of the CMYK colors (with the possible exception of a tiny amount of cyan) will fit within the sRGB color space
Going from ProPhoto RGB to CMYK and then back to sRGB gives you the control over how the image colors will look not only in CMYK but also when you are delivering RGB images Since the converted sRGB image has already had its total volume of colors clamped to the gamut of CMYK there is less chance that somebody down the ldquoprepress roadrdquo from you will mess up the colors of the image
PreparingImagesforDelivery
The proofWhen supplying digital files itrsquos important to also provide an aim print or actual proof that confirms on paper what the image should look like when reproduced In the past Irsquove resorted to actually sending the CMYK file to a service bureau for expensive contract proofs While the result is an unequivocal proof of the CMYK file it can be both costly and time consuming If you have a quality ink jet printer and accurate profiles for the printer you can print out from Photoshop and produce a cross-rendered proof A cross-rendered proof is made by using both the original CMYK profile as well as the printer profile to render in the print the accurate results of proofing to the final output device Again this presupposes that you have an accurate display and printer profile and that you follow the cross-rendering recipe for printing from Photoshop
This figure shows the Photoshop Print dialog box with a preview of the image Irsquove selected Let Photoshop Determine Colors from the Color Handling pop-up menu and selected the correct printer profile
PreparingImagesforDelivery
In the Print dialog box in Photoshop yoursquoll need to alter the settings you may normally use Rather than setting the Print space to your RGB or CMYK space you use the Proof option instead Under Options choose Let Photoshop Determine Colors from the Color Handling pop-up menu and select your particular printerrsquos profile However selecting the proof option in print allows the use of the Proof Setup Preset (shown below) which if yoursquove saved your soft proofing setups makes doing cross-rendered proofs a bit more efficient
To produce a cross-rendered proof select the saved soft proof settings Here Irsquove selected the SWOP-V2-BW-Off proof setup
You will definitely want to select the Simulate Black Ink option Whether you select Simulate Paper Color depends on your intent for the resulting print If you merely want to provide an aim print you may choose not to use this option
To produce an accurate cross-rendered proof select the Simulate Paper Color and the Simulate Black Ink options
However if you wish to provide a very accurate cross-rendered proof that could act as a con-tract proof for color you should select Simulate Paper Color It should be noted that just as the on-screen results will show a marked reduction in dynamic range so will a cross-rendered proof with this option turned on When reviewing the final print the paper white of the actual CMYK output profile will produce a scum tone over the image This preview will be a rather accurate reproduction of the final printed piece but it wonrsquot look very good which is actually what you want in an accurate proof Photographers should really only concern themselves with proofing the image not the final design of the page layout Note that even a highly accurate cross-rendered proof from an inkjet will not show the results of the halftone screening process so only the color can essentially be proofed
PreparingImagesforDelivery
Here Irsquove set the media settings (left) and the Printer Color Management settings (right)
Marking your territoryBefore actually saving your files for client delivery there is one additional step that is important to fulfill properly marking your images with proper metadatamdashmarking your territory if you will Most professional photographers would never send film to their clients without some sort of identification and the importance of marking your images is no less in the digital age Arguably itrsquos even more important now
Enter metadata about your image in the File Info dialog box in Photoshop or Adobe Bridge
PreparingImagesforDelivery
In Photoshop (or Bridge) you should complete the relevant metadata fields in the File Info dialog box All editable fields that are useful for downstream organization and identification should be employed
The four main IPTC metadata panels
New to Photoshop CS2 are the XMP for IPTC panels for expanded metadata support Itrsquos relatively simple to complete all the general fields with standard information such as contact copyright status and usage and save the completed forms as a template that can be applied to all images destined for delivery to third parties Communicate with your clients to get all the necessary information There really is no excuse not to do this critical step in preparing files for delivery
file formats for deliverySo you are ready to save the files for delivery However you arenrsquot quite done yet in making some important decisions The choice of file format and the final image naming is still a critical step
When delivering files to clients itrsquos important to adhere to proper naming conventions When naming files itrsquos critical to stick to an alphanumeric series of letters and numbers and use only approved special characters such as underscores or dashes for spaces You should not use any of the special symbols such as $ ^ amp ( ) + in a file name Depending on the final output device and the operating system it runs under special symbols can lead to unpredictable results
PreparingImagesforDelivery
Additionally even though recent operating systems such as Mac OS X and Windows XP may allow extended characters in a file name there are enough systems in use in the industry that cannot understand long file names Therefore you should use only a safe length for Mac OS 31 characters plus a period separating the file name and extension or 11 characters plus period and extension for MS DOS machines
The file format you supply is also an important consideration
File format options in Photoshop
If you are supplying 16-bit-per-channel CMYK files there is only a single optimal file format to use TIFF
TIFF file options when working with a 16-bit-per-channel image
When selecting the format options for a TIFF file it should be noted that some output devices cannot handle TIFF files with any compression such as LZW or ZIP Also when delivering for clients itrsquos generally not a good idea to supply layered files Unless you can be assured that the client will treat the layered files properly flattening is always the safest option
PreparingImagesforDelivery
If you are supplying 8-bit-per-channel CMYK files the format options grow
By changing the bit depth to 8 BitsChannel (left) you can select more file formats for delivery (right)
Mode changing to 8 bits and saving as a CMYK file will offer a variety of additional file formats However unless you have instructions to the contrary the safest file format is still TIFF
The Save As dialog box with the Embed Color Profile option deselected
There is an additional consideration when saving files intended for CMYK reproduction Unless yoursquove had direct and successful communications with the prepress personnel saving a CMYK file with an embedded profile might not be such a good idea While saving RGB files with embedded profiles is pretty much a universal good idea to avoid ambiguous color in graphic arts and print-ing embedded profiles can sometimes lead to problems for both technical and political reasons
Until the political realities change and RIPs can be updated to ensure they wonrsquot choke on embedded profilesmdashthis is actually rare but can happenmdashI provide CMYK files with no profiles I do note in the accompanying Read Me text files an indication of how the files were prepared If I have been fortunate enough to be working with a color management savvy prepress supplier I would be happy to embed the profile in the CMYK filemdashideally the profile they supplied me But until color management gets wider adoption in the graphic arts itrsquos easier and safer to strip the CMYK profile
If you need to transmit files instead of delivering them on a CD or DVD you can use either a zipped TIFF file or use JPG compression for the final file delivery In either case the file should be opened by the recipient and resaved as a standard TIFF file for final use Saving a final CMYK file as a JPEG file with Maximum Quality will rarely if ever produce any visible changes to the file However your client should be warned not to open the file or make changes and resave the file while in the JPEG format Multiple resaving in JPEG format is to be avoided
PreparingImagesforDelivery 0
Also you should alert your client if you have chosen not to embed a profile in the CMYK file that opening the image in Photoshop might prompt a warning dialog box
Photoshop returns a warning dialog box when you open a file that doesnrsquot have an embedded profile
Depending on the color management settings in your clientrsquos Photoshop setup they may see a warning when they open a file without an embedded profile If so you can tell them to assign the profile yoursquove used to convert the filemdashif itrsquos a profile included in Photoshop that is a simple solution If yoursquove stripped the profile and used a custom CMYK profile you should consider supplying the profile separately on disk or in the file transmission
If you are asked to supply files that are sized For Position Only (FPO) yoursquoll need to make sure the final image dimensions match the final high-resolution files exactly Only the pixel resolution should be downsampled Be sure to save the FPO version with an unambiguous file name that relates but would not be confused with the high-resolution file
The Image Size dialog showing a reduced resolution version of the original CMYK file (left) and selecting Save As (right) In the FPO version be sure to give it a noticible designation
PreparingImagesforDelivery 1
While it may seem that nobody actually reads Read Me files it is still an important practice to provide documentation and identification of images delivered to clients If nothing else you can point to the text file they failed to read as explaining any miscommunication on their part
Itrsquos good practice to include a Read Me file when you deliver your images to your clients
Regardless of whether you are burning to disk or transmitting over the net itrsquos important to include an organized file folder structure to help avoid confusion I place files inside named fold-ers that help explain their contents and segregate high-resolution CMYK files from FPOs from RGB files Particularly if you are burning to CD or DVD itrsquos useful to export the browsed cache from Adobe Bridge to make browsing from the CD or DVD quicker
When delivering files it helps to put them in an organized file folder structure
abouT THe auTHoR
JeffScheweasummacumlaudegraduateofRochesterInstituteofTechnologyhasbeenanadvertisingphotographerinChicagoforover25yearsHehasbeendoingdigitalimagingforover14yearsandiswidelyknownandrespectedinthedigitalimagingcommunityasaleadingpioneerinthefieldJeffisafeatureconsultantandalphatesterforPhotoshop
foR MoRe InfoRMaTIon
ForacomprehensiveoverviewofPhotoshopCS2pleasevisitwwwadobecomproductsphotoshopmainhtml
Adobe Systems Incorporated345ParkAvenueSanJoseCA95110-2704USAwwwadobecom
AdobetheAdobelogoAcrobatIllustratorInDesignandPhotoshopareeitherregisteredtrademarksortrademarksofAdobeSystemsIncorporatedintheUnitedStatesandorothercountriesAllothertrademarksarethepropertyoftheirrespectiveowners
copy2006JeffScheweAllrightsreserved
My personal preference even if you supply files initially via transmission is to burn the delivered files to CD or DVD I do this for several reasons to give the client a tangible result from the project that they can store and to burn a read-only version of the final delivered files that cannot be altered If at some point something happens to the file (for example somebody changes it poorly) therersquos always the original starting point image burned into the disc that cannot be changed While it doesnrsquot happen often it has happened that somebody made a mistake downstream of my file delivery and itrsquos useful to be able to point to a version of a file that represents the state of the delivered image before any additional changes were made
checklist for file deliveryConfirm final file specifications and requirements
Open a secure line of communication with client and prepress provider
Confirm final reproduction process (SWOP or Sheet Fed)
Confirm final output color space ideally with printer-supplied ICC profile
Confirm delivery of RGB CMYK or RGB plus CMYK
Tone and color correct with soft proofing for the final output
Confirm final file size and resolution
Provide image sharpening for output
Provide aim print or proof print for color
Embed image metadata for identification
Confirm final delivery file format
Provide Read Me file with documentation file list and contact information
Organize and segregate file types separate high-resolution files FPO RGB and CMYK
Provide read-only final files on CD or DVD
additional resourcesDigital Image Submission Guidelines (DISC) wwwdisc-infoorg
Universal Photographic Digital Imaging Guidelines (UPDIG) wwwupdigorg
Real World Color Management by Bruce Fraser Chris Murphy and Fred Bunting Published by Peachpit Press ISBN 0321267222
Color Management for Photographers by Andrew Rodney Published by Focal Press ISBN 0-240-80649-2
PixelGenius by PhotoKit Sharpener wwwpixelgeniuscom
Nik Software by Nik Sharpener Pro wwwniksoftwarecom
bull
bull
bull
bull
bull
bull
bull
bull
bull
bull
bull
bull
bull
bull
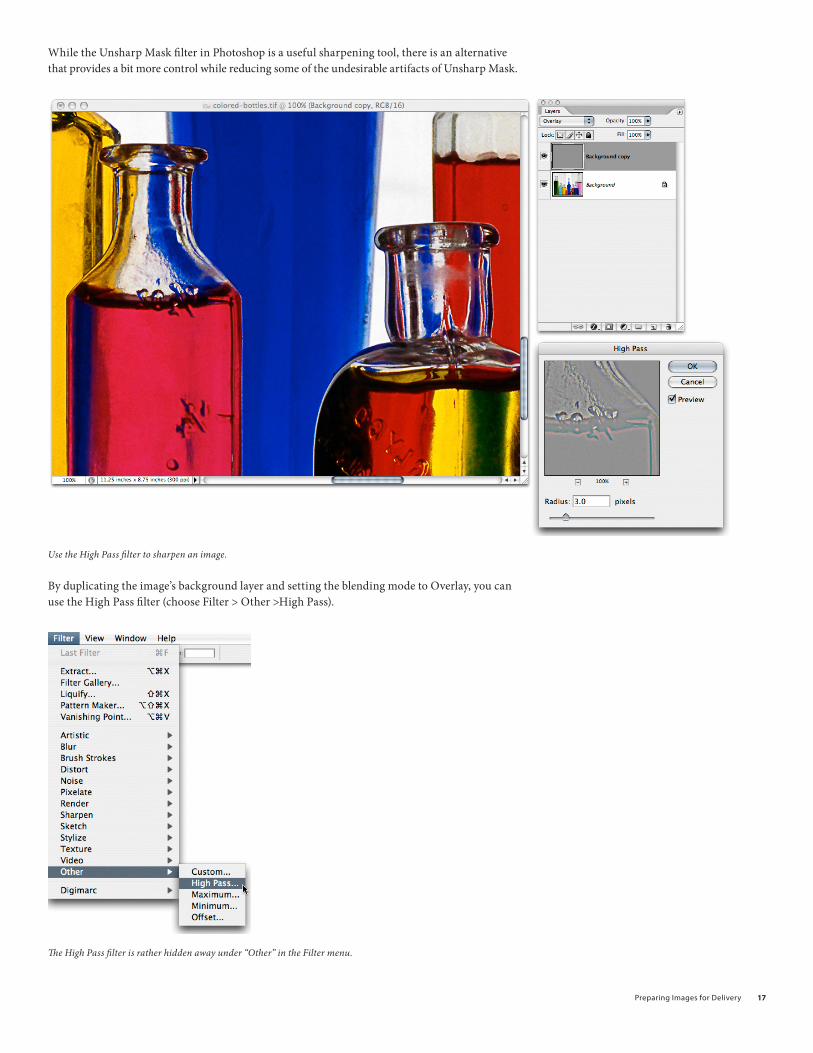
PreparingImagesforDelivery 1
While the Unsharp Mask filter in Photoshop is a useful sharpening tool there is an alternative that provides a bit more control while reducing some of the undesirable artifacts of Unsharp Mask
Use the High Pass filter to sharpen an image
By duplicating the imagersquos background layer and setting the blending mode to Overlay you can use the High Pass filter (choose Filter gt Other gtHigh Pass)
The High Pass filter is rather hidden away under ldquoOtherrdquo in the Filter menu
PreparingImagesforDelivery 1
This High Pass filter produces an apparent edge enhancement based on a pixel radius that allows the Overlay blend mode to increase the light edge while darkening the dark edge of image edges Setting the radius to 3 for a 300ppi image will enhance the edge halo approximately 1100 of an inch which happens to match the recommendations of Bruce Fraser
The results of using High Pass on an overlay blend mode layer The image edges snap at 50 zoom
There are third-party solutions specially designed for doing image sharpening that can increase the accuracy and predictability of output sharpening Nik Sharpener Pro by Nik Software Inc and PhotoKit Sharpener by PixelGenius are two such products Bruce Fraser was the primary product designer of PhotoKit Shapener and for disclosure purposes I must also indicate my involvement with PixelGenius Both products are designed to provide optimal output sharpening
But the caveat again final output sharpening can only be done on images whose final reproduc-tion size has been set Any resizing on the part of a downstream process will reintroduce soften-ing and thus mitigate the output sharpening Resharpening an already sharpened image that has been resized is not optimal
PreparingImagesforDelivery 1
converting to cMYKOnce the image has been optimized for the reproduction process in terms of tone color resolu-tion and image sharpness the final processing step is to convert the RGB image to CMYK This step can be as simple as doing a mode change from RGB to CMYK (assuming your Photoshop Color Settings are properly set up) or can involve a Convert To Profile transform
This figure shows the Mode change to CMYK I prefer to use the Convert to Profile command
Changing the mode from RGB to CMYK (by choosing Edit gt Mode gt CMYK Color) results in an image conversion from RGB to CMYK based on the current color settings in Photoshop While fine to do it contains a slight risk that the color settings may not be exactly what you expect When there are multiple users of Photoshop or if you havenrsquot produced a CMYK separation recently using the Convert To Profile command in the Edit menu allows for total control and clarity in the settings
In the Convert To Profile dialog box you can confirm the source space the destination space and the parameters on which the conversion will take place
PreparingImagesforDelivery 0
In the Convert to Profile dialog you must set the correct options I suggest using the Adobe (Ace) CMM (left) and use the same rendering intent I used to soft proof (right)
In the Convert To Profile dialog box you can set the CMM transform engine as well as confirm the rendering intent In general with Photoshop CS or CS2 you can always be assured of getting proper results when selecting Use Black Compensation to map image black to output black Itrsquos also generally a good idea to flatten all adjustment layers during conversion since some adjust-ment layers either will not work on CMYK layered files or will produce different results than their RGB counterparts
Another point to note if you are working in 16-bit-per-channel depth is that you should not only flatten while in 16 bit to make sure your adjustments are being completed in 16 bit but also transform from RGB to CMYK while still in 16 bit to receive the benefit of the higher bit depth during conversion
The final CMYK-separated and optimized file
PreparingImagesforDelivery 1
What about providing RGb filesTo offer greater flexibility to your clients you can also consider providing RGB files in addition to the CMYK files yoursquove separated However providing RGB files can be a problem If yoursquove used a large color space such as ProPhoto RGB delivering your RGB file to somebody who is not well versed in color management can result in some pretty ugly interpretations of your image
An image in ProPhoto RGB (left) and a duplicate of the image with sRGB assigned as the embedded profile (right)
The improper use of Photoshop Color Settings and policies can result in a misunderstanding of the use of profiles If the client or printer did not honor the embedded profile and merely assumed the image to be in sRGB the resulting display would be less than desirable
So if you want to work with your originals in a large gamut color space and deliver files to your clients that run a lower risk of miscommunication of color what do you do Well I can only tell you what I do and suggest you test it yourself for your own work
I take the final CMYK file and reconvert it to RGB Why Once the filersquos colors have been reduced to the gamut of CMYK converting the file back to RGB will not do any additional harmmdashpar-ticularly if you are working in 16 bit But it will result in an RGB file that would be pretty hard to misinterpret
Using Convert to Profile you select the RGB color space you want to convert the CMYK file to Adobe RGB on the left or I suggest sRGB shown on the right
PreparingImagesforDelivery
You can either convert to Adobe RGB or sRGB The advantage of providing an sRGB version of the file is that in the event the usage of the image also includes the Web yoursquoll have an image converted from CMYK to sRGB so the web image will match the CMYK rendering of the file
To better illustrate the process of converting from ProPhoto RGB to SWOP CMYK and back to sRGB Irsquove done screen shots of both the color space gamuts as well as plotted actual colors of the images in a program called ColorThink by CHROMIX (wwwchromixcom)
The gamuts and image plots have been done by plotting in Lab coordinates and in 3D It should be noted that the best way to see color space gamuts and image plots is in motion ColorThink allows you rotate the graph to better evaluate the relationships between color spaces and image plots
The gamut map on the left is ProPhoto RGB In the middle is sRGB and on the right is SWOP as contained in the Photoshop CS2 CMYK profile named US Web Coated (SWOP) v2 Note the screen shots are to scale
The figures above show the relative size and volume of the three color spaces ProPhoto RGB is huge and SWOP is tiny The challenge is to get the colors of the image to look good in the color space of the final output
On the left is the original Colored Bottle image mapped into the ProPhoto RGB color space The dots represent actual color samples from the image On the right is the image mapped into the SWOP color space As you can see a lot of the colors in the image are well outside of the printable range of the CMYK press
PreparingImagesforDelivery
Somehow the colors of the image must be mapped into the color space of the output The method of either compression or clipping will be dictated by the process you use to make the color conversion In the preceding mode change and convert to profile examples I showed two methods using Color Range to desaturate the image and using soft proofing to adjust for the resulting color transform
But why go from a super-huge color space such as ProPhoto RGB to SWOP and then back to sRGB Itrsquos really a matter of exercising your color control over the way delivered files are prepared for reproduction By using your eyes to evaluate the way in which colors will be reproduced you are able to dictate how your images reproduce on paper
On the left the final CMYK image colors are shown mapped in the SWOP color space notice the colors are now within the gamut of CMYK On the right the image has been converted back to sRGB from CMYK All of the CMYK colors (with the possible exception of a tiny amount of cyan) will fit within the sRGB color space
Going from ProPhoto RGB to CMYK and then back to sRGB gives you the control over how the image colors will look not only in CMYK but also when you are delivering RGB images Since the converted sRGB image has already had its total volume of colors clamped to the gamut of CMYK there is less chance that somebody down the ldquoprepress roadrdquo from you will mess up the colors of the image
PreparingImagesforDelivery
The proofWhen supplying digital files itrsquos important to also provide an aim print or actual proof that confirms on paper what the image should look like when reproduced In the past Irsquove resorted to actually sending the CMYK file to a service bureau for expensive contract proofs While the result is an unequivocal proof of the CMYK file it can be both costly and time consuming If you have a quality ink jet printer and accurate profiles for the printer you can print out from Photoshop and produce a cross-rendered proof A cross-rendered proof is made by using both the original CMYK profile as well as the printer profile to render in the print the accurate results of proofing to the final output device Again this presupposes that you have an accurate display and printer profile and that you follow the cross-rendering recipe for printing from Photoshop
This figure shows the Photoshop Print dialog box with a preview of the image Irsquove selected Let Photoshop Determine Colors from the Color Handling pop-up menu and selected the correct printer profile
PreparingImagesforDelivery
In the Print dialog box in Photoshop yoursquoll need to alter the settings you may normally use Rather than setting the Print space to your RGB or CMYK space you use the Proof option instead Under Options choose Let Photoshop Determine Colors from the Color Handling pop-up menu and select your particular printerrsquos profile However selecting the proof option in print allows the use of the Proof Setup Preset (shown below) which if yoursquove saved your soft proofing setups makes doing cross-rendered proofs a bit more efficient
To produce a cross-rendered proof select the saved soft proof settings Here Irsquove selected the SWOP-V2-BW-Off proof setup
You will definitely want to select the Simulate Black Ink option Whether you select Simulate Paper Color depends on your intent for the resulting print If you merely want to provide an aim print you may choose not to use this option
To produce an accurate cross-rendered proof select the Simulate Paper Color and the Simulate Black Ink options
However if you wish to provide a very accurate cross-rendered proof that could act as a con-tract proof for color you should select Simulate Paper Color It should be noted that just as the on-screen results will show a marked reduction in dynamic range so will a cross-rendered proof with this option turned on When reviewing the final print the paper white of the actual CMYK output profile will produce a scum tone over the image This preview will be a rather accurate reproduction of the final printed piece but it wonrsquot look very good which is actually what you want in an accurate proof Photographers should really only concern themselves with proofing the image not the final design of the page layout Note that even a highly accurate cross-rendered proof from an inkjet will not show the results of the halftone screening process so only the color can essentially be proofed
PreparingImagesforDelivery
Here Irsquove set the media settings (left) and the Printer Color Management settings (right)
Marking your territoryBefore actually saving your files for client delivery there is one additional step that is important to fulfill properly marking your images with proper metadatamdashmarking your territory if you will Most professional photographers would never send film to their clients without some sort of identification and the importance of marking your images is no less in the digital age Arguably itrsquos even more important now
Enter metadata about your image in the File Info dialog box in Photoshop or Adobe Bridge
PreparingImagesforDelivery
In Photoshop (or Bridge) you should complete the relevant metadata fields in the File Info dialog box All editable fields that are useful for downstream organization and identification should be employed
The four main IPTC metadata panels
New to Photoshop CS2 are the XMP for IPTC panels for expanded metadata support Itrsquos relatively simple to complete all the general fields with standard information such as contact copyright status and usage and save the completed forms as a template that can be applied to all images destined for delivery to third parties Communicate with your clients to get all the necessary information There really is no excuse not to do this critical step in preparing files for delivery
file formats for deliverySo you are ready to save the files for delivery However you arenrsquot quite done yet in making some important decisions The choice of file format and the final image naming is still a critical step
When delivering files to clients itrsquos important to adhere to proper naming conventions When naming files itrsquos critical to stick to an alphanumeric series of letters and numbers and use only approved special characters such as underscores or dashes for spaces You should not use any of the special symbols such as $ ^ amp ( ) + in a file name Depending on the final output device and the operating system it runs under special symbols can lead to unpredictable results
PreparingImagesforDelivery
Additionally even though recent operating systems such as Mac OS X and Windows XP may allow extended characters in a file name there are enough systems in use in the industry that cannot understand long file names Therefore you should use only a safe length for Mac OS 31 characters plus a period separating the file name and extension or 11 characters plus period and extension for MS DOS machines
The file format you supply is also an important consideration
File format options in Photoshop
If you are supplying 16-bit-per-channel CMYK files there is only a single optimal file format to use TIFF
TIFF file options when working with a 16-bit-per-channel image
When selecting the format options for a TIFF file it should be noted that some output devices cannot handle TIFF files with any compression such as LZW or ZIP Also when delivering for clients itrsquos generally not a good idea to supply layered files Unless you can be assured that the client will treat the layered files properly flattening is always the safest option
PreparingImagesforDelivery
If you are supplying 8-bit-per-channel CMYK files the format options grow
By changing the bit depth to 8 BitsChannel (left) you can select more file formats for delivery (right)
Mode changing to 8 bits and saving as a CMYK file will offer a variety of additional file formats However unless you have instructions to the contrary the safest file format is still TIFF
The Save As dialog box with the Embed Color Profile option deselected
There is an additional consideration when saving files intended for CMYK reproduction Unless yoursquove had direct and successful communications with the prepress personnel saving a CMYK file with an embedded profile might not be such a good idea While saving RGB files with embedded profiles is pretty much a universal good idea to avoid ambiguous color in graphic arts and print-ing embedded profiles can sometimes lead to problems for both technical and political reasons
Until the political realities change and RIPs can be updated to ensure they wonrsquot choke on embedded profilesmdashthis is actually rare but can happenmdashI provide CMYK files with no profiles I do note in the accompanying Read Me text files an indication of how the files were prepared If I have been fortunate enough to be working with a color management savvy prepress supplier I would be happy to embed the profile in the CMYK filemdashideally the profile they supplied me But until color management gets wider adoption in the graphic arts itrsquos easier and safer to strip the CMYK profile
If you need to transmit files instead of delivering them on a CD or DVD you can use either a zipped TIFF file or use JPG compression for the final file delivery In either case the file should be opened by the recipient and resaved as a standard TIFF file for final use Saving a final CMYK file as a JPEG file with Maximum Quality will rarely if ever produce any visible changes to the file However your client should be warned not to open the file or make changes and resave the file while in the JPEG format Multiple resaving in JPEG format is to be avoided
PreparingImagesforDelivery 0
Also you should alert your client if you have chosen not to embed a profile in the CMYK file that opening the image in Photoshop might prompt a warning dialog box
Photoshop returns a warning dialog box when you open a file that doesnrsquot have an embedded profile
Depending on the color management settings in your clientrsquos Photoshop setup they may see a warning when they open a file without an embedded profile If so you can tell them to assign the profile yoursquove used to convert the filemdashif itrsquos a profile included in Photoshop that is a simple solution If yoursquove stripped the profile and used a custom CMYK profile you should consider supplying the profile separately on disk or in the file transmission
If you are asked to supply files that are sized For Position Only (FPO) yoursquoll need to make sure the final image dimensions match the final high-resolution files exactly Only the pixel resolution should be downsampled Be sure to save the FPO version with an unambiguous file name that relates but would not be confused with the high-resolution file
The Image Size dialog showing a reduced resolution version of the original CMYK file (left) and selecting Save As (right) In the FPO version be sure to give it a noticible designation
PreparingImagesforDelivery 1
While it may seem that nobody actually reads Read Me files it is still an important practice to provide documentation and identification of images delivered to clients If nothing else you can point to the text file they failed to read as explaining any miscommunication on their part
Itrsquos good practice to include a Read Me file when you deliver your images to your clients
Regardless of whether you are burning to disk or transmitting over the net itrsquos important to include an organized file folder structure to help avoid confusion I place files inside named fold-ers that help explain their contents and segregate high-resolution CMYK files from FPOs from RGB files Particularly if you are burning to CD or DVD itrsquos useful to export the browsed cache from Adobe Bridge to make browsing from the CD or DVD quicker
When delivering files it helps to put them in an organized file folder structure
abouT THe auTHoR
JeffScheweasummacumlaudegraduateofRochesterInstituteofTechnologyhasbeenanadvertisingphotographerinChicagoforover25yearsHehasbeendoingdigitalimagingforover14yearsandiswidelyknownandrespectedinthedigitalimagingcommunityasaleadingpioneerinthefieldJeffisafeatureconsultantandalphatesterforPhotoshop
foR MoRe InfoRMaTIon
ForacomprehensiveoverviewofPhotoshopCS2pleasevisitwwwadobecomproductsphotoshopmainhtml
Adobe Systems Incorporated345ParkAvenueSanJoseCA95110-2704USAwwwadobecom
AdobetheAdobelogoAcrobatIllustratorInDesignandPhotoshopareeitherregisteredtrademarksortrademarksofAdobeSystemsIncorporatedintheUnitedStatesandorothercountriesAllothertrademarksarethepropertyoftheirrespectiveowners
copy2006JeffScheweAllrightsreserved
My personal preference even if you supply files initially via transmission is to burn the delivered files to CD or DVD I do this for several reasons to give the client a tangible result from the project that they can store and to burn a read-only version of the final delivered files that cannot be altered If at some point something happens to the file (for example somebody changes it poorly) therersquos always the original starting point image burned into the disc that cannot be changed While it doesnrsquot happen often it has happened that somebody made a mistake downstream of my file delivery and itrsquos useful to be able to point to a version of a file that represents the state of the delivered image before any additional changes were made
checklist for file deliveryConfirm final file specifications and requirements
Open a secure line of communication with client and prepress provider
Confirm final reproduction process (SWOP or Sheet Fed)
Confirm final output color space ideally with printer-supplied ICC profile
Confirm delivery of RGB CMYK or RGB plus CMYK
Tone and color correct with soft proofing for the final output
Confirm final file size and resolution
Provide image sharpening for output
Provide aim print or proof print for color
Embed image metadata for identification
Confirm final delivery file format
Provide Read Me file with documentation file list and contact information
Organize and segregate file types separate high-resolution files FPO RGB and CMYK
Provide read-only final files on CD or DVD
additional resourcesDigital Image Submission Guidelines (DISC) wwwdisc-infoorg
Universal Photographic Digital Imaging Guidelines (UPDIG) wwwupdigorg
Real World Color Management by Bruce Fraser Chris Murphy and Fred Bunting Published by Peachpit Press ISBN 0321267222
Color Management for Photographers by Andrew Rodney Published by Focal Press ISBN 0-240-80649-2
PixelGenius by PhotoKit Sharpener wwwpixelgeniuscom
Nik Software by Nik Sharpener Pro wwwniksoftwarecom
bull
bull
bull
bull
bull
bull
bull
bull
bull
bull
bull
bull
bull
bull
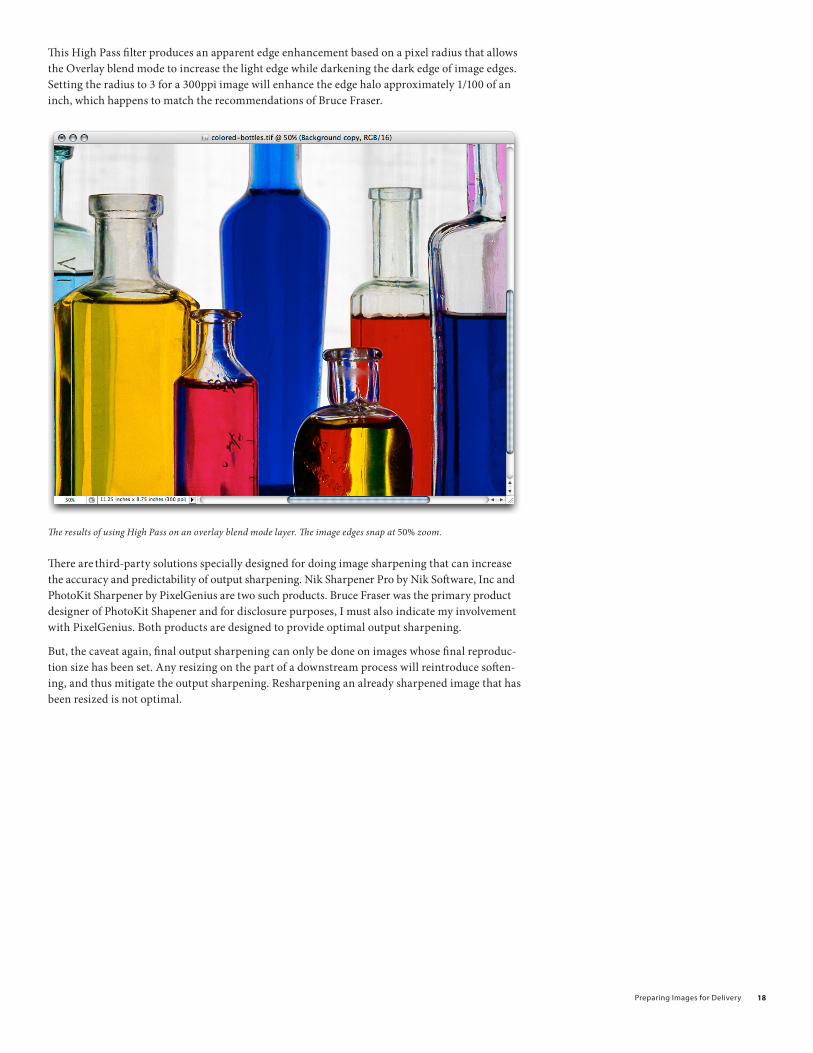
PreparingImagesforDelivery 1
converting to cMYKOnce the image has been optimized for the reproduction process in terms of tone color resolu-tion and image sharpness the final processing step is to convert the RGB image to CMYK This step can be as simple as doing a mode change from RGB to CMYK (assuming your Photoshop Color Settings are properly set up) or can involve a Convert To Profile transform
This figure shows the Mode change to CMYK I prefer to use the Convert to Profile command
Changing the mode from RGB to CMYK (by choosing Edit gt Mode gt CMYK Color) results in an image conversion from RGB to CMYK based on the current color settings in Photoshop While fine to do it contains a slight risk that the color settings may not be exactly what you expect When there are multiple users of Photoshop or if you havenrsquot produced a CMYK separation recently using the Convert To Profile command in the Edit menu allows for total control and clarity in the settings
In the Convert To Profile dialog box you can confirm the source space the destination space and the parameters on which the conversion will take place
PreparingImagesforDelivery 0
In the Convert to Profile dialog you must set the correct options I suggest using the Adobe (Ace) CMM (left) and use the same rendering intent I used to soft proof (right)
In the Convert To Profile dialog box you can set the CMM transform engine as well as confirm the rendering intent In general with Photoshop CS or CS2 you can always be assured of getting proper results when selecting Use Black Compensation to map image black to output black Itrsquos also generally a good idea to flatten all adjustment layers during conversion since some adjust-ment layers either will not work on CMYK layered files or will produce different results than their RGB counterparts
Another point to note if you are working in 16-bit-per-channel depth is that you should not only flatten while in 16 bit to make sure your adjustments are being completed in 16 bit but also transform from RGB to CMYK while still in 16 bit to receive the benefit of the higher bit depth during conversion
The final CMYK-separated and optimized file
PreparingImagesforDelivery 1
What about providing RGb filesTo offer greater flexibility to your clients you can also consider providing RGB files in addition to the CMYK files yoursquove separated However providing RGB files can be a problem If yoursquove used a large color space such as ProPhoto RGB delivering your RGB file to somebody who is not well versed in color management can result in some pretty ugly interpretations of your image
An image in ProPhoto RGB (left) and a duplicate of the image with sRGB assigned as the embedded profile (right)
The improper use of Photoshop Color Settings and policies can result in a misunderstanding of the use of profiles If the client or printer did not honor the embedded profile and merely assumed the image to be in sRGB the resulting display would be less than desirable
So if you want to work with your originals in a large gamut color space and deliver files to your clients that run a lower risk of miscommunication of color what do you do Well I can only tell you what I do and suggest you test it yourself for your own work
I take the final CMYK file and reconvert it to RGB Why Once the filersquos colors have been reduced to the gamut of CMYK converting the file back to RGB will not do any additional harmmdashpar-ticularly if you are working in 16 bit But it will result in an RGB file that would be pretty hard to misinterpret
Using Convert to Profile you select the RGB color space you want to convert the CMYK file to Adobe RGB on the left or I suggest sRGB shown on the right
PreparingImagesforDelivery
You can either convert to Adobe RGB or sRGB The advantage of providing an sRGB version of the file is that in the event the usage of the image also includes the Web yoursquoll have an image converted from CMYK to sRGB so the web image will match the CMYK rendering of the file
To better illustrate the process of converting from ProPhoto RGB to SWOP CMYK and back to sRGB Irsquove done screen shots of both the color space gamuts as well as plotted actual colors of the images in a program called ColorThink by CHROMIX (wwwchromixcom)
The gamuts and image plots have been done by plotting in Lab coordinates and in 3D It should be noted that the best way to see color space gamuts and image plots is in motion ColorThink allows you rotate the graph to better evaluate the relationships between color spaces and image plots
The gamut map on the left is ProPhoto RGB In the middle is sRGB and on the right is SWOP as contained in the Photoshop CS2 CMYK profile named US Web Coated (SWOP) v2 Note the screen shots are to scale
The figures above show the relative size and volume of the three color spaces ProPhoto RGB is huge and SWOP is tiny The challenge is to get the colors of the image to look good in the color space of the final output
On the left is the original Colored Bottle image mapped into the ProPhoto RGB color space The dots represent actual color samples from the image On the right is the image mapped into the SWOP color space As you can see a lot of the colors in the image are well outside of the printable range of the CMYK press
PreparingImagesforDelivery
Somehow the colors of the image must be mapped into the color space of the output The method of either compression or clipping will be dictated by the process you use to make the color conversion In the preceding mode change and convert to profile examples I showed two methods using Color Range to desaturate the image and using soft proofing to adjust for the resulting color transform
But why go from a super-huge color space such as ProPhoto RGB to SWOP and then back to sRGB Itrsquos really a matter of exercising your color control over the way delivered files are prepared for reproduction By using your eyes to evaluate the way in which colors will be reproduced you are able to dictate how your images reproduce on paper
On the left the final CMYK image colors are shown mapped in the SWOP color space notice the colors are now within the gamut of CMYK On the right the image has been converted back to sRGB from CMYK All of the CMYK colors (with the possible exception of a tiny amount of cyan) will fit within the sRGB color space
Going from ProPhoto RGB to CMYK and then back to sRGB gives you the control over how the image colors will look not only in CMYK but also when you are delivering RGB images Since the converted sRGB image has already had its total volume of colors clamped to the gamut of CMYK there is less chance that somebody down the ldquoprepress roadrdquo from you will mess up the colors of the image
PreparingImagesforDelivery
The proofWhen supplying digital files itrsquos important to also provide an aim print or actual proof that confirms on paper what the image should look like when reproduced In the past Irsquove resorted to actually sending the CMYK file to a service bureau for expensive contract proofs While the result is an unequivocal proof of the CMYK file it can be both costly and time consuming If you have a quality ink jet printer and accurate profiles for the printer you can print out from Photoshop and produce a cross-rendered proof A cross-rendered proof is made by using both the original CMYK profile as well as the printer profile to render in the print the accurate results of proofing to the final output device Again this presupposes that you have an accurate display and printer profile and that you follow the cross-rendering recipe for printing from Photoshop
This figure shows the Photoshop Print dialog box with a preview of the image Irsquove selected Let Photoshop Determine Colors from the Color Handling pop-up menu and selected the correct printer profile
PreparingImagesforDelivery
In the Print dialog box in Photoshop yoursquoll need to alter the settings you may normally use Rather than setting the Print space to your RGB or CMYK space you use the Proof option instead Under Options choose Let Photoshop Determine Colors from the Color Handling pop-up menu and select your particular printerrsquos profile However selecting the proof option in print allows the use of the Proof Setup Preset (shown below) which if yoursquove saved your soft proofing setups makes doing cross-rendered proofs a bit more efficient
To produce a cross-rendered proof select the saved soft proof settings Here Irsquove selected the SWOP-V2-BW-Off proof setup
You will definitely want to select the Simulate Black Ink option Whether you select Simulate Paper Color depends on your intent for the resulting print If you merely want to provide an aim print you may choose not to use this option
To produce an accurate cross-rendered proof select the Simulate Paper Color and the Simulate Black Ink options
However if you wish to provide a very accurate cross-rendered proof that could act as a con-tract proof for color you should select Simulate Paper Color It should be noted that just as the on-screen results will show a marked reduction in dynamic range so will a cross-rendered proof with this option turned on When reviewing the final print the paper white of the actual CMYK output profile will produce a scum tone over the image This preview will be a rather accurate reproduction of the final printed piece but it wonrsquot look very good which is actually what you want in an accurate proof Photographers should really only concern themselves with proofing the image not the final design of the page layout Note that even a highly accurate cross-rendered proof from an inkjet will not show the results of the halftone screening process so only the color can essentially be proofed
PreparingImagesforDelivery
Here Irsquove set the media settings (left) and the Printer Color Management settings (right)
Marking your territoryBefore actually saving your files for client delivery there is one additional step that is important to fulfill properly marking your images with proper metadatamdashmarking your territory if you will Most professional photographers would never send film to their clients without some sort of identification and the importance of marking your images is no less in the digital age Arguably itrsquos even more important now
Enter metadata about your image in the File Info dialog box in Photoshop or Adobe Bridge
PreparingImagesforDelivery
In Photoshop (or Bridge) you should complete the relevant metadata fields in the File Info dialog box All editable fields that are useful for downstream organization and identification should be employed
The four main IPTC metadata panels
New to Photoshop CS2 are the XMP for IPTC panels for expanded metadata support Itrsquos relatively simple to complete all the general fields with standard information such as contact copyright status and usage and save the completed forms as a template that can be applied to all images destined for delivery to third parties Communicate with your clients to get all the necessary information There really is no excuse not to do this critical step in preparing files for delivery
file formats for deliverySo you are ready to save the files for delivery However you arenrsquot quite done yet in making some important decisions The choice of file format and the final image naming is still a critical step
When delivering files to clients itrsquos important to adhere to proper naming conventions When naming files itrsquos critical to stick to an alphanumeric series of letters and numbers and use only approved special characters such as underscores or dashes for spaces You should not use any of the special symbols such as $ ^ amp ( ) + in a file name Depending on the final output device and the operating system it runs under special symbols can lead to unpredictable results
PreparingImagesforDelivery
Additionally even though recent operating systems such as Mac OS X and Windows XP may allow extended characters in a file name there are enough systems in use in the industry that cannot understand long file names Therefore you should use only a safe length for Mac OS 31 characters plus a period separating the file name and extension or 11 characters plus period and extension for MS DOS machines
The file format you supply is also an important consideration
File format options in Photoshop
If you are supplying 16-bit-per-channel CMYK files there is only a single optimal file format to use TIFF
TIFF file options when working with a 16-bit-per-channel image
When selecting the format options for a TIFF file it should be noted that some output devices cannot handle TIFF files with any compression such as LZW or ZIP Also when delivering for clients itrsquos generally not a good idea to supply layered files Unless you can be assured that the client will treat the layered files properly flattening is always the safest option
PreparingImagesforDelivery
If you are supplying 8-bit-per-channel CMYK files the format options grow
By changing the bit depth to 8 BitsChannel (left) you can select more file formats for delivery (right)
Mode changing to 8 bits and saving as a CMYK file will offer a variety of additional file formats However unless you have instructions to the contrary the safest file format is still TIFF
The Save As dialog box with the Embed Color Profile option deselected
There is an additional consideration when saving files intended for CMYK reproduction Unless yoursquove had direct and successful communications with the prepress personnel saving a CMYK file with an embedded profile might not be such a good idea While saving RGB files with embedded profiles is pretty much a universal good idea to avoid ambiguous color in graphic arts and print-ing embedded profiles can sometimes lead to problems for both technical and political reasons
Until the political realities change and RIPs can be updated to ensure they wonrsquot choke on embedded profilesmdashthis is actually rare but can happenmdashI provide CMYK files with no profiles I do note in the accompanying Read Me text files an indication of how the files were prepared If I have been fortunate enough to be working with a color management savvy prepress supplier I would be happy to embed the profile in the CMYK filemdashideally the profile they supplied me But until color management gets wider adoption in the graphic arts itrsquos easier and safer to strip the CMYK profile
If you need to transmit files instead of delivering them on a CD or DVD you can use either a zipped TIFF file or use JPG compression for the final file delivery In either case the file should be opened by the recipient and resaved as a standard TIFF file for final use Saving a final CMYK file as a JPEG file with Maximum Quality will rarely if ever produce any visible changes to the file However your client should be warned not to open the file or make changes and resave the file while in the JPEG format Multiple resaving in JPEG format is to be avoided
PreparingImagesforDelivery 0
Also you should alert your client if you have chosen not to embed a profile in the CMYK file that opening the image in Photoshop might prompt a warning dialog box
Photoshop returns a warning dialog box when you open a file that doesnrsquot have an embedded profile
Depending on the color management settings in your clientrsquos Photoshop setup they may see a warning when they open a file without an embedded profile If so you can tell them to assign the profile yoursquove used to convert the filemdashif itrsquos a profile included in Photoshop that is a simple solution If yoursquove stripped the profile and used a custom CMYK profile you should consider supplying the profile separately on disk or in the file transmission
If you are asked to supply files that are sized For Position Only (FPO) yoursquoll need to make sure the final image dimensions match the final high-resolution files exactly Only the pixel resolution should be downsampled Be sure to save the FPO version with an unambiguous file name that relates but would not be confused with the high-resolution file
The Image Size dialog showing a reduced resolution version of the original CMYK file (left) and selecting Save As (right) In the FPO version be sure to give it a noticible designation
PreparingImagesforDelivery 1
While it may seem that nobody actually reads Read Me files it is still an important practice to provide documentation and identification of images delivered to clients If nothing else you can point to the text file they failed to read as explaining any miscommunication on their part
Itrsquos good practice to include a Read Me file when you deliver your images to your clients
Regardless of whether you are burning to disk or transmitting over the net itrsquos important to include an organized file folder structure to help avoid confusion I place files inside named fold-ers that help explain their contents and segregate high-resolution CMYK files from FPOs from RGB files Particularly if you are burning to CD or DVD itrsquos useful to export the browsed cache from Adobe Bridge to make browsing from the CD or DVD quicker
When delivering files it helps to put them in an organized file folder structure
abouT THe auTHoR
JeffScheweasummacumlaudegraduateofRochesterInstituteofTechnologyhasbeenanadvertisingphotographerinChicagoforover25yearsHehasbeendoingdigitalimagingforover14yearsandiswidelyknownandrespectedinthedigitalimagingcommunityasaleadingpioneerinthefieldJeffisafeatureconsultantandalphatesterforPhotoshop
foR MoRe InfoRMaTIon
ForacomprehensiveoverviewofPhotoshopCS2pleasevisitwwwadobecomproductsphotoshopmainhtml
Adobe Systems Incorporated345ParkAvenueSanJoseCA95110-2704USAwwwadobecom
AdobetheAdobelogoAcrobatIllustratorInDesignandPhotoshopareeitherregisteredtrademarksortrademarksofAdobeSystemsIncorporatedintheUnitedStatesandorothercountriesAllothertrademarksarethepropertyoftheirrespectiveowners
copy2006JeffScheweAllrightsreserved
My personal preference even if you supply files initially via transmission is to burn the delivered files to CD or DVD I do this for several reasons to give the client a tangible result from the project that they can store and to burn a read-only version of the final delivered files that cannot be altered If at some point something happens to the file (for example somebody changes it poorly) therersquos always the original starting point image burned into the disc that cannot be changed While it doesnrsquot happen often it has happened that somebody made a mistake downstream of my file delivery and itrsquos useful to be able to point to a version of a file that represents the state of the delivered image before any additional changes were made
checklist for file deliveryConfirm final file specifications and requirements
Open a secure line of communication with client and prepress provider
Confirm final reproduction process (SWOP or Sheet Fed)
Confirm final output color space ideally with printer-supplied ICC profile
Confirm delivery of RGB CMYK or RGB plus CMYK
Tone and color correct with soft proofing for the final output
Confirm final file size and resolution
Provide image sharpening for output
Provide aim print or proof print for color
Embed image metadata for identification
Confirm final delivery file format
Provide Read Me file with documentation file list and contact information
Organize and segregate file types separate high-resolution files FPO RGB and CMYK
Provide read-only final files on CD or DVD
additional resourcesDigital Image Submission Guidelines (DISC) wwwdisc-infoorg
Universal Photographic Digital Imaging Guidelines (UPDIG) wwwupdigorg
Real World Color Management by Bruce Fraser Chris Murphy and Fred Bunting Published by Peachpit Press ISBN 0321267222
Color Management for Photographers by Andrew Rodney Published by Focal Press ISBN 0-240-80649-2
PixelGenius by PhotoKit Sharpener wwwpixelgeniuscom
Nik Software by Nik Sharpener Pro wwwniksoftwarecom
bull
bull
bull
bull
bull
bull
bull
bull
bull
bull
bull
bull
bull
bull
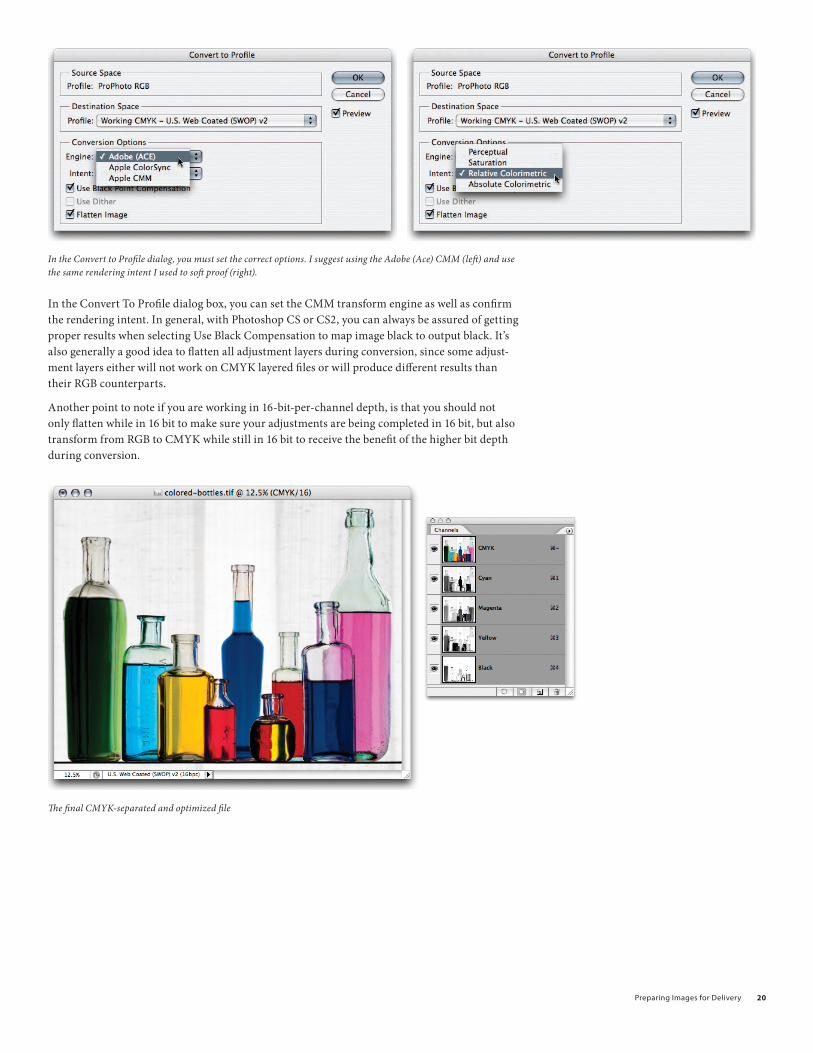
PreparingImagesforDelivery 0
In the Convert to Profile dialog you must set the correct options I suggest using the Adobe (Ace) CMM (left) and use the same rendering intent I used to soft proof (right)
In the Convert To Profile dialog box you can set the CMM transform engine as well as confirm the rendering intent In general with Photoshop CS or CS2 you can always be assured of getting proper results when selecting Use Black Compensation to map image black to output black Itrsquos also generally a good idea to flatten all adjustment layers during conversion since some adjust-ment layers either will not work on CMYK layered files or will produce different results than their RGB counterparts
Another point to note if you are working in 16-bit-per-channel depth is that you should not only flatten while in 16 bit to make sure your adjustments are being completed in 16 bit but also transform from RGB to CMYK while still in 16 bit to receive the benefit of the higher bit depth during conversion
The final CMYK-separated and optimized file
PreparingImagesforDelivery 1
What about providing RGb filesTo offer greater flexibility to your clients you can also consider providing RGB files in addition to the CMYK files yoursquove separated However providing RGB files can be a problem If yoursquove used a large color space such as ProPhoto RGB delivering your RGB file to somebody who is not well versed in color management can result in some pretty ugly interpretations of your image
An image in ProPhoto RGB (left) and a duplicate of the image with sRGB assigned as the embedded profile (right)
The improper use of Photoshop Color Settings and policies can result in a misunderstanding of the use of profiles If the client or printer did not honor the embedded profile and merely assumed the image to be in sRGB the resulting display would be less than desirable
So if you want to work with your originals in a large gamut color space and deliver files to your clients that run a lower risk of miscommunication of color what do you do Well I can only tell you what I do and suggest you test it yourself for your own work
I take the final CMYK file and reconvert it to RGB Why Once the filersquos colors have been reduced to the gamut of CMYK converting the file back to RGB will not do any additional harmmdashpar-ticularly if you are working in 16 bit But it will result in an RGB file that would be pretty hard to misinterpret
Using Convert to Profile you select the RGB color space you want to convert the CMYK file to Adobe RGB on the left or I suggest sRGB shown on the right
PreparingImagesforDelivery
You can either convert to Adobe RGB or sRGB The advantage of providing an sRGB version of the file is that in the event the usage of the image also includes the Web yoursquoll have an image converted from CMYK to sRGB so the web image will match the CMYK rendering of the file
To better illustrate the process of converting from ProPhoto RGB to SWOP CMYK and back to sRGB Irsquove done screen shots of both the color space gamuts as well as plotted actual colors of the images in a program called ColorThink by CHROMIX (wwwchromixcom)
The gamuts and image plots have been done by plotting in Lab coordinates and in 3D It should be noted that the best way to see color space gamuts and image plots is in motion ColorThink allows you rotate the graph to better evaluate the relationships between color spaces and image plots
The gamut map on the left is ProPhoto RGB In the middle is sRGB and on the right is SWOP as contained in the Photoshop CS2 CMYK profile named US Web Coated (SWOP) v2 Note the screen shots are to scale
The figures above show the relative size and volume of the three color spaces ProPhoto RGB is huge and SWOP is tiny The challenge is to get the colors of the image to look good in the color space of the final output
On the left is the original Colored Bottle image mapped into the ProPhoto RGB color space The dots represent actual color samples from the image On the right is the image mapped into the SWOP color space As you can see a lot of the colors in the image are well outside of the printable range of the CMYK press
PreparingImagesforDelivery
Somehow the colors of the image must be mapped into the color space of the output The method of either compression or clipping will be dictated by the process you use to make the color conversion In the preceding mode change and convert to profile examples I showed two methods using Color Range to desaturate the image and using soft proofing to adjust for the resulting color transform
But why go from a super-huge color space such as ProPhoto RGB to SWOP and then back to sRGB Itrsquos really a matter of exercising your color control over the way delivered files are prepared for reproduction By using your eyes to evaluate the way in which colors will be reproduced you are able to dictate how your images reproduce on paper
On the left the final CMYK image colors are shown mapped in the SWOP color space notice the colors are now within the gamut of CMYK On the right the image has been converted back to sRGB from CMYK All of the CMYK colors (with the possible exception of a tiny amount of cyan) will fit within the sRGB color space
Going from ProPhoto RGB to CMYK and then back to sRGB gives you the control over how the image colors will look not only in CMYK but also when you are delivering RGB images Since the converted sRGB image has already had its total volume of colors clamped to the gamut of CMYK there is less chance that somebody down the ldquoprepress roadrdquo from you will mess up the colors of the image
PreparingImagesforDelivery
The proofWhen supplying digital files itrsquos important to also provide an aim print or actual proof that confirms on paper what the image should look like when reproduced In the past Irsquove resorted to actually sending the CMYK file to a service bureau for expensive contract proofs While the result is an unequivocal proof of the CMYK file it can be both costly and time consuming If you have a quality ink jet printer and accurate profiles for the printer you can print out from Photoshop and produce a cross-rendered proof A cross-rendered proof is made by using both the original CMYK profile as well as the printer profile to render in the print the accurate results of proofing to the final output device Again this presupposes that you have an accurate display and printer profile and that you follow the cross-rendering recipe for printing from Photoshop
This figure shows the Photoshop Print dialog box with a preview of the image Irsquove selected Let Photoshop Determine Colors from the Color Handling pop-up menu and selected the correct printer profile
PreparingImagesforDelivery
In the Print dialog box in Photoshop yoursquoll need to alter the settings you may normally use Rather than setting the Print space to your RGB or CMYK space you use the Proof option instead Under Options choose Let Photoshop Determine Colors from the Color Handling pop-up menu and select your particular printerrsquos profile However selecting the proof option in print allows the use of the Proof Setup Preset (shown below) which if yoursquove saved your soft proofing setups makes doing cross-rendered proofs a bit more efficient
To produce a cross-rendered proof select the saved soft proof settings Here Irsquove selected the SWOP-V2-BW-Off proof setup
You will definitely want to select the Simulate Black Ink option Whether you select Simulate Paper Color depends on your intent for the resulting print If you merely want to provide an aim print you may choose not to use this option
To produce an accurate cross-rendered proof select the Simulate Paper Color and the Simulate Black Ink options
However if you wish to provide a very accurate cross-rendered proof that could act as a con-tract proof for color you should select Simulate Paper Color It should be noted that just as the on-screen results will show a marked reduction in dynamic range so will a cross-rendered proof with this option turned on When reviewing the final print the paper white of the actual CMYK output profile will produce a scum tone over the image This preview will be a rather accurate reproduction of the final printed piece but it wonrsquot look very good which is actually what you want in an accurate proof Photographers should really only concern themselves with proofing the image not the final design of the page layout Note that even a highly accurate cross-rendered proof from an inkjet will not show the results of the halftone screening process so only the color can essentially be proofed
PreparingImagesforDelivery
Here Irsquove set the media settings (left) and the Printer Color Management settings (right)
Marking your territoryBefore actually saving your files for client delivery there is one additional step that is important to fulfill properly marking your images with proper metadatamdashmarking your territory if you will Most professional photographers would never send film to their clients without some sort of identification and the importance of marking your images is no less in the digital age Arguably itrsquos even more important now
Enter metadata about your image in the File Info dialog box in Photoshop or Adobe Bridge
PreparingImagesforDelivery
In Photoshop (or Bridge) you should complete the relevant metadata fields in the File Info dialog box All editable fields that are useful for downstream organization and identification should be employed
The four main IPTC metadata panels
New to Photoshop CS2 are the XMP for IPTC panels for expanded metadata support Itrsquos relatively simple to complete all the general fields with standard information such as contact copyright status and usage and save the completed forms as a template that can be applied to all images destined for delivery to third parties Communicate with your clients to get all the necessary information There really is no excuse not to do this critical step in preparing files for delivery
file formats for deliverySo you are ready to save the files for delivery However you arenrsquot quite done yet in making some important decisions The choice of file format and the final image naming is still a critical step
When delivering files to clients itrsquos important to adhere to proper naming conventions When naming files itrsquos critical to stick to an alphanumeric series of letters and numbers and use only approved special characters such as underscores or dashes for spaces You should not use any of the special symbols such as $ ^ amp ( ) + in a file name Depending on the final output device and the operating system it runs under special symbols can lead to unpredictable results
PreparingImagesforDelivery
Additionally even though recent operating systems such as Mac OS X and Windows XP may allow extended characters in a file name there are enough systems in use in the industry that cannot understand long file names Therefore you should use only a safe length for Mac OS 31 characters plus a period separating the file name and extension or 11 characters plus period and extension for MS DOS machines
The file format you supply is also an important consideration
File format options in Photoshop
If you are supplying 16-bit-per-channel CMYK files there is only a single optimal file format to use TIFF
TIFF file options when working with a 16-bit-per-channel image
When selecting the format options for a TIFF file it should be noted that some output devices cannot handle TIFF files with any compression such as LZW or ZIP Also when delivering for clients itrsquos generally not a good idea to supply layered files Unless you can be assured that the client will treat the layered files properly flattening is always the safest option
PreparingImagesforDelivery
If you are supplying 8-bit-per-channel CMYK files the format options grow
By changing the bit depth to 8 BitsChannel (left) you can select more file formats for delivery (right)
Mode changing to 8 bits and saving as a CMYK file will offer a variety of additional file formats However unless you have instructions to the contrary the safest file format is still TIFF
The Save As dialog box with the Embed Color Profile option deselected
There is an additional consideration when saving files intended for CMYK reproduction Unless yoursquove had direct and successful communications with the prepress personnel saving a CMYK file with an embedded profile might not be such a good idea While saving RGB files with embedded profiles is pretty much a universal good idea to avoid ambiguous color in graphic arts and print-ing embedded profiles can sometimes lead to problems for both technical and political reasons
Until the political realities change and RIPs can be updated to ensure they wonrsquot choke on embedded profilesmdashthis is actually rare but can happenmdashI provide CMYK files with no profiles I do note in the accompanying Read Me text files an indication of how the files were prepared If I have been fortunate enough to be working with a color management savvy prepress supplier I would be happy to embed the profile in the CMYK filemdashideally the profile they supplied me But until color management gets wider adoption in the graphic arts itrsquos easier and safer to strip the CMYK profile
If you need to transmit files instead of delivering them on a CD or DVD you can use either a zipped TIFF file or use JPG compression for the final file delivery In either case the file should be opened by the recipient and resaved as a standard TIFF file for final use Saving a final CMYK file as a JPEG file with Maximum Quality will rarely if ever produce any visible changes to the file However your client should be warned not to open the file or make changes and resave the file while in the JPEG format Multiple resaving in JPEG format is to be avoided
PreparingImagesforDelivery 0
Also you should alert your client if you have chosen not to embed a profile in the CMYK file that opening the image in Photoshop might prompt a warning dialog box
Photoshop returns a warning dialog box when you open a file that doesnrsquot have an embedded profile
Depending on the color management settings in your clientrsquos Photoshop setup they may see a warning when they open a file without an embedded profile If so you can tell them to assign the profile yoursquove used to convert the filemdashif itrsquos a profile included in Photoshop that is a simple solution If yoursquove stripped the profile and used a custom CMYK profile you should consider supplying the profile separately on disk or in the file transmission
If you are asked to supply files that are sized For Position Only (FPO) yoursquoll need to make sure the final image dimensions match the final high-resolution files exactly Only the pixel resolution should be downsampled Be sure to save the FPO version with an unambiguous file name that relates but would not be confused with the high-resolution file
The Image Size dialog showing a reduced resolution version of the original CMYK file (left) and selecting Save As (right) In the FPO version be sure to give it a noticible designation
PreparingImagesforDelivery 1
While it may seem that nobody actually reads Read Me files it is still an important practice to provide documentation and identification of images delivered to clients If nothing else you can point to the text file they failed to read as explaining any miscommunication on their part
Itrsquos good practice to include a Read Me file when you deliver your images to your clients
Regardless of whether you are burning to disk or transmitting over the net itrsquos important to include an organized file folder structure to help avoid confusion I place files inside named fold-ers that help explain their contents and segregate high-resolution CMYK files from FPOs from RGB files Particularly if you are burning to CD or DVD itrsquos useful to export the browsed cache from Adobe Bridge to make browsing from the CD or DVD quicker
When delivering files it helps to put them in an organized file folder structure
abouT THe auTHoR
JeffScheweasummacumlaudegraduateofRochesterInstituteofTechnologyhasbeenanadvertisingphotographerinChicagoforover25yearsHehasbeendoingdigitalimagingforover14yearsandiswidelyknownandrespectedinthedigitalimagingcommunityasaleadingpioneerinthefieldJeffisafeatureconsultantandalphatesterforPhotoshop
foR MoRe InfoRMaTIon
ForacomprehensiveoverviewofPhotoshopCS2pleasevisitwwwadobecomproductsphotoshopmainhtml
Adobe Systems Incorporated345ParkAvenueSanJoseCA95110-2704USAwwwadobecom
AdobetheAdobelogoAcrobatIllustratorInDesignandPhotoshopareeitherregisteredtrademarksortrademarksofAdobeSystemsIncorporatedintheUnitedStatesandorothercountriesAllothertrademarksarethepropertyoftheirrespectiveowners
copy2006JeffScheweAllrightsreserved
My personal preference even if you supply files initially via transmission is to burn the delivered files to CD or DVD I do this for several reasons to give the client a tangible result from the project that they can store and to burn a read-only version of the final delivered files that cannot be altered If at some point something happens to the file (for example somebody changes it poorly) therersquos always the original starting point image burned into the disc that cannot be changed While it doesnrsquot happen often it has happened that somebody made a mistake downstream of my file delivery and itrsquos useful to be able to point to a version of a file that represents the state of the delivered image before any additional changes were made
checklist for file deliveryConfirm final file specifications and requirements
Open a secure line of communication with client and prepress provider
Confirm final reproduction process (SWOP or Sheet Fed)
Confirm final output color space ideally with printer-supplied ICC profile
Confirm delivery of RGB CMYK or RGB plus CMYK
Tone and color correct with soft proofing for the final output
Confirm final file size and resolution
Provide image sharpening for output
Provide aim print or proof print for color
Embed image metadata for identification
Confirm final delivery file format
Provide Read Me file with documentation file list and contact information
Organize and segregate file types separate high-resolution files FPO RGB and CMYK
Provide read-only final files on CD or DVD
additional resourcesDigital Image Submission Guidelines (DISC) wwwdisc-infoorg
Universal Photographic Digital Imaging Guidelines (UPDIG) wwwupdigorg
Real World Color Management by Bruce Fraser Chris Murphy and Fred Bunting Published by Peachpit Press ISBN 0321267222
Color Management for Photographers by Andrew Rodney Published by Focal Press ISBN 0-240-80649-2
PixelGenius by PhotoKit Sharpener wwwpixelgeniuscom
Nik Software by Nik Sharpener Pro wwwniksoftwarecom
bull
bull
bull
bull
bull
bull
bull
bull
bull
bull
bull
bull
bull
bull
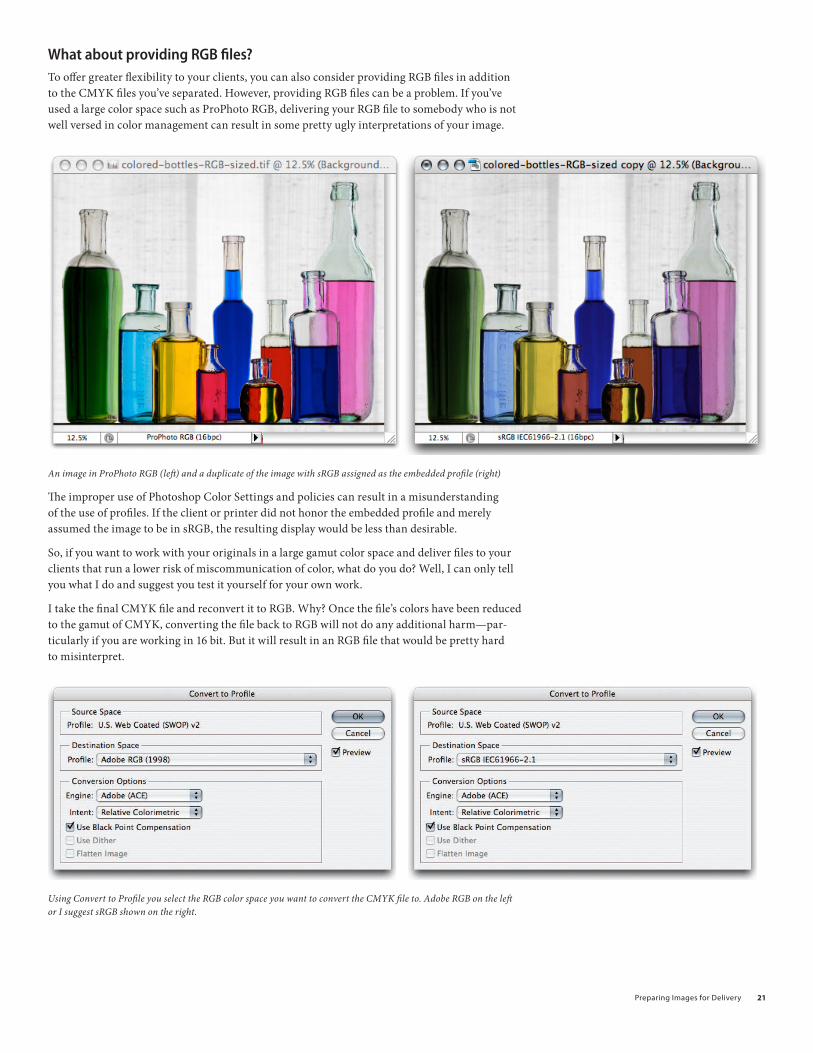
PreparingImagesforDelivery 1
What about providing RGb filesTo offer greater flexibility to your clients you can also consider providing RGB files in addition to the CMYK files yoursquove separated However providing RGB files can be a problem If yoursquove used a large color space such as ProPhoto RGB delivering your RGB file to somebody who is not well versed in color management can result in some pretty ugly interpretations of your image
An image in ProPhoto RGB (left) and a duplicate of the image with sRGB assigned as the embedded profile (right)
The improper use of Photoshop Color Settings and policies can result in a misunderstanding of the use of profiles If the client or printer did not honor the embedded profile and merely assumed the image to be in sRGB the resulting display would be less than desirable
So if you want to work with your originals in a large gamut color space and deliver files to your clients that run a lower risk of miscommunication of color what do you do Well I can only tell you what I do and suggest you test it yourself for your own work
I take the final CMYK file and reconvert it to RGB Why Once the filersquos colors have been reduced to the gamut of CMYK converting the file back to RGB will not do any additional harmmdashpar-ticularly if you are working in 16 bit But it will result in an RGB file that would be pretty hard to misinterpret
Using Convert to Profile you select the RGB color space you want to convert the CMYK file to Adobe RGB on the left or I suggest sRGB shown on the right
PreparingImagesforDelivery
You can either convert to Adobe RGB or sRGB The advantage of providing an sRGB version of the file is that in the event the usage of the image also includes the Web yoursquoll have an image converted from CMYK to sRGB so the web image will match the CMYK rendering of the file
To better illustrate the process of converting from ProPhoto RGB to SWOP CMYK and back to sRGB Irsquove done screen shots of both the color space gamuts as well as plotted actual colors of the images in a program called ColorThink by CHROMIX (wwwchromixcom)
The gamuts and image plots have been done by plotting in Lab coordinates and in 3D It should be noted that the best way to see color space gamuts and image plots is in motion ColorThink allows you rotate the graph to better evaluate the relationships between color spaces and image plots
The gamut map on the left is ProPhoto RGB In the middle is sRGB and on the right is SWOP as contained in the Photoshop CS2 CMYK profile named US Web Coated (SWOP) v2 Note the screen shots are to scale
The figures above show the relative size and volume of the three color spaces ProPhoto RGB is huge and SWOP is tiny The challenge is to get the colors of the image to look good in the color space of the final output
On the left is the original Colored Bottle image mapped into the ProPhoto RGB color space The dots represent actual color samples from the image On the right is the image mapped into the SWOP color space As you can see a lot of the colors in the image are well outside of the printable range of the CMYK press
PreparingImagesforDelivery
Somehow the colors of the image must be mapped into the color space of the output The method of either compression or clipping will be dictated by the process you use to make the color conversion In the preceding mode change and convert to profile examples I showed two methods using Color Range to desaturate the image and using soft proofing to adjust for the resulting color transform
But why go from a super-huge color space such as ProPhoto RGB to SWOP and then back to sRGB Itrsquos really a matter of exercising your color control over the way delivered files are prepared for reproduction By using your eyes to evaluate the way in which colors will be reproduced you are able to dictate how your images reproduce on paper
On the left the final CMYK image colors are shown mapped in the SWOP color space notice the colors are now within the gamut of CMYK On the right the image has been converted back to sRGB from CMYK All of the CMYK colors (with the possible exception of a tiny amount of cyan) will fit within the sRGB color space
Going from ProPhoto RGB to CMYK and then back to sRGB gives you the control over how the image colors will look not only in CMYK but also when you are delivering RGB images Since the converted sRGB image has already had its total volume of colors clamped to the gamut of CMYK there is less chance that somebody down the ldquoprepress roadrdquo from you will mess up the colors of the image
PreparingImagesforDelivery
The proofWhen supplying digital files itrsquos important to also provide an aim print or actual proof that confirms on paper what the image should look like when reproduced In the past Irsquove resorted to actually sending the CMYK file to a service bureau for expensive contract proofs While the result is an unequivocal proof of the CMYK file it can be both costly and time consuming If you have a quality ink jet printer and accurate profiles for the printer you can print out from Photoshop and produce a cross-rendered proof A cross-rendered proof is made by using both the original CMYK profile as well as the printer profile to render in the print the accurate results of proofing to the final output device Again this presupposes that you have an accurate display and printer profile and that you follow the cross-rendering recipe for printing from Photoshop
This figure shows the Photoshop Print dialog box with a preview of the image Irsquove selected Let Photoshop Determine Colors from the Color Handling pop-up menu and selected the correct printer profile
PreparingImagesforDelivery
In the Print dialog box in Photoshop yoursquoll need to alter the settings you may normally use Rather than setting the Print space to your RGB or CMYK space you use the Proof option instead Under Options choose Let Photoshop Determine Colors from the Color Handling pop-up menu and select your particular printerrsquos profile However selecting the proof option in print allows the use of the Proof Setup Preset (shown below) which if yoursquove saved your soft proofing setups makes doing cross-rendered proofs a bit more efficient
To produce a cross-rendered proof select the saved soft proof settings Here Irsquove selected the SWOP-V2-BW-Off proof setup
You will definitely want to select the Simulate Black Ink option Whether you select Simulate Paper Color depends on your intent for the resulting print If you merely want to provide an aim print you may choose not to use this option
To produce an accurate cross-rendered proof select the Simulate Paper Color and the Simulate Black Ink options
However if you wish to provide a very accurate cross-rendered proof that could act as a con-tract proof for color you should select Simulate Paper Color It should be noted that just as the on-screen results will show a marked reduction in dynamic range so will a cross-rendered proof with this option turned on When reviewing the final print the paper white of the actual CMYK output profile will produce a scum tone over the image This preview will be a rather accurate reproduction of the final printed piece but it wonrsquot look very good which is actually what you want in an accurate proof Photographers should really only concern themselves with proofing the image not the final design of the page layout Note that even a highly accurate cross-rendered proof from an inkjet will not show the results of the halftone screening process so only the color can essentially be proofed
PreparingImagesforDelivery
Here Irsquove set the media settings (left) and the Printer Color Management settings (right)
Marking your territoryBefore actually saving your files for client delivery there is one additional step that is important to fulfill properly marking your images with proper metadatamdashmarking your territory if you will Most professional photographers would never send film to their clients without some sort of identification and the importance of marking your images is no less in the digital age Arguably itrsquos even more important now
Enter metadata about your image in the File Info dialog box in Photoshop or Adobe Bridge
PreparingImagesforDelivery
In Photoshop (or Bridge) you should complete the relevant metadata fields in the File Info dialog box All editable fields that are useful for downstream organization and identification should be employed
The four main IPTC metadata panels
New to Photoshop CS2 are the XMP for IPTC panels for expanded metadata support Itrsquos relatively simple to complete all the general fields with standard information such as contact copyright status and usage and save the completed forms as a template that can be applied to all images destined for delivery to third parties Communicate with your clients to get all the necessary information There really is no excuse not to do this critical step in preparing files for delivery
file formats for deliverySo you are ready to save the files for delivery However you arenrsquot quite done yet in making some important decisions The choice of file format and the final image naming is still a critical step
When delivering files to clients itrsquos important to adhere to proper naming conventions When naming files itrsquos critical to stick to an alphanumeric series of letters and numbers and use only approved special characters such as underscores or dashes for spaces You should not use any of the special symbols such as $ ^ amp ( ) + in a file name Depending on the final output device and the operating system it runs under special symbols can lead to unpredictable results
PreparingImagesforDelivery
Additionally even though recent operating systems such as Mac OS X and Windows XP may allow extended characters in a file name there are enough systems in use in the industry that cannot understand long file names Therefore you should use only a safe length for Mac OS 31 characters plus a period separating the file name and extension or 11 characters plus period and extension for MS DOS machines
The file format you supply is also an important consideration
File format options in Photoshop
If you are supplying 16-bit-per-channel CMYK files there is only a single optimal file format to use TIFF
TIFF file options when working with a 16-bit-per-channel image
When selecting the format options for a TIFF file it should be noted that some output devices cannot handle TIFF files with any compression such as LZW or ZIP Also when delivering for clients itrsquos generally not a good idea to supply layered files Unless you can be assured that the client will treat the layered files properly flattening is always the safest option
PreparingImagesforDelivery
If you are supplying 8-bit-per-channel CMYK files the format options grow
By changing the bit depth to 8 BitsChannel (left) you can select more file formats for delivery (right)
Mode changing to 8 bits and saving as a CMYK file will offer a variety of additional file formats However unless you have instructions to the contrary the safest file format is still TIFF
The Save As dialog box with the Embed Color Profile option deselected
There is an additional consideration when saving files intended for CMYK reproduction Unless yoursquove had direct and successful communications with the prepress personnel saving a CMYK file with an embedded profile might not be such a good idea While saving RGB files with embedded profiles is pretty much a universal good idea to avoid ambiguous color in graphic arts and print-ing embedded profiles can sometimes lead to problems for both technical and political reasons
Until the political realities change and RIPs can be updated to ensure they wonrsquot choke on embedded profilesmdashthis is actually rare but can happenmdashI provide CMYK files with no profiles I do note in the accompanying Read Me text files an indication of how the files were prepared If I have been fortunate enough to be working with a color management savvy prepress supplier I would be happy to embed the profile in the CMYK filemdashideally the profile they supplied me But until color management gets wider adoption in the graphic arts itrsquos easier and safer to strip the CMYK profile
If you need to transmit files instead of delivering them on a CD or DVD you can use either a zipped TIFF file or use JPG compression for the final file delivery In either case the file should be opened by the recipient and resaved as a standard TIFF file for final use Saving a final CMYK file as a JPEG file with Maximum Quality will rarely if ever produce any visible changes to the file However your client should be warned not to open the file or make changes and resave the file while in the JPEG format Multiple resaving in JPEG format is to be avoided
PreparingImagesforDelivery 0
Also you should alert your client if you have chosen not to embed a profile in the CMYK file that opening the image in Photoshop might prompt a warning dialog box
Photoshop returns a warning dialog box when you open a file that doesnrsquot have an embedded profile
Depending on the color management settings in your clientrsquos Photoshop setup they may see a warning when they open a file without an embedded profile If so you can tell them to assign the profile yoursquove used to convert the filemdashif itrsquos a profile included in Photoshop that is a simple solution If yoursquove stripped the profile and used a custom CMYK profile you should consider supplying the profile separately on disk or in the file transmission
If you are asked to supply files that are sized For Position Only (FPO) yoursquoll need to make sure the final image dimensions match the final high-resolution files exactly Only the pixel resolution should be downsampled Be sure to save the FPO version with an unambiguous file name that relates but would not be confused with the high-resolution file
The Image Size dialog showing a reduced resolution version of the original CMYK file (left) and selecting Save As (right) In the FPO version be sure to give it a noticible designation
PreparingImagesforDelivery 1
While it may seem that nobody actually reads Read Me files it is still an important practice to provide documentation and identification of images delivered to clients If nothing else you can point to the text file they failed to read as explaining any miscommunication on their part
Itrsquos good practice to include a Read Me file when you deliver your images to your clients
Regardless of whether you are burning to disk or transmitting over the net itrsquos important to include an organized file folder structure to help avoid confusion I place files inside named fold-ers that help explain their contents and segregate high-resolution CMYK files from FPOs from RGB files Particularly if you are burning to CD or DVD itrsquos useful to export the browsed cache from Adobe Bridge to make browsing from the CD or DVD quicker
When delivering files it helps to put them in an organized file folder structure
abouT THe auTHoR
JeffScheweasummacumlaudegraduateofRochesterInstituteofTechnologyhasbeenanadvertisingphotographerinChicagoforover25yearsHehasbeendoingdigitalimagingforover14yearsandiswidelyknownandrespectedinthedigitalimagingcommunityasaleadingpioneerinthefieldJeffisafeatureconsultantandalphatesterforPhotoshop
foR MoRe InfoRMaTIon
ForacomprehensiveoverviewofPhotoshopCS2pleasevisitwwwadobecomproductsphotoshopmainhtml
Adobe Systems Incorporated345ParkAvenueSanJoseCA95110-2704USAwwwadobecom
AdobetheAdobelogoAcrobatIllustratorInDesignandPhotoshopareeitherregisteredtrademarksortrademarksofAdobeSystemsIncorporatedintheUnitedStatesandorothercountriesAllothertrademarksarethepropertyoftheirrespectiveowners
copy2006JeffScheweAllrightsreserved
My personal preference even if you supply files initially via transmission is to burn the delivered files to CD or DVD I do this for several reasons to give the client a tangible result from the project that they can store and to burn a read-only version of the final delivered files that cannot be altered If at some point something happens to the file (for example somebody changes it poorly) therersquos always the original starting point image burned into the disc that cannot be changed While it doesnrsquot happen often it has happened that somebody made a mistake downstream of my file delivery and itrsquos useful to be able to point to a version of a file that represents the state of the delivered image before any additional changes were made
checklist for file deliveryConfirm final file specifications and requirements
Open a secure line of communication with client and prepress provider
Confirm final reproduction process (SWOP or Sheet Fed)
Confirm final output color space ideally with printer-supplied ICC profile
Confirm delivery of RGB CMYK or RGB plus CMYK
Tone and color correct with soft proofing for the final output
Confirm final file size and resolution
Provide image sharpening for output
Provide aim print or proof print for color
Embed image metadata for identification
Confirm final delivery file format
Provide Read Me file with documentation file list and contact information
Organize and segregate file types separate high-resolution files FPO RGB and CMYK
Provide read-only final files on CD or DVD
additional resourcesDigital Image Submission Guidelines (DISC) wwwdisc-infoorg
Universal Photographic Digital Imaging Guidelines (UPDIG) wwwupdigorg
Real World Color Management by Bruce Fraser Chris Murphy and Fred Bunting Published by Peachpit Press ISBN 0321267222
Color Management for Photographers by Andrew Rodney Published by Focal Press ISBN 0-240-80649-2
PixelGenius by PhotoKit Sharpener wwwpixelgeniuscom
Nik Software by Nik Sharpener Pro wwwniksoftwarecom
bull
bull
bull
bull
bull
bull
bull
bull
bull
bull
bull
bull
bull
bull
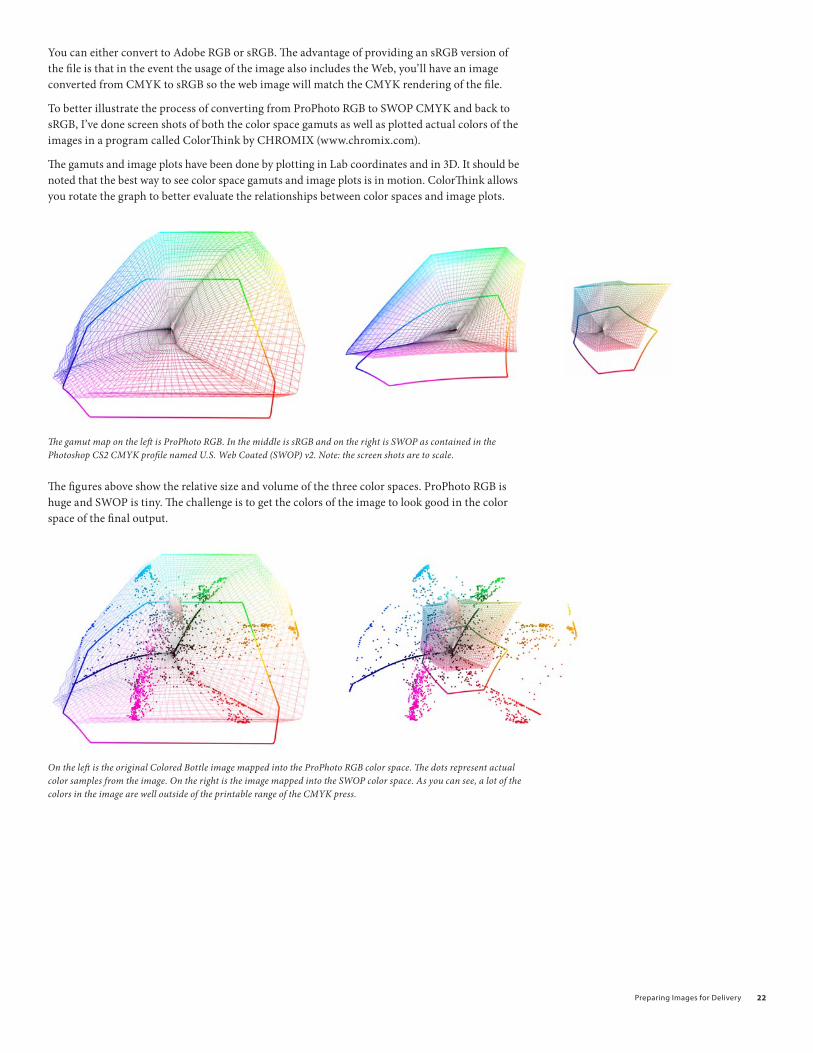
PreparingImagesforDelivery
You can either convert to Adobe RGB or sRGB The advantage of providing an sRGB version of the file is that in the event the usage of the image also includes the Web yoursquoll have an image converted from CMYK to sRGB so the web image will match the CMYK rendering of the file
To better illustrate the process of converting from ProPhoto RGB to SWOP CMYK and back to sRGB Irsquove done screen shots of both the color space gamuts as well as plotted actual colors of the images in a program called ColorThink by CHROMIX (wwwchromixcom)
The gamuts and image plots have been done by plotting in Lab coordinates and in 3D It should be noted that the best way to see color space gamuts and image plots is in motion ColorThink allows you rotate the graph to better evaluate the relationships between color spaces and image plots
The gamut map on the left is ProPhoto RGB In the middle is sRGB and on the right is SWOP as contained in the Photoshop CS2 CMYK profile named US Web Coated (SWOP) v2 Note the screen shots are to scale
The figures above show the relative size and volume of the three color spaces ProPhoto RGB is huge and SWOP is tiny The challenge is to get the colors of the image to look good in the color space of the final output
On the left is the original Colored Bottle image mapped into the ProPhoto RGB color space The dots represent actual color samples from the image On the right is the image mapped into the SWOP color space As you can see a lot of the colors in the image are well outside of the printable range of the CMYK press
PreparingImagesforDelivery
Somehow the colors of the image must be mapped into the color space of the output The method of either compression or clipping will be dictated by the process you use to make the color conversion In the preceding mode change and convert to profile examples I showed two methods using Color Range to desaturate the image and using soft proofing to adjust for the resulting color transform
But why go from a super-huge color space such as ProPhoto RGB to SWOP and then back to sRGB Itrsquos really a matter of exercising your color control over the way delivered files are prepared for reproduction By using your eyes to evaluate the way in which colors will be reproduced you are able to dictate how your images reproduce on paper
On the left the final CMYK image colors are shown mapped in the SWOP color space notice the colors are now within the gamut of CMYK On the right the image has been converted back to sRGB from CMYK All of the CMYK colors (with the possible exception of a tiny amount of cyan) will fit within the sRGB color space
Going from ProPhoto RGB to CMYK and then back to sRGB gives you the control over how the image colors will look not only in CMYK but also when you are delivering RGB images Since the converted sRGB image has already had its total volume of colors clamped to the gamut of CMYK there is less chance that somebody down the ldquoprepress roadrdquo from you will mess up the colors of the image
PreparingImagesforDelivery
The proofWhen supplying digital files itrsquos important to also provide an aim print or actual proof that confirms on paper what the image should look like when reproduced In the past Irsquove resorted to actually sending the CMYK file to a service bureau for expensive contract proofs While the result is an unequivocal proof of the CMYK file it can be both costly and time consuming If you have a quality ink jet printer and accurate profiles for the printer you can print out from Photoshop and produce a cross-rendered proof A cross-rendered proof is made by using both the original CMYK profile as well as the printer profile to render in the print the accurate results of proofing to the final output device Again this presupposes that you have an accurate display and printer profile and that you follow the cross-rendering recipe for printing from Photoshop
This figure shows the Photoshop Print dialog box with a preview of the image Irsquove selected Let Photoshop Determine Colors from the Color Handling pop-up menu and selected the correct printer profile
PreparingImagesforDelivery
In the Print dialog box in Photoshop yoursquoll need to alter the settings you may normally use Rather than setting the Print space to your RGB or CMYK space you use the Proof option instead Under Options choose Let Photoshop Determine Colors from the Color Handling pop-up menu and select your particular printerrsquos profile However selecting the proof option in print allows the use of the Proof Setup Preset (shown below) which if yoursquove saved your soft proofing setups makes doing cross-rendered proofs a bit more efficient
To produce a cross-rendered proof select the saved soft proof settings Here Irsquove selected the SWOP-V2-BW-Off proof setup
You will definitely want to select the Simulate Black Ink option Whether you select Simulate Paper Color depends on your intent for the resulting print If you merely want to provide an aim print you may choose not to use this option
To produce an accurate cross-rendered proof select the Simulate Paper Color and the Simulate Black Ink options
However if you wish to provide a very accurate cross-rendered proof that could act as a con-tract proof for color you should select Simulate Paper Color It should be noted that just as the on-screen results will show a marked reduction in dynamic range so will a cross-rendered proof with this option turned on When reviewing the final print the paper white of the actual CMYK output profile will produce a scum tone over the image This preview will be a rather accurate reproduction of the final printed piece but it wonrsquot look very good which is actually what you want in an accurate proof Photographers should really only concern themselves with proofing the image not the final design of the page layout Note that even a highly accurate cross-rendered proof from an inkjet will not show the results of the halftone screening process so only the color can essentially be proofed
PreparingImagesforDelivery
Here Irsquove set the media settings (left) and the Printer Color Management settings (right)
Marking your territoryBefore actually saving your files for client delivery there is one additional step that is important to fulfill properly marking your images with proper metadatamdashmarking your territory if you will Most professional photographers would never send film to their clients without some sort of identification and the importance of marking your images is no less in the digital age Arguably itrsquos even more important now
Enter metadata about your image in the File Info dialog box in Photoshop or Adobe Bridge
PreparingImagesforDelivery
In Photoshop (or Bridge) you should complete the relevant metadata fields in the File Info dialog box All editable fields that are useful for downstream organization and identification should be employed
The four main IPTC metadata panels
New to Photoshop CS2 are the XMP for IPTC panels for expanded metadata support Itrsquos relatively simple to complete all the general fields with standard information such as contact copyright status and usage and save the completed forms as a template that can be applied to all images destined for delivery to third parties Communicate with your clients to get all the necessary information There really is no excuse not to do this critical step in preparing files for delivery
file formats for deliverySo you are ready to save the files for delivery However you arenrsquot quite done yet in making some important decisions The choice of file format and the final image naming is still a critical step
When delivering files to clients itrsquos important to adhere to proper naming conventions When naming files itrsquos critical to stick to an alphanumeric series of letters and numbers and use only approved special characters such as underscores or dashes for spaces You should not use any of the special symbols such as $ ^ amp ( ) + in a file name Depending on the final output device and the operating system it runs under special symbols can lead to unpredictable results
PreparingImagesforDelivery
Additionally even though recent operating systems such as Mac OS X and Windows XP may allow extended characters in a file name there are enough systems in use in the industry that cannot understand long file names Therefore you should use only a safe length for Mac OS 31 characters plus a period separating the file name and extension or 11 characters plus period and extension for MS DOS machines
The file format you supply is also an important consideration
File format options in Photoshop
If you are supplying 16-bit-per-channel CMYK files there is only a single optimal file format to use TIFF
TIFF file options when working with a 16-bit-per-channel image
When selecting the format options for a TIFF file it should be noted that some output devices cannot handle TIFF files with any compression such as LZW or ZIP Also when delivering for clients itrsquos generally not a good idea to supply layered files Unless you can be assured that the client will treat the layered files properly flattening is always the safest option
PreparingImagesforDelivery
If you are supplying 8-bit-per-channel CMYK files the format options grow
By changing the bit depth to 8 BitsChannel (left) you can select more file formats for delivery (right)
Mode changing to 8 bits and saving as a CMYK file will offer a variety of additional file formats However unless you have instructions to the contrary the safest file format is still TIFF
The Save As dialog box with the Embed Color Profile option deselected
There is an additional consideration when saving files intended for CMYK reproduction Unless yoursquove had direct and successful communications with the prepress personnel saving a CMYK file with an embedded profile might not be such a good idea While saving RGB files with embedded profiles is pretty much a universal good idea to avoid ambiguous color in graphic arts and print-ing embedded profiles can sometimes lead to problems for both technical and political reasons
Until the political realities change and RIPs can be updated to ensure they wonrsquot choke on embedded profilesmdashthis is actually rare but can happenmdashI provide CMYK files with no profiles I do note in the accompanying Read Me text files an indication of how the files were prepared If I have been fortunate enough to be working with a color management savvy prepress supplier I would be happy to embed the profile in the CMYK filemdashideally the profile they supplied me But until color management gets wider adoption in the graphic arts itrsquos easier and safer to strip the CMYK profile
If you need to transmit files instead of delivering them on a CD or DVD you can use either a zipped TIFF file or use JPG compression for the final file delivery In either case the file should be opened by the recipient and resaved as a standard TIFF file for final use Saving a final CMYK file as a JPEG file with Maximum Quality will rarely if ever produce any visible changes to the file However your client should be warned not to open the file or make changes and resave the file while in the JPEG format Multiple resaving in JPEG format is to be avoided
PreparingImagesforDelivery 0
Also you should alert your client if you have chosen not to embed a profile in the CMYK file that opening the image in Photoshop might prompt a warning dialog box
Photoshop returns a warning dialog box when you open a file that doesnrsquot have an embedded profile
Depending on the color management settings in your clientrsquos Photoshop setup they may see a warning when they open a file without an embedded profile If so you can tell them to assign the profile yoursquove used to convert the filemdashif itrsquos a profile included in Photoshop that is a simple solution If yoursquove stripped the profile and used a custom CMYK profile you should consider supplying the profile separately on disk or in the file transmission
If you are asked to supply files that are sized For Position Only (FPO) yoursquoll need to make sure the final image dimensions match the final high-resolution files exactly Only the pixel resolution should be downsampled Be sure to save the FPO version with an unambiguous file name that relates but would not be confused with the high-resolution file
The Image Size dialog showing a reduced resolution version of the original CMYK file (left) and selecting Save As (right) In the FPO version be sure to give it a noticible designation
PreparingImagesforDelivery 1
While it may seem that nobody actually reads Read Me files it is still an important practice to provide documentation and identification of images delivered to clients If nothing else you can point to the text file they failed to read as explaining any miscommunication on their part
Itrsquos good practice to include a Read Me file when you deliver your images to your clients
Regardless of whether you are burning to disk or transmitting over the net itrsquos important to include an organized file folder structure to help avoid confusion I place files inside named fold-ers that help explain their contents and segregate high-resolution CMYK files from FPOs from RGB files Particularly if you are burning to CD or DVD itrsquos useful to export the browsed cache from Adobe Bridge to make browsing from the CD or DVD quicker
When delivering files it helps to put them in an organized file folder structure
abouT THe auTHoR
JeffScheweasummacumlaudegraduateofRochesterInstituteofTechnologyhasbeenanadvertisingphotographerinChicagoforover25yearsHehasbeendoingdigitalimagingforover14yearsandiswidelyknownandrespectedinthedigitalimagingcommunityasaleadingpioneerinthefieldJeffisafeatureconsultantandalphatesterforPhotoshop
foR MoRe InfoRMaTIon
ForacomprehensiveoverviewofPhotoshopCS2pleasevisitwwwadobecomproductsphotoshopmainhtml
Adobe Systems Incorporated345ParkAvenueSanJoseCA95110-2704USAwwwadobecom
AdobetheAdobelogoAcrobatIllustratorInDesignandPhotoshopareeitherregisteredtrademarksortrademarksofAdobeSystemsIncorporatedintheUnitedStatesandorothercountriesAllothertrademarksarethepropertyoftheirrespectiveowners
copy2006JeffScheweAllrightsreserved
My personal preference even if you supply files initially via transmission is to burn the delivered files to CD or DVD I do this for several reasons to give the client a tangible result from the project that they can store and to burn a read-only version of the final delivered files that cannot be altered If at some point something happens to the file (for example somebody changes it poorly) therersquos always the original starting point image burned into the disc that cannot be changed While it doesnrsquot happen often it has happened that somebody made a mistake downstream of my file delivery and itrsquos useful to be able to point to a version of a file that represents the state of the delivered image before any additional changes were made
checklist for file deliveryConfirm final file specifications and requirements
Open a secure line of communication with client and prepress provider
Confirm final reproduction process (SWOP or Sheet Fed)
Confirm final output color space ideally with printer-supplied ICC profile
Confirm delivery of RGB CMYK or RGB plus CMYK
Tone and color correct with soft proofing for the final output
Confirm final file size and resolution
Provide image sharpening for output
Provide aim print or proof print for color
Embed image metadata for identification
Confirm final delivery file format
Provide Read Me file with documentation file list and contact information
Organize and segregate file types separate high-resolution files FPO RGB and CMYK
Provide read-only final files on CD or DVD
additional resourcesDigital Image Submission Guidelines (DISC) wwwdisc-infoorg
Universal Photographic Digital Imaging Guidelines (UPDIG) wwwupdigorg
Real World Color Management by Bruce Fraser Chris Murphy and Fred Bunting Published by Peachpit Press ISBN 0321267222
Color Management for Photographers by Andrew Rodney Published by Focal Press ISBN 0-240-80649-2
PixelGenius by PhotoKit Sharpener wwwpixelgeniuscom
Nik Software by Nik Sharpener Pro wwwniksoftwarecom
bull
bull
bull
bull
bull
bull
bull
bull
bull
bull
bull
bull
bull
bull
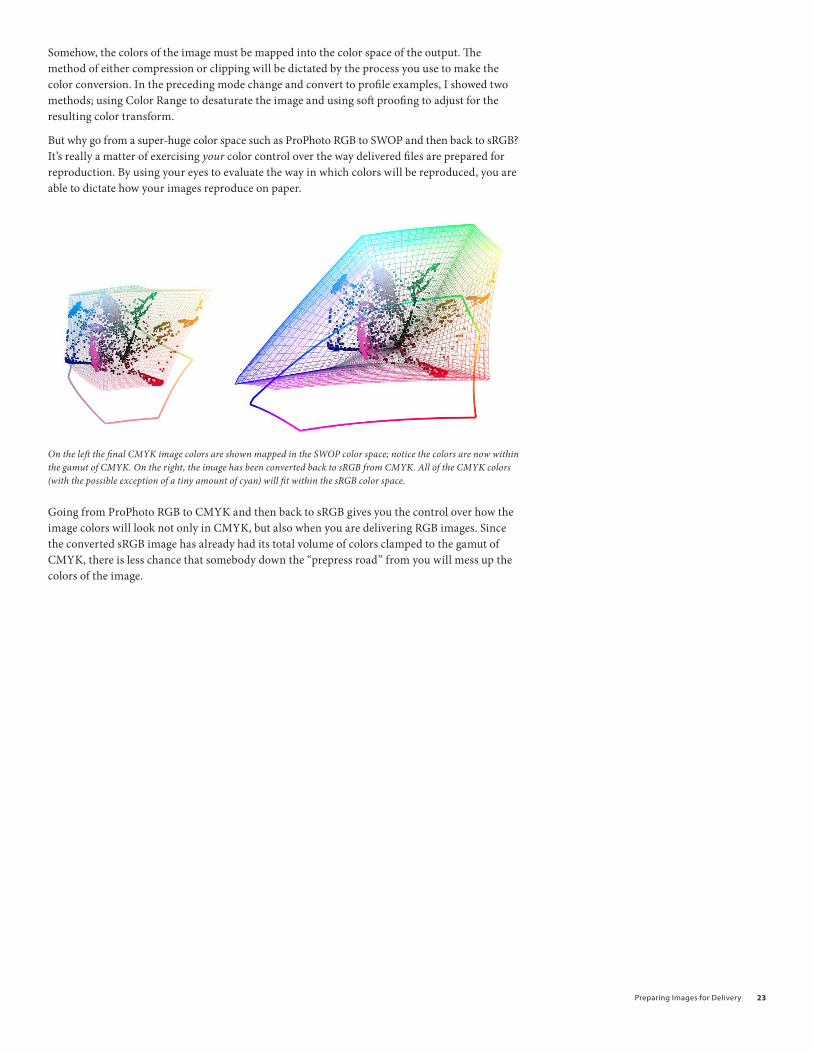
PreparingImagesforDelivery
Somehow the colors of the image must be mapped into the color space of the output The method of either compression or clipping will be dictated by the process you use to make the color conversion In the preceding mode change and convert to profile examples I showed two methods using Color Range to desaturate the image and using soft proofing to adjust for the resulting color transform
But why go from a super-huge color space such as ProPhoto RGB to SWOP and then back to sRGB Itrsquos really a matter of exercising your color control over the way delivered files are prepared for reproduction By using your eyes to evaluate the way in which colors will be reproduced you are able to dictate how your images reproduce on paper
On the left the final CMYK image colors are shown mapped in the SWOP color space notice the colors are now within the gamut of CMYK On the right the image has been converted back to sRGB from CMYK All of the CMYK colors (with the possible exception of a tiny amount of cyan) will fit within the sRGB color space
Going from ProPhoto RGB to CMYK and then back to sRGB gives you the control over how the image colors will look not only in CMYK but also when you are delivering RGB images Since the converted sRGB image has already had its total volume of colors clamped to the gamut of CMYK there is less chance that somebody down the ldquoprepress roadrdquo from you will mess up the colors of the image
PreparingImagesforDelivery
The proofWhen supplying digital files itrsquos important to also provide an aim print or actual proof that confirms on paper what the image should look like when reproduced In the past Irsquove resorted to actually sending the CMYK file to a service bureau for expensive contract proofs While the result is an unequivocal proof of the CMYK file it can be both costly and time consuming If you have a quality ink jet printer and accurate profiles for the printer you can print out from Photoshop and produce a cross-rendered proof A cross-rendered proof is made by using both the original CMYK profile as well as the printer profile to render in the print the accurate results of proofing to the final output device Again this presupposes that you have an accurate display and printer profile and that you follow the cross-rendering recipe for printing from Photoshop
This figure shows the Photoshop Print dialog box with a preview of the image Irsquove selected Let Photoshop Determine Colors from the Color Handling pop-up menu and selected the correct printer profile
PreparingImagesforDelivery
In the Print dialog box in Photoshop yoursquoll need to alter the settings you may normally use Rather than setting the Print space to your RGB or CMYK space you use the Proof option instead Under Options choose Let Photoshop Determine Colors from the Color Handling pop-up menu and select your particular printerrsquos profile However selecting the proof option in print allows the use of the Proof Setup Preset (shown below) which if yoursquove saved your soft proofing setups makes doing cross-rendered proofs a bit more efficient
To produce a cross-rendered proof select the saved soft proof settings Here Irsquove selected the SWOP-V2-BW-Off proof setup
You will definitely want to select the Simulate Black Ink option Whether you select Simulate Paper Color depends on your intent for the resulting print If you merely want to provide an aim print you may choose not to use this option
To produce an accurate cross-rendered proof select the Simulate Paper Color and the Simulate Black Ink options
However if you wish to provide a very accurate cross-rendered proof that could act as a con-tract proof for color you should select Simulate Paper Color It should be noted that just as the on-screen results will show a marked reduction in dynamic range so will a cross-rendered proof with this option turned on When reviewing the final print the paper white of the actual CMYK output profile will produce a scum tone over the image This preview will be a rather accurate reproduction of the final printed piece but it wonrsquot look very good which is actually what you want in an accurate proof Photographers should really only concern themselves with proofing the image not the final design of the page layout Note that even a highly accurate cross-rendered proof from an inkjet will not show the results of the halftone screening process so only the color can essentially be proofed
PreparingImagesforDelivery
Here Irsquove set the media settings (left) and the Printer Color Management settings (right)
Marking your territoryBefore actually saving your files for client delivery there is one additional step that is important to fulfill properly marking your images with proper metadatamdashmarking your territory if you will Most professional photographers would never send film to their clients without some sort of identification and the importance of marking your images is no less in the digital age Arguably itrsquos even more important now
Enter metadata about your image in the File Info dialog box in Photoshop or Adobe Bridge
PreparingImagesforDelivery
In Photoshop (or Bridge) you should complete the relevant metadata fields in the File Info dialog box All editable fields that are useful for downstream organization and identification should be employed
The four main IPTC metadata panels
New to Photoshop CS2 are the XMP for IPTC panels for expanded metadata support Itrsquos relatively simple to complete all the general fields with standard information such as contact copyright status and usage and save the completed forms as a template that can be applied to all images destined for delivery to third parties Communicate with your clients to get all the necessary information There really is no excuse not to do this critical step in preparing files for delivery
file formats for deliverySo you are ready to save the files for delivery However you arenrsquot quite done yet in making some important decisions The choice of file format and the final image naming is still a critical step
When delivering files to clients itrsquos important to adhere to proper naming conventions When naming files itrsquos critical to stick to an alphanumeric series of letters and numbers and use only approved special characters such as underscores or dashes for spaces You should not use any of the special symbols such as $ ^ amp ( ) + in a file name Depending on the final output device and the operating system it runs under special symbols can lead to unpredictable results
PreparingImagesforDelivery
Additionally even though recent operating systems such as Mac OS X and Windows XP may allow extended characters in a file name there are enough systems in use in the industry that cannot understand long file names Therefore you should use only a safe length for Mac OS 31 characters plus a period separating the file name and extension or 11 characters plus period and extension for MS DOS machines
The file format you supply is also an important consideration
File format options in Photoshop
If you are supplying 16-bit-per-channel CMYK files there is only a single optimal file format to use TIFF
TIFF file options when working with a 16-bit-per-channel image
When selecting the format options for a TIFF file it should be noted that some output devices cannot handle TIFF files with any compression such as LZW or ZIP Also when delivering for clients itrsquos generally not a good idea to supply layered files Unless you can be assured that the client will treat the layered files properly flattening is always the safest option
PreparingImagesforDelivery
If you are supplying 8-bit-per-channel CMYK files the format options grow
By changing the bit depth to 8 BitsChannel (left) you can select more file formats for delivery (right)
Mode changing to 8 bits and saving as a CMYK file will offer a variety of additional file formats However unless you have instructions to the contrary the safest file format is still TIFF
The Save As dialog box with the Embed Color Profile option deselected
There is an additional consideration when saving files intended for CMYK reproduction Unless yoursquove had direct and successful communications with the prepress personnel saving a CMYK file with an embedded profile might not be such a good idea While saving RGB files with embedded profiles is pretty much a universal good idea to avoid ambiguous color in graphic arts and print-ing embedded profiles can sometimes lead to problems for both technical and political reasons
Until the political realities change and RIPs can be updated to ensure they wonrsquot choke on embedded profilesmdashthis is actually rare but can happenmdashI provide CMYK files with no profiles I do note in the accompanying Read Me text files an indication of how the files were prepared If I have been fortunate enough to be working with a color management savvy prepress supplier I would be happy to embed the profile in the CMYK filemdashideally the profile they supplied me But until color management gets wider adoption in the graphic arts itrsquos easier and safer to strip the CMYK profile
If you need to transmit files instead of delivering them on a CD or DVD you can use either a zipped TIFF file or use JPG compression for the final file delivery In either case the file should be opened by the recipient and resaved as a standard TIFF file for final use Saving a final CMYK file as a JPEG file with Maximum Quality will rarely if ever produce any visible changes to the file However your client should be warned not to open the file or make changes and resave the file while in the JPEG format Multiple resaving in JPEG format is to be avoided
PreparingImagesforDelivery 0
Also you should alert your client if you have chosen not to embed a profile in the CMYK file that opening the image in Photoshop might prompt a warning dialog box
Photoshop returns a warning dialog box when you open a file that doesnrsquot have an embedded profile
Depending on the color management settings in your clientrsquos Photoshop setup they may see a warning when they open a file without an embedded profile If so you can tell them to assign the profile yoursquove used to convert the filemdashif itrsquos a profile included in Photoshop that is a simple solution If yoursquove stripped the profile and used a custom CMYK profile you should consider supplying the profile separately on disk or in the file transmission
If you are asked to supply files that are sized For Position Only (FPO) yoursquoll need to make sure the final image dimensions match the final high-resolution files exactly Only the pixel resolution should be downsampled Be sure to save the FPO version with an unambiguous file name that relates but would not be confused with the high-resolution file
The Image Size dialog showing a reduced resolution version of the original CMYK file (left) and selecting Save As (right) In the FPO version be sure to give it a noticible designation
PreparingImagesforDelivery 1
While it may seem that nobody actually reads Read Me files it is still an important practice to provide documentation and identification of images delivered to clients If nothing else you can point to the text file they failed to read as explaining any miscommunication on their part
Itrsquos good practice to include a Read Me file when you deliver your images to your clients
Regardless of whether you are burning to disk or transmitting over the net itrsquos important to include an organized file folder structure to help avoid confusion I place files inside named fold-ers that help explain their contents and segregate high-resolution CMYK files from FPOs from RGB files Particularly if you are burning to CD or DVD itrsquos useful to export the browsed cache from Adobe Bridge to make browsing from the CD or DVD quicker
When delivering files it helps to put them in an organized file folder structure
abouT THe auTHoR
JeffScheweasummacumlaudegraduateofRochesterInstituteofTechnologyhasbeenanadvertisingphotographerinChicagoforover25yearsHehasbeendoingdigitalimagingforover14yearsandiswidelyknownandrespectedinthedigitalimagingcommunityasaleadingpioneerinthefieldJeffisafeatureconsultantandalphatesterforPhotoshop
foR MoRe InfoRMaTIon
ForacomprehensiveoverviewofPhotoshopCS2pleasevisitwwwadobecomproductsphotoshopmainhtml
Adobe Systems Incorporated345ParkAvenueSanJoseCA95110-2704USAwwwadobecom
AdobetheAdobelogoAcrobatIllustratorInDesignandPhotoshopareeitherregisteredtrademarksortrademarksofAdobeSystemsIncorporatedintheUnitedStatesandorothercountriesAllothertrademarksarethepropertyoftheirrespectiveowners
copy2006JeffScheweAllrightsreserved
My personal preference even if you supply files initially via transmission is to burn the delivered files to CD or DVD I do this for several reasons to give the client a tangible result from the project that they can store and to burn a read-only version of the final delivered files that cannot be altered If at some point something happens to the file (for example somebody changes it poorly) therersquos always the original starting point image burned into the disc that cannot be changed While it doesnrsquot happen often it has happened that somebody made a mistake downstream of my file delivery and itrsquos useful to be able to point to a version of a file that represents the state of the delivered image before any additional changes were made
checklist for file deliveryConfirm final file specifications and requirements
Open a secure line of communication with client and prepress provider
Confirm final reproduction process (SWOP or Sheet Fed)
Confirm final output color space ideally with printer-supplied ICC profile
Confirm delivery of RGB CMYK or RGB plus CMYK
Tone and color correct with soft proofing for the final output
Confirm final file size and resolution
Provide image sharpening for output
Provide aim print or proof print for color
Embed image metadata for identification
Confirm final delivery file format
Provide Read Me file with documentation file list and contact information
Organize and segregate file types separate high-resolution files FPO RGB and CMYK
Provide read-only final files on CD or DVD
additional resourcesDigital Image Submission Guidelines (DISC) wwwdisc-infoorg
Universal Photographic Digital Imaging Guidelines (UPDIG) wwwupdigorg
Real World Color Management by Bruce Fraser Chris Murphy and Fred Bunting Published by Peachpit Press ISBN 0321267222
Color Management for Photographers by Andrew Rodney Published by Focal Press ISBN 0-240-80649-2
PixelGenius by PhotoKit Sharpener wwwpixelgeniuscom
Nik Software by Nik Sharpener Pro wwwniksoftwarecom
bull
bull
bull
bull
bull
bull
bull
bull
bull
bull
bull
bull
bull
bull
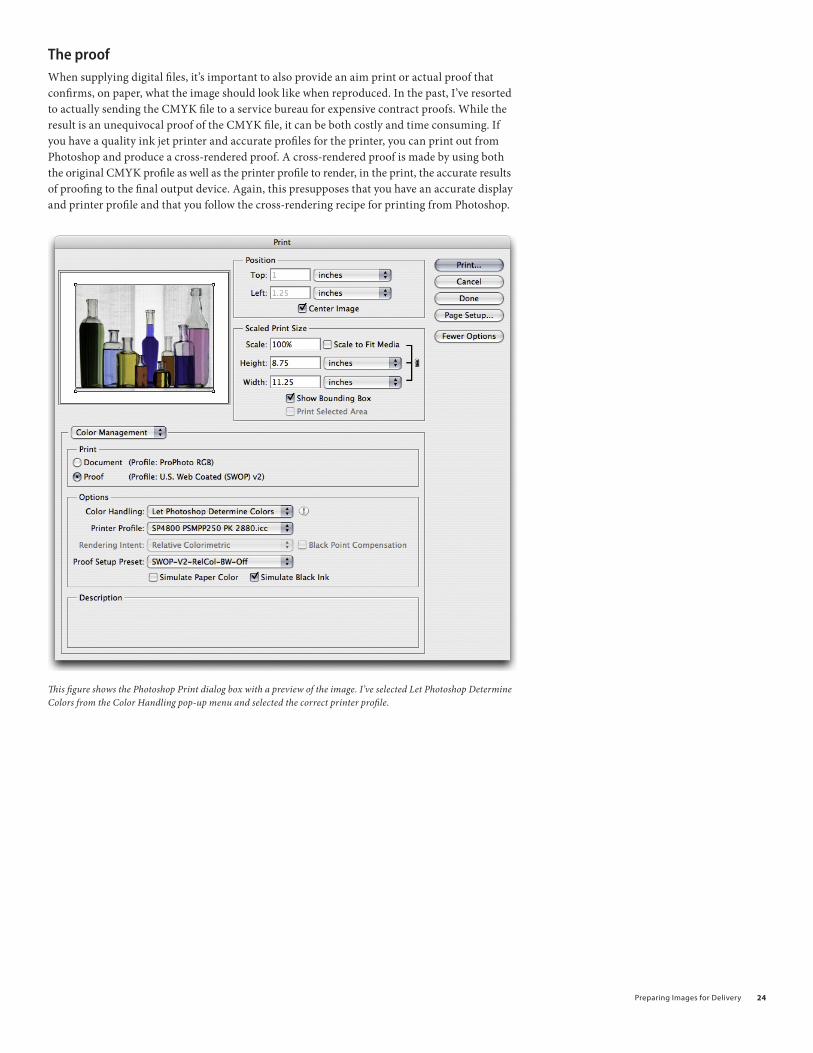
PreparingImagesforDelivery
Here Irsquove set the media settings (left) and the Printer Color Management settings (right)
Marking your territoryBefore actually saving your files for client delivery there is one additional step that is important to fulfill properly marking your images with proper metadatamdashmarking your territory if you will Most professional photographers would never send film to their clients without some sort of identification and the importance of marking your images is no less in the digital age Arguably itrsquos even more important now
Enter metadata about your image in the File Info dialog box in Photoshop or Adobe Bridge
PreparingImagesforDelivery
In Photoshop (or Bridge) you should complete the relevant metadata fields in the File Info dialog box All editable fields that are useful for downstream organization and identification should be employed
The four main IPTC metadata panels
New to Photoshop CS2 are the XMP for IPTC panels for expanded metadata support Itrsquos relatively simple to complete all the general fields with standard information such as contact copyright status and usage and save the completed forms as a template that can be applied to all images destined for delivery to third parties Communicate with your clients to get all the necessary information There really is no excuse not to do this critical step in preparing files for delivery
file formats for deliverySo you are ready to save the files for delivery However you arenrsquot quite done yet in making some important decisions The choice of file format and the final image naming is still a critical step
When delivering files to clients itrsquos important to adhere to proper naming conventions When naming files itrsquos critical to stick to an alphanumeric series of letters and numbers and use only approved special characters such as underscores or dashes for spaces You should not use any of the special symbols such as $ ^ amp ( ) + in a file name Depending on the final output device and the operating system it runs under special symbols can lead to unpredictable results
PreparingImagesforDelivery
Additionally even though recent operating systems such as Mac OS X and Windows XP may allow extended characters in a file name there are enough systems in use in the industry that cannot understand long file names Therefore you should use only a safe length for Mac OS 31 characters plus a period separating the file name and extension or 11 characters plus period and extension for MS DOS machines
The file format you supply is also an important consideration
File format options in Photoshop
If you are supplying 16-bit-per-channel CMYK files there is only a single optimal file format to use TIFF
TIFF file options when working with a 16-bit-per-channel image
When selecting the format options for a TIFF file it should be noted that some output devices cannot handle TIFF files with any compression such as LZW or ZIP Also when delivering for clients itrsquos generally not a good idea to supply layered files Unless you can be assured that the client will treat the layered files properly flattening is always the safest option
PreparingImagesforDelivery
If you are supplying 8-bit-per-channel CMYK files the format options grow
By changing the bit depth to 8 BitsChannel (left) you can select more file formats for delivery (right)
Mode changing to 8 bits and saving as a CMYK file will offer a variety of additional file formats However unless you have instructions to the contrary the safest file format is still TIFF
The Save As dialog box with the Embed Color Profile option deselected
There is an additional consideration when saving files intended for CMYK reproduction Unless yoursquove had direct and successful communications with the prepress personnel saving a CMYK file with an embedded profile might not be such a good idea While saving RGB files with embedded profiles is pretty much a universal good idea to avoid ambiguous color in graphic arts and print-ing embedded profiles can sometimes lead to problems for both technical and political reasons
Until the political realities change and RIPs can be updated to ensure they wonrsquot choke on embedded profilesmdashthis is actually rare but can happenmdashI provide CMYK files with no profiles I do note in the accompanying Read Me text files an indication of how the files were prepared If I have been fortunate enough to be working with a color management savvy prepress supplier I would be happy to embed the profile in the CMYK filemdashideally the profile they supplied me But until color management gets wider adoption in the graphic arts itrsquos easier and safer to strip the CMYK profile
If you need to transmit files instead of delivering them on a CD or DVD you can use either a zipped TIFF file or use JPG compression for the final file delivery In either case the file should be opened by the recipient and resaved as a standard TIFF file for final use Saving a final CMYK file as a JPEG file with Maximum Quality will rarely if ever produce any visible changes to the file However your client should be warned not to open the file or make changes and resave the file while in the JPEG format Multiple resaving in JPEG format is to be avoided
PreparingImagesforDelivery 0
Also you should alert your client if you have chosen not to embed a profile in the CMYK file that opening the image in Photoshop might prompt a warning dialog box
Photoshop returns a warning dialog box when you open a file that doesnrsquot have an embedded profile
Depending on the color management settings in your clientrsquos Photoshop setup they may see a warning when they open a file without an embedded profile If so you can tell them to assign the profile yoursquove used to convert the filemdashif itrsquos a profile included in Photoshop that is a simple solution If yoursquove stripped the profile and used a custom CMYK profile you should consider supplying the profile separately on disk or in the file transmission
If you are asked to supply files that are sized For Position Only (FPO) yoursquoll need to make sure the final image dimensions match the final high-resolution files exactly Only the pixel resolution should be downsampled Be sure to save the FPO version with an unambiguous file name that relates but would not be confused with the high-resolution file
The Image Size dialog showing a reduced resolution version of the original CMYK file (left) and selecting Save As (right) In the FPO version be sure to give it a noticible designation
PreparingImagesforDelivery 1
While it may seem that nobody actually reads Read Me files it is still an important practice to provide documentation and identification of images delivered to clients If nothing else you can point to the text file they failed to read as explaining any miscommunication on their part
Itrsquos good practice to include a Read Me file when you deliver your images to your clients
Regardless of whether you are burning to disk or transmitting over the net itrsquos important to include an organized file folder structure to help avoid confusion I place files inside named fold-ers that help explain their contents and segregate high-resolution CMYK files from FPOs from RGB files Particularly if you are burning to CD or DVD itrsquos useful to export the browsed cache from Adobe Bridge to make browsing from the CD or DVD quicker
When delivering files it helps to put them in an organized file folder structure
abouT THe auTHoR
JeffScheweasummacumlaudegraduateofRochesterInstituteofTechnologyhasbeenanadvertisingphotographerinChicagoforover25yearsHehasbeendoingdigitalimagingforover14yearsandiswidelyknownandrespectedinthedigitalimagingcommunityasaleadingpioneerinthefieldJeffisafeatureconsultantandalphatesterforPhotoshop
foR MoRe InfoRMaTIon
ForacomprehensiveoverviewofPhotoshopCS2pleasevisitwwwadobecomproductsphotoshopmainhtml
Adobe Systems Incorporated345ParkAvenueSanJoseCA95110-2704USAwwwadobecom
AdobetheAdobelogoAcrobatIllustratorInDesignandPhotoshopareeitherregisteredtrademarksortrademarksofAdobeSystemsIncorporatedintheUnitedStatesandorothercountriesAllothertrademarksarethepropertyoftheirrespectiveowners
copy2006JeffScheweAllrightsreserved
My personal preference even if you supply files initially via transmission is to burn the delivered files to CD or DVD I do this for several reasons to give the client a tangible result from the project that they can store and to burn a read-only version of the final delivered files that cannot be altered If at some point something happens to the file (for example somebody changes it poorly) therersquos always the original starting point image burned into the disc that cannot be changed While it doesnrsquot happen often it has happened that somebody made a mistake downstream of my file delivery and itrsquos useful to be able to point to a version of a file that represents the state of the delivered image before any additional changes were made
checklist for file deliveryConfirm final file specifications and requirements
Open a secure line of communication with client and prepress provider
Confirm final reproduction process (SWOP or Sheet Fed)
Confirm final output color space ideally with printer-supplied ICC profile
Confirm delivery of RGB CMYK or RGB plus CMYK
Tone and color correct with soft proofing for the final output
Confirm final file size and resolution
Provide image sharpening for output
Provide aim print or proof print for color
Embed image metadata for identification
Confirm final delivery file format
Provide Read Me file with documentation file list and contact information
Organize and segregate file types separate high-resolution files FPO RGB and CMYK
Provide read-only final files on CD or DVD
additional resourcesDigital Image Submission Guidelines (DISC) wwwdisc-infoorg
Universal Photographic Digital Imaging Guidelines (UPDIG) wwwupdigorg
Real World Color Management by Bruce Fraser Chris Murphy and Fred Bunting Published by Peachpit Press ISBN 0321267222
Color Management for Photographers by Andrew Rodney Published by Focal Press ISBN 0-240-80649-2
PixelGenius by PhotoKit Sharpener wwwpixelgeniuscom
Nik Software by Nik Sharpener Pro wwwniksoftwarecom
bull
bull
bull
bull
bull
bull
bull
bull
bull
bull
bull
bull
bull
bull
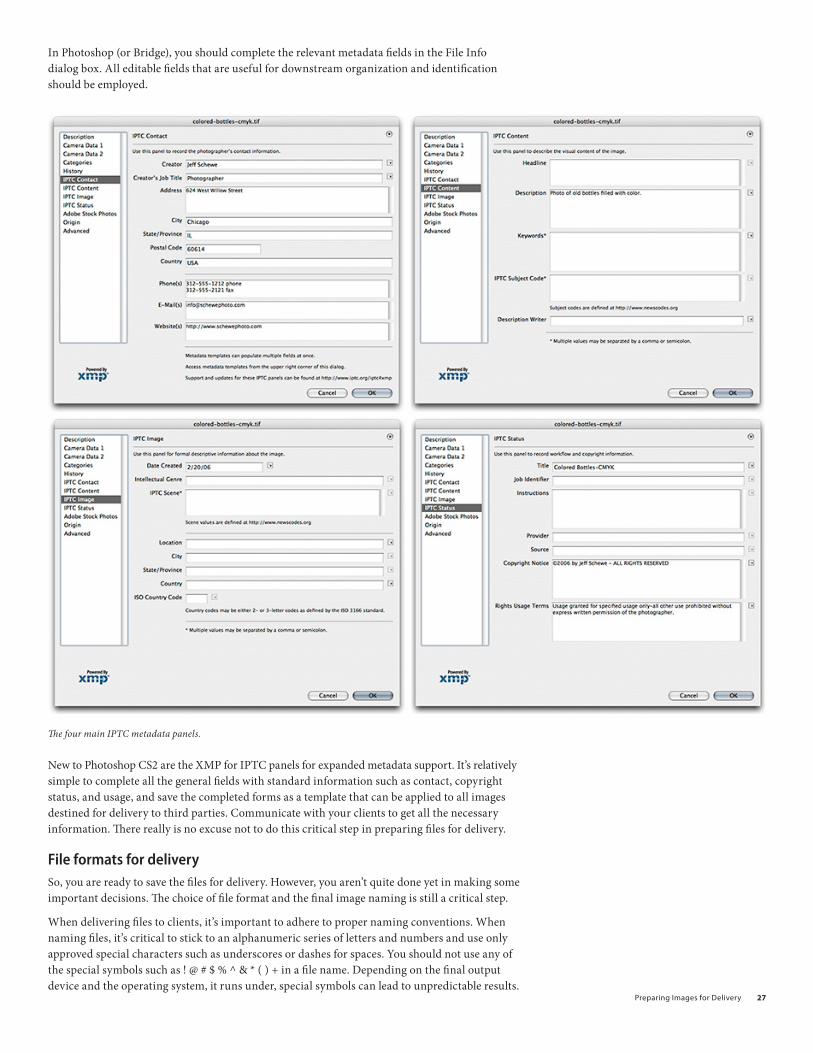
PreparingImagesforDelivery
Additionally even though recent operating systems such as Mac OS X and Windows XP may allow extended characters in a file name there are enough systems in use in the industry that cannot understand long file names Therefore you should use only a safe length for Mac OS 31 characters plus a period separating the file name and extension or 11 characters plus period and extension for MS DOS machines
The file format you supply is also an important consideration
File format options in Photoshop
If you are supplying 16-bit-per-channel CMYK files there is only a single optimal file format to use TIFF
TIFF file options when working with a 16-bit-per-channel image
When selecting the format options for a TIFF file it should be noted that some output devices cannot handle TIFF files with any compression such as LZW or ZIP Also when delivering for clients itrsquos generally not a good idea to supply layered files Unless you can be assured that the client will treat the layered files properly flattening is always the safest option
PreparingImagesforDelivery
If you are supplying 8-bit-per-channel CMYK files the format options grow
By changing the bit depth to 8 BitsChannel (left) you can select more file formats for delivery (right)
Mode changing to 8 bits and saving as a CMYK file will offer a variety of additional file formats However unless you have instructions to the contrary the safest file format is still TIFF
The Save As dialog box with the Embed Color Profile option deselected
There is an additional consideration when saving files intended for CMYK reproduction Unless yoursquove had direct and successful communications with the prepress personnel saving a CMYK file with an embedded profile might not be such a good idea While saving RGB files with embedded profiles is pretty much a universal good idea to avoid ambiguous color in graphic arts and print-ing embedded profiles can sometimes lead to problems for both technical and political reasons
Until the political realities change and RIPs can be updated to ensure they wonrsquot choke on embedded profilesmdashthis is actually rare but can happenmdashI provide CMYK files with no profiles I do note in the accompanying Read Me text files an indication of how the files were prepared If I have been fortunate enough to be working with a color management savvy prepress supplier I would be happy to embed the profile in the CMYK filemdashideally the profile they supplied me But until color management gets wider adoption in the graphic arts itrsquos easier and safer to strip the CMYK profile
If you need to transmit files instead of delivering them on a CD or DVD you can use either a zipped TIFF file or use JPG compression for the final file delivery In either case the file should be opened by the recipient and resaved as a standard TIFF file for final use Saving a final CMYK file as a JPEG file with Maximum Quality will rarely if ever produce any visible changes to the file However your client should be warned not to open the file or make changes and resave the file while in the JPEG format Multiple resaving in JPEG format is to be avoided
PreparingImagesforDelivery 0
Also you should alert your client if you have chosen not to embed a profile in the CMYK file that opening the image in Photoshop might prompt a warning dialog box
Photoshop returns a warning dialog box when you open a file that doesnrsquot have an embedded profile
Depending on the color management settings in your clientrsquos Photoshop setup they may see a warning when they open a file without an embedded profile If so you can tell them to assign the profile yoursquove used to convert the filemdashif itrsquos a profile included in Photoshop that is a simple solution If yoursquove stripped the profile and used a custom CMYK profile you should consider supplying the profile separately on disk or in the file transmission
If you are asked to supply files that are sized For Position Only (FPO) yoursquoll need to make sure the final image dimensions match the final high-resolution files exactly Only the pixel resolution should be downsampled Be sure to save the FPO version with an unambiguous file name that relates but would not be confused with the high-resolution file
The Image Size dialog showing a reduced resolution version of the original CMYK file (left) and selecting Save As (right) In the FPO version be sure to give it a noticible designation
PreparingImagesforDelivery 1
While it may seem that nobody actually reads Read Me files it is still an important practice to provide documentation and identification of images delivered to clients If nothing else you can point to the text file they failed to read as explaining any miscommunication on their part
Itrsquos good practice to include a Read Me file when you deliver your images to your clients
Regardless of whether you are burning to disk or transmitting over the net itrsquos important to include an organized file folder structure to help avoid confusion I place files inside named fold-ers that help explain their contents and segregate high-resolution CMYK files from FPOs from RGB files Particularly if you are burning to CD or DVD itrsquos useful to export the browsed cache from Adobe Bridge to make browsing from the CD or DVD quicker
When delivering files it helps to put them in an organized file folder structure
abouT THe auTHoR
JeffScheweasummacumlaudegraduateofRochesterInstituteofTechnologyhasbeenanadvertisingphotographerinChicagoforover25yearsHehasbeendoingdigitalimagingforover14yearsandiswidelyknownandrespectedinthedigitalimagingcommunityasaleadingpioneerinthefieldJeffisafeatureconsultantandalphatesterforPhotoshop
foR MoRe InfoRMaTIon
ForacomprehensiveoverviewofPhotoshopCS2pleasevisitwwwadobecomproductsphotoshopmainhtml
Adobe Systems Incorporated345ParkAvenueSanJoseCA95110-2704USAwwwadobecom
AdobetheAdobelogoAcrobatIllustratorInDesignandPhotoshopareeitherregisteredtrademarksortrademarksofAdobeSystemsIncorporatedintheUnitedStatesandorothercountriesAllothertrademarksarethepropertyoftheirrespectiveowners
copy2006JeffScheweAllrightsreserved
My personal preference even if you supply files initially via transmission is to burn the delivered files to CD or DVD I do this for several reasons to give the client a tangible result from the project that they can store and to burn a read-only version of the final delivered files that cannot be altered If at some point something happens to the file (for example somebody changes it poorly) therersquos always the original starting point image burned into the disc that cannot be changed While it doesnrsquot happen often it has happened that somebody made a mistake downstream of my file delivery and itrsquos useful to be able to point to a version of a file that represents the state of the delivered image before any additional changes were made
checklist for file deliveryConfirm final file specifications and requirements
Open a secure line of communication with client and prepress provider
Confirm final reproduction process (SWOP or Sheet Fed)
Confirm final output color space ideally with printer-supplied ICC profile
Confirm delivery of RGB CMYK or RGB plus CMYK
Tone and color correct with soft proofing for the final output
Confirm final file size and resolution
Provide image sharpening for output
Provide aim print or proof print for color
Embed image metadata for identification
Confirm final delivery file format
Provide Read Me file with documentation file list and contact information
Organize and segregate file types separate high-resolution files FPO RGB and CMYK
Provide read-only final files on CD or DVD
additional resourcesDigital Image Submission Guidelines (DISC) wwwdisc-infoorg
Universal Photographic Digital Imaging Guidelines (UPDIG) wwwupdigorg
Real World Color Management by Bruce Fraser Chris Murphy and Fred Bunting Published by Peachpit Press ISBN 0321267222
Color Management for Photographers by Andrew Rodney Published by Focal Press ISBN 0-240-80649-2
PixelGenius by PhotoKit Sharpener wwwpixelgeniuscom
Nik Software by Nik Sharpener Pro wwwniksoftwarecom
bull
bull
bull
bull
bull
bull
bull
bull
bull
bull
bull
bull
bull
bull
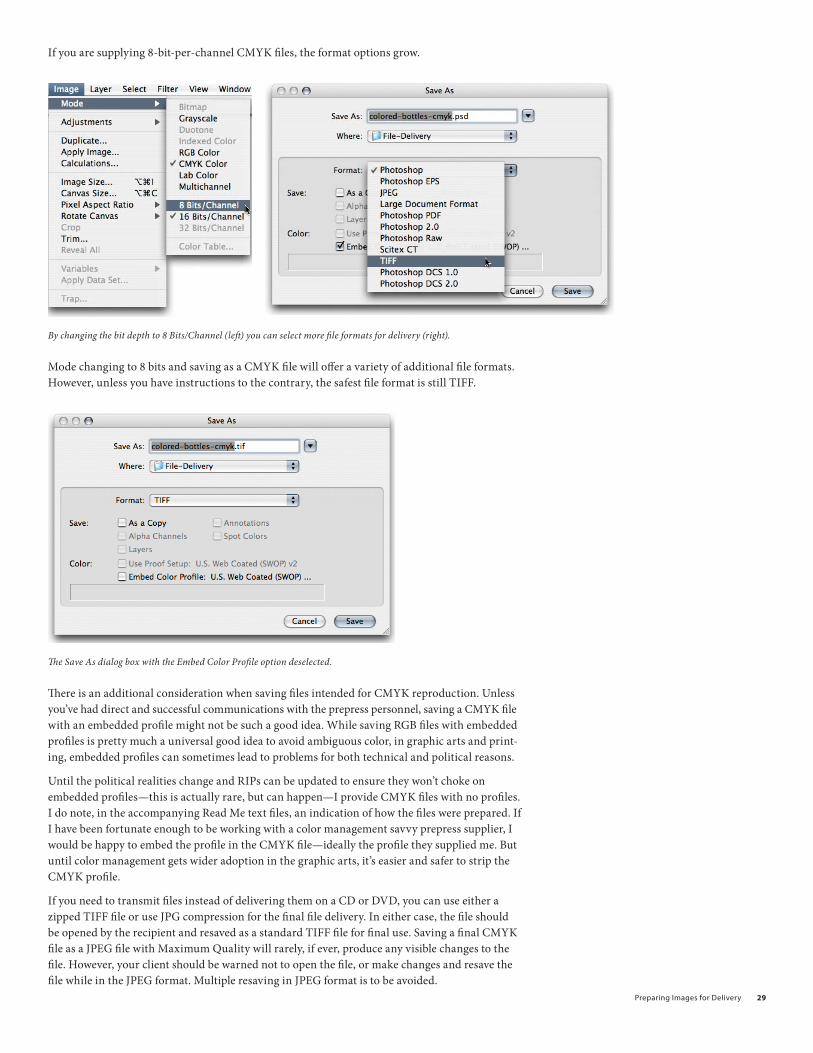
PreparingImagesforDelivery
If you are supplying 8-bit-per-channel CMYK files the format options grow
By changing the bit depth to 8 BitsChannel (left) you can select more file formats for delivery (right)
Mode changing to 8 bits and saving as a CMYK file will offer a variety of additional file formats However unless you have instructions to the contrary the safest file format is still TIFF
The Save As dialog box with the Embed Color Profile option deselected
There is an additional consideration when saving files intended for CMYK reproduction Unless yoursquove had direct and successful communications with the prepress personnel saving a CMYK file with an embedded profile might not be such a good idea While saving RGB files with embedded profiles is pretty much a universal good idea to avoid ambiguous color in graphic arts and print-ing embedded profiles can sometimes lead to problems for both technical and political reasons
Until the political realities change and RIPs can be updated to ensure they wonrsquot choke on embedded profilesmdashthis is actually rare but can happenmdashI provide CMYK files with no profiles I do note in the accompanying Read Me text files an indication of how the files were prepared If I have been fortunate enough to be working with a color management savvy prepress supplier I would be happy to embed the profile in the CMYK filemdashideally the profile they supplied me But until color management gets wider adoption in the graphic arts itrsquos easier and safer to strip the CMYK profile
If you need to transmit files instead of delivering them on a CD or DVD you can use either a zipped TIFF file or use JPG compression for the final file delivery In either case the file should be opened by the recipient and resaved as a standard TIFF file for final use Saving a final CMYK file as a JPEG file with Maximum Quality will rarely if ever produce any visible changes to the file However your client should be warned not to open the file or make changes and resave the file while in the JPEG format Multiple resaving in JPEG format is to be avoided
PreparingImagesforDelivery 0
Also you should alert your client if you have chosen not to embed a profile in the CMYK file that opening the image in Photoshop might prompt a warning dialog box
Photoshop returns a warning dialog box when you open a file that doesnrsquot have an embedded profile
Depending on the color management settings in your clientrsquos Photoshop setup they may see a warning when they open a file without an embedded profile If so you can tell them to assign the profile yoursquove used to convert the filemdashif itrsquos a profile included in Photoshop that is a simple solution If yoursquove stripped the profile and used a custom CMYK profile you should consider supplying the profile separately on disk or in the file transmission
If you are asked to supply files that are sized For Position Only (FPO) yoursquoll need to make sure the final image dimensions match the final high-resolution files exactly Only the pixel resolution should be downsampled Be sure to save the FPO version with an unambiguous file name that relates but would not be confused with the high-resolution file
The Image Size dialog showing a reduced resolution version of the original CMYK file (left) and selecting Save As (right) In the FPO version be sure to give it a noticible designation
PreparingImagesforDelivery 1
While it may seem that nobody actually reads Read Me files it is still an important practice to provide documentation and identification of images delivered to clients If nothing else you can point to the text file they failed to read as explaining any miscommunication on their part
Itrsquos good practice to include a Read Me file when you deliver your images to your clients
Regardless of whether you are burning to disk or transmitting over the net itrsquos important to include an organized file folder structure to help avoid confusion I place files inside named fold-ers that help explain their contents and segregate high-resolution CMYK files from FPOs from RGB files Particularly if you are burning to CD or DVD itrsquos useful to export the browsed cache from Adobe Bridge to make browsing from the CD or DVD quicker
When delivering files it helps to put them in an organized file folder structure
abouT THe auTHoR
JeffScheweasummacumlaudegraduateofRochesterInstituteofTechnologyhasbeenanadvertisingphotographerinChicagoforover25yearsHehasbeendoingdigitalimagingforover14yearsandiswidelyknownandrespectedinthedigitalimagingcommunityasaleadingpioneerinthefieldJeffisafeatureconsultantandalphatesterforPhotoshop
foR MoRe InfoRMaTIon
ForacomprehensiveoverviewofPhotoshopCS2pleasevisitwwwadobecomproductsphotoshopmainhtml
Adobe Systems Incorporated345ParkAvenueSanJoseCA95110-2704USAwwwadobecom
AdobetheAdobelogoAcrobatIllustratorInDesignandPhotoshopareeitherregisteredtrademarksortrademarksofAdobeSystemsIncorporatedintheUnitedStatesandorothercountriesAllothertrademarksarethepropertyoftheirrespectiveowners
copy2006JeffScheweAllrightsreserved
My personal preference even if you supply files initially via transmission is to burn the delivered files to CD or DVD I do this for several reasons to give the client a tangible result from the project that they can store and to burn a read-only version of the final delivered files that cannot be altered If at some point something happens to the file (for example somebody changes it poorly) therersquos always the original starting point image burned into the disc that cannot be changed While it doesnrsquot happen often it has happened that somebody made a mistake downstream of my file delivery and itrsquos useful to be able to point to a version of a file that represents the state of the delivered image before any additional changes were made
checklist for file deliveryConfirm final file specifications and requirements
Open a secure line of communication with client and prepress provider
Confirm final reproduction process (SWOP or Sheet Fed)
Confirm final output color space ideally with printer-supplied ICC profile
Confirm delivery of RGB CMYK or RGB plus CMYK
Tone and color correct with soft proofing for the final output
Confirm final file size and resolution
Provide image sharpening for output
Provide aim print or proof print for color
Embed image metadata for identification
Confirm final delivery file format
Provide Read Me file with documentation file list and contact information
Organize and segregate file types separate high-resolution files FPO RGB and CMYK
Provide read-only final files on CD or DVD
additional resourcesDigital Image Submission Guidelines (DISC) wwwdisc-infoorg
Universal Photographic Digital Imaging Guidelines (UPDIG) wwwupdigorg
Real World Color Management by Bruce Fraser Chris Murphy and Fred Bunting Published by Peachpit Press ISBN 0321267222
Color Management for Photographers by Andrew Rodney Published by Focal Press ISBN 0-240-80649-2
PixelGenius by PhotoKit Sharpener wwwpixelgeniuscom
Nik Software by Nik Sharpener Pro wwwniksoftwarecom
bull
bull
bull
bull
bull
bull
bull
bull
bull
bull
bull
bull
bull
bull
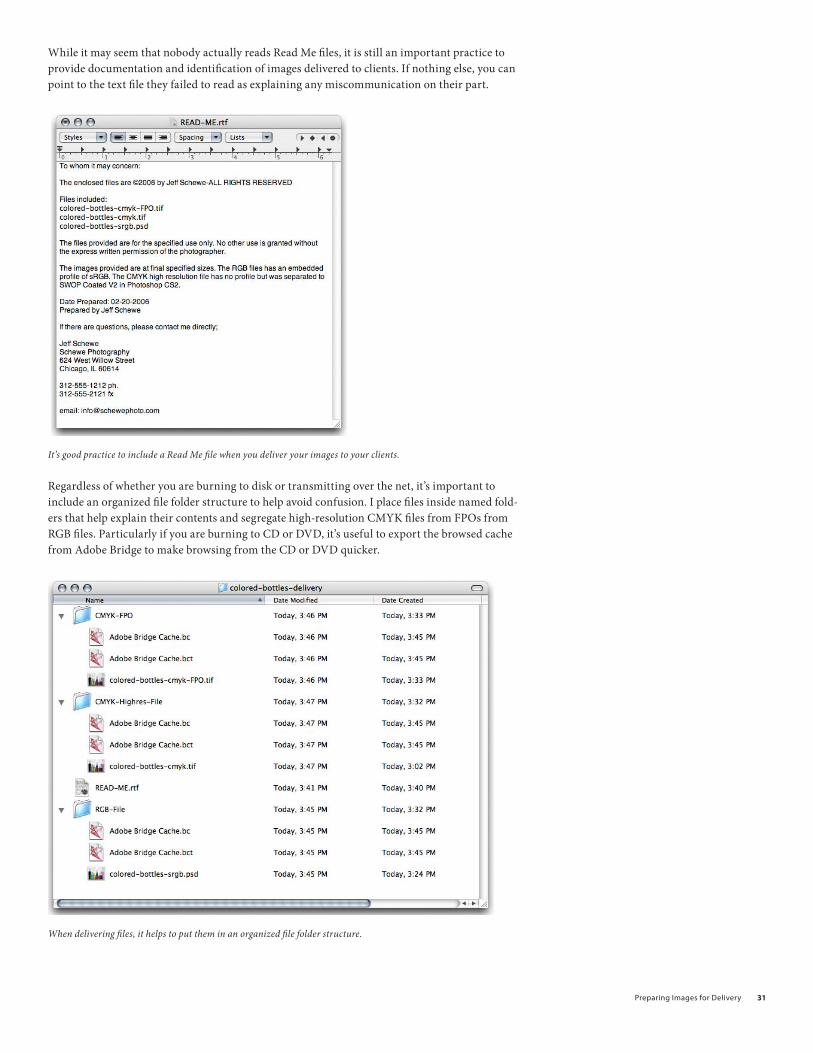
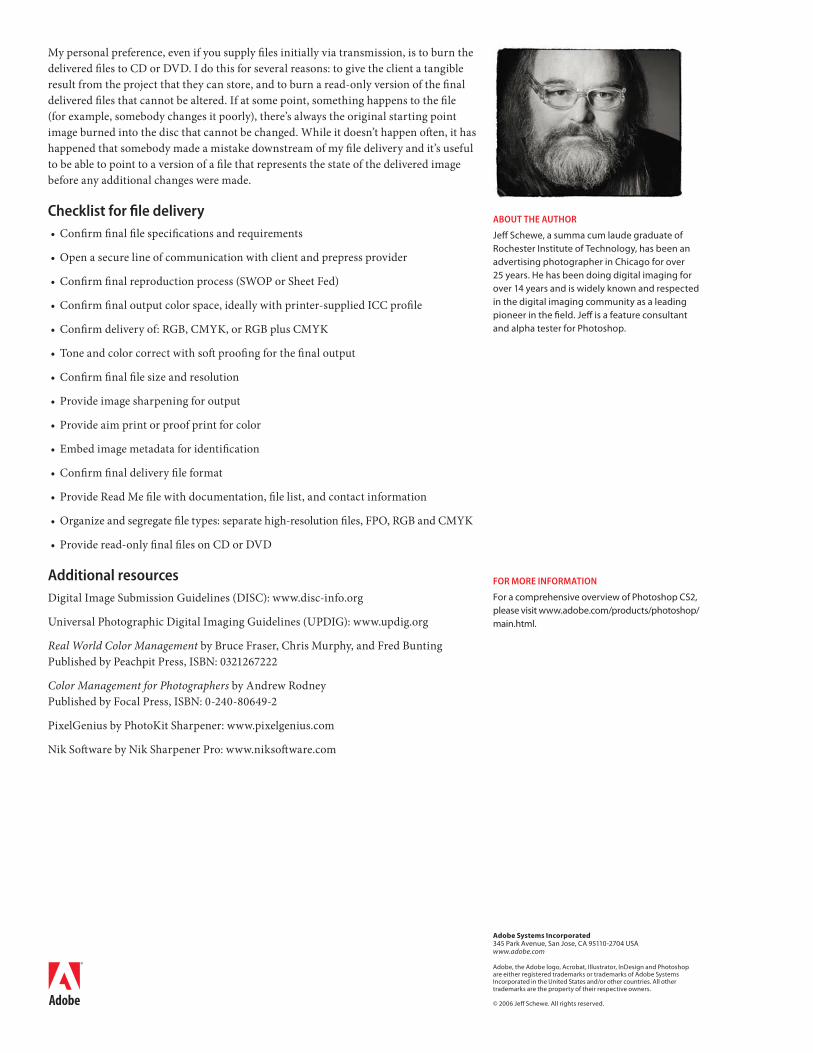