Embed Size (px)
Citation preview
COFFINChapter 21
You have the right.
When people hear that I made my own coffin at the age of 46, they react one of two ways: “You are so strange and morbid. That’s
just weird. Who does that?” Or, “I have always wanted to make my own coffin.”
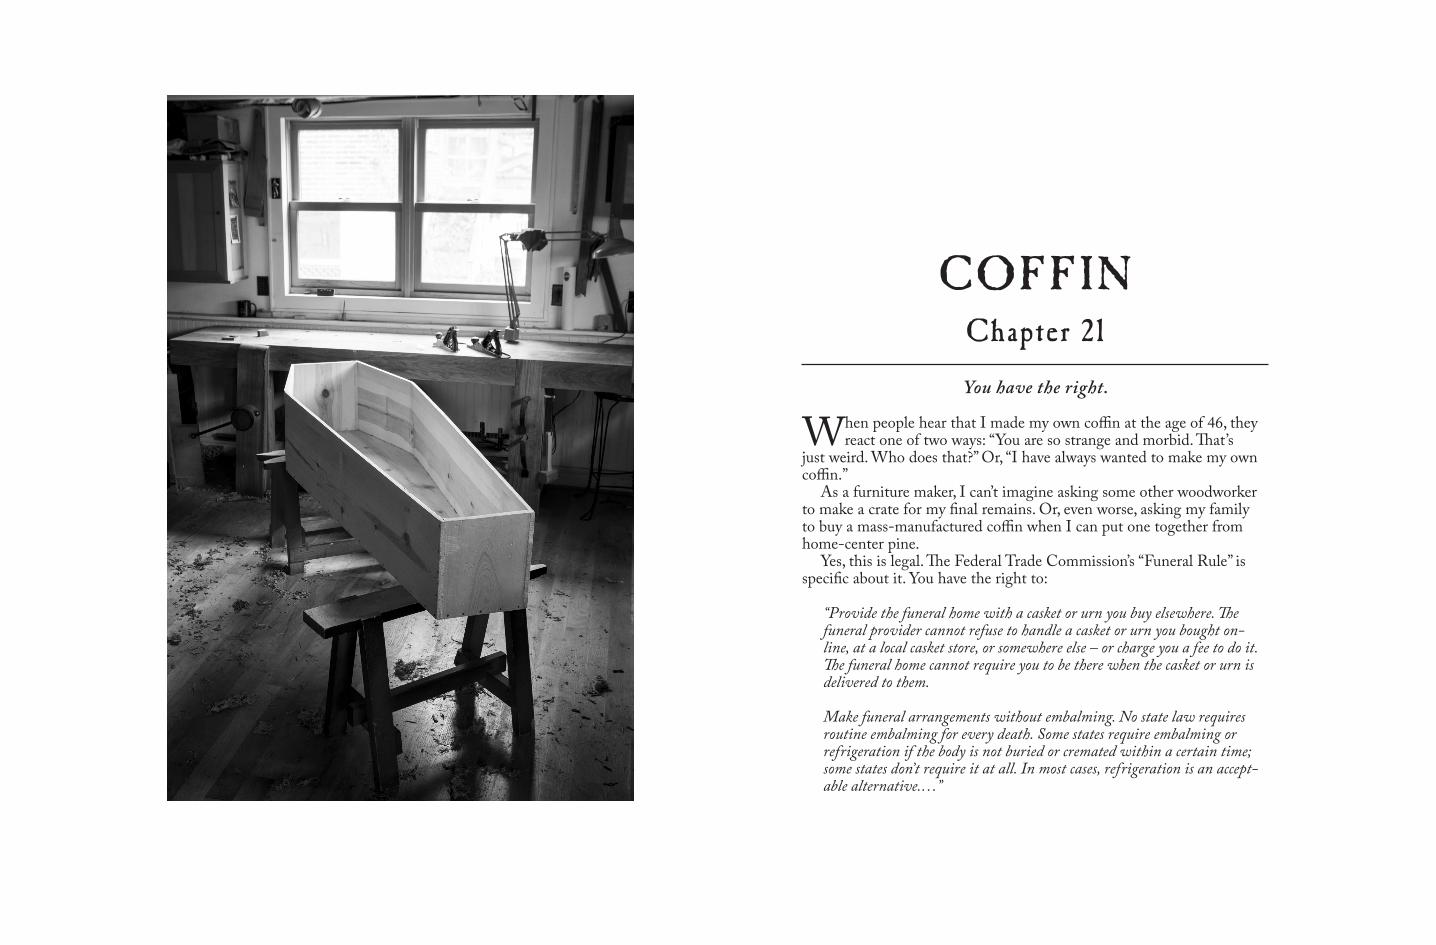
As a furniture maker, I can’t imagine asking some other woodworker to make a crate for my final remains. Or, even worse, asking my family to buy a mass-manufactured coffin when I can put one together from home-center pine.
Yes, this is legal. The Federal Trade Commission’s “Funeral Rule” is specific about it. You have the right to:
“Provide the funeral home with a casket or urn you buy elsewhere. The funeral provider cannot refuse to handle a casket or urn you bought on-line, at a local casket store, or somewhere else – or charge you a fee to do it. The funeral home cannot require you to be there when the casket or urn is delivered to them. Make funeral arrangements without embalming. No state law requires routine embalming for every death. Some states require embalming or refrigeration if the body is not buried or cremated within a certain time; some states don’t require it at all. In most cases, refrigeration is an accept-able alternative.…”
C H A P T E R 2 1 369
Every state has different details about exactly how it works, but the short answer is: Yes, you can do it.
But Why Now?
I’m not terminally ill, and I hope to be around for several more decades. So building a coffin now might seem a waste of storage space. I have
the opposite opinion: It creates storage space. This coffin has removable shelves. So it will hold books (or record
albums or bourbon bottles) until I die. Then it will hold me. It’s also a great yard decoration during Halloween – my wife’s favorite holiday.
Surprisingly, there is not much literature out there about making coffins. If you want to read more about the details of the process in 19th-century England, I recommend “Coffin-making & Undertaking,” edited by Paul Hasluck (Cassell & Co., 1913).
“Coffin-making & Undertaking” details construction of two types of coffins: the Lancashire pattern and the Southern Counties pattern. The Lancashire form uses sides that are bent around the bottom board using a fire lit inside the coffin. The Southern Counties form uses sides that are bent around the bottom using saw kerfs to help encourage the bend.
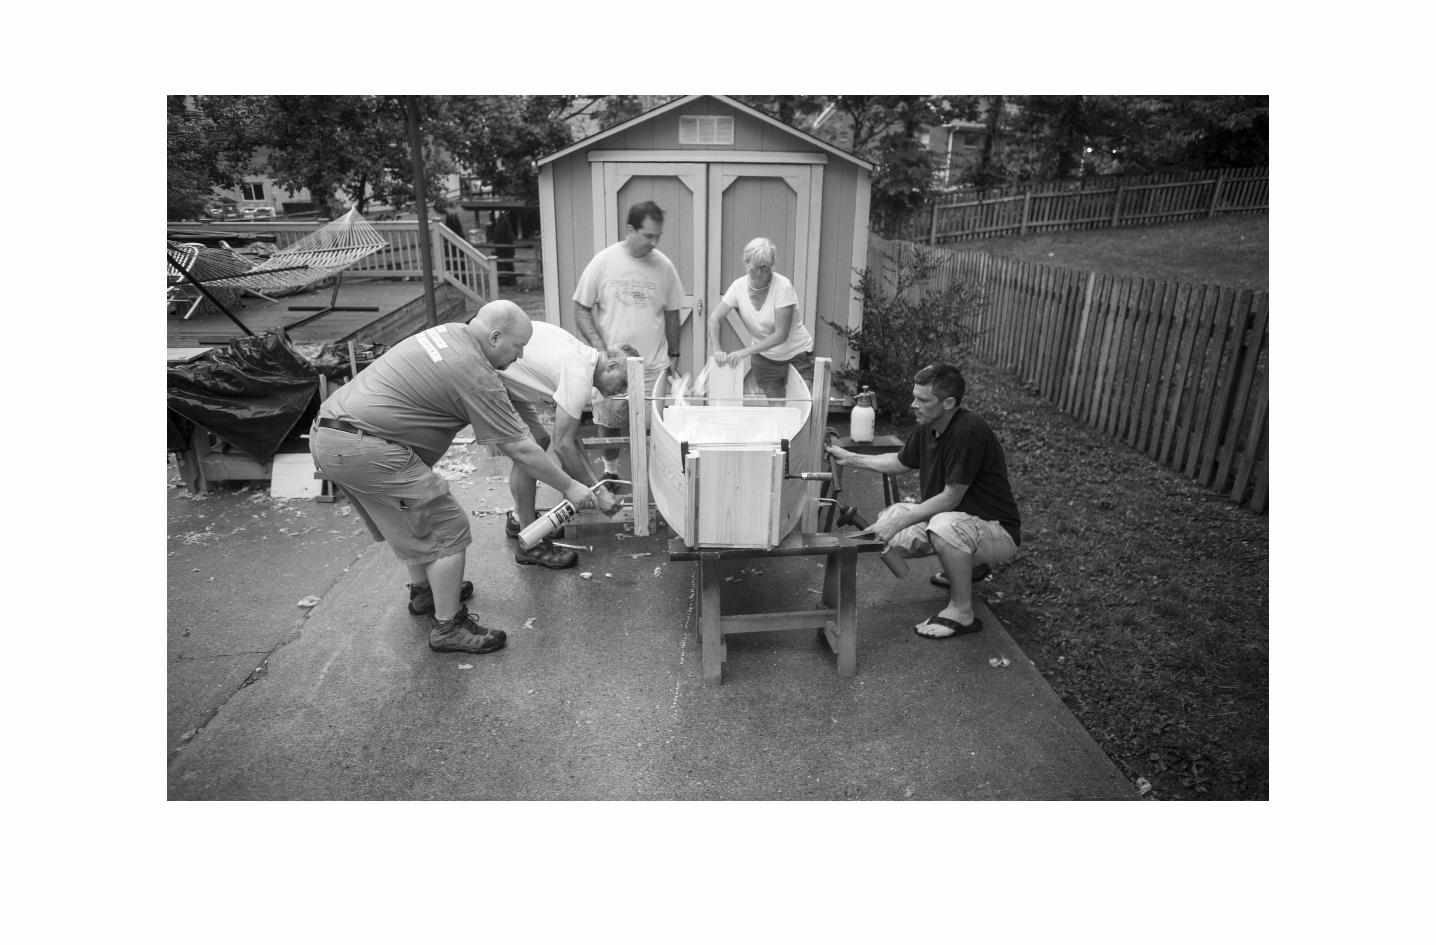
In the summer of 2014, a group of friends and I built coffins using both methods. While the Lancashire coffin was more exciting to build,
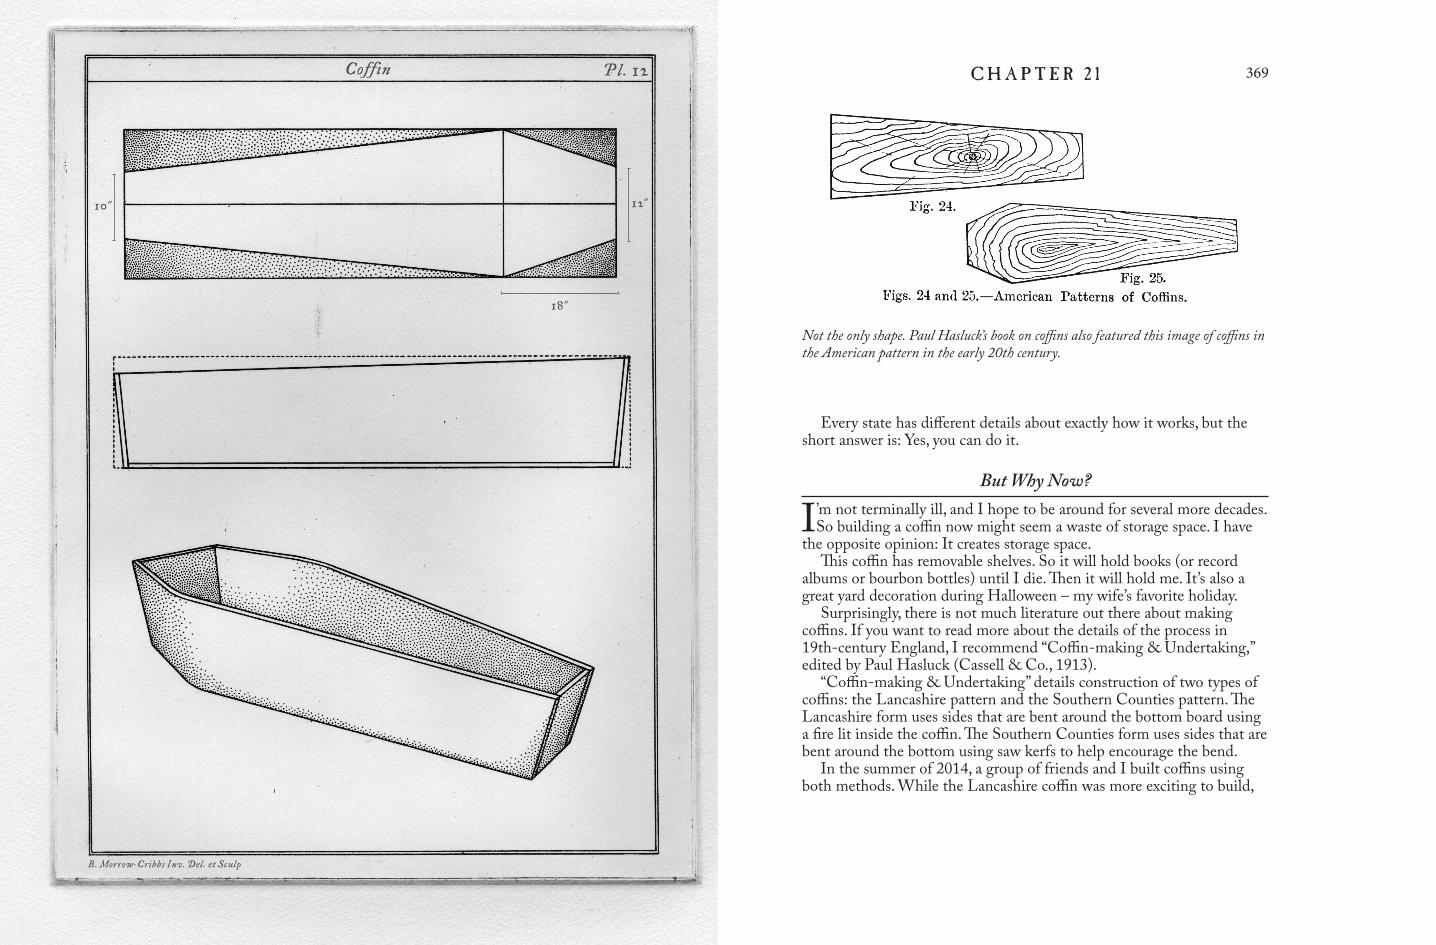
Not the only shape. Paul Hasluck’s book on coffins also featured this image of coffins in the American pattern in the early 20th century.
Coffin Pl. 12
B. Morrow- Cribbs Inv. Del. et Sculp
12"10"
18"
C O F F I N C H A P T E R 2 1370 371
adult. Unless you are going into the coffin-making business, you can skip the template and use your height and some standard measurements.
Take your height and add about 2" to set the length of the bottom board. Measure your width at your shoulders (mine is shy of 22"). Add 1" to that number – the breast of the coffin – and that measurement is the width of your bottom board.
Draw a centerline down the bottom board. At the head of the bottom board, mark its width as 12". Measure 18" down from the headboard and draw a line across the width of the bottom board. That point is the max-imum width of your bottom board (just under 23" in my example – two 1x12s). Down at the foot of the bottom board, mark the width as 10".
Then it’s connect-the-dots. Join the headboard to the line across the breast. Join the line across the breast to the footboard. The layout is done. See the plate on page 368 for an illustration of the layout.
it was tricky to make the bend with kiln-dried wood. We had to soak the parts for a long time – and get a team of people to manage the fire and the bend. Even then, it was touch-and-go. One of the coffin’s sides split badly during the bend on our first attempt. (Our second attempt went much better.)
Just like with making chairs, green wood or air-dried wood is better for bending. Because getting wide planks of green or air-dried pine is difficult in the city, I recommend you try the Southern Counties coffin. It is easy to make with home-center wood and with minimal assistance.
Lay Out the Bottom
Historically, shops that made coffins would keep a series of templates for the different sizes, from infant all the way up to a full-grown
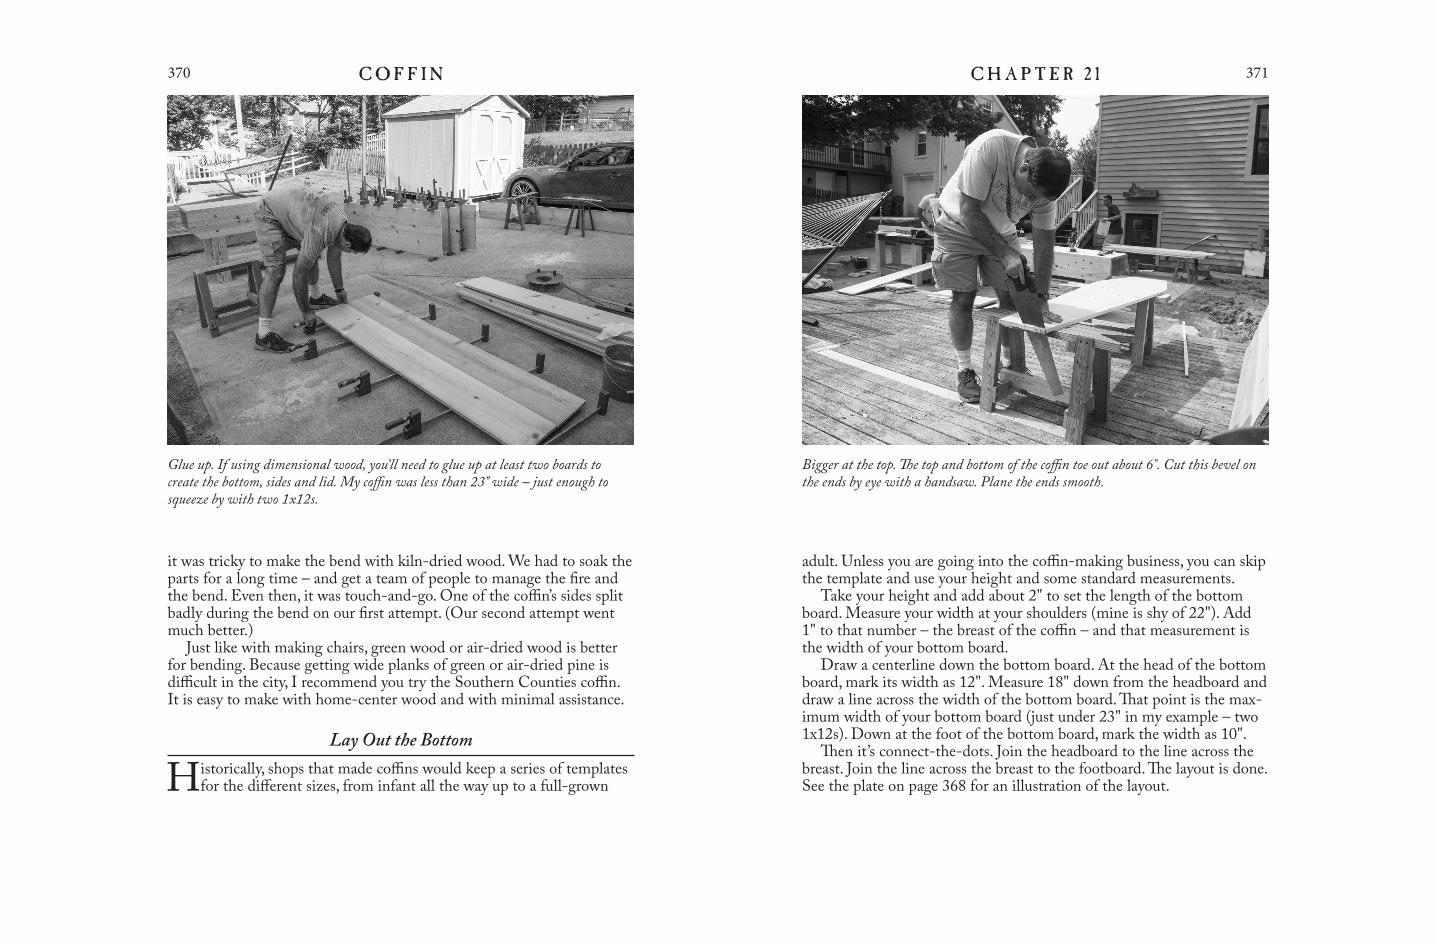
Glue up. If using dimensional wood, you’ll need to glue up at least two boards to create the bottom, sides and lid. My coffin was less than 23" wide – just enough to squeeze by with two 1x12s.
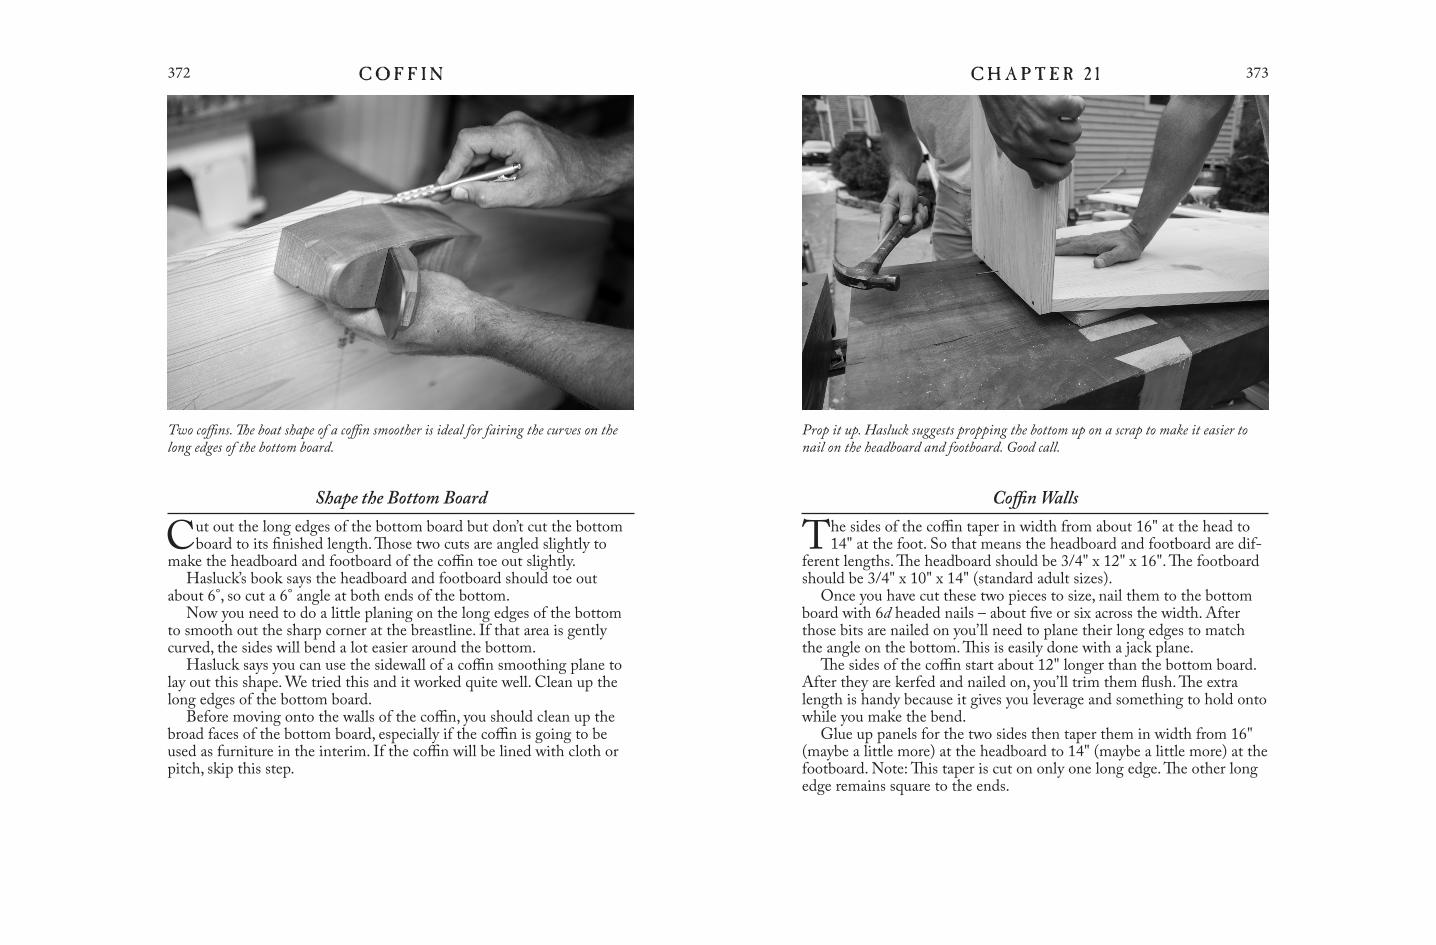
Bigger at the top. The top and bottom of the coffin toe out about 6°. Cut this bevel on the ends by eye with a handsaw. Plane the ends smooth.
C O F F I N C H A P T E R 2 1372 373
Coffin Walls
The sides of the coffin taper in width from about 16" at the head to 14" at the foot. So that means the headboard and footboard are dif-
ferent lengths. The headboard should be 3/4" x 12" x 16". The footboard should be 3/4" x 10" x 14" (standard adult sizes).
Once you have cut these two pieces to size, nail them to the bottom board with 6d headed nails – about five or six across the width. After those bits are nailed on you’ll need to plane their long edges to match the angle on the bottom. This is easily done with a jack plane.
The sides of the coffin start about 12" longer than the bottom board. After they are kerfed and nailed on, you’ll trim them flush. The extra length is handy because it gives you leverage and something to hold onto while you make the bend.
Glue up panels for the two sides then taper them in width from 16" (maybe a little more) at the headboard to 14" (maybe a little more) at the footboard. Note: This taper is cut on only one long edge. The other long edge remains square to the ends.
Shape the Bottom Board
Cut out the long edges of the bottom board but don’t cut the bottom board to its finished length. Those two cuts are angled slightly to
make the headboard and footboard of the coffin toe out slightly.Hasluck’s book says the headboard and footboard should toe out
about 6°, so cut a 6° angle at both ends of the bottom. Now you need to do a little planing on the long edges of the bottom
to smooth out the sharp corner at the breastline. If that area is gently curved, the sides will bend a lot easier around the bottom.
Hasluck says you can use the sidewall of a coffin smoothing plane to lay out this shape. We tried this and it worked quite well. Clean up the long edges of the bottom board.
Before moving onto the walls of the coffin, you should clean up the broad faces of the bottom board, especially if the coffin is going to be used as furniture in the interim. If the coffin will be lined with cloth or pitch, skip this step.
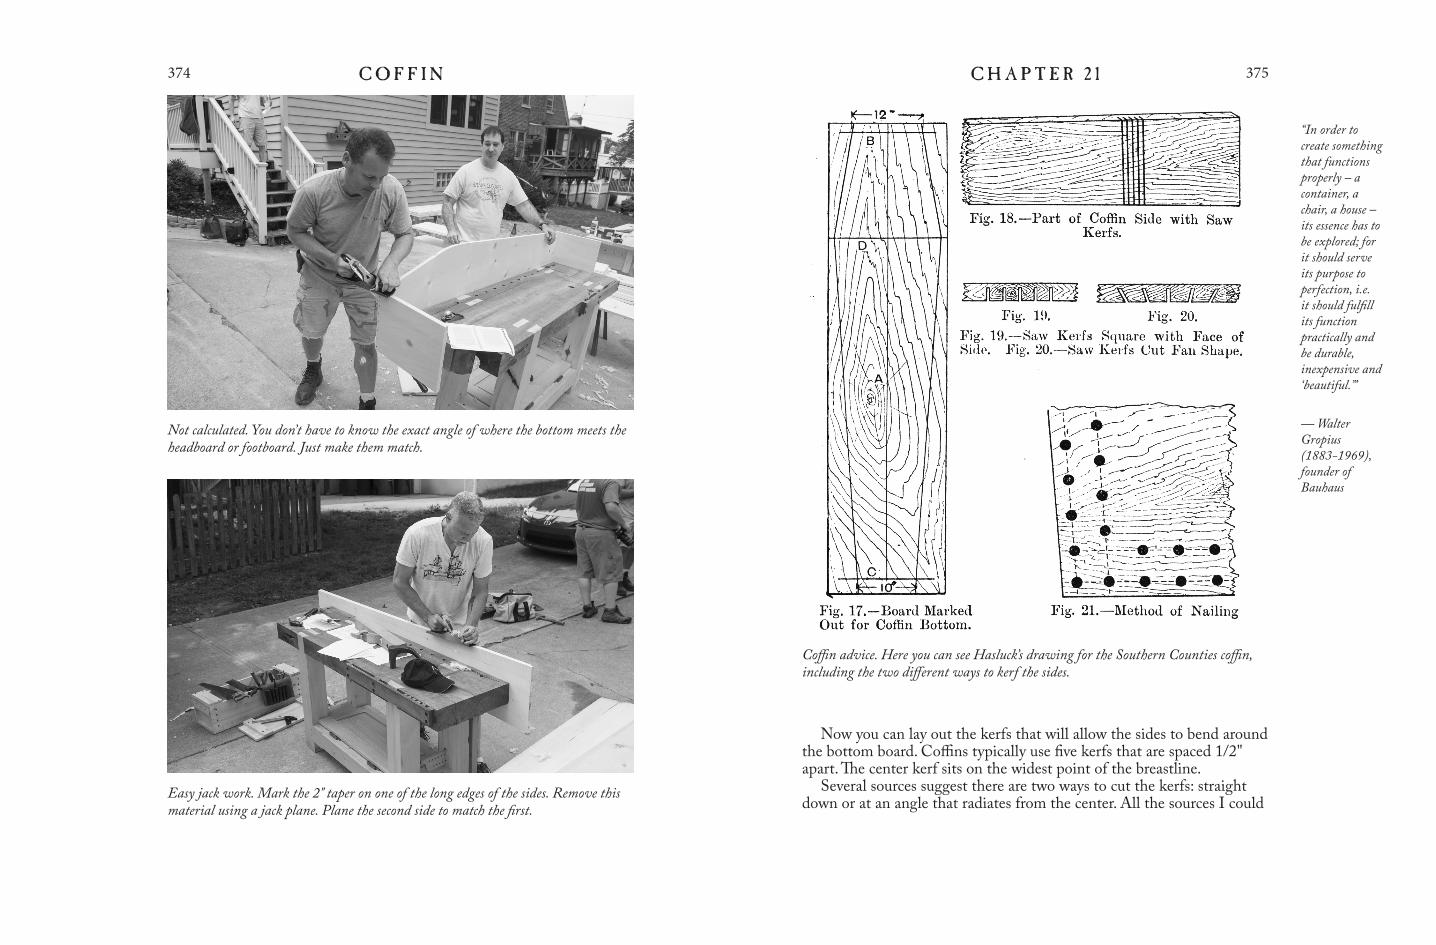
Two coffins. The boat shape of a coffin smoother is ideal for fairing the curves on the long edges of the bottom board.
Prop it up. Hasluck suggests propping the bottom up on a scrap to make it easier to nail on the headboard and footboard. Good call.
C O F F I N C H A P T E R 2 1374 375
Now you can lay out the kerfs that will allow the sides to bend around the bottom board. Coffins typically use five kerfs that are spaced 1/2" apart. The center kerf sits on the widest point of the breastline.
Several sources suggest there are two ways to cut the kerfs: straight down or at an angle that radiates from the center. All the sources I could
Not calculated. You don’t have to know the exact angle of where the bottom meets the headboard or footboard. Just make them match.
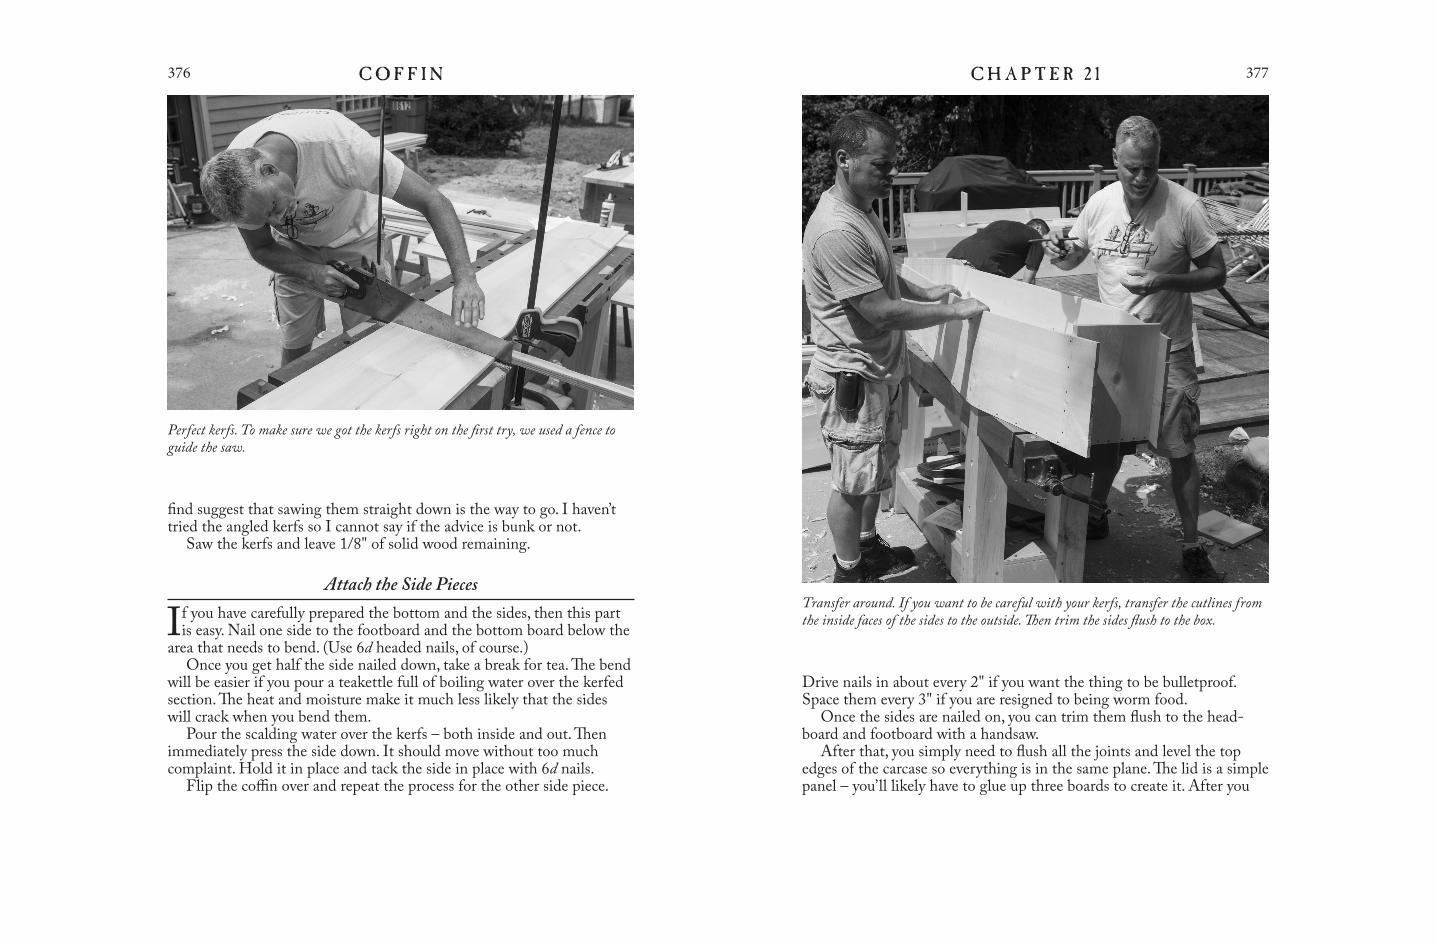
Easy jack work. Mark the 2" taper on one of the long edges of the sides. Remove this material using a jack plane. Plane the second side to match the first.
Coffin advice. Here you can see Hasluck’s drawing for the Southern Counties coffin, including the two different ways to kerf the sides.
“In order to create something that functions properly – a container, a chair, a house – its essence has to be explored; for it should serve its purpose to perfection, i.e. it should fulfill its function practically and be durable, inexpensive and ‘beautiful.’”
— Walter Gropius (1883-1969), founder of Bauhaus
C O F F I N C H A P T E R 2 1376 377
Drive nails in about every 2" if you want the thing to be bulletproof. Space them every 3" if you are resigned to being worm food.
Once the sides are nailed on, you can trim them flush to the head-board and footboard with a handsaw.
After that, you simply need to flush all the joints and level the top edges of the carcase so everything is in the same plane. The lid is a simple panel – you’ll likely have to glue up three boards to create it. After you
find suggest that sawing them straight down is the way to go. I haven’t tried the angled kerfs so I cannot say if the advice is bunk or not.
Saw the kerfs and leave 1/8" of solid wood remaining.
Attach the Side Pieces
If you have carefully prepared the bottom and the sides, then this part is easy. Nail one side to the footboard and the bottom board below the
area that needs to bend. (Use 6d headed nails, of course.) Once you get half the side nailed down, take a break for tea. The bend
will be easier if you pour a teakettle full of boiling water over the kerfed section. The heat and moisture make it much less likely that the sides will crack when you bend them.
Pour the scalding water over the kerfs – both inside and out. Then immediately press the side down. It should move without too much complaint. Hold it in place and tack the side in place with 6d nails.
Flip the coffin over and repeat the process for the other side piece.
Perfect kerfs. To make sure we got the kerfs right on the first try, we used a fence to guide the saw.
Transfer around. If you want to be careful with your kerfs, transfer the cutlines from the inside faces of the sides to the outside. Then trim the sides flush to the box.
C O F F I N C H A P T E R 2 1378 379
get the panel glued up, put it on your workbench and lay the carcase up-side down on the panel. Trace around the carcase. Saw the lid to shape.
You don’t need the lid just yet, so clean up the saw marks and get it ready to nail down when the time comes.
Many simple coffins included a bit of moulding around the base or some sort of faux finish to comfort the grieving that they weren’t com-plete cheapskates. Don’t fall for it. No one cares if you were able to afford miters or a fancy finish.
In the Meantime
If the coffin is for immediate use, it should be given a coat of raw lin-seed oil, according to Hasluck, then covered entirely in boiling pitch.
Then the exterior of the coffin is covered in plain blue dress material that is affixed with tacks.
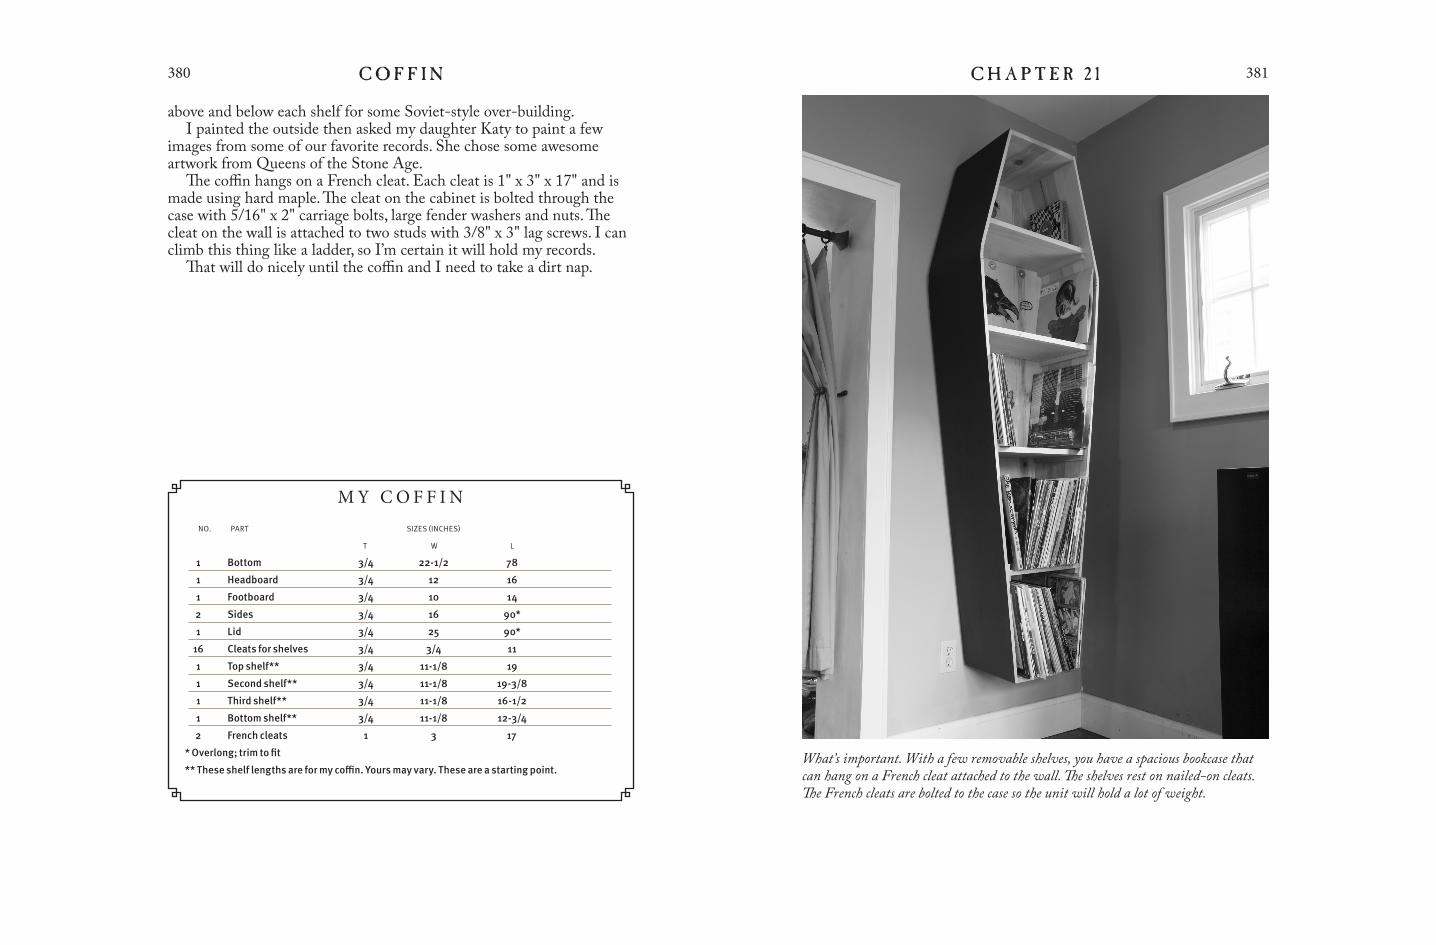
If the coffin will be for an occupant in the distant future you can finish it like furniture. You can add shelves to the interior to hold books, record albums or liquor bottles. This part is up to you. If you are going to make it a bookcase, check out the chapter on bookcases for advice on the three most common sizes of books you’ll need to accommodate.
I finished my unit to hold vinyl albums. The shelves are spaced about 15" apart to allow plenty of room for 12" albums. It was difficult to space the shelves precisely because the sides of the coffin are tapered. Not only that, the pine had warped a bit since assembly. So getting a precise fit was a fun exercise with a bevel gauge and a block plane.
The shelves are tacked in place through the coffin sides with 6d head-ed nails to make them easy to remove. Then I also tacked in angled cleats Five steps. Here is Charles Hayward’s drawing of how his family built coffins (Hay-
ward says his first project as a child was a coffin he built as a bed for his kitten).
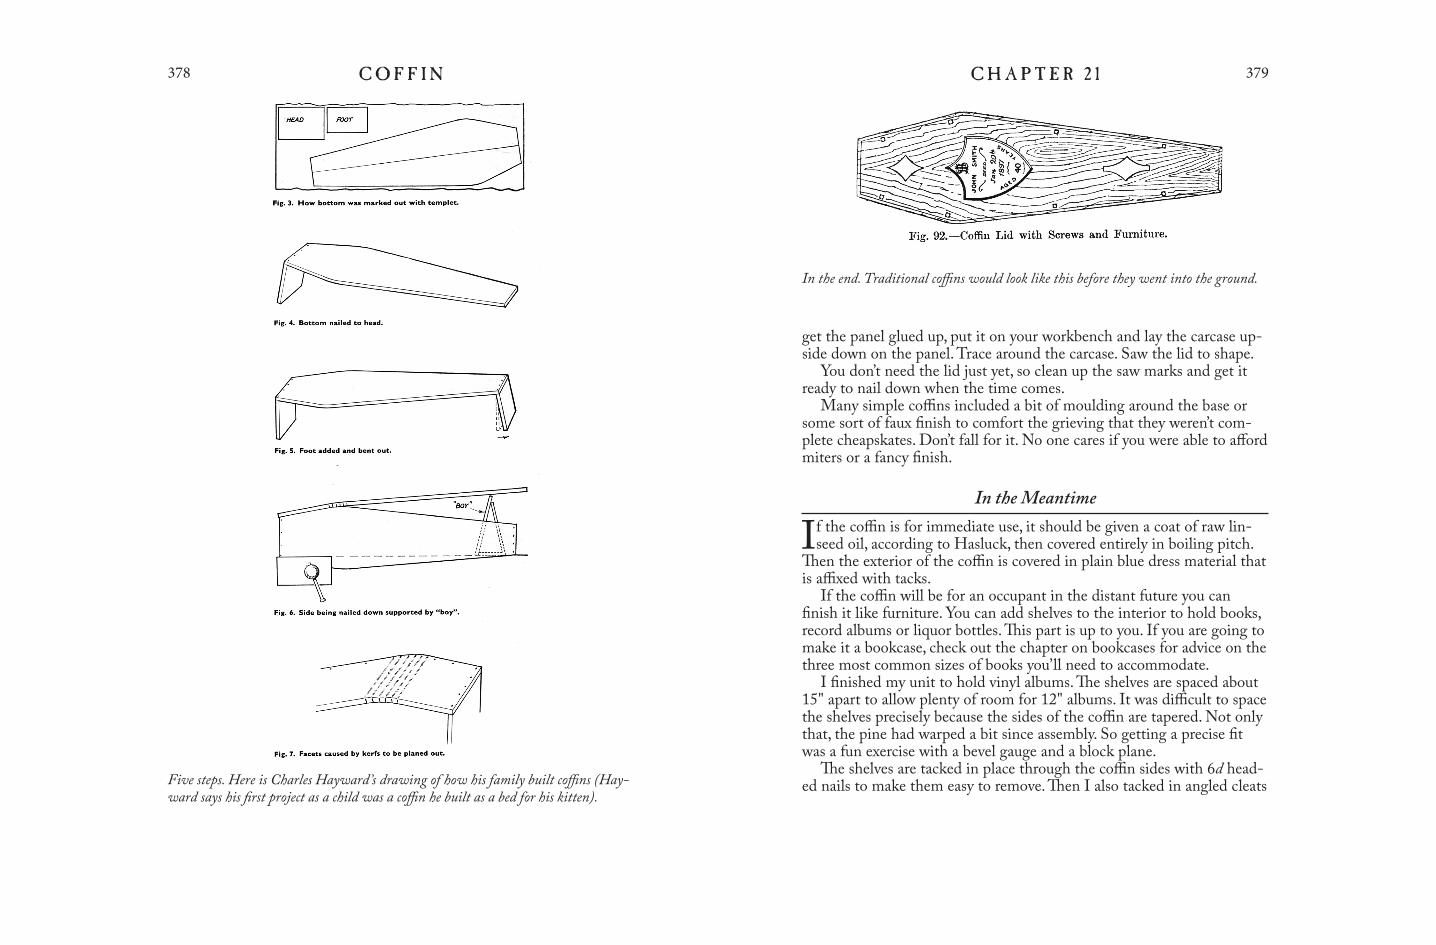
In the end. Traditional coffins would look like this before they went into the ground.
C O F F I N C H A P T E R 2 1380 381
What’s important. With a few removable shelves, you have a spacious bookcase that can hang on a French cleat attached to the wall. The shelves rest on nailed-on cleats. The French cleats are bolted to the case so the unit will hold a lot of weight.
M Y C O F F I N NO. PART SIZES (INCHES)
T W L
1 Bottom 3/4 22-1/2 78
1 Headboard 3/4 12 16
1 Footboard 3/4 10 14
2 Sides 3/4 16 90*
1 Lid 3/4 25 90*
16 Cleats for shelves 3/4 3/4 11
1 Top shelf** 3/4 11-1/8 19
1 Second shelf** 3/4 11-1/8 19-3/8
1 Third shelf** 3/4 11-1/8 16-1/2
1 Bottom shelf** 3/4 11-1/8 12-3/4
2 French cleats 1 3 17
* Overlong; trim to fit
** These shelf lengths are for my coffin. Yours may vary. These are a starting point.
above and below each shelf for some Soviet-style over-building.I painted the outside then asked my daughter Katy to paint a few
images from some of our favorite records. She chose some awesome artwork from Queens of the Stone Age.
The coffin hangs on a French cleat. Each cleat is 1" x 3" x 17" and is made using hard maple. The cleat on the cabinet is bolted through the case with 5/16" x 2" carriage bolts, large fender washers and nuts. The cleat on the wall is attached to two studs with 3/8" x 3" lag screws. I can climb this thing like a ladder, so I’m certain it will hold my records.
That will do nicely until the coffin and I need to take a dirt nap.


![Books LLC · Coffin hand-bills Harris's letter Panama mission or the wishes of the People'" [Reilly]. Binns, holding eight coffins on his back, was the Philadelphia publisher who](https://img.pdfslide.us/doc/110x75/60437fb3d1ceb03e722db96b/books-llc-coffin-hand-bills-harriss-letter-panama-mission-or-the-wishes-of-the.jpg)