Embed Size (px)
Citation preview

Code Kingdoms
for kids, with kids, by kids.
codekingdoms
Sandbox Guide
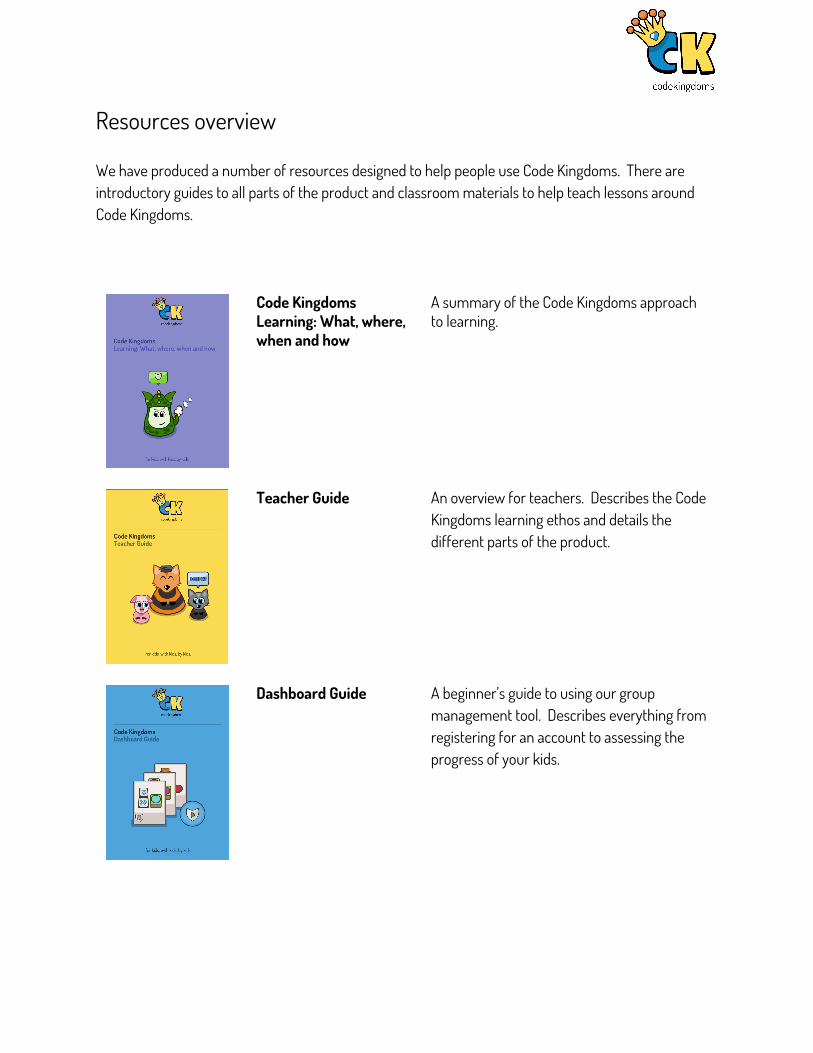
Resources overview We have produced a number of resources designed to help people use Code Kingdoms. There are introductory guides to all parts of the product and classroom materials to help teach lessons around Code Kingdoms.
Code Kingdoms Learning: What, where, when and how
A summary of the Code Kingdoms approach to learning.
Teacher Guide An overview for teachers. Describes the Code Kingdoms learning ethos and details the different parts of the product.
Dashboard Guide A beginner’s guide to using our group management tool. Describes everything from registering for an account to assessing the progress of your kids.

Sandbox guide A guide to using our unstructured creation environment. Learn everything from using the menus to making great puzzles.
Unit 1: Introducing Code Kingdoms
An introductory unit of six ‘off-the-shelf’ lesson plans. Targeted at KS2 kids.
Unit 2: Learning a language
Six ‘off-the-shelf’ lesson plans designed to teach kids the basic of JavaScript
Puzzle Packs A guide to building specific puzzles in Creative mode. Step-by-step instructions from start to finish. Four puzzles per pack.

Contents
About this guide 1
Sandbox View 2
Accessing the Sequencer (Coding Environment) 3
Using events 3
Coding in the Sequencer 4
How to use the Sequencer 5
Advanced coders 6
Code Cheat Sheet 7
OOSY Method 9
Frequently Asked Questions 10

About this Guide
This guide is for teachers, volunteers and kids wanting to use the Sandbox mode contained in CK School (school.codekingdoms.com). It guides you around the Sandbox mode and describes how to build your own puzzles and games in this environment.
Introduction The Sandbox mode is designed deliberately to be an open and unguided environment where players have the freedom to create the puzzles and games they want to code. As such, there are no in-game tutorials or assistance. For many, this is Minecraft but you get to code your world. This environment runs to the heart of what Code Kingdoms is about: giving kids the freedom and the tools to build what they want to build using code. We have supporting materials that allow teachers to teach lessons mapped to the National Curriculum and give players inspiration around what to build (available at codekingdoms.com/teachers ). The expectation is that these materials will serve as an introduction for teachers and players. With access to a full code library and numerous puzzle objects, we hope they will be inspired to exceed our expectations of what was possible in the Sandbox when it was first conceived.
1

Sandbox View This is the editing view in the Sandbox, all aspects of the land can be controlled from here.
Rewards Collected - the number of coins, bits and gems collected by the player Blocks Tab - change the terrain of your land Pieces Tab - these are puzzle objects that can be placed in the land and coded Decor Tab - make your land more aesthetically pleasing Animals Tab - animal's’ behaviour can be coded when placed in the land Crown Button - use your character to play the land you have created Zoom and Undo Tools - zoom in and out and undo your previous actions
2
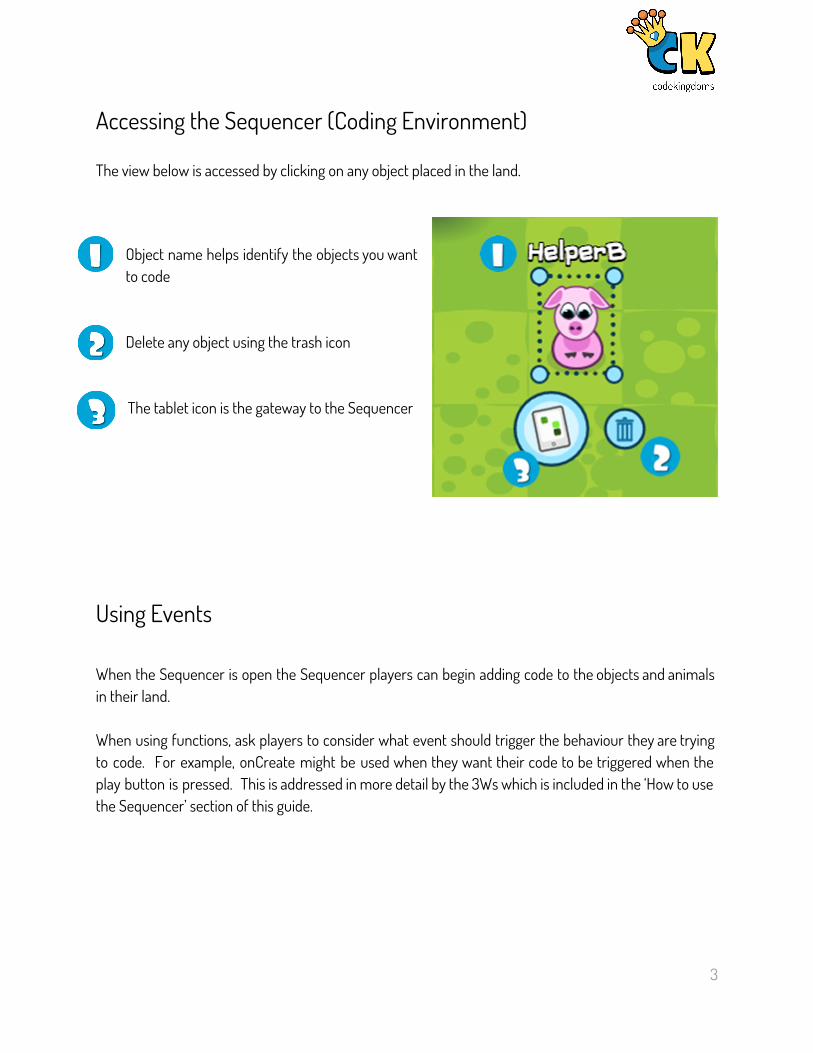
Accessing the Sequencer (Coding Environment) The view below is accessed by clicking on any object placed in the land.
Object name helps identify the objects you want to code
Delete any object using the trash icon The tablet icon is the gateway to the Sequencer
Using Events When the Sequencer is open the Sequencer players can begin adding code to the objects and animals in their land. When using functions, ask players to consider what event should trigger the behaviour they are trying to code. For example, onCreate might be used when they want their code to be triggered when the play button is pressed. This is addressed in more detail by the 3Ws which is included in the ‘How to use the Sequencer’ section of this guide.
3
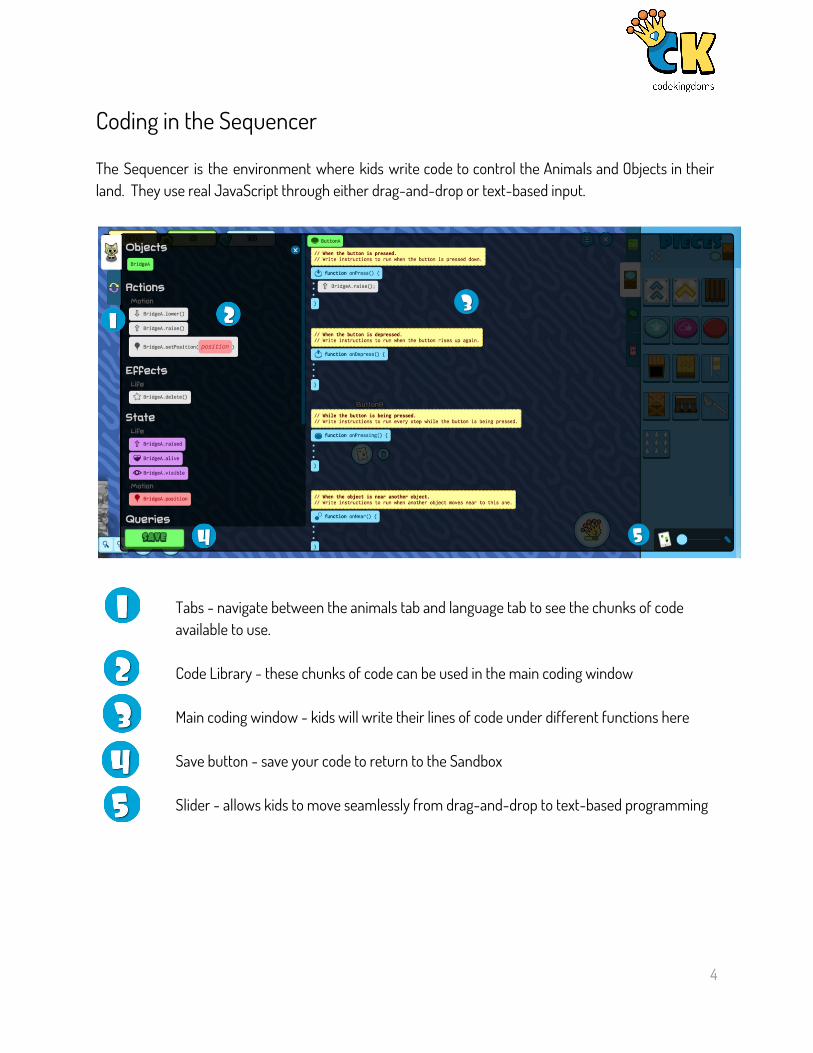
Coding in the Sequencer The Sequencer is the environment where kids write code to control the Animals and Objects in their land. They use real JavaScript through either drag-and-drop or text-based input.
Tabs - navigate between the animals tab and language tab to see the chunks of code available to use. Code Library - these chunks of code can be used in the main coding window Main coding window - kids will write their lines of code under different functions here Save button - save your code to return to the Sandbox Slider - allows kids to move seamlessly from drag-and-drop to text-based programming
4

How to use the Sequencer The unguided nature of the Sandbox mode means that players have access to the entire code library and are free to code what they like. We provide a basic structure called the 3Ws to help kids write code that achieves their aims.
3Ws
When? This is the event that triggers the code to run e.g. onPress for a button
Who? Which object should the piece of code control? e.g. Bridge A
What? What action should occur? e.g. raise
This structure would allow kids to create the following algorithm where a bridge would raise when Button A is pressed:
5

Advanced Coders Our unique slider allows kids to move seamlessly from drag-and-drop to text-based programming. Mastery of drag-and-drop isn’t a ceiling to their progression as they can begin to grasp the syntax and formatting of JavaScript through a typed input. The slider allows two kids to complete the same activity at two different skill levels. It is also a good motivator for beginners to see what they deem “real code” behind the drag-and-drop interface. The images below shows the same algorithm completed with the slider set at beginner and most advanced modes.
6
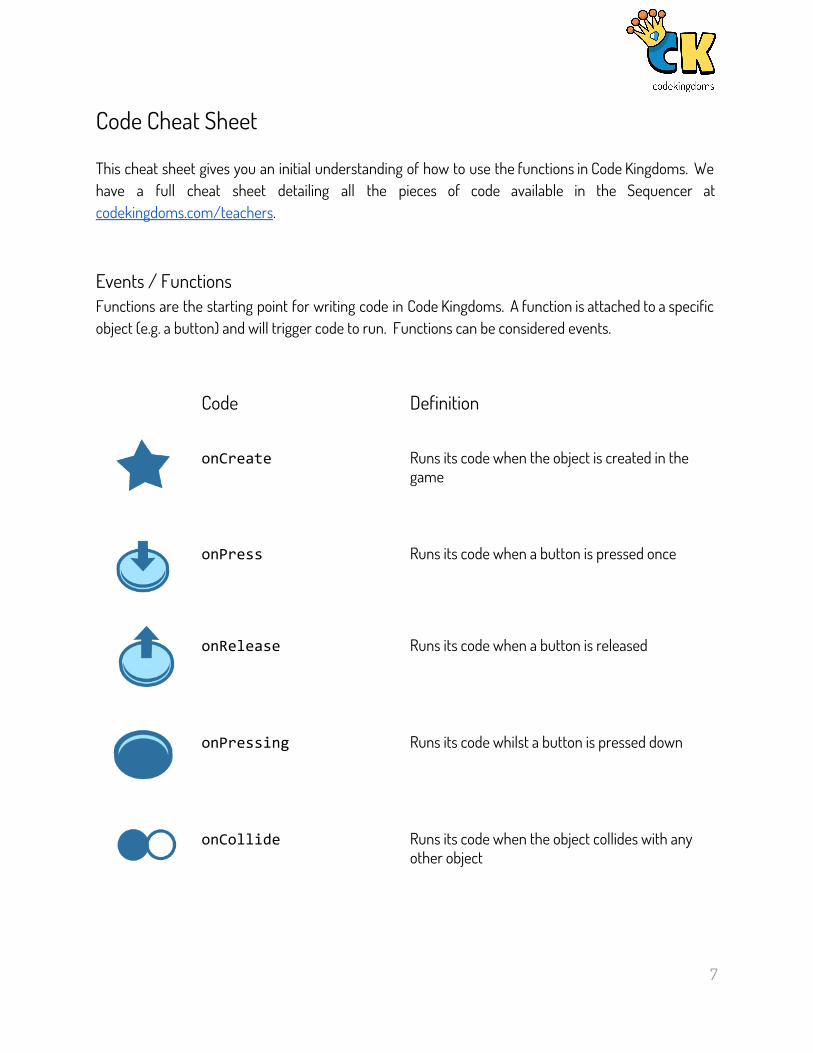
Code Cheat Sheet This cheat sheet gives you an initial understanding of how to use the functions in Code Kingdoms. We have a full cheat sheet detailing all the pieces of code available in the Sequencer at codekingdoms.com/teachers. Events / Functions Functions are the starting point for writing code in Code Kingdoms. A function is attached to a specific object (e.g. a button) and will trigger code to run. Functions can be considered events.
Code Definition
onCreate
Runs its code when the object is created in the game
onPress
Runs its code when a button is pressed once
onRelease
Runs its code when a button is released
onPressing
Runs its code whilst a button is pressed down
onCollide
Runs its code when the object collides with any other object
7

onNear
Runs its code when another object is nearby N.B. a near distance must be set for this to work, shown by a red circle around the object
onAlert
Runs its code when the player is nearby N.B. a near distance must be set for this to work, shown by a red circle around the object
onDie
Runs its code when the character dies
onCall
Runs its code when a character is called by another character
Ideas and Inspiration for your land If you’re stuck for puzzles to create, you can review our resources which will give you some ideas. You can find them at codekingdoms.com/teachers We also recommend structuring the creation of a new land around our OOSY Method:
8

OOSY Method
Objective Your land needs objective. For simplicity it can be to rescue the animals from the cages
Obstacle Next, the land should have an obstacle that makes the objective impossible to achieve e.g. placing a spike bed to block the path
Solution Now think of a solution that will allow the player to pass the obstacle e.g. a button that raises a bridge over a spike bed
Your Turn! Ask someone else to play your land to check it is fun and can be completed
9

Frequently Asked Questions Q. How do I save my Sandbox?
Teachers and group leaders can save lands using the Save Projects button from the Dashboard. When you want to revisit the saved land use the Load Projects button, also in the Dashboard. Q. How do I play my land?
Use the play button in the bottom right hand corner of the Sandbox to play your land as the main character. Q. Why hasn’t my code worked?
Check you are coding the correct object for the outcome you want. For example, if you want a bridge to raise when a button is pressed make sure you have added code to the button not the bridge. Q. Why can’t I control Glitch behaviour?
You can! We have pre-programmed some initial behaviours but you can overwrite them with your own code.
10

Planning Your Own Map
You can use the OOSY Method poster to help you design your map.
What is the objective of your game?
What objects (characters) will there be in your game and what will they do?
E.g. Giant Glitch – chases player around the map and aims to destroy it.
What obstacles will there be in your game?
What solutions will there be for the obstacles?

Planning Algorithms
When you create your map, the different objects within your game will need instructions to tell them what to do. Use this worksheet to help
you consider what those instructions might be. An example has already been done for you.
Object When? Who? What?
ButtonA
onPress SpikesA Lower
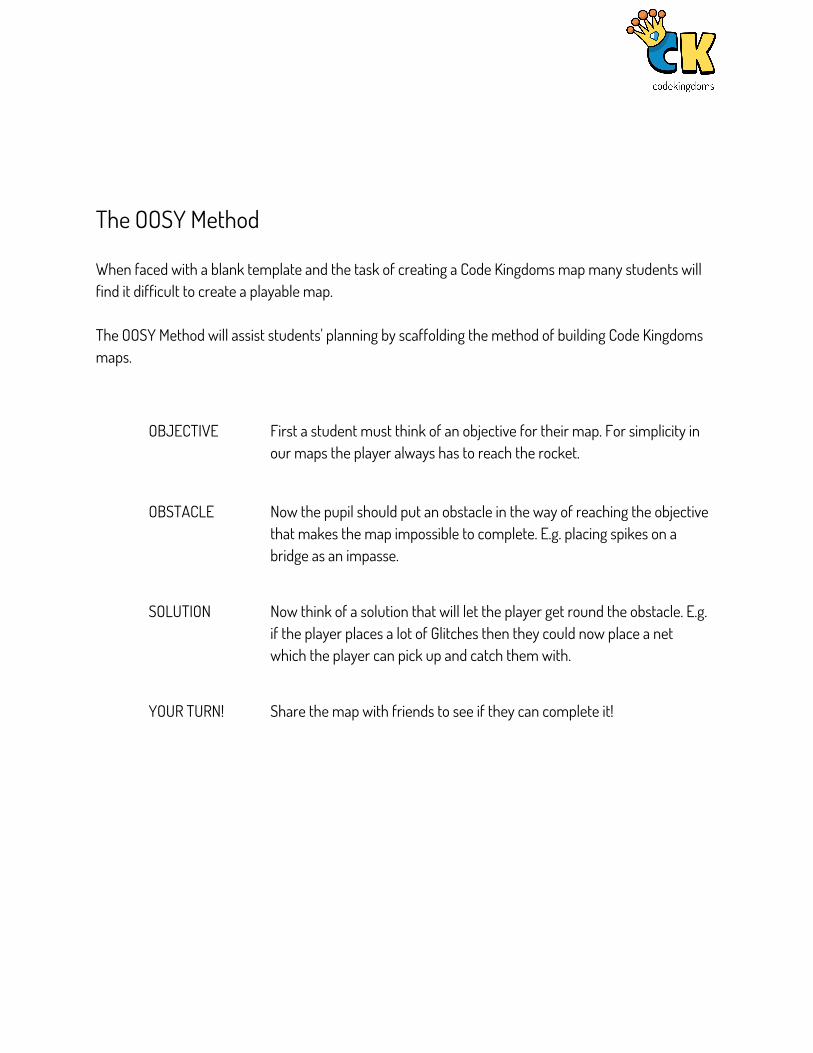
The OOSY Method
When faced with a blank template and the task of creating a Code Kingdoms map many students will
find it difficult to create a playable map.
The OOSY Method will assist students' planning by scaffolding the method of building Code Kingdoms
maps.
OBJECTIVE First a student must think of an objective for their map. For simplicity in
our maps the player always has to reach the rocket.
OBSTACLE Now the pupil should put an obstacle in the way of reaching the objective
that makes the map impossible to complete. E.g. placing spikes on a
bridge as an impasse.
SOLUTION
Now think of a solution that will let the player get round the obstacle. E.g.
if the player places a lot of Glitches then they could now place a net
which the player can pick up and catch them with.
YOUR TURN! Share the map with friends to see if they can complete it!

The 3Ws To assist students in thinking about structuring lines of code, we recommend using the 3Ws (When? Who? What?)
When?
onCreate
Who? Glitch A
What? walk towards player
This will allow students to create an algorithm where a Glitch will walk towards a player when it is created, which will look like: GlitchA.walkTowards(player);
This method help students to sequence their commands logically.


![[Public] YGG White Paper FINALAxie Infinity produced by Sky Mavis; The Sandbox produced by TSB; League of Kingdoms produced by NPlus. Asplay-to-earnevolves,YGG’sportfoliowillexpandtoothergamesthatfulfillthecriteriaand](https://img.pdfslide.us/doc/110x75/61341f6adfd10f4dd73b877b/public-ygg-white-paper-final-axie-infinity-produced-by-sky-mavis-the-sandbox.jpg)