Embed Size (px)
Citation preview
1
CMS Web Interface Excel Instructions Last Updated: November 15, 2017
2
Introduction
The Centers for Medicare & Medicaid Services (CMS) has announced that beginning with the 2017 Merit-based Incentive Payment System (MIPS) performance period, .xml file conversion is no longer necessary to upload beneficiary sampling data to the CMS Web Interface. The sample data can now be entered into the CMS Web Interface using the Excel format without the extra step of converting to .xml.
We recognize that the step of .xml conversion was burdensome, so in an effort to reduce this burden, we worked in partnership with administrators, clinicians, and hospitals across the country to develop a new streamlined Excel template for beneficiary sample reporting via the CMS Web Interface. Using this template will simplify the reporting process and reduce the possibility of upload errors in your reporting.
Simpler Excel Entry – How it Works:
Download the redesigned 2017 Excel reporting template (Note: the Excel template is in .xlsx format and will only work with Excel version 2010 or higher on both Windows and Mac computers)
Compile, sort, and check your sample data
Follow prompts and tips within spreadsheet cells
Drag and drop your Excel files into the CMS Web Interface
Data automatically uploads and converts for CMS approval
Check your reporting status and edit entries anytime See the step-by-step instructions outlined below to learn more about how to use the new Excel template to upload your files to the CMS Web Interface.
3
Table of Contents
Download Your Beneficiary Sample ................................................................................... 4
Understanding Your Streamlined Excel Template ............................................................. 6 Rows & Columns ................................................................................................................ 6 Pre-Filled Data ................................................................................................................... 7 Measure Questions ............................................................................................................ 8 Measure Question Help ...................................................................................................... 9 Locked Titles .....................................................................................................................10 Sort & Filter .......................................................................................................................11
Enter Beneficiary Data ........................................................................................................12 Built-In Tips .......................................................................................................................12 Drop-Down Answers .........................................................................................................12 Text-Input Answers ...........................................................................................................13 Conditional Inputs..............................................................................................................14 Data Formats ....................................................................................................................15 Enter Intentionally Blank Data ...........................................................................................15 Update Demographic Beneficiary Data ..............................................................................16
Upload Your Beneficiary Data ............................................................................................17
4
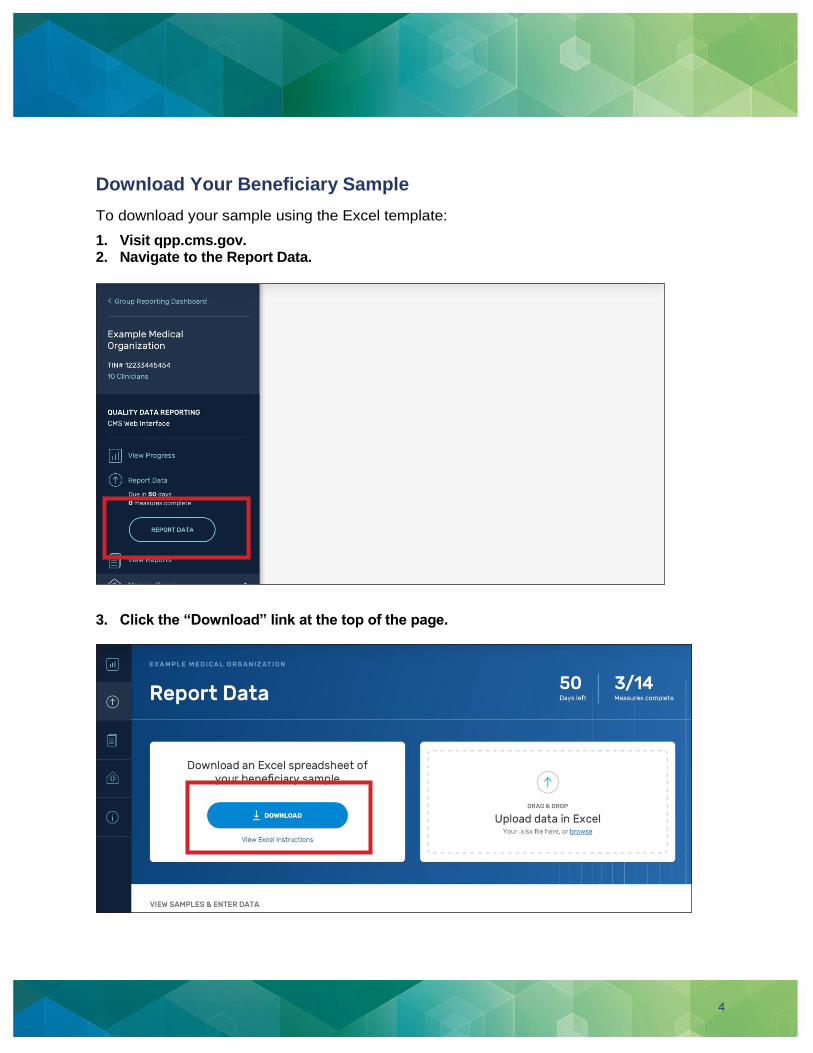
Download Your Beneficiary Sample
To download your sample using the Excel template:
1. Visit qpp.cms.gov. 2. Navigate to the Report Data.
3. Click the “Download” link at the top of the page.

5
4. Select your download preference.
Sample without Data: Your template will be populated with any data you’ve already entered into the CMS Web Interface—either manually or via a previous Excel upload.
Sample with Data: Your template will only contain CMS pre-filled data. It will be your original sample before your team inputs any data into the CMS Web Interface.
6
Understanding Your Streamlined Excel Template
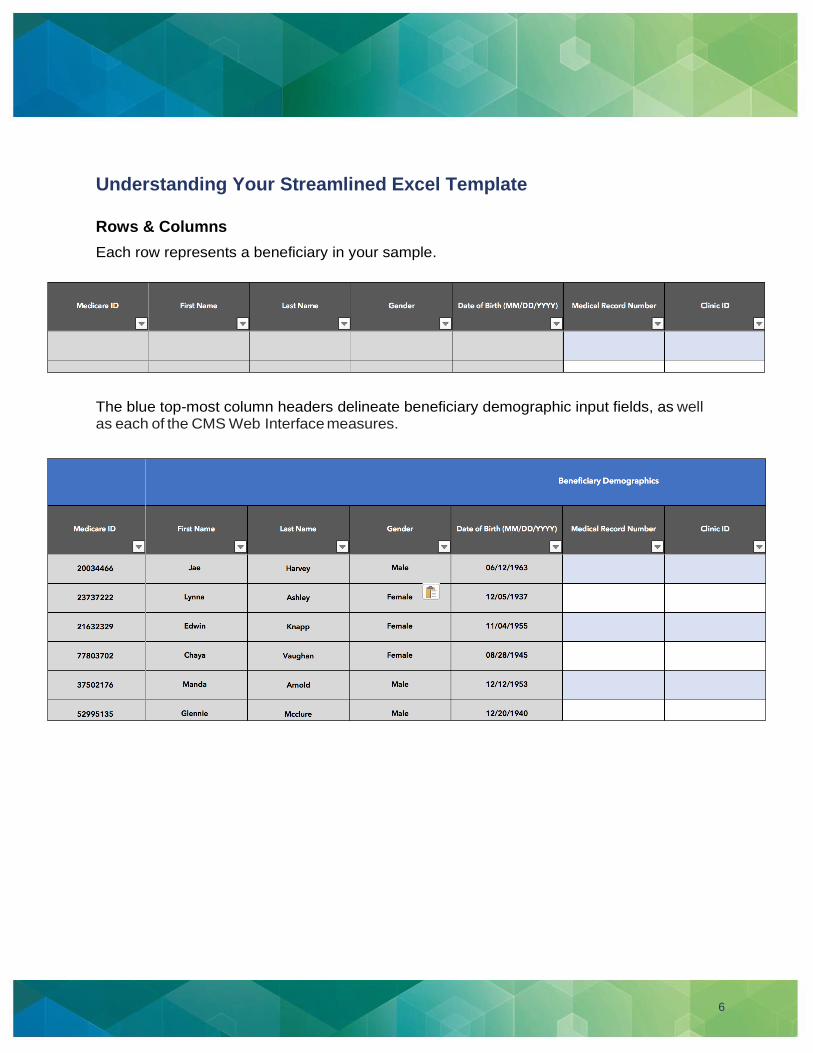
Rows & Columns
Each row represents a beneficiary in your sample.
The blue top-most column headers delineate beneficiary demographic input fields, as well as each of the CMS Web Interface measures.
7
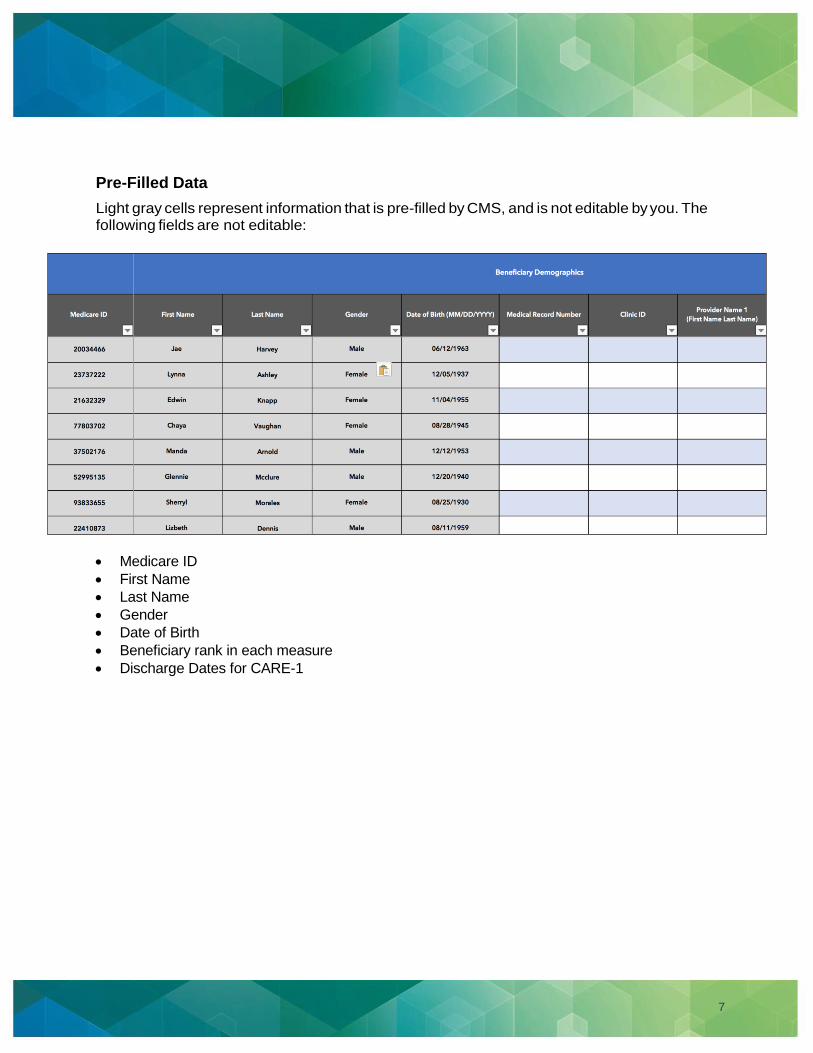
Pre-Filled Data
Light gray cells represent information that is pre-filled by CMS, and is not editable by you. The following fields are not editable:
Medicare ID
First Name
Last Name
Gender
Date of Birth
Beneficiary rank in each measure
Discharge Dates for CARE-1
8
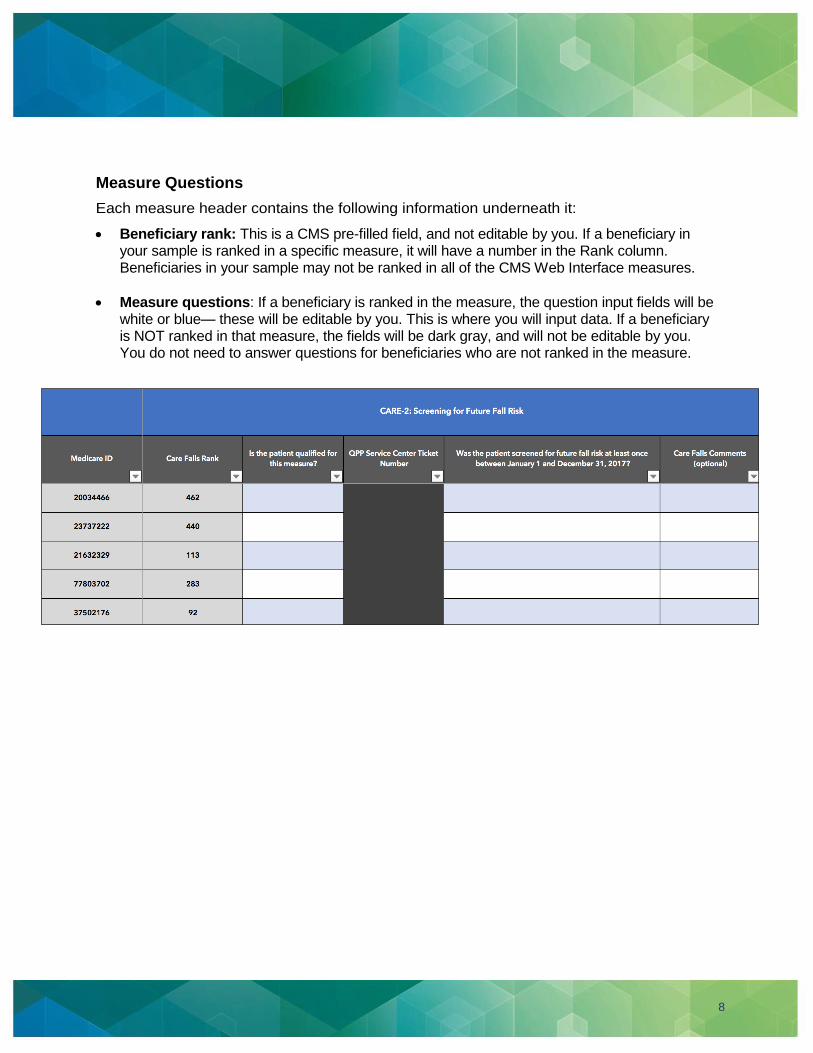
Measure Questions
Each measure header contains the following information underneath it:
Beneficiary rank: This is a CMS pre-filled field, and not editable by you. If a beneficiary in your sample is ranked in a specific measure, it will have a number in the Rank column. Beneficiaries in your sample may not be ranked in all of the CMS Web Interface measures.
Measure questions: If a beneficiary is ranked in the measure, the question input fields will be white or blue— these will be editable by you. This is where you will input data. If a beneficiary is NOT ranked in that measure, the fields will be dark gray, and will not be editable by you. You do not need to answer questions for beneficiaries who are not ranked in the measure.
9
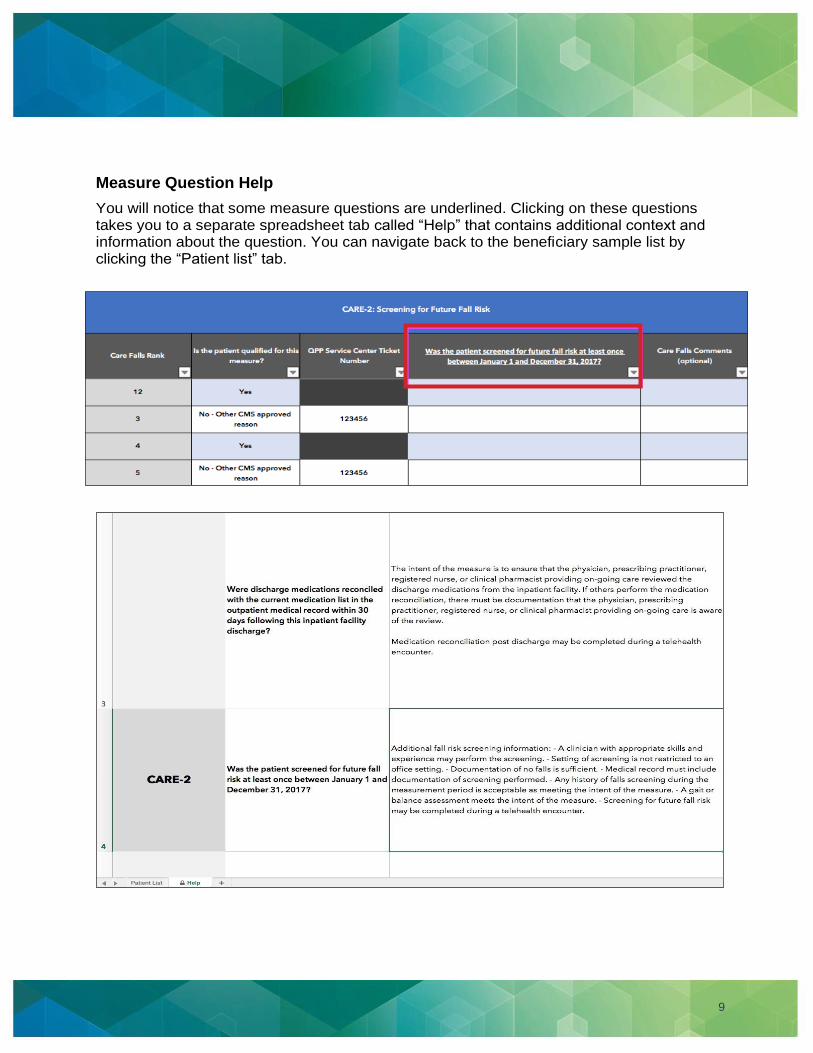
Measure Question Help
You will notice that some measure questions are underlined. Clicking on these questions takes you to a separate spreadsheet tab called “Help” that contains additional context and information about the question. You can navigate back to the beneficiary sample list by clicking the “Patient list” tab.
10
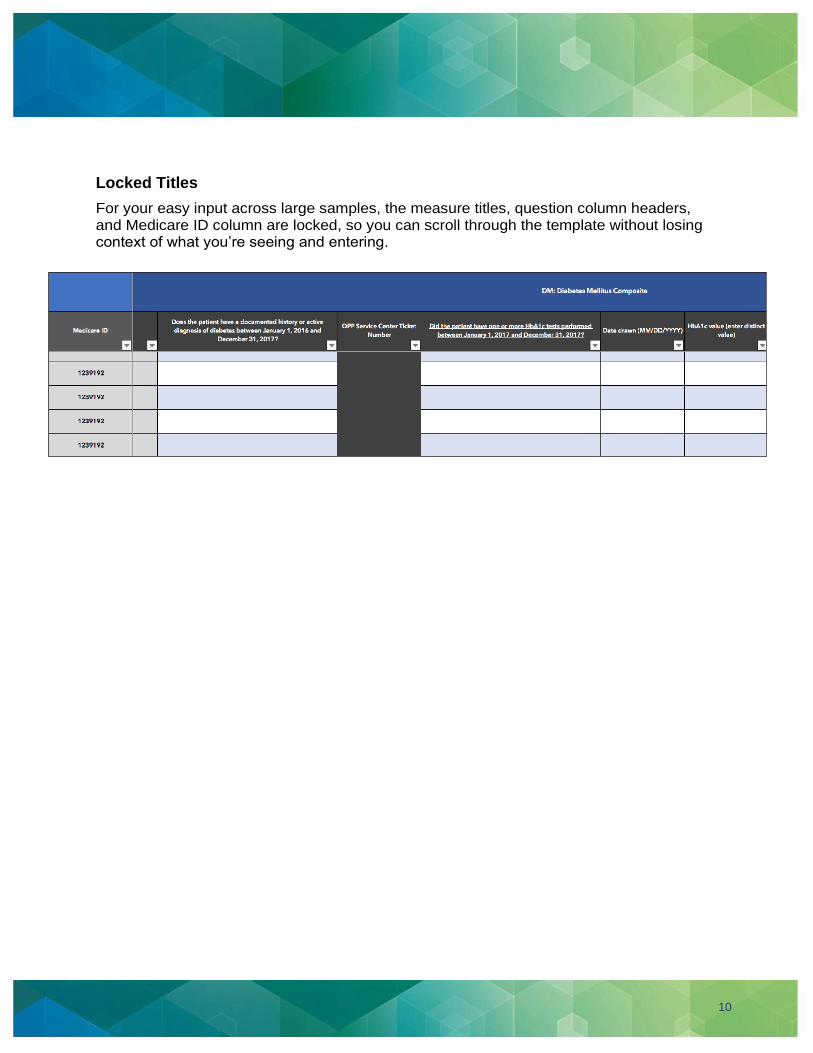
Locked Titles
For your easy input across large samples, the measure titles, question column headers, and Medicare ID column are locked, so you can scroll through the template without losing context of what you’re seeing and entering.
11
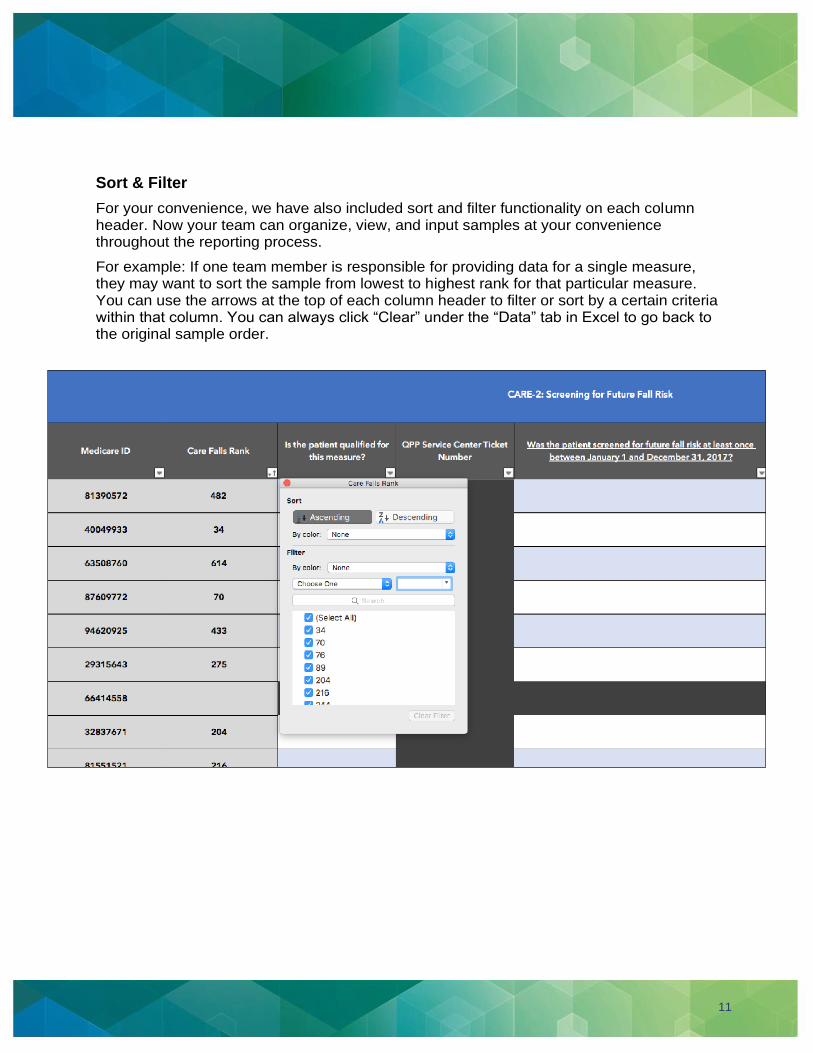
Sort & Filter
For your convenience, we have also included sort and filter functionality on each column header. Now your team can organize, view, and input samples at your convenience throughout the reporting process.
For example: If one team member is responsible for providing data for a single measure, they may want to sort the sample from lowest to highest rank for that particular measure. You can use the arrows at the top of each column header to filter or sort by a certain criteria within that column. You can always click “Clear” under the “Data” tab in Excel to go back to the original sample order.
12
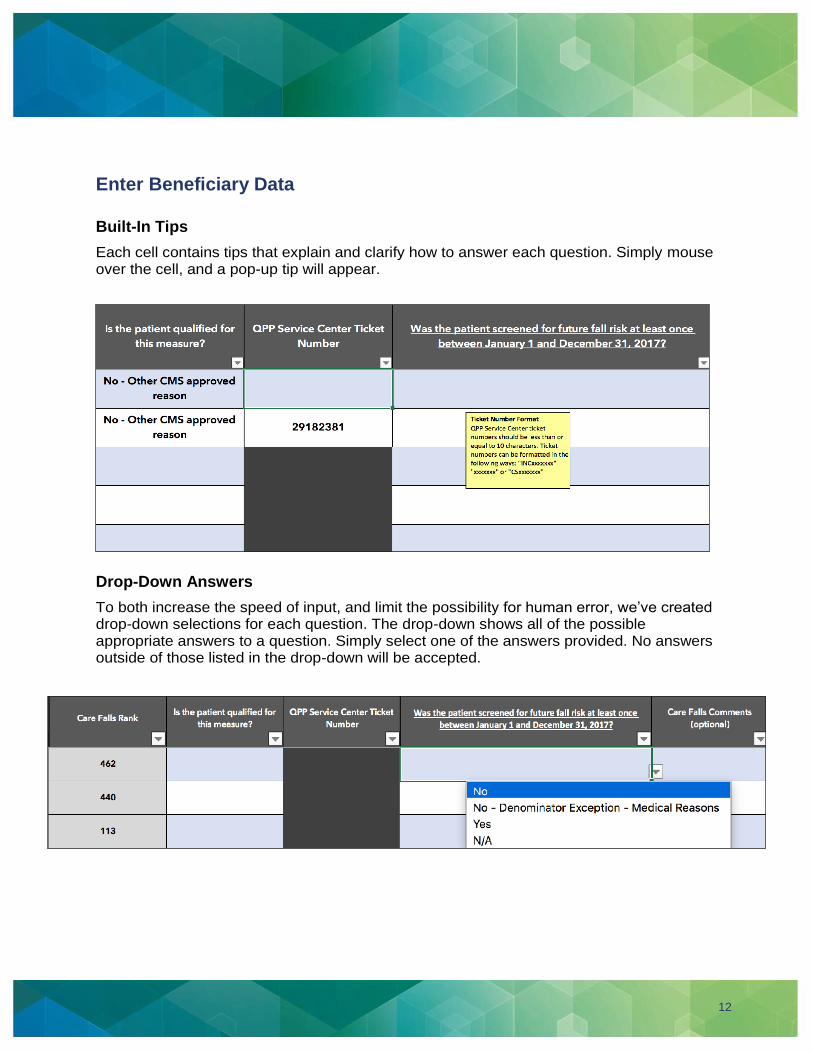
Enter Beneficiary Data
Built-In Tips
Each cell contains tips that explain and clarify how to answer each question. Simply mouse over the cell, and a pop-up tip will appear.
Drop-Down Answers
To both increase the speed of input, and limit the possibility for human error, we’ve created drop-down selections for each question. The drop-down shows all of the possible appropriate answers to a question. Simply select one of the answers provided. No answers outside of those listed in the drop-down will be accepted.

13
Text-Input Answers
Some fields require you to type text into the input field. In these cases, the field will be limited to the appropriate number of characters required for the input field.
For example: QPP Service Center ticket numbers cannot be longer than 10 characters. If you input more than 10 characters, the Excel template will show an error message.
14
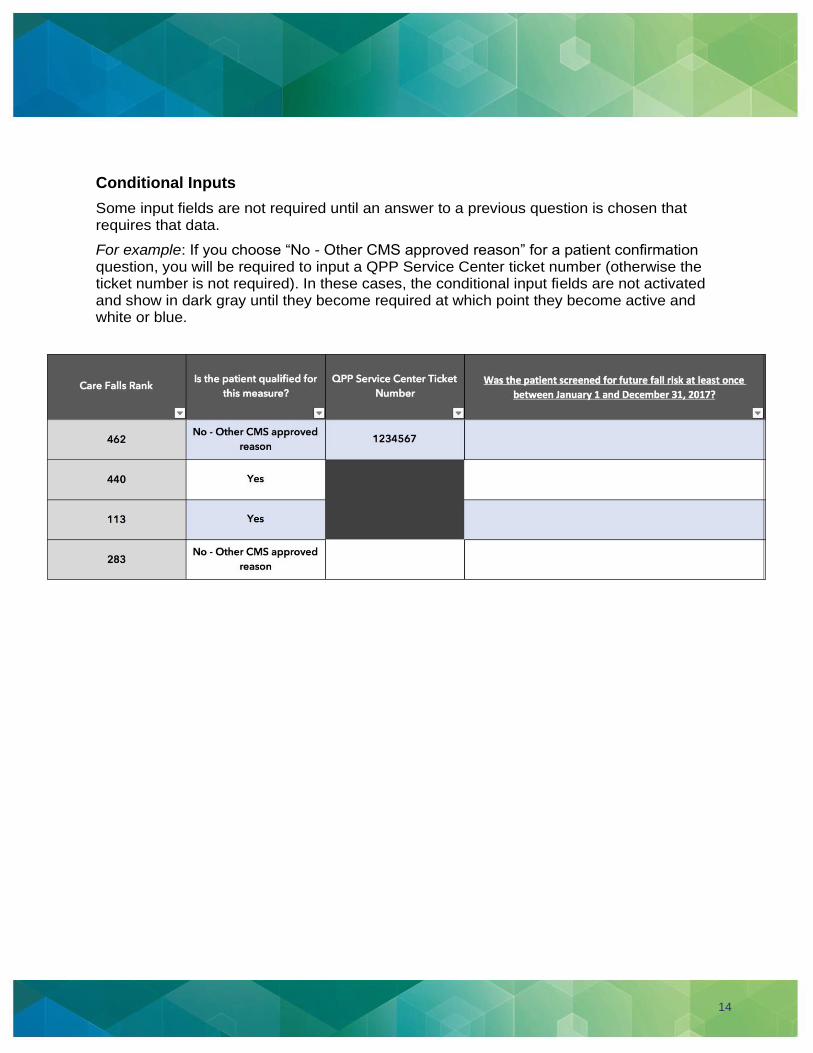
Conditional Inputs
Some input fields are not required until an answer to a previous question is chosen that requires that data.
For example: If you choose “No - Other CMS approved reason” for a patient confirmation question, you will be required to input a QPP Service Center ticket number (otherwise the ticket number is not required). In these cases, the conditional input fields are not activated and show in dark gray until they become required at which point they become active and white or blue.
15
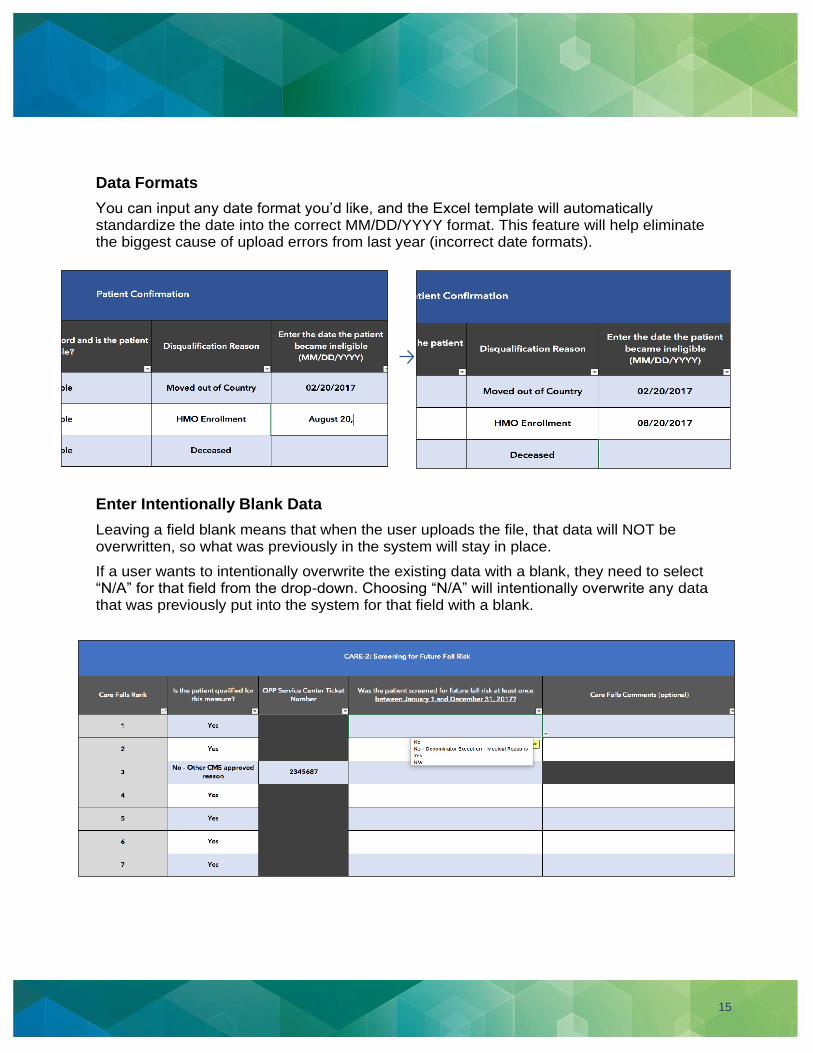
Data Formats
You can input any date format you’d like, and the Excel template will automatically standardize the date into the correct MM/DD/YYYY format. This feature will help eliminate the biggest cause of upload errors from last year (incorrect date formats).
Enter Intentionally Blank Data
Leaving a field blank means that when the user uploads the file, that data will NOT be overwritten, so what was previously in the system will stay in place.
If a user wants to intentionally overwrite the existing data with a blank, they need to select “N/A” for that field from the drop-down. Choosing “N/A” will intentionally overwrite any data that was previously put into the system for that field with a blank.
16
Update Demographic Beneficiary Data
You can edit the following beneficiary demographic data using the Excel template:
Medical Record Number – you can record a number associated with your internal systems here, for easy medical record location. This field is not required
Provider Name 1 – You can associate beneficiaries with providers, to more quickly locate their medical records internally. These fields are also not required.
Provider Name 2
Provider Name 3
Clinic ID – You can associate beneficiaries with clinics in your organization, to more quickly track down their medical records internally. This field is not required.
General Comment – You can use this field to track any additional notes on where the beneficiary’s medical record can be found internally.
You can edit the following beneficiary demographic data, ONLY using the CMS Web Interface manually. You cannot edit this information through the Excel template. We do this to limit the difficulty of locating the patients after an incorrect change:
First Name
Last Name
Gender
Date of Birth
17
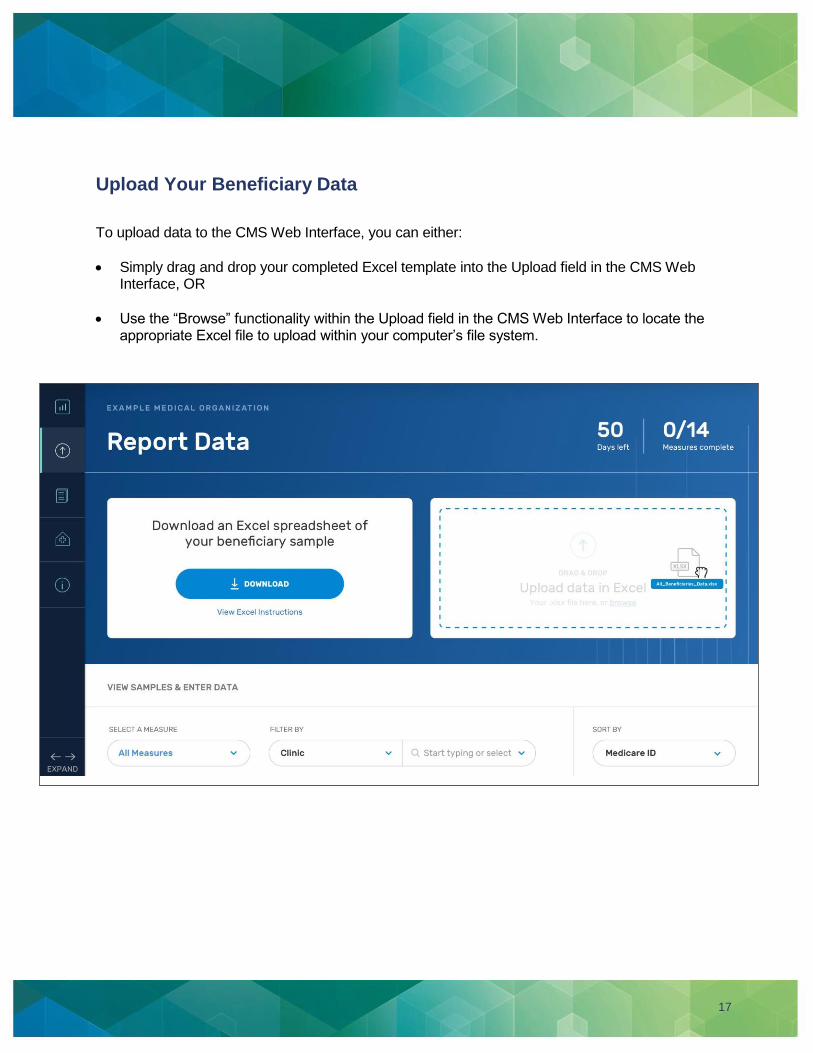
Upload Your Beneficiary Data
To upload data to the CMS Web Interface, you can either:
Simply drag and drop your completed Excel template into the Upload field in the CMS Web Interface, OR
Use the “Browse” functionality within the Upload field in the CMS Web Interface to locate the appropriate Excel file to upload within your computer’s file system.
18
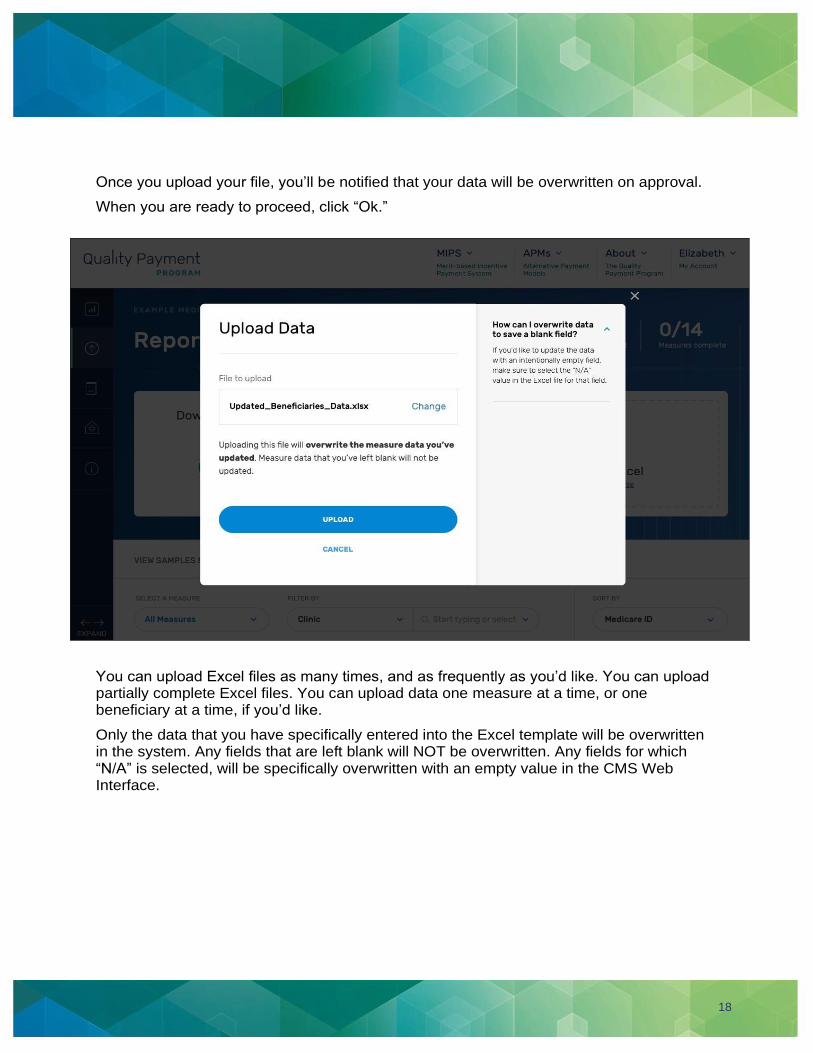
Once you upload your file, you’ll be notified that your data will be overwritten on approval.
When you are ready to proceed, click “Ok.”
You can upload Excel files as many times, and as frequently as you’d like. You can upload partially complete Excel files. You can upload data one measure at a time, or one beneficiary at a time, if you’d like.
Only the data that you have specifically entered into the Excel template will be overwritten in the system. Any fields that are left blank will NOT be overwritten. Any fields for which “N/A” is selected, will be specifically overwritten with an empty value in the CMS Web Interface.