Embed Size (px)
Citation preview
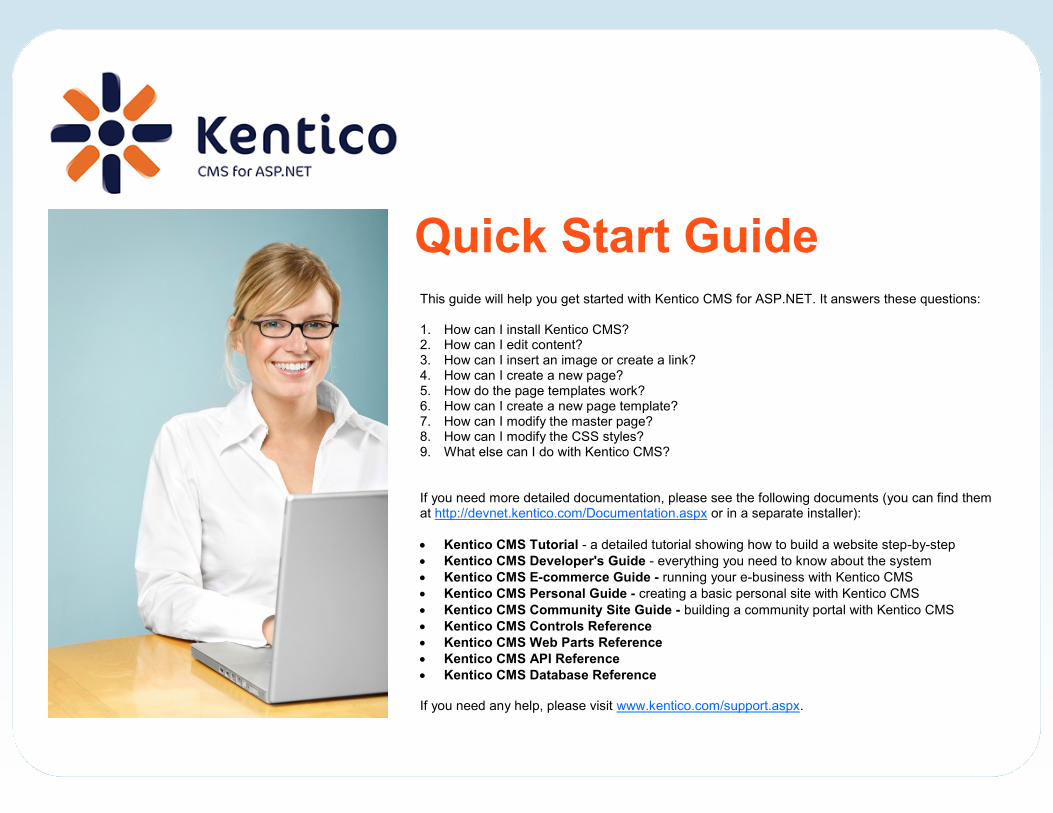
This guide will help you get started with Kentico CMS for ASP.NET. It answers these questions: 1. How can I install Kentico CMS? 2. How can I edit content? 3. How can I insert an image or create a link? 4. How can I create a new page? 5. How do the page templates work? 6. How can I create a new page template? 7. How can I modify the master page? 8. How can I modify the CSS styles? 9. What else can I do with Kentico CMS? If you need more detailed documentation, please see the following documents (you can find them at http://devnet.kentico.com/Documentation.aspx or in a separate installer):
Kentico CMS Tutorial - a detailed tutorial showing how to build a website step-by-step
Kentico CMS Developer's Guide - everything you need to know about the system
Kentico CMS E-commerce Guide - running your e-business with Kentico CMS
Kentico CMS Personal Guide - creating a basic personal site with Kentico CMS
Kentico CMS Community Site Guide - building a community portal with Kentico CMS
Kentico CMS Controls Reference
Kentico CMS Web Parts Reference
Kentico CMS API Reference
Kentico CMS Database Reference If you need any help, please visit www.kentico.com/support.aspx.
Quick Start Guide
Kentico CMS for ASP.NET - Quick Start Guide
1. How can I install Kentico CMS?
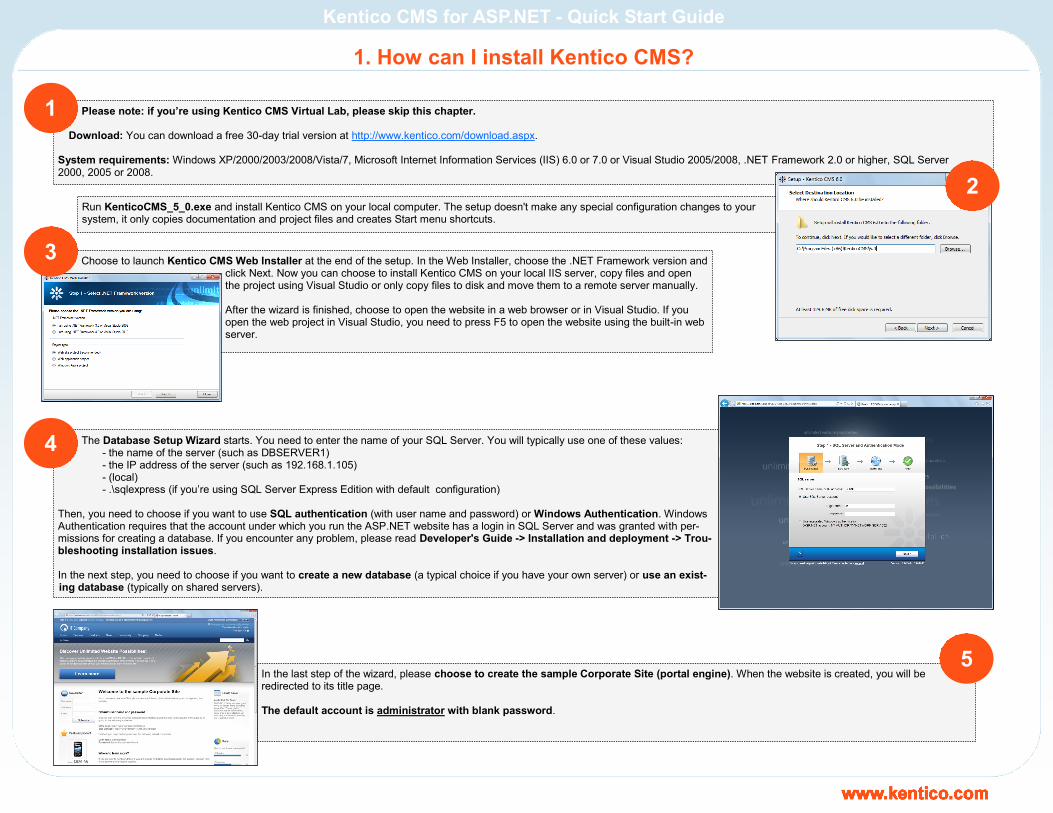
Please note: if you’re using Kentico CMS Virtual Lab, please skip this chapter.
Download: You can download a free 30-day trial version at http://www.kentico.com/download.aspx. System requirements: Windows XP/2000/2003/2008/Vista/7, Microsoft Internet Information Services (IIS) 6.0 or 7.0 or Visual Studio 2005/2008, .NET Framework 2.0 or higher, SQL Server 2000, 2005 or 2008.
1
Run KenticoCMS_5_0.exe and install Kentico CMS on your local computer. The setup doesn't make any special configuration changes to your system, it only copies documentation and project files and creates Start menu shortcuts.
2
Choose to launch Kentico CMS Web Installer at the end of the setup. In the Web Installer, choose the .NET Framework version and click Next. Now you can choose to install Kentico CMS on your local IIS server, copy files and open the project using Visual Studio or only copy files to disk and move them to a remote server manually. After the wizard is finished, choose to open the website in a web browser or in Visual Studio. If you open the web project in Visual Studio, you need to press F5 to open the website using the built-in web server.
3
The Database Setup Wizard starts. You need to enter the name of your SQL Server. You will typically use one of these values: - the name of the server (such as DBSERVER1) - the IP address of the server (such as 192.168.1.105) - (local) - .\sqlexpress (if you’re using SQL Server Express Edition with default configuration)
Then, you need to choose if you want to use SQL authentication (with user name and password) or Windows Authentication. Windows Authentication requires that the account under which you run the ASP.NET website has a login in SQL Server and was granted with per-missions for creating a database. If you encounter any problem, please read Developer's Guide -> Installation and deployment -> Trou-bleshooting installation issues.
In the next step, you need to choose if you want to create a new database (a typical choice if you have your own server) or use an exist-ing database (typically on shared servers).
4
In the last step of the wizard, please choose to create the sample Corporate Site (portal engine). When the website is created, you will be redirected to its title page. The default account is administrator with blank password.
5

Kentico CMS for ASP.NET - Quick Start Guide
2. How can I edit content?
Click the CMS Desk link at the top of the screen and sign in as administrator. The default password is blank, but if you’re using Kentico CMS Virtual Lab, you need to enter the password you have received in the invitation e-mail. The editing interface opens. On the left, you can see the content tree that represents the site structure (site map) and on the right, you can edit the content. Click Home in the content tree and change some text in the editable region. Click Save or press CTRL+S to save changes. You can see how the page looks live by choosing the Live Site view mode. Editable regions usually contain unstructured text. You can have several editable regions on a single page. You will typically use them for a home page, contact page and other pages without a strictly defined structure.
View mode Document actions Editing mode WYSIWYG editor toolbar
Content tree Editable region
Kentico CMS for ASP.NET - Quick Start Guide
3. How can I insert an image or create a link?
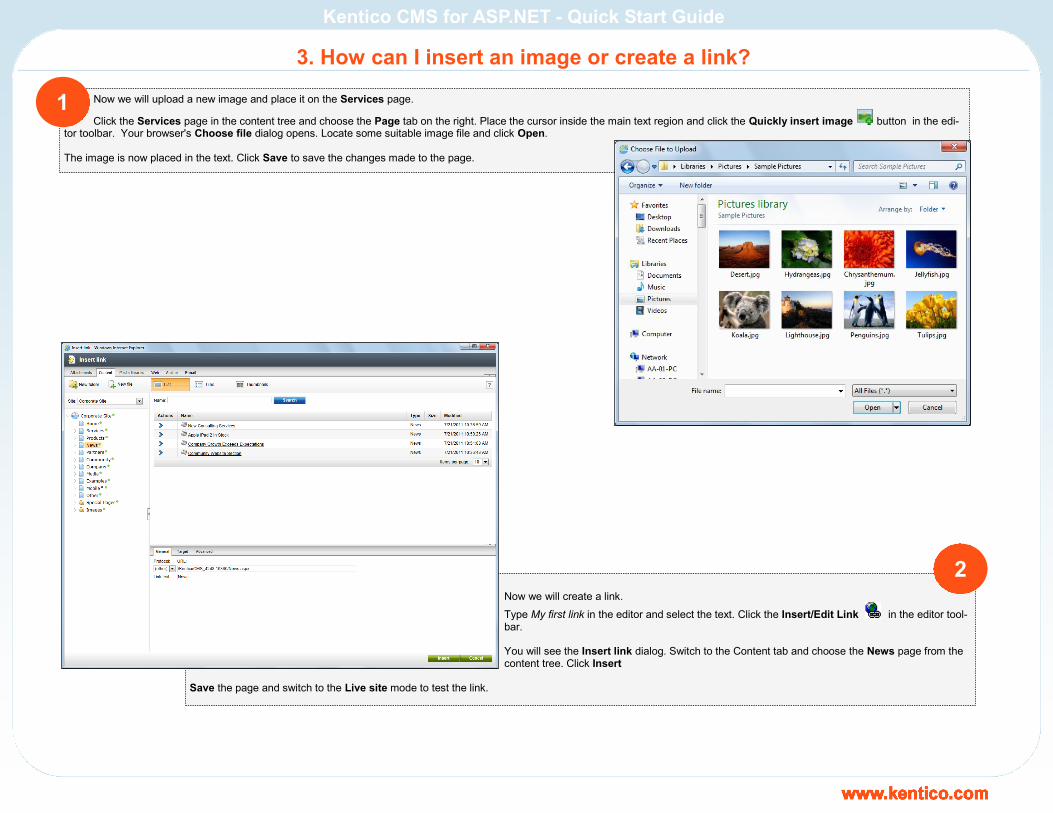
Now we will upload a new image and place it on the Services page.
Click the Services page in the content tree and choose the Page tab on the right. Place the cursor inside the main text region and click the Quickly insert image button in the edi-tor toolbar. Your browser's Choose file dialog opens. Locate some suitable image file and click Open. The image is now placed in the text. Click Save to save the changes made to the page.
1
Now we will create a link.
Type My first link in the editor and select the text. Click the Insert/Edit Link in the editor tool-bar. You will see the Insert link dialog. Switch to the Content tab and choose the News page from the content tree. Click Insert
Save the page and switch to the Live site mode to test the link.
2
Kentico CMS for ASP.NET - Quick Start Guide
4. How can I create a new page?
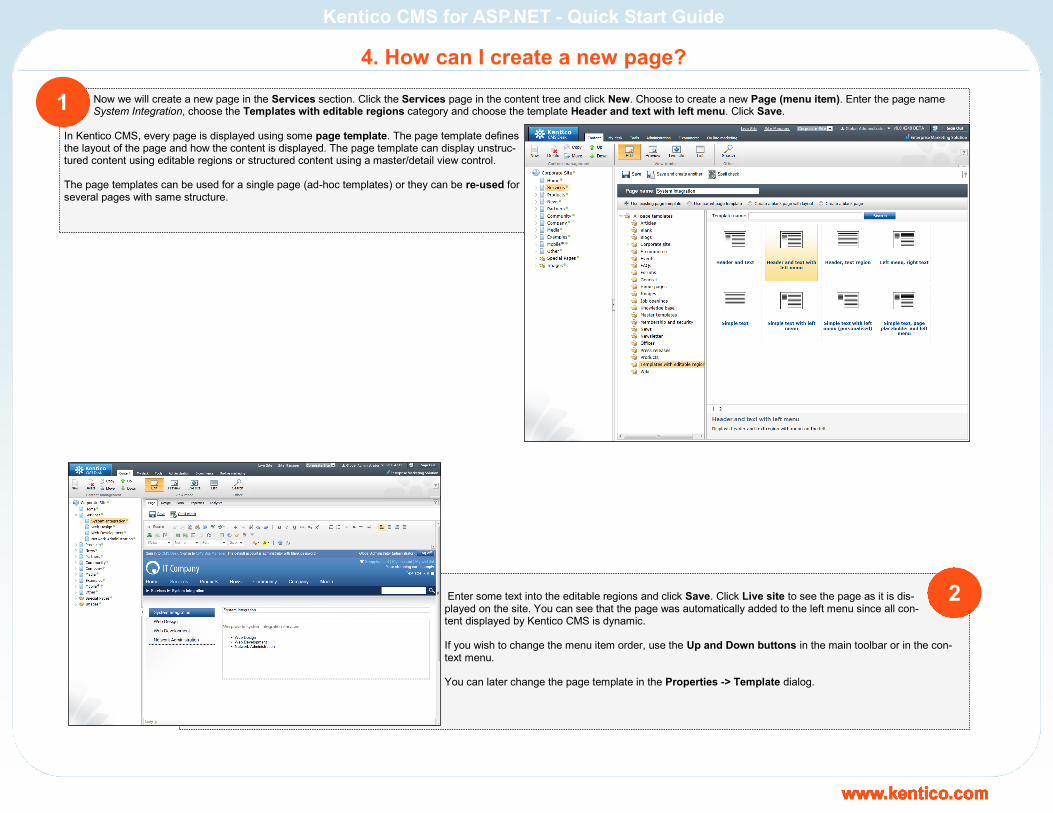
Now we will create a new page in the Services section. Click the Services page in the content tree and click New. Choose to create a new Page (menu item). Enter the page name System Integration, choose the Templates with editable regions category and choose the template Header and text with left menu. Click Save.
In Kentico CMS, every page is displayed using some page template. The page template defines the layout of the page and how the content is displayed. The page template can display unstruc-tured content using editable regions or structured content using a master/detail view control. The page templates can be used for a single page (ad-hoc templates) or they can be re-used for several pages with same structure.
1
Enter some text into the editable regions and click Save. Click Live site to see the page as it is dis-played on the site. You can see that the page was automatically added to the left menu since all con-tent displayed by Kentico CMS is dynamic. If you wish to change the menu item order, use the Up and Down buttons in the main toolbar or in the con-text menu. You can later change the page template in the Properties -> Template dialog.
2
Kentico CMS for ASP.NET - Quick Start Guide
5. How do the page templates work?
<div class="leftColumn>
<cc1:CMSWebPartZone ID="zoneLeft" runat="server" />
</div>
<div class="rightColumn>
<cc1:CMSWebPartZone ID="zoneRight" runat="server" />
</div>
We provide network
administration services.
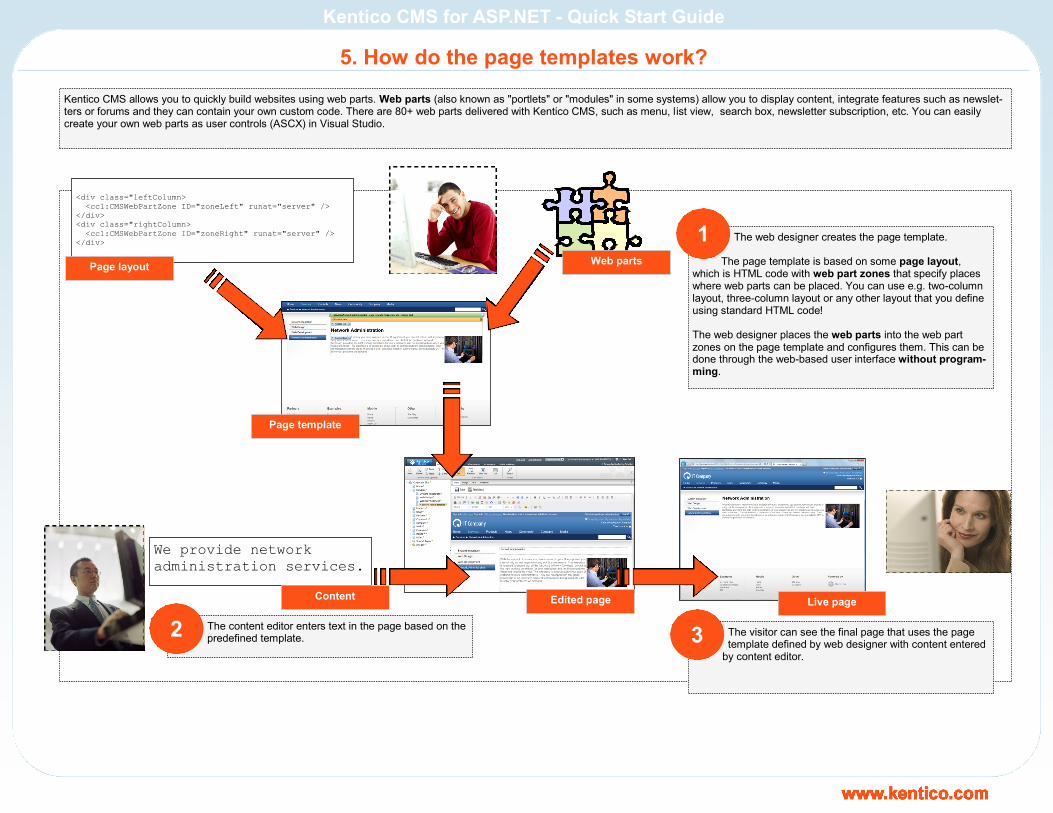
The web designer creates the page template.
The page template is based on some page layout, which is HTML code with web part zones that specify places where web parts can be placed. You can use e.g. two-column layout, three-column layout or any other layout that you define using standard HTML code! The web designer places the web parts into the web part zones on the page template and configures them. This can be done through the web-based user interface without program-ming.
Kentico CMS allows you to quickly build websites using web parts. Web parts (also known as "portlets" or "modules" in some systems) allow you to display content, integrate features such as newslet-ters or forums and they can contain your own custom code. There are 80+ web parts delivered with Kentico CMS, such as menu, list view, search box, newsletter subscription, etc. You can easily create your own web parts as user controls (ASCX) in Visual Studio.
1
The content editor enters text in the page based on the predefined template.
2 The visitor can see the final page that uses the page template defined by web designer with content entered
by content editor.
3
Page layout Web parts
Page template
Content Edited page Live page
Kentico CMS for ASP.NET - Quick Start Guide
6. How can I create a new page template?
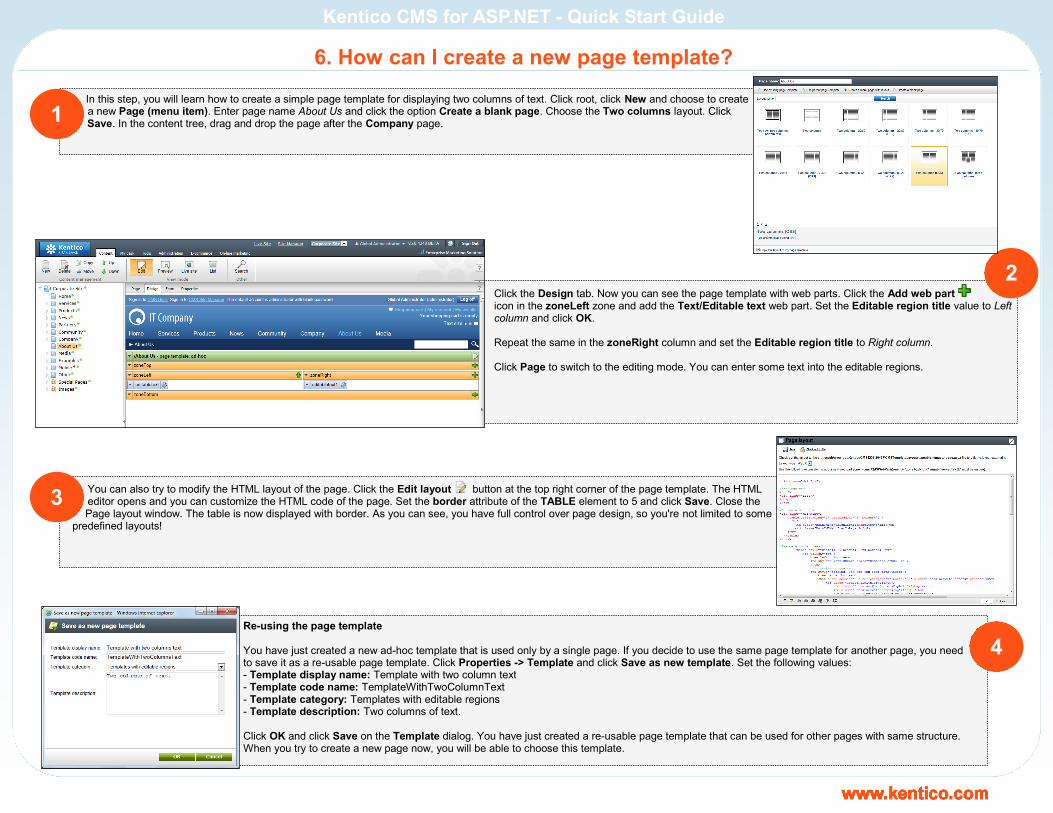
In this step, you will learn how to create a simple page template for displaying two columns of text. Click root, click New and choose to create a new Page (menu item). Enter page name About Us and click the option Create a blank page. Choose the Two columns layout. Click Save. In the content tree, drag and drop the page after the Company page.
1
Click the Design tab. Now you can see the page template with web parts. Click the Add web part icon in the zoneLeft zone and add the Text/Editable text web part. Set the Editable region title value to Left column and click OK. Repeat the same in the zoneRight column and set the Editable region title to Right column. Click Page to switch to the editing mode. You can enter some text into the editable regions.
2
You can also try to modify the HTML layout of the page. Click the Edit layout button at the top right corner of the page template. The HTML editor opens and you can customize the HTML code of the page. Set the border attribute of the TABLE element to 5 and click Save. Close the Page layout window. The table is now displayed with border. As you can see, you have full control over page design, so you're not limited to some
predefined layouts!
3
Re-using the page template You have just created a new ad-hoc template that is used only by a single page. If you decide to use the same page template for another page, you need to save it as a re-usable page template. Click Properties -> Template and click Save as new template. Set the following values: - Template display name: Template with two column text - Template code name: TemplateWithTwoColumnText - Template category: Templates with editable regions - Template description: Two columns of text. Click OK and click Save on the Template dialog. You have just created a re-usable page template that can be used for other pages with same structure. When you try to create a new page now, you will be able to choose this template.
4
Kentico CMS for ASP.NET - Quick Start Guide
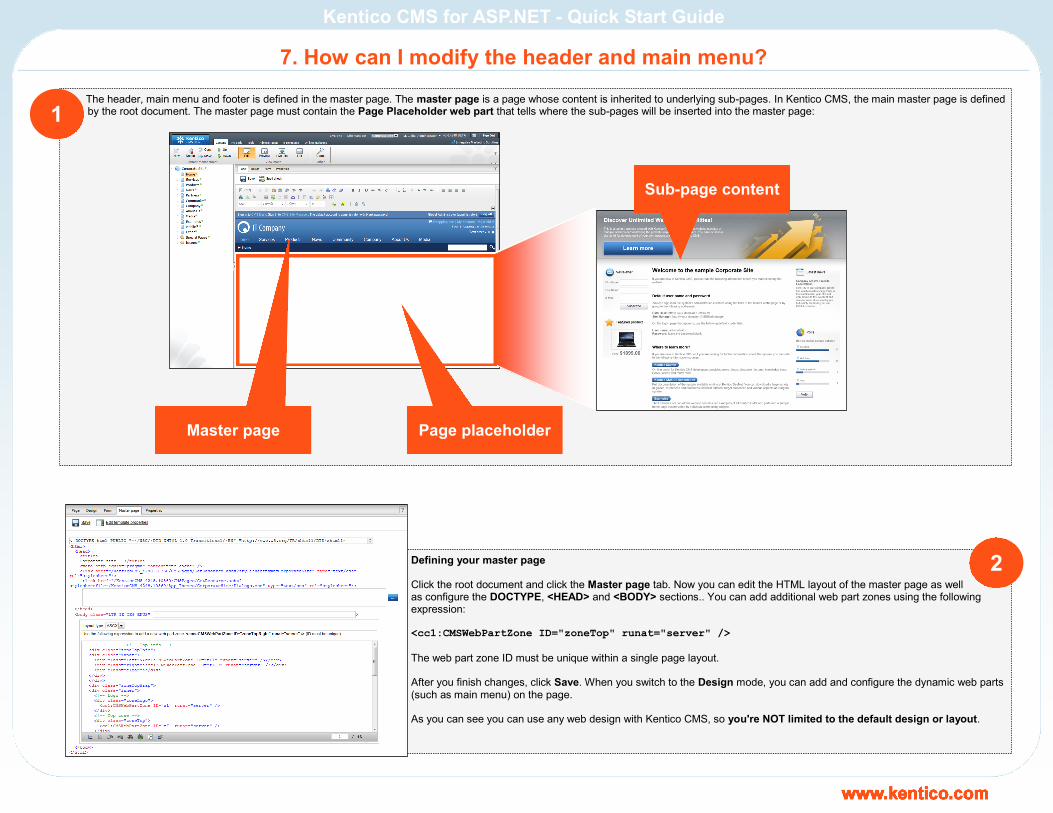
The header, main menu and footer is defined in the master page. The master page is a page whose content is inherited to underlying sub-pages. In Kentico CMS, the main master page is defined by the root document. The master page must contain the Page Placeholder web part that tells where the sub-pages will be inserted into the master page:
7. How can I modify the header and main menu?
1
Sub-page content
Page placeholder Master page
Defining your master page Click the root document and click the Master page tab. Now you can edit the HTML layout of the master page as well as configure the DOCTYPE, <HEAD> and <BODY> sections.. You can add additional web part zones using the following expression: <cc1:CMSWebPartZone ID="zoneTop" runat="server" />
The web part zone ID must be unique within a single page layout. After you finish changes, click Save. When you switch to the Design mode, you can add and configure the dynamic web parts (such as main menu) on the page. As you can see you can use any web design with Kentico CMS, so you're NOT limited to the default design or layout.
2
Kentico CMS for ASP.NET - Quick Start Guide
You can edit the CSS style sheets in Site Manager -> Development -> CSS style sheets. Edit the Corpo-rate Site style sheet and change the following style like this: p
{
color: #000000;
font-size: 15px;
}
This CSS class is used for most of the general text on the website. Save the changes. If you view the Home page now, you can see the text on the page is black instead of grey. Please note: it's recommended that you place the images and Flash animations that are part of the website design into the <web project>\App_Themes\<style sheet code name> folder. It will ensure that the files are ex-
ported when you are deploying the site to the live server.
8. How can I modify the CSS Styles?
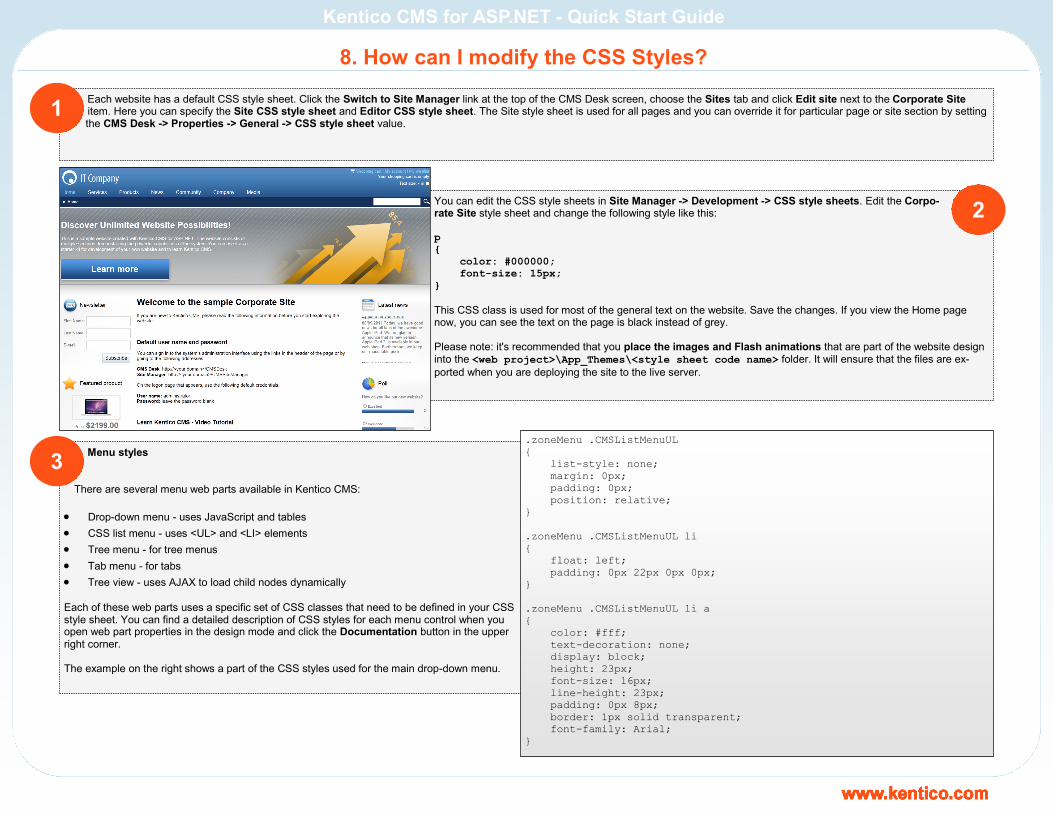
Each website has a default CSS style sheet. Click the Switch to Site Manager link at the top of the CMS Desk screen, choose the Sites tab and click Edit site next to the Corporate Site item. Here you can specify the Site CSS style sheet and Editor CSS style sheet. The Site style sheet is used for all pages and you can override it for particular page or site section by setting the CMS Desk -> Properties -> General -> CSS style sheet value.
1
2
Menu styles
There are several menu web parts available in Kentico CMS:
Drop-down menu - uses JavaScript and tables
CSS list menu - uses <UL> and <LI> elements
Tree menu - for tree menus
Tab menu - for tabs
Tree view - uses AJAX to load child nodes dynamically
Each of these web parts uses a specific set of CSS classes that need to be defined in your CSS style sheet. You can find a detailed description of CSS styles for each menu control when you open web part properties in the design mode and click the Documentation button in the upper right corner. The example on the right shows a part of the CSS styles used for the main drop-down menu.
3
.zoneMenu .CMSListMenuUL
{
list-style: none;
margin: 0px;
padding: 0px;
position: relative;
}
.zoneMenu .CMSListMenuUL li
{
float: left;
padding: 0px 22px 0px 0px;
}
.zoneMenu .CMSListMenuUL li a
{
color: #fff;
text-decoration: none;
display: block;
height: 23px;
font-size: 16px;
line-height: 23px;
padding: 0px 8px;
border: 1px solid transparent;
font-family: Arial;
}

Kentico CMS for ASP.NET - Quick Start Guide
Kentico CMS allows you to define a custom workflow process for chosen sections of the website. It gives the site owner a complete control over the content published on the website since every piece of content can be (for example) reviewed by a proofreader, mar-keting manager and site designer before it gets published on the website. You can configure workflow in Site Manager -> Development -> Workflows where you specify the steps, authorized users and workflow scope. Docu-ments under workflow can also use versioning, content locking (check-in/check-out) and roll-back.
9. What else can I do with Kentico CMS?
This guide shows only a small part of what can be achieved with Kentico CMS. For more details, please go through the Kentico CMS Tutorial that will show you how to build a website from scratch. You will find it at http://www.kentico.com/DevNet/Documentation.aspx. Below, you can find some examples of other features available in Kentico CMS.
Workflow and versioning
Kentico CMS comes with several pre-defined document types, such as news, article, job opening, product, etc. You can easily add custom document types in Site Manager -> Development -> Document types. Every document type can have any number of custom fields of different types (text, date/time, number, file, etc.). You can also add custom fields to the user profile, subscriber or customer in Site Manager -> Development -> System tables.
Customizable fields
Kentico CMS comes with many built-in modules, including: Blogs Booking system Content staging E-commerce Event calendar Forums Geomapping Image gallery Newsletter On-line forms Polls Reporting Wiki Web farm support Web analytics You can find more details on these modules in Kentico CMS Developer’s Guide.
Other modules
Kentico CMS uses a flexible security model. You can define global permissions that apply to all documents, as well as document-level permissions that apply only to the chosen document or site section. You can also create secured website areas for site members and display personalized content based on member profile.
Security and personlization
Kentico CMS allows you to build websites in any number of languages. Kentico CMS works with UNICODE, which means you can use any language, including Chinese and other eastern lan-guages. Kentico CMS supports also right-to-left (RTL) languages, such as Hebrew or Arabic. Kentico user interface is available in English, Dutch, German, French, Italian, Spanish, Czech and Slovak.
Multilingual and international support
Kentico CMS offers flexible licensing that fits every budget. You can choose from Standard, Professional and Enterprise Editions and you can purchase a license for a single website, single server (unlimited websites) or the unlimited license (any number of servers). The source code of the website and administration interface is available with all editions. If you wish to modify the core libraries, you can purchase full source code that contains all libraries. You can learn more details on licensing and buy the product at http://www.kentico.com/Buy.aspx.
Licensing and how to buy