Embed Size (px)
Citation preview
Kentico Content Management System (CMS
Table of Contents
i Graduate Center Kentico CMS, 2nd Edition
I. Introduction ....................................................................................................................................................... 1
II. Log into a Kentico CMS Desk to Edit GC Website ............................................................................................ 1
A. Select a Browser (Internet Explorer or Firefox only) .................................................................................. 1
B. Login to CMS Desk .................................................................................................................................... 2
III. Overview of the CMS Desk interface ................................................................................................................ 3
IV. Overview of Editable vs. Non-Editable Pages ................................................................................................... 3
V. Create a New Page ........................................................................................................................................... 3
A. Add a new Web Page to the site you are editing: ...................................................................................... 3
VI. Edit Mode: Add New Content using Widgets ..................................................................................................... 5
A. Add a General Module - Contact Widget .................................................................................................... 5
B. Right Module widget................................................................................................................................... 7
VII. Edit Mode: Edit Existing Page Content ............................................................................................................. 8
A. Edit content using existing Widgets ........................................................................................................... 8
B. Noteworthy icons on the WYSIWYG editor toolbar: ................................................................................... 9
VIII. Media Library .................................................................................................................................................. 10
A. Navigate to the Media Library: ................................................................................................................. 10
B. Managing files stored in the Media Library ............................................................................................... 11
IX. GC CMS Documentation ................................................................................................................................. 11
Page 1 of 11 Graduate Center Kentico CMS, 2nd Edition
I. Introduction
What is the Kentico Content Management System (CMS)?
Kentico Content Management System is a web-based system that will be used by the various departments, centers, etc. of the Graduate Center to edit, add, and manage content on their respective web pages. This system enables the centralization of content within and between the various Graduate Center entities.
II. Log into a Kentico CMS Desk to Edit GC Website
The Kentico CMS Desk is a work area to manage the content on the GC Website. You must login into the server (your workspace) in order to edit, add, and manage Website content. Any content entered in will be published to the live site (www.gc.cuny.edu) on an automated schedule. A web page review and approval process has been partially implemented and will continue to develop in later phases of the Website redesign process.
A. Select a Browser (Internet Explorer or Firefox only)
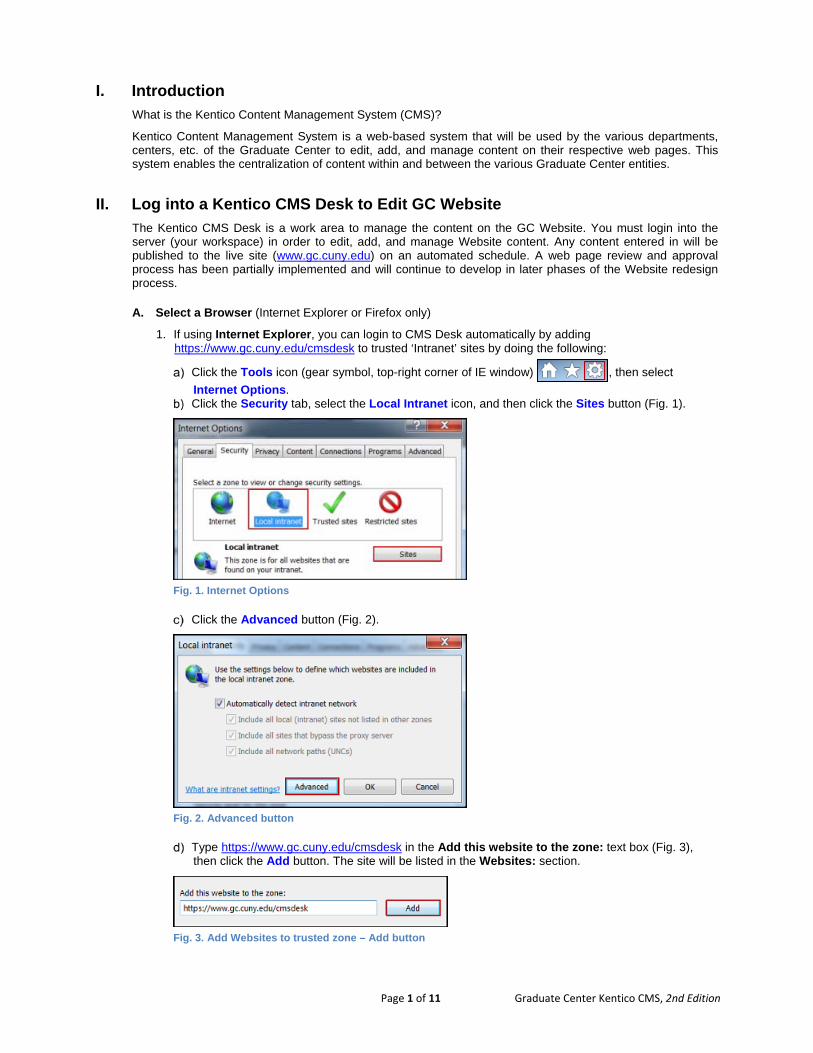
1. If using Internet Explorer, you can login to CMS Desk automatically by adding https://www.gc.cuny.edu/cmsdesk to trusted ‘Intranet’ sites by doing the following:
Click the Tools icon (gear symbol, top-right corner of IE window) , then select
Internet Options. Click the Security tab, select the Local Intranet icon, and then click the Sites button (Fig. 1).
Fig. 1. Internet Options
Click the Advanced button (Fig. 2).
Fig. 2. Advanced button
Type https://www.gc.cuny.edu/cmsdesk in the Add this website to the zone: text box (Fig. 3), then click the Add button. The site will be listed in the Websites: section.
Fig. 3. Add Websites to trusted zone – Add button
Page 2 of 11 Graduate Center Kentico CMS, 2nd Edition
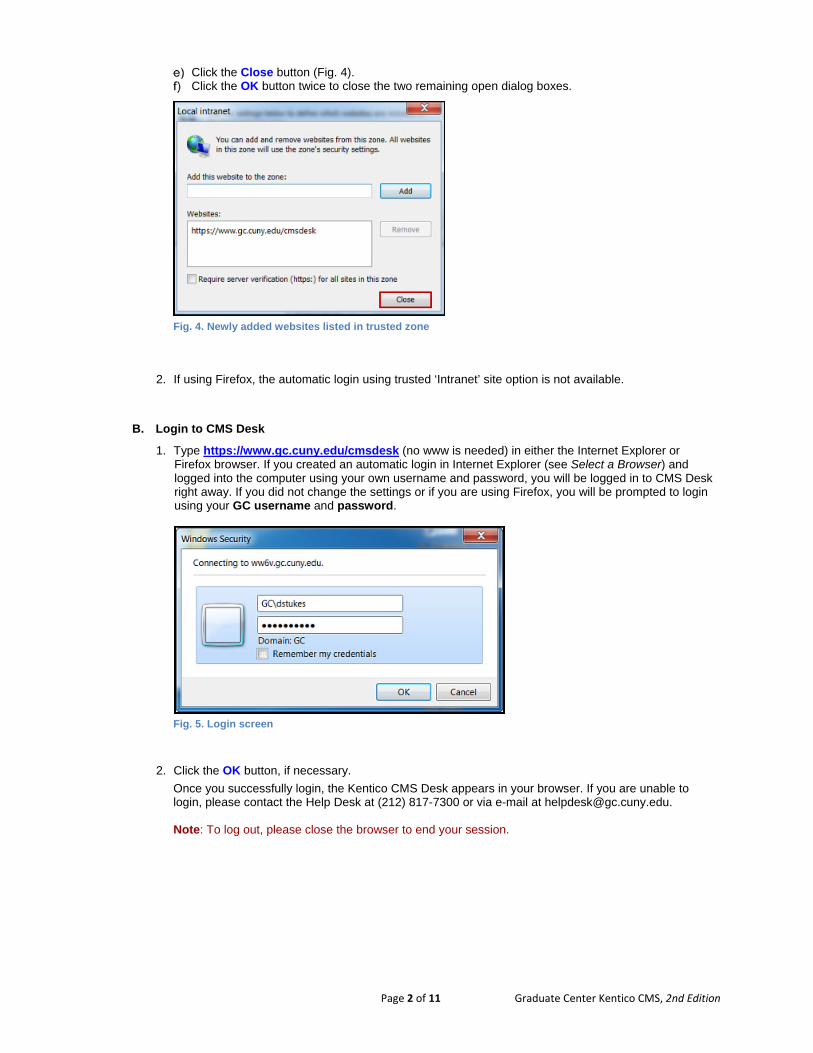
Click the Close button (Fig. 4). Click the OK button twice to close the two remaining open dialog boxes.
Fig. 4. Newly added websites listed in trusted zone
2. If using Firefox, the automatic login using trusted ‘Intranet’ site option is not available.
B. Login to CMS Desk
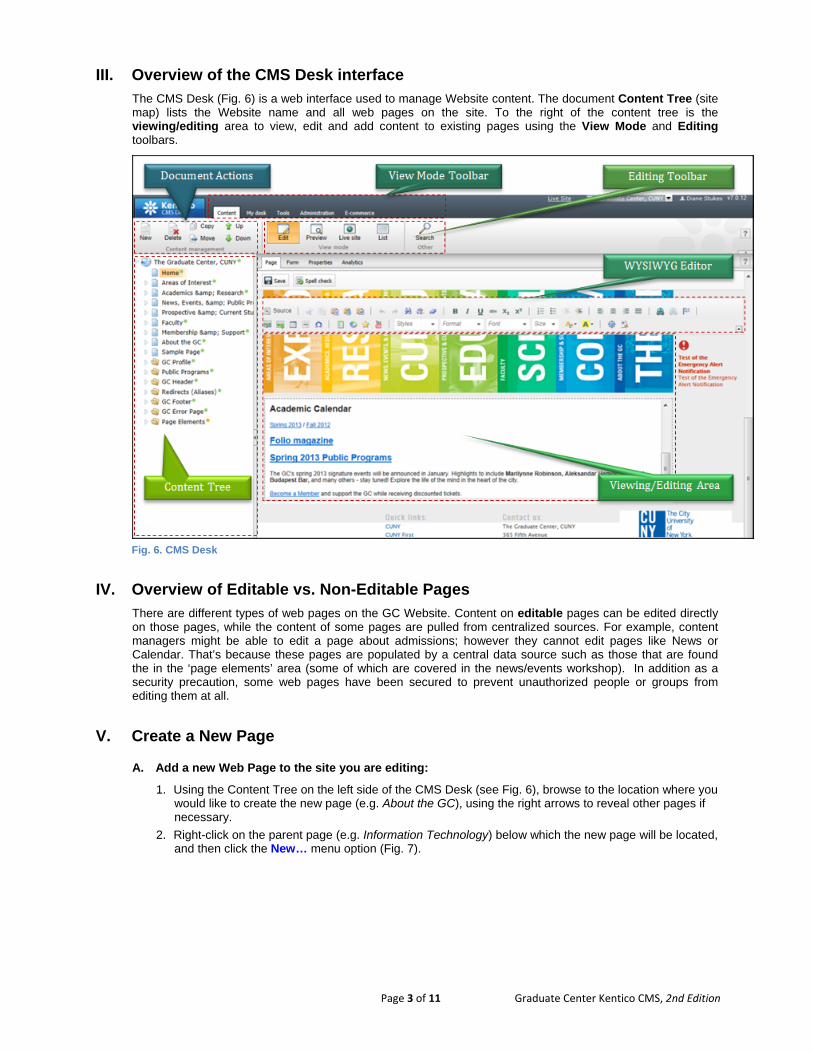
1. Type https://www.gc.cuny.edu/cmsdesk (no www is needed) in either the Internet Explorer or Firefox browser. If you created an automatic login in Internet Explorer (see Select a Browser) and logged into the computer using your own username and password, you will be logged in to CMS Desk right away. If you did not change the settings or if you are using Firefox, you will be prompted to login using your GC username and password.
Fig. 5. Login screen
2. Click the OK button, if necessary.
Once you successfully login, the Kentico CMS Desk appears in your browser. If you are unable to login, please contact the Help Desk at (212) 817-7300 or via e-mail at [email protected]. Note: To log out, please close the browser to end your session.
Page 3 of 11 Graduate Center Kentico CMS, 2nd Edition
III. Overview of the CMS Desk interface
The CMS Desk (Fig. 6) is a web interface used to manage Website content. The document Content Tree (site map) lists the Website name and all web pages on the site. To the right of the content tree is the viewing/editing area to view, edit and add content to existing pages using the View Mode and Editing toolbars.
Fig. 6. CMS Desk
IV. Overview of Editable vs. Non-Editable Pages
There are different types of web pages on the GC Website. Content on editable pages can be edited directly on those pages, while the content of some pages are pulled from centralized sources. For example, content managers might be able to edit a page about admissions; however they cannot edit pages like News or Calendar. That’s because these pages are populated by a central data source such as those that are found the in the ‘page elements’ area (some of which are covered in the news/events workshop). In addition as a security precaution, some web pages have been secured to prevent unauthorized people or groups from editing them at all.
V. Create a New Page
A. Add a new Web Page to the site you are editing:
1. Using the Content Tree on the left side of the CMS Desk (see Fig. 6), browse to the location where you would like to create the new page (e.g. About the GC), using the right arrows to reveal other pages if necessary.
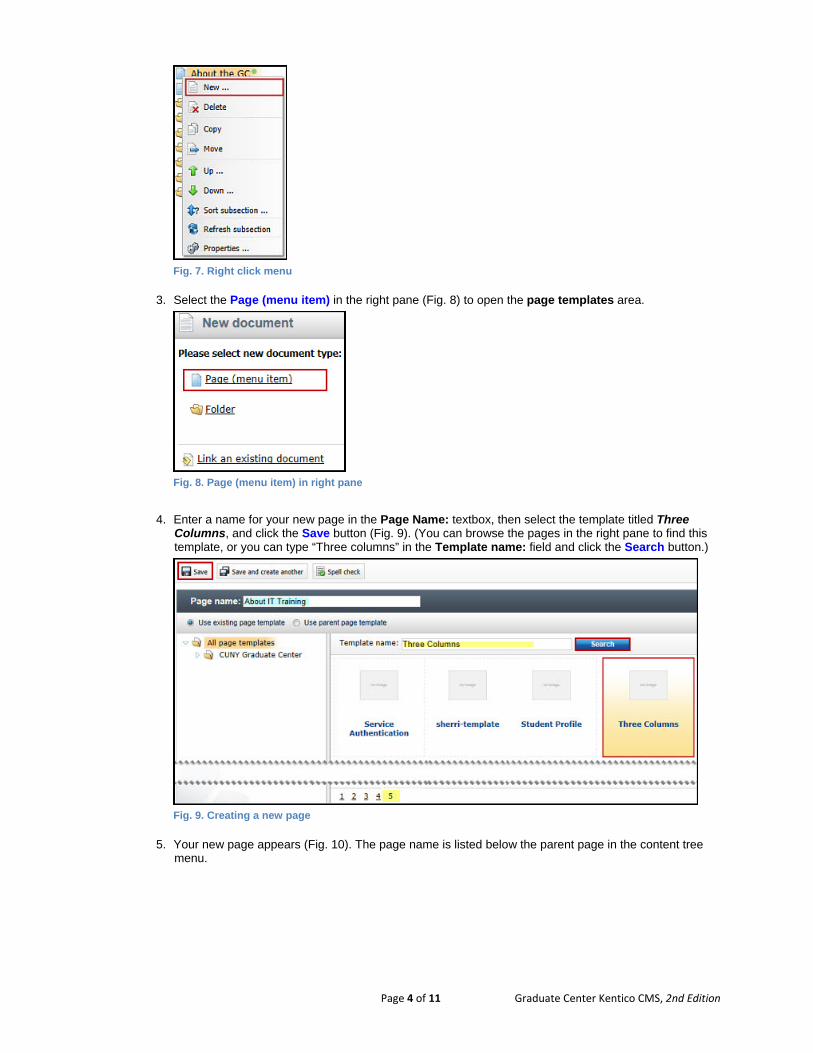
2. Right-click on the parent page (e.g. Information Technology) below which the new page will be located, and then click the New… menu option (Fig. 7).
Page 4 of 11 Graduate Center Kentico CMS, 2nd Edition
Fig. 7. Right click menu
3. Select the Page (menu item) in the right pane (Fig. 8) to open the page templates area.
Fig. 8. Page (menu item) in right pane
4. Enter a name for your new page in the Page Name: textbox, then select the template titled Three Columns, and click the Save button (Fig. 9). (You can browse the pages in the right pane to find this template, or you can type “Three columns” in the Template name: field and click the Search button.)
Fig. 9. Creating a new page
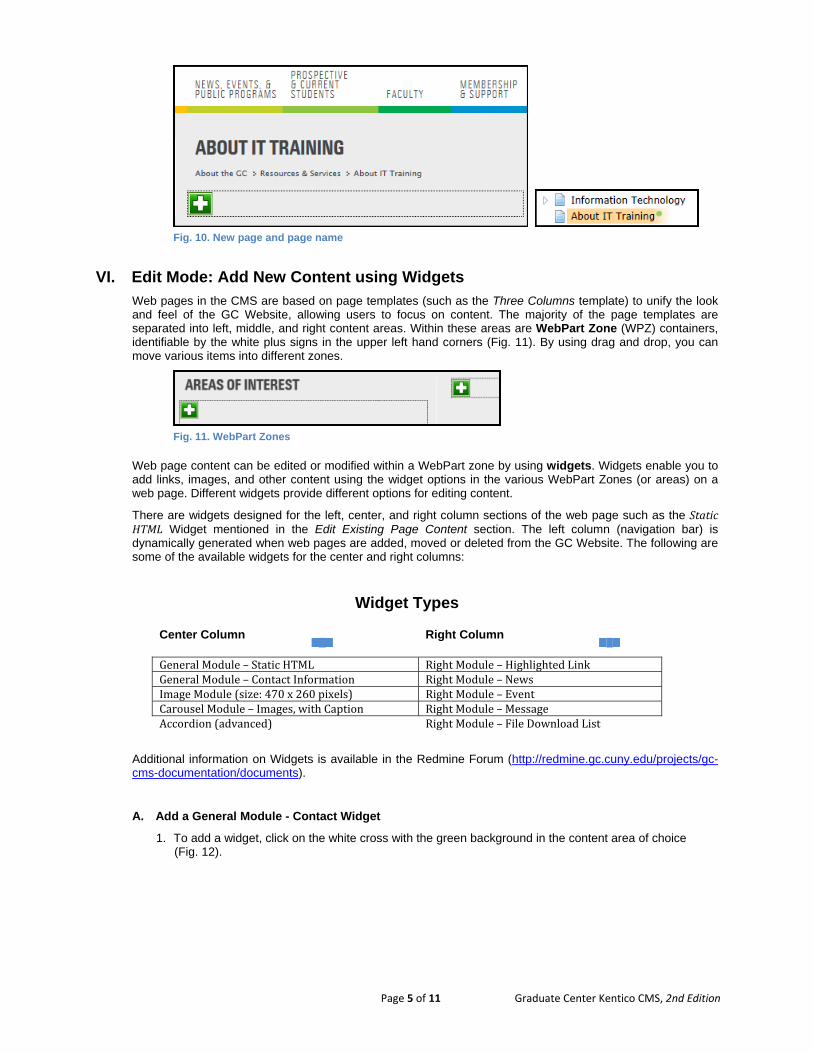
5. Your new page appears (Fig. 10). The page name is listed below the parent page in the content tree menu.
Page 5 of 11 Graduate Center Kentico CMS, 2nd Edition
Fig. 10. New page and page name
VI. Edit Mode: Add New Content using Widgets
Web pages in the CMS are based on page templates (such as the Three Columns template) to unify the look and feel of the GC Website, allowing users to focus on content. The majority of the page templates are separated into left, middle, and right content areas. Within these areas are WebPart Zone (WPZ) containers, identifiable by the white plus signs in the upper left hand corners (Fig. 11). By using drag and drop, you can move various items into different zones.
Fig. 11. WebPart Zones
Web page content can be edited or modified within a WebPart zone by using widgets. Widgets enable you to add links, images, and other content using the widget options in the various WebPart Zones (or areas) on a web page. Different widgets provide different options for editing content.
There are widgets designed for the left, center, and right column sections of the web page such as the StaticHTML Widget mentioned in the Edit Existing Page Content section. The left column (navigation bar) is dynamically generated when web pages are added, moved or deleted from the GC Website. The following are some of the available widgets for the center and right columns:
Widget Types
Center Column
Right Column
GeneralModule–StaticHTML RightModule– Highlighted LinkGeneralModule–ContactInformation RightModule– NewsImageModule(size:470x260pixels) RightModule– EventCarouselModule–Images,withCaption RightModule– MessageAccordion(advanced) RightModule– FileDownloadList
Additional information on Widgets is available in the Redmine Forum (http://redmine.gc.cuny.edu/projects/gc-cms-documentation/documents).
A. Add a General Module - Contact Widget
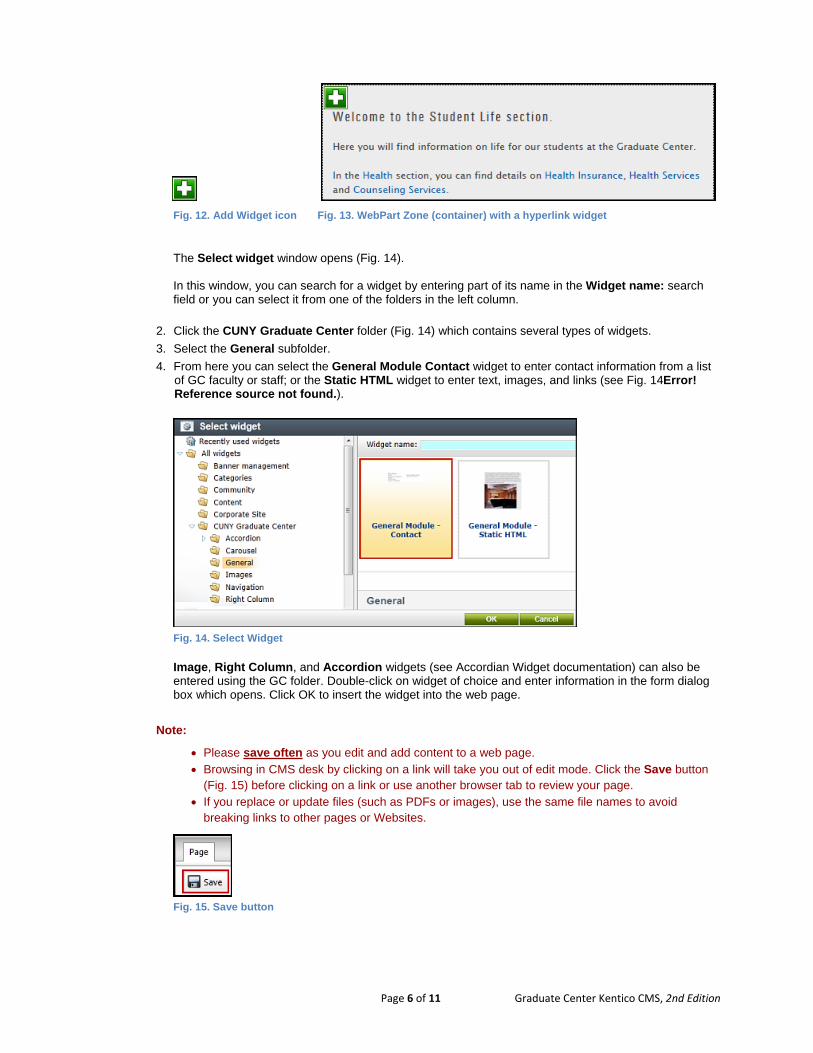
1. To add a widget, click on the white cross with the green background in the content area of choice (Fig. 12).
Page 6 of 11 Graduate Center Kentico CMS, 2nd Edition
Fig. 12. Add Widget icon Fig. 13. WebPart Zone (container) with a hyperlink widget
The Select widget window opens (Fig. 14). In this window, you can search for a widget by entering part of its name in the Widget name: search field or you can select it from one of the folders in the left column.
2. Click the CUNY Graduate Center folder (Fig. 14) which contains several types of widgets.
3. Select the General subfolder.
4. From here you can select the General Module Contact widget to enter contact information from a list of GC faculty or staff; or the Static HTML widget to enter text, images, and links (see Fig. 14Error! Reference source not found.).
Fig. 14. Select Widget
Image, Right Column, and Accordion widgets (see Accordian Widget documentation) can also be entered using the GC folder. Double-click on widget of choice and enter information in the form dialog box which opens. Click OK to insert the widget into the web page.
Note:
Please save often as you edit and add content to a web page. Browsing in CMS desk by clicking on a link will take you out of edit mode. Click the Save button
(Fig. 15) before clicking on a link or use another browser tab to review your page. If you replace or update files (such as PDFs or images), use the same file names to avoid
breaking links to other pages or Websites.
Fig. 15. Save button
Page 7 of 11 Graduate Center Kentico CMS, 2nd Edition
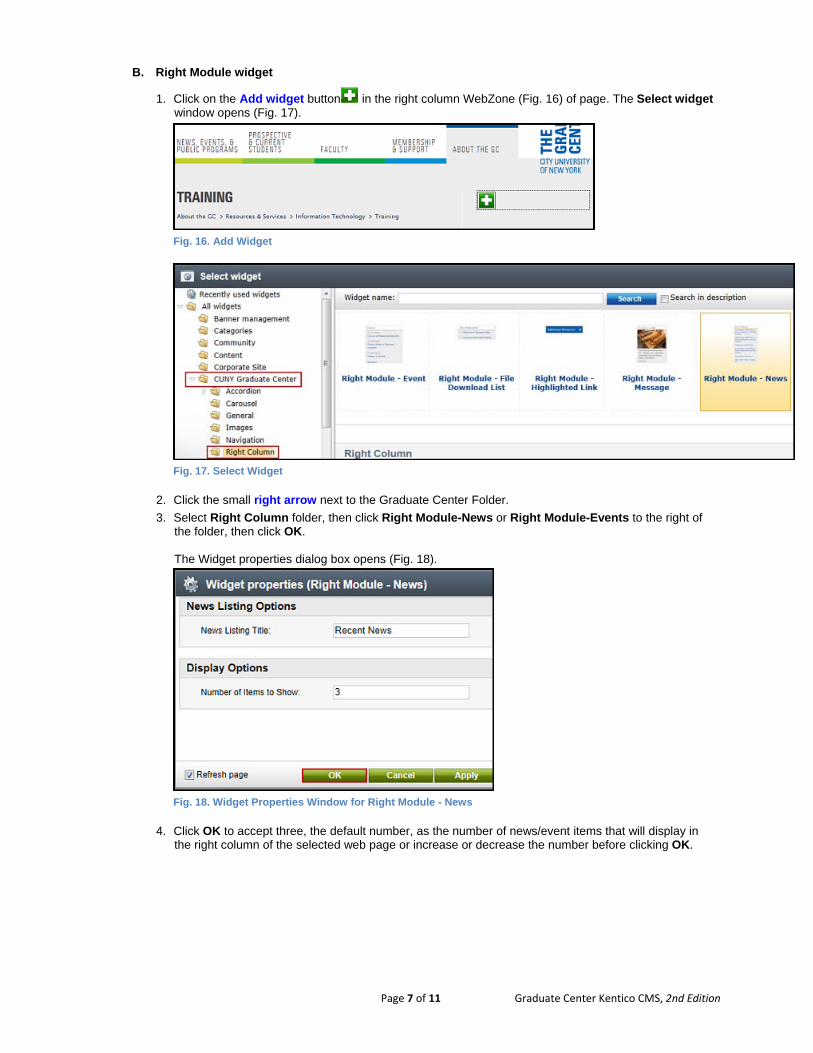
B. Right Module widget
1. Click on the Add widget button in the right column WebZone (Fig. 16) of page. The Select widget window opens (Fig. 17).
Fig. 16. Add Widget
Fig. 17. Select Widget
2. Click the small right arrow next to the Graduate Center Folder.
3. Select Right Column folder, then click Right Module-News or Right Module-Events to the right of the folder, then click OK. The Widget properties dialog box opens (Fig. 18).
Fig. 18. Widget Properties Window for Right Module - News
4. Click OK to accept three, the default number, as the number of news/event items that will display in the right column of the selected web page or increase or decrease the number before clicking OK.
Page 8 of 11 Graduate Center Kentico CMS, 2nd Edition
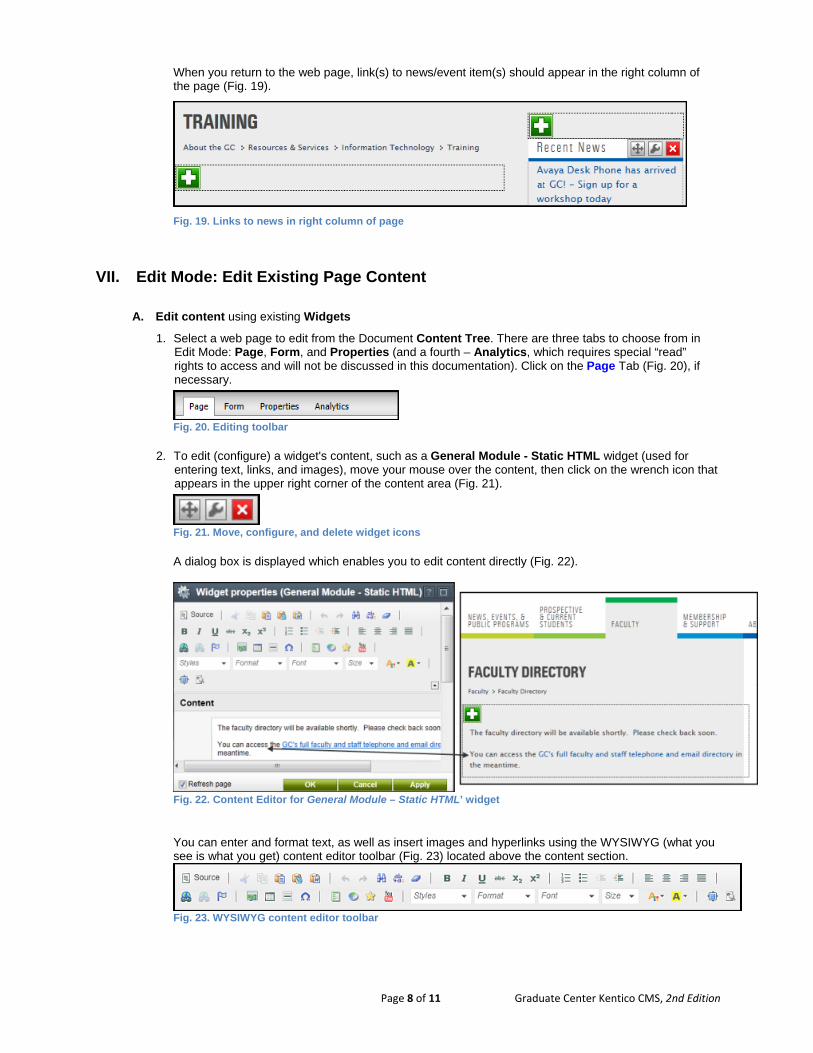
When you return to the web page, link(s) to news/event item(s) should appear in the right column of the page (Fig. 19).
Fig. 19. Links to news in right column of page
VII. Edit Mode: Edit Existing Page Content
A. Edit content using existing Widgets
1. Select a web page to edit from the Document Content Tree. There are three tabs to choose from in Edit Mode: Page, Form, and Properties (and a fourth – Analytics, which requires special “read” rights to access and will not be discussed in this documentation). Click on the Page Tab (Fig. 20), if necessary.
Fig. 20. Editing toolbar
2. To edit (configure) a widget's content, such as a General Module - Static HTML widget (used for entering text, links, and images), move your mouse over the content, then click on the wrench icon that appears in the upper right corner of the content area (Fig. 21).
Fig. 21. Move, configure, and delete widget icons
A dialog box is displayed which enables you to edit content directly (Fig. 22).
Fig. 22. Content Editor for General Module – Static HTML’ widget
You can enter and format text, as well as insert images and hyperlinks using the WYSIWYG (what you see is what you get) content editor toolbar (Fig. 23) located above the content section.
Fig. 23. WYSIWYG content editor toolbar
Page 9 of 11 Graduate Center Kentico CMS, 2nd Edition
3. Click OK when done.
B. Noteworthy icons on the WYSIWYG editor toolbar:
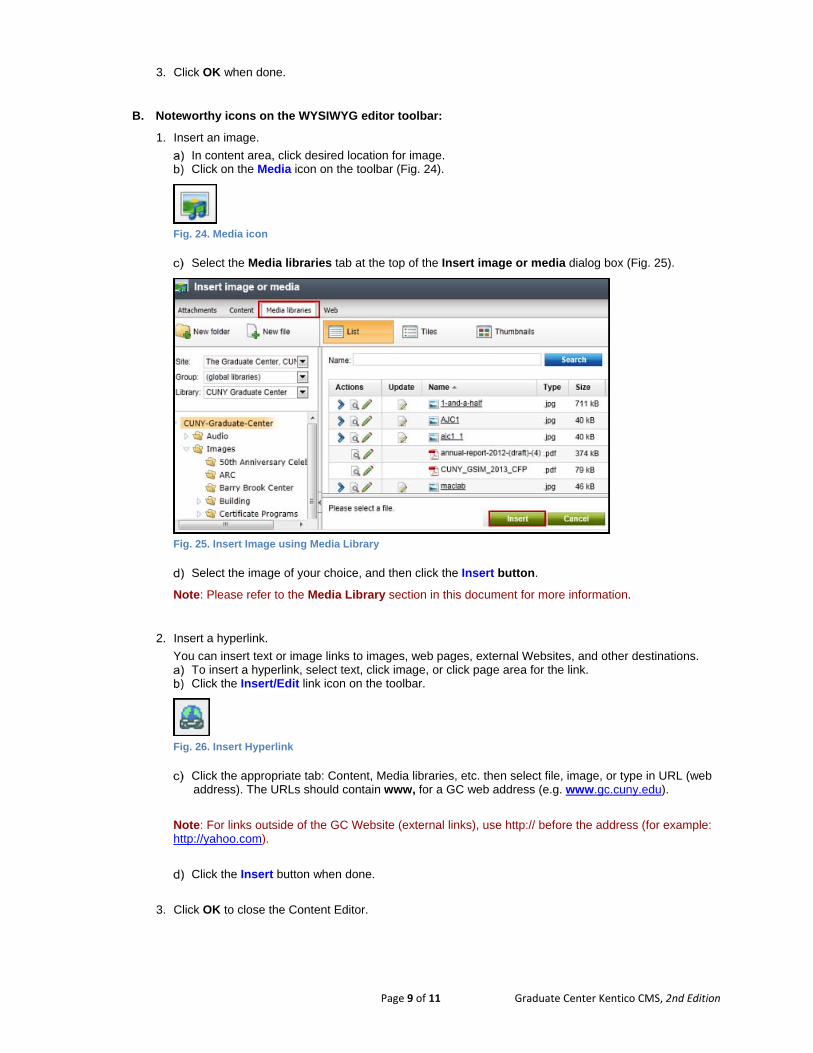
1. Insert an image.
In content area, click desired location for image. Click on the Media icon on the toolbar (Fig. 24).
Fig. 24. Media icon
Select the Media libraries tab at the top of the Insert image or media dialog box (Fig. 25).
Fig. 25. Insert Image using Media Library
Select the image of your choice, and then click the Insert button.
Note: Please refer to the Media Library section in this document for more information.
2. Insert a hyperlink.
You can insert text or image links to images, web pages, external Websites, and other destinations. To insert a hyperlink, select text, click image, or click page area for the link. Click the Insert/Edit link icon on the toolbar.
Fig. 26. Insert Hyperlink
Click the appropriate tab: Content, Media libraries, etc. then select file, image, or type in URL (web address). The URLs should contain www, for a GC web address (e.g. www.gc.cuny.edu).
Note: For links outside of the GC Website (external links), use http:// before the address (for example: http://yahoo.com).
Click the Insert button when done.
3. Click OK to close the Content Editor.
Page 10 of 11 Graduate Center Kentico CMS, 2nd Edition
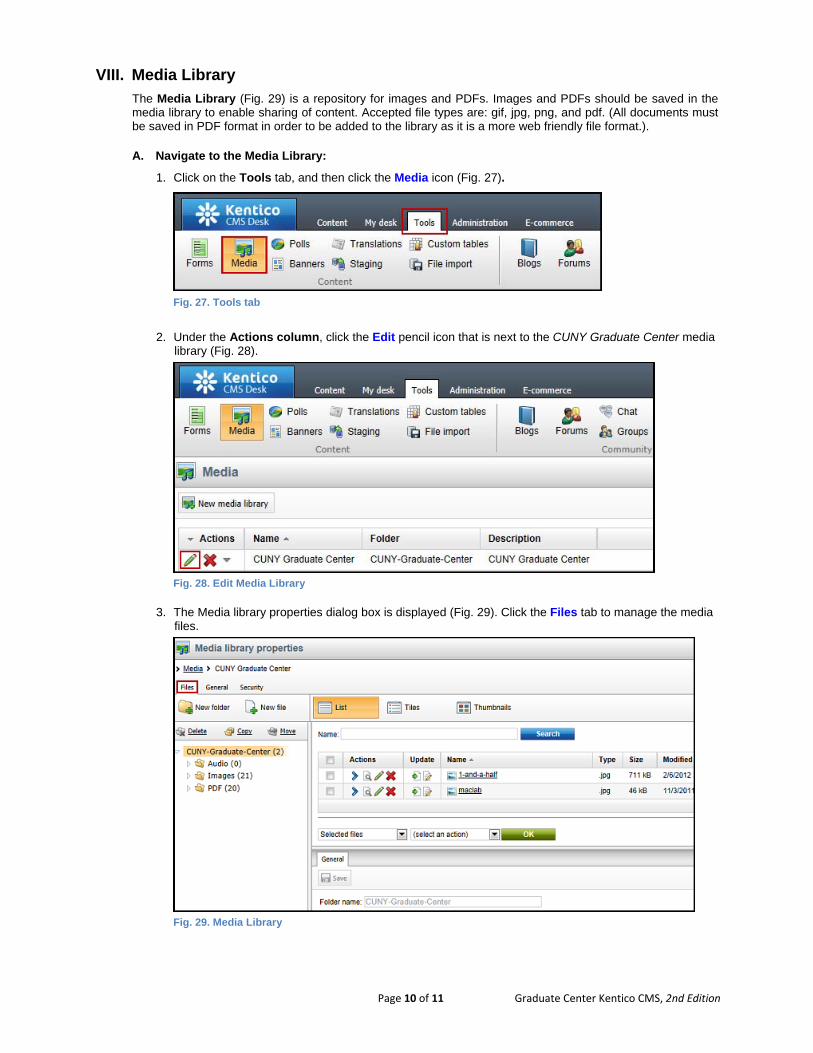
VIII. Media Library
The Media Library (Fig. 29) is a repository for images and PDFs. Images and PDFs should be saved in the media library to enable sharing of content. Accepted file types are: gif, jpg, png, and pdf. (All documents must be saved in PDF format in order to be added to the library as it is a more web friendly file format.).
A. Navigate to the Media Library:
1. Click on the Tools tab, and then click the Media icon (Fig. 27).
Fig. 27. Tools tab
2. Under the Actions column, click the Edit pencil icon that is next to the CUNY Graduate Center media library (Fig. 28).
Fig. 28. Edit Media Library
3. The Media library properties dialog box is displayed (Fig. 29). Click the Files tab to manage the media files.
Fig. 29. Media Library
Page 11 of 11 Graduate Center Kentico CMS, 2nd Edition
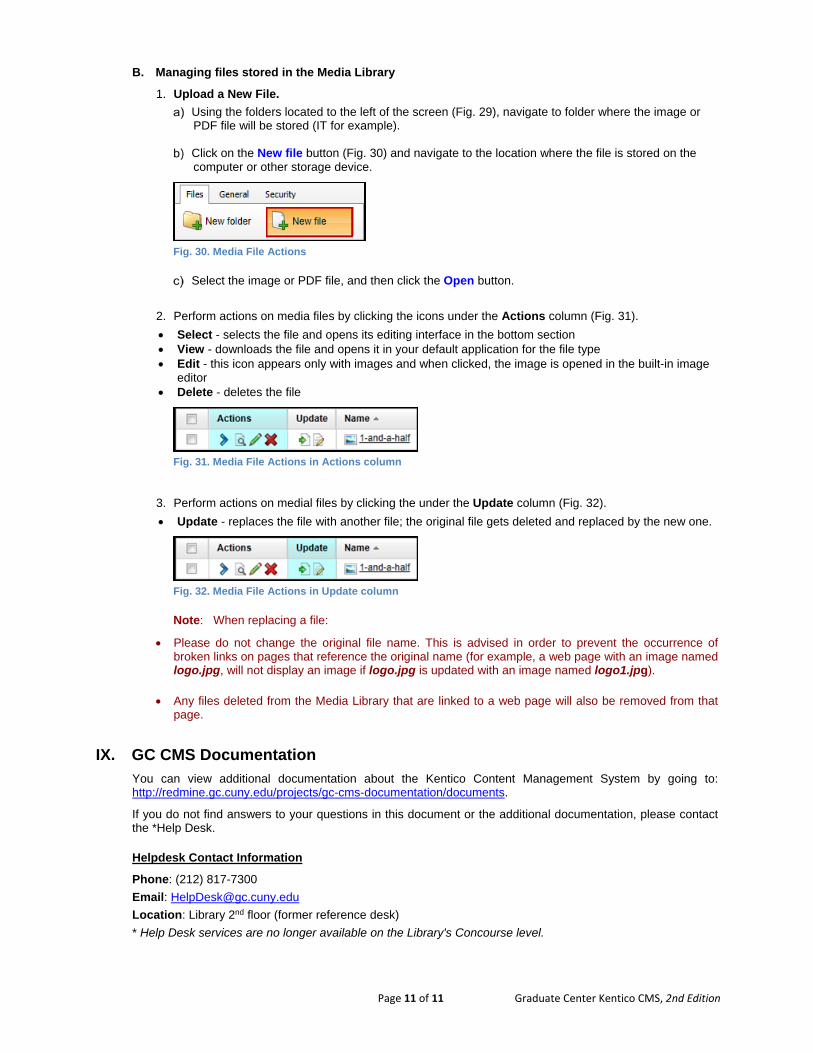
B. Managing files stored in the Media Library
1. Upload a New File.
Using the folders located to the left of the screen (Fig. 29), navigate to folder where the image or PDF file will be stored (IT for example).
Click on the New file button (Fig. 30) and navigate to the location where the file is stored on the computer or other storage device.
Fig. 30. Media File Actions
Select the image or PDF file, and then click the Open button.
2. Perform actions on media files by clicking the icons under the Actions column (Fig. 31).
Select - selects the file and opens its editing interface in the bottom section View - downloads the file and opens it in your default application for the file type Edit - this icon appears only with images and when clicked, the image is opened in the built-in image
editor Delete - deletes the file
Fig. 31. Media File Actions in Actions column
3. Perform actions on medial files by clicking the under the Update column (Fig. 32).
Update - replaces the file with another file; the original file gets deleted and replaced by the new one.
Fig. 32. Media File Actions in Update column
Note: When replacing a file:
Please do not change the original file name. This is advised in order to prevent the occurrence of broken links on pages that reference the original name (for example, a web page with an image named logo.jpg, will not display an image if logo.jpg is updated with an image named logo1.jpg).
Any files deleted from the Media Library that are linked to a web page will also be removed from that page.
IX. GC CMS Documentation
You can view additional documentation about the Kentico Content Management System by going to: http://redmine.gc.cuny.edu/projects/gc-cms-documentation/documents.
If you do not find answers to your questions in this document or the additional documentation, please contact the *Help Desk.
Helpdesk Contact Information
Phone: (212) 817-7300
Email: [email protected]
Location: Library 2nd floor (former reference desk)
* Help Desk services are no longer available on the Library's Concourse level.