Embed Size (px)
Citation preview
Oracle® Enterprise Single Sign-on Password Reset Client Installation and Setup Guide Release 10.1.4.0.3 E10344-01
June 2007
Oracle Enterprise Single Sign-on Password Reset Client Installation and Setup Guide, Release 10.1.4.0.3 E10344-01 Copyright © 2006-2007, Oracle. All rights reserved. The Programs (which include both the software and documentation) contain proprietary information; they are provided under a license agreement containing restrictions on use and disclosure and are also protected by copyright, patent, and other intellectual and industrial property laws. Reverse engineering, disassembly, or decompilation of the Programs, except to the extent required to obtain interoperability with other independently created software or as specified by law, is prohibited. The information contained in this document is subject to change without notice. If you find any problems in the documentation, please report them to us in writing. This document is not warranted to be error-free. Except as may be expressly permitted in your license agreement for these Programs, no part of these Programs may be reproduced or transmitted in any form or by any means, electronic or mechanical, for any purpose. If the Programs are delivered to the United States Government or anyone licensing or using the Programs on behalf of the United States Government, the following notice is applicable: U.S. GOVERNMENT RIGHTS Programs, software, databases, and related documentation and technical data delivered to U.S. Government customers are "commercial computer software" or "commercial technical data" pursuant to the applicable Federal Acquisition Regulation and agency-specific supplemental regulations. As such, use, duplication, disclosure, modification, and adaptation of the Programs, including documentation and technical data, shall be subject to the licensing restrictions set forth in the applicable Oracle license agreement, and, to the extent applicable, the additional rights set forth in FAR 52.227-19, Commercial Computer Software--Restricted Rights (June 1987). Oracle USA, Inc., 500 Oracle Parkway, Redwood City, CA 94065. The Programs are not intended for use in any nuclear, aviation, mass transit, medical, or other inherently dangerous applications. It shall be the licensee's responsibility to take all appropriate fail-safe, backup, redundancy and other measures to ensure the safe use of such applications if the Programs are used for such purposes, and we disclaim liability for any damages caused by such use of the Programs. Oracle, JD Edwards, PeopleSoft, and Siebel are registered trademarks of Oracle Corporation and/or its affiliates. Other names may be trademarks of their respective owners. The Programs may provide links to Web sites and access to content, products, and services from third parties. Oracle is not responsible for the availability of, or any content provided on, third-party Web sites. You bear all risks associated with the use of such content. If you choose to purchase any products or services from a third party, the relationship is directly between you and the third party. Oracle is not responsible for: (a) the quality of third-party products or services; or (b) fulfilling any of the terms of the agreement with the third party, including delivery of products or services and warranty obligations related to purchased products or services. Oracle is not responsible for any loss or damage of any sort that you may incur from dealing with any third party.
ESSO‐PR Client Installation and Setup Guide Table of Contents
Table of Contents
Installing the ESSO‐PR Client ..........................................................................................................................................4 Step by Step: Using the Installation Wizard to Install the ESSO‐PR Client........................................................5
Client Installation Settings .................................................................................................................................7 Automatic and Force Enrollment ......................................................................................................................7
Installing the Client at the Command Line ....................................................................................................................8 Installing Language Packs at the Command Line..................................................................................................8
Running the Reset Client Under a Specified User Account.......................................................................................10 Disabling the ‘Redirection’ Popup .........................................................................................................................10 Specifying the Window Title...................................................................................................................................10
Using ESSO‐PR Client With a Custom Reset Web Application ................................................................................12
Compatibility Issues........................................................................................................................................................13 Fast User Switching Not Available (Windows XP Users Only) .........................................................................13
ESSO‐PR Registry Settings .............................................................................................................................................14 ESSO‐PR Client Registry ..................................................................................................................................14
3 of 12
ESSO‐PR Client Installation and Setup Guide Installing the ESSO‐PR Client
Installing the ESSO-PR Client
The ESSO‐PR Client Installer provides the following functions:
• Supplies the components needed to run ESSO‐PR through the Windows interface
• Sets the registry values that point the ESSO‐PR client to the enrollment and reset service
• Offers or obliges workstation users to enroll in the password reset service if so configured
Installation can be performed with the Windows Install Wizard or at the command line. The installer package sspr_client.msi can also be customized with site‐specific settings using any standard MSI package editor, such as InstallShield AdminStudio or Wise Package Studio.
ESSO‐PR includes support for eight languages in addition to English: German, Spanish, French, Italian, Japanese, Korean, Simplified Chinese, and Brazilian Portuguese. The following instructions include steps to install support for these languages using both the Windows Install Wizard and the command line.
4 of 12
ESSO‐PR Client Installation and Setup Guide Installing the ESSO‐PR Client
Step by Step: Using the Installation Wizard to Install the ESSO-PR Client
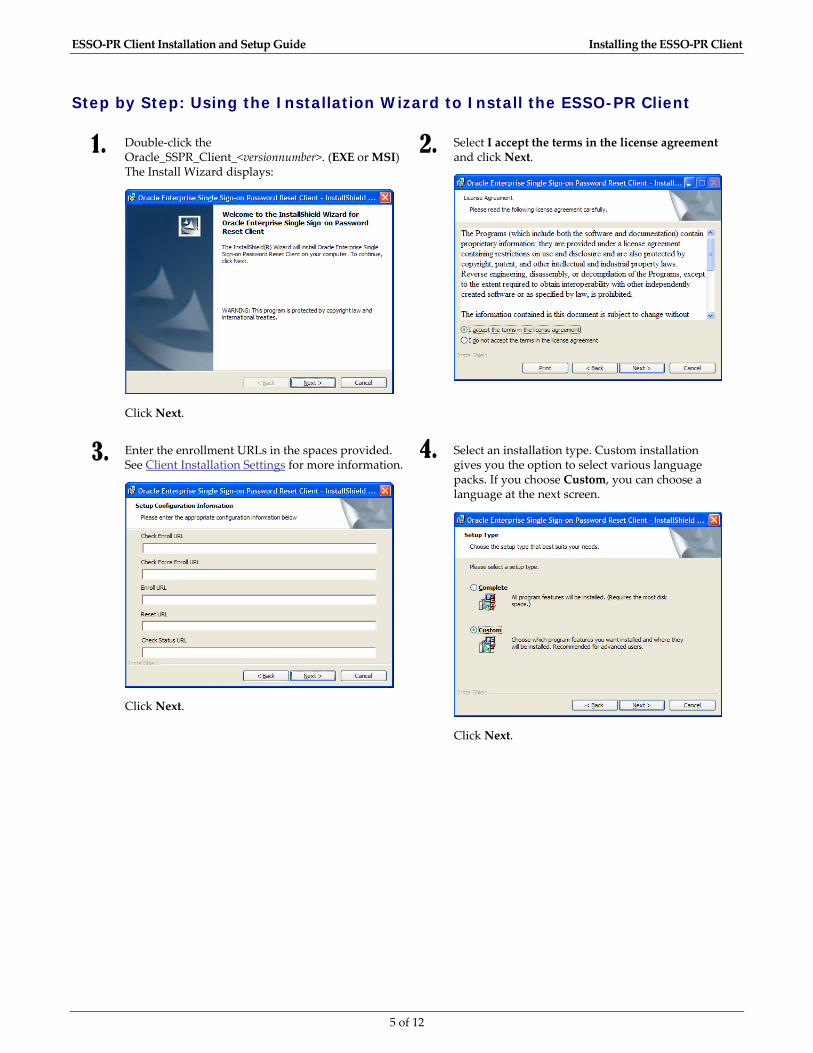
1. Double‐click the Oracle_SSPR_Client_<versionnumber>. (EXE or MSI) The Install Wizard displays:
Click Next.
2. Select I accept the terms in the license agreement and click Next.
Enter the enrollment URLs in the spaces provided. See Client Installation Settings for more information.
Click Next.
4. Select an installation type. Custom installation gives you the option to select various language packs. If you choose Custom, you can choose a language at the next screen.
Click Next.
3.
5 of 12
ESSO‐PR Client Installation and Setup Guide Installing the ESSO‐PR Client
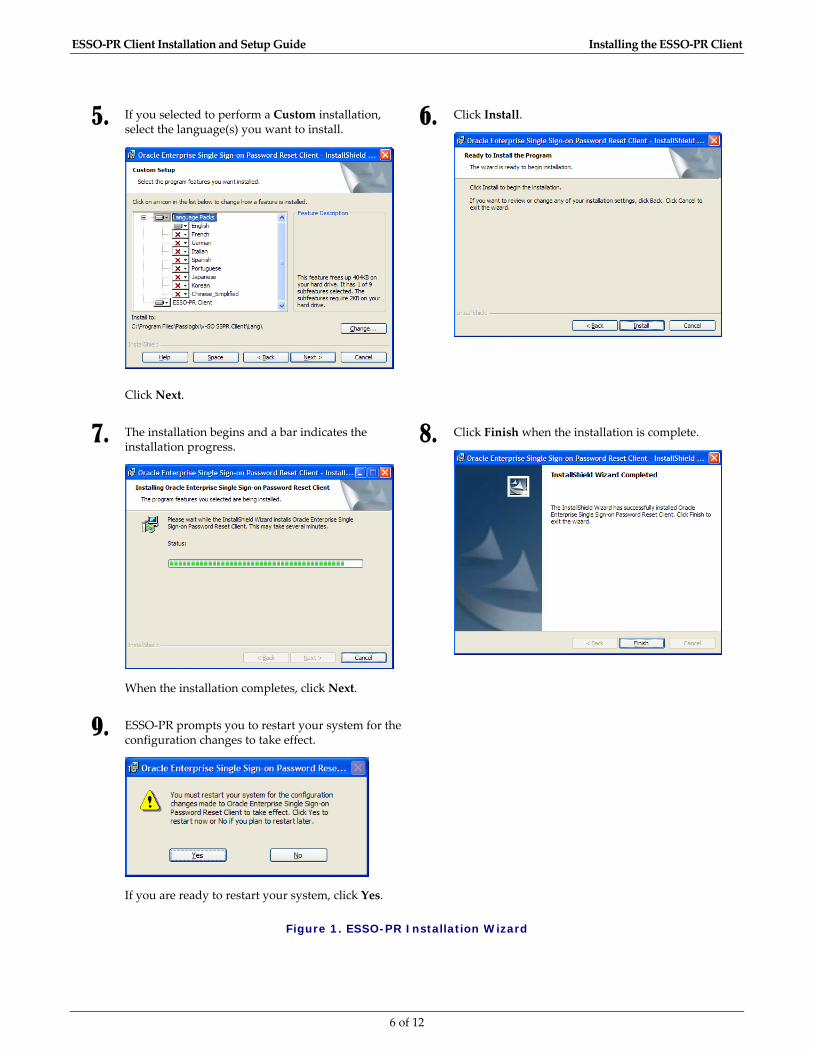
5. If you selected to perform a Custom installation, select the language(s) you want to install.
Click Next.
6. Click Install.
7. The installation begins and a bar indicates the installation progress.
When the installation completes, click Next.
8. Click Finish when the installation is complete.
9. ESSO‐PR prompts you to restart your system for the configuration changes to take effect.
If you are ready to restart your system, click Yes.
Figure 1. ESSO-PR Installation Wizard
6 of 12
ESSO‐PR Client Installation and Setup Guide Installing the ESSO‐PR Client
Installing Additional Language Packs
In order to install additional language after initial installation:
1. In the Windows control panel, launch Add/Remove Programs.
2. Highlight ESSO‐PR and click the Change button.
3. Navigate through the installer wizard and click the Modify button.
4. Select the additional language pack(s) that you want to install.
5. Reboot as instructed and relaunch Add/Remove Programs to complete the additional language installation
Client Installation Settings
The settings Enroll URL, Reset URL, Check Enroll URL, Check Force Enroll URL, and Check Status URL must be set during installation. These settings are URLs that point the ESSO‐PR client to the appropriate Web service resources for enrollment and password reset.
Setting
Enroll URL Type the URL of the Enrollment service default page
http://host/vgoselfservicereset/enrollmentclient/enrollments.aspx
Reset URL Type the URL of the reset service default page
http://host /vgoselfservicereset/resetclient/default.aspx
Check Enroll URL Type the URL of the Enrollment check service (checks if user is enrolled)
http://host/vgoselfservicereset/resetclient/checkenrollment.aspx
Check Force Enroll URL Type the URL of the force enrollment check service (checks if user is forced to enroll)
http://host /vgoselfservicereset/resetclient/checkforceenrollment.aspx
Check Status URL Type the URL of the status check service (checks for ESSO‐PR service availability) http://host /vgoselfservicereset/resetclient/checkstatus.aspx
Automatic and Force Enrollment
The optional settings, AutomaticEnroll and ForceEnrollment, control whether a workstation user is asked or required to enroll in the password reset service at his next logon. These values can be set by modifying the installer package; they are not added by the Install Wizard on the client. Refer to the ESSO‐PR Client Registry section on page 14 for the location of these Registry settings.
7 of 12
ESSO‐PR Client Installation and Setup Guide Installing the Client at the Command Line
Installing the Client at the Command Line
ESSO‐PR Client can be installed as a DOS command, using the following command syntax: msiexec /i [/q] c:\sspr_client.msi programURLs [REBOOT=ReallySuppress]
/q = Quiet Mode: Suppress all installer user interface messages. Refer to the description of other Windows Installer command line options for msiexec at http://msdn.microsoft.com.
REBOOT=ReallySuppress = Tells the Installer not to reboot under any circumstances.
Example
Using the following command line, it is possible to perform a silent installation without a reboot of the PC. This command assumes that the user’s Windows directory is Windows and the SSPR.msi is named sspr_client.msi: c:\windows\system32\msiexec /i /q c:\sspr_client.msi
REG_CHECKENROLLURL="http://host/vgoselfservicereset/resetclient/checkenrollment.aspx" REG_CHECKFORCEENROLLURL="http://host/vgoselfservicereset/resetclient/checkforceenrollment.aspx" REG_ENROLLURL="http://host/vgoselfservicereset/enrollmentclient/enrolluser.aspx" REG_RESETURL="http://host/vgoselfservicereset/resetclient/default.aspx" REG_CHECKSTATUSURL="http://host/vgoselfservicereset/resetclient/checkstatus.aspx" REBOOT=ReallySuppress
Note: You must type out the full path to the installer .msi, as in the example above. A single space MUST separate each REG_*=“*.aspx”—NOT a line return.
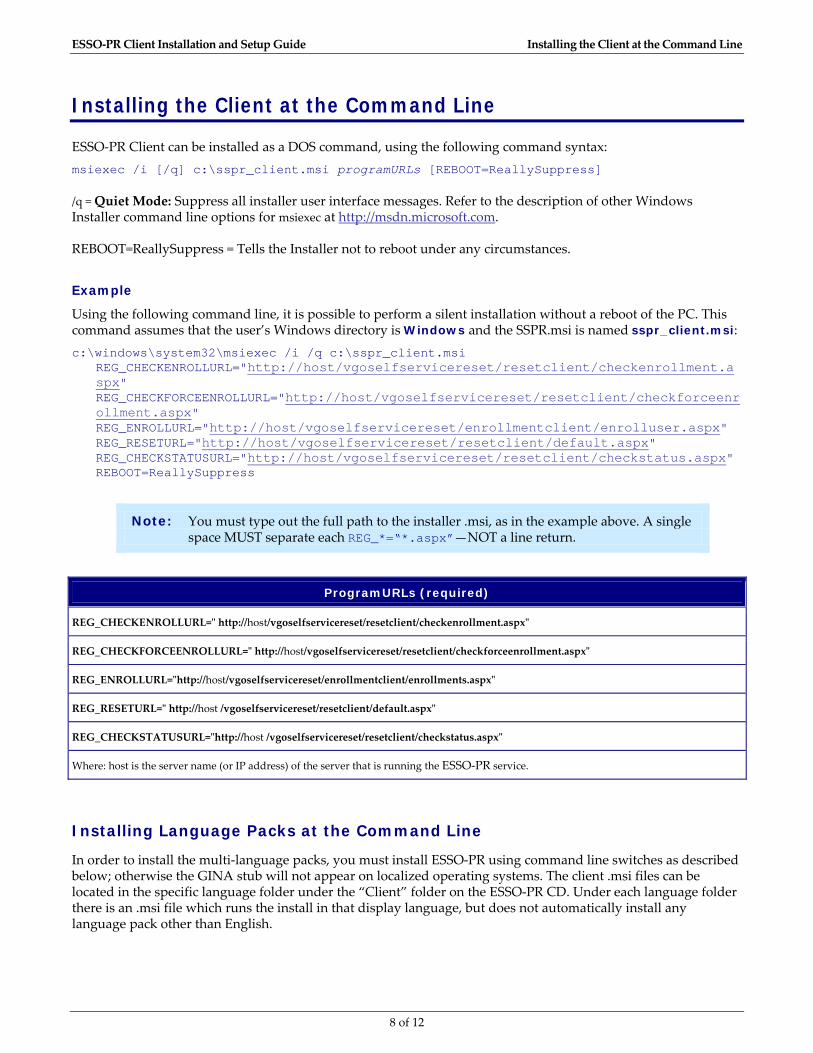
ProgramURLs (required)
REG_CHECKENROLLURL=ʺ http://host/vgoselfservicereset/resetclient/checkenrollment.aspxʺ
REG_CHECKFORCEENROLLURL=ʺ http://host/vgoselfservicereset/resetclient/checkforceenrollment.aspxʺ
REG_ENROLLURL=ʺhttp://host/vgoselfservicereset/enrollmentclient/enrollments.aspxʺ
REG_RESETURL=ʺ http://host /vgoselfservicereset/resetclient/default.aspxʺ
REG_CHECKSTATUSURL=ʺhttp://host /vgoselfservicereset/resetclient/checkstatus.aspxʺ
Where: host is the server name (or IP address) of the server that is running the ESSO‐PR service.
Installing Language Packs at the Command Line
In order to install the multi‐language packs, you must install ESSO‐PR using command line switches as described below; otherwise the GINA stub will not appear on localized operating systems. The client .msi files can be located in the specific language folder under the “Client” folder on the ESSO‐PR CD. Under each language folder there is an .msi file which runs the install in that display language, but does not automatically install any language pack other than English.
8 of 12
ESSO‐PR Client Installation and Setup Guide Installing the Client at the Command Line
The following is the command line switch used to select language packs to be used when running a silent install): msiexec /i "Location of .msi" /q ADDLOCAL=Gina,vgo_sspr_client,German <or> French <or>
Italian <or> Spanish <or> Japanese <or> Korean <or> Chinese_Simplified <or> Portuguese
The example above runs a silent install of the ESSO‐PR Client. You install the desired language pack by adding the ADDLOCAL switch and selecting the language.
9 of 12
ESSO‐PR Client Installation and Setup Guide Running the Reset Client Under a Specified User Account
Running the Reset Client Under a Specified User Account
The ESSO‐PR Client provides the ability to run the Reset client under a specified user account instead of the Local System account. This eliminates the possibility that the Reset client will have rights to access resources it should not.
To enable this feature, follow these steps:
1. Open a command prompt and run aspnet_setreg -k:software\passlogix\sspr\windowsinterface -u:domain\username -p:password, replacing domain\username and password with real values.
2. Ensure the key HKLM\Software\Passlogix\SSPR\WindowsInterface\ASPNET_SETREG exists. There should be two values in the key: password and userName.
3. Rename the ASPNET_SETREG key to RestrictedUser.
4. The Reset Client should launch under the configured user. The Enrollment Client will run under the logged‐on user.
To test this feature:
1. Open the Registry and browse to HKLM\Software\Passlogix\SSPR\WindowsInterface.
2. Copy the value of EnrollURL and set ResetURL to that value.
3. Launch the Reset client. The Enrollment screen appears.
4. The Enrollment screen should successfully identify you as the specified user.
Disabling the ‘Redirection’ Popup
It’s possible to disable the popup that indicates that ESSO‐PR is redirecting the user to an external reset page.
To disable this popup, the ESSO‐PR Client will create the following setting before launching windowsinterface.exe, and then restore it after redirection: HKEY_CURRENT_USER\Software\Microsoft\ Windows\CurrentVersion\Internet Settings Value: WarnonZoneCrossing.
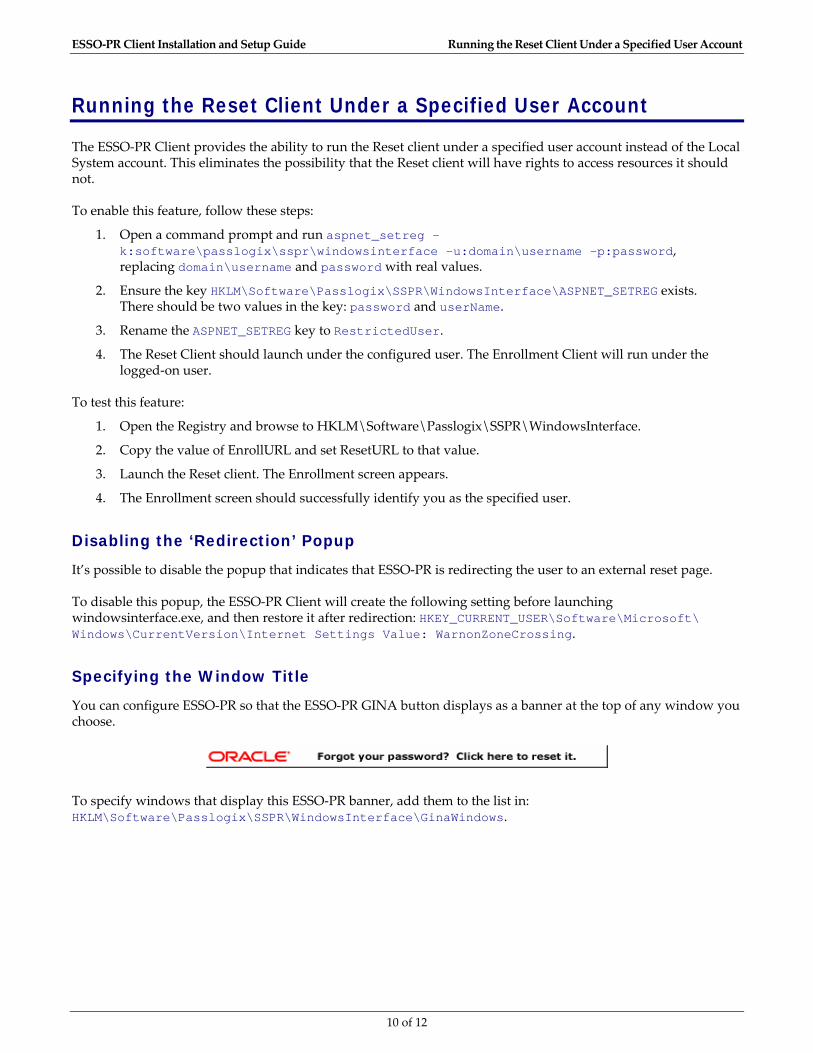
Specifying the Window Title
You can configure ESSO‐PR so that the ESSO‐PR GINA button displays as a banner at the top of any window you choose.
To specify windows that display this ESSO‐PR banner, add them to the list in: HKLM\Software\Passlogix\SSPR\WindowsInterface\GinaWindows.
10 of 12
ESSO‐PR Client Installation and Setup Guide Running the Reset Client Under a Specified User Account
Within this key, add a REG_SZ value for each window title you want to display the banner. The value name will be WindowTitleX, where X is a sequence number starting from 1, and the value data is the window title. For example:
WindowTitle1=Logon To Windows
WindowTitle2=Unlock Windows
Note: The window title needs to match exactly, including any leading or trailing white space.
11 of 12

ESSO‐PR Client Installation and Setup Guide Using ESSO‐PR Client With a Custom Reset Web Application
Using ESSO-PR Client With a Custom Reset Web Application
It is possible to configure the ESSO‐PR client in the absence of an ESSO‐PR Server installation.
Follow the instructions to install ESSO‐PR on the client machine.
1. Set the ResetURL value to point to the custom reset web application.
2. Set the StatusURL to a resource that will return the success response. This forces ESSO‐PR to bypass the status check and display the ResetURL contents. See below for details.
The StatusURL setting should point to a resource (such as an HTML file) that contains the following content: <HTML>
<HEAD>
<TITLE>CHECKSTATUS</TITLE>
</HEAD>
<BODY>
GOOD SSPR STATUS
</BODY>
</HTML>
12 of 12
ESSO‐PR Client Installation and Setup Guide Compatibility Issues
Compatibility Issues
Fast User Switching Not Available (Windows XP Users Only)
Installing the ESSO‐PR client on Windows XP disables the Fast User Switching feature, which allows multiple users to be logged on to a computer at the same time and to switch among logons by pressing +L. This feature is unavailable because ESSO‐PR utilizes a custom GINA (Graphical Identification and Authentication) component that replaces the Microsoft default GINA dynamic link library (Msgina.dll). To change logons on a Windows XP computer, a user must log off to allow the next user to logon. To do this, open Task Manager (CTRL+ALT+DELETE), and click Log off.
13 of 12
ESSO‐PR Client Installation and Setup Guide ESSO‐PR Registry Settings
ESSO-PR Registry Settings
ESSO-PR Client Registry
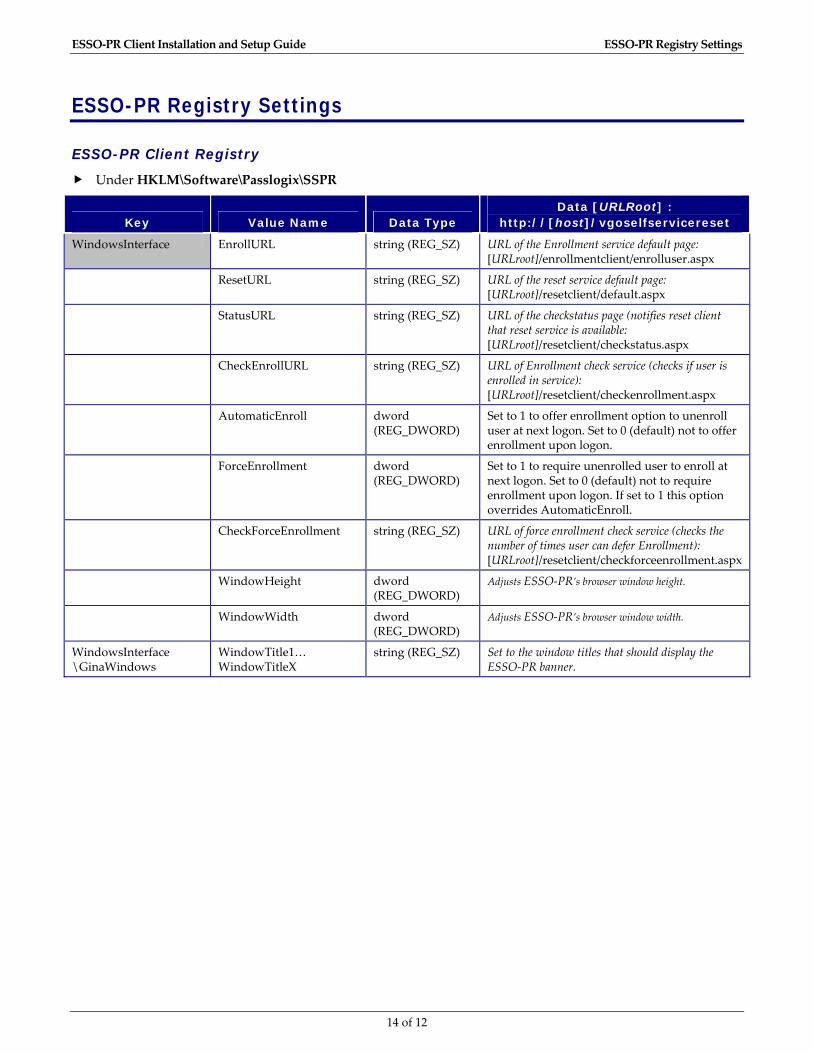
Under HKLM\Software\Passlogix\SSPR
Key Value Name Data Type Data [URLRoot] :
http://[host]/vgoselfservicereset
WindowsInterface EnrollURL string (REG_SZ) URL of the Enrollment service default page: [URLroot]/enrollmentclient/enrolluser.aspx
ResetURL string (REG_SZ) URL of the reset service default page: [URLroot]/resetclient/default.aspx
StatusURL string (REG_SZ) URL of the checkstatus page (notifies reset client that reset service is available: [URLroot]/resetclient/checkstatus.aspx
CheckEnrollURL string (REG_SZ) URL of Enrollment check service (checks if user is enrolled in service): [URLroot]/resetclient/checkenrollment.aspx
AutomaticEnroll dword (REG_DWORD)
Set to 1 to offer enrollment option to unenroll user at next logon. Set to 0 (default) not to offer enrollment upon logon.
ForceEnrollment dword (REG_DWORD)
Set to 1 to require unenrolled user to enroll at next logon. Set to 0 (default) not to require enrollment upon logon. If set to 1 this option overrides AutomaticEnroll.
CheckForceEnrollment string (REG_SZ) URL of force enrollment check service (checks the number of times user can defer Enrollment): [URLroot]/resetclient/checkforceenrollment.aspx
WindowHeight dword (REG_DWORD)
Adjusts ESSO‐PR’s browser window height.
WindowWidth dword (REG_DWORD)
Adjusts ESSO‐PR’s browser window width.
WindowsInterface \GinaWindows
WindowTitle1… WindowTitleX
string (REG_SZ) Set to the window titles that should display the ESSO‐PR banner.
14 of 12