Embed Size (px)
Citation preview

Setting gemstones in clusters can add drama and elegance to a design.
With this simple metal clay bezel-setting technique, you can set just
about any size or shape of gemstone, from marquis to princess cut.
You’ll make each bezel component individually, then assemble them as you
please, with the stones already in place. If you want to add contrast to your
settings, carve into the bezels to add texturing.
Embed kiln-safe stones in metal clay to give them a
bezel-set look, then arrange the components into clusters.
by Patrik Kusek
Frame Stones in Metal Clay Bezels
PROJECTBEGINNER | METAL CLAY
Build these earrings one stone at a time. A tube on the back keeps the earring in position when it’s worn.
facetjewelry.comFCT-
CRO
N02
16_A
RT92
©2012 Kalmbach Publishing Co. This material may not be reproduced in any form without permission from the publisher.

2
1 2 3
4 5
Part 1: Make Bezel Components materials ■ Metal clay, 45 g ■ Metal clay paste ■ Gemstones: For this project, I used cubic zirconia in the following shapes and sizes:
■ 2 Marquis-shape, 8 x 15 mm ■ 2 Princess-cut, 8 x 8 mm ■ 2 Round, 8 mm ■ 4 Round, 4.5 mm ■ 2 Round, 4 mm
■ Sterling silver wire, 20 gauge (0.8 mm), half-hard, 6 in. (15.2 cm)
additional tools & supplies ■ Metal clay extruder with 2 mm tube-making attachment
■ Small V-shaped carving tool ■ Butane torch ■ Pickle pot with pickle ■ Cup bur (optional)
Measure the stone’s height. Place the gemstone culet-side up on your work surface. Stack playing cards beside the stone, one at a time, until the card stack equals the height of the gemstone; you’ll know they’re equal when the last card in the stack slides over the culet without touching it [1]. Then, add 3 more cards to the stack to compensate for shrinkage. Roll out a slab of fresh clay to the thickness of your stack of cards.
Form the bezel interior. Push the gem- stone table-side down into the clay to make an impression [2]. Pick up the clay, and gently bend it to remove the stone.
Cut a hole in the clay. Use a drinking straw to make a hole in the clay slab. The hole will allow light to penetrate the back of the stone.
NOTE: The hole should be similar in shape to your stone, but smaller than the stone’s girdle. My stone is a marquis-shape, so I needed a roughly oval-shaped hole. I squeezed the straw gently between my thumb and forefinger to create an oval shape [3].
Use the compressed straw to make a hole through the clay. Remove the plug of clay from the straw, and reserve it for future use.
Trim the bezel. Place the gemstone culet-side down into the hole in the clay. Push the gemstone down into the clay until the table of the stone is almost (but not completely) flush with the surface of the clay. Make sure the gemstone is level.
Using a tissue blade, trim the excess clay to roughly conform to the shape of the gemstone [4]. Leave approximately 1⁄8 in. (3 mm) of extra clay around the stone to allow for shaping and refining of the bezel.
NOTE: It’s best to trim your bezel with straight edges. I trimmed my bezel into a diamond shape; I’ll refine the shape to match the curve of the marquis-shape stone after the component is dry.
Set the component on a mug warmer or in a food dehydrator until it is complete-ly dry (see the “Metal Clay Dryness” chart, page 4).
Refine the back of the bezel. Once the component is completely dry, turn it over to expose the hole in the back of the bezel. Use a V-shape carving tool to gently carve the hole into the shape of the stone [5]. Use care to not damage the stone when carving. You can also use a needle file to refine the shape of the hole. Again, be careful not to damage your stone.
ABOUT THE ARTIST: PATRIK KUSEK
Patrik Kusek, a senior instructor for Rio Grande, teaches metal clay workshops in the San Francisco area and
nationally. He was awarded 1st Place in metal clay in the 2007 Saul Bell Awards.Contact: www.patriksstudio.com

3
time-saving
tip
7
8
6
Shape the bezel. File or sand the outer edges of the bezel to conform to the shape of the gemstone [6]. Check for any cracks in the clay. If there are cracks, use paste to seal them, and set the piece aside again to dry completely, then sand any repaired areas.
Make bezels for all your stones. Repeat these steps with your remaining gem-stones. Remember, the hole in each bezel should match the shape of the stone:
• For princess-cut stones: Use an unaltered straw to cut a round hole. After the component is completely dry, carve the circle into a square.
• For round stones: Use unaltered straws for both the exterior shape and interior hole of the bezel. Alternatively, roll a ball of clay that is about 1½–2 times the size of the stone. Use the tip of a pencil or a rubber clay shaper to
make an impression in the clay ball [7]. Then, use a straw that is smaller than the gemstone to cut the hole through the ball. Set the stone into the clay, and use a tissue blade to cut around it. Remember to trim using straight cuts: Start by cutting the clay into a square shape, then trim each of the corners of the square to form an octagon. Set the piece aside to dry completely. After the component is dry, file and shape the bezel accordingly.
Carve the bezels. After the bezels are completely dry, use a V-shape carving tool to cut grooves into the bezel [8]. Make your first cut at the 3:00 o’clock position; start from the gemstone and carve towards the outside edge of the bezel. Make your next cut at the 9:00 position, then the 12:00 position, then the 6:00 position, and so on, until you’ve carved all the way around the entire bezel.
Lampwork bead maker and fellow metal clay artist Lynn Strollin, of La Loba Creations in Fountain Hills, Ariz., taught me this time-saving tip. Keep dried, refined, and preset gemstones on hand for “grab and use” readiness. By presetting your gemstones, you’ll speed up your workflow and increase your flexibility. You can easily mix and match shapes, colors, and sizes to get the look you want. I was able to get nine different compositions with only one set of gemstones.
4
Group the bezel components. Arrange the bezel components into a pleasing composition [9]. Repeat to arrange a matching, mirror-image set of components for the second earring.
NOTE: If you want variation, the bezel heights can all be different. For my design, I wanted just two different heights. I rolled out the clay for my three larger stones to the thickness of the largest stone, then filed the backs of the bezels to make all three the same height. I did the same thing with the smaller, round components so that they were of equal height.
Join the first two components. Choose two of the components to connect first; one of these should be the largest com- ponent in the design. Use a fine-tipped paintbrush to wet the area on each bezel where they will meet. Apply paste to this area, then gently press the components together for at least five seconds to secure the join. Use a rubber clay shaper or a damp brush to remove excess paste [10].
Set the assembly aside to dry until it is mostly dry, then add the next largest bezel component using the same method. Allow it to dry again until mostly dry before adding the next bezel component. Repeat until all bezel components are attached.
NOTE: Use the drying time of one earring to complete the next step for the opposite earring, alternating construction on each earring until both are complete.
When the two assemblies are complete, allow them to dry completely [11].
Refine the assemblies. Sand the sides of each assembly with fine-grit sandpaper. Check for any cracks that might have developed in the clay; if necessary, use paste to seal them, and set aside to dry. Refine with sandpaper until the sides are smooth and even.
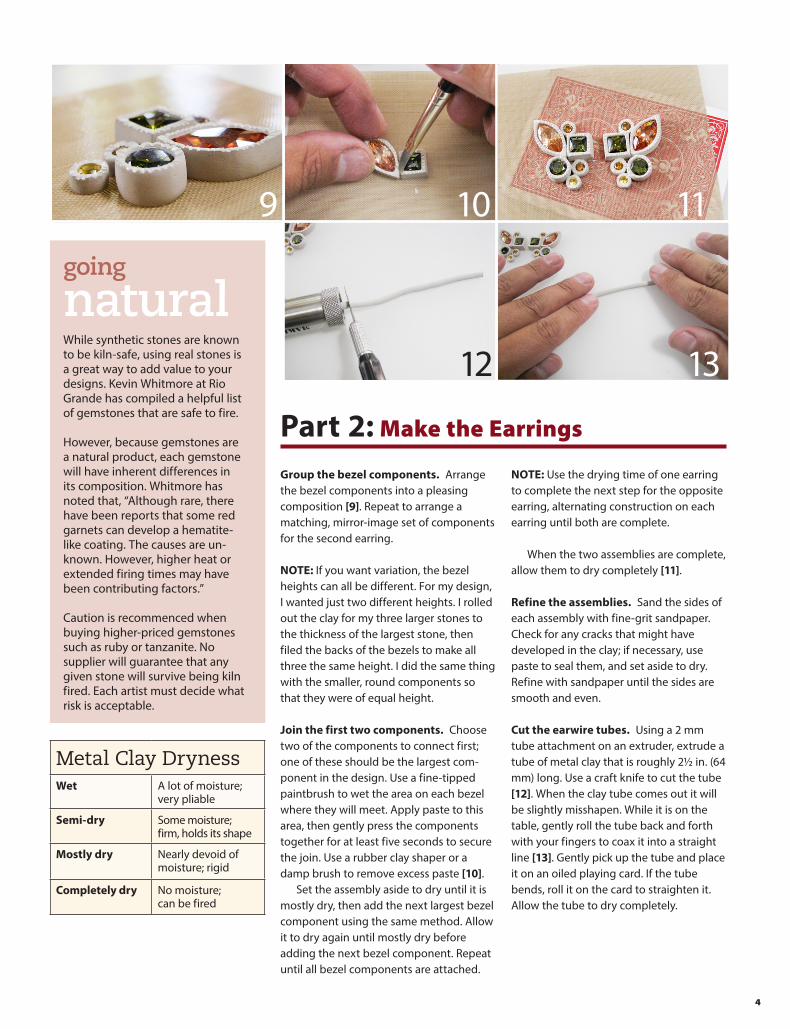
Cut the earwire tubes. Using a 2 mm tube attachment on an extruder, extrude a tube of metal clay that is roughly 2½ in. (64 mm) long. Use a craft knife to cut the tube [12]. When the clay tube comes out it will be slightly misshapen. While it is on the table, gently roll the tube back and forth with your fingers to coax it into a straight line [13]. Gently pick up the tube and place it on an oiled playing card. If the tube bends, roll it on the card to straighten it. Allow the tube to dry completely.
9 10 11
12
Part 2: Make the Earrings
going
naturalWhile synthetic stones are known to be kiln-safe, using real stones is a great way to add value to your designs. Kevin Whitmore at Rio Grande has compiled a helpful list of gemstones that are safe to fire.
However, because gemstones are a natural product, each gemstone will have inherent differences in its composition. Whitmore has noted that, “Although rare, there have been reports that some red garnets can develop a hematite-like coating. The causes are un- known. However, higher heat or extended firing times may have been contributing factors.”
Caution is recommenced when buying higher-priced gemstones such as ruby or tanzanite. No supplier will guarantee that any given stone will survive being kiln fired. Each artist must decide what risk is acceptable.
13
Metal Clay DrynessWet A lot of moisture;
very pliable
Semi-dry Some moisture; firm, holds its shape
Mostly dry Nearly devoid of moisture; rigid
Completely dry No moisture; can be fired

5
Make the earwires. Cut two 3-in. (76 mm)lengths of 20-gauge (0.8 mm) sterling silver wire. Using a torch, ball up one end of one of the wire [19]. Make sure the diameter of the ball is larger than the hole in the earwire tubes. Quench the wire, and pickle it to remove oxides. Repeat for the second wire.
Insert an earwire into an earwire tube so that the wire emerges at the top of the earring assembly. Hold the ball of the earwire against the bottom of the earwire tube with your thumb. Bend the earwire up and over a mandrel [20]. Use a file or a cup bur in a flex shaft to smooth the end of the ear wire to remove any sharp edges.
Work-harden the earwires by hammer-ing them lightly on a steel bench block.
NOTE: These earrings were designed to have some movement. However, if you want longer earwires, you may find that the earrings spin on the wires. To prevent this, flatten the ball of each earwire by hammering it lightly on a steel bench block, then use a needle file to make two notches in the end of the earwire tube. When reassembled, the flattened ball should fit in the notches and prevent the earring from spinning.
earring and the earwire tube. Set the earwire tube in place, and gently press the connection for at least five seconds. Use a clay shaper or damp paintbrush to wipe away any excess paste. Set the earring assembly aside to dry [16]. Repeat to join the second earwire tube to its earring assembly.
Refine. Refine the dry clay as much as possible before firing. When the earring assemblies are completely dry, sand them with polishing papers. To refine hard-to-reach areas, wrap a strip of polishing paper around a toothpick [17].
NOTE: Be sure to clean any excess metal clay dust off of the gemstones. If dust is left on the gemstones, the gemstone will appear cloudy after firing.
Fire. When firing, I use a fiber blanket with slots cut into it to support the earrings. Place the earrings face up with the earwire tubes inserted into the slot of the fiber blanket [18]. Fire according to the clay manufacturer’s instructions.
Finish. Use a soft brass brush and soapy water to polish the earrings. Alternatively, you can place them in a tumbler with steel shot and burnishing compound for 20 minutes.
Trim the earwire tubes. Place an earring assembly face down on your work surface. Use an emery board to sand one end of the dry tube until it is level. Be sure the hole is unobstructed.
Using a ruler, measure the section on the back of the earring where the earwire tube will be attached [14].
NOTE: This section should be at least half the length of the earring from top to bottom, to keep the earring from pivoting forward when it’s worn.
Mark that measurement on the tube and use a clean craft knife to cut the dry tube at the mark.
TIP: When cutting dry metal clay tubing, gently press down with your craft knife and roll it forward and backward until the blade cuts through the tube. A firm but gentle rolling motion works best.
File the cut end of the tube smooth, then use it as a guide to cut a second tube for the other earring.
Attach the earwire tubes. Sand one long side of the tube flat so that it will easily attach to the back of the earring assembly [15]. Repeat to file the second tube.
With a fine-tip paintbrush, wet both surfaces, and then apply paste to both the
14 15 16 17
18 19 20