Embed Size (px)
Citation preview
1
CIS—100
Chapter 9—PowerPoint

2
The PowerPoint User Interface
There is a tall band across the screen that contains many, very visual commands arranged into groups (much like that in Word).
3
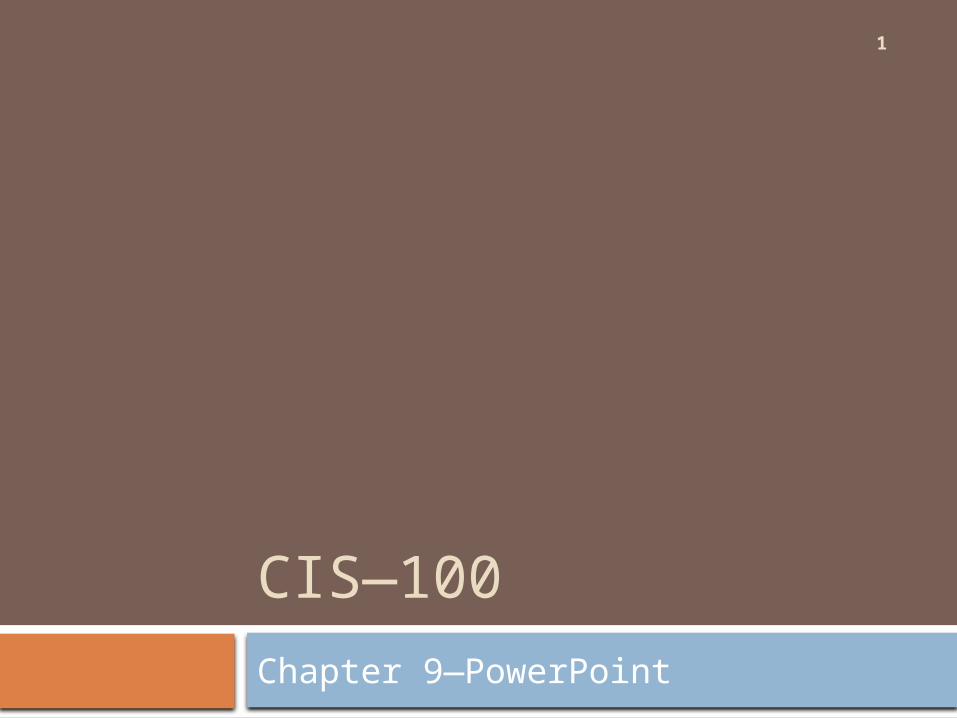
The Ribbon
The Ribbon groups the most frequently used commands into visual tabs.

4
Tabs Devoted to Main Tasks
Tabs organize commonly used functions.
5
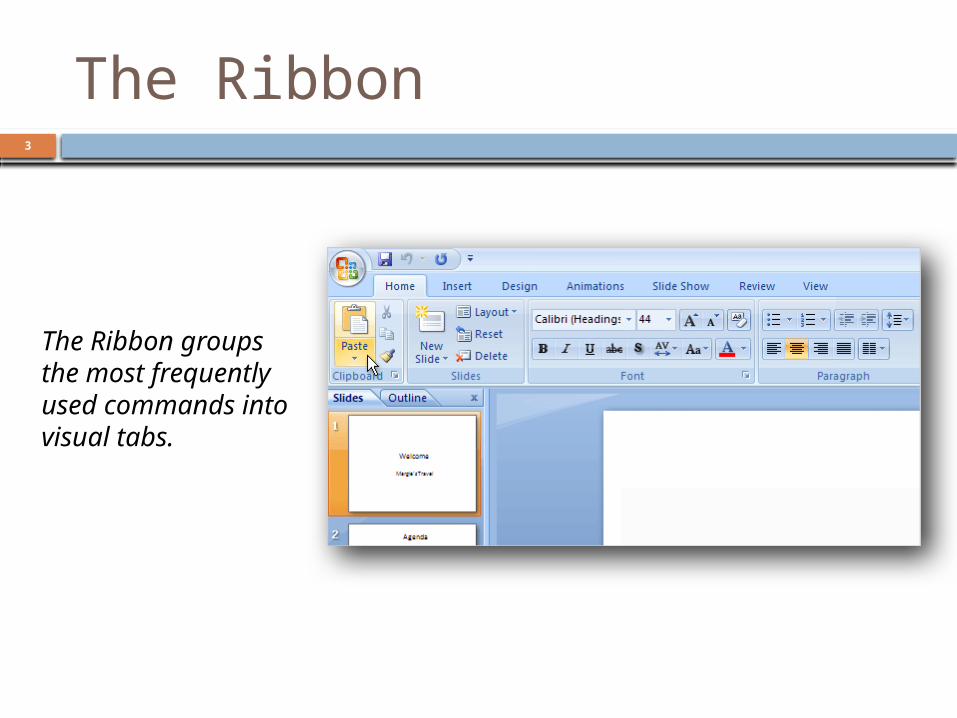
Displaying Galleries
1. A few types of transition effects show on the Ribbon. 2. For more effects, click the More button.
3. The full gallery of transition effects is displayed. Point to any effect to see it previewed on the slide; click it to apply it.
6
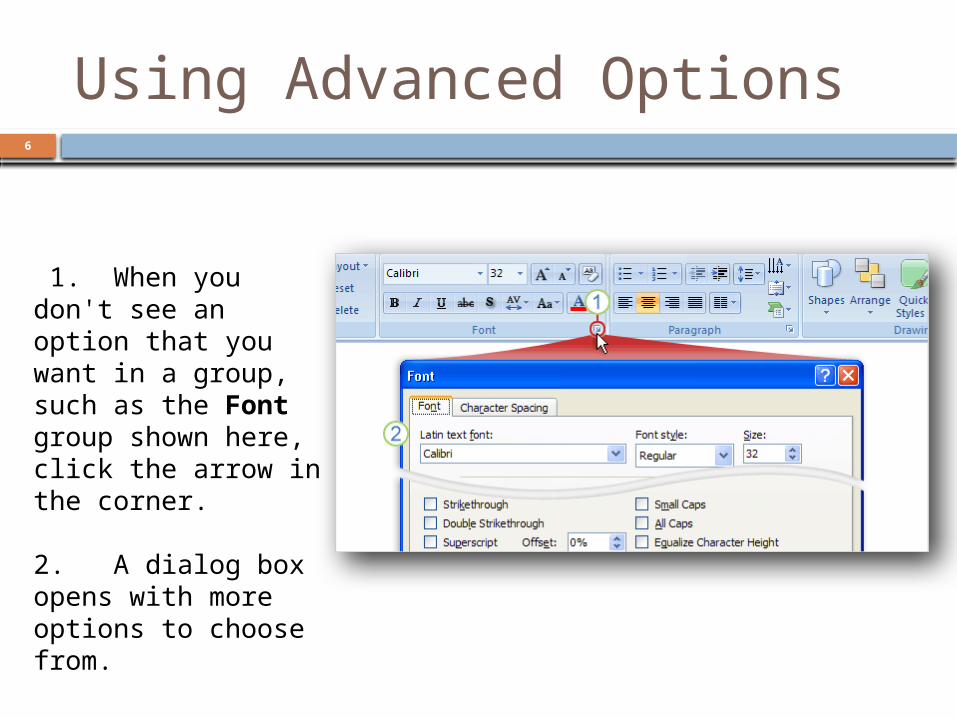
Using Advanced Options
1. When you don't see an option that you want in a group, such as the Font group shown here, click the arrow in the corner. 2. A dialog box opens with more options to choose from.
7
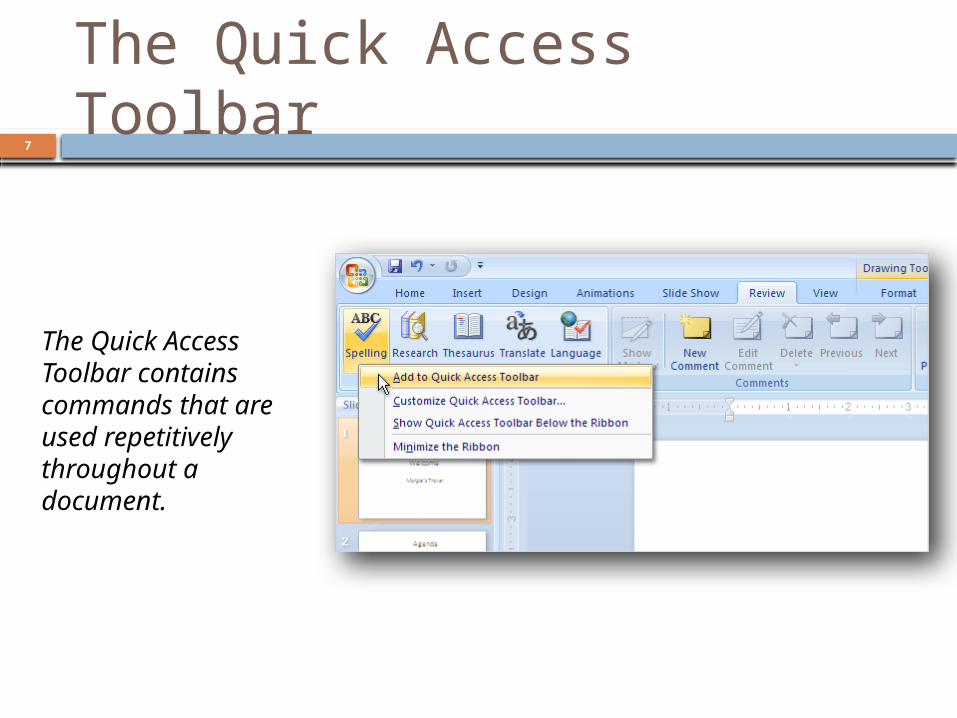
The Quick Access Toolbar
The Quick Access Toolbar contains commands that are used repetitively throughout a document.

8
Changing Views
9
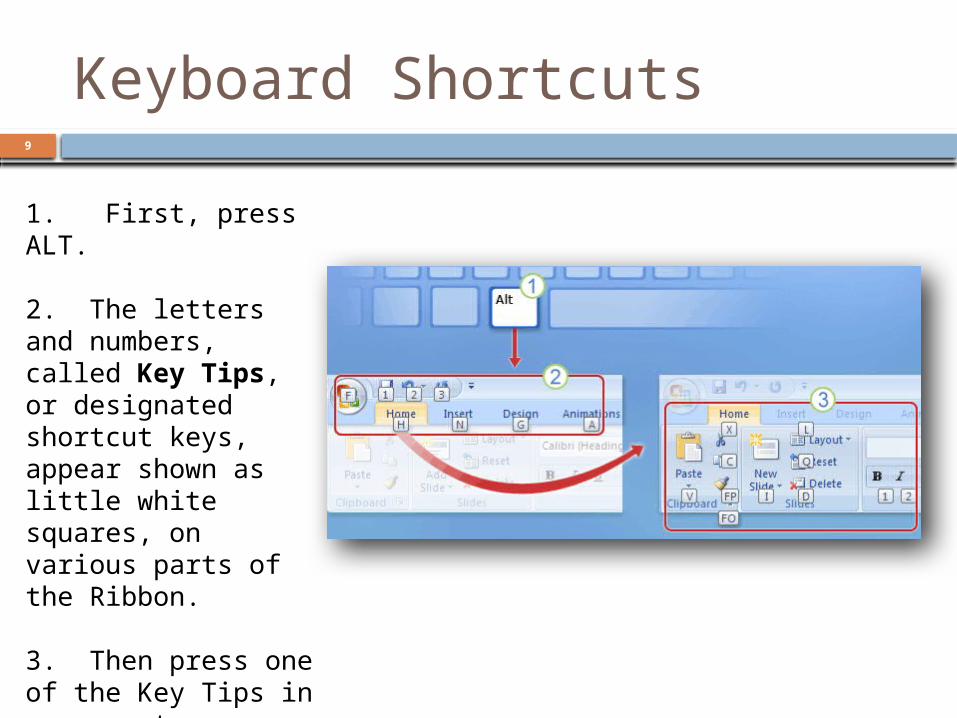
Keyboard Shortcuts
1. First, press ALT. 2. The letters and numbers, called Key Tips, or designated shortcut keys, appear shown as little white squares, on various parts of the Ribbon.
3. Then press one of the Key Tips in a group to complete the sequence. For example, pressing ALT, H, L would be the equivalent of clicking the Layout button.
10
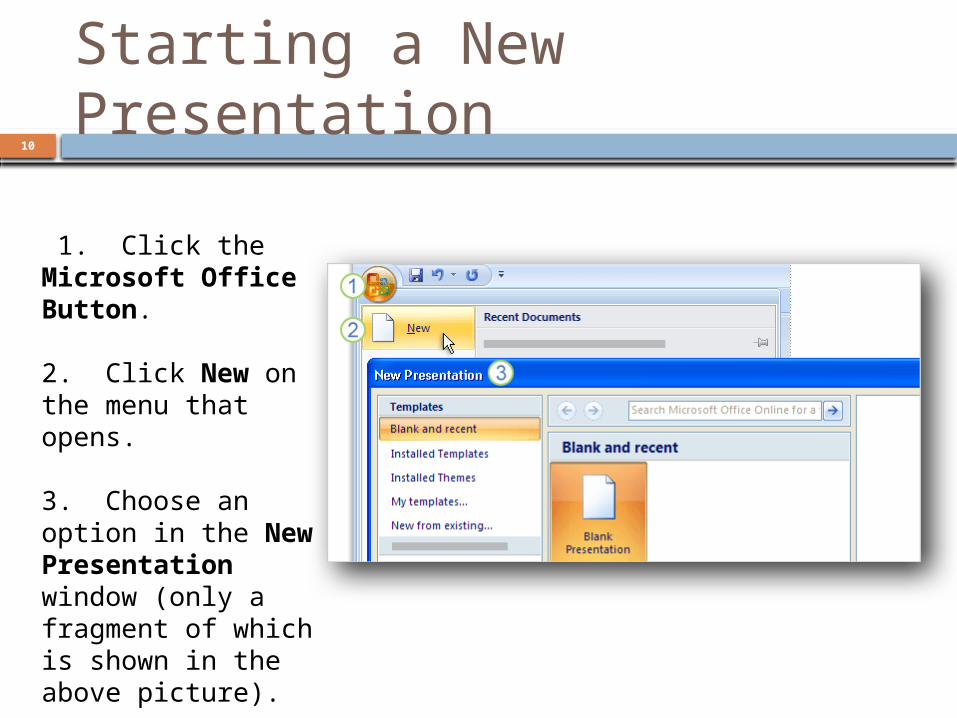
Starting a New Presentation
1. Click the Microsoft Office Button. 2. Click New on the menu that opens.
3. Choose an option in the New Presentation window (only a fragment of which is shown in the above picture).
11
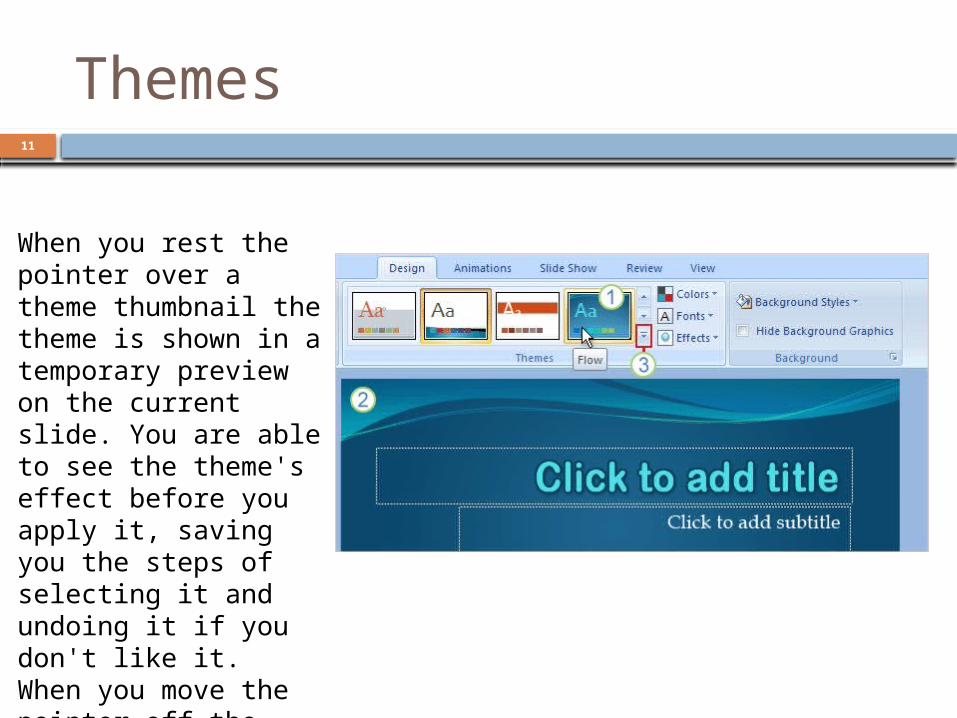
Themes
When you rest the pointer over a theme thumbnail the theme is shown in a temporary preview on the current slide. You are able to see the theme's effect before you apply it, saving you the steps of selecting it and undoing it if you don't like it. When you move the pointer off the thumbnail, the preview ends.

12
Tailoring Themes
1. Use the Colors, Fonts, and Effects galleries, all on the Design tab.
2. Look at other Background Styles. The choices use theme colors.
3. Point to a thumbnail to get a preview of the alternative background.
4. To apply your own background, such as a photograph, click Format Background.

13
Adding Slides and Choosing Layouts
On the Home tab, click New Slide, below the slide icon. Choose the appropriate layout and click on the slide that contains that layout.

14
Inserting a Picture
Inserting pictures, clip art, charts, and other design elements is easier than ever.

15
Inserting a Text Box Caption
For the picture caption, insert a text box. You'll find this on the Insert tab. When you insert the text box, the Drawing Tools are displayed. Click the Format tab, and use the commands on it to:
Choose a shape style for the text box or other shapes, and a shape fill, such as a gradient color; a shape outline color; and an effect, such as beveling or a shadow or glow.
Insert, change, and edit shapes. Position and arrange shapes.

16
Inserting an Org Chart
The org chart adopts the colors of the applied theme.
A Text pane appears next to the chart, and you can type text there.
Text you type in the Text pane maps to chart shapes and appears in the chart as you type.

17
Applying a Simple Animation
With the chart selected, click the arrow next to the Animate box to get the list of effects, which includes Fade, Wipe, and Fly In.
Select an option for making the org chart pieces appear on the slide. They can fade in all at once, by each branch in the chart, by each level, or by shape by shape.
As you point to an option, PowerPoint shows you a preview of the animation effect on the slide. The picture above s captures a shape as it's fading in.

18
Spell Checking and Reviewing NOTE: Narration, Set Up, and
More Use the Slide Show tab for creating narration, running through the show, creating a custom show, setting it up on multiple monitors, and more.
NOTE: Spelling, Research, and Comments On the Review tab, run spelling checks as you always have, use the Research service and thesaurus, and use comments to review the presentation.

19
Printing, Distributing, and Setting Program Options
1. Point to Print to open Print Preview.2. To change program-wide settings, click PowerPoint Options.
20
A New File Format
The new file format has several benefits, including a reduced file size and greater information security for your presentations.
You will not have problems opening and
editing an older presentation in PowerPoint 2007. But the file format change does affect presentation sharing between PowerPoint 2007 and older versions.
21
Benefits of the New File Format Safer presentations Presentations containing unwanted
code, macros, or controls are easier to identify and block. Reduced file size Presentations are automatically
compressed. Improved information security Personal and business-
sensitive information is easier to remove. Improved damaged-file recovery A file can still be opened
even if part of it is damaged. Easier integration Presentation content can be shared with
and opened in other programs.
22
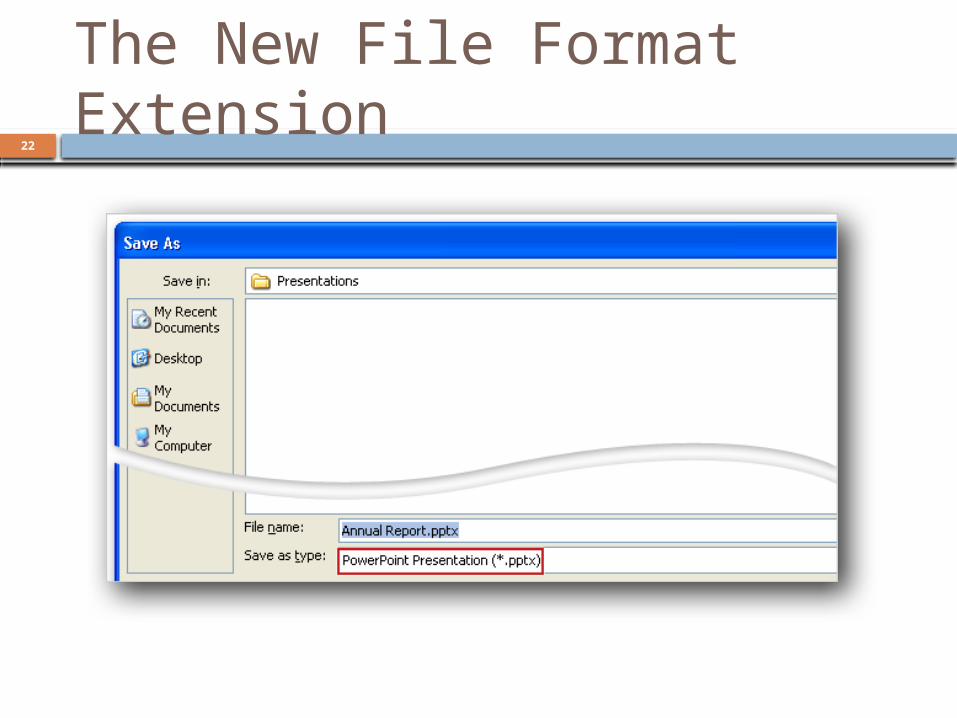
The New File Format Extension

23
Opening Presentations in Earlier Versions of PowerPoint
Converters allow you to open new presentations in older versions of PowerPoint.

24
Opening and Saving Existing Presentations
There is no problem opening and editing an older presentation in PowerPoint 2007. What you will need to decide is whether to keep the presentation in its original format or save it in the new format. PowerPoint 2007 helps you make that decision.

25
Checking for Compatability
When you open a presentation PowerPoint 2007 recognizes it as being in the old format. Behind the scenes it takes note of anything you add to the file, such as a SmartArt graphic that may not work exactly the same in the old format. When you click Save PowerPoint displays the Compatibility Checker dialog box. The checker details what will happen to PowerPoint 2007 elements if you save the file in its original format, PowerPoint 97-2003 Presentation (.ppt). (The picture illustrates this.)
You can cancel the checker and select the new format in
the Save As dialog box. Or, you can choose to continue and save in a previous format.

26
Saving in a Previous Format
You would save in the old format if someone who needed to work in the file did not have PowerPoint 2007 or the Compatibility Pack for opening PowerPoint 2007 files.
27
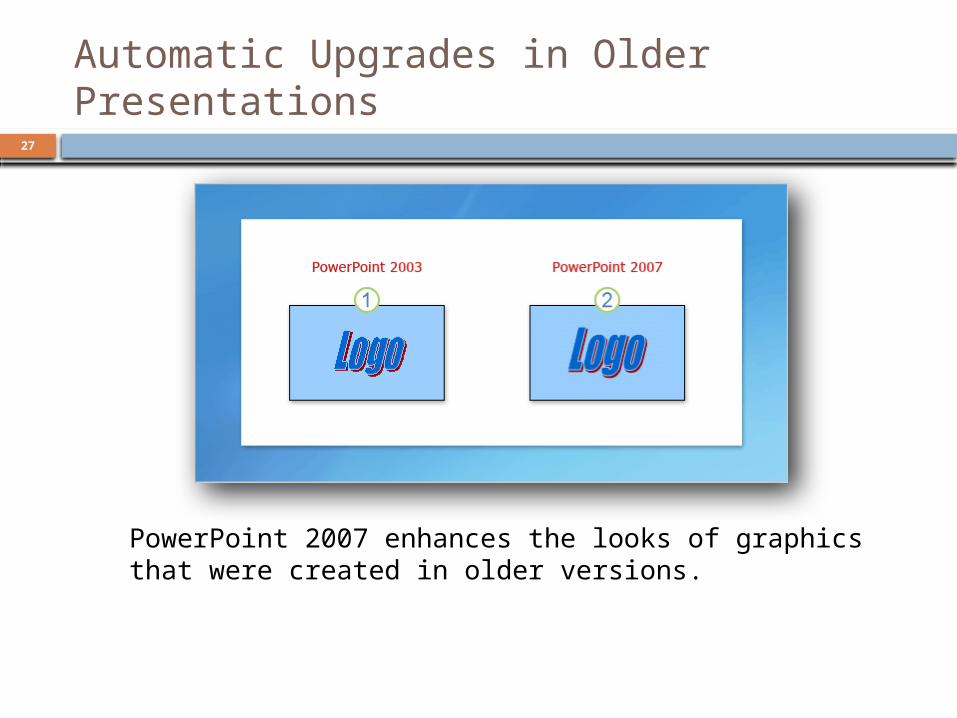
Automatic Upgrades in Older Presentations
PowerPoint 2007 enhances the looks of graphics that were created in older versions.

28
The Convert Command
Older PowerPoint presentations can be converted to the new PowerPoint 2007 format.
![Consider... [[Tall(John) Tall(John)]] [[Tall(John)]] = undecided, therefore [[Tall(John) Tall(John)]] = undecided](https://img.pdfslide.us/doc/110x75/5515d816550346cf6f8b4964/consider-talljohn-talljohn-talljohn-undecided-therefore-talljohn-talljohn-undecided.jpg)


![Analyst day – Russia & CIS Renewable Power...2018/07/23 · Microsoft PowerPoint - Analyst day Russia & CIS - Renewable Power final.ppt [Mode de compatibilité] Author dhawksle](https://img.pdfslide.us/doc/110x75/5f92522997af433268530ca2/analyst-day-a-russia-cis-renewable-power-20180723-microsoft-powerpoint.jpg)


![Cis Powerpoint Presentation[1]](https://img.pdfslide.us/doc/110x75/54c51bdc4a7959ce348b4699/cis-powerpoint-presentation1.jpg)