Embed Size (px)
Citation preview
Circuit Training
A Guide for Alcohol & Other Drug Agencies & Consumers
Acknowledgements
Thank you to the Foundation for Alcohol Research & Education (FARE) for providing funding for this resource.
The Western Australian Network of Alcohol and other Drug Agencies (WANADA) would like to thank those in the Alcohol and Other Drug sector as well as the university practicum students who contributed to this resource.
Acknowledgement
WANADA staff acknowledge Aboriginal and Torres Strait Islander people as the Traditional Custodians of this country and its waters. WANADA staff wish to pay their respect to Elders past and present and extend this to all Aboriginal people reading this message.
Disclaimer:
“Circuit training: a guide for alcohol and other drug agencies & consumers” is intended to provide information and some examples for working with alcohol and other drug consumers around exercise, health and wellbeing. This information and the examples are offered as a guide only. The guide is designed to assist workforce development and is based on information available at the date of publication.
For individual advice you should consult a General Practitioner or an Exercise Physiologist accredited by Exercise & Sports Science Australia (ESSA).
Copyright WANADA 2011
This work is copyright. Apart from any use as permitted under the Copyright Act 1968, no part may be reproduced by any process without prior written permission from the Western Australian Network of Alcohol and other Drug Agencies (WANADA). Requests and enquiries regarding reproduction and rights should be directed to WANADA.
i
ii
Contents
Benefits of exercise 1
What is circuit training? 1
How to design a circuit training routine 2
Circuit training guidelines 3 Sit up 4
Plank 5
Push ups 6
Chest press 7
Arm raises 8
Upright row 9
Bicep curl 10
Seated row 11
Squats 12
Lunges 13
Mountain climbers 14
Shuttles 15
Quick feet 16
Squat against wall 17
Dips 18
Cherry pickers 19
Shoulder press 20
Superman 21
Bridging 22
Star jumps 23
Example of an 11 station circuit training set-up 24
General run through of example session 25
iii
1
Benefits of exercise Exercise is an important aspect in everyone’s life; it has been shown that by exercising for as little as 20 minutes five times a week, improvements will be found. These include improvements to both physical and mental health. Some of the proven benefits to health that are associated with exercise include:
• Reduced risk of premature death
• Reduced risk of developing heart disease
• Reduced risk of developing high blood pressure
• Reduced risk of developing high cholesterol
• Reduced risk of developing colon cancer and breast cancer
• Reduced risk of developing diabetes
• Reduced or maintained body weight or body fat
• Build and maintain healthy muscles, bones, and joints
• Reduced symptoms of depression and anxiety
• Improved psychological well-being
• Enhanced work, recreation, and sport performance
What is circuit training? Circuit training is a fun and challenging form of exercise that develops stamina, flexibility and strength all in one exercise session. It is one of the only methods of exercising that has proven positive results towards increasing both strength and cardiovascular fitness in the same exercise session.
Circuit training is named after how the workout is structured rather than the type of exercises performed. A typical session consists of a series of stations or exercises completed one after the other with short rest periods in between them. Circuit routines can be composed of an almost endless supply of exercises and because of this avoids both muscle and Central Nervous System (CNS) staleness that can be associated with other forms of fitness training.
A well-designed circuit provides a balance between cardiovascular endurance (skipping, shuttle running etc) and targeting all of the body’s muscle groups. Circuit routines can also be designed to provide a high kilojoule or energy burning workout to help with weight loss. Circuit training is ideal for both advanced athletes and beginners because the intensity at which the individual works can be scaled to suit their ability and fitness. This allows the attendance of a group exercise session to vary in gender, fitness, coordination and physical ability.
How to design a circuit training routine When designing a circuit training routine there are a number of factors to consider.
1. The type of exercises to choose for the session
• This can be determined by the equipment and the amount of space available. Exercises that use an individual’s own body weight are ideal (e.g. push ups, squats and sit ups) as they generally use little space and require no equipment.
2. The number of exercises to include in a session
• Generally keeping the number of exercises between 10 and 12 is recommended. This is enough stations to target all muscle groups and include cardiovascular conditioning.
3. How long to work for at each station
• Usually a work period of 60 seconds is used as this allows time for the participant’s heart rate to rise (increased cardio fitness), acceptable levels of lactic acid to build (endurance/ fatigue resistance) and avoids excessive fatigue (injury).
• This factor is also heavily reliant on the rest period between stations. A work to rest ratio of 2:1 is ideal for circuit training. This means 1 minute work should have 30 seconds rest or 30 seconds work should get 15 seconds rest. Therefore the work period is twice as long as the rest period.
4. The amount of sets to complete
• This is the amount of times the participants complete a full circuit within a single training session.
• This factor is reliant on the amount of time, fitness levels and goals of the participants.
2
Circuit training guidelines
When completing circuit training a number of guidelines should be followed to ensure that significant gains to strength and endurance are achieved. These include the following:
• Create your circuit with 10 to 12 exercises and stations that target the entire body.
• Perform each exercise to a 2:1 work to rest ratio (varies with different goals).
• Complete circuit training 2 to 4 times per week for a minimum of 30 minutes. Because it incorporates strength training exercises, allow at least 48 hours between sessions that work the same muscle groups.
• Select weights/resistance that will allow you to perform the exercise for the entire period of time while still providing a challenge.
• As fitness improves, increase the difficulty of the exercise by increasing the exercise time, increasing the weights or resistance used, adding more difficult exercises, or decreasing the amount of time to rest between stations.
• To focus more on muscular strength, increase the intensity (resistance) of the exercise at each station and the rest time between stations to allow full muscular recovery between each exercise. A 1:1 work to rest ratio is advisable.
• To focus more on cardiovascular endurance, decrease the intensity of the exercise at each station, increase the length of time spent at each station, and shorten the rest between stations to keep your heart rate continuously elevated. A 4:1 work to rest ratio is advisable.
3
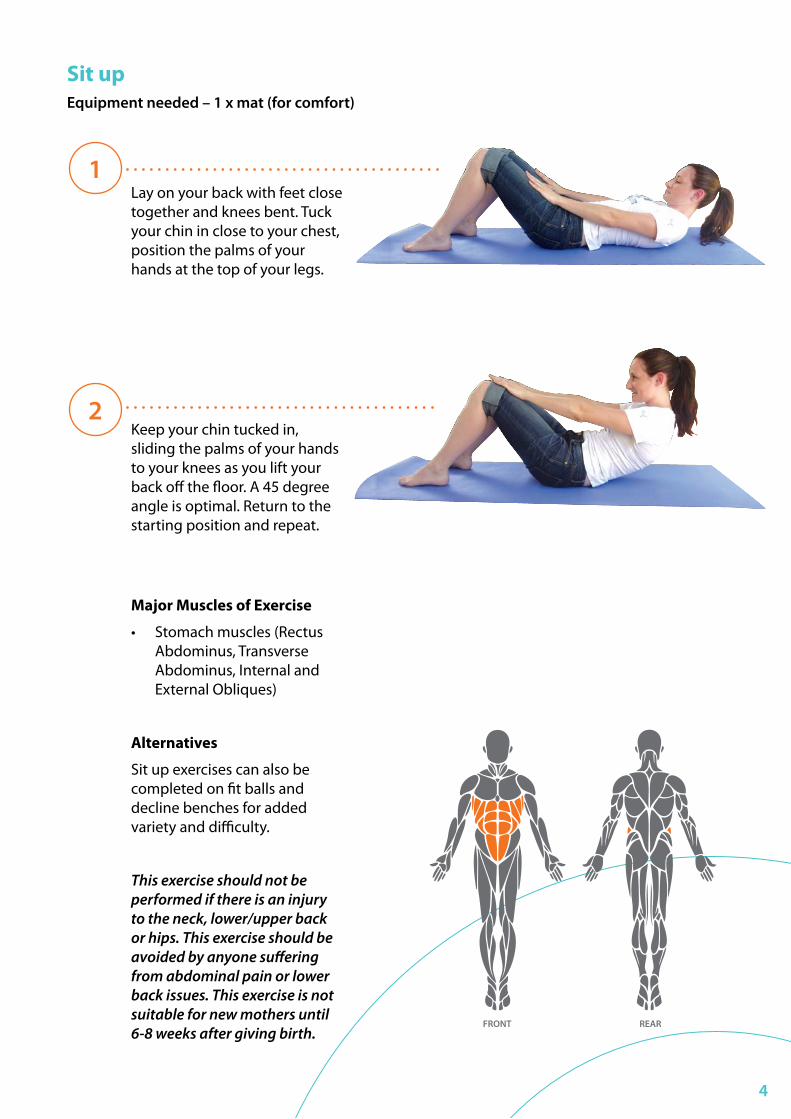
Sit up Equipment needed – 1 x mat (for comfort)
Lay on your back with feet close together and knees bent. Tuck your chin in close to your chest, position the palms of your hands at the top of your legs.
Keep your chin tucked in, sliding the palms of your hands to your knees as you lift your back off the floor. A 45 degree angle is optimal. Return to the starting position and repeat.
Major Muscles of Exercise
• Stomach muscles (Rectus Abdominus, Transverse Abdominus, Internal and External Obliques)
Alternatives
Sit up exercises can also be completed on fit balls and decline benches for added variety and difficulty.
This exercise should not be performed if there is an injury to the neck, lower/upper back or hips. This exercise should be avoided by anyone suffering from abdominal pain or lower back issues. This exercise is not suitable for new mothers until 6-8 weeks after giving birth.
1
2
FRONT REAR
4
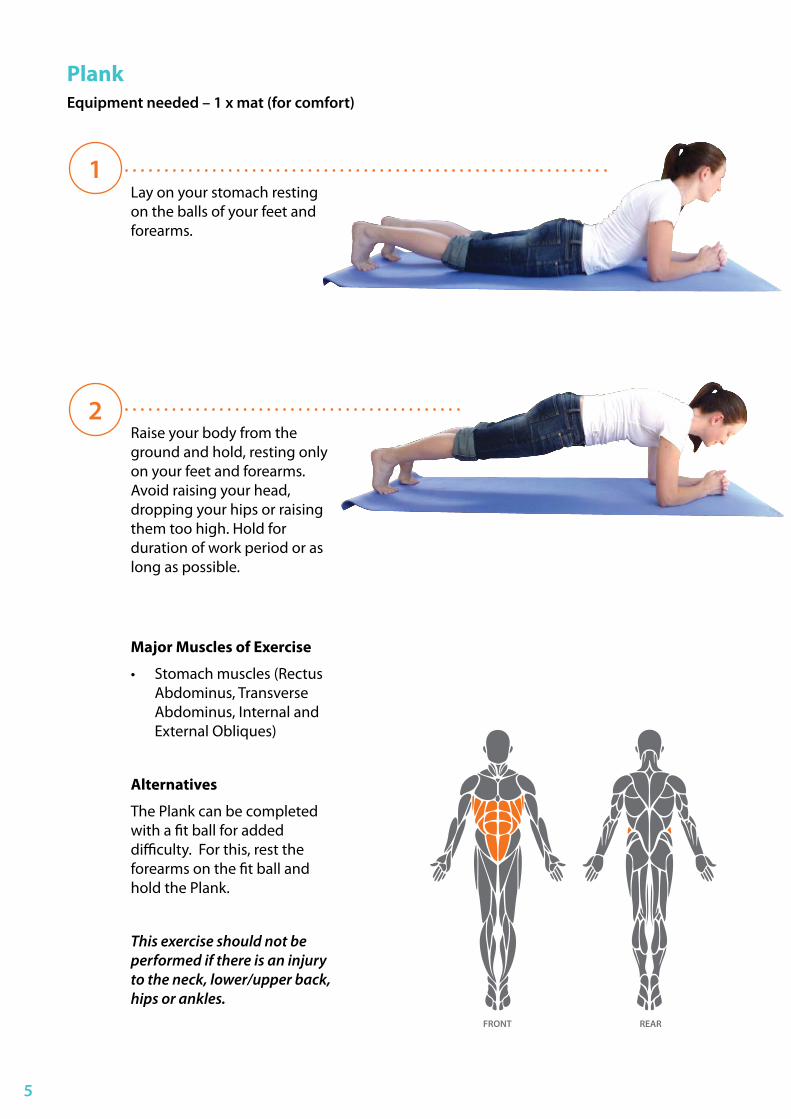
PlankEquipment needed – 1 x mat (for comfort)
Lay on your stomach resting on the balls of your feet and forearms.
Raise your body from the ground and hold, resting only on your feet and forearms. Avoid raising your head, dropping your hips or raising them too high. Hold for duration of work period or as long as possible.
Major Muscles of Exercise
• Stomach muscles (Rectus Abdominus, Transverse Abdominus, Internal and External Obliques)
Alternatives
The Plank can be completed with a fit ball for added difficulty. For this, rest the forearms on the fit ball and hold the Plank.
This exercise should not be performed if there is an injury to the neck, lower/upper back, hips or ankles.
1
2
FRONT REAR
5
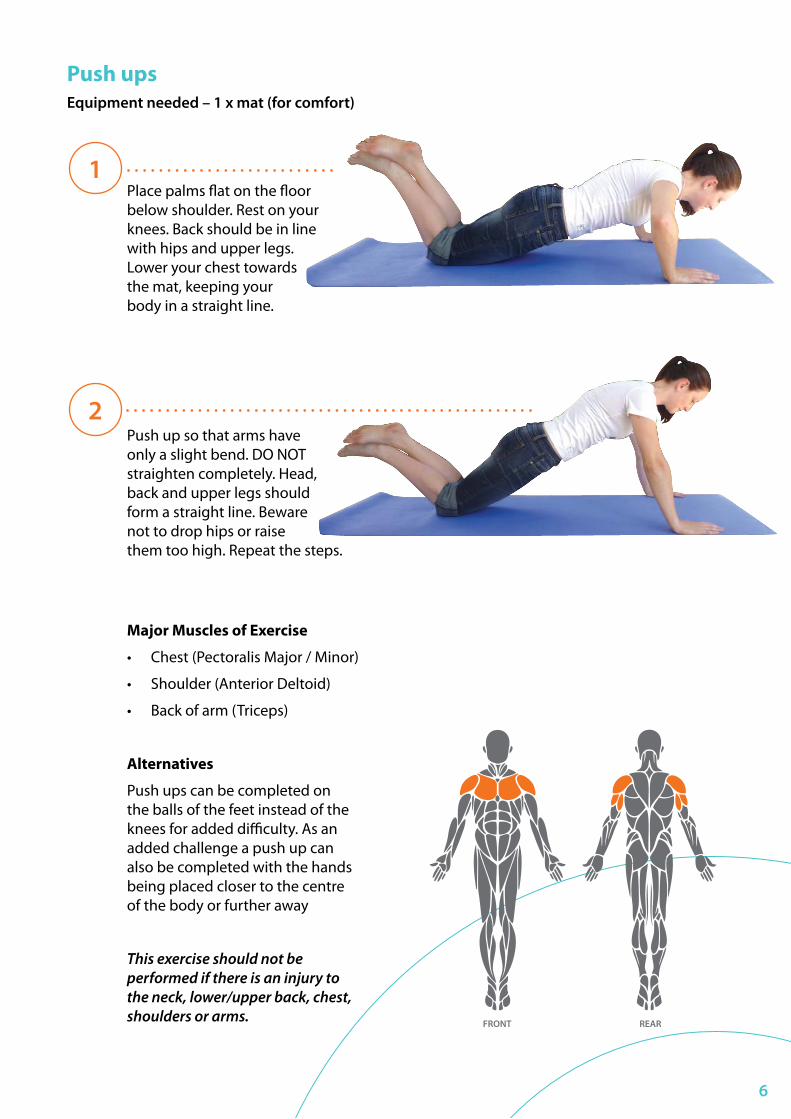
Push upsEquipment needed – 1 x mat (for comfort)
Place palms flat on the floor below shoulder. Rest on your knees. Back should be in line with hips and upper legs. Lower your chest towards the mat, keeping your body in a straight line.
Push up so that arms have only a slight bend. DO NOT straighten completely. Head, back and upper legs should form a straight line. Beware not to drop hips or raise them too high. Repeat the steps.
Major Muscles of Exercise
• Chest (Pectoralis Major / Minor)
• Shoulder (Anterior Deltoid)
• Back of arm (Triceps)
Alternatives
Push ups can be completed on the balls of the feet instead of the knees for added difficulty. As an added challenge a push up can also be completed with the hands being placed closer to the centre of the body or further away
This exercise should not be performed if there is an injury to the neck, lower/upper back, chest, shoulders or arms.
1
2
FRONT REAR
6
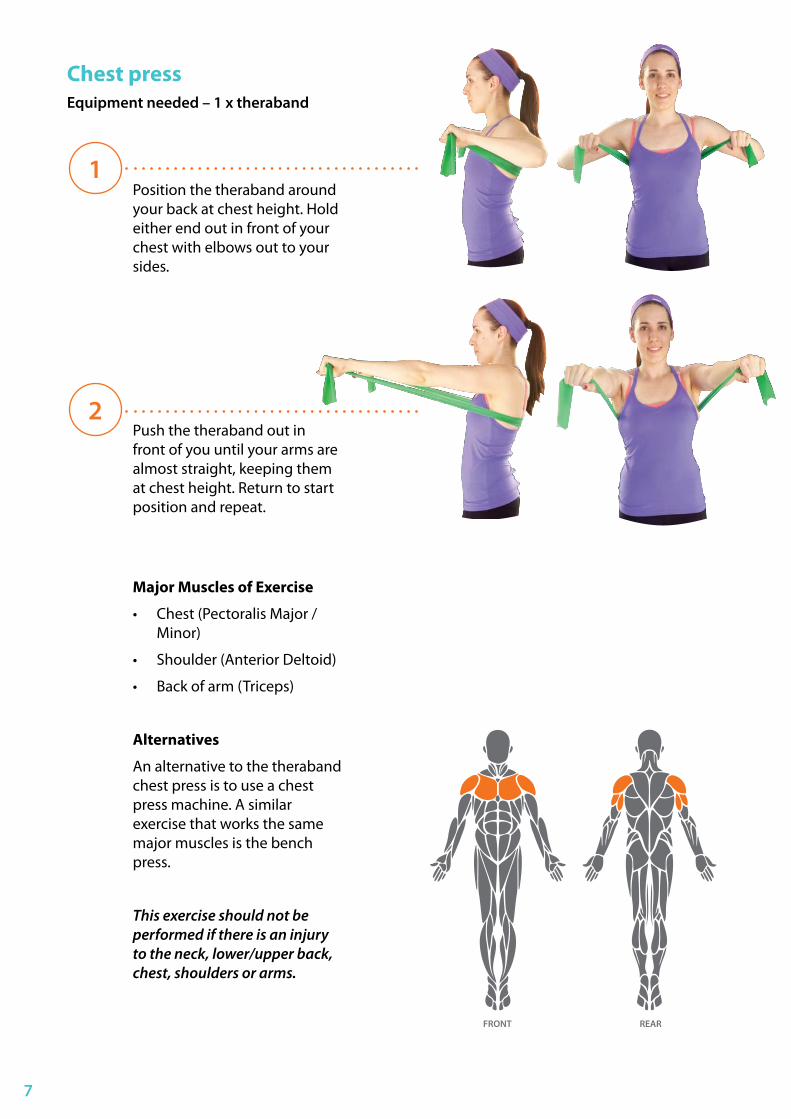
Chest pressEquipment needed – 1 x theraband
Position the theraband around your back at chest height. Hold either end out in front of your chest with elbows out to your sides.
Push the theraband out in front of you until your arms are almost straight, keeping them at chest height. Return to start position and repeat.
Major Muscles of Exercise
• Chest (Pectoralis Major / Minor)
• Shoulder (Anterior Deltoid)
• Back of arm (Triceps)
Alternatives
An alternative to the theraband chest press is to use a chest press machine. A similar exercise that works the same major muscles is the bench press.
This exercise should not be performed if there is an injury to the neck, lower/upper back, chest, shoulders or arms.
1
2
FRONT REAR
7
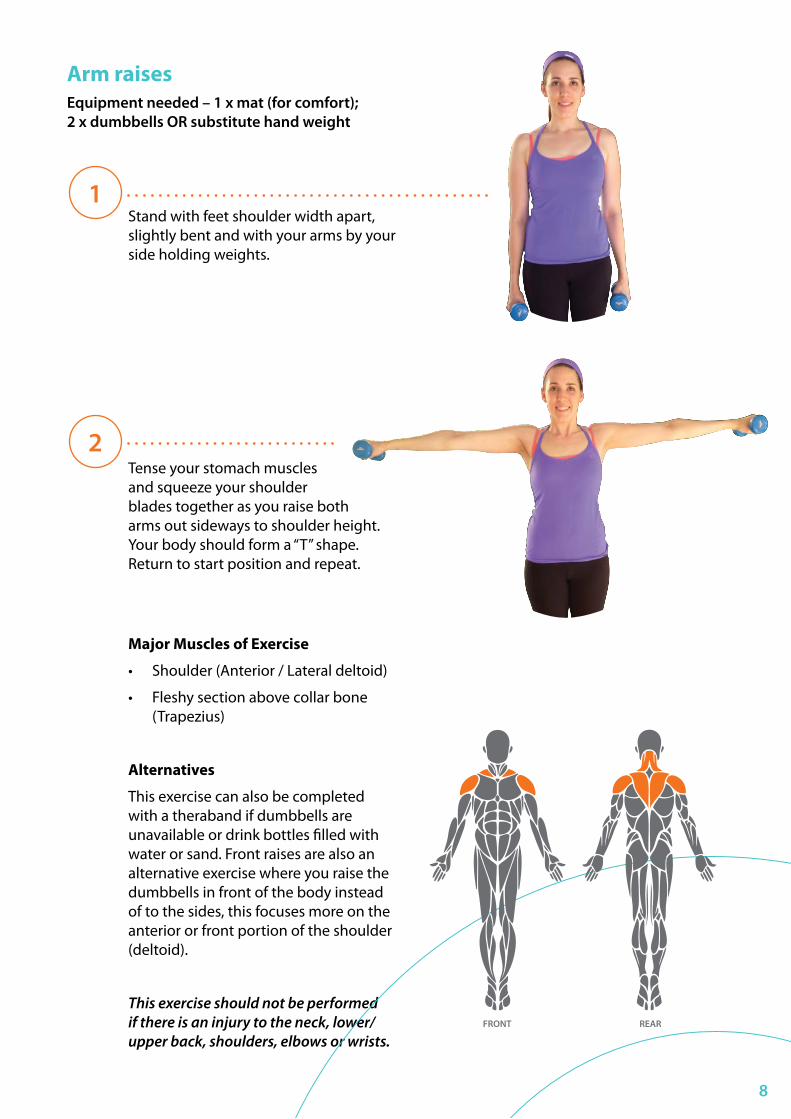
Arm raisesEquipment needed – 1 x mat (for comfort); 2 x dumbbells OR substitute hand weight
Stand with feet shoulder width apart, slightly bent and with your arms by your side holding weights.
Tense your stomach muscles and squeeze your shoulder blades together as you raise both arms out sideways to shoulder height. Your body should form a “T” shape. Return to start position and repeat.
Major Muscles of Exercise
• Shoulder (Anterior / Lateral deltoid)
• Fleshy section above collar bone (Trapezius)
Alternatives
This exercise can also be completed with a theraband if dumbbells are unavailable or drink bottles filled with water or sand. Front raises are also an alternative exercise where you raise the dumbbells in front of the body instead of to the sides, this focuses more on the anterior or front portion of the shoulder (deltoid).
This exercise should not be performed if there is an injury to the neck, lower/upper back, shoulders, elbows or wrists.
1
2
FRONT REAR
8
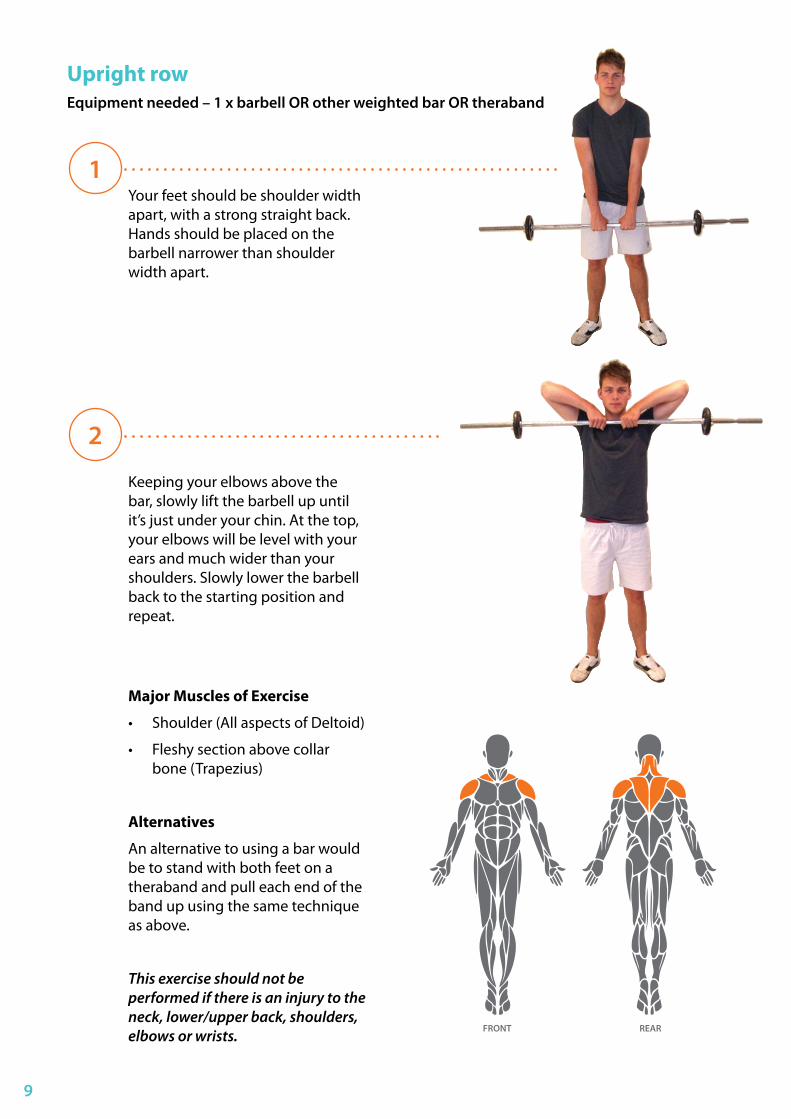
Upright rowEquipment needed – 1 x barbell OR other weighted bar OR theraband
Your feet should be shoulder width apart, with a strong straight back. Hands should be placed on the barbell narrower than shoulder width apart.
Keeping your elbows above the bar, slowly lift the barbell up until it’s just under your chin. At the top, your elbows will be level with your ears and much wider than your shoulders. Slowly lower the barbell back to the starting position and repeat.
Major Muscles of Exercise
• Shoulder (All aspects of Deltoid)
• Fleshy section above collar bone (Trapezius)
Alternatives
An alternative to using a bar would be to stand with both feet on a theraband and pull each end of the band up using the same technique as above.
This exercise should not be performed if there is an injury to the neck, lower/upper back, shoulders, elbows or wrists.
1
2
FRONT REAR
9
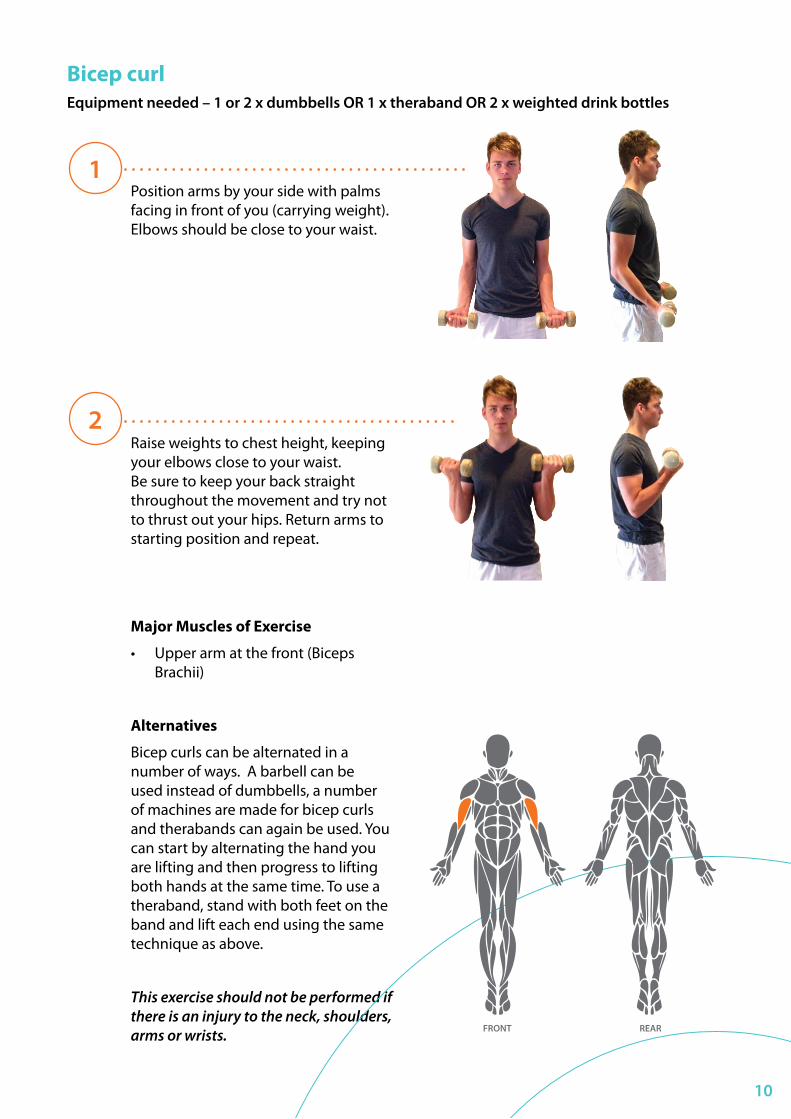
Bicep curlEquipment needed – 1 or 2 x dumbbells OR 1 x theraband OR 2 x weighted drink bottles
Position arms by your side with palms facing in front of you (carrying weight). Elbows should be close to your waist.
Raise weights to chest height, keeping your elbows close to your waist. Be sure to keep your back straight throughout the movement and try not to thrust out your hips. Return arms to starting position and repeat.
Major Muscles of Exercise
• Upper arm at the front (Biceps Brachii)
Alternatives
Bicep curls can be alternated in a number of ways. A barbell can be used instead of dumbbells, a number of machines are made for bicep curls and therabands can again be used. You can start by alternating the hand you are lifting and then progress to lifting both hands at the same time. To use a theraband, stand with both feet on the band and lift each end using the same technique as above.
This exercise should not be performed if there is an injury to the neck, shoulders, arms or wrists.
1
2
FRONT REAR
10
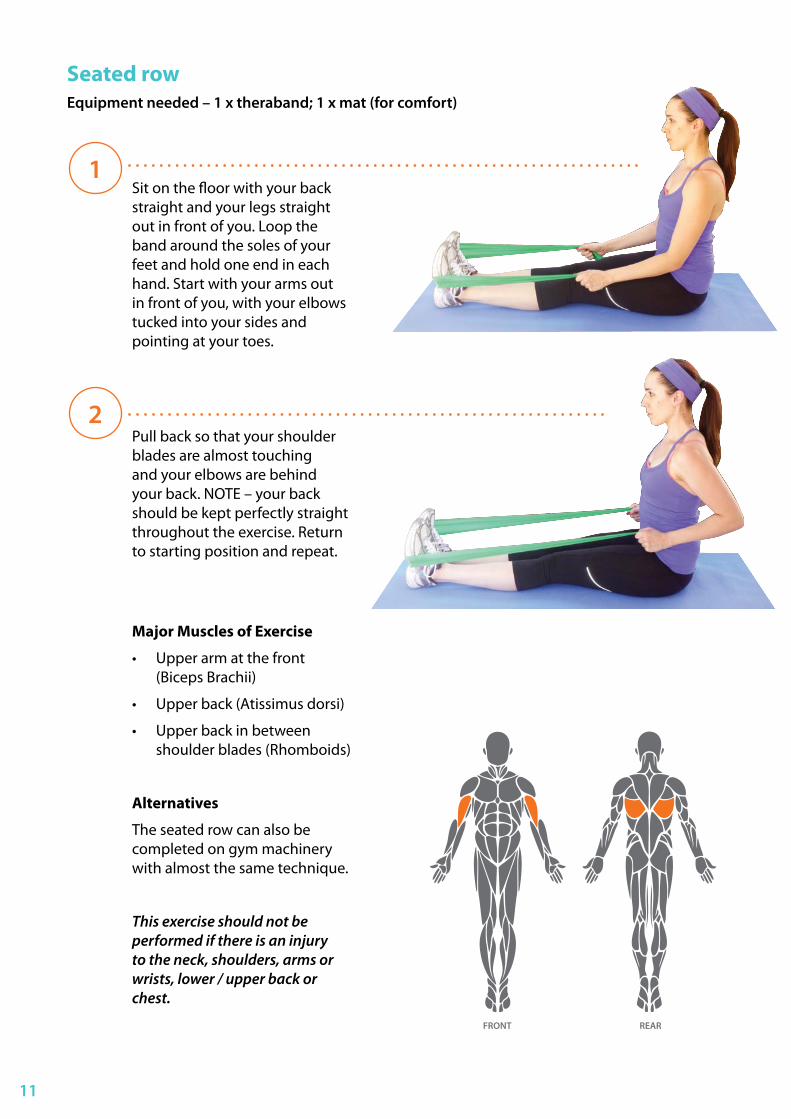
Seated row Equipment needed – 1 x theraband; 1 x mat (for comfort)
Sit on the floor with your back straight and your legs straight out in front of you. Loop the band around the soles of your feet and hold one end in each hand. Start with your arms out in front of you, with your elbows tucked into your sides and pointing at your toes.
Pull back so that your shoulder blades are almost touching and your elbows are behind your back. NOTE – your back should be kept perfectly straight throughout the exercise. Return to starting position and repeat.
Major Muscles of Exercise
• Upper arm at the front (Biceps Brachii)
• Upper back (Atissimus dorsi)
• Upper back in between shoulder blades (Rhomboids)
Alternatives
The seated row can also be completed on gym machinery with almost the same technique.
This exercise should not be performed if there is an injury to the neck, shoulders, arms or wrists, lower / upper back or chest.
1
2
FRONT REAR
11
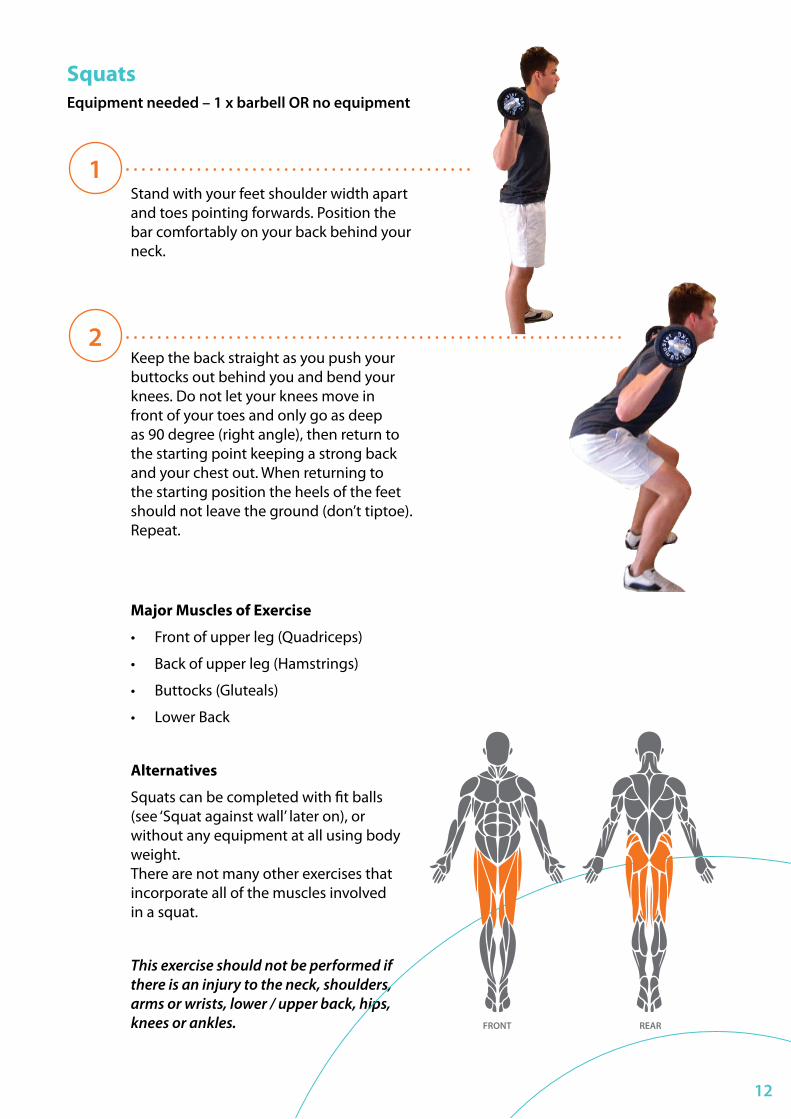
SquatsEquipment needed – 1 x barbell OR no equipment
Stand with your feet shoulder width apart and toes pointing forwards. Position the bar comfortably on your back behind your neck.
Keep the back straight as you push your buttocks out behind you and bend your knees. Do not let your knees move in front of your toes and only go as deep as 90 degree (right angle), then return to the starting point keeping a strong back and your chest out. When returning to the starting position the heels of the feet should not leave the ground (don’t tiptoe). Repeat.
Major Muscles of Exercise
• Front of upper leg (Quadriceps)
• Back of upper leg (Hamstrings)
• Buttocks (Gluteals)
• Lower Back
Alternatives
Squats can be completed with fit balls (see ‘Squat against wall’ later on), or without any equipment at all using body weight. There are not many other exercises that incorporate all of the muscles involved in a squat.
This exercise should not be performed if there is an injury to the neck, shoulders, arms or wrists, lower / upper back, hips, knees or ankles.
1
2
FRONT REAR
12
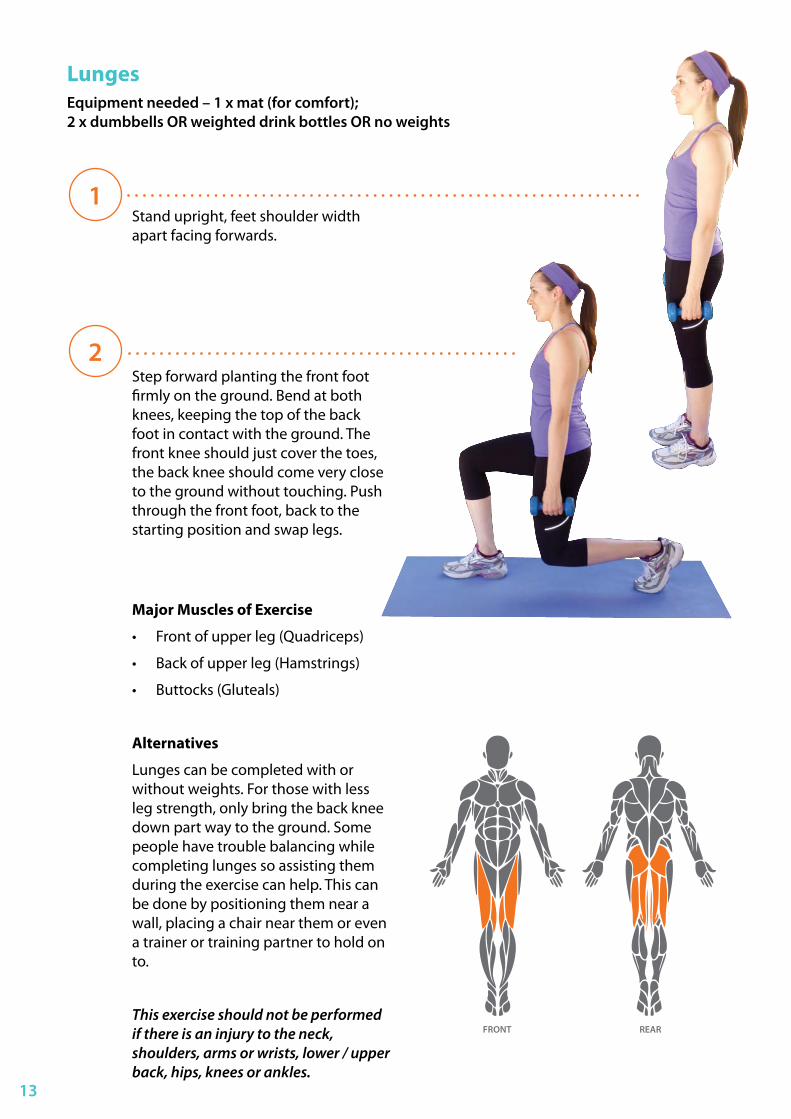
LungesEquipment needed – 1 x mat (for comfort); 2 x dumbbells OR weighted drink bottles OR no weights
Stand upright, feet shoulder width apart facing forwards.
Step forward planting the front foot firmly on the ground. Bend at both knees, keeping the top of the back foot in contact with the ground. The front knee should just cover the toes, the back knee should come very close to the ground without touching. Push through the front foot, back to the starting position and swap legs.
Major Muscles of Exercise
• Front of upper leg (Quadriceps)
• Back of upper leg (Hamstrings)
• Buttocks (Gluteals)
Alternatives
Lunges can be completed with or without weights. For those with less leg strength, only bring the back knee down part way to the ground. Some people have trouble balancing while completing lunges so assisting them during the exercise can help. This can be done by positioning them near a wall, placing a chair near them or even a trainer or training partner to hold on to.
This exercise should not be performed if there is an injury to the neck, shoulders, arms or wrists, lower / upper back, hips, knees or ankles.
1
2
FRONT REAR
13
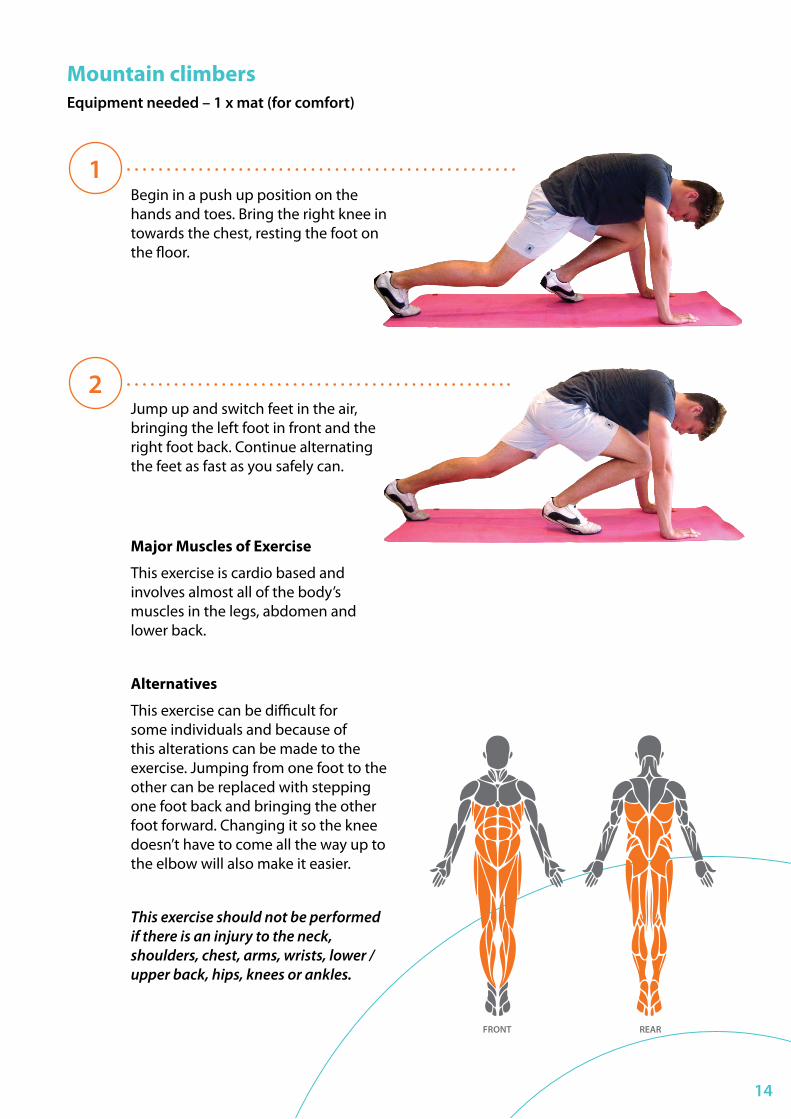
Mountain climbersEquipment needed – 1 x mat (for comfort)
Begin in a push up position on the hands and toes. Bring the right knee in towards the chest, resting the foot on the floor.
Jump up and switch feet in the air, bringing the left foot in front and the right foot back. Continue alternating the feet as fast as you safely can.
Major Muscles of Exercise
This exercise is cardio based and involves almost all of the body’s muscles in the legs, abdomen and lower back.
Alternatives
This exercise can be difficult for some individuals and because of this alterations can be made to the exercise. Jumping from one foot to the other can be replaced with stepping one foot back and bringing the other foot forward. Changing it so the knee doesn’t have to come all the way up to the elbow will also make it easier.
This exercise should not be performed if there is an injury to the neck, shoulders, chest, arms, wrists, lower / upper back, hips, knees or ankles.
1
2
FRONT REAR
14
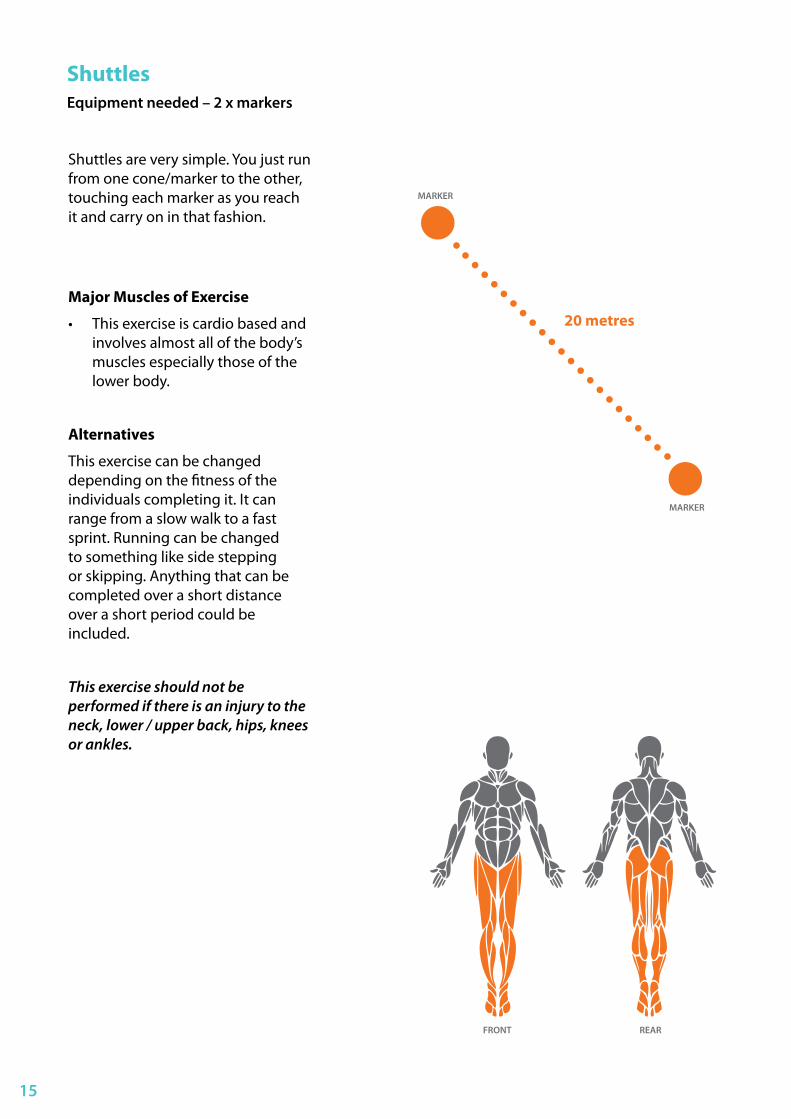
ShuttlesEquipment needed – 2 x markers
Shuttles are very simple. You just run from one cone/marker to the other, touching each marker as you reach it and carry on in that fashion.
Major Muscles of Exercise
• This exercise is cardio based and involves almost all of the body’s muscles especially those of the lower body.
Alternatives
This exercise can be changed depending on the fitness of the individuals completing it. It can range from a slow walk to a fast sprint. Running can be changed to something like side stepping or skipping. Anything that can be completed over a short distance over a short period could be included.
This exercise should not be performed if there is an injury to the neck, lower / upper back, hips, knees or ankles.
20 metres
FRONT
MARKER
MARKER
REAR
15
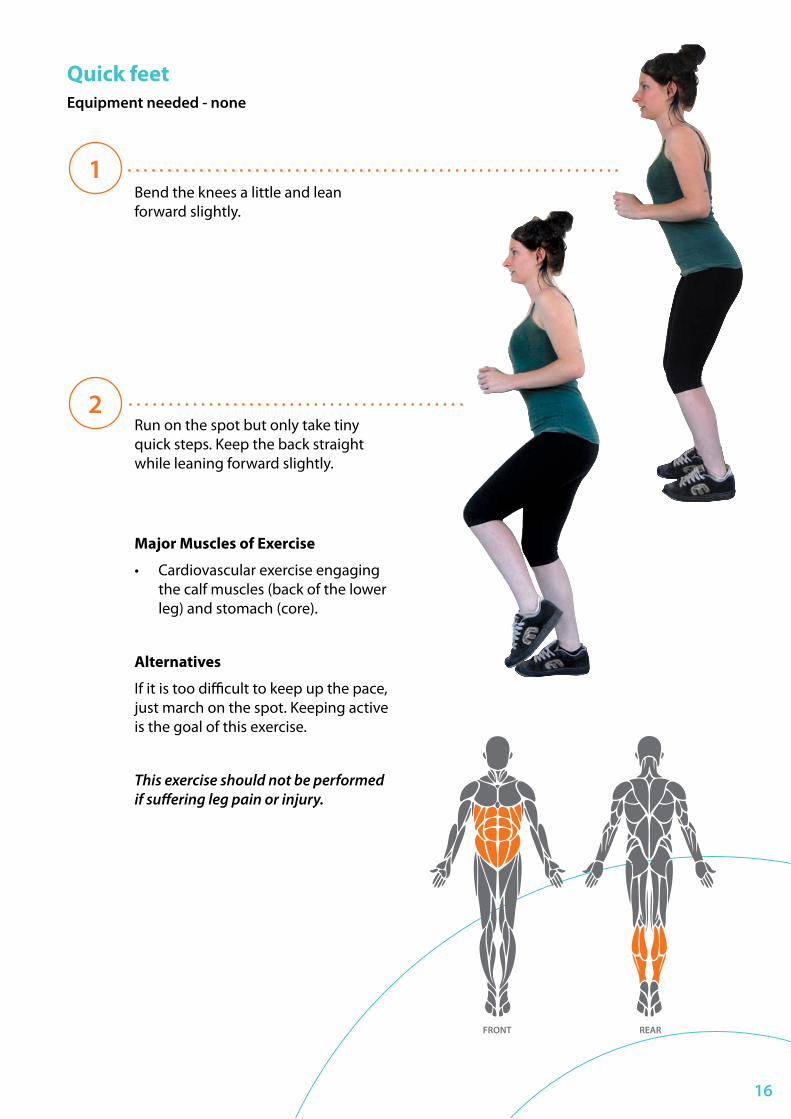
Quick feetEquipment needed - none
Bend the knees a little and lean forward slightly.
Run on the spot but only take tiny quick steps. Keep the back straight while leaning forward slightly.
Major Muscles of Exercise
• Cardiovascular exercise engaging the calf muscles (back of the lower leg) and stomach (core).
Alternatives
If it is too difficult to keep up the pace, just march on the spot. Keeping active is the goal of this exercise.
This exercise should not be performed if suffering leg pain or injury.
1
2
FRONT REAR
16

Squat against wallEquipment needed – 1 x fit ball
Place the ball between the wall and the lower back, lean back into it. Stand with feet shoulder width apart and drop down, as if you are taking a seat, while keeping the internal stomach muscles tight.
Bend down to a 90 degree angle at the knee. Return to standing by pushing through the feet. Similar to the lunge, make sure not to let the knees go forward past the toes. Repeat.
Major Muscles of Exercise
• Thighs (Quadriceps)
• Back of thigh (Hamstrings)
Due to the design of the pelvis, women tend to bend their knees inwards on the downwards movement. This is not optimal and the knees should be kept facing forward. Avoid this exercise if suffering from any leg injuries.
1
2
FRONT REAR
17
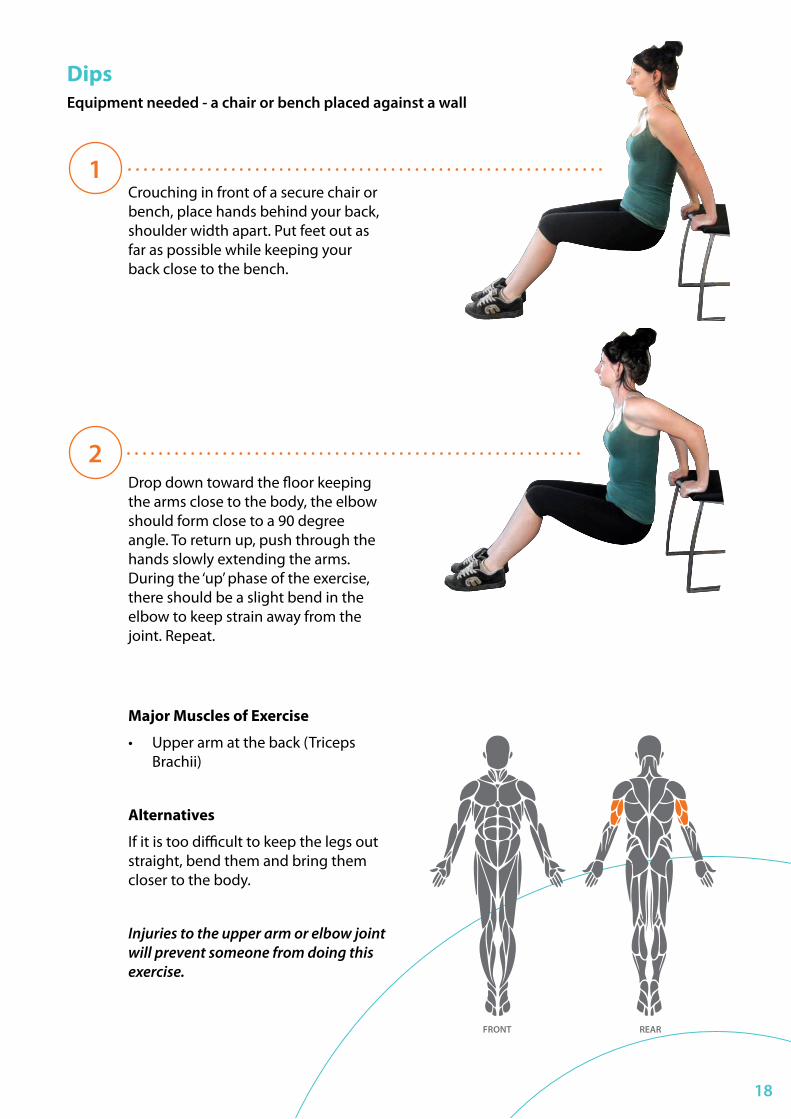
DipsEquipment needed - a chair or bench placed against a wall
Crouching in front of a secure chair or bench, place hands behind your back, shoulder width apart. Put feet out as far as possible while keeping your back close to the bench.
Drop down toward the floor keeping the arms close to the body, the elbow should form close to a 90 degree angle. To return up, push through the hands slowly extending the arms. During the ‘up’ phase of the exercise, there should be a slight bend in the elbow to keep strain away from the joint. Repeat.
Major Muscles of Exercise
• Upper arm at the back (Triceps Brachii)
Alternatives
If it is too difficult to keep the legs out straight, bend them and bring them closer to the body.
Injuries to the upper arm or elbow joint will prevent someone from doing this exercise.
1
2
FRONT REAR
18
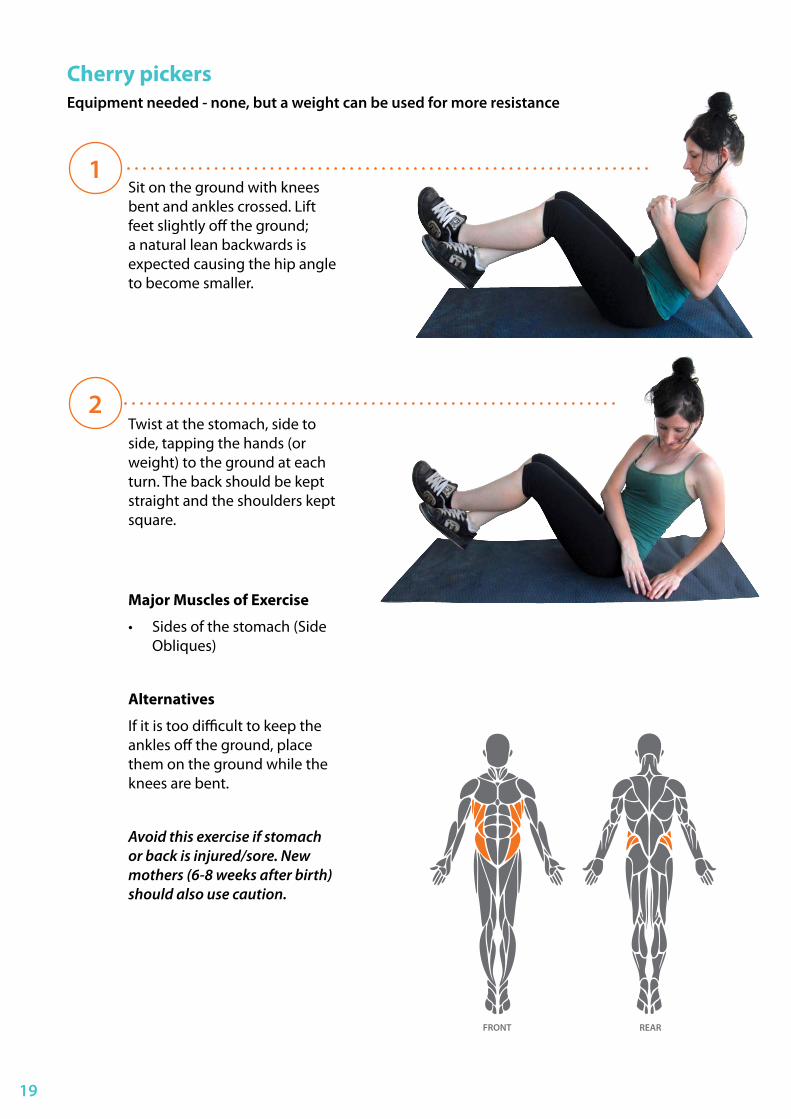
Cherry pickersEquipment needed - none, but a weight can be used for more resistance
Sit on the ground with knees bent and ankles crossed. Lift feet slightly off the ground; a natural lean backwards is expected causing the hip angle to become smaller.
Twist at the stomach, side to side, tapping the hands (or weight) to the ground at each turn. The back should be kept straight and the shoulders kept square.
Major Muscles of Exercise
• Sides of the stomach (Side Obliques)
Alternatives
If it is too difficult to keep the ankles off the ground, place them on the ground while the knees are bent.
Avoid this exercise if stomach or back is injured/sore. New mothers (6-8 weeks after birth) should also use caution.
1
2
FRONT REAR
19
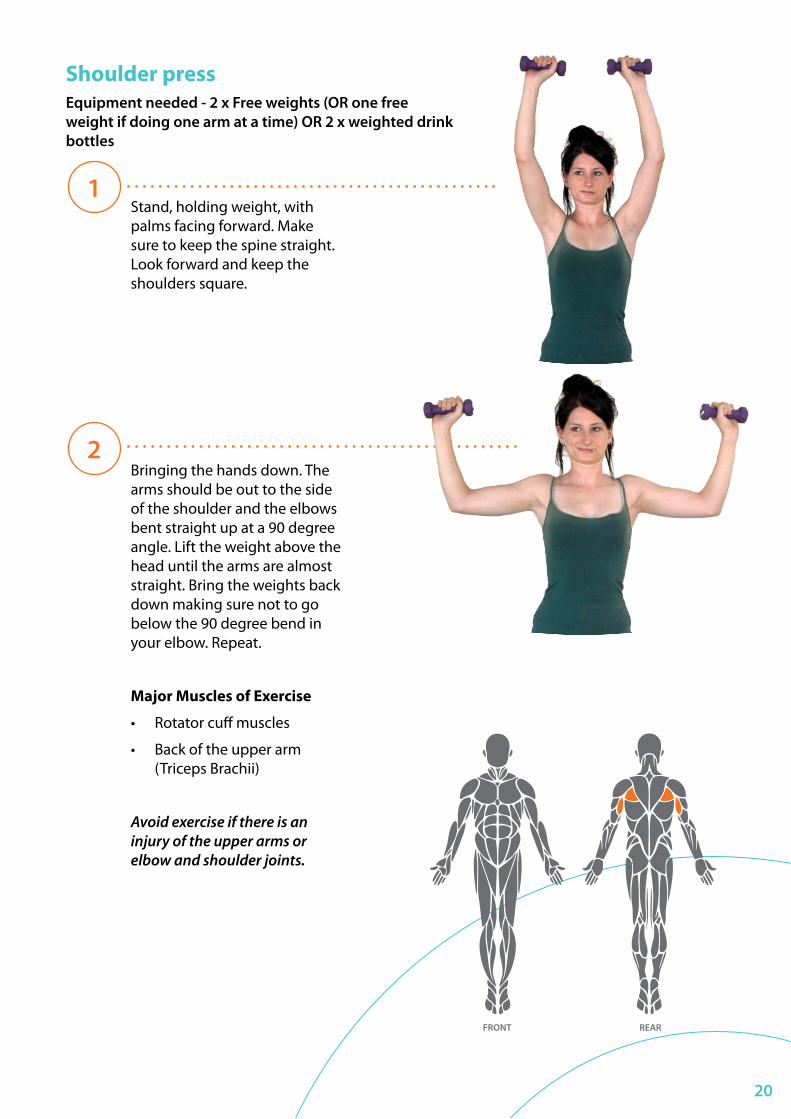
Shoulder pressEquipment needed - 2 x Free weights (OR one free weight if doing one arm at a time) OR 2 x weighted drink bottles
Stand, holding weight, with palms facing forward. Make sure to keep the spine straight. Look forward and keep the shoulders square.
Bringing the hands down. The arms should be out to the side of the shoulder and the elbows bent straight up at a 90 degree angle. Lift the weight above the head until the arms are almost straight. Bring the weights back down making sure not to go below the 90 degree bend in your elbow. Repeat.
Major Muscles of Exercise
• Rotator cuff muscles
• Back of the upper arm (Triceps Brachii)
Avoid exercise if there is an injury of the upper arms or elbow and shoulder joints.
1
2
FRONT REAR
20
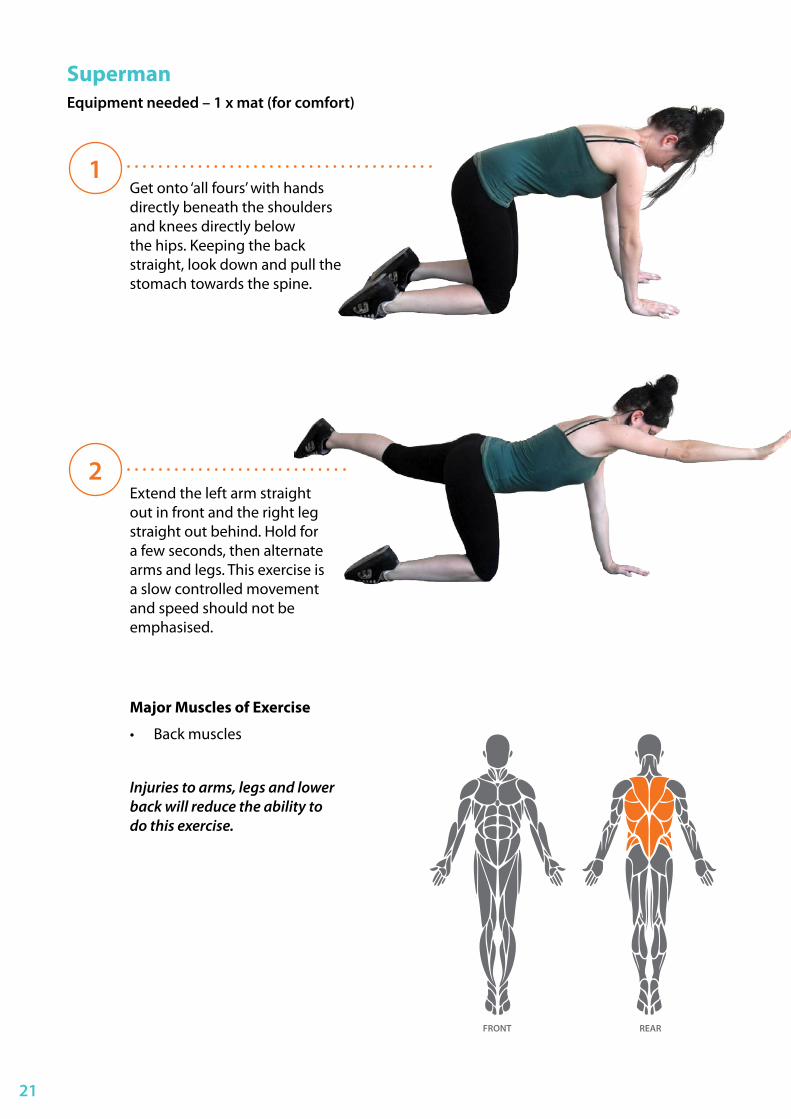
SupermanEquipment needed – 1 x mat (for comfort)
Get onto ‘all fours’ with hands directly beneath the shoulders and knees directly below the hips. Keeping the back straight, look down and pull the stomach towards the spine.
Extend the left arm straight out in front and the right leg straight out behind. Hold for a few seconds, then alternate arms and legs. This exercise is a slow controlled movement and speed should not be emphasised.
Major Muscles of Exercise
• Back muscles
Injuries to arms, legs and lower back will reduce the ability to do this exercise.
1
2
FRONT REAR
21
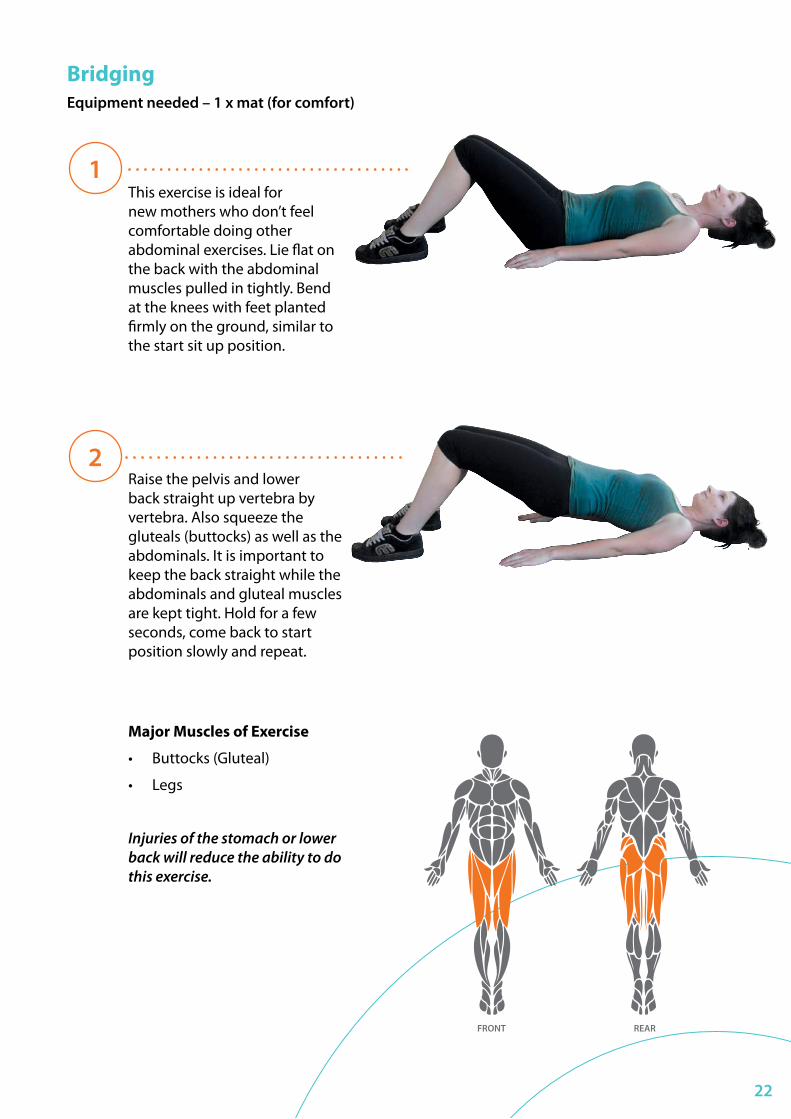
BridgingEquipment needed – 1 x mat (for comfort)
This exercise is ideal for new mothers who don’t feel comfortable doing other abdominal exercises. Lie flat on the back with the abdominal muscles pulled in tightly. Bend at the knees with feet planted firmly on the ground, similar to the start sit up position.
Raise the pelvis and lower back straight up vertebra by vertebra. Also squeeze the gluteals (buttocks) as well as the abdominals. It is important to keep the back straight while the abdominals and gluteal muscles are kept tight. Hold for a few seconds, come back to start position slowly and repeat.
Major Muscles of Exercise
• Buttocks (Gluteal)
• Legs
Injuries of the stomach or lower back will reduce the ability to do this exercise.
1
2
FRONT REAR
22
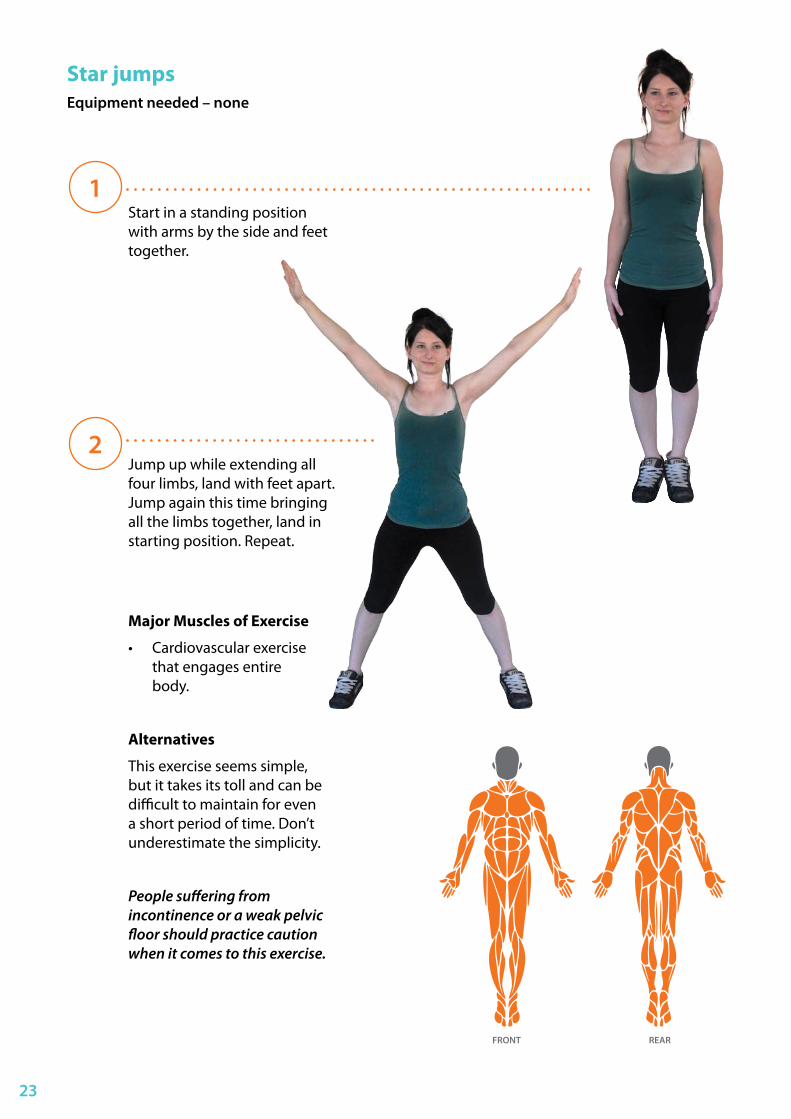
Star jumps Equipment needed – none
Start in a standing position with arms by the side and feet together.
Jump up while extending all four limbs, land with feet apart. Jump again this time bringing all the limbs together, land in starting position. Repeat.
Major Muscles of Exercise
• Cardiovascular exercise that engages entire body.
Alternatives
This exercise seems simple, but it takes its toll and can be difficult to maintain for even a short period of time. Don’t underestimate the simplicity.
People suffering from incontinence or a weak pelvic floor should practice caution when it comes to this exercise.
1
2
FRONT REAR
23
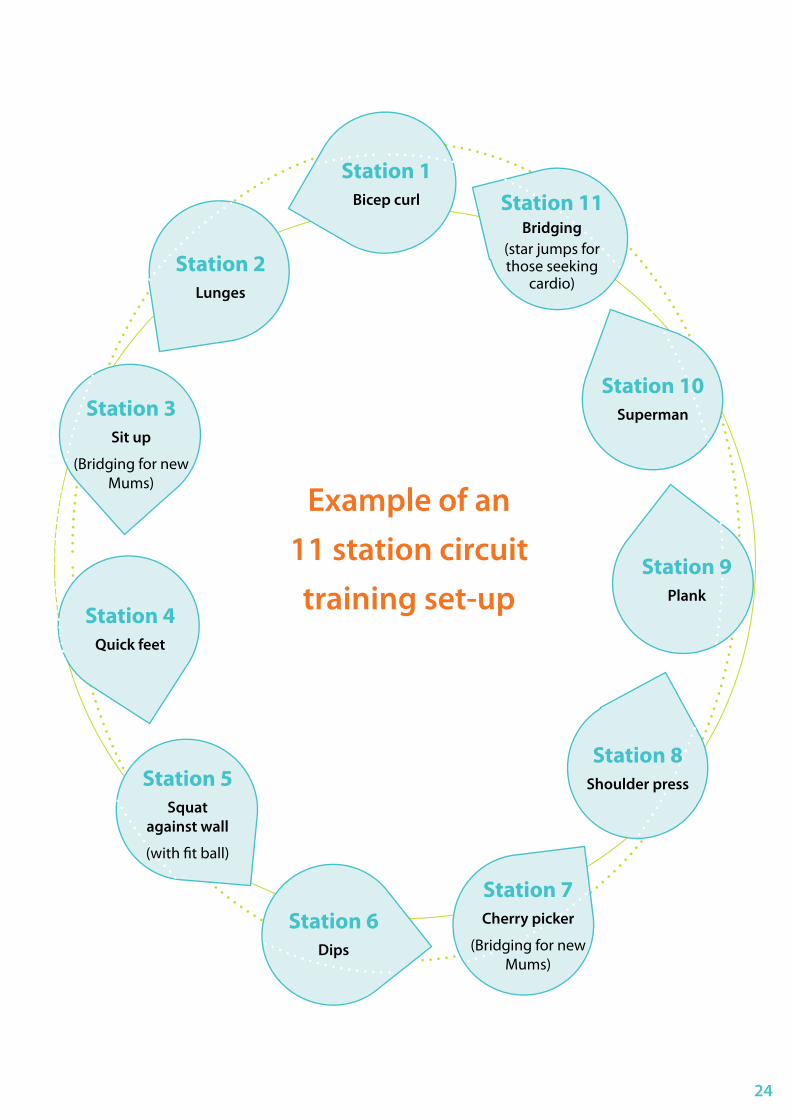
Example of an 11 station circuit training set-up
Station 2Lunges
Station 3Sit up
(Bridging for new Mums)
Station 5Squat
against wall
(with fit ball)
Station 6Dips
Station 7Cherry picker
(Bridging for new Mums)
Station 8Shoulder press
Station 9Plank
Station 10Superman
Station 1Bicep curl
Station 4Quick feet
Station 11Bridging
(star jumps for those seeking
cardio)
24
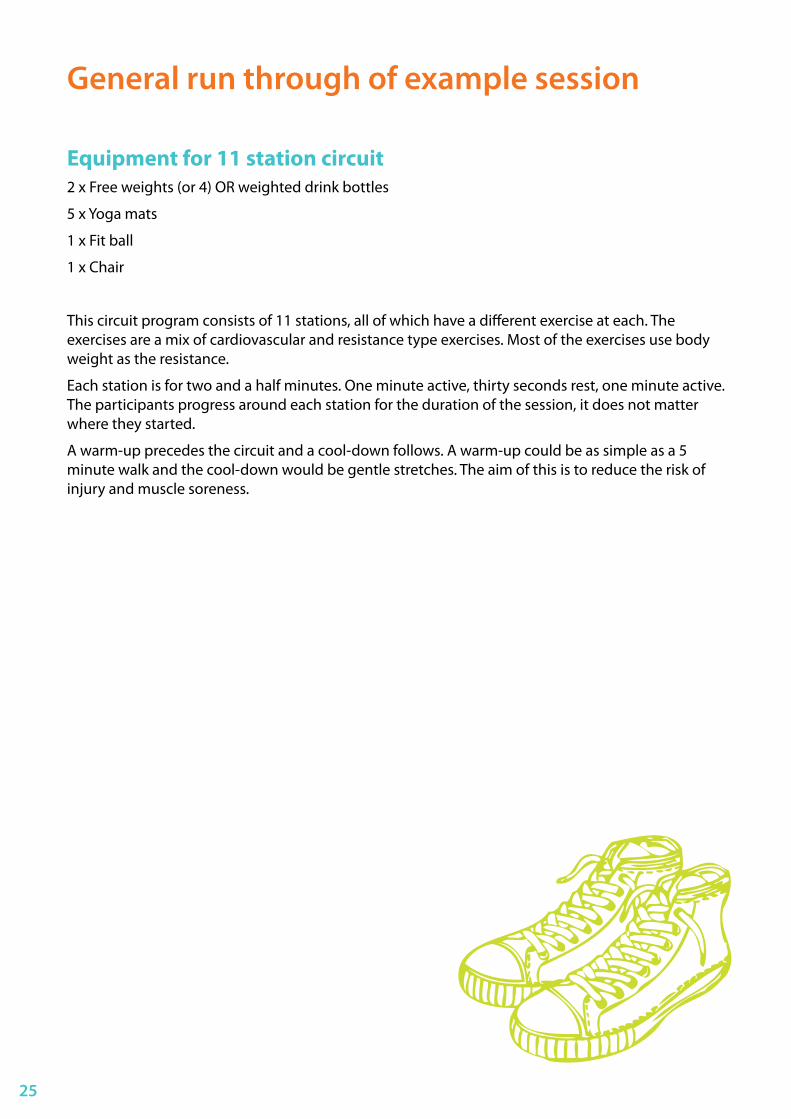
General run through of example session
Equipment for 11 station circuit2 x Free weights (or 4) OR weighted drink bottles
5 x Yoga mats
1 x Fit ball
1 x Chair
This circuit program consists of 11 stations, all of which have a different exercise at each. The exercises are a mix of cardiovascular and resistance type exercises. Most of the exercises use body weight as the resistance.
Each station is for two and a half minutes. One minute active, thirty seconds rest, one minute active. The participants progress around each station for the duration of the session, it does not matter where they started.
A warm-up precedes the circuit and a cool-down follows. A warm-up could be as simple as a 5 minute walk and the cool-down would be gentle stretches. The aim of this is to reduce the risk of injury and muscle soreness.
25
Level 1, 25 Gladstone St, Perth, WA 6000
PO Box 8048, Perth, WA 6849
P (08) 6365 6365F (08) 9328 1682E [email protected]
www.wanada.org.au
ABN 22 106 585 976