Embed Size (px)
Citation preview

CIP APPLICATION MANUAL MMS-WQM-208
June 1, 2014
Mireaux Management Solutions
ISO/API Consulting ■ Auditing ■ Training ■ Web QMS
The contents of these documents are the property of Mireaux Management Solutions. Any unauthorized use, copying or dissemination of this document is prohibited. Neither the contents nor the integrity of this document can be modified without written consent by Mireaux Management Solutions.

CIP APPLICATION MANUAL MMS-WQM-208
Revision: 06/01/2014
Table of Contents 1.0 PURPOSE AND SCOPE .............................................................................................................................................................................................................4 2.0 TERMS AND DEFINITIONS ...................................................................................................................................................................................................4 3.0 SECURITY ROLES ......................................................................................................................................................................................................................4 4.0 INSTRUCTIONS ..........................................................................................................................................................................................................................5
4.1 VIEWING/EDITING/DELETING A CIP ..................................................................................................................................................................6 4.1.1 VIEWING A CIP ...............................................................................................................................................................................................7 4.1.2 EDITING A CIP ................................................................................................................................................................................................7 4.1.3 DELETING A CIP .............................................................................................................................................................................................8
4.2 REQUEST A CIP ..............................................................................................................................................................................................................9 4.2.1 New CIP Request-Page 1 ............................................................................................................................................................................9 4.2.2 New CIP Request-Page 2: Customer Complaint Source ............................................................................................................. 12 4.2.3 New CIP Request-Page 2: External Audit Source .......................................................................................................................... 13 4.2.4 New CIP Request-Page 2: Internal Audit Source ........................................................................................................................... 14 4.2.5 New CIP Request-Page 2: Internal Issue Source ........................................................................................................................... 15 4.2.6 New CIP Request-Page 2: Lessons Learned Source ..................................................................................................................... 15 4.2.7 New CIP Request-Page 2: Management Review Source ............................................................................................................. 16 4.2.8 New CIP Request-Page 2: MOC (Management of Change) ........................................................................................................ 16 4.2.9 New CIP Request-Page 2: Out-Of-Tolerance Source .................................................................................................................... 16 4.2.10 New CIP Request-Page 2: Safety Incident Source ......................................................................................................................... 17 4.2.11 New CIP Request-Page 2: Supplier Issue Source........................................................................................................................... 18 4.2.12 New CIP Request-Page 2: Security Incident Source ..................................................................................................................... 18
4.3 LOCATING A CIP ......................................................................................................................................................................................................... 19 4.3.1 CIP Reports ................................................................................................................................................................................................... 19 4.3.2 Advanced Search ........................................................................................................................................................................................ 20 4.3.3 Find CIP/Go Button ................................................................................................................................................................................... 22
4.4 COORDINATING A CIP ............................................................................................................................................................................................. 24 4.5 RISK ASSESSMENT .................................................................................................................................................................................................... 28 4.6 RISK ASSESSMENT VERIFICATION .................................................................................................................................................................... 29 4.7 CIP INVESTIGATION ................................................................................................................................................................................................. 29 4.8 CIP INVESTIGATION VERIFICATION ................................................................................................................................................................. 32 4.9 CIP ACTION ................................................................................................................................................................................................................... 34 4.10 CIP ACTION VERIFICATION ................................................................................................................................................................................... 35 4.11 CIP VALIDATION ........................................................................................................................................................................................................ 37 4.12 REJECT A CIP ................................................................................................................................................................................................................ 38 4.13 REOPENING A CIP (ADMIN ONLY) ..................................................................................................................................................................... 38 4.14 CIP HISTORY ................................................................................................................................................................................................................ 39 4.15 CIP KEY PERFORMANCE INDICATORS (KPIS) .............................................................................................................................................. 39
Printed copies are considered uncontrolled Page 2 of 52 For Client Use Only

CIP APPLICATION MANUAL MMS-WQM-208
Revision: 01/31/2014
4.16 CIP ADMINISTRATION (ADMIN ONLY) ............................................................................................................................................................ 45
4.16.1 Adding/Editing/Removing Menu Values ......................................................................................................................................... 45 4.16.2 Linking Sources To CIPs .......................................................................................................................................................................... 47
5.0 REVISION LOG ......................................................................................................................................................................................................................... 50
Printed copies are considered uncontrolled Page 3 of 52 For Client Use Only

CIP APPLICATION MANUAL MMS-WQM-208
Revision: 06/01/2014
1.0 PURPOSE AND SCOPE
The Continual Improvement Program or CIP is a powerful closed-loop Corrective and Preventive Action application designed to handle opportunities for improvement from various sources such as customer complaints, internal or external audit findings, management review action items, supplier issues and any systemic company problem.
NOTE 1: In order to perform some of the actions below, you will need to be assigned the Administrator and/or CIPAdmin role.
NOTE 2: Depending on the customization of your Web QMS, the figures shown in this manual may not coincide perfectly with your Web QMS.
2.0 TERMS AND DEFINITIONS
CIP Continual Improvement Program
KPI Key Performance Indicators
NCR Nonconformance Report
3.0 SECURITY ROLES
Action Verification This user can verify that actions have indeed been physically taken and approve or reject each response as adequate.
Administrator Full Web QMS Enterprise Administrator. This user can edit, create, or delete pages, as well as add, edit, or delete modules. Administrators can also authorize users, add roles, view File Manager, clear Logs, and view/clear Recycle Bin.
CIP Admin This user has full administrative privilege to all CIP menus and records.
Coordination This user can accept or reject a CIP. If acceptable then he/she coordinates the CIP by assigning an Investigator and appropriate verifiers. The Coordinator can also fill out the containment portion of the CIP, setup reminders and escalation functioning, etc.
Employee This user has full access to view information on Web QMS, but limited ability to edit or create records. Employees can create and view CIPs.
Investigation Verification This user reviews proposed root cause analysis and actions and approves or disapproves each investigation response.
Printed copies are considered uncontrolled Page 4 of 52 For Client Use Only

CIP APPLICATION MANUAL MMS-WQM-208
Revision: 06/01/2014
Validation This user verifies that the original problem did not reappear and
closes the CIP as applicable.
Risk Assessment Verification This role is responsible for conducting risk assessment and submitting the risk score.
4.0 INSTRUCTIONS
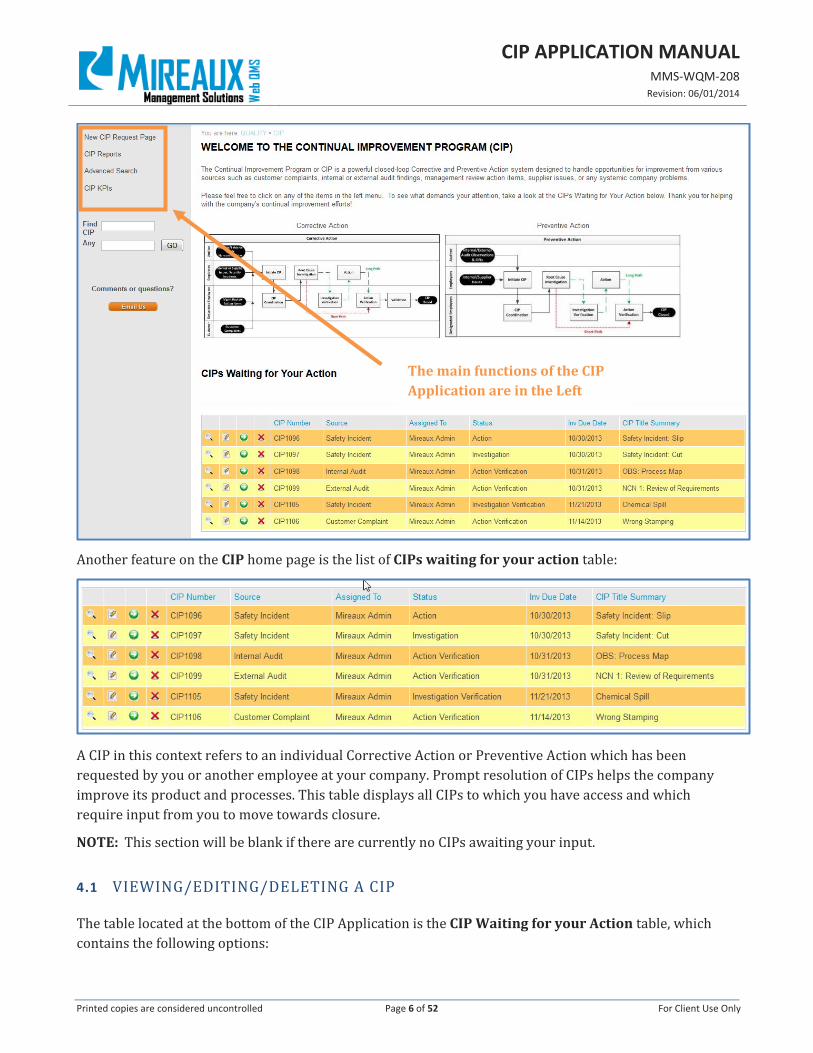
The Continual Improvement Program (CIP) page is located under the Quality Tab on the Top Menu of Web QMS. You can access the CIP Application from either the Quality Tab of the Top Menu or the Left Menu of the Quality page.
Once you SELECT CIP, you will be directed to the Continual Improvement Program (CIP) page which has its own menu on the left:
Printed copies are considered uncontrolled Page 5 of 52 For Client Use Only
CIP APPLICATION MANUAL MMS-WQM-208
Revision: 06/01/2014
Another feature on the CIP home page is the list of CIPs waiting for your action table:
A CIP in this context refers to an individual Corrective Action or Preventive Action which has been requested by you or another employee at your company. Prompt resolution of CIPs helps the company improve its product and processes. This table displays all CIPs to which you have access and which require input from you to move towards closure.
NOTE: This section will be blank if there are currently no CIPs awaiting your input.
4.1 VIEWING/EDITING/DELETING A CIP
The table located at the bottom of the CIP Application is the CIP Waiting for your Action table, which contains the following options:
The main functions of the CIP Application are in the Left
Printed copies are considered uncontrolled Page 6 of 52 For Client Use Only

CIP APPLICATION MANUAL MMS-WQM-208
Revision: 06/01/2014
ADMIN USER
4.1.1 VIEWING A CIP
• Magnifying Glass icon: CLICKING this icon displays a more detailed view of the selected CIP.
NOTE: If you find a number in “Associated NCR” field, this mean that the CIP was created from a specific NCR. The Associated NCR number is an active link which you can click to view the details of the associated NCR directly.
4.1.2 EDITING A CIP
• Green Arrow icon: CLICKING this allows you to proceed to the next step of the CIP action.
• Manage Yellow Pencil icon (ADMIN ONLY): CLICKING this allows you to edit the information of any existing CIP:
Printed copies are considered uncontrolled Page 7 of 52 For Client Use Only

CIP APPLICATION MANUAL MMS-WQM-208
Revision: 06/01/2014
When you CLICK the Manage Yellow Pencil icon, the CIP Edit Screen displays. Scroll down to view all the fields. Here is a partial snap shot:
You can edit all information of the CIP, excluding the CIP Number Field, according to your needs. For example, if you want to change the product, you need to REMOVE the Current Information in the Product field and ENTER new product name in it. CLICK Save to proceed.
If you want to change the CIP path, there are 4 fields that you need to change: CIPPath, CIPClassification, CIPmyPath and CIPStatus. For example, you can change CIPPath from Long Path (LP) to Short Path (SP), or change CIPClassification from Preventive Action (PA) to Corrective Action (CA). In this case, you will have to make sure you also change CIPmyPath from PALP to CASP. Meanwhile, do not forget to revise the CIPStatus field at the bottom of the edit screen and make sure you are at the correct stage which exists in the CASP.
In other words, if you have a CIP that is a Short Path and if you are at investigation verification stage, you have to change it to investigation stage or change it to action verification stage, because CASP does not have investigation verification and action stage. (See table in section 4.4 for stages associated with each path.) Without changing the CIPStatus, your CIP cannot proceed any more. As a result, your CIP would be stuck in that non-existing stage. Remember to change all 4 fields so that the information can be saved correctly into the system.
4.1.3 DELETING A CIP
• Red X Delete icon (ADMIN ONLY): CLICKING this allows you to delete the CIP record. After you CLICK the Red X Delete icon the following pop-up displays:
CLICK Delete to remove the record, or CLICK Cancel to go back to the table.
Printed copies are considered uncontrolled Page 8 of 52 For Client Use Only

CIP APPLICATION MANUAL MMS-WQM-208
Revision: 06/01/2014
4.2 REQUEST A CIP
CIPs can be either corrective, in response to a failure, or preventive, to stop possible sources of nonconformity before they become an issue. Any user can request a CIP at any time.
4.2.1 New CIP Request-Page 1
To access the New CIP Request Page, CLICK New CIP Request Page in the Left Menu of the CIP Application page or in the Top Menu of the Quality Tab.
The following screen will appear:
NOTE: Fields marked with a red asterisk are required.
The New CIP Request form is divided into two pages. The second page changes based on the Source entered on the first page. Different fields will be displayed on the second page depending on the source of the CIP, because CIPs from one source require different information about their origin than CIPs from another source. On the first page, you are asked to FILL OUT the Following Fields:
NOTE: The second page will populate differently depending on what is selected from the Source field.
The New CIP Request Page contains the following fields:
• CIP Number: This field is automatically filled with a system generated number. If the number is already taken, the system will prompt you to regenerate it.
• Issued Date: This is a system generated date, corresponding to the date the CIP is being filled out.
Printed copies are considered uncontrolled Page 9 of 52 For Client Use Only

CIP APPLICATION MANUAL MMS-WQM-208
Revision: 06/01/2014
• Originator: The name of the person requesting this CIP. This is automatically filled out with the
user name of the user who is logged on Web QMS. • CIP Type: SELECT from the drop down menu the Primary Area related to this CIP:
Environmental, Information Security (ISMS), Quality or Safety. • Site: SELECT from the drop down menu the Company Site where the opportunity for the CIP
appeared. If the CIP appeared in more than one site, then choose the main one. • Source: SELECT from the drop down menu the Origin of the CIP. The source should answer the
question: Where was the need for the CIP brought up? What process or venue led to the decision to create a CIP? The answer given in this field will affect the information requested of you on the second page of the New CIP Request process. Make sure you SELECT the correct Source from the following options: (Actual items may vary.)
- Customer Complaint - Internal Audit - External Audit - Internal Issue - Lessons Learned - Management Review - MOC (Management of Change) - Out-of-Tolerance - Safety Incident - Security Incident - Supplier Issue
• Product/Process: SELECT from the drop down menu the Process or Product more closely related to the CIP, if you do not see a process or product that closely relates, SELECT Not Product Related or contact the Administrator.
• Response Requirement: SELECT from the drop down menu the Appropriate Person (external) that is expecting a response on this CIP. This will alert the CIP Administrator to forward responses regarding this CIP as appropriate.
• Request Due Date: ENTER the date that you believe the CIP needs to be investigated by. The format is MM/DD/YYYY.
• Suggested Investigators: You may SUGGEST a person who you believe is best suited to investigate this CIP.
When you have completely filled out Page 1, CLICK Continue to Page 2 to continue the CIP Request process.
The page that is displayed after CLICKING Continue to Page 2 contains three sections.
The first section, whose fields are shaded grey, contains the information you entered previously. You cannot change this information now, though you can edit some fields later. The second section contains fields which vary depending on the answer given in the Source field on the previous page. We will discuss these a little later. The third section, which begins with CIP Summary Title, contains fields which are common to all CIPs regardless of Source.
Printed copies are considered uncontrolled Page 10 of 52 For Client Use Only

CIP APPLICATION MANUAL MMS-WQM-208
Revision: 06/01/2014
After you have filled out the fields on Page 2 which are particular to your source you can FILL OUT the Common Fields.
• CIP Summary Title: ENTER a very short summary of the CIP here. • Opportunity for Improvement: This is the problem statement. ENTER all the Information
Available, with specific details such as document numbers, sequence of events, any reference numbers and any other information that will assist in conducting root cause analysis and investigation.
• Attachments: If you have any evidence regarding the problem, you can UPLOAD them Here.
CLICK Submit CIP and the following should appear.
Fields entered on
Page 1
Fields particular to
the source
Common Fields
Printed copies are considered uncontrolled Page 11 of 52 For Client Use Only

CIP APPLICATION MANUAL MMS-WQM-208
Revision: 06/01/2014
The CIP Coordinator will receive an email similar to this:
4.2.2 New CIP Request-Page 2: Customer Complaint Source
If the Source of your CIP is a Customer Complaint, you will need to FILL OUT the Following Fields in the second section of New CIP Request (Page 2 of 2):
NOTE: Fields marked with a red asterisk are required.
The Customer Complaint Source page contains the following fields:
• Authorize Access to Customer Representative: SELECT whether you would (Yes) or would not (No) like to give the customer representative access to the CIP. If you give the customer rep access to the CIP, then he/she will receive an email.
• Customer Name: SELECT the Customer Name from the drop down menu. Customer Names can be managed in the CIP Administration section of the Organization Variables page. To learn how, refer to section 4.14 CIP Administration.
• Customer Email: ENTER the Customer Email, if available. • Customer Phone: ENTER the Customer Phone, if available. • Customer CAR Number: ENTER the Customer Corrective Action Request Number, if available.
Printed copies are considered uncontrolled Page 12 of 52 For Client Use Only

CIP APPLICATION MANUAL MMS-WQM-208
Revision: 06/01/2014
• Customer Representative: ENTER the name of the Customer Representative who issued the
corrective action, if available. • Product/Part/Item Number: ENTER the Product, Part, or Item Number in this field, if
available. • Part Revision: ENTER the Revision of the Product, Part, or Item, if available.
4.2.3 New CIP Request-Page 2: External Audit Source
If the Source of your CIP is an External Audit finding, you will need to FILL OUT the Following Fields in the second section of New CIP Request (Page 2 of 2):
NOTE: Fields marked with a red asterisk are required.
The External Audit Source page contains the following fields:
• Authorize Access to Auditor: SELECT Yes if you want the auditor to have access to this CIP. • Audit Date: ENTER the Date the audit was performed. • Audit Type: CHOOSE Process or Product from the drop down menu, depending on whether this
was a Process Audit or a Product Audit. • Auditing Company: ENTER the Name of the company who conducted the audit, if available. • Auditor Email Address: ENTER Auditor Email, if available. • Lead Auditor Name: ENTER the name of the Lead Auditor who conducted the audit. • Audit Number: If your audit has a Number, ENTER it here. A good format is the year plus the
audit number, i.e. 2010-1, 2010-2, etc. • Finding Number: This is where you can CHOOSE a Reference Number to differentiate specific
findings for a particular audit. This is an optional field, because the CIP Application will automatically assign a specific number to each CIP entered; however, you may find it useful for internal reference. A good format is to ENTER Nonconformities as NCN#, i.e. NCN1, NCN2, etc., observations as OBS#, i.e. OBS1, OBS2, etc., and opportunities for improvement as OFI#, i.e. OFI1, OFI2, etc.
• Standard: CHOOSE the Standard used when auditing, e.g. ISO 9001, from the drop down menu. • Section/Element Number: ENTER the Section or Element Number of the Standard referred to
in the finding, if available.
Printed copies are considered uncontrolled Page 13 of 52 For Client Use Only

CIP APPLICATION MANUAL MMS-WQM-208
Revision: 06/01/2014
• Document Number: ENTER the Number or Name of your organization’s procedure, if given in
the finding. • Document/Section Number: ENTER the Section or paragraph of the procedure above, if given
in the finding. • Finding TYPE: CHOOSE Major, Minor, Observation or OFI from the drop down menu.
4.2.4 New CIP Request-Page 2: Internal Audit Source
If the Source of your CIP is an Internal Audit finding, you will need to FILL OUT the Following Fields in the second section of New CIP Request (Page 2 of 2):
NOTE: Fields marked with a red asterisk are required.
The Internal Audit Source page contains the following fields:
• Audit Date: ENTER the Date the audit was performed. • Audit Type: CHOOSE Process or Product from the drop down menu, depending on whether this
was a Process Audit or a Product Audit. • Lead Auditor Name: ENTER the name of the Lead Auditor. • Audit Number: If your audit has a number, ENTER it here. A good format is the year plus the
audit number, i.e. 2010-1, 2010-2, etc. • Finding Number: This is where you can CHOOSE a Reference Number to differentiate specific
findings for a particular audit. This is an optional field, because the CIP Application will automatically assign a specific number to each CIP entered; however, you may find it useful for internal reference. A good format is to ENTER Nonconformities as NCN#, i.e. NCN1, NCN2, etc., observations as OBS#, i.e. OBS1, OBS2, etc., and opportunities for improvement as OFI#, i.e. OFI1, OFI2, etc.
• Standard: CHOOSE the Standard used when auditing, e.g. ISO 9001:2008, ISMS 27001, etc., from the drop down menu.
• Section/Element Number: ENTER the Section or Element Number of the Standard referred to in the finding, if available.
• Document Number: ENTER the Number or Name of your organization’s procedure, if given in the finding.
• Document/Section Number: ENTER the Section or Paragraph of the procedure above, if given in the finding.
• Finding Type: CHOOSE Major, Minor, Observation or OFI from the drop down menu.
Printed copies are considered uncontrolled Page 14 of 52 For Client Use Only
CIP APPLICATION MANUAL MMS-WQM-208
Revision: 06/01/2014
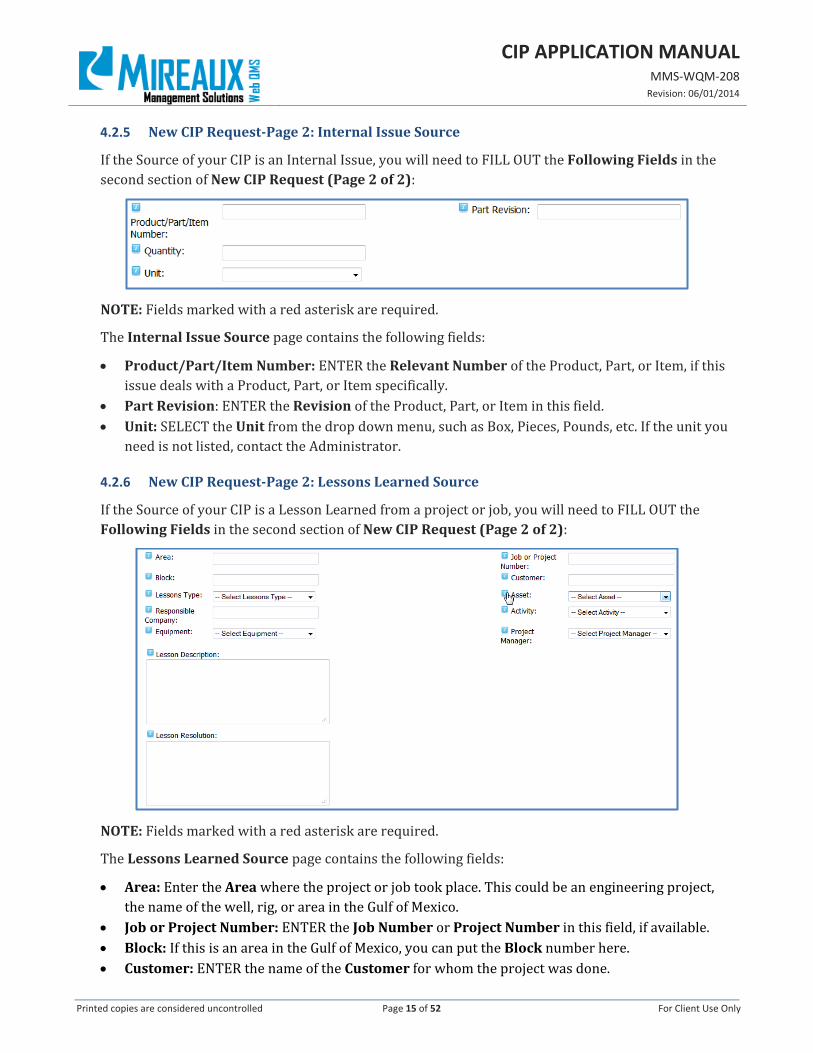
4.2.5 New CIP Request-Page 2: Internal Issue Source
If the Source of your CIP is an Internal Issue, you will need to FILL OUT the Following Fields in the second section of New CIP Request (Page 2 of 2):
NOTE: Fields marked with a red asterisk are required.
The Internal Issue Source page contains the following fields:
• Product/Part/Item Number: ENTER the Relevant Number of the Product, Part, or Item, if this issue deals with a Product, Part, or Item specifically.
• Part Revision: ENTER the Revision of the Product, Part, or Item in this field. • Unit: SELECT the Unit from the drop down menu, such as Box, Pieces, Pounds, etc. If the unit you
need is not listed, contact the Administrator.
4.2.6 New CIP Request-Page 2: Lessons Learned Source
If the Source of your CIP is a Lesson Learned from a project or job, you will need to FILL OUT the Following Fields in the second section of New CIP Request (Page 2 of 2):
NOTE: Fields marked with a red asterisk are required.
The Lessons Learned Source page contains the following fields:
• Area: Enter the Area where the project or job took place. This could be an engineering project, the name of the well, rig, or area in the Gulf of Mexico.
• Job or Project Number: ENTER the Job Number or Project Number in this field, if available. • Block: If this is an area in the Gulf of Mexico, you can put the Block number here. • Customer: ENTER the name of the Customer for whom the project was done.
Printed copies are considered uncontrolled Page 15 of 52 For Client Use Only

CIP APPLICATION MANUAL MMS-WQM-208
Revision: 06/01/2014
• Lessons Type: If your company differentiates Lesson Learned by TYPE then select them here. • Asset: SELECT the Asset that was used in this project or job. • Responsible Company: ENTER the name of the company which will be responsible for fixing the
problem, if any. • Activity: ENTER the Activity. • Equipment: SELECT the piece of Equipment involved in this project or job, if any. • Project Manager: ENTER the name of the Project Manager who handled this project or job. • Lessons Description: ENTER a description of the Lesson Learned. • Lesson Resolution: ENTER what was done to remediate the issue presented in the Lesson
Learned.
4.2.7 New CIP Request-Page 2: Management Review Source
If the Source of your CIP is a Management Review Action Item, you will need to FILL OUT the Following Field in the second section of New CIP Request (Page 2 of 2):
• Management Review Date: ENTER or SELECT the Date on which the Management Review took place.
4.2.8 New CIP Request-Page 2: MOC (Management of Change)
If the Source of your CIP is a MOC (Management of Change), you will need to FILL OUT the Following Field in the second section of New CIP Request (Page 2 of 2):
• Reason: SELECT the Reason from the drop down menu. If your reasons are not available or you need to change them, you can do so from the CIP Administration area in the Organization Variables page.
- Changes in Critical Supplier. - Changes in Organization Structure. - Changes to Approved Designs. - Changes to Key Personnel. - Changes to Management System procedures, including Improvements from CIPs. - Changes to OEM Spec, Application or service.
4.2.9 New CIP Request-Page 2: Out-Of-Tolerance Source
If the Source of your CIP is Equipment found Out-Of-Tolerance of Calibration, you will need to FILL OUT the Following Fields in the second section of New CIP Request (Page 2 of 2):
Printed copies are considered uncontrolled Page 16 of 52 For Client Use Only

CIP APPLICATION MANUAL MMS-WQM-208
Revision: 06/01/2014
NOTE: Fields marked with a red asterisk are required.
The Out-Of-Tolerance Source page contains the following fields:
• Equipment ID: ENTER the Equipment ID of the equipment which is out of calibration tolerance. • Date Out-of-Tolerance Was Found: ENTER the Date when the equipment was found to be out-
of-tolerance. • Date of Last Known Good Calibration: ENTER the Date when the equipment was last recorded
as performing correctly. • Equipment Type: ENTER the type of Equipment which was out of calibration tolerance. • Equipment Brand: ENTER the Brand of Equipment which was out of calibration tolerance. • Serial Number: ENTER Serial Number of the Equipment found out of calibration tolerance.
4.2.10 New CIP Request-Page 2: Safety Incident Source
If the Source of your CIP is a Safety Incident, you will need to FILL OUT the Following Fields in the second section of New CIP Request (Page 2 of 2):
NOTE: Fields marked with a red asterisk are required.
The Safety Incident Source page contains the following fields:
• Incident Date: ENTER the Date when the incident occurred. • Incident Time: ENTER the Time of the incident. • Project Manager: ENTER the Name of the Project Manager in this field, if applicable. • Job or Project Number: ENTER the Job Number or Project Number in this field, if applicable. • Responsible Company: ENTER the Name of the Company which is presumed responsible for
the incident. • Primary Contact: ENTER the name of the Primary Contact person. • Select Incident Type: SELECT the Type of Incident, i.e. Fire Explosion, Security, Spill, Injury,
etc., from the drop down menu. If your type of incident is not listed, contact the Administrator.
Printed copies are considered uncontrolled Page 17 of 52 For Client Use Only

CIP APPLICATION MANUAL MMS-WQM-208
Revision: 06/01/2014
4.2.11 New CIP Request-Page 2: Supplier Issue Source
If the Source of your CIP is a Supplier Issue, you will need to FILL OUT the Following Fields in the second section of New CIP Request (Page 2 of 2):
NOTE: Fields marked with a red asterisk are required.
The Supplier Issue Source page contains the following fields:
• Authorize Access to Supplier Representative: SELECT Yes if you want the Supplier Representative to have access to this CIP.
• Supplier Name: SELECT the Supplier Name from the drop down menu. Supplier names can be managed from the CIP Administrator Section of the Organization Variables page.
• Supplier Email: ENTER the Supplier email, if available. • Supplier Phone: ENTER the Supplier phone, if available. • Supplier Representative: ENTER the name of the Supplier Representative who will be issued
the corrective action. • Product/Part/Item Number: ENTER Product Number, Part Number, or Item Number in this
field associated with this CIP. • Part Revision: ENTER the revision of the Product, Part or Item, if available. • Unit: SELECT the unit, such as Box, Pieces, Pounds, etc., from the drop down menu. If the unit you
need is not listed, contact the Administrator. • Purchase Order: ENTER a Purchase Order number associated with the Supplier issue.
4.2.12 New CIP Request-Page 2: Security Incident Source
If the Source of your CIP is an Information Security Incident, you will need to FILL OUT the Following Fields in the second section of New CIP Request (Page 2 of 2):
Printed copies are considered uncontrolled Page 18 of 52 For Client Use Only

CIP APPLICATION MANUAL MMS-WQM-208
Revision: 06/01/2014
NOTE: Fields marked with a red asterisk are required.
The Security Incident Source page contains the following fields:
• Incident Date: ENTER the Date when the incident happened. • Incident Type: SELECT the Incident type, i.e. Failed, Attempt, or Suspected incident. • Nature of Incident: SELECT the Nature of the Incident, such as Security Policy, Network
Devices, etc., from the drop down menu. • Severity: SELECT from the drop down menu the Severity of the security incident, i.e. High,
Medium, or Low. • Assets Compromised: ENTER any Information that was compromised as a result of this security
incident. This is a rich text editor, so you can use formatting as you would in Microsoft Word. • Knowledge Access: SELECT who has Access to know about this security incident, i.e. Restricted
or Un-restricted.
4.3 LOCATING A CIP
Once you have created a CIP, it is easy to locate the CIP in order to review the information, work on advancing the CIP through the stages, delete the CIP, or otherwise make modifications. There are three main ways to locate a CIP: the CIP Reports page, the Advanced Search, and the Find CIP/Go Button search. Step-by-step guidelines on each of these methods are included below:
4.3.1 CIP Reports
To access the CIP Reports page, CLICK on CIP Reports in the Left Menu of the CIP Application page or in the Top Menu of the Quality Tab.
Printed copies are considered uncontrolled Page 19 of 52 For Client Use Only

CIP APPLICATION MANUAL MMS-WQM-208
Revision: 06/01/2014
The following screen will appear:
The top part of the page contains a field asking for the CIP Status. SELECT a Status to view all CIPs that share that status. You can view CIPs at all stages of the process: Awaiting Coordination, Awaiting Investigation, Awaiting Investigation Verification, Awaiting Action, Awaiting Action Verification, Awaiting Validation, Open, and Closed. SELECT the status whose CIPs you wish to view, and CLICK Submit for Report.
In this example, the CIP Status Reports page is displaying all CIPs which are currently Awaiting Coordination.
4.3.2 Advanced Search
Advanced Search is one of the most accurate ways to find a CIP, because so many variables can be used to narrow your search.
To access the Advanced Search page, CLICK on CIP Advanced Search in the Left Menu of the CIP Application page or in the Top Menu of the Quality Tab.
Printed copies are considered uncontrolled Page 20 of 52 For Client Use Only

CIP APPLICATION MANUAL MMS-WQM-208
Revision: 06/01/2014
The following screen will appear:
NOTE: All date fields must be filled out in conjunction with Date To and Date From.
Printed copies are considered uncontrolled Page 21 of 52 For Client Use Only

CIP APPLICATION MANUAL MMS-WQM-208
Revision: 06/01/2014
In this sample search, the user had selected Supplier Issue as the CIP source and 01/01/2012 to 01/01/2013 as the Issue Date range.
This search returns all CIPs that originated from a supplier issue in the month of May 2012.
4.3.3 Find CIP/Go Button
The CIP Left Menu has a Go button at the bottom of the menu:
Printed copies are considered uncontrolled Page 22 of 52 For Client Use Only

CIP APPLICATION MANUAL MMS-WQM-208
Revision: 06/01/2014
When you CLICK Go, the CIP Application displays all CIPs currently in the system, whether OPEN or CLOSED. Depending on your organization, this list could vary in length:
This is the easiest way to bring up all CIPs currently in the system. You can SCROLL down until you find the CIP you need.
The CIP Left Menu has a Find CIP area at the bottom of the menu:
If you know even a few characters of the CIP Number, you can TYPE it in here. CLICK Go, and all CIPs that contain those characters will be displayed.
For example, let us look for CIP No. 7D7FF38F3. First, TYPE “D7” in the Find CIP box:
When you CLICK Go, you will see that the results include only the CIPs whose numbers contain those characters, including our original CIP, CIP No. 7D7FF38F3:
Printed copies are considered uncontrolled Page 23 of 52 For Client Use Only

CIP APPLICATION MANUAL MMS-WQM-208
Revision: 06/01/2014
4.4 COORDINATING A CIP
Every CIP that is created must be coordinated in order to proceed to the investigation stage and subsequent stages. Critical decisions are made during the coordination stage that will determine what stages the CIP has to go through. Step-by step-guidelines on how to complete this stage are detailed below.
Review the Request by CLICKING the Magnifying Glass icon on the row of the CIP.
The CIP will be shown in the following format. Notice that the Status of the CIP reads Coordination. CLICK the Green Arrow icon to proceed.
You can also move to the next page by CLICKING the Green Arrow icon next to the Magnifying Glass icon on the CIP Number Search page.
The next page that appears will contain the Following Fields:
Printed copies are considered uncontrolled Page 24 of 52 For Client Use Only

CIP APPLICATION MANUAL MMS-WQM-208
Revision: 06/01/2014
NOTE: Fields marked with a red asterisk are required.
This page contains the following fields:
• Accept or Reject: If you agree with the CIP and consider it valid, then Accept it. If you feel the CIP is not valid, is not a systemic problem appropriate for the CIP system, perhaps is a duplicate, or is otherwise unsuitable, then you can Reject it. If you reject it, then you will be asked to ENTER a Comment explaining why you rejected the CIP. The requestor will receive an email with your comments.
If you Accept the CIP, keep filling in the other fields.
Only for MOC Source
Printed copies are considered uncontrolled Page 25 of 52 For Client Use Only

CIP APPLICATION MANUAL MMS-WQM-208
Revision: 06/01/2014
• CIP Classification: A CIP can be classified as:
- Corrective Action: The problem happened already and root cause analysis is necessary. - Preventive Action: The problem did not happen, but root cause analysis is necessary to prevent it
from happening in the future. - Action: Simple issue, which does not require root cause analysis, but whose resolution simply
needs to be tracked.
• CIP Path: Any CIP classified as Preventive or Corrective Action can have a Long or Short Path. The CIP will move through different stages, depending on the path chosen.
NOTE: The ISO 9001 standard, API Spec Q1 9th Edition and API Spec Q2 require that root cause analysis
be conducted on every Corrective or Preventive Action and the root cause be evaluated for the need to act on them. Additionally, the standards require verification of effectiveness. Both paths comply with the ISO and API standards, but the difference is as follows:
CIP Long Path: Upon investigation and root cause analysis of a CIP, a role called Investigator Verifier
must review the root cause analysis prior to give the okay to conduct the actions proposed. The Action Taker then conducts the actions and verification of effectiveness follows. This is what some people call a 7D method of conducting Corrective Action. There are 7 steps prior to closing a CIP.
CIP Short Path: Upon investigation and root cause analysis of a CIP, a role called Action Verifier, ensures that the root cause analysis was good and that the actions were indeed taken. Validation of effectiveness follows.
Therefore, regardless of the path, root cause analysis and verification of effectiveness take place. The following table summarizes the stages and differences associated with each path:
Printed copies are considered uncontrolled Page 26 of 52 For Client Use Only

CIP APPLICATION MANUAL MMS-WQM-208
Revision: 06/01/2014
Request Coordination Investigation Investigation Verification
Action Action Verification
Validation
CAR-Long Path
X X X X X X X
CAR-Short Path
X X X X X
PAR-Long Path
X X X X X X
PAR-Short Path
X X X X
Action X X X X
Request Coordination Risk Assessment Risk Assessment Verification
Action Action Verification
MOC X X X X X X
• Investigation Assigned To: CHOOSE the appropriate Employee to conduct the Root Cause Analysis and Investigation. If the requestor suggested an Employee, you can use that Employee if you think it is appropriate.
• Investigation Due Date: CHOOSE a Date for when the Investigation needs to be completed. If the requestor suggested a date, you can use that date if you think it appropriate.
• Select Investigator Verifier: SELECT a User to conduct the Verification of the Investigation when completed. The users shown will be those with the Investigation Verification role.
• Select Action Verifier: SELECT a User to conduct the verification of the action. The users shown will be those with the Action Verification role.
• Reminder Allowed: You can use this function to ensure that the investigator receives a reminder of the pending CIP investigation through an email so that he/she can act on time. If you SELECT Yes, the system will give you the option to ENTER the Number of Days prior to the due date you would like for the investigator to begin receiving emails.
• Investigation Reminder Days: ENTER the Number of Days before the investigation due date that you would like for email reminders to go out. The emails will continue daily until the CIP is investigated.
• Escalation Allowed: You can use this function to further ensure that the investigation of the CIP happens. If you SELECT Yes, the system will give you 2 choices:
- SELECT the Person to whom you would like to escalate the CIP email reminders. - SELECT the Number of Days after the CIP was due, that you would like the person selected above
to begin receiving the CIP email reminders.
• Containment Action: If you believe this CIP is critical and there are products or services that are nonconforming and that have the potential of being sent or delivered to the customer, then you must Act or have an immediate containment plan. This field is optional. If containment does not apply for your situation or CIP, then you do not have to enter anything.
Printed copies are considered uncontrolled Page 27 of 52 For Client Use Only
CIP APPLICATION MANUAL MMS-WQM-208
Revision: 06/01/2014
• Coordination Comments: ENTER here any Comments you would like to send to the investigator.
Once you coordinate the CIP, the CIP Investigator will receive an email.
Once you are done, CLICK Submit. The following will appear:
Once you coordinate a CIP, the CIP Investigator will receive an email alerting them to the CIP that need attention.
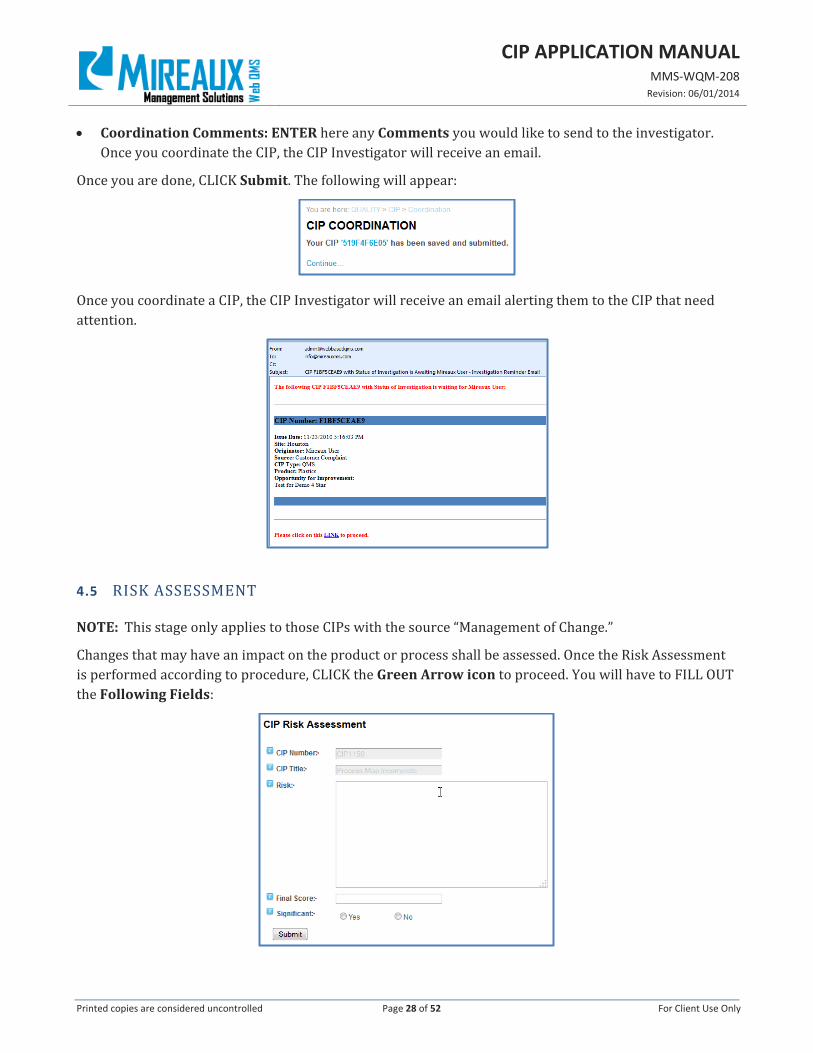
4.5 RISK ASSESSMENT
NOTE: This stage only applies to those CIPs with the source “Management of Change.”
Changes that may have an impact on the product or process shall be assessed. Once the Risk Assessment is performed according to procedure, CLICK the Green Arrow icon to proceed. You will have to FILL OUT the Following Fields:
Printed copies are considered uncontrolled Page 28 of 52 For Client Use Only

CIP APPLICATION MANUAL MMS-WQM-208
Revision: 06/01/2014
• Risk: ENTER any Comments regarding the Risk Assessment process or the risks considered when
reviewing the proposed change. • Final Score: ENTER the Risk Score obtained from the Risk Assessment. • Significant: Based on the Risk Assessment conducted, SELECT if the risk should be Significant or not.
4.6 RISK ASSESSMENT VERIFICATION
NOTE: This stage only applies to those CIPs with the source “Management of Change.”
Once a risk is assessed, it needs to be verified. Find the CIP whose risk assessment you wish to verify and review the Request, Coordination, and Risk Assessment Tabs. CLICK the Green Arrow icon to proceed. The next page that will appear contains the Following Fields:
• Accept or Reject the Risk Assessment, and Authorize the Change?: Accept- Risk assessment results were accepted and the change is authorized (CIP continues to the Action Stage). Reject- CIP goes back to Risk Assessment stage. Reject MOC- CIP is completely rejected.
• MOC Comments: ENTER any Comments that explain the acceptance or rejection decision.
4.7 CIP INVESTIGATION
Every CIP that is created and deemed Corrective or Preventive Action must be investigated. Investigation involves conducting a Root Cause Analysis to find the root causes of the problem or opportunity for improvement presented and to design all the actions and solutions to solve or prevent the problem from happening again. Step-by-step guidelines on how to complete this stage are detailed below.
To find out if you were assigned to a CIP, go to the CIP Application main page. If you were assigned a CIP, then you will see the CIP listed in the CIPs waiting for your action table.
Printed copies are considered uncontrolled Page 29 of 52 For Client Use Only

CIP APPLICATION MANUAL MMS-WQM-208
Revision: 06/01/2014
You can also access CIPs to which you have been assigned in other ways:
- When you are assigned to investigate a CIP, you will receive an email indicating that you are assigned as a CIP Investigator. CLICK the Link in the email to access the CIP page.
- You can also use any of the methods outlined in section 4.3 Locating a CIP.
Once you have arrived at the View All page for your assigned CIP, CLICK the Green Arrow icon to proceed.
The next page that will appear contains the Following Fields:
Printed copies are considered uncontrolled Page 30 of 52 For Client Use Only
CIP APPLICATION MANUAL MMS-WQM-208
Revision: 06/01/2014
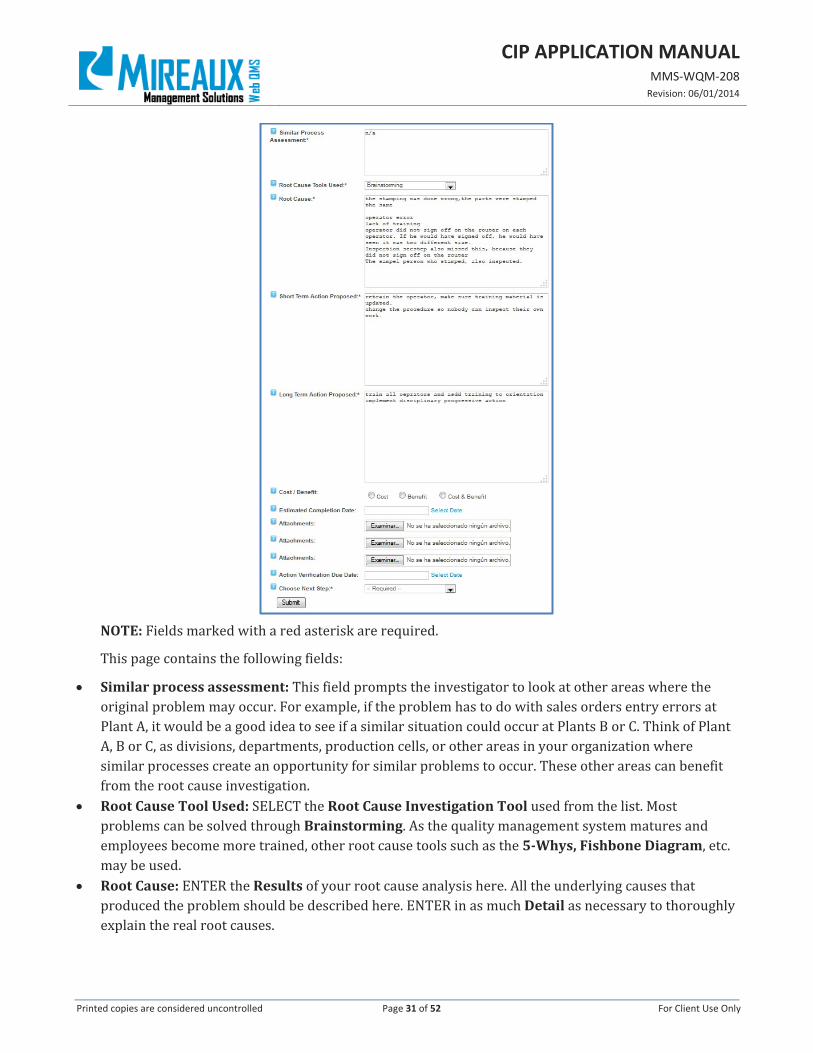
NOTE: Fields marked with a red asterisk are required.
This page contains the following fields:
• Similar process assessment: This field prompts the investigator to look at other areas where the original problem may occur. For example, if the problem has to do with sales orders entry errors at Plant A, it would be a good idea to see if a similar situation could occur at Plants B or C. Think of Plant A, B or C, as divisions, departments, production cells, or other areas in your organization where similar processes create an opportunity for similar problems to occur. These other areas can benefit from the root cause investigation.
• Root Cause Tool Used: SELECT the Root Cause Investigation Tool used from the list. Most problems can be solved through Brainstorming. As the quality management system matures and employees become more trained, other root cause tools such as the 5-Whys, Fishbone Diagram, etc. may be used.
• Root Cause: ENTER the Results of your root cause analysis here. All the underlying causes that produced the problem should be described here. ENTER in as much Detail as necessary to thoroughly explain the real root causes.
Printed copies are considered uncontrolled Page 31 of 52 For Client Use Only

CIP APPLICATION MANUAL MMS-WQM-208
Revision: 06/01/2014
• Short Term Action Proposed: Based on the root causes found, you should describe here all the
actions that can be taken immediately or fairly soon to solve the problem. ENTER as much Detail as necessary so that the solutions are clear and can be verified later.
• Long Term Action Proposed: Based on the root causes found, you should describe here all the actions that you believe can be taken in the long run in order to prevent the problem from happening again. ENTER as much detail as necessary so that the solutions are clear and can be verified later.
• Cost/Benefit: If you have information on how much the actions proposed may cost or what the benefits may be, you can SELECT Cost, Benefit, or Cost & Benefit. Once you SELECT one of these Options, another field will appear asking you more information regarding the details of the costs and benefits.
• Attachments: If you have any evidence or proof regarding the investigation conducted, you can UPLOAD it Here.
Once you are done, CLICK Submit.
Once you investigate a CIP, the user holding the CIP Investigator Verification role (Long Path) or CIP Action Verification role (Short Path) will receive an email notifying them that a CIP awaits their action.
4.8 CIP INVESTIGATION VERIFICATION
NOTE: This step only applies for CIP Type Long Path.
Once a CIP has been investigated, it needs to be verified. Investigation Verification involves reviewing the root cause analysis to ensure that it is appropriate and that the proposed actions address the root causes. Step-by-step guidelines on how to complete this stage are detailed below.
Find the CIP whose investigation you wish to verify and review the Request, Coordination, and Investigation Tabs. CLICK the Green Arrow icon to proceed.
The next page that will appear contains the Following Fields.
Printed copies are considered uncontrolled Page 32 of 52 For Client Use Only

CIP APPLICATION MANUAL MMS-WQM-208
Revision: 06/01/2014
NOTE: Fields marked with a red asterisk are required.
This page contains the following fields:
• Accept/Reject: If you agree with the CIP investigation and consider it valid, then Accept it. If you feel the CIP investigation is poor and does not address the root cause of the problem, then you can Reject it. If you reject it, you will be asked to ENTER a Comment and the CIP will be sent back to the Investigation stage. The Investigator will receive an email with your comments.
• Comments: ENTER here Statements regarding your verification of the investigation and actions proposed during the investigation stage.
• Action Assigned To: CHOOSE the appropriate Employee to conduct the action. You can use the same person who conducted the investigation or a different person.
• Action Due Date: CHOOSE the Date that you deem appropriate for the actions to be completed. This could be based on the severity of the CIP or on established procedures.
• Reminder Allowed: You can use this function to ensure that the Action Taker receives the pending CIP action through an email so that they can act on it in time. If you SELECT Yes, the system will give the option to ENTER the Number of days prior to the due date, which you would like for the Action Taker to begin receiving emails.
• Escalation Allowed: You can use this function to further ensure that someone checks up on CIPs which are not promptly acted upon. If you SELECT Yes, the system will give you 2 choices:
- SELECT the Person to whom you would like to escalate the CIP email reminders. - SELECT the Number of days after the CIP was due, that you would like the person selected above
to begin receiving the CIP email reminders, like this:
Printed copies are considered uncontrolled Page 33 of 52 For Client Use Only

CIP APPLICATION MANUAL MMS-WQM-208
Revision: 06/01/2014
Once you are done, CLICK Submit.
Once you verify the investigation of a CIP, the user holding the CIP Action role will receive an email notifying them that a CIP awaits their action.
4.9 CIP ACTION
NOTE: This step only applies to CIP Type Long Path.
Once a CIP has been investigated and the investigation is verified, then it is time to execute the actions recommended in the investigation. Taking actions means indicating when the actions were taken and whether all the actions were completed as proposed. Step-by-step guidelines on how to complete this stage are detailed below.
LOCATE the CIP on which you want to take action and REVIEW the Appropriate Tabs. CLICK the Green Arrow icon to proceed.
The next page that will appear contains the Following Fields:
Printed copies are considered uncontrolled Page 34 of 52 For Client Use Only

CIP APPLICATION MANUAL MMS-WQM-208
Revision: 06/01/2014
NOTE: Fields marked with a red asterisk are required.
This page contains the following fields:
• Short Term Action Comments: INDICATE here whether you have Completed all short term actions as proposed during the investigation stage.
• Long Term Action Comments: INDICATE here whether you have Completed all long term actions as proposed during the investigation stage.
• Cost/Benefit: If you have information on how much the actions cost, or what their benefits were, you can SELECT any of the Options. Once you SELECT one of the Options, another field will appear asking you more information regarding the details of the costs and benefits.
• Attachments: If you have any evidence or proof of the actions taken, you can UPLOAD them Here. • Notify relevant personnel: SELECT from the list of employees, Relevant Personnel that should be
notified of the MOC (CIPs of MOC Source only). • The requestor indicated the customer needs to be informed. Check here if done: Check if the
customer, auditor, or external party was informed of the CIP.
Once you are done, CLICK Submit.
Once you carry out the actions of a CIP, the user with the CIP Action Verification role will receive an email.
4.10 CIP ACTION VERIFICATION
Once a CIP has been acted on, it needs to be verified. Depending on whether the CIP is a Short Path or Long Path, it may be verified immediately after investigation or after action. Action verification involves
Printed copies are considered uncontrolled Page 35 of 52 For Client Use Only

CIP APPLICATION MANUAL MMS-WQM-208
Revision: 06/01/2014
looking at evidence to verify that the actions were indeed taken. Step-by-step guidelines on how to complete these steps are detailed below:
Find the CIP whose associated actions you want to verify and review the appropriate tabs. CLICK the Green Arrow icon to proceed.
In order to verify the actions taken regarding this CIP, you will need to FILL OUT the Following Fields:
NOTE: Fields marked with a red asterisk are required.
This CIP Action Verification page contains the following fields:
• Accept/Reject: If you have positively verified that the actions proposed during the CIP investigation stage and stated to be carried out during the CIP Action stage were completed, then you can Accept the CIP. If you feel the CIP actions have not been completed or were partially completed, then you can Reject the CIP. If you reject it, you will be asked to ENTER a Comment and the CIP will be sent back to the Action stage. The user with CIP Action role will receive an email with your comments.
• Comments: ENTER Statements to indicate any feedback you may have on the actions taken. • Validation Assigned To: CHOOSE the Appropriate Employee, from the pool of employees who are
part of the validation role, to conduct Validation. • Validation Due Date: CHOOSE the Date that you deem appropriate for the CIP to be validated. This
could be based on the severity of the CIP or on established procedures. Rule of thumb is 3 months or 90 days from the day of verification.
• Reminder Allowed: You can use this function to ensure that the person validating receives a reminder of the pending CIP validation through an email so that he/she can act on time. If you SELECT
Only for Corrective Actions
Printed copies are considered uncontrolled Page 36 of 52 For Client Use Only

CIP APPLICATION MANUAL MMS-WQM-208
Revision: 06/01/2014
Yes, the system will give the option to ENTER the Number of Days prior to the due date, which you would like for the person validating to begin receiving emails.
• Escalation Allowed: You can use this function to further ensure that someone checks up on CIPs which are not promptly validated. If you SELECT Yes, the system will give you 2 choices:
- First, SELECT the Person who should receive the escalated CIP email reminders. - Second, SELECT the Number of Days after the CIP was due, that you would like the person
selected above to begin receiving the CIP email reminders.
Once you are done, CLICK Submit.
Once you verify the actions of a CIP, the user holding the CIP Validation role will receive an email notifying them that a CIP awaits their action.
4.11 CIP VALIDATION
Once a CIP classified as Corrective Action has been verified, it needs to be validated. Preventive Actions, whether Short Path or Long Path, do not go through Validation. Validation involves reviewing evidence, not so much to see whether the actions were taken, but rather to see whether the original problem or opportunity for improvement happened or resurfaced again or not. In some cases validation is not possible and a thorough verification will serve as validation. Step-by-step guidelines on how to complete this stage are detailed below:
Find the CIP you want to validate and review the appropriate tabs. CLICK the Green Arrow icon to proceed.
The next page that will appear contains the Following Fields:
Printed copies are considered uncontrolled Page 37 of 52 For Client Use Only

CIP APPLICATION MANUAL MMS-WQM-208
Revision: 06/01/2014
NOTE: Fields marked with a red asterisk are required.
This CIP Validation page contains the following fields:
• Accept/Reject: If you have positively validated that the problem did not happen again then you can Accept the CIP. If you feel the problem will happen again or if the problem actually did happen, then you can Reject the CIP. If you reject it, you will be asked to ENTER a Comment and the CIP will be sent back to the Investigation stage. The CIP Investigation role will receive an email with your comments. If you accept the CIP, keep filling out the other fields
• Comments: ENTER Statements to indicate any feedback you may have for the overall CIP. • Upload Attachment: If you have any evidence or proof to support the validation, you can UPLOAD it
Here. You have up to 3 attachments to upload as you need.
Once you are done, CLICK Submit.
Once you validate a CIP, the CIP will be closed.
4.12 REJECT A CIP
A CIP can be Rejected in different stages and the CIP will be returned to an earlier stage. Here is a brief summary of the reject function within CIP Application:
ACTION RESULT WHO WILL BE NOTIFIED Reject at Coordination stage CIP will disappear Originator will receive the email
notification Reject at Investigation Verification stage
CIP will go back to Investigation stage
Investigator will receive the email notification
Reject at Action Verification stage CIP will go back to Action stage Action taker will receive the email notification
Reject at Validation stage CIP will go back to Investigation stage
Investigator will receive the email notification
If you reject a CIP and wish to confirm the rejection, CHECK the Current Stage of the CIP and make sure it agrees with the above table. You can also double check with the expected email recipient to see whether they received the email notification.
NOTE: CIPs can be rejected by the Administrator, the CIP Admin, or the appropriate role depending on the stage.
4.13 REOPENING A CIP (ADMIN ONLY)
In some cases, you may find that a closed CIP contains inaccurate information, is incomplete, or otherwise needs to be edited. For example, after closing a CIP, you may notice that you forgot to add Validation comments. Fortunately, the CIP Application allows you to reopen a closed CIP to make any necessary changes.
Printed copies are considered uncontrolled Page 38 of 52 For Client Use Only

CIP APPLICATION MANUAL MMS-WQM-208
Revision: 06/01/2014
Locate the CIP and CLICK the Manage Yellow Pencil icon to expand the edit page. To learn more about how to locate a CIP, refer to section 4.3 Locating a CIP. To learn more about using the direct link icons, refer to section 4.1 Viewing/Editing/Deleting a CIP.
Scroll down to the bottom part and change the CIP status to the stage where the information you wish to revise was entered. For example, if you wish to add comments in the Validation stage, change the CIP Status to Validation, then CLICK Save to proceed.
Once the CIP is back to the status you want to edit, proceed to edit and move through all stages until closure or put back to close status when done.
4.14 CIP HISTORY
Throughout all the stages, you can view the CIP’s history by going to the History Tab. The History Tab shows what happened at every stage in which employees approved, rejected or acted on the CIP.
4.15 CIP KEY PERFORMANCE INDICATORS (KPIS)
Key Performance Indicators (KPIs) display real-time CIP Information in a graphical format. To access the CIP KPIs page, CLICK on CIP KPIs in the Left Menu of the CIP Application page or in the Top Menu of the Quality Tab.
The following page will appear:
Printed copies are considered uncontrolled Page 39 of 52 For Client Use Only

CIP APPLICATION MANUAL MMS-WQM-208
Revision: 06/01/2014
If you want to view KPIs for the whole set of data, CLICK Run Report and Chart. If, however, you want to view a subset of KPI data, you can narrow the range of information used in creating the KPI graphs by using the available filters, which are as follows:
• CIP Site: SELECT the Location for which you wish to view CIP data. • CIP Products: SELECT the Product or Process for which you wish to view CIP data. • CIP Source: SELECT the CIP Creation Venue for which you wish to view CIP data. • CIP Type: SELECT from the drop down menu the Type (Environmental, ISMS, QMS, or Safety) for
which you wish to view CIP data. • CIP Status: SELECT the CIP status for which you wish to view CIP data. • Issue Date From: ENTER the Beginning of a Time Range during which CIPs whose data you wish to
view were issued. NOTE: Must be filled out in conjunction with Issue Date To.
• Issue Date To: ENTER the End of a Time Range during which CIPs whose data you wish to view were issued. NOTE: Must be filled out in conjunction with Issue Date From.
Once you have narrowed down your field, CLICK Run Report and Chart. At the top of the page, you will see a report containing information about the CIPs matching your filter criteria.
If you wish to further analyze the data, download this report as an Excel spreadsheet by CLICKING Excel.
Printed copies are considered uncontrolled Page 40 of 52 For Client Use Only

CIP APPLICATION MANUAL MMS-WQM-208
Revision: 06/01/2014
Below the report are several graphs which display real-time information about your company’s KPIs, which may include:
• Total CIPs by Location: Shows how many CIPs have been associated with each location.
Printed copies are considered uncontrolled Page 41 of 52 For Client Use Only

CIP APPLICATION MANUAL MMS-WQM-208
Revision: 06/01/2014
• Total OPEN CIPs by Source: Shows how many CIPs remain open for each CIP source.
• Total CIPs by Product or Process: Shows how many CIPs have been associated with each product or process.
Printed copies are considered uncontrolled Page 42 of 52 For Client Use Only

CIP APPLICATION MANUAL MMS-WQM-208
Revision: 06/01/2014
• Total CIPs by Classification: Shows how many CIPs were Preventive Actions, Corrective Actions, or
Actions.
Total Open CIPs by Status: Shows how many CIPs are currently open at each stage in the CIP Process.
Printed copies are considered uncontrolled Page 43 of 52 For Client Use Only

CIP APPLICATION MANUAL MMS-WQM-208
Revision: 06/01/2014
• CIP Investigation Aging Days: Shows how long CIPs took to be investigated per process.
CIP Closure Aging Days: Shows how long each CIP took to be closed.
Printed copies are considered uncontrolled Page 44 of 52 For Client Use Only

CIP APPLICATION MANUAL MMS-WQM-208
Revision: 06/01/2014
• Cost of CIP per Location: Shows the total cost of CIPs per location. The data will show if cost
information was entered.
NOTE: If a chart does not display it may be because no data is available for the filters used.
4.16 CIP ADMINISTRATION (ADMIN ONLY)
4.16.1 Adding/Editing/Removing Menu Values
CIP Administration allows the Administrator to change the options on the list throughout the CIP Application. In order to update the CIP Administration Application, a user must have the Administrator role. To access the CIP Administration Application, CLICK on Organization Variables in the Left Menu of the Admin page, in the body of the Admin page, or in the Top Menu of the Admin Tab:
In the Left Menu of the Organization Variables page, LOCATE the CIP Administration drop down menu. This menu will allow you to change options throughout the CIP Application. This menu contains the following features:
Printed copies are considered uncontrolled Page 45 of 52 For Client Use Only
CIP APPLICATION MANUAL MMS-WQM-208
Revision: 06/01/2014
- Customer Name - Product or Processes - Safety Incident Types - Sites - Standard - Supplier Name - Types - Root Cause Tools
The process of adding, editing, or removing values from these drop down menus is simple and the same for all options.
SELECT the Desired Option in the CIP Administration drop down menu, then CLICK Go.
The following page will appear:
CLICK Add to add another value to the selected list. ENTER the Value to be added into the Value field. CLICK Save.
Printed copies are considered uncontrolled Page 46 of 52 For Client Use Only

CIP APPLICATION MANUAL MMS-WQM-208
Revision: 06/01/2014
To edit or delete an existing value from the list:
• Edit: CLICKING the Manage Yellow Pencil icon allows you to edit an existing value. • Delete: CLICKING the Red X Delete icon allows you to delete an existing value.
4.16.2 Linking Sources To CIPs
When you create a batch of multiple CIPs from a specific event, such as from a Management Review, External Audit, or Internal Audit, it is useful to link all the related CIPs from that event to the respective page on Web QMS.
You can create this link using Advanced Search.
When you create CIPs based on the results of a Management Review, External Audit, or Internal Audit, keep track of the dates when the CIPs were requested
After you have created your CIPs, go to the Advanced Search page. For your search parameters, set the CIP Source to the source of the related CIPs (Management Review, External Audit, or Internal Audit) and set the Issue Date From and Issue Date To fields to include the whole timeframe when the CIPs were created, then CLICK Submit for Search. The search results will include all CIPs related to the event in question. Copy the URL at the top of the web browser of the search results page.
NOTE: If your results show too many CIPs or not enough, try changing your filters to ensure you get the correct number of CIPs.
Printed copies are considered uncontrolled Page 47 of 52 For Client Use Only

CIP APPLICATION MANUAL MMS-WQM-208
Revision: 06/01/2014
Once you have the URL of the list of all related CIPs, go to the Management Review, External Audits, or Internal Audits page, as applicable. You can access these pages from either the Quality Tab of the Main Menu or the Left Menu of the Quality page.
For demonstration purposes, we will use the Internal Audits page.
Once you have arrived at your relevant page, locate the source whose CIPs you wish to link, then CLICK the Manage Yellow Pencil icon next to it. The following page will appear:
Printed copies are considered uncontrolled Page 48 of 52 For Client Use Only

CIP APPLICATION MANUAL MMS-WQM-208
Revision: 06/01/2014
In the Rich Text Format box labeled Findings, TYPE the phrase “See CIPs…” or a phrase of your choice. HIGHLIGHT the Phrase, then CLICK the Hyperlink Manager icon.
The following window will appear:
Printed copies are considered uncontrolled Page 49 of 52 For Client Use Only

CIP APPLICATION MANUAL MMS-WQM-208
Revision: 06/01/2014
Paste the URL of the Advanced Search results page into the field labeled URL and choose “Parent” from the Target field. Then CLICK OK to return to the Edit Record page. Once there, CLICK Update. You will return to the page of the source of your CIPs.
The new CIPs link will take any user who clicks it, to a full list of all CIPs created as a result of that event (External Audit, Internal Audit, or Management Review).
5.0 REVISION LOG
DATE SECTION DESCRIPTION OF CHANGE APPROVED BY 02/06/2010 All Original Release of MMS-WQM-216 CIP Admin Guide and MMS-WQM-217 CIP User Guide. M. Boudreaux
1/12/2012 All MMS-WQM-216 formatting, adjusted the size and position of the picture, added content to section 4.11, added section 4.12.
M. Boudreaux
3/6/2012 All Add detailed introduction about CIP Request page2 due to the different choice in Recourse from CIP Request page 1 on MMS-WQM-216.
M. Boudreaux
3/29/2012 4.2 Added a new section about “Reject a CIP” on MMS-WQM-216. M. Boudreaux
4/11/2012 4.9 Added a new section about “Reopen a CIP”, edit the section 4.1 about edit a CIP on MMS-WQM-216.
M. Boudreaux
Printed copies are considered uncontrolled Page 50 of 52 For Client Use Only

CIP APPLICATION MANUAL MMS-WQM-208
Revision: 06/01/2014
DATE SECTION DESCRIPTION OF CHANGE APPROVED BY
5/1/2012 4.11, 4.1 Added a shot note about “Associated NCR” and updated the related screenshot on MMS-WQM-216.
M. Boudreaux
07/09/2012 4.1 MMS-WQM-216 updated to include application enhancements and skin changes. M. Boudreaux
01/31/2014 All Revision and integration of MMS-WQM-216 and MMS-WQM-217. Released as MXM-WQM-508 CIP Application Manual.
M. Boudreaux
06/01/2014 All Revision, editing, and formatting performed throughout the CIP Application Manual. M. Boudreaux
Printed copies are considered uncontrolled Page 51 of 52 For Client Use Only

CIP APPLICATION MANUAL MMS-WQM-208
Revision: 06/01/2014
Web QMS is a product of
MIREAUX MANAGEMENT SOLUTIONS www.mireauxms.com
For support: [email protected] or Telephone: 713-589-4680
Printed copies are considered uncontrolled Page 52 of 52 For Client Use Only