Embed Size (px)
Citation preview
CICS eWay Intelligent Adapter User’s Guide
Release 5.0.2
SeeBeyond Proprietary and Confidential

The information contained in this document is subject to change and is updated periodically to reflect changes to the applicable software. Although every effort has been made to ensure the accuracy of this document, SeeBeyond Technology Corporation (SeeBeyond) assumes no responsibility for any errors that may appear herein. The software described in this document is furnished under a License Agreement and may be used or copied only in accordance with the terms of such License Agreement. Printing, copying, or reproducing this document in any fashion is prohibited except in accordance with the License Agreement. The contents of this document are designated as being confidential and proprietary; are considered to be trade secrets of SeeBeyond; and may be used only in accordance with the License Agreement, as protected and enforceable by law. SeeBeyond assumes no responsibility for the use or reliability of its software on platforms that are not supported by SeeBeyond.
SeeBeyond, e*Gate, and e*Way are the registered trademarks of SeeBeyond Technology Corporation in the United States and select foreign countries; the SeeBeyond logo, e*Insight, and e*Xchange are trademarks of SeeBeyond Technology Corporation. The absence of a trademark from this list does not constitute a waiver of SeeBeyond Technology Corporation's intellectual property rights concerning that trademark. This document may contain references to other company, brand, and product names. These company, brand, and product names are used herein for identification purposes only and may be the trademarks of their respective owners.
© 2003 by SeeBeyond Technology Corporation. All Rights Reserved. This work is protected as an unpublished work under the copyright laws.
This work is confidential and proprietary information of SeeBeyond and must be maintained in strict confidence.
Version 20031218170904.
CICS eWay Intelligent Adapter User’s Guide 2 SeeBeyond Proprietary and Confidential
Contents
Contents
Chapter 1
Introducing the CICS eWay 7Overview 7
CICS Transaction Server 7The eWay Intelligent Adapter for CICS 8
z/OS CICS Security Considerations 9Security Considerations for SeeBeyond CICS Listener 9
Supported Operating System 11Also Supported 11
System Requirements 12
External System Requirements 12CICS Server Requirements for Using the SeeBeyond CICS Listener 12CICS Listener Requirements for Invoking DB2 Applications 13
Chapter 2
Installing the CICS eWay 14Installing the CICS eWay 14
Installing the CICS eWay on an eGate Supported System 14After Installation 15
SeeBeyond CICS Listener Installation for z/OS 15Installing the SeeBeyond CICS Listener from CD z/OS 15Installing the SeeBeyond CICS Listener from 3480 Tape 16
Copying the Tape Contents to Disk 16Installing the CICS CEDA Definitions 17Adding the CICS eWay Load Modules to CICS DFHRPL Concatenation 17Creating the STCCLCFG File 17
The SeeBeyond CICS Listener Configuration File Maintenance Screen for z/OS 18The SeeBeyond CICS Listener Monitor Screen for z/OS 23
CICS Listener Considerations for Invoking DB2 Applications 34RCT entry for the STCL SeeBeyond CICS Listener Transaction 35PPT entry to redirect DB2 application to another AOR 35
CICS eWay Intelligent Adapter User’s Guide 3 SeeBeyond Proprietary and Confidential
Contents
Chapter 3
Configuring the CICS eWay 37Creating and Configuring the CICS eWay 37
Selecting CICS as the External Application 37Modifying the CICS eWay Properties 38Using the Properties Sheet 38
CICS eWay Connectivity Map Configuration Properties 40Connector 40
Class 40Connection Transport 40Property.Tag 41Type 41
CICS Client 41CICS Program 41CICS TransId 42COMMAREA Length 42ECI call type 42ECI extend mode 42Encoding 42
CICS eWay Environment Explorer Configuration Properties 43SeeBeyond CICS Listener 43
COMMAREA Padding Character 43Host 44KeepAlive 44Listener Timeout 44NoDelay 44Polling Rate 45Port 45ReceiveBufSize 45SeeBeyond CICS Listener TransId 45SendBufSize 45Start Delay 46Start Type 46TP Timeout 46Transport Timeout 46
Tracing 47Timing 47
CICS Client 47CICS Password 47CICS UserId 47
Alerting and Logging 48
Chapter 4
Using eInsight Business Processes with the CICS eWay 49The eInsight Engine and Components 49
The CICS eWay With eInsight 50
CICS eWay Intelligent Adapter User’s Guide 4 SeeBeyond Proprietary and Confidential
Contents
The CICS eWay eInsight Sample Project 50
Importing a Sample Project 50
The CICS_BP_Sample Project Overview 51
Creating the CICS_BP_Sample Project 51Creating a Project 51Creating a Business Process 52
Creating the Business Process Flow 52Configuring the Modeling Elements 54
Creating a Connectivity Map 56Selecting the External Applications 57Populating the Connectivity Map 57
Binding the eWay Components 58Creating an Environment 59Configuring the eWay Properties 60
Configuring the File eWay Properties 60Configuring the CICS eWay Properties 61
Creating and Activating the Deployment Profile 62Running the Project 63
Chapter 5
Implementing a CICS eWay Project 65CICS eWay Components 65
CICS eWay Sample Projects 66
Importing a Sample Project 66
The CICS_JCE_Sample Project Overview 67
Creating the CICS_JCE_Sample Project 67Creating a Project 67Creating a Connectivity Map 68
Selecting the External Applications 68Populating the Connectivity Map 69
Creating the Collaboration Definitions 69Using the Collaboration Editor (Java) 71
Creating the CICSjms_Collab Business Rules 71Creating the JMS2File_Collab Collaboration Business Rules 75
Binding the eWay Components 76Creating an Environment 77Configuring the eWays 78
Configuring the File eWays 79Configuring the CICS eWay 79
Configuring the JMS Clients 80Creating and Activating the Deployment Profile 81Running the Project 82
The CICS_COBOL_Sample Project 83Creating a Project 83Creating a Connectivity Map 84
Selecting the External Applications 84
CICS eWay Intelligent Adapter User’s Guide 5 SeeBeyond Proprietary and Confidential

Contents
Populating the Connectivity Map 84Creating an Object Type Definition 85
Using the Cobol Copybook Wizard 85Creating a Collaboration Definition (Java) 86The CICS_COBOL_Collab Business Rules 86Creating Collaboration Bindings 94Creating an Environment 95Configuring the eWays 96
Configuring the File eWays 96Configuring the CICS eWay 96
Creating and Activating the Deployment Profile 97Running the Project 98
Chapter 6
Java Methods 99The CicsClient Class 99
CICS Javadoc 99
Packed Decimal Java Helper Methods 99ContainerExists 100CopyBack 100CopyTo 101GiveElem 101SetElem 102
Index 103
CICS eWay Intelligent Adapter User’s Guide 6 SeeBeyond Proprietary and Confidential
Chapter 1
Introducing the CICS eWay
This chapter includes a brief description of IBM’s Customer Information Control System™ (CICS™), an overview of the SeeBeyond eWay Intelligent Adapter for CICS, as well as system requirements for using the CICS eWay.
Chapter Topics
! Overview on page 7
! Supported Operating System on page 11
! System Requirements on page 12
! External System Requirements on page 12
1.1 Overview
CICS Transaction Server
IBM’s Customer Information Control System (CICS), is IBM’s most widely used proprietary, transaction monitor. CICS provides connectivity and online transaction management for mission-critical applications. It supports real-time distributed processing environments and online transaction processing (OLTP). According to IBM, CICS handles more than thirty billion transactions, processing more than one trillion dollars, per day.
CICS is the premier OLTP (On-Line Transaction Processing) product from IBM. It is used to access many file systems and databases including third party products. For IBM product, it interfaces with DB2, VSAM and IMS/DB. For non-IBM products, it interfaces with IDMS, ADABAS, DATACOM, to name a few. Most applications in CICS are written in COBOL, although it supports other languages such as PL/1.
OLTP systems provide accurate, up-to-date information within seconds, from terminals that give direct access to data held as either files or databases. CICS provides a company with numerous transaction processing and resource management functions, allowing the user to concentrate on developing application programs that meet that organization's specific business needs. CICS controls OLTP application programs in a distributed transaction processing (DTP) environment. CICS handles interactions between the terminal user and the application programs. Programs gain access to the CICS facilities with straightforward, high-level commands.
CICS eWay Intelligent Adapter User’s Guide 7 SeeBeyond Proprietary and Confidential
Chapter 1 Section 1.1Introducing the CICS eWay Overview
CICS provides:
! Communicationfunctions to terminals and systems required by application programs
! Control of concurrently running programs serving online users
! Facilities for accessing databases and files
! The ability to communicate with other CICS family members using Transmission Control Protocol/Internet Protocol (TCP/IP)
! Interactive facilities to configure specific systems
! Recovery processing and data protection, should a problem occur
The eWay Intelligent Adapter for CICS
The eWay Intelligent Adapter for CICS is an interface that enables remote bidirectional calls to CICS transactional programs. The CICS eWay includes a build tool, the Cobol Copybook Converter, that creates an Object Type Definition (OTD) from a Cobol Copybook file and generates eGate Object Type Definitions for use within the eGate environment. The Copybook file structures are passed into the CICS environment as the data buffer (Commarea).
A fixed Object Type Definition, the CICS_eWay.CICSClient OTD, designed to expose various essential portions of the CICS Java API, provides available methods and properties, as well as access to all message attributes.
The eWay uses the SeeBeyond CICS Listener as the underlying connection transport for accessing OS/390 V2R10 or z/OS CICS transactions.
SeeBeyond CICS Listener (STCL)
The CICS eWay connects to the IBM CICS Listener running on z/OS via the TCP/IP Sockets. The Listener accepts the incoming request and spawns a new process handing the socket connection off to the newly created process via TCP/IP givesocket()/takesocket() function calls. The spawned process invokes the user written CICS application program through an EXEC CICS LINK.
CICS eWay Intelligent Adapter User’s Guide 8 SeeBeyond Proprietary and Confidential
Chapter 1 Section 1.1Introducing the CICS eWay Overview
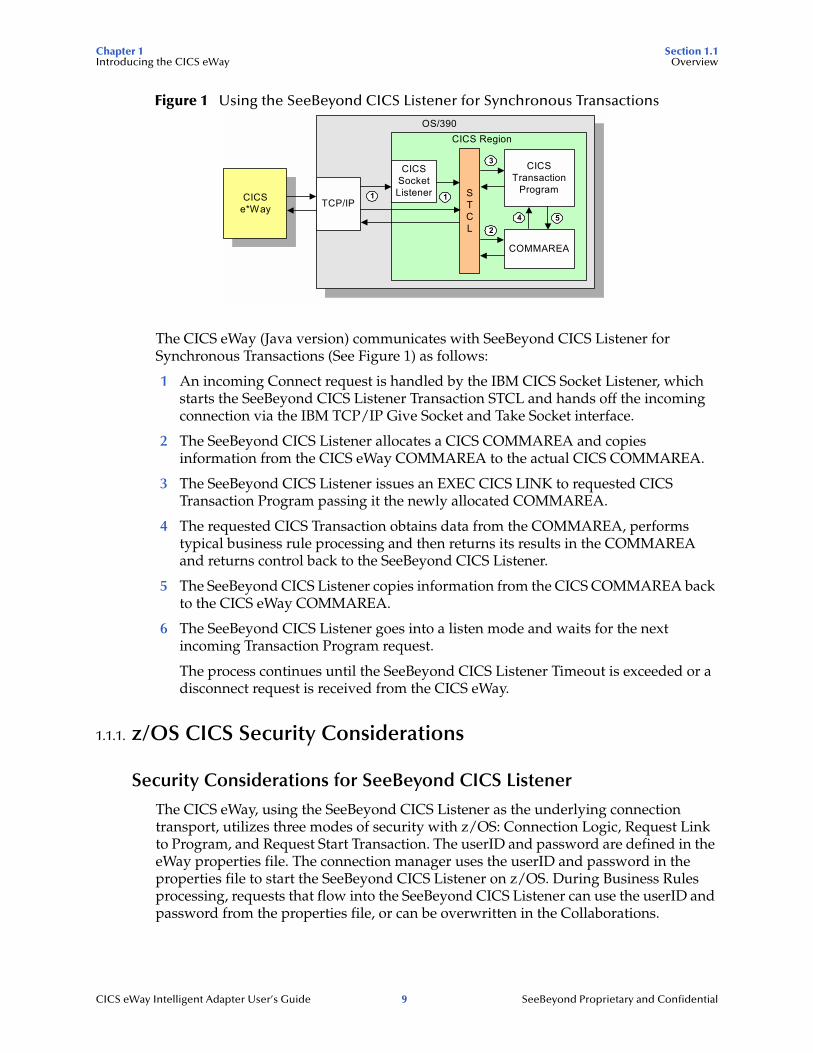
Figure 1 Using the SeeBeyond CICS Listener for Synchronous Transactions
The CICS eWay (Java version) communicates with SeeBeyond CICS Listener for Synchronous Transactions (See Figure 1) as follows:
1 An incoming Connect request is handled by the IBM CICS Socket Listener, which starts the SeeBeyond CICS Listener Transaction STCL and hands off the incoming connection via the IBM TCP/IP Give Socket and Take Socket interface.
2 The SeeBeyond CICS Listener allocates a CICS COMMAREA and copies information from the CICS eWay COMMAREA to the actual CICS COMMAREA.
3 The SeeBeyond CICS Listener issues an EXEC CICS LINK to requested CICS Transaction Program passing it the newly allocated COMMAREA.
4 The requested CICS Transaction obtains data from the COMMAREA, performs typical business rule processing and then returns its results in the COMMAREA and returns control back to the SeeBeyond CICS Listener.
5 The SeeBeyond CICS Listener copies information from the CICS COMMAREA back to the CICS eWay COMMAREA.
6 The SeeBeyond CICS Listener goes into a listen mode and waits for the next incoming Transaction Program request.
The process continues until the SeeBeyond CICS Listener Timeout is exceeded or a disconnect request is received from the CICS eWay.
1.1.1. z/OS CICS Security Considerations
Security Considerations for SeeBeyond CICS Listener
The CICS eWay, using the SeeBeyond CICS Listener as the underlying connection transport, utilizes three modes of security with z/OS: Connection Logic, Request Link to Program, and Request Start Transaction. The userID and password are defined in the eWay properties file. The connection manager uses the userID and password in the properties file to start the SeeBeyond CICS Listener on z/OS. During Business Rules processing, requests that flow into the SeeBeyond CICS Listener can use the userID and password from the properties file, or can be overwritten in the Collaborations.
CICSe*Way
OS/390
TCP/IP
CICSSocketListener
CICSTransaction
Program
COMMAREA
STCL 2
1
CICS Region
3
4 5
1
CICS eWay Intelligent Adapter User’s Guide 9 SeeBeyond Proprietary and Confidential
Chapter 1 Section 1.1Introducing the CICS eWay Overview
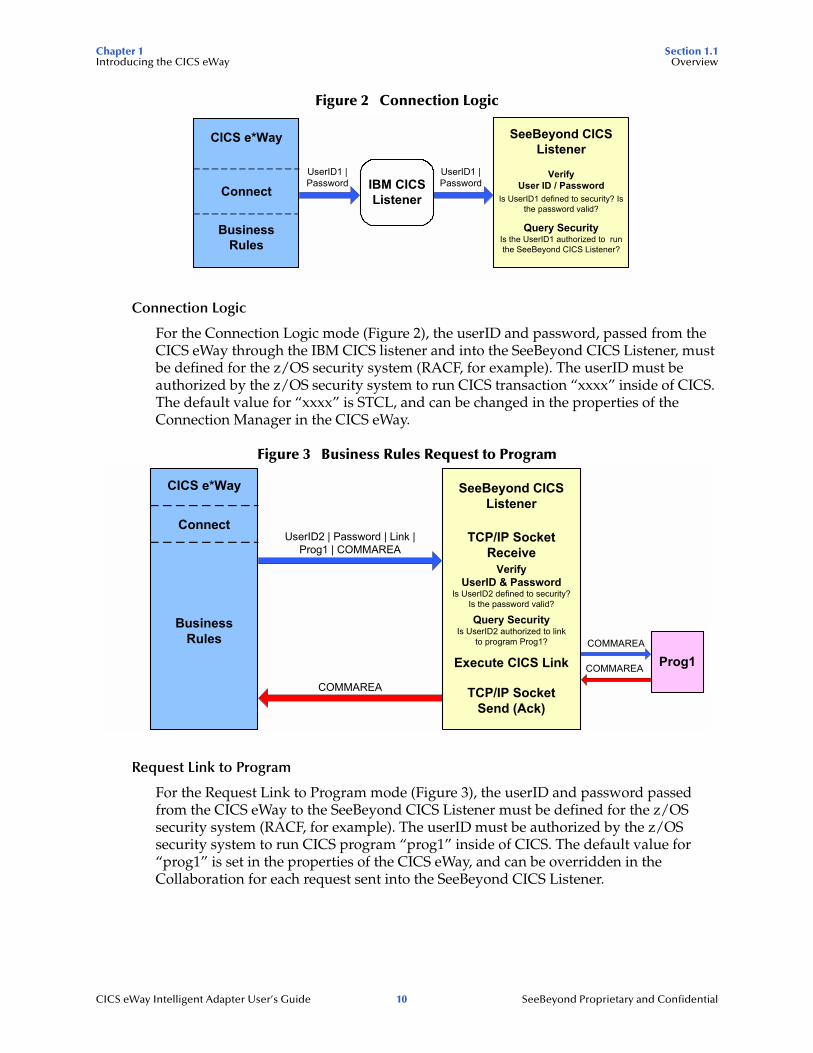
Figure 2 Connection Logic
Connection Logic
For the Connection Logic mode (Figure 2), the userID and password, passed from the CICS eWay through the IBM CICS listener and into the SeeBeyond CICS Listener, must be defined for the z/OS security system (RACF, for example). The userID must be authorized by the z/OS security system to run CICS transaction “xxxx” inside of CICS. The default value for “xxxx” is STCL, and can be changed in the properties of the Connection Manager in the CICS eWay.
Figure 3 Business Rules Request to Program
Request Link to Program
For the Request Link to Program mode (Figure 3), the userID and password passed from the CICS eWay to the SeeBeyond CICS Listener must be defined for the z/OS security system (RACF, for example). The userID must be authorized by the z/OS security system to run CICS program “prog1” inside of CICS. The default value for “prog1” is set in the properties of the CICS eWay, and can be overridden in the Collaboration for each request sent into the SeeBeyond CICS Listener.
IBM CICSListener
CICS e*Way
Connect
BusinessRules
UserID1 |Password
SeeBeyond CICSListener
VerifyUser ID / Password
Is UserID1 defined to security? Isthe password valid?
Query SecurityIs the UserID1 authorized to runthe SeeBeyond CICS Listener?
UserID1 |Password
CICS e*Way
Connect
BusinessRules
UserID2 | Password | Link |Prog1 | COMMAREA
SeeBeyond CICSListener
TCP/IP SocketReceive
COMMAREA TCP/IP SocketSend (Ack)
Prog1Execute CICS LinkCOMMAREA
COMMAREA
Query SecurityIs UserID2 authorized to link
to program Prog1?
VerifyUserID & Password
Is UserID2 defined to security?Is the password valid?
CICS eWay Intelligent Adapter User’s Guide 10 SeeBeyond Proprietary and Confidential
Chapter 1 Section 1.2Introducing the CICS eWay Supported Operating System
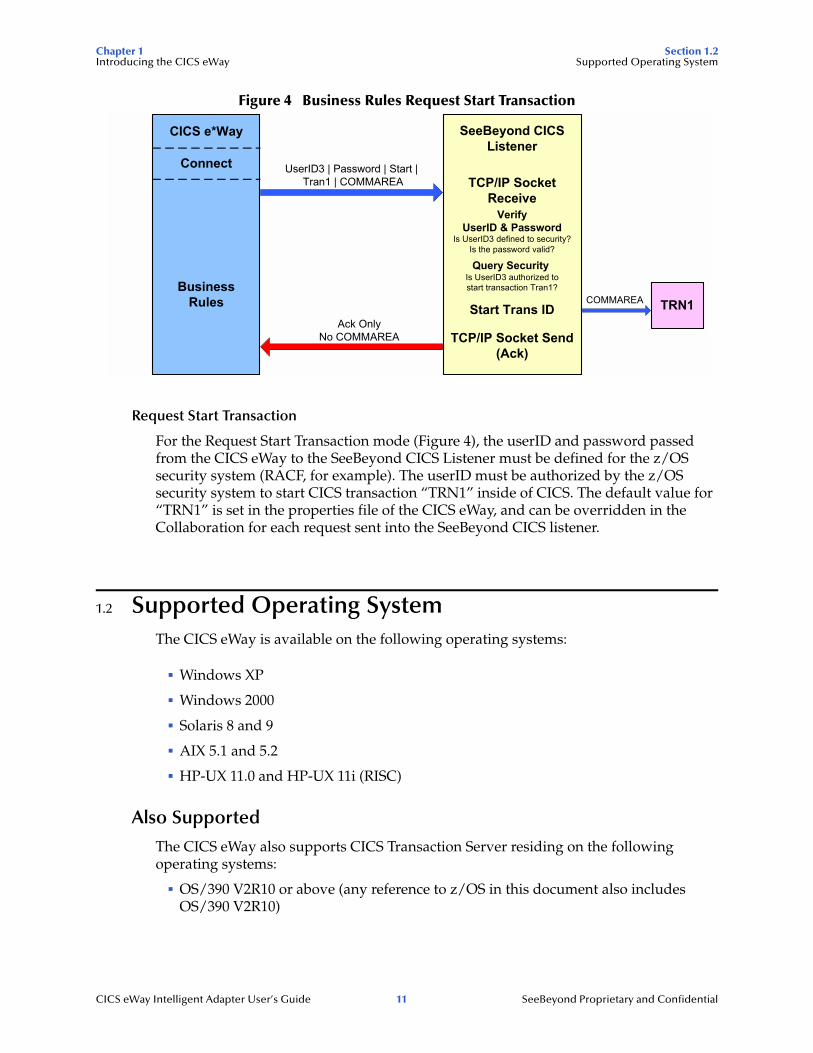
Figure 4 Business Rules Request Start Transaction
Request Start Transaction
For the Request Start Transaction mode (Figure 4), the userID and password passed from the CICS eWay to the SeeBeyond CICS Listener must be defined for the z/OS security system (RACF, for example). The userID must be authorized by the z/OS security system to start CICS transaction “TRN1” inside of CICS. The default value for “TRN1” is set in the properties file of the CICS eWay, and can be overridden in the Collaboration for each request sent into the SeeBeyond CICS listener.
1.2 Supported Operating SystemThe CICS eWay is available on the following operating systems:
! Windows XP
! Windows 2000
! Solaris 8 and 9
! AIX 5.1 and 5.2
! HP-UX 11.0 and HP-UX 11i (RISC)
Also Supported
The CICS eWay also supports CICS Transaction Server residing on the following operating systems:
! OS/390 V2R10 or above (any reference to z/OS in this document also includesOS/390 V2R10)
UserID3 | Password | Start | Tran1 | COMMAREA
TRN1Ack Only
No COMMAREA
COMMAREA
SeeBeyond CICSListener
TCP/IP SocketReceive
TCP/IP Socket Send(Ack)
Query SecurityIs UserID3 authorized tostart transaction Tran1?
VerifyUserID & Password
Is UserID3 defined to security?Is the password valid?
Start Trans ID
CICS e*Way
Connect
BusinessRules
CICS eWay Intelligent Adapter User’s Guide 11 SeeBeyond Proprietary and Confidential
Chapter 1 Section 1.3Introducing the CICS eWay System Requirements
1.3 System RequirementsTo set up and run the CICS eWay with the eGate Enterprise Designer, you need the following:
! A TCP/IP network connection
! Windows 2000 SP3, Windows 2003 Server, or Windows XP (required for the User Interface)
! Microsoft Internet Explorer 6.0 SP1 or above
Note: Open and review the Readme.txt eWay prior to installation, for any additional requirements.
1.4 External System RequirementsSoftware Requirements
! IBM CICS Transaction Server version 1.3 or 2.1
! The CICS eWay connects to CICS using the SeeBeyond CICS Listener (STCL). See CICS Server Requirements for Using the SeeBeyond CICS Listener on page 12 and CICS Listener Requirements for Invoking DB2 Applications on page 13 for specific requirements.
1.4.1. CICS Server Requirements for Using the SeeBeyond CICS Listener
To enable the eWay to communicate correctly with CICS using the SeeBeyond CICS Listener the following are required:
! OS/390 V2R10 or above (see System Requirements on page 12)
! Resource Access Control Facility (RACF) or an equivalent security product
! IBM CICS Transaction Server version 1.3 or 2.1
! IBM MVS TCP/IP socket runtime libraries, installed and configured for each CICS region in which the SeeBeyond CICS Listener will be run. For more information please refer to IBM’s TCP/IP V3R2 for MVS: CICS TCP/IP Socket Interface Guide.
! COBOL for z/OS and Language Environments
CICS eWay Intelligent Adapter User’s Guide 12 SeeBeyond Proprietary and Confidential
Chapter 1 Section 1.4Introducing the CICS eWay External System Requirements
1.4.2. CICS Listener Requirements for Invoking DB2 ApplicationsThere are two different techniques that can be used for invoking DB2 application programs through the SeeBeyond CICS Listener.
! RCT entry for the STCL SeeBeyond CICS Listener Transaction
! PPT entry to redirect DB2 application to another AOR (Application Owning Region)
For detailed information refer to CICS Listener Considerations for Invoking DB2 Applications on page 34.
CICS eWay Intelligent Adapter User’s Guide 13 SeeBeyond Proprietary and Confidential
Chapter 2
Installing the CICS eWay
This chapter contains installation information for the CICS eWay and SeeBeyond CICS Listener.
Chapter Topics
! Installing the CICS eWay on page 14
! SeeBeyond CICS Listener Installation for z/OS on page 15
! The SeeBeyond CICS Listener Configuration File Maintenance Screen for z/OS on page 18
2.1 Installing the CICS eWay During the eGate Integrator installation process, the Enterprise Manager, a web-based application, is used to select and upload eWays (eWay.sar files) from the eGate installation CD-ROM to the Repository.
When the Repository is running on a UNIX operating system, eGate and the eWays are installed using the Enterprise Manager from a computer running Windows, connected to the Repository server.
2.1.1. Installing the CICS eWay on an eGate Supported SystemThe CICS eWay is installed during the installation of the eGate Integrator. The eGate installation process includes the following operations:
! Installing the eGate Repository
! Uploading products to the Repository
! Downloading components (such as eGate Enterprise Designer and Logical Host)
! Viewing product information home pages
Follow the instructions for installing the eGate Integrator in the SeeBeyond ICAN Suite Installation Guide, and include the following steps:
1 During the procedures for uploading files to the eGate Repository using the Enterprise Manager, after uploading the eGate.sar file, select and upload the following files:
" CICSeWay.sar (to install the CICS eWay)
CICS eWay Intelligent Adapter User’s Guide 14 SeeBeyond Proprietary and Confidential
Chapter 2 Section 2.2Installing the CICS eWay SeeBeyond CICS Listener Installation for z/OS
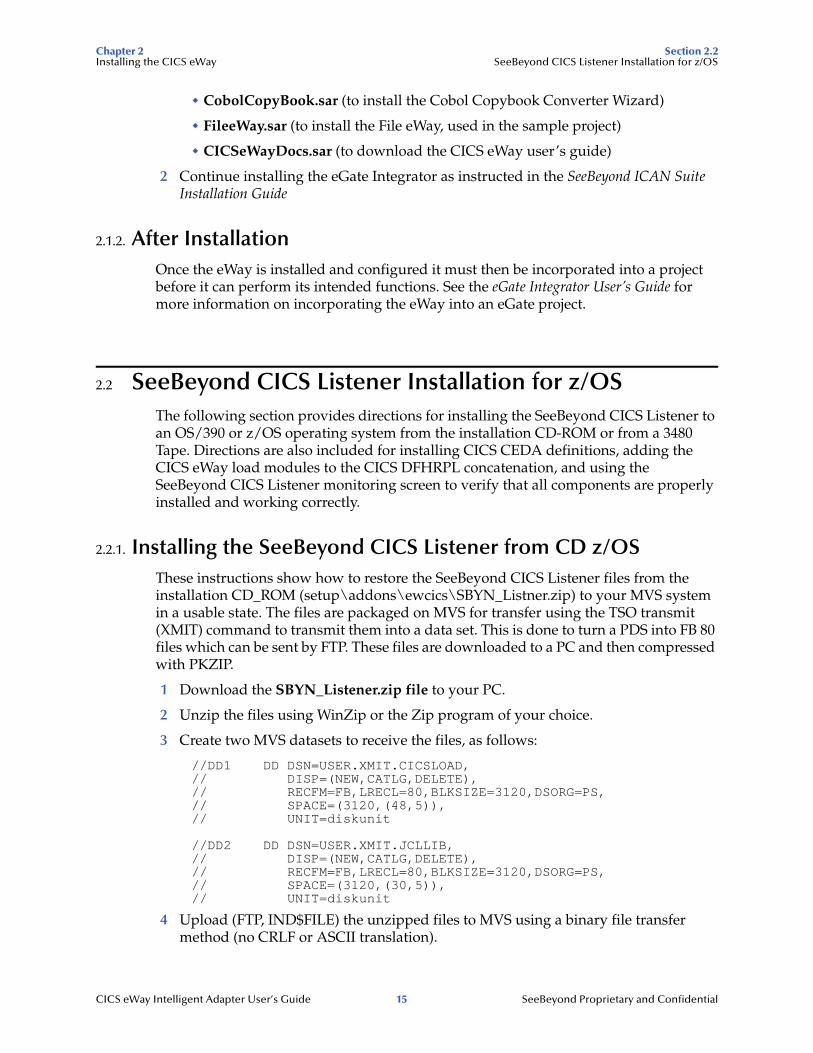
" CobolCopyBook.sar (to install the Cobol Copybook Converter Wizard)
" FileeWay.sar (to install the File eWay, used in the sample project)
" CICSeWayDocs.sar (to download the CICS eWay user’s guide)
2 Continue installing the eGate Integrator as instructed in the SeeBeyond ICAN Suite Installation Guide
2.1.2. After InstallationOnce the eWay is installed and configured it must then be incorporated into a project before it can perform its intended functions. See the eGate Integrator User’s Guide for more information on incorporating the eWay into an eGate project.
2.2 SeeBeyond CICS Listener Installation for z/OSThe following section provides directions for installing the SeeBeyond CICS Listener to an OS/390 or z/OS operating system from the installation CD-ROM or from a 3480 Tape. Directions are also included for installing CICS CEDA definitions, adding the CICS eWay load modules to the CICS DFHRPL concatenation, and using the SeeBeyond CICS Listener monitoring screen to verify that all components are properly installed and working correctly.
2.2.1. Installing the SeeBeyond CICS Listener from CD z/OSThese instructions show how to restore the SeeBeyond CICS Listener files from the installation CD_ROM (setup\addons\ewcics\SBYN_Listner.zip) to your MVS system in a usable state. The files are packaged on MVS for transfer using the TSO transmit (XMIT) command to transmit them into a data set. This is done to turn a PDS into FB 80 files which can be sent by FTP. These files are downloaded to a PC and then compressed with PKZIP.
1 Download the SBYN_Listener.zip file to your PC.
2 Unzip the files using WinZip or the Zip program of your choice.
3 Create two MVS datasets to receive the files, as follows:
//DD1 DD DSN=USER.XMIT.CICSLOAD,// DISP=(NEW,CATLG,DELETE), // RECFM=FB,LRECL=80,BLKSIZE=3120,DSORG=PS,// SPACE=(3120,(48,5)),// UNIT=diskunit
//DD2 DD DSN=USER.XMIT.JCLLIB,// DISP=(NEW,CATLG,DELETE), // RECFM=FB,LRECL=80,BLKSIZE=3120,DSORG=PS,// SPACE=(3120,(30,5)),// UNIT=diskunit
4 Upload (FTP, IND$FILE) the unzipped files to MVS using a binary file transfer method (no CRLF or ASCII translation).
CICS eWay Intelligent Adapter User’s Guide 15 SeeBeyond Proprietary and Confidential
Chapter 2 Section 2.2Installing the CICS eWay SeeBeyond CICS Listener Installation for z/OS
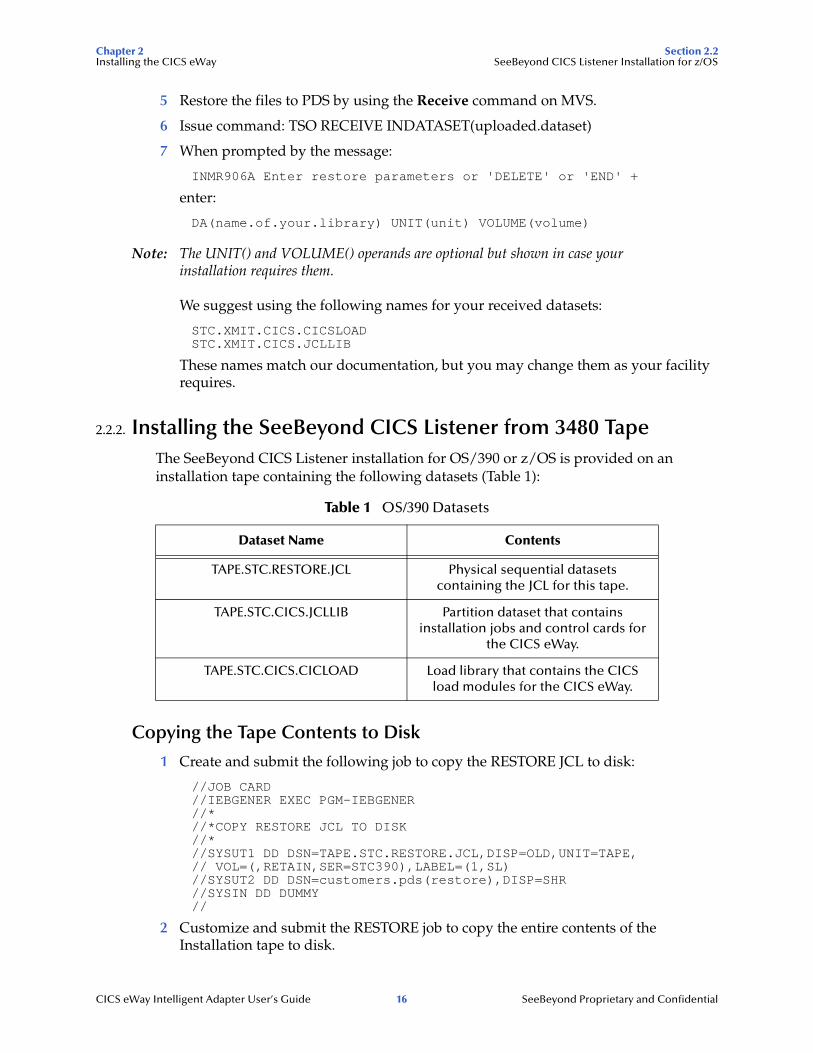
5 Restore the files to PDS by using the Receive command on MVS.
6 Issue command: TSO RECEIVE INDATASET(uploaded.dataset)
7 When prompted by the message:
INMR906A Enter restore parameters or 'DELETE' or 'END' +
enter:
DA(name.of.your.library) UNIT(unit) VOLUME(volume)
Note: The UNIT() and VOLUME() operands are optional but shown in case your installation requires them.
We suggest using the following names for your received datasets:
STC.XMIT.CICS.CICSLOAD STC.XMIT.CICS.JCLLIB
These names match our documentation, but you may change them as your facility requires.
2.2.2. Installing the SeeBeyond CICS Listener from 3480 TapeThe SeeBeyond CICS Listener installation for OS/390 or z/OS is provided on an installation tape containing the following datasets (Table 1):
Copying the Tape Contents to Disk
1 Create and submit the following job to copy the RESTORE JCL to disk:
//JOB CARD//IEBGENER EXEC PGM-IEBGENER//*//*COPY RESTORE JCL TO DISK//*//SYSUT1 DD DSN=TAPE.STC.RESTORE.JCL,DISP=OLD,UNIT=TAPE,// VOL=(,RETAIN,SER=STC390),LABEL=(1,SL)//SYSUT2 DD DSN=customers.pds(restore),DISP=SHR//SYSIN DD DUMMY//
2 Customize and submit the RESTORE job to copy the entire contents of the Installation tape to disk.
Table 1 OS/390 Datasets
Dataset Name Contents
TAPE.STC.RESTORE.JCL Physical sequential datasets containing the JCL for this tape.
TAPE.STC.CICS.JCLLIB Partition dataset that contains installation jobs and control cards for
the CICS eWay.
TAPE.STC.CICS.CICLOAD Load library that contains the CICS load modules for the CICS eWay.
CICS eWay Intelligent Adapter User’s Guide 16 SeeBeyond Proprietary and Confidential
Chapter 2 Section 2.2Installing the CICS eWay SeeBeyond CICS Listener Installation for z/OS
2.2.3. Installing the CICS CEDA DefinitionsCustomize the file definition in the JCLLIB member CEDALCFG to conform to your site's file naming conventions. Customize and submit job STCLCEDA to create CICS CEDA definitions for the CICS eWay.
2.2.4. Adding the CICS eWay Load Modules to CICS DFHRPL Concatenation
Add the following data set to the DFHRPL concatenation under CICS:
// DD DSN=&PREFIX..STC.CICS.CICSLOAD,DISP=SHR
2.2.5. Creating the STCCLCFG FileCustomize and submit the STCCLCFG job found in JCLLIB. Make sure the FCT entry STCCLCFG is closed and disabled in CICS before running this job.
CICS eWay Intelligent Adapter User’s Guide 17 SeeBeyond Proprietary and Confidential
Chapter 2 Section 2.3Installing the CICS eWay The SeeBeyond CICS Listener Configuration File Maintenance Screen for z/OS
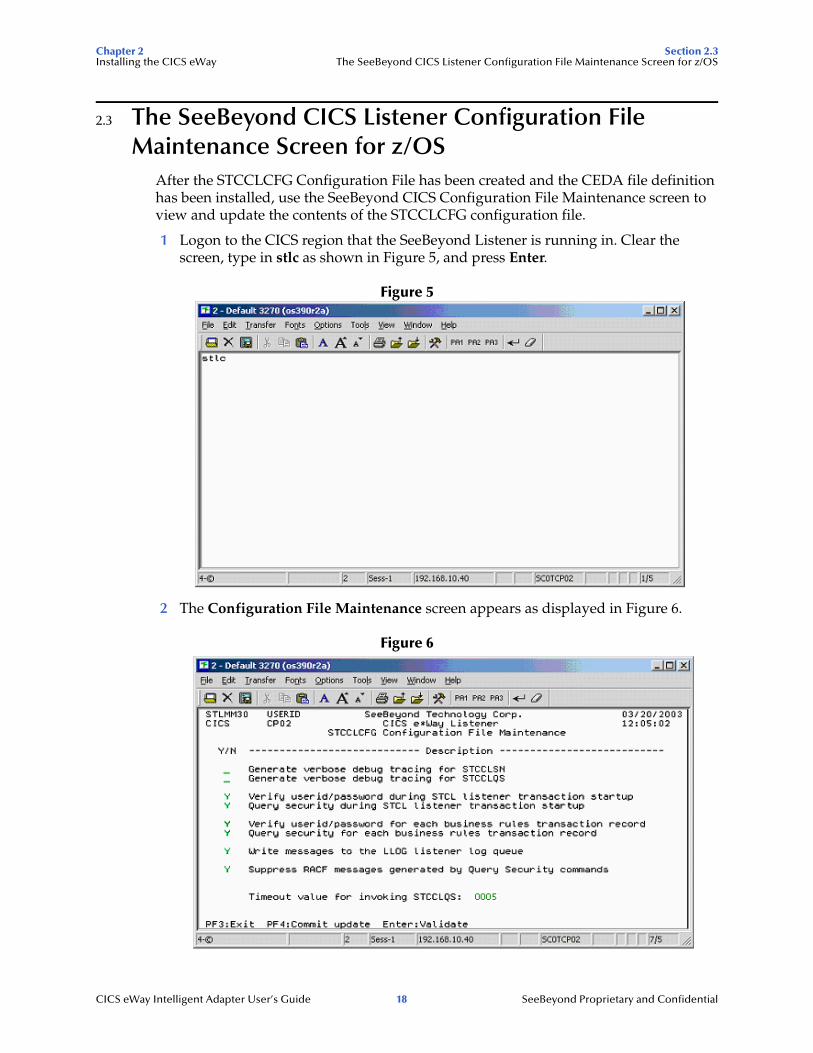
2.3 The SeeBeyond CICS Listener Configuration File Maintenance Screen for z/OS
After the STCCLCFG Configuration File has been created and the CEDA file definition has been installed, use the SeeBeyond CICS Configuration File Maintenance screen to view and update the contents of the STCCLCFG configuration file.
1 Logon to the CICS region that the SeeBeyond Listener is running in. Clear the screen, type in stlc as shown in Figure 5, and press Enter.
Figure 5
2 The Configuration File Maintenance screen appears as displayed in Figure 6.
Figure 6
CICS eWay Intelligent Adapter User’s Guide 18 SeeBeyond Proprietary and Confidential
Chapter 2 Section 2.3Installing the CICS eWay The SeeBeyond CICS Listener Configuration File Maintenance Screen for z/OS
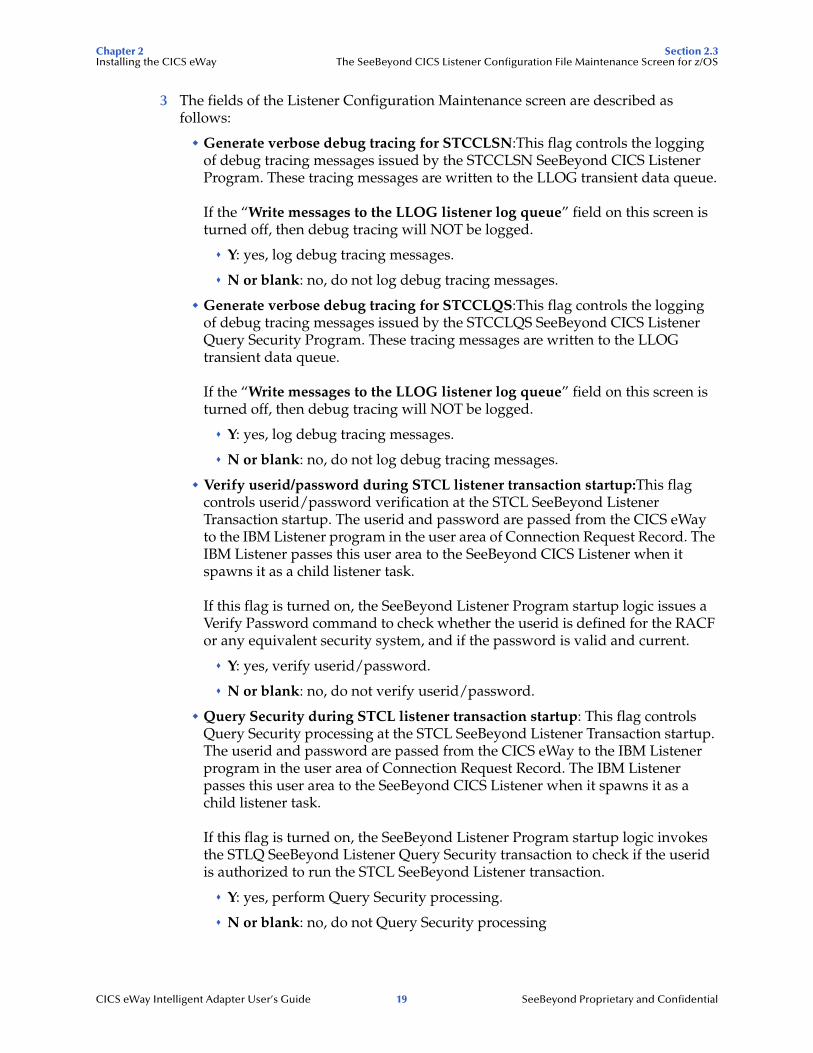
3 The fields of the Listener Configuration Maintenance screen are described as follows:
" Generate verbose debug tracing for STCCLSN:This flag controls the logging of debug tracing messages issued by the STCCLSN SeeBeyond CICS Listener Program. These tracing messages are written to the LLOG transient data queue.
If the “Write messages to the LLOG listener log queue” field on this screen is turned off, then debug tracing will NOT be logged.
# Y: yes, log debug tracing messages.
# N or blank: no, do not log debug tracing messages.
" Generate verbose debug tracing for STCCLQS:This flag controls the logging of debug tracing messages issued by the STCCLQS SeeBeyond CICS Listener Query Security Program. These tracing messages are written to the LLOG transient data queue.
If the “Write messages to the LLOG listener log queue” field on this screen is turned off, then debug tracing will NOT be logged.
# Y: yes, log debug tracing messages.
# N or blank: no, do not log debug tracing messages.
" Verify userid/password during STCL listener transaction startup:This flag controls userid/password verification at the STCL SeeBeyond Listener Transaction startup. The userid and password are passed from the CICS eWay to the IBM Listener program in the user area of Connection Request Record. The IBM Listener passes this user area to the SeeBeyond CICS Listener when it spawns it as a child listener task.
If this flag is turned on, the SeeBeyond Listener Program startup logic issues a Verify Password command to check whether the userid is defined for the RACF or any equivalent security system, and if the password is valid and current.
# Y: yes, verify userid/password.
# N or blank: no, do not verify userid/password.
" Query Security during STCL listener transaction startup: This flag controls Query Security processing at the STCL SeeBeyond Listener Transaction startup. The userid and password are passed from the CICS eWay to the IBM Listener program in the user area of Connection Request Record. The IBM Listener passes this user area to the SeeBeyond CICS Listener when it spawns it as a child listener task.
If this flag is turned on, the SeeBeyond Listener Program startup logic invokes the STLQ SeeBeyond Listener Query Security transaction to check if the userid is authorized to run the STCL SeeBeyond Listener transaction.
# Y: yes, perform Query Security processing.
# N or blank: no, do not Query Security processing
CICS eWay Intelligent Adapter User’s Guide 19 SeeBeyond Proprietary and Confidential
Chapter 2 Section 2.3Installing the CICS eWay The SeeBeyond CICS Listener Configuration File Maintenance Screen for z/OS
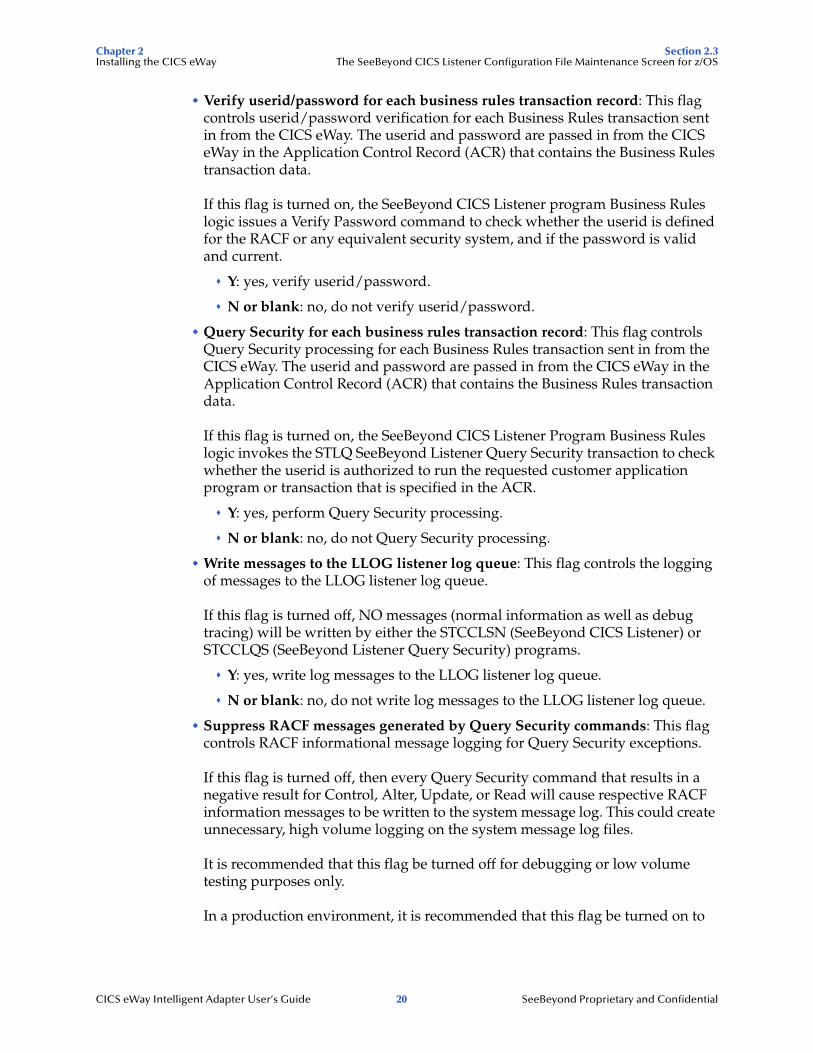
" Verify userid/password for each business rules transaction record: This flag controls userid/password verification for each Business Rules transaction sent in from the CICS eWay. The userid and password are passed in from the CICS eWay in the Application Control Record (ACR) that contains the Business Rules transaction data.
If this flag is turned on, the SeeBeyond CICS Listener program Business Rules logic issues a Verify Password command to check whether the userid is defined for the RACF or any equivalent security system, and if the password is valid and current.
# Y: yes, verify userid/password.
# N or blank: no, do not verify userid/password.
" Query Security for each business rules transaction record: This flag controls Query Security processing for each Business Rules transaction sent in from the CICS eWay. The userid and password are passed in from the CICS eWay in the Application Control Record (ACR) that contains the Business Rules transaction data.
If this flag is turned on, the SeeBeyond CICS Listener Program Business Rules logic invokes the STLQ SeeBeyond Listener Query Security transaction to check whether the userid is authorized to run the requested customer application program or transaction that is specified in the ACR.
# Y: yes, perform Query Security processing.
# N or blank: no, do not Query Security processing.
" Write messages to the LLOG listener log queue: This flag controls the logging of messages to the LLOG listener log queue.
If this flag is turned off, NO messages (normal information as well as debug tracing) will be written by either the STCCLSN (SeeBeyond CICS Listener) or STCCLQS (SeeBeyond Listener Query Security) programs.
# Y: yes, write log messages to the LLOG listener log queue.
# N or blank: no, do not write log messages to the LLOG listener log queue.
" Suppress RACF messages generated by Query Security commands: This flag controls RACF informational message logging for Query Security exceptions.
If this flag is turned off, then every Query Security command that results in a negative result for Control, Alter, Update, or Read will cause respective RACF information messages to be written to the system message log. This could create unnecessary, high volume logging on the system message log files.
It is recommended that this flag be turned off for debugging or low volume testing purposes only.
In a production environment, it is recommended that this flag be turned on to
CICS eWay Intelligent Adapter User’s Guide 20 SeeBeyond Proprietary and Confidential
Chapter 2 Section 2.3Installing the CICS eWay The SeeBeyond CICS Listener Configuration File Maintenance Screen for z/OS
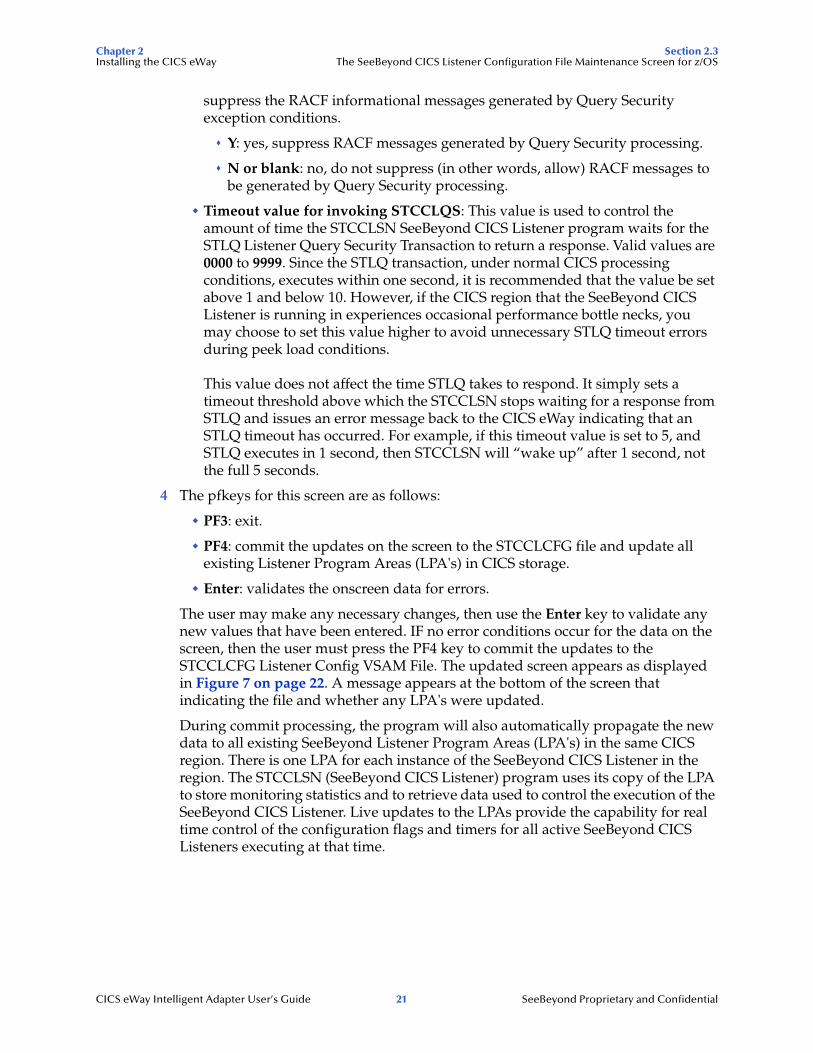
suppress the RACF informational messages generated by Query Security exception conditions.
# Y: yes, suppress RACF messages generated by Query Security processing.
# N or blank: no, do not suppress (in other words, allow) RACF messages to be generated by Query Security processing.
" Timeout value for invoking STCCLQS: This value is used to control the amount of time the STCCLSN SeeBeyond CICS Listener program waits for the STLQ Listener Query Security Transaction to return a response. Valid values are 0000 to 9999. Since the STLQ transaction, under normal CICS processing conditions, executes within one second, it is recommended that the value be set above 1 and below 10. However, if the CICS region that the SeeBeyond CICS Listener is running in experiences occasional performance bottle necks, you may choose to set this value higher to avoid unnecessary STLQ timeout errors during peek load conditions.
This value does not affect the time STLQ takes to respond. It simply sets a timeout threshold above which the STCCLSN stops waiting for a response from STLQ and issues an error message back to the CICS eWay indicating that an STLQ timeout has occurred. For example, if this timeout value is set to 5, and STLQ executes in 1 second, then STCCLSN will “wake up” after 1 second, not the full 5 seconds.
4 The pfkeys for this screen are as follows:
" PF3: exit.
" PF4: commit the updates on the screen to the STCCLCFG file and update all existing Listener Program Areas (LPA's) in CICS storage.
" Enter: validates the onscreen data for errors.
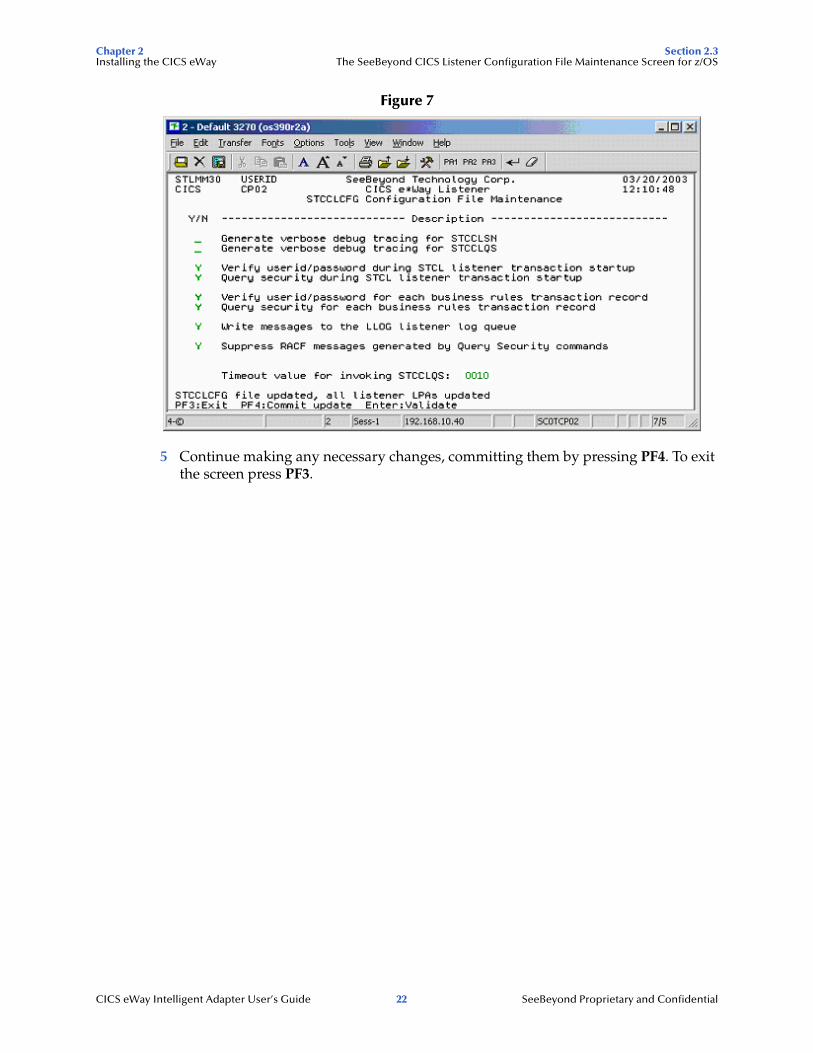
The user may make any necessary changes, then use the Enter key to validate any new values that have been entered. IF no error conditions occur for the data on the screen, then the user must press the PF4 key to commit the updates to the STCCLCFG Listener Config VSAM File. The updated screen appears as displayed in Figure 7 on page 22. A message appears at the bottom of the screen that indicating the file and whether any LPA's were updated.
During commit processing, the program will also automatically propagate the new data to all existing SeeBeyond Listener Program Areas (LPA's) in the same CICS region. There is one LPA for each instance of the SeeBeyond CICS Listener in the region. The STCCLSN (SeeBeyond CICS Listener) program uses its copy of the LPA to store monitoring statistics and to retrieve data used to control the execution of the SeeBeyond CICS Listener. Live updates to the LPAs provide the capability for real time control of the configuration flags and timers for all active SeeBeyond CICS Listeners executing at that time.
CICS eWay Intelligent Adapter User’s Guide 21 SeeBeyond Proprietary and Confidential
Chapter 2 Section 2.3Installing the CICS eWay The SeeBeyond CICS Listener Configuration File Maintenance Screen for z/OS
Figure 7
5 Continue making any necessary changes, committing them by pressing PF4. To exit the screen press PF3.
CICS eWay Intelligent Adapter User’s Guide 22 SeeBeyond Proprietary and Confidential
Chapter 2 Section 2.3Installing the CICS eWay The SeeBeyond CICS Listener Configuration File Maintenance Screen for z/OS
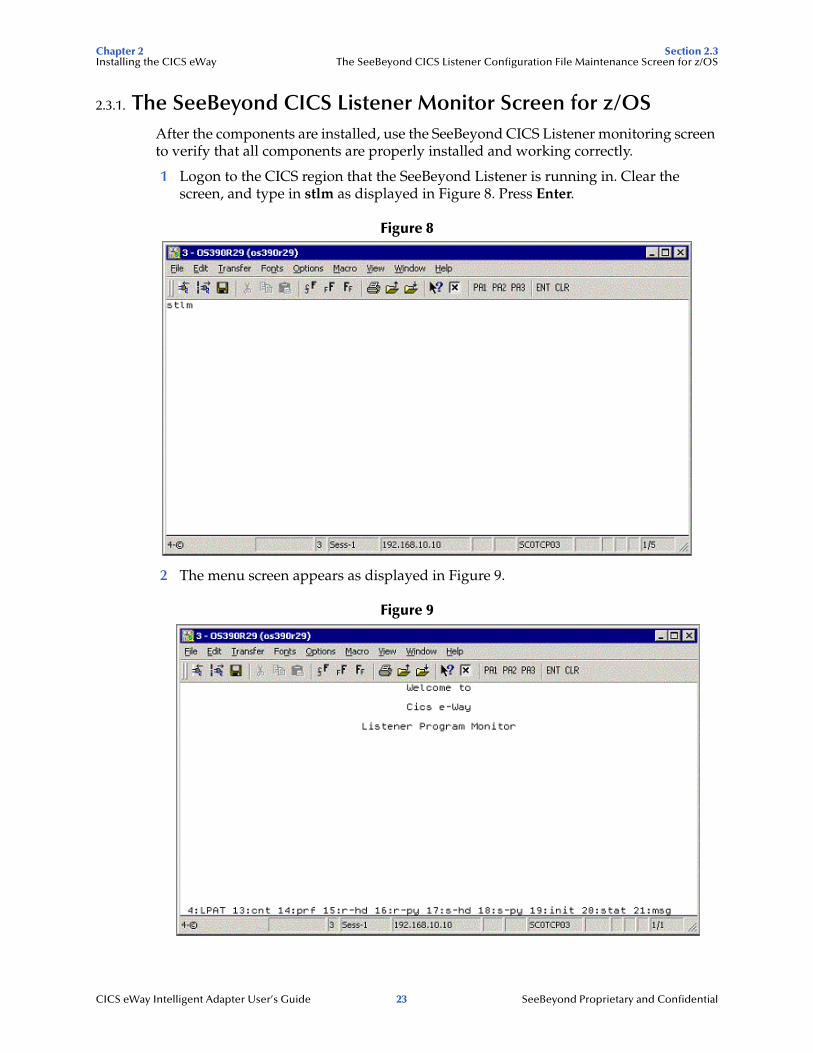
2.3.1. The SeeBeyond CICS Listener Monitor Screen for z/OSAfter the components are installed, use the SeeBeyond CICS Listener monitoring screen to verify that all components are properly installed and working correctly.
1 Logon to the CICS region that the SeeBeyond Listener is running in. Clear the screen, and type in stlm as displayed in Figure 8. Press Enter.
Figure 8
2 The menu screen appears as displayed in Figure 9.
Figure 9
CICS eWay Intelligent Adapter User’s Guide 23 SeeBeyond Proprietary and Confidential
Chapter 2 Section 2.3Installing the CICS eWay The SeeBeyond CICS Listener Configuration File Maintenance Screen for z/OS
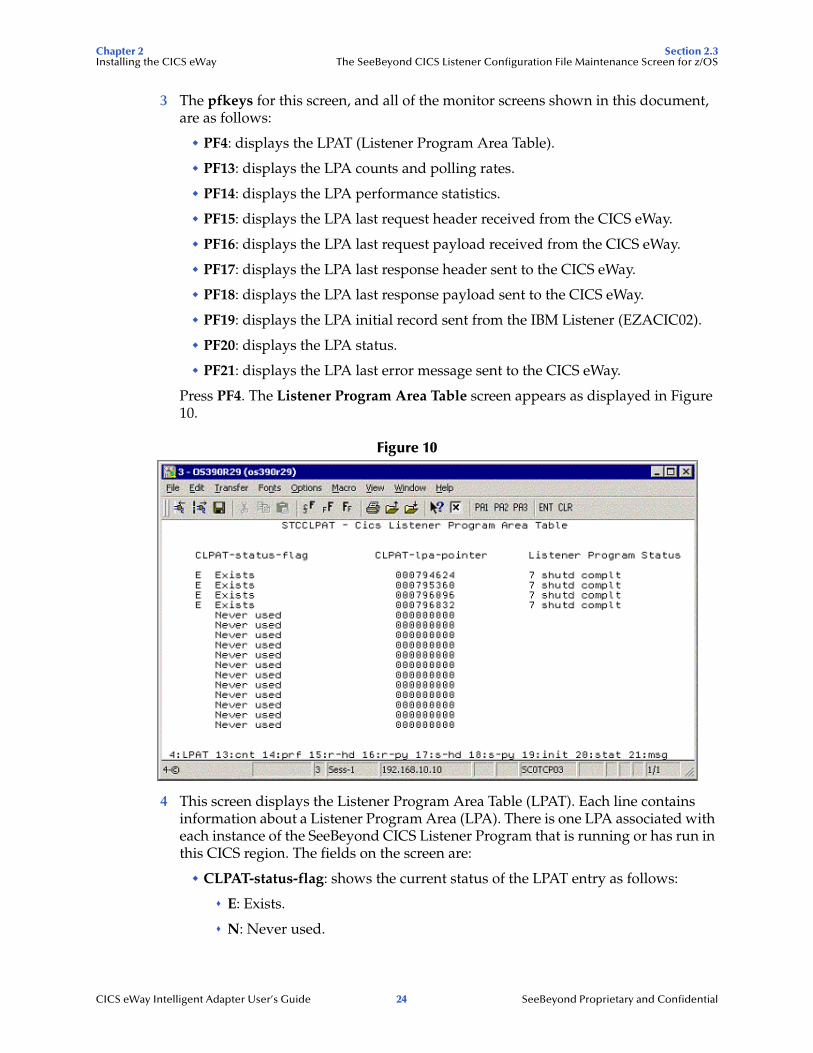
3 The pfkeys for this screen, and all of the monitor screens shown in this document, are as follows:
" PF4: displays the LPAT (Listener Program Area Table).
" PF13: displays the LPA counts and polling rates.
" PF14: displays the LPA performance statistics.
" PF15: displays the LPA last request header received from the CICS eWay.
" PF16: displays the LPA last request payload received from the CICS eWay.
" PF17: displays the LPA last response header sent to the CICS eWay.
" PF18: displays the LPA last response payload sent to the CICS eWay.
" PF19: displays the LPA initial record sent from the IBM Listener (EZACIC02).
" PF20: displays the LPA status.
" PF21: displays the LPA last error message sent to the CICS eWay.
Press PF4. The Listener Program Area Table screen appears as displayed in Figure 10.
Figure 10
4 This screen displays the Listener Program Area Table (LPAT). Each line contains information about a Listener Program Area (LPA). There is one LPA associated with each instance of the SeeBeyond CICS Listener Program that is running or has run in this CICS region. The fields on the screen are:
" CLPAT-status-flag: shows the current status of the LPAT entry as follows:
# E: Exists.
# N: Never used.
CICS eWay Intelligent Adapter User’s Guide 24 SeeBeyond Proprietary and Confidential
Chapter 2 Section 2.3Installing the CICS eWay The SeeBeyond CICS Listener Configuration File Maintenance Screen for z/OS
# C: Corrupted.
" CLPAT-lpa-pointer: shows the address of the most recent LPA in this entry.
" Listener Program Status: shows the last status of the Listener Program usingthis LPA.
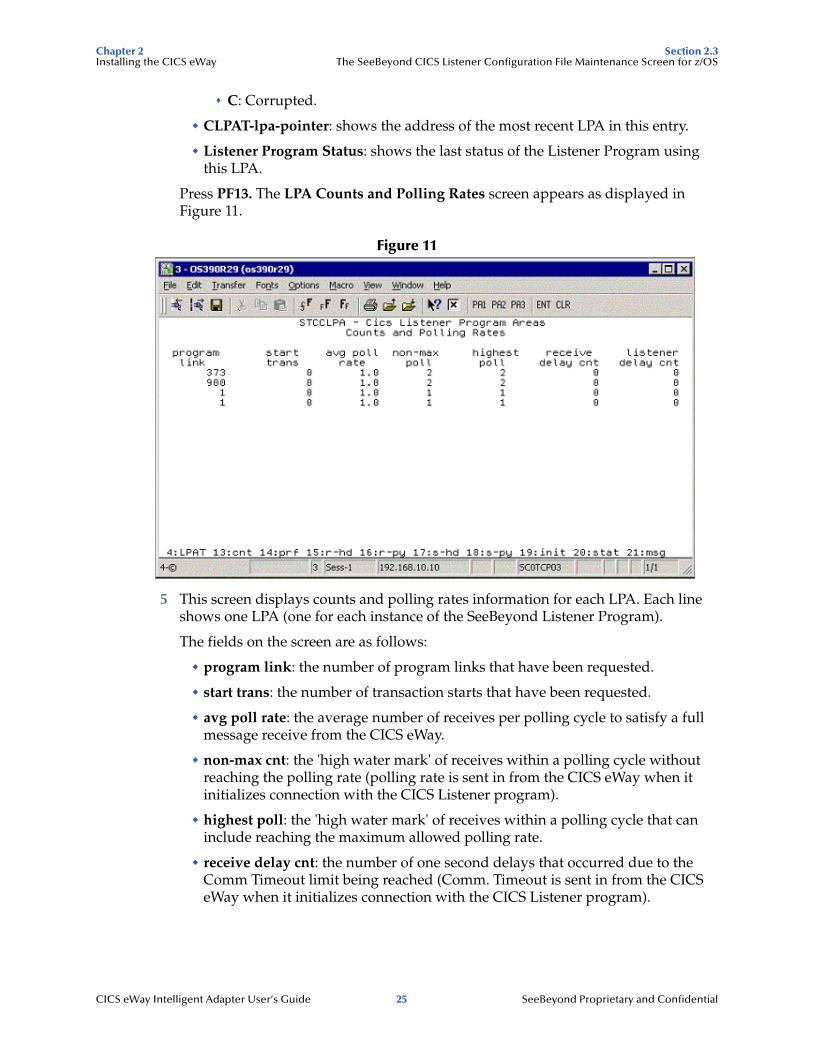
Press PF13. The LPA Counts and Polling Rates screen appears as displayed in Figure 11.
Figure 11
5 This screen displays counts and polling rates information for each LPA. Each line shows one LPA (one for each instance of the SeeBeyond Listener Program).
The fields on the screen are as follows:
" program link: the number of program links that have been requested.
" start trans: the number of transaction starts that have been requested.
" avg poll rate: the average number of receives per polling cycle to satisfy a full message receive from the CICS eWay.
" non-max cnt: the 'high water mark' of receives within a polling cycle without reaching the polling rate (polling rate is sent in from the CICS eWay when it initializes connection with the CICS Listener program).
" highest poll: the 'high water mark' of receives within a polling cycle that can include reaching the maximum allowed polling rate.
" receive delay cnt: the number of one second delays that occurred due to the Comm Timeout limit being reached (Comm. Timeout is sent in from the CICS eWay when it initializes connection with the CICS Listener program).
CICS eWay Intelligent Adapter User’s Guide 25 SeeBeyond Proprietary and Confidential
Chapter 2 Section 2.3Installing the CICS eWay The SeeBeyond CICS Listener Configuration File Maintenance Screen for z/OS
" listener delay cnt: number of one second delays that occur due to the Listener Timeout limit being reached (Listener Timeout is sent in from the CICS eWay when it initializes connection with the CICS Listener program).
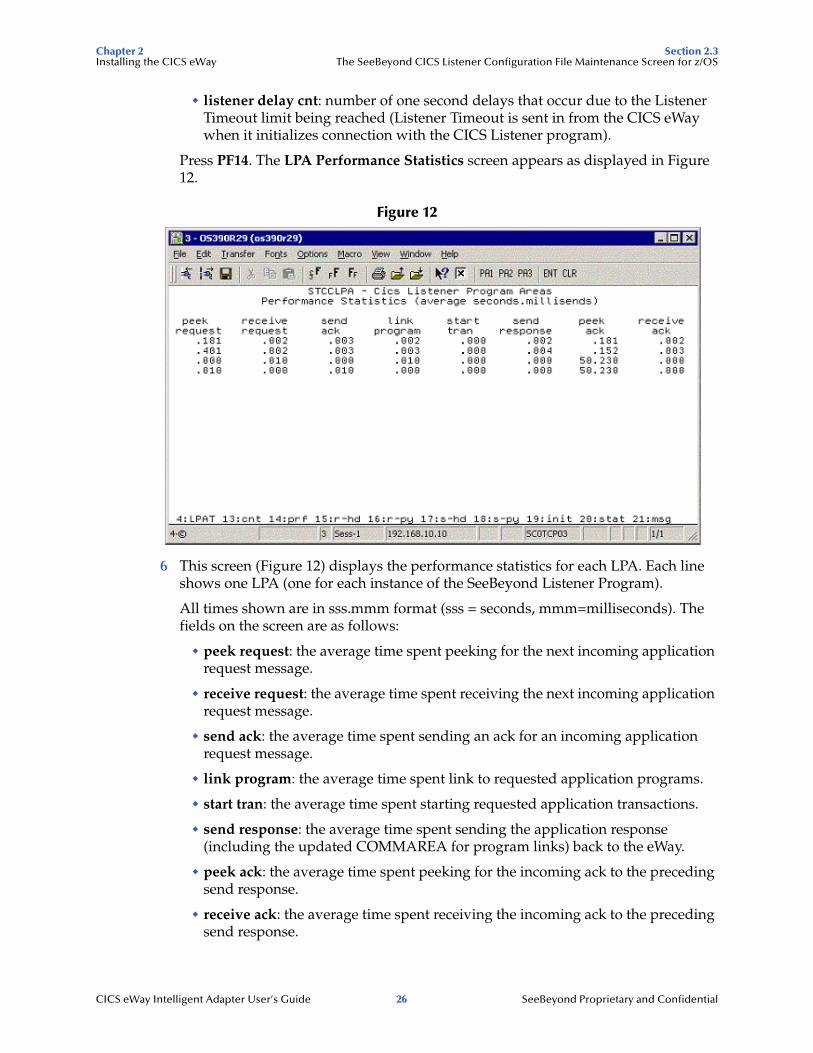
Press PF14. The LPA Performance Statistics screen appears as displayed in Figure 12.
Figure 12
6 This screen (Figure 12) displays the performance statistics for each LPA. Each line shows one LPA (one for each instance of the SeeBeyond Listener Program).
All times shown are in sss.mmm format (sss = seconds, mmm=milliseconds). The fields on the screen are as follows:
" peek request: the average time spent peeking for the next incoming application request message.
" receive request: the average time spent receiving the next incoming application request message.
" send ack: the average time spent sending an ack for an incoming application request message.
" link program: the average time spent link to requested application programs.
" start tran: the average time spent starting requested application transactions.
" send response: the average time spent sending the application response (including the updated COMMAREA for program links) back to the eWay.
" peek ack: the average time spent peeking for the incoming ack to the preceding send response.
" receive ack: the average time spent receiving the incoming ack to the preceding send response.
CICS eWay Intelligent Adapter User’s Guide 26 SeeBeyond Proprietary and Confidential
Chapter 2 Section 2.3Installing the CICS eWay The SeeBeyond CICS Listener Configuration File Maintenance Screen for z/OS
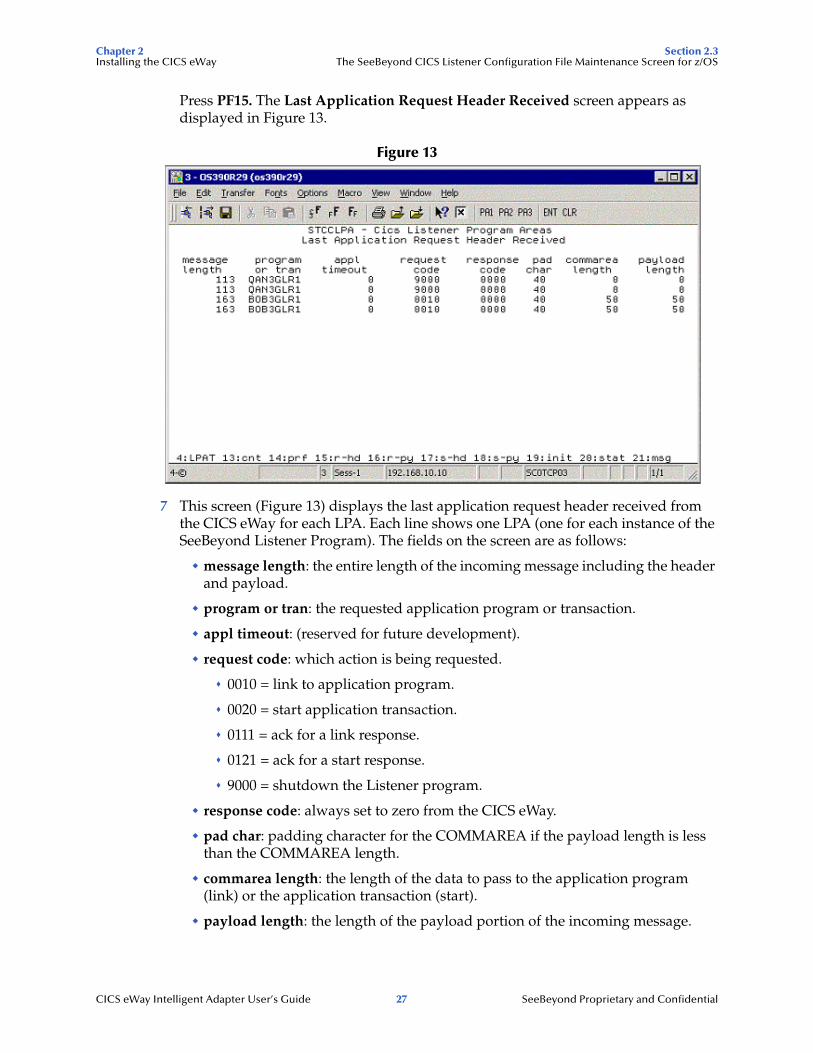
Press PF15. The Last Application Request Header Received screen appears as displayed in Figure 13.
Figure 13
7 This screen (Figure 13) displays the last application request header received from the CICS eWay for each LPA. Each line shows one LPA (one for each instance of the SeeBeyond Listener Program). The fields on the screen are as follows:
" message length: the entire length of the incoming message including the header and payload.
" program or tran: the requested application program or transaction.
" appl timeout: (reserved for future development).
" request code: which action is being requested.
# 0010 = link to application program.
# 0020 = start application transaction.
# 0111 = ack for a link response.
# 0121 = ack for a start response.
# 9000 = shutdown the Listener program.
" response code: always set to zero from the CICS eWay.
" pad char: padding character for the COMMAREA if the payload length is less than the COMMAREA length.
" commarea length: the length of the data to pass to the application program (link) or the application transaction (start).
" payload length: the length of the payload portion of the incoming message.
CICS eWay Intelligent Adapter User’s Guide 27 SeeBeyond Proprietary and Confidential

Chapter 2 Section 2.3Installing the CICS eWay The SeeBeyond CICS Listener Configuration File Maintenance Screen for z/OS
Press PF16. The Last Application Request Payload Received screen appears as displayed in Figure 14.
Figure 14
8 This screen (Figure 14) displays the last application request payload received from the CICS eWay for each LPA. Each line shows one LPA (one for each instance of the SeeBeyond Listener Program). There is one field on the screen:
" Payload Received: the incoming payload from the CICS eWay.
Press PF17. The Last Application Response Header screen appears as displayed in Figure 15.
CICS eWay Intelligent Adapter User’s Guide 28 SeeBeyond Proprietary and Confidential
Chapter 2 Section 2.3Installing the CICS eWay The SeeBeyond CICS Listener Configuration File Maintenance Screen for z/OS
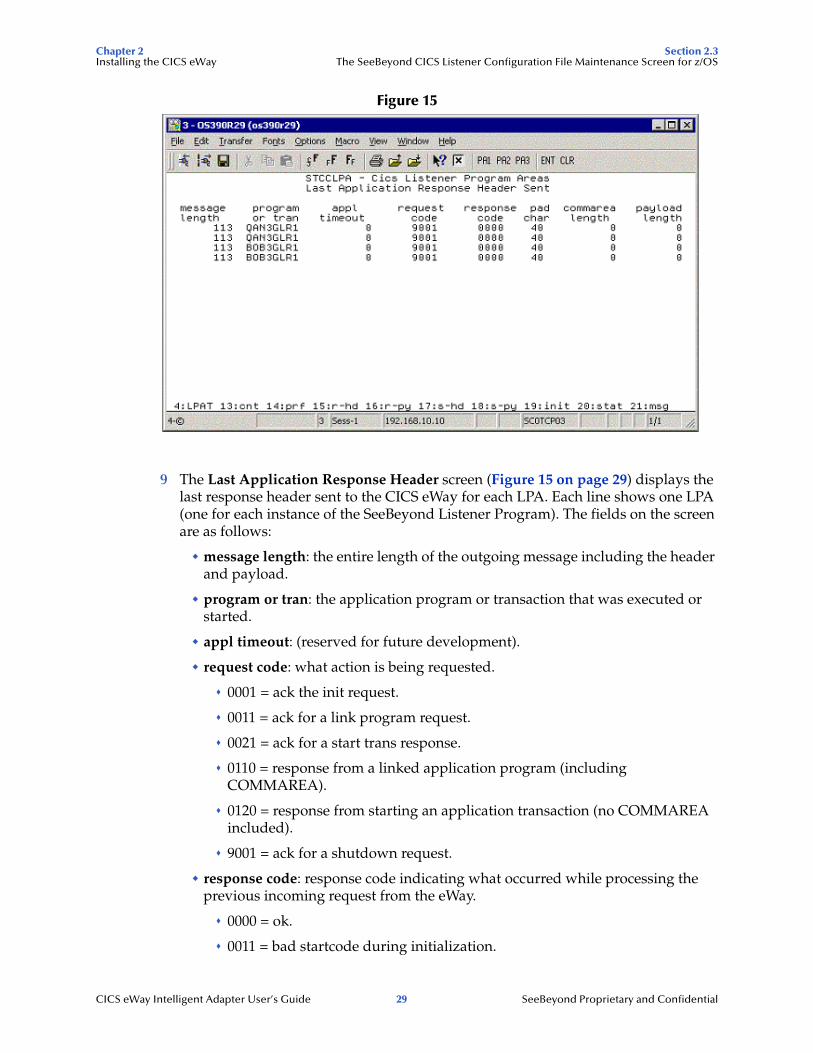
Figure 15
9 The Last Application Response Header screen (Figure 15 on page 29) displays the last response header sent to the CICS eWay for each LPA. Each line shows one LPA (one for each instance of the SeeBeyond Listener Program). The fields on the screen are as follows:
" message length: the entire length of the outgoing message including the header and payload.
" program or tran: the application program or transaction that was executed or started.
" appl timeout: (reserved for future development).
" request code: what action is being requested.
# 0001 = ack the init request.
# 0011 = ack for a link program request.
# 0021 = ack for a start trans response.
# 0110 = response from a linked application program (including COMMAREA).
# 0120 = response from starting an application transaction (no COMMAREA included).
# 9001 = ack for a shutdown request.
" response code: response code indicating what occurred while processing the previous incoming request from the eWay.
# 0000 = ok.
# 0011 = bad startcode during initialization.
CICS eWay Intelligent Adapter User’s Guide 29 SeeBeyond Proprietary and Confidential
Chapter 2 Section 2.3Installing the CICS eWay The SeeBeyond CICS Listener Configuration File Maintenance Screen for z/OS
# 0012 = bad password on init record.
# 0013 = bad comm timeout on init record.
# 0014 = bad appl timeout on init record.
# 0015 = bad Listener timeout on init record.
# 0016 = error reading the init record from transient data queue.
# 0017 = error retrieving the init record from the start data.
# 0018 = error while setting blocking mode.
# 0051 = bad payload length.
# 0052 = error while linking to a program.
# 0053 = error while starting a transaction.
# 0054 = bad request code.
# 0055 = bad response code.
# 0056 = partial message received.
# 0057 = bad program name.
# 0058 = bad message length.
# 0059 = bad commarea length.
" pad char: padding char that was sent in from the CICS eWay.
" commarea length: COMMAREA length that was sent in from the CICS eWay.
" payload length: payload length that was sent in from the CICS eWay (the Listener sets this to zero if this is a response to a start transaction request).
Press PF18. The Last Application Response Payload Sent screen appears as displayed in Figure 16.
CICS eWay Intelligent Adapter User’s Guide 30 SeeBeyond Proprietary and Confidential
Chapter 2 Section 2.3Installing the CICS eWay The SeeBeyond CICS Listener Configuration File Maintenance Screen for z/OS
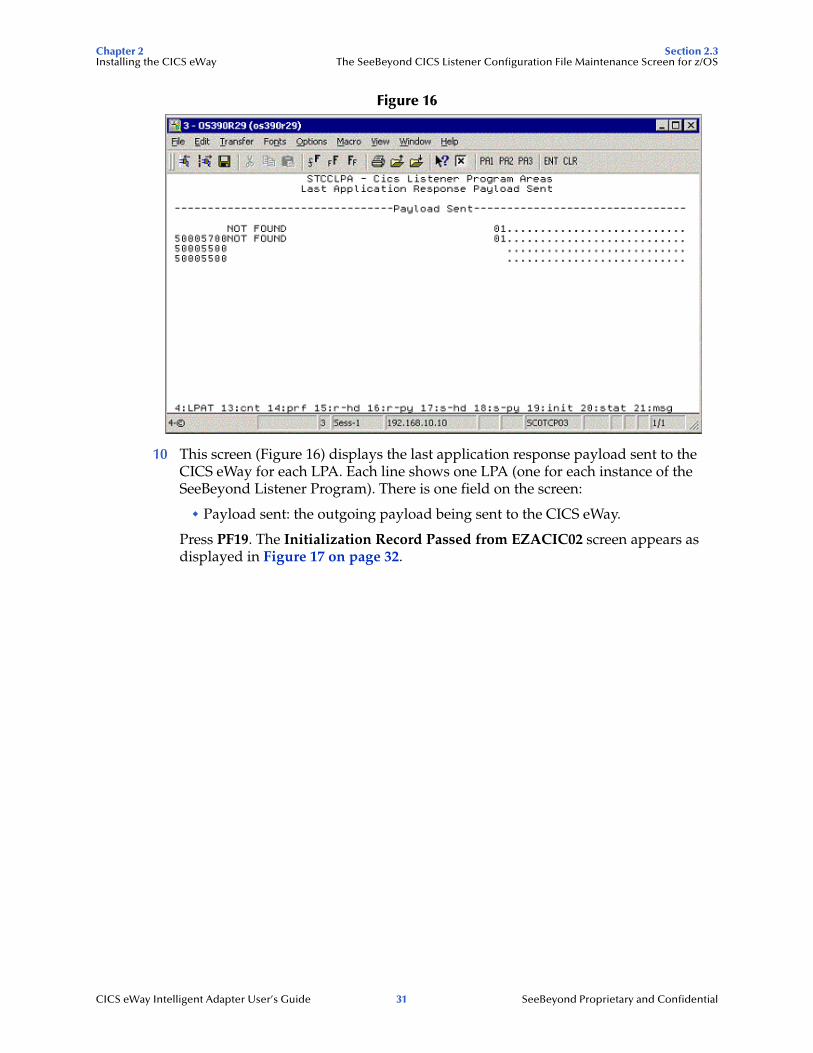
Figure 16
10 This screen (Figure 16) displays the last application response payload sent to the CICS eWay for each LPA. Each line shows one LPA (one for each instance of the SeeBeyond Listener Program). There is one field on the screen:
" Payload sent: the outgoing payload being sent to the CICS eWay.
Press PF19. The Initialization Record Passed from EZACIC02 screen appears as displayed in Figure 17 on page 32.
CICS eWay Intelligent Adapter User’s Guide 31 SeeBeyond Proprietary and Confidential
Chapter 2 Section 2.3Installing the CICS eWay The SeeBeyond CICS Listener Configuration File Maintenance Screen for z/OS
Figure 17
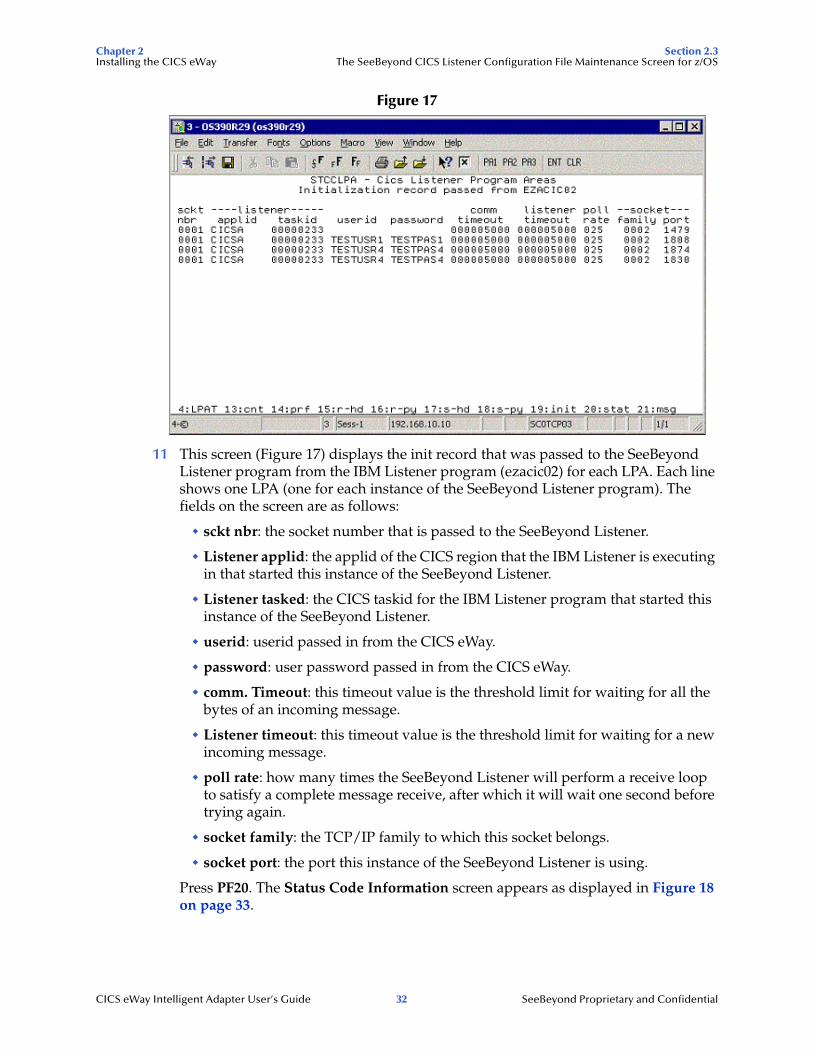
11 This screen (Figure 17) displays the init record that was passed to the SeeBeyond Listener program from the IBM Listener program (ezacic02) for each LPA. Each line shows one LPA (one for each instance of the SeeBeyond Listener program). The fields on the screen are as follows:
" sckt nbr: the socket number that is passed to the SeeBeyond Listener.
" Listener applid: the applid of the CICS region that the IBM Listener is executing in that started this instance of the SeeBeyond Listener.
" Listener tasked: the CICS taskid for the IBM Listener program that started this instance of the SeeBeyond Listener.
" userid: userid passed in from the CICS eWay.
" password: user password passed in from the CICS eWay.
" comm. Timeout: this timeout value is the threshold limit for waiting for all the bytes of an incoming message.
" Listener timeout: this timeout value is the threshold limit for waiting for a new incoming message.
" poll rate: how many times the SeeBeyond Listener will perform a receive loop to satisfy a complete message receive, after which it will wait one second before trying again.
" socket family: the TCP/IP family to which this socket belongs.
" socket port: the port this instance of the SeeBeyond Listener is using.
Press PF20. The Status Code Information screen appears as displayed in Figure 18 on page 33.
CICS eWay Intelligent Adapter User’s Guide 32 SeeBeyond Proprietary and Confidential
Chapter 2 Section 2.3Installing the CICS eWay The SeeBeyond CICS Listener Configuration File Maintenance Screen for z/OS
Figure 18
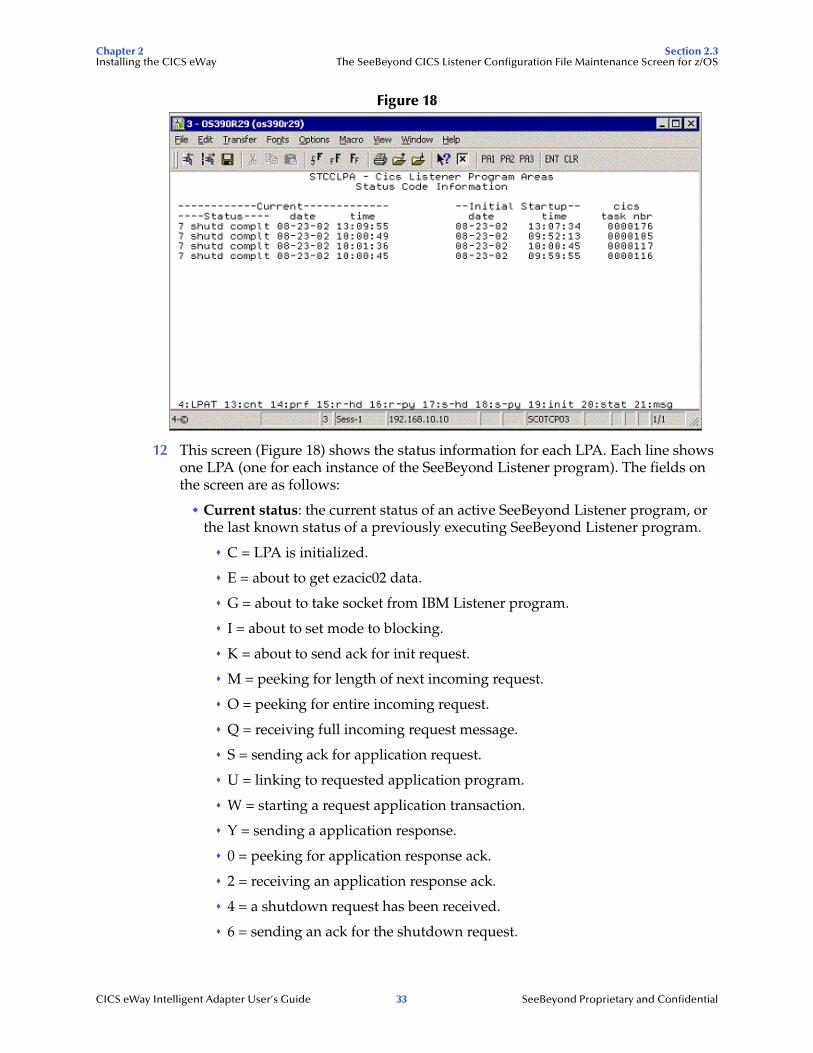
12 This screen (Figure 18) shows the status information for each LPA. Each line shows one LPA (one for each instance of the SeeBeyond Listener program). The fields on the screen are as follows:
" Current status: the current status of an active SeeBeyond Listener program, or the last known status of a previously executing SeeBeyond Listener program.
# C = LPA is initialized.
# E = about to get ezacic02 data.
# G = about to take socket from IBM Listener program.
# I = about to set mode to blocking.
# K = about to send ack for init request.
# M = peeking for length of next incoming request.
# O = peeking for entire incoming request.
# Q = receiving full incoming request message.
# S = sending ack for application request.
# U = linking to requested application program.
# W = starting a request application transaction.
# Y = sending a application response.
# 0 = peeking for application response ack.
# 2 = receiving an application response ack.
# 4 = a shutdown request has been received.
# 6 = sending an ack for the shutdown request.
CICS eWay Intelligent Adapter User’s Guide 33 SeeBeyond Proprietary and Confidential
Chapter 2 Section 2.4Installing the CICS eWay CICS Listener Considerations for Invoking DB2 Applications
# 7 = shutdown is complete, this LPA is now available for reuse.
# 8 = SeeBeyond Listener program appended.
" Current Status date: date for this status.
" Current Status time: time for this status.
" Initial Startup date: date this instance of the SeeBeyond Listener was started.
" Initial Startup time: time this instance of the SeeBeyond Listener was started.
" cics task nbr: the CICS eibtaskn for this instance of the SeeBeyond Listener.
Press PF21. The Error Message Sent screen appears as displayed in Figure 19.
Figure 19
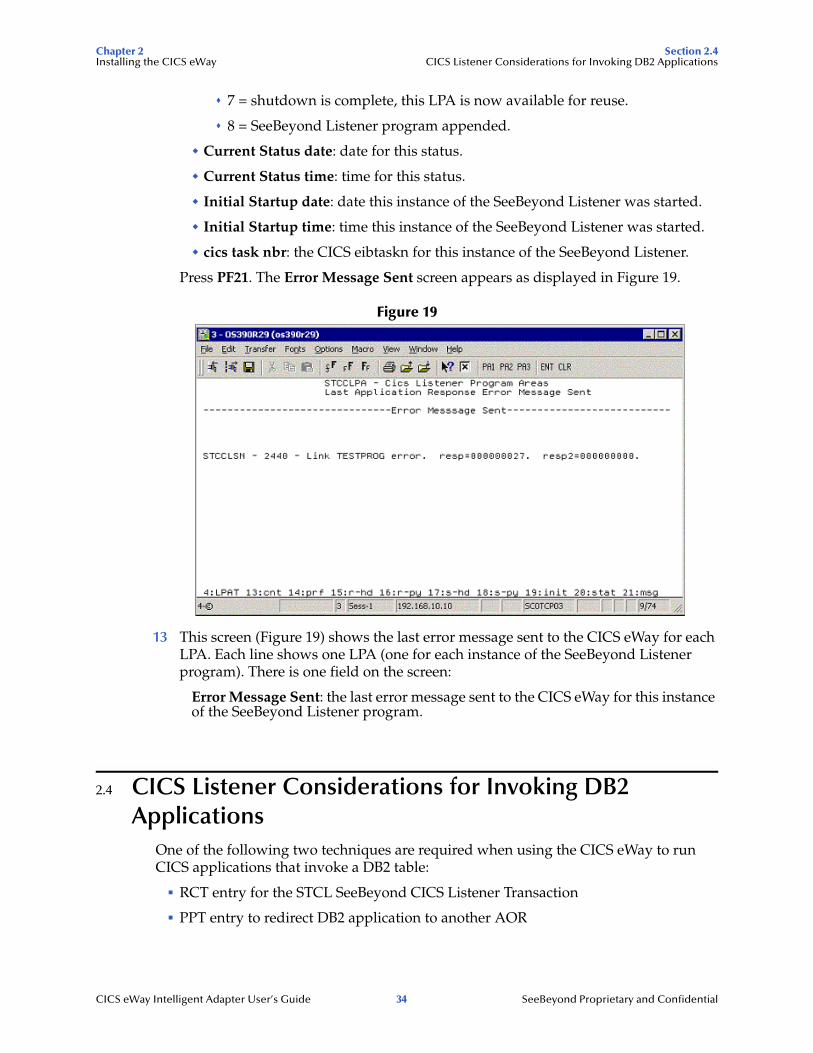
13 This screen (Figure 19) shows the last error message sent to the CICS eWay for each LPA. Each line shows one LPA (one for each instance of the SeeBeyond Listener program). There is one field on the screen:
Error Message Sent: the last error message sent to the CICS eWay for this instance of the SeeBeyond Listener program.
2.4 CICS Listener Considerations for Invoking DB2 Applications
One of the following two techniques are required when using the CICS eWay to run CICS applications that invoke a DB2 table:
! RCT entry for the STCL SeeBeyond CICS Listener Transaction
! PPT entry to redirect DB2 application to another AOR
CICS eWay Intelligent Adapter User’s Guide 34 SeeBeyond Proprietary and Confidential
Chapter 2 Section 2.4Installing the CICS eWay CICS Listener Considerations for Invoking DB2 Applications
RCT entry for the STCL SeeBeyond CICS Listener Transaction
To run DB2 application programs under the STCL SeeBeyond CICS Listener transid, an RCT entry for the STCL transaction must be created using an RCT macro definition similar to the one shown below or by using an equivalent RDO entry.
DSNCRCT TYPE=ENTRY,TXID=STCL,THRDM=0,THRDA=0,THRDS=0, TWAIT=POOL,PLAN=HD45LE06,AUTH=(SIGNID,*,*)
PPT entry to redirect DB2 application to another AOR
To redirect DB2 application programs to another AOR, the PPT entry for the requested DB2 application program in the TOR (where the STCL SeeBeyond CICS Listener transaction is running) must be defined to run the DB2 application program in a different region (usually an AOR) and under a specific PCT in that AOR. Refer to Figure 20 on page 36 for a detailed flow diagram showing the use of the PPT and PCT.
CICS eWay Intelligent Adapter User’s Guide 35 SeeBeyond Proprietary and Confidential

Chapter 2 Section 2.4Installing the CICS eWay CICS Listener Considerations for Invoking DB2 Applications
Figure 20 SeeBeyond CICS Listener invoking DB2 programs
Connection Manager
Send connection request record
Receive initial ack
Business Rules
Do until IQ is empty
Get next IQ record
Build Application Control Record (ACR) Including commarea Program = �PROG1'
Send ACR
Receive ACR ack
Receive ACR response with updated commarea
Send ACR response ack
put updated commarea to an IQ
end-do until
Termination
Send shutdown request
Receive shutdown ack
Shutdown e*Way
UNIX/Windows/Solaris OS/390
CICS eWayCICSTOR1
Terminal Owning RegionCICSAOR1
Application Owning Region
CSKL / EZACIC02IBM Listener
STCL / STCCLSNSeeBeyond Listener
Send initial ack
Do until shutdown is requested
Receive ACR
Send ACR ack
Exec CICS Link Program (PROG1) Commarea(�.)
Send ACR response
Receive ACR resp ack
End do until
IBM CICSProgram Domain
Receive Link request
Lookup PPT entry �PROG1�
Function Ship Link request to remote system AOR1 and run as transid TRN1
Receive result of Function Shipped Link request
Return result of remote link
PPT
PPT entry: PROG1 Transid: TRN1 Remoteysid: AOR1
Pre-existing resource definitions forexecuting customer�s application
PCT:TRN1
PPT:PROG1
RCT:PLAN1
Mirror TransactionTransid = TRN1
PROG1Customer
ApplicationDB2 Program
Customer�sApplication DB2
Databases
CICS eWay Intelligent Adapter User’s Guide 36 SeeBeyond Proprietary and Confidential
Chapter 3
Configuring the CICS eWay
This chapter describes how to create and configure the CICS eWay properties.
Chapter Topics
! Creating and Configuring the CICS eWay on page 37
! Using the Properties Sheet on page 38
! CICS eWay Connectivity Map Configuration Properties on page 40
! CICS eWay Environment Explorer Configuration Properties on page 43
3.1 Creating and Configuring the CICS eWayAll eWays contain a set of parameters with properties unique to that eWay type. After the eWays are established and a CICS External System is created in the project’s Environment, the eWay parameters can be modified for your specific system. The CICS eWay parameters are modified from two locations:
! From the Connectivity Map. These parameters most commonly apply to a specific component eWay, and may vary from other eWays (of the same type) in the project.
! From the Environment Explorer tree. These parameters are commonly global, applying to all eWays (of the same type) in the project. The saved properties are shared by all eWays in the CICS External System window.
3.1.1 Selecting CICS as the External ApplicationTo create a CICS eWay you must first create a CICS External Application in your Connectivity Map. CICS eWays are located between a CICS External Application and a Service. Services are containers for Collaborations, Business Processes, eTL processes, and so forth.
To create the CICS External Application
1 From the Connectivity Map toolbar, click the External Applications icon.
2 Select the CICS External Application from the menu (see Figure 21 on page 38). The selected CICS External Application icon appears on the Connectivity Map toolbar.
CICS eWay Intelligent Adapter User’s Guide 37 SeeBeyond Proprietary and Confidential
Chapter 3 Section 3.1Configuring the CICS eWay Creating and Configuring the CICS eWay
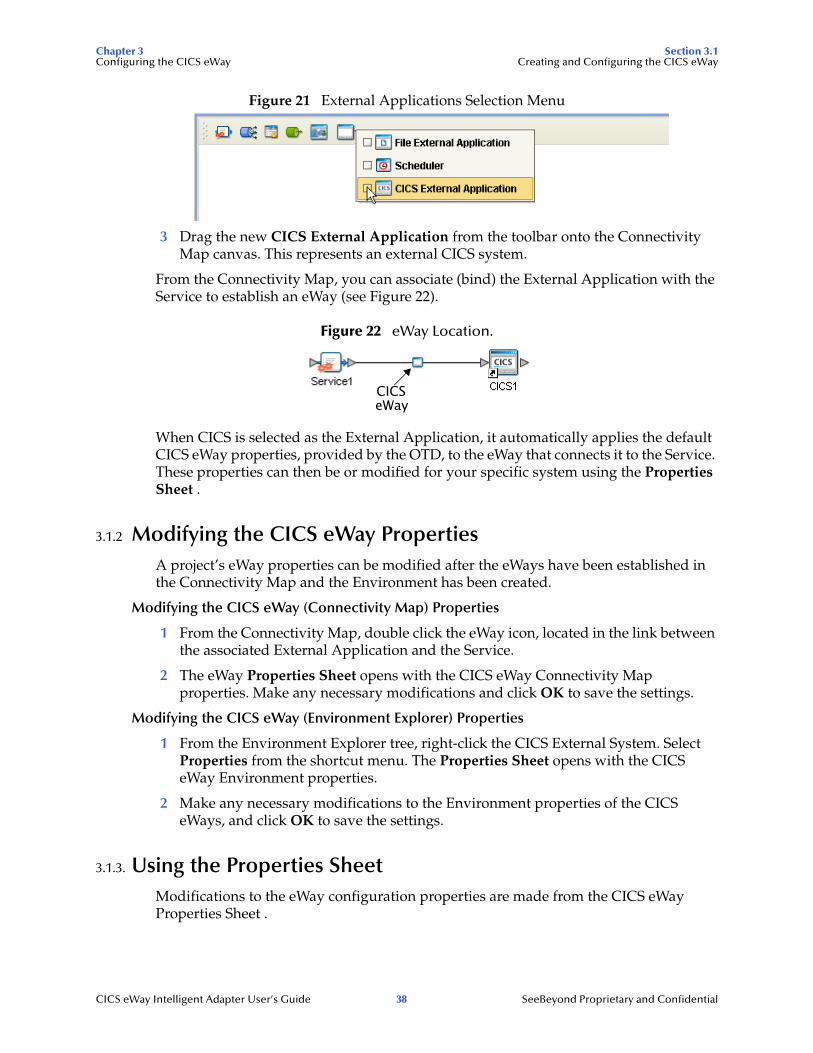
Figure 21 External Applications Selection Menu
3 Drag the new CICS External Application from the toolbar onto the Connectivity Map canvas. This represents an external CICS system.
From the Connectivity Map, you can associate (bind) the External Application with the Service to establish an eWay (see Figure 22).
Figure 22 eWay Location.
When CICS is selected as the External Application, it automatically applies the default CICS eWay properties, provided by the OTD, to the eWay that connects it to the Service. These properties can then be or modified for your specific system using the Properties Sheet .
3.1.2 Modifying the CICS eWay PropertiesA project’s eWay properties can be modified after the eWays have been established in the Connectivity Map and the Environment has been created.
Modifying the CICS eWay (Connectivity Map) Properties
1 From the Connectivity Map, double click the eWay icon, located in the link between the associated External Application and the Service.
2 The eWay Properties Sheet opens with the CICS eWay Connectivity Map properties. Make any necessary modifications and click OK to save the settings.
Modifying the CICS eWay (Environment Explorer) Properties
1 From the Environment Explorer tree, right-click the CICS External System. Select Properties from the shortcut menu. The Properties Sheet opens with the CICS eWay Environment properties.
2 Make any necessary modifications to the Environment properties of the CICS eWays, and click OK to save the settings.
3.1.3. Using the Properties Sheet Modifications to the eWay configuration properties are made from the CICS eWay Properties Sheet .
CICSeWay
CICS eWay Intelligent Adapter User’s Guide 38 SeeBeyond Proprietary and Confidential
Chapter 3 Section 3.1Configuring the CICS eWay Creating and Configuring the CICS eWay
To modify the default eWay configuration properties
1 Open the Properties Sheet to the CICS eWay default properties. An eWay has two different sets of parameters: those specific to that particular eWay (accessed from the Connectivity Map), and those that are common to all eWays of this type (accessed from the Environment Explorer tree).
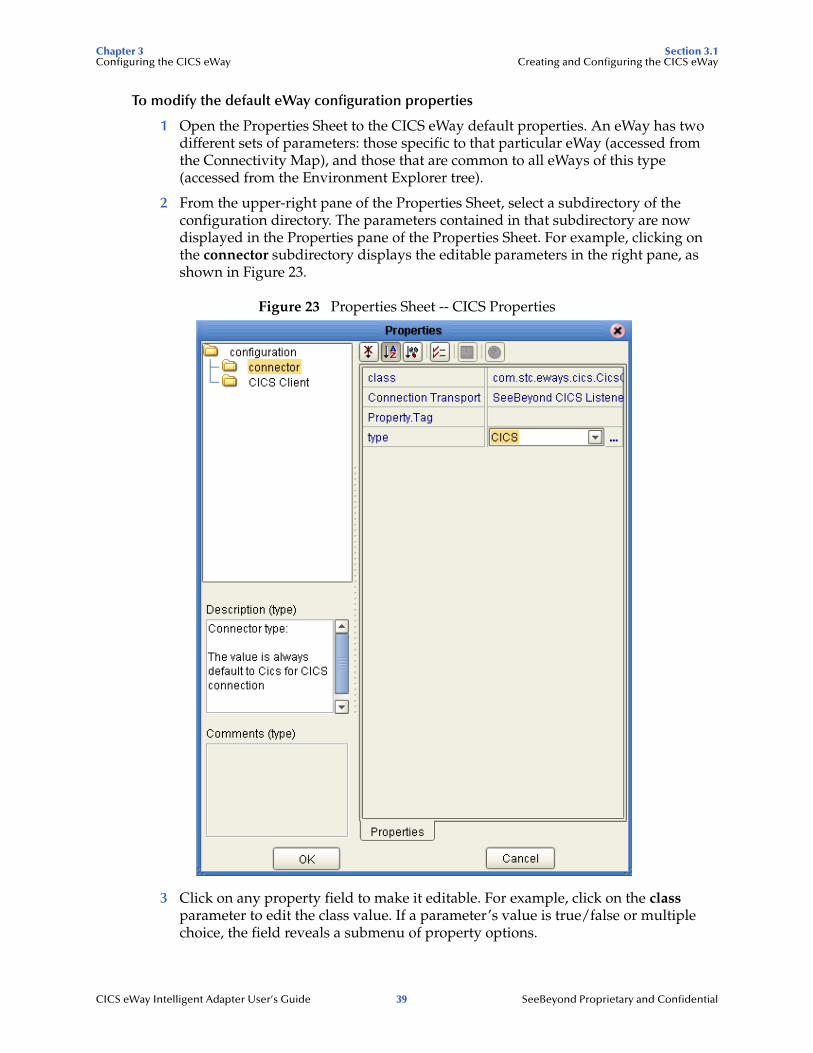
2 From the upper-right pane of the Properties Sheet, select a subdirectory of the configuration directory. The parameters contained in that subdirectory are now displayed in the Properties pane of the Properties Sheet. For example, clicking on the connector subdirectory displays the editable parameters in the right pane, as shown in Figure 23.
Figure 23 Properties Sheet -- CICS Properties
3 Click on any property field to make it editable. For example, click on the class parameter to edit the class value. If a parameter’s value is true/false or multiple choice, the field reveals a submenu of property options.
CICS eWay Intelligent Adapter User’s Guide 39 SeeBeyond Proprietary and Confidential
Chapter 3 Section 3.2Configuring the CICS eWay CICS eWay Connectivity Map Configuration Properties
Click on the ellipsis (. . .) in the properties field to open a separate configuration dialog box. This is helpful for large values that cannot be fully displayed in the parameter’s property field. Enter the property value in the dialog box and click OK. The value is now displayed in the parameter’s property field.
4 A description of each parameter is displayed in the Description pane when that parameter is selected, providing an explanation of any required settings or options.
5 The Comments pane provides an area for recording notes and information regarding the currently selected parameter. This is saved for future referral.
6 After modifying the configuration properties, click OK to close the Properties Sheet and save the changes.
3.2 CICS eWay Connectivity Map Configuration PropertiesThe CICS eWay configuration parameters, accessed from the Connectivity Map, are organized into the following sections:
! Connector on page 40
! CICS Client on page 41
3.2.1. ConnectorThis section contains a set of top level parameters:
! Class on page 40
! Connection Transport on page 40
! Property.Tag on page 41
! Type on page 41
Class
Description
Specifies the class name of the CICS Client connector object.
Required Value
The valid (class) package name for the CICS Client connector object. The default is com.stc.eways.cics.CicsClientConnector.
Connection Transport
Description
Specifies the underlying connection transport used by the CICS eWay. The SeeBeyond CICS Listener is the underlying transport to send requests to and get responses from a CICS region.
CICS eWay Intelligent Adapter User’s Guide 40 SeeBeyond Proprietary and Confidential
Chapter 3 Section 3.2Configuring the CICS eWay CICS eWay Connectivity Map Configuration Properties
Required Value
Enter the name of the selected underlying connection transport as follows:
SeeBeyond CICS Listener
SeeBeyond CICS Listener is the default.
Property.Tag
Description
Specifies the data source identity. This parameter is required by the current EBobConnectorFactory.
Required Value
The valid data source package name.
Type
Description
Specifies the connector type.
Required Value
CICS. The value always defaults to CICS for CICS connections.
3.2.2. CICS ClientThis section contains the following parameters for CICS Client setup:
! CICS Program on page 41
! CICS TransId on page 42
! COMMAREA Length on page 42
! ECI call type on page 42
! ECI extend mode on page 42
! Encoding on page 42
CICS Program
Description
Specifies the CICS program to be run on the server. Maximum length is eight characters.
Required Value
A valid CICS program name, eight characters or less.
CICS eWay Intelligent Adapter User’s Guide 41 SeeBeyond Proprietary and Confidential

Chapter 3 Section 3.2Configuring the CICS eWay CICS eWay Connectivity Map Configuration Properties
CICS TransId
Description
Specifies the CICS TransId to be run on the server. Maximum length is four characters.
Required Value
A valid CICS TransId, four characters or less.
COMMAREA Length
Description
Specifies the length (in bytes) of the communication area (COMMAREA) passed to the ECI.
Required Value
An integer in the range of 1 to 32659. The configured default is 1000.
ECI call type
Description
Specifies whether the ECI call type is Synchronous. Synchronous calls wait for the transaction to complete, then return the contents of the COMMAREA. Only Synchronous calls are supported
Required Value
Synchronous is the configured default.
ECI extend mode
Description
Specifies whether a logical unit of work is terminated at the end of a call.
Required Value
Yes or No. Yes indicates that the work unit is terminated at the end of a call. No is the configured default.
Encoding
Description
Specifies default encoding.
Required Value
The canonical name for any encoding set supported by Sun's Java Runtime Environment 1.1.8 (contained in rt.jar and i18n.jar). Examples are ASCII and Cp500 (EBCDIC). When running the CICS eWay on z/OS platforms, encoding should be set to "ISO-8859-1”.
CICS eWay Intelligent Adapter User’s Guide 42 SeeBeyond Proprietary and Confidential
Chapter 3 Section 3.3Configuring the CICS eWay CICS eWay Environment Explorer Configuration Properties
3.3 CICS eWay Environment Explorer Configuration Properties
The CICS eWay configuration parameters, accessed from the Environment Explorer tree, are organized into the following sections:
! SeeBeyond CICS Listener on page 43
! Tracing on page 47
! CICS Client on page 47
3.3.1. SeeBeyond CICS ListenerThese parameters are specific to the SeeBeyond CICS Listener. This section contains a set of top level parameters:
! COMMAREA Padding Character on page 43
! Host on page 44
! KeepAlive on page 44
! Listener Timeout on page 44
! NoDelay on page 44
! Polling Rate on page 45
! Port on page 45
! ReceiveBufSize on page 45
! SeeBeyond CICS Listener TransId on page 45
! SendBufSize on page 45
! Start Delay on page 46
! Start Type on page 46
! TP Timeout on page 46
! Transport Timeout on page 46
COMMAREA Padding Character
Description
Specifies the EBCDIC code for the character used by the SBYND listener to pad the COMMAREA at the CICS server when the actual length of the payload in the COMMAREA is shorter than the length given by CommAreaLength. The default value is hexadecimal 40 - EBCDIC space.
Required Value
! A character value coded in Hexadecimal. For example: 40 for Blanks, 00 for Low Values, FF for High Values, and so forth.
CICS eWay Intelligent Adapter User’s Guide 43 SeeBeyond Proprietary and Confidential
Chapter 3 Section 3.3Configuring the CICS eWay CICS eWay Environment Explorer Configuration Properties
Host
Description
Specifies the name of the mainframe host with which to connect. This is always CICS.
Required Value
CICS. The value always defaults to CICS for CICS connections. The default is CICS.
KeepAlive
Description
Specifies whether to enable socket keep-alive checking. A setting of TRUE enables an implementation specific time period when a probe is sent to the peer host. The purpose of this option is to detect if the peer host has crashed.
One of three responses is expected:
1. The peer responds with the expected ACK. The application is not notified (since everything is OK). TCP will send another probe following another 2 hours of inactivity.
2. The peer responds with an RST, which tells the local TCP that the peer host has crashed and rebooted. The socket is closed.
3. There is no response from the peer. The socket is closed.
Required Value
Enter TRUE or FALSE. TRUE is the default.
Listener Timeout
Description
Specifies the estimated amount of time (in milliseconds) for the SeeBeyond CICS Listener to wait for the next incoming transaction program request from the CICS eWay.
Required Value
An integer between 1 and 864000 representing milliseconds (for example, 120000 milliseconds equals 2 minutes). The default value is 5000.
NoDelay
Description
Specifies whether the system can delay connections or requests. Generally, NoDelay/True is necessary for high-volume and/or critical transactions. In cases of low-volume and/or noncritical transactions, you can use NoDelay/False. Required Values
Required Value
Enter TRUE or FALSE. TRUE is the default.
CICS eWay Intelligent Adapter User’s Guide 44 SeeBeyond Proprietary and Confidential
Chapter 3 Section 3.3Configuring the CICS eWay CICS eWay Environment Explorer Configuration Properties
Polling Rate
Description
Specifies the polling rate. This is the number of times the SeeBeyond CICS Listener will query the current TCP connection for incoming traffic before issuing an EXEC CICS DELAY for one second.
Required Value
An integer between 1 and 255 representing. The default value is 5.
Port
Description
Specifies the TCP/IP port where the SeeBeyond CICS Listener is listening. This is the port to which the CICS eWay will connect.
Required Value
The TCP/IP port to which SeeBeyond CICS Listener is listening. The default is 3001.
ReceiveBufSize
Description
Specifies the Receive Buffer Size (in bytes) for the underlying socket, this is a hint.
Required Value
An integer between 1 and 864000 representing bytes (for example, 10240 bytes equals 10 kilobytes). The default value is 4096.
SeeBeyond CICS Listener TransId
Description
Specifies the TransId of the SeeBeyond CICS Listener on the mainframe host. This is the CICS Transaction that the SeeBeyond CICS Listener is installed under.
Required Value
The valid TransId of the SeeBeyond Cics Listener
SendBufSize
Description
Specifies the Send Buffer Size for the underlying socket.
Required Value
An integer between 1 and 864000 representing bytes (for example, 10240 bytes equals 10 kilobytes). The default value is 4096.
CICS eWay Intelligent Adapter User’s Guide 45 SeeBeyond Proprietary and Confidential
Chapter 3 Section 3.3Configuring the CICS eWay CICS eWay Environment Explorer Configuration Properties
Start Delay
Description
Specifies the hours, minutes and seconds (interval of time) to delay starting the transaction program (TP) on the CICS server for the IC Start Type. This field is optional but must specify all 6 digits if used.
Required Value
A 6 digit integer. All 6 digits must be given if this is specified (for example, 000000).
Start Type
Description
Specifies the startup type. This can be either IC for CICS interval control or TD for CICS transient data. This is the CICS Startup type for the program being executed.
Required Value
Select IC or TD.
TP Timeout
Description
Specifies the amount of time the CICS eWay will wait for the SeeBeyond CICS Listener to return results for a current transaction program request.
Required Value
An integer between 1 and 864000 representing milliseconds (for example, 120000 milliseconds equals 2 minutes). The default value is 50000.
Transport Timeout
Description
Specifies the timeout used by both the local and host side for receive on the socket.
Required Value
An integer between 1 and 864000 representing milliseconds (for example, 120000 milliseconds equals 2 minutes). The default value is 5000.
CICS eWay Intelligent Adapter User’s Guide 46 SeeBeyond Proprietary and Confidential

Chapter 3 Section 3.3Configuring the CICS eWay CICS eWay Environment Explorer Configuration Properties
3.3.2. TracingThis section contains the following parameters for CICS Client setup:
! Timing on page 47
Timing
Description
Specifies whether or not to display time-stamps in the trace.
Required Value
On or Off. On indicates that the time-stamp is displayed in the trace. The default setting is On.
3.3.3. CICS ClientThis section contains the following parameters for CICS Client setup:
! CICS Password on page 47
! CICS UserId on page 47
CICS Password
Description
Specifies the password for the CICS user. Maximum length is eight characters.
Required Value
! A valid password for the user ID, eight characters or less.
CICS UserId
Description
Specifies the ID of the CICS user. Maximum length is eight characters.
Required Value
A valid CICS user ID, eight characters or less.
CICS eWay Intelligent Adapter User’s Guide 47 SeeBeyond Proprietary and Confidential
Chapter 3 Section 3.4Configuring the CICS eWay Alerting and Logging
3.4 Alerting and LoggingeGate provides an alerting and logging feature. This allows monitoring of messages, and captures any adverse messages in order of severity based on configured severity level and higher.
For information on enabling or modifying the level of logging for the various logging catagories, see the eGate Integrator System Administration Guide.
The alerts/status notifications for the CICS eWay are currently limited to Started, Running, Stopping, and Stopped.
CICS eWay Intelligent Adapter User’s Guide 48 SeeBeyond Proprietary and Confidential
Chapter 4
Using eInsight Business Processes with the CICS eWay
This chapter describes how to use the CICS eWay with the ICAN Suite’s eInsight Business Process Manager and the Web Services interface.
Note: You must have the eInsight.sar file installed to use the Web Services interface.
Chapter Topics
! The eInsight Engine and Components on page 49
! The CICS eWay With eInsight on page 50
! The CICS eWay eInsight Sample Project on page 50
4.1 The eInsight Engine and ComponentseGate components can be deployed as Activities in eInsight Business Processes. Once a component is associated with an Activity, eInsight invokes it using a Web Services interface. eGate components that can interface with eInsight in this way include the following:
! Object Type Definitions (OTDs)
! eWays
! Collaborations
Using the Enterprise Designer and eInsight, you can add an Activity to a Business Process, then associate that Activity with an eGate component, for example, an eWay. Then, when eInsight runs the Business Process, it automatically invokes that component via its Web Services interface.
See the eInsight Business Process Manager User’s Guide for details.
CICS eWay Intelligent Adapter User’s Guide 49 SeeBeyond Proprietary and Confidential

Chapter 4 Section 4.2Using eInsight Business Processes with the CICS eWay The CICS eWay With eInsight
4.2 The CICS eWay With eInsightAn eInsight Business Process Activity can be associated with the CICS eWay during the system design phase. To make this association, select the desired operators under the eWay in the Enterprise Explorer and drag it onto the eInsight Business Process Designer canvas.
The CICS eWay has the following operators available:
! execute
The operation is automatically changed to an Activity with an icon identifying the component that is the basis for the Activity. At run time, eInsight invokes each step in the order defined in the Business Process. Using eInsight’s Web Services interface, the Activity in turn invokes the CICS eWay.
4.3 The CICS eWay eInsight Sample ProjectThis following pages provide directions for creating a simple project that demonstrates how eInsight Business Processes are used with the CICS eWay. The same project can be downloaded from the Installation CD-ROM in a near-complete state.
For more information on creating ICAN projects see the eInsight Business Process Manager User’s Guide and the eGate Integrator User’s Guide.
4.4 Importing a Sample ProjectSample eWay projects are included as part of the installation CD-ROM package. To import a sample eWay project to the Enterprise Designer do the following:
1 The sample files are uploaded with the eWay’s documentation .sar file and downloaded from the Enterprise Manager’s Documentation tab. Extract the samples from the Enterprise Manager to a local file.
2 From the Enterprise Designer’s Project Explorer pane, right-click the Repository and select Import from the shortcut menu. The Import Manager appears.
3 Browse to the directory that contains the sample project zip file. Select the sample file (for this sample, CICS_BP_Sample.zip) and click Import. After the sample project is successfully imported, click Close.
4 When the import has successfully completed, right-click the Repository and select Refresh All from Repository from the shortcut menu.
5 Before the imported sample project can be run you must do the following:
" Create an Environment (see Creating an Environment on page 59)
CICS eWay Intelligent Adapter User’s Guide 50 SeeBeyond Proprietary and Confidential
Chapter 4 Section 4.5Using eInsight Business Processes with the CICS eWay The CICS_BP_Sample Project Overview
" Configure the eWay properties for your specific system (see Configuring the eWay Properties on page 60)
" Create a Deployment Profile (see Creating and Activating the Deployment Profile on page 62)
The following pages provide step by step directions for manually creating the CICS_BP_Sample project.
4.5 The CICS_BP_Sample Project OverviewThe CICS eWay project, CICS_BP_Sample, demonstrates the following:
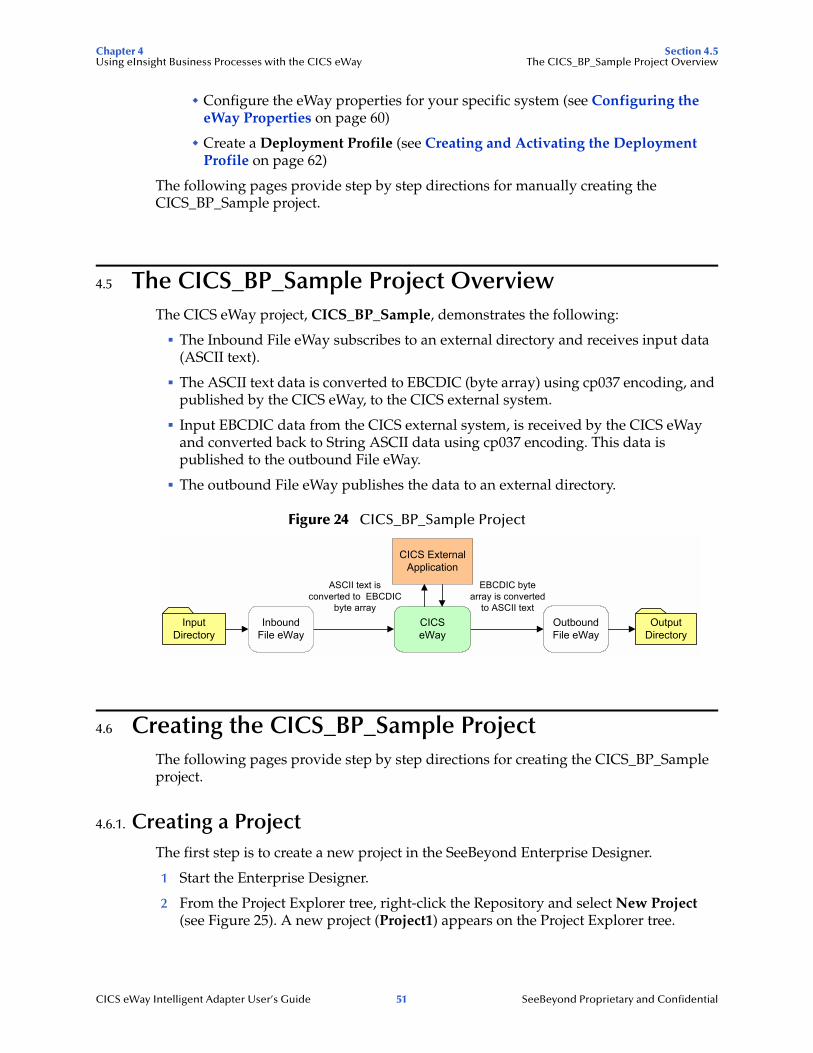
! The Inbound File eWay subscribes to an external directory and receives input data (ASCII text).
! The ASCII text data is converted to EBCDIC (byte array) using cp037 encoding, and published by the CICS eWay, to the CICS external system.
! Input EBCDIC data from the CICS external system, is received by the CICS eWay and converted back to String ASCII data using cp037 encoding. This data is published to the outbound File eWay.
! The outbound File eWay publishes the data to an external directory.
Figure 24 CICS_BP_Sample Project
4.6 Creating the CICS_BP_Sample ProjectThe following pages provide step by step directions for creating the CICS_BP_Sample project.
4.6.1. Creating a ProjectThe first step is to create a new project in the SeeBeyond Enterprise Designer.
1 Start the Enterprise Designer.
2 From the Project Explorer tree, right-click the Repository and select New Project (see Figure 25). A new project (Project1) appears on the Project Explorer tree.
InputDirectory
OutputDirectory
EBCDIC bytearray is converted
to ASCII text
ASCII text isconverted to EBCDIC
byte arrayCICSeWay
InboundFile eWay
OutboundFile eWay
CICS ExternalApplication
CICS eWay Intelligent Adapter User’s Guide 51 SeeBeyond Proprietary and Confidential

Chapter 4 Section 4.6Using eInsight Business Processes with the CICS eWay Creating the CICS_BP_Sample Project
Figure 25 Enterprise Explorer - New Project
3 Click twice on Project1 and rename the project (for this sample, CICS_BP_Sample).
4.6.2 Creating a Business ProcessTo create the CICS eInsight Business Process, do the following:
Creating the Business Process Flow
1 Right-click an existing project (for this sample CICS_BP_Sample) in the Enterprise Designer’s Project Explorer, and select New > Business Process from the shortcut menu. The eInsight Business Process Designer appears and BusinessProcess1 is added to the Project Explorer tree. Rename BusinessProcess1 to CICS_BP.
2 From the Project Explorer tree, expand the SeeBeyond > eWays > CICSeWay > CICS_eWay, and File > FileClient nodes.
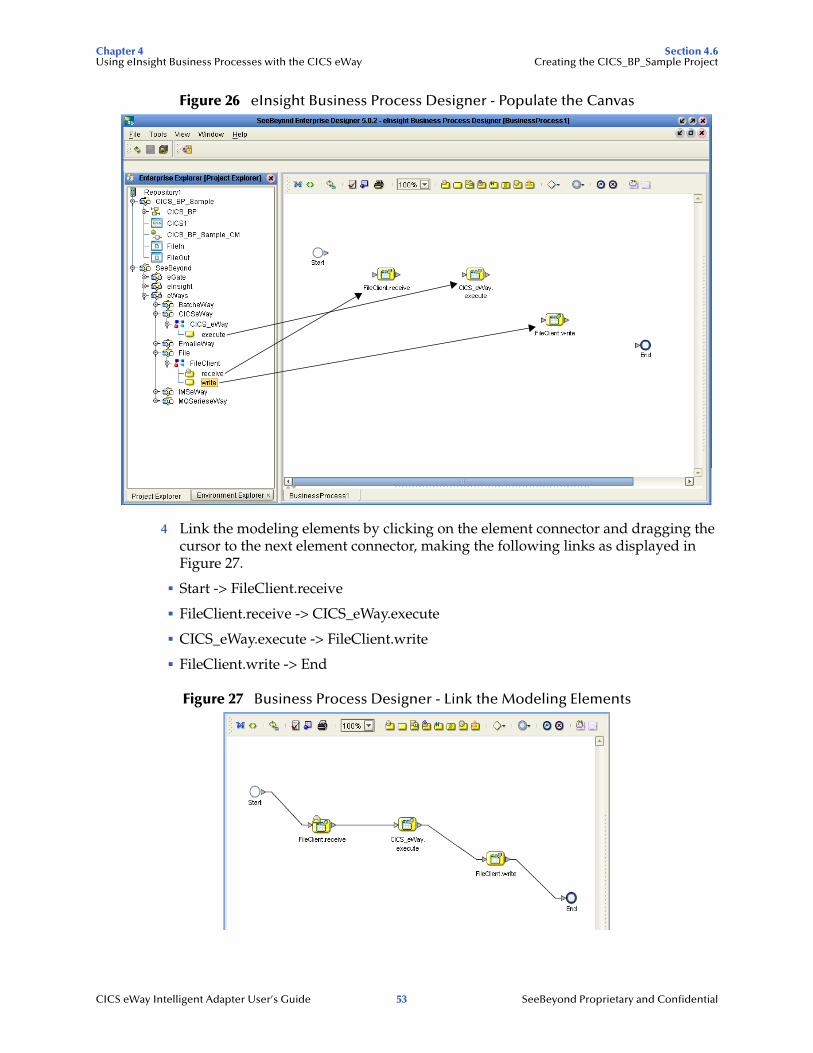
3 Populate the eInsight Business Process Designer’s modeling canvas with the following activities from the Project Explorer tree, as displayed in Figure 26 on page 53:
" receive, under SeeBeyond > eWays > File > FileClient
" execute, under SeeBeyond > eWays > CICSeWay > CICS_eWay
" write, under SeeBeyond > eWays > File > FileClient
CICS eWay Intelligent Adapter User’s Guide 52 SeeBeyond Proprietary and Confidential
Chapter 4 Section 4.6Using eInsight Business Processes with the CICS eWay Creating the CICS_BP_Sample Project
Figure 26 eInsight Business Process Designer - Populate the Canvas
4 Link the modeling elements by clicking on the element connector and dragging the cursor to the next element connector, making the following links as displayed in Figure 27.
! Start -> FileClient.receive
! FileClient.receive -> CICS_eWay.execute
! CICS_eWay.execute -> FileClient.write
! FileClient.write -> End
Figure 27 Business Process Designer - Link the Modeling Elements
CICS eWay Intelligent Adapter User’s Guide 53 SeeBeyond Proprietary and Confidential
Chapter 4 Section 4.6Using eInsight Business Processes with the CICS eWay Creating the CICS_BP_Sample Project
Configuring the Modeling Elements
Business Rules, created between the Business Process Activities, allow you to configure the relationships between the input and output Attributes of the Activities using the Business Process Designer’s Business Rule Designer.
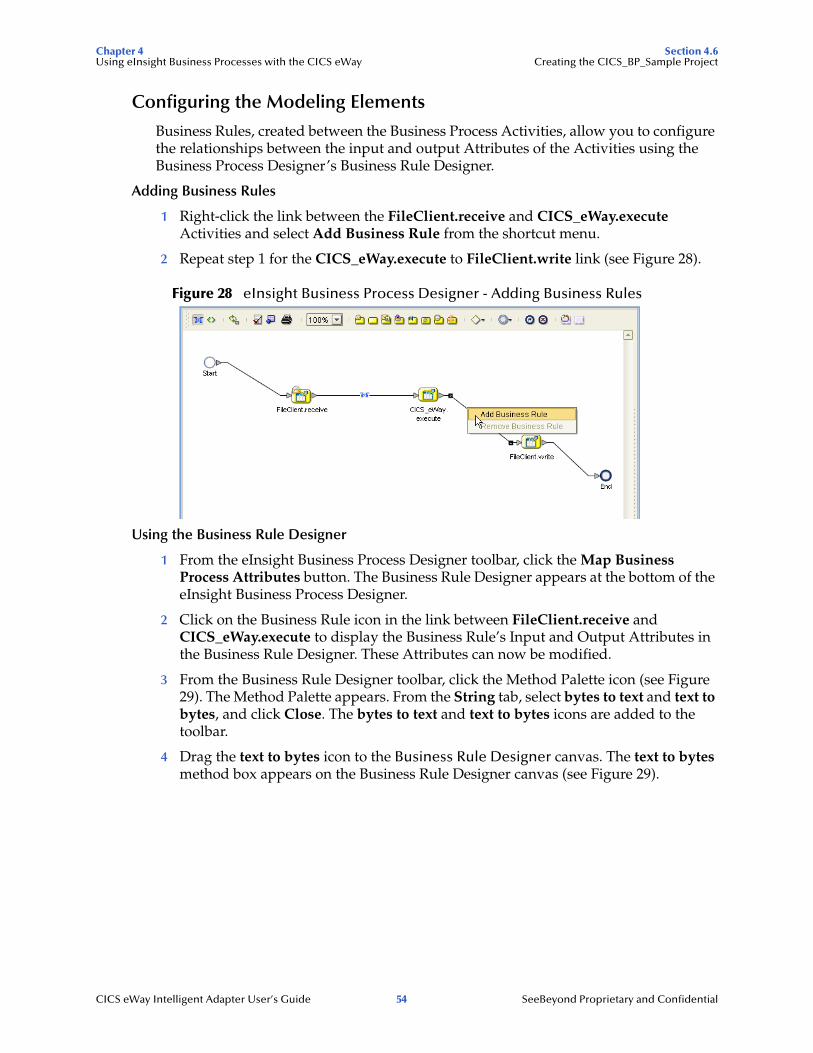
Adding Business Rules
1 Right-click the link between the FileClient.receive and CICS_eWay.execute Activities and select Add Business Rule from the shortcut menu.
2 Repeat step 1 for the CICS_eWay.execute to FileClient.write link (see Figure 28).
Figure 28 eInsight Business Process Designer - Adding Business Rules
Using the Business Rule Designer
1 From the eInsight Business Process Designer toolbar, click the Map Business Process Attributes button. The Business Rule Designer appears at the bottom of the eInsight Business Process Designer.
2 Click on the Business Rule icon in the link between FileClient.receive and CICS_eWay.execute to display the Business Rule’s Input and Output Attributes in the Business Rule Designer. These Attributes can now be modified.
3 From the Business Rule Designer toolbar, click the Method Palette icon (see Figure 29). The Method Palette appears. From the String tab, select bytes to text and text to bytes, and click Close. The bytes to text and text to bytes icons are added to the toolbar.
4 Drag the text to bytes icon to the Business Rule Designer canvas. The text to bytes method box appears on the Business Rule Designer canvas (see Figure 29).
CICS eWay Intelligent Adapter User’s Guide 54 SeeBeyond Proprietary and Confidential
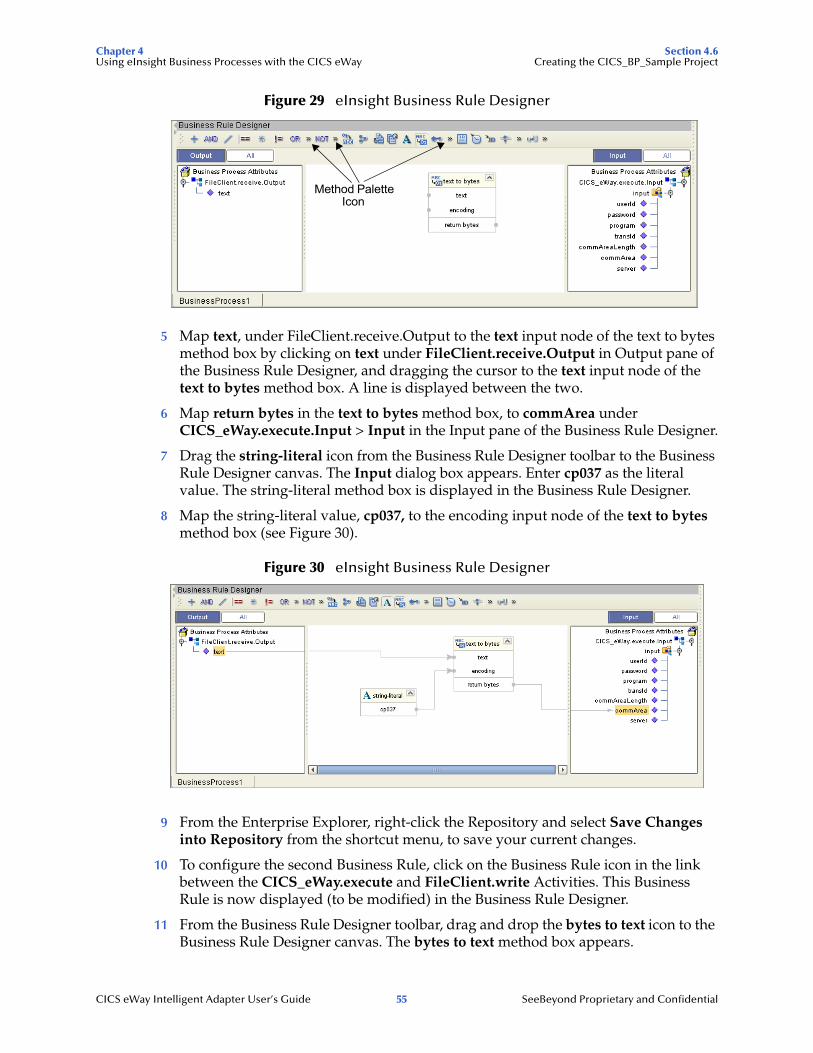
Chapter 4 Section 4.6Using eInsight Business Processes with the CICS eWay Creating the CICS_BP_Sample Project
Figure 29 eInsight Business Rule Designer
5 Map text, under FileClient.receive.Output to the text input node of the text to bytes method box by clicking on text under FileClient.receive.Output in Output pane of the Business Rule Designer, and dragging the cursor to the text input node of the text to bytes method box. A line is displayed between the two.
6 Map return bytes in the text to bytes method box, to commArea under CICS_eWay.execute.Input > Input in the Input pane of the Business Rule Designer.
7 Drag the string-literal icon from the Business Rule Designer toolbar to the Business Rule Designer canvas. The Input dialog box appears. Enter cp037 as the literal value. The string-literal method box is displayed in the Business Rule Designer.
8 Map the string-literal value, cp037, to the encoding input node of the text to bytes method box (see Figure 30).
Figure 30 eInsight Business Rule Designer
9 From the Enterprise Explorer, right-click the Repository and select Save Changes into Repository from the shortcut menu, to save your current changes.
10 To configure the second Business Rule, click on the Business Rule icon in the link between the CICS_eWay.execute and FileClient.write Activities. This Business Rule is now displayed (to be modified) in the Business Rule Designer.
11 From the Business Rule Designer toolbar, drag and drop the bytes to text icon to the Business Rule Designer canvas. The bytes to text method box appears.
Method PaletteIcon
CICS eWay Intelligent Adapter User’s Guide 55 SeeBeyond Proprietary and Confidential
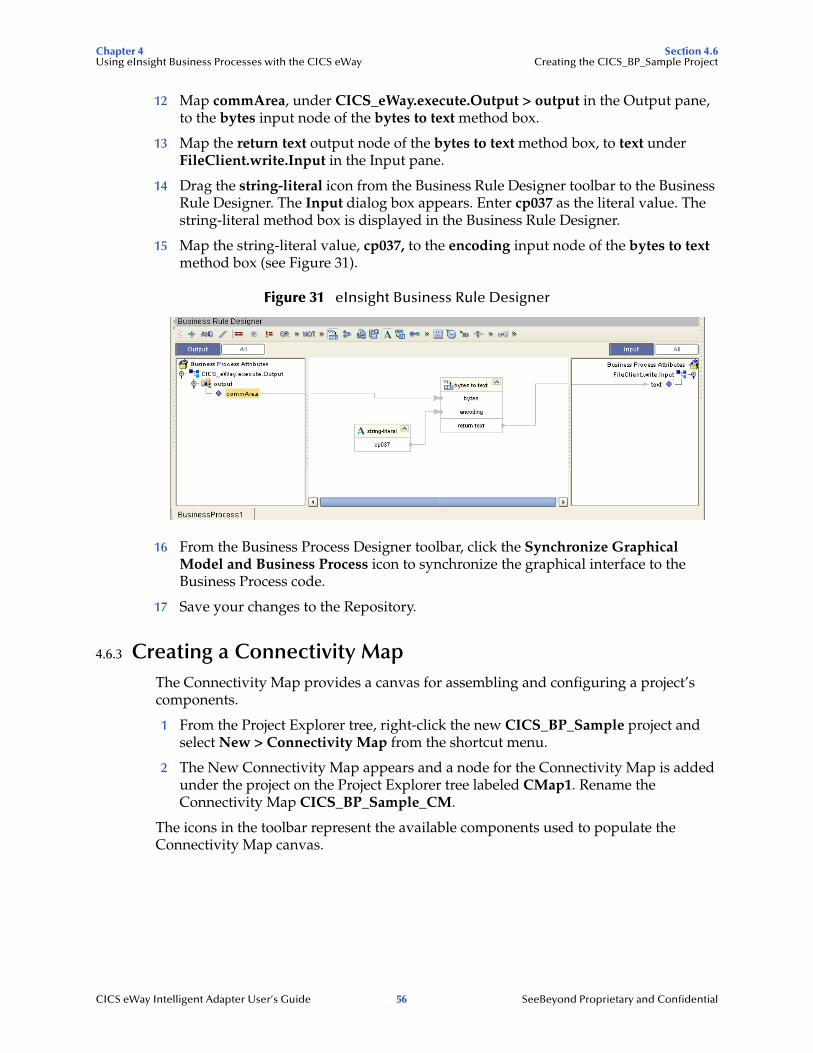
Chapter 4 Section 4.6Using eInsight Business Processes with the CICS eWay Creating the CICS_BP_Sample Project
12 Map commArea, under CICS_eWay.execute.Output > output in the Output pane, to the bytes input node of the bytes to text method box.
13 Map the return text output node of the bytes to text method box, to text under FileClient.write.Input in the Input pane.
14 Drag the string-literal icon from the Business Rule Designer toolbar to the Business Rule Designer. The Input dialog box appears. Enter cp037 as the literal value. The string-literal method box is displayed in the Business Rule Designer.
15 Map the string-literal value, cp037, to the encoding input node of the bytes to text method box (see Figure 31).
Figure 31 eInsight Business Rule Designer
16 From the Business Process Designer toolbar, click the Synchronize Graphical Model and Business Process icon to synchronize the graphical interface to the Business Process code.
17 Save your changes to the Repository.
4.6.3 Creating a Connectivity MapThe Connectivity Map provides a canvas for assembling and configuring a project’s components.
1 From the Project Explorer tree, right-click the new CICS_BP_Sample project and select New > Connectivity Map from the shortcut menu.
2 The New Connectivity Map appears and a node for the Connectivity Map is added under the project on the Project Explorer tree labeled CMap1. Rename the Connectivity Map CICS_BP_Sample_CM.
The icons in the toolbar represent the available components used to populate the Connectivity Map canvas.
CICS eWay Intelligent Adapter User’s Guide 56 SeeBeyond Proprietary and Confidential
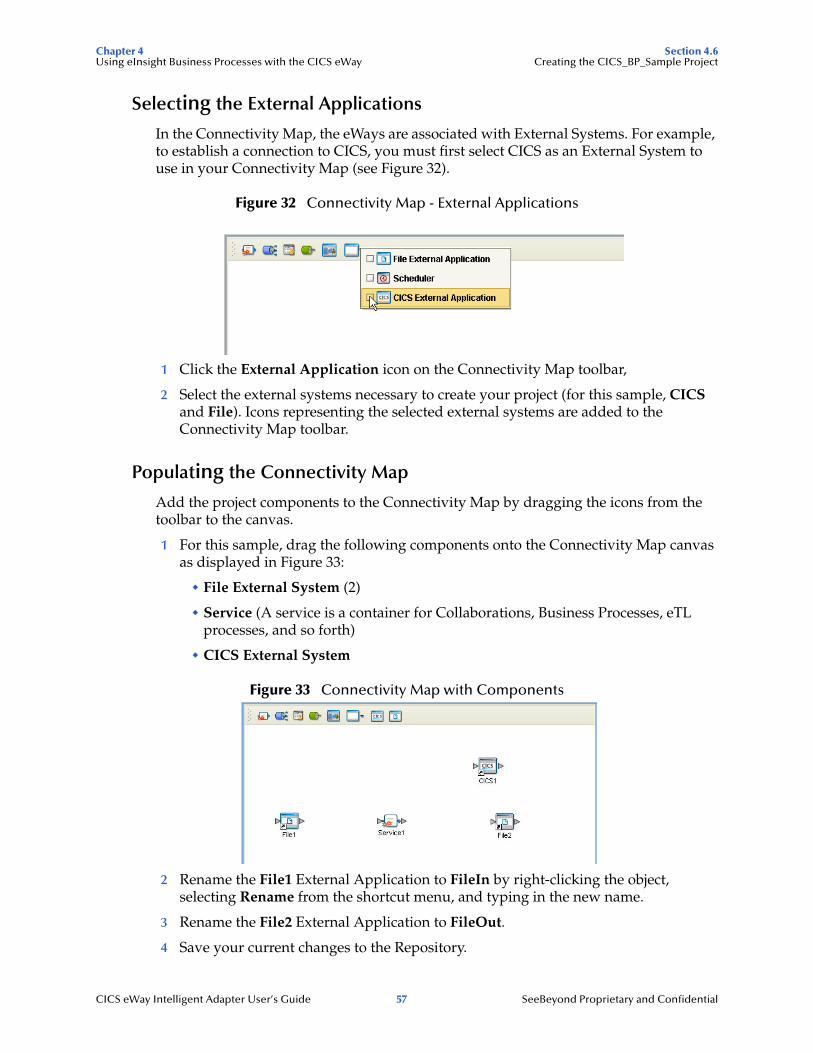
Chapter 4 Section 4.6Using eInsight Business Processes with the CICS eWay Creating the CICS_BP_Sample Project
Selecting the External Applications
In the Connectivity Map, the eWays are associated with External Systems. For example, to establish a connection to CICS, you must first select CICS as an External System to use in your Connectivity Map (see Figure 32).
Figure 32 Connectivity Map - External Applications
1 Click the External Application icon on the Connectivity Map toolbar,
2 Select the external systems necessary to create your project (for this sample, CICS and File). Icons representing the selected external systems are added to the Connectivity Map toolbar.
Populating the Connectivity Map
Add the project components to the Connectivity Map by dragging the icons from the toolbar to the canvas.
1 For this sample, drag the following components onto the Connectivity Map canvas as displayed in Figure 33:
" File External System (2)
" Service (A service is a container for Collaborations, Business Processes, eTL processes, and so forth)
" CICS External System
Figure 33 Connectivity Map with Components
2 Rename the File1 External Application to FileIn by right-clicking the object, selecting Rename from the shortcut menu, and typing in the new name.
3 Rename the File2 External Application to FileOut.
4 Save your current changes to the Repository.
CICS eWay Intelligent Adapter User’s Guide 57 SeeBeyond Proprietary and Confidential
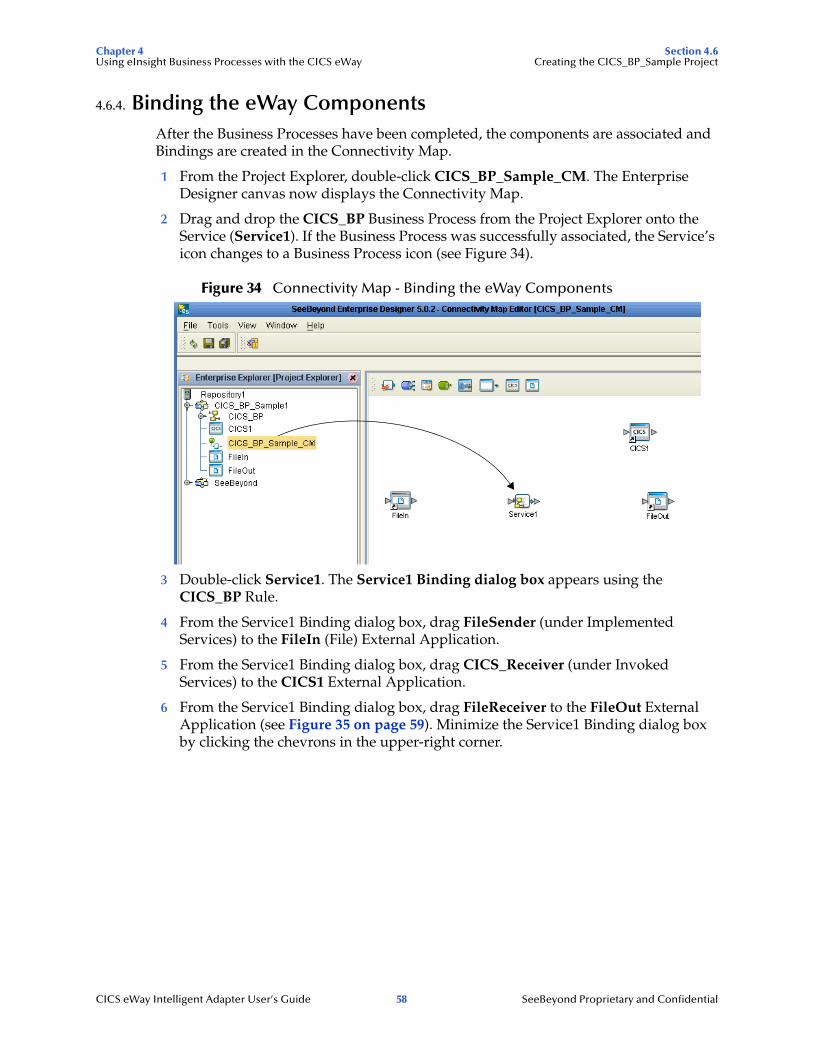
Chapter 4 Section 4.6Using eInsight Business Processes with the CICS eWay Creating the CICS_BP_Sample Project
4.6.4. Binding the eWay ComponentsAfter the Business Processes have been completed, the components are associated and Bindings are created in the Connectivity Map.
1 From the Project Explorer, double-click CICS_BP_Sample_CM. The Enterprise Designer canvas now displays the Connectivity Map.
2 Drag and drop the CICS_BP Business Process from the Project Explorer onto the Service (Service1). If the Business Process was successfully associated, the Service’s icon changes to a Business Process icon (see Figure 34).
Figure 34 Connectivity Map - Binding the eWay Components
3 Double-click Service1. The Service1 Binding dialog box appears using the CICS_BP Rule.
4 From the Service1 Binding dialog box, drag FileSender (under Implemented Services) to the FileIn (File) External Application.
5 From the Service1 Binding dialog box, drag CICS_Receiver (under Invoked Services) to the CICS1 External Application.
6 From the Service1 Binding dialog box, drag FileReceiver to the FileOut External Application (see Figure 35 on page 59). Minimize the Service1 Binding dialog box by clicking the chevrons in the upper-right corner.
CICS eWay Intelligent Adapter User’s Guide 58 SeeBeyond Proprietary and Confidential
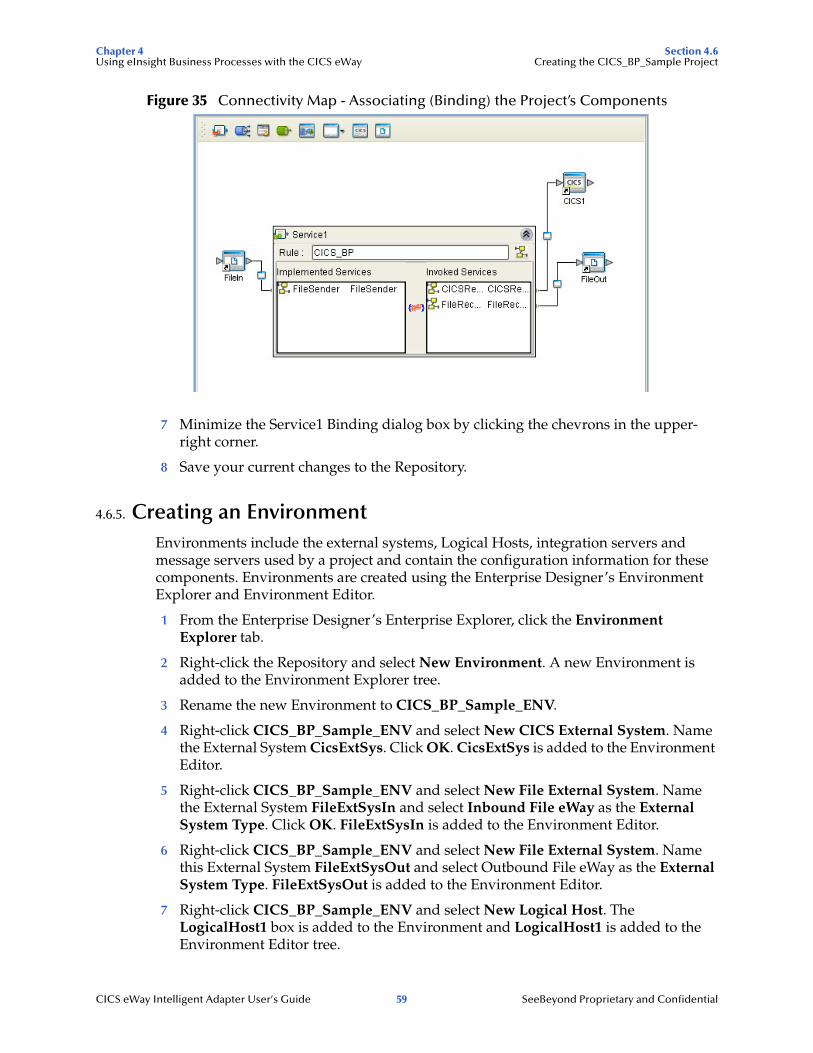
Chapter 4 Section 4.6Using eInsight Business Processes with the CICS eWay Creating the CICS_BP_Sample Project
Figure 35 Connectivity Map - Associating (Binding) the Project’s Components
7 Minimize the Service1 Binding dialog box by clicking the chevrons in the upper-right corner.
8 Save your current changes to the Repository.
4.6.5. Creating an EnvironmentEnvironments include the external systems, Logical Hosts, integration servers and message servers used by a project and contain the configuration information for these components. Environments are created using the Enterprise Designer’s Environment Explorer and Environment Editor.
1 From the Enterprise Designer’s Enterprise Explorer, click the Environment Explorer tab.
2 Right-click the Repository and select New Environment. A new Environment is added to the Environment Explorer tree.
3 Rename the new Environment to CICS_BP_Sample_ENV.
4 Right-click CICS_BP_Sample_ENV and select New CICS External System. Name the External System CicsExtSys. Click OK. CicsExtSys is added to the Environment Editor.
5 Right-click CICS_BP_Sample_ENV and select New File External System. Name the External System FileExtSysIn and select Inbound File eWay as the External System Type. Click OK. FileExtSysIn is added to the Environment Editor.
6 Right-click CICS_BP_Sample_ENV and select New File External System. Name this External System FileExtSysOut and select Outbound File eWay as the External System Type. FileExtSysOut is added to the Environment Editor.
7 Right-click CICS_BP_Sample_ENV and select New Logical Host. The LogicalHost1 box is added to the Environment and LogicalHost1 is added to the Environment Editor tree.
CICS eWay Intelligent Adapter User’s Guide 59 SeeBeyond Proprietary and Confidential
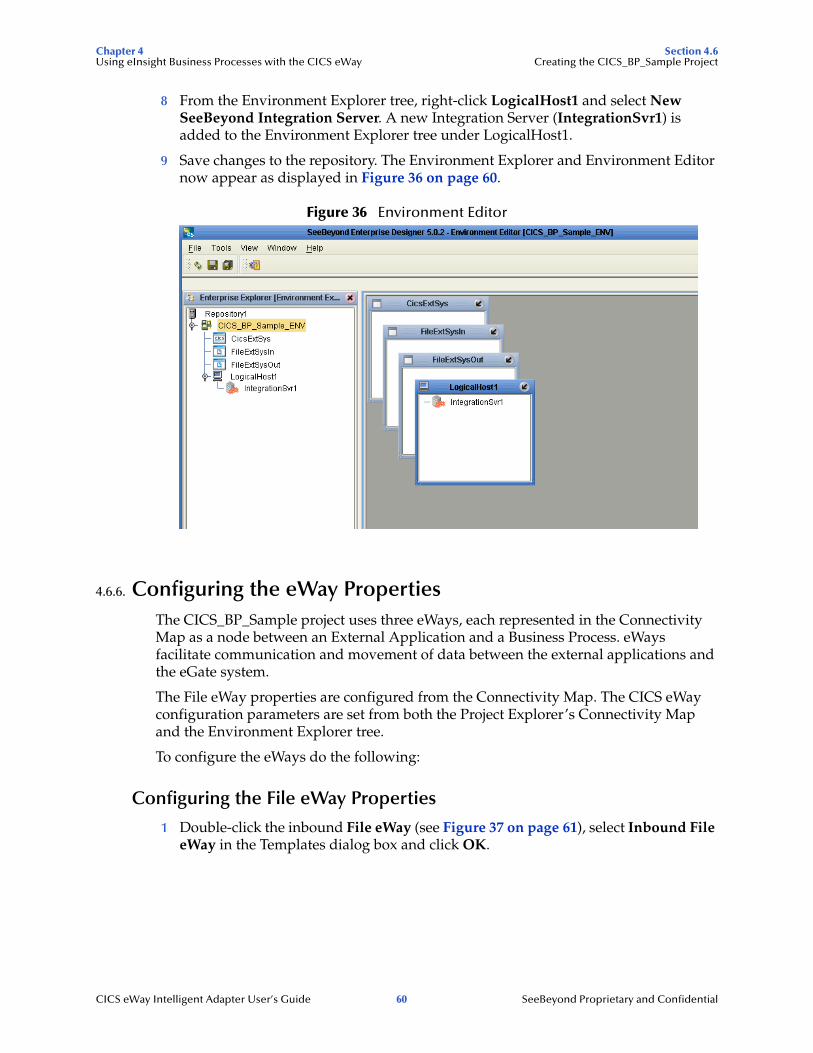
Chapter 4 Section 4.6Using eInsight Business Processes with the CICS eWay Creating the CICS_BP_Sample Project
8 From the Environment Explorer tree, right-click LogicalHost1 and select New SeeBeyond Integration Server. A new Integration Server (IntegrationSvr1) is added to the Environment Explorer tree under LogicalHost1.
9 Save changes to the repository. The Environment Explorer and Environment Editor now appear as displayed in Figure 36 on page 60.
Figure 36 Environment Editor
4.6.6. Configuring the eWay Properties The CICS_BP_Sample project uses three eWays, each represented in the Connectivity Map as a node between an External Application and a Business Process. eWays facilitate communication and movement of data between the external applications and the eGate system.
The File eWay properties are configured from the Connectivity Map. The CICS eWay configuration parameters are set from both the Project Explorer’s Connectivity Map and the Environment Explorer tree.
To configure the eWays do the following:
Configuring the File eWay Properties
1 Double-click the inbound File eWay (see Figure 37 on page 61), select Inbound File eWay in the Templates dialog box and click OK.
CICS eWay Intelligent Adapter User’s Guide 60 SeeBeyond Proprietary and Confidential
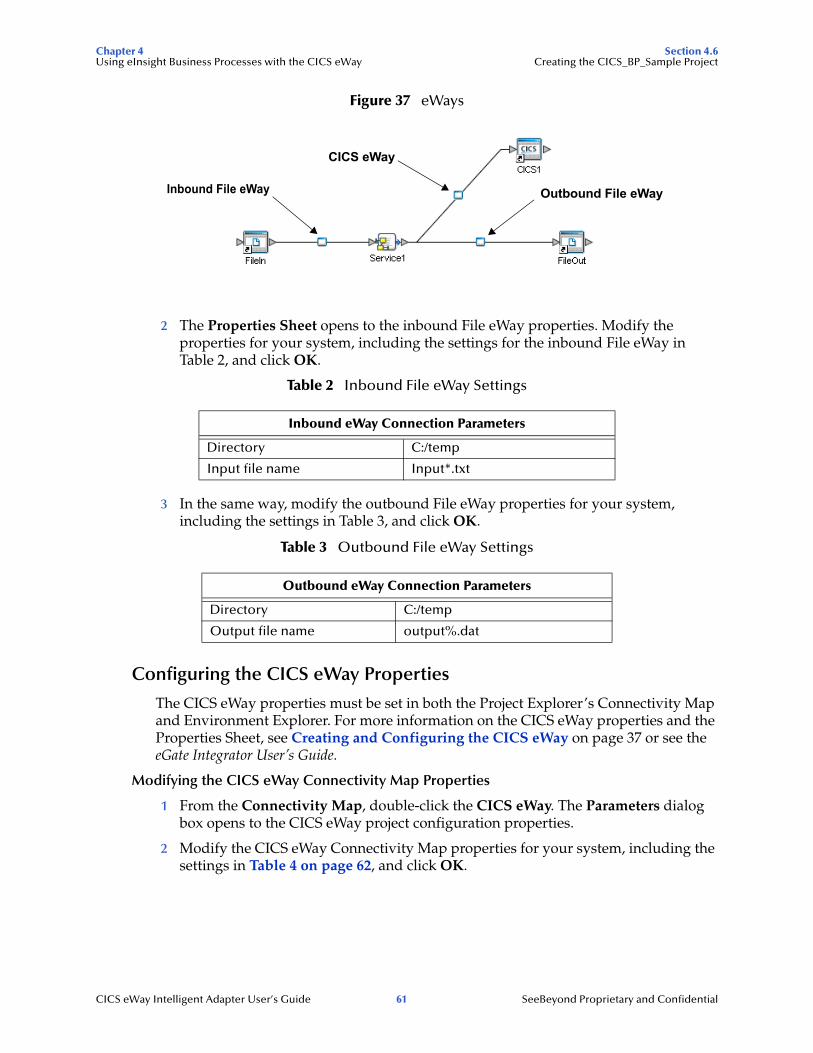
Chapter 4 Section 4.6Using eInsight Business Processes with the CICS eWay Creating the CICS_BP_Sample Project
Figure 37 eWays
2 The Properties Sheet opens to the inbound File eWay properties. Modify the properties for your system, including the settings for the inbound File eWay in Table 2, and click OK.
Table 2 Inbound File eWay Settings
3 In the same way, modify the outbound File eWay properties for your system, including the settings in Table 3, and click OK.
Table 3 Outbound File eWay Settings
Configuring the CICS eWay Properties
The CICS eWay properties must be set in both the Project Explorer’s Connectivity Map and Environment Explorer. For more information on the CICS eWay properties and the Properties Sheet, see Creating and Configuring the CICS eWay on page 37 or see the eGate Integrator User’s Guide.
Modifying the CICS eWay Connectivity Map Properties
1 From the Connectivity Map, double-click the CICS eWay. The Parameters dialog box opens to the CICS eWay project configuration properties.
2 Modify the CICS eWay Connectivity Map properties for your system, including the settings in Table 4 on page 62, and click OK.
Inbound eWay Connection Parameters
Directory C:/temp
Input file name Input*.txt
Outbound eWay Connection Parameters
Directory C:/temp
Output file name output%.dat
Inbound File eWay Outbound File eWay
CICS eWay
CICS eWay Intelligent Adapter User’s Guide 61 SeeBeyond Proprietary and Confidential
Chapter 4 Section 4.6Using eInsight Business Processes with the CICS eWay Creating the CICS_BP_Sample Project
Table 4 CICS eWay Connectivity Map Properties
Modifying the CICS eWay Environment Explorer Properties
1 From the Environment Explorer tree, right-click the CICS External System (CicsExtSys in this sample), and select Properties from the shortcut menu. The Properties Sheet appears.
2 Modify the CICS eWay environment properties for your system, including the settings in Table 5, and click OK.
Table 5 CICS Environment Explorer eWay Properties
4.6.7 Creating and Activating the Deployment ProfileDeployment Profiles are specific instances of a project in a particular Environment. A Deployment Profile contains information about the assignment of Services and message destinations to integration and message servers (JMS IQ Managers). It also contains version information for all versionable objects in the project. Deployment profiles are created using the Deployment Editor.
To create the CICS_BP_Sample Deployment Profile do the following:
1 From the Enterprise Explorer’s Project Explorer, right-click the project (CICS_BP_Sample) and select New > Deployment Profile from the shortcut menu.
CICS eWay (Connectivity Map) Properties
Connector Set as directed, otherwise use the default settings
Class com.stc.eways.cics.CicsClientConnector
Connection Transport SeeBeyond CICS Listener
Type CICS
CICS Client Set as directed, otherwise use the default settings.
COMMAREA Length 1000
CICS Program CICS program to be run on server
CICS eWay Environment Properties
SeeBeyond CICS Listener Settings Set as directed, otherwise use the default settings
Host Host Name
Port TCP/IP Port Number
CICS Client SettingsSet as directed, otherwise use the default settings.
CICS Password Password of CICS user
CICS UserId This is the Id of the CICS user
CICS eWay Intelligent Adapter User’s Guide 62 SeeBeyond Proprietary and Confidential
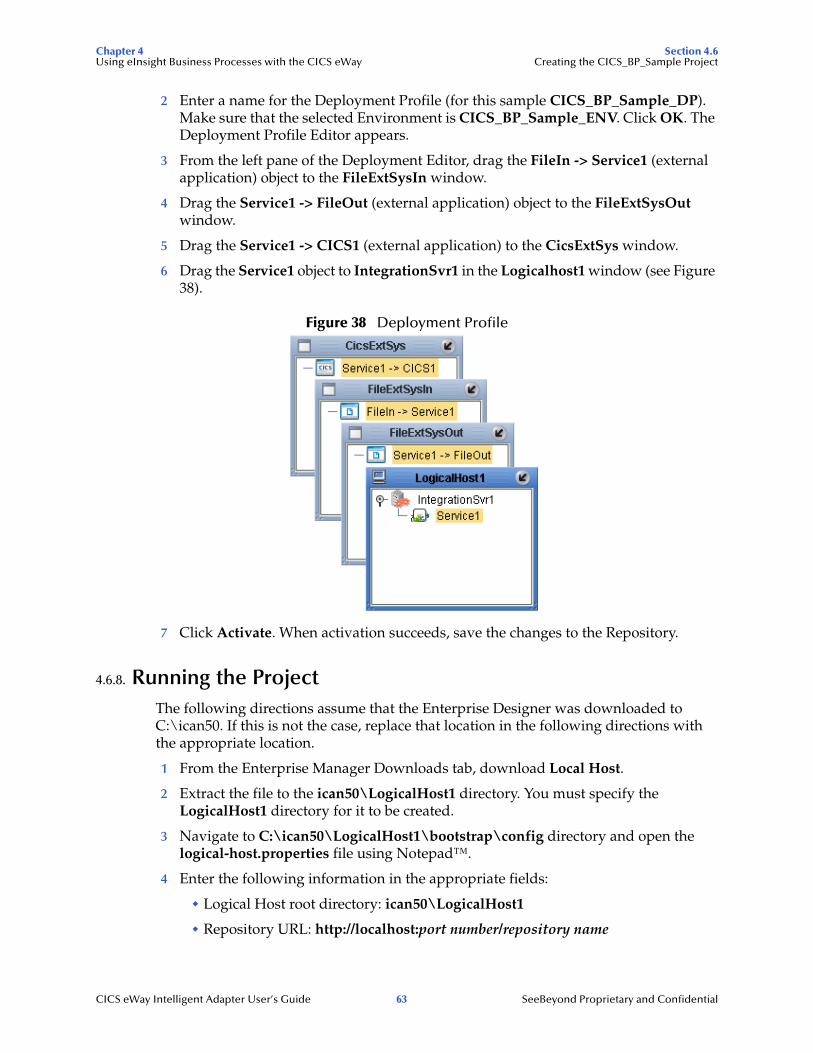
Chapter 4 Section 4.6Using eInsight Business Processes with the CICS eWay Creating the CICS_BP_Sample Project
2 Enter a name for the Deployment Profile (for this sample CICS_BP_Sample_DP). Make sure that the selected Environment is CICS_BP_Sample_ENV. Click OK. The Deployment Profile Editor appears.
3 From the left pane of the Deployment Editor, drag the FileIn -> Service1 (external application) object to the FileExtSysIn window.
4 Drag the Service1 -> FileOut (external application) object to the FileExtSysOut window.
5 Drag the Service1 -> CICS1 (external application) to the CicsExtSys window.
6 Drag the Service1 object to IntegrationSvr1 in the Logicalhost1 window (see Figure 38).
Figure 38 Deployment Profile
7 Click Activate. When activation succeeds, save the changes to the Repository.
4.6.8. Running the ProjectThe following directions assume that the Enterprise Designer was downloaded to C:\ican50. If this is not the case, replace that location in the following directions with the appropriate location.
1 From the Enterprise Manager Downloads tab, download Local Host.
2 Extract the file to the ican50\LogicalHost1 directory. You must specify the LogicalHost1 directory for it to be created.
3 Navigate to C:\ican50\LogicalHost1\bootstrap\config directory and open the logical-host.properties file using Notepad™.
4 Enter the following information in the appropriate fields:
" Logical Host root directory: ican50\LogicalHost1
" Repository URL: http://localhost:port number/repository name
CICS eWay Intelligent Adapter User’s Guide 63 SeeBeyond Proprietary and Confidential

Chapter 4 Section 4.6Using eInsight Business Processes with the CICS eWay Creating the CICS_BP_Sample Project
" Repository user name and password: Your user name and password
" Logical Host Environment name: CICS_BP_Sample_Env
" Logical Host name: LogicalHost1
Save your changes to logical-host.properties and close the file.
5 Run the bootstrap.bat file in the eGate50\LogicalHost1\bootstrap\bin directory.
6 Copy the sample input data file to the input directory.
CICS eWay Intelligent Adapter User’s Guide 64 SeeBeyond Proprietary and Confidential
Chapter 5
Implementing a CICS eWay Project
This chapter provides an introduction to the CICS eWay components and information on how these components are created and implemented in an eGate project. It is assumed that the reader understands the basics of creating a project using the SeeBeyond Enterprise Designer. For more information on creating an eGate project see the eGate Tutorial and the eGate Integrator User’s Guide.
Chapter Topics
! CICS eWay Components on page 65
! CICS eWay Sample Projects on page 66
" The CICS_JCE_Sample Project Overview on page 67
" The CICS_COBOL_Sample Project on page 83
5.1 CICS eWay ComponentsThis chapter presents sample CICS eWay projects created using the same procedures as the sample end-to-end project provided in the eGate Tutorial. CICS eWay components that are unique to this eWay include the following:
CICS eWay Configuration File
The configuration file for the CICS eWay contains the parameters that are used to connecting with a specific external system. These parameters are set using the Parameters dialog box. For more information about the CICS eWay Configuration File and the Parameters dialog box see Creating and Configuring the CICS eWay on page 37.
CICS_eWay.CICSClient OTD
The CICS_eWay.CICSClient OTD is provided with the eWay and contains methods and attributes used to create the Business Rules that invoke the CICS program.
Cobol Copybook Wizard
The Cobol Copybook Wizard allows the eGate Integrator to convert Cobol Copybook files into eGate Object Type Definition (OTD) files.
CICS eWay Intelligent Adapter User’s Guide 65 SeeBeyond Proprietary and Confidential

Chapter 5 Section 5.2Implementing a CICS eWay Project CICS eWay Sample Projects
5.2 CICS eWay Sample ProjectsTwo sample projects are defined in the following sections.
! CICS_JCE_Sample: a simple project that demonstrates the CICS eWay receiving data from a file, passing the data to the CICS External System, and writing the output from the CICS System to another file.
! CICS_COBOL_Sample: demonstrates a simple CICS project that uses the Cobol Copybook Converter.
5.3 Importing a Sample ProjectSample eWay projects are included as part of the installation CD-ROM package. To import a sample eWay project to the Enterprise Designer do the following:
1 The sample files are uploaded with the eWay’s documentation .sar file and downloaded from the Enterprise Manager’s Documentation tab. Extract the samples from the Enterprise Manager to a local file.
2 From the Enterprise Designer’s Project Explorer pane, right-click the Repository and select Import from the shortcut menu. The Import Manager appears.
3 Browse to the directory that contains the sample project zip file. Select the sample file (for this sample, CICSjms_JCE_Sample.zip) and click Import. After the sample project is successfully imported, click Close.
4 When the import has successfully completed, right-click the Repository and select Refresh All from Repository from the shortcut menu.
5 Before an imported sample project can be run you must do the following:
" Create an Environment (see Creating an Environment on page 77)
" Configure the eWays for your specific system (see Configuring the eWays on page 78)
" Create a Deployment Profile (see Creating and Activating the Deployment Profile on page 81)
CICS eWay Intelligent Adapter User’s Guide 66 SeeBeyond Proprietary and Confidential

Chapter 5 Section 5.4Implementing a CICS eWay Project The CICS_JCE_Sample Project Overview
5.4 The CICS_JCE_Sample Project OverviewThe CICS eWay project, CICS_JCE_Sample, demonstrates the following:
! Input data (ASCII text) is read from an external directory by the Inbound File eWay.
! The ASCII text data is converted to EBCDIC (byte array) using cp037 encoding, and published by the CICS eWay to the CICS external system.
! The CICS eWay subscribes to the CICS external system, receives EBCDIC input data, and converts it to String ASCII data using cp037 encoding. The data is then published to the JMS Topic.
! The outbound File eWay subscribes to the JMS Topic and publishes the data to an external directory.
Figure 39 CICS_JCE_Sample Project
5.5 Creating the CICS_JCE_Sample ProjectThe following pages provide step by step directions for manually creating the sample eWay components.
5.5.1. Creating a ProjectThe first step is to create a new project in the SeeBeyond Enterprise Designer.
1 Start the Enterprise Designer.
2 From the Enterprise Explorer’s Project Explorer tab, right-click your Repository on the Project Explorer tree and select New Project (see Figure 40 on page 68). A new project (Project1) appears on the Project Explorer tree.
JMSTopic
InputDirectory
OutputDirectory
EBCDIC bytearray is converted
to ASCII text
ASCII text isconverted to EBCDIC
byte array
CICSeWay
InboundFile eWay
OutboundFile eWay
CICS ExternalApplication
CICS eWay Intelligent Adapter User’s Guide 67 SeeBeyond Proprietary and Confidential
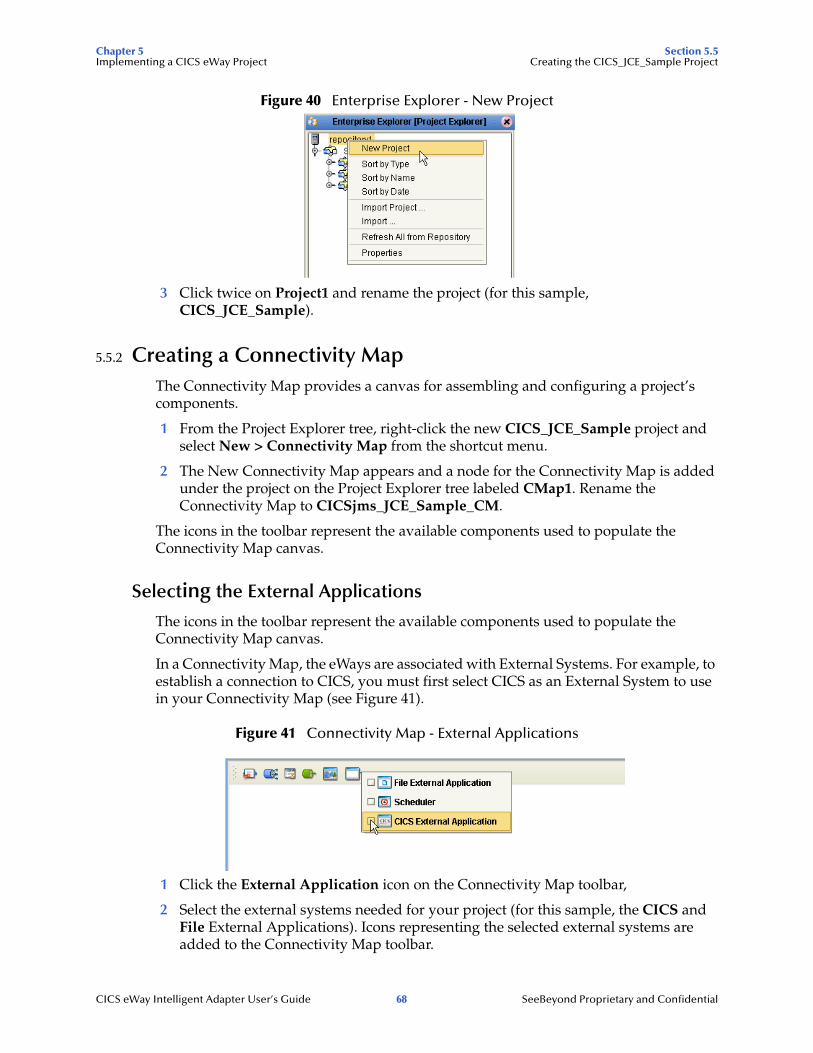
Chapter 5 Section 5.5Implementing a CICS eWay Project Creating the CICS_JCE_Sample Project
Figure 40 Enterprise Explorer - New Project
3 Click twice on Project1 and rename the project (for this sample, CICS_JCE_Sample).
5.5.2 Creating a Connectivity MapThe Connectivity Map provides a canvas for assembling and configuring a project’s components.
1 From the Project Explorer tree, right-click the new CICS_JCE_Sample project and select New > Connectivity Map from the shortcut menu.
2 The New Connectivity Map appears and a node for the Connectivity Map is added under the project on the Project Explorer tree labeled CMap1. Rename the Connectivity Map to CICSjms_JCE_Sample_CM.
The icons in the toolbar represent the available components used to populate the Connectivity Map canvas.
Selecting the External Applications
The icons in the toolbar represent the available components used to populate the Connectivity Map canvas.
In a Connectivity Map, the eWays are associated with External Systems. For example, to establish a connection to CICS, you must first select CICS as an External System to use in your Connectivity Map (see Figure 41).
Figure 41 Connectivity Map - External Applications
1 Click the External Application icon on the Connectivity Map toolbar,
2 Select the external systems needed for your project (for this sample, the CICS and File External Applications). Icons representing the selected external systems are added to the Connectivity Map toolbar.
CICS eWay Intelligent Adapter User’s Guide 68 SeeBeyond Proprietary and Confidential

Chapter 5 Section 5.5Implementing a CICS eWay Project Creating the CICS_JCE_Sample Project
Populating the Connectivity Map
Add the project components to the Connectivity Map by dragging the icons from the toolbar to the canvas.
1 For this sample, drag the following components onto the Connectivity Map canvas as displayed in Figure 42:
" File External System (2)
" Service (2) A service is a container for Collaborations, Business Processes, eTL processes, and so forth.
" Topic
" CICS External System
Figure 42 Connectivity Map with Components
2 Rename the objects by right-clicking the object, selecting Rename from the shortcut menu, and typing in the new name. Change the names as follows:
" File1 to FileIn
" Service1 to CICSjmsCollab
" Service2 to JMS2FileCollab
" File2 to FileOut
3 From the Enterprise Designer toolbar, click the Save All icon to save your current changes to the Repository.
5.5.3. Creating the Collaboration DefinitionsThe next step in the sample is to create two Collaborations using the Collaboration Definition Wizard (Java). Once the Collaboration Definitions have been created, the Business Rules of the Collaborations are written using the Collaboration Editor.
CICS eWay Intelligent Adapter User’s Guide 69 SeeBeyond Proprietary and Confidential
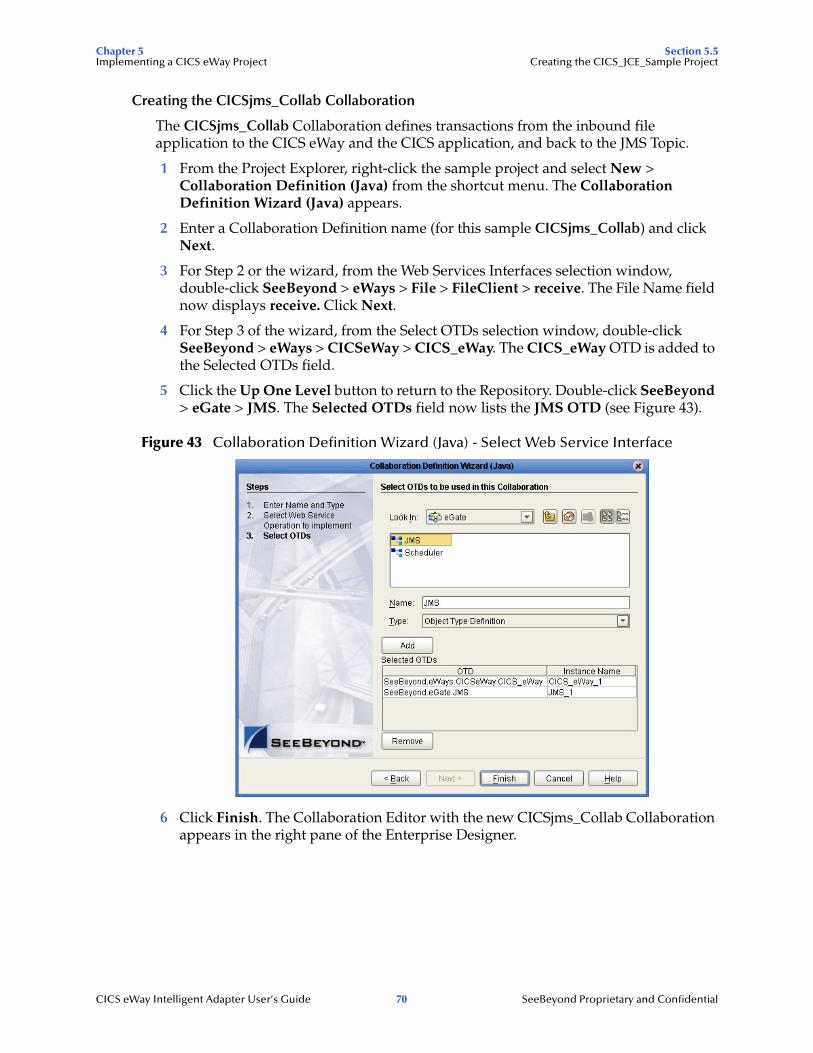
Chapter 5 Section 5.5Implementing a CICS eWay Project Creating the CICS_JCE_Sample Project
Creating the CICSjms_Collab Collaboration
The CICSjms_Collab Collaboration defines transactions from the inbound file application to the CICS eWay and the CICS application, and back to the JMS Topic.
1 From the Project Explorer, right-click the sample project and select New > Collaboration Definition (Java) from the shortcut menu. The Collaboration Definition Wizard (Java) appears.
2 Enter a Collaboration Definition name (for this sample CICSjms_Collab) and click Next.
3 For Step 2 or the wizard, from the Web Services Interfaces selection window, double-click SeeBeyond > eWays > File > FileClient > receive. The File Name field now displays receive. Click Next.
4 For Step 3 of the wizard, from the Select OTDs selection window, double-click SeeBeyond > eWays > CICSeWay > CICS_eWay. The CICS_eWay OTD is added to the Selected OTDs field.
5 Click the Up One Level button to return to the Repository. Double-click SeeBeyond > eGate > JMS. The Selected OTDs field now lists the JMS OTD (see Figure 43).
Figure 43 Collaboration Definition Wizard (Java) - Select Web Service Interface
6 Click Finish. The Collaboration Editor with the new CICSjms_Collab Collaboration appears in the right pane of the Enterprise Designer.
CICS eWay Intelligent Adapter User’s Guide 70 SeeBeyond Proprietary and Confidential
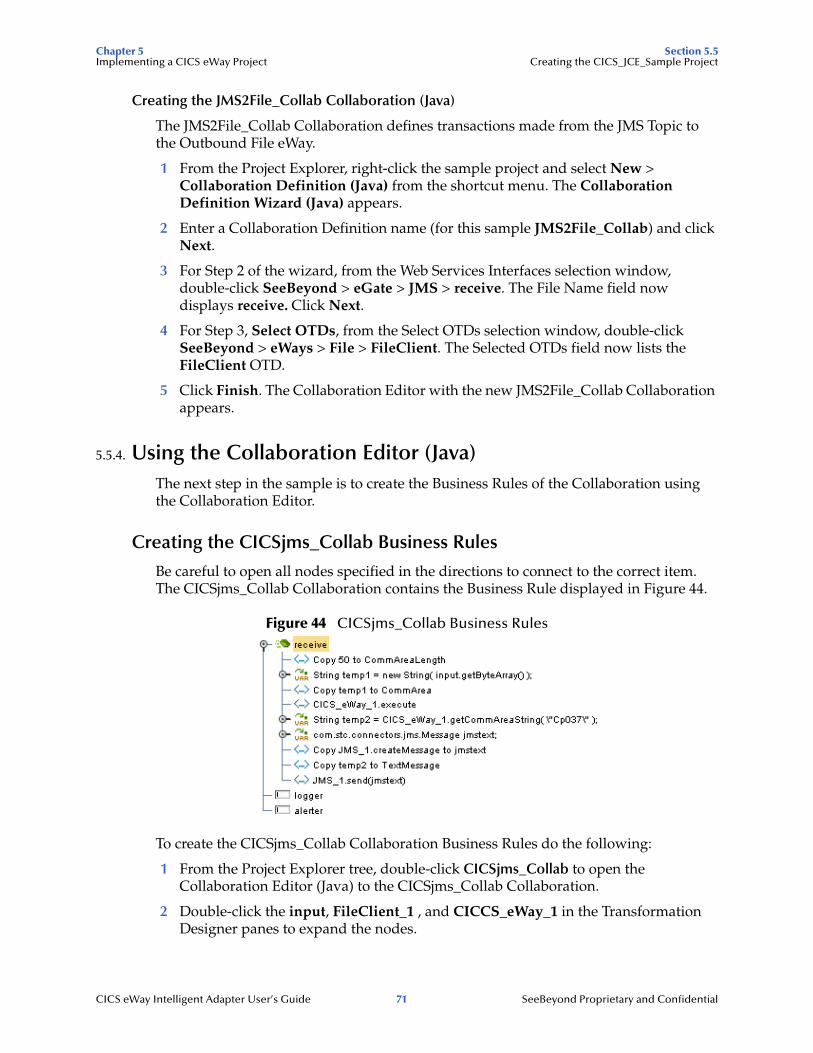
Chapter 5 Section 5.5Implementing a CICS eWay Project Creating the CICS_JCE_Sample Project
Creating the JMS2File_Collab Collaboration (Java)
The JMS2File_Collab Collaboration defines transactions made from the JMS Topic to the Outbound File eWay.
1 From the Project Explorer, right-click the sample project and select New > Collaboration Definition (Java) from the shortcut menu. The Collaboration Definition Wizard (Java) appears.
2 Enter a Collaboration Definition name (for this sample JMS2File_Collab) and click Next.
3 For Step 2 of the wizard, from the Web Services Interfaces selection window, double-click SeeBeyond > eGate > JMS > receive. The File Name field now displays receive. Click Next.
4 For Step 3, Select OTDs, from the Select OTDs selection window, double-click SeeBeyond > eWays > File > FileClient. The Selected OTDs field now lists the FileClient OTD.
5 Click Finish. The Collaboration Editor with the new JMS2File_Collab Collaboration appears.
5.5.4. Using the Collaboration Editor (Java)The next step in the sample is to create the Business Rules of the Collaboration using the Collaboration Editor.
Creating the CICSjms_Collab Business Rules
Be careful to open all nodes specified in the directions to connect to the correct item. The CICSjms_Collab Collaboration contains the Business Rule displayed in Figure 44.
Figure 44 CICSjms_Collab Business Rules
To create the CICSjms_Collab Collaboration Business Rules do the following:
1 From the Project Explorer tree, double-click CICSjms_Collab to open the Collaboration Editor (Java) to the CICSjms_Collab Collaboration.
2 Double-click the input, FileClient_1 , and CICCS_eWay_1 in the Transformation Designer panes to expand the nodes.
CICS eWay Intelligent Adapter User’s Guide 71 SeeBeyond Proprietary and Confidential
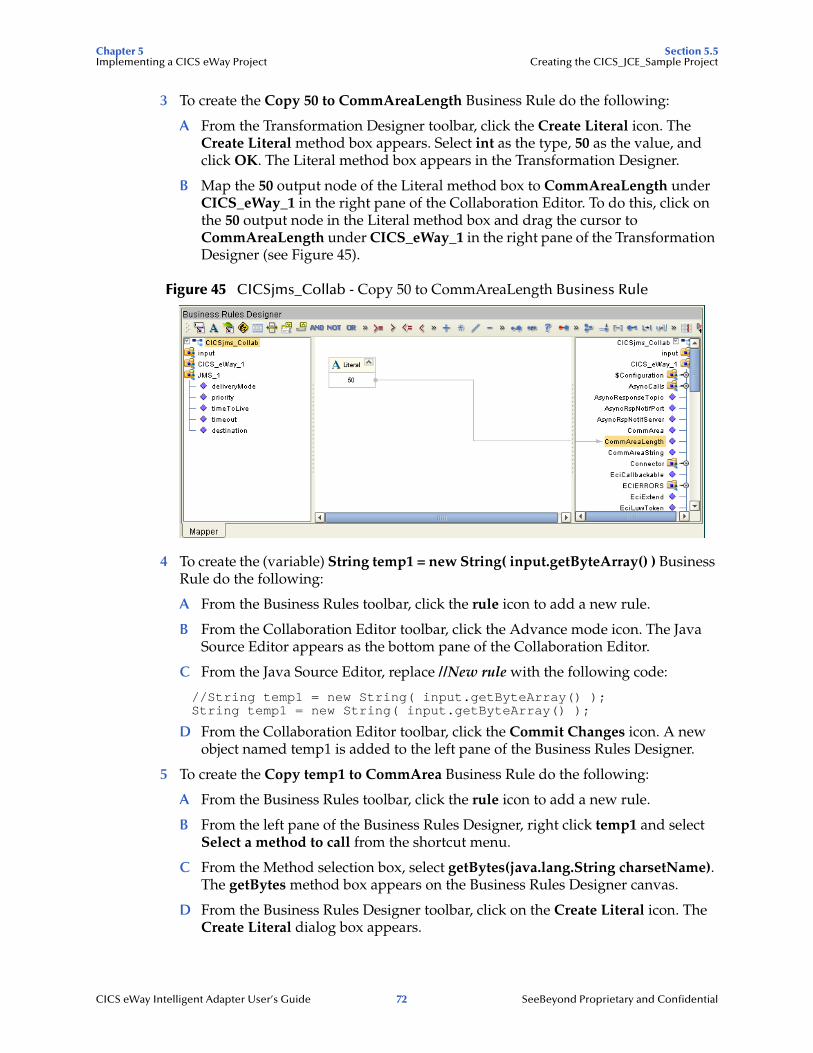
Chapter 5 Section 5.5Implementing a CICS eWay Project Creating the CICS_JCE_Sample Project
3 To create the Copy 50 to CommAreaLength Business Rule do the following:
A From the Transformation Designer toolbar, click the Create Literal icon. The Create Literal method box appears. Select int as the type, 50 as the value, and click OK. The Literal method box appears in the Transformation Designer.
B Map the 50 output node of the Literal method box to CommAreaLength under CICS_eWay_1 in the right pane of the Collaboration Editor. To do this, click on the 50 output node in the Literal method box and drag the cursor to CommAreaLength under CICS_eWay_1 in the right pane of the Transformation Designer (see Figure 45).
Figure 45 CICSjms_Collab - Copy 50 to CommAreaLength Business Rule
4 To create the (variable) String temp1 = new String( input.getByteArray() ) Business Rule do the following:
A From the Business Rules toolbar, click the rule icon to add a new rule.
B From the Collaboration Editor toolbar, click the Advance mode icon. The Java Source Editor appears as the bottom pane of the Collaboration Editor.
C From the Java Source Editor, replace //New rule with the following code:
//String temp1 = new String( input.getByteArray() );String temp1 = new String( input.getByteArray() );
D From the Collaboration Editor toolbar, click the Commit Changes icon. A new object named temp1 is added to the left pane of the Business Rules Designer.
5 To create the Copy temp1 to CommArea Business Rule do the following:
A From the Business Rules toolbar, click the rule icon to add a new rule.
B From the left pane of the Business Rules Designer, right click temp1 and select Select a method to call from the shortcut menu.
C From the Method selection box, select getBytes(java.lang.String charsetName). The getBytes method box appears on the Business Rules Designer canvas.
D From the Business Rules Designer toolbar, click on the Create Literal icon. The Create Literal dialog box appears.
CICS eWay Intelligent Adapter User’s Guide 72 SeeBeyond Proprietary and Confidential
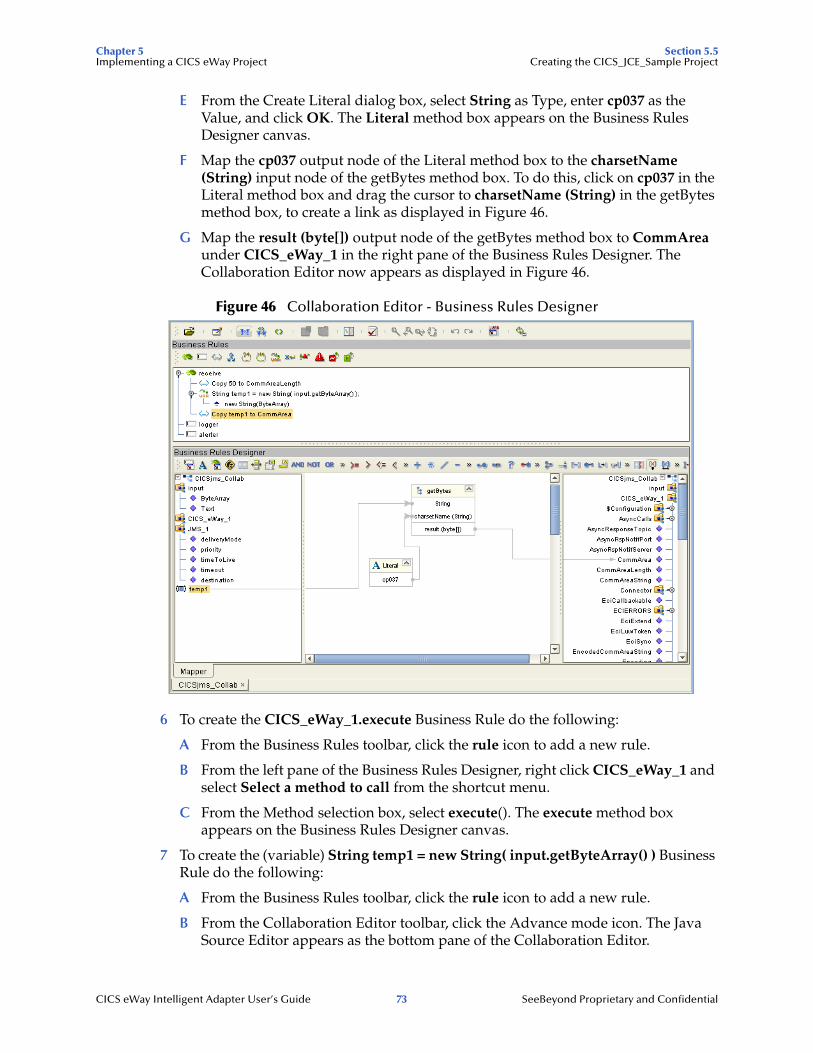
Chapter 5 Section 5.5Implementing a CICS eWay Project Creating the CICS_JCE_Sample Project
E From the Create Literal dialog box, select String as Type, enter cp037 as the Value, and click OK. The Literal method box appears on the Business Rules Designer canvas.
F Map the cp037 output node of the Literal method box to the charsetName (String) input node of the getBytes method box. To do this, click on cp037 in the Literal method box and drag the cursor to charsetName (String) in the getBytes method box, to create a link as displayed in Figure 46.
G Map the result (byte[]) output node of the getBytes method box to CommArea under CICS_eWay_1 in the right pane of the Business Rules Designer. The Collaboration Editor now appears as displayed in Figure 46.
Figure 46 Collaboration Editor - Business Rules Designer
6 To create the CICS_eWay_1.execute Business Rule do the following:
A From the Business Rules toolbar, click the rule icon to add a new rule.
B From the left pane of the Business Rules Designer, right click CICS_eWay_1 and select Select a method to call from the shortcut menu.
C From the Method selection box, select execute(). The execute method box appears on the Business Rules Designer canvas.
7 To create the (variable) String temp1 = new String( input.getByteArray() ) Business Rule do the following:
A From the Business Rules toolbar, click the rule icon to add a new rule.
B From the Collaboration Editor toolbar, click the Advance mode icon. The Java Source Editor appears as the bottom pane of the Collaboration Editor.
CICS eWay Intelligent Adapter User’s Guide 73 SeeBeyond Proprietary and Confidential
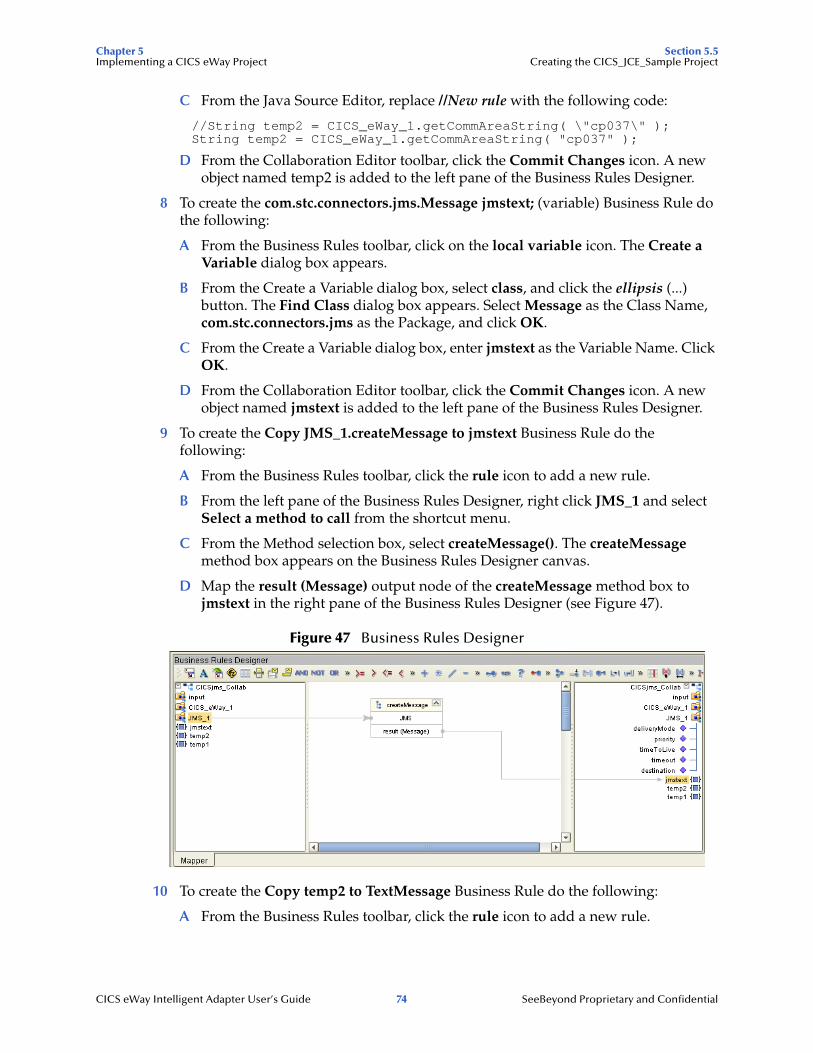
Chapter 5 Section 5.5Implementing a CICS eWay Project Creating the CICS_JCE_Sample Project
C From the Java Source Editor, replace //New rule with the following code:
//String temp2 = CICS_eWay_1.getCommAreaString( \"cp037\" );String temp2 = CICS_eWay_1.getCommAreaString( "cp037" );
D From the Collaboration Editor toolbar, click the Commit Changes icon. A new object named temp2 is added to the left pane of the Business Rules Designer.
8 To create the com.stc.connectors.jms.Message jmstext; (variable) Business Rule do the following:
A From the Business Rules toolbar, click on the local variable icon. The Create a Variable dialog box appears.
B From the Create a Variable dialog box, select class, and click the ellipsis (...) button. The Find Class dialog box appears. Select Message as the Class Name, com.stc.connectors.jms as the Package, and click OK.
C From the Create a Variable dialog box, enter jmstext as the Variable Name. Click OK.
D From the Collaboration Editor toolbar, click the Commit Changes icon. A new object named jmstext is added to the left pane of the Business Rules Designer.
9 To create the Copy JMS_1.createMessage to jmstext Business Rule do the following:
A From the Business Rules toolbar, click the rule icon to add a new rule.
B From the left pane of the Business Rules Designer, right click JMS_1 and select Select a method to call from the shortcut menu.
C From the Method selection box, select createMessage(). The createMessage method box appears on the Business Rules Designer canvas.
D Map the result (Message) output node of the createMessage method box to jmstext in the right pane of the Business Rules Designer (see Figure 47).
Figure 47 Business Rules Designer
10 To create the Copy temp2 to TextMessage Business Rule do the following:
A From the Business Rules toolbar, click the rule icon to add a new rule.
CICS eWay Intelligent Adapter User’s Guide 74 SeeBeyond Proprietary and Confidential
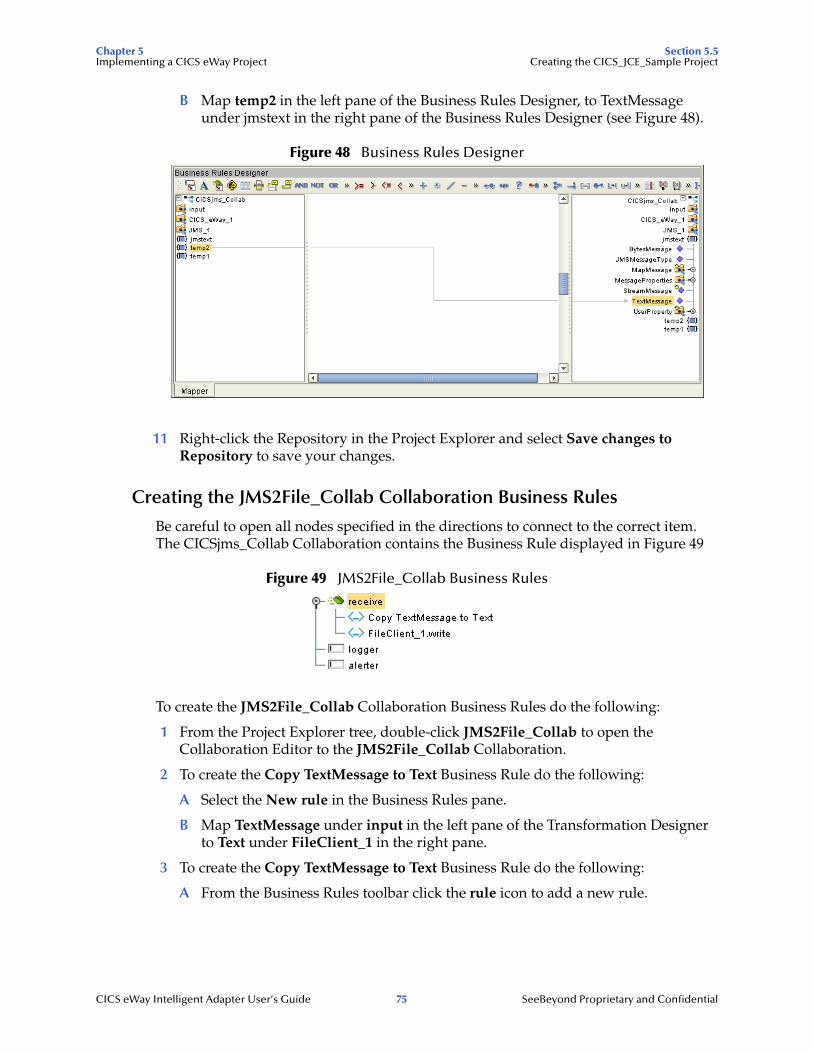
Chapter 5 Section 5.5Implementing a CICS eWay Project Creating the CICS_JCE_Sample Project
B Map temp2 in the left pane of the Business Rules Designer, to TextMessage under jmstext in the right pane of the Business Rules Designer (see Figure 48).
Figure 48 Business Rules Designer
11 Right-click the Repository in the Project Explorer and select Save changes to Repository to save your changes.
Creating the JMS2File_Collab Collaboration Business Rules
Be careful to open all nodes specified in the directions to connect to the correct item. The CICSjms_Collab Collaboration contains the Business Rule displayed in Figure 49
Figure 49 JMS2File_Collab Business Rules
To create the JMS2File_Collab Collaboration Business Rules do the following:
1 From the Project Explorer tree, double-click JMS2File_Collab to open the Collaboration Editor to the JMS2File_Collab Collaboration.
2 To create the Copy TextMessage to Text Business Rule do the following:
A Select the New rule in the Business Rules pane.
B Map TextMessage under input in the left pane of the Transformation Designer to Text under FileClient_1 in the right pane.
3 To create the Copy TextMessage to Text Business Rule do the following:
A From the Business Rules toolbar click the rule icon to add a new rule.
CICS eWay Intelligent Adapter User’s Guide 75 SeeBeyond Proprietary and Confidential
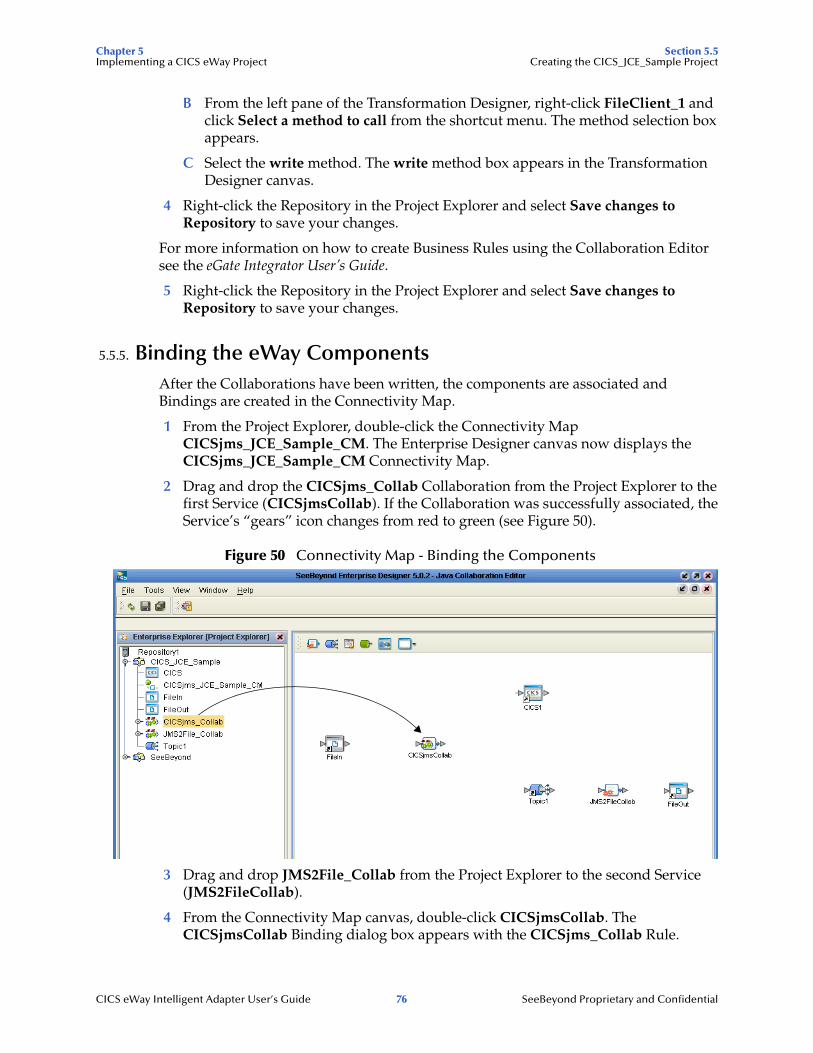
Chapter 5 Section 5.5Implementing a CICS eWay Project Creating the CICS_JCE_Sample Project
B From the left pane of the Transformation Designer, right-click FileClient_1 and click Select a method to call from the shortcut menu. The method selection box appears.
C Select the write method. The write method box appears in the Transformation Designer canvas.
4 Right-click the Repository in the Project Explorer and select Save changes to Repository to save your changes.
For more information on how to create Business Rules using the Collaboration Editor see the eGate Integrator User’s Guide.
5 Right-click the Repository in the Project Explorer and select Save changes to Repository to save your changes.
5.5.5. Binding the eWay ComponentsAfter the Collaborations have been written, the components are associated and Bindings are created in the Connectivity Map.
1 From the Project Explorer, double-click the Connectivity Map CICSjms_JCE_Sample_CM. The Enterprise Designer canvas now displays the CICSjms_JCE_Sample_CM Connectivity Map.
2 Drag and drop the CICSjms_Collab Collaboration from the Project Explorer to the first Service (CICSjmsCollab). If the Collaboration was successfully associated, the Service’s “gears” icon changes from red to green (see Figure 50).
Figure 50 Connectivity Map - Binding the Components
3 Drag and drop JMS2File_Collab from the Project Explorer to the second Service (JMS2FileCollab).
4 From the Connectivity Map canvas, double-click CICSjmsCollab. The CICSjmsCollab Binding dialog box appears with the CICSjms_Collab Rule.
CICS eWay Intelligent Adapter User’s Guide 76 SeeBeyond Proprietary and Confidential
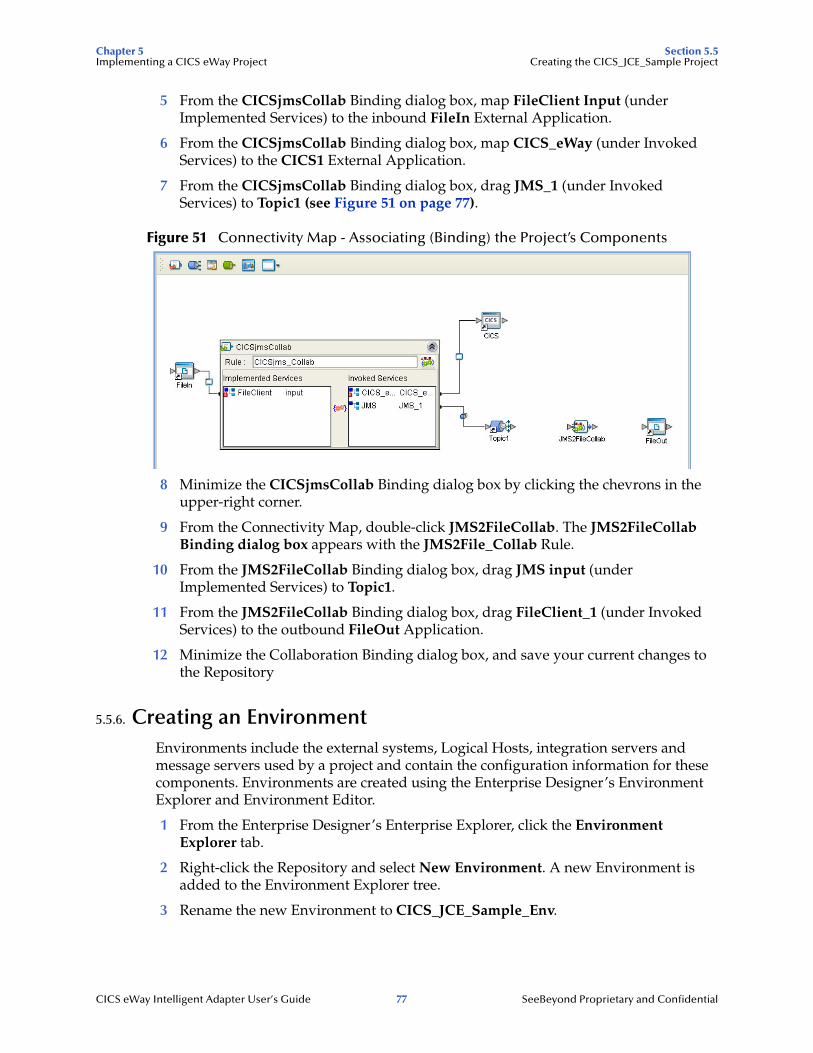
Chapter 5 Section 5.5Implementing a CICS eWay Project Creating the CICS_JCE_Sample Project
5 From the CICSjmsCollab Binding dialog box, map FileClient Input (under Implemented Services) to the inbound FileIn External Application.
6 From the CICSjmsCollab Binding dialog box, map CICS_eWay (under Invoked Services) to the CICS1 External Application.
7 From the CICSjmsCollab Binding dialog box, drag JMS_1 (under Invoked Services) to Topic1 (see Figure 51 on page 77).
Figure 51 Connectivity Map - Associating (Binding) the Project’s Components
8 Minimize the CICSjmsCollab Binding dialog box by clicking the chevrons in the upper-right corner.
9 From the Connectivity Map, double-click JMS2FileCollab. The JMS2FileCollab Binding dialog box appears with the JMS2File_Collab Rule.
10 From the JMS2FileCollab Binding dialog box, drag JMS input (under Implemented Services) to Topic1.
11 From the JMS2FileCollab Binding dialog box, drag FileClient_1 (under Invoked Services) to the outbound FileOut Application.
12 Minimize the Collaboration Binding dialog box, and save your current changes to the Repository
5.5.6. Creating an EnvironmentEnvironments include the external systems, Logical Hosts, integration servers and message servers used by a project and contain the configuration information for these components. Environments are created using the Enterprise Designer’s Environment Explorer and Environment Editor.
1 From the Enterprise Designer’s Enterprise Explorer, click the Environment Explorer tab.
2 Right-click the Repository and select New Environment. A new Environment is added to the Environment Explorer tree.
3 Rename the new Environment to CICS_JCE_Sample_Env.
CICS eWay Intelligent Adapter User’s Guide 77 SeeBeyond Proprietary and Confidential
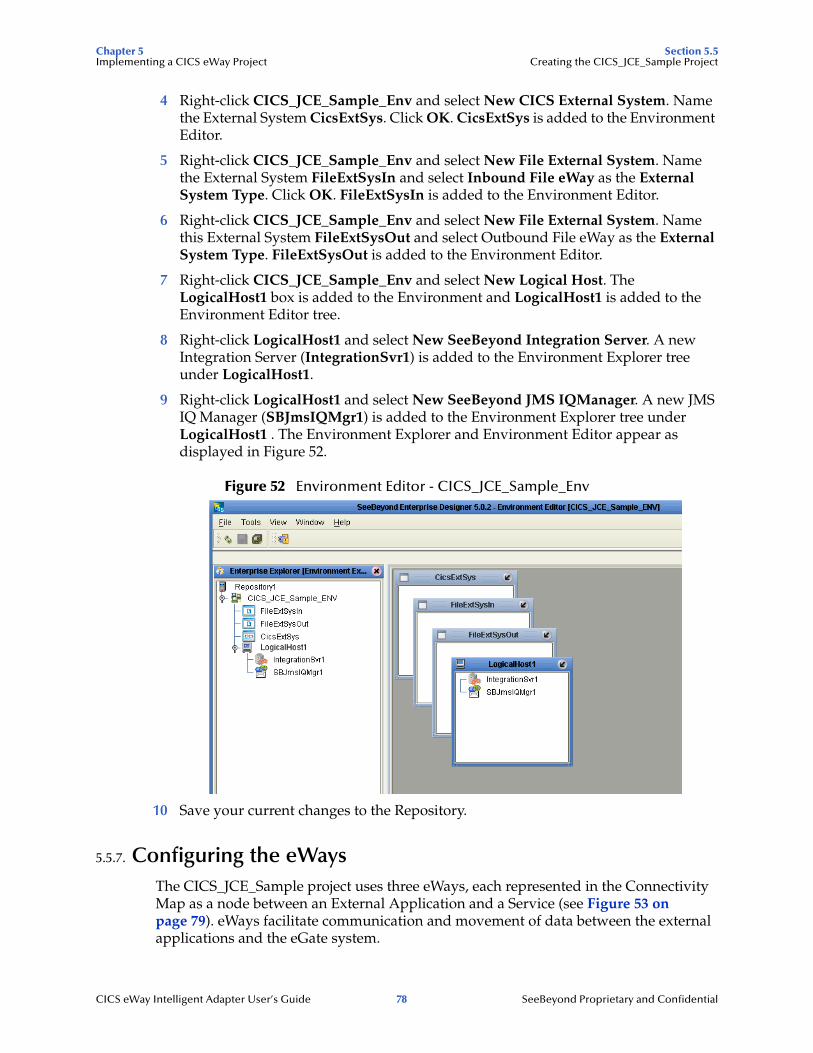
Chapter 5 Section 5.5Implementing a CICS eWay Project Creating the CICS_JCE_Sample Project
4 Right-click CICS_JCE_Sample_Env and select New CICS External System. Name the External System CicsExtSys. Click OK. CicsExtSys is added to the Environment Editor.
5 Right-click CICS_JCE_Sample_Env and select New File External System. Name the External System FileExtSysIn and select Inbound File eWay as the External System Type. Click OK. FileExtSysIn is added to the Environment Editor.
6 Right-click CICS_JCE_Sample_Env and select New File External System. Name this External System FileExtSysOut and select Outbound File eWay as the External System Type. FileExtSysOut is added to the Environment Editor.
7 Right-click CICS_JCE_Sample_Env and select New Logical Host. The LogicalHost1 box is added to the Environment and LogicalHost1 is added to the Environment Editor tree.
8 Right-click LogicalHost1 and select New SeeBeyond Integration Server. A new Integration Server (IntegrationSvr1) is added to the Environment Explorer tree under LogicalHost1.
9 Right-click LogicalHost1 and select New SeeBeyond JMS IQManager. A new JMS IQ Manager (SBJmsIQMgr1) is added to the Environment Explorer tree under LogicalHost1 . The Environment Explorer and Environment Editor appear as displayed in Figure 52.
Figure 52 Environment Editor - CICS_JCE_Sample_Env
10 Save your current changes to the Repository.
5.5.7. Configuring the eWaysThe CICS_JCE_Sample project uses three eWays, each represented in the Connectivity Map as a node between an External Application and a Service (see Figure 53 on page 79). eWays facilitate communication and movement of data between the external applications and the eGate system.
CICS eWay Intelligent Adapter User’s Guide 78 SeeBeyond Proprietary and Confidential

Chapter 5 Section 5.5Implementing a CICS eWay Project Creating the CICS_JCE_Sample Project
Figure 53 Configuring the eWays and JMS Properties
The File eWay configuration parameters are configured from the Connectivity Map. The CICS eWay configuration parameters are set from both the Project Explorer or Connectivity Map and the Environment Explorer. To configure the eWays do the following:
Configuring the File eWays
1 Double-click the Inbound File eWay, select Inbound File eWay in the Templates dialog box and click OK.
2 The Parameters dialog box opens to the Inbound File eWay configuration. Modify the configuration for your system, including the settings for the Inbound File eWay in Table 6, and click OK. The configuration settings are saved for the eWay.
Table 6 Inbound File eWay Settings
3 In the same way, modify the Outbound File eWay configuration for your system, including the settings in Table 7, and click OK.
Table 7 Outbound File eWay Settings
Configuring the CICS eWay
The CICS eWay configuration parameters must be set in both the Project Explorer and Environment Explorer. For more information on the CICS eWay configuration parameters and the Parameters dialog box, see Creating and Configuring the CICS eWay on page 37 or see the eGate Integrator User’s Guide.
For the CICS_JCE_Sample project, do the following:
Inbound eWay Connection Parameters
Directory C:/temp
Input file name Input*.txt
Outbound eWay Connection Parameters
Directory C:/temp
Output file name output%.dat
Inbound File eWay
Outbound File eWay
CICS eWay
JMS Properties Handle
CICS eWay Intelligent Adapter User’s Guide 79 SeeBeyond Proprietary and Confidential
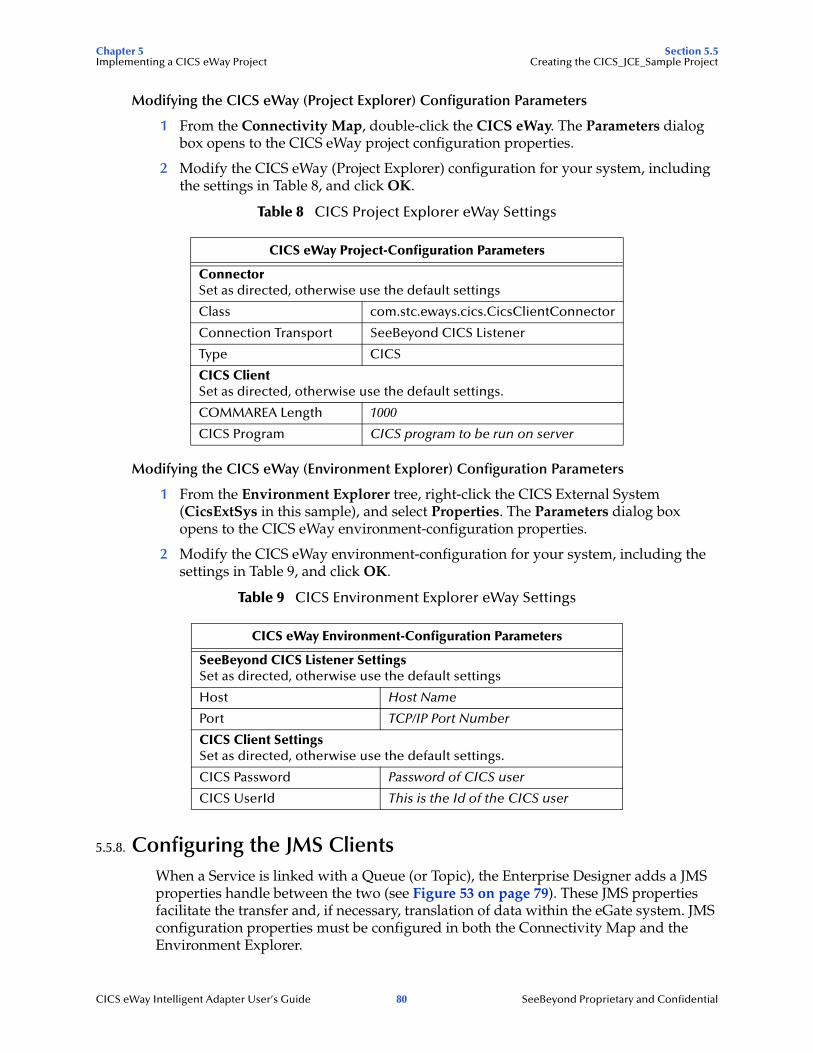
Chapter 5 Section 5.5Implementing a CICS eWay Project Creating the CICS_JCE_Sample Project
Modifying the CICS eWay (Project Explorer) Configuration Parameters
1 From the Connectivity Map, double-click the CICS eWay. The Parameters dialog box opens to the CICS eWay project configuration properties.
2 Modify the CICS eWay (Project Explorer) configuration for your system, including the settings in Table 8, and click OK.
Table 8 CICS Project Explorer eWay Settings
Modifying the CICS eWay (Environment Explorer) Configuration Parameters
1 From the Environment Explorer tree, right-click the CICS External System (CicsExtSys in this sample), and select Properties. The Parameters dialog box opens to the CICS eWay environment-configuration properties.
2 Modify the CICS eWay environment-configuration for your system, including the settings in Table 9, and click OK.
Table 9 CICS Environment Explorer eWay Settings
5.5.8. Configuring the JMS ClientsWhen a Service is linked with a Queue (or Topic), the Enterprise Designer adds a JMS properties handle between the two (see Figure 53 on page 79). These JMS properties facilitate the transfer and, if necessary, translation of data within the eGate system. JMS configuration properties must be configured in both the Connectivity Map and the Environment Explorer.
CICS eWay Project-Configuration Parameters
Connector Set as directed, otherwise use the default settings
Class com.stc.eways.cics.CicsClientConnector
Connection Transport SeeBeyond CICS Listener
Type CICS
CICS Client Set as directed, otherwise use the default settings.
COMMAREA Length 1000
CICS Program CICS program to be run on server
CICS eWay Environment-Configuration Parameters
SeeBeyond CICS Listener Settings Set as directed, otherwise use the default settings
Host Host Name
Port TCP/IP Port Number
CICS Client SettingsSet as directed, otherwise use the default settings.
CICS Password Password of CICS user
CICS UserId This is the Id of the CICS user
CICS eWay Intelligent Adapter User’s Guide 80 SeeBeyond Proprietary and Confidential
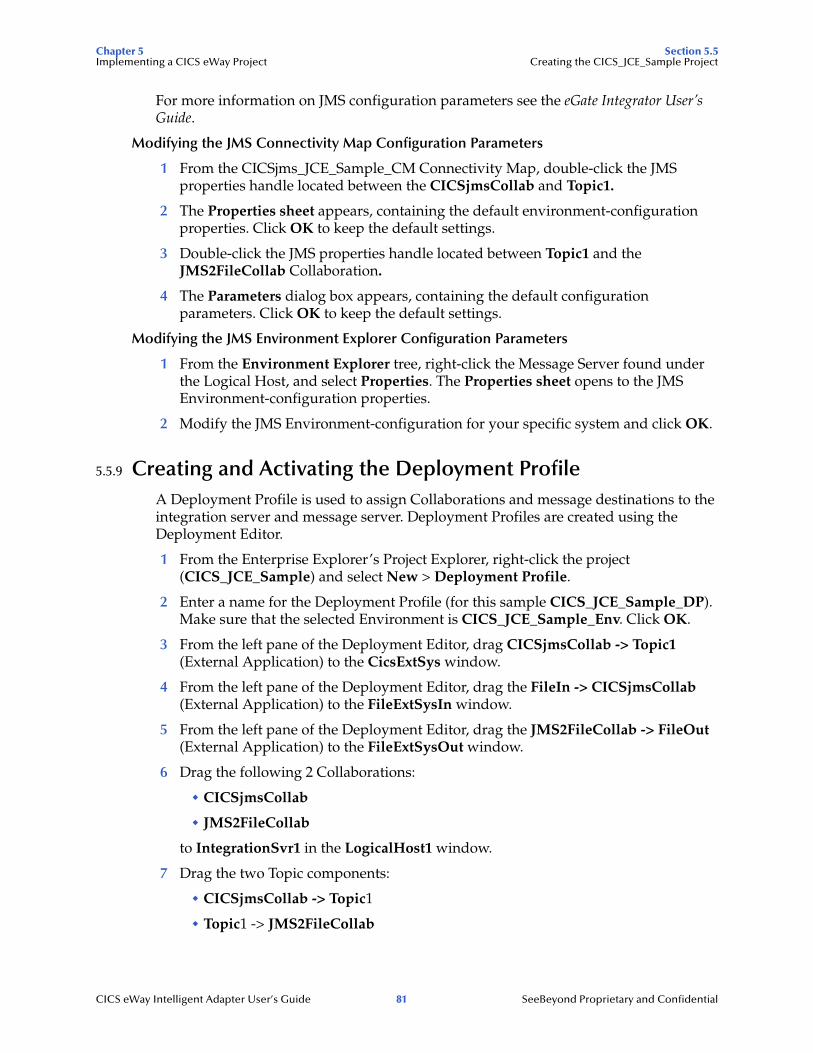
Chapter 5 Section 5.5Implementing a CICS eWay Project Creating the CICS_JCE_Sample Project
For more information on JMS configuration parameters see the eGate Integrator User’s Guide.
Modifying the JMS Connectivity Map Configuration Parameters
1 From the CICSjms_JCE_Sample_CM Connectivity Map, double-click the JMS properties handle located between the CICSjmsCollab and Topic1.
2 The Properties sheet appears, containing the default environment-configuration properties. Click OK to keep the default settings.
3 Double-click the JMS properties handle located between Topic1 and the JMS2FileCollab Collaboration.
4 The Parameters dialog box appears, containing the default configuration parameters. Click OK to keep the default settings.
Modifying the JMS Environment Explorer Configuration Parameters
1 From the Environment Explorer tree, right-click the Message Server found under the Logical Host, and select Properties. The Properties sheet opens to the JMS Environment-configuration properties.
2 Modify the JMS Environment-configuration for your specific system and click OK.
5.5.9 Creating and Activating the Deployment ProfileA Deployment Profile is used to assign Collaborations and message destinations to the integration server and message server. Deployment Profiles are created using the Deployment Editor.
1 From the Enterprise Explorer’s Project Explorer, right-click the project (CICS_JCE_Sample) and select New > Deployment Profile.
2 Enter a name for the Deployment Profile (for this sample CICS_JCE_Sample_DP). Make sure that the selected Environment is CICS_JCE_Sample_Env. Click OK.
3 From the left pane of the Deployment Editor, drag CICSjmsCollab -> Topic1 (External Application) to the CicsExtSys window.
4 From the left pane of the Deployment Editor, drag the FileIn -> CICSjmsCollab (External Application) to the FileExtSysIn window.
5 From the left pane of the Deployment Editor, drag the JMS2FileCollab -> FileOut (External Application) to the FileExtSysOut window.
6 Drag the following 2 Collaborations:
" CICSjmsCollab
" JMS2FileCollab
to IntegrationSvr1 in the LogicalHost1 window.
7 Drag the two Topic components:
" CICSjmsCollab -> Topic1
" Topic1 -> JMS2FileCollab
CICS eWay Intelligent Adapter User’s Guide 81 SeeBeyond Proprietary and Confidential
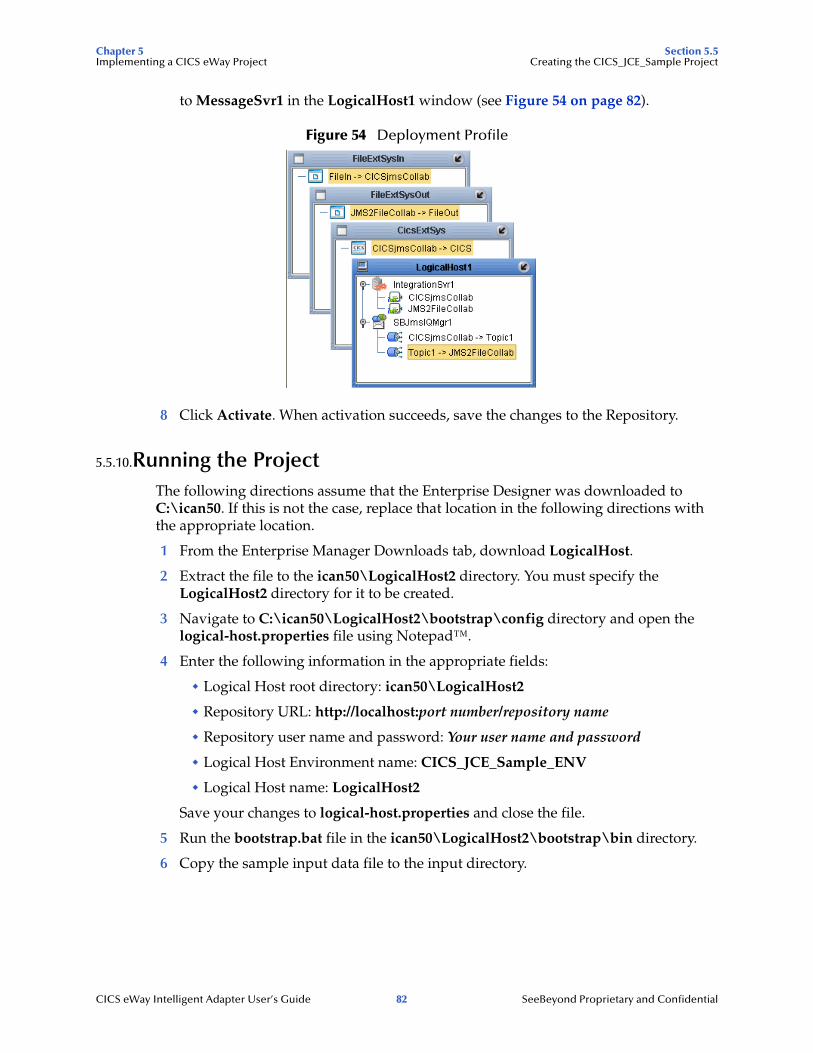
Chapter 5 Section 5.5Implementing a CICS eWay Project Creating the CICS_JCE_Sample Project
to MessageSvr1 in the LogicalHost1 window (see Figure 54 on page 82).
Figure 54 Deployment Profile
8 Click Activate. When activation succeeds, save the changes to the Repository.
5.5.10.Running the ProjectThe following directions assume that the Enterprise Designer was downloaded to C:\ican50. If this is not the case, replace that location in the following directions with the appropriate location.
1 From the Enterprise Manager Downloads tab, download LogicalHost.
2 Extract the file to the ican50\LogicalHost2 directory. You must specify the LogicalHost2 directory for it to be created.
3 Navigate to C:\ican50\LogicalHost2\bootstrap\config directory and open the logical-host.properties file using Notepad™.
4 Enter the following information in the appropriate fields:
" Logical Host root directory: ican50\LogicalHost2
" Repository URL: http://localhost:port number/repository name
" Repository user name and password: Your user name and password
" Logical Host Environment name: CICS_JCE_Sample_ENV
" Logical Host name: LogicalHost2
Save your changes to logical-host.properties and close the file.
5 Run the bootstrap.bat file in the ican50\LogicalHost2\bootstrap\bin directory.
6 Copy the sample input data file to the input directory.
CICS eWay Intelligent Adapter User’s Guide 82 SeeBeyond Proprietary and Confidential
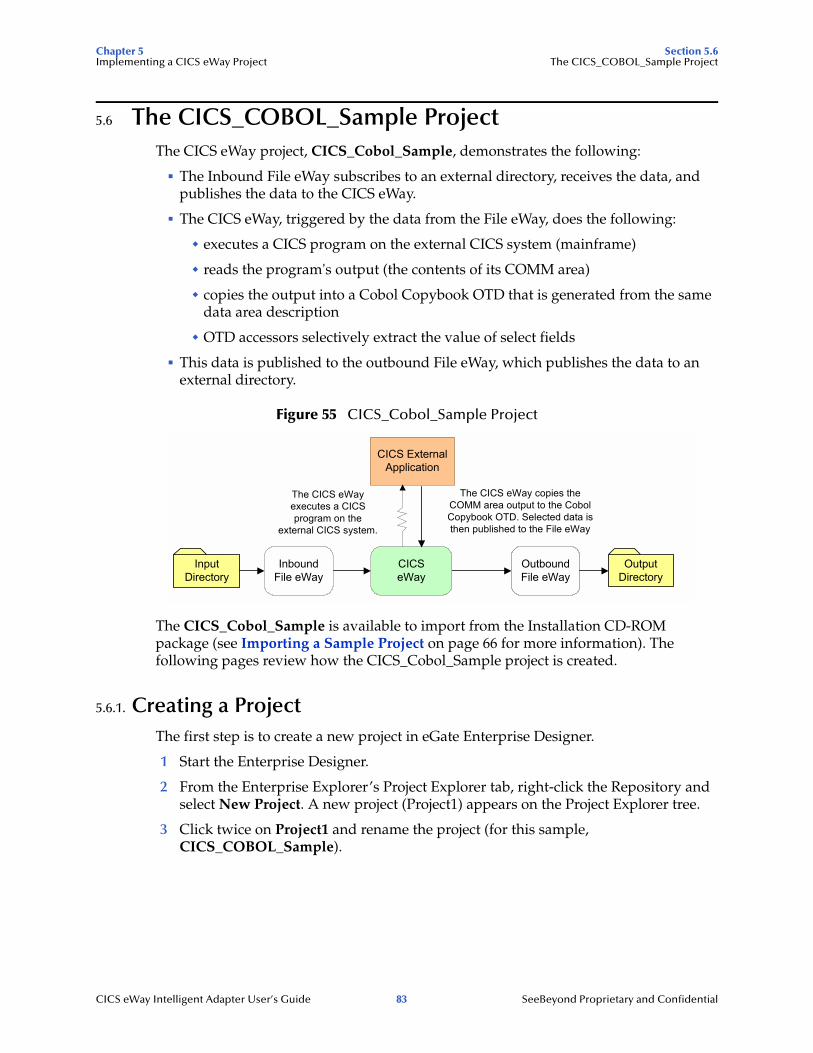
Chapter 5 Section 5.6Implementing a CICS eWay Project The CICS_COBOL_Sample Project
5.6 The CICS_COBOL_Sample ProjectThe CICS eWay project, CICS_Cobol_Sample, demonstrates the following:
! The Inbound File eWay subscribes to an external directory, receives the data, and publishes the data to the CICS eWay.
! The CICS eWay, triggered by the data from the File eWay, does the following:
" executes a CICS program on the external CICS system (mainframe)
" reads the program's output (the contents of its COMM area)
" copies the output into a Cobol Copybook OTD that is generated from the same data area description
" OTD accessors selectively extract the value of select fields
! This data is published to the outbound File eWay, which publishes the data to an external directory.
Figure 55 CICS_Cobol_Sample Project
The CICS_Cobol_Sample is available to import from the Installation CD-ROM package (see Importing a Sample Project on page 66 for more information). The following pages review how the CICS_Cobol_Sample project is created.
5.6.1. Creating a ProjectThe first step is to create a new project in eGate Enterprise Designer.
1 Start the Enterprise Designer.
2 From the Enterprise Explorer’s Project Explorer tab, right-click the Repository and select New Project. A new project (Project1) appears on the Project Explorer tree.
3 Click twice on Project1 and rename the project (for this sample, CICS_COBOL_Sample).
InputDirectory
OutputDirectory
The CICS eWay copies theCOMM area output to the CobolCopybook OTD. Selected data isthen published to the File eWay
The CICS eWayexecutes a CICSprogram on the
external CICS system.
CICSeWay
InboundFile eWay
OutboundFile eWay
CICS ExternalApplication
CICS eWay Intelligent Adapter User’s Guide 83 SeeBeyond Proprietary and Confidential

Chapter 5 Section 5.6Implementing a CICS eWay Project The CICS_COBOL_Sample Project
5.6.2 Creating a Connectivity MapThe Connectivity Map provides a canvas for assembling and configuring a project’s components.
1 In Enterprise Explorer’s Project Explorer, right-click the new project (CICS_COBOL_Sample) and select New > Connectivity Map from the shortcut menu.
2 The New Connectivity Map appears and a node for the Connectivity Map is added under the project on the Project Explorer tree labeled CMap1. Rename the CMap1 Connectivity Map to CICS_COBOL_Sample_CM
Selecting the External Applications
1 Click the External Application icon on the Connectivity Map toolbar,
2 Select the external systems needed for your project (for this sample, CICS and File). Icons representing the selected external systems are added to the Connectivity Map toolbar.
Populating the Connectivity Map
Add the project components to the Connectivity Map by dragging the icons from the toolbar to the canvas.
1 For the CICS_COBOL_Sample project, drag the following components onto the Connectivity Map canvas as displayed in Figure 56:
" File External System (2)
" Service
" CICS External System
Figure 56 Connectivity Map with Components
2 Rename the objects by right-clicking the object, selecting Rename from the shortcut menu, and typing in the new name. Change the names as follows:
" File1 to FileIn
" File2 to FileOut
CICS eWay Intelligent Adapter User’s Guide 84 SeeBeyond Proprietary and Confidential
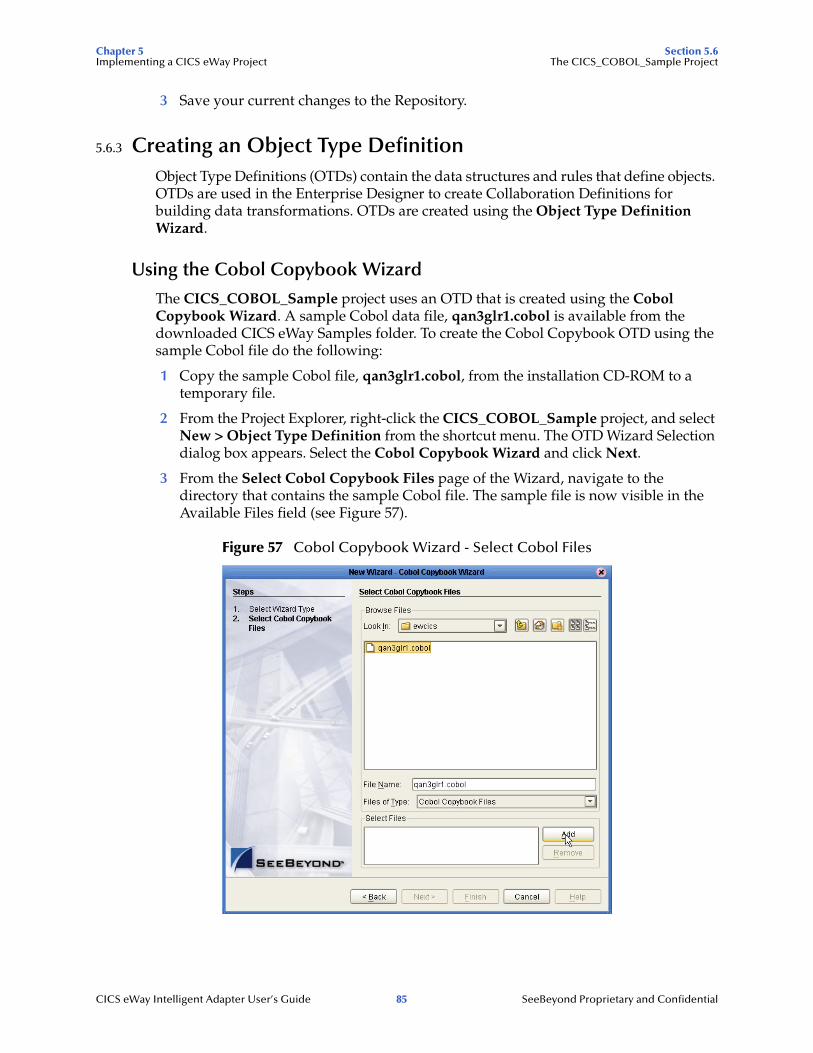
Chapter 5 Section 5.6Implementing a CICS eWay Project The CICS_COBOL_Sample Project
3 Save your current changes to the Repository.
5.6.3 Creating an Object Type DefinitionObject Type Definitions (OTDs) contain the data structures and rules that define objects. OTDs are used in the Enterprise Designer to create Collaboration Definitions for building data transformations. OTDs are created using the Object Type Definition Wizard.
Using the Cobol Copybook Wizard
The CICS_COBOL_Sample project uses an OTD that is created using the Cobol Copybook Wizard. A sample Cobol data file, qan3glr1.cobol is available from the downloaded CICS eWay Samples folder. To create the Cobol Copybook OTD using the sample Cobol file do the following:
1 Copy the sample Cobol file, qan3glr1.cobol, from the installation CD-ROM to a temporary file.
2 From the Project Explorer, right-click the CICS_COBOL_Sample project, and select New > Object Type Definition from the shortcut menu. The OTD Wizard Selection dialog box appears. Select the Cobol Copybook Wizard and click Next.
3 From the Select Cobol Copybook Files page of the Wizard, navigate to the directory that contains the sample Cobol file. The sample file is now visible in the Available Files field (see Figure 57).
Figure 57 Cobol Copybook Wizard - Select Cobol Files
CICS eWay Intelligent Adapter User’s Guide 85 SeeBeyond Proprietary and Confidential
Chapter 5 Section 5.6Implementing a CICS eWay Project The CICS_COBOL_Sample Project
4 Select the sample Cobol file and click the Add button. The file is added to the Selected Files field. Click Finish.
5 A Message dialog box appears if the OTD is created successfully, and the OTD is added to the Project Explorer tree as qan3glr1.
5.6.4. Creating a Collaboration Definition (Java)The next step is to create the CICS_COBOL_Collab Collaboration using the Collaboration Definition Wizard (Java). Once the Collaboration Definition has been created, the Business Rules of the Collaboration can be written using the Collaboration Editor (Java).
Creating the CICS_COBOL_Colab Collaboration
1 From the Project Explorer, right-click the CICS_COBOL_Sample project and select New > Collaboration Definition (Java) from the shortcut menu. The Collaboration Definition Wizard (Java) appears.
2 Enter a Collaboration Definition name (for this sample CICS_COBOL_Collab) and click Next.
3 For Step 2 of the Wizard, from the Web Services Interfaces selection window, double-click SeeBeyond > eWays > File > FileClient > receive. The File Name field now displays receive. Click Next.
4 For Step 3 of the Wizard, from the Select OTDs selection window, double-click SeeBeyond > eWays > CICSeWay > CICS_eWay. The CICS_eWay OTD is added to the Selected OTDs field.
5 Click the Up One Level button to return to the Repository directory. Double-click SeeBeyond > eWays > File > FileClient. The FileClient OTD is added to the Selected OTDs field.
6 Click the Up One Level button to return to the Repository directory. Double-click CICS_COBOL_Sample > qan3glr1. The qan3glr1 OTD is added to the Selected OTDs field.
7 Click Finish. The Collaboration Editor opens to the new Collaboration in the right pane of the Enterprise Designer.
5.6.5. The CICS_COBOL_Collab Business RulesThe the CICS_COBOL_Sample project uses one Collaboration created in the previous section, CICS_COBOL_Collab.
CICS_COBOL_Collab Business Rules
The CICS_COBOL_Collab Collaboration contains the Business Rule displayed in Figure 58 on page 87. These rules are created using the Collaboration Editor (Java).
CICS eWay Intelligent Adapter User’s Guide 86 SeeBeyond Proprietary and Confidential
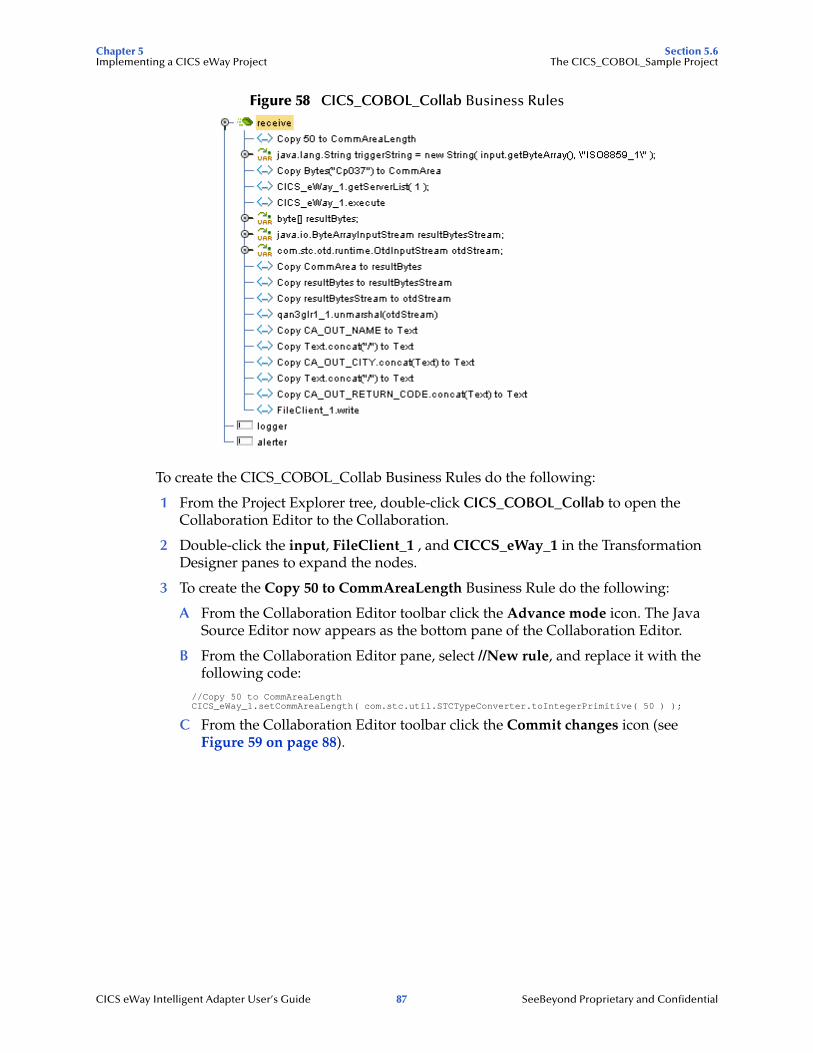
Chapter 5 Section 5.6Implementing a CICS eWay Project The CICS_COBOL_Sample Project
Figure 58 CICS_COBOL_Collab Business Rules
To create the CICS_COBOL_Collab Business Rules do the following:
1 From the Project Explorer tree, double-click CICS_COBOL_Collab to open the Collaboration Editor to the Collaboration.
2 Double-click the input, FileClient_1 , and CICCS_eWay_1 in the Transformation Designer panes to expand the nodes.
3 To create the Copy 50 to CommAreaLength Business Rule do the following:
A From the Collaboration Editor toolbar click the Advance mode icon. The Java Source Editor now appears as the bottom pane of the Collaboration Editor.
B From the Collaboration Editor pane, select //New rule, and replace it with the following code:
//Copy 50 to CommAreaLengthCICS_eWay_1.setCommAreaLength( com.stc.util.STCTypeConverter.toIntegerPrimitive( 50 ) );
C From the Collaboration Editor toolbar click the Commit changes icon (see Figure 59 on page 88).
CICS eWay Intelligent Adapter User’s Guide 87 SeeBeyond Proprietary and Confidential
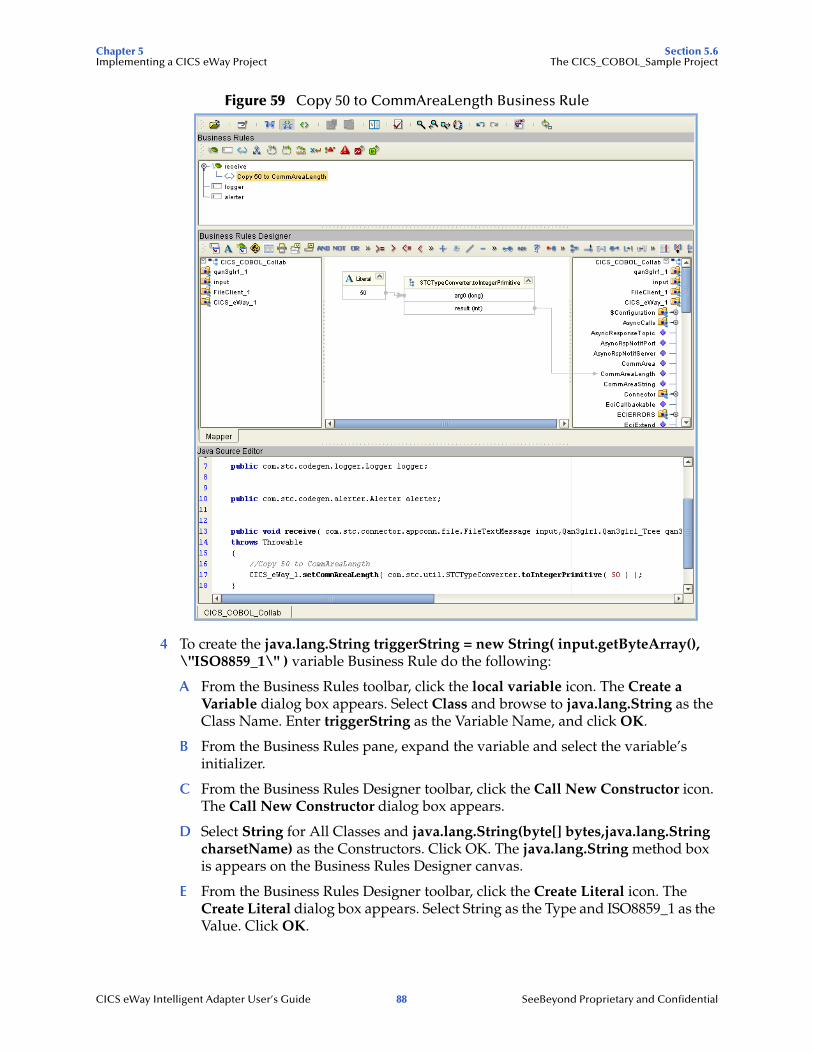
Chapter 5 Section 5.6Implementing a CICS eWay Project The CICS_COBOL_Sample Project
Figure 59 Copy 50 to CommAreaLength Business Rule
4 To create the java.lang.String triggerString = new String( input.getByteArray(), \"ISO8859_1\" ) variable Business Rule do the following:
A From the Business Rules toolbar, click the local variable icon. The Create a Variable dialog box appears. Select Class and browse to java.lang.String as the Class Name. Enter triggerString as the Variable Name, and click OK.
B From the Business Rules pane, expand the variable and select the variable’s initializer.
C From the Business Rules Designer toolbar, click the Call New Constructor icon. The Call New Constructor dialog box appears.
D Select String for All Classes and java.lang.String(byte[] bytes,java.lang.String charsetName) as the Constructors. Click OK. The java.lang.String method box is appears on the Business Rules Designer canvas.
E From the Business Rules Designer toolbar, click the Create Literal icon. The Create Literal dialog box appears. Select String as the Type and ISO8859_1 as the Value. Click OK.
CICS eWay Intelligent Adapter User’s Guide 88 SeeBeyond Proprietary and Confidential

Chapter 5 Section 5.6Implementing a CICS eWay Project The CICS_COBOL_Sample Project
F Map ByteArray under input in the left pane of the Business Rules Designer, to the bytes (byte[]) input node of the java.lang.String method box.
G Map the ISO8859_1 output node of the literal method box, to the charsetName (String) input node of the java.lang.String method box.
5 To create the Copy Bytes("cp037") to CommArea Business Rule do the following:
A From the Business Rules toolbar, click the rule icon to add a new rule.
B From the left pane of the Business Rules Designer, right click triggerString and select Select a method to call from the shortcut menu.
C From the Method selection box, select getBytes(java.lang.String charsetName). The getBytes method box appears on the Business Rules Designer canvas.
D From the Business Rules Designer toolbar, click on the Create Literal icon. The Create Literal dialog box appears.
E From the Create Literal dialog box, select String as Type, enter cp037 as the Value, and click OK. The Literal method box appears on the Business Rules Designer canvas.
F Map the cp037 output node of the Literal method box to the charsetName (String) input node of the getBytes method box. To do this, click on cp037 in the Literal method box and drag the cursor to charsetName (String) in the getBytes method box, to create a link as displayed in Figure 46.
G Map the result (byte[]) output node of the getBytes method box to CommArea under CICS_eWay_1 in the right pane of the Business Rules Designer.
6 To create the CICS_eWay_1.getServerList(1) Business Rule do the following:
A From the Business Rules toolbar, click the rule icon to add a new rule.
B From the Collaboration Editor pane, select //New rule, and replace it with the following code:
//CICS_eWay_1.getServerList( 1 );CICS_eWay_1.getServerList( 1 );
C From the Collaboration Editor toolbar click the Commit changes icon.
7 To create the CICS_eWay_1.execute Business Rule do the following:
A From the Business Rules toolbar, click the rule icon to add a new rule.
B From the left pane of the Business Rules Designer, right click CICS_eWay_1 and select Select a method to call from the shortcut menu.
C From the Method selection box, select execute(). The execute method box appears on the Business Rules Designer canvas.
8 To create the byte[] resultBytes variable Business Rule do the following:
A From the Business Rules toolbar, click the local variable icon. The Create a Variable dialog box appears. Select Primitive with byte as the value, and select Is array, for Type. Enter resultByte as the Variable Name, and click OK.
9 To create the java.io.ByteArrayInputStream resultBytesStream variable Business Rule do the following:
CICS eWay Intelligent Adapter User’s Guide 89 SeeBeyond Proprietary and Confidential
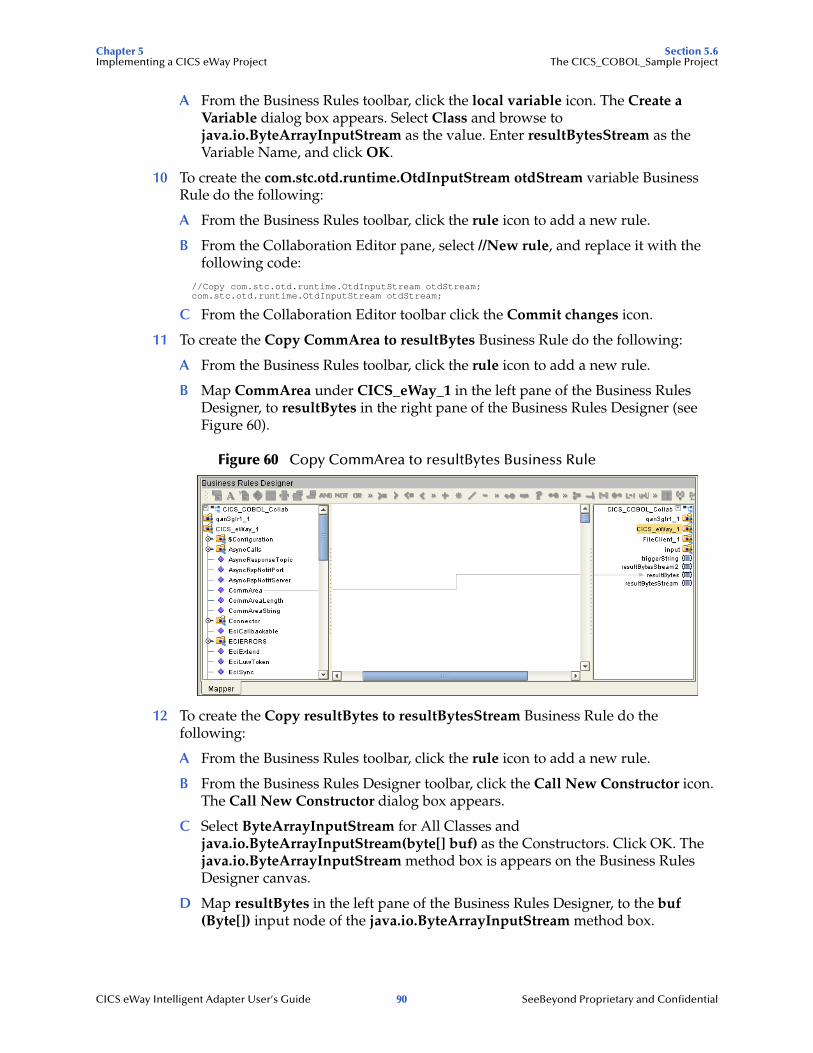
Chapter 5 Section 5.6Implementing a CICS eWay Project The CICS_COBOL_Sample Project
A From the Business Rules toolbar, click the local variable icon. The Create a Variable dialog box appears. Select Class and browse to java.io.ByteArrayInputStream as the value. Enter resultBytesStream as the Variable Name, and click OK.
10 To create the com.stc.otd.runtime.OtdInputStream otdStream variable Business Rule do the following:
A From the Business Rules toolbar, click the rule icon to add a new rule.
B From the Collaboration Editor pane, select //New rule, and replace it with the following code:
//Copy com.stc.otd.runtime.OtdInputStream otdStream;com.stc.otd.runtime.OtdInputStream otdStream;
C From the Collaboration Editor toolbar click the Commit changes icon.
11 To create the Copy CommArea to resultBytes Business Rule do the following:
A From the Business Rules toolbar, click the rule icon to add a new rule.
B Map CommArea under CICS_eWay_1 in the left pane of the Business Rules Designer, to resultBytes in the right pane of the Business Rules Designer (see Figure 60).
Figure 60 Copy CommArea to resultBytes Business Rule
12 To create the Copy resultBytes to resultBytesStream Business Rule do the following:
A From the Business Rules toolbar, click the rule icon to add a new rule.
B From the Business Rules Designer toolbar, click the Call New Constructor icon. The Call New Constructor dialog box appears.
C Select ByteArrayInputStream for All Classes and java.io.ByteArrayInputStream(byte[] buf) as the Constructors. Click OK. The java.io.ByteArrayInputStream method box is appears on the Business Rules Designer canvas.
D Map resultBytes in the left pane of the Business Rules Designer, to the buf (Byte[]) input node of the java.io.ByteArrayInputStream method box.
CICS eWay Intelligent Adapter User’s Guide 90 SeeBeyond Proprietary and Confidential
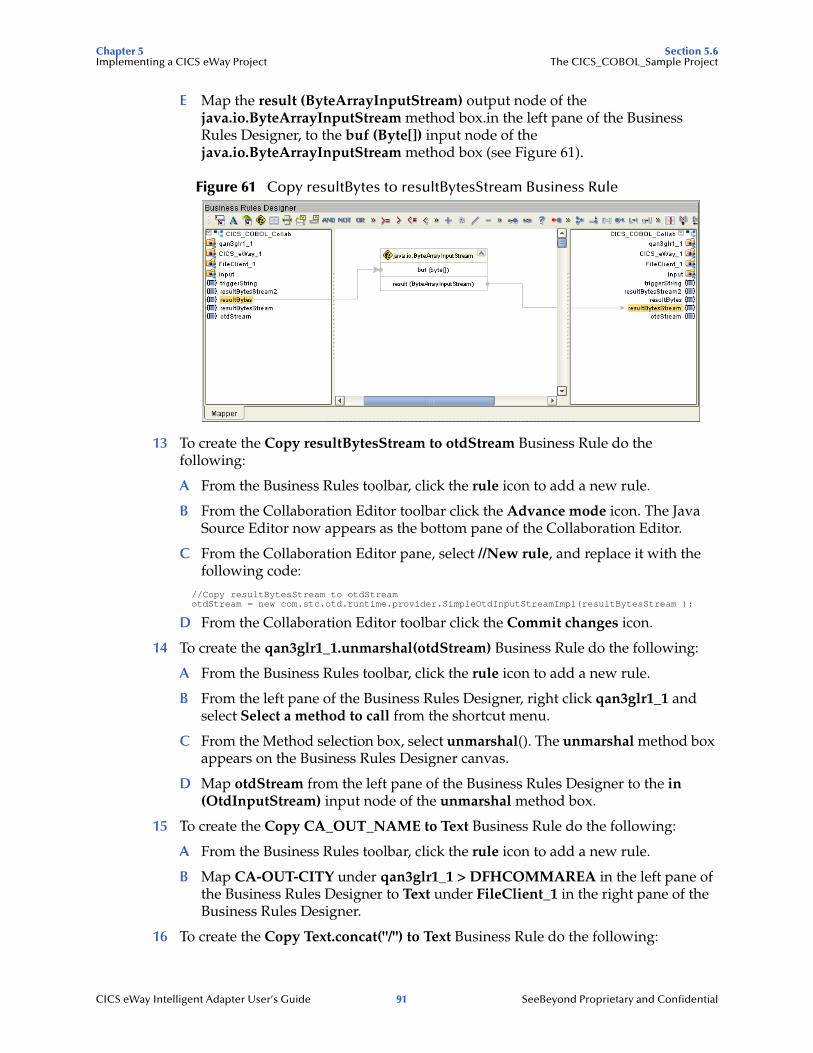
Chapter 5 Section 5.6Implementing a CICS eWay Project The CICS_COBOL_Sample Project
E Map the result (ByteArrayInputStream) output node of the java.io.ByteArrayInputStream method box.in the left pane of the Business Rules Designer, to the buf (Byte[]) input node of the java.io.ByteArrayInputStream method box (see Figure 61).
Figure 61 Copy resultBytes to resultBytesStream Business Rule
13 To create the Copy resultBytesStream to otdStream Business Rule do the following:
A From the Business Rules toolbar, click the rule icon to add a new rule.
B From the Collaboration Editor toolbar click the Advance mode icon. The Java Source Editor now appears as the bottom pane of the Collaboration Editor.
C From the Collaboration Editor pane, select //New rule, and replace it with the following code:
//Copy resultBytesStream to otdStreamotdStream = new com.stc.otd.runtime.provider.SimpleOtdInputStreamImpl(resultBytesStream );
D From the Collaboration Editor toolbar click the Commit changes icon.
14 To create the qan3glr1_1.unmarshal(otdStream) Business Rule do the following:
A From the Business Rules toolbar, click the rule icon to add a new rule.
B From the left pane of the Business Rules Designer, right click qan3glr1_1 and select Select a method to call from the shortcut menu.
C From the Method selection box, select unmarshal(). The unmarshal method box appears on the Business Rules Designer canvas.
D Map otdStream from the left pane of the Business Rules Designer to the in (OtdInputStream) input node of the unmarshal method box.
15 To create the Copy CA_OUT_NAME to Text Business Rule do the following:
A From the Business Rules toolbar, click the rule icon to add a new rule.
B Map CA-OUT-CITY under qan3glr1_1 > DFHCOMMAREA in the left pane of the Business Rules Designer to Text under FileClient_1 in the right pane of the Business Rules Designer.
16 To create the Copy Text.concat("/") to Text Business Rule do the following:
CICS eWay Intelligent Adapter User’s Guide 91 SeeBeyond Proprietary and Confidential
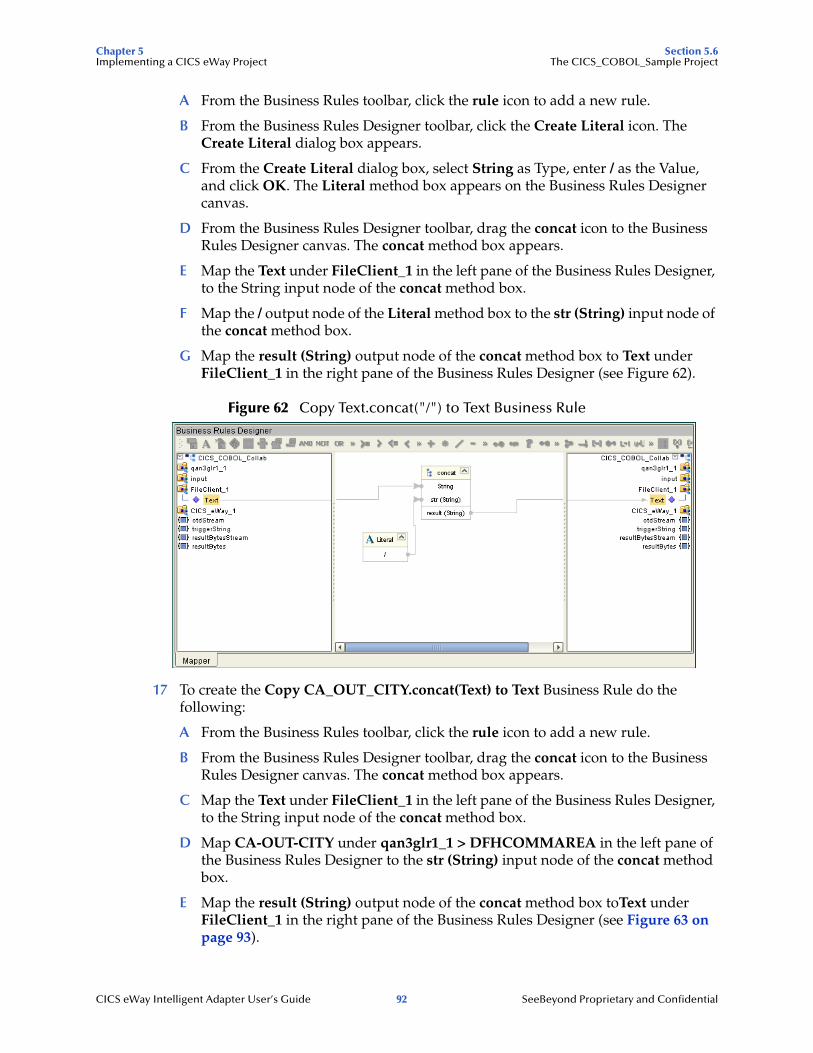
Chapter 5 Section 5.6Implementing a CICS eWay Project The CICS_COBOL_Sample Project
A From the Business Rules toolbar, click the rule icon to add a new rule.
B From the Business Rules Designer toolbar, click the Create Literal icon. The Create Literal dialog box appears.
C From the Create Literal dialog box, select String as Type, enter / as the Value, and click OK. The Literal method box appears on the Business Rules Designer canvas.
D From the Business Rules Designer toolbar, drag the concat icon to the Business Rules Designer canvas. The concat method box appears.
E Map the Text under FileClient_1 in the left pane of the Business Rules Designer, to the String input node of the concat method box.
F Map the / output node of the Literal method box to the str (String) input node of the concat method box.
G Map the result (String) output node of the concat method box to Text under FileClient_1 in the right pane of the Business Rules Designer (see Figure 62).
Figure 62 Copy Text.concat("/") to Text Business Rule
17 To create the Copy CA_OUT_CITY.concat(Text) to Text Business Rule do the following:
A From the Business Rules toolbar, click the rule icon to add a new rule.
B From the Business Rules Designer toolbar, drag the concat icon to the Business Rules Designer canvas. The concat method box appears.
C Map the Text under FileClient_1 in the left pane of the Business Rules Designer, to the String input node of the concat method box.
D Map CA-OUT-CITY under qan3glr1_1 > DFHCOMMAREA in the left pane of the Business Rules Designer to the str (String) input node of the concat method box.
E Map the result (String) output node of the concat method box toText under FileClient_1 in the right pane of the Business Rules Designer (see Figure 63 on page 93).
CICS eWay Intelligent Adapter User’s Guide 92 SeeBeyond Proprietary and Confidential
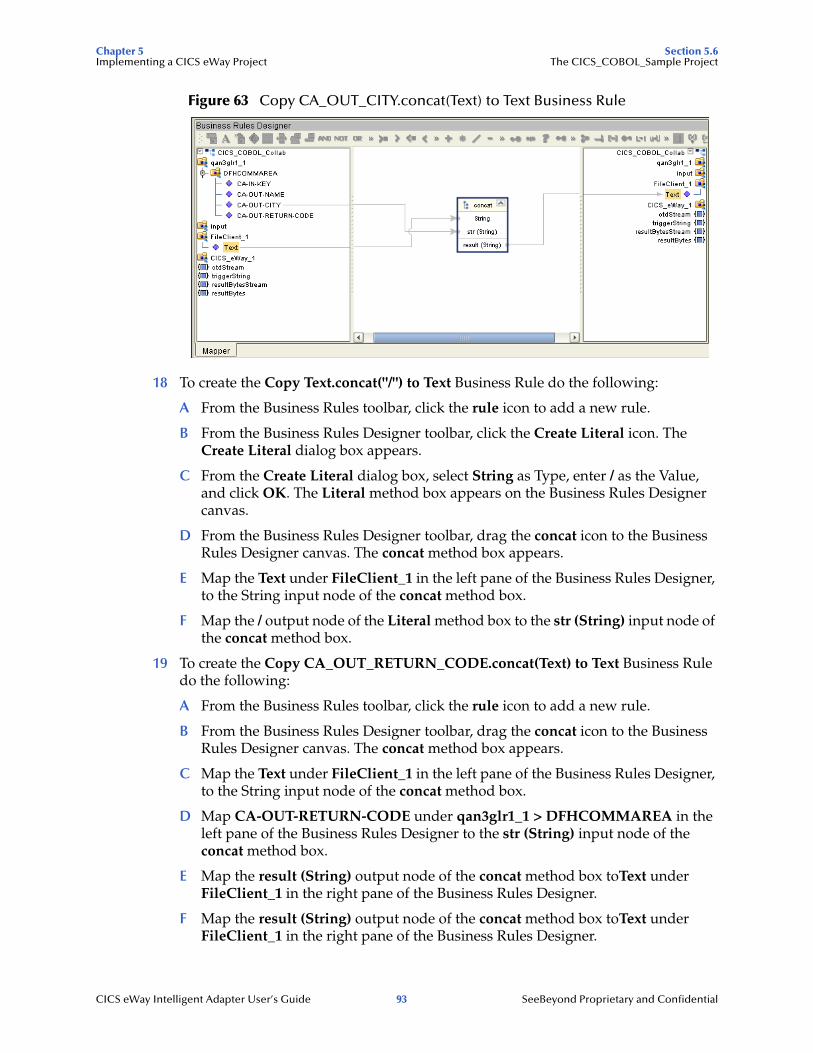
Chapter 5 Section 5.6Implementing a CICS eWay Project The CICS_COBOL_Sample Project
Figure 63 Copy CA_OUT_CITY.concat(Text) to Text Business Rule
18 To create the Copy Text.concat("/") to Text Business Rule do the following:
A From the Business Rules toolbar, click the rule icon to add a new rule.
B From the Business Rules Designer toolbar, click the Create Literal icon. The Create Literal dialog box appears.
C From the Create Literal dialog box, select String as Type, enter / as the Value, and click OK. The Literal method box appears on the Business Rules Designer canvas.
D From the Business Rules Designer toolbar, drag the concat icon to the Business Rules Designer canvas. The concat method box appears.
E Map the Text under FileClient_1 in the left pane of the Business Rules Designer, to the String input node of the concat method box.
F Map the / output node of the Literal method box to the str (String) input node of the concat method box.
19 To create the Copy CA_OUT_RETURN_CODE.concat(Text) to Text Business Rule do the following:
A From the Business Rules toolbar, click the rule icon to add a new rule.
B From the Business Rules Designer toolbar, drag the concat icon to the Business Rules Designer canvas. The concat method box appears.
C Map the Text under FileClient_1 in the left pane of the Business Rules Designer, to the String input node of the concat method box.
D Map CA-OUT-RETURN-CODE under qan3glr1_1 > DFHCOMMAREA in the left pane of the Business Rules Designer to the str (String) input node of the concat method box.
E Map the result (String) output node of the concat method box toText under FileClient_1 in the right pane of the Business Rules Designer.
F Map the result (String) output node of the concat method box toText under FileClient_1 in the right pane of the Business Rules Designer.
CICS eWay Intelligent Adapter User’s Guide 93 SeeBeyond Proprietary and Confidential

Chapter 5 Section 5.6Implementing a CICS eWay Project The CICS_COBOL_Sample Project
20 To create the FileClient_1.write Business Rule do the following:
A From the Business Rules toolbar, click the rule icon to add a new rule.
B From the left pane of the Business Rules Designer, right click FileClient_1 and select Select a method to call from the shortcut menu.
C From the Method selection box, select write(). The write method box appears on the Business Rules Designer canvas.
21 Save your current changes to the Repository.
For more information on how to create Business Rules using the Collaboration Editor (Java) see Using the Collaboration Editor (Java) on page 71, or see the eGate Integrator User’s Guide.
5.6.6. Creating Collaboration BindingsAfter the Collaborations have been written, the components are associated and the Collaboration Bindings are created in the Connectivity Map.
1 From the Project Explorer, double-click the Connectivity Map CM_CICS_COBOL_Sample. The Enterprise Designer canvas now displays the CM_CICS_COBOL_Sample Connectivity Map.
2 Drag and drop the CICS_COBOL_Collab Collaboration from the Project Explorer onto CicsCobolCollab in the CICS_COBOL_Sample_CM Connectivity Map. If the Collaboration was successfully associated, the Collaboration’s “gears” icon changes from red to green.
3 Double-click CicsCobolCollab. The CicsCobolCollab Binding dialog box appears.
4 From the CicsCobolCollab Binding dialog box, drag FileClient input (under Source) to the Inbound File external application.
5 From the CicsCobolCollab Binding dialog box, drag the FileClient FileClient_1 OTD (under Destination) to the outbound File external application.
6 From the CicsCobolCollab Binding dialog box, drag the CICS_eWay CICS_eWay_1 OTD (under Destination) to the CICS external application.
7 Minimize the CicsCobolCollab Binding dialog box. The Connectivity Map now appears similar to the Connectivity Map displayed in Figure 64 on page 95.
CICS eWay Intelligent Adapter User’s Guide 94 SeeBeyond Proprietary and Confidential

Chapter 5 Section 5.6Implementing a CICS eWay Project The CICS_COBOL_Sample Project
Figure 64 Connectivity Map - Connecting the Project’s Components
8 Right-click the Repository in the Project Explorer and select Save changes to Repository to save your changes.
5.6.7. Creating an EnvironmentEnvironments include the external systems, Logical Hosts, integration servers and message servers used by a project and contain the configuration information for these components.
1 From the Enterprise Designer’s Enterprise Explorer, click the Environment Explorer tab.
2 Right-click the Repository and select New Environment. A new environment is added to the Environment Explorer tree.
3 Rename the new environment to CICS_COBOL_Sample_ENV.
4 Right-click CICS_COBOL_Sample_ENV and select New CICS External System. Name the External System CicsExtSys. Click OK. CicsExtSys is added to the Environment Editor.
5 Right-click CICS_COBOL_Sample_ENV and select New File External System. Name the External System FileExtSysIn and select Inbound File eWay as the External System Type. Click OK. FileExtSysIn is added to the Environment Editor.
6 Right-click CICS_COBOL_Sample_ENV and select New File External System. Name this External System FileExtSysOut and select Outbound File eWay as the External System Type. FileExtSysOut is added to the Environment Editor.
7 Right-click CICS_COBOL_Sample_ENV and select New Logical Host. The LogicalHost1 box is added to the Environment and LogicalHost1 is added to the Environment Editor tree.
8 Right-click LogicalHost1 and select New SeeBeyond Integration Server. A new Integration Server (IntegrationSvr1) is added to the Environment Explorer tree under LogicalHost1.
9 Save your current changes to the repository.
CICS eWay Intelligent Adapter User’s Guide 95 SeeBeyond Proprietary and Confidential
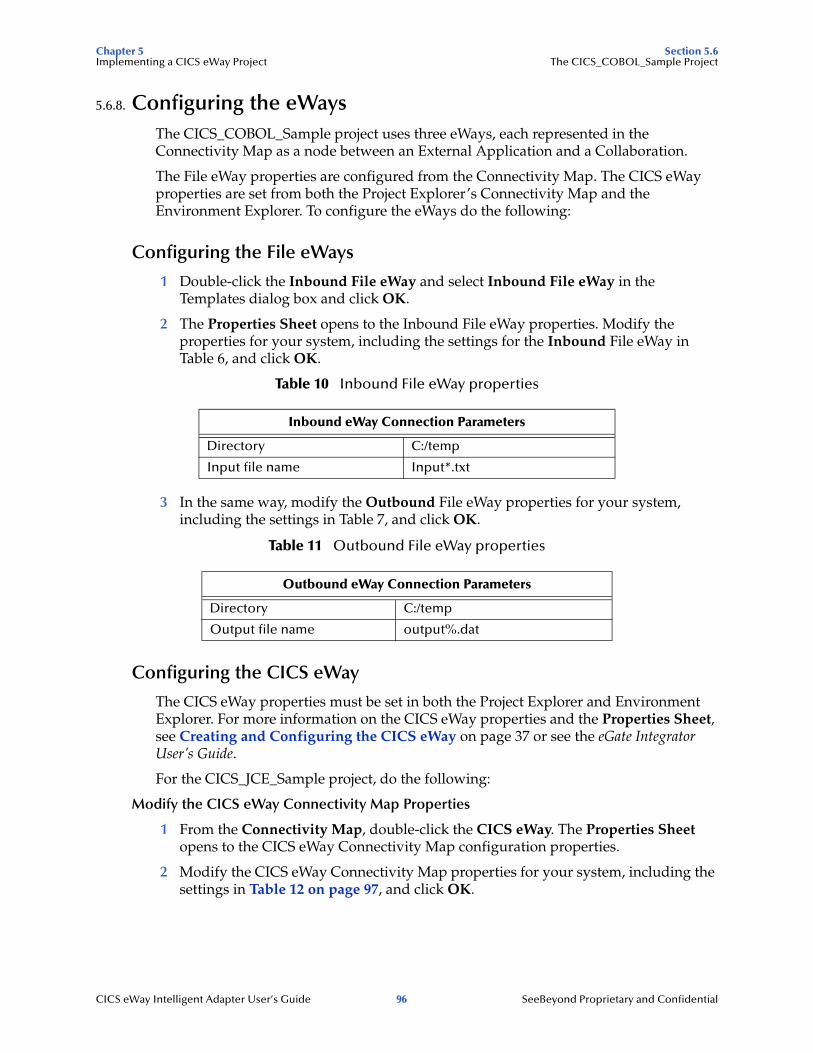
Chapter 5 Section 5.6Implementing a CICS eWay Project The CICS_COBOL_Sample Project
5.6.8. Configuring the eWaysThe CICS_COBOL_Sample project uses three eWays, each represented in the Connectivity Map as a node between an External Application and a Collaboration.
The File eWay properties are configured from the Connectivity Map. The CICS eWay properties are set from both the Project Explorer’s Connectivity Map and the Environment Explorer. To configure the eWays do the following:
Configuring the File eWays
1 Double-click the Inbound File eWay and select Inbound File eWay in the Templates dialog box and click OK.
2 The Properties Sheet opens to the Inbound File eWay properties. Modify the properties for your system, including the settings for the Inbound File eWay in Table 6, and click OK.
Table 10 Inbound File eWay properties
3 In the same way, modify the Outbound File eWay properties for your system, including the settings in Table 7, and click OK.
Table 11 Outbound File eWay properties
Configuring the CICS eWay
The CICS eWay properties must be set in both the Project Explorer and Environment Explorer. For more information on the CICS eWay properties and the Properties Sheet, see Creating and Configuring the CICS eWay on page 37 or see the eGate Integrator User’s Guide.
For the CICS_JCE_Sample project, do the following:
Modify the CICS eWay Connectivity Map Properties
1 From the Connectivity Map, double-click the CICS eWay. The Properties Sheet opens to the CICS eWay Connectivity Map configuration properties.
2 Modify the CICS eWay Connectivity Map properties for your system, including the settings in Table 12 on page 97, and click OK.
Inbound eWay Connection Parameters
Directory C:/temp
Input file name Input*.txt
Outbound eWay Connection Parameters
Directory C:/temp
Output file name output%.dat
CICS eWay Intelligent Adapter User’s Guide 96 SeeBeyond Proprietary and Confidential
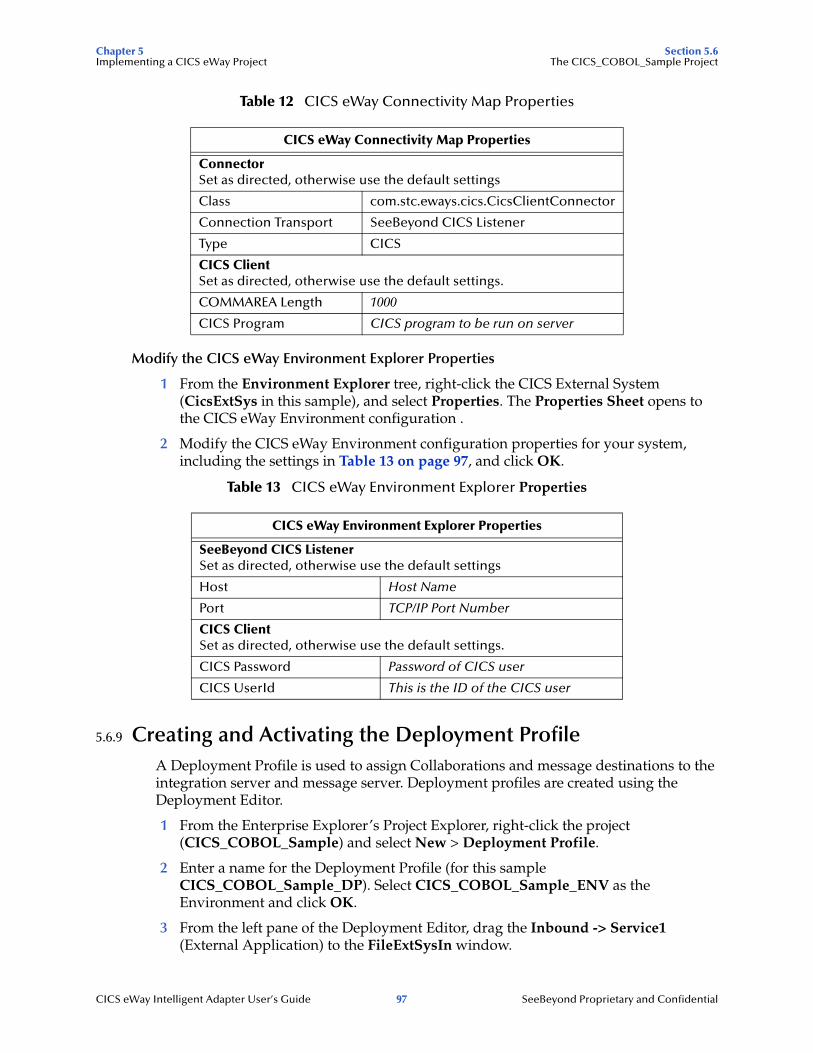
Chapter 5 Section 5.6Implementing a CICS eWay Project The CICS_COBOL_Sample Project
Table 12 CICS eWay Connectivity Map Properties
Modify the CICS eWay Environment Explorer Properties
1 From the Environment Explorer tree, right-click the CICS External System (CicsExtSys in this sample), and select Properties. The Properties Sheet opens to the CICS eWay Environment configuration .
2 Modify the CICS eWay Environment configuration properties for your system, including the settings in Table 13 on page 97, and click OK.
Table 13 CICS eWay Environment Explorer Properties
5.6.9 Creating and Activating the Deployment ProfileA Deployment Profile is used to assign Collaborations and message destinations to the integration server and message server. Deployment profiles are created using the Deployment Editor.
1 From the Enterprise Explorer’s Project Explorer, right-click the project (CICS_COBOL_Sample) and select New > Deployment Profile.
2 Enter a name for the Deployment Profile (for this sample CICS_COBOL_Sample_DP). Select CICS_COBOL_Sample_ENV as the Environment and click OK.
3 From the left pane of the Deployment Editor, drag the Inbound -> Service1 (External Application) to the FileExtSysIn window.
CICS eWay Connectivity Map Properties
Connector Set as directed, otherwise use the default settings
Class com.stc.eways.cics.CicsClientConnector
Connection Transport SeeBeyond CICS Listener
Type CICS
CICS Client Set as directed, otherwise use the default settings.
COMMAREA Length 1000
CICS Program CICS program to be run on server
CICS eWay Environment Explorer Properties
SeeBeyond CICS ListenerSet as directed, otherwise use the default settings
Host Host Name
Port TCP/IP Port Number
CICS ClientSet as directed, otherwise use the default settings.
CICS Password Password of CICS user
CICS UserId This is the ID of the CICS user
CICS eWay Intelligent Adapter User’s Guide 97 SeeBeyond Proprietary and Confidential
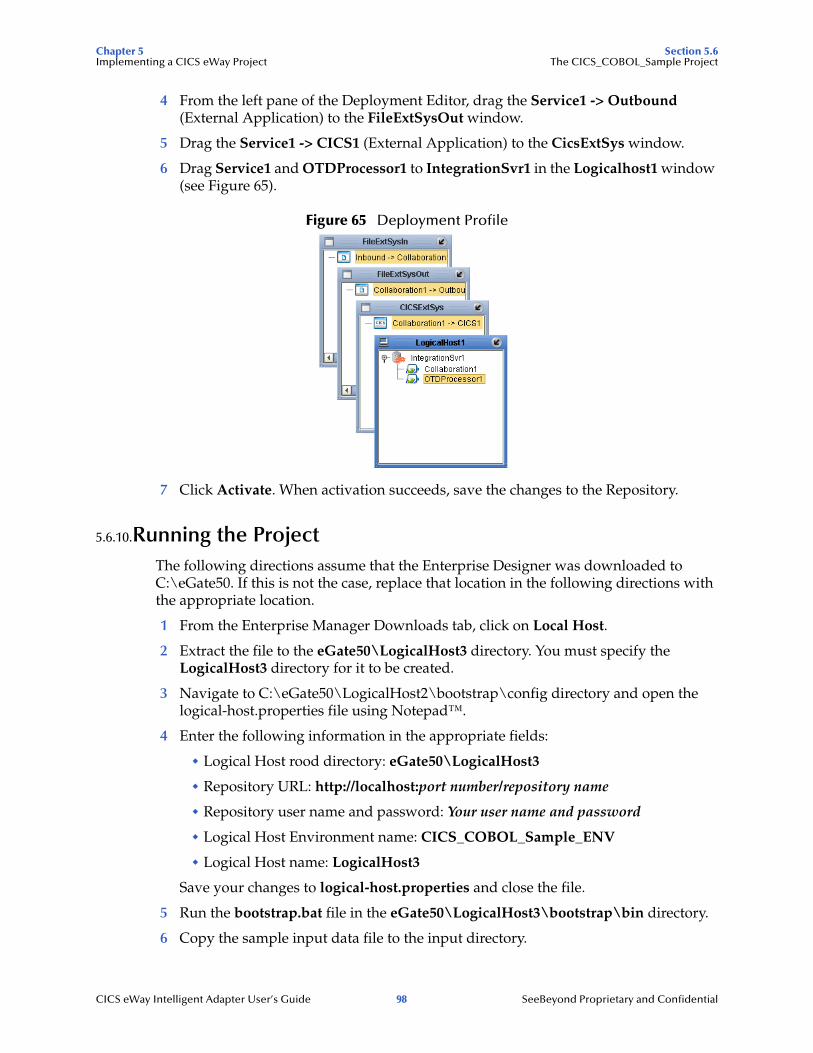
Chapter 5 Section 5.6Implementing a CICS eWay Project The CICS_COBOL_Sample Project
4 From the left pane of the Deployment Editor, drag the Service1 -> Outbound (External Application) to the FileExtSysOut window.
5 Drag the Service1 -> CICS1 (External Application) to the CicsExtSys window.
6 Drag Service1 and OTDProcessor1 to IntegrationSvr1 in the Logicalhost1 window (see Figure 65).
Figure 65 Deployment Profile
7 Click Activate. When activation succeeds, save the changes to the Repository.
5.6.10.Running the ProjectThe following directions assume that the Enterprise Designer was downloaded to C:\eGate50. If this is not the case, replace that location in the following directions with the appropriate location.
1 From the Enterprise Manager Downloads tab, click on Local Host.
2 Extract the file to the eGate50\LogicalHost3 directory. You must specify the LogicalHost3 directory for it to be created.
3 Navigate to C:\eGate50\LogicalHost2\bootstrap\config directory and open the logical-host.properties file using Notepad™.
4 Enter the following information in the appropriate fields:
" Logical Host rood directory: eGate50\LogicalHost3
" Repository URL: http://localhost:port number/repository name
" Repository user name and password: Your user name and password
" Logical Host Environment name: CICS_COBOL_Sample_ENV
" Logical Host name: LogicalHost3
Save your changes to logical-host.properties and close the file.
5 Run the bootstrap.bat file in the eGate50\LogicalHost3\bootstrap\bin directory.
6 Copy the sample input data file to the input directory.
CICS eWay Intelligent Adapter User’s Guide 98 SeeBeyond Proprietary and Confidential
Chapter 6
Java Methods
A number of Java methods have been exposed to make it easier to set information in the eWay’s OTD Editor and to get information from it. These methods are contained in the CicsClient Class.
Chapter Topics
! The CicsClient Class on page 99
! Packed Decimal Java Helper Methods on page 99
6.1 The CicsClient ClassThe CicsClient class represents an OTD through which a Collaboration can invoke transaction programs on a CICS server. Nodes and methods are exposed so that the Collaboration can conveniently prepare a request for a CICS program, invoke the program, and get result from the program.
CICS Javadoc
The Javadoc is uploaded with the eWay’s documentation file (CICSeWayDocs.sar) and downloaded from the Documentation tab of the Enterprise Manager. To access the full Javadoc, extract the Javadoc to an easily accessible folder, and double click the index.html file.
6.2 Packed Decimal Java Helper MethodsThe Java helper methods for the toPackedDecimal class. These methods are not exposed in the Collaboration but are available for use. For example, to use the CopyTo method to obtain a Hex value in a byte array you would use the following code:
MyPacked.toPackedDecimal("327.00") ; System.out.println( " Decimal value is : " + MyPacked.toString() ) ; byte[] work_buf = new byte[7]; MyPacked.CopyTo(work_buf, 7); for ( int Ii = 0 ; Ii < 7 ; Ii++ ) { int Ib = (int) new Byte(work_buf[Ii]).intValue(); if (Ib < 16) { System.out.println(" Byte" + Ii + " Hexvalue = 0" + Integer.toHexString(Ib)); } else
CICS eWay Intelligent Adapter User’s Guide 99 SeeBeyond Proprietary and Confidential

Chapter 6 Section 6.2Java Methods Packed Decimal Java Helper Methods
{ System.out.println(" Byte" + Ii + " Hexvalue = " + Integer.toHexString(Ib)); } }
This produces the following output:Decimal value is : 327.00Byte0 Hexvalue = 00Byte1 Hexvalue = 00Byte2 Hexvalue = 00Byte3 Hexvalue = 00Byte4 Hexvalue = 32Byte5 Hexvalue = 70Byte6 Hexvalue = 0c
These methods are described in detail on the following pages:
ContainerExists
Description
Checks to see if contents of a packed decimal are available.
Syntax
public com.stc.eways.cics.PackedDecimal boolean ContainerExists()
Parameters
None.
Return Values
Boolean
Throws
None.
CopyBack
Description
Builds a packed decimal from the payload in a byte array. The byte array must contain a valid packed decimal number.
Syntax
public com.stc.eways.cics.PackedDecimal void CopyBack(byte Origin[],int Size)
ContainerExists on page 100 GiveElem on page 101
CopyBack on page 100 SetElem on page 102
CopyTo on page 101
CICS eWay Intelligent Adapter User’s Guide 100 SeeBeyond Proprietary and Confidential
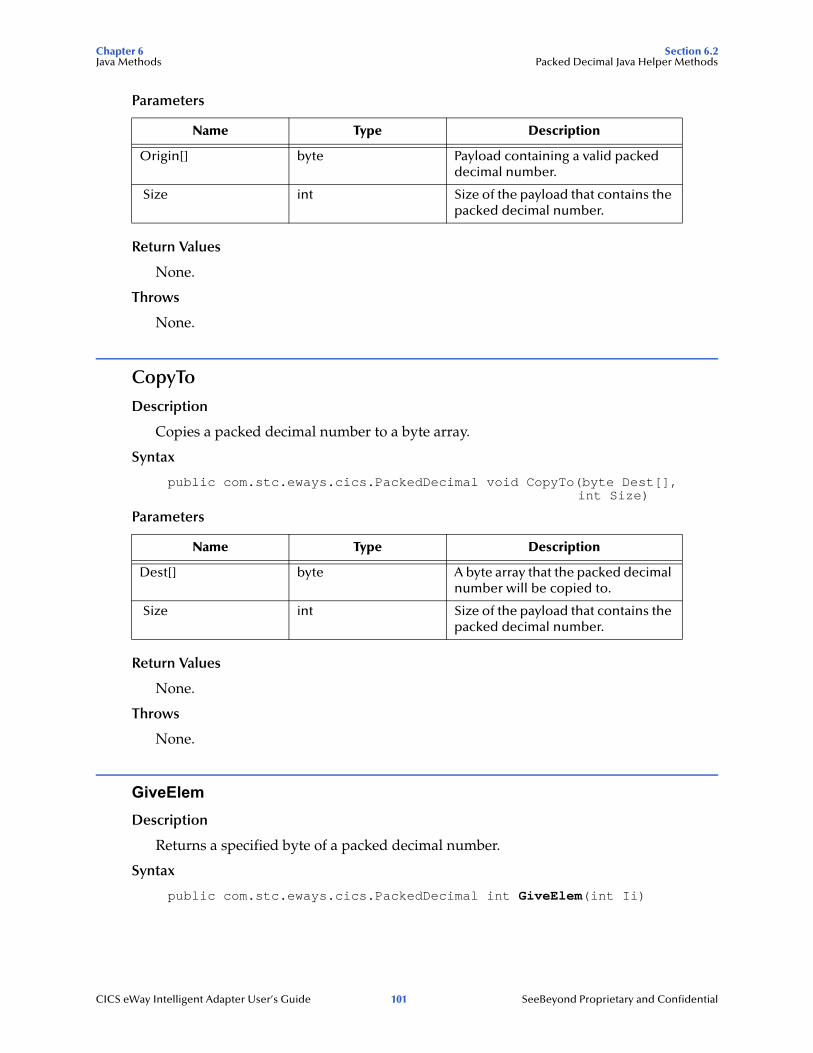
Chapter 6 Section 6.2Java Methods Packed Decimal Java Helper Methods
Parameters
Return Values
None.
Throws
None.
CopyTo
Description
Copies a packed decimal number to a byte array.
Syntax
public com.stc.eways.cics.PackedDecimal void CopyTo(byte Dest[], int Size)
Parameters
Return Values
None.
Throws
None.
GiveElemDescription
Returns a specified byte of a packed decimal number.
Syntax
public com.stc.eways.cics.PackedDecimal int GiveElem(int Ii)
Name Type Description
Origin[] byte Payload containing a valid packed decimal number.
Size int Size of the payload that contains the packed decimal number.
Name Type Description
Dest[] byte A byte array that the packed decimal number will be copied to.
Size int Size of the payload that contains the packed decimal number.
CICS eWay Intelligent Adapter User’s Guide 101 SeeBeyond Proprietary and Confidential
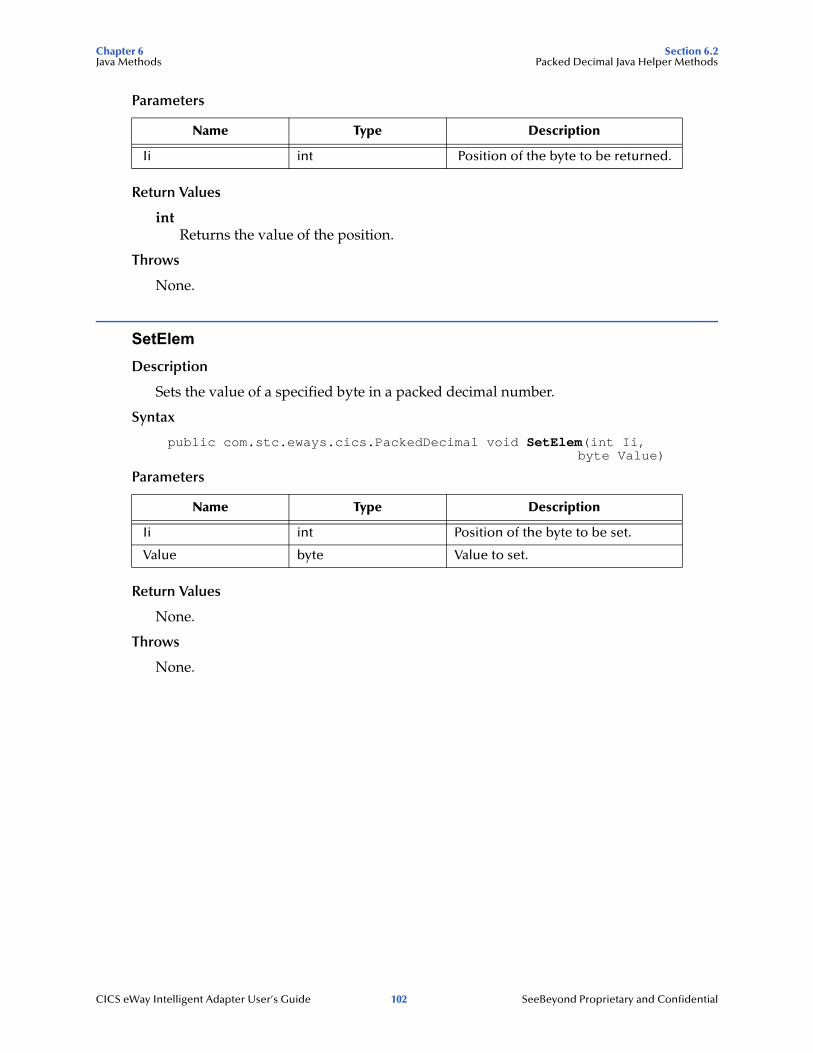
Chapter 6 Section 6.2Java Methods Packed Decimal Java Helper Methods
Parameters
Return Values
intReturns the value of the position.
Throws
None.
SetElemDescription
Sets the value of a specified byte in a packed decimal number.
Syntax
public com.stc.eways.cics.PackedDecimal void SetElem(int Ii, byte Value)
Parameters
Return Values
None.
Throws
None.
Name Type Description
Ii int Position of the byte to be returned.
Name Type Description
Ii int Position of the byte to be set.
Value byte Value to set.
CICS eWay Intelligent Adapter User’s Guide 102 SeeBeyond Proprietary and Confidential

Index
Index
Aalerting and logging 48alerts/status notifications 48
Bbinding 76
dialog box 59eWay components 58
bindings 94
CCEDA 15, 17CICS
overview 7CICS eWay
location 38modify properties 39overview 7, 8properties 37
Connectivity Map 37Environment Explorer tree 37
CICSClient OTD 65Cobol Copybook Converter
function described 8sample project 83
Cobol Copybook Wizard 85Collaboration
editor 69Collaboration definitions
Java 69Collaboration editor
Business Rules 71using 71
COMMAREA 8Connectivity Map 68
DDeployment Profile 81
creating 62DFHRPL Concatenation 17
EEnvironment 59, 77
creating 59Logical Host 59SeeBeyond Integration Server 60
eWayscreating 38
External Applicationcreating 37
External Applications 68
Hhelper methods 99
Iimplementation 65
JJava methods 99
CicsClient Class 99Javadoc 99JMS Client
properties 80
Llogging
enabling and modifying 48levels and catagories 48
Mmethods
packed decimal helper methods 99ContainerExists 100CopyBack 100CopyTo 101GiveElem 101SetElem 102
packed decimal helper methods example 102Microsoft Internet Explorer 12
Ooperating systems
supported 11
CICS eWay Intelligent Adapter User’s Guide 103 SeeBeyond Proprietary and Confidential

Index
Pproject
creating 67importing 66JCE sample overview 67using Java Collaborations 65
propertiesCICS Client 41, 47CICS Password 47CICS Program 41CICS TransId 42CICS UserId 47Class 40COMMAREA length 42COMMAREA Padding Character 43configuring 37configuring the eWays 60Connection Transport 40Connectivity Map properties 40
modifying 38Connector
Class 40ECI call type 42Encoding 42Host 44JMS Client 80KeepAlive 44Listener Timeout 44NoDelay 44Polling Rate 45Port 45Property.Tag 41ReceiveBufSize 45SeeBeyond CICS Listener 43SeeBeyond CICS Listener TransId 45SendBufSize 45Start Delay 46Start Type 46TP Timeout 46Transport Timeout 46Type 41
Properties Sheet 39
Rrunning a project 63, 82
Ssar files
CICSeWay.sar 14security 9security validation
request start transaction mode 10SeeBeyond Listener
business logic mode 10request link to program mode 10request start transaction mode 11
z/OS CICS security 9SeeBeyond CICS Listener
configuration file maintenance screen for z/OS 18
configuration requirements 12installation
3480 tape 16adding the CICS e*Way Load Module 17CICS CEDA definitions 17copying the tape contents to disk 16verifying proper installation 17z/OS 15
installation from CD-ROM 15monitor screen for OS/390 23overview 8
system requirements 12external 12
WWindows 12Windows 2000 12
CICS eWay Intelligent Adapter User’s Guide 104 SeeBeyond Proprietary and Confidential