Embed Size (px)
Citation preview
iWayiWay Transaction Adapter for CICS (XML) User’s GuideVersion 5 Release 5
Updated for J2EE CA 1.5
DN3501483.0305

EDA, EDA/SQL, FIDEL, FOCCALC, FOCUS, FOCUS Fusion, FOCUS Vision, Hospital-Trac, Information Builders, the Information Builders logo, Parlay, PC/FOCUS, SmartMart, SmartMode, SNAPpack, TableTalk, WALDO, Web390, WebFOCUS and WorldMART are registered trademarks, and iWay and iWay Software are trademarks of Information Builders, Inc.
Sun and Java are trademarks or registered trademarks of Sun Microsystems, Inc. in the U.S. and other countries.
Due to the nature of this material, this document refers to numerous hardware and software products by their trademarks. In most, if not all cases, these designations are claimed as trademarks or registered trademarks by their respective companies. It is not this publisher’s intent to use any of these names generically. The reader is therefore cautioned to investigate all claimed trademark rights before using any of these names other than to refer to the product described.
Copyright © 2005, by Information Builders, Inc and iWay Software. All rights reserved. Patent Pending. This manual, or parts thereof, may not be reproduced in any form without the written permission of Information Builders, Inc.
PrefaceThis documentation describes how to configure and use the iWay Transaction Adapter for CICS (XML).
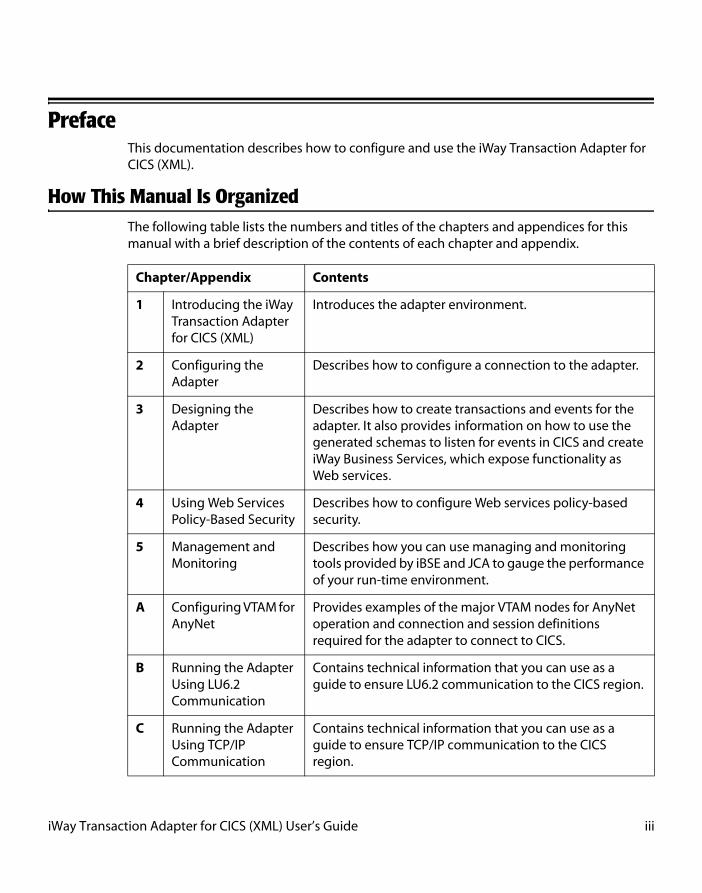
How This Manual Is OrganizedThe following table lists the numbers and titles of the chapters and appendices for this manual with a brief description of the contents of each chapter and appendix.
Chapter/Appendix Contents
1 Introducing the iWay Transaction Adapter for CICS (XML)
Introduces the adapter environment.
2 Configuring the Adapter
Describes how to configure a connection to the adapter.
3 Designing the Adapter
Describes how to create transactions and events for the adapter. It also provides information on how to use the generated schemas to listen for events in CICS and create iWay Business Services, which expose functionality as Web services.
4 Using Web Services Policy-Based Security
Describes how to configure Web services policy-based security.
5 Management and Monitoring
Describes how you can use managing and monitoring tools provided by iBSE and JCA to gauge the performance of your run-time environment.
A Configuring VTAM for AnyNet
Provides examples of the major VTAM nodes for AnyNet operation and connection and session definitions required for the adapter to connect to CICS.
B Running the Adapter Using LU6.2 Communication
Contains technical information that you can use as a guide to ensure LU6.2 communication to the CICS region.
C Running the Adapter Using TCP/IP Communication
Contains technical information that you can use as a guide to ensure TCP/IP communication to the CICS region.
iWay Transaction Adapter for CICS (XML) User’s Guide iii
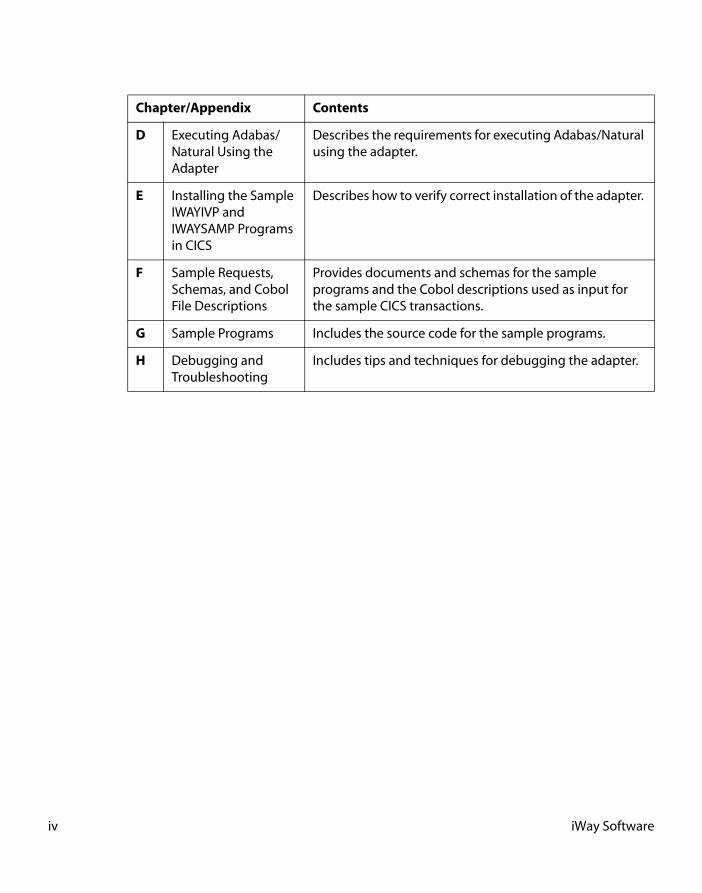
D Executing Adabas/Natural Using the Adapter
Describes the requirements for executing Adabas/Natural using the adapter.
E Installing the Sample IWAYIVP and IWAYSAMP Programs in CICS
Describes how to verify correct installation of the adapter.
F Sample Requests, Schemas, and Cobol File Descriptions
Provides documents and schemas for the sample programs and the Cobol descriptions used as input for the sample CICS transactions.
G Sample Programs Includes the source code for the sample programs.
H Debugging and Troubleshooting
Includes tips and techniques for debugging the adapter.
Chapter/Appendix Contents
iv iWay Software
Preface
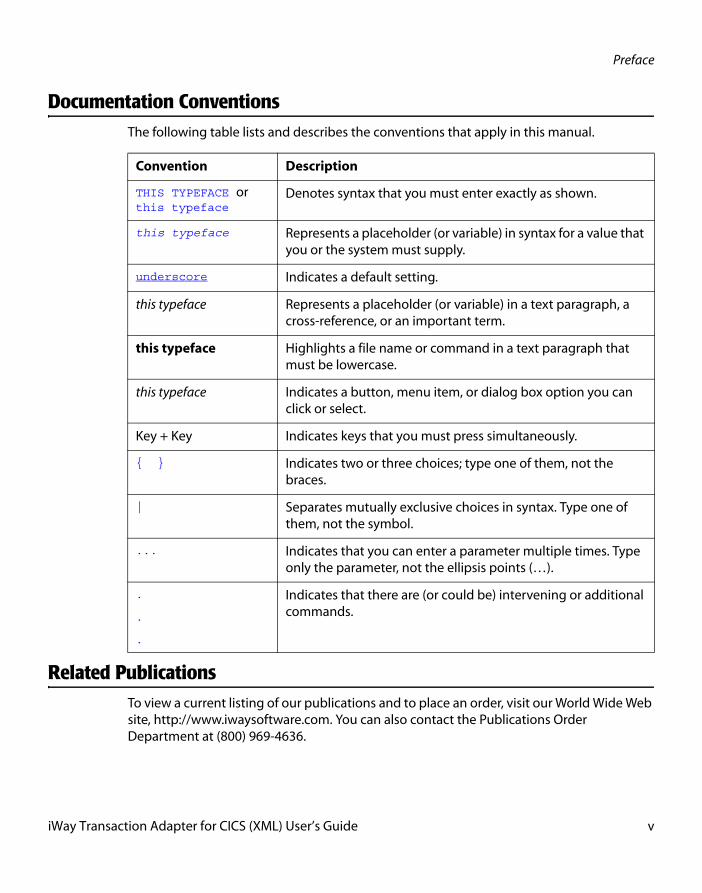
Documentation ConventionsThe following table lists and describes the conventions that apply in this manual.
Related PublicationsTo view a current listing of our publications and to place an order, visit our World Wide Web site, http://www.iwaysoftware.com. You can also contact the Publications Order Department at (800) 969-4636.
Convention Description
THIS TYPEFACE or this typeface
Denotes syntax that you must enter exactly as shown.
this typeface Represents a placeholder (or variable) in syntax for a value that you or the system must supply.
underscore Indicates a default setting.
this typeface Represents a placeholder (or variable) in a text paragraph, a cross-reference, or an important term.
this typeface Highlights a file name or command in a text paragraph that must be lowercase.
this typeface Indicates a button, menu item, or dialog box option you can click or select.
Key + Key Indicates keys that you must press simultaneously.
{ } Indicates two or three choices; type one of them, not the braces.
| Separates mutually exclusive choices in syntax. Type one of them, not the symbol.
... Indicates that you can enter a parameter multiple times. Type only the parameter, not the ellipsis points (…).
.
.
.
Indicates that there are (or could be) intervening or additional commands.
iWay Transaction Adapter for CICS (XML) User’s Guide v
Customer SupportDo you have questions about the iWay Transaction Adapter for CICS (XML)?
If you bought the product from a vendor other than iWay Software, contact your distributor.
If you bought the product directly from iWay Software, call Information Builders Customer Support Service (CSS) at (800) 736-6130 or (212) 736-6130. Customer Support Consultants are available Monday through Friday between 8:00 a.m. and 8:00 p.m. EST to address all your iWay Transaction Adapter for CICS (XML) questions. Information Builders consultants can also give you general guidance regarding product capabilities and documentation. Please be ready to provide your six-digit site code number (xxxx.xx) when you call.
You can also access support services electronically, 24 hours a day, with InfoResponse Online. InfoResponse Online is accessible through our World Wide Web site, http://www.informationbuilders.com. It connects you to the tracking system and known-problem database at the Information Builders support center. Registered users can open, update, and view the status of cases in the tracking system and read descriptions of reported software issues. New users can register immediately for this service. The technical support section of www.informationbuilders.com also provides usage techniques, diagnostic tips, and answers to frequently asked questions.
To learn about the full range of available support services, ask your Information Builders representative about InfoResponse Online, or call (800) 969-INFO.
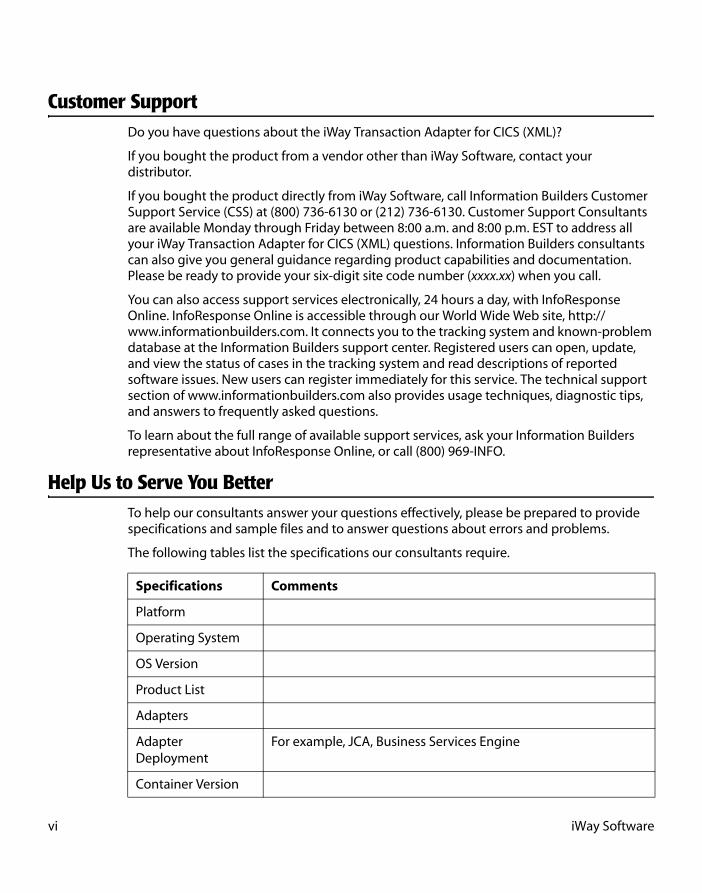
Help Us to Serve You BetterTo help our consultants answer your questions effectively, please be prepared to provide specifications and sample files and to answer questions about errors and problems.
The following tables list the specifications our consultants require.
Specifications Comments
Platform
Operating System
OS Version
Product List
Adapters
Adapter Deployment
For example, JCA, Business Services Engine
Container Version
vi iWay Software
Preface
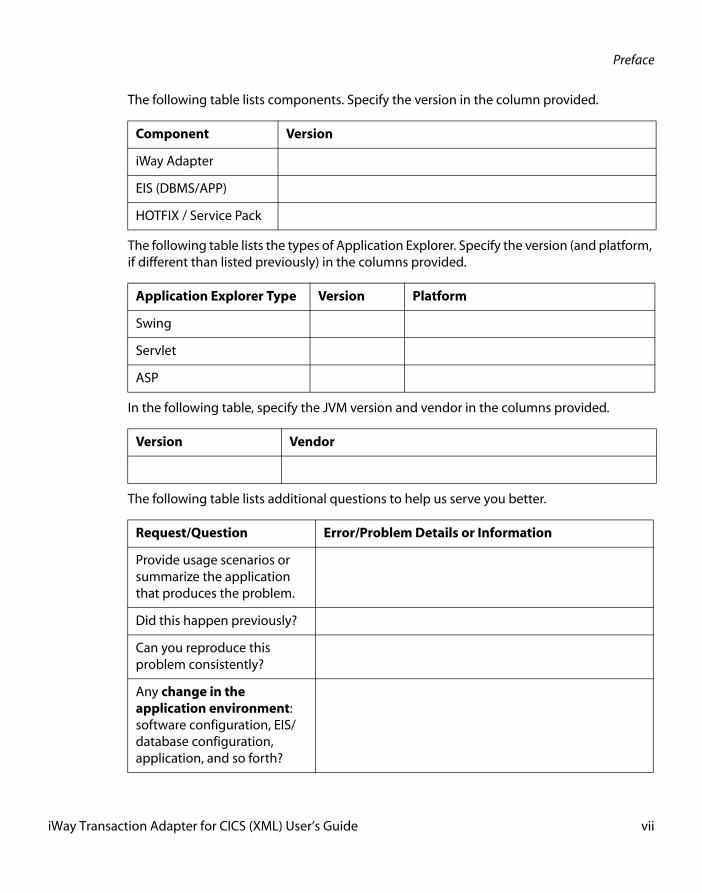
The following table lists components. Specify the version in the column provided.
The following table lists the types of Application Explorer. Specify the version (and platform, if different than listed previously) in the columns provided.
In the following table, specify the JVM version and vendor in the columns provided.
The following table lists additional questions to help us serve you better.
Component Version
iWay Adapter
EIS (DBMS/APP)
HOTFIX / Service Pack
Application Explorer Type Version Platform
Swing
Servlet
ASP
Version Vendor
Request/Question Error/Problem Details or Information
Provide usage scenarios or summarize the application that produces the problem.
Did this happen previously?
Can you reproduce this problem consistently?
Any change in the application environment: software configuration, EIS/database configuration, application, and so forth?
iWay Transaction Adapter for CICS (XML) User’s Guide vii
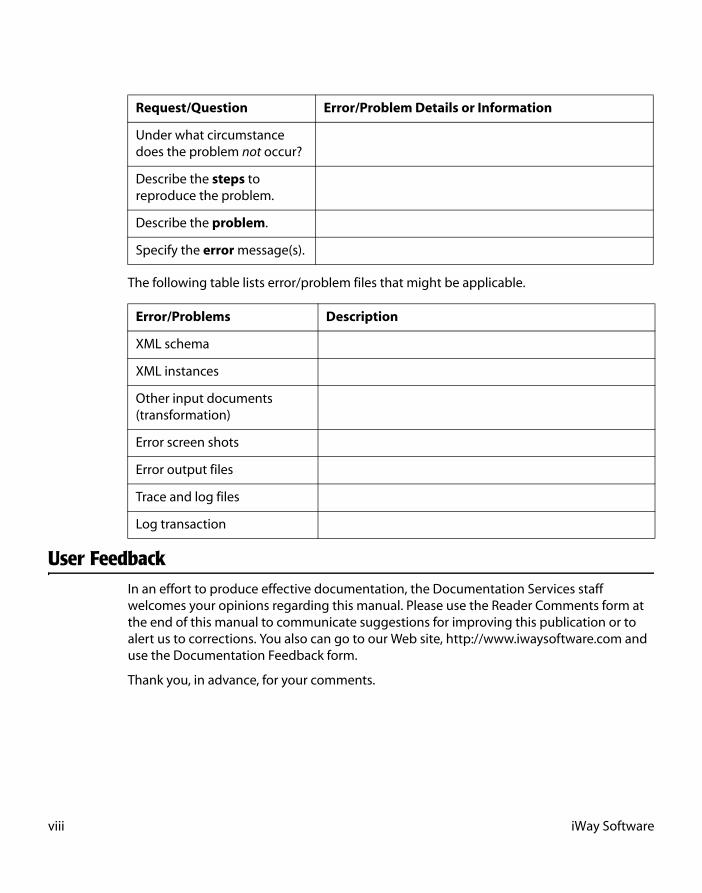
The following table lists error/problem files that might be applicable.
User FeedbackIn an effort to produce effective documentation, the Documentation Services staff welcomes your opinions regarding this manual. Please use the Reader Comments form at the end of this manual to communicate suggestions for improving this publication or to alert us to corrections. You also can go to our Web site, http://www.iwaysoftware.com and use the Documentation Feedback form.
Thank you, in advance, for your comments.
Under what circumstance does the problem not occur?
Describe the steps to reproduce the problem.
Describe the problem.
Specify the error message(s).
Error/Problems Description
XML schema
XML instances
Other input documents (transformation)
Error screen shots
Error output files
Trace and log files
Log transaction
Request/Question Error/Problem Details or Information
viii iWay Software
Preface
iWay Software Training and Professional ServicesInterested in training? Our Education Department offers a wide variety of training courses for iWay Software and other Information Builders products.
For information on course descriptions, locations, and dates, or to register for classes, visit our World Wide Web site, http://www.iwaysoftware.com or call (800) 969-INFO to speak to an Education Representative.
Interested in technical assistance for your implementation? Our Professional Services department provides expert design, systems architecture, implementation, and project management services for all your business integration projects. For information, visit our World Wide Web site, http://www.iwaysoftware.com.
iWay Transaction Adapter for CICS (XML) User’s Guide ix

x iWay Software
Contents1. Introducing the iWay Transaction Adapter for CICS (XML) . . . . . . . . . . . . . . . . . . . .1-1
Overview of the Adapter . . . . . . . . . . . . . . . . . . . . . . . . . . . . . . . . . . . . . . . . . . . . . . . . . . . . . . . . . . . . . . . . . . . . . .1-2The iWay Transaction Adapter for CICS (XML) . . . . . . . . . . . . . . . . . . . . . . . . . . . . . . . . . . . . . . . . . . . . . . . . . .1-3
CICS Programs . . . . . . . . . . . . . . . . . . . . . . . . . . . . . . . . . . . . . . . . . . . . . . . . . . . . . . . . . . . . . . . . . . . . . . . . . .1-4Software Requirements for the Adapter . . . . . . . . . . . . . . . . . . . . . . . . . . . . . . . . . . . . . . . . . . . . . . . . . .1-4
Deployment Information for the Adapter . . . . . . . . . . . . . . . . . . . . . . . . . . . . . . . . . . . . . . . . . . . . . . . . . . . . . .1-5Deployment Information Roadmap . . . . . . . . . . . . . . . . . . . . . . . . . . . . . . . . . . . . . . . . . . . . . . . . . . . . . .1-5The iWay Business Services Engine . . . . . . . . . . . . . . . . . . . . . . . . . . . . . . . . . . . . . . . . . . . . . . . . . . . . . . .1-6The iWay Enterprise Connector for J2EE Connector Architecture . . . . . . . . . . . . . . . . . . . . . . . . . .1-6
2. Configuring the Adapter . . . . . . . . . . . . . . . . . . . . . . . . . . . . . . . . . . . . . . . . . . . . . . . . . . .2-1Starting Servlet Application Explorer . . . . . . . . . . . . . . . . . . . . . . . . . . . . . . . . . . . . . . . . . . . . . . . . . . . . . . . . . .2-2Configuring a Connection to CICS . . . . . . . . . . . . . . . . . . . . . . . . . . . . . . . . . . . . . . . . . . . . . . . . . . . . . . . . . . . . .2-3Managing a Connection to CICS . . . . . . . . . . . . . . . . . . . . . . . . . . . . . . . . . . . . . . . . . . . . . . . . . . . . . . . . . . . . . 2-14
3. Designing the Adapter . . . . . . . . . . . . . . . . . . . . . . . . . . . . . . . . . . . . . . . . . . . . . . . . . . . .3-1Creating an Adapter Transaction . . . . . . . . . . . . . . . . . . . . . . . . . . . . . . . . . . . . . . . . . . . . . . . . . . . . . . . . . . . . . .3-2
Sample Program IWAYSAMP . . . . . . . . . . . . . . . . . . . . . . . . . . . . . . . . . . . . . . . . . . . . . . . . . . . . . . . . . . . . .3-3Cobol Descriptions for Input and Output Communications . . . . . . . . . . . . . . . . . . . . . . . . . . . . . . .3-8
Creating Schemas for an Adapter Transaction . . . . . . . . . . . . . . . . . . . . . . . . . . . . . . . . . . . . . . . . . . . . . . . . . .3-8Understanding iWay Business Services . . . . . . . . . . . . . . . . . . . . . . . . . . . . . . . . . . . . . . . . . . . . . . . . . . . . . . 3-10
Creating a Web Service . . . . . . . . . . . . . . . . . . . . . . . . . . . . . . . . . . . . . . . . . . . . . . . . . . . . . . . . . . . . . . . . 3-10Testing the Web Service . . . . . . . . . . . . . . . . . . . . . . . . . . . . . . . . . . . . . . . . . . . . . . . . . . . . . . . . . . . . . . . 3-13Generating WSDL From a Web Service . . . . . . . . . . . . . . . . . . . . . . . . . . . . . . . . . . . . . . . . . . . . . . . . . 3-14Identity Propagation . . . . . . . . . . . . . . . . . . . . . . . . . . . . . . . . . . . . . . . . . . . . . . . . . . . . . . . . . . . . . . . . . . 3-16
Creating an Event . . . . . . . . . . . . . . . . . . . . . . . . . . . . . . . . . . . . . . . . . . . . . . . . . . . . . . . . . . . . . . . . . . . . . . . . . . . 3-16Creating, Editing, and Deleting an Event Port . . . . . . . . . . . . . . . . . . . . . . . . . . . . . . . . . . . . . . . . . . . . . . . . 3-17
Creating an Event Port From the iWay Events Tab . . . . . . . . . . . . . . . . . . . . . . . . . . . . . . . . . . . . . . 3-17Editing and Deleting an Event Port . . . . . . . . . . . . . . . . . . . . . . . . . . . . . . . . . . . . . . . . . . . . . . . . . . . . . 3-33
Creating, Editing, and Deleting an Event Channel . . . . . . . . . . . . . . . . . . . . . . . . . . . . . . . . . . . . . . . . . . . . 3-34Editing and Deleting a Channel . . . . . . . . . . . . . . . . . . . . . . . . . . . . . . . . . . . . . . . . . . . . . . . . . . . . . . . . 3-41
4. Using Web Services Policy-Based Security . . . . . . . . . . . . . . . . . . . . . . . . . . . . . . . . . .4-1iWay Business Services Policy-Based Security . . . . . . . . . . . . . . . . . . . . . . . . . . . . . . . . . . . . . . . . . . . . . . . . . .4-2Configuring iWay Business Services Policy-Based Security . . . . . . . . . . . . . . . . . . . . . . . . . . . . . . . . . . . . . .4-3
5. Management and Monitoring . . . . . . . . . . . . . . . . . . . . . . . . . . . . . . . . . . . . . . . . . . . . . .5-1Managing and Monitoring Services and Events Using iBSE . . . . . . . . . . . . . . . . . . . . . . . . . . . . . . . . . . . . .5-2Managing and Monitoring Services and Events Using the JCA Test Tool . . . . . . . . . . . . . . . . . . . . . . 5-17Setting Engine Log Levels . . . . . . . . . . . . . . . . . . . . . . . . . . . . . . . . . . . . . . . . . . . . . . . . . . . . . . . . . . . . . . . . . . . 5-22
iWay Transaction Adapter for CICS (XML) User’s Guide xi
Contents
Migrating Repositories . . . . . . . . . . . . . . . . . . . . . . . . . . . . . . . . . . . . . . . . . . . . . . . . . . . . . . . . . . . . . . . . . . . . . . 5-23File Repositories . . . . . . . . . . . . . . . . . . . . . . . . . . . . . . . . . . . . . . . . . . . . . . . . . . . . . . . . . . . . . . . . . . . . . . . 5-23iBSE Repositories . . . . . . . . . . . . . . . . . . . . . . . . . . . . . . . . . . . . . . . . . . . . . . . . . . . . . . . . . . . . . . . . . . . . . . 5-23JCA Repositories . . . . . . . . . . . . . . . . . . . . . . . . . . . . . . . . . . . . . . . . . . . . . . . . . . . . . . . . . . . . . . . . . . . . . . 5-28Migrating Event Handling Configurations . . . . . . . . . . . . . . . . . . . . . . . . . . . . . . . . . . . . . . . . . . . . . . 5-28
Exporting or Importing Targets . . . . . . . . . . . . . . . . . . . . . . . . . . . . . . . . . . . . . . . . . . . . . . . . . . . . . . . . . . . . . . 5-32Retrieving or Updating Web Service Method Connection Information . . . . . . . . . . . . . . . . . . . . . . . . 5-37Starting or Stopping a Channel Programmatically . . . . . . . . . . . . . . . . . . . . . . . . . . . . . . . . . . . . . . . . . . . . 5-40
A. Configuring VTAM for AnyNet . . . . . . . . . . . . . . . . . . . . . . . . . . . . . . . . . . . . . . . . . . . . A-1VTAM and AnyNet Configuration Requirements . . . . . . . . . . . . . . . . . . . . . . . . . . . . . . . . . . . . . . . . . . . . . . A-2TCP6.2 AnyNet Setup Samples for the VTAM Administrator . . . . . . . . . . . . . . . . . . . . . . . . . . . . . . . . . . . . A-2TCP6.2 AnyNet Setup Samples for the CICS Administrator . . . . . . . . . . . . . . . . . . . . . . . . . . . . . . . . . . . . . A-3Post-Configuration Steps . . . . . . . . . . . . . . . . . . . . . . . . . . . . . . . . . . . . . . . . . . . . . . . . . . . . . . . . . . . . . . . . . . . . A-6
Verifying That the AnyNet Port is Listening . . . . . . . . . . . . . . . . . . . . . . . . . . . . . . . . . . . . . . . . . . . . . . A-6Verifying That the CICS Program is Accessible and Enabled in the CICS Region . . . . . . . . . . . . A-7
Error Conditions . . . . . . . . . . . . . . . . . . . . . . . . . . . . . . . . . . . . . . . . . . . . . . . . . . . . . . . . . . . . . . . . . . . . . . . . . . . . . A-8VTAM BIND Failures . . . . . . . . . . . . . . . . . . . . . . . . . . . . . . . . . . . . . . . . . . . . . . . . . . . . . . . . . . . . . . . . . . . . A-8Connect Failures Module BPX1AI0 . . . . . . . . . . . . . . . . . . . . . . . . . . . . . . . . . . . . . . . . . . . . . . . . . . . . . . A-8
B. Running the Adapter Using LU6.2 Communication . . . . . . . . . . . . . . . . . . . . . . . . . .B-1MVS OS/390 APPC Communication . . . . . . . . . . . . . . . . . . . . . . . . . . . . . . . . . . . . . . . . . . . . . . . . . . . . . . . . . . . .B-2
LU6.2 Setup on MVS . . . . . . . . . . . . . . . . . . . . . . . . . . . . . . . . . . . . . . . . . . . . . . . . . . . . . . . . . . . . . . . . . . . . .B-2LU6.2 Setup on CICS . . . . . . . . . . . . . . . . . . . . . . . . . . . . . . . . . . . . . . . . . . . . . . . . . . . . . . . . . . . . . . . . . . . . .B-3
Microsoft SNA Server Communication . . . . . . . . . . . . . . . . . . . . . . . . . . . . . . . . . . . . . . . . . . . . . . . . . . . . . . . . .B-4LU6.2 Setup on a Windows SNA Server . . . . . . . . . . . . . . . . . . . . . . . . . . . . . . . . . . . . . . . . . . . . . . . . . . .B-4
Application Run Time Requirements . . . . . . . . . . . . . . . . . . . . . . . . . . . . . . . . . . . . . . . . . . . . . . . . . . . . . . . . . . .B-6
C. Running the Adapter Using TCP/IP Communication . . . . . . . . . . . . . . . . . . . . . . . . .C-1MVS OS/390 TCP/IP Communication . . . . . . . . . . . . . . . . . . . . . . . . . . . . . . . . . . . . . . . . . . . . . . . . . . . . . . . . . . .C-2
TCP/IP Requirements . . . . . . . . . . . . . . . . . . . . . . . . . . . . . . . . . . . . . . . . . . . . . . . . . . . . . . . . . . . . . . . . . . . .C-2
D. Executing Adabas/Natural Using the Adapter . . . . . . . . . . . . . . . . . . . . . . . . . . . . . . D-1Natural Program Execution Overview . . . . . . . . . . . . . . . . . . . . . . . . . . . . . . . . . . . . . . . . . . . . . . . . . . . . . . . . . D-2Adabas/Natural Proxy Programs . . . . . . . . . . . . . . . . . . . . . . . . . . . . . . . . . . . . . . . . . . . . . . . . . . . . . . . . . . . . . . D-3
E. Installing the Sample IWAYIVP and IWAYSAMP Programs in CICS . . . . . . . . . . . . .E-1Installing and Configuring the Sample CICS Program IWAYIVP . . . . . . . . . . . . . . . . . . . . . . . . . . . . . . . . . .E-2Installing and Configuring the Sample CICS Program IWAYSAMP . . . . . . . . . . . . . . . . . . . . . . . . . . . . . . .E-5
xii iWay Software

Contents
F. Sample Requests, Schemas, and Cobol File Descriptions . . . . . . . . . . . . . . . . . . . . .F-1Request Document for the Generic Transaction IWAYIVP . . . . . . . . . . . . . . . . . . . . . . . . . . . . . . . . . . . . . . .F-2Request Schema for the Generic Transaction IWAYIVP . . . . . . . . . . . . . . . . . . . . . . . . . . . . . . . . . . . . . . . . .F-3Response Schema for the Generic Transaction IWAYIVP . . . . . . . . . . . . . . . . . . . . . . . . . . . . . . . . . . . . . . . .F-4Request Documents for the Program IWAYSAMP . . . . . . . . . . . . . . . . . . . . . . . . . . . . . . . . . . . . . . . . . . . . . .F-5Request Schema for the Program IWAYSAMP . . . . . . . . . . . . . . . . . . . . . . . . . . . . . . . . . . . . . . . . . . . . . . . . .F-6Response Schema for the Program IWAYSAMP . . . . . . . . . . . . . . . . . . . . . . . . . . . . . . . . . . . . . . . . . . . . . . . .F-7Request Document for the Program AASNATN . . . . . . . . . . . . . . . . . . . . . . . . . . . . . . . . . . . . . . . . . . . . . . . . .F-8Request Schema for the Program AASNATN . . . . . . . . . . . . . . . . . . . . . . . . . . . . . . . . . . . . . . . . . . . . . . . . . . .F-8Response Schema for the Program AASNATN . . . . . . . . . . . . . . . . . . . . . . . . . . . . . . . . . . . . . . . . . . . . . . . . . .F-9Sample Cobol File Descriptions . . . . . . . . . . . . . . . . . . . . . . . . . . . . . . . . . . . . . . . . . . . . . . . . . . . . . . . . . . . . . . .F-10
G. Sample Programs . . . . . . . . . . . . . . . . . . . . . . . . . . . . . . . . . . . . . . . . . . . . . . . . . . . . . . . . G-1IWAYIVP Program . . . . . . . . . . . . . . . . . . . . . . . . . . . . . . . . . . . . . . . . . . . . . . . . . . . . . . . . . . . . . . . . . . . . . . . . . . . . G-2IWAYSAMP Program . . . . . . . . . . . . . . . . . . . . . . . . . . . . . . . . . . . . . . . . . . . . . . . . . . . . . . . . . . . . . . . . . . . . . . . . . G-3CICS TCP/IP Sockets Program for Mainframe . . . . . . . . . . . . . . . . . . . . . . . . . . . . . . . . . . . . . . . . . . . . . . . . . . G-4CICS TCP/IP Sockets Program for TX . . . . . . . . . . . . . . . . . . . . . . . . . . . . . . . . . . . . . . . . . . . . . . . . . . . . . . . . . . G-9
H. Debugging and Troubleshooting . . . . . . . . . . . . . . . . . . . . . . . . . . . . . . . . . . . . . . . . . . H-1Troubleshooting . . . . . . . . . . . . . . . . . . . . . . . . . . . . . . . . . . . . . . . . . . . . . . . . . . . . . . . . . . . . . . . . . . . . . . . . . . . . . H-2Data Type Conversions . . . . . . . . . . . . . . . . . . . . . . . . . . . . . . . . . . . . . . . . . . . . . . . . . . . . . . . . . . . . . . . . . . . . . . . H-4
iWay Transaction Adapter for CICS (XML) User’s Guide xiii

Contents
xiv iWay Software

CHAPTER 1
Introducing the iWay Transaction Adapter for CICS (XML)
Topics:
• Overview of the Adapter
• The iWay Transaction Adapter for CICS (XML)
• Deployment Information for the Adapter
This section describes the iWay Transaction Adapter for CICS (XML). The adapter supports automatic transaction invocation, message transformation, and error recovery. The adapter enables applications to call CICS programs and to work with the native features and syntax of CICS.
iWay Transaction Adapter for CICS (XML) User’s Guide 1-1

Overview of the Adapter
Overview of the AdapterThe adapter enables you to execute CICS programs. The advantages of the adapter include the following:
• No modification required to existing CICS programs.
• No installation of new code required on CICS.
• Adapter processing performed off of the mainframe.
• Configuration by metadata—no coding required.
• Support for older versions of CICS.
• Support for CICS COMMAREA programs.
The following diagram illustrates the framework for executing CICS programs with the iWay Application Explorer and the iWay Transaction Adapter for CICS.
The following bidirectional scenarios are supported by the adapter:
• CICS services
• CICS events
1-2 iWay Software
Introducing the iWay Transaction Adapter for CICS (XML)
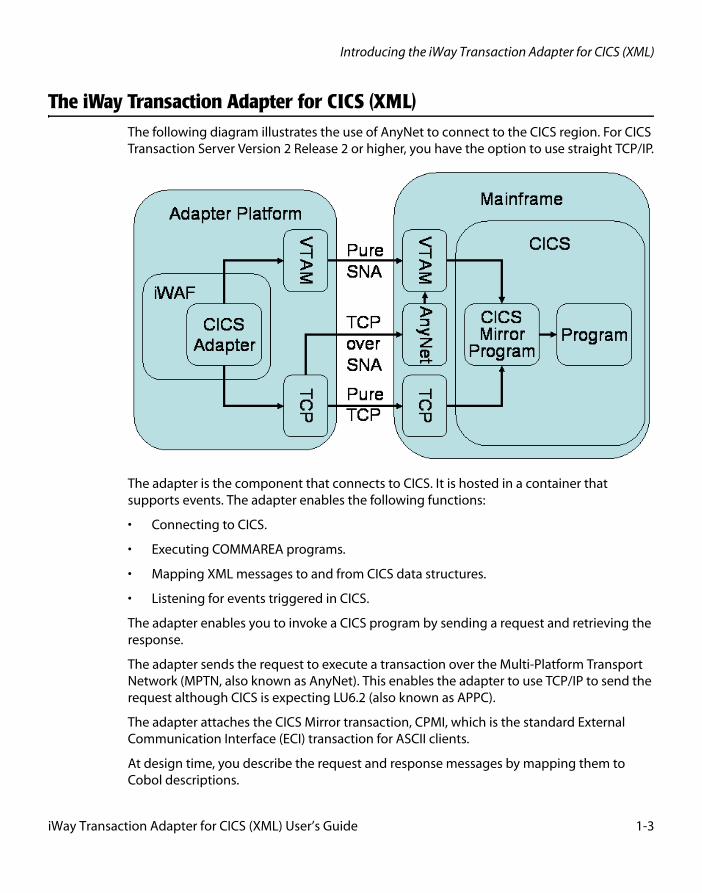
The iWay Transaction Adapter for CICS (XML)The following diagram illustrates the use of AnyNet to connect to the CICS region. For CICS Transaction Server Version 2 Release 2 or higher, you have the option to use straight TCP/IP.
The adapter is the component that connects to CICS. It is hosted in a container that supports events. The adapter enables the following functions:
• Connecting to CICS.
• Executing COMMAREA programs.
• Mapping XML messages to and from CICS data structures.
• Listening for events triggered in CICS.
The adapter enables you to invoke a CICS program by sending a request and retrieving the response.
The adapter sends the request to execute a transaction over the Multi-Platform Transport Network (MPTN, also known as AnyNet). This enables the adapter to use TCP/IP to send the request although CICS is expecting LU6.2 (also known as APPC).
The adapter attaches the CICS Mirror transaction, CPMI, which is the standard External Communication Interface (ECI) transaction for ASCII clients.
At design time, you describe the request and response messages by mapping them to Cobol descriptions.
iWay Transaction Adapter for CICS (XML) User’s Guide 1-3

The iWay Transaction Adapter for CICS (XML)
Note:
• Because distributed transactions are not supported, the synchronization level is CONFIRM.
• An extended call (executing several program calls in one unit of work) currently is not supported.
CICS ProgramsThe two main types of CICS programs are:
• COMMAREA programs that are designed to be called by other CICS programs.
• 3270 programs that read and write terminal screen maps using Basic Mapping Support (BMS).
Because the adapter can execute only COMMAREA programs, this distinction is important.
To execute 3270 programs, you require a screen scraper such as the iWay Adapter for 3270. For many years CICS applications were structured so that the business processing, as opposed to the screen dialogue, was in COMMAREA programs. Therefore, in many cases, executing a COMMAREA program is recommended for application integration.
Software Requirements for the AdapterThe following are the software requirements for the adapter:
• OS/390 v2.6 or higher or z/OS.
• TCP/IP communication available to the adapter.
• VTAM AnyNet option (for CICS Transaction Server Version 2 Release 1 or earlier).
• One of the following releases of CICS:
• CICS Transaction Server for z/OS, Version 2 Release 2.
• CICS Transaction Server for OS/390, Version 1 Release 2 or higher.
• IBM CICS/ESA, Version 4 Release 1.
• CICS Transaction Server for VSE/ESA, Version 1.1.0 or higher.
• CICS for VSE/ESA, Version 2.3.
• CICS for IBM OS/400, Version 4.4.
• TXSeries, Version 4.2 (HP-UX); TXSeries, Version 4.3 with PTF 4 (Windows NT, AIX, SunSM Solaris™ operating environment); or TXSeries, Version 5.0 (AIX and Windows).
• For Adabas/Natural execution, Adabas and Natural must be installed and configured within the CICS region.
1-4 iWay Software
Introducing the iWay Transaction Adapter for CICS (XML)
Deployment Information for the AdapterThe iWay Transaction Adapter for CICS (XML) works in conjunction with iWay Application Explorer with either of the following components:
• iWay Business Services Engine (iBSE)
• iWay Enterprise Connector for J2EE™ Connector Architecture (JCA)
Application Explorer is used to configure database connections and create Web services and events. It can be configured to work in a Web services environment in conjunction with the iWay Business Services Engine or with the iWay Enterprise Connector for J2EE Connector Architecture (JCA). When working in a JCA environment, the connector uses the Common Client Interface (CCI) to provide fast integration services using iWay Adapters instead of Web services.
Both iBSE and the iWay connector for JCA are deployed to an application server such as Java Sun Application Server with iWay Application Explorer and the adapters.
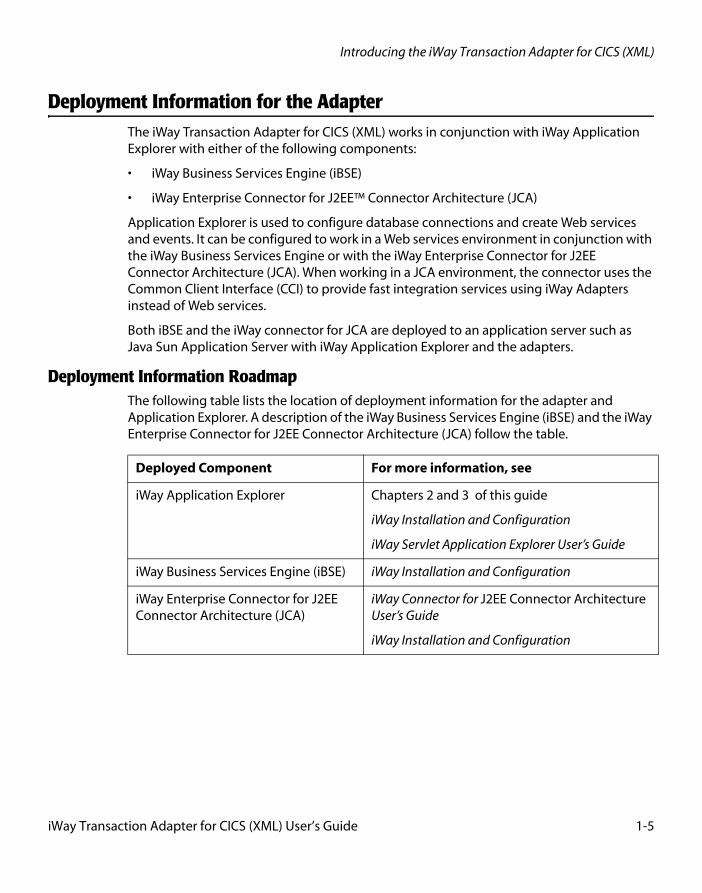
Deployment Information RoadmapThe following table lists the location of deployment information for the adapter and Application Explorer. A description of the iWay Business Services Engine (iBSE) and the iWay Enterprise Connector for J2EE Connector Architecture (JCA) follow the table.
Deployed Component For more information, see
iWay Application Explorer Chapters 2 and 3 of this guide
iWay Installation and Configuration
iWay Servlet Application Explorer User’s Guide
iWay Business Services Engine (iBSE) iWay Installation and Configuration
iWay Enterprise Connector for J2EE Connector Architecture (JCA)
iWay Connector for J2EE Connector Architecture User’s Guide
iWay Installation and Configuration
iWay Transaction Adapter for CICS (XML) User’s Guide 1-5
Deployment Information for the Adapter
The iWay Business Services EngineThe iWay Business Services Engine (iBSE) exposes—as Web services—enterprise assets that are accessible from adapters regardless of the programming language or the particular operating system.
iBSE simplifies the creation and execution of Web services when running:
• Custom and legacy applications
• Database queries and stored procedures
• Packaged applications
• Terminal emulation and screen-based systems
• Transactional systems
Web services is a distributed programming architecture that overcomes hurdles with Enterprise Application Integration (EAI) that other programming models cannot. It enables programs to communicate with one another using a text-based but platform- and language-independent message format called XML.
Coupled with a platform- and language-independent messaging protocol called SOAP (Simple Object Access Protocol), XML enables application development and integration by assembling previously built components from multiple Web services.
The iWay Enterprise Connector for J2EE Connector ArchitectureThe iWay Enterprise Connector for J2EE Connector Architecture (JCA) enables developers of JCA-compliant applications to deploy iWay adapters as JCA resources. The connector is supported on the Sun Java System Application Server.
The iWay Connector for JCA is distributed as a standard Resource Adapter Archive (RAR) for deployment to the application server. Thus, the connector can be used in systems that are non-compliant, although services such as pooled connections are not available.
Two connectors are distributed in the iWay installation package. One conforms to the JCA 1.0 specification, with extensions that allow for the consumption of events. The other conforms to the JCA 1.5 specification. The JCA 1.0 connector provides for event functionality through the configuration of ports and channels. When using the adapter in conjunction with a JCA 1.5 connector, there is no need to create event ports to dispose of event data. However, you must create a channel to enable event listening capabilities. For more information on event capabilities of the iWay JCA connectors, see Chapter 3, Designing the Adapter. For more information on installing and deploying both connectors see iWay Installation and Configuration.
1-6 iWay Software
CHAPTER 2
Configuring the Adapter
Topics:
• Starting Servlet Application Explorer
• Configuring a Connection to CICS
• Managing a Connection to CICS
At design time, you use Application Explorer to create the configuration and metadata the adapter requires at run time. This section describes how to configure a connection to CICS.
iWay Transaction Adapter for CICS (XML) User’s Guide 2-1
Starting Servlet Application Explorer
Starting Servlet Application ExplorerThe server must be started where Servlet Application Explorer is running.
Procedure: How to Start Application Explorer
1. Ensure the server is started where Application Explorer is running.
2. Type the following URL in your browser window
http://hostname:port/iwae/index.html
where:
hostname
Is the machine where Application Explorer is installed.
port
Is the port number for iBSE. The default port is 80.
Application Explorer opens.
The Available Hosts drop-down list appears in the upper-right corner. Three tabs appear near the top of the Application Explorer screen. From left to right they are:
• iWay Adapters, where you create and manage connections to CICS.
• iWay Events, where you configure CICS event listening.
• iWay Business Services, where you create and view business services.
The left pane of the window contains an expandable list of adapter nodes (based on the adapters installed), events, or business services, depending on the tab that is selected. The right pane provides the details of the selected adapter, event, or service, and is the work area where you will define and modify adapter functions and services.
The Available Hosts drop-down list specifies to which Servlet iBSE instance or JCA instance you connect.
For more information on accessing different instances of a JCA installation or a Servlet iBSE, see the iWay Installation and Configuration documentation.
You are now ready to define a new target to CICS.
2-2 iWay Software
Configuring the Adapter
Configuring a Connection to CICSTo access an adapter, you must configure a connection to that adapter. After the connection is created, it automatically is saved. You must establish a connection to the system every time you start Application Explorer or after disconnecting.
Procedure: How to Configure a Connection to CICS
1. Expand the iWay Adapters node in Application Explorer.
2. Click the CICS node.
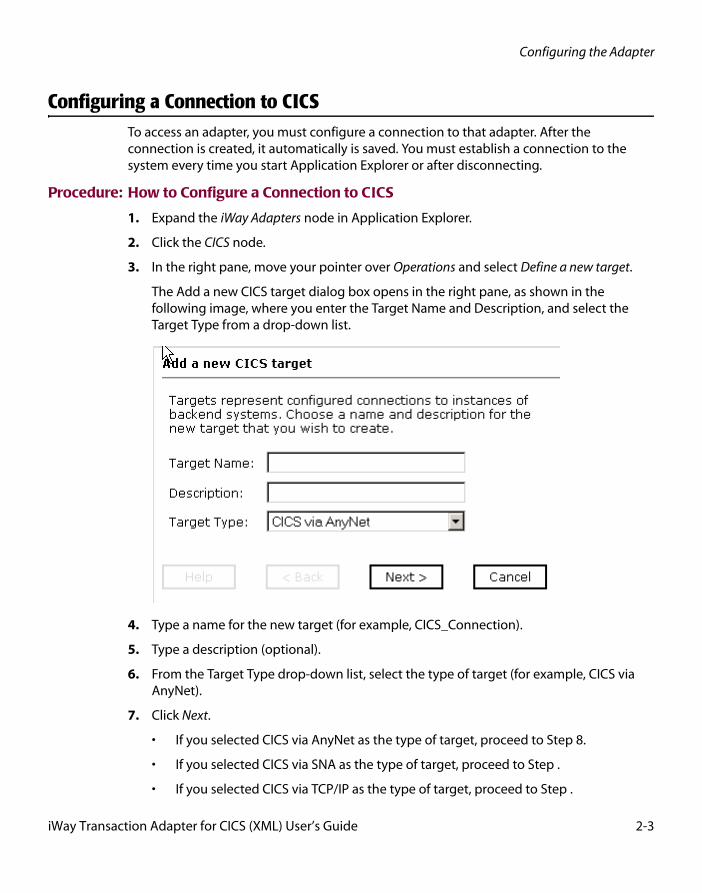
3. In the right pane, move your pointer over Operations and select Define a new target.
The Add a new CICS target dialog box opens in the right pane, as shown in the following image, where you enter the Target Name and Description, and select the Target Type from a drop-down list.
4. Type a name for the new target (for example, CICS_Connection).
5. Type a description (optional).
6. From the Target Type drop-down list, select the type of target (for example, CICS via AnyNet).
7. Click Next.
• If you selected CICS via AnyNet as the type of target, proceed to Step 8.
• If you selected CICS via SNA as the type of target, proceed to Step .
• If you selected CICS via TCP/IP as the type of target, proceed to Step .
iWay Transaction Adapter for CICS (XML) User’s Guide 2-3
Configuring a Connection to CICS
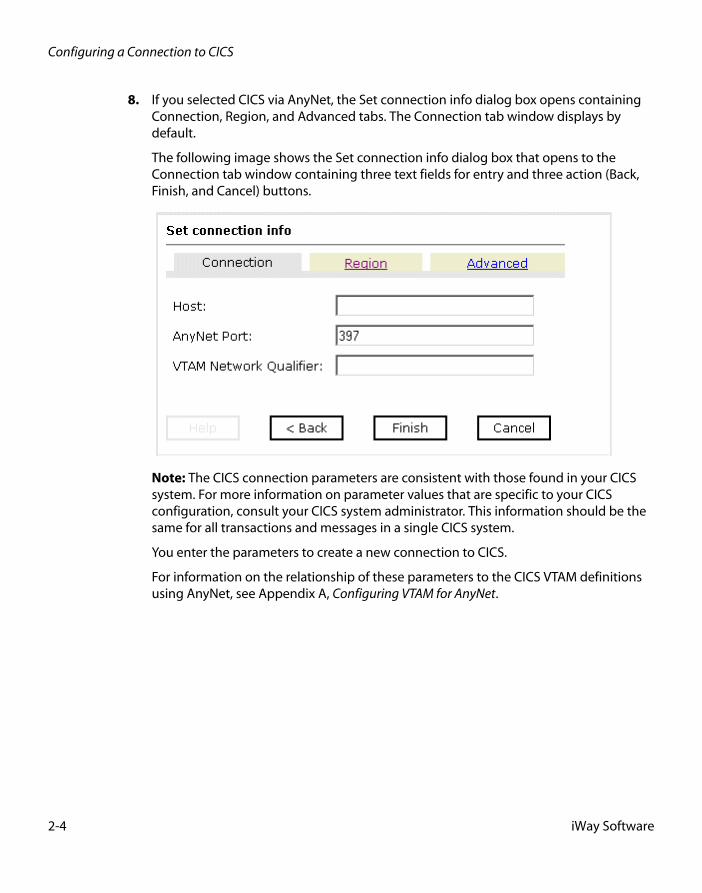
8. If you selected CICS via AnyNet, the Set connection info dialog box opens containing Connection, Region, and Advanced tabs. The Connection tab window displays by default.
The following image shows the Set connection info dialog box that opens to the Connection tab window containing three text fields for entry and three action (Back, Finish, and Cancel) buttons.
Note: The CICS connection parameters are consistent with those found in your CICS system. For more information on parameter values that are specific to your CICS configuration, consult your CICS system administrator. This information should be the same for all transactions and messages in a single CICS system.
You enter the parameters to create a new connection to CICS.
For information on the relationship of these parameters to the CICS VTAM definitions using AnyNet, see Appendix A, Configuring VTAM for AnyNet.
2-4 iWay Software
Configuring the Adapter
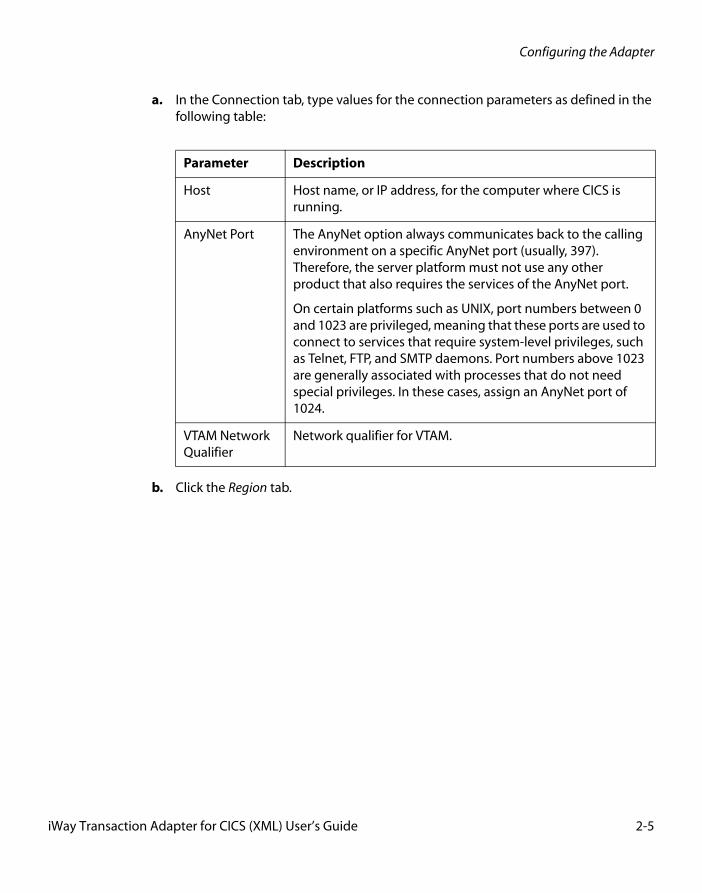
a. In the Connection tab, type values for the connection parameters as defined in the following table:
b. Click the Region tab.
Parameter Description
Host Host name, or IP address, for the computer where CICS is running.
AnyNet Port The AnyNet option always communicates back to the calling environment on a specific AnyNet port (usually, 397). Therefore, the server platform must not use any other product that also requires the services of the AnyNet port.
On certain platforms such as UNIX, port numbers between 0 and 1023 are privileged, meaning that these ports are used to connect to services that require system-level privileges, such as Telnet, FTP, and SMTP daemons. Port numbers above 1023 are generally associated with processes that do not need special privileges. In these cases, assign an AnyNet port of 1024.
VTAM Network Qualifier
Network qualifier for VTAM.
iWay Transaction Adapter for CICS (XML) User’s Guide 2-5
Configuring a Connection to CICS
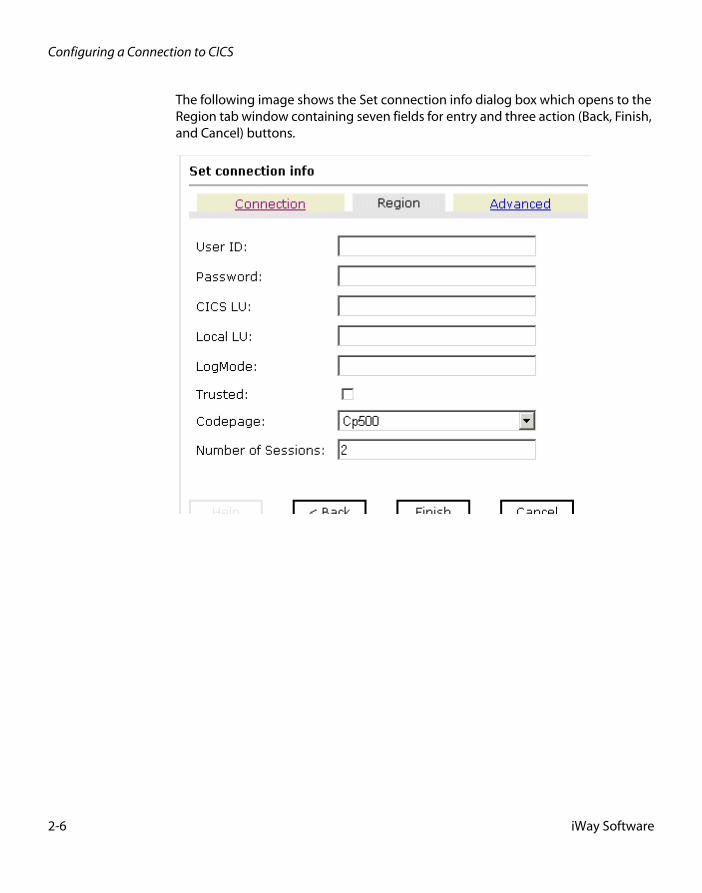
The following image shows the Set connection info dialog box which opens to the Region tab window containing seven fields for entry and three action (Back, Finish, and Cancel) buttons.
2-6 iWay Software
Configuring the Adapter
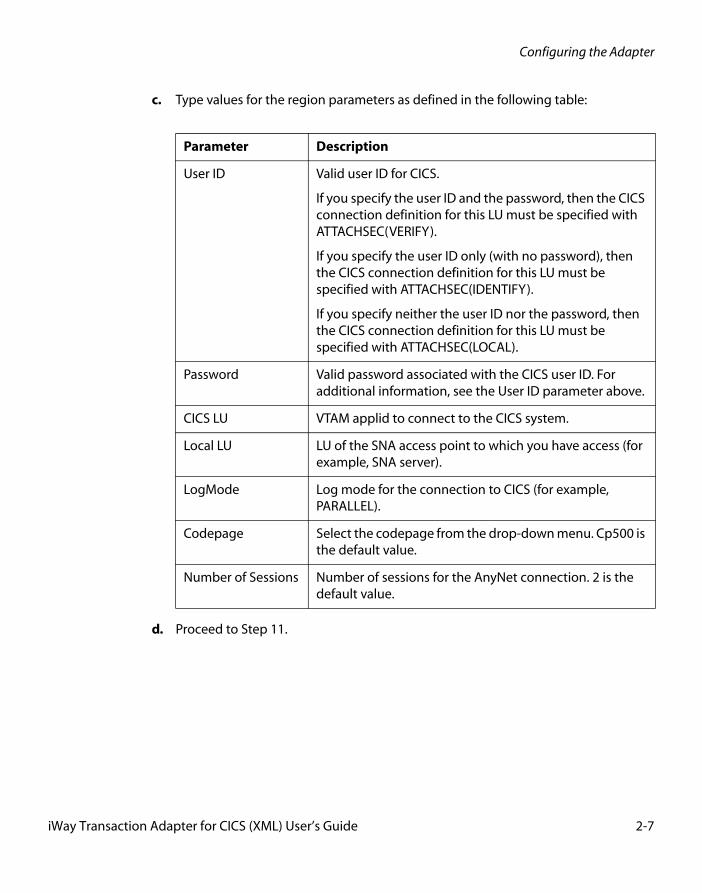
c. Type values for the region parameters as defined in the following table:
d. Proceed to Step 11.
Parameter Description
User ID Valid user ID for CICS.
If you specify the user ID and the password, then the CICS connection definition for this LU must be specified with ATTACHSEC(VERIFY).
If you specify the user ID only (with no password), then the CICS connection definition for this LU must be specified with ATTACHSEC(IDENTIFY).
If you specify neither the user ID nor the password, then the CICS connection definition for this LU must be specified with ATTACHSEC(LOCAL).
Password Valid password associated with the CICS user ID. For additional information, see the User ID parameter above.
CICS LU VTAM applid to connect to the CICS system.
Local LU LU of the SNA access point to which you have access (for example, SNA server).
LogMode Log mode for the connection to CICS (for example, PARALLEL).
Codepage Select the codepage from the drop-down menu. Cp500 is the default value.
Number of Sessions Number of sessions for the AnyNet connection. 2 is the default value.
iWay Transaction Adapter for CICS (XML) User’s Guide 2-7
Configuring a Connection to CICS
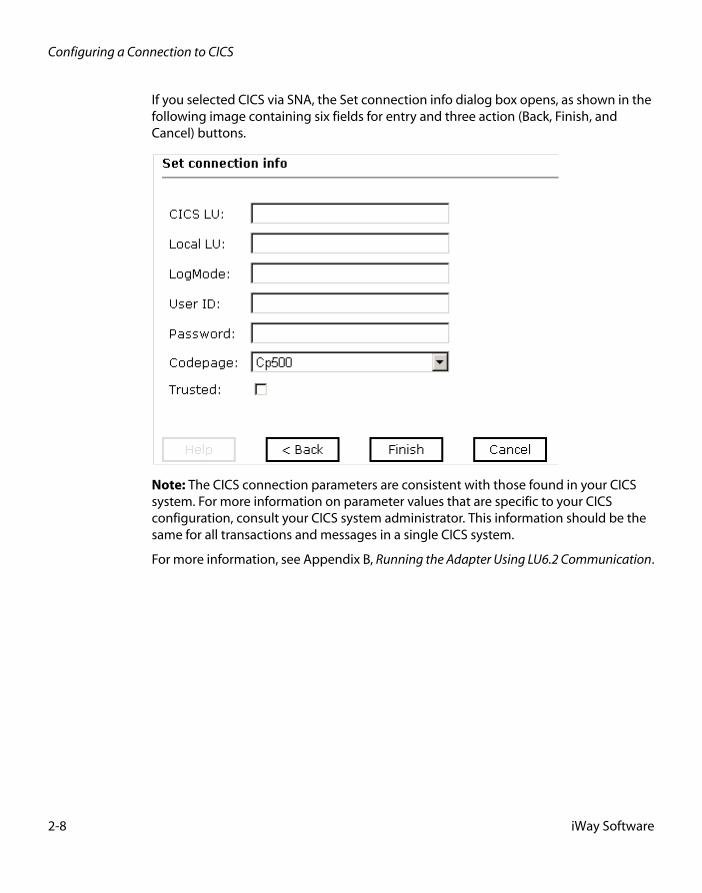
If you selected CICS via SNA, the Set connection info dialog box opens, as shown in the following image containing six fields for entry and three action (Back, Finish, and Cancel) buttons.
Note: The CICS connection parameters are consistent with those found in your CICS system. For more information on parameter values that are specific to your CICS configuration, consult your CICS system administrator. This information should be the same for all transactions and messages in a single CICS system.
For more information, see Appendix B, Running the Adapter Using LU6.2 Communication.
2-8 iWay Software
Configuring the Adapter
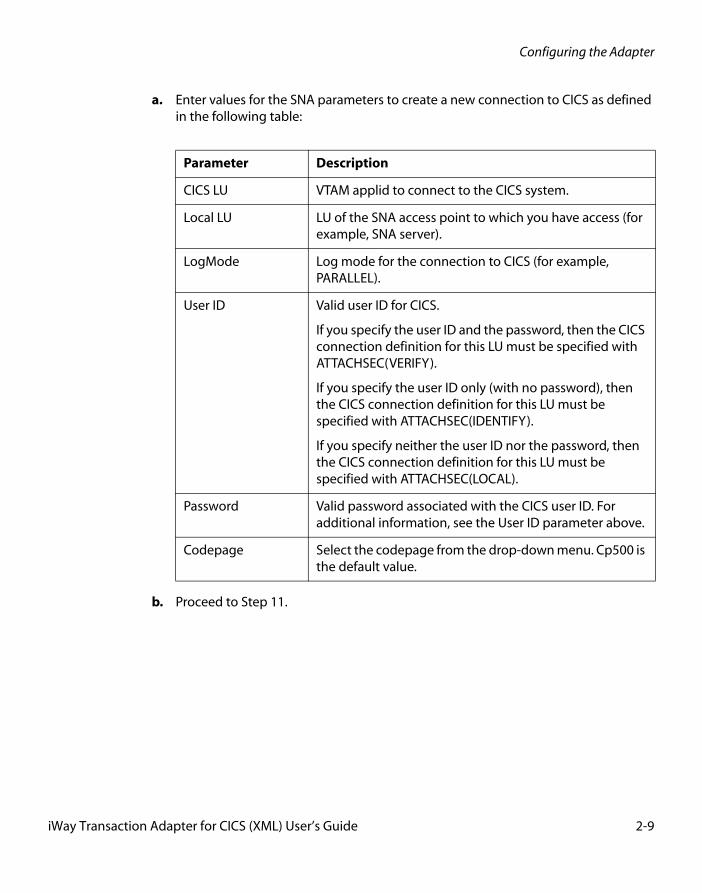
a. Enter values for the SNA parameters to create a new connection to CICS as defined in the following table:
b. Proceed to Step 11.
Parameter Description
CICS LU VTAM applid to connect to the CICS system.
Local LU LU of the SNA access point to which you have access (for example, SNA server).
LogMode Log mode for the connection to CICS (for example, PARALLEL).
User ID Valid user ID for CICS.
If you specify the user ID and the password, then the CICS connection definition for this LU must be specified with ATTACHSEC(VERIFY).
If you specify the user ID only (with no password), then the CICS connection definition for this LU must be specified with ATTACHSEC(IDENTIFY).
If you specify neither the user ID nor the password, then the CICS connection definition for this LU must be specified with ATTACHSEC(LOCAL).
Password Valid password associated with the CICS user ID. For additional information, see the User ID parameter above.
Codepage Select the codepage from the drop-down menu. Cp500 is the default value.
iWay Transaction Adapter for CICS (XML) User’s Guide 2-9
Configuring a Connection to CICS
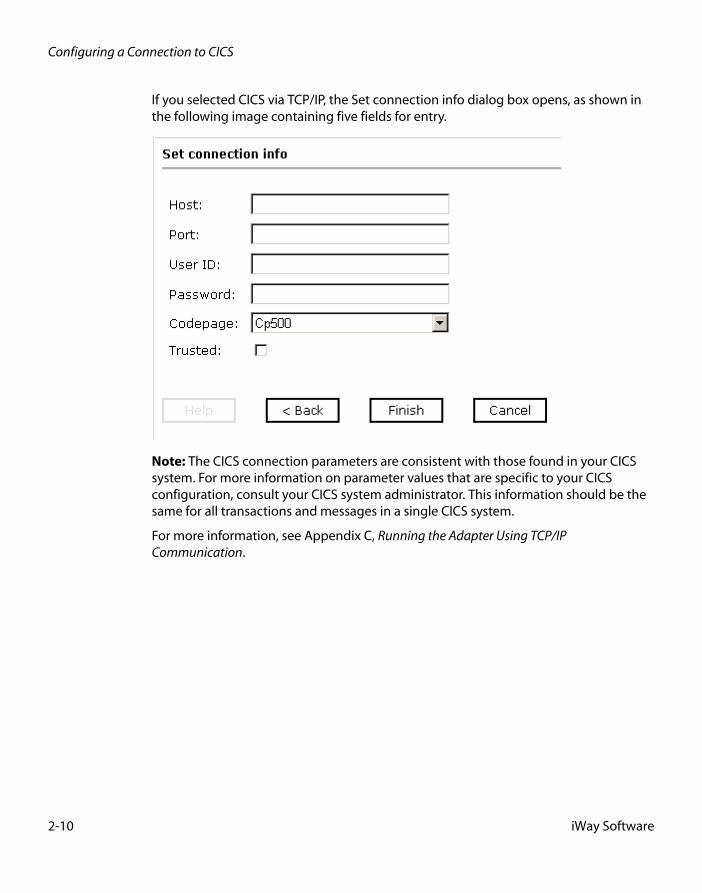
If you selected CICS via TCP/IP, the Set connection info dialog box opens, as shown in the following image containing five fields for entry.
Note: The CICS connection parameters are consistent with those found in your CICS system. For more information on parameter values that are specific to your CICS configuration, consult your CICS system administrator. This information should be the same for all transactions and messages in a single CICS system.
For more information, see Appendix C, Running the Adapter Using TCP/IP Communication.
2-10 iWay Software
Configuring the Adapter
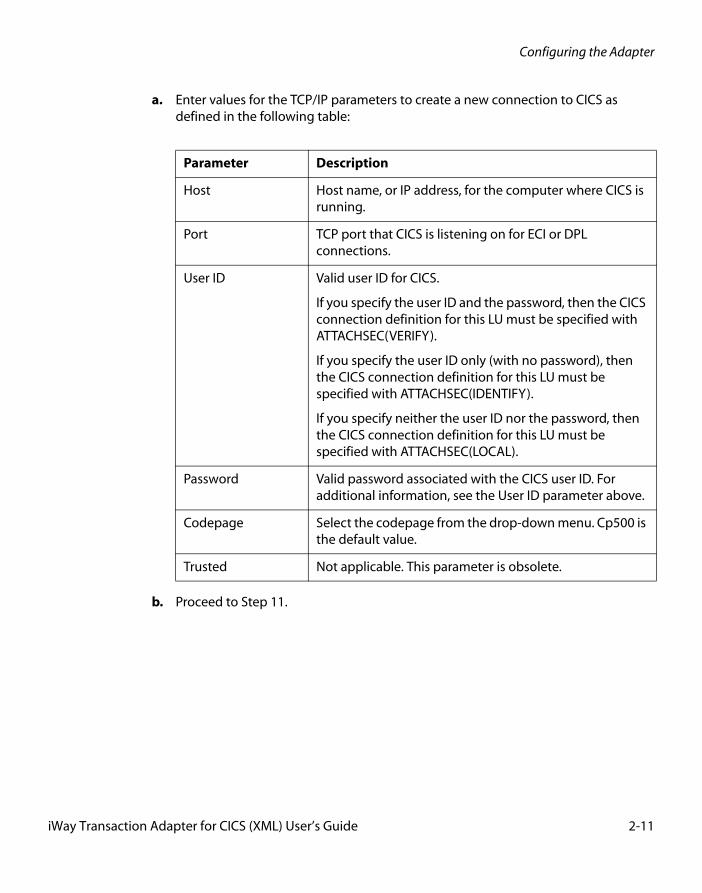
a. Enter values for the TCP/IP parameters to create a new connection to CICS as defined in the following table:
b. Proceed to Step 11.
Parameter Description
Host Host name, or IP address, for the computer where CICS is running.
Port TCP port that CICS is listening on for ECI or DPL connections.
User ID Valid user ID for CICS.
If you specify the user ID and the password, then the CICS connection definition for this LU must be specified with ATTACHSEC(VERIFY).
If you specify the user ID only (with no password), then the CICS connection definition for this LU must be specified with ATTACHSEC(IDENTIFY).
If you specify neither the user ID nor the password, then the CICS connection definition for this LU must be specified with ATTACHSEC(LOCAL).
Password Valid password associated with the CICS user ID. For additional information, see the User ID parameter above.
Codepage Select the codepage from the drop-down menu. Cp500 is the default value.
Trusted Not applicable. This parameter is obsolete.
iWay Transaction Adapter for CICS (XML) User’s Guide 2-11
Configuring a Connection to CICS
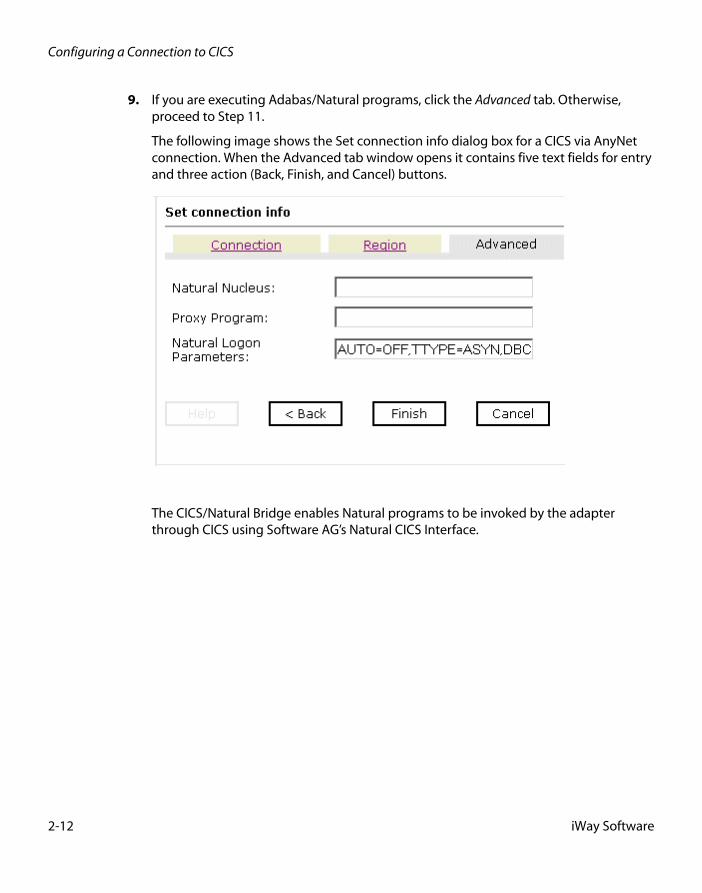
9. If you are executing Adabas/Natural programs, click the Advanced tab. Otherwise, proceed to Step 11.
The following image shows the Set connection info dialog box for a CICS via AnyNet connection. When the Advanced tab window opens it contains five text fields for entry and three action (Back, Finish, and Cancel) buttons.
The CICS/Natural Bridge enables Natural programs to be invoked by the adapter through CICS using Software AG’s Natural CICS Interface.
2-12 iWay Software

Configuring the Adapter
10. Enter values for the Advanced parameters as defined in the following table:
11. Click Finish.
The newly created connection, CICS_Connection, appears as a node under the CICS service adapter. The configuration information is stored in the repository for the configuration you defined at installation time.
Procedure: How to Connect to a Defined CICS Target
1. Expand the iWay Adapters node.
2. Expand the CICS node.
3. Click the target name (for example, CICS_Connection) under the CICS node.
4. Move your pointer over Operations and select Connect.
The Connect to CICS_Connection dialog box opens, populated with values you entered for the connection parameters.
Parameter Description
Connection Time Limit (ms)
Specify a timeout interval (in milliseconds).
Natural Nucleus Name of the Natural subsystem on which the Natural program you wish to invoke resides. For example, for Natural Version 3.14, the nucleus is N314re.
Proxy Program CICS program that calls the Natural CICS Interface. The name of the proxy provided by iWay Software is AASNATC.
Natural Logon Parameters
String that represents the default logon parameters. It can be modified depending on installation requirements.
Note: Software AG’s Natural CICS Interface requires a programmatic “logon” to the Natural System.
CICS Mirror Mirror program used for AnyNet connections. Use the default unless the mirror program is different than DFHMIRS.
iWay Transaction Adapter for CICS (XML) User’s Guide 2-13
Managing a Connection to CICS
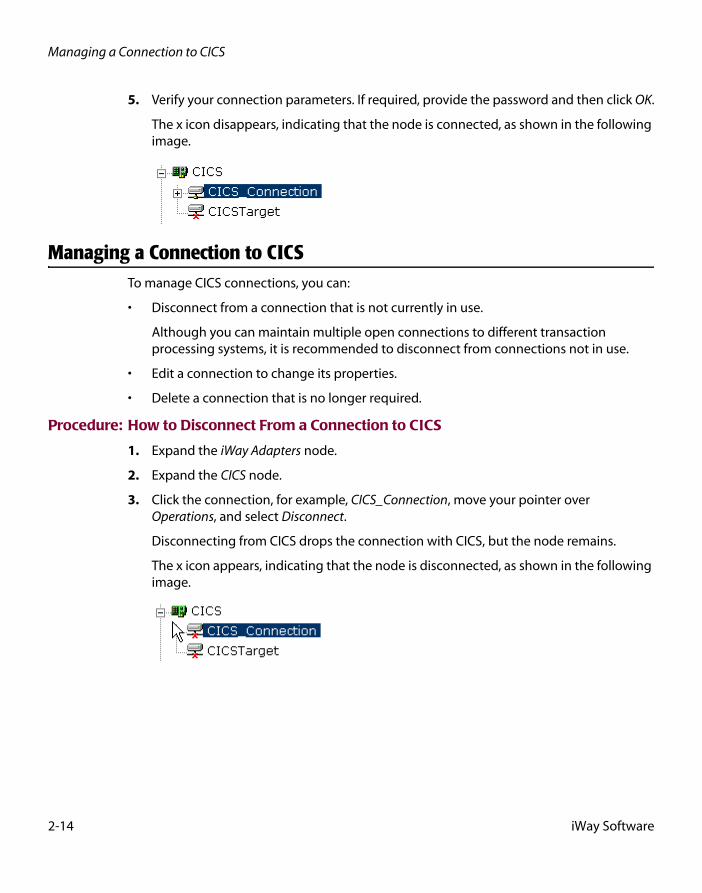
5. Verify your connection parameters. If required, provide the password and then click OK.
The x icon disappears, indicating that the node is connected, as shown in the following image.
Managing a Connection to CICSTo manage CICS connections, you can:
• Disconnect from a connection that is not currently in use.
Although you can maintain multiple open connections to different transaction processing systems, it is recommended to disconnect from connections not in use.
• Edit a connection to change its properties.
• Delete a connection that is no longer required.
Procedure: How to Disconnect From a Connection to CICS
1. Expand the iWay Adapters node.
2. Expand the CICS node.
3. Click the connection, for example, CICS_Connection, move your pointer over Operations, and select Disconnect.
Disconnecting from CICS drops the connection with CICS, but the node remains.
The x icon appears, indicating that the node is disconnected, as shown in the following image.
2-14 iWay Software

Configuring the Adapter
Procedure: How to Edit a Connection to CICS
1. In the left pane of Application Explorer, expand the iWay Adapters node.
2. Expand the CICS node and select the defined target (for example, CICS_Connection) you want to edit.
3. In the right pane, move the pointer over Operations and select Edit.
The following image shows the Edit dialog box that opens in the right pane containing three fields (Target Name, Description, and Target Type) and two action buttons (Next and Cancel).
4. Modify the target information as needed and then click Next.
The Set connection info dialog box opens in the right pane containing the Connection, Region, and Advanced tabs.
5. Modify the information as needed and then click Finish.
iWay Transaction Adapter for CICS (XML) User’s Guide 2-15
Managing a Connection to CICS
Procedure: How to Delete a Connection to CICS
1. Expand the iWay Adapters node.
2. Expand the CICS node.
3. Click the connection, for example, CICS_Connection, move your pointer over Operations, and select Delete.
A message appears, prompting you to confirm the deletion of the node.
4. Click OK.
The node disappears from the list of available connections.
2-16 iWay Software
CHAPTER 3
Designing the Adapter
Topics:
• Creating an Adapter Transaction
• Creating Schemas for an Adapter Transaction
• Understanding iWay Business Services
• Creating an Event
• Creating, Editing, and Deleting an Event Port
• Creating, Editing, and Deleting an Event Channel
Application Explorer is a Web application running within a servlet container and is accessible through a browser. It enables the adapter to explore metadata and create XML schemas.
The following topics describe how to use Application Explorer to create CICS transactions and generate request and response XML schemas for new or existing transactions. These schemas are used to represent a transaction for integration with external systems.
In addition, this section provides information on how to use the generated schemas to listen for events in CICS and create iWay Business Services, which expose functionality as Web services.
iWay Transaction Adapter for CICS (XML) User’s Guide 3-1
Creating an Adapter Transaction
Creating an Adapter TransactionAfter you create a connection to CICS, you can add adapter transactions using Application Explorer. A single CICS connection may be associated with multiple transactions. Each transaction represents one service offered by CICS and consists of a program and its metadata.
A generic transaction is automatically added and represents CICS services whose data will not be mapped to XML. You can use a generic transaction for programs that accept no input and for programs that return no output or when it is acceptable to return a non-formatted answer set.
For example, the supplied program IWAYIVP connects to CICS and returns “Congratulations” on successful adapter installation and configuration. Because IWAYIVP requires no input or output, you do not require Cobol descriptions for the input or output. One request and response schema is applicable for this program. The request schema for the generic transaction is in Appendix F, Sample Requests, Schemas, and Cobol File Descriptions.
Using the generic transaction, the XML request document that is received must include the name of the program to be called in the <Transaction> element. The payload to be sent as the COMMAREA must be in the <CommArea> tag, which can be a maximum of 32,500 bytes.
The generic response schema is constructed from the data received from CICS. If the <CommArea> element has more than 80 bytes, the received COMMAREA is split into 80-byte messages. Illegal XML characters (‘<‘, ‘/’, and ‘&’) are converted to XML entities.
For programs that require input and output and a formatted response, which is usually the case, (IWAYIVP is an exception), you must add your own adapter transactions, as described in How to Create an Adapter Transaction on page 3-3. XML request messages must specify the transaction to use in the location attribute of the <Transaction> tag. For example, if you create a CICS transaction called IWAYSAMP, the location is "CICS/Transactions/IWAYSAMP".
To view a sample generic request or response schema or for information about specifying a transaction to use in the location attribute of the <Transaction> tag, see Appendix F, Sample Requests, Schemas, and Cobol File Descriptions.
3-2 iWay Software
Designing the Adapter
Sample Program IWAYSAMPiWay Software supplies the IWAYSAMP and IWAYIVP programs with the adapter. This document uses the IWAYSAMP program for illustration purposes and as a reference for the adapter. Based on what is passed to the IWAYSAMP program, an answer set is returned from the program with two possible layouts.
• If the value for the field STAT is 'P', the program returns 40 bytes of data.
• If the value for the field STAT is 'F', the program returns 60 bytes of data.
The IWAYSAMP program is an example of a program that returns multiple answer sets. Two different answer sets are returned based on what is passed in the request. The adapter enables you to create a response schema that contains different possible return messages.
Sample request documents are in Appendix F, Sample Requests, Schemas, and Cobol File Descriptions, with a sample response schema for the IWAYSAMP program. You specify the output as explained in Creating an Adapter Transaction on page 3-2. You must know the field in the Cobol description that can be used as a record type and the value of that field. You specify the value of the field to create the appropriate response schema. This is also true for events to determine what layout is returned from CICS when you configure a CICS event.
Procedure: How to Create an Adapter Transaction
1. Expand the iWay Events tab.
The iWay Events window opens.
2. Expand the CICS node and connect to a CICS target (for example, CICS_Connection).
3. Expand the node to which you connected.
The Transaction node appears under the connected node.
4. Click Transactions, move your pointer over Operations, and select Add Service.
iWay Transaction Adapter for CICS (XML) User’s Guide 3-3
Creating an Adapter Transaction
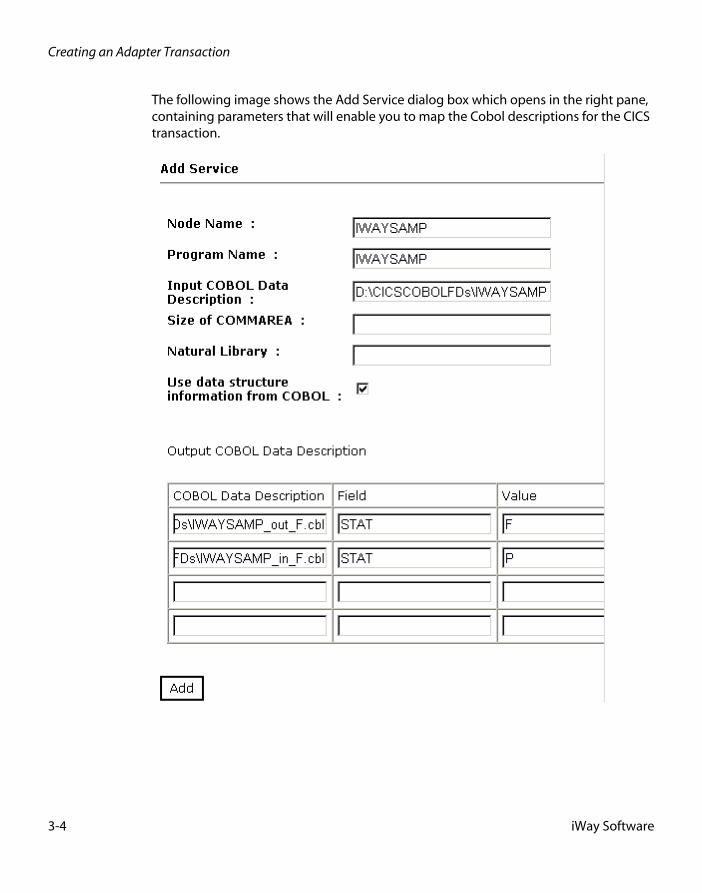
The following image shows the Add Service dialog box which opens in the right pane, containing parameters that will enable you to map the Cobol descriptions for the CICS transaction.
3-4 iWay Software
Designing the Adapter
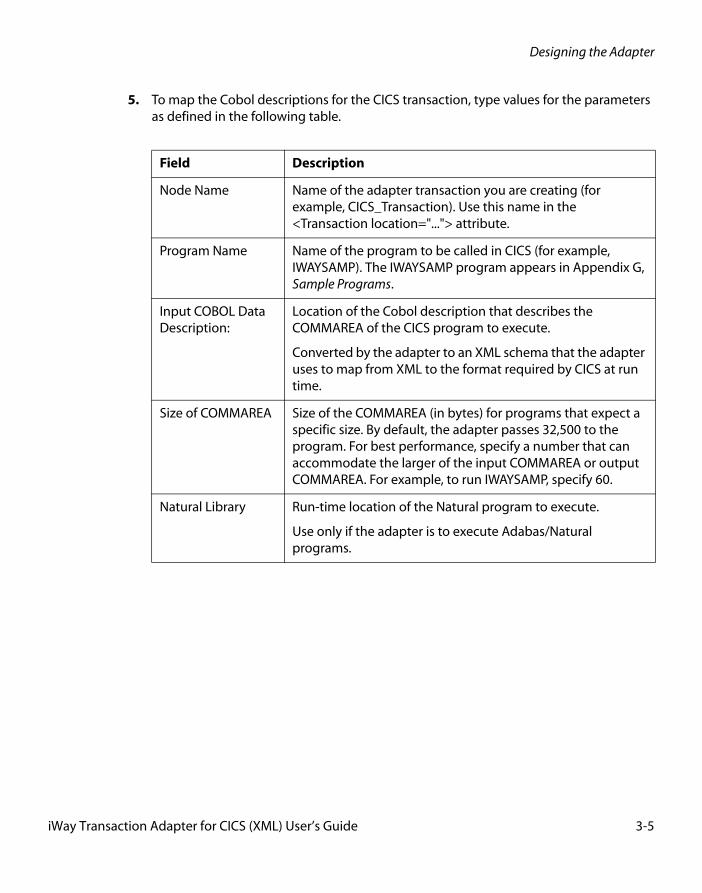
5. To map the Cobol descriptions for the CICS transaction, type values for the parameters as defined in the following table.
Field Description
Node Name Name of the adapter transaction you are creating (for example, CICS_Transaction). Use this name in the <Transaction location="..."> attribute.
Program Name Name of the program to be called in CICS (for example, IWAYSAMP). The IWAYSAMP program appears in Appendix G, Sample Programs.
Input COBOL Data Description:
Location of the Cobol description that describes the COMMAREA of the CICS program to execute.
Converted by the adapter to an XML schema that the adapter uses to map from XML to the format required by CICS at run time.
Size of COMMAREA Size of the COMMAREA (in bytes) for programs that expect a specific size. By default, the adapter passes 32,500 to the program. For best performance, specify a number that can accommodate the larger of the input COMMAREA or output COMMAREA. For example, to run IWAYSAMP, specify 60.
Natural Library Run-time location of the Natural program to execute.
Use only if the adapter is to execute Adabas/Natural programs.
iWay Transaction Adapter for CICS (XML) User’s Guide 3-5
Creating an Adapter Transaction
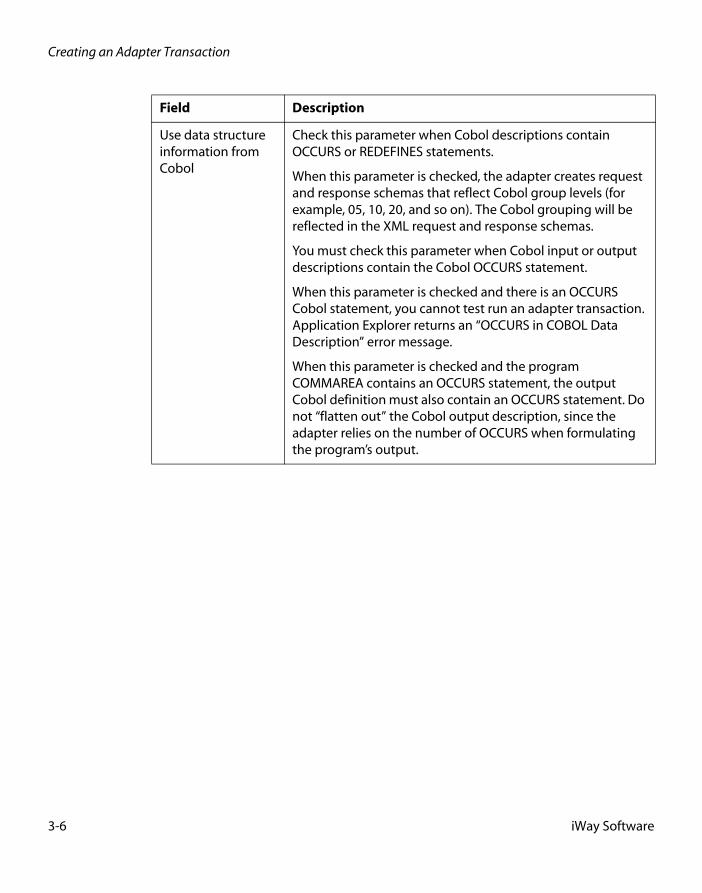
Use data structure information from Cobol
Check this parameter when Cobol descriptions contain OCCURS or REDEFINES statements.
When this parameter is checked, the adapter creates request and response schemas that reflect Cobol group levels (for example, 05, 10, 20, and so on). The Cobol grouping will be reflected in the XML request and response schemas.
You must check this parameter when Cobol input or output descriptions contain the Cobol OCCURS statement.
When this parameter is checked and there is an OCCURS Cobol statement, you cannot test run an adapter transaction. Application Explorer returns an “OCCURS in COBOL Data Description” error message.
When this parameter is checked and the program COMMAREA contains an OCCURS statement, the output Cobol definition must also contain an OCCURS statement. Do not “flatten out” the Cobol output description, since the adapter relies on the number of OCCURS when formulating the program’s output.
Field Description
3-6 iWay Software
Designing the Adapter
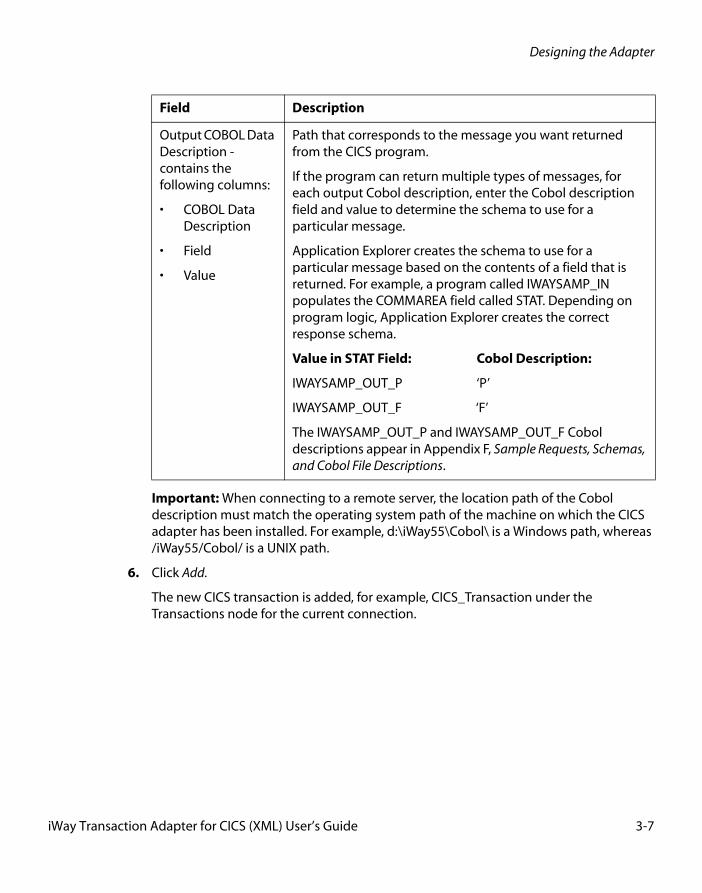
Important: When connecting to a remote server, the location path of the Cobol description must match the operating system path of the machine on which the CICS adapter has been installed. For example, d:\iWay55\Cobol\ is a Windows path, whereas /iWay55/Cobol/ is a UNIX path.
6. Click Add.
The new CICS transaction is added, for example, CICS_Transaction under the Transactions node for the current connection.
Output COBOL Data Description - contains the following columns:
• COBOL Data Description
• Field
• Value
Path that corresponds to the message you want returned from the CICS program.
If the program can return multiple types of messages, for each output Cobol description, enter the Cobol description field and value to determine the schema to use for a particular message.
Application Explorer creates the schema to use for a particular message based on the contents of a field that is returned. For example, a program called IWAYSAMP_IN populates the COMMAREA field called STAT. Depending on program logic, Application Explorer creates the correct response schema.
Value in STAT Field: Cobol Description:
IWAYSAMP_OUT_P ‘P’
IWAYSAMP_OUT_F ‘F’
The IWAYSAMP_OUT_P and IWAYSAMP_OUT_F Cobol descriptions appear in Appendix F, Sample Requests, Schemas, and Cobol File Descriptions.
Field Description
iWay Transaction Adapter for CICS (XML) User’s Guide 3-7
Creating Schemas for an Adapter Transaction
Cobol Descriptions for Input and Output CommunicationsThe following are considerations for Cobol descriptions for input and output communications.
You must use the following syntax for binary, packed, and float fields for the Cobol descriptions for the adapter transaction input and output formats.
For a binary field:
05 BINARY-FIELD PIC S9(n) COMP.
For a packed-decimal field:
05 PACKED-FIELD PIC S9(n) COMP-3.
For a single-float field:
05 FLOAT-SINGLE COMP-1.
For a double-float field:
05 FLOAT-DOUBLE COMP-2.
Note: Underscores are not supported in Cobol descriptions.
Creating Schemas for an Adapter TransactionWhen deployed to the Sun Java System Application Server and used in conjunction with an iBSE configuration, Application Explorer stores the schemas it creates in subdirectories under the Sun directory structure on the machine where the Sun Java System Application Server is installed. When used in conjunction with an iWay JCA configuration, Application Explorer stores schemas in a subdirectory of the iWay home directory.
When the adapter is used with an iBSE configuration, Application Explorer stores the schemas under a \schemas subdirectory in the Sun Java System Application Server installation directory, for example,
C:\SUN\AppServer\domains\domain1\applications\j2ee-apps\ibse\ibse_war\wsdl\schemas\service\CICS\CICS_Connection
where:
CICS_Connection
Is the name of the connection to the as defined in Application Explorer. Under this directory, Application Explorer creates subdirectories containing schemas.
3-8 iWay Software
Designing the Adapter
When the adapter is used with a JCA configuration, Application Explorer stores the schemas under a \schemas subdirectory of the iWay home directory, for example,
C:\Program Files\iWay55\config\base\schemas\CICS\CICS_Connection
where:
CICS_Connection
Is the name of the connection to the CICS system as defined in Application Explorer. Application Explorer stores the schemas in this directory.
Procedure: How to Create Schemas for an Adapter Transaction
1. In the left pane, select the transaction for which you want to generate schemas.
2. In the right pane, move the pointer over Operations and select Generate Schema.
The adapter generates the schemas for the selected Cobol descriptions and associates them with the transaction. The schemas generated for the sample Cobol descriptions appear in Appendix F, Sample Requests, Schemas, and Cobol File Descriptions.
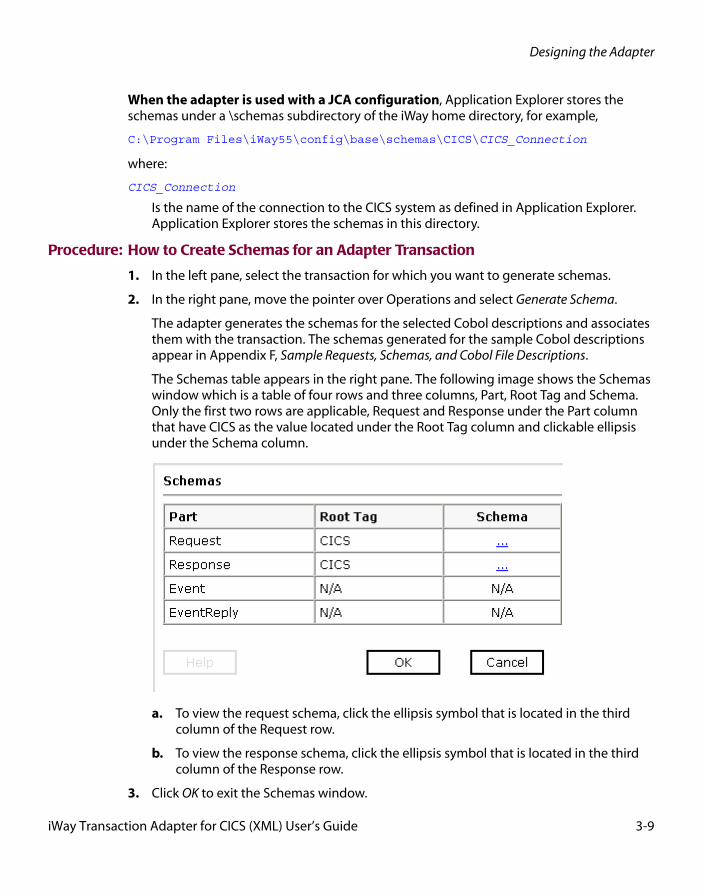
The Schemas table appears in the right pane. The following image shows the Schemas window which is a table of four rows and three columns, Part, Root Tag and Schema. Only the first two rows are applicable, Request and Response under the Part column that have CICS as the value located under the Root Tag column and clickable ellipsis under the Schema column.
a. To view the request schema, click the ellipsis symbol that is located in the third column of the Request row.
b. To view the response schema, click the ellipsis symbol that is located in the third column of the Response row.
3. Click OK to exit the Schemas window.
iWay Transaction Adapter for CICS (XML) User’s Guide 3-9
Understanding iWay Business Services
Understanding iWay Business ServicesApplication Explorer provides Web developers with a simple, consistent mechanism for extending the capabilities of the adapter. The iWay Business Services Engine exposes functionality as Web services. It serves as a gateway to heterogeneous back-end applications and databases.
A Web service is a self-contained, modularized function that can be published and accessed across a network using open standards. It is the implementation of an interface by a component and is an executable entity. For the caller or sender, a Web service can be considered as a “black box” that may require input and delivers a result. A Web service integrates within an enterprise as well as across enterprises on any communication technology stack, whether asynchronous or synchronous, in any format.
Note: In a J2EE Connector Architecture (JCA) implementation of iWay adapters, Web services are not available. When the adapters are deployed to use the iWay Connector for JCA, the Common Client Interface provides integration services using the iWay adapters. For more information, see the iWay Installation and Configuration documentation and the iWay Connector for J2EE Connector Architecture User’s Guide.
Creating a Web ServiceAfter you connect to your application system and create an XML schema for a transaction, you can create a Web service. The following procedure describes how to create a Web service using Application Explorer.
Procedure: How to Create a Web Service
1. Click the iWay Adapters tab.
The iWay Adapters window opens.
2. In the left pane, expand the CICS node.
3. Connect to a CICS target (for example, CICS_Connection).
4. Expand the node to which you connected.
The Transaction node appears under the connected node.
5. Click Transactions and then select the transaction for which you want to create a Web service.
3-10 iWay Software
Designing the Adapter
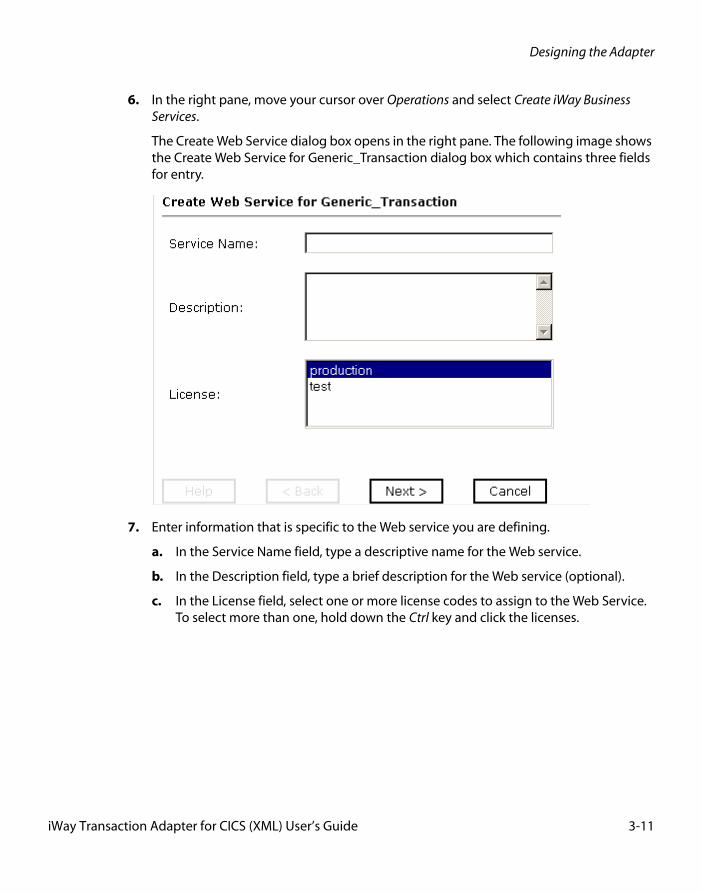
6. In the right pane, move your cursor over Operations and select Create iWay Business Services.
The Create Web Service dialog box opens in the right pane. The following image shows the Create Web Service for Generic_Transaction dialog box which contains three fields for entry.
7. Enter information that is specific to the Web service you are defining.
a. In the Service Name field, type a descriptive name for the Web service.
b. In the Description field, type a brief description for the Web service (optional).
c. In the License field, select one or more license codes to assign to the Web Service. To select more than one, hold down the Ctrl key and click the licenses.
iWay Transaction Adapter for CICS (XML) User’s Guide 3-11
Understanding iWay Business Services
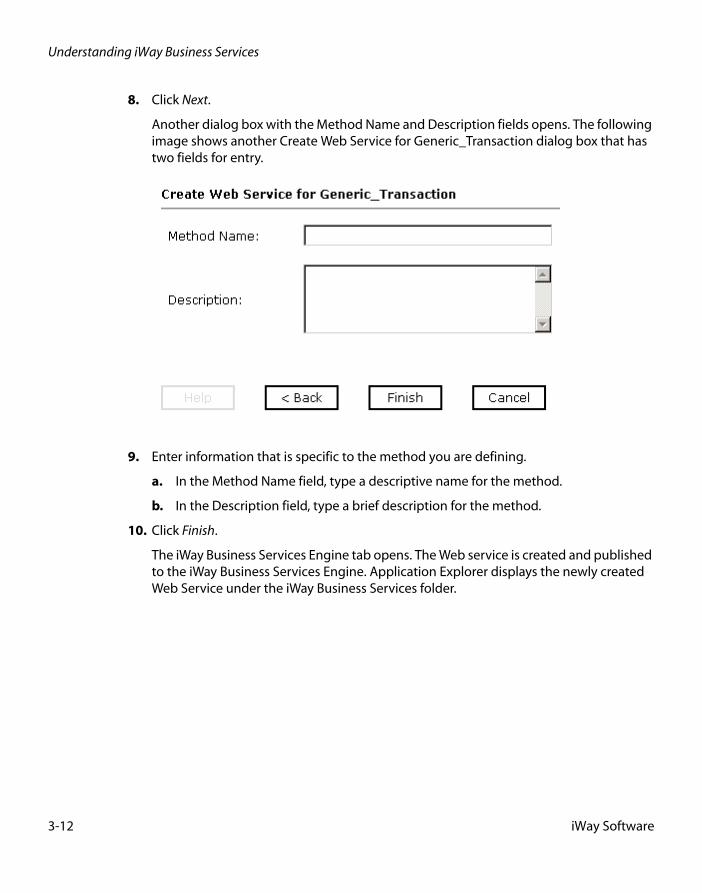
8. Click Next.
Another dialog box with the Method Name and Description fields opens. The following image shows another Create Web Service for Generic_Transaction dialog box that has two fields for entry.
9. Enter information that is specific to the method you are defining.
a. In the Method Name field, type a descriptive name for the method.
b. In the Description field, type a brief description for the method.
10. Click Finish.
The iWay Business Services Engine tab opens. The Web service is created and published to the iWay Business Services Engine. Application Explorer displays the newly created Web Service under the iWay Business Services folder.
3-12 iWay Software
Designing the Adapter
Testing the Web ServiceAfter a business service is created, test it to ensure that it functions properly. iWay provides a test tool for testing the business service.
Procedure: How to Test the Web Service
1. If you are not on the iWay Business Services tab of Application Explorer, click the tab to access business services.
2. If it is not expanded, expand the list of business services under iWay Business Services.
3. Expand the Services node.
4. Select the name of the business service you want to test.
The business service name appears as a link in the right pane.
5. In the right pane, click the named business services link.
The test option appears in the right pane.
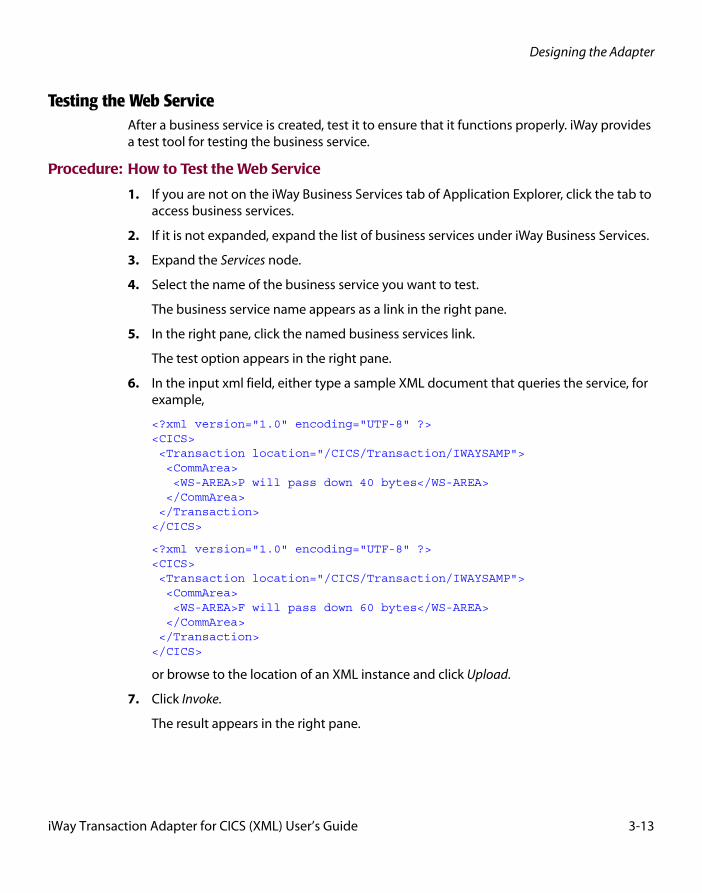
6. In the input xml field, either type a sample XML document that queries the service, for example,
<?xml version="1.0" encoding="UTF-8" ?><CICS> <Transaction location="/CICS/Transaction/IWAYSAMP"> <CommArea> <WS-AREA>P will pass down 40 bytes</WS-AREA> </CommArea> </Transaction></CICS>
<?xml version="1.0" encoding="UTF-8" ?><CICS> <Transaction location="/CICS/Transaction/IWAYSAMP"> <CommArea> <WS-AREA>F will pass down 60 bytes</WS-AREA> </CommArea> </Transaction></CICS>
or browse to the location of an XML instance and click Upload.
7. Click Invoke.
The result appears in the right pane.
iWay Transaction Adapter for CICS (XML) User’s Guide 3-13
Understanding iWay Business Services
Generating WSDL From a Web ServiceGenerating Web Services Description Language (WSDL) from a Web service enables you to make the Web service available to other services within a host server such as Sun Java System Application Server.
Procedure: How to Generate WSDL From a Web Service
1. If you are not already in the iWay Business Services tab, click the tab to access business services.
2. In the left pane, expand the list of services to display the Web service for which you want to generate WSDL.
3. Click the Web service.
The link for the service appears in the right pane.
4. Right-click the Service Description link and choose Save Target As.
5. Choose a location for the file and specify .wsdl for the extension.
Note: The file extension must be .wsdl.
6. Click Save.
3-14 iWay Software
Designing the Adapter
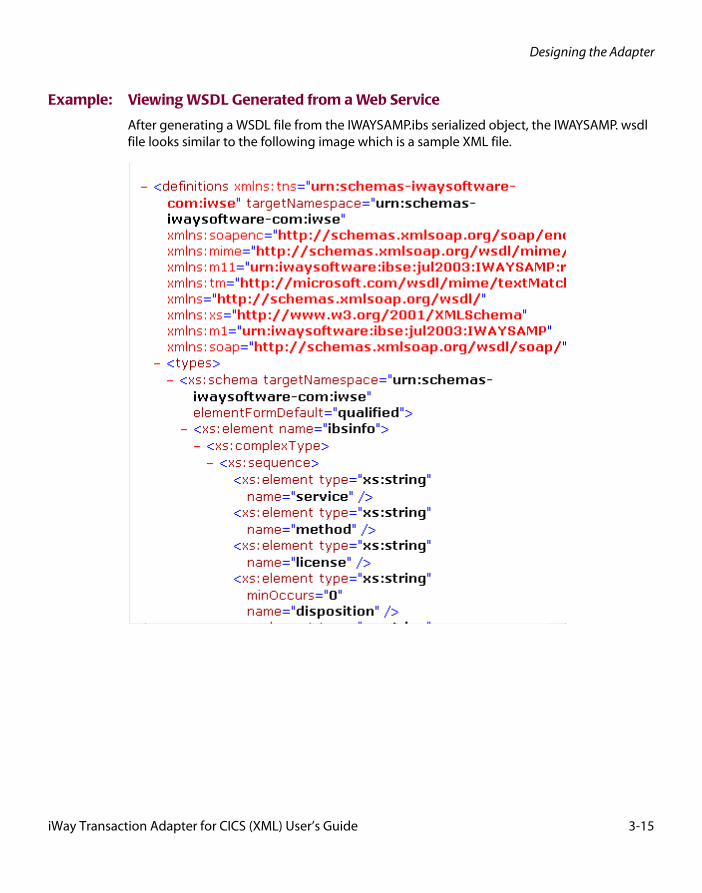
Example: Viewing WSDL Generated from a Web Service
After generating a WSDL file from the IWAYSAMP.ibs serialized object, the IWAYSAMP. wsdl file looks similar to the following image which is a sample XML file.
iWay Transaction Adapter for CICS (XML) User’s Guide 3-15
Creating an Event
Identity PropagationIf you test or execute a Web service using a third party XML editor, for example XMLSPY, the Username and Password values that you specify in the SOAP header must be valid and are used to connect to CICS. The user name and password values that you provided for CICS during target creation using Application Explorer are overwritten for this Web service request. The following is a sample SOAP header that is included in the WSDL file for a Web service:
<SOAP-ENV:Header> <m:ibsinfo xmlns:m="urn:schemas-iwaysoftware-com:iwse"> <m:service>String</m:service> <m:method>String</m:method> <m:license>String</m:license> <m:disposition>String</m:disposition> <m:Username>String</m:Username> <m:Password>String</m:Password> <m:language>String</m:language> </m:ibsinfo></SOAP-ENV:Header>
Note: You can remove the following tags from the SOAP header, since they are not required:
<m:disposition>String</m:disposition>
<m:language>String</m:language>
Creating an EventEvents are generated by the CICS transaction processing system as a result of activity on that system. You can use events to trigger an action in your application. For example, the CICS application program can generate an event when customer information is updated. If your application must perform when this happens, you must provide a mechanism to publish that event to the outside world.
The adapter has the capability of capturing events using protocols such as TCP/IP or a File directory. For other protocols, such as HTTP, contact Customer Support Services.
The following steps describe creating an event and processing it by the adapter:
• Creating the CICS application program.
For example, a program can be triggered by certain criteria and publish information to the specific protocol, such as TCP/IP. The application program that is written for the event passes data to a TCP/IP port.
• Configuring the connection using Application Explorer to create the event schema from a Cobol File Description.
The Cobol File Description describes the format and layout of the data that is passed by the TCP/IP program to the TCP/IP port.
3-16 iWay Software

Designing the Adapter
• Configuring an iWay port and channel using Application Explorer.
After the event schema is created, you can configure an iWay port and channel using Application Explorer. The port you specify is the same port to which the CICS application event program is writing the event data.
For information on creating an iWay event port, see Creating, Editing, and Deleting an Event Port on page 3-17. For information on creating a channel, see Creating, Editing, and Deleting an Event Channel on page 3-34.
Important: When using the adapter in conjunction with the iWay connector for JCA 1.5, there is no need to create event ports to dispose of event data. However, you must create a channel to enable event listening capabilities.
Creating, Editing, and Deleting an Event PortApplication Explorer enables you to create event ports from the iWay Adapters tab or from the iWay Events tab. You also can modify or delete an existing port.
Important: When using the adapter in conjunction with the iWay connector for JCA 1.5, there is no need to create event ports to dispose of event data. However, you must create a channel to enable event listening capabilities.
Creating an Event Port From the iWay Events TabThe following procedures describe how to create an event port from the iWay Events window for various dispositions using Application Explorer. You can switch between an iBSE and a JCA deployment by choosing one or the other from the drop-down menu in the upper right of Application Explorer.
The following dispositions are available when using Application Explorer in conjunction with an iBSE deployment.
• File
• iBSE
• MSMQ
• JMSQ
• SOAP
• HTTP
• MQ Series
Note: The MAIL disposition option will be supported in a future release.
iWay Transaction Adapter for CICS (XML) User’s Guide 3-17
Creating, Editing, and Deleting an Event Port
The following dispositions are available when using Application Explorer in conjunction with a JCA connector deployment.
• File
• JMSQ
• HTTP
• MQ Series
Important: When using the adapter in conjunction with the iWay connector for JCA 1.5, there is no need to create event ports to dispose of event data. However, you must create a channel to enable event listening capabilities.
Procedure: How to Create an Event Port for File
1. Click the iWay Events tab.
The iWay Events window opens.
2. In the left pane, expand the CICS node.
3. Select the ports node.
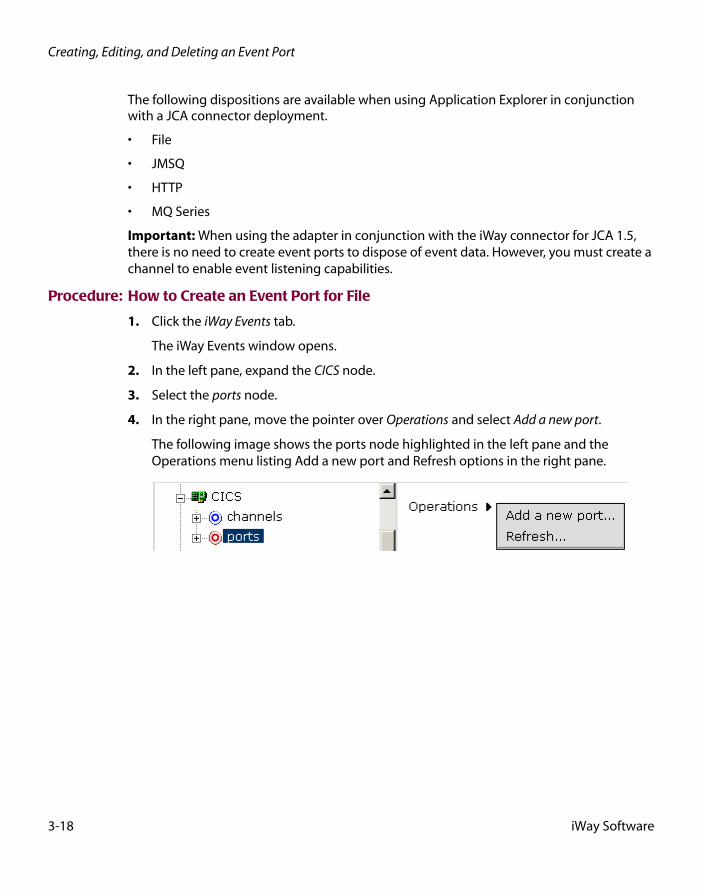
4. In the right pane, move the pointer over Operations and select Add a new port.
The following image shows the ports node highlighted in the left pane and the Operations menu listing Add a new port and Refresh options in the right pane.
3-18 iWay Software

Designing the Adapter
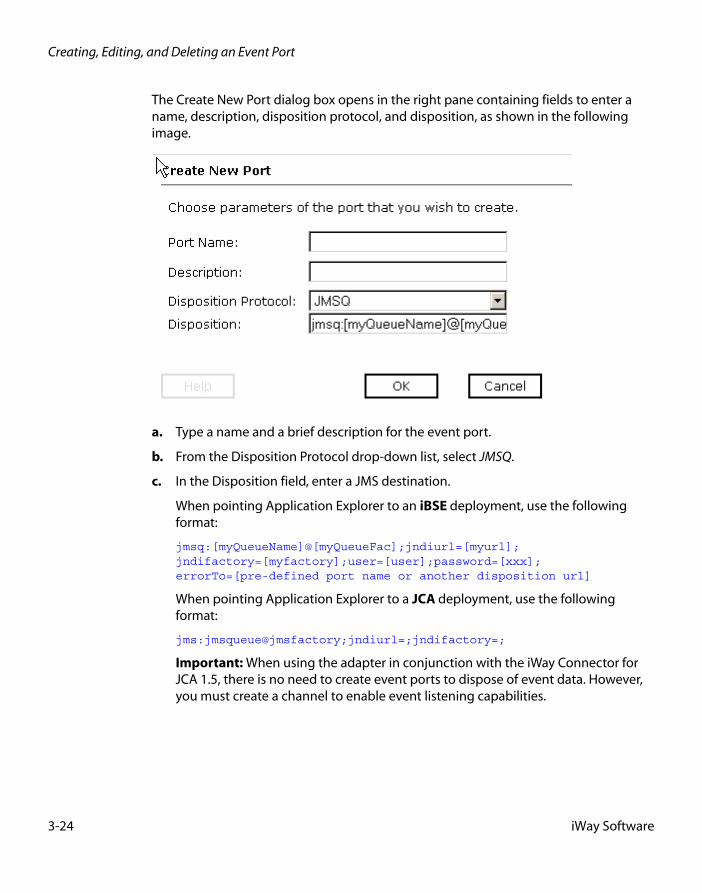
The Create New Port dialog box opens in the right pane containing fields to enter a name, description, disposition protocol, and disposition, as shown in the following image.
a. Type a name and a brief description for the event port.
b. From the Disposition Protocol drop-down list, select FILE.
c. In the Disposition field, specify a destination file to which the event data is written.
When pointing Application Explorer to an iBSE deployment, specify the destination file using the following format:
ifile://[location];errorTo=[pre-defined port name or another disposition url]
When pointing Application Explorer to a JCA deployment, provide the full path to the directory.
Important: When using the adapter in conjunction with the iWay Connector for JCA 1.5, there is no need to create event ports to dispose of event data. However, you must create a channel to enable event listening capabilities.
iWay Transaction Adapter for CICS (XML) User’s Guide 3-19
Creating, Editing, and Deleting an Event Port
The following table lists and defines the parameters for the File disposition:
5. Click OK.
The port appears under the ports node in the left pane. In the right pane, a table appears that summarizes the information associated with the event port you created.
You are ready to associate the event port with a channel. For more information, see Creating, Editing, and Deleting an Event Channel on page 3-34.
Procedure: How to Create an Event Port for iBSE
1. Click the iWay Events tab.
The iWay Events window opens.
2. In the left pane, expand the CICS node.
3. Select the ports node.
4. Move the pointer over Operations and select Add a new port.
Parameter Description
Location Destination and file name of the document where event data is written. For example, D:\in\x.txt
ErrorTo Location to which error logs are sent. Optional.
A predefined port name or another disposition URL. The URL must be complete, including the protocol.
3-20 iWay Software
Designing the Adapter
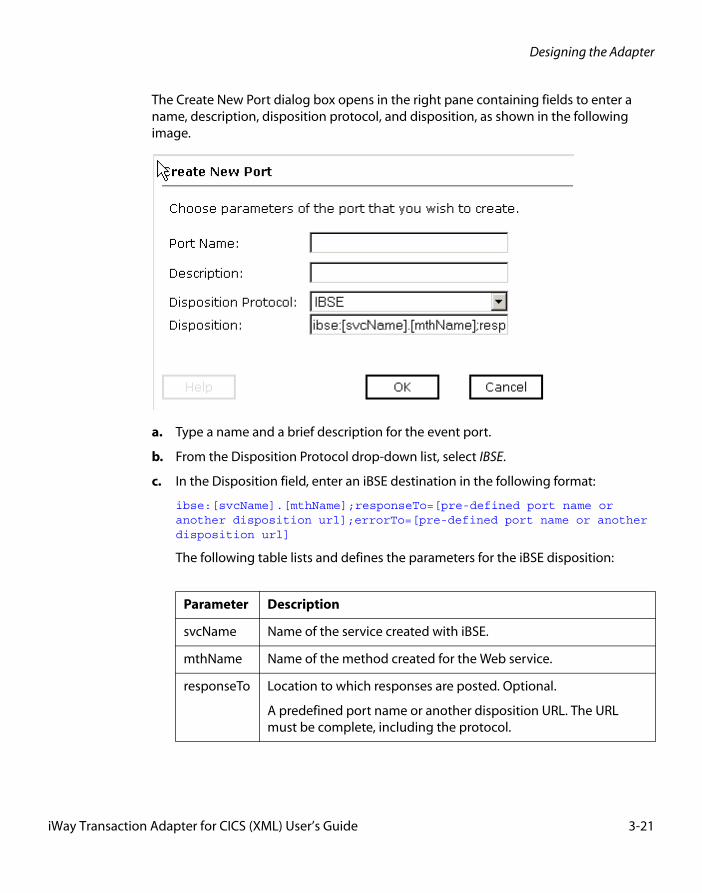
The Create New Port dialog box opens in the right pane containing fields to enter a name, description, disposition protocol, and disposition, as shown in the following image.
a. Type a name and a brief description for the event port.
b. From the Disposition Protocol drop-down list, select IBSE.
c. In the Disposition field, enter an iBSE destination in the following format:
ibse:[svcName].[mthName];responseTo=[pre-defined port name or another disposition url];errorTo=[pre-defined port name or another disposition url]
The following table lists and defines the parameters for the iBSE disposition:
Parameter Description
svcName Name of the service created with iBSE.
mthName Name of the method created for the Web service.
responseTo Location to which responses are posted. Optional.
A predefined port name or another disposition URL. The URL must be complete, including the protocol.
iWay Transaction Adapter for CICS (XML) User’s Guide 3-21
Creating, Editing, and Deleting an Event Port
5. Click OK.
The port appears under the ports node in the left pane. In the right pane, a table appears that summarizes the information associated with the event port you created.
You are ready to associate the event port with a channel. For more information, see Creating, Editing, and Deleting an Event Channel on page 3-34.
Procedure: How to Create an Event Port for MSMQ
1. Click the iWay Events tab.
The iWay Events window opens.
2. In the left pane, expand the CICS node.
3. Select the ports node.
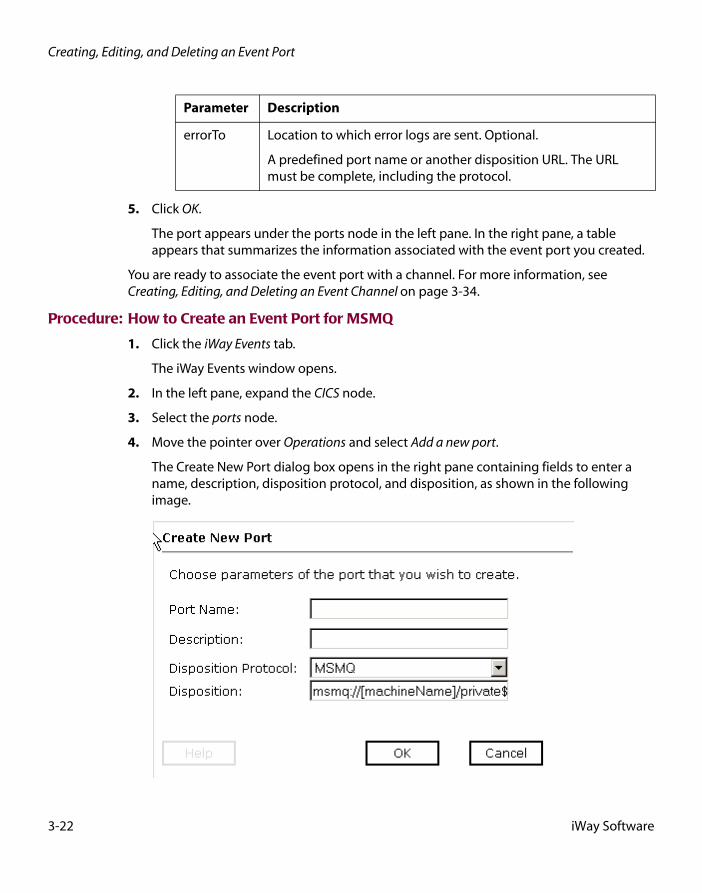
4. Move the pointer over Operations and select Add a new port.
The Create New Port dialog box opens in the right pane containing fields to enter a name, description, disposition protocol, and disposition, as shown in the following image.
errorTo Location to which error logs are sent. Optional.
A predefined port name or another disposition URL. The URL must be complete, including the protocol.
Parameter Description
3-22 iWay Software
Designing the Adapter
a. Type a name and a brief description for the event port.
b. From the Disposition Protocol drop-down list, select MSMQ.
c. In the Disposition field, enter an MSMQ destination in the following format:
msmq:/[machineName]/private$/qName;errorTo=[pre-defined port name or another disposition url]
Note: This syntax is for a private queue. Private queues are queues that are not published in Active Directory. They appear only on the local computer that contains them. Private queues are accessible only by Message Queuing applications that recognize the full path name or format name of the queue.
The following table lists and defines the parameters for the MSMQ disposition:
5. Click OK.
The port appears under the ports node in the left pane. In the right pane, a table appears that summarizes the information associated with the event port you created.
You are now ready to associate the event port with a channel. For more information, see Creating, Editing, and Deleting an Event Channel on page 3-34.
Procedure: How to Create an Event Port for JMSQ
1. Click the iWay Events tab.
The iWay Events window opens.
2. In the left pane, expand the CICS node.
3. Select the ports node.
4. Move the pointer over Operations and select Add a new port.
Parameter Description
machineName Machine name where the Microsoft Queuing system is running.
qName Name of the private queue where messages are placed.
errorTo Location to which error logs are sent. Optional.
A predefined port name or another disposition URL. The URL must be complete, including the protocol.
iWay Transaction Adapter for CICS (XML) User’s Guide 3-23
Creating, Editing, and Deleting an Event Port
The Create New Port dialog box opens in the right pane containing fields to enter a name, description, disposition protocol, and disposition, as shown in the following image.
a. Type a name and a brief description for the event port.
b. From the Disposition Protocol drop-down list, select JMSQ.
c. In the Disposition field, enter a JMS destination.
When pointing Application Explorer to an iBSE deployment, use the following format:
jmsq:[myQueueName]@[myQueueFac];jndiurl=[myurl];jndifactory=[myfactory];user=[user];password=[xxx];errorTo=[pre-defined port name or another disposition url]
When pointing Application Explorer to a JCA deployment, use the following format:
jms:jmsqueue@jmsfactory;jndiurl=;jndifactory=;
Important: When using the adapter in conjunction with the iWay Connector for JCA 1.5, there is no need to create event ports to dispose of event data. However, you must create a channel to enable event listening capabilities.
3-24 iWay Software
Designing the Adapter
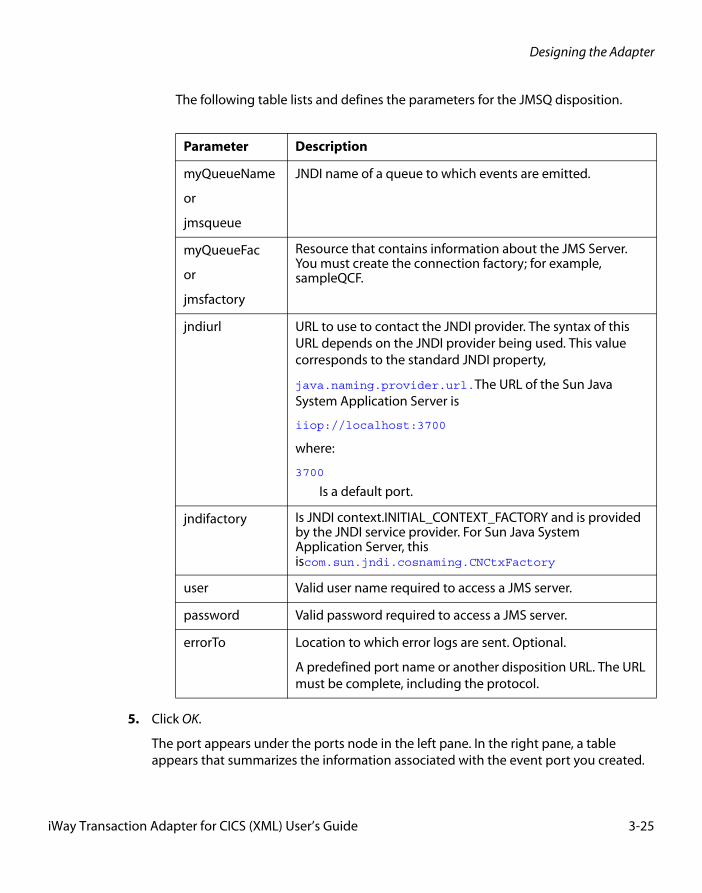
The following table lists and defines the parameters for the JMSQ disposition.
5. Click OK.
The port appears under the ports node in the left pane. In the right pane, a table appears that summarizes the information associated with the event port you created.
Parameter Description
myQueueName
or
jmsqueue
JNDI name of a queue to which events are emitted.
myQueueFac
or
jmsfactory
Resource that contains information about the JMS Server. You must create the connection factory; for example, sampleQCF.
jndiurl URL to use to contact the JNDI provider. The syntax of this URL depends on the JNDI provider being used. This value corresponds to the standard JNDI property,
java.naming.provider.url.The URL of the Sun Java System Application Server is
iiop://localhost:3700
where:
3700
Is a default port.
jndifactory Is JNDI context.INITIAL_CONTEXT_FACTORY and is provided by the JNDI service provider. For Sun Java System Application Server, this iscom.sun.jndi.cosnaming.CNCtxFactory
user Valid user name required to access a JMS server.
password Valid password required to access a JMS server.
errorTo Location to which error logs are sent. Optional.
A predefined port name or another disposition URL. The URL must be complete, including the protocol.
iWay Transaction Adapter for CICS (XML) User’s Guide 3-25
Creating, Editing, and Deleting an Event Port
You are now ready to associate the event port with a channel. For more information, see Creating, Editing, and Deleting an Event Channel on page 3-34.
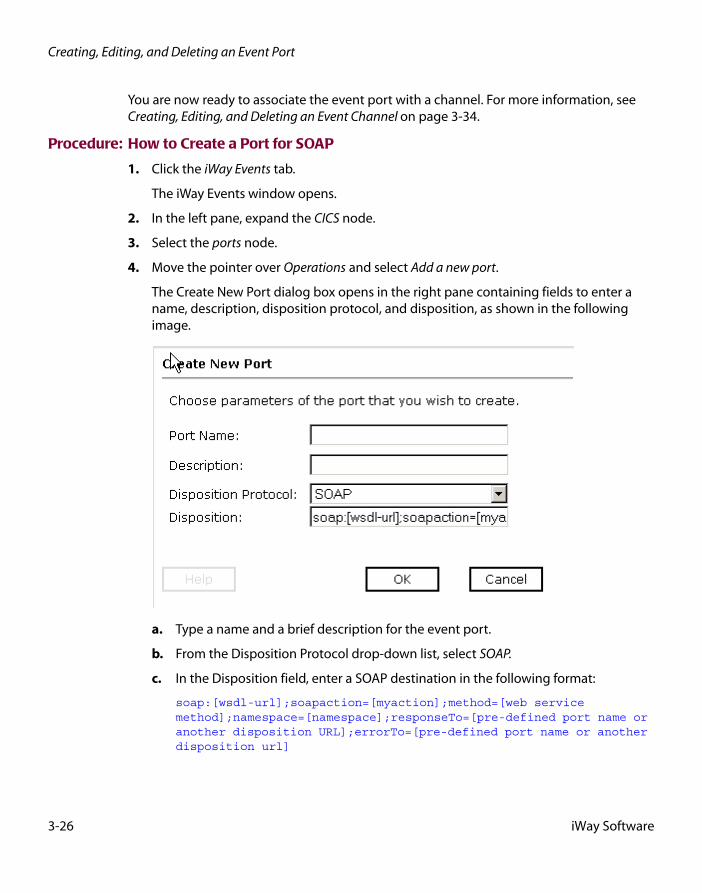
Procedure: How to Create a Port for SOAP
1. Click the iWay Events tab.
The iWay Events window opens.
2. In the left pane, expand the CICS node.
3. Select the ports node.
4. Move the pointer over Operations and select Add a new port.
The Create New Port dialog box opens in the right pane containing fields to enter a name, description, disposition protocol, and disposition, as shown in the following image.
a. Type a name and a brief description for the event port.
b. From the Disposition Protocol drop-down list, select SOAP.
c. In the Disposition field, enter a SOAP destination in the following format:
soap:[wsdl-url];soapaction=[myaction];method=[web service method];namespace=[namespace];responseTo=[pre-defined port name or another disposition URL];errorTo=[pre-defined port name or another disposition url]
3-26 iWay Software
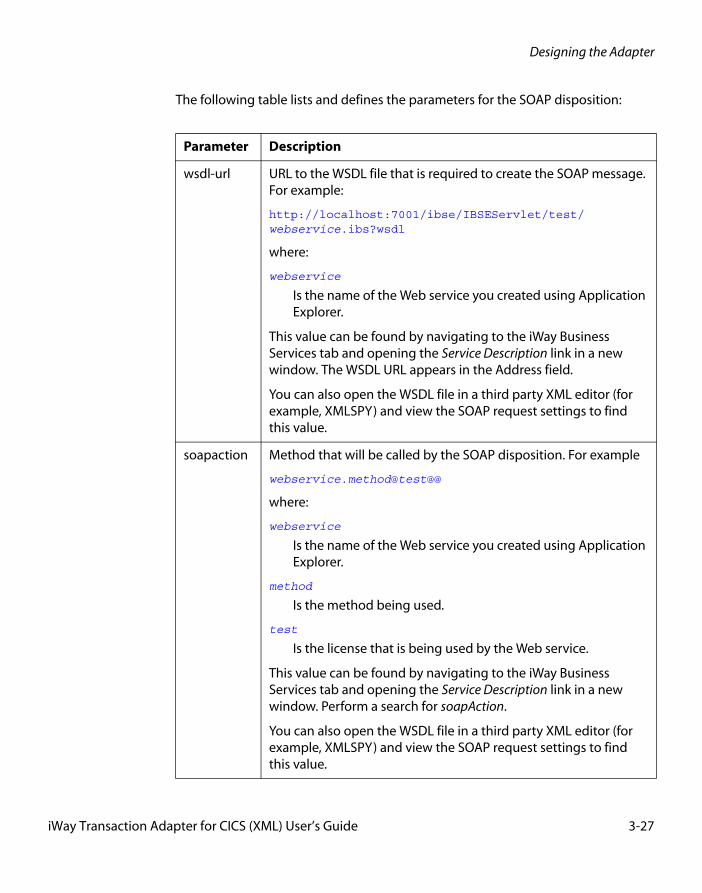
Designing the Adapter
The following table lists and defines the parameters for the SOAP disposition:
Parameter Description
wsdl-url URL to the WSDL file that is required to create the SOAP message. For example:
http://localhost:7001/ibse/IBSEServlet/test/ webservice.ibs?wsdl
where:
webservice
Is the name of the Web service you created using Application Explorer.
This value can be found by navigating to the iWay Business Services tab and opening the Service Description link in a new window. The WSDL URL appears in the Address field.
You can also open the WSDL file in a third party XML editor (for example, XMLSPY) and view the SOAP request settings to find this value.
soapaction Method that will be called by the SOAP disposition. For example
webservice.method@test@@
where:
webservice
Is the name of the Web service you created using Application Explorer.
method
Is the method being used.
test
Is the license that is being used by the Web service.
This value can be found by navigating to the iWay Business Services tab and opening the Service Description link in a new window. Perform a search for soapAction.
You can also open the WSDL file in a third party XML editor (for example, XMLSPY) and view the SOAP request settings to find this value.
iWay Transaction Adapter for CICS (XML) User’s Guide 3-27
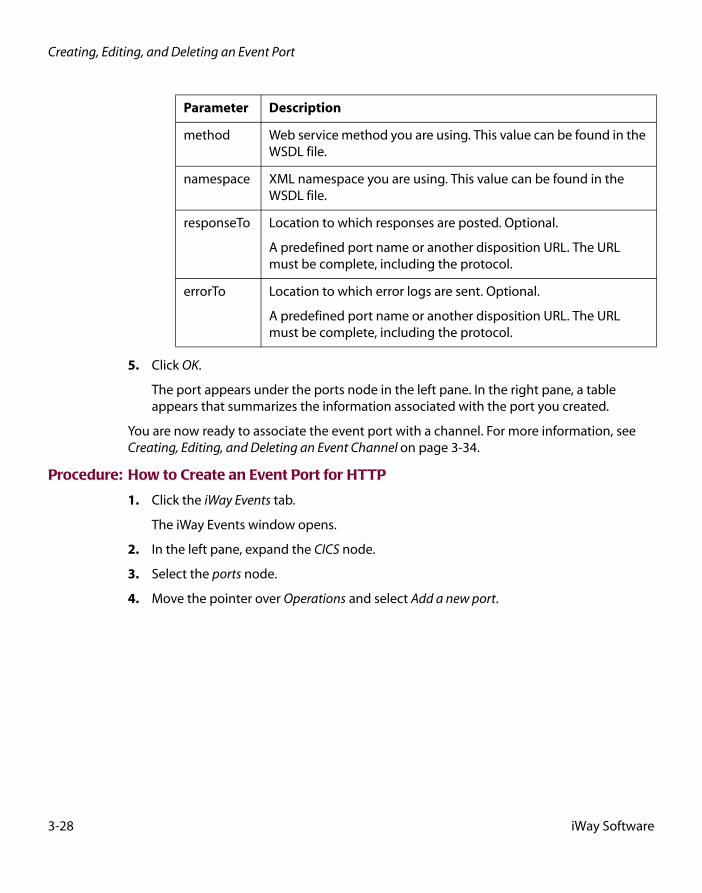
Creating, Editing, and Deleting an Event Port
5. Click OK.
The port appears under the ports node in the left pane. In the right pane, a table appears that summarizes the information associated with the port you created.
You are now ready to associate the event port with a channel. For more information, see Creating, Editing, and Deleting an Event Channel on page 3-34.
Procedure: How to Create an Event Port for HTTP
1. Click the iWay Events tab.
The iWay Events window opens.
2. In the left pane, expand the CICS node.
3. Select the ports node.
4. Move the pointer over Operations and select Add a new port.
method Web service method you are using. This value can be found in the WSDL file.
namespace XML namespace you are using. This value can be found in the WSDL file.
responseTo Location to which responses are posted. Optional.
A predefined port name or another disposition URL. The URL must be complete, including the protocol.
errorTo Location to which error logs are sent. Optional.
A predefined port name or another disposition URL. The URL must be complete, including the protocol.
Parameter Description
3-28 iWay Software
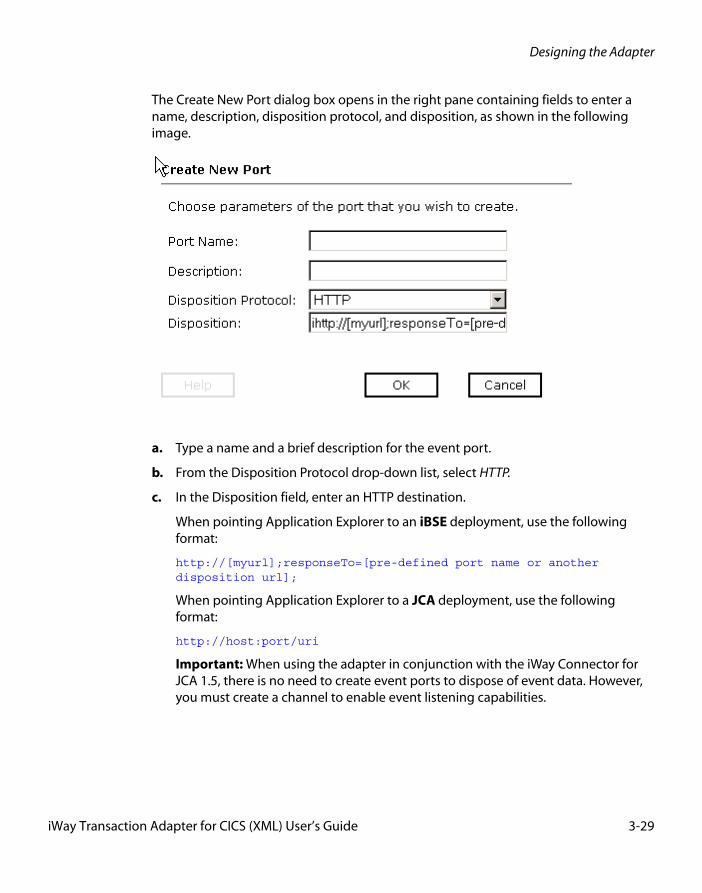
Designing the Adapter
The Create New Port dialog box opens in the right pane containing fields to enter a name, description, disposition protocol, and disposition, as shown in the following image.
a. Type a name and a brief description for the event port.
b. From the Disposition Protocol drop-down list, select HTTP.
c. In the Disposition field, enter an HTTP destination.
When pointing Application Explorer to an iBSE deployment, use the following format:
http://[myurl];responseTo=[pre-defined port name or another disposition url];
When pointing Application Explorer to a JCA deployment, use the following format:
http://host:port/uri
Important: When using the adapter in conjunction with the iWay Connector for JCA 1.5, there is no need to create event ports to dispose of event data. However, you must create a channel to enable event listening capabilities.
iWay Transaction Adapter for CICS (XML) User’s Guide 3-29
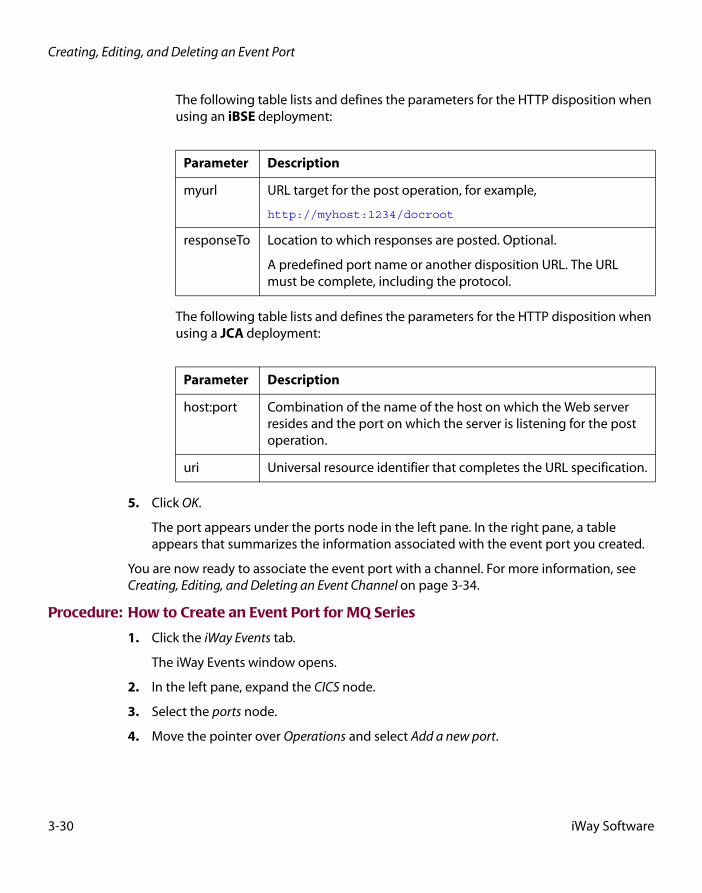
Creating, Editing, and Deleting an Event Port
The following table lists and defines the parameters for the HTTP disposition when using an iBSE deployment:
The following table lists and defines the parameters for the HTTP disposition when using a JCA deployment:
5. Click OK.
The port appears under the ports node in the left pane. In the right pane, a table appears that summarizes the information associated with the event port you created.
You are now ready to associate the event port with a channel. For more information, see Creating, Editing, and Deleting an Event Channel on page 3-34.
Procedure: How to Create an Event Port for MQ Series
1. Click the iWay Events tab.
The iWay Events window opens.
2. In the left pane, expand the CICS node.
3. Select the ports node.
4. Move the pointer over Operations and select Add a new port.
Parameter Description
myurl URL target for the post operation, for example,
http://myhost:1234/docroot
responseTo Location to which responses are posted. Optional.
A predefined port name or another disposition URL. The URL must be complete, including the protocol.
Parameter Description
host:port Combination of the name of the host on which the Web server resides and the port on which the server is listening for the post operation.
uri Universal resource identifier that completes the URL specification.
3-30 iWay Software
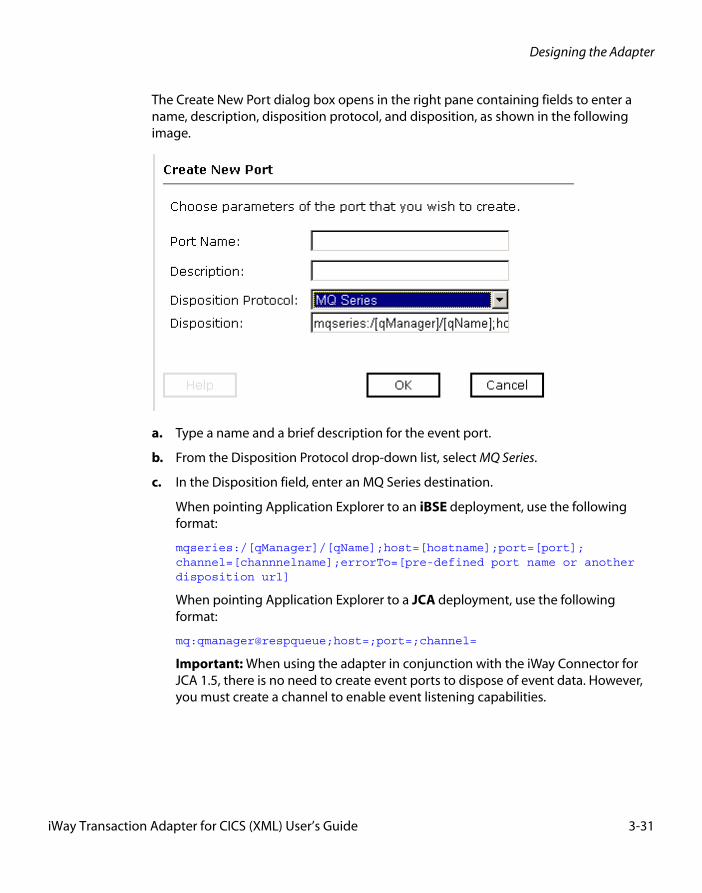
Designing the Adapter
The Create New Port dialog box opens in the right pane containing fields to enter a name, description, disposition protocol, and disposition, as shown in the following image.
a. Type a name and a brief description for the event port.
b. From the Disposition Protocol drop-down list, select MQ Series.
c. In the Disposition field, enter an MQ Series destination.
When pointing Application Explorer to an iBSE deployment, use the following format:
mqseries:/[qManager]/[qName];host=[hostname];port=[port];channel=[channnelname];errorTo=[pre-defined port name or another disposition url]
When pointing Application Explorer to a JCA deployment, use the following format:
mq:qmanager@respqueue;host=;port=;channel=
Important: When using the adapter in conjunction with the iWay Connector for JCA 1.5, there is no need to create event ports to dispose of event data. However, you must create a channel to enable event listening capabilities.
iWay Transaction Adapter for CICS (XML) User’s Guide 3-31
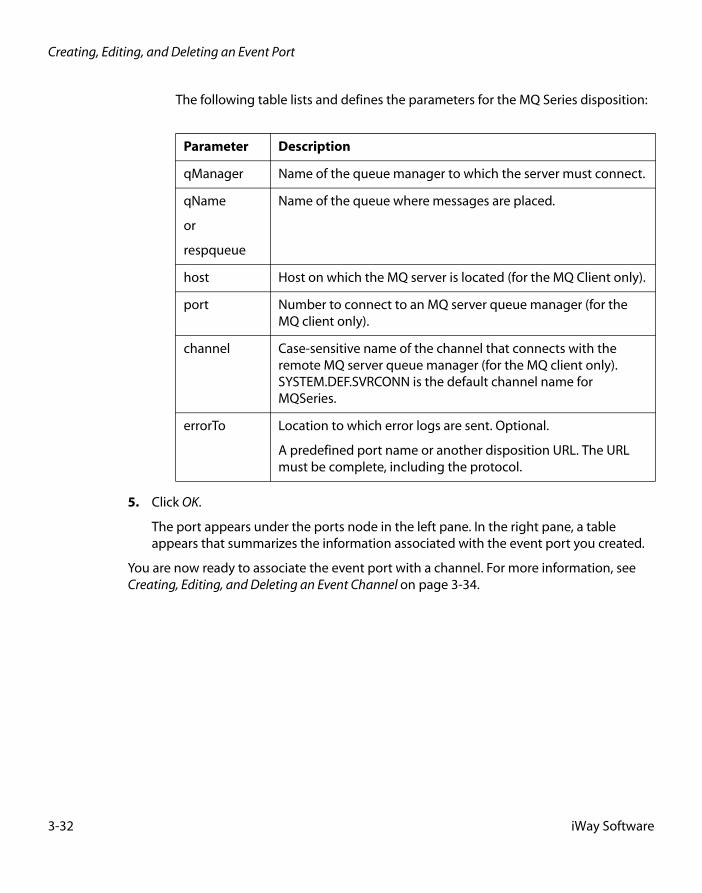
Creating, Editing, and Deleting an Event Port
The following table lists and defines the parameters for the MQ Series disposition:
5. Click OK.
The port appears under the ports node in the left pane. In the right pane, a table appears that summarizes the information associated with the event port you created.
You are now ready to associate the event port with a channel. For more information, see Creating, Editing, and Deleting an Event Channel on page 3-34.
Parameter Description
qManager Name of the queue manager to which the server must connect.
qName
or
respqueue
Name of the queue where messages are placed.
host Host on which the MQ server is located (for the MQ Client only).
port Number to connect to an MQ server queue manager (for the MQ client only).
channel Case-sensitive name of the channel that connects with the remote MQ server queue manager (for the MQ client only). SYSTEM.DEF.SVRCONN is the default channel name for MQSeries.
errorTo Location to which error logs are sent. Optional.
A predefined port name or another disposition URL. The URL must be complete, including the protocol.
3-32 iWay Software

Designing the Adapter
Editing and Deleting an Event PortThe following procedures provide information on how to edit and delete an event port using Application Explorer.
Procedure: How to Edit an Event Port
1. Click the iWay Events tab.
The iWay Events window opens.
2. In the left pane, expand the CICS node.
3. Select the ports node.
4. Select the event port you want to edit.
5. In the right pane, move the pointer over Operations and select Edit.
The Edit Port dialog box opens.
6. Make the necessary changes and click OK.
Procedure: How to Delete an Event Port
1. Click the iWay Events tab.
The iWay Events window opens.
2. In the left pane, expand the CICS node.
3. Select the ports node.
4. Select the event port you want to delete.
5. In the right pane, move the pointer over Operations and select Delete.
A confirmation dialog box opens.
6. To delete the event port you selected, click OK.
The event port disappears from the list in the left pane.
iWay Transaction Adapter for CICS (XML) User’s Guide 3-33
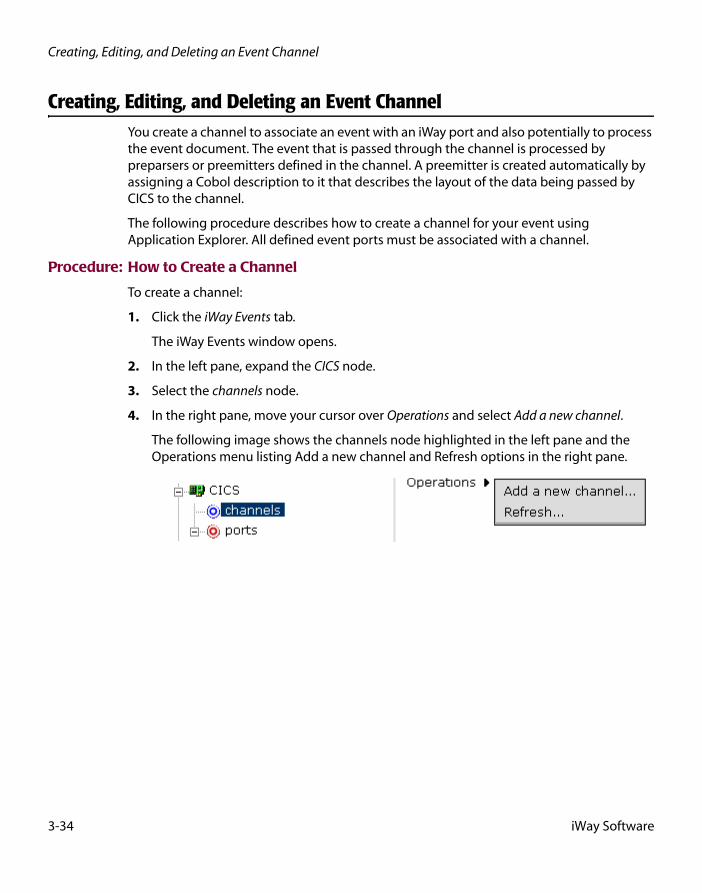
Creating, Editing, and Deleting an Event Channel
Creating, Editing, and Deleting an Event ChannelYou create a channel to associate an event with an iWay port and also potentially to process the event document. The event that is passed through the channel is processed by preparsers or preemitters defined in the channel. A preemitter is created automatically by assigning a Cobol description to it that describes the layout of the data being passed by CICS to the channel.
The following procedure describes how to create a channel for your event using Application Explorer. All defined event ports must be associated with a channel.
Procedure: How to Create a Channel
To create a channel:
1. Click the iWay Events tab.
The iWay Events window opens.
2. In the left pane, expand the CICS node.
3. Select the channels node.
4. In the right pane, move your cursor over Operations and select Add a new channel.
The following image shows the channels node highlighted in the left pane and the Operations menu listing Add a new channel and Refresh options in the right pane.
3-34 iWay Software
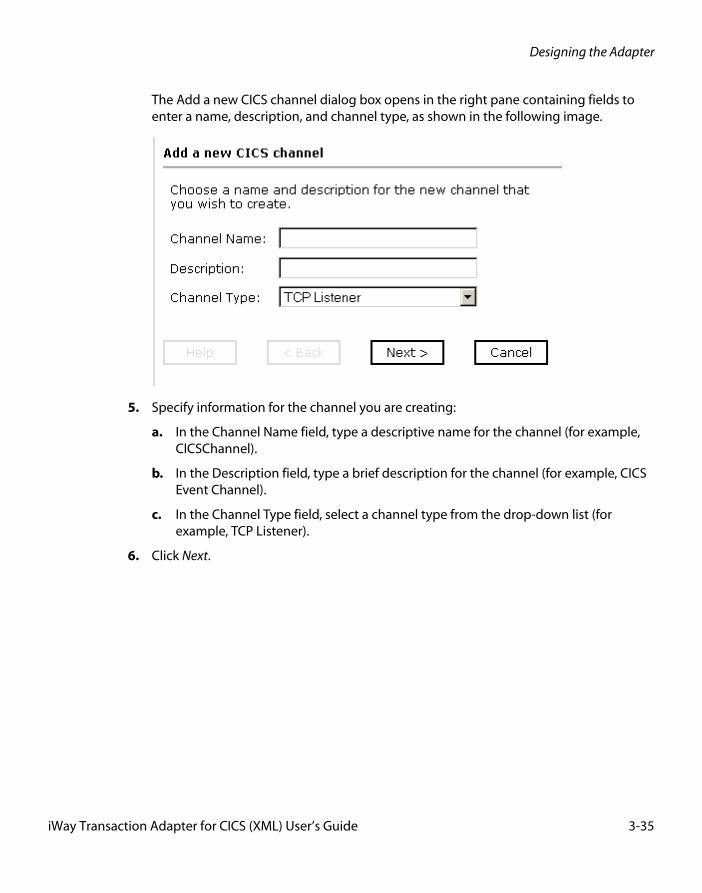
Designing the Adapter
The Add a new CICS channel dialog box opens in the right pane containing fields to enter a name, description, and channel type, as shown in the following image.
5. Specify information for the channel you are creating:
a. In the Channel Name field, type a descriptive name for the channel (for example, CICSChannel).
b. In the Description field, type a brief description for the channel (for example, CICS Event Channel).
c. In the Channel Type field, select a channel type from the drop-down list (for example, TCP Listener).
6. Click Next.
iWay Transaction Adapter for CICS (XML) User’s Guide 3-35
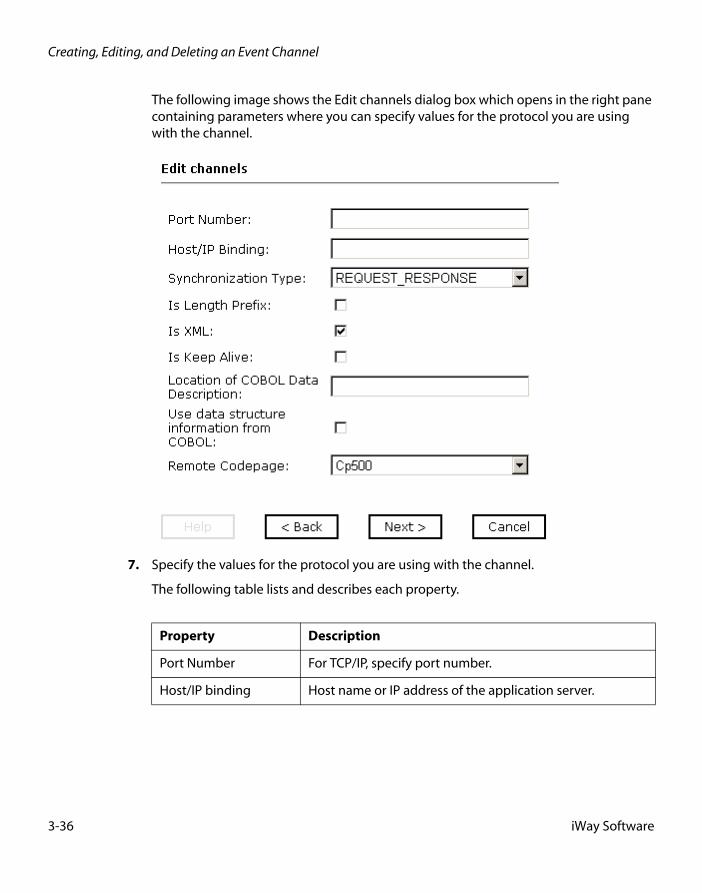
Creating, Editing, and Deleting an Event Channel
The following image shows the Edit channels dialog box which opens in the right pane containing parameters where you can specify values for the protocol you are using with the channel.
7. Specify the values for the protocol you are using with the channel.
The following table lists and describes each property.
Property Description
Port Number For TCP/IP, specify port number.
Host/IP binding Host name or IP address of the application server.
3-36 iWay Software
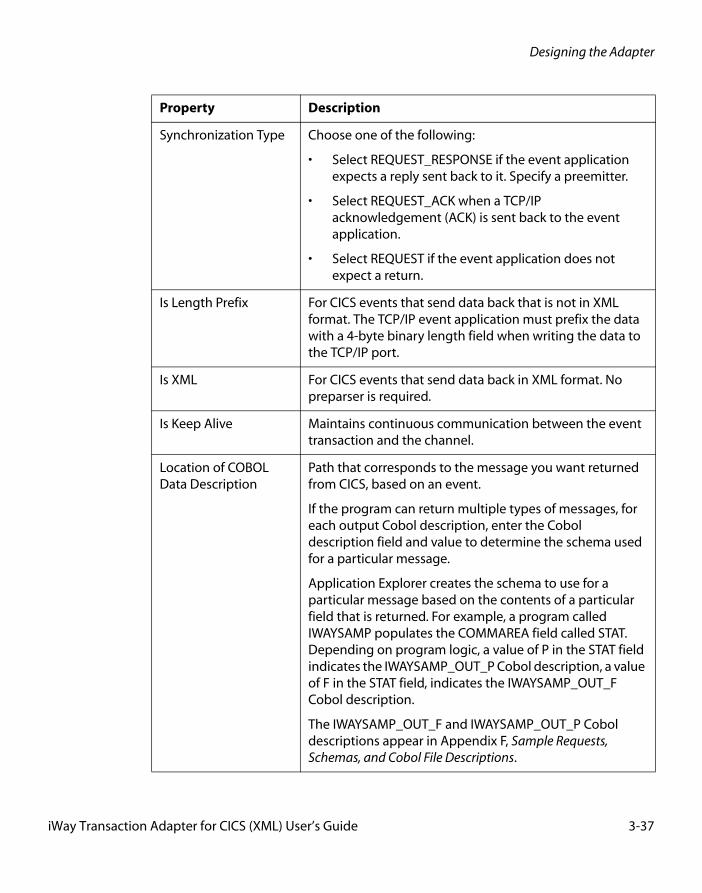
Designing the Adapter
Synchronization Type Choose one of the following:
• Select REQUEST_RESPONSE if the event application expects a reply sent back to it. Specify a preemitter.
• Select REQUEST_ACK when a TCP/IP acknowledgement (ACK) is sent back to the event application.
• Select REQUEST if the event application does not expect a return.
Is Length Prefix For CICS events that send data back that is not in XML format. The TCP/IP event application must prefix the data with a 4-byte binary length field when writing the data to the TCP/IP port.
Is XML For CICS events that send data back in XML format. No preparser is required.
Is Keep Alive Maintains continuous communication between the event transaction and the channel.
Location of COBOL Data Description
Path that corresponds to the message you want returned from CICS, based on an event.
If the program can return multiple types of messages, for each output Cobol description, enter the Cobol description field and value to determine the schema used for a particular message.
Application Explorer creates the schema to use for a particular message based on the contents of a particular field that is returned. For example, a program called IWAYSAMP populates the COMMAREA field called STAT. Depending on program logic, a value of P in the STAT field indicates the IWAYSAMP_OUT_P Cobol description, a value of F in the STAT field, indicates the IWAYSAMP_OUT_F Cobol description.
The IWAYSAMP_OUT_F and IWAYSAMP_OUT_P Cobol descriptions appear in Appendix F, Sample Requests, Schemas, and Cobol File Descriptions.
Property Description
iWay Transaction Adapter for CICS (XML) User’s Guide 3-37
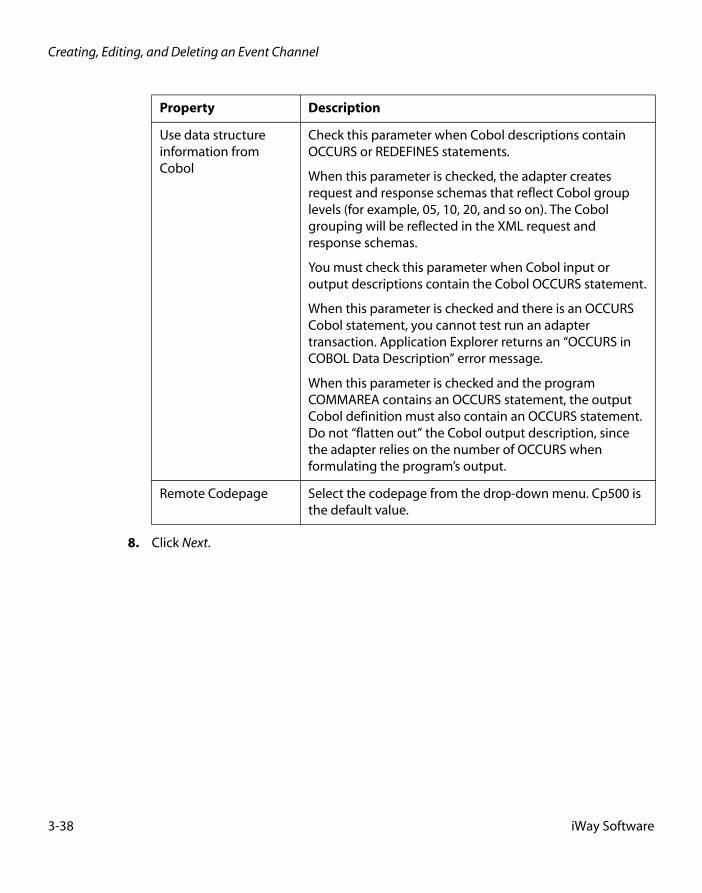
Creating, Editing, and Deleting an Event Channel
8. Click Next.
Use data structure information from Cobol
Check this parameter when Cobol descriptions contain OCCURS or REDEFINES statements.
When this parameter is checked, the adapter creates request and response schemas that reflect Cobol group levels (for example, 05, 10, 20, and so on). The Cobol grouping will be reflected in the XML request and response schemas.
You must check this parameter when Cobol input or output descriptions contain the Cobol OCCURS statement.
When this parameter is checked and there is an OCCURS Cobol statement, you cannot test run an adapter transaction. Application Explorer returns an “OCCURS in COBOL Data Description” error message.
When this parameter is checked and the program COMMAREA contains an OCCURS statement, the output Cobol definition must also contain an OCCURS statement. Do not “flatten out” the Cobol output description, since the adapter relies on the number of OCCURS when formulating the program’s output.
Remote Codepage Select the codepage from the drop-down menu. Cp500 is the default value.
Property Description
3-38 iWay Software
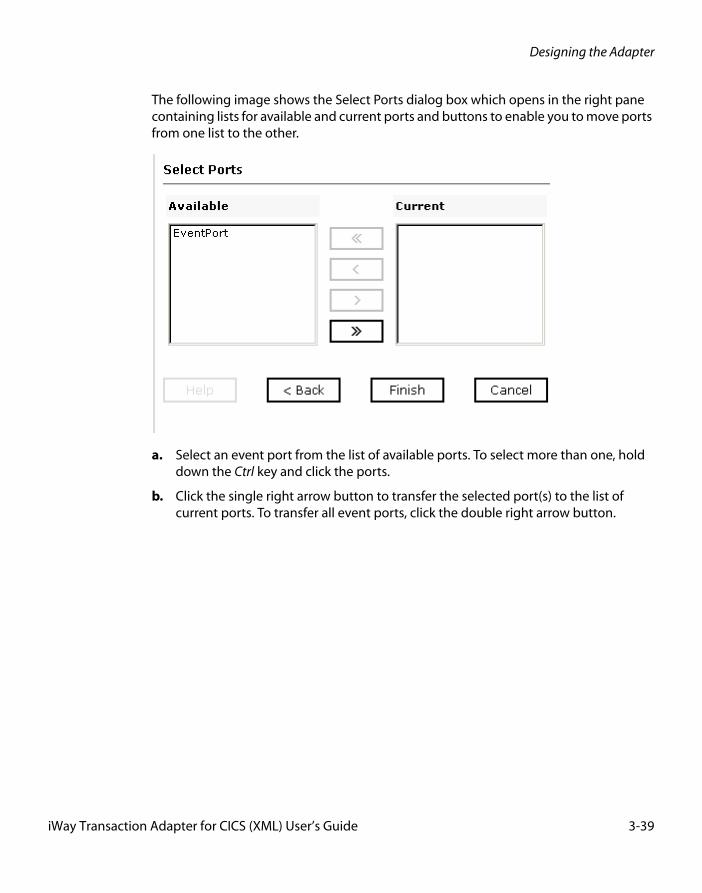
Designing the Adapter
The following image shows the Select Ports dialog box which opens in the right pane containing lists for available and current ports and buttons to enable you to move ports from one list to the other.
a. Select an event port from the list of available ports. To select more than one, hold down the Ctrl key and click the ports.
b. Click the single right arrow button to transfer the selected port(s) to the list of current ports. To transfer all event ports, click the double right arrow button.
iWay Transaction Adapter for CICS (XML) User’s Guide 3-39
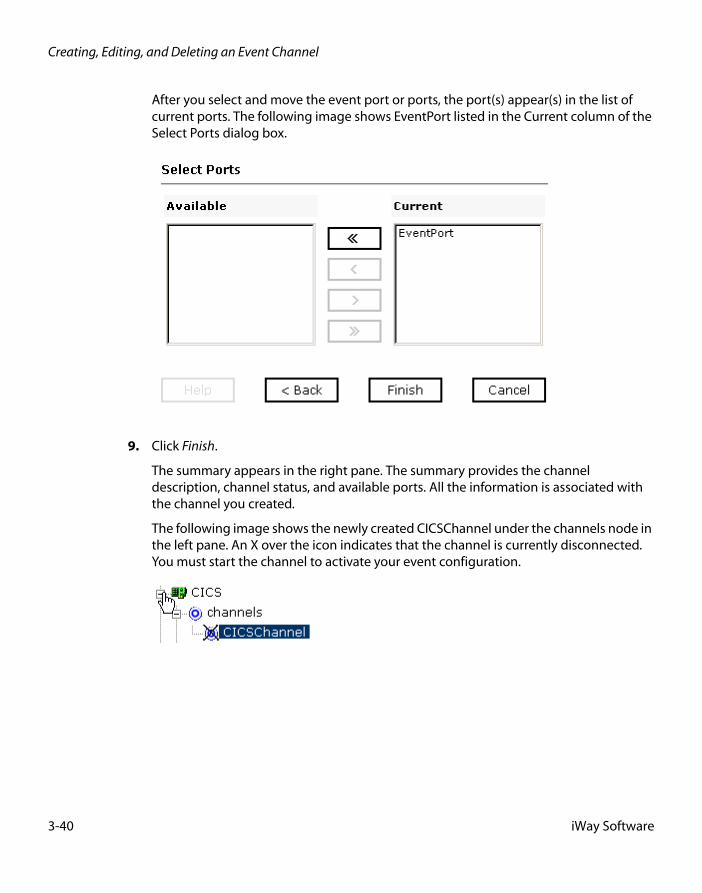
Creating, Editing, and Deleting an Event Channel
After you select and move the event port or ports, the port(s) appear(s) in the list of current ports. The following image shows EventPort listed in the Current column of the Select Ports dialog box.
9. Click Finish.
The summary appears in the right pane. The summary provides the channel description, channel status, and available ports. All the information is associated with the channel you created.
The following image shows the newly created CICSChannel under the channels node in the left pane. An X over the icon indicates that the channel is currently disconnected. You must start the channel to activate your event configuration.
3-40 iWay Software
Designing the Adapter
Procedure: How to Start or Stop a Channel
To start or stop a channel:
1. Click the iWay Events tab.
The iWay Events window opens.
2. In the left pane, expand the CICS node.
3. Select the channels node.
4. Select the channel you want to start or stop.
5. In the right pane, move your cursor over Operations.
a. If you want to start the channel, select Start the channel.
The channel becomes active and the X over the icon disappears.
b. If you want to stop the channel, select Stop the channel.
The channel becomes inactive and the X appears over the icon.
Editing and Deleting a ChannelThe following procedures describe how to edit and delete a channel.
Procedure: How to Edit a Channel
To edit a channel:
1. Click the iWay Events tab.
The iWay Events window opens.
2. In the left pane, expand the CICS node.
3. Select the channels node.
4. Select the channel you want to edit.
5. In the right pane, move your cursor over Operations and select Edit.
The Edit Channel dialog box opens.
6. Make any required changes to the channel configuration and click OK.
iWay Transaction Adapter for CICS (XML) User’s Guide 3-41
Creating, Editing, and Deleting an Event Channel
Procedure: How to Delete a Channel
To delete a channel:
1. Click the iWay Events tab.
The iWay Events window opens.
2. In the left pane, expand the CICS node.
3. Select the channels node.
4. Select the channel you want to delete.
5. In the right pane, move your cursor over Operations and select Delete.
A confirmation dialog box opens.
6. To delete the channel you selected, click OK.
The channel disappears from the list in the left pane.
3-42 iWay Software
CHAPTER 4
Using Web Services Policy-Based Security
Topics:
• iWay Business Services Policy-Based Security
• Configuring iWay Business Services Policy-Based Security
Servlet Application Explorer provides a security feature called iWay Business Services policy-based security. The following topics describe how this feature works and how to configure it.
iWay Transaction Adapter for CICS (XML) User’s Guide 4-1
iWay Business Services Policy-Based Security
iWay Business Services Policy-Based SecurityiWay Business Services provide a layer of abstraction between the back-end business logic they invoke and the user or application running the business service. This enables easy application integration but raises the issue of controlling the use and execution of critical and sensitive business logic that is run as a business service.
Servlet Application Explorer controls the use of business services that use adapters with a feature called policy-based security. This feature enables an administrator to apply policies to iWay Business Services (iBS) to deny or permit their execution.
A policy is a set of privileges associated with the execution of a business service that can be applied to an existing or new iBS. When you assign specific rights or privileges inside a policy, you need not recreate privileges for every iBS that has security issues in common with other iWay Business Services. Instead, you can use one policy for many iWay Business Services.
The goal is to secure requests at both the transport and the SOAP request level that is transmitted on the wire. Some policies do not deal with security issues directly but affect the run-time behavior of the business services to which they are applied.
The iBSE administrator creates an instance of a policy type, names it, associates individual users and/or groups (a collection of users), and then applies the policy to one or more business services.
You can assign a policy to an iBS or to a method within an iBS. If a policy is applied only to a method, other methods in that iBS are not governed by it. However, if a policy is applied to the iBS, all methods are governed by it. At run time, the user ID and password that are sent to iBSE in the SOAP request message are checked against the list of users for all policies applied to the specific iBS. The Resource Execution policy type is supported and dictates who can or cannot execute the iBS.
When a policy is not applied, the default value for an iBS is to “grant all.” For example, anyone can execute the iBS until the Resource Execution policy is associated to the iBS. At that time, only users granted execution permission, or those who do not belong to a group that was denied execution permissions, have access to the iBS.
4-2 iWay Software
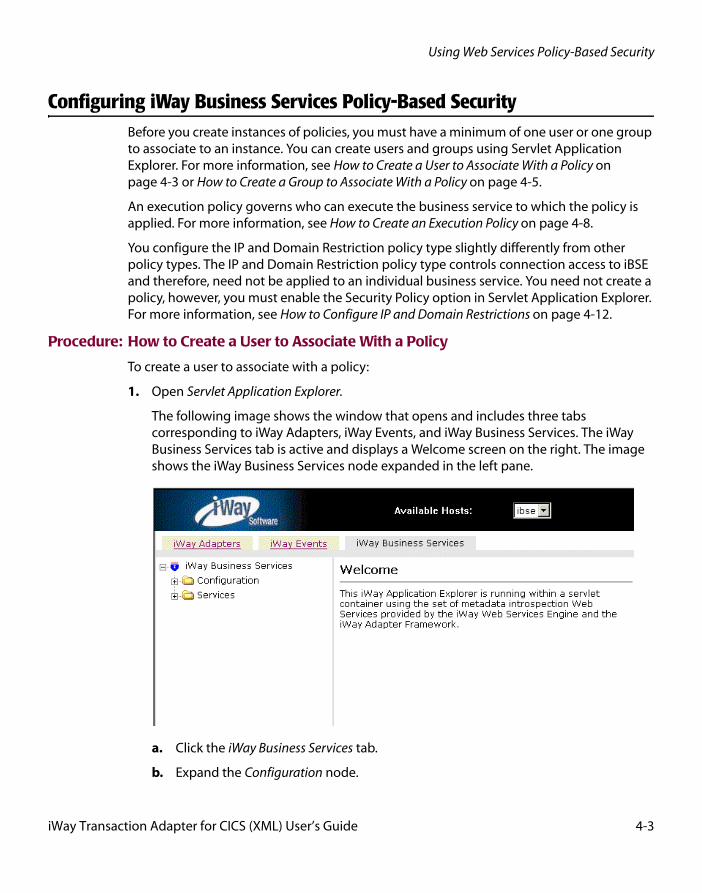
Using Web Services Policy-Based Security
Configuring iWay Business Services Policy-Based SecurityBefore you create instances of policies, you must have a minimum of one user or one group to associate to an instance. You can create users and groups using Servlet Application Explorer. For more information, see How to Create a User to Associate With a Policy on page 4-3 or How to Create a Group to Associate With a Policy on page 4-5.
An execution policy governs who can execute the business service to which the policy is applied. For more information, see How to Create an Execution Policy on page 4-8.
You configure the IP and Domain Restriction policy type slightly differently from other policy types. The IP and Domain Restriction policy type controls connection access to iBSE and therefore, need not be applied to an individual business service. You need not create a policy, however, you must enable the Security Policy option in Servlet Application Explorer. For more information, see How to Configure IP and Domain Restrictions on page 4-12.
Procedure: How to Create a User to Associate With a Policy
To create a user to associate with a policy:
1. Open Servlet Application Explorer.
The following image shows the window that opens and includes three tabs corresponding to iWay Adapters, iWay Events, and iWay Business Services. The iWay Business Services tab is active and displays a Welcome screen on the right. The image shows the iWay Business Services node expanded in the left pane.
a. Click the iWay Business Services tab.
b. Expand the Configuration node.
iWay Transaction Adapter for CICS (XML) User’s Guide 4-3
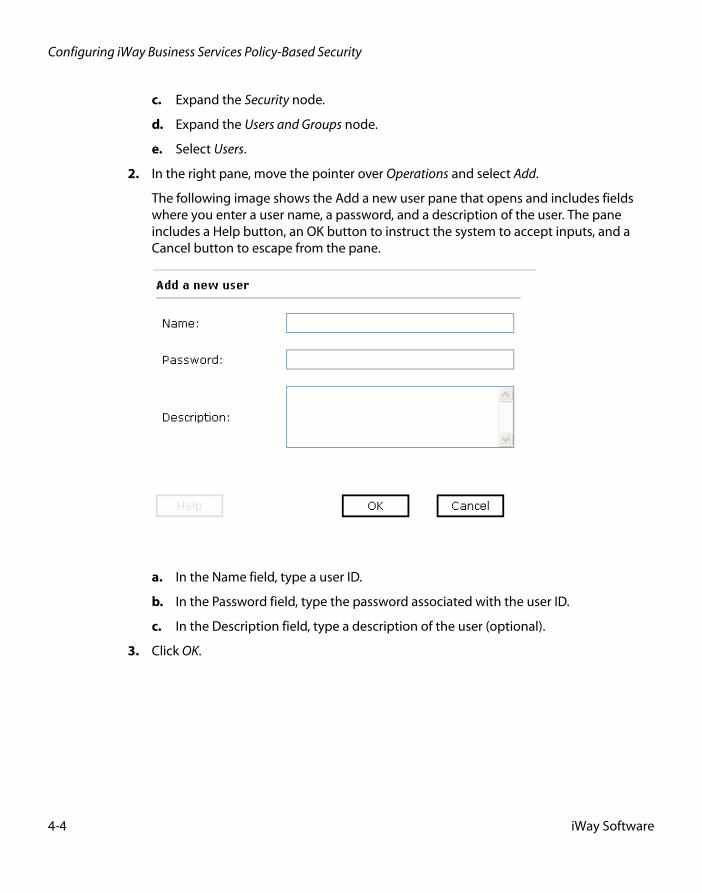
Configuring iWay Business Services Policy-Based Security
c. Expand the Security node.
d. Expand the Users and Groups node.
e. Select Users.
2. In the right pane, move the pointer over Operations and select Add.
The following image shows the Add a new user pane that opens and includes fields where you enter a user name, a password, and a description of the user. The pane includes a Help button, an OK button to instruct the system to accept inputs, and a Cancel button to escape from the pane.
a. In the Name field, type a user ID.
b. In the Password field, type the password associated with the user ID.
c. In the Description field, type a description of the user (optional).
3. Click OK.
4-4 iWay Software

Using Web Services Policy-Based Security
The following image opens and shows a new user added to the configuration. It includes a definition of a user and a user ID and description.
Procedure: How to Create a Group to Associate With a Policy
To create a group to associate with a policy:
1. Open Servlet Application Explorer.
a. Click the iWay Business Servicestab.
b. Expand the Configuration node.
c. Expand the Security node.
d. Expand the Users and Groups node.
e. Select Groups.
2. In the right pane, move the pointer over Operations and click Add.
iWay Transaction Adapter for CICS (XML) User’s Guide 4-5
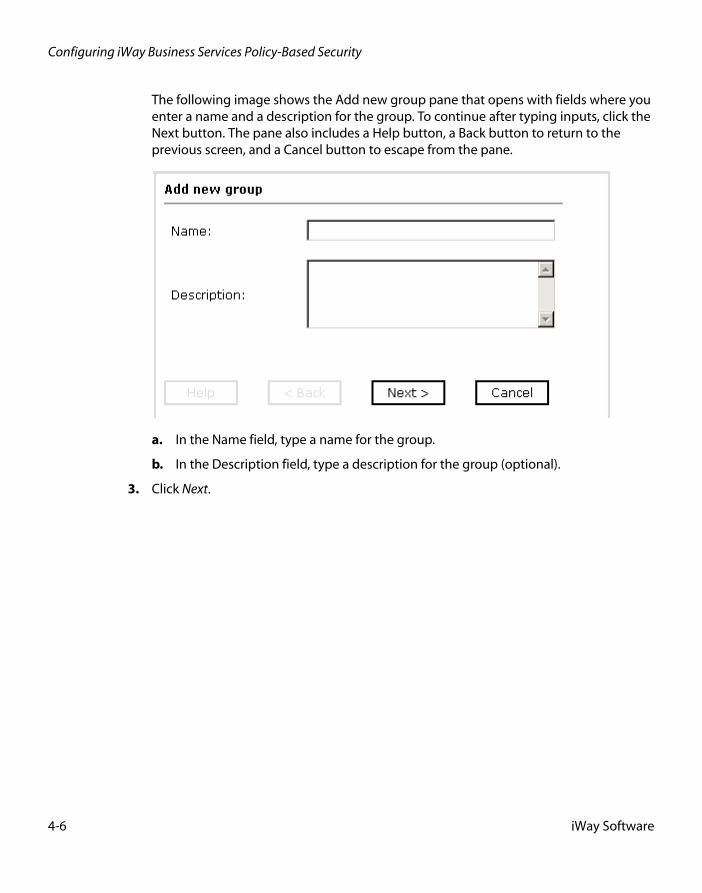
Configuring iWay Business Services Policy-Based Security
The following image shows the Add new group pane that opens with fields where you enter a name and a description for the group. To continue after typing inputs, click the Next button. The pane also includes a Help button, a Back button to return to the previous screen, and a Cancel button to escape from the pane.
a. In the Name field, type a name for the group.
b. In the Description field, type a description for the group (optional).
3. Click Next.
4-6 iWay Software
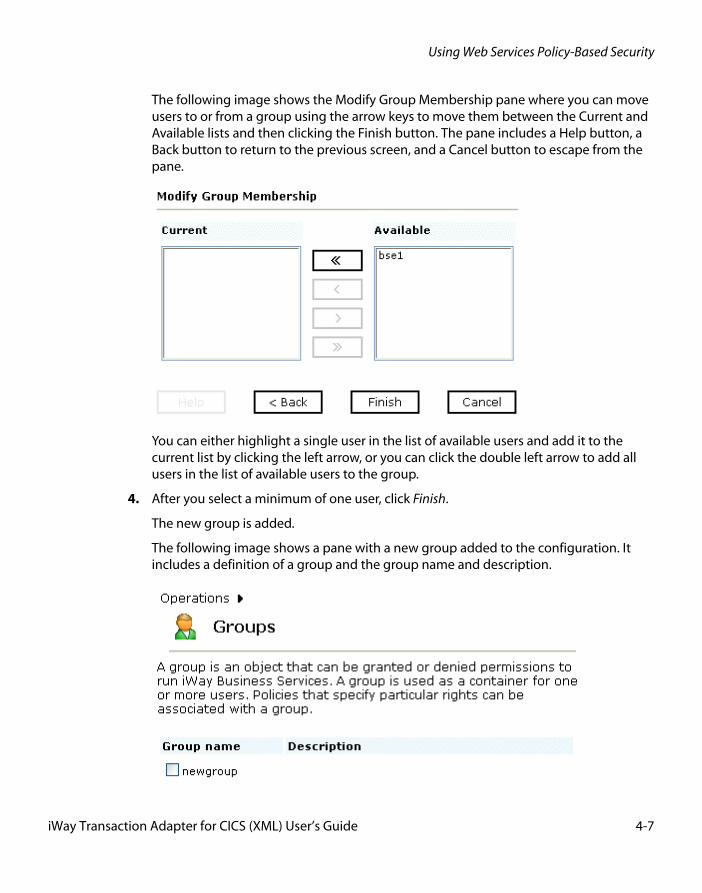
Using Web Services Policy-Based Security
The following image shows the Modify Group Membership pane where you can move users to or from a group using the arrow keys to move them between the Current and Available lists and then clicking the Finish button. The pane includes a Help button, a Back button to return to the previous screen, and a Cancel button to escape from the pane.
You can either highlight a single user in the list of available users and add it to the current list by clicking the left arrow, or you can click the double left arrow to add all users in the list of available users to the group.
4. After you select a minimum of one user, click Finish.
The new group is added.
The following image shows a pane with a new group added to the configuration. It includes a definition of a group and the group name and description.
iWay Transaction Adapter for CICS (XML) User’s Guide 4-7
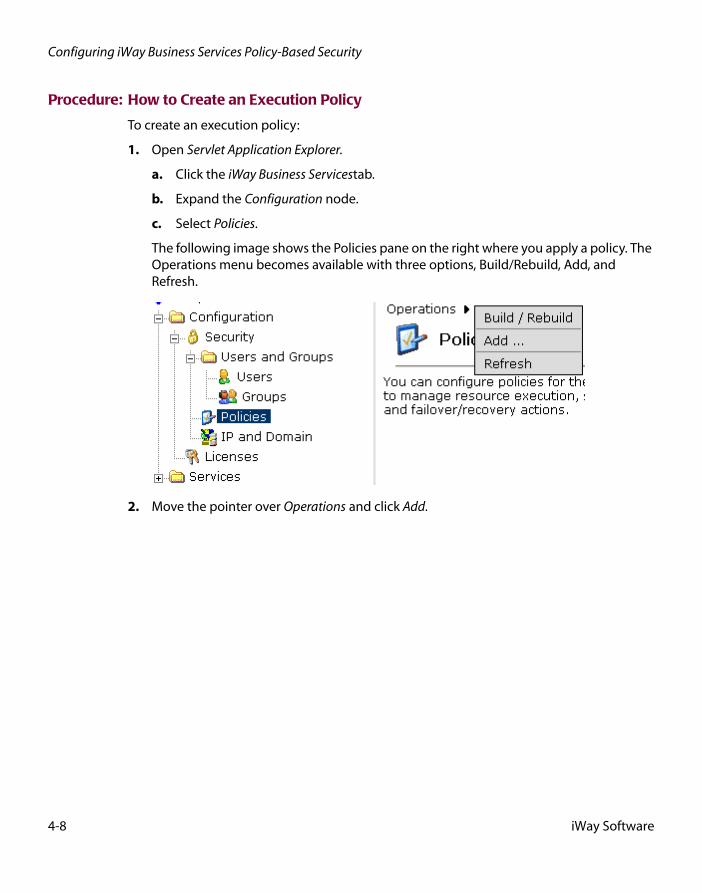
Configuring iWay Business Services Policy-Based Security
Procedure: How to Create an Execution Policy
To create an execution policy:
1. Open Servlet Application Explorer.
a. Click the iWay Business Servicestab.
b. Expand the Configuration node.
c. Select Policies.
The following image shows the Policies pane on the right where you apply a policy. The Operations menu becomes available with three options, Build/Rebuild, Add, and Refresh.
2. Move the pointer over Operations and click Add.
4-8 iWay Software
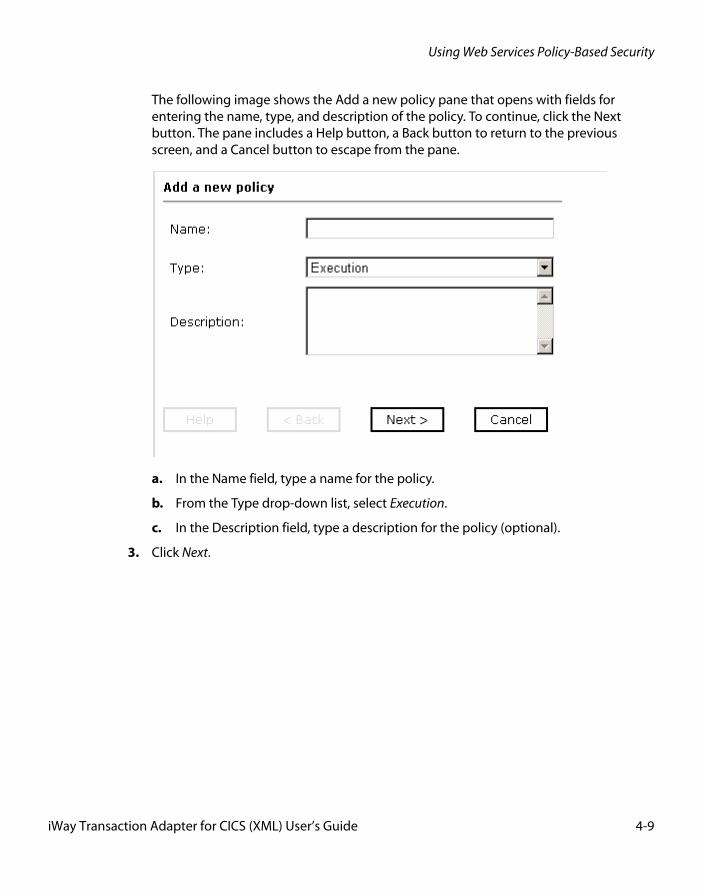
Using Web Services Policy-Based Security
The following image shows the Add a new policy pane that opens with fields for entering the name, type, and description of the policy. To continue, click the Next button. The pane includes a Help button, a Back button to return to the previous screen, and a Cancel button to escape from the pane.
a. In the Name field, type a name for the policy.
b. From the Type drop-down list, select Execution.
c. In the Description field, type a description for the policy (optional).
3. Click Next.
iWay Transaction Adapter for CICS (XML) User’s Guide 4-9
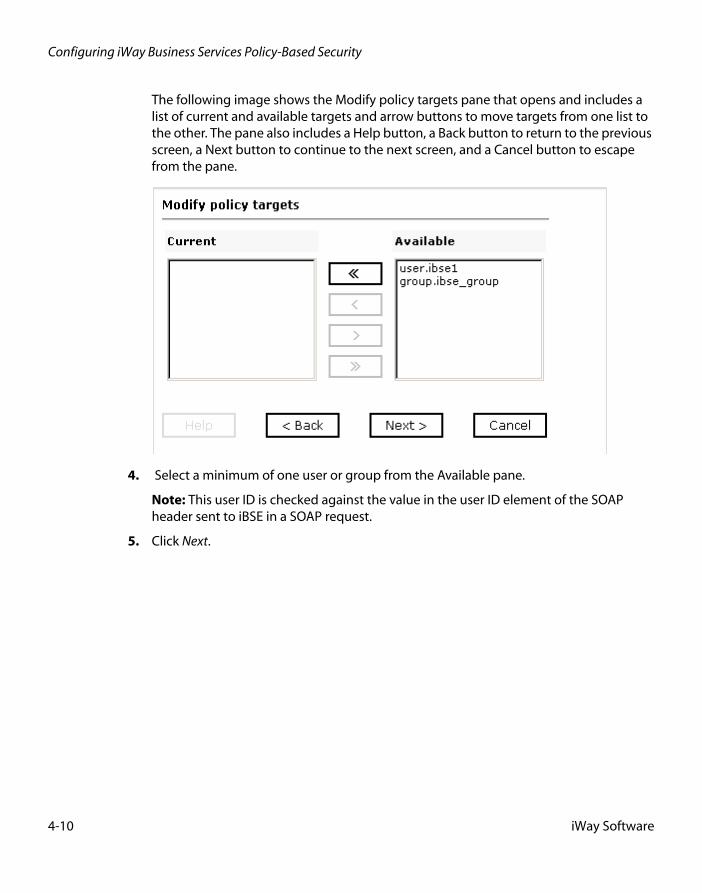
Configuring iWay Business Services Policy-Based Security
The following image shows the Modify policy targets pane that opens and includes a list of current and available targets and arrow buttons to move targets from one list to the other. The pane also includes a Help button, a Back button to return to the previous screen, a Next button to continue to the next screen, and a Cancel button to escape from the pane.
4. Select a minimum of one user or group from the Available pane.
Note: This user ID is checked against the value in the user ID element of the SOAP header sent to iBSE in a SOAP request.
5. Click Next.
4-10 iWay Software
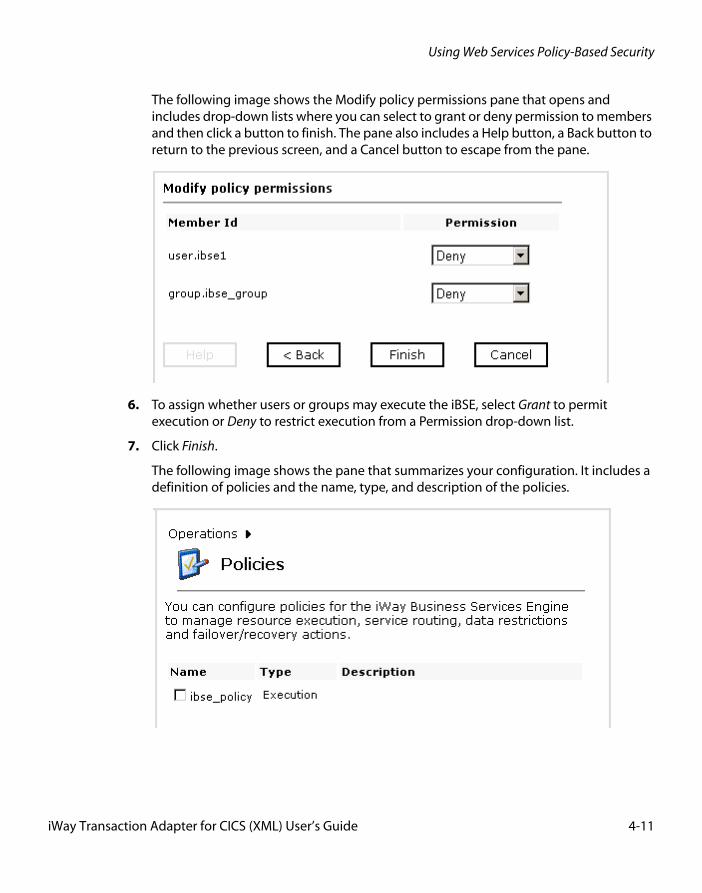
Using Web Services Policy-Based Security
The following image shows the Modify policy permissions pane that opens and includes drop-down lists where you can select to grant or deny permission to members and then click a button to finish. The pane also includes a Help button, a Back button to return to the previous screen, and a Cancel button to escape from the pane.
6. To assign whether users or groups may execute the iBSE, select Grant to permit execution or Deny to restrict execution from a Permission drop-down list.
7. Click Finish.
The following image shows the pane that summarizes your configuration. It includes a definition of policies and the name, type, and description of the policies.
iWay Transaction Adapter for CICS (XML) User’s Guide 4-11
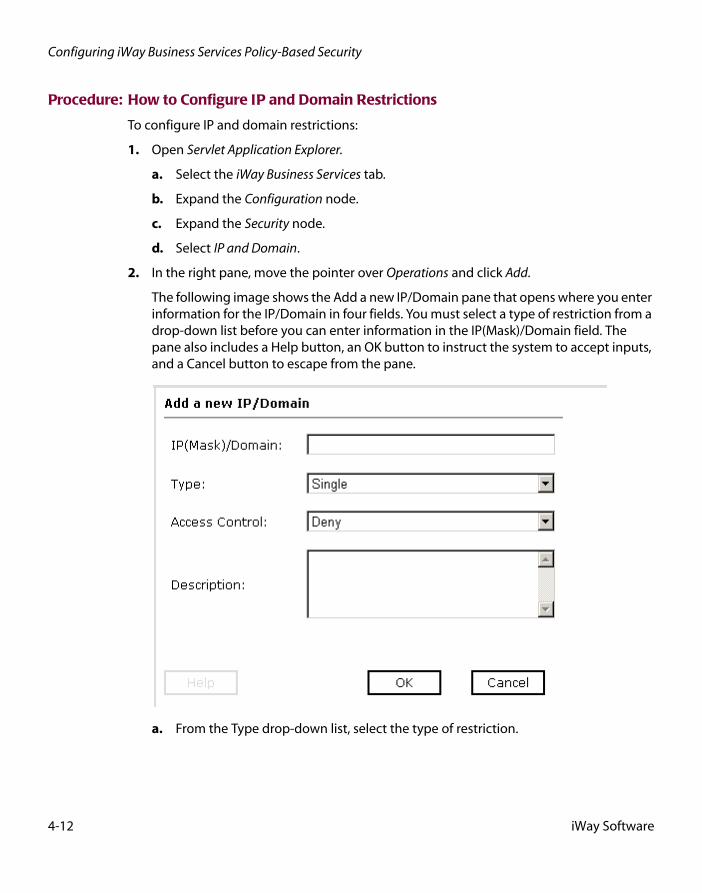
Configuring iWay Business Services Policy-Based Security
Procedure: How to Configure IP and Domain Restrictions
To configure IP and domain restrictions:
1. Open Servlet Application Explorer.
a. Select the iWay Business Services tab.
b. Expand the Configuration node.
c. Expand the Security node.
d. Select IP and Domain.
2. In the right pane, move the pointer over Operations and click Add.
The following image shows the Add a new IP/Domain pane that opens where you enter information for the IP/Domain in four fields. You must select a type of restriction from a drop-down list before you can enter information in the IP(Mask)/Domain field. The pane also includes a Help button, an OK button to instruct the system to accept inputs, and a Cancel button to escape from the pane.
a. From the Type drop-down list, select the type of restriction.
4-12 iWay Software
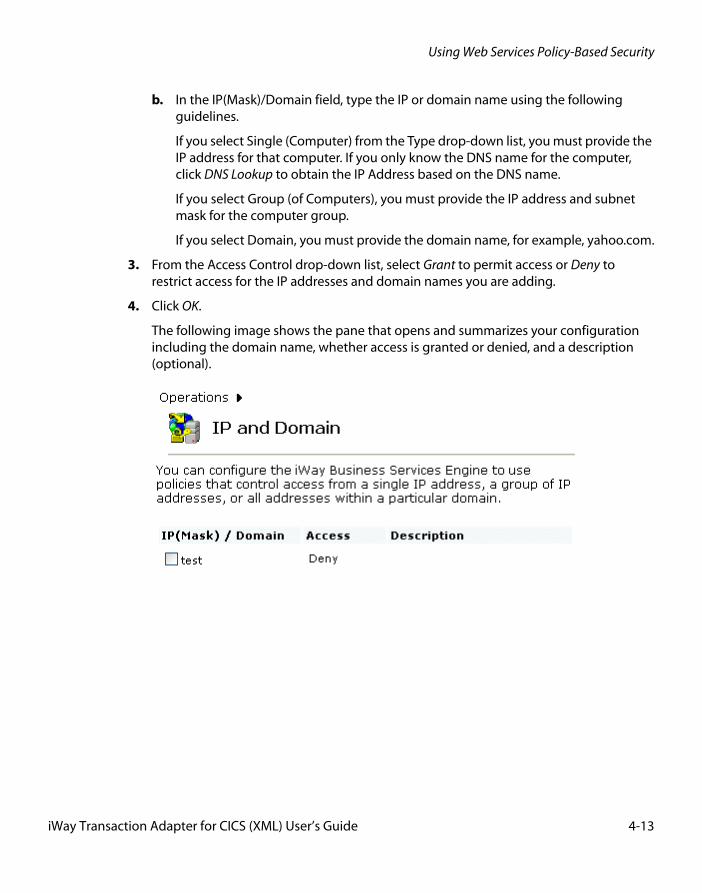
Using Web Services Policy-Based Security
b. In the IP(Mask)/Domain field, type the IP or domain name using the following guidelines.
If you select Single (Computer) from the Type drop-down list, you must provide the IP address for that computer. If you only know the DNS name for the computer, click DNS Lookup to obtain the IP Address based on the DNS name.
If you select Group (of Computers), you must provide the IP address and subnet mask for the computer group.
If you select Domain, you must provide the domain name, for example, yahoo.com.
3. From the Access Control drop-down list, select Grant to permit access or Deny to restrict access for the IP addresses and domain names you are adding.
4. Click OK.
The following image shows the pane that opens and summarizes your configuration including the domain name, whether access is granted or denied, and a description (optional).
iWay Transaction Adapter for CICS (XML) User’s Guide 4-13

Configuring iWay Business Services Policy-Based Security
4-14 iWay Software
CHAPTER 5
Management and Monitoring
Topics:
• Managing and Monitoring Services and Events Using iBSE
• Managing and Monitoring Services and Events Using the JCA Test Tool
• Setting Engine Log Levels
• Migrating Repositories
• Exporting or Importing Targets
• Retrieving or Updating Web Service Method Connection Information
• Starting or Stopping a Channel Programmatically
After you create services and events using Servlet Application Explorer, you can use managing and monitoring tools provided by the iWay Business Services Engine (iBSE) and the iWay Connector for JCA to measure the performance of your run-time environment. This section describes how to configure and use these features.
iWay Transaction Adapter for CICS (XML) User’s Guide 5-1
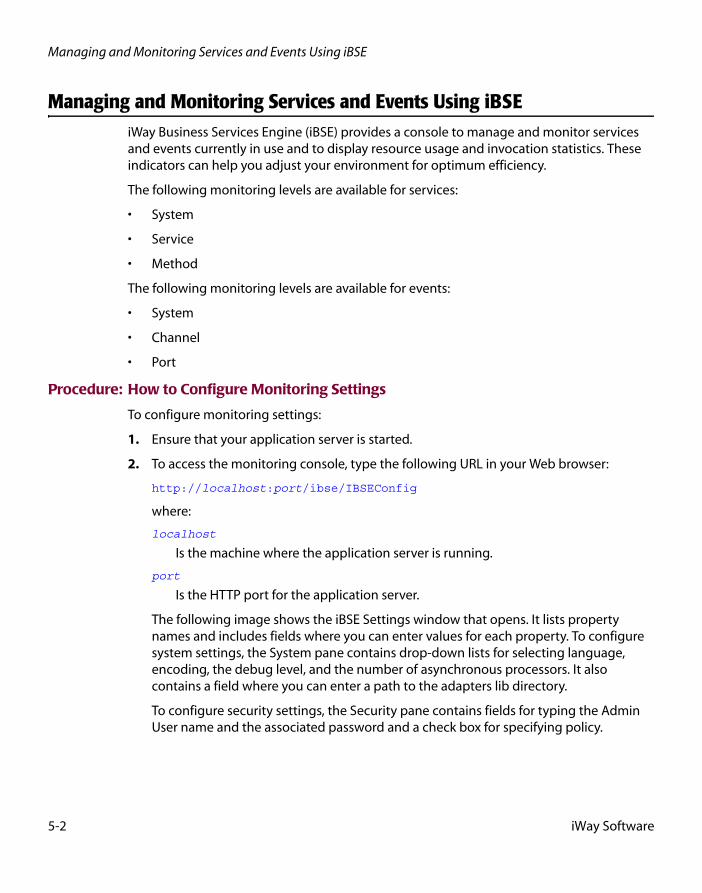
Managing and Monitoring Services and Events Using iBSE
Managing and Monitoring Services and Events Using iBSEiWay Business Services Engine (iBSE) provides a console to manage and monitor services and events currently in use and to display resource usage and invocation statistics. These indicators can help you adjust your environment for optimum efficiency.
The following monitoring levels are available for services:
• System
• Service
• Method
The following monitoring levels are available for events:
• System
• Channel
• Port
Procedure: How to Configure Monitoring Settings
To configure monitoring settings:
1. Ensure that your application server is started.
2. To access the monitoring console, type the following URL in your Web browser:
http://localhost:port/ibse/IBSEConfig
where:
localhost
Is the machine where the application server is running.
port
Is the HTTP port for the application server.
The following image shows the iBSE Settings window that opens. It lists property names and includes fields where you can enter values for each property. To configure system settings, the System pane contains drop-down lists for selecting language, encoding, the debug level, and the number of asynchronous processors. It also contains a field where you can enter a path to the adapters lib directory.
To configure security settings, the Security pane contains fields for typing the Admin User name and the associated password and a check box for specifying policy.
5-2 iWay Software
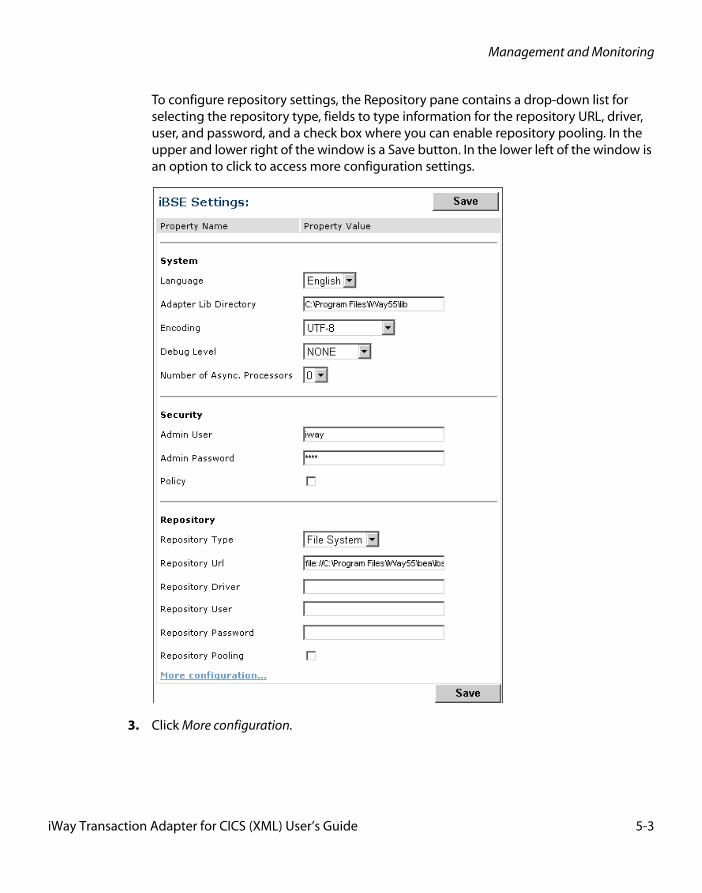
Management and Monitoring
To configure repository settings, the Repository pane contains a drop-down list for selecting the repository type, fields to type information for the repository URL, driver, user, and password, and a check box where you can enable repository pooling. In the upper and lower right of the window is a Save button. In the lower left of the window is an option to click to access more configuration settings.
3. Click More configuration.
iWay Transaction Adapter for CICS (XML) User’s Guide 5-3
Managing and Monitoring Services and Events Using iBSE
Tip: To access the monitoring console directly, type the following URL in your Web browser
http://localhost:port/ibse/IBSEStatus
where:
localhost
Is the machine where the application server is running.
port
Is the HTTP port for the application server.
The following image shows the iBSE Monitoring Settings window that opens. It lists property names and includes a corresponding field where you can enter values for each property. The Monitoring pane contains a drop-down list for selecting the repository type, fields to type information for the repository URL, driver, user, and password, and a check box where you can enable repository pooling. The Auditing pane contains an option button to click to specify whether to store a message and a drop-down list where you can select the maximum messages to store. At the bottom of the window is a row of buttons that you can click to save your configuration, view events, or view services. The Save History button is inactive. After you enter properties and choose whether to save or view, you can click the Start Monitoring button.
5-4 iWay Software
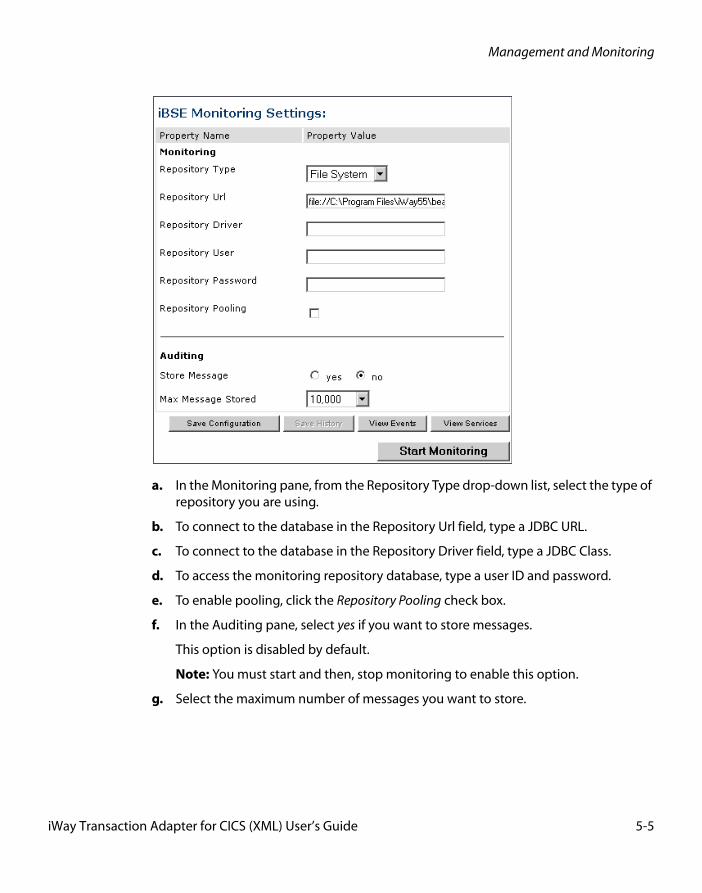
Management and Monitoring
a. In the Monitoring pane, from the Repository Type drop-down list, select the type of repository you are using.
b. To connect to the database in the Repository Url field, type a JDBC URL.
c. To connect to the database in the Repository Driver field, type a JDBC Class.
d. To access the monitoring repository database, type a user ID and password.
e. To enable pooling, click the Repository Pooling check box.
f. In the Auditing pane, select yes if you want to store messages.
This option is disabled by default.
Note: You must start and then, stop monitoring to enable this option.
g. Select the maximum number of messages you want to store.
iWay Transaction Adapter for CICS (XML) User’s Guide 5-5
Managing and Monitoring Services and Events Using iBSE
By default, 10,000 is selected.
Note: Depending on your environment and the number of messages that are exchanged, storing a large number of messages may affect system performance. If you need more information about your system resources, consult your system administrator.
h. Click Save Configuration.
4. Click Start Monitoring.
iBSE begins to monitor all services and events currently in use. If you selected the option to store messages, iBSE stores messages.
5. To stop monitoring, click Stop Monitoring.
Procedure: How to Monitor Services
To monitor services:
1. Ensure that your application server is started.
2. From the iBSE Monitoring Settings window, click Start Monitoring.
3. Click View Services.
5-6 iWay Software
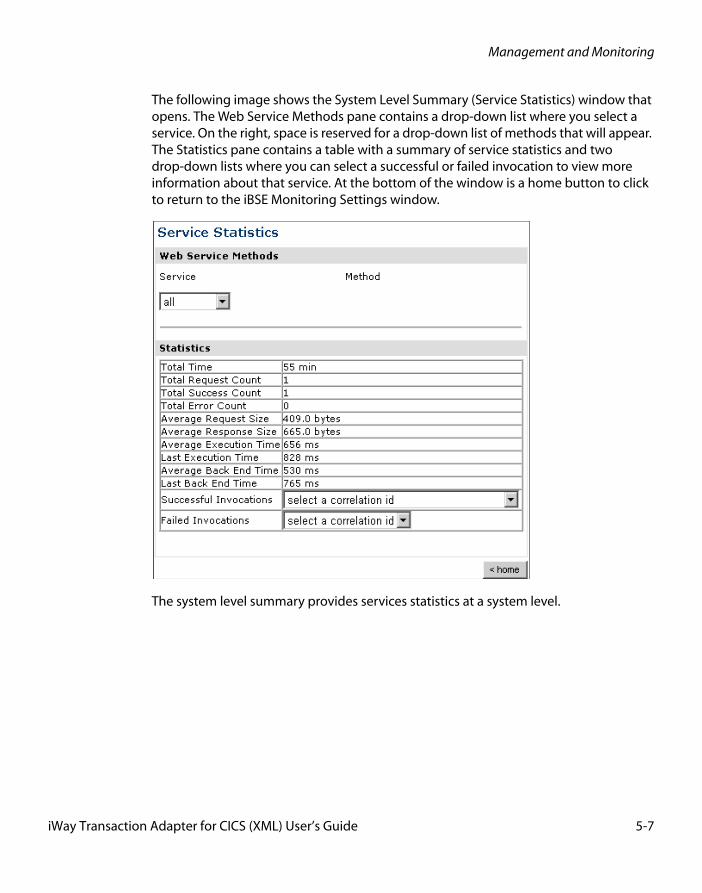
Management and Monitoring
The following image shows the System Level Summary (Service Statistics) window that opens. The Web Service Methods pane contains a drop-down list where you select a service. On the right, space is reserved for a drop-down list of methods that will appear. The Statistics pane contains a table with a summary of service statistics and two drop-down lists where you can select a successful or failed invocation to view more information about that service. At the bottom of the window is a home button to click to return to the iBSE Monitoring Settings window.
The system level summary provides services statistics at a system level.
iWay Transaction Adapter for CICS (XML) User’s Guide 5-7
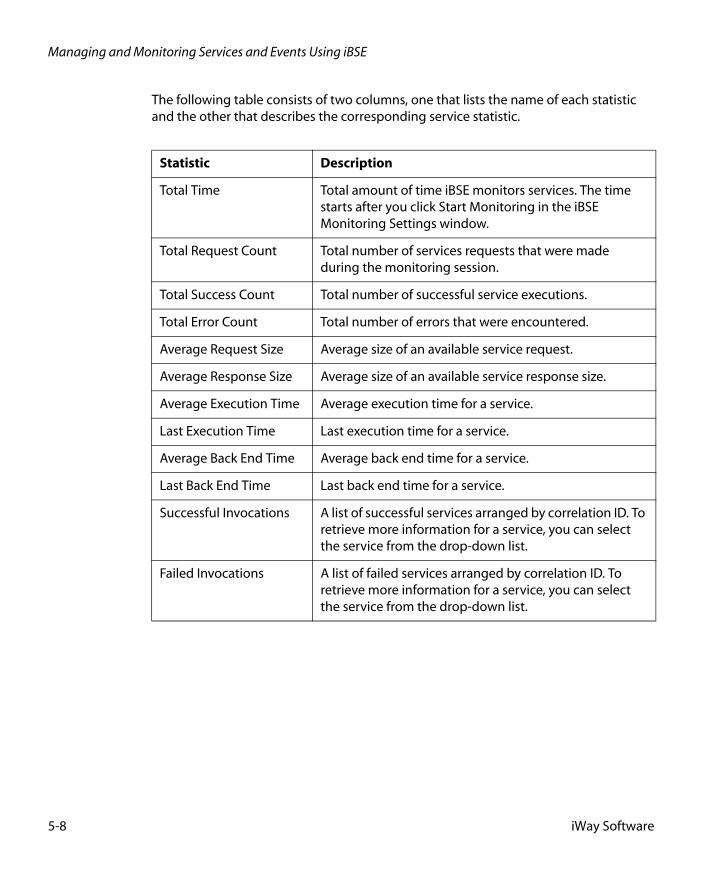
Managing and Monitoring Services and Events Using iBSE
The following table consists of two columns, one that lists the name of each statistic and the other that describes the corresponding service statistic.
Statistic Description
Total Time Total amount of time iBSE monitors services. The time starts after you click Start Monitoring in the iBSE Monitoring Settings window.
Total Request Count Total number of services requests that were made during the monitoring session.
Total Success Count Total number of successful service executions.
Total Error Count Total number of errors that were encountered.
Average Request Size Average size of an available service request.
Average Response Size Average size of an available service response size.
Average Execution Time Average execution time for a service.
Last Execution Time Last execution time for a service.
Average Back End Time Average back end time for a service.
Last Back End Time Last back end time for a service.
Successful Invocations A list of successful services arranged by correlation ID. To retrieve more information for a service, you can select the service from the drop-down list.
Failed Invocations A list of failed services arranged by correlation ID. To retrieve more information for a service, you can select the service from the drop-down list.
5-8 iWay Software
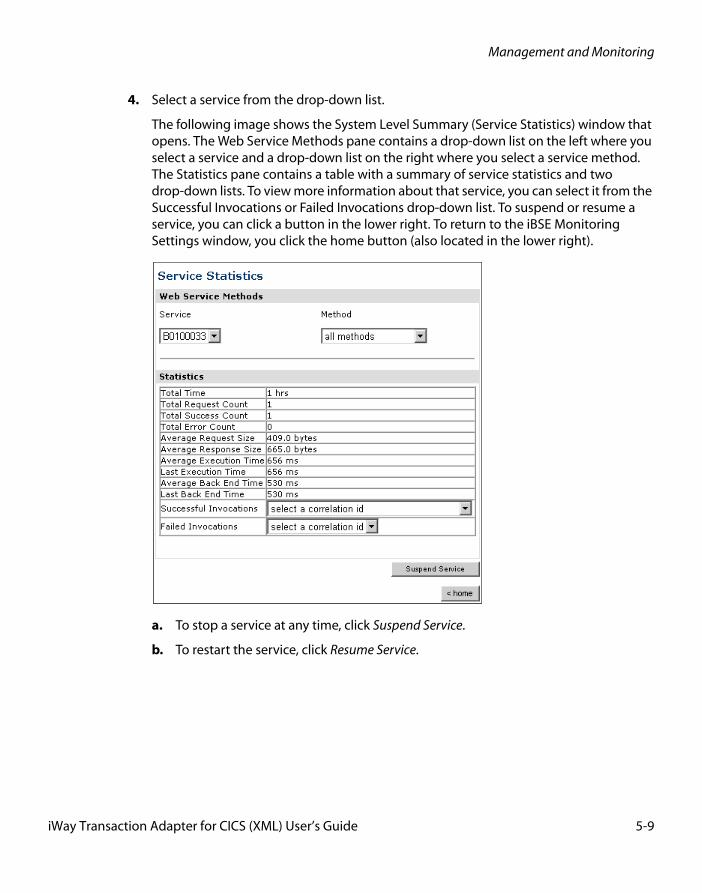
Management and Monitoring
4. Select a service from the drop-down list.
The following image shows the System Level Summary (Service Statistics) window that opens. The Web Service Methods pane contains a drop-down list on the left where you select a service and a drop-down list on the right where you select a service method. The Statistics pane contains a table with a summary of service statistics and two drop-down lists. To view more information about that service, you can select it from the Successful Invocations or Failed Invocations drop-down list. To suspend or resume a service, you can click a button in the lower right. To return to the iBSE Monitoring Settings window, you click the home button (also located in the lower right).
a. To stop a service at any time, click Suspend Service.
b. To restart the service, click Resume Service.
iWay Transaction Adapter for CICS (XML) User’s Guide 5-9
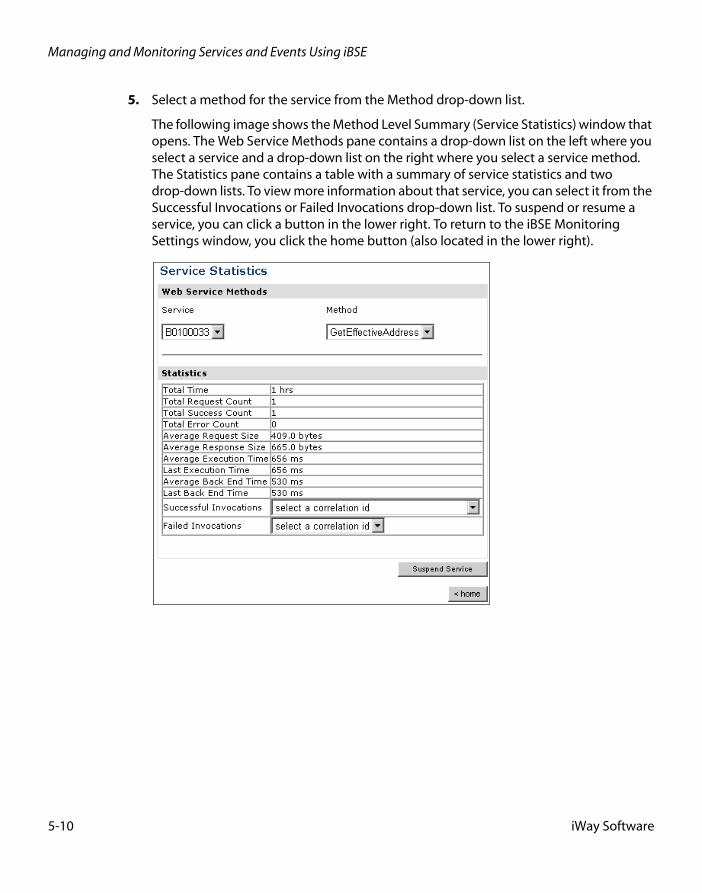
Managing and Monitoring Services and Events Using iBSE
5. Select a method for the service from the Method drop-down list.
The following image shows the Method Level Summary (Service Statistics) window that opens. The Web Service Methods pane contains a drop-down list on the left where you select a service and a drop-down list on the right where you select a service method. The Statistics pane contains a table with a summary of service statistics and two drop-down lists. To view more information about that service, you can select it from the Successful Invocations or Failed Invocations drop-down list. To suspend or resume a service, you can click a button in the lower right. To return to the iBSE Monitoring Settings window, you click the home button (also located in the lower right).
5-10 iWay Software
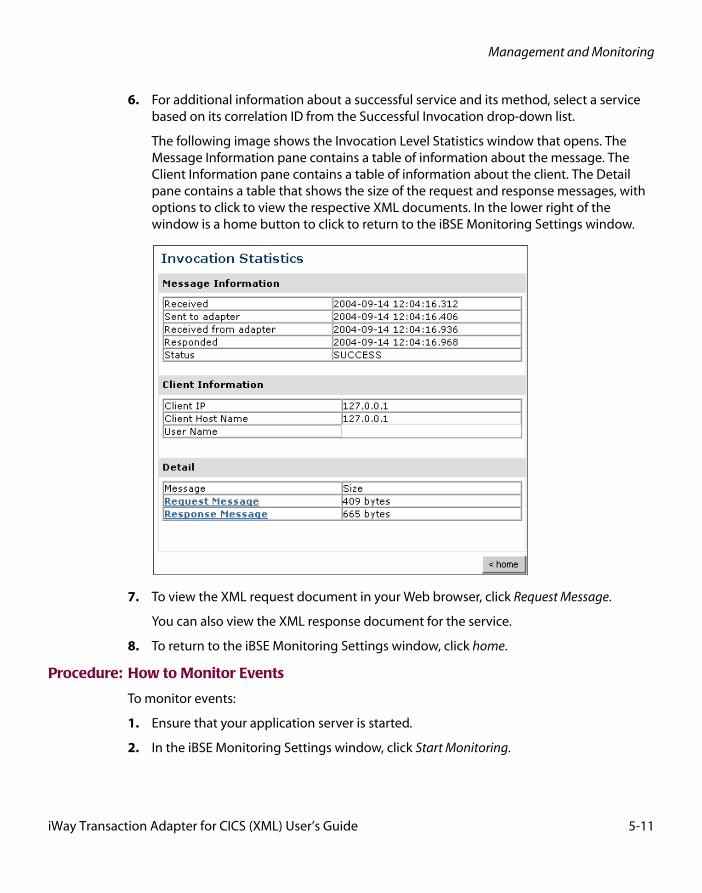
Management and Monitoring
6. For additional information about a successful service and its method, select a service based on its correlation ID from the Successful Invocation drop-down list.
The following image shows the Invocation Level Statistics window that opens. The Message Information pane contains a table of information about the message. The Client Information pane contains a table of information about the client. The Detail pane contains a table that shows the size of the request and response messages, with options to click to view the respective XML documents. In the lower right of the window is a home button to click to return to the iBSE Monitoring Settings window.
7. To view the XML request document in your Web browser, click Request Message.
You can also view the XML response document for the service.
8. To return to the iBSE Monitoring Settings window, click home.
Procedure: How to Monitor Events
To monitor events:
1. Ensure that your application server is started.
2. In the iBSE Monitoring Settings window, click Start Monitoring.
iWay Transaction Adapter for CICS (XML) User’s Guide 5-11
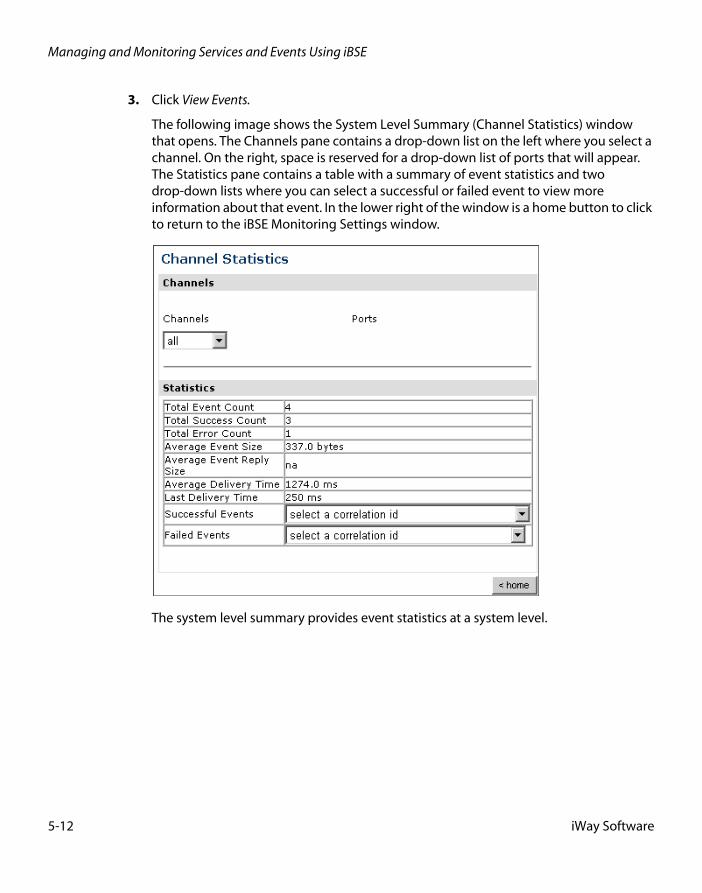
Managing and Monitoring Services and Events Using iBSE
3. Click View Events.
The following image shows the System Level Summary (Channel Statistics) window that opens. The Channels pane contains a drop-down list on the left where you select a channel. On the right, space is reserved for a drop-down list of ports that will appear. The Statistics pane contains a table with a summary of event statistics and two drop-down lists where you can select a successful or failed event to view more information about that event. In the lower right of the window is a home button to click to return to the iBSE Monitoring Settings window.
The system level summary provides event statistics at a system level.
5-12 iWay Software
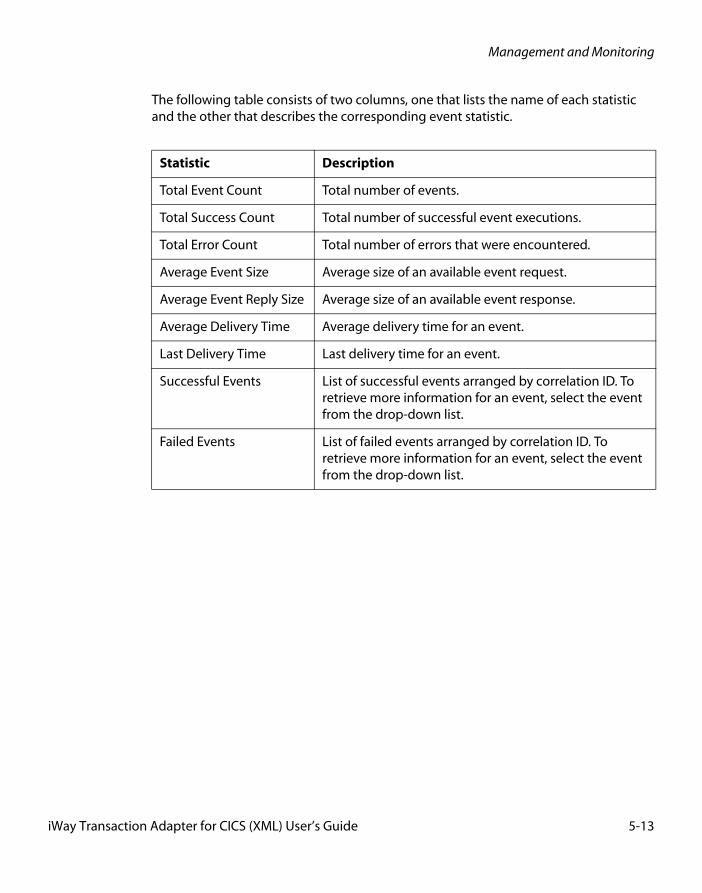
Management and Monitoring
The following table consists of two columns, one that lists the name of each statistic and the other that describes the corresponding event statistic.
Statistic Description
Total Event Count Total number of events.
Total Success Count Total number of successful event executions.
Total Error Count Total number of errors that were encountered.
Average Event Size Average size of an available event request.
Average Event Reply Size Average size of an available event response.
Average Delivery Time Average delivery time for an event.
Last Delivery Time Last delivery time for an event.
Successful Events List of successful events arranged by correlation ID. To retrieve more information for an event, select the event from the drop-down list.
Failed Events List of failed events arranged by correlation ID. To retrieve more information for an event, select the event from the drop-down list.
iWay Transaction Adapter for CICS (XML) User’s Guide 5-13
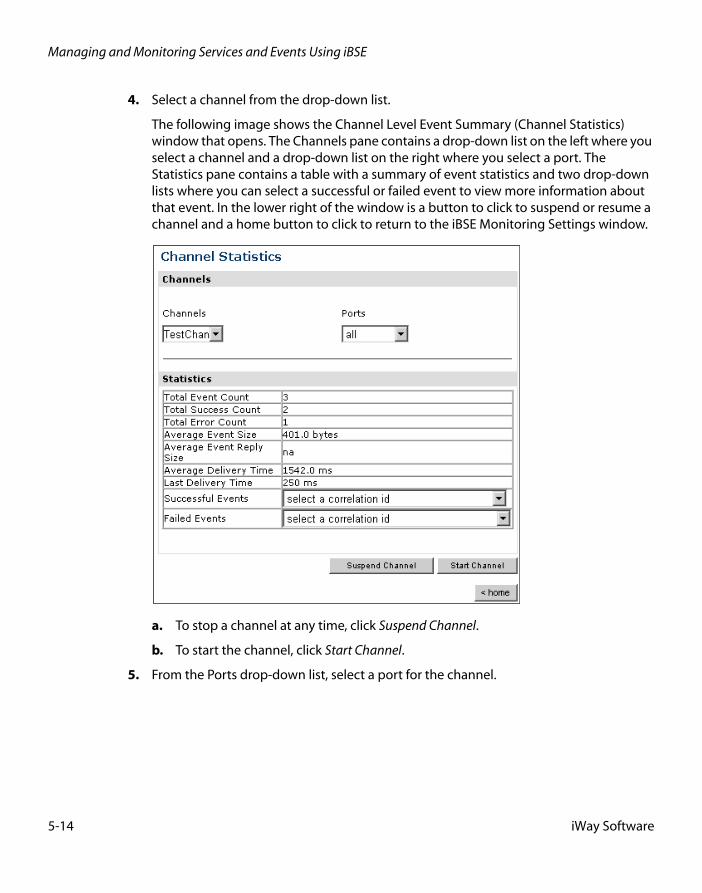
Managing and Monitoring Services and Events Using iBSE
4. Select a channel from the drop-down list.
The following image shows the Channel Level Event Summary (Channel Statistics) window that opens. The Channels pane contains a drop-down list on the left where you select a channel and a drop-down list on the right where you select a port. The Statistics pane contains a table with a summary of event statistics and two drop-down lists where you can select a successful or failed event to view more information about that event. In the lower right of the window is a button to click to suspend or resume a channel and a home button to click to return to the iBSE Monitoring Settings window.
a. To stop a channel at any time, click Suspend Channel.
b. To start the channel, click Start Channel.
5. From the Ports drop-down list, select a port for the channel.
5-14 iWay Software
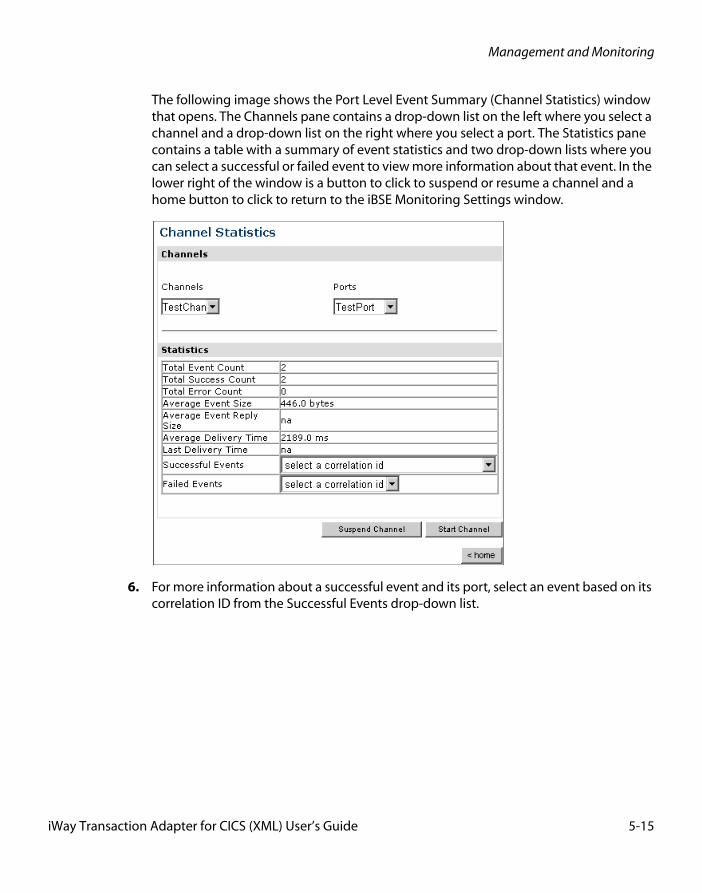
Management and Monitoring
The following image shows the Port Level Event Summary (Channel Statistics) window that opens. The Channels pane contains a drop-down list on the left where you select a channel and a drop-down list on the right where you select a port. The Statistics pane contains a table with a summary of event statistics and two drop-down lists where you can select a successful or failed event to view more information about that event. In the lower right of the window is a button to click to suspend or resume a channel and a home button to click to return to the iBSE Monitoring Settings window.
6. For more information about a successful event and its port, select an event based on its correlation ID from the Successful Events drop-down list.
iWay Transaction Adapter for CICS (XML) User’s Guide 5-15
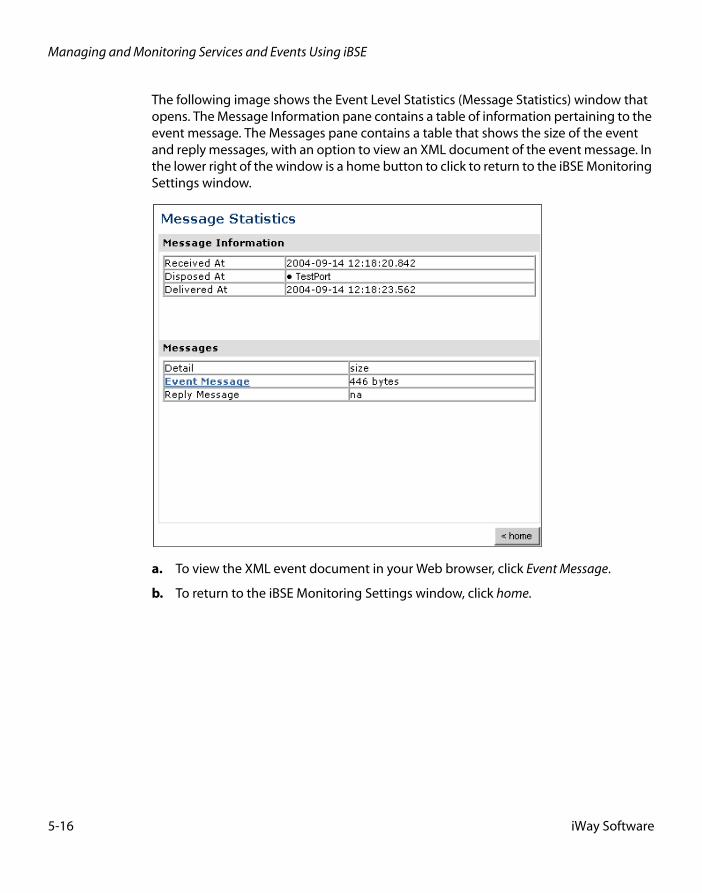
Managing and Monitoring Services and Events Using iBSE
The following image shows the Event Level Statistics (Message Statistics) window that opens. The Message Information pane contains a table of information pertaining to the event message. The Messages pane contains a table that shows the size of the event and reply messages, with an option to view an XML document of the event message. In the lower right of the window is a home button to click to return to the iBSE Monitoring Settings window.
a. To view the XML event document in your Web browser, click Event Message.
b. To return to the iBSE Monitoring Settings window, click home.
5-16 iWay Software
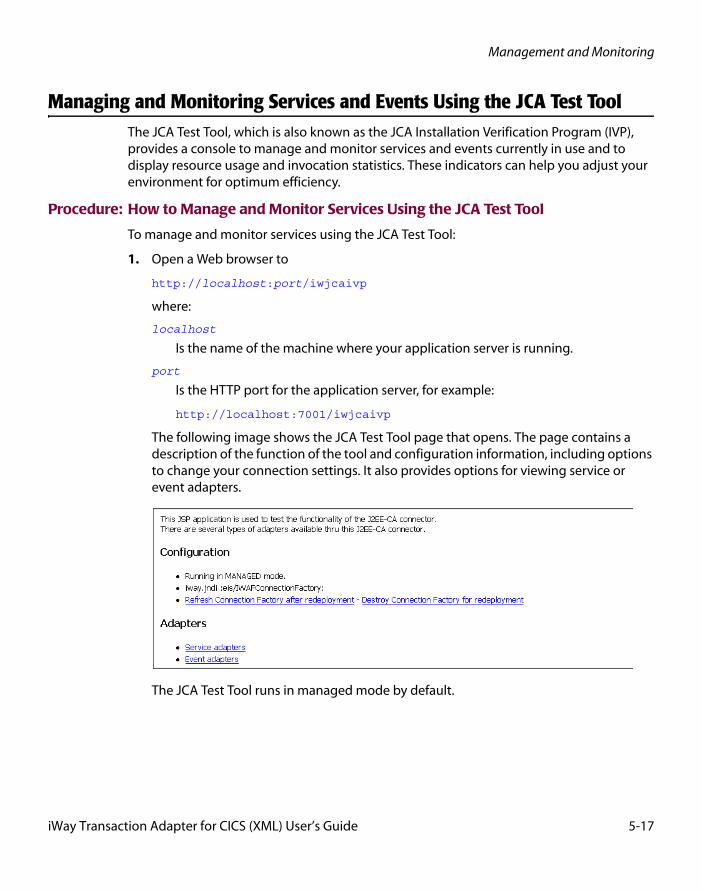
Management and Monitoring
Managing and Monitoring Services and Events Using the JCA Test ToolThe JCA Test Tool, which is also known as the JCA Installation Verification Program (IVP), provides a console to manage and monitor services and events currently in use and to display resource usage and invocation statistics. These indicators can help you adjust your environment for optimum efficiency.
Procedure: How to Manage and Monitor Services Using the JCA Test Tool
To manage and monitor services using the JCA Test Tool:
1. Open a Web browser to
http://localhost:port/iwjcaivp
where:
localhost
Is the name of the machine where your application server is running.
port
Is the HTTP port for the application server, for example:
http://localhost:7001/iwjcaivp
The following image shows the JCA Test Tool page that opens. The page contains a description of the function of the tool and configuration information, including options to change your connection settings. It also provides options for viewing service or event adapters.
The JCA Test Tool runs in managed mode by default.
iWay Transaction Adapter for CICS (XML) User’s Guide 5-17
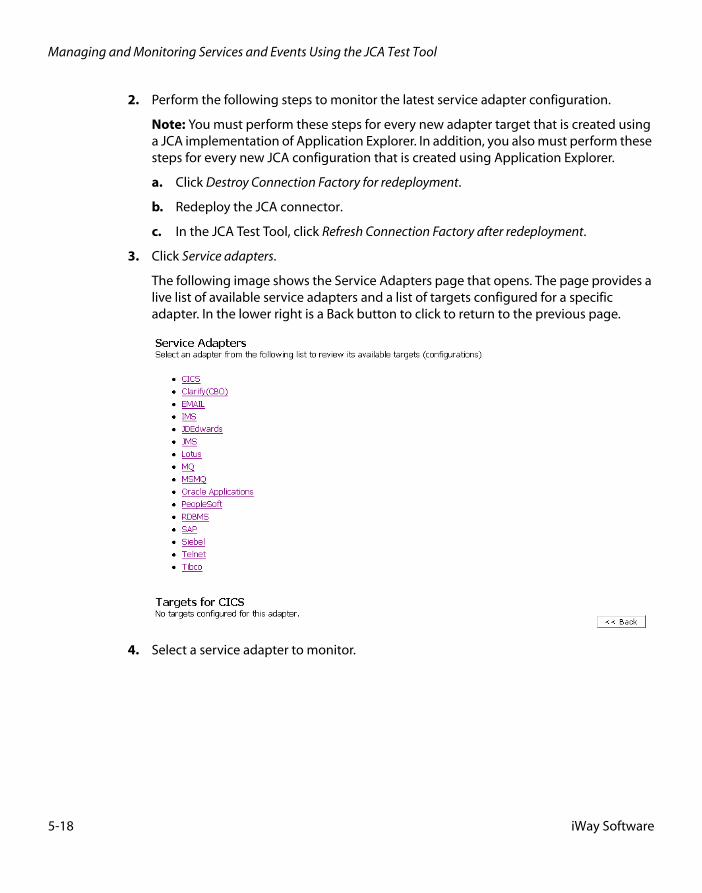
Managing and Monitoring Services and Events Using the JCA Test Tool
2. Perform the following steps to monitor the latest service adapter configuration.
Note: You must perform these steps for every new adapter target that is created using a JCA implementation of Application Explorer. In addition, you also must perform these steps for every new JCA configuration that is created using Application Explorer.
a. Click Destroy Connection Factory for redeployment.
b. Redeploy the JCA connector.
c. In the JCA Test Tool, click Refresh Connection Factory after redeployment.
3. Click Service adapters.
The following image shows the Service Adapters page that opens. The page provides a live list of available service adapters and a list of targets configured for a specific adapter. In the lower right is a Back button to click to return to the previous page.
4. Select a service adapter to monitor.
5-18 iWay Software
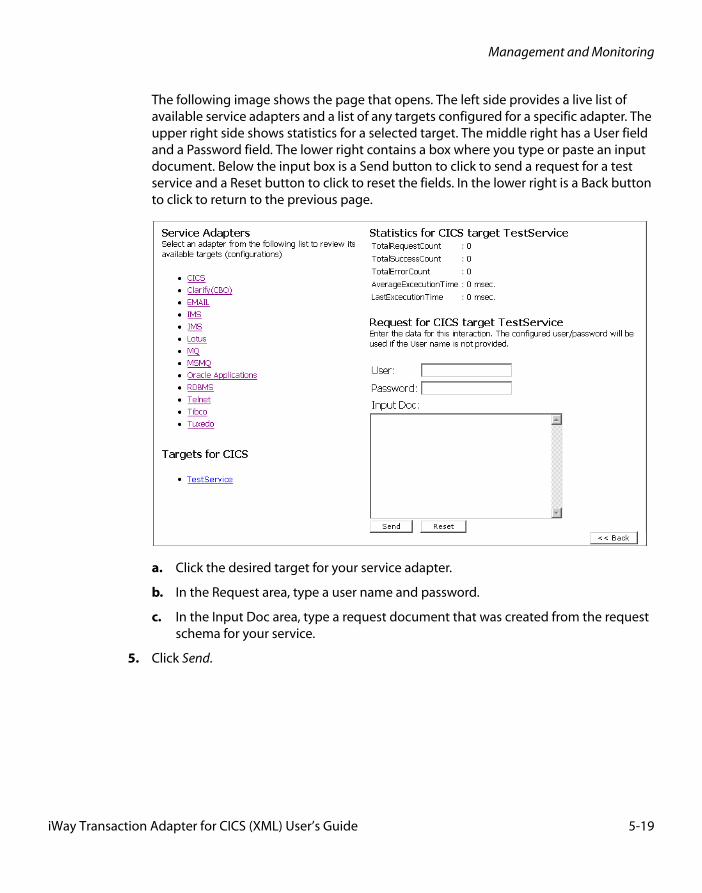
Management and Monitoring
The following image shows the page that opens. The left side provides a live list of available service adapters and a list of any targets configured for a specific adapter. The upper right side shows statistics for a selected target. The middle right has a User field and a Password field. The lower right contains a box where you type or paste an input document. Below the input box is a Send button to click to send a request for a test service and a Reset button to click to reset the fields. In the lower right is a Back button to click to return to the previous page.
a. Click the desired target for your service adapter.
b. In the Request area, type a user name and password.
c. In the Input Doc area, type a request document that was created from the request schema for your service.
5. Click Send.
iWay Transaction Adapter for CICS (XML) User’s Guide 5-19
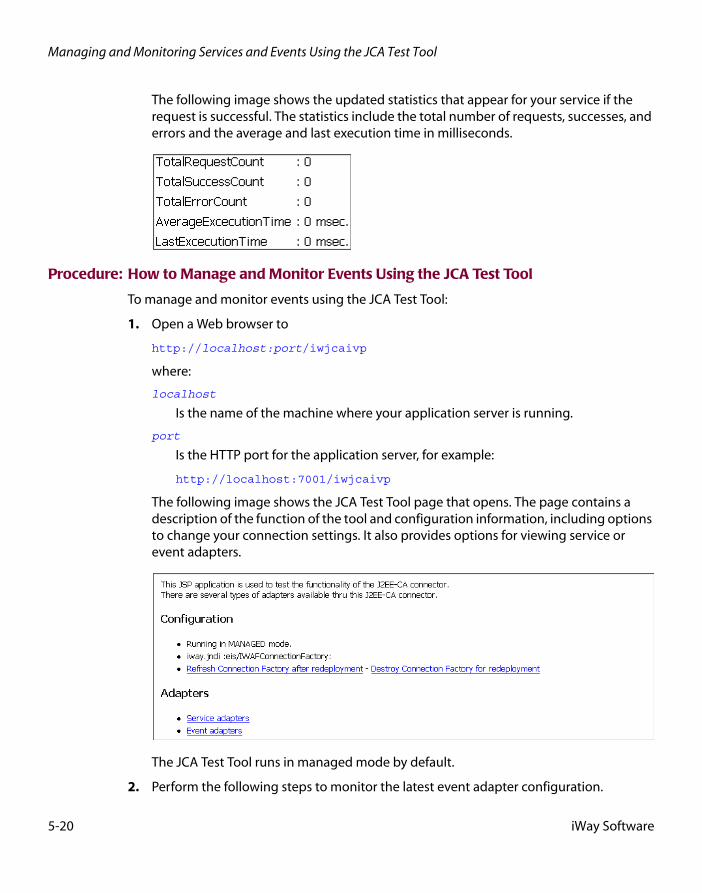
Managing and Monitoring Services and Events Using the JCA Test Tool
The following image shows the updated statistics that appear for your service if the request is successful. The statistics include the total number of requests, successes, and errors and the average and last execution time in milliseconds.
Procedure: How to Manage and Monitor Events Using the JCA Test Tool
To manage and monitor events using the JCA Test Tool:
1. Open a Web browser to
http://localhost:port/iwjcaivp
where:
localhost
Is the name of the machine where your application server is running.
port
Is the HTTP port for the application server, for example:
http://localhost:7001/iwjcaivp
The following image shows the JCA Test Tool page that opens. The page contains a description of the function of the tool and configuration information, including options to change your connection settings. It also provides options for viewing service or event adapters.
The JCA Test Tool runs in managed mode by default.
2. Perform the following steps to monitor the latest event adapter configuration.
5-20 iWay Software
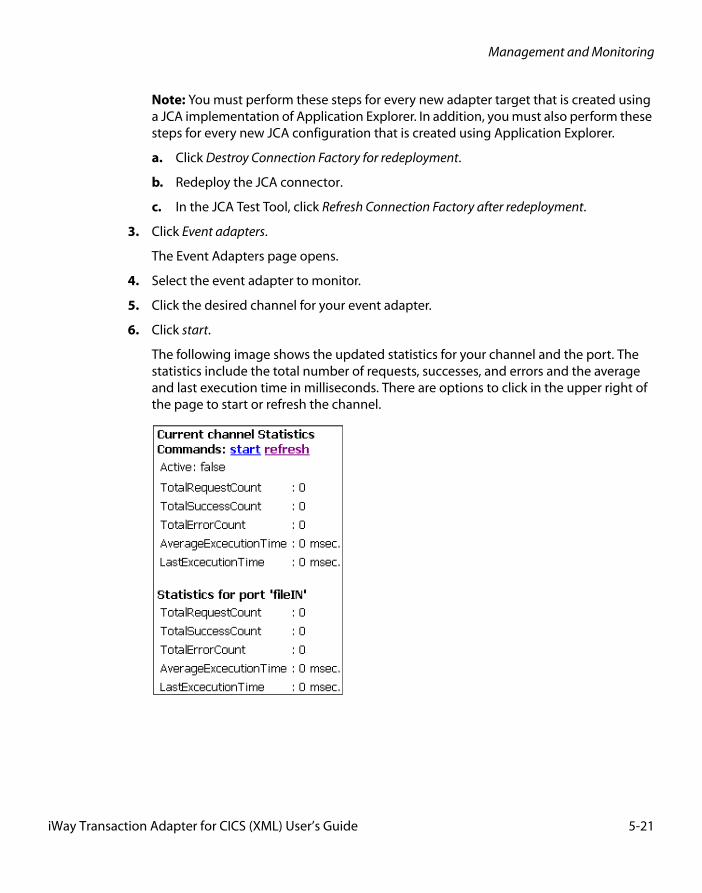
Management and Monitoring
Note: You must perform these steps for every new adapter target that is created using a JCA implementation of Application Explorer. In addition, you must also perform these steps for every new JCA configuration that is created using Application Explorer.
a. Click Destroy Connection Factory for redeployment.
b. Redeploy the JCA connector.
c. In the JCA Test Tool, click Refresh Connection Factory after redeployment.
3. Click Event adapters.
The Event Adapters page opens.
4. Select the event adapter to monitor.
5. Click the desired channel for your event adapter.
6. Click start.
The following image shows the updated statistics for your channel and the port. The statistics include the total number of requests, successes, and errors and the average and last execution time in milliseconds. There are options to click in the upper right of the page to start or refresh the channel.
iWay Transaction Adapter for CICS (XML) User’s Guide 5-21

Setting Engine Log Levels
Setting Engine Log LevelsThe following section describes how to set engine log levels for Servlet iBSE and JCA. For more information, see the documentation.
Procedure: How to Enable Tracing for Servlet iBSE
To enable tracing for Servlet iBSE:
1. Open the Servlet iBSE configuration page at
http://localhost:port/ibse/IBSEConfig
where:
localhost
Is the name of the machine where your application server is running.
port
Is the HTTP port for the application server, for example:
http://localhost:7001/ibse/IBSEConfig
2. In the System pane, from the Debug drop-down list, select the level of tracing.
3. Click Save.
Tracing information is written to the ibselogs directory where your application server accesses or has expanded Servlet iBSE.
Procedure: How to Enable Tracing for JCA
To enable tracing for JCA:
1. Open the extracted ra.xml file in a text editor.
2. Locate and change the following setting:
LogLevel. This setting can be set to DEBUG, INFO, or ERROR.
<context-param><config-property> <config-property-name>LogLevel</config-property-name> <config-property-type>java.lang.String</config-property-type> <config-property-value></config-property-value></config-property>
For example:
<config-property-value>DEBUG</config-property-value>
5-22 iWay Software
Management and Monitoring
A directory in the configuration directory contains the logs.
a. Review the logs generated by your application server.
b. Leave the remainder of the previous file unchanged.
3. Save the file and exit the editor.
4. Redeploy the connector.
Migrating RepositoriesDuring design time, a repository is used to store metadata created when using Application Explorer to configure adapter connections, browse EIS objects, configure services, and configure listeners to listen for EIS events. For more information on configuring repositories, see the iWay 5.5 Installation and Configuration documentation.
The information in the repository also is referenced at run time. For management purposes, you can migrate iBSE and JCA repositories to new destinations without affecting your existing configuration. For example, you may want to migrate a repository from a development environment to a production environment.
File RepositoriesIf you want to migrate a File repository to another destination, copy the ibserepo.xml file from the following path
drive:\Program Files\iWay55\ibse\ibserepo.xml
where:
drive
Is the location of your iWay 5.5 installation.
You can place the ibserepo.xml file in a new location that is a root directory of the iBSE Web application, for example:
drive:\ProductionConfig\ibse\ibserepo.xml
iBSE RepositoriesThe following topic describes how to migrate an iBSE repository that is configured for Oracle. You can follow the same procedure if you want to migrate an iBSE repository that is configured for Microsoft SQL Server 2000, Sybase, or DB2. However, when you are configuring a new environment, you must execute the script that creates the repository tables for your database. In addition, verify that all required files and drivers for your database are in the class path. For more information on configuring repositories, see the iWay 5.5 Installation and Configuration documentation.
iWay Transaction Adapter for CICS (XML) User’s Guide 5-23
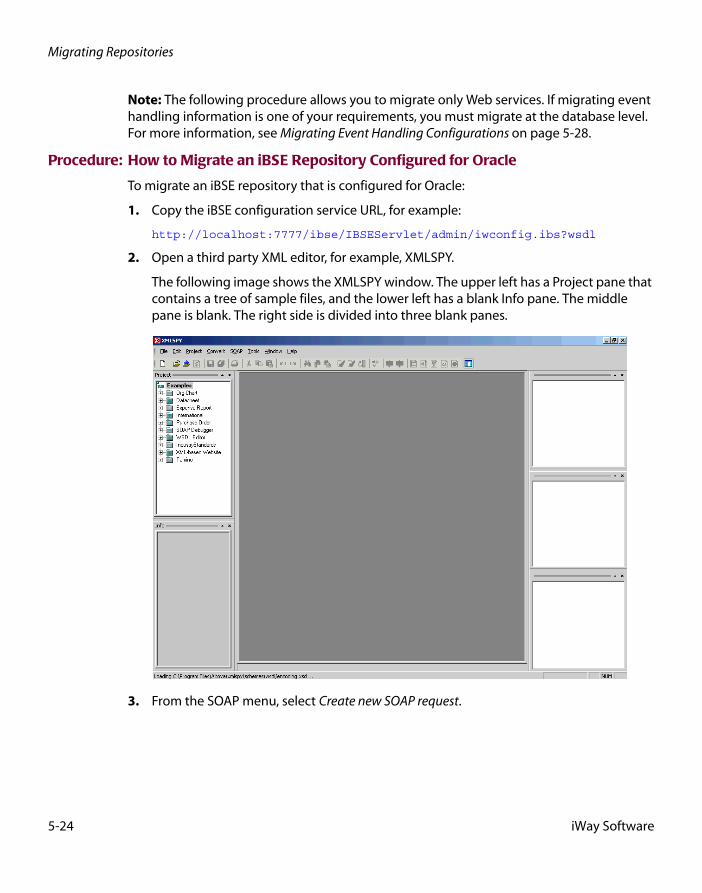
Migrating Repositories
Note: The following procedure allows you to migrate only Web services. If migrating event handling information is one of your requirements, you must migrate at the database level. For more information, see Migrating Event Handling Configurations on page 5-28.
Procedure: How to Migrate an iBSE Repository Configured for Oracle
To migrate an iBSE repository that is configured for Oracle:
1. Copy the iBSE configuration service URL, for example:
http://localhost:7777/ibse/IBSEServlet/admin/iwconfig.ibs?wsdl
2. Open a third party XML editor, for example, XMLSPY.
The following image shows the XMLSPY window. The upper left has a Project pane that contains a tree of sample files, and the lower left has a blank Info pane. The middle pane is blank. The right side is divided into three blank panes.
3. From the SOAP menu, select Create new SOAP request.
5-24 iWay Software

Management and Monitoring
The following image shows the WSDL file location dialog box that opens, where you enter a local path or URL. The dialog includes Browse, Window, OK, and Cancel buttons.
4. In the Choose a file field, paste the iBSE configuration service URL.
5. Click OK.
The following image shows the soap operation name dialog box that opens with a list of available control methods. You can select from the list and click OK or to escape from the dialog box, you can click Cancel.
6. Select the MIGRATEREPO(MIGRATEREPO parameters) control method and click OK.
iWay Transaction Adapter for CICS (XML) User’s Guide 5-25
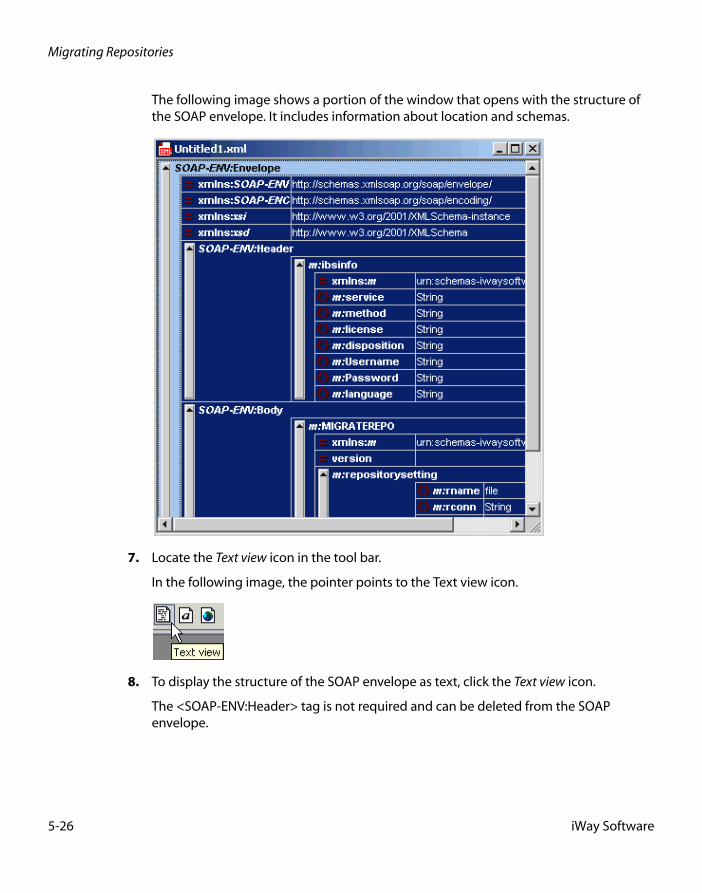
Migrating Repositories
The following image shows a portion of the window that opens with the structure of the SOAP envelope. It includes information about location and schemas.
7. Locate the Text view icon in the tool bar.
In the following image, the pointer points to the Text view icon.
8. To display the structure of the SOAP envelope as text, click the Text view icon.
The <SOAP-ENV:Header> tag is not required and can be deleted from the SOAP envelope.
5-26 iWay Software
Management and Monitoring
9. Locate the following section:
<m:MIGRATEREPO xmlns:m="urn:schemas-iwaysoftware-com:jul2003:ibse:config" version=""><m:repositorysetting><m:rname>oracle</m:rname><m:rconn>String</m:rconn><m:rdriver>String</m:rdriver><m:ruser>String</m:ruser><m:rpwd>String</m:rpwd></m:repositorysetting><m:servicename>String</m:servicename></m:MIGRATEREPO>
a. For the <m:rconn> tag, replace the String placeholder with the repository URL where you want to migrate your existing iBSE repository.
For example, the Oracle repository URL has the following format:
jdbc:oracle:thin:@[host]:[port]:[sid]
b. For the <m:rdriver> tag, replace the String placeholder with the location of your Oracle driver.
Note: This is an optional tag. If you do not specify a value, the default Oracle JDBC driver is used.
c. For the <m:ruser> tag, replace the String placeholder with a valid user name to access the Oracle repository.
d. For the <m:rpwd> tag, replace the String placeholder with a valid password to access the Oracle repository.
10. Perform one of the following migration options.
If you want to migrate a single Web service from the current iBSE repository, type the Web service name in the <m:servicename> tag, for example:
<m:servicename>Service1</m:servicename>
If you want to migrate multiple Web services from the current iBSE repository, duplicate the <m:servicename> tag for each Web service, for example:
<m:servicename>Service1</m:servicename><m:servicename>Service2</m:servicename>
If you want to migrate all Web services from the current iBSE repository, remove the <m:servicename> tag.
11. From the SOAP menu, select Send request to server.
Your iBSE repository and the Web services you specified migrate to the new Oracle repository URL that you specified.
iWay Transaction Adapter for CICS (XML) User’s Guide 5-27
Migrating Repositories
JCA RepositoriesThe following procedure describes how to migrate a JCA repository. For more information on configuring JCA repositories, see the documentation.
Procedure: How to Migrate a JCA Repository
To migrate a JCA repository:
1. Navigate to the location of your JCA configuration directory where the repository schemas and other information is stored, for example:
C:\Program Files\iway55\config\base
2. Locate and copy the repository.xml file.
3. Place this file in a new JCA configuration directory to migrate the existing repository.
Your JCA repository migrates to the new JCA configuration directory.
Migrating Event Handling ConfigurationsThis topic describes how to migrate your iBSE repositories at a database level for Microsoft SQL Server 2000, Oracle, Sybase, or DB2. You can use this information to migrate event handling information, for example, port or channel configurations.
Procedure How to Migrate a Microsoft SQL Server 2000 Repository
To migrate a Microsoft SQL Server 2000 repository:
1. Open a command prompt and navigate to the iWay setup directory. The default location on Windows is:
C:\Program Files\iWay55\etc\setup
This directory contains SQL to create the repository tables in the following file:
iwse.sql
5-28 iWay Software
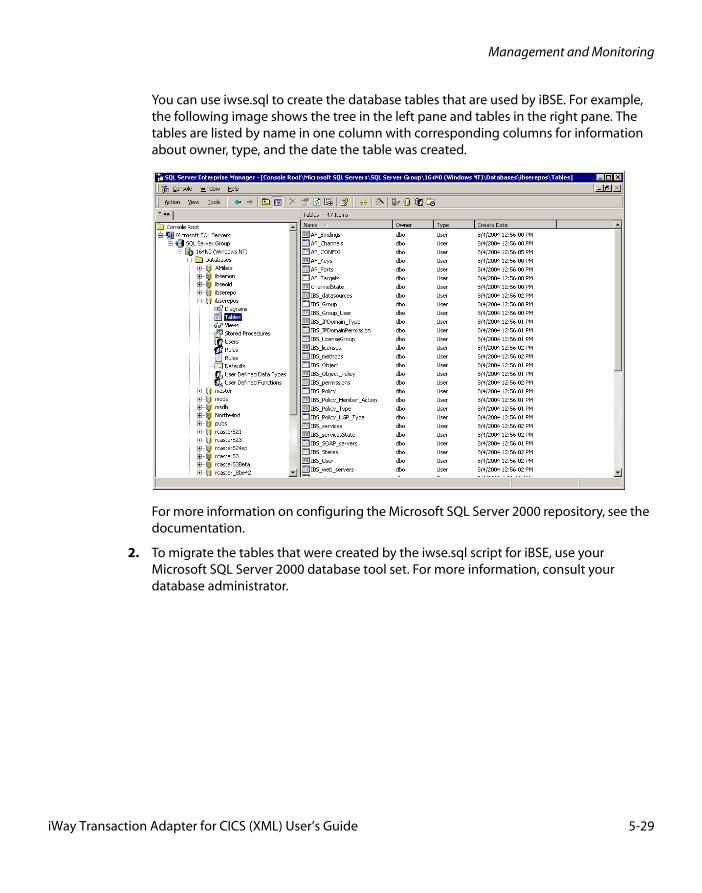
Management and Monitoring
You can use iwse.sql to create the database tables that are used by iBSE. For example, the following image shows the tree in the left pane and tables in the right pane. The tables are listed by name in one column with corresponding columns for information about owner, type, and the date the table was created.
For more information on configuring the Microsoft SQL Server 2000 repository, see the documentation.
2. To migrate the tables that were created by the iwse.sql script for iBSE, use your Microsoft SQL Server 2000 database tool set. For more information, consult your database administrator.
iWay Transaction Adapter for CICS (XML) User’s Guide 5-29
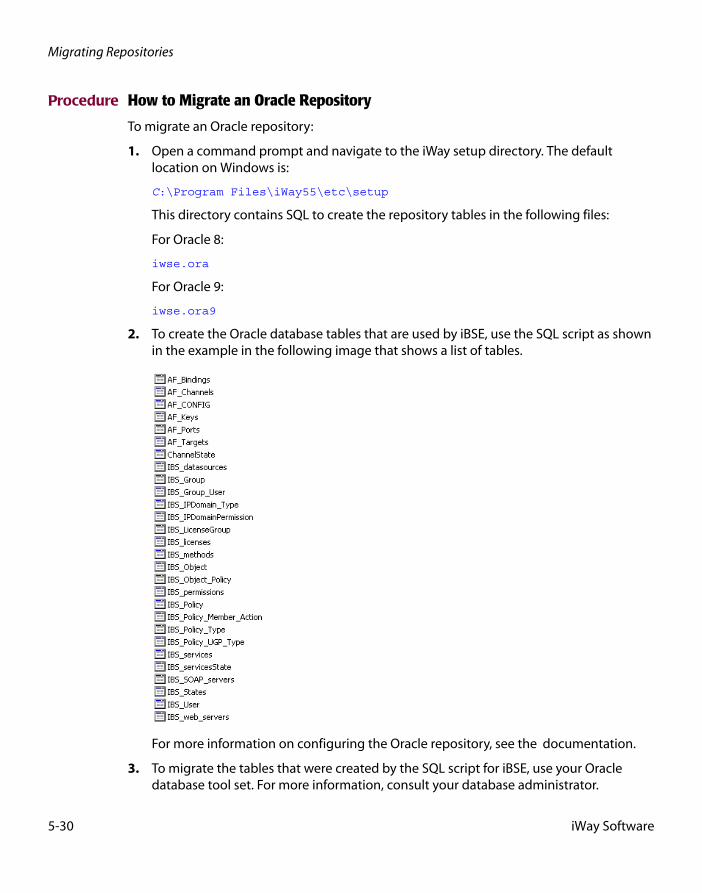
Migrating Repositories
Procedure How to Migrate an Oracle Repository
To migrate an Oracle repository:
1. Open a command prompt and navigate to the iWay setup directory. The default location on Windows is:
C:\Program Files\iWay55\etc\setup
This directory contains SQL to create the repository tables in the following files:
For Oracle 8:
iwse.ora
For Oracle 9:
iwse.ora9
2. To create the Oracle database tables that are used by iBSE, use the SQL script as shown in the example in the following image that shows a list of tables.
For more information on configuring the Oracle repository, see the documentation.
3. To migrate the tables that were created by the SQL script for iBSE, use your Oracle database tool set. For more information, consult your database administrator.
5-30 iWay Software
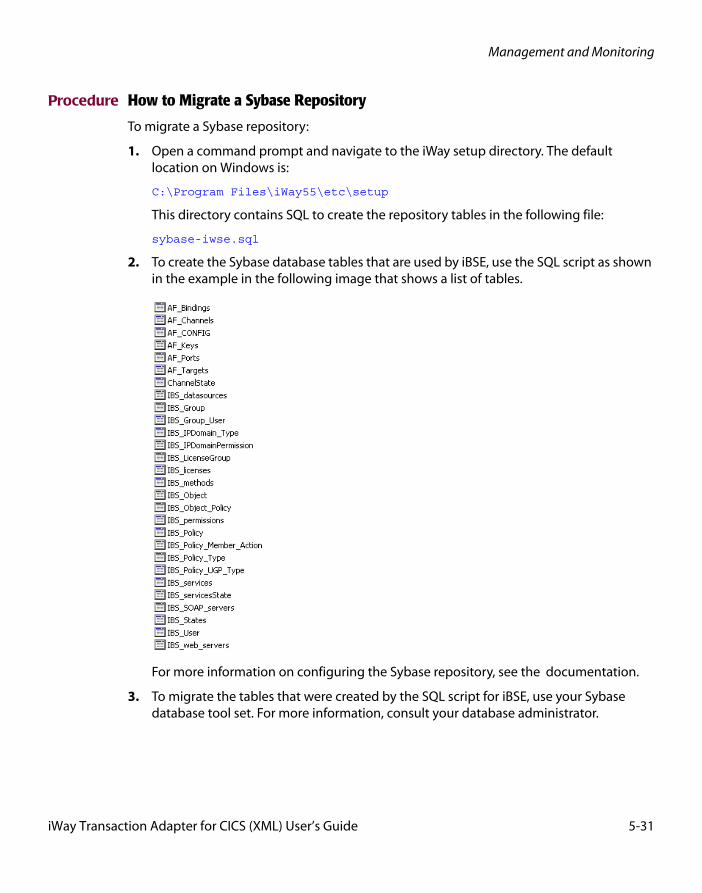
Management and Monitoring
Procedure How to Migrate a Sybase Repository
To migrate a Sybase repository:
1. Open a command prompt and navigate to the iWay setup directory. The default location on Windows is:
C:\Program Files\iWay55\etc\setup
This directory contains SQL to create the repository tables in the following file:
sybase-iwse.sql
2. To create the Sybase database tables that are used by iBSE, use the SQL script as shown in the example in the following image that shows a list of tables.
For more information on configuring the Sybase repository, see the documentation.
3. To migrate the tables that were created by the SQL script for iBSE, use your Sybase database tool set. For more information, consult your database administrator.
iWay Transaction Adapter for CICS (XML) User’s Guide 5-31
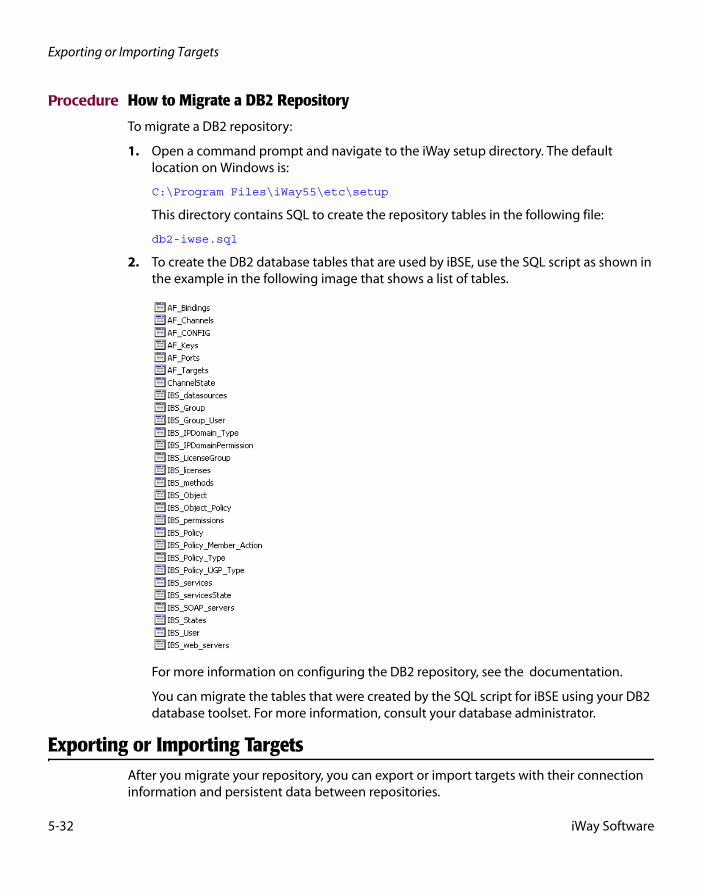
Exporting or Importing Targets
Procedure How to Migrate a DB2 Repository
To migrate a DB2 repository:
1. Open a command prompt and navigate to the iWay setup directory. The default location on Windows is:
C:\Program Files\iWay55\etc\setup
This directory contains SQL to create the repository tables in the following file:
db2-iwse.sql
2. To create the DB2 database tables that are used by iBSE, use the SQL script as shown in the example in the following image that shows a list of tables.
For more information on configuring the DB2 repository, see the documentation.
You can migrate the tables that were created by the SQL script for iBSE using your DB2 database toolset. For more information, consult your database administrator.
Exporting or Importing TargetsAfter you migrate your repository, you can export or import targets with their connection information and persistent data between repositories.
5-32 iWay Software
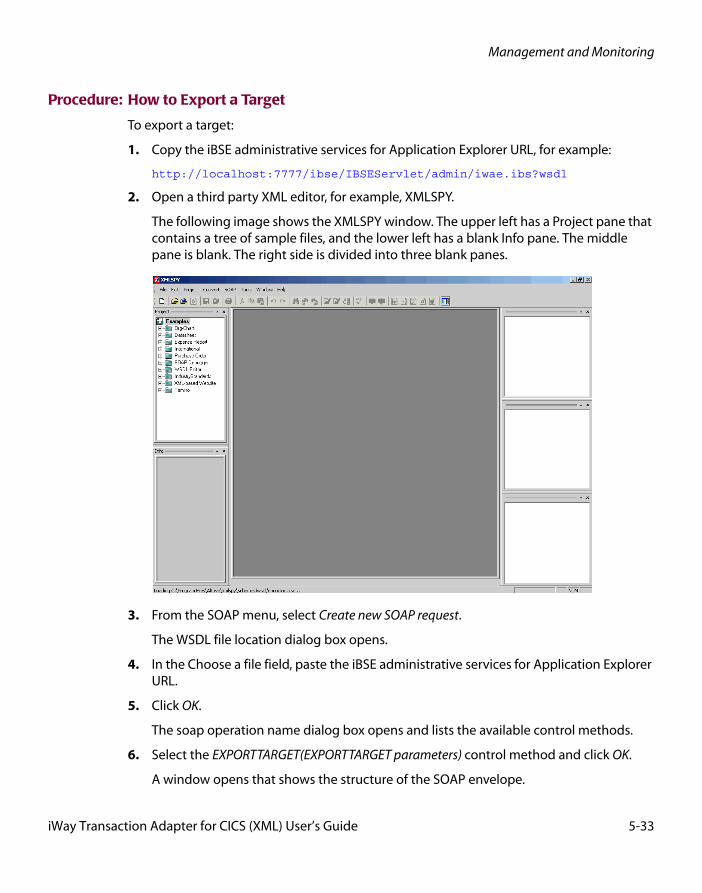
Management and Monitoring
Procedure: How to Export a Target
To export a target:
1. Copy the iBSE administrative services for Application Explorer URL, for example:
http://localhost:7777/ibse/IBSEServlet/admin/iwae.ibs?wsdl
2. Open a third party XML editor, for example, XMLSPY.
The following image shows the XMLSPY window. The upper left has a Project pane that contains a tree of sample files, and the lower left has a blank Info pane. The middle pane is blank. The right side is divided into three blank panes.
3. From the SOAP menu, select Create new SOAP request.
The WSDL file location dialog box opens.
4. In the Choose a file field, paste the iBSE administrative services for Application Explorer URL.
5. Click OK.
The soap operation name dialog box opens and lists the available control methods.
6. Select the EXPORTTARGET(EXPORTTARGET parameters) control method and click OK.
A window opens that shows the structure of the SOAP envelope.
iWay Transaction Adapter for CICS (XML) User’s Guide 5-33
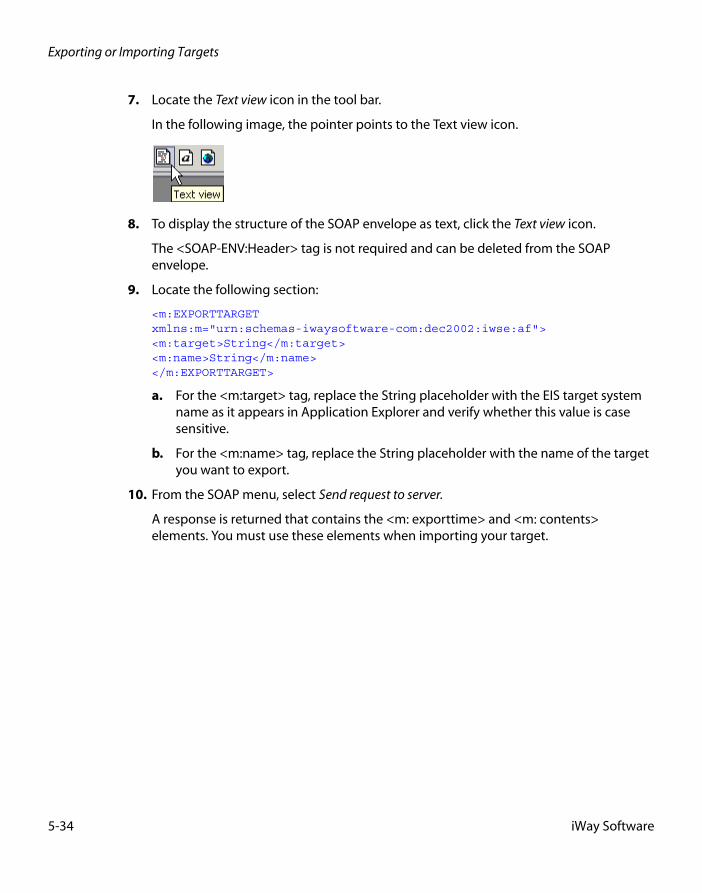
Exporting or Importing Targets
7. Locate the Text view icon in the tool bar.
In the following image, the pointer points to the Text view icon.
8. To display the structure of the SOAP envelope as text, click the Text view icon.
The <SOAP-ENV:Header> tag is not required and can be deleted from the SOAP envelope.
9. Locate the following section:
<m:EXPORTTARGET xmlns:m="urn:schemas-iwaysoftware-com:dec2002:iwse:af"><m:target>String</m:target><m:name>String</m:name></m:EXPORTTARGET>
a. For the <m:target> tag, replace the String placeholder with the EIS target system name as it appears in Application Explorer and verify whether this value is case sensitive.
b. For the <m:name> tag, replace the String placeholder with the name of the target you want to export.
10. From the SOAP menu, select Send request to server.
A response is returned that contains the <m: exporttime> and <m: contents> elements. You must use these elements when importing your target.
5-34 iWay Software
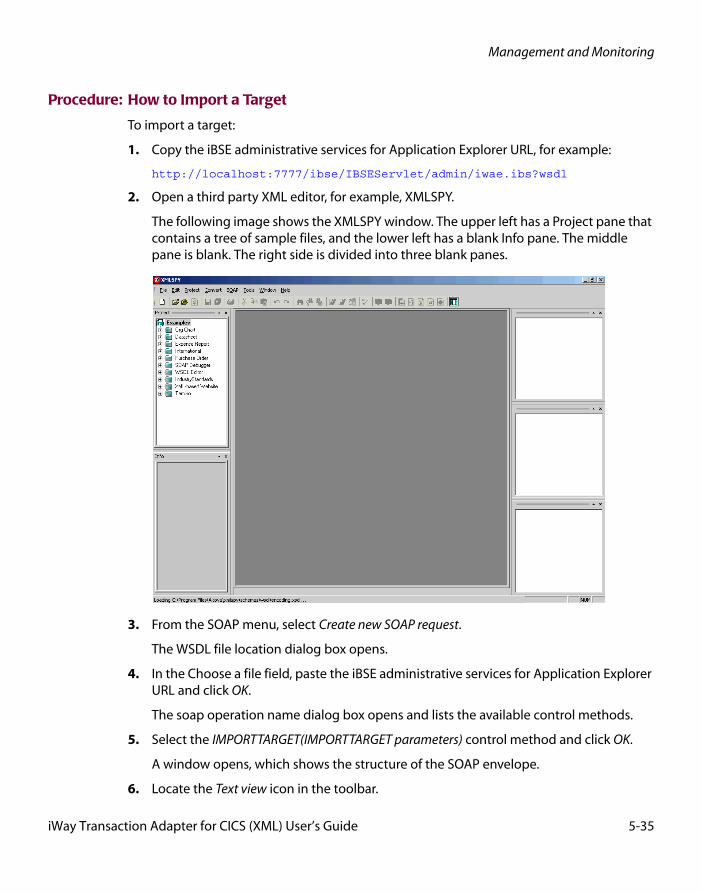
Management and Monitoring
Procedure: How to Import a Target
To import a target:
1. Copy the iBSE administrative services for Application Explorer URL, for example:
http://localhost:7777/ibse/IBSEServlet/admin/iwae.ibs?wsdl
2. Open a third party XML editor, for example, XMLSPY.
The following image shows the XMLSPY window. The upper left has a Project pane that contains a tree of sample files, and the lower left has a blank Info pane. The middle pane is blank. The right side is divided into three blank panes.
3. From the SOAP menu, select Create new SOAP request.
The WSDL file location dialog box opens.
4. In the Choose a file field, paste the iBSE administrative services for Application Explorer URL and click OK.
The soap operation name dialog box opens and lists the available control methods.
5. Select the IMPORTTARGET(IMPORTTARGET parameters) control method and click OK.
A window opens, which shows the structure of the SOAP envelope.
6. Locate the Text view icon in the toolbar.
iWay Transaction Adapter for CICS (XML) User’s Guide 5-35
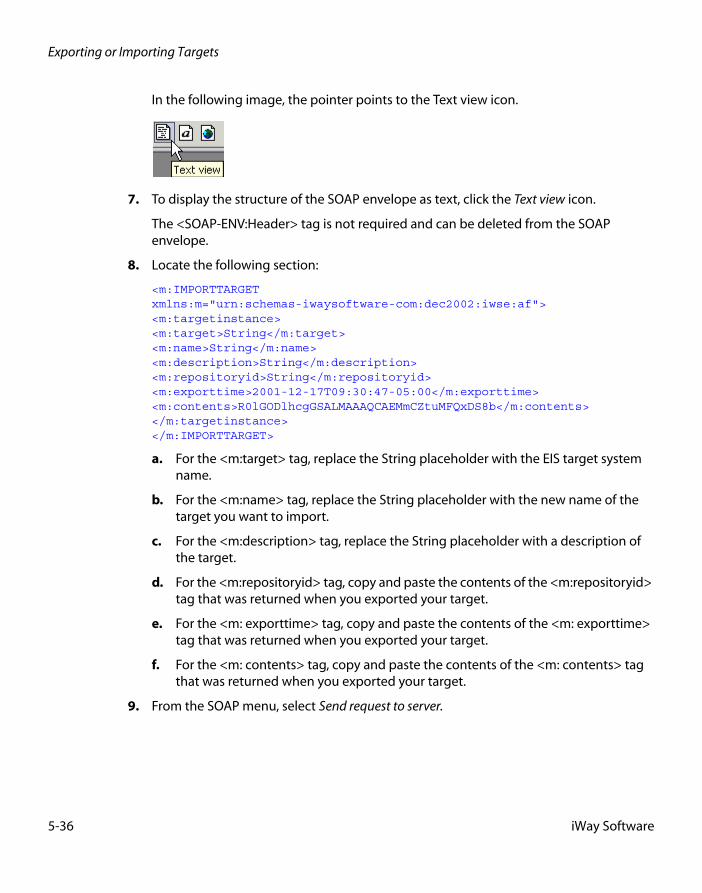
Exporting or Importing Targets
In the following image, the pointer points to the Text view icon.
7. To display the structure of the SOAP envelope as text, click the Text view icon.
The <SOAP-ENV:Header> tag is not required and can be deleted from the SOAP envelope.
8. Locate the following section:
<m:IMPORTTARGET xmlns:m="urn:schemas-iwaysoftware-com:dec2002:iwse:af"><m:targetinstance><m:target>String</m:target><m:name>String</m:name><m:description>String</m:description><m:repositoryid>String</m:repositoryid><m:exporttime>2001-12-17T09:30:47-05:00</m:exporttime><m:contents>R0lGODlhcgGSALMAAAQCAEMmCZtuMFQxDS8b</m:contents></m:targetinstance></m:IMPORTTARGET>
a. For the <m:target> tag, replace the String placeholder with the EIS target system name.
b. For the <m:name> tag, replace the String placeholder with the new name of the target you want to import.
c. For the <m:description> tag, replace the String placeholder with a description of the target.
d. For the <m:repositoryid> tag, copy and paste the contents of the <m:repositoryid> tag that was returned when you exported your target.
e. For the <m: exporttime> tag, copy and paste the contents of the <m: exporttime> tag that was returned when you exported your target.
f. For the <m: contents> tag, copy and paste the contents of the <m: contents> tag that was returned when you exported your target.
9. From the SOAP menu, select Send request to server.
5-36 iWay Software
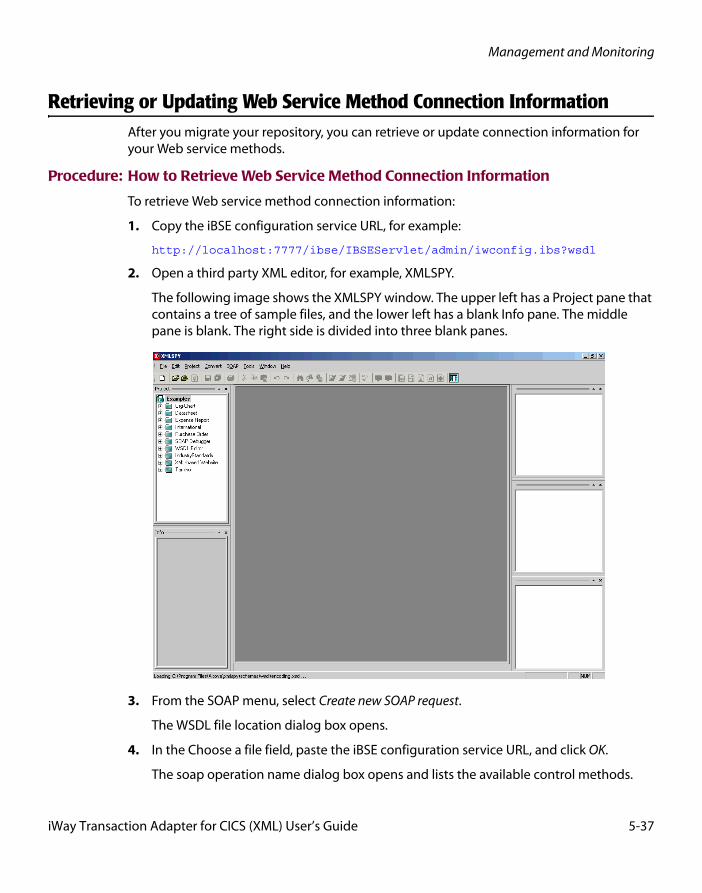
Management and Monitoring
Retrieving or Updating Web Service Method Connection InformationAfter you migrate your repository, you can retrieve or update connection information for your Web service methods.
Procedure: How to Retrieve Web Service Method Connection Information
To retrieve Web service method connection information:
1. Copy the iBSE configuration service URL, for example:
http://localhost:7777/ibse/IBSEServlet/admin/iwconfig.ibs?wsdl
2. Open a third party XML editor, for example, XMLSPY.
The following image shows the XMLSPY window. The upper left has a Project pane that contains a tree of sample files, and the lower left has a blank Info pane. The middle pane is blank. The right side is divided into three blank panes.
3. From the SOAP menu, select Create new SOAP request.
The WSDL file location dialog box opens.
4. In the Choose a file field, paste the iBSE configuration service URL, and click OK.
The soap operation name dialog box opens and lists the available control methods.
iWay Transaction Adapter for CICS (XML) User’s Guide 5-37
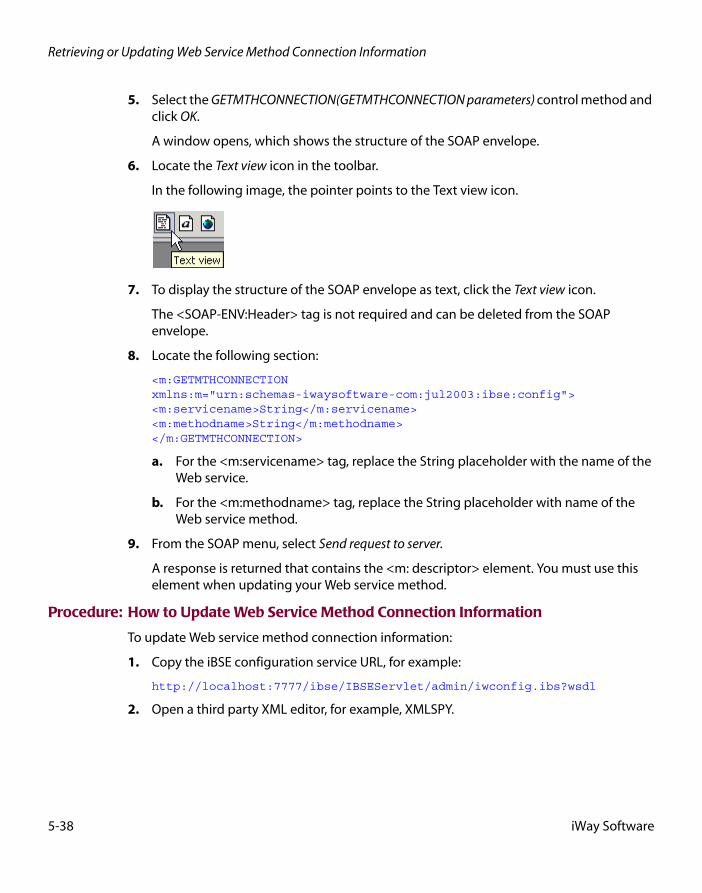
Retrieving or Updating Web Service Method Connection Information
5. Select the GETMTHCONNECTION(GETMTHCONNECTION parameters) control method and click OK.
A window opens, which shows the structure of the SOAP envelope.
6. Locate the Text view icon in the toolbar.
In the following image, the pointer points to the Text view icon.
7. To display the structure of the SOAP envelope as text, click the Text view icon.
The <SOAP-ENV:Header> tag is not required and can be deleted from the SOAP envelope.
8. Locate the following section:
<m:GETMTHCONNECTION xmlns:m="urn:schemas-iwaysoftware-com:jul2003:ibse:config"><m:servicename>String</m:servicename><m:methodname>String</m:methodname></m:GETMTHCONNECTION>
a. For the <m:servicename> tag, replace the String placeholder with the name of the Web service.
b. For the <m:methodname> tag, replace the String placeholder with name of the Web service method.
9. From the SOAP menu, select Send request to server.
A response is returned that contains the <m: descriptor> element. You must use this element when updating your Web service method.
Procedure: How to Update Web Service Method Connection Information
To update Web service method connection information:
1. Copy the iBSE configuration service URL, for example:
http://localhost:7777/ibse/IBSEServlet/admin/iwconfig.ibs?wsdl
2. Open a third party XML editor, for example, XMLSPY.
5-38 iWay Software

Management and Monitoring
The following image shows the XMLSPY window. The upper left has a Project pane that contains a tree of sample files, and the lower left has a blank Info pane. The middle pane is blank. The right side is divided into three blank panes.
3. From the SOAP menu, select Create new SOAP request.
The WSDL file location dialog box opens.
4. In the Choose a file field, paste the iBSE configuration service URL, and click OK.
The soap operation name dialog box opens and lists the available control methods.
5. Select the SETMTHCONNECTION(SETMTHCONNECTION parameters) control method and click OK.
A window opens that shows the structure of the SOAP envelope.
6. Locate the Text view icon in the toolbar.
In the following image, the pointer points to the Text view icon.
7. To display the structure of the SOAP envelope as text, click the Text view icon.
iWay Transaction Adapter for CICS (XML) User’s Guide 5-39
Starting or Stopping a Channel Programmatically
The <SOAP-ENV:Header> tag is not required and can be deleted from the SOAP envelope.
8. Locate the following section:
<m:SETMTHCONNECTION xmlns:m="urn:schemas-iwaysoftware-com:jul2003:ibse:config"><m:servicename>String</m:servicename><m:methodname>String</m:methodname><m:descriptor format="" channel=""> <m:option title=""> <m:group title=""> <m:param/> </m:group> </m:option></m:descriptor></m:SETMTHCONNECTION>
a. For the <m:servicename> tag, replace the String placeholder with the name of the Web service.
b. For the <m:methodname> tag, replace the String placeholder with the name of the Web service method.
c. For the <m: descriptor> tag, copy and paste the contents of the <m: descriptor> tag that was returned when you retrieved Web Service method connection information.
9. Modify the contents of the <m: descriptor> tag to change the existing Web Service method connection information.
10. From the SOAP menu, select Send request to server.
Starting or Stopping a Channel ProgrammaticallyThe following topic describes how to start or stop a channel programmatically.
Procedure: How to Start a Channel Programmatically
To start a channel programmatically:
1. Copy the iBSE control event URL, for example:
http://localhost:7777/ibse/IBSEServlet/admin/iwevent.ibs?wsdl
2. Open a third party XML editor, for example, XMLSPY.
5-40 iWay Software
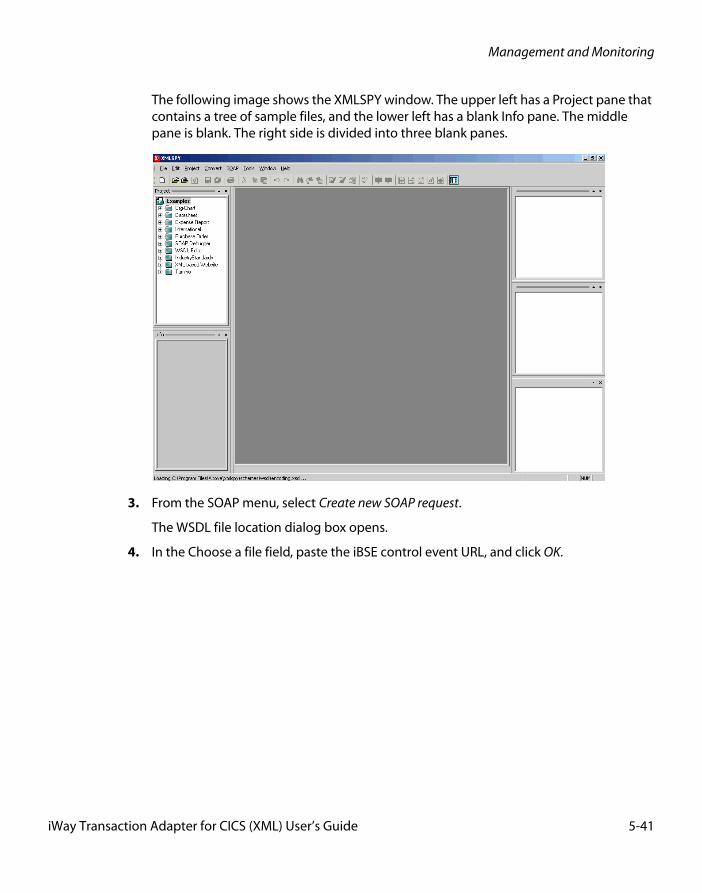
Management and Monitoring
The following image shows the XMLSPY window. The upper left has a Project pane that contains a tree of sample files, and the lower left has a blank Info pane. The middle pane is blank. The right side is divided into three blank panes.
3. From the SOAP menu, select Create new SOAP request.
The WSDL file location dialog box opens.
4. In the Choose a file field, paste the iBSE control event URL, and click OK.
iWay Transaction Adapter for CICS (XML) User’s Guide 5-41
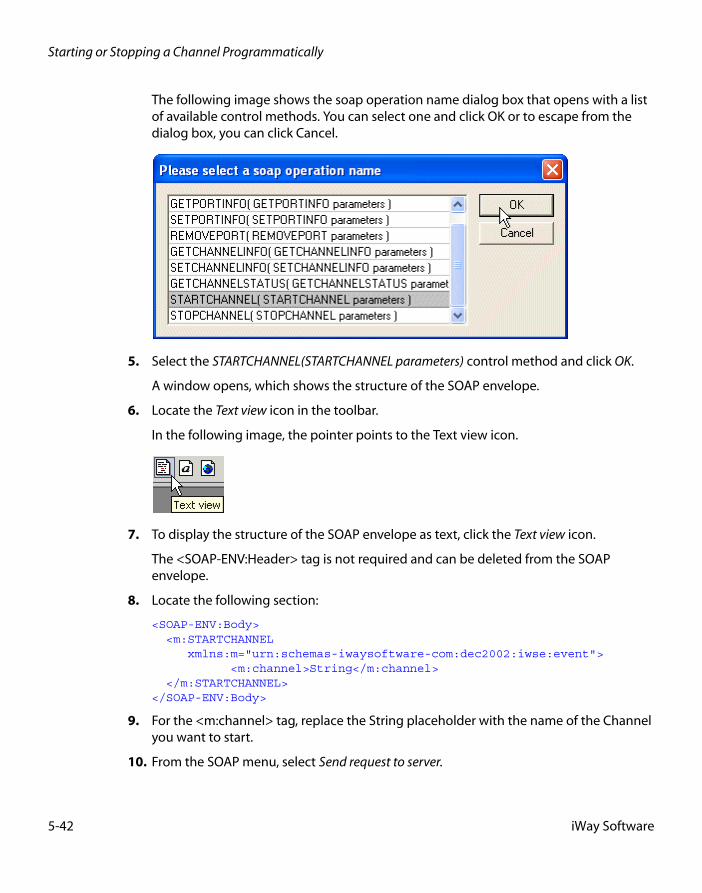
Starting or Stopping a Channel Programmatically
The following image shows the soap operation name dialog box that opens with a list of available control methods. You can select one and click OK or to escape from the dialog box, you can click Cancel.
5. Select the STARTCHANNEL(STARTCHANNEL parameters) control method and click OK.
A window opens, which shows the structure of the SOAP envelope.
6. Locate the Text view icon in the toolbar.
In the following image, the pointer points to the Text view icon.
7. To display the structure of the SOAP envelope as text, click the Text view icon.
The <SOAP-ENV:Header> tag is not required and can be deleted from the SOAP envelope.
8. Locate the following section:
<SOAP-ENV:Body> <m:STARTCHANNEL xmlns:m="urn:schemas-iwaysoftware-com:dec2002:iwse:event"> <m:channel>String</m:channel> </m:STARTCHANNEL></SOAP-ENV:Body>
9. For the <m:channel> tag, replace the String placeholder with the name of the Channel you want to start.
10. From the SOAP menu, select Send request to server.
5-42 iWay Software
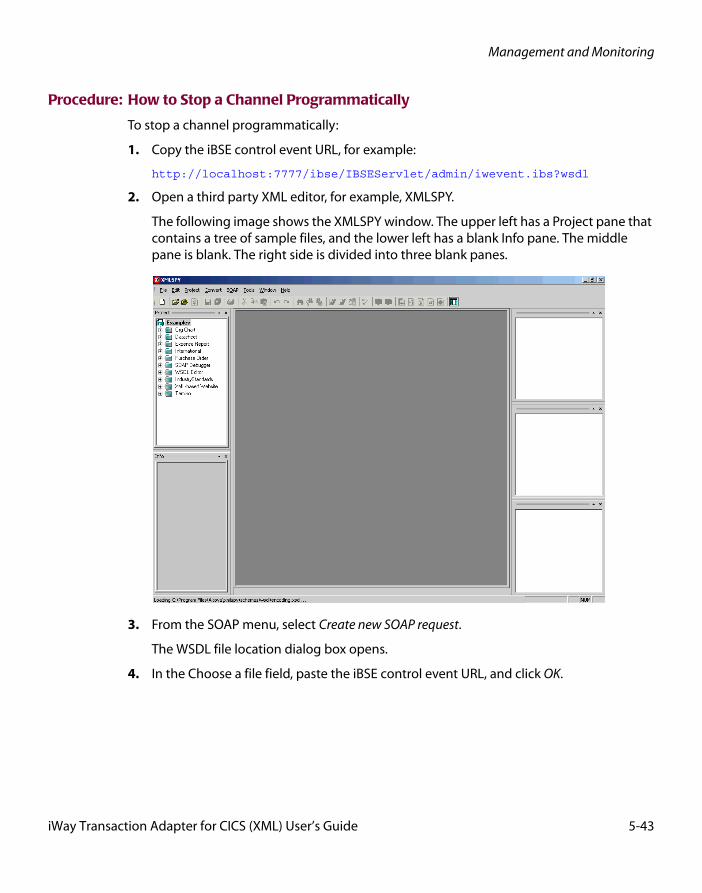
Management and Monitoring
Procedure: How to Stop a Channel Programmatically
To stop a channel programmatically:
1. Copy the iBSE control event URL, for example:
http://localhost:7777/ibse/IBSEServlet/admin/iwevent.ibs?wsdl
2. Open a third party XML editor, for example, XMLSPY.
The following image shows the XMLSPY window. The upper left has a Project pane that contains a tree of sample files, and the lower left has a blank Info pane. The middle pane is blank. The right side is divided into three blank panes.
3. From the SOAP menu, select Create new SOAP request.
The WSDL file location dialog box opens.
4. In the Choose a file field, paste the iBSE control event URL, and click OK.
iWay Transaction Adapter for CICS (XML) User’s Guide 5-43
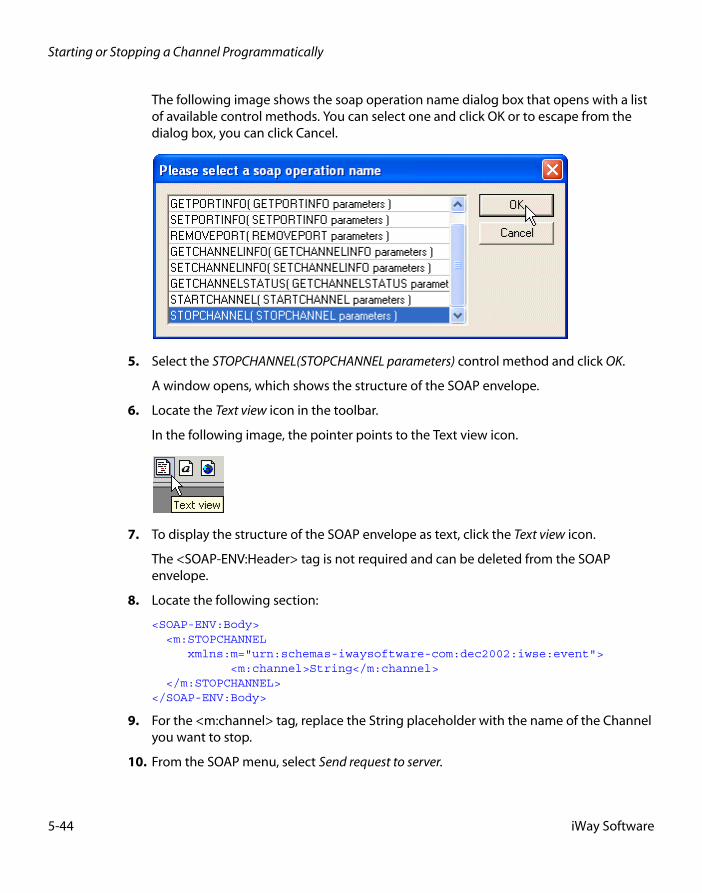
Starting or Stopping a Channel Programmatically
The following image shows the soap operation name dialog box that opens with a list of available control methods. You can select one and click OK or to escape from the dialog box, you can click Cancel.
5. Select the STOPCHANNEL(STOPCHANNEL parameters) control method and click OK.
A window opens, which shows the structure of the SOAP envelope.
6. Locate the Text view icon in the toolbar.
In the following image, the pointer points to the Text view icon.
7. To display the structure of the SOAP envelope as text, click the Text view icon.
The <SOAP-ENV:Header> tag is not required and can be deleted from the SOAP envelope.
8. Locate the following section:
<SOAP-ENV:Body> <m:STOPCHANNEL xmlns:m="urn:schemas-iwaysoftware-com:dec2002:iwse:event"> <m:channel>String</m:channel> </m:STOPCHANNEL></SOAP-ENV:Body>
9. For the <m:channel> tag, replace the String placeholder with the name of the Channel you want to stop.
10. From the SOAP menu, select Send request to server.
5-44 iWay Software
APPENDIX A
Configuring VTAM for AnyNet
Topics:
• VTAM and AnyNet Configuration Requirements
• TCP6.2 AnyNet Setup Samples for the VTAM Administrator
• TCP6.2 AnyNet Setup Samples for the CICS Administrator
• Post-Configuration Steps
• Error Conditions
Although the adapter requires no code to be installed on the mainframe, VTAM using AnyNet and CICS must be configured correctly. This appendix provides the configuration and communications information the adapter requires to communicate with CICS.
iWay Transaction Adapter for CICS (XML) User’s Guide A-1
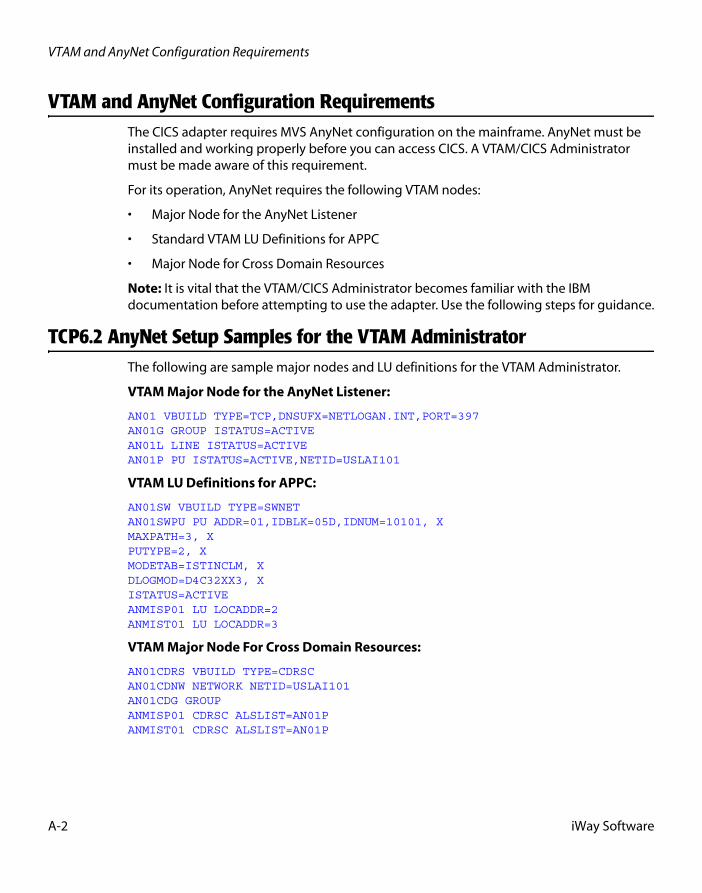
VTAM and AnyNet Configuration Requirements
VTAM and AnyNet Configuration RequirementsThe CICS adapter requires MVS AnyNet configuration on the mainframe. AnyNet must be installed and working properly before you can access CICS. A VTAM/CICS Administrator must be made aware of this requirement.
For its operation, AnyNet requires the following VTAM nodes:
• Major Node for the AnyNet Listener
• Standard VTAM LU Definitions for APPC
• Major Node for Cross Domain Resources
Note: It is vital that the VTAM/CICS Administrator becomes familiar with the IBM documentation before attempting to use the adapter. Use the following steps for guidance.
TCP6.2 AnyNet Setup Samples for the VTAM AdministratorThe following are sample major nodes and LU definitions for the VTAM Administrator.
VTAM Major Node for the AnyNet Listener:
AN01 VBUILD TYPE=TCP,DNSUFX=NETLOGAN.INT,PORT=397AN01G GROUP ISTATUS=ACTIVEAN01L LINE ISTATUS=ACTIVEAN01P PU ISTATUS=ACTIVE,NETID=USLAI101
VTAM LU Definitions for APPC:
AN01SW VBUILD TYPE=SWNETAN01SWPU PU ADDR=01,IDBLK=05D,IDNUM=10101, XMAXPATH=3, XPUTYPE=2, XMODETAB=ISTINCLM, XDLOGMOD=D4C32XX3, XISTATUS=ACTIVEANMISP01 LU LOCADDR=2ANMIST01 LU LOCADDR=3
VTAM Major Node For Cross Domain Resources:
AN01CDRS VBUILD TYPE=CDRSCAN01CDNW NETWORK NETID=USLAI101AN01CDG GROUPANMISP01 CDRSC ALSLIST=AN01PANMIST01 CDRSC ALSLIST=AN01P
A-2 iWay Software
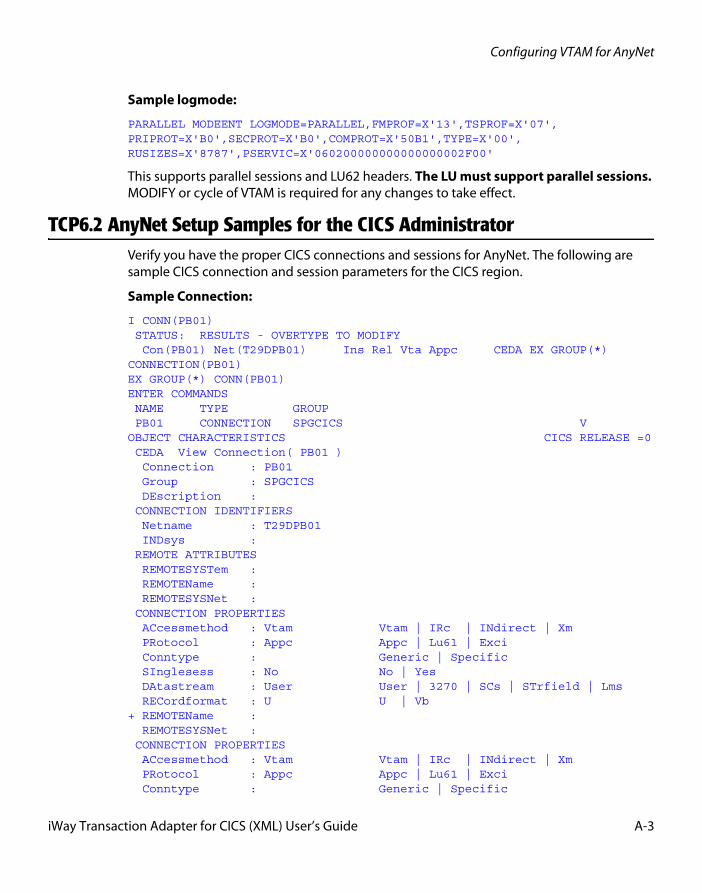
Configuring VTAM for AnyNet
Sample logmode:
PARALLEL MODEENT LOGMODE=PARALLEL,FMPROF=X'13',TSPROF=X'07',PRIPROT=X'B0',SECPROT=X'B0',COMPROT=X'50B1',TYPE=X'00',RUSIZES=X'8787',PSERVIC=X'060200000000000000002F00'
This supports parallel sessions and LU62 headers. The LU must support parallel sessions. MODIFY or cycle of VTAM is required for any changes to take effect.
TCP6.2 AnyNet Setup Samples for the CICS AdministratorVerify you have the proper CICS connections and sessions for AnyNet. The following are sample CICS connection and session parameters for the CICS region.
Sample Connection:
I CONN(PB01) STATUS: RESULTS - OVERTYPE TO MODIFY Con(PB01) Net(T29DPB01) Ins Rel Vta Appc CEDA EX GROUP(*)CONNECTION(PB01)EX GROUP(*) CONN(PB01)ENTER COMMANDS NAME TYPE GROUP PB01 CONNECTION SPGCICS VOBJECT CHARACTERISTICS CICS RELEASE =0 CEDA View Connection( PB01 ) Connection : PB01 Group : SPGCICS DEscription : CONNECTION IDENTIFIERS Netname : T29DPB01 INDsys : REMOTE ATTRIBUTES REMOTESYSTem : REMOTEName : REMOTESYSNet : CONNECTION PROPERTIES ACcessmethod : Vtam Vtam | IRc | INdirect | Xm PRotocol : Appc Appc | Lu61 | Exci Conntype : Generic | Specific SInglesess : No No | Yes DAtastream : User User | 3270 | SCs | STrfield | Lms RECordformat : U U | Vb+ REMOTEName : REMOTESYSNet : CONNECTION PROPERTIES ACcessmethod : Vtam Vtam | IRc | INdirect | Xm PRotocol : Appc Appc | Lu61 | Exci Conntype : Generic | Specific
iWay Transaction Adapter for CICS (XML) User’s Guide A-3
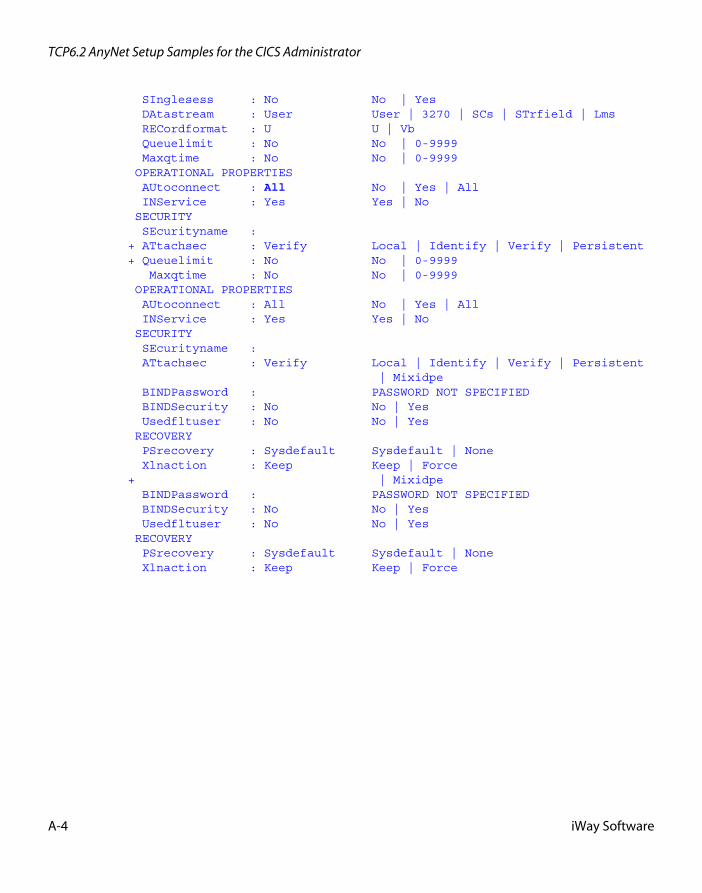
TCP6.2 AnyNet Setup Samples for the CICS Administrator
SInglesess : No No | Yes DAtastream : User User | 3270 | SCs | STrfield | Lms RECordformat : U U | Vb Queuelimit : No No | 0-9999 Maxqtime : No No | 0-9999 OPERATIONAL PROPERTIES AUtoconnect : All No | Yes | All INService : Yes Yes | No SECURITY SEcurityname :+ ATtachsec : Verify Local | Identify | Verify | Persistent+ Queuelimit : No No | 0-9999 Maxqtime : No No | 0-9999 OPERATIONAL PROPERTIES AUtoconnect : All No | Yes | All INService : Yes Yes | No SECURITY SEcurityname : ATtachsec : Verify Local | Identify | Verify | Persistent | Mixidpe BINDPassword : PASSWORD NOT SPECIFIED BINDSecurity : No No | Yes Usedfltuser : No No | Yes RECOVERY PSrecovery : Sysdefault Sysdefault | None Xlnaction : Keep Keep | Force+ | Mixidpe BINDPassword : PASSWORD NOT SPECIFIED BINDSecurity : No No | Yes Usedfltuser : No No | Yes RECOVERY PSrecovery : Sysdefault Sysdefault | None Xlnaction : Keep Keep | Force
A-4 iWay Software
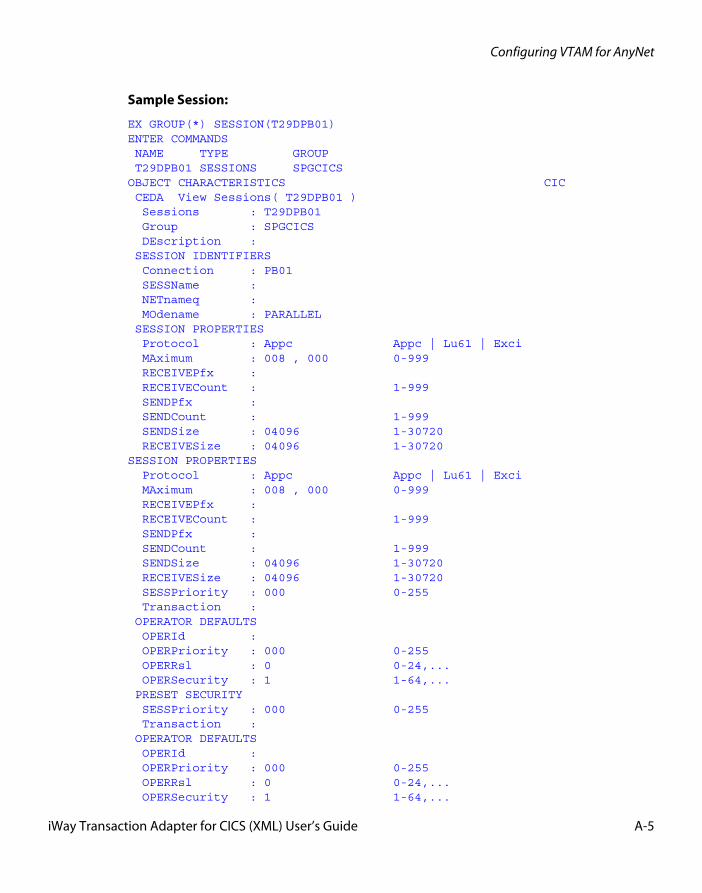
Configuring VTAM for AnyNet
Sample Session:
EX GROUP(*) SESSION(T29DPB01)ENTER COMMANDS NAME TYPE GROUP T29DPB01 SESSIONS SPGCICSOBJECT CHARACTERISTICS CIC CEDA View Sessions( T29DPB01 ) Sessions : T29DPB01 Group : SPGCICS DEscription : SESSION IDENTIFIERS Connection : PB01 SESSName : NETnameq : MOdename : PARALLEL SESSION PROPERTIES Protocol : Appc Appc | Lu61 | Exci MAximum : 008 , 000 0-999 RECEIVEPfx : RECEIVECount : 1-999 SENDPfx : SENDCount : 1-999 SENDSize : 04096 1-30720 RECEIVESize : 04096 1-30720SESSION PROPERTIES Protocol : Appc Appc | Lu61 | Exci MAximum : 008 , 000 0-999 RECEIVEPfx : RECEIVECount : 1-999 SENDPfx : SENDCount : 1-999 SENDSize : 04096 1-30720 RECEIVESize : 04096 1-30720 SESSPriority : 000 0-255 Transaction : OPERATOR DEFAULTS OPERId : OPERPriority : 000 0-255 OPERRsl : 0 0-24,... OPERSecurity : 1 1-64,... PRESET SECURITY SESSPriority : 000 0-255 Transaction : OPERATOR DEFAULTS OPERId : OPERPriority : 000 0-255 OPERRsl : 0 0-24,... OPERSecurity : 1 1-64,...
iWay Transaction Adapter for CICS (XML) User’s Guide A-5
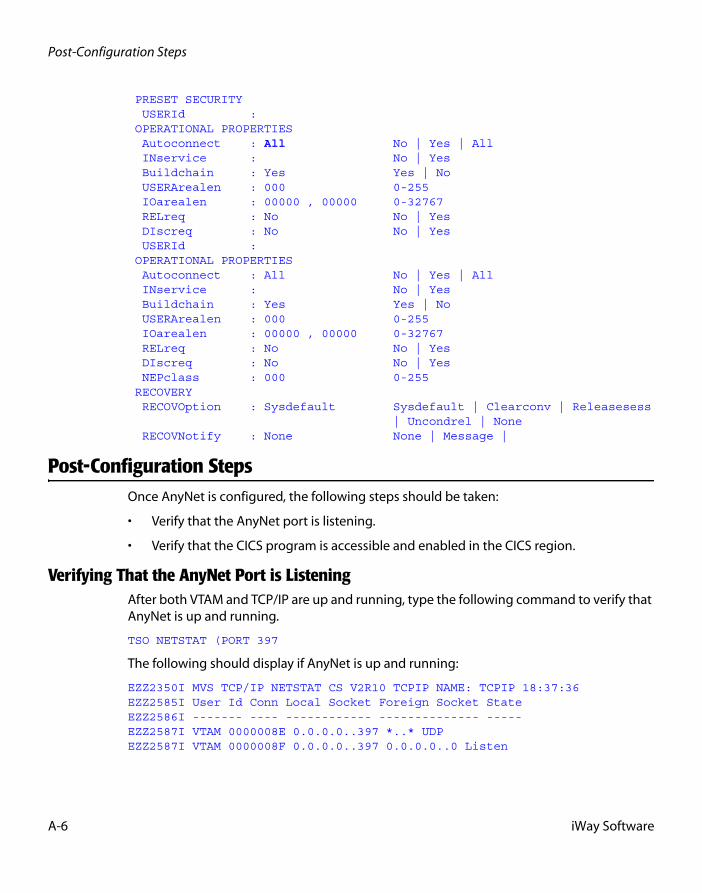
Post-Configuration Steps
PRESET SECURITY USERId : OPERATIONAL PROPERTIES Autoconnect : All No | Yes | All INservice : No | Yes Buildchain : Yes Yes | No USERArealen : 000 0-255 IOarealen : 00000 , 00000 0-32767 RELreq : No No | Yes DIscreq : No No | Yes USERId : OPERATIONAL PROPERTIES Autoconnect : All No | Yes | All INservice : No | Yes Buildchain : Yes Yes | No USERArealen : 000 0-255 IOarealen : 00000 , 00000 0-32767 RELreq : No No | Yes DIscreq : No No | Yes NEPclass : 000 0-255 RECOVERY RECOVOption : Sysdefault Sysdefault | Clearconv | Releasesess | Uncondrel | None RECOVNotify : None None | Message |
Post-Configuration StepsOnce AnyNet is configured, the following steps should be taken:
• Verify that the AnyNet port is listening.
• Verify that the CICS program is accessible and enabled in the CICS region.
Verifying That the AnyNet Port is ListeningAfter both VTAM and TCP/IP are up and running, type the following command to verify that AnyNet is up and running.
TSO NETSTAT (PORT 397
The following should display if AnyNet is up and running:
EZZ2350I MVS TCP/IP NETSTAT CS V2R10 TCPIP NAME: TCPIP 18:37:36EZZ2585I User Id Conn Local Socket Foreign Socket StateEZZ2586I ------- ---- ------------ -------------- -----EZZ2587I VTAM 0000008E 0.0.0.0..397 *..* UDPEZZ2587I VTAM 0000008F 0.0.0.0..397 0.0.0.0..0 Listen
A-6 iWay Software
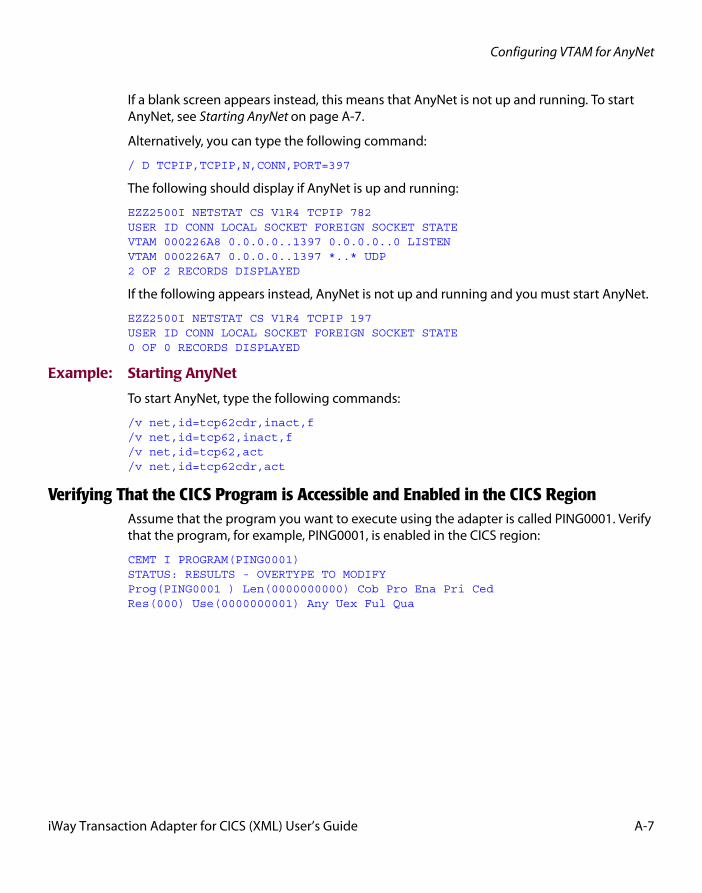
Configuring VTAM for AnyNet
If a blank screen appears instead, this means that AnyNet is not up and running. To start AnyNet, see Starting AnyNet on page A-7.
Alternatively, you can type the following command:
/ D TCPIP,TCPIP,N,CONN,PORT=397
The following should display if AnyNet is up and running:
EZZ2500I NETSTAT CS V1R4 TCPIP 782USER ID CONN LOCAL SOCKET FOREIGN SOCKET STATEVTAM 000226A8 0.0.0.0..1397 0.0.0.0..0 LISTENVTAM 000226A7 0.0.0.0..1397 *..* UDP2 OF 2 RECORDS DISPLAYED
If the following appears instead, AnyNet is not up and running and you must start AnyNet.
EZZ2500I NETSTAT CS V1R4 TCPIP 197USER ID CONN LOCAL SOCKET FOREIGN SOCKET STATE0 OF 0 RECORDS DISPLAYED
Example: Starting AnyNet
To start AnyNet, type the following commands:
/v net,id=tcp62cdr,inact,f/v net,id=tcp62,inact,f/v net,id=tcp62,act/v net,id=tcp62cdr,act
Verifying That the CICS Program is Accessible and Enabled in the CICS RegionAssume that the program you want to execute using the adapter is called PING0001. Verify that the program, for example, PING0001, is enabled in the CICS region:
CEMT I PROGRAM(PING0001)STATUS: RESULTS - OVERTYPE TO MODIFYProg(PING0001 ) Len(0000000000) Cob Pro Ena Pri CedRes(000) Use(0000000001) Any Uex Ful Qua
iWay Transaction Adapter for CICS (XML) User’s Guide A-7
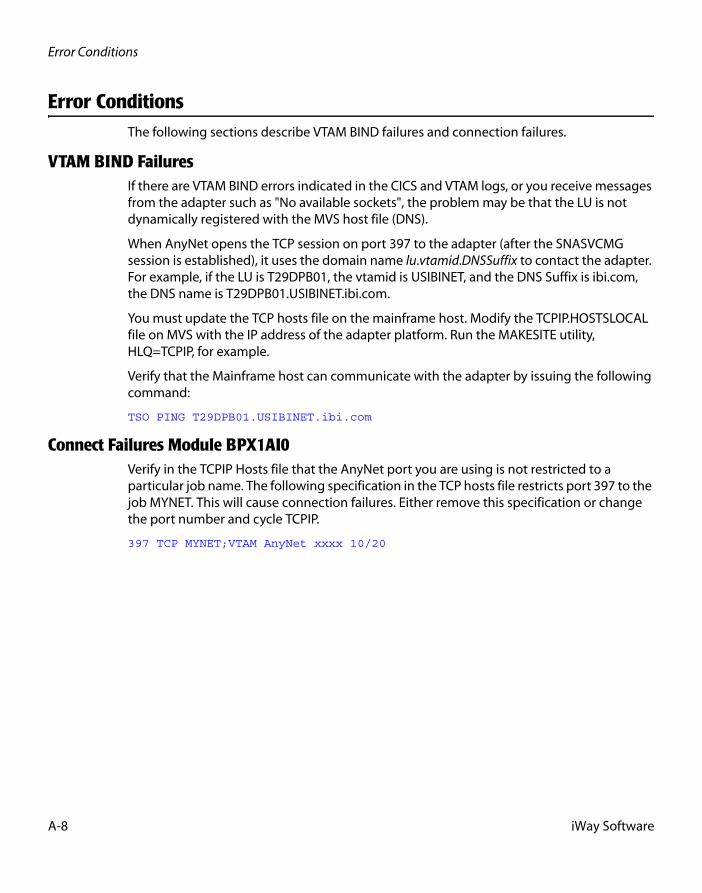
Error Conditions
Error ConditionsThe following sections describe VTAM BIND failures and connection failures.
VTAM BIND FailuresIf there are VTAM BIND errors indicated in the CICS and VTAM logs, or you receive messages from the adapter such as "No available sockets", the problem may be that the LU is not dynamically registered with the MVS host file (DNS).
When AnyNet opens the TCP session on port 397 to the adapter (after the SNASVCMG session is established), it uses the domain name lu.vtamid.DNSSuffix to contact the adapter. For example, if the LU is T29DPB01, the vtamid is USIBINET, and the DNS Suffix is ibi.com, the DNS name is T29DPB01.USIBINET.ibi.com.
You must update the TCP hosts file on the mainframe host. Modify the TCPIP.HOSTSLOCAL file on MVS with the IP address of the adapter platform. Run the MAKESITE utility, HLQ=TCPIP, for example.
Verify that the Mainframe host can communicate with the adapter by issuing the following command:
TSO PING T29DPB01.USIBINET.ibi.com
Connect Failures Module BPX1AI0Verify in the TCPIP Hosts file that the AnyNet port you are using is not restricted to a particular job name. The following specification in the TCP hosts file restricts port 397 to the job MYNET. This will cause connection failures. Either remove this specification or change the port number and cycle TCPIP.
397 TCP MYNET;VTAM AnyNet xxxx 10/20
A-8 iWay Software
APPENDIX B
Running the Adapter Using LU6.2 Communication
Topics:
• MVS OS/390 APPC Communication
• Microsoft SNA Server Communication
• Application Run Time Requirements
This appendix contains technical information that you can use as a guide to ensure LU6.2 communication to the CICS region.
iWay Transaction Adapter for CICS (XML) User’s Guide B-1
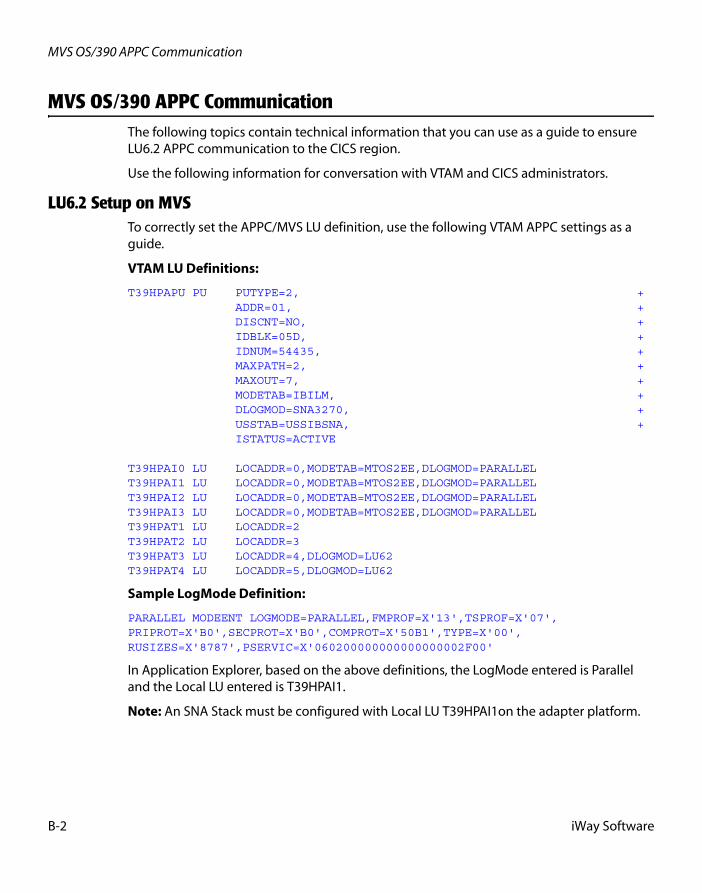
MVS OS/390 APPC Communication
MVS OS/390 APPC CommunicationThe following topics contain technical information that you can use as a guide to ensure LU6.2 APPC communication to the CICS region.
Use the following information for conversation with VTAM and CICS administrators.
LU6.2 Setup on MVSTo correctly set the APPC/MVS LU definition, use the following VTAM APPC settings as a guide.
VTAM LU Definitions:
T39HPAPU PU PUTYPE=2, + ADDR=01, + DISCNT=NO, + IDBLK=05D, + IDNUM=54435, + MAXPATH=2, + MAXOUT=7, + MODETAB=IBILM, + DLOGMOD=SNA3270, + USSTAB=USSIBSNA, + ISTATUS=ACTIVE T39HPAI0 LU LOCADDR=0,MODETAB=MTOS2EE,DLOGMOD=PARALLELT39HPAI1 LU LOCADDR=0,MODETAB=MTOS2EE,DLOGMOD=PARALLELT39HPAI2 LU LOCADDR=0,MODETAB=MTOS2EE,DLOGMOD=PARALLELT39HPAI3 LU LOCADDR=0,MODETAB=MTOS2EE,DLOGMOD=PARALLELT39HPAT1 LU LOCADDR=2T39HPAT2 LU LOCADDR=3T39HPAT3 LU LOCADDR=4,DLOGMOD=LU62T39HPAT4 LU LOCADDR=5,DLOGMOD=LU62
Sample LogMode Definition:
PARALLEL MODEENT LOGMODE=PARALLEL,FMPROF=X'13',TSPROF=X'07',PRIPROT=X'B0',SECPROT=X'B0',COMPROT=X'50B1',TYPE=X'00',RUSIZES=X'8787',PSERVIC=X'060200000000000000002F00'
In Application Explorer, based on the above definitions, the LogMode entered is Parallel and the Local LU entered is T39HPAI1.
Note: An SNA Stack must be configured with Local LU T39HPAI1on the adapter platform.
B-2 iWay Software
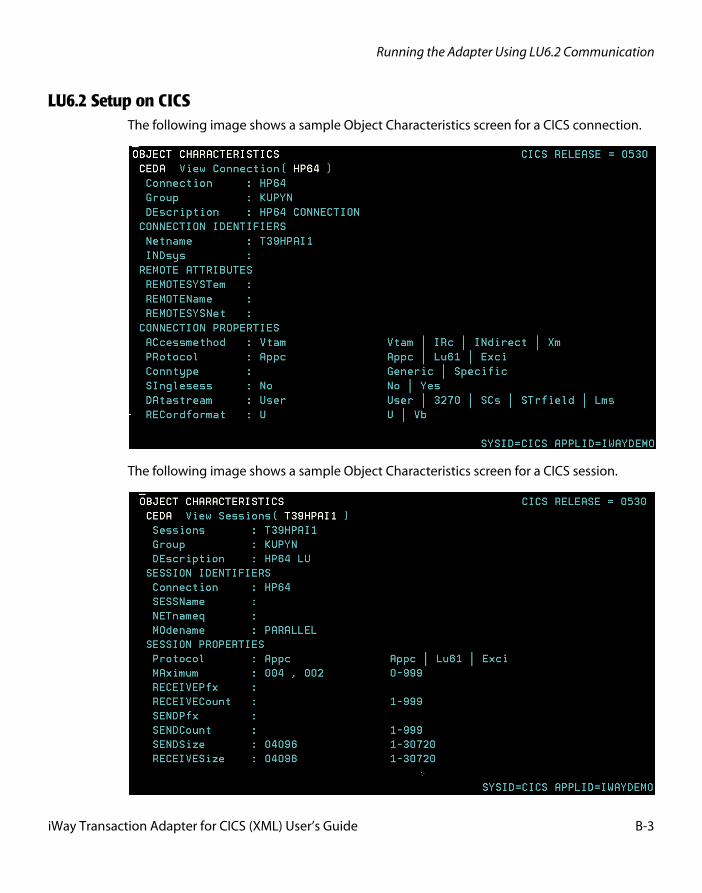
Running the Adapter Using LU6.2 Communication
LU6.2 Setup on CICSThe following image shows a sample Object Characteristics screen for a CICS connection.
The following image shows a sample Object Characteristics screen for a CICS session.
iWay Transaction Adapter for CICS (XML) User’s Guide B-3
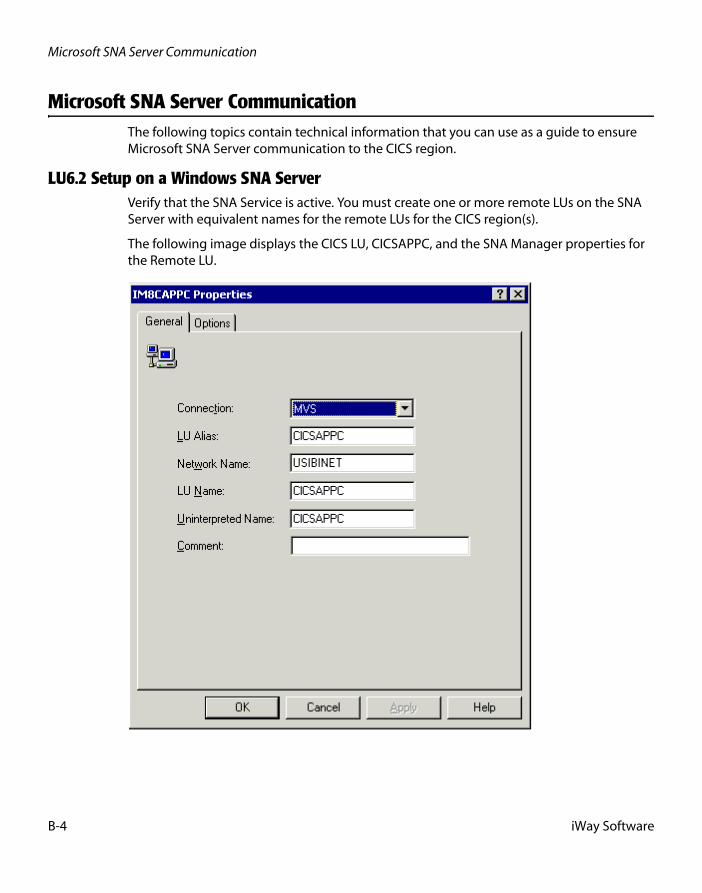
Microsoft SNA Server Communication
Microsoft SNA Server CommunicationThe following topics contain technical information that you can use as a guide to ensure Microsoft SNA Server communication to the CICS region.
LU6.2 Setup on a Windows SNA ServerVerify that the SNA Service is active. You must create one or more remote LUs on the SNA Server with equivalent names for the remote LUs for the CICS region(s).
The following image displays the CICS LU, CICSAPPC, and the SNA Manager properties for the Remote LU.
B-4 iWay Software
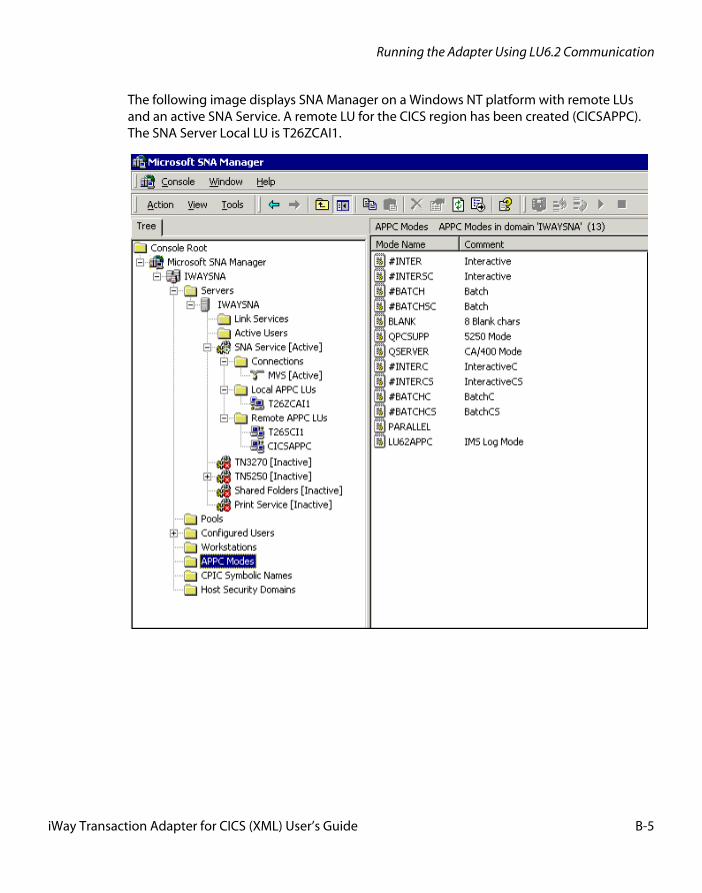
Running the Adapter Using LU6.2 Communication
The following image displays SNA Manager on a Windows NT platform with remote LUs and an active SNA Service. A remote LU for the CICS region has been created (CICSAPPC). The SNA Server Local LU is T26ZCAI1.
iWay Transaction Adapter for CICS (XML) User’s Guide B-5
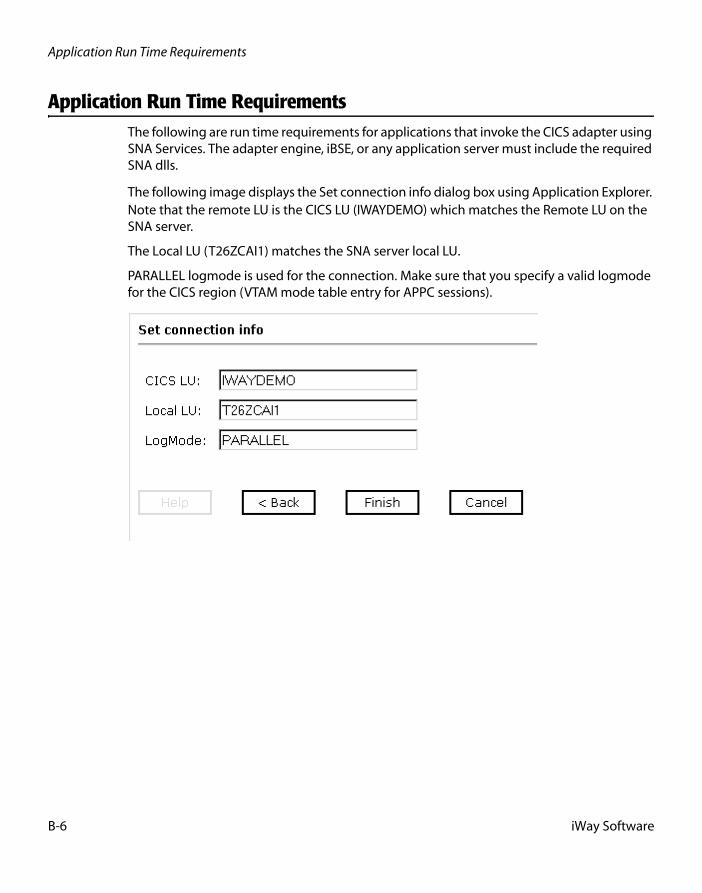
Application Run Time Requirements
Application Run Time RequirementsThe following are run time requirements for applications that invoke the CICS adapter using SNA Services. The adapter engine, iBSE, or any application server must include the required SNA dlls.
The following image displays the Set connection info dialog box using Application Explorer. Note that the remote LU is the CICS LU (IWAYDEMO) which matches the Remote LU on the SNA server.
The Local LU (T26ZCAI1) matches the SNA server local LU.
PARALLEL logmode is used for the connection. Make sure that you specify a valid logmode for the CICS region (VTAM mode table entry for APPC sessions).
B-6 iWay Software
APPENDIX C
Running the Adapter Using TCP/IP Communication
Topic:
• MVS OS/390 TCP/IP Communication
This appendix contains technical information that you can use as a guide to ensure TCP/IP communication to the CICS region.
iWay Transaction Adapter for CICS (XML) User’s Guide C-1
MVS OS/390 TCP/IP Communication
MVS OS/390 TCP/IP CommunicationThe following topic contains technical information that you can use as a guide to ensure TCP/IP communication to the CICS region.
Use the following information for conversation with VTAM and CICS administrators.
TCP/IP RequirementsThe following are requirements for TCP/IP communication to the CICS region:
• TCP must be installed on z/OS.
• The CICS system initialization must specify TCPIP=YES (the default is NO). Note that the TCP parameter is not related to the TCP/IP protocol.
• You must define a TCPIPSERVICE for the CICS region. This can be accomplished using CEDA. You must specify PROTOCOL(ECI) and ATTACHSEC(LOCAL).
Note: The default transaction is CIEP. This can be changed if you want. You may want to set STATUS(OPEN) so that it is started when installed. The default port is 1435. This can be changed using the PORT parameter.
For this to run, the TCPIPSERVICE must be installed and started. This can be accomplished automatically (by ensuring that the TCPIPSERVICE is defined in a group that is in a CICS start up list) or manually from CEDA.
C-2 iWay Software

APPENDIX D
Executing Adabas/Natural Using the Adapter
Topics:
• Natural Program Execution Overview
• Adabas/Natural Proxy Programs
This appendix describes the requirements for executing Adabas/Natural Proxy Programs using the adapter.
iWay Transaction Adapter for CICS (XML) User’s Guide D-1
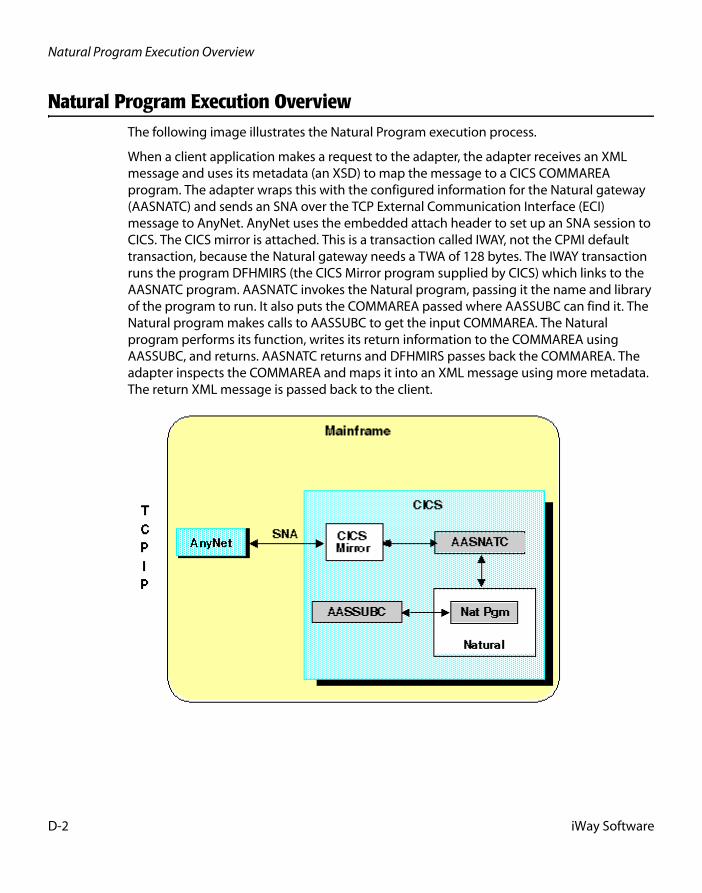
Natural Program Execution Overview
Natural Program Execution OverviewThe following image illustrates the Natural Program execution process.
When a client application makes a request to the adapter, the adapter receives an XML message and uses its metadata (an XSD) to map the message to a CICS COMMAREA program. The adapter wraps this with the configured information for the Natural gateway (AASNATC) and sends an SNA over the TCP External Communication Interface (ECI) message to AnyNet. AnyNet uses the embedded attach header to set up an SNA session to CICS. The CICS mirror is attached. This is a transaction called IWAY, not the CPMI default transaction, because the Natural gateway needs a TWA of 128 bytes. The IWAY transaction runs the program DFHMIRS (the CICS Mirror program supplied by CICS) which links to the AASNATC program. AASNATC invokes the Natural program, passing it the name and library of the program to run. It also puts the COMMAREA passed where AASSUBC can find it. The Natural program makes calls to AASSUBC to get the input COMMAREA. The Natural program performs its function, writes its return information to the COMMAREA using AASSUBC, and returns. AASNATC returns and DFHMIRS passes back the COMMAREA. The adapter inspects the COMMAREA and maps it into an XML message using more metadata. The return XML message is passed back to the client.
D-2 iWay Software
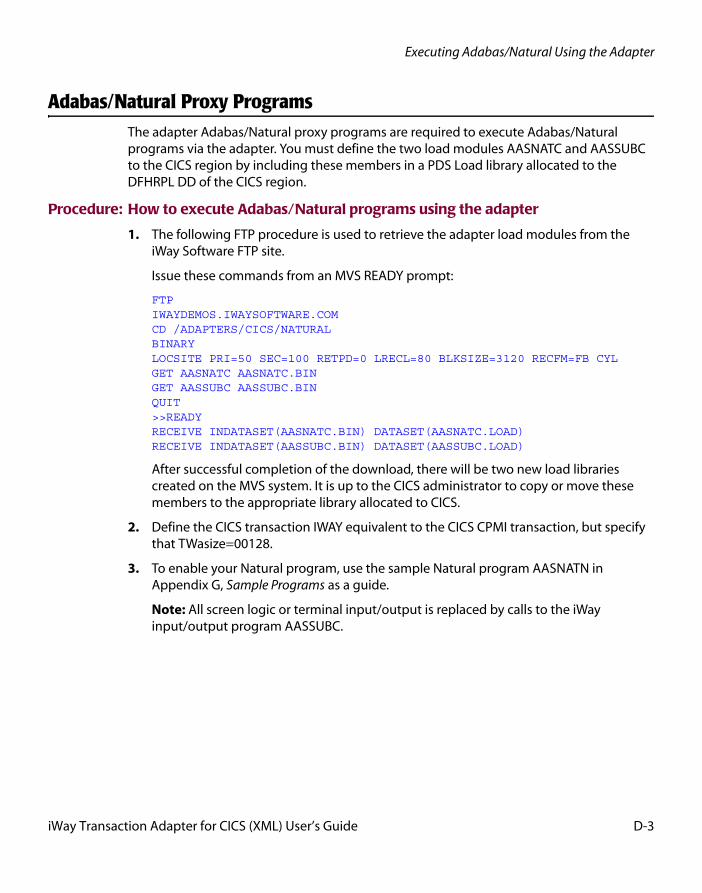
Executing Adabas/Natural Using the Adapter
Adabas/Natural Proxy ProgramsThe adapter Adabas/Natural proxy programs are required to execute Adabas/Natural programs via the adapter. You must define the two load modules AASNATC and AASSUBC to the CICS region by including these members in a PDS Load library allocated to the DFHRPL DD of the CICS region.
Procedure: How to execute Adabas/Natural programs using the adapter
1. The following FTP procedure is used to retrieve the adapter load modules from the iWay Software FTP site.
Issue these commands from an MVS READY prompt:
FTPIWAYDEMOS.IWAYSOFTWARE.COMCD /ADAPTERS/CICS/NATURALBINARYLOCSITE PRI=50 SEC=100 RETPD=0 LRECL=80 BLKSIZE=3120 RECFM=FB CYLGET AASNATC AASNATC.BINGET AASSUBC AASSUBC.BINQUIT>>READYRECEIVE INDATASET(AASNATC.BIN) DATASET(AASNATC.LOAD)RECEIVE INDATASET(AASSUBC.BIN) DATASET(AASSUBC.LOAD)
After successful completion of the download, there will be two new load libraries created on the MVS system. It is up to the CICS administrator to copy or move these members to the appropriate library allocated to CICS.
2. Define the CICS transaction IWAY equivalent to the CICS CPMI transaction, but specify that TWasize=00128.
3. To enable your Natural program, use the sample Natural program AASNATN in Appendix G, Sample Programs as a guide.
Note: All screen logic or terminal input/output is replaced by calls to the iWay input/output program AASSUBC.
iWay Transaction Adapter for CICS (XML) User’s Guide D-3

Adabas/Natural Proxy Programs
D-4 iWay Software

APPENDIX E
Installing the Sample IWAYIVP and IWAYSAMP Programs in CICS
Topics:
• Installing and Configuring the Sample CICS Program IWAYIVP
• Installing and Configuring the Sample CICS Program IWAYSAMP
This section describes how to verify that you have correctly installed the adapter.
iWay Transaction Adapter for CICS (XML) User’s Guide E-1

Installing and Configuring the Sample CICS Program IWAYIVP
Installing and Configuring the Sample CICS Program IWAYIVPThe following procedure demonstrates how to install and configure the sample CICS program, IWAYIVP. Sample source code for the Cobol program IWAYIVP is provided in Appendix G, Sample Programs. For specific information for your site, see your CICS Systems Administrator.
Procedure: How to Install and Configure the Sample CICS Program IWAYIVP
To install and configure the sample CICS program, IWAYIVP:
1. Use the source code provided in Appendix G, Sample Programs, compile the program, and make it available to CICS.
2. Define the Cobol program to the CICS region.
a. Log onto the CICS region.
b. Issue the following command:
CEDA DEF PROG(IWAYIVP) GROUP(IWAY)
E-2 iWay Software

Installing the Sample IWAYIVP and IWAYSAMP Programs in CICS
The following image shows the Define Program (IWAYIVP) mainframe screen that appears after you issue the command.
3. Install the program in the CICS region.
a. Issue the following command:
CEDA INST PROG(IWAYIVP) GROUP(IWAY)
iWay Transaction Adapter for CICS (XML) User’s Guide E-3
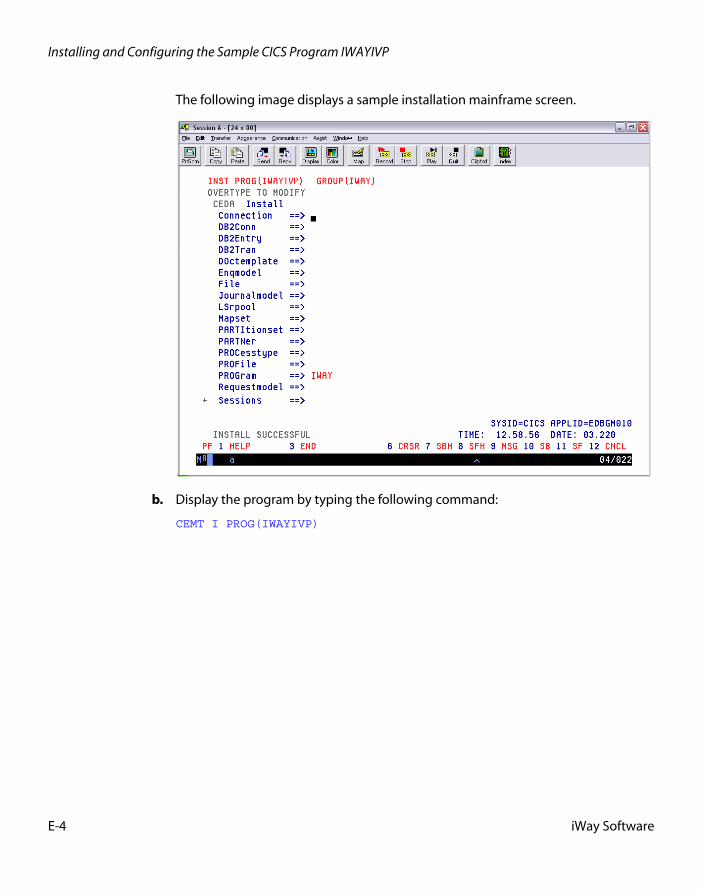
Installing and Configuring the Sample CICS Program IWAYIVP
The following image displays a sample installation mainframe screen.
b. Display the program by typing the following command:
CEMT I PROG(IWAYIVP)
E-4 iWay Software
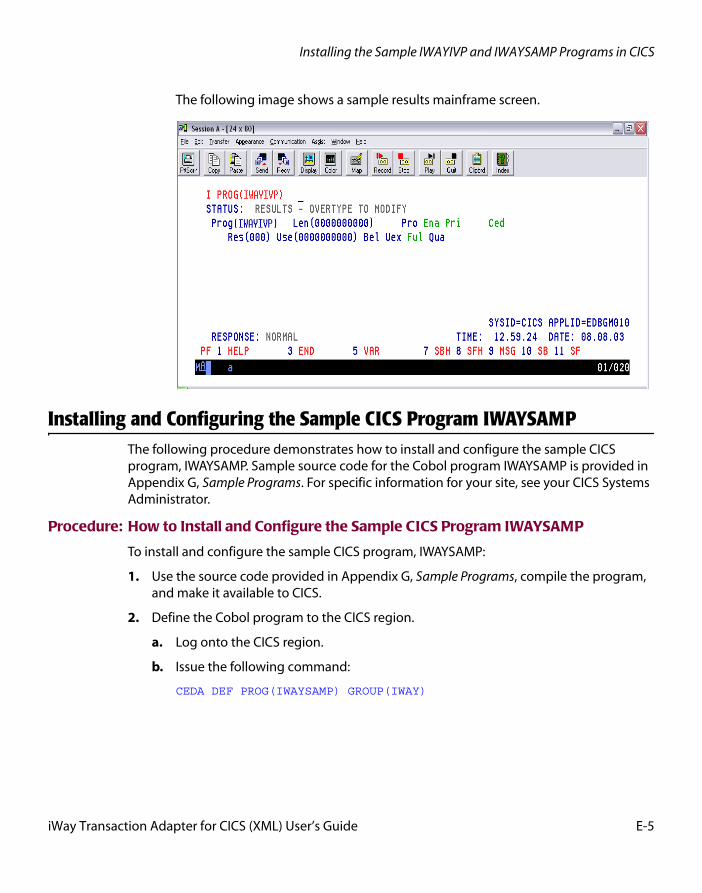
Installing the Sample IWAYIVP and IWAYSAMP Programs in CICS
The following image shows a sample results mainframe screen.
Installing and Configuring the Sample CICS Program IWAYSAMPThe following procedure demonstrates how to install and configure the sample CICS program, IWAYSAMP. Sample source code for the Cobol program IWAYSAMP is provided in Appendix G, Sample Programs. For specific information for your site, see your CICS Systems Administrator.
Procedure: How to Install and Configure the Sample CICS Program IWAYSAMP
To install and configure the sample CICS program, IWAYSAMP:
1. Use the source code provided in Appendix G, Sample Programs, compile the program, and make it available to CICS.
2. Define the Cobol program to the CICS region.
a. Log onto the CICS region.
b. Issue the following command:
CEDA DEF PROG(IWAYSAMP) GROUP(IWAY)
iWay Transaction Adapter for CICS (XML) User’s Guide E-5
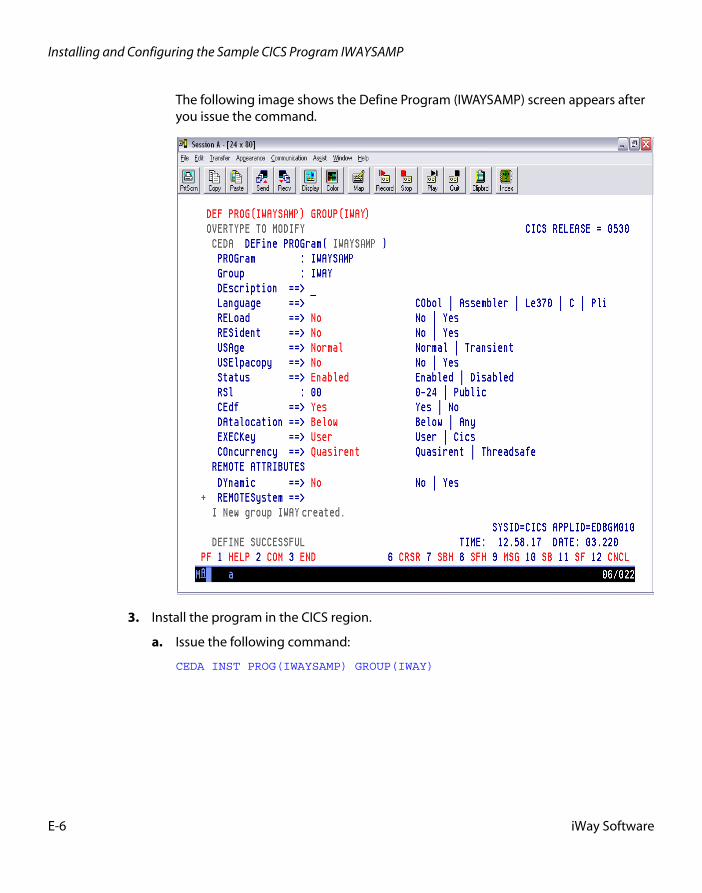
Installing and Configuring the Sample CICS Program IWAYSAMP
The following image shows the Define Program (IWAYSAMP) screen appears after you issue the command.
3. Install the program in the CICS region.
a. Issue the following command:
CEDA INST PROG(IWAYSAMP) GROUP(IWAY)
E-6 iWay Software
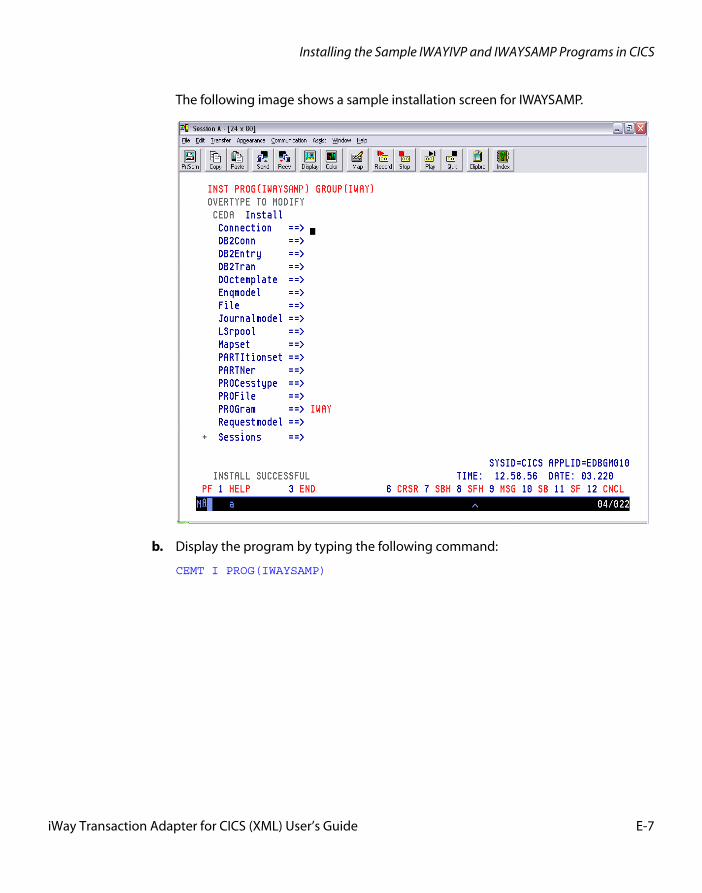
Installing the Sample IWAYIVP and IWAYSAMP Programs in CICS
The following image shows a sample installation screen for IWAYSAMP.
b. Display the program by typing the following command:
CEMT I PROG(IWAYSAMP)
iWay Transaction Adapter for CICS (XML) User’s Guide E-7
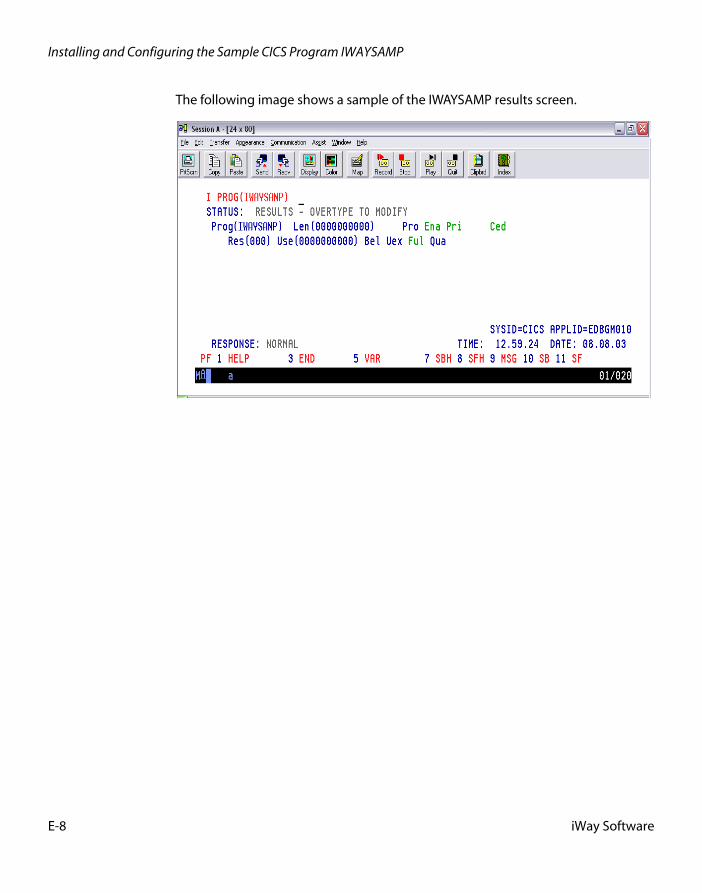
Installing and Configuring the Sample CICS Program IWAYSAMP
The following image shows a sample of the IWAYSAMP results screen.
E-8 iWay Software
APPENDIX F
Sample Requests, Schemas, and Cobol File Descriptions
Topics:
• Request Document for the Generic Transaction IWAYIVP
• Request Schema for the Generic Transaction IWAYIVP
• Response Schema for the Generic Transaction IWAYIVP
• Request Documents for the Program IWAYSAMP
• Request Schema for the Program IWAYSAMP
• Response Schema for the Program IWAYSAMP
• Request Document for the Program AASNATN
• Request Schema for the Program AASNATN
• Response Schema for the Program AASNATN
• Sample Cobol File Descriptions
After you create a connection to CICS, you can add CICS transactions using Application Explorer. The generic transaction is always added automatically and represents CICS services whose data will not be mapped to XML.
The documents and schemas for the sample programs are shown in the following topics. Also, the Cobol descriptions that were used as input for the sample CICS transactions are shown.
iWay Transaction Adapter for CICS (XML) User’s Guide F-1
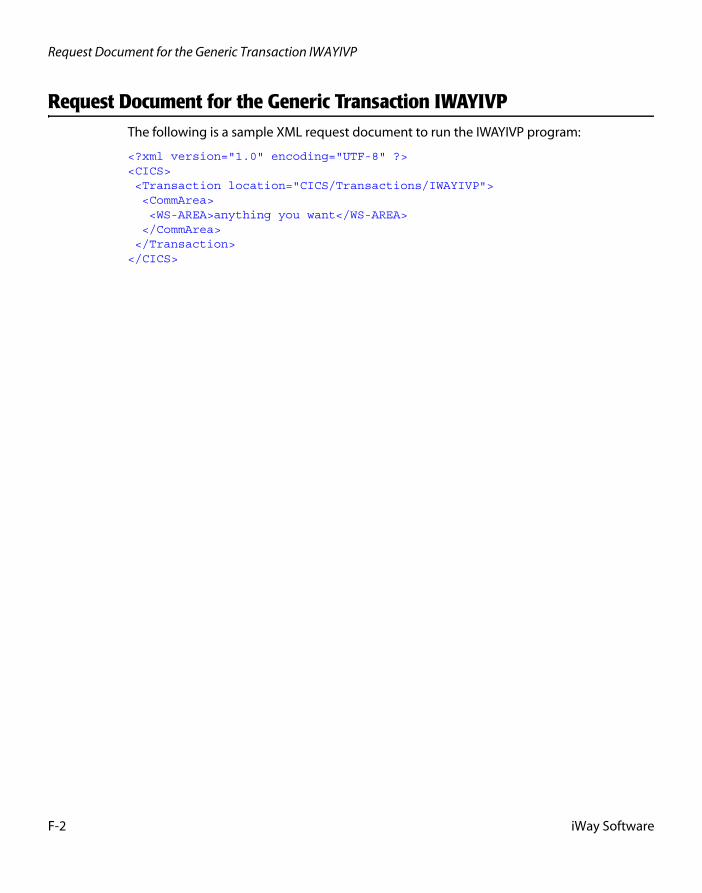
Request Document for the Generic Transaction IWAYIVP
Request Document for the Generic Transaction IWAYIVPThe following is a sample XML request document to run the IWAYIVP program:
<?xml version="1.0" encoding="UTF-8" ?><CICS> <Transaction location="CICS/Transactions/IWAYIVP"> <CommArea> <WS-AREA>anything you want</WS-AREA> </CommArea> </Transaction></CICS>
F-2 iWay Software
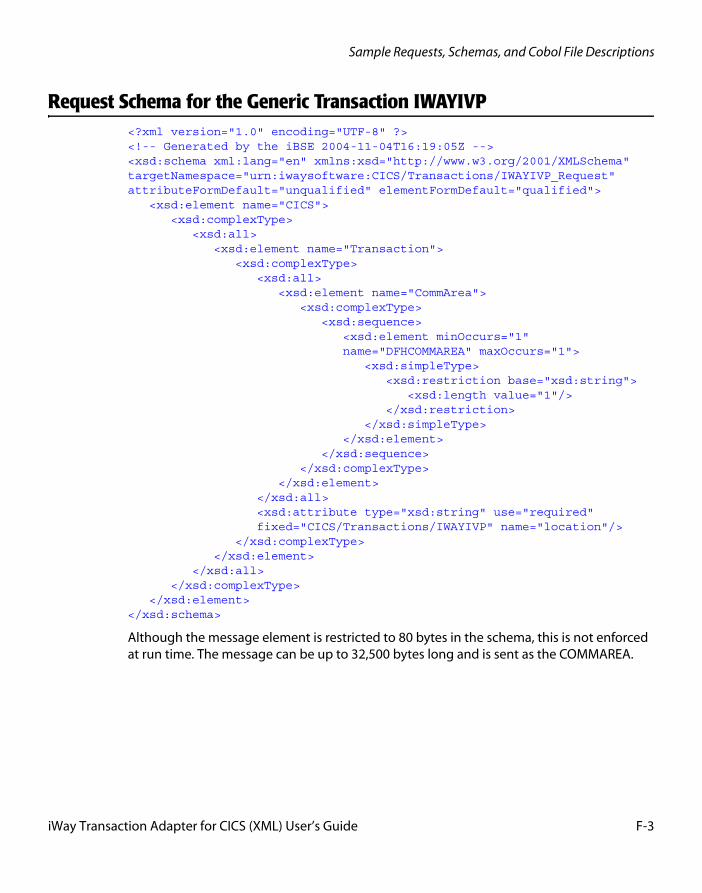
Sample Requests, Schemas, and Cobol File Descriptions
Request Schema for the Generic Transaction IWAYIVP<?xml version="1.0" encoding="UTF-8" ?><!-- Generated by the iBSE 2004-11-04T16:19:05Z --><xsd:schema xml:lang="en" xmlns:xsd="http://www.w3.org/2001/XMLSchema" targetNamespace="urn:iwaysoftware:CICS/Transactions/IWAYIVP_Request" attributeFormDefault="unqualified" elementFormDefault="qualified"> <xsd:element name="CICS"> <xsd:complexType> <xsd:all> <xsd:element name="Transaction"> <xsd:complexType> <xsd:all> <xsd:element name="CommArea"> <xsd:complexType> <xsd:sequence> <xsd:element minOccurs="1" name="DFHCOMMAREA" maxOccurs="1"> <xsd:simpleType> <xsd:restriction base="xsd:string"> <xsd:length value="1"/> </xsd:restriction> </xsd:simpleType> </xsd:element> </xsd:sequence> </xsd:complexType> </xsd:element> </xsd:all> <xsd:attribute type="xsd:string" use="required" fixed="CICS/Transactions/IWAYIVP" name="location"/> </xsd:complexType> </xsd:element> </xsd:all> </xsd:complexType> </xsd:element></xsd:schema>
Although the message element is restricted to 80 bytes in the schema, this is not enforced at run time. The message can be up to 32,500 bytes long and is sent as the COMMAREA.
iWay Transaction Adapter for CICS (XML) User’s Guide F-3
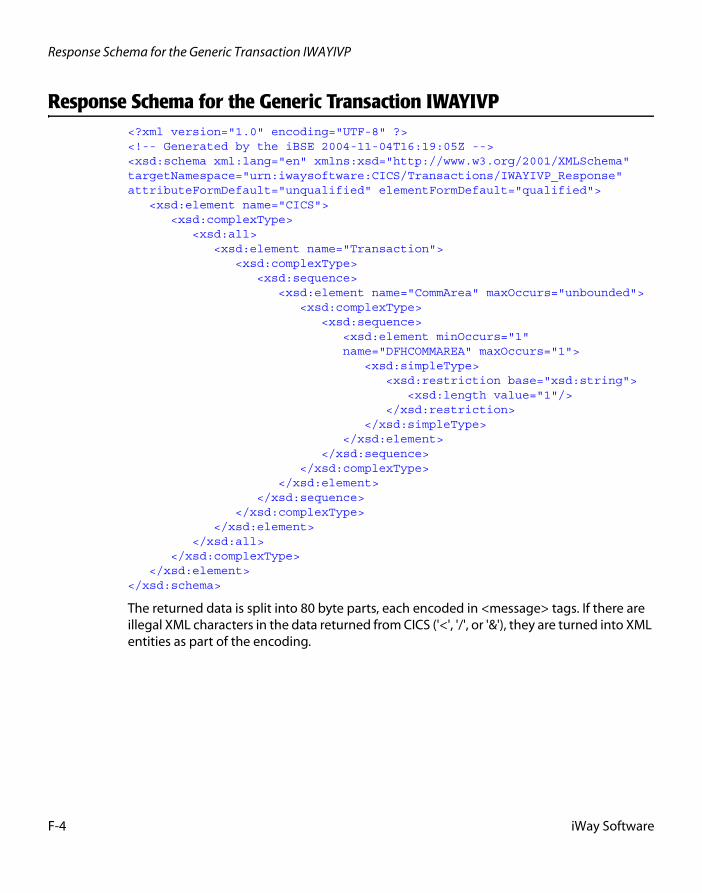
Response Schema for the Generic Transaction IWAYIVP
Response Schema for the Generic Transaction IWAYIVP<?xml version="1.0" encoding="UTF-8" ?><!-- Generated by the iBSE 2004-11-04T16:19:05Z --><xsd:schema xml:lang="en" xmlns:xsd="http://www.w3.org/2001/XMLSchema" targetNamespace="urn:iwaysoftware:CICS/Transactions/IWAYIVP_Response" attributeFormDefault="unqualified" elementFormDefault="qualified"> <xsd:element name="CICS"> <xsd:complexType> <xsd:all> <xsd:element name="Transaction"> <xsd:complexType> <xsd:sequence> <xsd:element name="CommArea" maxOccurs="unbounded"> <xsd:complexType> <xsd:sequence> <xsd:element minOccurs="1" name="DFHCOMMAREA" maxOccurs="1"> <xsd:simpleType> <xsd:restriction base="xsd:string"> <xsd:length value="1"/> </xsd:restriction> </xsd:simpleType> </xsd:element> </xsd:sequence> </xsd:complexType> </xsd:element> </xsd:sequence> </xsd:complexType> </xsd:element> </xsd:all> </xsd:complexType> </xsd:element></xsd:schema>
The returned data is split into 80 byte parts, each encoded in <message> tags. If there are illegal XML characters in the data returned from CICS ('<', '/', or '&'), they are turned into XML entities as part of the encoding.
F-4 iWay Software
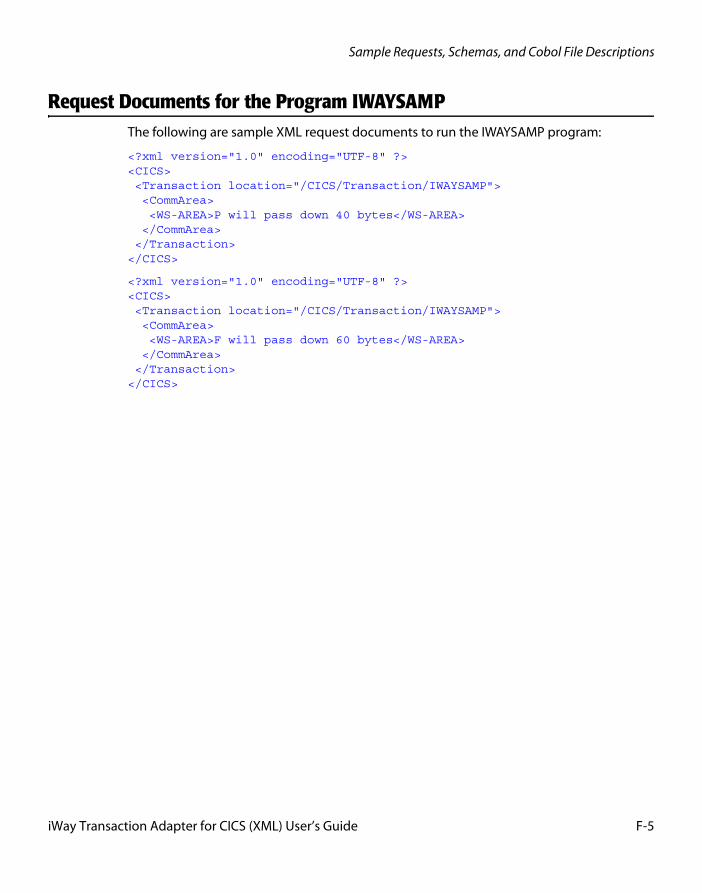
Sample Requests, Schemas, and Cobol File Descriptions
Request Documents for the Program IWAYSAMPThe following are sample XML request documents to run the IWAYSAMP program:
<?xml version="1.0" encoding="UTF-8" ?> <CICS> <Transaction location="/CICS/Transaction/IWAYSAMP"> <CommArea> <WS-AREA>P will pass down 40 bytes</WS-AREA> </CommArea> </Transaction></CICS>
<?xml version="1.0" encoding="UTF-8" ?><CICS> <Transaction location="/CICS/Transaction/IWAYSAMP"> <CommArea> <WS-AREA>F will pass down 60 bytes</WS-AREA> </CommArea> </Transaction></CICS>
iWay Transaction Adapter for CICS (XML) User’s Guide F-5
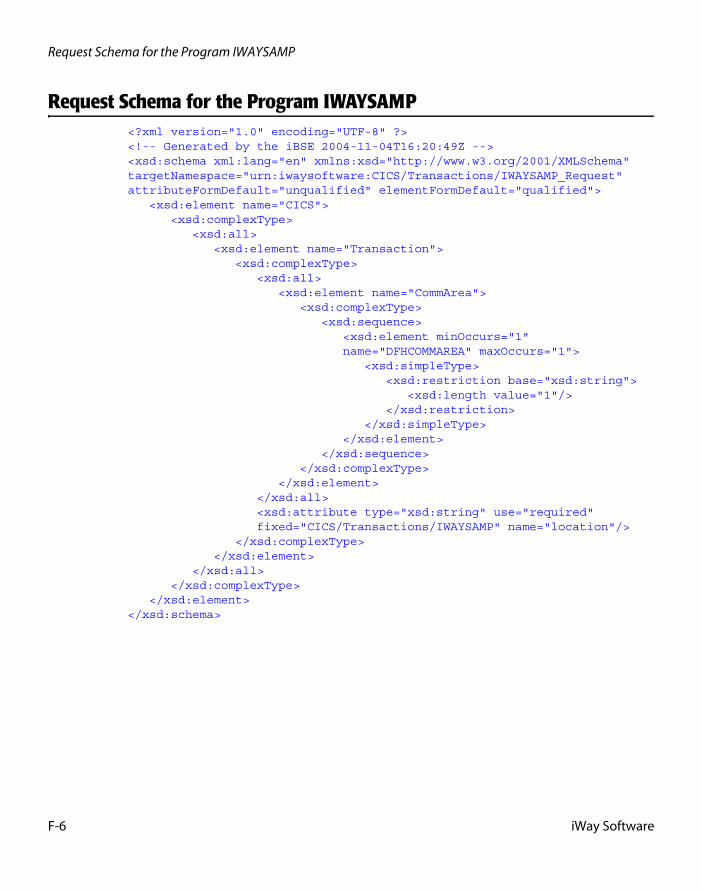
Request Schema for the Program IWAYSAMP
Request Schema for the Program IWAYSAMP <?xml version="1.0" encoding="UTF-8" ?><!-- Generated by the iBSE 2004-11-04T16:20:49Z --><xsd:schema xml:lang="en" xmlns:xsd="http://www.w3.org/2001/XMLSchema" targetNamespace="urn:iwaysoftware:CICS/Transactions/IWAYSAMP_Request" attributeFormDefault="unqualified" elementFormDefault="qualified"> <xsd:element name="CICS"> <xsd:complexType> <xsd:all> <xsd:element name="Transaction"> <xsd:complexType> <xsd:all> <xsd:element name="CommArea"> <xsd:complexType> <xsd:sequence> <xsd:element minOccurs="1" name="DFHCOMMAREA" maxOccurs="1"> <xsd:simpleType> <xsd:restriction base="xsd:string"> <xsd:length value="1"/> </xsd:restriction> </xsd:simpleType> </xsd:element> </xsd:sequence> </xsd:complexType> </xsd:element> </xsd:all> <xsd:attribute type="xsd:string" use="required" fixed="CICS/Transactions/IWAYSAMP" name="location"/> </xsd:complexType> </xsd:element> </xsd:all> </xsd:complexType> </xsd:element></xsd:schema>
F-6 iWay Software
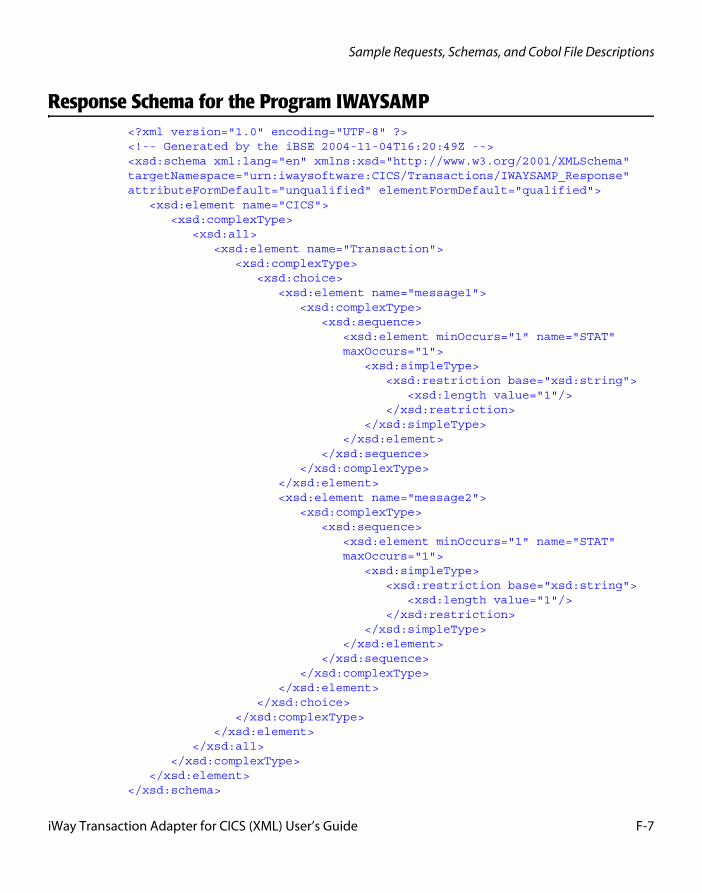
Sample Requests, Schemas, and Cobol File Descriptions
Response Schema for the Program IWAYSAMP<?xml version="1.0" encoding="UTF-8" ?><!-- Generated by the iBSE 2004-11-04T16:20:49Z --><xsd:schema xml:lang="en" xmlns:xsd="http://www.w3.org/2001/XMLSchema" targetNamespace="urn:iwaysoftware:CICS/Transactions/IWAYSAMP_Response" attributeFormDefault="unqualified" elementFormDefault="qualified"> <xsd:element name="CICS"> <xsd:complexType> <xsd:all> <xsd:element name="Transaction"> <xsd:complexType> <xsd:choice> <xsd:element name="message1"> <xsd:complexType> <xsd:sequence> <xsd:element minOccurs="1" name="STAT" maxOccurs="1"> <xsd:simpleType> <xsd:restriction base="xsd:string"> <xsd:length value="1"/> </xsd:restriction> </xsd:simpleType> </xsd:element> </xsd:sequence> </xsd:complexType> </xsd:element> <xsd:element name="message2"> <xsd:complexType> <xsd:sequence> <xsd:element minOccurs="1" name="STAT" maxOccurs="1"> <xsd:simpleType> <xsd:restriction base="xsd:string"> <xsd:length value="1"/> </xsd:restriction> </xsd:simpleType> </xsd:element> </xsd:sequence> </xsd:complexType> </xsd:element> </xsd:choice> </xsd:complexType> </xsd:element> </xsd:all> </xsd:complexType> </xsd:element></xsd:schema>
iWay Transaction Adapter for CICS (XML) User’s Guide F-7
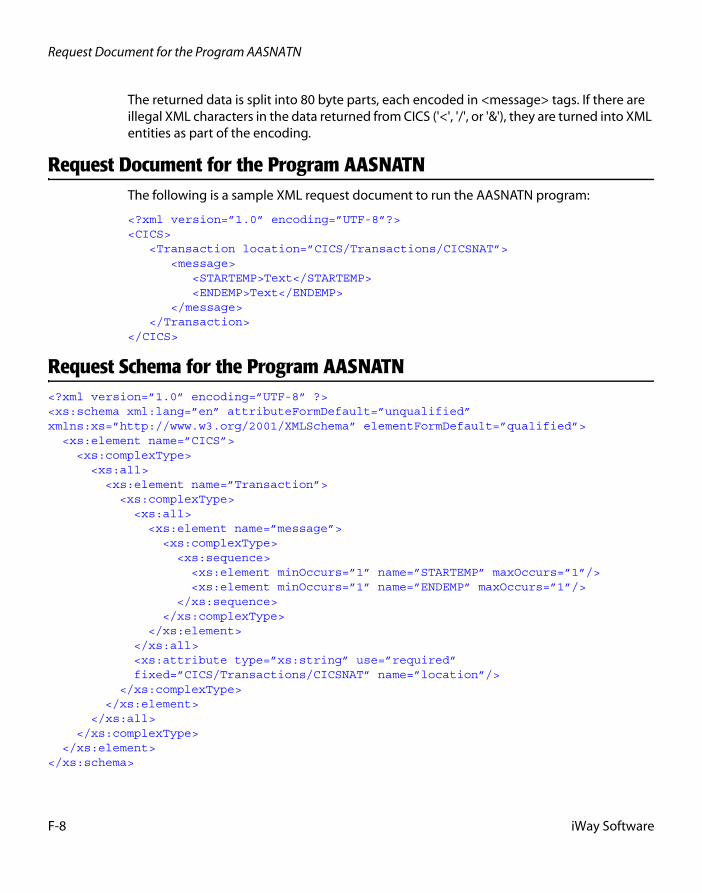
Request Document for the Program AASNATN
The returned data is split into 80 byte parts, each encoded in <message> tags. If there are illegal XML characters in the data returned from CICS ('<', '/', or '&'), they are turned into XML entities as part of the encoding.
Request Document for the Program AASNATNThe following is a sample XML request document to run the AASNATN program:
<?xml version=”1.0” encoding=”UTF-8”?><CICS> <Transaction location=”CICS/Transactions/CICSNAT”> <message> <STARTEMP>Text</STARTEMP> <ENDEMP>Text</ENDEMP> </message> </Transaction></CICS>
Request Schema for the Program AASNATN<?xml version=”1.0” encoding=”UTF-8” ?><xs:schema xml:lang=”en” attributeFormDefault=”unqualified” xmlns:xs=”http://www.w3.org/2001/XMLSchema” elementFormDefault=”qualified”> <xs:element name=”CICS”> <xs:complexType> <xs:all> <xs:element name=”Transaction”> <xs:complexType> <xs:all> <xs:element name=”message”> <xs:complexType> <xs:sequence> <xs:element minOccurs=”1” name=”STARTEMP” maxOccurs=”1”/> <xs:element minOccurs=”1” name=”ENDEMP” maxOccurs=”1”/> </xs:sequence> </xs:complexType> </xs:element> </xs:all> <xs:attribute type=”xs:string” use=”required” fixed=”CICS/Transactions/CICSNAT” name=”location”/> </xs:complexType> </xs:element> </xs:all> </xs:complexType> </xs:element></xs:schema>
F-8 iWay Software
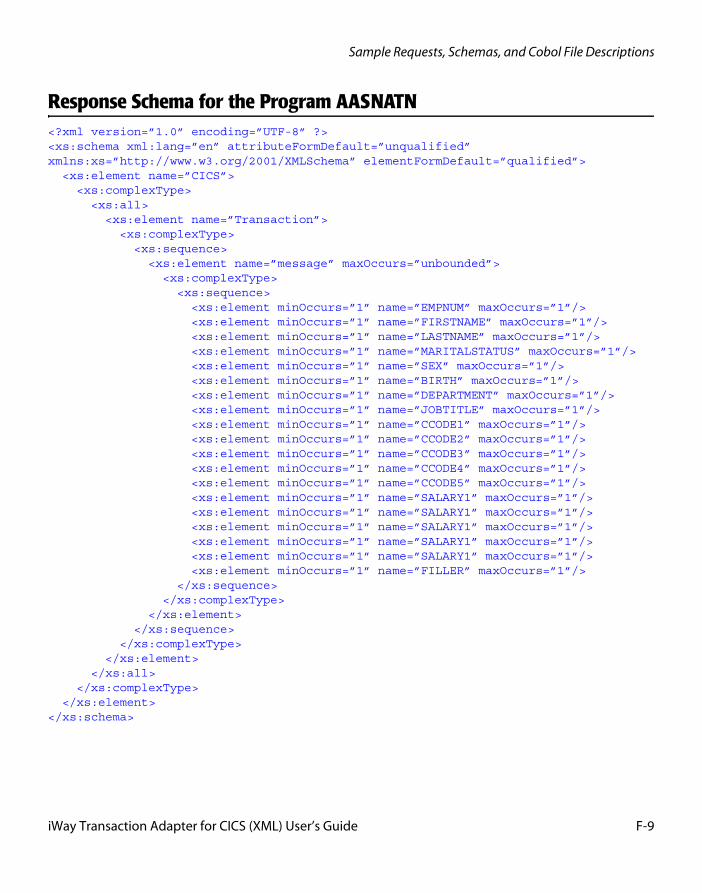
Sample Requests, Schemas, and Cobol File Descriptions
Response Schema for the Program AASNATN<?xml version=”1.0” encoding=”UTF-8” ?><xs:schema xml:lang=”en” attributeFormDefault=”unqualified” xmlns:xs=”http://www.w3.org/2001/XMLSchema” elementFormDefault=”qualified”> <xs:element name=”CICS”> <xs:complexType> <xs:all> <xs:element name=”Transaction”> <xs:complexType> <xs:sequence> <xs:element name=”message” maxOccurs=”unbounded”> <xs:complexType> <xs:sequence> <xs:element minOccurs=”1” name=”EMPNUM” maxOccurs=”1”/> <xs:element minOccurs=”1” name=”FIRSTNAME” maxOccurs=”1”/> <xs:element minOccurs=”1” name=”LASTNAME” maxOccurs=”1”/> <xs:element minOccurs=”1” name=”MARITALSTATUS” maxOccurs=”1”/> <xs:element minOccurs=”1” name=”SEX” maxOccurs=”1”/> <xs:element minOccurs=”1” name=”BIRTH” maxOccurs=”1”/> <xs:element minOccurs=”1” name=”DEPARTMENT” maxOccurs=”1”/> <xs:element minOccurs=”1” name=”JOBTITLE” maxOccurs=”1”/> <xs:element minOccurs=”1” name=”CCODE1” maxOccurs=”1”/> <xs:element minOccurs=”1” name=”CCODE2” maxOccurs=”1”/> <xs:element minOccurs=”1” name=”CCODE3” maxOccurs=”1”/> <xs:element minOccurs=”1” name=”CCODE4” maxOccurs=”1”/> <xs:element minOccurs=”1” name=”CCODE5” maxOccurs=”1”/> <xs:element minOccurs=”1” name=”SALARY1” maxOccurs=”1”/> <xs:element minOccurs=”1” name=”SALARY1” maxOccurs=”1”/> <xs:element minOccurs=”1” name=”SALARY1” maxOccurs=”1”/> <xs:element minOccurs=”1” name=”SALARY1” maxOccurs=”1”/> <xs:element minOccurs=”1” name=”SALARY1” maxOccurs=”1”/> <xs:element minOccurs=”1” name=”FILLER” maxOccurs=”1”/> </xs:sequence> </xs:complexType> </xs:element> </xs:sequence> </xs:complexType> </xs:element> </xs:all> </xs:complexType> </xs:element></xs:schema>
iWay Transaction Adapter for CICS (XML) User’s Guide F-9
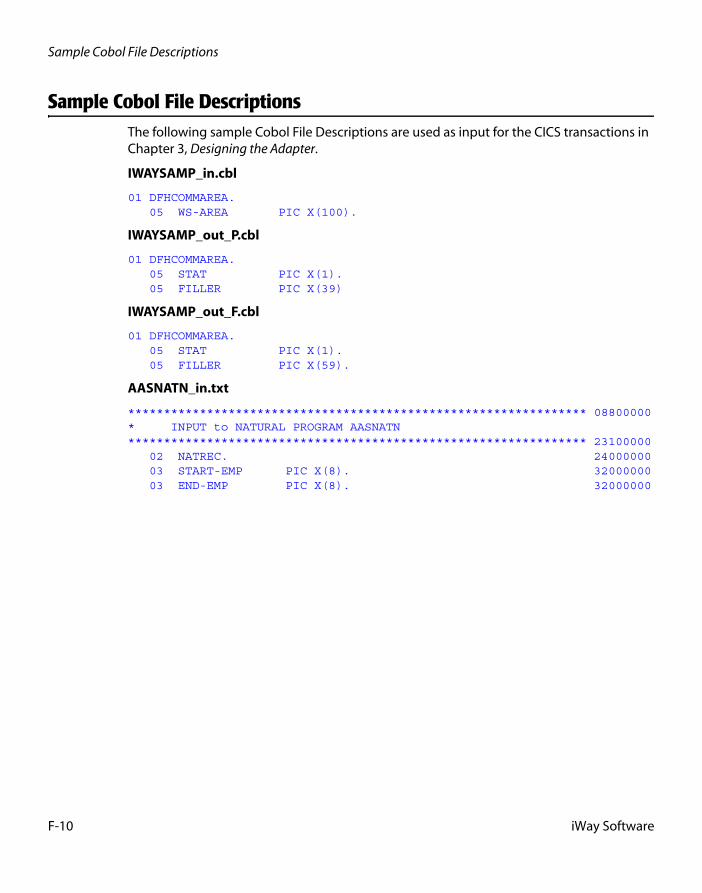
Sample Cobol File Descriptions
Sample Cobol File DescriptionsThe following sample Cobol File Descriptions are used as input for the CICS transactions in Chapter 3, Designing the Adapter.
IWAYSAMP_in.cbl
01 DFHCOMMAREA. 05 WS-AREA PIC X(100).
IWAYSAMP_out_P.cbl
01 DFHCOMMAREA. 05 STAT PIC X(1). 05 FILLER PIC X(39)
IWAYSAMP_out_F.cbl
01 DFHCOMMAREA. 05 STAT PIC X(1). 05 FILLER PIC X(59).
AASNATN_in.txt
**************************************************************** 08800000* INPUT to NATURAL PROGRAM AASNATN**************************************************************** 23100000 02 NATREC. 24000000 03 START-EMP PIC X(8). 32000000 03 END-EMP PIC X(8). 32000000
F-10 iWay Software
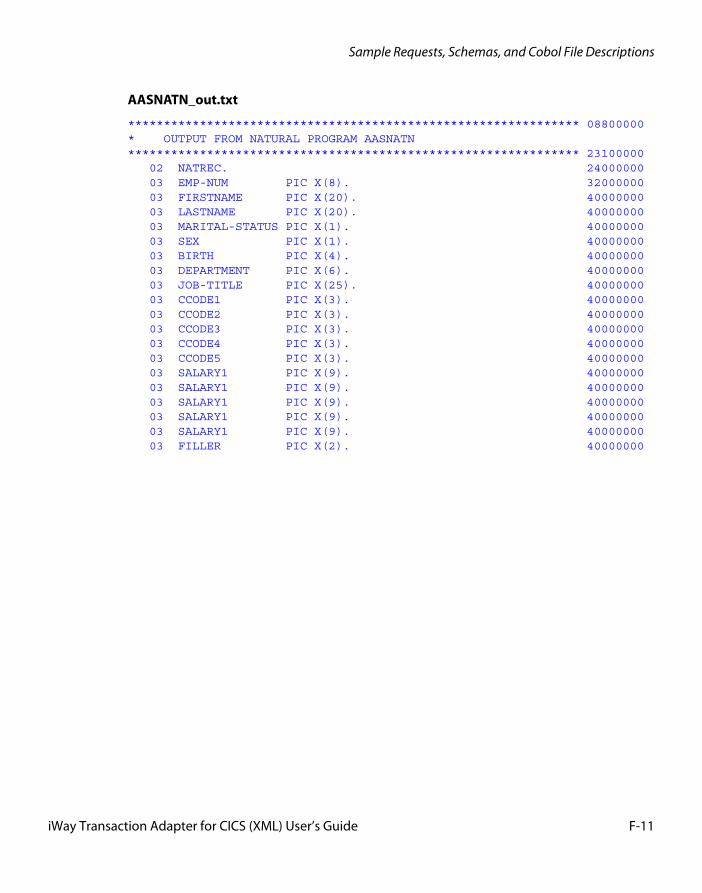
Sample Requests, Schemas, and Cobol File Descriptions
AASNATN_out.txt
*************************************************************** 08800000* OUTPUT FROM NATURAL PROGRAM AASNATN*************************************************************** 23100000 02 NATREC. 24000000 03 EMP-NUM PIC X(8). 32000000 03 FIRSTNAME PIC X(20). 40000000 03 LASTNAME PIC X(20). 40000000 03 MARITAL-STATUS PIC X(1). 40000000 03 SEX PIC X(1). 40000000 03 BIRTH PIC X(4). 40000000 03 DEPARTMENT PIC X(6). 40000000 03 JOB-TITLE PIC X(25). 40000000 03 CCODE1 PIC X(3). 40000000 03 CCODE2 PIC X(3). 40000000 03 CCODE3 PIC X(3). 40000000 03 CCODE4 PIC X(3). 40000000 03 CCODE5 PIC X(3). 40000000 03 SALARY1 PIC X(9). 40000000 03 SALARY1 PIC X(9). 40000000 03 SALARY1 PIC X(9). 40000000 03 SALARY1 PIC X(9). 40000000 03 SALARY1 PIC X(9). 40000000 03 FILLER PIC X(2). 40000000
iWay Transaction Adapter for CICS (XML) User’s Guide F-11

Sample Cobol File Descriptions
F-12 iWay Software

APPENDIX G
Sample Programs
Topics:
• IWAYIVP Program
• IWAYSAMP Program
• CICS TCP/IP Sockets Program for Mainframe
• CICS TCP/IP Sockets Program for TX
This appendix includes the source code for the sample programs.
iWay Transaction Adapter for CICS (XML) User’s Guide G-1
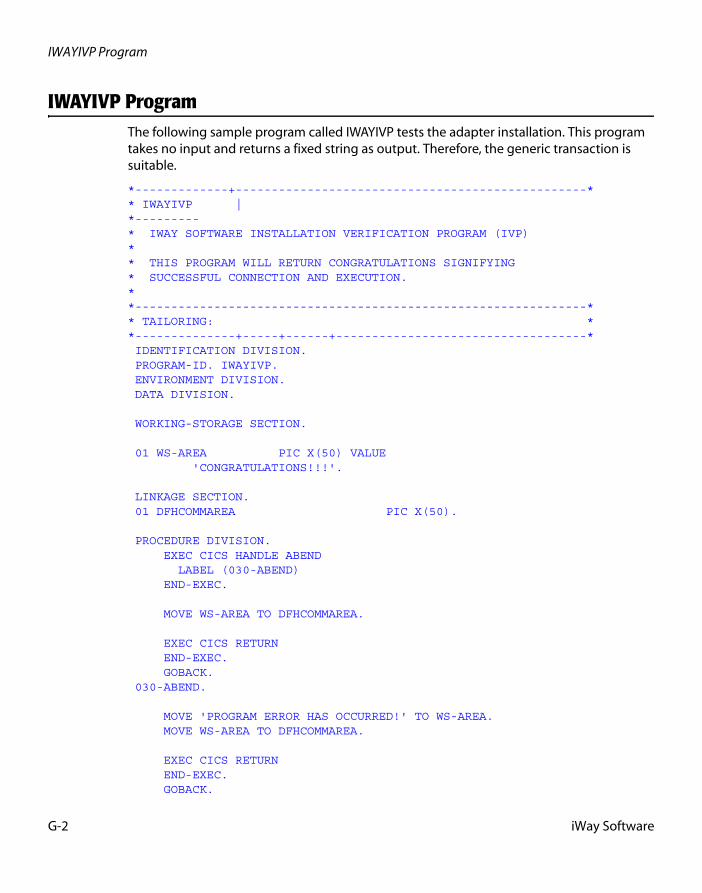
IWAYIVP Program
IWAYIVP ProgramThe following sample program called IWAYIVP tests the adapter installation. This program takes no input and returns a fixed string as output. Therefore, the generic transaction is suitable.
*-------------+-------------------------------------------------** IWAYIVP |*---------* IWAY SOFTWARE INSTALLATION VERIFICATION PROGRAM (IVP)** THIS PROGRAM WILL RETURN CONGRATULATIONS SIGNIFYING* SUCCESSFUL CONNECTION AND EXECUTION.**---------------------------------------------------------------** TAILORING: **--------------+-----+------+-----------------------------------* IDENTIFICATION DIVISION. PROGRAM-ID. IWAYIVP. ENVIRONMENT DIVISION. DATA DIVISION. WORKING-STORAGE SECTION. 01 WS-AREA PIC X(50) VALUE 'CONGRATULATIONS!!!'. LINKAGE SECTION. 01 DFHCOMMAREA PIC X(50). PROCEDURE DIVISION. EXEC CICS HANDLE ABEND LABEL (030-ABEND) END-EXEC. MOVE WS-AREA TO DFHCOMMAREA. EXEC CICS RETURN END-EXEC. GOBACK. 030-ABEND. MOVE 'PROGRAM ERROR HAS OCCURRED!' TO WS-AREA. MOVE WS-AREA TO DFHCOMMAREA. EXEC CICS RETURN END-EXEC. GOBACK.
G-2 iWay Software
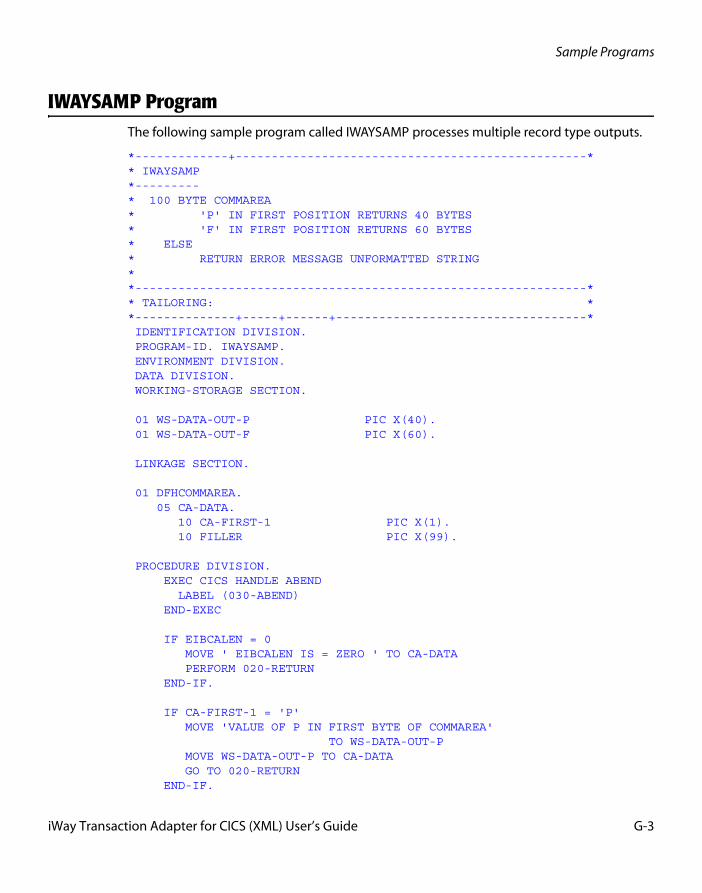
Sample Programs
IWAYSAMP ProgramThe following sample program called IWAYSAMP processes multiple record type outputs.
*-------------+-------------------------------------------------** IWAYSAMP*---------* 100 BYTE COMMAREA* 'P' IN FIRST POSITION RETURNS 40 BYTES* 'F' IN FIRST POSITION RETURNS 60 BYTES* ELSE* RETURN ERROR MESSAGE UNFORMATTED STRING**---------------------------------------------------------------** TAILORING: **--------------+-----+------+-----------------------------------* IDENTIFICATION DIVISION. PROGRAM-ID. IWAYSAMP. ENVIRONMENT DIVISION. DATA DIVISION. WORKING-STORAGE SECTION. 01 WS-DATA-OUT-P PIC X(40). 01 WS-DATA-OUT-F PIC X(60). LINKAGE SECTION. 01 DFHCOMMAREA. 05 CA-DATA. 10 CA-FIRST-1 PIC X(1). 10 FILLER PIC X(99). PROCEDURE DIVISION. EXEC CICS HANDLE ABEND LABEL (030-ABEND) END-EXEC IF EIBCALEN = 0 MOVE ' EIBCALEN IS = ZERO ' TO CA-DATA PERFORM 020-RETURN END-IF. IF CA-FIRST-1 = 'P' MOVE 'VALUE OF P IN FIRST BYTE OF COMMAREA' TO WS-DATA-OUT-P MOVE WS-DATA-OUT-P TO CA-DATA GO TO 020-RETURN END-IF.
iWay Transaction Adapter for CICS (XML) User’s Guide G-3
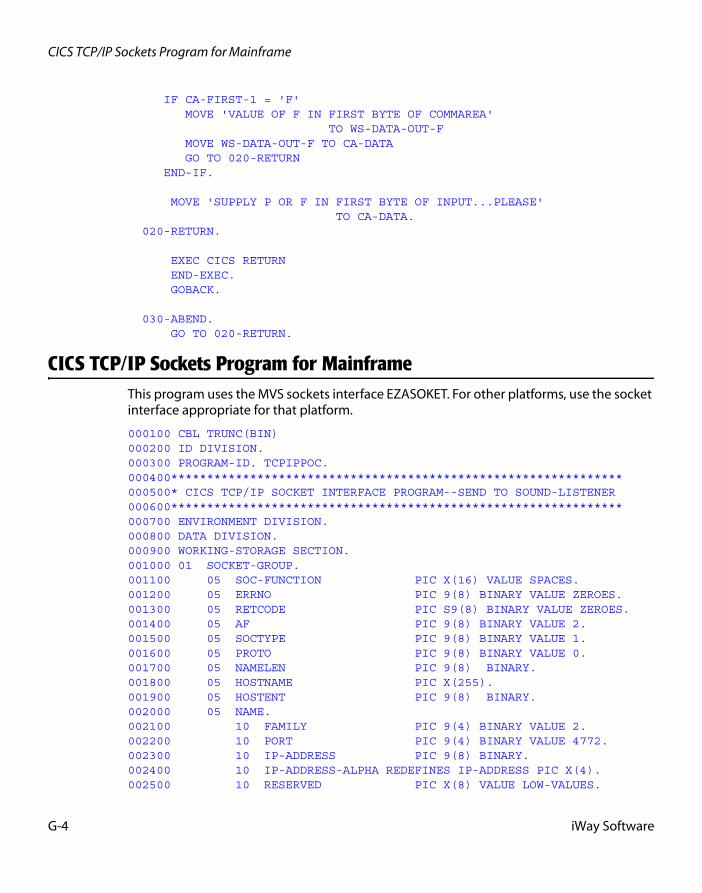
CICS TCP/IP Sockets Program for Mainframe
IF CA-FIRST-1 = 'F' MOVE 'VALUE OF F IN FIRST BYTE OF COMMAREA' TO WS-DATA-OUT-F MOVE WS-DATA-OUT-F TO CA-DATA GO TO 020-RETURN END-IF. MOVE 'SUPPLY P OR F IN FIRST BYTE OF INPUT...PLEASE' TO CA-DATA. 020-RETURN. EXEC CICS RETURN END-EXEC. GOBACK. 030-ABEND. GO TO 020-RETURN.
CICS TCP/IP Sockets Program for MainframeThis program uses the MVS sockets interface EZASOKET. For other platforms, use the socket interface appropriate for that platform.
000100 CBL TRUNC(BIN)000200 ID DIVISION.000300 PROGRAM-ID. TCPIPPOC.000400***************************************************************000500* CICS TCP/IP SOCKET INTERFACE PROGRAM--SEND TO SOUND-LISTENER000600***************************************************************000700 ENVIRONMENT DIVISION.000800 DATA DIVISION.000900 WORKING-STORAGE SECTION.001000 01 SOCKET-GROUP.001100 05 SOC-FUNCTION PIC X(16) VALUE SPACES.001200 05 ERRNO PIC 9(8) BINARY VALUE ZEROES.001300 05 RETCODE PIC S9(8) BINARY VALUE ZEROES.001400 05 AF PIC 9(8) BINARY VALUE 2.001500 05 SOCTYPE PIC 9(8) BINARY VALUE 1.001600 05 PROTO PIC 9(8) BINARY VALUE 0.001700 05 NAMELEN PIC 9(8) BINARY.001800 05 HOSTNAME PIC X(255).001900 05 HOSTENT PIC 9(8) BINARY.002000 05 NAME.002100 10 FAMILY PIC 9(4) BINARY VALUE 2.002200 10 PORT PIC 9(4) BINARY VALUE 4772.002300 10 IP-ADDRESS PIC 9(8) BINARY.002400 10 IP-ADDRESS-ALPHA REDEFINES IP-ADDRESS PIC X(4).002500 10 RESERVED PIC X(8) VALUE LOW-VALUES.
G-4 iWay Software
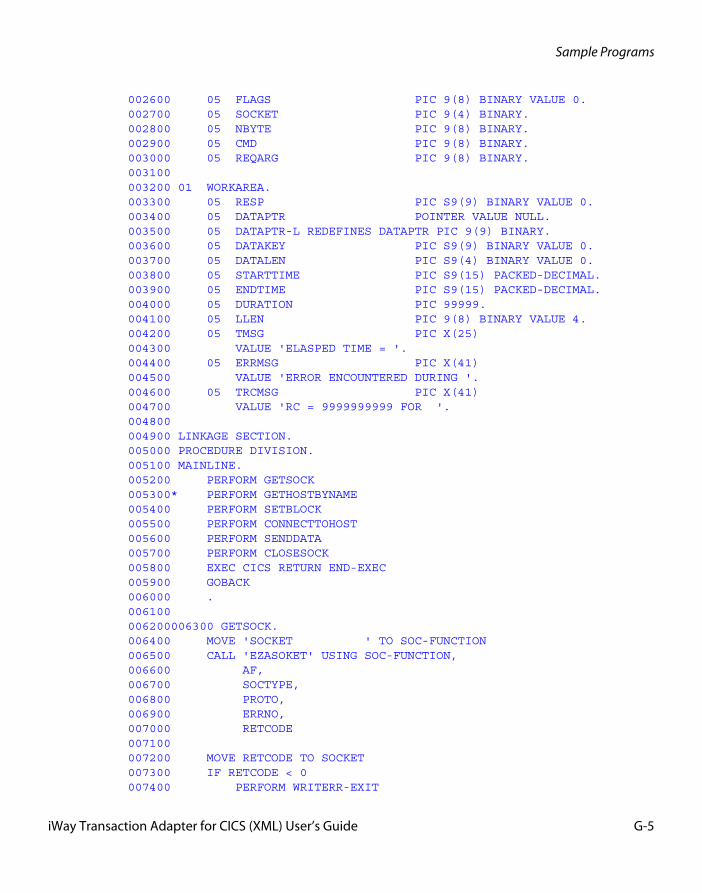
Sample Programs
002600 05 FLAGS PIC 9(8) BINARY VALUE 0.002700 05 SOCKET PIC 9(4) BINARY.002800 05 NBYTE PIC 9(8) BINARY.002900 05 CMD PIC 9(8) BINARY.003000 05 REQARG PIC 9(8) BINARY.003100003200 01 WORKAREA.003300 05 RESP PIC S9(9) BINARY VALUE 0.003400 05 DATAPTR POINTER VALUE NULL.003500 05 DATAPTR-L REDEFINES DATAPTR PIC 9(9) BINARY.003600 05 DATAKEY PIC S9(9) BINARY VALUE 0.003700 05 DATALEN PIC S9(4) BINARY VALUE 0.003800 05 STARTTIME PIC S9(15) PACKED-DECIMAL.003900 05 ENDTIME PIC S9(15) PACKED-DECIMAL.004000 05 DURATION PIC 99999.004100 05 LLEN PIC 9(8) BINARY VALUE 4.004200 05 TMSG PIC X(25)004300 VALUE 'ELASPED TIME = '.004400 05 ERRMSG PIC X(41)004500 VALUE 'ERROR ENCOUNTERED DURING '.004600 05 TRCMSG PIC X(41)004700 VALUE 'RC = 9999999999 FOR '.004800004900 LINKAGE SECTION.005000 PROCEDURE DIVISION.005100 MAINLINE.005200 PERFORM GETSOCK005300* PERFORM GETHOSTBYNAME005400 PERFORM SETBLOCK005500 PERFORM CONNECTTOHOST005600 PERFORM SENDDATA005700 PERFORM CLOSESOCK005800 EXEC CICS RETURN END-EXEC005900 GOBACK006000 .006100006200006300 GETSOCK.006400 MOVE 'SOCKET ' TO SOC-FUNCTION006500 CALL 'EZASOKET' USING SOC-FUNCTION,006600 AF,006700 SOCTYPE,006800 PROTO,006900 ERRNO,007000 RETCODE007100007200 MOVE RETCODE TO SOCKET007300 IF RETCODE < 0007400 PERFORM WRITERR-EXIT
iWay Transaction Adapter for CICS (XML) User’s Guide G-5
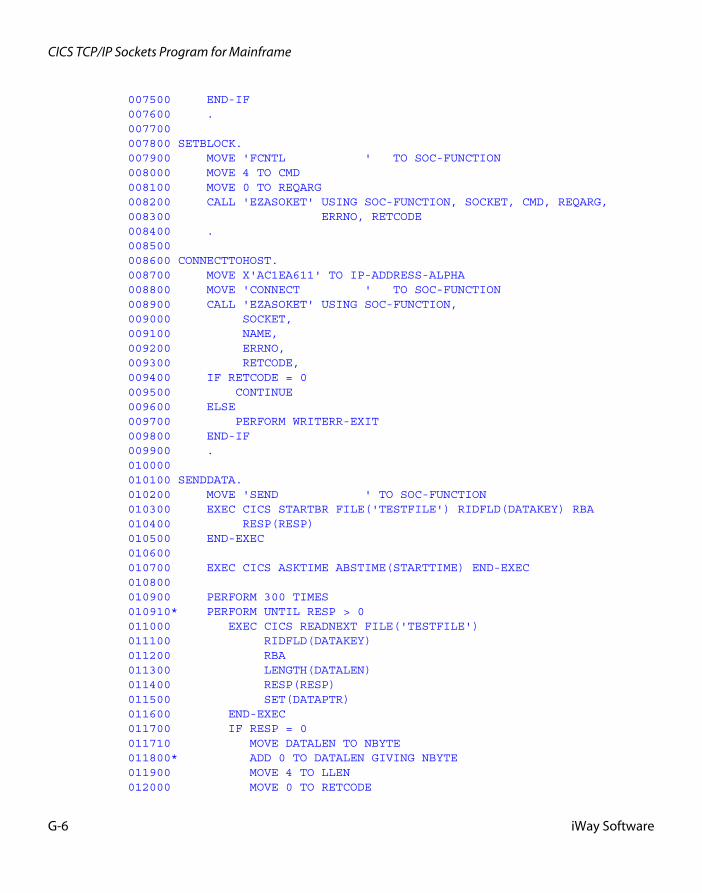
CICS TCP/IP Sockets Program for Mainframe
007500 END-IF007600 .007700007800 SETBLOCK.007900 MOVE 'FCNTL ' TO SOC-FUNCTION008000 MOVE 4 TO CMD008100 MOVE 0 TO REQARG008200 CALL 'EZASOKET' USING SOC-FUNCTION, SOCKET, CMD, REQARG,008300 ERRNO, RETCODE008400 .008500008600 CONNECTTOHOST.008700 MOVE X'AC1EA611' TO IP-ADDRESS-ALPHA008800 MOVE 'CONNECT ' TO SOC-FUNCTION008900 CALL 'EZASOKET' USING SOC-FUNCTION,009000 SOCKET,009100 NAME,009200 ERRNO,009300 RETCODE,009400 IF RETCODE = 0009500 CONTINUE009600 ELSE009700 PERFORM WRITERR-EXIT009800 END-IF009900 .010000010100 SENDDATA.010200 MOVE 'SEND ' TO SOC-FUNCTION010300 EXEC CICS STARTBR FILE('TESTFILE') RIDFLD(DATAKEY) RBA010400 RESP(RESP)010500 END-EXEC010600010700 EXEC CICS ASKTIME ABSTIME(STARTTIME) END-EXEC010800010900 PERFORM 300 TIMES010910* PERFORM UNTIL RESP > 0011000 EXEC CICS READNEXT FILE('TESTFILE')011100 RIDFLD(DATAKEY)011200 RBA011300 LENGTH(DATALEN)011400 RESP(RESP)011500 SET(DATAPTR)011600 END-EXEC011700 IF RESP = 0011710 MOVE DATALEN TO NBYTE011800* ADD 0 TO DATALEN GIVING NBYTE011900 MOVE 4 TO LLEN012000 MOVE 0 TO RETCODE
G-6 iWay Software
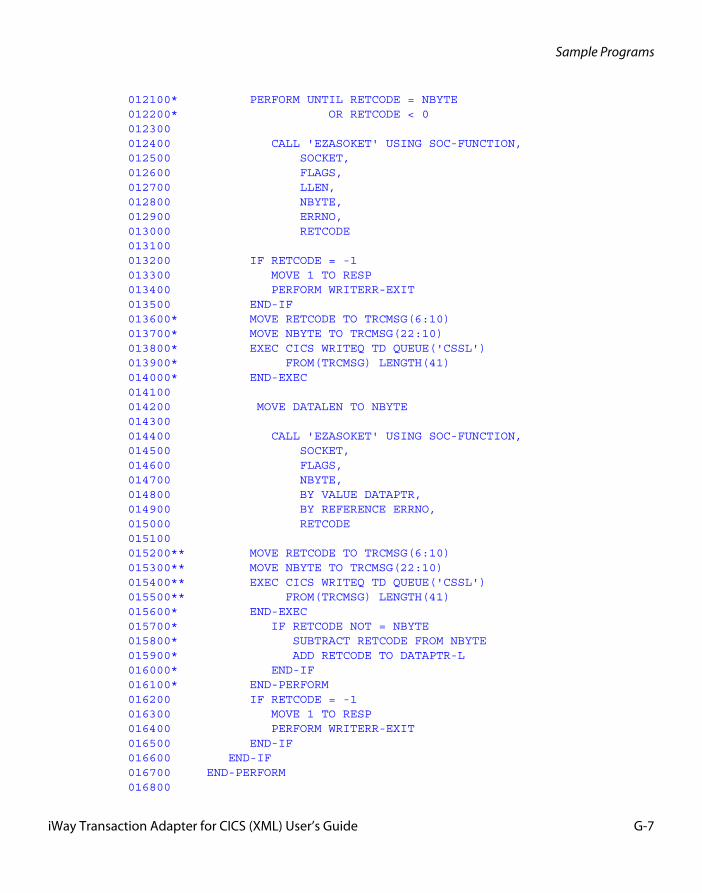
Sample Programs
012100* PERFORM UNTIL RETCODE = NBYTE012200* OR RETCODE < 0012300012400 CALL 'EZASOKET' USING SOC-FUNCTION,012500 SOCKET,012600 FLAGS,012700 LLEN,012800 NBYTE,012900 ERRNO,013000 RETCODE013100013200 IF RETCODE = -1013300 MOVE 1 TO RESP013400 PERFORM WRITERR-EXIT013500 END-IF013600* MOVE RETCODE TO TRCMSG(6:10)013700* MOVE NBYTE TO TRCMSG(22:10)013800* EXEC CICS WRITEQ TD QUEUE('CSSL')013900* FROM(TRCMSG) LENGTH(41)014000* END-EXEC014100014200 MOVE DATALEN TO NBYTE014300014400 CALL 'EZASOKET' USING SOC-FUNCTION,014500 SOCKET,014600 FLAGS,014700 NBYTE,014800 BY VALUE DATAPTR,014900 BY REFERENCE ERRNO,015000 RETCODE015100015200** MOVE RETCODE TO TRCMSG(6:10)015300** MOVE NBYTE TO TRCMSG(22:10)015400** EXEC CICS WRITEQ TD QUEUE('CSSL')015500** FROM(TRCMSG) LENGTH(41)015600* END-EXEC015700* IF RETCODE NOT = NBYTE015800* SUBTRACT RETCODE FROM NBYTE015900* ADD RETCODE TO DATAPTR-L016000* END-IF016100* END-PERFORM016200 IF RETCODE = -1016300 MOVE 1 TO RESP016400 PERFORM WRITERR-EXIT016500 END-IF016600 END-IF016700 END-PERFORM016800
iWay Transaction Adapter for CICS (XML) User’s Guide G-7
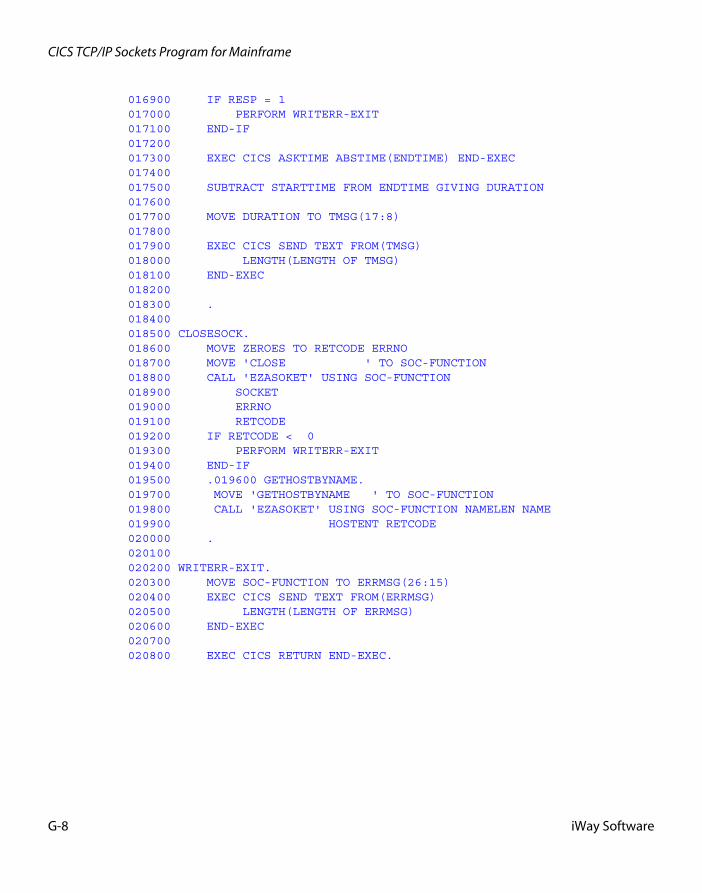
CICS TCP/IP Sockets Program for Mainframe
016900 IF RESP = 1017000 PERFORM WRITERR-EXIT017100 END-IF017200017300 EXEC CICS ASKTIME ABSTIME(ENDTIME) END-EXEC017400017500 SUBTRACT STARTTIME FROM ENDTIME GIVING DURATION017600017700 MOVE DURATION TO TMSG(17:8)017800017900 EXEC CICS SEND TEXT FROM(TMSG)018000 LENGTH(LENGTH OF TMSG)018100 END-EXEC018200018300 .018400018500 CLOSESOCK.018600 MOVE ZEROES TO RETCODE ERRNO018700 MOVE 'CLOSE ' TO SOC-FUNCTION018800 CALL 'EZASOKET' USING SOC-FUNCTION018900 SOCKET019000 ERRNO019100 RETCODE019200 IF RETCODE < 0019300 PERFORM WRITERR-EXIT019400 END-IF019500 .019600 GETHOSTBYNAME.019700 MOVE 'GETHOSTBYNAME ' TO SOC-FUNCTION019800 CALL 'EZASOKET' USING SOC-FUNCTION NAMELEN NAME019900 HOSTENT RETCODE020000 .020100020200 WRITERR-EXIT.020300 MOVE SOC-FUNCTION TO ERRMSG(26:15)020400 EXEC CICS SEND TEXT FROM(ERRMSG)020500 LENGTH(LENGTH OF ERRMSG)020600 END-EXEC020700020800 EXEC CICS RETURN END-EXEC.
G-8 iWay Software
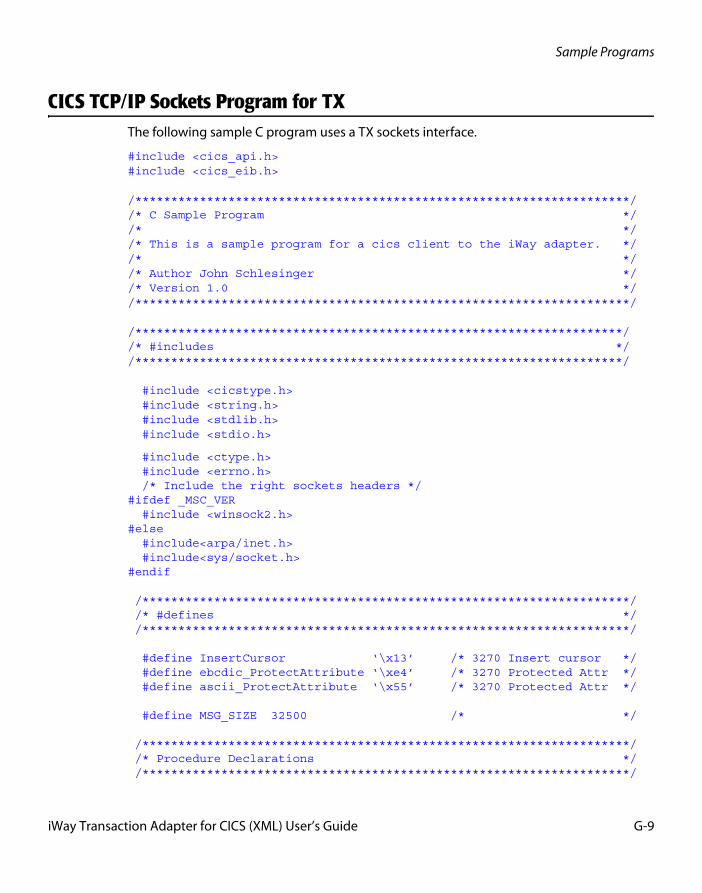
Sample Programs
CICS TCP/IP Sockets Program for TXThe following sample C program uses a TX sockets interface.
#include <cics_api.h>#include <cics_eib.h> /*********************************************************************//* C Sample Program *//* *//* This is a sample program for a cics client to the iWay adapter. *//* *//* Author John Schlesinger *//* Version 1.0 *//*********************************************************************/ /********************************************************************//* #includes *//********************************************************************/ #include <cicstype.h> #include <string.h> #include <stdlib.h> #include <stdio.h>
#include <ctype.h> #include <errno.h> /* Include the right sockets headers */#ifdef _MSC_VER #include <winsock2.h>#else #include<arpa/inet.h> #include<sys/socket.h>#endif /********************************************************************/ /* #defines */ /********************************************************************/ #define InsertCursor ‘\x13’ /* 3270 Insert cursor */ #define ebcdic_ProtectAttribute ‘\xe4’ /* 3270 Protected Attr */ #define ascii_ProtectAttribute ‘\x55’ /* 3270 Protected Attr */ #define MSG_SIZE 32500 /* */ /********************************************************************/ /* Procedure Declarations */ /********************************************************************/
iWay Transaction Adapter for CICS (XML) User’s Guide G-9
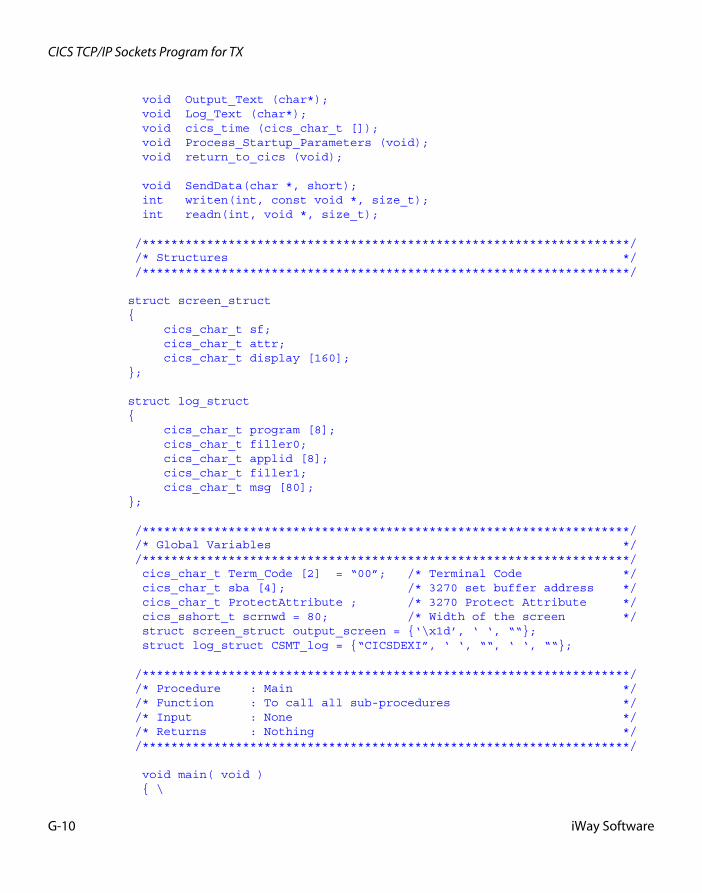
CICS TCP/IP Sockets Program for TX
void Output_Text (char*); void Log_Text (char*); void cics_time (cics_char_t []); void Process_Startup_Parameters (void); void return_to_cics (void); void SendData(char *, short); int writen(int, const void *, size_t); int readn(int, void *, size_t); /********************************************************************/ /* Structures */ /********************************************************************/ struct screen_struct{ cics_char_t sf; cics_char_t attr; cics_char_t display [160];}; struct log_struct{ cics_char_t program [8]; cics_char_t filler0; cics_char_t applid [8]; cics_char_t filler1; cics_char_t msg [80];}; /********************************************************************/ /* Global Variables */ /********************************************************************/ cics_char_t Term_Code [2] = “00”; /* Terminal Code */ cics_char_t sba [4]; /* 3270 set buffer address */ cics_char_t ProtectAttribute ; /* 3270 Protect Attribute */ cics_sshort_t scrnwd = 80; /* Width of the screen */ struct screen_struct output_screen = {‘\x1d’, ‘ ‘, ““}; struct log_struct CSMT_log = {“CICSDEXI”, ‘ ‘, ““, ‘ ‘, ““}; /********************************************************************/ /* Procedure : Main */ /* Function : To call all sub-procedures */ /* Input : None */ /* Returns : Nothing */ /********************************************************************/ void main( void ) { \
G-10 iWay Software
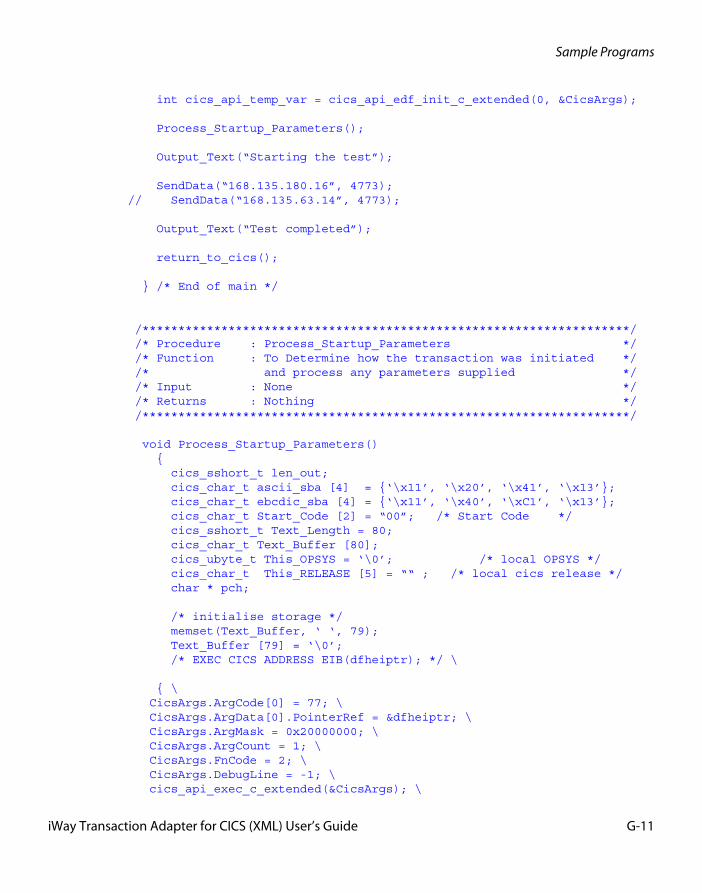
Sample Programs
int cics_api_temp_var = cics_api_edf_init_c_extended(0, &CicsArgs); Process_Startup_Parameters(); Output_Text(“Starting the test”); SendData(“168.135.180.16”, 4773);// SendData(“168.135.63.14”, 4773); Output_Text(“Test completed”); return_to_cics(); } /* End of main */ /********************************************************************/ /* Procedure : Process_Startup_Parameters */ /* Function : To Determine how the transaction was initiated */ /* and process any parameters supplied */ /* Input : None */ /* Returns : Nothing */ /********************************************************************/ void Process_Startup_Parameters() { cics_sshort_t len_out; cics_char_t ascii_sba [4] = {‘\x11’, ‘\x20’, ‘\x41’, ‘\x13’}; cics_char_t ebcdic_sba [4] = {‘\x11’, ‘\x40’, ‘\xC1’, ‘\x13’}; cics_char_t Start_Code [2] = “00”; /* Start Code */ cics_sshort_t Text_Length = 80; cics_char_t Text_Buffer [80]; cics_ubyte_t This_OPSYS = ‘\0’; /* local OPSYS */ cics_char_t This_RELEASE [5] = ““ ; /* local cics release */ char * pch; /* initialise storage */ memset(Text_Buffer, ‘ ‘, 79); Text_Buffer [79] = ‘\0’; /* EXEC CICS ADDRESS EIB(dfheiptr); */ \ { \ CicsArgs.ArgCode[0] = 77; \ CicsArgs.ArgData[0].PointerRef = &dfheiptr; \ CicsArgs.ArgMask = 0x20000000; \ CicsArgs.ArgCount = 1; \ CicsArgs.FnCode = 2; \ CicsArgs.DebugLine = -1; \ cics_api_exec_c_extended(&CicsArgs); \
iWay Transaction Adapter for CICS (XML) User’s Guide G-11
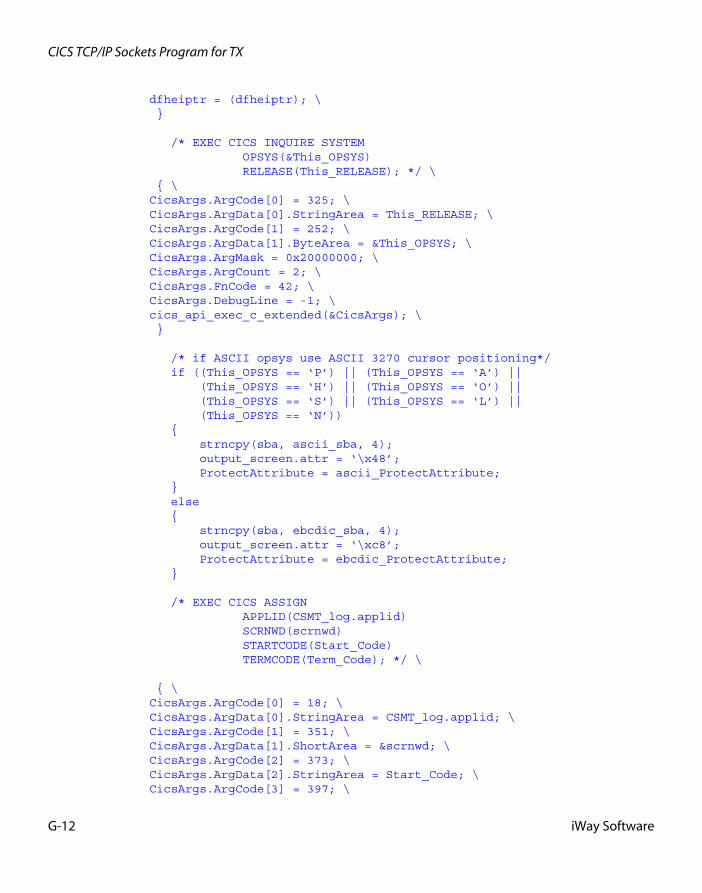
CICS TCP/IP Sockets Program for TX
dfheiptr = (dfheiptr); \ } /* EXEC CICS INQUIRE SYSTEM OPSYS(&This_OPSYS) RELEASE(This_RELEASE); */ \ { \ CicsArgs.ArgCode[0] = 325; \ CicsArgs.ArgData[0].StringArea = This_RELEASE; \ CicsArgs.ArgCode[1] = 252; \ CicsArgs.ArgData[1].ByteArea = &This_OPSYS; \ CicsArgs.ArgMask = 0x20000000; \ CicsArgs.ArgCount = 2; \ CicsArgs.FnCode = 42; \ CicsArgs.DebugLine = -1; \ cics_api_exec_c_extended(&CicsArgs); \ } /* if ASCII opsys use ASCII 3270 cursor positioning*/ if ((This_OPSYS == ‘P’) || (This_OPSYS == ‘A’) || (This_OPSYS == ‘H’) || (This_OPSYS == ‘O’) || (This_OPSYS == ‘S’) || (This_OPSYS == ‘L’) || (This_OPSYS == ‘N’)) { strncpy(sba, ascii_sba, 4); output_screen.attr = ‘\x48’; ProtectAttribute = ascii_ProtectAttribute; } else { strncpy(sba, ebcdic_sba, 4); output_screen.attr = ‘\xc8’; ProtectAttribute = ebcdic_ProtectAttribute; } /* EXEC CICS ASSIGN APPLID(CSMT_log.applid) SCRNWD(scrnwd) STARTCODE(Start_Code) TERMCODE(Term_Code); */ \ { \ CicsArgs.ArgCode[0] = 18; \ CicsArgs.ArgData[0].StringArea = CSMT_log.applid; \ CicsArgs.ArgCode[1] = 351; \ CicsArgs.ArgData[1].ShortArea = &scrnwd; \ CicsArgs.ArgCode[2] = 373; \ CicsArgs.ArgData[2].StringArea = Start_Code; \ CicsArgs.ArgCode[3] = 397; \
G-12 iWay Software
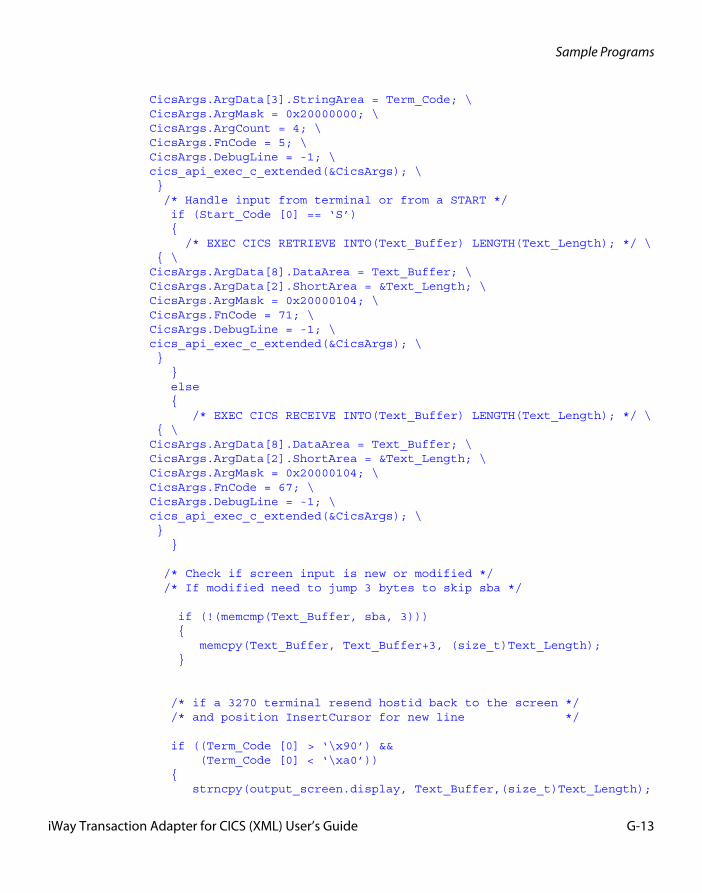
Sample Programs
CicsArgs.ArgData[3].StringArea = Term_Code; \ CicsArgs.ArgMask = 0x20000000; \ CicsArgs.ArgCount = 4; \ CicsArgs.FnCode = 5; \ CicsArgs.DebugLine = -1; \ cics_api_exec_c_extended(&CicsArgs); \ } /* Handle input from terminal or from a START */ if (Start_Code [0] == ‘S’) { /* EXEC CICS RETRIEVE INTO(Text_Buffer) LENGTH(Text_Length); */ \ { \ CicsArgs.ArgData[8].DataArea = Text_Buffer; \ CicsArgs.ArgData[2].ShortArea = &Text_Length; \ CicsArgs.ArgMask = 0x20000104; \ CicsArgs.FnCode = 71; \ CicsArgs.DebugLine = -1; \ cics_api_exec_c_extended(&CicsArgs); \ } } else { /* EXEC CICS RECEIVE INTO(Text_Buffer) LENGTH(Text_Length); */ \ { \ CicsArgs.ArgData[8].DataArea = Text_Buffer; \ CicsArgs.ArgData[2].ShortArea = &Text_Length; \ CicsArgs.ArgMask = 0x20000104; \ CicsArgs.FnCode = 67; \ CicsArgs.DebugLine = -1; \ cics_api_exec_c_extended(&CicsArgs); \ } } /* Check if screen input is new or modified */ /* If modified need to jump 3 bytes to skip sba */ if (!(memcmp(Text_Buffer, sba, 3))) { memcpy(Text_Buffer, Text_Buffer+3, (size_t)Text_Length); } /* if a 3270 terminal resend hostid back to the screen */ /* and position InsertCursor for new line */ if ((Term_Code [0] > ‘\x90’) && (Term_Code [0] < ‘\xa0’)) { strncpy(output_screen.display, Text_Buffer,(size_t)Text_Length);
iWay Transaction Adapter for CICS (XML) User’s Guide G-13
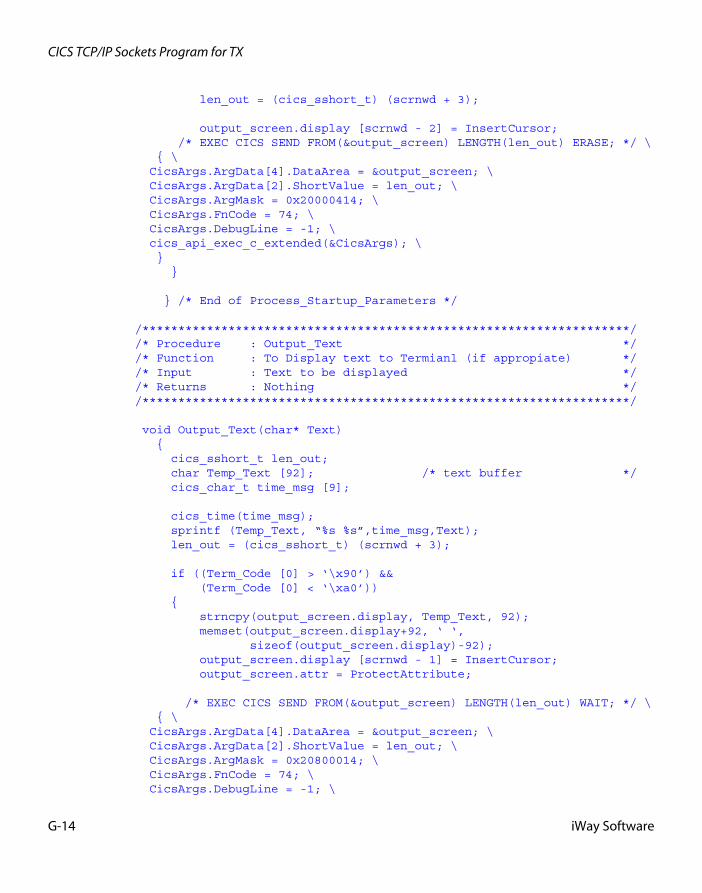
CICS TCP/IP Sockets Program for TX
len_out = (cics_sshort_t) (scrnwd + 3); output_screen.display [scrnwd - 2] = InsertCursor; /* EXEC CICS SEND FROM(&output_screen) LENGTH(len_out) ERASE; */ \ { \ CicsArgs.ArgData[4].DataArea = &output_screen; \ CicsArgs.ArgData[2].ShortValue = len_out; \ CicsArgs.ArgMask = 0x20000414; \ CicsArgs.FnCode = 74; \ CicsArgs.DebugLine = -1; \ cics_api_exec_c_extended(&CicsArgs); \ } } } /* End of Process_Startup_Parameters */ /********************************************************************/ /* Procedure : Output_Text */ /* Function : To Display text to Termianl (if appropiate) */ /* Input : Text to be displayed */ /* Returns : Nothing */ /********************************************************************/ void Output_Text(char* Text) { cics_sshort_t len_out; char Temp_Text [92]; /* text buffer */ cics_char_t time_msg [9]; cics_time(time_msg); sprintf (Temp_Text, “%s %s”,time_msg,Text); len_out = (cics_sshort_t) (scrnwd + 3); if ((Term_Code [0] > ‘\x90’) && (Term_Code [0] < ‘\xa0’)) { strncpy(output_screen.display, Temp_Text, 92); memset(output_screen.display+92, ‘ ‘, sizeof(output_screen.display)-92); output_screen.display [scrnwd - 1] = InsertCursor; output_screen.attr = ProtectAttribute; /* EXEC CICS SEND FROM(&output_screen) LENGTH(len_out) WAIT; */ \ { \ CicsArgs.ArgData[4].DataArea = &output_screen; \ CicsArgs.ArgData[2].ShortValue = len_out; \ CicsArgs.ArgMask = 0x20800014; \ CicsArgs.FnCode = 74; \ CicsArgs.DebugLine = -1; \
G-14 iWay Software
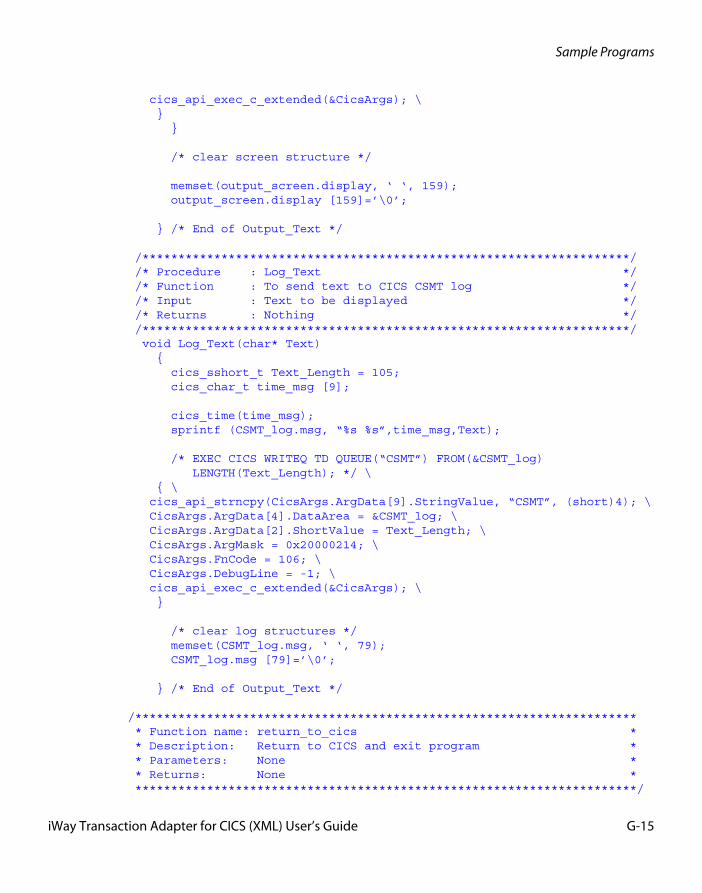
Sample Programs
cics_api_exec_c_extended(&CicsArgs); \ } } /* clear screen structure */ memset(output_screen.display, ‘ ‘, 159); output_screen.display [159]=’\0’; } /* End of Output_Text */ /********************************************************************/ /* Procedure : Log_Text */ /* Function : To send text to CICS CSMT log */ /* Input : Text to be displayed */ /* Returns : Nothing */ /********************************************************************/ void Log_Text(char* Text) { cics_sshort_t Text_Length = 105; cics_char_t time_msg [9]; cics_time(time_msg); sprintf (CSMT_log.msg, “%s %s”,time_msg,Text); /* EXEC CICS WRITEQ TD QUEUE(“CSMT”) FROM(&CSMT_log) LENGTH(Text_Length); */ \ { \ cics_api_strncpy(CicsArgs.ArgData[9].StringValue, “CSMT”, (short)4); \ CicsArgs.ArgData[4].DataArea = &CSMT_log; \ CicsArgs.ArgData[2].ShortValue = Text_Length; \ CicsArgs.ArgMask = 0x20000214; \ CicsArgs.FnCode = 106; \ CicsArgs.DebugLine = -1; \ cics_api_exec_c_extended(&CicsArgs); \ } /* clear log structures */ memset(CSMT_log.msg, ‘ ‘, 79); CSMT_log.msg [79]=’\0’; } /* End of Output_Text */ /********************************************************************** * Function name: return_to_cics * * Description: Return to CICS and exit program * * Parameters: None * * Returns: None * **********************************************************************/
iWay Transaction Adapter for CICS (XML) User’s Guide G-15

CICS TCP/IP Sockets Program for TX
void return_to_cics(void){ cics_char_t blank_log [80] = ““ ; /* write blank line to log */ /* EXEC CICS WRITEQ TD QUEUE(“CSMT”) FROM(blank_log) LENGTH(80); */ \ { \ cics_api_strncpy(CicsArgs.ArgData[9].StringValue, “CSMT”, (short)4); \ CicsArgs.ArgData[4].DataArea = blank_log; \ CicsArgs.ArgData[2].ShortValue = 80; \ CicsArgs.ArgMask = 0x20000214; \ CicsArgs.FnCode = 106; \ CicsArgs.DebugLine = -1; \ cics_api_exec_c_extended(&CicsArgs); \ } /* reposition 3270 cursor if ((Term_Code [0] > ‘\x90’) && (Term_Code [0] < ‘\xa0’)) { EXEC CICS SEND FROM(sba) LENGTH(4); } */ /* EXEC CICS RETURN; */ \ { \ CicsArgs.ArgMask = 0x20000000; \ CicsArgs.FnCode = 72; \ CicsArgs.DebugLine = -1; \ cics_api_exec_c_extended(&CicsArgs); \ }} /********************************************************************** * Function name: SendData * * Description: Sends the data to the host and port * * Inputs: Host id and port number * * Returns: None * **********************************************************************/ void SendData(char * Host_Id, short Port_Num){ char * pch; static char Temp_Text [80]; /* text buffer */ int connfd, crc, i, BytesRead; struct sockaddr_in servaddr; char RcvBuf[MSG_SIZE+1]; char MsgBuf[] = \“<?xml version=’1.0’ encoding=’UTF-8’?> \
G-16 iWay Software
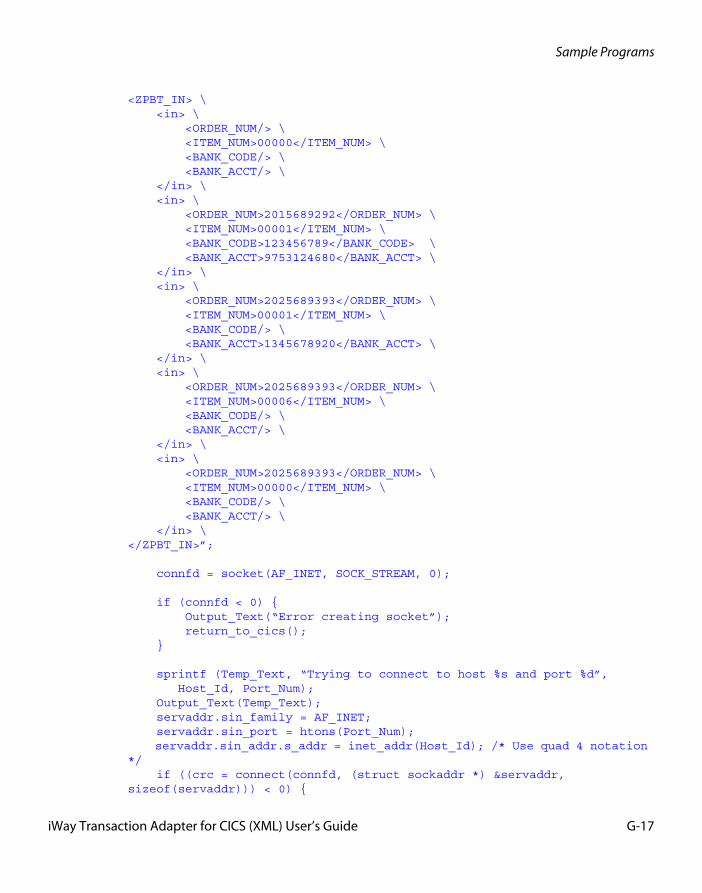
Sample Programs
<ZPBT_IN> \ <in> \ <ORDER_NUM/> \ <ITEM_NUM>00000</ITEM_NUM> \ <BANK_CODE/> \ <BANK_ACCT/> \ </in> \ <in> \ <ORDER_NUM>2015689292</ORDER_NUM> \ <ITEM_NUM>00001</ITEM_NUM> \ <BANK_CODE>123456789</BANK_CODE> \ <BANK_ACCT>9753124680</BANK_ACCT> \ </in> \ <in> \ <ORDER_NUM>2025689393</ORDER_NUM> \ <ITEM_NUM>00001</ITEM_NUM> \ <BANK_CODE/> \ <BANK_ACCT>1345678920</BANK_ACCT> \ </in> \ <in> \ <ORDER_NUM>2025689393</ORDER_NUM> \ <ITEM_NUM>00006</ITEM_NUM> \ <BANK_CODE/> \ <BANK_ACCT/> \ </in> \ <in> \ <ORDER_NUM>2025689393</ORDER_NUM> \ <ITEM_NUM>00000</ITEM_NUM> \ <BANK_CODE/> \ <BANK_ACCT/> \ </in> \</ZPBT_IN>”; connfd = socket(AF_INET, SOCK_STREAM, 0); if (connfd < 0) { Output_Text(“Error creating socket”); return_to_cics(); } sprintf (Temp_Text, “Trying to connect to host %s and port %d”, Host_Id, Port_Num); Output_Text(Temp_Text); servaddr.sin_family = AF_INET; servaddr.sin_port = htons(Port_Num); servaddr.sin_addr.s_addr = inet_addr(Host_Id); /* Use quad 4 notation */ if ((crc = connect(connfd, (struct sockaddr *) &servaddr, sizeof(servaddr))) < 0) {
iWay Transaction Adapter for CICS (XML) User’s Guide G-17
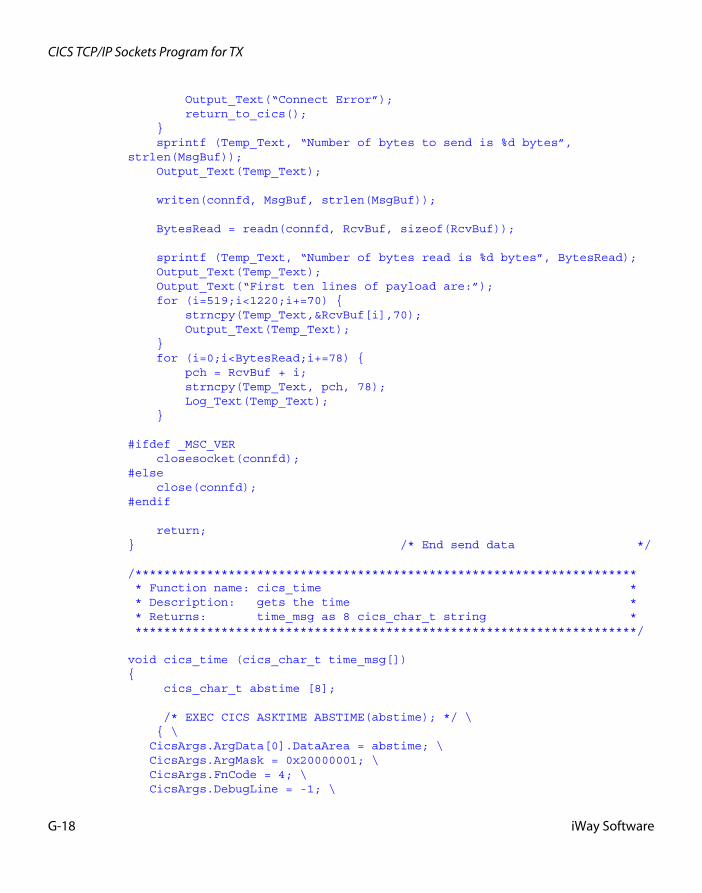
CICS TCP/IP Sockets Program for TX
Output_Text(“Connect Error”); return_to_cics(); } sprintf (Temp_Text, “Number of bytes to send is %d bytes”, strlen(MsgBuf)); Output_Text(Temp_Text); writen(connfd, MsgBuf, strlen(MsgBuf)); BytesRead = readn(connfd, RcvBuf, sizeof(RcvBuf)); sprintf (Temp_Text, “Number of bytes read is %d bytes”, BytesRead); Output_Text(Temp_Text); Output_Text(“First ten lines of payload are:”); for (i=519;i<1220;i+=70) { strncpy(Temp_Text,&RcvBuf[i],70); Output_Text(Temp_Text); } for (i=0;i<BytesRead;i+=78) { pch = RcvBuf + i; strncpy(Temp_Text, pch, 78); Log_Text(Temp_Text); } #ifdef _MSC_VER closesocket(connfd);#else close(connfd);#endif return;} /* End send data */ /********************************************************************** * Function name: cics_time * * Description: gets the time * * Returns: time_msg as 8 cics_char_t string * **********************************************************************/ void cics_time (cics_char_t time_msg[]){ cics_char_t abstime [8]; /* EXEC CICS ASKTIME ABSTIME(abstime); */ \ { \ CicsArgs.ArgData[0].DataArea = abstime; \ CicsArgs.ArgMask = 0x20000001; \ CicsArgs.FnCode = 4; \ CicsArgs.DebugLine = -1; \
G-18 iWay Software
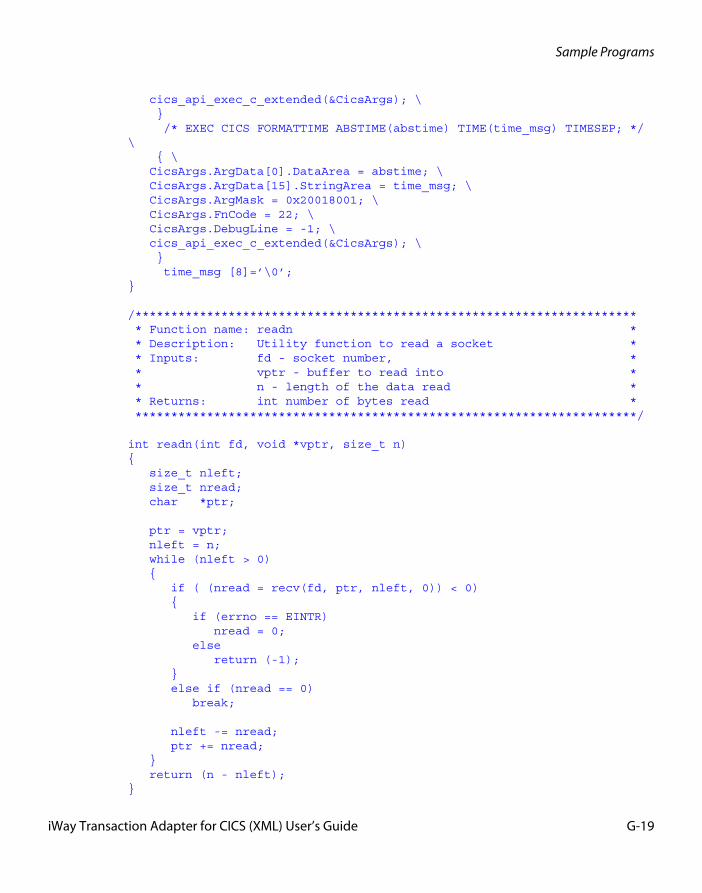
Sample Programs
cics_api_exec_c_extended(&CicsArgs); \ } /* EXEC CICS FORMATTIME ABSTIME(abstime) TIME(time_msg) TIMESEP; */ \ { \ CicsArgs.ArgData[0].DataArea = abstime; \ CicsArgs.ArgData[15].StringArea = time_msg; \ CicsArgs.ArgMask = 0x20018001; \ CicsArgs.FnCode = 22; \ CicsArgs.DebugLine = -1; \ cics_api_exec_c_extended(&CicsArgs); \ } time_msg [8]=’\0’;} /********************************************************************** * Function name: readn * * Description: Utility function to read a socket * * Inputs: fd - socket number, * * vptr - buffer to read into * * n - length of the data read * * Returns: int number of bytes read * **********************************************************************/ int readn(int fd, void *vptr, size_t n){ size_t nleft; size_t nread; char *ptr; ptr = vptr; nleft = n; while (nleft > 0) { if ( (nread = recv(fd, ptr, nleft, 0)) < 0) { if (errno == EINTR) nread = 0; else return (-1); } else if (nread == 0) break; nleft -= nread; ptr += nread; } return (n - nleft);}
iWay Transaction Adapter for CICS (XML) User’s Guide G-19
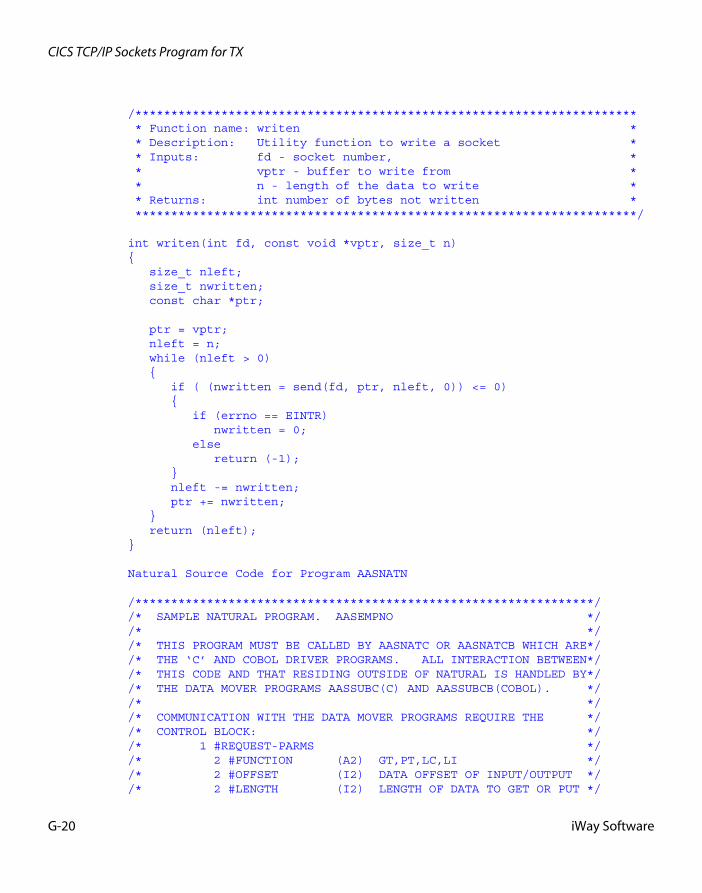
CICS TCP/IP Sockets Program for TX
/********************************************************************** * Function name: writen * * Description: Utility function to write a socket * * Inputs: fd - socket number, * * vptr - buffer to write from * * n - length of the data to write * * Returns: int number of bytes not written * **********************************************************************/ int writen(int fd, const void *vptr, size_t n){ size_t nleft; size_t nwritten; const char *ptr; ptr = vptr; nleft = n; while (nleft > 0) { if ( (nwritten = send(fd, ptr, nleft, 0)) <= 0) { if (errno == EINTR) nwritten = 0; else return (-1); } nleft -= nwritten; ptr += nwritten; } return (nleft);} Natural Source Code for Program AASNATN /****************************************************************//* SAMPLE NATURAL PROGRAM. AASEMPNO *//* *//* THIS PROGRAM MUST BE CALLED BY AASNATC OR AASNATCB WHICH ARE*//* THE ‘C’ AND COBOL DRIVER PROGRAMS. ALL INTERACTION BETWEEN*//* THIS CODE AND THAT RESIDING OUTSIDE OF NATURAL IS HANDLED BY*//* THE DATA MOVER PROGRAMS AASSUBC(C) AND AASSUBCB(COBOL). *//* *//* COMMUNICATION WITH THE DATA MOVER PROGRAMS REQUIRE THE *//* CONTROL BLOCK: *//* 1 #REQUEST-PARMS *//* 2 #FUNCTION (A2) GT,PT,LC,LI *//* 2 #OFFSET (I2) DATA OFFSET OF INPUT/OUTPUT *//* 2 #LENGTH (I2) LENGTH OF DATA TO GET OR PUT */
G-20 iWay Software
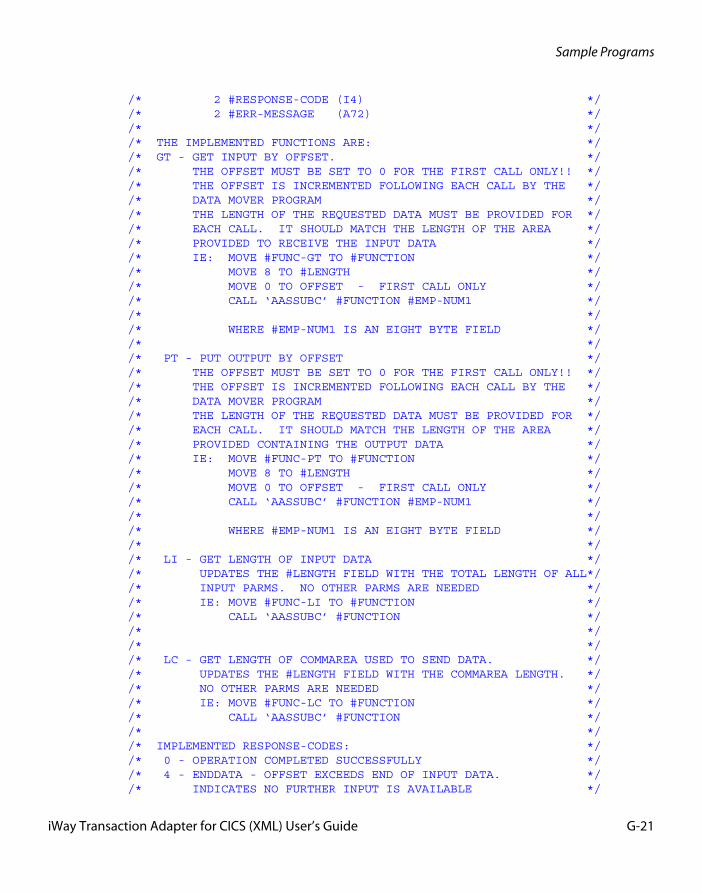
Sample Programs
/* 2 #RESPONSE-CODE (I4) *//* 2 #ERR-MESSAGE (A72) *//* *//* THE IMPLEMENTED FUNCTIONS ARE: *//* GT - GET INPUT BY OFFSET. *//* THE OFFSET MUST BE SET TO 0 FOR THE FIRST CALL ONLY!! *//* THE OFFSET IS INCREMENTED FOLLOWING EACH CALL BY THE *//* DATA MOVER PROGRAM *//* THE LENGTH OF THE REQUESTED DATA MUST BE PROVIDED FOR *//* EACH CALL. IT SHOULD MATCH THE LENGTH OF THE AREA *//* PROVIDED TO RECEIVE THE INPUT DATA *//* IE: MOVE #FUNC-GT TO #FUNCTION *//* MOVE 8 TO #LENGTH *//* MOVE 0 TO OFFSET - FIRST CALL ONLY *//* CALL ‘AASSUBC’ #FUNCTION #EMP-NUM1 *//* *//* WHERE #EMP-NUM1 IS AN EIGHT BYTE FIELD *//* *//* PT - PUT OUTPUT BY OFFSET *//* THE OFFSET MUST BE SET TO 0 FOR THE FIRST CALL ONLY!! *//* THE OFFSET IS INCREMENTED FOLLOWING EACH CALL BY THE *//* DATA MOVER PROGRAM *//* THE LENGTH OF THE REQUESTED DATA MUST BE PROVIDED FOR *//* EACH CALL. IT SHOULD MATCH THE LENGTH OF THE AREA *//* PROVIDED CONTAINING THE OUTPUT DATA *//* IE: MOVE #FUNC-PT TO #FUNCTION *//* MOVE 8 TO #LENGTH *//* MOVE 0 TO OFFSET - FIRST CALL ONLY *//* CALL ‘AASSUBC’ #FUNCTION #EMP-NUM1 *//* *//* WHERE #EMP-NUM1 IS AN EIGHT BYTE FIELD *//* *//* LI - GET LENGTH OF INPUT DATA *//* UPDATES THE #LENGTH FIELD WITH THE TOTAL LENGTH OF ALL*//* INPUT PARMS. NO OTHER PARMS ARE NEEDED *//* IE: MOVE #FUNC-LI TO #FUNCTION *//* CALL ‘AASSUBC’ #FUNCTION *//* *//* *//* LC - GET LENGTH OF COMMAREA USED TO SEND DATA. *//* UPDATES THE #LENGTH FIELD WITH THE COMMAREA LENGTH. *//* NO OTHER PARMS ARE NEEDED *//* IE: MOVE #FUNC-LC TO #FUNCTION *//* CALL ‘AASSUBC’ #FUNCTION *//* *//* IMPLEMENTED RESPONSE-CODES: *//* 0 - OPERATION COMPLETED SUCCESSFULLY *//* 4 - ENDDATA - OFFSET EXCEEDS END OF INPUT DATA. *//* INDICATES NO FURTHER INPUT IS AVAILABLE */
iWay Transaction Adapter for CICS (XML) User’s Guide G-21
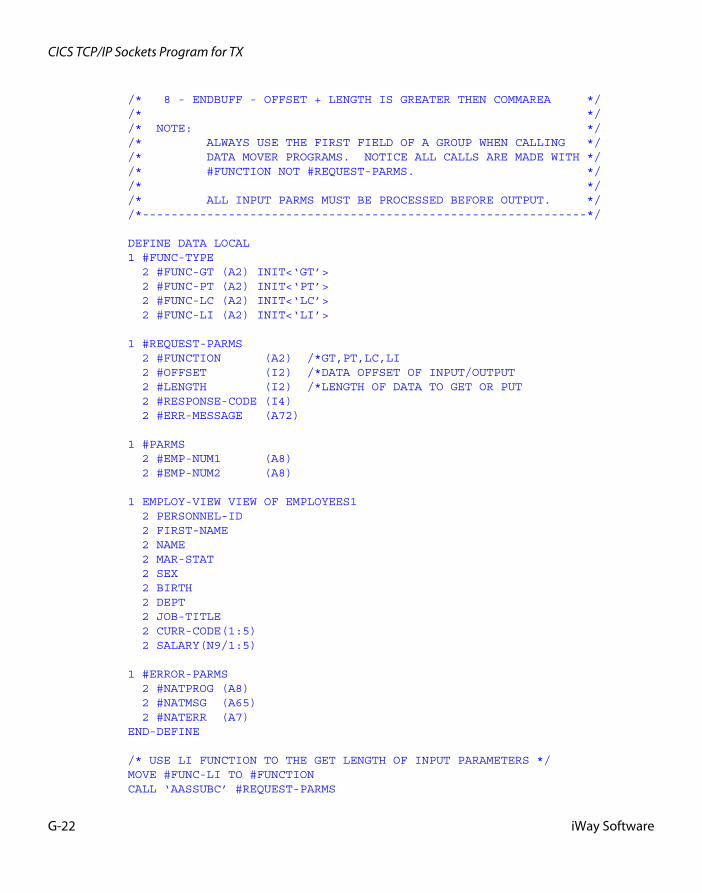
CICS TCP/IP Sockets Program for TX
/* 8 - ENDBUFF - OFFSET + LENGTH IS GREATER THEN COMMAREA *//* *//* NOTE: *//* ALWAYS USE THE FIRST FIELD OF A GROUP WHEN CALLING *//* DATA MOVER PROGRAMS. NOTICE ALL CALLS ARE MADE WITH *//* #FUNCTION NOT #REQUEST-PARMS. *//* *//* ALL INPUT PARMS MUST BE PROCESSED BEFORE OUTPUT. *//*--------------------------------------------------------------*/ DEFINE DATA LOCAL1 #FUNC-TYPE 2 #FUNC-GT (A2) INIT<‘GT’> 2 #FUNC-PT (A2) INIT<‘PT’> 2 #FUNC-LC (A2) INIT<‘LC’> 2 #FUNC-LI (A2) INIT<‘LI’> 1 #REQUEST-PARMS 2 #FUNCTION (A2) /*GT,PT,LC,LI 2 #OFFSET (I2) /*DATA OFFSET OF INPUT/OUTPUT 2 #LENGTH (I2) /*LENGTH OF DATA TO GET OR PUT 2 #RESPONSE-CODE (I4) 2 #ERR-MESSAGE (A72) 1 #PARMS 2 #EMP-NUM1 (A8) 2 #EMP-NUM2 (A8) 1 EMPLOY-VIEW VIEW OF EMPLOYEES1 2 PERSONNEL-ID 2 FIRST-NAME 2 NAME 2 MAR-STAT 2 SEX 2 BIRTH 2 DEPT 2 JOB-TITLE 2 CURR-CODE(1:5) 2 SALARY(N9/1:5) 1 #ERROR-PARMS 2 #NATPROG (A8) 2 #NATMSG (A65) 2 #NATERR (A7)END-DEFINE /* USE LI FUNCTION TO THE GET LENGTH OF INPUT PARAMETERS */MOVE #FUNC-LI TO #FUNCTIONCALL ‘AASSUBC’ #REQUEST-PARMS
G-22 iWay Software
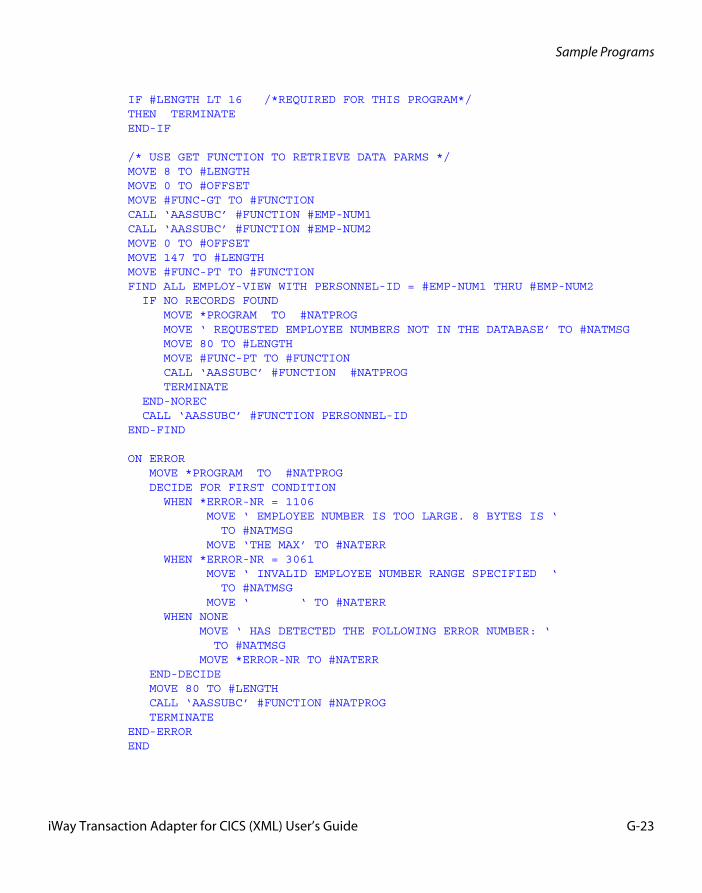
Sample Programs
IF #LENGTH LT 16 /*REQUIRED FOR THIS PROGRAM*/THEN TERMINATEEND-IF /* USE GET FUNCTION TO RETRIEVE DATA PARMS */MOVE 8 TO #LENGTHMOVE 0 TO #OFFSETMOVE #FUNC-GT TO #FUNCTIONCALL ‘AASSUBC’ #FUNCTION #EMP-NUM1CALL ‘AASSUBC’ #FUNCTION #EMP-NUM2MOVE 0 TO #OFFSETMOVE 147 TO #LENGTHMOVE #FUNC-PT TO #FUNCTIONFIND ALL EMPLOY-VIEW WITH PERSONNEL-ID = #EMP-NUM1 THRU #EMP-NUM2 IF NO RECORDS FOUND MOVE *PROGRAM TO #NATPROG MOVE ‘ REQUESTED EMPLOYEE NUMBERS NOT IN THE DATABASE’ TO #NATMSG MOVE 80 TO #LENGTH MOVE #FUNC-PT TO #FUNCTION CALL ‘AASSUBC’ #FUNCTION #NATPROG TERMINATE END-NOREC CALL ‘AASSUBC’ #FUNCTION PERSONNEL-IDEND-FIND ON ERROR MOVE *PROGRAM TO #NATPROG DECIDE FOR FIRST CONDITION WHEN *ERROR-NR = 1106 MOVE ‘ EMPLOYEE NUMBER IS TOO LARGE. 8 BYTES IS ‘ TO #NATMSG MOVE ‘THE MAX’ TO #NATERR WHEN *ERROR-NR = 3061 MOVE ‘ INVALID EMPLOYEE NUMBER RANGE SPECIFIED ‘ TO #NATMSG MOVE ‘ ‘ TO #NATERR WHEN NONE MOVE ‘ HAS DETECTED THE FOLLOWING ERROR NUMBER: ‘ TO #NATMSG MOVE *ERROR-NR TO #NATERR END-DECIDE MOVE 80 TO #LENGTH CALL ‘AASSUBC’ #FUNCTION #NATPROG TERMINATEEND-ERROREND
iWay Transaction Adapter for CICS (XML) User’s Guide G-23

CICS TCP/IP Sockets Program for TX
G-24 iWay Software
APPENDIX H
Debugging and Troubleshooting
Topics:
• Troubleshooting
• Data Type Conversions
This section includes tips and techniques for debugging the adapter.
iWay Transaction Adapter for CICS (XML) User’s Guide H-1
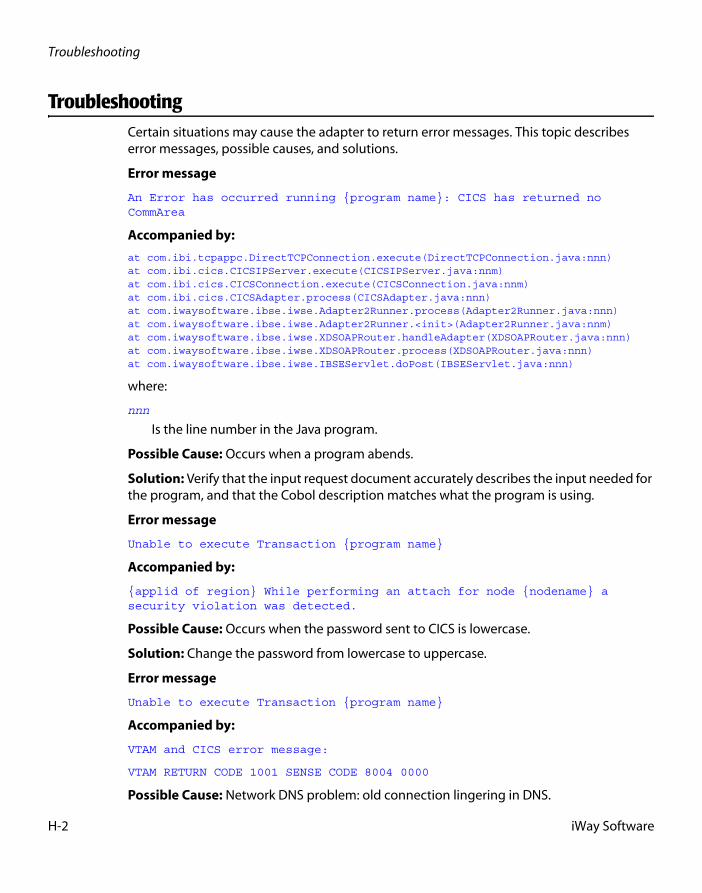
Troubleshooting
TroubleshootingCertain situations may cause the adapter to return error messages. This topic describes error messages, possible causes, and solutions.
Error message
An Error has occurred running {program name}: CICS has returned no CommArea
Accompanied by:
at com.ibi.tcpappc.DirectTCPConnection.execute(DirectTCPConnection.java:nnn)at com.ibi.cics.CICSIPServer.execute(CICSIPServer.java:nnm)at com.ibi.cics.CICSConnection.execute(CICSConnection.java:nnm)at com.ibi.cics.CICSAdapter.process(CICSAdapter.java:nnn)at com.iwaysoftware.ibse.iwse.Adapter2Runner.process(Adapter2Runner.java:nnn)at com.iwaysoftware.ibse.iwse.Adapter2Runner.<init>(Adapter2Runner.java:nnm)at com.iwaysoftware.ibse.iwse.XDSOAPRouter.handleAdapter(XDSOAPRouter.java:nnn)at com.iwaysoftware.ibse.iwse.XDSOAPRouter.process(XDSOAPRouter.java:nnn)at com.iwaysoftware.ibse.iwse.IBSEServlet.doPost(IBSEServlet.java:nnn)
where:
nnn
Is the line number in the Java program.
Possible Cause: Occurs when a program abends.
Solution: Verify that the input request document accurately describes the input needed for the program, and that the Cobol description matches what the program is using.
Error message
Unable to execute Transaction {program name}
Accompanied by:
{applid of region} While performing an attach for node {nodename} a security violation was detected.
Possible Cause: Occurs when the password sent to CICS is lowercase.
Solution: Change the password from lowercase to uppercase.
Error message
Unable to execute Transaction {program name}
Accompanied by:
VTAM and CICS error message:
VTAM RETURN CODE 1001 SENSE CODE 8004 0000
Possible Cause: Network DNS problem: old connection lingering in DNS.
H-2 iWay Software
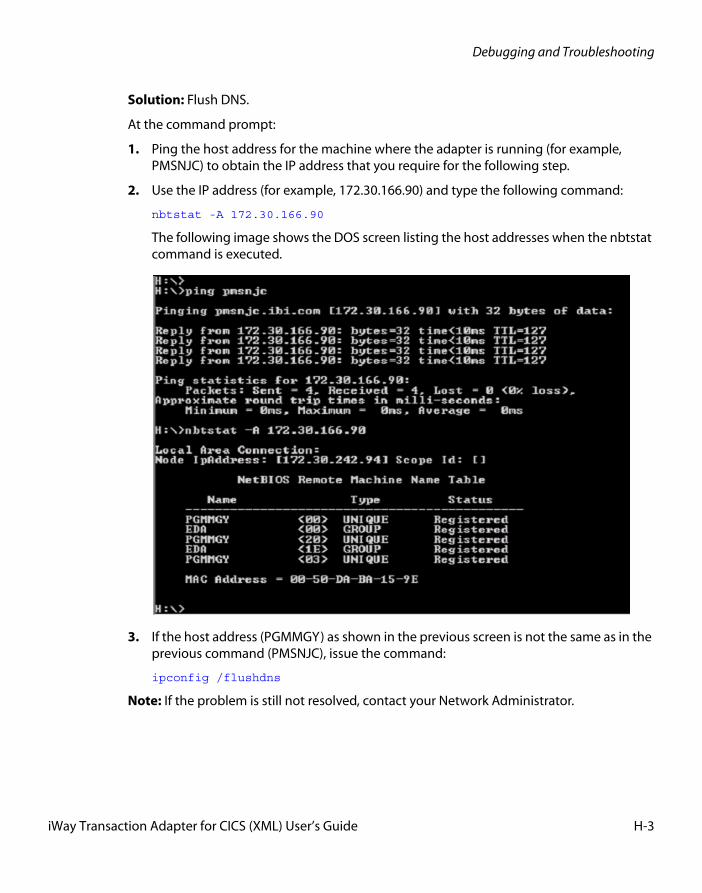
Debugging and Troubleshooting
Solution: Flush DNS.
At the command prompt:
1. Ping the host address for the machine where the adapter is running (for example, PMSNJC) to obtain the IP address that you require for the following step.
2. Use the IP address (for example, 172.30.166.90) and type the following command:
nbtstat -A 172.30.166.90
The following image shows the DOS screen listing the host addresses when the nbtstat command is executed.
3. If the host address (PGMMGY) as shown in the previous screen is not the same as in the previous command (PMSNJC), issue the command:
ipconfig /flushdns
Note: If the problem is still not resolved, contact your Network Administrator.
iWay Transaction Adapter for CICS (XML) User’s Guide H-3
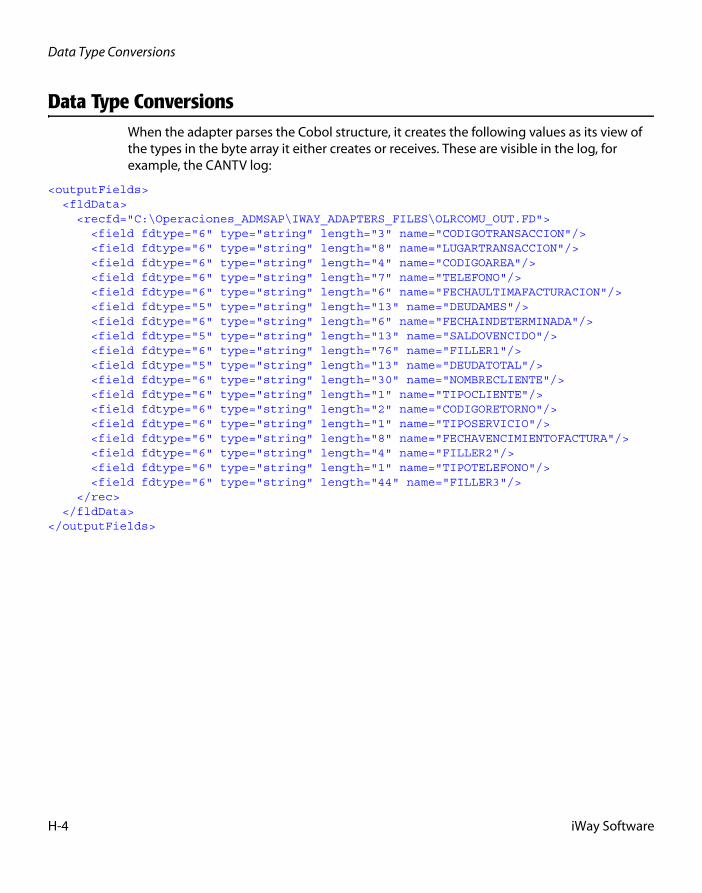
Data Type Conversions
Data Type ConversionsWhen the adapter parses the Cobol structure, it creates the following values as its view of the types in the byte array it either creates or receives. These are visible in the log, for example, the CANTV log:
<outputFields> <fldData> <recfd="C:\Operaciones_ADMSAP\IWAY_ADAPTERS_FILES\OLRCOMU_OUT.FD"> <field fdtype="6" type="string" length="3" name="CODIGOTRANSACCION"/> <field fdtype="6" type="string" length="8" name="LUGARTRANSACCION"/> <field fdtype="6" type="string" length="4" name="CODIGOAREA"/> <field fdtype="6" type="string" length="7" name="TELEFONO"/> <field fdtype="6" type="string" length="6" name="FECHAULTIMAFACTURACION"/> <field fdtype="5" type="string" length="13" name="DEUDAMES"/> <field fdtype="6" type="string" length="6" name="FECHAINDETERMINADA"/> <field fdtype="5" type="string" length="13" name="SALDOVENCIDO"/> <field fdtype="6" type="string" length="76" name="FILLER1"/> <field fdtype="5" type="string" length="13" name="DEUDATOTAL"/> <field fdtype="6" type="string" length="30" name="NOMBRECLIENTE"/> <field fdtype="6" type="string" length="1" name="TIPOCLIENTE"/> <field fdtype="6" type="string" length="2" name="CODIGORETORNO"/> <field fdtype="6" type="string" length="1" name="TIPOSERVICIO"/> <field fdtype="6" type="string" length="8" name="FECHAVENCIMIENTOFACTURA"/> <field fdtype="6" type="string" length="4" name="FILLER2"/> <field fdtype="6" type="string" length="1" name="TIPOTELEFONO"/> <field fdtype="6" type="string" length="44" name="FILLER3"/> </rec> </fldData></outputFields>
H-4 iWay Software

Reader Comments
In an ongoing effort to produce effective documentation, the Documentation Services staff at Information Builders welcomes any opinion you can offer regarding this manual.Please use this form to relay suggestions for improving this publication or to alert us to corrections. Identify specific pages where applicable. You can contact us through the following methods:
Name:_________________________________________________________________________________
Company:______________________________________________________________________________
Address:_______________________________________________________________________________
Telephone:____________________________________Date:_____________________________________
E-mail:_________________________________________________________________________________
Comments:
Mail: Documentation Services - Customer SupportInformation Builders, Inc. Two Penn Plaza New York, NY 10121-2898
Fax: (212) 967-0460
E-mail: [email protected]
Web form: http://www.informationbuilders.com/bookstore/derf.html
Information Builders, Two Penn Plaza, New York, NY 10121-2898 (212) 736-4433
iWay Transaction Adapter for CICS (XML) User’s Guide DN3501483.0305Version 5 Release 5

Reader Comments
Information Builders, Two Penn Plaza, New York, NY 10121-2898 (212) 736-4433
iWay Transaction Adapter for CICS (XML) User’s Guide DN3501483.0305Version 5 Release 5